Download User Manual Version 2

Transcript
User Manual
Version 2
PO Box 1401 Cordova, TN 38088-1401 phone:888-371-6878
web:www.excellerate.com email:[email protected]
COPYRIGHT
Excellerate Copyright © 1999-2002 Micro System Design, All rights reserved.
Other company names and product names are trademarks of their respected
companies.
PROGRAM LICENSE AGREEMENT
CAREFULLY READ THE FOLLOWING TERMS AND CONDITIONS BEFORE
USING THIS PROGRAM. USING THIS PROGRAM INDICATES YOUR
ACCEPTANCE OF THESE TERMS AND CONDITIONS. IF YOU ARE NOT IN
AGREEMENT, RETURN THE PROGRAM UNUSED AND YOUR MONEY WILL
BE REFUNDED.
LICENSE You are granted a non-exclusive license to use the enclosed program
subject to the terms of this agreement.
SINGLE USER LICENSE With a single user license, you are allowed to use one
copy of the software on one machine. If you wish to use the software on multiple
computers, you must purchase the multi-user version.
MULTI-USER LICENSE With the multi-user license, you are allowed to use as
many copies of the software as needed as long as they are used within your
organization.
LIMITATIONS OR REMEDIES
Micro System Design will replace defective diskettes which are returned to Micro
System Design with a copy of your invoice or receipt.
IN NO EVENT WILL MICRO SYSTEM DESIGN BE LIABLE TO YOU FOR ANY
DAMAGES, INCLUDING ANY LOST PROFITS, LOST SAVINGS OR OTHER
INCIDENTAL OR CONSEQUENTIAL DAMAGES ARISING OUT OF THE USE OR
INABILITY TO USE SUCH PROGRAM EVEN IF MICRO SYSTEM DESIGN HAS
BEEN ADVISED OF THE POSSIBILITY OF SUCH DAMAGES, OR FOR ANY
CLAIM BY ANY OTHER PARTY. WHILE MICRO SYSTEM DESIGN HAS MADE
EVERY EFFORT TO ENSURE THE ACCURACY AND COMPREHENSIVENESS
OF THE PROGRAM, IN NO EVENT WILL MICRO SYSTEM DESIGN BE LIABLE
FOR ANY ERRORS, OR OMISSIONS IN THE PROGRAM, OR ADD-ON
PRODUCTS.
Technical Support
Micro System Design offers free technical support through email and our online
resources. See or web site at www.excellerate.com. Our complete annual support
plan includes free software updates, telephone support including help with
designing and modifying reports or views, and a subscription to our newsletter.
Our data conversion service can convert data from your existing systems.
Our support phone number is 901-754-0315.
more information about these services.
Contact us at 888-371-6878 for
Comments, Suggestions
Micro System Design is committed to perfecting and improving Excellerate.
Send comments, suggestions, support questions to: [email protected]
Excellerate Team
Design, Programming
Design, Testing
Kevin Tingle, Andrew Silver
Technical Support
Web-site
Marketing
Prayer
Pete Sciacchetano, Dylan Robbins
Graphics Design
Manual
Pete Sciacchetano, Dylan Robbins
Keith Neely
Crystal Tingle
Erin Kealy
Cell group 1-A-2-C
Special thanks to the staff of Bethany World Prayer Center and the Bethany Cell
Church Network (BCCN) for their ongoing commitment, support and labor in the
design, testing, and enhancement of Excellerate.
Table of Contents
Chapter 1: Installation ........................................................................................ 9
System Requirements....................................................................................... 9
Installing Excellerate ......................................................................................... 9
Chapter 2: Getting Started ............................................................................... 11
Creating your New Database .......................................................................... 11
Preferences .................................................................................................... 12
Users and IDs ................................................................................................. 19
Logging on...................................................................................................... 21
Program Registration ...................................................................................... 21
Pick-lists ......................................................................................................... 22
Zip Codes ....................................................................................................... 23
Member Steps ................................................................................................ 24
Member Profiles.............................................................................................. 25
Chapter 3: Getting Around ............................................................................... 27
Main Screen.................................................................................................... 27
Tool Bar.......................................................................................................... 28
Browse Screens.............................................................................................. 28
Views.............................................................................................................. 29
Quick Searches............................................................................................... 30
Status Bar....................................................................................................... 30
Getting Around in Edit Screens ....................................................................... 30
Associated Info Tabs....................................................................................... 31
Chapter 4: Pre-Members, Members and Pastors ............................................ 33
Member Screen .............................................................................................. 35
Member Addresses ......................................................................................... 38
Members - Associated Information Tabs ......................................................... 39
Adding Members............................................................................................. 42
Adding Family Members.................................................................................. 43
Editing Member Information ............................................................................ 43
Deleting Members........................................................................................... 43
Searching for Members................................................................................... 44
Pre-Members .................................................................................................. 45
Chapter 5: Cells ................................................................................................ 47
Cell Screen ..................................................................................................... 48
Cells - Associated Information Tabs ................................................................ 51
Representing Your Cell Structure in Excellerate .............................................. 53
Adding Cells.................................................................................................... 56
Editing Cell Information ................................................................................... 58
Deleting Cells.................................................................................................. 58
Assigning Members to Cells.............................................................................58
Primary and Secondary Cells...........................................................................59
Searching for Cells ..........................................................................................60
Multiplying a Cell .............................................................................................61
Viewing Cell Growth ........................................................................................62
The Cell Tree A Better View of your Cell Structure........................................65
The Cell Organizational Chart..........................................................................67
Entering Cell Meeting Totals and Attendance...................................................68
Updating Cell Meeting Totals ...........................................................................70
Example of a Typical Cell Week.......................................................................72
Chapter 6: Classes............................................................................................73
Chapter 7: Organizations..................................................................................77
Chapter 8: Church Attendance.........................................................................79
Chapter 9: Contributions ..................................................................................81
Contribution Security .......................................................................................82
Contribution Types ..........................................................................................82
Contribution Accounts......................................................................................82
Contribution Records.......................................................................................83
Pledges ...........................................................................................................84
Entering Contributions (Batch Processing) .......................................................85
Loose Cash .....................................................................................................88
Updating Batches ............................................................................................89
Reverse-Updating Batches ..............................................................................89
Viewing/Editing Member Contributions.............................................................89
End of Period Processing ................................................................................90
Exporting Contributions ...................................................................................90
Resetting Contribution Totals...........................................................................91
Removing Old Contributions ............................................................................91
Removing Old Locks........................................................................................91
Chapter 10: Views .............................................................................................93
What are Views ...............................................................................................93
Selecting Views ...............................................................................................94
Creating a New View .......................................................................................94
Editing a View..................................................................................................96
Importing, Exporting and Downloading Views from the Web.............................97
Advanced Views..............................................................................................97
Chapter 11: Reporting.......................................................................................99
Reports and Views ..........................................................................................99
Report Styles.................................................................................................100
Member Reports............................................................................................101
Cell Reports.................................................................................................. 104
Class Reports ............................................................................................... 108
Organization Reports .................................................................................... 108
Contribution Reports ..................................................................................... 109
Custom Reports............................................................................................ 113
Mail Merge.................................................................................................... 116
Chapter 12: Internet Integration..................................................................... 117
Web Integration............................................................................................. 117
Setting up Web Integration............................................................................ 117
Using web integration.................................................................................... 120
Modifying Web integration to fit your web-site................................................ 121
List of Excellerate s Web Integration Files ..................................................... 128
EMAIL........................................................................................................... 129
Setting up EMAIL .......................................................................................... 129
Using EMAIL................................................................................................. 130
Merge-Fields In EMAIL.................................................................................. 131
EMAIL-ing Reports........................................................................................ 132
Chapter 13: Utilities........................................................................................ 133
Change User Password ................................................................................ 133
Set Database Password................................................................................ 133
Remove Members......................................................................................... 133
Remove Old Contributions ............................................................................ 134
Re-Index / Compact Database ...................................................................... 135
Remove Old Locks........................................................................................ 136
Edit History Fields ......................................................................................... 136
Edit Required Fields...................................................................................... 136
Update Cell Meeting History.......................................................................... 136
Enter Church Attendance .............................................................................. 136
Importing and Exporting ................................................................................ 140
Importing Church Attendance with Barcodes ................................................. 142
Appendix......................................................................................................... 145
Browse Columns........................................................................................... 145
Member Pictures........................................................................................... 145
Report Styles ................................................................................................ 145
Technical Support ......................................................................................... 150
Installation
Chapter 1: Installation
System Requirements
Minimum requirements:
Pentium 233 Mhz or higher PC compatible running Windows 95/98/NT
100MB free disk space, 32MB RAM
Screen resolution of 800 X 600 or better
Recommended requirements:
Pentium 300 or higher PC compatible running Windows 95/98/NT
100MB free disk space, 64MB RAM
Network / Multi-user requirements:
Any network environment such as Novell, or Windows NT, that supports
workstations running Windows 95 or above, where the main database
file can be stored in one central location accessible by the users.
Installing Excellerate
Close any running programs before installing Excellerate.
Single Computer Installation:
To install Excellerate, simply insert the CD into your CD-ROM drive, and
the setup program will start automatically. If Autorun is disabled on your
computer, then from the Start Menu, Run command, type: D:\SETUP
(where D: is the letter of your CD-ROM drive.)
After the installation program completes, Excellerate will be loaded on to
your computer, and accessible from the Start Menu, or desktop icon.
Network Installation:
Excellerate s recommended network setup is to have the application
installed on each workstation. These workstations would then reference
the database located on a file server.
9
Installation
First, install the application on the file server as in the previously
described Single Computer Installation. For some file servers, you may
have to actually run the installation on one of the workstations, but
specify the file server s drive designation ( such as N: ) when prompted
for where to install Excellerate. Make sure that the directory you install
Excellerate on is accessible to all of the workstations that will be using
the program. Once installed on the file server, run Excellerate, and
create your new database. Next, install the application on each
workstation in the same manner, but when prompted to create a new
database, choose Open other database and open the database that you
just created located on your file server. When prompted if you would like
this to be your default database, answer yes.
Actually, the only files needed on the file server are the database, which
will have a .MDB and .CFG extension, the report styles with .QR
extension, and the Pictures directory (See Member Pictures). Make
sure your report styles are copied to the file server, otherwise, many
of the reports will not work.
If you have a previous version of Excellerate, make sure all computers
are upgraded to the same version of the software.
10
Getting Started
Chapter 2: Getting Started
Creating your New Database
The first time Excellerate is started, you will see the First-time setup screen:
This screen appears when it cannot find the Excellerate database. For a singleuser setup, choose Create new database. If this is a multi-user network setup and
the database has already been installed on your file server, choose Open other
database, and locate the database on the file server.
The ID and password for your new database is MANAGER, and the USER ID is
SETUP . This ID gives you full access to all program functionality. You may and
should change the password to prevent unauthorized users from having full
access.
11
Getting Started
Preferences
Any time a new database is created, you will immediately be taken to the
Preferences screen:
The Preferences screen allows you to define the specific requirements and
attributes of your church.
Church Information You may begin by entering your church name and address
information. This information will appear on reports and other printouts from the
program.
Database Name You can create several databases within Excellerate. This is
useful if you want to have a training database separate from your main database,
or for keeping multiple congregations separate form one another. The Database
Name option allows you to specify which database to automatically open when
starting Excellerate. Typically this would be your database.mdb located in the
12
Getting Started
directory where you installed Excellerate, but if you are using the network version,
this will be the database on your file server. (This is a local option that only affects
this workstation)
Word Processor - If you would like Excellerate to automatically start your word
processor for mail merges, enter the full path to your word processor. (This is a
local option that only affects this workstation)
Use Printer Tray If you wish to default all Excellerate reports to a specific printer
tray, set that option here. Note - not all trays specified here are applicable to all
printers. For most printers the default of First, or Auto will work.
Open To Module
Specifies the module that you want to see first when the
program is started. This may vary from person to person, depending on their job
duties. (This is a local option that only affects this workstation)
Allow State/Province more than 2 letters Allows international users to use full
state or province names instead of the 2 letter abbreviation.
Format for phone #s Specifies the format for phone numbers. The default is
the United States format. Use 9 to represent numbers, c for characters, \( and \)
for parentheses.
Enter your names for The next section will allow you to specify your choice of
names for your cell divisions, cell interns, and cell supervisors. Cell divisions refer
to the method you use to organize your cell groups. For example, you may divide
your area or city into Districts, Zones, and Sections. For larger organizations, it
may be necessary to label the divisions as Congregation, District, Zone, and
Section, for example. Enter your names in the four division fields starting with
Division1 as your biggest division. It is not necessary to use all of the available
fields for divisions. If your church has two divisions, simply leave the other fields
blank. The cell designation does not need to be specified here, that field is
always labeled Cell. For example, for cell group 1-A-5-B , which stands for
District-Zone-Section-Cell, only specify Div1 = District, Div2= Zone, Div3=
Section. The Cell identifier is recorded in a separate field within the cell group file.
The program also allows you three fields for naming cell intern types, which gives
your church the flexibility to have several intern types, such as a cell intern, a
worship intern, possibly a youth intern. The final designation is for a cell
supervisor, or an individual that acts as manager or overseer of another cell. This
might be helpful for your children s pastor, if you have children s cells. Those cells
may be overseen by the District and Zone pastors in one way, but also by the
children s pastor in another.
13
Getting Started
User Definable Fields Although Excellerate is designed to track many aspects
of your church members, cells, classes, and organizations, there may be items
specific to your church that are not already included in the program. This section
allows you to specify your names for the user-defined fields throughout the
program. You may want to know if a member has any pets, for example, and
could designate the Members User1 field as Pets. The user fields can be setup as
regular text entry fields, or pick-lists. To specify that a user field is a pick-list,
select the appropriate pick-list type next to the user field. For example,
means
forced pick-lists, or that the user can only choose a value from the pick-list.
means optional pick-list, so the user can choose an item from the list, or type in
their own.
means no pick-list. See Pick-lists under the Preferences menu
option for setting up values for your pick-lists.
Contribution Options:
Before using the contribution module, you should verify several program options
within Excellerate to ensure they are set according to your church operation.
14
Getting Started
Hash totals While entering contributions, Excellerate can calculate hash totals
for you to ensure that all of the contributions have been entered correctly. Hash
totals are either the sum of the member IDs or envelope numbers that are entered
into a contribution batch. You would compare your pre-calculated hash total to
the one generated by the program to verify all contributions have been entered.
You can choose to calculate hash totals by Member ID, Envelope #, or None.
Next available receipt number Excellerate assigns unique receipt numbers to
each contribution so that a receipt can be printed if necessary. This option allows
you to choose the next available number.
Default contribution account code When entering contributions, Excellerate
can set the default account code to any of the accounts you have set up. This way
you can reduce the number of times you have to choose an account code. See
Accounts later in this manual.
Use same code until changed
When entering contributions, you can tell
Excellerate to always use the same contribution code until it is changed.
Otherwise, it will default every time to the default code specified in the previous
field.
Default contribution type Again like account codes, you can set the default
contribution type here. You can set up any kind of contribution type in the pick-lists
menu option.
Default member lookup field
When entering contributions, you can lookup
members by either their MemberID, Envelope #, or Last name. Set this field to
whichever method you will use most.
Accounting period Excellerate tracks contributions according to the accounting
period. Here you can set your current accounting period. The accounting period is
only used to calculate contribution totals for the various periods such as month-todate, quarter-to-date, etc
Show member name when entering contributions This option allows you to
hide the member s name when entering contributions. If your church uses the
member ID or Envelope # to enter contributions, you can keep the member s
identification private so that other people in the room will not see the member s
name. This option disables the ability to look up members by last name during
contribution entry.
15
Getting Started
Allow editing contributions after they have been posted If you want to be
able to add, edit and delete contributions after they have been updated from batch
entry, check this box. Typically you would not want to allow this, but if your church
is smaller, and doesn t require the batch entry process, contributions could be
added by going to the member edit screen, and to the Contribution associated
information tab.
Prompt before resetting account totals When Excellerate detects the current
date has changed into a new month, quarter, or year, it will prompt you to be sure
it is ok to advance the system to the next accounting period, and to reset the old
monthly, quarterly, or appropriate totals. If you do not want to be prompted
uncheck this box.
Canadian receipt number generation and tracking on contribution
statements This option is available for countries such as Canada, that require
receipt number tracking on their contribution statements. This option will generate
unique receipt numbers for each statement, and those numbers will be stored in
the member s change history. Once the statements have printed correctly, those
contributions are protected from generating a new receipt number, but those
statements can be re-printed with the original receipt number by choosing the reprint report style.
Date last contribution statements printed / updated
When the Canadian
option is selected, this field records the date of the last contribution statements that
were printed. Excellerate will then prevent generating new receipt numbers for
these same contributions. You can reprint those statements by using a re-print
report style. This style will use the same receipt number that printed on the
original statements. Basically, Excellerate will prevent the use of a report style that
generates a new receipt number for contributions earlier than this date.
IRS Message to appear on Member Contribution Statements This allows you
to enter the required IRS message that should appear on the Member Contribution
Statements.
Your message to appear on Member Contribution Statements
you to enter your own message on the statements.
16
This allows
Getting Started
Cell Group Options:
Next, in the Cell Group Options box, you must answer several questions about
how your cell groups are organized:
¨
If you want children included in your cell group meeting totals, then check the
first box. There is a separate total for children as well, but if you want them
totaled with the member and visitor counts, then select this option.
¨
If your cell leaders are considered members of the cell they lead and should be
counted there as members, then check the second box. A member may be a
leader of as many cell groups as they want.
¨
If you wish to have your cell groups named by the combination of divisions
they represent, then check the third box in this section. For example, if Matt is
a cell leader in District 1, Zone A, Section 5, Cell B, then you may choose to
name his cell 1-A-5-B. In this case you would check the use divisions in cell
names box. If you don t want the divisions included in the cell name, for
example, names like Teen Life or Matt s Cell, you would leave the third box
unchecked.
What is a division? Essentially, division is the generic term used in Excellerate to
describe the levels within your cell structure, such as District, Zone, Section, etc .
Some churches may include Congregation, or City as one of their divisions.
17
Getting Started
¨
If you wish to allow your members to join more than one cell group, check this
box.
¨
The next field in this section allows you to specify the day of the week that your
church has designated as the beginning of the cell week. This may differ
depending on the specific situations of each church. This option is used when
displaying the pop-up calendars for entering dates referring to cell weeks.
¨
You can also specify how you want to default the cell member attendance.
You can choose to default member s attendance to Present, Absent, Use last
weeks attendance, or to turn off cell attendance.
¨
The Prompt for meeting updates option specifies when you would like the
program to remind you to run the update for cell meeting totals.
In order to be able to track your churches cell growth, you will enter weekly cell
meeting totals into the system. This usually consists of entering the number of
members, visitors, etc for each cell. You must also record that certain cells did
not meet, or did not turn in a meeting report. The update for cell meeting totals
option goes through your list of current, active cells (after you ve made any cell
information changes and entered your meeting totals) and makes sure you ve
made an entry for each cell. If not, the update will automatically make an entry for
you indicating that the cell did not turn in a report. You can then print a list these
cells if you need to follow-up with them. It is OK if some cells don t turn in a report,
but the system must have an entry for each cell every week, and the update
ensures this.
Email Options
Excellerate has the ability to send email messages. You will need to have an
SMTP outgoing mail server to take advantage of this feature. See the section on
setting up email in the Internet Integration chapter of this manual.
Web Options
The web integration feature allows you to integrate data from Excellerate with your
church web-site. See the section on Setting up Web Integration in the Internet
Integration chapter of this manual.
18
Getting Started
Users and IDs
As with the Preferences screen, if this is your first time using the program, you will
automatically be taken to the Users screen. Otherwise, User IDs can be accessed
from the Options Menu.
This screen allows you to enter all of the users of the system, their email address,
their default view, and their levels of access.
Default User View
Users can be assigned a default view, which can narrow their view of the database
to the area they re interested in. For example, your church may have several
district secretaries, and each of them can set up their program to open to the view
that they use the most, (such as District One for the District One secretary). When
a user has a default view assigned, that becomes their initial view when they start
the program. They can always choose another view at any time. If a default view
is not specified for the user, then they will see all records when the program starts.
19
Getting Started
User Access
To allow or disallow users from viewing or modifying different types of information
within the program, you assign them access codes. Access codes provide
different levels of access to different areas of the program. For example, to allow a
user full access to member information, give them a D for member access. The D
code allows deletions and updates. The U code allows updates only, and the R
code allows read only. A blank prevents access to that area of the program.
SUMMARY OF USER ACCESS AREAS:
ACCESS AREA
Members
Cell Groups
Classes
Organizations
Financial
Visits / Counsels
User IDs
Preferences / Options
Database Maintenance
Cell Meeting Updates
Report Modifications
Saved Views
Send Emails
ACCESS CODE
Member and related information
Cell groups and related information
Classes and attendees
Organizations and their members
Member contribution information
Meetings or counselings with members
Maintaining User IDs
Program preferences, pick-lists, and defaults
Re-indexing or Compacting the database. Purging
deleted members from system.
Ability to run the cell meeting update
Ability to change report styles
Ability to change saved views of the database
Ability to send emails
SUMMARY OF USER ACCESS CODES:
TYPE OF ACCESS
Read-only
Update
Delete and update
Only allow seeing a member s
last giving date
No access
ACCESS CODE
R
U
D
G (applies to financial area only)
Blank
The following options require Delete and Update access in the financial area:
change accounts, reset or reverse-update contributions, end of period processing
Remember to change the MANAGER password at some point. This ID defaults to
full access to the system for setting up users, etc
Here s an idea Consider setting up a STAFF User ID, without a password,
which allows read-only access to Members, etc, This allows staff members to log
on quickly to access basic information, such as phone numbers and addresses.
20
Getting Started
Logging on
Once you ve setup your preferences and users, you can now log into the system:
The logon screen prompts you for your User ID
and password.
The default User ID is
MANAGER and the password is SETUP. The
logon prompt shows you the database that you
are logging in to. If you wish to log into a
different database you can hit the
button
which will prompt you for a database.
Program Registration
You must enter your registration information into Excellerate to enable its full
functionality. From the Utilities menu, choose Program Registration:
Enter the registration name, and
registration code that were provided
with your purchase of Excellerate.
This information will be located on the
inside cover of the user manual. The
s in the registration code are
Zero s. It is also important that you
choose the configuration that you
purchased: Under 500, or Unlimited
Members, as well as if you have the
Network Version.
Now that you are successfully logged on and have entered your registration,
continue with the program setup by choosing the following under the Options
menu.
21
Getting Started
Pick-lists
Before using the program, it is important to set up your churches values for the
pick-lists to be used within the program. Pick-list setup is located in the Options
Menu:
To add new entries to a pick-list, first
choose the field for which the entries
apply using the Show picklists for Field
selection.
Then use the Add Item
button to add the entries for that field.
The same procedure is used for
changing or deleting entries except you
would use the appropriate button.
Pick-lists are handy lists that pop up when entering information into certain fields.
For example, when you need to enter a district for a cell report, you can choose it
from a list instead of typing it. These pick-lists are defined by first choosing the
field for which the pick-list belongs, and then Add, Change, or Delete the values for
that list. Most pick-lists will already have some common values entered. You may
just need to review these values to make sure they are appropriate for your
church.
Although the full use of many of the options will become clearer once you begin
using the program, completion of the Division pick-lists (Div1, Div2, etc ) is
important. Division pick-lists are the possible values for each Division. For
example, in a District-Zone-Section structure, you may enter values 1,2,3,4,5 for
Div1 (District). And A,B,C,D,E for Div2 (Zone) and so on. You may use values
that are up to eight characters in length such as East and West if your cell
hierarchy is structured that way.
22
Getting Started
Zip Codes
The next setup step to complete is the zip code table:
By entering the zip codes your church anticipates using, along with their
corresponding city and state, Excellerate can automatically enter the city and state
for you when pre-members or members are added to the system. The program
can also automatically assign those members to a specific division, (not a specific
cell) based on their zip code. This may, for example, prove helpful in assigning
people to follow up with first-time visitors to a church service. The visitor s zip
code would automatically put them into a division, and someone from that division
could maintain contact with them. Although they may not remain in that division
upon becoming members, they have a point of contact from the church that is
specific to their area.
Simply hit the Add Zip button to enter a new zip code, and the corresponding
divisions.
You may also add zip codes as you use the program during member entry.
23
Getting Started
Member Steps
Member Steps is also accessed from the Options menu:
The Member Steps option allows you to enter the Steps or Levels a member
may go through in their spiritual development process. These are milestones in a
member s development, so a class may be a step even though there is another
module for entering more details on each class.
Whether your church has a highly defined system of discipleship classes or one
that is more open-ended, the Member Steps option will be useful. You may add
steps at any time to this list. You may also designate different steps as Auto-Load
steps. All Auto-Load steps can be loaded for a member at once so that it is easy
to see which steps have been completed, and which steps have not.
24
Getting Started
Member Profiles
The Member Profiles option is where you enter a list of all possible attributes that
you may want to keep for members. These are typically things like hobbies,
talents, or interests, but can be used for any purpose:
With member profiles, you can search for members with a specific interest when a
need arises in that area. This may include everything from locating seamstresses
willing to sew costumes to identifying people interested in bicycling that could
assist in planting a special-interest cell group.
Check for Duplicate Members
When adding new people to Excellerate, the program can automatically check to
see if the person has already been entered. To enable this feature make sure
Check for Duplicate Members is checked in the Options menu. As you type in a
new person s first and last name, Excellerate will search to see if anyone with that
name has already been entered. You will then see a list of matches to determine if
the new member has already been entered. To disable the feature, un-check this
option.
25
Getting Around
Chapter 3: Getting Around
Now that you have installed and configured Excellerate for your church, we will
take a look at getting around within the program, and introduce some of the
screens and toolbars.
Main Screen
This is the main screen that you will see when starting Excellerate:
The Member module will be the first module you see when you start the program.
Remember, however, that you may change this initial module to Cells, Classes, or
any other module by setting the Open to module field in the Preferences screen.
27
Getting Around
Tool Bar
The Tool Bar allows you to navigate within the program quickly. The first six
buttons on the left side of the tool bar will take you to the different modules of the
program. These button also have function assigned to them which can also be
used.
F4-Pre-Members, F5-Members, F6-Cells Groups, F7-Classes, F8-Organizations, F9-Pastors,
F10-Contributions, F12-Change Views
The buttons on the right side of the toolbar are for working in the currently selected
module.
The
buttons are for Adding, Deleting, and Editing records.
The
button is used for finding records within the current module.
The
button is used for sorting the current view in different ways.
The
button is for printing lists and reports
Other buttons will appear on the toolbar that are specific to the selected module.
Fly-by hints are available for these buttons as you hold the mouse pointer over
them.
The remaining button on the left portion of the tool bar is the
Select Different
Views button, which allows you to view selected records, such as First time
visitors, Members with children, Youth Cells, etc
Browse Screens
When you select a module to work in, Members, Cells, etc you will see the
browse screen for that module. The browse screen lists the records in that module
for the current view you have selected. The browse screen can be re-arranged to
show different columns. These columns can be moved around, and re-sized to
meet your needs. The column arrangement will be saved for the next time you use
the program. To move a column, drag the column header with the mouse. To resize a column, drag the divider between column headers. If you shrink a column
all the way, it will be removed from the view. To return you column arrangement
back to the default, right-click a column header and choose restore default
columns. (See Browse Columns in the appendix for more information)
28
Getting Around
Views
A view is basically a subset of the records for a particular module. Views allow you
to look at the records your interested in. This can make working with the database
much easier because you are only looking at the information relevant to your task.
Use the Select different view button to choose or create a new view:
Views are not only for viewing information, but for reporting as well. This can be
very powerful when combined with the reporting and mail-merging capabilities of
Excellerate. For example, to print mailing labels for your cell leaders, you would
simply choose the view for Cell Leaders, then choose the report for Member Lists /
Labels from the Reports menu option. You could also use that same view of Cell
Leaders and print a Member Development report to check on their development
progress. Users can easily create their own views, and save them for future use.
Views can even be imported from our web site and exchanged with other users.
(See the chapter on Views for more information)
29
Getting Around
Quick Searches
In any module, you can quickly search for a record just by typing a few letters of
the name. To search for the first Smith, just type Smith , and the Search for
dialog box will appear. This will also work for Cells, Classes, etc
Status Bar
The status bar is located at the bottom of your screen and shows your current view
for the records in a given module. This could be All Members , or Cells in
District-1 for example. The right side of the status bar shows the number of
records in the current view. The left side of the status bar is used for displaying
status messages during program operation.
Getting Around in Edit Screens
While editing a record from any module, you can jump to the previous or next
record in the view without having to exit the record, by using these buttons:
While in an edit screen for any module, you can hit the following hot keys for easier
navigation:
Hot Key
Function
Alt-U
Go up to the previous record in the view
Alt-D
Go down to the next record in the view
Alt-I
Go to the associated info tabs
F4
Jump to the Pre-Member module
F5
Jump to the Member module
F6
Jump to the Cell module
F7
Jump to the Class module
F8
Jump to the Organization module
F9
Jump to the Pastor module
F10
Jump to the Contribution module
F12
Change the current view
Ctrl-F
Find another record in the module
Ctrl-M
New email message in member module
Ctrl-R
Refresh the current view
Double-click blue Jump to that edit screen
underlined text
30
Getting Around
Associated Info Tabs
When you are editing a record, the top half of the screen will contain the pertinent
information for that record, and the bottom half of the screen will contain a series of
associated information tabs. These tabs will contain more information that is
associated with the record.
For example the member screen will have the following associated info tabs:
Other family members, Follow-up Information, Member profiles, Member s cell
group, etc
The information in these tabs will contain links to the other parts of
the program. For example, If you are viewing a particular member, you will see
their family members listed in the family members tab. If you double-click a family
member, you are automatically taken to that member s edit screen. You can also
see that this member belongs to a cell group. You may double-click that cell group
link, which will take you directly to that cell s screen of information along with all of
its associated views. These work much like a web page with links to related
information.
Remember! Any information that is underlined blue, can be double-clicked to jump
to that edit screen.
31
Pre-Members, Members and Pastors
Chapter 4: Pre-Members, Members and
Pastors
The Member, Pre-Member, and Pastor modules all use the same information
screens with a few differences.
Pre-Members are the people you are interested in following-up with, or mailing out
marketing information to. These may be first-time church visitors, or an area of
your city that you may be targeting. Pre-Members contain all of the same
information fields as a member, because at some point you are hoping to move a
pre-member to the member module. The main difference between pre-members
and members is that pre-members can not join cells, classes, organizations, or use
other associated information tabs. They can have family members and follow-up
information. Pre-Members are actually stored in a separate table to avoid slowing
down access to member information. At any time you can transfer a pre-member
to the member module. Use the
button, or the F4 key to select the PreMember Module
Pastors, on the other hand are exactly like members except the Pastor Field in the
Member record is coded with the type of pastor. Pastors are members, and are
stored in the member table along with other members. The only difference when
you select the pastor module, is that your view is automatically setup to show
pastors only. Use the
button, or the F9 key to select the Pastor Module.
Members are of course, the members of your church. They are also any
individual, or business that you wish to track contributions for. Members would
also include anyone you wish to track through cell groups, member steps, classes
and organizations. Your cell groups may consist of a few members from other
churches. These people would still be entered into the member module, and
designated as OtherChurch in their member type field. Use the
button, or
the F5 key to select the Member Module.
We will describe the Member Module in detail here. Remember it contains the
same screens used for the Pre-Member and Pastor Modules.
33
Pre-Members, Members and Pastors
When selecting the Member Module, you will see the Member browse screen:
The member browse screen shows the members in your church. From this screen
you add, edit and delete members, and can see different subsets of your members
by selecting other views.
Next, we will take a look at the Member Screen, and the information it contains:
34
Pre-Members, Members and Pastors
Member Screen
The Member screen as well as the other edit screens in Excellerate is divided in
half. The top half contains all of the general information about the member, and
the bottom half contains the associated information tabs.
Most of the fields in the member screen are self-explanatory, but we will highlight
the fields with special meaning, or that are not apparent.
Member ID
A member s ID number is automatically assigned when the
member is entered into the system. This number is unique to this
member, and is used to link all other related information to the
member.
Last
The Last name field can be used for a member s last name, or a
business name.
Prefix
The Prefix has a user-definable pick-list that can be modified in
program options. For business choose Bus.
35
Pre-Members, Members and Pastors
Relation
Specify Head if this member is the head of the household,
otherwise choose Spouse, Child or leave blank. This field is also
used to determine how to address mailing labels when using the
Mr. & Mrs. option.
Family
The family button allows you to assign the member to a family.
For new members of a new family, do not choose a family, and the
system will create the family for you. Then subsequent members
can be assigned to the new family. If a member needs to be
removed from a family, this button can do that as well.
Status
The status field specifies the member s status. This can be Active,
Inactive, or Deleted.
Active members are current, active
members. Inactive members are those that may have moved
away, but have given contributions in the past year. These
members must remain in the system until the end of the year.
Then they can be deleted. Deleted members are marked for
deletion. These members can be permanently removed from the
system at the end of the year. Inactive and Deleted members can
not be modified, or assigned to cells, classes, etc
Picture
The picture window is a thumbnail view of the picture assigned to
this member. See member pictures in the appendix for more
information on assigning pictures.
Member Type The member type is used to classify the member. These types
can be setup by the user.
Pastor Type
Pastor Type designates this member as a pastor.
types can be setup using the pick-lists menu option.
Mail Code
Mail Code allows you to assign a code to the member. These
codes can be excluded from mail-outs. You can use any code that
is meaningful to you. Typically, N would be used to designate that
this member should not receive any mail-outs.
Envelope
The Envelope Number field allows you to assign a contributions
envelope number to the member so that their contributions can be
entered by simply looking up this number as opposed to searching
for their name. Envelope is one of the quick search fields
available in member searches.
36
The pastor
Pre-Members, Members and Pastors
Comments
The Comments field can be used for recording any comments, or
other information for which there is no specific field. You can enter
as much information in this field as you wish. The Comments field
automatically expands when you place the cursor in this field to
allow you to see more information. When you go to another field,
it shrinks back to its original size. Comments can also be included
on reports.
User1-4
The user fields can be renamed in the preferences option to any
other item that your church wants to track for it s members. These
fields can be set up to accept any value, or values from a pick-list.
The Cell Group Information section will show what cell group, if any, the user
belongs to. Since this field is underlined in blue, you can also double-click it to
jump directly to their cell group. The fields below specify what divisions the
member is assigned to. Members can be assigned to divisions, but not
necessarily a cell. New members may be assigned to a District, and Zone, for
example to be followed-up on by that zone pastor, but they may not yet be in a
cell. When they do join a cell, these fields are updated to reflect the divisions of
the new cell. These fields can be automatically assigned when entering the
member s zip-code. See member addresses below.
The Cell Member sponsor field is used when the member joins a cell. If one of
the existing cell members were responsible for the new member joining their cell,
then that person would be recorded here. This way you would know to keep these
members together when multiplying the cell. You may find other uses for this field
as well.
37
Pre-Members, Members and Pastors
Member Addresses
To add a member s address, use the
button on the left side of the screen
next to the address window. The member address screen will appear.
Address Type allows you to specify whether this address is the home address,
work address, etc
If you have already setup the zip-codes under the options
menu, then as you type in zip-codes, the city and state will automatically be
entered for you. Also by hitting the Auto Assign button, you can assign the
member to a set of divisions. This may be a District for most cell churches.
The other buttons to the left of the address window on the member screen are for
editing, deleting, and viewing the previous or next addresses.
Family addresses and Split addresses
When a member is added to a family, they automatically get assigned to the family
address. The family address is the address that is shared by all members of the
family. If you pull up one of the family members, and change the address, it is
changed for all family members. If you need to change the address for one of the
family members, then that member s address needs to be split out from the family
address. To do this you would choose split family address from the member
screen, and this will make that member s address separate from the rest of the
family s. Then changes can be made to that address without affecting the other
family members. If that family member decides to move back home, and you want
to un-split their address, you will need to do the following: Remove the member
from the family by using the family button, and then selecting Remove member
from family. Save the member, then re-assign them to their original family.
38
Pre-Members, Members and Pastors
Members - Associated Information Tabs
Associated Information Tabs appear in the bottom portion of each member s
screen, and contain various information associated with the member. The following
nine associated information tabs are available from within the member edit screen:
¨
Family
Lists any family members and their vital information
¨
Follow-up
Includes date member joined, how they heard about the
church, and other follow-up information
¨
Profiles
Hobbies, interests or any other member attribute
¨
Member Steps
Steps in the member s development cycle, such as water
baptism, becoming a participator, or becoming a leader
¨
Organizations
Organizations within the church in which the member
participates, such as worship team or children s church
¨
Visits/Counsels
Records any visits or counseling sessions with pastors,
Including time, location, and any notes from the session
¨
Classes
List of classes that the member has attended or is
scheduled to attend
¨
Member History
History of any changes in member information, such as
address changes or name changes.
¨
Cell Groups
Notes name of cell group a member is in, along
with cell type and date the member joined the cell.
¨
Cell Attendance
Lists each cell meeting that the member has attended.
¨
Contributions/
Pledges
Lists member contributions and their pledges.
¨
Church Attendance Lists each church service that the member has attended.
39
Pre-Members, Members and Pastors
The Family Member tab allows you to see all of the members of a family. Double
clicking a family member will bring up their screen. Family members can quickly
be added by hitting the Add button for this tab.
The Follow Up tab is used for following-up on new visitors or members. These
people can be assigned a sponsor who would be responsible for following-up with
them. You can track how they heard about the church, dates of first visit, or joined,
and up to four contact attempts and their responses. All of the pick-list values for
these items are user definable in the Options menu.
The Profiles tab is used to track various attributes about a person such as
interests or hobbies. You can enter any, and as many profile codes as you wish,
as long as they have been set up in the member profiles list under the options
menu.
With member profiles, you can search for members with a specific interest when a
need arises in that area. This may include everything from locating seamstresses
willing to sew costumes to identifying people interested in bicycling that could
assist in planting a special-interest cell group.
The Member Steps tab allows you to track a member s progress through your
churches member development process.
40
Pre-Members, Members and Pastors
To add a new step to this member, use the
button:
From this screen, you can select a specific step to add to the member, or you can
choose Pre-load Auto Steps . This option will automatically load all of the member
steps that have been designated as Auto-Steps . This way, when you pull up a
member record, you can easily see which steps have been completed, and which
steps have not:
To indicate that a step has been completed, simply double click the completed field
for the desired step.
The Organizations tab view allows you to track any organizations a member is
involved in. These may include choir, prayer teams, kid s services, etc
Remember, you can double-click the organization to quickly jump to that screen.
The Visits/Counsels tab is used for recording visits, meetings, counseling, etc
between members and the staff, as well as between members and other members.
Often in a cell church, cell leaders and members do much of the ministry as well as
the church staff. You have the option of viewing visits with the current member, or
visits the current member has had with others.
41
Pre-Members, Members and Pastors
The Classes tab allows you to track which classes this member has taken, or is
scheduled to take. This list will show each session of a particular class, so this tab
gives more detail than if you had a member step indicating that the class was
completed. Again, as in member steps, when adding a class, you can choose to
add all sessions of a class to the member to make it easier to see what has been
completed, and what is left. Also, the attended field can be double-clicked to
quickly indicate that the member attended that session.
The Member History tab records certain changes that have been made to a
member s record. This will show the members cell group membership history, and
any changes to the History Fields . You can setup which fields you wish to record
change history on by entering them into the History Fields List under the Utilities
menu option. The member history list also show which user made the change,
and when.
The Cell Groups tab shows which cell group this member belongs to, and which
groups this member may lead. You will frequently want to jump back and forth
between a member and their cell group, and can easily do so by double-clicking
the cell group, or the member s name. You can also move a member to a different
cell group from this tab, by editing the cell member record, and hitting the Move to
new cell button. To remove the member from a cell use the same process but
leave the To Cell blank.
The Cell Attendance tab shows which cell meetings this member has attended.
Each cell meeting is listed indicating whether the member attended or not.
The Contributions/Pledges tab shows the member s contribution summary, and a
choice of seeing their individual contributions, their family contributions, or their
pledges. These contributions can be edited from this screen if the program options
have been set to allow it.
The Church Attendance tab shows the date that this member has attended a
church service. Time in and out can also be recorded which is useful for checking
children in and out of children s church.
Adding Members
To add a new member to the system, simply press the
add button or hit
insert, while viewing the member browse. When adding new members, there are
several Required Fields that must be entered before you can save the entry. You
can specify which fields are required fields in the Utility menu. For new members
of a new family you do not need to select a family. The program will automatically
create a new family entry for you.
42
Pre-Members, Members and Pastors
Adding Family Members
While adding a new member, you can quickly add another family member by
clicking the
button for the family members tab. This will save your current
member, and add a new record with the last name and address already filled in.
Your cursor will be placed in the first name field ready for you to continue.
The other way to add a new family member, is to add them as described in Adding
Members above, but this time, select the family they belong to by using the family
button.
All family members by default share the same address. Any changes to the
address will be applied to all family members. To specify a different address for
one of the family members, you would use the split address feature. See Member
Addresses above.
If you ve made a mistake, and assigned a member to the wrong family, simply edit
that member, hit the family button, and select a new family. You can also remove
a member from a family by selecting remove member from family under the family
button.
Editing Member Information
To edit a member record, simply double-click it, press enter, or use the
button. Once you ve made your changes, save them with the
button, or cancel your changes with the
cancel button.
edit
save
Deleting Members
To delete a member, use the
key from the member browse, or edit the
member, and choose the Deleted status. This will only mark the member as
Deleted, and not actually remove it from the system. This is so that history can be
kept on these members, and so that you can recover the member if you deleted
them by mistake. To physically and permanently remove deleted members, you
use the Remove Deleted Members option in the Utility menu. This option can not
be recovered from, unless you have a backup, so use caution. The remove option
requires database security to perform.
The other choice in the member status field is Inactive. This is similar to delete,
but you can not remove inactive members. This option would be used to hide
43
Pre-Members, Members and Pastors
members that are no longer active in the church, but may have given contributions
this year. The system will need to keep these members until all contribution
reports are printed. At that time, those members can be deleted.
Searching for Members
There are two ways to search for members. First, is to use the
find button:
This method allows you to quickly search by several fields. This type of search will
return all members matching the search criteria in a search results view. Hit
escape to return to the previous view.
The other way to search is to simply start typing a few letters of the member s
name:
The Search for
window appears. This method will take you to the first
occurrence of the last name that matches the search criteria in the current view.
You can also search for the last name, comma, first name. This will not find a
member that is not in the current view.
44
Pre-Members, Members and Pastors
Pre-Members
Once again, Pre-Members are the people you are interested in following-up with,
or mailing out marketing information to. These may be first-time church visitors, or
an area of your city that you may be targeting. Pre-Members contain all of the
same information fields as a member, because at some point you are hoping to
move a pre-member to the member module. The main difference between premembers and members is that pre-members can not join cells, classes,
organizations, or other associated information tabs. They can have family
members and follow-up information. Pre-Members are actually stored in a
separate table to avoid slowing down accesses to member information.
At any time you can transfer pre-members to the member module. When you
select the Pre-Member module, the
Move Pre-Members button appears in
the toolbar. This button will move
pre-members from the pre-member
module to the member module. This process will actually move the pre-member s
entire family, assigning a new family number and member numbers. The
addresses and follow-up information is transferred along with the pre-member.
45
Cells
Chapter 5: Cells
The Cell module is probably the most important module in Excellerate. This
module manages all the members, meetings, activities, growth etc
of your
churches cell groups. To access the cell module, use the
cell button or hit
the F6 key. After selecting the Cell Module you will see the Cell browse screen:
The cell browse screen shows the cell groups of your church. From this screen
you add, edit and delete cells, and can see different subsets of your cells by
selecting other views.
Next, we will take a look at the Cell Screen, and the information it contains
47
Cells
Cell Screen
The Cell Information Screen shows all information relating to this cell group. The
top half of the screen shows details on the cell, and the bottom half shows the
associated information tabs.
Division Fields
The top section of the cell screen lists the division codes that this cell belongs in.
Remember a division is the generic term used in Excellerate to describe the
levels within your cell structure, such as District, Zone, Section, etc . Some
churches may include Congregation, or City as one of their divisions.
In this example we are using District, Zone, and Section. We will explain more
about using these fields in the section on Adding Cells. The values for the division
48
Cells
fields can be chosen by using the pick-lists. These pick-lists are defined in the
pick-lists menu option.
Status
This field indicates whether the cell is Active or Inactive. You may
want to inactivate a cell for a period of time, and then re-activate it
later. When the cell is inactive, you will not be able to record
meeting totals for it, and the cell will not show up on your reports.
This is useful for student cells that only meet during the school
year. Inactivating a cell is better than deleting it, because you
don t loose any history. The cell remains in the database, but is
hidden from most cell maintenance functions.
Type/Sub
The Cell type field lets you classify your cells into categories. This
could be categories such as Family, Work, Groups of 12, Youth,
etc . The Sub field allows you to further categorize your cell by
using a sub-type. These choices are defined in the pick-lists menu
option. There is one type of cell that is handled differently than
other cells. If a cell has the type Control , then this cell is
excluded from cell meeting totals entry and reporting.
A Control cell is a cell that is used to identify a leadership position in the cell
hierarchy such as the District 1 Zone A Leader. We create a cell with the name 1A and assign the District 1 Zone A leader as the leader of this cell. In a traditional
cell structure such as the 5 X 5 structure, the 1-A Leader may be a full time staff
member, and not a cell leader. In this case the cell 1-A would not have any
members, and would not have any meetings, but it would have cells under it in the
cell hierarchy. Therefore we set the cell type to Control so that it is not included in
cell meeting total functions.
The Control cell type and overall cell hierarchy is discussed
further in the section on Adding Cells.
Started
The date that the cell was started. When multiplying cells,
Excellerate will enter this value for you.
To Multiply
The target date for this cell to multiply. You can then report on this
field to list all cells targeted to multiply next month, etc
Meets on
The day and time when the cell meets.
Frequency
How often the cell meets. Most cells will meet weekly, but you
may have some cells that meet daily, monthly, or periodically.
49
Cells
Description
This is a general description of the group. This can be used in
printing group menus and providing information on your web-site
about the groups.
Primary meeting Phone & Address These fields specify where the cell meeting
is primarily held. The last four digits of the Phone field is used as
the default password for logging in to the online reporting form.
Members
This field shows how many cell members are in this cell.
Cell Leader
The cell leader. When a new leader is assigned to a cell, history
of the leader change is recorded, and the new cell leader s phone
number can be loaded into the primary meeting phone
Intern 1-3
These fields may be renamed to titles that your church uses. You
may have several interns. Although every cell will not have the
need for three interns, it may prove helpful as cell leaders attempt
to give responsibility to various cell members, according to their
willingness and gifting. Your cell leaders may wish to have a
worship leader intern, a cell leader intern, and an outreach intern
simultaneously.
Supervisor
The cell supervisor is a field that can be used for another
individual besides the cell s district and zone pastors that is
responsible for the cell. This could be your children s pastor, if you
have children s cells. Those cells may be overseen by the district
and zone pastors in one way, but also by the children s pastor in
another.
Parent Cells
Parent cells are the key to how the cell hierarchy is represented in
Excellerate. By assigning a parent cell to a new cell, you have
connected the new cell to the cell hierarchy. See the section
below on representing your cell structure in Excellerate for more
information on parent fields.
Generation
The generation fields show what generation the cell is in relation to
the associated parent field whether it be Organizational or Birth
parent. The generation is automatically calculated any time a
parent field is changed.
User fields
Use these fields to track other cell information you church may be
interested in. These field names can be set up in program
preferences.
50
Cells
Cells - Associated Information Tabs
Associated Information Tabs appear in the bottom portion of each cells s screen,
and contain various information associated with the cell group. The following five
associated information tabs are available from within the cell edit screen:
¨
Cell Members
Lists all cell members and their member development
information.
¨
Activities
List any activities that the cell group is involved in.
¨
Member History
Lists past members that have moved out of the cell.
¨
Cell Meetings
Lists the cell meeting totals that have been entered for
the cell.
¨
Cell History
Lists any changes that have been made to the cell.
¨
Cell Attendance
Lists the cell members attendance history
The Cell Members tab allows you to see the cell members that belong to this cell
along with their member development information. As you choose different
members on the left side of the information tab, their member steps, or classes
appear on the right. You can choose Member Steps or Classes to view on the
right.
You can jump to a cell member s screen by double-clicking their name.
To add new members to this cell, simply hit the add button while viewing the cell
members tab. To delete a cell member, you could use the delete button, or you
could move the cell member out of this group. By moving members you can give a
reason for the move.
51
Cells
To move a cell member, highlight that member, and hit the Moves button in the cell
edit screen.
From this screen simply choose the new cell to move the member to, and the
reason for the move. If the cell member is not moving to a new cell, then leave the
To cell blank.
The Activities tab allows you to assign different activities to a cell group. These
may be things like community outreach, or prayer for a missionary.
When you set a date for these activities, you can automatically be reminded of
them on the Cell Leader Report forms that get printed each week. This form will
show any activities that are coming up in the current month.
52
Cells
The Member History tab simply lists former members that have moved out of this
group, and why.
The Cell Meetings tab shows the cell meeting totals that were entered for this
group. You can see from this information how the cell is growing. You can edit
these entries by highlighting the entry and using the edit button for the tab. The
edit screen for cell meeting totals is a shorter version of the Mass Cell Meeting
Totals Entry screen accessible from the cell browse. You would use the Mass Cell
Meeting Totals Entry screen on a weekly basis for entering all of your cell totals,
but this tab allows you to easily see and maintain the meeting totals for a particular
cell.
The Cell History tab shows change history to the fields that are designated as
history fields. This list of history fields can be modified in the Utilities menu.
The Cell Attendance tab shows individual cell member s attendance history.
Member s attendance can be modified here by double-clicking the Attended
column. Again, on a weekly basis you would use the Mass Cell Meeting Totals
Entry screen for recording attendance for all of your cells, but this tab shows the
attendance for one particular cell.
Representing Your Cell Structure in Excellerate
In the following discussion we will use the names District, Zone, and Section to
identify our divisions. Your church may use other names.
If you were to draw a chart of your churches cell structure, you would probably
draw an organizational chart with cells listed under district, zone and section
pastors. In Excellerate, to represent cells as being under the district 1 pastor for
example, you would create a Control cell group for district 1. Then assign the
district 1 pastor to be the leader of that cell. Next you would create a Control cell
group for Zone 1-A and assign the zone pastor to be the leader of that cell. Now to
show that cell 1-A is under cell 1, set cell 1-A s Organizational Parent Cell to the
district cell 1. You would also create a cell 1-B, and set it s Organizational Parent
Cell to district cell 1. You would continue in this manner until you get to your actual
cells, which would be placed under the section control cells. By setting the cell s
parent field, you are placing it under another cell.
53
Cells
Remember, control cells are for district, zone, section and cells that do not have
any members. To make a cell a control cell, you set the cell s type field to Control .
Control cells do not meet, and do not have any members. These cells will not
appear on weekly meeting total reports. The control cells appear as pastor icons
in the cell tree below.
In the following example, we have created these control cells in district 1:
District cells:
1 (Keith Buchert)
Zone cells:
1-A (Chip Montana)
1-B (Tom Gess)
Section cells:
1-A-1 (TinaLogan)
1-A-2 (John Bivona)
1-A-3 (Hank Sinclair)
1-A-4 (Charles Payne)
Now we can assign real cells, 1-A-1-A, 1-A-1-C, 1-A-1-D and 1-A-1-E to section
cell 1-A-1 (Tina Logan).
54
Cells
We use cells to represent the district, zone and section leaders for three reasons:
1. It makes more sense to put cells under the position District 1 than the person
District 1 Pastor . The person may change, but the position will not.
2. By creating district, zone and section cells, you can assign activities to these
cells, track history and other information that applies to the whole district, zone,
etc
3. In the Groups of 12 structure, the district, zone, section leaders have real cells
where their group of 12 are their cell members. These G12 members are
encouraged to lead cells themselves, and those cells would be under the
district, zone, or section cell.
In the Groups of 12 structure, the pastor cell, district and zone cells are real cells
with the cell leader s group of 12 as members. These cells would meet, therefore,
they would not be considered control cells. Also in the G12 structure, each cell
leader is a member of someone else s G12. For example, In the G12 example
below, Brandon Ellis is the district 1 leader, and has a real cell called cell 1.
Brandon s group of 12 are his cell s members, one of whom is Grant Samuel.
Grant is also a zone leader of zone 1-A and has a cell called 1-A. So, his cell
would be linked under Brandon s cell 1 by setting his cell s Organizational Parent
Field to cell 1.
In this example, all cells are real cells, not control cells. Here you see the senior
pastor has a cell, and Brandon Ellis, the District 1 pastor is a member of it. We
also see Brandon s group of 12, where the first three members have not started
their own cell yet, but the other members have.
55
Cells
Each cell can actually have two different kinds of cell parents:
Organizational Parent This is the parent cell from an organizational point of
view. It answers the question Who is responsible for my cell in terms of an
organizational or administrative hierarchy?
Birth Parent
This is the parent cell from a birthed-from point of view. It
answers the question What cell was my cell birthed from? This will usually be the
same as the organizational parent, but a new cell may have been birthed from
district 1, but because the new leader really lives in district 2, that cell may be put
under district 2. It is still good to know which cell the new cell was birthed from.
When setting up your cell structure you really only need to assign Organizational
Parents. Birth parents will be calculated and entered for new cell multiplications.
Now that you understand how the cell structure is implemented, here is the
easiest way to start entering and structuring your cell groups:
First, start by entering all of your cell groups without worrying about assigning the
Organizational or Birth parents. Next, enter any Control groups for Districts,
Zones, etc
if you are using that type of structure. Now, use the Cell
Organization Tree to view all of your groups. They will all appear in a list on the
left-hand side. Finally, drag each cell on top of the cell it should fall under. For
example, if you have a cell called 1-A-1-B , it would fall under Control cell 1-A-1
so you would drag cell 1-A-1-B on top of cell 1-A-1 . This will automatically
assign the Organizational parent. Continue dragging your cells around until your
structure looks like you want.
Adding Cells
To add a new cell to the system, simply press the
add button or hit insert,
while viewing the cell browse. When adding new cells, there may be several
Required Fields that must be entered before you can save the entry. You can
specify which fields are required fields in the Utility menu.
Start by entering a cell for the head pastor, or whoever oversees all of your cell
groups. This cell and leader will appear as the head of all the cells on you
organizational chart. Then add your district cells, or whatever you call your first
level cells, and set their organizational parent to be the head cell. Continue with
your other cells in this manner until you have them all entered, and assigned
parents.
56
Cells
When adding your cells, you start by entering their division fields. Your church may
choose not to use all four of these division fields. This is defined by the names
you ve chosen for the division in the program options screen. If you left a division
blank, that field would not appear in the cell screen. To enter cell 1-A-2-B, you
would set District=1, Zone=A, Section=2, and Cell=B. If this were a District cell 1,
you would only enter District=1. The Cell field would be blank, unless you wanted
to make it clear that this was a district cell by putting the word (District) in the cell
name field. The cell field identifies this cell within the given division hierarchy.
This can be a letter, number, or up to an eight character name.
The actual name of the cell will be the combination of the division and cell fields,
unless you chose not to use the divisions as the cell name in the preferences
screen. Then the cell name will appear as just the value in the cell field. Here are
some example cell names:
¨
¨
¨
¨
5-A-1-B
MyChurch-5-A-1-B
5-A-1-Teens
Chicago-East-1-B
If you choose not to use the divisions in naming a cell, then you may designate a
simple name similar to the following:
¨
¨
¨
Kevin s
Teen Life
Singles
Remember if the cell is a district, zone or section cell, and does not have any
members, it s type field should be set to Control so it will not ask for meeting
totals, or show up on weekly reports.
Also assign the cell leader, by choosing a member from the pick-list. Again, if this
is a district 1 cell, the leader would be the district 1 pastor and so on.
Next, assign the cell s Organizational Parent field by picking the parent from the
drop down pick-list. This parent may be a district, zone or section cell, or in a G12
structure it may be any cell that this leader belongs to.
Now, you will add the members of the cell. This is done by simply clicking the add
button in the cell member associated information tab, and picking the member from
the pick-list.
You can also enter any activities that this cell is involved with.
57
Cells
Editing Cell Information
To edit a cell record, simply double-click it, press enter, or use the
button. Once you ve made your changes, save them with the
button, or cancel your changes with the
cancel button.
edit
save
Deleting Cells
There are two methods of deleting cells. If the cell was entered by mistake, or you
do not wish to keep any history of the cell and wish to delete it, use the
button from the cell browse. This will remove the cell from the database. If you
wish to delete the cell, but want to keep history on it, or it is really only going to be
inactive for a period of time before re-activating it, then inactivate the cell by
choosing the inactive status within the cell s edit screen.
Assigning Members to Cells
Members can be assigned to a cell group from either the member edit screen, or
the cell edit screen. To add a cell member from the cell edit screen, choose the cell
members associated information tab, and hit the
button to add a new cell
member.
From this screen, simply choose the member you wish to add to the cell from the
member pick-list. The members must already be entered into the member module
before you can add them to a cell. You can also specify the date the member has
joined the cell.
58
Cells
To assign cell members from the member screen, choose the Cell Groups
Associated Information Tab from the member s edit screen. Use the
button to
add the member to a cell group:
From the screen, use the drop down pick-list to choose the cell to join. By default,
this pick-list will show the cells in the division that the member has been assigned
to. For example, if the member has been assigned to 1-A-1, or District 1, Zone A,
and Section 1, then the cell pick-list will only show cells in 1-A-1. To view all of the
cells, select the List All Cells option.
Primary and Secondary Cells
Excellerate allows members to belong to multiple cell groups. This can be
disabled based on the cell options in the program preferences. If a member joins
more than one cell group, you have to choose one of the groups to be their primary
group, and all other groups become secondary. The main difference between
primary and secondary groups is that the member s primary group will be
displayed as the members cell group on all screens and reports. When a cell
group is made primary, that group s division codes (District, Zone, Section, etc )
are put in the member s record, therefore assigning that member to those
divisions. Member s attendance can be tracked for primary as well as secondary
groups, and all of the member s groups will be listed in their cell groups associated
information tab.
To make a specific cell their primary cell, use the Make this their Primary cell
button when adding or editing a cell member. When a cell is chosen as the
primary, all others become secondary.
59
Cells
Searching for Cells
There are two ways to search for cells. First, is to use the
the cell browse screen:
find button from
This method allows you to quickly search by the cell name field, or another field in
the cell table. This type of search will return all cells matching the search criteria in
a search results view. Hit escape to return to the previous view.
The other way to search is to simply start typing a few letters of the cell name:
The Search for
window appears. This method will take you to the first
occurrence of the cell name that matches the search criteria in the current view.
This will not find a cell that is not in the current view.
60
Cells
Multiplying a Cell
When a cell group grows in size, it becomes time to multiply into two or more
groups. From the cell that needs to multiply, use the Multiply Cell button to create
a new cell group and to move members to the new group.
This screen allows you to enter the name of a new cell group, a new leader, and to
indicate which members will move to the new group. After hitting Create Cell, the
new group will be created, the selected members moved, and the new cell s parent
field will be set to the appropriate cell depending on the parent option you checked.
To indicate which members will move, double-click their record, and the move field
will change to .
If a cell is multiplying into more than two cells, repeat the process for each new cell
group.
61
Cells
Viewing Cell Growth
Once a cell has been meeting, and has weekly cell meeting totals entered for it,
you can view its growth in several ways. From cell group edit screen choose the
Growth button. This will bring up the following screen:
This screen is asking you what information you want to graph. The first question is
for what date range. You can enter a date range by hand, or use the calendar
button to select a range of dates.
To select a date range, you left-click the starting
date, and right-click then ending date. Or, you
can select a week by clicking the week number
in the left column, or the month or year.
62
Cells
Next you can choose to graph each cells one at a time beginning with the current
cell, or you can choose to include a selection of cells by specifying the selection
criteria.
Lastly, you indicate which values you want to appear on the graph. The first four
items in the left column of the screen are for graphing the number of people
attending your groups. The next four options in the middle, are the user-defined
totals that you can track for your cell groups. The last four pertain to the number of
meetings, reports, or cells. To look at how the number of cells are growing in your
church, include that item in the graph.
These graphs are produced from the meeting totals that you will enter each week
for your cells. So, if you choose not to enter these totals, you will not be able to
graph your churches cell growth.
Hit the Graph button, and you will see a graph similar to the following:
63
Cells
This graph shows the growth of this cell group by different criteria. The red bars in
the back represent the total number of people that attended the meetings. The
other bars in front show how many of them were church members, or visitors, or
children, etc. You can double-click the top of any bar to see the specifics of that
bar. You can choose different representations of this graph by using the tools in
the toolbar.
Since we chose to graph our cells one at a time, we can use the Previous and
Next Cell buttons to graph those cells. These buttons will display the previous and
next cells in our current view. So, if we wanted to look at the groups in zone 1-A in
detail, we would choose that view first, then view the graphs for each cell one at a
time.
We can also produce this graph for an entire selection of cells. This way we could
look to see how a district or zone was doing as a whole. This is done by unchecking the Graph individual cells, and entering our cell selection criteria.
This graph can also be accessed from the
64
button in the cell browse.
Cells
The Cell Tree
A Better View of your Cell Structure
Once you ve entered your cell groups, and assigned their parent fields, you will be
able to get an overall view of your cell structure by using the cell tree. The cell tree
list your cells in an outline or tree diagram similar to that used by Windows
Explorer:
The cell tree will show all of the cells in your current view, and how they appear in
your cell organizational structure. The cells that fall under another cell are
underneath, and indented. You can collapse and expand different sections of the
tree to focus on different areas by clicking on the + or icon next to the cell.
The cell tree is not only for viewing your cell structure, but also for maintaining it.
From this screen you can actually drag and drop entire sections, zones, etc from
under one district to another. You can move cells around, to keep your cell
structure balanced. Double-click a cell to go to that cell s edit screen to make any
changes.
65
Cells
When you right-click a cell, the cell s members will be displayed:
In this example, we see the members of cell group 1-A-1-A. Just as you can drag
and drop cell groups, you can also move cell members. Here, Terry Baker is being
moved from 1-A-1-A to group 1-A-1-D. The normal cell move screen will appear
asking for the reason why this member was moved. If you double-click a cell
member, you can go to their edit screen to make changes.
In a Groups of 12 structure, when you right-click a cell to see it s members, it will
look similar to the following:
66
Cells
In this example, we see Brandon s group of 12. Since he is encouraging his
members to start their own cells, we see that four of them have. These are
denoted by the picture of a member with a cell around them. One of them even
has groups under him (Lewis Taylor).
The Cell Organizational Chart
The cell tree is a helpful view of your cell structure, but sometimes is easier to look
at the traditional organizational chart that we are used to seeing. These charts
can be impossible to create by hand, especially with a large number of groups.
The cell tree can be viewed as an organizational chart by simply pressing the
button:
The organizational chart can be viewed on screen, or printed. You can adjust the
width of each level, as well as the height of each item to get the best fit. You can
also change the sort order, so that if you turn the chart on the side, to look like a
real vertical organizational chart, the cell groups will be in order from left to right.
67
Cells
Entering Cell Meeting Totals and Attendance
The key to tracking your churches cell growth is to record your weekly cell meeting
totals. Excellerate helps you do this in two ways. First, by providing cell leader
report forms that you print, or log into online each week for your cell leaders.
These forms list the existing cell members and provide a place to record the
number of members, visitors, children, and other counts that may be of interest to
your church. Second, by downloading the totals from the online forms (See the
online integration chapter,) or by using the Cell Meeting Totals Entry screen:
There is a lot of information on the screen at first glance, but we tried to put all of
the functionality you need while entering cell meeting totals, in one screen. This
way you won t have to get out of one screen into another to add a cell member,
etc
Basically, the screen works like this. All of the cells that you are responsible for
are listed in the window on the left. This will be the cells in your current view, so if
you work with district 1 cells, these will be the only ones you see here. The middle
window lists the current cell members of the cell highlighted on the left. The
window on the right is where you record the totals for the meeting.
68
Cells
To start entering totals, you simple specify which cell week you are reporting for.
You can do this by typing in the dates, or by using the calendar button. Then you
just fill in the fields for the meetings. You only have to enter the date and topic one
time, and they will be carried over to each cell meeting for you. The person who
led the cell meeting will already be set to the cell leader, but you can change that if
another member led the meeting. Enter the totals from the cell leader report form,
and then hit the Save/Next button. This will save your totals for the current cell,
and then bring up the next cell for you to enter totals. So the process is really just
entering a few numbers, and hitting Save/Next, until you are done. As you enter
your totals, you will notice the date of the meeting appear in the cell list in red.
This shows you that a report has been turned in and entered for that cell. The
cells without a date have not been entered yet.
When a cell decides not to meet for some reason, it is important that you still make
an entry for that cell. All you need to do is check the Cell did not meet box. Also
if a cell did not turn in a report, you need to make an entry as well. You can check
the Cell did not report box for those cells. When you check Cell did not report
the word NoRep will appear in the cell list to remind you that a report has not
been turned in for that cell. You can go back and enter a report if it is turned in
later.
If you have cell meetings that have been entered using the Web Integration
feature, those entries will appear with a red w next to the cell name and date. If
an exclamation mark ! appears after the w! that means that this entry may
require additional user intervention. This could mean that there is a new member
or visitor that needs to be added to Excellerate. That information will appear in the
comments section for this entry.
Occasionally you will need to add a new member to a cell, or delete a member.
You can do that right here from this screen by using the Add, Edit, or Delete
buttons.
Cell Attendance
You can also track individual cell member s attendance from this same screen.
Tracking member s attendance allows you to review an individual s cell attendance
history to observe their faithfulness, or to look for signs of continued absence.
To record member s attendance using the Cell Meeting Totals entry screen, simply
double-click their name in the Current Cell Members list. Each time you click their
name, their attended status changes between Yes and No. You can quickly mark
all members present or absent by using the Tag All button.
69
Cells
As members are tagged, Excellerate will automatically calculate the number of
members present at the meeting. It is possible to enter a different member count
than the number checked off if necessary.
To further ease the process of entering attendance, you may choose how you want
the attendance to be marked by default. In the program s preferences screen you
can choose to have the attendance default to all present, all absent, or to use the
attendance from last week s meeting. You may also choose to turn off cell
attendance tracking here.
As cell member attendance is recorded, the information is available in each
member s edit screen in their Cell Attendance associated information tab. From
that tab you can view an individual member s attendance history.
Cell Attendance Reports
By using the Cell Member Attendance Chart , attendance can also be reported
in a chart form to easily see a cell s history. This report can be printed for all cells,
or any view of your cells such as a district.
The Members Who Missed Cell Meetings report allows you to list those
members who have missed a certain number of consecutive cell meetings.
Updating Cell Meeting Totals
It is important to make an entry for each cell every week. This is how the program
knows how many cells you had a few months back before you added a lot of new
cells. To make this a little easier for you, there is a routine that should be run each
week after making any cell group and cell member changes, and after entering
your meeting totals. This routine goes through your list of cells and checks to see
if a cell meeting totals entry has been made for each cell. If not, it will
automatically enter Cell did not report entry for that cell. This way if you forgot to
check that a cell did not turn in a report, the update will catch it and enter it for you.
70
Cells
The update asks you what week you want to run it for. This will be the same week
that you ve just finished entering cell meeting totals for. It is possible to run the
update for a previous week, but remember it will look at your current list of cells, to
determine if there was a missing cell report. So, if you have added new cells since
the week you are trying to run this for, it will record NoRep entries for those new
cells. They can be deleted in the cell edit screen if necessary. There is no harm in
running the update more than once for the same period.
Even if you decide not to enter meeting totals, you should run the update weekly.
This way it will record the number of cells you had that week and will allow you to
graph your cell growth even if you can t graph member, visitor, and other meeting
totals.
You probably don t want to run the cell meeting update before you ve made all of
your cell meeting totals entries. This would cause every cell to show NoRep
when you go to enter your totals. This will not cause any problems, but it may be
confusing to the users. For this reason, and the fact that you can affect your
historical meeting totals by running this for a previous week, you need Cell
meeting update security to run the update.
Once you ve completed your cell meeting totals entry, and have run the cell
meeting update, you are ready to print out your weekly cell meeting reports. See
the Reports chapter for more information.
71
Cells
Example of a Typical Cell Week
We will take a look at the functions you may perform in a typical cell week to give
you an idea of the events that may take place. This is not a required list of
activities, this is just an example of some of them that might take place.
Add any new cells that may have been planted.
Update any new cell activities.
Make any cell changes, member changes, moves, etc
Multiply those cells that may have multiplied this week.
Check cell tree to see if our structure needs to be adjusted.
Send data files to web-site if using Web Integration
Print all of the cell leader reports for the week.
Retrieve cell meeting results from the web-site if using Web Integration.
Enter cell-meeting totals from the report forms that get turned in.
Print a missing cell reports list to see who hasn t turned in a report.
After all reports are turned in and processed, run cell meeting update.
Print cell summary report for pastor.
Print weekly cell meeting reports for each district pastor.
72
Classes
Chapter 6: Classes
The classes module allows you to enter the classes your church offers. These
may be classes that elevate your members to a higher step in their member
development, or any other type of class where you need to track attendance.
Excellerate s classes module can manage classes that are made up of multiple
sessions, allowing members to sign-up for all or some of those sessions. To view
the class module, use the
button, or hit the F7 key.
To add a new class hit the add button on the right side of the toolbar. To edit or
delete a class, use those buttons as well.
73
Classes
The top section of the screen shows basic information about the class including
the class name, leader, and when, where it meets.
The next section lists the sessions that make up this class. For example, if a class
has three parts to it, maybe with three different topics, you would enter each part in
this section. Members can then be assigned to a specific session, or to all
sessions. To add, edit or delete a class session, use the add, edit and delete
buttons in the scheduled class session window. Notice in the window the number
of attendees. This number reflects the number of members signed up for this
session of the class. As a member completes the session this number is
decreased.
The bottom half of the screen is for the class associated information. In this case
the only associated information is the current attendees of the selected session.
74
Classes
To add a member to a class, simply hit the add button in the attendees tab.
From this screen you can choose the member to add to a specific session, or you
could add the member to all sessions of the class by using the Assign to all
sessions button. If a class session has already been assigned a date and time,
that information will be filled in automatically for you. If the member has already
attended this class or session, check the Attended box.
As members complete each session of the class, you can simply double-click their
record in the Attended column. This will change their status to Attended for you,
and remove them from this list of current attendees. You will still be able to look at
the member s screen to see the classes and sessions they have completed, but
this screen will only show current or future attendees.
Adding members to classes can also be done from within the members screen.
75
Organizations
Chapter 7: Organizations
The Organizations Module is used to keep track of church organizations such as
the choir, orchestra, prayer teams, or other committees. You could use
organizations for any group that does not require tracking detailed attendance.
With organizations you basically just assign members to them, and print out
member rosters, and other lists. To view the organizations module, use the
button, or hit the F8 key.
To add a new organization use the add button on the right side of the toolbar.
To edit or delete an organization use those button as well.
77
Organizations
Organization Screen
In the organization screen you can specify the type of organization by using the
pick-list configurable from the pick-lists options menu. You can also specify other
information such as leader, meeting times, and up to five user fields which you
setup in the program preferences screen.
The only associated information tab in the organization screen is the organization s
members. This tab lists the members that belong the organization, the date they
joined, and a position if applicable. Members can be added by using the add
button, deleted with the delete button, and edited with the edit button. You can
jump directly to a member by double-clicking their name in the member
organization information tab. You can also jump to this screen from a member s
organizations tab by double-clicking the organization name.
78
Church Attendance
Chapter 8: Church Attendance
Excellerate now includes the ability to track church attendance. Similar to cell
attendance tracking, you can now record individual member s church attendance.
This can be used to track any number of different types of services including
children s church. Entering church attendance is slightly different than entering cell
attendance because you have all of the members to choose from, not just those
who belong to a cell. The Member Module now has a special screen for entering
church attendance. This screen lists all of the members in your view, and allows
you to check them off if they have attended.
The ability to enter attendance based on a view allows you to use the church
attendance feature for more than just Sunday service. For example, if you wanted
to use it to track children s church, you would first select a view of all of the
children, then hit the Church Attendance button. This way you only see the
children while you are marking attendance. This screen also allows you to record
the time in and out if desired. For a Sunday morning service, you can set the
79
Church Attendance
default time in and out to the service time, and those times will be recorded for
each member. If you set one of the default times to Current Time , the program
will use the current time to record their attendance. This again would be useful for
checking children in and out. There are several ways of marking a person
attended:
Double-click or press enter in the Attended column will set their attendance and
their in and out times.
Double-click or press enter in either of the time columns will set their attendance
and only that particular time (in or out).
Use the All or None buttons to mark all members present, or none of the members.
Notice you can also double-click a member s name to jump to their edit screen. As
you mark member s church attendance, the record of their attendance appears in
their member edit screen in the Church Attendance associated information tab.
If you are interested in tracking counts of members, visitors, and other attendance,
set up a cell called Sunday Service, or whatever you call your church services, and
enter those numbers just as you would a cell meeting report. This way you can
report and graph your church growth. Remember you can track totals other than
attendance such as the number of salvation s using this method.
See Importing Church Attendance with Barcodes in the Utilities section of this
manual for information on how to use bar coding with church attendance.
Church Attendance Reports
Member church attendance can be reported in a chart similar to cell attendance.
You can view approximately 6 months of attendance at a time.
A church attendance report style has also been added to the Member Lists and
Labels report to allow you to report individual member attendance.
80
Contributions
Chapter 9: Contributions
The contribution module is designed to record member contributions so that you
can print member contribution statements at the end of the year, or as often as you
wish. It is not a complete financial system, but will handle the tracking and
reporting of all income received from your church members. The contribution
totals can then be exported periodically to your financial system for further
analysis. This approach offers a good, clean separation of data because
Excellerate is your complete member information database, and your financial
system can handle the other accounting needs of your church without you having
to update member information in two systems. To use the contribution module use
the Contribution button
or hit F10:
See Contribution Settings in the Getting Started section of this manual for details
on configuring this module for your church.
81
Contributions
Contribution Security
There are two ways Excellerate secures your contribution information. First, you
can grant different levels of access to individual users by setting their User Access
codes in the User IDs setup screen. To prevent any access to financial
information, leave the financial field blank. To allow read access only, enter the
letter
. To allow read and update access, which includes adding and editing
contributions, use the letter . To allow full access, which includes deleting, use
. There is one other special level denoted by the letter
.
will allow a user
to see the last date a member gave, but not any other giving details. This applies
to the financial field only. The following options require Delete and Update access:
change accounts, reset or reverse-update contributions, end of period processing.
The second way is to allow you to set a database password. This will prevent
users from opening the database with another program other than Excellerate
without knowing the password. To set the password, use the Set Database
Password option in the utilities menu. See the chapter on utilities for more details.
Contribution Types
Excellerate allows you to set up the various types of contributions that you wish to
track. The default types are Cash, Check, Credit Card, Money Order, and Other.
You can set up these types using the pick-lists menu option and choosing
Contributions.Type for the field. Summaries can be printed on the various
contribution reports showing break downs for these different types.
Contribution Accounts
Contributions can be posted toward any number of different accounts or funds.
For example, you may want to designate contributed money for a certain purpose
such as missions, a building project, or a general fund. Then as contributions are
received, they are totaled into the different accounts so at any time, you can see
how much money your church is receiving in these different areas. Each account
records a weekly, monthly, quarterly, yearly, last year, and beginning-to-date
totals.
To view the contribution accounts, go to the contribution module by using the
contributions button, or by hitting F10. In the contribution module you will see two
areas. The top portion lists the contribution batches, and the bottom portion lists
the accounts. To add, edit, or delete an account first click in the account window in
the bottom portion of the screen, then use add, edit, or delete buttons in the
toolbar.
82
Contributions
When entering a new account, you must specify an Account code and description.
The account code is a short code use to specify the account when entering
contributions. This code can be numbers or letters up to four in length. You may
also specify other account information. This can be used to specify a bank
account number, or other values that may be useful to you financial system if you
plan on exporting your contributions. If you are exporting to Quicken or
QuickBooks, for example, you can specify the Quicken category that corresponds
to this account. The begin and end dates are available for your information only,
and do not affect how contributions are recorded. These may be useful for
planning different projects such as a new building.
The accounts you set up here will also appear on the member contribution
statements if your members have contributed to these accounts.
These account totals can be exported by using the Export Account Totals menu
option in the Contributions menu.
Contribution Records
Excellerate can track many types of member contributions including cash, checks,
credit cards, etc.
Tax-deductible as well as non tax-deductible items can be
recorded. A description can be entered for more detail, such as specifying a
particular missionary, etc
83
Contributions
Each contribution is tied to individual members, but can be reported for their whole
family. This allows contributions to follow a child who gets married, etc. The
Check # field allows you to enter a check number, or you can enter one of the
other contribution types such as cash. Different types can be added using the
Options, Picklists menu. Each contribution must be designated for a specific
account or fund, which can be chosen from the pick-list. Also, the date, batch
number, receipt number, and accounting period are recorded.
Pledges
Pledges can also be entered for members. This can help during contribution entry,
and allow you to get an idea of what your projected income will be for the different
accounts. Each pledge must be designated for a specific account. Pledges can
be actual amounts, or allocated as percentages.
They are not entered
automatically into Excellerate, but they can be used during contribution entry, to
enter their pledged amounts for you.
The frequency and payments fields allow you to specify how often this amount will
be given, and for how long. They are only used for projecting future income in the
84
Contributions
pledge reports and graphs, not for automatically entering the amounts. You must
specify a from date when entering a pledge, and the to date is optional. These
dates are used to project future income, as well as controlling whether or not the
pledge is enabled during contribution entry. If the current date is outside of the
pledge s dates, you will not be able to use the pledge to post contributions for you.
The total expected pledge field is only for your information, and not used in any
calculations.
Entering Contributions (Batch Processing)
Excellerate processes your contributions in batches using a streamlined
contribution entry system. You simply create a batch, enter all of the contributions
for that week or month, or whatever period you desire. Then print the batch report,
and update. When you update the batch, all of the entered contributions are
posted to the members.
Create a new batch
To create a new batch, go to the contribution module by using the contribution
button, or by hitting F10. In the contribution module, you will see two screens.
The top portion lists all of the batches that were entered into the system. To add a
new batch click in the batch list screen, then hit the add button.
Enter the date for this batch, and verify that the displayed accounting period is
correct. You may change the accounting period for the batch if necessary. You
also have the option of entering your pre-calculated batch or hash totals for the
program to use to compare against running totals generated during the
contribution entry process. These totals will help ensure that there were no data
entry errors made. The batch total is simply the sum of all of the contributions that
will be entered. The hash total can either be the sum of the member ID s, or the
Envelope numbers used during contribution entry. These totals do not have to be
85
Contributions
used. If you wish to designate this batch for a particular purpose, or bank account,
etc use the Batch Designation field. Entries for this field can be setup in User
Pick-lists.
Next, the Contribution Batch screen will appear:
This screen will list each contribution entered into this batch. At the top you will
see the batch number, date, accounting period, batch, and hash totals if entered.
For both the batch and the hash totals you will see the current amount, which
represent the total of the contributions entered into the batch, the pre-calculated
amount entered by the user, and the difference. The difference totals should be
zero if the batch was entered correctly.
86
Contributions
Entering the contributions
Entering contributions is quick and easy with the contribution entry screen. To
begin, use the add button or hit insert.
With this screen you simply enter the Member ID or Envelope number, tab to enter
the amount, check # or type, and then hit enter. Repeat this process for each
contribution to be entered. Notice that if you don t know the member ID or
Envelope number, you can always use the name search field. Just start typing a
few letters of the last name, and the member will be selected for you. You can
change the account that the contribution is designated for, if necessary, but this
can be defaulted to any account you have set up.
As you select members, their name and address will be displayed directly below
the input fields so that you can verify this information. You can also add or change
members on the fly by using the relevant buttons, or double-click the underlined
member name or address to jump to that member.
As you enter contributions for this member they will appear in the Posted for this
member window. This window shows all entries posted for this member in the
current batch. You can change any one of these by clicking on the entry. The
distribution window in the bottom left, will show how the contributions for this
87
Contributions
member were distributed into the different accounts. For example, if a member
gives $400, where $300 is designated for the general fund, and $100 for missions,
you will see the total contribution for the member, then the $300 and the $100 in
the distribution window.
Notice the Pledge window on the right side of the screen. This window lists any
pledges for the selected member. If the pledges are active (their dates are
current) you can use the Post using pledges button to post these amounts as a
contribution.
When you are done entering contributions into the batch, use the Done button.
This will exit the entry process, and take you to the batch screen.
Editing a contribution
From the batch screen you can add, edit, or delete contributions. To edit, simply
double-click the contribution, or highlight it and press enter. The contribution will
appear as if you were entering it. All of the member s contributions will appear in
the Posted for this member window, and you can click on any one of them to
change them.
To delete an entry, highlight the entry in the batch screen, and click delete.
Loose Cash
Loose cash contributions can also be entered into Excellerate, even though it is
not posted to any particular member. This is helpful so that you can track and
report the total amount of income received regardless of whether or not you know
whom it was from. To enter loose cash during batch entry, just choose a member
ID of zero. This will post the contribution to the Loose Cash Contribution screen.
These contributions will not be reported on the Member Contribution Statements,
because they are not assigned to any member, but will be included in any
contribution reports. These contributions can be viewed and edited using the Edit
Loose Cash Contributions menu option.
88
Contributions
Updating Batches
After entering your contributions into batches, you need to update them to the
members. Updating a batch moves the contributions for that batch into the
member s contribution file. Batches can be updated one at a time, several within a
batch number range, or all the batches entered for a specific user. To update the
current batch you are working on, use the update button on the Contribution Batch
screen. Or, you can use the Update Contribution Batch menu option. Once a
batch has been updated, it is closed, and contributions no longer get posted to it.
If a mistake has been made it is possible to reverse-update a batch, make the
corrections, and update it again. Before the batches are updated, you have the
option of exporting the batch totals to your financial system. See exporting
contributions later in this manual. You can also print a batch report at this time,
which lists each contribution along with a summary by account and type at the
bottom of the report. These batch reports could be used to match up against bank
deposits.
Reverse-Updating Batches
Once a batch has been updated, it is closed to further contribution postings. If a
mistake was made in a batch that has been updated, or you forgot to export the
batch before it was updated, you can reverse-update it. This process brings back
the contributions from the member s file to the batch. At this point you can
continue adding, editing, or deleting contributions until you are finished. Now the
batch can be exported if necessary, and updated again. Batches from earlier
accounting periods can be reverse-updated, and modified, and the changes to the
batch will be counted in the accounting period of the batch, not the current period.
Viewing/Editing Member Contributions
Once a contribution batch has been updated, those contributions are posted to the
members file. To view those contributions choose the Contributions/Pledges
associated information tab in the member s edit screen.
89
Contributions
This screen allows you to see the member s giving summary along with their
contributions, their family s contributions, or the their pledges. These different
views can be selected by choosing the appropriate button on the left of the screen.
If the program options allow users to modify contributions after they have been
updated, you will be able to add, edit, or delete contributions here within a
member s edit screen.
Typically, contributions are reported for the entire family in one statement. If you
want certain family members to receive their own individual contribution statement
separate from the family, you can check the Report separately from family box.
This is useful for adult children living with their parents.
Remember this information is only displayed if the user has the proper security
access.
End of Period Processing
In order for Excellerate to calculate periodic contribution totals, it must use an
accounting period.
This period tells the program what month and year you are
working in, and calculates weekly, monthly, quarterly, and yearly totals
accordingly. Excellerate will automatically prompt you when it is time to reset
these periodic account totals when the computer s date advances to the next
month. Before resetting these totals, you should print your accounting reports, so
you have a copy of these numbers. These totals are just for your information, and
do not affect how the system functions. You can choose to have Excellerate
automatically update these totals without prompting you using the settings in the
program preferences.
Exporting Contributions
Excellerate can export contributions in two ways. First, you can export the
contribution batches as they are updated. When updating contribution batches,
choose the Export batches to accounting system button. This will export the
account totals for the batch, one record for each account. These exports might
represent deposits being made to a checking account, and can be imported into
your financial system. The second export is the account export. This will export
the current account totals for all of your accounts. You may choose which total to
export such as week, month, quarter, etc
Currently Excellerate exports in text
format or Quicken/QuickBooks QIF format.
When exporting to Quicken,
Excellerate will use the information in the account s Other Account Info field as
90
Contributions
the Quicken category to post to. If using some other financial software, this field
may be used for a similar purpose such as general ledger account numbers.
Resetting Contribution Totals
If you ever experience a power outage or other computer problem during
contribution entry, you may find that a member or account total does not match the
contributions entered in the system. If this happens, you can use the reset
contribution totals menu option which will cause Excellerate to go through all of the
contributions and recalculate each member s totals and the account totals.
Removing Old Contributions
Excellerate can store years of contribution data even after all of the reporting has
been done for those years. This allows you to continue to report and analyze
giving history for those years. Although it is convenient to have that data on hand,
you may be able to improve performance in the contribution module by removing
those old contributions. The remove old contributions option allows you to first
make a copy of your current database to a backup file, then to delete contributions
for previous years that have already been reported. This way, the size of your
current database is reduced improving performance, and you can always open the
backup copy of the database to access the removed contributions. After removing
the old contributions, it is a good idea to run the Reindex/Compact utility.
Removing Old Locks
Once again if you experience a power outage during contribution entry, you may
find that a batch is left in the In use state preventing anyone from working in the
batch. If this happens you can use the remove old locks menu option to remove
any database locks left open. Make sure no other user is logged into the system
when you do this.
91
Views
Chapter 10: Views
What are Views
A view is basically a subset of the records for a particular module. Views allow you
to look at the records your interested in. This can make working with the database
much easier because you are only looking at the information relevant to your task.
Each module has its own set of views. For example, the Member Module will have
views relating to members as in the following:
If you wanted to use a cell view, you would have to be in the Cell Module to see a
list of those views. Views also play an important role in reporting. If you want a
report of all members who have a birthday this month, you would first select the
view Member Birthdays for Month , then specify the current month. The member
browse will then show all members who s birthday is in the current month. Now
you can report on these members in several ways by choosing the appropriate
report, labels, or mail-merge from the reports menu.
93
Views
Selecting Views
To select a view, simply use the Select different view button from the toolbar, or
the Select different view option under the view menu, and choose the desired view.
You can choose the current view, one of the saved views that are available to all
users, or your default view, which is defined by your default view parameters
assigned to your user id.
Most views have prompts built into them. These views will ask you for a view
criteria such as what district , what member type , etc. By prompting the user for
these values, you don t have to have a separate view for each district, or member
type, etc
Creating a New View
Excellerate comes with several common views built-in, but undoubtedly you will
want to create your own. This can be done by using the Build new view button in
the Select view screen. When you build a new view, you are actually building a
query or an SQL statement for the access engine to process. Instead of having to
write this statement by hand, the Build new view screen builds it for you by asking
a few questions:
94
Views
The Build new view screen asks the following questions:
1.
2.
3.
4.
What module is this view for, and what kind of information should we get?
What do you want to call this view?
Which records do you want to select?
How do you want them sorted?
The first question is answered by choosing an entry from the pick-list. For the
member module, you have the following option:
Members
Members and their Addresses
Members and their Classes
Members, the Cell they're a MEMBER of and their Cell Activities
Members, the Cell they're a LEADER of and their Cell Activities
Members, the Cell they're an INTERN of and their Cell Activities
Members, the Cell they're a SUPERVISOR of and their Cell Activities
Members and their Meetings/Counseling
Members and their Organizations
Members and their Profile Codes
Members and their Member Steps
Members and their Contributions
Members and their Pledges
Members and their Church Attendance
Which item you choose depends upon what information you want to select, or sort
on. For example, if you want to view members that live in Memphis , you would
need to select on the city field of the member s address. Therefore, you would
choose Members and their Addresses.
For the second question, simply enter a description for the new view such as:
Members that live in Memphis.
The third question is answered by adding selection criteria. To select members
that live in Memphis, hit the Add button in the Selection section. You will see the
following Selection Criteria screen:
95
Views
We want all members where their City equals Memphis. In the Table field, choose
Addresses, for Field choose City, the Condition is
and the Value would be
Memphis. That s it! Hit, OK, then OK again, and you will see a list of members
that live in Memphis. Now, a better view would be to ask the user for the city, so
that you wont have to have several views, one for each city. To do this, instead of
specifying Memphis for the Value, use the ? Ask user for value option in the Value
field. Now anytime you use this view, it will first ask for what city you are interested
in.
The answer to the last question is specified in much the same way. Choose Add
in the Sort section, and specify the Table and field you want to sort by. You can
also choose Ascending or Descending sort order.
You will notice, that as your are answering these questions, the SQL statement is
being built in the SQL window at the bottom of the screen. This is for those who
have experience with SQL, and want to see the details of the view. This SQL
statement can also be modified to create an Advanced View. See Advanced
Views later in this chapter.
Once you ve built your view, and are satisfied with it, you can save it for future use.
Just choose the Save current view button, and the view will be saved in the list of
saved views. This view will now be available for you and other users to use at any
time.
Editing a View
To modify a new view that you ve just created, use the Edit current view button.
This will bring up the same screen that you used to build the view. To modify an
existing saved view, use the Edit saved view button. Any changes to a saved view
will be seen by all other users as well. You may want to make temporary changes
to a saved view, maybe for a quick report. To do this without affecting all other
users, you would first use the saved view. Now that the view is your current view,
you would edit it like a new view that you just created. If you decide to keep this
view, you can change the description, and save it just as you would a new view.
To delete a saved view, use the Delete saved view button.
96
Views
Importing, Exporting and Downloading Views from the Web
Since there could be a very wide variety of useful views that a church may desire,
Excellerate allows you to import and export views to be exchanged with other
churches, and to take advantage of new views offered through our web site. To
export a view, you can either export the current view, or a saved view by choosing
the appropriate export button.
When importing a view from a file, use the Import view button and select the
filename to import. This view then becomes your current view. You must save it
to make it available for other users, or to be able to choose it from the saved views
in the future.
Views can be exchanged through our web site at www.msdweb.com. When
downloading a view from the web site, remember where you save the file on your
hard drive, because once it is downloaded, you will use the import view button to
import it.
Advanced Views
Advanced views are views in which the SQL statement has been customized
beyond the basic capabilities of the view builder. To create an advanced view, you
can start with the basic view builder screen, then modify the SQL statement in the
SQL window to meet your needs. You should have a pretty good understanding of
SQL before attempting to create or edit advanced views.
For views to be able to prompt the user for a value in an expression, use the
parameter notation :Pn where n is a value between 0 and 9. For example to select
Members by MemberType, and have the view ask for MemberType, use the
following SQL statement:
SELECT
DISTINCTROW
Members.*
(Members.MemberType = :P0)
FROM
Members
WHERE
The :P0 will actually get replaced by the value you are prompted for. There is one
special parameter call the Attendees Parameter :PA. This parameter prompts the
user for the number of attendees in a cell meeting. This value is usually compared
to the Total field in the Cell Meetings Table for finding the cells with less than a
certain number of attendees.
The following are some guidelines that must be followed when working with
advanced views.
97
Views
-
Always use uppercase letters for the SQL keywords. For example SELECT,
WHERE, ORDER, etc
-
Always place the ORDER clause at the end of the statement
-
Any expression containing a parameter must be enclosed in parentheses, and
must have spaces around the operator for example:
SELECT DISTINCTROW Members.* FROM Members INNER
MemberSteps ON Members.MemberID=MemberSteps.MemberID
WHERE (MemberSteps.Step = :P1) ORDER BY Members.Lastname;
-
JOIN
Remember Excellerate uses the Microsoft Access Jet Engine to process the
SQL for the views, so a knowledge of Microsoft Access SQL will be helpful.
98
Reporting
Chapter 11: Reporting
Reports and Views
One of the most important parts of any church management system is its reporting.
Excellerate uses a combination of views and reports to produce the wide variety of
reporting for a church. Many of the reports are based on the current view you
have selected. For example, the Members list and labels report can be used for
cell leaders, visitors, pastors, etc
Likewise, for a particular view, you could print
a list, mailing labels or mail-merge with your word processor. This approach will
provide many possible combinations of reporting.
The following is an example of the Member Info Report. Like many of the reports
in Excellerate, you can report on either the current record, or the current view:
This screen is showing that our current view is Members in District 1 . To print a
detailed report for these members select the Current View choice, and hit Print. To
print the report for the current member, select that option before printing. From
this screen you can change the view for the report, by using the Change Selection
button. This will allow you to pick a new view to use for this report.
You may also Preview a report before printing it by using the Preview button.
Saving Reports
From the report preview screen, you can save the contents of a report to a text file
for use in another program. Choose the save button, select Text files in the Save
as type field, then type the name of the file to save the report to.
Important - You must type the .TXT extension on your filename when saving
reports to a file (example: C:\MEMBERS.TXT)
99
Reporting
Report Styles
Another valuable feature of Excellerate s reporting is the ability to select different
styles for many of the reports. This allows you to print in a variety of formats from
labels, to lists, to letters. For example, in the Member Lists/Labels report, you can
choose from the following styles:
These styles can be completely modified by the user to meet their needs. You can
modify an existing style, and save it as a new style. You can also download new
styles from our web site: www.msdweb.com. See the appendix for instructions on
creating and modifying report styles.
100
Reporting
Member Reports
Member Info Report
101
Reporting
The Member Info Report produces a detailed member report, including all
associated info tabs such as family members, profiles, cell groups, etc
Member List/Labels
The Member List/Labels report is a report with different styles. With this report you
can print a member list of names and addresses, mailing labels, etc
This report
also allows you to exclude certain members from mail-outs. If you indicated that
certain members should not receive mailings by setting their Mail Code to , or
some other value of your choice, you can specify not to report for that mail code
here. Just specify the code to exclude from the report. If you are printing mailing
labels for your members, and you don t want to send the same mail-out to the
husband, wife, and children of a family, you can choose one of the family options
for your report. By choosing one of the family options, only one label per family will
be printed. The way the label is addressed depends on the family option you
choose. For example, you could choose Family Mr. and Mrs. Last name, or The
Lastname Family, etc
Currently the labels are the only style that take advantage
of the family salutation, but you could change any style to use the FamilyName
field.
Member Development Report
The Member Development Report shows your members progress through the
Member Steps, and Classes. It is useful in seeing how far along they ve come in
their development process. This report can be printed for the current member, or
the current view of members.
Member Counseling/Meetings Report
The Member Counseling/Meetings Report lists details of your members
counseling sessions or meetings. These could be prior, or future meetings. You
can specify a specific counselor if desired, and the meeting date range to print.
This report uses report styles which can be modified to suit your needs.
Counselor s Report
This report is very similar to the Member Counseling/Meetings Report, except that
the member report is grouped by member, and this report is grouped by counselor.
This is helpful for a senior pastor to review the meetings of his counselors. Again,
this report can be modified.
102
Reporting
Follow-up Report
The Sponsor s Follow-up Report allows you to print a lists of people that someone
is responsible for following-up with. This report finds members who s follow-up
sponsor ID matches the person your printing the report for. This may be for a
district pastor, section leader, or cell leader. This report can use different report
styles to produce a variety of results.
Visitor Report
The Visitor Report allows you to print a lists of visitors from both the member and
pre-member module. This report allows you to select certain types of visitors, such
as those who you wish to follow-up on from an information card, alter visit, etc
This report can also be limited to a specific date range, as well as a district, zone,
etc
Church Attendance Chart
The Church Attendance Chart prints a chart showing the members and their
church attendance history in a chart to easily spot attendance trends. You can run
this report for a specific view of your members, and for any date range of up to
approximately six months.
103
Reporting
Cell Reports
Cell Info Report
The Cell Info Report, like the Member Info Report shows detailed information for a
cell group, or a list of cell groups in the current view. The following associated info
tabs will also appear on this report:
-Cell Members
-Cell Activities
-Member Change History
-Cell History
Cell List Report
The Cell List Report is another report that uses different styles to produce a wide
variety of printouts. You can choose a view that shows just the cell groups, or the
cells with their members, or activities, etc
This report also can be printed for any
cell view, or for just one cell.
104
Reporting
Cell Leader Form
The Cell Leader Form is the form you print out each week for your cell leaders.
This form provides the leader with a list of members, their phone numbers, a place
to check off if they ve contacted them or not, etc
This report can also remind
your leaders of upcoming cell activities, and member s birthdays! This is another
report that uses styles, which can be modified by the user to meet the cell group
reporting needs of your church. New styles will be available at our web site:
www.msdweb.com.
105
Reporting
Cell Meeting Report by Division
The Cell Meeting Report by Division gives you a weekly report of the attendance in
your cells. This report can be configured to show each cell s meeting totals, or a
summary like this for each District, Zone, or whatever division names you use.
Cell Meeting Report by Date
The Cell Meeting Report by Date provides a breakdown by Month or Year of your
cell growth. This report lets you look over a period of time to see if, and where
your cells are growing, if attendance is increasing, etc
106
Reporting
Cell Member Attendance Chart
The Cell Member Attendance Chart can chart cell member attendance to easily
observe their faithfulness, or look for signs of continued absence. This can be
reported by date range for up to 20 weeks of history. You can also report for
specific districts, zones, etc
Members Who Missed Cell Meetings
The Members Who Missed Cell Meetings report allows you to list those members
who have missed a certain number of consecutive cell meetings. This is a tool to
quickly spot members to follow-up on.
Missing Cell Report List
The Missing Cell Report List provides a list of cells who have not yet turned in their
cell leader report form. These are the forms that are used to report the attendance
in your cells. This report is a handy way to follow-up with these leaders.
Cell Tree Diagram
See Cell Tree Diagram in the chapter on Cells.
Cell Growth Graph
See Cell Growth Graph in the chapter on Cells.
107
Reporting
Class Reports
Class List Report
The Class List Report is a generic report for your classes, sessions, and
attendance. This report uses different styles to produce the information you need.
Again, you can modify these styles to show different items in the report.
Class Members Report
The Class Members Report allows you to report on members who have either
already taken a class, or are scheduled to take a class. This report can be used to
print out a roster to record attendance. The option in this report allow you to print
for your current class view or a specific class, and which sessions to report. You
may also specify a date range for reporting on previous attendance.
Organization Reports
Organizations List Report
The Organizations List Report is also a generic report for your organizations that
can use several different report styles to produce the information you need. The
default style is a contact list of members of the organizations, and their phone
numbers.
108
Reporting
Contribution Reports
Member Contribution Statements
One of the main purposes for tracking contributions is to be able to print the
required Member Contribution Statements at the end of the year. These
statements can actually be printed at any time, and can be modified because they
use report styles. There are several default styles including single column
contributions, two-column contributions, contributions and pledges, text only
versions, etc
Other styles will be available from our web site: www.msdweb.com
As you can see, you can choose the date range to report on, or you can generate
a receipt by reporting for a specific contribution. As with other member reports,
you can choose to exclude certain members based on the mail code. If you want
the member contributions reported to the whole family, you would choose one of
the family reporting options instead of individual members.
109
Reporting
If there are certain family members that you wish to receive their statement
separately from their family, you can indicate that in the member s edit
screen under the contribution tab.
If you selected the Canadian option in contribution preferences, and choose the
Canadian report style, Excellerate will provide functionality to generate receipt
numbers on your contribution statements. These receipt numbers will be stored in
the member s change history, and once the statements have printed correctly,
those contributions are protected from generating a new receipt number. This is
done by setting the Date last contribution statements printed field in the
contribution options screen. Those statements can be re-printed with the original
receipt number by choosing the re-print report style.
Here is an example of a member contribution statement:
110
Reporting
Contribution Batch Report
The contribution batch report can be printed at any time. This report lists each
contribution for the batch and can be grouped and subtotaled in many different
ways.
Here is an example of the contribution batch report:
111
Reporting
Contribution Graph
The contribution graph will graph contribution income and pledges for each of the
accounts. These can be grouped by week, month, quarter, or year.
Member Contribution Report
The Member Contribution Report can be used to report on a specific view of your
members. You may want to see how much members in a certain zip-code are
contributing, or compare different age groups, etc
This report also allows you to
compare a member s pledged giving with their actual giving.
Member Contribution Chart
The member contribution chart allows you to see your member s giving history
over a whole year
Top Contributor Report
This report will allow you to report givers who contributed over a certain amount for
any date range. The list of givers will be sorted by giving amount, and can be run
for a specific account.
Pledge Report and Pledge Projection Report
The Pledge report lists member pledges, and the Pledge Projection Report
projects income based on member pledges.
112
Reporting
Custom Reports
A custom report is a report that you create yourself. These reports are similar to
report styles, except that you tell the report what data to report on. This is actually
done by building a view and a style, and saving them in a custom report.
Custom reports can be created when there are not any other similar reports in the
different modules. For example, if you want to create some sort of list of people, it
would be better to modify one of the Member report styles rather than creating a
custom report. Always check to see if you could modify an existing, or create a
new report style before deciding on building a custom report.
113
Reporting
Creating a Custom Report
To create a custom report, choose the New button. You will then see the report
editor screen:
The only difference between the report editor for report styles, and custom reports
is the Data button. This button allows you to select the data to be used in the
report:
114
Reporting
You will notice this screen looks very much like the build view screen. Basically
you are doing the same thing, that is, building an SQL statement to produce the
data necessary for the report. You can still use prompts to ask the user for certain
values in selecting your data just as in a view. The report data criteria you build
here gets saved with your custom report.
Remember, these reports can be exchanged with other churches, so visit our web
site to exchange custom reports.
See the chapter on Views for more information on selecting data.
See Report Styles in the appendix for more information about designing the report
content.
115
Reporting
Mail Merge
Excellerate allows you to easily create mail-merges with your word processor.
Basically, Excellerate will export your current view to a text file or access database.
This file is then used by your word processor to merge with a document. When
you select Mail Merge under the reports menu, you see a screen similar to the
following:
Since we are in the Member module, we have the choice of excluding certain mail
codes, and we could limit the records to one per family instead of each family
member.
You can also choose what format to export the data. Access format would
probably be preferable, but some older word processors may not recognize that
format. In that case, use the text format.
When you hit Create Mail Merge Database, Excellerate will ask you for a filename,
then export your view to that file. If you setup the path to your word processor in
the program options screen, your word processor can automatically be loaded for
you. See your word processor documentation on how to create a mail merge
document, but make sure you choose the file that you just created from excellerate
for your data source.
116
Internet Integration
Chapter 12: Internet Integration
There are two parts to Excellerate s Internet integration: Web Integration, and
Email. Web Integration allows you to transfer data between Excellerate and your
web-site to provide features such as searching or listing groups, and entering
weekly cell group report forms on your site. Built-in email allows you to easily send
email messages to your members from within Excellerate.
Web Integration
The web integration feature allows you to integrate data from Excellerate with your
church web-site. Specifically, you can upload data and web scripts to your site
using Excellerate s built-in transfer utilities so that your cell leaders can fill out their
weekly cell group report forms online instead of turning in paper forms. Then once
a week, you would retrieve that information into Excellerate, where it automatically
gets entered in to the Cell Meeting Total Entry screen for review. Also by
uploading data to your site, you can provide the users of your web-site with the
ability to view information about your cell groups.
To take advantage of the web integration features, you will need:
- FTP access to your web-site. (You will need your userid and password)
- Your web server must support PERL 5.004 or later to take advantage of the
cell lookup and cell meeting entry scripts we provide.
Setting up Web Integration
Setting up web integration basically involves two steps:
-
Entering your web-server information
Uploading Excellerate s perl scripts and support files
To setup web integration, use the Web Integration screen in the utilities menu
option, or from the preferences screen.
Start by entering the following information about your web-site, and how you
access it in the Web Host Settings Tab:
117
Internet Integration
Web-site s FTP Hostname or IP addres - This is your web-site s FTP
hostname or IP address. It will look something like: FTP.MYCHURCH.COM
Port - This is the FTP port and is almost always 21.
Username, Password - This is the user name and password assigned to you
for logging into your web-site or FTP host for making changes.
Proxy Server - If your local computer is behind a firewall, or other layer
before you get to the internet, enter that information here. See your network
administrator.
Next, the Web Server Configuration tab holds information about your site:
Directory name for CGI files: This is the directory where your scripts will be
stored. Most of the time this is called cgi-bin , but could be called scripts or
some other name. This directory must have Execute rights to run the scripts.
Directory name for data files: This is where you want Excellerate to store the
data files that get uploaded to your web-site. For the simplest installation, use
the same directory as your CGI files. This way you will not have to modify any
of the script files. If you choose a different directory other than the CGI
directory, you will need to modify EXFORM.PL and EXSUBMIT.PL to reflect
the new directory name. See the section below on Modifying the scripts for a
different data directory.
118
Internet Integration
A simple built-in FTP utility is available in the FTP Utility tab. This utility will allow
you to list files and directories of your web-site, as well as upload/download other
files. There is a Command button, so if you know the names of the FTP
commands, you can quickly enter them here. Also included on this page is a
button that will upload your database or other files to Excellerate support if you
need help with your data.
Now that the directories have been setup and scripts modified if needed, you can
use the Install buttons to install the scripts and support files on your web-site.
The Install server scripts on web-site button will install the perl scripts to the
cgi directory on your site.
The Install cell report from template button will install the supporting template
files to the data directory on your site.
Finally, use the Cell Meeting Results tab to send the data files to the web-site.
First choose what data you want on the site. You will need to choose Cells and
Members if you want to use online cell meeting reporting. Meeting history can be
uploaded for those who wish to write their own scripts to take advantage of the
past 12 weeks of cell meeting history. Also choose the number of days back from
today that you want to allow for entering meeting history. By default it is set for 14
which will allow entering meeting history for the past two weeks. Now you can use
the Send to web button to export your cell and member data, and upload it to the
web-site.
By default, all non-sensitive member information fields are uploaded to the website. To see what those fields actually are, look at the website.map file located in
the Excellerate folder. You can modify this file to remove any other fields that you
do not want to be uploaded to your web-site.
119
Internet Integration
Now, your web-site is ready for web integration. By default, the following URLs will
run the scritps. Of course, replace WWW.MYCHURCH.COM with your web-site,
and cgi-bin will be the name of your CGI directory:
www.mychurch.com\cgi-bin\exform.pl logs into weekly cell meeting entry.
www.mychurch.com\cgi-bin\exclsrch.pl finds and lists cell groups.
There are also two HTML files that can be used for the above functions and can be
modified to look like your web-site. The above perl files can be modified as well,
but the HTML files may be easier, and the exform.pl supports the picklist for
choosing a cell group whereas the HTML form does not. These files are:
www.mychurch.com\cgi-bin\exlogin.htm logs into weekly cell meeting entry.
www.mychurch.com\cgi-bin\exclsrlg.htm finds and lists cell groups.
You will probably want to add a link to your web-site that takes your users to the
cell meeting entry form, and cell finding form, so they don t have to type in
www.mychurch.com\cgi-bin\exform.pl, etc
Using web integration
Now that the site has been setup, you can begin using Excellerate s web
integration features. Your cell leaders will be able to pull up their weekly report
forms by entering their cell name, and a password. The default password is the
last four digits of the leader s phone number, or the phone number located in
the Primary meeting phone field in the cell record. If you want to use a different
password, enter that password as the last four characters in that field, or change
the exform.pl script. Also visitors to your web-site will be able to find groups based
on zip code, or description of the cell. For zip code searching, the zip code for the
cell group needs to be entered somewhere in the Primary meeting address field for
the groups. You may modify the script to search on a different field if needed.
Here is an example of the steps that would occur on a weekly basis:
120
Internet Integration
-Use the Export and Send to web button on the web integration screen to upload
new information to the web-site.
-Use the Retrieve from web button on the web integration screen to retrieve any
cell meeting results that may have been entered.
-Use the View cell meeting screen button to view any meetings that may have
been retrieved from the web. Meetings from the web will appear on the left with a
red w next to the date of the meeting. If you see w! that means there are
comments for that meeting that may require your manual intervention for adding a
new member, or visitor, etc
Any information that you request in your online cell
leader report form that can not be directly imported into an Excellerate cell meeting
entry will be included in the comments section of the cell meeting entry. This way
you can be flagged that there is more information and you can decide what to do
with it.
-Use the Print cell meeting report to print a report for those entries. Again (w)
indicates a meeting from the web.
-Continue with your normal weekly cell routine, but now many of your weekly totals
will already be entered for you!
Modifying Web integration to fit your web-site
All of the included web integration files can be modified to meet the needs and
look, of your church web-site. The following information will help any web
developer in modifying the PERL or HTML files. The online cell meeting reporting
and the cell search and listing scripts use HTML templates to display the pages, so
these files can be modified to look like whatever you want. The PERL files can be
modified if you need to change the functionality of the scripts.
Modifying the scripts for a different data directory
Use the buttons on the Web Server Configuration tab, Edit EXFORM.PL , and
Edit EXSUBMIT.PL for editing these files. The line that needs to change is the
one that contains:
$filesdir=
;
This line needs to be changed to hold the directory name of where you want to
store your data files. All web servers are not standard, so the exact file
specification may be different from host to host, but the general rule is to put the
path of the data directory starting from the web user s login root directory. So, if
121
Internet Integration
the actual data directory is called c:\home\root\username\DataFiles , and a web
user s root directory is c:\home\root\username , then the $filesdir variable would
look like this:
$filesdir= DataFiles ;
If the data directory was c:\home\root\username\DataFiles\Excellerate , then the
$filesdir variable would look like this:
$filesdir= DataFiles\Excellerate
Again, each host is different, but if you are having trouble with the script look at the
error message generated when trying to execute the script. It will give you an idea
of where it is trying to find the data, then you can adjust your $filesdir variable
accordingly. One advantage of putting your data files in a separate directory is
that you can set the access rights of that directory so that the data can not be
accessed by anyone except by using the scripts. See your web-site administrator
for information on how to restrict access to that directory.
Modifying the HTML templates for a different look
Cell Meeting Reporting
There are two ways to log into cell meeting reporting. You can use the
EXFORM.PL file, or the EXLOGIN.HTM file. The perl file allows choosing a cell
group from a picklist whereas the html file does not. So if you want the picklist
functionality, you will need to modify the perl file to change the look. If you don t
need the picklist, then modify the html file, and the users will have to type in the
cell name, or the leader name exactly as it is entered in Excellerate. The leader
name will have to be entered like Lastname, Firstname.
Cell Leader Report Form login html page (EXLOGIN.HTM).
122
Internet Integration
The form section on this page should include:
<INPUT TYPE="text" NAME="LOGIN"> for the username
<INPUT TYPE="text" NAME="PSWD"> for the password
The form's ACTION attribute should be set to the location on the server of the file
named exform.pl:
<FORM ACTION="http://www.yourwebsite.com/cgi-bin/exform.pl">
** The default password for logging into your online cell leader form is the last four
digits of the leader s phone number, or the phone number located in the Primary
meeting phone field in the cell record. If you want to use a different password,
enter that password as the last four characters in that field, or change the
exform.pl script **
The look of the actual cell meeting report form is based on a template. The
template is read in by the script, then outputted to a web page with the cell s
information included. The template can be modified to accept different types of
information. The standard information such as meeting date, and member/visitor
counts will be imported into the cell meeting history table. Any information that you
request in your online report form that can not be directly imported into an
Excellerate cell meeting history will be included in the comments section of that
record. You will be flagged with a red w! which means there is more information
for you to do something with.
123
Internet Integration
Here is an example of the default cell leader report form:
124
Internet Integration
Cell Leader Report Form Template file (EXREPORT.HTM).
All INPUT NAMEs and field names are case sensitive. Use the form tag like this:
<FORM name="Name" action=^LocationOfScript^>
The ^LocationOfScript^ tag will be replaced by the cgi with the correct information.
Somewhere in the form, you have to include this comment:
<!-- Form Variables -->
This is used by the script for internal information.
The following tags are required for the cell leader report form. These tags must
appear in the report form. If you do not want input tags displayed for user input,
set their TYPE= HIDDEN .
Display cell information tags (required):
^Cell_Name^ for the cell's name
^Cell_LeaderName^ for the cell's leader's name
Input tags for cell information (required): (These fields will be validated when the
form's script is called)
DATE ->text
TOPIC ->text
LEADBY ->text
DIDNTMEET ->checkbox
Input tags for cell meeting information and totals (required): (These fields will be
validated when the form's script is called)
MEMTOTAL ->text
VISITORS ->text
CHILDREN ->text
SALVATIONS ->text
USER1 ->text
USER2 ->text
USER3 ->text
USER4 ->text
125
Internet Integration
The following tags are optional:
To display cell member information on the form, wrap the member section in
comment tags like this:
<!-- Exc MemberInfo -->
Include in this area the html you want to use to display
member information (tables are usually used)
Keep in mind that whatever is between these comment brackets
will be repeated for each cell group member
<!-- Exc MemberInfo -->
If you want a specific member field to show up in the cell member information area,
include the field name with delimiters such as ^Field_Name*^. For example, to
show a member s first and lastname use:
^Mem_FirstLastName*^
The delimiters are crucial. If you want the birthdate and anniversary to show up if
they occur during the next two cell weeks, use ^BIRTHDAY*^ or
^ANNIVERSARY*^.
You can also use both in the same field like
^BIRTHDAY*^^ANNIVERSARY*^
Cell Searching and Listing
There are two ways to use the cell searching and listing functionality. You can use
the EXCLSRCH.PL file, or the EXCLSRLG.HTM file. The functionality of both
methods are the same.
Cell Group Search form html (EXCLSRLG.HTM)
Note: All INPUT NAMEs and field names are case sensitive. The cell group
search page should contain the following input tags. There should be a radio
group named group for each of the field elements you want to give the user the
ability to search on. The VALUE of each individual radio button should be its
126
Internet Integration
corresponding field name. For example, if you want the user to be able to search
by the cell description field or address, the radio group will look like:
<INPUT
Search
<INPUT
Search
TYPE="radio" NAME="group" VALUE="Cells_Description" CHECKED>
by cell description
TYPE="radio" NAME="group" VALUE="Cells_PriAddress">
on address
The form needs a text input tag like this:
<INPUT TYPE="text" NAME="criteria" VALUE="" SIZE="40">
The form tag should have the METHOD attribute set to the location on the server
of the file named exclsrc.pl such as:
<FORM ACTION="http://www.yourwebsite.com/cgi-bin/exclsrch.pl">
The look of the actual cell listing is also based on a template. The template is read
in by the script, then outputted to a web page with the cell s information included.
Cell Group Search results template (EXCLSRCH.HTM)
Note: All INPUT NAME s and field names are case sensitive. Wrap the results
section in comment tags like:
<!-- ExcCellSearchInfo -->
You put the individual cell fields you want to display in here.
This entire section will be repeated for each cell that matches
the query string.
<!-- ExcCellSearchInfo -->
The actual cell information fields you want to display should be have the form
^Field_Name*^. For example, to show the Cell Description field, use:
^Cells_Description*^
127
Internet Integration
There are two default styles of the cell search results templates:
Exclsrch (listing form).htm
Exclsrch (paragraph form).htm
The first one lists the found cells in a table, one row at a time. The second
template lists each cell in a paragraph format. To use one of these styles, copy it
to the default name of exclsrch.htm before uploading your scripts to the web-site.
List of Excellerate s Web Integration Files
All of Excellerate's web integration files start with the letters 'ex'
The following is a list of those files and what they are used for:
Cell Reporting:
exform.pl
script for logging into weekly cell reporting
exlogin.htm
HTML form for logging into weekly cell reporting
exsubmit.pl
script to process entered weekly cell report forms
exreport.htm
HTML template for what the weekly cell report form looks like
Cell Searching:
exclsrch.pl
script for searching for, and listing cell groups
exclsrlg.htm
HTML form for searching for cell groups
exclsrch.htm
HTML template for what the cell list looks like
Data Files:
exbusy.txt
exmaster.txt
excells.txt
exclmems.ndx
exclhist.txt
exmembrs.txt
exmembrs.ndx
flag file telling scripts we're uploading data
Excellerate's master table uploaded to web-site
Excellerate's cell table uploaded to web-site
Excellerate's cell member IDs uploaded to web-site
Excellerate's cell history uploaded to web-site
Excellerate's members uploaded to web-site
member ID index file for faster access to exmembrs.txt
website.map
map file listing which fields to send to the web-site
128
Internet Integration
EMAIL
Excellerate has the ability to send email to your members and pre-members. You
can send emails to an individual member, or to an entire view of members. Email
messages can be formatted with different fonts and colors, as well as include
merge fields and file attachments. Excellerate s report styles can be modified to
include email addresses, and automatically emailed to those members.
Setting up EMAIL
To setup Excellerate s email feature, go to the Options menu, then Preferences,
and choose the Email options button.
SMTP Server - This is the out-going email server name or IP address. A typical
server name might be MAIL.MYCHURCH.COM, or SMTP.MYCHURCH.COM
SMTP Port - This is the port number for the SMTP server, and is usualy 25.
UserID - This is the userid for the SMTP server assigned to you when you set up
your email.
Default Return Email - This is the default return email address that can appear
on your messages.
Default Return Name - This is the default name of the sender that canl appear on
your messages.
129
Internet Integration
Maximum email addresses in the TO or CC fields - When sending emails to a
list of members, Excellerate will try to put as many email addresses in the TO, or
CC field of a message that it can. The maximum number of addresses allowed on
many servers is 50. If your server only allows more or less, you can enter that
number here. The default is 25.
If you want your users to be able to send emails with their own return address on
it, you can enter their email addresses in the user-id setup screen. Then the user
will have a choice of sending the message from their own email account, or from
the church email account.
Excellerate only allows sending emails, so any replies or returned emails will have
to be received by your normal email program.
Using EMAIL
To send an email, you must be in one of the people modules (members, premembers, or pastors.) Simply highlight the member you wish to email, and hit the
email button on the right side of the toolbar. The email screen will appear with that
person s email address entered if they have one. Otherwise it will be blank. You
can also send an email for a member within their member edit screen by hitting the
Email button next to their email address.
To select other members to include on this email, use the To, or CC buttons. This
will bring up a screen that will allow you to type in additional email addresses,
choose other members, or to select the current view of members. Addresses can
130
Internet Integration
be added to the To, CC, or BCC list, by using the appropriate buttons. Email
addresses in the BCC list will not be seen by the other recipients of the message.
When sending emails, you may want to send them from your own personal email
address, so that when a person replies, you will receive it in your email program.
Or you may want to send email from the church main email address. You have the
option of choosing which email address the message will be from, by selecting
either your own, or the churches email address in the From pick-list. The church
email address can be setup in the mail settings under preferences, and your email
address is set up when your user-id is created.
A formatted message can be entered, using the font, and color tools in the toolbar.
Use the attach button to attach files. (Only plain text messages can be sent with
files) Use the File save and Files open buttons to save and retrieve common
emails.
When sending emails from Excellerate, the sent messages are saved in the sent
mail screen. To see a list of sent emails, use the Utilities menu, then Email, then
View sent mail. This screen will allow you to view and retrieve sent emails. If for
some reason you want to send an email to an individual, but you want to send it
from your default mail program, you can use the Utilities menu, then Email, then
Email this member using default mail program. This will send the message using
your default mail program, and the sent message will be saved in that program s
sent messages folder.
There is also a menu option in the Help menu for quickly emailing technical
support.
Merge-Fields In EMAIL
Excellerate also allows including merge fields in your emails. To include fields
from a member s record, use the [table.field] notation. So if you wanted to email all
of your new visitors, and address them by their first name, you would use:
Dear [Members.Firstname],
Excellerate would replace [Members.Firstname] with the member s first name. To
see what the email would look like with the data inserted, use the preview button in
the toolbar.
You can include fields from the MEMBERS, PREMEMBERS, or CELL table.
131
Internet Integration
EMAIL-ing Reports
Excellerate can email reports that use report styles. There is an example of a cell
leader report style that can be emailed. To create a report style that can be
emailed, all you have to do is insert a special field in the report. When you go to
PRINT the report, Excellerate will check first to see if it can be emailed, if so you
will be asked if you want to email it. If not, it will be printed as normal. The
following email fields can be added to your report style:
EMAILTO:emailaddress
EMAILBYID:Members.MemberID
EMAILADDR:Members.Email
EMAILTO: emails to the hard-coded email address that follows.
EMAILBYID: emails to the email address for the memberID database field that
follows.
EMAILADDR: emails to the email address for the email database field that follows.
When the report engine sees one of these fields, it will email everything from that
field until it sees another one, to that person. For example, in a cell leader report
form, each page would go to a different leader. So, in the top of the report style in
the detail band, you would place an EMAIL field, then the report engine would
email each page to the appropriate person. See the section on creating report
styles for more information on modifying these reports.
Basically the report engine converts the report to text, then emails it. So you will
probably have to modify your styles to fixed text font, and spaced out enough so
that the conversion to text looks correct. See the included cell leader report form
for an example.
132
Utilities
Chapter 13: Utilities
Change User Password
Your users may want to change their passwords occasionally. This can be done
from the Utilities menu option. You must know your current password in order to
change it. When entering a new password, you must enter it twice to be sure you
typed it correctly.
Set Database Password
This option allows you to specify a password for the entire Excellerate database.
This password will protect your database from being opened from another
program, such as Microsoft Access, unless that user knows the password. When
you set a database password, Excellerate will still be able to open the database
without prompting your users for the password. Only when an attempt is made to
open the database from any other program, will you need the password. If you are
setting the database password for the first time, you will leave the current
password blank, and only specify a new one. When you set a database password
in Excellerate, it will be converted to all uppercase letters, so if you want to open
the database with another application, remember to use all uppercase. When
setting a database password, Excellerate makes a temporary copy of the
database, so be sure you have enough disk space available to hold the temporary
file. Also, no other users can be using Excellerate when you change the
password.
Remove Members
When you delete a member in Excellerate, the member record is still in the
system, and can be viewed by viewing the Deleted/Inactive members. This is so
that history can be kept on these members, and so that you can recover the
member if you deleted them by mistake. To permanently remove deleted
members, you use the Remove Deleted Members option in the Utility menu. This
option can not be recovered from, unless you have a backup, so use caution:
133
Utilities
When using this option, you have the choice to remove all deleted members, or if
the current member you were viewing has a Deleted status, you have the choice of
removing that one member. This option permanently removes the members, so
you also have the option of printing out the records before removing them. You
have the choice of printing a detailed report, a list, or no report at all.
You also have the option to remove all members from your current view, e.g. all
members in the state of Texas. To do this you need to create a view of the
members you want to delete. Select the Remove members from the current view:
All Members option. We suggest that you select the option to print a member list or
detailed member report before proceeding to delete that view. This process is
irreversible so use extreme caution when selecting which group of members you
want to delete.
When the Remove Deleted Members option is used from the Pre-Member Module,
you have an added option of removing Pre-Members whose first visit to the church
is older than a certain date. This allows you to remove people from the system
who are no longer being followed-up on, or have no interest in the church.
The Remove Deleted Members option requires DATABASE security access to
perform this action.
Remove Old Contributions
Excellerate can store years of contribution data even after all of the reporting has
been done for those years. This allows you to continue to report and analyze
giving history for those years. Although it is convenient to have that data on hand,
you may be able to improve performance in the contribution module by removing
those old contributions. The remove old contributions option allows you to first
make a copy of your current database to a backup file, then to delete contributions
for previous years that have already been reported. This way, the size of your
134
Utilities
current database is reduced improving performance, and you can always open the
backup copy of the database to access the removed contributions. After removing
the old contributions, it is a good idea to run the Reindex/Compact utility.
Re-Index / Compact Database
When Excellerate removes deleted records from the database, the space they took
up on the hard disc is not necessarily recovered. If you have deleted a large
number of records from the system, you could run the Re-Index / Compact
Database utility option to recover that space. This operation requires DATABASE
security level.
135
Utilities
Remove Old Locks
Excellerate will periodically put locks on information that is being updated by users.
In the event of a power failure, or some other reason for improperly exiting
Excellerate, there may be a lock left open. If you receive a message indicating a
user has something in use, and you know for sure this is not the case, you can use
this option to remove that lock. This should rarely happen. This option requires
DATABASE security.
Edit History Fields
The Member module can track changes to critical fields, and record those changes
in the Member History associated information tab. You can specify which member
fields get tracked this way by using the Edit History Fields utility. With this utility,
you simply list the fields in the Member or Address table for which you wish to
record change history. This option requires PREFERENCES security
Edit Required Fields
The Member and Cell modules can require a user to enter certain fields before
saving a record. For example, it is a good idea to require a member s last name,
first name, and member type when adding members. The list of fields that are
required by these modules can be specified in the Edit Required Fields utility
option. With this utility you simply list the fields from the Member, Address, or
Cells tables that you want required. This option requires PREFERENCES
security.
Update Cell Meeting History
See Updating Cell Meeting History in the chapter on Cells.
Enter Church Attendance
See the chapter on Church Attendance.
136
Utilities
Flex Fields
Flex Fields are user definable fields that can actually be added to the Excellerate
database. These fields can be added to the member, cell, class, or organization
edit screens, and positioned by simply dragging them into place. These fields are
great for information that you want to keep track of that doesn't quite fit into the
existing fields. You can also designate whether your new fields use pick-lists or
not. Since these fields are added to the database, they can also be used in views,
reports and even exported to your website for use with Excellerate's internet
integration. Your flex field definitions can be imported and exported so that you
can add new groups of fields that may be offered by our support staff, or even
other churches.
Adding Flex Fields
To add flex fields, use the Utilities, Setup Flex Fields, menu option. You will see
the following screen:
137
Utilities
Hit the Add field button to add a new field.
Module specifies which module to add the field to. You can choose members,
cells, classes, or organizations. Tab order allows you to specify the order in which
you tab through your fields. Enter 1 for the first field, 2 for the second, etc... You
may leave this field blank. Next choose a name for your new field. All flex fields
must start with FF_, so if you may have a field like FF_SchoolName. Next
choose the type of field: Text, Number, Date, Currency, Yes/No, Memo. For Text
fields, you will also need to specify the length (1 - 255) for the field. If the field will
need a pick-list, choose the pick-list type. Use 'F' for a forced pick-list, which
means that the entry must come from the pick-list only. Use 'O' for an option picklist, which allows other entries besides the values of the pick-list. Use 'N' for no
pick-list. Entries for these pick-lists can be added in the Options, Pick-lists menu
just like other pick-list values. The next section allows you to specify a title to
appear on the screen for the field, and positioning of the field. You may enter the
X, Y, W (width), H (height) values for the field, or leave the X and Y blank. Once
the field has been added, you can reposition within the screen later. Also choose
the location for the field. For Member fields, they can be placed in the main
screen, the Follow-up tab, or the Member step tab. For the other modules, you
can only choose the main screen. Finally, specify any special display format for
the field, such as Bold.
If you wish, you may add titles without fields, or fields without titles. Just leave the
title, or field blank. The first flex field must have a title.
You may also edit or delete flex fields using the corresponding buttons.
Remember, when you delete a flex field, the associated data in that field is deleted
and can not be recovered.
138
Utilities
The import and export buttons will allow you to import or export a group of fields all
at once. This allows you to exchange field definitions with other databases, our
support staff or even other churches.
Positioning Flex Fields
Once the fields have been added, you can go to the member, or cell screen to reposition them. To position the fields, right-click on any of the flex fields. They will
all turn red indicating they can be moved. Simply drag the field to the correct
position. When all of the fields are in the correct position, right-click one of them to
save. You can move several fields at the same time, by shift - right-clicking a field.
Enter the number of fields to select, then drag them. Shift - right-click again and
reset the count back to 1.
Exporting Flex Field Data
To export the data in flex fields, you must first modify the export maps such as
website.map, or default.map and add the flex field entries to that file. You can use
notepad to edit those files.
139
Utilities
Importing and Exporting
Importing
When starting to use any new database program, it can be a time consuming task
to hand-enter your data, especially names and addresses. Therefore Excellerate
has provided a generic member import utility that will allow you to import member
information. If you already have your member information in another database,
you could export it from that database, and import it into Excellerate. To import
members and their addresses into Excellerate, first export them from your
database in such a way that there is one record per member that contains the
member information and their address. This can be in an Access database, or text
file. If using a text file, a quoted, comma delimited format is preferred. You may
be able to use other formats such as tab-delimited, depending on how your
database exports the information. To import the data into Excellerate, use the
Import Members utility under the File menu:
140
Utilities
As you can see from the instructions on the screen, this is a four step process.
Basically you are importing the data from your file into an intermediate Excellerate
file. Then you can view this data to be sure it imported correctly before loading it
into Excellerate.
Step 1 Use the import File button to open your import file. Once your file has
been opened, Excellerate will display the fields in the field list, and the first few
lines of data in the import preview window.
Step 2 Map the fields from your import file to the fields in the transfer database.
This is done by clicking the field in the import list, then finding the matching field in
the transfer list, and clicking it. You will notice a line drawn from field to field
showing the map. Continue with this until all desired import fields are mapped.
Step 3 Load data into transfer table. This is done by using the Load into transfer
table button.
Step 4 Load data from transfer table into Excellerate. Once you ve check the
data in the transfer table window, and have verified that it imported correctly, you
can then use Load the data in to Excellerate. You have a choice of loading the
data into the Member or Pre-Member module. If you have a lot of data in your old
database that needs cleaning up, you could transfer everything into the PreMember, then go through and move the current members into the Member
module.
Note If the data in the transfer table window does not look the way you want.
You can clear the table and try again by using the Clear Transfer Table button.
Exporting
To export data from Excellerate, simply choose the module and view of the data
you wish to export, and choose Export under the file menu. This will look similar to
the Mail Merge screen since they both basically do the same thing. You can
choose to exclude members with a mail code if desired, and you can specify the
format of the export table as either text, or Access.
When exporting, you can choose a map file to use to map Excellerate fields to
other names, or to exclude fields. Excellerate comes with a map file for exporting
your members to Microsoft Outlook, then even to your hand-held computer or
PDA!
To export contributions, see that section in the chapter on contributions.
141
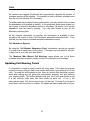
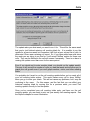
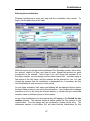
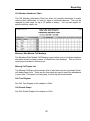
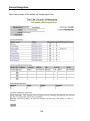
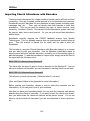
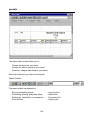
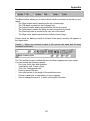
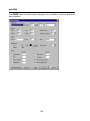
Utilities
Importing Church Attendance with Barcodes
Tracking church attendance for a large number of people can be difficult and time
consuming. One way to speed up that process is to use barcodes and scanners.
Excellerate can print barcodes for your members in many formats including cards,
nametags, lists, etc
Then, you can simply scan their barcode to track their
attendance. This can be used for tracking any type of church service, most
commonly, Children s Church. Excellerate s church attendance system can track
the service, date, time-in and time-out. Or, you can just record their attendance
without times.
Excellerate currently supports the CS2000 handheld scanner from Symbol
Technologies. This is a portable scanner that can read several hundred scans at
once. Then the scanner is placed into its cradle and the data is read into
Excellerate.
The first step in using the Church Attendance with Barcodes feature, is to choose
how you want to print your barcodes. Use the Members Lists/Labels report to
select a report style that includes barcodes, or modify one of the existing styles to
add the barcodes. To add the barcodes to a report style, simply add a text field to
the report with the following value:
BARCODE15:I+MemberQuery.MemberID
This value tells the report to print a check-in barcode for the MemberID. You can
also print a check-out barcode if you are interested in tracking check-ins and outs.
BARCODE15:O+MemberQuery.MemberID
This will print a check-out barcode. (Note the letter O, not zero.)
(Also, see Report Styles in the Appendix for more information.)
Before printing your barcodes, choose a view to select the members you are
interested in, or you can print for all of your members.
Now that you have your barcodes printed, you can scan the codes as each person
attends using the check-in barcodes. If you want to track the check-outs as well,
then you would scan the check-out barcode as the person leaves. You do not
have to use the check-out barcodes if you are not interested in time-in and timeout.
142
Utilities
Once the barcodes have been scanned, place the scanner into its cradle, and use
the File, Import Church Attendance menu option.
From this screen, choose the service type for which you want to import, then select
your scanner. Currently only the Symbol CS 2000 is supported. Select the COM
port that your scanner cradle is connected to. Also, enter the date of the service
as well as the time, if you are interested in tracking the time. You may leave the
time blank.
Next, hit the Read scan data button to read the scanner. You should see the
attendance data listed in the window. If you do not see any attendance data, then
either the scanner is empty, or the scanner is not connected correctly to your
computer. Make sure the COM port you chose is the correct one. After the
attendance data appears, hit Import Attendance to import that data into
Excellerate.
You should now see church attendance records in the member s edit screen, and
should be able to use views and reports to analyze the information.
143
Appendix
Appendix
Browse Columns
The column arrangements for the browse screens in the different modules are
actually stored in .ini files in the program directory, and can be edited, and copied
just like any other file. Each entry in the file contains the fieldname, the column
title, and the width of the column. You can actually display any field contained in
the table for the module you are viewing. The default column layouts are stored in
the same type of file, but named .new instead of .ini.
Member Pictures
Member pictures are not stored in the database. This would increase the size of
the database to an unmanageable size. Therefore the pictures are stored in a
directory having the same name and location as your database, with the word
_Pictures appended to the end of it. This is would usually be called:
C:\Program Files\Excellerate\Database_Pictures
unless you installed Excellerate into a different directory, on a network, or used a
different name other than Database, for your database.
The pictures are named the same as the member number they identify. So
member with Member ID 100 could have a picture stored in the pictures directory
called 100.BMP or 100.PCX, etc . Excellerate can read the following formats:
PCX, BMP, TIFF, and JPEG file formats. For TIFF, and JPEG, use the following
file extensions: TIF or JPG.
When acquiring member images with a scanner or digital camera, save them in
Excellerate s pictures directory.
Report Styles
Report styles allow you to design and choose different report styles for a report.
For example, a Member list report could look like a mailing list, or a contact list, or
even labels. To create a new report style, choose the new button on a report
screen that uses styles. You see the report editor screen with a default or possibly
blank report style:
145
ppendix
The report editor screen allows you to:
-
Choose the layout for your report
Choose the data to include in your report
Place text, shapes, data fields on your report
Lets look at the tools you use to build reports:
Report Toolbar:
The report toolbar has buttons for:
-
Saving and loading reports
Previewing, printing, and printer setup
Adding text, data fields, or expressions
Zoom buttons
146
- Layout button
- Data button
- Component list
- Snap to grid
Appendix
The Band toolbar allows you to select which bands or sections to include on your
report:
- The Page header band is printed at the top of each page.
- The Title band is printed on the first page only.
- The Column header band is printed before the list of records
- The Detail band contains the fields for each record that is printed
- The Summary band is printed at the very end of the report
- The Page footer band is printed at the bottom of each page.
Simply check the bands you wish to include in the report, and they will appear in
the report editor.
Careful!
When you uncheck a band, it will remove the band and all items
contained in the band.
The Text toolbar is used to define the text, and how it appears on a your report.
You can choose the following options:
- Font, size, bold, italic and underline.
- Justification: Left, Center, Right.
- Text color, Background color
- Framing around the text
- Auto size the text to the length of the particular value
- Choose a data field, or expression, or text to appear
- View or change the exact x, y, width, and height of the item
147
ppendix
The Layout button is used to select the paper size, orientation, columns, and other
layout options:
148
Appendix
To insert text, shapes, or data fields into your report, first choose a band that they
will be placed into. Then use the
button, and click in the band where you
want the item to appear. Now using the text toolbar you can type in the text to
appear. Or, you can use the
expression builder button to choose an
expression or data field:
This screen lists the expressions, as well as the fields that are available for you to
use. The table called Query1 is the table returned from your SQL statement
when you selected your data to be included in the report. If you do not see a
Query table, or there are no fields available in the field list, that means you have
not selected any data for the report yet. You can do so by using the Data button in
the report toolbar.
The Master table is the table that contains most of your churches settings such as
Name, Address, User defined field names, etc
When your satisfied with your report design, save it, and give it a descriptive name.
These reports will be available for other users if you are using the multi-user
network version.
149
ppendix
Technical Support
Micro System Design offers free technical support through email and our online
resources. See or web site at www.excellerate.com. Our complete annual support
plan includes free software updates, telephone support including help with
designing and modifying reports, and a subscription to our newsletter. Our data
conversion service can convert data from your existing systems.
Our support phone number is 901-754-0315.
more information about these services.
150
Contact us at 888-371-6878 for