1
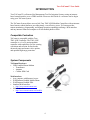
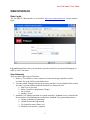
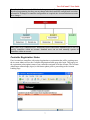
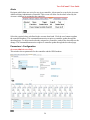
TriComm™ Version 2.0 Users Guide January 2010 Toro TriComm™ User Guide TABLE OF CONTENTS For Questions or Support, in U.S. contact: ..................................................................................... 3 Outside of the U.S.: [email protected] INTRODUCTION........................................... 3 INTRODUCTION .......................................................................................................................... 4 Compatible Controllers............................................................................................................... 4 System Components.................................................................................................................... 4 Functionality Overview .............................................................................................................. 5 Important Tips............................................................................................................................. 5 WEB INTERFACE......................................................................................................................... 6 User Login .................................................................................................................................. 6 User Hierarchy ........................................................................................................................ 6 Controller Registration Status..................................................................................................... 7 Account Landing Page................................................................................................................ 8 Controller Hierarchy ............................................................................................................... 8 Connection Status ................................................................................................................... 9 Sort Options ............................................................................................................................ 9 Side Navigation Tree ............................................................................................................ 10 Landing Page Tab Options.................................................................................................... 10 Controllers......................................................................................................................... 12 Map View.......................................................................................................................... 12 Commands ........................................................................................................................ 14 Control Panel ............................................................................................................................ 14 Program Page ........................................................................................................................ 15 Program Selection............................................................................................................. 16 Water Days (Choose from one of the three following options):....................................... 16 Parameters:........................................................................................................................ 16 Start Times ........................................................................................................................ 17 Run Times......................................................................................................................... 17 Command Buttons ............................................................................................................ 18 Start OneCycle .................................................................................................................. 18 Templates.......................................................................................................................... 18 Manual Operations................................................................................................................ 19 Manually Start a Station: .................................................................................................. 19 Stop a Manually Running Station or Program.................................................................. 19 Stop all Stations Running Manually: ................................................................................ 19 Controller Status ................................................................................................................... 20 Flow Control ......................................................................................................................... 22 Alerts..................................................................................................................................... 24 Parameters > Configuration .................................................................................................. 24 Controller Info .................................................................................................................. 25 Controller Output .............................................................................................................. 25 Parameters......................................................................................................................... 25 Parameters > Version & Communication ............................................................................. 27 Upload Page .......................................................................................................................... 28 Download Page ..................................................................................................................... 29 To Download: ................................................................................................................... 29 Administrative Functions.......................................................................................................... 30 2 Toro TriComm™ User Guide Mapping (Map Upload) ........................................................................................................ 30 Areas ..................................................................................................................................... 31 Setting Season Adjust ....................................................................................................... 31 Alerts..................................................................................................................................... 33 To Create A New Alert ..................................................................................................... 34 Reports .................................................................................................................................. 35 Communication................................................................................................................. 36 Alerts................................................................................................................................. 37 E-Mail ............................................................................................................................... 37 Consumption Report ......................................................................................................... 38 Controller Updates ............................................................................................................ 39 Season Adjust (SA) Auto.................................................................................................. 40 Logout ................................................................................................................................... 42 ADVANCED FUNCTIONALITY............................................................................................... 43 Automatic ET Adjustment ........................................................................................................ 43 Weather Station Requirements ............................................................................................. 43 Weather Station & Automatic ET Adjust Setup & Programming........................................ 43 Weather Station Setup....................................................................................................... 43 Auto ET Adjust Setup....................................................................................................... 44 Controller Programming Indications ................................................................................ 45 Reports .................................................................................................................................. 46 Historical Weather Data Reports ...................................................................................... 46 Automatic ET Adjust Reports........................................................................................... 48 Alerts..................................................................................................................................... 49 Automatic ET Adjust Alerts ............................................................................................. 49 TriComm Mobile Interface [Cellular Phone or PDA] .............................................................. 50 Overview & Login ................................................................................................................ 50 Description of Auto Log-in............................................................................................... 50 TriComm Mobile Operation ................................................................................................. 51 Controller Selection .......................................................................................................... 51 How to Start Stations ........................................................................................................ 52 How to Stop Stations: ....................................................................................................... 52 How to Start Programs:..................................................................................................... 53 How to Stop Programs:..................................................................................................... 53 Status & Programming.......................................................................................................... 54 Get Status .......................................................................................................................... 54 Program Information & Operation.................................................................................... 55 For Questions or Support, in U.S. contact: Toro NSN® 1-800-ASK TORO (275-8676) Outside of the U.S.: [email protected] 3 Toro TriComm™ User Guide INTRODUCTION Toro TriComm™ is a Remote Site Management Tool for Irrigation Systems, using an internetbased control interface over a GPRS network. Please use this Guide as a reference tool to begin using your TriComm System. The TriComm System allows users to link Toro TMC-424E Modular Controllers with an internet based remote control platform, providing timely, cost-effective access. TriComm provides remote monitoring, programming, and manual operation capabilities utilizing a Web-interface and any internet-connected computer or WAP-enabled phone or PDA. Compatible Controllers TriComm is compatible with the Toro TMC-424E Controller. The TMC-424E controller is a 4- to 24-station modular controller with capabilities for flow sensing with alarm and reaction for line breaks, advanced pump and master valve options, and optional high surge protection. System Components TriComm Hardware: y GPRS-enabled Smart Modem à Transformer à Antenna à Cellular SIM Card Web Interface: y Any computer with Internet Access y WAP/Internet Enabled Mobile Phone y WAP/Internet Enabled PDA y Standard Web Interface: à http://www.torotricomm.com y Mobile Interface: à http://www.torotricomm.com/mobile 4 Toro TriComm™ User Guide Functionality Overview The TriComm System’s feature set is unlike any site management solution available, making it the premier choice for maintenance contractors, and smaller municipal & commercial applications: y Remote programming, monitoring, and manual operation of TMC-424E Modular controllers from a web-enabled PC, mobile phone, or mobile handheld device. y Customizable alarm notification through e-mails sent to mobile device y Multiple user permission levels. y Multi-language capability (English, Spanish, French, German, Italian, Portuguese) y Automatic Season Adjust % Adjustment with Real Time ET In order to begin using TriComm, users must have a TriComm modem registered from their authorized Toro distributor with an active SIM card. Upon purchase of the TriComm modem, users will receive a username and password that allows them to log-on to the TriComm System. Important Tips y y y y y This User Guide assumes that the user is familiar with the capabilities of the TMC-424E controller. As such, it does not go into detail on all features. Please refer to the TMC-424E User Manual for any additional feature clarification. When a new controller is first brought online, the Account-Admin should do an “Upload” of all controller information (programs & configuration). This sets up the available stations and flow modules (configuration) for that controller in the TriComm System and pulls in any programming already in the controller. To remotely Stop all irrigation, use the Stop Program button on the Program Tab. To stop an individual Program, Get Status to identify the currently operating station in the desired program. Then, use the Manual page and select the current active station in the program, and use the Stop button. Stopping that station will stop the program. Any changes to programming through the TriComm Web interface must be saved (Save button) and then downloaded to the target controller using the Downloads Page. NOTE: When an order for a new Modem Kit is placed, an initial setup and test of the modem will be performed with a new TMC-424E controller in the target Account Web Service. The TriComm Modem Kit will be shipped with an Active SIM card. When the Modem Kit is installed, connected to controller, and powered up, the Modem will automatically query the Web Service, creating a communications connection, at which point, the new controller will be Online in the Account Web Interface. 5 Toro TriComm™ User Guide WEB INTERFACE User Login The TriComm 2.0 Web interface is accessed at: http://www.torotricomm.com. Access requires login. Log-on Screen: Please enter your username, password, and select your preferred language in order to access TriComm. User Hierarchy There are three login levels in TriComm: 1. Dealer (= Toro NSN®): Create customer accounts and assign controllers to these accounts. Set up & Add Account-Admin users. 2. Account-Admin: Manage and operate account controllers. Set up Standard Users within Accounts. Account-Admin can do all Standard User Functions, and: a. Add Users to Account b. Make Controller Configuration Changes c. Set up Alerts d. Manage “Areas” 3. Standard User: Manual operation of account controllers. Standard access is intended for the equivalent of field maintenance technicians. Standard User permissioning allows: a. Change Controller Programming b. Upload/Download Programming c. Get controller status (alarms, etc) d. Manually start stations / programs 6 Toro TriComm™ User Guide Note: Standard Users can make Web-based changes to controller programming or upload / download programming, but they can not change individual controller configuration or modem information. If changes to controller configuration are required, the Account-Admin must make those changes. Note: There is no “controller-level” permission which would allow standard users to only see specific controllers within an account. Standard users can see and manually operate all controllers within an account. Controller Registration Status If an Account has controllers with expired registration or registration that will be expiring soon, the Account-Admin will see the Controller Registration Status page after login. This page gives the registration (subscription) status of any controllers assigned to his/her account. The AccountAdmin must acknowledge (Agree) to this status update prior to proceeding to the Account Landing Page. 7 Toro TriComm™ User Guide Account Landing Page The Account Landing Page is the first page an Account-Admin or Standard User sees after login. A mouse-click on the Toro Logo in the upper-left of the Web Pages will show this screen at any time. This page is the start point for the application, where the user can select a controller directly from the screen or use the tree-view on the left side. Controller Hierarchy Controllers can exist singularly within an Account, or be grouped into Areas for shared functions (e.g. monthly season adjust). 8 Toro TriComm™ User Guide Connection Status The Screen gives a basic “Connection Status” for each account controller: Green Icon: Controller is online. Green Icon means that the last communication time with the controller was not more than 10 minutes ago. Green+ Red Outline Icon: Controller is online and needs updates (download) Grey Icon: Controller is offline Grey + Red Outline Icon: Controller is offline and needs updates (download). Note: The Controller is not technically “always online” with the Web interface. So, current controller programming is not continuously displayed. The TriComm Modem connected to the controller periodically talks to the controller to verify communication status and then sends a “keep alive” signal to the Web interface to maintain communication path and provide the Communication status shown on the landing page. Clicking on the controller icon will open the Control Panel for the specific controller in the Web interface. TriComm is basically a “mirror” of the controller. All operation’s which are possible from the TMC-424E are possible on the TriComm Web interface. Sort Options Depending on how many controllers an Account has, users may wish to “sort” controllers utilizing the options provided on the right-hand side of the landing page (radio buttons): 9 Toro TriComm™ User Guide Select the view sorting option. Sort by ID, show device ID only; Sort by Name, show device name only; Sort by Connection, show both name and ID. Side Navigation Tree y y y The Tree-View: allows the user to select the controller to program. Controllers will appear grouped in “Areas” if areas have been assigned. Downloads on the top of the tree-view frame is the link to the Download page as described later in this document. The progress bar will show each controller specific communication status while the server is communicating with an individual controller. By clicking on a Controller Icon either in the navigation tree or on the Landing Page main-screen will take you to the Control Panel for that controller. IMPORTANT: The TriComm Web Service stores only the most recent controller programming data “Saved” (whether downloaded to controller, or not). There is no option to permanently “save” specific programming (permanent backup). Any SAVE will overwrite the programming on the Web Server. In the event a field controller loses programming, the most recent saved information can be downloaded from the Web Service. Landing Page Tab Options At the top of the landing page, there are three tabbed options: Controllers Map View Commands Provides listing of all Account Controllers & displays connectivity status. Allows placement view of controllers on a Map Image. Allows Global Commands to be sent to all Account Controllers (e.g. Set Time). 10 Toro TriComm™ User Guide 11 Toro TriComm™ User Guide Controllers Provides listing of all Account Controllers & displays connectivity status. Map View Allows placement view of controllers on a Map Image. 12 Toro TriComm™ User Guide Using Map View Please refer to “Map Upload” Section of Administrative Functions to learn how to upload a System Map. Once Map is uploaded: 1. Click on (Map View) Tab from Controller Landing Page 2. Account Map Image should be displayed in Screen 3. On right hand side of map, click (Click to Open) indication 4. Select (left click) Controller or Weather Station to place on Map 5. Place cursor on Map where Controller or Weather or Weather Station is physically located and Left Click on your Mouse to place the Controller Icon. Controller Icon will now display on Map showing connectivity status. Mouseover will provide last Connection (Communication). Clicking on the Controller Icon will take you to the Control Panel for that Device. Notes: To Remove a Controller Icon from the Map, select the Controller in the list and click the (Remove from Map) Button. To reposition a Controller Icon on the Map, follow steps 4 & 5 above. The controller Icon will re-position to the new point. 13 Toro TriComm™ User Guide Commands Allows Global Commands to be sent to all controllers in the account (e.g. Set Time). Control Panel Clicking on a Controller Icon either in the navigation tree or on the Landing Page main-screen will take you to the Control Panel for that controller. The Control Panel provides access to the programming and status of each individual controller. The information displayed is the information last received from the controller. To get current status and programming information from a controller, the Upload and Get Status functions discussed later in this document are required. The Top of the Control Panel provides tabbed access to the major Functionality required for Controller programming, operation, and monitoring. 14 Toro TriComm™ User Guide The Control Panel will automatically open the window for the tab most recently used. But, left to right, the tabs are: Program Manual Status Flow Control Alerts Parameters Upload Provides access to all basic programming within an individual controller. Manual Operation of Individual Stations Report of currently operating stations, programs, and any active alarms by station. Controls set points for flow alarms and resets to the learned flow feature. Assigns user-made alerts to be active for any given controller. Controller & modem configuration settings. Upload current controller programming and configurations to Web service Program Page The Program Page provides access to all the basic programming functions of a TMC-424E Controller: 15 Toro TriComm™ User Guide The following list outlines the settings displayed on the Program Page. For ease of understanding, where required, the corresponding Controller Dial program function on the faceplate of the controller is highlighted. Starting from the upper left corner: Program Selection y y y Program A, B, C, D (combo box): Here we can choose the program Controller Slide Switch > A,B,C,D Program Name: User can define a Name for each program (stored in Web Interface only). Edit Program: Selecting this box allows the user to edit the program. A pop-up will appear reminding the User to save changes after editing: Water Days (Choose from one of the three following options): à Interval Days (radio button): Irrigate every “X” days, with current day of interval. Controller Dial >Day Interval à Odd/Even Days (radio button): Set irrigation mode for Odd or Even. Irrigate by Odd/Even days on the permissible days. Controller Dial >Odd/Even à Weekdays (radio button): Set irrigation mode for week days on the permissible days (choose each day of 7-day week). Controller Dial->Calendar Days Note: Permissable Days apply to all three watering day options. By default, all days are selected to allow watering. Deselect any day where watering is not desired. Parameters: y Area %: Season Adjust set for Area in Areas page. This value is the same for all programs in the controller and can not be changed on this page. This value equates to current monthly Season Adjust set in Controller. Controller Dial >Season Adjust > M01…M12 y Program %: Percentage Adjust for selected program. Controller Dial >Season Adjust Slide Switch > A,B,C,D 16 Toro TriComm™ User Guide y y y y y y y y y Total Seasonal Adjust %: Actual Season Adjust applied to stations/runtimes in selected program, and is the result of the following formula = Area % * Program %. The maximum Season adjust that can be applied to the controller is 200%. Master Valve Enabled (check box): Main Terminal Master Valve / Pump Start will activate with Program when checked. Controller Dial > Special Functions > MVA Y/N Slide Switch > Program A,B,C,D Use RainSensor (check box): Checked = RainSensor Activation will Cancel Program. Controller Dial > Sensors > RSA Y/N Slide Switch > Program A,B,C,D Pump Delay (Off > up to 60 Sec): Delay between main terminal MV/PS activation and first station in program activating. Controller Dial > Special Functions > PD Pump Delay Enabled (check box): Main terminal MV/PS will stay active during Station Delay when checked. Controller Dial > Special Functions > PE Station Delay (Min : Sec): Set delay between station operation within program. Controller Dial > Special Functions > SD Line Fill (Off > 9 Minutes): Sets delay between first station activation in program and flow monitoring to allow Main Line Fill turbulence to subside and not cause flow alarm. Controller Dial > Sensors > FIL:0M Cycle Enabled (check box): Allows multiple cycles of Program Controller Dial > Special Functions > CYC – Y/N Cycle Repeat / Delay: Repeat = number of additional times program should run (1 = 1 repeat, then program will run two cycles total). Delay (Min / Sec) = Delay between program cycles (time = 0, then cycles will run back-to-back). Controller Dial > Special Functions > RPT… DL Start Times (masked edit text box “hh:mm AM/PM”) There are 16 start times total, to be programmed. These will affect all programs, so if Program A will have 2 start times, all other Programs will have 14 start times to be used. Start time boxes are color-coded to provide an easy view of free versus occupied start times: y Deep Green tabs with 00:00: free start times to be set y Light Green tabs with hour inserted: start time used from this program y Grey tab with hour inserted: start time used by another program To set a Start Time: click on the dark or light green tab and insert the correct start time (hh:mm). Type A for AM and P for PM. Controller Dial >Start Times > Start Times 01…16 Slide Switch > Programs A,B,C,D Run Times (masked edit text box “hh:mm AM/PM”) Shows the runtimes for the available stations according to the Module Configuration of the specific controller. Available Stations will be set during the first connection to the controller by the Upload feature. Each program has (up to) 24 runtimes according to its configuration. To set run times, click in each station tab, and insert a run time. Controller Dial >Station Times > Station 01…24 Slide Switch > Programs A,B,C,D 17 Toro TriComm™ User Guide Command Buttons Start OneCycle This function allows a manual start of the program. Click on the icon to start. Controller Dial > Manual Program Stop Program This function will stop all irrigation (manually or automatically started). Click on the icon to Stop. Controller Dial > OFF (temporarily, then back to RUN) Note: Stop Program only stops all currently running programs. It does not cancel any programs that have not started (pending Start Times). Save Saves program parameters to the database. This command requires a controller update through the download page. Important: After made a new program is created or an existing program is modified, it has to be saved in the Server, which is the TriComm memory. At this point, TriComm will know that there is a new/modified program for this controller. The controller icon will then have a red square to advise that the new/modified program must be sent to the controller. This operation must be done from the Download page. After the download to the controller, the new/modified program will be in the controller. Templates To the Right of the program screen you will see a “click to open” option: This opens a “Template” Window that allows you to save programs as Templates to be loaded at a later time (seasonal programs) or to be copied to other controllers (similar to a program copy function): 18 Toro TriComm™ User Guide Manual Operations Manual Operations provides the ability to manually start individual stations on the target controller. Manually start a station for hh:mm time: hh = hours, mm=minutes. Update the time and check the required stations and click the “Start” button. • TMC-424E: Allows selection of 1-3 stations concurrently. Right top corner shows the maximum stations running at a time according to the controller stacking parameter. See Controller Dial->Special Functions->1…3PROG option Note: This value can be changed on the Parameters Tab Manually Start a Station: 1. Click on the green time slot of desired station 2. Type in a run time (default is 5 minutes for TMC-424E, but it is possible to set run times in seconds if the controller is configured correctly. See section on “parameters”.) 3. Click on the check box below the station 4. Click on the Start icon Stop a Manually Running Station or Program: 1. Click on the check box below the desired station 2. Click on the Stop icon Note: This will stop a station running manually, or if the station is running as part of a Program, it will stop the affected program. Stop all Stations Running Manually: 1. Click on the Stop All icon 19 Toro TriComm™ User Guide Controller Status Controller Status provides the last retrieved status of the controller, displaying operating programs & stations as well as any alarms, etc, at that time. Current controller status is retrieved by utilizing the Get Status button at the top or bottom of the page. Starting from the Upper Left Corner: y Last Updated: this window shows the date/time that the controller status was last updated. To check the current controller status, click on the Get Status icon. y y y A, B, C, D: each of these tabs, shows active stations and runtime left on stations running. Rain Sensor Status: this tab shows the rain sensor status. If the rainsensor is not active (dry), it will shows OFF in a grey box. When the rainsensor is active (wet), ON will be displayed in an orange box. Output Status: these tabs show the actual status of each station. The list is automatically created by TriComm, following the controller’s set up (see Upload section). During a manual start, the active station will be highlighted in blue, while during an automatic program start, it will be highlighted of orange. 20 Toro TriComm™ User Guide y Station Short Alerts: these tabs show any short related to any station. In case of Fuse Alert on the controller (FUSE), the associated station will be red. y Over Flow Alerts: These tabs show any over flow related to any station. In the event of a flow alarm (FLOW), the associated station will be red. Under flow alerts: These tabs show any under flow related to any station. In the event of a flow alarm (FLOW), the associated station will be red. Critical Flow Alerts: these tabs show any critical flow related to any station. In the event of a flow alarm (FLOW), the associated station will be red. Get Status icon: this function allows the user to retrieve current status of the controller. y y y y Clear Alert icon: In case of any alert/alarm, it is possible to clear it on the screen and on the controller. However, if the situation is not corrected (fixed in the field) the next time the associated station tries starting, the same alert/alarm will occur. 21 Toro TriComm™ User Guide Flow Control Flow Control allows the setup of Flow parameters in the target TMC-424E controller. Flow Monitoring is an optional feature in all TMC-424E controllers and requires a Blue Flow Module (TSM-4F or TSM-8F) installed in the controller. This window allows the user to set thresholds for flow alarms. TriComm will automatically create the list of stations for the controller upon first Upload. There are three alarm thresholds for each station: 1. Critical Flow % - Percent above Learned Flow (should be above Overflow) that a Critical Flow Alarm will occur. 2. Overflow % - Percent above Learned Flow that an Overflow Alarm will occur. 3. Underflow % - Percent under Learned flow that an Underflow Alarm will occur. 22 Toro TriComm™ User Guide The threshold of each alarm will define when the alarm will be activated. Each alarm will react in a different way: 1. Critical Flow: The system will advance through all stations in the currently running program at 5 second intervals and shut down All Stations and Master Valves / Pump Starts. 2. Over Flow: The system will monitor the individual station for one minute and then advance to the next station within the program. 3. Under Flow: The system will monitor the individual station for one minute and then advance to the next station within the program. There is another flow alert associated with Normally Open Master Valves and Nominal Flow (NF), or flow expected when no irrigation is occurring. When the Nominal Flow setting is exceeded, the TMC-424E displays 0FLOW in its LCD and shuts the Normally Open Master Valve. This threshold is set as part of the Parameters window in the TriComm Web interface. To set-up the controller flow alert parameters: 1) The number of stations are shown according to the controller modules configuration. 2) For each station, set the flow alert thresholds: a) Critical Flow % b) Over Flow % c) Under Flow % 3) If, on the actual controller, Controller Dial->Sensors->FLO-Y, for any given station, then you can see all the following flow settings: • Critical Flow threshold: not shown in the picture. Should be inserted above the high(%) for each station. Stored in the controller critical-flow variable. • High Flow threshold: flow percentage above the nominal flow. Stored in the controller high-flow variable. • Low Flow threshold: flow percentage below the nominal flow. Stored in the controller low-flow variable. • Learn Flow (Label, read-only): Shows the controller “learned” flow for a specific station. This value is read in the Upload Tab > Upload Flow Configuration button. • Reset: Resets the learned flow per station. Resetting this value causes the controller to “learn” the flow in the next time it reads flow. • Save: (command button) Saves the configuration data to the database. This action requires a controller update through the download page. This will be highlighted from the red square around the controller’s icon. Once the download is complete, all data will be saved in the controller Note: When a controller is initially installed, all Learned Flows should be cleared and all stations should be run individually for three minutes to allow the controller to Learn Flow for each station. The easiest way to accomplish this is utilizing the Valve Test feature on the TMC-424E Controller Dial. Note: Learned Flow display is dependant on Flow Sensor selection in the parameters screen. The TMC-424E learns flow in pulses per second. TriComm will convert this flow to Gallons or Liters per Minute. Please refer to your TMC-424E Manual for information & a chart regarding conversion of Pulses to Gallons or Liters per Minute. 23 Toro TriComm™ User Guide Alerts Designate which alerts are active for any given controller. Alerts must be set up by the AccountAdmin utilizing Administrative Functions. This screen will allow for the alerts created by the Account -Admin to be assigned to the controller. Select the required alerts as defined in the account alerts-bank. Click the save button to update the controller database. This command button action requires a controller update through the download page. To delete an alert already assigned to a controller, uncheck the alert and save the change. This command button action requires a controller update through the download page. Parameters > Configuration (Account-Admin Access Only) This window shows parameters for the controller and the GPRS modem. 24 Toro TriComm™ User Guide Controller Info y ID: (label, read-only) shows the controller unique ID y Name: (string) allows the account-admin user to enter a controller name. y Area: Set the controller Area association (if any). y Time Zone: (combo-box) set the controller time zone. y Daylight Savings: (combo-box, minutes) sets the controller day light savings value. Allows the option for half-hour time zones. Used to change clock time at the start of, and end of Daylight Savings. This is a manual change, it will not occur automatically. The User must hit the Set Clock button. Controller Output y Output: Shows the modules currently in the controller (4- or 8-station) and whether they are flow sensing modules y y y If Flow Sensing Module: à MV Type: Sets Flow Sensor Master Valve Terminal (on the module itself) as either Normally Open or Normally Closed. à No Flow: Sets the Nominal Flow Threshold for a Normally Open Master Valve. This is the flow expected when no stations are running. If this value is exceeded when no irrigation is occurring, the Normally Open Master Valve will be shut (energized). This value is displayed in Pulses (refer to TMC-424E operating manual). Stations Available: Indicates the stations available per module slot (4 or 8). If flow sensing modules installed, drop-down box sets the flow sensor to be used by each station. Station Descriptions: Describes the location of the station. Parameters y Per Station MV Enabled: à If the Per Station MV Enable is checked, then a checkbox is enabled for each station in the Controller Output: à If the per station MV Enable checkbox is checked, the controller main Master Valve / Pump Start terminal will be active when that station is active. If the box is unchecked, the main terminal MV/PS will de-energize when that station is irrigating. This setting is in 25 Toro TriComm™ User Guide effect when any individual program has MV – Y. Controller Dial >Special Functions >MVS Y/N Controller Dial>Special Functions >Station 01… 24 / MV-Y/N Note: the configuration must be saved after the Per Station MV Enabled checkbox is selected for the individual MV Enable checkboxes to show up. y y y y y Program Stacking: Number of stations or programs (manual) that the controller can run simultaneously. Controller >Special Functions >1…3PROG Language: (Displayed in Controller LCD) English, Spanish, French, Italian, German, Portuguese Controller Dial >Special Functions >ENG Runtime Seconds Enabled: Allows setting individual Station Runtimes in Seconds (times less than 1 minute). Controller Dial > Special Functions > SEC Y/N 24H Time Format: If set, then the controller time shows in 24 hour Format instead of 12 Hour AM/PM format. The time format shown in the Status page is also set by this value. Controller >Special Functions >12H/24H Simulated (Flow Sensor): If a flow sensor is not connected to the controller, the user can check the simulated box and enter a theoretical flow rate for each station on the Flow Control tab. TriComm will use this theoretical flow to calculate water use based on station runtime (See Consumption Report in Reports Section). Flow Meter: If a flow sensor is connected to the TMC-424E Controller, the user should leave the simulated box unchecked and select the Type/size of Flow Sensor connected to the system. TriComm will then use appropriate K and Offset Factors to convert Learned Flow (pulses per second) to GPM or LPM Flow Rates for each station. These values will be displayed in the Learned Flow boxes of the Flow Control Tab. These “Learned” Flow Rates will be used calculate water use based on station runtime (See Consumption Report in Reports Section). Save Button Saves the configuration data to the database. This action requires a controller Update through the download page. 26 Toro TriComm™ User Guide Parameters > Version & Communication (Account-Admin Access Only) This Window displays information regarding Controller and Modem Firmware versions and GPRS (cellular) communications signal strength. y y y y y y y y y WAC version: Shows the modem Java app version Slave ARM version: Shows the modem ARM micro app version TC65 version: Shows the modem hardware/firmware version Toro Version: Shows the TMC-424E firmware version Signal: Shows bars for communications signal strength quality level. 1-8 = 1 bar, 9-15 = 2 bars, +15 = 3 bars Cell ID: Shows cellular cell ID. Important for cellular carrier troubleshooting SIM ID: Shows SIM card ID IMEI: Shows modem hardware identification number Get Status: (command button) Get the system versions as shown above. 27 Toro TriComm™ User Guide Upload Page This Page provides capability to Upload configuration and programming information from the target controller. Note: It is important to do an upload when a controller is first brought online, before commencing programming changes through the TriComm interface. This allows the system to know the capabilities of and modules installed within the TMC-424E controller. Upload options are broken down into specific sections to minimize data transmission (and costs) by only uploaded the information currently required. In this page the user uploads the controller data divided into logic groups. y Upload Controller configuration: (command button) uploads data from the TMC controller. y Upload Program A-D data: (command button) uploads programs data from the controller. y Upload Flow configuration: (command button) uploads flow data from the controller. y Upload Alert configuration: (command button) uploads alert data from the modem. 28 Toro TriComm™ User Guide Download Page Once controller programming is modified in the TriComm System, changes will be saved in the server, but must be downloaded to the controller to become active. A pending program change that has not been sent to the controller will be indicated in the Control Panel by a red square around the controller. After successful download, the red square will disappear. The Download page is used to send any saved changes to the target controller. It can be accessed at anytime through the link on the top of the left-hand navigation tree. Clicking “Downloads” will allow users to access a list of pending downloads to send to controllers. Pending downloads will have a description of the download. y y Download: (command-button) executes controller update to checked controllers. Cancel Download: (command-button) resets checked controllers state (zero) to “Ready” state. To Download: y From the download page, select the controller/update from the list which has been automatically created, clicking on the left tab. y Click on the Download icon. y The status toolbar shows the download status. y The download is complete and the controller has received the new information from TriComm when the status toolbar is at 100%. y The controller receiving the download will then be removed from the download list. 29 Toro TriComm™ User Guide The user has the option to cancel the saved changes selectively. This page shows all the account’s controllers that require updates. y Select All: (check-box) check = mark all controllers in the list for download. y Controllers list: (table) checked controllers are ready for download. y Cancel link: (link) expand a specific controller updates table, where the user can selectively remove updates from the list. Updated database data will be restored to the data before the user updates. y y Apply: (command-button) removes checked updates from the list. Cancel: (command-button) closes the updates expand window. Administrative Functions Administration Functions are broken down into six basic options accessed by the account-admin through links in the upper right hand portion of the Control Panel. Mapping (Map Upload) TriComm has the ability, from the Landing Page, to display controllers in a Map View of the system. The Map Upload Administrative Function provides the ability to upload the system map. 1. Click on to select image file from your computer (.JPG format required) 2. Click on 3. Provide a Name for the System Map 4. Click to Upload Map. Confirmation of Upload will be provided. Note: This map will be used for the entire Account. There is no option to Upload Multiple Maps for Different Areas. 30 Toro TriComm™ User Guide Areas (Account-Admin Access Only) “Areas” option provides controller grouping, where these controllers share the same seasonaladjust value. Setting Season Adjust 1. Create an “Area” in Areas Page 2. Assign a controller to an Area in Parameters -> Configuration 3. Set “Season Adjust” in Areas. a. Season Adjust Value has four options, selected from the Seasonal Usage combo: i. Manual ii. Calendar iii. ET Calc iv. ET (Automatic) b. When the user selects the Calendar option, a calendar Season Adjust (SA) values show on the right. Once the save button is clicked, all the controllers that are attached to this area will require a download and will show as such in the tree-view. These values are updated at the controller: Dial->Seasonal Adjust->Right_Arrow M01..M12 31 Toro TriComm™ User Guide c. When the user selects the Manual option, all months’ Season Adjust factors are set to the same [%] value. d. When the user selects ET Calc, function allows use of the ET value calculator. The user needs to enter both Expected and Actual ET values and click the Calculate button. The calculation is: SA [%] = Actual/Expected (ET). This will place the result (rounded to 5% increments) in the Seasonal Adjust [%]. To update the controller, select save and then complete a controller download. e. For ET Season Adjust, please refer to the AUTOMATIC ET ADJUSTMENT section of this manual. 32 Toro TriComm™ User Guide Season Adjust will be updated on selected controllers as shown on Control Panel > Program Tab: The actual station runtime is adjusted by both the season adjust value and the program adjust value according to this equation: Season Adjust (Area) * [per] Program Adjust = Calculated Seasonal [%] (actual runtime adjustment) = Actual adjustment to individual stations. Once an Area seasonal-adjust value is updated, a download for all attached controllers is required through the download page. Alerts (Account-Admin Access Only) This page defines the account alerts bank. Using this bank allows the account-admin user to later attach alerts per controller using the controller alert tab. 33 Toro TriComm™ User Guide y Alerts list: (list box) show the existing account alerts. To modify an alert, click on it from the list, edit the required fields and click save. Account alerts are saved at the server ONLY and do not required controllers update. y y y Name: (string) alert name as shown in the list. Type: (combo-box) trigger type: Trigger: (combo-box) trigger source. All = all possible outputs (1…24). The alert will trigger by any (all) outputs (stations). If numeric (1 – 24) the alert will be triggered ONLY by the specified output. Text: (string) message to be sent to the specified user(s) below. The message header (email subject) includes the controller-ID and controller-name Alert distribution list: (selection table) (checkbox) Set = include this user in the distribution list; (checkbox) email = send the alert message text to this email (Users.Email); (checkbox) mobile = send the alert message text to this email (Users.Mobile_Email); Save/Delete/New: (command button) Modify account alerts list. y y y To Create A New Alert 1) Click on the New icon 2) 3) 4) 5) After a few seconds, the Name tab will be empty Fill the tab with the Alert Name Choose the type of alert in the Type box Choose the affected Output(s) in the Trigger box (by selecting All, the system will send alert message if Alert occurs for any station, but will not give the specific station name). Note: Due to the flexibility of TriComm, it is possible to create alerts for each individual station in a controller. However, to do that, the user must create that alert and designate the Trigger as the individual station, creating one for each station. If the User selects “All” as the Trigger, an alert will be sent no matter what output the alert occurred on, but it will not indicate which output is affected. 6) Fill the Text tab with the message to be sent when this alert will occur. 7) Choose the user name from the list, and then choose the email address, from Primary, Mobile, or both. 8) After Alerts are created, click on the save icon to save settings in the Server. The alert needs to be selected for each controller on the Controller Alert page followed by a download to the controller. 34 Toro TriComm™ User Guide Reports There are six Reports available to users of TriComm: Communication Report Alert Report Email Report Consumption Report Controller Updates SA Auto Update Generates communication summary report in order to check data communication for any abnormal controller behavior – Displays communication as Kbytes (KB) transmitted. Generates summery reports of triggered Alerts in order to diagnose controller behavior. Generates sent emails summary report in order to follow up with the system operation and verify Alert transmission. Generates a “Theoretical” Water Usage Report based on Learned Flow per station and Daily Run Times. Generates a Report of Controller Updates (when, what values) – Can provide report of Season Adjust Update only (to verify Auto ET). Generates a Report of Automatic Updates of controller Season Adjust. All Reports have three user options: y y y Generate: (command button) Generates the report for the selected controller over the selected time-window. The report is shown on the screen. Export: (command button) Creates a comma-separated (CSV) file to be imported to Excel. Clicking the Export button will prompt the user to download the file to his PC. For some Internet Explorer® users, the “ctrl” key must be held when exporting data or users should add torotricomm.com as a secure site to their computer’s browser settings. Print: (command button) Sends the displayed report to a printer. 35 Toro TriComm™ User Guide Communication Generates communication summary report in order to check data communication for any abnormal controller behavior – Displays communication as Kbytes (KB) transmitted. 36 Toro TriComm™ User Guide Alerts Generates a summary report of Alerts and indicates whether they were triggered (TRUE) or not and the date and time of the Alert. E-Mail Generates sent e-mails summary report in order to follow up with the system. 37 Toro TriComm™ User Guide Consumption Report Generates a “Theoretical” Water Usage Report based on Learned Flow per station and Daily Run Times. In order to “Set Up” the TriComm System for Consumption reporting, the System needs to know a flow rate per station. This flow rate can either be entered by the user (Step 1 Below) or be calculated using Learned Flow and the Flow Sensor Size/Type (Step 2 Below). Users can also enter a Price Per Unit factor to estimate how much a particular scheduled program may cost over a given time period given estimated flow rates (Step 3 Below). 1. If a flow sensor is not connected to the controller, the user can check the “Simulated” box in the Parameters Tab (Config Section) and enter a theoretical flow rate for each station on the Flow Control tab in the “Learned Flow” box. TriComm will use this theoretical flow to calculate water use based on station runtime. 2. If a flow sensor is connected to the TMC-424E Controller, the user should leave the Simulated box unchecked on the Parameters Tab (Config Section) and select the Type/size of Flow Sensor connected to the system. TriComm will then use appropriate K and Offset Factors to convert Learned Flow (pulses per second) to GPM or LPM Flow Rates for each station. This value will be displayed for each station on the Flow Control tab in the “Learned Flow” box. These “Learned” Flow Rates will be used to calculate water use based on station runtime (See Consumption Report in Reports Section). Note: The consumption information provided by the Consumption Report is estimated based on daily runtime programs multiplied by learned flow per station provided from a flow sensor or simulated flow provided by the user estimate. Consumption reports are theoretical in that they are based only on the scheduled run times and will not reflect actual variations in flow that be caused by pipe breaks, water shortages, etc. 3. To display an estimated cost, a price per unit factor can be entered. This will be calculated based on the consumption, multiplied by the pricing factor. This will be displayed along side the estimated consumed amount in the graph and table included in the Consumption Report. 38 Toro TriComm™ User Guide Controller Updates Generates a Report of Controller Updates (transmissions to / from controller). 39 Toro TriComm™ User Guide Season Adjust (SA) Auto Generates a Report of Automatic Updates of controller Season Adjust. Can be used to verify Automatic ET Adjustment. 40 Toro TriComm™ User Guide Users (Account-Admin Access Only) Once Account Admin logs in, he/she can only define new Standard Users. New Account-Admins must be set up by Toro NSN®. Clicking on the “New” button will show the “expand” details, where the account-admin set the user access-level and the creation date. y Login name: (string) the account administrator login name. y Password: (string) user login password. The login name and password combination must be unique in the system. If the dealer tries to create an existing login name, the system will reject this attempt. y Confirm password: (string) required for creating a password. y First name / last name: (strings) user descriptive name as will show on the upper-right corner after login y Email: (string) also known as email1. Used for user email alerts y Mobile Email: (string) also known as email2. Used for user email alerts y Phone/Fax/Comments: (string) used for customer support. Is not required for system operation. y Approve date: use the calendar to mark the day the user is created y Access-level: User 41 Toro TriComm™ User Guide y Standard User Privileges can be set as shown using the check boxes: à à à à à y Enabled = Enables Ability to Set Specific User Permissions Program Updates = Ability to Upload Programs from target Controller and Download Program Changes to Target Controller Station/Program Activation = Ability to Start/Stop Programs and Stations Manually Status Request Enabled = Ability to Request Controller Status (See Stations Running & Any Alerts) Example: If the Account-Admin wanted to enable a User to only Start / Stop Stations and Programs and Get Controller Status (but not change programming), permissioning would look like: Save/Delete/New: (command buttons) users list maintenance. Note: As previously mentioned, there is currently no permissioning that allows Users to only see & work with specific controller in the Account. The user permissioning applies to all controllers within the Account. Logout By clicking on this icon, the user will be logged out of the TriComm Web interface and the Login page will appear. 42 Toro TriComm™ User Guide ADVANCED FUNCTIONALITY Automatic ET Adjustment The TriComm System includes the ability to connect a weather station into the system to automatically receive weather information, as well as manually or automatically adjust controller Season Adjust % on a daily basis based on ET data. Weather Station Requirements Requirements for TriComm Weather are: TriComm Weather Station Modem Kit (Purchased through Toro) Davis Instruments Vantage Pro2 Weather Station with Weather Console (purchased separately) Instructions for connection of the Weather Station Modem Kit to the Davis Weather Console are provided with the TriComm Weather Station Modem Kit. Weather Station & Automatic ET Adjust Setup & Programming When the Weather Station is properly installed with Modem Kit connected to weather Console, the weather station should appear in your account as a new device with weather Icon: WS Modem Not Connected / Online WS Modem Connected & Online Weather Station Setup When you click on your new weather station, you will be taken to the Main Screens for the Weather Station. There are two tabbed options: History – Provides Historical Reports of Weather Data Parameters – Provides Configurations & Version / Communication Options 1. Click on Weather Station Icon 2. Select Parameters > Configuration 43 Toro TriComm™ User Guide 3. In Config Tab, Set Name, Time Zone, and Daylight Savings, if applicable. 4. Select Area where the Weather Station is located Note: When performing Automatic ET Adjust, the Area the Weather Station is assigned to is the group of controllers its weather data will be used to adjust. 5. Selecting Version & Communications Tab will allow you to verify cellular reception. If poor reception, please attempt new location of Modem Antenna. Auto ET Adjust Setup Once the Weather Station is Connected and Online and Setup is Complete: in upper right-hand corner of screen 1. Select Areas 2. Select the Area the Weather Station is Assigned to 3. Select Seasonal Adjust Method: AUTO ET 4. The Following Settings are Required: a. Weather Association: Select Weather Station which will be used to Adjust this Area. b. Auto Update: How often the Season Adjust in the controller should be updated. i. Manually Update only ii. Once a Day (automatic) c. ET Usage: i. Last daily ET = ET Value Accumulated for Last 24 Hours ii. Seven Day Average = Average Daily ET for Last Seven Days Note: Seven Day Average should be used if Irrigation Schedules do not run daily. This compensates for daily variations in-between irrigation days rather than basing irrigation only on yesterday’s weather. 44 Toro TriComm™ User Guide d. Update Time: This is the time when TriComm will update the Season Adjust for all controllers assigned to the selected Area. It is recommended that Update Time occur a minimum of 30 Minutes before Irrigation Start Time. e. Reference ET: This Value is what the Actual ET is compared to for setting Season Adjust % - [Actual ET / Reference ET] * 100 = Season Adjust % IMPORTANT: Reference ET should be set to the daily ET value the baseline programming (100% Season Adjust) is intended to irrigate for. If the controller is programmed for irrigation in the hottest month of the year, then Reference ET will be the Average Daily ET for that Month in your region. Reference ET should not be changed during the year. Once programmed, the TriComm System will vary the Season Adjust according to seasonal weather patterns. The maximum Season Adjust the system will calculate is 200%. The TriComm System will now automatically adjust the Monthly Season Adjust for all controllers in the assigned Area based on Actual ET Values. It is important that controllers requiring adjustment are assigned to this area (Controller > Parameters > Config > Area). Note: If User desires to “Turn Off” Irrigation in an Area, they will select Seasonal Adjust Method > One Value, and set Season Adjust as OFF. Controller Programming Indications Season Adjust will be updated on selected controllers as shown on Control Panel > Program Tab: Season Adjust (Area by Auto ET) * [per] Program Adjust = Calculated Seasonal [%] (actual runtime adjustment) = Actual adjustment to individual stations. In Any Given program, if you mouseover the Run Time box for any station, the StationTime displays the programmed Run Time, and the mouseover box will display the actual runtime based on Seasonal Adjust (example below, Seasonal Adjust = 100%): 45 Toro TriComm™ User Guide Reports Historical Weather Data Reports 1. Select Weather Station from TriComm Main Page or Left-Hand Navigation Tree 2. Select History Tab 3. Select Get Data to retrieve latest Weather Station Data 4. Select History Graph 5. Select Value you want Historical graph For [e.g. ET] 6. Select Start Date and End Date for Data to Graph 7. Select Option i. Generate: (command button) Generates the report for the selected controller over the selected time-window. The report is shown on the screen. ii. Export: (command button) Creates a comma-separated (CSV) file to be imported to Excel. Clicking the Export button will prompt the user to download the file to his PC. iii. Print: (command button) Sends the displayed report to a printer. If Generate is chosen, Graph of selected Historical Data for selected Date Range will be displayed: 46 Toro TriComm™ User Guide Above Graph shows Daily ET Accumulation over 3-day period with daily total reset at Midnight. Other data selections (Temperature, etc) will show point measurement of values, not cumulative value. Graphing Options include: Data Range (period total): o Hourly o Daily Graphing Format o Lines o Bars 47 Toro TriComm™ User Guide If History Tabular is selected instead of History Graph, Data will be displayed in a Table format of cumulative values: Automatic ET Adjust Reports TriComm provides the ability to get a report of when Auto ET Adjust Occurs: 1. Select Reports in upper right hand corner of screen. 2. Select SA Auto Report tab. 3. Select report Period and Date Range 4. Select Controller [Device] report desired for 48 Toro TriComm™ User Guide 5. Select Option i. Generate: (command button) Generates the report for the selected controller over the selected time-window. The report is shown on the screen. ii. Export: (command button) Creates a comma-separated (CSV) file to be imported to Excel. Clicking the Export button will prompt the user to download the file to his PC. iii. Print: (command button) Sends the displayed report to a printer. Alerts Automatic ET Adjust Alerts TriComm provides the ability to get an e-Mail alert to a mobile device when a controller receives its automatic Season Adjust Update (ET). 1) Go to the Alerts Section of TriComm 2) Click on the New icon 3) 4) 5) 6) After a few seconds, the Name tab will be empty Fill the tab with the Alert Name Choose SA Update in the Type box Choose the affected Output(s) in the Trigger box (selecting All, the system will send alert message if SA Update occurs in any controller (but will not give the specific controller name). 7) Fill the Text tab with the message to be sent when this alert will occur. 8) Choose the user name from the list, and then choose the email address, from Primary, Mobile, or both. 9) After Alerts are created, click on the save icon to save settings in the Server. Then, a download to the controller will be needed. This process will set up an Alert to be triggered anytime an Automatic Season Adjust occurs. 49 Toro TriComm™ User Guide TriComm Mobile Interface [Cellular Phone or PDA] Overview & Login Users have the ability to manually start or stop stations and/or programs through the TriComm Mobile application using their mobile phone or PDA, or other web-enabled hand held device. To access TriComm through a mobile phone, an Internet connection and username and password are required. (The same username and password that has been provided for the web-version of TriComm allows users to access the mobile version of TriComm.) Follow these steps to use TriComm: • Connect your mobile phone or PDA to the internet • Type in the web site: www.torotricomm.com/mobile You will see a Login Screen similar to the one below: • Type in username and password, which will be the same username and password used for the web version of TriComm • Select your language • Press “Go” Description of Auto Log-in TriComm mobile will remember and store user’s log-in information, as long as users are accessing the mobile application from the same handheld device every time they access TriComm. This simplifies mobile access by enabling users to access the manual start/stop page upon connecting to the mobile application. Users that “logout” to leave the TriComm mobile application will be prompted to log-in again. 50 Toro TriComm™ User Guide TriComm Mobile Operation Controller Selection After a few seconds you will see: 1. Select the area to be modified 2. Choose the controller to be operated 3. Press the (Go) Button 4. If an error occurs, press the “Logout” button to return to the main page You will then see: You will then have two options: start/stop stations, and start/stop programs. After every command received from the controller a notice will appear over Select Stations. This notice will change every time a command is sent. 51 Toro TriComm™ User Guide How to Start Stations 1. Select the station from (Select Station) option 2. Choose the run time from the 3. Click the (Minutes) option (Start) icon from the “Select Stations” area After the command has been executed a “Done! HH:MMAM/PM10:02 AM” notice will appear over Select Stations. This will confirm that the command was received from the controller. How to Stop Stations: 1. Click on the (Stop) button in the “Select Stations” area After the command has been executed a “Done! HH:MM AM/PM” notice will appear over “Select Stations.” This will confirm that the command was received from the controller. 52 Toro TriComm™ User Guide How to Start Programs: 1. Select the program from the 2. Under the “Program” option, click the (Program) option (A, B, C or D) (Start) button Once the command has been executed, a “Done! HH:MM AM/PM” notice will appear just over “Select Stations.” This will confirm that the request has been received from the controller. How to Stop Programs: 1. Under the “Program:” Option, click on the (Stop) button After the command has been executed, a “Done! 10:15 AM” notice will appear just over “Select Stations.” This will confirm that the request has been received from the controller. 53 Toro TriComm™ User Guide Status & Programming Get Status 1. Select the Controller from “Controllers” Section: 2. Select 3. Select displayed: [Status] from menu Options. Screen below will be displayed: [Get Status] Button. “Request Sent HH:MM AM/PM” will be 54 Toro TriComm™ User Guide 4. After about 20 seconds (allow time for Controller Status to be retrieved), press the {View status] Button. Screen below will be displayed (below display shows Station 2 on by Manual Operation): Program Information & Operation 1. Select the Controller from “Controllers” Section: 2. Select Program (A, B, C, or D) from Menu. Below screen will be displayed (Program B selected): 55 Toro TriComm™ User Guide 3. To adjust Per Program Season Adjust: a. Select desired Season Adjust from Dropdown List b. Click [Save} button c. Click [Update Controller] button 4. To Adjust or Set a Start Time: a. Click on the Start Time desired (e.g. b. Option will appear (as below) to adjust the selected Start Time: ) c. Once desired time is input, select [Save] to set time. Display will show “Done! HH:MM AM/PM” to indicate new start time (an * will also appear next to the Start Time updated. d. Select Times to target controller. [Update Controller] Button to send updated Start 56 Toro TriComm™ User Guide This Page Intentionally Left Blank 57 Toro TriComm™ User Guide www.toro.com ©2010 The Toro Company 58