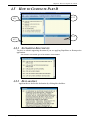
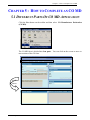
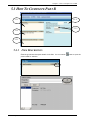
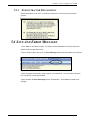
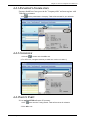
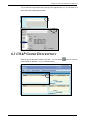
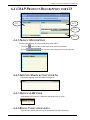
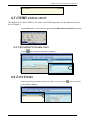
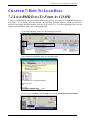
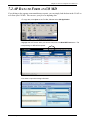
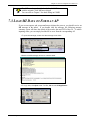
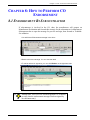
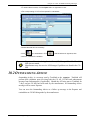
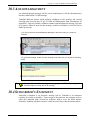
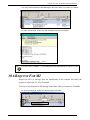
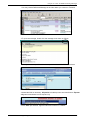
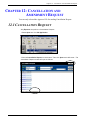
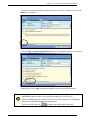
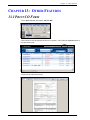
1
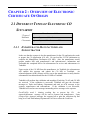
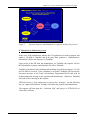
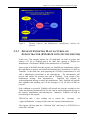
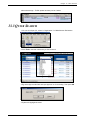
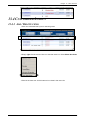
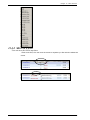
Electronic Certificate of Origin
User Manual
REF : 20060620V04
Chapter 1 : Introduction........................................................................................................................1
1.1
Background ...................................................................................................................1
1.2
Traditional.....................................................................................................................1
1.3
Electronic Way CO Application....................................................................................2
1.3.1
Parties Involved.....................................................................................................3
Chapter 2 : Overview of Electronic Certificate Of Origin....................................................................4
2.1
Different Types of Electronic CO Scenario s.................................................................4
2.1.1
Exporter-cum-Manufacturer and Subcontractor ...................................................4
2.1.2
Separate Exporter and Manufacturer.....................................................................5
2.1.3
Separate Exporter, Manufacturer and Subcontractor (Exporter initiates the
process) 7
Chapter 3: Company Setup ..................................................................................................................9
3.1
Install Confidentiality Key............................................................................................9
3.2
Confirm Company Profile Information.......................................................................10
3.3
Create Trading Partner Profile.....................................................................................12
3.4
Install ID-Cert .............................................................................................................13
Chapter 4 : How to Complete an CO AP ...........................................................................................16
4.1
Different Parts of an CO APPLICATION...................................................................16
4.2
How to Complete Part I - Application.........................................................................19
4.2.1
Certificate of Hong Kong Origin.........................................................................20
4.2.2
Exporter’s Information........................................................................................20
4.2.3
Application to be Submitted to............................................................................21
4.2.4
Consignee's Information......................................................................................21
4.2.5
Other Information................................................................................................22
4.2.6
Expeditious Issue.................................................................................................23
4.2.7
Notify Party's Information...................................................................................23
4.2.8
Manufacturers' Information.................................................................................24
4.2.9
Departure Date ....................................................................................................25
4.2.10
Destination Country............................................................................................25
4.2.11
Mode Of Transport..............................................................................................26
4.2.12
Port Of Discharge ................................................................................................26
4.2.13
Final Destination If On Carriage .........................................................................26
4.2.14
Party To Bill.........................................................................................................26
4.2.15
GACO's Membership No ....................................................................................27
4.3
How To Complete Part B ............................................................................................27
4.3.1
Goods Description...............................................................................................27
4.3.2
Manufacturer .......................................................................................................28
4.3.3
Responsible Quality and Unit .............................................................................28
4.3.4
FOB Value ...........................................................................................................28
4.3.5
Quantity Indicator ...............................................................................................29
4.4
How To Complete Part C ............................................................................................29
4.4.1
Product Description.............................................................................................29
4.4.2
Shipping Marks & Container No ........................................................................30
4.4.3
No & Kind of Packages.......................................................................................30
4.4.4
HS Code & Category No.....................................................................................31
4.4.5
Quantity & Unit...................................................................................................31
4.4.6
4.4.7
Brand Names and Labels.....................................................................................31
Total No & Kind of Package ...............................................................................31
4.5
How to Complete Part D.............................................................................................32
4.5.1
Supporting Documents........................................................................................32
4.5.2
Declaration..........................................................................................................32
4.5.3
Special Request Code..........................................................................................33
4.5.4
Special Declaration / Statement ..........................................................................33
4.6
Save And Error Messages ...........................................................................................33
Chapter 5 : How to Complete an CO MD..........................................................................................35
5.1
Different Parts Of CO MD Application......................................................................35
5.2
How to Complete Part A .............................................................................................37
5.2.1
Certificate of Hong Kong Origin.........................................................................38
5.2.2
Manufacture’s Information.................................................................................38
5.2.3
Principal Process(es) Done by Manufacturer and Outworker in HK..................39
5.2.4
Address of Goods Available for Inspection.........................................................39
5.2.5
Other Information................................................................................................39
5.2.6
Exporter’s Information........................................................................................40
5.2.7
Party to Bill..........................................................................................................40
5.2.8
Manufacturer’s Declaration................................................................................40
5.2.9
Manufacturer’s Special Declaration/Statement..................................................40
5.3
How To Complete Part B ............................................................................................41
5.3.1
Item Description..................................................................................................41
5.3.2
Materials and Components of Hong Kong Origin ..............................................42
5.3.3
Materials and Components of Other Origin........................................................42
5.3.4
Item Quantity and Unit........................................................................................42
5.3.5
Item Quantity Details ..........................................................................................42
5.4
How To Complete Part C ............................................................................................43
5.4.1
Item Description And Quality............................................................................43
5.4.2
PN No. ................................................................................................................43
5.5
How to Complete Part IV............................................................................................43
5.5.1
Subcontractor's Information................................................................................44
5.5.2
Principal process(es) undertaken by Subcontractor............................................44
5.5.3
Subcontractor Declaration...................................................................................45
5.6
Save And Error Messages ...........................................................................................45
Chapter 6: How To Complete An CEPA co.........................................................................................46
6.1
Apply CEPA CO .........................................................................................................46
6.2
COAP Application.......................................................................................................46
6.2.1
Exporter's Information........................................................................................47
6.2.2
Consignee............................................................................................................47
6.2.3
Notify Party.........................................................................................................47
6.3
COAP Goods Description...........................................................................................48
6.4
COAP Product Description for CO.............................................................................49
6.4.1
Product Description.............................................................................................49
6.4.2
Shipping Marks & Container No ........................................................................49
6.4.3
Mainland HS Code..............................................................................................49
6.4.4
Brand Names And Labels....................................................................................49
6.5
COMD Application.....................................................................................................50
6.5.1
6.6
Exporter's Information........................................................................................50
Line Items....................................................................................................................50
Chapter 7: How To Load Data ............................................................................................................51
7.1
Load RMD Data To Form An CO MD........................................................................51
7.2
AP Data to Form an CO MD.......................................................................................53
7.3
Load MI Data to Form an AP......................................................................................54
Chapter 8: How to Perform CO Endorsement ....................................................................................56
8.1
Endorsement By Subcontractor...................................................................................56
Chapter 9: Sign, Send and Receive Message .....................................................................................57
9.1
Sign CO.......................................................................................................................57
9.1.1
Sign One Message ...............................................................................................59
9.2
Send Messages ............................................................................................................59
9.3
Receive Message.........................................................................................................60
Chapter 10: How to Handle Incoming Messages................................................................................62
10.1
Application Error.........................................................................................................62
10.2
Outstanding Advice.....................................................................................................63
10.3
Acknowledgement.......................................................................................................65
10.4
Subscriber's Statement.................................................................................................65
10.5
Request For RMD .......................................................................................................66
10.6
Request For MI............................................................................................................67
10.7
CO MD Endorsement ..................................................................................................68
10.8
Deferment ....................................................................................................................68
10.9
Approval Message .......................................................................................................70
Chapter 11: Print Collection Slip .......................................................................................................71
Chapter 12: Cancellation and Amendment Request............................................................................72
12.1
Cancellation Request...................................................................................................72
12.2
Amendment Request...................................................................................................74
Chapter 13: Other Features ................................................................................................................76
13.1
Print CO Form.............................................................................................................76
13.2
Broadcast CO Profile ..................................................................................................77
13.3
Quick Search...............................................................................................................78
13.4
Customized Layout .....................................................................................................79
13.4.1
Add / Delete field ................................................................................................79
13.4.2
Moving Field.......................................................................................................80
Chapter 14: Appendix.........................................................................................................................81
14.1
Message Types ............................................................................................................81
14.2
Status Explanation.......................................................................................................81
Chapter 1: Introduction
CHAPTER 1 : INTRODUCTION
1.1 BACKGROUND
A Certificate of Hong Kong Origin (CHKO), commonly known as “CO”, is used to
certify that the goods concerned are of Hong Kong origin. It is issued only when it
has been established that the goods are the natural produce of Hong Kong or the
product of a manufacturing process in Hong Kong which has changed permanently
and substantially the shape, nature, form or utility of the basic materials used in
manufacture.
A Certificate of Origin – Processing (COP), commonly known as “CP”, is used to
certify that a manufacturing process is carried out in Hong Kong. The application for
CP is very much similar to that of the CO. They share the same application form and
procedures. The only difference is that there are two additional fields on the CP.
They are the “Country of Manufacture” and the “Processes carried out in Hong
Kong”. Moreover, CP will not be supported by PN.
The Trade And Industry Department is the agency of the Govt of HK which issues
Certificates of Origin (CO). Apart from the Trade And Industry Department, there
are five Government Approved Certification Organizations (GACOs) in HK which
have been designated by the HKSAR Govt as competent to issue CO. These
organizations are:
l
l
l
l
l
The Hong Kong General Chamber of Commerce
Federation of Hong Kong Industries
The Indian Chamber of Commerce, Hong Kong
The Chinese Manufacturers’ Association of Hong Kong
The Chinese General Chamber of Commerce
1.2 TRADITIONAL
The exporter, who is the prime responsible party for the lodgment of CHKO, would
complete the CHKO application and submit the form to TID/GACO’s at least 2
clearing working days before the departure of the carrying vessel.
One copy of the CHKO application form and a set of the Certificate of Hong Kong
Origin in triplicate duly completed in all details are submitted. The CHKO
application form contains details and declaration of the exporter, details and
declaration of the manufacturer, and details and declaration of the subcontractor, if
any, and details of the consignment and shipment. Therefore, it is jointly completed
by the exporter, manufacturer and subcontractor as appropriate. The Certificate
contains the consignment and shipment information and the signatory of the issuing
organization.
Introduction
1
Chapter 1: Introduction
It takes two clearing working days to process the CO. If everything is in order, the
CO will be endorsed by Trade And Industry Department or GACOs. The duplicate
will be issued to the applicant through the Issuing Counters of Certification
Branch/GACOs.
1.3 ELECTRONIC WAY CO A PPLICATION
CO Paper Submission Method
Sent to
Manufacturer
Exporter fills
CO Form
Manufacturer
2 Working Days
CO Certificate
Trade And
Industry Dept
In the electronic scenario of CO, it covers both the CO and CP application. Traders
have an option to choose from the software. Moreover, there is a choice of the
manufacturer or the exporter to initiate the CO Form.
The applicant needs to complete an application and generate a corresponding
document (Request for manufacturer declaration (RMD) to manufacturer or
manufacturer information (MI) to exporter) to his trading partner via Tradelink.
Upon receipt of the RMD/MI via Tradelink, the trading partner will use this
information to prepare and sumbit the manufacturer declaration (CO MD) or CO
application (AP) to Tradelink.
Tradelink will perform data validation and matching if both the CO AP and CO MD
are received. If the validation is successful, Tradelink will pass the two
ELECTRONIC messages to Trade And Industry Department and send an
Acknowledgement message to exporter and manufacturer. Otherwise, Tradelink will
send an application error message to the exporter.
When Trade And Industry Department receives the two ELECTRONIC messages for
the CO application, it takes 1 clear working day to process it. On the following day,
an “Approval Message ” will be sent to the exporter and manufacturer via Tradelink if
the application is successful. Otherwise, “Deferment” message will be sent.
Upon receipt of the “Approval” message, the exporter needs to print the “collection
slip” and bring it to Trade And Industry Department or GACOs for collection of the
certificate.
Introduction
2
Chapter 1: Introduction
1.3.1 PARTIES INVOLVED
4 maximum parties can be involved in the CO Application. Combinations may be:
l
l
l
l
l
Exporter-cum-Manufacturer
Exporter-cum-Manufacturer with 2 subcontractors
1 Exporter and 3 manufacturers
1 Exporter, 2 manufacturers and 1 subcontractor
1 Exporter, 1 manufacturer and 2 subcontractors
Either the exporter or the manufacturer can initiate the CO application.
Introduction
3
Chapter 2 : Overview Of Electronic Certificate Of Origin
CHAPTER 2 : OVERVIEW OF ELECTRONIC
CERTIFICATE OF ORIGIN
2.1 DIFFERENT TYPES OF ELECTRONIC CO
SCENARIOS
Exporter-cum-Manufacturer and Subcontractor
3 Types of
Separate Exporter and Manufacturer
Electronic
CO scenario Separate Exporter, Manufacturer and Subcontractor
2.1.1
EXPORTER-CUM-MANUFACTURER AND
SUBCONTRACTOR
In the case that the exporter is also the manufacturer for the CO application, he needs
to prepare the CO Application (CO AP). He can load the CO AP information to
complete his Manufacturer Declaration (CO MD). Also, the manufacturer would
prepare another MD with manufacturer’s and subcontractor’s information and
forwarded this completed MD to his subcontractor for review and endorsement via
Tradelink.
Upon receipt of the CO MD from his manufacturer via Tradelink, the subcontractor
will endorse this message and submit the CO MD to Tradelink.
An
acknowledgement (ACK) message will be sent to the manufacturer to notify that the
subcontractor has endorsed and sent the CO MD to Tradelink.
Tradelink will perform data validation and matching if both the CO AP and CO MD
are received. If the validation is successful, Tradelink will pass the electronic
messages to Trade And Industry Department and send an ACK message to the
exporter, manufacturer and subcontractor. If the validation is not successful,
Tradelink will send an error message/outstanding advice message to the exporter.
Govt/GACOs need 1 clearing working day to process the CO.
An
approval/deferment message will be sent to exporter and manufacturer. Upon
receipt of the Approval message, the exporter has to print the collection slip and
bring it to Trade And Industry Department/GACOs to collect the Certificate.
Overview Of Electronic CO
4
Chapter 2 : Overview Of Electronic Certificate Of Origin
Figure 1
2.1.2
Exporter-cum-Manufacturer and subcontractor
SEPARATE EXPORTER AND MANUFACTURER
I Exporter initiates the process
In this case, if the exporter initiates the CO application, he needs to prepare and
submit a CO AP to Tradelink and at the same time, generate a “Request for
Manufacturer’s Declaration” (RMD) to the manufacturer via Tradelink.
Upon receipt of the RMD from the exporter via Tradelink, the manufacturer will use
this information to prepare and submit the Manufacturer’s Declaration (CO MD) to
Tradelink.
Tradelink will perform data validation and matching once all the messages ie CO AP
and CO MD are received. If the validation is successful, Tradelink will forward the
electronic messages to the Trade And Industry Department/GACOs and send an
Acknowledgement message to the exporter and manufacturer. Otherwise, Tradelink
will send an error message to the exporter.
TID/GACOs take 1 clear working day to process the messages. On the following
day, an “Approval/Deferment” message will be sent to the exporter and manufacturer.
The exporter will then print the “Collection Slip” and bring it to TID/GACOs to
collect the Certificate.
Overview Of Electronic CO
5
Chapter 2 : Overview Of Electronic Certificate Of Origin
Figure 2
Separate Exporter and Manufacturer (exporter initiates the process)
II Manufacturer initiates the process
In this case, if the manufacturer initiates the CO application, he needs to prepare and
submit a CO MD to Tradelink and at the same time, generate a “Manufacturer’s
Information” (MI) to the Exporter via Tradelink.
Upon receipt of the MI from the manufacturer via Tradelink, the exporter will use
this information to prepare and submit the CO AP to Tradelink.
Tradelink will perform data validation and matching once all the messages ie CO AP
and CO MD are received. If the validation is successful, Tradelink will forward the
electronic messages to the Trade And Industry Department/GACOs and send an
Acknowledgement message to the exporter and manufacturer. Otherwise, Tradelink
will send an error message to the exporter.
TID/GACOs take 1 clear working day to process the messages. On the following
day, an “Approval/Deferment” message will send to the exporter and manufacturer.
The exporter will then print the “Collection Slip” and bring it to TID/GACOs to
collect the Certificate.
Overview Of Electronic CO
6
Chapter 2 : Overview Of Electronic Certificate Of Origin
Figure 3
2.1.3
Separate Exporter and Manufacturer (manufacturer initiates the
process)
SEPARATE EXPORTER, MANUFACTURER AND
SUBCONTRACTOR (EXPORTER INITIATES THE PROCESS)
In this case, if the exporter initiates the CO application, he needs to prepare and
submit a CO AP to Tradelink and at the same time, generate a “Request for
Manufacturer’s Declaration” (RMD) to the manufacturer via Tradelink.
Upon receipt of the RMD from the exporter via Tradelink, the manufacturer will use
this information to prepare and submit the Manufacturer’s Declaration (CO MD) to
Tradelink. At the same time, upon preparing the CO MD by manufacturer, he will
send a Manufacturer Declaration to his subcontractor. The subcontractor will
preview and endorse the message and send to Tradelink. Upon receipt of the
endorsement message from subcontractor,
Tradelink will forward an
Acknowledgement message to notify the manufacturer. Then, Tradelink will perform
data validation and matching once all the messages ie CO AP and CO MD are
received.
If the validation is successful, Tradelink will forward the electronic messages to the
Trade And Industry Department/GACOs and send an Acknowledgement message to
the exporter, manufacturer and subcontractor. Otherwise, Tradelink will send an
error message to the exporter.
TID/GACOs take 1 clear working day to process the
messages.
“Approval/Deferment ” message will be sent to the exporter and manufacturer.
An
The exporter will then print the “Collection Slip” and bring it to TID/GACOs to
collect the Certificate.
Overview Of Electronic CO
7
Chapter 2 : Overview Of Electronic Certificate Of Origin
Figure 4
Overview Of Electronic CO
Separate Exporter, Manufacturer and subcontractor (exporter initiates
the process)
8
Chapter 3 : Company Set Up
CHAPTER 3: COMPANY SETUP
3.1 INSTALL CONFIDENTIALITY KEY
In order to facilitate first time set up, Tradelink combines the useful information
(Confidentiality Key diskette, Company Profile and Tradelink Backend System
Information Sheet for each company) into a single diskette called the Confidentiality
Key Diskette. You can simply run Auto Setup in a quick and easy manner.
1 Choose Auto Confidentiality Key Setup under Admin of the menu bar.
2 Press
Company Set UP
and
to carry on
9
Chapter 3 : Company Set Up
3 You can view your company profile here. Press
4 Press
5 Press
to finish the Confidentiality key Setup
3.2 CONFIRM COMPANY PROFILE INFORMATION
After successfully install the Confidentiality Key, you have to check the company
profile information are correct.
Company Set UP
10
Chapter 3 : Company Set Up
1 Go to Setup menu and choose Company.
2 Double click to open the selected company profile.
3 After finished checking the company profile information, click CO / PN Address Code
folder to enter the factory information.
Company Set UP
11
Chapter 3 : Company Set Up
4 Click
to finished the update.
Select the nature of
that factory
Enter the Address
Code and factory
Address information.
Tips
Please contact Tradelink if you found incorrect information appears in your company
profile.
Address Code information should be the same as the one register at Trade And Industry
Department.
3.3 CREATE TRADING PARTNER PROFILE
Trading partners are those companies with business relationship of the manufacturer eg.
subcontractor or local supplier.
1 Go to Setup and select Trading Partner. Press
Company Set UP
12
Chapter 3 : Company Set Up
2 Enter the Partner Code, which is assigned by you for ease of reference.
3 Enter the Name and Address of the trading partner.
4 After finish, click the CO/PN Address Code folder to enter the factory information.
5 You can use mouse to click the nature of the trading partner.
6 Click
to finished the update.
Select the nature of
that factory
Enter the Address
Code and factory
Address information.
3.4 INSTALL ID-CERT
When your company subscribed Tradelink’s service, someone had been nominated as
the signatory officer to sign documents.
To initialize your signature key (ID-Cert), you should have the following items on
hand:
Company Set UP
13
Chapter 3 : Company Set Up
1
2
Personal ID-Cert Class 1
ID-Cert Password
1 Go to Setup menu and choose Security. Select Install Signature Keys
2 Press
to start installation.
3 Insert the ID Cert Diskette into the floppy drive or plug the ID-Cert USB token to the USB
Hug. Enter the Serial No. and Signature Key Password according to the PIN Mailer that
Tradelink provided. Press
Company Set UP
to continuos.
14
Chapter 3 : Company Set Up
4 Input the fields of HKID Card Number. Press
to carry on.
5 After initializing the signatory officer’s Signature Key successfully, the system will prompt
you to change the new Password. Press
6 Press
to continuos.
to set your Signature key as a default key. Press
to abort
this function.
7 Signature key has been installed successfully. You can press
Company Set UP
to exit.
15
Chapter 4 : How to Complete An CO AP
CHAPTER 4 : HOW TO COMPLETE AN CO AP
4.1
DIFFERENT PARTS OF AN CO
APPLICATION
Click the New button on the toolbar and then select CO and CO Application.
The CO form is divided into four parts. You can click on the screen to move to next
sections of the CO form.
A
B
C
D
How to Complete An CO AP
16
Chapter 4 : How to Complete An CO AP
Part A It includes: Type of certificate, Exporter’s information, Certificate Issuing Organization,
Consignee’s Information, Other Information, Notify Party’s Information, Manufacturer’s
Information, Shipment Information and Party to Bill.
Scroll
Down
How to Complete An CO AP
17
Chapter 4 : How to Complete An CO AP
Part - B
It includes: Goods Description, Manufacturer information, Responsible Quantity, Quantity
Indicator, and Unit and FOB Value.
Part C It includes: Shipping Marks & Container No., Product Description, HS code, Category No.,
Quantity and Unit, Brand Names and Labels and Total No & Kind of Package.
How to Complete An CO AP
18
Chapter 4 : How to Complete An CO AP
Part D It includes: Supporting Documents, Special Request Code, Declaration and Special
Declaration/Statement.
4.2
HOW TO COMPLETE PART I - A PPLICATION
4.2.1
4.2.5
4.2.2
4.2.6
4.2.3
4.2.7
4.2.4
Scroll
Down
How to Complete An CO AP
19
Chapter 4 : How to Complete An CO AP
4.2.8
4.2.9
4.2.14
4.2.10
4.2.15
4.2.11
4.2.12
4.2.1
4.2.13
CERTIFICATE OF HONG KONG ORIGIN
1 Use mouse to click this field to select the appropriate certificate type. Totally 3 types
Tips :
CO
COP
is used to certify that the goods concerned are of Hong Kong origin
is used to certify that the goods concerned have go through certain
manufacturing processes in Hong Kong but not yet fulfill Hong Kong
Origin Status.
CEPA CO is used to apply zero tariff for trade in goods between Mainland
China and Hong Kong
4.2.2
EXPORTER’S INFORMATION
Exporter should have been preset in the “Company table” and must register with
Tradelink as customer.
How to Complete An CO AP
20
Chapter 4 : How to Complete An CO AP
1 Click
4.2.3
and the preset data in Company Table will be showed for your selection.
APPLICATION TO BE SUBMITTED TO
You can choose where to collect the certificate.
1 Use mouse to click the
to show the list for selection.
2 For some issuing organizations, if you click the
button and choose the location to
take the certificate.
4.2.4
CONSIGNEE'S INFORMATION
It is an optional field and you can preset in the trading partner table.
1 Click the
How to Complete An CO AP
to select and click OK to exit.
21
Chapter 4 : How to Complete An CO AP
2 Upon finished, enter the country code of the consignee. You can direct input the country
code or click the
button and the code table will be prompted out.
3 Enter the country name in the field of Name. Select the appropriate country code and click
OK to exit.
4 If the goods are to be shipped to the Country of final Destination on behalf of a third party
instead of the consignee, indicate it by clicking the Consigned to the order of check box.
4.2.5
OTHER INFORMATION
It is a user defined field and is optional to user.
1 Click
icon and you can open the table for entering internal department ’s reference
code/number of your company.
2 Click OK to exit.
How to Complete An CO AP
22
Chapter 4 : How to Complete An CO AP
4.2.6
EXPEDITIOUS ISSUE
If it is an expeditious issue, click the
Tips
button and select the reason for such application.
Supporting document has to be submitted when Expeditious Issue is
selected (you can refer to Part 4.5.1 for details).
It takes 1 clearing working day to process an electronic CO. If
Expeditious Issue is selected, the CO will be handled as fast as possible.
4.2.7
NOTIFY PARTY 'S INFORMATION
It is an optional field and enters if necessary.
1 Click
button and the Trading Partner Table will be shown for selection.
2 Click OK to exit.
How to Complete An CO AP
23
Chapter 4 : How to Complete An CO AP
3 If you need to notify another third party eg. bank regarding this CO, you can enter its or
select under the trading partner table
4.2.8
MANUFACTURERS' INFORMATION
1 Enter the manufacturer information. Use mouse to click the
button. A table will be
shown for your selection.
2 Input Factory Registration No (FR#). Click RMD boxed if necessary
Tips
FR No: Input the FR no of the manufacturer
Generate RMD: Ensure the RMD checkbox being ticked. Otherwise, the
manufacturers will not received the RMD message
Manufacturer: Select up to 3 manufacturers in a CO form
How to Complete An CO AP
24
Chapter 4 : How to Complete An CO AP
4.2.9
DEPARTURE DATE
Click the
Tips
button to select the date.
The submission of the CO should be made at least two clear working days
before the departure date of the carrying vessel (this does not include the day
of submission, the departure day and intervening public holidays and
Sundays)
4.2.10 DESTINATION COUNTRY
Enter the code for the destination country. Or you can search from the country code table
How to Complete An CO AP
25
Chapter 4 : How to Complete An CO AP
4.2.11 MODE OF TRANSPORT
Click this field and you will find the options listed out for your selection.
If you select by sea, the corresponding field vessel no. will appear. Upon finished, enter the
port of loading field.
4.2.12 PORT OF DISCHARGE
Enter the port of discharge in this field. Click the
button, the table will prompt up for your
selection
4.2.13 FINAL DESTINATION IF ON CARRIAGE
Enter this field only if the Port of Discharge is different from the Final Destination.
4.2.14 PARTY TO BILL
Enter the Party ID of the party who is responsible to pay for the CO application.
How to Complete An CO AP
26
Chapter 4 : How to Complete An CO AP
Tips
Party ID must be the same in CO AP and CO MD. Failure to match this
information would result in rejection by Tradelink due to party to bill does
not match.
4.2.15 GACO' S MEMBERSHIP NO
If you are a member of a GACO and choose to apply the CO application at the GACO, you
can enjoy a discounted CO application fee by providing the GACO’s membership number in
the following field.
4.3
HOW TO COMPLETE PART B
4.3.2
4.3.1
4.3.3
4.3.4
4.3.5
4.3.1
GOODS DESCRIPTION
Enter the goods description details in this field. You can use the
button to open the
product table for selection. Or you can enter directly.
How to Complete An CO AP
27
Chapter 4 : How to Complete An CO AP
4.3.2
MANUFACTURER
You do not have to enter this field as this information has been copied from point 4.2.8
4.3.3
RESPONSIBLE QUALITY AND UNIT
Enter the quantity responsible by each manufacturer. Enter the unit code as appropriate. You
can use mouse to activate the code table as follows:
4.3.4
FOB VALUE
Enter the FOB value of the goods
How to Complete An CO AP
28
Chapter 4 : How to Complete An CO AP
4.3.5
QUANTITY INDICATOR
Indicate if the quantity is part process, part quantity or part process and part quantity.
Tips
HQ1 Part quality means the pieces of manufacturers are equal
HQ2 Part process means each manufacturers response for part of the product
HQ3 Part process and part quality mean include both HQ1and HQ2
4.4
HOW TO COMPLETE PART C
4.4.1
4.4.2
4.4.4
4.4.5
4.4.3
4.4.6
4.4.7
4.4.1
PRODUCT DESCRIPTION
You can enter directly or search from the product table.
1 Click the
2 Or press
How to Complete An CO AP
button and the product table will be opened for selection.
can copy the product description from line item part
29
Chapter 4 : How to Complete An CO AP
4.4.2
SHIPPING MARKS & CONTAINER NO
Indicate the shipping marks and labels of the goods.
4.4.3
NO & KIND OF PACKAGES
Input the number and kind of packages in the field. Or Click the
How to Complete An CO AP
button for selection
30
Chapter 4 : How to Complete An CO AP
4.4.4
HS CODE & CATEGORY NO.
Input the product HS Code and Category No. into these fields.
Tips
4.4.5
You have to enter the Category No. only if it is an export of textile
goods to sensitive market.
You have to enter the Mainland HS Code if you apply a CEPA CO
QUANTITY & UNIT
Input the product quantity and unit into these fields.
4.4.6
BRAND NAMES AND LABELS
Input the brand names and labels of the product into this field if necessary.
4.4.7
TOTAL NO & KIND OF PACKAGE
Input the total sum of package and its kind of package
Tips
You can leave the field total kind of package blank if two line items are
with different package types.
The software will automatically sum up the Total No. and Kind of Package
of all line items if they are with the same package types.
How to Complete An CO AP
31
Chapter 4 : How to Complete An CO AP
4.5
HOW TO COMPLETE PART D
4.5.2
4.5.1
4.5.4
4.5.3
4.5.1
SUPPORTING DOCUMENTS
You have to submit supporting document if you are applying Expeditious or Retrospective
applications.
Use mouse to choose the type of document to be submitted.
4.5.2
DECLARATION
Applicant has to declare his declaration by clicking this checkbox.
How to Complete An CO AP
32
Chapter 4 : How to Complete An CO AP
4.5.3
SPECIAL REQUEST CODE
Please fill in when necessary.
4.5.4
SPECIAL DECLARATION / STATEMENT
Please fill in when necessary.
4.6
SAVE AND ERROR MESSAGES
1 Click
to save the document. The Unique Certificate Reference (UCR) number will
appear at the top right hand corner
2 If the CO application contains any errors, you will find an
section has
been added as follows:
How to Complete An CO AP
33
Chapter 4 : How to Complete An CO AP
Error
Description
3 The error messages will be listed on the screen for your reference. You can double click
each error line item to correct the mistakes.
4 Upon finished, the Error Messages section will disappear. Click Save and update such
changes.
How to Complete An CO AP
34
Chapter 5 : How to Complete An CO MD
CHAPTER 5 : HOW TO COMPLETE AN CO MD
5.1 DIFFERENT PARTS OF CO MD APPLICATION
Click the New button on the toolbar and then select CO Manufacturer Declaration
(CO MD).
The CO MD form is divided into four parts. You can click on the screen to move to
next sections of the CO form.
Scroll
Down
How to Complete An CO MD
35
Chapter 5 : How to Complete An CO MD
A
B
C
D
Part A It includes: Type of Certificate, Manufacturer’s Information, Principal Process(es) Done by
Manufacturer and Outworker in HK, Address of Goods Available for Inspection, Manufacturer
Declaration, Other Information, Exporter’s Information, Party to Bill, Manufacturer’s Special
Declaration/Statement.
Scroll
Down
Part B It includes: Item Description, Materials and Components of Hong Kong Origin, Materials and
Components of Other Origin, Item Quantity, Item Unit, Item Quantity Details and HS Code.
How to Complete An CO MD
36
Chapter 5 : How to Complete An CO MD
Part C It includes: PN information of each line item.
Part D It includes: Subcontractor’s Information eg Name, BR No., FR No., EDI Address, LSA No.,
Address Code, Principal Process(es) Undertaken by Subcontractor and Subcontractor
Declaration.
5.2 HOW TO COMPLETE PART A
5.2.5
5.2.1
5.2.2
5.2.6
5.2.3
5.2.7
5.2.4
5.2.9
5.2.8
How to Complete An CO MD
37
Chapter 5 : How to Complete An CO MD
5.2.1
CERTIFICATE OF HONG KONG ORIGIN
Use mouse to click this field to select the appropriate application type.
Tips :
CO
COP
is used to certify that the goods concerned are of Hong Kong origin
is used to certify that the goods concerned have go through certain
manufacturing processes in Hong Kong but not yet fulfill Hong Kong
Origin Status.
CEPA CO is used to apply zero tariff for trade in goods between Mainland
China and Hong Kong
5.2.2
MANUFACTURE’S INFORMATION
Manufacturer should have been preset in the “Company table” and must register with
Tradelink as customer.
Click
and the preset data in Company Table will be shown for your selection.
Press OK to exit.
Select the Address Code of the manufacturer. Click the icon to choose.
Indicate the nature of the manufacturer by clicking this field.
How to Complete An CO MD
38
Chapter 5 : How to Complete An CO MD
5.2.3
PRINCIPAL PROCESS(ES) DONE BY MANUFACTURER AND
OUTWORKER IN HK
Enter the principal process(es) done by manufacturer and outworker in HK.
5.2.4
ADDRESS OF GOODS AVAILABLE FOR INSPECTION
Enter the address where the goods are available for inspection.
5.2.5
OTHER INFORMATION
It is a user defined field and is optional to user.
Click
icon and you can open the table for entering internal department ’s reference
code/number of your company.
Click OK to exit.
How to Complete An CO MD
39
Chapter 5 : How to Complete An CO MD
5.2.6
EXPORTER’S INFORMATION
Click the
5.2.7
icon to open the code table for selection.
PARTY TO BILL
Select which party to pay for the CO.
Enter the EDI address of the party who is responsible to pay for the CO application.
5.2.8
MANUFACTURER’S DECLARATION
Manufacturer has to click this checkbox when preparing the CO MD.
5.2.9
MANUFACTURER’S SPECIAL DECLARATION/STATEMENT
Enter the special declaration/statement when necessary.
How to Complete An CO MD
40
Chapter 5 : How to Complete An CO MD
5.3 HOW TO COMPLETE PART B
5.3.4
5.3.1
5.3.5
5.3.2
5.3.3
5.3.1
ITEM DESCRIPTION
Enter the goods item description details in this field. You can use the
button to open the
product table for selection.
How to Complete An CO MD
41
Chapter 5 : How to Complete An CO MD
5.3.2
MATERIALS AND COMPONENTS OF HONG KONG ORIGIN
Enter the materials and components parts used in manufacture/production of the goods
above.
5.3.3
MATERIALS AND COMPONENTS OF OTHER ORIGIN
Enter the materials and components of other origin country.
5.3.4
ITEM QUANTITY AND UNIT
Enter the Item Quantity and Unit in this field.
Enter the Item Unit in the field. You can click the
5.3.5
for selection.
ITEM QUANTITY DETAILS
Fill in the item quantity details of each party in this field.
Select if the quantity is part quantity, part process and part process and part quantity.
How to Complete An CO MD
42
Chapter 5 : How to Complete An CO MD
5.4 HOW TO COMPLETE PART C
5.4.2
5.4.1
5.4.1
ITEM DESCRIPTION AND QUALITY
Enter item description and quantity of each line item.
5.4.2
PN NO.
Enter PN number if applicable. You can click the
button to search the appropriate
approved PN number.
5.5 HOW TO COMPLETE PART IV
5.5.1
5.5.3
5.5.2
How to Complete An CO MD
43
Chapter 5 : How to Complete An CO MD
5.5.1
SUBCONTRACTOR'S INFORMATION
1 Click the
button and the table will pop up for your selection.
2 Enter the LSA no. into this field.
3 Select the appropriate Address Code.
Tips
If no subcontractor is involved, you can ignore section 5.5
The format of LSA no. is P/99999/99
5.5.2
PRINCIPAL PROCESS(ES) UNDERTAKEN BY
SUBCONTRACTOR
Enter the principal process undertaken by subcontractor.
How to Complete An CO MD
44
Chapter 5 : How to Complete An CO MD
5.5.3
SUBCONTRACTOR DECLARATION
Ensure Declaration Code "S01" is clicked if subcontractor is involved in the production
process.
5.6 SAVE AND ERROR MESSAGES
1 Click Save to save the document. The Unique Certificate Reference (UCR) number will
appear at the top right hand corner.
2 If the CO MD contains any errors, an Error Message section has been added on as follows:
3 Error messages will be listed on the screen for your reference. You can double click each
error line item to correct the mistakes.
4 Upon finished, the Error Messages section will disappear. Click Save and update such
changes.
How to Complete An CO MD
45
Chapter 6 : How To Complete An CEPA CO
CHAPTER 6: HOW TO COMPLETE AN CEPA
CO
6.1 APPLY CEPA CO
The application of CEPA CO is 95% similar with CO and COP application. For data input detail, please
refer to Chapter 4.
After 01 July 2006, some specific field must be input Chinese characters in the application form if
trader apply for CEPA CO. Heading are showing in Chinese characters at the same time
Tips
Everything remain unchanged before 01 July 2006
Traders should submit Chinese Supplementary Information to
TID by access the TID web site
1 Manufacture and Exporter must select "CEPA CO" for CO type in the application form
6.2 COAP APPLICATION
6.2.1
6.2.2
How To Complete An CEPA CO
6.2.3
46
Chapter 6 : How To Complete An CEPA CO
6.2.1 EXPORTER'S INFORMATION
Exporter should have been preset in the "Company table" and must register with
Tradelink as customer:
Click
and the preset data in Company Table will be showed for your selection.
6.2.2 CONSIGNEE
1 Click the
to select and click OK to exit.
(*For CEPA CO, consignee must be provided and could not be blank.*)
6.2.3NOTIFY PARTY
It is an optional field and enters if necessary.
1 Click
button and the Trading Partner Table will be shown for selection.
2 Click OK to exit.
How To Complete An CEPA CO
47
Chapter 6 : How To Complete An CEPA CO
3 If you need to notify another third party eg bank regarding this CO, you can enter its of
select under the tradking partner table
6.3 COAP GOODS DESCRIPTION
Enter the goods description details in this field. You can use the
button to open the
product table for selection. Or you can enter directly.
How To Complete An CEPA CO
48
Chapter 6 : How To Complete An CEPA CO
6.4 COAP PRODUCT DESCRIPTION FOR CO
6.4.1
6.4.2
6.4.3
6.4.4
6.4.1 PRODUCT DESCRIPTION
You can enter directly or search from the product table.
1 Click the
Or press
button and the product table will be opened for selection.
can copy the product description from line item part
6.4.2 SHIPPING MARKS & CONTAINER NO
Indicate the shipping marks and labels of the goods.
6.4.3 MAINLAND HS CODE
Input Mainland HS Code if it is difference with Hong Kong HS Code.
6.4.4 BRAND NAMES AND LABELS
Input the brand names and labels of the product into this field if necessary.
How To Complete An CEPA CO
49
Chapter 6 : How To Complete An CEPA CO
6.5 COMD A PPLICATION
The application of CEPA COMD is 95% similar with COMD application. For data input detail, please
refer to Chapter 5.
Click the New button on the toolbar and then select CO Manufacturer Declaration (CO MD)
6.5.1 EXPORTER'S INFORMATION
Click the
icon to open the code table for selection.
6.6 LINE ITEMS
Enter the goods item description details in this field. You can use the
button to open the
product table for selection.
How To Complete An CEPA CO
50
Chapter 6 : How To Complete An CEPA CO
CHAPTER 7: HOW TO LOAD DATA
7.1 LOAD RMD DATA TO FORM AN CO MD
If you are a manufacturer and your exporter initiates the process, you will receive an RMD message in
your inbox. If you double click the message, the following message summary screen will show the
details of the sender, the RMD number, date and UCR of the CO. To reduce inputting effort, you can
simply load the RMD to make your corresponding MD.
1 To open the message, double click the message in the Inbox.
2 You can find the information when you open the screen.
3 To copy data, click Open at the Tool Bar, then choose CO Manufacturer Declaration.
How To Complete An CEPA CO
51
Chapter 6 : How To Complete An CEPA CO
4 Click RMD type document at the bottom.
5 Double click the corresponding RMD. The following message will prompt up for your
confirmation. Click Yes, then the Manufacturer’s Declaration (CO MD) screen appears.
6 The impored UCR number appears on top right hand corner. Manufacturer has to fill up the
missing information as majority of the information has been brought forward from the RMD.
How To Complete An CEPA CO
52
Chapter 6 : How To Complete An CEPA CO
7.2 AP DATA TO FORM AN CO MD
If you belong to the exporter-cum-manufacturer scenario, you can simply load the data in the CO AP so
as to form your CO MD. This can save your job of re-inputting data.
1 To copy data, click Open on the Tool Bar, CO and select CO Application.
2 Highlight the UCR record which you want to load, then click New MD From button. The
corresponding CO MD will be opened.
3 You have to input the missing information.
How To Complete An CEPA CO
53
Chapter 6 : How To Complete An CEPA CO
Tips
The UCR number on the right hand side of COMD is same
with the original COAP that user selected
You can refer to Chapter 5 for detail filling an COMD
7.3 LOAD MI DATA TO FORM AN AP
If you are an exporter and your manufacturer initiates the process, you should receive an
MI message in the inbox. If you double click the message, the following message
summary screen will show the details of the sender, date and UCR of the CO. To reduce
inputting effort, you can simply load the MI so as to form the corresponding AP.
1 To open the message, double click the message in the Inbox.
2 Double click MI message at inbox to view the detail
3 To copy data, click Open at the Tool Bar, CO choose CO Application.
How To Complete An CEPA CO
54
Chapter 6 : How To Complete An CEPA CO
3 Click MI page on the bottom. Select the corresponding MI.
4 Double click to start copying. The following message will prompt up for your confirmation.
Click Yes, then the Manufacturer’s Declaration (MD) screen appears.
5 The imported UCR number appears on top right hand corner. Exporter has to fill up the
missing information as some of the information has been brought forward from the AP.
Tips
The UCR number on the right hand side of COAP is same
with the original MI message at inbox
You can refer to Chapter 4 for detail filling an COAP
How To Complete An CEPA CO
55
Chapter 8 : How To Perform CO Endorsement
CHAPTER 8: HOW TO PERFORM CO
ENDORSEMENT
8.1 ENDORSEMENT BY SUBCONTRACTOR
If subcontractor is involved in the CO, then, the manufacturer will prepare an
Manufacturer Declaration and forward this message for the subcontractor’s endorsement.
Subcontractor has to open the message for preview and sign, then forward to Tradelink
for validation.
1 You will find an Endorsement message in the Inbox.
2 Double click inbox message. You can view the detail
3 To add an electronic signature, you can click Endorse on the right hand side.
Tips
Manufacturer will receive an Acknowledgement via Tradelink
to notify that the endorsement messages has been signed by
his subcontractor(s)
How To Perform CO Endorsement
56
Chapter 9 : Sign, Send And Receive Message
CHAPTER 9: SIGN, SEND AND RECEIVE
MESSAGE
You are now ready to sign the completed CO messages by putting an electronic signature on it and then
sending it to Government via Tradelink. Valunet Deluxe gives you the choice of signing a single CO
application or a group of applications.
9.1 SIGN CO
1 Click Sign. Select CO Application/CO Manufacturer Declaration.
2 You can use the function key on the right hand side to choose the appropriate application
type
3 To select a group of forms for signature, you use the Space Bar to select the required
document. The
Sign, Send And Receive Message
icons will appear upon selected for signature.
57
Chapter 9 : Sign, Send And Receive Message
4 Click
on the top of right hand side, you will see the following screen:
5 Enter the Serial No., you can find it on the disk. Press Tab to enter to the field Private Key
Password.
6 Click
button and choose other drive eg. USB
7 Click Next to start signing the document.
8 You can view the signing process and finished status
Sign, Send And Receive Message
58
Chapter 9 : Sign, Send And Receive Message
9 Click Close and you will see the COAP / COMD message at outbox
9.1.1 SIGN ONE MESSAGE
User can sign an opened COAP / COMD form. Upon opening the form, you will find a
at the top. Click sign and you will see the signing screen appears.
button
9.2 SEND MESSAGES
“Send” means you are transmitting the documents to Tradelink.
1 Click Tools on menu bar, and select Connect and then Send Only.
Sign, Send And Receive Message
59
Chapter 9 : Sign, Send And Receive Message
2 ITVS Message Handler will pop up to process your request
3 No record at Outbox after send out messages successfully
4 Sendbox will save all sending out messages record
9.3 RECEIVE MESSAGE
“Receive” means you are receiving documents from Tradelink.
1 Click Tools on the menu bar, select Connect and then Receive Only.
Sign, Send And Receive Message
60
Chapter 9 : Sign, Send And Receive Message
2 When the receiving process is completed, the incoming message will appear in the Inbox
Sign, Send And Receive Message
61
Chapter 10 : How To Handle Incoming Messages
CHAPTER 10: HOW TO HANDLE INCOMING
MESSAGES
Some messages which you may receive when you connect to Tradelink:
l
l
l
l
l
l
l
Possible messages from Tradelink:
Application Error
Outstanding Advice
Acknowledgement
Subscriber Statement
Request for Manufacturer Declaration (RMD)
Request for Manufacturer Information (MI)
CO MD Endorsement
Possible messages from Government:
l
l
Deferment
Approval Message
10.1 APPLICATION ERROR
Tradelink Backend System would perform validation on the message and security
checking upon receiving the CO AP, CO MD and Endorsement by Subcontractor (if
applicable). An Application Error message will be sent to exporter only within 30 mins
if the validation is not satisfactorily. Exporter has to follow up with the error message
and re-send it to Tradelink for further validation.
You may receive the Application Error Message in the Inbox when you connect to
Tradelink.
1 To open the message, double click the message in the Inbox as follows:
2 The error code and error description will be shown on the screen.
How To Handle Incoming Messages
62
Chapter 10 : How To Handle Incoming Messages
3 To amend the document, click the Open button on right hand corner.
4 The corresponding CO AP will be opened for amendment.
5 Amend the data field as necessary.
6 Click
upon amendment. Click
to add the electronic signature, then
connect to Tradelink for validation.
Tips
Exporter will receive the Application Error (AE) Message if the CO AP and CO
MD does not match.
Manufacturer may also receive AE Messages if problems are found in the CO
MD
10.2 OUTSTANDING ADVICE
Outstanding Advice is a message sent by Tradelink to the exporter. Tradelink will
perform data validation upon receiving both the CO AP, CO MD and endorsement
message from Subcontractor (if applicable). Should the AP being sent to Tradelink for
7 days, and no CO MD has been made by the manufacturer, an Outstanding Advice
message will be sent to Exporter.
You can serve the Outstanding Advice as a follow up message to the Exporter and
remind him no CO MD being made by the manufacturer.
How To Handle Incoming Messages
63
Chapter 10 : How To Handle Incoming Messages
1 You will receive the Outstanding Advice message in the Inbox when you make connection
to Tradelink.
2 To open the message, double click the message in the Inbox as follows:
3 You will find the outstanding manufacturer’s information is being listed in this screen.
4 Exporter has to follow up with the manufacturer (eg by phone to ensure the CO MD
reaches Tradelink within the next 7 days).
Tips
Should there is no CO MD to Tradelink after 7 days of the received CO AP.
Tradelink will then issue an Outstanding Advice message to the Exporter
If the required CO MD still not reached Tradelink after 14 days of the CO AP,
Tradelink will disregard this CO application and a termination notice will be
sent to the exporter.
On the other hand, if the CO MD and Endorsement from Subcontractor's (if
applicable) have been sent to Tradelink after 7 days and no CO AP being
received, Tradelink will disregard this CO application and a termination notice
will be send to the manufacturer
Exporter has to prepare another new CO AP and send it to Tradelink if the
former CO AP is being disregarded
How To Handle Incoming Messages
64
Chapter 10 : How To Handle Incoming Messages
10.3 ACKNOWLEDGEMENT
An acknowledgement message will be sent to manufacturer if all the subcontractor(s)
has/have endorsed the CO MD message.
Tradelink Backend System would perform validation on the message and security
checking upon receiving the CO AP, CO MD and Endorsement from subcontractor (if
applicable). Upon successfully validation, another acknowledgement message will send
to all parties within 30 mins and the message would be forwarded to Govt/GACOs for
further processing.
1 You may receive the Acknowledgement Message in the Inbox when you connect to
Tradelink.
2 To open the message, double click the message in the Inbox and you will see the following
screen
Tips
You should receive Government message eg Approval / Deferred message on the
third day upon receiving the ACK message
10.4 SUBSCRIBER'S STATEMENT
Subscriber’s statement is an electronic message sent by Tradelink to its customers
regularly (bi-weekly or monthly). Upon receipt of the statement, the customer needs to
ensure the dedicated bank account has sufficient fund to cover the billed amount.
Normally, Tradelink will debit customer’s bank account 2 days after the statement date.
How To Handle Incoming Messages
65
Chapter 10 : How To Handle Incoming Messages
1 Click View on the tool bar then select Statement of Account.
2 Double click the bill and the following message will be opened.
3 You can view the statement detail by double click each statement
10.5 REQUEST FOR RMD
Request for MD is a message from the exporter to the manufacturer(s) and notify the
manufacturer to submit his Manufacturer Declaration to Tradelink.
How To Handle Incoming Messages
66
Chapter 10 : How To Handle Incoming Messages
1 You may receive Request for MD Message in the Inbox when you connect to Tradelink.
2 To view the message, double click the message in the Inbox as follows:
Tips
You can refer to Chapter 7.1 for loading the RMD information to form a CO MD
10.6 REQUEST FOR MI
Request for MI is a message from the manufacturer to the exporter and notify the
exporter to submit his CO AP to Tradelink.
You may receive Request for MI Message in the Inbox when you connect to Tradelink.
1 To open the message, double click the message in the Inbox.
How To Handle Incoming Messages
67
Chapter 10 : How To Handle Incoming Messages
2 Double click MI message at inbox to view the detail
Tips
You can refer to Chapter 7.3 for loading the MI information to form a CO AP
10.7 CO MD ENDORSEMENT
MD Endorsement is a message sent from manufacturer to his subcontractor and request
the subcontractor to review and add an electronic signature on the CO form.
You may receive CO MD Endorsement message in the Inbox when you connect to
Tradelink.
1 You will find an Endorsement message in the Inbox.
Tips
You can refer to Chapter 8 for details of handling an endorsement message
10.8 DEFERMENT
Deferment is an inquiry message sent by Government to the exporter and manufacturer
on a particular CO application.
How To Handle Incoming Messages
68
Chapter 10 : How To Handle Incoming Messages
1 You may receive Deferment Message in the Inbox when you connect to Tradelink.
2 To open the message, double click the message in the Inbox as follows:
3 Click Open on the top left hand corner to open the related CO AP for amendment.
4 Amend the field as necessary. All parties included exporters and manufacture. Exporter
only mean amendment involve exporter only
5 Click Save upon finished. Sign document and connect to Tradelink.
How To Handle Incoming Messages
69
Chapter 10 : How To Handle Incoming Messages
10.9 APPROVAL MESSAGE
Approval Message will be sent to manufacturer and exporter by Government for the
approved certificate.
You may receive the Approval Message in the Inbox when you connect to Tradelink.
1 To open the message, click the message in the Inbox.
2 Double click and you can see the expanded message with an approval number.
Tips
You have to print the collection slip for the certificate (you can refer to chapter 11
for detail)
How To Handle Incoming Messages
70
Chapter 11 : Print Collection Slip
CHAPTER 11: PRINT COLLECTION SLIP
Upon received the approval message, you can print the collection slip to collect the
certificate of origin.
1 Click Report at the Menu Bar, then select Collection Slip. The following screen appears:
2 You can choose different UCR, Collection Office, Issue Organization, Approved No. or
period of the CO response in the screen. Select as appropriate.
3 Click Preview to view the collection slip
4 Click Print to print out the collection slip hard copy
Print Collection Slip
71
Chapter 12 : Cancellation And Amendment Request
CHAPTER 12: CANCELLATION AND
AMENDMENT REQUEST
You can only selected the Approved CO for sending Cancellation Request.
12.1 CANCELLATION REQUEST
Only Exporter can perform a Cancellation Request.
1 Select Open and click CO Application .
2 Choose Cancellation Request on the bottom. Then click Open at the left corner. The
Cancellation Request screen will open as follows:
Cancellation And Amendment Request
72
Chapter 12 : Cancellation And Amendment Request
3 All necessary information will be brought forward onto the screen. Exporter has to click the
Reason for cancellation.
4 Click the Type of Supporting Document folder and click the paper document to be submit.
5 Upon finish, click the Sign for signature or Save to record the cancellation request.
Tips
Only exporter can make cancellation. Exporter has to ensure all the data on the
cancellation request screen is correct before sending it to Gov’t/GACOs.
If the cancellation request is approved by Govt/GACOs, Approval of Cancellation
will be sent to both the exporter and manufacturer.
Exporter can click the icon
Cancellation And Amendment Request
to change the information if necessary.
73
Chapter 12 : Cancellation And Amendment Request
12.2 AMENDMENT REQUEST
You can only selected the Approved CO AP/MD for making an Amendment Request on
a particular CO AP or CO MD.
1 Select Open and click CO Application / Manufacturer Declaration .
2 Select the approved CO AP / MD. You can use the icons on the right hand side to shortlist
the approved messages. Click Open to open the document for amendment.
3 The status will be changed to Amendment on the top right hand side of the document.
4 Edit / Amend the field as necessary. Upon finish, click Save or Sign to add an electronic
signature.
Cancellation And Amendment Request
74
Chapter 12 : Cancellation And Amendment Request
Tips
If the Amendment only involves the exporter, then, the exporter needs to
amend/edit the field and forwards the message to Tradelink. The
Exporter has to click the status tag as Amendment involves exporter
only. Then only the amended CO AP will be sent to Govt/GACOs.
However, if the Amendment involves both the exporter and
manufacturer, the exporter has to change status: Amendment involves
all parties and the amendment process will be similar to preparing a
fresh CO application. Exporter/Manufacturer has to amend the CO
AP/CO MD, then forward an RMD/MI message to his trading partner.
Tradelink will perform validation upon receiving the re-submitted CO
AP and CO MD.
Cancellation And Amendment Request
75
Chapter 13 : Other Features
CHAPTER 13: OTHER FEATURES
13.1 PRINT CO FORM
1 Click Open, CO and select either CO AP / MD
2 Use mouse to click the appropriate form to be printed. Then select the Preview button at
top right hand corner.
3 Click Print to print out hard copy
Other Features
76
Chapter 13 : Other Features
13.2 BROADCAST CO PROFILE
You can send your company profile to your trading partners electronically by using this
function.
1 Click Broadcast Company Profile for CO/PN under menu bar, the following screen will
appear:
2 Input the Tradelink assigned E_mail Address and click insert to add another E_Mail
address field. Upon finish, click Sign.
Other Features
77
Chapter 13 : Other Features
electronicmessage – Profile update has been put into Outbox.
13.3 QUICK SEARCH
1 You can click Open CO, select CO Application / CO Manufacturer Declaration
2 Click Find to view the criteria that you like to search
3 Eg, select Approval No field and input approval no for searching. Then press OK
4 System will highlight the result
Other Features
78
Chapter 13 : Other Features
13.4 CUSTOMIZED LAYOUT
13.4.1 ADD / DELETE FIELD
1 User can customized the layout in searching menu
2 Simply right click the mouse. User can view the menu bar. Select Show data items
3 Show in the menu bar. Unclick mean do not show in the menu bar
Other Features
79
Chapter 13 : Other Features
13.4.2 MOVING FIELD
User can move the field to anywhere.
1 Point to the field, click and move the mouse to anywhere you like and then release the
mouse.
Other Features
80
Chapter 14 : Appendix
CHAPTER 14: APPENDIX
14.1 MESSAGE TYPES
Type Message
Details
Received by
1
Acknowledgement Tradelink Backend System would perform validation on Manufacturer,
(ACK)
the message and security checking of the manufacturer, Exporter and
exporter and subcontractor against the traders profile subcontractor
record. Upon successfully validation, the ACK message
will be issued to parties involved for CO application, resubmission and amendment.
2
Approval
Govt takes 1 working day to validate the message. Upon Manufacturer and
successfully validated the CO application, this message Exporter
will be sent out.
3
Syntax Error
When a message is sent, it undergoes syntactic checks as Sender
well as content check. If the syntax is found to be
invalid, a syntax error is generated.
4
Application Error
If the syntax error is passed, the document undergoes a Exporter
content check for validation of subscriber information,
signature authentication and other document specific
validation. If any of these fails, an application error is
sent.
5
Rejection/Approval Should the Govt rejected or approved for request for Exporter and
for
Cancellation cancellation/request, this message will be sent.
Manufacturer
Request
Deferment
It is an inquiry message from Government on specific Exporter and
PN application.
Manufacturer
6
* Other messages will be sent to both the manufacturer and exporter.
14.2 STATUS EXPLANATION
User can refer to the following table for the detail explanation of each Status
Appendix
81
Chapter 14 : Appendix
Prepared
Completed
Signed
Sending
Acknowledged
Syntax Error
Application
Error
Expeditious
Issue rejected
Withdrawn
Approved
Deferred
Rejected
Cancelled
Suspended
Revoked
Terminated
Appendix
The application is created but failed in validation check
The application is created and being validated successfully
The application has been signed and awaiting for sending
The application is being sent to its recipient
The application has reached by the issuing organization
The application has been rejected by Tradelink due to syntactical error of the
message
The application has been rejected by Tradelink due to error
The issuing organization has rejected the expeditious issue request for the
application
The issuing organization has accepted the withdrawal request from the user
The issuing organization has approved the application
The issuing organization has deferred the application
The issuing organization has rejected the application
The issuing organization has accepted the cancellation request from the user
The issuing organization has suspended the application
The issuing organization has revoked the application
The application has expired or can not be further processed
82