1
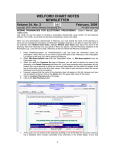
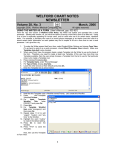
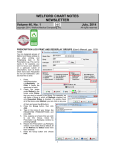
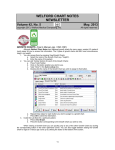
WELFORD CHART NOTES
NEWSLETTER
Volume 35, No. 2
August, 2009
copyright 2009, Welford Medical Computing, Inc.
All rights reserved
ELECTRONIC PRESCRIBING ADD PHARMACY NEW WORKFLOW (User’s Manual,
pgs. 1068-1070)
Newcrop has changed the workflow for specifying a new pharmacy for a patient. Previously, on the
Compose Rx page, the Select Pharmacy drop-down list would show all of the pharmacies for all of the
patients at your site. Newcrop has changed this so that this list only shows the pharmacies to which you
have previously sent at least one prescription electronically for this patient. In order to specify a new
pharmacy to which you want to send the prescription for this patient, follow these steps:
1.
2.
3.
4.
5.
6.
Click on the “Pt. Details” tab at the top of the screen.
Click on “Click here to add/update
patient pharmacy list”.
You will now see a list of all of the
pharmacies for all of the patients for
whom you have sent at least one
electronic prescription. If the pharmacy
you wish to add is on this list, place a
checkmark next to it; then press Save
Changes.
If the pharmacy does not appear on this
list, press the Admin tab in the upper right corner of the screen. Click on Location Pharmacy List.
Click on Add Pharmacy. Search for the pharmacy you wish to add to the list. Place a checkmark
next to the name of any pharmacies you wish to add, then press Add Checked Pharmacies. (This
is the same workflow as before and is described in the User’s Manual on pages 1069-1070). Now
follow steps #1-#3 to designate the Pharmacy you just added as being one assigned to this
particular patient.
Click on the “Compose Rx” tab at the top of the screen.
The newly added pharmacy that you have specified for this patient in steps #1-#4 now appears in
the Select Pharmacy drop-down list. Choose it now.
3
USING THE NEW HELP SYSTEM ACROSS A NETWORK (User’s Manual, pgs. 1522)
Version 5.6 introduces a more modern help system using the Microsoft Windows CHM format. The help is
stored in a file called CHART32.CHM. Unfortunately, Microsoft has made it difficult to access this file over a
network from one computer to another. It has introduced a security feature which blocks this access
because some malware has taken advantage of the CHM format to distribute a virus across a network.
Instead of seeing the help text in the right hand pane, you will see “Navigation to the webpage was
canceled”.
It
is
still
possible
to
access
the
help file from
one computer
to
another
across
a
network.
The security
patch and its
effects
are
fully described
on Microsoft's web site at http://support.microsoft.com/kb/896358
If you trust all the computers on your LAN or intranet (and the people using them), you can lower the
restrictions on the Local Intranet zone to allow CHM files to be displayed with the following steps:
1.
Click Start, click Run, type regedit, and then click OK.
2.
Locate and then click the following subkey:
3.
HKEY_LOCAL_MACHINE\SOFTWARE\Microsoft\HTMLHelp\1.x\ItssRestrictions
4.
If this registry subkey does not exist, create it.
5.
Right-click the ItssRestrictions subkey, point to New, and then click DWORD Value.
6.
Type MaxAllowedZone, and then press Enter.
7.
Right-click the MaxAllowedZone value, and then click Modify.
8.
In the Value data box, type 1, and then click OK.
9.
Quit Registry Editor.
If this solution does not work for you, please see http://support.microsoft.com/kb/896358 for alternatives.
SEND US YOUR TIPS
If you have tips, shortcuts, questions, or suggestions for future newsletter topics, please send them to us at:
Welford Medical Computing, Inc.
or
MEDCOM Information Systems
3779 Hermitage Trail
2117 Stonington Avenue
Rockford, IL 61114
Hoffman Estates, IL 60195
4