1
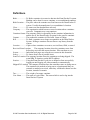
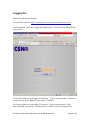
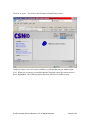
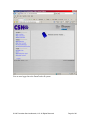
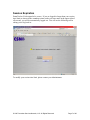
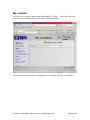
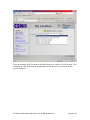
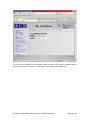
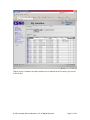
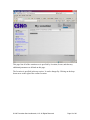
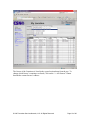
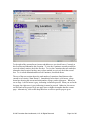
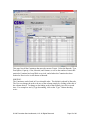
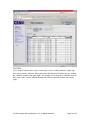
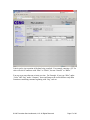
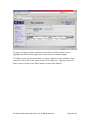
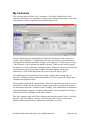
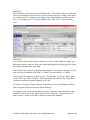
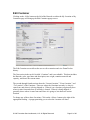
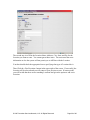
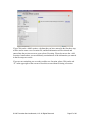
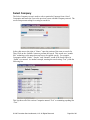
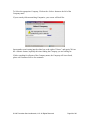
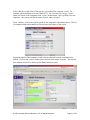
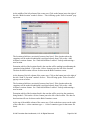
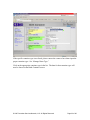
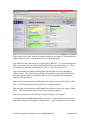
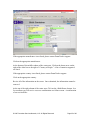
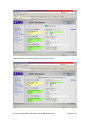
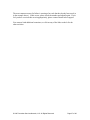
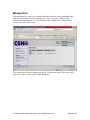
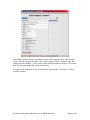
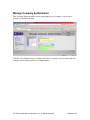
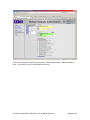
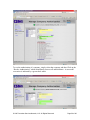
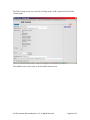
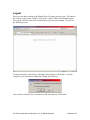
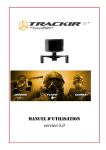
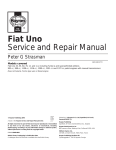
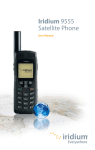
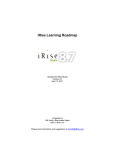
™
DrumTracker II
Web User Interface
User’s
Manual
© 2007 Container Services Network, LLC All Rights Reserved
Page 1 of 60
SYSTEM OVERVIEW
DrumTracker II has been designed to collect, compile, store, and disseminate information
about closed loop containers including all current and past ownership, type and
accessories, locations, ladings, status, reconditioning, recertifying, weight, and ultimate
recycling. The system is web based to provide immediate up-to-the-minute information
from any Internet connected device. All data is secure with fully encrypted passwords
and other security features similar to your bank.
This user manual will help you make the most of your DrumTracker II experience. You
will find it most helpful when trying to utilize some of the systems more complicated
features.
TABLE OF CONTENTS
Definitions............................................................................3
Logging On ..........................................................................4
Session Expiration ...............................................................7
My Location.........................................................................8
My Containers....................................................................19
Edit Container ....................................................................21
Find/Add Affiliate Location ..............................................25
Select Company .................................................................28
Birth Container...................................................................30
Manage User ......................................................................38
My User Account ...............................................................43
Company Manage ..............................................................44
Manage Company Authorization .......................................48
Manage Drum Type ...........................................................51
Manage Content .................................................................56
Logout ................................................................................60
© 2007 Container Services Network, LLC All Rights Reserved
Page 2 of 60
Definitions
Birth .....................To Birth a container is to enter its data into the DrumTracker II system.
Birthing can be done for a new container, or a reconditioned container.
Birth Location ......The place where the container was first known to the DrumTracker II
system. Usually the manufacturer’s or reconditioner’s location.
Clear.....................To remove an item that had been selected.
Company ..............The organization which has one or more locations where containers
can exist. Companies may own containers.
Container Owner..The company which is responsible for the container information in,
and the use of, the DrumTracker II system for the specific container.
Content.................The product the container is filled with. Same as Lading.
Kill .......................To mark a container as no longer recognizable on the DrumTracker
System. Killing a container does not remove any history from the
system.
Location ...............A place where containers are sent to, received from, filled, or stored.
Received From Location
The company location where the containers came from
before they arrived at the current location. Who sent them to you.
Screen...................Individual web pages are referred to as screens in this document.
Select....................To choose from a list of possible items.
Send To Location .The company location where the containers are being shipped. The
actual Ship To location, not the Bill To address.
Session .................Using the DrumTracker II web site as defined as from successfully
logging on until logging off, either manually or automatically.
Shipped To Location The company location where the containers came are being sent to.
The containers are marked as being sent to a location until they are
scanned or marked as received, when they will then be shown as at the
location, instead of in transit.
Tare ......................The weight of an empty container.
User Name ...........The same as Login Name. The name which is used to log into the
DrumTracker II system.
© 2007 Container Services Network, LLC All Rights Reserved
Page 3 of 60
Logging On
Open Microsoft Internet Explorer.
Go to the CSN web site: http://ContainerServicesNetwork.com/DrumTracker.htm
Click on the link “Click here to login into DrumTracker” You will see the DrumTracker
Login screen:
Click on the white box to the right of “UserName.” Type in your username. Usernames
are not case sensitive (“BSmith” is the same as “bsmith”).
Click on the white box to the right of “Password.” Type in your password. Note:
Passwords ARE case sensitive (“MyPassword” is NOT the same as “mypassword”).
© 2007 Container Services Network, LLC All Rights Reserved
Page 4 of 60
Click on <Log In>. You will see the Welcome to DrumTracker screen:
On the left, there is a list of screens available to you depending on your authorization
level. When you are on any screen other than the Welcome screen, the current screen’s
title is highlighted. The following figure shows the full list of available screens.
© 2007 Container Services Network, LLC All Rights Reserved
Page 5 of 60
You are now logged in to the DrumTracker II system.
© 2007 Container Services Network, LLC All Rights Reserved
Page 6 of 60
Session Expiration
DrumTracker II is designed to be secure. If you are logged in longer than your session
time limit (as shown in the countdown timer under your user name in the upper right of
all screens), you will be automatically logged out. You will see the following screen
asking you to log back in:
To modify your session time limit, please contact your Administrator.
© 2007 Container Services Network, LLC All Rights Reserved
Page 7 of 60
My Location
Click on <My Location> under the top left heading of “Tracker.” You will see the “My
Location” screen which prompts you to select a specific location:
Click on the Location select box’s drop down arrow to obtain a list of your locations:
© 2007 Container Services Network, LLC All Rights Reserved
Page 8 of 60
Click on the name of the Location at which the drums you want to view are located. This
will bring up a list of the Owners and quantities of the drums for each Owner at that
specific Location.
© 2007 Container Services Network, LLC All Rights Reserved
Page 9 of 60
To view a list of containers of any Owner at that Location, Click on the <Expand> button
to the left of the Owner’s name. This will give you a list of the Containers:
© 2007 Container Services Network, LLC All Rights Reserved
Page 10 of 60
If there are no Containers currently marked as at or inbound to the Location, your screen
will look like:
© 2007 Container Services Network, LLC All Rights Reserved
Page 11 of 60
This page lists all of the containers as is specified by Location, Owner, and then any
additional parameters as defined on this page.
The Location is specified in the top section. It can be changed by Clicking on the dropdown arrow to the right of the current Location:
© 2007 Container Services Network, LLC All Rights Reserved
Page 12 of 60
The Owner of the Containers is listed in the second section down from the top. To
change which Owner’s containers are listed, Click on the “<< All Owners” button
beneath the current Owner’s address:
© 2007 Container Services Network, LLC All Rights Reserved
Page 13 of 60
To the right of the current Owner’s name and address are two check boxes, Currently at
this Location and Inbound to this Location. To view the Containers currently marked as
received at that Location, check the first box. To view the Containers that are marked as
inbound to that Location, but have not yet been marked as received, check the second
box. To view both Inbound and Received Containers, check both boxes.
The top of the next section shows the total number of containers listed that meet the
current set of criteria (“Num Drums”). Immediately below that is a left arrow, a drop
down box showing the current and total number of pages, and a right arrow. When you
are on Page 1, the left arrow is grey, indicating it cannot be pressed. When you are on the
last page, the right arrow is grey indicating it cannot be pressed. Otherwise, the arrows
are blue and can be pressed to go one page lower or higher in number than the current
page. Alternatively, click on the drop-down box to select a specific page to go to:
© 2007 Container Services Network, LLC All Rights Reserved
Page 14 of 60
This page lists all the Containers that meet the current Criteria. It lists the Barcode, Type,
Description, Capacity, Color, Material, and Content, as well as the number of times that
particular Container has been filled or serviced, and whether the Container has been
marked as Received or is still shown as Inbound.
SORTING:
The Containers can be listed in User selectable order. The default is ordered by Barcode.
The User can change the order to be any of the columns simply by clicking on the title of
the column desired. To change to descending order of that column, just click a second
time. For example to sort by Type descending, click on the “Type” column heading
twice:
© 2007 Container Services Network, LLC All Rights Reserved
Page 15 of 60
CRITERIA:
If you want to limit the list to only a certain type, color, or other parameter, simply type
that criteria into the white box below the column heading and reload the page by clicking
the <Reload> button in the upper right. For example, to see only those containers that are
Blue, type “Blue” into the column heading and click the <Reload> button in the upper
right:
© 2007 Container Services Network, LLC All Rights Reserved
Page 16 of 60
Criteria can be just a portion of the data being searched. For example, entering a “B” for
color will select Containers with “Blue” or “Black”, but not “Natural” or “White.”
You may type more than one criteria at a time. For Example, if you type “Blue” under
“Color” and “Org” under “Contents,” that would narrow the search down to only Blue
Containers containing contents beginning with “Org” such as:
© 2007 Container Services Network, LLC All Rights Reserved
Page 17 of 60
To return to a listing of all the containers for that Owner at that Location, remove
(highlight and delete) all the typing in the boxes below the column headings.
To Change in any way the current Status, Location, Contents or other parameter of any
container, Click on the <Edit> button to the left of its Barcode. A pop-up screen will
then be shown. Please see the Edit Container section of this Manual.
© 2007 Container Services Network, LLC All Rights Reserved
Page 18 of 60
My Containers
This selection shows all of the User’s containers. It includes a detailed list of each
container by barcode, type, description, capacity, color, material, and content. Also listed
is the number of times a container has been filled and serviced.
The top section shows the total number of containers listed that meet the current set of
criteria (“Num Containers”). Immediately below that is a left arrow, a drop down box
showing the current and total number of pages, and a right arrow. When you are on Page
1, the left arrow is grey, indicating it cannot be pressed. When you are on the last page,
the right arrow is grey indicating it cannot be pressed. Otherwise, the arrows are blue and
can be pressed to go one page lower or higher in number than the current page.
Alternatively, Click on the drop-down box to select a specific page to go to.
The middle top sections permits the User to input a starting and/or ending range of
barcodes. By filling in either or both of the numbers, the list is presented with just those
Containers meeting that criteria.
The top right section lists the current Owner. If the User has been Authorized to view the
Containers of another Owner, then their Company name will be listed in the drop-down
list immediately under the “Container Owner” heading. This Authorization is determined
by the Administrator using the “Company Authorization” screen reached by Clicking on
that title on the left of the Main screen under “Admin.”
This My Containers page lists all the Containers that meet the current Criteria. It lists the
Barcode, Type, Description, Capacity, Color, Material, and Content, as well as the
number of times that particular Container has been filled or serviced.
© 2007 Container Services Network, LLC All Rights Reserved
Page 19 of 60
SORTING:
The Containers can be listed in User selectable order. The default is ordered by Barcode.
The User can change the order to be any of the columns simply by clicking on the title of
the column desired. To change to descending order of that column, just click a second
time. For example to sort by Type descending, click on the “Type” column heading
twice:
CRITERIA:
If you want to limit the list to only a certain type, color, or other parameter, simply type
that criteria into the white box below the column heading and reload the page by clicking
the <Reload> button in the upper right.
Criteria can be just a portion of the data being searched. For example, entering a “B” for
color will select Containers with “Blue” or “Black”, but not “Natural” or “White.”
You may type more than one criteria at a time. For Example, if you type “Blue” under
“Color” and “Org” under “Contents,” that would narrow the search down to only Blue
Containers containing contents beginning with “Org”
To return to a listing of all the containers for that Owner, remove (highlight and delete)
all the typing in the boxes below the column headings.
To Change in any way the current Status, Location, Contents or other parameter of any
container, Click on the <Edit> button to the left of its Barcode. A pop-up screen will
then be shown. Please see the Edit Container section of this Manual.
© 2007 Container Services Network, LLC All Rights Reserved
Page 20 of 60
Edit Container
Clicking on the <Edit> button to the left of the Barcode on either the My Location or My
Containers page will bring up the Edit Container popup screen:
The Edit Container screen allows the user to edit a container and view DrumTracker
history.
The first section in the top left is titled “Container” and is not editable. This data includes
the Barcode, color, type name and description, tare weight, container material and
capacity, and shows the current status.
The second through fourth sections show the “Current Location,” “From Location,” and
“To Location” of the Container. These are where the Container currently is, where it
came from, and where it is being shipped to. When it is at a location you generally have
where it came from and where it currently is located. When it is being shipped, it
generally shows where it came from and where it is going to, but shows no current
location.
To change any of these three Locations, Click on the <Select> button to the right of the
appropriate heading. A popup permitting you to select the Location will show:
© 2007 Container Services Network, LLC All Rights Reserved
Page 21 of 60
The Locations listed will be those with which you are Affiliated (See Add Affiliate
Location) or to which you have previously shipped a container. Click on the <Select>
button to the left of the Location to put that Location into the Container’s screen.
Click on <Clear> to remove any current Location information from the Container’s
screen.
By changing the Location data on the screen, then Clicking on the <Update Container>
button in the upper right of the screen, the database is updated and the container’s
Location is adjusted.
The bottom section of the Edit Container screen shows the tracking history of the
Container. This section shows where and when the Container was birthed, sent to,
received from, filled, emptied, and reconditioned.
The upper right section shows the current Status and allows the User to change the Status
by simply clicking on the radio button to the left of the appropriate Status. To change the
Status to Filled, use the lower right section titled “Content.” [A “radio button” for those
of you too young to remember car radios with push buttons, are the little white dots to the
left of a list. Only one can be selected at any time. When you click on any one, any
previously selected will be unselected. The selected one is indicated by a black dot.]
The Lot Number and Fill weight may be edited directly on the Edit Container screen.
The Contents and its descriptors are selected by Clicking the <Select> button to the right
of the “Content” title. Clicking the <Select> button gives the User a Select Content
popup screen:
© 2007 Container Services Network, LLC All Rights Reserved
Page 22 of 60
The Contents which are on this list are those created by the Administrator by Clicking on
“Manage Content” on the lower left of the Main screen. See the chapter on Manage
Content.
Clicking on <Select> will insert the data for the selected contents into the Container’s
screen.
After the changes and selections are made, the User Clicks on the <Update Container>
button at the upper right of the screen to enter the new data into the system. The Changes
will either be confirmed with a Green check, or not confirmed as shown by a Red “X” at
the top of the screen:
© 2007 Container Services Network, LLC All Rights Reserved
Page 23 of 60
To remove a Container from the system, an authorized User can Click on the <Kill
Container> button in the upper right of the screen.
© 2007 Container Services Network, LLC All Rights Reserved
Page 24 of 60
Find/Add Affiliate Location
Clicking on the <Add Affiliate Location> button on the Select Location screen brings up
the Find/Add Affiliate Location popup screen:
This screen is intended to be a 3-step process. First, Select a Company by Clicking on
the <Select> button to the right of “Company.” See Select Company chapter for specific
help with the Select Company screen.
Once a Company has been selected, that Company’s information will be filled in:
© 2007 Container Services Network, LLC All Rights Reserved
Page 25 of 60
The second step is to fill in the Location Name, Address, City, State, and Zip for the
Location you want to enter. You cannot guess these items. You must enter the exact
information or else the system will not permit you to Affiliate with the Location.
You then should check the appropriate boxes specifying what type of Location this is.
Then Click the <Find Location> button in the upper right of the screen. If successful, the
Location will be selected and you will return to your previous screen. If unsuccessful,
you will be told that there are no matching Locations and given the option to add a new
Location:
© 2007 Container Services Network, LLC All Rights Reserved
Page 26 of 60
If you Click on the <Add Location>, the data that you have entered in the first three step
will be used to create a new Location file, and that information will be selected and
entered into the previous screen as your selected Location. Please do not use the <Add
Location> button unless you are absolutely certain that all of the information you entered
in the first steps are correct.
If you are not certain that you are ready to add a new Location, please Click on the red
“X” in the upper right of the screen to close this screen without selecting a Location.
© 2007 Container Services Network, LLC All Rights Reserved
Page 27 of 60
Select Company
The Select Company screen is used to select a particular Company from a list of
Companies and return the User to the previous screen with that Company entered. The
screen first presents asking for a string to search for:
In the white area to the right of “Name:” enter the portion of the name to search for.
Then Click on the <Submit> button to perform the search. This search uses “sounds
like” technology so the name does not have to be spelled exactly. For example,
Companies named “Smith,” “Smyth,” and “Smouth” would all be listed if the text
“Smith” was entered. As another example, entering the search string “Test” yields the
following list:
This list shows all of the various Companies named “Test” or containing anything like
“Test.”
© 2007 Container Services Network, LLC All Rights Reserved
Page 28 of 60
To Select the appropriate Company, Click on the <Select> button to the left of the
Company name.
If your search yields no matching Companies, your screen will look like:
Input another search string into the white box to the right of “Name:” and again Click on
the <Submit> button, hopefully this time finding the Company you are looking for.
If after searching for all parts of the Company name, the Company still is not listed,
please call Customer Service for assistance.
© 2007 Container Services Network, LLC All Rights Reserved
Page 29 of 60
Birth Container
Click on <Birth Container> under the top left heading of “Tracker.” You will see the
“Birth Container” screen:
The center area is divided into three columns. The left column contains the Owner and
location information; the center column the container information; and the right column
contains the buttons for actions to be taken on the data.
At the top of the left column of the center area, Click on the button just to the right of the
title “Container Owner” marked <Select>. This will bring up the “Select Company” popup screen:
© 2007 Container Services Network, LLC All Rights Reserved
Page 30 of 60
In the white box in the center of the pop-up, type some of the company’s name. For
example, when searching for Acme Chemical Co., Inc. you only have to type “Acme”
and it will list all of the companies with “Acme” in their name. Also, spelling is not too
important – the system will search names close to what you typed.
Click <Submit> to have the system search for the companies with similar names. The list
of companies with similar names will be shown at the bottom of the screen:
Determine which of the companies listed is the one that will own the containers to be
birthed. Click on the <Select> button just to the left of the owner company. The data for
that company will now be shown on the Birth Container screen.
© 2007 Container Services Network, LLC All Rights Reserved
Page 31 of 60
At the middle of the left column of the center area, Click on the button just to the right of
the title “Birth Location” marked <Select>. This will bring up the “Select Location” popup screen:
The locations which have previously been used are listed. If the location where the
containers will be made/reconditioned is not listed already, then Click on the <Add
Affiliate Location> button. See “Find/Add Affiliate Location” for help with entering a
new location.
Determine which of the locations listed is the one that will be making/reconditioning the
containers being birthed. Click on the <Select> button just to the left of the location.
The data for that location will now be shown on the Birth Container screen.
At the bottom of the left column of the center area, Click on the button just to the right of
the title “Send To Location” marked <Select>. This will bring up the “Select Location”
pop-up screen as before.
The locations which have previously been used are listed. If the location where the
containers will be made/reconditioned is not listed already, then Click on the <Add
Affiliate Location> button. See “Find/Add Affiliate Location” for help with entering a
new location.
Determine which of the locations listed is the one that will be receiving the containers
being birthed. Click on the <Select> button just to the left of the location. The data for
that location will now be shown on the Birth Container screen.
At the top of the middle column of the center area, Click on the down arrow on the right
of the white box <--select container type-->. A list of container types for that owner are
listed.
© 2007 Container Services Network, LLC All Rights Reserved
Page 32 of 60
If the specific container type is not listed, please contact the owner to have them input the
proper container type. See “Manage Drum Type.”
Click on the appropriate container type in the list. The data for that container type will
now be shown on the Birth Container screen.
© 2007 Container Services Network, LLC All Rights Reserved
Page 33 of 60
In the center of the center area, the Container Parameters are entered. Click on either the
button in front of “New” or the button in front of “Reconditioned.”
Type in the bar code in the white area to the right of “Barcode:” If you are birthing more
than one container, the bar code entered should be the first one in the series. i.e. If you
are birthing four containers numbered 105, 106, 107, and 108, just enter 105.
Type in the number of containers being birthed in the white area just to the right of
“Drum Count:” This is the number (quantity) of containers being birthed with the first
bar code being the number typed above and every bar code being one more than the
previous bar code number.
Enter the date of manufacture/reconditioning in the white area just to the right of “Birth
Date:” This field defaults to the current date if you do not change it.
Enter the time of manufacture/reconditioning in the white area just to the right of “Birth
Time:” This field defaults to the current time if you do not change it.
Type in any accessories in the white area just to the right of “Accessories:”
At the bottom of the middle column of the center area, Click on the down arrow on the
right of the white box to the right of “Manufacturer:” A list of manufacturers are listed.
© 2007 Container Services Network, LLC All Rights Reserved
Page 34 of 60
If the appropriate manufacturer is not listed, please contact DrumTracker support.
Click on the appropriate manufacturer.
At the bottom of the middle column of the center area, Click on the down arrow on the
right of the white box to the right of “Country of Origin:” A list of countries supported
are listed.
If the appropriate country is not listed, please contact DrumTracker support.
Click on the appropriate country.
Review all of the information on the screen. Once submitted, the information cannot be
removed.
At the top of the right column of the center area, Click on the <Birth Drum> button. In a
few moments you will receive a success confirmation or a failure reason. A confirmation
of success look like:
© 2007 Container Services Network, LLC All Rights Reserved
Page 35 of 60
and a notification of Failure and the reason why looks like:
© 2007 Container Services Network, LLC All Rights Reserved
Page 36 of 60
The most common reason for failure is entering a bar code that has already been used (as
in the example above). If this occurs, please check the number and submit again. If you
feel you have received this error inappropriately, please contact DrumTracker support.
You can now birth additional containers, or click on any of the links on the left to do
other activities.
© 2007 Container Services Network, LLC All Rights Reserved
Page 37 of 60
Manage User
Full information for each User is entered and edited on these screens, including login
names and passwords. It is here that the user’s level of security, visibility, and
management authorities are set. By Clicking on the “Manage User” link in the left
section, you will see the screen:
The current users for your company are listed. To add a new user, Click on the <Add
new user> button. A new popup will be displayed:
© 2007 Container Services Network, LLC All Rights Reserved
Page 38 of 60
In the upper left section is where you can enter all the contact information for the user.
The lower left section shows the information for your company.
The new User Name is shown in the top of the upper right section. Remember – This is
the user’s permanent Login ID – it cannot be changed by you or the user.
Right below the user name are two places to input the user’s new password. These can
be changed by you or the user whenever logged in. The system does not store the
password, only a non-reversible encryption of the password. Neither you nor the user can
ever see the password. If ever the password is forgotten, then a new password can easily
be entered in the edit user screen.
The authorizations for specific Functions and viewing of various data are listed as
checkboxes in the lower right hand section. Items that you are not allowed to set are
shown with grey checkboxes and cannot be changed.
© 2007 Container Services Network, LLC All Rights Reserved
Page 39 of 60
Most of the Functions indicate whether those screens are available to the User. For
example, if “Manage User” is not checked, then the User will not have the “Manage
User” link available on the left side of their screens.
The ability to Kill a container on the Edit Container screen is controlled by the “Kill
Drum” check box. If not checked, then there will not be a “Kill Drum” button on the
“Edit Container” screen. Similarly, the “Edit Container” check box controls whether
there will be an “Update Container” button on the “Edit Container” screen.
The “Use Web Tool” and “Use Scanner” control whether the User is able to log on to the
web site or a scanner, respectively. For example, if there was a warehouse worker that
needed to use the scanner, but you did not want him to do anything on the web site, you
would check the “Use Scanner” check box and not check the “Use Web Tool” box.
The check boxes under the “View Container” heading determine what properties of the
container the user can see. For example, if you did not want a particular temp worker to
see what is in the containers, just uncheck the “Content” check box.
The bottom right section is where the authorization for how much of the history is
viewable by that particular person. “Previous Location means that the user can see where
the container was last. “At Location” means that the user can see where the container
currently is. “Company History” means all of the times the container has been at any of
this company’s locations. “Location History” means all of the times the container has
been at this particular location. “Back to last recondition” means the user can view the
container’s history only back to the last time it was reconditioned.
Once all of the information has been entered, Click on the “Add User” button. A green
check mark indicates that the User has been successfully added.
To edit a User, click on the <Edit> button to the left of the User’s name. You will see the
Edit User screen:
© 2007 Container Services Network, LLC All Rights Reserved
Page 40 of 60
Here you can do all of the same functions as the Add User screen, except you cannot
change the User’s Login name. All the rest of the data is the same.
To exit without saving changes, Click on the Red X in the upper right corner to close the
screen.
Once you have corrected all the user data, Click on the <Update User> button. You will
then be given a green check mark if successful:
© 2007 Container Services Network, LLC All Rights Reserved
Page 41 of 60
Please note that even if the password was changed, you will not see the new password in
the Edit Successful screen. It has been updated, but the password is never shown.
© 2007 Container Services Network, LLC All Rights Reserved
Page 42 of 60
My User Account
This selection allows the user to change their password and personal information.
The User Account Login cannot be changed. Contact the Administrator if the user name
needs to be changed for any reason.
Passwords are not stored in the system. If a password needs to be reset, “My User
Account” is where it is done. Input the new password in the boxes to the right of
“Password” and “Retype Password” making sure that you type the same thing in both
boxes. Upper and lower case are different.
To enter, update or delete any of the other contact information, just type or delete any of
the information in the right hand section.
© 2007 Container Services Network, LLC All Rights Reserved
Page 43 of 60
Company Manage
The Company Manage screen allows the administrator user to add a new company or edit
an existing company.
To edit a current company, Click on <Edit> to the left of the company’s name.
© 2007 Container Services Network, LLC All Rights Reserved
Page 44 of 60
The company ID cannot be changed. The name and contact information can be changed
by an administrator. The address shown here should be the billing address for the
company. This is not always the same as the shipping address for the containers.
The “Owns Containers” check box determines whether this company appears on the lists
of possible owners of containers and other similar places. Do not change this box unless
you are told to change it.
The address in the Company screen should be the billing or administrative address of the
company. Where containers get shipped to and stored are called Locations. Containers
can only be shipped to Locations, not to a Company as was input in the Add or Edit
Company screens. Locations are listed at the bottom of the Edit Company screen. To
add a location, Click on the <Add Location> button to the right of the “Locations” title:
© 2007 Container Services Network, LLC All Rights Reserved
Page 45 of 60
The name and contact information for the location should be entered. The address should
be the shipping address for this location.
The type of location should be indicated by checking the boxes. A single location can be
multiple types. For example, a Content Manufacturer can also be a Filler; a Dealer can
also be a Warehouse.
To edit a location, on the Manage Company screen, Click on the <Edit> button to the left
of the location to be edited:
© 2007 Container Services Network, LLC All Rights Reserved
Page 46 of 60
Any changes to the location’s information or type can be changed on the Edit Location
screen. Once the changes are done, Click on the <Apply Changes> button to enter the
changes into the database. To leave the screen without entering the changes, Click on the
Red X in the upper right hand corner of the screen.
To remove a location from the list of locations for the company, Click on the <Delete
Location> button.
© 2007 Container Services Network, LLC All Rights Reserved
Page 47 of 60
Manage Company Authorization
This selection allows the admin user to grant authority to a company to view and or
manage its DrumTracker data.
With the select button, the user is taken to the Select Company screen to choose the new
company and in detail grant levels of authorization.
© 2007 Container Services Network, LLC All Rights Reserved
Page 48 of 60
After all selections, the admin user selects the <Edit Authorization> button to add new
data. If successful, a green check indicated success:
© 2007 Container Services Network, LLC All Rights Reserved
Page 49 of 60
To revoke authorization of a company, simply select that company and then Click on the
“Revoke Authorization” which immediately removes all authorizations. A successful
revocation is indicated by a green check mark:
© 2007 Container Services Network, LLC All Rights Reserved
Page 50 of 60
Manage Drum Type
This screen allows the user to add and edit container types for your company that are in
the DrumTracker II system.
The main screen lists the current container types. The <Add Container Type> button is
used to go to the Add Container Type screen. The Add Container Type screen allows the
user to enter the name, description, material, color, capacity, tare weight, and
recertification period of the new container type.
© 2007 Container Services Network, LLC All Rights Reserved
Page 51 of 60
The name of the container type should be a short name representative of the container. It
should be what workers call the container within your company. The Description should
be the complete description of the container.
The material which the container is made of is selected from a drop-down list. IBCs that
are a combination of a plastic bottle and a steel cage are considered to be of “composite”
materials.
The color of the container is selected from another drop-down list. Only the most
common colors are listed. For any other color or combination of colors, select “Multicolored” or “Other.” When a batch of containers are not all the same color, such as a
truckload of reconditioned containers, “Various” should be used.
© 2007 Container Services Network, LLC All Rights Reserved
Page 52 of 60
The capacity of the container should be selected from the next drop-down list. If you are
using a container with a capacity not listed, please see your administrator.
The tare weight of the container should be entered. This weight is necessary to properly
determine the weight of filled containers.
A recertification period may be entered if desired.
If you want to not enter this new container type, simply Click on the Red X in the upper
right hand corner.
To add this data as a new container type, Click on the “Add Container Type” button.
You will receive a confirmatory screen. Then the new container type will be included in
the list on the Manage Container Type screen.
The <Edit> button to the left of the container name will show the Edit Container Type
screen. The Edit Container Type screen allows the user to change name, description,
© 2007 Container Services Network, LLC All Rights Reserved
Page 53 of 60
material, color, capacity, tare weight and recertification period of an existing container, or
mark the container type as currently unused.
To mark a container type as currently unused, simply Click on the <Mark as Unused>
button. Doing so will show you a confirmatory screen such as:
Setting the container type to unused will prevent it from showing up on any drop-down
lists in the Edit Container screens. An unused container type will continue to show up
highlighted in red on the “Manage Container Types” screen:
© 2007 Container Services Network, LLC All Rights Reserved
Page 54 of 60
After changes are made to any of the container parameters, Click on the <Apply
Changes> button to enter the updated data. The changes will be reflected in the list on
the “Manage Container Types” screen.
© 2007 Container Services Network, LLC All Rights Reserved
Page 55 of 60
Manage Content
The Manage Contents screen allows the user to see a current list of possible contents, and
to add to this list or edit any content:
The <Add Content> button is used to show the “Add New Content” screen where the
user can add a new type of content:
© 2007 Container Services Network, LLC All Rights Reserved
Page 56 of 60
The Add New Content screen allows the user to enter public name, private name,
chemical market, category, density, manufacturer, and MSDS, of the new content. Also
the user may select the Fill with Same Chemical Only selection.
The Public Name should include the Generic name for the contents. This is the
information that will be available to anyone in possession of the container for emergency
purposes. The Private name will only be disclosed to those who have been properly
authorized and authenticated.
The Chemical Market is selected by clicking on the most appropriate radio button. The
Category is similarly selected.
The Density of the product is used to determine the weight of the filled container or how
much product the container has in it. Density may be entered in either metric or US
measurements.
The manufacturer can be entered in the appropriate box.
The URL of the MSDS sheet should be entered into the MSDS field. This entry must
start with “http://” in order for it to work. This is the field the scanners will use to
provide the MSDS sheet to the warehouse and field workers.
© 2007 Container Services Network, LLC All Rights Reserved
Page 57 of 60
After all selections are made the user selects the <Add Content> button to enter the new
data. The user is returned to the Manage Contents screen where the new content is listed.
© 2007 Container Services Network, LLC All Rights Reserved
Page 58 of 60
The Edit Content screen is accessed by Clicking on the <Edit> button to the left of the
Content name.
The editable items are the same as for the Add Content screen.
© 2007 Container Services Network, LLC All Rights Reserved
Page 59 of 60
Logout
When you are done working in the DrumTracker II system, please log out. This ensures
the security of the system. Simply Click on the “Logout” link in the left hand section.
The system will close all of your records and log your session as ending. You will see
the following screen:
On most computers, your browser will simply close and you will be done. On some
computers, you will need to confirm the closing of the browser:
Once you have Clicked <Yes>, the browser will close and you will be done.
© 2007 Container Services Network, LLC All Rights Reserved
Page 60 of 60