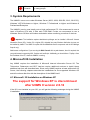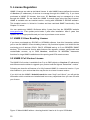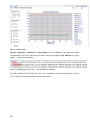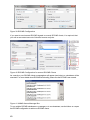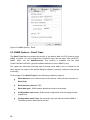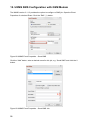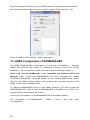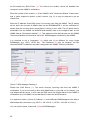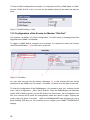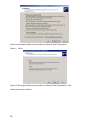
1
Version: 2015-11-26
UNMS II – UPS Network Management System
User manual
Version: 2015-11-26
Copyright Statement for Intellectual Property and Confidential Information
The information contained in this manual is non-conditional and may be changed without
due notice. Although GENEREX has attempted to provide accurate information within this
document, GENEREX assumes no responsibility for the accuracy of this information.
GENEREX shall not be liable for any indirect, special, consequential, or accidental
damage including, without limitations, lost profits or revenues, costs of replacement goods,
loss or damage to data arising out of the use of this document
GENEREX the manufacturer of this product undertakes no obligations with this
information. The products that are described in this brochure are given on the sole basis of
information to its channel partners for them to have a better understanding of the
GENEREX products.
GENEREX allows its channel partners to transfer information contained in this document
to third persons, either staff within their own Company or their own customers, either
electronically or mechanically, or by photocopies or similar means. GENEREX states that
the content must not be altered or adapted in any way without written permission from
GENEREX.
It is agreed that all rights, title and interest in the GENEREX‟s trademarks or trade names
(whether or not registered) or goodwill from time to time of GENEREX or in any intellectual
property right including without limitation any copyright, patents relating to the Products,
shall remain the exclusive property of GENEREX.
GENEREX will undertake to deal promptly with any complaints about the content of this
document. Comments or complaints about the document should be address ed to
GENEREX Systems GmbH.
Copyright of the European Union is effective (Copyright EU).
Copyright (c) 1995-2015 GENEREX GmbH, Hamburg, Germany. All rights reserved.
Revision
3
History
Date
-001
First Release of UNMS Version 2.
10/2005
-011
SNMP functionality added
10/2005
-012
Updated: Web console site icons
11/2005
-013
01/2006
Added: Event groups, user management and
password protection. Improved job-, email- and event
configuration.
-014
Update: Web console screenshots for this
documentation
01/2006
-015
Updated: Service properties and UNMS options
screenshots
04/2008
-016
Added: Special screens
07/2009
-017
Added: Troubleshooting: Disable UNMS II Data
Logging
11/2009
-018
Added: Monitoring extensions
11/2009
-019
Added: Threshold event configuration
01/2010
-020
Added: UNMS II with IIS 6.0 on x64 OS
03/2010
-021
Added: Redundancy configuration
04/2010
-022
Added: RASMANAGER support, monitoring of
offline devices
04/2010
-023
Added: Support for SNMP cards from nonGENEREX compliant manufacturers
04/2010
-024
Added: IIS installation for WIN XP, WIN 7, WIN
2008 R2
06/2010
-025
Added: Working with Discover Services
05/2011
-026
Added: License Regulation
07/2011
-027
Changed: General changes on manual format and
texts, adding new, extended explanations for features.
08/2011
-028
Added: Email Traps
02/2012
-029
Added: UNMS Options – Secure Settings
03/2012
-030
Added: UNMS SMS Configuration
03/2013
-031
Added: Windows 8, WIN Server 2012 R2
Compability
08/2014
Table of contents
1. Introduction
2. Architecture Overview
3. System Requirements
4. Microsoft IIS Installation
4.1 Microsoft IIS Installation on Windows XP
4.2 Microsoft IIS Installation on Windows 7/8
4.3 IIS Installation on Windows 2008 Server R2
4.4 IIS Installation on Windows 2012 Server R2
5. License Regulation
5.1 UNMS II 9-User Bundling License
5.2 UNMS II Full Version License
5.3 UNMS II Full Version with Teleservice Module
5.4 UNMS II Full Version License with OPC Module
5.5 UNMS II Full Version License with Teleservice/Datacenter Module
6. Getting Started with UNMS II
7. UNMS Admin Console
7.1 Discover Services
7.2 Main Screen
7.3 Sites and Services
7.3.1 UNMS II Group
7.4 Events and Priorities
7.4 Starting and Stopping the UNMS II
7.5 Working with the Site Explorer
7.6 Changing Service Properties
7.7 Working with the Event Explorer
7.8 Changing Event Properties
7.9 Changing Job Properties
7.9.1 Configure RCCMD Server Jobs
8. Customizing UNMS
8.1 Working with Site Maps
8.2 Sub-Screen Editing
9. UNMS Options
9.1 UNMS Options - Editor
9.2 UNMS Options - Email
9.3 UNMS Options – Email Traps
9.4 UNMS Options – Users
9.4.1 UNMS Options – Secure Settings
9.5 UNMS Options – Logging
9.6 UNMS Options – System
10. Configuration Backup and Restore/Software Update
11. UNMS Redundancy Configuration
11.1 Example Shutdown of a computer with redundancy
4
6
7
8
8
8
10
11
13
15
15
15
16
16
17
17
18
18
19
20
21
22
23
24
24
30
31
38
41
42
42
43
44
45
45
46
49
50
52
52
53
54
57
12. UNMS SMS Configuration with GSM Modem
58
The UNMS version 2.1.13 provides the option to configure a SMS job.
Open the Event Properties of a desired Event. Click the “Edit” (1.) button.
58
13. UNMS Configuration of RASMANAGER
59
13.1 RAS Client Settings
60
13.2 Configuration of the Events for Modem “Dial-Out”
62
13.3 Configuration of the UNMS II Workstation for incoming Dial Connections
(Windows XP, SP2)
63
13.4 Configuration of the UNMS II Workstation for incoming Dial Connections
(Windows Server 2003)
66
12.5 UNMS Teleservice - Create a Modem Connection
76
14. UNMS – Web Console
83
15. Monitoring Extension
87
16. Getting Technical Support
88
17. Troubleshooting
89
17.1 Problems at Execution of the Setup
89
17.2 Problems during Installation
90
17.3 The Service “Network Lost” Event is notified too fast
90
17.4 A running Skype Program claims the UNMS Web Port
90
17.5 Disable IIS Website Logging for UNMS II
91
17.6 Problems with Web-Interface on 64-bit WIN Server 2003
91
17.7 Problems with the Display of http://localhost (IIS Welcome Page does not
appear)
91
17.8 RAS Manager Dial-In Problems
92
Appendix
92
A Figures
92
5
1. Introduction
The UPS Network Management System (UNMS) is a monitoring and managing system for
many
different
emergency
Environmentalmanagers,
power
supply
Batterymanager)
in
systems
networks
(UPS,
of
Generator,
different
organisations/customers. UNMS II is an automated overview system that monitors and
informs the responsible personnel of alarms occurring at the different facilities. This greatly
increases the security and reliability of networked systems relying on stable power
supplies.
The UNMS II offers the following benefits:
UNMS II monitors the UPS devices over IP networks, mobile networks (global
system for mobile communications GSM) analogue telephone lines (Remote
Access Service RAS) and through Emails (Pushmail).
By using multiple Web Consoles, UNMS II encourages sharing of management
information by many people. Through different logins the various sites may be
managed by separate personnel.
UNMS II transmits acoustical messages, emails, does logfile entries and
requires an acknowledge from the enduser for new alarms to guarantee that the
user is alerted and recovery processes may begin. Extensive logging and
filtering functions allows the management of very large installations.
UNMS II works with any GENEREX compatible UPS and alarm management
devices
(CS121,
CS122,
SITEMANAGER,
SITEMONITOR,
SENSORMANAGER, BACS) using the GENEREX native network protocol
"UPSTCP" or SNMP.
UNMS II supports also all non-GENEREX UPS devices which use the RFC
1628 UPS MIB and private MIB from APC via SNMP (functionality not
guaranteed, depends on the quality and conformity of this product).
UNMS II works as RCCMD server - this function allows managing the
messaging and shutdown of RCCMD clients in your network from this central
management console.
UNMS II is designed also for the use with parallel-redundant UPS installation.
Several UPS management devices (CS121) maybe formed into groups with
separate configuration and redundancy levels.
Note : That the screens and menus shown on your computer may differ from those pictured in this
document.
6
2. Architecture Overview
UNMS II is an UPS network monitor designed to inform you of emergency power supply
systems problems in your network or the customers network. The UNMS uses network
(LAN) connections as default, but allows also connections through MODEM and GSM
Routers
(RASMANAGER
Analogue
and
RASMANAGER
Teleservice/Datacenter license) or “Push Email”.
GSM,
requires
a
The UNMS server service runs
intermittent and checks on UPS devices you specify in a list. When problems are
encountered, the UNMS server service can send notifications out to administrative
contacts in a various ways (Email, RCCMD network message, etc. ). Actual status
information, historical logs, and reports can all be accessed via a web-browser (Web
Console).
Figure 1 UNMS II into a network environment
No.
7
Name
Description
1
UNMS
Server
The UNMS server service running on this computer with
MS web server installation.
2
Site
A user defined group of services (e. g. UPS devices).
Define a name for this group and configure individually
group rules for those devices belonging to this group.
3
Service
A single service (e. g. UPS device with CS121 SNMP card
or UPSMAN or BACS) that is monitored by the UNMS
server.
4
Web
Console
Web consoles provide sharing of management information
by many people.
3. System Requirements
The UNMS II server runs under Windows Server (2003, 2008, 2008 R2, 2012, 2012 R2 ) ,
Windows VISTA Business or higher, Windows 7 Professional or higher and Windows 8
Professional/Enterprise
The UNMS II service runs ideally onto a high performance PC. We recommend to use at
least a DualCore CPU with 2 GHz and 4 GB RAM. Further we recommend to use a
Windows Server OS than a Windows workstation when monitoring more than 9 devices.
Important: The installation requires administrator privileges and an installed « Microsoft “Internet
Information Server (IIS) » Version 5.0 or higher (IIS is included into every Windows distribution, but may not
be installed by default. The UNMS II requires the WorldWideWeb-Service component and the IIS Manager
Snap-In only).
Web-browser configurations: If you are using the Web Console with any web-browser, then it is required, that
your web-browser is supporting XML, Cookies and JavaScript. Additionally you should allow « PopUps » from
the IP address of the PC, where the UNMS II is running.
4. Microsoft IIS Installation
Any UNMS requires the installation of Microsoft Internet Information Server IIS. The
Teleservice, Datacenter and OPC Versions require additional services to install, these
additional services will described later. Since every UNMS requires at least a Microsoft IIS
Server, the following chapters describe the installations for the supported Windows OS
and will continue after this with the description of the UNMS itself.
4.1 Microsoft IIS Installation on Windows XP
The support for Windows XP is discontinued
after UNMS II version 2.0.12
If the IIS is not installed on your OS, you will get the following message during the UNMS
II installation.
8
Figure 2 UNMS II error message
Click the “Add or Remove Programs” button into the “Control Panel”. Click the
“Add/Remove Windows Components” button. Enable the “Internet Information Services
(IIS),
Figure 3 Windows Components Wizard
but disable the SMTP Service and click the « Next » button.
Figure 4 Disable SMTP Service
Insert your Windows XP CD and click the “Next” button.
9
Figure 5 Configuring components
Figure 6 Completion
4.2 Microsoft IIS Installation on Windows 7/8
If the IIS is not installed on your OS, you will get the following message during the UNMS
II installation.
Figure 7 UNMS II error message
10
Click the “Programs” button into the “Control Panel” and click the « Enable/Disable
Windows Features » button. Enable the following features:
Figure 8 Windows Features
Click the « Ok » button to complete the installation and start UNMS Setup again.
4.3 IIS Installation on Windows 2008 Server R2
NOTE : If you want to use the Internet Explorer on this Server for UNMS, then you have to
disable the IE Enhanced Security for Windows Server 2003 and 2008 OS.
Here an example of the configuration Internet Explorer IE Enhanced Security (IE ESC) on
Windows Server 2008 R2:
11
Figure 9 Configure IE ESC
Open the “Control Panel” and click the “Turn Windows features on or off” link (below the
“Programs” label) to open the “Server Manager”.
Figure 10 Add Roles Wizard
Open the dialog box “Web Server IIS” and select “Role Services”.
12
Figure 11 Role Services
Click the « Ok » button to complete the installation and start the UNMS Setup again.
Start the UNMS setup.exe again, if IIS problems are solved, the Setup starts now for the
installation of the UNMS software.
4.4 IIS Installation on Windows 2012 Server R2
Open the Server Manager and click on “Add Roles and Features”. Click the “Web Server
(IIS)” button into the Server Roles menu and then on “Add Features” or rather “Next”.
Figure 12 Add Roles and Features
13
Click on “WinRM IIS Extension” into the menu Features and then on “Add Features” or
rather “Next”.
Figure 13 Add Roles and Features – WinRM IIS Extension
Click on “Application Development” into the menu Role Services/Web Server and enable
the “ISAPI Extensions” under Management Tools, the “IIS 6 Management Compatibility”
and then on “Install”.
Figure 14 Role Services
14
5. License Regulation
UNMS II licenses are sold as individual license. A valid UNMS license defines the number
of Services (IP addresses) of devices to manage through this UNMS. Eg. If you have
purchased a UNMS 50 licenses, than max. 50 Services may be managed at a time
through this UNMS. Do not install the UNMS II several times using the same license !
UNMS is available also as bundled version, coming with UPSMAN or RCCMD software.
This bundled version is limited to 9-nodes and has restricted SNMP functionality. See
Chapter 5.1 below.
You can update any UNMS II Software within 2 years free from the GENEREX website
www.generex.de. Free update period ends 2 years after installation. After 2 years free
updates are no longer possible and you have to purchase a new version.
5.1 UNMS II 9-User Bundling License
If you have purchased any RCCMD or UPSMAN software, than this licensekey entitles
you to use the UNMS II 9-user bundling license, fully functional system, but limited for the
monitoring up to 9 devices (CS121, BACS, UPSMAN and up to 3 non GENEREX SNMP
devices). The commercial version adds features like upgrade, updates, configurable and
customizable screens, up to 5000 Services, teleservice for MODEMs, datacenter
functions for large UNMS installations with reporting and VPN remote access.
5.2 UNMS II Full Version License
The UNMS II full version is available from 5 up to 5000 objects or Services (IP addresses)
and offers several modules to upgrade your product until the highest “Datacenter” version.
Following we describe all features of a fully licensed UNMS II commercial version. If you
miss features in your version than this may be due to a lower licensed version.
If you click into the UNMS II AdminConsole the menu “Help” and “About”, you will get the
information which modules are installed and how many objects/services you can use with
your license.
Figure 15 About UNMS Infobox– showing that this Version is for up to 250 Nodes
15
5.3 UNMS II Full Version with Teleservice Module
The Teleservice Module is an extension for the UNMS which provides telephone line
support
for
analogue
modems
(RASMANAGER
analog)
and
GSM
Routers,
(RASMANAGER GSM). This Module is displayed in the About UNMS infobox as “UNMS
RAS Agent”
Figure 16 About UNMS Infobox– Version is for up to 25 Nodes and Teleservice
5.4 UNMS II Full Version License with OPC Module
The OPC Module is a extension for the UNMS to work as OPC client. This Module is
displayed in the About UNMS infobox as “UNMS OPC Agent”. Please note that OPC is an
industrial general purpose protocol – any linkage of OPC informations into UNMS requires
custom development steps.
16
Figure 17 About UNMS Infobox– Version is for up to 100 Nodes and OPC
5.5 UNMS II Full Version License with Teleservice/Datacenter
Module
The Datacenter Module is a extension for the UNMS to work as Datacenter manager.
This module allows to manage offline installations through “pushmail” (Email) and through
the other connections (Teleservice MODEM, Ethernet, SNMP, OPC server). Additionally
this Datacenter module includes reporting functions and scheduling options to allow an
automated monitoring and alarm forwarding of large installations. This Module is displayed
in the About UNMS infobox as “UNMS Datacenter”.
6. Getting Started with UNMS II
Although the UNMS II comes in some cases pre-configured, there are some settings you
have to go through before you can start monitoring.
Primarily you have to define, which IP addresses and devices you want to monitor and
which events have to be regarded as alarms. The UNMS II Admin Console simplifies this
and other UNMS II related administrative tasks. It is described in the next sections.
The UNMS Admin Console is launched automatically after installation has completed. To
start it again later, go to the Windows Start menu and use the Programs/UNMS/Admin
Console menu.
17
7. UNMS Admin Console
Attention: You need Administrator privileges for using the Admin Console !
The UNMS II is split in 2 parts, the UNMS Admin Console, for administrative purposes,
and the UNMS web-interface, for remote Web access. The Admin Console runs a
Microsoft Internet Explorer embedded in a Window, called Web Console. The Web
Console view is designed through the Site Maps and its related tools Site Explorer and
Event Explorer.
Generally a webbrowser is the graphical interface for all users, who are not working on the
UNMS Admin Console and are working and watching the system as it operates.
The UNMS Admin Console is for configuration of the UNMS II screens and the
embedded MS Internet Explorer shows in the Web Console page how the changes would
look, if viewed with a web-browser from remote.
The UNMS Admin Console is the toolkit for the UNMS II Administrator, when doing
changes on the configuration, while the normal monitoring process is usually run through
any web-browser.
7.1 Discover Services
After the UNMS II is started the first time, the Discover Services will be started
automatically to help you finding Services (UPS, BACS, SNMP cards ..) in your local
network environment.
Figure 18 Discover Services
18
Enter the subnet address, which you want to scan, and enter the IP range (default 1 to
254). If you got additional SNMP devices into your network environment, enable the box
“Search SNMP devices” too and click the “Start Scan” button. If you already know your IP
address and do not want to use Discovery Service, cancel this service.
After the scan is finished, you can allocate the UPS or other objects found in a list and
move them to their Zones/Sites with Drag-and-drop. Use the “SHIFT” and “ARROW” keys
to Drag-and-drop several objects at once.
You can choose to use the UPS modelname or the IP address as UNMS site/device
name.
Figure 19 UPS allocation and moving to Zones/Sites by drag&drop
Click the „Apply“ button to confirm your settings and restart the UNMS II to use your
configuration changes.
After having the UNMS II successfully started, you may continue working with the UNMS II
Admin Console to complete your settings or to add Sites and Servicesmanually.
7.2 Main Screen
The following diagram and table show the main elements of the Admin Console, when
starting it the first time. (Here with user login screen)
19
1
2
3
4
5
Figure 20 Admin Console – Main Screen
No.
Name
Description
Page
Menu
Standard application menu.
Button Bar
Provides shortcut buttons for common tasks and features.
3
View
Selection
You can switch between Web Console, in which the integrated Web
Browser is displayed, and Site Maps, which allows you to customize
the Web Console.
4
Web
Console
Display area of the integrated Web Browser, if in Web Console
mode.
Error! Bookmark
not defined.
Map Editor
Display area of the Site Maps Editor (not in all Editions), if in editor
mode.
Error! Bookmark
not defined.
Site
Explorer
Hierarchical view of all defined sites and their related services
(devices).
Error! Bookmark
not defined.
Event
Explorer
Hierarchical view of all defined events and their related command
handlers.
Error! Bookmark
not defined.
1
2
5
In the following part we explain the configuration options inside the UNMS Admin
Console.
7.3 Sites and Services
Sites and Services are managed through the Site Explorer
20
Site Explorer: The Site Explorer panel is your tool to add, change Sites, add Services,
and form several Sites into Groups.
Figure 21 Admin Console – Site Explorer
Definitons:
Service: A Service is any kind of IP address or hostname, which is typical an UPS or
battery system controlled by a CS121 or BACS Webmanger or any other GENEREX or
UNMS compatible device like third party SNMP cards. So a Service is the managing
device itself and is always member of a previously defined Site.
Example for a Service: A Service is a managed device like an UPS SNMP card. For
example, a CS121, a BACS Webmanager, a SiteMonitor, the UPSMAN Software or any
RFC 1628 compliant SNMP device are defined as Services.
Site : A Site is a set of well-known Services, like UPS or IP adresses in a certain location.
These locations are called “Sites” and represent the organisational or physial location of
such Services. Any alarm on any Service in this Site will change the Site status itself. So
if any of the Services in this Site has an alarm, the Site itself will display this alarm in the
Site Icon.
Example for a Site: You may define the Site “UPS Customer A”. In this Site you have now
e. g. 5 Services running with 5 UPS. This Site may get its individual background and alarm
reactions, if formed into a Group.
7.3.1 UNMS II Group
Group : A Group is a set of Services belonging together, like a several UPS installation
in the same network or at the same customers organisation.. A Group is defining a set of
Services, which in case of alarms will be treated identically. So all devices (UPS,
batteries, etc.) will have the same reactions in case of alarms, if they belong to the same
Group. Through Groups you can define different alarm reactions, e. g. if members of the
Group belong to different organisations.
21
Example for a Group: If in a Group defined as “UPS Group” and added to this Group all
Services, which have UPS, than you can define actions, which will apply for all devices in
the Group. So an UPS alarm on any of the devices in this group will send an email to the
UPS service center in your organisation, while an alarm in the Group “Batteries” will send
an email to the battery service department in your company.
Through the Site Explorer you configure relationsships of your Services and Sites.
Get into the Site Explorer, click the desired Service button and change the Service
Properties. Open the Group dropdown menu, click on “Edit…” and add the desired group
name.
Figure 22 Service/Event Properties – Edit Group
Repeat this procedure for all Services, that you want to add to a Group. Get into the
Event Explorer and add the desired Event to this new Group. Open the accordant Event
Properties of the Event, that you want to add to the new Group. Open the dropdown
menu under “Match service group”, “Edit…” and add the desired Group. This Event is
valid only for this Group exclusively.
7.4 Events and Priorities
Jobs and Event reactions in the UNMS are managed through the Event Explorer.
The UNMS shows the Sites and Services on a graphical screen as icons. Such icons
display their status according to the configured priorities. For example, if one service of the
Site runs into as critical defined status while another service of this Site is still in normal
status, then the whole site will be in a critical state and displays this through this higher
priorized icon.
To define which events are critical or not, you use the UNMS Admin Console tool Event
Explorer.
22
Figure 23 Admin Console – Event Explorer
The Event Explorer panel is your tool to add, remove or change Events.
An event may be an already predefined alarm of a Service like at the alarm “ups on
battery”. There are many predefined events found in the Event Explorer for UPS
(Uninteruptible Power Supplies), ATS (Automatic Transfer Switches), BACS (Battery
Analyse and Care System), network, alarm contacts, etc., additionally you have also the
option to add more events.
7.4 Starting and Stopping the UNMS II
You have to save and restart the UNMS before any of your configurations becomes
effective. You can restart the UNMS II using the start/stop commands in the UNMS II
Admin Console button bar:
Figure 24 Admin Console – starting/stopping the UNMS II
Restarting or stopping the UNMS or rebooting your UNMS server computer, is a longer
process and may take several minutes, depending on the size/amount of Sites, Serives
you have configured. When you restart the UNMS service, all remote sessions connected
to your monitored devices are logged out, any status and measurement data is
interrupted, all Web Console connections are unavailable until the UNMS II is restarted.
23
7.5 Working with the Site Explorer
Locate the Explorer Panel on the right side of the console. If you can‟t see the Explorer
Panel, use the View/View Site Explorer menu to show it. Select the first tab marked Site
Explorer. The displayed Sites and Services tree shows all sites and their related
services as defined within your UNMS.
Figure 25 Site Explorer
Single-click on the small box to the left of a site icon (building icon) to expand or collapse
that site in the tree.
Left-click on any object name to select that object.
Use the « Delete key » to remove the selected object.
Right-click on a site (building icon) or service icon (gear icon) or name to see the available
context menus.
Open a site tree and use the Edit/Insert Service menus or Button Bar buttons to add
service objects to the site tree.
7.6 Changing Service Properties
Using the Site Explorer tree, expand the site icon (building icon) that contains the service
of interest. Then Right-Click on the desired service icon (gear icon) and use the
“Properties” context menu.
Service Properties General: Enter the service name in the “Name” edit box. This is a
name to identify your device in the UNMS II listbox and graphical screen.
Service: Click the Service box to disable the monitoring of this service, if currently
unavailable.
24
Choose a Group for this service. „STANDARD“ is default. Define an individual name for a
group to configure group rules for those devices belonging to this group (see Group
configuration later in this manual).
Enter the Service IP address in the “DNS name or IP address” edit box. This can be an IP
address or as DNS name.
Choose the “Connection type”: For UPSMAN Software, CS121, BACS or any other
GENEREX device choose “CS121 compatible (UPSTCP)” and use the default IP port
5769. Other non-GENEREX devices are found as SNMP compatibles in the drop-downlist
box to choose.
Figure 26 Site Explorer – Service Properties – Connection type
For SNMP devices: Choose the appropriate vendor and enter the service community
string in the community edit box (community string is configured on the remote device, as
default select “public”). The default community is “public”!
DNS name or IP address: Enter a hostname or IP address of your Service, eg. The IP
address of your CS121 or SNMP card. At CS121 the default TCP port is 5769, at SNMP
the community string has to be entered in this menu.
Service Properties Info: For each Service you can provide information as plain text or
hyperlink which will be visible on the UNMS graphical screen as INFO button. You can
add, remove or edit text informations for this specific Service, such information is then
displayed on the UNMS II graphical screen and may help other UNMS II operators to find
additional informations or instructions for this specific site.
These entries are displayed under the corresponding service behind an INFO button.
25
Figure 27 Site Explorer – Service Properties – Info
You can add further information for every service. If you click the “More customer data…”
button, you can add an email address, which will receive an email, if you enable the
function “Send mail to contract” into the Job Editor.
Figure 28 Site Explorer – Service Properties – Contract
You can add additional information for every service as text or rather hyperlink. These
entries will be displayed below the accordant service.
Service Properties Report: In this menu you can generate automatic and manual reports
of the logged UPS data. Enter a start date and a start time and select the desired interval.
In addition you can enter email recipients into the box “Send report to:”. If you click the
“Generate report now” button, you can generate a report at anytime.
26
Figure 29 Site Explorer – Service Properties – Report
Service Properties Advanced - Remote Monitor: This is an option if you do not want to
use the HTTP default web-link of this Service. At GENEREX devices, the like the CS121,
the “landing” HTTP page is predefined. At non-GENEREX devices the Webserver can not
show the standard UPS layout. To change this you may enter here a different web-page to
connect directly to the Webserver page of this Service.
Figure 30 Site Explorer – Advanced – Remote Monitor – configured URL to Webserverpage of an APC Smartnetwork SNMP Card
27
The moment a URL is configured in the Remote Monitor, a doubleclick on this Service in
the UNMS will open the Webpage of this device directly, skipping the default display of a
UPSVIEW or other UNMS standard graphical screens.
Service Properties - Advanced - Data Logging : Enable this option to activate a local
log file in the UNMS server for this Service and define the interval for updating values (in
minutes). It creates a local logfile for this Service in the UNMS. Through this option you
may built up large databases for your Services monitored by the UNMS, without the
restriction of local flashrom limitations of SNMP cards.
Please note that you have to restart the UNMS to start logging functions.
If this option is enabled you will see in the UNMS interface a new button “Data charts”.
Click on this button to see the logfile of this Service grafically in the UNMS.
For old devices there is an option to enable the Legacy Mode. Open the properties of a
device, go to Advanced and enable the Legacy Mode for supporting devices with older
firmware (3.x).
Figure 31 Data charts button
When Data Logging is enabled, you can use the charts for inspecting the data and get a
long term history of this Service.
28
Figure 32 Data chart
Service Properties - Advanced - Copy logfile: From the UNMS II you may also export
the data into a CSV file. Goto copy the data of the local logfile of this Service via „Copy
logfile...“ to any other directory.
Figure 30 DataLog as CSV File – Time Reference Variable
The first variable into the CSV file “tref” (time reference) serves as basis point of time
(01.01.1970) for the determination of the current time.
29
Figure 33 Advanced
Service Properties - Advanced Communication Parameters: To change the timeout default
for SNMP network communication. If you have a slow network connection or SNMP device with
longer timeouts, this may causes constantly alarms because of slow responses to SNMP
requests. You may change these parameters to make the UNMS II more tolerant at this Service
(IP address) to avoid such false communication error messages. NOTE: This is only function in
Services using SNMP as Connection type.
Check “Let the UNMS generate the „upsGeneralFault‟ events” if it is not required to
distinguish
between
different
alarm triggers
– Then UNMS
will
generate an
„upsGeneralFault‟ for each alarm.
“Separate Sensor Manager events from other events” is a feature only for customized
UNMS software with SENSORMANAGER, not active in most standard UNMS.
7.7 Working with the Event Explorer
The Event Explorer is your tool for the configuration of events and reactions of the UNMS
II monitored Sites and Services.
Locate the Explorer panel on the right side of the console. If you can‟t see the Explorer
panel, use the View/View Event Explorer menu to show it. Select the second tab marked
Event Explorer. The displayed Events and Commands tree shows all events and their
related alarms and priorities as defined within your UNMS.
30
Figure 34 Event Explorer
Single-click on the small box to the left of a group icon (file icon) to expand or collapse this
event group in the tree.
Left-click on any object name to select that object.
Use the « Delete key » to remove the selected object.
Right-click on a group (file icon) or event icon (colored box icon) or name to see the
available context menus.
Open an events tree and use the Edit/Insert Event menus or Button Bar buttons to add
event objects to the tree.
7.8 Changing Event Properties
Using the Event Explorer tree, expand the events icon (file icon) that contains the desired
alarm. Then Right-Click on the alarm icon (colored box icon) and use the « Properties »
context menu to add/change jobs as reaction on this event.
31
Figure 35 Event Properties – New Event – Event Priorities
Event Properties Event Identifier: Choose the Event Identifier you want to customize or
to add to your event managed items. Open the Identifier drop-down list box and e. g.
select the event “upsOnBattery”. Default Event Priority is „0: Info“.
The UNMS II provides the following events, where most of these Events are not activated
by default :
Event
ATS Events (Automatic Transferswitch)
atsSourceBFailure
atsGeneralFault
atsRedundancyLost
atsOutputOverload
atsSourcesAsynchronous
atsStaticSwitchAFailure
atsStaticSwitchBFailure
atsOnStaticSwitchA
atsOnStaticSwitchB
atsOnManualBypassA
atsOnManualBypassB
atSourceAFailure
AUX Events (Auxiliary Contacts at AUX port)
32
auxPort1
auxPort2
auxPort3
auxPort4
comPin01
comPin06
comPin08
BACS Events (Battery Events when using BACS)
bacsCommunicationLost
bacsVoltageLow
bacsTemperatureHigh
bacsTemperatureLow
bacsResistorHigh
bacsResistorLow
bacsEqualizingError
bacsVoltageWarnHigh
bacsVoltageWarnLow
bacsTemperatureWarnHigh
bacsTemperatureWarnLow
bacsSystemFailure
bacsResistorWarnHigh
bacsResistorWarnLow
bacsStateCharging
bacsStateDischarging
bacs StateDischargingStopped
bacsStateFloatCharging
bacsVoltageFailure
bacsTemperatureFailure
bacsResistorFailure
bacsGeneralAlarm
bacsVoltageDiffHigh
33
bacsBatteryBreakerOpen
bacsVoltageHigh
Device Events (Common Device Events)
devCommon
devWarning
devCritical
RAS Manager (Teleservice RASMANAGER Events)
rasOutConnecting
rasOutConnected
rasOutFailure
rasInConnected
rasOutAutoConnected
Redundanz Ereignisse
grpOnBattery
grpAutonomy20Min
grpAutonomy15Min
grpAutonomy10Min
grpAutonomy5Min
grpRedundancyLost
grpRedundancy05Pc
Sensor Events
sensorHigh1
sensorHigh2
sensorHigh3
sensorHigh4
sensorHigh5
sensorHigh6
sensorHigh7
sensorHigh8
sensorLow1
sensorLow2
34
sensorLow3
sensorLow4
sensorLow5
sensorLow6
sensorLow7
sensorLow8
SiteManager Events (Sitemanager multiple Alarms)
sman2AnalogInput01
sman2AnalogInput02
sman2AnalogInput03
sman2AnalogInput04
sman2AnalogInput05
sman2AnalogInput06
sman2AnalogInput07
sman2AnalogInput08
sman2DigitalOuput01
sman2DigitalOuput02
sman2DigitalOuput03
sman2DigitalOuput04
sman2DigitalOuput05
sman2DigitalOuput06
sman2DigitalOuput07
sman2DigitalOuput08
sman2IoMarker01
sman2IoMarker02
sman2IoMarker03
sman2IoMarker04
sman2IoMarker05
sman2IoMarker06
sman2IoMarker07
sman2IoMarker08
35
SiteMonitor Events (Sitemonitor Digital Alarms)
smon2DigitalInput01
smon2DigitalInput64
smon2IoMarker01
smon2IoMarker16
System Events (UNMS system alarms and
notifications)
nmsStarted
nmsStopped
nmsAckByUser
nmsCmdByUser
nmsErrStates
netConnectionLost
netParseError
UPS Events (UPS alarms and events)
upsModelUnknown
upsBatteryBad
upsBypassBad
upsOutputOffAsRequested
upsOffAsRequested
upsChargerFailed
upsOutputOff
upsSystemOff
upsFanFailure
upsFuseFailure
upsGeneralFault
upsDiagnosticTestFailed
upsOnBattery
upsCommunicationLost
upsAwaitingPower
upsShutdownPending
upsShutdownImminent
36
upsTestInProgress
upsBatteryCharged
upsDieselOnLoad
upsDieselAvailable
upsEssentialBusBad
upsGenEssentialBusBreakerClosed
upsLowBattery
upsInputBreakerClosed
upsBypassBreakerClosed
upsEssentialBusBreakerClosed
upsDCDCConverterOn
upsManualBypassClosed
upsEssentialBusOverload
upsOutputBreakerClosed
upsSecondsOnBattery
upsEstimatedMinutesRemaining
upsDepletedBattery
upsTempBad
upsInputBad
upsOutputBad
upsOutputOverload
upsOnBypass
Event Properties Actions Display Name. Enter the name for this event in the Display
Name edit box. This Name will be displayed to identify your configured job in the UNMS II
logfilesEvent Properties Event Priority: Choose the event priority from the Event
Priority drop-down list for this new name and the corresponding event. This defines the
colour of the icon in the UNMS II graphical screen.
Event Properties Log Message: You can customize the message that is printed in the
event log. Default is “$(EVENT)”, which is writing only the standard event name into the
logfile. You may add now more log entries by choosing these from the drop-down list (see
fig. 24).
37
Event Properties Run a job: Choose the job to execute from the Run a job dropdown
list and add a desired delay in seconds into Delay actions:. To create a new kind of job or
change an existing one, select <New…> or <Edit…> from the Run command dropdown
list (see chapter 7.9 Changing Job Properties).
Event Properties Filters/Match service group: Select a specific service group to match
this event. Select “ANY” to match all target services.
Some events like „upsEstimatedMinutesRemaining“ provide the functionality to define a
threshold (Evaluate condition). The actions will be executed if this threshold is reached.
Figure 36 Event Properties – New Event – Evaluate condition
In Figure 31 the Event Identifier is „upsEstimatedMinutesRemaining“. Actions described
below (set color to “Critical”, log Message $(Event), run a job “Default”) and “ANY” Group
member will use these settings if the value „upsEstimatedMinutesRemaining“ is less than
5 (Minutes).
7.9 Changing Job Properties
You can change Job Properties within the Event Properties dialog. Choose the job name you
want to change from the Jobs list or click the Add button to add a new customized job.
38
Figure 37 Event Properties – New Event – Run a Job – create or edit a new Job
Check the Write to log file box, if this event should be written to the UNMS Event Log file
(default is on).
Check the Show local Alarm box if this event should be displayed in the local Alarm Box of the
UNMS server.
To send an email when this Event occurs, click the “…” button behind the “Send Email” row and
enter the accordant email recipients.
Figure 38 Email-Addresses – List of Recipients
Note: To enable Send Email, you must first configure the outgoing mail server in the Email
page under the Tools/UNMS Options menu.
Run RCCMD: This is a shutdown and messaging tool to remotely shutdown computers or send
messages. To run RCCMD, when an event occurs, click the „…‟ button on the left of the Run
RCCMD edit box. In the following dialog you can enter the RCCMD arguments for 1 IP address
or RCCMD hostname.
39
Figure 39 RCCMD Configuration
If you want to send several RCCMD signals to several RCCMD clients, it is required, that
you edit an accordant amount of identical events and jobs.
Figure 40 RCCMD Configuration for several RCCMD Clients
As a result on your RCCMD clients a messagebox will appear (see below) or a shutdown will be
executed. For more details about RCCMD functionality, please use the RCCMD user manual.
Figure 41 UNMS Alarms Message Box
To run multiple RCCMD shutdowns or messages or to use broadcast, use the listbox or reopen
the RCCMD configuration to add more RCCMD clients.
40
To run an external program when an event occurs, click the „…‟ button on the left of the
Run Program edit box. In the following dialog you can enter the program name and zero
or more program arguments.
Figure 42 External Program
7.9.1 Configure RCCMD Server Jobs
Using the Event Explorer tree, expand an events icon (file icon), that contains the alarm of
interest. Then Right-Click on any of the alarm icons (colored box icon) and use the
Properties context menu to open the Event Properties dialog.
Select “<Edit…>” under Run job to open the “Job Editor” dialog (see below)…
Now select a Job or create a „[New job]“ in the Event Properties for the desired Events
that should trigger the RCCMD command.
Figure 43 Event Properties – Run a job
To configure a RCCMD command directly, click the „...“ button behind Run RCCMD.
You can enter the accordant IP addresses/host names and the port. Furthermore, you can
enable SSL. The functions „Send Shutdown command“ and „Send message“ are at hand.
41
Figure 44 Job Editor – Run RCCMD – RCCMD configuration
8. Customizing UNMS
Note: The Site Maps function is not available in all editions. In addition Site Maps views are not live
views ! You have to save and restart the UNMS to see the changes in the UNMS webserver !
8.1 Working with Site Maps
Locate the View Selection on the top of the console. Select the second tab marked Site Maps.
The displayed editor screen shows the background and the layout of all site icons as they will be
displayed later in a Web Console.
42
Figure 45 Site Maps – Europe Card
No.
1
2
3
Name
Description
Editor Tab
Click on the Site Maps tab to switch to the editor mode.
View Selection
Click the Sites button to switch to the main screen.
Click the Services button to switch to the services list.
Screen
Designer
Here you can layout the site icons by drag-and drop operations, add new sites and change
existing site properties.
Left-click on any object icon to select that object.
Use the Delete key to remove the selected object.
Right-click on a site icon to see the available context menus.
Double-click on a site icon to switch to the service list view mode.
For how to set Site Maps properties, see Setting Editor Options.
8.2 Sub-Screen Editing
The UNMS II provides to create several sub-menus, e. g. a screen as main page and several
other screens as sub-screens. Please do the following to edit such sub-screens.To build a subscreen use the “Edit menu” and click “New Site…”.
Enter the name into the “Site name” box.
Check the box Background image file. In this example the “Europe.png” file was
selected with the “Browse…” button, which is integrated in the UNMS II.
Figure 46 Site Maps – New Site – Background image file
Build a new site on the sub-screen eg. “europe” with the function “New Site…”. In this example
the sub-screen “Hamburg” is following. A graphic file type PNG with the desired background has
to be copied into the directory C:\UPS\unmsII\www\image\. The size of the PNG file depends
on the resolution of your display. To have a perfect screen you may resize you pictures.
On the sub-screen “Generex Headquarter” the sub-screens “HW121, HW131, BACS” were built.
43
Behind this sub-screens determine services. In this section you can build the objects (e.
g. UPS) via the Site Explorer with the “New Service” function.
Figure 47 Site Properties – New Site – Web Console View
The status of the services will be displayed via the icons on every sub-screen. The colours of the
status will be combined displayed on the overlaying sections, so that an ANY alarm in the screen
of “HW131” will be displayed on the section “europe” with a red LED.
Save your settings and restart the UNMS II.
Figure 48 Web-Browser – LogFile
Advice: It is required to create all Sites at first and to select the desired background pictures. As far
as a Service is defined, it is not possible to change the background anymore!
9. UNMS Options
Note that the Site and following page are not available in all Editions.
44
Figure 49 UNMS Options
9.1 UNMS Options - Editor
In the UNMS Options you may change backgrounds, configure Email,
passwords, configure Logging options and setup UNMS System settings
setup login and
Use the Browse… button to locate a background image for the Web Console main screen.
Note that the image must be in the UNMS image directory. Not in all Editions: Choose the stripe
set for the site icons in the Web Console from the Map site icon stripe drop-down list.
Select the Hide the site icon labels box to hide the icon text labels in the Map Editor view.
Press the OK button to save your changes.
9.2 UNMS Options - Email
To send out Emails from the UNMS you have to setup an email account and configure it in the
Email menue:
Click the Enable Email Client box to activate the Email Client for the UNMS.
Set the Outgoing Server (SMTP) to the IP address of your Email server.
Set the Sender Email Address to an Email address that is valid at the server above.
Click the Use Authentication box if the server from above requires user authentication.
Enter the authentication user name and related password in the appropriated edit boxes.
Enable the feature Use secure connection (TLS encryption), if you want to use email
encryption and adjust the SMTP port accordingly, if necessary.
45
Figure 50 UNMS Options - Email
9.3 UNMS Options – Email Traps
The Email Trap feature provides the transfer of the device data via POP protocol to the
UNMS II service. You can configure the connection type, like the other ones (UPSTCP,
SNMP, RAS), into the AdminConsole. This function is available into the Data
Center/TeleService Edition (optional software extension for the UNMS II) only.
This agent can assimilate incoming data (incoming email traffic) only in contrast to the
other agents, but might be the optimal fitting for relevant o security customers and remote
monitoring.
For the usage of the Email Traps are the following conditions required:
Email box/user is an email account for all devices, which will be monitored via
Email Trap
Email transfer protocol: POP
Email data type: JSON data as attachment must be accredited
Configuration mail server: Global email configuration must be equipped (see
chapter 9.2)
Configuration email client: As connection type per device into the UNMS II.
The settings will be described as follows:
46
Figure 52 UNMS Options – Email Traps – Account settings
Enter the accordant incoming server (POP3), the user name and the password. Click the
“Advanced settings…” button for further settings, which are required for your mail server.
Figure 53 UNMS Options – Email Traps – Advanced Settings
Click the “Check settings” button to check the connection to your mail server. You should
get the message “Connection to POP3 server successful” after a couple of seconds.
Now add some devices, which should be monitored via Email Trap:
47
Figure 54 UNMS Options – Email Traps – Service Properties
Select the connection type “E-Mail Traps” and enter the accordant MAC address of the
CS121.
Caution: If you choose SNMP, be sure your device utilizes SNMPv2. SNMPv3 is NOT
supported.
Figure 55 UNMS Options – Email Traps – Service Properties – MAC address
The interval of the “UNMS II Heartbeat” will be defined at the CS121. The “UNMS II
Heartbeat” is a regularly sent email, which transfers the status of the device. If the email
will not be received, the UNMS II will trigger a warning. If no alarms will occur, the UNMS
II heartbeat email will send the latest measuring values regularly.
48
Every grafical UPS/device screen contains a timestamp, which displays the last incoming
Email Trap or UNMS II Heartbeat.
Figure 56 UNMS Options – Email Traps – Screen with timestamp
Every alarm triggers beside the regular UNMS II Heartbeat a further one, which will be
sent immediately. This means, that the display is always up to date at alarm states, but will
be updated in normal operation just in higher intervals (see timestamp). Advice: A direct
connection via web-browser, like at networks, is not possible, this button
is not at
present into this display. If you want to log the measuring values, it is required to enable
the datalog function into the UNMS II (see chapter 7.6).
9.4 UNMS Options – Users
With user management you can restrict and audit user capabilities and actions. There are three
predefined users: admin, operator and guest. The predefined passwords are equal to the user
name, for example „admin‟ for the admin user.
To disable access control, click the Anonymous Access box (not recommended). Click the
New button to add a new user account. Click the Properties button to change an existing user
account. Click the Delete button to delete an existing user account (Note that the predefined user
admin can not be deleted).
49
Figure 57 UNMS Options – Users – User Properties
Note on groups: The users group defines the access level as follows:
Administrators: Full access to all UNMS capabilities.
Operators: Full access from Web-Console, but no access to Administrator Console.
Users: Read-only access from Web Console
In UNMS Options -> Users you may set an automatic Logout. After that time the user has
to reenter the password. Please be aware that the operation will only work correctly with a
web browser. In the administration console you may configure still devices and events
after logout.
9.4.1 UNMS Options – Secure Settings
Advice: The Secure settings function and the following menu are available with the TeleService
Modul only.
The Administrator can control or rather allocate the access authorization of the Sites to
groups via Secure settings. The sub sites inherit the authorization of the Site
automatically. You can see in the following example, that a group „Hamburg“ was created,
which should be authorized for the group members Hamburg and Administrators.
50
Figure 58 UNMS Options – Users – Secure Settings
Thereby it is secured, that the group Hamburg (and Administrators) get access to the Site
Hamburg and its sub-sites “Nord” and “Süd” only. The other Sites BACS, CS121, Email
Traps, Facility Management and Foreign Devices, as you can see in the above example,
are not apparent for the group Hamburg.
Figure 59 UNMS Web Console – Login Group Hamburg – Start Screen
51
9.5 UNMS Options – Logging
Under Event log file schedule you can save log files for different periods of time. They can
contain Event logs for a day, a week, a month or a specific amount of memory. If you want to
save several days, weeks etc. you have to change the Number of old logs to keep accordingly.
Figure 60 UNMS Options – Logging
Under Data log file schedule you can save log files for different periods of time. They can
contain Data logs for a day, a week, a month or a specific amount of memory. If you want to
save several days, weeks etc. you have to change the Number of old logs to keep
accordingly.
9.6 UNMS Options – System
On the System page it is possible to modify the TCP port, the refresh rate, check interval and the
service lost delay by clicking the box.
Figure 61 UNMS Options – System
52
10. Configuration Backup and Restore/Software Update
To allow UNMS updates and for not to loose your configurations we strongly recommend
to save a UNMS backup file whenever you make changes. With this backup file you may at
anytime remove and reinstall or update your UNMS software and load the configuration
later afterwards again.
In the “UNMS Administrator” Program open the “File” menu and choose the “Backup…”
item to open the “Backup files” Dialog.
In the field for “Backup to” enter a Name for your Backup (In this example we used
“newBackup”).
Click the <Backup> button to save a backup of the configuration under this name.
Figure 62 UNMS Backup – Backup files
In the “UNMS Administrator” Program open the “File” menu and choose the “Restore…”
item to open the “Restore files” Dialog.
Select the name of the Backup that you to restore from the list of available Backups (In this
example we used “new Backup”). Click the <Restore> button to restore the selected
backup of the configuration.
The following message request your confirmation to use the backup as the current
configuration. Click the <Yes> button to restore the configuration from above.
Please note that you must restart the UNMS before this configuration changes (the
backup) take place.
53
Figure 63 UNMS Restore – Restore files
If you want to update the UNMS II version, it is required to deinstall the old version, install the
current UNMS II version and to use the „Restore“ function for the usage of the desired
configuration.
11. UNMS Redundancy Configuration
The UNMS redundancy configuration is an optional feature of the UNMS and requires and
additional license upgrade. If you do not use the Redundancy UNMS Version, you may skip this
chapter and continue with the following Chapter 12. UNMS redundany is useful if you should
have devices/sites which are working in a redundant mode, eg. a 2 UPS which are having their
own SNMP or CS121/BACS manager, but working in parallel and redundant. If one of these 2
UPS would stop working, running on battery, etc. (any EVENT is possible) you may not want to
execute shutdowns or major alarms. In such a situation it may be useful to define that only minor
alarms / jobs are started if the other UPS is still running fine. For such a configuration you may
use the Redundancy configuration described in the following chapter.
Open the Redundancy configuration via “Tools” into the Administrator Console. The configured
services/devices in your UNMS will appear in a list box.
Figure 64 UNMS Redundancy Configuration
Mark a service and click the „Configure service...“ button to get into the Service redundancy
configuration.
54
Choose now the Services in your configuration where you have a parallel redundancy situation
and move these to the windows “Services selected for the Redundancy Group” and choose
the redundancy level.
Click on “Configure redundant service” to configure the Events on these devices that may
have an effect on the system they are backing up. Typical risks are overload situations on a
single Service which would not be seen as long as the system runs in parallel and the load is
distributed between the other UPS in the group. But if one or more Redundancy Group members
should fail, than it could be possible than ALL the load has to be burdened by the remaining UPS
– which could be too much. To avoid this situation you may want to configure an “redundancy
lost alarm” in case the load in the group would exceed that amount a single device could supply.
For this setup you have to define the redundancy level of this Redundancy Group.
In the following we describe as an example the configuration for a setup of 2 UPS which are in
parallel and redundant. In case one of the 2 UPS load increases more than 50% and overload
condition could make also the second UPS fail. To avoid this situation is may be important to
watch the load on both UPS and trigger an alarm if the load should increase on one of the 2 of
more then 50%.
Since there are just 2 UPS in the Redundancy Group, the redundancy level can be only “1”.
One of the 2 UPS may fail and the remaining one is capable to supply the load. (“0” would mean
“no redundancy” – this would be identical as if you configure a single Service, no redundancy at
all).
By choosing 2 UPS as the Redundancy Group the redundancy lost alarm threshold is
automatically set to 50% on each. If you choose 3, the UNMS automatically lowers the level to
33.33% of the redundancy level is 1. At a higher redundancy level the load level would
automatically increase. So, the automatic alarm threshold load parameter is set be the UNMS
through the number of Services in the Redundancy Group and the redundancy level.
All events will appear into the left section as Available events, which have been previously
configured into the Event Explorer or are default. Alike the example with individual Service LOAD
you may configure other Events. Enter the true power of the UPS into „Nominal Ouput Power
(in kVA) “. Therefore, the UNMS II is able to calculate by itself, if a shutdown is really required, in
case the load is increasing. The more parallel redundant systems you define, the more the load
value for a single device will decrease. E.g. if you have 3 UPS in parallel redundancy, than the
load per single UPS would be 33.33%, etc.
Figure 65 UNMS Redundancy Configuration – Redundant Service Configuration
55
In the EVENTs you will find now new events, the Redundancy Events. The following special
Redundancy Events events are available:
grpOnBattery – The redundancy is lost, both UPSs are actually running on battery.
grpAutonomy20Min – The redundancy is lost. The UPS in the redundancy Group
with the lowest autonomy time is the one that determines if this event is TRUE. If
during a battery operation any of redundancy Group members are reading an
autonomy time of less than 20 minutes, the defined job will be executed.
grpRedundancyLost – The redundancy is lost. This is a warning and should tell you
that actually the load of the redundant system is too high for the configured
redundancy level. If in this situation one of the group members would fail, the
remaining Services could be in an overload situation. This event is designed to warn
the user of such a situation.
grpRedundancy05Pc – The redundancy is lost. This job will be executed, if the
overall load is more than 95% on every single phase. Only 5% load reserve is
avaiblabe now. This is an option for a a « Pre-Warning » of the above described
« grpRedundancyLost » event.
Figure 66 UNMS Redundancy Screen of 2 UPS, showing the reserve power on each
phase.
56
11.1 Example Shutdown of a computer with redundancy
A powerfail, which will trigger a RCCMD shutdown signal to a remote client in
a redundant group consisting of two UPS, will be desribed in the following
example. This shutdown will only be sent, when both UPS are in battery mode.
After both device are registered and configured in the redundancy
configuration (see chapter 11), a new event has to be made in the folder
‚Redundancy Events. Choose ‚grpAlarmOnBattery„, a display-name, a high
event priority and if required a delay for the event. Now create a RCCMD
job, by choosing <Edit…> in the drop-down menu ‚Run a job„, here
choose a name for the job and set the the IP address of the receiver for
the RCCMD shutdown.
Figure 67 UNMS Redundanz- Job für RCCMD Shutdown in der Gruppe
57
12. UNMS SMS Configuration with GSM Modem
The UNMS version 2.1.13 provides the option to configure a SMS job. Open the Event
Properties of a desired Event. Click the “Edit” (1.) button.
Figure 68 UNMS Event Properties – Send SMS
Click the “Add” button, enter a desired name for this job, e.g. “Send SMS” and click the 2.
button.
Figure 69 UNMS Event Properties – Send SMS Job
58
Enter the accordant COM port, where the GSM modem is connected and enter the baud
rate. Enter the receiver telephone number (up to 7) into the “Phone numbers:” field.
Figure 70 UNMS Event Properties – SMS Configuration
13. UNMS Configuration of RASMANAGER
The UNMS RASMANAGER configuration is for the use of RASMAN_A – analogue
Modem Dial-in/Dial-Out and requires a « Teleservice » license. If you do not use the
RASMAN_A , you may skip this chapter and continue with the following Chapter 13.
Please note, that the RASManager is not compatible with Windows VISTA and
Windows 7 yet. To work with RASMANAGER you have to purchase the « UNMS
TELESERVICE MODULE » as license upgrade for your existing UNMS license. Please
note, that any UNMS optional module is only working with commercial versions of the
UNMS, not with any free UNMS license.
To integrate RASMANAGER devices in the UNMS monitoring, you have to setup the
RASMANAGER first. How to setup a RASMANAGER is described in the CS121 user
manual, following an abstract of this manual.
You may skip this chapter, if your RASMANGER has been already installed.
The configuration
« Configuration ».
59
of
RASMANAGER
/
UNMS is
found in
the
menu
under
Figure 71 UNMS RAS Configuration
Please note, that this function requires a RASMANAGER license key which is optional for
CS121 and BACS systems (only included per default in a RASMANAGER).
Configure/Select the accordant UPS model in your RASMANGER and define the
parameter of the LAN interface for the connection at the customers network.
The usage of the LAN interface is optional and is not required for the modem connection.
If no customers network is present, you can accomplish the following settings from a
notebook via cross-cable. Assign the IP address 10.10.10.11 for your notebook.
For setting up a CS121 or BACS system, please refer to the user manual of these
devices. We describe here only the RASMANAGER related parts.
For the configuration of the connection settings of the modem operation, please get into
the „RAS Configuration“ menu.
13.1 RAS Client Settings
Figure 72 RAS Manager Settings 1
60
At first enable the „RAS Client“ (1). The client is the module, which will establish the
connection to the UNMS II workstation.
Enter the number of the modem (2) of the UNMS II with Teleservice Module. Please note,
that in some telephone system a prefix number (e.g. 0) is may be required to get an
outside line.
Enter the IP address of the RAS server for incoming calls from the UNMS. This IP adress
will be active the moment a UNMS dials into the RASMANGER. It will be a different IP
adress than the one this device would have if running in your LAN. This IP adress has to
accessible from the UNMS via MODEM and therefore has to be configured also on the
UNMS side as „Destination Address“ (3). This address will be defined later into the UNMS
Teleservice Module and should be set to ALL RASManagers monitored by this UNMS.
It is required to set a „Username“ (4), which has to be different for every single
RASManger (e.g. UPS1, UPS2 etc.). The Password (5) may be identical, but the
username MUST be different and later configured in the UNMS Teleservice Module.
Figure 73 RAS Manager Settings 2
Enable the „RAS Server“ (1). The server receives incoming calls from the UNMS II
workstation. If you do not want to allow that UNMS dials in (only dial out for alarms), you
may deactivate the server. In this case the RAS server will trigger alarms to the UNMS II
workstation only, but UNMS can not dial back to check the actual situation.
It is required to enter a „Server IP Address“ (2) at the different RASManagers to be able to
differentiate the connections (e.g. UPS1 = 192.168.10.11, UPS2 = 192.168.10.12 etc.).
You can use the same „Password“ (4) for all RASManagers.
61
To finish the RAS configuration successful, it is required to set the „COM2 Mode“ to „RAS“
into the „COM2 & AUX“ menu. You can use the default values for the baud rate and the
parity.
Figure 74 COM2 Settings – RAS
13.2 Configuration of the Events for Modem “Dial-Out”
The operator can define via „Event Configuration“, for which alarm a message should be
triggered to the UNMS II workstation.
To trigger a UNMS dialout message at an overload, it is required to select the function
„Send RAS Notification“ (1) into the event „Overload“.
Figure 75 Job Editor
You can enter any text into the window „Message“ (2). In this example this text will be
transferred to the UNMS only if the event « Overload » is active for more than 60 seconds.
To finish the configuration of the RASManager, it is required to save your settings via the
menu „Save Configuration“, „Save, Exit & Reboot“. After the RASManager has rebooted
(status LED is flashing green), put the DIP-Switch into the position „On“ to integrate it now
into your network and to leave the configuration mode and reboot it again. (Unplug the
power supply for about 3 seconds. ) After the RASMANAGER has rebooted you see a
green flashing LED and you can continue now to configure your UNMS TELESERVICE
settings.
62
13.3 Configuration of the UNMS II Workstation for incoming Dial
Connections (Windows XP, SP2)
!!! The support for Windows XP was dropped since UNMS II version 2.0.12 !!!
If your UNMS runs on a Windows XP, some settings have to be made on the XP system
to make RAS service available.
The Windows internal RAS server is used for the receiving of incoming connections of
UPS. Get into the network connection via the control panel and click the „Create New
Connection“ button.
Figure 76 Connection Wizard
Click the „Next“ button and select the „Set up an advanced connection“ option.
Figure 77 Connection Wizard – New Connection Type
Select the „Accept incoming connections“.
63
Figure 78 Connection Wizard – Advanced Connection Options
Select the desired modem out of the device list.
Figure 79 Incoming Connection Properties
Enable the option „Do not allow VPN connections“.
64
Figure 80 Incoming Virtual Private Network (VPN) Connection
For the determination of the incoming calls, it is required to create an own user for every
UPS. Click the „Add“ button.
Figure 81 User Permissions
The „Username“ and „Password“ have to be the same ones as for the RAS client of the
RASManager.
65
Figure 82 New User
Now it is required to enter the IP addresses, which will be assigned from the server during
the dial-in. Enter the „Destination Address“ as starting address, e.g. 192.168.199.1 (1).
If you have set only one modem for dial-ins, it is enough to set an address range till
192.168.199.2 (2), but it is possible to set a wider range (192.168.199.30). In this case, it
would be possible, if you are using several modems, to receive 30 connections at the
same time.
Figure 83 Incoming TCP/IP Properties
13.4 Configuration of the UNMS II Workstation for incoming Dial
Connections (Windows Server 2003)
If your UNMS runs on a Windows Server 2003, some settings have to be made on the
W2003 system to make RAS service available.
66
The Windows internal RAS server is used for the receiving of incoming connections of
UPS. Get into the Routing and Remote Access menu via the Administrative Tools. Enable
the Routing via the context menu.
Figure 84 Routing and Remote Access
Figure 85 Routing and Remote Access Server Setup Wizard
Select the « Remote access (dial-up or VPN) « option.
67
Figure 86 Routing and Remote Access Server Setup Wizard Configuration
Select « VPN ».
Figure 87 Routing and Remote Access Server Setup Wizard Configuration, VPN
Select the network interface.
68
Figure 88 Routing and Remote Access Server Setup Wizard Configuration, VPN
Connection
Figure 89 Routing and Remote Access Server Setup Wizard Configuration, Network
Selection
Select « From a specified range of addresses ».
69
Figure 90 Routing and Remote Access Server Setup Wizard IP Address Assignment
Enter the desired IP range.
Figure 91 New Address Range
Select “No”, if you do not use a RADIUS server.
Figure 92 Routing and Remote Access Server Setup Wizard IP – Multiple RAS
70
Figure 93 Routing and Remote Access Server Setup Wizard Completion
Now you server is enabled as remote access server.
It is required to configure the authentification method « Unencrypted password (PAP) ».
Click with your right mouse button (context menu) on your server into the « Routing and
RAS » menu. Select « Properties » and click the « Authentication Methods… » button.
Figure 94 Local Properties
71
Figure 95 Authentication Methods
Please note, that all other authentification methods have to be disabled!
Figure 96 Routing and Remote Access GX206 (local)
It is required to create a new remote access policy. Right-click on Remote Access Policy
and select « New Remote Access Policy ».
72
Figure 97 Routing and Remote New Remote Access Policy
Select « Set up a custom policy » and enter the desired name.
Figure 98 New Remote Access Policy Wizard – Select Attribute
Select the attribute « NAS Port-Type, Async (Modem) ».
73
Figure 99 New Remote Access Policy Wizard – NAS Port-Type
Figure 100 New Remote Access Policy Wizard – Policy Conditions
Specify the conditions via the « Add » button and select « Grant remote access
permission ».
74
Figure 101 New Remote Access Policy Wizard – Permissions
Click the « Finish » button to complete your configuration.
Figure 102 New Remote Access Policy Wizard – Completion
After the set up of the custom policy « UNMS Dial-In », it is required to configure the
« Unencrypted authentication (PAP, SPAP) ». Click the « RAS policy » button into the
« Routing and RAS » menu and click with your right mouse button (context menu) on
« UNMS Dial-In ». Select « Properties », click the « Edit Profile » button and open the tap
« Authentification ».
75
Figure 103 Teleservice Properties – Edit Dial-in Profile
Please note, that all other authentification methods have to be disabled !
12.5 UNMS Teleservice - Create a Modem Connection
Create a new service and select as connection type „RASManager compatible“.
Figure 104 Service Properties
Click the „RAS properties...“ button for the configuration of the parameters. At first, it is
required to create a modem connection via the „Configure RAS...“ button.
76
Figure 105 RAS Properties
The Windows PPP configuration will start now. For the usage of the Windows
Configuration we refer to Microsoft user manual or help. We describe in the following only
the most important configuration issues which you have to configure to a Modem
connection..
Create a new „Local Area Connection“ via the button „New“.
Figure 106 Network Connections
Select the option „Connect to the network at my workplace“.
77
Figure 107 New Connection Wizard – Network Connection Type
Select the desired modem out of the device list. The MODEM on your UNMS has to
installed already. The supported Modem by UNMS is the type DEVELO/Microlink or
compatibles.
Figure 108 Network Setup Wizard
Enter an unique name, no other RASMANAGER device in your UNMS should have the
same name.
78
Figure 109 New Connection Wizard – Connection Name
Enter the accordant telephone number of the RASManager. This is the telefonnumber the
UNMS has to dial to reach this RASMANAGERs Modem. If any prefix is necessary for
your Telefonesystem, please add this or configure this in your MODEM configuration.
Figure 110 New Connection Wizard – Phone Number to Dial
Click the „Properties“ button to configure the network settings.
Figure 111 Network Connections – Choose a network connection
Click on the „Networking“ button to configure the network settings for this MODEM PPP
connection.
79
Figure 112 Network Connections – Networking - Advanced
And on the Networking page on the „Properties“ button.
Click on „Advanced ....“.
Disable „Use default gateway on remote network“.
Figure 113 Internet Protocol Properties – Advanced TCP/IP Settings
Click the „Connect“ button to.
Figure 114 Network Connections - Connect
80
Test your connection by dialling it manually. Enter the username (1) and the password (2),
which you defined into the RAS Configuration of your RASMANAGER for the „RAS
Server“. Windows offers to save and remember these settings and use it for the following
users, please activate this function (3) Select the option „Anyone who uses this computer
(4). Finally click the „Connection“ (5) button to dial out to your RASMANGER and establish
a connection.
Figure 115 Network Connections - Dial
If all settings were defined properly, the following icon will appear into the task bar in the
lower right side.
Click the right mouse button onto this icon, select „disconnect“, to disconnect manually
created connection (Click the „Cancel“ button) and check this later with your UNMS
Teleservice.
Figure 116 Connection Icon - Network Connections – Cancel manually created connection
Now enter and the „RAS dial settings“. Enter the accordant IP address of the
RASManager server.
To avoid manually executed modem connections for a longer time, you should enable
„Disconnect“ function and set a time between 5 and 10 minutes.
81
Figure 117 RAS Properties - Settings
You have successfully setup your RASMANAGER and UNMS Teleservice. Restart the
UNMS now and connect via MODEM to your RASMANAGER.
Figure 118 RAS Properties - Settings
82
To test incoming alarm calls we recommend to create an alarm on the RASMANAGER
side and watch if the connection gets established and if the UNMS picks up the call and
displays the alarm.
If this works, your installation of RASMANAGER and configuration of UNMS
TELESERVICE is finished and you may add in the same way more RASMANAGERs to
your UNMS Teleservice, until the number of licenses reached. To extend your UNMS to
more RASMANAGERs, please purchase and upgrade of your exisiting TELESERVICE
license.
14. UNMS – Web Console
A UNMS is mainly monitored from remote by using a Webbrowser. A Webbrowser is described
in this manual as a Web Console. The Webconsole shows the actual status information,
historical logs and all reports can be accessed and inspected. This allows you to access your
management information from different computers of different customers or facilities in your
network. By using multiple Web Consoles, you can encourages sharing of management
information by many people.
You can login from any workstation that is running TCP/IP and is connected to your network
(e.g. over the Internet, DSL, leased line, LAN, VPN, etc.).
The Web Console has the following requirements:
You must enable JavaScript in your browser.
Your browser must support the XML standard.
You should allow Cookies from the UNMS server system.
You should allow Popup Windows from the UNMS server.
The Web Console will operate best with recent versions of the
Microsoft Internet Explorer and the Mozilla Firefox browsers.
Using your Web browser from any system, enter the address for the UNMS start page as follows:
”http://a.b.c.d/unms” where a.b.c.d is the IP address or DNS name of your UNMS server
system. The Web Console will be executed inside your Web browser.
Web Console – Notification Area: Whenever a critical event occurs then the UNMS will bring
up a notification box with an audible alarm on every connected Web Console. You can click the
Speaker icon to mute the sound for this notification.
83
Figure 119 Web Console – Notification Area
Web Console – Main Screen: You can view the Main Screen by using the Home button.The
following diagram and table shows the main elements of a Web Console
Web Console – Viewing a Site: You can view a particular site from the Main Screen. The
following diagram and table shows the site elements of a Web Console.
Figure 120 Web Console – Main Screen
84
No.
Name
Description
1
Alarm Bar
Displays new alarms graphically (red blinking) and acoustically (beep). To mute
click on the loudspeaker symbol. Any incoming new alarm will remove the
previous displayed alarm.
2
Menu Bar
Navigation to the main/home page of your UNMS. Also for viewing LogFile,
Sign Out, Help and About box with UNMS version and module information
3
Navigation
Bar
navigate backward/forward between the UNMS last screens
4
Site
The name of the current site
Main Frame
Graphical view of sites and services. The contents depends on the current
UNMS location.
5
Click on an icon to view it‟s details (see also: Viewing a Service).
.
Web Console – Viewing a Service : You can view the status of a particular service from the
Site View or the Logfile View. The following diagram and table shows the typical service
elements of a UPS in a Web Console. Services (UPS, BACS, SITEMANAGERs,
SENSORMANAGERs, CS121, ATS Automatic Transfer Switches etc.) may have individual
screens. The UNMS will display the graphic for this device – depending on the manufacturer of
the device – in different styles. For details about such individual device screens please refer to
the user manual of this UPS or other product.
Figure 121 Web Console – Site View
85
No.
Name
Description
1
Location
Bar
The location/name of this service within the UNMS.
2
Link
Button
Direct link to the web-interface of the CS121 of this UPS. With this button
you leave the UNMS and open a separate browser windows to reach the
device internal webserver directly.
3
Service
Panel
Schematic view of the service status and values. Here the display of a
standard UPS single phase.
4
Service
Status
Displays the service status. The LED shows the event priority color and
the event messages text that you have defined for the actual service
status. Green is signaling that the device is OK, yellow is showing a
warning, red is showing that there is an alarm present.
Related to the service type you have defined, you are able to click the
LED or the text to navigate to the web-page of this service (e.g. CS121
Web Adapter).
5
6
Data
charts
Click on this button for the display of the UPS values into a chart. To
activate this function you have to enable the UNMS logging for this device
– see page 26.
Log file
Click on this button to show all text log files of this device since it became
a member of the UNMS system.
When UNMS is running you may connect to every Service by a doubleclick on the Icon
(marked as « 2 » in figure 99) to see the UPSVIEW screen for this device. If you want to
leave the UNMS an get directly redirected to the inbuilt Webserver of this Service, than
click the > Button – this will open a webbrowser directly to your Service where a new login
may be requested.
Generally the colors signify the alarm levels. Green means « in use and OK », Yellow
means « not in use, standby and OK », Red means « Alarm, not ready »
Web Console – Viewing the LogFile: You can view the Logfile by using the Logfile button.
The following diagram and table shows the logfile elements of a Web Console.
86
Figure 122 Web Console – LogFile View
No.
Name
1
Filter Bar
Description
Here you can choose between various filter options to spare you
from having to read through the complete history.
Click on the Show button to apply your filter options to the current
logfile view.
2
Historical
Log
A table that contains all historical event information‟s. You can
browse the table by clicking on the Previous, Next or New button
above of this table.
Click on a service name to view the service data (see Viewing a
Service).
15. Monitoring Extension
If you want to extend your UNMS II for further UPS, it is required to upgrade your license. Click
into the UNMS II Administrator Console the „Help/About UNMS“ button and click the „Change“
button in the new window.
Advice: The upgrade is valid for the extension of objects/devices. The upgrade is not valid, if you
want to add UNMS Modules (e. g. TeleService).
87
Figure 123 About UNMS – Monitoring Extension
Select the accordant path to the UNMS II Key File, import it and restart the UNMS II.
Figure 124 Monitoring Extension – Import UNMS license file
16. Getting Technical Support
You can view the Support Page by using the Help menu from the status bar. The following
diagram and table shows the help elements of a Web Console.
88
Figure 125 Help Menu
No.
Name
Description
1
Menu
Click on the Help button to view the help page.
2
User
Manual
Click on the View documentation button to open this User Manual.
Support
Email
Click on the Contact support to send an email to the technical
support.
3
Note that this manual is delivered in the common Adobe PDF
format. If you do not have the Adobe's Acrobat Reader installed yet,
you can download a free version from the Adobe website at
"http://www.adobe.com".
17. Troubleshooting
17.1 Problems at Execution of the Setup
If the setup does not start or you receive the following message,
Figure 126 Opening setup.exe
it is required that you open the “start.htm” via the context menu, click the “Open with” button and
select the Internet Explorer.
89
17.2 Problems during Installation
If you get the following error message during the installation, it is required to reinstall the IIS.
Figure 127 UNMS II Server Setup Error
17.3 The Service “Network Lost” Event is notified too fast
If the network connection to one or more monitored devices/services is lost periodically due
problems with this devices or your network, then you may want to define a grace period for the
notification of this event.:
Open the Administrator Console and choose „UNMS Options‟ from
the „Tools‟ menu. Then choose the „System‟ page tab in this dialog.
Select the „Modify service lost delay‟ box and enter your delay for the
notification of the „Network lost‟ event in seconds in the edit field (The
default value for this delay is „0‟ seconds).
Hit the „OK‟ button and restart the UNMS server.
17.4 A running Skype Program claims the UNMS Web Port
The UNMS Web Server may not start correctly if Skype is installed on this computer and has
started before the UNMS Web Server (e.g. after the installation of the UNMS). This problem may
occur when you allow Skype to claim the standard HTTP-Port (TCP-Port 80) for communication.
If you encounter such problem, use the following steps for a solution:
Open Skype and configure it so that it not uses the standard HTTPPort (TCP-Port 80) for its communication. Please refer to the Skype
manual for how to configure Skype.
Restart Skype to force that it releases this resource.
In the „Control Panel‟ open the „Administrative Tools‟.
Select the Internet-Information-Server (IIS) and restart it.
90
17.5 Disable IIS Website Logging for UNMS II
You can disable the UNMS II website logging into the IIS (Internet Information Service)
configuration. Open the IIS configuration via the “Control Panel/Administrative Tools”. Open the
context menu onto “Default Web Site” and select the “Properties”.
Figure 128 IIS Manager – Default Web Site Properties
17.6 Problems with Web-Interface on 64-bit WIN Server 2003
To enable IIS 6.0 to run 32-bit applications on 64-bit Windows OS:
1. Open a command prompt and navigate to the %systemdrive%\Inetpub\AdminScripts directory
2. Type the following command: “cscript.exe adsutil.vbs set
W3SVC/AppPools/Enable32BitAppOnWin64 true “
3. Press ENTER
17.7 Problems with the Display of http://localhost (IIS Welcome
Page does not appear)
On some OS, it might be required to create a “Default Web Site” into the IIS Manager and
to set the “DefaultAppPool” as application pool. The UNMS II might not be able to create
an own site without this object.
91
Figure 129 IIS Manager – Default Web Site
17.8 RAS Manager Dial-In Problems
After the reboot, the RAS Manager can be dialed once only. Every further try will fail,
because the modem of the RAS Manager does not respond. The problem might be a
faulty IP address configuration at the RAS Manager. Please enter the IP address with full
octets like this: 010.011.012.001.
Appendix
A Figures
Figure 1 UNMS II into a network environment ....................................................................... 7
Figure 2 UNMS II error message ............................................................................................ 9
Figure 3 Windows Components Wizard ................................................................................. 9
Figure 4 Disable SMTP Service.............................................................................................. 9
Figure 5 Configuring components ........................................................................................ 10
Figure 6 Completion .............................................................................................................. 10
Figure 7 UNMS II error message .......................................................................................... 10
Figure 8 Windows Features .................................................................................................. 11
Figure 9 Configure IE ESC ................................................................................................... 12
Figure 10 Add Roles Wizard ................................................................................................. 12
Figure 11 Role Services ........................................................................................................ 13
92
Figure 12 Add Roles and Features ....................................................................................... 13
Figure 13 Add Roles and Features – WinRM IIS Extension................................................ 14
Figure 14 Role Services ........................................................................................................ 14
Figure 15 About UNMS Infobox– showing that this Version is for up to 250 Nodes .......... 15
Figure 16 About UNMS Infobox– Version is for up to 25 Nodes and Teleservice .............. 16
Figure 17 About UNMS Infobox– Version is for up to 100 Nodes and OPC ....................... 17
Figure 18 Discover Services ................................................................................................. 18
Figure 19 UPS allocation and moving to Zones/Sites by drag&drop .................................. 19
Figure 20 Admin Console – Main Screen............................................................................. 20
Figure 21 Admin Console – Site Explorer ............................................................................ 21
Figure 22 Service/Event Properties – Edit Group ................................................................ 22
Figure 23 Admin Console – Event Explorer ......................................................................... 23
Figure 24 Admin Console – starting/stopping the UNMS II ................................................. 23
Figure 25 Site Explorer ......................................................................................................... 24
Figure 26 Site Explorer – Service Properties – Connection type ........................................ 25
Figure 27 Site Explorer – Service Properties – Info............................................................. 26
Figure 28 Site Explorer – Service Properties – Contract ..................................................... 26
Figure 29 Site Explorer – Service Properties – Report ........................................................ 27
Figure 30 Site Explorer – Advanced – Remote Monitor – configured URL to Webserverpage of an APC Smartnetwork SNMP Card ................................................................. 27
Figure 31 Data charts button ................................................................................................ 28
Figure 32 Data chart ............................................................................................................. 29
Figure 30 DataLog as CSV File – Time Reference Variable ............................................... 29
Figure 33 Advanced .............................................................................................................. 30
Figure 34 Event Explorer ...................................................................................................... 31
Figure 35 Event Properties – New Event – Event Priorities ................................................ 32
Figure 36 Event Properties – New Event – Evaluate condition ........................................... 38
Figure 37 Event Properties – New Event – Run a Job – create or edit a new Job............. 39
Figure 38 Email-Addresses – List of Recipients .................................................................. 39
Figure 39 RCCMD Configuration .......................................................................................... 40
93
Figure 40 RCCMD Configuration for several RCCMD Clients ............................................ 40
Figure 41 UNMS Alarms Message Box ................................................................................ 40
Figure 42 External Program .................................................................................................. 41
Figure 43 Event Properties – Run a job ............................................................................... 41
Figure 44 Job Editor – Run RCCMD – RCCMD configuration ............................................ 42
Figure 45 Site Maps – Europe Card ..................................................................................... 43
Figure 46 Site Maps – New Site – Background image file .................................................. 43
Figure 47 Site Properties – New Site – Web Console View ................................................ 44
Figure 49 UNMS Options ...................................................................................................... 45
Figure 50 UNMS Options - Email ......................................................................................... 46
Figure 52 UNMS Options – Email Traps – Account settings ............................................... 47
Figure 53 UNMS Options – Email Traps – Advanced Settings ........................................... 47
Figure 54 UNMS Options – Email Traps – Service Properties ............................................ 48
Figure 55 UNMS Options – Email Traps – Service Properties – MAC address ................. 48
Figure 56 UNMS Options – Email Traps – Screen with timestamp .................................... 49
Figure 57 UNMS Options – Users – User Properties .......................................................... 50
Figure 58 UNMS Options – Users – Secure Settings .......................................................... 51
Figure 59 UNMS Web Console – Login Group Hamburg – Start Screen ........................... 51
Figure 60 UNMS Options – Logging..................................................................................... 52
Figure 61 UNMS Options – System ..................................................................................... 52
Figure 62 UNMS Backup – Backup files .............................................................................. 53
Figure 63 UNMS Restore – Restore files ............................................................................. 54
Figure 64 UNMS Redundancy Configuration ....................................................................... 54
Figure 65 UNMS Redundancy Configuration – Redundant Service Configuration ............ 55
Figure 66 UNMS Redundancy Screen of 2 UPS, showing the reserve power on each
phase. ............................................................................................................................. 56
Figure 69 UNMS Event Properties – SMS Configuration .................................................... 59
Figure 70 UNMS RAS Configuration .................................................................................... 60
Figure 71 RAS Manager Settings 1 ...................................................................................... 60
Figure 72 RAS Manager Settings 2 ...................................................................................... 61
94
Figure 73 COM2 Settings – RAS .......................................................................................... 62
Figure 74 Job Editor .............................................................................................................. 62
Figure 75 Connection Wizard ............................................................................................... 63
Figure 76 Connection Wizard – New Connection Type ....................................................... 63
Figure 77 Connection Wizard – Advanced Connection Options ......................................... 64
Figure 78 Incoming Connection Properties .......................................................................... 64
Figure 79 Incoming Virtual Private Network (VPN) Connection .......................................... 65
Figure 80 User Permissions.................................................................................................. 65
Figure 81 New User .............................................................................................................. 66
Figure 82 Incoming TCP/IP Properties ................................................................................. 66
Figure 83 Routing and Remote Access ................................................................................ 67
Figure 84 Routing and Remote Access Server Setup Wizard ............................................ 67
Figure 85 Routing and Remote Access Server Setup Wizard Configuration ..................... 68
Figure 86 Routing and Remote Access Server Setup Wizard Configuration, VPN ............ 68
Figure 87 Routing and Remote Access Server Setup Wizard Configuration, VPN
Connection ..................................................................................................................... 69
Figure 88 Routing and Remote Access Server Setup Wizard Configuration, Network
Selection......................................................................................................................... 69
Figure 89 Routing and Remote Access Server Setup Wizard IP Address Assignment ..... 70
Figure 90 New Address Range............................................................................................. 70
Figure 91 Routing and Remote Access Server Setup Wizard IP – Multiple RAS .............. 70
Figure 92 Routing and Remote Access Server Setup Wizard Completion ......................... 71
Figure 93 Local Properties .................................................................................................... 71
Figure 94 Authentication Methods ........................................................................................ 72
Figure 95 Routing and Remote Access GX206 (local) ........................................................ 72
Figure 96 Routing and Remote New Remote Access Policy .............................................. 73
Figure 97 New Remote Access Policy Wizard – Select Attribute ....................................... 73
Figure 98 New Remote Access Policy Wizard – NAS Port-Type ........................................ 74
Figure 99 New Remote Access Policy Wizard – Policy Conditions .................................... 74
Figure 100 New Remote Access Policy Wizard – Permissions .......................................... 75
95
Figure 101 New Remote Access Policy Wizard – Completion ............................................ 75
Figure 102 Teleservice Properties – Edit Dial-in Profile ...................................................... 76
Figure 103 Service Properties .............................................................................................. 76
Figure 104 RAS Properties ................................................................................................... 77
Figure 105 Network Connections ......................................................................................... 77
Figure 106 New Connection Wizard – Network Connection Type ...................................... 78
Figure 107 Network Setup Wizard ........................................................................................ 78
Figure 108 New Connection Wizard – Connection Name ................................................... 79
Figure 109 New Connection Wizard – Phone Number to Dial ............................................ 79
Figure 110 Network Connections – Choose a network connection .................................... 79
Figure 111 Network Connections – Networking - Advanced ............................................... 80
Figure 112 Internet Protocol Properties – Advanced TCP/IP Settings ............................... 80
Figure 113 Network Connections - Connect ........................................................................ 80
Figure 115 Connection Icon - Network Connections – Cancel manually created connection
........................................................................................................................................ 81
Figure 116 RAS Properties - Settings .................................................................................. 82
Figure 117 RAS Properties - Settings .................................................................................. 82
Figure 118 Web Console – Notification Area ....................................................................... 84
Figure 119 Web Console – Main Screen ............................................................................. 84
Figure 120 Web Console – Site View ................................................................................... 85
Figure 121 Web Console – LogFile View ............................................................................. 87
Figure 122 About UNMS – Monitoring Extension ................................................................ 88
Figure 123 Monitoring Extension – Import UNMS license file ............................................. 88
Figure 124 Help Menu........................................................................................................... 89
Figure 125 Opening setup.exe ............................................................................................. 89
Figure 126 UNMS II Server Setup Error............................................................................... 90
Figure 127 IIS Manager – Default Web Site Properties....................................................... 91
Figure 128 IIS Manager – Default Web Site ........................................................................ 92
96