1
milestone
XProtect
Remote Client 3.0
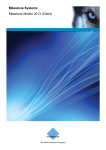
User’s Manual
Milestone XProtect Remote Client 3.0; User’s Manual
Target Audience for this Document
This document is aimed at users of the Milestone XProtect Remote Client.
This document provides users with detailed descriptions of Milestone XProtect Remote Client
features. It furthermore provides a considerable number of targeted “how-to” examples, guiding
users through completing common tasks in Milestone XProtect Remote Client.
Note that depending on your user rights and your role in your organization, some features in the
Milestone XProtect Remote Client may not be available to you. Ask your surveillance system
administrator if in doubt.
www.milestonesys.com
Target Audience for this Document
Milestone XProtect Remote Client 3.0; User’s Manual
Copyright, Trademarks and Important
Information
Copyright
© 2006 Milestone Systems A/S.
Trademarks
XProtect is a registered trademark of Milestone Systems A/S.
Microsoft and Windows are registered trademarks of Microsoft Corporation.
All other trademarks mentioned in this document are trademarks of their respective owners.
Disclaimer
This document is intended for general information purposes only, and due care has been taken in
its preparation.
Any risk arising from the use of this information rests with the recipient, and nothing herein should
be construed as constituting any kind of warranty.
Milestone Systems A/S reserve the right to make adjustments without prior notification.
All names of people and organizations used in this document's examples are fictitious. Any
resemblance to any actual organization or person, living or dead, is purely coincidental and
unintended.
www.milestonesys.com
Copyright, Trademarks and …
Milestone XProtect Remote Client 3.0; User’s Manual
Contents
INTRODUCTION.......................................................... 8
About the Remote Client ....................................................................... 8
What are Remote Users Able to do with the Remote Client? ...................... 8
How does the Remote Client Get Images from the Surveillance System? .... 9
How can User Rights Affect Use of the Remote Client?.............................. 9
DOWNLOAD AND INSTALLATION ............................. 10
Downloading and Installing a Remote Client from Server................... 10
Installing a Remote Client from CD..................................................... 11
ACCESSING THE REMOTE CLIENT ............................. 12
Accessing a Remote Client Run from Server ....................................... 12
Accessing a Locally Installed Remote Client ....................................... 13
Upon Accessing: Logging In................................................................ 13
If You Log In for the First Time.............................................................14
Logging in on Different Computers ........................................................14
CREATING VIEWS..................................................... 15
Views/Groups Concept ....................................................................... 15
Private and Shared Groups ..................................................................15
Are any Views in Shared Groups Available? ............................................16
Which Types of Groups Can You Create Views in? ...................................17
Creating Views in Private Groups........................................................ 17
Creating a Private Group .....................................................................18
Creating a View in a Private Group ........................................................18
Adding Cameras to the View ................................................................19
Creating Views in Shared Groups........................................................ 20
Creating a Shared Group .....................................................................21
Creating a View in a Shared Group........................................................21
www.milestonesys.com
Page 4
Contents
Milestone XProtect Remote Client 3.0; User’s Manual
Adding Cameras to the View ................................................................22
Using Your Views on Different Computers .......................................... 23
FURTHER CONFIGURATION ...................................... 24
Which Type of Groups Can You Edit Views in? .................................... 24
Using Static Images in Views.............................................................. 25
Using HTML Pages in Views ................................................................ 25
Renaming Groups ............................................................................... 26
Deleting Groups .................................................................................. 27
Renaming Views ................................................................................. 27
Deleting Views.................................................................................... 27
Adjusting Camera Settings ................................................................. 27
Image Quality ....................................................................................28
Frame Rate ........................................................................................28
IPIX Split Mode...................................................................................28
Apply to All ........................................................................................29
Configuring Joystick Control ............................................................... 29
VIEWING LIVE IMAGES ............................................ 31
Selecting a View ................................................................................. 31
Image Bars ........................................................................................31
Enlarging Images from a Particular Camera ...........................................32
Output Control .................................................................................... 33
PTZ Control ......................................................................................... 33
Point-and-Click Control........................................................................33
PTZ Navigation Buttons .......................................................................33
PTZ Preset Positions............................................................................34
IPIX PTZ Positions...............................................................................34
VIEWING RECORDED IMAGES .................................. 35
Selecting a View ................................................................................. 35
Enlarging Images from a Particular Camera ...........................................36
Time Navigation.................................................................................. 36
Master Time .......................................................................................36
www.milestonesys.com
Page 5
Contents
Milestone XProtect Remote Client 3.0; User’s Manual
Browse Buttons ..................................................................................37
Time Sliders .......................................................................................37
Playback Slider and Buttons .................................................................37
Go To Time ........................................................................................38
Sequences .......................................................................................... 38
PTZ Control ......................................................................................... 39
Navigation by Dragging Inside IPIX Images ...........................................39
Navigation Buttons .............................................................................40
Presets ..............................................................................................40
IPIX PTZ Positions...............................................................................40
Printing Images .................................................................................. 40
Exporting Images ............................................................................... 41
EXPORTING EVIDENCE IN AVI AND JPEG FORMATS . 42
KEYBOARD SHORTCUTS............................................ 45
On All Tabs ......................................................................................... 45
On Live Tab Only................................................................................. 45
On Browse Tab Only ........................................................................... 45
ADVANCED USE: HTML PAGE FOR REMOTE CLIENT
NAVIGATION ............................................................ 47
Creating a Simple HTML Page with Button Navigation ........................ 47
Buttons for Switching between Remote Client’s Views .............................47
Buttons for Switching between Remote Client’s Three Tabs ......................47
Buttons for Hiding/Showing Remote Client’s Navigation Pane ...................48
Buttons for Hiding/Showing Remote Client’s Title Bar ..............................48
Buttons for Switching to a Particular Time in Time Navigation ..................48
Example of an HTML Page with Buttons .................................................48
Using an HTML Page with Image Map Navigation ............................... 50
Example of an HTML Page with an Image Map ........................................50
Importing the HTML Page ................................................................... 51
System Administrator’s Check List...................................................... 51
www.milestonesys.com
Page 6
Contents
Milestone XProtect Remote Client 3.0; User’s Manual
LOGGING OUT OF THE REMOTE CLIENT .................... 53
GLOSSARY ................................................................ 54
INDEX ...................................................................... 55
www.milestonesys.com
Page 7
Contents
Milestone XProtect Remote Client 3.0; User’s Manual
Introduction
About the Remote Client
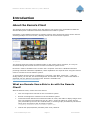
The Remote Client provides remote users with feature-rich access to an organization’s Milestone
XProtect Enterprise or Milestone XProtect Professional surveillance system.
Depending on the Milestone XProtect surveillance system used, the Remote Client can be used for
accessing multiple servers at a time, allowing remote user access across systems.
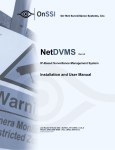
Example of the Remote Client, displaying images from
16 cameras
The Remote Client may either be installed locally on the remote user’s computer, or it may be
accessed through the internet and run from the surveillance system server.
DirectX 9.0 must be installed on the remote user’s computer. DirectX is a Windows extension
providing advanced multimedia capabilities; these capabilities are required when using the Remote
Client to connect to the surveillance system.
To check which DirectX version is installed on a computer, click Start, select Run..., and type
dxdiag. When you click OK, the DirectX Diagnostic Tool window will open; version information is
displayed near the bottom of its System tab. DirectX is available from
http://www.microsoft.com/downloads/.
What are Remote Users Able to do with the Remote
Client?
With the Remote Client, remote users are able to:
View live images from cameras on the surveillance system.
Create and switch between an unlimited number of views, each able to display images from
up to 16 cameras from multiple servers at a time*. Views can placed in private groups
(only accessible by the user who created them) or shared groups (accessible by all Remote
Client users connected to the surveillance system).
* Depending on Milestone XProtect surveillance system used
Browse recordings from cameras on the surveillance system.
Control PTZ (Pan/Tilt/Zoom) and IPIX (360° view) cameras.
www.milestonesys.com
Page 8
Introduction
Milestone XProtect Remote Client 3.0; User’s Manual
Activate external outputs.
Print images.
Get quick overviews of sequences with detected motion.
Generate and export evidence in AVI (movie clip) and JPEG (still image) formats.
View HTML pages and static images.
How does the Remote Client Get Images from the
Surveillance System?
Images viewed by Remote Client users are provided by surveillance system’s Image Server. The
Image Server runs as a service on the surveillance system server; it does not require separate
hardware.
The access rights of individual Remote Client users are defined by the surveillance system
administrator on the Image Server.
How can User Rights Affect Use of the Remote Client?
The rights of individual remote users are specified centrally by the surveillance system
administrator. The rights of an individual user will determine the user’s ability to use the Remote
Client’s features.
Basically, the surveillance system administrator is able to restrict a user’s rights to the following:
Access to the Remote Client
Ability to use features on the Remote Client’s tabs
Access to each of the Remote Client’s tabs: Live, Browse and Setup
Ability to create views (views determine the way in which images from one or more
cameras are displayed)
Ability to view images from specific cameras
The ability to use various features of the Remote Client may therefore vary considerably from user
to user. Ask your surveillance system administrator if in doubt about your user rights.
www.milestonesys.com
Page 9
Introduction
Milestone XProtect Remote Client 3.0; User’s Manual
Download and Installation
Note: Download and installation of the Remote Client may not be necessary: The Remote Client
may indeed be downloaded and installed locally on the remote user’s computer, but it may also be
run directly from the surveillance system server. If you choose to run the Remote Client directly
from the surveillance system server, you simply access it through the internet (see Accessing a
Remote Client Run from Server on page 12). When this is the case, no downloading or installation
is required. The Remote Client may also be installed from a software CD.
Downloading and Installing a Remote Client from
Server
If you wish to download and install the Remote Client from the surveillance system server, do the
following:
1. Open an Internet Explorer browser (version 6.0 or later), and connect to the URL or IP
address specified by your system administrator in order to connect to the surveillance
system server.
When you connect to the surveillance system server, you will see a welcome page.
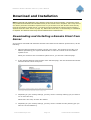
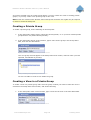
2. In the XProtect Remote Client section of the welcome page, click the Download and install
XProtect Remote Client locally link:
Detail from welcome page; arrow indicates Download
and install XProtect Remote Client locally link
3. Depending on your security settings, you may receive a security warning (Do you want to
run or save this file?).
When this is the case, click the Run button.
4. Depending on your security settings, you may receive a further security warning (Do you
want to run this software?).
www.milestonesys.com
Page 10
Download and Installation
Milestone XProtect Remote Client 3.0; User’s Manual
When this is the case, click the Run button.
5. The Milestone XProtect Remote Client Setup Wizard begins.
In the wizard, click Next and follow the installation instructions.
Installing a Remote Client from CD
If you wish to install the Remote Client from the Milestone XProtect Enterprise software CD, do the
following:
1. Insert the Milestone XProtect Enterprise software CD, wait for a short while, select required
language, then click the Install Milestone XProtect Remote Client link.
Tip: Depending on your security settings, you may receive one or more security
warnings (Do you want to run or save this file?, Do you want to run this software?). When
this is the case, click the Run button.
2. The Remote Client Setup Wizard begins.
In the wizard, click Next and follow the installation instructions.
www.milestonesys.com
Page 11
Download and Installation
Milestone XProtect Remote Client 3.0; User’s Manual
Accessing the Remote Client
Accessing and configuring the Remote Client is very straightforward. Even first time users will
typically be able to start and set up their Remote Client in a matter of minutes.
The Remote Client may either be installed locally on the remote user’s computer, or it may be run
from the surveillance system server.
The way you access the Remote Client differs slightly depending on which of the two options is
used.
Accessing a Remote Client Run from Server
If you want to run the Remote Client straight from the surveillance system server, open an
Internet Explorer browser (version 6.0 or later), and connect to the URL or IP address specified by
your system administrator.
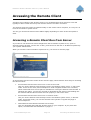
When you connect to the surveillance system server, you will see a welcome page:
Detail from welcome page
In the XProtect Remote Client section of the welcome page, select between three ways of accessing
the Remote Client:
Run XProtect Remote Client from server in full screen mode:
Lets you use the Remote Client directly from the surveillance system server, in full screen
mode. In full screen mode, Internet Explorer’s usual navigation buttons are not shown,
which means that more screen space is available for viewing the Remote Client window. If
selecting this option, you may be required to download the file full.hta. Downloading this
file ensures that the Remote Client will work properly in full screen mode.
Run XProtect Remote Client from server in browser mode:
Lets you use the Remote Client directly from the surveillance system server, in browser
mode. In browser mode, you view the Remote Client just like a regular web page in
Internet Explorer.
Download and install XProtect Remote Client locally:
Lets you download and install the Remote Client on your computer. If you prefer this
option, see Download and Installation on page 10.
www.milestonesys.com
Page 12
Accessing the Remote Client
Milestone XProtect Remote Client 3.0; User’s Manual
Tip: By selecting Remember my settings, you can save your preferred access method (e.g.
browser mode) and automatically use it the next time you connect. This requires that your
browser’s privacy settings allow cookies; to check your browser’s privacy settings, select the Tools
menu, then Internet Options..., then the Privacy tab, on which privacy settings are determined in
the Settings section.
Accessing a Locally Installed Remote Client
If the Remote Client is already installed locally on your computer, simply click the Remote Client
shortcut to access it.
Depending on your selections when installing the Remote Client locally, the shortcut may be
located in Windows’ quick launch bar (next to the Start button), or it may be placed on your
desktop.
You may also access a locally installed Remote Client by selecting Start > All Programs > Milestone
XProtect Enterprise Remote Client, then selecting either browser or full screen mode.
Upon Accessing: Logging In
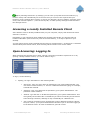
When accessing the Remote Client, either running it from the surveillance system server or by
opening a locally installed version, you will be asked to log in:
Detail from Remote Client login window
To log in, do the following:
1. Specify your login information in the following fields:
Username: Type your user name as specified by your system administrator. The
user name is case-sensitive, i.e. there is a difference between typing, for example,
amanda and Amanda.
Password: Type your password as specified by your system administrator. The
password is case-sensitive.
Address: Type the URL or IP address specified by your system administrator. This
will typically be the same URL or IP address you used if connecting to the Remote
Client through a browser, although it may occasionally be a different one.
Port: Internet connections may use different ports for different purposes. Specify
the port number, your system administrator has asked you to use when logging in
to the Remote Client. In most circumstances, port 80 is used.
www.milestonesys.com
Page 13
Accessing the Remote Client
Milestone XProtect Remote Client 3.0; User’s Manual
Tip: The vast majority of Remote Client users will always log in to the same address
and port number. However, if you occasionally log in to different addresses and ports, or
log in with different user names, the Previous Logins list lets you select your previously
specified logins, in which case all you have to do is specify your password.
2. Click the Login link.
After a short wait, the Remote Client window will open.
The Remote Client window has three tabs: Live, Browse and Setup.
Remote Client’s three tabs
The Live tab is used for viewing live images from cameras, the Browse tab is used for
browsing recorded images from cameras, and the Setup tab is used for configuring the
Remote Client.
Note: Depending on your user rights, you may not be able to access all three tabs.
If You Log In for the First Time
If you have logged in for the first time, you need to determine whether any views exist.
Views determine how images from cameras are displayed in the Remote Client, and are thus
required in order to be able to use the Remote Client.
One or more views may already have been created for you, or you may need to create views
yourself.
Read more about views, including how to determine if any views have already been created for
you, in Creating Views on page 15.
Logging in on Different Computers
Your user settings are stored on the surveillance system server. This means that your login can be
used on any computer that has a Remote Client installed.
www.milestonesys.com
Page 14
Accessing the Remote Client
Milestone XProtect Remote Client 3.0; User’s Manual
Creating Views
The way in which images from one or more cameras are displayed in the Remote Client is called a
view. A view may contain images from up to 16* cameras. A Remote Client can handle an
unlimited number of views, allowing you to switch between various collections of camera images.
* Depending on Milestone XProtect surveillance system used
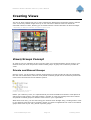
Example of a Remote Client displaying a view with images from
16 different cameras; the view is highlighted in red frame
Views/Groups Concept
In order to help you maintain an easy overview when you navigate between various views in your
Remote Client, all views are placed in folders called groups. A group can contain any number of
views.
Private and Shared Groups
Groups, in turn, can be private or shared. Views placed in private groups can only be accessed by
the user who created them, whereas views placed in shared groups can be accessed by all Remote
Client users connected to the surveillance system.
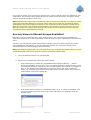
Simplified example of views in
private and shared groups
Before you create any views, it is important that you know the difference between views placed in
shared and private groups—not least because a number of views may already have been created
and placed in shared groups for Remote Client users in your organization.
When that is the case, you can start using your Remote Client straight away; creating further views
in your Remote Client will not be necessary unless you want to supplement the views in the shared
groups with views of your own, placed in private groups.
www.milestonesys.com
Page 15
Creating Views
Milestone XProtect Remote Client 3.0; User’s Manual
If you want to create views yourself, for example if no views in shared groups are available in your
organization, the Remote Client’s Setup tab lets you create groups and views, and specify which
cameras should be included in each view.
Note: Particular user rights may be required in order to access the Setup tab. Your ability to create
groups and views also depends on your user rights. From time to time your surveillance system
administrator may make changes to camera or user properties on the surveillance system server.
When this is the case, such changes will take effect in the Remote Client the first time you log in
after the changes were made. Such changes may require you to re-create your views. Ask your
surveillance system administrator if in doubt.
Are any Views in Shared Groups Available?
Especially if you are a first-time user of the Remote Client, you will want to know whether any
views have already been created and placed in shared groups for your organization’s Remote Client
users.
Typically, your surveillance system administrator will have told you if shared groups are used in
your organization. Alternatively, to quickly determine whether any views have already been
created and placed in shared groups, do the following:
Note: This method requires that your user rights permit you to access the Remote Client’s Live tab
and/or Browse tab. Most users will have access to at least one of these tabs.
1. Go to the Remote Client’s Live or Browse tab.
2. On the Live or Browse tab, look at the Views section:
If the Views section contains any expandable folders labeled [Shared] ..., shared
groups are available, and you may—your user rights permitting—begin using the views
in the shared groups for viewing live and recorded images. See Viewing Live Images on
page 31 and Viewing Recorded Images on page 35. Only if you want to add more
views, e.g. customize your Remote Client with views in private groups, do you need to
create further views on the Setup tab.
Example of Views section containing
shared groups with views
If the Views section contains no expandable folders at all, no views are available, and
you must create at least one view on the Setup tab before you can begin using the
Remote Client.
Example of Views section containing
no expandable folders
www.milestonesys.com
Page 16
Creating Views
Milestone XProtect Remote Client 3.0; User’s Manual
If the Views section contains one or more expandable folders labeled [Private] ..., you
have already created one or more views in private groups.
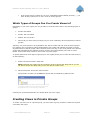
Which Types of Groups Can You Create Views in?
Depending on your user rights, you may be able to create and edit views in the following types of
groups:
Private and shared
Private, but not shared
Shared, but not private
None at all (in which case you simply rely on views created by others and placed in shared
groups)
Typically, only a few people in an organization are able to create and edit views in shared groups.
For example, the surveillance system administrator may create and maintain a number of views
and place them in shared groups: When Remote Client users log in, the views placed in the shared
groups will automatically be available to them, and the users will basically not need to create
further views unless they want their own views in private groups.
To quickly determine which types of groups your user rights permit you to create and edit views in,
do the following:
1. Select the Remote Client’s Setup tab.
Note: Particular user rights may be required in order to access the Setup tab. If you are
not able to access the Setup tab, you are not able to create views.
2. On the Setup tab, look at the Views section:
Group folders to which you do not have access will be indicated by padlock icons.
Example: The user is able to create and edit views
in private groups, but not in shared groups. Note
the padlock icon on the shared group folder.
Consult your system administrator if in doubt about your user rights.
Creating Views in Private Groups
To create your first view in a private group, you first create a group, and then create the required
view within the group.
www.milestonesys.com
Page 17
Creating Views
Milestone XProtect Remote Client 3.0; User’s Manual
If you have created views in private groups before, you may create new views in existing private
groups, or you may create a new private group for the view.
Note: Views are created on the Remote Client’s Setup tab. Particular user rights may be required
in order to access the Setup tab.
Creating a Private Group
To create a private group, do the following on the Setup tab:
1. In the Setup tab’s Views section, select the [Private] folder, or—if you have created private
groups before—any folder labeled [Private].
2. In the Setup tab’s Group Control section, type a name for the group in the Group Name
field, then click the New button.
Typing a name in Setup tab’s Group Control section
Your new group will now appear in the Setup tab’s Views section, with the name you have
specified, and labeled as [Private]:
Newly created group appearing in Views section
You are now able to create a view within the group.
Creating a View in a Private Group
To create a view in a private group, make sure the group in which you want to create the view is
selected in the Setup tab’s Views section, and do the following:
1. In the Setup tab’s View Control section, type a name for the view in the View Name field.
Typing a name in Setup tab’s View Control section
www.milestonesys.com
Page 18
Creating Views
Milestone XProtect Remote Client 3.0; User’s Manual
2. Click one of the View Control section’s seven available New View layouts:
Your new view is automatically added to the selected group:
Newly created view appearing under group
Tip: A group, whether private or shared, can contain an unlimited number of views. More than
one private and shared group can exist.
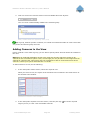
Adding Cameras to the View
Having created a view within a group, you are able to specify which cameras should be included in
the view.
To add cameras to a view, do the following:
1. In the Setup tab’s Views section, select the required view.
When you select a view, the layout of the selected view is outlined in the main section of
the Remote Client window.
Layout of selected view is outlined in main section
(indicated in red frame in this example)
2. In the Setup tab’s System Overview section, click the plus sign
engine (server) to view a list of available cameras.
www.milestonesys.com
Page 19
next to the required
Creating Views
Milestone XProtect Remote Client 3.0; User’s Manual
Example: Engine with five available cameras
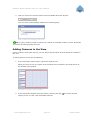
3. In the list, select a camera and drag the camera to the required position in the view.
When you have dragged a camera to a position in the view, the name of the camera will
appear in the selected position. You will not see images from the camera yet, as the Setup
tab is only for configuration, not for viewing images.
Repeat for each camera required in the view.
Tip: If you want to use all of the cameras under an engine, you may simply drag the
required engine to the view; this will automatically place all of the engine’s cameras in the
view, beginning at the selected position. Remember to have sufficient positions available in
the view.
Tip: You can always change the cameras in your view: Either drag the System
Overview section’s Clear link to a position in the view to clear the position, or simply
overwrite a position by dragging a different camera to the position.
4. You are now able to use your view: You may—your user rights permitting—select the view
on the Live tab (see Viewing Live Images on page 31) and on the Browse tab (see Viewing
Recorded Images on page 35).
Tip: In addition to cameras, you are able to add static images and HTML pages to views. See
Further Configuration on page 24.
Creating Views in Shared Groups
To create view in a shared group, you first create a group, then create the required view within the
group.
If you have created views in shared groups before, you may create new views in existing shared
groups, or you may create a new shared group for the view.
Note: Views are created on the Remote Client’s Setup tab. Particular user rights may be required
in order to access the Setup tab and in order to be able to create shared views. When creating a
shared view, bear in mind that depending on their user rights not all users may have access to all
cameras on the surveillance system.
www.milestonesys.com
Page 20
Creating Views
Milestone XProtect Remote Client 3.0; User’s Manual
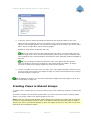
Creating a Shared Group
To create a shared group, do the following on the Setup tab:
1. In the Setup tab’s Views section, select the [Shared] folder, or—if you have created shared
groups before—any folder labeled [Shared].
2. In the Setup tab’s Group Control section, type a name for the group in the Group Name
field, then click the New button.
Typing a name in Setup tab’s Group Control section
Tip: Bear in mind that since the group is shared, it will also appear in other users’
Remote Clients; therefore use a name which other users will immediately be able to
understand.
Your new group will now appear in the Setup tab’s Views section, with the name you have
specified, and labeled as [Shared]:
Newly created group appearing in Views section
You are now able to create a view within the group.
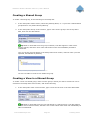
Creating a View in a Shared Group
To create a view in a shared group, make sure the group in which you want to create the view is
selected in the Setup tab’s Views section, and do the following:
1. In the Setup tab’s View Control section, type a name for the view in the View Name field.
Typing a name in Setup tab’s View Control section
Tip: Bear in mind that since the view will appear in a shared group, it will also appear
in other users’ Remote Clients; therefore use a name which other users will immediately be
able to understand.
www.milestonesys.com
Page 21
Creating Views
Milestone XProtect Remote Client 3.0; User’s Manual
2. Click one of the View Control section’s seven available New View layouts:
Your new view is automatically added to the selected group:
Newly created shared view appearing under group
Tip: A group, whether private or shared, can contain an unlimited number of views. More than
one private and shared group can exist.
Adding Cameras to the View
Having created a view within a group, you are able to specify which cameras should be included in
the view.
Note: Bear in mind that depending on their user rights not all users may have access to all
cameras on the surveillance system. Thus, even though you may be able to view images from all
cameras in a shared view, other users may not necessarily be able to view images from all the
cameras. Consult your system administrator if in doubt.
To add cameras to a view, do the following:
1. In the Setup tab’s Views section, select the required view.
When you select a view, the layout of the selected view is outlined in the main section of
the Remote Client window.
Layout of selected view is outlined in main section
(indicated in red frame in this example)
2. In the Setup tab’s System Overview section, click the plus sign
engine (server) to view a list of available cameras.
www.milestonesys.com
Page 22
next to the required
Creating Views
Milestone XProtect Remote Client 3.0; User’s Manual
Example: Engine with five available cameras
3. In the list, select a camera and drag the camera to the required position in the view.
When you have dragged a camera to a position in the view, the name of the camera will
appear in the selected position. You will not see images from the camera yet, as the Setup
tab is only for configuration, not for viewing images.
Repeat for each camera required in the view.
Tip: If you want to use all of the cameras under an engine, you may simply drag the
required engine to the view; this will automatically place all of the engine’s cameras in the
view, beginning at the selected position. Remember to have sufficient positions available in
the view.
Tip: You can always change the cameras in the view: Either drag the System Overview
section’s Clear link to a position in the view to clear the position, or simply overwrite a
position by dragging a different camera to the position.
4. Remote Client users on your surveillance system will now able to access the view in the
shared group as from their next login.
Tip: In addition to cameras, you are able to add static images and HTML pages to views. See
Further Configuration on page 24.
Using Your Views on Different Computers
Your user settings, including your private views, are stored on the surveillance system server.
This means that you are able to use your private views on any computer that has a Remote Client
installed, provided you log in to the Remote Client with your own user name and password.
www.milestonesys.com
Page 23
Creating Views
Milestone XProtect Remote Client 3.0; User’s Manual
Further Configuration
In addition to creation of groups and views, the Remote Client’s Setup tab lets you edit existing
groups and views. The Setup tab furthermore lets you adjust camera settings, and set up joystick
control for PTZ (Pan/Tilt/Zoom) cameras.
Note: Particular user rights may be required in order to access the Setup tab. Your ability to edit
groups and views also depends on your user rights. Basically, if you are able to create groups and
views, you are also able to edit them. From time to time your surveillance system administrator
may make changes to camera or user properties on the surveillance system. When this is the case,
such changes will take effect in the Remote Client the first time you log in after the changes were
made. Such changes may require you to re-create your views. Ask your surveillance system
administrator if in doubt.
Which Type of Groups Can You Edit Views in?
Depending on your user rights, you may be able to create and edit views in the following types of
groups:
Private and shared
Private, but not shared
Shared, but not private
None at all (in which case you simply rely on views created by others and placed in shared
groups)
To quickly determine which types of groups your user rights permit you to create and edit views in,
do the following:
1. Select the Remote Client’s Setup tab.
Note: Particular user rights may be required in order to access the Setup tab. If you are
not able to access the Setup tab, you are not able to create views.
2. On the Setup tab, look at the Views section:
Group folders to which you do not have access will be indicated by padlock icons.
Example: The user is able to create and edit views
in private groups, but not in shared groups. Note
the padlock icon on the shared group folder.
Consult your system administrator if in doubt about your user rights.
www.milestonesys.com
Page 24
Further Configuration
Milestone XProtect Remote Client 3.0; User’s Manual
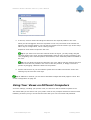
Using Static Images in Views
You are not limited to viewing camera images in a view; you are able to view static images (such
as GIF or JPEG) as well.
Example: A company logo inserted as a static image (in
this case viewed on the Live tab). The feature could
equally well be used for inserting maps, floor plans,
photos of wanted persons, etc.
To use a static image in a view, do the following on the Setup tab:
1. Drag the System Overview section’s Static Image link to the required position in the view.
2. Release the mouse button over the required position. When you release the mouse button,
the Choose File window opens, letting you select the required static image file.
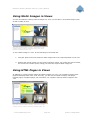
Using HTML Pages in Views
In addition to viewing camera images and static images in a view, you are able to import HTML
pages and display them in the view. This way, you are able to include company web pages,
intranet pages, navigation pages, link collections, etc. together with the camera images in the
view.
Example: A company web page inserted in a view (in
this case viewed on the Live tab). The feature could
equally well be used for inserting clickable maps, etc.
www.milestonesys.com
Page 25
Further Configuration
Milestone XProtect Remote Client 3.0; User’s Manual
Tip: When your imported HTML pages contain links, it is recommended that links have the
target='blank' attribute. Example: <a href="otherwebpage.htm" target="blank">Link</a>.
This will make the links open in separate windows, which will help you avoid losing view of the
Remote Client window itself due to a link opening a web page in the same browser window as the
Remote Client. This, however, does not apply if using an imported HTML page for navigation
between the Remote Client’s different views; read more about this in Advanced Use: HTML page for
Remote Client Navigation on page 47.
To include an HTML page in a view, do the following:
1. Drag the System Overview section’s HTML Page link to the required position in the view.
When you release the mouse button over the required position, the Import HTML Page
window opens:
Import HTML Page window
2. In the Import HTML Page window’s Url field, type the URL of the required HTML page
(example: http://www.mywebsite.com/mywebpage.htm). Always include the http:// prefix.
- or If the HTML page is stored locally on your computer, specify its location on your computer
(example: C:\myfiles\mywebpage.htm), or click the Browse... link to browse for the
required HTML page.
3. In the Title field, you are able to specify a title for the HTML page. The title will appear in
blue title bar above the HTML page itself when it is displayed in the view.
4. Select scaling for the HTML page, either No scaling (default) or the required scaling
(640×480, 800×600, 1024×768 or 1280×1024).
5. Click the OK link.
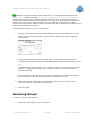
Renaming Groups
To rename a group, do the following:
1. Select the required group in the Views section.
www.milestonesys.com
Page 26
Further Configuration
Milestone XProtect Remote Client 3.0; User’s Manual
2. In the Group Control section, overwrite the existing name in the Group Name field.
3. Click the Rename button.
Deleting Groups
Note: Deleting a group will delete all views within the group as well.
To delete a group, do the following:
1. Select the required group in the Views section.
2. In the Group Control section, click the Delete button.
You will be asked to confirm that you want to delete the group and all of its views.
Renaming Views
To rename a view, do the following:
1. Select the required view in the Views section.
2. In the View Control section, overwrite the existing name in the View Name field.
3. Click the Rename button.
Deleting Views
To delete a view, do the following:
1. Select the required view in the Views section.
2. In the View Control section, click the Delete button.
You will be asked to confirm that you want to delete the view.
Adjusting Camera Settings
In the Setup tab’s Camera Control section, you are able to adjust camera settings.
To adjust camera settings, select the position of the required camera in the view. The position you
select will be indicated by a bold border.
www.milestonesys.com
Page 27
Further Configuration
Milestone XProtect Remote Client 3.0; User’s Manual
Image Quality
The Image Quality setting determines the quality of the images when viewed, but also affects
bandwidth usage. If the Remote Client is used over the internet, over a slow network connection,
or if for other reasons you need to limit the bandwidth used by the Remote Client, image quality
can be reduced on the server side by selecting e.g. Low or Medium
Tip: You can quickly reduce the bandwidth usage for all cameras in the view by reducing the
image quality for a single camera, then clicking the Apply To All button.
Tip: If you have selected reduced image quality for a camera, images from the camera will be
displayed in full quality when viewed enlarged (see Enlarging Images from a Particular Camera on
page 31 and 36).
Frame Rate
The Frame Rate setting lets you select a frame rate for the selected camera. Default is Unlimited.
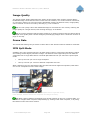
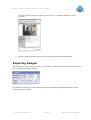
IPIX Split Mode
Available only if the selected camera is an IPIX camera. IPIX is a technology that allows creation
and viewing of 360-degree panoramic images. The Remote Client supports up to four different
viewpoints from a single IPIX camera. The IPIX Split Mode list lets you select the required spilt
mode:
One by One lets you view a single viewpoint.
Two by Two lets you view four different viewpoints at a time.
When viewed on the Live and Browse tabs, the IPIX camera will appear as specified, with either
one or four viewpoints from the same image:
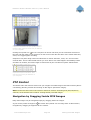
Two by Two: Live tab displaying four different viewpoints from a single IPIX camera;
in this example, the IPIX camera's four viewpoints are enlarged for clarity.
Tip: When viewing different viewpoints from an IPIX camera on the Live or Browse tabs, you
are able to navigate each viewpoint independently by clicking inside each viewpoint, or by using
the buttons in the PTZ Control section.
www.milestonesys.com
Page 28
Further Configuration
Milestone XProtect Remote Client 3.0; User’s Manual
Apply to All
The Apply To All button lets you quickly apply the camera settings for the selected camera to all
cameras in the view.
Configuring Joystick Control
The Joystick Control section lets you configure joystick control of PTZ (Pan/Tilt/Zoom) cameras.
Joystick configuration control requires that a joystick is attached to the computer running the
Remote Client.
Note: Even though joystick control is supported for a large number of PTZ cameras, not all PTZ
cameras may be joystick-controlled. Consult your surveillance system administrator if in doubt
about joystick support for cameras; your surveillance system administrator will be able to find
information about joystick support for cameras in the release note for your organization’s Milestone
XProtect surveillance system.
Click the Joystick Control section’s Setup... button to access the Joystick Setup window.
The Joystick Setup window
The Joystick Setup window’s Joystick Axes section lets you configure the axes used for the joystick.
With a joystick, you are typically able to navigate camera images three-dimensionally, along three
axes: an X-axis, a Y-axis, and a Z-axis.
The Z-axis typically refers to the depth (zoom) level.
Example: X-, Y-, and Z-axes
The Joystick Axes section contains the following buttons and check boxes:
www.milestonesys.com
Page 29
Further Configuration
Milestone XProtect Remote Client 3.0; User’s Manual
Button, Check
Box
Description
Invert y-axis
Lets you invert the Y-axis.
This way, you are able to select whether the camera should move up or
down when you move the joystick towards you and away from you
respectively.
z-axis uses a
relative
positioning
scheme
Lets you specify whether the Z-axis should use a relative or an absolute
positioning scheme.
Default values
Resets axes settings, letting you use the joystick’s default axes settings.
This will affect the way you zoom in and out with camera.
The Joystick Setup window’s Joystick Buttons section lets you specify which joystick buttons should
be used for particular actions:
To assign an action to a particular joystick button, select the required action in the list, then click
the required joystick button.
When a button is assigned to an action, the name of the button will be listed together with the
name of the action.
To stop using a particular joystick button for a particular action, select the button/action in the list,
then click the Unselect button.
To free all joystick buttons from their associated actions, click the Unselect All button.
www.milestonesys.com
Page 30
Further Configuration
Milestone XProtect Remote Client 3.0; User’s Manual
Viewing Live Images
You view live images on the Remote Client’s Live tab.
When you select the Remote Client’s Live tab, the Remote Client will connect to the surveillance
system server, and display live images from the cameras in the selected view.
Note: In order to view live images in the Remote Client, the Monitor application must be running
on the surveillance system; consult your surveillance system administrator if in doubt. Depending
on your user rights, access to viewing live images from some cameras may be restricted.
The Live tab, in this example displaying a view
with images from eight cameras
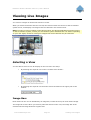
Selecting a View
You are able to select a view for display on the Live tab in two ways:
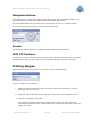
By selecting the required view in the Live tab’s Views section:
Detail from Live tab’s Views section
By selecting the required view from the Views list located in the upper part of the
window:
Views list
Image Bars
Each camera in the view is identified by an image bar, located in the top of each camera image.
The image bar is blue. When you select a particular camera in the view, the image bar of the
selected camera image becomes a lighter blue.
www.milestonesys.com
Page 31
Viewing Live Images
Milestone XProtect Remote Client 3.0; User’s Manual
Camera image; enlarged detail shows image bar
The image bar displays the name of the camera as well as the name of the device to which the
camera is connected. The device name is displayed first, in square brackets, followed by the
camera name.
Each image bar will display the word Live when live images are displayed, and the word Stopped if
the camera is stopped.
Each image bar features three colored indicators:
Event indicator (the leftmost of the three indicators, solid yellow): Lights up when
specific events, defined by the surveillance system administrator, occur. Click anywhere
inside the image to reset the event indicator. This indicator may appear black if event
indication has not been specified for the camera in question, of if no specified events
have occurred. Consult your surveillance system administrator if in doubt.
Motion indicator (the indicator in the middle, solid red): Lights up when motion is
detected in the image. Click anywhere inside the image to reset the motion indicator.
Online indicator (the rightmost of the three indicators, blinking green): Changes state
every time an image is received from the camera.
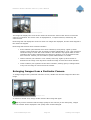
Enlarging Images from a Particular Camera
To enlarge images from a particular camera in a view, double-click the blue image bar above the
image.
Double-clicking blue bar above image enlarges view
To return to normal view, simply double-click the blue image bar again.
Tip: If you have selected reduced image quality for the camera (on the Setup tab), images
from the camera will be displayed in full quality when viewed enlarged.
www.milestonesys.com
Page 32
Viewing Live Images
Milestone XProtect Remote Client 3.0; User’s Manual
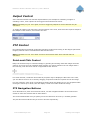
Output Control
If the selected camera has external outputs defined, for example for switching on lights or
sounding a siren, such outputs can be triggered from the Remote Client.
Note: Depending on your user rights, access to triggering outputs for some cameras may be
restricted.
To trigger an output, first select the required camera in the view, then select the required output in
the Output Control section, and click the Fire link.
Output Control section
PTZ Control
PTZ (Pan/Tilt/Zoom) and IPIX (technology allowing creation and viewing of 360-degree panoramic
images) cameras can be controlled from the Remote Client.
Note: Depending on your user rights, access to PTZ controls from some cameras may be
restricted.
Point-and-Click Control
Many PTZ cameras may be controlled simply by pointing and clicking inside the images from the
camera. If you see a set of crosshairs when placing your mouse pointer over the images from a
PTZ camera, point-and-click control is supported for the camera.
Crosshairs indicate point-and-click control.
For some cameras, crosshairs may look different.
For some cameras, crosshairs surrounded by a square may be displayed. When this is the case,
you are able to zoom in on an area by dragging a square around the required area in the image.
For such cameras, zoom level is controlled by holding down the SHIFT key on your keyboard while
moving the mouse up or down; this will display a zoom level slider inside the image.
PTZ Navigation Buttons
As an alternative to point-and-click PTZ control, use the navigation buttons in the PTZ Control
section to move the selected PTZ or IPIX camera.
The round middle button lets you quickly move the camera to its home (i.e. default) position.
The plus and minus buttons lets you zoom in and out respectively.
www.milestonesys.com
Page 33
Viewing Live Images
Milestone XProtect Remote Client 3.0; User’s Manual
PTZ Control section
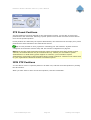
PTZ Preset Positions
If preset positions have been defined for the selected PTZ camera, you are able to select such
positions from the Presets list. Selecting a preset position from the list will make the PTZ camera
move to the specified position.
Preset positions are defined by the system administrator; the Presets list will be empty if no preset
positions have been defined for the selected PTZ camera.
Tip: You may be able to use a joystick for controlling your PTZ cameras. Joystick control is
configured on the Remote Client’s Setup tab. See Further Configuration on page 24.
Note: Even though joystick and point-and-click control is supported for a large number of PTZ
cameras, not all PTZ cameras may be controlled this way. Consult your surveillance system
administrator if in doubt about joystick support for cameras; your surveillance system
administrator will be able to find information about joystick support for cameras in the release note
for your organization’s Milestone XProtect surveillance system.
IPIX PTZ Positions
You are able to move to a specific position in an IPIX view, and then save that position by clicking
the Save button.
When you later want to return to the saved position, click the Load button.
www.milestonesys.com
Page 34
Viewing Live Images
Milestone XProtect Remote Client 3.0; User’s Manual
Viewing Recorded Images
You view recorded images on the Remote Client’s Browse tab.
When you select the Remote Client’s Browse tab, the Remote Client will connect to the surveillance
system server, and display recorded images from the cameras in the selected view. This way, you
are able to browse recorded images.
Note: Depending on your user rights, access to browsing images from some cameras may be
restricted. Date and time formats used when browsing recorded images may vary depending on
your computer’s regional settings. Illustrations in this help topic, and date and time formats used in
the illustrations, are thus for guidance only.
The Browse tab provides you with a number of advanced features for browsing recorded images.
In addition to image browsing features, the Browse tab also lets you print images, and export AVIs
(movie clips) and JPEGs (still images).
The Browse tab, in this example displaying a
view with images from eight cameras
Selecting a View
You are able to select a view for display on the Browse tab in two ways:
By selecting the required view in the Browse tab’s Views section:
Detail from Live tab’s Views section
By selecting the required view from the Views list located in the upper part of the
window:
Views list
www.milestonesys.com
Page 35
Viewing Recorded Images
Milestone XProtect Remote Client 3.0; User’s Manual
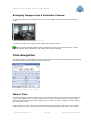
Enlarging Images from a Particular Camera
To enlarge images from a particular camera in a view, double-click the blue title bar above the
image.
Double-clicking blue bar above image enlarges view
To return to normal view, simply double-click the blue title bar again.
Tip: If you have selected reduced image quality for the camera (on the Setup tab), images
from the camera will be displayed in full quality when viewed enlarged.
Time Navigation
The Browse tab’s Time Navigation section provides you with controls for browsing and playing back
recorded images from the camera selected in the view.
Time Navigation section. Date and time
format may be different on your computer.
Master Time
The Time Navigation section’s Master Time area shows the master time and date of the recordings
viewed. The master time is the time to which all the cameras viewed are tied. This means that
when you browse recordings, all the images you see in the view will, in principle, be from exactly
the same point in time.
Some cameras, however, may only record if motion is detected. Also, there may be no recorded
images from one or more cameras in the view matching the specified point in time. When this is
www.milestonesys.com
Page 36
Viewing Recorded Images
Milestone XProtect Remote Client 3.0; User’s Manual
the case, the last image in the camera’s database prior to the specified point in time will be
displayed in the view.
Master Time area. Date and time format
may be different on your computer.
The Master Time area also displays the current playback speed (example: 1.00x, indicating realtime).
Browse Buttons
The Time Navigation section’s browse buttons lets you manually navigate through recordings from
the camera selected in the view.
Browse buttons
Previous image: Moves to the image just before the one currently viewed
Next image: Moves to the image just after the one currently viewed
Previous sequence: Moves to the first image in the previous sequence
Next sequence: Moves to the first image in the following sequence
First image: Moves to the first image in the database for the selected camera
Last image: Moves to the last image in the database for the selected camera
Time Sliders
The Time Navigation section’s time sliders let you browse recordings simply by dragging the sliders’
handles. Drag to the left to move backwards in time; drag to the right to move forward in time.
Use the upper times slider for fine browsing within a limited period of time; use the lower slider for
coarser browsing within longer time spans.
Time sliders
Playback Slider and Buttons
The Time Navigation section’s playback slider lets you specify the required playback speed. In the
slider’s middle position, playback speed is real-time (1.00x).
www.milestonesys.com
Page 37
Viewing Recorded Images
Milestone XProtect Remote Client 3.0; User’s Manual
Drag the slider to the left for a slower playback speed; drag to the right for a faster playback
speed.
An indication of the exact playback speed is displayed in the upper right corner of the Time
Navigation section’s Master Time area.
Playback slider and buttons
Use the playback buttons to play back recordings:
Play reverse: Plays back recordings backwards in time
Play forward: Plays back recordings forward in time
Stop: Stops playback
Tip: Dragging the playback slider to its leftmost position pauses playback.
Go To Time
The Time Navigation section’s Go To Time fields let you quickly jump to a specific point in time.
Go To Time fields. Date and time format
may be different on your computer.
Specify required date in the first field and required time in the second field, then click the Go To
link.
Sequences
The Browse tab’s Sequences section provides you with an overview of recorded sequences for the
camera selected in the view.
To use the Sequences section, select the required camera in the view, then click the Sequences
section’s Get Sequences button.
Clicking the Get Sequences button will retrieve a list of up to 40 sequences: 20 sequences prior to
the point in time displayed in the view, and 20 sequences following the point in time displayed in
the view.
Each sequence will be listed with date and time as well as the length of the sequence. Clicking a
sequence in the list will move all images in the view to the time the sequence.
If the Preview check box is selected, you are able to quickly view each sequence by placing the
mouse pointer over the required sequence in the list:
www.milestonesys.com
Page 38
Viewing Recorded Images
Milestone XProtect Remote Client 3.0; User’s Manual
Sequences section; placing mouse pointer over
a sequence indication lets you quickly view the
incident. Date and time format may be different
on your computer.
Clicking the expand icon next to a sequence in the list will show you the exact date and time of
the first and last image in the sequence as well as the exact date and time of the motion detection,
event, etc. triggering the recording.
Sequences may often begin some seconds before a motion detection, event, etc. and end some
seconds after. This so-called buffer allows you to be able to see what happens immediately before
and after an incident; the buffer length is determined by the surveillance system administrator.
Detail from Sequences section, showing
expanded sequence indication. Date
and time format may be different on
your computer.
PTZ Control
The Browse tab’s PTZ Control section lets you navigate recorded images from IPIX cameras (IPIX is
a technology allowing creation and viewing of 360-degree panoramic images).
Note: The Browse tab’s PTZ Control section cannot be used for controlling PTZ (Pan/Tilt/Zoom)
cameras, as the Browse tab is used for viewing already recorded images.
Navigation by Dragging Inside IPIX Images
Many IPIX images may be navigated simply by dragging inside the images.
If your mouse pointer changes to
or similar when placed over an image from an IPIX camera,
navigation by dragging is supported for the camera.
www.milestonesys.com
Page 39
Viewing Recorded Images
Milestone XProtect Remote Client 3.0; User’s Manual
Navigation Buttons
As an alternative to navigation by dragging inside IPIX images, use the navigation buttons in the
PTZ Control section to move around the view from the selected IPIX camera.
The round middle button lets you quickly move the camera to its home (i.e. default) position.
The plus and minus buttons lets you zoom in and out respectively.
PTZ Control section
Presets
The Presets list does not apply for navigating recorded images from IPIX cameras.
IPIX PTZ Positions
You are able to move to a specific position in the IPIX view, and then save that position by clicking
the Save button. When you later want to return to the saved position, click the Load button.
Printing Images
With the Browse section’s Print section, you are able to print recorded images.
Print section
To print an image, do the following:
1. Select the required camera from the Print section’s Source list. Alternatively, you may
select the camera in the view.
2. Select the required date and time by using the controls in the Time Navigation section.
3. Click the Print section’s Print button.
This will open a separate window with a preview of the image to be printed as well as
information about camera name, image capture time, print time and user name of the user
printing the image.
www.milestonesys.com
Page 40
Viewing Recorded Images
Milestone XProtect Remote Client 3.0; User’s Manual
You also have the option of including a user’s note, for example a description of the
recording.
Window with preview and information
about printed image
4. Click the separate window’s Print link to print the image and associated details.
Exporting Images
With the Browse section’s Export section, you are able to export recorded images in the AVI (movie
clip) and JPEG (still image) formats.
Export section. Date and time format may
be different on your computer.
See Exporting Evidence in AVI and JPEG Formats in the following for detailed information about
exporting recorded images.
www.milestonesys.com
Page 41
Viewing Recorded Images
Milestone XProtect Remote Client 3.0; User’s Manual
Exporting Evidence in AVI and JPEG
Formats
With the Remote Client you are able to quickly generate and export video evidence in the AVI
(movie clip) and JPEG (still image) formats.
Note: Depending on your user rights, access to generating AVI or JPEG evidence from some
cameras may be restricted. Date and time formats used when browsing recorded images may vary
depending on your computer’s regional settings. Illustrations in this help topic, and date and time
formats used in the illustrations, are thus for guidance only.
To export video evidence, do the following:
1. Select the Remote Client’s Browse tab.
2. In the Browse tab’s Export section, specify start date and time for the export by typing the
date in the first Start Time field and the time in the second field.
Export section. Date and time format may
be different on your computer.
Tip: Instead of manually specifying date and time, you may use the Browse tab’s Time
Navigation features to move to the required start point, then click the upper of the Export
section’s Set links. This will automatically set the date and time of the viewed image into
the Start Time fields.
3. In the End Time fields, specify end date and time for the export.
As was the case with the start date and time, end date and time must be in the correct
format if specified manually. Alternatively, use the Set link as described above.
4. Select the required camera from the Source list.
5. Click the Export button.
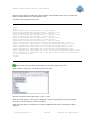
This will open an export dialog, listing the specified start time, end time, and camera:
www.milestonesys.com
Page 42
Exporting Evidence …
Milestone XProtect Remote Client 3.0; User’s Manual
Export dialog. Date and time format
may be different on your computer.
6. In the export dialog, select the required export format: AVI (movie clip) or JPEG (still
images).
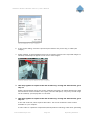
7. Select whether to add timestamps from the surveillance system to the exported images. If
selected, timestamps will appear in the corner of the images:
Timestamps; arrow indicates actual position. Date
and time format may be different on your computer.
8. This step applies for export in the AVI format only; if using the JPEG format, go to
step 11
Select required frame rate for the export. With the Full option, all images between the start
and end times will be included in the export; with the Half option, only every second image
will be included, yet still play back in real-time.
9. This step applies for export in the AVI format only; if using the JPEG format, go to
step 11
In the AVI Codec list, select required AVI codec. The list will contain the video codecs
available on your computer.
A video codec is a particular compression/decompression technology used when generating
www.milestonesys.com
Page 43
Exporting Evidence …
Milestone XProtect Remote Client 3.0; User’s Manual
video files. Your choice of codec will affect the quality and size of the AVI file.
Tip: The Indeo® video 5.10 codec, if available on your computer, generally provides a
very good compromise between quality and file size.
10. This step applies for export in the AVI format only; if using the JPEG format, go to
step 11
By default, the AVI file will get a file name based on the export start time, along the
structure yyyymmddhhmmss.avi (year, month, day, hour, minute, second; example:
20050630160430 for a file with a start time of 16:04:30 on 30th June 2005). The name
will automatically appear in the AVI File Name field.
The default file name format is independent of regional settings on your computer.
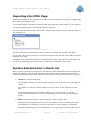
You are always able to change the default file name to a name of your choice, simply by
overwriting the default file name. Remember that the file name must include the .avi file
extension.
11. Specify export destination.
If you select Desktop, your exported file will be saved in an automatically created Exported
Images folder on the desktop of your computer.
If you select Path, you are able to specify a path yourself. The exported file will be saved in
an automatically created Exported Images folder under the path you specify (example: If
you specify a path like C:\My Stuff\My Files, the exported file will be saved in C:\My
Stuff\My Files\Exported Images).
When specifying a path this way, the folders you specify do not have to be existing ones; if
they do not already exist, they will be created automatically.
12. Click the Export link to begin the export.
The status bar in the upper part of the export dialog will display the status of the export:
Export status bar
Tip: If you are exporting very long sequences, export may—depending on your
selected export settings—take a while. You can continue to use the Remote Client for other
purposes while the export process is underway.
If the Close On Completion check box is selected (default), the export dialog will
automatically close when the export is finished.
Upon completion, you are able to view and distribute the exported file.
www.milestonesys.com
Page 44
Exporting Evidence …
Milestone XProtect Remote Client 3.0; User’s Manual
Keyboard Shortcuts
You are able to use the following keyboard shortcuts in the Remote Client:
On All Tabs
CTRL+1
Go to Live tab
CTRL+3
Go to Setup tab
CTRL+2
CTRL+DOWN
ARROW
CTRL+UP ARROW
Go to Browse tab
Go to the next view in the Views list (located in the upper part of the
window)
Go to the previous view in the Views list (located in the upper part of the
window)
On Live Tab Only
PLUS SIGN
PTZ camera, zoom in
UP ARROW
PTZ camera, move up
MINUS SIGN
DOWN ARROW
LEFT ARROW
RIGHT ARROW
HOME (numeric
keypad only)
END (numeric
keypad only)
PAGE UP (numeric
keypad only)
PAGE DOWN
(numeric keypad
only)
5 (numeric keypad
only)
PTZ camera, zoom out
PTZ camera, move down
PTZ camera, move left
PTZ camera, move right
PTZ camera, move up and left
PTZ camera, move down and left
PTZ camera, move up and right
PTZ camera, move down and right
PTZ camera, move to default position
On Browse Tab Only
RIGHT ARROW
Move to next image
PAGE DOWN
Move to next sequence
LEFT ARROW
Move to previous image
www.milestonesys.com
Page 45
Keyboard Shortcuts
Milestone XProtect Remote Client 3.0; User’s Manual
PAGE UP
Move to previous sequence
END
Move to last image
HOME
Move to first image
www.milestonesys.com
Page 46
Keyboard Shortcuts
Milestone XProtect Remote Client 3.0; User’s Manual
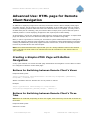
Advanced Use: HTML page for Remote
Client Navigation
In addition to displaying images from cameras, the Remote Client is able to display HTML pages
and static images. This provides a high degree of flexibility as such HTML pages may be used for
intuitively switching between different views in the Remote Client. For example, you may insert a
clickable floor plan of a building, and you would be able to simply click a part of the floor plan to
instantly switch to a view displaying images from the required part of the building.
In the following, you will see examples of HTML pages for Remote Client navigation: a simple HTML
page with buttons, and a more advanced HTML page with a clickable image map.
Often, it will be a good idea to consult your surveillance system administrator before creating and
using HTML pages for Remote Client navigation. For surveillance system administrators involved in
creating and distributing such HTML pages to Remote Client users, a check list outlining the tasks
involved is provided at the end of this chapter.
Note: The method described here requires that you run a locally installed version of the Remote
Client, and that the HTML page to be imported and used for navigation is also stored locally on
your computer.
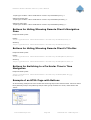
Creating a Simple HTML Page with Button
Navigation
A very quick solution is to create an HTML page with buttons for navigation. You are able to create
five categories of buttons on the HTML page:
Buttons for Switching between Remote Client’s Views
Required HTML syntax:
<input type="button" value="Buttontext" onclick="top.changeView('[Viewstatus]
Groupname', 'Viewname');">
Where viewstatus refers to whether the view is private or shared.
Example:
<input type="button" value="Change to: Group1-View2"
onclick="top.changeView('[Shared] Group1', 'View2');">
Buttons for Switching between Remote Client’s Three
Tabs
Note: Bear in mind that, depending on their user rights, some users may not be able to access all
three tabs.
Required HTML syntax:
Switch to Live tab:
www.milestonesys.com
Page 47
Advanced Use: HTML Page for …
Milestone XProtect Remote Client 3.0; User’s Manual
<input type="button" value="Buttontext" onclick="top.selectPane('live');">
Switch to Browse tab:
<input type="button" value="Buttontext" onclick="top.selectPane('browse');">
Switch to Setup tab:
<input type="button" value="Buttontext" onclick="top.selectPane('setup');">
Buttons for Hiding/Showing Remote Client’s Navigation
Pane
Required HTML syntax:
Hiding:
<input type="button" value="Buttontext" onclick="top.showPane(false);">
Showing:
<input type="button" value="Buttontext" onclick="top.showPane(true);">
Buttons for Hiding/Showing Remote Client’s Title Bar
Required HTML syntax:
Hiding:
<input type="button" value="Buttontext" onclick="top.showTopTitle(false);">
Showing:
<input type="button" value="Buttontext" onclick="top.showTopTitle(true);">
Buttons for Switching to a Particular Time in Time
Navigation
Required HTML syntax:
<input type="button" value="Buttontext" onclick="top.setTime('Mmm dd yyyy
hh:mm:ss');">
Example of an HTML Page with Buttons
In the following example we have created two shared groups in the Remote Client. We have called
them [Shared] Group1 and [Shared] Group2. Each group contains two views, called View1 and
View2:
Two groups, each containing two views
www.milestonesys.com
Page 48
Advanced Use: HTML Page for …
Milestone XProtect Remote Client 3.0; User’s Manual
We have also created an HTML page with examples of all available button types, including the
ability to switch between our four different views.
The HTML for the page looks like this:
<html>
<body>
<input type="button" value="Change to: Group1-View1"
onclick="top.changeView('[Shared] Group1', 'View1');"><br>
<input type="button" value="Change to: Group1-View2"
onclick="top.changeView('[Shared] Group1', 'View2');"><br>
<input type="button" value="Change to: Group2-View1"
onclick="top.changeView('[Shared] Group2', 'View1');"><br>
<input type="button" value="Change to: Group2-View2"
onclick="top.changeView('[Shared] Group2', 'View2');"><br>
<input type="button" value="Live" onclick="top.selectPane('live');"><br>
<input type="button" value="Browse" onclick="top.selectPane('browse');"><br>
<input type="button" value="Setup" onclick="top.selectPane('setup');"><br>
<input type="button" value="Show pane" onclick="top.showPane(true);"><br>
<input type="button" value="Hide pane" onclick="top.showPane(false);"><br>
<input type="button" value="Show top title" onclick="top.showTopTitle(true);"><br>
<input type="button" value="Hide top title" onclick="top.showTopTitle(false);"><br>
<input type="button" value="Set time to New Year's Eve" onclick="top.setTime('Dec
31 2004 23:59:50');"><br>
</body>
</html>
Tip: You may copy the HTML, and modify it for an HTML page of your own.
When viewed in a browser, our HTML page looks like this:
HTML page with buttons for navigating between views
We have saved the HTML page locally, on the C: drive.
When the HTML page is to be used for navigation, saving the HTML page locally is necessary
because of security features in Internet Explorer.
When the HTML page is saved locally, a locally installed Remote Client will always be able to
display it.
www.milestonesys.com
Page 49
Advanced Use: HTML Page for …
Milestone XProtect Remote Client 3.0; User’s Manual
Using an HTML Page with Image Map Navigation
You may also create an HTML page with more advanced content, for example an image map
allowing users to switch between views.
Example of an HTML Page with an Image Map
In the following example we have kept the Remote Client groups and views from the previous
example.
Instead of using buttons, we have created an HTML page with an image of a floor plan, and created
an image map based on the floor plan.
Viewed in a browser, our HTML page looks like this:
HTML page with image map for navigating between views
How you structure an image map is of course highly individual.
For this example, we divided the floor plan into colored zones, and defined an image map area for
each zone. This way, you will be able to simply click a zone in order to go to the view containing
cameras from that zone.
For instance, the red zone on our image map mirrors the Change to: Group2-View2 button from
the previous example: When clicking the red zone, you will go to View2 in Group2.
When used in one of our Remote Client views, the HTML page looked like this:
Example of HTML page with clickable floor plan imported into a view
www.milestonesys.com
Page 50
Advanced Use: HTML Page for …
Milestone XProtect Remote Client 3.0; User’s Manual
Importing the HTML Page
Importing an HTML page for navigation is no different from importing any other type of HTML page
into a view in the Remote Client.
The important thing to remember is that the HTML page should be stored locally on your computer.
To import an HTML page, go to the Remote Client’s Setup tab.
From the setup tab’s System Overview section, drag the HTML Page link to the required position in
the required view.
Click and drag HTML Page link to required position in view
This will open the Import HTML Page window, in which you specify the required HTML page.
You are also able to specify a title for it; the title will appear in the title bar of the HTML page when
displayed in the view.
Depending on the navigation features you have included on your HTML page, you may often want
to import the HTML page into several views in order for the navigation to fully work.
System Administrator’s Check List
Often, it will be a good idea to consult your surveillance system administrator before creating and
using HTML pages for Remote Client navigation. Surveillance system administrators involved in
creating and distributing such HTML pages to Remote Client users may use the following check list:
1. Create the required HTML page.
The navigation controls in the HTML page must match the views users see in their Remote
Clients.
For example, in order for a button leading to View2 to work, a view called View2 must
exist.
If you intend to distribute a navigation HTML page to a group of users, it is highly
recommended that the views in which the HTML page will be used are placed in shared
groups.
2. Save the HTML page locally on each computer on which it will be used.
When saving the HTML page locally, save it at a location to which an unambiguous path
can be defined, for example in a folder on the user’s C: drive (example: C:\myfolder).
Saving the HTML page on the user’s desktop or in the user’s My Documents folder will not
www.milestonesys.com
Page 51
Advanced Use: HTML Page for …
Milestone XProtect Remote Client 3.0; User’s Manual
work properly due to the way Windows constructs the path to such locations.
3. Verify that the Remote Clients in which the HTML page will be used are locally installed
versions.
If not, download and install the Remote Client software on each computer on which the
HTML page will be used.
4. Import the HTML page into the Remote Client views in which it will be used.
5. Test that the navigation controls on the imported HTML page work as intended.
6. Enjoy simple and intuitive Remote Client navigation, tailored to meet your organization’s
needs.
www.milestonesys.com
Page 52
Advanced Use: HTML Page for …
Milestone XProtect Remote Client 3.0; User’s Manual
Logging Out of the Remote Client
To log out of the Remote Client, simply click the Log Out button in the Remote Client’s top bar:
Log Out button
www.milestonesys.com
Page 53
Logging Out of the Remote Client
Milestone XProtect Remote Client 3.0; User’s Manual
Glossary
A
AVI: A popular file format for video. Files in this format carry the .avi file extension.
C
Codec: A technology for compressing and decompressing audio and video data, for example in an
exported AVI file. MPEG and Indeo are examples of frequently used codecs.
D
DirectX: A Windows extension providing advanced multimedia capabilities.
F
Frame Rate: A measure indicating the amount of information contained in motion video. Frame
rate is typically measured in FPS (Frames Per second). The higher frame rate, the smoother motion
in video sequence will appear.
H
HTTP: HyperText Transfer Protocol, a standard for exchanging files across the internet. HTTP is the
standard used for formatting and transmission of data on the world wide web.
I
IP Address: Internet Protocol address; the identifier for a computer or device on a network. Used
by the TCP/IP protocol for routing data traffic to the intended destination. An IP address consists of
four numbers, each between 0 and 256, separated by full stops (example: 192.168.212.2).
IPIX: A technology that allows creation and viewing of 360-degree panoramic images. IPIX is a
trademark of Internet Picture Corporation (IPIX).
J
JPEG: An image compression technology, named after the Joint Photographic Experts Group. Files
created with JPEG compression usually carry the .jpg file extension.
P
PTZ: Pan/Tilt/Zoom; a highly movable and flexible type of camera.
U
URL: Uniform Resource Locator; an address of a resource on the world wide web. The first part of
a URL specifies which protocol (i.e. data communication standard) to use when accessing the
resource, whereas the second part of the URL specifies the domain or IP address at which the
resource is located. Example: http://www.milestonesys.com.
www.milestonesys.com
Page 54
Glossary
Milestone XProtect Remote Client 3.0; User’s Manual
Index
—A—
Absolute Positioning ........................................................................................................... 30
Accessing Locally Installed Remote Client ............................................................................. 13
Accessing Remote Client from Server ................................................................................... 12
Adding Cameras to a View .............................................................................................19, 22
AVI ........................................................................................................................ 9, 42, 54
—B—
Browse Tab ........................................................................................... 14, 16, 28, 35, 42, 48
Browser Mode.................................................................................................................... 12
Buffer ............................................................................................................................... 39
—C—
Camera Control Section ...................................................................................................... 27
Camera Settings, Adjusting ................................................................................................. 27
Codec..........................................................................................................................43, 54
Crosshairs....................................................................................................................33, 39
—D—
DirectX ......................................................................................................................... 8, 54
Download.......................................................................................................................... 10
—E—
Event ............................................................................................................................... 39
Export ..............................................................................................................................42
Export Section ..............................................................................................................41, 42
Exporting AVI and JPG ........................................................................................................ 42
—F—
Frame Rate ............................................................................................................28, 43, 54
Full Screen Mode ............................................................................................................... 12
—G—
Group Control Section ...................................................................................................18, 21
Groups ............................................................................................................................. 15
Groups, Deleting................................................................................................................ 27
Groups, Renaming ............................................................................................................. 26
—H—
HTML Page ............................................................................................................... 9, 25, 47
—I—
Image Bars ....................................................................................................................... 31
Image Map........................................................................................................................ 50
Image Quality ................................................................................................................... 28
Import HTML Page Window ............................................................................................26, 51
Installation........................................................................................................................ 10
IP Address ............................................................................................................ 10, 13, 54
IPIX .............................................................................................................8, 33, 34, 39, 54
www.milestonesys.com
Page 55
Index
Milestone XProtect Remote Client 3.0; User’s Manual
IPIX Split Mode.................................................................................................................. 28
—J—
Joystick ...................................................................................................................... 29, 34
Joystick Setup Window ....................................................................................................... 29
JPG ........................................................................................................................ 9, 25, 42
—K—
Keyboard Shortcuts............................................................................................................ 45
—L—
Live Tab......................................................................................................14, 16, 28, 31, 47
Logging In ........................................................................................................................ 13
Logging Out ...................................................................................................................... 53
—N—
Navigation, Using HTML Page for ......................................................................................... 47
—O—
Output.............................................................................................................................. 33
Output Buttons .................................................................................................................. 33
Output Control Section ....................................................................................................... 33
—P—
Pan/Tilt/Zoom .................................................................................................... 8, 29, 33, 54
Password .......................................................................................................................... 13
Port 80 ............................................................................................................................. 13
Pre/Post Buffer .................................................................................................................. 39
Preset Positions ................................................................................................................. 34
Print Section...................................................................................................................... 40
Printing Images ................................................................................................................. 40
Private Groups........................................................................................................ 15, 17, 24
PTZ ................................................................................................................... 8, 29, 33, 54
PTZ Control Section.......................................................................................................33, 39
—R—
Relative Positioning ............................................................................................................ 30
Remote Client, About ........................................................................................................... 8
—S—
Scaling, HTML Page ............................................................................................................ 26
Sequences Section ............................................................................................................. 38
Setup Tab .......................................................................14, 16, 17, 18, 20, 24, 25, 27, 48, 51
Shared Groups .................................................................................15, 16, 17, 20, 24, 48, 51
Shortcut Keys.................................................................................................................... 45
Static Images ................................................................................................................ 9, 25
System Overview Section.............................................................................. 19, 22, 25, 26, 51
—T—
Target Audience................................................................................................................... 2
Text Message, Mobile Phone....................................................................................... See SMS
Time Navigation Section ..................................................................................................... 36
www.milestonesys.com
Page 56
Index
Milestone XProtect Remote Client 3.0; User’s Manual
—U—
User Rights, Defining for Remote Access ................................................................................. 9
—V—
View Control Section .....................................................................................................18, 21
Views ............................................................................................................................... 15
Views Section ............................................................. 16, 17, 18, 19, 21, 22, 24, 26, 27, 31, 35
Views, Deleting.................................................................................................................. 27
Views, Renaming ............................................................................................................... 27
—X—
X-Axis, Joystick ................................................................................................................. 29
—Y—
Y-Axis, Joystick.................................................................................................................. 29
—Z—
Z-Axis, Joystick ................................................................................................................. 29
www.milestonesys.com
Page 57
Index
Milestone XProtect Remote Client 3.0; User’s Manual
Milestone Systems A/S
Copenhagen, Denmark
Tel.: +45 88 300 300
Fax: +45 88 300 301
[email protected]
www.milestonesys.com
RC30-um-3-081106
www.milestonesys.com
Page 58
Contact