1
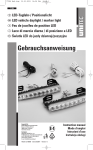
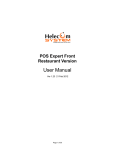
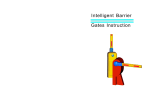
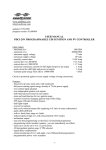
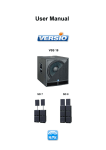
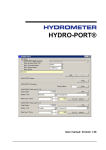
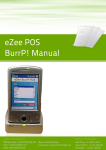
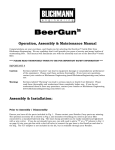
TOUCH POS 7 USER MANUAL EARO SOFTWARE TOUCH POS 7 1. WORKING WITH THE TABLE’S 1.A This Is Your Main Point Of Sale Screen. CASH OFF MENU BLOCK: This section is where you can cash off your transaction, give discounts, refund items, placing the items on a table setting you Qty per item wrung up, and see a simple cashup sheet for the till. ITEM LIST: POINT OF SALE TEMPLATE: This is you current list of orders wrung up from the point of sale, item name, Qty, Price and Total. This is your main point of sale screen for all the menu items in your menu that you are selling; the top block is your group’s example (beers, Burgers). The bottom block is your selling items for your store example (hunters dry, cheese burger) which will appear in the order list to the left ones pressed by user. Earo Systems | Touch POS 7 User Manual 1 TOUCH POS 7 1.B Adding Items Onto A Table / Tab, Click on Table / Tab. This menu screen will appear after touching the Table / Tab button on the Touch Pos, You may use any number you want depending on the table you\tab numbers you have for your store. The Ok Button will bring you to the next step in the Table process. The CANCEL Button with cancel the selection of the tables. Earo Systems | Touch POS 7 User Manual 2 TOUCH POS 7 1.C : Selecting The Staff Member Working the Table. . SELECTING THE STAFF: OK / SELECT AND CANCEL: Here you can find your staff members either by Name, Surname or ID Number, or simply tick the tick box Only Show Drivers and your listed drivers for you store will display in the main screen. To do so just highlight the name of the staff you wish to select. By Pressing ok / select you will select the highlighted staff member and assign them to the table completing the table for that current order. If you click on Cancel it will still complete the order but will Not Allocate a waiter for that order. STAFF LIST: In this section a list of all your staff members will display. . . . Earo Systems | Touch POS 7 User Manual 3 TOUCH POS 7 1.D Working With The Table Section, (This Screen Will Appear After Selecting Staff) POS TABS: This will allow you to switch between the main screen and your tables / tabs screen. TABLES / TABS LIST: Here will display the list of open table and tabs you have running, it will display the table number, amount, total items, the customer, waiter working that table along with time opened, checkup of table time elapsed and the table / tab limit. . TABLES / TABS FUNCTIONS: This is your function bar for your tables and tabs that are displayed in the list to the left here you can manage your tables and tabs for the customers. . Earo Systems | Touch POS 7 User Manual 4 TOUCH POS 7 1.2 Working With The Function Bar (1) This button finalizes the table / tab, after pressing the button it will bring up the cash off screen. (2) This button will allow you to allocate a customer on the selected Table / Tab. (3) This button will allow you to modify the table items. (4) This button will allow you to allocate a waiter on the selected Table / Tab. (5) This button will print your slip \ bill for the customer on selected table. (6) This button will add a checkup stamp (Time Stamp) resetting elapsed time. (7) This button will allow you to split the bill between two customer’s \ tables. (10) This button will bring up a navigation bar for easy navigation thru the list. (8) This button will set a table / tab limit for the selected customer. (9) This button will print a bill to the kitchen letting them know witch course to prepare. Earo Systems | Touch POS 7 User Manual 5 TOUCH POS 7 CASH OFF SCREEN: (1) : Finalize Tab / Table This is your cash off screen you can manually put in the amount that the sale is or use the quick links 10,20,50,100,200,300,500,1000 After the amount is entered simply press on OK (DEFAULT CASH) or you can use the functions to the right EFT,VISA,MASTER (Note they will cash off the transaction when pressed) or simply press Cancel to close the screen. It will display Amount Owing, VAT, Items, Amount Paid (User Input) and Change. (2) : Allocate Customer ALLOCATING CUSTOMER: Here you can select search by different criteria being Name, ID Number, Cell, Etc. OK / SELECT: After you have highlighted your customer simply press on OK/SELECT ADD CUSTOMER: Here you can add a new customer or modify an existing one. NAVIGATION: Will simply let you scroll up and down with the customer list LAST ORDER: Will simply let see the last order for the customer selected in the list Earo Systems | Touch POS 7 User Manual 6 TOUCH POS 7 (3) : Use Order (Modify) CURRENT TABLE: COMPLETE: Here will display the current Table / Tab you are modifying. After the extra items are wrung up just press on complete Table modification and it will take you back to the table tab where your table list is located ITEM LIST: Please note that the blue items are the earlier that was wrung up before the table modification. (4) : Allocate Waiter ALLOCATING WAITER: Here you can select search by different criteria being Name, Surname and ID Number for your staff members. SELCECT AND CANCEL: After you have highlighted the staff member simply press on OK / SELECT to continue or you may cancel this screen (5) : Print Bill Print Bill will instantly print the bill for that order when pressed. (6) : Add Checkup Stamp CHECKUP: Your current system date will appear here when pressed. Earo Systems | Touch POS 7 User Manual 7 TOUCH POS 7 (7) : Split Bill ADD - REMOVE: By pressing these buttons you can add or remove items between the two Bills, Tables and Tab. ORIGINAL: The left side is your original table where the items can be moved to the new table. TABLE NUMBER: Here you can input a new table number for the split bill. This section will display the total items and amount for the table (8) : Tab / Table Limit DISPLAY SECTION: In this section it will display the table number along with the current tab limit , total and the value until the limit is reached for the customer. INPUT SCREEN: As you type the amount given to you it will start displaying here. ADD - REMOVE: This is the input keypad for the amount you wish to input for the limit OK: When OK is pressed it will accept the limit you have enterd. CLEAR LIMIT: When this button is pressed it will completely CLEAR the current limit for this Tab / Table and it will revert back to 0.00 Earo Systems | Touch POS 7 User Manual 8 TOUCH POS 7 (9) : Prepare Course PREPARE COURSE: This menu will allow you to send the course to the back kitchen for the kitchen staff to know when they can start preparing the meal\course\starter depending on which one you sent to the back for the kitchen staff make. (10) : Show Navigation SHOW NAVIGATION: By pressing the show navigation button the following block you see here will appear and you can scroll up and down the list of your current Tables / Tabs. Earo Systems | Touch POS 7 User Manual 9 TOUCH POS 7 2. WORKING WITH THE DELIVERY 2.A Delivery Main Screen. DELIVERY TAB: CURRENT DELIVERIES: This is your delivery tab you can access it at any time to see which open deliveries you have. This section will display all the current open deliveries you currently have. DELEVIRY FUNCTIONS: This is your function bar for your delivery’s that are displayed in the list to the right here you can manage your Deliveries for the customers. . Earo Systems | Touch POS 7 User Manual 10 TOUCH POS 7 2.B Making A Delivery. CONFIRM: DELIVER BUTTON: After you have rung up the order the customer requested pressed the Deliver button and NOT the Cash Off button. After the deliver button has been pressed this window will appear asking you if you want to confirm the order you have just made. By pressing YES you will be able to continue to the next step of your delivery DELIVERY TAB: This is your delivery tab you can access it at any time to see which open deliveries you have. Earo Systems | Touch POS 7 User Manual 11 TOUCH POS 7 2.C Selecting The Customer. SELECTING / FIND CUSTOMER: Here you can select search by different criteria being Name, ID Number, Cell, Etc. OK / SELECT: After you have highlighted your customer simply press on OK/SELECT ADD CUSTOMER: Here you can add a new customer or modify an existing one. NAVIGATION: Will simply let you scroll up and down with the customer list LAST ORDER: Will simply let see the last order for the customer selected in the list Earo Systems | Touch POS 7 User Manual 12 TOUCH POS 7 2.D Selecting The Staff Member Working The Deliverie. . SELECTING THE STAFF: OK / SELECT AND CANCEL: Here you can find your staff members either by Name, Surname or ID Number, or simply tick the tick box Only Show Drivers and your listed drivers for you store will display in the main screen. To do so just highlight the name of the staff you wish to select. By Pressing ok / select you will select the highlighted staff member and assign them to the delivery and therefore closing this window. STAFF LIST: In this section a list of all your staff members will display. . . Earo Systems | Touch POS 7 User Manual 13 TOUCH POS 7 2.E : Completing Your Delivery. CUSTOMER: Here it will display the customer for the current delivery. ITEM LIST: COMPLETE: After the extra items are wrung up just press on complete Table modification and it will take you to the delivery tab where the customer you have just made a delivery for will now appear. Please note that the blue items are the items you have already wrung up, simply complete the order if you don’t wish to make any changes. Earo Systems | Touch POS 7 User Manual 14 TOUCH POS 7 2.F Working With The Function Bar (1) This button finalizes the Delivery, after pressing the button it will bring up the cash off screen. (2) This button will allow you to print the delivery note for the customer. (3) This button will allow you to modify the Delivery items. (4) This button will allow you to allocate a customer on the selected Delivery. (5) This button will allow you to allocate a driver on the selected Delivery. (6) This button will allow you to tell the program that the driver has left the store (7) This button will allow you send a text message to the customer. (9) This button will bring up a navigation bar for easy navigation thru the list. (8) This button will allow you to see a detailed directions list. Earo Systems | Touch POS 7 User Manual 15 TOUCH POS 7 CASH OFF SCREEN: (1) : Finalize Delivery This is your cash off screen you can manually put in the amount that the sale is or use the quick links 10,20,50,100,200,300,500,1000 After the amount is entered simply press on OK (DEFAULT CASH) or you can use the functions to the right EFT,VISA,MASTER (Note they will cash off the transaction when pressed) or simply press Cancel to close the screen. It will display Amount Owing, VAT, Items, Amount Paid (User Input) and Change. (2) :Print Delivery Note Print Delivery Note will instantly print the bill for that delivery when pressed. Earo Systems | Touch POS 7 User Manual 16 TOUCH POS 7 (3) : Use Order (Modify) CURRENT CUSTOMER: COMPLETE: Here will display the current customer you are modifying. After the extra items are wrung up just press on complete Table modification and it will take you back to the Delivery tab where your Deliveries list is. located ITEM LIST: Please note that the blue items are the earlier that was wrung up before the table modification. (4) : Allocate Customer ALLOCATING CUSTOMER: Here you can select search by different criteria being Name, ID Number, Cell, Etc. OK / SELECT: After you have highlighted your customer simply press on OK/SELECT ADD CUSTOMER: Here you can add a new customer or modify an existing one. NAVIGATION: Will simply let you scroll up and down with the customer list LAST ORDER: Will simply let see the last order for the customer selected in the list Earo Systems | Touch POS 7 User Manual 17 TOUCH POS 7 (5) : Allocate Driver ALLOCATING DRIVER: Here you can select search by different criteria being Name, Surname and ID Number for your Delivery staff. SELECT AND CANCEL: After you have highlighted the Drivers name simply press on OK / SELECT to continue or you may cancel this screen (6) :Driver Out The Driver Out button when pressed will let the system know that the current driver allocated to that deliver has just left for the customer and the other is on its way out. Earo Systems | Touch POS 7 User Manual 18 TOUCH POS 7 (7) : Sms Updates ON ITS WAY: AT DOOR: When pressed it will send a text message to the customer. When pressed it will send a text message to the customer Hallo [NAME] [SURNAME] Hallo [NAME] [SURNAME] Your order is complete and the driver has been dispatched Our driver [DRIVER] is at your residence/workplace [DATE] [TIME] ORDER PLACED: When pressed it will send a text message to the customer. Hallo [NAME] [SURNAME] We confirm your order [ORDER] at [DATE] [TIME] your delivery man is [DRIVER] CLOSE / CANCEL: This Button when press will simply just close this wind and return you to the delivery screen. CREDITS AVAILABLE: By pressing this button it will display your available credits left (sms’ s) for your store. Earo Systems | Touch POS 7 User Manual 19 TOUCH POS 7 (8) :Directions FUNCTION PANEL: DIRECTION SECTION: Recalculate will Calculate a different route for the driver and you can print a A4 paper of directions to the customer or simply close. This section will display a turn by turn list to the customer address. ADDRESS: This will display the “from and to” address to the customer note this can only be changed in the customer accounts section and not here. MAP: This will display a Google map overview of the route to the selected customer. Earo Systems | Touch POS 7 User Manual 20 TOUCH POS 7 (9) : Show Navigation HIDE NAVIGATION: By pressing the hide navigation button the following block you see here will disappear. SHOW NAVIGATION: By pressing the show navigation button the following block you see here will appear and you can scroll up and down the list of your current Deliveries. Earo Systems | Touch POS 7 User Manual 21 TOUCH POS 7 3. WORKING WITH THE COLLECTION 3.A Collection Main Screen. COLLECTION TAB: CURRENT COLLECTIONS: This is your collection tab you can access it at any time to see which open collections you have. This section will display all the current open \ pending collections you currently have. COLLECTION FUNCTIONS: This is your function bar for your collections that are displayed in the list to the right here you can manage your collections for the customers. . Earo Systems | Touch POS 7 User Manual 22 TOUCH POS 7 3.B Making A Collection. CONFIRM: COLLECT BUTTON: After you have rung up the order the customer requested pressed the Deliver button and NOT the Cash Off button. After the collect button has been pressed this window will appear asking you if you want to confirm the order you have just made. By pressing YES you will be able to continue to the next step of your collection. DELIVERY TAB: This is your delivery tab you can access it at any time to see which open deliveries you have. Earo Systems | Touch POS 7 User Manual 23 TOUCH POS 7 3.C Selecting The Customer. SELECTING / FIND CUSTOMER: Here you can select search by different criteria being Name, ID Number, Cell, Etc. OK / SELECT: After you have highlighted your customer simply press on OK/SELECT ADD CUSTOMER: Here you can add a new customer or modify an existing one. NAVIGATION: Will simply let you scroll up and down with the customer list LAST ORDER: Will simply let see the last order for the customer selected in the list Earo Systems | Touch POS 7 User Manual 24 TOUCH POS 7 3.D : Completing Your Collection. CUSTOMER: Here it will display the customer for the current Collection. ITEM LIST: COMPLETE: After the extra items are wrung up just press on complete Collection modification and it will take you to the collection tab where the customer you have just made a collection for will now appear. Please note that the blue items are the items you have already wrung up, simply complete the order if you don’t wish to make any changes. Earo Systems | Touch POS 7 User Manual 25 TOUCH POS 7 3.E Working With The Function Bar (1) This button finalizes the Delivery, after pressing the button it will bring up the cash off screen. (2) This button will allow you to modify the Collection items. (3) This button will allow you to allocate a customer to the selected Collection. (4) This button will allow you to send out messages to the customers. (5) This button will allow you to bring up the navigator panel. This window is just there for a quick view at the customer highlighted. Earo Systems | Touch POS 7 User Manual 26 TOUCH POS 7 CASH OFF SCREEN: (1) : Finalize Collection This is your cash off screen you can manually put in the amount that the sale is or use the quick links 10,20,50,100,200,300,500,1000 After the amount is entered simply press on OK (DEFAULT CASH) or you can use the functions to the right EFT,VISA,MASTER (Note they will cash off the transaction when pressed) or simply press Cancel to close the screen. It will display Amount Owing, VAT, Items, Amount Paid (User Input) and Change. (2) : Use Order (Modify) CURRENT CUSTOMER: COMPLETE: After the extra items are wrung up just press on complete Table modification and it will take you back to the Collection tab where your Collection list is. located Here will display the current customer and Tab you are modifying. ITEM LIST: Please note that the blue items are the earlier items that was wrung up before the Collection modification. Earo Systems | Touch POS 7 User Manual 27 TOUCH POS 7 (3) : Allocate Customer ALLOCATING CUSTOMER: Here you can select search by different criteria being Name, ID Number, Cell, Etc. OK / SELECT: After you have highlighted your customer simply press on OK/SELECT ADD CUSTOMER: Here you can add a new customer or modify an existing one. NAVIGATION: Will simply let you scroll up and down with the customer list LAST ORDER: Will simply let see the last order for the customer selected in the list Earo Systems | Touch POS 7 User Manual 28 TOUCH POS 7 (4) : Sms Message Updates READY TO COLLECT: When pressed it will send a text message to the customer. CREDITS AVAILABLE: By pressing this button it will display your available credits left (sms’ s) for your store. Hallo [NAME] [SURNAME] Your order [ORDER] at [DATE] [TIME] is complete and ready for collection. ORDER PLACED: When pressed it will send a text message to the customer. Hallo [NAME] [SURNAME] We confirm your order [ORDER] at [DATE] [TIME] and has been placed. CLOSE / CANCEL: This Button when press will simply just close this wind and return you to the Collection screen. Earo Systems | Touch POS 7 User Manual 29 TOUCH POS 7 (5) : Show Navigation HIDE NAVIGATION: By pressing the hide navigation button the following block you see here will disappear. SHOW NAVIGATION: By pressing the show navigation button the following block you see here will appear and you can scroll up and down the list of your current Collections. Earo Systems | Touch POS 7 User Manual 30