1
Contents
Foreword................................................................................................................................................................................. 3
1. Introduction ........................................................................................................................................................................ 4
2. Operation ............................................................................................................................................................................ 5
3. Preparation ......................................................................................................................................................................... 6
3.1 Guarantee sticker to be returned ................................................................................................................................. 6
3.2 Product label to be kept................................................................................................................................................ 6
3.3. Activating the pendant ................................................................................................................................................. 6
4. Recognition programming ............................................................................................................................................... 7
4.1 Programming for use with the control panel ................................................................................................................ 7
4.2 Programming for use with the dialler............................................................................................................................ 8
5. Main configuration operations......................................................................................................................................... 9
6. Assembly .......................................................................................................................................................................... 12
6.1 Assembling the quick-fastener and neck cord .......................................................................................................... 12
6.2 Assembling the clip holder.......................................................................................................................................... 13
7. Testing operation and radio coverage in test mode ................................................................................................... 14
8. Performing a real test...................................................................................................................................................... 16
9. Advanced programming ................................................................................................................................................. 17
9.1 “Comfort” type application ......................................................................................................................................... 17
9.2 Programming a pendant relayed to a control panel................................................................................................... 18
10. Battery status indication............................................................................................................................................... 19
11. Technical data ................................................................................................................................................................ 19
2
Foreword
We would like to thank you for buying an alarm pendant. To install the pendant in the best conditions, we advise
you to do the following:
1. read the precautions to be taken (below) as well as the “Introduction” and “Operation” chapters,
2. follow the chronological order of the manual, which describes the different operations to be performed step by
step.
Precautions to be taken:
• The pendant has been designed with a non-dismountable enclosure to guarantee that it is watertight. The batteries cannot be
replaced. Change the pendant at the end of its battery life.
• In its factory configuration, the pendant’s battery life is 10 years (based on 1 activation per day). Depending on its use and
possible reprogramming, the pendant’s battery life may be reduced to roughly 5 years (based on 5 activations per day).
• In normal conditions of use, the sliding part of the pendant should be kept closed to prevent premature battery wear.
• If the user has a pacemaker, s/he must check with his/her doctor whether the device used is compatible with the pendant.
The pendant’s radio characteristics are given in the chapter entitled “Technical data” at the end of this manual.
• If the pendant’s batteries are not used for long periods of time, this may stop the pendant working. To prevent this from happening, it is
strongly advisable to perform a weekly battery test, as described in the chapter entitled “Battery status indication”. The user can also test
the status of the batteries at any time to check that the pendant is working properly.
• The pendant has an average radio range with respect to the control panel (or dialler) of 200 m in free field conditions. This means that it will
not work outside of this range given that the control panel (or dialler) will not be able to receive the messages transmitted by the pendant.
Likewise, the control panel (or dialler) will not transmit alarms to the pendant user if the user is located outside of this range.
Furthermore, owing to the composition of certain types of construction materials (some of which prevent or distort the propagation of radio
waves; see control panel manual), and depending on how the pendant is activated and worn (e.g. close to the body), the radio range can be
reduced. Taking into account these requirements, and in order to guarantee the best operating conditions for the user, it is essential to test
the pendant’s radio coverage as soon as it is installed. This test is described in the chapter entitled “Testing operation and radio
coverage in test mode”).
• Alarms transmitted by the pendant are sent to the control panel (or dialler) installed in the user’s home. They are taken into account
according to the configuration chosen when the pendant is installed. The pendant is not a medical tele-assistance device. It only enables a
certain number of alarms defined in this manual to be triggered. However, whatever its configuration, it cannot guarantee that the user
will receive personal or emergency assistance. When the pendant is connected to a remotely monitored alarm system, the alarms
transmitted to the remote monitoring service will be processed according to the provisions outlined in the remote monitoring contract.
Unless the emergency calls issued by the pendant are transmitted to a remote monitoring centre fitted with a medical unit, the alarms issued
will not be treated as medical emergencies. It is therefore up to pendant users wishing to be connected to a remote monitoring company
to ensure the company offers this type of service, and notably to check whether it provides medical assistance.
3
1. Introduction
● The pendant can be used to send messages 24 hours a day whether the alarm system is armed or disarmed.
Depending on its configuration, the pendant can be used to:
- transmit alarm messages to a remote monitoring service or to an individual’s phone via the telephone dialler,
- trigger an audible alarm via the system’s sirens,
- activate beeping on the alarm control panel.
● It can be worn:
- as a pendant using the neck cord,
or
- clipped to a belt using the holder. The holder can also be fixed to a wall.
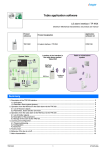
● The pendant is compatible with TwinBand® alarm systems (434.5/869 MHz). It transmits radio messages to the
system (control panel or dialler) with which it has been programmed to operate:
1st configuration: with control panel
Control panel
or transmitting
panel
)
)
)))
With
or without
dialler
)))
2nd configuration:
without control panel
Dialler alone
)))
))
))
3rd configuration: can be combined
with the first two and makes it
possible to use the pendant’s pushbutton to operate electrical devices or
lighting via control receivers or
remote-controlled sockets.
)))
))
9 max
IMPORTANT: the pendant cannot be recognised directly by a dialler
alone SH511AX, SH512AX, SH513AX and SH514AX.
4
2. Operation
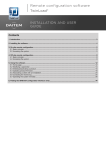
Sliding part
Push-button
and LED
Quickfastener
• The pendant can be activated by pulling
the sliding part down or by pressing on
the push-button (for more than 2 sec.). If
the sliding part stays in downward
position, the message is transmitted every
15 min.
• The pendant is factory-configured to send
the “Silent alarm” command. The sliding
part and push-button can be
programmed separately to send the
“Alarm” or “Local call” command
(see chapter on “Main configuration
operations”).
• The push-button can also be reprogrammed to send “Comfort”
type commands (see chapter on “Advanced programming”) in
order to:
- trigger a fire alarm,
- activate beeping or the door bell function on the control panel,
- operate an electrical device or lighting via external receivers or
remote-controlled sockets.
• The push-button LED shows that the pendant is working
properly:
- it indicates the battery status when the button is briefly pressed,
- it confirms the different radio commands transmitted by the
sliding part or the push-button:
* “Call” type (“Alarm”, “Silent alarm” or “Local call”): the LED
flashes red,
* “Comfort” type: the LED flashes green (push-button only).
Each command sent by pressing the push-button for longer
than 2 seconds (LED flashes green or red), is preceded by a
“battery status test” indicated by the LED briefly flashing red.
- it confirms configuration and indicates the function allocated to
the sliding part or push-button (in programming mode).
5
3. Preparation
3.1 Guarantee sticker to be returned
SH601AU
A1142A047879
Coller sur certif
Guarantee
sticker
3.3. Activating the pendant
Remove the pre-cut part of the
sticker and stick it to the guarantee
certificate in the user manual
supplied with the control panel. If
you are adding the siren to an
existing system, use the guarantee
sticker provided with this product.
This operation should only be
performed when the pendant is first
used:
LED ON
LED OFF
2 s.
1. Pull the sliding part 2. Push the
down. The pendant
sliding part
LED flashes for
up to close
roughly 2 seconds
it.
and then goes out.
3.2 Product label to be kept
The product label, on the back page of the manual, should be kept. You
will be asked to provide it should you need to get in contact with the
technical support service regarding the pendant.
6
4. Recognition programming
IMPORTANT: when performing recognition programming, the product does not need to be placed next to the control
panel (or dialler). In fact, we advise you to move it away slightly (place the product at least 2 m away).
4.1 Programming for use with the control panel
Programming makes it possible for
the control panel to recognise the
pendant.
1. When performing recognition
programming, the control panel
must be in installation mode. If it
is not, enter:
master code
2. Perform the next programming step:
LED ON
LED OFF
)))
))
poi
ADVICE: before doing anything, study
the step 2 programming sequence.
Check the programming LED making
sure to press the push-button for the
required amount of time.
“beep,
command X”
10 s max.
then
installer code
2 s.
1. Press
then # on
the control
panel
keypad.
*
2. Press and hold the pendant pushbutton until the control panel
responds.
3. The control panel
issues a voice
message to confirm
pendant
programming.
IMPORTANT: the control panel indicates a programming error by issuing 3 short
beeps. When this happens, perform programming again from the start.
7
4.2 Programming for use with the dialler
IMPORTANT: the pendant cannot be recognised directly by a dialler alone SH511AX, SH512AX, SH513AX and SH514AX.
The pendant is only programmed
to operate with a dialler when
there is no alarm control panel in
the system.
1. To perform the pendant
programming operation, the
dialler must be in installation
mode. If it is not, enter:
master code
then
installer code
ADVICE: before doing anything, study
the step 2 programming sequence.
Check the programming LED making
sure to press the push-button for the
required amount of time.
2. Perform the next programming step:
LED ON
LED OFF
2 s.
)))
))
y
después
“beep,
command X”
10 s max.
2. Press and hold the pendant
push-button until the dialler
responds.
1. Press then #
on the dialler
keypad
*
3. The dialler issues
a voice message
to confirm
pendant
programming.
IMPORTANT: the dialler indicates a programming error by issuing 3 short
beeps. When this happens, perform programming again from the start.
8
5. Main configuration operations
The sliding part and the push-button are factory-programmed for the “Silent alarm” command.
Pendant programming makes it possible to customise the command sent by the sliding part and/or push-button,
depending on the user’s needs:
1. Choose whether you want the sliding part or the push-button to trigger the alarm.
2. Choose a command n° from the table below to correspond to the chosen trigger (sliding part or pushbutton).
Command description
Command
n°
System response in user mode depending on the command sent
Control panel
Siren
Dialler
Alarm
22
sounding + control panel relay triggering:
90 sec.
sounding:
90 sec.
transmission
Silent alarm (factory)
24
Local call
28
control panel relay triggering: 90 sec.
no response
transmission
“beep, beep, beep, beep, Urgent call...”: 3 min.
no response
no response
3. Perform programming according to the sequence described on the next page.
ADVICE: before doing anything, study the programming sequence and example on the next page. Check
the programming LED making sure to press the push-button for the required amount of time.
IMPORTANT: when the LED flashes red 3 times in a row during or after programming, this indicates that there has
been a programming error. When this happens, perform programming again from the start.
9
A. Programming sequence
Each digit in the command n° corresponds to
the number of times the push-button is pressed:
Trigger chosen
Choice of
command n°
Number of times pressed
1st digit
2nd digit
Pushbutton
Press
once
Alarm: 22
Press twice
Press twice
Silent alarm
(factory): 24
Press twice Press 4 times
Sliding part
Press
twice
Local call: 28
Press twice Press 8 times
1,5 s.
1
2 max
approx.
5 s.
approx. 10 s.
{
LED
OFF
{
{
LED
ON
approx
2 s.
pause
approx. 10 s.
approx.
2 s.
Opening
closing
sequence
Pull the sliding part
down then quickly
close it twice.
Press
and hold
(10 s) the
push-button
until the LED
goes out.
Press briefly
once or twice
to select the
trigger to be
programmed.
Press for 5 s.
until the LED
goes out
briefly and
then release
the button
when it lights
up again
10
Press several times according to:
1st digit
of the
command n°
2nd digit
of the
command n°
Press
and hold
(10 s) to end
the sequence
and until the
LED goes out.
The LED
lights up
permanently
to confirm
programming
B. Example of programming
• Programming the sliding part to trigger on “Alarm”:
- to select the sliding part, press the push-button: twice
- the command n° corresponding to the “Alarm” is: 22
1
2
2
Pull the sliding part
down then quickly
close it twice.
Press and
hold (10 s)
until the
LED goes
out.
2
Press twice
to select the
sliding part.
Press for 5 s. until
the LED goes out
briefly then release
the button when it
lights up again.
2
Press twice
for the 1st digit
of the
command n°
Press and hold
until the LED
goes out.
Press twice
for the 2nd digit
of the
command n°
• Checking programming
1
2
2
Pull the sliding part
down then quickly
close it twice.
Press and
hold (10 s)
until the
LED goes
out.
Press twice
to select the
sliding part.
2
Press for 5 s. until
the LED goes out
briefly then release
the button when it
lights up again.
11
Press and
hold until
the LED
goes out.
The LED flashes
twice to confirm
the 1st digit
2
The LED flashes
twice to confirm
the 2nd digit
6. Assembly
6.1 Assembling the quick-fastener and neck cord
Assemble the quick-fastener and insert the neck cord as shown below:
1.
2.
3.
4.
5.
Neck cord
IMPORTANT:
not use the
breakaway
release.
Quick-fastener
The breakaway release provides additional safety by releasing the neck cord if it is pulled on too hard.
The neck cord and quick-fastener are delivered in the same box. They must only be replaced with the products
available through the after-sale service.
12
6.2 Assembling the holder
The pendant can be clipped to the holder:
1. Holder clipped to a belt
Clip the pendant on the holder.
2. Holder fixed to a wall:
A. Before fixing the holder, place it with the
pendant close to the fixing location and check
the radio link with the control panel (or dialler).
B. Mark the fixing points.
C. Choose appropriate wall plugs in relation to the
size of the screws and then drill holes in the
holder and the wall.
D. Insert the plugs and
then screw the holder
to the wall and check
it is properly fixed.
E. Clip the pendant
Fixing
points
on to it.
Holder
Grip
13
7. Testing operation and radio coverage in test mode
IMPORTANT: Whatever the command sent by the sliding part or push-button:
• the advantage of the test mode is being able to test the pendant without reducing the radio range and:
- with sounding that lasts a shorter time: control panel (3 s.), siren (5 s.)
- without triggering telephone transmission,
• the siren’s sounding power can cause hearing disorders and the necessary precautions must therefore be taken
during testing.
1. Switch the control panel (or dialler) to test mode:
installer code
“beep, test mode”
2. Test operation:
Each command sent when the push-button is pressed for
more than 2 s (red or green flashing) is preceded by a “battery
status test” which briefly causes the LED to light up red.
• Press the push-button for 2 seconds (or pull on the sliding
part), the pendant LED flashes for roughly two seconds
before going out.
If the sliding part remains open, the message is re-transmitted
every 15 min.
• Use the table opposite to check the control panel response.
The dialler, in test mode, responds with a sharp beep and
does not trigger transmission whatever the command sent by
the pendant.
14
Command
description
Alarm
Silent Alarm
(factory setting)
Local call
Fire alarm (1)
Door bell (1)
Audible signal (1)
Control panel response
in test mode
sounding: 3 s.
“beep, alarm, command
n°”
“beep, emergency call,
command n°”
“beep, fire alarm,
command n°”
“ding, dong, command n°”
“beep, beep, beep, beep”
(1) “Comfort” type command (green). Only possible
with push-button (see chapter on “Advanced
programming”).
3. Test radio coverage:
The procedure described below must be followed to test radio coverage:
Pull down on the sliding part of the pendant in each place occupied by the user (each room, garage, cellar, loft,
garden, etc.) in order to check that the radio link with the control panel (or dialler) works. You will need to
do this with the help of a second person.
If necessary, and in order to increase radio coverage, it is possible to:
A. adjust the position of the control panel (or dialler),
B. use the alarm control panel via the system’s radio relay (see “Advanced programming/Programming a
pendant relayed to the control panel”).
4. Switch the control panel (or dialler) back to normal user mode:
master code
“beep, off”
REMINDER: during normal operation, make sure the pendant’s sliding part is closed to prevent premature battery
wear.
15
8. Performing a real test
IMPORTANT
• You are now going to perform a real test in user mode. Depending on the command sent by the sliding part or the
push-button, this test may trigger the alarm devices and telephone transmission.
• We advise you to warn your correspondents beforehand, as well as neighbours, and not to let the sirens sound for
too long. The siren’s sounding power can cause hearing disorders and the necessary precautions must therefore be
taken.
1. Switch the control panel (or
dialler) to user mode (see
previous section).
2. A. Pull down on the sliding
part. The pendant LED
flashes for roughly 2 s and
then goes out.
- Close the sliding part.
- Using the table
opposite, check that the
system responds to the
command sent.
B. Press the push-button for
several seconds and
check the system
responds.
Command
description
Alarm
Silent alarm
(factory setting)
Local call
Fire alarm (2)
Door bell (2)
Audible signal (2)
System responses in user mode
Outdoor siren Dialler
Control
panel alarm
memory
sounding: 90 s (1) sounding: 90 s transmission: yes
alarm
no sounding (1)
no response
transmission: yes
alarm
“beep, beep, beep, no response
no response yes
beep, Emergency
call..” 3 min
fire sounding:
fire sounding:
transmission: yes
5 min
5 min
fire alarm,
command n°
ding dong
no response
no response no
“beep, beep, beep, no response
no response no
beep”
Control panel
Control
panel
events log
yes
yes
no
yes
no
no
(1) For control panels with a relay, the control panel relay is triggered for 90 s.
(2) “Comfort” type command (green). Only possible with the push-button (see chapter on
“Advanced programming”).
16
9. Advanced programming
9.1 “Comfort” type application
REMINDER: the push-button can also be reprogrammed to send “Comfort” type commands (green LED).
• General commands: using the table below, choose a command n° then programme the push-button using
the sequence described in step 3 of the chapter on “Main configuration operations”
Command description
Fire alarm
Door bell
Audible signal
Trigger disabled
Command
Control panel response
n°
32
specific fire sounding: 5 min
38
42
44
ding dong
beep, beep, beep, beep
-
Outdoor siren
Dialler
fire sounding:
5 min
no response
no response
-
fire transmission
no response
no response
-
• Commands from external receivers or remote-controlled sockets (also consult the manual for these products)
1. Using the table opposite, choose
Command description
Command
Command description
Command
a command n° and then configure
n°
n°
the push-button according to the
Light pulse (*)
50
Relay 2 timer
78
sequence described in step 3
Light toggle switch
56
Relay 3 pulse (*)
80
of the chapter on “Main
Light timer
58
Relay 3 toggle switch
86
configuration operations”.
Relay 1 pulse (*)
60
Relay 3 timer
88
Each digit of the command n°
corresponds to the number of times
the push-button is pressed
(digit “0” = button pressed 10 times
in a row).
Relay 1 toggle switch
Relay 1 timer
Relay 2 pulse (*)
Relay 2 toggle switch
(*) External receiver command only.
17
66
68
70
76
Relay 4 pulse (*)
Relay 4 toggle switch
Relay 4 timer
90
96
98
2. Configure the pendant to be recognised by the external receiver or remote-controlled socket.
green led
red led
LED ON
LED OFF
)))
or
or
))
10 s max.
1. Press and hold the pendant pushbutton until the end of the step 3.
2. When the pendant LED flashes green,
press the programming key on the external
receiver or the remote-controlled socket
for 2 seconds. The programming LED briefly
lights up.
3. The programming LED on the
receiver or remote-controlled
socket lights up for 2 seconds to
confirm recognition programming.
9.2 Programming a pendant relayed to the control panel
To increase radio coverage, the pendant can be relayed to the control panel as a last resort. In this case, the
pendant is no longer directly linked to the control panel. To perform this operation, the pendant must first be
deleted from the control panel (like a command) and the radio relay must be programmed to be recognised by the
control panel (see radio relay manual). Next, the pendant must be programmed to be recognised by the
control panel via the radio relay. To do this, perform the programming sequence below:
LED ON
“bip”
)))
))
LED OFF
2 s.
))
)))
“beep, command X,
relayed”
10 s max.
1. Press the radio relay test
button.
2. Press and hold the pendant push-button until the
control panel responds.
18
3. The control panel issues a voice message
to confirm relayed pendant programming.
10. Battery status indication
11. Technical data
Testing the battery status
• Radio:
- transmission: TwinBand® (434.5/869 MHz)
- ERP (effective radiated power): 10 mW max.
- average radio range: 200 m in free field conditions
• Customisation of commands issued: push-button
and sliding part can be programmed separately
• Use: portable
• Enclosure: watertight and non-dismountable
• Power supply: 2 non-replaceable CR 2016 type 3 V
lithium batteries
• Dual-coloured LED to indicate:
- battery status
- radio command transmission
- programming
• Battery life = product service life:
- 10 years based on 1 activation per day
- 5 years based on 5 activations per day
• Degree of protection: IP 67 (can be immersed at a
depth of 1 m for 30 min.)
• Colour: White and grey
• Weight: 33 g
• Operating temperature: + 0 °C to + 55 °C
• Dimensions (L x w x h): 37.3 x 14 x 88 mm
• Delivered with: 1 quick-fastener, 1 neck cord (fitted
with a breakaway release) and 1 clip holder
The system control panel or telephone dialler do not
provide a “batteries flat” indication.
• Briefly press (less than 2 s) the pendant push-button.
The red LED should light up briefly indicating that the
batteries are still charged.
• When the pendant’s batteries are flat, the LED does
not light up when the push-button is briefly pressed.
When this is the case, the pendant must be changed
within one month.
REMINDER: The pendant has been designed with a nondismountable enclosure to ensure it is watertight. The
batteries cannot be replaced. The pendant must be
replaced when it reaches the end of its battery life.
19
Products code
EN 300 220-2 V3.2.1
EN 50130-4 (95) + A1 (98) + A2 (2002)
EN 60950 (2006)
EN 301 489-1 V1.8.1
SH601AU
X
X
X
X
This product can be used in all EU, EEA countries and Switzerland.
Crolles, 02.01.2013
Signature:
Patrick Bernard,
Director of Research
and Development
TECHNICAL SUPPORT
To obtain advice when installing this product or before
returning equipment, please contact the technical support
team.
• Product information can be found on the product label
on the last page of this manual.
• The technical support telephone number is provided in
the documents supplied with the main product (control
panel or dialler).
Product label
This label must be kept
as you may be asked to
provide it when you
contact the technical
support team concerning
the pendant.
Waste processing of electrical and electronic devices at the end of their service life (Applicable in European Union
countries and other European countries with a waste collection system). Used on products or product packaging, this
symbol indicates that the product must not be thrown out with household waste. It must be taken to a waste collection
point for electrical and electronic product recycling. When you make sure that this product is disposed of in the most
appropriate manner, you are helping to protect the environment and human health. If you would like additional information
concerning the recycling of this product, please contact your town/city council, nearest waste collection centre or the shop
where you bought the product.
804967/B - 07.2013
DECLARATION OF CONFORMITY
GB
Manufacturer: Hager Security SAS
13
Address: F-38926 Crolles Cedex - France
Product type: Alarm pendant
Trade mark: Daitem
We declare under our sole responsibility that the product to which this
declaration relates is compliant with the essential requirements of the
following directives:
• R&TTE Directive: 99/5/EEC
• Low voltage directive: 2006/95/EC
• Directive ROHS: 2002/95/EC
in compliance with the following harmonised European standards: