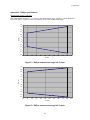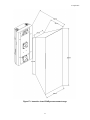
1
16 April 2007
USER’S MANUAL
RibEye™ Multi-Point Deflection Measurement System
3-Axis Version for the SID2S ATD
Boxboro Systems, LLC
978-257-2219
www.boxborosystems.com
1
16 April 2007
Table of Contents
Page
1.0 Overview....................................................................................................................4
2.0 Mounting the RibEye ...............................................................................................6
2.1 Controller/sensor mounting .................................................................................6
2.2 LED mounting .....................................................................................................8
2.3 Interface box mounting........................................................................................9
3.0 Operating the RibEye...............................................................................................9
3.1 RibEye IP address................................................................................................9
3.2 Powering up the RibEye.....................................................................................10
3.3 Using the web interface ......................................................................................10
3.3.1 Test data .................................................................................................11
3.3.2 LED location data ..................................................................................11
3.3.3 LED position data ..................................................................................11
3.4 Status box ...........................................................................................................11
3.5 Triggering/DAS interface box............................................................................12
3.5.1 Switch or TTL trigger signals ................................................................12
3.5.2 Differential trigger signals .....................................................................13
3.6 Web interface button functions ..........................................................................13
3.6.1 “Save Parameters” .................................................................................13
3.6.2 “Get Current XYZ”................................................................................13
3.6.3 “Run Test” .............................................................................................13
3.7 Downloading test data ........................................................................................14
3.8 Using the manual “Arm” switch.........................................................................15
4.0 RibEye data files ......................................................................................................15
4.1 Data description and range .................................................................................15
4.2 Importing a data file ...........................................................................................15
Appendixes
A. Setting the RibEye’s IP address .........................................................................18
B. Setting up a Windows HyperTerminal ...............................................................20
C. Configuring Windows XP for a fixed IP address...............................................23
D. Finding the IP address of a RibEye ....................................................................25
E. DAS/trigger connector pinouts and trigger circuits............................................26
F. RibEye specifications .........................................................................................30
2
16 April 2007
List of Figures
Figure No.
1A
1B
2
3
4
5
6
7
8
9
10
11
12
A1
B1
B2
B3
B4
B5
B6
C1
C2
C3
D1
E1
E2
E3
E4
E5
F1
F2
F3
F4
F5
Page
RibEye controller/sensor rear view ................................................................4
RibEye controller/sensor front view...............................................................4
RibEye LEDs ..................................................................................................5
RibEye interface (trunk) box ..........................................................................5
RibEye connections ........................................................................................6
RibEye controller/sensor mounting ................................................................7
LED radiation pattern .....................................................................................8
Plastic-cased LEDs for alternative mounting locations..................................9
RibEye web screen ........................................................................................10
LED positions ................................................................................................12
FTP file download window ...........................................................................14
Importing data into Excel ..............................................................................16
Excel data display ..........................................................................................17
HyperTerminal screen ...................................................................................19
HyperTerminal connection screen 1..............................................................20
HyperTerminal connection screen 2..............................................................20
HyperTerminal connection screen 3..............................................................21
HyperTerminal connection screen 4..............................................................21
HyperTerminal connection screen 5..............................................................22
Saving the HyperTerminal connection ..........................................................22
Windows XP configuration screen 1 .............................................................23
Windows XP configuration screen 2 .............................................................23
Windows XP configuration screen 3 .............................................................24
Finding RibEye IP addresses .........................................................................25
Trigger signals ...............................................................................................26
Trigger switch connection .............................................................................27
Alternate trigger switch connection...............................................................27
TTL trigger source connection ......................................................................28
Differential trigger source connection ...........................................................29
RibEye measurement range in X-Y plane .....................................................30
RibEye measurement range in Z-Y plane......................................................30
Isometric view of RibEye measurement range..............................................31
RibEye power requirements ..........................................................................32
RibEye active trigger and control signals......................................................32
3
16 April 2007
USER’S MANUAL
RibEye™ Multi-Point Deflection Measurement System
3-Axis Version for the SID2S ATD
1.0
Overview
The RibEye measurement system as designed for this anthropomorphic test dummy (ATD) has the
following components:
• The RibEye controller/sensor (Figures 1A and 1B), located in the ATD spine.
• Six light-emitting diodes (LEDs), mounted on the ribs. The LEDs (Figure 2) are designed to be
mounted in the order shown in the photo; that is, the top LED goes on the top rib, etc.
• Interface box (Figure 3), also called the trunk box because it is usually placed in the trunk of the
vehicle.
Figure 1B. RibEye controller/sensor
front view
Figure 1A. RibEye controller/sensor
rear view
4
16 April 2007
Figure 3. RibEye interface (trunk) box
Figure 2. RibEye LEDS
The RibEye components are interconnected as shown in Figure 4. Power and communications cables are
provided for connecting the controller/sensor to the interface box in the trunk. The interface box has
sockets for Ethernet connection, power input, and data acquisition system (DAS) connection/trigger input.
Mating connectors and pigtail cables are provided for the power input and DAS/trigger connectors. The
power cable should be connected to a DC power source. The DAS/trigger cable is used to provide a
trigger input to the RibEye. In the future, this cable will be used to connect to common data acquisition
systems for automatic control of the RibEye through the DAS.
5
16 April 2007
LED#1
LED#2
LED#3
Controller/Sensor
LED#4
LED#5
LED#6
Communications
Cable
Status
Light
Power
Cable
Manual Arm
Button
Interface (Trunk) Box
Ethernet
Jack
DAS/
Trigger
Cable
Power
Input
Cable
Figure 4. RibEye connections
2.0
Mounting the RibEye
2.1
Controller/sensor mounting
The RibEye controller/sensor should be mounted to the dummy’s spine before assembling the ribs onto
the spine. The controller/sensor is mounted using four bolts and standoff as shown in Figure 5. Route the
LED wires through the non-struck side of the spine and out the rib opening. Connect the LEDs to the
RibEye controller/sensor connector. Then slide the RibEye controller/sensor in through the rib side
opening and mount it with the screws and spacers.
6
16 April 2007
Figure 5. RibEye controller/sensor mounting
7
16 April 2007
2.2
LED mounting
The LEDs mount to the center of the inside of the ribs using four screws for the top (shoulder) rib and two
screws for each of the remaining ribs. Referring back to Figure 2, the LEDs are shown in the order that
they are mounted, with the top LED in the picture attaching to the top rib. Note that the LEDs for ribs 1,
2, 5, and 6 are angled so that they will be aimed toward the sensor heads, providing the maximum amount
of light to the sensors. DANGER: The LEDs are very bright when driven at full power. Do not look
directly at the LEDs during full power operation.
Figure 6 shows the radiation pattern of the LEDs. Note that the brightest light is directly in front of the
LED (on axis), and the brightness gets lower at larger angles. The RibEye controller continuously adjusts
how hard it drives the LEDs to get a good signal from the sensors.
Figure 6. LED radiation pattern
The RibEye uses different calibration curves to process the LED data, depending on which rib (the Z-axis
location) that the LED is mounted on. To obtain the guaranteed accuracy, either the LEDs must be
mounted on the ribs specified (default locations) as described above, or the RibEye must be told which rib
the LED is mounted on. See Section 3.3.2 for overriding the default rib locations for each LED.
For special testing, where the user wishes to mount LEDs in alternative positions, LEDs with plastic cases
are available from R.A. Denton. The cases have holes allowing the LEDs to be mounted with zip ties or
safety wire to any desired locations; epoxy or double-stick tape also can be used. Figure 7 shows the
plastic-cased LEDs mounted on frontal-impact dummy ribs. Note that the LEDs are available in flat
packages and in two different angled packages to allow aiming them at the sensors. After the LEDs are
mounted, the LED cables should be tied down using nylon zip ties to prevent the cables from crossing the
path between the LEDs and the sensor heads. If the light from a LED to a sensor head is blocked, the
position reading will be invalid.
8
16 April 2007
Figure 7. Plastic-cased LEDs for alternative mounting locations
(shown on frontal-impact dummy ribs)
2.3
Interface box mounting
The interface box, or trunk box, is intended to be mounted in the trunk of the vehicle, near the DAS and
the power source. Four holes are provided on the base of the box for mounting. The interface box can be
mounted in any orientation, but we recommend that it be mounted such that the side of the box with all of
the connectors is easily accessible.
The communications and power cables from the spine box are connected to jacks on the interface box.
An Ethernet cable is used to connect the interface box to a router/hub or directly to a laptop PC. Jacks are
provided for incoming power and DAS/trigger connections.
3.0
Operating the RibEye
The RibEye operates as a stand-alone smart sensor that collects and stores data. In this stand-alone mode,
the RibEye serves a web page to any web browser and is controlled via its web interface. The RibEye has
been tested with two web browsers, Microsoft Internet Explorer and Mozilla Firefox. In the future, the
RibEye could operate in an integrated mode instead of stand-alone. When integrated with standard crash
test data acquisition systems, the RibEye would appear as an additional 18 position-measurement
channels.
3.1
RibEye IP address
The RibEye ships from the factory with its IP address set to 192.168.0.240. This IP address can be
changed to work with your local area network (LAN). You can also communicate with the RibEye
directly using a PC, without connecting to a LAN. To directly connect a PC to the RibEye, your PC must
be set up with a fixed IP address on the same subnet as the RibEye. Appendixes A and B explain how to
9
16 April 2007
change the RibEye’s IP address and set up a Windows HyperTerminal for communication with the
RibEye. Appendix C explains how to set up a Windows XP PC for a fixed IP address. If you are using
an operating system other than Windows, refer to your operating system user’s manual or system
administrator for instructions on setting up a fixed IP address. Appendix D explains how to find the
RibEye’s IP address.
3.2
Powering up the RibEye
When the RibEye is powered up, it takes about 18 seconds to complete booting. While it is booting, it
will turn on each of the LEDs in sequence, starting with LED #1. The “Status” light on the interface box
in the trunk of the vehicle will blink rapidly at 10 flashes per second. When booting is completed, the
“Status” light will flash slowly, on for 1 second and off for 1 second (0.5 flashes per second).
3.3
Using the web interface
After booting up the RibEye, launch your web browser and type in the following address:
http://192.168.0.240. If you have changed the IP address of your RibEye, use the IP address you set
instead of 192.168.0.240. Your browser will display the web page shown in Figure 8.
Figure 8. RibEye web screen
10
16 April 2007
3.3.1 Test data
The white fields on the left side of the screen are for user-entered data. The first seven fields (from “Data
File Name” to “Test Type”) may contain up to 20 characters. The “Data File Name” is used to name your
data file. After a test is run, the internal file name will be whatever you entered in this field. The
information in the rest of these fields is copied to the test data file.
3.3.2 LED location data
The LED location fields allow up to 10 characters and must contain an identifying number for each LED.
The RibEye will automatically copy the LED location data to the data file as a header identifying the
columns. The RibEye will also automatically add an “X”, “Y”, or “Z” to the name in the location field to
form the data column headers.
The default rib location, as marked on the LED cables and described in Section 2.3, can be overridden for
special tests. To override the default LED location, set the LED location field to “RIBn”, where “n”
equals a number from 1 to 6. For example, if LED #2 is mounted on Rib 4, enter “RIB4” in the location
field for LED #2. This will ensure that the RibEye uses the correct calibration curve when processing the
data for LED #2.
In addition to the number identifying the LED location, this field can also contain other characters that the
user might wish to add, such as “RIB3Left”. The RibEye will search for “RIBn” in the text for the LED
location.
If you are using the RibEye for a special test, not in the SID2S dummy, you should select the rib number
that is closest to the Z location of the LED with respect to the center of RibEye controller/sensor. For
example, if the LED is approximately 100 mm above the centerline, set the rib location to RIB1 in the
setup field to assure using the correct calibration curve.
3.3.3 LED position data
The RibEye fills in the LED positions when you click on the “Get Current XYZ” button on the right-hand
side of the screen (see Section 3.6.2 below). When you click this button, the RibEye will turn on the
LEDs briefly, calculate the current positions, and display them as shown in Figure 9.
3.4
Status box
The “Status” box (top right in Figures 8 and 9) displays what the RibEye is currently doing. When the
RibEye is ready for user input, it displays “WAITING FOR USER INPUT”. Other messages displayed in
the “Status” box are:
• GETTING CURRENT XYZ POSITIONS
• SAVING TEST SETUP
• ERASING DATA FLASH
• COLLECTING PRE-T0 DATA, WAITING FOR TRIGGER (T0 = time zero)
• PROCESSING AND SAVING TEST DATA
• TEST COMPLETE, WAITING FOR USER INPUT
• UPLOADING TEST DATA - PLEASE WAIT
11
16 April 2007
Figure 9. LED positions
3.5
Triggering/DAS interface box
This drop-down box allows you to choose the trigger input type. There are four choices:
1. Switch or TTL, Rising Edge Trigger
2. Switch or TTL, Falling Edge Trigger
3. Differential, Rising Edge Trigger
4. Differential, Falling Edge Trigger
Refer to Appendix E for the DAS/trigger connector pinouts, trigger circuits, the cable color code, and
sample connection diagrams.
3.5.1 Switch or TTL trigger signals
The Switch or TTL selections are for connecting to a tape switch, or a DAS trigger output that drives at
TTL levels, or a DAS that uses an open collector type output. Select “Rising Edge Trigger” if the trigger
voltage goes from a low voltage to a high voltage when the trigger occurs. Select “Falling Edge Trigger”
if the trigger voltage goes from a high voltage to a low voltage when the trigger occurs.
12
16 April 2007
3.5.2 Differential trigger signals
Some DAS systems, such as KT or Messring, have a trigger bus that generates differential output signals
at RS485 signal levels. Use the “Differential” setting if you are connecting to a differential trigger bus.
3.6
Web interface button functions
3.6.1 “Save Parameters”
This button saves the current test parameters in flash memory. All of the user input text boxes, the LED
locations, and the trigger selection will be saved. When the RibEye is powered up, it reads the parameters
from flash memory to fill in the web page. Note that when you run a test, the RibEye first saves the
parameters. While the RibEye is saving the parameters, the “Status” box displays “SAVING TEST
SETUP”.
3.6.2 “Get Current XYZ”
When the user clicks on this button, the LEDs will turn on briefly, and the RibEye will display the current
X, Y, and Z positions of the LEDs on the left-hand side of the screen. The “Status” box will display
“GETTING CURRENT XYZ” while it is updating.
IMPORTANT NOTE: If a LED is out of range, all of the X, Y, and Z positions will display as “1” if the
TOP sensor is receiving insufficient light, “2” if the BOTTOM sensor is receiving insufficient light, “4” if
the MIDDLE sensor is receiving insufficient light, and “5”, “6”, or “7” if a COMBINATION of sensors
are receiving insufficient light.
3.6.3 “Run Test”
When you click on the “Run Test” button, a pop-up box will ask you to confirm that you want to run a
test. If you click “OK”, the RibEye will do the following:
• Save the test parameters in flash memory in the test file area. The “Status” box will display the
message, “SAVING TEST SETUP”.
• Erase the raw data storage flash. This typically takes a few seconds but can take as long as 30
seconds. The “Status” box will display “ERASING DATA FLASH”. The “Status” light on the
trunk box (interface box in trunk of vehicle) will flash at a rate of 1 flash per second.
• Start acquiring pre-trigger data in a circular buffer while waiting for the trigger input. The
“Status” box will display “COLLECTING PRE-T0 DATA; WAITING FOR TRIGGER”. The
trunk box’s “Status” light will flash at 2 flashes per second.
• When a trigger occurs, the RibEye will continue to collect data for 910 milliseconds.
• After data collection is complete, the RibEye will immediately store the raw data into flash
memory. The “Status” box will display “STORING RAW DATA”. The “Status” light will flash
at 5 flashes per second.
• Next, the RibEye will start converting the raw data to engineering units and store it in flash
memory. The “Status” box will display “PROCESSING AND STORING TEST DATA”. The
“Status” light will continue to flash at 5 flashes per second. Note that if power to the RibEye is
interrupted during this step, when power is reapplied, the RibEye will reprocess the raw data and
save the processed data in flash memory.
• When the test is completed, the “Status” box will display “TEST COMPLETE, WAITING FOR
USER INPUT”. The “Download Test Data File” link will change to show the name of the data
file you had entered. The trunk box’s “Status” light will go back to flashing at 1 flash every 2
seconds.
13
16 April 2007
3.7
Downloading test data
If you left-click on the “Download Test Data File” link, your browser will open a new window and start
an FTP data transfer as shown in Figure 10.
Figure 10. FTP file download window
If you prefer, you can download the data by right-clicking on the “Download Test Data File” link. In
Internet Explorer, choose “Save Target As” and press the “Save” button to store the file with the name
you designated.
Alternatively, you can use any FTP program to connect to the RibEye and download the test data file.
You can use any file name you want, because the RibEye will return the last test run (it stores only one
data file). The RibEye supports both normal and passive modes of FTP transfer.
While downloading data, the RibEye will not respond to other commands. During download, the
“Status” light on the trunk box will flash at 5 flashes per second. If you manually refresh the web page
(press the F5 key in Internet Explorer, or click on the “Refresh” button), the “Status” box will display
“UPLOADING TEST DATA - PLEASE WAIT”.
Note: If you have already downloaded a test data file with the same name, Internet Explorer will get the
data from its cache instead of from the RibEye. To prevent this from happening, make the following
14
16 April 2007
changes in your Internet Explorer setup, using the Tools menu and selecting Internet Options. On the
Advanced tab, check “Empty Temporary Internet Files Folder when browser is closed”. Also, to assure
that Internet Explorer updates the web page instead of displaying its cached version of the web page,
under the Tools/Internet Options/General tab, go to the Browsing history settings and click on “check for
newer versions of stored web pages automatically.”
3.8
Using the manual “Arm” switch
Pressing the “Arm” switch on the trunk box for 3 seconds produces the same result as clicking on the
“Run Test” button on the RibEye web page. However, because the system is armed by the switch, the
web page won’t update automatically. You can determine that the system is armed by watching the
“Status” light on the trunk box. When the RibEye starts collecting pre-T0 data, the “Status” light will
flash at 2 flashes per second. After a trigger is received, the flasher speed increases to 5 flashes per
second while processing and saving test data. When the test is complete and the data is processed and
stored, the “Status” flasher will slow back down to 1 flash every 2 seconds.
To see the status on the web page, you will have to press F5 in Internet Explorer to update the page. You
will have to keep pressing the F5 key to update the web page until the test data is stored in flash memory
and the web page “Status” box says “WAITING FOR USER INPUT”.
4.0
RibEye data files
4.1
Data description and range
The RibEye data files are comma-delimited text files. They are approximately 1.4 megabytes in size.
You can import the comma-delimited files into any analysis software application, including Microsoft
Excel.
When the RibEye processes the sensor data into engineering units, it checks that there was sufficient light
magnitude to calculate accurate X, Y, and Z positions. If there was insufficient light for an accurate
calculation, it will force the data out of range. If there was insufficient light on the TOP sensor, the X, Y,
and Z data will be forced to a “1”. If there was insufficient light on the BOTTOM sensor, the X, Y, and Z
data will be forced to a “2”. If there was insufficient light on the MIDDLE sensor the X, Y, and Z data
will be forced to a “4”. If there was insufficient light on a COMBINATION of sensors, the X, Y, and Z
data will be forced to a “5”, “6”, or “7”. A “5” means that the top and middle sensors were blocked. A
“6” means that the middle and bottom sensors were blocked, and a “7” means that all sensors were
blocked.
To compensate for ambient light conditions, the RibEye takes an additional sensor reading per data
collection cycle with none of the LEDs turned on. If there is very bright ambient light (much greater than
normal room lighting), the difference between the LED on and the ambient reading may not be enough
for an accurate position calculation, and the data will be forced out of range.
4.2
Importing a data file
To import the data file into Excel using the Text Import Wizard (Figure 11), do the following:
• Open Excel.
• Choose “File Æ Open” and click on the name of the file to be imported.
• Select the “Delimited” button and then click on “Next”.
• Check the “Comma” box. Excel will show a preview of what the data will look like.
• If the preview is satisfactory, click on the “Finish” button, and Excel will display the data in
columns as shown in Figure 12.
15
16 April 2007
Figure 11. Importing data into Excel
16
16 April 2007
Figure 12. Excel data display
17
16 April 2007
Appendix A. Setting the RibEye’s IP address
When the RibEye ships from the factory, the IP address is set to 192.168.0.240. You can change the IP
address by sending commands to the RibEye over the LAN connection to port 23 using a Telnet terminal
program.
The following example uses Windows HyperTerminal. Refer to Appendix B for instructions on
configuring Windows HyperTerminal to communicate with the RibEye. If you are using an operating
system other than Windows, refer to your documentation for the Telnet program installed on your system.
To change the RibEye’s IP address using Windows HyperTerminal, follow these steps.
1) Start Windows HyperTerminal
2) Hit the “Enter” key until the command prompt (pound/number sign = #) appears
3) At the command prompt, type the following, but replacing the “x”s with the new IP address—
set ip eth0 ip-address xxx.xxx.x.xxx
4) Press the “Enter” key again.
The IP address of the RibEye is now changed temporarily. It is not permanently stored in the RibEye
flash memory, so if the RibEye is powered down, it will not remember the change.
Because the IP address has been changed, HyperTerminal will no longer communicate with the RibEye,
so you must change the HyperTerminal host address:
1) Go to “File/Properties” and change “Host Address”
2) Click on “Call/Disconnect”
3) Click on “Call/Call”
4) If you don’t immediately get a command prompt, press the “Enter” key until you do
5) Finally, type “Save”.
You should see the message “Saving Configuration and exiting”, which indicates that the change of IP
address is permanent. You may wish to re-save your HyperTerminal session with the new IP address so
that it will connect immediately the next time. Figure A1 shows the HyperTerminal screen after saving.
IMPORTANT: If you change the RibEye IP address, you should write the new IP address on a sticker
and attach the sticker to the interface box in the vehicle trunk so that the number is readily available for
the next time you are using the RibEye.
NOTE: If you change the RibEye IP address to a different subnet (that is, if you change more than the
last three digits), you might have to change the IP address of your PC to the new subnet also, depending
on your LAN configuration.
For example, if you change the RibEye IP from—
192.168.0.240
to—
192.168.2.240
you might have to change your PC to an IP address on the 192.168.2 subnet.
18
16 April 2007
Figure A1. HyperTerminal screen
19
16 April 2007
Appendix B. Setting up a Windows HyperTerminal
Follow these steps for setting up a Windows HyperTerminal.
Go to “Start Æ Programs Æ Accessories Æ Communications Æ HyperTerminal”
Set up the HyperTerminal Connection
At the first screen (Figure B1), enter a name for the connection and choose an icon to represent it. Then
click on the “OK” button.
Figure B1. HyperTerminal connection screen 1
At the next screen (Figure B2), ignore the first three lines and click on the pull-down menu for the last
line (“Connect using:”). Select “TCP/IP (Winsock).”
Figure B2. HyperTerminal connection screen 2
20
16 April 2007
Selecting this option, even without clicking “OK”, causes the following screen to appear (Figure B3):
Figure B3. HyperTerminal connection screen 3
Enter an IP address for the RibEye connection. Make sure that the port number is set to 23 as shown.
Click on the “OK” button. The HyperTerminal window will appear (Figure B4) with the name you have
chosen for the connection at the top of the screen. The bottom left-hand side of the screen shows that
there is no connection yet between the computer and the RibEye.
Figure B4. HyperTerminal connection screen 4
To connect to the RibEye, press the “Enter” key until the command prompt (pound/number
sign = #) appears. When the connection is successful, the word “Connected” will appear at the bottom
left-hand corner of the HyperTerminal screen (Figure B5).
21
16 April 2007
Figure B5. HyperTerminal connection screen 5
Saving the HyperTerminal Setup for Future Connections
Go to the top of the screen and select “File Æ Save As”. Type a name for the HyperTerminal connection
as shown in Figure B6. After the initial setup, you need only click on the file name in order to set up a
communication connection to the RibEye.
Figure B6. Saving the HyperTerminal connection
22
16 April 2007
Appendix C. Configuring Windows XP for a fixed IP address
If you want to connect a PC directly to the RibEye instead of through your LAN, you must set up your IP
with a fixed address on the same subnet as the RibEye. For example, if the RibEye IP address is
192.168.0.240, you must set up your PC IP address to be 192.168.0.xxx, where “xxx” is any number
between 1 and 254, except 240. If you are running an operating system other than Windows XP, refer to
your operating system documentation for setting a fixed IP address.
On Windows XP, follow these steps:
On the desktop, right-click on “MY NETWORK PLACES” and click on “Properties”. You will get a
screen like Figure C1.
Figure C1. Windows XP configuration screen 1
Right-click on your Local Area Connection and click on “Properties”. You will get a screen like
Figure C2.
Figure C2. Windows XP configuration screen 2
23
16 April 2007
Click on “Internet Protocol (TCP/IP)” to highlight it and then click on “Properties”. You will get a screen
like Figure C3.
Figure C3. Windows XP configuration screen 3
Select “Use the following IP address”
Set the IP address to your desired address, and make sure that the subnet mask is set to 255.255.255.0 as
shown in Figure C3. You don’t have to fill in the default gateway or DNS server addresses.
Then click on the “OK” button until all windows are closed. You might get a message saying that you
have to re-boot for the changes to take effect.
You are now set to a fixed IP address.
24
16 April 2007
Appendix D. Finding the IP address of a RibEye
If the RibEye IP address has been changed, you can find its address using the free Auto Discovery
Manager (ADM) software from MultiTech Inc.’s FTP site. The RibEye broadcasts its IP address every
10 seconds in a UDP packet directed to port 1020. The ADM software listens on port 1020 and displays
the IP addresses of the RibEyes that it finds. The software will run on Windows 2000 and XP.
To download the ADM software, launch your internet-connected browser and type the following
command in your browser’s address window, or click on the link below.
ftp://ftp.multitech.com/embedded/socketethernetip/
You will see a list of files. As of this writing, the file name for the current version of the ADM software
is “adm-v101.exe”, but the version number may change in the future. Click on this file to download the
installer for this application.
Run the installer and follow the on-screen instructions to install the program. When you run the program
it will display the RibEyes found and their IP addresses as shown in Figure D1. Note that in this
example, the ADM found two RibEyes:
S/N 000075 at IP address 192.168.0.240
S/N 000082 at IP address 192.168.0.241
Figure D1. Finding RibEye IP addresses
25
16 April 2007
Appendix E. DAS/trigger connector pinouts and trigger circuits
The DAS/trigger interface connector on the RibEye’s interface box is a 24-pin connector. A mating
cable, terminated in a pigtail, is supplied with the RibEye. At this time, 6 of the connector’s 24 pins can
be used for triggering. Figure E1 lists the pinouts, pigtail color code, and signal function for these 6 pins.
The remaining pins are for future control and communications connections to DAS systems. The unused
signals pins are internally connected to active signals and should not be connected externally.
Figure E1. Trigger signals
Pin #
10
20
7
6
11
8
Color Code
white
tan
blue
green
black/stripe
violet
Function
switch trigger in
5V through 1k resistor for pull-up
ground
differential trigger in +
differential trigger in –
+5V (50 milli-amp maximum)
Figures E2 through E5 show how to connect trigger switches, active TTL level trigger sources, and
differential trigger sources. Where a trigger switch is shown, you can use the same configuration for open
collector transistor output trigger sources. If you want to use a photo-interrupter type trigger source, you
can power it from the 5V supply on pin 8.
Figures E2 through E5 also show the input circuitry in the interface box. Note that the differential
receiver connected to pins 6 and 11 is enabled when a differential trigger is selected. The output of the
receiver is internally connected to pin 10, the “SWITCH OR TTL” trigger input.
WARNING: DO NOT DRIVE PIN 10 WHEN DIFFERENTIAL TRIGGERING IS SELECTED. THIS
MAY CAUSE THE INPUT CIRCUITS TO BE DAMAGED.
WARNING: DO NOT EXCEED THE MAXIMUM INPUT RATING GIVEN IN THE SPECIFICATIONS
SECTION (Appendix F).
26
16 April 2007
Figure E2. Trigger switch connection
For this connection, if the switch closes at the start of the event, select—
SWITCH OR TTL, FALLING EDGE TRIGGER
If the switch opens at the start of the event, select—
SWITCH OR TTL, RISING EDGE TRIGGER
Figure E3. Alternate trigger switch connection
For this connection, if the switch closes at the start of the event, select—
SWITCH OR TTL, RISING EDGE TRIGGER
If the switch opens at the start of the event, select—
SWITCH OR TTL, FALLING EDGE TRIGGER
27
16 April 2007
Figure E4. TTL trigger source connection
For this connection, if the input at pin 10 goes from 0V to 5V at the start of the event, select—
SWITCH OR TTL, RISING EDGE TRIGGER
If the input at pin 10 goes from 5V to 0V at the start of the event, select—
SWITCH OR TTL, FALLING EDGE TRIGGER
28
16 April 2007
Figure E5. Differential trigger source connection
In this configuration, if the differential driver transitions from HIGH (pin 6 voltage > pin 11 voltage) to
LOW (pin 6 voltage < pin 11 voltage) at the start of the event, select—
DIFFERENTIAL, FALLING EDGE TRIGGER
If the differential driver transitions from LOW (pin 6 voltage < pin 11 voltage) to HIGH (pin 6 voltage >
pin 11 voltage) at the start of the event, select—
DIFFERENTIAL, RISING EDGE TRIGGER
Note that when differential triggering is selected, the output of the differential receiver can be monitored
at pin 10.
29
16 April 2007
Appendix F. RibEye specifications
Measurement accuracy and range
The measurement accuracy is +/– 1 mm over the measurement range, which is a volume defined in
Figures F1 and F2. Figure F3 shows an isometric view of the measurement range.
60
50
40
30
20
X mm
10
0
-10
-20
-30
-40
-50
-60
80
90
100
110
120
130
140
150
160
170
180
190
180
190
Y mm
Figure F1. RibEye measurement range in X-Y plane
150
125
100
75
50
Z mm
25
0
-25
-50
-75
-100
-125
-150
80
90
100
110
120
130
140
150
160
170
Y mm
Figure F2. RibEye measurement range in Z-Y plane
30
16 April 2007
Figure F3. Isometric view of RibEye measurement range
31
16 April 2007
Power requirements
The RibEye can be powered by any DC voltage source from 12 to 36 Volts. The power cable from the
RibEye’s interface box to the power source has two conductors: the red wire is positive, and the black
wire is negative. The interface box has an internal self-resetting polymer fuse. It can take up to ½ hour to
reset after an overload.
The power draw depends on the RibEye’s operating conditions, as shown in Figure F4.
Figure F4. RibEye power requirements
Operating
Conditions
On/idling
Collecting data (typical)
Maximum*
Interface Box
3.3
3.3
3.3
Controller + LEDs
Watts
2
5
9
Total
5.3
8.3
12.3
* When all LEDs are out of view of both sensors and driven to full power.
Data acquisition and storage
Sample rate: 10,000 samples per second per LED
Acquisition time: 90 milliseconds pre-trigger, 990 milliseconds post-trigger
Data is collected to RAM memory and stored post-test in flash memory.
Control signals
The DAS/trigger interface cable has 20 conductors used for trigger inputs and control/hand-shaking
signals to an external data acquisition system. At this time, only the trigger signals are programmed. The
other control wires are not used, but are connected to internal circuitry and should not be connected. All
unused control wires should be individually insulated and protected.
The active trigger and control signals are listed in Figure F5.
Figure F5. RibEye active trigger and control signals
Pin #
10
20
7
6
11
8
Color Code
white
tan
blue
green
black/stripe
violet
Function
switch trigger in
5V through 1k resistor for pull-up
ground
differential trigger in +
differential trigger in –
+5V (50 milli-amp maximum)
Differential trigger inputs (pins 6, 11)
•
Maximum differential input voltage: +/– 12 VDC
•
Minimum differential input voltage: +/– 0.2 VDC
•
Common mode input voltage +/– 12 VDC
32
16 April 2007
Switch trigger input (pin 10 with respect to pin 7, ground)
•
Maximum input voltage = 5.0 VDC
•
Minimum “on” voltage = 3.3 VDC
•
Maximum “off” voltage = 0.4 VDC
•
Current limited by 1k resistor
Additional 5V for external power (pin 8)
•
Output voltage 4.75 to 5.25 volts
•
Limit external loads to 50 milli-amp maximum
•
Short circuit will cause resettable fuse to trip
Communication and power cables
These cables connect the interface box in the vehicle trunk to the RibEye’s controller. The
communication and power cables are internal to the RibEye system and should not be modified in any
way. No user connections are available on these cables.
Telnet Server for test automation
The RibEye provides a Telnet Server on port 3000 that can be used for test automation.
33