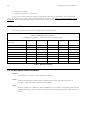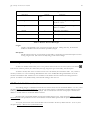
1
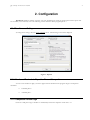
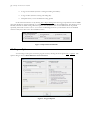
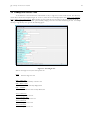
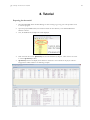
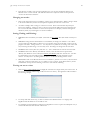
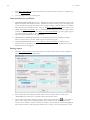
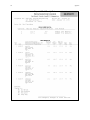
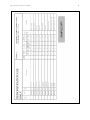
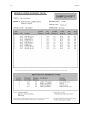
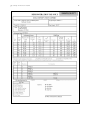
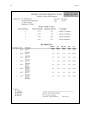
2
1.
Introduction
1.3 Starting QC-Density
To start QC-Density, run GDM by clicking on its desktop icon, finding it on the Start Menu, or navigating to
GDM.EXE. On the opening GDM screen, QC-Density should be listed as one of the installed modules. If it is not listed
there was an error during installation.
Open an existing project or create a new project, then (if necessary) click on the QC-Density link displayed on the
left side of the GDM Source and Sample screen. QC-Density will load and display the test and Proctor data, if any have been
entered. More information about running GDM is described in the GEOSYSTEM for Windows, GEOSYSTEM Data
Manager reference guide.
1.4 Data Requirements
QC-Density requires field data from field density tests. This includes the in-situ density and moisture and the
percent of oversize material if applicable. Also required are the results data from the corresponding moisture-density
relationship (Proctor) test. Proctor test results for tests that have been entered into the GEOSYSTEM for Windows
Moisture-Density Test module are automatically transferred to the QC-Density database. Other data such as locations,
material descriptions, test methods, etc. can also be entered and reported.