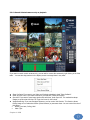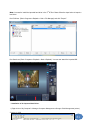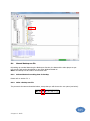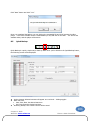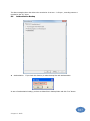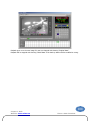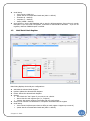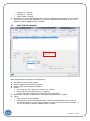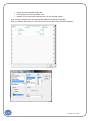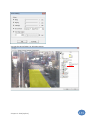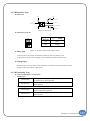
1
Veilux Rack Mount Sever DVR User’s Manual Chapter 1. DVR 1 Table of Contents Chapter 1. DVR .................................................................................................................... 7 1. Introduction ................................................................................................................... 7 1.1. Overview ................................................................................................................... 7 1.2. Main Features ........................................................................................................... 7 1.3. Warning .................................................................................................................... 9 2. File System .................................................................................................................... 9 2.1. Before Starting System ............................................................................................. 9 2.2. File System Setup ..................................................................................................... 9 2.2.1. Logon to File System ................................................................................................ 9 2.2.2. Make Database ....................................................................................................... 10 3. DVR Viewer .................................................................................................................. 13 3.1. Start Application ..................................................................................................... 13 3.1.1. Logon to the DVR Main .......................................................................................... 13 3.2. Functions ................................................................................................................ 15 3.2.1. Camera Indication Boxes ........................................................................................ 15 3.2.2 Screen Mode Buttons.............................................................................................. 16 3.2.3. System Status Window ........................................................................................... 17 3.2.4. Pan/Tilt Control Box................................................................................................ 18 3.2.5. DB information........................................................................................................ 20 3.2.6. Context Menu Functions ......................................................................................... 20 3.2.7. Extra Functions ....................................................................................................... 24 4. System Setup ............................................................................................................... 25 4.1. Start System Setup ................................................................................................. 25 4.2. System Setup.......................................................................................................... 26 4.3. Camera & Motion Setup ......................................................................................... 31 4.4. Recording Setup ..................................................................................................... 36 4.5. Display & Pan/Tilt Setup ......................................................................................... 39 4.6. Sensor Setup .......................................................................................................... 40 4.7. Audio Setup ............................................................................................................ 41 4.8. Network Setup ........................................................................................................ 46 4.9. Notification Setup ................................................................................................... 56 4.10. User Setup .............................................................................................................. 58 4.11. Plugin Setup ........................................................................................................... 61 4.12. IP Setup .................................................................................................................. 63 5. Playback ...................................................................................................................... 67 5.1. Start Application ..................................................................................................... 67 5.1.1. Logon to the Playback ............................................................................................ 67 5.2. Functions ................................................................................................................ 69 5.2.1. Screen Mode Icons ................................................................................................. 69 5.2.2. Status Information Window .................................................................................... 70 5.2.3. Calendar Window.................................................................................................... 70 5.2.4. Image Control Menu ............................................................................................... 71 5.2.5. Utility Menu............................................................................................................. 71 5.2.6. Play Menu ............................................................................................................... 72 5.2.7. Record Table(Hour Bar) ......................................................................................... 73 5.2.8. Record Table(Minutes Bar) ..................................................................................... 73 5.2.9. Exit Button .............................................................................................................. 73 5.2.10. Bookmark Button .................................................................................................... 73 5.2.11. Motion (Object) Search .......................................................................................... 75 5.2.12. Search Selected cameras only on playback ............................................................ 77 6. Playback (Using Removable HDD) ................................................................................. 79 6.1. Export Data (DVR Side) .......................................................................................... 80 Chapter 1. DVR Website: www.veilux.net Phone 1-800-510-6528 2 6.2. Import Data (3rd 3rd PC Side) ................................................................................ 80 6.3. Import Data (3rd PC Side)-Using DVR Program ...................................................... 83 Chapter 1. DVR .................................................................................................................... 7 1. 2. 3. 4. 5. 6. Introduction ................................................................................................................... 7 1.1. Overview ................................................................................................................... 7 1.2. Main Features ........................................................................................................... 7 1.3. Warning .................................................................................................................... 9 File System .................................................................................................................... 9 2.1. Before Starting System ............................................................................................. 9 2.2. File System Setup ..................................................................................................... 9 2.2.1. Logon to File System ................................................................................................ 9 2.2.2. Make Database ....................................................................................................... 10 DVR Viewer .................................................................................................................. 13 3.1. Start Application ..................................................................................................... 13 3.1.1. Logon to the DVR Main .......................................................................................... 13 3.2. Functions ................................................................................................................ 15 3.2.1. Camera Indication Boxes ........................................................................................ 15 3.2.2 Screen Mode Buttons.............................................................................................. 16 3.2.3. System Status Window ........................................................................................... 17 3.2.4. Pan/Tilt Control Box................................................................................................ 18 3.2.5. DB information........................................................................................................ 20 3.2.6. Context Menu Functions ......................................................................................... 20 3.2.7. Extra Functions ....................................................................................................... 24 System Setup ............................................................................................................... 25 4.1. Start System Setup ................................................................................................. 25 4.2. System Setup.......................................................................................................... 26 4.3. Camera & Motion Setup ......................................................................................... 31 4.4. Recording Setup ..................................................................................................... 36 4.5. Display & Pan/Tilt Setup ......................................................................................... 39 4.6. Sensor Setup .......................................................................................................... 40 4.7. Audio Setup ............................................................................................................ 41 4.8. Network Setup ........................................................................................................ 46 4.9. Notification Setup ................................................................................................... 56 4.10. User Setup .............................................................................................................. 58 4.11. Plugin Setup ........................................................................................................... 61 4.12. IP Setup .................................................................................................................. 63 Playback ...................................................................................................................... 67 5.1. Start Application ..................................................................................................... 67 5.1.1. Logon to the Playback ............................................................................................ 67 5.2. Functions ................................................................................................................ 69 5.2.1. Screen Mode Icons ................................................................................................. 69 5.2.2. Status Information Window .................................................................................... 70 5.2.3. Calendar Window.................................................................................................... 70 5.2.4. Image Control Menu ............................................................................................... 71 5.2.5. Utility Menu............................................................................................................. 71 5.2.6. Play Menu ............................................................................................................... 72 5.2.7. Record Table(Hour Bar) ......................................................................................... 73 5.2.8. Record Table(Minutes Bar) ..................................................................................... 73 5.2.9. Exit Button .............................................................................................................. 73 5.2.10. Bookmark Button .................................................................................................... 73 5.2.11. Motion (Object) Search .......................................................................................... 75 5.2.12. Search Selected cameras only on playback ............................................................ 77 Playback (Using Removable HDD) ................................................................................. 79 6.1. Export Data (DVR Side) .......................................................................................... 80 Chapter 1. DVR 3 6.2. Import Data (3rd 3rd PC Side) ................................................................................ 80 6.3. Import Data (3rd PC Side)-Using DVR Program ...................................................... 83 7. Remote Surveillance ..................................................................................................... 83 7.1. Start remote program(single mode) ....................................................................... 82 7.2. Connect Main System ............................................................................................. 83 7.3. Setup Site ............................................................................................................... 83 7.4. Remote Navigation ................................................................................................. 85 7.5. Options ................................................................................................................... 89 7.6. Mulit Remote Monitoring ........................................................................................ 93 7.7. Local Play Back ....................................................................................................... 97 7.8. Quick RMS .............................................................................................................. 99 8. BACKUP ....................................................................................................................... 83 8.1. Start Application ................................................................................................... 101 8.2. Functions .............................................................................................................. 102 8.2.1. Tool Bar ................................................................................................................ 102 8.2.2. Status Bar ............................................................................................................. 103 8.2.3. Menu Bar .............................................................................................................. 103 8.3. Manual Backup ..................................................................................................... 103 8.3.3. Select desired recording data for backup ............................................................. 103 8.3.4. Select device or folder for backup ........................................................................ 104 8.3.5. Start Manual backup ............................................................................................. 104 8.4. Manual Backup.exe file ......................................................................................... 105 8.4.1. Selected desired recording data for backup ......................................................... 105 8.4.2. Make a backup.exe file ......................................................................................... 105 8.5. Quick Backup ........................................................................................................ 106 8.6. Authentication Backup .......................................................................................... 107 8.7. Auto Backup ......................................................................................................... 109 8.7.1. Option Setup ......................................................................................................... 109 8.7.2. Concurrent Backup Setup ..................................................................................... 110 8.7.3. Scheduled Backup Setup ...................................................................................... 111 8.8. Backup on CD or DVD .......................................................................................... 112 8.9. Backup Viewer ...................................................................................................... 114 9. Image Authentication .................................................................................................. 116 10. Log Viewer .................................................................................................................. 119 10.1. Event..................................................................................................................... 119 10.2. System .................................................................................................................. 120 10.3. Login ..................................................................................................................... 121 10.4. Network ................................................................................................................ 122 10.5. POS ....................................................................................................................... 123 10.6. Filter...................................................................................................................... 124 10.6.1. Event..................................................................................................................... 124 10.6.2. System .................................................................................................................. 124 10.6.3. Login ..................................................................................................................... 124 10.6.4. Network ................................................................................................................ 125 10.6.5. POS ....................................................................................................................... 125 10.7. Setup .................................................................................................................... 126 11. DNS Service ................................................................................................................ 127 11.1. DNS Client Setup .................................................................................................. 127 Chapter 2. POS ................................................................................................................. 130 1. Type of POS ................................................................................................................ 130 1.1 Single Serial Cash Register ................................................................................... 130 1.2 Multi Serial Cash Register ..................................................................................... 131 1.3 Multi TCP Cash Register ....................................................................................... 132 Chapter 1. DVR Website: www.veilux.net Phone 1-800-510-6528 4 2. 3. 4. POS Search .................................................................................................................133 Font Setting ................................................................................................................137 Action Code Setting .....................................................................................................138 4.1. Add User defined Action Code.............................................................................. 138 Chapter 3. NVR ................................................................................................................ 140 1. NVR Setting ................................................................................................................140 1.1. Activate NVR......................................................................................................... 140 1.2. How to register License Code............................................................................... 141 1.3. Backup License File .............................................................................................. 143 Chapter 4. VCA(Option) ................................................................................................... 144 Chapter 5. LPR (Option) ................................................................................................... 165 5. LPR Application ...........................................................................................................165 5.1. Start Application ................................................................................................... 165 5.2. Setup LPR ............................................................................................................. 166 5.3. Run LPR ................................................................................................................ 169 6. Search ........................................................................................................................170 6.1. LPR Search ........................................................................................................... 171 6.2. Vehicle .................................................................................................................. 173 6.3. Report................................................................................................................... 174 Chapter 6. VSR-1604P Sensor I/O Card Card ...............................................................176 6.1 Introduction to VSR-1604P Sensor I/O Card Card ............................................................176 6.2 Functions of Major Connectors .......................................................................................177 6.2.1 Major Connectors .......................................................................................................177 6.2.2 Details of major connectors.........................................................................................177 6.3 Sensors (Digital Input)...................................................................................................179 6.3.1 DI Specification ..........................................................................................................179 6.3.2 DI Interface Type .......................................................................................................180 6.3.3 DI Operating Type......................................................................................................180 6.4 Controls (Digital Output)................................................................................................181 6.4.1 DO Specification .........................................................................................................181 6.4.2 DO Operation .............................................................................................................181 6.5 RS-485/422 ..................................................................................................................181 6.5.1 RS-485/422 Specification ............................................................................................181 6.5.2 RS-485/422 Operation ................................................................................................181 6.6 Connecting VSR-1604P Sensor I/O Card Card and External Devices ..................................183 6.6.1 Connecting a Capture Card .........................................................................................183 6.6.2 Connecting DI/DO External Devices .............................................................................183 6.6.3 Connecting RS-485/422 Devices ..................................................................................184 6.6.4 Connecting Signal Cables of RS-485/422 Devices..........................................................184 Chapter 7. VSR-404 Sensor I/O Card Card ...................................................................... 185 7.1 Introduction to VSR-404 Sensor I/O Card Card................................................................185 7.2 Functions of Major Connectors .......................................................................................185 7.2.1 Major Connectors .......................................................................................................185 7.2.2 Details of major connectors.........................................................................................186 7.2.3 Internal Digital Input ..................................................................................................187 7.3 Sensors (Digital Input)...................................................................................................188 7.3.1 DI Specification ..........................................................................................................188 7.3.2 DI Interface Type .......................................................................................................189 7.3.3 DI Operating Type......................................................................................................189 Chapter 1. DVR 5 7.4 Controls (Digital Output) ................................................................................................ 190 7.4.1 DO Specification ......................................................................................................... 190 7.4.2 DO Operation ............................................................................................................. 190 7.5 RS-485/422 .................................................................................................................. 190 7.5.1 RS-485/422 Specifications ........................................................................................... 190 7.5.2 RS-485/422 Operation ................................................................................................ 191 7.6 Connecting VSR-404 Sensor I/O Card Card and External Devices ..................................... 193 7.6.1 Connecting a Capture Card ......................................................................................... 193 7.6.2 Connecting DI/DO External Devices ............................................................................. 193 7.6.3 Connecting RS-485/422 Devices .................................................................................. 193 7.6.4 Connecting Signal Cables of RS-485/422 Devices.......................................................... 194 7.7 Reference ..................................................................................................................... 194 7.7.1 Terminating resistance ................................................................................................ 194 7.7.2 RS-485/422 Connector Functions ................................................................................. 194 Chapter 1. DVR Website: www.veilux.net Phone 1-800-510-6528 6 Chapter Chapter 1. DVR1 DVR 1. Introduction 1.1. Overview Your new DVR is a state-of–the-art Digital Video Recording System. This system completely PC based system and can be operated at Windows systems. (Windows XP, Windows 2000, Windows 2003, Windows Vista and Windows 7) It has real time or high speed monitoring features, digital recording and play back features, and remote access features which make it one of the most versatile systems on the market. 1.2. Main Features Simultaneous Recording and Playback You can record up to 64 channels of video with time lapse and event based recording modes. The system also can record multiple video channels with simultaneous alarm conditions and motion detections. It also supports audio recording and text insertion for POS or access control functions. Renovated Database Our renovated database system can support multiple cameras and remote access efficiently. DB (Database) Recovery The system was designed to recover recorded data automatically in the event that an abnormal operation or system shut down (a power loss, for example). Remote Access You can connect to multiple sites, and each site can be connected with multiple users at the same time. Chapter 1. DVR 7 User-Friendly Operation Settings and menus are designed for non-expert users, so anybody can navigate the whole system without spending days learning how to operate it. Multiple Picture Qualities and Resolutions Configurations are so flexible. You can set each camera individually for resolution, compression, frame rate and recording events. Multi-Zone Motion Detection The systems support whole screen motion detection, or user defined area motion detection, with several detection areas for each camera. Scheduled Video Recording Operate with 5 different recording modes, including alarm recording, scheduled recording, motion recording and combinations of each. Each camera and mode can be defined hourly, daily, or weekly. Live View Shutdown Shut down the live screen viewing screen to access the Windows Desktop, while all the cameras continue to record. Networking Support You can remotely connect to DVR through multiple network configurations, including LAN/WAN/ISDN or PSTN. You can also manually configure the ports of each DVR, which allows you to utilize a single high-speed connection to address multiple DVRs from a remote site. Once connected, navigate and operate all the system functions as if you were at the main system-the interface is the same remotely as it is at the server. Pan/Tilt/Zoom Control multiple PTZ camera formats, locally or from a remote location. Watchdog In the unlikely event system freezes, the system’s watchdog feature will automatically reboot the system. Audio Monitor live audio, recording, playback and backup audio on one or multiple cameras. Multi-Board If you want to have a 8 cameras inputs DVR system from 4 cameras input system (like VSR-4 & VRS-4Pro), you can get a 8ch DVR system after installation of one more VSR-4 or VSR-4 PRO capture card in the existing 4ch DVR system. Note: Our DVR software doesn't support VMS-2400 board & VMS-2400 board as multi board. Chapter 1. DVR Website: www.veilux.net Phone 1-800-510-6528 8 DVR Server - RMS You can use both the RMS (Remote Monitoring Software) and DVR Server on the same PC at once. 1.3. Warning CE (Communaut’ European) This is a class A product. In a domestic environment this product may cause radio interference in which case the user may be required to take adequate measures. FCC (Federal Communications Commission) This equipment has been tested and found to comply with the limits for a Class A digital device, pursuant to Part 15 of the FCC Rules. These limits are designed to provide reasonable protection against harmful interference when the equipment is operated in a commercial environment. This equipment generates, uses, and can radiate radio frequency energy and, if not installed and used in accordance with the instruction manual, may cause harmful interference to radio communications. Operation of this equipment in a residential area is likely to cause harmful interference in which case the user will be required to correct the interference at its own expense. 2. File System 2.1. Before Starting System Before starting, the file system must be setup. Only after the file system has been configured can the main system start. If the file system has not configured, please follow the instructions below. 2.2. File System Setup Start the “File Manager” program by going into Windows: StartProgramsDVRMain File Manager 2.2.1. Logon to File System When you start the file manager (fsutil.exe) program, the program will ask for your “Account” and “Password.” The system’s Default Account is “1”, and the Password is left blank. After entering the account, click “OK” button to start the File Utility System. Chapter 1. DVR 9 Note: Instead of using the keyboard, you can logon using only with mouse. Simply click the keyboard button (which is right below the password field), and the system will show the keyboard. A keyboard will come up as shown below; simply use click on the keys the same as typing on the keyboard. Either method will work. 2.2.2. Make Database After logging in to the file system, the first window screen will appear as follows Create: Add baskets. Chapter 1. DVR Website: www.veilux.net Phone 1-800-510-6528 10 Select hard disk and click Create or Double click the hard disk drive: If you want to use multiple hard drives on the system, configure each drive individually. It is a good idea to leave the operating system partition out of the video database. When you select a hard disk drive (double click), the File System Utility will ask for the create database on the drive. Click “OK” button. When the File System finishes the Database setup, the following screen will appear. Chapter 1. DVR 11 Indicate of DB state: Hard disk which not exist db Empty disk Current use disk Full saved disk Full saved and current use disk Physical error disk. Not writable disk. Logical error disk. Not writable disk. Full disk. Not writable disk. Stopped disk Internal working disk Start: Be able to save the video data and search the recording data. Stop: Protect to save the video data but able to search the recording data. Import: When you use the recording data from other DVR system in your system (See page 67) Export: When you send the own recording data to other system (See page 67) Remove: When you delete the data files for exported drive. If you click “Ok” button, all the data files will be deleted in disks. Options: Set the database save option. Chapter 1. DVR Website: www.veilux.net Phone 1-800-510-6528 12 • • • • Name: Enter the name of Database. In most cases, the default name can be used. Camera count: Specify the maximum number of cameras that will be used for this DVR system. Use: You can set the “save days” for recording. Database save Days: If you set to 30 days, the recording data would be keep for 30 days only. “0” would not be effective for the function. Note: It is okay to have more cameras than you will actually be connecting. If you choose to add cameras later, you will be limited to the number of cameras setup here unless you redo the database. 3. DVR Viewer 3.1. Start Application From the Windows Desktop, double click the DVR Viewer icon, or run the DVRMain.exe program in C:\Program Files\DVR\Main folder 3.1.1. Logon to the DVR Main When you start the DVRMain (dvrmain.exe) program, the program will ask for your “Account” and “Password.” The system’s Default Account is “1”, and the Password is left blank. After entering the account, click “OK” button to start the DVR Main. Chapter 1. DVR 13 Note: Instead of using the keyboard, you can logon using only with mouse. Simply click the keyboard button (which is right below the password field), and the system will show the keyboard. A keyboard will come up as shown below; simply use click on the keys the same as typing on the keyboard. Either method will work. When the DVR program starts, the video screen will be displayed as follows. Chapter 1. DVR Website: www.veilux.net Phone 1-800-510-6528 14 3.2. Functions 3.2.1. Camera Indication Boxes The Camera Indication Boxes are near the bottom of the main screen. You can see the status of each camera that is installed as follows The Green box: Mean the system is viewing the current (real-time) image. The Red box: Mean that image from the specified camera is recording. The White box: Mean that no camera installed. If the system is configured for more than 16 cameras, the camera boxes will be displayed as follows. Chapter 1. DVR 15 3.2.2. Screen Mode Buttons • Single-Screen-Mode • 4-Channel Multi-Screen • 6-Channel Multi-Screen • 9-Channel Multi-Screen • 10-Channel Multi-Screen • 13-Channel Multi-Screen • 16-Channel Multi-Screen • 25-Channel Multi-Screen • 32-Channel Multi-Screen • 49-Channel Multi-Screen • 64-Channel Multi-Screen • Full-Screen Mode • Next-Screen Mode • Auto-Rotation Mode Chapter 1. DVR Website: www.veilux.net Phone 1-800-510-6528 16 Note: Relay 9 will be shown for hybrid DVR/NVR only and it will be activated when you selected an IP camera only. : Relay Off : Relay On Minimize Screen Mode: Minimize the Window. Click here to deactivate any of the DVR controls. A password is required. Click here to activate the controls again. A password is required. 3.2.3. System Status Window The System Status Window will show the real time status and events occurring Events: Motion Detected, Sensor, video loss and so on(including camera number and time) ALARM Icon: If an input signal from the external sensors is occurring, this icon flickers. NETWORK Icon: This icon flickers if someone is remotely connected to the system. This can be turned off in the system settings. Chapter 1. DVR 17 3.2.4. Pan/Tilt Control Box If Pan/Tilt camera is installed, you can control the Focus, Zoom, Light, and Camera directions through this control box. Auto Pan Preset Auto Scan Auto Pan: Based on the auto pan features of whichever PTZ camera is installed. Auto Scan: Auto scans through the first 9 presets (1→2→3→5→6→7→8→9→1→2→…) Preset: If you click here, the following dialogue box will appear. Chapter 1. DVR Website: www.veilux.net Phone 1-800-510-6528 18 • Preset - No.: Number of the Preset position (1~128). - Location: Description of the location for the preset position. - Go: Click the “Go” button, and the camera will move to that preset position. - Save: To save the current position of the PTZ in that preset location. - Delete: Deletes the selected preset position. First, move the PTZ camera to the desired position and then please select the number of the preset position and enter the location. Click “Save” to set the preset. • Tour (This function only operates on PTZ devices that accommodate the feature) - No.: Number of the Touring (1~128). - Program: Specify the order of the presets used in the Tour. - Run: Click the “Run” button, to initiate the preprogrammed tour. The camera will stay on each location for 5 seconds before moving to the next position. - Save: Saves the Tour number after you have setup the Tour. - Delete: Deletes the selected Tour. How to setup a Tour: Click cell you want to setup and type in the preset position numbers in the order you want. (e.g. 23, 52, 3, 15, 12, 3, 4, 18, 21 , 235231512341821…) And click “Save” button. Initiating the Tour: Simply click the “Run” button and the PTZ camera will start “touring”. Click again to stop. • Control & Setup - Diff. Operation Mode: Check this box and the U, D, L, R keys will be changed from “click and move” to “cursor move”. (In case of CyberScan1, you must click the box to insert ‘START(PTZ)’ value and ‘END(PTZ)’ value in the setting of ‘AUTO SCAN SETUP’. You also need to click the box when you input title for the position of the Auto scan (Touring). Please refer to the PTZ manual for the details. - MENU: Calls the settings menu of PTZ camera. - ENT: Enters values chosen while you are in menu mode. - CLR / ESC: Cancels options currently chosen in menu mode. - U: Move up camera. (or, move up cursor.) - D: Move down camera. (or move down cursor.) - L: Move left camera. (or , move left cursor.) - R: Move right camera. (or, move right cursor.) - H: Goes to home position. - AP: Start/Stop auto pan. - Focus +/-: Focus near/far. - Zoom +/-: Zoom in/out. - Iris +/-: Iris open/close. - Hor Scrollbar: Pan speed. - Vert Scrollbar: Tilt Speed. Chapter 1. DVR 19 3.2.5. DB information following screen appears. If you click this area, the 3.2.6. Context Menu Functions The context menu box shows the usable items by the setting. Chapter 1. DVR Website: www.veilux.net Phone 1-800-510-6528 20 Stop Capture: This will stop capturing images on the recorder, but it is saving image on disk.(Live board does not support this function. Other overlay boards return to original status (capture) when a user clicks split mode) Save as Snapshot: Take a snapshot from the live video of the specified camera into C:\\Programs Files\\DVR\\Main\\SavedImages\\01~64 folder Save as AVI: This will save an AVI file of current camera into C:\\Programs Files\\DVR\\Main\\ SavedImages \\01~64 folder. It will continue until it is unchecked. Print : Prints an image of current camera.(If a printer is installed) OneSearch: Bring up the “One Search” feature installed with the system. You can search and view live at the same time. Open Pan/Tilt: You can work rightly pan/tilt that you want to control by right clicking on a specific camera. Audio: If you set to use audio(except System Audio) at Audio tab, you can listen audio in live mode. And it Image Rendering: If you use Grandeye IP camera, you can control this function. This function allows You can control PTZ on screen using mouse. is possible two-way audio with IPCamera. fisheye image to be rendered as VCams(Virtual camera) or panorama views.(Refer to 65p.) Chapter 1. DVR 21 Digital Zoom: You can display zoomed image. To Zoom in-out on an area of interest, move slider bar. And if you want to display zoomed image on viewer, check “Use Digital Zoom”, otherwise uncheck this function. (The Digital Zoom is not available when you use VCA option.) Chapter 1. DVR Website: www.veilux.net Phone 1-800-510-6528 22 User Mode Monitor You can control the split mode, rotation, auto switch, pan/tilt function. Chapter 1. DVR 23 3.2.7. Extra Functions Freeform Display on Live Viewer: You can rearrange the live camera screen by dragging and dropping cameras into whatever position you like. To add cameras outside of the range of the screen (i.e., camera 5 in a four camera view), go to the 16 position screens and drag the camera to the position you want, then return to the smaller camera view. In the 32 channel view, Camera 1 is the same as the middle image. Chapter 1. DVR Website: www.veilux.net Phone 1-800-510-6528 24 4. System Setup 4.1. Start System Setup To start the Setting menu, click the Setting button from the Action Buttons at the bottom of the live view screen. To modify the System Configuration, you must have proper accessibility. Enter your Account and Password. The system has Default Account ID of “1”, and the password is blank. After entering Account ID and password, click “OK” button to start the Setting Menu. Note: Instead of using the keyboard, you can logon using only with mouse. Simply click the keyboard button (which is right below the password field), and the system will show the keyboard. A keyboard will come up as shown below; simply use click on the keys the same as typing on the keyboard. Either method will work. Chapter 1. DVR 25 4.2. System Setup Click “System” tab, and the detailed system setting menu will be displayed. Start Screen: You can choose the default startup screen from this location • Screen Mode - Single: This supports only one monitor. - Extension: This supports multi monitors. - : This button supports advanced functions about under Extension. If you want to select specific cameras on multi monitors, click this button. (Refer to 19p) Chapter 1. DVR Website: www.veilux.net Phone 1-800-510-6528 26 How to use the Multi-Monitor From the main Desktop screen, right click in an empty position and select “Properties”. Then select “Settings” for the dialog as follows. Click monitor “2”, and select “Extend my Windows desktop onto this monitor.” Click “Apply”, and then “OK” Chapter 1. DVR 27 • • • • Full Screen: Start the system without any menu or buttons-full screen on the video only. Auto startup: Start the main program automatically when the Windows system starts. Auto Startup Viewer: Start the main video viewer with Windows startup. If only Auto Startup is selected, the system will record, even though the cameras are not viewing. When close viewer, close all service: Select this box to stop all the services when you exit the main screen. Note: The system will stop recording if you exit the main viewer screen. Video Type • • NTSC PAL CCTV Control Key • Disable Ctrl+Alt+Del: Check this box to disable the use of Ctrl+Alt+Del to reset or disable programming functions in Windows. This also locks the Exit and Minimize buttons. Chapter 1. DVR Website: www.veilux.net Phone 1-800-510-6528 28 Instant Recording • Use Instant Recording: Allow instant recording of cameras based on user intervention. the instant recording button on the main viewing screen. This enables Message • Hide RMS Message: Hide connect or disconnect message of RMS (notification of remote connectivity). Memory • Enable Large Memory: This option lets you tune the use of memory and memory address space in your computer. It is used to allocate more memory to applications and less memory to the operating system. This option increases the size of the user process address space from 2 GB to 3 GB. This can improve performance of servers that run virtual-memory-intensive applications. If you experience the “Out of Memory” dialog when using 64Channel DVR/NVR with D1, you can check this option to resolve the problem. This option need to restart the operating system. Important warning This option can cause the VGA card load fail. VGA card load fail results in pink screen on DVRViewer. Please restore this option if you have any problem after check this option. Site Information • • Site: Define the name of site. Location: Specify the system location. Display • Border: Show a white line between cameras LogFile Setup • Interval of Motion Event: Set the interval for logging motion to the log file. By setting the logging • Use Motion log: If you don’t want to look for motion log, uncheck this function. interval longer, the log file will be smaller (default = 60sec) Viewer Mode • Shut Down - Use: Check to select that you want the system to shut down at a particular time. - Time: Configure the time when the system will be shut down. Note: The system will need to be restarted manually. • Auto Reboot - Use: Check to select if you want the system to reboot at particular times. - Day Selections: You can set up a schedule of time, date a day of the week - Apply Same Value: If you set Sunday’s options, you can apply this button to set all the days the same. Chapter 1. DVR 29 • Watchdog - Use H/W: In case there is a malfunction, the system will complete a hardware reset of the system to try and correct the error. - Interval: You can choose the interval time for the system to check for defects. - Reconnect time of IP camera: When IP camera is disconnected, try to connect to IP camera per interval time. • Backup setup: Set the Back-up option or manage schedule of back-up (refer to section 7-7 Auto Back- Up) • Save Config: User can save DVR configuration value to the *.ini file. • Restore Config: User can load DVR configuration value from the *.ini file. And user has to restart the • DVR Viewer. But user must not use the *.ini file that user created on the other DVR system.(e.g. After saving A.ini file on system A, user must not load A.ini on system B. User have to use A.ini file on system A only) Render Type: You can choose D3D or GDI according to user’s PC environment. D3D is default value. When you use VCA, you should set up this option to D3D. You should choose GDI option when VGA card does not support D3D or perform well. Chapter 1. DVR Website: www.veilux.net Phone 1-800-510-6528 30 4.3. Camera & Motion Setup Display Options • • • • • • • Use: Check this box to enable the chosen camera on the specified channel in the Camera box. ID: Individual Camera ID description. View on PC monitor: Check to enable the image to be viewed on the PC Screen. View on TV monitor: Check to enable the image to be viewed on the TV Screen. Note: IP cameras can’t use the external video out (View on TV monitor) View on Remote monitor: If left unchecked, the camera can be disabled for remote viewing. Time Zone: Get the Local Time Zone Use Daylight: Adjust clock for daylight Video loopback: 0-1/2-3 Note: This function supports to link one input to the other input using one video source Frame Rate • • • Use Max Frames: If this box is checked, the system will automatically record at the highest rate available for your system. If unchecked, you can specify the frame rate for the camera. Frame Rate: Define the frame rate for the specified camera. Time & Event Interval: If the Time/Event recording method is chosen, this setting defines how often images are recorded if there is no motion or sensor. Chapter 1. DVR 31 Compression Mode • • • • Mode: Selects either M-JPEG (smaller files), or M-MPEG (full frame recording), or H.264. Image Size: Screen resolution. Note: If the system is set for NTSC, you can select 320x240 or 640x240 or 640x480 If the system is set for PAL, you can select 352x288 or 704x288 or 704x576 Interlaced Mode: If image size is 640x480, you can select the Interlaced Mode. This reduces image tear common to 640x480 images in most DVR systems. Image Quality: Control the quality of the image (Note: the higher the quality, the larger the files size) Display VCA: Select this box to display VCA information on Viewer Stamp • • • Use: Select this box to have the time displayed on the recorded image. Date: Select this box to add the date to the recorded image. Position: Select the location of the Time/Date stamp. Pre/Post Record: You can define the number of frames that will be recorded before and after detecting motion Pre: Define the number of frames to record before detecting event. • Post: Define the number of frames to record after detecting event. • Note: If you are recording audio, it is best to set the number of “Post” recording to 30 framers or more. *When user use the IP products, the unit of this value is number of second. E.g., Pre=3sec.(not frames), post=100sec.(not frames) • Motion Detect Use Camera MD: Use motion detection function from IP camera, in this case, do not use s/w motion detection from DVR. It will be activated when you use IP product only. • • : Lunch IP camera Setup webpage. This will be shown IP product only. Sensitivity: Defines the percentage of sensitivity–lower is more sensitive (the default value is 10%). • • Tolerance: If there is a recording problem (always recording over night) due to the camera noise at : This is advanced button about Tolerance limit night time, you can adjust the sensitivity by the control of "Tolerance". Lower value is more sensitive Chapter 1. DVR Website: www.veilux.net Phone 1-800-510-6528 32 • • • • • • • Whole Area: Motion will be detected anywhere in the screen. User Area: Motion will be detected in defined areas. ADD: To add an area for motion detection, click the ADD button, and define the range by clicking the area and making a box around the area you want for detection. The system will display a red box around the new area (see the sample picture below). Delete: To delete an area previously defined, select the defined box, and then click the DEL button. Test: Activate this button and the screen will display detected areas as red dots. This is useful in defining motion areas. ACTIVE: When the motion is detected, this button with highlight and indicate that the system will record. Use this to verify that the Sensitivity is set correctly. Relay Out Use: If you want motion to trigger a relay, activate the settings here. (Additional equipment is - required to send the Output. Use to extend relay or rename relay, click “Adv” button Motion: You can trigger a relay when motion event VideoLoss: You can use a video loss event to trigger a relay output Protection Area: You can mask an area on fixed cameras for privacy.(defined the same way as with Motion Detection); Not used with HW compression cards and IP Cameras. Chapter 1. DVR 33 - Motion Trace: If motion is activated, the area of motion is shown in the DVR Viewer as seen below. Chapter 1. DVR Website: www.veilux.net Phone 1-800-510-6528 34 Alarm Setting • • • • • • • • • • Event: Check event type. Beep: Creates an audio alert if an alarm event occurs for the defined number of seconds. The audio occurs through both the internal and external speaker, but only the external speaker works in Microsoft® Windows® 7. Popup: If a motion, sensor or video loss event occurs, the corresponding camera will popup for the set amount of seconds. View on DVR Monitor: If a motion or sensor event is occurs, the corresponding camera will popup for the set amount of seconds. View on TV Monitor: If a motion or sensor event is occurs, it can be displayed on a TV monitor connected to the composite output for the set amount of seconds. Message: A visual ALERT message can be displayed on the screen, for the defined number of seconds. The alert can be turned off by user input. This is only controlled by a video loss or sensor event. Recording to force: After sensor event occurs, it will be recording compulsively full frames of the channels which are set by sensor recording method. To stop the forced recording, click the “Alarm Area” (in red) on the DVR Viewer screen. Save to extra disk with AVI format: If a motion or sensor event is occurs, the system can save current images as an AVI file during the event interval to disk. Go to Preset: If a motion or sensor event occurs, it can move a camera to preset. Sensor No: If you select sensor no, when sensor event occurs, camera will move as preset no to be set. Chapter 1. DVR 35 Advanced Setting • Work Hour: This is the time that the system records under the normal configuration - From: Start Time - To: End Time • After Hour: The system will record based on the advanced setup settings during the time outside the time zone established as Work Hour. - On Normal: The System will record data regularly. - On Alarm or Motion: The system will record at a different rate of motion. 4.4. Recording Setup Your DVR has 8 different recording modes that you can choose. The recording schedule is based on a one week schedule. Define the schedule according to the day and hour in each day. Normal Mode In this mode, the DVR continuously records images from the selected camera. Sensor Mode Chapter 1. DVR Website: www.veilux.net Phone 1-800-510-6528 36 In this mode, the DVR will record the images only if any event occurs from a sensor connected to the system. If you select Event/Audio, system will record the images whether audio is detected or sensor does. Time/Event Mode The system will continuously record one frame per period set (1,5,10,15,20,30 seconds, 1, 5, 10, 15,20, 30, 60 minutes). If there is motion or sensor detection, the DVR will begin recording the set frame rate. Select the Event/Audio option to record at the higher frame rate if only audio is detected. Motion Mode (most commonly used mode) In this mode, the system will record images only if motion is detected within the defined areas. Select the Event/Audio option to record at the higher frame rate if only audio is detected. Motion Sensor Mode In this mode, the system will record images when a sensor event has occurred and/or if motion is detected. Select the Event/Audio option to record at the higher frame rate if only audio is detected. Watch Mode In this mode, system will not record any images from the selected camera, and will only display the live image on the screen. Audio Mode In this mode, the system will record images only if audio occurs. Event/Audio Check this option, the system will record images according to chosen recording mode and when audio event occurs additionally. It is operated with every recording mode, except Normal, Audio and Watch mode. (You cannot set this option with IP products like DIP, DIC series.) Recording Schedule example • Sunday – Saturday (00:00 – 03:00): The system will record all captured images. • Sunday – Saturday (03:00 – 06:00): The system will record only if a sensor event is detected. Chapter 1. DVR 37 Sunday – Saturday (6:00 – 9:00): The system will record only if any motion is detected. Sunday – Saturday (12:00 – 15:00): The system will record if a VCA event is detected. Sunday – Saturday (15:00 – 18:00): The system will record if a sensor event is detected, or if there is motion detected. • Sunday – Saturday (18:00 – 21:00): The system will record based on the Time/Event Mode and at the frame rate indicated in that section. If there is motion, the system will record at the faster rate. • Sunday – Saturday (21:00 – 24:00): The system will record captured images if motion is detected. Note: If you are settings any or all of the cameras the same, you can set one camera and then copy it to others by right clicking on the screen to bring up the following window. Then choose the appropriate selection to copy the settings to other cameras. • • • Choose the options from the following window. The blue highlighted cameras will receive the copied settings. Chapter 1. DVR Website: www.veilux.net Phone 1-800-510-6528 38 4.5. Display & Pan/Tilt Setup Screen Control Option: Change the brightness, contrast, saturation and hue of each camera. Note: The automatic gain control feature is only available on some systems, and should only be used in circumstances where the video signal is too weak or too strong. • Transaction Data Control: If the system has been built to support the POS function, this button will be • • • Preview Textout: Display a sample of what the overlay text will be for the POS. Display data to overlay: Turn on or off the POS display on the live screen. Embedding: If a capture board supports POS function, Video and Pos data will be displayed separately active or embedded into the video. Pan/Tilt: Select the settings to match your PTZ camera. Clipping: It is to stretch the actual image to hide the extra space (like black line). The unit is pixel. Chapter 1. DVR 39 4.6. Sensor Setup Options • • • • inactive. Use Master Sensor: If you select one sensor as master sensor, when master sensor is active, other sensor will be unused. When master sensor is inactive, other sensor will be changed as use. Flags • Sensor Type: Define the type (open or close) of signal from the sensor. • Selected Camera: Configure a sensor to a specific camera. N/O – Normally Open N/C – Normally Closed Sensor Output • • • Use: Select this box to enable the sensor function on the DVR. Location: This is a description of the sensor location. Use Embedded Data: When sensor is active, senor location will be embedding on image until event is Instant record: If you want to record all camera when sensor event, check this box. Recording to stop use main UI instant recording button. Use Relay Output: If you want to use the sensor to activate a relay, check this box to define the output. (Additional equipment is required to send the Output.) Relay Time: Define how many seconds are set between triggering the relays. Sensor Test Chapter 1. DVR Website: www.veilux.net Phone 1-800-510-6528 40 4.7. Audio Setup : Active : Not active Options • Use: Check to enable audio on a particular channel. Note: Channel 1 is the audio from the sound card. Higher channels are from the DVR components. Channel 1 is the only channel that is available to listen to live – the other channels record and can be played back only. • Do not save if silent: The system will not use the audio to start recording. Motion and sensor recording will continue to be in effect, however. Select Camera: This will associate audio to a particular camera. If you want to communicate from the remote site to the DVR using audio, you must have a sound card. In the case of two-way audio, the sound card channel does not record that audio. You must use channel 2 or above for recording audio on the DVR. Chapter 1. DVR 41 How to check the audio if it is not working properly: Problem 1: Check if there is another recording program is running. If there is another recording program running, the recording function on the DVR system will not work. Problem 2: Check the path for input signal and make sure it is set up as Microphone. Review the following steps. (OS: Windows XP) Run ‘Sounds and Audio Devices’ in the Control Panel Click Advanced in under “Sounds and Audio Devices Properties Select Options, Properties. Chapter 1. DVR Website: www.veilux.net Phone 1-800-510-6528 42 Select ‘Recording’ and click “OK”. Click the “Select” box for the Microphone. If you want to playback the video with audio on the remote site, you also need to take the above steps on the remote PC. Chapter 1. DVR 43 After setting, test if the setting is correct or not as follows. Start, Program, Accessories, Entertainment, Sound Recorder Chapter 1. DVR Website: www.veilux.net Phone 1-800-510-6528 44 Note: From the DVR software, when you playback the recording data with sound, you must set the playback speed to 1x. Also, please check the “Mute all” settings and volume level. Chapter 1. DVR 45 4.8. Network Setup Allow network Connections • • Allow network Connections: Allow network (remote) connections to the DVR. TCP/IP Port: TCP/IP port number. (The default port is 9871). Note: This feature can be useful if you are using multiple DVRs with only one static IP address. Each DVR should have at least 10 ports between them (i.e., DVR1 = 9871, DVR2 = 9881, etc.). If you use different TCP/IP ports, you can port map the incoming connections to specific DVRs. See your network administrator for more information. * If you want to use RMS through the WAN(Internet), you have to forward the port number 9871~9876 to connect on DVR server side before anything else. Compression Mode • • M-JPEG, M-MPEG: Choose the video transmission compression method, either M-JPEG or M-MPEG (faster) Image Quality: Control the quality of the images that will be sent to the remote site. Bandwidth Chapter 1. DVR Website: www.veilux.net Phone 1-800-510-6528 46 • Bandwidth limits: 0 kb/s (bytes) • Default: 0 (Maximum Bandwidth) Other input values limit the bandwidth the system uses for transmission. It is input as kbytes/sec. (I.e., 128 = 128Kb per second of bandwidth.) CMS (Central Monitoring Software) • • • • Use CMS: If this box is checked, the DVR Server try to connect with the CMS server once it is started. After the connection is established, it will send alarm notifications to the CMS server and interact with CMS server. IP: Enter the CMS server IP Address Port: Enter the CMS server Port number.(default 5502) Retry Gap: Select the number of minutes between retries when connection is lost. A selection of 0 minutes means that the DVR will not retry when if a connection fails with CMS server. Web Service: • Port: Default HTTP port is 80 Modem (Dial-up) Connection Settings (only for systems with a modem connection) The following settings occur in the operating system (Windows XP is shown) Control Panel Network Connections Create a new connection Chapter 1. DVR 47 New Connection Wizard’ shows, click ‘Next’. Select ‘Setup an advanced connection’ as “Network Connection Type” and click ‘Next’. Chapter 1. DVR Website: www.veilux.net Phone 1-800-510-6528 48 Select ‘Accept incoming connections’ as “ Advanced Connection Options” and click ‘Next’. Select the modem corresponding with ‘Incoming Connections’ and click ‘Properties’. Chapter 1. DVR 49 Click Properties and check that the port speed is the same as installed Modem. If yes, return to the ‘New Connection Wizard’ and click ‘Next’. Click on the ’Do not allow virtual private connection’ and then ‘Next’. Chapter 1. DVR Website: www.veilux.net Phone 1-800-510-6528 50 Click ‘ Add’ to register a new user for Dial-up Networking connection. Please enter a User ID & Password and click ‘OK’. Click on the new user and click ‘Next’. Select ‘Internet Protocol(TCP/IP)’ and then ‘Properties’. Chapter 1. DVR 51 Please specify TCP/IP address for remote connection. (See your network administrator for an IP address) Click ‘Finish’, to complete the settings. Chapter 1. DVR Website: www.veilux.net Phone 1-800-510-6528 52 Look in ’Network Connections’ , to see your new ‘Incoming Connections’. If there is no Modem connection listed and you are using Windows98 SE, correct the connection setting as follows (not needed in Windows XP) Start�Programs�Accessories�Communications�Dial-Up Networking. Under ‘Make New Connection’, insert the computer name, select a proper Modem and click ‘Next’. Chapter 1. DVR 53 Insert telephone number and click ‘Next’. “Finish’ Start�Programs�Accessories�Communications�Dial-Up Networking. You should see a new icon for the connection. Chapter 1. DVR Website: www.veilux.net Phone 1-800-510-6528 54 Double check the new icon, select “sever Types” and check that TCP/IP is checked Chapter 1. DVR 55 4.9. Notification Setup You can configure Notifications that will alert users or the remote site directly when motion is detected, sensors are triggered, or other events occur. ADD: Add remote site with following information • • • • IP/Tel No: The IP or Telephone number of the remote site. Port: TCP/IP Port number. Transfer Device: Choose a network type for the connection (LAN, Modem, ISDN) Password of IUSER_NOTIFY: If you select MODEM or ISDN, you will need a password to login to the Remote Surveillance System. Events: Check the types of events you want to create a notification for. • E-Mail Service (This function isn’t supported for MODEM, ISDN) • Chapter 1. DVR Website: www.veilux.net Phone 1-800-510-6528 56 - E-Mail: Check to send e-mail for the event. - From: Type the individual’s e-mail address to send the notification.(default [email protected]) - To: Type the individual’s e-mail address to receive the notification - Outgoing mail (SMTP): Type Outgoing mail Server (see your administrator if you need this information) - Port: Type Port number (standard port is Port 25) - Attach video: Choose the number of images to attach (if none, there will still be a detail report of the event sent to the user). Update: Select this option if you are modifying a notification that has already been defined. Delete: Select this option to delete a notification that has already been defined. Events • • • • • • System: When a user changed setting value of DVR, it notifies to RMS Motion or Sensor or Audio: When motion or sensor or audio events happened to DVR server, it notifies to RMS. Video: When video on/off happened to DVR server, it notifies to RMS. Pos: It is possible to notify to RMS if DVR server enable to popup of POS action code.(Refer to 107p) Network: When IP camera/IP Server disconnected VCA Event, VCA Count: Schedules • • • Camera: Select a specific camera Copy All: Apply to all cameras. Notify Info • • Notify: Click the “Notify” button and define a schedule for notification. Eraser: Erase selected time zone. Dial up connections cannot notify more than one RMS at a time. Chapter 1. DVR 57 4.10. User Setup Add: Authorized users can add additional users. . Access Mode Admin: Administrators have full access to the entire system. Users: Users have partial access to the system (defined by an Admin). Auto Pass: If you check this box, the system will assume that whoever logged into the system first is the current user, and will grant access based on their level. Note: The system may not require passwords in this case. Also, if you choose this function, the DVR must be restarted to begin the function Access Level: When “Users” is selected, this category highlights. You can then define accessibilities for • a specified user. • • • • • Plugin Level POS System LPR Setup Access camera Information • • • • Account: User ID (used when a user logs on to the system) Password: Password (used when a user logs on to the system) Default account when window startup: Detail Information: Name, Alas, Phone, E-Mail, Address Delete: Select this option to delete an account that has already been defined. Update: Select this option to modify an account that has already been defined. GroupUser • - User • - Group Group - The group ID could not log in for the connection. Add - To create new group. Each group will have different rights for the access and all users in the same group will have same rights which are allocated for the group. There would be no need to input a detailed information and password. The add and delete of the group will be done by “ GroupManage”. Chapter 1. DVR Website: www.veilux.net Phone 1-800-510-6528 58 Delete - To delete a group and all users together. Update - If you change s the right of the group, all users of the group will be changed and followed. GroupManager • Able to add, delete each user for each group. Admin only will have a right to access the Groupmanager. Group - Show registerd groupst. User List - Show all users registerd in each group. Add - Input Account, Password of new user and click “ Add”. Delete - To delete a user from User List. Update - Able to change the pw of the user. FileImport - it is able to register all new users using TXT file into the selected group. FileimportInfo - Show processing of the file import. InfoReset - To remove the information of the window for “FileimportInfo”. OK - Close Groupmanager. Chapter 1. DVR 59 Fileimportinfo • • • • • • exist account - Already existed the user. Invalid data - coming incorrect data. File Import Result Total - total number of users by TXT file. ADD Success - number of registered users. ADD Fail - number of no registration. Invalid data - number of incorrect data for user list It would not How to make the TXY file to be imported. The necessary information are ID, PW, User Name for user list (txt file). Chapter 1. DVR Website: www.veilux.net be registered. Phone 1-800-510-6528 60 4.11. Plugin Setup This is User SDK for integration into other software packages, such as access control. Chapter 1. DVR 61 BMS1: When motion or sensor event is detected, it will send a message to particular Server. You can edit source code of NetMsg.dll. We support the NetMsg SDK. • • • • • • • Camera: Camera no Use: If you want to send a message, check “Use” On Motion: Motion Event On Sensor: Sensor Event IP Address: Enter the IP address of the specific server to notify. Port: Enter the Port of the Server. Message: Enter the message you want to send. NNEvent: Send a jpg image to particular Server. You can edit source code of NotiEvent.dll. We support the NotiEvent SDK. Chapter 1. DVR Website: www.veilux.net Phone 1-800-510-6528 62 • • Host Address: IP address of particular Server Port: Port of particular Server SaveJPG: The user can get current jpg image from each camera using an application programmed through httptsvr.exe. You can edit source code of SaveJpg.dll. We support the SaveJPG SDK. 4.12. IP Setup Chapter 1. DVR 63 Type of IP Product List: Please the brand that you want to use the IP cameras so that the search will be faster. Note: 3 rd Product will be required a License Key Search: IP Product scans IP Products immediately when click ‘Search’ button. Add: If a user wants to use DIP400, select DIP 400 item on the second list and click “Add” button. Remove: If a user wants to cancel usage of IP products to be added, after selecting DIP400 item on the third list, click “Remove” button. UP/Down: Adjust channel number of each camera. But can’t mix Own Products group and 3rd party Products. Add manually: If can’t find IP Products automatically, a user must add it manually. First check item on the first list. Update: If you want to change location, Protocol, User ID, User Pass, enter the new value of item and click “Update” button. Apply: If you want to save the change of the Camera Setting for IP product , click ”Apply” button or ”OK” button. Chapter 1. DVR Website: www.veilux.net Phone 1-800-510-6528 64 Product DIP/DIC series IP100 Vivotek(IP61x4) Vivotek(VS3100) Arm Axis User ID root admin root root root root root Used Pass pass pass root root root root(or ‘pass’) root(or ‘pass’) Arecont ACTi Admin 123456 IPCameraA/B IQeye Luxon Grandeye Veilux Zavio ZavioD DynaColor Etrovision Cnbtec DIPV/DICV 360Vision Cellinx Icantek root root admin admin Admin admin admin Admin root root root username root Admin root system admin admin Admin admin admin 1234 pass admin pass password pass Admin Protocol TCP/UDP Port 554~557 2000 UDP TCP HTTP RTSP HTTP HTTP HTTP HTTP/ RTSP HTTP HTTP HTTP HTTP HTTP/HTTPS HTTP HTTP/RTSP 9000/9201(pima port)/1(channel) 80 554/30000(rtp port) 80 6000/6001/6002 5000/80/7070/5000/5002 6005/6006/228.5.6.1/0(channel) 9000/9201(pima port)/1(channel) 80 80 80 80/554 80/8070(MJPEG)/8090(MPEG4) 80/8070(MJPEG)/8090(MPEG4) 80 1852/80 80 80/443 80 1852/80 80/554 How to check your device is whether http(80) or https(443), double click IP on second list. Click “Device info” on IPAdminTool, you can see Web URL http://192.168.0.46:80 or “https://192.168.0.46:443) Chapter 1. DVR 65 But if your device (DIPV/DICV) is set 80 port, you have to change Http port from 443 to 80. Just uncheck Enable HTTPS, and click “Update” button. Chapter 1. DVR Website: www.veilux.net Phone 1-800-510-6528 66 How to get video of Axis. • When a user wants to change IP of AXIS, double click item of the second List. Information of the Item will be displayed as follows Enter System Options -> Users -> User Settings Note: Check “Enable anonymous viewer login” (no user name or password required) 5. Playback 5.1. Start Application From the Windows Desktop, double click the DVR Search icon, or run the Search.exe program in C:\Program Files\DVR\Main folder 5.1.1. Logon to the Playback When you start the DVR Search (search.exe) program, the program will ask for your “Account” and “Password.” The system’s Default Account is “1”, and the Password is left blank. After entering the account, click “OK” button to start the DVR Search. To playback the recorded video, execute the search program (at the bottom of the main screen). Chapter 1. DVR 67 Note: Instead of using the keyboard, you can logon using only with mouse. Simply click the keyboard button (which is right below the password field), and the system will show the keyboard. A keyboard will come up as shown below; simply use click on the keys the same as typing on the keyboard. Either method will work. Chapter 1. DVR Website: www.veilux.net Phone 1-800-510-6528 68 When the Search program starts, the video screen will be displayed as follows. 5.2. Functions 5.2.1. Screen Mode Icons 5.2.2. Screen Mode Buttons • Single-Screen-Mode: Display the recorded video from one camera, • Multi-Screen-Mode: Display 4 the recorded video from 4 different cameras • Multi-Screen-Mode: Display 9 the recorded video from 9 different cameras • Multi-Screen-Mode: Display 16 the recorded video from 16 different cameras • Regular-Size-Mode: Recorded video will be displayed the same size as the captured image. Chapter 1. DVR 69 • Double-Size-Mode: Recorded video will be displayed 2 times larger than the captured image. • Panorama-Mode: Views sequential still images from one camera. 5.2.3. Status Information Window This window will show the status of displayed video and captured time information. Date and Time information of the captured image. Camera Number. Recording mode used. Type of Image compression used. 5.2.4. Calendar Window The calendar represents the dates when video is recorded. If the color of a date is RED, there has been video recorded on that date, otherwise the dates will be black if there is not recorded data. When you click on a specific date, the Record Table (Section 4.1.7) will show what data has been recorded that day. Month and Year Left Arrow: To move to the previous month, click this button. Right Arrow: To move to the next month, click this button. Chapter 1. DVR Website: www.veilux.net Phone 1-800-510-6528 70 5.2.5. Image Control Menu You can modify the captured images using these controls. SHARP: Control the sharpness of the captured image. BLUR: Control the blur of the captured image ZOOM: Zoom into a specific area of the captured image. If you select a specific area of the image, the selected area will be maximized in the window. If no select, the image will be enlarged each 10% per clicking based on the center. B / W: Convert the image to black & white ORIGN: Go back to the original image CANCEL: Cancel previous commands one by one BRIGHT: Control brightness -/+ CONTRAST: Control contrast -/+ 5.2.6. Utility Menu 6. 7. 8. Control the speed of the displayed image. 9. Chapter 1. DVR 71 5.2.6. Play Menu The controls select forward, backward, play and stop. The first image Backward one image frame: Stop Forward one image frame The last Image Backward Play Forward Play Speed Bar 1 2 3 4 5 6 1) Min Speed, 2) 1/2x Speed, 3) 1x Speed, 4) 2x Speed, 5) 4x Speed, 6) Max (skips frames) Chapter 1. DVR Website: www.veilux.net Phone 1-800-510-6528 72 5.2.7. Record Table(Hour Bar) When you select a Date from the Calendar, system will show the recording information below the video screen. Camera: C1, C2, etc. represent the camera number chosen. Time Cell: Show time zone for 24 hours (00 to 24) The color of the cell represents the type of recording that the system made. Darker versions of each color mean that audio was recording during that time. 5.2.8. Record Table(Minutes Bar) When you select a time from the Record table, the system will show the minutes of that hour (0 to 60). 5.2.9. Exit Button Select this to exit from the playback screen. 5.2.10. Bookmark Button You can make a bookmark of selected images for reference or review later. the video drops off in the normal course of recording if not saved. This does not save the data and Review previous bookmarked images. Review next bookmarked images. Make a bookmark for an image on the playback screen. List the current active bookmarks. The following screen will appear: Chapter 1. DVR 73 • • • • • • OK: Select and view an active bookmark. Cancel: Cancel the list of bookmark. Delete Item: Delete selected item. Delete All: Delete all items. Backup: Save a copy of the selected bookmark. Modification: Add a note for the selected item. Directory (Media): Files will be saved to this folder. (default = CD/DVD Drive) Chapter 1. DVR Website: www.veilux.net Phone 1-800-510-6528 74 5.2.11. Motion (Object) Search You can set a section of video for motion detection based on existing recorded data, and search for data within that area (object search). • • • • • Find Range Camera Number: Select camera number. From: Starting time. Until: Finishing time. From First: Select from the first minute of recorded data that day. Until Last: Select to the last minute of recorded data that day. Find Setup Whole Area Mode: Motion will be searched in the whole area. User Area Mode: Motion will be searched in the area you define. Add: Use this to define an area for searching. Click the “Add” button, and then drag an outlined square around the area you want to search. More than one area can be defined. • Delete: Used to delete defined areas that you do not want. • Add to the bookmark with result data: Check this box to store the images as bookmarks, automatically. • Sensitivity: Define the Rate of Sensitivity (the default value is 10%). A lower percentage is more sensitive. • • • Chapter 1. DVR 75 Find All: Find all image data during setting time. Find Next: Find image by image. Clear All: Clear bookmarks for all items. Bookmark: Make a bookmark for selected items. Search result • Move to first item. • Move to previous item. • Move to previous item in sequence. • Move to next item in sequence. • Move to next item. • Move to last item. • Adjust the speed. Chapter 1. DVR Website: www.veilux.net Phone 1-800-510-6528 76 5.2.12. Search Selected cameras only on playback If you want to search certain cameras only, you can add or remove the cameras by right clicking in the time table. You can also drag cameras in the display screen to arrange them in any order. Show Pos Data: If you want to see Video and Pos data embedded, check ”Show PosData”. Show as Local Time: If you want to search to get local time, check this function. Sync AVI: If you want to save image synchronize with time, check Sync AVI. This method has dump images to synchronize with time. So if you don’t want it, don’t check. Image Rendering: If you use Grandeye IPcamera, you can control this function. This function allows fisheye image to be rendered as VCams (Virtual camera) or panorama views. You can control the size of this dialog. Mount Type: Auto, Ceiling, Wall • Video Type • Chapter 1. DVR 77 VCam: VCams can be retrospectively panned, tilted and zoomed in the same way as an ordinary motorized dome camera but do not suffer from the same limitations. Panorama: Panoramas are rendered as two 180 degree views. Fisheye: Fisheye views allow the camera images to be seen without geometric processing, but with the option to zoom and pan. CameraNo: Number of camera that you are searching. Backup: Save rendered image or backup specific video to AVI files as. Show Second Slider: If you want to search second image, check “Show Second Slider”. You can see slider bar above minute bar. You can control the size of this dialog. - Mount Type: Auto: Ceiling: Wall: - Video Type VCam: VCams can be retrospectively panned, tilted and zoomed in the same way as an Ordinary motorized dome camera but do not suffer from the same limitations. Panorama: Panoramas are rendered as two 180 degree views. Fisheye: Fisheye views allow the camera images to be seen without geometric processing, but with the option to zoom and pan. - CameraNo: Number of camera that you are searching. Chapter 1. DVR Website: www.veilux.net Phone 1-800-510-6528 78 6. Playback (Using Removable HDD) Chapter 1. DVR 79 In some cases, you may want to remove the original hard drive and play it back in another PC (sometimes the courts may require the original drive as evidence). 6.1 Export Data (DVR Side) Run the FsUtil.exe utility: (Start->Programs->DVR->Main->File Manager) and click “Export”. Moving POS Data: If you have to move POS data, set the POS save Directory on the Removable Hard disk. You can set the POS save Directory using setup Dialog(Setup->Transactions->Save Directory) For Example if you set the video DB on the D:\ Drive, set the POS save Directory on D:\ Drive too. Then POS data is exported with video data, and you can search the POS data on third PC. 6.2. Import Data (3rd 3rd PC Side) Install the Playback program from provided on the CD. (CD\Playback\DISK1\setup.exe) Chapter 1. DVR Website: www.veilux.net Phone 1-800-510-6528 80 Note: You need to install the imported hard drive in the 3rd PC first. Please follow the steps below to import a hard drive. Run FsUtil.exe. (Start->Programs->Playback-> Main->File Manager) and click “Import”. Run Search.exe (Start->Programs->Playback-> Main->Playback). You can now search the imported DB. < Installation of An Imported Hard Drive>. 1) Right click on “My Computer”->Manage->Computer Management->Storage->Disk Management (select). Chapter 1. DVR 81 Place your mouse on the “Disk 1” as below and right click to choose ->Import Foreign Disks. 2) Select “Disk group” as below and click “OK”. After checking the disk volumes information as below and click “OK”. 4) The hard drive is added into the system. Chapter 1. DVR Website: www.veilux.net Phone 1-800-510-6528 82 6.3. Import Data (3rd PC Side)-Using DVR Program Execute the FSUtil.exe and import the removable disk.(See section 5.2 Import – Using Playback Program). You can now playback exported video data using your PC. If you want to playback POS data, set the POS save directory the same as the directory it was exported from. For example, If POS data exists on the D:\POSDATA, set that directory as POS save directory. You can set POS save directory using SETUP dialog. (Setup.exe->Transactions->Save Directory). 7. Remote Surveillance 7.1. Start Remote Program (Single Mode) To use the remote service from a remote site, install the “DVR Remote” program. Once installed, start the program from the Windows Desktop, or run the DVRHost.exe program in C:\Program Files\DVR\Remote folder. 7.2. Connect Main System Chapter 1. DVR 83 The first screen of DVR Remote program is nearly the same as the DVR Main screen. The Remote Screen also has the “CONNECT” and “DISCONNECT” buttons as follows: Click the “Connect” button to display the connection dialog box with the list of established servers. From here, you can connect to the site of your choice. After selecting the Site, click “OK” to start the remote session. If this is the first time to using the Remote program, you will need to setup the Site first. 7.3. Setup Site Click the “Setup” button from the Connect window, and the Site Information Window will be displayed as follows: 1) Click the “ADD” button, for the Site Information window: Chapter 1. DVR Website: www.veilux.net Phone 1-800-510-6528 84 - Site Name: Enter a descriptive site name – you can define any name you can recognize easily. IP Address: Enter the IP address of the site. Port: Enter TCP/IP Port number, the default port number is “9871” and typically does not need to be changed Use Auto Logon: You don’t need to logon every time you try to connect to DVR, Account: Enter a account of DVR you register. Password: Enter a password of DVR you register Network: If you use dial up modem, check “Modem, ISDN” and enter the phone number, Windows user ID and password for the DVR server. 2) Add Group You can use the “Multi-Channel” connection to make a grouping of multiple servers and cameras that you want to connect to by the remote surveillance program. When you click “Add Group”, you will see following window and can make your own group from a list of available 3) Delete Chapter 1. DVR 85 Click on any Site that you want to delete from the list, and then simply click the “Remove” button. 4) Modify From the Site Information Window, Click any site from the list that you want to modify, and click the “Modify” button. You can then modify any information attributes in the window, except the Site Name. To change the Site Name, you must delete the site and re-add it with the correct name. 7.4. Remote Navigation Chapter 1. DVR Website: www.veilux.net Phone 1-800-510-6528 86 1) Action Buttons R. PLAYBACK “Remote Playback”: Used to search recorded will be displayed and operate the same as Main DVR’s Playback Menu. (Note the action button . If you click this icon during the remote search, the icon will change to green and the transmitting images will be recorded at your PC). SETTING: Configure any of the system parameters on the DVR from the Remote system. By clicking the SETTING button, the Setting Menu window will be displayed and operates the same as Main DVR’s Setting Menu. L.PLAYBACK “Local Playback”: Searches the recorded images from local client system. By clicking the L. PLAYBACK button, the Playback window will be displayed and operates just like the Main DVR’s Playback Menu. DISCONNECT: Disconnects the current session. - 2) You can turn on or off individual cameras by right clicking on the camera button at the bottom of the screen. 3) • Screen Mode Icons Single-Screen-Mode • 4-Channel Multi-Screen • 6-Channel Multi-Screen • 9-Channel Multi-Screen • 10-Channel Multi-Screen • 13-Channel Multi-Screen • 16-Channel Multi-Screen • 25-Channel Multi-Screen • 32-Channel Multi-Screen Chapter 1. DVR 87 • 49-Channel Multi-Screen • 64-Channel Multi-Screen • Full-Screen Mode • Next-Screen Mode • Auto-Rotation Mode 4) System Status Window : System Status Window shows the status or events from the DVR system : Relay Off : Relay On installed, you can control focus, zoom, pan, tilt and other functions through this control box. - Sever name: Displays the name of the remote site. - Transmission speed: Displays the transmission speed of system. 5) Pan/Tilt/Zoom Control Box : If a P/T/Z camera is Chapter 1. DVR Website: www.veilux.net Phone 1-800-510-6528 88 : System Status Window shows the status or events from the DVR system. 6) Camera arrangement on the live view. By left clicking and dragging cameras on the screen, you can arrange the camera format to any sequence you wish. DVR - Chapter 1. DVR 89 : Click this button to show camera information from the 7.5. Options Right click the mouse button on any screen to bring up the options menu as seen below. 1) Network: Click on the Network option to bring up networking site information 2) Options: Click the Options menu to display the following Chapter 1. DVR Website: www.veilux.net Phone 1-800-510-6528 90 window: Remote Tab: Sets the viewer mode when starting or closing. - - Auto startup: Select this option to have the system to begin with windows. When close viewer, close all service: Check this box to close all services when the remote viewer program is shut down. This shuts down the resident program, which allows incoming alarm notifications. Use buffering space for data receiving: If you use a LAN for receiving video, you can use the buffering space to speed up the transfer. (Recommended setting is 4096KB) Show PosData Embedded: If a user selects this check box, Video and POS data is displayed as an overlay. If it is not selected, the data will be recorded, but not viewed on the video screen. Auto switching time interval: This sets the automatic display switching time (unit = seconds – default: 5sec, max: 30 sec) Save Folder: You can select a folder for saving image. Startup with remote viewer: Select start mode for the remote program – either single or multi. DNS (Dynamic IP) service: refer to Section 9 (DNS Service) 2-2) Notification Tab Chapter 1. DVR 91 : Use: Enable the PC to receive data from the remote DVR Alert • Beep: Creates and audible notification on incoming data. • Popup: Pops up video from an alarmed event on server. • Emergency Save: When remote notification is activated, the remote PC will backup the transferred video automatically. The action icon will turn green . If you click the action icon while it is green color, the remote backup will stop. - Events: You can select the events which are applied to remote notification. - Connection: If you save the Account ID and password, you can access systems without a separate login during remote notifications (recommended). - 3)Sound: Select the Sound option to see following sub–menu. This allows you to send, receive, or activate two way audio communications between the server and remote sites. - Duplex: Enables two way audio - Out: Send audio data to the server (requires a local microphone). - In: Receive audio from the server (requires connected speakers). - Off: No use audio. *Note: When you use the Multi Remote Monitoring viewer, you can use the two way audio mode only on the active server. 4) OneSearch : Chapter 1. DVR Website: www.veilux.net Phone 1-800-510-6528 92 If there are no image recorded, it will be displayed this message box. 7.6. Multi Remote Monitoring After run Remote program, if you select Multi Channel from the bottom of the screen, you can monitor Chapter 1. DVR 93 multiple cameras installed at the different server locations. (up to 64). Single: One remote PC able to connect with one DVR server. - Multi-Channel: One remote PC able to connect to multiple cameras and DVR servers. 1) Connection to Servers Each camera window can display a camera from any server. First, choose the window to which to view the camera in, “connect” while in Multi channel mode, and select the server you want to connect to. Then choose the camera number you want. You will need to do this for each window. You can define groups of camera in the Group Add section under Setup. Chapter 1. DVR Website: www.veilux.net Phone 1-800-510-6528 94 Insert ID and password for the server to be connected. After logging on, the system shows the following window, displaying the available cameras from the chosen server. Simply select the desired camera to monitor. Once the connection is established, you will the video on the No.2 screen of client. Chapter 1. DVR 95 You can connect other channels by repeating the process the same as above. 1-2) Using the Group connect When you select “Multi-Channel” and click “CONNECT”, you will see the following window. Select the desired group from group table and click “OK”. Chapter 1. DVR Website: www.veilux.net Phone 1-800-510-6528 96 2) Action Button R. PLAYBACK “Remote Playback”: Used to search recorded images from Server DVR. When you click the R. PLAYBACK button, the Playback window will be displayed and operate the same as Main DVR’s Playback Menu. (Note the action button . If you click this icon during the remote search, the icon will change to green and the transmitting images will be recorded at your PC). SETTING: Configure any of the system parameters on the DVR from the Remote system. By clicking the SETTING button, the Setting Menu window will be displayed and operates the same as Main DVR’s Setting Menu. L.PLAYBACK “Local Playback”: Searches the recorded images from local client system. By clicking the L. PLAYBACK button, the Playback window will be displayed and operates just like the Main DVR’s Playback Menu. - DISCONNECT: Disconnects the current session. The following window will display, and then select the desired camera(s) to disconnect and click “OK”. Chapter 1. DVR 97 7.7. Local Playback To search locally recorded images previously captured from the remote system, click on the L. PLAYBACK button from the main screen in the “DVR Remote” program. The local playback window will be displayed - Site: Select the Site button to select the desired site containing the recorded video. Chapter 1. DVR Website: www.veilux.net Phone 1-800-510-6528 98 Once you have selected the desired site, you will need to select either “ORIGIN” or “REMOTE” for the type of recording (see below). - ORIGIN: If you recorded transmitted images to your local machine from the DVR system through remote search, it will be recorded here. REMOTE: If you recorded transmitted images to your local machine from the live view or main Remote Viewer screen, it will be recorded hear. If user wants to see Video and Pos data embedded, user click right button of the mouse, check “Show Pos data” menu button - Show Pos Data: If you want to see Video and Pos data embedded, check ”Show PosData” - Show as Local Time: If you want to search to get local time, check this function. - Sync AVI: If you want to save image synchronize with time, click Sync AVI. This method has dump images to synchronize with time. So if you don’t want it, don’t check. - Image Rendering: If you use Grandeye IPcamera, you can control this function. This function allows fisheye image to be rendered as VCams(Virtual camera) or panorama views. (Refer to 70 page) Chapter 1. DVR 99 7.8. Quick RMS The Quick RMS is a quick way to connect with a small window that can be kept on your screen while you do other things. The Quick RMS program is located in Start/Programs/DVR/Remote. : Connect button Once a site has been defined in the main RMS, clicking this button will give you access to the site(s). Log on as in the main program. : Disconnect button : Single-Screen-Mode : Multi-Screen-Mode Camera: Select the camera number to want to view. : After you connect to server, If you click Relay button, you can control relays of DVR server. Chapter 1. DVR Website: www.veilux.net Phone 1-800-510-6528 100 8. 8.1 BACKUP Start Application DVR BACK-UP program allows backup the recorded data into a various devices such as HDD, DAT, DVD, ONSTREAM, CD-RW etc., either manually or automatically. To backup recorded data, go to Start/Programs/DVR/Image Backup (dvBackup.exe) or, Click “BACKUP” from the monitoring screen. Enter an account and password with access to the backup features (default Account is “1” with no password. Click “OK” After logging on, the following screen is displayed. Show the existing recording data, listed by date. Show the device or folder the backup will go into. Show the status of the backup. 8.2. Functions 8.2.1 Tool Bar Exit: Exit button Start: Start button for manual backup. Backup to exe. File: See section 7.4 Quick Backup Stop: Stop or pause the backup. Option: Sets Manual Back-up or Scheduled Backup Viewer: Opens the Back-up Viewer Make .exe files: Make to .exe file using created Backup Folders and dll Chapter 1. DVR Website: www.veilux.net 102 Phone 1-800-510-6528 8.2.2 Status Bar Time: Shows the current second of video being backed up. Processing: Shows the level of completion for the current backup. 8.2.3 Menu Bar As an option, you can backup files in AVI format. Check this “Backup as AVI” button for this option. 8.3 Manual Backup To backup a specific time of recorded data, select this option and follow the sequence below. 8.3.3 Select desired recording data for backup 103 Chapter 1. DVR Using the recorded data tree, you can select data by camera, then day, hour, and minute. 8.3.4 Select device or folder for backup 8.3.5 Start Manual backup After setting the recorded data and device (or folder) for backup, the start button will become active. Click “Start” button and click “Yes” Once the backup is done successfully, the status window will show the message “Backup exited normally with code 0”, and the processing bar will show “Not working”. A new folder called “BACKUP” is created. Chapter 1. DVR Website: www.veilux.net 104 Phone 1-800-510-6528 8.4 Manual Backup.exe file By backing up recorded data using the Backup.exe function, the data and the video player are put into one file, and can be played back on any other Windows based PC. Note: The backup.exe file needs to be less than 2GB. 8.4.1 Selected desired recording data for backup Please refer to section 7.3.1. 8.4.2 Make a backup.exe file The process is the same as described above, except that you will choose the .exe option (see below). 105 Chapter 1. DVR Click “Start” button and click “ Yes” Once you completed the backup, you can click on the executable file and it will execute the video player. Look at the calendar for the recorded dates (in red) and click on the date. You will see the available video, and the player will be active. 8.5 Quick Backup Quick Backup is a quick, simple way to back up data. Once you’ve clicked on the Quick Backup button, the following screen will be displayed. Select Cameras: Selected cameras will appear as a red circle – clicking toggles. Date and Time: Start Time: Enter the desired start time. • End Time: Enter the desired end time. • Directory (Media): This is where the file will be saved. Chapter 1. DVR Website: www.veilux.net 106 Phone 1-800-510-6528 The above example shows the video to be recorded as 12:00 a.m. ~3:54 p.m., recording cameras 1 recorded to the “E:\” drive. 8.6 Authentication Backup Authentication: If you check this function, it makes backup files with authentication. In case of authentication backup, you have to delete files in backup folder and click “Yes” button. 107 Chapter 1. DVR Playback goes on to the next image if it was not changed with showing “Original Data”. Playback will be stopped with showing “FALSE Data” if the back-up data would be modified or wrong. Chapter 1. DVR Website: www.veilux.net 108 Phone 1-800-510-6528 8.7 Auto Backup 8.7.1 Option Setup Click the “Change Backup Options” button on Tool bar to display the following window. Run this program when windows starts: Allow this program to run in the background: If the Backup program is running, the program is located on the Task bar. Authentication: Refer to section 7.6. 109 Chapter 1. DVR 8.7.2 Concurrent Backup Setup Click the “Scheduled backup” tab. The default setting is disabled. Note: Scheduled cameras are designated with a red circle. The X indicates that the camera will not be backed up. • • Backup state: Latest backup time: Show latest backup time of schedule backup. Start backup pointer on time: Starting point for next backup • • • Select backup style Disable: Disable the scheduled backup. Concurrent: Recording and Backup is done at the same time. Schedule ( a week): a daily or weekly backup schedule. Backup Overwrite: If the space is not enough for recording on schedule backup, the oldest data will be removed (all camera data for 1 minute) and backup. Files saved from backup application will be put in this folder: The above example shows that video will be concurrently backed up, but only backing up cameras 2, 3, 4, 5, 6, 8,9 with the backup located on drive F:. Chapter 1. DVR Website: www.veilux.net 110 Phone 1-800-510-6528 8.7.3 Scheduled Backup Setup Use this option to set a daily or weekly backup. Note: If you want to set all cameras on a particular day or time, click a “Day” cell, “Time” cell, or click on the “No.” cell to select all cameras. Note: Depending on the configuration of your specific DVR and the data being recorded, backups may slow the recording frame rate down. User select No. of cameras and Day for desired backup Time: Starting time for backup operation. Above picture shows all data backed up except Sunday. 111 Chapter 1. DVR 8.8 Backup on CD or DVD Backing up to a CD-R/RW or DVD-R/DVD-RW is shown below, as long as Nero CD burning software is installed in your system. Disk space: You can choose the amount of space on the CD which you want to use for backup data (default max 680MB). If the Disc space shows 0 MB, there is no space to write, or you need to insert a writable CD. Auto Burning: If you select this function, burning will be automatically (recommended). Once the options have been set, click “Save” and the following will be displayed. Chapter 1. DVR Website: www.veilux.net 112 Phone 1-800-510-6528 Disk Name: Name your backup disc here. Writing Speed: Select speed of writing to burn(default is ok in most circumstances). Burn: Click here when you are ready to make the copy. Abort: Click “Abort” to abandon the backup operation. Exit: If the data size to backup is more than the capacity of your disc, you will need to insert additional media during the process. 113 Chapter 1. DVR 8.9 Backup Viewer Follow this procedure to view data backed up to your hard drive or CD. process if the backed up data is not in the .exe form. Typically you would use this Click on the Viewer icon to bring up the playback screen. Please refer to “Play Back“ for detailed operation of the “Back-up Viewer”. Click on the Browse button to choose a different directory if needed. Chapter 1. DVR Website: www.veilux.net 114 Phone 1-800-510-6528 User can search data of backup by multi viewer. Show Pos Data: If you want to see Video and Pos data embedded, click right then check ”Show PosData” Show as Local Time: If you want to search and view local time, click the right of the mouse, check this function. 115 Chapter 1. DVR 9 Image Authentication This is a program for authenticating recorded JPG or BMP images in saved from the search program. Start the “Image Tool” program by clicking Start/Programs/DVR/Tools /Image Authentication, or run the ImgAuth.exe program in C:\Program Files\DVR\CommonFiles\Tools folder. Click “Open” to find an image file. Select an image file. Chapter 1. DVR Website: www.veilux.net 116 Phone 1-800-510-6528 • ORIGIN: If this is an original, unaltered image, the image data will appear on the screen and the “Origin” notification will appear. 117 Chapter 1. DVR • Modify This is a modified image. Chapter 1. DVR Website: www.veilux.net 118 Phone 1-800-510-6528 10 Log Viewer Click C:\Programs Files\DVR\Main\LogViewer.exe, or Start/Programs/DVR/Main/Log Viewer. This program shows events, system changes, logins, network connections, and POS logs recorded. 10.1 Event Time: The time when the Motion, Sensor, or Video loss event occurred. Device: Show the camera associated with the event. Event: Show the type of event that occurred. Information: Display the reason for logging the event as follows. • Information: This shows information occurred. • Warning: This shows warning occurred. • Error: This shows error occurred. Double click on the log list and you can view related video in Playback. If you are prompted for the logon window to run Playback, type the User and Password. One click on the log list will record a Bookmark of the Playback. See Section 4.1.10 119 Chapter 1. DVR 10.2 System Time: This column shows the time when the system event occurred. Event: The events tracked are as follows. DVR Viewer Program Start, DVR Viewer Program Exit DVR Main Program Start, DVR Main Program Exit DVR Search Program Start, DVR Search Program Exit And so on Mode: This column shows whether event was a local or remote event. Information: Display the reason for logging the event as follows. • Information: This shows information occurred. • Warning: This shows warning occurred. • Error: This shows error occurred. • • • • Chapter 1. DVR Website: www.veilux.net 120 Phone 1-800-510-6528 10.3 Login Time: This column shows the time when the login event occurred. Process Name: Program Name User Login: This column shows the ID of the login user. User Logout: This column shows the ID of the logout user. Status: This column shows whether login or logout attempts were successful, or failed. Mode: This column shows whether the login was local or remote. 121 Chapter 1. DVR 10.4 Network Time: This column shows the time when the network vent occurred. Event: This column shows whether RMS is connected or disconnected. Address: This column shows the IP Address of RMS connected. Mode: This column shows whether network event was local or remote. Information: Display the reason for logging the event as follows. • Information: This shows information occurred. • Warning: This shows warning occurred. • Error: This shows error occurred. Chapter 1. DVR Website: www.veilux.net 122 Phone 1-800-510-6528 10.5 POS Time: This column shows the time when the POS event occurred. Event: The events tracked are as follows. TranMain Start, TranMain Exit OpenDatabase Success, OpenDatabase Fail Device started And so on Driver: This column shows the name of the driver loaded. Port: This column shows the port number associated with Driver. Information: Display the reason for logging the event as follows. • Information: This shows information occurred. • Warning: This shows warning occurred. • Error: This shows error occurred. • • • • 123 Chapter 1. DVR 10.6 Filter 10.6.1 Event Time: Select the start time and end time to search. Camera: Select the camera number to search. Event: Select the event to search. Information: Select the type to search. 10.6.2 System Time: Select the start time and end time to search. Event: Select the event to search. Mode: Select the mode to search. Information: Select the type to search. 10.6.3 Login Chapter 1. DVR Website: www.veilux.net 124 Phone 1-800-510-6528 Time: Select the start time and end time to search. Progress: Select the program name to search. Login: Select the Login ID to search. Logout: Select the Logout ID to search. Status: Select the status to search. Mode: Select the mode to search. 10.6.4 Network Time: Select the start time and end time to search. Event: Select the event to search. Address: Type the IP Address of RMS to search. Mode: Select the mode to search. Information: Select the type to search. 10.6.5 POS Time: Select the start time and end time to search. Event: Select the event to search. Driver: Type the driver to search. Port: Select the port to search. Information: Select the type to search. 125 Chapter 1. DVR 10.7 Setup LogFile: Select the start time and end time to search. • Save LogFile period of 7 days • Save LogFile period of 15 days • Save LogFile period of 30 days Change Search’s user/password: Type User and password required to run Search.exe Set to tray icon on exit: If you check this, the program will minimize to the tray icon on exit. Auto startup Logserver service: If you uncheck this, you must run the LogServer.exe manually (not recommended). Eventlog Search Option • Show event and action log • Show event log • Show action log Chapter 1. DVR Website: www.veilux.net 126 Phone 1-800-510-6528 11 DNS Service 11.1 DNS Client Setup The DNS Service allows a DVR with a dynamic IP address to be accessed from a remote location. The DVR communicates with a DNS server, sharing its location on the internet, and then the remote location can ask the DNS server where the DVR is located and create a handshake. Once the handshake is created, the DNS server drops out of the communication. Follow these directions to initiate the DNS service. (Note: You may have to get the DNS Server IP address from your dealer.) Run the DNSClient.exe in C:\Program Files \DVR\Main, or under Start/Programs/DVR/Main/DNS Client Setting DNS Server Setup • DNS Server IP: Insert DNS server IP (use 210.121.206.205, or another if supplied by your • • Port: Insert Port Number (Default is 9870) Time Out: Maximum waiting time for connecting with the server. dealer). 127 Chapter 1. DVR Register Information • • • • Domain name: Insert a chosen Domain Name (can be anything, but less than 32 characters. Password: Create a password E-Mail: Insert and email address (for sending alarm event notification, if used). New Domain button: Click to register a new domain name on the DNS Server. After completing the required information, click “Register”. If your on-line register is successful, following window will show up. If your domain name is already registered on the DNS server, following window will be appear. must then use a different new domain name. Chapter 1. DVR Website: www.veilux.net You 128 Phone 1-800-510-6528 • Check Domain button: Used to check if your domain name is registered on the DNS server or not. Domain name is registered on the DNS server. Domain name is not registered on the DNS server. 129 Chapter 1. DVR Chapter 2 Chapter 2. POS POS 1. Type of POS 1.1 Single Serial Cash Register Main Dialog displays the Serial port configurations. Add: Add the selected Cash Register. Update: Update the selected Cash Register. Delete: Delete the selected Cash Register. Options • Use: Check the “Use” option if you want to use a device. • Device: Set the cash register type (i.e., Casio610001) • Camera: Set camera number to associate with the cash register. Action Count: Number of transactions or exceptions associated with the register 1.2 Serial Setup • Port: Choose a COM Port • Speed: Set the communication baud rate (9600 = default) • Flow Bits: (8 = default) • Stop Bits: (1 = default) • Parity: (NONE = default) Save Directory: Set the POS database path to save the POS transactions. Ensure there is enough disk space. If you use under 16 registers, a minimum of 3GB should be allocated. If you use 16 registers, minimum 5GB disk space is needed. Multi Serial Cash Register Main Dialog displays the Serial port configurations. Add: Add the selected Cash Register. Update: Update the selected Cash Register. Delete: Delete the selected Cash Register. Options • Use: Check the “Use” option if you want to use a device. • Device: Set the cash register type (i.e., Fuijits1S) • Camera: Set camera number to associate with the cash register. Action Count: Number of transactions or exceptions associated with the register Serial Setup • Port: Choose Port(these ports have to differ per cash register. Support up to max 16) • Speed: Set the communication baud rate (9600 = default) Chapter 2. POS 131 1.3 • Flow Bits: (8 = default) • Stop Bits: (1 = default) • Parity: (NONE = default) Save Directory: Set the POS database path to save the POS transactions. Ensure there is enough disk space If you use under 16 registers, a minimum of 3GB should be allocated. If you use 16 registers, minimum 5GB disk space is needed. Multi TCP Cash Register Main Dialog displays the TCP/IP port configurations. 132 Add: Add the selected Cash Register. Update: Update the selected Cash Register. Delete: Delete the selected Cash Register. Options • Use: Check the “Use” option if you want to use a device. • Device: Set the cash register type (i.e., Fuijits1S) • Camera: Set camera number to associate with the cash register. Action Count: Number of transactions or exceptions associated with the register TCP/IP • Port: Type Port no (except 9876) • Save Directory: Set the POS database path to save the POS transactions. Ensure there is enough disk space If you use under 16 registers, a minimum of 3GB should be allocated. you use 16 registers, minimum 5GB disk space is needed. If Chapter 2. POS 2. POS Search If you want to query all transaction listed for the selected day, use this button Below is the display screen when you click the POS button. If a user wants to see Video and Pos data embedded, click right button of the mouse, check “Show Pos Data” menu button. Basically Video data is only displayed, Pos data is not overlayed. Transaction List Header meaning • • • • • • • No: Transaction list sequence Number Time: DVR’s save time of the transaction CAM: Camera Number Register: Cash Register Type Register Time: Cash Register Time (Most registers) Receipt No: Cash Register Receipt Number (Most registers) Total: Total Price per transaction • • • • • • • <<: Move to the first page <: Move to the previous page >: Move to the next page. >>: Move to the last page Query: Define specific searches Report: Show the statistical graph Print: It will print a displayed receipt. Chapter 2. POS 133 • • • Popup: Show an enlarged receipt data Font: Change font, font size and/or color Refresh: If you requery the transaction list, use the “Refresh” button. If you click the Transaction list, the popup dialog displays the original receipt data. When you click the Play button, you can see the text on the video of the selected transaction. 134 Chapter 2. POS Query: If you want to extend search, click this button Below is the display screen when you click the Query button. Start Day & Time: Choose start day & time End Day & Time: Choose end day & time Camera: Choose camera number Item: Edit the Item to search Code: Choose the Action Code to search Value: Set a Value for the Search Query: Execute the Search Chapter 2. POS 135 Report: If you want to see statistical graph, click the “Report” button. The DVR or remote computer must have Microsoft Excel installed for this feature to work. 136 Chapter 2. POS 3. Font Setting You can change the size and type of the font to make the text easier to see. Use the Display tab in the Setting Menu, then choose Transaction Data Control to change the font. Chapter 2. POS 137 4. Action Code Setting When user double-clicks Item of the list control, the Action Code Window will be displayed as follows. Action Code: Select an action code to define an exception for certain transactions Pre: Set the pre-recording frames when the action code is activated. Post: Set the post-recording frames when the action code is activated.. Save Path: Designate the folder name to save the Pre/Post images. Text Color: Set the color for the register text during the designated action code. Popup: If the action code is activated, the corresponding camera pops up. Interval: 1~100 sec Beep: If the action code is activated, the system will make an audible alert. 4.1. Add User defined Action Code You can add user defined Action Codes for specific needs. Action codes can be defined in actioncode.ini file in the c:\program files\DVR\Main\drivers directory. Open the actioncode.ini file, and add the new action codes in the [USER ACTIONCODE] section. User defined action code format is ACTIONCODE=ACTIONNAME,ACTIONSTRING ACTIONCODE ACTIONNAME 138 : 2byte string from 01~99, It is a unique code by used by program internally. : It a display name of action code located in the combo box of Search Program. Chapter 2. POS ACTIONSTRING : It a string shown in the receipt data Example1) Add New ActionCode. You can add New action code from 01 ~ 99 [USER ACTIONCODE] 01=AccessOK,Access Granted In this case “Acces Granted” shown in the data, treated as Actioncode 01 and it’s display name is “AccessOK” Example2) Update Exsiting ActionCode You can modify existing ActionCode. In this case you can write the code in the [POS ACTIONCODE] or [SCALE ACTIONCODE] [USER ACTIONCODE] AM=Cash,Cash Amount In this case AM predefined POS Actioncode is redefined with the string you want. Example3) Define same ActionCode with different string. [USER ACTIONCODE] 01=AccessOK,Access Granted 01=AccessOK,Door is Opened 02=AccessFail,Door is Closed AM=Cash,Cash Amount 03=DoorUsed,Door Used In this case, “Access Granted” and “Door is Opened” are treated as same action code 01. Chapter 2. POS 139 Chapter 3 NVR Chapter 3. NVR 1. NVR Setting 1.1 Activate NVR After installation of NVR, you have to activate the NVR with the license key if you don’t use capture card or DIP/DIC series/IP100 product. If you don’t activate, NVR will run as demo version. (only 30 days available). To activate NVR choose the C:\Program Files\DVR\main\Activate.exe 1.2 How to register License Code After installation of NVR software, you have to activate the NVR software with the license key. If you don’t activate, NVR software will run as demo version. To activate NVR choose the C:\Program Files\DVR\Main\Activate.exe Select License type: Demo License: 30 days free license, 16ch cameras connection allowed. Software Key License: Enter License key from us, and authenticate it with our server. It’s • • • possible using on/off line. USB Dongle: USB hardware key lock controls the license. Chapter 3. NVR 141 Software Key License • Enter Activation Code: - License Key: Enter License key from us. • Online Activation: - Activation Server IP & Activation Server Port: They are information to activate NVR via Online. They are IP address & Port of Veilux License Server and default values. Users don’t need to change them. • Offline Activation: If your CMS server is not connected to internet, choose Offline Activation. And save the information in the files, and send the files to us. We will check the files and then send the license aut. file to you. You should copy the license aut. file into the C:\Program Files\DVR\Main directory. 142 Chapter 2. POS USB Dongle If you choose USB Dongle, you have to install the USB driver first. Plug the USB dongle into your system, and then click USB Driver Install button. Right Dialog Inform you to choose “Continue Anyway” button if Windows OS ask to install the DAE USB Lock driver. If USB Driver installed successfully, Click Next, and license information will be displayed. 1.3 Backup License File When you remove the system OS or the NVR Software, you have to backup the license aut. file (C:\Program Files\DVR\Main directory). And after re-setup the system, copy the backup file into the original directory (C:\Program Files\DVR\Main directory). And then you can use NVR again with license. But if you didn’t backup the license aut. file you have to reactivate NVR (See above 1.1.) License aut. file have information about system network card. So, if you change your network card, you have to reactivate NVR (See above 1.1.) Chapter 3. NVR 143 Chapter 4 Chapter 4. VCA(Option) VCA(Option) 1. VCA Overview DVR provides the real-time video analytics. At the core of the product is an advanced object tracking engine that continually tracks moving and stationary targets. We provides 2 types of VCA products: VCApresence: Continually tracks moving and stationary targets and generates real-time alerts of object presence in multiple overlapping detection zones. VCAsurveillance: Continually tracks and classifies moving and stationary targets and features a full suite of rule-based filters including. Multiple filters are supported on any combination of multiple overlapping detection zones. VCAcounting: Events occur when size-defined objects pass through defined zone or lane. Capture(including Pro) card support VCA and IP products that’s name ends with ‘V’ (ex DIP100V) support VCA too. 2. VCA Activate Before VCA can be enabled, it must be activated. Capture card (including P ro type): We provide License.VCA file in the installation CD. Copy that file into the DVR main directory.(ex: C:\Program files\DVR\Main directory). If you copy that file VCA runs as VCA surveillance mode, otherwise VCA runs as VCA Presence mode. I P products: There is no need to activate the VCA. IP products run as surveillance mode automatically. 3. VCA Setup 3.1. Camera Setup Firstly, Display VCA check box should be checked to enable the VCA functions. After setup, DVR viewer displays the VCA event viewer at the bottom. Using Mouse context menu you can use VCA menus. Chapter 4. VCA(Option) 145 To setup VCA, click VCA Property, and then click Setup button. In IP product case, VCA setup page is showed on webpage. (See section 4.7 about webpage setup) Chapter 4. VCA(Option) 146 3.2. Calibration In order to estimate object parameters such as height, speed, area and classification, the camera must first be calibrated. Camera calibration involves establishing a reference to the ground plane in the scene. To calibrate the camera for the scene, select the Calibration setup page: Chapter 4. VCA(Option) 147 Step 1: Find some people in the scene Find some people or some people-sized objects in the scene. Try to find a person near the camera, and a person further away from the camera. Place the mimics on top of or near the people. Step 2: Adjust tilt angle and height Now, adjust the camera tilt angle and the camera height until the mimics are approximately the same size as the people in the scene. To adjust the tilt angle, click and drag the ground plane with the left mouse button. To adjust the camera height, scroll the mouse wheel up and down. Step 3: Verify the setup Once you are happy that the scene is correctly calibrated, verify the settings by dragging the mimics around and comparing them to other people or people-sized objects in the scene. The more locations in the scene where the calibration is verified, the more accurate the calibration will be. The tilt angle and camera height can be fine-tuned in the same way as detailed in Step 2. Vertical FOV The vertical field of view is required when calibrating a camera. If you know the vertical field of view of the camera it can be entered directly. If however, you don't know the vertical field of view, it can be determined from the following table, given the vertical image dimension and its focal length: If you are unable to determine the vertical field of view for your camera from the above table, leave the field of view at its default setting, 40°. Measurement Units: Choose Metric or Imperial Chapter 4. VCA(Option) 148 3.3. Advanced Object tracking When checked, it allows to available object detection and tracking. Abandoned/removed object detection Check/Uncheck to enable/disable abandoned/removed object detection. When checked, a background process to detect abandoned and removed objects is enabled. Counting Line Check/Uncheck to enable/disable the counting line functionality. Camera Shake Compensation The camera shake cancellation function is used to improve the VCA performance with shaking cameras. If your installation suffers from camera shake problems, enable this function to improve the VCA performance. If camera shake is not an issue in your installation, best performance will be achieved with this setting disabled. Alarm retrigger Time When event occurs, alarm is raised after user defined time. Tracker Configuration You can set up minimum size of tracked object and minimum recognition time. Chapter 4. VCA(Option) 149 3.4. Object Classifier The object classification is based on properties extracted from the object including object area and speed. If you want to add new object, click Add New Object Classifier button and enter the Min/Max Area, Min/Max speed. Chapter 4. VCA(Option) 150 3.5. Zones and Rules In order to detect events of interest, detection zones and lines must be defined. Detection zones define an area of interest. Detection lines are similar to detection zones but they define a perimeter instead of a region. Zones and lines can be edited to be any shape or size. Zones and lines are controlled by manipulating "nodes" that represent the zone/line vertices. To change the shape of a zone or line, simply grab a node with the left mouse button and drag it to the desired location. It is possible to configure "nondetection" zones, where nothing is detected or tracked. Object Presence Objects that are present inside a zone or pass through a line will trigger the rule and raise an alarm. Object Enter and Exit An object entered alarm is raised when an object crosses from the outside to the inside of a detection zone. Conversely, an object exited alarm is raised when an object crosses from the inside to the outside of a detection zone: Object Appear and Disappear An object appears alarm is raised when an object appears inside a detection zone. Note that this is different from object entered detection since the object must be initially detected inside the zone without entering, e.g. people appearing in a doorway, or cars appearing from an underground car park. Conversely an object disappear alarm is raised when an object disappears inside a detection zone. Again, this is different from object exit detection since the object must be tracked into the zone and then disappear without exiting the zone. Chapter 4. VCA(Option) 151 Object Stopped Objects that are stopped inside a zone for longer than the defined amount of time will trigger the rule and raise an alarm. Object Dwell Objects that dwell inside a zone for longer than the defined amount of time will trigger the rule and raise an alarm. Object Direction Adjust the direction and acceptance angle to suit the detection scenario. Objects that travel in the configured direction (within the limits of the acceptance angle) through a zone or over a line trigger the rule and raise an alarm. Object Speed Objects that travel within the bounds of the configured speeds, through a zone or over a line trigger the rule and raise an alarm. Tailgating After one object generates an event, another object generates the same event in the defined amount of time will trigger the rule and raise an alarm. Only IP Products include this function. Abandoned Object When there is no movement after new object appear will trigger the rule and raise an alarm. The time should be set more 10seconds. Only IP Products include this function. Removed Object Object disappear for more than defined amount of time will trigger the rule and raise an alarm. The time should be set more 10seconds. Only IP Products include this function. Counting Line When size-defined objects pass through defined lane will trigger the rule and raise an alarm. Only VCA counting includes this function. Note: The camera must be calibrated for this function to be available. Chapter 4. VCA(Option) 152 3.6. Tamper Detection The tamper detection function is intended to detect camera tampering events such as bagging, defocusing, moving the camera, etc. This is achieved by detecting large persistent changes in the image. Chapter 4. VCA(Option) 153 4. VCA Action Setup Double Click the Cells written “No Action” to setup Action. You can see the Dialog like below. Set the Actions like beep, Popup, Alert Message, Go to Preset, Relay output for your purpose. You can set the VCA action by each event and count Chapter 4. VCA(Option) 154 You can also set up ‘Action’ on VCA setup screen. Chapter 4. VCA(Option) 155 5. VCA Event Monitoring On the Bottom of the DVR Viewer you can monitor VCA events at real-time. You can see the Event type, Event Time, Zone name, Object class on the list box. Using Mouse Right’s context menu, you can Hide or Show the VCA Event viewer. If you want to search the image of one event, just double click the list box’s item. OneSearch.exe program shows that event’s video image. VCA Property Dialog box allows you to Hide or Show the many type of information. You can also reset the Counter on the live monitoring. Chapter 4. VCA(Option) 156 6. VCA Event Search DVR search program includes the VCA event search menu. Click VCA button to search the VCA Event. On Video Image Window, click mouse left button. The context menu includes the VCA Property. Click Query button to search with conditions. Click Report button to view the VCA Report. VCA Report shows the statistics the VCA events. Chapter 4. VCA(Option) 157 Click “Count” button to display the count history of the day. If you want to detailed query of the counter, click Query button, and select count. You can choose the counter name and set the counter value you want to query. Chapter 4. VCA(Option) 158 Click Event Report to view the VCA Event by type. If you double click the line, sub window shows the details of the events. Click Count Report to view the Counters value by date. It displays the Min/Max counter value of the each camera’s counter. Save: Saves the data into the CSV file for backup. Print Preview & Print: Allows you to print the report. Chapter 4. VCA(Option) 159 7. IP Product VCA Setup If user uses HTTPS, screen is showed as follow. After choose “Continue to this website”, process will be proceed.. A window is showed to set up, you should fill out defined username and password by device. (Default values are “root” and “pass”.) Basically, only VCA Presence is set on IP Products. If you want to set up another VCA product on your IP device, send us hardware code of the device as following screen. After then you can get Activation code from us. Enter the Activation code and clock “Apply”, finally you can use VCA functions. (No blank when you enter the Activation code.) Chapter 4. VCA(Option) 160 You can set up to enable and functions of VCA after activation. It could be showed a message as below, when you choose “Zone and Rules” or “Tamper Detection”. In this case, you should install ActiveX as follows for VCA setup. Chapter 4. VCA(Option) 161 Chapter 4. VCA(Option) 162 After click “Yes”, internet explorer is closed and start to set up. Chapter 4. VCA(Option) 163 After click ‘Finish’, internet explorer is restarted. Chapter 4. VCA(Option) 164 Chapter 5 LPR(Option) LPR Application 5.1 Start Application From the Windows “Desk Top”, double click the DVR Viewer icon, or run the DVRMain.exe program in C:\Program Files\DVR\Main folder. When User starts DVR program, current captured images from cameras will be displayed as follows If you want to hide the LPRViewer Dialog, Click Right-Mouse. Then Context Menu displayed, you can Hide or Show LPRViewer. Chapter 4. VCA(Option) 165 5.2 Setup LPR Click Setup button on LPR Dialog. And Logon Dialog box displayed. You have to have the user right to setup the LPR. Use DVR Setup->Users-> Plugin Level->LPR Setup access right. First you should setup the Lane information. Use : Check if you want to use this lane. Recognition Trigger : If you want to use recognition trigger, just click motion or sensor check box. If you click Motion, license recognition is only processed during motion period. And to use motion trigger, you should set the DVR camera save mode as Motion. (DVR Setup->Camera tab->Save Schedule) If you click Sensor, license recognition is only processed during sensor period. And to use sensor trigger, you should set the DVR sensor. (DVR Setup->Sensor tab, and set the Sensor camera number same as DVR Camera on above Dialog). If you don’t check Motion or Sensor, license recognition is processed continuously all the time. Chapter 4. VCA(Option) 166 Lane Type : If it is a Entering Lane, choose In, if Exiting Lane, choose Out, or Just Pass Choose Pass. If you don’t have In and Out lane as pair, just use Pass lane type. DVR Camera : Select the camera number of DVR. System provide category up to 9. You can change the category names for your need. It is used for grouping vehicles. And you can set the action(Beep, Alert etc..) by categories. You can define actions by category, or plate number. You can Add, Remove, Modify Action Chapter 4. VCA(Option) 167 Lane : Select the Lane Number. Select one Of the Type of action you want. Plate : Enter the Plate Number. Category : Select the Category. None Category : If you want to Action which is not grouped by category. Action Type Beep Alert Text Color Relay : Beep Sound : Alert Message Box : On Monitoring Window, Category text is displayed using selected color. : Select the Relay Number and Relay sec, If you want to send Relay when selected plate is recognized. Chapter 4. VCA(Option) 168 5.3 Run LPR After you setup LPR, and click OK, LPR Module start automatically. It provides real time monitoring window of recognition status You can move this window by Mouse drag. You can see the playback data by double click the list item. In this case DVR OneSearch is displayed by selected camera and selected time The Camera Number is defined in the Setup → Lane Setup Dialog Chapter 4. VCA(Option) 169 6 Search You can search LPR recognition information by using Search.exe program. When you start the program, the LPR Search Button is displayed on the last side of the panel. Click the LPR Search button. This is the LPR Search button. Chapter 4. VCA(Option) 170 6.1 LPR Search If you click the LPR Search Button, LPR Search window is displayed on the button. You can see the Recognition result by list for the day. If you want to specific search, click the Query button. And then above window is displayed, and you can set the specific option. Click Query button again, above dialog is disappeared. If you click Currently In Vehicles button, Vehicles displayed currently in Parking lot. Use Reset button to clear search option, and set the default value. Chapter 4. VCA(Option) 171 You can add Vehicle’s Information by Mouse Right Click on the LPR Search’s List Control. Chapter 4. VCA(Option) 172 6.2 Vehicle Click Vehicle button, and you can see the Vehicles management Dialog. You Can Add Vehicles and Modify Vehicles Information, and delete the selected vehicles. Search Option You can find the specific vehicles depending on the options you choose. You can enter partial or full part of Information in the Search Option Fields. For Example) If you enter “P” in the Plate field, All vehicles could be found which include “P” character. Chapter 4. VCA(Option) 173 6.3 Report Using Report button, you can see the statistics of the vehicles In/Out. - Vehicles In/Out Vehicles In/Out Information is displayed during selected data & time. - Currently In Vehicles Vehicles currently in parking lot displayed. - Daily Lane Report Daily vehicle’s count displayed by Lane, by Lane Type - Daily Parking Time Report Daily vehicle’s parking time displayed. Total Vehicle, Total Parking Time, Min Parking time, Max Parking Time, Average Parking Time. - Save You can save the report information as CSV file. - Print Preview / Print You can print the report information. Chapter 4. VCA(Option) 174 On the Report Dialog, You can modify column information by mouse right click on the Header area. You can see the Column which you want by Column Show Menu. And If you click Column Save, Column Show Information and column Width is saved, and then next time you click this report same column displayed. You can modify Column’s width by Column to Best Fit your needs menu. Chapter 4. VCA(Option) 175 Chapter 6 I/O Card & RS-485 VSR-1604P (optional) Chapter 6. VSR-1604P Sensor I/O Card 6.1 Introduction to VSR-1604P Sensor I/O Card This product is a DI/DO extension card designed for PC-based DVRs. The VSR-1604P Sensor I/O Card supports 16 DI channels and 4 DO channels. Chapter 4. VCA(Option) 176 6.2 Functions of Major Connectors 6.2.1 Major Connectors 1 20 pin box connector for sensor/control capture card connection 8 Female connector for DSUB-25 pin signal connection 7 4pin connector for RS-485/422 device 2 20 pin box connector for sensor/control extension card connection 6 RS232 port for RS-485/422 5 RS-485/422 terminal end resistance select pin header 3 Sensor type select switch 4 RS-485/422 select pin header Figure 13. Major Connectors of VSR-1604P Sensor I/O Card 6.2.2 Details of major connectors 1 20 pin box connector (J4) for connecting the sensor/control capture card This connector is used to connect the VSR-1604P Sensor I/O Card and the capture card. 2 20 pin box connector (J5) for connecting the sensor/control extension card This connector is identical to the J4 and is connected to the extension card. 3 Sensor Type Select Switch (S1) The relay type or voltage type for the sensor interface type can be set by turning the switch on and off. The switch is a 2-pin deep switch and so both pins must be on or off simultaneously. 4 RS485/422 select pin header (JP2) This is a jumper pin header used to select RS485 or 422. 5 RS485/422 terminating resistance select pin header (JP1) This is a pin header used to select the 120Ω terminating resistance connection. For details regarding terminating resistance, see Section 5.7.1 Terminating resistance. 6 RS232 port for RS485/422 (J2) This port is used to connect the COM port of the system with the RS 232. Chapter 4. VCA(Option) 177 7 4-pin connector for connecting RS485/422 devices (J1) This connector is used to connect the RS485/422 cable of an external device. 8 Female connector for connecting DSUB-25pin signals (J3) This is a DSUB-25 female connector used to receive incoming DI signals and to send DO signals externally. Points 1 through 20 of the connector are used to receive DI signals. Of those, pins 5, 10, 15 and 20 are common pins. When connecting a specific channel terminal with the common terminal by way of a sensor or switch, whether the sensor or switch turns on or off can be checked on the software monitor. Pins 21 to 25 of the connector are used to send DO signals with pin 25 as the common pin. DO signals can be controlled by software. If a DO turns on, the relay switch of the capture card will shorten the terminal and common terminal of that On channel. DI DI DI DI DI DI DI DI DI DI DI DI DI 1 2 3 4 COMM 5 6 7 8 COMM 9 10 11 1 2 3 4 5 6 7 8 9 10 11 12 13 J3 14 15 16 17 18 19 20 21 22 23 24 25 DI 12 DI COMM DI 13 DI 14 DI 15 DI 16 DI COMM DO 1 DO 2 DO 3 DO 4 DO COMM Figure 14. Female Connector for Connecting DSUB-25 Pin Signals At DSUB-37 connector, ‘DI-COMM’ reads ‘S-COMM’. ‘DO_COMM reads ‘C-COMM’. Chapter 4. VCA(Option) 178 6.3 Sensors (Digital Input) 6.3.1 DI Specification ► Channel: 16 channels ► Interface Type: Relay type, voltage type ► Input operating range (if turned ON) Voltage Type: Min: 3V, Typ: 5V, Max: 12V DC Relay Type: Min: 0Ω, Max: 170Ω conductor resistance ► As the interface type (Voltage / Relay) and operating type (Normal Open / Normal Close) of the external sensor affects the settings, it must be set to 0(L) or 1(H) depending on what type of software or application is actually installed. ex) The value recognized by software when a relay type and normal open sensor is used Sensor Off => 0(L), Sensor On => 1(H) The value recognized by software when a relay type and normal close sensor is used Sensor Off => 1(H), Sensor On => 0(L) DI Type External Sensor Type Normal Open Voltage Type Normal Close Normal Open Relay Type Normal Close Sensor Status The value recognized by the software OFF 1(H) ON 0(L) OFF 0(L) ON 1(H) OFF 0(L) ON 1(H) OFF 1(H) ON 0(L) Table 3. Sensor (digital input) Status Table Chapter 4. VCA(Option) 179 6.3.2 DI Interface Type ► DI Circuit +5V 1 2 DI S el ect S wi tch +5V DI (L ogi cal ) DI Por t DI Common Photo Coupl er 1 2 DI S el ect S wi tch Figure 15. DI Circuit ► DI Select Switch (S1) S WITCH ON 1 TYPE ON Relay OFF Voltage OFF ► Relay Type Figure 16. DI Select Switch and its Status Table ♦ If the switch is on, the DI port and DI common are short-circuited or at 0V. ♦ Type: Relay output sensor, magnetic switch, NPN open collector output sensor ► Voltage Type ♦ If the switch is on, the electric current is drawn to the DI port and runs the photo coupler. ♦ Type: PNP open collector output sensor 6.3.3 DI Operating Type ► About Normal Open / Normal Close ♦ Relay Type Normal Open This type is normally open (high impedance), but is shortcircuited or at OV when operated. Normal Close This type is normally short-circuited or at OV, but is opened when operated ♦ Voltage Type Normal Open This type is normally open (high impedance), but generates certain voltage when operated. Normal Close This type normally generates certain voltage, but is opened when operated. Chapter 4. VCA(Option) 180 6.4 Controls (Digital Output) 6.4.1 DO Specification ► Channel: 4 channels ► Output Type: Relay interface ► Relay Rating: Max: 250Vdc, 0.15A, 30W 6.4.2 DO Operation ► Its relay type is normal open. ► Before software runs, the relay is set to Off. ► Turn on or off the corresponding relay using the software. If the relay is on, the DO port and DO common are short-circuited. 6.5 RS-485/422 6.5.1 RS-485/422 Specification ► Standard RS-485, RS-422 ► Input Operating Range Min: -7V, Max +12VDC ► Able to connect 16 devices 6.5.2 RS-485/422 Operation ► RS-485/422 Select Pin Header (JP2) ♦ RS-485/422 Selection RS485 RS422 JP2 JUMPER TYPE 1-2 RS-485 2-3 RS-422 1 Figure 17. RS-485/422 Select Pin Header and its Status Table Chapter 4. VCA(Option) 181 ♦ When RS-485 is selected J1 Pin Number 1 2 3 4 Function (RTS enabled) Function (RTS disabled) TX+(Noninverting Driver Output) RX+(Noninverting Receiver Input) TX-(Inverting Driver Output) RX-(Inverting Receiver Input) TX+(Noninverting Driver Output) TX-(Inverting Driver Output) Table 4. Status Table when RS-485 is selected ♦ When RS-422 is selected J1 Pin Function Number 1 RX+(Noninverting Receiver Input) 2 RX-(Inverting Receiver Input) 3 TX+(Noninverting Driver Output) 4 TX-(Inverting Driver Output) Table 5. Status Table when RS-422 is selected ► RS485/422 Terminating resistance Select Pin Header (JP1) ♦ What is the Terminating resistance? The terminating resistance is used for the impedance matching of wires in order to prevent any distortion or attenuation caused by transfer delay when data is transferred through a RS-422 or RS485 device over a long distance. The terminating resistance is not normally used for a short-distance transfer (less than 1.2km), but rather for a long-distance data transfer, especially when the communication line is unstable. The VSR-1604P Sensor I/O Card is designed to easily connect and cancel the terminating resistance by way of a jumper. Chapter 4. VCA(Option) 182 ♦ Selecting Terminating resistance The terminating resistance creates 120Ω resistance between 1 and 2 pins of the JP1. When RS422 is selected, the resistance will be created between RX+ and RX-, while when RS-485 is selected, it will be created between TRX+ and TRX-. R+ 1 2 3 R- ON JUMPER 1-2(ON) 2-3(OFF) OFF JP1 TYPE 120Ω MATCHING NO 120Ω MATCHING 1 Figure 18. RS-485/422 Terminating Resistance Select Pin Header and its Status Table 6.6 Connecting VSR-1604P Sensor, RS-485 I/O Card and External Devices 6.6.1 Connecting a Capture Card Connect the 20-pin box connector (J4) to the capture card. Use the J5 connector to add an extension card. 6.6.2 Connecting DI/DO External Devices The DIs are used to connect external sensors or switches while the DOs are used to connect external sirens or alarm lamps. To connect DIs or DOs, use the DSUB-25 pin female connector (J3). S EN1 S EN2 S EN3 S EN15 S EN16 Ou t pu t T er m i n al ( B u zzer , B el l , et c) DI 1 DI 2 DI 3 1 2 3 DI 15 DI 16 DI Common 18 19 20 DO DO DO DO DO 21 22 23 24 25 1 2 3 4 Common PT Z R ecei v er ( R S -485 / 422) COM Por t Figure 19. Connecting DI/DO External Devices Chapter 4. VCA(Option) 183 Figure 20. Cable for Connecting DSUB-25 Pin Signals At DSUB-37 connector, ‘DI-COMM’ reads ‘S-COMM’. ‘DO_COMM reads ‘C-COMM’. 6.6.3 Connecting RS-485/422 Devices The RS485/422 communication functions are used to control pan/tilt/zoom cameras. Connect a RS485/422 device to the JI by way of a 4 pin connector. J1 TRX+ TRXTX+ TX- 1 4 Figure 21. RS-485/422 Device Pin Layout 6.6.4 Connecting Signal Cables of RS-485/422 Devices These cables are used to connect the devices to the COM port of another system. Use only the RJ connectors provided by the company. The following figure illustrates the pin layout. J2 1 2 3 4 TX RX RTS Figure 22. RS-485/422 Device Signal Cable Pin Layout Chapter 4. VCA(Option) 184 Chapter 7 I/O Card & RS-485 VSR-404 (optional) VSR-404 Sensor I/O Card 7.1 Introduction to VSR-404 Sensor I/O Card This product is a DI/DO extension card designed for PC-based DVRs. The VSR-404 Sensor I/O Card supports 4 DI channels and 4 DO channels. 7.2 Functions of Major Connectors 7.2.1 Major Connectors Figure 23. Major Connectors of VSR-404 Sensor I/O Card Chapter 4. VCA(Option) 185 7.2.2 Details of major connectors 1 20 pin box connector (J3) for connecting the sensor/control capture card This connector is used to connect the VSR-404 Sensor I/O Card and the capture card. 2 20 pin box connector (J6) for connecting the sensor/control extension card This connector is identical to the J3 and is connected to the extension card. 3 RS485/422 Select pin header (JP3) This is a jumper pin header used to select RS485 or 422. 4 Sensor type select switch (S1) The relay type or voltage type for the sensor interface type can be set by turning the switch on and off. The switch is a 2-pin deep switch and so both pins must be conjunctively on or off. 5 RS485/422 terminating resistance select pin header (JP1) This is a pin header used to select 120Ù end resistance connection. For details regarding terminating resistance, see Section 5.7.1 Terminating resistance. 6 RS232 port for RS485/422 (J2) This port is used to connect the COM port of the system with the RS 232. 7 4-pin connector for connecting RS485/422 Devices (J1) This connector is used to connect the RS485/422 cable of an external device. 8 DI 1-4 terminal block for sensor input signal connection (J4) This connector is used to receive externally incoming DI signals. The channel numbers are 1, 2, 3, and 4 from top to bottom. They act as terminals for receiving DI signals and the lowest terminal is used as a common port. If connecting a specific channel and the common terminal by way of a sensor or switch, whether the sensor or switch turns on or off can be checked on the software monitor. 9 DI 1-4 terminal block for control input signal connection (J5) This connector is used to send out DO signals. The channel numbers are 1, 2, 3, and 4 from top to bottom. They act as terminals for sending out DO signals and the lowest terminal is used as a common port. DO signals can be controlled by software. If a DO turns on, the relay switch of the capture card will shorten the terminal and common terminal of that On channel. 103 pin internal DI connector This connector is used to connect to the internal DI port in the system. This connector is shared with DI 4. For this reason, DI 4 and this connector cannot be used at the same time. About the detail, refer to 5.2.3 Chapter 4. VCA(Option) 186 7.2.3 Internal Digital Input ► Description of Internal Digital Input The „internal DI port‟ means a digital input port that is located inside the PC bracket when you install an EIO card in your PC. The „external DI port‟ means a normal digital input port that is attached to the PC bracket when you install an EIO card in your PC. The internal DI port shares with one of the external DI ports. In other words, if the internal DI port is used, you cannot use one of the external DI ports. The internal DI port is connected to the last external port of them by hardware. When you use internal DI port, it is not mandatory to remove the external DI port. Just do not use the last external DI port (DI4) Internal DI port MUST use a relay type device. This internal DI port is shared with an external DI port. Therefore, pins to be used will be different depending on the sensor type of external DI port. Figure 13. The internal DI port connection according to the sensor type of external DI port ► Voltage Type If you want to use voltage type sensor to the external DI port, please set DI select switch (SW2) as OFF and then connect the internal DI cable to pin 1 and 2 of 3-pin connector as the following picture. ► Relay Type If you want to use relay type sensor to the external DI port, please set DI select switch (SW2) as ON and then connect internal DI cable to pin 2 and 3 of 3-pin connector. Chapter 4. VCA(Option) 187 7.3 Sensors (Digital Input) 7.3.1 DI Specification ► Channel: 4 channels ► Interface Type: Relay Type, Voltage Type ► Input operating range (if turned ON) Voltage Type: Min: 3V, Typ: 5V, Max: 12V DC Relay Type: Min: 0Ω, Max: 170Ω conductor resistance ► As the interface type (Voltage / Relay) and operating type (Normal Open / Normal Close) of the external sensor affects the settings, it must be set to 0(L) or 1(H) depending on what type of software or application is actually installed. ex) The value recognized by the software when a relay type and normal open sensor is used Sensor Off => 0(L), Sensor On => 1(H) The value recognized by the software when a relay type and normal close sensor is used Sensor Off => 1(H), Sensor On => 0(L) DI Type External Sensor Type Normal Open Voltage Type Normal Close Normal Open Relay Type Normal Close Sensor Status The value recognized by the software OFF 1(H) ON 0(L) OFF 0(L) ON 1(H) OFF 0(L) ON 1(H) OFF 1(H) ON 0(L) Table 6. Sensor (digital input) Status Table Chapter 4. VCA(Option) 188 7.3.2 DI Interface Type ► DI Circuit +5V 1 2 DI S el ect S wi tch +5V DI (L ogi cal ) DI Por t DI Common Photo Coupl er 1 2 DI S el ect S wi tch Figure 24. DI Circuit ► DI Select Switch (S1) S WITCH ON 1 TYPE ON Relay OFF Voltage OFF ► Relay Type Figure 25. DI Select Switch and its Status Table ♦ If the switch is on, the DI port and DI common are short-circuited or at 0V. ♦ Type: Relay output sensor, magnetic switch, NPN open collector output sensor ► Voltage Type ♦ If the switch is on, the electric current is drawn to the DI port and runs the photo coupler. ♦ Type: PNP open collector output sensor 7.3.3 DI Operating Type ► About Normal Open / Normal Close ♦ Relay Type Normal Open This type is normally open (high impedance), but is shortcircuited or at OV when operated. Normal Close This type is normally short-circuited or at OV, but is opened when operated. ♦ Voltage Type Normal Open This type is normally open (high impedance), but generates certain voltage when operated. Normal Close This type normally generates voltage, but is opened when operated. Chapter 4. VCA(Option) 189 7.4 Controls (Digital Output) 7.4.1 DO Specification ► Channel: 4 channels ► Output Type: Relay interface ► Relay Rating: Max: 24VAC 500mA/12VDC 1A 7.4.2 DO Operation ► Its relay type is normal open. ► Before software runs, the relay is set to Off. ► Turn on or off the corresponding relay using the software. If the relay is on, the DO port and DO common are short-circuited. 7.5 RS-485/422 7.5.1 RS-485/422 Specifications ► Standard RS-485, RS-422 ► Input Operating Range Min: -7V, Max +12VDC ► Able to connect 128 devices Chapter 4. VCA(Option) 190 7.5.2 RS-485/422 Operation ►RS485/422 Selection Pin Header (JP3) ♦ RS485/422 Selection RS422 RS485 JP3 JUMPER TYPE 1-2 RS-485 2-3 RS-422 1 Figure 26. RS-485/422 Select Pin Header and its Status Table ♦ When RS-485 is selected J1 Pin Number 1 2 3 4 Function (RTS enabled) Function (RTS disabled) TX+(Noninverting Driver Output) RX+(Noninverting Receiver Input) TX-(Inverting Driver Output) RX-(Inverting Receiver Input) TX+(Noninverting Driver Output) TX-(Inverting Driver Output) Table 7. Status Table when RS-485 is selected ♦ When RS-422 is selected J1 Pin Function Number 1 RX+(Noninverting Receiver Input) 2 RX-(Inverting Receiver Input) 3 TX+(Noninverting Driver Output) 4 TX-(Inverting Driver Output) Table 8. Status Table when RS-422 is selected ► RS485/422 Terminating resistance Select Pin Header (JP1) ♦ What is the Terminating resistance? The terminating resistance is used for the impedance matching of wires in order to prevent any distortion or attenuation caused by transfer delay when data is transferred through the RS-422 or RS-485 over a long distance. The terminating resistance is not normally used for a short-distance transfer (less than 1.2km), but rather for a long-distance data transfer, especially when the communication line is unstable. The VRS-404 Sensor I/O Card is designed to easily connect and cancel the terminating resistance by way of a jumper. Chapter 4. VCA(Option) 191 ♦ Selecting Terminating resistance The terminating resistance creates 120Ω resistance between pins 1 and 2 of the JP1. When RS422 is selected, resistance will be created between RX+ and RX-, while when RS-485 is selected, it will be created between TRX+ and TRX-. R+ R- ON OFF JP1 1 2 3 JUMPER 1-2(ON) 2-3(OFF) TYPE 120Ω MATCHING NO 120Ω MATCHING 1 Figure 27. RS-485/422 Terminating Resistance Select Pin Header and its Status Table Chapter 4. VCA(Option) 192 7.6 Connecting VRS-404 Sensor I/O Card and External Devices 7.6.1 Connecting a Capture Card Connect the 20-pin box connector (J3) to the capture card. Use the J6 connector to add an extension card. 7.6.2 Connecting DI/DO External Devices The DIs are used to connect external sensors or switches and are attached to the J4 connector. The DOs are used to connect external sensors or switches and are attached to the J5 connector. DO 1 DO 2 D0 3 D0 4 DO 1~4 Common Ou t pu t T er m i n al ( B u z z er , B el l , et c) S EN1 S EN2 S EN3 S EN4 DI DI DI DI DI 1 2 3 4 1~4 Common PT Z R ecei v er ( R S -485 / 422) COM Por t Figure 28. Connecting DI/DO External Devices 7.6.3 Connecting RS-485/422 Devices The RS485/422 communication functions are used to control pan/tilt/zoom cameras. Connect a RS485/422 device to the JI by way of a 4 pin connector. J1 1 4 TRX+ TRXTX+ TX- Figure 29. RS-485/422 Device Pin Layout Chapter 4. VCA(Option) 193 7.6.4 Connecting Signal Cables of RS-485/422 Devices These cables are used to connect the devices to a COM port of another system. Use only the RJ connectors provided by the company. The following figure illustrates the pin layout. J2 1 2 TX RX RTS 3 4 Figure 30. RS-485/422 Device Signal Cable Pin Layout 7.7 Reference 7.7.1 Terminating resistance ♦ What is the Terminating resistance? The terminating resistance is used for the impedance matching of wires in order to prevent any distortion or attenuation caused by transfer delay when data is transferred through the RS-422 or RS-485 over a long distance. The terminating resistance is not normally used for a short-distance transfer (less than 1.2km), but rather for a long-distance data transfer, especially when the communication line is unstable. The VRS-404 Sensor I/O Card is designed to easily connect and cancel the terminating resistance by way of a jumper. ♦ Selecting Terminating resistance The terminating resistance creates 120Ω resistance between pins 1 and 2 of the JP1. When RS422 is selected, the resistance will be created between RX+ and RX-, while when RS-485 is selected, it will be created between TRX+ and TRX-. R+ R- 1 2 3 JUMPER ON OFF JP1 TYPE 1-2(ON) 120Ω MATCHING 2-3(OFF) NO 120Ω MATCHING 1 Figure 31. Terminating Resistance Select Pin Header and its Status Table 7.7.2 RS-485/422 Connector Functions The VRS-404 sensor I/O Card supports RS485 or RS422 communication using its JI connector. RS485 or RS422 communication can be selected by using the select pin header. ►RS485/422 Select Pin Header (JP3) RS422 RS485 JP3 1 JUMPER TYPE 1-2 RS485 2-3 RS422 Figure 32. RS-485/422 Select Pin Header and its Status Table ♦ RS485/422 Selection ► To select RS485 Connect pin 1 and pin 2 of the JP3 to the jumper (see the above figure). ► To select RS422 Connect pin 2 and pin 3 of the JP3 to the jumper (see the above figure). Chapter 4. VCA(Option) 194