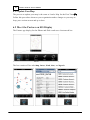
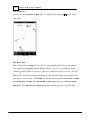
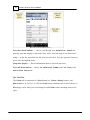
1
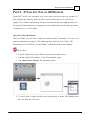
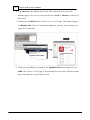
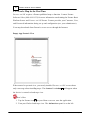
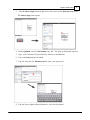
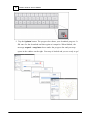
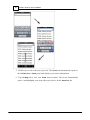
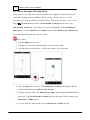
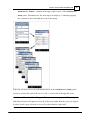
Partner on iOS
version 1.4.0
User Manual
© 2013 Partner Software, Inc.
Contents
3
Table of Contents
Part 1. Welcome to Your Partner on iOS
v1.4.0 Manual
5
Part 2. If You Are New to iOS Devices
7
Part 3. Install the App
9
Part 4. Start the App
13
Part 5. Partner on iOS: iPad
15
1.............................................................................................................. 15
5.1
Start Using Partner on iOS
...........................................................................................................................
16
5.1.1 Load
a Map for the First Time
...........................................................................................................................
19
5.1.2 Update
Your Map
2.............................................................................................................. 19
5.2
Meet the Partner on iOS Display
3.............................................................................................................. 24
5.3
Navigate the Map
........................................................................................................................... 25
5.3.1 Zoom
........................................................................................................................... 28
5.3.2 Pan
4.............................................................................................................. 29
5.4
Get Information from the Map
........................................................................................................................... 29
5.4.1 Navigate
........................................................................................................................... 30
5.4.2 Find
...........................................................................................................................
33
5.4.3 Move
through a Selection Stack
5.............................................................................................................. 35
5.5
Use Apple Location Services in Partner on iOS
...........................................................................................................................
38
5.5.1 Pan
to Your Location
...........................................................................................................................
39
5.5.2 Track
Your Position
...........................................................................................................................
40
5.5.3 Find
a Route
© 2013 Partner Software, Inc.
4
Partner on iOS v1.4.0 User Manual
Part 6. Partner on iOS: iPhone and iPod
Touch
43
1.............................................................................................................. 43
6.1
Start Using Partner on iOS
...........................................................................................................................
44
6.1.1 Load
a Map for the First Time
...........................................................................................................................
48
6.1.2 Update
Your Map
2.............................................................................................................. 48
6.2
Meet the Partner on iOS Display
3.............................................................................................................. 57
6.3
Navigate the Map
........................................................................................................................... 58
6.3.1 Zoom
........................................................................................................................... 60
6.3.2 Pan
4.............................................................................................................. 61
6.4
Get Information from the Map
........................................................................................................................... 62
6.4.1 Navigate
........................................................................................................................... 65
6.4.2 Find
...........................................................................................................................
68
6.4.3 Move
through a Selection Stack
5.............................................................................................................. 70
6.5
Use Apple Location Services in Partner on iOS
...........................................................................................................................
73
6.5.1 Pan
to Your Location
...........................................................................................................................
74
6.5.2 Track
Your Position
...........................................................................................................................
76
6.5.3 Find
a Route
Part 7. FAQ
79
Part 8. Useful Links
81
Index
83
© 2013 Partner Software, Inc.
Wel come to Your Partner on i OS v1 .4 .0 Manual
5
Part 1. Welcome to Your Partner on iOS
v1.4.0 Manual
Partner on iOS gives you full access to your map and data on an Apple ® mobile
device without an Internet connection. You will soon find using Partner on iOS has
become second nature. You will move around your maps, select map items, and view
information about them without thinking. With a network connection, seeing and
tracking your position, routing, updating your map are easy. This document gets you
started. It will be a useful reference later.
Note —
The maps presented in this document are examples only. Maps for your
organization will be different.
M anual Conve ntions
Terms
cursor — Denotes your position in an area requiring a typed entry. It displays as a
blinking vertical line.
tap, select, or choose — Directs you to tap your finger on the screen.
double tap — Specifies you tap the screen twice in the same place.
drag — This action results in moving something from one place to another on screen.
Use your finger to tap, hold and drag a list, switch, or screen item to a new position.
Remove your finger from the screen when you reach your destination.
swipe — Place four fingers on the screen. Quickly drag them right or left to switch to
another screen.
Us e of Fonts and S tyl e
Computer specific items such as selection menus, buttons, window names, and
© 2013 P a r tne r So f twa r e , I nc .
6
Partner on iOS v1.4.0 User Manual
messages are displayed in the Courier New bold font.
New or possibly unfamiliar terms are shown in italics when encountered the first
time.
Items you supply to the computer (Search bar entries, for example) are placed in
quotes. For example, Type "meter".
Menu S el ecti on
When directed to make a series of selections to complete a task, the selections will
be stated in order from first to last and separated by a right angle bracket >. For
example, Settings>Location>Enable>ON, directs you make four selections.
1. Settings panel
2. Location pane
3. Enable switch
4. ON position
Note — Sometimes a 'selection' orients you to a place in the interface rather than
requiring you to tap something. In the above example, The second
'selection' (Location pane) is actually a position in the Settings panel and does
not require any tap or input. It is intended to guide you to the area containing the
third selection (Enable switch).
Procedures
Nu mb ered s t ep -b y -s t ep d irect io n s are p reced ed b y t h e fo llo win g Part n er s y mb o l an d h ead in g .
Here's How
Notes , Ti ps , and Warni ng s , Troubl es hooti ng
Sp ecial mes s ag es are lab eled as No t es , Tip s , W arn in g s , o r Tro u b les h o o t in g an d are p res en t ed
in s id e p ag e wid e lin es as fo llo ws .
Note —
The maps, forms, and reports presented in this document are examples only.
Maps, forms, and reports for your organization will be different.
© 2013 Partner Software, Inc.
If You Are New to iOS Devices
7
Part 2. If You Are New to iOS Devices
Apple iOS ® devices are extremely easy to use once you know your way around. At
first, though, the simplicity of the interface may mask the power of each device.
Apple's User Guides explain many features and controls that you might not discover
for yourself. Instructions for accessing your User Guide and specific topics pertinent
to using Partner on iOS follow.
Ope n the Safari Bookmark
The User Guide for your device comes as a built- in Safari® bookmark. To view it, an
internet connection is required. The following steps open the User Guide. The
illustrations are of the iPad ® , but the iPhone ® and iPod touch® work similarly.
Here's How
1. Tap the Safari icon on your Home screen to open the browser.
2. Tap the Safari book symbol. A list of bookmarks opens.
3. Tap iPad User Guide. The document opens.
4. To scroll, place a finger on the screen and drag up or down. This brings topics
into view that are off screen.
© 2013 Partner Software, Inc.
8
Partner on iOS v1.4.0 User Manual
Topics Pe rtine nt to Us ing Partner on iOS
While all information in the User Guides is useful, certain items are essential for
Partner on iOS. Become familiar with the following topics.
i OS 5 ®
Topic (left side of screen)
Subtopic (right side of screen)
At a Glance
Settings (scroll)
Location Services
*Maps (scroll)
All subtopics
i OS 6 ®
Topic (left side of screen)
Subtopic (right side of screen)
Basics
Using Apps
Settings
Privacy (Location Services)
Maps*
All subtopics
*iO S 6 p rovides t he A p p le M ap s ® ap p
© 2013 Partner Software, Inc.
Install the App
9
Part 3. Install the App
Download Partner on iOS from the App Store S M to your device using the Internet.
Even though the app is free, an Apple ID® is required. The following steps use
pictures of the iPad as examples, but the iPhone and iPod touch work similarly.
Here's How
1. Tap the App Store icon on your Home screen to open it.
2. Tap the Search bar in the upper left corner. The pop up keyboard appears.
3. Type "Partner on iOS" using your finger to tap the keys on the screen. Your
matches appear as you type.
© 2013 Partner Software, Inc.
10
Partner on iOS v1.4.0 User Manual
4. Tap Partner on iOS in the Results. The keyboard closes and your
matches appear. Be sure to select your device (iPad or iPhone) at the top of
the screen.
5. Double tap the FREE button for the Partner on iOS app. The button changes
to INSTALLING. If you are not already signed in, you may need to enter your
Apple ID at this point.
6. When your installation is complete, the INSTALLING button changes to say
OPEN. The Partner on iOS app is now installed on your device and the Partner
App icon is placed on your Home screen.
© 2013 Partner Software, Inc.
Install the App
7. Double tap OPEN. The App Store window is replaced by Partner on iOS.
© 2013 Partner Software, Inc.
11
Start the App
13
Part 4. Start the App
Once Partner on iOS is installed on your device, tap the Partner icon on your Home
screen to open the software.
Here's How
1. Find the Partner on iOS icon on your Home screen.
2. Tap the icon with your finger. You will see a brief view of the Partner logo and
then the app opens.
If you just installed your Partner app you must load your map (iPad
iPod touch
44
). Otherwise, you are now ready to work.
© 2013 Partner Software, Inc.
16
or iPhone,
Partner on iOS: iPad
15
Part 5. Partner on iOS: iPad
The user interface of Partner on iOS v1.4 for the iPad is different from the one used
for iPhone and iPod touch devices. The iPad interface has a side window for
controls and data. The iPhone / iPod touch interface uses a bottom tab bar for
controls and different screens to display data. The smaller screen size of the iPhone
and iPod touch devices demand an interface that uses less screen space. Instructions
for using Partner on iOS v1.4 are provided by device due to the differing user
interfaces.
5.1 Start Using P artner on iOS
This section explains how to load your map for the first time and how to update your
map when your organization changes it.
Partner on iOS is a free app
9
available on the App Store SM . It is useless, however,
without a Partner map to view (Partner Basic Platform required). Contact Partner
Software Sales (800- 964- 1833) for more information.
© 2013 Partner Software, Inc.
16
Partner on iOS v1.4.0 User Manual
5.1.1 Load a Map for the First Time
Partner on iOS requires a Partner published map to function. Contact Partner
Software Sales (800- 964- 1833) for more information on obtaining the Partner Basic
Platform license and Partner on iOS license. Partner provides your Customer, User,
and Password information during set up and configuration (see your administrator).
Your map downloads from Partner's secure server through the Internet.
Empty App Portrait Vie w
When rotated to portrait view, your newly installed Partner on iOS screen shows
only a message about installing maps. The Control window
19
will appear when
the device is rotated to landscape view.
Here's How
1. Tap the Partner icon
13
on your Home screen to start the application.
2. Turn your iPad to landscape view. The Selection panel is on the left.
© 2013 Partner Software, Inc.
Partner on iOS: iPad
3.
17
Tap the Settings button in the lower left corner of the Selection panel.
The Settings panel opens.
4. Under Update, tap the Customer entry bar. The pop up keyboard appears.
5. Type your Customer ID (provided by Partner at installation).
6. Leave the User entry bar blank.
7. Tap the entry bar for Password and enter your password.
8. Tap the lower right keyboard button to close the keyboard.
© 2013 Partner Software, Inc.
18
Partner on iOS v1.4.0 User Manual
9. Tap the Update button. The progress bar shows your download progress. It
fills once for the download and then again as it unpacks. When finished, the
message unpack complete shows under the progress bar and your map
opens in the window on the right. Your map is loaded and you are ready to go!
© 2013 Partner Software, Inc.
Partner on iOS: iPad
19
5.1.2 Update Your Map
The process to update your map is the same as Load a Map for the First Time.
16
Follow this procedure whenever your organization makes changes to your map to
keep your version current and up to date.
5.2 Meet the P artner on iOS Display
The Partner on iOS display consists of the Control and Map windows. The
Control window is only visible and usable when your device is in landscape
position. In portrait view the Map window occupies the entire iPad screen.
La n ds c a pe vi e w
© 2013 Partner Software, Inc.
P o r t r a i t vi e w
20
Partner on iOS v1.4.0 User Manual
The Control window has three panels: the Settings panel, the Selection
panel, and the Find panel.
S e t t i n g s pa n e l
S e l e c t i o n pa n e l
Fi n d pa n e l
© 2013 Partner Software, Inc.
Partner on iOS: iPad
21
The Se ttings Pane l
The Settings panel updates, or loads, your map and enables/disables the
Location features. It also gives software version information. A button in the top
left corner opens the Selection panel.
P a r t s o f t h e S e t t i n g s pa n e l
Update pane — Downloads a new map from the Internet to your device from
Partner's secure server. Customer, User, and Password information are provided
by Partner during system installation. The blue bar shows download progress.
Download and unpack messages appear below the progress bar.
About pane — Identifies program, version, and build.
Location pane — Contains switches to enable the locator and follow features.
Se le ction button — Tap to open the Selection panel.
© 2013 Partner Software, Inc.
22
Partner on iOS v1.4.0 User Manual
The Se le ction Pane l
The Selection panel displays map data and has buttons for moving through a
Selection Stack list, Home (key map) view, Location features, as well as the
Settings and Find panels.
P a r t s o f t h e S e l e c t i o n pa n e l
Se le ction Stack buttons — Where a location contains multiple map items, for
example, a pole, transformer, and security light, it may be difficult to tap exactly the
one you want. Partner on iOS solves this by listing every item within a specified
radius of your tap. The resulting group of items is called a Selection Stack . The
Selection Stack buttons move you through the list one item at a time. Each
item's data is displayed in the Selection panel. Move forward using + and
backward using -. At the the end of the list, the Selection display will clear. Use
© 2013 Partner Software, Inc.
Partner on iOS: iPad
23
the opposite button to move back through the items.
Find button — Opens the Find panel.
Go button — Opens the iOS- provided maps app and displays the route from your
location to a selected Partner map item. A map item must be selected in your Partner
map before tapping Go. Network connection required. Location>Enable
36
must
be turned on.
He re button — Navigates to and marks your location with an arrow.
Location>Enable
36
must be turned on.
Home button — Navigates immediately to key map view, showing the entire mapped
area.
Se ttings button — Opens the Settings panel.
M ap data dis play — Shows information about a selected map item.
The Find Pane l
The Find panel is composed of a Selection Panel button, Find entry bar,
and Find Results list.
© 2013 Partner Software, Inc.
24
Partner on iOS v1.4.0 User Manual
P a r t s o f t h e Fi n d pa n e l
Find e ntry bar — Search for a map item by typing unique identifying information
here. Matches appear as you type.
Find Re s ults lis t — Scrollable list of matches for the data entered in the find bar.
Tap an item to select. The map pans to the item.
Se le ction button — Opens the Selection panel.
5.3 Navigate the Map
The full map of your service area is much larger than the iPad screen can comfortably
show. Partner on iOS provides a way to change the area visible in the Map window
(zoom), and a way to re- center the view (pan).
Se e M ore or Le s s Are a: Zoom
You may want to see where a transformer is in relation to its substation, so you need
to see a large map area. Or you may want to see which pole contains a consumer's
© 2013 Partner Software, Inc.
Partner on iOS: iPad
25
security light, so you want a close- up view. Changing the amount of area you see is
called zooming.
Diffe re nt Zoom, Diffe re nt Symbols : Le ve ls of De tail
You might want to see a large amount of detail when viewing a small map area. When
viewing a large map area, the same level of detail would be overwhelming. Partner
on iOS adjusts the amount of detail by showing or hiding map symbols as you zoom.
Each of these adjustments results in a lev el of detail.
Se e a Diffe re nt Location: Pan
Suppose you are looking at a road intersection and want to see what lies north, but
that area is currently outside the Map window. Re- centering your view is called
panning.
5.3.1 Zoom
Zooming increases or decreases the region you see on screen. Zoom in to see a small
area in detail such as house locations. Zoom out to show your map from a distant
view so you see more area at once. For example, you could look at a county- sized
area to see where the subdivisions are.
Zo o m i n
© 2013 Partner Software, Inc.
26
Partner on iOS v1.4.0 User Manual
Zo o m o u t
Se e Things Locally: Zoom In
Use the spread gesture to zoom in.
Here's How
1. Place two closed fingertips on the screen.
2. Slide your fingertips open across the screen.
Less map area is visible on screen, but you can see more detail than before. Repeat
the spread gesture as needed.
© 2013 Partner Software, Inc.
Partner on iOS: iPad
Se e Things Dis tantly: Zoom Out
Use the pinch gesture to zoom out.
Here's How
1. Place two open fingertips on the screen.
2. Drag them closed across the screen.
As you zoom out more map area is visible on screen and the symbols you see are
more general.
© 2013 Partner Software, Inc.
27
28
Partner on iOS v1.4.0 User Manual
5.3.2 Pan
See different map locations by panning. It's like dragging a different portion of your
map into view.
Pa n to s e e a n o th e r l o ca ti o n .
Here's How
1. Place a finger on the screen in the direction of the place you want to see next.
2. Drag your finger across the screen in the Map window in the opposite
direction of the area you want to see.
The starting map region will slide out of the window as new area slides into view.
Repeat the finger- dragging gesture until you can see the area you want.
© 2013 Partner Software, Inc.
Partner on iOS: iPad
29
5.4 Get Information from the Map
To view information associated with an item on the map, you must select it. Partner
on iOS provides two approaches to item selection. First, you may navigate to the
item and tap it. Second, you may use the Find feature. Here you type identifying
information and choose the desired item from a list. The Find feature centers your
map item in the Map window and selects it. A filled circle indicates that the item is
selected.
Se le ction Stack
Where a location contains multiple map items, for example, a pole, transformer, and
security light, it may be difficult to tap exactly the one you want. Partner on iOS
solves this by listing every item within a specified radius of your tap. The resulting
group of items is called a Selection Stack . The Selection panel lists the
information on a per- item basis. Selection Stack
22
buttons allow you to move
back and forth through the items.
The Find feature, in contrast, selects only the map item you specify, even when it is
located in a stack. The Selection Stack buttons deselect it. Tapping the stack
on screen will give you access to the whole group.
5.4.1 Navigate
Suppose you need to reach a customer. You see the house on your map, but how do
you find the contact information? Tap the house, and the information is displayed in
the Selection panel.
Here's How
1. Open the Selection panel
2. Pan
28
and zoom
25
22
.
until you find the map item you want.
3. Tap the item with your finger. A filled circle appears around the symbol
indicating selection.
© 2013 Partner Software, Inc.
30
Partner on iOS v1.4.0 User Manual
Information about the map item is displayed in the Selection panel. The
Selection panel scrolls; use your finger to drag the information into view. If the
item is part of a Selection Stack
Stack
22
29
, you may need to use the Selection
buttons.
Deselect by tapping your finger on an empty area of the map. The Selection panel
clears and the highlight disappears.
5.4.2 Find
If you know something specific about the map item you want, you can use that
information to select the item. Begin typing your information into the Find entry bar.
As you type, map items that match what you have entered so far appear in the results
list. Since different kinds of items can start with the same characters, the list may
contain items in which you have no interest. To help you identify what you seek, each
item in the results list is followed by what kind of item it is, separated by a colon.
© 2013 Partner Software, Inc.
Partner on iOS: iPad
31
Here's How
1. Open the Find
24
panel.
2. Tap your finger in the Find
24
entry bar. The pop up keyboard appears. Tap the
.?123 key to open the number keyboard, if needed.
3. Use your finger to type the item you are looking for. As you type, matches appear
in the results list. Each match is followed by its Find type. Find types are grouped
together.
4. Tap the keyboard
18
key in the lower right to close the keyboard. Drag your
finger on screen to scroll through the Results list.
5. Tap the item you want to select. The Map window automatically pans to the area
and highlights the item at your current zoom level. Zoom in or out as needed.
© 2013 Partner Software, Inc.
32
Partner on iOS v1.4.0 User Manual
6. Tap the Selection button in the upper left corner of the Find panel. The
Selection panel opens and your selected item's information is displayed.
NOTE — Find limits the results from each find type to 8. Continue typing to see
your match in the list. The more characters your enter, the more likely your item will
be in the results.
© 2013 Partner Software, Inc.
Partner on iOS: iPad
33
5.4.3 Move through a Selection Stack
Some spots on the map have several map items placed close together or stacked on
top of each other making individual selection difficult. The Partner on iOS solves this
by listing every item within a specified radius of your tap. The resulting group of
items is called a Selection Stack
29
. The Selection Stack buttons move you
through the list one item at a time. Each item's data is displayed in the Selection
panel. Move forward using + and backward using -. At the the end of the list the
Selection display will clear. Use the opposite button to move back through the
items.
Here's How
1. Open the Selection
2. Navigate
29
22
panel.
to a location with map items on top of each other.
3. Tap the items to select them. Information for one item displays in the Selection
panel.
© 2013 Partner Software, Inc.
34
Partner on iOS v1.4.0 User Manual
4. Tap the Selection Stack + button in the upper right corner. Information for
the next map item displays.
5. Continue tapping the + button to move through the items in the group.
When the selection clears (the filled circle disappears from the map and no
information shows in the Selection panel) you have reached the end of the stack.
Use the - to move back through the items.
Note for an Ele ctrical Data M ap — When you select a span, the filled circle
indicating selection will appear at an end of the span rather than the spot you tapped.
In other words, span selection is on a pole rather than the span itself.
© 2013 Partner Software, Inc.
Partner on iOS: iPad
35
5.5 Use Apple Location Services in Partner on iOS
Sometimes it is useful to find your position on the map. Partner on iOS may be able
to help.
The Location
Services
8
21
features of Partner on iOS depend on Apple's Location
to find out where you are. All iPad models support Location
Services and do not require an Internet connection. But not all device
Locations Services use the same method. In other words, iPad models vary in
the way Location Services determines your location.
Wi- Fi only models use your position in relation to known Wi- Fi hotspots to make a
best guess about your location. However, if you are working in a remote area with
few known Wi- Fi hotspots, Location Services may not be able to show where
you are or may give an inaccurate location reading.
iPad 2 Wi- Fi + 3G and the new iPad with Retina display Wi- Fi + Cellular (3G /
Cellular models) have a built in Assisted GPS (aGPS) that uses satellite radio signals,
like regular GPS, along with network data to determine your position. The 3G /
Cellular devices are more likely to provide an accurate and reliable location reading,
even when working in rural areas. So, even though Partner on iOS works on all
models of iPad, Partner recommends the 3G / Cellular models for maximum
useability.
Since all Partner on iOS Location features depend on Apple's Location
Services
7
, Location Services must be turned on for the iPad as a whole
and for the Partner on iOS application. In addition, Partner's Location features
must be enabled in the Settings panel of Partner on iOS.
© 2013 Partner Software, Inc.
36
Partner on iOS v1.4.0 User Manual
Here's How
1. Open the Settings
21
panel.
2. In the Location area, slide the Enable switch to ON. A window opens asking
your permission to use your current location.
3. Tap OK with your finger. The disabled message in the Location area
disappears and your location information now displays there. An arrow appears in
your map showing your location and direction.
© 2013 Partner Software, Inc.
Partner on iOS: iPad
37
An a r r o w m a r k s y o u r l o c a t i o n i n y o u r P a r t n e r m a p.
Se e Yours e lf in Partne r
Partner on iOS can display your position in relation to your current map view, or it
can display the map in relation to your current position. In the first case the map
stays put, and an arrow that represents you moves around as you do. In the second
case, the arrow remains centered in the Map window, and the map pans as you move
around.
Ge t a Sugge s te d Route in your iOS-Provide d M aps App
Partner on iOS links to the built- in iOS maps app, so you can find a path between
your present location and any unit on your Partner map. This feature requires an
internet connection. For Wi- Fi only iPad models, a hotspot must be within range. 3G
and Cellular models can use Wi- Fi or a wireless data plan.
© 2013 Partner Software, Inc.
38
Partner on iOS v1.4.0 User Manual
Us e the iOS-Provide d
Se e Your Location
M aps App
Wi-Fi mode ls
Location Services uses
Wi- Fi connection
known Wi- Fi hotspots
required
No Internet connection
required
3G or Ce llular mode ls
Location Services uses
Wi- Fi connection or
built- in aGPS (satellite
data plan required
signals plus known Wi- Fi
hotspots)
No Internet connection
required
5.5.1 Pan to Your Location
See yourself in your Partner map by using the Here button. An arrow represents you
and shows where you are.
Here's How
1. Enable Apple's Location Services
2. Turn on the Location Enable
3. Open the Selection
22
36
8
.
switch.
panel.
4. Tap the Here button. The map pans and centers on your location at your
current zoom level. An arrow represents you.
© 2013 Partner Software, Inc.
Partner on iOS: iPad
39
5.5.2 Track Your Position
You may display your position in relation to your current map view, or you may
display the map in relation to your current position. In the first case the map stays
put, and an arrow that represents you moves around as you do. In the second case,
the arrow remains centered in the Map window, and the map pans as you move
around, tracking your position. Turn on the Follow switch to track your position.
Here's How
1. Enable Apple's Location Services
2. Turn on the Location Enable
36
8
.
switch.
3. Slide the Follow switch to ON. The map centers on your location as you
travel. Your location is shown by an arrow in the map.
© 2013 Partner Software, Inc.
40
Partner on iOS v1.4.0 User Manual
Note — If you pan away from your location (arrow) while the Follow switch is on,
it will re- center on the arrow whenever your location information is refreshed. Slide
the Follow switch to OFF when not in use.
5.5.3 Find a Route
Partner on iOS links to the built- in iOS maps app, so you can find a path between
your present location and any unit on your Partner map. This feature requires an
Internet connection. For Wi- Fi only iPad models, a hotspot must be within range. 3G
/ Cellular models can use Wi- Fi or a wireless data plan.
Here's How
1. Enable Apple's Location Services
2. Turn on Partner's Location Enable
3. Navigate
29
or use the Find
30
8
36
on your iPad.
switch.
panel to locate and select your map item. (An
item must be selected in the Partner map to get a suggested route.)
4. Open the Selection
22
panel.
5. Tap the Go button at the bottom of the panel. The iOS- provided maps app
opens. A green pin marks your location; a red pin shows your selected item's
location. Your suggested route is shown in blue.
© 2013 Partner Software, Inc.
Partner on iOS: iPad
41
To return to Partner on iOS from the Maps app, place four fingers on the right edge
of the screen, then drag them across the screen to the left.
To return to the Maps app from Partner, place four fingers on the left edge of the
screen, then drag them across the screen to the right.
If more applications are open, you may have to swipe a few times to find the one you
want.
Trouble s hooting
Proble m: The iOS- provided maps app opens showing the location of my
destination (selected item in Partner map), but there is no suggested route.
Explanation: Your location information is not available to the Maps app, so it
can not give you a suggested route. The only location it knows is your selected
Partner map item. Check to see if Partner's Location Enable switch is ON. If
so, then an issue is preventing Apple's Location Services from determining
your location.
Proble m: When I tap the Go button, the built- in iOS maps app doesn't open.
Explanation: You must select something in your Partner map.
© 2013 Partner Software, Inc.
42
Partner on iOS v1.4.0 User Manual
Proble m: The iOS- provided maps app opens but only shows a grid. There is no
map and no selected route.
Explanation: You are without a network connection. Either you are out of range
or Networks is disabled in your iPad Settings.
The iOS M ap Options
Using the Go button of the Selection panel opens the iOS- provided Maps
application. Your initial view gives you a suggested route on a map. You have the
option of displaying directions as well as changing the type of map.
See the topic If You Are New to iOS Devices
7
to find out how to access the iPad
User Guide. Information for using the Maps app is found there.
© 2013 Partner Software, Inc.
Partner on iOS: iPhone and iPod Touch
43
Part 6. Partner on iOS: iPhone and iPod Touch
The user interface of Partner on iOS v1.4 for the iPad is different from the one used
for iPhone and iPod touch devices. The iPad interface has a side window for
controls and data. The iPhone / iPod touch interface uses a bottom tab bar for
controls and different screens to display data. The smaller screen size of the iPhone
and iPod touch devices demand an interface that uses less screen space. Instructions
for using Partner on iOS v1.4 are provided by device due to the differing user
interfaces.
6.1 Start Using P artner on iOS
This section explains how to load your map for the first time and how to update your
map when your organization changes it.
Partner on iOS is a free app
9
available on the App Store SM . It is useless, however,
without a Partner map to view (Partner Basic Platform required). Contact Partner
Software Sales (800- 964- 1833) for more information.
© 2013 Partner Software, Inc.
44
Partner on iOS v1.4.0 User Manual
6.1.1 Load a Map for the First Time
Partner on iOS requires a Partner published map to function. Contact Partner
Software Sales (800- 964- 1833) for more information on obtaining the Partner Basic
Platform license and Partner on iOS license. Partner provides your Customer, User,
and Password information during set up and configuration (see your administrator).
Your map downloads from Partner's secure server through the Internet.
Empty App Vie w
Your newly installed Partner on iOS screen shows only a message about installing
maps. You must download your map using the Customer ID and password provided
to your organization by Partner.
Here's How
1. Tap the Partner icon
13
on your Home screen to start the application.
2. Tap the Synch button in the lower right corner of the screen. The Synch
window opens.
© 2013 Partner Software, Inc.
Partner on iOS: iPhone and iPod Touch
45
3. In the Update pane, tap the Customer entry bar. The pop up keyboard
appears.
4. Type your Customer ID (provided by Partner during installation).
5. Leave the User entry bar blank.
6. Tap the entry bar for Password and enter your password (provided by
Partner during installation).
7. In the lower right corner of the keyboard, tap the Done button to close the
keyboard.
© 2013 Partner Software, Inc.
46
Partner on iOS v1.4.0 User Manual
8. Tap the Update button. The progress bar shows your download
advancement. It fills once for the download and then again as it unpacks.
When finished, the message unpack complete shows under the progress
bar.
© 2013 Partner Software, Inc.
Partner on iOS: iPhone and iPod Touch
47
9. In the lower left of the screen tap the Map button. The Map window opens and
displays your map. Your map is loaded and you are ready to work.
© 2013 Partner Software, Inc.
48
Partner on iOS v1.4.0 User Manual
6.1.2 Update Your Map
The process to update your map is the same as Load a Map for the First Time
44
.
Follow this procedure whenever your organization makes changes to your map to
keep your version current and up to date.
6.2 Meet the P artner on iOS Display
The Partner app display for the iPhone and iPod touch uses a bottom tab bar.
Ta b ba r
The bar consists of five tabs: Map, Data, Find, Nav, and Synch.
© 2013 Partner Software, Inc.
Partner on iOS: iPhone and iPod Touch
Tap the button in the tab bar to open it. A description of each tab and its parts
follows.
© 2013 Partner Software, Inc.
49
50
Partner on iOS v1.4.0 User Manual
The M ap Tab
Access your map through the Map tab. Use Multi- Touch gestures
8
to pan, zoom
and select.
Ma p t a b
The Data Tab
Tap a map item in the Map tab to select it. Some map locations have items placed
close together making individual selection difficult. Partner on iOS lists all items
within a specified radius of your tap. This list is called the Selection Stack . Tap the
Data tab to view the list of items included in your selection radius, then tap the item
you want to view its data. The Data tab consists of two panels, Selected Items
and Selection Data. The Selected Items panel shows your Selection
Stack list. The Selection Data panel shows information for a specific item.
© 2013 Partner Software, Inc.
Partner on iOS: iPhone and iPod Touch
51
Da t a t a b, S e l e c t e d It e m s pa n e l
Se le ction Stack lis t —Where a location contains multiple map items, for example, a
pole, transformer, and security light, it may be difficult to tap exactly the one you
want. Partner on iOS solves this by listing every item within a specified radius of
your tap. The resulting group of items is called a Selection Stack . The Selected
Items panel shows your Selection Stack list. Tap an item to select it and view
its information in the Selection Data panel.
© 2013 Partner Software, Inc.
52
Partner on iOS v1.4.0 User Manual
Da t a t a b, S e l e c t i o n Da t a pa n e l
Se le ction Stack buttons — Moves you through your Selection Stack list
item- by- item and displays each item's data. Move forward using + and backward
using -. At the the end of the list the selection will clear. Use the opposite button to
move back through the items.
M ap data dis play — Shows information about a selected map item.
Se le cte d Ite ms button — Opens the Selected Items panel and displays the
Selection Stack list.
The Find Tab
The Find tab is composed of a Find entry bar, Clear Entry button, and
Results list. In Partner on iOS the Find feature eliminates the need to choose a
Find type; enter what you are looking for and Find returns matching items of all
types.
© 2013 Partner Software, Inc.
Partner on iOS: iPhone and iPod Touch
53
Fi n d t a b
Find e ntry bar — Search for a map item by typing unique identifying information
here. Matches appear as you type.
Cle ar Entry button — Tap this button to remove all characters from the entry bar.
Find Re s ults lis t — Scrollable list of matches for the data entered in the Find bar.
Double tap an item to select it; the Selection Data panel opens automatically.
Tap the Map tab to view the item's location.
The Nav Tab
The Nav tab contains controls for the iOS- provided maps app and Partner's
Location features.
© 2013 Partner Software, Inc.
54
Partner on iOS v1.4.0 User Manual
Na v t a b
Navigation (iOS M aps ) — These buttons operate with the iOS- provided maps in
conjunction with Partner map selections. Choosing a button from this pane opens the
iOS- provided maps app to provide routing and location information for Partner map
locations. The Location Enable switch must be in the ON position. A network
connection is required.
Navigate to Se le ction button — Select an item in your Partner map, then select
this button to open the iOS- provided maps app. Both locations are marked and
routing suggestions are given from your location to the selected Partner map item.
Show Se le ction button — Opens the iOS- provided maps app and displays the
location of a selected Partner map item.
Show Curre nt Location button — Opens the iOS- provided maps app and
displays your current location.
Location (Partne r) buttons — These buttons operate with your Partner map.
Home Vie w — Navigates immediately to key map view.
Vie w Curre nt Location — Navigates to and marks your location with an arrow.
The Location Enable switch must be in the ON position.
iOS Location Se rvice s s witche s — Allows you to find your location in the Partner
© 2013 Partner Software, Inc.
Partner on iOS: iPhone and iPod Touch
55
and iOS- provided maps. Apple's Location Services must be enabled. A
network connection is required to access the iOS- provided maps app.
Enable — Turn on this switch to use the View Your Current Location
button or to use any of the Navigation (iOS Maps) buttons.
Follow — When in the ON position, the Partner map centers on your location as
you travel. Your location is shown by an arrow in the map. The Enable switch
must also be turned on.
Curre nt Location coordinate s — When the Enable switch is on, your location
coordinates display here. Usually, the top set are map coordinates while the bottom
set are longitude, latitude coordinates. When Enable is turned off, the disabled
message appears.
The Synch Tab
The Synch tab updates your map and provides information about the Partner on
iOS software.
© 2013 Partner Software, Inc.
56
Partner on iOS v1.4.0 User Manual
S y n ch ta b
Update pane — Downloads a new map from the Internet to your device from
Partner's secure server. Customer, User, and Password information are provided
by Partner during installation. The blue bar shows download progress. Download and
unpack messages appear below the progress bar.
Re me mbe r s witch — When switched on, your update credentials are retained
whenever the app restarts. Your credentials are remembered when your device
sleeps, is turned off, or the app closed.
Update button — Starts the download of a new map. You must have entered (or
remembered) correct customer, user, and password information for the update to
be successful.
About pane — Identifies the application, version, and build.
© 2013 Partner Software, Inc.
Partner on iOS: iPhone and iPod Touch
57
6.3 Navigate the Map
The full map of your service area is much larger than the iPad screen can comfortably
show. Partner on iOS provides a way to change the area visible in the Map window
(zoom), and a way to re- center the view (pan).
Se e M ore or Le s s Are a: Zoom
You may want to see where a transformer is in relation to its substation, so you need
to see a large map area. Or you may want to see which pole contains a consumer's
security light, so you want a close- up view. Changing the amount of area you see is
called zooming.
Diffe re nt Zoom, Diffe re nt Symbols : Le ve ls of De tail
You might want to see a large amount of detail when viewing a small map area. When
viewing a large map area, the same level of detail would be overwhelming. Partner
on iOS adjusts the amount of detail by showing or hiding map symbols as you zoom.
Each of these adjustments results in a lev el of detail.
Se e a Diffe re nt Location: Pan
Suppose you are looking at a road intersection and want to see what lies north, but
that area is currently outside the Map window. Re- centering your view is called
panning.
© 2013 Partner Software, Inc.
58
Partner on iOS v1.4.0 User Manual
6.3.1 Zoom
Zooming increases or decreases the region you see on screen. To see a small area in
detail, zoom in. For example, you could view house locations in a neighborhood. To
see a large area all at once, zoom out. For example, you could look at a county- sized
area to see where the subdivisions are.
Zo o m i n
Zo o m o u t
Se e Things Locally: Zoom In
Use the spread gesture to zoom in.
Here's How
1. Place two closed fingertips on the screen.
2. Slide your fingertips open across the screen.
© 2013 Partner Software, Inc.
Partner on iOS: iPhone and iPod Touch
59
Less map area is visible on screen, but you can see more detail than before. Repeat
the spread gesture as needed.
Se e Things Dis tantly: Zoom Out
Use the pinch gesture to zoom out.
Here's How
1. Place two open fingertips on the screen.
2. Drag them closed across the screen.
© 2013 Partner Software, Inc.
60
Partner on iOS v1.4.0 User Manual
As you zoom out more map area is visible on screen. The symbols you see are more
general.
6.3.2 Pan
See different map locations by panning. It's like dragging a different portion of your
map into view.
Pa n to s e e a n o th e r l o ca ti o n .
Here's How
1. Place a finger on the screen in the direction of the place you want to see next.
2. Drag your finger across the screen in the Map window in the opposite
direction of the area you want to see.
© 2013 Partner Software, Inc.
Partner on iOS: iPhone and iPod Touch
61
The starting region will slide out of the window as new area slides into view. Repeat
the finger- dragging gesture until you can see the area you want.
6.4 Get Information from the Map
To view information associated with an item on the map, you must select it. Partner
on iOS provides two approaches to item selection. First, you may navigate to the
item and tap it. Second, you may use the Find feature. Here you type identifying
information and choose the desired item from a list.
A shaded disk highlights the item and indicates it is selected.
Se le ction Stack
Where a location contains multiple map items, for example, a pole, transformer, and
security light, it may be difficult to tap exactly the one you want. Partner on iOS
solves this by listing every item within a specified radius of your tap. The resulting
group of items is called a Selection Stack . Tapping Data tab opens the Selected
Items panel where you view the list of items. Select an item in the list, the
Selection Data panel opens, and displays the item's information. The
© 2013 Partner Software, Inc.
62
Partner on iOS v1.4.0 User Manual
Selection Stack buttons move through the Selection Stack one item at a
time. The buttons allow you to move back and forth through the list. Tap the Map tab
to return to the map.
The Find feature, in contrast, selects only the map item you specify, even when it is
located in a stack. The Selection Stack buttons deselect it. Tapping the stack
on the map will give you access to the whole group.
6.4.1 Navigate
Suppose you need to reach a customer. You see the house on your map, but how do
you find the contact information? Tap the house to select it. If other map items are
positioned close to the house they may be included in the selection radius. This group
of items within a selection radius is a Selection Stack . View the Selection
Stack list in the Selected Items panel of the Data tab. Tap the item in the list
(in this case, the consumer) to view its data in the Selection Data panel.
Here's How
1. Tap the Map tab to open it.
2. Pan and zoom until you find the map item you want.
3. Tap the item with your finger. A filled circle appears around the symbol
indicating selection.
© 2013 Partner Software, Inc.
Partner on iOS: iPhone and iPod Touch
63
4. Tap the Data tab to open it. The Selected Items panel opens and lists all
items included in your selection radius.
5. Tap the item you want information about. The Selection Data panel
opens. Scroll to see all the data; use your finger to drag the information into
view.
© 2013 Partner Software, Inc.
64
Partner on iOS v1.4.0 User Manual
To see data for other items in your selection, choose one of the following methods.
1. Tap the Selected Items button to return to the Selected Items list.
Select an item in the list to view its data.
2. Tap the Selection Stack + button to view data for each Selection
Stack item one at a time. When you reach the end of your list the data display
is blank. Tap the - button to move back through the list item by item.
Deselect by tapping your finger in an empty area of the map. The filled circle
disappears and the Data tab clears.
© 2013 Partner Software, Inc.
Partner on iOS: iPhone and iPod Touch
65
6.4.2 Find
If you know something specific about the map item you want, you can use that
information to select the item. Begin typing your information into the Find entry bar.
As you type, map items matching what you entered so far appear in the results list.
Since different kinds of items can start with the same characters, the list may contain
items in which you have no interest. To help you identify what you seek, each item in
the results list is followed by what kind of item it is, separated by a colon.
Here's How
1. Tap the Find tab to open it.
2. Tap in the Find entry bar. The pop- up keyboard is displayed. Tap the .?
123 key to open the number keyboard, if needed.
3. Use your finger to type the item you are looking for. As you type, matches
appear in the results list. Each match is followed by its Find type. Find types
are grouped together.
4. Tap the Search key in the lower right to close the keyboard. Drag your
finger up or down on the screen to scroll through the Results list.
© 2013 Partner Software, Inc.
66
Partner on iOS v1.4.0 User Manual
5. Double tap to select the item you want. The Data tab automatically opens to
the Selection Data panel and displays your item's information.
6. Tap the Map tab to view your Find item's location. The viewer automatically
pans to and highlights your item when you select it in the Results list.
© 2013 Partner Software, Inc.
Partner on iOS: iPhone and iPod Touch
67
NOTE — Find limits the results from each Find type to 8. Continue typing to see
your match in the list. The more characters your enter, the more likely your item will
be in the results.
© 2013 Partner Software, Inc.
68
Partner on iOS v1.4.0 User Manual
6.4.3 Move through a Selection Stack
Some spots on the map have several symbols close together or stacked on top of
each other making selection difficult. When you tap an item, Partner on iOS
provides a list of items within a specified radius. This group of items is a Selection
Stack
61
. The Data tab provides the Selected Items panel to view your
Selection Stack list. Tap an item to view its information in the Selection
Data panel. Use the Selection Stack buttons of the Selection Data panel
move through each item's data one at a time.
Here's How
1. Tap the Map tab to open it.
2. Navigate to a location with map items on top of each other.
3. Tap the items to select them. A filled circle marks your selection.
4. Tap the Data tab to open it. The Selected Items panel displays the list
of items included in your Selection Stack.
5. Tap the item you want. The Selection Data panel displays information for
your item. Tap the Selected Items button in the upper left to return to the
Selected Items panel.
6. To view data for other items in your Selection Stack, tap the
© 2013 Partner Software, Inc.
Partner on iOS: iPhone and iPod Touch
69
Selection Stack + button in the upper right corner of the Selection
Data panel. Information for the next map item displays. Continuing tapping
the + button to move through the items in the group.
When the selection clears (no information shows in the Selection Data panel)
you have reached the end of the list. Use the - to move back through the items.
Note for an Ele ctrical Data M ap — When you select a span, the filled circle
indicating selection will appear at an end of the span rather than the spot you tapped.
In other words, span selection is on a pole rather than the span itself.
© 2013 Partner Software, Inc.
70
Partner on iOS v1.4.0 User Manual
6.5 Use Apple Location Services in P artner on iOS
Sometimes it is useful to find your position on the map. Partner on iOS may be able
to help.
The Location
Services
8
54
features of Partner on iOS depend on Apple's Location
to find out where you are. All iOS device models support Location
Services and do not require an Internet connection. But not all device
Locations Services use the same method. In other words, iOS device models
vary in the way Location Services determines your location.
Wi- Fi only models use your position in relation to known Wi- Fi hotspots to make a
best guess about your location. However, if you are working in a remote area with
few known Wi- Fi hotspots, Location Services may not be able to show where
you are or may give an inaccurate location reading.
3G / Cellular models have a built in Assisted GPS (aGPS) that uses satellite radio
signals, like regular GPS, along with network data to determine your position. The
3G / Cellular devices are more likely to provide an accurate and reliable location
reading, even when working in rural areas. So, even though Partner on iOS works on
all models of iOS devices, Partner recommends the 3G / Cellular models for
maximum useability.
Since all Partner on iOS Location features depend on Apple's Location
Services, Location Services must be turned on for the device as a whole
and for the Partner on iOS application. (See If You Are New to iOS Devices
7
.) In
addition, Partner's Location features must be enabled in the Nav tab of Partner
on iOS.
Here's How
© 2013 Partner Software, Inc.
Partner on iOS: iPhone and iPod Touch
1. Open the Nav
54
71
tab.
2. Under Location (Partner), slide the Enable switch to ON. All
Navigation (iOS Maps) and Naviation (Partner) buttons are
enabled. The disabled message under the switches disappears and your
location coordinates (map coordinates first, then longitude and latitude on
bottom) display.
3. Under Location (Partner), tap the Home View button. The Map tab
opens displaying your key map view. An arrow shows your location and
direction.
Se e Yours e lf in Partne r
Partner on iOS can display your position in relation to your current map view, or it
© 2013 Partner Software, Inc.
72
Partner on iOS v1.4.0 User Manual
can display the map in relation to your current position. In the first case the map
stays put, and an arrow that represents you moves around as you do. In the second
case, the arrow remains centered in the Map window, and the map pans as you move
around.
Ge t a Sugge s te d Route in your iOS-Provide d M aps App
Partner on iOS links to the built- in iOS maps app, so you can find a path between
your present location and any item on your Partner map. This feature requires an
internet connection. For Wi- Fi only devices, a hotspot must be within range. 3G and
Cellular devices can use Wi- Fi or a wireless data plan.
Se e Your Location
Wi-Fi mode ls
Us e the iOS-Provide d
M aps App
Location Services uses
Wi- Fi connection
known Wi- Fi hotspots
required
No Internet connection
required
3G or Ce llular mode ls
Location Services uses
Wi- Fi connection or
built- in aGPS (satellite
data plan required
signals plus known Wi- Fi
hotspots)
No Internet connection
required
© 2013 Partner Software, Inc.
Partner on iOS: iPhone and iPod Touch
73
6.5.1 Pan to Your Location
See yourself in your Partner map by using the View Current Location button.
The Map window pans to and centers on your location. An arrow represents you and
shows where you are. The arrow changes position to reflect your movement each
time your location information refreshes. The map does not pan with your movement.
Note — Due to the lack of an internal compass on the iPod touch, the arrow does
not indicate direction.
Here's How
1. Enable Apple's Location Services
8
.
2. Tap the Nav tab to open it.
3. Under Location (Partner), turn on the Enable switch.
4. Under Location (Partner), tap the View Current Location
button. The Map tab opens centered on your location at your current zoom
level. An arrow represents you and marks your location.
© 2013 Partner Software, Inc.
74
Partner on iOS v1.4.0 User Manual
6.5.2 Track Your Position
You may display your position in relation to your current map view, or you may
display the map in relation to your current position. In the first case the map stays
put, and an arrow that represents you moves around as you do. (See Pan to Your
Location
73
.) In the second case, the arrow remains centered in the Map window,
and the map pans as you move around, tracking your position. Turn on the Follow
switch to track your position.
Here's How
1. Enable Apple's Location Services
8
.
2. Tap the Nav tab to open it.
3. Under Location (Partner), turn on the Enable
70
switch.
4. Under Location (Partner), slide the Follow switch to ON.
5. Tap the Map tab to open it. The map centers on your location as you travel. An
arrow shows your location and direction on the map.
Note — Due to the lack of an internal compass on the iPod touch, the arrow does
not indicate direction.
© 2013 Partner Software, Inc.
Partner on iOS: iPhone and iPod Touch
75
Note — If you pan away from your location (arrow) while the Follow switch is on,
the Map window will re- center on the arrow whenever your location information
refreshes. Slide the Follow switch to OFF when not in use.
© 2013 Partner Software, Inc.
76
Partner on iOS v1.4.0 User Manual
6.5.3 Find a Route
Partner on iOS links to the built- in iOS maps app, so you can find a path between
your present location and any item in your Partner map. This feature requires an
Internet connection. For Wi- Fi only models (iPod touch), a hotspot must be within
range. 3G / Cellular models (iPhones) can use Wi- Fi or a wireless data plan.
Here's How
1. Enable Apple's Location Services
8
.
2. Tap the Map tab to open it.
3. Navigate
62
or use the Find
65
tab to locate and select your Partner map
item. (You must select an item in the Partner map to get a suggested route.)
4. Tap the Nav tab to open it.
5. Under Location (Partner), turn on the Enable
70
switch.
6. Under Navigation (iOS Maps), tap the Navigate to Selection
button. The iOS- provided maps app opens. A green pin marks your location; a
red pin marks your Partner map item. The suggested route is shown in blue.
To return to Partner on iOS from the Maps app, double click your device's Home
button and select the Partner icon from your open apps.
© 2013 Partner Software, Inc.
Partner on iOS: iPhone and iPod Touch
77
Trouble s hooting
Proble m: The Navigate to Selection button is not available.
Explanation: You must slide the Location (Partner) Enable switch to
ON to have access to the Navigation (iOS Maps) buttons.
Proble m: When I tap the Show Selection button under Navigation (iOS
Maps) nothing happens. The iOS- provided maps app does not open.
Explanation: First you must select something in your Partner Map.
Proble m: I turned on the Enable switch under Location (Partner), but
the message below states disabled on device and many of the navigation
and location buttons are not available to me. What's wrong?
Explanation: Apple's Location Services is off. Go to
Settings>Privacy>Location Services to turn them on.
Proble m: Navigate to Selection opens the iOS- provided map, but only
shows the location of my selected Partner map item. There is no suggested route
and my current location is not shown. The Location (Partner) Enable
switch is ON, but the message area is blank.
Explanation: You are without a network connection. Either you are out of range
or Wi- Fi is disabled in your Settings.
© 2013 Partner Software, Inc.
78
Partner on iOS v1.4.0 User Manual
The iOS M ap Options
Using the Navigate to Selection button of the Nav tab opens the iOS- provided Maps
application. Your initial view shows you a suggested route on a map. You have the
option of displaying directions as well as changing the type of map.
See the topic If You Are New to iOS Devices
7
to find out how to access the Apple
User Guides. Information for using the Maps app is found there.
© 2013 Partner Software, Inc.
FAQ
79
Part 7. FAQ
Here are some Partner in iOS frequently asked questions and helpful tips.
don't see your question, contact Partner
81
If you
for the answer. This list will grow and
benefit from your inquiries — so, don't be shy!
I'm having trouble vie wing my s cre e n. How do I adjus t s cre e n brightne s s ?
Screen brightness controls for your device are found in Settings, Brightness &
Wallpaper. For detailed instructions go to your User Guide, Basics, Using apps,
Adjusting screen brightness.
I'm s e e ing s trange things in my dis play, but I'm not s ure how to de s cribe it to
Partne r s upport. What s hould I do?
When submitting a visual problem with the Partner on iOS software, please do the
following:
1. Create a screenshot of the issue by pressing the power and home buttons at
the same time.
2. Open the Photos app.
3. Select the screenshot.
4. Email it to [email protected] with a description of the problem.
See your User Guide
© 2013 Partner Software, Inc.
7
if you need detailed instructions on any of these steps.
Useful Links
81
Part 8. Useful Links
Partner on iOS web site FAQ: http://partnersoft.com/products/ios/FAQ/index.html
Apple: http://www.apple.com/
Partner: http://partnersoft.com/
Sales and Support: www.partnersoft.com/email_form/ios_viewer/index.html
Documentation: www.partnersoft.com/email_form/ios_documentation/index.html
© 2013 Partner Software, Inc.
Index
-G-
Index
Go button 22, 41
Google Maps 40, 76
-A-
-H-
About pane 21, 56
Apple User Guide topics
arrow 38, 39, 73, 74
8
Here button 22, 38
hide keyboard 18
Home button 22
Home View button 54
-CClear entry button 53
Control window 20
Current location coordinates
-Ddata 29, 32, 61, 62, 66
data display 22, 29, 32, 62, 66
Data tab 51
deselect 30, 64
directions 40, 76
downloading 18, 46
-Eempty app 16, 44
empty Map window
Enable switch 36
83
16, 44
-FFind 30, 65
Find button 22
Find entry bar 24, 53
Find panel 20, 24, 30, 65
Find results list 24, 53
Find tab 53
Follow 39, 74
Follow switch 39, 40, 54, 74
© 2013 Partner Software, Inc.
-I54
icon 13
install app 9
iOS-provided Maps app troubleshooting
-Kkeyboard key
18
-Llandscape view 19, 48
level of detail 24, 57
license requirements 16, 44
line 34, 69
load map 16, 44
location 35, 70
Location (Partner) buttons 54
Location Enable switch 36, 54
Location features switch 36
Location features switches 21, 54
Location pane 21
Location Services 38, 73
-Mmap data display 22, 52
map information 29, 32, 61, 62, 66
Map tab 50
map update 21, 56
Map window 19, 48, 50
41, 77
84
Partner on iOS v1.4.0 User Manual
minimize keyboard
18
-NNav tab 54
Navigate to Selection button 54, 76
navigation 24, 57
Navigation (iOS Maps) buttons 54
no maps installed 16, 44
number keyboard 31, 65
-OOperations window
Selection Stack list 51
Settings button 22
Settings panel 20, 21
Show Current Location button
Show Selection button 54
software information 21, 56
software version 21, 56
span 34, 69
stacked symbols 29, 61
start viewer 13
Synch tab 56
54
-T19, 48
tab bar 48
track 39, 74
-Ppan 24, 28, 57, 60
Partner Location features switch
Partner on iOS icon 13
portrait view 19, 48
portrait view, iPad 16
-U36
-RRemember switch 56
route 37, 40, 72, 76
routing 41, 76
-Ssearch 30, 65
see data 29, 32, 61, 62, 66
select 29, 31, 61, 62, 66
select a line 34, 69
select a span 34, 69
selected item information 52
Selected Items button 52
Selected Items list 51
Selected Items panel 51
Selection button 21, 24
Selection Data 52
Selection panel 20, 22
Selection Stack 29, 33, 61, 68
Selection Stack buttons 22, 33, 52, 68
unpack 18, 46
Update button 21, 56
update map 16, 19, 44, 48
update messages 18, 46
Update pane 21, 56
update progress bar 18, 46
-VView Current Location button
54, 73
-Zzoom 24, 25, 57, 58
zoom in 25, 58
zoom out 25, 58
© 2013 Partner Software, Inc.