1
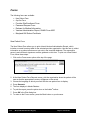
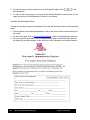
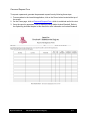
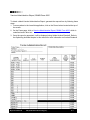
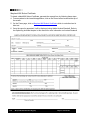
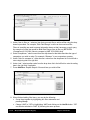
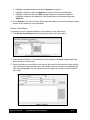
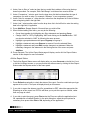
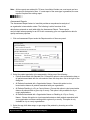
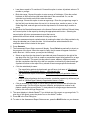
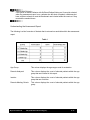
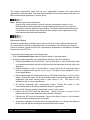
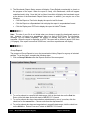
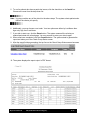
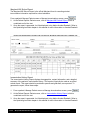
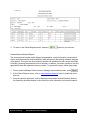
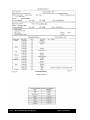
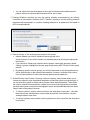
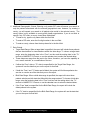
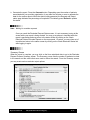
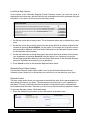
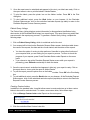
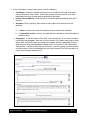
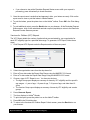
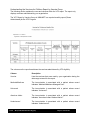
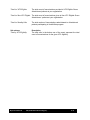
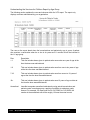
Forms and Reports In this chapter: New Patient Form Opt-Out Form Provider Site Enrollment Form Password Request Form Release for Medical Information Form Vaccine Administration Report Maryland 896 School Certificate Ad Hoc List Report Ad Hoc Count Report Assessment Report Benchmark Report Group Reports Vaccine Administration Record Immunization History Report Immunizations Needed Report Reminder/Recall Vaccines for Children Report CoCASA Extract Forms The following forms are available: New Patient Form Opt-Out Form Provider Site Enrollment Form Password Request Form Release for Medical Information Vaccine Administration Report, DHMH Form 4500 Maryland 896 School Certificate New Patient Form The New Patient Form allows you to print a blank Vaccine Administration Record, which includes a current inventory table for the selected provider organization. Use this form to collect information on a patient who does not yet exist in the ImmuNet database. The responsible person’s and clinician’s signatures are also gathered on this form. To print out a New Patient Form, follow these steps: 1. Click on the Forms menu option at the top of the page. 2. At the New Patient Form Request screen, pick the organization where the patient will be seen so that the appropriate inventory will appear on the record. 3. Choose the language in which you would like the new patient form to display. 4. Press Generate. 5. The form displays in Adobe Reader® 6. To print the report, press the printer icon on the Adobe® toolbar. 7. Press OK in the Print dialog box. 8. To return to the Forms screen, press the Back button on your browser. 12.2 Maryland Immunization Registry Reports and Forms Opt-Out Form The Opt-Out Form is the form the patient may sign if they wish to not have their record available to registry users. To generate the form, follow these steps: 1. From anywhere in the ImmuNet application, click on the Forms button located at the top of the screen. 2. On the Forms page, click on Opt-Out Form, which is underlined and in blue text. 3. Once the report is generated, it will be displayed using Adobe Acrobat Reader®. Refer to the Optimizing ImmuNet chapter in this manual for more information on Acrobat Reader®. Reports and Forms Maryland Immunization Registry 12.3 4. To print the report, press the printer icon on the Adobe® toolbar. Press Print dialog box. in the 5. To return to the Forms screen, you may close the Acrobat Reader® by clicking the X in the upper right corner of the Withdrawal of Consent Form window. Provider Site Enrollment Form To begin the enrollment process, generate the Provider Site Enrollment form by following these steps: 1. From anywhere in the ImmuNet application, click on the Forms button located at the top of the screen. 2. On the Forms page, click on Provider Site Enrollment, which is underlined and in blue text. 3. Once the report is generated, it will be displayed using Adobe Acrobat Reader®. Refer to the Optimizing ImmuNet chapter in this manual for more information on Acrobat Reader®. 12.4 Maryland Immunization Registry Reports and Forms Password Request Form To request a password, generate the password request form by following these steps: 1. From anywhere in the ImmuNet application, click on the Forms button located at the top of the screen. 2. On the Forms page, click on Password Request Form, which is underlined and in blue text. 3. Once the report is generated, it will be displayed using Adobe Acrobat Reader®. Refer to the Optimizing ImmuNet chapter in this manual for more information on Acrobat Reader®. Reports and Forms Maryland Immunization Registry 12.5 Release for Medical Information on Opt-Out Patient Form To obtain Release for Medical Information on Opt-Out Patient, generate the request form by following these steps: 1. From anywhere in the ImmuNet application, click on the Forms button located at the top of the screen. 2. On the Forms page, click on Release for Medical Information Form, which is underlined and in blue text. 3. Once the report is generated, it will be displayed using Adobe Acrobat Reader®. Refer to the Optimizing ImmuNet chapter in this manual for more information on Acrobat Reader®. 12.6 Maryland Immunization Registry Reports and Forms Vaccine Administration Report, DHMH Form 4500 To obtain a blank Vaccine Administration Report, generate the request form by following these steps: 1. From anywhere in the ImmuNet application, click on the Forms button located at the top of the screen. 2. On the Forms page, click on Vaccine Administration Report, DHMH Form 4500, which is underlined and in blue text. 3. Once the report is generated, it will be displayed using Adobe Acrobat Reader®. Refer to the Optimizing ImmuNet chapter in this manual for more information on Acrobat Reader®. Reports and Forms Maryland Immunization Registry 12.7 Maryland 896 School Certificate To obtain a blank 896 School Certificate, generate the request form by following these steps: 4. From anywhere in the ImmuNet application, click on the Forms button located at the top of the screen. 5. On the Forms page, click on Maryland 896 School Certificate, which is underlined and in blue text. 6. Once the report is generated, it will be displayed using Adobe Acrobat Reader®. Refer to the Optimizing ImmuNet chapter in this manual for more information on Acrobat Reader®. 12.8 Maryland Immunization Registry Reports and Forms Reports Ad Hoc Reports The Ad Hoc Reports function in ImmuNet allows the user to create customized reports. Filters within the Ad Hoc Reporting function help to narrow a search by date, site, vaccine group, ethnicity, and other factors. City and county public health departments may include in their reports patients associated with their departments or those living within the same city or county. The Ad Hoc reporting function produces two types of reports; one type produces lists with information about selected patients, the other type produces counts, either of patients or of immunizations. Note: Patients whose information is added or changed on the day the report is run may not appear in the results until the following day. Ad Hoc List Reports To produce a list of information about selected patients, follow these steps: 1. Click on Ad Hoc List Report under the Reports section of the menu panel. 2. Select the items that you would like to display on the report by double-clicking on the desired items from the left column (for example, Patient Last Name) or by highlighting the item and pressing ADD. This will copy the item to the right column and add it to your report. Select the single item by which you would like to have the report sorted and click on the sort order (first-to-last or last-to-first). Note: Sorting the report will increase the time it takes to process it. Reports and Forms Maryland Immunization Registry 12.9 3. Under “Item to filter on,” select an item that you would like to add as a filter using the drop down list provided. For example, “Birth Date Range” could be an item used as a filter. Filters in ImmuNet are used to narrow information down so that it answers a user’s query. An example of a filter item would be Birth Date Range (Item to filter on) BETWEEN (Comparison) 01/01/2004 (Value to compare to) AND 12/31/2004 (And). 4. Under Comparison,” select a word from the drop down list that best describes the type of comparison you wish to make. For example, “Between” is one comparison operator. 5. Under “Value to compare to,” either choose a value from the drop down list in the left field or enter a beginning date in the right field. 6. Under “and,” select another value from the drop down list in the left field or enter the ending date in the right field, if applicable. 7. Press Add/Save. Repeat Steps 4-8 for each item you wish to filter. 8. When finished adding filter items, you may do the following: 12.10 Group them together by highlighting two filter statements and pressing Group. Change “AND” to “OR” by highlighting “AND” and clicking on the And/Or button. “OR” can also be switched to “AND” by following the same process. Maryland Immunization Registry Reports and Forms Highlight a grouped statement and press Ungroup to ungroup it. Highlight a statement and press Remove to remove it from the selected filters. Highlight a statement and press Edit to make changes to a statement. Make the necessary changes to the statement in the filtering section of the screen and press Add/Save 10. Press Generate. The Ad Hoc Report Status page will display; see the Ad Hoc Report Status section of this chapter for more information. Ad Hoc Count Report To produce a count of selected patients or immunizations, follow these steps: 1. Click Ad Hoc Count Report under the Reports section of the menu panel. 2. Select whether Patients or Immunizations will be counted by clicking the appropriate radio button at the top of the screen. 3. Select the factors you would like to use to group the counts on the report by double-clicking on the desired item from the left column (for example, Vaccine Group) or by highlighting the item and pressing Add. This will copy the item to the right column so that it can be used in your report. Reports and Forms Maryland Immunization Registry 12.11 4. Under “Item to filter on” select an item that you would like to add as a filter using the drop down list provided. For example, “Birth Date Range” could be an item used as a filter. 5. Under “Comparison,” select a word from the drop down list that best describes the type of comparison you wish to make. For example, “Between” is one comparison operator. 6. Under “Value to compare to,” either choose a value from the drop down list in the left field or enter a beginning date in the right field. 7. Under “and,” select another value from the drop down list in the left field or enter the ending date in the right field, if applicable. 8. Press Add/Save. Repeat Steps 4-8 for each item you wish to filter. 9. When finished adding filter items, you may do the following: Group them together by highlighting two filter statements and pressing Group. Change “AND” to “OR” by highlighting “AND” and clicking on the And/Or button. “OR” can also be switched to “AND” by following the same process. Highlight a grouped statement and press Ungroup to ungroup it. Highlight a statement and press Remove to remove it from the selected filters. Highlight a statement and press Edit to make changes to a statement. Make the necessary changes to the statement in the filtering section of the screen and press Add/Save 10. Press Generate. The Ad Hoc Report Status page will display; see the Ad Hoc Report Status section of this chapter for more information. Ad Hoc Report Status 1. The Ad Hoc Report Status screen will display after you press Generate on the Ad Hoc Count or Ad Hoc List Report screens, or you may access the status screen by clicking Ad Hoc Report Status under the Reports section of the menu panel. 2. Press Refresh occasionally to check the status of the report. Once the underlined report type appears in blue, click it. The report will display directly on this screen. 3. If you wish to export the data as a text file, spreadsheet or PDF, select the appropriate link. Exporting an ad hoc report in a PDF file will allow you to print the report as a whole, rather than one page at a time. 4. If you wish to print the report, press Print under the File menu within the application (text file, spreadsheet or Adobe® Reader). In the print dialog box, adjust the print options as necessary, then press either Print or Ok, depending on the application. 12.12 Maryland Immunization Registry Reports and Forms Note: Ad hoc reports are retained for 72 hours; ImmuNet will retain one count report and one list report for that period of time. If a new report of the same type is generated, the new report will replace the existing report. Assessment Reports The Assessment Report feature in ImmuNet provides a comprehensive analysis of an organization’s immunization status. The following is a brief overview of the data that are returned on each table within the Assessment Report. These reports can be helpful when preparing for an AFIX visit or assessing your own organization’s data for quality assurance purposes. 1. Click on Assessment Report under the Reports section of the menu panel. 2. Select the patient population to be assessed by clicking one of the following: Patients Associated with Selected Site: Choose this option to view immunization data on all patients associated with the site selected from the drop down list at the right of the dialog box. All Patients Associated with <Organization Name>: Choose this option to view immunization data on all patients associated with your organization. All Patients Residing in <City or County Name>: Choose this option to view immunization data on all patients within a given city or county. This option is only available for city or county organizations. All Patients Associated with <Organization Name> or Residing in <City or County Name>: Choose this option to view immunization data on both patients associated with your organization and those residing within a given city or county. This option is only available for city or county organizations. 3. Select the age, birth date range, or age range of the patients by choosing one of the following: Reports and Forms Maryland Immunization Registry 12.13 Less than or equal to 72 months old: Choose this option to return all patients who are 72 months or younger. Birth date range: Choose this option to enter a range of birth dates. Enter the earliest birth date in the first field and the latest birth date in the second field. Or, use the calendar icons beside each field to enter the dates. Age range: Choose this option to enter an age range. Enter the youngest age range in the first field; use the drop down list next to it to choose days, months or years. In the Oldest Age field, enter an age and use the drop down list to choose days, months or years. 4. Select either the Standard Assessment or the Assess Patients with Sufficient Refusal history as Covered option for the report by choosing the appropriate radio button. Selecting the second option will return an assessment report that counts patients with sufficient refusal comments as being up-to-date. 5. Select the assessment report evaluation date by entering the date in the field provided or by using the calendar icon to enter the date. No immunizations administered after the evaluation date will be included in the report. 6. Press Generate. 7. The Assessment Report Status screen will display. Press Refresh occasionally to check on the progress of the report. When the report is ready, the job name will appear underlined and in blue text. At this screen you may do the following: Select an age from the drop down list provided and press Generate (to the right of the age drop down list) if you wish to create an assessment report listing patients for an agespecific benchmark. This report lists the patient’s name, address, telephone number, and the vaccinations that they did or did not complete or refused by the benchmark age. A patient will show on the report if they missed at least one age-specific benchmark. Click the underlined job name. o The report listing patients by benchmark age will have a job name of: (Benchmark Patient Listing) <Organization Name> - <Benchmark Age>. o The assessment report will be called: (Assessment Report)<Organization Name> <Date>. o A report listing all patients who have missed a vaccination opportunity will have a job name of: (Missed Opps Patients)<Organization Name>-<Date>. Click an underlined age range to view a listing of patients returned that fall within the specified range. This list will give the name, address, and telephone number for all patients meeting the record criteria. To view patients for all age ranges that meet the criteria, click on the All Age Ranges link. 8. The report displays in Adobe Reader® if you clicked one of the report or age range links. To print one of the reports, press the printer icon on the Adobe® toolbar. 9. Press OK in the Print Dialog box 10. To return to the Assessment Report Status screen, press the BACK button on your browser. 12.14 Maryland Immunization Registry Reports and Forms Note: Patients with Refusals If the option to Assess Patients with Sufficient Refusal History as Covered is selected when the assessment report is run, patients who fall short of needed, valid doses but have sufficient refusals to meet the benchmark are included within the count as if they received the needed doses. Understanding the Assessment Report The following is a brief overview of the data that is returned on each table within the assessment report. Table 1 Age Group: This column displays the age ranges used for evaluation. Records Analyzed: This column displays the count of selected patients within the age group that are included in this report. Inactive: This column displays the count of selected patients within the age group that are not active. Records Meeting Criteria: This column displays the count of selected patients within the age group. Reports and Forms Maryland Immunization Registry 12.15 Table 2 Age (Months): This column displays the age of the patient on the assessment date. Up-to-Date (UTD): This column displays the percent of patients (out of the total number of active patients for that age group) meeting the criteria on the assessment date. The criteria are given at the bottom of the report page. For example, a seven-month-old UTD patient who has met the criteria will have had three DTaP, two HepB, two HIB, and two Polio vaccinations. Late UTD @ Assessment: This column displays the percent of patients (out of the total number of active patients for that age group) meeting the criteria on the date the report was run, rather than on the assessment date. 12.16 Maryland Immunization Registry Reports and Forms Table 3 The Age-Specific Immunization Benchmarks chart shows how many doses of each vaccine a patient should have by the age listed at the left to be determined UTD. This chart is used to create the Assessment of Patients Meeting Age-Specific Benchmarks table. Table 4 UTD Age: This column shows the maximum age the patient has attained by the assessment date. Vaccine Columns: These seven columns display the count of the patients who have met the vaccination criteria by the UTD age. Total Meeting Age Criteria: This column gives a count of all the patients who are at least the age listed under UTD Age. However, the 72 Months UTD Age category includes patients from 48 to 72 months of age. % Coverage: This column displays the percentage of patients meeting all UTD criteria, out of a total of all patients at least the age listed under UTD Age. Reports and Forms Maryland Immunization Registry 12.17 Table 5 Column 1: In the first row of column one, the age range of patients examined in this table is displayed. In subsequent rows within this column, the number of vaccines needed by the patient is displayed. Column 2: In the first row of column two, a count is displayed of all patients for this age group who are behind schedule for four or fewer vaccinations. Subsequent boxes display a count of patients for this age group who need additional vaccinations to be UTD. Column 3: In the first row of column three, a percent is displayed of all patients for this age group who are behind schedule for four or fewer vaccinations (out of the total number of patients for this age group). Subsequent rows within this column display a percentage of patients for this age group who need additional vaccinations to be UTD. Table 6 Late Start Rates: A patient who did not receive one full dose of DTaP by 90 days of age is considered to have gotten a late start. The values in column three of the late start row are the percentages of patients (within the age groups listed in column four) who have not received the first DTaP dose by 3 months of age. Drop Off Rates: The drop off rate section of this chart shows the percentage of patients (column three) in various age groups (column two) who have not gone beyond 12 or 24-month status (column four) in their immunizations. Immunization status is calculated using the formula outlined at the bottom of the chart. 12.18 Maryland Immunization Registry Reports and Forms Table 7 The Hep B chart gives the number and percentage of patients who did not receive a birth dose of the Hep B vaccination and who did not complete the three-dose series. Patients evaluated are between six and 72 months old and have at least one immunization in ImmuNet. Table 8 Age Group on Eval Date: This column lists the age group of the selected patients and the immunization benchmark used for evaluation. Total Patients in Age Group: This column gives the total number of patients within the age group listed in the first column. Patients Not Up to Date: This column gives the count and percentage of patients who are not up to date for the benchmark listed in column one. Missed Op on Last Visit: This column gives the count and percentage of patients who are not up to date and who had a missed opportunity for vaccination on the last visit on or before the evaluation date. Reports and Forms Maryland Immunization Registry 12.19 The missed opportunities report lists all your organization’s patients who have missed opportunities to be vaccinated. This report lists the patient’s first and last names, birth date, and date of each missed opportunity by vaccine group. Note: Missed Opportunities Assessment Keep in mind, since ImmuNet is used for reporting immunization records, it only identifies patients that had at least one immunization at their last visit, but missed an opportunity to receive additional immunizations. The Missed Opportunities Assessment in ImmuNet will not include any patients that were treated at your organization for any other reason except vaccination purposes. Benchmark Reports Benchmark reports allow ImmuNet users to retrieve a list and count of patients who have met an immunization benchmark or predefined series of benchmarks. The resulting report may be viewed in ImmuNet, exported as a text file, exported as a spreadsheet or exported as a Portable Document Format (PDF) file. To generate a benchmark report, follow these steps: 1. Click on Benchmark Report under the Reports section of the menu panel. 2. Select the patient population to be assessed by clicking on one of the following: Patients Associated with Selected Site: Choose this option to view immunization data on all patients associated with the site selected from the drop down list at the right of the dialog box. Patients Residing in <City or County Name>: Choose this option to view immunization data on all patients within a given city or county. This option is only available for city or county organizations. Patients Associated with <Organization Name> OR Patients Residing in <City or County Name>: Choose this option to view immunization data on patients associated with your organization and those residing within a given county or city. This option is only available for city or county organizations. All Patients Associated with <Organization Name>: Choose this option to view immunization data on all patients associated with your organization. 3. Click one of the following to specify the patients to return on the report: 12.20 Patients who did NOT meet the benchmark: Choose this option to return a list of patients who did not meet the benchmark(s) defined in the table. Patients who DID meet the benchmark: Choose this option to return a list of patients who met the benchmark(s) defined in the table. All patients, regardless of whether they met the benchmark or not: Choose this option to return a list of all patients meeting the criteria defined on the screen. Maryland Immunization Registry Reports and Forms 4. Select the age, birth date range, or age range of the patients by choosing one of the following: Less than or equal to 72 months old: Choose this option to return all patients who are 72 months old or younger. Birth date range: Choose this option to enter a range of birth dates. Enter the earliest birth date in the first field and the latest birth date in the second field that you wish included on the report, or use the calendar icons beside each field to enter the dates. Age range: Choose this option to enter an age range. Enter the youngest age in the first field, then use the drop down list next to it to choose days, months, or years. In the Oldest Age field, enter an age and use the pick list to choose days, months, or years. 5. Select either the Standard Assessment or the Assess Patients with Sufficient Refusal History as Covered option for the report by choosing the appropriate radio button. Selecting the second option will return a benchmark report that counts patients with sufficient refusal comments as being up-to-date. Refusals of Vaccine In order for patient refusals of vaccine to be calculated correctly on assessment and benchmark reports, an appropriate Applies-to-Date must be entered for refusal comments on the Patient Comments tab. Refer to the Manage Patients chapter of this manual for more information. 6. Select the report evaluation date by entering the date in the field provided or by using the calendar icon to enter the date. No immunizations administered after the evaluation date will be included in the report. 7. Select the benchmark(s) to be used on the report: To select one or more single vaccine benchmarks within a single row, click the box where the vaccine and the number of months intersect. For example, clicking the box with “4” in it where “DTaP” and “@ 19 months” intersect will result in a report with this benchmark included. To select all benchmarks in a row, you may click on the first box in the row that indicates “@ X months.” To select benchmarks in a predefined series, select one of the 431, 43133, or 431331 combinations at the bottom of the table. 8. Press Generate. Reports and Forms Maryland Immunization Registry 12.21 9. The Benchmark Report Status screen will display. Press Refresh occasionally to check on the progress of the report. When the report is ready, click Benchmark, which will appear underlined and in blue. Once this link is clicked, ImmuNet will display the benchmark report at the bottom of the Benchmark Report Status screen. In addition, you may do one of the following: Click the Export as Text link to display the report in text file format. Click the Export as a Spreadsheet link to display the report in a spreadsheet format. Click the Display as a PDF link to display the report in Adobe® Reader. Note: The size of your file is not limited when you choose to export the benchmark report as text. However, to export as a spreadsheet, there is a limit of 65,535 lines. The information message “file not loaded completely” will display to indicate that part of the report was truncated. When the report is displayed as a PDF, the report will be limited to about 5,000 lines (119 pages); if the report is more than 5,000 lines, a red error report banner will display. Group Reports The purpose of Group Reports is to run the Immunization History Report for a group of selected patients. To run the report, complete the following steps: 1. Click on Group Patients under the Reports section of the menu panel. 2. To run for patients in a specific birth date range, click on the check box on the first line. Enter a from birth date and to birth date in MM/DD/YYYY format. 3. To run for patients who have immunizations administered by one of your sites, click the check box on the second line. Choose a site from the drop down list. 4. To run for patients who have an immunization in a specific date range, click the check box on the third line. Enter a From and To date in MM/DD/YYYY format. 12.22 Maryland Immunization Registry Reports and Forms 5. To run for patients who have a particular insurer, click the check box on the fourth line. Choose an insurer from the drop down list. Note: You may combine any of the criteria in the above steps. The system selects patients who fulfill all the criteria you specify. 6. Additionally, you may choose a sort order. Your two options are either by Last Name then Age or by Age, then Last Name. 7. If you wish to start over, click the Reset button. The system erases all the criteria you entered and starts with a fresh page. You may proceed to enter your criteria again. 8. When criteria are completed, click the Generate button. The system starts to generate the report and takes you to the Check Group Status screen. 9. After the report finishes generating, the top line on the Check Group Status screen becomes a hyperlink. Click on the hyperlink. 10. The system displays the report output in PDF format. Reports and Forms Maryland Immunization Registry 12.23 Patient Reports For all patients in ImmuNet, you may generate the following reports from the Patient Reports Screen: Vaccine Administration Report, DHMH Form 4500 Maryland 896 School Certificate Immunization History Report Immunizations Needed Vaccine Administration Report, DHMH Form 4500 The Vaccine Administration Record displays demographics, contact information, and immunization history for the selected patient. The responsible person’s and clinician’s signatures can also be collected on this form. To generate the report, follow these steps: 1. From a patient’s Manage Patient screen or Manage Immunizations screen, press . 2. At the Patient Reports screen, choose your org name under the “Additional Information” column for the Vaccine Administration report. 3. Click on Vaccine Administration Report, DHMH Form 4500, which is underlined and in blue text. 4. Once the report is generated, it will be displayed using Adobe Acrobat Reader®. Refer to the Optimizing ImmuNet chapter in this manual for more information on Acrobat Reader®. 12.24 Maryland Immunization Registry Reports and Forms 5. To return to the Patient Reports screen, press the Reports and Forms Maryland Immunization Registry button on your browser. 12.25 Maryland 896 School Report The Maryland 896 School Report is the official Maryland form for recording student immunization information required for school admission. From a patient’s Manage Patient screen or Manage Immunizations screen, press . 2. At the Patient Reports Patient screen, click on Maryland 896 School Report, which is underlined and in blue text. 3. Once the report is generated, it will be displayed using Adobe Acrobat Reader®. Refer to the Optimizing ImmuNet chapter in this manual for more information on Acrobat Reader®. Immunization History Report The Immunization History Report displays demographics, contact information, and a detailed summary of the patient’s immunization history. This report will typically be used as an official school record. This report should be provided to parents and guardians, as requested. To generate the report, follow these steps: 1. From a patient’s Manage Patient screen or Manage Immunizations screen, press 2. At the Patient Reports Patient screen, click on Immunization History Report, which is underlined and in blue text. 3. Once the report is generated, it will be displayed using Adobe Acrobat Reader®. Refer to the Optimizing ImmuNet chapter in this manual for more information on Acrobat Reader®. 12.26 Maryland Immunization Registry Reports and Forms . 4. To return to the Patient Reports screen, press the button on your browser. Immunizations Needed Report The Immunizations Needed report displays demographics, contact information, immunization history, and immunizations recommended by date according to the tracking schedule assigned to the patient. This report can be provided to parents and guardians for their records and helps to identify upcoming immunizations for their children. In addition, it provides a place for the next appointment date and organization phone number. To generate the report, follow these steps: 1. From a patient’s Manage Patient screen or Manage Immunizations screen, press 2. At the Patient Reports screen, click on Immunizations Needed, which is underlined and in blue text. 3. Once the report is generated, it will be displayed using Adobe Acrobat Reader®. Refer to the Optimizing ImmuNet chapter in this manual for more information on Acrobat Reader®. Reports and Forms Maryland Immunization Registry 12.27 . 12.28 Maryland Immunization Registry Reports and Forms 4. To return to the Patient Reports screen, you may close the Acrobat Reader® by clicking the Back Button in the upper right corner of the Immunizations Needed Report window. Reminder/Recall From the Reports menu option, you may generate reminder and recall notices, which include letters, mailing labels, and patient listings. Note: Generation of reminder and recall notices Reminder and recall notices can be generated for each patient, provided that the following conditions are met: The status is “Active” in the Patient Information Section for your organization. The “Allow Reminder and Recall Contact?” indicator in the Patient Information Section is “Yes.” The patient has complete address information listed in the Address Information Section. Reminder/Recall Requests To select and submit reminder/recall criteria for patients, you will need to fill in the criteria on the Reminder Request screen. Follow these steps to generate reminder/recall requests: 1. Click Reminder/Recall under Reports on the menu panel. 2. Patient Population: This section is available only to State and Local County Public Health organizations. Users associated with these organizations can select patients based on their specific organization or that are residing in a specific county by selecting one of the following options: To generate a reminder for all patients associated with your organization select the top radio button. To generate a reminder for all patients within your county, select the second radio button. By default, inactive patients and patients not allowing reminders will be included in this report. You can click on the check the boxes to that appear on the right to exclude inactive patients and/or patients who have requested that reminders not be sent to them. To generate a reminder for both patients associated with your organization or residing in your county, select the third radio button. By default, inactive patients and patients not allowing reminders will be included in this report. Reports and Forms Maryland Immunization Registry 12.29 You can check the boxes that appear on the right to exclude inactive patients and/or patients who have requested that reminders not be sent to them. 3. Tracking Schedule: ImmuNet only uses the tracking schedule recommended by the Advisory Committee on Immunizations Practices (ACIP). Therefore, selecting to use the tracking schedule associated with each patient or a uniform tracking schedule for all patients will be based on ACIP recommendations. 4. Vaccine Groups: in the vaccine groups section of the screen: Indicate whether you wish to include all vaccine groups in the search criteria or if you wish to include only selected groups by clicking the appropriate radio button. If you choose to include only selected vaccine groups, select these groups by double clicking a group or highlighting a chosen group and pressing ADD. Do this for each group desired. By selecting specific vaccine groups, you will limit the search to only those patients who will be due/past-due for the selected immunizations. However, ImmuNet will provide a list of all immunizations for which the selected patients are due/past-due. 5. School/Primary Care Provider: Choosing a school or primary care provider allows you to narrow your search to only the patients assigned to a particular school or physician/clinic. If you do not wish to specify a school and/or provider, leave these fields blank. These fields can only be utilized if the organization created a list of schools and physicians to populate the drop down boxes on the patient demographic screen and has selected data from these fields in each of the patient’s records. 12.30 To choose a school, select a school name from the drop down list provided. Note that these schools are maintained for each provider through the User Interface, using the ‘manage schools’ menu item. To choose a primary care provider, select a physician or clinic name from the drop down list provided. Maryland Immunization Registry Reports and Forms 6. Additional Demographic Criteria: Entering a city and/or ZIP code will narrow your search to only the patients associated with the entered geographical area. However, by entering a county, you will expand your search to all patients who reside in the selected county. The county option is only available to county public health organizations. If you do not wish to specify a city, ZIP code, or county, leave these fields blank. To enter a city, type the city name within the first field. To enter a ZIP code, enter the five-digit number in the next field. To enter a county, choose from the drop down list in the third field. 7. Date Criteria Target Date Range: When a target date is specified, the report will include those patients that are due/overdue for immunizations within the date range. To choose a target date range, enter the beginning date in the “From” text box and the ending date in the “To” text box in MM/DD/YYYY format, or use the calendar icon to select the desired dates. These dates can range from the past to the future; therefore, you have the capability to run a recall, reminder, or a combination of the two. If either the “From” date or “To” date is unspecified for the Target Date Range, the system will use the date that you run the report for that field. If both the “From” and “To” dates are left blank, the system will find those patients who are due or overdue as of the date that you run the report. Birth Date Range: When a birth date range is specified, the report will return those patients who have a birth date that falls within the range entered. To choose a birth date range, enter the beginning date in the “From” text box and the ending date in the “To” text box in MM/DD/YYYY format, or use the calendar icons to select the desired dates. If the “From” date is unspecified for the Birth Date Range, the report will include the oldest patients in the system. If the “To” date is unspecified for the Birth Date Range, the system will use the date that you run the report for that field. Reports and Forms Maryland Immunization Registry 12.31 Weeks Since Last Notice: When a number is entered in this field, the report will include only those patients who have not received a reminder notice within the specified number of weeks prior to the current date. Note: Patients are shared between organizations; therefore, another organization may have recently generated a notice for the patient. Exclude Patients More Than: To exclude patients who are overdue and who may have received several reminders already, provide a number of months from the drop down list provided. Exclude from: If excluding patients overdue for a certain number of months, indicate the date from which patients should be excluded; choose either the current date or the Target “From” Date (uses the date from the field at the top of the section) by clicking the appropriate radio button. If no target date information is entered, patients will be excluded from the date the report was run. 8. Sorting Criteria: This section allows you to specify how the data will be sorted. If a sort order is not specified, ImmuNet will sort the report results first by the patient’s last name in ascending order (A to Z), then by the first name in ascending order. 12.32 Sort 1st By: Choose a primary information field by selecting from the drop down list provided. Ascending/descending order: Choose how the primary field is sorted; choose either ascending (A to Z) or descending (Z to A) order from the drop down list. You may, if desired, complete additional ordering sequences for the second through fourth sorts. Maryland Immunization Registry Reports and Forms 9. Generate the report: Press the Generate button. Depending upon the number of patients associated with your provider organization, it may take five minutes or more to generate the data for the various reports. While the data is being generated, the Request and Output status page indicates the percentage of completion. Periodically press Refresh to update the status. Note: Waiting for reminder requests Once you reach the Reminder Request Status screen, it is not necessary to stay at this screen while your report is being created. You may go anywhere in ImmuNet while the report is generating and may return to the status screen by clicking on the Check Reminder Status link under Reports on the menu panel. Likewise, you may close out of ImmuNet and return to the status screen by clicking on the Check Reminder Status link after logging in again. Summary Screen When the report is complete, you may click on the blue underlined date to go to the Reminder Request Process Summary screen. The Summary screen lists the number of patients involved in the search and the criteria that were used to define the search. From the Summary screen, you may create various reminder output options. Reports and Forms Maryland Immunization Registry 12.33 Last Notice Date Options On the bottom of the Reminder Request Process Summary screen, you have the option of resetting the last notice date, which will affect future reminder/recall notices generated using this information. Your options on the last notice date table include: 1. Set the last notice date to today’s date. This is the default option and is indicated by a check mark. 2. Set the last notice date to reflect the previous last notice date for all patients eligible for this reminder by pressing Revert Eligible. Use this option if you choose not to have the current report generation reflected in the Last Notice Date option on the Reminder Request screen for the recipients of this reminder. 3. Set the last notice date to reflect the previous last notice date for all patients immunized by your organization by pressing Revert All. Use this option if you choose not to have the current report generation reflected in the Last Notice Date option on the Reminder Request screen for all patients immunized by your organization. 4. Press Cancel to return to the Reminder Request Status screen. Reminder/Recall Output Options The Reminder Request Output Options table, found on the Reminder Request Process Summary screen, allows you to choose how you would like to use the data from your query. Reminder Letters The letter output option allows you to generate a standard form letter for the parent/guardian for each patient returned on your query. The letter allows room at the top for your organization’s letterhead. The body of the letter includes the patient’s immunization history, recommended immunizations and due dates. There are up to two lines for free text and/or a telephone number. To generate Reminder Letters, follow these steps: 1. Under the Additional Input column or the Letter section of the table, enter: 12.34 Maryland Immunization Registry Reports and Forms A report name in the appropriate field, if desired. If a report name is not indicated, the report will simply be named “Reminder Letter” on the Reminder Report Status screen Additional information in the Free Text field, if desired. You may include a maximum of 400 characters in this field. Any information entered in this text box will be presented as the closing for each of the letters generated in your report. A telephone number in the appropriate field, if desired. If a telephone number is entered in this text box, then the number will be presented in the closing for each of the letters generated in your report. 2. Click on Reminder Letter, which is underlined and in blue text. 3. Your report will be listed on the Reminder Request Status screen; the bottom table shows the name of the request, the date and time it was started, and the status of the request. You have the option of moving to other portions of ImmuNet or using other functions of your computer while you are waiting for your letters to process. To return to check the progress of your request, press Check Reminder Status under Reports on the menu panel. If you choose to stay at the Reminder Request Status screen while your request is processing, press Refresh occasionally to check the status. 4. Once the status says Ready and the report name is underlined and appears in blue, your letters are ready to be viewed. Click on the report name to view or print the letters in Adobe Reader®. 5. To print the letters, press the printer icon on the Adobe® toolbar. Press OK in the Print dialog box. 6. To print additional output, press the BACK button on your browser. At the Reminder Request Status screen, click on the underlined reminder request (top table) to return to the Reminder Request Process Summary screen. Mailing Labels The labels output option produces 30 labels per page on Avery Mailing Labels #5160. To generate mailing labels, follow these steps: 1. 2. Click on Mailing Labels, which is underlined and in blue text. Your request will be listed on the Reminder Request Status screen; the bottom table shows the name of the request, the date and time it was started, and the status of the request. You have the option of moving to other portions of ImmuNet or using other functions of your computer while you are waiting for your labels to process. To return to check the progress of your request, press Check Reminder Status under Reports on the menu panel. If you choose to stay at the Reminder Request Status screen while your request is processing, press Refresh occasionally to check the status. Reports and Forms Maryland Immunization Registry 12.35 3. Once the report name is underlined and appears in blue text, your labels are ready. Click on the report name to view or print the labels in Adobe Reader®. 4. To print the labels, press the printer icon on the Adobe® toolbar. Press OK in the Print dialog box. 5. To print additional output, press the Back button on your browser. At the Reminder Request Status screen, click on the underlined reminder request (top table) to return to the Reminder Request Process Summary screen. Patient Query Listings The Patient Query Listing displays contact information for those patients identified as being due/overdue in the Reminder/Recall output in a report format. This report lists every patient that was returned in the report query process. To generate a Patient Query Listing, complete the following steps: 1. Click on Patient Query Listing, which is underlined and in blue text. 2. Your request will be listed on the Reminder Request Status screen; the bottom table shows the name of the request, the date and time it was started, and the status of the request. You have the option of moving to other portions of ImmuNet or using other functions of your computer while you are waiting for your report to process. To return to check the progress of your request, press Check Reminder Status under Reports on the menu panel. If you choose to stay at the Reminder Request Status screen while your request is processing, press Refresh occasionally to check the status. 3. Once the report name is underlined and appears in blue text, your report is ready. Click on the report name to view or print the report in Adobe Reader®. 4. To print the report, press the printer icon on the Adobe® toolbar. Press OK in the Print dialog box. 5. To print additional output, press the Back button on your browser. At the Reminder Request Status screen, click on the underlined reminder request (top table) to return to the Reminder Request Process Summary screen. Creating Custom Letters In addition to the standard letter, ImmuNet allows users to create and store up to three custom letters to be used for reminder/recall. To create a new custom letter, follow these steps. 1. Click on Manage Custom Letter under Reports on the menu panel. 2. Click the underlined New Custom Letter link. 12.36 Maryland Immunization Registry Reports and Forms 3. At the Create New Custom Letter screen, enter the following: Top Margin: Choose the number of blank lines you would like at the top of the letter from the drop down list provided. These blank spaces will leave room for your office letterhead to show up on each letter generated from the report. Include Patient Address: Check the box to include the patient’s address at the top of the letter. Salutation: Enter a greeting, then choose a name option from the drop down list provided. a. If name is chosen, the name of the patient will show up after the salutation. b. If responsible person is chosen, the letter will read <salutation> Parent/Guardian of <patient name>. Paragraph 1: In the field marked “First Part”, enter desired text. If you wish to include a name within the paragraph, enter text up to the mention of the name ending with a single space. Next, choose the name you would like to appear within the paragraph from the drop down list (either parent/guardian, patient name, or no name). In the field marked “Second Part”, continue to enter the rest of the text. If you do not wish to include a name, you may enter all of the first paragraph text in the field marked “First Part” and select “no name” from the name drop down list. Reports and Forms Maryland Immunization Registry 12.37 Immunization History: Check the box to include the patient’s immunization history in the letter. Paragraph 2: Enter more text in this field, if desired. Immunization recommendations: Check this box to include the immunizations recommended for the patient in the letter. Paragraph 3: Enter text in this field, if desired. Closing: Enter a closing word or statement in this field. If you wish to include your provider organization’s name and/or telephone number after the closing, check the appropriate box(es). Name and Save the Custom Letter: Enter a name for the letter in the field provided. When the letter is complete, press Save. Generating Custom Letters The custom letter output option allows you to generate a customized letter for each patient returned on your query. To create a new custom letter, refer to the “Creating Custom Letters” section of this chapter. To generate a custom letter from the Reminder Request Process Summary screen, follow these steps: 1. Click the link with the name of the custom letter. The letter will begin generating immediately. 2. Your report will be listed on the Reminder Request Status screen; the bottom table shows the name of the request, the date and time it was started, and the status of the request. 12.38 You have the option of moving to other portions of ImmuNet or using other functions of your computer while you are waiting for your letters to process. To return to check the progress of your request, press Check Reminder Status under Reports on the menu panel. Maryland Immunization Registry Reports and Forms If you choose to stay at the Reminder Request Status screen while your request is processing, press occasionally to check the status. 3. Once the report name is underlined and appears in blue, your letters are ready. Click on the report name to view or print the letters in Adobe Reader®. 4. To print the letters, press the printer icon on the Adobe® toolbar. Press OK in the Print dialog box. 5. To print additional output, press the Back button on your browser. At the Reminder Request Status screen, click on the underlined reminder request (top table) to return to the Reminder Request Process Summary screen. Vaccines for Children (VFC) Reports The VFC Report details the number of patients that are vaccinated by your organization for each VFC eligibility type for a specified date range. To generate a VFC Report, follow these steps: 1. Click Request VFC Reports under the Reports section of the menu panel. 2. Select the organization name from the drop down list. 3. Enter a From date under the Report Date Range using the MM/DD/YYYY format. 4. Enter a To date under the Report Date Range using the MM/DD/YYYY format. 5. Choose a type of VFC Report to run. You have two choices: The Age Group report displays a summary of doses by VFC eligibility and four specific age ranges: < 1 year of age, 1-6 years of age, 7-18 years of age, and older than 19 years. The Vaccine Group report displays a summary of doses by VFC eligibility and vaccine groups. 6. Press Generate Report. 7. The form displays in Adobe® Reader. 8. To print the report, press the printer icon on the Adobe® toolbar. 9. Press OK in the Print dialog box. 10. To return to the Vaccines for Children Report Criteria screen, press the Back button on your browser. Reports and Forms Maryland Immunization Registry 12.39 Understanding the Vaccines for Children Report by Vaccine Group The following section explains the rows and columns within the VFC report. The report only displays vaccines administered by your organization. The VFC Report by Vaccine Group in IMMUNET is a required monthly report (Doses Administered) for the VFC Program. The columns on the report break down the vaccines administered by VFC eligibility. Column Vaccine Description Lists the vaccines that were used by your organization during the date range entered for the report. Medicaid/Medicare The immunization is associated with a patient whose record indicates “Medicaid/Medicare Managed Care”. Uninsured The immunization is associated with a patient whose record indicates “Uninsured”. American Indian The immunization is associated with a patient whose record indicates “American Indian/ Alaskan Native”. Underinsured The immunization is associated with a patient whose record indicates “Underinsured”. 12.40 Maryland Immunization Registry Reports and Forms Total # of VFC Eligible The total count of immunizations provided to VFC Eligible Doses Administered patients at your organization. Total # of Non-VFC Eligible The total count of immunizations given to Non-VFC Eligible Doses Administered patients at your organization. Total # of Healthy Kids The total number of immunizations administered to Administered patients participating in Health Kids program. Sub column Total by VFC Eligibility Description The total cells in the bottom row of the report represent the total count of immunizations for the given VFC eligibility. Reports and Forms Maryland Immunization Registry 12.41 Understanding the Vaccines for Children Report by Age Group The following section explains the rows and columns within the VFC report. The report only displays vaccines administered by your organization. The rows on the report break down the immunizations and patients by age in years. A patient who receives a vaccination when he or she is six years and 11 months old will be included in the 1-6 age group. Row <1 Description This row includes doses given to patients who were under one year of age at the time the dose was administered. 1-6 This row includes doses given to patients who were from one to six years of age at the time the dose was administered. 7-18 This row includes doses given to patients who were from seven to 18 years of age at the time the dose was administered. 19+ This row includes doses given to patients who were 19 years of age or older at the time the dose was administered. Annualized ImmuNet computes annualized estimates by using actual immunization and patient counts in each age group, applying a multiplier to estimate a yearly amount. For example, if a report was run for 01/01/2006 to 01/31/2006, the number in the annualized row will be roughly 12 times the actual counts. 12.42 Maryland Immunization Registry Reports and Forms The columns on the report break down the immunizations and patients by VFC eligibility. Column VFC Eligibility Unknown Description The immunization is associated with a patient whose patient record indicates “VFC Eligibility Unknown”. Not VFC Eligible The immunization is associated with a patient whose record indicates “Not VFC Eligible”. Medicaid/Medicare The immunization is associated with a patient whose record indicates “Medicaid/Medicare Managed Care”. Uninsured The immunization is associated with a patient whose record indicates “Uninsured”. American Indian The immunization is associated with a patient whose record indicates “American Indian/ Alaskan Native”. Underinsured The immunization is associated with a patient whose record indicates “Underinsured”. Healthy Kids The immunization is associated with a patient whose record indicates “Healthy Kids”. Sub columns Imms Description This sub-column counts the number of immunizations given to patients within each VFC eligibility category for the specified date range. Distinct Patients This sub-column counts the number of distinct patients associated with the immunizations given within each VFC eligibility category for the specified date range. (e.x.,A single patient who received three doses would contribute +3 to the Imms column but only +1 to the Distinct Patients column.) Totals include counts by VFC eligibility, age group, and grand total. Total Field Total by VFC Eligibility Sum of Immunizations Reports and Forms Description The total cells in the bottom row of the report represent the total count of immunizations or distinct patients for the given VFC eligibility, regardless of the age at which the dose was administered. The second-to-last column of the report shows a count of the number of immunizations given in each age category, regardless of VFC eligibility. Maryland Immunization Registry 12.43 Comprehensive Clinic Assessment Software Application (CoCASA) Extracts Note: This section of the user manual is only for users with role of Administrative User (Public Health) in ImmuNet. The Comprehensive Clinic Assessment Software Application (CoCASA) is a tool provided by the Centers for Disease Control and Prevention (CDC) for assessing immunization practices within a clinic, private practice, or any other environment where immunizations are provided. IMMUNET is able to extract your organization’s immunization information and save it in a format that may be used to import into CoCASA for analysis. Administrative (Public Health) users must gain Soft-access to the specific organization prior to running the CoCASA extract. For instructions on gaining Soft-access, please refer to the AFIX/CoCASA Training Handout. To perform an extract of information for CoCASA, follow these steps: 1. Click on the CoCASA Extract menu item under Reports on the menu panel. 2. Enter a Common Review Date in the MM/DD/YYYY format or click on the calendar icon to set the date. This date is known as the “as of” date in CoCASA. 3. Enter the minimum age the patient must be on the common review date by entering a number and choosing days, months or years from the drop down list. This field defaults to 0 months. 4. Enter the age the patient must be under on the common review date by entering a number and choosing days, months, or years from the drop down list. This field defaults to 36 months. 5. If a city or county organization, choose the appropriate radio button to report on (this section is not available for private organizations): 12.44 Only those patients associated with your organization. Only the patients within your city or county. Both patients within your organization and in your city or county. Maryland Immunization Registry Reports and Forms If you choose the second or third radio button, select the desired city or county(s) by double clicking a county name or by highlighting a chosen county and pressing Add. Do this for each city or county desired. Note: Only county organizations running an extract on themselves would have the county option. Otherwise, Administrative (Public Health) users can only run the extract on the active patients for the organization that they are soft accessing. 6. Press OK. 7. A screen will display instructing you to check the status of the extract by going to the Check Request Status screen. 8. Click on Check Request Status under Reports on the menu panel. You may click the Refresh button at any time to update the status of the report. You have the option of moving to other portions of IMMUNET or using other functions of your computer while you are waiting for your download to process. To return to check the progress of your download, click Check Request Status on the menu panel. When your extract is complete, it will appear in the status table underlined and in blue text. 9. Double click the name of the underlined CoCASA file. In the File Download box, press RUN. You may get a security warning from Internet Explorer. If the security window pops up, press RUN again. Your extract file will save on your computer’s desk top. It will be named cocasa ###.txt and stored as a text document. Reports and Forms Maryland Immunization Registry 12.45 Importing a Text File into CoCASA To import your text file into the CoCASA program, follow these steps: 1. Open your CoCASA program. 2. Select Import from the File menu, then select Import Using Template. 3. In the template window, choose “Maryland” from the scroll-down list. Press OK. Your import fields will automatically populate on the template screen. 4. In the Age Range section of the import window, enter the same age range that you used in ImmuNet when creating your extract. Make sure to click the correct radio button for months or years. Also, be sure to enter the correct date in the “as of” field. This date will be the Common Review Date you entered into ImmuNet when you created your extract. 5. 12.46 Next, at the File Name field, click Browse to locate your newly created CoCASA text file (.txt) Maryland Immunization Registry Reports and Forms 6. Lastly, name the assessment in the assessment field at the bottom of the screen, then click the Import button a. LHD’s should name the assessment the same way you would normally name any other assessment in CoCASA: county# - last 2 #s for the year-org name (e.g., (21-09-Healthy Peds) b. Some records may not be able to import into CoCASA because of errors in IMMUNET data entry or because CoCASA does not accept it (ex. Synagis). If there are any errors during importing, an error report will generate for your viewing in text file format. To identify the vaccines rejected, refer to the CVX code list maintained by the National Center for Immunization and Respiratory Diseases (NCIRD). http://www.cdc.gov/vaccines/programs/iis/stds/cvx.htm 7. Click the Close button to exit the import window. You now are able to select the assessment you have uploaded from ImmuNet and run CoCASA reports as you normally would. Note: CoCASA extracts may take more than 20 minutes to download, depending on the size of your organization. Instead of waiting on the status screen for the download to complete, you may work with other features in ImmuNet and even log out while the file is downloading. To return to the status screen, press Check Request Status. Reports and Forms Maryland Immunization Registry 12.47