1
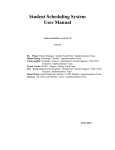
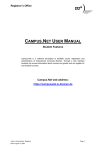
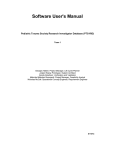
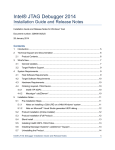
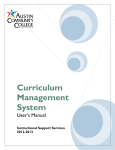
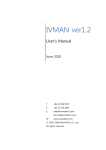
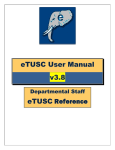
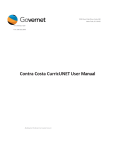
Student Scheduling System User Manual Student Scheduling System Team 06 Douglass Kinnes Alexey Tregubov Mihir Daptardar Ihsan Tolga Simone Lojeck : Project Manager, Quality Focal Point, Implementer : System Architect, UML Modeler, Implementer : Operational Concept Engineer, Quality Focal Point, Implementer : Life Cycle Planner, Feasibility Analyst, Implementer : IV&V, Quality Focal Point, Shaper 04/20/2013 User Manual (UM) Version 1.7 Version History Date Author Version 03/29/2013 Ihsan Tolga 1.0 Draft version of UM is formed. Initial information and guidelines added. To satisfy the requirements of the CCD/TRR and to provide instructions to the users how to use the scheduling system software. 04/05/2013 Ihsan Tolga 1.1 Sections updated. Guidelines for operation added. Updates made with respect to upcoming CCD. 04/13/2013 Ihsan Tolga 1.5 Screenshots updated. Minor revisions made. Admin side is updated with respect to the CCD session. Error acknowledgments added. CCD concern evaluated and changes made. New screenshots due to new UI. 04/20/2013 Ihsan Tolga 1.7 Student Side updated. Admin side screenshot updated. Updates/revisions made for TS with full system capability. UM_IOC2_S13b_T06_V1.7.doc Changes made ii Rationale Version Date: 04/20/13 User Manual (UM) Version 1.7 Table of Contents VERSION HISTORY ..................................................................................................................................... II TABLE OF CONTENTS .............................................................................................................................. III TABLE OF TABLES ....................................................................................................................................IV TABLE OF FIGURES ...................................................................................................................................V 1. 2. Introduction .......................................................................................................................................................1 1.1 System Overview .......................................................................................................................................1 1.2 System Requirements ................................................................................................................................1 Installation Procedures.......................................................................................................................................2 2.1 Initialization procedures ............................................................................................................................2 2.2 Re-installation ............................................................................................................................................3 2.3 De-installation............................................................................................................................................3 3. Operational Procedures ......................................................................................................................................4 4. Troubleshooting ............................................................................................................................................... 11 4.1 Frequently Asked questions ..................................................................................................................... 12 4.2 Error Codes and Messages ....................................................................................................................... 13 4.3 Note ......................................................................................................................................................... 14 UM_IOC2_S13b_T06_V1.7.doc iii Version Date: 04/20/13 User Manual (UM) Version 1.7 Table of Tables No table of figures entries found. UM_IOC2_S13b_T06_V1.7.doc iv Version Date: 04/20/13 User Manual (UM) Version 1.7 Table of Figures Figure 1: Starting PLAY Console ..................................................................................................................................3 Figure 2: Courses Page .................................................................................................................................................4 Figure 3: Add Course Page ...........................................................................................................................................5 Figure 4: Add Course Group Page................................................................................................................................5 Figure 5: Course Group Page .......................................................................................................................................6 Figure 6: Requirements Page ........................................................................................................................................7 Figure 7: Degree Program Page ...................................................................................................................................7 Figure 8: Documentation Page .....................................................................................................................................8 Figure 9: Degree Selection Page ..................................................................................................................................9 Figure 10: Degree Selection Page - Courses ................................................................................................................9 Figure 11: Study Plan Page ........................................................................................................................................ 10 Figure 12: No Study Plan Page ................................................................................................................................... 11 Figure 13: Course Add Page ....................................................................................................................................... 12 Figure 14: Course Edit Page ....................................................................................................................................... 13 Figure 15: Missing Login Screen ................................................................................................................................ 13 Figure 16: Degree Program Add Page ....................................................................................................................... 14 UM_IOC2_S13b_T06_V1.7.doc v Version Date: 04/20/13 User Manual (UM) Version 1.7 1. Introduction 1.1 System Overview The purpose of Student Scheduling System is to provide a study plan creation facilitator for both undergrad students and faculty of Steven’s Institute of Technology. With current manual method, forming a single study plan for a single student may take hours of collaborative work of advisors and students and regarding each student has different course history or plans, they need to form unique study plan for the majority of the students. By using the Student Scheduling System; this process is automated; in other words, after entering the data representing his/her course history/graduation plans, a student can get possible study plan generated by the system. And for the administrative side; they can add/remove courses to the system, modify courses’ features/information, form new course groups and create new degree programs. Meanwhile they are also able to delete/modify these course groups, degree programs or even requirements to complete these programs. 1.2 System Requirements 1.2.1 Minimum hardware/software requirements for running the Student Scheduling System are given below under the related headers. Requirements might show minor differences among the different systems or hardware/OS equipment. Therefore; the given requirements below represent a recommended configuration as well to operate the Student Scheduling System properly. Hardware Requirements Server Side Hardware Requirements: Processor : Intel® Xeon E3xxx Processor or equivalent. Memory : 3GB Storage : 5GB for database tier Data Bandwidth : (Relative to the simultaneous numbers of users.) ~1 Mbit/s Domain Name and Dedicated IP address I/O Devices for Maintenance Issues User Side Hardware Requirements: Processor : Intel® Centrino/Ix/Celeron/PentiumIV; AMD Athlon/Phenom/FX processors or equivalent. Memory : 1GB free space Internet Connection I/O Devices to operate Web Browsers properly. UM_IOC2_S13b_T06_V1.7.doc 1 Version Date: 04/20/13 User Manual (UM) 1.2.2 Version 1.7 Software Requirements Server Side Software Requirements: UNIX Server or Windows Server Java Runtime Environment 6 or higher. MySQL PLAY framework for Java Java Editor (Recommended for maintenance issues) XAMPP (Recommended for maintenance issues) Java IDE for maintenance. User Side Software Requirements: 1.2.3 Windows, Linux, MacOSx or equivalent (mobile) operating system that can operate supported web browsers. Google Chrome, Mozilla Firefox web browser. (Strongly recommended.) Java Runtime Environment 6 or higher. Other Requirements It is highly recommended for the student users to be familiar about the courses and their course histories, especially in the cases they are transfer students. For administrative side; it is highly recommended to be familiar about the relations between course groups and their effects on graduation satisfaction. It is highly recommended for maintainers to feel comfortable with Java and Web developing and using MySQL like relational database software. 2. Installation Procedures Follow the steps below to complete installation of Student Scheduling System successfully: Copy the “student_scheduling_system” directory into the server hard-drive. Install Java PLAY! Framework to the system if it is not already installed. Configure the system’s path for operating easiness. Start database application. “db_schema”, “db_init_values” Open Java PLAY! Framework console from command window. Run the “student_scheduling_system” application under the related directory. You can reach the working version on “localhost”. (Preferably on port 9000) Enter the domain address in address bar of web browser. 2.1 Initialization procedures Copy the “student_scheduling_system” directory into the server hard-drive. Install Java PLAY! Framework to the system if it is not already installed. Configure the system’s path for operating easiness. Start database application. “db_schema”, “db_init_values” Open Java PLAY! Framework console from command window. Run the “student_scheduling_system” application under the related directory. UM_IOC2_S13b_T06_V1.7.doc 2 Version Date: 04/20/13 User Manual (UM) Version 1.7 You can reach the working version on “localhost” by calling it from your browsers address space. (Preferably on port:9000) Enter the domain address in the address bar of your web browser. Figure 1: Starting PLAY Console 2.2 Re-installation Delete the path from the path address bar under environment settings. Execute db_drop_schema under db directory in source files directory for database reset. Delete the directory includes source files and .java classes from the hard-drive. Stop the PLAY! Framework (Ctrl+d), clean the workspace. Exit from PLAY! Console. Repeat the procedure for initial installation. 2.3 De-installation Follow the steps below to successfully uninstall Student Scheduling System from the server. Delete the path from the path address bar under environment settings. Execute “db_drop_schema” under “db” directory in source files directory for database reset. Delete the directory includes source files and .java classes from the hard-drive. Stop the PLAY! Framework (Ctrl+d), clean the workspace. Exit from PLAY! Console. Delete the PLAY! Directory from the hard-drive. UM_IOC2_S13b_T06_V1.7.doc 3 Version Date: 04/20/13 User Manual (UM) Version 1.7 3. Operational Procedures For the Administrative Users: On login screen; type defined user name and password in related input boxes. Then click on the login button. The system will check your authorization for related side admin or student. You can return the homepage by clicking on Home button at any time. From the menu on the left of the screen; select the desired section. There are also links representing recent path in breadcrumbs form at each page’s top section to return back. o For Administrative Users: Courses: The courses and the information related to them in database are shown in the table as a list. To add a new course; click on the Add Course button on top of the list. To edit a course, click on the Edit button next to the course’s title. To delete a course, click on the Delete button next to the course’s title and confirm the operation on alert box by simply clicking on the “Yes”. Figure 2: Courses Page UM_IOC2_S13b_T06_V1.7.doc Add New Course: You should enter the Title in a string form (the system will produce abbreviation from that title i.e. HUM, CS), Course Numbers / Credits as integers, “on campus” / “online” information by checking the related checkboxes. Finally, for the Prerequisites (Prereq) and Corequisites; you should enter those courses’ names as a combination of Prefix and Course Number (i.e. CS105) by leaving a space between different courses (if there are any). Click on the Submit button to add the course. 4 Version Date: 04/20/13 User Manual (UM) Version 1.7 Figure 3: Add Course Page Course Groups: The course groups and their related information are shown on the table on this page. To edit/delete any course group, click on the Delete or Edit button next to the related course’s name. To add/form a new course group, click on the Add New Course Group button on top of the list. Add New Course Group: You should enter the name of the new course group in related text box and the abbreviation for this particular course group in the given text boxes. And regarding which way is desired to form the new course group, either List of Course or Combination of Groups should be selected. Click on the Submit button after the required information is entered. Figure 4: Add Course Group Page o UM_IOC2_S13b_T06_V1.7.doc List of Courses: The combination of Prefix and Course number (i.e. CS105) should be entered in this box by leaving one space between them if this radio button is selected. 5 Version Date: 04/20/13 User Manual (UM) Version 1.7 o Combination of Courses: The abbreviation of desired course groups should be entered in this text box by leaving one space between them to form a new course group including already existing course groups. Figure 5: Course Group Page Requirements: Existing requirements and information related to them are shown in the table on this page. To edit/delete a requirement; click on the Edit or Delete button next to the name of each existing requirement. To add a new requirement, click on the Add New Requirement button on top of the list. Add New Requirement: Enter the Name and the Abbreviation for each of the new requirement. Select the requirement type and select the required information for the selected requirement if needed (i.e. for “Simple”). It will be added to the list on the previous Requirements page. Click on the Submit button after the required information is entered. Requirement types are given below: o Simple (Select group) o Degree Specific Prerequisite o Degree Specific Corequisite o Predefined Semester (Select semester) o Combination UM_IOC2_S13b_T06_V1.7.doc 6 Version Date: 04/20/13 User Manual (UM) Version 1.7 Figure 6: Requirements Page Degree Programs: The offered “degree programs” exist in the database are shown on this page. To edit/delete an existing degree program, click on the Edit or Delete button next to its related degree program. To add a new degree program, click on the Add New Degree Program link on top of the list. Add New Degree Program: Enter the desired name of the new degree program in the related text box. After that, select the Requirements among the existing ones in database which are required to satisfy to graduate from this particular degree program. Click on the Submit button after the required information is entered. Figure 7: Degree Program Page Documentation: You can get the desired documentation/manual by clicking on the related links on this page. i.e. User’s Manual UM_IOC2_S13b_T06_V1.7.doc 7 Version Date: 04/20/13 User Manual (UM) Version 1.7 Figure 8: Documentation Page For the Student Users: On login screen; type given User Name and Password to login. Then click on the Submit Query button. You can return the homepage by clicking on Home button at any time. To login as a “student” will lead you to the “Degree Selection” screen. At the top, there are links representing recent path in breadcrumbs form to return back. UM_IOC2_S13b_T06_V1.7.doc 8 Version Date: 04/20/13 User Manual (UM) Version 1.7 Figure 9: Degree Selection Page o For Student Users: Select Desired Degree from the list with the same title. (i.e. CS_Entering_2011_Starting_With_CS115) Enter the Year of Entry as degree catalog year in the related input box. (as an integer form i.e. 2008) Enter the Desired Number of Semesters in the given input box as an integer (i.e. 8). Note that; if there is no possible study plan for the given number of semester, the system will not be able to provide a plan naturally. Click on the Submit Query button after entering the required information. Figure 10: Degree Selection Page - Courses UM_IOC2_S13b_T06_V1.7.doc 9 Version Date: 04/20/13 User Manual (UM) Version 1.7 From screen shown above: Select minimum and maximum number of courses desired to be taken in each semester. And for each requirement (they are listed in order); select the courses taken before or wanted to be taken particularly, besides its location and term only as optional. It should be noted that too narrow specifications may lead to no study plan solution found by the system. If no course is selected within these course groups shown or there is are missing course/courses, the system will assign course on its own. Click on the Submit Query button. Study plan screen will be retrieved after the system builds a study plan. Figure 11: Study Plan Page Courses for constructed study plan are listed right section of their related semesters and year. Courses (prefix and number) in red color are the courses which the user particularly selected. Ones in white are the courses which the system selected in place of the user. If the system cannot construct a valid study plan, it will show “No Study Plan” page as a result. The reasons may be too few semesters, non-correlated courses (i.e. prerequisites) or too few maximum course numbers per semester. In other cases, desired classes might not be available on those selected semesters either. UM_IOC2_S13b_T06_V1.7.doc 10 Version Date: 04/20/13 User Manual (UM) Version 1.7 Figure 12: No Study Plan Page In such cases (with too tight or too loose constraints), it may take up to one minute for system to construct a study plan or figure that there is no valid study plan with given constraints. To overcome these problems, relieve some of the constraints you gave to the system as inputs. That is sensible to start this relaxation process with the constraint with the least priority. 4. Troubleshooting UM_IOC2_S13b_T06_V1.7.doc 11 Version Date: 04/20/13 User Manual (UM) Version 1.7 4.1 Frequently Asked questions Do I need to login either as a student or an administrator to interact with the system? o Yes, to build a study plan as a student, you need to login to the system with your personal credentials (input information); and to get access to the actions of administrative side like adding/deleting courses/requirements/degree programs, you need to login as an admin with individual credentials as well. For “Course Add” function; is there any preferred format to enter prerequisites and corequisites? o Yes; you need to enter these course related information with such format <prefixes><course number> with space/and/or between each course. For example: “CS105 and CS125”; “CS105 CS145”; CS105 or CS201” and so on. Figure 13: Course Add Page For “Edit Course” function; is there a preferred format to enter prerequisites and corequisites? o Yes, it requires the same format with the inputting of “Course Add” function as below: <prefixes><course number> with space/and/or between each course. For example: “CS105 and CS125”; “CS105 CS145”; CS105 or CS201” and so on. UM_IOC2_S13b_T06_V1.7.doc 12 Version Date: 04/20/13 User Manual (UM) Version 1.7 Figure 14: Course Edit Page 4.2 Error Codes and Messages Login action: login = xxx, password: xxx: This error means that you entered wrong login information; the error might be either in username or password or both. The information you entered and the ones in database do not match. Figure 15: Missing Login Screen UM_IOC2_S13b_T06_V1.7.doc 13 Version Date: 04/20/13 User Manual (UM) Version 1.7 Blank Screen (soon to be filled with a valid error message screen) : This means that you did not enter sufficient information to commit the action you desire. For example; to add a new Degree Program, you must enter Degree Program Name and select at least one of the checkboxes which belong to existing requirements on database. Figure 16: Degree Program Add Page 4.3 Note CCD : Core Capability Drive-through Courses to be added for initial tests are stated in the supporting document of “Demonstration Guideline”. Administrators should get their authentication initials in person from system manager. UM_IOC2_S13b_T06_V1.7.doc 14 Version Date: 04/20/13