1
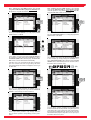
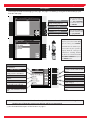
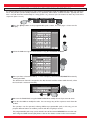
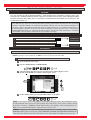
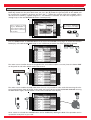
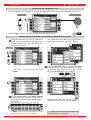
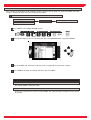
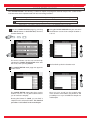
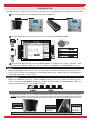
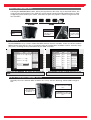
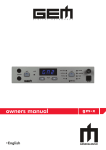
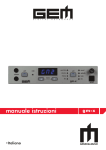
D I G I T A L
K E Y B O A R D S
Genesys Genesys Pro
(with hard disk kit)
Genesys s
Genesys s
Genesys series
Genesys series
Genesys grand ensemble
Genesys xp
release notes
•English
Genesys series
Genesys series release notes
GENESYS SERIE UPGRADE RELEASE NOTES
The present Genesys manual addendum contains all the functions instructions introduced by the
latest operating system upgrade and it is valid for the following Genesys models:
Genesys/Genesys “standard” with hard disk kit (code 970466) installed on board
Genesys S
Genesys S
Genesys ensemble
Genesys grand ensemble
Genesys xp
Genesys Oriental
V 1.01
V 2.01
V. 2.01
V 1.03
V 1.03
V 1.04
V. 1.01
In this manual addendum we’ll refer to all this models only as “Genesys”
RELEASE NOTES INDEX
Checking the operating system release
How to upgrade the operating system
Connect the genesys to the as1
Genesys microtuning response programming
Assign an user scale to a programmable pad
Create an user scale
Create or modify one (or more) user scale
Assign the user scale to a programmable pad
Assign a user scale to a programmable pad
Edit parts menu upgrade
Edit parts menu: l+r mode
Edit parts menu: portamento
Edit parts menu: legato
Play list programming upgrade
Standard midifile editing upgrade
Midifile transpose
Midifile mixing parameters: volume
Midifile mixing parameters: pan
Midifile mixing parameters: to change a sound in a midi track
Change a sound in a sequencer track in genesys xp
To confirm the editing procedure: store
Sample editor upgrade
Create a multisample using up 32 different samples
The auto assign function
The midi set up
Folder “autoload” function
Genesys series release notes
page1
page3
page4
page4
page4
page4
page5
page8
page8
page9
page10
page11
page16
page17
page17
page18
page18
page19
page19
page21
page21
page22
page25
page27
CHECKING THE OPERATING SYSTEM RELEASE
It is very important to install on board the latest operating system release of the instrument. For this reason first
of all check the currently installed O.S. Version:
1 Press the button SYSTEM on the control panel
2 The display show the SYSTEM setting main screen
4 In the higher part of the display the currently installed
O.S. data is reported. Please compare this date with
the one of the O.S. CD included in the Genesys package. In case the CD has a later date, please upgrade
the instrument. Also check in our websiste: www.
generalmusic.com.
3 Press F7 function button to select "BATTERY&RELEASE"
menu.
WARNING!
Before you proceed with the upgrading, please save all personal data stored in the
internal memory of the Genesys .
HOW TO UPGRADE THE OPERATING SYSTEM
1 Insert the operating system CD in the CD driver
6 Select the CD Rom as installation driver by turn the
alpha dial. Then press the ENTER button.
2 Switch OFF the Genesys
3 Switch on the instrument, rotating the ALPHA DIAL on
the panel at the same time.
4 The following SYSTEM SET UP screen appears in the
display:
7 After the confirm message, press ENTER again.
The upgrade will start. The upgrade will be
completed in a few minutes. Once the operation is
over, the main screen is showed on the display.
5 Select the number 2, using the cursor button DOWN
NOTE: in the Genesys there are two types of operating system upgrades:
1) Complete upgrade which contains new functions and implementations, optimization, debug and musical resource
update (Sounds and styles). This type of upgrade due to its size is normally archived in a CD.
2)
Upgrade patch. It consists of debug and optimization of the system without update the musical resource. Normally the
upgrade patch can be downloaded from our website and easily transferred in a floppy disk to upgrade the Genesys.
release notes
Genesys series
CONNECT THE GENESYS TO THE AS1
The AS1 is an important (optional) accessory allows you to perform using the arabic (and ethnic) scales, for all
details please refer to the AS1 owners manual.
AS1 Genesys is an optional accessory and have to be purchased separately. Please skip this chapter if you don’t have
an AS1
STEPS
1
Connect the Genesys to the AC power (please do not switch ON the keyboard at this point!)
2
Connect the Genesys to the a speaker system (or to an headphones)
3
Connect the AS1 adapter to the AC power, (please do not switch ON the AS1 at this point!)
4
Connect the Genesys and AS1 MIDI terminal
MIDI In
MIDI Out
MIDI In
MIDI Out
Please connect the AS1 MIDI Out to the Genesys MIDI In as a main connection. It is also possible to connect
a second MIDI cable from the Genesys MIDI Out to the AS1 MIDI In. This connection is facultative and serves
only as a means of observing AS1 command panel changes when sequenced data is played back on the
Genesys. For further details please refer to the relative chapter of the AS1 owners manual.
5
START THE GENESYS
6
TUNE THE GENESYS MIDI COMMON CHANNEL
To properly work with the AS1 the Genesys COMMON CHANNEL has to be set on channel 16.
A Press the button MIDI on the panel
The display shows the relative screen
B Press the function button [F5], COMMON/ARRG.
AS1 connection
Page1
release notes
Genesys series
The display now shows the MIDI COMMON channel setting screen
C
Set the COMMON channel =16 by rotating the DIAL
6
Now Start the AS1
Exit the MIDI menu pressing the button ESCAPE. The Genesys it is now ready to perform with the AS1 using
the arabic scales.
EXAMPLE
MIDI In
MIDI Out
Once the previous step are completed, recall any of the oriental preset and play along the keyboard
MIDI In
MIDI Out
Pressing now any of the AS1 function button (1-12) the corresponding note pitch will be realtime altered in oriental
style (1/4 of tone). The led of the pressed button will be ON, indicating the altered note. Pressing the button again
the pitch alteration is canceled (corresponding led OFF). More than one note can be used at the same time.
For more detail about this topic please refer to the AS1 owners manual.
Page2
AS1 connection
release notes
Genesys series
GENESYS MICROTUNING RESPONSE PROGRAMMING
Concept:
In Genesys the global Microtuning response can be set in order to affect ALL the PARTS both played in
realtime and triggered by the styles, or only the solo PARTS played in realtime, without affecting the parts
triggered by the styles. You can select the option you prefer.
Steps:
1 Press the button SYSTEM on the panel
Example with PART SELECT=ALL (default)
MIDI In
MIDI Out
2 Select the TUNING&SCALE menu using the
CURSOR, then press ENTER
Play on the keyboard using the styles and press any
of the ARABIC SCALE detune buttons on the AS1,
for example F#. In this way all the notes=F# will
be detuned, in all octaves and in all the instruments
of the used section (realtime and styles).
4 Select now the UPPER option by rotating the DIAL
The instrument enter the TUNING&SCALE
menu.
3 Press the function button F2 PART SELECT
Selecting the UPPER mode, only the notes of the
realtime tracks assigned to the UPPER section will
be affected by the AS1 detuning.
Example selecting PART SELECT=UPPER
MIDI In
MIDI Out
The default set up is ALL. This mean that detuning
one note with the AS1, ALL the same notes and ALL
the instruments used in your performance will be
detuned (even those triggered by the accompaniment tracks).
microtuning response programming
Play on the keyboard using the styles and press any
of the ARABIC SCALE detune buttons on the AS1,
for example F#. In this way only the notes=F# of all
the octaves assigned to the UPPER sections (soloist
sounds), will be affected by the detuning.
Page3
release notes
Genesys series
ASSIGN AN USER SCALE TO A PROGRAMMABLE PAD
Concept:
This function allows you to assign to any of the programmable pads, a custom temperament or user
scale that is memorized in any of the User scale memory locations.
Steps:
A
Create or modify one (or more) USER SCALE
B Assign the USER SCALE to a Programmable Pad
Description
CREATE AN USER SCALE
1 Press the SYSTEM button on the panel
4 Select the note you want to detune using the
CURSOR, then input the new value by rotating
the DIAL (i.e. D#-1 in this example)
SELECT
2 Press the TUNING & SCALE [F5] function button
3 Select KEYBOARD SCALE in the menu with the
DOWN CURSOR, then select USER1 by rotating
the DIAL
5 Repeat the detune operation selecting other
notes as desired
6 Once you have finished detuning the notes,
press the SAVE button [F8]
7 Select a USER scale to memorize your custom
scale (USER1 in this case) , then press ENTER
Your custom scale pitch data is now memorized in
the USER1 location. You can memorize other user
scale using the remaining locations (from 2 to 8)
Page4
assign a user scale to a pad
release notes
Genesys series
ASSIGN A USER SCALE TO A PROGRAMMABLE PAD
1
Press the EDIT button in the programmable pads
section. The edit page is shown on the display.
2
Select a PAD to assign the USER scale using the
UP/DOWN CURSOR. (the pad n.4 is used in this
example)
5 select the PAD n. 3 with the CURSOR, assign the
SCALE OFF function by rotating the DIAL
By pressing PAD n. 4 you can now recall in realtime the
temperament you have programmed in the USER scale 1.
Pressing the PAD n. 3 (SCALE OFF), you restore the normal
temperament (EQUAL).
3
Once you have selected the PAD, assign the SCALE
function by rotating the DIAL
4
Moving to the next field (USER 1) using the RIGHT CURSOR. Here you can select the USER scale memory to
assign to the PAD. (USER scale location from 1 to 8)
Now it is possible to select another pad to assign a
different USER scale or the SCALE OFF function, to
restore the normal temperament during your performance
The programmable pad set up can be stored in one of the internal MEMORIES or stored in realtime by using
the LOCK function [F8]. Please refer to the relative section in the owner manual.
assign a user scale to a pad
Page5
release notes
Genesys series
MULTIPEDAL MODE
The multipedal is a new optional accessory unit specifically designed for Genesys. This unit has six pedal
switches. All six may be used with the simple connection of only one pedal input: leaving the remaining
two available for volume and sustain.
1 Press the [PRESET] button in SECTION EDIT
4 Select the function you want to recall with each
pedal by rotating the DIAL.
It is also possible to check the function assigned
to the pedal simply pressing the relative footswitch.
2 Press the function button [B] or ENTER to enter
the menu
3 Select MULTIPEDAL in the pedal 1 field
5 Select another footswitch by using the CURSOR,
then select the desired function with the data
DIAL.
Repeat the operation until the six footswitches
are assigned to the functions you wish them to
control.
In this example we assume the MULTIPEDAL is connected to the input N. 1 on the rear panel. If you
have Connected the MULTIPEDAL to a different
input, you will have to select the correct one.
4 Press the function button [F5] MULTIPEDAL 1
NOTE:
To access the MULTIPEDAL mode functions, the optional MULTIPEDAL unit has to be connected to the Genesys.
Up to 3 MULTIPEDAL unit can be connected at the same time
to the Genesys pedal input
NOTE:
DAMPER, SOFT and SOSTENUTO can not be assigned to the
single switch pedal in MULTIPEDAL mode.
The display shows the MULTIPEDAL assign
screen
Page6
multipedal mode
release notes
Genesys series
FUNCTIONS ASSIGNABLES TO THE MULTIPEDAL SWITCH
Off
No effect
Start/Stop
Simulates the Start/Stop button.
Synchro
Enable /disable the syncro function
Intro
Activates the Intro.
Fill <
Activates the Fill< function.
Fill =
Activates the Fill function.
Fill >
Activates the Fill> function.
Ending
Activates the Ending function.
Variation 1
Switches to Variation 1.
Variation 2
Switches to Variation 2.
Variation 3
Switches to Variation 3
Variation 4
Switches to Variation 4.
Var >
Switches to the next Variation.
Var <
Switches to the previous Variation.
Memory>
Advances to the next memories
Memory<
Advances to the previous memories
Harmony
Activates/deactivates the Harmony function
Bass Inv.
Enables/disables the Bass inv. Function
Arrange On/Off
Activates/deactivates the Arranger
Fade In/Out
Activates/deactivates the Fade In/Out function.
Tempo >
Increases the Tempo setting by one unit at a time.
Tempo <
Decreases the Tempo setting by one unit at a time.
Punch
Minor
Activates/deactivates the Punch recording function during recording
operations.
Changes the speed of the Rotary effect from Slow to Fast or vice
versa.
Converts the currently held chord to the minor chord.
Dim
Converts the currently held chord to the diminished chord.
Min
7th Converts the currently held chord to the minor 7th chord.
Rotary s/f
Maj 7th
Converts the currently held chord to the Major 7th chord.
Voc. Genius on/off
Enable/Disable the vocal processor
Freeze Chord
Locks the current chord (pedal held), allowing you to play freely with
both hands across the entire key-board without triggering changes
in the Style auto-accompaniment. The function deactivates at pedal
release.
modo
Page7
release notes
Genesys series
EDIT PARTS MENU UPGRADE
The Genesys now features some exciting and useful new functions in the EDIT PARTS menu, increasing the
instrument’s versatility within PRESET programming and editing areas.
A
In the MODE/PRIORITY menu the new L+R Mode has now been included
B
In the EDIT PARTS Page 2 menu the PORTAMENTO mode has been included
C
In the EDIT PARTS Page 2 menu the LEGATO mode has been included
EDIT PARTS MENU: L+R Mode
The L+R priority mode allows you to play a selected part (instrument sound) of the Preset monophonicly,
triggering the notes played by only the left and right side of a chord.
1 Enter the EDIT PARTS menu pressing the PRESET button in the panel and
then the function button [F2]
To select the EDIT PARTS menu press F2 or use the CURSOR to select
the EDIT PARTS, and the press ENTER to confirm.
Navigation
2 Press the function button [F6] MODE/PRIORITY
3 The display shows the MODE/PRIORITY page set up
MODE PRIORITY TRACK VALUE
POLY
The track play polyphonic
MONO L The track play in monophonic
mode with left priority
MONO R The track play in monophonic
mode with right priority
MONO T The track play in monophonic
mode with last played note
priority
MONO The track play in monoL+R
phonic mode with left + right
priority
4 Select the PART using the UP/DOWN CURSOR and MODE/PRIORITY
Mode L+R by rotating the DIAL
Page8
preset edit menu upgrade
release notes
Genesys series
EDIT PARTS MENU: PORTAMENTO
This feature allows you to play a selected part (instrument sound) from a PRESET using the PORTAMENTO
feature. The portamento is a feature typically associated with acoustic instruments (i.e. violin, human voice,
trombone) providing a frequency shift sliding effect, between two different notes (pitch).
1 Enter the EDIT PARTS menu by pressing the PRESET button in the panel and
then the function button [F2]
To select the EDIT PARTS menu press F2 or use the CURSOR to select the EDIT
PARTS, and the press ENTER to confirm.
Navigation
2 Press the button [PAGE NEXT] on the panel to select the Page 2 control menu
3 Press the function button [F4] PORTAMENTO, the control menu will appear
on the screen
MODE OFF no portamento
NORMAL portamento creates
a pitch slide whenever a new
note is played.
LEGATO
activates
the
portamento effect only when
a note is played while another
note is still being held.
navigation
SPEED
Adjust the time taken for the
pitch slide to occur.
TIME RATE
This control affects the way that the SPEED setting is interpreted. Setting this parameter to TIME, the SPEED value
controls the actual amount of time it takes to slide from any note to any other note regardless of the “distance”
in pitch between the two. Thus the time taken to slide between any two notes will always be the same. Setting to
RATE, the SPEED value controls the amount of pitch change per second. This means that the time it takes to slide
from one note to another depends entirely on the “distance” it has to travel between the two. This means that the
time taken to slide between any two notes will be different depending on which notes are played.
preset edit menu upgrade
TYPE
This feature only applies when, during the
course of sliding from one note to another,
you play an new note somewhere in
between the two, (which begins a separate
portamento, [pitch slide] of it’s own). The
TYPE setting controls where this new slide will
commence from
Floating The new portamento will commence
from the pitch which the previous
portamento had reached when the
new key was pressed.
Re-Start The new portamento will
commence from the ultimate
destination of the previous
portamento.
Page9
release notes
Genesys series
EDIT PARTS MENU: LEGATO
This function will allow you to skip the initial attack portion of the sound if you play the keys in “LEGATO”
style while using this mode. It allows you to emulate wind instrument performances with a new level of
authenticity.
1 Enter the EDIT PARTS menu pressing the PRESET button in the panel and
then the function button [F2]
To select the EDIT PARTS menu press F2 or use the CURSOR to select the
EDIT PARTS, and the press ENTER to confirm.
navigation
2 Press the button [PAGE NEXT] on the panel to select the Page 2 control
menu
3 Press the button LEGATO [F5] on the panel. The function will now enabled
This function allows you to obtain impressive results with wind and brass solo instruments. Try by
selecting any of internal Genesys presents from these families and enable this function, to enhance
your performance.
To memorize any of the functions described in these pages, simply press the [STORE] button , then select
a destination location (MEMORIES, PRESETS, STYLE PRESETS) for the current edited preset, then press
[ENTER] to confirm. For more details, please refer to the STORE chapter in your owners manual.
Page10
preset edit menu upgrade
release notes
Genesys series
PLAY LIST PROGRAMMING UPGRADE
Genesys PLAY LIST function has been further upgraded. It is now possible to realtime add music files in a
PLAY LIST without stops the current song playing, in this way become easier to arrange and manage your
repertoire even in realtime.
1 Enter the SONG PLAYER pressing SELECT on the
panel
2 Select PLAY LIST by pressing the function button [F]
5 Type a name for the new play list, then press ENTER
6 The new play list title appears in the screen, now press
[ENTER]
The very first time you enable the function, the display
will show a screen like this
3 Press the function button F1 [LIST]
7 Press the function button [F6 EDIT], then select ADD.
Press [ENTER] to start adding files to the PLAY list
The command ADD allows to insert music files in the PLAY LIST
taken from the internal hard disk, ADD FROM DB LIST allows
to insert music files taken from the internal DB LIST
selection
data
confirm
4 Press the function button F7 NEW to create a new
play list
play list programming upgrade
8 Select any file from the hard disk using the CURSOR,
then press [ENTER]
Page11
release notes
Genesys series
9 The first song is now added to the PLAY LIST
13 Select the songs the list. Press ENTER to confirm the
The song file can be now played immeately by
simply pressing the PLAY button in the SONG
PLAYER section. The song start playing and you
can ADD another song to the list without stop
the current song playing!
During this operation the previous song continues to play
without interruption.
A multiple songs selection is also possible, by simply
selecting a next song with the cursor and pressing
ENTER to confirm.
selection, the song title is show in black
10 Repeat the ADD operation selecting another song
from the DB LIST. Press [F6] EDIT , select ADD from
DB LIST using the DOWN CURSOR, then press
ENTER.
Repeat the operation as many time as you need.
11 The DB LIST contents appears in the screen
14 Once the song selection is completed press [F1] INS
12 Select any of the DB LIST song files
For a faster song selection can be used: the UP/DOWN
CURSOR, the PAGE PREV/NEXT Buttons, the DIAL.
The selected songs are now add to the PLAY LIST.
Page12
play list programming upgrade
release notes
Genesys series
Note: enabling the [F7] LOOP function, any selected
song of the PLAY LIST will be played automatically once
the previous song will be finish to play.
Note: disabling the [F7] LOOP function, any selected
song of the PLAY LIST will be automatically selected
once the previous song will be finish, but to start the
song the PLAY button have to be pressed.
[F7]
PLAY LOOP
enabled
The Song "DANCING QUEEN" is currently playing and the
LOOP function is enabled
Select another song during the PLAY, (LOVE ME TENDER in
the example) by simply moving the CURSOR on it. Once
"DANCING QUEEN" will be finish to play, "LOVE ME TENDER" will be selected and started automatically.
If another song is not selected during the first song playing
(the cursor remain in the same song location), the instrument automatically will switches and play the next song of
the PLAY LIST.
[F7]
PLAY LOOP
disabled
The Song "DANCING QUEEN" is currently playing and the
LOOP function is disabled
Select another song during the PLAY, (LOVE ME TENDER
in the example) by simply moving the CURSOR on it.
Once "DANCING QUEEN" will be finish to play "LOVE ME
TENDER" will be automatically select but not started. Press
the PLAY button to start the song.
[F7]
PLAY LOOP
enabled
[F7]
PLAY LOOP
disabled
Once the song "AFTER THE LOVE HAS GONE" (in the example) finish to play, the next song of the list "DANCING
QUEEN" is automatically selected and started.
In this way it will be possible to easy arrange and manage your music repertoire "on fly" during your live performance
play list programming upgrade
As in the above example, disabling the [F7] PLAY LOOP
function and do not selecting another song during the first
song playing (the cursor remain in the same song location),
the instrument automatically will switches to the next song
of the PLAY LIST. To play the song will be necessary to press
the PLAY button on the panel.
Page13
release notes
Genesys series
Descriptions
Lets analyze the PLAY LIST managing screen page. This page is recalled by pressing the function button [F1] LIST
from the main page
F6 RENAME
Allows to add and to rename an
already existing play list
Select first the PLAY LIST
you want to rename,
press [F6] RENAME,
type the new name, then
press ENTER.
F7 NEW
Create a new Play list
F8 DELETE
Delete an existing PLAY LIST
Select first the PLAY LIST
you want to delete, then
press [F8] DELETE.
It is possible to create multiple
play lists, (Press the button [F7],
type the name, press ENTER).
Each PLAY LIST can contain a special selection of your repertoire,
properly fitted for each type of
performance: wedding, karaoke
bar, disco etc. Select them with the
UP/DOWN CURSOR and press
the ENTER button.
ADD
Adds music files from the internal hard disk
ADD
FROM
DB
LIST
Allows to add music files already present in the DB list
DELETE
Deletes a selected file from the
play list
MOVE UP/DOWN
Shifts a position up/down a
selected file in the play list
F5 SEARCH
The PLAY LIST features a search
function, as the same as the
DB list
F6 EDIT
Enter the Play list edit menu
F7 PLAY LOOP MODE
Allows to play in loop the selected songs (*)
MODIFY
F8 BACK
Allows to modify the number,
artist, title attributes of the
files
Returns the screen to the main
page
NOTE: From this release version the above descripted functions works realtime and multitasking, then
selecting any of them the current song playing will be not interrupted.
(*) See the detailed description of this function on page 8
Page14
play list programming upgrade
release notes
Genesys series
ASSIGN TO A PAD THE MUTE OF THE SEQUENCER TRACKS
It is now possible to assign (using one or more of the programmable pads) the MUTE function from any sequencer
track. This provides you the ability to obtain a very powerful “Minus One” realtime function. Typically this function is used to mute the lead melody in a Song (track n. 4), however you can choose to mute any track of the
sequencer (from 1 to 32).
1 Press the [EDIT] button in the programmable pads section. The edit page is shown on the
display.
2 Select the PAD to assign the mute function using the UP/DOWN CURSOR.
3 Once you have selected the PAD (n. 1 in this example), select the MUTE/DEMUTE function by
rotating the DIAL.
The default mute channel is assigned to the #4, the track and the relative Midi channel, where
the lead track is memorized usually.
4 Move on the TRACK field using the RIGHT CURSOR to modify the track you want to mute.
5 Then Use the DIAL to modify the value. You can assign any of the sequencer track from #1
to #32.
The operation can be repeated, selecting different programmable pads, in this way you can
prepare different buttons to realtime perform with the Song Player section.
The programmable pad set up can be stored in one of the internal MEMORIES or saved in realtime using the LOCK function [F8]. Please refer to the relative section in the owner manual.
assign the track mute to a pad
Page15
release notes
Genesys series
STANDARD MIDIFILE EDITING UPGRADE
Concept:
It is now possible to edit a standard midifile (“.mid” format) music parameters (sounds, levels, pan,
transpose etc.) without loading it into the sequencer memory. In this way the entire editing procedure
became more fast and simple, then it is possible to maintain meta event data such as the lyrics info
contained in the file. (*)
(*) IMPORTANT NOTE: The meta event data format inside the midifile is not unique and these data could be
write in different way. The previous Genesys Ensemble operating system allows the meta event info (eventually)
contained in a standard midifile to be visualized in the display and from video out. The instrument during the use
of the player (direct to disk, DB List or PLAY List) allows to visualize the Lyrics even in different format. This was
not allowed loading a midifile in memory for mix and sound editing, in fact the lyrics info if not corresponding to
the TUNE 1000® format (the one of Genesys internal text editor), was missed. In this way the O.S. V 1.02 allows
to edit midifiles music parameters without the meta event data are missing.
Steps:
A
Locate the midifile to edit
B
Edit the music parameter (sounds, levels, transpose etc.)
C
Save the edited midifile
Floppy/CD
From:
Hard Disk
To:
Hard Disk
Description
LOCATE THE MIDIFILE TO EDIT
It is possible to edit a standard midifile directly in the support where it is memorized (floppy or CD),
before copying it in the hard disk, or after it has been copied in the hard disk
A THE MIDIFILE IS STORED IN A FLOPPY DISK (CD)
1 Insert the floppy in the driver
2 Press the SELECT button in SONG PLAYER
3 Select the Floppy disk driver by pressing the function button [A], then select
the title of the midifile you want to edit using the cursor
4 Let the midifile play by pressing the PLAY button on the panel.
NOTE: as we will see in the next chapters the possible editing procedure are basically the same
already analyzed in the section edit of the manual. The actual news consist of the possibility offered
by this O.S. release, to STORE the edited data directly in the midifiles, without loading them into
RAM memory and maintaining their original format (.mid) as well.
BEWARE: using this procedure pay attention that the parameter you’re editing is supported by the GENERALMIDI standard, then correspond to: GEN. TRANPOSE, VOLUME, PAN, PROGRAM CHANGE. The
other Genesys parameters present in the edit menu are supported by the GEM songs format only.
Page16
midifile edit upgrade
release notes
Genesys series
MIDIFILE TRANSPOSE
It is possible now realtime transpose the entire selected or played midifile, by simply pressing the TRANSPOSE #/ buttons on the panel. Each time you press the [#] button the general pitch of the midifile will
be increased of a semitone, each time you press the [ ] button the general pitch of the midifile will be
decreased of a semitone, a global range of +/- 24 semitones is allowed. To restore the original pitch it’s
enough to press the two TRANSPOSE buttons contemporarily.
b
b
In this condition of editing the TRANSPOSE really modify the MIDI note
events value contained in
the midifile.
The semitone TRANSPOSE
value is shows in the display.
A
/, -*"-
MIDIFILE MIXING PARAMETERS: VOLUME
Press the MIXER button on SECTION EDIT area to access the VOLUME set up page. As well as the function
button [F1] will recall the VOLUME page in case a different parameter has been previuosly selected.
The main screen visualize the tracks assigned to the current Preset (from 17 to 24). Press the button PART
on the panel to select the midifile tracks from 9 to 16
Track selection
The main screen visualize the Midi tracks from 9 to 16, it is possible to select each of them using the relative function buttons from [A] to [H], as the same way can be also used the UP/DOWN CURSOR. Pressing
the PART button again, the track from 1 to 8 will be visualized in the display.
Once a track is selected the VOLUME value can be modified by rotating the DIAL. The operation can be
repeated as many time as you need.
midifile edit upgrade
Page17
release notes
Genesys series
MIDIFILE MIXING PARAMETERS: PAN
Press [F2) PAN to select the PAN set up page. The PAN value of each track can be modified as you wish.
Track selection
Value modifying
Press the PART button on the panel to select the tracks from 9 to 16.
MIDIFILE MIXING PARAMETERS: TO CHANGE A SOUND IN A MIDI TRACK
1 Select the midi track you want to change the
sound, using the UP/DOWN CURSOR (or the
function buttons A-H). The selected track is
visualized in “reverse”.
The display now shows the first sound of the first
bank in the sound family you have selected.
Bank
Program
Change number
Track selection
To the track n. 1 is currently assigned the sound
PIANO1
2 Press the SINGLE button in the PRESET FAMILIES
selection area, then the button of the family instrument you want to change. PIANO family in
this example.
3 Press the PAGE NEXT button to select the desidered
sound bank, then recall the sound by pressing the
associated function buttons. [F7] or [F8] to recall
the sound REALGRAND, in this example.
Repeat the operation over the other tracks as
many time as you need to edit the midifile.
PRESET FAMILIES |256 PRESETS / OVER 1000SINGLE SOUNDS / SAMPLES / DRAWBAR ORGAN
2
PIANO
MALLET
ORGAN
GUITAR
BASS
STRINGS
REAL
SOUNDS
DRAWBAR
PIANO
CHROM
ORGAN
GUITAR
BASS
STRINGS
ENSEMB
BRASS
ORCH.
ACCORD
BRASS
WIND
SYNT
DRUMS
EFFECTS
SAMPLES
REED
PIPE
SYN.LEAD
SYN.PAD
SYNTH FX
ETHNIC
PERC
EFFECTS
GENERAL
1
In SINGLE sound mode, the sound families are indicated by the silkscreen below each button
Page18
(*) Please consult the next chapter about the
sound selection in Genesys xp
midifile edit upgrade
release notes
Genesys series
CHANGE A SOUND IN A SEQUENCER TRACK IN GENESYS XP
Genesys xp is the module version of the workstation, for this reason has a different control panel layout
and a different method to recall the single sounds in the sequencer tracks.
To enter in the single sounds selection menu: select any of the sequencer track, then press the SOUND
button in RESOURCE section.
The display shows the following screen
The function buttons A-H
and F1-F8 select the sound
family (Sound bank).
the buttons from 1 to 8
in the RESOURCES area,
select the sound inside the
family (sound bank).
TO CONFIRM THE EDITING PROCEDURE: STORE
The editing to the function just described (TRANSPOSE, VOLUME LEVEL, PAN, SOUND) can be executed in
the way and order you wish (i.e. only the TRANSPOSE, only VOLUME, etc.). The most important operation
at the end of each editing session is to fix the editing in the midifile, for this purpose have to be used the
STORE button (*).
1 Once your midifile editing is completed, press
the STORE button on the panel (from any screen
you are located on).
This screen allows to assign a destination driver
(HD, Floppy) and a directory for the edited midifile.
It is possible to create a new midifile subfolder into
the main MIDIFILE folder using the NEW FOLDER
[G] command.
2 A confirm screen appears in the display, press
the ENTER button as request
IMPORTANT NOTE: in order to save the modified midifile sound map in a correct way, take care before to
store the edited data, to disable the GENERALMIDI mode in EDIT MIDI MENU (set: GENERALMIDI [OFF]) .
midifile edit upgrade
Page19
release notes
Genesys series
LOCATE THE MIDIFILE TO EDIT
Now see the second option of this editing procedure (please refer to page 16), then the midifile you want
to edit is already stored in the internal Genesys hard disk.
B THE MIDIFILE IS ALREADY COPYIED ON THE HARD DISK
Floppy disk MIDIFILE
CD ROM MIDIFILE
COPY
HARD DISK [MIDIFILE] FOLDER
1 Press SELECT in the SONG PLAYER Section
2 Select the hard disk as driver and locate the file in the MIDIFILE folder using the CURSOR
3 Play the midifile and execute the edit you wish as explained in the previous chapter
4 Press STORE to confirm the editing and then save the midifile
Saving Options:
OVERWRITE the existing midifile
The edited midifile replace the older
Save the midifile with a different name
In this way you’ll have two versions of the midifile: the original and the modified. Use the option
you prefer.
Page20
midifile edit upgrade
release notes
Genesys series
SAMPLE EDITOR UPGRADE
The SAMPLE EDITOR is the Genesys section to import and program external sample. This section of the
instrument has been implemented with two interesting functions:
A
It is now possible to create multisamples using up to 32 different samples
B
An AUTO ASSIGN function for a single sample to a multisample it is now available
CREATE A MULTISAMPLE USING UP 32 DIFFERENT SAMPLES
1 Enter the SAMPLE EDITOR page by pressing
the PRESET button in SECTION EDIT, then the
function button G.
3 Using the DOWN CURSOR now you can select
the different screens from sample location n.
9 to 16
1
2
The menu selection can be even executed by
selecting the SAMPLE TRANSLATOR menu with
the cursor, then pressing ENTER.
4 And so forth up the the location n.32
2 The SAMPLE EDITOR main page now appears
in the screen
The SAMPLE EDITOR main page show you the
location from n.1 to n.8 (the locations allows
you to load user samples).
Now your user sound can be created using
more accurate and realistic way thanks to the
possibility to use up to 32 different sample in a
multisample.
Pressing the button F1 LOAD, you can load a
sample in to the selected location. The detailed
procedure is described in the next chapter
sample editor
Page21
release notes
Genesys series
THE AUTO ASSIGN FUNCTION
Concept:
The AUTO ASSIGN is a very useful function that allows to shorten the key mapping of the samples
along the keyboard. This function automatically assigning each of the samples you have already
loaded in the list, its separate range of keys. It arranges the samples in order according to the source
note of each sample, (the key on the keyboard which plays back the sample at it’s original pitch) or,
if the source pitches are the same, the order of the samples in the list. To use this function, simply go
to the assign menu after loading your samples and press the AUTO button.
In the next example we create a synth sound multisample including 4 different wave files:
Sample #1
Sample #2
Sample #3
Sample #4
ROOT: C3
ROOT: C4
ROOT: C5
ROOT: C6
Steps:
A
Import WAV files in the instrument
B
Load the WAV files in the sample editor
C
Load each WAV files in the sample editor
D
Use the AUTO ASSIGN function to set the keyboard area for each sample
E
Save the multisample
Description
1 Enter the SAMPLE EDITOR page, then press [F1] LOAD
2 Locate the driver (floppy, cd rom) or the directory where the samples are memorized, press ENTER
to load
The samples can be loaded directly from a media support (CD ROM floppy) or copied first in an hard
disk directory, then loaded in memory, as in this example.
Page22
sample editor
release notes
Genesys series
“ROOT”
NOTE
The first sample is now loaded in the slot n. 1. As you can see, in this case the “ROOT” note of the sample
is correctly recognized by the sample editor.
ATTENTION! Due to some software sampler editors wave saving format, the ROOT note could not be automatically recognized by the instrument. In this case select the ROOT note field on the display, then input the ROOT
note manually, by rotating the DIAL.
SELECT
DEFINITION:
The sample ROOT note is the real note (main frequency) which the sample has been captured.
3 Once the first sample is loaded, move on slot n. 2 using the DOWN CURSOR and load the second
sample of the multisample we are creating
4 Continue to load samples until all of multisample partials are loaded into memory
sample editor
Page23
release notes
Genesys series
5 Once the multisamples is complete press the button [F8] AUTO ASSIGN
6 After a few seconds each sample is automatically assigned to a keyboard zone. Save the multisample
by pressing the function button [F2] SAVE.
C2
Sample #1
Sample #2
Sample #3
Sample #4
ROOT= C3
ROOT= C4
ROOT= C5
ROOT= C6
F#3
F#4
C7
F#5
The AUTO ASSIGN setting can be modified using the ASSIGN (F4) page options.
For the details about the SAVE and ASSIGN sample edit operations, please refer to the SAMPLE
EDITOR chapter in the Genesys user manual.
Page24
sample editor
release notes
Genesys series
THE MIDI SET UP
The MIDI Set Up is a function that simplifies the connection of an external MIDI device (digital piano or accordion).
1 Connect your MIDI controller MIDI Out to the Genesys MIDI In
MIDI Out
MIDI In
MIDI Out
MIDI In
2 Press the MIDI button on the panel, then the function button [F5] COMMON/ARRG.
4
1
2
3
3 Select the field MIDI SET UP using the CURSOR DOWN. The default value of this parameter is OFF
(disabled). By rotating the DIAL you can select: PIANO, ACCORDION 1 and ACCORDION 2 set up.
PIANO
Enable the COMMON channel N. 1. In this way it is possible to control the realtime functions of the Genesys
(presets, styles, memories etc.) Using an external MIDI keyboard, like a digital piano, by transmitting on a
single MIDI channel (N. 1 in this set up).
ACCORDION 1
Enable the COMMON channel N. 1 and the CHORD channel 2. This set up allows the following performance, related to the KEYBOARD MODE pad selection. The BASS/SPLIT and MANUAL/BASS modes are
automatically adjusted for use with a MIDI accordion.
SELECTING BASS/SPLIT
Enabling the accordion set up 1, the BASS/SPLIT mode allows you to play your accordion in real time,
(without the arrangements), playing the active voice (preset) in the right hand keyboard, while the left
hand can play the bass in the first two line of buttons, and the chord in the remaining lines of buttons.
LEAD
Play the selected
PRESET
CHORD
BASS
Play the BASS sound
recalled by the selected PRESET
The chord play the
chord sound recalled by the selected PRESET
With this set up it is possible to use the DRUMS track of each style, performing the accordion in realtime.
the midi set up
Page25
release notes
Genesys series
SELECTING MANUAL/BASS
Selecting the MANUAL/BASS button, allows you to perform in the same way as described before, but
using the styles/arrangements. The chord lines will be played with the left hand lead the Genesys chord
recognizing system of the styles section, while the bass parts are played in realtime using the first two
line of buttons.
CHORD
BASS
LEAD
Play the BASS sound
recalled by the selected PRESET
Play the selected
PRESET
The Played chord
lead the arrangement section of the
currently selected
style
ACCORDION 2
The ACCORDION set up 2 works without the MIDI common channel activation. In this case all the realtime
MIDI channels of the Genesys are re-arranged in order to lead the three accordion sections. Select the setup
you prefer, according to the specifications of your MIDI accordion.
Select the ACCORDION SET UP #2 by rotating the
DIAL.
ACCORDION SET UP #2 MIDI Channel set up
MIDI ACCORDION STANDARD SET UP
Normally the most common MIDI accordion are set up with the following default MIDI configuration:
The BASS lines of the left
keyboard Transmit on MIDI
ch. 2
The right side
keyboard Transmit
on MIDI ch. 1
Page26
The CHORD lines of the left
keyboard Transmit on MIDI
ch. 3
the midi set up
release notes
Genesys series
FOLDER “AUTOLOAD” FUNCTION
The great Genesys operating power allows you to customize every section of the instrument, in a very accurate way: preset, memories, samples, user styles etc. Can be quickly created or edited to be used in your
live (or studio) performance set up.
In Genesys the internal software data such as: the operating system, the musical resource, the user data etc. Are
stored in a large backed RAM memory area. The RAM is powered by an apposite internal battery, this battery is continuously charged during the normal use of the instrument. When the instrument is switched off the backup battery
maintain the internal RAM data for a period up to 6/7 days, after this period all the memory data are missed. Every
time you switch on the Genesys, the instrument check the RAM data contents, if the resource data are not present,
it reload them from the internal hard drive, as the same way as a personal computer. The AUTOLOAD folder data
contents is automatically loaded together with the other data resources.
Concept:
It is now possible to automatically reload all your custom set up of the instrument, when Genesys
load the operating system and the musical resource from the internal hard drive.
Description:
1 Load first into RAM memory all your custom set up data of the instrument (Preset, Style preset,
User style, User sounds etc.).
2 Press the DISK button on the panel and select RAM. The display shows in the column on the right
the folders containing the edited or created data.
In this example we have stored in RAM some
song, sounds, preset, user style and system data
(SYSTEM).
3 Press the function button F2 SAVE to save the entire RAM contents.
4 Press ENTER when the confirm message appears in the display.
5 Press the function button [G] NEW FOLDER, and give the name “AUTOLOAD” to the new folder
6 Once the new folder appears in the display press ENTER, all the data are saved in this folder.
Page27
Specifications are subject to change without prior notice
PRINTED IN ITALY
Generalmusic S.p.A. Via delle Rose, 12
47842 S.Giovanni in Marignano (RN) - Italy
Tel. +39 0541 959511Fax +39 0541 957404 www.generalmusic.com