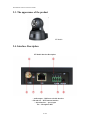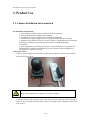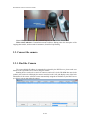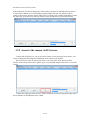
1
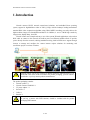
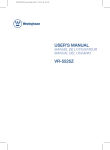
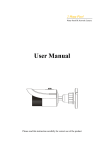
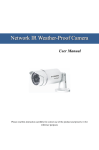
Household IP Cameras Instruction manual
GS-W3200 Wireless IP Cameras
Instruction Manual
2012/2/4
1 / 21
Household IP Cameras Instruction manual
Contents
1. Introduction......................................................................................................................................... 3
2. Product Description............................................................................................................................. 4
2.1. Feature...................................................................................................................................... 4
2.2. Specifications ........................................................................................................................... 4
2.3. The appearance of the product ................................................................................................. 6
2.4. Interface Description................................................................................................................ 6
3. Product Use......................................................................................................................................... 7
3.1. camera installation and connection .......................................................................................... 7
3.2. Connect the camcorder............................................................................................................. 8
3.2.1. Change camera network parameters ............................................................................. 8
3.2.2. Access to the camera via IE browser............................................................................. 9
3.2.3. Connect to Easy View ................................................................................................ 11
3.3.Camera other applications....................................................................................................... 15
3.3.1. Mjpeg stream............................................................................................................... 15
3.3.2. RTSP stream................................................................................................................ 15
3.3.3. ONVIF ........................................................................................................................ 18
2 / 21
Household IP Cameras Instruction manual
1. Introduction
Network cameras Hi3507 network camera-based solutions, and embedded Linux operating
system, support for high-definition video in 720P @ 25fps, with the industry's leading international
standard H264 video compression algorithm, using H264, MJPEG encoding, can easily achieve the
high-resolution images low-bandwidth transmission. In addition, it uses a CMOS high sensitivity
image sensor, display sharp, clear HD.
Network camera uses a simple and easy to use video systems IP-based applications, only need an
RJ45 cable to connect to the network, the built-in power-over-Ethernet module allows to provide
power directly from the network, reducing installation wiring, built-in WEB server support through
browser to manage and configure the camera internet explore solutions for monitoring and
surveillance project on various occasions.
Network camera you buy the product box should contain the following items, if it is
found that some of the items not found in the product packaging, you can contact a
local dealer or you buy camera products manufacturers.
The product packaging contains:
Network camera * 1
Network Camera CD-ROM * 1
5V power adapter * 1
Screw Kit * 1
Cable * 1
Bracket * 1
If you buy a camera with WIFI function, should be included with the product
packaging WIFI antenna.
3 / 21
Household IP Cameras Instruction manual
2. Product Description
2.1. Feature
Megapixels CMOS sensor, integrated low lux function (5 series) / integrated WDR function (7
series) / highest resolution reached UXGA 1600 * 1200 (9 series)
Real time (MJPEG/H.264) dual-stream encoding
The use of advanced H264 video compression algorithms, support for the H264 Main
[email protected] coding, H.264 Baseline [email protected] coding and the MJPEG /JPEG the
Baseline encoding, you can easily achieve high-resolution images of low-bandwidth transmission
Embedded Linux-based operating system, built-in WEB server, can be accessed directly via a
Web browser, system stability, powerful, secure and reliable
Standard RTSP stream output, supports VLC streaming
Integrated ONVIF standard and various brands of camera can easily compatible platform software
Bi-directional and echo cancellation function, monitoring and real time voice synchronization
Supports alarm input and output
Built-in automatic filter switch, can meet the needs of monitoring day and night
Support for WIFI, and SD card
2.2. Specifications
Item
GS-W3200 Wireless IP Cameras
2.0 Megapixel CMOS Sensor
Device
Size
Effective Pixels
Min.Scene Illumination
1/4 inch
2MP:1600*1200,1MP:1280*720
Color
0.5 LUX(IR ON)
B/W
Yes
IR Sensitivity
Yes
IR Cut
Lens
Yes
Lens
3.6mm
Horizontal355°vertical 90°
Viewing Angle
4 / 21
Household IP Cameras Instruction manual
Linux System
Day/Nigh
IR distance
Internal Linux system
8-10 M
Functions
Motion Detection
Yes
BLC
AGC
Yes
Auto
S/N Ratio
Video Compression
White Balance
Fixed Aperture F1.2
S/N Ratio
>50 dB
Compression
H.264
Main Flow:
1600*1200@15fps
1280*720@25fps
Picture Resolution
Minor Flow:
640*360@25fps
160*112@25fps
Audio
Alarm I/O
Network
Bit Rate
32 K~ 4.0 M bps
Image Frame Rate
15 FPS
Compression
G.711
Two way audio
support
Alarm I/O
Ethernet
Protocol
Software
Operating
Power
Physical
Approvals
Web Browser
1 channel in/out put
Ethernet (10/100 Base-T),RJ-45 connector
HTTP/DHCP/IP/TCP/UDP/DDNS/RTSP/SMTP; WIFI/
802.11/b/g
support Internet Explorer、Firefox、Google
Mobile phone
Support IPhone、Android
Remote
Support DDNS、P2P
Temperature
-10°~60°C
Humidity
20—80%
Power Consumption
DC 5V,2A
Dimension
Weight
Certification
100*99*118MM L*W*H
0.5KG
CE ,FCC
5 / 21
Household IP Cameras Instruction manual
2.3. The appearance of the product
PT Models
2.4. Interface Description
PT Models Interface Description
Audio output RJ45 network cable interface
SD card slot WIFI antenna interface
Alarm interface power input
The Microphone MIC
6 / 21
Household IP Cameras Instruction manual
3. Product Use
3.1. Camera installation and connection
Pre-installation considerations:
1. Unpack the box carefully check to confirm the items list consistent.
2. Please read this chapter carefully before installing.
3. Installation, be sure to turn off the power of all related equipment.
4, Check the power supply voltage to prevent voltage unworthy cause device damage.
5. Installation environment: Do not use excessive moisture or high temperature environment,
maintain good ventilation, pay attention to the anti-rain; avoid installing rattling
environment.
6. If the equipment is not working properly, please contact the dealer to buy equipment, do
not disassemble or modify the equipment in any way. Problems caused by unauthorized
modification or repair your own risk.
Connect the camera:
Connect to power adapter, the power indicator light (green) at this time, the device start and selftest, the PTZ begin to twirl.
Must use the supplied power adapter or 5V/2A power adapter.
Access your network with a network cable to the camera, directly connected to the PC through a
switch or network normal network indicator (yellow) will begin to flash, the physical connection
of the camera.
7 / 21
Household IP Cameras Instruction manual
Green LED: power status indicator, when lit in power, the normal state should be lit.
Yellow status indicator: Communication status indicator, flashing when the description of the
ongoing data transfer, under normal circumstances, should be kept blinking.
3.2. Connect the camera
3.2.1. Find the Camera
The camera default IP address is automatically assigned by the DHCP server, please make sure
that the router open DHCP server before using the camera.
Running device search tool to search for camera (search tool is in the CD-ROM that came in the
product), the search tool will display the camera connected to the LAN, and displays some of the basic
information of the camera. when the camera automatically assigned an IP address by the DHCP server
(see below) you can start using the camera.
8 / 21
Household IP Cameras Instruction manual
If the information of camera is displayed by search tools is 0 (as shown), indicating that your camera
is connected, but did not receive an IP address assign by DHCP, this time you will not be able to
connect to the camera, check the router's DHCP service is already open or DHCP assigned has reached
the upper limit, at the same time make sure that the camera and the router is on the same network.
3.2.2. Access to the camera via IE browser
Camera built-in WEB server, you can access the camera, preview the image of the camera, view
camera configuration and change the configuration of the camera via IE browser.
Run a search tool, select the camera you want to visit, click on the "Web" button, the Web
interface of the camera will be able to quickly open, we recommend using the IE browser to access the
camera.
Camera Web login page (shown below), require entering the account and password of the camera,
factory default account and password are: admin.
9 / 21
Household IP Cameras Instruction manual
After logging in, you need to install OCX control to display the camera images, you can click on
the upper right corner of the "plug-in download” to download control, you can also click on the
prompt information" RSAV.exe "link to download, the same product CD" IE Plug You can also find
RSAV.exe installation program in “IE Plug-in” in the product CD.
10 / 21
Household IP Cameras Instruction manual
After the controls (RSAV.exe) the is installed, refresh the page, click on the top of the page
prompts a message selector allows the use of add-ins,
After setup is complete, the monitoring image will appear on the page.
IE interface operation, please read the product documentation supplied CD-ROM,
network cameras IE Manual.
3.2.3. Connect to Easy View
Easy View is a small, simple monitoring software, has basic real-time monitoring, storage and
playback functions. Easy view connect to the camera via a P2P way, In this way, you can very easily
add camera which already connected to the internet. When the camera is connected to the Internet, you
can connect the camera to Easy View only if you add the UID of the camera to Easy view. Here are
the steps to add cameras to the Easy view:
Open the CD-ROM to find Easy View software and install it.
11 / 21
Household IP Cameras Instruction manual
After installation, run Easy view
Right click on my video camera, add a user group
12 / 21
Household IP Cameras Instruction manual
Right click on the group name, add a camera, enter the information of camera, click "OK" to
complete add.
Serial number: input the UID of camera, UID is a set of 20 characters consist of numbers and
letters, recorded in the camera label.
Name: enter the name of the camera, can define any name.
User account: Enter the camera's user name, the factory default is: admin
Password: Enter the password, the factory default is: admin
13 / 21
Household IP Cameras Instruction manual
After added equipment, there will be a list of cameras has been added in the upper left corner of
the page, double-click the camera name to preview the real-time image.
14 / 21
Household IP Cameras Instruction manual
Please read the document "EasyView user manual” in the product CD for Easy view
detailed function.
3.3. Camera other applications
3.3.1. Mjpeg Stream
Input in the browser the camera the address + mobile.htm access MJPEG streams, such as:
http://192.168.1.128:8000/mobile.htm
JPEG picture Also can crawl through the following command:
http://192.168.1.128:8000/cgi-bin/net_jpeg.cgi?ch=0
3.3.2. RTSP Stream
Our camera output is standard RTSP stream, you can use VLC player or other support RTSP
streaming software to connect the camera RTSP stream watch online.
15 / 21
Household IP Cameras Instruction manual
First to know the network URL address of the camera, such as the IP address of the camera is
192.168.1.128 RTSP port is 554, our camera network corresponding to the following URL address:
Main stream: rtsp :/ / 192.168.1.128:554 / ch0_0.h264
Secondary stream: rtsp :/ / 192.168.1.128:554 / ch0_1.h264
Audio stream: rtsp :/ / 192.168.1.128:554 / ch0_3.h264
Concrete steps to connect the camera with VLC:
Running VLC, then select Open Network streaming.
Camera network and then enter the URL address, then play.
16 / 21
Household IP Cameras Instruction manual
VLC player to play the camera image.
17 / 21
Household IP Cameras Instruction manual
3.3.3. ONVIF
ONVIF is committed to advance the application of network video in the security market through
a global open interface standard , this interface standard for network video products from different
manufacturers will ensure interoperability.
Our network cameras integrated ONVIF core specification 1.0.2.2, so that the camera can easily
access to support the ONVIF the platform software, such as Milestone, Geovision, Axxon Let
Milestone for example, describes how ONVIF is connected to the other platform software .
Running the Milestone XProtect Go Management Application, in the main interface, select "add
hardware"
Add hardware, device detection method to select the high-speed, click Next.
18 / 21
Household IP Cameras Instruction manual
Milestone will automatically scan and search our camera, enter a user name and password, then
check to use, then clicks Next.
This interface we have successfully connected cameras Click Finish to add the camera.
19 / 21
Household IP Cameras Instruction manual
Management hardware camera, you can view the camera has been added.
Milestone XProtect Smart Client viewing camera.
20 / 21
Household IP Cameras Instruction manual
Detailed connection methods and other brands of software compatibility information,
please read the product CD-ROM that comes with "ONVIF compatibility testing
documentation.
21 / 21