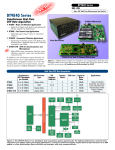
1
Title Page
UM-19199-T
DT9840 Series Getting
Started Manual
Copyright Page
Seventeenth Edition
August, 2013
Copyright © 2013 by Data Translation, Inc.
All rights reserved.
Information furnished by Data Translation, Inc. is believed to be
accurate and reliable; however, no responsibility is assumed by
Data Translation, Inc. for its use; nor for any infringements of
patents or other rights of third parties which may result from its
use. No license is granted by implication or otherwise under any
patent rights of Data Translation, Inc.
Data Translation, Inc.
100 Locke Drive
Marlboro, MA 01752-1192
(508) 481-3700
www.datatranslation.com
Fax: (508) 481-8620
E-mail: [email protected]
Use, duplication, or disclosure by the United States Government
is subject to restrictions as set forth in subparagraph (c)(1)(ii) of
the Rights in Technical Data and Computer software clause at 48
C.F.R, 252.227-7013, or in subparagraph (c)(2) of the Commercial
Computer Software - Registered Rights clause at 48 C.F.R.,
52-227-19 as applicable. Data Translation, Inc., 100 Locke Drive,
Marlboro, MA 01752.
Data Translation® is a registered trademark of Data Translation,
Inc.
All other brand and product names are trademarks or registered
trademarks of their respective companies.
Table of Contents
Table of Contents
About this Manual . . . . . . . . . . . . . . . . . . . . . . . . . . . . . . . . . . . . . . . . . . . . . . . . . . . . . . 5
Intended Audience. . . . . . . . . . . . . . . . . . . . . . . . . . . . . . . . . . . . . . . . . . . . . . . . . . . . . . . . . . . . . 5
How this Manual is Organized . . . . . . . . . . . . . . . . . . . . . . . . . . . . . . . . . . . . . . . . . . . . . . . . . . 5
Conventions Used in this Manual . . . . . . . . . . . . . . . . . . . . . . . . . . . . . . . . . . . . . . . . . . . . . . . . 6
Related Information . . . . . . . . . . . . . . . . . . . . . . . . . . . . . . . . . . . . . . . . . . . . . . . . . . . . . . . . . . . . 6
Where to Get Help . . . . . . . . . . . . . . . . . . . . . . . . . . . . . . . . . . . . . . . . . . . . . . . . . . . . . . . . . . . . . 6
Chapter 1: Overview . . . . . . . . . . . . . . . . . . . . . . . . . . . . . . . . . . . . . . . . . . . . . . . . . . . . 7
Features . . . . . . . . . . . . . . . . . . . . . . . . . . . . . . . . . . . . . . . . . . . . . . . . . . . . . . . . . . . . . . . . . . . . . . 8
Supported Software . . . . . . . . . . . . . . . . . . . . . . . . . . . . . . . . . . . . . . . . . . . . . . . . . . . . . . . . . . . 12
Supported Configurations . . . . . . . . . . . . . . . . . . . . . . . . . . . . . . . . . . . . . . . . . . . . . . . . . . . . . 13
Accessories . . . . . . . . . . . . . . . . . . . . . . . . . . . . . . . . . . . . . . . . . . . . . . . . . . . . . . . . . . . . . . . . . . 14
Chapter 2: Preparing to Use a DT9840 Series Module . . . . . . . . . . . . . . . . . . . . . . . . 15
Unpacking . . . . . . . . . . . . . . . . . . . . . . . . . . . . . . . . . . . . . . . . . . . . . . . . . . . . . . . . . . . . . . . . . . . 17
Checking the System Requirements . . . . . . . . . . . . . . . . . . . . . . . . . . . . . . . . . . . . . . . . . . . . . 18
Installing the Software . . . . . . . . . . . . . . . . . . . . . . . . . . . . . . . . . . . . . . . . . . . . . . . . . . . . . . . . . 19
Building and Running the Example Programs . . . . . . . . . . . . . . . . . . . . . . . . . . . . . . . . . . . . 20
DSP Programs . . . . . . . . . . . . . . . . . . . . . . . . . . . . . . . . . . . . . . . . . . . . . . . . . . . . . . . . . . . . 20
Building the DSP Example Programs in Code Composer 3.3 . . . . . . . . . . . . . . . . 20
Building DSP Programs in Code Composer 5.2.1 . . . . . . . . . . . . . . . . . . . . . . . . . . 21
Host Applications . . . . . . . . . . . . . . . . . . . . . . . . . . . . . . . . . . . . . . . . . . . . . . . . . . . . . . . . . 21
Viewing the Documentation Online . . . . . . . . . . . . . . . . . . . . . . . . . . . . . . . . . . . . . . . . . . . . . 22
Chapter 3: Setting up a DT9840 Series Module . . . . . . . . . . . . . . . . . . . . . . . . . . . . . 23
Applying Power to a DT9840 Series Module . . . . . . . . . . . . . . . . . . . . . . . . . . . . . . . . . . . . . . 25
Attaching the Module to the Computer . . . . . . . . . . . . . . . . . . . . . . . . . . . . . . . . . . . . . . . . . . 26
Connecting Directly to the Host Computer . . . . . . . . . . . . . . . . . . . . . . . . . . . . . . . . . . . 26
Connecting Modules Together through the Scalable Bus . . . . . . . . . . . . . . . . . . . . . . . . 27
Connecting to a Self-Powered USB Hub . . . . . . . . . . . . . . . . . . . . . . . . . . . . . . . . . . . . . . 29
Configuring DT9840 Series Modules. . . . . . . . . . . . . . . . . . . . . . . . . . . . . . . . . . . . . . . . . . . . . 31
Attaching the EP358E Accessory Panel to a DT9841E Module . . . . . . . . . . . . . . . . . . . . . . . 34
Setting up the Module for Debugging Using the Serial Port. . . . . . . . . . . . . . . . . . . . . . . . . 35
Setting Up HyperTerminal to View the Activity of the Serial Port . . . . . . . . . . . . . . . . 36
Setting up HyperTerminal to Print Information from the Serial Port . . . . . . . . . . . . . . 39
Chapter 4: Wiring Signals . . . . . . . . . . . . . . . . . . . . . . . . . . . . . . . . . . . . . . . . . . . . . . . 41
Preparing to Wire Signals . . . . . . . . . . . . . . . . . . . . . . . . . . . . . . . . . . . . . . . . . . . . . . . . . . . . . . 43
Wiring Recommendations . . . . . . . . . . . . . . . . . . . . . . . . . . . . . . . . . . . . . . . . . . . . . . . . . . 43
Wiring to the Sleek Box . . . . . . . . . . . . . . . . . . . . . . . . . . . . . . . . . . . . . . . . . . . . . . . . . . . . 43
3
Contents
Wiring to the EP358E Accessory Panel . . . . . . . . . . . . . . . . . . . . . . . . . . . . . . . . . . . . . . . 47
Connecting Analog Input Signals . . . . . . . . . . . . . . . . . . . . . . . . . . . . . . . . . . . . . . . . . . . . . . . 49
Connecting Differential Analog Input Signals to the DT9841 or DT9841E . . . . . . . . . 49
Connecting Single-Ended Voltage Inputs to the DT9841-VIB, DT9842/2, or
DT9842/8 Sleek Box . . . . . . . . . . . . . . . . . . . . . . . . . . . . . . . . . . . . . . . . . . . . . . . . . . . . . . 53
Connecting Analog Output Signals. . . . . . . . . . . . . . . . . . . . . . . . . . . . . . . . . . . . . . . . . . . . . . 54
Connecting Digital I/O Signals . . . . . . . . . . . . . . . . . . . . . . . . . . . . . . . . . . . . . . . . . . . . . . . . . 55
Connecting Counter/Timer Signals . . . . . . . . . . . . . . . . . . . . . . . . . . . . . . . . . . . . . . . . . . . . . 56
Connecting Signals for Event Counting and Up/Down Counting Operations . . . . . 56
Connecting Signals for a Measurement Operation . . . . . . . . . . . . . . . . . . . . . . . . . . . . . 58
Connecting Signals for Pulse Output Operations . . . . . . . . . . . . . . . . . . . . . . . . . . . . . . 59
Chapter 5: Verifying the Operation of a Module . . . . . . . . . . . . . . . . . . . . . . . . . . . . . 61
Running the DT9840 Series Download Utility. . . . . . . . . . . . . . . . . . . . . . . . . . . . . . . . . . . . . 63
Performing Quick LED Tests . . . . . . . . . . . . . . . . . . . . . . . . . . . . . . . . . . . . . . . . . . . . . . . . . . . 65
Downloading and Running a DSP Program . . . . . . . . . . . . . . . . . . . . . . . . . . . . . . . . . . . . . . 67
Performing Memory Tests. . . . . . . . . . . . . . . . . . . . . . . . . . . . . . . . . . . . . . . . . . . . . . . . . . . . . . 69
Chapter 6: Programming Flash Memory . . . . . . . . . . . . . . . . . . . . . . . . . . . . . . . . . . . 71
Overview . . . . . . . . . . . . . . . . . . . . . . . . . . . . . . . . . . . . . . . . . . . . . . . . . . . . . . . . . . . . . . . . . . . . 73
Using the DT9840 Series Flash Programmer Utility . . . . . . . . . . . . . . . . . . . . . . . . . . . . . . . . 74
Programming Flash Memory Using Command-Line Options . . . . . . . . . . . . . . . . . . . . . . . 77
Constructing a Data File . . . . . . . . . . . . . . . . . . . . . . . . . . . . . . . . . . . . . . . . . . . . . . . . . . . . . . . 78
Chapter 7: Troubleshooting . . . . . . . . . . . . . . . . . . . . . . . . . . . . . . . . . . . . . . . . . . . . . 79
General Checklist . . . . . . . . . . . . . . . . . . . . . . . . . . . . . . . . . . . . . . . . . . . . . . . . . . . . . . . . . . . . . 81
Technical Support . . . . . . . . . . . . . . . . . . . . . . . . . . . . . . . . . . . . . . . . . . . . . . . . . . . . . . . . . . . . . 83
If Your Module Needs Factory Service . . . . . . . . . . . . . . . . . . . . . . . . . . . . . . . . . . . . . . . . . . . 84
Appendix A: Wiring to the Board-Level Version of the Module . . . . . . . . . . . . . . . . 85
Wiring to the DT9841, DT9842/2, or DT9842/8 Board-Level Version . . . . . . . . . . . . . . . . . 86
Wiring to the DT9841E Board-Level Version . . . . . . . . . . . . . . . . . . . . . . . . . . . . . . . . . . . . . . 90
Appendix B: Windows Administrator Permissions . . . . . . . . . . . . . . . . . . . . . . . . . . 93
Index . . . . . . . . . . . . . . . . . . . . . . . . . . . . . . . . . . . . . . . . . . . . . . . . . . . . . . . . . . . . . . . . 95
4
About this Manual
This manual describes how to install and set up your DT9840 Series module and device driver,
and verify that your module is working properly.
Intended Audience
This document is intended for engineers, scientists, technicians, or others responsible for
installing and setting up a DT9840 Series module to perform data acquisition operations. It is
assumed that you are familiar with the requirements of your application. It is also assumed
that you are familiar with the Microsoft®Windows® XP, Windows Vista®, or Windows 7
operating system.
How this Manual is Organized
This manual is organized as follows:
• Chapter 1, “Overview,” describes the key features of the DT9840 Series hardware and
software, and provides an overview of the getting started procedure.
• Chapter 2, “Preparing to Use a DT9840 Series Module,” describes how to unpack the
DT9840 Series package, check the system requirements, install the DT9840 Series software
using Windows XP, Windows Vista, or Windows 7, build and run the example programs,
and view the DT9840 Series documentation online.
• Chapter 3, “Setting up a DT9840 Series Module,” describes how to apply power to the
module, attach the module to the host computer, configure the device driver, and debug
the module using the serial port.
• Chapter 4, “Wiring Signals,” describes how to wire signals to a DT9840 Series module.
• Chapter 5, “Verifying the Operation of a Module,” describes how to verify the operation
of a DT9840 Series module using the DT9840 Series Download Utility.
• Chapter 6, “Programming Flash Memory,” describes how to load a DSP program into the
flash memory of a DT9840 Series module.
• Chapter 7, “Troubleshooting,” provides information that you can use to resolve problems
with a DT9840 Series module, should they occur.
An index completes this manual.
5
About this Manual
Conventions Used in this Manual
The following conventions are used in this manual:
• Notes provide useful information that requires special emphasis, cautions provide
information to help you avoid losing data or damaging your equipment, and warnings
provide information to help you avoid catastrophic damage to yourself or your
equipment.
• Items that you select or type are shown in bold.
• Courier font is used to represent source code.
Related Information
Refer to the following documents for more information on using a DT9840 Series module:
• DT9840 Series User’s Manual (UM-19197). This manual, included on the DT9840 Series
Software CD, describes the hardware features of a DT9840 Series module, including the
registers, specifications, and connector pin assignment information.
• DT9840 Series DSP Library User’s Manual (UM-19591). This manual, included on the
DT9840 Series Software CD, describes the communication and I/O functions required to
write a DSP application for a DT9840 Series module.
• DT9840 Series Host Communication Library User’s Manual (UM-19593). This manual,
included on the DT9840 Series Software CD, describes how to use the DT9840 Series Host
Communication Library to write a host application program that communicates with the
DSP program running on a DT9840 Series module.
• Documentation for Code Composer StudioTM Integrated Development Environment (IDE)
from Texas Instruments.
• Documentation for Texas Instruments TMS320C6713 DSP processor.
• Microsoft XP, Windows Vista, or Windows 7 documentation.
• Microsoft Visual Studio documentation.
• USB 1.1 and USB 2.0 specifications available on the USB web site (http://www.usb.org).
Where to Get Help
Should you run into problems installing or using a DT9840 Series module, the Data
Translation Technical Support Department is available to provide technical assistance. Refer to
page 79 for more information. If you are outside the U.S. or Canada, call your local distributor,
whose number is listed on Data Translation’s web site (www.datatranslation.com).
6
1
Overview
Features . . . . . . . . . . . . . . . . . . . . . . . . . . . . . . . . . . . . . . . . . . . . . . . . . . . . . . . . . . . . . . . . . . . . . . 8
Supported Software . . . . . . . . . . . . . . . . . . . . . . . . . . . . . . . . . . . . . . . . . . . . . . . . . . . . . . . . . . . 12
Supported Configurations . . . . . . . . . . . . . . . . . . . . . . . . . . . . . . . . . . . . . . . . . . . . . . . . . . . . . 13
Accessories . . . . . . . . . . . . . . . . . . . . . . . . . . . . . . . . . . . . . . . . . . . . . . . . . . . . . . . . . . . . . . . . . . 14
7
Chapter 1
Features
The DT9840 Series data acquisition modules provide digital signal processing (DSP) and
control capabilities for the Universal Serial Bus (USB). DT9840 Series module resides outside
of the host computer and attach to the host computer with a single USB cable to ease
installation. Modules can be "hot swapped" or plugged and unplugged while the host
computer is on, making them useful for many data acquisition applications.
Currently, the DT9840 Series consists of the DT9841, DT9841E, DT9841-VIB, DT9842/2, and
DT9842/8 modules.
The DT9841, DT9841-VIB, DT9842/2, and DT9842/8 modules provide 8 analog input
channels and support the Scalable Bus for connecting up to four modules together. The
DT9841E provides 2 analog input channels and does not support the Scalable Bus. The
DT9840 Series modules provide the following major features:
• USB 2.0 and 1.1 compatibility.
• Software programmable floating-point DSP and control functions running on the module.
• Isolated output common from the USB bus to 500 V peak.
• For the DT9841-VIB module, two 8-bit ports that you can program for digital input or
digital output; port 0, if configured for digital input, supports interrupt-on-change on all
eight bits.
For all other DT9840 Series modules, three 8-bit ports that you can program for digital
input or digital output; port 0, if configured for digital input, supports
interrupt-on-change on all eight bits.
• Three programmable 32-bit user counter/timer channels that support event counting,
frequency measurement, rate generation, one-shot, repetitive one-shot, and up/down
counting.
• Internal and external sample clock sources.
• Continuous sampling and output rates of up to 100 kSamples/s per channel.
• Internal and external trigger sources.
• Serial port for connecting an RS-232-compliant device for debugging.
• JTAG port for direct support from third-party debug devices, such as the XDS510 or
Blackhawk emulator.
Table 1 describes the key differences among the modules.
8
Overview
Table 1: DT9840 Series Modules
Analog
Inputs
Models
Converter
Type
Resolution
Sampling
Rate
Analog
Filtering
Analog
Outputs
Scalable
Bus
DT9841
8DIa
Delta-Sigma
24-bitb
200 Hz to
100 kHz
Yesc
2d
Yes
DT9841-VIBe
8SEa
Delta-Sigma
24-bitb
200 Hz to
100 kHz
Yesc
2d
Yes
DT9841E
2DIa
Delta-Sigma
24-bitb
200 Hz to
100 kHz
Yesc
2d
No
DT9842/2
8SEa
Successive
Approximation
16-bitb
0 Hz to
100 kHz
No
2f
Yes
DT9842/8
8SEa
Successive
Approximation
16-bitb
0 Hz to
100 kHz
No
8f
Yes
a. DI refers to differential mode and SE refers to single-ended mode. For differential inputs only, you can configure the
termination resistance in software on a channel-by-channel basis.
b. The input signal range is ±10 V.
c. Software-selectable output filters of 5 kHz and 20 kHz are available.
d. Software-selectable output ranges of ±10 V and ±2.5 V are available.
e. The DT9841-VIB supports IEPE (Integrated Electronic Piezoelectric) functions on the analog input channels, allowing
you to connect IEPE inputs. The DT9841-VIB module has two 8-bit digital I/O ports, where the standard DT9841
product has three 8-bit digital I/O ports.
f. The output signal range is ±10 V.
Figure 1 shows the board layout of the DT9841, DT9842/2, and DT9842/8 modules. Figure 2
shows the board layout of the DT9841E module.
Note: The DT9841-VIB version is available in the Sleek Box configuration only.
9
Chapter 1
Analog Input
Connector
2-Color LED
CR1
J18
USB
Connector
J6
DT9841, DT9842/2, and
DT9842/8 Modules
Analog Output,
Digital I/O, and
Counter/Timer
Connector
J13
TB1
+5 V Output
Screw Terminal Block
+5 V Output
Connector
Scalable Bus Connectors
Ext Clock
BNC
Ext Trigger
BNC
Debug LEDs
J12
J15
Address LEDs
J16
4
2
M
CR15
J19
1
Serial I/O Connector
J4
J17
+5 V Input
BNC
J11
Power Switch
SW1
D7
D5
D6
D3
D4
D1
D2
CR12 CR14 CR11
CR13
CR7
D0
CR9
CR8 CR10
Figure 1: Layout of the DT9841, DT9842/2, and DT9842/8 Modules (Board-Level Version)
10
Overview
J6
USB
Connector
TB2
CR6
J11
2-Color LED
+5 V Input
BNC
Auxiliary
Connector
J4
Serial
Connector
TB3
JTag
Connector
J3
Fan
Connector
J1
DT9841E Module
Analog Input
Connector
J2
Analog Output,
Digital I/O, and
Counter/Timer
Connector
Figure 2: Layout of the DT9841E Module (Board-Level Version)
11
Chapter 1
Supported Software
The following software is provided on the DT9840 Series Software CD that is shipped with
DT9840 Series modules:
• DT9840 Series Device Driver – The DT9840 Series Device Driver provides the low-level
support for DT9840 Series modules. You must install the DT9840 Series Device Driver to
use any of the supported software packages or utilities for DT9840 Series modules. Refer
to page 19 for more information on installing the device driver.
• DT9840 Series DSP Library – The DT9840 Series DSP Library provides I/O and
communication functions that you can call from a DSP application program on a DT9840
Series module using Code Composer Studio from Texas Instruments. Refer to the DT9840
Series DSP Library User’s Manual for more information on using the DT9840 Series DSP
Library.
• DT9840 Series Host Communication Library – The DT9840 Series Host Communication
Library provides functions that you can call from a host application program using
Microsoft Visual Studio to allow communication between the host and a DT9840 Series
module. Refer to the DT9840 Series Host Communication Library User’s Manual for more
information on using the DT9840 Series Host Communication Library.
• DT9840 Series Download Utility – The DT9840 Series Download Utility allows you to
download a DSP program (that conforms to the Code Composer Studio standard) into the
SDRAM of a DT9840 Series module, run the DSP program, and perform memory and LED
tests on the module. Refer to Chapter 5 starting on page 61 for more information on using
the DT9840 Series Download Utility.
• DT9840 Series Flash Programmer Utility – The DT9840 Series Flash Programmer Utility
allows you to download a DSP program (that conforms to the Code Composer Studio
standard) into the flash memory of a DT9840 Series module. Refer to Chapter 6 starting on
page 71 for more information on using the DT9840 Series Flash Programmer Utility.
• Example Programs –Example programs are provided that illustrate how to call the
functions in the DT9840 Series Host Communication Library and DT9840 Series DSP
Library. Refer to page 20 for information on building and running these example
programs.
• DT9841 Calibration Utility – The DT9841 Calibration Utility allows you to calibrate the
analog I/O circuitry of a DT9841 or DT9841E module. Refer to the DT9840 Series User’s
Manual for more information on using this utility.
12
Overview
Supported Configurations
You can purchase a DT9840 Series module in one of the following configurations; all
configurations include a DT9840 Series Software CD and a 1.83-meter USB cable (EP365) that
connects the USB connector of the module to the USB connector on the host computer:
• Board-level configuration – The following board-level configurations are available for
OEM embedded applications:
− DT9841 – DT9841 module with 8 analog inputs, 2 analog outputs, 3 digital I/O ports, 3
counter/timer channels, 128 MBytes of SDRAM memory, and 2 MB of flash memory
packaged in a 6U board-level configuration.
− DT9841E – DT9841E module with 2 analog inputs, 2 analog outputs, 3 digital I/O
ports, 3 counter/timer channels, 128 MBytes of SDRAM memory, and 2 MB of flash
memory packaged in a board-level configuration.
− DT9842/2 – DT9842/2 module with 8 analog inputs, 2 analog outputs, 3 digital I/O
ports, 3 counter/timer channels, 128 MBytes of SDRAM memory and 2 MB of flash
memory packaged in a 6U board-level configuration.
− DT9842/8 – DT9842/8 module with 8 analog inputs, 8 analog outputs, 3 digital I/O
ports, 3 counter/timer channels, 128 MBytes of SDRAM memory, and 2 MB of flash
memory, packaged in a 6U board-level configuration.
• Sleek Box configuration – The Sleek Box configuration packages the board-level version of
the module in a CE-compliant box with standard signal connectors, power supply, and
fan. The following Sleek Box configurations are available:
− DT9841-SB – DT9841 module with 128 MBytes of SDRAM memory and 2 MB of flash
memory, packaged in the Sleek Box configuration.
− DT9841-VIB-SB – DT9841-VIB module with 8 analog inputs that provide IEPE
functions, 2 analog outputs, and 2 digital I/O ports, 3 counter/timer channels, 128
MBytes of SDRAM memory, and 2 MB of flash memory, packaged in the Sleek Box
configuration.
− DT9842/2-SB – DT9842/2 module with 128 MBytes of SDRAM memory and 2 MB of
flash memory, packaged in the Sleek Box configuration.
− DT9842/8-SB – DT9842/8 module with 128 MBytes of SDRAM memory and 2 MB of
flash memory, packaged in the Sleek Box configuration.
Note: The DT9841E module is not available in the Sleek Box configuration.
• Developer’s Kit configuration – The DT9841E-DK configuration provides a complete
solution for developing applications for the DT9841E module. This kit includes the
DT9840 Series CD, the DT9841E module, the EP365 USB cable, the EP348 power supply,
the EP358E accessory panel for easy signal connections, and two EP344 cables to connect
the EP358E accessory panel to the DT9841E module. Refer to page 14 for more
information on the included accessories.
13
Chapter 1
Accessories
You can purchase the following optional items separately from Data Translation for use with
the DT9840 Series:
• EP342 – A 0.2-meter, shielded cable that connects multiple DT9840 Series modules
together using the Scalable Bus. Note that this accessory is not available for the DT9841E
module.
• EP354 – An RS-232 serial adapter that has one 9-pin D-sub male connector on one end and
a 9-pin D-sub female connector on the other end. The EP354 serial adapter connects to the
serial port of a DT9840 Series module and to the EP335 cable, which is shipped with the
EP354 serial adapter.
Note: To attach the DT9841E to the EP354 serial adapter, you need the EP368 cable that
comes with the EP354. The EP368 cable is a 6-inch cable that has a 10-pin connector on one
end for attaching to the J4 connector on the DT9841E and a 9-pin D-sub, female connector
on the other end for attaching to the EP354 serial adapter.
The EP335 cable that comes with the EP354 serial adapter is a 9-pin, 2-meter cable that has
one 9-pin D-sub male connector on one end and a 9-pin D-sub female connector on the
other end. The EP335 cable connects the EP354 serial adapter board to an
RS-232-compliant device.
• EP348 – An external +5 V, 6 A, switching power supply for the module. This power
supply includes a 4-pin locking connector for attaching the power supply to the J11
connector on the module and a cable that connects the power supply to a wall outlet.
The EP348 power supply is included when you purchase a Sleek Box version of the
module.
• EP358E – An accessory panel that connects to the DT9841E module. The EP358E provides
BNCs for all analog I/O connections, and three connectors that allow access to all of the
signals on the module. Two EP344 cables are provided with the EP358E accessory panel.
The EP344 is a 6-inch, 68-pin ribbon cable that connects one of the two 68-pin connectors
on the back of the EP358E accessory panel to one of the two 68-pin connectors on the
DT9841E module. Refer to page 34 for connection information.
14
2
Preparing to Use a
DT9840 Series Module
Unpacking . . . . . . . . . . . . . . . . . . . . . . . . . . . . . . . . . . . . . . . . . . . . . . . . . . . . . . . . . . . . . . . . . . . 17
Checking the System Requirements . . . . . . . . . . . . . . . . . . . . . . . . . . . . . . . . . . . . . . . . . . . . . 18
Installing the Software . . . . . . . . . . . . . . . . . . . . . . . . . . . . . . . . . . . . . . . . . . . . . . . . . . . . . . . . . 19
Building and Running the Example Programs . . . . . . . . . . . . . . . . . . . . . . . . . . . . . . . . . . . . 20
Viewing the Documentation Online . . . . . . . . . . . . . . . . . . . . . . . . . . . . . . . . . . . . . . . . . . . . . 22
15
Chapter 2
Prepare to Use a Module
(this chapter)
Set up the Module
(see Chapter 3 starting on page 23)
Wire Signals
(see Chapter 4 starting on page 41)
Verify the Operation of the Module
(see Chapter 5 starting on page 61)
Program the Flash of the Module
(see Chapter 6 starting on page 71)
If Needed, Troubleshoot the Module
(see Chapter 7 starting on page 79)
16
Preparing to Use a DT9840 Series Module
Unpacking
Open the shipping box and verify that the following items are present:
• DT9840 Series module (if you purchased a Sleek Box configuration, the module will be
enclosed inside the Sleek Box)
• EP365 USB cable
• DT9840 Series Software CD
Note: If you ordered the DT9840 Series module in a Sleek Box configuration, make sure that
you also received the power supply (EP348).
If you ordered the DT9841E-DK developer’s kit, make sure that you also received the power
supply (EP348), the accessory panel (EP358E), and two cables for connecting the EP358E
accessory panel to the module (EP344).
If an item is missing or damaged, contact Data Translation. If you are in the United States, call
the Customer Service Department at (508) 481-3700, ext. 1323. An application engineer will
guide you through the appropriate steps for replacing missing or damaged items. If you are
located outside the United States, call your local distributor, listed on Data Translation’s web
site (www.datatranslation.com).
Once you have unpacked your module, check the system requirements, as described in the
next section.
17
Chapter 2
Checking the System Requirements
For reliable operation, your DT9840 Series module requires the items listed in Table 2.
Table 2: Minimum System Requirements
Feature
Minimum Requirements
Texas Instruments Code Composer Studio
(CSS) and TI DSP/BIOS
CCS Version 3.3 and TI DSP/BIOS 5.31.08
or
CCS Version 5.2.1 and TI DSP/BIOS 5.41.13.42
Microsoft Visual Studio
Version 6.0 or greater
Operating System
Windows XP professional edition, Windows Vista, or
Windows 7a
Processor
Pentium 233 MHz or higher
USB Ports
One or more (version 1.1 or 2.0)
RAM
64 MB or more; 128 MB or higher is recommended
CD-ROM Drives
One or more
Monitor
Super VGA, or compatible, display (800 x 600 or higher
is recommended)
a. For USB 2.0 support, install Service Pack 2 for Windows XP. Note that for some PCs, you may also need to
disable standby mode on your system. If you are unsure of whether you are using USB 2.0 or USB 1.1, run the
Data Translation DT9840 Series Control Panel, described on page 31. Consult Microsoft for more information.
Note that the DT9840 Series DSP Library and all example programs require Code Composer
Studio version 3.3 and TI DSP/BIOS 5.31.08, or Code Composer Studio version 5.2.1 and TI
DSP/BIOS 5.41.13.42. To verify that the correct version of the TI DSP/BIOS is selected, run the
CCS Component Manager, and ensure that the correct version of the TI DSP/BIOS is selected.
In a typical installation, you can find the CCS Component Manager in the following path:
C:\CCStudio_vx.x\cc\bin\comp_mgr.exe (where x.x is the version of Code Composer).
18
Preparing to Use a DT9840 Series Module
Installing the Software
Notes: Make sure that you have Administrator rights before installing the DT9840 Series
software. Refer to Appendix B for information on ensuring that your system has the proper
permissions.
If you are using both Code Composer Studio and a JTag emulator, make sure that you install
Code Composer Studio before installing the JTag emulator. You can install the DT9840 Series
software either before or after you install the Code Composer Studio software. However,
ensure that the DT9840 Series software is installed before attempting to install a DT9840
Series module.
To install the software, do the following:
1. Insert the DT9840 Series Software CD into your CD-ROM drive.
2. Click Start from the Task Bar, and then click Run.
The Run dialog box appears.
3. In the Command Line edit box, enter D:\SETUP.EXE.
If your CD-ROM is not in drive D:, enter the letter of the drive where your CD-ROM is located.
The InstallShield Wizard for the DT9840 Series appears.
4. Click Next.
The wizard prompts you to select a module type.
5. Select the DT9840 Series module type you are using (DT9841, DT9841E, DT9841-VIB,
DT9842/2, or DT9842/8), and then click Next.
6. Select the type of installation to perform (Full, Compact, or Custom), the click Next.
7. Either change the directory path and/or name using Browse or accept the default
directory, and then click Next.
The wizard prompts you for the program folder name.
8. Either enter a new name for the program folder or accept the default name, and then click
Next.
The files are copied. When installation is complete, the wizard prompts you to read the
ReleaseNotes.txt file now or later.
9. Click Yes to read the release notes now. Otherwise, click No.
19
Chapter 2
Building and Running the Example Programs
A number of example programs are provided with the DT9840 Series software. As shipped,
these examples are provided in source-code form. Refer to the Readme file on the CD for a list
of the examples and what they demonstrate.
The source code and project files for all examples are installed, by default, in the following
locations:
For 32-bit Windows:
\Program Files\Data Translation\DT9840 Series\Examples
For 64-bit Windows:
\Program Files (x86)\Data Translation\DT9840 Series\Examples
DSP Programs
The DSP programs are installed in the subfolder named DSP under each example folder. DSP
programs are built with TI Code Composer Studio.
Note: Refer to the DT9840 Series DSP Library User’s Manual for instructions on creating your
own DSP programs for aDT9840 Series module.
Building the DSP Example Programs in Code Composer 3.3
To build the DSP example programs in Code Composer 3.3, perform the following steps:
1. Open the DSP project in the Code Composer 3.3 IDE using the menu Project -> Open.
2. Select a file with the .pjt extension.
3. Build the project using the menu option Project -> Rebuild all.
20
Preparing to Use a DT9840 Series Module
Building DSP Programs in Code Composer 5.2.1
To build the DSP example programs in Code Composer 5.2.1, perform the following steps:
1. Start Code Composer Studio 5.2.1.
2. From the Project menu, select Import Existing CCS Eclipse Project.
3. Browse to the folder that contains the DSP projects for the examples that you want to
build.
Eclipse automatically discovers all projects in that folder and all subfolders and displays them.
4. Check the projects that you wish to import.
5. Click Finish.
The projects are imported into the Code Composer Studio Eclipse IDE.
Host Applications
Several examples have a host application that communicates and interacts with the DSP
program that reside in the DSP on the DT9840 Series module. Host applications are installed
in the subfolder named Host under each example folder. Host applications are built using
Microsoft Visual Studio 10 or higher.
To build a host example application, perform the following steps:
1. Start Microsoft Visual Studio.
2. Open the solution (.sln) file.
3. Rebuild the solution.
Note: Refer to the DT9840 Series Host Communication Library User’s Manual for instructions
on creating your own host application that communicates with aDT9840 Series module.
21
Chapter 2
Viewing the Documentation Online
Once you have installed the DT9840 Series software, you can view the DT9840 Series
documentation by clicking the manual title. You can access the manuals from the Data
Translation, Inc\DT9840 Series program group.
To view the documentation, you need Adobe Acrobat Reader, version 6.0 or greater, which is
available from www.adobe.com.
Here are a few helpful hints about using Adobe Acrobat Reader:
• To navigate to a specific section of the document, click a heading from the table of contents
on the left side of the document.
• Within the document, click the text shown in blue to jump to the appropriate reference
(the pointer changes from a hand to an index finger).
• To go back to the page from which the jump was made, click the right mouse button and
Go Back, or from the main menu, click Document, then Go Back.
• To print the document, from the main menu, click File, and then Print.
• To increase or decrease the size of the displayed document, from the main menu, click
View, and then Zoom.
• By default, text and monochrome images are smoothed in Acrobat Reader, resulting in
blurry images. If you wish, you can turn smoothing off by clicking File, and then
Preferences/General, and unchecking Smooth Text and Images.
22
3
Setting up a
DT9840 Series Module
Applying Power to a DT9840 Series Module . . . . . . . . . . . . . . . . . . . . . . . . . . . . . . . . . . . . . . 25
Attaching the Module to the Computer . . . . . . . . . . . . . . . . . . . . . . . . . . . . . . . . . . . . . . . . . . 26
Configuring DT9840 Series Modules. . . . . . . . . . . . . . . . . . . . . . . . . . . . . . . . . . . . . . . . . . . . . 31
Attaching the EP358E Accessory Panel to a DT9841E Module . . . . . . . . . . . . . . . . . . . . . . . 34
Setting up the Module for Debugging Using the Serial Port. . . . . . . . . . . . . . . . . . . . . . . . . 35
23
Chapter 3
Prepare to Use a Module
(see Chapter 2 starting on page 15)
Set up the Module
(this chapter)
Wire Signals
(see Chapter 4 starting on page 41)
Verify the Operation of the Module
(see Chapter 5 starting on page 61)
Program the Flash of the Module
(see Chapter 6 starting on page 71)
If Needed, Troubleshoot the Module
(see Chapter 7 starting on page 79)
Note: DT9840 Series modules are factory-calibrated and require no further adjustment.
To set up a DT9840 Series module, you must do the following:
1. Apply power to the module, as described on page 25
2. Attach the module to the host computer, as described on page 26
3. Configure the module, as described on page 31
4. For DT9841E users, connect the optional EP358E accessory panel to the module, as
described on page 34
5. If desired, set up the module for serial debugging, as described on page 35
24
Setting up a DT9840 Series Module
Applying Power to a DT9840 Series Module
DT9840 Series modules require an external +5 V power supply, such as the EP348, that is
isolated from the computer or from the power commons (up to 500 V minimum).
Note: The EP348 is shipped with all Sleek Box models and the DT9841E-DK developer’s kit
and is available separately as an accessory to the DT9840 Series.
To apply power to a DT9840 Series module, do the following:
1. Connect the +5 V power supply (EP348 or equivalent) to the +5 V input connector (J11) on
the DT9840 Series module. Figure 3 on page 25 shows how to connect the EP348 to the
Sleek Box version of the module.
2. Plug the power supply to a wall outlet, and then turn on the power supply.
3. Press the power switch, SW1, on the DT9840 Series module.
If the power supply is attached correctly to the module, LED CR1, shown in Figure 3, turns green.
Note: If you are using the DT9841E module, the LED is labelled CR6, not LED CR1; the
power is turned on automatically when the power supply is turned on. Refer to page 11
for the layout of the DT9841E module.
2-Color LED
(CR1)
+5 V In Power
Connector (J11)
Scalable Bus
(J12)
EP348
External +5 V
Power Supply
Scalable Bus
(J13)
USB 2.0
Connector
Serial Port
(J4)
Power Switch
(SW1)
To wall outlet
Figure 3: Attaching a +5 V External Power Supply to a DT9840 Series Module
Now, you can attach the module to the host computer, as described in the next section.
25
Chapter 3
Attaching the Module to the Computer
You can attach a DT9840 Series module to the host computer in one of three ways:
• Connect one or two modules directly to the USB ports of your host computer, described
on this page. This method is recommended if you want to use one or two modules
independently.
• Connect up to four modules (one master and three slaves) together using the Scalable Bus
and the EP342 cable, described on page 27. This method is recommended if you want to
synchronize the operation of up to four modules.
Note: If you are using DT9841E modules, this method is not supported.
• Connect multiple modules to one or more self-powered USB hubs, described on page 29.
This method is recommended if you want to use more than two modules independently.
Notes: The practical number of modules that you can attach to your host computer using a
self-powered hub depends on the bandwidth of the USB bus and your application.
Once a module is plugged in, you can unplug a module, then plug it in again, if you wish,
without causing damage. This process is called hot-swapping. Your application may take a
few seconds to recognize a module once it is plugged back in.
Connecting Directly to the Host Computer
Note: Install the software using the instructions on page 19 before performing this
procedure.
Generally, host computers have one or more USB ports. These ports are completely
independent from one another. If you want to connect up to two DT9840 Series modules
directly to the host computer and access them independently, do the following:
1. Attach one end of the USB cable (EP365), which is shipped with the DT9840 Series
module, to the USB connector (J6) on the module. Figure 4 shows how to connect the USB
cable to the Sleek Box version of a module.
2. Attach the other end of the USB cable to the USB 2.0 port of the your host computer.
The operating system automatically detects the USB device, downloads and starts the firmware
(LED CR1, shown in Figure 4, turns red), and loads and starts the Windows driver (LED CR1
turns orange).
26
Setting up a DT9840 Series Module
Notes: If you are using the DT9841E module, the LED is labelled CR6, not LED CR1. Refer
to page 11 for the layout of the DT9841E module.
USB 1.1 is also supported, but at USB 1.1 transfer rates.
2-Color LED
(CR1)
USB 2.0
Connector
(J6)
USB Cable
To USB 2.0 port on
host computer
To DT9840
Series
module
Figure 4: Attaching DT9840 Series Modules Directly to the Host Computer
3. Repeat steps 1 to 2 to attach another DT9840 Series module to the host computer, if
desired.
You can now configure the module, as described on page 31.
Connecting Modules Together through the Scalable Bus
Note: Install the software using the instructions on page 19 before performing this
procedure.
Skip this procedure if you are using a DT9841E; the DT9841E does not support the Scalable
Bus.
27
Chapter 3
To connect up to four DT9840 Series modules together and to the host computer, do the
following:
1. For the first module in the chain (known as the master), attach one end of the USB cable
(EP365), which is shipped with the module, to the USB connector (J6) on the module;
attach the other end of the USB cable to one of the USB ports on the host computer, as
shown in Figure 4 on page 27.
The operating system automatically detects the USB device, downloads and starts the firmware
(LED CR1, shown in Figure 4 on page 27, turns red), and loads and starts the Windows driver
(LED CR1 turns orange).
2. Attach one end of the EP342 cable to one of the Scalable Bus connectors (J12 or J13) on the
master module; attach the other end of this cable to one of the Scalable Bus connectors (J12
or J13) on the next DT9840 Series module in the chain, known as a slave, as shown in
Figure 5.
The operating system automatically detects the USB devices as they are installed.
Host
Computer
DT9840 Series
Modules
USB Cable
Master - 0
Slave - 1
J13
Slave - 2
J13
Slave - 3
J13
J12
EP342
EP342
J13
J12
J12
EP342
Note that you must configure the address of each
of the module in the chain and terminate both the
master module and the last slave module in the
chain using the Data Translation DT9840 Series
Control Panel, described on page 31.
Figure 5: Attaching Multiple DT9840 Series Modules Together
3. Repeat step 2 until you have attached the number of DT9840 Series modules that you
desire (up to four – one master and up to three slaves).
Now, configure the modules, as described on page 31.
28
Setting up a DT9840 Series Module
Connecting to a Self-Powered USB Hub
Self-powered USB hubs are USB hubs that are powered by their own external power supply.
Theoretically, you can connect up to five self-powered USB hubs to a USB port on the host
computer. Each of these hubs supports up to four DT9840 Series modules that you can use
independently. However, the practical number of DT9840 Series modules that you can connect
to a single USB port depends on the throughput you want to achieve.
Note: Install the software using the instructions on page 19 before performing this
procedure.
To connect a DT9840 Series module to a self-powered USB hub, do the following:
1. Attach one end of the USB cable (EP365) to the USB connector (J6) on the DT9840 Series
module and the other end of the USB cable to a USB 2.0 port on a self-powered USB hub,
as shown in Figure 6.
DT9840 Series Module
Connector J6
USB
Cable
Host
Computer
USB
Cable
Self-Powered
USB Hub
Power Supply
for Hub
Figure 6: Attaching a DT9840 Series Module to a Self-Powered Hub
2. Connect the power supply for the self-powered USB hub to an external power supply, as
shown in Figure 6 on page 29.
3. Connect the hub to the USB port on the host computer using another USB cable, as shown
in Figure 6 on page 29.
The operating system automatically detects the USB device, downloads and starts the firmware
(LED CR1, shown in Figure 3, turns red), and loads and starts the Windows driver (LED CR1
turns orange).
Note: If you are using the DT9841E module, the LED is labelled CR6, not LED CR1. Refer
to page 11 for the layout of the DT9841E module.
29
Chapter 3
4. Repeat steps 1 to 3 until you have attached the number of hubs (up to five) and DT9840
Series modules (up to four per hub) that you desire, as shown in Figure 7.
The operating system automatically detects the USB devices as they are installed.
DT9840 Series Modules
USB Cables
Self-Powered
USB Hubs
Host
Computer
. . .connect up to 5
hubs and up to 4
modules per hub
USB
Cable
Power Supply
for Hub
USB
Cable
Power Supply
for Hub
USB Cables
DT9840 Series Modules
Figure 7: Attaching Multiple DT9840 Series Modules to the Host Computer
Using Self-Powered USB Hubs
You can now configure the modules, as described on page 31.
30
Setting up a DT9840 Series Module
Configuring DT9840 Series Modules
To configure the DT9840 Series modules, do the following:
1. From the Control Panel on the host computer, double-click the Data Translation DT9840
Series Control Panel icon.
The DT9840 Series Module Configuration dialog box appears:
2. Click the name of the DT9840 Series module that you want to configure.
The module number, serial number that was factory-programmed on the module, revision of the
FPGA on the module, and the USB port type (2.0 or 1.1) are displayed.
3. If you want to change the name of the module, enter a new name in the Board Name field,
overwriting the default name. This name is applied when you click the OK button.
4. If you are using the Scalable Bus to connect up to three slave modules to the master
module, do the following:
a. Enable operation of the Scalable Bus.
b. Configure the first module in the chain as the Master, and specify Bus Termination as
On.
Bus Address 0 is automatically selected and position M of Address LED (CR15) is turned on.
Refer to Figure 8 for the location of this LED.
31
Chapter 3
DAC Ch0 DAC Ch3
Analog In/Out
Digital In/Out
AD Ch0 AD Ch2 AD Ch4 AD Ch6
DAC Ch1 DAC Ch4 DAC Ch6
AD Ch1 AD Ch3 AD Ch5 AD Ch7
DAC Ch2 DAC Ch5 DAC Ch7
Counter Timer
Analog Inputs
Analog Outputs
124M
Address LED (CR15)
Analog Input Controls
Address
TTL
TTL
5V Out
Clock Trigger
- +
Figure 8: Address LED (CR15)
c.
Configure the last module in the chain as a Slave, specify Bus Termination as On, and
specify a unique Bus Address from 1 to 3.
Positions 1 and 2 of Address LED (CR15) are turned on, as needed, to represent addresses 1 to
3. For example, if you specify an address of 1, only position 1 of CR15 is turned on. If you
specify an address of 3, positions 1 and 2 of CR15 are turned on.
d. Configure all the modules in the middle of the chain as Slaves, specify Bus
Termination as Off, and specify a unique Bus Address from 1 to 3.
Positions 1 and 2 of Address LED (CR15) are turned on, as needed, to represent addresses 1 to
3. For example, if you specify an address of 1, only position 1 of CR15 is turned on. If you
specify an address of 3, positions 1 and 2 of CR15 are turned on.
5. Click OK.
6. Close the DT9840 Series Control Panel.
7. Use software to configure the modules for synchronous or asynchronous operation.
For synchronous operation, where all slave modules operate at the frequency of the
master clock source, set the clock source for each slave module to Scalable Bus master
clock. In this configuration, you can set the clock source for the master module to either
internal or external. (If you select external, ensure that you attach a clock signal to the Ext
Clk BNC on the master module.) The master clock and reset signals are then provided to
the slaves through the Scalable Bus connections.
For asynchronous operation, you can set the clock source for both the master and slave
modules to either internal or external (but not to Scalable Bus master). Each module is
then clocked separately; you can communicate with all the modules on the bus using
software. If you are using a DT9841E module, select asynchronous operation.
32
Setting up a DT9840 Series Module
Note: When you are addressing a slave from the master module, the address LEDs (CR15)
on the master are turned on to indicate both the master module and the slave module that is
being addressed. For example, if you are using the master to communicate to a slave module
with an address of 1, position 3 (M) of address LED CR15 is turned on to indicate that the
module is configured as a master, and position 1 of address LED CR15 is turned on to
indicate that the master is communicating with a slave module whose address is 1.
When the master is broadcasting to all slave modules, no address LEDs (CR15) are turned on.
33
Chapter 3
Attaching the EP358E Accessory Panel to a DT9841E
Module
Note: Skip this section if you did not purchase the DT9841E-DK developer’s kit or EP358E
accessory panel.
Data Translation provides the optional EP358E accessory panel to make connecting signals to
the DT9841E module easier. To attach the EP358E accessory panel to the DT9841E module, do
the following:
1. Attach one end of an EP344 cable, included with the EP358E, to the J202 connector on the
back of the EP358E accessory pane.
2. Attach the other end of this cable to the J2 connector on the DT9841E module, as shown in
Figure 9.
Connector
J201
EP344
Cable
J1
Connector
J202
Back of
EP358E
Accessory
Panel)
EP344
Cable
J2
3. Using the remaining EP344 cable, attach one end of the cable to the J201 connector on the
back of the EP358E accessory panel and the other end of this cable to the J1 connector on
the DT9841E module, as shown in Figure 9.
DT9841E
Module
Figure 9: Attaching the EP344 Cables to the EP358E and DT9841E Module
You are now ready to wire signals to the EP358E accessory panel using the instructions in
Chapter 4 starting on page 41.
34
Setting up a DT9840 Series Module
Setting up the Module for Debugging Using the Serial
Port
Note: Skip this section if you do not want to use the serial port on the DT9840 Series module
for debugging purposes.
If you want to debug the operation of the DT9840 Series module using the J4 serial port, you
need the optional EP354 serial adapter.
Do the following to set up the module for serial debugging:
1. If you are using the DT9841E, attach the 10-pin connector of the EP368 cable into the J4
connector on the DT9841E module, and then connect the 9-pin D-sub connector on the
other end of the EP368 cable into the male connector of the EP354 serial adapter, securing
it with the two retaining screws on the EP354, as shown in Figure 10.
DT9841E
Module
EP368 Cable
EP354
Serial Adapter
Host
Computer or
RS-232Compliant
Device
Serial Port
(J4)
Serial
Connector
EP335
Serial Cable
Figure 10: Connecting an RS-233-Complaint Device to
the Serial Port (J4) of the DT9841E
For all other DT9840 Series modules, connect the male connector of the EP354 serial
adapter directly into the serial connector (J4) of the DT9840 Series module, and secure it
with the two retaining screws on the EP354 serial adapter, as shown in Figure 11.
35
Chapter 3
All other DT9840
Series Modules
(not the DT9841E)
EP354
Serial Adapter
Serial Port
(J4)
Host
Computer or
RS-232Compliant
Device
Serial
Connector
EP335
Serial Cable
Figure 11: Connecting an RS-233-Complaint Device to
the Serial Port (J4) of all other DT9840 Series Module (not the DT9841E)
2. Connect the female connector of the EP354 serial adapter to the male connector of the
EP335 serial cable, and secure it with the two thumb screws on the EP335 cable.
3. Connect the female connector of the EP335 serial cable into the serial connector of your
computer or other RS-232-compliant serial device, and secure it with the two thumb
screws on the EP335 cable.
4. Set up HyperTerminal, described in the next section, or similar application to view the
activity of the serial port.
5. Set up HyperTerminal, described on page 39, or similar application for printing
information from the serial port.
You can now use the serial debugging functions in the DT9840 Series DSP Library to log
information to the serial port, and view this information on the attached computer monitor.
Refer to the DT9840 Series DSP Library User’s Manual for more information on how to use the
serial debugging functions.
Setting Up HyperTerminal to View the Activity of the Serial Port
If you connected a computer to the serial port and want to use the standard Windows
HyperTerminal application to view the activity on the serial port, do the following:
1. From your Windows Task Bar, click Start\Programs\Accessories\Communications\
HyperTerminal.
The HyperTerminal application opens and the following screen appears:
36
Setting up a DT9840 Series Module
2. Enter a name for your connection, such as MyTerminal, and then click OK.
The following screen appears:
3. Select the COM port to which you connected the EP335 cable.
The following screen appears:
37
Chapter 3
4. Configure the selected COM port to use 115200 baud, 8 data bits, no parity, 1 stop bit, and
no flow control, and then click OK.
The following screen appears:
If you want to print information from the serial port, continue with the next section.
38
Setting up a DT9840 Series Module
Setting up HyperTerminal to Print Information from the Serial Port
If you want to set up HyperTerminal to implicitly add line feeds to every carriage return (one
way to ensure that lines print correctly when using HyperTerminal with the DT_Printf
function), do the following:
Note: With this configuration of HyperTerminal, use the \r format instead of the \n format
with the DT_Printf function. Refer to the DT9840 Series DSP Library User’s Manual for more
information on this function.
1. Click File, and then click Properties.
The following screen appears:
2. Click Settings.
The following screen appears:
39
Chapter 3
3. Configure the functions, arrows, and control keys to act as Terminal Keys, configure the
backspace key to send Ctrl+H, specify ANSIW emulation, specify VT100 as the Telnet
terminal ID, and specify 500 backscroll buffer lines.
4. Click ASCII Setup.
The following screen appears:
5. Check the box corresponding to Append line feeds to incoming line ends, uncheck all the
other checkboxes, and then click OK.
40
4
Wiring Signals
Preparing to Wire Signals . . . . . . . . . . . . . . . . . . . . . . . . . . . . . . . . . . . . . . . . . . . . . . . . . . . . . . 43
Connecting Analog Input Signals . . . . . . . . . . . . . . . . . . . . . . . . . . . . . . . . . . . . . . . . . . . . . . . 49
Connecting Analog Output Signals. . . . . . . . . . . . . . . . . . . . . . . . . . . . . . . . . . . . . . . . . . . . . . 54
Connecting Digital I/O Signals . . . . . . . . . . . . . . . . . . . . . . . . . . . . . . . . . . . . . . . . . . . . . . . . . 55
Connecting Counter/Timer Signals . . . . . . . . . . . . . . . . . . . . . . . . . . . . . . . . . . . . . . . . . . . . . 56
41
Chapter 4
Prepare to Use a Module
(see Chapter 2 starting on page 15)
Set up the Module
(see Chapter 3 starting on page 23)
Wire Signals
(this chapter)
Verify the Operation of the Module
(see Chapter 5 starting on page 61)
Program the Flash of the Module
(see Chapter 6 starting on page 71)
If Needed, Troubleshoot the Module
(see Chapter 7 starting on page 79)
42
Wiring Signals
Preparing to Wire Signals
CAUTION:
To avoid electrostatic sensitivity, we recommend that you unplug
your DT9840 Series module from the computer before wiring signals.
This section provides recommendations and information about wiring signals to the Sleek Box
or to the EP358E accessory panel. If you are using the board-level version of the module, use
this section for conceptual information, and refer to Appendix A starting on page 85 for
connector pin assignments.
Wiring Recommendations
Keep the following recommendations in mind when wiring signals to a DT9840 Series
module:
• Use individually shielded twisted-pair wire (size 14 to 26 AWG) when using a DT9840
Series module in highly noisy electrical environments.
• Separate power and signal lines by using physically different wiring paths or conduits.
• To avoid noise, do not locate the DT9840 Series module and cabling next to sources that
produce high electromagnetic fields, such as large electric motors, power lines, solenoids,
and electric arcs, unless the signals are enclosed in a mumetal shield.
• Prevent electrostatic discharge to the I/O while the DT9840 Series module is operational.
• Connect all unused analog input channels to analog ground.
Wiring to the Sleek Box
Figure 13 shows the connectors on the front panel of the DT9841-VIB-SB Sleek Box.
43
Chapter 4
Connector J1
Connector J2
DAC Ch0
Analog In/Out
AD Ch0 AD Ch2 AD Ch4 AD Ch6
Digital In/Out
DAC Ch1
C/T 0 Clock Connector J19
Input
AD Ch1 AD Ch3 AD Ch5 AD Ch7
Counter Timer
Analog Inputs
Analog Outputs
124M
Analog Input Controls
Address
TTL
TTL
5V Out
Clock Trigger
- +
If you use the BNC labelled CT0 Clock as a tachometer input,
ensure that you condition your signal to a TTL input, then
configure the counter/timer for continuous measure mode.
Figure 12: I/O Connectors on the DT9841-VIB-SB Sleek Box
Figure 13 shows the connectors on the front panel of the Sleek Box for all other DT9840 Series
modules (not including the DT9841-VIB-SB.
Connector J2
Connector J1
DAC Ch0 DAC Ch3
Analog In/Out
Digital In/Out
AD Ch0 AD Ch2 AD Ch4 AD Ch6
DAC Ch1 DAC Ch4 DAC Ch6
AD Ch1 AD Ch3 AD Ch5 AD Ch7
DAC Ch2 DAC Ch5 DAC Ch7
Connector J19
Counter Timer
Analog Inputs
Analog Outputs
124M
Analog Input Controls
Address
TTL
TTL
5V Out
Clock Trigger
- +
Notes:
The DT9841E only provides AD Ch 0 and AD Ch1.
DAC Ch2 through 7 are available on the DT9842/8 module only.
Figure 13: I/O Connectors on Other DT9840 Series Sleek Boxes (not including the DT9841-VIB-SB)
44
Wiring Signals
You can connect signals to the Sleek Box in the following ways:
• BNC connectors − BNCs labelled AD Ch0 to AD Ch7 are provided for attaching eight
analog input signals. The BNCs are wired on the box to reflect the channel configuration
(single-ended or differential) of your module.
On the DT9841 and DT9842/2 Sleek Box, BNCs labelled DAC Ch0 and DAC Ch1 are
provided for attaching two analog output signals. On the DT9842/8 Sleek Box, BNCs
labelled DAC Ch0 to DAC Ch7 are provided for attaching eight analog output signals.
The BNC labelled TTL Clock is provided for attaching an external clock signal. The BNC
labelled TTL Trigger is provided for attaching an external trigger signal.
• Analog In/Out Connector (J1) − A 37-pin connector provided for attaching analog I/O
signals. Refer to Table 3 on page 45 for more information on this connector.
• Digital In/Out Connector (J2) − A 37-pin connector provided for attaching digital I/O
signals. Refer to Table 4 on page 46 for more information on this connector.
• Counter Timer Connector (J19) − A 25-pin connector provided for attaching
counter/timer signals. Refer to Table 5 on page 47 for more information on this connector.
• Screw terminal block − Α screw terminal block is provided for attaching an external +5 V
power output signal.
Table 3: Analog In/Out Connector (J1) Pin Assignments
J1 Pin
Assignment
Signal Description
J1 Pin
Assignment
Signal Description
1
Analog Input 00
2
Analog Input 01
3
Analog Input 02
4
Analog Input 03
5
Analog Input 04
6
Analog Input 05
7
Analog Input 06
8
Analog Input 07
9
Analog Common
10
Analog Output 00
11
Analog Output 01
12
Analog Output 02a
13
Analog Output 03a
14
Analog Output 04a
15
Analog Output 05a
16
Analog Output 06a
17
Analog Output 07a
18
Analog Common
19
Reserved
20
Analog Input 00 Returnb
21
Analog Input 01 Returnb
22
Analog Input 02 Returnb
23
Analog Input 03 Returnb
24
Analog Input 04 Returnb
25
Analog Input 05 Returnb
26
Analog Input 06 Returnb
27
Analog Input 07 Returnb
28
Analog Common
29
Analog Output 00 Return
30
Analog Output 01 Return
32
Analog Output 03 Returna
31
Analog Output 02
Returna
45
Chapter 4
Table 3: Analog In/Out Connector (J1) Pin Assignments (cont.)
J1 Pin
Assignment
Signal Description
J1 Pin
Assignment
Signal Description
33
Analog Output 04 Returna
34
Analog Output 05 Returna
35
Analog Output 06 Returna
36
Analog Output 07 Returna
37
Analog Common
a. Available on the DT9842/8 module only. For all other modules, these are reserved.
b. For the DT9841-VIB, DT9842/2, and DT9842/8, which have single-ended analog inputs, these
signals are analog grounds.
Table 4: Digital In/Out Connector (J2) Pin Assignments
J2 Pin
Assignment
Signal Description
J2 Pin
Assignment
1
Digital In/Out 3, Port 0
2
Digital In/Out 2, Port 0
3
Digital In/Out 1, Port 0
4
Digital In/Out 0, Port 0
5
Digital In/Out 3, Port 1
6
Digital In/Out 2, Port 1
7
Digital In/Out 1, Port 1
8
Digital In/Out 0, Port 1
9
Digital In/Out 3, Port 2a/TINP1b
10
Digital In/Out 2, Port 2a/Encoder 2 Clrb
11
Digital In/Out 1, Port 2a/Encoder 1 Clrb
12
Digital In/Out 0, Port 2a/Encoder 0 Clrb
13
Isolated Digital Ground
14
Isolated Digital Ground
15
Isolated Digital Ground
16
Isolated Digital Ground
17
Isolated Digital Ground
18
Isolated Digital Ground
19
Reserved
20
Digital In/Out 7, Port 0
21
Digital In/Out 6, Port 0
22
Digital In/Out 5, Port 0
23
Digital In/Out 4, Port 0
24
Digital In/Out 7, Port 1
25
Digital In/Out 6, Port 1
26
Digital In/Out 5, Port 1
27
Digital In/Out 4, Port 1
28
Digital In/Out 7, Port 2a
29
Digital In/Out 6, Port 2a
30
Digital In/Out 5, Port 2a
31
Digital In/Out 4, Port 2a
32
Isolated Digital Ground
33
Isolated Digital Ground
34
Isolated Digital Ground
35
Isolated Digital Ground
36
Isolated Digital Ground
37
Isolated Digital Ground
a. The DT9841-VIB does not provide digital I/O port 2; these signals are reserved.
b. Currently, not implemented.
46
Signal Description
Wiring Signals
Table 5: Counter/Timer Connector (J19) Pin Assignments
J13 Pin
Assignment
Signal Description
J13 Pin
Assignment
Signal Description
1
User Counter Output 2
2
User Clock Input 2/Encoder A2a
3
User Counter Output 1
4
User Clock Input 1/Encoder A1a
5
User Counter Output 0
6
User Clock Input 0/Encoder A0a
7
Isolated Digital Ground
8
Isolated Digital Ground
9
Isolated Digital Ground
10
Isolated Digital Ground
11
Isolated Digital Ground
12
Isolated Digital Ground
13
Reserved
14
External Gate 2/Encoder B2a
15
Isolated Digital Ground
16
External Gate 1/Encoder B1a
17
Isolated Digital Ground
18
External Gate 0/Encoder B0a
19
Isolated Digital Ground
20
Isolated Digital Ground
21
Isolated Digital Ground
22
Isolated Digital Ground
23
Isolated Digital Ground
24
Isolated Digital Ground
25
Isolated Digital Ground
a. Currently, the encoder signals are not implemented.
Wiring to the EP358E Accessory Panel
The optional EP358E accessory panel is provided for the DT9841E module, and comes with
the DT9841E-DK developer’s kit. Refer to page 47 for more information on connecting the
accessory panel to the DT9841E. Figure 14 shows the connectors on the front side of the
EP358E accessory panel.
You can connect signals to the EP358E accessory panel in the following ways:
• BNC connectors – BNCs labelled CH0 and CH1 are provided for attaching two
differential analog input signals.
BNCs labelled DAC0 and DAC1 are provided for attaching two analog output signals.
• Analog In/Out Connector (J1) – A 37-pin connector provided for attaching analog I/O
signals. Refer to Table 3 on page 45 for more information on this connector.
• Digital In/Out Connector (J2) – A 37-pin connector provided for attaching digital I/O
signals. Refer to Table 4 on page 46 for more information on this connector.
• Counter Timer Connector (J19) – A 25-pin connector provided for attaching
counter/timer signals. Refer to Table 5 on page 47 for more information on this connector.
47
Chapter 4
CH0
DAC1
Connector J1
Analog I/O
CH1
DAC0
Connector J2
Digital I/O
Connector J19
Counter/Timer
Figure 14: I/O Connectors on the Front of the EP358E Accessory Panel
48
Wiring Signals
Connecting Analog Input Signals
All DT9840 Series modules support analog input channels to which you can connect voltage
and current loop inputs. The DT9841 module supports 8 differential analog inputs. The
DT9841-VIB module supports 8 single-ended channels and also allows connection to IEPE
inputs. The DT9841E module supports 2 differential analog inputs. The DT9842/2 and
DT9842/8 modules support 8 single-ended analog inputs.
The following subsections describe how to connect differential analog inputs to the DT9841
and DT9841E modules, and single-ended analog inputs to the DT9841-VIB, DT9842/2, and
DT9842/8.
Connecting Differential Analog Input Signals to the DT9841 or
DT9841E
Figure 15 shows how to connect differential voltage inputs (channels 0 and 1, in this case) to
the BNCs on the DT9841 Sleek Box.
Analog In/Out (J1)
Analog In 0
Signal
Source
Analog In 1
Note that the Sleek Box automatically
connects the Analog Ground and Analog
Input Return signals appropriately.
AD Ch0 AD Ch2 AD Ch4 AD Ch6
AD Ch1 AD Ch3 AD Ch5 AD Ch7
Analog Inputs
Figure 15: Connecting Differential Inputs to the BNCs on the DT9841 Sleek Box
If you are using a DT9841E, Figure 15 shows how to connect differential voltage inputs
(channels 0 and 1, in this case) to the BNCs on the EP358E accessory panel.
49
Chapter 4
Analog In/Out (J1)
AD Ch0
Analog In 0
Signal
Source
AD Ch1
Analog In 1
Note that the EP358E automatically
connects the Analog Ground and Analog
Input Return signals appropriately.
Figure 16: Connecting Differential Inputs to the BNCs on the EP358E Accessory Panel
If you’d rather, you can also connect differential inputs to the Analog In/Out (J1) connector on
the DT9841 Sleek Box or EP358E accessory panel. Figure 17 illustrates how to connect a
floating signal source to the Analog In/Out (J1) connector. (A floating signal source is a
voltage source that has no connection with earth ground.)
Note: For floating signal sources, we recommend that you provide a bias return path for the
differential channels by adding 1 kΩ of termination resistance from the low side of the
channel to isolated analog ground. You do this in software when you set up the A/D
operation.
+
Sleek Box or EP358E
Analog In 0
J1, Pin 1
Floating
Signal
Source
Rs
Analog In 0
Return
J1, Pin 20
Analog Common
J1, Pin 28
It is recommended that you select 1 kΩ of
termination resistance in software when
you set up the A/D operation to connect the
low side of channel 0 to analog ground.
Figure 17: Connecting a Floating Signal Source to the Analog In/Out (J1) Connector on the
DT9841 Sleek Box or EP358E Accessory Panel
50
Wiring Signals
Figure 18 illustrates how to connect a nonfloating signal source to the Analog In/Out (J1)
connector on the DT9841 Sleek Box or EP358E accessory panel. In the case of nonfloating
signal sources, the signal source itself provides the bias return path; therefore, you do not need
to provide bias return resistance through software.
Rs is the signal source resistance while Rv is the resistance required to balance the bridge. Note
that the negative side of the bridge supply must be returned to analog ground.
Bridge
Rv
Sleek Box or EP358E
Analog In 0
J1, Pin 1
Analog In 0
Return
Rs
Analog Common
J1, Pin 20
J1, Pin 28
-
+
DC Supply
Figure 18: Connecting a Nonfloating Signal Source to the Analog In/Out (J1) Connector
on the DT9841 Sleek Box or EP358E Accessory Panel
Note that since they measure the difference between the signals at the high (+) and low (−)
inputs, differential connections usually cancel any common-mode voltages, leaving only the
signal. However, if you are using a grounded signal source and ground loop problems arise,
connect the differential signals to the Analog In/Out (J1) connector on the DT9841 Sleek Box
or EP358E accessory panel, as shown in Figure 19.
Ensure that the low side of the signal (−) is connected to ground at the signal source, not at the
Sleek Box or EP358E, and do not tie the two grounds together.
51
Chapter 4
Sleek Box or EP358E
+
Analog In 0
J1, Pin 1
Grounded
Signal
Source
Es
Analog In 0
Return
J1, Pin 20
-
Analog Ground
Signal Source
Ground Vg1
J1, Pin 28
It is recommended that you select 1 kΩ of
termination resistance in software when
you set up the A/D operation to connect the
low side of channel 0 to analog ground.
Figure 19: Connecting a Grounded Signal Source to the Analog In/Out (J1) Connector
on the DT9841 Sleek Box or EP358E Accessory Panel
Figure 20 shows how to connect a current loop input to the Analog In/Out (J1) connector on
the DT9841 Sleek Box or EP358E accessory panel.
Note: If you are using current loop inputs, set up the software so that bias return resistance
is used. For more information, refer to page 31.
+VCC
Sleek Box or EP358E
4 to 20 mA
Analog Input 0
J1, Pin 1
User-installed
resistor
Analog Input 0 Return
J1, Pin 20
Analog Common
J1, Pin 28
The user-installed resistor connects the high side of
the channel to the low side of the corresponding
channel, thereby acting as a shunt. If, for example,
you add a 250 Ω resistor, then connect a 4 to 20 mA
current loop input to channel 0, the input range is
converted to 1 to 5 V.
It is recommended that you select 1 kΩ of
termination resistance in software when you set up
the A/D operation to connect the low side of channel
0 to analog ground.
Figure 20: Connecting Current Inputs to the Analog In/Out (J1) Connector on the
DT9841 Sleek Box or EP358E Accessory Panel
52
Wiring Signals
Connecting Single-Ended Voltage Inputs to the DT9841-VIB,
DT9842/2, or DT9842/8 Sleek Box
Note: If you are using single-ended inputs, we recommend that you set up the software so
that termination resistance is not used for the A/D subsystem.
Figure 15 shows how to connect single-ended voltage inputs (channels 0 and 1, in this case) to
the BNCs on the DT9841-VIB, DT9842/2, or DT9842/8 Sleek Box.
Analog In/Out (J1)
AD Ch0 AD Ch2 AD Ch4 AD Ch6
Analog In 0
Signal
Source
Analog In 1
AD Ch1 AD Ch3 AD Ch5 AD Ch7
Analog Inputs
Note that the Sleek Box automatically
connects the Analog Ground signals
together.
Figure 21: Connecting Single-Ended Inputs to the BNCs on the
DT9841-VIB, DT9842/2, or DT9842/8 Sleek Box
If you’d rather, you can also connect single-ended inputs to the Analog In/Out (J1) connector
on the DT9841-VIB, DT9842/2, or DT9842/8 Sleek Box, as shown in Figure 22.
Signal Source
Sleek Box
+
Vsource 1
-
Analog In 0
J1, pin 1
+
Vsource 0
Analog In 1
J1, pin 2
Analog Ground
J1, pin 18
Figure 22: Connecting Single-Ended Inputs to the Analog In/Out (J1) Connector on the
DT9841-VIB, DT9842/2, or DT9842/8 Sleek Box
53
Chapter 4
Connecting Analog Output Signals
DT9841, DT9841E, DT9841-VIB, and DT9842/2 modules support two analog output channels.
The DT9842/8 module supports eight analog output channels.
Figure 23 shows how to connect an analog output voltage signal (channel 0, in this case) to the
BNCs of the Sleek Box.
Signal
Source
Analog Out 0
DAC Ch0 DAC Ch3
Analog Out 1
DAC Ch1 DAC Ch4 DAC Ch6
Digital In/Out
DAC Ch2 DAC Ch5 DAC Ch7
Note that the Sleek Box automatically
connects the Analog Output Return
signals appropriately.
Analog Outputs
Figure 23: Connecting Analog Output Signals to the BNCs on the Sleek Box
If you are using a DT9841E, Figure 24 shows how to connect an analog output voltage signal
(channel 0, in this case) to the BNCs on the EP358E accessory panel.
Analog Out 0
Signal
Source
Analog Out 1
DAC Ch0
Digital In/Out (J2)
DAC Ch1
Note that the Sleek Box automatically
connects the Analog Output Return
signals appropriately.
Figure 24: Connecting Analog Output Signals to the BNCs on the EP358E Accessory Panel
If you’d rather, you can also connect analog outputs to the Analog In/Out (J1) connector on
the Sleek Box or EP358E accessory panel, as shown in Figure 25.
Sleek Box or EP358E
Analog Output 0
J1, Pin 10
Load
Analog Output 0 Return
J1, Pin 29
Figure 25: Connecting Analog Outputs to the Analog In/Out (J1)
Connector on the Sleek Box or EP358E Accessory Panel
54
Wiring Signals
Connecting Digital I/O Signals
The DT9841-VIB supports two 8-bit ports (ports 0 and 1) that you can program for digital
input or digital output. All other DT9840 Series modules support three 8-bit ports (ports 0, 1,
and 2) that you can program for digital input or digital output. Port 0, if configured for digital
input, supports interrupt-on-change on all eight bits.
Figure 26 shows how to connect digital input signals to the Digital In/Out (J2) connector on
the Sleek Box or EP358E accessory panel.
TTL Inputs
Sleek Box or EP358E
Digital Input Line 1 (Port 0)
Digital Input Line 0 (Port 0)
Isolated Digital Ground
J2, Pin 3
J2, Pin 4
J2, Pin 13
Figure 26: Connecting Digital Inputs to the Digital In/Out (J2) Connector on the Sleek Box
Figure 27 shows how to connect digital output signals to the Digital In/Out (J2) connector on
the Sleek Box or EP358E accessory panel.
0 Out = LED On
500
Ω
Sleek Box or EP358E
J2, Pin 8
Digital Output Line 0 (Port 1)
+
5V
Isolated Digital Ground
J2, Pin 13
Figure 27: Connecting Digital Outputs to the Digital In/Out (J2) Connector on the Sleek Box
55
Chapter 4
Connecting Counter/Timer Signals
The DT9840 Series module provides three 32-bit user counter/timer channels that you can use
to perform the following operations:
• Event counting and up/down counting
• Measurements, including frequency, period, and pulse width measurements
• Pulse output operations, including rate generation, one-shot, and repetitive one-shot
operations
Note: For the DT9841-VIB module, the counter/timer 0 clock input signal is also brought
out to a BNC connector on the front panel (CT0 Clock). If you want to use this input as a
tachometer input, ensure that you condition your signal to a TTL input, then configure your
counter/timer operation for continuous measure mode.
This section describes how to connect counter/timer signals to perform these operations.
Refer to the DT9840 Series User’s Manual for more information on using the counter/timers.
Connecting Signals for Event Counting and Up/Down Counting
Operations
In standard event counting operations, clock pulses are counted while the gate signal is active.
In up/down counting operations, the counter increments when the gate signal is active and
decrements when the gate signal is inactive; an external gate signal is required.
Figure 28 shows an example of how to connect signals to the Counter/Timer (J19) connector
on the Sleek Box or EP358E accessory panel for an event counting or up/down counting
operation when using an externally-supplied hardware gate.
Sleek Box or EP358E
User Clock Input 0
J19, Pin 6
Gate 0
Signal Source
External
Gating
Switch
J19, Pin 18
Isolated Digital
Ground
J19, Pin 19
J19, Pin 20
Isolated Digital Ground
Figure 28: Connecting Signals for an Event Counting or Up/Down Counting Operation
Using an External Gate
56
Wiring Signals
Figure 29 shows an example of how to connect signals to the Counter/Timer (J19) connector
on the Sleek Box or EP358E accessory panel for an event counting operation using a software
gate (no external gate connection is required).
Sleek Box or EP358E
User Clock Input 0
J13, Pin 6
Signal Source
Isolated Digital Ground
J13, Pin 7
Figure 29: Connecting Signals for an Event Counting Operation Using a Software Gate
Figure 30 shows an example of connecting signals to the Counter/Timer (J19) connector on the
Sleek Box or EP358E accessory panel to cascade two counters for an event counting operation.
Note: You can also internally cascade counters using software; if you internally cascade the
counters, you do not need to make the external cascading connections.
Sleek Box or EP358E
User Clock Input 0
Gate 1
Gate 0
Signal
Source
External
Gating
Switch
Isolated Digital
Ground
J19, Pin 4
J19, Pin 5
J19, Pin 6
J19, Pin 16
J19, Pin 18
User Clock
Input 1
User
Counter
Output 0
J19, Pin 19
J19, Pin 20
Isolated Digital Ground
Figure 30: Cascading Counters for an Event Counting Operation
57
Chapter 4
Connecting Signals for a Measurement Operation
In measure mode, you do not specify the clock input source or gate type in software; the
physical input connection and the specified edge type determine the signal that is measured.
Figure 31 shows an example of connecting signals to the Counter/Timer (J19) connector on the
Sleek Box or EP358E accessory panel for a frequency measurement operation. In this example,
the signal whose frequency you want to measure is connected to the clock input pin of
counter/timer 0.
Sleek Box or EP358E
User Clock Input 0
J19, Pin 6
Signal Source
Isolated Digital Ground
J19, Pin 7
Figure 31: Connecting Signals for a Frequency Measurement Operation
Counter/timer 0 starts counting when it detects the first rising edge of the signal connected to
the clock input pin and stops counting when it detects the first falling edge of the signal
connected to the clock input pin (these edges are specified in software). The software returns
the count.
You can calculate the frequency of your signal using this count, as follows:
Frequency = 18 MHz/Number of Counts
58
Wiring Signals
Connecting Signals for Pulse Output Operations
Figure 32 shows an example of connecting signals to the Counter/Timer (J19) connector on the
Sleek Box or EP358E accessory panel for a continuous pulse operation (rate generation mode).
This example uses an external gate.
Sleek Box or EP358E
User Clock Output 0
Gate 0
External
Gating
Switch
Heater
Controller
J19, Pin 5
J19, Pin 18
Isolated Digital
Ground
J19, Pin 19
J19, Pin 20
Isolated Digital Ground
Figure 32: Connecting Signals for a Pulse Output Operation
Figure 33 shows an example of connecting signals to the Counter/Timer (J19) connector on the
Sleek Box or EP358E accessory panel to externally cascade two counters for a rate generation
operation. In this example, the gate to counter/timer 1 is logic high.
Note: You can also cascade counters internally using software; if you internally cascade the
counters, you do not need to make the external cascading connections.
Sleek Box or EP358E
J19, Pin 4
User Clock
Input 1
J19, Pin 5
User Clock Input 0
Gate 0
Signal
Source
External
Gating
Switch
Isolated Digital Ground
Isolated Digital Ground
J19, Pin 6
J19, Pin 18
User
Counter
Output 0
J19, Pin 19
J19, Pin 20
Figure 33: Cascading Counters for a Rate Generation Operation
59
Chapter 4
Figure 34 shows an example of connecting signals to the Counter/Timer (J19) connector on the
Sleek Box or EP358E accessory panel to cascade two counters for a one-shot operation. In this
example, the gate for counter/timer 0 is logic high.
Note: You can also internally cascade counters using software; if you internally cascade the
counters, you do not need to make the external cascading connections.
Sleek Box or EP358E
J19, Pin 4
User Clock
Input 1
J19, Pin 5
User Clock Input 0
J19, Pin 6
Signal
Source
Isolated Digital Ground
Gate 1
User
Counter
Output 0
J19, Pin 12
J19, Pin 16
One-Shot
Trigger
Isolated Digital Ground
J19, Pin 19
Figure 34: Cascading Counters for a One-Shot or Repetitive One-Shot Operation
60
5
Verifying the Operation
of a Module
Running the DT9840 Series Download Utility. . . . . . . . . . . . . . . . . . . . . . . . . . . . . . . . . . . . . 63
Performing Quick LED Tests . . . . . . . . . . . . . . . . . . . . . . . . . . . . . . . . . . . . . . . . . . . . . . . . . . . 65
Downloading and Running a DSP Program . . . . . . . . . . . . . . . . . . . . . . . . . . . . . . . . . . . . . . 67
Performing Memory Tests. . . . . . . . . . . . . . . . . . . . . . . . . . . . . . . . . . . . . . . . . . . . . . . . . . . . . . 69
61
Chapter 5
Prepare to Use a Module
(see Chapter 2 starting on page 15)
Set up the Module
(see Chapter 3 starting on page 23)
Wire Signals
(see Chapter 4 starting on page 41)
Verify the Operation of the Module
(this chapter)
Program the Flash of the Module
(see Chapter 6 starting on page 71)
If Needed, Troubleshoot the Module
(see Chapter 7 starting on page 79)
To verify the operation of your module, use the DT9840 Series Download Utility.
The DT9840 Series Download Utility provided on the DT9840 Series Software CD allows you
to verify that the DT9840 Series module is operating properly. Using this utility, you can
perform quick LED and memory tests on a DT9840 Series module, and download a DSP
program to the SDRAM of a DT9840 Series module.
62
Verifying the Operation of a Module
Running the DT9840 Series Download Utility
To run the DT9840 Series Download Utility, do the following:
1. From Start\Programs\Data Translation, Inc\DT9840 Series, click DT9840 Series
Download Utility.
The screen shown in Figure 35 appears.
Figure 35: DT9840 Series Download Utility
2. From the Board drop-down list, select the DT9840 Series module to which you want to
download a file or on which you want to perform diagnostics tests.
3. Click the Quick test tab, described on page 65, to turn the debug LEDs on and off. This
test verifies basic communication with a DT9840 Series module.
Note: Debug LEDs are not provided on the DT9841E; therefore, skip this step if you are
using a DT9841E module.
4. Click the File download tab, described on page 67, and download and run the
LEDFlash.out DSP program that is provided on the DT9840 Series Software CD with the
module. This program flashes the LEDs on the DT9840 Series module. This step
demonstrates host to DSP communication.
63
Chapter 5
Note: Debug LEDs are not provided on the DT9841E; therefore, do not download the
LEDFlash.out program if you are using the DT9841E module.
5. Click the Memory tab, described on page 69, if you want to debug your DSP application
by reading from or writing to various memory locations on the DSP.
6. When you are finished with this utility, click Exit.
64
Verifying the Operation of a Module
Performing Quick LED Tests
Note: Debug LEDs are not provided on the DT9841E; therefore, skip this procedure if you
are using a DT9841E module.
Quick LED tests allow you to verify that the DT9840 Series Device Driver and USB connection
to the module are installed and working properly. You can perform quick LED tests at any
time after the DT9840 Series software has been installed. A DSP program does not have to be
running.
When the Quick tests tab is selected, the screen shown in Figure 36 appears.
Figure 36: Quick Tests Tab
Click the D0 to D7 radio buttons that correspond to the debug LEDs (CR7 to CR14) that you
want to turn on. Refer to Figure 1 on page 10 for the location of these LEDs.
Note: These LEDs are accessible through a removable side panel on the Sleek Box.
If the DT9840 Series module is working properly, all the debug LEDs that were selected
should light on the module, while all the LEDs that were unselected should not light.
65
Chapter 5
Note: If you previously downloaded and ran a DSP program on the DT9840 Series module,
and an error was detected, LED CR1, shown in Figure 1 on page 10, stops flashing and all the
debug LEDs turn on.
66
Verifying the Operation of a Module
Downloading and Running a DSP Program
The File download tab allows you to download a compiled DSP program to the SDRAM of a
DT9840 Series module, and run that program. You create a DSP program using Code
Composer from Texas Instruments. The DSP program must conform to the COFF (Common
Object File Format) format, which has a .OUT extension.
When the File download tab is selected, the screen shown in Figure 37 appears.
Figure 37: File Download Tab
To download a DSP program to the SDRAM of a DT9840 Series module and run that program,
do the following:
1. Enter the path of the COFF file that you want to download to the DSP of the module in the
File text box, or use the Browse button to locate the COFF file. You can use the
precompiled DSP program called LEDFlash.OUT that is provided on the DT9840 Series
Software CD, if you wish.
Note: Debug LEDs are not provided on the DT9841E; therefore, do not download the
LEDFlash.out program if you are using the DT9841E module.
67
Chapter 5
2. If you want each segment that is downloaded to the DT9840 Series module to be read
back from DSP memory and verified, click the Verify download checkbox. Clicking this
checkbox slows down the download significantly, but ensures that any errors caused by
loading the DSP program into non-existent memory ranges are caught.
If you do not want to verify the download operation, clear the checkbox.
3. Click Download file to download the file to the SDRAM of the DT9840 Series module.
4. Once the file has been downloaded, click Run to run the downloaded file.
If you downloaded and ran the LEDFlash.OUT program, the debug LEDs on the module flash.
Refer to Figure 1 on page 10 for the location of these LEDs.
Once a DT9840 Series DSP program is running successfully, LED CR1 (shown in Figure 1 on
page 10) turns red when the firmware is loaded and started, then turns orange when the
Windows driver is loaded and started. When you download and run a DSP program, this LED
flashes green and orange. If an error occurs, this LED stops flashing and all the debug LEDs
turn on. You can define the state of the debug LEDs, if you wish, using software.
Note: If you are using the DT9841E module, the LED is labelled CR6, not LED CR1. Refer to
page 11 for the layout of the DT9841E module.
If a module loses power, you must download the program into SDRAM again. Alternatively, if
you have a flash version of the module, you can load the program into flash using the DT9840
Series Flash Programmer Utility, described in Chapter 6 starting on page 71. Once a program
has been loaded into flash, the program is restarted automatically when the module is
powered on.
68
Verifying the Operation of a Module
Performing Memory Tests
Note: You can perform memory tests at any time after the DT9840 Series software has been
installed. A DSP program does not have to be running.
The Memory tab allows you to debug your DSP application by reading various memory
locations on the DSP. When the Memory tab is selected, the screen shown in Figure 38
appears.
Figure 38: Memory Tab
To read the data at specified memory locations, do the following:
1. Enter the hexadecimal value of the starting address in Address text box.
2. Enter the number of bytes of memory to read or write in the Length text box.
3. To read the specified number of bytes from the specified address, click Read; to write the
specified number of bytes to the specified address, click Write.
The data in the specified locations is displayed.
For more information on the memory locations, refer to the DT9840 Series User’s Manual.
69
Chapter 5
70
6
Programming Flash Memory
Overview . . . . . . . . . . . . . . . . . . . . . . . . . . . . . . . . . . . . . . . . . . . . . . . . . . . . . . . . . . . . . . . . . . . . 73
Using the DT9840 Series Flash Programmer Utility . . . . . . . . . . . . . . . . . . . . . . . . . . . . . . . . 74
Programming Flash Memory Using Command-Line Options . . . . . . . . . . . . . . . . . . . . . . . 77
Constructing a Data File . . . . . . . . . . . . . . . . . . . . . . . . . . . . . . . . . . . . . . . . . . . . . . . . . . . . . . . 78
71
Chapter 6
Prepare to Use a Module
(see Chapter 2 starting on page 15)
Set up the Module
(see Chapter 3 starting on page 23)
Wire Signals
(see Chapter 4 starting on page 41)
Verify the Operation of the Module
(see Chapter 5 starting on page 61)
Program the Flash of the Module
(this chapter)
If Needed, Troubleshoot the Module
(see Chapter 7 starting on page 79)
72
Programming Flash Memory
Overview
DT9840 Series modules include 2 MB of flash (nonvolatile) memory. The memory is divided
into two sections: a single 64 KB block is reserved for user data; the remaining memory (2 MB
– 64 KB) is reserved for storing a DSP program.
Using the DT9840 Series Flash Programmer Utility provided on the DT9840 Series Software
CD, you can copy either a DSP program (COFF file) or a user data (DAT) file into the flash
memory of the DT9840 Series module. By copying a DSP program into flash, the module can
operate autonomously, automatically restarting this program each time it is powered on. By
copying a user data into flash, you can ensure that valuable information, such as configuration
information or collected data, persists across power cycles, even if the DT9840 Series module
loses power or is turned off.
Internally, the DT9840 Series Flash Programmer Utility downloads a small bootloader utility
to the flash memory of the module. Once you have loaded a DSP program into flash, the
bootloader utility copies the DSP program from flash to SDRAM memory for faster program
execution.
Note: Internally, the bootloader utility is copied from flash to the lowest 1 KB of SDRAM.
Ensure that your program does not overwrite the lowest 1 KB of SDRAM, or the bootloader
will fail to run.
Only one DSP program and one data file can reside in flash memory. However, you can
overwrite the flash memory up to one million times with a new or modified DSP program or
data file, if you wish.
To ensure proper operation, we highly recommend that you first download your DSP
program into the SDRAM of the module (using the DT9840 Series Download Utility described
in Chapter 5), and verify that both the program and the module are operating properly before
copying a DSP program into flash memory.
Note: Only one DSP program can be running at a time. For example, if you load a program
into flash, and then decide to either reprogram the flash or download a program into
SDRAM, the running program is aborted when the flash programming or download
operation is performed.
73
Chapter 6
Using the DT9840 Series Flash Programmer Utility
To use the DT9840 Series Flash Programmer Utility to copy a DSP program or data file into
flash memory, do the following:
1. From Start\Programs\Data Translation, Inc\DT9840 Series, click DT9840 Series Flash
Programmer Utility.
A screen similar to Figure 39 appears.
Figure 39: DT9840 Series Flash Programmer Utility
2. From the Board drop-down list, select the DT9840 Series module whose flash you want to
program.
Note: If a DSP program is already running on the specified module, the running DSP
program is aborted.
Ensure that power is not interrupted to the specified module and that the host program is
not communicating with the module during the rest of this procedure.
74
Programming Flash Memory
3. In the COFF /DAT file text box, enter or browse to the path of the program (COFF file) or
user data file (DAT file) that you want to copy into the flash of the specified module. Note
that the user data file must be of the format specified on page 77.
4. If you wish, enter version information for the specified program into the Version text box.
This field applies only to program (COFF) files; you can enter up to 32 characters in this
field. If a program file already resides in flash, the version of the program, as originally
specified, appears in this text box.
5. If you wish, enter comments about the specified program into the Comments text box.
This field applies only to program (COFF) files; you can enter up to 256 characters in this
field. If a program already resides in flash, the comments related to this program, as
originally specified, appear in this text box.
6. Click Board options.
The following dialog box appears:
7. Ensure that the sizes of the communication buffers (used to exchange data between the
host program and the DT9840 Series module) and the value of the debug flag (used to
control serial debugging on the module) match the values that are specified in the
BOARD_OPTIONS structure of your host program (used by the DT_BoardOpen
function). If the values specified here do not match your host program, an error will
result.
By default, the size of each communication buffer is 64 KBytes and the value of the debug
flag is 00000000 (hexadecimal notation). Refer to the DT9840 Series Host Communication
Library Manual for more information on these parameters.
Note: The DSP to Host buffer and Host to DSP buffer edit boxes accept only numeric
characters. The Debug Flag edit box accepts only the hexadecimal characters 0 to 9 and A
to F.
If a program already resides in flash, the board options related to this file appear in the
edit fields.
8. Click OK to close the Board Options dialog box.
75
Chapter 6
9. Click Program, and then click Yes to program the flash with the specified DSP program
(COFF) or data (DAT) file.
The appropriate section of flash memory is erased before the new file is loaded. For example, if you
choose to program a data file in flash memory, the 64 KByte section of flash memory is first erased
before the new data file is programmed; the program file in the other section of flash memory
remains unaffected. When the operation is finished, a message is displayed to indicate that the flash
memory was programmed successfully; the date and time of programming are shown.
10. When you are finished with this utility, click Done.
11. To run a DSP program from flash, power off, and then power on your module.
The DSP program restarts automatically each time the module is powered up.
Note: If you want to erase the contents in flash memory, select the Erase All button of the
DT9840 Series Flash Programmer Utility. Using this button, both the program file and the
data file are erased.
76
Programming Flash Memory
Programming Flash Memory Using Command-Line
Options
If desired, you can use the following command-line option to copy a DSP program (COFF file)
into flash memory:
FlashProg Program.out
where Program.out represents the name of the COFF file to copy into flash memory.
If you want to copy a data file into flash memory from the command-line, use this option:
FlashProg Datafile.dat
where Datafile.dat represents the name of the data file to copy into the reserved area in flash
memory. This file must be of the format specified on page 77.
77
Chapter 6
Constructing a Data File
Before programming a data (DAT) file into flash memory, ensure that the data file has the
following format:
• USHORT DataFileID – This field is always set to 0x009a to indicate that it is a DT9840 data
file.
• USHORT NumBytes – This field indicates how many bytes (between 1 and 65535) to copy
into the reserved 64 KB block in flash memory.
• BYTE Data[] – This field specifies the data to copy to the reserved 64 KB block in flash
memory.
Note that only the data specified by Data[] is copied to flash memory; the values specified by
DataFileID and NumBytes are not copied into flash memory.
78
7
Troubleshooting
General Checklist . . . . . . . . . . . . . . . . . . . . . . . . . . . . . . . . . . . . . . . . . . . . . . . . . . . . . . . . . . . . . 81
Technical Support . . . . . . . . . . . . . . . . . . . . . . . . . . . . . . . . . . . . . . . . . . . . . . . . . . . . . . . . . . . . . 83
If Your Module Needs Factory Service . . . . . . . . . . . . . . . . . . . . . . . . . . . . . . . . . . . . . . . . . . . 84
79
Chapter 7
Prepare to Use a Module
(see Chapter 2 starting on page 15)
Set up the Module
(see Chapter 3 starting on page 23)
Wire Signals
(see Chapter 4 starting on page 41)
Verify the Operation of the Module
(see Chapter 5 starting on page 61)
Program the Flash of the Module
(see Chapter 6 starting on page 71)
If Needed, Troubleshoot the Module
(this chapter)
80
Troubleshooting
General Checklist
Should you experience problems using the DT9840 Series module, follow these steps:
1. Read all the documentation provided for your product, including any “Read This First”
information.
2. Check the DT9840 Series Software CD for any README files and ensure that you have
used the latest installation and configuration information available.
3. Check that your system meets the requirements stated on page 18.
4. Check that you have installed your software properly using the instructions in Chapter 2
starting on page 15.
5. Check that you have installed your hardware properly using the instructions in Chapter 3
starting on page 23.
6. Check that you have wired your signals properly using the instructions in Chapter 4
starting on page 41.
7. Search the DT Knowledgebase in the Support section of the Data Translation web site (at
www.datatranslation.com) for an answer to your problem.
If you still experience problems, try using the information in Table 6 to isolate and solve the
problem. If you cannot identify the problem, refer to page 81.
Table 6: Troubleshooting Problems
Symptom
Module does not
respond.
Intermittent
operation.
Device failure
error reported.
Possible Cause
Possible Solution
The module configuration is
incorrect.
Check your software settings.
The module is damaged.
Contact Data Translation for technical support; refer to
page 83.
Loose connections or vibrations
exist.
Check your wiring and tighten any loose connections or
cushion vibration sources; see the instructions in the
Chapter 4 starting on page 41.
The module is overheating.
Check environmental and ambient temperature;
consult the module’s specifications in Appendix A of
the DT9840 Series User’s Manual and the
documentation provided by your computer
manufacturer for more information.
Electrical noise exists.
Check your wiring and either provide better shielding or
reroute unshielded wiring; see the instructions in
Chapter 4 starting on page 41.
The DT9840 Series module cannot
communicate with the Microsoft bus
driver or a problem with the bus
driver exists.
Check your cabling and tighten any loose connections;
see the instructions in Chapter 3 starting on page 23.
The DT9840 Series module was
removed while an operation was
being performed.
Ensure that your DT9840 Series module is properly
installed; see the instructions in the Chapter 3 starting
on page 23.
81
Chapter 7
Table 6: Troubleshooting Problems (cont.)
Symptom
Data appears to
be invalid.
82
Possible Cause
Possible Solution
An open connection exists.
Check your wiring and fix any open connections; see
the instructions in Chapter 4 starting on page 41.
A transducer is not connected to the
channel being read.
Check the transducer connections; see the instructions
in Chapter 4 starting on page 41.
The module is set up for differential
inputs while the transducers are
wired as single-ended inputs or vice
versa.
Check your wiring and ensure that the software and
hardware are set up as differential; see the instructions
in Chapter 4 starting on page 41.
Computer does
not boot.
The power supply of the computer is
too small to handle all the system
resources.
Check the power requirements of your system
resources and, if needed, get a larger power supply;
consult the module’s specifications in Appendix A of
the DT9840 Series User’s Manual.
USB 2.0 is not
recognized.
Your operating system does not
have the appropriate Service Pack
installed.
Ensure that you load the appropriate Windows Service
Pack (version 2 for Windows XP). If you are unsure of
whether you are using USB 2.0 or USB 1.1, run the
Data Translation DT9840 Series Control Panel,
described on page 31.
Standby mode is enabled on your
PC.
For some PCs, you may need to disable standby mode
on your system for proper USB 2.0 operation. Consult
Microsoft for more information
Troubleshooting
Technical Support
If you have difficulty using a DT9840 Series module, Data Translation’s Technical Support
Department is available to provide technical assistance.
To request technical support, go to our web site at http://www.datatranslation.com and click
on the Support link.
When requesting technical support, be prepared to provide the following information:
• Your product serial number
• The hardware/software product you need help on
• The version of the CD you are using
• Your contract number, if applicable
If you are located outside the USA, contact your local distributor; see our web site
(www.datatranslation.com) for the name and telephone number of your nearest distributor.
83
Chapter 7
If Your Module Needs Factory Service
If your module must be returned to Data Translation, do the following:
1. Record the module’s serial number, and then contact the Customer Service Department at
(508) 481-3700, ext. 1323 (if you are in the USA) and obtain a Return Material
Authorization (RMA).
If you are located outside the USA, call your local distributor for authorization and
shipping instructions; see our web site (www.datatranslation.com) for the name and
telephone number of your nearest distributor. All return shipments to Data Translation
must be marked with the correct RMA number to ensure proper processing.
2. Using the original packing materials, if available, package the module as follows:
− Wrap the module in an electrically conductive plastic material. Handle with ground
protection. A static discharge can destroy components on the module.
− Place in a secure shipping container.
3. Return the module to the following address, making sure the RMA number is visible on
the outside of the box.
Customer Service Dept.
Data Translation, Inc.
100 Locke Drive
Marlboro, MA 01752-1192
84
A
Wiring to the Board-Level Version of the
Module
Wiring to the DT9841, DT9842/2, or DT9842/8 Board-Level Version . . . . . . . . . . . . . . . . . 86
Wiring to the DT9841E Board-Level Version . . . . . . . . . . . . . . . . . . . . . . . . . . . . . . . . . . . . . . 90
85
Appendix A
Wiring to the DT9841, DT9842/2, or DT9842/8
Board-Level Version
Note: The DT9841-VIB is not available as a board-level version. It is available in the Sleek
Box configuration only.
If you purchased the board-level version of the DT9841, DT9842/2, or DT9842/8 module, you
can connect I/O signals to the module in the following ways:
• BNC connectors – The BNC labelled TTL Clock is provided for attaching an external
clock signal. The BNC labelled TTL Trigger is provided for attaching an external trigger
signal.
• Analog Input Connector (J18) – A 68-pin connector provided for attaching analog input
signals. Refer to Table 7 on page 86 for more information on this connector.
• Analog Output, Digital I/O, and Counter/Timer Connector (J17) – A 68-pin connector
provided for attaching analog output, digital I/O, and counter/timer signals. Refer to
Table 8 on page 88 for more information on this connector.
For information on the other connectors on the module, refer to Appendix B of the DT9840
Series User’s Manual.
Table 7: Pin Assignments for Connector J18 on a DT9841, DT9842/2, and DT9842/8 Module
Pin
86
Signal Description
Pin
Signal Description
34
Analog Input 00
68
Analog Input 00 Returna
33
Analog Input 01
67
Analog Input 01 Returna
32
Analog Input 02
66
Analog Input 02 Returna
31
Analog Input 03
65
Analog Input 03 Returna
30
Analog Input 04
64
Analog Input 04 Returna
29
Analog Input 05
63
Analog Input 05 Returna
28
Analog Input 06
62
Analog Input 06 Returna
27
Analog Input 07
61
Analog Input 07 Returna
26
Reserved
60
Reserved
25
Reserved
59
Reserved
24
Reserved
58
Reserved
23
Reserved
57
Reserved
22
Reserved
56
Reserved
21
Reserved
55
Reserved
20
Reserved
54
Reserved
Wiring to the Board-Level Version of the Module
Table 7: Pin Assignments for Connector J18 on a DT9841, DT9842/2, and DT9842/8 Module (cont.)
Pin
Signal Description
Pin
Signal Description
19
Reserved
53
Reserved
18
Reserved
52
Reserved
17
Reserved
51
Reserved
16
Reserved
50
Reserved
15
Reserved
49
Reserved
14
Reserved
48
Reserved
13
Reserved
47
Reserved
12
Reserved
46
Reserved
11
Reserved
45
Reserved
10
Reserved
44
Reserved
9
Reserved
43
Reserved
8
Reserved
42
Reserved
7
Reserved
41
Reserved
6
Reserved
40
Reserved
5
Reserved
39
Reserved
4
Reserved
38
Reserved
3
Reserved
37
Reserved
2
Amp Low
36
Analog Common
1
+5 V Isolated Output
35
Isolated Power Ground
a. For the DT9842/2 and DT9842/8, which have single-ended analog inputs, these signals are
analog grounds.
87
Appendix A
Table 8: Pin Assignments for Connector J17 on a DT9841, DT9842/2, and DT9842/8 Module
Pin
88
Signal Description
Pin
Signal Description
34
Analog Output 00
68
Analog Output 00 Return
33
Analog Output 01
67
Analog Output 01 Return
32
Analog Output 02a
66
Analog Output 02 Returna
31
Analog Output 03a
65
Analog Output 03 Returna
30
Analog Output 04a
64
Analog Output 04 Returna
29
Analog Output 05a
63
Analog Output 05 Returna
28
Analog Output 06a
62
Analog Output 06 Returna
27
Analog Output 07a
61
Analog Output 07 Returna
26
External D/A Triggerb
60
Isolated Digital Ground
25
External D/A Clockb
59
Isolated Digital Ground
24
External A/D Triggerb
58
Isolated Digital Ground
23
External A/D Clockb
57
Isolated Digital Ground
22
Digital Input
Triggerb
56
Isolated Digital Ground
21
Digital Input Clockb
55
Isolated Digital Ground
20
Digital Output Triggerb
54
Isolated Digital Ground
19
Digital Output Clockb
53
Isolated Digital Ground
18
Digital Input/Output 3, Port 0
52
Digital Input/Output 7, Port 0
17
Digital Input/Output 2, Port 0
51
Digital Input/Output 6, Port 0
16
Digital Input/Output 1, Port 0
50
Digital Input/Output 5, Port 0
15
Digital Input/Output 0, Port 0
49
Digital Input/Output 4, Port 0
14
Digital Input/Output 3, Port 1
48
Digital Input/Output 7, Port 1
13
Digital Input/Output 2, Port 1
47
Digital Input/Output 6, Port 1
12
Digital Input/Output 1, Port 1
46
Digital Input/Output 5, Port 1
11
Digital Input/Output 0, Port 1
45
Digital Input/Output 4, Port 1
10
Digital Input/Output 3, Port 2/TINP1b
44
Digital Input/Output 7, Port 2
9
Digital Input/Output 2, Port 2/Encoder 2 Clrb
43
Digital Input/Output 6, Port 2
8
Digital Input/Output 1, Port 2/Encoder 1 Clrb
42
Digital Input/Output 5, Port 2
7
Digital Input/Output 0, Port 2/Encoder 0 Clrb
41
Digital Input/Output 4, Port 2
40
Isolated Digital Ground
A0b
6
User Clock Input 0/Encoder
5
User Counter Output 0
39
External Gate 0/Encoder B0b
4
User Clock Input 1/Encoder A1b
38
Isolated Digital Ground
Wiring to the Board-Level Version of the Module
Table 8: Pin Assignments for Connector J17 on a DT9841, DT9842/2, and DT9842/8 Module (cont.)
Pin
Signal Description
Pin
Signal Description
3
User Counter Output 1
37
External Gate 1/Encoder B1b
2
User Clock Input 2/Encoder A2b
36
Isolated Digital Ground
1
User Counter Output 2
35
External Gate 2/Encoder B2b
a. Available on the DT9842/8 module only.
b. Currently, this function is not implemented.
89
Appendix A
Wiring to the DT9841E Board-Level Version
If you purchased the DT9841E module, you can connect I/O signals to the module in the
following ways:
• Analog Input Connector (J2) – A 68-pin connector provided for attaching analog input
signals. Refer to Table 9 for more information on this connector.
• Analog Output, Digital I/O, and Counter/Timer Connector (J1) – A 68-pin connector
provided for attaching an analog output, digital I/O, and counter/timer signals, as well
as an external trigger or clock. Refer to Table 10 for more information on this connector.
For information on the other connectors on the module, refer to Appendix B of the DT9840
Series User’s Manual.
Table 9: Pin Assignments for Connector J2 on a DT9841E Module
Pin
90
Signal Description
Pin
Signal Description
34
Analog Input 00
68
Analog Input 00 Return
33
Analog Input 01
67
Analog Input 01 Return
32
Reserved
66
Reserved
31
Reserved
65
Reserved
30
Reserved
64
Reserved
29
Reserved
63
Reserved
28
Reserved
62
Reserved
27
Reserved
61
Reserved
26
Reserved
60
Reserved
25
Reserved
59
Reserved
24
Reserved
58
Reserved
23
Reserved
57
Reserved
22
Reserved
56
Reserved
21
Reserved
55
Reserved
20
Reserved
54
Reserved
19
Reserved
53
Reserved
18
Reserved
52
Reserved
17
Reserved
51
Reserved
16
Reserved
50
Reserved
15
Reserved
49
Reserved
14
Reserved
48
Reserved
13
Reserved
47
Reserved
Wiring to the Board-Level Version of the Module
Table 9: Pin Assignments for Connector J2 on a DT9841E Module (cont.)
Pin
Signal Description
Pin
Signal Description
12
Reserved
46
Reserved
11
Reserved
45
Reserved
10
Reserved
44
Reserved
9
Reserved
43
Reserved
8
Reserved
42
Reserved
7
Reserved
41
Reserved
6
Reserved
40
Reserved
5
Reserved
39
Reserved
4
Reserved
38
Reserved
3
Reserved
37
Reserved
2
Amp Low
36
Analog Common
1
+5 V Isolated Output
35
Isolated Power Ground
Table 10: Pin Assignments for Connector J1 on a DT9841E Module
Pin
Signal Description
Pin
Signal Description
34
Analog Output 00
68
Analog Output 00 Return
33
Analog Output 01
67
Analog Output 01 Return
32
Reserved
66
Reserved
31
Reserved
65
Reserved
30
Reserved
64
Reserved
29
Reserved
63
Reserved
28
Reserved
62
Reserved
27
Reserved
61
Reserved
26
External D/A Triggera
60
Isolated Digital Ground
25
External D/A Clocka
59
Isolated Digital Ground
24
External A/D Triggerb
58
Isolated Digital Ground
23
External A/D Clockc
57
Isolated Digital Ground
22
Digital Input Triggera
56
Isolated Digital Ground
21
Digital Input Clocka
55
Isolated Digital Ground
20
Digital Output Triggera
54
Isolated Digital Ground
19
Digital Output Clocka
53
Isolated Digital Ground
18
Digital Input/Output 3, Port 0
52
Digital Input/Output 7, Port 0
91
Appendix A
Table 10: Pin Assignments for Connector J1 on a DT9841E Module (cont.)
Pin
Signal Description
Pin
17
Digital Input/Output 2, Port 0
51
Digital Input/Output 6, Port 0
16
Digital Input/Output 1, Port 0
50
Digital Input/Output 5, Port 0
15
Digital Input/Output 0, Port 0
49
Digital Input/Output 4, Port 0
14
Digital Input/Output 3, Port 1
48
Digital Input/Output 7, Port 1
13
Digital Input/Output 2, Port 1
47
Digital Input/Output 6, Port 1
12
Digital Input/Output 1, Port 1
46
Digital Input/Output 5, Port 1
11
Digital Input/Output 0, Port 1
45
Digital Input/Output 4, Port 1
10
Digital Input/Output 3, Port 2/TINP1a
44
Digital Input/Output 7, Port 2
9
Digital Input/Output 2, Port 2/Encoder 2 Clra
43
Digital Input/Output 6, Port 2
8
Digital Input/Output 1, Port 2/Encoder 1 Clra
42
Digital Input/Output 5, Port 2
7
Digital Input/Output 0, Port 2/Encoder 0
Clra
41
Digital Input/Output 4, Port 2
6
User Clock Input 0/Encoder A0a
40
Isolated Digital Ground
5
User Counter Output 0
39
External Gate 0/Encoder B0a
4
User Clock Input 1/Encoder A1a
38
Isolated Digital Ground
3
User Counter Output 1
37
External Gate 1/Encoder B1a
2
User Clock Input 2/Encoder A2a
36
Isolated Digital Ground
1
User Counter Output 2
35
External Gate 2/Encoder B2a
a. Currently, this function is not implemented.
b. Use this pin to connect an external trigger to the DT9841E module.
c. Use this pin to connect an external clock to the DT9841E module.
92
Signal Description
B
Windows Administrator Permissions
93
Appendix B
On some systems, you may encounter permissions problems if your Administrator
permissions are not set up properly.
To allievate this problem, configure the UAC settings of your system as follows:
1. From Windows, click the Start button.
2. Type User account control, and press Enter.
3. When the User account control settings box appears, move the slider to Never notify,
and click OK.
Contact your system administrator and/or refer to your Windows documentation for more
information.
94
Index
Index
Symbols
+5 V power supply 14
Numerics
2-color LED 10, 11, 27
A
accessories 14
accessory panel 14
administrator 93
analog input signals 49
wiring current inputs 52
wiring differential analog input signals 49
wiring floating analog input signal sources 50
wiring grounded analog input signal sources 52
wiring nonfloating analog input signal sources 51
wiring single-ended analog inputs 53
wiring single-ended inputs 53
analog output signals, wiring 54
applying power 25
attaching the EP358E 34
attaching the module to the computer 26
directly 26
using a self-powered USB hub 29
using the Scalable Bus 27
B
baud rate 38
bias return resistance 50
building example programs 20
C
cables
EP335 14, 36
EP342 14
EP344 14, 34
EP365 28, 29
EP368 14, 35
calibration utility 12
carriage returns 39
COM port settings 38
configurations 13
configuring the module 31
connecting to the host computer
directly 26
using a self-powered USB hub 29
using the Scalable Bus 27
connector J17 pin assignments, board-level version
88, 91
connector J18 pin assignments, board-level version
86, 90
conventions used 6
counter/timer signals 56
wiring for event counting 56
wiring for event counting with a software gate 57
wiring for event counting with cascaded counters
57
wiring for measurement operations 58
wiring for pulse output operations 59
wiring for up/down counting 56
CR1 10, 11, 25, 26, 27, 28, 29, 66, 68
CR10 65
CR11 65
CR12 65
CR13 65
CR14 65
CR7 65
CR8 65
CR9 65
customer service 84
D
data bits 38
debug LEDs 10
debugging the module using the serial port 35
developer’s kit 13
digital I/O signals, wiring 55
downloading a DSP program 67
DT9840 Series board-level version 10
DT9840 Series Control Panel 31
DT9840 Series Device Driver 12
DT9840 Series Download Utility 12
downloading a DSP program 67
memory tests 69
quick LED tests 65
running 63
running a DSP program 67
using 62
DT9840 Series DSP Library 12
95
Index
DT9840 Series Flash Programmer Utility 12
overview 73
using 74
DT9840 Series Host Communication Library 12
DT9841 13
DT9841 Calibration Utility 12
DT9841E 13
DT9841E-DK 13
DT9841-SB 13
DT9841-VIB-SB 13
DT9842/2 13
DT9842/2-SB 13
DT9842/8 13
DT9842/8-SB 13
E
EP335 cable 14, 36
EP342 cable 14
EP344 cable 14, 34
EP348 external power supply 14
EP354 serial adapter 14, 35
EP358E 14
attaching 34
EP365 cable 13, 28, 29
EP368 cable 14, 35
event counting 56
using a software gate 57
using an external gate 56
using cascaded counters 57
example programs 12, 20
F
factory service 84
features 8
flow control 38
frequency measurement, wiring 58
H
hot-swapping 26
HyperTerminal 36
I
installing the software 19
J
J1 connector pin assignments, Sleek Box 45
96
J17 connector pin assignments, board-level version
88, 91
J18 connector pin assignments, board-level version
86, 90
J19 connector pin assignments, Sleek Box 47
J2 connector pin assignments, Sleek Box 46
J4 serial connector 35
L
layout
DT9840 Series board-level version 10
Sleek Box back panel 25
Sleek Box front panel 32
LED tests 65
LEDs
CR1 10, 11, 25, 26, 27, 28, 29, 66, 68
CR10 65
CR11 65
CR12 65
CR13 65
CR14 65
CR7 65
CR8 65
CR9 65
debug 10
testing 65
line feeds 39
M
measurement operations, wiring 58
memory tests 69
O
one-shot
using cascaded counters 60
wiring 59
P
parity 38
period measurement, wiring 58
permissions 93
pin assignments, board-level version 86, 88, 90, 91
power supply 14, 25
power switch 25
power, applying 25
preparing to wire signals 43
pulse output, wiring 59
Index
pulse width measurement, wiring 58
U
R
unpacking 17
up/down counting, wiring 56
USB cable 13, 28, 29
rate generation
using cascaded counters 59
wiring 59
recommendations for wiring 43
related documents 6
repetitive one-shot
using cascaded counters 60
wiring 59
requirements 18
returning a module to the factory 84
RMA 84
RS-232 adapter 14, 35
running a DSP program 67
running example programs 20
S
serial debugging functions 36
serial port 35
service and support procedure 83
Sleek Box 13
analog I/O pin assignments 45
back panel layout 25
counter/timer pin assignments 47
digital I/O pin assignments 46
front panel layout 32
I/O connectors 44, 48
wiring 43, 47
software supported 12
stop bits 38
SW1 25
system requirements 18
V
viewing the documentation 22
W
Windows administrator permissions 93
wiring
analog input signals 49
digital input signals 55
digital output signals 55
event counting with a software gate 57
event counting with cascaded counters 57
event counting with external gate 56
measurement operations 58
one-shot with cascaded counters 60
preparing to 43
pulse output signals 59
rate generation with cascaded counters 59
recommendations 43
repetitive one-shot with cascaded counters 60
to the Sleek Box 43, 47
up/down counting 56
T
tachometer input 56
technical support 83
tests
LED 65
memory 69
troubleshooting
procedure 81
service and support procedure 83
troubleshooting table 81
97
Index
98