1
2.3.0 User Manual
Documentation Version: 2.3.0
(Revision Date: 29/10/2010)
©2003-2010 Whorl Ltd.
No part of this documentation may be reproduced without the express written permission
of Whorl Ltd.
"This product includes PHP, freely available from http://www.php.net/"
mySQL, Xitami, phpMyAdmin, Linux, Apache, Windows, Quickbooks are copyright their respective owners.
InnovaStudio WYSIWYG Editor is ©2007 INNOVA STUDIO. Used under license. The InnovaStudio WYSIWYG
Editor may not be used outside of JShop Server without separate licensing from InnovaStudio
(http://www.innovastudio.com/)
2.3.0 User Manual : Contents
Table of Contents
9
Part 1 Introduction
Part 2 Administration System
10
2.1 Administration
...................................................................................................................................
System Layout
10
2.2 User
...................................................................................................................................
Options
12
Part 3 User Management
13
3.1 The
...................................................................................................................................
Administrator Account
13
3.2 List
...................................................................................................................................
of Groups
13
3.3 Adding/Editing
...................................................................................................................................
a Group
14
3.4 List
...................................................................................................................................
of Users
14
3.5 Adding/Editing
...................................................................................................................................
a User
15
3.6 Management
...................................................................................................................................
Options
16
3.7 Viewing
...................................................................................................................................
Log Files
17
3.8 Clearing
...................................................................................................................................
the Log Files
18
Part 4 General Settings
19
4.1 Company
...................................................................................................................................
Details
19
4.2 Global
...................................................................................................................................
Options
20
4.3 Cart
...................................................................................................................................
Sessions & Security Settings
22
4.4 General
...................................................................................................................................
Settings
25
4.5 WYSIWYG
...................................................................................................................................
Settings
26
4.6 Currency
...................................................................................................................................
Settings
26
4.6.1 Adding/Editing
.........................................................................................................................................................
a Currency
27
4.6.2 Live
.........................................................................................................................................................
Exchange Rate Service
29
4.7 Language
...................................................................................................................................
Settings
29
4.7.1 Adding/Editing
.........................................................................................................................................................
a Language
30
4.8 Extra
...................................................................................................................................
Product Fields
30
4.8.1 Adding/Editing
.........................................................................................................................................................
Extra Fields
31
4.8.2 Image
.........................................................................................................................................................
Extra Fields
32
4.9 Extra
...................................................................................................................................
Section Fields
33
4.9.1 Adding/Editing
.........................................................................................................................................................
Extra Fields
33
4.9.2 Image
.........................................................................................................................................................
Extra Fields
34
4.10 Extra
...................................................................................................................................
Article Fields
35
4.10.1 Adding/Editing
.........................................................................................................................................................
Extra Fields
35
4.10.2 Image
.........................................................................................................................................................
Extra Fields
36
4.11 Contact
...................................................................................................................................
Form Fields
37
4.11.1 Adding/Editing
.........................................................................................................................................................
Contact Form Fields
37
© 1997-2010 Whorl Ltd. Reproduction prohibited without permission.
3
4.12 Captcha
...................................................................................................................................
Settings
38
4.13 Search/Listing
...................................................................................................................................
Settings
40
4.14 Product
...................................................................................................................................
Editing
41
4.15 Meta
...................................................................................................................................
Tag Details
42
4.16 Stock
...................................................................................................................................
Control Settings
42
4.17 Order
...................................................................................................................................
Admin Settings
43
4.18 Order
...................................................................................................................................
Status Settings
44
4.18.1 Adding/Editing
.........................................................................................................................................................
Order Statuses
45
4.19 Extra
...................................................................................................................................
Order Paperwork
45
4.19.1 Adding/Editing
.........................................................................................................................................................
Paperwork Templates
46
4.20 Digital
...................................................................................................................................
Products Settings
46
4.21 Automated
...................................................................................................................................
Jobs
47
4.21.1 Adding/Editing
.........................................................................................................................................................
Automated Jobs
48
4.22 Image
...................................................................................................................................
Settings
50
4.23 Cache
...................................................................................................................................
Settings
52
4.24 XML
...................................................................................................................................
Sitemap
53
4.25 List
...................................................................................................................................
Settings
54
4.26 Section
...................................................................................................................................
Settings
56
4.27 Search
...................................................................................................................................
Settings
56
4.28 Basket
...................................................................................................................................
Settings
58
4.29 Review
...................................................................................................................................
Settings
59
4.30 Recent
...................................................................................................................................
View Settings
59
4.31 Users
...................................................................................................................................
Online Settings
60
4.32 Send
...................................................................................................................................
to a Friend Fields
61
4.32.1 Adding/Editing
.........................................................................................................................................................
Send to a Friend Fields
61
Part 5 Contents
63
5.1 Sections
...................................................................................................................................
Structure
63
5.2 Adding/Editing
...................................................................................................................................
Sections
66
5.2.1 Extra
.........................................................................................................................................................
Fields
68
5.2.2 Additional
.........................................................................................................................................................
Languages
68
5.3 ABC
...................................................................................................................................
Sections Listing
69
5.4 Invisible
...................................................................................................................................
Sections Listing
69
5.5 Product
...................................................................................................................................
Categories
69
5.6 Product
...................................................................................................................................
Flags
70
5.7 Edit
...................................................................................................................................
Template Product
71
5.8 Adding/Editing
...................................................................................................................................
Products
71
5.8.1
5.8.2
5.8.3
5.8.4
5.8.5
5.8.6
General
.........................................................................................................................................................
Details
72
Extra
.........................................................................................................................................................
Fields
76
Digital
.........................................................................................................................................................
Download Options
77
Group
.........................................................................................................................................................
Product Settings
78
Advanced
.........................................................................................................................................................
Pricing / Combinations
78
Stock
.........................................................................................................................................................
Control
80
2.3.0 User Manual : Contents
5.8.7 Product
.........................................................................................................................................................
Options
81
5.8.8 Associated
.........................................................................................................................................................
Products
82
5.8.9 Misc.
.........................................................................................................................................................
Options
82
5.8.10 Other
.........................................................................................................................................................
Languages
83
5.9 ABC
...................................................................................................................................
Products Listing
83
5.10 Invisible
...................................................................................................................................
Products Listing
84
5.11 Sort
...................................................................................................................................
Special Offers
84
5.12 Sort
...................................................................................................................................
New Products
85
5.13 Sort
...................................................................................................................................
Top Products
85
5.14 Global
...................................................................................................................................
Price Change
85
5.15 Global
...................................................................................................................................
Option Reset
85
5.16 Articles
................................................................................................................................... 86
5.16.1
5.16.2
5.16.3
5.16.4
Article
.........................................................................................................................................................
Browser
86
Adding/Editing
.........................................................................................................................................................
Articles
87
ABC
.........................................................................................................................................................
Articles Listing
90
Invisible
.........................................................................................................................................................
Articles Listing
91
Part 6 Tax/Shipping
92
6.1 Main
...................................................................................................................................
Country List
92
6.2 Country
...................................................................................................................................
Settings
93
6.3 Reorder
...................................................................................................................................
Countries
93
6.4 Tax
...................................................................................................................................
Menu General Settings
94
6.5 Country
...................................................................................................................................
Level Tax
95
6.6 County/State
...................................................................................................................................
Level Tax
95
6.7 Shipping
...................................................................................................................................
Menu General Settings
96
6.8 Shipping
...................................................................................................................................
Zones
96
6.9 Shipping
...................................................................................................................................
Types
98
6.9.1 Adding/Editing
.........................................................................................................................................................
Shipping Types
98
6.9.2 Shipping
.........................................................................................................................................................
Rates
99
6.10 ...................................................................................................................................
Couriers
101
6.10.1 Adding/Editing
.........................................................................................................................................................
Couriers
101
6.11 ...................................................................................................................................
Suppliers General Settings
101
6.12 ...................................................................................................................................
Suppliers Email Templates
102
6.13 ...................................................................................................................................
Supplier Fields
104
6.13.1 Adding/Editing
.........................................................................................................................................................
Supplier Fields
105
6.14 ...................................................................................................................................
ABC Supplier Listing
106
6.15 ...................................................................................................................................
Adding/Editing Suppliers
106
Part 7 Logs
108
7.1 ...................................................................................................................................
General Options
108
7.2 ...................................................................................................................................
Logs Summary
109
7.3 ...................................................................................................................................
Log Reports
109
7.4 ...................................................................................................................................
Clear Logs
111
© 1997-2010 Whorl Ltd. Reproduction prohibited without permission.
5
Part 8 Templates
112
8.1 ...................................................................................................................................
Email Options
112
8.2 ...................................................................................................................................
Email Templates
113
8.3 ...................................................................................................................................
Template Settings
116
8.4 ...................................................................................................................................
Installed Template Sets
117
8.5 ...................................................................................................................................
Edit Options
118
8.6 ...................................................................................................................................
Edit CSS File
119
8.7 ...................................................................................................................................
Advanced Template Defaults
120
8.8 ...................................................................................................................................
Template Editing
121
8.9 ...................................................................................................................................
Remove Compiled
123
8.10 ...................................................................................................................................
Snippets
123
8.10.1 Adding/Editing
.........................................................................................................................................................
Snippets
124
8.11 ...................................................................................................................................
Labels
124
8.12 ...................................................................................................................................
Open Shop
126
Part 9 Import/Export
127
9.1 ...................................................................................................................................
Saving Import/Export Layouts
127
9.2 ...................................................................................................................................
The Main Fields Boxes
127
9.3 ...................................................................................................................................
Additional Import/Export Information
128
9.4 ...................................................................................................................................
Importing
128
9.4.1 Update
.........................................................................................................................................................
Product Images
129
9.4.2 Update
.........................................................................................................................................................
Stock Levels
129
9.4.3 Update
.........................................................................................................................................................
Main Prices
129
9.4.4 Update
.........................................................................................................................................................
Existing Products
129
9.4.5 New
.........................................................................................................................................................
Products
130
9.4.6 Update
.........................................................................................................................................................
Qty Discounts
130
9.4.7 Update
.........................................................................................................................................................
Base Pricing Combinations
130
9.4.8 Update
.........................................................................................................................................................
Attribute Combinations
131
9.4.9 Mailing
.........................................................................................................................................................
List
131
9.4.10 Customers
......................................................................................................................................................... 131
9.4.11 Sections
......................................................................................................................................................... 131
9.4.12 Associated
......................................................................................................................................................... 132
9.5 ...................................................................................................................................
Exporting
132
9.5.1 Available
.........................................................................................................................................................
Exports
133
9.6 ...................................................................................................................................
Quickbooks Menu
133
9.6.1 Quickbooks
.........................................................................................................................................................
Settings
134
9.6.2 Quickbooks
.........................................................................................................................................................
Export
135
Part 10 Newsletter
137
10.1 ...................................................................................................................................
Newsletter Options
137
10.2 ...................................................................................................................................
List of Newsletters
138
10.3 ...................................................................................................................................
Adding/Editing Newsletters
140
10.4 ...................................................................................................................................
Subscribed Emails
141
10.5 ...................................................................................................................................
Un-Activated Emails
141
2.3.0 User Manual : Contents
10.6 ...................................................................................................................................
Bulk Remove Emails
141
10.7 ...................................................................................................................................
Latest News
141
10.8 ...................................................................................................................................
Adding/Editing News Items
142
Part 11 Customers
143
11.1 ...................................................................................................................................
General Settings
143
11.2 ...................................................................................................................................
Account Types
144
11.3 ...................................................................................................................................
Account Assign Rules
145
11.4 ...................................................................................................................................
Customer Fields
147
11.4.1 Adding/Editing
.........................................................................................................................................................
Customer Fields
148
11.5 ...................................................................................................................................
Delivery Address Fields
149
11.5.1 Adding/Editing
.........................................................................................................................................................
Delivery Address Fields
151
11.6 ...................................................................................................................................
Adding/Editing a Customer
153
11.7 ...................................................................................................................................
ABC Customer Listing
154
11.8 ...................................................................................................................................
Date Customer Listing
154
11.9 ...................................................................................................................................
Unmoderated Reviews
154
11.10 ...................................................................................................................................
Reviews by Product
155
Part 12 Checkout
156
12.1 ...................................................................................................................................
Checkout Settings
156
12.2 ...................................................................................................................................
Extra Order Fields
156
12.2.1 Adding/Editing
.........................................................................................................................................................
Extra Order Fields
158
12.3 ...................................................................................................................................
Payment Options
159
12.3.1 Adding/Editing
.........................................................................................................................................................
Payment Options
160
12.4 ...................................................................................................................................
Credit Card Fields
161
12.4.1 Editing
.........................................................................................................................................................
Credit Card Fields
162
12.5 ...................................................................................................................................
Gift Certificate Settings
163
12.6 ...................................................................................................................................
Gift Certificate Fields
164
12.7 ...................................................................................................................................
Create/Edit Gift Certificates
165
12.8 ...................................................................................................................................
Search Gift Certificates
167
12.9 ...................................................................................................................................
Automatic Discounts
168
12.9.1 Adding/Editing
.........................................................................................................................................................
Automatic Discounts
168
12.10 ...................................................................................................................................
Offer Code Settings
173
12.11 ...................................................................................................................................
List of Offer Codes
173
12.11.1.........................................................................................................................................................
Adding/Editing Offer Codes
173
12.12 ...................................................................................................................................
Redeemed Codes Report
177
Part 13 Reports
178
13.1 ...................................................................................................................................
General Options
178
13.2 ...................................................................................................................................
Reports Summary
178
13.3 ...................................................................................................................................
Clear Report Data
179
13.4 ...................................................................................................................................
Individual Reports
179
© 1997-2010 Whorl Ltd. Reproduction prohibited without permission.
7
13.4.1 .........................................................................................................................................................
Order Summary Report
179
13.4.2 Stock
.........................................................................................................................................................
Level Report
180
13.4.3 Other
.........................................................................................................................................................
Reports
181
Part 14 Affiliates
182
14.1 ...................................................................................................................................
General Options
182
14.2 ...................................................................................................................................
Affiliate Groups
183
14.3 ...................................................................................................................................
Affiliate Banners
184
14.3.1 Adding/Editing
.........................................................................................................................................................
Banners
185
14.4 ...................................................................................................................................
Affiliate Fields
185
14.4.1 Adding/Editing
.........................................................................................................................................................
Affiliate Fields
187
14.5 ...................................................................................................................................
Adding/Editing an Affiliate
188
14.6 ...................................................................................................................................
Affiliate Lists
189
14.7 ...................................................................................................................................
Creating/Editing a Transaction
189
14.8 ...................................................................................................................................
Transactions
190
14.9 ...................................................................................................................................
Show Payment Due List
191
192
Part 15 Orders
15.1 ...................................................................................................................................
Orders List
192
15.2 ...................................................................................................................................
Order Searching
193
15.3 ...................................................................................................................................
Accessing an Order's Details
194
15.4 ...................................................................................................................................
Editing Orders
194
15.4.1 .........................................................................................................................................................
Adding Products
195
15.4.2 Product
.........................................................................................................................................................
Details Screen
195
15.5 ...................................................................................................................................
Creating New Orders
196
15.6 ...................................................................................................................................
Processing Orders
196
15.7 ...................................................................................................................................
Dispatching
196
15.8 ...................................................................................................................................
Receipt Printing
198
Part 16 Backup
199
16.1 ...................................................................................................................................
Backup Database
199
16.2 ...................................................................................................................................
Restore Database
200
16.3 ...................................................................................................................................
Other Methods for Backup and Restore
200
Part 17 Payment Gateways
201
17.1 ...................................................................................................................................
Integration with Other Payment Gateways
201
17.2 ...................................................................................................................................
The Use of cURL
201
17.3 ...................................................................................................................................
Secure Server Requirements
201
17.4 ...................................................................................................................................
Gateways
202
17.4.1
17.4.2
17.4.3
17.4.4
17.4.5
2checkout
.........................................................................................................................................................
202
......................................................................................................................................................... 202
Authorize.net
.........................................................................................................................................................
Banque
Populaire RTS
204
.........................................................................................................................................................
Barclays
ePDQ
204
......................................................................................................................................................... 206
CardSave
2.3.0 User Manual : Contents
17.4.6 ChronoPay
......................................................................................................................................................... 207
17.4.7 ecardon
.........................................................................................................................................................
XML
207
17.4.8 eMS
.........................................................................................................................................................
(e-services.rs)
208
17.4.9 eProcessingNetwork
......................................................................................................................................................... 208
17.4.10.........................................................................................................................................................
goEmerchant
209
17.4.11.........................................................................................................................................................
Google Checkout
209
17.4.12.........................................................................................................................................................
InternetSecure
211
17.4.13.........................................................................................................................................................
Moneris eSelect Plus Hosted Paypage
212
17.4.14.........................................................................................................................................................
Multicards
212
17.4.15.........................................................................................................................................................
Multipay
213
17.4.16.........................................................................................................................................................
NoChex
214
17.4.17.........................................................................................................................................................
Optimal Payments API
214
17.4.18.........................................................................................................................................................
Paypal
215
17.4.19.........................................................................................................................................................
PayPoint
218
17.4.20.........................................................................................................................................................
PaySystems TPP-Pro
219
17.4.21.........................................................................................................................................................
PSiGate HTML
220
17.4.22.........................................................................................................................................................
RBS Worldpay Select Junior
220
17.4.23.........................................................................................................................................................
Realex
221
17.4.24.........................................................................................................................................................
Sage Pay
223
17.4.25.........................................................................................................................................................
SecureHosting
224
17.4.26.........................................................................................................................................................
SecureTrading
225
17.4.27.........................................................................................................................................................
Skipjack Secure Process (HTML)
226
17.4.28.........................................................................................................................................................
USA ePay
227
17.4.29.........................................................................................................................................................
UseCash
227
17.4.30.........................................................................................................................................................
Verisign
228
Part 18 Currency Exchange Services
230
18.1 ...................................................................................................................................
RBS Worldpay
230
Index
0
© 1997-2010 Whorl Ltd. Reproduction prohibited without permission.
Introduction :
1
9
Introduction
JShop Server is a database-driven e-commerce system designed for servers that support both PHP and
mySQL. Featuring a wealth of features for high-end e-commerce systems, such as customer accounts, stock
control and order processing, JShop Server is designed for those companies wanting to offer a greater level of
service to their on-line customers.
Out Of The Box Functionality
As soon as JShop Server is installed it is a fully functioning store that you can add sections and products to.
Obviously there are many features and settings in JShop Server that can change the way it operates but you
will be able to add product to your shopping cart and visit the checkout as soon as you’ve added your first
product.
Unique Web-Based Administration System
Web-based administration systems are nothing new but the interface for JShop Server takes them a step
further. Arranged more like an application the administration system is quick and easy to navigate and the onscreen features are intuitive – in fact it’s almost like using an application on-line. A great deal of time and
effort has gone into creating the look and feel of the administration system and with unique features such as
interactive hiding and showing of information on the product page, administration doesn’t hinder your
productivity, it enhances it.
Template Driven Design
JShop Server stores are designed 100% using templates. tSys is JShop Server’s built-in template system that
provides quick and easy additions to normal HTML to design your store. Of course you may only wish to change
small parts of the default templates but tSys’s power enables you to produce a completely unique looking store
should you wish to.
In-Built Order Management System
One of JShop Server’s strengths is its in-built order management system that provides everything from receipt
printing to customer emails and dispatch functionality. Orders can be edited and the order status system allows
you to keep track of orders at every step of the way.
9
Administration System : Administration System Layout
2
2.1
10
Administration System
Administration System Layout
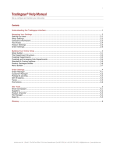
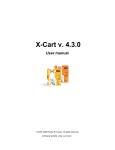
The JShop Server Administration System
The overall structure of the administration system is split into 4 parts: the top menu, the left sub-menu, the
main content area of the screen and the bottom search panel. In addition there is a built-in announcements
system which is show on the main administration screen.
The Menu Bar
All the main functions are accessed through the top menu options. By default you can left click on these to visit
a particular administration section, e.g. Users, or right click on them to see a sub-menu for the section.
10
Administration System : Administration System Layout
11
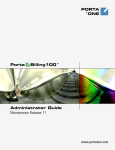
The Right-Click Sub-Menu
The Left Sub-Menu
Once you have entered a particular section of the administration system, such as the User section for instance,
the left hand part of the screen will show all the sub-options available within that section. This provides a quick
and easy way to skip between screens within a particular section.
This left menu can be turned on or off per user (please see the section on User Options)
Main Content Area
This is where your main settings screens will be shown. All actions within JShop Server, such as setting
system options, editing products and processing orders is performed in the main content area.
The Search Panel
The search panel provides quick and easy access to the various searches that can be performed in the
administration system. For instance, search for products or orders. Clicking the ‘Search Panel’ text will hide or
show the search panel. Often you’ll probably want to hide the search panel when it’s not in-use to provide
greater screen space for the main content.
JShop Server Announcements
The administration system includes an embedded announcements system that we can use to alter customers
to product information, details on security patches and information on new releases. In addition to a button
being provided on the top left of the screen, if there is a new announcements that a logged in user has not yet
read a strap line will appear underneath the top menu bar with the title of the announcement.
The announcements facility can be activated or de-activated for individual users in the Users section of the
administration system.
11
Administration System : User Options
2.2
12
User Options
On the top left of the screen there is a button called ‘User Options’. This provides each individual user with the
ability to alter some facilities of the administration system to suit their preferred way of working.
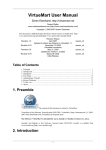
The User Options Screen
Show Left Hand Menu Section
If you’d prefer to just use the top menu options, for instance if you wished to maximise the screen space
available for the main content area, select NO here to hide the left menu section.
Search Panel Expanded At Login
Here you can specify whether you want the search panel (at the bottom of the screen) shown open when you
login or closed, preserving screen space.
Default Page At Login
This allows you to select which screen in JShop Server should show be default when you login to the system. If
you generally process orders, you’ll want to make the Orders screen your default page.
Main Menu Mouse Button Configuration
The top menu buttons, by default, load the administration section with a left-click and show the sub-menu
drop-down with a right click. However, you can use this setting to swap these mouse buttons around.
Action Menu Position On Orders List
On the orders page each order has an ‘Action’ drop-down available to process the order in a number of
different ways. By default this will show in the far-right column of the orders screen although using this option
you can alter this to show on the far-left.
Action Menu Activate
In addition to changing the menu position on the orders list you can change whether the options show when
you put the mouse over the Action button or when you click on it. Again, you can change this option to suit.
Note: Many of these options will not take effect when changed until the next time you login to JShop
Server.
12
User Management :
3
13
User Management
JShop Server has built-in user management for the administration system, with customisable permission
groups, that enable you to setup an unlimited number of administration user accounts, each with different
access permissions for which parts of the administration system they can use. In addition to this. JShop
Server’s user management features include the ability to log all actions and log successful and failed login
attempts.
The basic structure of the administration accounts system consists of user groups and user accounts. A user
account can only be used by one person at any given time and each user can be a member of multiple user
groups for access permissions.
3.1
The Administrator Account
A default account is setup when JShop Server is installed, with username administrator (at installation this
account also has a password of administrator). This is the main administration account for your system and
this account cannot be deleted although you can alter the username and password. With this main
administration account you can still enter and use the JShop Server administration system as normal whilst
locking out all other user accounts or setting them to safe mode (see below). This is useful if you need to do
updates to the system that require no other activity to be going on.
Note: For security reasons you should immediately change the administrator username and password as
soon as you have installed JShop Server.
3.2
List of Groups
This screen shows a list of all the user groups setup in the system. There is a default user group setup called
‘Administrators’ which provides full access to all parts of the system. This user group cannot be deleted. For
other user groups you can click on an ‘Edit’ button or on the group name is take you to the editing page or click
the ‘Delete’ button to remove then group.
List Of User Groups
13
User Management : Adding/Editing a Group
3.3
14
Adding/Editing a Group
The group details screen, obtained by clicking ‘Edit’ on the List of Groups or by clicking the ‘Add New Group’ link
on the Users menu, gives you the ability to create a new user permissions group or edit an existing one.
Editing A Group
Group Name
Enter a name here to describe the group you are adding or editing.
Allowed Access For This Group
Here you’ll see a long list of various permissions that you can grant or deny access to for this group. Any option
that is checked will give members of the user group permission, any un-checked option will mean that
members of the group do not have permission.
You’ll also see ‘Check All’ and ‘Uncheck All’ against the light blue main section lines. These enable you to
quickly set all the section’s sub-options either checked or un-checked.
3.4
List of Users
This page shows you a list of all the user accounts currently setup in the system. Either clicking on the ‘Edit’
button or on the username will take you through to the user editing page. Clicking the ‘Delete’ button will
remove the user account (this is not available for the main administrator account).
14
User Management : List of Users
15
List Of Users Screen
In addition the third button ‘View Log’ will show you an action log just for that user, making it easy to track the
actions of an individual user in the system.
3.5
Adding/Editing a User
The users details screen, obtained by clicking ‘Edit’ on the List of Users or by clicking the ‘Add New User’ link on
the Users menu, gives you the ability to create a new user account or edit an existing one.
Note: From version 2.1.1 onwards you can change the administrator username to any desired username
and we recommend you do this for security reasons.
Editing A User
The information required on these screens is as follows. The ‘Login Enabled’ and ‘Deny ‘Member Of’ options
are not editable for the administrator user. This account always has complete access to the system.
Username
This is the actual username for the account, used when logging in. If you are editing an account this field will
not be editable.
Password
Here you should enter a password when creating a new user account. When editing an account only enter a
password if you want to change the current user account’s password. If you leave it empty, the password will
not be updated for the account.
Real Name
Enter a real name for the account. This is simply to help you identify different accounts.
Show JShop Server Announcements
Change this option to enable or disable the built-in JShop Server Announcement system. When active the user
will see a button along the top menu to provide access to the announcements we have made and, if there’s a
new announcement that they haven’t yet seen, they’ll also see a strap line underneath the top menu providing
details of the new announcement.
15
User Management : Adding/Editing a User
16
Login Enabled?
You can enable and disable individual user accounts. Checking the NO option will mean that you cannot login to
the administration system with this user account. Checking YES will enable the account for login.
Member Of
This section allows you to provide membership of user groups to the user. Multiple groups can be selected,
allowing you to combine certain permission groups together for a single user.
Note: Permissions are inclusive. If access to a section is denied in one group and allowed in another group
and the user is a member of both groups, they will be given access.
3.6
Management Options
This screen gives you some global options for the user management of JShop Server. The options are as
follows:
The Management Options screen gives you access to global user settings
Non-Administrator Safe Mode
With this set to YES all user accounts, apart from the main administrator account, will use the system in ‘Safe
Mode’. This means that although edit/delete/add etc. buttons will be available no updates to the database will
be saved, effectively making the system ‘read-only’.
User Action Logging Enabled?
Set this to YES if you want user actions saved to a log file for later viewing. Actions included in this include all
add actions, edit actions and delete actions and changes to order status etc. If you are running a busy system
with many changes each and every day you should be aware that the logs created can get quite large. Please
see ‘Clear Action Log File’ for more information.
16
User Management : Management Options
17
User Login/Logout Logging Enabled?
Set this to YES for log records to be created each time somebody tries to login to the administration system.
This will log the username used and whether the login failed or was successful. This is separate to the normal
user action logging (even though the records appear in the same log file), as this would normally be turned on
(for security reasons) even if you didn’t want to log all actions performed in the system.
Disable User Logins?
If set to YES this will instantly disable all user accounts, denying them access to the system.
Number User Actions Per Page
This is a configuration option for the viewing of action log files. It simply sets how many actions should be
shown per page when viewing the log files.
Check IP Address
With this option enabled when a user logs in to the administration system their IP address is stored. With each
page load within the administration system this stored IP address is checked against the user’s current IP
address. If the two differ the user is forcibly logged-out and taken back to the login page. This is a security
feature to stop access to the administration system from different IP addresses with the same login details. If
your users are on dial-up connections you should be aware that if they have to re-connect to the internet, their
IP address will change and they will be logged out and need to login again.
Timeout Login With No Action After
This allows you to set a time limit after which, if no page has been visited in the administration system the
user will automatically be logged out. This is a security feature to prevent user login sessions staying active if
the user forgot to Logout. Setting the time limit to 0 will de-activate this option.
Block Unsuccessful Logins
This options provides some protection from brute force attacks, where an attacker would repeatedly try
logging in to your administration system with different passwords in an attempt to gain access. By using this
option you can only allow a certain number of unsuccessful login attempts before that username is locked out
for a period of time. A block can be reset from the ‘List of Users’ from the administration system.
3.7
Viewing Log Files
You can view overall log files (for all users) in date order, with the most recent action first, by clicking on the
‘View Actions Log File’ option on the Users menu.
All log actions have a date, time, username, IP address and description of the action. Failed login attempts (if
being logged) will show up in bold to help pick any possible unauthorised login attempts.
User activity logs give you a view of everything that’s happening in your administration system.
On the ‘List of Users’ page you can click the ‘View Log’ button against an individual user to see just actions
made by that user.
17
User Management : Clearing the Log Files
3.8
18
Clearing the Log Files
If you are logging all user actions the log database can soon grow quite large and so, periodically, we suggest
that you clear the log files. This can be done from the ‘Clear Actions Log File’ link on the Users menu.
18
General Settings :
4
19
General Settings
The General section of JShop Server’s administration system is where you setup most of the fundamental
options for your store. The menu in this section is split into two.
General Menu
These options are where you can setup global options such as company details, languages, currencies etc. and
also options that alter the configuration of the administration system.
Shop Navigation Menu
These options cover some of the navigation elements to your shop such as how many products are listed on a
section page, how you want to sort the basket etc.
Note: As the options in General are powerful and can make large changes to your store, for instance
adding and removing a currency, we suggest that few users are given access to this section.
4.1
Company Details
This is where you can setup the basic company details for your store. Many of the pre-installed templates and
email templates use the information you enter here, so it should be applicable for public view.
Company Details screen is where you can enter your company information
The fields should be fairly self-explanatory, however, the General Email setting is only used for display on the
templates. The actual email addresses that JShop Server sends various emails to for the merchant are set in
the Email Options and against email templates in the Templates section of the administration system.
19
General Settings : Global Options
4.2
20
Global Options
These options cover a few global settings for your store and should be used with caution.
Global Options
Shop Availability
Is Shop Available?
Setting this to NO will instantly take your shop off-line. No matter what page the user tries to load the
unavailable.html template will be served to the user. This is useful if you need to make updates to your store
and you do not want it being used until those updates are finished. It should also be used when you are
installing any JShop Server updates.
Allow These IP Addresses To View Shop Even When Unavailable
This setting allows you to provide limited access to your store, for instance if you’re doing a lot of updates that
you don’t want seen during their change. You can make the shop unavailable with the previous option but enter
a comma separated list of IP addresses that will still be permitted access to the store and see it as normal.
Force Admin System to Use SSL
If you have setup your store with a secure certificate, and have entered the secure URL in the required place in
the config.php file for the system (please see the Installation section of this manual) then setting this option to
YES will force the admin system to be used under SSL.
20
General Settings : Global Options
21
Default Settings
Order Number Offset
Internally orders are stored starting at order number 1 as we use mySQL’s own auto numbering sequence.
Here you can set a number that should be added to the 1 when order numbers are displayed. For instance, the
default is 200000 so all order numbers viewed in the administration system or on the front-end of your shop
will display by adding 200000 to the internal order number. For example order number 1 will display as
200001.
Default Country
When new customers visit your site this is the country they will be assigned until they log in or order from your
store. This is used to calculate any tax that should be shown by default.
Shop URL Format & Search Engine Friendlyness
Omit Section ID From Product Links
By default JShop Server will include the section ID in any product URL accessed from within a section.
However, if you’re concerned about search engines penalising you for duplicate content you can select this
option to stop this being added. If turned off and products are in multiple sections the breadcrumb trail is not
guaranteed to show the correct path to the section the customer was in, the system will show the first path it
locates in its database.
Remove .php From Links
If you server supports it, you can select this option to have the .php removed from many links in JShop Server.
If selected, a product URL will look something like http://www.domain.com/product?xProd=25
Use Safe URLs Where Applicable
This option is for those using Apache web servers who have mod_rewrite setup to support URLs in the style
http://www.domain.com/product.php/20/3 rather than the normal style which would be: http://www.domain.
com/product.php?xProd=20&xSec=3. You can check whether your system supports this easily by going to a
page and adding /hello to the end of it. For instance, the following: http://www.domain.com/index.php/hello –
if the page shows correctly then your site supports mod_rewrite. Although many search engines (including
Google) will index pages with the normal style of URL, some will not and, if your server supports it, you should
turn this option on. Please speak to us or your hosting company if you need more information on this. NOTE:
With this option on you should ensure that your templates have the <BASE> tag in them, e.g.: <BASE
HREF=”{shop.baseDIR}”> otherwise images will not appear correctly on the page. You can normally include
this in top.html and this will then be included in all pages.
If using Safe URLs Append Section Name Or Product Name To URLs
If selected your URLs will include your product and section names, to provide more descriptive URLs.
If YES, use the following character to replace spaces and non-safe characters:
Here you can specify what character should be used to replace non-safe URL characters in section names and
product names. My default this is the underscore ‘_’ character but you could also use any other character of
your choosing. If you wish to replace the characters with an empty string (so that nothing appears in their
place) leave this field blank. Be careful which character you choose, however, as some characters will not be
suitable for URLs. Normal usage would include _, - or +
In addition here you can select to either Remove or Leave duplicate replacements. For instance, if you have
two non-safe characters in succession selecting Remove in this option will leave only one replacement
character, e.g. this_is rather than this__is
Activate 301 Redirects For Spiders When URL Doesn’t Match Selected Format
Again, if you’re worried about search engines picking up duplicate contact, you can use this to force JShop
21
General Settings : Global Options
22
Server to issue a 301 redirect should the spider visit using a URL that doesn’t match the selected format,
providing them with the correct format. This won’t affect normal visitors to the store.
Response Code To Send Spiders for Invalid/Unavailable Products or Sections
By default JShop Server will send a normal 302 redirect to the home page if a spider arrives at a product or
section that either no longer exists in your store or has been made invisible. Here you can change the response
that you would like sent.
Server Time Settings
Select Store Time Zone
This option lets you select the time zone you’d like to use for your store. For instance, in the United Kingdom
you’d choose GMT. This option is useful if you host in a different country to where you operate as the chances
are that the server time zone will not match your time zone. Setting this option ensures that everything is kept
in your local time zone.
Is DST In Effect?
Change this option to set whether Daylight Saving Time (DST) is currently in effect or not in your time zone.
The system will then automatically alter its time settings accordingly.
4.3
Cart Sessions & Security Settings
This settings page provides complete control over how JShop Server handles cart sessions and the security
associated with them. It is worth taking some time to familiarise yourself with these options and to change
them to suit your particular store. This page has extensive in-line help to aid in making decisions on what
settings to use.
The ‘Advanced Options’ title, when clicked, will display more advanced settings for cart session security. The
default security options provide a basic level of security that is applicable to all installations but this can be
further tailored using the advanced options.
22
General Settings : Cart Sessions & Security Settings
23
Cart Sessions & Security Settings
Basic Options
Cookie Name
This will not be applicable to most but for advanced users this gives you control over the cart identifier cookie
name that JShop Server uses. In addition to using cookies, JShop Server also uses a session identifier on URLs
if required (e.g. for those customers who do not accept cookies).
Cookie Expiry Time
By default the cookie expiry time for cart sessions is set to 3 hours after the last action was performed, e.g.
the customer visited a page in the store. You can change this expiry time here by entering a new number of
hours. For instance, if you wanted carts to be maintained for a longer period of time, enter a higher number of
hours here.
History To Keep When Pruning Carts
JShop Server includes an automated jobs system, one of which is the periodic pruning of old carts in its
database. If you have the automatic job activated for cart pruning (see the Automated Jobs section of this
manual) then this setting sets the number of days you’d like to keep when carts are pruned. If you’d like to
keep cart history for a while, to use in the reports for instance, then you can change this setting to keep more
history. However, it’s advisable to keep on top of your carts as the information can build up a great deal over
time.
Advanced Options
23
General Settings : Cart Sessions & Security Settings
24
Check User Agent
This is recommended as a simple check that a session is owned by the user it was created for. However it is
not perfect as many users have exactly the same user agent string.
Check IP Address
Although this will provide greater security on sessions this can cause issues with some ISPs (specifically AOL)
where a user's IP address changes frequently during a visit. If set to YES, you can specify the number of octets
(sections) of the IP address to use. If you are using this it's also advisable to activate the 'Track IP With Cookie'
option for those customers whos IP address changes. NOTE: This option is not recommended for those
running http:// and https:// on different domains.
IP Octets (sections) to Include
255 = check this octet, xxx = ignore. For those customers where IP addresses can change you may try using
255.xxx.xxx.xxx at the least to check a main group of IP addresses, although this may still cause isolated issues
depending on their ISP NOTE: Only applicable if 'Check IP Address' is set to YES.
Track IP With Cookie
If you are checking IP addresses it is advisable to enable this option which will help to maintain a session for
those on changing IP addresses. This is only really of any use if your http:// and https:// are running on the
same domain, or you are not running an SSL certificate on your store. NOTE: Only applicable if 'Check IP
Address' is set to YES.
Action on Hash Check Failure
Under most circumstances if a cart hash check fails it is advisable to create a new cart, copying the contents of
the existing cart but blanking out customer login information. This would avoid a valid customer's cart from
being accidentally dropped if their IP address changes
Check Referrer
This option will check the referrer value when a customer visits the site with a session in the URL. If the
referrer is not your site (and not blank as some users legitimately hide the referring URL with privacy software)
then a new session will be created. Although not perfect, this option is recommended as a simple check to
capture many instances of a user sharing a URL to your store that includes a session
Create New Cart ID On Login
Use this option to force the customer's session to obtain a new Cart ID if they login to a customer account. This
is useful for splitting sessions should the customer have shared a URL with their session ID and other checks
have failed to identify this. By creating a new Cart ID, their session is then guaranteed to be unique.
Create New Cart ID On Checkout
Use this option to force the customer's session to obtain a new Cart ID when they start the checkout
procedure. This is useful for splitting sessions should the customer have shared a URL with their session ID
and other checks have failed to identify this. By creating a new Cart ID, their session is then guaranteed to be
unique.
Customer Account Login Timeout
With this option set to a non-zero number, it sets the number of minutes that a customer should remain logged
into their customer account. After this period of time has passed with no activity, either in their customer
account or checkout, the customer will no longer be marked as logged in into their account for their session
and they will need to login again if they wish to go to their account details or checkout.
Log Cart Creation & Checks
If you need to track dropped carts or find out if there are options you are using above that are causing carts to
be dropped or copied please use this option and specify a filename. The log file created is a simple CSV
detailing:
24
General Settings : Cart Sessions & Security Settings
25
CartID,User Agent,Referrer,IP Address,Status,New CartID (if applicable)
NOTE: This should be used for debugging only and should not be left activated as it will create a very large
log file if run for prolonged periods. Under normal circumstances you would not need to activate this.
4.4
General Settings
This screen contains some general display settings that are applicable to the whole of JShop Server.
General Settings
Date Format
You can specify how you would like dates to be shown in both the administration system and the front-end by
changing the format string here. An explanation of the possible options is also given. For instance, if you were
a US store you would want to show the month first.
Time Format
As per Date Format, this changes how the time is to be shown in both the administration system and on the
front-end. Again an explanation of the possible options is also given.
Convert Line Breaks To <br/> on Products and Section Fields
By default this is set to YES meaning that any line breaks you enter in a product or section description will be
automatically converted to <br/>’s when they are displayed on the front-end of your shop. It doesn’t actually
alter the data that’s entered in any way, this is simply something that happens before the data is sent to the
template system. If you wish to retain complete control over how your descriptions are shown, turn this option
off. Doing so means you will need to enter your own <br/>s for line breaks to be shown correctly.
25
General Settings : General Settings
26
Note: If you have the WYSIWYG editor turned on, this option will have no effect.
4.5
WYSIWYG Settings
JShop Server includes a built-in WYSIWYG editor, Innovastudio, that provides rich HTML editing in a number of
places, for instance product and section descriptions or snippet editing. This screen contains the settings
available to customise the use of the WYSIWYG editor.
WYSIWYG Settings
Enable WYSIWYG Editor
Using the WYSIWYG editor is optional and it can be turned off using this option. If it is turned off, areas that
would use the WYSIWYG editor will, instead, use large text box areas for editing.
CSS Stylesheet Location
If you wish to provide access to certain CSS styles then here you can enter the URL to the CSS file you’d like to
use.
Editor Configuration File
Here you can change the configuration file used for the editor. These are located in the admin/resources/
wysiwygconfigs directory and, if you’re comfortable with creating new ones for the editor we use, these can be
placed in this directory to be chosen from this drop-down.
Note: We cannot provide support for creating your own configuration files.
4.6
Currency Settings
This is where you setup the currencies that your shop will use. By default only one currency is setup on
installation. This is GBP, but can be changed to whatever base currency you want to use. This base currency,
however, cannot be deleted and if you create additional currencies that use exchange rates, they will be
calculated from this base currency.
List of currencies
26
General Settings : Currency Settings
27
The main screen gives you an overall view of the currencies setup in your store including the currency code,
descriptive name and whether or not the currency is calculated via. an exchange rate. There are buttons for
editing a currency, deleting a currency or adding a new currency.
Changing The Default Currency
The bar at the bottom of this screen allows you to change the default currency. When a visitor first arrives at
your store this will be the currency they initially see all prices in.
4.6.1
Adding/Editing a Currency
Adding and editing a currency both use the same screen. The only difference is that when editing the base
currency some of the options, such as exchange rate settings, are unavailable as they are not applicable.
Information required on this screen is as follows:
Editing an existing currency
ISO Code
This should be the ISO 3-letter code for the currency. This needs to be correct as when using payment
gateways, most require this field to be sent and if it isn’t accurate the gateway will not pick up the correct
currency for the transaction. Whatever you enter here will automatically be converted to upper-case when
saved for consistency (many payment gateways expect the currency code to be in upper-case).
Some examples of currency codes are:
GBP = British Pounds
EUR = Euros
USD = United States Dollars
AUD = Australian Dollars
CAN = Canadian Dollars.
A complete list of currency codes can be found here: http://www.oanda.com/site/help/iso_code.shtml
ISO Number
This is the 3-digit ISO Number for the currency and will only need to be used if your selected payment gateway
requires it, e.g. Barclays ePDQ and Velocity Pay require this. Your payment gateway’s manual will give you the
correct numbers, e.g. 826 = GBP and 840 = USD.
27
General Settings : Currency Settings
28
Name
This is your descriptive name for the currency. Usually you would use this to display the currency selection on
your site (the default templates use this).
Decimal Places
Enter the number of decimal places you would like to display the currency in. More often than not, currencies
use 2 decimals places.
Pre-Text, Middle-Text and Post-Text
This defines the actual formatting of the currency when shown in JShop Server. For instance if you were
setting up GBP and you wanted the currency to display like this: £10.99 you values you would use are as
follows:
Pre-Text
Middle-Text
Post-Text
£
.
As you can see by setting these three options you can completely configure how the currency is to be
displayed.
Note: The currency symbol for the Euro (€) is obtained by pressing Ctrl-Alt-4 on a United Kingdom
keyboard. This does not always show correctly in emails, we have found. For instance, one copy of Outlook
may display it correctly where as another version on another machine may display it as ? instead.
Visible
You can opt to make a currency invisible, meaning that it will not appear in the actual shop. This is useful if you
want to add a currency to your store but need to setup prices before you actually make the currency available.
It also allows you temporarily suspend taking orders in a currency.
Can Checkout In Currency?
If you want to show a currency in your store simply for information purposes this option allows you to do this.
If the customer is browsing your store in a currency with this option set to YES, they will be automatically
changed to the base currency when they come to checkout.
Use Exchange Rate and Exchange Rate
These options allow you to set a currency to be calculated automatically via. an exchange rate rather than
having prices individually entered. All exchange rates are worked out from the base currency so, for instance,
if you had a base currency of GBP and wanted to show EUR based on an exchange rate you could enter and
exchange rate figure of 1.4 (depending on what exchange rates are at the time). This would calculate EUR to
be 1.4 x GBP.
NOTE: It is important that once your store is up and running and you have orders in different currencies
that you do not delete any currencies that you no longer wish to use – simply set them to Visible = NO.
The reason for this is that many parts of the JShop Server system reply upon the currency information
stored here and past orders will not show prices formatted correctly if the currency is missing.
28
General Settings : Currency Settings
4.6.2
29
Live Exchange Rate Service
JShop Server includes the ability to use a live exchange rate service to automatically retrieve and use up to
date exchange rates every day for your store.
Note: Currently only Worldpay’s exchange service is supported which requires a Worldpay account. Other
exchange rate services will be added in future updates as required.
Selecting A Live Exchange Service.
You can select the exchange rate service you wish to use from the drop-down (or select Off to turn this feature
off). Click the ‘Change Service’ button and you will be taken to the settings screen for the service you have
chosen.
Please see the ‘Currency Exchange Services’ section for details on setting up your chosen service.
4.7
Language Settings
JShop Server is fully multi-language and you can setup as many languages as you want to use. In addition
there is no need to enter everything in all the languages you wish to show if you do not want to. For instance,
if you don’t enter an alternative language version of a product description, JShop Server will, instead, show the
default language description. This enables you to setup languages as you go along, gradually entering
alternative language versions of text.
Not only can products and sections be multi-language but also product options, field titles, payment methods
and shipping methods. In addition the native language versions of product information are stored with orders,
enabling you to send native language emails to your customers.
List of languages
Finally, all text on the templates is displayed using Labels and Snippets. These are discussed in more detail in
the Templates section of this documentation. But it means that absolutely everything on your store can be
made fully multi-language.
Changing The Default Language
The bar at the bottom of this screen allows you to change the default language. When a visitor first arrives at
your store this will be the language they initially see all prices in.
Note: Once you have setup a new language you will see new fields that can be filled in on many sections of
the administration system. These allow you to enter the alternative language versions for fields that this
can be used on.
29
General Settings : Language Settings
4.7.1
30
Adding/Editing a Language
Adding and editing a language both use the same screen. Details of the fields are given below.
Editing an existing language
Name
This is the name of the language. Normally this would be the name shown to the customer to select the
language (the default templates with JShop Server use this).
Visible
Setting this to NO will mean that the language isn’t visible from the front-end shop. This is useful if you wish to
add a language but need to enter in additional language information for products etc. before you want the
language to be visible.
Language Uses Double-Byte Encoding
Some language, such as Japanese, use Double-Byte encoding for characters. If the language you are adding or
editing is like this please select YES for this option to ensure that JShop Server handles the encoding correctly.
4.8
Extra Product Fields
In addition to the normal product information that JShop Server allows, you can setup additional product
information fields with this section. For instance, this is where you can setup option fields that the customer
has to select, extra image fields or extra descriptive test fields. You can also change their display order by
using the ‘Sort /Reorder Extra Fields’ button.
List of extra product fields
What Extra Field Types Are Available?
There is a selection of different extra field type available and they are as follows:
Type
Description
30
General Settings : Extra Product Fields
TEXT
Up to 250 characters text field
TEXTAREA
Unlimited text field, similar to the product description field
IMAGE
Shown as an image
SELECT
Shown as a select box (only one option selectable)
CHECKBOXES
Shown as checkboxes. Each option is shown as a new text box so can be
used to select multiple options for the same extra field, e.g. extra pizza
toppings.
RADIOBUTTONS
Shown as radio buttons. (only one option selectable)
USERINPUT
Shown as a text entry box for the product allowing customers to enter
personalisation information for the product.
31
Of all the fields CHECKBOXES probably needs more of an explanation. Unlike the other select option fields
(SELECT and RADIOBUTTONS), CHECKBOXES allows multiple options for the same field to be selected. This is
very powerful if you have a number of optional extras for products as they can all be encapsulated in a single
field.
Note: Once an extra field has been setup you cannot change its type.
4.8.1
Adding/Editing Extra Fields
Adding and editing extra fields both use the same screen. However, when adding an extra field you need to
make sure that you select the correct type as this cannot be changed later on. You choose the type of an extra
field by using the select box by the ‘Add New Field’ button.
Editing an extra field. This shop has multiple languages as well
Information that can be entered for each field is as follows:
Name
This is an internal name for the field and should not contain any spaces. This is not shown to the customer in
the default templates.
Title
This is the public name for the field and the default templates use this when showing the extra field.
Exclude From Loop
The default templates use a loop created with the tSys template language that loops through all your extra
product fields on the product page and outputs any content that they may have. However, sometimes you may
want to display one or two extra fields in a different way and by checking this to YES you can remove them
from that default loop in the templates and display them elsewhere on the page where you want to.
31
General Settings : Extra Product Fields
32
Size (only for USERINPUT fields)
Specifies the display size of the text input box.
Maximum Length (only for USERINPUT fields)
Specifies the maximum number of characters that the customer can enter into the USERINPUT field.
4.8.2
Image Extra Fields
There are many additional fields available for the IMAGE type of extra field.
Editing an IMAGE extra field
Default Image
This allows you to select a default image that will be shown on a product page if no product specific image has
been uploaded for this field via the product editing screen. You can either upload an image from your local
computer here or pick one that’s already been uploaded.
Image Display Dimensions
This specifies how you want the image displayed on the screen. If you only provide one of the options then the
image will be constrained to that size and the other dimension will scale to fit. For example setting ‘x’ to 300
and ‘y’ to 0 will lead to the image always being shown 300 pixels wide but will allow the height to change
accordingly, so the image always stays in relative scale.
Resize Images At Upload
If you have GD enabled on your PHP installation you can use this option to have images uploaded for this field
automatically resized to the dimensions entered in the option above. This means that the version that’s stored
on the server will be the correct dimensions already. In addition you can get a quality setting that will be used
if the uploaded image is a JPG file.
32
General Settings : Extra Section Fields
4.9
33
Extra Section Fields
In much the same way as for products, JShop Server allows you to setup extra information fields against
sections. You can also change their display order by using the ‘Sort /Reorder Extra Fields’ button.
List of extra section fields
What Extra Field Types Are Available?
There is a selection of different extra field type available and they are as follows:
Type
Description
TEXT
Up to 250 characters text field
TEXTAREA
Unlimited text field, similar to the product description field
IMAGE
Shown as an image
Note: Once an extra field has been setup you cannot change its type.
4.9.1
Adding/Editing Extra Fields
Adding and editing extra fields both use the same screen. However, when adding an extra field you need to
make sure that you select the correct type as this cannot be changed later on. You choose the type of an extra
field by using the select box by the ‘Add New Field’ button.
Editing an extra section field
Information that can be entered for each field is as follows:
Name
This is an internal name for the field and should not contain any spaces. This is not shown to the customer in
the default templates.
Title
33
General Settings : Extra Section Fields
34
This is the public name for the field and the default templates use this when showing the extra field.
Exclude From Loop
The default templates use a loop created with the tSys template language that loops through all your extra
section fields on the section page and outputs any content that they may have. However, sometimes you may
want to display one or two extra fields in a different way and by checking this to YES you can remove them
from that default loop in the templates and display them elsewhere on the page where you want to.
4.9.2
Image Extra Fields
There are many additional fields available for the IMAGE type of extra field.
Editing an IMAGE extra field
Default Image
This allows you to select a default image that will be shown on a section page if no section specific image has
been uploaded for this field via the section editing screen. You can either upload an image from your local
computer here or pick one that’s already been uploaded.
Image Display Dimensions
This specifies how you want the image displayed on the screen. If you only provide one of the options then the
image will be constrained to that size and the other dimension will scale to fit. For example setting ‘x’ to 300
and ‘y’ to 0 will lead to the image always being shown 300 pixels wide but will allow the height to change
accordingly, so the image always stays in relative scale.
Resize Images At Upload
If you have GD enabled on your PHP installation you can use this option to have images uploaded for this field
automatically resized to the dimensions entered in the option above. This means that the version that’s stored
on the server will be the correct dimensions already. In addition you can get a quality setting that will be used
if the uploaded image is a JPG file.
34
General Settings : Extra Article Fields
4.10
35
Extra Article Fields
In much the same way as for products, JShop Server allows you to setup extra information fields against
articles. You can also change their display order by using the ‘Sort /Reorder Extra Fields’ button.
List of extra article fields
What Extra Field Types Are Available?
There is a selection of different extra field type available and they are as follows:
Type
Description
TEXT
Up to 250 characters text field
TEXTAREA
Unlimited text field, similar to the product description field
IMAGE
Shown as an image
Note: Once an extra field has been setup you cannot change its type.
4.10.1
Adding/Editing Extra Fields
Adding and editing extra fields both use the same screen. However, when adding an extra field you need to
make sure that you select the correct type as this cannot be changed later on. You choose the type of an extra
field by using the select box by the ‘Add New Field’ button.
Editing an extra article field
Information that can be entered for each field is as follows:
Name
This is an internal name for the field and should not contain any spaces. This is not shown to the customer in
the default templates.
Title
35
General Settings : Extra Article Fields
36
This is the public name for the field and the default templates use this when showing the extra field.
Exclude From Loop
The default templates use a loop created with the tSys template language that loops through all your extra
article fields on the article page and outputs any content that they may have. However, sometimes you may
want to display one or two extra fields in a different way and by checking this to YES you can remove them
from that default loop in the templates and display them elsewhere on the page where you want to.
4.10.2
Image Extra Fields
There are many additional fields available for the IMAGE type of extra field.
Editing an IMAGE extra field
Default Image
This allows you to select a default image that will be shown on an article page if no article specific image has
been uploaded for this field via the article editing screen. You can either upload an image from your local
computer here or pick one that’s already been uploaded.
Image Display Dimensions
This specifies how you want the image displayed on the screen. If you only provide one of the options then the
image will be constrained to that size and the other dimension will scale to fit. For example setting ‘x’ to 300
and ‘y’ to 0 will lead to the image always being shown 300 pixels wide but will allow the height to change
accordingly, so the image always stays in relative scale.
Resize Images At Upload
If you have GD enabled on your PHP installation you can use this option to have images uploaded for this field
automatically resized to the dimensions entered in the option above. This means that the version that’s stored
on the server will be the correct dimensions already. In addition you can get a quality setting that will be used
if the uploaded image is a JPG file.
36
General Settings : Contact Form Fields
4.11
37
Contact Form Fields
The contact form (template contactform.html) is a page in your store where customers can automatically send
an email to you. This section of the administration system allows you to setup the fields that you would like the
customer to fill in. There are 4 field types available, as detailed below:
Type
Description
TEXT
Single line entry field
TEXTAREA
Multiple row entry field
SELECT
A select box of options
CHECKBOX
Single check-box
Each of the fields can be validated and validation messages displayed if they are not filled in.
List of contact form fields
4.11.1
Adding/Editing Contact Form Fields
Adding and editing contact form fields uses the same screen. However, some of the options are only available
for certain types of fields. Options available are as follows:
Editing a TEXT extra field, showing options already filled in
37
General Settings : Contact Form Fields
38
Name
This is an internal name that is used in the database. It must be unique and you will be told if it is not. This
field is not generally shown to the customer.
Title
This is the description of the field that is shown to the customer in the default templates.
Size and Maximum Length (only for TEXT type fields)
Size is the actual size of the form field on the page and maximum length is the maximum number of
characters a customer can enter into the field.
Columns and Rows (only for TEXTAREA type fields)
This is the number of columns and rows that the field should be sized to on the contact form page.
Validation, Validate For and Validation Message
If you want to make it a requirement that a field is filled in you should select YES for the Validation radio
button. In addition, with the Validate For option, you can select how you want the field validated. There are a
number of built-in validation types, such as Not Blank or Email Address and, in addition, choosing “Custom
Regex:” allows you to enter a Perl style regular expression for the validation, permitting complex validation
routines to be used. If you are not sure how to use regular expressions or wish to find some for your particular
need a good site is http://regexlib.com/ where you will find many that you can enter here.
Finally the Validation Message is the error message you wish to display if the validation or the field fails and
requires the user to re-input information.
NOTE: The regular expression validation uses Perl style regular expressions. This has changed in version
2.3.0 from POSIX due to the depreciation of the ereg group of functions in PHP
Visible
Setting this to NO will make a field invisible on the contact form.
Content (only available for SELECT type fields)
This allows you to enter a list of options for a select box field. You can enter a new option by typing it in the
Option: box and either pressing return or clicking the ‘Add’ button.
If you select an already entered option its contents will appear in the Option: box allowing you to change it.
You can then click ‘Apply’ to save that change.
In addition the three little buttons on the right of the content box allow you to move options up and down the
list (changing their display order) or, by clicking the red X, to delete an option completely.
4.12
Captcha Settings
This screen allows you to activate the built-in support for reCAPTCHA (http://www.recaptcha.com/) to provide
challenges on various forms within JShop Server. Captcha challenges are designed to help distinguish between
robots and humans visiting your site and are useful for stopping spam or unwanted emails.
reCAPTCHA is © Carnegie Mellon University
38
General Settings : Captcha Settings
39
Captcha Selection
Captcha to use
Here you can select ‘No Catpcha’ or ‘reCATPCHA’ which is the only captcha system currently supported by
JShop Server. Additional captcha options may become available in the future.
Where it should be used
Here you can select which forms or actions in your store will require the visitor to answer a captcha challenge.
At the very least we suggest that you do this on the Contact Form and Send To A Friend form.
If you select ‘reCAPTCHA’ then an additional section of the screen will be displayed which allows you to set
your options and account details for reCAPTCHA. These settings are as follows:
reCAPTCHA Settings
Public Key
This is where you should enter the public key that reCAPTCHA provided to you.
Private Key
This is where you should enter the private key that reCAPTCHA provided to you.
Include Customisation
39
General Settings : Captcha Settings
40
If selected this will activate output for JavaScript customisation options provided by the reCAPTCHA system.
Only is this is set to YES will the following options become available.
Theme
reCAPTCHA has a number of display styles and here you can select which display style you would like to use on
your site.
Language Options
Depending on the languages you have setup in your store you will see the corresponding number of language
selection boxes. This allows you to select what language reCAPTCHA should display in for each language you
have setup in your store.
4.13
Search/Listing Settings
These options allow you to change the number of records that are shown on various pages in the
administration system before pages are used with Previous and Next buttons. They are as follows:
Search / Listing Settings
Number Products per Page
This sets how many products should be shown on the product list page, e.g. when searching for products in
the Content section of the administration system.
Number Sections per Page
This sets how many sections should be shown on the section list page, e.g. when searching for sections in the
Content section of the administration system.
Number Orders per Page
This sets how many orders should be shown on the orders list page.
Number Customers per Page
This sets how many customers should be shown on the customer list page, e.g. when searching for customers
in the Customers section of the administration system.
Number Customer Reviews per Page
This sets how many customer reviews should be shown on the customer review list page, e.g. when searching
for customer reviews in the Customers section of the administration system.
40
General Settings : Product Editing
4.14
41
Product Editing
As the product information screens in the administration system contain a large amount of information about
each product, JShop Server splits the product page up into sections. Each section contains a particular group of
options and settings and these can be individually rolled-up or shown by clicking on the ‘show’ and ‘hide’ links
next to each section’s title.
Product Editing settings, a unique feature of JShop Server
The Product Editing options allow you to setup which of these sections should be hidden, or rolled-up, when
you first go the product information screen. You can also set different sections to be hidden depending on
whether you are adding a product, editing a product or cloning a product.
For instance, when adding a product you may decide that you need all the sections visible, in which case you
will un-check all these boxes. When editing, however, you may not need the Advanced Pricing or Associated
Products section visible by default, in which case you would opt for them to be hidden to start with.
Of course, when you are on a product information screen you can click the ‘show’ and ‘hide’ links to
dynamically display or hide different sections.
Default Check 2-way Links For Associated Products
If you wish the product editing screen to have the 2-way link checkbox when adding associated products
unchecked by default (so only create 1-way links, e.g. from the product to the associated product and not in
reverse) then set this to NO. Alternatively set this to YES to have the box checked by default.
41
General Settings : Meta Tag Details
4.15
42
Meta Tag Details
Although JShop Server contains product and section specific Meta Tag options, this section allows you to setup
Meta Tags that will be used by other pages.
Meta Tag Details
The fields available on this screen are as follows:
Author Name
This is the author field Meta Tag details
Description
This is the description field Meta Tag. Many search engines use this as the description that’s shown on the
search results page.
Keywords
This is the keywords field Meta Tag.
Always use these, ignore products / sections Meta Tag settings
Selecting this checkbox option will mean that the author, description and keywords Meta Tags you enter on this
screen will be used on all pages and any entered for particular products or sections will not be used.
Note: You could opt to remove the Meta Tag fields from the templates completely and use your own
manually coded Meta Tags if you wish.
4.16
Stock Control Settings
JShop Server includes advanced stock control features that not only allow you to operate stock control on
individual products but also down to individual options or combinations of options. There are a number of
different ways in which the stock control can operate and the options here set some of the global stock control
options.
Stock Control Settings
Global Enable Stock Control?
42
General Settings : Stock Control Settings
43
If set to YES, stock control is enabled in your store. You will still need to enable it for individual products. If set
to NO all stock control routines are bypassed.
Send Warning Level Email
Against each product you can set a warning level. If the stock for this product falls below this warning level and
this option is set to YES, a warning level email will be sent. This email can be configured in Templates.
Send Zero Level Email
Once a product reaches zero stock, or below, if this option is set to YES, an out of stock email will be sent.
Emails will continue if the stock level falls even lower.
Use Warning Level Instead Of Zero For Stock Check
If this option is set to YES, rather than using 0 as the level to determine if a product should be considered out
of stock, the warning level set against the product will be used instead.
Force Stock Check At Checkout
When set to YES and the customer tries to checkout a final stock check will be performed. If any of the
products in the cart are found to be out of stock or have limited stock the customer will be notified. The
template cartstockproblem.html is used for this notification.
Show Product Level Stock On Section Structure
If set to YES an extra column will appear on the section structure page showing the product level stock for the
product (if applicable). Note: This will not show the stock levels for any option level stocks you have set.
4.17
Order Admin Settings
One of JShop Server’s best features is the comprehensive order management that comes built in. The system
can operate in a number of different ways, offering different functionality tailored to your needs and uses. This
section allows you to change how the order administration in JShop Server works.
JShop Server includes a fully configurable order management system
Activate Dispatch Functionality
If you do not wish to use the dispatch functionality, e.g. marking orders as dispatched etc., please select NO on
this option, otherwise select YES. Many of the subsequent options on this page will have no effect if
Dispatching is turned off.
Dispatch Button on Orders Screen
When set to YES this will show a dedicated Dispatch button for each order on the orders screen. Regardless of
43
General Settings : Order Admin Settings
44
the setting here, the actions drop-down against orders will show the dispatch option as will the drop-down at
the top of the screen for processing multiple orders in one go.
Allow Partial Dispatches
If YES is selected, when dispatching an order an intermediate screen will show allowing you to select which
order lines and how many of each order line have been dispatched. Outstanding quantities will be left on the
order and the order will be marked as PART DISPATCHED. This allows you to operate back ordering.
Email Customer on Dispatch
Setting this option to YES will automatically send a dispatch notification email to the customer. This email can
be configured in Templates.
Send Copy of Dispatch Email
If set to YES, a copy of the dispatch email will be sent to the email address entered in the Email Address field.
Activate Dispatch Tracking
If you wish to include dispatch tracking information in the email to the customer then set this option to YES.
When dispatching you will be able to enter dispatch information including a dispatch reference and courier
name and contact details. A list of Couriers can be setup in the Tax/Shipping section.
Activate Receipt
If YES is selected a link will appear against orders allowing a receipt to be printed. This receipt uses a
template called receipt.html which is located in the usual template directory.
Show CC Number In Groups Of 4 Numbers With Spaces
If you wish to show the credit card number on the order details screen grouped into 4-digit blocks then set this
to YES, alternatively set it to NO.
4.18
Order Status Settings
With version 2.0 JShop Server provides customisable order status’. This allows you to create your own order
status settings and also select what should happen when an order is given an available status.
From the main status list you can add, edit and delete different statuses. However, there are a number of
default statuses that are special in JShop Server and these can be edited but cannot be deleted.
Order Status List
44
General Settings : Order Status Settings
4.18.1
45
Adding/Editing Order Statuses
Adding and editing order statuses uses the same screen.
Order Status Detail Screen
Name
This is simply the name you would like to give this order status
Order List Highlight Color
On the main orders screen you can highlight rows with different colors to help highlight orders of different
status. The value entered here is a HTML color, e.g. #000000 for black and #ffffff for white. You can use the
Pick button to select a colour from the built-in colour picker in JShop Server.
Processing When Order Given This Status
The checkboxes here allow you to specify what processing JShop Server should do when a status is given to
an order. These options should be self-explanatory and obviously, options such as Deduct from Stock will only
be relevant if you are using the stock system.
4.19
Extra Order Paperwork
Within JShop Server you can setup multiple templates to use for printing different types of paperwork, in
addition to the built-in Receipt printing facility. Once setup, multiple orders can be selected at once in the Order
Administration section of JShop Server and can be printed using any one of the paperwork templates you have
created. For more information about settings up paperwork templates please see the Templates Variables And
Attributes section of this documentation.
From the main paperwork list you can add, edit and delete different paperwork templates. Paperwork
templates should be stored in the main templates directory for JShop Server.
Extra Order Paperwork List
45
General Settings : Extra Order Paperwork
4.19.1
46
Adding/Editing Paperwork Templates
Adding and editing order paperwork templates use the same screen. The options on the screen are:
Extra Order Paperwork List
Name
This is the name you would like to give to the paperwork, and is shown in the select box on the Order
Administration screen for you to select it and print orders using it.
Template For Paperwork
Here you should select the template (from the standard templates directory) that you would like to use for the
paperwork. Please see the Templates Variables And Attributes section of the documentation for special
information about working with templates for paperwork.
4.20
Digital Products Settings
JShop Server supports digital products allowing you to sell downloadable products. It automatically creates
download references for purchases of digital products and provides a number of ways of limiting how that
download reference can be used. In addition individual products can be set so that, when dispatching digital
products, registration names and registration codes are requested and stored by JShop Server.
Digital Products Settings
Activate Digital Products Support
If set to YES, digital products are activated and a new block will appear on the product editing screen allowing
you to specify the download file for the product and registration details settings.
Download Key Valid Time In Hours
This allows you to set how long a download key generated by JShop Server should remain valid. After this time
limit has expired the key can no longer be used. Set this to 0 for the time limit to be ignored.
Download Key Number Uses
This allows you to set how many times a file may be downloaded (or attempted to be downloaded) before the
key can no longer be used. Once the number has been reached the key can no longer be used. Set this to 0 for
the time limit to be ignored.
Download Files Directory
46
General Settings : Digital Products Settings
47
This specifies the directory on your server where the digital download files are to be stored. Please see the
installation instructions in Section 2 of this documentation for more information on the digital files directory.
Activate Instant Dispatch
For digital products that do not require a registration name and/or code this option, when set to YES, will allow
the instant dispatch of digital products as soon as the order is set to paid. If you use this option you should
ensure that you have the Partial Dispatch option also set to YES to account for mixed digital/non-digital or
digital with/without registration information orders.
NOTE: In order for the digital product functionality to work correctly you will also have to activate the
dispatch features of JShop Server.
4.21
Automated Jobs
JShop Server includes an automated jobs system that provides a facility to run certain activities on a timed
basis in a similar way to ‘cron’ on Unix systems. However, unlike cron, the automated jobs system is handled
by JShop Server, specifically from the front-end so jobs may not always run at exactly the time specified. If a
job should have been run at a specific time, the next time a page is visited on the store the job will then be
run. So, for very time sensitive applications it’s not suitable, but a range of jobs are included as standard and
the facility exists to call custom PHP scripts if you wish to run other jobs on a timed basis.
Note: We cannot support custom PHP scripts used for automated jobs. However, please see the Extending
JShop Server section of this manual for more information.
List of Automated Jobs
From the main jobs list you can add, edit or delete automated jobs.
47
General Settings : Automated Jobs
4.21.1
48
Adding/Editing Automated Jobs
Adding and editing automated jobs use the same screen.
Automated Job Editing Screen
Name
This is a name you’d like to give your job to help you identify it on the main automated jobs list.
Job To Run
There are a number of built-in jobs, as follows:
Log Pruning – This job will automatically remove log data according to the amount of history you want kept
(set in the Logs section of the administration system)
Cart Pruning – This job will automatically remove old cart data according to the amount of history you want
kept (set in General -> Global Settings)
Optimize Database – This job will run mySQL optimization on your database to ensure it’s kept as fast as
possible.
Clear Cache – If you’re using the cache facility in JShop Server this job will completely clear the cache.
Custom Script – You can also select custom scripts to run. If you select this option you can enter the path
to the script in the text box below. The path you enter should be from the main JShop Server directory.
Active
Specifies if the job is active or not.
Day Of Week
This setting says which day of the week the job should be run. You can specify a single day or choose ‘Any(*)’
if you want the job to run every single day. This option will override any ‘Day of Month’ setting if you select
anything other than ‘Any(*)’
Day Of Month
Alternatively you can set a single day of the month that you would like a job to run, or again select ‘Any(*)’ for
any day.
Hour
This is the hour of the day that you would like the job to run. Again, select ‘Any(*)’ to have a job run every
hour.
Minute
This allows you to specify what minute of the hour you would like the job to run.
48
General Settings : Automated Jobs
49
Note: Remember that jobs are triggered by visits to the front-end store by customers so jobs may not
run at exactly the time you specify here. If a job is over-due, the next time a customer loads a page on
your site the job will automatically run.
49
General Settings : Image Settings
4.22
50
Image Settings
JShop Server includes the ability to set default images for various image fields, in addition to display
dimensions and, should you have GD enabled in PHP, the ability for the system to resize images at upload.
50
General Settings : Image Settings
51
Image Settings
Image Fields
For each type of image there are a number of settings that can be changed on this screen:
Default Image
This allows you to select a default image that will be shown on a product page if no product specific image has
been uploaded for this field via the product editing screen. You can either upload an image from your local
computer here or pick one that’s already been uploaded.
Image Display Dimensions
This specifies how you want the image displayed on the screen. If you only provide one of the options then the
image will be constrained to that size and the other dimension will scale to fit. For example setting ‘x’ to 300
and ‘y’ to 0 will lead to the image always being shown 300 pixels wide but will allow the height to change
accordingly, so the image always stays in relative scale.
Resize Images At Upload
If you have GD enabled on your PHP installation you can use this option to have images uploaded for this field
automatically resized to the dimensions entered in the option above. This means that the version that’s stored
on the server will be the correct dimensions already. In addition you can get a quality setting that will be used
if the uploaded image is a JPG file.
Dimensions When Shown In Cart (Product Thumbnail Only)
The default templates show the product thumbnail image on the cart.html template. This option lets you set
the dimensions that the image should be shown at the cart. Please note that the image will be re-sized using
these dimensions only and not using GD.
Dimensions When Shown In Navigation Bars (Product Thumbnail Only)
The default templates show the product thumbnail image on the navigation bars on the store, e.g. New
Products, Special Offers etc. This option lets you set the dimensions that the image should be shown at. Please
note that the image will be re-sized using these dimensions only and not using GD.
Upload Directories
This section of the screen allows you to set the default upload directories for the different image fields. Most of
the time you would not need to change these but if you have a lot of product images, for instance, you may
want to change the default product image directories for new uploads.
51
General Settings : Cache Settings
4.23
52
Cache Settings
JShop Server includes a built-in cache system to help ease the load on the server’s mySQL process for some
commonly used data and data that requires complex queries to create.
Cache Settings
Cache Directory
This simply outputs the setting you have in your static/config.php file which specifies the current location of the
cache on your server.
Cache Options
Options are the main configuration settings for your store and these are retrieved from the database on every
page load. However, you can cache these so that the query is not run on every page load. This is only really
recommended once a store is setup and options won’t change option. However, JShop Server handles the
refreshing of the options cache automatically, so if you change an option, JShop Server will re-build the cache
for you.
Cache Labels
Labels cover much of the text that the customer sees on the front-end of your store and again, these are
retrieved from the database for each page load. In many situations in makes sense to cache these, especially if
you have multiple languages, to reduce the queries required on the database. JShop Server will automatically
re-build the cache if this is enabled when labels are changed.
Cache Bestsellers
The bestsellers list is, by default, shown on every single page in JShop Server. In many circumstances it makes
sense to cache the bestsellers result as much of the time this list will not change. You can also set the amount
of time the cache should be kept before it is refreshed. The longer this time limit is, the longer the cache will
be used before refreshing.
Cache Recommended Products
Recommended products, shown on individual product pages, constitutes the most complex mySQL query that
JShop Server performs. If you’re using the Recommended Products facility it is strongly recommended that you
cache these results. In addition, we would generally recommend that this cache is only refreshed once a day,
so a valid time of 1440 should be used.
Cache Rootsections
The main section list (shown on the left menu in the default template) can be cached using this option. This
vastly reduces the amount of work mySQL has to do for each page load, especially if you are retrieving
52
General Settings : Cache Settings
53
multiple sub-sections for display on the section list. JShop Server will automatically handle the refreshing of
these cache results.
4.24
XML Sitemap
JShop Server includes XML sitemap production, suitable for submitting to search engines such as Google. It
can maintain this automatically or you can re-generate the sitemap as and when you need. To use the sitemap
facility you will need to have your cache directory setup correctly (please see the installation manual for more
information on permissions etc. for the cache directory).
The XML Sitemap Screen
Sitemap Filename
You are shown here the URL you should use to submit the sitemap to search engines etc.
Content To Include
For each type of page in your store you can specify a number of options that will be included in the sitemap:
Include
Specify YES to include this page type in the sitemap, otherwise select NO to omit it.
Priority
This specifies the priority of this type of page in relation to other pages on your site. Valid values are between
0.0 and 1.0.
Last Modification
This sets what last modification date JShop Server should use for this page type, or it can be omitted. Search
engines may not use this information.
53
General Settings : XML Sitemap
54
Change Frequency
This sets how frequently you want to suggest to the search engine that the contents on this page type
changes.
Other Options
Automatically Generate New Sitemap
Here you can specify, in hours, how often the sitemap should be re-generated. If the sitemap is requested and
the currently stored version is older than the number of hours you specify here a new one will be created and
used instead.
Generate XML Sitemap
The section at the bottom of the screen allows you to manually re-generate your sitemap if you should need
to. Once 'Generate Sitemap' is clicked, an information screen will show detailing the progress of the generation
and letting you know when this has finished. You should not close the page before it has completed.
4.25
List Settings
This provides some overall control for the front-end of your store, regarding lists of products retrieved from
the database. These settings have been included to help restrict excessive queries from the database and to
provide ways of setting exactly how many products will appear in various sections.
Of course you could enter very high numbers into these options if you wish to just have everything returned.
Updating various list settings
Bestsellers
54
General Settings : List Settings
55
Maximum Bestsellers To List.
The bestseller list of products is automatically generated by JShop Server based on products ordered from
your shop. This setting allows you to limit how many bestsellers should be made available for the templates.
Calculate By
This allows you to set how you would like JShop Server to calculate the bestseller list. You can opt to either
calculate by total quantities sold or the number of times a product has been purchased.
Limit Order History Query To
By setting this to a number higher than zero, JShop Server will limit the order history examined to create the
bestseller list to the number of days specified. This is taken from the current date and worked back, so a value
of 14, for instance, would only take into account the last 14 days of orders when calculating.
Product Selection Limit
This option allows you to set whether the bestseller list should only choose products specific to the section you
are in, and below. For instance, on the front page, products from the entire store will be chosen, but as you
drill-down using the sections, setting this to ‘Section Specific’ will limit which products are included in this list.
We only suggest using ‘Section Specific’ if you are caching the bestseller results as the mySQL query required
is more complex for this method.
Random Products
Maximum Random Products To List
Again this is an automatically generated list of products from JShop Server. If you are not within a particular
section, the random products are taken from the whole product database, if you are in a particular section of
the shop the products are taken from the current section and any sections on the next level down. So, as you
move deeper into sections, the possibilities returned by the random products become more and more tailored
to the current section, keeping them relevant.
Product Selection Limit
This option allows you to set whether the random products list should only choose products specific to the
section you are in, and below. For instance, on the front page, products from the entire store will be chosen,
but as you drill-down using the sections, setting this to ‘Section Specific’ will limit which products are included
in this list.
Other Lists
Maximum New Products To List
A product is set to being new in the product information screen. This allows you to set a maximum number of
new products to send to the templates.
Maximum Top Products To List
Again a product is set to being a top product on the product information screen. This allows you to set a
maximum number of top products to send to the templates.
Maximum Special Offers To List
Once again set in the product information screen.
Maximum Recommendations To List
Recommendations are an automatically produced list of products shown on a product page. JShop Server
calculates the recommendations based on orders that have also included the currently shown product. It then
arranges these by the most occurrences of a product being sold in conjunction with the currently shown
project. This allows you to limit the number of products sent to the templates.
55
General Settings : List Settings
56
Maximum Reviews To List on Product Page
Normally you would only want to show the first few reviews on the actual product page. The default templates
provide a link to a separate product review page where all the reviews are shown.
4.26
Section Settings
This is where you can setup general options for how information about sections and information on section
pages is displayed.
Section Settings
Number Products per Section Page
This gives the total number of products that are shown on a section before Previous and Next style paging is
used.
Include Sub Sections on Pages After Page One
If there is more than one page to a section (because of the number of products) and this option is set to NO
will only show products on subsequent pages and not any sub-sections.
Retrieve Sub-Sections for Root Section
This option allows you to create sub-section lists for the main root sections on the front-end of your store. The
default templates have this ability if this option is set to YES but only include the code to show up to two levels
(the main level and the level below). However, you can includes how many levels you want retrieved and
update the templates accordingly to show this number of levels. If you increase the number of levels you are
retrieving you should consider caching rootsections as the number of queries radically increases for each level
you add.
4.27
Search Settings
JShop Server includes a comprehensive search facility for your store that will not only search products but also
sections. In addition, search results can be sorted by a number of fields and also returned based upon price
ranges.
56
General Settings : Search Settings
57
Updating the Search Settings
The options in this section allow you to tailor the search function in your store.
Number Products Per Page
This sets the maximum number of products shown on the search results page before Previous and Next
buttons are needed.
Product Fields To Search On
This option allows you to set which product fields are included when a search is done.
Include Sections In Search
If set to YES the search routine will also search section titles and descriptions for matches and return those
results as well.
Max Number of Sections To Return
If the above option is turned on, this sets the maximum number of sections that will be returned. This is a total
number of sections to return, there will not be any Previous or Next paging on the results.
If 1 Product Found Take Directly To Product Page
If set to YES when a customer searches on your site, if there is only one product match they will be taken
directly to the product page, omitting the search results page.
Activate Search Suggest?
Setting this option to YES will activate the search suggest system (as long as the correct template additions are
in place for this). The search suggest will provide a drop down below the search box with products that match
the entered text.
57
General Settings : Search Settings
58
Characters Trigger Limit
If set to a value above 0, the search suggest system will only provide suggestions once the entered number of
characters has been entered.
Search On and Sort By
Here you can specify which product field you would like the search suggest to operate on and in what order
they will be returned. This include the product name, product code or a combination of both of them.
Only Search From Start Of Field
When set to YES, the search suggest system will match the entered text to the start of the field selected in the
'Search On and Sort By' option. If set to NO, it will search for the text anywhere in the field(s) selected in
'Search On and Sort By'
Result Limit
This option allows you to limit the total number of results returned.
4.28
Basket Settings
This provides some basic options for the basket / cart used in your store.
Basket Settings
General
Basket Sort Order
Allows you to specify the order in which items in the basket are displayed on the basket page. Available options
are:
Product Name – sort by the product name.
Product Code – sort by the product code.
Price (High to Low) – sort by the highest price to the lowest price.
Price (Low to High) – sort by the lowest price to the highest price.
Quantity – sort by quantity, with the highest quantity first.
Added Order (First to Last) - sort by the order the products were added, with the one added first shown
at the top.
Added Order (Last to First) - sort by the order the products were added, with the one added last shown
at the top.
Show Basket After Add?
With this option set to YES the customer will be automatically taken to the main basket / cart page after they
add a new product. Set to NO, the customer will be returned to the page they were viewing (if possible).
58
General Settings : Basket Settings
59
Associated Products
Show Associated Products
This option allows you to show associated products on the basket screen. It selects from the full list of
associated products for all products in the basket.
Maximum Associated Products To Show
Limits the number of associated products selected to this number.
Select And Sort By
As you would not really wish to show all the associated products for the products in the basket, this option lets
you dictate how you want them selected and sorted. The options are as follows:
Product Name, Product Code, Price (High to Low), Price (Low to High), Associated Position and Random.
Associated Position sorts and selects according to the positioning. For instance, all those products that appear
at the top of the associated products lists for products will be selected before those appearing below the top
spot, and so on.
Random is a special option that’s useful if you wish to show constantly changing associated products on the
basket page. By selecting random, JShop Server will randomly choose one of the other Select and Sort By
options each time the page is loaded. By doing this the products, and the order in which they appear, will
change as the different options are used.
4.29
Review Settings
JShop Server includes the ability for registered customers (those with a customer account) to be able to add
reviews to products. This section provides some basic options for the review system within JShop Server.
Review Settings
Each user can only review a product once – the system does not allow multiple reviews for the same product
from the same customer.
Enable Customer Reviews?
If set to YES, customer reviews will be activated and customers will be able to add reviews (including a rating)
to products in your store.
Moderate Customer Reviews?
If set to YES a customer review will not automatically appear in your store until it has been set to visible in the
administration system (this is done in the Customers section). It would normally be advisable to activate this
option to avoid any unwanted reviews or spam being available on your site.
4.30
Recent View Settings
Your store has a feature that allows customers to quickly and easily look over a list of products and sections
that they have viewed in your store. This screen allows you to turn this feature on or off and to set some
options.
59
General Settings : Recent View Settings
60
Recent View Settings
Activate Recently Viewed Feature
When set to YES JShop Server will store product and section history for customers, allowing them to easily
skip back to products or sections they’ve already looked at in your store.
Product History To Store
The maximum number of products to retain in the Recently Viewed product history for a customer.
Section History To Store
The maximum number of sections to retain in the Recently Viewed section history for a customer.
4.31
Users Online Settings
This simple feature lets you include on your shop’s pages an indication of how many other people are currently
on your site.
If you have this option set to YES, you will also see the users online statistics below the Update Settings button
so you can view details in the admin system.
Users Online Settings
Activate Users Online Feature
When set to YES JShop Server will start tracking the number of users online on your site which you can then
display via. the templates for your store.
Time Limit For Calculation
This allows you to set the length of time in minutes that’s used to determine how many people online. For
instance a value of 60 will include everybody that’s been active on-line for the last hour and a value of 10 will
only include those that have been active on-line in the last 10 minutes.
Reset Most Ever Users Online Figures
If checked, when ‘Update Settings’ is clicked the most ever users online figure and date will be reset.
60
General Settings : Send to a Friend Fields
4.32
61
Send to a Friend Fields
The send to a friend page (template send2friend.html) is a page in your store where customers can send a link
to the current page they’re on to their friends. This section of the administration system allows you to setup
the fields that you would like the customer to fill in. There are 4 field types available:
List of contact form fields
Type
Description
TEXT
Single line entry field
TEXTAREA
Multiple row entry field
SELECT
A select box of options
CHECKBOX
Single check-box
Each of the fields can be validated and validation messages displayed if they are not filled in.
4.32.1
Adding/Editing Send to a Friend Fields
Adding and editing contact form fields uses the same screen. However, some of the options are only available
for certain types of fields. Options available are as follows:
Editing a TEXT extra field, showing options already filled in
61
General Settings : Send to a Friend Fields
62
Name
This is an internal name that is used in the database. It must be unique and you will be told if it is not. This
field is not generally shown to the customer.
Title
This is the description of the field that is shown to the customer in the default templates.
Size and Maximum Length (only for TEXT type fields)
Size is the actual size of the form field on the page and maximum length is the maximum number of
characters a customer can enter into the field.
Columns and Rows (only for TEXTAREA type fields)
This is the number of columns and rows that the field should be sized to on the contact form page.
Validation, Validate For and Validation Message
If you want to make it a requirement that a field is filled in you should select YES for the Validation radio
button. In addition, with the Validate For option, you can select how you want the field validated. There are a
number of built-in validation types, such as Not Blank or Email Address and, in addition, choosing “Custom
Regex:” allows you to enter a Perl style regular expression for the validation, permitting complex validation
routines to be used. If you are not sure how to use regular expressions or wish to find some for your particular
need a good site is http://regexlib.com/ where you will find many that you can enter here.
Finally the Validation Message is the error message you wish to display if the validation or the field fails and
requires the user to re-input information.
NOTE: The regular expression validation uses Perl style regular expressions. This has changed in version
2.3.0 from POSIX due to the depreciation of the ereg group of functions in PHP
Visible
Setting this to NO will make a field invisible on the contact form.
Content (only available for SELECT type fields)
This allows you to enter a list of options for a select box field. You can enter a new option by typing it in the
Option: box and either pressing return or clicking the ‘Add’ button.
If you select an already entered option its contents will appear in the Option: box allowing you to change it.
You can then click ‘Apply’ to save that change.
In addition the three little buttons on the right of the content box allow you to move options up and down the
list (changing their display order) or, by clicking the red X, to delete an option completely.
62
Contents :
5
63
Contents
The Contents section of the JShop Server administration system is where you setup the sections and products
for your store. It is probably the part of the administration system where you will spend most time as it
represents the core of your store.
The menu in this section is split into 3 parts: Sections, Products and Articles.
JShop Server supports unlimited sections and section depth, e.g. you can categorise your store to an infinite
level of sections and sub-sections. Each section can only appear in the store once for consistency but products
can appear in as many sections as you want through an easy selector on the product information screen.
Sections and products can be made invisible at any time should the need arise and both can also be setup to
only be available to certain customer types should you need that functionality. For instance you could present
some sections to wholesale customers that aren’t available to other customers, and the same for products.
At first glance the product information screen may seem daunting but JShop Server categorises the settings
available against products and presents them in a concise and intuitive fashion.
Please read this part of the documentation in depth as there are many powerful functions and settings within
Contents that you may otherwise miss.
5.1
Sections Structure
The Sections Structure screen when it is first shown starts at the root of your store – the main section. This is
the section that the default templates use on the front page (index.html).
The Sections Structure screen is split into two – at the top you have a list of sub-sections and at the bottom
you have a list of products, both applicable to the section you are currently viewing.
Account Type Selection
At the top right of the screen there is a drop down called ‘Account Type’ with a ‘Show’ button. This allows you
to limit the information you see in the Sections Structure screen to only show products and sections specific to
a particular customer account type. This is useful for viewing the information that different customer accounts
will see.
Account Type Selector
The Sections Part Of The Screen
63
Contents : Sections Structure
64
The Sections Part Of The Screen
Here you see the sub-sections for the current section. If you think of the current section as the parent, these
are that section’s children. The buttons at the top of this list do the following:
Edit Section: This shows the section editing screen for the section you are viewing. For instance, when
Sections Structure first loads, clicking this button will edit the main section’s settings.
Insert New Sub Section: This shows the section adding screen and when created the section will appear in
the list, making it a child of the currently viewed section.
Sort / Reorder: This shows the reordering screen that allows you to move the sub-sections up and down to
change their display order.
Once you have created some sub-sections via. the ‘Insert New Sub Section’ button you will see them appearing
on the section list. Clicking on the title of one of these will transfer you to the section structure for that section.
Now the page shows you sub-sections that appear on that section and products that appear on the section as
well.
To help you navigate the section structure the top title bar contains the full path to the current section you are
viewing and you can click on any of the previous section’s titles to go back to that level.
Each sub-section listed has an ‘Edit’ button that will launch the edit screen for that section and a ‘Delete’ button
if you wish to remove the section.
The Products Part Of The Screen
The Products Part Of The Screen
The products part of the screen shows the products that will appear in this section. The buttons at the top of
this list do the following:
64
Contents : Sections Structure
65
Insert New Product Here: This shows the product adding screen and once added the product will
automatically be added to the currently viewed section.
Sort/Reorder: This shows the reordering screen that allows you to move the products up and down to
change their display order for this section.
Clicking on a product code or product name (or, indeed, the ‘Edit’ button) will show the product editing screen
for that product. In addition there are two other buttons shown for each product, these are as follows:
Clone: A powerful feature of JShop Server, the Clone button will launch the product adding screen but with
the selected product’s details already loaded. This allows you to quickly and easily create a new product based
on a product that already exists in the database.
Remove: This does not delete the product from JShop Server, it simply removes it from the current section.
All other sections the product appears in are unaffected by this.
Delete: This option will delete the product from the JShop Server database entirely.
In addition, if you have the stock control system turned on and the option selected to show stock levels on this
screen, you’ll see a column with applicable stock levels shown.
At the bottom of the product part of the screen is a search box. This allows you to quickly search for products
to add to this section. The screen that appears will show you a list of all products found, along with a select
button for each one. In addition to this, the checkboxes to the left of each product allow you to select more
than one product from the list and then clicking on the ‘Select’ button at the top all of these products will be
added to the current section. You will, of course, be taken back to the relevant section once you have selected
products.
65
Contents : Adding/Editing Sections
5.2
66
Adding/Editing Sections
You can only add a new section from the Section Structure page. However, there are several places where
Edit buttons are available for sections. Both adding and editing a section use the same screen.
66
Contents : Adding/Editing Sections
67
The General Part Of The Section Editing Screen
Title
This is the section title.
SEO URL Title
If entered and you are using Safe URLs with the option to add names to URLs, this text will be used instead of
the section's title field for this text.
Short Description
A 250 character short description for the section. You would normally use this where the section appears as a
sub-section (the default templates use this).
Full Description
An unlimited text field for the full section description that would be shown on the actual section page.
META Description
A specific Meta Tag description field for this section.
META Keywords
A specific Meta Tag keywords field for this section.
Thumbnail
A thumbnail image for this section. This would normally be shown where the section appears as a sub-section
(the default templates use this). You have the option of clicking ‘Browse…’ to upload an image from your local
PC or clicking the ‘Pick Image…’ button to launch the in-built image picker. The image picker will show the
sections/thumbnail directory contents and you can search for the correct image through that, if it has already
been uploaded. In addition you can enter a name directly into the Pick: field if you know it already exists in the
sections/thumbnails directory. The pick field will also accept a URL to an image if you wish to directly link to
images on another site.
Image
A full sized image for this section. This would normally be shown on the section page itself. You have the
option of clicking ‘Browse…’ to upload an image from your local PC or clicking the ‘Pick Image…’ button to
launch the in-built image picker. The image picker will show the sections/normal directory contents and you
can search for the correct image through that, if it has already been uploaded. In addition you can enter a
name directly into the Pick: field if you know it already exists in the sections/normal directory. The pick field
will also accept a URL to an image if you wish to directly link to images on another site.
Is Section Visible?
Setting this to NO will automatically make the section inaccessible from your store.
Available To Customer Types
This selection allows you to select which customer account types can view this section – if a customer’s
account type doesn’t match this list then the section will not be displayed for them. In this way you can create
sections only visible to certain customer types. Selecting ‘All’ makes the section available to all account types.
You may also select multiple account types by using the Shift and CTRL keys on your keyboard.
Parent Section
This allows you to quickly set where you would like this section to appear. By changing this setting you can
move sections (and any of their sub-sections) to different parts of your shop. Click the ‘Pick Parent Section’ to
launch a pop-up allowing you to drill-down the current section structure and select the new parent for this
section.
Template For Section Page
67
Contents : Adding/Editing Sections
68
Sections are not limited to a single template page. You can setup more than one template for sections and
have different sections use different templates. Here you can select the template that the section should use –
the default is section.html
Exclude From Sitemap
If you do not wish this section to appear in the sitemap select NO here, otherwise select YES.
5.2.1
Extra Fields
Extra Fields Part Of The Section Editing Screen
This section is where your extra section fields will appear (see the ‘General’ section of the documentation for
more information on setting up extra product fields).
1. Extra product fields of type TEXT will be shown as a single text line field.
2. Extra product fields of type TEXTAREA will be shown as a multiple text line field into with HTML can also be
added.
3. Extra product fields of type IMAGE will be shown in the same way as the normal Thumbnail and Image
fields. Images are stored in products/extras however.
5.2.2
Additional Languages
Languages Part Of The Section Editing Screen
If you only have one language setup in your store, this section will not be shown. Otherwise it will present you
68
Contents : Adding/Editing Sections
69
with alternative language fields for the section title, short description, long description, Meta Keywords, Meta
Description and any extra TEXT or TEXTAREA fields you have setup.
5.3
ABC Sections Listing
The ABC Sections Listing provides a full list of sections within your store in alphabetical order. Clicking on any
section title will show the Section Structure page for that section. In addition you will see ‘Edit’ and ‘Delete’
buttons for each section shown.
An example section listing screen, this is an ABC Section list.
5.4
Invisible Sections Listing
This is displayed in the same format as the ABC Sections Listing but this one only shows those sections that
currently have their Visible field set to NO.
5.5
Product Categories
Product categories allow you to categorise your product database. At the moment JShop Server only uses this
for Global Price Changes (see later in this section) but in the future the uses of Product Categories will be
enhanced to provide more functionality.
List Of Product Categories
The list of product categories shows you all the current categories you have setup in your store. Each product
category has ‘Edit’ and ‘Delete’ buttons. The only exception to this is the default ‘General’ category which
cannot be deleted.
List of Product Categories
69
Contents : Product Categories
70
Adding / Editing A Product Category
Adding and editing a product category use the same screen. The fields available for product categories are as
follows:
Editing a product category
Name
The name of the category. This is purely internal and is not shown to the customer at any point.
5.6
Product Flags
Product Flags allows you to create any extra flags you need against products. These are in the format of YES/
NO options and are would mainly be used in the templates to display certain things if they are set to YES (the
value to check is actually Y or N in the templates). Once created they become available in the ‘Product Options’
block of the Product Editing Screen.
List Of Product Flags
The list of product flags shows you all the current flags you have setup in your store. Each product flag has
‘Edit’ and ‘Delete’ buttons.
List of Product Flags
Adding / Editing A Product Flag
Adding and editing a product flag use the same screen. The fields available for product flags are as follows:
Editing a product flag
Name
The name of the flag. It is this name you would use in the templates, e.g. {product.flags.storeavailable} in the
above example.
Descriptive Name
This is the name for the flag that is shown on the product editing screen. You would make this a more intuitive
to describe the flag.
70
Contents : Edit Template Product
5.7
71
Edit Template Product
This is another powerful feature of JShop Server's content management. The template product is used as the
basis for every new product you add to your store. When you click the ‘Add New Product’ link from the Content
menu or the ‘Insert New Product Here’ button on the Section Structure screen, the product information screen
that appears will be filled in according to the settings you have used in the template product. The template
product is edited just like any other product within JShop Server.
If most or all of your products use the same extra field options, for instance, you can set those up in the
template product and they will already be filled in every time you add a new product. Of course, whilst filling in
field settings for the new product you can remove them if they’re not needed for the product you’re adding but
the basic reason for using the template product is that many stores sell similar items with similar entries and,
hence, using the template product will save time and effort.
5.8
Adding/Editing Products
Adding and editing products happens on the same screen. There is a lot of product information that can be
stored in JShop Server and product management is very powerful in the system. At first glance the product
information screen can look a little bit overwhelming which is why we have split up the fields into logical
blocks, each of which can be shown or hidden as needed.
In General -> Product Editing you can set which blocks are hidden by default when adding, editing or cloning a
product. We suggest you use this feature, especially the settings for editing a product as it will help to reduce
the amount of information on screen to only that that is most often changed.
At the top of each block on the product information screen is the block title and a blue link. If a block is visible it
will say ‘hide’ and clicking it will roll the block up so just the block’s title is visible. Once a block has been rolled
up, the link will change to ‘show’ and clicking it again will un-roll the block again, showing you the fields
contained within it.
This section on adding and editing products has also been split into the same blocks you will see on the
product information screen for consistency.
Note: As with all other screens in JShop Server no edits will be saved unless you click the bottom Insert /
Update button.
71
Contents : Adding/Editing Products
5.8.1
72
General Details
These are the most common settings for products and the block contains all the basic product information that
all products need. The fields are as follows:
72
Contents : Adding/Editing Products
73
73
Contents : Adding/Editing Products
74
General Details Block
Code (SKU)
This is your product code for the product. It is optional and can be left blank, however the system won’t allow
two products to have the same non-blank product code.
Name
This is the product’s name.
SEO URL Title
If entered and you are using Safe URLs with the option to add names to URLs, this text will be used instead of
the product's name field for this text.
Short Description
A 250 character short description for the product that you could use to put on a section page that lists many
products.
Full Description
An unlimited text field for the full description of the product. This may contain any HTML you wish to use.
Search Keywords
An extra field that can be used to contain extra keywords that people might search for when trying to find this
product. For instance, you could include any common misspellings in here.
META Description
A specific Meta Tag description field for this product.
META Keywords
A specific Meta Tag keywords field for this product.
Thumbnail
A thumbnail image for this product. This would normally be shown where the product appears on a section
page (the default templates use this). You have the option of clicking ‘Browse…’ to upload an image from your
local PC or clicking the ‘Pick Image…’ button to launch the in-built image picker. The image picker will show the
products/thumbnail directory contents and you can search for the correct image through that, if it has already
been uploaded. In addition you can enter a name directly into the Pick: field if you know it already exists in the
products/thumbnails directory. The pick field will also accept a URL to an image if you wish to directly link to
images on another site.
Image
A full sized image for this product. This would normally be shown on the product page itself (the default
templates do this). You have the option of clicking ‘Browse…’ to upload an image from your local PC or clicking
the ‘Pick Image…’ button to launch the in-built image picker. The image picker will show the products/normal
directory contents and you can search for the correct image through that if it has already been uploaded. In
addition you can enter a name directly into the Pick: field if you know it already exists in the products/normal
directory. The pick field will also accept a URL to an image if you wish to directly link to images on another site.
Price
Provides entry boxes for the price in all the currencies that exist in your store. For those currencies that are
calculated by exchange rate, the entry box will be greyed out and will automatically update once the new base
currency price has been entered.
Normal Price
This field allows you to enter a second price, maybe a normal retail price for instance. The template system
includes calculations and attributes that allow you to show the difference between this price and your selling
74
Contents : Adding/Editing Products
75
price, and also a percentage difference. This is useful if you want to show how much customers can save by
purchasing with you.
One-Off Price
In addition to the normal price for a product that is obviously linked to the quantity ordered, e.g. 3 of a product
would be 3 x Price, JShop Server provides the ability to include a One-Off Price for the product that is not
linked to the quantity ordered. So, no matter how many of a product is ordered, this One-Off Price will only be
added to the total once. This is useful for setup charges, for instance. This field allows you to enter any
applicable one-off price (you can also change the one-off price dependant on any options selected for the
product in the ‘Advanced Pricing/Combinations’ section of the product editing screen.
Orderable Quantity
These two options (Minimum and Maximum) allow you to limit how many of a certain product can be ordered.
Leaving either’s value at 0 will make JShop Server ignore that limit so, for instance, you could set a minimum
of 10 but no maximum, meaning that people could order any quantity as long as it was 10 or above.
Weight
The weight of the product. JShop Server makes no stipulation on the unit of measurement of weight that you
use, so please use what you are comfortable with if you intend to use this field.
Tax Rate
Allows you to choose the tax rate for this product. Possible selections are Zero Rate, Standard Rate or Second
Rate. Please see the ‘Tax/Shipping’ section of this documentation for more information.
Free Shipping
Selecting YES in this field will mean that the product is completely excluded from any quantity, weight or goods
total values used to calculate shipping.
Exclude Account Type Discounts
When set to YES any customer account type discounts will not be applied to this product, allowing you to
exempt it from normal discounts, or apply your own product-level discounts in the ‘Advanced Pricing/
Combinations’ section of the product editing screen.
Supplier And Supplier’s Product Code
Here you can select the supplier for this product (should you be using the supplier sub-system in JShop Server)
along with the supplier’s product code for this product. In addition to setting the product code here you can
also change the supplier’s product code in the Advanced Pricing / Combinations section of the product editing
screen.
Supplier Cost
You can also enter an associated supplier cost and the currency that this is in and you can do this here.
75
Contents : Adding/Editing Products
5.8.2
76
Extra Fields
This section is where your extra product fields will appear (see the ‘General’ section of the documentation for
more information on setting up extra product fields).
Extra Fields Block: Here there is a SELECT field and a TEXT field being edited
Extra product fields of type TEXT will be shown as a single text line field.
Extra product fields of type TEXTAREA will be shown as a multiple text line field into with HTML can also be
added.
Extra product fields of type IMAGE will be shown in the same way as the normal Thumbnail and Image
fields. Images are stored in products/extras however.
Extra product fields of type USERINPUT will show a select box with 3 options in it. Exclude (if you don’t wish
to include the field for the product), Include (if you want to include the field for the product but not make it
compulsory) and Required (if you want to include the field for the product and make it compulsory).
All other fields, the SELECTBOX, RADIOBUTTONS and CHECKBOXES fields will be shown in a different way that
provides a lot of functionality whilst remaining simple to use.
Each option in these fields can not only have a name (and alternative language versions if you are running your
JShop Server store with multiple languages) but it can also be set to only be visible to certain customer
account types and either add a percentage or a fixed price to the overall price of the item.
Note: On the front-end of your store products with options cannot be added from anywhere other than
from the actual product page itself, i.e. not from the product listed on a section. You can include an ‘add to
cart’ button on the section page for the product but the customer will be forwarded directly to the
product page rather than the product automatically being added to the basket.
Note: On the front-end product pages, the price fields will dynamically update (if the user has Javascript
enabled) when options are chosen that change the product’s price. This gives the customer an instant
update on the total price for the product.
The fields available for each option are:
New
This is where you enter the option’s text that will be shown to the customer.
Option Visible
You can make options temporarily invisible in the store by unchecking this option. The option will then appear
in the option list (on the right) in grey, rather than black, giving you a visual indication of which options are
visible.
76
Contents : Adding/Editing Products
77
Account Types
If you wish to limit the option to only being available for a certain customer account type then select the
account type here. Selecting ‘All’ will make it available for everybody.
Percent or Prices
If you want the option to impact on the price of a product then you should enter either a percentage difference
here (percentages can also be minus, if you wish to remove a percentage from the price) or a flat rate price
that will be added (or taken away in the case of a minus price) from the overall price for the product.
Clicking ‘Add’ will add the current field settings as a new option. If you click on an already existing option in the
list on the right an ‘Apply’ button will also appear that you should click once you have finished updating the
option’s settings.
The right box also has up and down arrows that can be used to change the display order of the options and a
red X to delete a selected option from the list.
In addition to the pricing options available for individual selections in extra fields, please see the ‘Advanced
Pricing / Combinations’ section for further product pricing options.
5.8.3
Digital Download Options
Digital Download Options
This section offers settings for digital download products. Here you can specify the digital file and registration
information.
Is Digital Product?
Set to YES if the product is a digital product.
Digital File
This is where you choose the actual digital download file for the product. You can either ‘Browse…’ to upload a
file from your computer or choose ‘Pick File…’ NOTE: It is much better to upload files using FTP as PHP has an
in-built maximum file limit for uploads that your hosting company will set, normally not very large. If your file is
larger than the maximum your PHP setup will allow the file will not upload correctly and you should use FTP.
Registration Details
Here you have 3 options for registration information for your digital product. If either ‘Registration Code’ or
‘Registration Code and Name’ are selected you will be prompted to enter registration information on the
dispatch screen. If ‘None’ is selected you will not be required to enter dispatch information for the product.
77
Contents : Adding/Editing Products
5.8.4
78
Group Product Settings
Group Product Settings
JShop Server includes the ability for you to create a product made from other products in your store. For
instance you could create a special offer pack that contains several other products. Stock control is handled
across all the grouped products, so all products with stock control activated will be checked and debited as per
normal. You can also include products in a group product that are invisible from your main site should you wish
to.
The top box on the left is where you can enter a search string to find products. Clicking the ‘Search’ button will
load the search results into the larger box on the left. Once you have performed a search clicking on the
product code or product name will add the product to the list on the right, which is the full list of products that
will be displayed on this product’s product page. The value entered in the Qty box below the search results will
be the quantity used when adding a product to the grouping, e.g. if you enter 2 in the Qty box, 2 of the
selected product will be included in the group product.
Additionally you can alter the display order of the grouped products by selecting a product in the right hand
window and using the up and down arrows to move it up and down the list. Finally the red X will remove a
product from the list.
Note: Currently you can only include products in a group product that have no selectable options.
5.8.5
Advanced Pricing / Combinations
Advanced Pricing / Combinations Block: Qty Discounts is shown
This section takes product pricing and product attributes a step further with three different pricing /
78
Contents : Adding/Editing Products
79
combination types. They are as follows:
Qty Discounts
This enables you to setup quantity discounts on the product. The discounts can take the form of a flat rate
discount or a percentage discount. In addition the quantity discounts can be made available only to certain
customer types.
There is also an option at the bottom of this section called “Quantities for the product with different options
should be combined for any quantity discounts above”. You should set this to YES if you would like all selections
of a product with options to count towards the quantity discount. For instance, if the customer orders the same
product in red and blue, their quantities will be combined when calculating the quantity discount.
Base Pricing Combinations
If pricing of individual options in the Extra Fields block isn’t sufficient to capture how you need to charge for an
item the Base Price Combinations enables you to change the actual base price of a product (set in the General
Details block) based on combinations of selected options. For instance, if all had a size and colour extra field
and all colours in all sizes were the same price apart from the Small, Black one and the Large, Blue one, you
could enter a base pricing combination here that changes the price of the product if either of those
combinations are selected. With base pricing combinations if you select to use a flat price, this will become the
new product price. If you decide to use a percentage change this will be calculated using the existing base
price set in the General Details block.
Attribute Combinations
This is a feature we feel is unique to JShop Server. Like the Base Pricing Combinations here you can setup
combinations of options (or even a single option) and change the weight, product code, supplier’s product
code, stock level, minimum orderable quantity or maximum orderable quantity of the product. As you can see
changing the weight of a product if Large was selected would be very useful for shipping, changing the product
code is good for your own order management and changing the stock level allows you to keep track of the
stock levels for each variation of the product independently. In addition there is a sixth option in Attribute
Combinations that allows you to exclude a combination of items from being added to the shopping cart.
Attribute combinations also act in a drill-down fashion. For instance you could set the product code for all
products that have Large selected to one code, but also add in an option so if it was Large and Blue, the code
would again be different – any other combination with Large would use the code assigned to Large on its own.
In this way JShop Server checks for the loosest match first, so by the time it has worked through all the
options it has selected the most specific for the selected options.
One-Off Prices
Acting in a similar way to the Base Pricing Combinations facility the One-Off Prices facility allows you to change
the one-off price for the product depending on what options are chosen or the customer account type viewing
the product.
You can switch between the 4 different pricing / combination types by clicking the radio buttons at the top. The
large box will then change to show the type you are currently looking at. Also note that the options available
for each of the types differ.
Note: This section is purposefully free from too much validation to give you the freedom to combine
pricing combinations as you need them. However, this can also lead to confusion and care must be taken
that especially with pricing options, conflicts do not arise that cause the product pricing to not be as
expected. It is suggested that you try out different uses of the combinations for yourself to see just
what’s possible.
79
Contents : Adding/Editing Products
5.8.6
80
Stock Control
Stock Control Block
These options cover any product-level stock control you wish to use. Please also see the ‘Advanced Pricing /
Combinations’ section for combination-level stock control. The fields here are as follows:
Enabled?
There are three options here. Select ‘No’ if you don’t wish to track stock on this product, select ‘Yes’ if you wish
to track stock on this product and track the main stock level (even if you have product option stock levels as
well) or select Yes, but track options only’ if you want to track stock on options but ignore the main stock level.
If you choose this last option you can ignore the Stock Level setting below.
Note: This will have no effect if the global stock control setting is not on (please see the ‘General’ section
of the documentation)
Stock Level
This is your actual stock level for the product.
Warning Level
The stock control system in JShop Server allows you to send emails when a product’s stock falls below the
warning level, to give you an advanced warning that you may have stock problems with a product soon.
Action on Zero?
This tells JShop Server what it is to do when the product’s stock reaches zero. There are two options:
Leave Available (with purchase): This leaves the product visible and purchasable in your store. If you
wanted to show the product but not allow a customer to add it to their basket you would use this option and
use an if statement in the template to see if the stock was above zero. If it was you would show the add to
cart button, otherwise you could hide it.
Leave Available (no purchase): This leaves the product visible but cannot be purchased. Any attempt to
add the product to the basket will result in the customer receiving an out of stock message on the cart
template.
Hide: JShop Server will not send the product to the templates at all if the stock level reaches zero.
80
Contents : Adding/Editing Products
5.8.7
81
Product Options
Product Options Block
These are some general categorisation options for the product and this is where you set which sections the
product should appear in and what customers can view the product etc. The fields here are as follows:
Product Category
Allows you to select which internal product category the product belongs to.
Show In Section
The top select box here provides a list of all the sections (and their full paths). You can select sections from
this list and click ‘Add’ to add them to the bottom box which contains the list of sections that this product is to
be shown on. Selecting a section from the bottom box and clicking ‘Remove’ will remove this product from that
section. In addition you can click the 'Set Default' button whilst one of the selected sections is highlighted. This
will make it the default section for the product, and will be used when generating links from other lists on your
store, e.g. random products, and on the sitemap. This will also be used when the system creates canonical
links for products.
New Product
Select YES if you would like the product marked as a new product.
Top Product
Select YES if you would like the product marked as a top product.
On Special Offer?
Select YES if you would like the product to be marked as on special offer.
Is Product Visible?
Selecting NO here will hide the product from your store. You can instantly make it visible again by selecting
YES.
If invisible still allow product to be shown with direct link
81
Contents : Adding/Editing Products
82
If a product is set to be invisible and this option is set to YES, the product can still be accessed via. with a
direct link. It will not appear in any sections or through the search, however. This is useful if you wish to setup
a special offer product only for certain advertising as the product can only be found by going to it directly.
Available To Customer Types
This field allows you to select which customer account types can view this product – if a customer’s account
type doesn’t match this list then the product will not be displayed for them. In this way you can create products
only visible to certain customer types. Selecting ‘All’ makes the product available to all account types. You may
also select multiple account types by using the Shift and CTRL keys on your keyboard.
Product Flags
Any addition product flags you have setup in your store using the ‘Product Flags’ option available in the
Contents section of the administration system will appear here with YES / NO radio buttons in the same way as
the special offer etc. flags.
5.8.8
Associated Products
Associated Products Block: A search has been performed for products here
JShop Server allows you to associate a product with other products within your store to enable cross-selling.
This section provides the means to select other products to link to the one you are adding or editing.
The top box on the left is where you can enter a search string to find products. Clicking the ‘Search’ button will
load the search results into the larger box on the left. Once you have performed a search clicking on the
product code or product name will add the product to the list on the right, which is the full list of products that
will be displayed on this product’s product page.
Additionally you can alter the display order of the associated products by selecting a product in the right hand
window and using the up and down arrows to move it up and down the list. Finally the red X will remove a
product from the list.
There is one other option available here – Create 2-way links for new selections. This enables you not only to
show the selected product on this product’s page but also the other way around. Those that you select like this
will have (<->) shown after the product name in the list on the right.
5.8.9
Misc. Options
The Misc. Options Block
This section contains only one field – Template For Product Page. As with sections, you can set up different
product page templates if you wish and choose to show some products with one templates, and others with
another. The default template is product.html.
82
Contents : Adding/Editing Products
5.8.10
83
Other Languages
An Example Languages Block
If you only have one language setup in your store, this section will be empty. Otherwise it will present you with
alternative language fields for the product name, short description, long description, Meta Keywords, Meta
Description and any TEXT or TEXTAREA extra product fields you are using.
5.9
ABC Products Listing
The ABC Products Listing provides a full list of products within your store in alphabetical order of product code
then product name. Clicking on any product code or name will show the product editing page for that product.
In addition you will see ‘Edit’ and ‘Delete’ buttons for each section shown along with a ‘Clone’ button. The use
of the ‘Clone’ button is described in the ‘Sections Structure’ part of the documentation.
83
Contents : ABC Products Listing
84
A typical product listing screen.
5.10
Invisible Products Listing
This is displayed in the same format as the ABC Products Listing but this one only shows those products that
currently have their Visible field set to NO.
5.11
Sort Special Offers
This brings up the reordering screen for products you have marked as Special Offer (see ‘Adding / Editing
Products’). You can move products up/down/to the top/to the bottom, changing their display order. Special
Offers are shown in the default templates on the right hand navigation menu for the store, but you can
obviously show them anywhere you like.
A typical sort / reorder screen
84
Contents : Sort New Products
5.12
85
Sort New Products
This brings up the reordering screen for products you have marked as New (see ‘Adding / Editing Products’).
You can move products and down, changing their display order. New Products are shown in the default
templates on the right hand navigation menu for the store, but you can obviously show them anywhere you
like.
5.13
Sort Top Products
This brings up the reordering screen for products you have marked as Top (see ‘Adding / Editing Products’).
You can move products and down, changing their display order. Top Products are shown in the default
templates on the right hand navigation menu for the store, but you can obviously show them anywhere you
like.
5.14
Global Price Change
This is a powerful function and one that cannot be undone once it has been used. It basically allows you to
make a percentage price change (either plus or minus) to your product database.
The Global Price Change Screen
The screen gives you the choice of either changing a particular category of Products or changing all the
products in the database.
Note: We suggest using this function with caution and only if you are certain that you need to update
prices in this way. Using the Import / Export facilities you can update prices outside of JShop Server and
re-import them, giving you greater flexibility over your price changes. If you do use this function we
suggest exporting the prices before the change so that they can be easily re-imported again if need be.
5.15
Global Option Reset
This function provides a quick and easy way of resetting special offer, new product and top product options
against products to NO. Once used these changes cannot be undone automatically.
The Global Option Reset Screen
In addition, if you have product flags setup, you can reset those flags to NO in the same way.
85
Contents : Articles
5.16
86
Articles
Articles is JShop Server's content management system that allows you to quickly and easily add and maintain
informational pages on your site. You could use this for help articles, delivery information, your terms and
conditions, frequently asked questions, news etc. Articles provides a unified way of providing all this content
and, in conjunction with different templates for different content types and with the options available against
articles, and sub-articles, you can use the same system to deliver a wealth of different types of content. In
addition JShop Server's Articles system provides you with ways of grouping like links together to use as
collections on the front end of your store and advanced options such as automatic RSS feed generation.
5.16.1
Article Browser
The Article Browser provides you with navigation for all your content. When you first visit this section you will
see the main articles in your store.
Account Type Selection
At the top right of the screen there is a drop down called ‘Account Type’ with a ‘Show’ button. This allows you
to limit the information you see in the article browser screen to only show articles specific to a particular
customer account type. This is useful for viewing the information that different customer accounts will see.
Account Type Selector
The Articles Part of the Screen
The Articles Part Of The Screen
Here you see the sub-articles for the currently selected article. If you think of the current article as the parent,
these are that article's children. The buttons at the top of this list do the following:
Edit Article: This shows the article editing screen for the article you are viewing. For instance, when the
article browser first loads, clicking this button will edit the main article's settings, although generally you would
not use the main article in your store.
Insert New Article: This shows the article adding screen and when created the added will appear in the list,
making it a child of the currently viewed article.
Sort / Reorder: This shows the reordering screen that allows you to move the sub-articles up and down to
change their display order. However, if the parent article is not set to 'Manual Sorting' you will not see this
option and JShop Server will take care of the sorting for you.
86
Contents : Articles
87
Once you have created some sub-articles via. the ‘Insert New Article’ button you will see them appearing on
the article list. Clicking on the title of one of these will transfer you to the article browser for that article.
To help you navigate the article browser the top title bar contains the full path to the current article you are
viewing and you can click on any of the previous article's titles to go back up to that level.
5.16.2
Adding/Editing Articles
Adding and editing articles happens on the same screen.
The General Section of the Article Editing Screen
Title
This is the article title.
87
Contents : Articles
88
SEO URL Title
If entered and you are using Safe URLs with the option to add names to URLs, this text will be used instead of
the article's title field for this text.
Name (for Templates)
This field allows you to set a simple name for the article to allow you to refer to it in your templates. This
feature allows you to quickly and easily edit the templates to provide additional link areas. In the default
templates the top links, bottom links and news section are all referenced in this way so their sub-articles can
be pulled out and displayed to suit.
Abstract
A 250 character short abstract for the article.
Content
An unlimited text field for the full article content.
META Description
A specific Meta Tag description field for this article.
META Keywords
A specific Meta Tag keywords field for this article.
Is Article Visible?
Setting this to NO will automatically make the article inaccessible from your store.
Available To Customer Types
This selection allows you to select which customer account types can view this article – if a customer’s account
type doesn’t match this list then the article will not be displayed for them. In this way you can create articles
only visible to certain customer types. Selecting ‘All’ makes the article available to all account types. You may
also select multiple account types by using the Shift and CTRL keys on your keyboard.
Parent Article
This allows you to quickly set where you would like this article to appear. By changing this setting you can
move articles (and any of their sub-articles) to different parts of your article structure. Click the ‘Pick Parent
Article to launch a pop-up allowing you to drill-down the current article structure and select the new parent for
this article.
Template For Article Page
Articles are not limited to a single template page. You can setup more than one template for articles and have
different articles use different templates. Here you can select the template that the article should use – the
default is article.html
5.16.2.1
Extra Fields
Extra Fields Part Of The Article Editing Screen
This section is where your extra article fields will appear (see the ‘General’ section of the documentation for
more information on setting up extra article fields).
88
Contents : Articles
89
1. Extra product fields of type TEXT will be shown as a single text line field.
2. Extra product fields of type TEXTAREA will be shown as a multiple text line field into with HTML can also be
added.
3. Extra product fields of type IMAGE will be shown in the same way as the normal Thumbnail and Image
fields. Images are stored in products/extras however.
5.16.2.2
Additional Options
The Additional Options Part of the Article Editing Screen
Sub Article Sort Order
Here you can specify how you want sub-articles for this article sorted. The options available are:
Manual Sorting - you handle the sorting manually using the 'Sort/Reorder' facility on the article browser
Created (Newest First)
Created (Oldest First)
Alphabetical (A-Z)
Alphabetical (Z-A)
ID (Highest First) - when an article is added it is given a unique sequential ID, this sorts using that
ID (Lowest First) - when an article is added it is given a unique sequential ID, this sorts using that
Default Template For Sub Articles When Created
Here you can specify what template any sub-articles should be set to use when they are created. By using this
option you can ensure that sub-articles use a consistent theme without having to think about setting the
template manually for each one.
Exclude From Breadcrumb
Sometimes you will want to use an article as a container for other articles but won't necessarily want it to
appear in the breadcrumb. If so set this option to YES. The Top Links collection in a fresh installation of JShop
Server has this set to YES, for example.
Depth Retrieve (for Navigation)
This is primarily for advanced template editing where you want to create template code to not only show subarticles but also sub-sub-articles etc. if you're created a complex navigation where you want multiple levels
shown on the same templates.
Creation Date/Time
Primarily useful if you're sorting articles by Creation Time. This can be changed after the article is created.
Exclude From Sitemap
If you do not wish this article to appear in the sitemap select NO here, otherwise select YES.
89
Contents : Articles
5.16.2.3
90
RSS Feed Options
JShop Server can automatically create RSS feeds from articles and sub-articles and this section of the article
editing screen allows you to set those options.
Please note that RSS feeds can only be created for articles that are available to customer account type
'All' and will only include sub-articles also available to customer account type 'All'. RSS feeds re also multilanguage.
RSS Feed Options section of Article Editing Screen
Include Article in Parent RSS Feeds
If a parent article has an RSS feed activated for it, this determines whether this sub-article will appear in the
RSS feed.
Provide Sub-Article Feed
When turned on for an article an RSS link will be shown on the article page linking to an RSS feed for subarticles. The article title will be used for the title of the RSS feed.
Depth Retrieve (for RSS Feed)
Sets how many levels down you want to include the sub-articles from for this article's RSS feed.
Maximum Entries in Feed
Limits the maximum number of entries included in the feed. They will be sorted by creation date/time in
descending order.
Field For RSS Content
Here you can set whether you would like to use the abstract or main content field for the description for each
entry in the RSS feed.
5.16.3
ABC Articles Listing
The ABC Articles Listing provides a full list of articles within your store in alphabetical order. Clicking on any
article title will show the article browser page for that article. In addition you will see ‘Edit’ and ‘Delete’ buttons
for each section shown.
90
Contents : Articles
91
An example article listing screen, this is an ABC Article list.
5.16.4
Invisible Articles Listing
This is displayed in the same format as the ABC Articles Listing but this one only shows those articles that
currently have their Visible field set to NO.
91
Tax/Shipping :
6
92
Tax/Shipping
JShop Server includes full tax and shipping support, both of which can be configured in a number of different
ways. The Tax / Shipping sections of the administration covers both tax and shipping and also the main list of
countries for your store.
6.1
Main Country List
This is where you can add, edit and delete countries from the main country list used by JShop Server.
Extract of Main Country List Screen
Each one has an ‘Edit’ and ‘Delete’ button and in addition there is an ‘Add New Country’ button at the bottom of
the list to create a new country.
Adding / Editing Countries
The Add/Edit Country Screen
Name
This is the visible display name of the country.
ISO Code
This is the official ISO Code for the country and should be two upper-case characters.
ISO Number
This is the official ISO Number for the country.
Visible
If set to NO the country will not be visible in your store.
92
Tax/Shipping : Country Settings
6.2
93
Country Settings
The screen allows you to choose which countries that will be available in your store. This setting is split into
two large selection boxes; the left one is a list of countries that are currently excluded from your store and
won’t appear, the right one is a list of countries that are included in your store and will appear.
Choosing countries for your store
You can move countries between the two boxes by selecting one in the left box and clicking the round rightarrow button. This will move the country into the ‘Available Countries’ list. Selecting a country in the right box
and clicking the round left arrow button will move a country into the ‘Unavailable Countries’ list.
Once you have finished updating your country settings you can click the ‘Update Country Settings’ button to
save the changes.
Note: JShop Server contains a full current list of all recognised countries. This country database table also
includes relevant ISO codes that are required by some payment gateways. If countries change in the
future we will issue updates to keep this list accurate and complete.
6.3
Reorder Countries
Not only can you select which countries you want to appear in your store but you can also change their display
order (as with many other things within JShop Server). Changing the order of the countries alters the order
they will appear in the country select boxes for billing and delivery addresses.
93
Tax/Shipping : Reorder Countries
94
Reordering the country list
6.4
Tax Menu General Settings
On this screen you can specify some overall tax options.
Tax Menu General Settings
Tax Enabled
If you wish to enable tax in your store select YES, otherwise select NO.
Add Tax on Shipping
If you wish to add tax onto the shipping charge you setup in JShop Server (presuming that you are using
shipping in your store) select YES for this option, otherwise no tax will be added to the order total for the
shipping charge.
Include Delivery Address In Tax Calculation
This setting allows you to check the delivery address for tax, in addition to the billing address. For instance, if
you are in Europe but the purchaser is in the United States and wants it delivered in Europe then tax would be
applicable. This is set as an option as some countries tax does not operate on this policy.
Zero Tax If Delivery Address Not Taxable
If you set this option to YES, even if the billing address is taxable, if the delivery address is not taxable, all tax
values will be zero’d.
Tax Rounding
94
Tax/Shipping : Tax Menu General Settings
95
JShop Server includes two different tax rounding machanisms. With ‘Round tax before multiplying by quantity’
selected, the tax for a product will be worked out on a quantity of 1 and then multiplied by the cart quantity
(usually used in B2C sites). With ‘Round tax after multiplying by quantity’ the tax will be calculated on the full
quantity (usually B2B or small value items).
6.5
Country Level Tax
This is where you setup the country level tax rates. For instance in Europe VAT is a country level tax rate and
this would be setup in here. However, if your company operates from a number of different countries you can
setup different tax rates from these screens.
Extract of Country Tax Rates Screen
Each one has an ‘Edit’ and ‘Delete’ button and in addition there is an ‘Add New Tax Rate’ button at the bottom
of the list to create a new tax rate against a country.
Adding / Editing Tax Rates
The Add/Edit Tax Rate Screen
Country
This is the visible display name of the country. When editing a tax rate this cannot be changed, when created a
tax rate this will be shown in a drop-down box for you to pick the applicable country.
Standard Tax Rate
This is the standard tax rate you would like to charge for this country.
Second Tax Rate
This is the second (normally reduced if applicable to your country) that you want to charge for this country.
6.6
County/State Level Tax
In addition to the country tax you can specify a county/state level tax. The way this works is that JShop Server
first sees if there is a country level tax for the customer’s country. If a county/state level tax appears for the
customer’s county/state then this is used instead of the country level tax.
95
Tax/Shipping : County/State Level Tax
96
The County/State Level Tax Screen
Counties/States entered can be moved from the left ‘Un-Taxed’ list to the right ‘Taxed’ list. Any that appear in
the right list will then have applicable Standard and Second Tax Rate values applied should they be used by a
customer.
Note: This screen is only available if you have changed the county and deliveryCounty fields to be select
boxes in Customers. Otherwise no county/state tax can be calculated by JShop Server.
6.7
Shipping Menu General Settings
On this screen you can specify some overall shipping options for your store.
Shipping Menu General Settings
Shipping Enabled
Select YES if you want to include shipping in your store, select NO otherwise for no shipping charges to be
calculated.
Default Shipping
This allows you to select the default shipping option that is selected when a customer checks out. If you have
alternative options for shipping the customer will still be able to change their method of shipping.
Show Shipping On Cart
If selected, the normal cart page (cart.html) for your site will also show currently selected shipping costs. In
addition the customer will be given the option to change the shipping type on the cart screen.
6.8
Shipping Zones
The shipping in JShop Server works on zones and this is the first part of the shipping you need to sort out –
you enter rates against shipping types according to zones. A zone is defined as a group of countries and/or
counties/states. For instance if you were running a store from the UK you might setup one zone that simply
contains United Kingdom, another that contains all the European countries, one for America and another for
the rest of the world.
96
Tax/Shipping : Shipping Zones
97
With countries, once a country is marked to a zone it cannot be put in another zone unless it is first removed
from the zone it is in or that zone is deleted. This stops you from putting a country in more than one zone
which would give unpredictable results.
List Of Shipping Zones
The main shipping zones page lists all the zones you have setup, by their name. Each one has an ‘Edit’ and
‘Delete’ button and in addition there is an ‘Add New Zone’ button at the bottom of the list to create a new zone.
Shipping Zones List
Adding / Editing Shipping Zones
Editing a shipping zone
Adding and editing zones uses the same screen. The following fields are available:
Name
This is an internal name to help you remember what the zone contains.
Countries In Zone
On the left you will see a list of all the countries in your store that do not currently have a zone associated with
them. On the right is a list of countries that are in the current zone (obviously if you are adding a new zone this
list will be blank). You can move countries between the two boxes by selecting the countries in one and clicking
the appropriate left or right arrow.
97
Tax/Shipping : Shipping Zones
98
Counties/States In Zone
This will only appear if you have opted for the county and deliveryCounty fields to be shown as select boxes. If
this is the case a list of counties/states that you have previously entered will appear in the left hand box, and
the counties/states selected for this zone in the right hand box. Again you can select counties/states and click
the appropriate left or right arrow buttons to move them between boxes.
6.9
Shipping Types
Once you have setup your shipping zones you can now enter your shipping types. These are the actual
shipping choices you will make available to your customers when they checkout. For instance you may want to
give the option of First Class Post or Next Day delivery, for example. Both of these are separate shipping types.
Once you have setup a shipping type you can then enter rates against those types for the different zones in
your store and that will be dealt with in the next section.
List of shipping types
The main shipping types page lists all the shipping types you have setup, according to the order in which they
should appear (the order can be changed by clicking the ‘Sort/Reorder Types’ button). Each shipping type has
an ‘Edit’, ‘Delete’ and ‘Rates’ button. The Rates button take you to the screen to enter rates for this shipping
type and this will be dealt with in the next section. In addition to these buttons there is an ‘Add New Type’
button at the bottom of the list to create a new shipping type.
6.9.1
Adding/Editing Shipping Types
Adding and editing shipping types uses the same screen. The fields available are as follows:
98
Tax/Shipping : Shipping Types
99
Editing an existing shipping type
Name
This is the name that will be shown on your store’s checkout and should be easy for the customer to
understand.
Flat Rate / Multiplication
This decides how a rate should be used to calculate the shipping cost. For instance, if you choose ‘Flat Rate’
then the prices you enter in the shipping rates will be the actual shipping cost. If, however, you choose
‘Multiplication’, then the applicable shipping rate will be multiplied by the ‘Value to Use’ amount. For instance, if
you were using Quantity as the ‘Value to Use’ field then a rate would by multiplied by the quantity to get the
shipping cost.
Value To Use
Each shipping type can be based on a different value from the shopping cart. The options are Quantity (the
total number of items in the cart), Goods Total (the total price of the goods, excluding any tax) and Weight (the
total weight of all the items in the cart). The value is used to create different rate entries that can cover
different possibilities for this value. For instance using Quantity, you could setup one rate that was only used if
the quantity was less than 10, and another rate if the quantity was over 10. The ‘Round-Up Values’ option, if
set to YES, will round the value used to calculate the shipping to the next whole number, e.g. a value of 101.45
would be rounded to 102.
Base Price
In addition to the shipping cost calculated from the rates each shipping type can have a base price as well.
Here you would normally put a standard packaging and handling charge (if applicable).
Available To Customer Type
Here you can choose the customer account type that this shipping type is available for. ‘All’ means that it is
applicable to all customer account types. If a customer checks out and does not have a customer account type
that matches the selection here, this shipping type will not be shown as an option.
Weight Limits
A common problem with shipping is that some methods/companies can only ship using certain methods if the
weight is below a given weight. These options allow you to hide shipping types from customer selection on the
checkout if the total basket weight is above or below what’s entered here. Entering 0 de-activates a weight
threshold.
Goods Totals Limits
As with the weight limits these options allow you to hide a shipping type from being visible to a customer if
goods total limits fall outside the thresholds entered. Entering 0 de-activates these thresholds.
Shipping Value Taxable
If you have set shipping to be taxable in your store you can override this for each shipping type by setting this
option to NO.
6.9.2
Shipping Rates
On the shipping types list screen there is a green ‘Rates’ button next to each of the shipping types that you
setup. Clicking this brings up the shipping rates page for that shipping type.
The main shipping rates page shows the currently entered shipping rates, organised by zone, for the selected
shipping type (the shipping type is shown in the page’s grey title bar).
99
Tax/Shipping : Shipping Types
100
List of shipping rates for a shipping type
Adding / Editing Shipping Rates
Adding a new shipping rate
Adding and editing shipping rates is done on the same screen. Fields available on this screen are as follows:
From ‘x’
Where x is the ‘Value To Use’ setup for the shipping type. For instance, if the shipping type was using Quantity
then this would say ‘From Qty’. In here you should enter the lower limit that this rate is applicable to, for
instance 1.
To ‘x’
Where x is the ‘Value to Use’ setup for the shipping type. For instance, if the shipping type was using Quantity
then this would say ‘To Qty’. In here you should enter the upper limit that this rate is applicable to, for instance
10.
All/Others
If selected this rate will ignore the From and To values and will, instead, by used for any values that fall
outside any of the other rates. This is a catch-all option.
Price
After the word price you’ll see either Flat Rate or Multiplication which tells you how the shipping costs are
calculated for this shipping type. For instance, if the shipping type was flat rate, the price you enter here would
be the final shipping cost. If the shipping type was multiplication, the price you enter here would be multiplied
by the shopping cart’s ‘Value To Use’ (either Quantity, Goods Total or Weight). For instance, if you were using
Goods Total as the ‘Value To Use’ in the shipping type and this rate’s From value was 1 and to value was 100
to be charged by a Multiplication, when a customer with a goods value of 56 tried to checkout, the price you
enter here would be multiplied by 56 to give the shipping cost.
Zone
This allows you to select the zone that this rate is applicable to. Different zones for the same shipping type can
have completely different rates associated with them.
100
Tax/Shipping : Couriers
6.10
101
Couriers
Linked to dispatching in JShop Server you can assign a courier to an order when dispatching. This information
can then be carried across in emails to the customer to allow them to quickly and easily track their order.
List of Couriers
The courier page lists all the couriers you have setup in the system along with a button to select one as the
default. The default will be the option selected when you go to the dispatching screen. Each courier has an
‘Edit’ and ‘Delete’ button. In addition to these buttons there is an ‘Add New Courier’ button at the bottom of the
list to create a new courier.
6.10.1
Adding/Editing Couriers
Adding and editing couriers is performed on the same screen.
Editing an existing Courier
Name
This is the name of the courier.
Website URL
This is the website URL for the courier. It is most useful to enter a link that takes the customer directly to the
tracking page on the courier's website for ease of use.
Additional Contact Information
If you wish to provide your customer with any additional contact information then you can use this free text
box.
6.11
Suppliers General Settings
Within JShop Server the suppliers module allows you to assign suppliers to products, allowing you to email
suppliers to dispatch goods, in a drop-shipping arrangement. Supplier emails only contain products particular
to that supplier and different email templates can be created for use with different suppliers.
101
Tax/Shipping : Suppliers General Settings
102
The general settings screen sets up the main settings for the supplier system.
Supplier General Settings
Activate Supplier System
If you wish to use the supplier system select YES here, otherwise select NO.
6.12
Suppliers Email Templates
This is where you can setup email templates to use for supplier emails. You can setup any number of different
templates and templates can be re-used for multiple suppliers.
List of Supplier Email Templates
The main screen shows a list of current templates along with Edit and Delete buttons.
Adding / Editing Email Templates
102
Tax/Shipping : Suppliers Email Templates
103
Supplier Email Template Editing
Adding or editing an email template uses the same screen with the following options available:
Template Name
This is the name you wish to call this template.
Subject
This is the subject line for the email.
Content (Text Version) / Content (HTML Version)
This is the actual body content for the email itself. If you only want to send a text version, leave the HTML
version blank, and visa-versa. You can supply both, in which case the recipient’s email software will decide
which to use.
From/Reply-To Email Address
This is the email address that will appear as the from address.
103
Tax/Shipping : Supplier Fields
6.13
104
Supplier Fields
This is where you setup fields for information you wish to store about suppliers in your system. There is a
basic set installed with JShop Server and all, apart from sup_company can be deleted. Feel free to add fields
for any information you wish to keep about a supplier. In addition any of these fields can be used in the emails
to suppliers.
There are 4 field types available, as detailed below:
Type
Description
TEXT
Single line entry field
TEXTAREA
Multiple row entry field
SELECT
A select box of options
CHECKBOX
Single check-box
Each of the fields can be validated and validation messages displayed if they are not filled in.
List Of Supplier Fields
List of Supplier Fields
The list of supplier fields gives you an overall view of the fields for suppliers, their internal and viewable titles
along with an ‘Edit’ button and a ‘Delete’ button.
At the bottom of this screen there is also an ‘Add New Field’ button along with a select box for the type of field
you would like to add.
104
Tax/Shipping : Supplier Fields
6.13.1
105
Adding/Editing Supplier Fields
Adding and editing supplier fields uses the same screen. However, some of the options are only available for
certain types of fields. Options available are as follows:
Editing an existing TEXT type field
Name
This is an internal name that is used in the database. It must be unique and you will be told if it is not. This
field is not generally shown to the customer.
Title
This is the description of the field that is shown to the customer in the default templates.
Size and Maximum Length (only for TEXT type fields)
Size is the actual size of the form field on the page and maximum length is the maximum number of
characters a customer can enter into the field.
Columns and Rows (only for TEXTAREA type fields)
This is the number of columns and rows that the field should be sized to on the contact form page.
Validation, Validate For and Validation Message
If you want to make it a requirement that a field is filled in you should select YES for the Validation radio
button. In addition, with the Validate For option, you can select how you want the field validated. There are a
number of built-in validation types, such as Not Blank or Email Address and, in addition, choosing “Custom
Regex:” allows you to enter a Perl style regular expression for the validation, permitting complex validation
routines to be used. If you are not sure how to use regular expressions or wish to find some for your particular
need a good site is http://regexlib.com/ where you will find many that you can enter here.
Finally the Validation Message is the error message you wish to display if the validation or the field fails and
requires the user to re-input information.
NOTE: The regular expression validation uses Perl style regular expressions. This has changed in version
2.3.0 from POSIX due to the depreciation of the ereg group of functions in PHP
105
Tax/Shipping : Supplier Fields
106
Visible
Setting this to NO will make a field invisible.
Content (only available for SELECT type fields)
This allows you to enter a list of options for a select box field. You can enter a new option by typing it in the
Option: box and either pressing return or clicking the ‘Add’ button.
If you select an already entered option its contents will appear in the Option: box allowing you to change it.
You can then click ‘Apply’ to save that change.
In addition the three little buttons on the right of the content box allow you to move items up and down the list
(changing their display order) or, by clicking the red X, to delete an item completely.
6.14
ABC Supplier Listing
The ABC Supplier Listing shows a complete listing page of all the suppliers in your system, split into pages
depending on the number you have setup. It shows the company name of the supplier along with Edit and
Delete buttons.
ABC Supplier Listing
In addition to this straight-forward listing, a search panel is provided at the bottom of the screen to allow you
to search for suppliers.
6.15
Adding/Editing Suppliers
Adding and editing suppliers uses the same screen. Fields available largely depend on what you have setup in
Supplier Fields, and you’ll see an entry point for each of those on this screen. In addition, however, there are
some special supplier fields that also require filling in, and these are explained below.
Editing an existing supplier
Send Supplier Emails For Orders
If you wish to send this supplier order emails then set this to YES.
Email Address For Orders
This is the email address for the supplier where the order emails should be sent.
106
Tax/Shipping : Adding/Editing Suppliers
107
Account Number With Supplier
This is your account number with the supplier. This can be included on the email template should you need to
include your account number on the order emails.
107
Logs :
7
108
Logs
Built into JShop Server is a log system that tracks visitors to your store, much like normal server access logs
do. However, there are some important differences:
1. Because the system is built into JShop Server it can track information specific to your store which would be
difficult for normal logging systems to do.
2. The logging system uses a database table and hence can produce ‘live’ results. By this we mean that you do
not have to wait for log reports to be generated each day and can see visits to your web site as they
happen.
The log system also includes a built in graphing function.
7.1
General Options
This section allows you to setup the main log system configuration options.
Logs General Options
Enable Visitor Logging?
If set to YES, JShop Server’s visitor logging will be enabled and information about visits to your store will be
saved to a database. You should be aware that log information can grow very large so if you are short of
space this option should be turned off or you should operate a very strict time scale in which the logs are
cleared (see ‘Clear Logs’). If this option is set to NO, no log information will be stored.
Do Reverse DNS Lookup?
Reverse DNS Lookup is used to find the details for the ‘Top Level Domain’ report. However, if you are finding
that your store is slow with this option turned on this means that the DNS server your site is using is slow to
respond and so, to improve performance, you should set this feature to NO.
Ignore Referrers From Reports
This option is used to filter out any internal referrals from one page to another. For instance if your site’s
domain is www.yourdomain.com, you should put www.yourdomain.com in this field, otherwise the Referrer
report would include your site’s internal links, rendering the report useless.
Ignore IPs From Logs
This is useful if you wish to disable logging from set IP addresses, for instance the IP addresses you and your
employees use to access the Internet. By doing this your own hits will not appear in the logs.
History To Keep When Pruning
If you have an automated job (or jobs) active for pruning the logs the setting here will dictate the history in
days that log information will be kept. Logging can generate a lot of information and it’s important to keep on
108
Logs : General Options
109
top of this in order to stop the database growing to an unmanageable size.
7.2
Logs Summary
This screen simply gives you an overview of data in the log database. It tells you the total number of page hits
registered, the range of dates the hits cover, the total number of days the logs cover and the average number
of hits per day.
Logs Summary
7.3
Log Reports
The logs system provides a range of different reports and these are detailed below:
Report
Description
Browser Type
Report showing the spread of browsers on your web site.
Grouped by browser type.
Operating System
Report showing the spread of operating systems on your web
site. Grouped by operating system.
Referring URL
Report showing sites that people have come from to reach your
store. Grouped by URL.
Search Engine Summary
Report showing search engines that people have come from to
reach your store. Grouped by search engine.
Search Engine / Keywords
Combined
Report showing search engines and keywords used on those
search engines to reach your store. Grouped by search engine
and keywords.
Search Engine Keywords
Report showing the keywords used in search engines to reach
your store. Grouped by keywords.
Pages Viewed
Report showing the popularity of different pages on your site.
Grouped by page name (without any query strings)
Top Level Domain
Report showing the top level domain name of visitors, e.g. .
com, .uk etc. Grouped by top level domain.
IP Address
Reporting showing IP addresses of visitors that have visited your
site. Grouped by IP address
Note: The search engine reports are based on those search engines that JShop Server can recognise. The
list of recognised search engines can be updated by us so if you have a request for a new search engine to
be included please do let us know. This update can be issued quickly.
Each report is grouped by a certain type of record, for instance the operating system report is grouped by
operating system which means that all occurrences of an operating system are grouped into one record with a
total. The reports then show the results grouped by the total for each of the types of record, in descending
109
Logs : Log Reports
110
order.
Report Selector
By using the Select Range section of the Logs menu you can restrict the date range you want the reports to
cover and in addition select a primary grouping for the reports, to help split the report up even further.
For instance, should you select Month as the grouping, the report will show totals for occurrences by month
and not for the total in the database. This becomes more useful when grouping by day of week, for instance,
as it allows you to see which day of the week is the most popular for referrals, and from which sites, for
example.
In addition to the actual textual report each report has an associated graph with it. Unlike the textual report,
the graph doesn’t use the primary grouping, e.g. month and just groups by type of record for the whole date
range. The graphs are designed to give you an overall feel for popularity of certain records, e.g. browser,
rather than for detailed analysis.
The graphs, along with the textual reports, are suitable for printing and the top of the logs reports page
contains a ‘Print Logs’ button on the right, which will bring up a print dialog.
An example of one of the graphs is below.
Log Graph: This one shows popularity of top level domains
110
Logs : Clear Logs
7.4
111
Clear Logs
Clear Logs
This screen gives you the ability to delete log information in the database. Log data can grow large so it’s
advisable to periodically delete the log information from the database using this option. For large sites with a
large number of visitors a day, weekly or, if you have sufficient room on your server, monthly, is advisable.
Each page viewed in the store adds one record to the logs database.
Alternatively you should consider using an automated job (General -> Automated Jobs) to keep the log data in
check.
111
Templates :
8
112
Templates
This section deals with the options that are available on the Templates menu in the JShop Server
administration system. For a more detailed discussion of the templates and how they work, you should consult
the separate Templates manual available for JShop Server. This covers, in detail, using the templates
themselves to change both your store and emails.
The Templates menu consists of four different parts. Firstly there is the ‘Email Templates Menu’ and the
options there cover emails sent out from the system (excluding the newsletters, which are dealt with
separately – see the ‘Newsletters’ section). Secondly there is the ‘HTML Templates Menu’ and this covers
settings for the templates that dictate the look and feel of your store’s front-end. Thirdly there is the ‘Open
Shop’ menu and this provides links to opening your store with a number of different template settings (please
see tSys section of the Templates manual available for JShop Server). Finally is the ‘Template Navigation’
section that provides a file list of the templates directory and gives access to on-screen editing of the
templates.
8.1
Email Options
This screen allows you to set some overall configuration options for emails that are sent out by JShop Server.
Email Options
Default Send To Email Address(es)
This is for emails that are sent from JShop Server to the merchant and here you can provide a comma
separated list of email addresses that you would like these merchant emails sent to. You can enter any number
of email addresses here separated by commas. This can be over-ridden by individual email template options.
Default From Email Address
All emails that come from the system will use this email address as the ‘From’ address. This means that if a
customer replies to one of the automatically generated JShop Server emails, they will be replying to this From
address. This can be over-ridden by individual email template options.
Send Payment Success/Failure Emails
This allows you to set whether or not you want the system to send out payment success and failure emails to
the merchant. With this set to YES, not only will the merchant receive an email when an order is initially placed
but, in the case of payment gateways that require the customer to visit the actual payment gateway, the
merchant will receive an email confirming that the order has been paid or that the order payment has failed,
depending on what happens at the payment gateway. Please see the ‘Checkout’ and ‘Orders’ section for more
information on this.
Email Method
112
Templates : Email Options
113
In JShop Server you can select to either use PHP’s built in mail() function or, if you have access to a third party
SMTP server (especially useful if you wish to use the newsletter feature in JShop Server) then you can select
SMTP Server from this box. Depending what is selected here the following options will be available.
Add ‘-f’ Option For Return Headers (PHP mail() Only)
Some servers require that the mailing ‘-f’ option is used to send the from address. If you are having difficultly
sending emails from JShop Server try turning this option on.
SMTP Server Email Options
Server Address
Here you enter the address of the SMTP server you wish to use.
Server Port
Here you enter the port that you wish to connect to the server on. This would normally be 25 although some
third party email services (such as http://www.authsmtp.com) also provide alternative port access.
Requires Authentication
If you select YES for this option you can then enter the Server Username and Server Password in the boxes
below. Many third party SMTP services will require username and password authentication.
8.2
Email Templates
Emails sent from the system use exactly the same template language as the HTML template – the in-built tSys
template system – and can have plain text and HTML versions. For more information on using this template
language please see the ‘tSys – The JShop Server Template Language’ section.
113
Templates : Email Templates
114
List of Email Templates
This screen provides a descriptive list of all the emails that JShop Server can send out along with edit buttons
for each one. By default, these emails already have applicable content in them when you install JShop Server
but you can, of course, alter these as much as you like. In addition the system allows you to setup multiple
email templates for the same action, for instance you should send order status change emails in different
formats to different recipients, one to the customer, one to a central processing email address, another to an
email address that goes through to a mobile phone etc.
When you click the ‘Edit’ button against an email template you will be presented with an editing screen where
you can change both the subject and the content of the email. Clicking update on this screen will take you back
to the email templates list.
114
Templates : Email Templates
115
List of Email Templates
Fields available when editing an email template are as follows:
Subject
This is the subject for the email. This can include template attributes etc.
Content
This is the normal text-only version of the email. If you do not wish to send a text-only version of the email
(although it is advisable to have a plain text version for those customers who do not have HTML compliant
email software) then leave this field blank.
Content HTML
If you wish to have an HTML version of an email you can enter the HTML for the email here. If this is left blank
no HTML version of the email will be sent.
Recipient Email Address(es)
A number of options are available here from the drop down:
Customer – The email will be sent to the customer
Merchant – The email will be sent to the default merchant email address (set in Templates -> Email
Options
115
Templates : Email Templates
116
Special – Available for some email types, e.g. use Special to send an emailed gift certificate to the intended
recipient.
Custom – Select this if you’d like to enter a different email address to send the email to in the box below
the drop-down.
From/Reply-To Email Address
This allows you to set the from address that will be sent with the email. If left blank the default address from
Email Options will be used instead.
Activated
If set to NO, this email will not be sent. This is useful if you want to turn off some of the emails to stop JShop
Server from sending them.
8.3
Template Settings
This screen allows you to set some of the global settings for the template system and also for template editing.
You should refer to the Templates Manual for a detailed discussion of options for the templates themselves
such the xTFC and xRTU options.
Template Settings
Compile Mode
This dictates how JShop Server handles the templates for your store’s front-end. The template system can
operate in several different modes. Once developed you would normally run mode 2 – ‘Compile if compiled
version doesn’t exist’ as this is quicker and less intensive on the server. Whilst developing option 1 would
normally be used – ‘Run templates uncompiled’
Word Wrap When Editing
This sets whether you would like the template contents word-wrapped on the template editing screen.
Allow xTFC Command On Front-End
If set to YES, the normal template compile mode can be overridden and forced to use the ‘Force compilation
each time’ mode. You would normally set this to NO if you did not need to use the xTFC option, for security
reasons.
Allow xRTU Command On Front-End
If set to YES, the normal template compile mode can be overridden and forced to use the ‘Run templates
uncompiled’ mode. You would normally set this to NO if you did not need to use the xRTU option, for security
reasons.
116
Templates : Template Settings
117
Convert Line Breaks To <br/> on Snippets
Setting this option to YES will change all line breaks in Snippets to <br/> tags before they are sent to the
template system for display. This is useful if Snippets will normally be edited by people who are not
comfortable with HTML and just want to enter paragraphs of text. Setting this option to NO will mean that line
breaks will not be converted and so you will have to enter <br/> tags yourself in order to create paragraphs or
breaks in text. In both modes Snippets can, of course, contain any other HTML you want to use.
Note: If you have the WYSIWYG editor turned on, this option will have no effect.
Strip HTML Comments When Outputting
With this option turned on, anything contained in normal HTML comments in your templates will be stripped
from the resulting page output.
Disallow PHP in Templates
With this option enabled, the tSys template system in JShop Server will strip any PHP blocks from the
uncompiled versions of your templates before parsing and processing. We recommend using this option for
security reasons, especially on shared servers where 777 permissions create cross-account security risks due
to poor server side security. We strongly recommend that if you are on a shared server and have to use 777
permissions on the template directory that you set this option to YES.
8.4
Installed Template Sets
The Installed Template Sets menu option provides you with access to all the template sets you currently have
installed for your JShop Server installed. By default a single template set is installed with JShop Server
although you can create your own additional sets or find others that have been produced for use with the
system. We will be launching a template shop later in 2009 to provide access to further high quality templates
ready for use with JShop Server. For more information on developing template sets, or altering the default
templates, please see the separate Templates manual for JShop Server.
The main screen provides you with an overview of the template sets installed, including a thumbnail
representation of each one, some information and a description for each set and a number of options. The set
shown at the top of this list in a darker colour is your currently selected default template set (the set used by
your store when somebody visits). If you have more than one set installed, each additional set will show an
orange ‘Set As Default’ button which you can click to change the default templates used for your site. You can
also open your site in another template set, without setting it as the default, by clicking the red ‘View Site’
button.
Template sets designed for version 2.2.0 and above of JShop Server will also show an ‘Edit Options’ button
which will provide access to the designer-defined options available for the templates and for all template sets
where CSS files are found a select box and ‘Edit CSS File’ button will be shown providing access to JShop
Server’s built-in CSS editor.
117
Templates : Installed Template Sets
118
Example of Installed Template Sets screen
8.5
Edit Options
For those template sets designed to work with the new template management system in JShop Server 2.2.0, a
blue ‘Edit Options’ button will be displayed which, when clicked will display options specific to that template set.
For instance, here is the options screen for the default JShop Server templates. As you can see this allows you
to upload a new logo, select which CSS colour scheme you would like to use and set a number of display
options for your store. The options available for each template set are up to the designer who created the
template set, so you won’t always see the same options.
Typical Edit Options Screen
118
Templates : Edit CSS File
8.6
119
Edit CSS File
This option provides a powerful yet simple editor for changing colours, fonts and various other display options
controlled by the CSS files for the templates. For more information on the technical side of the CSS editor, and
how to develop CSS files that support the extra features used by the editor please see the separate Templates
manual for JShop Server.
JShop Server Built In CSS Editor
The CSS Editor may look daunting at first but actually it’s pretty easy to follow. On the left hand side of the
screen you’ll see a list of all the CSS selectors within the CSS file you’re editing. If you’re editing a CSS file
designed with JShop Server’s CSS editor in mind you’ll see headings, helping to split up the various selectors
to help guide your way around them. In addition you’ll also see blue help buttons and, if you put your mouse
over these, you’ll get some more explanation about what that selector does. The default templates for version
2.2.0 include help on all the selectors.
If you click on a selector on the left, this will load up the selector’s style options in the right hand pane. This
part of the screen is split into the following sections:
119
Templates : Edit CSS File
120
Colours – The basic colours for the selector, so here you can set background colours and foreground (text)
colours.
Font Styling – This is where you can change the font settings for the selector.
Padding – This is where you can change the padding around the selector, so for instance you could change
the padding around each link you have on your site.
Margins – Similar to padding, margins provide you with a way of increasing or decreasing spacing around
an element that uses the selector.
Borders – Here you can set the different borders you would like elements using the selector to have.
Other – In here are any other CSS attributes for the selector that are not covered by JShop Server’s CSS
Editor.
What you’ll notice when you click on a selector on the left is that not all the sections on the right will display –
the editor will only expand those sections that have settings for the chosen selector. However, you can easily
expand other sections, if you’d like to add attributes for them to the chosen selector, by clicking on the
section’s title, eg. click on Colours to expand or collapse the Colours selection.
When you make a change to a selector you’ll see a Save Changes button appear next to the Close button at
the bottom of the window. Clicking this will update your CSS file whilst keeping the editor open. By doing this
you can have the editor open in a window and have your site open in another browser window, allowing you to
refresh that to see how the changes you have made work in practise.
8.7
Advanced Template Defaults
Advanced Template Defaults provides you with a way to select additional default template sets that should be
selected for different browsers. You could use this to select a different template set for visitors using Internet
Explorer 6, for instance, or for those visiting from mobile platforms. The listing page shows a complete listing
of all the defaults you currently have setup. It shows the browsers selected, any custom detection strings you
have added and the template set that should be selected along with Edit and Delete buttons.
Advanced Template Defaults Listing
Adding / Editing Defaults
Adding and editing defaults uses the same screen. Here you can select any number of the browsers that JShop
Server recognises as standard, enter any custom browser detection strings and select the template set you
wish to use as the default.
120
Templates : Advanced Template Defaults
121
Editing a template default record
Recognised Browsers
All the browsers listed in this section are already detected as standard by JShop Server so you simply have to
click the checkboxes next to each one to select them.
Custom Selection
As browsers are constantly being released and as it’s impossible to code in every single browser available into
JShop Server, here you can enter up to three different custom detection strings to pick up additional browsers.
For each option all the keywords you enter have to be found in the visiting browser’s user agent string in order
to make a positive match.
Use Template Set
Here you can select which of your currently installed template sets to use as the default.
8.8
Template Editing
JShop Server include a simple template editor for managing your templates. The Template Navigation (as
show below) allows you to navigate through the template directories. You can click on a template name in
order to bring up the template editing screen in a pop-up. Templates are shown in black and directories are
shown in blue.
121
Templates : Template Editing
122
Template Settings
Note: You cannot navigate any higher than the main JShop Server directory for security reasons.
The template editing screen allows you to make changes to templates via. your browser. Changes to the
template can be saved by clicking on the ‘Save’ button or the template can be saved under a different name by
entering a name in the text box at the bottom and clicking ‘Save As’. This is useful if you want to use different
templates for different product and section pages (the template that a product or a section uses can be
specified on the product/section information screens – please see the ‘Content’ section for more information.
Template Settings
122
Templates : Remove Compiled
8.9
123
Remove Compiled
This screen allows you to remove all the currently compiled templates for each of the installed template sets.
This is useful if you want to make sure that all the compiled templates are up to date as the first time a
template is needed if a compiled version doesn’t exist, one will be created.
8.10
Snippets
Snippets are long section of text or HTML that you can include in your templates. This allows you to change,
for instance, the welcome text on the front page without having to edit the templates. Snippets, in contrast to
Labels, can have both a title and a main content. In the default templates the news section on the left hand
menu uses both the title and the content of the Snippet called News. Changing the information for a snippet
will update what is shown immediately.
Some snippets are setup by default and are used in the default templates. However, you do not have to use
those that are setup by default and you can setup as many other snippets as you would like to use.
Snippets are fully multi-language as well and if you have alternative languages setup for your store the adding
and editing screens allow you to enter alternative language versions of both the title and the content of the
snippet.
List Of Snippets
List of Snippets
The list of snippets gives you an overview of all the snippets you currently have setup in JShop Server along
123
Templates : Snippets
124
with ‘Edit’ and ‘Delete’ buttons for each one. In addition the ‘Add New Snippet’ button at the bottom of the list
allows you to add a new snippet.
8.10.1
Adding/Editing Snippets
Adding and editing snippets uses the same screen and the options available are as follows:
Editing A Snippet
Name
This is the internal name for the snippet and only letters and numbers are allowed. This is the name you use
to pick the snippet out on a template. For instance, if you had a snippet called News, you can use
{snippet=News.title} to show the snippet’s title and {snippet=News.content} to show the snippet’s content.
Title
This is the title field for the snippet. This is optional and if you just want to make use of a snippet’s content that
is perfectly acceptable. You would normally only fill this in if you intend to use the title on your templates.
Content
This is a long test field that can contain as much information as you like, including any amount of HTML.
8.11
Labels
In contrast to snippets, labels are smaller pieces of text (up to 250 characters) that are used throughout the
default templates anywhere that text that does not come from the database is show on the page. Labels are
used to make multi-language versions of your site much easier – each label can have alternative language
versions (if you are using multi-language). This enables you to use one set of templates that can display in any
of your languages.
In addition labels are also useful if you want to change some of the display text as you do not have to edit the
templates – as soon as you update a label the change will appear on the front-end of your store.
124
Templates : Labels
125
Of course, using labels isn’t compulsory and many might find that they do not want to use them if they aren’t
using multi-languages. In this case, you can simply replace the label in the templates with whatever text you
want to show. The default templates do use labels throughout but this is easy to change when editing the
templates.
List Of Labels
List Of Labels (shortened for display purposes)
The list of labels gives you an overview of all the labels currently setup in JShop Server. The first column gives
the type of the label and this helps to split them up into logical groups for editing. This type is also used when
using the label in a template. For instance in type ‘account’ there is a label called ‘accountHomeLink’. This can
be included on a template by using {labels.account.accountHomeLink}.
In addition the ‘Add Label With New Type’ allows you to add a new label type to the list.
Adding / Editing Labels
Adding and editing labels use slightly different screens. Adding a label provides you with a single label entry
section along with an editable label name, as shown below.
Adding a New Label
As you can see in the above image, alternatives are being entered for the different languages the shop is setup
for.
When editing labels, a whole list of the labels within the type selected are shown on the screen allowing quick
and easy editing of the whole type. In addition there is a check box at the end of each label’s row that, if
checked, will delete the label when you click the ‘Update Labels’ button. A typical edit screen is shown over the
page:
125
Templates : Labels
126
Editing All The Labels In ‘copyright’
8.12
Open Shop
The links here allow you to open the shop in a number of different template modes. If your shop is already live
and you want to force some templates to recompile you can use the ‘With Force Compile On’. This will allow
you to navigate the store and each page you view will be recompiled. All other users on the site will still be
using the currently compiled version (presuming you are operating the templates compiled) until you view that
page in this mode. Once you have forced the template to recompile all other users on the site will then use the
newly compiled version.
Using ‘With Uncompiled On’ means that the store will open and use the normal templates rather than the
compiled versions. This is useful if you’re making some changes to the templates but don’t want normal users
to see them yet, as they will still be using the compiled versions.
Note: ‘With Force Compile On’ uses the xTFC option so if this is not enabled in Template Settings then this
link will simply open the shop in the normal template mode. The same is true for ‘With Uncompiled On’ as
well.
126
Import/Export :
9
127
Import/Export
Getting information into and out of a new system is always important and this section provides both import and
export routines to help you in this.
What Files Can Be Imported?
The import routines in JShop Server accept any normal CSV file with Windows line breaks. If you are
preparing a CSV file from a Mac, you will need to ensure that Windows line breaks are used, otherwise this
may cause unexpected results when importing.
9.1
Saving Import/Export Layouts
Each of the import / export screens has a small section at the top which provides the ability to load and save
previously make import or export layouts. On any particular import or export screen previously saved layouts
applicable to the current import or export section will be shown in a drop-down box and you can select one of
these and click the ‘Load’ button to load it. Selecting one of the saved layouts and clicking ‘Delete’ will allow
you to delete it.
Layout Management
Once loaded a further button will appear marked ‘Save’, enabling you to save an updated layout to the same
name. Alternatively, you can use the ‘Save As’ button to save a new layout or save a loaded layout with a new
name (the original will still exist as well).
Inclusion Of The ‘Save’ Button
These routines make it easy to retrieve a layout that you use often, for instance you can save a layout for
exporting orders and each time you export orders you can re-load this layout to make sure that the CSV file
that is created is outputted in the same way.
9.2
The Main Fields Boxes
For both importing and exporting fields can be selected in left hand box and clicking on the arrow will transfer
them to the right hand box. On the far right of the two boxes the up and down arrows will move fields up and
down the field order and the red X will remove them altogether from the right hand box.
127
Import/Export : The Main Fields Boxes
128
Main Fields Boxes: This one is for updating image locations.
9.3
Additional Import/Export Information
Each of the import / export screens also has the same section near the bottom of the page – Additional Import
(or Export) Information. These fields describe the actual format of the CSV file to be imported or exported and
are as follows:
Additional Import / Export Information
First row contains column headings
For imports this means that the first row contains column headings and this first line will be ignored. For
exports this means that the first line in the export will contain all the column heading you have included in the
correct order.
Field Delimiter (Separator)
This describes how each field in a record is separated. The choices are Tab, Comma, SemiColon or Pipe.
Text Qualified by Quote Marks
If YES is selected, for imports all starting and ending quote marks on a text field will be stripped before being
put into the database. For exports, all text fields will be surrounded by quote marks.
9.4
Importing
When on an import screen the left hand select box shows a list of all the possible fields that JShop Server will
recognise for the import and the right hand screen should contain a list of all the fields in your import CSV file
in the correct order. If there are extra fields in your CSV file you can use the special SKIP_FIELD field from the
left hand box to tell JShop Server to skip the field, as it’s not needed.
128
Import/Export : Importing
129
Location Of Import File
Selecting File To Import
JShop Server provides you with two options of supplying the file to import:
Upload From Computer
Clicking the ‘Browse’ button will open a file dialog window and allow you to choose the file you wish to import
from your local machine. Please note that large files may not work correctly using this method due to
configuration settings in PHP limiting the size of uploaded files.
Load From Server
Here you can enter a path and file name to an import file located on your server. This is the best option for
larger imports.
9.4.1
Update Product Images
This is an import screen and provides the ability to import a list of product IDs and / or product codes along
with corresponding image locations. You should have already uploaded the images to your server and make
sure that the references that you import here are relative to the main JShop Server directory. Without either a
product ID or product code field being included in the import CSV, products will not be updated as there will be
no way of cross-referencing import records to the appropriate product.
9.4.2
Update Stock Levels
This is an import screen and provides the ability to import a list of product IDs and / or product codes along
with corresponding stock levels. Without either a product ID or product code field being included in the import
CSV, products will not be updated as there will be no way of cross-referencing import records to the
appropriate product.
Note: This will only update the basic stock level settings for products and not any combination stock levels
that you have setup. Also, updating stock levels should not be done whilst orders are being processed on
the system as importing new stock levels will set the stock level absolutely and this may lead to
discrepancies afterwards.
9.4.3
Update Main Prices
This is an import screen and provides the ability to import a list of product IDs and / or product codes along
with corresponding main prices. Without either a product ID or product code field being included in the import
CSV, products will not be updated as there will be no way of cross-referencing import records to the
appropriate product.
Note: Only those currencies that are not calculated by exchange rates can have their prices updated by
this import. Currencies calculated by exchange rates will not appear in the left hand box.
9.4.4
Update Existing Products
This is an import screen and provides the ability to import a list of product IDs and / or other product
information to update existing product information in your store. Without either a product ID or product code
field being included in the import CSV, products will not be updated as there will be no way of crossreferencing import records to the appropriate product.
129
Import/Export : Importing
130
For product extra fields that are select boxes, check boxes or radio buttons you can enter a list of options,
separated by commas, to load up these field options.
If you wish to import directly into certain sections you can use either the sectionIDs field or the sectionNames
field to set the sections that the product appear in. sectionIDs should contain a list of internal section IDs,
separated by commas, and sectionNames should contain a list of section titles, again separated by commas.
9.4.5
New Products
This provides the ability to import new products into the JShop Server product database. We only recommend
using the product ID field if you are using the ‘Replace Insert’ Insert Method (see below.)
For product extra fields that are select boxes, check boxes or radio buttons you can enter a list of options,
separated by commas, to load up these field options.
If you wish to import directly into certain sections you can use either the sectionIDs field or the sectionNames
field to set the sections that the product appear in. sectionIDs should contain a list of internal section IDs,
separated by commas, and sectionNames should contain a list of section titles, again separated by commas.
An extra box is available with this import entitled ‘Insert Method’. There are three possible options:
Straight Insert: JShop Server will attempt to import the products directly, without affecting any existing
products. If you are importing a product ID and that product ID already exists in the database, JShop Server
will not add the record to the database.
Replace Insert: JShop Server will import the records, updating any products that already exist with the
new information and creating new records for those that don’t exist. The decision to update or replace is
made by checking to see if the product ID already exists. Be warned, if a product ID does already exist the
record will first be deleted before the new data with the same product ID is inserted – this could cause data
loss.
Drop All Products Then Insert: As the name suggests this will drop every product in the database then
insert the products from the CSV file. Use this option with caution!
9.4.6
Update Qty Discounts
This import screen provides you with the ability to import different quantity discounts for already existing
products in the system. Your import file should use either the productID field or the product code (code) field to
link to ensure that the information is linked correctly to the product record.
For the accTypeID field you will also need to use the correct account Type ID, which is a number. You can use
0 for ‘All Accounts’.
NOTE: Importing quantity discounts for a product will cause already existing quantity discounts for that
product to be removed before the import. Only products that exist in the import file will be affected, other
products will remain unchanged.
9.4.7
Update Base Pricing Combinations
This import screen provides you with the ability to import different base pricing combinations for already
existing products in the system. Your import file should use either the productID field or the product code
(code) field to link to ensure that the information is linked correctly to the product record.
For the accTypeID field you will also need to use the correct account Type ID, which is a number. You can use
0 for ‘All Accounts’.
For your option fields you should enter the text version of the option and only a single option can be entered
for each field on each row of the import. They must match exactly or the record will not be imported.
130
Import/Export : Importing
131
NOTE: Importing base pricing combinations for a product will cause already existing base pricing
combinations for that product to be removed before the import. Only products that exist in the import file
will be affected, other products will remain unchanged.
9.4.8
Update Attribute Combinations
This import screen provides you with the ability to import different attribute combinations for already existing
products in the system. Your import file should use either the productID fields or the product code (code) field
to link to ensure that the information is linked correctly to the product record.
For your option fields you should enter the text version of the option and only a single option can be entered
for each field on each row of the import. They must match exactly or the record will not be imported.
The type field describes what the attribute is and the following are permitted values:
W = Weight
C = Product Code
S = Stock Level
q = Minimum Quantity
Q = Maximum Quantity
E = Exclude
U = Supplier Code
For Stock Levels (S) you can also set the Exclude flag to Y or N according to whether you want the option
excluded from purchase if it goes out of stock.
NOTE: Importing attribute combinations for a product will cause already existing attribute combinations
for that product to be removed before the import. Only products that exist in the import file will be
affected, other products will remain unchanged.
9.4.9
Mailing List
This is an import screen and provides the ability to import a list of email addresses to the JShop Server
newsletter distribution list.
9.4.10
Customers
This is an import screen and provides the ability to import customers into your database. Important fields are
as follows:
Password – this should be the pain text password. It will be encrypted by the system on import.
Account Type ID – this is the internal accTypeID for the customer. The default account type is 1.
Email – Ideally you should ensure that all records have an email address against them, otherwise the
account cannot be used by the customer on the site.
9.4.11
Sections
This provides a way of importing sections into your store. Important fields are as follows:
parentID – this is the internal (Jshop Server) ID number for the section that this section should have as a
parent in the section structure.
131
Import/Export : Importing
9.4.12
132
Associated
This import provides a quick way for you to assign associated products in your store. The file you import is a
set format, although within that you can use either productIDs or product codes to do the linking and field
separators can be specified. It also provides a way for you to specify bi-directional associations and the
positioning of each associated product against their relative products. More information is available on the
import screen itself.
9.5
Exporting
When on an export screen the left hand select box shows a list of all the possible fields that JShop Server will
export and the right hand screen shows those fields you have selected to export and the order in which they
will be exported.
Saving The Exported File
Selecting How To Export The Data
JShop Server provides you with three different options when exporting.
Download File In Browser
This will cause a file download box to pop-up and allow you to save the file to your local computer. Please note
that some browsers do not support this method and you will not be able to use this to export information.
Output To Screen (Save With ‘View Source’)
This will output the export to the screen and you can then save it to your local machine by using the View
Source option in your web browser.
Save To Server
This lets you save the export directly to your web server in the location specified by the ‘Server File Name’
field. It is important that you enter a valid path and file name and that the directly you are exporting to has the
correct permissions to allow PHP to create a file. In addition please note that it is advisable to export to a
password protected directory to disallow people getting access to the files via. the web. For extra security
choose a path that is outside of the web root.
Exporting Orders
When exporting orders there is an additional section of the export screen that allows you to choose a data
range for the export along with a selection to only export orders with a certain order status.
Extra Selection Criteria For Order Exports
132
Import/Export : Exporting
9.5.1
133
Available Exports
Export Mailing List
Export screen that provides access to all the records on your mailing list. Currently only two fields are
available. RecipientID is an internal JShop Server identifier for the record.
Export Orders
Export screen that provides access to all the orders from your store. This screen also provides you with a Date
Range selector allowing you to limit the range of orders that will appear in the exported file.
Note: Including any of the order line fields, e.g. lineID, product code, product name etc. will cause the
export file to include a line for each of the order lines. These lines will all contain the same basic order
header information.
Export Products
Export screen that provides access to all the products in your store.
Note: Only those currencies that are not calculated by exchange rates can be exported.
Export Customers
Export screen that provides access to all the customers from your store.
Export Stock Levels
Export screen that provides access to just the product stock level fields. This is useful for creating an export
that can then be updated in a spreadsheet on your PC and imported again using the ‘Update Stock Levels’
import option.
Export Affiliates
Export screen that provides access to all the affiliates in your store.
Export Sections
Export screen that provides access to all the sections currently setup in your store.
9.6
Quickbooks Menu
JShop Server provides an order export in Quickbooks IIF format for importing into the Quickbooks accounting
software. Currently this export supports the United Kingdom, United States and Australian versions of
Quickbooks and it’s important that you select the correct version on the Quickbooks Settings screen for the
export to work correctly.
In addition import errors into Quickbooks can be caused by choosing incorrect account settings on the
133
Import/Export : Quickbooks Menu
134
Quickbooks Settings screen so you should be careful when setting up your exports and importing into
Quickbooks, testing with a dummy company if possible to make sure it’s working correctly for you.
9.6.1
Quickbooks Settings
These options cover a few global settings for your store and should be used with caution.
The Quickbooks Settings Screen
International Version
It is important that you select the correct international version of Quickbooks that you’re using here as the
export formats are different depending on the version you use.
Order Prefix
If you would like to prefix all the order numbers from JShop Server with a certain string to help identify them
once in Quickbooks, enter that string here. If you leave it blank no prefix will be added.
Transaction Class
This is the INC account that you want to use for the transaction
Tax Class (US Only)
This is only used for the US version of Quickbooks and specifies the INC account for the tax component of
orders
Declare Products As Inventory Items
If set to YES, the export will add extra lines to define the products on an order as inventory within Quickbooks.
Asset Account
This is the asset account to use for inventory items (if you are declaring products as inventory items).
Cost Of Goods Account
This is the cost of goods (COG) account to use for inventory items (if you are declaring products as inventory
items).
134
Import/Export : Quickbooks Menu
135
Product Income Account
This is the the income (INC) account to assign products on orders to.
Shipping Income Account
This is the the income (INC) account to assign shipping lines on orders to.
Gift Certificate Income Account
This is the the income (INC) account to assign gift certificate orders to.
Discount Account
This is the the income (INC) account to assign discount totals to.
9.6.2
Quickbooks Export
This is the screen where you create the order export file for importing into Quickbooks.
The Quickbooks Export Screen
Selecting Which Orders To Export
You can select orders either by date range, or by order number range. Which ever you select, ensure that you
have the correct radio button selected, by clicking on the relevant title, e.g. “Select By Order Numbers”.
In addition to the date range and order number range you can also specify only to export orders of a given
order status within the range specified. Use the ‘Order Status’ drop-down to select a specific order status or
choose ‘Any Status’ to output all orders within the range.
Saving The Exported File
135
Import/Export : Quickbooks Menu
136
Selecting How To Export The Data
JShop Server provides you with three different options when exporting.
Download File In Browser
This will cause a file download box to pop-up and allow you to save the file to your local computer. Please note
that some browsers do not support this method and you will not be able to use this to export information.
Output To Screen (Save With ‘View Source’)
This will output the export to the screen and you can then save it to your local machine by using the View
Source option in your web browser.
Save To Server
This lets you save the export directly to your web server in the location specified by the ‘Server File Name’
field. It is important that you enter a valid path and file name and that the directly you are exporting to has the
correct permissions to allow PHP to create a file. In addition please note that it is advisable to export to a
password protected directory to disallow people getting access to the files via. the web. For extra security
choose a path that is outside of the web root.
136
Newsletter :
10
137
Newsletter
The Newsletter sub-system in JShop Server provides both a means of capturing email addresses in your store
via. the Join Newsletter section (if used) and also when people order via. a checkbox on the billing details.
Customers with accounts can also change their newsletter setting on the customer account details screen. If
you are using the Affiliates system within JShop Server you can also send newsletters to affiliates using the
Newsletter system.
You are not forced to use the included Newsletter system if you do not want to. By using the Import/Export
section of JShop Server the full mailing list that is used for the Newsletter can be exported for use outside of
the system.
In addition to the actual Newsletter, this section of the administration system also provides a ‘Latest News’
feature for your store where you can create news items for display in your store.
Note: By default the newsletter options are ‘opt-in’ for the customer. Although this could be changed in
the templates, for instance when ordering or editing customer account details, to force inclusion in the
newsletter we strongly advise against this as there a number of laws that protect consumers from being
automatically included on mailing lists.
10.1
Newsletter Options
This screen allows you to set some general options for newsletters that you send out using JShop Server.
Newsletter Options
Reply/From Email Address For Newsletters
This option sets the email address that the recipient will see on the newsletter. If they reply to the newsletter
this will also be the address their reply arrives to.
Newsletter Test Recipient
This is the recipient email address that you would like to use when clicking the ‘Test’ button on the List of
Newsletter. The email address specified here will receive the test mailing of the newsletter.
Ban Sign-Ups From These Domains
You can enter a comma separated list of domain here that you do not want to allow sign-ups from. Often
spam-bots use fake addresses at your own domain name when filling in forms, so you should enter your own
domain name here, e.g. ‘whorl.co.uk,jshop.co.uk’
Activate Double-Opt In Signup
137
Newsletter : Newsletter Options
138
When activated new signups to the newsletter will be sent an email with an activation link in it to double
confirm that they signed up to the newsletter. Without clicking this link their account will not become active in
the system and they will not receive the newsletter.
Email Addresses To List Per Page
This option sets the number of newsletter email records to show per page on the ‘Subscribed Emails’ page.
Convert Line Breaks To <br/> on News Items
This gives you the option of having JShop Server automatically convert line breaks to <br/> tags when
displaying news items on your site. If you set this to NO you will have to enter your own line breaks.
Note: If you have the WYSIWYG editor turned on, this option will have no effect.
Sending: Emails Per Batch
JShop Server sends the newsletter out in batches, refreshing the sending page after each batch to keep you up
to date on progress. This setting dictates how many emails are sent in each batch. A typical setting would be
around 50 – 100. However, if you experience time outs you should lower this setting to take into account the
speed of your mail server.
Sending: Automatically Process Next Batch
When set to YES, no user input is required between sending each batch, the page reloads and the next batch
is sent automatically. If set to NO, the sending screen will require you to click on a link in order to send the
next batch. For most, a setting of YES would normally be used here.
10.2
List of Newsletters
This screen provides a list of all the newsletters you have setup using JShop Server. Newsletters are not
automatically deleted once sent, so they can be sent again should you wish.
List of Newsletters
Against each newsletter shown you will see the date the newsletter was created, the intended recipient list
and the current send status. The status will be one of the following:
Status
Description
NOT SENT
This shows that the newsletter has not currently been sent out
from the system.
SENT
This shows that the newsletter has been sent out from the
system.
BEING SENT
This shows that the newsletter is currently being sent out by
JShop Server. Please see below for more information on this.
138
Newsletter : List of Newsletters
SEND INCOMPLETE
139
The send process was started but has not yet been finished.
Along with each newsletter listed there is are ‘Edit’, ‘Delete’ and ‘Test’ buttons. The ‘Test’ button will send a
copy of the newsletter, via email, to the test recipient email address as specified in the ‘Newsletter Options’
screen.
In addition, depending on the status of the newsletter a fourth button may be seen. If the newsletter has not
been sent this button will say ‘Send’ and, once clicked, will start the send process. If the newsletter has been
sent this button will say ‘Reset’ and will be reset the status of the newsletter to NOT SENT allowing it to be
sent again.
Once you click the ‘Send’ button you will be asked to confirm that you wish to send the newsletter. Clicking OK
will load a pop-up window with the send page and the first batch will be processed. You will need to keep this
window open for the duration of the sending process. After each batch the screen will update and, depending
on your newsletter options, will either automatically proceed to process the next batch or wait for user input
before sending the next batch.
By re-loading the List Of Newsletters page you can keep track of the current status of the newsletter. If the
system is still sending the newsletter out to recipients it will appear as BEING SENT. If the system has finished
sending the newsletter it will appear as SENT.
139
Newsletter : Adding/Editing Newsletters
10.3
140
Adding/Editing Newsletters
The adding and editing screens use the same page and below are details of the fields available:
Editing a newsletter
Recipient List
This select box allows you to select who should receive the newsletter. If you are using the affiliate system in
JShop Server you will also be able to select affiliates here to send them a separate newsletter.
In addition to being able to send to the full mailing list for customers, you can select to send to only those with
certain customer account types. Note: A cross-reference is done between the main subscribed newsletter
email list and the customer account database – only those customers who appear on the newsletter email list
will be emailed, others will not.
With affiliates again you can send a newsletter to all affiliates or select only certain affiliate groups to send
newsletters tailored to them.
Subject
This is the subject of the email message that will appear in the recipients email inbox.
Content Text
This is the plain text version of the newsletter that will be sent to the recipient. If you do not wish to have a
plain-text version of your newsletter then you should leave this field blank.
140
Newsletter : Adding/Editing Newsletters
141
Content HTML
This is the HTML version of the newsletter that will be sent to the recipient. If you do not wish to have a HTML
version of your newsletter then you should leave this field blank.
It is always good practice to include a remove link in emails you send and JShop Server provides a way of
doing this. By including {removelink} in your newsletter, this will be replaced with a remove link particular to
the individual recipient that, when clicked, will automatically remove them from the newsletter mailing list.
10.4
Subscribed Emails
This screen provides a listing of all the email addresses currently subscribed to your main customer
newsletter. In addition you can search by using the ‘Search Mailing List’ section on the left hand menu of the
main screen which will provide the same Subscribed Emails list limited to the search you have entered.
List Of Subscribed Email Addresses
10.5
Un-Activated Emails
Similar to the Subscribed Emails list, this list shows any email addresses that have been added but have not
yet been verified. This list will only contain items if you have activated the Double Opt-In option in Newsletter > Newsletter Options screen.
10.6
Bulk Remove Emails
Should you wish to bulk remove email addresses from your mailing list you can do so with this option. You
simply need to provide a text file with a single email address per line. The file you wish to use can be supplied
using the ‘Browse’ button on this screen. Once selected click ‘Remove Emails’ to process the list.
10.7
Latest News
List Of News Items
Along with each news item listed there is an ‘Edit’ button and a ‘Delete’ button. In addition there is a ‘Sort /
141
Newsletter : Latest News
142
Reorder News’ button that allows you to change the display order of news items. By default news items are
displayed in date order.
Note: Please see section 20 of the documentation for more information on how to display news items in
your store.
10.8
Adding/Editing News Items
The adding and editing screens use the same page and below are details of the fields available:
Editing a news item
Title
This is the title of the news items
Content
This is the full detail for the news items. This field can contain as much information as you require and can
include HTML. Note that line breaks are automatically converted into <BR> tags when displayed in your store.
Reset Date Of This News Item To Now
This option is only available when editing a news item and if checked the news item’s date and time will be reset to the current date and time when it is saved.
In addition, you will also see extra language versions of the available fields if you have multiple languages
setup in your store.
142
Customers :
11
143
Customers
JShop Server includes a comprehensive customer account and management system. In JShop Server it is
possible for customers to open accounts, setup an address book of delivery addresses, manage and send a
wish list and many other features. In addition the administration system in JShop Server provides the ability to
setup multiple customer account types and to allocate customers to these account types. Rather than just a
way of categorising customers, you can give automatic discounts, give other special discounts, change the
payment options available or even show sections and products only to certain customer types.
This section allows you to manage your customers, account types and customer reviews.
11.1
General Settings
This screen gives you access to some overall configuration options for customers in JShop Server.
General Settings
Allow Customer Accounts
If set to YES, customers will be allowed to open accounts, otherwise customer accounts will not be available in
your store.
Automatically Login On Account Creation
If set to YES, when a customer opens an account they will automatically be logged in. This means that, for
instance, during checkout, they will immediately go to the next stage of ordering without having to enter their
login details again.
Take Customer To Account At Login
If set to YES, the customer will automatically be forwarded to their account home page when they login,
otherwise they will either be taken back to the previous page or, in some circumstances where this is not
possible, taken back to the front page of the store.
Allow Separate Delivery Address
If this option is set to NO, the ordering system will not allow the entry of a separate delivery address and
customers will only be allowed to purchase giving their billing address.
Make County/DeliveryCounty Field A Select Box
This option changes the county/state fields that JShop Server uses. If set to YES these fields will become select
boxes, rather than text entry field. The purpose of this is if you need to provide a set list of counties / states for
the purposes of tax and / or shipping. If you set this as YES, you can set options for these select boxes by
editing the county field in ‘Customer Fields’ or the deliveryCounty field in ‘Delivery Address Fields’.
Note: The select options in county and deliveryCounty fields will be linked to avoid inconsistency between
the two.
143
Customers : General Settings
144
New Accounts Default Account Type
This allows you to set the account type given to all newly opened accounts.
Minimum Password Length
This allows you to set the minimum number of characters a customer may use for their password.
11.2
Account Types
This is where you can create account types for your customers. When a customer field signs up from your
store they are automatically entered into the ‘General’ customer account type. You can then choose to move
them into another customer account type as the need arises.
List Of Account Types
This screen shows you the currently available account types you have setup in JShop Server.
The List Of Account Types
The General account type, although it can have its name changed, cannot be deleted as this is the default
account in JShop Server.
Along with each of the account types is an ‘Edit’ button to edit the account type details and a ‘Delete’ button to
remove the account type.
Adding / Editing Account Types
Adding and editing account types uses the same screen. The following fields are available for account types:
Editing an existing account type
Name
This is the internal name for the account type.
Description
A description, never shown on the front-end, to help you remember what the account type is for.
144
Customers : Account Types
145
Show Prices Including Tax
The default product price field that is sent to the templates can either include or exclude tax, based on this
setting. For instance for general customers you would probably opt to include tax in the price shown on the
product pages and in the cart. However, if you have wholesale customers, for instance, then it may be
preferable to show the prices excluding tax. In both instances tax will be shown as a separate line at checkout.
Discount %
This is a very powerful feature that enables you to give an automatic discount off product prices to members of
a customer account type. This discount isn’t shown as an extra line in the cart or at checkout – the prices the
customer sees throughout the store will be the price excluding this discount. This is useful if you have
wholesale customers, for instance, that receive a standard percentage discount off normal product prices.
Allow Separate Delivery Address
If you are allowing deperate Delivery Addresses in Customers -> General Settings you can still disable this
ability per account type by using this option. If you wish customers with an account type to be able to select a
separate delivery address select YES here, otherwise select NO.
11.3
Account Assign Rules
Account assign rules within JShop Server allow you to automatically set or adjust a customer’s given account
type depending on the information they enter whilst either creating their account or editing their account.
However, in addition to setting their customer account type you can also set their tax exempt status. This
would allow you, for instance, to setup an extra customer field and use a regular expression to validate any
VAT number or your own customer account reference numbers.
The main list gives an overview of the rules you have setup, indicating what account type they’re setting the
customer to and whether they’re setting the tax exempt flag against their customer account type.
List of Account Assign Rules
In addition the ‘Sort / Reorder Rules Order’ allows you to change the order in which the rules are applied. So,
you should put the least restrictive rules first, and the most restrictive rules last. The last matched rule will
dictate how the customer is treated.
Adding / Editing Account Assign Rules
Adding and editing account assign rules use the same screen.
145
Customers : Account Assign Rules
146
Editing an Existing Account Assign Rule
Name
This is an internal name only that helps you identify different rules in the administration system.
Assign Account Type
Here you can select what account type a customer should be given that matches this rule. You can select ‘Set
Default / No Change’ if you don’t wish to change their customer account type.
Assign Tax Exempt
If set to YES then the customer will not have tax charged. This could be used, for instance, if you’re selling
across Europe as customers with valid VAT numbers from a different European country usually don’t have to
pay the tax at the time of purchase, and account for it locally.
Only if Country Equals
Here you can select one or more countries that this rule should apply to. You can multi-select using the SHIFT
and CTRL keys as you would in any other application. In addition you can select ‘No Country Check’ if you don’t
wish to restrict this rule to a given country or countries.
If Field Match & AND If Field Match
This is where you can pick up on what the customer has entered into different customer fields to help qualify
the rule. Each line has three boxes. The first is the field you would like to check, the second is the type of
comparison you would like to do on the first and the third is the actual comparison value. The comparison type
drop-down contains several selections:
Not Blank – Just checks that the field is not blank.
Equals – Checks whether the field equals the value entered (this comparison is not case sensitive)
Custom Regex – Allows you to enter a custom regular expression to match more complex scenarios.
The rules are “ANDed” together which means that the customer’s entries have to match all the rules entered
here in order to satisfy the criteria.
NOTE: The regular expression validation uses Perl style regular expressions. This has changed in version
2.3.0 from POSIX due to the depreciation of the ereg group of functions in PHP
146
Customers : Customer Fields
11.4
147
Customer Fields
JShop Server has a standard set of customer fields that you cannot delete (some of them, however, can be
made invisible to the customer). In addition to the standard customer fields you can also setup additional
customer fields. These customer fields do not necessarily have to be editable by the customer – in fact there
are a number of options that give you control over who fills them in (the customer, or you), whether they have
to be completed when ordering (for instance, if somebody orders from your site with no account) and whether
they are to be included in the order details available in the Order Management system.
There are 4 field types available, as detailed below:
Type
Description
TEXT
Single line entry field
TEXTAREA
Multiple row entry field
SELECT
A select box of options
CHECKBOX
Single check-box
Each of the fields can be validated and validation messages displayed if they are not filled in.
Note: The county field can be changed to a select box if you need to operate tax and / or shipping against
a set list of options. This is done in the General Settings page of the Customer section of the
administration system.
List Of Customer Fields
List of Customer Fields
The list of customer fields gives you an overall view of the fields for customers, their internal and viewable
147
Customers : Customer Fields
148
titles along with an ‘Edit’ button and, if the field isn’t one of the standard JShop Server customer fields, a
‘Delete’ button.
At the bottom of this screen there is also an ‘Add New Field’ button along with a select box for the type of field
you would like to add.
11.4.1
Adding/Editing Customer Fields
Adding and editing customer fields uses the same screen. However, some of the options are only available for
certain types of fields. Options available are as follows:
Editing an existing TEXT type field
Name
This is an internal name that is used in the database. It must be unique and you will be told if it is not. This
field is not generally shown to the customer.
Title
This is the description of the field that is shown to the customer in the default templates.
Size and Maximum Length (only for TEXT type fields)
Size is the actual size of the form field on the page and maximum length is the maximum number of
characters a customer can enter into the field.
Columns and Rows (only for TEXTAREA type fields)
This is the number of columns and rows that the field should be sized to on the contact form page.
Validation, Validate For and Validation Message
If you want to make it a requirement that a field is filled in you should select YES for the Validation radio
button. In addition, with the Validate For option, you can select how you want the field validated. There are a
number of built-in validation types, such as Not Blank or Email Address and, in addition, choosing “Custom
Regex:” allows you to enter a Perl style regular expression for the validation, permitting complex validation
routines to be used. If you are not sure how to use regular expressions or wish to find some for your particular
148
Customers : Customer Fields
149
need a good site is http://regexlib.com/ where you will find many that you can enter here.
Finally the Validation Message is the error message you wish to display if the validation or the field fails and
requires the user to re-input information.
NOTE: The regular expression validation uses Perl style regular expressions. This has changed in version
2.3.0 from POSIX due to the depreciation of the ereg group of functions in PHP
Include When Ordering
Selecting YES for this option will save any contents of this field with any order the customer places. This isn’t a
link to the customer record, the order will contain the data that the user (or internally, see below) had in this
field at the time of ordering. In addition selecting this option will show this field on the checkout billing page for
those customers who do not have accounts.
Internal Only
Selecting YES for this option will mean that the field is not shown to the customer and they can not fill it in.
Instead this is only saved internally. Selecting both this and ‘Include When Ordering’ would be useful for
making sure that internal accounts references for the customer are saved with the order and thus available for
export using the ‘Import/Export’ section of JShop Server.
Visible
Setting this to NO will make a field invisible.
Content (only available for SELECT type fields)
This allows you to enter a list of options for a select box field. You can enter a new option by typing it in the
Option: box and either pressing return or clicking the ‘Add’ button.
Content Section Available For SELECT Type Fields
If you select an already entered option its contents will appear in the Option: box allowing you to change it.
You can then click ‘Apply’ to save that change.
In addition the three little buttons on the right of the content box allow you to move items up and down the list
(changing their display order) or, by clicking the red X, to delete an item completely.
11.5
Delivery Address Fields
JShop Server has a standard set of delivery fields that you cannot delete (some of them, however, can be
made invisible to the customer). In addition to the standard delivery address fields you can also setup
additional delivery address fields. For any extra delivery address fields you can specify if they should be
included when ordering, meaning that they will be saved with the order and the customer will also be asked to
fill them in if adding a new delivery address when ordering.
There are 4 field types available, as detailed below:
149
Customers : Delivery Address Fields
Type
Description
TEXT
Single line entry field
TEXTAREA
Multiple row entry field
SELECT
A select box of options
CHECKBOX
Single check-box
150
Each of the fields can be validated and validation messages displayed if they are not filled in.
Note: The deliveryCounty field can be changed to a select box if you need to operate tax and / or shipping
against a set list of options. This is done in the General Settings page of the Customer section of the
administration system.
List Of Delivery Address Fields
List of Delivery Address Fields
The list of delivery address fields gives you an overall view of the fields for customers, their internal and
viewable titles along with an ‘Edit’ button and, if the field isn’t one of the standard JShop Server customer
fields, a ‘Delete’ button.
At the bottom of this screen there is also an ‘Add New Field’ button along with a select box for the type of field
you would like to add.
150
Customers : Delivery Address Fields
11.5.1
151
Adding/Editing Delivery Address Fields
Adding and editing delivery address fields uses the same screen. However, some of the options are only
available for certain types of fields. Options available are as follows:
Editing a Delivery Address field
Name
This is an internal name that is used in the database. It must be unique and you will be told if it is not. This
field is not generally shown to the customer.
Title
This is the description of the field that is shown to the customer in the default templates.
Size and Maximum Length (only for TEXT type fields)
Size is the actual size of the form field on the page and maximum length is the maximum number of
characters a customer can enter into the field.
Columns and Rows (only for TEXTAREA type fields)
This is the number of columns and rows that the field should be sized to on the contact form page.
Validation, Validate For and Validation Message
If you want to make it a requirement that a field is filled in you should select YES for the Validation radio
button. In addition, with the Validate For option, you can select how you want the field validated. There are a
number of built-in validation types, such as Not Blank or Email Address and, in addition, choosing “Custom
Regex:” allows you to enter a Perl style regular expression for the validation, permitting complex validation
routines to be used. If you are not sure how to use regular expressions or wish to find some for your particular
need a good site is http://regexlib.com/ where you will find many that you can enter here.
Finally the Validation Message is the error message you wish to display if the validation or the field fails and
requires the user to re-input information.
NOTE: The regular expression validation uses Perl style regular expressions. This has changed in version
2.3.0 from POSIX due to the depreciation of the ereg group of functions in PHP
151
Customers : Delivery Address Fields
152
Include When Ordering
Selecting YES for this option will save any contents of this field with any order the customer places. This isn’t a
link to the customer record, the order will contain the data that the user (or internally, see below) had in this
field at the time of ordering. In addition selecting this option will show this field on the delivery checkout page
for those customers who do not have accounts.
Visible
Setting this to NO will make a field invisible.
Content (only available for SELECT type fields)
This allows you to enter a list of options for a select box field. You can enter a new option by typing it in the
Option: box and either pressing return or clicking the ‘Add’ button.
If you select an already entered option its contents will appear in the Option: box allowing you to change it.
You can then click ‘Apply’ to save that change.
Content Section Available For SELECT Type Fields
In addition the three little buttons on the right of the content box allow you to move items up and down the list
(changing their display order) or, by clicking the red X, to delete an item completely.
152
Customers : Adding/Editing a Customer
11.6
153
Adding/Editing a Customer
Adding and editing a customer uses the same screen. You can add a new customer by clicking the ‘Add New
Customer’ menu option and edit a customer from the customer listing / search pages.
Editing an existing customer
The fields shown on this screen are those from the ‘Customer Fields’ setting page plus the following:
Email Address
The email address of the customer. The system will not allow you to setup a customer with the same email
address as a customer that already exists in the store.
Password
Only enter a password here if you want to set/change a password for the customer. Left blank, any existing
password will be left unchanged.
Account Type
This select box allows you to select which customer account type this customer belongs to. Please see the
‘Account Types’ heading (discussed previously in this section) for more information on account types.
Tax Exempt
This allows you to set whether the customer should be exempt from tax. This is useful if you’re dealing with
other companies and tax rules allow zero tax. For instance, in the EU sales between VAT registered companies
should not be taxed. By default this is set to NO.
153
Customers : ABC Customer Listing
11.7
154
ABC Customer Listing
This shows a list of customers in surname, forename order along with ‘Edit’ and ‘Delete’ buttons.
11.8
Date Customer Listing
This shows a list of customer in descending date of sign-up, with the newest first. It also shows 'Edit’ and
‘Delete’ buttons.
A typical list of customers
11.9
Unmoderated Reviews
If you are operating the review functionality of JShop Server along with the setting that allows reviews to be
moderated (please see the ‘General’ section for more details on customer reviews), this will display a list of
currently unmoderated reviews (those reviews with the visible flag set to NO).
Unmoderated Review List
From this list you can see the author, the date the review was made, the product it relates to and the rating
given. In addition there are ‘Edit’ and ‘Delete’ buttons available for each of the reviews.
Once either deleted or edited and the visible flag set to YES the review will disappear from this list.
Editing Reviews
The edit review screen shows the author of the review, the product code and name and the rating the
customer gave. In addition to this, the following fields are editable:
154
Customers : Unmoderated Reviews
155
Title
The title of the review that the customer entered.
Review
The actual review itself that the customer entered.
Editing a review
11.10
Reviews by Product
This shows all reviews, irrespective of the visible flag, sorted alphabetically by product code and product name.
As with the Unmoderated Reviews list there are ‘Edit’ and ‘Delete’ buttons for each of the customer reviews.
155
Checkout :
12
156
Checkout
The Checkout section of the administration system gives you access to configuration options and settings for
the way the checkout procedures of your store should operate. This section includes any extra order fields,
your payment options and gift certificate settings.
12.1
Checkout Settings
This screen lets you set some of the global checkout options for your store.
Checkout Settings
Allow One Step Checkout
Select YES if you would like to use the one step checkout facility that was added in version 2.3.0. Only
customers with Javascript enabled will be able to use the one step checkout, other customers will be taken
through the normal multi-step checkout.
Show Summary Before Order Submit (One Step Checkout)
Select YES if you would like the customer to view the normal order summary screen before actually submitting
the order to you with the one step checkout.
Force Customer Account Creation
With this option set to YES, visitors to your store will not be able to checkout unless they already have an
account or unless they open an account. The option to checkout without an account will be removed.
Minimum Order Value (Base Currency)
A setting above 0 activates this option. This allows you to set a minimum goods total value (excluding tax) that
the customer must have in their basket before they are allowed to check out.
Skip Payment Option Step If Only One Payment Type Available
If you are only taking credit cards on your store through a payment gateway that the customer is transferred
to, or via. other options excluding gift certificates and offer codes you can select YES here to skip the payment
option step at checkout, taking the customer directly onto the order summary screen before they submit their
order.
12.2
Extra Order Fields
When you first install JShop Server an extra order field has already been created for you. This is the ‘I agree
to the terms and conditions’ check box on the final ordering page. We have included this as an example of the
extra order fields and because it is a field that most people need. Any other extra order fields you setup will
also be shown on this final ordering page and any data entered saved with the order, unless you opt for them
to be ‘Internal Only’ in which case you can edit these through the order administration system for any other
156
Checkout : Extra Order Fields
157
information you need to store against an order.
There are 4 field types available, as detailed below:
Type
Description
TEXT
Single line entry field
TEXTAREA
Multiple row entry field
SELECT
A select box of options
CHECKBOX
Single check-box
Each of the fields can be validated and validation messages displayed if they are not filled in.
List Of Extra Order Fields
The list of extra order fields gives you an overall view of the fields for the final ordering page along with an
‘Edit’ button and a ‘Delete’ button.
Extra Order Fields List
At the bottom of this screen there is also an ‘Add New Field’ button along with a select box for the type of field
you would like to add.
157
Checkout : Extra Order Fields
12.2.1
158
Adding/Editing Extra Order Fields
Adding and editing extra order fields uses the same screen. However, some of the options are only available
for certain types of fields. Options available are as follows:
Editing an Extra Order Field
Name
This is an internal name that is used in the database. It must be unique and you will be told if it is not. This
field is not generally shown to the customer.
Title
This is the description of the field that is shown to the customer in the default templates.
Size and Maximum Length (only for TEXT type fields)
Size is the actual size of the form field on the page and maximum length is the maximum number of
characters a customer can enter into the field.
Columns and Rows (only for TEXTAREA type fields)
This is the number of columns and rows that the field should be sized to on the contact form page.
Validation, Validate For and Validation Message
If you want to make it a requirement that a field is filled in you should select YES for the Validation radio
button. In addition, with the Validate For option, you can select how you want the field validated. There are a
number of built-in validation types, such as Not Blank or Email Address and, in addition, choosing “Custom
Regex:” allows you to enter a Perl style regular expression for the validation, permitting complex validation
routines to be used. If you are not sure how to use regular expressions or wish to find some for your particular
need a good site is http://regexlib.com/ where you will find many that you can enter here.
Finally the Validation Message is the error message you wish to display if the validation or the field fails and
requires the user to re-input information.
NOTE: The regular expression validation uses Perl style regular expressions. This has changed in version
2.3.0 from POSIX due to the depreciation of the ereg group of functions in PHP
158
Checkout : Extra Order Fields
159
Internal Only
Selecting YES for this option will mean that the field is not presented to the customer to fill in. Instead it will be
saved with an order empty and this can then be filled in by editing the order in the order management section
of JShop Server. This is useful if you need extra fields against an order to store other, internal information.
Visible
Setting this to NO will make a field invisible.
Content (only available for SELECT type fields)
This allows you to enter a list of options for a select box field. You can enter a new option by typing it in the
Option: box and either pressing return or clicking the ‘Add’ button.
If you select an already entered option its contents will appear in the Option: box allowing you to change it.
You can then click ‘Apply’ to save that change.
In addition the three little buttons on the right of the content box allow you to move items up and down the list
(changing their display order) or, by clicking the red X, to delete an item completely.
12.3
Payment Options
This is where you can setup the various payment options you wish to give customers when they checkout. In
addition to being able to provide Credit Card, PayPal and NoChex payments (should you want to), you can also
setup an unlimited number of other ‘offline’ payment methods that the customer can choose on the payment
details page when checking out.
List Of Payment Options
This screen presents a list of the currently setup payment options. It includes details on whether the payment
option is enabled and which customer types it is available for. Next to each payment option is an ‘Edit’ button
and on all but the Credit Card, PayPal and NoChex options, a ‘Delete’ button will be available in order to
remove the payment option completely.
Payment Options list
PayPal, NoChex and Credit Card (if you have selected a payment gateway for credit cards on the Edit screen)
will also have green ‘Settings’ buttons available. For more information on what the screens clicking on these
buttons bring up please see the ‘Payment Gateways’ section of this documentation.
Note: Credit Card, PayPal and NoChex options cannot be deleted from the store completely but if you do
not wish to use any of them you can set the Enabled flag to NO on the edit screen and they will not then
appear as a payment option to the customer.
159
Checkout : Payment Options
12.3.1
160
Adding/Editing Payment Options
Adding and editing payment options uses the same screen. The fields available are as follows (some of these
are only available for certain payment option types):
Editing a Payment Option
Name
This is the name of the payment option. This will be shown to the customer in your store.
Enabled
Select NO if you want to remove this payment option completely from being selected in your store’s checkout
process.
Account Types
This selects what customer account types can actually see this payment option, this gives you the ability to only
show specific customers of a certain account type some payment options. Selecting ‘All’ will make the payment
option available to all customers.
Customer Email Confirmation
This allows you to set when the customer will receive their email confirmation. This is important especially
where payment gateways are concerned as some of them require that JShop Server transfers the customer to
the payment gateway for them to make their final payment for the order. JShop Server will first save the
order, then forward them onto the payment gateway. Once the customer has made payment at the payment
gateway, JShop Server will normally receive a notification on payment status.
The options available here are:
No customer confirmation email: If the customer pays using this payment option they will not be sent a
confirmation email.
When order is placed: As soon as the order is created by JShop Server the customer confirmation email
will be sent.
When order is marked as paid: As soon as the order is marked as paid, either manually through the
Order Management section or automatically by a notification from a payment gateway, the customer
confirmation email will be sent.
160
Checkout : Payment Options
161
Set Order Status
This option allows you to set what status the order should be set to when this payment option is used. By doing
this you can trigger certain processing to happen straight away for certain payment methods or highlight an
order in a particular way on the Orders screen.
Route Through Gateway (only available for the credit card option)
This allows you to set up how the credit cards will be processed. The select box lists the currently supported
payment gateways along with an option called ‘Offline’. If you plan on taking credit card details yourself and
processing them manually then ‘Offline’ is the option you should choose. You should only choose one of the
other options if you actually have an account with that payment gateway.
Once you have set a payment gateway on this page, a green ‘Settings’ button will appear on the Credit Card
line on the List Of Payment Options screen. Clicking this button will allow you to setup integration details for the
payment gateway. For more information on this see the ‘Payment Gateway’ section of this documentation.
12.4
Credit Card Fields
Note: This screen is only applicable if you are using the ‘Offline’ method for Credit Cards or if you’re using a
payment gateway where credit card details are taken directly on your site (please see the ‘Payment
Gateways’ section for details on this.)
This screen lets you setup the credit card fields that you would like to present the customer with on the
payment details page should they choose to pay by credit card. You cannot add fields to this list and you cannot
delete them but you can set some fields to be invisible should you not want it to appear.
Note: If you are not using a payment gateway you should not, under any circumstances, make the ccCVV
field visible for the customer to enter.
The ccType field which is a select box of accepted credit card types has validation that uses a built in routine
within JShop Server. The credit card names you enter determine whether or not this validation is carried out.
Entering the following credit card names exactly as shown below will be validated for correctness as far as is
possible:
Visa, Mastercard, American Express, Discover, JCB, Diners Club, Switch, Solo
Any other card types that are sent to the credit card validation routine will simply return true as it will have no
basis on which to accept or decline it for validation.
List of Credit Card fields
161
Checkout : Credit Card Fields
12.4.1
162
Editing Credit Card Fields
You can edit some of the information against the credit card details. The fields are as follows:
Note: The Visible field is only available on some fields.
Editing the credit card type field
Name
This is an internal name that is used in the database. It must be unique and you will be told if it is not. This
field is not generally shown to the customer.
Title
This is the description of the field that is shown to the customer in the default templates.
Size and Maximum Length (only for TEXT type fields)
Size is the actual size of the form field on the page and maximum length is the maximum number of
characters a customer can enter into the field.
Validation, Validate For and Validation Message
If you want to make it a requirement that a field is filled in you should select YES for the Validation radio
button. In addition, with the Validate For option, you can select how you want the field validated. There are a
number of built-in validation types, such as Not Blank or Email Address and, in addition, choosing “Custom
Regex:” allows you to enter a Perl style regular expression for the validation, permitting complex validation
routines to be used. If you are not sure how to use regular expressions or wish to find some for your particular
need a good site is http://regexlib.com/ where you will find many that you can enter here.
Finally the Validation Message is the error message you wish to display if the validation or the field fails and
requires the user to re-input information.
NOTE: The regular expression validation uses Perl style regular expressions. This has changed in version
2.3.0 from POSIX due to the depreciation of the ereg group of functions in PHP
162
Checkout : Credit Card Fields
163
Visible
Setting this to NO will make a field invisible.
Content (only available for SELECT type fields)
This allows you to enter a list of options for a select box field. You can enter a new option by typing it in the
Option: box and either pressing return or clicking the ‘Add’ button.
If you select an already entered option its contents will appear in the Option: box allowing you to change it.
You can then click ‘Apply’ to save that change.
In addition the three little buttons on the right of the content box allow you to move items up and down the list
(changing their display order) or, by clicking the red X, to delete an item completely.
12.5
Gift Certificate Settings
JShop Server includes a full gift certificate system that allows the purchase and redemption of either emailtype or postal-type gift certificates (please see the ‘Order Administration’ section of this documentation for
more information.)
Gift Certificate Settings
Gift Certificates that are sold in a multi-currency store are currency specific. This means that the currency that
the gift certificate is sold in has to be used by the redeemer in order to redeem the certificate. This is due to
problems relating the value of a certificate in a currency that you have setup not using an exchange rate to the
actual base currency of the store.
This screen allows you to set some of the general gift certificates options. Options available are:
Enable Gift Certificates
If this is set to NO, gift certificates will not be available for purchase or redemption in your store. Note: It is
possible to bypass this option for purchasing of gift certificates but the standard templates do include a check –
if this option is set to NO the templates will not show the gift certificate purchase option or the redemption
option on the front-end.
Expiry In Days
This sets up the default length of time a gift certificate is valid for, with 0 meaning that the gift certificate
should never expire. It is important that you check on the laws in the country in which you operate as to
whether you can set gift certificates to expire at all or have to provide a minimum length of time. For instance,
in some US states it is illegal to sell gift certificates that expire and this is becoming more and more common.
163
Checkout : Gift Certificate Fields
12.6
164
Gift Certificate Fields
List of Gift Certificate Fields
This allows you to edit the display of the gift certificate fields that are presented to the customer on the gift
certificate purchasing page. You can change the display order of the fields by clicking the ‘Sort/Reorder Fields’
button.
You cannot add extra fields to this list and you cannot delete any of the existing gift certificate fields either.
Editing Gift Certificate Fields
The editable fields are as follows:
Name
This is an internal name that is used in the database. It must be unique and you will be told if it is not. This
field is not generally shown to the customer.
Title
This is the description of the field that is shown to the customer in the default templates.
Editing a Gift Certificate field
Size and Maximum Length (only for TEXT type fields)
164
Checkout : Gift Certificate Fields
165
Size is the actual size of the form field on the page and maximum length is the maximum number of
characters a customer can enter into the field.
Validation, Validate For and Validation Message
If you want to make it a requirement that a field is filled in you should select YES for the Validation radio
button. In addition, with the Validate For option, you can select how you want the field validated. There are a
number of built-in validation types, such as Not Blank or Email Address and, in addition, choosing “Custom
Regex:” allows you to enter a Perl style regular expression for the validation, permitting complex validation
routines to be used. If you are not sure how to use regular expressions or wish to find some for your particular
need a good site is http://regexlib.com/ where you will find many that you can enter here.
Finally the Validation Message is the error message you wish to display if the validation or the field fails and
requires the user to re-input information.
NOTE: The regular expression validation uses Perl style regular expressions. This has changed in version
2.3.0 from POSIX due to the depreciation of the ereg group of functions in PHP
12.7
Create/Edit Gift Certificates
Both adding and editing a gift certificate use the same screen although when editing a gift certificate some of
the fields cannot be changed. When editing a gift certificate the bottom of the editing screen will also give a
breakdown on the orders that the gift certificate was used on, how much was used and how much is left on
the certificate.
165
Checkout : Create/Edit Gift Certificates
166
Editing a Gift Certificate
The fields are as follows:
Status
This is the current status of the gift certificate. The different states for a gift certificate are:
Activated: The gift certificate is active and can be used.
Not Activated: The gift certificate is not active and cannot be used.
From Name
The name of the person the gift certificate is coming from.
To Name
The name of the person the gift certificate is going to.
Message
Any message to be put on the gift certificate.
Amount
The amount of the gift certificate and the currency (if applicable) that this gift certificate is for.
166
Checkout : Create/Edit Gift Certificates
167
Expires
Expiry details for the gift certificate. If set to Yes, the expiry date can be selected from the three drop down
boxes.
Type
Sets the type of the gift certificate. An email gift certificate is sent via. email to the recipient and a postal gift
certificate needs to be printed and sent to the delivery address. Please see the ‘Order Management’ section for
more information on this.
Delivery Details
These fields are for the actual delivery details for the gift certificate. If you have selected an email gift
certificate then you should fill in the Email Address field. Alternatively for a postal gift certificate you should fill
in the postal address details.
12.8
Search Gift Certificates
The Search Gift Certificates section on the search panel at the bottom of the screen gives you the ability to
search for gift certificates based on either the Certificate Serial Number, the from name or the to name. In
addition you can specify a particular status for the gift certificate, to filter out only those you want to see. You
do not have to enter anything into the search string if you just want to display all gift certificates of a certain
status.
Typical list of Gift Certificates
The list of gift certificates gives you details of the Certificate Serial Number (which is auto-generated when a
gift certificate is created), who it is from, who it is to, the type, expiry details and status. Each line has an ‘Edit’
and a ‘Delete’ button as well.
In addition for email gift certificates a button called ‘Email’ will be displayed which, when clicked, allows you to
automatically send out the gift certificate email. Note: This also happens automatically when an email gift
certificate order is marked as dispatched in the Order Management system.
For postal certificates a button called ‘Show’ will be displayed which, when clicked, will open up a new window
with the printable gift certificate. This printable gift certificate is generated using the template giftcert_print.
html which can be found in the normal templates directory.
167
Checkout : Automatic Discounts
12.9
168
Automatic Discounts
In addition to the standard discounts available per customer types, the Automatic Discounts section allows you
to setup additional discounts based upon a number of criteria, including products in the cart. These discounts
can take several forms, including goods total and shipping total discounts or cheapest product free etc. For
instance, setting up an Automatic Discount that gives a 100% discount off the shipping cost when the goods in
the cart total more than 100 GBP would equate to free shipping. Automatic discounts can also be shown on
your front end store against products and sections that have products that qualify and full automatic lists,
presented in a similar way to the search or section listing pages.
Automatic Discounts are shown as a separate line in the cart and at checkout, giving the total amount of all the
discounts that are applicable to the order.
List Of Automatic Discounts
The list of Special Discounts is separated into two sections, those that give a discount on the goods total and
those that give a discount off the shipping cost. The list also shows you the goods total level or quantity level
that needs to be achieved for the discount to take effect, the customer account types it is applicable to and the
actual discount percentage.
Automatic Discounts List
In addition each line has an ‘Edit’ and ‘Delete’ button and a new Automatic Discount can be added by clicking
the ‘Add New Discount’ button at the bottom of the screen.
12.9.1
Adding/Editing Automatic Discounts
Adding and editing Automatic Discounts uses the same screen. The screen is split into several sections as
follows.
General
168
Checkout : Automatic Discounts
169
General Section of Automatic Discounts Screen
Internal Name
This is an internal name to help you reference the discounts you have setup. It is not normally shown to the
customer.
Title
This is the text that will be shown to the customer to describe the discount.
SEO URL Title
If specified, links to the discount listing page for this discount will use this text instead of the title string.
Description
169
Checkout : Automatic Discounts
170
By default this is shown on the discount listing page, which lists all the products and sections that a discount
applies to.
Image
By default this is shown on the discount listing page, which lists all the products and sections that a discount
applies to.
Template For Discount Page
You can setup different templates for different discounts should you wish to, giving you the ability to display
different discount listing pages in different ways to suit. By default a single discount listing template is included
in JShop Server.
Offer Type
There are several discount options available here:
Goods Total - This type will apply the discount to the entire goods total of the cart. It can still be limited so
that it only comes into effect if the 'Requires Products' section is met.
Shipping Total - This type will apply the discount to the entire shipping total of the cart. It can still be
limited so that it only comes into effect if the 'Requires Products' section is met.
Qualifying Products: Cheapest Free - This will apply an 100% discount to the cheapest qualifying
product from the 'Requires Products' section that is in the cart.
Qualifying Products: Most Expensive Free - This will apply an 100% discount to the most expensive
qualifying product from the 'Requires Products' section that is in the cart.
Qualifying Products: Discount - This will apply the specified discount amount (see below) to all the
qualifying products from the 'Requires Products' section that are in the cart.
Qualifying Products: Set Price - This will apply a fixed price to all the qualifying products from the
'Requires Products' section that are in the cart.
Amount
Here you can supply the actual discount either as a percentage or a fixed amount in any of the currencies in
your store. For 'Qualifying Products: Cheapest Free' and 'Qualifying Products: Most Expensive Free' this field
does not apply.
Value Excludes Tax?
Select YES here if the value you have entered (this does not apply to percentage discounts) should be used by
the system as including any tax already.
Discount Tax?
Select YES here if you want to discount tax as well as goods/shipping values.
Discount Active?
Select YES to ensure that the discount is active in your store or NO to turn it off.
Public Display
Select YES here if you would like the discount listed on your store, alongside products and sections that it
applies to and also include a link to the discount listing page for this entry.
Usage Limitations
170
Checkout : Automatic Discounts
171
The Usage Limitations Section of the Automatic Discounts Screen
Valid From
If you wish to select a date when this discount becomes active, select it here. This allows you to setup
discounts to come into effect in the future.
Expires
Here you can specify that the discount should expire on the given date, or select No to create a discount that
never expires.
Only Allow If Goods Total >
Here you can specify that the discount should only become available if the goods total in the cart (before
discounts) is greater than the amounts you enter here.
Only Allow If Total Quantity >
Here you can specify that the discount should only become available if the total number of products in the cart
is above the give nvalue.
Account Types
This box allows you to select the customer account types that the discount is applicable to. ‘All’ literally means
all accounts. You may select any combination of account types by clicking on the account type names whilst
holding the Shift or CTRL key.
Requires Products
171
Checkout : Automatic Discounts
172
Requires Products Section of the Automatic Discounts Screen
Products In These Sections
This section allows you to pick which sections you wish to include in the discount. Only products that appear in
the section itself will be included, if you wish to include products from sub-sections you should also select them
here.
Products In These Categories
This part allows you to select product categories for inclusion in the discount. All products in any of the product
categories selected will be included.
Any Of These Products
This part allows you to select individual products to include in the discount.
Product Multiples
This part of 'Requires Products' allows you to specify how many of the qualifying products need to be in the
cart for the discount to become active. If you are using one of the Qualifying Products discount types, you will
need to enter at least 1 for the quantity here. However, you can use this section for offers such as buy one get
one free. The drop down provides the following options:
EXACTLY - This will match the quantity you enter and only that quantity. So, if the customer had more than
the quantity of qualifying products in the cart, the discount would only apply to the quantity entered here.
EXACTLY (with multiples) - This will match multiples of the quantity you enter. If you were doing a buy
one get one free, you could specify a quantity of 2 and use this option to match 2, 4, 6, 8 etc. products apply
the discount to each group of two.
OR MORE - This option allows you to specify that the quantity is the minimum and any number above that
can be included in the discount.
172
Checkout : Offer Code Settings
12.10
173
Offer Code Settings
JShop Server includes an offer code system that allows you to setup discount offer codes that can be entered
on the payment step of your store’s checkout to receive a discount against the total cost of the order.
Offer Code Settings
This screen allows you to set some of the offer code system options. Options available are:
Enable Offer Codes
If this is set to NO, offer codes will not be available for redemption in your store. Set this option to YES if you
would like to activate the offer code system.
12.11
List of Offer Codes
Offer codes allow you to setup discounts that require the entry of a special code to redeem them. They can
also be based upon a number of criteria, including products in the cart. These discounts can take several
forms, including goods total and shipping total discounts or cheapest product free etc. For instance, setting up
an offer code that gives a 100% discount off the shipping cost when the goods in the cart total more than 100
GBP would equate to free shipping.
Offer codes are shown as a separate line in the cart and at checkout, giving the total amount of all the
discounts that are applicable to the order.
Typical list of Offer Codes
The list of offer codes gives you details of the code itself and the amount it is for. Each line has an ‘Edit’ and a
‘Delete’ button as well.
12.11.1
Adding/Editing Offer Codes
Adding and editing offer codes uses the same screen. The screen is split into several sections as follows.
General
173
Checkout : List of Offer Codes
174
General Section of the Offer Codes Screen
Code
This is the text you will require the customer to enter in order to redeem the code.
Offer Type
There are several discount options available here:
Goods Total - This type will apply the offer code to the entire goods total of the cart. It can still be limited
so that it only comes into effect if the 'Requires Products' section is met.
Shipping Total - This type will apply the offer code to the entire shipping total of the cart. It can still be
limited so that it only comes into effect if the 'Requires Products' section is met.
Qualifying Products: Cheapest Free - This will apply an 100% discount to the cheapest qualifying
product from the 'Requires Products' section that is in the cart.
Qualifying Products: Most Expensive Free - This will apply an 100% discount to the most expensive
qualifying product from the 'Requires Products' section that is in the cart.
Qualifying Products: Discount - This will apply the specified discount amount (see below) to all the
qualifying products from the 'Requires Products' section that are in the cart.
Qualifying Products: Set Price - This will apply a fixed price to all the qualifying products from the
'Requires Products' section that are in the cart.
Amount
Here you can supply the actual discount either as a percentage or a fixed amount in any of the currencies in
your store. For 'Qualifying Products: Cheapest Free' and 'Qualifying Products: Most Expensive Free' this field
does not apply.
Value Excludes Tax?
Select YES here if the value you have entered (this does not apply to percentage discounts) should be used by
the system as including any tax already.
Discount Tax?
Select YES here if you want to discount tax as well as goods/shipping values.
Discount Active?
Select YES to ensure that the discount is active in your store or NO to turn it off.
Usage Limitations
174
Checkout : List of Offer Codes
175
The Usage Limitations Section of the Offer Codes Screen
Valid From
If you wish to select a date when this offer code becomes active, select it here. This allows you to setup offer
codes to come into effect in the future.
Expires
Here you can specify that the offer code should expire on the given date, or select No to create an offer code
that never expires.
Allow Multiple Use By Same Person
If set to NO the system will attempt to deny a customer using an offer code more than once, however, no
system is full-proof in this regard. JShop Server uses checks on customer accounts, cookies and email
addresses to try to limit a customer to a single use if this option is set to YES.
Only Allow If Goods Total >
Here you can specify that the discount should only become available if the goods total in the cart (before
discounts) is greater than the amounts you enter here.
Only Allow If Total Quantity >
Here you can specify that the discount should only become available if the total number of products in the cart
is above the give nvalue.
Account Types
This box allows you to select the customer account types that the discount is applicable to. ‘All’ literally means
all accounts. You may select any combination of account types by clicking on the account type names whilst
holding the Shift or CTRL key.
Requires Products
175
Checkout : List of Offer Codes
176
Requires Products Section of the Automatic Discounts Screen
Products In These Sections
This section allows you to pick which sections you wish to include in the discount. Only products that appear in
the section itself will be included, if you wish to include products from sub-sections you should also select them
here.
Products In These Categories
This part allows you to select product categories for inclusion in the discount. All products in any of the product
categories selected will be included.
Any Of These Products
This part allows you to select individual products to include in the discount.
Product Multiples
This part of 'Requires Products' allows you to specify how many of the qualifying products need to be in the
cart for the discount to become active. If you are using one of the Qualifying Products discount types, you will
need to enter at least 1 for the quantity here. However, you can use this section for offers such as buy one get
one free. The drop down provides the following options:
EXACTLY - This will match the quantity you enter and only that quantity. So, if the customer had more than
the quantity of qualifying products in the cart, the discount would only apply to the quantity entered here.
EXACTLY (with multiples) - This will match multiples of the quantity you enter. If you were doing a buy
one get one free, you could specify a quantity of 2 and use this option to match 2, 4, 6, 8 etc. products apply
the discount to each group of two.
OR MORE - This option allows you to specify that the quantity is the minimum and any number above that
can be included in the discount.
176
Checkout : Redeemed Codes Report
12.12
177
Redeemed Codes Report
This reports allows you to select date ranges and display a summary giving the total amounts used for each
offer code during that period. It also gives the number of times that the offer code was used.
Redeemed Code Report
177
Reports :
13
178
Reports
JShop Server includes a comprehensive reports sections that produces a number of different reports covering
products, sections, abandoned carts, orders and customer accounts.
13.1
General Options
This screen allows you to set some of the global reporting options – the changes you make here can limit the
reports that are available.
General Options
Track Product Popularity?
If this is set to YES JShop Server will keep track of how many times people view products, this information is
used for the Product Popularity report. If this is set to NO, no information will be stored for that report.
Track Section Popularity?
If this is set to YES JShop Server will keep track of how many times people view sections, this information is
used for the Section Popularity report. If this is set to NO, no information will be stored for that report.
Track Search Statistics?
If this is set to YES JShop Server will track search terms used in the search facility of your store. It will also
track the average number of products and sections returned for each of the search terms.
13.2
Reports Summary
Reports Summary
This screen gives a general overview of your store including the total number of products, sections, product
views, outstanding carts, the number of products in those outstanding carts, orders and customer account
totals.
178
Reports : Clear Report Data
13.3
179
Clear Report Data
This screen allows you to periodically clear some of the data that JShop Professional stores for the reports.
Clear Report Data
Clear Popularity Records Up To And Including
Clicking on the ‘Clear Popularity Data Now’ will remove any popularity data for products and sections before
and including the selected date. Obviously tracking data can build up to be quite large, especially on busy sites,
so this should be done regularly to keep the data manageable.
Clear Abandoned Carts Up To And Including
Clicking on the ‘Clear Abandoned Carts Now’ button will remove any old JShop Server carts from the database.
Again this information can build up over time so it is advisable to periodically delete old carts after you have
run any reports that use this data.
Clear Search Statistics Up To And Including
Clicking on this button will remove search statistics data up until the date specified.
13.4
Individual Reports
13.4.1
Order Summary Report
This report provides quick an easy way to obtain order totals from JShop Server. There are a number of
configuration options available:
Order Summary Report Selections
179
Reports : Individual Reports
180
Date From
This is the start date for the report
Date To
This is the end date for the report
Group by
This is how you want to summarise each entry. You can group by day, month or year.
Orders In Currency
Use this box to select which currency you wish to see a report for
Order Status
Use this box to select which order status you want to see a report for.
Totals To Show
By checking the different boxes you can opt to show any of the available sub-totals for your orders report.
An Example Of The Output Of The Orders Summary Report
13.4.2
Stock Level Report
The Stock level Report provides listings of products in your store depending on a combination of selection
choices that can be made.
Order Summary Report Selections
Type
Here you can select between a main stock level report of option stock level report.
Include
This specifies what products to include. You can include all or only include products that meet a certain stock
status, e.g. zero or negative.
Order By
This allows you to alter the sorting of the report to your own desired order.
180
Reports : Individual Reports
13.4.3
181
Other Reports
All the other reports utilize the same selection screens and provide the same selection options. The reports are
as follows:
Report
Description
Product Popularity
Report showing store products in order of the number of times
they have been viewed. Grouped by product code/name.
Section Popularity
Report showing store sections in order of the number of times
they have been viewed. Grouped by section title.
Abandoned Carts Products
Report showing store products in order of the number of times
they appear in abandoned carts. Grouped by product code/
name.
Search Statistics
Report showing terms searched for in your store and the
number of products and section returned for those terms
Total Orders
Report showing the total number of orders.
Ordered Products
Report showing store products in order of the number of times
they appear in orders. Grouped by product code/name.
New Customer Accounts
Report showing the total number of customer accounts opened.
Each report is grouped by a certain type of record, for instance the Product Popularity report is grouped by
product code/name which means that all occurrences of a product are grouped into one record with a total.
The reports then show the results grouped by the total for each of the types of record, in descending order.
Selection And Sorting Options For Reports
By using the Date From and Date To section of the screen you can restrict the date range you want the
reports to cover and in addition select a primary grouping for the reports, to help split the report up even
further. For instance, should you select Month as the grouping, the report will show totals for occurrences by
month and not for the total in the database. This is useful for reports such as the Total Orders report as it
allows you to show breakdown totals for particular periods, right down to individual days.
181
Affiliates :
14
182
Affiliates
With version 1.2.0 of JShop Server we introduced the built-in affiliate system. This provides you with the ability
to run your own Affiliate system (including 2nd tier commissions if you wish to) directly from your store with no
third party software required.
This section of the documentation discusses the Affiliates section of the administration system and the various
features of the Affiliate system.
Note: All commission payments are created in the base currency for your store and all payment
information in the affiliate system will be shown in this currency.
14.1
General Options
This screen allows you to set your global Affiliate options. The changes you make here will affect how your
affiliate system will operate, how commissions are created and how you will handle the sign-up of new
affiliates.
Affiliate Settings
Activate Affiliate System
If you wish to use the in-built affiliate system for JShop Server you should set this option to YES, otherwise set
this to NO.
Affiliate Signup Moderated
If you wish to vet each affiliate before allowing them to actually use the system then you can moderate signups
by setting this option to YES. Alternatively, setting this option to NO will activate the affiliate account straight
away.
Activate 2nd Tier Feature
A second tier affiliate system provides two levels of commission on sales. Imagine this scenario: An affiliate
signs up and via the link on their web site another customer comes to your site and signs up as an affiliate.
When that affiliate places a link to your site on theirs, any customer coming through and purchasing from your
site will create a commission for them. In addition, with the 2nd Tier feature you can set a commission level to
the original affiliate, through which this affiliate signed up. This is a 2nd Tier commission. Setting this option to
YES will activate the 2nd Tier commission functionality in the affiliate system.
Minimum Payment Amount
182
Affiliates : General Options
183
This is the level over which you will pay out to affiliates. It is used when creating the ‘Show Payment Due List’.
Life Span Of Cookie
By adjusting this setting you can decide whether a customer who has come through an affiliate needs to
purchase on their first visit for the affiliate to obtain a commission (set this to 0 to operate like this) or whether
they can order at any time within ‘x’ number of days for the affiliate to receive commission.
Status Of Created Commission
Your affiliates will only see authorized transactions appear in their account administration. This option lets you
say whether you would like the automatic commissions generated from the order processing system to be
unauthorized or authorized by default. Unauthorized payments have to be manually authorized later. If a
customer checks out in a currency that isn't linked to the base currency by an exchange rate the system will
create an Un-Authorized payment regardless of this setting.
Include Shipping For Commission Calculation
This option decides whether you will include an order’s shipping total in the total used to calculate a
commission. This is only applicable if you are calculating commissions based on percentages.
Include Tax For Commission Calculation
This option decides whether you will include an order’s tax total in the total used to calculate a commission.
This is only applicable if you are calculating commissions based on percentages.
14.2
Affiliate Groups
The affiliate system in JShop Server provides a means to create different groups of affiliates, each of which
has different commission rates. This is useful if you have some affiliates that you wish to enter into special
agreements with or you wish to reward with higher commissions.
List Of Affiliate Groups
This screen shows you the currently available affiliate groups you have setup in JShop Server. By default there
is a General affiliate group that all new affiliates will be placed into. This is where you should set you default
commission rates to normal affiliates.
The List Of Affiliate Groups
The General group, although it can have its name changed, cannot be deleted as this is the default group in
JShop Server.
Along with each of the groups is an ‘Edit’ button to edit the group’s details and a ‘Delete’ button to remove the
group from the system.
Adding / Editing Affiliate Groups
Adding and editing affiliate groups uses the same screen. The following fields are available for affiliate groups:
183
Affiliates : Affiliate Groups
184
Editing an existing Affiliate Group
Name
This is the internal name for the affiliate group.
Base Commission
This is the commission orders that have come through an affiliate that is a member of this group will attract. It
can either be a percentage or a flat rate in the base currency for your store.
2nd Tier Commission
If the 2nd Tier Commission function of the affiliate system is activated, this is the commission the original
affiliate will attract. It can either be a percentage or a flat rate in the base currency for your store.
14.3
Affiliate Banners
You can provide your affiliates with any number of banners you would like them to use to link through to your
site and you can even limit which affiliates have access to which banners through their affiliate administration.
List Of Banners
This screen shows you the currently available banners that you have setup.
The List Of Banners
Along with each of the banners is an ‘Edit’ button to edit the banner’s details and a ‘Delete’ button to remove
the banner from the system.
184
Affiliates : Affiliate Banners
14.3.1
185
Adding/Editing Banners
Adding and editing banners uses the same screen. The following fields are available for affiliate banners:
Editing an existing banner
Name
This is the descriptive name for the banner.
Banner Image
The actual banner image itself. You have the option of clicking ‘Browse…’ to upload an image from your local
PC or clicking the ‘Pick Image…’ button to launch the in-built image picker. The image picker will show the
banners directory contents and you can search for the correct image through that, if it has already been
uploaded. In addition you can enter a name directly into the Pick: field if you know it already exists in the
banners directory. The pick field will also accept a URL to an image if you wish to directly link to images on
another site.
Image Size
To give more information to your affiliates on the banner you can enter the ideal width and height for
displaying it on their site.
Description
Informative description to help your affiliates decide which banner to use.
Available To Affiliate Groups
With this option you can limit which affiliate groups see this banner as an option in their affiliate administration.
You may select more than one group from this list by holding down the CTRL key whilst clicking on them.
Selecting the ‘All’ group will make this banner available to the members of all affiliate groups.
14.4
Affiliate Fields
JShop Server has a standard set of affiliate account fields although you are free to add, edit or make these
invisible as your needs dictate
There are 4 field types available, as detailed below:
185
Affiliates : Affiliate Fields
186
Type
Description
TEXT
Single line entry field
TEXTAREA
Multiple row entry field
SELECT
A select box of options
CHECKBOX
Single check-box
Each of the fields can be validated and validation messages displayed if they are not filled in.
List Of Affiliate Fields
List of Affiliate Fields
The list of affiliate fields gives you an overall view of the fields for customers, their internal and viewable titles
along with an ‘Edit’ button and ‘Delete’ button (if applicable).
At the bottom of this screen there is also an ‘Add New Field’ button along with a select box for the type of field
you would like to add.
186
Affiliates : Affiliate Fields
14.4.1
187
Adding/Editing Affiliate Fields
Adding and editing affiliate fields uses the same screen. However, some of the options are only available for
certain types of fields. Options available are as follows:
Editing an Affiliate Field
Name
This is an internal name that is used in the database. It must be unique and you will be told if it is not. This
field is not generally shown to the customer.
Title
This is the description of the field that is shown to the customer in the default templates.
Size and Maximum Length (only for TEXT type fields)
Size is the actual size of the form field on the page and maximum length is the maximum number of
characters a customer can enter into the field.
Columns and Rows (only for TEXTAREA type fields)
This is the number of columns and rows that the field should be sized to on the contact form page.
Validation, Validate For and Validation Message
If you want to make it a requirement that a field is filled in you should select YES for the Validation radio
button. In addition, with the Validate For option, you can select how you want the field validated. There are a
number of built-in validation types, such as Not Blank or Email Address and, in addition, choosing “Custom
Regex:” allows you to enter a Perl style regular expression for the validation, permitting complex validation
routines to be used. If you are not sure how to use regular expressions or wish to find some for your particular
need a good site is http://regexlib.com/ where you will find many that you can enter here.
Finally the Validation Message is the error message you wish to display if the validation or the field fails and
requires the user to re-input information.
NOTE: The regular expression validation uses Perl style regular expressions. This has changed in version
2.3.0 from POSIX due to the depreciation of the ereg group of functions in PHP
Visible
Setting this to NO will make a field invisible.
187
Affiliates : Affiliate Fields
188
Content (only available for SELECT type fields)
This allows you to enter a list of options for a select box field. You can enter a new option by typing it in the
Option: box and either pressing return or clicking the ‘Add’ button.
If you select an already entered option its contents will appear in the Option: box allowing you to change it.
You can then click ‘Apply’ to save that change.
In addition the three little buttons on the right of the content box allow you to move items up and down the list
(changing their display order) or, by clicking the red X, to delete an item completely.
14.5
Adding/Editing an Affiliate
Adding and editing an affiliate uses the same screen. You can add a new affiliate by clicking the ‘Add New
Affiliate’ menu option and edit a customer from the affiliate listing / search pages.
When editing an affiliate for any that have 2nd tier affiliates you will see a link providing access to a list of
those affiliates. In addition if the affiliate you are editing is a 2nd tier affiliate a link will be provided to the
parent affiliate.
Editing an existing affiliate account
The fields shown on this screen are those from the ‘Affiliate Fields’ setting page plus the following:
Username
This is the affiliate’s username that they use to login to their account.
Password
Only enter a password here if you want to set/change a password for the affiliate. Left blank, any existing
188
Affiliates : Adding/Editing an Affiliate
189
password will be left unchanged.
Affiliate Group
This select box allows you to select which affiliate group this affiliate belongs to. Please see the ‘Affiliate
Groups’ heading (discussed previously in this section) for more information on affiliate groups.
Status
This lets you set the status of the affiliate’s account. Possible values are:
‘New’ – Generally used when affiliate signups are being moderated. Affiliate will not have access to their
administration system.
‘Live’ – Normal status for an affiliate account that is operational.
‘On Hold’ – Status you can use in exceptional circumstances when you wish to halt the affiliate logging into
their administration system or receiving commission payments.
‘Declined’ – Generally used when the affiliate signups are being moderated and the account has been
declined.
14.6
Affiliate Lists
New Affiliate Listing
This shows a list of all affiliates with the account status of ‘New’. This list is mostly used for moderation of
affiliate signups.
ABC Affiliate Listing
This shows a list of all affiliates of all status in alphabetical order of company name.
A typical list of affiliates
Date Affiliate Listing
This shows a list of all affiliates of all status in descending date order, with the newest first.
14.7
Creating/Editing a Transaction
Each commission or payment is created as a transaction in the affiliate system. You can, at any time, create or
edit transactions for affiliates and both these operations are carried our on the same screen. Some of the
information, however, cannot be edited once a transaction has been created.
189
Affiliates : Creating/Editing a Transaction
190
Editing an existing affiliate transaction
The fields shown on this screen are as follows
Affiliate
When adding a new transaction you can choose the affiliate to create this for from the drop-down box shown
for this field. Once a transaction has been created you cannot edit the affiliate it is for.
Reference
Use this to enter a reference for the transaction that the affiliate will see. When transactions for commissions
are automatically created by JShop Server the reference will be the order number it was for.
Transaction Type
This select box allows you to set the type for the transaction. The possibilities are:
‘Credit’ – The affiliate account is credited with the transaction amount.
‘Debit’ – The affiliate account is debited with the transaction amount (this is useful for refunded orders etc.)
‘Payment’ – A payment transaction is created.
Amount
This is the amount of the transaction in the base currency of your store.
Transaction Status
Affiliates only see Authorized transactions and this select box allows you to change the status of the
transaction. Options are Authorized and ‘Un-Authorized’.
14.8
Transactions
Transactions (All)
This shows a list of all affiliate transactions in date order with the newest first.
190
Affiliates : Transactions
191
A typical list of affiliate transactions.
Transactions (UnAuth’d)
This shows a list of all un-authorized affiliate transactions in date order with the newest first.
14.9
Show Payment Due List
When you are ready to make payments to affiliates this report will show you a list of all the affiliates whos
balance is over the minimum payment amount (set in General Settings). Each entry shows how much is
payable along with the company name, payee and postal address. There is also a button for each entry called
‘Mark Paid’ that will set the account as paid and send an email to the affiliate alerting them to the payment.
A typical payment due list.
191
Orders :
15
192
Orders
JShop Server includes a comprehensive Order Management system that features automatic emails to
customers and merchants, dispatching with dispatch tracking and partial dispatching / back ordering, receipt
printing and order editing.
The order management is designed to be quick and easy to use and, above all, productive. There is a
comprehensive searching mechanism always available on the orders screen and orders can be printed enmass. Linked with the Checkout -> Extra Order Fields settings and Customer -> Customer Fields settings, the
information stored with each order that’s both publicly available to the customer and privately available to your
own organisation within the order management system can be expanded and tailored to your own company’s
needs.
15.1
Orders List
The main orders screen constitutes the orders list and is presented full screen width and in descending order
number order. Each line shows you the order number, the date and time that the order was placed, the
customer’s name, order total, printed status, order status and action and process options.
A typical list of orders
In addition on the far left of the list each order line has a checkbox. Multiple orders can be selected and an
action chosen from the top select box. This provides access to view orders, delete orders, print orders,
receipts or any additional paperwork templates you have setup, send supplier emails (should you be using this
option) and set the orders as paid or as cancelled.
In addition each line has an ‘Action’ button that can be used process individual orders. By default this appears
on the far right, although both this position and when it’s shown (either by mouse over or mouse click) can be
changed on a per-user basis via the User Options button located at the top right of the JShop Server menu.
192
Orders : Orders List
193
The Order Action Drop-Down
15.2
Order Searching
At the bottom of the Jshop Server administration in the search panel are the order searching controls. These
stay on screen all the time you are in the order management system giving you quick access to them. There
are several different ways in which orders can be searched for:
Note: Orders are always displayed with the most recent at the top of the list.
Date Range
Here you can select a range: Today, Yesterday, Last 7 Days or Last Month, or you can select a month and year
to view.
Status
This allows you to view orders by a specific order status and whether the order is marked as printed or
unprinted.
Search String
This is a free text search that searches customer’s name, order number and customer’s email address.
Printed
This allows you to select whether to show only printed, unprinted or all orders.
Product Category
This allows you to select only orders that include products from a certain category in your store.
193
Orders : Accessing an Order's Details
15.3
194
Accessing an Order's Details
To see the full details of an order, simply click the order number from the Orders List. This will show a screen
containing the product information at the top, followed by billing and delivery addresses (if applicable), then
payment details, processing details, dispatch information, any extra order fields and finally other fields such as
the standard internal notes field and the customer’s IP address.
In addition to viewing orders singularly you can view a selection of orders at once by using the checkboxes on
the orders list page and you can print either a single order from the order details page or multiple orders at
once from the orders list page.
15.4
Editing Orders
To edit an order click the ‘Edit’ button in the Action column on the orders list page. From here you can update
many of the order’s settings and, in addition the top of the screen gives you access to editing of the actual
products and totals of the order.
Editing the products on an order
You’ll see text entry boxes next to the Quantity boxes, Price boxes, Discount Total, Shipping Total, Shipping
Method and Tax Total lines. Here you can change the values for the order and click ‘Update Order Lines’ for
them to take effect. For all these fields (except the shipping method) the current values are also shown for
clarity.
Most product lines will show a check box next to the price field. When checked this will lock the price of the
product so, when you update the order lines again, this price will not change even it should do. Similar check
boxes appear for the Shipping Total and Discount Total. These are especially useful if you are editing an order
after your discount or shipping settings have changed as it enables you to keep the old calculation rather than
have the system calculate new, different, charges for you.
In addition there is a checkbox for each line in the ‘Remove’ column. Any checked lines will be deleted from the
order once ‘Update Order Lines’ is clicked.
Finally, if the ‘Zero Tax Charges’ checkbox is checked when ‘Update Order Lines’ is clicked all tax on the order
will be zeroed.
On the main details screen the important buttons are the ‘Set Customer’ and ‘Re-calculate Tax & Shipping’
ones. With the ‘Set Customer’ button the system will use the customer’s email address you have entered to
locate and load up their customer account. This will pre-fill the billing address details and set tax etc.
accordingly. If the customer does not have an account it will set the tax settings etc. to the default.
With the ‘Re-calculate Tax & Shipping’ buttons, updated customer billing and delivery address details are used
to re-calculate the tax and shipping on an order. It is important that you use this option if you change the billing
or delivery address details to ensure that the correct shipping and tax is calculated as part of the order.
194
Orders : Editing Orders
195
NOTE: The order is never actually changed until you click the ‘Update Order’ button at the bottom of the
main details screen. Only at this point will the order actually be changed.
15.4.1
Adding Products
Next to the ‘Update Order Lines’ button you will also see an ‘Add Products’ button. Clicking this brings up a popup window containing a product search where you can search for products to add to the order.
Against each product you will see either an ‘Add To Basket’ or ‘Select Options’ button. The ‘Add To Basket’
button will only show for those products with no selectable options against them. For those that do have
selectable options you can click the ‘Select Options’ button to show the product detail screen.
Searching for products to add to an order
15.4.2
Product Details Screen
Accessed by either clicking on the ‘Select Options’ button or the product name or code on the product search
screen, this screen shows you more details about the product, allows you to make any selections that are
needed and gives a link to the product on your main web site. From here you can change the quantity to add
and change any selectable options.
195
Orders : Editing Orders
196
A typical product options screen when adding a product to an order
15.5
Creating New Orders
JShop Server includes the ability to create orders via. the administration interface. This uses exactly the same
screens as shown when editing an order. To create an order click on the ‘Create Order’ button on the main
orders listing screen (you can select the currency to create the order in using the drop-down beside the
‘Create Order’ button).
15.6
Processing Orders
The Action column on the order list page provides processing options for a single order. It provides access to
order status changes, order printing and paperwork printing, including any extra order paperwork you have
setup templates for.
In addition to this the Printed column in the orders list provides you with visual confirmation that orders have
been printed, often a pre-requisite before progressing an order through your dispatch process.
15.7
Dispatching
There are a number of different ways that dispatching can work, depending on the settings you have chosen in
General -> Order Admin Settings. We shall take each option in turn here.
Note: If you are using the Digital Products feature of JShop Server you should make sure that you have
dispatching enabled for it to work correctly.
196
Orders : Dispatching
197
Dispatch screen showing both dispatch tracking and partial dispatch functionality
Dispatch Functionality Activated
If the dispatch functionality has been activated a ‘Dispatch’ button will appear in the Process column on the
order list page. Clicking this and OK’ing the confirmation box that will appear will mark the order as dispatched
and you will be returned to the orders list page.
Dispatch Tracking Activated
If the dispatch tracking functionality has been activated, clicking the ‘Dispatch’ button will bring up an
intermediate page that allows you to enter the dispatch tracking information that can, in turn, be included on
the email sent to the customer. This also pulls on the Courier information which is setup in Tax/Shipping ->
Couriers. Each order can have the following dispatch tracking information with it:
Enable Tracking
If set to NO this will disable dispatch tracking for the order and dispatch tracking information will not be sent to
the customer.
Tracking Reference
This is where you enter the tracking reference for the courier you have used to dispatch the goods to the
customer.
Tracking Misc.
This is a free field in case you need to give the customer any extra information about the dispatch.
Courier
This lets you select the courier that you have used which allows both the courier name and contact details to
be included in the email to the customer.
Allow Partial Dispatches
If this option has been turned on the intermediate page after clicking the ‘Dispatch’ button will contain a basket
at the top. This will detail the order lines and quantities that are left to dispatch on the order. Here you can
change the quantities to those actually being dispatched. If there are still product lines left after the dispatch
the order is marked as Part Dispatched and remains open for further dispatches. Any order lines that are not
included at all in the dispatch can have their quantities set to 0.
By default when you first view this page, the Dispatch field box for each line will equal the total quantity left on
the order line.
197
Orders : Dispatching
198
Dispatching Gift Certificates
Email gift certificates can be dispatched by clicking the ‘Dispatch’ button on the orders list. If you are not using
the dispatch functionality they can be sent to the recipients email address using the routines in Customers.
Postal gift certificates require printing and this can be done from the orders detail page. A link to the printable
gift certificate can be found with the other gift certificate information in the order’s basket at the top of the
details page. The postal gift certificate is designed using the template giftcert_print.html which is in the normal
templates directory for JShop Server.
15.8
Receipt Printing
JShop Server can also print receipts. In the Action column on the orders list page is an orange ‘Receipt’ button
(if you have enabled Receipt printing in General -> Order Admin Settings). This will open a new window with
the receipt ready for printing. This receipt is designed using the template receipt.html which is in the normal
templates directory for JShop Server.
198
Backup :
16
199
Backup
JShop Server includes a full backup and restore system to help you store and, if necessary, retrieve the data
for your store. It is always advisable to keep backups of your data and not only can this be done through JShop
Server but there are also other methods that can be used to ensure your data is safe (please see later in this
section).
The initial installation SQL for JShop Server was created using the Backup Database functions of the software.
16.1
Backup Database
This screen allows you to backup your database. This does a complete backup of all the data in the database.
Note: Images, templates and the PHP files for JShop Server are not stored in the database and so should be
backed up separately.
Backup Screen
Note: If your database is large the backup file might take many minutes to create and also take some
time to download.
Saving The Backup File
JShop Server provides you with three different options when backing up.
Download File In Browser
This will cause a file download box to pop-up and allow you to save the file to your local computer. Please note
that some browsers do not support this method and you will not be able to use this to backup data.
Output To Screen (Save With ‘View Source’)
This will output the backup to the screen and you can then save it to your local machine by using the View
Source option in your web browser.
Save To Server
This lets you save the backup directly to your web server in the location specified by the ‘Server File Name’
field. It is important that you enter a valid path and file name and that the directly you are backing up to has
the correct permissions to allow PHP to create a file. In addition please note that it is advisable to backup to a
password protected directory to disallow people getting access to the files via. the web. For extra security
choose a path that is outside of the web root.
199
Backup : Restore Database
16.2
200
Restore Database
If the need ever arises for you to restore a previously made backup, this option allows you to do this.
Restore Screen
Upload From Computer
Clicking the ‘Browse’ button will open a file dialog window and allow you to choose the file you wish to restore
from your local machine. Please note that large files may not work correctly using this method due to
configuration settings in PHP limiting the size of uploaded files.
Load From Server
Here you can enter a path and file name to a backup file located on your server. This is the best option for
larger restores.
Once you have picked your backup file, click Restore Data and the process will begin.
Note: As soon as the restore begins all tables currently in the JShop Server database will be dropped and
you will not be able to retrieve them. Please be certain that you wish to restore your data. It is advisable
to only make the Backup/Restore section available to the administrator account to avoid any accidental
use. Once the restore has finished you will also be logged out should you try to continue accessing the
admin system and will have to login again.
16.3
Other Methods for Backup and Restore
As discussed in the Installation manual, if you are comfortable with mySQL we suggest installing phpMyAdmin
on your server. With phpMyAdmin you are able to backup your whole database, or just certain tables from it,
export these to files and load them in again.
Many users may find the flexibility that phpMyAdmin can offer more suitable for their needs. Please note that
although we cannot give support directly on using phpMyAdmin we can help in its use with JShop Server.
200
Payment Gateways :
17
201
Payment Gateways
This section describes the payment gateways that JShop Server supports. Some of these payment gateways
require extra setup, normally in your payment gateway’s administration system.
Note: We cannot guarantee that the order status within JShop Server will always update correctly. This
can be down to the customer not completing their purchase, the payment gateway not sending a
notification of payment status back to JShop Server or time-out problems when the payment gateway
tries to contact your server.
You should always check payments with your administration system from the payment gateway – this is the
only 100% authoritative source of payment information.
17.1
Integration with Other Payment Gateways
JShop Server’s integration with payment gateways is modular which enables us to add new payment gateways
to the supported list in between upgrades. If you wish to use a payment gateway that is not currently
supported by JShop Server please contact us.
We cannot guarantee we will be able to support all payment gateways, mostly because some rely upon special
software being installed on your server (that your server may not be capable of having) or require particular
operating systems on your server.
However, the majority will not be a problem to install so please feel free to contact us. Charges for the
integration of a new gateway will depend on the complexity of the required integration and the demand for the
gateway.
17.2
The Use of cURL
Some payment gateways require the use of secure server socket connections between the merchant’s server
and the payment gateway’s server either for authorising a transaction or receiving a response regarding
payment status. For example, USA ePAY requires a secure server socket connection to actually authorise a
payment and PayPal requires a secure server socket connection for the merchant’s web site to receive a
notification of payment status.
For these instances JShop Server uses a PHP extension called cURL. Further cURL needs to be compiled with
SSL support. This is available as standard on many servers and you may already have it installed and if you
have any doubt you should contact your hosting company or system administrator for more information.
17.3
Secure Server Requirements
If you are taking credit card details for processing off-line or if you are using one of the payment gateways that
require your site to take the credit card details, such as USA ePAY, you will need a secure server. This secure
server should operate from the same web root as your normal server, e.g. all normal files can be accessed
under http:// or https:// - please speak to your web hosting company for more information. However, please
refer to our Installation manual which contains advice on taking credit card details directly and why, in the
majority of circumstances, you should not consider doing so.
201
Payment Gateways : Gateways
17.4
Gateways
17.4.1
2checkout
202
Server Requirements
There are no extra server requirements needed to integrate with 2checkout.
Where Are Credit Card Details Taken?
Credit card details are taken on 2checkout’s payment page.
Settings Page Details
Account Number
This is the account number issued to you by 2checkout when you signed up for an account with them.
Secret Word
This is the secret word you setup at 2checkout. This needs to be correct otherwise JShop Server will not
receive payment status notifications from 2checkout
What Do I Need To Setup At 2checkout?
In your 2checkout administration system you should go to Shopping Cart -> Cart Details and set the following:
Return to a routine on your site after credit card processed?:
Set this to Yes
Return URL:
Set this to the gateways/response/2checkout.php URL on your server, e.g.
http://www.yourdomain.com/jss/gateways/response/2checkout.php
(this will be different on your server and depends on where you installed JShop Server to).
Next go into Account Details -> Return and set the following:
Secret Word:
Set this to the same secret word you entered into JShop Server’s 2checkout settings. This secret word setting
is right at the bottom of the Account Details -> Return page on 2checkout.
17.4.2
Authorize.net
17.4.2.1
Authorize.net SIM
Server Requirements
There are no extra server requirements needed to integrate with Authorize.net SIM.
Where Are Credit Card Details Taken?
Credit card details are taken on Authorize.net’s payment page.
Settings Page Details
Login ID
202
Payment Gateways : Gateways
203
This is the login ID issued to you by Authorize.net when you signed up for an account with them.
Transaction Key
This is a valid transaction key for your Authorize.net account. These can be created in your Authorize.net
administration system.
Test Mode
When set to YES no live transactions will take place via. Authorize.net. Set to NO when you do wish to process
live transactions.
Description
This is the description of the order that you would like to appear on the Authorize.net payment page.
Send Customer Email From Authorize.net
If set to YES the customer will also receive an email confirming their payment from Authorize.net
What Do I Need To Setup At Authorize.net?
You need to ensure that you set the Response/Receipt URL correctly in your Authorize.net administration
system. On the settings page for Authorize.net in JShop Server you will be told what the correct URL should be
for this. Make sure you use this exactly otherwise JShop Server will not receive responses from Authorize.net.
In addition you need to make sure that the transaction key you enter into JShop Server is a valid transaction
key for your account.
17.4.2.2
Authorize.net AIM
Server Requirements
You will require your own secure server certificate (SSL) and cURL installed for PHP with secure sockets
support.
Where Are Credit Card Details Taken?
Credit card details are taken on your site.
Settings Page Details
Login ID
This is the login ID issued to you by Authorize.net when you signed up for an account with them.
Password
This is your Authorize.net account password.
Test Mode
When set to YES no live transactions will take place via. Authorize.net. Set to NO when you do wish to process
live transactions.
Transaction Mode
This is the type of authorization to perform on the credit card – either a Full Authorization or a Pre
Authorization. With a Pre Authorization you will need to login to Authorize.net in order to release the funds
when ready.
What Do I Need To Setup At Authorize.net?
203
Payment Gateways : Gateways
204
According to Authorize.net it is recommended that you set your ‘Password-Required Mode’ to TRUE in your
Authorize.net administration interface. This requires the use of your password in order to submit an order via.
the web through a system such as JShop Server.
17.4.3
Banque Populaire RTS
Server Requirements
There are no extra server requirements needed to integrate with this gateway.
Where Are Credit Card Details Taken?
Credit card details are taken on the payment gateway’s payment page.
Settings Page Details
Internet Member Number
This is the number on your prima card (6 numbers)
Merchant Activity Code (MCC)
You will have received this with your contract (4 numbers)
Contract Number (Business Number)
You will have received this with your contract (10 numbers)
Payment Type
The option selected here should match what you have been setup for with the Banque Populaire system,
otherwise an error will be generated when attempting to checkout.
Name of Merchant’s Server
Purely informational
Merchant’s Name
Purely informational
Merchant’s Email Address
Used to generate a confirmation email of the order information from the system
Automatic Redirection Timer
Number of seconds before the completion page at Banque Populaire automatically sends the customer back to
your site.
What Do I Need To Setup At Banque Populaire?
There is nothing you need to setup on your gateway’s administration pages.
17.4.4
Barclays ePDQ
Server Requirements
There are no extra server requirements needed to integrate with Barclays ePDQ.
Where Are Credit Card Details Taken?
Credit card details are taken on Barclays ePDQ payment page.
204
Payment Gateways : Gateways
205
Settings Page Details
Client ID <currency>
For each currency you are allowing people to check out in you will need to enter the corresponding client ID in
the appropriate box.
Note: It is important that you set ISO numbers for your currencies in General -> Currency Settings in
order for the ePDQ integration to work correctly.
Charge Type
Here you can choose between a Full Authorisation or Pre Authorisation. With Pre Authorisation you will need to
login to your Barclays ePDQ administration system in order to release the funds when ready.
Passphrase
Passphrase that corresponds to the passphrase you have entered into your Barclays ePDQ CPI setup.
Merchant Display Name
The company name you wish to display on the Barclays ePDQ payment page.
Payment Page Text Colour
The colour of the text you wish to use on the payment page, in normal HTML colour syntax e.g. #000000 =
Black, #FFFFFF = White
Payment Page Background Colour
The colour of the background you wish to use on the payment page, in normal HTML colour syntax e.g.
#000000 = Black, #FFFFFF = White
Payment Page Logo
The full URL to any logo you would like to show on the Barclays ePDQ payment page. Note: This should only be
used if you have a secure server and can reference the image with https://
Supported Card Types
Here you can select the card types that you support through Barclays ePDQ. This will limit the selections
available to the customer on the payment page.
Use https (if available) for Transfer to Barlcays
If you are using an SSL certificate with your JShop Server store you should select YES for this option as it will
avoid transferring the customer to an http:// connection to send them to Barclays.
Show Delivery Information
If you do not wish to show the delivery address information on the Barclays ePDQ checkout screens, select YES
here.
What Do I Need To Setup At Barclays?
On the details page for Barclays ePDQ in JShop Server you will be given details that you need to enter into your
ePDQ CPI administration. In addition you should ensure that the Passphrase you enter into JShop Server
matches the Passphrase you enter into the CPI.
Finally, you will need to password protect the gateways/barclays/ directory with a .htaccess username and
password and also enter these details into your ePDQ CPI.
205
Payment Gateways : Gateways
17.4.5
206
CardSave
Enter topic text here.
17.4.5.1
CardSave Direct
Server Requirements
You will require your own secure server certificate (SSL) and cURL installed for PHP with secure sockets
support.
Where Are Credit Card Details Taken?
Credit card details are taken on your site. In addition, for 3D Secure transactions, an IFRAME will be shown
within your site for the customer to enter their authentication password.
Settings Page Details
Merchant ID
This is the Merchant ID issued to you by the gateway.
Password
This is the transaction password issued to you by the gateway.
What Do I Need To Setup At Cardsave?
There is nothing that you need to setup at CardSave.
17.4.5.2
CardSave Hosted
Server Requirements
There are no extra server requirements needed to integrate with CardSave Hosted Payment Page.
Where Are Credit Card Details Taken?
Credit card details are taken on CardSave's payment page.
Settings Page Details
Merchant ID
This is the Merchant ID issued to you by the gateway
Pre-Shared Key
This is the pre-shared key available from CardSave via. the Merchant Information page.
Password
This is the transaction password issued to you by the gateway.
Order Description
A free text field describing the order.
Transaction Type
Here you can select SALE or PREAUTH
206
Payment Gateways : Gateways
207
What Do I Need To Setup At Cardsave?
There is nothing that you need to setup at CardSave.
17.4.6
ChronoPay
Server Requirements
There are no extra server requirements needed to integrate with this gateway.
Where Are Credit Card Details Taken?
Credit card details are taken on the payment gateway’s payment page.
Settings Page Details
Product ID Fields
ChronoPay will have provided you with individual IDs for each currency you can take in your store. You should
enter these here.
Checkout Languages
Here you can specify what language the customer sees on the ChronoPay pages depending on what language
they were viewing your store in.
Product Description
Descriptive text that appears on the ChronoPay payment page.
What Do I Need To Setup At ChronoPay?
You will need to setup the following options in your Chronopay Admin:
Access URL: (see the JShop Server settings page for the gateway for the URL)
17.4.7
ecardon XML
Server Requirements
You will require your own secure server certificate (SSL) and cURL installed for PHP with secure sockets
support.
Where Are Credit Card Details Taken?
Credit card details are taken on your site. This integration does not support 3D Secure.
Settings Page Details
Sender ID
This is the sender ID issued to you by the gateway when you signed up for an account with them.
Channel ID <currency>
For each currency you are allowing people to check out in you will need to enter the corresponding channel ID
in the appropriate box.
User ID
This is the user ID issued to you by the gateway when you signed up for an account with them.
207
Payment Gateways : Gateways
208
User Password
This is the user password you have setup with the gateway for transactions.
Transaction Mode
ecardon provide both a test mode and a live mode.
Payment Usage
A free text description that will appear on the customer's credit card bill.
What Do I Need To Setup At ecardon?
There is nothing that you need to setup at eMS.
17.4.8
eMS (e-services.rs)
Server Requirements
There are no extra server requirements needed to integrate with eMS.
Where Are Credit Card Details Taken?
Credit card details are taken on eMS's payment page.
Settings Page Details
Username
This is the username issued to you by eMS when you signed up for an account with them.
Password
This is the transaction password issued to you by eMS.
Store ID
This is the Store ID issued to you by eMS
Order Description
A free text field to describe the order on the eMS payment pages
What Do I Need To Setup At eMS?
There is nothing that you need to setup at eMS.
17.4.9
eProcessingNetwork
Server Requirements
There are no extra server requirements needed to integrate with eProcessingNetwork.
Where Are Credit Card Details Taken?
Credit card details are taken on eProcessingNetwork’s payment page.
Settings Page Details
208
Payment Gateways : Gateways
209
Account Number / Username
This is the account number / username issued to you by eProcessingNetwork when you signed up for an
account with them.
Background Color
This is the background color that will be used on the payment page.
What Do I Need To Setup At eProcessingNetwork?
You should not need to setup anything at eProcessingNetwork in order for transactions to be successfully
processed.
17.4.10
goEmerchant
Server Requirements
There are no extra server requirements needed to integrate with goEmerchant.
Where Are Credit Card Details Taken?
Credit card details are taken on the goEmerchant payment page on their site.
Settings Page Details
goEmerchant Merchant Name
Your merchant name as issued by goEmerchant when you signed up for an account with them.
What Do I Need To Setup At goEmerchant?
You should not need to setup anything at goEmerchant in order for transactions to be successfully processed.
17.4.11
Google Checkout
Server Requirements
An SSL certificate is required and cURL support with SSL needs to be available in PHP.
Where Are Credit Card Details Taken?
Payment details are taken on Google's own checkout pages.
Settings Page Details
Mode
Select either the Google Checkout sandbox of live service
Merchant ID
Your Google Checkout merchant ID
Merchant Key
Your Google Checkout merchant key
Button Size
209
Payment Gateways : Gateways
210
Select the size of the Google Checkout button you would like to display on your site.
Button Style
Select the style of the Google Checkout button you would like to display on your site.
Merchant Location
Select your country. Please note that Google Checkout only supports merchants from the United Kingdom or
the US.
County/State Cross Reference
As Google Checkout allows free text entry of counties outside the US, and a pre-defined list of 2-letter US state
abbreviations, here you can provide alternative spelling versions to match what comes from back from Google
Checkout. This only applies if you are displaying County/States as a select box in JShop Server.
What Do I Need To Setup At Google?
Within your Google Checkout account (either Sandbox or Live), login and go to Settings -> Integration. Here
you will find your Merchant ID and Key. Ensure that 'My company will only post digitally signed carts' is checked
and that 'Notification as XML' is selected. In 'API callback URL' enter the URL shown on the settings page for
Google Checkout in JShop Server. Set the API version number to 2.2.
What Else do I Need to Setup for JShop Server?
You will need to implement an htaccess username and password on the gateways/googlecheckout directory.
This should use your Google Checkout Merchant ID as the username and Merchant Key as the password. Your
hosting control panel would normally provide the ability to password protect directories.
Processing Google Checkout Orders
When an order is placed using Google Checkout on your store, your Orders page will show the Google
Checkout order number on the orders list along with the current financial and fulfillment status of the order at
Google. From the Orders page in JShop Server you can tell Google that you want to process the payment,
cancel the order or mark the order as delivered. The options available depend on the current financial and
fulfillment status. Please note that this will not impact your JShop Server order status, which you should
process as normal. When sending processing messages to Google Checkout the financial and fulfillment status
will be updated once JShop Server receives a response.
Integration Notes
Please bear the following in mind when using Paypal Express. As it bypasses the normal JShop Server
checkout there are some important things to be aware of:
1. Default shipping prices have to be sent when sending a customer to Google Checkout. These defaults are
used if the merchant calculations facility fails during the customer's checkout. JShop Server uses the
following method to create these default values: (1) If a shipping type is available to the default country set
in JShop Server it calculates using this location, (2) If it is not available to the default country, JShop Server
picks the first zone used on the shipping type to calculate the order. Under normal circumstances the
merchant calculations will provide exact shipping costs as the customer checks out through Google
Checkout.
2. Discounts and discount codes redeemed on your site (via. the cart page, or automatically calculated
discounts) have to be sent to Google Checkout as negative cart items. There can be tax issues caused by
this as Google Checkout calculates the tax themselves, although JShop Server will attempt to account for
210
Payment Gateways : Gateways
3.
4.
5.
6.
211
this. When an order notification comes back from Google Checkout to your store, JShop Server splits out this
line again to use for its own discount totals.
Gift certificates cannot be redeemed through Google Checkout, nor can they be purchased from your store
using Google Checkout as payment.
If you use one-off prices in your store against products you should not use Google Checkout as it has no
support for this
Calculations done on Google Checkout may lead to different rounding or totals than if the JShop Server
checkout was used.
Editing orders in JShop Server that have been placed with Google Checkout is not recommended as this will
have no impact on the order in Google Checkout. In addition Google Checkout does not send across per-item
tax totals when a customer completes the ordering process at Google Checkout and this may cause
problems with order editing.
17.4.12
InternetSecure
Server Requirements
There are no extra server requirements needed to integrate with InternetSecure.
Where Are Credit Card Details Taken?
Credit card details are taken on InternetSecure’s payment page.
Settings Page Details
Merchant Number
This is the account number issued to you by InternetSecure when you signed up for an account with them.
Transaction Mode
InternetSecure have 3 transaction modes. Use ‘Test Mode (Success)’ to test successful transactions, use ‘Test
Mode (Failure)’ to test failed transactions and use ‘Live Mode’ to use your InternetSecure account live.
Language
Select the language you wish the payment page to be displayed in.
Description
Enter a description for orders passed to InternetSecure.
What Do I Need To Setup At InternetSecure?
In your InternetSecure administration system you should go to Export Scripts -> Export Script Options and set
the following:
Server Domain Name:
Set this to the domain name of your server.
Web Page:
Set this to the gateways/response/internetsecure.php URL on your server, e.g.
http://www.yourdomain.com/gateways/response/internetsecure.php
(this will be different on your server and depends on where you installed JShop Server to).
Note: InternetSecure will only send a notification if the payment is successful. JShop Server will receive no
notification if payment fails.
211
Payment Gateways : Gateways
17.4.13
212
Moneris eSelect Plus Hosted Paypage
Server Requirements
There are no extra server requirements needed to integrate with Monseris eSelect PLUS Hosted Paypage
Where Are Credit Card Details Taken?
Credit card details are taken on the payment gateway’s payment page.
Settings Page Details
PS Store ID
This is your account ID with the gateway.
HPP Key
This is your Hosted Paypage Token (HPP Key) as issued by the gateway.
Language
Choose between one of the available languages – this dictates what language the payment pages will be
shown in.
Server
Here you should choose the test server whilst testing your setup and the live server when you are ready to put
your gateway integration into live more.
What Do I Need To Setup At Moneris?
You will need to create a hosted paypage within your Moneris account. When setting this up you can enter the
following details for JShop Server’s integration:
Response Method: Send to your server as a POST
Approved URL: (see the JShop Server settings page for the gateway for the URL)
Declined URL: (see the JShop Server settings page for the gateway for the URL)
17.4.14
Multicards
Server Requirements
There are no extra server requirements needed to integrate with Multicards.
Where Are Credit Card Details Taken?
Credit card details are taken on Multicard’s payment page.
Settings Page Details
Multicards Merchant ID
This is the merchant ID issued to you by Multicards when you signed up for an account with them.
Description
This is the description of the order that will appear on the Multicards payment page.
Authorisation Mode
Multicards have 2 authorisation modes. ‘Normal’ takes the payment straight away and ‘Deferred’ secures
212
Payment Gateways : Gateways
213
payment on the customer’s credit card until it is released by you in Multicard’s administration system.
Silent Post Password
This should be the same as the silent post password you setup in Mulitcards. If it is not, JShop Server will not
receive updates on payment status.
Page IDs
Each currency you transact in with Multicards has its own payment page with a unique reference. Enter the
appropriate references here for each of the currencies in your store.
What Do I Need To Setup At Multicards?
For each of your payment pages at Multicards you need to ensure that the following options are set:
Post URL
Set this on each of your Multicards payment pages to the Post URL shown on JShop Server’s Multicards
settings page.
Silent Post
Make sure this is set to YES
Post Fields
Set this to: user1,user2
Silent Post Password
Set this to the same password you entered in JShop Server’s Multicards settings page.
17.4.15
Multipay
Server Requirements
There are no extra server requirements needed to integrate with Multipay.
Where Are Credit Card Details Taken?
Credit card details are taken on the Multipay payment page on their site.
Settings Page Details
Administrator ID (free field)
You can use this as a reference so that you know where orders are coming from if you have more than one
ordering process.
Seller ID From Multipay
Your seller ID as issued by Multipay when you signed up for an account.
Order Description
A description of the order that will appear on the Multipay payment page.
Country
The country of the merchant
Language
The language you would like the payment page to appear in.
213
Payment Gateways : Gateways
214
Payment Types Allowd
Check all those payment types that you would like to accept on your Multipay payment page. The customer will
then have a selection of which to choose from.
What Do I Need To Setup At Multipay?
You should not need to setup anything at Multipay in order for transactions to be successfully processed.
17.4.16
NoChex
Server Requirements
There are no extra server requirements needed to integrate with NoChex.
Where Are Credit Card Details Taken?
Payment details are taken on NoChex’s payment page.
Settings Page Details
Account
Enter the email address of your NoChex account here.
Description
This is the description of the order that will appear on the NoChex payment page.
Logo
This lets you specify a logo to appear on the NoChex payment page. However, this needs to be from a secure
server otherwise a security notice will be shown to the customer on the NoChex payment page.
What Do I Need To Setup At NoChex?
Nothing needs to be setup at NoChex.
Note: JShop Server will only receive a payment notification if the customer clicks the “Continue” link at
the bottom of the NoChex payment confirmation page. NoChex only accepts GBP!
17.4.17
Optimal Payments API
Server Requirements
You will require your own secure server certificate (SSL) and cURL installed for PHP with secure sockets
support.
Where Are Credit Card Details Taken?
Credit card details are taken on your site.
Settings Page Details
Account Number
This is your account number with Optimal Payments
214
Payment Gateways : Gateways
215
Merchant ID
This is your merchant ID with Optimal Payments
Merchant Password
This password will be given to you by Optimal Payments and is automatically generated by them.
Server
Here you should choose the test server whilst testing your setup and the live server when you are ready to put
your gateway integration into live more.
What Do I Need To Setup At Optimal Payments?
You should not need to setup anything at Optimal Payments in order for transactions to be successfully
processed.
17.4.18
Paypal
17.4.18.1
Paypal Website Payments Standard
Server Requirements
In order to receive payment status notifications your server will require cURL with SSL support. Sending the
customer to PayPal to make payment and returning them to your order success page does not require any
special server requirements however.
Where Are Credit Card Details Taken?
Payment details are taken on PayPal’s payment page.
Settings Page Details
Account
Enter the email address of your PayPal account here.
Description
This is the description of the order that will appear on the PayPal payment page.
Logo
This lets you specify a logo to appear on the PayPal payment page. However, this needs to be from a secure
server otherwise a security notice will be shown to the customer on the PayPal payment page.
Live/Testing Server
Here you can specify whether you wish to use the live Paypal checkout or, for integration testing, the Paypal
Sandbox.
What Do I Need To Setup At PayPal?
To receive payment notifications (assuming you have cURL with SSL support installed) you will need to go into
your PayPal account and activate the “Instant Payment Notification” feature that’s available. All you have to do
is turn this on, JShop Server will send the correct notification URL to PayPal.
215
Payment Gateways : Gateways
17.4.18.2
216
Paypal Express
Server Requirements
An SSL certificate is required and cURL support with SSL needs to be available in PHP. Paypal has strict rules
on the positioning of their logos and checkout buttons on your website. Please see the following document for
more information:
Express Checkout Button Placement and Usage
Where Are Credit Card Details Taken?
Payment details are taken on Paypal's own payment pages.
Settings Page Details
Username
This is your Paypal Express API username (please note that this is not your Paypal email address)
Password
This is your Paypal Express API password (please note that this is not your normal Paypal password)
Signature
This is the API signature provided by Paypal's own administration system for API calls.
Payment Type
Here you can select whether you want to fully action a sale straight away or just authorize a card before
manually actioning the full payment through Paypal's administration system once the goods are ready to be
dispatched.
Live/Testing Mode
JShop Server does support Paypal's sandbox testing mode and this can be selected here.
Checkout Locale
For each language you have setup in your JShop Server store you can select which language Paypal's own
checkout pages should be shown in here.
Show JShop's Shipping Address
If selected, JShop Server will send any shipping address it already has (if the customer selected Paypal
Express whilst going through your own checkout) on the Paypal checkout pages.
Page Style
Here you can enter the name of any page style you have setup at Paypal. If you do not have one, leave this
field blank.
What Do I Need To Setup At PayPal?
When you setup Paypal Express you need an API username, password and signature. These are setup in your
Paypal admin system by logging in, going to My Account -> Profile -> API Access -> Request API Credentials > Request API Signature. Applying for a Centinel account in order to be able to use 3D Secure is also done
through your Paypal admin system.
Integration Notes
216
Payment Gateways : Gateways
217
Please bear the following in mind when using Paypal Express. As it bypasses the normal JShop Server
checkout there are some important things to be aware of:
1. When using their live shipping rate update service (which JShop Server does) the software has to provide
Paypal with a maximum value for the order which cannot be breached. This is really quite awkward as it's
not feasible for JShop Server to calculate every single permutation of shipping for every shipping zone for a
given cart and so the system sets the maximum amount to double the order total when we send the order.
2. Paypal Express does not send a billing address back to the system, it will only provide a shipping address
and so JShop Server will use this as the billing address as well as the shipping address when creating the
order if your checkout has been bypassed completely.
17.4.18.3
Paypal Website Payments Pro
Server Requirements
An SSL certificate is required and cURL support with SSL needs to be available in PHP. Please also note that, if
you are using Paypal Website Payments Pro, it is obligatory to also enable and use Paypal Express on your
website. If you do not you will be breaching Paypal's terms and conditions of use. The integration also supports
3D Secure using Paypal's partner, Centinel Commerce. Please refer to Paypal's own documentation and
administration system for details on how to apply for an account with Centinel to add 3D Secure support.
Where Are Credit Card Details Taken?
Payment details are taken on your own checkout pages.
Settings Page Details
Payment Type
Here you can select whether you want to fully action a sale straight away or just authorize a card before
manually actioning the full payment through Paypal's administration system once the goods are ready to be
dispatched.
Live/Testing Mode
JShop Server does support Paypal's sandbox testing mode and this can be selected here.
Enable 3D Secure
If you have a Centinel 3D Secure account setup you can turn this option on, otherwise leave it off.
Centinel Processor ID
The processor ID provided to you by Centinel Commerce.
Centinel merchant ID
The merchant ID provided to you by Centinel Commerce.
Centinel Transaction Password
The transaction password provided to you by Centinel Commerce.
What Do I Need To Setup At PayPal?
When you setup Paypal Pro you need an API username, password and signature. These are setup in your
Paypal admin system by logging in, going to My Account -> Profile -> API Access -> Request API Credentials > Request API Signature. Applying for a Centinel account in order to be able to use 3D Secure is also done
217
Payment Gateways : Gateways
218
through your Paypal admin system.
17.4.19
PayPoint
Enter topic text here.
17.4.19.1
PayPoint Lite / Professional (Secpay)
Server Requirements
There are no extra server requirements needed to integrate with Paypoint.
Where Are Credit Card Details Taken?
Credit card details are taken on Paypoint's payment page.
Settings Page Details
Merchant ID
This is the account number issued to you by Paypoint when you signed up for an account with them. For
testing you can use the secpay Merchant ID.
Transaction Mode
Paypoint have 3 transaction modes. Use ‘Test Mode (Success)’ to test successful transactions, use ‘Test Mode
(Failure)’ to test failed transactions and use ‘Live Mode’ to use your Paypoint account live.
Authorisation Mode
Paypoint have 3 authorisation modes. ‘Full Authorisation’ takes the payment straight away, ‘Deferred’ secures a
nominal payment on the credit card until fully released by yourself in the Paypoint administration system,
‘Deferred Full’ secures the full payment on the credit card until fully released by yourself.
Digest Key
This is the digest key that you need to setup at Paypoint (see below). It is required for payment notifications.
Remote Password
If you wish to have Paypoint authenticate that the transaction has originated from your store you should set
your remote password in Paypoint's admin system and enter it here. In addition, however, checking this is not
setup by Paypoint by default and, to quote their manual:
"...please ask for this to be done by emailing [email protected], quoting your Paypoint account ID and
requesting that the ‘req_digest=true’ option be added to your account."
What Do I Need To Setup At Paypoint?
In your Paypoint administration system you should go to Change Remote Passwords and set the following:
Which Password Type?
Select ‘Digest Key’ and enter a digest key password (this needs to be the same as you enter into JShop
Server’s Paypoint settings page otherwise JShop Server will not receive payment notifications correctly.)
218
Payment Gateways : Gateways
17.4.19.2
219
PayPoint Metacharge
Server Requirements
There are no extra server requirements needed to integrate with Paypoint.
Where Are Credit Card Details Taken?
Credit card details are taken on Paypoint's payment page.
Settings Page Details
MCPE Installation ID
This is the installation ID provided to you by the payment gateway.
Mode
Paypoint have 3 transaction modes. Use ‘Test Mode (Success)’ to test successful transactions, use ‘Test Mode
(Failure)’ to test failed transactions and use ‘Live Mode’ to use your Paypoint account live.
Authorisation Mode
Paypoint have 2 authorisation modes. 'Auth with Capture' takes the payment straight away, ‘Pre-Auth’ secures
a nominal payment on the credit card until fully released by yourself in the Paypoint administration system.
Order Description
This is a free text field to describe the order for the customer.
What Do I Need To Setup At Paypoint?
In your Paypoint administration system you should go to Settings Account Management -> Installations and set
the following against the correct installation ID:
Return URL
The URL to use here is shown on the PayPoint Metacharge settings screen in JShop Server
Response URL
The URL to use here is shown on the PayPoint Metacharge settings screen in JShop Server
Password Protection
If you are password protecting the gateways/response/paypointmetacharge directory on your server ensure
that you enter the correct username and password at Paypoint in the 'Response HTTP Auth Username' and
'Response HTTP Auth Password' fields
17.4.20
PaySystems TPP-Pro
Server Requirements
There are no extra server requirements needed to integrate with PaySystems TPP-Pro.
Where Are Credit Card Details Taken?
Credit card details are taken on the PaySystems TPP-Pro payment page on their site.
Settings Page Details
PaySystems Merchant ID
Your merchant ID as issued by PaySystems TPP-Pro when you signed up for an account with them.
219
Payment Gateways : Gateways
220
Payment Page Order Description
A description of the order that will be shown on the PaySystems TPP-Pro payment page that the customer
sees.
What Do I Need To Setup At PaySystems TPP-Pro?
You should not need to setup anything at PaySystems TPP-Pro in order for transactions to be successfully
processed.
17.4.21
PSiGate HTML
Server Requirements
There are no extra server requirements needed to integrate with PSiGate HTML.
Where Are Credit Card Details Taken?
Credit card details are taken on the payment gateway’s payment page.
Settings Page Details
Merchant ID
This is your merchant ID with the gateway.
Transaction Mode
Whilst testing you can choose any of the Test Mode option to simulate the given response, e.g. declined or
good. When you are ready to go live you should change this setting to ‘Live’
Authorization Mode
Here you can choose been PreAuth (amounts are secured on a card but not taken) and Sale (amounts are
taken instantly from the customer’s card)
What Do I Need To Setup At PSiGate?
You should not need to setup anything at Optimal Payments in order for transactions to be successfully
processed.
17.4.22
RBS Worldpay Select Junior
Server Requirements
There are no extra server requirements needed to integrate with Worldpay.
Where Are Credit Card Details Taken?
Credit card details are taken on Worldpay’s payment page.
Settings Page Details
Installation ID
This is the installation ID issued to you by Worldpay when you signed up for an account with them.
Description
220
Payment Gateways : Gateways
221
This is the description of the order that will appear on the Worldpay payment page.
Transaction Mode
Worldpay have 3 transaction modes. Use ‘Test Mode (Success)’ to test successful transactions, use ‘Test Mode
(Failure)’ to test failed transactions and use ‘Live Mode’ to use your Worldpay account live.
Authorisation Mode
Worldpay have 2 authorisation modes. ‘Full Authorisation’ takes the payment straight away and ‘PreAuthorisation’ secures payment on the customer’s credit card until it is released by you in Worldpay’s
administration system.
Contact Mode
This option allows you to specify whether the customer is able to change their contact details whilst on
Worldpay’s payment pages. You can either let them change their details, fix them (but show them to the
customer) or hide them completely.
Callback Password
This is the callback password that you also need to enter into Worldpay’s administration system (please see
below).
What Do I Need To Setup At Worldpay?
In your Worldpay administration system you should go Configuration Options and set the following:
Callback URL
Set this to the gateways/response/worldpay.php URL on your server, e.g.
http://www.yourdomain.com/jss/gateways/response/worldpay.php
(this will be different on your server and depends on where you installed JShop Server to)
Callback Enabled?
Make sure that this is checked
Callback Password
Enter the same callback password as you entered into JShop Server’s Worldpay Settings page.
Use Callback Response
If this is checked the order success page from JShop Server will be shown as the confirmation page rather
than Worldpay’s own confirmation page.
17.4.23
Realex
17.4.23.1
Realex Redirect
Server Requirements
There are no extra server requirements needed to integrate with this gateway.
Where Are Credit Card Details Taken?
Credit card details are taken on the payment gateway’s payment page.
Settings Page Details
Merchant ID
This is your merchant ID with the gateway.
221
Payment Gateways : Gateways
222
Secret
This is the shared secret given to you by the payment gateway as part of your setup
Account
This is the settlement account these payments should go to. Please consult the gateway for more information
on the required setting here.
Auto Settle Mode
Here you can choose between manual settling, which means that you have to login to your Realex
administration system to fully process a payment or settling in the next batch, which will automatically process
payments.
What Do I Need To Setup At Realex?
You will need to contact Realex to let them know the response URL for your store. This is listed in JShop
Server on the settings page for the Realex Redirect integration.
17.4.23.2
Realex Remote
Server Requirements
You will require your own secure server certificate (SSL) and cURL installed for PHP with secure sockets
support.
Where Are Credit Card Details Taken?
Credit card details are taken on your site.
Settings Page Details
Merchant ID
This is your merchant ID with the gateway.
Secret
This is the shared secret given to you by the payment gateway as part of your setup
Account
This is the settlement account these payments should go to. Please consult the gateway for more information
on the required setting here.
Auto Settle Mode
Here you can choose between manual settling, which means that you have to login to your Realex
administration system to fully process a payment or settling in the next batch, which will automatically process
payments.
What Do I Need To Setup At Realex?
You should not need to setup anything at Realex in order for transactions to be successfully processed.
222
Payment Gateways : Gateways
17.4.24
Sage Pay
17.4.24.1
Sage Pay VSP Form
223
Server Requirements
There are no extra server requirements needed to integrate with Sage Pay.
Where Are Credit Card Details Taken?
Credit card details are taken on Sage Pay’s payment page.
Settings Page Details
Vendor ID
This is the account number issued to you by Sage Pay when you signed up for an account with them. If you
just wish to test you can use the testvendor Vendor ID.
Encryption Password
Again issued by Sage Pay. If you just wish to test you can use the testvendor Encryption Password.
Description
Enter a description for the order that will appear on Sage Pay’s payment page.
Transaction Mode
Sage Pay provide both a test mode and a live mode. If you are testing with the testvendor details ensure that
you also use ‘Test Mode’ here.
Apply AVS/CV2 Check
This allows you to fine tune how you want AVS and CV2 checking to be applied to orders. For more
information please refer to Sage Pay’s own integration documentation.
Apply 3D Secure
This allows you to fine tune how you want 3D Secure checking to be applied to orders. For more information
please refer to Sage Pay’s own integration documentation.
Authorisation Mode
Protx provide ‘Full Authorisation’ where payment is taken straight away and ‘Deferred’ where payment is only
taken after it is released by you in Sage Pay’s administration system.
Vendor Email
The email address you would like Sage Pay to send the merchant confirmation email to (this is separate to any
email sent from JShop Server).
Send Customer Email From Sage Pay
If this is set to NO, JShop Server will not forward the customer’s email address to Sage Pay and Sage Pay will
not send the customer an email confirming the order.
What Do I Need To Setup At Sage Pay?
Nothing needs setting up in your Sage Pay administration system.
223
Payment Gateways : Gateways
17.4.24.2
224
Sage Pay VSP Direct
Server Requirements
You will require your own secure server certificate (SSL) and cURL installed for PHP with secure sockets
support.
Where Are Credit Card Details Taken?
Credit card details are taken on your site. In addition, for 3D Secure transactions, an IFRAME will be shown
within your site for the customer to enter their authentication password.
Settings Page Details
Vendor ID
This is the account number issued to you by Sage Pay when you signed up for an account with them. If you
just wish to test you can use the testvendor Vendor ID.
Description
Enter a description for the order that will appear on Page Pay’s payment page.
Transaction Mode
Sage Pay provide both a test mode and a live mode. If you are testing with the testvendor details ensure that
you also use ‘Test Mode’ here.
Authorisation Mode
Protx provide ‘Full Authorisation’ where payment is taken straight away and ‘Deferred’ where payment is only
taken after it is released by you in Sage Pay’s administration system.
Apply AVS/CV2 Check
This allows you to fine tune how you want AVS and CV2 checking to be applied to orders. For more
information please refer to Sage Pay’s own integration documentation.
Apply 3D Secure
This allows you to fine tune how you want 3D Secure checking to be applied to orders. For more information
please refer to Sage Pay’s own integration documentation.
What Do I Need To Setup At Sage Pay?
If you are using the Simulator at Sage Pay you will need to ensure that you activated the VSP Direct option in
order to test the gateway integration correctly. You will also need to ensure that you have setup your full Sage
Pay account correctly, including your server’s IP address, in order to allow transactions to be sent to their
system correctly. It is important to familiarise yourself with Sage Pay’s own documentation for the VSP Direct
system as it is highly configurable.
Test card numbers, house numbers, postcodes and CVS numbers can be located in Sage Pay’s VSP Direct
integration manual.
17.4.25
SecureHosting
Server Requirements
There are no extra server requirements needed to integrate with SecureHosting.
Where Are Credit Card Details Taken?
Credit card details are taken on a SecureHosting payment page. In the gateways/resources/SecureHosting/
224
Payment Gateways : Gateways
225
directory in the JShop Server installation are two template files both of which you should upload to your
SecureHosting account. You may edit them but they provide the basic functionality for the integration with
JShop Server.
Settings Page Details
SecureHosting SH Reference Number
This is the account number / username issued to you by SecureHosting when you signed up for an account
with them.
SecureHosting Check Code
Again, this is issued to you by SecureHosting and can be retrieved from your SecureHosting administration
system.
Template File Name
This is the name of the template you wish to use for the payment page. Most people should leave this as
template.html – the default template file that comes with JShop Server is already called template.html
What Do I Need To Setup At SecureHosting?
You should not need to setup anything at SecureHosting in order for transactions to be successfully processed.
17.4.26
SecureTrading
Server Requirements
There are no extra server requirements needed to integrate with SecureTrading.
Where Are Credit Card Details Taken?
Credit card details are taken on SecureTrading’s payment page.
Settings Page Details
Merchant ID
This is the account number issued to you by SecureTrading when you signed up for an account with them.
Email Customer Confirmation
Set to YES if you would like SecureTrading to email a confirmation to the customer as well as JShop Server.
Merchant Email Address
Enter the email address that you would like confirmations from SecureTrading to arrive.
What Do I Need To Setup At SecureTrading?
In order for JShop Server to receive payment status notifications you need to edit and upload some files to
your SecureTrading administration system. When you installed JShop Server a sub-directory was created in
the main gateways directory called ‘resources’. Within this is a directory called ‘SecureTrading’. The following
files are in there:
callback.txt
callback-f.txt
form.html
225
Payment Gateways : Gateways
226
Editing callback.txt and callback-f.txt
Open both of these files in a text editor. The contents of both are exactly the same, like this:
method1
url1
fields1
pipe1
POST
http://www.yourdomain.com/gateways/response/securetrading.php
orderref, streference, stauthcode, stresult, rnd
yes
You need to edit the url1 line in both and change the URL to the url where gateways/response/securetrading.
php can be found on your server. All three files (including form.html) then need to be uploaded to your
SecureTrading account.
17.4.27
Skipjack Secure Process (HTML)
Server Requirements
There are no extra server requirements needed to integrate with this gateway.
Where Are Credit Card Details Taken?
Credit card details are taken on the payment gateway’s payment page.
Settings Page Details
Skipjack HTML Serial Number
This is your Skipjack ID as given by the payment gateway.
Company Name
Text you want to display in the company name on the payment gateway pages.
Text Top
Text you want to display at the top of the payment gateway pages.
Text Bottom
Text you want to display at the bottom of the payment gateway pages.
Page Title
Text you want to display as the page title of the payment gateway pages.
Page Background Colour
A HTML color (e.g. #000000) for the background of the payment pages.
Page Text Colour
A HTML color (e.g. #000000) for the text of the payment pages.
Submit Button Text
The text for the submit button on the payment pages.
Submit Button Text
The text for the reset button on the payment pages.
What Do I Need To Setup At Skipjack?
226
Payment Gateways : Gateways
227
You will need to setup the following options in your Skipjack Admin, specifically in Preference -> Response
Files:
Send Customer to the following WebPages/URLs: Ensure this is selected.
Thank you for your order: (see the JShop Server settings page for the gateway for the URL)
Backend Response URL: (see the JShop Server settings page for the gateway for the URL)
17.4.28
USA ePay
Server Requirements
You will require a secure server and cURL installed with SSL support in order to use the USA ePay payment
gateway.
Where Are Credit Card Details Taken?
Credit card details are taken on your site and authorisation happens between your server and USA ePay’s
server directly – the customer is never transferred to USA ePay’s servers.
Settings Page Details
Source Key
Enter the source key as provided by USA ePay.
Transaction Mode
USA ePay have 2 transaction modes. Use ‘Test Mode’ to test transactions and use ‘Live Mode’ to use your USA
ePay account live.
Authorisation Mode
USA ePay have 2 authorisation modes. ‘Sale’ takes payment immediately, ‘Pre-Auth’ reserves the payment on
the customer’s credit card until payment is released by yourself in USA ePay’s administration system.
Email Customer
Select Yes if you want USA ePay to email the customer a confirmation as well as JShop Server.
What Do I Need To Setup At USA ePay?
There is nothing that you need to setup at USA ePay.
17.4.29
UseCash
Server Requirements
There are no extra server requirements needed to integrate with this gateway although to use the full security
offered you need to be running PHP version 4.3.0 or greater.
Where Are Credit Card Details Taken?
Customers do not pay with credit cards using UseCash, they print off a bardcode which they take to their
nearest PayZone to pay with cash. Your system is then automatically notified. Please note that UseCash can
only currently accept payments in Euros.
Settings Page Details
Vendor Username
227
Payment Gateways : Gateways
228
Username provided to you by UseCash
Secret Key
This is the secret key you have set against your account at UseCash
What Do I Need To Setup At UseCash?
You will need to setup the following options in your UseCash Admin:
Callback URL: (see the JShop Server settings page for the gateway for the URL)
17.4.30
Verisign
17.4.30.1
Verisign Payflow Link USA
Server Requirements
There are no extra server requirements needed to integrate with Verisign Link.
Where Are Credit Card Details Taken?
Credit card details are taken on Verisign payment page.
Settings Page Details
Login ID
This is your Verisign Login ID.
Partner
This is your Verisign Partner name.
Transaction Type
Choose between one of the available options for transaction type – Sale, Authorisation, Delayed Capture.
Description
The company name you wish to display on the Verisign payment page.
What Do I Need To Setup At Verisign?
On the details page for Verisign Payflow Link USA in JShop Server you will be given details that you need to
enter into your Verisign administration. These are entered into the Account Info -> Payflow Link Info section of
the Verisign Administration. They are as follows:
Return URL Method: POST
Return URL: (see the JShop Server settings page for the gateway for the URL)
Silent POST: Tick the check box
Silent POST URL: (see the JShop Server settings page for the gateway for the URL).
17.4.30.2
Verisign Payflow Link Australia
Server Requirements
There are no extra server requirements needed to integrate with Verisign Link.
Where Are Credit Card Details Taken?
Credit card details are taken on Verisign payment page.
228
Payment Gateways : Gateways
229
Settings Page Details
Login ID
This is your Verisign Login ID.
Partner
This is your Verisign Partner name.
Transaction Type
Choose between one of the available options for transaction type – Sale, Authorisation, Delayed Capture.
Description
The company name you wish to display on the Verisign payment page.
What Do I Need To Setup At Verisign?
On the details page for Verisign Payflow Link Australia in JShop Server you will be given details that you need
to enter into your Verisign administration. These are entered into the Account Info -> Payflow Link Info section
of the Verisign Administration. They are as follows:
Return URL Method: POST
Return URL: (see the JShop Server settings page for the gateway for the URL)
Silent POST: Tick the check box
Silent POST URL: (see the JShop Server settings page for the gateway for the URL).
229
Currency Exchange Services :
18
230
Currency Exchange Services
This section describes the live currency exchange rate services that JShop Server supports. Some of these
services require extra setup, normally in your service’s administration system.
Integration With Other Exchange Services
JShop Server’s integration with currency exchange services is modular which enables us to add new services
to the supported list with the minimum of effort. If you wish to use a service that is not currently supported by
JShop Server please contact us.
We cannot guarantee we will be able to support all currency exchange services, mostly because some rely
upon special software being installed on your server (that your server may not be capable of having) or require
particular operating systems on your server.
However, the majority will not be a problem to install so please feel free to contact us. There may be a charge
for integrating your chosen currency exchange service.
18.1
RBS Worldpay
Server Requirements
There are no extra server requirements needed to integrate with the Worldpay currency exchange service
although you will need to be a Worldpay merchant in order to use it.
Settings Page Details
Worldpay Installation ID
This is your installation ID as setup by Worldpay.
Worldpay Info Password
This is the information password you have setup at Worldpay.
What Do I Need To Setup At Worldpay?
You need to ensure that you have setup an Info Password at Worldpay for the Installation ID you will be using
to access the exchange rate service, otherwise exchange rate information will not be received by JShop
Server.
230