1
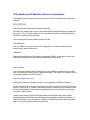
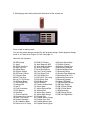
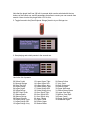
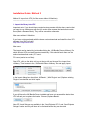
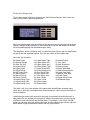
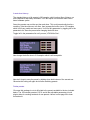
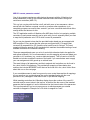
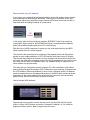
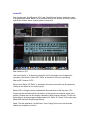
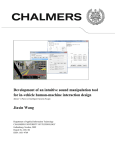
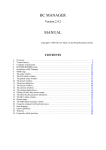
SonicProjects
VM Bundle
Installation Guide
www.sonicprojects.ch
Indoduction
Wecome dear customer and congratulations on your purchase! The VM bundle is
completely pre-configured and ready to play. It includes:
- OP-X (V-Machine Edition)
- Stringer (V-Machine Edition)
- SimpleDelay (a simple delay plugin)
- SimpleReverb (a simple reverb plugin)
- Two pre-configured banks (one for OP-X, one for Stringer)
All of this is provided in one handy library file.
Everything you normally have to spend hours to do manually, namely create presets,
rename them, adjust levels, add effects, has already been done for you. You will find
awesome presets, using effect settings we have used in the past to create our famous
demo audio clips. This of course won't stop you setting up your own presets.
The two included send effect plugins are extremely low cpu and optimized to be used
with those synth sounds. The delay has a fixed time setting of 500ms which always
turned out to be perfect, with adjustable feedback. The reverb has got three parameters
and some useful internal presets for every situation.
OP-X and Stringer went through a long and intense adaptation process to fit the needs
and limited power of V-Machine. The result of this is amongst other things an almost
unbelievable cpu consumption reduction of up to 50% for OP-X and 60% for Stringer!
Have a look at the detailed list further below to see what's been changed.
So the goal was to make our and your dream true to have all those famous sounds
which originally were based on tons of equipment within a box of 18x12x4 cm and a
weight of just a few hundred grams!
Here's the list of adaptations:
OP-X:
- CPU usage reduced by an average of 40% up to 50%
- no keyboard animation to save cpu
- no popping up licensee window for faster loading after preset change
- instead the licensee can be displayed by clicking on "A" next to the levers
- starting phase offset correction for phasing-free startup after plugin sleep
- 128 instead of 64 internal presets, containing the best sounds of the library
- registration engine changed for easy licensing within vfx
Stringer:
- CPU usage reduced by an average of 40-60% by changing the envelopes
- linear envelope response in stacked sounds (two engines) to save cpu
- if only the upper engine is active the envelopes are logarithmic again
- in this case the lower attack knob can choose between 3 envelope types
- completely new gui; this will be the next standard version's one
- registration engine changed for easy licensing within vfx
VFX software and V-Machine firmware requirements
This updated bundle at least requires this version of the VFX software and V-Machine
firmware:
2.0.20101204
In any lower version the bundle won't work correctly!
So before you install make sure your vfx software and V-Machine firmware at least has
this version. The 2.0. prefix means it's the 2.0 software and the numbers afterwards is
the date of release (year/month/day).
You can check the current software version like this:
VFX application:
Click on „MENU“ in the top bar of the VFX application. This will show the software
version below „Menu:System Info“
V-Machine:
Depress the two buttons of the highest row (labeled „MENU“ on the right) at the same
time which will show the firmware version below „Menu:System Info“.
How to update:
If the version and release date is lower than 2.0.20101204 then please first on update
your vfx software and then too the V-Machine firmware. The newest vfx software version
can be downloaded from SM Pro Audio:
http://www.smproaudio.com/
Once the vfx software is updated you also can upgrade the V-Machine firmware.
For this start VFX, click on the small white vfx icon in the top left corner and in the menu
choose „V-MACHINE -> update V-MACHINE firmware“ and follow the instructions. Note
that this could change in later versions so always too be sure to read the user manual
provided by SM Pro audio.
Owners of the former version VM Bundle please note that the radio button sample
preset selections will be reset since Stringer has been slightly updated in this area for
clean functionality in the 2.0 software. So either re-initialize those and save the presets
again or use the new and updated Stringer bank.
Full Version - Quick Installation Guide
V-Machine users:
----------------------There are two Methods. Which one you prefer depends on your personal preferences
and the way you work with VFX and the V-Machine.
Method 1: Directly from a stick
For this just copy the „VM Bundle.vfxlibrary“ to a stick, mount this stick on your
computer, start VFX and point the library location to the „VM Bundle.vfxlibrary“ on this
stick. Then license OP-X and Stringer with your key in the „SonicProjects OP-X“ and
„SonicProjects Stringer“ banks and restart VFX. Once licensed the plugins can be
directly played from the stick now with your V-Machine.
A detailed guide for this method can be found on page 5.
Method 2: Import library to VFX
For this start VFX and import the „VM Bundle.vfxlibrary“ library to your current library
using „File->Import from VFX library“. If you still have the demo version in there and
want to use some custom sounds furthermore then before rename the banks they are
inluded in (otherwise they will be overwritten). Be sure that „All Banks“, „With Pugins“
and „Replace existing plugins“ are checked. If you haven't renamed the demo banks
then VFX will prompt you to replace them (do it). Now license OP-X and Stringer in the
„SonicProjects OP-X“ and „SonicProjects Stringer“ banks and restart VFX.
A detailed guide for this method can be found on page 10.
Mac users who don't own a V-Machine:
--------------------------------------------------If you haven't done already for the demo version before then first on download and
install the free VFX application from SM Pro Audio:
http://www.smproaudio.com/
If you already have the demo version installed and want to use some customized
patches furthermore then before rename the concerned banks.
Now doubleclick the „VM Bundle.vfxlibrary“ file which should launch VFX and start the
import automatically. If this isn't the case then start VFX manually and import the library
by clicking on the small white vfx icon on the top left and choose „File->Import from VFX
library“. Be sure „All Banks“, „With Plugins“ and „Replace existing plugins“ are checked.
If you don't use them anymore you also can replace the demo banks. Now license OP-X
and Stringer with your key. Use „Ctrl + V“ (Strg + V) to paste. The plugins will only start
working after having closed and restarted VFX.
A detailed installation guide can be found on page 10.
Installation Guide: Method 1
Method 1: Directly from USB stick (V-Machine owners only)
-----------------------------------------------------------------------------1. Copy library to stick
Copy the „VM Bundle.vfxlibrary“ to a fast USB stick. This can be the stick that also
contains your other VFX libraries.
2. Mount the stick on your computer
Insert the stick in a free USB connector of your computer and start VFX. In VFX click on
the white vfx icon on the top left and choose „options“(mac: „preferences“).
In the „Primary“ field you can see your currently active library location. Remember this
place so that you can switch back to it later.
Now click on the browse button and browse to the „VM Bundle.vfxlibrary“ on the stick.
Note that the drive letter depends on your system:
Now click on „close“. VFX will load the VM Bundle library from the stick now. VFX may
restart itself for it. Now you should see OP-X in the „SonicProjects OP-X“ bank.
If no plugin window can be seen then click on the small white vfx icon at the top left of
VFX and check „Show VST Editor“.
3. License OP-X and Stringer
Click into the blue window on the top right of OP-X to launch the registration window:
Now enter your license key. Be careful not to add any space bars at the beginning and
the end of the lines. 0 is always zero, no letter. You also can use copy and paste to
avoid typing mistakes.
Mac users: use ctrl + v (strg + v) to paste
When the key has been entered correctly then there will be a „thank you for registering“
window popping up. Click on „ok“. If the key has not been entered correctly nothing will
happen at all.
Note that the plugin will only start working after restarting VFX. But you can wait with
this until you have licensed Stringer too.
So toggle too to the „SonicProjects Stringer“ bank with the button at the top right and
unlock Stringer in the same way:
Now close the vfx application, wait 20 seconds and restart it. Go to the banks and check
if the plugins are working by clicking on the virtual keyboard or playing midi notes on
your midi keyboard. Note that the virtual keyboards are not animated to save cpu, so
they won't react to midi notes when you are using an external keyboard.
Now the library on your stick is ready to be used in the way you prefer it or the way you
are used to. If you are not familiar with this then read page 12. The following page
shows how you can play the plugins directly from the stick.
Play the synths directly from the stick
As soon as the library is licensed you can play the synths directly from the stick, and edit
them on demand with the VFX software, create new presets and banks.
Note that there are several other ways of using a library, including importing it to your
main library, and if there's enough free space, importing the plugins and banks to the VMachine's internal disk and update banks then from the stick or over USB cable from
the VFX application. Read page 13 for this.
1. Start your v-machine, wait until startup is finished, and insert the stick
If there's endless long loading that looks like a hang then your usb stick is too slow or
damaged. Take a new and faster one in that case.
Based on our own experience the quality and speed of sticks can vary drastically even
within the same series, and sticks can get damaged easily.
3. Scroll forward in the banks until you see [SonicProjects OP-X]. Press „Load“.
4. Start playing and switch presets with the buttons of the second row
Press „Load“ to load a preset.
You can also switch presets remotely by midi program change. Switch program change
mode to „to Preset, then Plugins“ for this. See page 15.
Here's the list of presets:
00 SEM Sweep
01 Jump!
02 OB-Xa SyncSolo
03 Shine On Solo
04 OB-Xa Brass
05 OB Nice Strings
06 OB Power Chords
07 Pulsemod Pad
08 BJH Train Solo
09 Live To Tell Strings
10 OB Broad Brass
11 Soft Interval Solo
12 Holiday Mini
13 Axel F.
14 Final Countdown
15 BJH Martyrs
16 SyncSolo
17 4-Voice SawSolo
18 Polymoog Vox Humana
19 Rush Tom Sawyer
20 Parsons Numbers
21 99 Luftballons Bass
22 Prince Let's Go Crazy
23 Bit99 LFO Brass
24 Jarre Magnetic ARP
25 Jarre Magnetic Brass
26 Journey Separate
27 Rush Subdivisions
28 Floyd Turns Prophet
29 Floyd Signs Flute
30 Floyd Signs Pad
31 BJH Life Is For Living
32 BJH Warm Solo
33 BJH Borderline
34 BJH Echoes
35 Parsons Vulture Bass
36 Jupiter Harp
37 Jupiter Envmod Pad
38 Jupiter8 Perc
39 Jupiter Sync Unison
40 Jupiter Dark Strings
41 Prophet Pad
42 Prophet Warm Strings
43 Prophet Sync Solo
44 Prophet Narrow Sync
45 Prophet Echoing Sync
46 Prophet Warm Bass
47 Prophet Clavinet
48 Prophet Closed Perc
49 Minimoog Octabass
50 Minimoog Bass Slow
51 Minimoog Saturn
52 Shining Clear Minimoog
53 Minimoog Filter LFO
54 Minimoog Percussive
55 Minimoog Snappy
56 Classic OB Brass
57 OB Sustained Strings
58 OB Deep Strings
59 OB-X Power Sweep
60 OB-X Pulse Brass
61 SEM Upsweep
62 OB Pitchup Strings
63 OB Fifth Slightbrass
Note that the plugin itself has 128 built in presets which can be switched with the two
buttons of the lowest row, and 82 parameters that allow to create your own sounds from
scratch. Have a look at the plugin within VFX for this.
5. Toggle forward to the [SonicProjects Stringer] bank to try out Stringer too.
6. Start playing and switch presets in the second row.
Here's the list of presets:
00 Solina Combi
01 Moongirl Strings
02 Shine On Split
03 Logan Strings
04 Logan Organ
05 Solina Strings
06 ARP Omni Synth
07 Welson Brass
08 Welson Strings
09 Eternal Chords
10 Logan Strings Tight
11 Logan Strings Soft
12 Logan Strings Juicy
13 Logan Organ Tight
14 Logan Organ Soft
15 Logan Organ Juicy
16 Solina Strings Tight
17 Solina Strings Soft
18 Solina Strings Juicy
19 Omni Synth Tight
20 Omni Synth Soft
21 Omni Synth Juicy
22 Jarre Chords
23 Logan Combi
24 Double Organ
25 Welson Brass
26 Octave Solina
27 Juicy Omni
28 Omni Welsoned
29 Octave Logan
30 Organ Welsoned
31 Octave Stereo Brass
32 Logan Omni Split
33 Welson Omni Split
34 Power Combi
35 Organ Synth Combi
36 Sustained Organ
Installation Guide: Method 2
Method 2: Import into VFX (for Mac users without V-Machine)
--------------------------------------------------------------------------------1. Import the library into VFX
Important note: If you should have created custom presets with the demo version that
you want to use furthermore with the full version then rename the banks that contain
them (Bank->Rename Bank). They will be overwritten otherwise.
Mac users without V-Machine:
If you have not done already with the demo version download and install the free VFX
software from SM Pro Audio:
http://www.smproaudio.com/
Mac users:
The import can be started by just doubleclicking the „VM Bundle Demo.vfxlibrary“ file
which will start VFX and start import automatically. If this should't work then use the
method as described under „PC users“.
PC users (works too on Mac):
Start VFX, click on the white vfx icon at the top left and choose file->import from
vfxlibrary. Then browse to the „VM Bundle Demo.vfxlibrary“ file and apply import.
In the import dialog box check that „All Banks“, „With Plugins“ and „Replace existing
Plugins“ are checked and click import.
If you still have the VM Bundle Demo installed and have not renamed the banks then
VFX will ask you to replace the banks. Choose „Replace Banks“.
Now OP-X and Stringer are available in the „SonicProjects OP-X“ and „SonicProjects
Stringer“ banks and only still have to be licensed before they can be used.
2. License OP-X and Stringer
In the „SonicProjects OP-X“ bank you now should see the OP-X plugin interface. If you
don't then activate VST Editor by clicking on the small white vfx icon at the top left of
VFX and checking „Show VST Editor“.
Now click into the blue window on the top right of OP-X to launch the reg window:
Now enter your license key. Be careful not to add any space bars at the beginning and
the end of the lines. 0 is always zero, no letter. You also can use copy and paste to
avoid typing mistakes.
Mac users: use ctrl + v (strg + v) to paste
When the key has been entered correctly then there will be a „thank you for registering“
window popping up. Click on „ok“. If the key has not been entered correctly nothing will
happen at all.
Note that the plugin will only start working after restarting VFX. But you can wait with
this until you have licensed Stringer too.
So toggle too to the „SonicProjects Stringer“ bank with the button at the top right and
unlock Stringer in the same way:
Now close the vfx application, wait 20 seconds and restart it. OP-X and Stringer can be
played now. Note that the virtual keyboards are not animated to save cpu, so they won't
respond to midi notes when you are using an external keyboard. V-Machine owners now
can synchronize VFX to the V-Machine in the preferred way. We however highly
recommend to use a USB stick for it because of speed.
Possible ways of using the library
Once the library on the stick is licensed there are several possible ways to use it with
your V-Machine and VFX, dependent on your personal preferences.
Method 1. Edit and play the VM Bundle directly from the stick
This is the most straight forward and easiest way. Shortly spoken you play the synths
directly from the stick with the V-Machine, and for editing you mount in on your
computer and point the primary library location (options) to it as you've done for
licensing. All new and edited presets and banks will reside on the stick then. Note that
the stick too can contain other libraries you need.
To play the synths with your V-Machine simply start your V-Machine, and when startup
has finished mount the stick. Then toggle forward in the banks until you see the banks
[SonicProjects OP-X] and [SonicProjects Stringer] and start playing.
Read the following page for details.
Method 2. Import the library to VFX and synchronize to your V-Machine
If you have one central library for all banks and plugins that resides on your computer or
on a stick then you can import the VM Bundle library to it. For this start VFX and click on
the white vfx icon on the top left and choose file->import from vfxlibrary and then browse
to the „VM Bundle.vfxlibrary“ on your stick and import it.
Read the page 7 for a detailed guide on this.
Now after editing you either export the banks as library file to a USB stick (file->export to
vfxlibrary and choose all banks or just the new ones), or you also can synchronize it
directly over usb cable with your V-Machine.
Please read the V-Machine manual for details on this. Export library to USB stick:
If you plan to synchronze over cable then it's recommended to import the two basic
banks [SonicProjects OP-X] and [SonicProjects Stringer] first on from the USB stick to
the internal drive of the V-Machine which too will import the plugins themselves which
together with the sample data of Stringer and all presets have about 121 mb of data
which would take hours to transfer over cable. It works much faster from USB stick.
Note that your V-Machine's internal disk has to have enough free space for this.
So as you can see the easiest and fastest way is to use the library directly from the
stick. Note that a USB stick can hold as many independent libraries as you want, so you
still can have everything you need on one stick.
Transfer the plugins and banks to the V-Machine's internal disk
If you don't want to use a stick for playing OP-X and Stringer then you can transfer the
plugins and banks to the internal flash drive of the V-Machine. Prerequisite is that it has
enough free space left. The full bundle needs about 128mb.
In any case the licensed library should be on a USB stick first since this allows for the
fastest transfer. If you have chosen installation and licensing directly from the stick then
it's already ready for it. If you have chosen the import to VFX method then you first on
need to export the library to a USB stick.
1. Export the needed plugs and banks onto a usb stick
Click on the small white vfx icon at the top left of VFX and choose file->export to vfx
library. Now you can choose dedicated banks (so in this case SonicProjects OP-X and
SonicProjects Stringer) or you too can export all banks.
Point the destination path to the root directory of a connected USB stick.
2. Transfer the banks and plugins from the stick to the V-Machine
Once the library resides on the USB stick you can play it directly from the stick and on
demand too import it to the internal drive of the V-Machine.
Start your v-machine, wait until startup is finished, and insert the stick.
Toggle forward in the banks until you see [SonicProjects OP-X] and load it.
This is the first of the two banks that have to be transferred. If it's a fast stick you will
note that you already can play the presets directly from the usb stick. So if there should
be not enough left space anymore on the internal drive you could also just directly play
the synths from the stick, which only will reserve the used amount of ram. But your main
goal presumably is to get it all into the machine, so let's go on.
So now let's transfer the bank to the internal flash drive so that you also can play the
plugins without the usb stick connected to the machine. For this hold down both menu
buttons which will bring you into the global system menu.
Now toggle right in the menu items with the top left button until you see Menu:Import.
Now you either can import all banks at once or just the selected bank. If you only have
the VM Bundle on the stick you could right go for “All Banks + Plugins”, which will
transfer the two banks and all plugins to the internal disk of the V-Machine.
Now the “SonicProjects OP-X” and “SonicProjects Stringer” banks will be listed in the
internal banks without brackets. All needed plugins now reside too on the internal disk. If
you have the library too within VFX then you now can simply update banks either over
cable with the “SYNC” function of VFX or by before exporting them to a stick. Please
Read the V-Machine manual for details on this.
Play from the internal disk
So now everything is ready to actually start playing the plugins. Let's begin with the
„SonicProjects OP-X“ bank. Toggle to it with the upper two buttons.
Presets are switched with the buttons of the second row. What's displayed as „Patch“ in
the lowest row is only one parameter of the current patch, namely the internal patch of
OP-X used in this preset.
You can also switch presets remotely by midi program change, which will change
presets without the need to depress the „Load“ button. Switch program change mode to
„to Preset, then Plugins“ in the „MIDI Options“ menu for this, see next page.
Here's the list of presets:
00 SEM Sweep
01 Jump!
02 OB-Xa SyncSolo
03 Shine On Solo
04 OB-Xa Brass
05 OB Nice Strings
06 OB Power Chords
07 Pulsemod Pad
08 BJH Train Solo
09 Live To Tell Strings
10 OB Broad Brass
11 Soft Interval Solo
12 Holiday Mini
13 Axel F.
14 Final Countdown
15 BJH Martyrs
16 SyncSolo
17 4-Voice SawSolo
18 Polymoog Vox Humana
19 Rush Tom Sawyer
20 Parsons Numbers
21 99 Luftballons Bass
22 Prince Let's Go Crazy
23 Bit99 LFO Brass
24 Jarre Magnetic ARP
25 Jarre Magnetic Brass
26 Journey Separate
27 Rush Subdivisions
28 Floyd Turns Prophet
29 Floyd Signs Flute
30 Floyd Signs Pad
31 BJH Life Is For Living
32 BJH Warm Solo
33 BJH Borderline
34 BJH Echoes
35 Parsons Vulture Bass
36 Jupiter Harp
37 Jupiter Envmod Pad
38 Jupiter8 Perc
39 Jupiter Sync Unison
40 Jupiter Dark Strings
41 Prophet Pad
42 Prophet Warm Strings
43 Prophet Sync Solo
44 Prophet Narrow Sync
45 Prophet Echoing Sync
46 Prophet Warm Bass
47 Prophet Clavinet
48 Prophet Closed Perc
49 Minimoog Octabass
50 Minimoog Bass Slow
51 Minimoog Saturn
52 Shining Clear Minimoog
53 Minimoog Filter LFO
54 Minimoog Percussive
55 Minimoog Snappy
56 Classic OB Brass
57 OB Sustained Strings
58 OB Deep Strings
59 OB-X Power Sweep
60 OB-X Pulse Brass
61 SEM Upsweep
62 OB Pitchup Strings
63 OB Fifth Slightbrass
So let's go to Stringer now.
To play the presets of Stringer, toggle to the „SonicProjects Stringer“ bank, which too
offers a lot of useful ready to play presets.
Also here switch presets with the buttons of the second row or by external midi program
change. Stringer initially takes two to three seconds to load the sampleset into the ram,
but once loaded presets can be switched quite fastly.
The sampleset, which is 70mb by itself, is loaded two times into the ram for independent
access for the two separate engines. So it will use 140mb of the installed ram.
Here's the list of presets:
00 Solina Combi
01 Moongirl Strings
02 Shine On Split
03 Logan Strings
04 Logan Organ
05 Solina Strings
06 ARP Omni Synth
07 Welson Brass
08 Welson Strings
09 Eternal Chords
10 Logan Strings Tight
11 Logan Strings Soft
12 Logan Strings Juicy
13 Logan Organ Tight
14 Logan Organ Soft
15 Logan Organ Juicy
16 Solina Strings Tight
17 Solina Strings Soft
18 Solina Strings Juicy
19 Omni Synth Tight
20 Omni Synth Soft
21 Omni Synth Juicy
22 Jarre Chords
23 Logan Combi
24 Double Organ
25 Welson Brass
26 Octave Solina
27 Juicy Omni
28 Omni Welsoned
29 Octave Logan
30 Organ Welsoned
31 Octave Stereo Brass
32 Logan Omni Split
33 Welson Omni Split
34 Power Combi
35 Organ Synth Combi
36 Sustained Organ
The (tight / soft / juicy) are variants of the same patch with different envelope types,
which vary in their cpu consumption and release behaviour. Have a look at the docs for
more information.
Combis always combine two sounds in one patch for extremely fat and rich sound. In
split presets the two engines are assigned to different keyboard areas, so you can play
a different sound with the left and the right hand. For example, in the „Shine On Split“
preset you can play the organ with the left hand and the solina strings with the right one
which allows to play those famous chords with only one instance.
If you want to remotely change presets by midi program changes, then before change
the program change mode from patch to preset in the system menu.
1. Hold down both menu buttons to enter the global menu
2. Toggle left with the top left button until you have the „MIDI Options“ menu.
3. Change the „Send Program Change“ parameter to „to Preset, then Plugins“. In the
second row goto the parameter „Program Change Delay“ and set it to „Immeadiate“.
Now click on „Back“ to leave the menu.
Now presets will be changed immediatly when you send a MIDI program change
message from your external equimpent.
The introducing four digits expression in the third line is the unique id of the plugin
whose parameter is currently displayed. The ids of this package are:
OPXU: OP-X
SPDE: SimpleDelay
SPRV: SimpleReverb
STC2: Stringer
Apart from the 128 internal patches that build the base of the preset OP-X has a total of
82 different parameters ready to tweak or create new sounds from scratch. This
however is better done in the vfx application or using external controllers.
Internal patches:
Only switch this one when you want to edit the preset, which you anyway better do in the
vfx application. Of course you could also go through the internal patches in a dry preset
to see what's all there. There are 128 internal patches which build the base for creating
new presets.
A word about latency:
The standard latency of all presets is 256 samples, which is about 5ms of latency, so
quite responsive and hardly noticeable. It's in fact equal or even better than even in
some hardware synths.
Some few presets max out the cpu then and when. This could occasionally lead to a
crackling. If that should occur too often, then increase the buffer size to 512 samples,
which is still very usable and more save. You'll find this parameter by toggling left in the
parameter's list. Save the preset after changing the buffer size.
Toggle left in the parameters list until you see „VFX Buffer Size“.
Now change the buffer size to 512 samples which is still acceptable.
Now don't forget to save the preset by holding down both buttons of the second row.
Otherwise the setting will again be lost after switching presets.
Further presets:
Of course this package is not at all limited to the presets available in the two included
banks. The 128 internal presets of OP-X and all the adjustable parameters in both
plugins allow for creating hundreds of new presets. Have a look at page 20 to learn
more about it.
MIDI CC remote parameter control
One of the greatest experiences while playing the presets with the V-Machine is to
tweak parameters on the fly with external controller knobs and buttons using midi
continuous controllers (MIDI CC).
This e.g. lets you play with the filter cutoff, add a bit more or less resonance, detune
sounds with osc2 detune or spread, as well as countless other operations, up to
completely program new sounds from scratch if you have a controller device that offers
enough knobs and buttons for this.
The VFX application and the V-Machine offer MIDI-learn for this, but assigning multiple
controllers in each preset manually can be quite a bit of work, especially when you want
to map the full parameter set of OP-X which covers 82 parameters!
So you may be pleased to hear that the provided banks already are pre-mapped with
MIDI controllers. Every preset has the same pre-configured midi CC mapping that
covers all 82 parameters for OP-X and the most useful ones for Stringer. The used
mapping follows the popular Pro53 standard which matches the standard setting of most
available controllers for immediate tweaking.
These pre-mapped banks save you a lot of work which otherwise had to be applied for
each preset manually. So it's recommended to use this mapping as base and adapt your
controller to it if necessary (e.g. create a dedicated preset). This full version of the VM
Bundle too includes unmapped versions of the banks if you nevertheless want to apply
your own assignments from gound up on a blank base.
The exact listings of all parameters and their assigned midi controllers can be found in
the „docs“ folder of this package. The provided pre-mapping of these banks also
matches the included BCR2000 Toolkit that can be found too in the „docs“ folder. More
about this one on the next page.
If you nevertheless want to start from ground up on a neutral base and do all mappings
by your own then you could exchange the current standard banks with the ones
provided in the „Unmapped“ folder which have no pre-defined mapping.
While tweaking controllers the V-Machine display shows the number of the used CC
controller and its current value in the top line, in the third line the name of the tweaked
parameter that's mapped to it and in the bottom line the internal value of the parameter.
This is quite practical if you're not anymore sure to which parameter an external
controller is mapped to. Example for cc70 which is mapped to Cutoff:
Remote control using CC feedback:
If you want to go a step further then get a controller device with endless rotary controls
and led-buttons like the Behringer BCR2000. These types of controllers let you edit
parameters without any parameter jumps, because the buttons and knobs are able to
keep track with the changed settings of a new preset.
In the „docs“ folder there's provided a complete „BCR2000 Toolkit“ that contains a
custom MIDI Sysex preset for the BCR2000 as well as a comprehensive installation
guide and printable template pictures for OP-X and Stringer.
With the help of a MIDI sequencer or player you can load the preset into your BCR
which is easier than you would suppose.
The preset fits the preconfigured cc mapping of the mapped banks and offers direct
access to every single parameter of OP-X (82) and the most useful ones of Stringer.
The controls were grouped by function for easy oversight and the push functions of the
top knobs row either offer a separate function as button supplement or are used to reset
the rotatry function back to a standard value, e.g. standard tuning for master tune or
center position for the pan knobs.
This setup lets you completely remotely program OP-X like a hardware synth without
boring scrolling through the menues of the V-Machine or even reaching a computer with
the VFX software. When midi feedback is active in the V-Machine then the V-Machine
sends a complete dump of all mapped parameters to the BCR which updates all knobs
and buttons to the current setting of the new preset as if they they were moved with
ghost's hands, and all this within the fraction of a second.
How to activate MIDI feedback:
Depress both menu buttons to enter the main menu and scroll left with the top left
button to „Menu: MIDI Options“ and switch „Parameter Feedback“ to „On“ and then
depress the button next to „Back“ to again leave the menu.
Inside VFX:
After licensing the „SonicProjects OP-X“ and „SonicProjects Stringer“ banks are ready
to be played and edited. Banks can be switched with the two buttons at the top, presets
with the two buttons below, marked yellow in the picture.
Mac Version of VFX:
Click on the white „X“ in the dock to bring the GUI of the plugin to the foreground if
necessary. Also check if „Show VST Editor“ is checked in vfx menu (see below).
Mac and PC Version of VFX:
Be sure that „Show VST Editor“ is checked in the main menu which can be opened by
clicking on the white vfx icon at the top left.
Banks (OP-X, Stringer) can be switched with the two buttons of the top row in VFX.
Presets can be switched with the two buttons of the second row (marked yellow in the
picture). Presets also can be remotely switched by MIDI program changes. For this you
before have to change program change mode from „Patch“ to „Preset“ in the main menu
(Menu:MIDI Options->ProgChange:Preset).
Apple: The free application „SoundFlower“ from Cycling74 lets you route the audio
stream to a sequencer of choice.
Create your own presets and banks
Of course the possibilities don't stop here. The provided banks are just a good starting
point and a well chosen collection of usable presets for immediate use.
With a bit of skill you can also create your own custom presets and banks. OP-X comes
with 128 internal presets, so the v-machine bank only uses half of them already. Take
some time and try them out by switching them in a dry preset. It's recommended to
remove and reload OP-X first (in the vfx application) because the first internal patch
always is overwritten by the current chunk file otherwise.
Of course you can also tweak the patches to your liking or create your own ones from
scratch. Also have a look at our site, since we plan to provide further „ready to play“
banks and presets in vfx format in the future.
A very welcome function for creating own new presets is the „Preset -> Clone Preset
from“ in the top menu of vfx. This will overtake all settings of the cloned preset, including
all channel and volume settings, which normally won't be changed. Unload and reload
the plugin once to have the clean patches list again without the first patch being
overwritten by the current chunk file.
You of course also can combine presets of several banks to new banks, the plugins
don't have to be separated in banks. For a gig, you probably will prefer to have the
needed sounds in the order of your set in one bank.
You can arrange banks in the vfx application, but also can copy presets around
manually in the vfx library. You however need to re-number the items then.
Don't try to use two instances of OP-X or Stringer in one preset, nor both combined. The
v-machine simply has not enough CPU power for this. Upgrade to the V-Rack to use
multible instances and more sophisticated send or insert effects.
If you should have imported OP-X and Stringer into the V-Machine's internal disk (see
page 11) then it would suffice to send the new banks and presets to the V-Machine
using cable SYNC. To transfer a bank by usb cable connect your V-Machine (running)
and click on „SYNC“, choose the banks to transfer, and then confirm. Of course you can
also load them into the machine by usb stick as usual which is faster, or do all of the
preset work directly from the stick. It's all up to you.
Final Note:
This guide was written based on the vfx software version 20101204. Details or functions
of the vfx software and the v-machine may change, so always refer to the current vfx
and v-machine docs, since things described here may get obsolete or outdated.
It's always recommended to have the most up to date vfx software version and vmachine firmware installed. Keep yourself informed on the SM-Pro Audio website. We
only can do support for our plugins. Contact us at:
http://www.sonicprojects.ch/