1
Installation Guide - Stage 3
Oracle Financial Services:
Anti-Money Laundering |Fraud| Trading Compliance |Broker
Compliance |Energy and Commodity Trading Compliance|
Enterprise Case Management | Know Your Customer|FATCA
Management
Release 6.2.1
September 2013
Installation Guide - Stage 3
Oracle Financial Services
Anti-Money Laundering |Fraud| Trading Compliance |Broker
Compliance |Energy and Commodity Trading Compliance|
Enterprise Case Management | Know Your Customer
Release 6.2.1
September 2013
Document Control Number: 9MN12-62110009
Document Number: IGST3-13-FCCM-0009-6.2.1-01
Oracle Financial Services Software, Inc.
1900 Oracle Way
Reston, VA 20190
Document Number: IGST3-13-FCCM-0009-6.2.1-01
First Edition (September 2013)
Copyright © 1996-2013, Oracle and/or its affiliates. All rights reserved.
Printed in U.S.A. No part of this publication may be reproduced, stored in a retrieval system, or transmitted in any form or by
any means, electronic, mechanical, photocopying, recording, or otherwise without the prior written permission.
Trademarks
Oracle is a registered trademark of Oracle Corporation and/or its affiliates.
Other names may be trademarks of their respective owners.
Oracle Financial Services Software, Inc.
1900 Oracle Way
Reston, VA 20190
Phone: (703)-478-9000
Fax: (703)-318-6340
Internet: www.oracle.com/financialservices
Contents
List of Figures ................................................................................................................ vii
List of Tables ................................................................................................................... ix
About This Guide ............................................................................................................ xi
Introduction ..........................................................................................................................................................................xi
Who Should Use this Guide ...............................................................................................................................................xi
How this Guide is Organized ............................................................................................................................................xii
Where to Find More Information ....................................................................................................................................xii
Conventions Used in this Guide ......................................................................................................................................xiii
C HAPTER 1
Preparing to Install .......................................................................... 1
Deployment Architecture.....................................................................................................................................................2
Environment Details.............................................................................................................................................................3
Installation Checklist .............................................................................................................................................................4
Populating the GRC_InstallConfig.xml File......................................................................................................................8
Layer - GENERAL........................................................................................................................................................9
Layer - APPLICATION .............................................................................................................................................15
Layer - DATABASE ....................................................................................................................................................24
Layer - WEB .................................................................................................................................................................30
C HAPTER 2
Installation Activities..................................................................... 33
Installing OFSFCCM Solution in Silent Mode ...............................................................................................................33
Verification of Installation Logs........................................................................................................................................34
C HAPTER 3
Post Installation ............................................................................. 37
Restart Application servers ................................................................................................................................................37
Web Layer Configuration ...................................................................................................................................................38
Workaround for AIX 6.1 ............................................................................................................................................39
Workaround for WebLogic as Web Application Server .........................................................................................39
OFSAAI Redeployment .....................................................................................................................................................39
Admin Tools Deployment..................................................................................................................................................39
Scenario Wizard Configuration and Deployment ..........................................................................................................40
Restarting Web Application server....................................................................................................................................41
Creating Users to Access OFSFCCM Solution ..............................................................................................................41
Perform Administrative activities for OFSECM.....................................................................................................41
Perform Configurations for OFSECM.....................................................................................................................41
Installation Guide - Stage 3 Release 6.2.1
v
Contents
Perform Administrative activities for KYC .............................................................................................................42
Setting OFSFCCM UI as Home Page of OFSAAI for a Particular User...................................................................42
C HAPTER 4
Uninstalling OFSFCCM ................................................................. 43
C HAPTER 5
Deploying Analytic Reports and Threshold Analyzer ............... 47
Installing OBIEE Server ....................................................................................................................................................47
Installing OBIEE Windows Administration Client .......................................................................................................47
Disabling the Cache Feature in OBIEE Server ..............................................................................................................48
Change Default Repository Password..............................................................................................................................48
Configuring OBIEE Connection Pool.............................................................................................................................49
Deploying OFSFCCM Report Analytics .........................................................................................................................50
Post Installation Steps.........................................................................................................................................................51
Accessing Reports through OFSFCCM Application.....................................................................................................52
APPENDIX A
Installation Order for Multi-Tier Installation of OFSFCCM ........ 53
OFSAAI APP, DB Layer on Machine A and OFSAAI WEB Layer on Machine B .........................................53
OFSAAI APP Layer on Machine A and OFSAAI DB, WEB Layer on Machine B .........................................53
OFSAAI APP, WEB Layer on Machine A and OFSAAI DB Layer on Machine B .........................................53
OFSAAI APP Layer on Machine A, OFSAAI DB Layer on Machine B and OFSAAI WEB Layer on
Machine C .....................................................................................................................................................................53
APPENDIX B
ETL Source Creation .................................................................... 55
APPENDIX C
Configuration for the KYC File Rename.sh ................................ 57
Steps for Creating the Access Permission for Copying the File from One Machine to Another ..........................57
Calling the Shell Script for Copying the Files from One Path to Another.................................................................58
APPENDIX D
Watchlist_FuzzyMatch ................................................................. 59
Calling the Shell Script for Copying the Files from One Path to Another.................................................................60
vi
Installation Guide - Stage 3 Release 6.2.1
List of Figures
Figure 1. Deployment Architecture............................................................................................................................................2
Figure 2. Multi-tier Configuration ............................................................................................................................................58
Figure 3. Single-tier Configuration ...........................................................................................................................................58
Figure 4. Multi-tier Configuration ............................................................................................................................................60
Figure 5. Single-tier Configuration ...........................................................................................................................................60
Installation Guide - Stage 3 Release 6.2.1
vii
List of Figures
viii
Installation Guide - Stage 1 Release 6.2.1
List of Tables
Table 1.
Table 2.
Table 3.
Table 4.
Table 5.
Table 6.
Table 7.
Table 8.
Conventions Used in this Guide .............................................................................................................................xiii
Environment Details ....................................................................................................................................................3
Installation Checklist ....................................................................................................................................................4
Placeholders in Layer - GENERAL ..........................................................................................................................9
Placeholders in Layer - APPLICATION ................................................................................................................15
Placeholders in Layer - DATABASE.......................................................................................................................24
Placeholders in layer – WEB.....................................................................................................................................30
Placeholders in GRC_InstallConfig.xml .................................................................................................................44
Installation Guide - Stage 3 Release 6.2.1
ix
List of Tables
x
Installation Guide - Stage 3 Release 6.2.1
About This Guide
This guide provides comprehensive instructions for installing and configuring the Oracle Financial Services
Financial Crime and Compliance Management (OFSFCCM) Release 6.2.1 product that includes Enterprise Case
Management (OFSECM) and Oracle Financial Services Know Your Customer (OFSKYC).
This chapter focuses on the following topics:
Who Should Use this Guide
How this Guide is Organized
Where to Find More Information
Conventions Used in this Guide
Introduction
The Oracle Financial Services Financial Crime and Compliance Management product installation happens in three
stages:
Stage 1 (OFSBDF) Installation – This stage creates four Atomic schemas namely, Alert Management
(AM), Case Management (CM), Know Your Customer (KYC), and Financial Services Data Framework
(FSDF) schema. The Alert and Case Management data models are created during the Stage 1 installation
while the KYC and FSDF schema data models are created during Stage 3 installation.
Stage 2 (OFSAAI) Installation – For this installation, we can either use the user created during Stage1
installation (config_user) or any other manually created user. In case you are using a manually created user,
then Stage1 and Stage2 installations can be done in parallel. There is no dependency for Stage 1 and Stage 2
except that both the installations must use the same database instance.
Stage 3 (OFSFCCM) Installation – This guide talks about OFSFCCM product installation which requires
Stage 1 and Stage 2 installations to be completed successfully.
Who Should Use this Guide
The Installation Guide - Stage 3 is designed for use by the OFSFCCM Installers and OFSFCCM Administrators. Their
roles and responsibilities include the following:
OFSFCCM Installer: This user installs and configures the OFSFCCM product at the deployment site.
OFSFCCM Administrator: This user performs OFSFCCM related administrative activities, maintains user
accounts, and performs mapping of User Groups (internally mapped with roles) to users.
Installation Guide - Stage 3 Release 6.2.1
xi
About this Guide
How this Guide is Organized
TheInstallation Guide - Stage 3 includes the following chapters:
Chapter 1, Preparing to Install, details the activities that occur prior to the installation of OFSFCCM and
identifies all the third-party software’s necessary to run the OFSFCCM solution.
Chapter 2, Installation Activities, provides step-by-step installation activities for installing the OFSFCCM
solution.
Chapter 3, Post Installation, details the steps that must be followed after successful installation of OFSFCCM
solution.
Chapter 4, Uninstalling OFSFCCM, details the steps that must be followed for un-installation of OFSFCCM
solution.
Chapter 5, Deploying Analytic Reports and Threshold Analyzer, explains how to integrate Analytic Reports and
Threshold Analyzer with OFSFCCM solution.
Appendix A, Installation Order for Multi-Tier Installation of OFSFCCM, explains the installation
order of OFSFCCM on different machines hosting OFSAAI Layer(s).
Appendix B, ETL Source Creation, explains steps for creation of ETL.
Where to Find More Information
The OFSFCCM installation is done in three stages. The three installation guides are as follows:
Installation Guide Stage: 1: This Installation Guide provides instructions for installing Oracle Financial Services
Behavior Detection Framework (OFSBDF) Scenarios, and Data Ingestion and Detection Algorithms to
support Behavior Detection.
(Stage 2) Oracle Financial Services Analytical Applications Infrastructure Installation and Configuration Release 7.3: This
installation and configuration guide provides instructions for installing and configuring OFSAAI.
For more information about OFSFCCM, refer to the following documents:
Configuration Guide: Provides instruction to configure OFSFCCM solution.
Administration Guide: Provides instruction to perform administrative activities for the OFSFCCM solution.
Oracle Financial Services Analytical Applications Infrastructure Installation and Configuration Release 7.3: This
Installation and Configuration Guide provides instructions for installing and configuring OFSAAI.
Oracle Financial Services Analytical Applications Infrastructure User Manual Release 7.3: This manual provides
instructions for System Administration components of Infrastructure and assists the administrator in
configuring the system, managing users, and performing administrative tasks effectively.
To find more information about Oracle Financial Services application and our complete product line, visit our
website at www.oracle.com/financial services.
xii
Installation Guide - Stage 3 Release 6.2.1
About this Guide
Conventions Used in this Guide
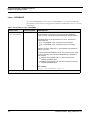
Table 1 lists the conventions used in this guide.
Table 1. Conventions Used in this Guide
Convention
Italics
Meaning
Names of books, chapters, and sections as references
Emphasis
Bold
Object of an action (menu names, field names, options,
button names) in a step-by-step procedure
Commands typed at a prompt
User input
Monospace
Directories and subdirectories
File names and extensions
Process names
Code sample, including keywords and variables within text
and as separate paragraphs, and user-defined program
elements within text
<Variable>
Substitute input value
Installation Guide - Stage 3 Release 6.2.1
xiii
About this Guide
xiv
Installation Guide - Stage 3 Release 6.2.1
CHAPTER 1
Preparing to Install
This chapter provides information about system hardware and software requirements and pre-installation activities.
This chapter includes the following topics:
Deployment Architecture
Environment Details
Installation Checklist
Populating the GRC_InstallConfig.xml File
Installation Guide - Stage 3 Release 6.2.1
1
Deployment Architecture
Chapter 1–Preparing to Install
Deployment Architecture
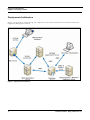
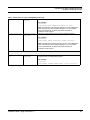
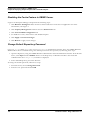
Figure 1 shows the flow of data through the components of the Oracle Financial Services Financial Crime and
Compliance Management solution.
Figure 1. Deployment Architecture
2
Installation Guide - Stage 3 Release 6.2.1
Environment Details
Chapter 1–Preparing to Install
Environment Details
The OFSFCCM solution will be installed using the hardware and software environments as described in following
table:
Table 2. Environment Details
Back- End Environment
Hardware
OEL 5.5
or
RHEL 5.3 /5.5
or
Sun Solaris 10 -64 Bit
or
AIX 6.1
64-bit x 86 architecture
Software
Oracle 11g R2 (11.2.0.2.0) - 64 bit
Java 1.6.0_[latest update] - 64 bit
Websphere 7.0.0.[latest update] -64
bit or Weblogic 10.3.[latest update] 64 bit
OFSBDF 6.2.1
OFSAAI 7.3
OBIEE 11.1.1.6.7
Front-End Client Access
Windows XP Service Pack 3 /
Windows 7
Software
Java Plug-in 1.6.0_[latest update]
Microsoft Internet Explorer 8.0 / 9.0
Microsoft Office 2007
Adobe Reader 8.0 or later
Installation Guide - Stage 3 Release 6.2.1
3
Installation Checklist
Chapter 1–Preparing to Install
Installation Checklist
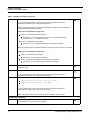
Table 3 lists the Installation Checklist to be completed for installing the OFSFCCM solution. Follow the checklist in
the sequence mentioned below and perform the listed activities.
Table 3. Installation Checklist
Step No.
Task
Done
Check the OFSFCCM 6.2.1 Release Notes and Read Me document for any additional
steps to be performed on OFSBDF or OFSAAI.
General
1
Note: For more details, contact Oracle support.
2
Ensure that the required hardware and software are installed and configured.
For more information on environment details refer Environment Details, on page 3.
Ensure that the OFSBDF 6.2.1 is installed and configured. Obtain the unix user ID and
password used for OFSBDF 6.2.1 installation
OFSBDF 6.2.1
3
Note: Make sure that $FIC_HOME should not be the same as <OFSBDF_Installed
Directory>.
For more information, refer to the Installation Guide Stage: 1.
4
Note down the following OFSBDF schemas with a valid User ID and Password and Role
Names:
Business schema (business_schema_owner)
Market schema (market_schema_owner)
Alert Management Schema (mantas_schema_owner)
Web Schema (web_user)
KDD Schema (kdd_schema_owner)
KDD MNR Schema (tools_user)
DB UTIL Schema (db_util_user)
Algorithm Schema (server_user)
Ingest Schema (Ingest schema Owner)
FSDF Schema (fsdf_schema_owner)
KYC Schema (kyc_schema_owner)
Case Management Schema (case_schema_owner)
Note: Refer to <OFSBDF Installed
Directory>/database/db_tools/mantas_cfg/db_variables.cfg file for
schema names written against the variables provided in brackets of respective schema.
Algorithm Role (kdd_algorithm_role)
Analyst Role (kdd_analyst_role)
Data Loader Role (data_loader_role)
4
Installation Guide - Stage 3 Release 6.2.1
Installation Checklist
Chapter 1–Preparing to Install
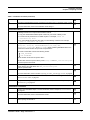
Table 3. Installation Checklist (Continued)
5
Take a back up of the following atomic schemas:
Alert Management Schema
Case Management Schema
For more details, refer to the Installation Guide Stage: 1.
Note: The backup must be kept until the successful installation of the solution.
OFSAAI 7.3
6
Ensure that the OFSAAI 7.3 is installed and configured.
For more details, refer to the Oracle Financial Services Analytical Applications
Infrastructure Installation and Configuration Release 7.3.
Note: Make sure that $FIC_HOME should not be the same as <OFSBDF_Installed
Directory>.
Contact Oracle Support for installing any additional patches on top of
OFSAAI, if required.
Before installing OFSFCCM 6.2.1, make sure to install the 7.3.3 patch on top of Oracle
Financial Services Analytical Applications Infrastructure 7.3 (OFSAAI), in the following
order:
OFSAAI
7.3.3.0.0
7
Bug IDs
OFSAAI 7.3.3.0.0 Interim Release
Ensure that the ftpshare path of the OFSAAI Application Layer (APP), Data Base Layer
(DB), and Web Application Layer (WEB) layers are configured and have recursive
read/write/execute permission for the user installing OFSFCCM.
For more details, refer to the Oracle Financial Services Analytical Applications
Infrastructure Installation and Configuration Release 7.3.
Note: If having multiple installation of FCCM products then keep different ftpshare path
for each installation.
Installation Guide - Stage 3 Release 6.2.1
5
Installation Checklist
Chapter 1–Preparing to Install
Table 3. Installation Checklist (Continued)
8
Ensure to configure OFSAAI WEB/APP/DB server as part of OFSAAI Installation.
For more information, refer to Oracle Financial Services Analytical Applications
Infrastructure Installation and Configuration Release 7.3.
While configuring OFSAAI, do not perform the following configuration since FCCM 6.2.1
installer will perform it during installation:
Chapter 4 Post Installation Configuration
Section 4.1 Configure Resource Reference
Sub Section 4.1.1 Configure Resource Reference in Infrastructure Web
Application ->4.1.1.1 Configure web.xml
Section 4.5 Additional Configurations
Sub Section 4.5.7 Configure Information Domain schema privileges
While configuring OFSAAI, do perform additional configurations since FCCM 6.2.1 requires
it
Chapter 4 Post Installation Configuration
Section 4.5 Additional Configurations
Sub Section 4.5.1 Configure FTP//SFTP
Section 4.5.4 SFTP Configuration for Excel//Document Upload
Sub Section 4.5.18 Configure HTPs Certificate information
9
Ensure that OFSAAI application server is up and running before installing the OFSFCCM
Application Layer.
10
Note down the OFSAAI configuration schema User ID and Password.
For more details, refer to the Oracle Financial Services Analytical Applications
Infrastructure Installation and Configuration Release 7.3.
11
Take the back up of the following:
OFSAAI Configuration Schema (“Config” schema)
OFSAAI Installed directory ($FIC_HOME)
For more details, refer to the Oracle Financial Services Analytical Applications
Infrastructure Installation and Configuration Release 7.3.
Note: The backup must be kept until the successful installation of the solution.
OFSFCCM Pre Installation
12
6
Prior to installation, ensure that sufficient free temp space (minimum 1 GB free) is available
in /tmp directory of unix server hosting OFSAAI.
Installation Guide - Stage 3 Release 6.2.1
Installation Checklist
Chapter 1–Preparing to Install
Table 3. Installation Checklist (Continued)
13
Ensure that the Oracle database instance is up and running.
14
Ensure that the database instance parameter processes is set to a minimum value of 1000.
For more information, refer to the Installation Guide Stage: 1.
OFSFCCM Installation
15
Once you have downloaded the Installer from e-delivery or support.oracle.com, refer to the
following instructions to unzip the downloaded contents:
1. Copy the downloaded Installer zip file contents to your server in Binary mode.
2. Provide execute permissions to Installer zip file. For example, chmod 751
<Installer zip file>
3. To unzip Installer zip file using this utility, run the following command: For example,
unzip -a <Installer zip file>
16
Navigate to <Unzipped Installer Directory>/OFSFCCM_v6.2.1 folder and copy
Setup.bin, Setup.sh, validateXMLinputs.jar,log4j.xml,
GRCInstall_Config.xml, and Data_Model folder containing DataModel files to the
machine that hosts OFSAAI and provide 740 permissions.
The Data model folder contains the following folders:
FSDF_DataModel
KYC DataModel
These folders contain the rescpective XMLs.
All other files must be copied in binary mode. Setup.sh and GRC_InstallConfig.xml
must be copied in text mode.
17
Create a copy of GRC_InstallConfig.xml as GRC_InstallConfig.xml.bak in the
same directory and add values as in GRC_InstallConfig.xml.
system specific details.
18
Populate GRC_InstallConfig.xml.
For more information, refer to section Populating
the GRC_InstallConfig.xml File, on page 8.
19
Install OFSFCCM solution. For more information, refer to section Installing
Solution in Silent Mode, on page 33.
OFSFCCM
20
Verify Installation logs for any error. For more information, refer section Verification
Installation Logs, on page 34.
of
Installation,
OFSFCCM Post Installation
21
Perform post-installation steps. For more information, refer to Chapter 3, Post
on page 37.
22
Create users to access OFSFCCM solution and other administrative activities.
For more information, refer to Administration Guide.
23
Ensure to access OFSFCCM URL with server's Fully Qualified Domain Name (FQDN)
while opening OFSFCCM UI.
Installation Guide - Stage 3 Release 6.2.1
7
Populating the GRC_InstallConfig.xml File
Chapter 1–Preparing to Install
Populating the GRC_InstallConfig.xml File
This section explains the steps to populate the GRC_InstallConfig.xml file. Open the GRC_InstallConfig.xml
under the OFSFCCM installer kit directory and enter the required input parameters as per the instructions.
This file contains the following four sections:
Layer - GENERAL
Layer - APPLICATION
Layer - DATABASE
Layer - WEB
contains placeholders, in the format ##<PLACEHOLDER Name>##, wherever user
input is required. Replace these placeholders with the corresponding values as mentioned against each one of these
placeholders.
The GRC_InstallConfig.xml
Note:
1. In single-tier installation, all layers sections are mandatory.
2. In multi-tier installation, while performing individual tier installation, GENERAL layer section information is
mandatory for all layers.
8
Installation Guide - Stage 3 Release 6.2.1
Populating the GRC_InstallConfig.xml File
Chapter 1–Preparing to Install
Layer - GENERAL
The Layer GENERAL (<Layer name="GENERAL">) contains the following placeholders to provide parameter
values specific to the users’ system:
Table 4. Placeholders in Layer - GENERAL
Variable name
PLACEHOLDERS
DESCRIPTION
VariableGroup name="OFSAA_INFRASTRUCTURE_CUSTOMER_CODE"
CUSTID
##CUST_ID##
This variable is used to store the Customer ID. Replace this
placeholder with Customer Code used during OFSAAI Installation.
For example:
<VariableGroup
name="OFSAA_INFRASTRUCTURE_CUSTOMER_CODE">
<Variable name="CUSTID">OFSAAICUSTID</Variable>
</VariableGroup>
VariableGroup name="PRE_INSTALLATION"
PRE_INSTALL
##PRE_INSTALL##
This variable is used to identify whether installer will perform the
following pre-installation activities:
Infodom and Segment Creation for all atomic schemas
Data Model Upload for KYC and FSDF atomic schema
ETL Application Source creation for KYC atomic schema
Replace this placeholder with either of the following values:
- Allowable values are 0 and 1
1 - If the user wants one or more of the above pre-installation
steps to be performed by the installer
0 - If the user has performed all the above steps through
OFSAAI front-end or the installer (or in case running the
installation for second time)
For example:
<VariableGroup name="PRE_INSTALLATION">
<Variable name="PRE_INSTALL">1</Variable>
</VariableGroup>
Note: Oracle recommends that the installer to perform all these
steps. In case, OFSFCCM installation has been performed second
time after successful un-installation, then this parameter will be kept
as 0 since it is a one-time activity.
For more information, refer to Chapter 4, Uninstalling OFSFCCM.
Installation Guide - Stage 3 Release 6.2.1
9
Populating the GRC_InstallConfig.xml File
Chapter 1–Preparing to Install
Table 4. Placeholders in Layer - GENERAL (Continued)
VariableGroup name="INFODOM_1"
INFODOM_NAME
##INFODOM_1##
This variable is used to specify the Alert Management Information
Domain (Infodom) name.
Replace this placeholder with the Alert Management Infodom name
in either of the following cases:
If already created from OFSAAI front end
Or
To be created by the Installer
Make sure to follow these conventions while creating a new infodom.
Consider the following:
Information Domain name specified must be at least 6
characters long
Information Domain name must not contain any special
characters or extra spaces
Information Domain name must be less than or equal to 20
characters
For example:
<Variable name="INFODOM_NAME">AMINFO</Variable>
SEGMENT_CODE
##SEGMENT_1##
This variable is used to specify the Alert Management Segment
Code.
Replace this placeholder with Alert Management Segment Code in
either of the following cases:
If already created from OFSAAI front end
Or
To be created by the Installer
Make sure to follow these conventions. Consider the following while
giving a new Segment Code:
The segment code must be unique
There must be no special characters and extra spaces in the
code entered
The maximum length of Segment Code must be less than or
equal to of 10 characters
For example:
<Variable name=”SEGMENT_CODE">AMSEG</Variable>
10
Installation Guide - Stage 3 Release 6.2.1
Populating the GRC_InstallConfig.xml File
Chapter 1–Preparing to Install
Table 4. Placeholders in Layer - GENERAL (Continued)
VariableGroup name="INFODOM_2"
INFODOM_NAME
##INFODOM_2##
This variable is used to specify the Case Management Information
Domain (Infodom) name.
Replace this placeholder with Case Management Infodom name in
either of the following cases:
If already created from OFSAAI front end
Or
To be created by Installer
Make sure to follow these conventions. Consider the following while
giving a new Information Domain Name:
The Information Domain name specified is of minimum 6
characters long
The Information Domain name does not contain any special
characters or extra spaces.
The maximum length of Information Domain must be less than
or equal to 20 characters
For example:
<Variable name="INFODOM_NAME">CMINFO</Variable>
SEGMENT_CODE
##SEGMENT_2##
This variable is used to specify the Case Management Segment
Code.
Replace this placeholder with the Case Management Segment Code
in either of the following cases:
If already created from OFSAAI front end
Or
To be created by the Installer
Make sure to follow these conventions. Consider the following while
giving a new Segment Code:
The segment code is unique
There are no special characters and extra spaces in the code
entered
The Segment Code must be less than or equal to 10 characters
For example:
<Variable name=”SEGMENT_CODE">CMSEG</Variable>
Installation Guide - Stage 3 Release 6.2.1
11
Populating the GRC_InstallConfig.xml File
Chapter 1–Preparing to Install
Table 4. Placeholders in Layer - GENERAL (Continued)
VariableGroup name="INFODOM_3"
INFODOM_NAME
##INFODOM_3##
This variable is used to specify the KYC Information Domain
(Infodom) name.
Replace this placeholder with KYC Infodom name in either of the
following cases:
If already created from OFSAAI front end
Or
To be created by the Installer
Make sure to follow these conventions. Consider the following while
giving a new Information Domain Name:
The Information Domain name specified is of minimum 6
characters long
The Information Domain name does not contain any special
characters or extra spaces
The maximum length of Information Domain name must be less
than or equal to 20 characters
For example:
<Variable name="INFODOM_NAME">KYCINFO</Variable>
SEGMENT_CODE
##SEGMENT_3##
This variable is used to specify the KYC Segment Code.
Replace this placeholder with KYC Segment Code in either of the
following cases:
If already created from OFSAAI front end
Or
To be created by the Installer
Make sure to follow these conventions. Consider the following while
giving a new Segment Code:
Enter a unique segment code
There are no special characters and extra spaces in the code
entered
The maximum length of Segment Code must be less than or
equal to 10 characters
For example:
<Variable name=”SEGMENT_CODE">KYCSEG</Variable>
12
Installation Guide - Stage 3 Release 6.2.1
Populating the GRC_InstallConfig.xml File
Chapter 1–Preparing to Install
Table 4. Placeholders in Layer - GENERAL (Continued)
VariableGroup name="INFODOM_4"
INFODOM_NAME
##INFODOM_4##
This variable is used to specify the FSDF Information Domain
(Infodom) name.
Replace this placeholder with FSDF Infodom name in either of the
following cases:
If already created from OFSAAI front end
Or
To be created by the Installer
Make sure to follow these convention while giving a new Information
Domain Name:
The Information Domain name specified is of minimum 6
characters long
The Information Domain name does not contain any special
characters or extra spaces
The maximum length of Information Domain name must be less
than or equal to 20 characters
For example:
<Variable name="INFODOM_NAME">FSDFINFO</Variable>
SEGMENT_CODE
##SEGMENT_4##
This variable is used to specify the FSDF Segment Code.
Replace this placeholder with FSDF Segment Code in either of the
following cases:
Iif already created from OFSAAI front end
Or
To be created by the Installer
Make sure to follow these conventions while giving a new Segment
Code:
The segment code must be unique
There are no special characters and extra spaces in the code
entered.
The maximum length of Segment Code must be less than or
equal to 10 characters
For example:
<Variable name="SEGMENT_CODE">FSDFSEG</Variable>
Installation Guide - Stage 3 Release 6.2.1
13
Populating the GRC_InstallConfig.xml File
Chapter 1–Preparing to Install
Table 4. Placeholders in Layer - GENERAL (Continued)
VariableGroup name="LOCAL_FTPSHARE_PATH"
FTPSHARE_PATH
##FTPSHARE_PATH##
This variable is used to identify the common share area path.
Replace this placeholder with the same path as configured during
OFSAAI Installation.
For example:
<VariableGroup name="LOCAL_FTPSHARE_PATH">
<Variable
name="FTPSHARE_PATH">/home/ftpshare</Variable>
</VariableGroup>
Note: If having multiple installation of FCCM products on same
server, then keep different ftpshare path for this installation.
14
Installation Guide - Stage 3 Release 6.2.1
Populating the GRC_InstallConfig.xml File
Chapter 1–Preparing to Install
Layer - APPLICATION
The Layer APPLICATION (<Layer name="APPLICATION">) consist of the following placeholders, which must be
replaced for installation of Application Layer as one of its component.
Table 5. Placeholders in Layer - APPLICATION
Variable name
PLACEHOLDERS
DESCRIPTION
Layer
name="APPLICATION
"
##APP_LAYER##
This variable is used to identify FCCM Application Layer component
to be installed on this machine, as per the OFSAAI Installation option
(or Multi-tier) followed while installing OFSAAI platform.
Allowable values for this placeholder are 0 and 1. Replace this
placeholder with
1 – if Application Layer component is to be installed
0 – if Application Layer component is not to be installed
In case OFSAAI was installed as single tier mode, replace the
place holder with 1
In case OFSAAI was installed as multi –tier mode, this value
needs to be set according to OFSAAI application layer installed
on this machine
Replace the placeholder with 1 for the machine hosting
OFSAAI application layer
Replace the placeholder with 0 for the machine not hosting
OFSAAI application layer
Note: For installing FCCM, the application layer must be installed
first, followed by Database and Web layer installation.
For example:
<Layer name="APPLICATION" flag="1">
VariableGroup name="ALERT_MANAGEMENT_DB_DETAILS”
ATOMIC_SCHEMA_USE
R_NAME
##ALERT_MANAGEM
ENT_USER##
This variable is used to identify the first Atomic Schema. For FCCM,
the first Atomic schema is Alert Management Schema.
Replace the placeholder with Alert Management Schema Name.
For example:
<VariableGroup name="ALERT_MANAGEMENT_DB_DETAILS">
<Variable
name="ATOMIC_SCHEMA_USER_NAME">AM</Variable>
</VariableGroup>
Refer to the Installation Checklist, point # 4 for the schema name.
Installation Guide - Stage 3 Release 6.2.1
15
Populating the GRC_InstallConfig.xml File
Chapter 1–Preparing to Install
Table 5. Placeholders in Layer - APPLICATION (Continued)
VariableGroup name="CASE_MANAGEMENT_DB_DETAILS"
ATOMIC_SCHEMA_USE
R_NAME
##CASE_MANAGEME
NT_USER##
This variable is used to identify the second Atomic Schema. For
FCCM, the second Atomic schema is Case Management Schema.
Replace the placeholder with Case Management Schema Name.
For example:
<VariableGroup name="CASE_MANAGEMENT_DB_DETAILS">
<Variable
name="ATOMIC_SCHEMA_USER_NAME">CM</Variable>
</VariableGroup>
Refer to the Installation Checklist, point # 4 for the schema name.
VariableGroup name="KYC_DB_DETAILS"
ATOMIC_SCHEMA_USE
R_NAME
##KYC_USER##
This variable is used to identify the third Atomic Schema. For FCCM,
the third Atomic schema is KYC Schema.
Replace the placeholder with KYC Schema Name.
For example:
<VariableGroup name="KYC_DB_DETAILS">
<Variable
name="ATOMIC_SCHEMA_USER_NAME">KYC</Variable>
</VariableGroup>
Refer to the Installation Checklist, point # 4 for the schema name.
VariableGroup name="FSDF_DB_DETAILS"
ATOMIC_SCHEMA_USE
R_NAME
##FSDF_USER##
This variable is used to identify the fourt Atomic Schema. For
FCCM, the fourth Atomic schema is FSDF Schema.
Replace the placeholder with FSDF Schema Name.
For example:
<VariableGroup name="FSDF_DB_DETAILS">
<Variable
name="ATOMIC_SCHEMA_USER_NAME">FSDF</Variable>
</VariableGroup>
Refer to the Installation Checklist, point # 4 for the schema name.
16
Installation Guide - Stage 3 Release 6.2.1
Populating the GRC_InstallConfig.xml File
Chapter 1–Preparing to Install
Table 5. Placeholders in Layer - APPLICATION (Continued)
VariableGroup name="DATABASE_SCHEMA_DETAILS"
BUSINESS_SCHEMA_U
SER
##BUSINESS_USER
##
This variable is used to identify the Business Schema name.
Replace the placeholder with Business Schema Name.
For example:
<Variable
name="BUSINESS_SCHEMA_USER">BUSINESS</Variable>
Refer to the Installation Checklist, point # 4 for the schema name.
VariableGroup name="LOG_DETAILS"
APP_LAYER_LOG_PAT
H
##APP_LOG_PATH#
#
This variable is used to identify Application Layer log path to store
logs for all front-end and back-end components that will be created by
OFSAAI. For example, Information Domain.
Replace this placeholder with an absolute path.
For example:
<Variable name="APP_LAYER_LOG_PATH">/home/
ftpshare/APP_logs</Variable>
DB_LAYER_LOG_PATH
##DB_LOG_PATH##
This variable is used to identify the Database Layer log path to store
logs for all front-end and back-end components that will be created by
OFSAAI.
For example:
<Variable
name="DB_LAYER_LOG_PATH">/home/ftpshare/DB_logs</Va
riable>
TaskGroup name="PRE_INSTALLATION_CONFIGURATION_SUB_SOL_1"
ActionGroup
name="CREATE_INFO
DOM"
##INFODOM_FLAG_
1##
This variable is used to identify the Alert Management Information
Domain to be created by the installer.
Allowable values for this placeholder are 0 and 1. Replace this
placeholder with
1 – If Infodom for Alert Management is to be created
0 – If Infodom for Alert Management is already created
For example:
<ActionGroup name="CREATE_INFODOM" flag="1">
Installation Guide - Stage 3 Release 6.2.1
17
Populating the GRC_InstallConfig.xml File
Chapter 1–Preparing to Install
Table 5. Placeholders in Layer - APPLICATION (Continued)
INFODOM_DESCRIPTI
ON
##INFODOM_DESC_
1##
This variable is used to identify the Alert Management Information
Domain description.
This value is required only if ##INFODOM_FLAG_1## and
##PRE_INSTALL## has been replaced by 1.
Replace this placeholder with a description for Alert Management
Information Domain by following these conventions:
Ensure that the description field is not empty
Ensure that the description field should not exceed 100
characters
For example:
<Variable name="INFODOM_DESCRIPTION">Alert
Management Infodom</Variable>
DATABASE_NAME
##DB_NAME_1##
This variable is used to identify the Database Name for Alert
Management Information Domain.
This value is required only if ##INFODOM_FLAG_1## and
##PRE_INSTALL## has been replaced by 1.
Replace this placeholder with a name for the Alert Management
Database by following these conventions:
There are no special characters and extra spaces in the name
The length of database Name must not exceed 20 characters
For example:
<Variable name="DATABASE_NAME">AMDB</Variable>
TaskGroup name="PRE_INSTALLATION_CONFIGURATION_SUB_SOL_2"
ActionGroup
name="CREATE_INFO
DOM"
##INFODOM_FLAG_
2##
This variable is used to identify the Case Management Information
Domain to be created by the installer.
Allowable values for this placeholder are 0 and 1. Replace this
placeholder with
1 – if Infodom for Case Management is to be created
0 – if Infodom for Case Management is already created
For example:
<ActionGroup name="CREATE_INFODOM" flag="1">
18
Installation Guide - Stage 3 Release 6.2.1
Populating the GRC_InstallConfig.xml File
Chapter 1–Preparing to Install
Table 5. Placeholders in Layer - APPLICATION (Continued)
INFODOM_DESCRIPTI
ON
##INFODOM_DESC_
2##
This variable is used to identify the Case Management Information
Domain description.
This value is required only if ##INFODOM_FLAG_2## and
##PRE_INSTALL## has been replaced by 1.
Replace this placeholder with a description for Case Management
Information Domain by following these conventions:
Ensure the description field is not empty
Ensure the description field should not exceed 100 characters
For example:
<Variable name="INFODOM_DESCRIPTION">Case
Management Infodom</Variable>
DATABASE_NAME
##DB_NAME_2##
This variable is used to identify the Database Name for Case
Management Information Domain.
This value is required only if ##INFODOM_FLAG_2## and
##PRE_INSTALL## has been replaced by 1.
Replace this placeholder with a name for the Case Management
Database by following these conventions:
There are no special characters and extra spaces in the name
The length of database name must not exceed 20 characters
For example:
<Variable name="DATABASE_NAME">CMDB</Variable>
TaskGroup name="PRE_INSTALLATION_CONFIGURATION_SUB_SOL_3"
ActionGroup
name="CREATE_INFO
DOM"
##INFODOM_FLAG_
3##
This variable is used to identify the KYC Information Domain to be
created by the installer.
Allowable values for this placeholder are 0 and 1. Replace this
placeholder with
1 – if Infodom for KYC is to be created
0 – if Infodom for KYC is already created
For example:
<ActionGroup name="CREATE_INFODOM" flag="1">
INFODOM_DESCRIPTI
ON
##INFODOM_DESC_
3##
This variable is used to identify the KYC Information Domain
description.
This value is required only if ##INFODOM_FLAG_3## and
##PRE_INSTALL## has been replaced by 1.
Replace this placeholder with a description for KYC Information
Domain by following these conventions:
Ensure that the description field is not empty
Ensure that the description field should not exceed 100
characters
For example:
<Variable name="INFODOM_DESCRIPTION">KYC
Infodom</Variable>
Installation Guide - Stage 3 Release 6.2.1
19
Populating the GRC_InstallConfig.xml File
Chapter 1–Preparing to Install
Table 5. Placeholders in Layer - APPLICATION (Continued)
DATABASE_NAME
##DB_NAME_3##
This variable is used to identify the Database Name for KYC
Information Domain.
This value is required only if ##INFODOM_FLAG_3## and
##PRE_INSTALL## has been replaced by 1.
Replace this placeholder with a name for the KYC Database by
following these conventions:
There are no special characters and extra spaces in the name
The length of database name must not exceed 20 characters
For example:
<Variable
name="DATABASE_NAME">KYCDB.oracle.com</Variable>
Note: A TNS entry must be made in tnsnames.ora with tnsname
same as the value provided for KYC Database Name. If sqlnet.ora
is configured with a vaue in NAMES.DEFAULT_DOMAIN then make
sure to use same domain while defining Database Name. It is
required for KYC Batch processing.
Or
OFSAAI recommends for the Oracle database, the #DB_NAME_3##
must be same as the TNS (Transparent Network Substrate)
Database Name. In case, the TNS Database Name is not yet used as
Database_Name for any other Atomic Schema.
ActionGroup
name="DATA_MODEL_
UPLOAD"
##MODEL_UPLOAD_
FLAG_1##
This variable is used to identify whether Data Model Upload for KYC
is to be done through the Installer.
Allowable values for this placeholder are 0 and 1. Replace this
placeholder with
1 – if Data Model Upload for KYC is to be done through Installer
0 – if Data Model Upload for KYC is already completed
For example:
<ActionGroup name="DATA_MODEL_UPLOAD" flag="1">
DATAMODEL_TYPE
##DM_TYPE_1##
This variable is used to identify the type of Data Model Upload for
KYC that is to be done through the Installer.
This value is required only if ##MODEL_UPLOAD_FLAG_1## and
##PRE_INSTALL## has been replaced by 1.
Replace this placeholder with the type of DataModel upload to be
performed. Allowable values are 0.
0=SLICED Model Upload
For example:
<Variable name="DATAMODEL_TYPE">0</Variable>
20
Installation Guide - Stage 3 Release 6.2.1
Populating the GRC_InstallConfig.xml File
Chapter 1–Preparing to Install
Table 5. Placeholders in Layer - APPLICATION (Continued)
LOGICAL_UPLOAD
##LOGICAL_UPLOA
D_1##
This variable is used to identify if Data Model Upload for KYC is to be
Logical.
This value is required only if ##MODEL_UPLOAD_FLAG_1## and
##PRE_INSTALL## has been replaced by 1.
Replace this placeholder with the type of DataModel upload to be
performed. Allowable values are 0.
For example:
<Variable name="LOGICAL_UPLOAD">0</Variable>
DATAMODEL_FILE_PA
TH
##DM_FILE_PATH_
1##
This variable is used to identify the type of Data Model file path used
for KYC data Model Upload.
This value is required only if ##MODEL_UPLOAD_FLAG_1## and
##PRE_INSTALL## has been replaced by 1.
Replace this placeholder with the absolute path of DataModel file.
For example:
<Variable
name="DATAMODEL_FILE_PATH">/home/FCCMkit/DataModel/
KYC_DataModel/Data Model KYC Release 2.0
Oracle.xml</Variable>
ActionGroup
name="ETL_CREATIO
N"
##ETL_FLAG_1##
This variable is used to identify whether ETL Application and Sources
creation for KYC is to be done through the installer.
S
Allowable values for this placeholder are 0 and 1. Replace this
placeholder with
1 – if ETL Application and Sources creation for KYC is to be
done through the Installer
0 – if ETL Application and Sources for KYC is already completed
For example:
<ActionGroup name="ETL_CREATION" flag="1">
Note: For Installations on RAC databases, ETL Application and
Source creation is not supported by installer. Therefore keep this flag
as 0. Once installation completes, perform ETL Application and
Source creation from OFSAAI UI for KYC.
ETL_CODE
##ETL_CODE_1##
This variable is used to identify the Atomic Schema for which ETL
Application and Sources creation is to be done through the
installer.This value is required only if ##ETL_FLAG_1## and
##PRE_INSTALL## has been replaced by 1.
Replace this placeholder with 3 for KYC.
For example:
<Variable name="ETL_CODE">3</Variable>
Installation Guide - Stage 3 Release 6.2.1
21
Populating the GRC_InstallConfig.xml File
Chapter 1–Preparing to Install
Table 5. Placeholders in Layer - APPLICATION (Continued)
IS_RAC
##IS_RAC_1##
This variable is used to identify whether the database is RAC.
This value is required only if ##ETL_FLAG_1## and
##PRE_INSTALL## has been replaced by 1.
Allowable Values are 0 and 1. Replace this placeholder with:
1 – if Database on which OFSAAI is installed is RAC
0 - if Database on which OFSAAI is installed is not RAC
For example:
<Variable name="IS_RAC">0</Variable>
TaskGroup name="PRE_INSTALLATION_CONFIGURATION_SUB_SOL_4"
ActionGroup
name="CREATE_INFO
DOM"
##INFODOM_FLAG_
4##
This variable is used to identify the FSDF Information Domain to be
created by the installer.
Allowable values for this placeholder are 0 and 1. Replace this
placeholder with
1 - f Infodom for FSDF is to be created
0 - if Infodom for FSDF is already created
For example:
<ActionGroup name="CREATE_INFODOM" flag="1">
INFODOM_DESCRIPTI
ON
##INFODOM_DESC_
4##
This variable is used to identify the FSDF Information Domain
description.
This value is required only if ##INFODOM_FLAG_4## and
##PRE_INSTALL## has been replaced by 1.
Replace this placeholder with a description for FSDF Information
Domain by following these conventions:
Ensure the description field is not empty
Ensure the description field should not exceed 100 characters
For example:
<Variable name="INFODOM_DESCRIPTION">FSDF
Infodom</Variable>
DATABASE_NAME
##DB_NAME_4##
This variable is used to identify the Database Name for FSDF
Information Domain.
This value is required only if ##INFODOM_FLAG_4## and
##PRE_INSTALL## has been replaced by 1.
Replace this placeholder with a name for the FSDF Database by
following below conventions:
There are no special characters and extra spaces in the name
The length of database Name should not exceed 20 characters
For example:
<Variable name="DATABASE_NAME">FSDF DB</Variable>
22
Installation Guide - Stage 3 Release 6.2.1
Populating the GRC_InstallConfig.xml File
Chapter 1–Preparing to Install
Table 5. Placeholders in Layer - APPLICATION (Continued)
ActionGroup
name="DATA_MODEL_
UPLOAD"
##MODEL_UPLOAD_
FLAG_2##
This variable is used to identify whether Data Model Upload for FSDF
is to be done through the Installer
Allowable values for this placeholder are 0 and 1. Replace this
placeholder with
1 - if Data Model Upload for FSDF is to be done through the Installer
0 - if Data Model Upload for FSDF is already completed
For example:
<ActionGroup name="DATA_MODEL_UPLOAD" flag="1">
DATAMODEL_TYPE
##DM_TYPE_2##
This variable is used to identify the type of Data Model Upload for
FSDF that is to be done through the Installer.
This value is required only if ##MODEL_UPLOAD_FLAG_2## and
##PRE_INSTALL## has been replaced by 1.
Replace this placeholder with the type of DataModel upload to be
performed. Allowable values are 0.
0=SLICED Model Upload
For example:
<Variable name="DATAMODEL_TYPE">0</Variable>
LOGICAL_UPLOAD
##LOGICAL_UPLOA
D_2##
This variable is used to identify if the Data Model Upload for FSDF is
to be Logical.
This value is required only if ##MODEL_UPLOAD_FLAG_2## and
##PRE_INSTALL## has been replaced by 1.
Replace this placeholder with the type of DataModel upload to be
performed. Allowable values are 0.
For example:
<Variable name="LOGICAL_UPLOAD">0</Variable>
DATAMODEL_FILE_PA
TH
##DM_FILE_PATH_
2##
This variable is used to identify the type of Data Model file path used
for FSDF data model upload.
This value is required only if ##MODEL_UPLOAD_FLAG_2## and
##PRE_INSTALL## has been replaced by 1.
Replace this placeholder with the absolute path of DataModel file.
For example:
<Variable name="DATAMODEL_FILE_PATH">/home/FCCMkit/
Data
Model/FSDF_DataModel/FCCM_Staging_Release62.xml</Va
riable>
Installation Guide - Stage 3 Release 6.2.1
23
Populating the GRC_InstallConfig.xml File
Chapter 1–Preparing to Install
Layer - DATABASE
The Layer DATABASE (<Layer name="DATABASE">) contains the following
placeholders, which must be configured for installation of Database Layer as one of its
component.
Table 6. Placeholders in Layer - DATABASE
Variable name
PLACEHOLDERS
DESCRIPTION
Layer
name="DATABASE"
##DB_LAYER##
This variable is used to Identify FCCM Database Layer component
to be installed on this machine, as per the OFSAAI Installation
option (or multi- tier) followed while installing the OFSAAI platform.
Allowable values for this placeholder are 0 and 1. Replace this
placeholder with
1 – if DATABASE Layer component is to be installed.
0 – if DATABASE Layer component is not to be installed
Replace the place holder with 1 in case OFSAAI was installed as
single – tier mode
In case OFSAAI was installed as multi –tier mode, this value needs
to be set according to the OFSAAI DATABASE layer installed on
this machine:
Replace the placeholder with 1 for the machine hosting
OFSAAI DATABASE layer
Replace the placeholder with 0 for the machine NOT hosting
OFSAAI DATABASE layer
For example:
<Layer name="DATABASE" flag="1">
VariableGroup name="DATABASE_DETAILS"
24
Installation Guide - Stage 3 Release 6.2.1
Populating the GRC_InstallConfig.xml File
Chapter 1–Preparing to Install
Table 6. Placeholders in Layer - DATABASE (Continued)
DATABASE_URL
##DB_URL##
Replace this placeholder with OFSAAI Configuration Schema
Database URL for the connection purpose.
For example:
<Variable
name="DATABASE_URL">jdbc:oracle:thin:@DBSERVER.OR
ACLE.COM:1521:ORCL</Variable>
Refer to the value of DEFAULT_CONNECTION_URL parameter in
the file- DynamicServices.xml under $FIC_APP_HOME/conf
for value of this parameter.
If you are using RAC database then provide the URL in below
format:
jdbc:oracle:thin:@(DESCRIPTION=(ADDRESS_LIST=(ADDR
ESS=(PROTOCOL=TCP)(HOST=<DBSERVER1.ORACLE.COM>
)(port=1521))(ADDRESS=(PROTOCOL=TCP)(HOST=1<DBSER
VER2.ORACLE.COM>)(PORT=1521))(LOAD_BALANCE=no)(FA
ILOVER=yes))(CONNECT_DATA=(SERVICE_NAME=<dbname>)
))
Note: In RAC DB, ETL application and sources are not
created by the installer, perform Appendix B to create the
same.
FICMASTER_DRIVER
##DB_DRIVER##
Replace this placeholder with the OFSAAI Configuration Schema
Database Driver for the connection purpose.
For example:
<Variable
name="FICMASTER_DRIVER">oracle.jdbc.driver.Oracle
Driver</Variable>
Note: Refer to the value of DEFAULT_DRIVER parameter in the
file- DynamicServices.xml under $FIC_APP_HOME/conf for
value of this parameter.
FICMASTER_USER
##CONFIGURATION
_USER##
Replace this placeholder with the value of OFSAAI Configuration
Schema user.
For example:
<Variable
name="FICMASTER_USER">REVELEUS</Variable>
Refer to the Installation Checklist, point #10 for the schema name.
VariableGroup name="DATABASE_SCHEMA_DETAILS”
Installation Guide - Stage 3 Release 6.2.1
25
Populating the GRC_InstallConfig.xml File
Chapter 1–Preparing to Install
Table 6. Placeholders in Layer - DATABASE (Continued)
BUSINESS_SCHEMA_
USER
##BUSINESS_USER
##
This variable is used to identify the Business Schema name.
Replace the placeholder with BUSINESS Schema Name.
For example:
<Variable
name="BUSINESS_SCHEMA_USER">BUSINESS</Variable>
Refer to the Installation Checklist, point # 4 for the schema name.
MARKET_SCHEMA_US
ER
##MARKET_USER##
This variable is used to identify the Market Schema name.
Replace the placeholder with Market Schema Name.
For example:
<Variable
name="MARKET_SCHEMA_USER">MARKET</Variable>
Refer to the Installation Checklist, point # 4 for the schema name.
ALERT_MANAGEMENT
_SCHEMA_USER
##ALERT_MANAGEM
ENT_USER##
This variable is used to identify the Alert Management Schema
name.
Replace the placeholder with the Alert Management Schema name.
For example:
<Variable
name="ALERT_MANAGEMENT_SCHEMA_USER">AM</Variable>
Refer to the Installation Checklist, point # 4 for the schema name.
KDD_WEB_SCHEMA_U
SER
##KDD_WEB_USER#
#
This variable is used to identify the WEB Schema name.
Replace the placeholder with WEB Schema Name.
For example:
<Variable
name="KDD_WEB_SCHEMA_USER">KDD_WEB</Variable>
Refer to the Installation Checklist, point # 4 for the schema name.
KDD_SCHEMA_USER
##KDD_USER##
This variable is used to identify the KDD Schema name.
Replace the placeholder with KDD Schema Name.
For example:
<Variable name="KDD_SCHEMA_USER">KDD</Variable>
Refer to the Installation Checklist, point # 4 for the schema name.
26
Installation Guide - Stage 3 Release 6.2.1
Populating the GRC_InstallConfig.xml File
Chapter 1–Preparing to Install
Table 6. Placeholders in Layer - DATABASE (Continued)
KDD_MNR_SCHEMA_U
SER
##KDD_MNR_USER#
#
This variable is used to identify the KDD MNR Schema name.
Replace the placeholder with MNR Schema Name.
For example:
<Variable
name="KDD_MNR_SCHEMA_USER">KDD_MNR</Variable>
Refer to the Installation Checklist, point # 4 for the schema name.
DB_UTIL_USER
##DB_UTIL_USER#
#
This variable is used to identify the DB UTIL Schema name.
Replace the placeholder with DB UTIL Schema Name.
For example:
<Variable
name="DB_UTIL_USER">DB_UTIL_USER</Variable>
Refer to the Installation Checklist, point # 4 for the schema name.
KDD_ALG_SCHEMA_U
SER
##KDD_ALG_USER#
#
This variable is used to identify the Algorithm Schema name.
Replace the placeholder with Algorithm Schema Name.
For example:
<Variable
name="KDD_ALG_SCHEMA_USER">KDD_ALG</Variable>
Refer to the Installation Checklist, point # 4 for the schema name.
INGEST_SCHEMA_US
ER
##
INGEST_SCHEMA
_USER##
This variable is used to identify the Ingest Schema name.
Replace the placeholder with Ingest Schema Name.
For example:
<Variable
name="INGEST_SCHEMA_USER">INGEST_USER</Variable>
Refer to the Installation Checklist, point # 4 for the schema name.
FSDF_SCHEMA_USER
##
FSDF_SCHEMA_USE
R##
This variable is used to identify the FSDF Schema name.
Replace the placeholder with FSDF Schema Name.
For example:
<Variable
name="FSDF_SCHEMA_USER">FSDF_USER</Variable>
Refer to the Installation Checklist, point # 4 for the schema name.
KDD_ALGORITHM
##KDD_ALG_ROLE#
#
This variable is used to identify the Algorithm Role name.
Replace the placeholder with Algorithm Role Name.
For example:
<Variable
name="KDD_ALGORITHM">KDD_ALGORITHM</Variable>
Refer to the Installation Checklist, point # 4 for the role name.
Installation Guide - Stage 3 Release 6.2.1
27
Populating the GRC_InstallConfig.xml File
Chapter 1–Preparing to Install
Table 6. Placeholders in Layer - DATABASE (Continued)
KDD_ANALYST
##KDD_ANALYST_R
OLE##
This variable is used to identify the Analyst Role name.
Replace the placeholder with Analyst Role Name.
For example:
<Variable
name="KDD_ANALYST">KDD_ANALYST</Variable>
Refer to the Installation Checklist, point # 4 for the role name.
DATA_LOADER_ROLE
##DATA_LOADER_R
OLE##
This variable is used to identify the Data Loader Role name.
Replace the placeholder with Data Loader Role Name.
For example:
<Variable name="DATA_LOADER_ROLE"> DATA_LOADER
</Variable>
Refer to the Installation Checklist, point # 4 for the role name.
VariableGroup name="OFSBDP_DETAILS”
SINGLE_TIER_FLAG
##
SINGLE_TIER_FLA
G##
This variable is used to identify that OFSBDF is on same machine
as in which the OFSAAI DB layer is installed.
0: if installed on same machine
1: if installed on different machine
For example:
<Variable name="SINGLE_TIER_FLAG">0</Variable>
OFSBDP_USER_ID
##OFSBDP_USER_I
D##
This variable takes the direct login unix user input of the machine
where OFSBDF is installed.
For Example:
<Variable name="OFSBDP_USER_ID">ofsaa</Variable>
OFSBDP_SERVER_HO
ST
##
OFSBDP_SERVER_H
OST##
This variable takes the input of the hostname or IP address of the
machine where OFSBDF is installed.
For example:
<Variable
name="OFSBDP_SERVER_HOST">unix.oracle.com</Variab
le
OFSBDP_HOME
##
OFSBDP_HOME##
This attribute holds the path where the execute.sh file is present
in the OFSBDF installed System.
For example:
<Variable name="OFSBDP_HOME"><OFSBDF Installed
Directory>/bdf/scripts</Variable>
VariableGroup name="TABLESPACE_1"
28
Installation Guide - Stage 3 Release 6.2.1
Populating the GRC_InstallConfig.xml File
Chapter 1–Preparing to Install
Table 6. Placeholders in Layer - DATABASE (Continued)
DATA_TABLE_SPACE
##DATA_TABLESPA
CE_1##
Replace this placeholder with KYC Data Tablespace Name.
For example:
<Variable
name="DATA_TABLE_SPACE">KYC_DATA</Variable>
Note: It should be the same as the value of KYC Data Tablespace
name created during the OFSBDF installation. For more details,
refer to APPENDIX D, OFSBDF Data Model Variables of
Installation Guide: Stage 1.
INDEX_TABLE_SPAC
E
##INDEX_TABLESP
ACE_1##
Replace this placeholder with KYC INDEX Tablespace Name.
For example:
<Variable
name="INDEX_TABLE_SPACE">KYC_INDEX</Variable>
Note: It should be the same as the value of KYC Index Tablespace
name created during the OFSBDF installation. For more details,
refer to APPENDIX D, OFSBDF Data Model Variables of
Installation Guide: Stage 1.
VariableGroup name="ADMIN_TOOLS_CONTEXT_NAME"
ADMIN_CONTEXT_NA
ME
##ADMIN_TOOLS_C
ONTEXT##
Replace this placeholder with a string to be used as context name
for Admin Tools, for deployment purpose.
For example:
<Variable
name="ADMIN_CONTEXT_NAME">admin_tools</Variable>
Installation Guide - Stage 3 Release 6.2.1
29
Populating the GRC_InstallConfig.xml File
Chapter 1–Preparing to Install
Layer - WEB
The Layer WEB (<Layer name="WEB">) contains the following placeholders which must be configured for
installation of WEB layer as one of its component:
Table 7. Placeholders in layer – WEB
Variable
PLACEHOLDERS
DESCRIPTION
Layer
name="WEB"
##WEB_LAYER##
This variable is used to identify OFSFCCM Web Layer component to be
installed on this machine, as per the OFSAAI installation option (or multitier) followed while installing OFSAAI platform.
Allowable values for this placeholder are 0 and 1. Replace this
placeholder with
1 – if WEB Layer component is to be installed
0 – if WEB Layer component is not to be installed
In case OFSAAI was installed as single – tier mode, replace the place
holder with 1.
In case OFSAAI was installed as multi-tier mode, this value needs to be
set according to the OFSAAI Web layer installed on this machine:
Replace the placeholder with 1 for the machine hosting OFSAAI
Web layer
Replace the placeholder with 0 for the machine not hosting OFSAAI
Web layer
Note: For installing OFSFCCM, APP layer installation happens first and
then followed by Database and Web layer.
For example:
<Layer name="WEB" flag="1">
VariableGroup name="DATABASE_DETAILS"
FICMASTER_USER
##CONFIGURATIO
N_USER##
Replace this placeholder with the value of OFSAAI Configuration Schema
user.
For example:
<Variable name="FICMASTER_USER">REVELEUS</Variable>
Refer to the Installation Checklist, point # 10 for the schema name.
VariableGroup name="DATABASE_SCHEMA_DETAILS"
BUSINESS_SCHEMA
_USER
##BUSINESS_USE
R##
This variable is used to identify the Business Schema name.
Replace the placeholder with BUSINESS Schema Name.
For example:
<Variable
name="BUSINESS_SCHEMA_USER">BUSINESS</Variable>
Refer to the Installation Checklist, point # 4 for the schema name.
30
Installation Guide - Stage 3 Release 6.2.1
Populating the GRC_InstallConfig.xml File
Chapter 1–Preparing to Install
Table 7. Placeholders in layer – WEB (Continued)
MARKET_SCHEMA_U
SER
##MARKET_USER#
#
This variable is used to identify the Market Schema name.
Replace the placeholder with Market Schema Name.
For example:
<Variable name="MARKET_SCHEMA_USER">MARKET</Variable>
Refer to the Installation Checklist, point # 4 for the schema name.
ALERT_MANAGEMEN
T_SCHEMA_USER
##ALERT_MANAGE
MENT_USER##
This variable is used to identify the Alert Management Schema name.
Replace the placeholder with Alert Management Schema Name.
For example:
<Variable
name="ALERT_MANAGEMENT_SCHEMA_USER">AM</Variable>
Refer to the Installation Checklist, point # 4 for the schema name.
KDD_WEB_SCHEMA_
USER
##KDD_WEB_USER
##
This variable is used to identify the WEB Schema name.
Replace the placeholder with WEB Schema Name.
For example:
<Variable
name="KDD_WEB_SCHEMA_USER">KDD_WEB</Variable>
Refer to the Installation Checklist, point # 4 for the schema name.
KDD_SCHEMA_USER
##KDD_USER##
This variable is used to identify the KDD Schema name.
Replace the placeholder with KDD Schema Name.
For example:
<Variable name="KDD_SCHEMA_USER">KDD</Variable>
Refer to the Installation Checklist, point # 4 for the schema name.
KDD_MNR_SCHEMA_
USER
##KDD_MNR_USER
##
This variable is used to identify the KDD MNR Schema name.
Replace the placeholder with MNR Schema Name.
For example:
<Variable
name="KDD_MNR_SCHEMA_USER">KDD_MNR</Variable>
Refer to the Installation Checklist, point # 4 for the schema name.
Installation Guide - Stage 3 Release 6.2.1
31
Populating the GRC_InstallConfig.xml File
Chapter 1–Preparing to Install
Table 7. Placeholders in layer – WEB (Continued)
VariableGroup name="OBIEE_REPORTS_INSTALLATION"
OBIEE_REPORTS
##OBIEE##
This variable is used to identify whether Oracle Business Intelligence
Enterprise Edition (OBIEE) needs to be integrated in the setup.
Allowable values for this placeholder are 0 and 1. Replace this
placeholder with
0 – if OBIEE reports related files are not be installed
1 – if OBIEE reports related files are to be installed
For example:
<Variable name="OBIEE_REPORTS">1</Variable>
32
Installation Guide - Stage 3 Release 6.2.1
CHAPTER 2
Installation Activities
This chapter covers the following topics:
Installing OFSFCCM Solution in Silent Mode
Verification of Installation Logs
Installing OFSFCCM Solution in Silent Mode
OFSFCCM comprises the components that are installed in the OFSAAI Database, Application, and Web layers. If
OFSAAI is installed in multi-tier architecture, then the OFSFCCM installer must be invoked on each machine that
hosts different tiers. This chapter describes the installation process in which OFSAAI is installed using single-tier
option.
For single-tier installation, the installer must be invoked only once on the machine that hosts all the OFSAAI
platform tiers.
Note: For multi-tier installation, the installation must be done in the following order:
Application Layer.
Database Layer (The Database layer installation must be performed after Application Layer).
Web Layer (The Web Layer installation must be performed after Database Layer installation).
Note: For more information, refer to Appendix A, “Installation Order for Multi-Tier Installation of
OFSFCCM,” for installation order of OFSFCCM solution.
To install OFSFCCM in silent mode, follow these steps:
1. Execute .profile to set the environment variables using the following command:
$ ksh
$ .
./.profile
2. Navigate to the OFSFCCM installer kit directory.
3. Execute the following command:
$ ./Setup.sh SILENT
Note: Installation for Solaris Box displays an incorrect message: /<Stage3 Installer Kit>/Setup.bin: !: not
found.
The file is present. The installation continues and ends successfully. Ignore this message.
Installation Guide - Stage 3 Release 6.2.1
33
Verification of Installation Logs
Chapter 2–Installation Activities
4. Enter the following passwords raised by the installer.
[LOG] Starting up.....
Enter Config Schema Password:
Enter BUSINESS Schema Password:
Enter MARKET Schema Password:
Enter Alert Management Schema Password:
Enter KDD-WEB Schema Password:
Enter KDD Schema Password:
Enter KDD MNR Schema Password:
Enter DB UTIL Schema Password:
Enter KDD ALGORITHM Schema Password:
Enter INGEST Schema Password:
Enter FSDF Schema Password:
Enter OFSBDP User Password:
Enter Case Management Schema Password:
Enter KYC Atomic Schema Password:
Note: In case of single-tier installation, the installer will not prompt for the Config Schema Password.
Subsequently, the installation process starts. After successful installation, the following message is displayed:
Installation Complete.
Verification of Installation Logs
Once you complete the installation process, check the installation logs for any errors.
1. SolutionSetup_InstallLog.log, which is created in OFSFCCM installed directory ($FIC_HOME).
2. SolutionsLOG.log, which is created in OFSFCCM installed directory ($FIC_HOME).
3. FCCM62_LOG.log, which is created at the path from where installation is triggered.
Note: If you observe any warnings/non fatal errors/fatal errors/exceptions/ORA error reported in either of
the logs, notify the OFSECM support personnel. Do not proceed with the installation process until all the
issues are addressed.
Upon successful installation, proceed to post installation steps as explained in the following chapters.
Ignore the following warning message coming in SolutionSetup_InstallLog.log where the placeholders
<ftpshare> in the message is replaced with the actual ftpshare area path.
Additional Notes: WARNING - Source <ftpshare>/STAGE/ExcelUpload/INFODOM does not exist.
Note: For RAC DB, JDBC, url is required in the format:
jdbc:oracle:thin:(DESCRIPTION = (ADDRESS = (PROTOCOL = TCP)(HOST = Server.Host Name)(PORT =
1521)) (CONNECT_DATA = (SERVER = DEDICATED) (SERVICE_NAME =.Database Name)))
34
Installation Guide - Stage 3 Release 6.2.1
Verification of Installation Logs
Chapter 2–Installation Activities
Note: For Installations on RAC databases, ETL Application and Source creation is not supported by installer.
Therefore perform ETL Application and Source creation from OFSAAI UI for KYC after installation. Once
done, proceed with next chapter. For more details, refer to the Appendix B.
Installation Guide - Stage 3 Release 6.2.1
35
Verification of Installation Logs
Chapter 2–Installation Activities
36
Installation Guide - Stage 3 Release 6.2.1
CHAPTER 3
Post Installation
This chapter explains the post installation activities and includes the following topics:
Restart Application servers
Web Layer Configuration
OFSAAI Redeployment
Admin Tools Deployment
Scenario Wizard Configuration and Deployment
Restarting Web Application server
Creating Users to Access OFSFCCM Solution
Setting OFSFCCM UI as Home Page of OFSAAI for a Particular User
Restart Application servers
After successful installation of OFSFCCM, restart the OFSAAI Application Server and ICC Server.
Note: For more information on starting Application servers (Infrastructure Server) and ICC server, refer to
Oracle Financial Services Analytical Applications Infrastructure Installation and Configuration Release 7.3.
During the restart of OFSAAI Application server, ignore the following message appearing on the console of
OFSAAI application server and proceed further.
java.io.FileNotFoundException: /<ftpshare
path>/<AMINFODOM>/erwin/fipxml/<AMINFODOM>_DATABASE.XML
java.io.FileNotFoundException: /<ftpshare
path>/<CMINFODOM>/erwin/fipxml/<CMINFODOM>DATABASE.XML
(No such file or directory)
(No such file or directory)
Note: The placeholders <AMINFODOM> and <CMINFODOM> in the message are replaced with the Alert
Management Infodom values.
Installation Guide - Stage 3 Release 6.2.1
37
Web Layer Configuration
Chapter 3–Post Installation
Web Layer Configuration
1. Login to the Web Application server console for creating Java Data Base Connectivity (JDBC) resources for
AM, CM, KYC, and FSDF schemas by providing AM, CM, KYC, and FSDF infodom names and respective
Atomic Schema DB usernames and passwords, respectively.
For more information, refer to Oracle Financial Services Analytical Applications Infrastructure Installation and Configuration Release 7.3.
Note: In Web Logic, while creating Data Source, do not select any driver for (Thin XA). Always choose database driver as Oracle’s driver (Thin) for service connection; Version.
2. Verify the connection pool settings for AM, CM, KYC, and FSDF Data Sources. It must be 100.
Note: Web Sphere has its own tunable Connection pool settings.
FCCM recommends to keep Max Connection = 100 but it depends on the number of users (specific to Admin
Tools). In case while accessing Admin Tools, if you get no connection pool available, then perform the following settings:
Maximum connections = 0 (to remove the upper cap of allocated)
Minimum connections = 0
Aged timeout = 660
Follow these steps depending on the type of Web Application server (Websphere/Weblogic) used:
For Websphere:
a. Login to the Websphere admin console.
b. Click on Resources, select JDBC, and then select JDBC Providers.
c. Click on data sources applicable for OFSFCCM (apply the following setting for AM, CM, KYC, and
FSDF data sources).
i. Click Data Sources in additional properties. Click the data source name again. Click Connection
Pool Properties in additional properties. If the value for maximum connection is less than 100,
then make it 100.
For Weblogic:
a. Login to the Weblogic admin console.
b. Click Services, select JDBC, and then select Data Sources.
c. Click on data sources applicable for OFSFCCM 6.2.1 (apply the following setting for AM, CM, KYC,
and FSDF data sources).
i. Click the Connection Pool tab. If the value for the maximum Capacity is less than 100, then
make it 100.
3. Verify the memory settings for the Web Application Server. Set the minimum heap size as 512 MB and the
maximum heap size as 3072 MB.
Note: For more information, refer to the Oracle Financial Services Analytical Applications Infrastructure
Installation and Configuration Release 7.3.
38
Installation Guide - Stage 3 Release 6.2.1
OFSAAI Redeployment
Chapter 3–Post Installation
Workaround for AIX 6.1
Perform the following step for Bug 16830426 if using AIX 6.1 box, the Stage 3 Installer adds an additional
'FICMASTER' entry.
Follow these steps:
1. Navigate to $FIC_WEB_HOME/webroot/WEB-INF/web.xml
2. Open web.xml and remove one set of the following tags (if duplicate entries present):
<resource-ref>
<res-ref-name>jdbc/FICMASTER</res-ref-name>
<res-type>javax.sql.DataSource</res-type>
<res-auth>Container</res-auth>
</resource-ref>
3. Save file.
4. Recreate OFSAAI ear file.
Workaround for WebLogic as Web Application Server
Update the file ‘startWebLogic.sh’ in ‘<WebLogic_Instance_Home>/bin/’ directory as follows:
Locate the following line in the shell script:
echo "starting weblogic with Java version:"
Edit the Weblogic startup script which starts up the Oracle Financial Services application server and add the
following three parameters above -echo "starting weblogic with Java version:":
Add the following lines in the shell script:
JAVA_OPTIONS="${JAVA_OPTIONS}
-Djavax.xml.soap.SOAPConnectionFactory=org.apache.axis.soap.SOAPConnectionFactoryImpl"
JAVA_OPTIONS="${JAVA_OPTIONS}
-Djavax.xml.soap.MessageFactory=org.apache.axis.soap.MessageFactoryImpl"
JAVA_OPTIONS="${JAVA_OPTIONS}
-Djavax.xml.soap.SOAPFactory=org.apache.axis.soap.SOAPFactoryImpl"
OFSAAI Redeployment
Deploy the <Context-name>.ear (for example, OFSAAI.ear) available at $FIC_HOME/ficweb directory.
Note: For instructions on deploying the EAR file, refer to the Oracle Financial Services Analytical Applications
Infrastructure Installation and Configuration Release 7.3.
Admin Tools Deployment
To deploy Admin Tools, follow these steps:
1. Go to $FIC_HOME/ficweb/AM installed directory and run the script file ./changePasswords.sh. It will ask
for the following passwords:
Enter password for Web Application User:
Installation Guide - Stage 3 Release 6.2.1
39
Scenario Wizard Configuration and Deployment
Chapter 3–Post Installation
Enter password for Data Miner User:
Note: Enter passwords corresponding to the following user names, respectively.
Web Schema (web_user)
KDD MNR Schema (tools_user)
Refer to the Installation Checklist, point # 4 for more details.
2. Go to $FIC_HOME/ficweb/AM installed directory and run the script file ./create_at_war.sh
3. Deploy the <admin_tool_context-name>.war (for example, admin_tools.war) available at
$FIC_HOME/AM directory, as an application on your Web Application Server.
While deploying war file, keep same context name as given against variable ADMIN_CONTEXT_NAME in
GRC_InstallConfig.xml File.
Note: For instructions on deploying the EAR file, refer to Oracle Financial Services Analytical Applications Infrastructure Installation and Configuration Release 7.3.
Scenario Wizard Configuration and Deployment
Navigate to $FIC_HOME/ficweb/SCENARIO_WIZARD and follow these steps:
1. Execute ./install.sh. When prompted for password, enter the KDD MNR Schema password.
Note: Refer to the Installation Checklist, point # 4 for more information.
2. Deploy the <context-name>.war file (for example SMLiteWeb.war) available at
$FIC_HOME/ficweb/SCENARIO_WIZARD as an application on your Web Application Server. While deploying
war file, keep context name as SMLiteWeb.
Note: At a moment of time, only one instance of Scenario Wizard will run on one Application server.
While launching the Scenario Wizard if you find any exception pop up saying java.rmi.bind
exception or java.rmi.unknownhost exception, follow these steps:
a. Stop the SMLiteWeb.war
b. Navigate to <deployed area>SMLiteWeb\WEB-INF\classes\conf\mantas_cfg\install.cfg
c. In install.cfg change the token to some other port which is not occupied.
d. Define rmiPort. By default keep it 1099
rmiPort=1099
e. Restart the server.
Note:
For instructions on deploying the EAR file, refer to the Oracle Financial Services Analytical Applications Infrastructure
Installation and Configuration Release 7.3.
For Front-end access, the following settings must be changed on the client side for the Scenario Wizard to work on
Windows XP/Windows 7.
1. Navigate to Java Control Panel.
2. Under the General tab ensure the following two settings:
40
Installation Guide - Stage 3 Release 6.2.1
Restarting Web Application server
Chapter 3–Post Installation
a. Navigate to Network Settings and change the Network Proxy Settings to Direct Connection.
b. Navigate to Settings under Temporary Internet Files and perform the following steps:
i. Check the option to Keep temporary files on my computer.
ii. Click Delete Files to clear the Java cache.
Restarting Web Application server
Once all the above steps are completed, restart the Web Application Server.
Creating Users to Access OFSFCCM Solution
Create users to access OFSFCCM application. For more information, refer to sections, About OFSECM User
Authentication and About User Setup in the Administration Guide.
Perform Administrative activities for OFSECM
Access the OFSFCCM UI as ECM Administrator and perform all the steps given in the following sections of
Administration Guide.
About Configuring Access Control Metadata
Mapping Users To Access Control Metadata
About Scenario Manager Login Accounts
About Changing Passwords for System Accounts
About Configuring File Type Extensions
About Configuring File Size
About Configuring Status To User Role Table
Note: Once Security Attributes mapping is completed for the ECM Administrator user, restart OFSAAI and
Web Application servers before accessing the Admin Tools application.
Perform Configurations for OFSECM
Access the OFSFCCM UI as ECM Administrator and perform all the steps given in the following sections of
Configuration Guide.
Configuring the Base Time Zone
Configuring the Default Currency Code
Configuring E-mail
Configuring XML Export
Configuring Organization Relationships for Trade Blotter
Configuring Search Criteria Population Options for Trade Blotter
Installation Guide - Stage 3 Release 6.2.1
41
Setting OFSFCCM UI as Home Page of OFSAAI for a Particular User
Chapter 3–Post Installation
Configuring Case Correlation Owner
Configuring Default Case Owner
Configuring Default Alert Owner
Configuring the Alert/Case Auto Assignment Web Service
Perform Administrative activities for KYC
Access the OFSFCCM UI as a KYC Administrator and perform all the steps given in the KYCAdministration Guide.
Note: Appendix C and D should be performed for successful KYC installation.
Setting OFSFCCM UI as Home Page of OFSAAI for a Particular User
To set OFSFCCM UI as home page of OFSAAI, follow these steps:
1. Log in as an ECM Administrator/Supervisor user.
2. Navigate to Home page.
3. Select Enterprise Case Management as your default page and click Save.
42
Installation Guide - Stage 3 Release 6.2.1
CHAPTER 4
Uninstalling OFSFCCM
To uninstall the OFSFCCM in a particular OFSAAI Layer, follow these steps. For multi-tier architecture,
OFSFCCM Uninstaller must be run on all servers hosting an OFSAAI Layer.
1. Before uninstalling the OFSFCCM, execute .profile to set the environment variables using the following
command:
$ ksh
$ .
./.profile
2. Navigate to $FIC_HOME/Uninstall_FCCM62 directory and execute the following command:
$ ./Uninstall_App.sh
3. Input the Configuration Schema Password when prompted.
4. After running Uninstaller on all the layers, follow these steps:
a. Uninstall the OFSAAI ear file deployed on the Web Application Server.
b. Navigate to $FIC_HOME/ficweb on server hosting WEB Layer and execute the following command to
recreate the ear file.
$ ./ant.sh
c. Deploy the new ear file on Web Server.
Note: For more information on deploying the EAR file, refer to the Oracle Financial Services Analytical Applications Infrastructure Installation and Configuration Release 7.3.
5. The OFSFCCM Uninstaller does not perform the following activities:
a. It does not delete Infodom and Segment created as part of OFSFCCM installation.
b. It does not revert DataModel Upload done as part of OFSFCCM installation.
c. It does not delete ETL Applications and Sources created as part of OFSFCCM installation.
6. If you are re-installing OFSFCCM after running the un-installer, keep the same InfoDom and Segment Names
for all the atomic schemas. For consecutive installation, replace the following parameters in
GRC_InstallConfig.xml with 0 before starting installation next time, since they already exist in the database.
Mark the following parameters as 0 in GRC_InstallConfig.xml file for next time installation after successful
uninstallation:
Installation Guide - Stage 3 Release 6.2.1
43
Chapter 4–Uninstalling OFSFCCM
Table 8. Placeholders in GRC_InstallConfig.xml
Variable
Preferred Value
Description
VariableGroup name="PRE_INSTALLATION"
PRE_INSTALL
0
This variable is used to identify whether the installer will perform
the following pre-Installation activities:
1. Infodom and Segment Creation for all atomic schemas.
2. Data Model Upload for KYC and FSDF atomic schema.
3. ETL Application Source creation for KYC atomic
schema.
Replace this placeholder with 0.
For example:
<VariableGroup name="PRE_INSTALLATION">
<Variable name="PRE_INSTALL">0</Variable>
</VariableGroup>
Note: In case OFSFCCM is being installed second time after
successfully un-installing, then keep this parameter as 0, since it
is a onetime activity.
TaskGroup name="PRE_INSTALLATION_CONFIGURATION_SUB_SOL_1"
ActionGroup
name="CREATE_INFOD
OM"
0
This variable is used to identify the Alert Management
Information Domain to be created by the installer.
Replace this placeholder with 0.
For example:
<ActionGroup name="CREATE_INFODOM" flag="0">
Note: In case OFSFCCM is being installed second time after
successfully un-installing, then keep this parameter as 0, since it
is a onetime activity.
TaskGroup name="PRE_INSTALLATION_CONFIGURATION_SUB_SOL_2"
ActionGroup
name="CREATE_INFOD
OM"
0
This variable is used to identify the Case Management
Information Domain to be created by the installer.
Replace this placeholder with 0.
For example:
<ActionGroup name="CREATE_INFODOM" flag="0">
Note: In case OFSFCCM is being installed a second time after
successfully un-installing, then keep this parameter as 0, since it
is a onetime activity.
44
Installation Guide - Stage 3 Release 6.2.1
Chapter 4–Uninstalling OFSFCCM
Table 8. Placeholders in GRC_InstallConfig.xml (Continued)
TaskGroup name="PRE_INSTALLATION_CONFIGURATION_SUB_SOL_3"
ActionGroup
name="CREATE_INFOD
OM"
0
This variable is used to identify the KYC Information Domain to
be created by the installer.
Replace this placeholder with 0.
For example:
<ActionGroup name="CREATE_INFODOM" flag="0">
Note: In case OFSFCCM is being installed a second time after
successfully un-installing, then keep this parameter as 0, since it
is a onetime activity.
ActionGroup
name="DATA_MODEL_U
PLOAD"
0
This variable is used to identify whether the Data Model Upload
for KYC is to be done through the Installer.
Replace this placeholder with 0.
For example:
<ActionGroup name="DATA_MODEL_UPLOAD" flag="0">
Note: In case OFSFCCM is being installed a second time after
successfully un-installing, then replace this placeholder with 0.
ActionGroup
name="ETL_CREATION
"
0
This variable is used to identify whether the ETL application and
sources creation for KYC is to be done through the Installer.
Replace this placeholder with 0.
For example:
<ActionGroup name="ETL_CREATION" flag="0">
Note: In case OFSFCCM is being installed a second time after
successfully un-installing, then replace this placeholder with 0.
Installation Guide - Stage 3 Release 6.2.1
45
Chapter 4–Uninstalling OFSFCCM
Table 8. Placeholders in GRC_InstallConfig.xml (Continued)
TaskGroup name="PRE_INSTALLATION_CONFIGURATION_SUB_SOL_4"
ActionGroup
name="CREATE_INFOD
OM"
0
This variable is used to identify the FSDF Information Domain to
be created by the installer.
Replace this placeholder with 0.
0 – if Infodom for FSDF is already created
For example:
<ActionGroup name="CREATE_INFODOM" flag="0">
Note: In case OFS FCCM installation is performed second time
after successful un-installation, then keep this parameter as 0
since it is a onetime activity.
ActionGroup
name="DATA_MODEL_U
PLOAD"
0
This variable is used to identify whether Data Model Upload for
FSDF is to be done through the Installer.
Replace this placeholder with 0
1 – If Data Model Upload for FSDF is to be done through
the installer
0 – If Data Model Upload for FSDF is already completed
For example:
<ActionGroup name="DATA_MODEL_UPLOAD" flag="0">
Note: In case OFS FCCM installation is performed second time
after successful un-installation, then replace this placeholder
with 0.
46
Installation Guide - Stage 3 Release 6.2.1
CHAPTER 5
Deploying Analytic Reports and
Threshold Analyzer
This chapter explains how to deploy Analytics on Oracle Business Intelligence Enterprise Edition (OBIEE) and
integrate Analytic Reports and Threshold Analyzer in the OFSECM UI.
This chapter includes the following topics:
Installing OBIEE Server
Installing OBIEE Windows Administration Client
Disabling the Cache Feature in OBIEE Server
Change Default Repository Password
Configuring OBIEE Connection Pool
Deploying OFSFCCM Report Analytics
Post Installation Steps
Accessing Reports through OFSFCCM Application
Installing OBIEE Server
To install the Oracle Business Intelligence Enterprise Edition (OBIEE) server, refer to Oracle® Fusion Middleware
Installation Guide for Oracle Business Intelligence11g Release 1 (11.1.1.6.7). After installation, get the Enterprise Manager
URL, Username, Password, and OBIEE installed directory from the system administrator.
Installing OBIEE Windows Administration Client
To install the OBIEE repository administration client for Windows machine, refer to Oracle® Fusion Middleware
Installation Guide for Oracle Business Intelligence11g Release 1 (11.1.1.6.7).
The OBIEE repository administration client can be downloaded from running OBIEE setup from the following
URL:
<protocol>://<OBIEE Server Name>:<OBIEE Analytics port>/analytics
From LHS menu, click Get Started and select Download BI Desktop Tools.
Installation Guide - Stage 3 Release 6.2.1
47
Disabling the Cache Feature in OBIEE Server
Chapter 5–Deploying Analytic Reports and Threshold Analyzer
Disabling the Cache Feature in OBIEE Server
Login to the Enterprise Manager and perform the following steps:
1. Click Business Intelligence folder from the left hand side menu and select coreapplicaiton. For more
information, refer Figure 1.
2. Click Capacity Management and then select the Performance tab.
3. Click Lock and Edit Configuration tab.
4. To disable the Cache, uncheck the Cache Enabled Option.
5. Click Apply and Activate Changes.
6. Click Restart to apply recent changes.
Change Default Repository Password
Copy ECM_6.2.rpd from $FIC_HOME/OBIEE/Repository to the Windows machine where the OBIEE Windows
administration client is installed. Change the default password for the repository by following these steps:
1. Open the Repository using the OBIEE Windows administration client from Windows machine. From the File
menu, select Open and click Offline. Browse to the Repository on Windows machine. The Oracle BI
Administration Tool - ECM_6.2.rpd windows is displayed.
2. Enter default Repository password: Mantas61
To change the default password, follow these steps:
1. From File menu, choose Change Password.
2. Enter the new password and click OK.
48
Installation Guide - Stage 3 Release 6.2.1
Configuring OBIEE Connection Pool
Chapter 5–Deploying Analytic Reports and Threshold Analyzer
Configuring OBIEE Connection Pool
To configure the Connection Pool of the repository, follow these steps:
1. Open the same Repository (as in the previous step) on the Windows machine. The Oracle BI Administration
Tool - ECM_6.2.rpd windows is displayed.
2. Expand the D4010S10 folder in the Physical section.
3. Double-click Connection Pool to open the Connection Pool Properties window.
4. Enter the following in the Data Source Name text box of the Connection Pool Properties window after
modifying <Database Server Host Name> and <Database Name>
Data Source Name = (DESCRIPTION=(ADDRESS=(PROTOCOL=TCP)(HOST=<Database Server HostName>)(PORT=1521))(CONNECT_DATA=(SERVER=DEDICATED) (SERVICE_NAME=<Database Name>)))
5. Enter the Alert Management schema user in the User name text box.
6. Enter the Alert Management schema user password in the Password text box.
7. Click OK.
8. Expand the folder and test connection for any one table name by Right Click > view data.
9. Perform similar changes in the Connection Pools for all remaining folders in the Physical Layer by providing
the following schema details for all Connection Pools:
a. D4010S10 > Alert Management Schema
b. D5011S10 > Report Schema (refer report_user in <OFSBDP Installed
Directory>/database/db_tools/mantas_cfg/db_variables.cfg file. For more details, refer to
the Installation Guide - Stage 1).
c. KYC1.1DEV-179 > Alert Management Schema
d. MNTS583 > Alert Management Schema
e. UIC_73 > CaseMng connection pool ->Case Management Schema
f. UIC_73 > Security connection pool->Alert Management Schema
10. Select Save option from the File menu. The following message is displayed:Do you want to check global consistency?,
11. Click Yes. The following message is displayed: Consistency check didn’t find any errors, warning or best practices
violations.
12. Click OK.
Installation Guide - Stage 3 Release 6.2.1
49
Deploying OFSFCCM Report Analytics
Chapter 5–Deploying Analytic Reports and Threshold Analyzer
Deploying OFSFCCM Report Analytics
To deploy Analytic Reports, follow these steps:
1. Stop Oracle Process Manager and Notification Server (OPMN) services by executing the following command
from <OBIEE Installed Directory>/instances/instance1/bin
./opmnctl stopall
2. Change the value in Nqsconfig.ini file located at
<FMW_HOME>/instances/instance1/config/OracleBIServerComponent/coreapplication_obis1/
directory
From
EVALUATE_SUPPORT_LEVEL = 0;
To
EVALUATE_SUPPORT_LEVEL =2;
3. Copy ANALYTICS_REPORT folder from $FIC_HOME/OBIEE and place under <OBIEE Installed
Directory>/instances/instance1/bifoundation/OracleBIPresentationServicesComponent/core
application_obips1/catalog.
4. Login into Enterprise Manager, click the Business Intelligence folder at left hand side and select
coreapplication, then click on Deployment tab.
5. Click the Repository tab.
6. Click on Lock and Edit Configuration tab.
7. Click Close on the Confirmation pop-up window.
8. In the Upload BI Server Repository Section, browse the repository file from the Windows machine.
9. Enter the new repository password in the Repository Password and Confirm Password text boxes.
10. In BI Presentation Catalog section, provide the Catalog Location as <OBIEE Installed
Directory>/instances/instance1/bifoundation/OracleBIPresentationServicesComponent/core
application_obips1/catalog/ANALYTICS_REPORT
11. Click Apply.
12. Click Activate Changes and close the activate changes pop-up window.
13. Click Close on the Confirmation pop-up window.
14. Modify <OBIEE Installer Directory>
/instances/instance1/config/OracleBIPresentationServicesComponent/coreapplication_obip
s1/instanceconfig.xml as below
From
<Security>
<!--This Configuration setting is managed by Oracle Enterprise Manager Fusion Middleware Control-->
<ClientSessionExpireMinutes>210</ClientSessionExpireMinutes>
</Security>
To
<Security>
50
Installation Guide - Stage 3 Release 6.2.1
Post Installation Steps
Chapter 5–Deploying Analytic Reports and Threshold Analyzer
<!--This Configuration setting is managed by Oracle Enterprise Manager Fusion Middleware Control-->
<ClientSessionExpireMinutes>210</ClientSessionExpireMinutes>
<InIFrameRenderingMode>allow</InIFrameRenderingMode>
</Security>
15. Restart OBIEE server.
16. Modify Instanceconfig.xml available
at<FMW_HOME>/instances/instance1/config/OracleBIPresentationServicesComponent/coreappli
cation_obips1/instanceconfig.xml location
Add the tag under the Security Section in Instance Config.xml
<InIFrameRenderingMode>allow</InIFrameRenderingMode>
So that it looks like below after adding above tag:
<Security>
<!--This Configuration setting is managed by Oracle Enterprise Manager Fusion Middleware Control-->
<ClientSessionExpireMinutes>210</ClientSessionExpireMinutes>
<InIFrameRenderingMode>allow</InIFrameRenderingMode>
</Security>
17. Start the Oracle Process Manager and Notification Server (OPMN) services by executing the following
command from <OBIEE Installed Directory>/instances/instance1/bin
./opmnctl startall
Post Installation Steps
After installing the OBIEE server, follow these steps:
1. Log in as OFSECM Admin User with valid username and password. The OFSECM Home page is displayed.
2. Click FCCM and then click the Administration Menu and select the Manage Parameters and click Manage
Common Parameters.
3. Choose Parameter Category as UI and Parameter Name as OBIEE.
4. Set Attribute 2 Value = <PROTOCOL>://<OBIEE_SERVER_NAME>:<PORT>
Note: <PROTOCOL> is the web page access PROTOCOL (http or https) and <OBIEE_SERVER_NAME> is the
FQN (fully qualified name)/host name of the of the server, where OBIEE is installed.
is the PORT number used in OBIEE installation. It may change based on the OBIEE version. Enter
the correct PORT number if it is not 9704.
<PORT>
Placeholder variables are mentioned between angle brackets. Update the placeholders with actual value.
5. Verify Attribute 4 Value. It must be the OFSECM application URL. If the same OFSECM application is
deployed on different machines, then modify the OFSECM Application URL in Attribute 4 Value
appropriately.
Installation Guide - Stage 3 Release 6.2.1
51
Accessing Reports through OFSFCCM Application
Chapter 5–Deploying Analytic Reports and Threshold Analyzer
Accessing Reports through OFSFCCM Application
For more information on Accessing Reports, refer to the Alert Management User Guide.
Note: For Bug 13713131: An error displays when a user clicks on the pie chart or tries to access the Threshold
Analyzer reports.
This is an issue with Solaris OS. Apply Solaris patch #13055819 to solve this issue.
52
Installation Guide - Stage 3 Release 6.2.1
APPENDIX A
Installation Order for Multi-Tier
Installation of OFSFCCM
If OFSAAI is installed in a multi-tier architecture, then installation order of OFSFCCM on different machines
hosting OFSAAI Layer(s) will depend on the OFSAAI Installation architecture, as mentioned below:
OFSAAI APP, DB Layer on Machine A and OFSAAI WEB Layer on Machine B
1. Execute installer on Machine A with ##APP_LAYER## and ##DB_LAYER## flags as 1, ##WEB_LAYER## flag as
0.
2. Execute installer on Machine B with ##APP_LAYER## and ##DB_LAYER## flags as 0, ##WEB_LAYER##
flag as 1.
OFSAAI APP Layer on Machine A and OFSAAI DB, WEB Layer on Machine B
1. Execute installer on Machine A with ##APP_LAYER## flag as 1, ##DB_LAYER## and ##WEB_LAYER## flags as
0.
2. Execute installer on Machine B with ##APP_LAYER## flag as 0, ##DB_LAYER## and ##WEB_LAYER##
flags as 1.
OFSAAI APP, WEB Layer on Machine A and OFSAAI DB Layer on Machine B
1. Execute installer on Machine A with ##APP_LAYER## flag as 1, ##DB_LAYER## and ##WEB_LAYER## flags as
0.
2. Execute installer on Machine B with ##DB_LAYER## flag as 1, ##APP_LAYER## and ##WEB_LAYER## flags as
0.
3. Execute installer on Machine A with ##WEB_LAYER## flag as 1, ##APP_LAYER## and ##DB_LAYER## flags as
0.
OFSAAI APP Layer on Machine A, OFSAAI DB Layer on Machine B and OFSAAI WEB
Layer on Machine C
1. Execute installer on Machine A with ##APP_LAYER## flag as 1, ##DB_LAYER## and ##WEB_LAYER## flags as
0.
2. Execute installer on Machine B with ##DB_LAYER## flag as 1, ##APP_LAYER## and ##WEB_LAYER## flags as
0.
3. Execute installer on Machine C with ##WEB_LAYER## flag as 1, ##APP_LAYER## and ##DB_LAYER## flags as
0.
Installation Guide - Stage 3 Release 6.2.1
53
Appendix E—Installation Order for Multi-Tier Installation of OFSFCCM
54
Installation Guide - Stage 3 Release 6.2.1
APPENDIX B
ETL Source Creation
Create the following applications:
File2Table_Load
FicMaster
KYCApplication
BusinessSchema
OracleSchema
NOTE: The Application Name and Data Source names are case sensitive and should be created as specified.
Ensure that folders are created with the Data Source Name in the ftpshare/STAGE area in the application and
database layer.
Create the following data sources:
FileTable - A Flat File Source pointing to the source database to hold the F2T Definitions. The date format
should be set as mm-dd-yyyy.
ConfigSource - An RDBMS Source pointing to the Configuration database to hold the configuration
information. The date format should be set as mm-dd-yyyy.
KYCsource - An RDBMS Source pointing to the KYC Atomic Schema to hold the T2T Definitions. The
date format should be set as mm-dd-yyyy.
BusinessSchema - An RDBMS Source pointing to the Business database to hold the Business schema
information. The date format should be set as mm-dd-yyyy.
OracleSchema - An RDBMS Source pointing to the Alert Management database to hold the Alert
Management schema information. The date format should be set as mm-dd-yyyy.
Map the Source to the respective application:
Data Source FileTable to Application File2Table_Load.
Data Source ConfigSource to Application FicMaster.
Data Source KYCsource to Application KYC.
Data Source BusinessSchema to Application BusinessSchema.
Data Source OracleSchema to Application OracleSchema.
Generate the Source Model for the Sources - FicMaster, KYCsource, Business, and Mantas Schema.
NOTE: For more details refer to the Oracle Financial Services Analytical Applications Infrastructure User Manual
Release 7.3 to perform the steps mentioned above.
Installation Guide - Stage 3 Release 6.2.1
55
Appendix B—ETL Source Creation
56
Installation Guide - Stage 3 Release 6.2.1
APPENDIX C
Configuration for the KYC File
Rename.sh
Below is the configuration which must be done for KYC_File_Rename.sh file found in ficdb/bin path. The script
will work fine for both Multitier and Single tier configuration.
Steps for Creating the Access Permission for Copying the File from One
Machine to Another
The below steps from 1 to 3 for providing the access must be done only for the Multi tier environment. These steps
are not required for a single tier configuration, follow steps from 4 to 5 only for single tier.
1. Execute the command ssh-keygen -t rsa in the machine from where the files are to be copied (machine
where the ficdb layer of OFSAAI is installed).
$ ssh-keygen -t rsa
Generating public/private rsa key pair.
Enter file in which to save the key (/home/gsh/.ssh/id_rsa): ---- just press Enter
Enter passphrase (empty for no passphrase): ---- just press Enter
Enter same passphrase again: ---- just press Enter
Your identification has been saved in /home/gsh/.ssh/id_rsa.
Your public key has been saved in /home/gsh/.ssh/id_rsa.pub.
The key fingerprint is:
23:b1:27:c8:23:a3:73:ea:a8:3f:7a:71:85:e1:59:59 gsh@ofsaa
2. Copy this id_rsa.pub file which is created in the path /home/gsh/.ssh/ into the Destination machine in
the path /home/gsh/.ssh/id_rsa.pub. This file has to be moved manually from one machine to another
machine.
3. Navigate to the path /home/gsh/.ssh/ in the machine where the files are to be copied and execute the below
commands:
$ cat id_rsa.pub >>/home/gsh/.ssh/authorized_keys
$ chmod 700 /home/gsh/.ssh/authorized_keys
Note: The paths are according to our setup, when the ssh-keygen -t rsa is executed the paths of your setup
will be displayed below the command.
Installation Guide - Stage 3 Release 6.2.1
57
Calling the Shell Script for Copying the Files from One Path to Another
Appendix C—Configuration for the KYC File Rename.sh
Calling the Shell Script for Copying the Files from One Path to Another
4. Open the KYC_File_Rename.sh which is present in the path <OFSAAI
Installed Area>/ficdb/bin of DB layer and configure the paths and details
as mentioned in the following screenshots. After the changes are done move the
file to the /ficdb/bin/ area. Provide executable permissions to the file.
5. Execute the task through the batch execution screen of the OFSAAI application
and check if the files are moved to the destination path.
Figure 2. Multi-tier Configuration
Figure 3. Single-tier Configuration
58
Installation Guide - Stage 3 Release 6.2.1
APPENDIX D
Watchlist_FuzzyMatch
Execute the below mentioned create synonym queries by logging in as the
INGEST_USER.
Replace the ##KYC_USER## place holder with name of the KYC ATOMIC schema.
CREATE SYNONYM DIM_CUSTOMER_TYPE for ##KYC_USER##.DIM_CUSTOMER_TYPE;
CREATE SYNONYM DIM_JURISDICTION for ##KYC_USER##.DIM_JURISDICTION;
CREATE SYNONYM FCT_TP_WLS_REQUESTS_PRCNG for ##KYC_USER##.FCT_TP_WLS_REQUESTS_PRCNG;
CREATE SYNONYM FCT_WLS_RESULT_STG for ##KYC_USER##.FCT_WLS_RESULT_STG;
Installation Guide - Stage 3 Release 6.2.1
59
Calling the Shell Script for Copying the Files from One Path to Another
Appendix C—Configuration for the KYC File Rename.sh
Calling the Shell Script for Copying the Files from One Path to Another
6. Open the KYC_File_Rename.sh which is present in the path <OFSAAI
Installed Area>/ficdb/bin of DB layer and configure the paths and details as
mentioned in the following screenshots. After the changes are done move the file
to the /ficdb/bin/ area. Provide executable permissions to the file.
7. Execute the task through the batch execution screen of the OFSAAI application
and check if the files are moved to the destination path.
Figure 4. Multi-tier Configuration
Figure 5. Single-tier Configuration
60
Installation Guide - Stage 3 Release 6.2.1