1
PRONTO_BACKUP
USER’S MANUAL V2.0
1
PRONTO_BACKUP
USER’S MANUAL V2.0
1. PRONTO BACKUP OPERATION....................................................3
1.1 PRONTO BACKUP MASTER OPERATION ....................................................... 4
1.2 PRONTO BACKUP SLAVE OPERATION ........................................................... 6
2. PRONTO BACKUP FRONT PANEL................................................7
3. PRONTO BACKUP DISPLAY...........................................................9
4. PRONTO BACKUP MENU................................................................11
4.1 {X21} ............................................................................................................................... 13
4.2 {BACKUP}....................................................................................................................... 15
4.3 {CONF}............................................................................................................................25
4.4 {INF} ...............................................................................................................................27
5. PRONTO BACKUP REMOTE MONITORING LINES ............28
6. PRONTO BACKUP DISPLAY INFORMATION FILDS.........29
7. PRONTO BACKUP CONNECTORS ..............................................34
8. JUMPERS ............................................................................................36
9. PRONTO BACKUP TECHNICAL SPECIFICATIONS ............37
10. PRONTO BACKUP MENU TREE...................................................39
2
PRONTO_BACKUP
USER’S MANUAL V2.0
1.PRONTO BACKUP OPERATION
The Pronto Backup can be configured under two kinds of operations:
MASTER or SLAVE. The selection of one or another working is established
through programming the microswitch nº4 located on the rear panel of the
unit. That programmation must be carried out before the unit were switched
on in order to be effective. If the microswitch nº4 is in “UP” position, the
Pronto Backup will work as MASTER. If it is in “DOWN” position, it will
work as SLAVE. The display will indicate in which mode the unit is working:
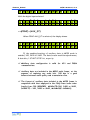
B K U P
M A S
T E R
B K U P
S L A V E
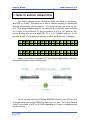
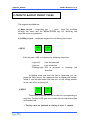
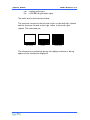
Please, find below an example of Pronto Backup application to note the
differences between both working modes.
As we can see, the Pronto Backup MASTER monitors the X21 line and
it decides when the backup ISDN line must start to work. The Pronto Backup
SLAVE only works in X21 or in ISDN depending on if there is communication
by the last one.
3
PRONTO_BACKUP
USER’S MANUAL V2.0
??
1.1 PRONTO BACKUP MASTER
The Pronto Backup MASTER will be connected to a dedicated
line through its X21 port and an ISDN basic access (backup line).
The X21 audio mode is selected from the menu. The unit allows
selecting between MPEG Layer II or MPEG Layer III at 64, 128 or
256 Kbps.
Once the backup option has been validated in the menu (BACKUPENABLE-ON), the Pronto Backup will monitor the status of the X21
line continuously in order to decide if the X21 line is dropped or, in
case the unit is working in backup mode (ISDN connection), if the X21
communication has been re-established. The Pronto Backup MASTER
decides if the X21 line is dropped when the audio synchronism has been
lost for the programmed time in TIMER-DOWN option of the menu
(10 seconds minimum).
The user must be careful to disable the backup mode
(BACKUP_ENABLE_OFF) to avoid that there was any interference in
the installation and configuration operations of the unit.
When the audio synchronism has been lost during the programmed
time by the user (TIMER-DOWN), the unit will be configured in
backup mode according to the mode previously selected by the user
(BACKUP-CODEC). Once it has been configured, the codec will
proceed to call to the programmed numbers by the user (BACKUP-TALINE-DIAL). The number of calls ( one or two B channels) will depend
on the mode that the user has chosen (64 o 128 Kbps) when the unit
starts working in backup mode.
The Pronto Backup will try the connection so many times as it will
be necessary until the connection will be established or until it decides
that the X21 line has been recovered. If the backup is disabled during
the calling process or when the ISDN communication is connected, the
unit will proceed to work at X21 mode independently if the X21 line is
recovered or not.
While the unit is working in backup mode, the unit is monitoring the
X21 line in order to decide if the line has been recovered or not. If
the audio synchronism is detected in the received audio by the X21
4
PRONTO_BACKUP
USER’S MANUAL V2.0
port, the programmed countdown in the TIMER-UP starts. If the
countdown finishes, the Pronto Backup goes to X21 mode again and
therefore leaving the backup mode after ending the communication by
the ISDN line.
In order to avoid the entry of unwanted calls, the Pronto Backup
terminal adapter allows the programming of call filters (BACKUPTA_CNUM), as well as the subaddressing through the option of local
numbers (BACKUP-TA-LNUM).
5
PRONTO_BACKUP
USER’S MANUAL V2.0
??
1.2 PRONTO BACKUP SLAVE
If the Pronto Backup starts as SLAVE, the entry or exit to the
backup mode will be guided by different criterions than the defined
ones in the MASTER mode. First of all, it is necessary that the Backup
option be enabled.
The unit will work by defect in X21 mode monitoring the state
of the ISDN line continuously. If a incoming call is detected, the unit
will decide to work in backup mode automatically. If the call hungs up,
the unit will pass to work in X21 mode again.
During the backup phase the Pronto Backup goes on sending
coded audio through the X21 line in order to the Pronto Backup
MASTER can detect that the line has been recovered.
In the Pronto Backup SLAVE is also possible to program call
filters and subaddressing in order to avoid the entry of unwanted calls.
6
PRONTO_BACKUP
USER’S MANUAL V2.0
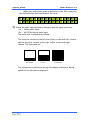
2.PRONTO BACKUP FRONT PANEL
The keypads provided are:
a) Menu keypad – comprising the ? , ? and ? keys for scrolling
through the menu and the MENU/ENTER key for selecting the
required action or parameter.
b) Dialling keypad – telephone keypad for introducing the timers.
c) KEYS
CALL
1
CALL
2
Each key has a LED to indicate the following situations:
- Light off:
Line disconnected
- Light on:
Line connected
- Flashing light: Call in progress or incoming call
detected.
In Backup mode and once the line is connected, you can
press the CALL key of the respective line to display the number
called if the call was made from the unit, or the calling number
in the case of an incoming call.
d) KEYS
END
1
END
2
These keys terminate the call on the line corresponding to
each key. The key’s LED goes out to show that its associated line
is disconnected.
? The key must be pressed on during at least 1 second.
7
PRONTO_BACKUP
d) KEYS
USER’S MANUAL V2.0
ON AIR 1
ON AIR 2
These keys are not available in any mode. In X21 mode, the
LED’s will be always ON and, in Backup mode when the ISDN line
is connected.
8
PRONTO_BACKUP
USER’S MANUAL V2.0
3.PRONTO BACKUP DISPLAY
The Pronto Backup display comprises the status panel, which
continually shows the status of the unit and the menu display, showing
different options in a tree structure.
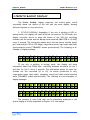
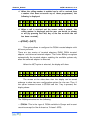
1.- STATUS DISPLAY: Depending if the unit is working in X21 or
backup mode, the display will show different information. In X21 mode, the
display controller starts to show the status of the X21 line, switching
between the line status and the Backup mode selected (MASTER or SLAVE)
every 5 seconds. The information shown about the line status includes speed
port selected (64, 128 or 256 kbps), compression mode, input audio and audio
synchronisation state (“FRAMED” means synchronised). The following is an
example of display message:
L 1
X 2 1
J O I N T
6 4 K b
F R A M E D
L 3
- A
-
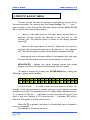
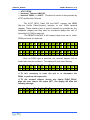
If the unit is working in backup mode, the display will show
information about the ISDN lines, switching between the status for line 1
and that for line 2 every 5 seconds. The information shown for each line
includes the line concerned (L1 or L2), its status (connected or not),
compression mode, input audio, telephone control and audio synchronisation
state (“FRAMED” means synchronised). The following are two examples of
display messages.
L 1
1 2
C O N N E C T E D
8 K
F R A M E D
-
A -
L 2
1 2
C O N N E C T E D
8 K
F R A M E D
-
A -
The meaning of each field that can be potentially displayed in the
status display is briefly explained in Chapter 6 of this manual.
9
PRONTO_BACKUP
USER’S MANUAL V2.0
?
By pressing Key 1 or 2 on the front panel, the display will switch
immediately.
2.- MENU DISPLAY: When ENTER/MENU is pressed, the equipment’s
menu is displayed. If no other action takes place during the next 17 seconds,
the display automatically switches back to the status display.
The different menu options are explained below in detail. You are
recommended to follow these explanations along with the menu tree included
at the end of this manual.
10
PRONTO_BACKUP
USER’S MANUAL V2.0
4.PRONTO BACKUP MENU
The user can use the menu of options on the display to control all the
functions necessary for working with the Pronto Backup. The ? , ? and ?
keys are used to move through the different options, and the MENU/ENTER
key is used to select the required option.
? : Moves to the menu option to the right. When the last option is
selected, this key returns the selection to the first one, i.e., the
leftmost one. The selected option is shown on the display between
braces ({}).
? : Moves to the menu option on the left. When the first option is
selected, this key moves the selection to the last one, i.e., the rightmost
one. The selected option is shown on the display between braces ({}).
? : Steps up one level in the menu. When at the topmost level, this exits
the menu function and returns to the status display for each line.
MENU/ENTER : Enables the option between braces and passes
program control to the subroutine associated with that option.
The menu is entered by pressing the ENTER/MENU key, causing the
following to appear on the display:
< - { X 2
1
}
M E N U
B A C K U P
- - >
C O N F
The arrow keys? ? are used to move from one option to another; for
example, if the right arrow key is pressed, the menu item L2 appears enclosed
between braces ({}). The selected option will always appear between braces.
If, at the end of the line, ? is pressed, the selection point will return to the
start of the line. Likewise, if L1 is selected and ? is pressed, INF will be
selected. This applies to all the menu screens.
When ENTER is pressed, the menu for the selected option, enclosed in
braces, is displayed.
The meaning of the above options is:
11
PRONTO_BACKUP
USER’S MANUAL V2.0
?? X21: Functions and parameters for configuring the operation in
X21.
?? BACKUP: Functions and parameters for configuring Backup.
?? CONF: General equipment configuration parameters.
?? INF: More information for each line, additional to the data shown on
the status display.
The following gives details of each of these selections.
12
PRONTO_BACKUP
USER’S MANUAL V2.0
4.1.- {X21}
On selecting X21, the display shows:
X 2 1
M E N U
{ C O D E C }
S P E E D
?? CODEC: Audio encoding/decoding mode configuration for X21 line.
?? SPEED: X21 speed configuration.
Selecting these leads to:
??
{X21}-{CODEC}
This option allows the encoding/decoding mode for line 1 to be
selected.
On pressing ENTER/MENU with the CODEC option selected,
the display shows:
X 2 1
M P E G
I I
{
L A Y E R
I I I }
Once the Layer is selected, the menu goes to the audio mode selection:
X 2 1
M P E G
M O D E
{ M O N O }
J S
D U A L
When the speed selected is 64 Kbps, once the mode is selected, the
menu goes to select the sampling frequency (48 , 32 or 24 KHz). The
menu on the display will show:
L 1
{ 4
M P E G
F S
8 K }
3 2 K
2
4 K
?
If the speed selected is 128 or 256 Kbps, the sampling
frequency will be always 48 KHz.
13
PRONTO_BACKUP
USER’S MANUAL V2.0
??
{X21}-{SPEED}
This option accesses the section for the speed port configuration
. The display shows:
B I
{ 6
T
4 }
R A T E
1 2 8
K B P S
2 5 6
?
Pronto Backup with 2.00 version or later supports 384
kbps as well.
?
MPEG Layer III doesn’t support 384 Kbps. If the X21
audio mode selected is Layer III, 384 Kbps doesn´t appear on
the speed menu option. If the X21 speed selected is 384 Kbps,
it isn’t possible to select Layer III as X21 mode transmission.
If the speed port is either 128, 256 or 384, the display will be
as above but with the line mode enclosed in braces.
14
PRONTO_BACKUP
USER’S MANUAL V2.0
4.2.{BACKUP}
On selecting BACKUP, the display shows:
<
{
- B A C K U P
T I M E R } C O D E C
- - >
T A
The BACKUP option allows the configuration of the parameters related
with the backup operation.
?? TIMER: Timers programming.
?? CODEC: Audio encoding-decoding mode configuration for backup
line.
?? TA: Terminal
communication.
adadptor
configuration
for
ISDN
backup
?? ENABLE: To enable or disable the backup operation.
Selecting these leads to:
??
{BACKUP}-{TIMER}
This option allows to programm the timers to decide when the unit goes
to backup mode or when the unit goes to X21 mode again. The display
will show:
B A C K U P
T
{ D O W N }
I M E R
U P
In the Down timer, the user programms the time the unit will
need to decide that the X21 line is dropped. The Up timer is the X21
line recovering time . The minimum time can be programmed is 10 sc.
B A C K U P
T
I M E
D O W N
15
PRONTO_BACKUP
(
1
USER’S MANUAL V2.0
0
-
2
5
B A C K U P
( 1 0 - 2 5
5
)
1
0
-
5
T I M E
) 1 0 -
S
c
U P
S c
The time is introduced by using the keypad of the frontal panel.
?
In Slave operation, this option is not available.
??
{BACKUP}-{CODEC}
This option allows the encoding-decoding mode for the backup line to
be selected. The display will show:
B K
M P E G
I I
{
L A Y E R
I I I }
The LAYER option allows the line to be configured for any
MPEG Layer II or Layer III encoding mode.
Here it is possible the selection of the Layer. Once the Layer is
selected, the menu goes to the bit rate selection menu:
B K
B R (
C O D E C
M P E G
K B ) : { 6 4 }
1
2
8
Dependig on the selected bit rate, the user will have different options.
?? 64 Kbps
Selecting the 64 Kbps option and pressing the ENTER/MENU
key will allow the selection of the MONO, DUAL or JOINT STEREO
mode. The menu on the display will show:
B K
M P E G
{ M O N O }
M O D E
J S
D U A L
Once the mode is selected, press the ENTER/MENU key to
select the sampling frequency (48 , 32 or 24 KHz). The menu on the
display will show:
16
PRONTO_BACKUP
USER’S MANUAL V2.0
B K
M P E G
M O N O
{ 4 8 K }
3 2 K
2 4 K
?
The MPEG Layer II MONO mode at a sampling frequency of
24 Khz is compatible with CDQPrima configured as follows:
ENCODER:
Bit Rate= 64 Kbps; Algorithm MPEGL2; Sample rate 24
Khz;
ALG MODE Mono; LINE FMT 1 LN.
DECODER:
INDEP, that is, independent of encoder.
?? 128 Kbps
Selecting the 128 Kbps option and pressing the ENTER/MENU
key will allow the selection of the inverse multiplexing protocol.
Depending on the Layer selected, these are the available options:
If we have selected Layer II, the display will show:
B K
J
T x
5 2
M O D E
{ C C S T E L O S }
If we have selected Layer III, the display will show:
L 1
- -
-
T X
M O D E
{ C C S T E L O S }
??J52
When J52 is selected the inverse multiplexing protocol used is the
standard J52.
??CCSTELOS
When CCSTELOS is selected (it is equivalent the TELOS option in
PRONTO_ISDN 2) the transmision mode is compatible with CCS
and TELOS codecs.
17
PRONTO_BACKUP
USER’S MANUAL V2.0
Once the transmision mode is selected, the menu goes to the audio
mode selection menu (MONO, JOINT STEREO or DUAL). The display
will show:
B K
M P E G
{ M O N O }
?
M O D E
J S
D U A L
At 128 Kbps, the sampling frequency is always 48 KHz.
?
The CCSTELOS mode permits the compatibility between the
PRONTO BACKUP and the TELOS ZEPHYR configured as
ISO/MPEG Layer II JOINT STEREO and two 64 Kbps channels.
This mode is compatible as well with the following CCS units:
CDQ2000-> The encoder configured in ISO/MPEG Layer
II JOINT STEREO and sampling frequency of 48 Khz. The
decoder can work independent or not. In previous version to
the 4.0, the decoder must be configured independent of
the encoder (configuration of swithc nº 6 in UPPER
position).
CDQPrima->
ENCODER:
Bit Rate= 128 Kbps; Algorithm MPEGL2, CCN or CCS;
Sample rate 48 Khz; ALG MODE Joint Stereo; LINE FMT
CCS 2 LN.
DECODER:
Independent or not.
??
{BACKUP}-{TA}
Used for selecting parameters to configure the terminal adaptor. The
display shows:
M E N U
B A C K U P
T A
{ L I N E }
C O N F
18
PRONTO_BACKUP
USER’S MANUAL V2.0
??
{BACKUP}-{TA}-{LINE}
Used for selecting parameters to configure the terminal adaptor. Given
the terminal adaptor is able to manage the two B channels the display
shows:
M E N U
B A C K U P
T A
{ L 1 }
L 2
For each line will be possible to configure the following parameters:
L 1
T E R M I N A L
A D A P
{ L N U M } C N U M
D I A L
?? LNUM: Abbreviation for “LOCAL NUMBER”. This option allows the
local number associated with line 1 to be configured. Configuring the
local number of a line means that the line will only respond to calls
to that number. Thus, if multiple numbers are available on the same
line, a different local number can be assigned to each line, providing
automatic line selection (and selection of its associated audio) from
the calling terminal, or if there are several devices on the same bus,
select one of them (sub-addressing). The local number is recorded in
the equipment’s non-volatile memory.
?? CNUM: Abbreviation for “CALLING NUMBER”. This option allows
up to three calling numbers to be configured for each line. The
calling number means that when the equipment receives a call, it will
check that it has been made from one of the numbers programmed
with this option. It will only answer calls from one of these three
numbers if automatic answer mode has been selected. In manual
answer mode, the calling number will be displayed on the screen and
the user can decide whether or not to answer it. The programmed
calling numbers are independent for each line. Thus, a call filter can
be programmed to prevent the entry of unwanted calls. Calling
numbers are recorded in the equipment’s non-volatile memory.
?? DIAL: The dialling number for backup mode.
19
PRONTO_BACKUP
USER’S MANUAL V2.0
The following are further details of these options (If L2 is
selected, the same options will be available):
??
{L1}-{TA}-{LNUM}
This option assigns a local number to line 1 or de-assigns it.
When a local number has been assigned to a line, the terminal adaptor
will only answer if that number is called. When ENTER/MENU is
pressed, the display shows:
L 1
L N U M
{ N O N E }
N U M B E R
If NONE is selected, no local number will be assigned to the
line. If NUMBER is selected, the display changes to:
L 1
-
L O C A L
N U M B E R
As numbers are entered at the dialling keypad, they appear on
the display as with the dialling processes. When ENTER/MENU is
pressed, the number is assigned as the local number.
? When a local number is associated to a line, the equipment will
only answer calls made to that number and will not notify
anything else even if the call is made to another number
assigned to the same basic rate interface. Consequently, if
the equipment does not answer a call, check the programmed
local number.
??
{L1}-{TA}-{CNUM}
This option allows one or more telephone numbers (up to 3) to be
assigned as the telephone numbers to which the equipment will answer
when they call. This prevents the equipment from answering an
unwanted call (for example, a caller who has dialled the wrong number).
When a call is received, the caller’s telephone number is stored in a
variable which is accessible to the micro-controller. This will decide
20
PRONTO_BACKUP
USER’S MANUAL V2.0
whether or not to answer, depending on whether or not it matches one
of the programmed numbers. When ENTER/MENU is pressed with the
CNUM option selected, the display shows:
L 1
C N U M
{ O F F }
O N
If the OFF option is selected and the line is in auto answer
mode, the call will be answered automatically regardless of the number
making the call.
If the calling numbers are enabled, the display will show the
same contents but “ON” will be enclosed in braces instead of “OFF”. If
they are enabled, and in addition, the line is in auto answer mode, any
call on this line will be answered or rejected depending on whether the
calling number matches one of the numbers stored in the table.
Enabling the calling number table thus serves as a call selection filter.
The equipment contains a non-volatile memory so that even when it is
switched off, the numbers in the telephone book do not disappear. The
book has a capacity for three numbers (for each line).
When L1-TA-LNUM-ON is selected, the following appears on display:
L 1
-
C A L
L
I N G
N U M
1
The number at the top right of the display shows the index
number in the book of the calling number; the ? and ? keys can be used
to step through the book to higher or lower index numbers,
respectively. At index 3, pressing the ? key will move to the first
index and from the first index, pressing the ? key will move up a level
in the menu tree. The user may change the numbers stored in the table
using the keypad on the front panel.
As the user dials numbers, these appear on the display and a
flashing cursor moves to the right. The ? key can be used to erase
numbers and to move the flashing cursor to the left, up to the starting
point. Up to 16 digits can be entered per number.
21
PRONTO_BACKUP
USER’S MANUAL V2.0
? When the calling number is enabled and a call is
received from
a number that does not match any of those programmed, the
following is displayed:
R E J E C T
C A L L
L 1
C A L L I N G
N U M B E R
: Y
? When
a call is received and the answer mode is manual, the
calling number is displayed and the user can decide to answer
or not (by pressing the CALL key of the line on which the call
has been received).
??
{CONF}-{NET}
This option allows to configure the ISDN terminal adapter with
diferent protocols.
There are two version of terminal adapters: EURO_ISDN terminal
adapter and Universal terminal adapter. The Pronto Backup recognizes
automatically the terminal adapter enabling the available options only
when the universal adapter is detected.
When the NET option is selected, the display will show:
< - { E I S
C O N F
N E T
D N }
A T T 5 E
- - >
S S
The arrows at the sides show that the display can be moved
sideways to show two more configuration options for the user. Thus, if
the option between braces is EISDN and the ? key is pressed, the
display shows:
< - C O N F
{ D M S 1 0 0 }
N E T
N A T
1
- >
The ISDN protocolos are the following:
EISDN: This is the type of ISDN available in Europe and in most
countries except for North America. It hasn't SPID.
??
22
PRONTO_BACKUP
USER’S MANUAL V2.0
AT&T 5ESS.
?? Northern Telecom DMS100.
?? National ISDN 1 o NAT1: This kind of switch is also provided by
AT&T and Northen Telecom.
??
The AT&T 5ESS, DMS 100 and NAT1 request the SPID
(Service Profile Identification) numbers to the ISDN network
company. These numbers (one of each B channel) are provided by the
telephone company and they must be introduced always that one of
these kind of ISDN is selected.
The PRONTO BACKUP 3 will request them once one of these
ISDN protocols are selected:
L 1
-
S P
I D
N U M B E R
L 2
-
S P
I D
N U M B E R
Once an ISDN type is selected, the terminal adapter will be
loaded with the new software. The display will show the following:
L O A D
I N G
T A
? It
isn't necessary to reset the unit or to disconnect the
ISDN to perform this operation.
? If
the terminal adapter version only admits EURO_ISDN,
when the user selects the option NET, the display will show the
following message:
I N
N O T
E
I S D N
A V A I L A B L
E
23
PRONTO_BACKUP
USER’S MANUAL V2.0
??
{BACKUP}-{ENABLE }
With this option, the Backup opartion can be enabled (ON) or
disabled (OFF).
B A C K
O F F
U P
E N A B L E
{ O N }
The display wil show if the backup is enabled or not:
B K U P
M A S
T E R
O N
?
This option is only available when the Pronto Backup is
working as MASTER.
24
PRONTO_BACKUP
USER’S MANUAL V2.0
4.3.- {CONF}
This main menu option accesses the section for the general
configuration of the equipment - those parameters that affect both line 1 and
line 2. The display shows:
G E N E R A L
{ A U D _ I N }
C O N F I G
A U X _ D T
?? AUD_IN: Selection of analog or digital audio input.
?? AUX_DT: Configuration of the auxilary data.
??
{CONF}-{AUD_IN}
These options allow the user to select between analog or digital
audio input (AES/EBU format).
{
C O N F
A U D I O
A N A L O G } A E S
/
E B U
If the AES/EBU audio input is selected, the display will be the
same except that the AES/EBU option will be enclosed in braces. If
AES/EBU is selected, it will be necessary to select the synchronism:
C O N F
S Y N C :
A U D
{ A U D
I O
I O }
D I G
E X T
The AUDIO option selects synchronism with the digital audio
input, and The EXT option selects synchronism with a external clock
Information on the audio input is stored in the non-volatile memory so
that it is retained even when the equipment is switched off.
The audio interface selected is shown on the bottom right of the
status screen as follows.
With the analog input selected:
L 1
X 2
1
6
4 K b
L 3
25
PRONTO_BACKUP
USER’S MANUAL V2.0
J O I N T
F R A M E D
-
A -
-
L 3
D -
With the digital input selected:
L 1
X 2 1
J O I N T
6 4 K b
F R A M E D
??
{CONF}-{AUX_DT}
When CONF-AUX_DT is selected, the display shows:
C O N F
{ O F F }
A U X
D A T A
3 0 0
2 4 0 0
9
6
If the sending/receiving of auxiliary data in MPEG mode is
enabled, 300, 2400 or 9600. The data format would be asynchronous,
8 data bits, 1 START/STOP bit, no parity.
??
Auxiliary
data configuration is valid for X21 and ISDN
communications.
? Auxiliary
data are included in the MPEG audio frame, at the
expense of replacing any audio bits. 300 bps is a good
balance between audio quality and transmission rate.
? The
format of auxiliary data included in the MPEG frame is
compatible with that employed in the CDQ Prima audio codec
family from CCS (GENERIC, MUXRATE=300, 2400 or 9600,
DSPRATE = 300, 2400 or 9600, MUXMODE= NOMUX).
26
PRONTO_BACKUP
USER’S MANUAL V2.0
4.4.- {INF}
When this option is selected, the following message is displayed:
I N F O R M A T I O N
{ V E R S I O N }
L I N E
??
{INF}-{VERSION}
This option gives information about the software version:
M I C R O : 1
D S P c o d :
.
1
0
.
[ T A : 2
D S P d e
0
1
]
.
. 2
C :
0
0
0
-
-
>
-
-
>
0
1
??
{INF}-{LINE}
This option gives information about the current configuraton of the
terminal adaptor:
L
I N E
{ L 1
}
I N F O R M A T I O N
L 2
The ? ,? and ENTER keys can be used to obtain the following
additional information about the lines:
?? CN -> YES or NO, depending on whether the call filter (CALLING
NUMBER) is enabled.
?? LN -> If a local number has been entered, it is shown at the bottom
of the display.
?? Auxiliary data enabled/disabled and the data speed selected (300,
2400 or 9600 bps).
27
PRONTO_BACKUP
USER’S MANUAL V2.0
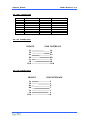
5.PRONTO BACKUP REMOTE MONITORING
LINES
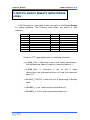
A DB 15 connector is provided on the rear panel of the Pronto Backup
for status signalling. The following table shows the pinouts of this
connector.
PIN
1
2
3
4
5
6
7
8
SEÑAL
NC
NC
NC
NC
NC
DGND
DGND
+15VA
PIN
9
10
11
12
13
14
15
SEÑAL
L_REM_CALL 1
L_REM_CALL 2
BACKUP_STATUS
FRAMED_1
FRAMED_2
NC
AGND
These are TTL-type signals with the following functions:
??L_REM_CALL 1: Indicates a call on line 1 when intermittent;
line disconnected when at 0 and line connected when at 1.
??L_REM_CALL 2: Indicates a call on line 2 when
intermittent; line disconnected when at 0 and line connected
when at 1.
??BACKUP_STATUS: 1 when the unit is opererating in Backup
mode.
??FRAMED_1: Line 1 audio synchronized when at 1.
??FRAMED_2: Line 2 audio synchronized when at 1.
28
PRONTO_BACKUP
USER’S MANUAL V2.0
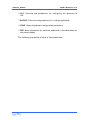
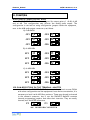
6.PRONTO BACKUP DISPLAY INFORMATION
FIELDS
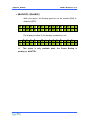
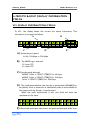
X21 DISPLAY INFORMATIONS FIELDS
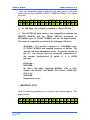
In X21, the display shows the current line status information. This
information is arranged as follows:
A
B
L 1
X 2 1
1 2 8 K b
J O I N T
F R A M E D
C
A)
D
L 2
- A E
Shows the port speed:
64 Kb, 128 Kbps or 256 Kbps
B)
The MPEG Layer selected:
L2: layer III
L3: layer III
C)
Encoding mode selected:
MONO, DUAL o JOINT STEREO for 64 Kbps.
MONO, DUAL o JOINT STEREO for 128 Kbps.
DUAL o JOINT STEREO for 256 Kbps.
D)
This field shows whether the decoder is synchronised (FRAMED) or
not (blank). Once a connection is established, audio is not available at
the output until the decoder is synchronised.
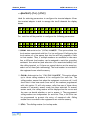
When tha audio synchronism is lost, this field will show the
countdown of the timer:
L 1
X 2
F A I L
E)
1
1
0
2
0
8 K b
8 S c
L 2
- A -
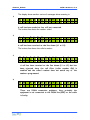
Shows the audio input selected on the menu and the input audio level:
29
PRONTO_BACKUP
USER’S MANUAL V2.0
-A- : Analog audio input
-D- : AES/EBU digital audio input.
The audio level is indicated as follows:
The character located on the left side refers to the audio left channel
and the character located on the right refers to the audio right
channel. The icons used are:
NO AUDIO
AUDIO
OVERLOAD
The information is polled only during the display rotations or during
update of the information displayed.
30
PRONTO_BACKUP
USER’S MANUAL V2.0
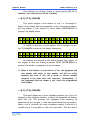
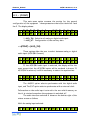
BACKUP DISPLAY INFORMATIONS FIELDS
In Backup operation, the display shows the current line status information.
This information is arranged as follows:
A
B
C
L 1
C O N N E C
L 2
6 4 K
F R A M E D
D
E
M N
- A -
F
A) Shows the line to which the information refers, L1 or L2.
B)
Shows the state of the communications line:
IDLE: DISCONNECTED
CONNECTED
RING:
RECEIVING A CALL
CALLING
C) It shows two kind of information:
??
D)
The selected layer and audio mode:
L2: Layer II
L3: layer III
MN: Mono
JS: Joint Stereo
DU: Dual
Encoding mode selected:
64 Kbps, J52, CCSTE.
E)
This field shows whether the decoder is synchronised (FRAMED) or not
(blank).
31
PRONTO_BACKUP
USER’S MANUAL V2.0
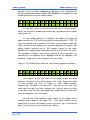
When tha audio synchronism is detected in the X21 connection,
this field will show the countdown of the timer:
L 1
C O N N E C
L 2
6 4 K
0 0 8 S c
F)
M N
- A
Shows the audio input selected on the menu and the input audio level:
-A- : Analog audio input
-D- : AES/EBU digital audio input.
The audio level is indicated as follows:
The character located on the left side refers to the audio left channel
and the character located on the right refers to the audio right
channel. The icons used are:
NO AUDIO
AUDIO
OVERLOAD
The information is polled only during the display rotations or during
update of the information displayed.
32
PRONTO_BACKUP
USER’S MANUAL V2.0
The display shows another series of messages whose meaning is:
1)
L 1
1 2
C A L L I N G .
3 4 5 6 7 8 9
.
.
A call has been made but has still not connected.
The bottom line shows the number called.
2)
L 1
1 2
R I N G
3 4 5 6 7 8
9
A call has been received on the line shown (L1 or L2).
The bottom line shows the caller’s number.
3)
R E J E C T
C A L L
L 1
C A L L I N G
N U M B E R
: Y
A call has been received on the line shown (L1 or L2) but has
been rejected since the call filter (caller number ON) is
enabled and the caller’s number does not match any of the
numbers programmed.
4)
N O
P H Y S I C A L
L I N E
I
S D N
There are ISDN connection problems. Very probably the
equipment is not connected to the ISDN line (BRI) or the cable
is faulty.
33
PRONTO_BACKUP
USER’S MANUAL V2.0
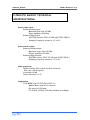
7.PRONTO BACKUP CONNECTORS
ANALOG AUDIO
PIN 1
PIN 2
PIN 3
GND
+
-
DIGITAL AUDIO
PIN
1
2
3
4
5
SIGNAL
AES/EBU IN GND
SYNC IN GND
AES/EBU OUT -
PIN
6
7
8
9
SIGNAL
AES/EBU IN +
SYNC IN +
GND
AES/EBU OUT +
SIGNAL
NC
Tx
Rx
NC
GND
PIN
6
7
8
9
SIGNAL
NC
NC
NC
NC
AUXILIARY DATA
PIN
1
2
3
4
5
REMOTE CONTROL
PIN
1
2
3
4
5
6
7
8
SEÑAL
NC
NC
NC
NC
NC
DGND
DGND
+15VA
PIN
9
10
11
12
13
14
15
SEÑAL
L_REM_CALL 1
L_REM_CALL 2
BACKUP_STATUS
FRAMED_1
FRAMED_2
NC
AGND
FUNCTION
BUZZER
X
X
BACKUP MODE
UP
OFF
X
X
MASTER
DOWN
ON
X
X
SLAVE
MICROSWITCHES
Nº
1
2
3
4
34
PRONTO_BACKUP
USER’S MANUAL V2.0
X21 PORT CONNECTORS
PIN
1
2
3
4
5
6
7
8
SIGNAL
NC
TA
NC
RA
NC
SA
NC
GND
PIN
9
10
11
12
13
14
15
SIGNAL
TB
NC
RB
NC
SB
NC
NC
X21-X21 CONNECTION
PRONTO
TA
TB
RA
RB
SA
SB
GND
LINE INTERFACE
TA
TB
RA
RB
SA
SB
GND
X21-V35 CONNECTION
PRONTO
TA
TB
RA
RB
SA
SB
GND
LINE INTERFACE
P
S
R
T
V
X
B
35
PRONTO_BACKUP
USER’S MANUAL V2.0
8.JUMPERS
SELECTION OF AUDIO OUTPUT GAIN
The PRONTO BACKUP can be configured for output gains of +0 dB, +4 dB
and +6 dB. This configuration only affects the analog audio output. The
configuration is carried out using configuration jumpers inside the equipment,
near to the XLR audio output connectors, as follows:
A) 0 dB GAIN
JP1
JP4
JP2
JP5
JP3
JP6
B) +4 dB GAIN
JP1
JP4
JP2
JP5
JP3
JP6
C) +6 dB GAIN
JP1
JP4
JP2
JP5
JP3
JP6
100 OHM RESISTORS IN THE TERMINAL ADAPTER
When the PRONTO BACKUP is connected to a basic access ISDN
with a bus configuration and the equipment forms the bus termination, it is
necessary to load it with 100 Ohm resistors. These may already be located
in the network connector, but if not the PRONTO BACKUP contains
internal programming jumpers that allow their insertion. They are easily
located, near the RJ45 connectors.
P2
P3
100? RESISTORS CONNECTED
36
PRONTO_BACKUP
USER’S MANUAL V2.0
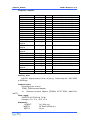
9.PRONTO BACKUP TECHNICAL
SPECIFICATIONS
Stereo audio input:
Balanced analog input:
Maximum input level +20 dBu.
Input impedance 20 kOhm.
Balanced digital input:
AES/EBU format: EIAJ CP-340 type I/IEC-958 Pro
Sampling frequency converter: 1:3 to 3:1.
Stereo audio output:
Balanced analog output:
Maximum output level +20 dBu.
Output impedance 50 Ohm.
Balanced digital output:
AES/EBU format: EIAJ CP-340 type I/IEC-958 Pro
Sampling frequency converter: 1:3 to 3:1.
Audio properties:
Quantification: 24 bits A/D and D/A converter.
S/N ratio > 90 dB typical.
Crosstalk > 80 dB
Phase difference < 0.3º
Compression:
ISO/MPEG Layer II/III (ISO 11172-3) :
Modes: Mono, Dual & Joint Stereo.
Bit rates: 64, 128 kbps.
Fs: 48 KHz (32 KHz y 24 KHz available in 64 Kbps)
37
PRONTO_BACKUP
USER’S MANUAL V2.0
Frequency response:
MODO
MPEG LII MONO
MPEG LII MONO
MPEG LII MONO
MPEG LII DUAL
MPEG LII DUAL
MPEG LII DUAL
MPEG LII JS
MPEG LII JS
MPEG LII JS
MPEG LII MONO
MPEG LII DUAL
MPEG LII JS
MPEG LIII
MONO
MPEG LIII
MONO
MPEG LIII
MONO
MPEG LIII DUAL
MPEG LIII DUAL
MPEG LIII DUAL
MPEG LIII JS
MPEG LIII JS
MPEG LIII JS
MPEG LIII
MONO
MPEG LIII DUAL
MPEG LIII JS
BIT RATE
64 Kbps
64 Kbps
64 Kbps
64 Kbps
64 Kbps
64 Kbps
64 Kbps
64 Kbps
64 Kbps
128 Kbps
128 Kbps
128 Kbps
64 Kbps
Fs
48
24
32
48
24
32
48
24
32
48
48
48
48
ANCHO DE BANDA
20Hz,10.5 KHz. (+/- 0.5 dB)
20Hz,10.5 KHz. (+/- 0.5 dB)
20Hz,12 KHz. (+/- 0.5 dB)
20Hz, 4 KHz. (+/- 0.5 dB)
20Hz, 4.5 KHz. (+/- 0.5 dB)
20Hz, 5 KHz. (+/- 0.5 dB)
20Hz, 4.5 KHz. (+/- 0.5 dB)
20Hz, 6 KHz. (+/- 0.5 dB)
20Hz, 6 KHz. (+/- 0.5 dB)
20Hz, 18-20 KHz. (+/- 0.5 dB)
20Hz,10.5
KHz. (+/- 0.5 dB)
20Hz, 15-20 KHz. (+/- 0.5 dB)
20Hz, 15 KHz. (+/- 0.5 dB)
64 Kbps
24
20Hz, 11 KHz. (+/- 0.5 dB)
64 Kbps
32
20Hz, 15 KHz. (+/- 0.5 dB)
64 Kbps
64 Kbps
64 Kbps
64 Kbps
64 Kbps
64 Kbps
128 Kbps
48
24
32
48
24
32
48
20Hz, 8 KHz. (+/- 0.5 dB)
20Hz, 8 KHz. (+/- 0.5 dB)
20Hz, 8 KHz. (+/- 0.5 dB)
20Hz, 8 KHz. (+/- 0.5 dB)
20Hz, 8 KHz. (+/- 0.5 dB)
20Hz, 8 KHz. (+/- 0.5 dB)
20Hz, 20 KHz. (+/- 0.5 dB)
128 Kbps
128 Kbps
48
48
20Hz, 20 KHz. (+/- 0.5 dB)
20Hz, 20 KHz. (+/- 0.5 dB)
Auxiliary data:
RS-232: Asynchronous, 8 bits, no parity, 1 start/stop bit, 300, 2400
or 9600 bps.
Communications:
Dependig on the version:
EURO_ISDN terminal adapter
or Universal terminal adapter (EISDN, AT&T 5ESS, DMS 100,
NAT1).
Power supply:
94-250 V AC 50/60 Hz 30 W
Voltages: +5 V, -5 V, +15 V, -15 V
Dimensions:
HEIGHT:
1U ( 4.44 cm)
WIDTH:
19” RACK (48.26 cm)
DEPTH:
30 cm.
38
PRONTO_BACKUP
Weight:
USER’S MANUAL V2.0
Approximately 3 kg
39
PRONTO BACKUP
USER’S MANUAL V2.0
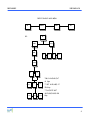
PRONTO BACKUP MAIN MENU:
X21
BACKUP
X21:
CONF
INF
X21
SPEED
CODEC
MPEG
64
128
256
384
LAYER
II
III
*ONLY AVAILABLE AT
64
MONO**
JS
DUAL
Kbps
** NOT AVAILABLE AT
256 Kbps
***LAYER III NOT
AVAILABLE WHEN 384
48 KHz
32 KHz*
24 KHz*
Kbps.
40
PRONTO BACKUP
USER’S MANUAL V2.0
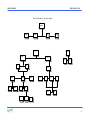
PRONTO BACKUP: BACKUP MENU
BACKUP
TIMER
CODEC
TA
ENABLE
TA
ENABLE
LINE
CONF
OFF
L1
ON
L2
NET
LNUM
NONE
CNUM
NUMBER
OFF
DIAL
EISDN
5ESS
DMS100
ON
SPID1
1
NAT1
2
SPID2
3
41
PRONTO BACKUP
USER’S MANUAL V2.0
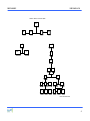
PRONTO BACKUP: BACKUP MENU
BACKUP
TIMER
CODEC
TA
ENABLE
TIMER
DOWN
CODEC
UP
MPEG
LAYER
II
III
128
64 Kbps
MONO
48 KHz
JS
32 KHz
Kbps
DUAL
24 KHz
J52*
MONO
CCSTELOS
JS
DUAL
*J52 ONLY AVAILABLE IN LAYER II
42
PRONTO BACKUP
USER’S MANUAL V2.0
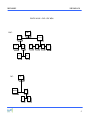
PRONTO BACKUP: CONF & INF MENU
CONF:
CONF
AUD_IN
AUX_DATA
AES/
ANALOG
300
2400
9600
EXT
AUDIO
INF:
OFF
EBU
INF
LINE
VERSION
L1
L2
43