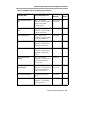
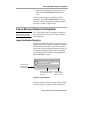
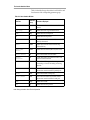
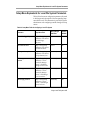
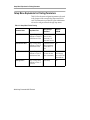
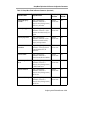
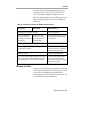
1
NCDware System Administrator’s
Guide for UNIX Systems
Part Number 9300672, Revision A
November, 1998
Network Computing Devices, Inc.
350 North Bernardo Avenue
Mountain View, California 94043
Telephone (650) 694-0650
FAX (650) 961-7711
Copyright
Copyright © 1998 by Network Computing Devices, Inc. The information contained in this
document is subject to change without notice. Network Computing Devices, Inc. shall not be liable
for errors contained herein or for incidental or consequential damages in connection with the
furnishing, performance, or use of this material. This document contains information which is
protected by copyright. All rights are reserved. No part of this document may be photocopied,
reproduced, or translated to another language without the prior written consent of Network
Computing Devices, Inc.
Trademarks
Network Computing Devices, PC-Xware, and XRemote are registered trademarks of Network
Computing Devices, Inc. Explora, HMX, Marathon, NCDware, ThinSTAR, and WinCenter are
trademarks of Network Computing Devices, Inc.
PostScript, Display PostScript, FrameMaker, and Adobe are trademarks of Adobe Systems
Incorporated.
MetaFrame and WinFrame are trademarks of Citrix Systems, Inc.
UNIX is a registered trademark in the United States and other countries licensed exclusively
through X/Open Company Limited.
X Window System is a trademark of X Consortium, Inc.
Windows 95, Windows NT, and Windows Terminal Server are trademarks of Microsoft
Corporation. Windows and Microsoft are registered trademarks of Microsoft Corporation.
Other trademarks and service marks are the trademarks and service marks of their respective
companies.
All terms mentioned in this book that are known to be trademarks or service marks have been
appropriately capitalized. NCD cannot attest to the accuracy of this information. Use of a term in
this book should not be regarded as affecting the validity of any trademark or service mark.
Revisions
Revision history of this document:
Part No.
Revision Date
Description
9300672
Rev A November 1998
Revised for NCDware 5.1
9300569
Rev B October 1997
Revised for NCDware 5.0
9300461
Rev A August 1996
Revised for NCDware 4.1
9300353
Rev A July 1995
NCDware 4.0 (first release of this guide)
Contents
Chapter 1 About this Manual
Intended Audience 1-1
How to Use This Manual 1-1
About NCD Manuals 1-3
Conventions Used in this Manual 1-5
Comments on the Manual 1-6
Chapter 2 Introduction to Thin Client Devices and
NCDware
NCD Terminals and the Network Environment 2-1
The X Window System 2-2
NCDware Software 2-3
Boot Monitor 2-3
X Servers 2-4
Host-Resident Utilities 2-4
Chapter 3 Preparing Terminals for Booting
Terminal Boot Actions 3-2
Booting Preparations Performed by ncdinstall 3-3
Setting the Token-Ring Network Speed—HMX Terminals 3-3
iii
Contents
Optional Preparations Before Booting 3-5
Improving Reliability 3-5
Booting 3-5
Login Services 3-6
Font Service 3-6
Name Service 3-6
License Service 3-7
Address Discovery—Using DHCP and BOOTP 3-7
Supported Option Tags 3-7
Dynamic IP Address Allocation using BOOTP 3-8
The bootptab.cfg File 3-8
The bootptab.ip File 3-10
Setting Up Domain Name Service for the Terminal 3-11
Verify that DNS Is Enabled on the Host 3-11
Configure the Terminal to Use DNS 3-11
Placing Required Files in Non-Standard Locations 3-12
Changing X Server Module Load Policy 3-14
About Module Load Policies 3-14
Changing Module Load Policies 3-15
Putting Modules in a Non-Standard Location 3-15
Licensed Features and Types of Licenses 3-16
Managing Node Licenses 3-17
Managing Floating and Site Licenses 3-17
License Management Binaries and Files 3-18
Installing License Management Software 3-19
Specifying License Server Hosts 3-20
Setting Up the license.dat File 3-20
Using an Options File 3-22
iv
Contents
Starting the License Management Daemons 3-22
Setting Up License Management on WinCenter Hosts 3-23
Configuring Terminals for the Network 3-25
Adding Terminals to the Network 3-25
Modifying Information about Terminals in System Files 3-27
Deleting Terminals from System Files 3-28
Booting Terminals 3-29
Booting from a PC Card 3-29
Rebooting 3-29
Booting Terminals Manually 3-29
Manual Boot from a Local File System 3-30
Manual Boot Using TFTP or NFS 3-30
Setup Menu Equivalents for Remote Configuration Parameters
3-31
Chapter 4 Terminal Configuration Methods
Terminal Configuration Overview 4-1
Deciding How to Configure Terminals 4-2
Remote Configuration Files 4-2
Console Setup Menus—Interactive Configuration 4-2
TELNET—Interactive Configuration 4-3
Boot Monitor Setup Menus—Interactive Configuration
4-3
Interaction of Configuration Methods 4-3
About Configuration Parameters 4-4
Read/Write Parameters 4-4
Read-Only Parameters 4-5
When Parameters Take Effect 4-5
v
Contents
Configuring Terminals Using Remote Configuration Files 4-5
Host-Resident Configuration Files Created by ncdinstall 4-6
The Terminal-Specific Configuration Files 4-7
The Generic Remote Configuration File 4-8
Example Configuration File from the NCDware
Distribution 4-10
Editing Remote Configuration Files 4-11
Configuration Commands Used in Remote Configuration
Files 4-12
User Preferences File 4-12
Configuring Terminals Using Setup Menus 4-14
Displaying the Setup Menus 4-14
Changing Parameters in Setup Menus 4-16
Cancelling Changes 4-17
Applying Changes to the Current Configuration 4-17
Saving Changes 4-17
Loading Default Values 4-18
Configuring a Remote Terminal through Setup Menus 4-19
Configuring Terminals Using TELNET 4-20
Setting Passwords 4-20
Connecting to a Terminal’s Configuration Daemon 4-21
Using Interactive Configuration Commands 4-22
About Configuration Parameters 4-25
Read-Only and Write-Only Parameters 4-25
Parameter Values 4-25
Setting Parameters in Tables 4-26
Working with Tables in TELNET Sessions 4-26
Working with Tables in Remote Configuration Files 4-27
vi
Contents
Controlling Access to Terminal Configuration Data 4-28
Disabling the Setup Menus 4-28
Controlling Access to the Console and Setup Menus 4-28
Controlling Access to the Console 4-28
Controlling Access to Setup Menus 4-29
Setup Menu Equivalents for the Auto-Save Parameters 4-30
Chapter 5 Login and X Session Management
XDM’s Purpose and Functions 5-1
Specifying the Hosts Offered for Login 5-2
Displaying a Login Banner Only 5-3
Login from a List of Specified Hosts 5-3
Login from One Specific Host 5-3
Login from the First Host to Respond 5-3
Displaying a Login Chooser 5-4
Listing Specific Hosts in the Login Chooser 5-4
Listing All Available Hosts in the Login Chooser 5-5
Windows NT Hosts in the Login Chooser 5-5
Using XDM to Customize the User Environment 5-6
Configuring a System-Wide Environment 5-6
Configuring Individual Environments 5-6
Controlling User and Host Connections to Terminals 5-7
Configuring the Host for XDM Access Control 5-8
Configuring the Terminal for XDM Access Control 5-9
Controlling Access When Clients Are Running on Multiple
Hosts 5-10
Using xauth Interactively 5-11
Automating xauth 5-11
vii
Contents
Using the NCD Display Manager 5-11
About the NCD Display Manager 5-11
Setting Up the NCD Display Manager 5-13
Configuring NCD Terminal Emulator Login 5-14
Automating Login through the NCD Terminal Emulator 5-15
Configuring Terminal Emulator Sessions without Login 5-16
Configuring Login to Microsoft Windows NT Hosts 5-17
Setup Menu Equivalents for Configuration Parameters 5-18
Chapter 6 Configuring Font Service
Using Bitmap Fonts 6-1
Bitmap Font Formats 6-2
Putting Fonts on a Non-Standard Host 6-2
Adding Bitmap Fonts to Font Directories 6-3
Using Alternate Fonts 6-4
Deleting Bitmap Fonts and Font Directories 6-5
Changing the Terminal’s Font Path 6-5
Changing the Font Path Permanently 6-5
Setting the Font Path for the Current X Session 6-6
Configuring the Font Path for CDE Bitmap Fonts 6-7
Using the NCD Font Server 6-8
Configuring Font Server Operation 6-9
Enabling the Font Server 6-11
Adding Font Servers to the Font Path 6-11
Adding Font Servers to the Font Path for CDE 6-12
Adding Outline Fonts 6-13
Setup Menu Equivalents for the Font Parameters 6-14
viii
Contents
Chapter 7 Starting and Configuring Local Clients
Summary of Local Clients 7-1
Starting Local Clients 7-10
Starting Clients Automatically at Boot Time 7-10
Adding Clients to a Window Manager’s Root Menu 7-11
Configuring a Window Manager’s Menus 7-11
Launcher Configuration Files 7-12
Adding Local Clients to a Root Menu 7-13
Adding Host-Based Clients to a Root Menu 7-13
Adding Local Clients to the Default Root Menu 7-14
Starting Local Clients from the Console 7-15
Restricting Access to Clients 7-15
Disabling Access to Specific Local Clients from the
Terminal 7-15
Restricting Access to Local Clients from Other Hosts 7-16
Restricting User Access to Local Clients 7-17
Configuring Local Clients 7-17
Setting Resources for Local Clients 7-17
Setting Resource Values through Remote Configuration
7-17
Setting Resources in Resource Files 7-18
Using Command-Line Options 7-18
Setup Menu Equivalents for Local Client Parameters 7-19
ix
Contents
Chapter 8 Getting Information About Terminal Operations
Displaying the Console 8-1
Console Messages 8-2
Format of Console Messages 8-4
Viewing Messages in the Console Window 8-4
Viewing Messages through TELNET 8-5
Logging Messages to a File 8-5
Configuring Message Logging 8-6
Configuring Message Time Stamps 8-6
Changing the Message Buffer Size 8-6
Enabling Extended Diagnostics 8-6
X Server Messages Displayed in Dialog Boxes 8-7
Logout Confirmation Dialog Box 8-7
Kill X Clients Dialog Box 8-8
The Console Statistics Menus 8-8
Displaying General Information—Show Version 8-8
Displaying Memory Information—Show Memory 8-10
Displaying Status of Clients—Show X Connections 8-11
Displaying Terminal and Network Statistics—Show Statistics
8-11
Displaying a Remote Terminal’s Statistics 8-13
Setup Menu Equivalents for Message Logging Parameters 8-14
x
Contents
Chapter 9 Using a Local File System
Overview 9-1
Local File System on a PC Card 9-1
Local File System on a Floppy Disk 9-2
Managing Files in a Local File System 9-3
Configuring the Terminal for Local File Manager Use 9-3
Starting the Local File Manager 9-3
Hints for Copying Files 9-4
Local File Manager Commands 9-5
Configuring the Local File Manager 9-7
Specifying a Password 9-7
Setting Up Access Control for the Local File Manager 9-7
Specifying the Ports for Local File Manager Access 9-8
NFS Mount of a Local File System 9-8
Configuring a PC Card for Booting 9-10
Preparing the PC Card for Booting 9-10
Preparing the Terminal for Booting 9-13
Booting from a Local PC Card 9-13
NFS Booting from a Remote PC Card 9-17
Using a Local File System on a Diskette 9-21
Configuring a Terminal for Floppy Disk Drive Use 9-21
The ncdfloppy Commands 9-22
The ncdfloppy Command-Line Syntax 9-24
ncdfloppy Naming Conventions 9-25
Setup Menu Equivalents for Local File System Parameters 9-27
xi
Contents
Chapter 10 Using Printers with NCD Terminals
Overview 10-1
Connecting a Printer to a Terminal 10-2
Printer Cabling 10-2
Configuring Terminal Ports and Daemons 10-2
Configuring the Serial Port and Serial Daemon 10-2
Configuring the Parallel Daemon 10-3
Using the Command-Line Printing Utilities 10-4
Setting Environment Variables 10-5
Using the ncdlp Printing Utility 10-5
Using the ncdprint Printing Utility 10-7
Printing from Local Client Menus 10-9
Setting Up the Print Table 10-10
Printing from Terminal Emulator Windows 10-12
Printing from the NCD Mosaic Browser 10-12
Printing from the NCD Applet Viewer and Other Java
Applications 10-12
Printer Selection 10-13
Default Print Queue 10-13
Printing to a File 10-13
Setup Menu Equivalents for Printing Parameters 10-14
Chapter 11 Reassigning Keyboard Functions Using the
Keymap Editor
About the Keymap Editor 11-1
Starting the Keymap Editor 11-2
Exiting from the Keymap Editor 11-2
xii
Contents
Keymap Editor Window and Menus 11-3
Keycap Sections 11-4
Menu Bar Options 11-4
Mapping the Keyboard—Basic Mode 11-5
Writing a Keymap to a File and Applying a Keymap 11-6
Displaying the Write Translations Window 11-6
Writing a Keymap to a File 11-7
Applying Keymaps to Windows on the Desktop 11-8
Applying a Keymap to the Original Window 11-8
Applying a Keymap to All Open Windows 11-8
Importing a Keymap from a File or Window 11-8
Mapping the Keyboard—Advanced Mode 11-10
Advanced Mode Menus 11-11
Creating Translations 11-11
Chapter 12 Accessing Windows NT Servers
Overview and Requirements 12-2
Choosing a Connection Protocol 12-2
About the Windows Access Utility 12-3
About the ICA Client 12-4
Requirements 12-5
Load Balancing 12-5
About Color Depth 12-5
Methods of Configuring Connections 12-6
Configuring Connections in the Windows Access Chooser 12-7
Adding Connections 12-7
Copying Connections 12-9
Editing Connections 12-11
xiii
Contents
Deleting Connections 12-11
Saving Connections 12-12
Controlling the Windows Access Dialog Box 12-12
Automatically Displaying Windows Access 12-12
Preventing Modifications to Windows Access 12-13
Other Methods of Starting Windows NT Connections 12-13
Summary of Commands for Starting Connections 12-13
Commands for Starting ICA Connections 12-13
Commands for Starting WinCenter Connections 12-16
Starting a Session Automatically 12-17
Configuring an Automatic ICA Connection 12-17
Configuring an Automatic WinCenter Connection 12-17
Starting a Session with a Remote Shell Command 12-18
Starting an ICA Session 12-18
Starting a WinCenter Session 12-18
Starting a Session from Start Local Command in the Console
12-18
Adding an NT Session to the Default Root Menu 12-18
Connection through the Login Chooser 12-19
Connections that Appear in the Login Chooser 12-19
Changes to the Login Chooser 12-20
Specifying the Keymap 12-20
Specifying the Keymap for ICA Connections 12-20
Specifying the Keymap for WinCenter Connections 12-22
Configuring NCDware for ICA Master Browser Connectivity
12-22
Disabling Queries to the Master Browser for Login Hosts
12-22
Setting the Number of Retry Attempts 12-23
xiv
Contents
Setting the Timeout 12-23
Enabling Diagnostic Messages 12-23
About the WinCenter Configuration Parameters 12-24
Specifying Colormap Usage 12-24
Specifying Window Size, Colors, and Audio 12-26
Accessing NT Files from NCD Terminals 12-28
Adding Directories to the File Service Table 12-28
User Accounts and Permissions 12-28
Setup Menu Equivalents for Remote Configuration Parameters
12-29
Chapter 13 Configuring a Wireless Terminal
The Wireless Network 13-1
Hardware and Software Requirements 13-1
Installing the PC Card 13-2
Configuring the Terminal 13-2
Changing the Domain Number 13-3
Changing the Roaming Configuration 13-3
Changing the Security ID 13-4
Displaying Wireless Information 13-5
Displaying Wireless Information from the Boot Monitor 13-5
Information About the LAN Adapter and Access Point
13-6
Network Statistics 13-6
Displaying Wireless Information from the Console 13-6
Displaying Access Point, LAN Adapter, and Signal
Information 13-6
Displaying Wireless Network Statistics 13-7
xv
Contents
Displaying Wireless Information using TELNET 13-7
Displaying Access Point, LAN Adapter, and Signal
Information 13-7
Displaying Wireless Network Statistics 13-7
Testing the Wireless System 13-8
Configuring the Access Point 13-8
Using BOOTP/DHCP 13-8
Using SNMP (Simple Network Management Protocol) 13-9
Installing the MIB 13-9
Making the MIB Accessible 13-9
Displaying and Changing Variables 13-10
Finding the SNMP Variables 13-10
Chapter 14 Configuring and Using Java
Overview and Requirements 14-1
Java Files and Directories 14-2
Protocols for Accessing Java Files 14-3
Caching Java Files for Better Performance 14-3
Installing Java Files in a Non-Standard Directory 14-3
Using Java Commands 14-3
Using appletviewer 14-3
Configuring the Command Line 14-4
Configuring the Properties File 14-4
Using the java Command 14-5
Setting the Class Path 14-8
Setting java Properties 14-8
Setting the Java Home Directory 14-8
Setting the Current Working Directory 14-8
Setting the User’s Home Directory 14-9
xvi
Contents
Java Fonts 14-9
Setting the Time of Day 14-9
Setting Environment Variables 14-9
Providing Print Services 14-10
Setup Menu Equivalents for Java Configuration Parameters 14-11
Chapter 15 Configuring the NCD Mosaic Browser
Overview 15-1
Requirements 15-2
Selecting the Browser Version 15-3
Starting the Browser 15-3
Setting Up the User’s Environment—NFS 15-4
Setting the Environment Variables and Mounting Directories
15-6
Environment Variables 15-6
User Files and Directories 15-6
More Than One User on a Terminal 15-7
Mounting a Temporary Directory 15-7
Setting the UID and GID 15-7
User Preference Files 15-7
Setting Up the User’s Environment—TFTP 15-8
Setting the Environment Variables 15-8
Setting Up Files and Directories 15-9
Providing Print Services 15-10
Making Java Available 15-10
Browser Help Files 15-10
xvii
Contents
Setting Browser Variables and Controlling Preferences 15-11
Specifying the Size of the Browser Cache 15-11
Specifying Maximum TCP/IP Connections 15-12
Enabling or Disabling Automatic Image Loading 15-12
Enabling or Disabling JavaScript 15-12
Enabling or Disabling Applets 15-13
Specifying a Default Home Page 15-13
Specifying Proxy Servers and the Mail Server 15-13
About Proxy Servers 15-14
Specifying the HTTP Proxy Server and Overrides 15-14
Specifying the FTP Proxy Host and Overrides 15-15
Specifying the Gopher Proxy Host and Overrides 15-15
Specifying the SOCKS Server Host and Port 15-16
Specifying the Mail Server 15-16
Setting Browser Variables for Special Environments 15-16
Changing the Size of the Image and Document Caches
15-17
Controlling the Display of Animated GIF Files 15-17
About Browser Fonts 15-18
Setup Menu Equivalents for Browser Configuration Parameters
15-19
Chapter 16 Setting Up XRemote
Overview 16-1
XRemote Over a Serial Connection 16-2
XRemote on a LAN 16-3
Simultaneous XRemote and LAN Sessions 16-4
XRemote and a Local Printer 16-4
How XRemote is Used 16-4
Requirements for Using XRemote 16-4
xviii
Contents
Setting Up the Physical Connection 16-6
Setting Up a Modem Connection 16-6
Modem Requirements 16-6
Cabling and Serial Ports 16-7
Setting Up a Modem—Generic Instructions 16-7
Setting Up a US Robotics Modem 16-8
Setting Up a Direct Host Connection 16-9
Setting Up a LAN Connection 16-10
Setting Up the Terminal 16-10
The X Server 16-10
Resetting NVRAM 16-10
Setting Configuration Parameters 16-11
Serial Port Numbers in Parameters 16-11
Configuring the Serial Port 16-12
Configuring PPP and SLIP Characteristics 16-12
Setting Up XRemote Hosts 16-15
Preparing the User’s Environment 16-15
Setting the User’s Search Path 16-16
Creating the User’s Startup Files 16-16
About Startup Files 16-16
Creating Startup Files 16-16
Configuring the Helper 16-17
Accessing Fonts When Using XRemote 16-17
XRemote Log Files 16-18
Providing Print Services 16-19
Setup Menu Equivalents for Configuration Parameters 16-19
xix
Contents
Chapter 17 Configuring Display PostScript
DPS Overview 17-1
DPS Requirements 17-2
Using DPS Support Files 17-3
The PostScript Resource File 17-3
Sections in the PostScript Resource File 17-3
Creating or Updating the PostScript Resource File 17-5
The Virtual Memory File 17-7
The Color-Rendering File 17-7
The Context Initialization File 17-7
Adobe Fonts for DPS 17-8
Configuring the DPS Resource Path 17-10
Configuring DPS Font Access by X Clients 17-11
Freeing the DPS Cache 17-12
Setup Menu Equivalents for Remote Configuration Parameters
17-13
Chapter 18 Troubleshooting
Troubleshooting Boot Failures 18-1
Getting the Terminal Booted 18-1
Resetting NVRAM 18-1
Using the Boot Monitor Setup Menus 18-2
Booting Manually 18-4
Loopback Failure When Booting Manually 18-4
Boot Failure Messages 18-6
If the Terminal Boots from the Wrong Host 18-9
If X Server Modules Fail to Load 18-10
NFS or TFTP Problems on the Host 18-10
Terminal Configuration Problems 18-10
xx
Contents
Terminal Can’t Find Other Files 18-11
Error Messages 18-11
Solving File Transfer Problems 18-11
If the Terminal Loaded a Configuration File 18-12
If You Are Using TFTP for File Transfers 18-12
If You Are Using NFS for File Transfers 18-13
Files Not Installed 18-13
File Service Table 18-13
Troubleshooting XDM Login Failures 18-14
Check the XDM Log File 18-14
Problems with the Login Chooser 18-14
If the Host Is Not Listed in the Login Chooser 18-14
Check XDM on the Host 18-14
Host Is Listed But XDMCP Message Appears 18-15
Host Does Not Respond 18-15
Logging in Through the Login Banner Fails 18-15
Login Banner Keeps Reappearing 18-16
XDM Logs Out for No Reason 18-16
Clients in Session Files Don’t Start 18-16
If Resource Settings are Ignored 18-17
If XDM Stops Running 18-17
Problems with System Console XDM 18-18
Font and Font Server Problems 18-18
Terminal Cannot Find Specific Fonts 18-18
Font Format is Wrong 18-19
Incorrect Compression Factor 18-19
New Font Path Doesn’t Work 18-19
Using xset to Change the Font Path 18-20
Application Launcher Font Problems 18-20
xxi
Contents
Host-Specific Font Problems 18-20
Font Server Problems 18-21
Keyboard and Keymap Problems 18-21
Shift Keys Not Working Properly 18-22
Control and Caps Lock Keys Swapped on 101-Key Keyboard
18-22
New Keyboard Not Working Properly 18-22
Escape Key Doesn’t Work on VT-220-style Keyboard 18-23
Checking Keyboard Mapping 18-23
Using the NCD Keymapper Utility 18-23
Using the xmodmap Client 18-23
Using the xev Client 18-24
Compatibility with the Boot Monitor 18-24
Window Manager Problems 18-24
Cut-and-Paste Between Local Clients 18-25
Java Stack Overflows 18-25
NCD Mosaic Browser 18-25
Navigating in the NCD Mosaic Browser 18-25
Displaying Text and Graphics 18-26
Fonts 18-26
In-line GIFs 18-26
Local Printing Problems 18-26
Printer Setup Problem 18-27
Colormap Problems 18-27
Application Launcher Problems 18-27
xxii
Contents
Network Configuration Problems 18-28
Checking Network Statistics 18-28
Lost Carrier Errors 18-28
High Collision Rates 18-28
Terminal Boots But Cannot Connect to Certain Hosts 18-28
Routing Table and ARP Cache 18-29
Gateway Not Specified Correctly 18-29
Checking the Connection 18-29
Reasons for Failures to Connect 18-30
Hosts with Multiple Ethernet Addresses 18-31
Lost Ethernet Address 18-31
XRemote Problems 18-32
XRemote Error Messages 18-32
Garbled Characters Displayed 18-33
Keystrokes Do Not Appear in the Terminal Emulator
Window 18-33
Memory Problems 18-34
Displaying Memory Statistics 18-34
Popup Warning Messages 18-34
Failure to Open Display—Console Messages 18-35
Memory-Saving Suggestions 18-35
Font Usage 18-35
Discarding X Settings 18-35
Diagnostic Messages Buffer Size 18-36
XRemote Data Compression Mode 18-36
Disabling Local Clients 18-36
ARC Cache Size 18-36
Backing Store 18-36
Adding Memory 18-36
xxiii
Contents
NCD Mosaic Browser/Java 18-37
Video Player 18-37
Troubleshooting Display PostScript 18-37
If the DPS Extension Fails to Start 18-37
File Service Problems 18-38
DPS Applications on Solaris Systems 18-39
Running AnswerBook 18-39
Running ImageTool 18-39
Running PageView 18-40
Diagnosing Terminal Crashes 18-41
Preliminary Actions to Take After a Crash 18-41
Crashes Caused by Hardware or Network Problems 18-42
Reproducing the Crash 18-42
Uploading Files Generated by the Crash 18-42
Uploading Files Using TFTP 18-42
Uploading Files Using NFS 18-43
Accessing NCD Support Files and Utilities 18-44
Using FTP 18-44
Using the World Wide Web 18-45
Contacting Technical Support 18-45
Sending E-Mail or Faxes to Technical Support 18-45
Using the Web 18-45
Phoning Technical Support 18-45
Information to Provide 18-46
xxiv
Contents
Appendix A Using 16-bit and 24-bit Color
Setting Color Depth and Monitor Resolution A-2
Effects of Video Memory on Resolution and Color Depth A-2
Effects of Color Depth on Other Configuration Parameters
A-2
Setting Monitor Resolution and Color Depth in the Boot
Monitor A-3
Setting Color Depth in Remote Configuration Files A-3
Setting Color Depth in the Console A-4
Color Support for Third-Party Applications A-7
8-bit Applications in 8-bit Mode A-7
8-bit Applications in 16-bit and 24-bit Modes A-7
16-bit and 24-bit Applications in 16-bit and 24-bit Modes A-7
Appendix B Setting the Time of Day
Overview B-1
Using the time-zone Parameter B-2
Using the time-offset-from-gmt Parameter B-2
Setup Menu Equivalents for Configuration Parameters B-3
Appendix C Updating the Boot Monitor
Overview C-1
Updating the Boot Monitor C-2
Bibliography
Glossary
Index
xxv
Contents
xxvi
1 About this Manual
This chapter provides basic information about this manual
and other NCD publications.
Intended Audience
This manual is intended for a system administrator who is
responsible for:
❏ Setting up NCD thin client (terminal) software
❏ Setting up the terminal user’s work environment
The manual assumes familiarity with the UNIX operating
system, the X Window System (X), and local area networks—
Ethernet or Token-Ring.
If you are not familiar with X, NCD recommends the series of
books on X published by O’Reilly & Associates, Inc. The series
includes books for users and for system administrators.
How to Use This Manual
This manual contains information about managing NCD
terminals using NCDware 5.1.
The instructions in this manual assume that you have used the
standard installation script (ncdinstall) for installing NCDware
and installing your terminals. While the installation program
prepares hosts and terminals for basic usage, terminals can be
customized in many ways. This manual guides you through
the configuration methods to use and provides information
about customizing the software.
About this Manual 1-1
How to Use This Manual
The following list briefly describes the information in each
chapter:
❏ Chapter 1—Information about NCD publications
❏ Chapter 2—Understanding NCD software
❏ Chapter 3—Adding terminals to the network and
preparing them for booting. This chapter includes the
features most commonly customized by system
administrators and how to manage licenses for the
options that require licensing.
❏ Chapter 4—Configuring terminals through remote
configuration files, Setup menus, and TELNET
❏ Chapter 5—Configuring terminals for XDM login service,
configuring users’ X sessions, using the NCD Display
Manager, and configuring login through the NCD
Terminal Emulator
❏ Chapter 6—Configuring the basic bitmap font service
and using a font server
❏ Chapter 7—Starting and configuring local clients. This is
basic information that applies to all local clients; some
local clients are described more fully in their own
chapters.
❏ Chapter 8—Using the Console to get information about
terminal operations and using the diagnostic message
facility
❏ Chapter 9—Using a local file system on a PC card or
floppy disk
❏ Chapter 10—Setting up a printer attached to a terminal
and configuring printing services on local or remote
printers
❏ Chapter 11—Reassigning keyboard functions with the
graphical Keymap Editor
❏ Chapter 12—Configuring NCDware to connect to
Microsoft Windows NT servers and to access files on
Windows NT servers
❏ Chapter 13—Configuring terminals for wireless use
1-2 About this Manual
About NCD Manuals
❏
Chapter 14—Configuring Java and using Java
commands
❏ Chapter 15—Configuring the NCD Mosaic Browser and
using commands for starting the browser
❏ Chapter 16—Setting up a terminal for remote use using
NCD’s XRemote software
❏ Chapter 17—Configuring terminals and hosts for
applications that use Display PostScript
❏ Chapter 18—Handling problems that may occur when
using NCDware
❏ Appendix A—Using 16- and 24-bit color depth
❏ Appendix B—Configuring terminals to supply date and
time information
❏ Appendix C—Updating the Boot Monitor on Explora
400/450/700 terminals
The glossary explains terms used in this manual.
About NCD Manuals
The following manuals are included with the NCDware
CD-ROM:
❏ NCDware CD Insert—instructions for installing
NCDware on UNIX and WinCenter hosts
❏ NCDware Release Notes—description of new features in
this release, known problems, and problems that have
been fixed
❏ NCDware System Administrator’s Guide for UNIX
Systems—information for system administrators
❏ NCDware User’s Guide—introductory manual providing
information to assist users in becoming productive with
their terminals
❏ Remote Configuration Parameter Quick Reference—
descriptions of remote configuration parameters
❏ Using the 3270 Terminal Emulator—how to use and
configure NCD’s 3270 terminal emulation software
About this Manual 1-3
About NCD Manuals
❏
To order manuals, contact NCD Sales
Support at (650) 694-0650.
1-4 About this Manual
NCDware Publications Roadmap—high-level index of
major topics in NCD manuals; points the reader to the
documents or chapters in which major topics are
addressed
The following manual is available online at www.ncd.com
and is available as a printed book as a special order:
❏ NCDware Reference Manual—details about many aspects
of NCDware and alternatives to some of the procedures
in the System Administrator’s Guide. Also covers topics
either not covered or covered in less detail in the System
Administrator’s Guide.
The following manuals are included with the Quick Start PC
card:
❏ Installing a PC Card in Your NCD Thin Client Device—how
to install and use a PC card with your terminal
❏ NCDware User’s Guide—introductory manual providing
information to assist users in becoming productive with
their terminals
On-line man pages for local and host-based clients are
installed along with NCDware.
The FLEXlm End User Manual, a detailed description of how to
use and configure FLEXlm license management software, is
available on the NCDware CD-ROM in HTML format and
online from the following URL: www.globetrotter.com.
For information about NCD’s WinCenter software, see the
manuals accompanying the WinCenter software. For
information about tuning NCDware for use with WinCenter,
see Chapter 12 in this Guide.
Conventions Used in this Manual
Conventions Used in this Manual
The following typographical conventions are used in this
manual.
Text in This Format
Indicates ...
display text
Text displayed on the screen or text in a file, for example, a field in
the Setup menus
input text
Text to be typed as shown
variable
Portion of a command line or line in a file where you provide the
value; for example, a terminal’s IP address
filename
The name of a system file, directory, or pathname
emphasized text
An especially important word or phrase or explanatory text
parameter name
The name of a remote configuration parameter
“true”
A value assigned to a remote configuration parameter
Other conventions used in this manual are:
❏ When you should press two keys at the same time, they
are shown as in this example:
Ctrl-Z
Press the Control and z keys together
❏ You should always press Return after typing a command
in a terminal emulator or in the Boot Monitor.
❏ Movement through menus in the Console is shown as a
series of arrows. For example, Setup ⇒ Change Setup
Parameters ⇒ Serial means to display the Setup menu,
select the Change Setup Parameters menu item and open
the Serial hide box.
About this Manual 1-5
Comments on the Manual
Comments on the Manual
You can send comments, suggestions, or questions about this
manual to the NCD Technical Publications Department by
Internet e-mail. Write to [email protected].
1-6 About this Manual
2 Introduction to Thin Client Devices and
NCDware
This chapter introduces NCD thin client devices (terminals),
NCDware (NCD’s terminal and host software), and the
network computing environment.
NCD Terminals and the Network Environment
NCD terminals operate in a distributed network computing
environment that allows users to run multiple applications
residing on host computers. Figure 2-1 on the next page shows
a basic network computing system consisting of terminals and
application hosts.
Using a terminal and NCDware, users can run applications
written for the X Window System, legacy applications
designed for ASCII terminals, applications running on
Microsoft Windows NT hosts, and applications written for
IBM 3270-series terminals.
To run Windows NT applications, you need NCD’s WinCenter
software (sold separately from NCDware), Citrix WinFrame,
or Citrix MetaFrame. WinCenter also allows you to run Java,
video, and UNIX applications on the NT desktop.
Besides running applications on many different types of host
systems, NCD terminals can use devices such as printers and
plotters. Some of these devices can be attached directly to a
terminal (serial or parallel printers or a floppy drive) and
accessed by remote terminals as well.
Introduction to Thin Client Devices and NCDware 2-1
The X Window System
Supercomputer
Minicomputer
Workstation
Windows NT
NT System
Windows
System
running NCD's WinCenter
software
LAN
NCD Network
NCD
Terminal
Computer
File Edit
Data
Data
Minicomputer
Data
Data
Supercomputer
Data
Workstation
Data
Application
Windows
Application
Figure 2-1 A Network Computing System
The X Window System
The distributed networking environment described in the
previous section is made possible by the X Window System
(X), which is a client/server system:
❏ The clients are the application programs. Applications
receive their input from devices attached to the terminal
and display their output in windows on the screen. The
customary input devices are a keyboard and mouse, but
applications can also use a light pen, trackball, or touchsensitive screen for user input.
❏ The X server is software that runs on the terminal and
manages the terminal’s hardware and its
communications with the network.
2-2 Introduction to Thin Client Devices and NCDware
NCDware Software
Figure 2-2 shows the core of the X client/server environment.
Host Computer
X Application/Client
X Library
X Protocol
LAN
X Server
NCD Terminal
Keyboard
Mouse
Monitor
Figure 2-2 X Client/Server Model
NCDware Software
NCDware consists of X servers, the Boot Monitor, and host-
resident software needed to support terminals.
Boot Monitor
The Boot Monitor is firmware residing in PROMs
(programmable read-only memory) in a terminal’s base. The
Boot Monitor:
❏ Assists in booting
❏ Provides commands for running diagnostic tests and for
accessing a terminal’s configuration data
Introduction to Thin Client Devices and NCDware 2-3
NCDware Software
❏
❏
Provides direct, menu-based access to the configuration
parameters necessary for booting
Can be upgraded by downloading a new Boot Monitor
image
X Servers
NCD provides both host-resident X servers that are
downloaded to the terminal as it boots and local X servers
installed on PC cards (also called PCMCIA cards) in the
terminal base. PC cards are removable and provide local
memory as well as X servers.
The basic X server is supplemented by a number of separate
loadable modules. Modules are local clients, X extensions, or
other features:
❏ Local clients are application programs that run on the
terminal’s microprocessor rather than on a host
computer. Local clients include the ICA (Independent
Computing Architecture) Client, the Login Chooser,
terminal emulators, window managers, configuration
utilities, and statistical displays.
❏ Other loadable features include audio, XRemote (for
using a terminal at a remote site), and SNMP (Simple
Network Management Protocol).
❏ X extensions include Display PostScript (DPS) and the X
Imaging Extension (XIE).
The following loadable features require the purchase of
licenses before they can be used: Java, the NCD Mosaic
Browser, OpenGL, the CompCore video fast MPEG decoder,
Starlight Networks’ StarWorks software support, NCDnet, the
3270 Terminal Emulator, DPS, XIE, the local Motif Window
Manager, and XRemote.
Host-Resident Utilities
NCD provides host software, such as font conversion utilities
and a font server. Binaries for software are provided on the
NCDware CD-ROM for the supported host systems. See the
2-4 Introduction to Thin Client Devices and NCDware
NCDware Software
NCDware Release Notes for a list of supported hosts and
binaries.
Source code for NCD host software is available at the NCD FTP
site. For information about downloading files from the FTP
site, see “Using FTP” on page 18-44.
Introduction to Thin Client Devices and NCDware 2-5
NCDware Software
2-6 Introduction to Thin Client Devices and NCDware
3 Preparing Terminals for Booting
This chapter describes how to add a terminal to an existing
network and prepare the terminal to boot (that is, to load and
execute an X server). The major topics in this chapter are:
Tip
This chapter provides directions for
configuring terminals through remote
configuration files. For system
administrators who use the Console
for terminal configuration, information
about Setup menu fields is provided at
the end of the chapter.
❏
❏
❏
❏
A description of terminal boot actions
Boot preparations performed by ncdinstall
Setting the Token-Ring speed of HMX terminals
Optional boot preparations (improving reliability, using
BOOTP/DHCP, using NCD’s BOOTP dynamic address
allocation, setting up domain name service, relocating
required files, configuring X server module loading and
relocating modules, and managing licenses)
❏ Configuring terminals for the network (adding
terminals, modifying terminal setup, and deleting
terminals from the network)
❏ Booting terminals
The instructions in this chapter assume that your host systems
and terminals are physically set up on an operating Ethernet
or Token-Ring network, you used ncdinstall (the NCD
installation program) to install NCDware on a host computer,
and you are using ncdinstall to add terminals to the network.
For information about installing NCDware, see the NCDware
CD insert.
Preparing Terminals for Booting 3-1
Terminal Boot Actions
Terminal Boot Actions
NVRAM
Non-volatile terminal RAM that
contains the data required for booting.
NVRAM contents are initially set at the
factory and retained when the
terminal is rebooted or powered off.
DHCP
Dynamic Host Configuration Protocol,
a bootstrap protocol that is
backwardly compatible with BOOTP
and provides dynamic IP address
assignments.
BOOTP
Bootstrap protocol that downloads
network parameters from a host to a
terminal as the terminal boots.
RARP
Reverse Address Resolution
Protocol, a boot protocol that provides
IP addresses only.
When you power on a terminal, the default booting actions
performed by the terminal’s Boot Monitor are:
❏ Performing self-tests and displaying results on the screen
❏ Reading the terminal’s NVRAM for configuration
information
❏ When booting from the network, broadcasting the
terminal’s physical (Ethernet) address to the network
using DHCP, BOOTP, or RARP. A host that has the
terminal’s Ethernet address in its network database
responds with the terminal’s IP (Internet Protocol)
address. Other information may be supplied in the host
response.
❏ Sending requests for an X server to the host that
responded to the Ethernet broadcast, to a host specified
in the BOOTP/DHCP packet, or to a host address set in
NVRAM; sending the same request over the network to
other hosts if the first host does not respond
❏ Downloading an X server using TFTP (Trivial File
Transfer Protocol) or NFS (Network File System) from the
first host that answers the terminal’s DHCP, BOOTP, or
RARP request. The answering host is called the boot host.
❏ Executing the X server, which controls subsequent
terminal actions
Tip
Most booting actions can be modified.
See “Optional Preparations Before
Booting” on page 3-5 and the
Reference Manual.
The X server performs the following default actions to
complete the booting process:
❏ Loading a remote configuration file from the boot host
and reconfiguring itself accordingly; reading the font
directories and color database on the boot host
Tip
You can use remote configuration to
change which clients start at log in.
See Chapter 7.
❏
❏
3-2 Preparing Terminals for Booting
Displaying an XDM (X Display Manager) login dialog
box
Displaying the Console, which provides access to
NCDware utilities and commands
Booting Preparations Performed by ncdinstall
Booting Preparations Performed by ncdinstall
When you install NCDware on a host computer, ncdinstall’s
actions include the following preparations for booting:
❏ Examining the host system, and setting up X server
downloading and file transfer (NFS or TFTP)
— If you select TFTP, ncdinstall starts TFTP on the host if
it is not already running
— If you select NFS, ncdinstall exports the X server
directory and directories containing other files
needed by the terminal
Tip
You can also use RARP for address
determination, or set the addresses in
NVRAM manually.
❏
❏
❏
❏
Examining the host system and, if necessary, installing
and starting BOOTP so the terminal can find its IP
address and other important network addresses
Examining the host and if necessary, installing and
starting XDM software for login and session management
Examining the host, and if necessary, installing license
management software and adding startup commands to
host startup files
Adding each terminal’s’ Ethernet address, IP address,
hostname, subnet mask, and gateway to the BOOTP
database (/etc/bootptab) and the IP address to /etc/hosts
for address discovery and network participation
Setting the Token-Ring Network Speed—HMX Terminals
Before booting an HMX terminal in a Token-Ring network,
you must set the terminal’s Token-Ring speed to match the
speed of the Token-Ring network. Explora, Explora Pro,
Explora 400/450, and Explora 700 terminals are able to sense
the network’s speed and set this parameter automatically.
You must reset the Token-Ring speed on HMX terminals if the
network speed changes or the terminal’s NVRAM is reset to
default values. The message described in the following
Preparing Terminals for Booting 3-3
Setting the Token-Ring Network Speed—HMX Terminals
procedure appears whenever the Token-Ring speed is not set
or not set to the correct speed.
Caution
Booting a terminal that has an incorrect Token-Ring speed setting
may disrupt Token-Ring network activity.
To set the Token-Ring speed on an HMX terminal:
1. Make sure the terminal is attached to the Token-Ring
network.
2. Power on the terminal. The terminal displays a message
followed by the Boot Monitor prompt:
Warning: You must use the ‘tr 4’ or
‘tr 16’ command to specify the token ring
speed to be 4 or 16 Mbps. The wrong speed
may disrupt ring communications!
>
3. Type the appropriate tr command to set the Token-Ring
speed to the speed of the network:
> tr 4
or
> tr 16
This command sets the Token-Ring speed in NVRAM, so
you do not need to type the command again unless the
network speed changes or you load NVRAM defaults.
4. To continue booting, type a boot command; for example,
to boot using TFTP:
> bt
3-4 Preparing Terminals for Booting
Optional Preparations Before Booting
Optional Preparations Before Booting
This section describes the following procedures that you may
need to perform before booting terminals:
❏ Taking steps to improve reliability
❏ Configuring BOOTP/DHCP
❏ Using dynamic IP address allocation with BOOTP
❏ Configuring terminals for DNS (Domain Name System)
❏ Configuring the terminal to access files that are in nonstandard locations
❏ Changing the X server module configuration
❏ Managing licenses for optional features
Improving Reliability
This section offers suggestions for maximizing reliability by
eliminating circumstances in which a single point of failure
could prevent operation.
Booting
During the boot process, failure recovery is automatic; the
booting process restarts after a failure.
Some terminal configuration options that improve booting
reliability are:
See the Remote Configuration
Parameter Quick Reference or the
Reference Manual for more
information about these parameters.
❏
❏
Using more than one boot method in case the first is
unavailable. In a remote configuration file, use the bootsecond-source and boot-third-source parameters to specify
additional methods in case the primary one is not
functioning. Choices are “tftp,” “nfs,” “ncdnet” or
“local.”
Trying more than one boot host in case the initial boot
host is unavailable. In a remote configuration file, use the
boot-tcpip-second-server and boot-tcpip-third-server
parameters to specify the IP addresses of alternate hosts
to use.
Preparing Terminals for Booting 3-5
Optional Preparations Before Booting
On the boot host, you can use the -p and -l bootpd options
to specify when a secondary UNIX host should respond
to terminal BOOTP requests. see the bootpd(8) man page
for more information.
Login Services
You can increase the reliability of login service by making sure
that users have automatic access to more than one host
through the login banner, the Login Chooser, and Terminal
Host Chooser (for login through terminal emulation). Some
suggestions follow; for more information, see Chapter 5.
❏ Specify that XDM requests are sent to more than one host
and that a login banner is displayed by the first host that
responds to the request. Use the login local client in the
exec-startup-commands parameter.
❏ Specify that XDM requests are sent to more than one host
and that all hosts are listed in the Login Chooser.
❏ Specify that all available hosts are listed in the Login
Chooser.
❏ Specify more than one login host for NCD Terminal
Emulator connections
Font Service
To ensure reliable font service, you can specify more than one
font server in the xserver-default-font-path parameter. See
Chapter 6 for more information about font servers.
Name Service
ncdinstall ensures that reliable name service is available for
translating between hostnames and IP addresses by
configuring terminals to use both DNS (Domain Name
System) and IEN-116 name services. See “Setting Up Domain
Name Service for the Terminal” on page 3-11 for more
information about configuring terminals for name service.
3-6 Preparing Terminals for Booting
Optional Preparations Before Booting
License Service
To increase license server reliability, specify more than one
host as a license server in the unit-license-agents parameter.
Place license server binaries and data files on all of the license
server hosts. For information about license servers, see
“Licensed Features and Types of Licenses” on page 3-16.
Address Discovery—Using DHCP and BOOTP
Tip
To change the priority of DHCP,
BOOTP, and RARP requests during
booting, use the Network menu in the
Boot Monitor Setup menus. See
Chapter 18 for information on using
Boot Monitor Setup.
You can use BOOTP, DHCP (requires Boot Monitor 2.8 or later),
or RARP to obtain network information for NCD terminals at
boot time. When you add terminals using ncdinstall, the
terminals are added to the BOOTP/DHCP database (the
/etc/bootptab file).
This section describes the BOOTP/DHCP options recognized
by NCD terminals. For information about using BOOTP to
allocate IP addresses dynamically, see “Dynamic IP Address
Allocation using BOOTP” on page 3-8.
Supported Option Tags
NCDware supports the option tags listed in Table 3-1 in the
BOOTP/DHCP database file.
Table 3-1 BOOTP/DHCP Option Tags
Option Tag
Description
bf
X server filename
ds
DNS (Domain Name System) server host addresses
gw
Gateway
ha
Terminal Ethernet address
hd
X server directory
hn
Terminal hostname (Boolean value; specifies that the hostname be sent in the
packet; the hostname is taken from the name field, which is the first field in the
entry up to the first colon)
Preparing Terminals for Booting 3-7
Optional Preparations Before Booting
Table 3-1 BOOTP/DHCP Option Tags (Continued)
Option Tag
Description
ip
Terminal IP address
ns
IEN-116 name server host addresses
sm
Subnet mask
to
Time offset from Coordinated Universal Time
ts
Time server host IP address
vm
Vendor magic (specifies the method of interpreting tags; should always be set
to “rfc1048”)
t15
Domain name suffix
t28
IP broadcast address
t31
ICMP router discovery enabled
t49
XDM (X Display Manager) host addresses (listed in order of preference)
t144
“Configuration file pathname” (the filename must be enclosed in quotes); for
example t144=”/usr/lib/X11/ncd/configs/erwhmx”
Dynamic IP Address Allocation using BOOTP
To make sure that terminals power on immediately to a usable
state after hardware and software installation, NCDware
provides automatic IP allocation through BOOTP. This section
describes how to use this feature.
The bootptab.cfg File
To enable automatic IP address allocation, create an ASCII file
called /etc/bootptab.cfg that lists Ethernet ranges and IP
address ranges for dynamic allocation. bootpd reads this file at
startup.
If your network has more than one boot host, you should
install an /etc/booptab.cfg file on only one of them.
3-8 Preparing Terminals for Booting
Optional Preparations Before Booting
The bootptab.cfg file contains two types of entries:
❏ An ether line defines:
— A symbolic name for the range of Ethernet addresses
— The range of physical Ethernet addresses for which
IP addresses can be allocated
❏ An ip line defines:
— The range of IP addresses for automatic allocation
— Optionally, a bootptab format string
You must begin each ether and ip line on a separate line and
end each with a newline character. Separate the fields in each
line with either a space or a tab.
See the bootptab.cfg (5) man page
for other ether and ip formats.
The simplest syntax of the ether line is:
ether ether_name ethernet1 to ethernet2 = net1 ... netn
where:
ether_name
Is the symbolic name for the Ethernet
range defined in this entry.
ethernet1
ethernet2
Are the lower and upper limits of
Ethernet addresses for which IP addresses
are allocated automatically.
net1 ... netn
Are the symbolic names given to the IP
addresses associated with the Ethernet
range defined in this ether line.
The simplest syntax of the ip line is:
ip netn dns ip1 to ip2 [= string]
where:
netn
Is the symbolic name of the range of IP
addresses defined in this ip entry. This
symbolic name is the same as netn
defined in an ether line.
Preparing Terminals for Booting 3-9
Optional Preparations Before Booting
dns
Is the method for determining if an IP
address or hostname in the range is
already in use. The permitted values are:
none
bootpd does not use DNS or the
hosts table (/etc/hosts) to assign a
hostname or IP address or to
determine whether a hostname or
address is in use.
name
bootpd uses the hostname or IP
returned by the DNS name server
or the hosts file for the terminal. If
none is assigned, bootpd supplies
the name.
busy
bootpd does not use IP addresses
from DNS or the hosts table. It
uses the next available IP address
in the range provided.
ip1
ip2
Are the lower and upper limits of the
range of IP addresses that can be
allocated automatically.
string
Is an optional bootptab format string,
such as :tc=.NET1. (See the bootptab (5)
man page.)
The bootptab.ip File
bootpd maintains the bootptab.ip file, which contains the
successful allocations of IP addresses to hosts. The file is
retained after bootpd resets, so the same addresses can be
assigned to hosts the next time they boot. You can view this
file, but you should not attempt to edit it.
3-10 Preparing Terminals for Booting
Optional Preparations Before Booting
Setting Up Domain Name Service for the Terminal
Tip
You can also use IEN-116 name
service protocol or a local name
translation table in the tcpip-namelocal-cache remote configuration
parameter.
If you set up a DNS server host and the terminals to use a name
service, you can use hostnames instead of addresses when
configuring the terminal and when using commands that
require a network address.
To use DNS (Domain Name System), verify that it is enabled
on the host and configure the terminal as described in the
following sections.
Verify that DNS Is Enabled on the Host
To verify that DNS is enabled on the host:
1. Verify that DNS software (named or in.named) is enabled
in a startup file (such as /etc/rc.local) on the name server
host. Use a command such as the following to find the
command line that starts the name service software:
# grep named /etc/rc*
/etc/rc.local: if [-f /usr/etc/in.named -a -f /etc/named.boot]; then
in.named; echo -n ‘ named’) > /dev/console
2.
3.
Make sure that the DNS name service database is set up
on the server host.
Run the ps command to verify that named or in.named is
running.
Configure the Terminal to Use DNS
If you use ncdinstall to add terminals, terminals use DNS and
the boot host is designated as the name server host.
If you don’t use ncdinstall or you want to use additional or
different name server hosts, use the following procedure to
configure terminals for name service:
Note
1.
Place the following assignments at the
beginning of the remote configuration file,
ahead of any parameters that use hostnames.
Set the tcpip-name-server-protocol parameter to “dns” or
to “both” if you want terminals to use IEN-116 name
service as well.
Preparing Terminals for Booting 3-11
Optional Preparations Before Booting
2.
3.
4.
Enter the IP addresses of the name server hosts into the
tcpip-name-servers table. For example:
tcpip-name-servers = {
{ 192.43.150.001 }
{ 192.43.150.005 }
}
Other name servers may be placed automatically in the
tcpip-name-servers table after the terminal boots:
— Name servers stored in NVRAM
— Name servers specified in the /etc/bootptab file
Set the tcpip-dns-default-domain parameter to the default
domain suffix to be appended to hostnames in searches.
If you set this parameter, you do not have to use the
complete domain name when specifying hostnames. The
suffix is not appended to fully qualified names (names
that contain all the components of the domain name).
The default domain suffix is the same as the domain
name obtained from the Internet authority. For example,
the line specifying NCD’s default domain suffix is:
tcpip-dns-default-domain = ncd.com
Insert an apply command after the name server
parameter settings in the remote configuration file to
ensure that the name service is in effect for subsequent
parameters that use hostnames.
Placing Required Files in Non-Standard Locations
After it loads an X server, the terminal uses the file service
table (defined in the file-service-table parameter) for all file
access. Many types of files may be accessed by the terminal;
for example, remote configuration files and files accessed by
local clients such as the NCD Mosaic Browser’s user preference
files.
For some files, such as remote configuration files, the X server
uses default pathnames (called local mount points), and the
file service table maps these to the actual locations of the files
(called file server mount points).
3-12 Preparing Terminals for Booting
Optional Preparations Before Booting
By default, the terminal uses the boot host as the initial file
server for configuration files, fonts, the color database file, and
keysym database files. The boot host appears automatically in
the file service table.
You can use the file-initial-server-1 and file-initial-server-2
parameters to specify up to two additional initial file servers.
These file servers also appear automatically in the file service
table. Use the file-initial-protocol-1 and file-initial-protocol-2
parameters to specify the protocol to use for each file server;
the default is “tftp.”
If any files required by the terminal are not located on hosts
that are in the file service table, or files are not in their default
locations, configure the file-service-table parameter to add file
server hosts or map the default locations to the actual
locations.
Because of the automatic entries in the table, it is best not to
directly edit the table. Instead, add rows to the end of the table
as shown in Figure 3-1.
To add an entry to the file service table:
1. In the local mount point field, type the default location;
for example /usr/local/lib/X11/ncd/configs for remote
configuration files.
2. In the server mount point field, type the actual location
of the file on the host.
3. Enter the name or IP address of the host in the file server
field.
4. Set the protocol field to “NFS” or “TFTP.”
5. Leave the remaining fields at their default values unless
you have special requirements. For information about
Preparing Terminals for Booting 3-13
Optional Preparations Before Booting
these fields, see the Remote Configuration Parameter Quick
Reference.
Local mount point, the
file access point used
by the X server
File server
host name
or IP
address
File
access
protocol
file-service-table[-1]= { /usr/lib/X11/ncd/configs nil eagle tftp
/usr/local/lib/X11/ncd/configs unix 3 30 8192 8192 }
File server mount point, the
pathname for the directory or file
system containing the files on the
file server host
Figure 3-1 The file-service-table Parameter
Changing X Server Module Load Policy
The basic X server is supplemented by numerous separate
modules. A module may contain a local client, extension,
library, or protocol.
Tip
The local clients that are not loadable
modules are Change Quick Setup,
Console, Lock Screen, and Logout.
They are always available unless you
disable them.
Modules are listed in the modsmodel.doc file, where model is
the model on which the modules run, such as modshmx.doc for
the HMX family of terminals. This ASCII file is installed by
ncdinstall in the modules directory (described in “Putting
Modules in a Non-Standard Location” on page 3-15). Modules
are described in the NCDware Release Notes.
About Module Load Policies
By default, the terminal loads modules when they are needed
and unloads them when the user logs out or when the X server
needs memory. This load policy is called on-demand.
A terminal can also be configured to load modules at boot
time. At-boot loading is useful for clients that take a long time
to load, such as the local Motif Window Manager.
3-14 Preparing Terminals for Booting
Optional Preparations Before Booting
Tip
The LAT module must be loaded at
boot to be available for use.
You can also disable modules so that they cannot be loaded.
Disabled clients appear in a dithered (grayed-out) font in the
Console menus.
Changing Module Load Policies
To change server module load policy, include the modulesload-policy parameter in a remote configuration file, and list
each module whose load policy you want to change. This
parameter is a table with rows that follow the format name
policy where:
name
Is the name of the module, as listed in the
modules documentation file, modsmodel.doc.
policy
Is the load policy: “on-demand,” “at-boot,” or
“disable.”
The following example sets the local Motif Window Manager
module to load at boot and disables the Change Setup
Parameters menu and touch screen module.
modules-load-policy = {
{mwm
at-boot}
{touchscreen
disable}
{setup
disable}
}
Putting Modules in a Non-Standard Location
ncdinstall puts modules in the /tftpboot/ncd/release/modsmodel
directory, where release is the NCDware version number, such
as Xncd.5.1.xxx and model is the terminal model on which the
modules run, such as modshmx for the HMX family of
terminals.
On systems running secure TFTP, ncdinstall puts modules in
the /secure_dir/tftpboot/ncd/release/modsmodel directory, where
secure_dir is the TFTP secure directory.
Preparing Terminals for Booting 3-15
Optional Preparations Before Booting
Tip
If a terminal cannot find modules
during booting, error messages
display. To find out where the X server
is looking for server modules, check
the Change Quick Setup local client
for the current value of Files ⇒
Loadable Modules Directory, and if
necessary, change it.
When the terminal boots, it first looks for modules in the
directory specified in the modules-directory parameter. The X
server sets the value of modules-directory based on the location
of the X server boot image. If the modules are not found in the
directory specified in modules-directory, the terminal looks in
/tftpboot/ncd/release/modsmodel.
If you change the location of X server modules on the boot
host, include a line similar to the following example in a
remote configuration file to set the modules-directory
parameter to the new location:
modules-directory = /usr/vendor/ncd/modshmx
The new directory is included automatically in the file service
table.
Licensed Features and Types of Licenses
Licenses are required for OpenGL, the CompCore video fast
MPEG decoder, Starlight Networks’ StarWorks software
support, NCDnet, 3270 Terminal Emulator, DPS (Display
PostScript), XIE (X Imaging Extension), the local Motif
Window Manager, the NCD Mosaic Browser, Java, and
XRemote.
There are three types of licenses:
Floating
license
A 20-character license string authorizes a fixed
number of terminals on a network to use the
feature at the same time; the authorization is
provided for a specific Microsoft Windows NT or
UNIX host.
Site
license
A 20-character license string authorizes
unlimited use of the feature at your site; the
authorization is provided for a specific Windows
NT or UNIX host.
Node
license
A 12- or 16-character license string authorizes a
terminal to use the feature; the terminal is
identified by its Ethernet address. When you add
terminals using ncdinstall, node licenses (also
called node-locked licenses) are installed.
3-16 Preparing Terminals for Booting
Optional Preparations Before Booting
Managing Node Licenses
If you add terminals to the network using ncdinstall, you can
enter node licenses at that time.
To establish node licenses after you have added terminals to
the network or if you are not using ncdinstall to add terminals,
use the unit-license-key parameter to include a license key in a
terminal’s remote configuration file.
If a terminal has more than one node license, include a unitlicense-key parameter for each license. After including a
license key in a configuration file, you must reboot the
terminal for the license to become effective.
Managing Floating and Site Licenses
NCDware includes Globetrotter Software, Inc.’s FLEXlm
license management software for managing floating and site
licenses. FLEXlm license management software supports
Windows NT hosts as well as UNIX hosts. The FLEXlm End
User Manual and responses to frequently asked questions are
provided in HTML format in the flexuser and flexfaq files in the
terminals/ncd/Xncd.5.1.xxx directory on the NCDware CD-ROM.
You can also obtain the manual from www.globetrotter.com.
The following sections outline the steps you may need to take
to establish floating and site licenses.
For information about license management on WinCenter
hosts, see “Setting Up License Management on WinCenter
Hosts” on page 3-23.
Tip
Some extensions are not unloaded
when the user finishes using them;
therefore, their floating licenses are
not released. To release the license,
the user must restart the X session.
To establish and manage floating and site licenses, you must
perform some or all of the following actions:
❏ If you are not using ncdinstall, install the license
management software on the host(s) that you wish to use
as license servers. The software is installed by ncdinstall.
See “Installing License Management Software” on
page 3-19 for more information.
Preparing Terminals for Booting 3-17
Optional Preparations Before Booting
If you do not have a license for a
feature that you need, call NCD Sales
Support at (650) 694-0650.
❏
❏
❏
When you obtain licenses from NCD, a license.dat file
containing the required licensing data is supplied. This
file must be placed on all license servers or the data in the
file must be combined with data in an existing license.dat
file. See“Setting Up the license.dat File” on page 3-20.
Customize the granting of license privileges based on
user, hostname, or display name or control logging of
license usage information by using options files. See
“Using an Options File” on page 3-22.
If you did not select the ncdinstall option for preparing
system services, start ncdlicense. For floating licenses, also
start lmgrd. Make sure these daemons start when the host
system reboots. If you select the option for preparing
system services in ncdinstall, commands for starting these
programs are added to system startup files. See “Starting
the License Management Daemons” on page 3-22.
License Management Binaries and Files
Table 3-2 lists the license management binaries and files
required for floating or site licenses.
Table 3-2 Required Software for Floating and Site Licenses
Name
Description
Required for
Floating Licenses
Required for
Site Licenses
license.dat
The license data file
yes
yes
ncdlicense
The FLEXlm client that negotiates with
lmgrd for licenses needed by terminals
yes
yes
ncdlmd
FLEXlm’s vendor daemon, which tracks
NCDware licenses that are checked out
yes
no
lmgrd
FLEXlm’s license manager daemon
yes
no
NCDware also includes the license management utilities listed
in Table 3-3. To run one of these utilities, include lmutil in the
command line; for example:
% lmutil lmstat
3-18 Preparing Terminals for Booting
Optional Preparations Before Booting
If you link the names of the utilities to lmutil, you can specify
just the utility name in the command line.
For information about the syntax and usage of these utilities,
see the utility man pages or the FLEXlm End User Manual.
Table 3-3 License Management Utilities
Utility Name
Description
lmcksum (1)
Prints license checksums
lmdiag (1)
Diagnoses license checkout problems
lmdown (1)
Shuts down all license software
lmhostid (1)
Reports the host identification of a system
lmremove (1)
Removes specific licenses and returns them to the license pool
lmreread (1)
Tells the license software to read the license file
lmstat (1)
Reports status of the license software and feature usage
lmswitchr
Switches the report writer log file
lmver (1)
Reports the FLEXlm library or binary versions
Installing License Management Software
For UNIX hosts, ncdinstall automatically installs the license
management binaries ncdlicense, ncdlmd, and lmgrd in
/usr/bin/X11/ncd. If you install NCDware manually, you can
place the binaries in any location you choose.
For Windows NT (WinCenter) hosts, setup installs the license
management executables, lmgrd.exe and ncdlicense.exe, in
c:\winnt.
You also need to install the license.dat file. See “Setting Up the
license.dat File” on page 3-20.
Preparing Terminals for Booting 3-19
Optional Preparations Before Booting
Specifying License Server Hosts
If you install NCDware or terminals using ncdinstall, the
installation program sets the license server to the boot host. If
you are setting up other license server hosts, you must list
their hostnames or IP addresses in the unit-license-agents
parameter. For example:
unit-license-agents = {
{ eagle }
{ kestrel }
}
Setting Up the license.dat File
The license.dat file, which contains the required licensing data,
must be installed on each license server host. There are three
possible scenarios for setting up this file:
❏ If you are not already using products licensed via
FLEXlm software, use the license.dat file supplied by
NCD. See the following section, “Using the license.dat
File from NCD”.
❏ If you have applications from a vendor other than NCD
that use FLEXlm software and you can combine the
license.dat files, see “Combining an Existing license.dat
File with NCD’s license.dat” on page 3-21.
❏ If you have applications from a vendor other than NCD
that use FLEXlm software, but the license.dat files are
incompatible because of differences in how you
configure the license software, you must install a
separate license.dat file and run a separate lmgrd for each
file on each license server host. See “Installing More than
One License File on a Host” on page 3-21.
Using the license.dat File from NCD
For UNIX hosts, ncdinstall puts the license.dat file in the
/usr/local/flexlm/licenses directory on the boot host. If you
change the location of the license.dat file, you must set the
LM_LICENSE_FILE environment variable to the new location.
For Windows NT hosts, copy the license.dat file that you obtain
from Sales Support to c:\flexlm. See “Setting Up License
3-20 Preparing Terminals for Booting
Optional Preparations Before Booting
Management on WinCenter Hosts” on page 3-23 for
information about how to get and install the license.dat file.
If you have multiple license server hosts, install a license.dat
file on each host.
See the lmreread (1) man page for
more information about using
lmreread.
If the license management binaries are running when you put
the license file on the license server, use the lmreread utility to
force the license manager software to read the new license file:
% lmutil lmreread
Combining an Existing license.dat File with NCD’s license.dat
If you are already running FLEXlm software on your network
for managing applications other than NCD’s, check the
already existing license.dat file and the file supplied by NCD to
see if the files are compatible.
Tip
Always use the newest versions of
lmgrd, vendor daemons, and
FLEXlm utilities.
If each file has the same number of SERVER lines and
DAEMON lines, and the files contain identical hostid fields in
each SERVER line, you can combine the two license.dat files
and run only one lmgrd. Note that lmgrd is not required for site
licenses.
To combine the two files, use any text editor. Read the
contents of all compatible files into one file, and remove the
extra set of SERVER lines.
See the lmreread (1) man page for
more information about using
lmreread.
If the license management binaries were running when you
edited the license file, you must use the lmreread utility to force
the license manager software to read the edited license file:
% /usr/bin/X11/ncd/lmutil lmreread
Installing More than One License File on a Host
See the FLEXlm End User Manual for
more information about license
management software incompatibility.
When you use incompatible license.dat files, you must run an
instance of lmgrd for each of the license files (not required for
site licenses). To do so:
❏ Make sure the port number on the SERVER line of each
license file is unique.
❏ For floating licenses only, start the appropriate version of
lmgrd for a license file (see “Starting the License
Management Daemons” on page 3-22).
Preparing Terminals for Booting 3-21
Optional Preparations Before Booting
— Place the incompatible license files and their
respective lmgrd programs in different directories
and start the programs using the following syntax:
% lmgrd -c /pathname/license.dat
or
— Rename the incompatible license files and lmgrd
programs to product-specific names. Specify the
non-standard license file names using the
LM_LICENSE_FILE variable. To include more than
one license file in the LM_LICENSE_FILE variable,
separate the license file pathnames by colons; for
example:
% setenv LM_LICENSE_FILE /usr/local/flexlm/licenses/ncd/license.dat:
/usr/local/flexlm/licenses/misc/license.dat
Using an Options File
The syntax and format of options files are described in detail
in FLEXlm documents. This section outlines the steps required
to use an options file. To use an options file you must:
1. Create the file.
2. Place the file in /usr/local/flexlm/options.
3. Add the file’s pathname to the license.dat file. Place it in
the fourth field in the DAEMON line for ncdlmd. For
example:
DAEMON ncdlmd /etc/ncdlmd /usr/local/flexlm/options/ncdlm.opt
Starting the License Management Daemons
See the lmgrd (1) and ncdlicense (1)
man pages for information about
command options.
The ncdinstall program starts the ncdlicense and lmgrd
daemons. If you need to start them manually, use the
commands described in this section.
The following commands assume the default locations for the
daemons.
❏ For floating licenses and site licenses, start ncdlicense:
% /usr/bin/X11/ncd/ncdlicense -c /pathname/license.dat
3-22 Preparing Terminals for Booting
Optional Preparations Before Booting
❏
For floating licenses only, start lmgrd:
% /usr/bin/X11/ncd/lmgrd -c /pathname/license.dat
If you put the license.dat file in a location other than the
default, you must either set the LM_LICENSE_FILE
environment variable to name the location or use the -c option
and the full pathname of the license.dat file to start both
daemons.
The ncdinstall program adds startup line(s) for the daemon(s)
to your system startup files, such as /etc/rc.boot or /etc/rc.local.
When you reboot the license server, the daemons start
automatically.
If you did not choose to prepare system services while
running ncdinstall or you did not use ncdinstall, add the
relevant startup lines shown in this section to your system
startup file.
Setting Up License Management on WinCenter Hosts
This section contains directions for setting up the WinCenter
host as a license server for floating and site licenses.
The FLEXlm License Server and the NCD License Proxy Server
executables are installed in c:\winnt\system32 when you
install NCDware. This section contains directions for
uninstalling the executables.
Setting Up the WinCenter Host
To set up the WinCenter host:
1. Install the IPX protocol if it is not already installed. This
is required for Step 2.
a. In the Control Panel, select Network.
b. Select Protocols and add IPX.
c. When prompted, restart the computer.
2. Get the host ID of the WinCenter host:
a. Open a DOS prompt window.
b. Run the following command:
lmutil lmhostid
Preparing Terminals for Booting 3-23
Optional Preparations Before Booting
3.
4.
5.
6.
If the IPX protocol is not installed, this command
reports a host ID of ffffffff, which is not valid.
Give the host ID and hostname to NCD Sales Support—
(650) 694-0650. Sales Support will generate a license.dat
file and e-mail it to you.
Copy the license.dat file to c:\flexlm\license.dat.
If you put the license.dat file somewhere else, you must
create a system environment variable for it as follows:
a. In the Control Panel, select System.
b. On the Environment tab, select any system variable.
c. Enter LM_LICENSE_FILE in the Variable: field.
d. Enter the absolute path to the license.dat file in the
Value: field.
e. Click OK.
Restart the WinCenter host.
In about three minutes, terminals can start getting
licenses from the WinCenter host.
Uninstalling the License Services
To uninstall the FLEXlm License Server, type:
lminstall remove
To uninstall the NCD License Proxy Server, type:
ncdlicense -remove
3-24 Preparing Terminals for Booting
Configuring Terminals for the Network
Configuring Terminals for the Network
See the NCDware Reference Manual
for information on configuring the
network database files.
You can use ncdinstall to add terminals to database files and to
modify and delete information that ncdinstall places in the
databases. If you did not use ncdinstall initially to add a
terminal to the network, you cannot use it later to modify or
remove that terminal from the network. Instead, you must
change the databases manually.
When running ncdinstall, you can use the following
commands:
q
Quit from ncdinstall
m
Go to Main Menu
t
Go to the top of the current submenu
h
Display Help
!
Enter a subshell; type exit to return to ncdinstall
Adding Terminals to the Network
To add terminals to the network, run ncdinstall on the host on
which you installed NCDware. ncdinstall prompts you to
supply the information listed in Table 3-4 about each terminal
and adds information about each terminal to the /etc/hosts and
/etc/bootptab system files. This information is necessary for
terminals to participate on the network. Before changing
system files, ncdinstall creates copies of the original files,
adding a _O extension to the filename.
In addition, ncdinstall creates two remote configuration files
for each terminal. See Chapter 4 for information on these files.
To add terminals to the network:
1. Log in as root on the host on which you used ncdinstall to
install NCDware.
2. In the installation directory, type:
# ncdinstall
Preparing Terminals for Booting 3-25
Configuring Terminals for the Network
Table 3-4 Information Required to Add a Terminal
Data
Description
Model
The terminal model: HMX, Explora, Explora Pro, Explora 400/450, or Explora 700.
IP address
The terminal’s Internet address; for example, 139.43.193.93.
Ethernet
address
A physical address set in NVRAM in the factory and printed on a sticker on the
bottom of the terminal base or on the outside of the carton containing the base. The
Ethernet address is a 12-character string beginning with 0000A7; for example,
0000A7123608.
Name
(hostname)
The terminal’s hostname, which is a unique name consisting of alphanumeric
characters that you assign to the terminal to correspond with its IP address.
Subnet
mask
A 4-part, 32-bit mask used to distinguish the subnet from the rest of the IP address,
such as 255.255.255.0.
Gateway
The IP address of the gateway device. You only need to supply a gateway address
if the terminal is on a different subnet from the host computer.
Node
licenses
If you are using node licenses for any licensed features, you need a 12- or 16character license string for each licensed feature. If you don’t have the licenses you
need, contact NCD Sales Support.
Tip
You can press Return at most
ncdinstall prompts to select the
default, which appears in brackets
following the prompt.
3.
From the Main menu, select 3 Configure NCD
Terminals.
4.
From the Configure NCD Terminals menu, select
1 Add NCD Terminal.
5.
ncdinstall prompts you to supply the model, IP address,
6.
7.
8.
3-26 Preparing Terminals for Booting
Ethernet address, hostname, subnet mask, and gateway.
Verify your input and correct any errors.
Specify whether you want to use the terminal as an NFS
server. Type y for yes or n for no.
Specify whether you want to export a local file system
(that is, use the terminal as an NFS file server). Type 1 to
export a PC card file system, 2 for a floppy, or all for
both.
Configuring Terminals for the Network
9.
If you are not using node licenses, press Return and go to
the next step. If you are using node licenses, answer the
following:
— Type y to indicate you want to use a licensed feature.
— Enter the 12- or 16-character license string and press
Return.
— Type y to indicate you want to license an additional
feature or press Return to continue.
10. Repeat Step 5 through Step 9 for each terminal you want
to add.
11. When you’ve finished adding terminals, type q to exit
from ncdinstall.
Modifying Information about Terminals in System Files
To modify terminal information in the /etc/hosts and
/etc/bootptab system files, run ncdinstall on the host on which
you installed NCDware.
Tip
You cannot use ncdinstall to modify
system file information about
terminals that were added to the
network without ncdinstall. You must
modify the files manually.
To modify information:
1. Log in as root on the host on which you used ncdinstall to
install NCDware.
2. In the installation directory, type:
# ncdinstall
3. From the Main menu, select 3 Configure NCD
Terminals.
Tip
You can press Return at most
ncdinstall prompts to select the
default, which appears in brackets
following the prompt.
4.
5.
6.
7.
From the Configure NCD Terminals menu, select
3 Modify NCD Terminal.
To view a list of the terminals that ncdinstall can modify,
press Return.
Enter the hostname of the terminal for which you want
to modify information.
ncdinstall displays the current information in the
databases for the terminal that you selected and permits
you to supply a new model, IP address, Ethernet address,
hostname, subnet mask, gateway, NFS server status, local
file system to export, or node license. For fields that are
Preparing Terminals for Booting 3-27
Configuring Terminals for the Network
correct, just press Return; ncdinstall prompts you for the
next field.
8. Verify your input and correct any errors.
9. Repeat Steps 6, 7, and 8 for each terminal you want to
modify.
10. When you’ve finished modifying terminals, type q to exit
from ncdinstall.
Deleting Terminals from System Files
To delete terminal information contained in the /etc/hosts and
/etc/bootptab system files, run ncdinstall on the host on which
you installed NCDware.
Tip
You cannot use ncdinstall to delete
system file information about
terminals that were not added to the
network by ncdinstall. You must
modify the files manually.
To delete information:
1. Log in as root on the host on which you used ncdinstall to
install NCDware.
2. In the installation directory, type:
# ncdinstall
3. From the Main Menu, select 3 Configure NCD
Terminals.
Tip
You can press Return at most
ncdinstall prompts to select the
default, which appears in brackets
following the prompt.
4.
From the Configure NCD Terminals menu, select
2 Delete NCD Terminal.
5.
To view a list of the terminals that ncdinstall can delete,
press Return.
Enter the hostnames of the terminals to be deleted. Place
spaces between hostnames.
Verify your input and correct any errors.
When you’ve finished deleting terminals, type q to exit
from ncdinstall.
6.
7.
8.
3-28 Preparing Terminals for Booting
Booting Terminals
Booting Terminals
By default, when a terminal is powered on or rebooted, it
requests an X server first via TFTP and then via NFS. If the
terminal has a PC card with an X server, the terminal tries to
boot first from the card and then tries TFTP and NFS. The
terminal boots from the first of these sources that provides an
X server.
Booting from a PC Card
If you install a PC card containing an X server in a terminal
that previously booted from the network, the terminal first
tries to boot from the network. To try booting from the PC card
first, set the boot-desired-source parameter to “local.”
You can also set this parameter in the Boot Monitor Setup
menus in the Boot window. See Chapter 18 for more
information about the Boot Monitor Setup menus.
Rebooting
To reboot a terminal, select Console ⇒ Reboot.
Booting Terminals Manually
You can boot a terminal manually from the Boot Monitor
prompt (>). This is useful when no address determination
protocol exists on the boot host, you want to boot from a host
other than the normal boot host, or you want to load a
different X server from the one normally loaded.
By default, the terminal displays the Boot Monitor prompt if it
cannot locate an X server to load.
You can invoke the Boot Monitor by pressing the Escape key
while address requests are being broadcast to the network
(when the words TFTP load or NFS load appear). After you
press the Escape key, the Boot Monitor prompt appears.
To access the Boot Monitor after the X server has started, use
the relevant key combination listed in Table 3-5. Stopping the
Preparing Terminals for Booting 3-29
Booting Terminals
X server in this way while clients are running may cause
unpredictable behavior.
Table 3-5 Boot Monitor Access Key Combination
Keyboard Type 1
Key Combination
101- or 102-key
(for the Windows 95-compatible, US English, and IBM PS/2
versions, use Caps Lock-Left Alt-Setup)
Ctrl-Left Alt-Setup
VT220-compatible
Ctrl-Compose-F3
108-key
Ctrl-Left Alt-F3
97-key
Left Alt-Caps Lock-Setup
107-key (Sun Type 4-compatible)
Stop-A (L1-A)
122-key (3270-compatible Lexmark)
Alt Rule-Home
123-key (Sun Type 5-compatible)
Stop-A (L1-A)
1
NCD keyboard models are identified on the bottom of the keyboard.
Manual Boot from a Local File System
To boot manually from a PC card, use the bl command:
> bl
Manual Boot Using TFTP or NFS
To load the server manually using TFTP, use the bt command:
> bt [file ][ terminal_IP host_IP ] [ gateway_IP [ subnet_mask ]]
To load the server manually using NFS, use the bn command:
> bn [file ][ terminal_IP host_IP ] [ gateway_IP [ subnet_mask ]]
The command-line options for both bt and bn are:
file
The name of the X server to load
terminal_IP
The IP address of the terminal
host_IP
The IP address of the boot host
3-30 Preparing Terminals for Booting
Setup Menu Equivalents for Remote Configuration Parameters
gateway_IP
The IP address of the gateway
subnet_mask
The subnet mask, specified as an IP
address or as a hexadecimal number
Examples of manual boot commands follow:
> bt
> bt Xncdhmx
> bn Xncdhmx 192.43.153.226 192.43.153.24
Setup Menu Equivalents for Remote Configuration
Parameters
Table 3-6 lists the remote configuration parameters discussed
in this chapter and the corresponding Setup menu field for
each. This information is provided for system administrators
who use the Console to configure terminals.
Table 3-6 Setup Menu Fields for Preparing Terminals for Booting
Parameter Name
Console Setup Menu Field
When
Changes
Take Effect
Saved in
NVRAM
boot-second-source
Setup ⇒ Change Setup Parameters ⇒
Booting ⇒ Secondary Boot Source
At boot time
Yes
boot-tcpip-second-server
Setup ⇒ Change Setup Parameters ⇒
Booting ⇒ (TCP/IP Boot Options
section) Secondary TCP/IP Server
At boot time
Yes
boot-tcpip-third-server
Setup ⇒ Change Setup Parameters ⇒
Booting ⇒ (TCP/IP Boot Options
section) Tertiary TCP/IP Server
At boot time
Yes
boot-third-source
Setup ⇒ Change Setup Parameters ⇒
Booting ⇒ Tertiary Boot Source
At boot time
Yes
Preparing Terminals for Booting 3-31
Setup Menu Equivalents for Remote Configuration Parameters
Table 3-6 Setup Menu Fields for Preparing Terminals for Booting (Continued)
When
Changes
Take Effect
Saved in
NVRAM
Setup ⇒ Change Setup Parameters ⇒
Commands and Startup ⇒ Startup
Commands or Setup ⇒ Change Quick
Setup ⇒ Session ⇒ XSession, Terminal
Session, XRemote Session
Immediately
No
file-initial-protocol-1
Setup ⇒ Change Setup Parameters ⇒
File Service ⇒ Initial Protocol 1 or
Setup ⇒ Change Quick Setup ⇒ Files
⇒ File Service Protocol
At boot time
Yes
file-initial-protocol-2
Setup ⇒ Change Setup Parameters ⇒
File Service ⇒ Initial Protocol 2 or
Setup ⇒ Change Quick Setup ⇒ Files
⇒ Backup File Service Protocol
At boot time
Yes
file-initial-server-1
Setup ⇒ Change Setup Parameters ⇒
File Service ⇒ Initial File Server 1 or
Setup ⇒ Change Quick Setup ⇒ Files
⇒ File Server Address
At boot time
Yes
file-initial-server-2
Setup ⇒ Change Setup Parameters ⇒
File Service ⇒ Initial File Server 2 or
Setup ⇒ Change Quick Setup ⇒ Files
⇒ Backup File Server Address
At boot time
Yes
file-service-table
Setup ⇒ Change Setup Parameters ⇒
File Service ⇒ File Service Table
Immediately
No
modules-directory
Setup ⇒ Change Setup Parameters ⇒
Loadable Modules ⇒ Loadable
Modules Directory or Setup ⇒ Change
Quick Setup ⇒ Files ⇒ Loadable
Modules Directory
Immediately
No
modules-load-policy
Setup ⇒ Change Setup Parameters ⇒
Loadable Modules ⇒ Load Policy
Immediately
No
Parameter Name
Console Setup Menu Field
exec-startup-commands
3-32 Preparing Terminals for Booting
Setup Menu Equivalents for Remote Configuration Parameters
Table 3-6 Setup Menu Fields for Preparing Terminals for Booting (Continued)
When
Changes
Take Effect
Saved in
NVRAM
Setup ⇒ Change Setup Parameters ⇒
TCP/IP Name Service ⇒ DNS Default
Domain
Immediately
No
tcpip-name-local-cache
Setup ⇒ Change Setup Parameters ⇒
TCP/IP Name Service ⇒ Local Name
Cache
Immediately
No
tcpip-name-serverprotocol
Setup ⇒ Change Setup Parameters ⇒
TCP/IP Name Service ⇒ Name Server
Protocol or Setup ⇒ Change Quick
Setup ⇒ Network ⇒ TCP/IP Name
Service Protocol
Immediately
Yes
tcpip-name-servers
Setup ⇒ Change Setup Parameters ⇒
TCP/IP Name Service ⇒ Name Servers
or Setup ⇒ Change Quick Setup ⇒
Network ⇒ TCP/IP Name Servers
Immediately
Yes
unit-license-agents
Setup ⇒ Change Setup Parameters ⇒
Licenses ⇒ License Agents
Immediately
No
unit-license-key
Setup ⇒ Change Setup Parameters
Licenses ⇒ License Key or Setup ⇒
Change Quick Setup ⇒ Licenses ⇒
License Key
Immediately
Yes
xserver-default-font-path
Setup ⇒ Change Setup Parameters ⇒
Fonts ⇒ Default Font Path or Setup ⇒
Change Quick Setup ⇒ Fonts ⇒
Default Font Path at Reset
Immediately
No
Parameter Name
Console Setup Menu Field
tcpip-dns-defaultdomain
Preparing Terminals for Booting 3-33
Setup Menu Equivalents for Remote Configuration Parameters
3-34 Preparing Terminals for Booting
4 Terminal Configuration Methods
This chapter describes methods for changing the attributes of
NCD terminals that have already been added to the network
and helps you decide which method to use. The major topics
in this chapter are:
Tip
Some of the procedures in this
chapter provide directions for
configuring terminals through remote
configuration parameters. For system
administrators who use the Console
for terminal configuration, information
about corresponding Setup menu
fields is provided at the end of the
chapter.
❏
An overview of terminal configuration methods, how
they interact with each other, and configuration
parameters
❏ Configuring terminals through remote configuration
files
❏ Configuring terminals through Console Setup menus
❏ Configuring terminals through TELNET
❏ Controlling access to configuration data
For information about the remote configuration files on PC
cards, see Using a PC Card in Your NCD Thin Client Device.
For information about using SNMP (Simple Network
Management Protocol) to display and set parameters, see the
NCDware Reference Manual.
Terminal Configuration Overview
See Chapter 3 for instructions on
adding terminals.
When you are adding a new terminal to your network, NCD
recommends that you use the ncdinstall program. ncdinstall is
used both to install NCDware and to add terminals to the
network.
The ncdinstall program adds the terminal to network database
files and creates standard terminal configuration files for you.
Terminal Configuration Methods 4-1
Terminal Configuration Overview
Deciding How to Configure Terminals
All of the terminal configuration methods operate on the same
database of configuration data. The interface to the data
differs, as does the permanence of the configuration changes.
Remote Configuration Files
Remote configuration means automatically loading an ASCII
file of configuration data to a terminal when the terminal
boots. For terminals that download their X server from a host
computer, configuration files are also downloaded (using
either the TFTP or NFS protocol). For terminals that load their
X server from a local PC card, configuration files are loaded
from the card.
For each terminal you add to the network, ncdinstall creates
two terminal-specific remote configuration files. A generic
file, which contains common configuration data for all the
terminals, is also created if it does not already exist. These files
contain the basic configuration information for proper
terminal operation.
For most sites, remote configuration files are the best way to
configure terminals because:
❏ From a central location on a host computer, you can
configure all the terminals on the network.
❏ Remote configuration files provide permanent
configuration for each terminal because they are
automatically loaded each time the terminal boots.
Console Setup Menus—Interactive Configuration
The Setup menus, which are accessible from the Console
window, display the current configuration of the terminal and
permit you to make immediate configuration changes. There
are three Setup menus:
❏ Change Quick Setup provides a small set of the most
essential configuration parameters
❏ Change Setup Parameters provides all of the
configuration parameters
4-2 Terminal Configuration Methods
Terminal Configuration Overview
❏
NVRAM
Non-volatile RAM in the terminal’s
base, which contains the parameters
used for booting. NVRAM contents
are initially set at the factory. NVRAM
settings are retained when the
terminal is rebooted or powered off.
Change User Preferences customizes the work
environment of the terminal user
Setup menus are useful for making immediate changes to the
terminal’s current configuration or experimenting with
parameter changes. You can make the changes permanent by
writing them to a remote configuration file, and some
parameters can be saved in NVRAM.
You can use Setup menus to configure the terminal you are
using or another terminal on the network.
A possible drawback of the Setup menus is that users can
make configuration changes, although you can control access
to configuration data.
TELNET—Interactive Configuration
TELNET
A general-purpose network utility
program for communicating with
another host (terminal or computer)
on the network.
You can use TELNET to configure a terminal through an NCD
terminal emulation window.
Like the Setup menus, TELNET shows the current
configuration of a terminal and is most useful for making
immediate changes to the current configuration or
experimenting with parameter changes.
You can use TELNET to configure the terminal you are using
or another terminal on the network.
A password is required, and users cannot configure terminals
through TELNET unless they know the password.
Boot Monitor Setup Menus—Interactive Configuration
See Chapter 18 for information on
using the Boot Monitor Setup menus.
The essential parameters for booting a terminal can be set in
the Boot Monitor’s Setup menus and saved in NVRAM.
Interaction of Configuration Methods
When the terminal boots, it reads its configuration data from
the following sources and loads the data into its memory:
1. First, configuration data is loaded from the terminal’s
NVRAM.
2. Information from the BOOTP/DHCP configuration file
(/etc/bootptab) is downloaded to the terminal. Much of
Terminal Configuration Methods 4-3
Terminal Configuration Overview
the data in this file corresponds to terminal configuration
parameters.
3. Finally, the remote configuration file is downloaded.
Data from the last source to be loaded takes precedence; for
example, data in the remote configuration file takes
precedence over data in the bootptab file and data in NVRAM.
While the terminal is running, you can change the terminal’s
current configuration using the Setup menus or TELNET. You
may also write data from the Setup menus or TELNET into
NVRAM or remote configuration files, thus changing the
terminal’s default configuration at boot time.
About Configuration Parameters
See the Remote Configuration
Parameter Quick Reference for a
complete list of read/write and writeonly configuration parameters,
possible values, SNMP names, and
other information.
Almost all of the terminal’s configuration parameters are
either read/write or read-only. A few parameters, consisting
of passwords and encryption keys, are write-only. Each
configuration parameter corresponds to a variable in the MIB
file, which defines SNMP variables for NCD terminals.
Read/Write Parameters
With few exceptions, you can use either remote configuration
files, Console Setup menus, or TELNET to set all of the
read/write parameters.
See the Reference Manual for a listing
of Setup menu items and
corresponding remote configuration
names.
Read/write parameter names have two different formats: one
for the parameters in the Setup menus and one for the
parameters set through TELNET or remote configuration files.
For example:
Configuration File/TELNET Name
Setup Menu Name
boot-automatically
Boot automatically
at power-up
serial-interfaces-table
Serial Interfaces
Table
Parameters are organized into groups according to their
functions, and the remote configuration file/TELNET name of
each parameter begins with its group name. Groups
4-4 Terminal Configuration Methods
Configuring Terminals Using Remote Configuration Files
correspond to the hide boxes displayed in Setup ⇒ Change
Setup Parameters. For example, parameters in the boot group
have names beginning with boot- and correspond to the fields
in the Change Setup Parameters Booting section.
All of the parameters in Setup ⇒ Change User Preferences
belong to the pref group.
Read-Only Parameters
See the Reference Manual for a listing
of each statistic field in Show
Statistics, a description, and the
corresponding remote configuration
name.
Read-only parameters are used to report statistics about a
terminal’s operations. You can view them using TELNET or in
the Console’s Show Statistics menu.
When Parameters Take Effect
See the Remote Configuration
Parameter Quick Reference for
information about when each
parameter takes effect.
A given parameter may take effect:
❏ Immediately—after you press Apply in the Setup menus
or type an apply command when configuring a terminal
via TELNET
❏ At boot time
❏ At session startup time
❏ At context creation; that is, when the relevant X server
module is loaded
Configuring Terminals Using Remote Configuration Files
This section describes how to configure terminals using
remote configuration files and how to set up a user
preferences file.
When you install terminals using ncdinstall, it automatically
creates configuration files on the boot host. In the file setup
created by ncdinstall, the terminal reads both the individual
and generic files. The generic file contains data that pertains to
all terminals on the network.
Values in a downloaded configuration file override the
default values in NVRAM and the X server.
Terminal Configuration Methods 4-5
Configuring Terminals Using Remote Configuration Files
Terminals automatically try to load a terminal-specific file. If a
terminal does not find its specific file, it tries to download a
generic file.
Terminals that boot from a network host automatically
attempt to load their configuration files from the same host.
Terminals that boot from a PC card automatically attempt to
load a configuration file from the card.
By default, a terminal boots whether or not it can find a
configuration file. If a configuration file is not found, the
terminal uses configuration information found in the
terminal’s NVRAM and the default settings in the X server.
Host-Resident Configuration Files Created by ncdinstall
When you use ncdinstall to add terminals, the following files
are created:
❏ Two terminal-specific files:
— The name of the terminal-specific file controlled by
the system administrator is the terminal’s IP address
converted to hexadecimal format. For example, the
terminal with IP address 192.40.150.4 has a
configuration file named C0289604.
— The name of the file for the user’s configuration data
is the same as the terminal-specific file plus the suffix
.stp; for example, C0289604.stp.
❏ The generic file ncd_std (created only once, not created if
it already exists). This file is for storing configuration
data common to a group of terminals.
All configuration files are placed by ncdinstall in the default
configuration file directory (/usr/lib/X11/ncd/configs) on the
boot host. On hosts using secure TFTP, configuration files are
normally in /tftpboot/usr/lib/X11/ncd/configs. If the file access
method is TFTP, the configuration files must be worldwritable and world-readable.
If you do not use ncdinstall to add terminals or you prefer to
create your own configuration files, you can start with the
example file on the NCDware CD-ROM.
4-6 Terminal Configuration Methods
Configuring Terminals Using Remote Configuration Files
The Terminal-Specific Configuration Files
This section describes the two terminal-specific files created
by ncdinstall for each terminal you add.
System Administrator’s File
The terminal-specific system administrator’s configuration
file created by ncdinstall contains the assignments and read
commands shown in the example in Figure 4-1. These entries
are explained in the text following the figure.
Lines
preceded by
a pound
sign are
comments.
# ncd_std -- standard terminal configuration file.
read /usr/lib/X11/ncd/configs/ncd_std
#modules-directory = "/tftpboot/modsxpt"
#modules-load-policy = {}
file-enable-nfs-server = true
file-enable-floppy-filesystem = true
file-nfs-access-control-list = {
{ /local 0.0.0.0 Read-Only }
{ /xfloppy 0.0.0.0 Read-Write }
}
unit-license-key = 1234567890123456
login-ncddm-enabled = true
# 01020309.stp -- auto-save file which is under user control
read /usr/lib/X11/ncd/configs/01020309.stp
Figure 4-1 Terminal-Specific Remote Configuration File
The commands and assignments in the terminal-specific file
are:
❏ The first read statement reads the contents of the generic
file and adds the assignments in the generic file to the
terminal’s configuration data.
❏ The three parameters in the file group are not always
present in the file. Their purpose is to export the local file
system on the terminal’s PC card or floppy diskette. They
are placed in the file if you chose to export the file system
while adding the terminal. For more information about
these parameters, see Chapter 9.
Terminal Configuration Methods 4-7
Configuring Terminals Using Remote Configuration Files
❏
❏
❏
The unit-license-key parameter is not always present in
the file. It is placed in the file if the terminal is licensed for
optional features and you enter one or more license keys
while adding the terminal.
The login-ncddm-enabled parameter facilitates use of Java
and the NCD Mosaic Browser. For more information
about ncddm, see Chapter 5 and Chapter 15.
The second read statement reads the contents of the
user’s configuration file and applies settings in the file to
the terminal’s configuration.
User’s File
The user’s configuration file is initially empty. Users who have
access to the Setup menus in the Console can save terminal
configuration information in their .stp files.
To save current changes into the .stp file:
1. From the File menu of a Setup menu (Change Quick
Setup, Change Setup Parameters, or Change User
Preferences), select Save to File.
2. The name of the .stp file is displayed in the dialog box.
Click on OK.
3. Changes are saved to the .stp file.
You can delete the .stp files if you don’t permit users to
configure their own terminals.
The Generic Remote Configuration File
The ncd_std generic file contains parameters used by all
terminals on the network. The terminal does not directly load
the generic file if there is a terminal-specific file. The terminalspecific file reads the generic file. Figure 4-2 shows an example
of the file created by ncdinstall.
4-8 Terminal Configuration Methods
Configuring Terminals Using Remote Configuration Files
# ncd_std -- standard terminal configuration file
tcpip-name-server-protocol = both
tcpip-dns-default-domain = ncd.com
tcpip-name-servers = {
{ 139.40.202.19 }
}
exec-startup-commands = {
{ “login 139.40.202.19” }
}
xserver-default-font-path = {
{ “built-ins” }
{ “/usr/lib/X11/ncd/fonts/pcf/misc/” }
{ “/usr/lib/X11/ncd/fonts/pcf/75dpi/” }
{ “/usr/lib/X11/ncd/fonts/pcf/100dpi/” }
{ “/usr/lib/X11/ncd/fonts/pcf/dw75dpi/” }
{ “/usr/lib/X11/ncd/fonts/pcf/dw100dpi/” }
{ “/usr/lib/X11/ncd/fonts/pcf/java/” }
{ “/usr/lib/X11/ncd/fonts/pcf/Xol/” }
}
#browser-environment = {
#
{ “HOME” “/usr/lib/X11/ncd/users” }
#
{ “BROWSER_HOME” “$HOME” }
#}
# Browser entries in file-service-table[]
file-service-table[-1] = { /tmp nil 139.40.202.19 tftp
/usr/lib/X11/ncd/users/tmp }
file-service-table[-1] = { /usr/lib/X11/ncd/users nil
139.40.202.19 tftp
/usr/lib/X11/ncd/users }
apply
Figure 4-2 Generic Remote Configuration File
Terminal Configuration Methods 4-9
Configuring Terminals Using Remote Configuration Files
Tip
The name service parameters must
be listed first. Until the terminal has
read the name service parameters, all
hosts must be referenced by their IP
addresses, instead of their
hostnames.
The parameters in the ncd_std file are:
❏ The tcpip-name-server-protocol parameter sets the name
service protocol to both DNS and IEN-116. The name
service resolves hostnames and their IP addresses.
❏ The tcpip-dns-default-domain parameter sets the default
domain suffix that is appended to hostnames in name
service searches; for example, ncd.com.
❏ Each row in the tcpip-name-servers parameter table
contains the IP address of a name server host. These are
hosts that provide the name service protocol. By default,
the boot host is the name server host.
❏ Each row in the exec-startup-commands table contains a
command for displaying a local client. The default
command in the file displays a login prompt for the boot
host. Because there are white spaces in the command
line, the line must be surrounded by quotes.
❏ Each row in the xserver-default-font-path table is the
pathname of a font directory containing fonts used by
clients running on the terminal.
❏ The additions to the file-service-table parameter permit
users to write their preference files and hot list files from
the NCD Mosaic Browser when you are using TFTP for
file access.
❏ The apply command applies all of the preceding
parameter settings to the current configuration.
Example Configuration File from the NCDware Distribution
If you don’t use ncdinstall to add terminals and want to create
your own configuration files, you can use the example file
(hex_ip.sample) included on the NCDware distribution and
installed by ncdinstall in /usr/lib/X11/ncd/configs. The
parameters in the file are the same as those in Setup ⇒ Change
Quick Setup. All parameters in the example file are set to their
default values.
4-10 Terminal Configuration Methods
Configuring Terminals Using Remote Configuration Files
To use the example file:
1. Copy the file to the terminal-specific filename, which is
the terminal’s IP address in hexadecimal, or to the
generic filename, ncd_std.
To convert an IP address to a hexadecimal filename, you
can use the UNIX bc(1) utility. For example:
% bc
obase=16
192;40;154;4
C0
28
9A
4
2.
3.
Each portion of the IP address must be represented by
two characters, so the filename should be C0289A04.
Edit parameters as required.
Make sure the file has the correct permissions. The file
should be readable by all.
Editing Remote Configuration Files
You can edit any remote configuration file with a text editor
(such as vi).
When editing a configuration file, be sure to retain the correct
file permissions. Remote configuration files must be readable
and writable by all.
Terminal Configuration Methods 4-11
Configuring Terminals Using Remote Configuration Files
Configuration Commands Used in Remote Configuration Files
Table 4-1 lists the commands most commonly used in remote
configuration files.
Table 4-1 Commands in Remote Configuration Files
Command and Syntax
What the Command Does
parameter = value
A simple assignment statement setting the value of the parameter.
White space around the equals sign (=) is optional.
For statements that extend past the end of a line, use the backslash
character (\) at the end of each continuation line, except the last.
parameter = {
{ value ... }
}
A parameter table, consisting of rows containing one or more values.
White space is required between values in a row.
Delimiters are required around each row and the entire table.
Long rows can extend past the end of the line without an end-of-line
character.
#
Introduces a comment. Comments are one line in length.
read filename
Reads parameter settings from another file.
apply
Applies preceding assignments to the terminal’s current configuration.
Usually not necessary because when the terminal reads to the end of
the configuration file, it automatically applies all of the assignments in
the file.
write nvram
Writes to NVRAM any parameters that are stored in NVRAM.
User Preferences File
Configuration files are associated with a specific terminal
instead of a specific user. If the user moves to a different
terminal, the configuration files associated with that terminal
are loaded. You can, however, prepare a preferences file that
is loaded when the user logs in, so the user has the same user
preference settings at any terminal and preferences are
preserved after the user logs out.
4-12 Terminal Configuration Methods
Configuring Terminals Using Remote Configuration Files
The preferences file is loaded by the ncdloadprefs utility when
the user’s X session begins. This utility is installed by
ncdinstall for most hosts.
Tip
If you do not have ncdloadprefs, call
NCD Technical Support.
To create a preferences file:
1. If you use TFTP as the file transfer protocol:
a. Create the empty file before attempting to write to it;
for example:
% touch .ncdprefs
b. Make sure the file is accessible through the terminal’s
file service table.
See Chapter 3 for information on the
file service table.
c. If you are using secure TFTP, make sure the file is in a
secure TFTP directory.
If you use NFS as the file transfer protocol, make sure the
file is available through the terminal’s file service table
and the file system is exported.
Put the file in the user’s home directory. The file should
have the following permissions: readable and writable
by the owner, readable by the group, and readable by
others.
Set the user’s preference settings in Setup ⇒ Change
User Preferences.
From the File menu in the User Preferences window,
select Save to File ... In the dialog box that
appears, type the pathname of the preferences file. Click
OK.
2.
3.
4.
5.
See Chapter 5 for information on
.xsession files.
6.
Place the following command in an XDM .xsession file in
the user’s home directory:
ncdloadprefs -display $DISPLAY $HOME/pref_file &
7.
where pref_file is the name of the user’s preference file.
The next time the user logs in on any terminal, the
settings in the user’s personal preferences file take effect.
Terminal Configuration Methods 4-13
Configuring Terminals Using Setup Menus
Configuring Terminals Using Setup Menus
Setup menus are useful for immediate and temporary
configuration changes or if users are permitted to partially or
completely configure their own terminals.
Displaying the Setup Menus
Setup menus are accessible from the Console menu bar while
the terminal is running.
If the Console is not visible, press the Setup key. To hide the
Console, press the Setup key again.
For keyboards that do not have a Setup key, use the relevant
key combination in Table 4-2 to display or hide the Console.
Table 4-2 Setup Key Equivalents
Keyboard
Key Combinations
Sun Type-4-compatible
Press the Alt Graph key and the
Help Setup key simultaneously
VT220-compatible
Press the Compose key and the F3
key simultaneously
108-key-style
Press the Alt key and the F3 key
simultaneously
122-key 3270-compatible
Press the Alt key and the Alt-ExSel
key simultaneously
Windows 95-compatible
Press the Pause key
To display the Setup menu items, click on Setup in the Console
menu bar. The menu items shown in Figure 4-3 are displayed.
4-14 Terminal Configuration Methods
Configuring Terminals Using Setup Menus
Click on Setup to display
the Setup menu items
Figure 4-3 Terminal Console and Setup Menus
The Setup menu items are:
❏ Change Quick Setup—Contains the most common
configuration parameters: booting, network, file
transfers, session type (XDM, XRemote, or terminal
emulation), and fonts.
❏ Change Setup Parameters—Contains all of the terminal’s
configuration parameters.
❏ Change User Preferences—Contains parameters for
customizing user preferences.
Selecting a menu item displays a configuration window that
lists configuration parameter hide boxes. The Booting hide
box, for example, contains parameters for loading and
executing an X server. To reveal parameters, click on a hide
box.
You can also display parameters by selecting a group from the
Sections menu at the top of the configuration window.
Write-only parameters (passwords and encryption keys) are
blank if not set and displayed as a series of asterisks (*) if set.
Terminal Configuration Methods 4-15
Configuring Terminals Using Setup Menus
Changing Parameters in Setup Menus
Parameters are represented by several different kinds of
fields. Table 4-3 lists instructions for changing each type of
parameter field.
Table 4-3 Setup Field Types
Field Type
To Change the Value ...
Example
slider
Drag the slider to the right or left.
Change User Preferences ⇒
Bell
toggle button
Click on the button to turn the parameter on
or off.
Change User Preferences ⇒
Keyboard ⇒ Enable
Keyboard Autorepeat
radio button
Click on one of the buttons offered to select a
parameter value.
Change User Preferences ⇒
Keyboard ⇒ LED 1, LED 2,
LED 3
drop-down list
Click on the list to display the choices and
select one.
Change Quick Setup ⇒
Booting ⇒ Boot From
text-entry field
Type a permitted value.
Change Setup Parameters ⇒
Licenses ⇒ License Key
table
Delete, add, or change rows in tables.
Change Setup Parameters ⇒
Commands and Startup ⇒
Startup Commands
To delete a row, click anywhere in the row and
press the Delete button. To add a row,
position the cursor in a row and click on the
New button. A new row appears above the
current row; fields are set to “nil,” all 0s, or the
default value.
To change a value in a row, click on the
specific parameter you want to change. The
parameter appears in the text entry field.
Position the cursor in the text entry field,
backspace to erase, and type a new value. The
values for some fields are displayed as dropdown lists.
4-16 Terminal Configuration Methods
Configuring Terminals Using Setup Menus
Cancelling Changes
If you make changes in a configuration window and decide to
cancel them, click on the Restart or Cancel button at the
bottom of the window before applying the changes:
❏ The Restart button cancels changes and leaves the
window open.
❏ The Cancel button cancels changes and closes the
window.
Applying Changes to the Current Configuration
To apply parameter changes:
1. Click on Apply at the bottom of the configuration
window.
2. The Messages: field at the bottom of the window tells
you when the changes take effect:
— Applying changes means the changes occur
immediately.
— parameter will change at next boot after Apply
is clicked on means the parameter changes after
you reboot the terminal. These parameters must be
saved as described in the next section.
Saving Changes
Some parameters can be saved in NVRAM; all parameters can
be saved in a configuration file.
Saving Changes in NVRAM
Tip
The Remote Configuration Parameter
Quick Reference provides a complete
list of remote configuration
parameters, including whether a
parameter is stored in NVRAM.
A number of important parameters are stored in a terminal’s
NVRAM. These parameters are set to default values at the
factory. If you change any of these parameters and select Save
to NVRAM from the File menu or click on Apply, the new values
are saved in NVRAM.
If you don’t want changes saved in NVRAM when you click on
Apply, set the config-auto-save-nvram parameter to “false.”
Terminal Configuration Methods 4-17
Configuring Terminals Using Setup Menus
Saving Changes in the User’s Configuration File
Tip
To save only the changed
parameters, Auto Saved Info in the
Configuration hide box must be set to
User Changes, which is the default.
To change this parameter, use the
config-auto-saved-info parameter.
To save changes into the user’s configuration file, you or the
user can change the Setup parameters and save the changes to
the file. Make sure Auto Save File is selected, and click on
Apply. By default, the changes are saved in the .stp file on the
host or PC card.
In the configuration file scheme created by ncdinstall, the
contents of the .stp file are read from the hex-ip-address file
when the terminal boots.
If you don’t want users to write changes into configuration
files, set the config-auto-save-file parameter to “false.”
Loading Default Values
When you load defaults from the Setup menus, parameters
are reset according to the values in the remote configuration
file loaded at boot time.
To load a terminal’s defaults (contents of the remote
configuration file):
1. Click on Defaults at the bottom of the configuration
window or select Restore Defaults from the File menu
(Change Setup Parameters and Change Quick Setup
only).
Parameter settings in the terminal’s remote configuration
file are loaded into the terminal. The Messages: area
shows the file(s) loaded.
2. Click on Apply to put the newly loaded parameters into
effect.
To load parameters from a different file, select Read from
File from the File menu and type the file’s pathname in the
dialog box.
4-18 Terminal Configuration Methods
Configuring Terminals Using Setup Menus
Configuring a Remote Terminal through Setup Menus
You must set a configuration password (as described in
“Setting Passwords” on page 4-20) for information on setting
passwords.) before you can display or change another
terminal’s setup values using the Setup menus.
Tip
When configuring a terminal remotely,
make sure your terminal and the
remote terminal are running the same
version of NCDware. Otherwise,
configuration changes may result in
errors.
To use the Setup menus to configure another terminal on the
network:
1. Select Connect to New Unit from File menu of the
Change Setup Parameters, Change Quick Setup, or
Change User Preferences window.
2. In the dialog box displayed:
— Type the terminal’s name or IP address in the Unit:
field.
— Type the relevant password in the Password: field.
3. The Setup menu for the other terminal is displayed and
you can use it as if you were configuring your own
terminal.
The title of the Setup menu window identifies the remote
terminal you’re connected to.
4. Follow the procedures described in “Changing
Parameters in Setup Menus” on page 4-16 to configure
the terminal.
5. To disconnect from the remote terminal, click on Cancel
at the bottom of the window or select Close from the File
menu.
Terminal Configuration Methods 4-19
Configuring Terminals Using TELNET
Configuring Terminals Using TELNET
This method is useful for quickly configuring a few terminals
from a central location and for testing configuration changes
before making them permanent.
Configuration daemon and
Preferences daemon
Daemons that run in the terminal and
provide network and local access to a
terminal’s configuration and user
preferences data.
You can interactively display or modify a terminal’s
configuration parameters while the terminal is running by:
❏ Starting the NCD Terminal Emulator (ncdterm) and
connecting to the terminal’s Configuration daemon or
Preferences daemon through its TELNET port, or
❏ Using a host computer’s TELNET utility
When using this type of interactive configuration, you can use
all of the commands used in remote configuration files plus
some additional commands.
Using TELNET, you can display the read-only parameters as
well as the read/write parameters.
You must set a read/write password for changing
configuration through TELNET. There is a default read-only
password (public) that permits you to look at, but not change,
configuration data.
Setting Passwords
Tip
If you have already set password(s)
for using the Setup menus, these
passwords apply to access through
TELNET as well.
The most convenient way to set passwords is through the
Console Setup menus. You can set a global password that
provides read/write access to configuration parameters and
other data, individual read/write and read-only passwords to
all configuration data, and separate passwords for the user
preferences parameters.
4-20 Terminal Configuration Methods
Configuring Terminals Using TELNET
Tip
Passwords are saved in a limited area
in NVRAM reserved for saving various
strings. To conserve space, you may
want to use a global password.
To set passwords for accessing a terminal’s onfiguration data
and User Preferences data:
1. Display the Access Control hide box in Setup ⇒
Change Setup Parameters.
2. To set passwords for controlling access to terminal
configuration data, type passwords in either or both of
these fields:
—
—
3.
To set passwords for controlling access to user
preferences data, type passwords in either or both of
these fields:
—
—
SNMP
Simple Network Management
Protocol. A protocol for monitoring
and controlling the activity of devices
on a network. See the NCDware
Reference Manual for more
information about SNMP.
4.
Config Read-Only Password
Config Read-Write Password
User Preferences Read-Only Password
User Preferences Read-Write Password
To set a global password, type a password in the Unit
Global Password field. The global password applies to
terminal configuration and user preference data, the
Local File Manager (which allows you to manipulate
files on PC cards), and SNMP data and commands.
5. Click on Apply at the bottom of the Setup Parameters
window to save the password(s) in NVRAM.
When viewing parameters through TELNET, an unset
password has the value “nil.” When set, the password is not
displayed. Instead, the value is shown as “<get-protected>.”
Connecting to a Terminal’s Configuration Daemon
You can connect to the TELNET port of the terminal you are
working on or to another terminal on the network. To connect
to a terminal’s Configuration or Preferences daemon:
1. From the Console, start the Terminal Emulator chooser
(Terminals ⇒ New Terminal).
— To connect to the local terminal’s daemon, select
Config from the Default Hosts list and click OK.
— To connect to a remote terminal’s daemon, type the
terminal’s hostname or IP address, followed by 5999
Terminal Configuration Methods 4-21
Configuring Terminals Using TELNET
(the configuration port) in the Service: field. For
example:
ncd1.abc.com 5999
2.
3.
4.
5.
A TELNET session window displays.
Type your configuration password after the Password:
prompt in the Terminal Emulator window and press
Return.
A prompt (>) appears. You can now type any of the
configuration commands listed in Table 4-4.
To disconnect from the daemon, type quit after the
prompt.
Using Interactive Configuration Commands
See Table 4-4 on page 4-23 for more
commands.
The configuration commands you can use and the data
displayed in a terminal emulator session depend upon the
type of password you use when starting the session:
❏ A read/write configuration password gives access to all
of the configuration commands.
❏ A read-only configuration password gives access to only
the get, help, and quit commands.
❏ A user preferences password gives access to most
configuration commands and to user preferences data
only.
Table 4-4 lists the most essential configuration commands.
Press return after each command.
An example TELNET session is shown in Figure 4-4.
4-22 Terminal Configuration Methods
Configuring Terminals Using TELNET
Table 4-4 Configuration Commands for Use with TELNET
Command
Description
help
Displays a summary of all of the configuration commands.
get parameter ...
Displays the specified parameter(s).
get group
Displays the parameters in the specified group.
set parameter = value
A simple assignment statement. Sets the specified parameter to the
specified value. All assignments are pending until you type an
apply command. The word set is optional. White space around
the equals sign is not required.
See “Setting Parameters in Tables” on page 4-26 for information
about adding rows to parameter tables or setting selected variables
within a row.
cancel
Cancels all pending changes.
apply
Applies pending commands to the current configuration.
write nvram
Writes to NVRAM any parameters that are saved in NVRAM.
This command is not available when you are accessing user
preferences parameters only.
write filename read-write
Writes all of the read/write parameters to the specified
configuration file.
write filename parameter
Writes the parameter and its current value to the specified
configuration file.
For example, write C02B994F boot-automatically writes one
parameter to a terminal’s configuration file.
write filename group
Writes all the parameters in the group to the specified
configuration file.
For example, write ncd_std config writes all the parameters in the
config group to the generic configuration file.
Terminal Configuration Methods 4-23
Configuring Terminals Using TELNET
> help
Displays all configuration commands.
get <param>
get [<group> | groups | all] [read-only | read-write]
set <param> = <value>
.
.
.
> get exec
Displays parameters in the exec group.
exec-access-control-enabled = false
exec-access-control-list ={
An empty table.
}
exec-startup-commands = {
A table with two rows of data.
{ "console" }
{ "login" }
}
> get boot-automatically
Displays one parameter
boot-automatically = true
> set boot-automatically = false
Changes a parameter’s value.
> apply
Applies pending changes to the terminal’s current
configuration.
> get boot-automatically
boot-automatically = false
> cancel
> quit
Cancels all pending changes that have not been
applied.
Ends the TELNET session.
Figure 4-4 Example TELNET Configuration Session
4-24 Terminal Configuration Methods
About Configuration Parameters
About Configuration Parameters
This section describes the general characteristics of
configuration parameters. See the Remote Configuration
Parameter Quick Reference for a complete description of each
remote configuration parameter.
Read-Only and Write-Only Parameters
Read-only parameters and write-only parameters (passwords
and encryption keys) are displayed by TELNET with a pound
sign (#) before their names and cannot be edited. Passwords or
encryption keys that you have set have the value “<getprotected>.” Unset passwords and encryption keys have the
value “nil.”
In general, passwords and encryption keys should not be set
in remote configuration files because they will not be
encrypted.
Passwords and encryption keys can be set through the Setup
menus, and are displayed, when set, as a series of asterisks.
Parameter Values
Some parameters take integers as values, others take strings or
Boolean (true/false) values.
String values containing embedded white spaces must be
surrounded by single or double quotes in TELNET sessions
and in remote configuration files; for example:
"login myhost"
For parameters that take Boolean values, you can use the
values true/false, yes/no, or on/off. Boolean parameters are
displayed in the Setup menus as toggle buttons.
The keyword “null” or “nil” in TELNET sessions and remote
configuration files indicates that no value is set for the
parameter. This is seen only in parameters for passwords and
encryption keys that have no default value.
Terminal Configuration Methods 4-25
About Configuration Parameters
The keyword “default” is accepted by all parameters and sets
the parameter to its default value in TELNET sessions and
remote configuration files.
Always type parameter names in lowercase. Some parameter
values are not case-sensitive; that is, “true” can be written
“True” or “TRUE.” String values, such as filenames and
hostnames, are case-sensitive.
Setting Parameters in Tables
In TELNET sessions and remote configuration files, curly
braces are required as delimiters for the entire table and for
each row within a table.
Working with Tables in TELNET Sessions
When working with tables in TELNET sessions, you use the
row number to specify the row you want to delete, change, or
add.
Adding Rows
Assume that you have set up the following table, which
automatically runs the listed commands each time the user
logs in:
exec-startup-commands = {
{ wm }
{ term }
{ "login eagle" }
}
To add row 4, use a simple assignment statement such as:
> exec-startup-commands[4] = { lat }
The resulting table is:
exec-startup-commands = {
{ wm }
{ term }
{ "login eagle" }
{ lat }
}
4-26 Terminal Configuration Methods
About Configuration Parameters
To add a row to the end of the table use the index number -1.
For example:
> exec-startup-commands[-1] = { ncdclock }
Changing Values within a Row
To change values in a row, use the row number and a simple
assignment statement. For example, assume that you have the
following table, which specifies the attributes of the terminal’s
serial ports:
serial-interfaces-table = {
{ 1 terminal terminal 2400 8 1 none none none }
{ 2 terminal terminal 9600 8 1 none none none }
}
See the Remote Configuration
Parameter Quick Reference for the
names of the fields in table rows.
To reset the baud rate only, use the parameter name for baud
rate and a simple assignment statement without curly braces:
> serial-interfaces-table[1]baud-rate = 9600
Deleting Rows
To clear all parameters from a row, use the row number and
one set of empty curly braces. For example:
> exec-startup-commands[2] = { }
To clear all parameters from a table, use nested sets of empty
curly braces. For example:
> exec-startup-commands = {{ }}
Working with Tables in Remote Configuration Files
For many tables, you can simply edit the table itself in the
remote configuration file with a text editor.
Some tables, however, have rows that are added
automatically by the X server; for example, the file service
table. For these tables, you should add each new row to the
end of the table, using the index number -1, as described in
“Adding Rows” on page 4-26.
Terminal Configuration Methods 4-27
Controlling Access to Terminal Configuration Data
Controlling Access to Terminal Configuration Data
Depending upon the requirements of your site, you may not
want users to change terminal configuration data. This section
describes the following methods for controlling access to this
data:
❏ Disabling the Setup menus
❏ Controlling access to the Console and Setup menus
through passwords
Disabling the Setup Menus
See Chapter 7 for details on disabling
Setup menus and other local clients.
The easiest way to prevent access to configuration data is to
disable any or all of the Setup menus so that no one can use
this method of displaying or changing terminal configuration
values. The command names to use when disabling the Setup
menus are quicksetup, setup, and pref.
Controlling Access to the Console and Setup Menus
You can require passwords for displaying the Console and for
reading or writing a terminal’s configuration data through the
Setup menus. You can set separate passwords for each local
client or set a single, global password for controlling access to
all of them.
Although you can set passwords directly in remote
configuration files, it is preferable to set them through the
Setup menus. Passwords set directly in remote configuration
files are not encrypted.
Controlling Access to the Console
To set the Console password:
1. Click on the Access Control hide box in the Change
Setup Parameters window.
2. Type a password in the Console Display Password
field.
3. Click on Enforce Console Password Locally.
4. Click on Apply to save the password in NVRAM.
4-28 Terminal Configuration Methods
Controlling Access to Terminal Configuration Data
Controlling Access to Setup Menus
Tip
If you have already set password(s)
for TELNET access to a terminal’s
configuration data, these passwords
apply to the Setup menus as well.
Skip to Step 5 to apply the
password(s) locally.
To require passwords for reading or writing a terminal’s
configuration data through the Setup menus:
1. Click on the Access Control hide box in the Change
Setup Parameters window.
2. To set passwords for controlling access to Change Setup
Parameters and Change Quick Setup, type passwords in
one or both of the following fields. (There is an initial
default read-only password, public.)
—
—
3.
To set passwords for controlling access to Change User
Preferences, type passwords in one or both of the
following fields:
—
—
Tip
Passwords are saved in a limited area
in NVRAM reserved for saving various
string values. Using a global
password conserves space.
4.
SNMP
Simple Network Management
Protocol. A protocol for monitoring
and controlling the activity of devices
on a network.
5.
Config Read-Only Password
Config Read-Write Password
User Preferences Read-Only Password
User Preferences Read-Write Password
To set a global password, type the password in the Unit
Global Password field. The global password provides
read/write access to the Console, Change Setup
Parameters, Change Quick Setup, Change User
Preferences menus, the Local File Manager (used to
manipulate files on PC cards or floppy drives), and SNMP
variables and commands.
6.
Click on Enforce Config Passwords Locally and
Enforce User Preferences Passwords Locally.
Otherwise, the passwords are requested only when you
connect to the terminal from another terminal’s Setup
menus or from an NCD Terminal Emulator TELNET
window.
Click on Apply to save the password(s) in NVRAM.
Terminal Configuration Methods 4-29
Setup Menu Equivalents for the Auto-Save Parameters
Setup Menu Equivalents for the Auto-Save Parameters
Table 4-5 lists the remote configuration parameters discussed
in this chapter and a description of the corresponding Setup
menu field for each. This information is provided for system
administrators who configure terminals through Setup
menus.
Table 4-5 Setup Menu Fields for Auto-Save Parameters
When Changes
Take Effect
Saved in
NVRAM
Setup ⇒ Change Setup
Parameters ⇒ Configuration ⇒
(Configuration Daemon Service)
Auto Save File
Immediately
No
config-auto-save-nvram
Setup ⇒ Change Setup
Parameters ⇒ Configuration ⇒
(Configuration Daemon Service)
Auto Save NVRAM
Immediately
No
config-auto-saved-info
Setup ⇒ Change Setup
Parameters ⇒ Configuration ⇒
(Configuration Daemon Service)
Auto Saved Info
Immediately
No
Parameter Name
Console Setup Menu Field
config-auto-save-file
4-30 Terminal Configuration Methods
5 Login and X Session Management
This chapter describes how to manage login and logout, configure
the user’s session, use the NCD Display Manager.
Tip
Procedures in this chapter
provide directions for
configuring terminals through
remote configuration files. For
system administrators who
use the Console for terminal
configuration, information
about Setup menu fields is
provided at the end of the
chapter.
The topics covered in this chapter are:
❏ A description of XDM (X Display Manager)
❏ Configuring XDM, including specifying the hosts offered for
login and configuring the NCD Login Chooser
The instructions in this chapter assume that XDM software is
installed and enabled on the host.
❏ Setting up the user’s X session environment
❏ Configuring access to the terminal by clients and users
❏ Using the NCD Display Manager (ncddm) to set the user’s
environment variables
❏ Configuring login through the NCD Terminal Emulator
❏ Configuring login to Microsoft Windows NT hosts (This is
introductory material; this topic is covered more fully in
Chapter 12.)
XDM’s Purpose and Functions
XDM is host- and terminal-resident software for managing login,
logout, and client startup. XDM software consists of the xdm
program on the host and an implementation of XDMCP (X Display
Management Control Protocol) in the terminal.
You can configure XDM to start clients automatically and to reset
the terminal when the user logs out.
Login and X Session Management 5-1
XDM’s Purpose and Functions
Host-resident XDM configuration files control the functions of XDM.
The most commonly used files are:
❏ Xsession—The systemwide startup script for managing the X
session; you can also use an individual session management
script, called .xsession.
❏ xdm-config—Resources for the xdm program, including
pointers to other configuration files such as Xresources
❏ Xaccess—A configuration file that determines how XDM
responds to login queries from the terminal and affects the
Login Chooser
❏ Xresources—A resource file for configuring the login banner
❏ Xstartup and Xreset—Optional scripts. Xstartup executes just
before the user’s session begins, and Xreset executes just
before the session ends. If you activate the NCD Display
Manager while you are installing software with ncdinstall, a
line is added to each of these files. For more information about
the NCD Display Manager and the lines added to these files,
see “Using the NCD Display Manager” on page 5-12.
On terminals installed using ncdinstall, XDM displays a login
banner from the boot host requesting a username and password for
logging in to the host. You can configure the terminal to display a
Login Chooser for the user to choose a login host. After the user
chooses a host from the Login Chooser, a login banner is displayed.
5-2 Login and X Session Management
Specifying the Hosts Offered for Login
Specifying the Hosts Offered for Login
After a user logs out, an NCD terminal that was installed and
configured using ncdinstall and does not have a pre-existing remote
configuration file sends an XDM query requesting a response from
the host on which NCDware was installed. The host displays a login
banner for the user to log in.
This section describes how to specify the hosts to offer to the user
for login.
Displaying a Login Banner Only
There are several ways to display a login banner only, without first
displaying a Login Chooser.
Login from a List of Specified Hosts
To configure a terminal to request login from a list of specified
hosts and display a login banner from the first available host
among them:
1.
See the ncdlogin (1) man
page for more information
about ncdlogin options.
In the exec-startup-commands parameter, include login -h
host1+host2+hostn. The host variables are the names of the
hosts you want offered for login. For example:
exec-startup-commands = {{“login eagle+hawk+dove+falcon”}}
2.
Log out, then log in again. The terminal displays a login
banner from the first available of the specified hosts.
Login from One Specific Host
To configure a terminal to request login from a specific host and
display a login banner from that host:
Tip
To configure the terminal to try
indefinitely to log in to the
specified host, use the persist option to the login
command.
1.
2.
In the exec-startup-commands parameter, include “login” and
the name of the host you want offered for login. For example:
exec-startup-commands = {{“login eagle”}}
Log out, then log in again. The terminal displays a login
banner from the specified host.
Login and X Session Management 5-3
Specifying the Hosts Offered for Login
Login from the First Host to Respond
broadcast query
The terminal sends a general
query to the network for any
host running XDM. The other
types of queries are direct and
indirect, which request a
response from a specific host.
An indirect query may also be
passed on to another host or
result in a list of available
hosts.
To configure a terminal to display a login banner from the first host
to respond to an XDM broadcast query:
1. In the exec-startup-commands parameter, include “login.” For
example:
exec-startup-commands = {{login}}
2. Set the login-xdm-broadcasts parameter to use the first host that
responds. For example:
login-xdm-broadcasts = use-first
3. Log out, then log in again. The first host to answer the
terminal’s broadcast request displays a login banner.
Displaying a Login Chooser
There are two ways to display a Login Chooser before displaying a
login banner.
Listing Specific Hosts in the Login Chooser
To configure a terminal to display a Login Chooser offering a
specific set of hosts for login services:
1. In the exec-startup-commands parameter, include “login.” For
example:
exec-startup-commands = {{login}}
2. In the login-default-hosts parameter, specify the hosts to be
offered in the Login Chooser (Figure 5-3) .
A string describing the host
for users
login-default-hosts = {
{ tcp
eagle
{ ncdnet hawk
{ tcp
falcon
}
The type of network on
which the host resides
"Mktg Sun" }
"Engr VAX" }
"Engr VAX" }
The login hostname
Figure 5-1 Listing Hosts in the Login Chooser
5-4 Login and X Session Management
Specifying the Hosts Offered for Login
3.
Set the login-xdm-broadcasts parameter:
— If other hosts might respond to broadcasts and you do not
want them listed in the Login Chooser, set the parameter
as follows:
login-xdm-broadcasts = ignore
— If other hosts might respond to broadcasts and you do
want them listed in the Login Chooser, set the parameter
as follows:
login-xdm-broadcasts = prompt
4.
If you want to restrict host choices to the hosts listed in the
login-default-hosts table, set the login-restrict-host-choices
5.
parameter to “true.” Otherwise, the user can enter a hostname
in the Host: field of the Login Chooser and log in to that host.
After the user logs out, the terminal displays a Login Chooser
with a list of default hosts.
Listing All Available Hosts in the Login Chooser
To configure the Login Chooser to offer login through all the
available hosts:
Tip
You can set the login-xdmbroadcast-wait-time
parameter to specify the
number of seconds the
terminal waits for hosts to
respond to a query before it
begins to display hostnames in
the Login Chooser. The default
is 3 seconds.
1.
2.
3.
In the exec-startup-commands parameter, include “login.” For
example:
exec-startup-commands = {{login}}
Set the login-xdm-broadcasts parameter:
login-xdm-broadcasts = prompt
After the user logs out, the terminal displays a Login Chooser
listing all the hosts that answered the terminals broadcast.
Windows NT Hosts in the Login Chooser
If Windows NT hosts or published applications are added to the
Windows Access chooser (Console ⇒ Utilities ⇒ Windows Access),
those connections also appear automatically in the Login Chooser.
For more information about Windows NT connections, see
Chapter 12.
Login and X Session Management 5-5
Using XDM to Customize the User Environment
Using XDM to Customize the User Environment
XDM uses two types of startup files for configuring user
environments. The Xsession file provides a system-wide
environment, and the .xsession file provides an individual user
environment that differs from the standard environment.
Configuring a System-Wide Environment
The system Xsession file is a startup script used for configuring a
standard environment. Typically, an Xsession file performs the
following functions:
❏ Executes xrdb (1) to load the resource database
❏ Starts initial clients, including a window manager
❏ Executes the script in the .xsession file (if the user has an
individual .xsession file)
❏ Sets up the standard environment (if the user doesn’t have an
individual .xsession file)
ncdinstall installs default Xsession files for the OpenWindows
environment for Sun hosts, the HP VUE environment for HP-UX
hosts, and the local NCD Window Manager environment for all
other hosts.
The ncdinstall program puts sample Xsession files in the directory
/usr/lib/X11/xdm. You can use a text editor to edit the configuration
files to suit your environment.
Configuring Individual Environments
The default Xsession file checks for a .xsession file and executes it.
Consequently, you can use a .xsession file for users who do not want
to use the systemwide environment. When the last client in the
.xsession file finishes executing, the script also finishes executing
and the user is logged out.
5-6 Login and X Session Management
Using XDM to Customize the User Environment
When creating or editing .xsession scripts, follow these rules:
Tip
XDM does not execute .login,
.cshrc, or .profile files, so
environment variables and
aliases defined in these files
must be replicated in
.xsession files. Set the search
path to include all the
directories and programs the
user needs.
❏
❏
❏
❏
❏
Do not set the DISPLAY variable; XDM sets it.
Run clients in the background unless a client must take effect
before another client. For example, run clients such as xrdb,
xset, and xmodmap in the foreground.
Load the client resource database using xrdb.
To start the host-based NCD Window Manager (ncdwm), add
an ncdwm command.
To start a local window manager, add the ncdrunwm command
(for the local NCD Window Manager) or ncdrunwm -mwm (for
the local Motif Window Manager).
ncdrunwm should be the last client started in the script.
ncdrunwm
The host-based application
launcher that provides
application startup and host
access services for NCD
local clients.
❏
Otherwise, run the last client in the foreground so that exiting
from this client is equivalent to logging out. You can make the
launcher the last client, with a logout menu entry in the
launcher configuration file. For example:
“Log Off”
f.quit
When the user selects Log Off from the menu, the session
ends.
Make the file world-executable.
Login and X Session Management 5-7
Controlling User and Host Connections to Terminals
Controlling User and Host Connections to Terminals
XDM access control ensures that only clients started by authorized
users from authorized hosts can connect to NCD terminals. XDM
access control employs an authorization key known to the X server
running on the user’s terminal and to the clients that the user starts.
For access control to be effective, you must configure both the XDM
host(s) and terminals.
Configuring the Host for XDM Access Control
To configure the host:
1. On hosts running xdm, make sure that XDM access control is in
effect. You can specify access control for some or all terminals
managed by a host by configuring the xdm-config file, which is
located in /usr/lib/X11/xdm.
— The following line turns on user-based access control for
all terminals connecting to the host:
DisplayManager*authorize: true
— To enable access control generally but disable it for one or
more terminals, follow the line above with a line
specifying each terminal on which user-based access
control is disabled. For example:
DisplayManager.ncdu85_0.authorize: false
— Conversely, to disable access control generally but enable
it for one or more terminals, include a line disabling
access control for all terminals:
DisplayManager*authorize: false
— Follow the line above with an enabling line for each
terminal that uses access control. For example:
DisplayManager.ncdu85_0.authorize: true
2.
After configuring the xdm-config file, send xdm a SIGHUP
signal to direct xdm to read the file. For example:
# kill -HUP ‘cat /usr/lib/X11/xdm/xdm-pid‘
5-8 Login and X Session Management
Controlling User and Host Connections to Terminals
XDM-AUTHORIZATION-1
An authorization method that
uses an encrypted key.
3.
If you are using XDM-AUTHORIZATION-1 on any terminals,
create an xdm-keys file in the /usr/lib/X11/xdm directory. Each
line in this file consists of the Ethernet address of a terminal
using XDM-AUTHORIZATION-1 and the terminal’s encryption
key. For example:
-Ethernet-00:00:a7:10:51:10
0x1234999
Only root should be able to read and write this file.
An encryption key can be any number you wish, as long as it
consists of up to 14 hexadecimal digits preceded by 0x.
Note that the same key is used to configure the terminal, as
described in the next section.
Configuring the Terminal for XDM Access Control
To make XDM access control effective, you must enable X server
access control and make sure the access control list is empty.
To configure a terminal for XDM access control:
1. Enable X server access control:
a. The xserver-access-control-enabled parameter controls the
current status of host-based access control. This is reset to
the default mode when the terminal boots. Set this
parameter to “true.”
b. The xserver-access-control-enabled-default parameter
controls the default status of host-based access control.
Set this parameter to “true.”
2. Enter the hosts from which clients are allowed to connect to
the terminal’s X server into the xserver-access-control-list table.
An example table is shown in Figure 5-2.
Hosts from which clients
without the authorization key
are permitted X server access
xserver-access-control-list = {
The client connects to the host using this
{ eagle
tcpip }
protocol. Hosts with access through both
{ ncdu10 tcpip }
TCP/IP and DECnet must have entries
{ ncdu10 ncdnet }
in the access control list for both
}
Figure 5-2 Specifying Hosts Permitted X Server Access
Login and X Session Management 5-9
Controlling User and Host Connections to Terminals
— To make sure that only clients with the authorization key
can connect to the X server, the access control list must be
empty:
xserver-access-control-list = {}
— If it is acceptable for clients without the authorization key
to connect to the X server, list the hosts on which the
clients reside in the access control list.
— If users must start clients on hosts other than the login
host and user home directories are not shared, you must
take steps to permit these clients to connect to the server.
See “Controlling Access When Clients Are Running on
Multiple Hosts”.
Tip
The encryption key is
displayed in the Change Setup
Parameters window as a
series of asterisks (****). When
viewing configuration data
using TELNET, the value of
the parameter is “<getprotected>” if set and “nil” if not
set.
3.
For terminals using XDM-AUTHORIZATION-1, set the
encryption key in the Console (Setup ⇒ Change Setup
Parameters ⇒ Access Control ⇒ (X Server section) XDM
Authentication Key). It must be the same encryption key that
you put in the xdm-keys file.
Changes take effect at the start of the X session, and the key is
saved in NVRAM.
Controlling Access When Clients Are Running on Multiple Hosts
.Xauthority
A file created by XDM and
used in user-based access
control for storing magic
cookies.
XDM access control relies on all clients having access to the
authorization key in the .Xauthority file in the user’s home directory.
xauth (1)
A utility used in host access
control when access is
required by clients running on
hosts other than the user’s
login host.
If you need to run clients from a host that does not have a shared
home directory, you can use the xauth (1) utility to extract the
authorization key from the .Xauthority file in the user’s home
directory on one host and merge it into .Xauthority files in the user’s
home directory on other hosts.
This must be done at the start of each X session, so you should
automate the process by putting backgrounded xauth commands in
startup scripts (Xsession or .xsession).
This is the case if you run all clients on the host where user home
directories reside or if user home directories are shared across all
hosts on which your clients run.
5-10 Login and X Session Management
Controlling User and Host Connections to Terminals
magic cookie
A secret password used with
XDM to control access to the X
server and protect a user’s
display from unauthorized
access.
In addition, you can use xauth to put the magic cookie in another
user’s .Xauthority file, enabling that user to start clients on the
terminal.
Two ways of using xauth to extract the authorization key and merge
it into another file are shown in the following sections.
Using xauth Interactively
The following example shows an interactive session with xauth.
1. On the login host, use the xauth command to list the
authorization keys in use, extract the key for the user’s
terminal, and place it in a holding file. For example:
$ cd $HOME
$ xauth
Using authority file /u/JRuser/.Xauthority
xauth> list
ncd5:0 MIT-MAGIC-COOKIE 4b7641306f456d5a7794c6d
ncd6:0 MIT-MAGIC-COOKIE 522e6853394958444652456
xauth> extract cookie.file ncd5:0
1 entries written to "cookie.file"
xauth> q
$
2.
On the other hosts from which the user needs to run clients,
merge the extracted key into the .Xauthority file:
$ xauth
xauth> merge cookie.file
Automating xauth
To automate xauth, use a command like the following, which
extracts the authorization key from the current host and merges it
into a .Xauthority file on another host (host2 in this example):
xauth extract - $DISPLAY | rsh host2 xauth merge -
Login and X Session Management 5-11
Using the NCD Display Manager
Using the NCD Display Manager
This section describes how to use the NCD Display Manager
(ncddm).
About the NCD Display Manager
The NCD Display Manager is a host-based daemon that:
❏ Enhances terminal security for NFS file access
❏ Provides environment variables required by local clients, such
as java and the NCD Mosaic Browser
❏ Makes it possible to prevent anyone but the logged-in user
from starting local clients using the remote shell command,
provided the user logs in through a login service, such as XDM
ncddm(1) and a helper utility, ncdloguser(1), are installed and started
on the login host when you use ncdinstall to install NCDware and
you select NFS as the file access method. ncdloguser records
information in a log file for use by ncddm. By default, the log files are
located in the /usr/lib/X11/xdm/ncd directory, and the name of a log
file is the value of the DISPLAY variable without the :0 suffix.
If ncddm is enabled on the terminal, the terminal queries ncddm for
the user’s name (USER), home directory (HOME), and the UID (user
identification) and GID (group identification). The user’s home
directory is added to the terminal’s file service table, but you must
arrange to export it from the host. The terminal uses this
information as follows:
❏ The username can be used to prevent anyone but the user who
is logged in on the terminal from using rsh and remsh to start
local clients. Otherwise, there is nothing to prevent individual
users from doing so, although you can use host-based access
control.
❏ The appletviewer command uses the pathname of the user’s
home directory to find the .hotjava/properties file. The NCD
Mosaic Browser needs the user name and home directory to
access browser preference files and other files, such as the
history file and hot list.
5-12 Login and X Session Management
Using the NCD Display Manager
Tip
If you set the xserver-retainx-settings parameter to 'true,”
the UID and GID are not reset
to “nobody” when the user logs
out. This can cause a security
problem by granting
unauthorized access to a
user’s home directory.
❏
On NCD terminals, the UID and GID are used to control NFS
file access. ncddm gets the UID and GID from the entry for the
user in the /etc/passwd file or from NIS and resets both
variables to “nobody” when the user logs out. If ncddm cannot
obtain these values, the values in the terminal’s file-nfs-uid
and file-nfs-gid parameters are used. The default for both
parameters is -2, which corresponds to “nobody” (the NFS
default anonymous user).
Setting Up the NCD Display Manager
To set up the NCD Display Manager, follow these steps:
Tip
ncdinstall adds the
ncdloguser login
command to the XDM
Xstartup file and
ncdloguser logout to the
Xreset file.
Tip
ncdloguser creates files for all
terminals on which a user logs
in, even if the terminal is not
running the current release of
NCDware.
1.
2.
Make sure that the user’s login host is running XDM (or some
other login service). For XDM, make sure that XDM files are
installed in the normal locations—/usr/lib/X11/xdm and
/usr/bin/X11.
Create the log directory, /usr/lib/X11/xdm/ncd. For security
reasons, the directory should be writable only by root.
ncdloguser records user information in this directory for each
terminal.
If you are using CDE (Common Desktop Environment) or VUE
(Hewlett Packard’s desktop environment), use the commandline arguments for ncddm and ncdloguser to specify the
pathname of the log directory (see the man pages for the
relevant arguments).
3. ncdinstall starts ncddm and runs it in the background. For
ncddm to start automatically when the host is rebooted, put a
command line in a system startup script.
4. To enable the terminal to query ncddm, set the login-ncddmenabled parameter to “true” in a remote configuration file.
5. If desired, use the login-ncddm-tcp-port parameter to change
the TCP port used by ncddm from its default value of 677.
6. To implement user-based access control, which prevents
anyone but the user from using rsh to start local clients on the
terminal, set the exec-user-access-control parameter to “true.”
When the user logs in, the username, home directory, UID, and GID
are retrieved by the terminal.
Login and X Session Management 5-13
Configuring NCD Terminal Emulator Login
Configuring NCD Terminal Emulator Login
NCD Terminal Emulator
(ncdterm)
The local NCD VT320 terminal
emulator, which supports color
terminals and permits
connection via LAT, TELNET,
CTERM, and serial protocols.
Users working on systems that are not running XDM can log in to
hosts through the Terminal Host Chooser in the Console (Terminals
⇒ New Terminal). Users can display a Terminal Host Chooser that
lists all hosts or that offers hosts via specific protocols. Table 3-1 lists
the choices in the Terminals menu and the types of connections
listed in each.
Table 3-1 NCD Terminal Emulator Protocols
Tip
By default, the Terminal Host
Chooser lists connections to
local services (the Local File
Manager, the Configuration
daemon, and the Diagnostic
daemon). To prevent listing of
local services, set the
showLocal resource to
“false.” This setting affects all
versions of the Terminal Host
Chooser.
Console ⇒ Terminals Menu Item
Connections Listed
New Terminal
TELNET, LAT, CTERM,
and serial
New Telnet
TELNET
New LAT
LAT
New CTerm
CTERM
New Serial
serial
The main Terminal Host Chooser displays all connections, and the
protocol-specific choosers each display a subset of the connections.
Thus, the TELNET chooser displays the TELNET connections; the
CTERM chooser displays the CTERM connections; and the LAT
chooser displays the LAT connections. If more than one serial port
is available, a Serial chooser displays the serial connections. If there
is only one serial port, a terminal emulator window opens when
you select Terminals ⇒ New Serial.
See Chapter 7 for the commands for invoking the terminal emulator
from a command line and the ncdterm(1) man page for all of the
options and X resources. For information about using the NCD
Terminal Emulator, see the User’s Guide.
You can configure the Terminal Host Chooser in the following
ways:
❏ To automatically display the Terminal Host Chooser or
terminal emulation windows after the terminal is reset, list
commands in the exec-startup-commands table. For example,
5-14 Login and X Session Management
Configuring NCD Terminal Emulator Login
❏
the following exec-startup-commands table displays the
Terminal Host Chooser at reset:
exec-startup-commands = {term}
To specify a default list of terminal emulator login hosts, list
all of the hosts (TELNET, CTERM hosts and LAT) to be
displayed in the choosers in the term-default-hosts table. An
example table is shown in Figure 5-3.
term-default-hosts = {
{ telnet
walrus
{ cterm
eng3100
}
The client connects to the
host using this protocol
Name of the
login host
"home machine"
}
"jane’s machine" }
Description of the
login host
Figure 5-3 Listing Hosts in the Terminal Emulator Host Choosers
❏
❏
To prevent users from logging into hosts not listed in the
choosers, set the term-restrict-host-choices parameter to “true.”
To reset the timeout for establishing a connection before
declaring an error condition, use the term-default-connecttimeout parameter.
Automating Login through the NCD Terminal Emulator
Tip
When using XDM to log in,
resources set in xserverinitial-x-resources are
erased. Instead, use xrdb (1)
in a session management file
to load resources after the X
session starts.
To set up a default host for a TELNET or LAT terminal emulation
session so users do not have to type a hostname or IP address when
logging in through an NCD Terminal Emulator window, you can
set resources in the xserver-initial-x-resources parameter or in
resource files. For example:
xserver-initial-x-resources = NCDterm*defaultHost:lakota
If you specify a default host, you can set the following resources to
further customize the window.
The autoConnect resource automatically connects the user to the
default host. Only the login prompt appears in the window; no
hostname prompt appears. For example:
xserver-initial-x-resources = ’NCDterm*defaultHost:lakota NCDterm*autoConnect:true’
Login and X Session Management 5-15
Configuring NCD Terminal Emulator Login
The autoReconnect and exitOnDisconnect resources determine the
behavior of the terminal emulator when the user exits.
❏ If autoReconnect is “true,” the emulator reconnects to the
default host after disconnecting. The default value is “true.”
❏ If exitOnDisconnect is “true,” the emulator exits after
disconnecting. The default value is “false.”
Configuring NCD Terminal Emulator Sessions without Login
The host-based ncdrunterm program opens an NCD Terminal
Emulator window on an NCD terminal without requiring login to
the UNIX host. ncdrunterm starts an NCD Terminal Emulator
connection via TELNET to a shell on the UNIX host. The host to
which the emulator connects is the host on which you enter the
command.
The ncdrunterm program bypasses the standard UNIX user
authentication procedures of username and password checking,
and should be used only on systems that do not require those
standard security measures.
To use ncdrunterm:
❏ The ncdrunterm utility must be owned by root. The super-user
must use the chown (1) command to set ownership.
❏ Set permission to “set user ID on execution”:
% chmod 4555 ncdrunterm
To start an ncdrunterm connection, type:
% ncdrunterm -display $DISPLAY
ncdrunterm also accepts all NCD Terminal Emulator options except
for -ctype and -host. See ncdterm(1) man page for more information
about options.
5-16 Login and X Session Management
Configuring Login to Microsoft Windows NT Hosts
Configuring Login to Microsoft Windows NT Hosts
You can use the NCD login command to set up automatic
connections to Windows NT servers. The servers must be running
Citrix WinFrame or MetaFrame.
For an automatic connection to a Windows NT server, using the
NCD ICA (Independent Computing Architecture) Client, place the
following command in the terminal’s remote configuration file:
exec-startup-commands = {
{ login -c ica hostname }
}
where hostname is the name or IP address of the Windows NT
server.
For more information about this and other methods of configuring
login to Windows NT servers, see Chapter 12.
Login and X Session Management 5-17
Setup Menu Equivalents for Remote Configuration Parameters
Setup Menu Equivalents for Remote Configuration
Parameters
Table 5-1 lists the remote configuration parameters discussed in
this chapter and a description of the corresponding Setup menu
field for each. This information is provided for system
administrators who configure terminals through the Console and
for configuring parameters (such as passwords and encryption
keys) that should only be set in the Console.
Table 5-1 Setup Menu Fields for Configuring Login
When Changes
Take Effect
Saved in
NVRAM
Setup ⇒ Change Setup
Parameters ⇒ Commands and
Startup ⇒ Startup Commands
Immediately
No
exec-user-access-control
Setup ⇒ Change Setup
Parameters ⇒ Access Control ⇒
Enable Execution User Access
Control
Immediately
No
login-default-hosts
Setup ⇒ Change Setup
Parameters ⇒ Login ⇒ Default
Hosts
Immediately
No
login-ncddm-enabled
Setup ⇒ Change Setup
Parameters ⇒ Login ⇒
(NCDDM section) NCD Display
Manager Enabled
Immediately
No
login-ncddm-tcp-port
Setup ⇒ Change Setup
Parameters ⇒ Login (NCDDM
section) NCD Display Manager
TCP Port Number
Immediately
No
login-restrict-host-choices
Setup ⇒ Change Setup
Parameters ⇒ Login ⇒ Restrict
Host Choices
Immediately
No
Parameter Name
Console Setup Menu Field
exec-startup-commands
5-18 Login and X Session Management
Setup Menu Equivalents for Remote Configuration Parameters
Table 5-1 Setup Menu Fields for Configuring Login (Continued)
When Changes
Take Effect
Saved in
NVRAM
Setup ⇒ Change Setup
Parameters ⇒ Access Control ⇒
(X Server section) XDM
Authentication Key
At the start of
the X session
Yes
login-xdm-broadcast-waittime
Setup ⇒ Change Setup
Parameters ⇒ Login ⇒ Wait for
Broadcasts for (seconds)
Immediately
No
login-xdm-broadcasts
Setup ⇒ Change Setup
Parameters ⇒ Login ⇒ What to
do with XDMCP Broadcasts
Immediately
No
term-default-hosts
Setup ⇒ Change Setup
Parameters ⇒ VT320 Terminal
Emulation ⇒ Default Hosts
Immediately
No
term-restrict-host-choices
Setup ⇒ Change Setup
Parameters ⇒ VT320 Terminal
Emulation ⇒ Restrict Host
Choices
Immediately
No
xserver-access-controlenabled
Setup ⇒ Change Setup
Parameters ⇒ Access Control ⇒
(X Server section) Enable X
Access Control
Immediately
No
xserver-access-controlenabled-default
Setup ⇒ Change Setup
Parameters ⇒ Access Control ⇒
(X Server section) Default for
Enable X Access Control
At the start of
the X session
No
xserver-access-control-list
Not available through Setup
menus
Immediately
No
xserver-initial-x-resources
Setup ⇒ Change Setup
Parameters ⇒ X and Graphics
⇒ Initial X Resources
Immediately
No
Parameter Name
Console Setup Menu Field
login-xdm-authenticationkey
Login and X Session Management 5-19
Setup Menu Equivalents for Remote Configuration Parameters
5-20 Login and X Session Management
6 Configuring Font Service
This chapter describes the tasks involved in preparing the
host and the terminal so applications can access the fonts they
need to run properly on an NCD terminal. The chapter
describes both bitmap fonts and the NCD font server.
Tip
Procedures in this chapter provide
directions for configuring terminals
through remote configuration files. For
system administrators who use the
Console for terminal configuration,
information about Setup menu fields
is provided at the end of the chapter.
The major topics in this chapter are:
❏ Using bitmap fonts—including font formats, font hosts,
adding and deleting fonts, font substitutions (aliasing),
and configuring a terminal’s font path
❏ Using the NCD font server—including configuring and
starting the font server, adding font servers to the font
path, and adding outline fonts
Using Bitmap Fonts
bitmap font
A collection of pre-rendered
characters in a particular style and
size. Each bitmap font is stored in a
separate file.
The NCDware distribution includes a full set of the standard
X Window System bitmap fonts plus the outline fonts used by
the font server.
The instructions in this section assume that the default font
access protocol, TFTP, is enabled on the host and that the fonts
included in the NCDware distribution are installed in the
default directory, /usr/lib/X11/ncd/fonts. These actions are
performed during installation by ncdinstall.
fonts.dir
A required file that lists all of the fonts
in the font directory.
fonts.alias
An optional file in a font directory that
lists substitutes for unavailable fonts.
Terminals also contain built-in fonts to use in X server
downloading and when downloaded fonts are unavailable.
Fonts are organized into font directories containing font files
(definitions of fonts) and the fonts.dir and fonts.alias font
management files. Fonts and management files are in
subdirectories of the directory /usr/lib/X11/ncd/fonts.
Configuring Font Service 6-1
Using Bitmap Fonts
By default, an NCD terminal searches for fonts on the boot
host. If you have specified other initial file servers, the
terminal searches for fonts on them as well.
The terminal’s font path specifies the directories in which it
should search for fonts.
Bitmap Font Formats
font server
Host-based software that relieves the
X server of all tasks related to
downloading fonts; it also scales
outline fonts. The NCD font server is
described in “Using the NCD Font
Server” on page 6-8.
Without a font server, NCD terminals can read the following
compressed (12-bit compression) and uncompressed font
formats:
❏ PCF (Portable Compiled Font)
❏ NCD’s SNF (Server Normal Font)
❏ DWF (DECwindows Format).
Putting Fonts on a Non-Standard Host
Tip
The file-initial-server-1 and fileinitial-server-2 remote configuration
parameters define the initial file
servers.
If you want to put the font directory on a host other than the
boot host or an initial file server or in a different directory, you
must map the default font location known by the terminal to
the host or directory.
Use the file-service-table parameter to map the default location
(the local mount point) to the location of the font directory on
the file server host (the file server mount point). Figure 6-1
shows an example file service table.
File server host
file-service-table = {
{/usr/lib/X11/ncd/ nil eagle tftp /usr/local/lib/X11/ncd unknown 3 30 8192 8192}
}
Local mount point
File server mount point
Figure 6-1 File Service Table Entry for Fonts
6-2 Configuring Font Service
Using Bitmap Fonts
To change the file server access point:
See Chapter 3 for more information
about the file service table and initial
file servers.
1.
2.
3.
Find the entry in the file-service-table parameter that has
“/usr/lib/X11/ncd/” in the local mount point field.
/usr/lib/X11/ncd/ is the pathname that the terminal uses in
looking for fonts.
In the file server mount point field, type the actual
location of the fonts.
If the fonts are on a host other than the boot host or an
initial file server, enter the name or IP address of the host
in the file server field.
Adding Bitmap Fonts to Font Directories
You can add bitmap fonts by including them in the font
directory and entering the font name in fonts.dir. To add
bitmap fonts:
1. If you don’t already have a font directory for the fonts
you’re adding, use mkdir(1) to create one.
Tip
If you are using secure TFTP, make
sure the font directory is a
subdirectory of the TFTP home
directory.
2.
3.
Tip
The font filename extension indicates
its format, for example, .snf for SNFformatted fonts, .pcf for PCFformatted fonts, and .dwf for DWFformatted fonts.
4.
5.
6.
7.
Make sure that the font directory is on either the boot
host or an initial file server. If it is not, map the new
directory s as shown in “Putting Fonts on a NonStandard Host” on page 6-2.
Use chmod(1) to make the font directories worldexecutable and world-readable and the font files worldreadable.
Make sure the font files are in formats that the terminal
can read: NCD SNF, PCF, or DWF.
If fonts are in BDF (Bitmap Distribution Format), convert
them to PCF using ncdbdftopcf (1). For example:
# ncdbdftopcf myfont.bdf -o myfont.pcf
Copy or move the font files into the font directory.
To compress fonts to save disk space, run compress(1) in
12-bit mode on the new font files. Use 12-bit
compression. For example
# compress -b 12 myfont.pcf
Configuring Font Service 6-3
Using Bitmap Fonts
8.
Run ncdmkfontdir(1) in the font directory to build (or
rebuild) the fonts.dir file. For example:
# cd /usr/lib/X11/fonts/100dpi
# ncdmkfontdir
9. If you want to use the new fonts as substitutes for fonts
that you do not have, add an entry to the fonts.alias file,
as described in “Using Alternate Fonts” on page 6-4.
10. Add new font directories to the terminal font path, as
described in “Changing the Terminal’s Font Path” on
page 6-5.
11. If you are adding fonts to an existing directory, use
Rescan Font Path (Utilities ⇒ Rescan Font Path) to direct
the terminal to reread the font directory.
Using Alternate Fonts
Tip
If your site has many terminals, you
should maintain a fonts.alias file in a
font directory accessed by many or all
terminals.
If an application requires a font that is unavailable, it might
use an alternate default font that does not look right; or it
might crash, refuse to run, or run poorly.
You can use a fonts.alias file to instruct the terminal to
substitute a different font (called an alias) for the one the client
requested.
Tip
In specifying fonts in resources, on a
command line, and in font database
files, you must follow the X Window
System convention of using XLFD
(X Logical Font Description) font
names.
The font alias need only be in any one of the font directories in
the terminal’s font path, and the alias need not be in the same
directory as the aliased font. The terminal applies the alias to
the other directories it accesses.
To create a fonts.alias file and add an entry:
1. If no fonts.alias file exists, create one in the directory
containing the substitute font and make it worldreadable.
2. In the fonts.alias file, add a line that maps the font name
that the client requests to the name of the substitute font.
For example, if the client is requesting a font called
odd_font, you would add a line like this:
odd_font
-misc-fixed-medium-r-normal--10-100-75-75-c-60-iso8859-1
6-4 Configuring Font Service
Using Bitmap Fonts
Deleting Bitmap Fonts and Font Directories
To delete bitmap fonts:
1. Delete the font files.
2. Update the fonts.dir file by running ncdmkfontdir in the
directory from which the fonts were deleted; for
example:
# cd /usr/lib/X11/fonts/100dpi
# ncdmkfontdir
3. Use the Rescan Font Path utility in the Console (Utilities
⇒ Rescan Font Path) to direct the X server to read the
fonts.dir file.
To delete bitmap font directories:
1. Delete the directories.
2. Update the current font path, if desired (see instructions
in “Setting the Font Path for the Current X Session” on
page 6-6).
3. Remove the deleted directories from the default font
path (use the instructions in “Changing the Font Path
Permanently” on page 6-5).
Changing the Terminal’s Font Path
By default, when the X server resets, the font path reverts to
the path specified in the xserver-default-font-path parameter.
The terminal does not read changes to the default font path
until it has been rebooted. (The pref-font-path parameter,
described in “Setting the Font Path for the Current X Session”
on page 6-6, changes the font path for the current session.)
Changing the Font Path Permanently
Tip
You can use the xserver-font-pathalias-table parameter to substitute
simple names, like “misc,” for the
complete font directory path or font
server names used in parameters.
The default font path settings in the X server match the
resolution of the terminal’s monitor.
Built-in fonts in the default font path provide the correct
cursors for the NCD terminal. Do not remove them from the
default font path.
Configuring Font Service 6-5
Using Bitmap Fonts
The default font path for 100-dpi (dots-per-inch) monitors is:
built-ins
/usr/lib/X11/ncd/fonts/pcf/misc
/usr/lib/X11/ncd/fonts/pcf/100dpi
/usr/lib/X11/ncd/fonts/pcf/dw100dpi
Tip
If you are using secure TFTP, do not
include the TFTP home directory
name in the names of the directories
in the font path; it is added
automatically.
To change the terminal’s default font path, change the font
path defined in xserver-default-font-path. Be careful to keep the
built-in fonts at the top of the font path.
If you’re using a remote configuration file to add a font called
MyAppFonts, the entry might be similar to the one that
follows:
xserver-default-font-path= {
{built-ins}
{/usr/lib/X11/NCD/fonts/pcf/misc}
{/usr/lib/X11/NCD/fonts/pcf/100dpi}
{/usr/lib/X11/NCD/fonts/pcf/dw100dpi}
{/usr/lib/X11/NCD/fonts/pcf/MyAppFonts}
}
Setting the Font Path for the Current X Session
You can set the terminal’s font path for the duration of the X
session. This is useful for setting specialized font paths for
individual users.
Setting the Current Font Path from the Console
The current font path overrides the default font path.
To change the current font path from the Console:
Tip
You can change a remote terminal’s
current font path by displaying the
User Preferences window on your
terminal and selecting Connect to
New Unit from the File menu. After
entering the remote terminal’s IP
address or hostname and the User
Preferences password or global
password, follow Step 3 through
Step 6.
6-6 Configuring Font Service
1.
2.
3.
4.
5.
6.
Select Setup ⇒ Change User Preferences.
If User Preferences passwords are set and enforced
locally, enter the read/write password and click on OK.
Open the Fonts hide box.
Add, delete, or replace font directories in the Current
Font Path.
Click on Apply to put the new font path into effect.
Click on Cancel to exit from the User Preferences
window.
Using Bitmap Fonts
Setting the Current Font Path in the Remote Configuration File
To change the current font path in the remote configuration
file, use the pref-font-path parameter. This parameter
overrides the value in xserver-default-font-path parameter for
the duration of the X session. For example, to add the font
directory MyAppFonts to the font path:
See Chapter 4 for information about
how this and other user preferences
can be saved after the user logs out.
pref-font-path = {
{built-ins}
{/usr/lib/X11/ncd/fonts/pcf/misc}
{/usr/lib/X11/ncd/fonts/pcf/100dpi}
{/usr/lib/X11/ncd/fonts/pcf/dw100dpi}
{/usr/lib/X11/ncd/fonts/pcf/MyAppFonts}
}
Configuring the Font Path for CDE Bitmap Fonts
This section describes how to configure the font path to work
with CDE (Common Desktop Environment).
If you are not using a font server, configure the font path as
shown in the following example for a Solaris system. The CDE
fonts may be in a different directory on other systems.
Note that the 75dpi font directory precedes all other font
directories. If the font path is not set in this manner, the text in
dtterm does not look right.
xserver-default-font-path = {
{ /usr/lib/X11/ncd/fonts/pcf/75dpi
{ /usr/dt/config/xfonts/C/ }
{ built-ins }
{ /usr/lib/X11/ncd/fonts/pcf/misc/ }
{ /usr/lib/X11/ncd/fonts/pcf/100dpi/ }
{ /usr/lib/X11/ncd/fonts/Xol }
}
If the fonts have been compressed with 16-bit compression,
recompress them in 12-bit compression mode. NCD terminals
require 12-bit compression.
If you are using TFTP, make sure the fonts are located under
the secure directory.
Configuring Font Service 6-7
Using the NCD Font Server
See “Putting Fonts on a NonStandard Host” on page 6-2 for more
information about the file service
table.
You will probably need to modify the terminal’s file-servicetable parameter so the terminal can download fonts from the
/usr/dt/config/xfonts/C directory.
You may also need to make modifications to the TFTP or NFS
setup on the host. For these reasons, NCD recommends using
a font server instead. For information on using a font server
and setting up the font path for a font server and CDE, see the
next section and “Adding Font Servers to the Font Path for
CDE” on page 6-12.
Using the NCD Font Server
The NCD font server (ncdfs) is host-resident software that can
perform all the tasks related to downloading fonts to NCD
terminals. The font server is required if you are using outline
fonts.
Tip
You can use font servers from other
vendors with NCD terminals.
outline font
A font that can be scaled to arbitrary
sizes and resolutions; it is stored as a
set of instructions for drawing curves.
6-8 Configuring Font Service
ncdinstall installs the font server software, including sample
font server configuration files. The sample files are placed in
the /usr/lib/X11/ncd/fs. The instructions in this section assume
that the NCD font server software was installed by ncdinstall.
You must run the font server on each host that provides
outline fonts to NCD terminals.
The font server provides access to more fonts than basic
bitmap font service does, and it can decrease the time it takes
to display fonts.
The NCD font server reads both bitmap and outline font
formats. The outline fonts included with NCDware are IBM
Type 1 (Adobe) and Bitstream Speedo. The font server can
read any of the following bitmap font formats in either
compressed or uncompressed form:
❏ SNF (Server Normal Format) from NCD, HewlettPackard, IBM, Digital Equipment Corp., Santa Cruz
Operations, and Sun Microsystems (not including Sun
OpenWindows FB fonts)
❏ BDF (Bitmap Distribution Format)
Using the NCD Font Server
❏
❏
PCF (Portable Compiled Format)
Scaled bitmap fonts
Configuring Font Server Operation
You may need to edit the font server configuration file,
/usr/lib/X11/fs/config, to suit your site.
The config file is an ASCII file consisting of parameter names
(also called keywords), each associated with a value or values
in the syntax parameter = value.
Configuration file conventions are:
❏ Entries are case-sensitive.
❏ Commas separate values if the parameter accepts more
than one value.
❏ A pound sign (#) precedes each comment line.
Table 6-1 lists font server parameters, permitted values,
default values, and descriptions.
Table 6-1 Font Server Configuration Parameters
Parameter
alternate-servers
Value (Type
and Default)
Description
List of strings
(nil)
Alternate font servers to be tried if the connection to the
current font server is lost. For example:
alternate-servers =
tcp/green:7001,tcp/green:7002
cache-size
Integer
(100,000)
The size in bytes of the font server cache.
Configuring Font Service 6-9
Using the NCD Font Server
Table 6-1 Font Server Configuration Parameters (Continued)
Parameter
catalogue
Value (Type
and Default)
Description
List of strings
(nil)
The font sources to be accessed by the font server in
order of preference. For example:
catalogue=
ibm:/usr/lib/X11/ncd/fonts/100dpi,
/usr/lib/fonts/speedo,
/usr/lib/X11/ncd/fonts/misc,
/usr/lib/X11/ncd/fonts/100dpi
When specifying SNF format fonts from a company
other than NCD, use a prefix followed by a colon to
identify the source. The prefixes are hp (HP), ibm (IBM),
dec (DEC), sco (SCO), and sun (Sun).
client-limit
Integer (20)
The number of clients the font server supports before
refusing service.
clone-self
Boolean (no)
Whether the font server should try to clone itself when
the limit set in client-limit is reached.
default-point-size
Integer (120)
The default point size (in tenths of a point) for fonts for
which point size is not included in the font name.
default-resolutions
List of
resolutions
(nil)
The screen resolutions that the font server supports by
default for cases in which the resolution is not included
in the font name.
error-file
String (none)
The file for logging error messages and notices.
error-method
String
(none)
The logging method for error messages and notices. The
methods are:
❏
❏
❏
❏
port
Integer
(7100)
6-10 Configuring Font Service
None (use stderr)
File (use the file that is named in error-file)
Syslog (use syslogd (8) on systems that support it)
Off (no messages and warnings are sent)
The TCP port on which the font server listens for
connections.
Using the NCD Font Server
Table 6-1 Font Server Configuration Parameters (Continued)
Value (Type
and Default)
Description
scaled-bitmaps
Boolean
(yes)
Whether the font server should scale bitmaps when an
application requests it.
snf-format
Bit-endian,
byte-endian,
glyph-pad,
scanline-pad
(msb, msb, 4, 4)
(NCD format)
How to read SNF format fonts.
transport
String
(tcpip)
The network protocol. Permissible entries are “tcpip” or
“decnet.”
trusted-clients
List of strings
(nil)
Clients from which the font server can accept
connections. If none are listed, the font server accepts
any connection.
Parameter
Enabling the Font Server
To enable the font server, add the following line to a host
startup file (such as /etc/rc.local):
if [ -f /usr/lib/X11/ncd/fs/config ]; then
/usr/bin/X11/ncdfs &
echo -n ‘ Starting ncdfs ‘
fi
The font server starts when the host is rebooted.
Adding Font Servers to the Font Path
The terminal accesses font servers through its font path. To
add one or more font servers to the font path, specify the font
path using the xserver-default-font-path parameter.
To add font servers to the font path, follow the instructions for
changing the font path in “Changing the Font Path
Permanently” on page 6-5. Instead of a pathname, however,
use the syntax:
Configuring Font Service 6-11
Using the NCD Font Server
tcp/hostname1 [+hostname2+hostnamen]:port
where:
hostname1
Is the hostname or IP address of the system on
which the font server resides. hostname2 and
subsequent hostnames are hosts that provide
redundancy in case hosts listed earlier are
unavailable.
port
Is the TCP port on which the font server listens
for connections.
For example, the following assignment includes the font
server on the host “fontsys” in the font path:
Tip
Built-ins are the fonts that are supplied
with your X server in case
downloaded fonts are unavailable.
xserver-default-font-path = {
{built-ins}
{tcp/fontsys:7100}
{/usr/lib/X11/ncd/fonts/pcf/misc}
{/usr/lib/X11/ncd/fonts/pcf/100dpi}
{/usr/lib/X11/fonts/pcf/dw100dpi}
}
Placing the font server in the font path directly after the builtin fonts is the most efficient method of font access, unless you
are configuring the font path for CDE.
Adding Font Servers to the Font Path for CDE
When setting up the font path to work with CDE and a font
server, put the font server last in the font path:
xserver-default-font-path = {
{built-ins}
{/usr/lib/X11/ncd/fonts/pcf/misc}
{/usr/lib/X11/ncd/fonts/pcf/100dpi}
{/usr/lib/X11/fonts/pcf/dw100dpi}
{tcp/fontsys:7100}
}
6-12 Configuring Font Service
Using the NCD Font Server
Adding Outline Fonts
To add supplemental outline fonts:
1. If you don’t already have a font directory for the new
fonts, use the UNIX mkdir(1) command to create one.
2. Make sure that the font directory is on either the boot
host or an initial file server. If not, map the directory to
the terminal’s default font directory (see “Putting Fonts
on a Non-Standard Host” on page 6-2).
fonts.scale
A font directory file that correlates
outline fonts with their XLFD name;
used with the Display PostScript
extension.
3.
Tip
A well-formed name contains all 14
hyphens and an entry for each field. If
you do not know what to enter for a
field, use an asterisk (*) to indicate a
wildcard value. Try to be as specific as
possible to avoid getting unsuitable
fonts. For details on font names, see
the Reference Manual.
5.
4.
6.
Use the UNIX chmod(1) command to make font files
readable by the UID under which the font server is
running.
Copy or move the font files into the font directory.
Edit the fonts.scale file to add the new outline fonts. Each
field and character must be entered accurately.
Outline font names must be well-formed. In addition,
outline font names must have five zeros in the XLFD
fields for pixel size, point size, horizontal and vertical
resolution, and width.
If you are adding fonts to an existing directory, use the
Rescan Font Path command in the Console (Utilities ⇒
Rescan Font Path) to direct the terminal to reread the font
directory.
Configuring Font Service 6-13
Setup Menu Equivalents for the Font Parameters
Setup Menu Equivalents for the Font Parameters
Table 6-2 lists the remote configuration parameters discussed
in this chapter and the corresponding Setup menu field for
each. This information is provided for system administrators
who configure terminals through Setup menus.
Table 6-2 Setup Menu Fields for Fonts
Parameter Name
Console Setup Menu Field
When Changes
Take Effect
Saved in
NVRAM
file-service-table
Setup ⇒ Change Setup Parameters
⇒ File Service ⇒ File Service Table
Immediately
No
pref-font-path
Setup ⇒ Change User Preferences
⇒ Fonts ⇒ Current Font Path
Immediately
No
xserver-default-font-path
Setup ⇒ Change Setup Parameters
⇒ Fonts ⇒ Default Font Path
Immediately
No
xserver-retain-font-path
Setup ⇒ Change Setup Parameters
⇒ Fonts ⇒ Retain Font Path Across
Sessions
Immediately
No
6-14 Configuring Font Service
7 Starting and Configuring Local Clients
This chapter describes local clients and the common
procedures for starting them, controlling access to them, and
configuring them.
Tip
Procedures in this chapter provide
directions for configuring terminals
through remote configuration files. For
system administrators who use the
Console for terminal configuration,
information about Setup menu fields
is provided at the end of the chapter.
Most local clients are implemented as X server modules. The
instructions in this chapter assume that the X server and its
modules have been installed by ncdinstall. For information
about the location of the X server modules and configuring
module load policies, see Chapter 3.
The topics in this chapter are:
❏ Descriptions of the local clients and local commands
❏ Methods for starting local clients
❏ Controlling access to local clients
❏ Methods of configuring local clients
Summary of Local Clients
Local clients (also called local commands) are X programs that
run on the terminal instead of on host computers. In most
ways, local clients are normal X clients; for example, you can
use X resources to customize them. By using local clients for
such tasks as terminal emulation and window management,
you can off-load some of the processing from network hosts to
the terminal.
Table 7-1 lists the NCD local clients and corresponding
Console menu items and summarizes the purpose, command
syntax (for use in remote configuration, remote shell
commands, and startup files) and commonly used options for
each local client. A complete list of command-line options and
resources for each local client is included in its man page.
Starting and Configuring Local Clients 7-1
Summary of Local Clients
Many of these local clients are discussed in detail in this
manual and in other NCDware manuals.
As noted in the table some console menu items are not local
clients.
Table 7-1 Local Client Menu Choices, Commands, and Functions
Console Name & Location
Command and
Options
Function
Console (accessed through
Setup key or key
combination)
console
Provides a menu bar for accessing local
clients and a hide box for displaying
diagnostic messages. See the ncdconsole(1)
man page.
Console ⇒ Clear Messages
Not a local client
Deletes all output from the Messages area.
Console ⇒ Rescan
Messages
Not a local client
Recalls messages that were deleted from the
Messages area.
Console ⇒ Abort Waiting
Fonts
Not a local client
Cancels persistent font requests to the NCD
font server.
Console ⇒ Abort Ringing
Bell
Not a local client
Stops the bell ringing.
Console ⇒ Abort Serial
Line 1
Console ⇒ Abort Serial
Line 2
Console ⇒ Abort Serial
Line 3
Console ⇒ Abort Parallel
Port 1
Console ⇒ Abort Parallel
Port 2
Not local clients
Cancels a serial or parallel connection.
Console ⇒ Reboot ...
Not a local client
Reboots the terminal.
7-2 Starting and Configuring Local Clients
Summary of Local Clients
Table 7-1 Local Client Menu Choices, Commands, and Functions (Continued)
Console Name & Location
Command and
Options
Function
Login ⇒ Login New X
Session
login
[ -d display ]
[ -h host1 [ +hostn ]
[ -c ica host ]
[ -n network ]
[ -persist ]
Displays the Login Chooser (lists hosts to
log into through XDM or DECwindows) or
a login banner (if -h is used). Uses the ICA
Client (-c ica option) or WinCenter to
connect to a Windows NT host. The -d
option specifies the X server (by default,
hostname:0.0). The -h option specifies the
host(s). The -n option specifies the type of
network protocol to use, either “tcp” or
“ncdnet” (default is “tcp”). The -persist
option causes the X server to continue to
attempt to log in to a specified host(s)
indefinitely. See the ncdlogin (1) man page.
Login ⇒ Logout
logout
Logs the user out of the X session after
displaying a warning dialog box.
See the ncdlogout (1) man page.
Terminals ⇒ New Terminal
term
[ -ctype type ]
[ -help ]
Displays the Terminal Host Choosers,
which list hosts to log into through terminal
emulation. The -ctype option specifies the
connection type (“telnet,” “lat,” “cterm,” or
“serial”) and -help lists the available
options. See the ncdterm (1) man page.
Terminals ⇒ New 3270
tn3270
[ -h hostname ]
[ -p portnumber ]
Displays the NCD 3270 terminal emulator,
which is compatible with IBM 3287
terminals; requires a license. The -h option
specifies the host to connect to; the -p
option specifies the port number.
See the ncd3270 (1) man page.
Starting and Configuring Local Clients 7-3
Summary of Local Clients
Table 7-1 Local Client Menu Choices, Commands, and Functions (Continued)
Console Name & Location
Command and
Options
Function
Terminals ⇒ New 3179G
tn3270 -gddm
[ -h hostname ]
[ -p portnumber]
Starts a 3270 emulation window for
running mainframe graphics (GDDM)
applications; requires a license. The -loadps
option enables programmed symbols
support; the -S3 option specifies model type
3; the -E option sets the terminal ID string to
“extended.”
See the ncd3270 (1) man page.
Terminals ⇒ Keymap
Editor
keymap_editor
Displays keyboard layouts and the actions
associated with each key, permitting a user
to remap the keyboard for the 3270
Terminal Emulator (ncd3270) or the NCD
Terminal Emulator (ncdterm).
See the keymap_editor(1) man page.
Terminals ⇒ New Telnet
term -ctype telnet
[ -help ]
Displays the Terminal Host Chooser that
lists TELNET login hosts. The -ctype telnet
option specifies a TELNET connection, and
-help lists the available options.
See the ncdterm(1) man page.
Terminals ⇒ New LAT
term -ctype lat
[ -help ]
Displays the Terminal Host Chooser that
lists LAT login hosts. The -ctype lat option
specifies a LAT connection, and -help lists
the available options.
See the ncdterm(1) man page.
Terminals ⇒ New CTerm
term -ctype cterm
[ -help ]
Displays the Terminal Host Chooser that
lists CTERM login hosts (requires an
NCDnet license). The -ctype cterm option
specifies a CTERM connection. and -help
lists the available options. See the
ncdterm(1) man page.
7-4 Starting and Configuring Local Clients
Summary of Local Clients
Table 7-1 Local Client Menu Choices, Commands, and Functions (Continued)
Console Name & Location
Command and
Options
Function
Terminals ⇒ New Serial
term -ctype serial
[ -help ]
On terminals with more than one serial
port, displays a Terminal Host Chooser that
lists serial connections. The -ctype serial
option specifies a serial connection and
-help lists the available options. On
terminals with one serial port, displays a
serial terminal emulation window. See the
ncdterm(1) man page.
Terminals ⇒ New Dialer
dialer
[ -help }
Lists serial ports and provides a
Communications menu for selecting a serial
port mode. The -help option lists the
available options. See the ncdterm(1) man
page.
WindowMgr ⇒ NCD
Window Manager
wm
Provides OSF/Motif-style window
management on the terminal. NCD
recommends using the host-based program
ncdrunwm to start the local NCD Window
Manager (wm). NCDware also includes a
host-based version of the NCD Window
Manager (ncdwm). See the ncdwm (1) and
ncdrunwm (1) man pages.
WindowMgr ⇒ Motif
Window Manager
mwm
Provides OSF/Motif window management
on the terminal; requires a license. NCD
recommends using the host-based program
ncdrunwm to start the local Motif Window
Manager (command name mwm). This
client requires a license.
See the mwm(1) and ncdrunwm(1) man
pages.
Utilities ⇒ Refresh Screen
Not a local client
Redraws the screen.
Utilities ⇒ Blank Screen
Not a local client
Starts the screen saver.
Starting and Configuring Local Clients 7-5
Summary of Local Clients
Table 7-1 Local Client Menu Choices, Commands, and Functions (Continued)
Console Name & Location
Command and
Options
Utilities ⇒ Lock Screen
lock
Locks the screen after prompting for a
password. Keeps anyone without the
password from using the terminal.
See the ncdlockscreen(1) man page.
Utilities ⇒ Rescan Font
Path
Not a local client
Rescans the font path
Utilities ⇒ Free DPS
Memory
Not a local client
Releases terminal memory used by Display
PostScript applications
Utilities ⇒ Test Network
test net
Runs the network test. See the ncdtestnet(1)
man page.
Utilities ⇒ Start Local
Command
startcmd
Displays a window for the user to enter a
command line for a local client or local
command.
Utilities ⇒ Start NCD
Mosaic Browser
browser
Starts the NCD Mosaic Browser. See the
nmosaic(1) man page.
Utilities ⇒ Start Java Applet
startjava or
appletviewer URL
Displays a window for the user to type an
URL for a Java applet or starts an applet.
See the appletviewer(1) man page.
Utilities ⇒ Video Player
vp [ -options ]
videoname
Runs the NCD Video Player, which
decodes, displays, and controls MPEG-1
format digitized video. See the vp(1) and
ncdsendvideo(1) man pages.
Utilities ⇒ Windows Access
icaui [ host ]
Displays the Windows Access dialog box
that allows connections to Windows NT
hosts using ICA and WinCenter. See the
icaui(1) man page.
7-6 Starting and Configuring Local Clients
Function
Summary of Local Clients
Table 7-1 Local Client Menu Choices, Commands, and Functions (Continued)
Console Name & Location
Command and
Options
Function
Setup ⇒ Change Quick
Setup
quicksetup
[ -d display ]
[ -h host ]
[ -p password ]
Displays the Quick Setup window for
changing the most frequently modified
configuration parameters. The -d option
specifies the X server to use, by default,
hostname:0.0; the -h option specifies the
host to try to connect to; the -p option
specifies a password required for
connecting to a remote terminal using the
-h option.
Setup ⇒ Change Setup
Parameters
setup
[ -d display ]
[ -h host ]
[ -p password ]
Displays the Setup Parameters window for
making immediate and temporary
configuration changes. The -d option
specifies the X server to use, by default,
hostname:0.0; the -h option specifies the
host to try to connect to; the -p option
specifies a password required for
connecting to a remote terminal using the
-h option. See the ncdsetup (1) man page.
Setup ⇒ Change User
Preferences
pref
[ -d display ]
[ -h host ]
[ -p password ]
Displays the User Preferences window for
making immediate and temporary changes
in the configuration parameters governing
user preferences. The -d option specifies the
X server to use, by default, hostname:0.0;
the -h option specifies the host to try to
connect to; the -p option specifies a
password required for connecting to a
remote terminal using the -h option. See the
ncdpref(1) man page.
Statistics ⇒ Show Version
show version
Displays version numbers and other
information about the current state of the
terminal. See the ncdshow(1) man page.
Statistics ⇒ Show Memory
show memory
Displays information about free and
installed memory in the terminal. See the
ncdshow(1) man page.
Starting and Configuring Local Clients 7-7
Summary of Local Clients
Table 7-1 Local Client Menu Choices, Commands, and Functions (Continued)
Console Name & Location
Command and
Options
Statistics ⇒ Show X
Connections
show connections
Displays information about all the current
X clients connected to the terminal. See the
ncdshow(1) man page.
Statistics ⇒ Show Statistics
stats
[ -d display ]
[ -h host ]
[ -p password ]
Displays statistics pertaining to the
terminal. The -d option specifies the X
server to use, by default, hostname:0.0; the
-h option specifies the host to try to connect
to; the -p option specifies a password
required for connecting to a remote
terminal using the -h option. See the
ncdstats(1) man page.
Statistics ⇒ Show Wireless
show wireless
Displays information about the wireless
Access Point. Explora, Explora Pro, and
Explora 400/450 only.
No Console item
touchscreen
Enables software support for a touch screen
monitor. Do not use the pref-xservercurrent-pointing-device parameter with
touchscreen because touchscreen
automatically puts the terminal in “mouseand-extension-device” mode. See the User’s
Guide and the touchscreen(1) man page.
No Console item 1
java
Starts standalone Java applications. See the
java(1) man page.
No Console item 1
startjava
Displays the Applet Viewer dialog box.
No Console item 1
ncdclock
[ -analog ]
[ -digital ]
[ -help ]
Displays the local time in analog (-analog)
or digital (-digital) form. The -help option
lists all options. See the ncdclock(1) man
page.
No Console item 1
video
The MPEG1 video decoder driver. Displays
a video without the Video Player graphical
user interface. See the User’s Guide or the
video(1) man page.
7-8 Starting and Configuring Local Clients
Function
Summary of Local Clients
Table 7-1 Local Client Menu Choices, Commands, and Functions (Continued)
Console Name & Location
Command and
Options
No Console item 1
ncd3287
Starts the NCD 3287 print emulator, a local
client for printing from a mainframe to a
printer attached to a local terminal or a
remote terminal via a serial or parallel port.
See the ncd3287(1) man page.
No console item 2
wincen
Starts WinCenter from the terminal. In
Utilities ⇒ Start Local command, use the
format wincen hostname; hostname is the
name of an NT system running WinCenter.
When starting WinCenter with an rsh
command, use the format rsh ncdname
wincen hostname; ncdname is the
hostname of the NCD terminal. See Chapter
12, Accessing Windows NT Servers, and the
WinCenter documentation.
No console item 2
icaclnt
Starts a connection to a Windows NT host
using the ICA Client. In Utilities ⇒ Start
Local command, use the format icaclnt
hostname; hostname is the name of an NT
system running WinFrame or MetaFrame.
When starting the ICA client with an rsh
command, use the format rsh ncdname
wincen hostname; ncdname is the
hostname of the NCD terminal. See the
icaclnt(1) man page and Chapter 12,
Accessing Windows NT Servers.
1
2
Function
This local client is not listed in Console menus. It must be invoked from a command line, from Utilities ⇒
Start Local Command, or from a remote configuration file using the exec-startup-commands parameter.
This local client is not listed in Console menus. It is used by the Windows Access utility (Utilities ⇒
Windows Access) and can be invoked from a command line, from Utilities ⇒ Start Local Command, or
from a remote configuration file using the exec-startup-commands parameter.
Starting and Configuring Local Clients 7-9
Starting Local Clients
Starting Local Clients
You can configure the following ways to start local clients:
❏ Setting up remote configuration files to start local clients
automatically at boot time
❏ Adding local clients to root menus, including the default
root menu
❏ Configuring XDM session files to start local clients
automatically when the X session starts
Without configuring anything, users can start local clients by:
❏ Selecting local client items from Console menus
❏ Entering local client commands in the dialog displayed
by the Start Local Command item in the Console’s
Utilities menu
Some local clients can also be started in other ways. For
example, the Keymap Editor can be started from menu items
in the VT320 or 3270 terminal emulator clients.
Starting Clients Automatically at Boot Time
To configure local clients to start automatically at boot time,
use the exec-startup-commands parameter in a remote
configuration file.
Tip
By default, exec-startup-commands
includes the console and login
clients, which start automatically
when the terminal boots. If execstartup-commands is an empty
table, no local clients start
automatically at boot time.
The commands permitted in the exec-startup-commands
parameter are the local client commands listed in Table 7-1.
You can use command-line options to define client behavior
and appearance by enclosing the command and its options in
single or double quotes. Clients start in the order in which you
list them in exec-startup-commands.
For example, the following parameter assignment starts the
local NCD Window Manager first, then the Terminal Host
Chooser, and finally the Login Chooser:
exec-startup-commands = {
{ wm }{ "term -rv" }{ login }
}
7-10 Starting and Configuring Local Clients
Starting Local Clients
Adding Clients to a Window Manager’s Root Menu
root menu
Menu displayed by placing the pointer
on the root window and clicking a
mouse button.
You can customize a window manager’s root menus so that
users can start clients by selecting a menu item.
Configuring a Window Manager’s Menus
The host-based ncdrunwm launcher utility starts either the
local NCD Window Manager or the local Motif Window
Manager. The launcher reads its configuration file and sends
the information to the local window manager. When the local
window manager starts, it displays the user’s root menus as
specified in the launcher’s configuration file.
Tip
The local NCD window managers’
default root menus list many of the
NCD local clients and a selection for
quitting the local window manager.
Mouse buttons not bound to a menu in
the launcher configuration file display
the default menu when the pointer is
on the root window.
To customize root menus:
1. Set up a launcher configuration file on the host on which
the launcher runs. (The following sections describe how
to compose commands for starting clients in the launcher
configuration file.)
2. Place a command to start ncdrunwm in a session startup
file, such as Xsession or .xsession.
The following example runs ncdrunwm on the boot host
and starts the local NCD Window Manager on the
display named in the environment variable DISPLAY.
ncdrunwm -d $DISPLAY
If the ncdrunwm program quits, the local window manager
also quits unless you include ncdrunwm’s -k option. With the
-k option, the local window manager rkeeps running but the
customized root menus no longer function.
To restart ncdrunwm and regain the customized root menus,
use ncdrestartwm:
$ ncdrestartwm
You can also use ncdrestartwm to restart the window manager
after altering the launcher configuration file or window
manager X resource settings.
Starting and Configuring Local Clients 7-11
Starting Local Clients
Launcher Configuration Files
A launcher configuration file is an ASCII file that follows the
format conventions of mwm’s system.mwmrc file.
ncdrunwm can read any of the following launcher
configuration files. It uses the first file it finds and searches for
files in the following order:
1. A file specified using ncdrunwm’s -f option
2. A .launchrc file in the user’s home directory
3. A .mwmrc file in the user’s home directory
4. A systemwide launcher file, /usr/lib/X11/system.launchrc
5. A systemwide mwm file, /usr/lib/X11/system.mwmrc
Sample systemwide menu configuration files (system.launchrc
and system.mwmrc) are available from the NCD FTP site. Edit
them to suit your environment or use them as guidelines for
the syntax to use in launcher configuration files for individual
users.
The syntax used for defining root menus in a launcher
configuration file is: "label" [!] function where:
label
function
Is the item label that appears in the root menu.
Is the f.* function or command executed when
the user selects the item.
Place an exclamation mark (!) before functions that are
composed of commands (such as a remote shell command).
When the function is an mwm f.* function name (such as
f.menu or f.title), the exclamation mark is unnecessary.
Tip
Including unsupported functions in a
launcher configuration file results in a
warning message that the launcher is
ignoring unknown keyword:
function.
The mwm functions supported by ncdrunwm are: f.kill, f.lower,
f.maximize, f.minimize, f.move, f.normalize, f.resize, f.exec,
f.menu, f.nop, f.quit_mwm, f.restart, f.separator, and f.title.
7-12 Starting and Configuring Local Clients
Starting Local Clients
Adding Local Clients to a Root Menu
Tip
Do not use remote shell commands to
start window managers. Use the hostbased ncdrunwm application
launcher instead.
To start local clients, use remote shell commands (rsh or remsh)
as functions in launcher configuration entries. When you use
remote shell commands to start local clients, a daemon in the
terminal responds to the remote shell request and starts the
local client.
Remote shell command syntax is:
rsh hostname command options
where:
Is the terminal where the local client is to run.
command Is the local client command.
hostname
options
Tip
You can also use remote shell
commands in startup files (such as
XDM Xsession and .xsession files).
Are the command options listed in Table 7-1 and
in the man pages.
For example, the following command starts the Terminal Host
Chooser on a terminal with the hostname ncdu10:
rsh ncdu10 term
When you include a remote shell command in a launcher
configuration file as a function, enclose the entire command
and its options in single or double quotes.
The following entries in a launcher configuration file create a
root menu item for starting an NCD Terminal Emulator via
TELNET:
"Local Telnet" ! "rsh $NCDNAME term -ctype telnet &"
Entries in mwm launcher configuration files for starting local
clients include the mwm function name, for example:
"Local Telnet" f.exec "rsh $NCDNAME term -ctype telnet &"
Adding Host-Based Clients to a Root Menu
xterm (1)
A standard host-based terminal
emulator client.
"kestrel"
To start host-based clients from a window manager menu,
you must define the display on which you want the client to
run.
For example, to start an xterm on the terminal from the host
kestrel, assuming that the DISPLAY environment variable is set:
!"rsh kestrel -n /usr/bin/X11/xterm -display $DISPLAY &"
Starting and Configuring Local Clients 7-13
Starting Local Clients
Adding Local Clients to the Default Root Menu
The default root menu lists a number of local client
commands. If you do not configure root menus or if some
mouse buttons are not bound to a root menu, pressing a
mouse button in the root window displays the default root
menu.
To add local clients to the default root menu, add commands
in the exec-command-menu table.
For example, to add a command to the menu to start a specific
Java applet, you could add the following line:
{ "Draw Demo" "appletviewer http://java.sun.com/applets/DrawTest/example1.html" }
The default entries in exec-command-menu are listed in
Table 7-2.
Table 7-2 Default Root Menu Contents
Menu Label
Command
Show Console
console
Start Terminal
term
Start Dialer
dialer
Start 3270
tn3270
Start 3179G
tn3270 -gddm -loadps -E -S3
Start Keymap Editor
keymap_editor
Show Memory
show memory
Show X Connections
show connections
Lock Screen
lock
Setup User Preferences
pref
Login
login
Logout
logout
7-14 Starting and Configuring Local Clients
Starting Local Clients
Starting Local Clients from the Console
Tip
To redefine the value for the Setup
key or key combination, use prefconsole-key-sequence.
After the X server is running, users can start local clients by
selecting a command from the Console menus or by typing a
command name in the dialog box displayed by selecting Start
Local Command from the Utilities menu.
To display the Console, press the Setup key or, on keyboards
that do not have a Setup key, a Setup key combination
(Table 7-3.)
Table 7-3 Setup Key Equivalents
Keyboard
Key Combination
Sun Type-4-compatible
Press the Alt Graph key and the
Help Setup key simultaneously
VT220-style
Press the Compose key and the F3
key simultaneously
108-key-style
Press the Alt key and the F3 key
simultaneously
122-key 3270-compatible
Press the Alt key and the Alt/ExSel
key simultaneously
Windows 95-compatible
Pause
Restricting Access to Clients
You can disable access to specific local clients or restrict access
to local clients through remote configuration.
Disabling Access to Specific Local Clients from the Terminal
To disable specific local clients, list their command names in
the exec-disabled-commands table.
For example, to disable the Change Setup Parameters local
client:
exec-disabled-commands = {
{ setup }
}
Starting and Configuring Local Clients 7-15
Starting Local Clients
Tip
You cannot disable an individual show
command (show version, show
memory, and show connection).
You can disable show, however,
which disables the Show Version,
Show Memory, and Show X
Connections items in the Console’s
Statistics menu. You can disable the
Show Statistics item by disabling
stats.
The next time you boot the terminal, the disabled clients’
names are grayed out in the Console menu bar or pull-down
menu.
In addition to the clients listed in Table 7-1, you can disable the
low-memory warning by listing the command warning in the
exec-disabled-commands table.
You can disable the Console so that it neither appears on
startup nor is accessible through the Setup key or key
combination by including it in the exec-disabled-commands
table.
Restricting Access to Local Clients from Other Hosts
You can prevent all users on specified hosts from running
local clients on a terminal. To restrict access to a terminal’s
local clients from other network hosts:
1. In a remote configuration file, set exec-access-controlenabled to “true.”
2. Define the hosts with authorized access to local clients in
the exec-access-control-list parameter. Figure 7-1 shows an
example.
exec-access-control-list = {
{ eagle tcpip }
{ eagle ncdnet }
{ ncdu10 tcpip }
{ falcon ncdnet }
}
The hostnames or network addresses of
hosts with authorized access to local clients
The protocol family in use for
network communications
Figure 7-1 Specifying Hosts Authorized to Access Local Clients
Hosts using both TCP/IP and DECnet to start clients must have
two entries in the table.
To restrict all access to local clients, enable access control with
the exec-access-control-list parameter, but make the access
control list empty.
7-16 Starting and Configuring Local Clients
Configuring Local Clients
Restricting User Access to Local Clients
The exec-user-access-control parameter prevents the use of a
remote shell command to start local clients by anyone but the
logged in user.
This restriction is effective only if the user logs in through
XDM and you run the NCD Display Manager (ncddm) on the
login host, enable the terminal for ncddm, and set the exec-useraccess-control parameter to “true.” See Chapter 5 for more
information about ncddm.
Configuring Local Clients
X resource
In the X Window System, a variable
used to set a value defining the
behavior or appearance of a client.
You can configure many aspects of the appearance and
behavior of local clients through X resources and commandline options. Table 7-1 on page 7-2 lists many of the commandline options available for configuring local clients. The local
client man pages list all resources and command-line options.
Setting Resources for Local Clients
This section describes the two methods of setting resources for
local clients:
❏ Setting resources in remote configuration files (only if
you are not using a session manager, such as XDM)
❏ Setting resources in .Xdefaults files or other resource files
(requires loading resources using xrdb)
Setting Resource Values through Remote Configuration
If you are not using XDM or a session manager, you can set X
resource values for local clients in the xserver-initial-xresources parameter. When it starts, XDM erases resources set
in this parameter.
Type resources as a single string surrounded by single quotes
(so you can use double quotes in resource settings). Use a
backslash to escape all special characters; for example, to
escape # and \n, use \# and \\n.
Starting and Configuring Local Clients 7-17
Configuring Local Clients
For example, to use this method to set some local NCD
Window Manager X resources:
xserver-initial-x-resources = ’ncdwm.iconDirection: ne-v
ncdwm.activeBackground: \#000000
ncdwm.KeyboardFocusPolicy: pointer
ncdwm.packIcons: off
ncdwm.flashUnmap: off’
Setting Resources in Resource Files
If you are using XDM or some other session manager, you
must use a resource file such as a .Xdefaults file instead of
using a remote configuration to load resources.
X resource file
A file, commonly named .Xdefaults,
used to set many resources at once.
You can use command-line options to
override resources set through
resource files.
Local clients cannot directly read the settings in .Xdefaults files
or other X resource files. You must use xrdb (1), usually run
from a startup file, to load local client resources from the
resource file. For example, the following command in an
Xsession or .xsession file loads the user’s .Xdefaults file:
xrdb -display $DISPLAY $HOME/.Xdefaults
Using Command-Line Options
You can configure local clients by using the command-line
options described in the man pages.
For example, the following command specifies the size and
placement of the Terminal Host Chooser:
rsh ncdu66 term -geometry 80x24+2+150
7-18 Starting and Configuring Local Clients
Setup Menu Equivalents for Local Client Parameters
Setup Menu Equivalents for Local Client Parameters
Table 7-4 lists the remote configuration parameters discussed
in this chapter and a description of the corresponding Setup
menu field for each. This information is provided for system
administrators who configure terminals through Setup
menus.
Table 7-4 Setup Menu Fields for Local Clients
When Changes
Take Effect
Saved in
NVRAM
Setup ⇒ Change Setup
Parameters ⇒ Access Control
⇒ (Local Command Execution
Daemon section) Enable
Execution Access Control
Immediately
No
exec-access-control-list
Setup ⇒ Change Setup
Parameters ⇒ Access Control
(Local Command Execution
Daemon section) ⇒ Execution
Access Control List
Immediately
No
exec-command-menu
Setup ⇒ Change Setup
Parameters ⇒ Commands and
Startup ⇒ Command Menu
Immediately
No
exec-disabled-commands
Setup ⇒ Change Setup
Parameters ⇒ Commands and
Startup ⇒ Disabled
Commands
Immediately
No
exec-startup-commands
Setup ⇒ Change Setup
Parameters ⇒ Commands and
Startup ⇒ Startup Commands
Immediately
No
Parameter Name
Console Setup Menu Field
exec-access-control-enabled
Starting and Configuring Local Clients 7-19
Setup Menu Equivalents for Local Client Parameters
Table 7-4 Setup Menu Fields for Local Clients (Continued)
When Changes
Take Effect
Saved in
NVRAM
Setup ⇒ Change Setup
Parameters ⇒ Access Control
⇒ (Local Command Execution
Daemon section) Execution
User Access Control
Immediately
No
Not available in the Setup
menus
Immediately
No
Parameter Name
Console Setup Menu Field
exec-user-access-control
xserver-initial-x-resources
7-20 Starting and Configuring Local Clients
8 Getting Information About Terminal
Operations
Tip
Procedures in this chapter provide
directions for configuring terminals
through remote configuration files. For
system administrators who use the
console for terminal configuration
tasks, information about Setup menu
fields is provided at the end of this
chapter.
This chapter describes how to retrieve information about the
terminal, the X server, and the terminal’s network interfaces.
This chapter covers the following major topics:
❏ Displaying the Console
❏ Displaying and understanding Console messages
(For explanations of X server messages, see the NCDware
Reference Manual.)
❏ Configuring message logging
❏ Understanding message dialog boxes
❏ Displaying statistics in Console Statistics windows
Displaying the Console
The Console is a local client that provides access to other local
clients (such as the clients that display terminal statistics) and
to terminal commands (such as the boot command). By
default, the Console is displayed after the terminal boots.
If the Console is not visible, press the Setup key. To hide the
Console, press the Setup key again.
Tip
To change the key sequence for
displaying the Console, use the prefconsole-key-sequence parameter.
For keyboards that do not have a Setup key, use the relevant
key combination in Table 8-1 to display or hide the Console.
The Console itself or any of the local clients listed in its menus
can be disabled to prevent their use. For information about
disabling local clients, see Chapter 7.
Access to the Console can be controlled through a password
set in Setup ⇒ Change Setup Parameters ⇒ Access Control;
for more information about setting a Console password, see
Chapter 4.
Getting Information About Terminal Operations 8-1
Console Messages
Table 8-1 Setup Key Equivalents
Keyboard
Key Combinations
Sun Type-4-compatible
Press the Alt Graph key and the
Help Setup key simultaneously
VT220-style
Press the Compose key and the F3
key simultaneously
108-key-style
Press the Alt key and the F3 key
simultaneously
122-key 3270-compatible
Press the Alt key and the Alt/ExSel
key simultaneously
Windows 95-compatible
Press the Pause key
Console Messages
See the NCDware Reference Manual
for explanations of all of the X server
messages.
The Console’s Messages hide box displays messages logged
by the X server and its modules (such as the messages issued
by the Configuration daemon, which maintains terminal
configuration data).
Messages generated by the Boot Monitor are not logged.
Messages generated by applications, such as XDM, may be
logged in files maintained by the applications.
Click to
display
X server
messages
Figure 8-1 Console Message Hide Box
8-2 Getting Information About Terminal Operations
Console Messages
Many of the messages displayed in the Console are issued by
the terminal as it boots. These messages show how the
terminal reads its configuration file, keymap file, color
definition file, and fonts. Other messages in the Console
reflect ongoing operations, such as starting clients and
loading fonts as clients request them.
See Using the 3270 Terminal
Emulator for messages generated by
the 3270 emulator.
Most messages are informational, reporting successful
actions. If the terminal is not operating as you would expect,
however, messages in the Console window can be helpful in
solving the problem.
These following example messages of differing severity levels
were issued by the Configuration daemon.
See “Enabling Extended Diagnostics”
on page 8-6 for information about
displaying more messages.
❏
Informational message—The module has performed the
activity successfully.
%CONFIGD-I-IPADDR, IP address for this unit:
192.40.50.12
❏
Warning message—The module may have completed
some, but not all, of the requested activity.
%CONFIGD-W-BADPASSWD, incorrect password
entered
❏
Error message—The module did not complete the
requested activity but is attempting to continue.
%CONFIGD-E-GATEWAYBADNET, gateway 89.0.0.1 is
not on local net
❏
Fatal message—The module did not complete the
requested activity and cannot continue.
%CONFIGD-F-INITUI, unable to initialize user
interface
Getting Information About Terminal Operations 8-3
Console Messages
Format of Console Messages
See the NCDware Reference Manual
for explanations of all the X server
messages.
X server messages follow the format:
%MODULE-L-ABBREV, full message text
where:
MODULE Is the NCDware module issuing the message,
such as CONFIGD or FILE.
L
ABBREV
Is the message’s level of severity:
I
An informational message. The module
completed its activities successfully.
W
A warning message. The module may not
have completed all of its activities. You
should verify the results to see if they were
completed correctly.
E
An error. The module did not complete its
activities but is attempting to continue.
F
A fatal error. The module did not complete
its activities and cannot continue.
Is the abbreviated message; for example, READ
for an operation that involved reading a file.
For example:
%FILE-I-READ, reading font file: fonts.alias
See Chapter 18 for information on
contacting Technical Support.
You should take steps to resolve messages with severity levels
E and F. Contact NCD Technical Support if you need
assistance.
Viewing Messages in the Console Window
You can see current messages by opening the Messages hide
box:
1. In the Console, click on Messages.
2. To see more messages, scroll through messages in the
window or enlarge the window.
8-4 Getting Information About Terminal Operations
Console Messages
Console ⇒ Clear Messages clears messages from the message
area. Console ⇒ Rescan Messages redisplays messages that
were cleared previously.
Viewing Messages through TELNET
You can see current messages on the local terminal or a remote
terminal by connecting directly to the diagnostic module
through a TELNET connection:
1. In the Console, select Terminals ⇒ New Terminal
— For the local terminal, select Diag from the Default
Hosts list.
— For a remote terminal, enter the hostname or IP
address of the NCD terminal to which you want to
connect and the TELNET diagnostics port in the
Service field. The default port number is 5998.
For example:
ncdu10 5998
Tip
While you are connected, ask the
terminal user to perform the action
causing the problem. You can read
the messages as they are issued.
2.
Click OK.
3.
The current messages display in a Terminal Emulator
window. To see all of the messages, use the window
scroll bar.
When you are finished, close the TELNET connection and
the Terminal Emulator window by selecting Exit from
the File menu.
4.
Logging Messages to a File
You can log messages to a file using the NFS protocol:
1. Specify the filename in the diag-log-file parameter. There
is no default filename or directory, so you must specify
the complete pathname.
2. The log file must be accessible through the file access
table described in Chapter 3. Place the file in a directory
accessible through the table or create a new entry in the
table. The file access method in the table entry must be
NFS.
Getting Information About Terminal Operations 8-5
Console Messages
Configuring Message Logging
You can configure:
❏ Time stamps attached to the messages
❏ Size of buffer used for saving messages in the terminal
❏ Extended messages for file and font access
Configuring Message Time Stamps
Messages collected in the buffer and viewed through TELNET
have time stamps appended to them. Time stamps are not
displayed in the Console message area. Time stamps indicate
when the message was issued relative to the last reboot of the
terminal. Time stamps follow the format +d:hh:mm:ss (days,
hours, minutes, and seconds).
Some messages may have no time stamps because, by default,
the next time stamp is not written until one second has
elapsed. This time interval is called the time stamp frequency.
You can change the frequency with the diag-timestampfrequency parameter. Specify the number of seconds as an
integer.
Changing the Message Buffer Size
The default size of the internal buffer used for logging
messages is 8,192 bytes. If you are not capturing all the
messages you need, you can change the size of the buffer with
the diag-buffer-size parameter. Specify the number of bytes as
an integer.
Enabling Extended Diagnostics
You can generate more detailed messages for the following:
❏ To generate more detailed messages about the file
service, set the file-extended-diagnostics parameter to
“true.”
Tip
NCD recommends enabling extended
font diagnostics only if you have a font
problem. This parameter generates a
large number of messages.
❏
❏
To generate more detailed messages about fonts, set the
pref-font-extended-diagnostics parameter to “true.”
To generate extended diagnostic messages for IP routing,
set the ip-extended-routing-diagnostics parameter to
“true.”
8-6 Getting Information About Terminal Operations
X Server Messages Displayed in Dialog Boxes
❏
To generate extended diagnostic messages for the ICA
Client, set the ica-extended-diagnostics parameter to
“true.”
All of the extended diagnostics parameters take effect
immediately, and only file-extended-diagnostics is saved to
NVRAM. To make the other parameter settings permanent,
place them in a remote configuration file.
X Server Messages Displayed in Dialog Boxes
See “Popup Warning Messages” on
page 18-34 for a description of the
low-on-memory popup messages.
The X server displays some of its messages in dialog boxes
that prompt the user to take action. This section describes
those dialog boxes.
Logout Confirmation Dialog Box
The logout confirmation box (Figure 8-2) appears when the
XDMCP connection to the login host is broken. The connection
is broken when the user selects Logout from the Console’s
Login menu or when the ncdlogout command is invoked. You
can configure the terminal to log the user out immediately
instead of displaying the dialog box by setting login-xdmaction-on-disconnect to “logout.”
Ends the X session;
displays Console
and Login Chooser
Displays the Show Connections
popup window listing current X
connections
Aborts the logout
process and resumes
the current X session
Figure 8-2 Logout Dialog Box
Variations of the logout dialog box appear when the XDMCP
connection changes. For example, if the host XDM process
Getting Information About Terminal Operations 8-7
The Console Statistics Menus
does not respond to periodic checks made by the X server, the
following message appears in a dialog box:
TCP login manager on host not responding. There
are 1 local and 6 remote applications running.
Shutdown windows and logout?
Kill X Clients Dialog Box
The Kill X Clients dialog box (Figure 8-3) appears when the X
server finds that host-based clients are already connected to
the terminal when the user is trying to log in.
Aborts the hostbased client
Aborts the
login attempt
Displays the Show Connections
popup window listing current
X connections
The host-based
client remains
connected to the X
server, although
XDM may shut down
the client anyway
Figure 8-3 Kill X Clients Dialog Box
The Console Statistics Menus
The Statistics item in the Console’s menu bar displays the
Show menu. This section describes the items in that menu.
Displaying General Information—Show Version
Click on Show Version to display a popup window that
contains information about the terminal and the software
running on the terminal.
8-8 Getting Information About Terminal Operations
The Console Statistics Menus
Click the OK button to close the window.
You can cut and paste from Show Version to other windows:
❏ Click the left mouse button in a row to select the entire
row.
❏ Click the right mouse button on any row to select all of
the text in the window.
Table 8-2 lists the contents of the Show Version window.
Table 8-2 Contents of the Show Version Window
Field
Information Displayed
Model
Terminal model
NCDware
Software version number and X server name
Boot Monitor
Boot Monitor version
Screen
Display type
Resolution
Display resolution and dots per inch
Keyboard
Type of keyboard attached (family name)
Memory
Amount of memory installed
Bundled Features
X server features that you may use without an additional license
Licensed Features
X server features or local clients for which you currently hold a
license
Built in Ethernet
or
Built in Token Ring
Default physical Ethernet or Token-Ring network address
Current Ethernet
or
Current Token Ring
Current physical Ethernet or Token-Ring address
TCP/IP Name
Terminal’s hostname for Internet communications
TCP/IP Address
Terminal’s address for Internet communications
TCP/IP Netmask
Subnet mask (address used in routing)
Getting Information About Terminal Operations 8-9
The Console Statistics Menus
Table 8-2 Contents of the Show Version Window (Continued)
Field
Information Displayed
NCDnet Name
Node name for use in DECnet communications
NCDnet Address
Node address for use in DECnet communications
Booted From
Boot host (host from which terminal was booted)
X Session Host
Login host
Displaying Memory Information—Show Memory
Click on the Show Memory item to display a graphical
representation of the amount of unused terminal memory.
Below the graph, figures are displayed for:
❏ Total installed memory
❏ Total free (unused) memory
❏ Size of the largest block of free memory
The buttons at the bottom of the window have the following
functions:
❏ The Update button adds to the graph by showing an
updated reading of free memory.
❏ The Restart button restarts the graph with an updated
reading of free memory.
❏ The Cancel button closes the window.
8-10 Getting Information About Terminal Operations
The Console Statistics Menus
Displaying Status of Clients—Show X Connections
Click on the Show X Connections item to display a popup
window that lists all active X clients and the terminal
resources the clients are using. The information displayed for
each client is listed in Table 8-3.
Table 8-3 Show X Connections Window
Field
Information Displayed
Name
Client’s name
Host
Host on which the client is running
Auth
Type of authorization used
XID
Window identification number
Windows
Windows created by the client
Pixmaps
Off-screen drawing areas used by the client
GCs
Graphics context information
Fonts
Number of fonts in use
Cursors
Cursors created by the client
Cells
Color cells allocated by the client
Colormaps
Colormaps allocated by the client
Displaying Terminal and Network Statistics—Show Statistics
See the Reference Manual for more
information about statistics.
Click on the Show Statistics item to display a window of
hide boxes, each containing detailed statistics.
The Update button updates the statistics displayed in the
window. The Cancel button closes the window.
Tip
You can also view the read-only
configuration parameters using the
Terminals menu. See Chapter 4 for
more information.
Each field displayed in this window corresponds to a readonly configuration parameter.
To find an explanation of a statistical menu field and its
corresponding parameter name, see the NCDware Reference
Manual.
Getting Information About Terminal Operations 8-11
The Console Statistics Menus
Table 8-4 describes the type of statistics in each hide box and
lists the name of the corresponding parameter group.
Table 8-4 Show Statistics Window
Hide Box
Parameter
Group
Ethernet
enet
Characteristics and status of the terminal’s Ethernet
interface
Font Usage
font
Statistics about font usage and the font cache
ICMP
icmp
Statistics about the ICMP protocol
IP
ip
Statistics about the IP protocol
Loadable Modules
modules
Information about the X server modules currently
loaded by the terminal
NCDnet
ncdnet
Statistics about terminal communications using
NCDnet (DECnet)
NCDnet Name
Service
ncdnet
Statistics about the NCDnet (DECnet) name service
Network Buffers
net
Status of the terminal’s network buffers
Network
Interfaces
net
Overall characteristics and operational status of the
terminal’s network interfaces
NFS
nfs
Statistics about NFS usage, an alternative protocol for
downloading an X server and reading and writing
other files
Parallel Daemons
parallel
Status of the Parallel daemon(s), terminal-resident
daemons that control the terminal’s parallel ports
Serial
serial
Status of the terminal’s serial port(s)
Serial Daemons
serial
Status of the Serial daemon(s), terminal-resident
daemons that control the terminal’s serial ports
SNMP
snmp
Statistics about SNMP
TCP
tcp
Statistics about the TCP protocol
Information Displayed
8-12 Getting Information About Terminal Operations
The Console Statistics Menus
Table 8-4 Show Statistics Window (Continued)
Parameter
Group
Hide Box
Information Displayed
TCP/IP Name
Service
tcpip
Statistics about the TCP/IP name service, which
translates from IP addresses to domain names
TFTP
tftp
Statistics about TFTP (Trivial File Transfer Protocol)
usage, the protocol used by NCD terminals to
download a server, and read and write other files
Token Ring
tokring
Characteristics and operational status of the terminal’s
Token-Ring interface
UDP
udp
Statistics about the UDP protocol
Unit
unit
Miscellaneous terminal attributes
Wireless LAN
pwireless
Statistics about wireless terminals
XRemote
xremote
Statistics and status about XRemote
Displaying a Remote Terminal’s Statistics
To view another terminal’s statistics:
1. Select Connect to New Unit from the File menu in the
Show Statistics menu.
See Chapter 4 for information about
setting passwords.
2.
In the dialog box, type the other terminal’s hostname or
IP address and one of the following passwords:
— Configuration daemon read/write password (no
default password)
— Configuration daemon read-only password. You can
use the default password, which is “public.”
— Global password (no default password)
The remote terminal’s Statistics menus appear.
Getting Information About Terminal Operations 8-13
Setup Menu Equivalents for Message Logging Parameters
Setup Menu Equivalents for Message Logging Parameters
Table 8-5 lists the remote configuration parameters used in
this chapter and the corresponding fields in the Setup menus.
This information is provided for system administrators who
use the Console for terminal configuration.
Table 8-5 Setup Menu Fields for Configuring the Message Facility
When Changes
Take Effect
Saved in
NVRAM
Setup ⇒ Change Setup
Parameters ⇒ Diagnostics ⇒
Buffer Size
Immediately
No
diag-log-file
Setup ⇒ Change Setup
Parameters ⇒ Diagnostics ⇒
Log File
Immediately
No
diag-timestamp-frequency
Setup ⇒ Change Setup
Parameters ⇒ Diagnostics ⇒
Timestamp Frequency
Immediately
No
file-extended-diagnostics
Setup ⇒ Change Setup
Parameters ⇒ File Service ⇒
Extended Diagnostics
Immediately
Yes
ica-extended-diagnostics
Setup ⇒ Change Setup
Parameters ⇒ ICA ⇒
Extended ICA Diagnostics
Immediately
No
ip-extended-routing-diagnostics
Setup ⇒ Change Setup
Parameters ⇒ IP ⇒
Extended Routing
Diagnostics
Immediately
No
login-xdm-action-on-disconnect
Setup ⇒ Change Setup
Parameters ⇒ Login ⇒
(XDM section) What to do
when XDM disconnects
Immediately
No
Parameter
Setup Menu Field
diag-buffer-size
8-14 Getting Information About Terminal Operations
Setup Menu Equivalents for Message Logging Parameters
Table 8-5 Setup Menu Fields for Configuring the Message Facility (Continued)
When Changes
Take Effect
Saved in
NVRAM
Setup ⇒ Change Setup
Parameters ⇒ Console and
Utilities ⇒ Console Key
Sequence
At boot
No
Setup ⇒ Change User
Preferences ⇒ Fonts ⇒ Show
Extended Font Diagnostics
Immediately
No
Parameter
Setup Menu Field
pref-console-key-sequence
pref-font-extended-diagnostics
Getting Information About Terminal Operations 8-15
Setup Menu Equivalents for Message Logging Parameters
8-16 Getting Information About Terminal Operations
9 Using a Local File System
Tip
Most of the procedures in this chapter
provide directions for configuring
terminals through remote
configuration files. For system
administrators who use the Console
for terminal configuration, information
about Setup menu fields is provided at
the end of the chapter.
This chapter describes how to use a terminal’s local file
system, which can be on a PC card or a diskette. The major
topics in this chapter are:
❏ An overview of local file system usage
❏ Using the Local File Manager to manage the local file
system on a PC card or floppy disk
❏ Mounting the local file system on UNIX hosts
❏ Configuring terminals and preparing PC cards for:
— Booting a terminal from a local PC card
— Booting terminals from another terminal’s PC card
❏ Configuring terminals to use a local file system on a
diskette
❏ Using the floppy drive
For information about using a pre-configured NCD Quick
Start PC card on a LAN or for XRemote over a serial
connection, see Using a PC Card in Your NCD Thin Client Device.
This document is included with the Quick Start PC cards.
Overview
NCD terminals can access files located on a local file system.
The local file system resides on a PC card installed in the
terminal or on a diskette in a floppy drive attached to the
terminal.
Local File System on a PC Card
You can use the local file system on a PC card to store the X
server and support files needed for booting both the local
terminal and other terminals on a local area network or for
using XRemote over a serial connection to a host.
Using a Local File System 9-1
Overview
To access the files on a PC card, you use the terminal’s built-in
Local File Manager.
On a PC card, you specify the local file system as /local. The
pathname /local refers only to the local file system on a PC
card. The terminal cannot access a host-based file system
whose pathname starts with /local until after the configuration
file has been read. Once the configuration file has been read,
however, you can create a file service table entry mapping
/local to another local mount point.
Local File System on a Floppy Disk
On a floppy disk, you specify the local file system as /xfloppy.
You can use a terminal’s floppy drive to copy files between a
UNIX host and DOS-compatible 720K or 1.44M floppy disks.
You can access the local file system on a floppy disk using
either the Local File Manager or the hostside ncdfloppy
command.
Caution
Do not try to access the floppy drive using both the Local File
Manager and the hostside ncdfloppy utility without rebooting the
terminal between use of the two methods. Switching access
methods without rebooting can damage files.
9-2 Using a Local File System
Managing Files in a Local File System
Managing Files in a Local File System
The Local File Manager is a utility for managing a local file
system. The Local File Manager includes commands to:
❏ Format the local file system and verify its structure
❏ Make and remove directories, change the current
working directory, and list directory content recursively
❏ Copy, delete, list, rename, and compare files
❏ Display information about the local file system and the
current directory
Configuring the Terminal for Local File Manager Use
Before using the Local File Manager to access a floppy drive,
the file-enable-floppy-filesystem parameter must be set to
“true” in the terminal’s remote configuration file. The default
setting is “false.”
Starting the Local File Manager
The Local File Manager on the terminal at which you’re
working (the local terminal) can be used with or without
requiring a password. A password is required when
connecting to a remote terminal’s Local File Manager; see
“Specifying a Password” on page 9-7.
After you start the Local File Manager, you can use the
commands listed in Table 9-1. Press Return after each
command.
To use the Local File Manager:
1. From the Console, select Terminals ⇒ New Terminal to
start a Terminal Host Chooser.
— To access files on the local terminal, select File from
the Default Hosts list.
— To access files on a remote terminal, type the
hostname or IP address of the terminal, followed by
the port number, in the Service field of the
Using a Local File System 9-3
Managing Files in a Local File System
2.
3.
4.
5.
Terminal Host Chooser. The default port number is
5996.
Click on OK or press Return.
If a password is required, the Local File Manager
password prompt appears:
Trying 192.43.116.50 . . .
Connected to ncdu7.
Escape character is ‘^]’.
***NCD X Terminal Local File Manager ***
Password:
Type the Local File Manager password and press Return.
The Local File Manager starts immediately and a prompt
(>) appears:
***NCD X Terminal Local File Manager***
>
If the Local File Manager disconnects instead of
displaying a prompt (>), make sure a password has been
defined and you are using the correct password. See
“Configuring the Local File Manager” on page 9-7.
Before copying files, read the following section, “Hints
for Copying Files”. To copy files, use the following
command:
> copy sourcefile destfile
To disconnect from the Local File Manager, use the
following command:
> quit
Hints for Copying Files
Before copying files, make sure that the terminal’s file service
table includes an entry for the remote file system. For
information about the file service table, see Chapter 3.
Make sure the PC card or floppy disk has been formatted. For
information on formatting, see “Local File Manager
Commands” on page 9-5.
9-4 Using a Local File System
Managing Files in a Local File System
If you are copying files to a PC card, make sure the card is
write-enabled.
If you are copying files to a PC card and you have recently
deleted files from the local file system, use the reclaim
command first to ensure that all available space is accessible.
Before using TFTP to copy files from the local file system to a
remote file system, an empty file with the desired name must
exist already on the remote file system and write access must
be enabled for the file.
Local File Manager Commands
Table 9-1 lists the Local File Manager commands.
The Local File Manager does not recognize wildcard
characters.
Press Return after typing a Local File Manager command.
Table 9-1 Local File Manager Commands
Command
Description
cd directory
Changes the current working directory.
compare file1 file2 or
cmp file1 file2
Compares the contents of the two files and displays a message
stating whether the files are equivalent.
copy sourcefile destfile
or
cp sourcefile destfile
Copies sourcefile to destfile. Copying files may take a long
time and affect the X server’s response time while it is taking
place.
cwd or pwd
Displays the current working directory.
delete file(s) or
del file(s) or
remove file(s) or
rm file(s) or
Deletes files from the local file system. On a PC card, after
using the delete command, use the reclaim command to repack previously used file space for subsequent use.
Using a Local File System 9-5
Managing Files in a Local File System
Table 9-1 Local File Manager Commands (Continued)
Command
Description
format [ filesystem ]
Formats the local file system. filesystem is either /local (PC
card) or /xfloppy (diskette). The default is to format /local.
The -q and -720 options are for use
with a floppy drive only.
Formatting the file system destroys all data on the card or disk.
On a floppy drive, the -q option formats more quickly, but
should be used only if the disk has already been completely
formatted and you are sure it is in perfect condition
(containing no bad sectors). The -720 option formats a 720K
floppy disk.
Formatting a PC card requires about two minutes per
megabyte.
help
Displays a list of Local File Manager commands.
info or df [ filesystem ]
Lists the total size (in bytes) of the local file system and the
total number of free bytes available.
list or ls or dir [ -R ] [ directory ]
Displays a list of the files stored in the local file system. The -R
option lists subdirectory content recursively.
mkdir dir_name
Creates a directory in the local file system.
quit
Disconnects from the Local File Manager.
rename file1 file2
Changes a filename without altering its contents.
rmdir directory ...
Deletes directories.
reclaim
Reclaims previously used file system space. This command
may take several minutes, so use it after you have finished
other operations on the local file system.
(for PC card use only)
verify
(for PC card use only)
9-6 Using a Local File System
Confirms that the local file system structure is valid.
Configuring the Local File Manager
Configuring the Local File Manager
This section describes the following optional Local File
Manager tasks:
❏ Specifying a password
❏ Setting up host-based access control
❏ Specifying the TCP and TELNET ports
Specifying a Password
No password is required for the Local File Manager on the
local terminal. If you are using host-based TELNET to run the
Local File Manager or accessing a remote terminal from the
local terminal, you must define a password for the Local File
Manager.
You specify a password through the Console (Setup ⇒
Change Setup Parameters ⇒ Access Control (File Manager
section) ⇒ Password). This password takes up space in the
area of NVRAM reserved for passwords and certain other
strings. The password takes effect immediately after you click
Apply.
See Chapter 4 for information on the
global password.
Instead of setting a separate password for accessing the Local
File Manager, you can use the global password.
Setting Up Access Control for the Local File Manager
You can control which network hosts have permission to
access a terminal’s local file file system.
To set up an access control list for the Local File Manager:
1. List the hosts permitted access in the file-manager-accesscontrol-list table. Each entry in this table consists of a
hostname or network address followed by the type of
network connection (“tcpip” or “ncdnet”).
2. Set the file-manager-access-control-enabled parameter to
“true.”
Using a Local File System 9-7
NFS Mount of a Local File System
Specifying the Ports for Local File Manager Access
The default TCP port is 5976, and the default TELNET port is
5996.
You can change the defaults using the file-manager-tcp-port
and file-manager-telnet-port parameters.
NFS Mount of a Local File System
You can use the mount command to mount a terminal’s local
file system on a UNIX host. You access the files via NFS. After
mounting the file system and configuring the terminal, you
can use standard UNIX commands (such as cp, mv, rm, mkdir,
rmdir) to access the local file system.
If you use ncdinstall to add a terminal and you indicate that
you want to export the local file system, some of the
parameters in the following procedure are set automatically in
the terminal’s remote configuration file.
To mount and configure access to a terminal’s local file
system:
1. If the local file system is on a floppy disk, make sure the
file-enable-floppy-filesystem parameter is set to “true” (set
automatically by ncdinstall).
2. Make sure that file-enable-nfs-server is set to “true.” This
starts the NFS server daemon on the terminal after the
terminal is rebooted (set automatically by ncdinstall).
3. Mount the local file system on the UNIX host using the
terminal’s hostname and /xfloppy or /local to specify the
local file system. For example:
# mount ncdu325:/xfloppy /u/john/floppy
# mount ncdu325:/local /u/ncd325
If the UNIX host is one of the following, note the
recommended changes to the default mount command
when you mount a PC card file system:
— On AIX hosts, use -o soft, timeo=30, retrans=10, and
wsize=2048.
9-8 Using a Local File System
NFS Mount of a Local File System
4.
— On Solaris 2.3 or 2.4 or HP-UX hosts, use -o soft,
retrans=10, and wsize=2048.
— On SunOS hosts, use -o soft and retrans=10.
By default, all hosts can access the local file system and
all hosts have read/write access. You can specify both
the hosts that have access and the default access
permission:
— To change the default policy for all access to the local
file system via NFS, use the file-nfs-access-controldefault parameter. The default setting is "readwrite," and the other choices are "read-only" and
"no-access."
— To specify the hosts that can access the local file
system and specify the access policy for each host,
use the file-nfs-access-control-list policy. This
parameter is set automatically by ncdinstall to the
following:
file-nfs-access-control-list = {
{ /local 0.0.0.0 Read-Only }
{ /xfloppy 0.0.0.0 Read-Write }
}
Using a Local File System 9-9
Configuring a PC Card for Booting
Configuring a PC Card for Booting
This section describes how to prepare a PC card for booting
terminals and how to configure the terminal for PC card
booting.
Quick Start cards purchased from NCD already have the files
required for booting installed on them. For more information
about these cards, see Using a PC Card in Your NCD Thin Client
Device.
Preparing the PC Card for Booting
The files needed for local booting from a PC card are:
❏ A uncompressed or compressed X server (with the
filename extension .bl). Compressed servers are
recommended for the 4 MB cards; uncompressed servers
are required if you are using the card to boot remote
terminals. The ncdinstall installation program
automatically installs both compressed and
uncompressed X servers on the boot host.
❏ The loadable modules you need
❏ Fonts and font aliases for the user interface and
applications
❏ Terminal configuration files
❏ A color database file
See the NCDware Release Notes for a complete list of X servers
and support files available for your terminal.
9-10 Using a Local File System
Configuring a PC Card for Booting
To install the files:
1. On the host, prepare remote configuration files for the PC
card. NCD recommends using ncd_std and ncd_std.stp
files. ncd_std.stp is an (initially) empty file, which is used
for saving parameter settings from the Setup menus. The
parameter settings recommended in the ncd_std file are:
boot-desired-source = local
Boot from the PC card
config-unix-directory = /local/configs
Use the remote configuration files on the
PC card
xserver-default-font-path [-1] = /local/fonts
Use the fonts on the PC card
xserver-rgb-file = /local/rgb.txt
Use the color database on the PC card
read /local/ncd_std.stp
Read the configuration file that includes
changes made in the Setup menus
2.
3.
4.
5.
Insert the PC card in the terminal and boot the terminal.
Make sure that the X server has access to the files you
want to copy to the PC card through the file-service-table
parameter.
Start the Local File Manager as described in “Starting the
Local File Manager” on page 9-3.
If the PC card has not been formatted, use the format
command to format the card. Formatting takes about
two minutes per megabyte.
Caution
Formatting the card destroys any data on the card.
6.
Use the copy command to place an X server file on the PC
card. If you are copying a compressed server
(recommended for 4 MB PC cards), be sure to include the
.bl extension when naming the file on the PC card. For
example:
> copy /tftpboot/Xncd.5.1.xxx/Xncdhmx.bl
Xncdhmx.bl
Using a Local File System 9-11
Configuring a PC Card for Booting
7.
Create a directory named modsmodel (where model
specifies the terminal model, such as hmx or xpl) on the
PC card and copy each desired X server module into it.
For example, on an HMX terminal:
> mkdir modshmx
> copy /tftpboot/Xncd.5.1.xxx/modshmx/setup.hmx
8.
> cp
> cp
modshmx/setup.hmx
Copy the configuration files into /local on the PC card; for
example:
/usr/lib/X11/ncd/ncd_std
ncd_std
/usr/lib/X11/ncd/ncd_std.stp
ncd_std.stp
9.
You can place fonts needed by the terminal on the PC
card. Depending on the capacity of the card and the
number and size of the other files stored on the card, you
may only be able to store a limited number of fonts.
A minimal set of fonts is built into the X server. They
allow the terminal to boot and the local clients to run.
The built-in fonts are not usually sufficient to support
host-based applications. To avoid downloading fonts
from a host, the minimum set of fonts you need are the
fonts in the 100dpi and dw100dpi font directories and the
following fonts from the misc font directory:
10x20.pcf
6x10.pcf
6x12.pcf
6x13.pcf
6x13B.pcf
6x9.pcf
Tip
NCD recommends compressing the
fonts you store on the PC card.
Compressed fonts take up less room
on the PC card, but load more slowly
than uncompressed fonts.
7x13.pcf
7x13B.pcf
7x14.pcf
7x14B.pcf
8x13.pcf
8x13B.pcf
To place font files on a PC card:
a. Copy all the font files that you want to put on the card
into one directory on the host. From within that
directory, use the UNIX compress command to
compress them:
# compress -b 12 *
9-12 Using a Local File System
8x16.pcf
9x15.pcf
9x15B.pcf
olgl10.snf.Z
olgl12.snf.Z
olgl14.snf.Z
olgl19.snf.Z
Configuring a PC Card for Booting
b. Create a fonts.dir file by running the following
command from within the font directory on the host:
# ncdmkfontdir
c. If you are using font aliases, create a fonts.alias file in
the font directory on the host. See Chapter 6 for
information about creating this file.
d. Create a directory called fonts on the card and copy
the files from the font directory on the host into the
fonts directory on the PC card. For example:
> mkdir fonts
> cp /usr/lib/X11/ncd/fonts/tmpdir/10x20.pcf.z
fonts/10x20.pcf
10. Copy the rgb.txt color definition file to the /local directory
on the PC card. For example:
> cp /usr/lib/X11/ncd/rgb.txt
rgb.txt
11. Reboot the terminal.
Preparing the Terminal for Booting
This section describes how to set up a terminal to boot from a
PC card—either a card installed in the terminal or a card on
another terminal.
You need the following information:
❏ The IP address of the terminal
❏ The subnet mask for the terminal (if any)
❏ The broadcast address for the terminal
❏ The IP address of the gateway computer for your
network (if any)
Booting from a Local PC Card
On each terminal that boots from a local PC card, you use the
Boot Monitor’s Setup menus to configure the terminal.
Using a Local File System 9-13
Configuring a PC Card for Booting
Complete the following steps on each terminal:
Tip
You can enter the Boot Monitor after
the terminal boots by using the
appropriate key combination (see
Table 3-5 on page 3-30).
1.
2.
Enter the Boot Monitor. To invoke the Boot Monitor
while the terminal is booting, pressing the Escape key
while address requests are being broadcast to the
network (when the words TFTP load or NFS load
appear). After you press the Escape key, the Boot Monitor
prompt appears.
Reset the terminal’s NVRAM to its default values by
typing the following commands:
> nv
NVRAM Utility
C [adr] - change location adr
D - [start] [end] display contents
L - load defaults X server
Q - return to monitor
M - load MWT defaults
R - reload NVRAM values
S - save new values
->> l
Load defaults.
->> s
Save configuration values.
Are you sure? y
->> q
Quit the NVRAM utility.
3.
4.
9-14 Using a Local File System
Display the Boot Monitor Setup menus by typing the
following command:
> se
Use the right arrow key to highlight Monitor in the
menu bar. The Boot Monitor and Color Depth menus
appear.
a. Use the right arrow key to move to the Color Depth
menu, and use the down arrow key to select the color
depth. The available resolutions and refresh rates for
the chosen color depth are listed in the Resolution
menu.
b. Use the left arrow key to move to the Resolution
menu, and use the down arrow key to select the
resolution and refresh rate.
Configuring a PC Card for Booting
The available resolution and color depth settings are
listed in Table 9-2. For more information about color
depth, see Appendix A, Using 16-bit and 24-bit Color.
Table 9-2 Monitor Resolution and Color Depth Selection
Resolution (pixels)
Color Depth (bits per pixel)
Automatic Detection (DDC)
This selection appears if a
DDC-compatible monitor is
attached to the terminal. When
you specify the color depth, the
resolution is automatically set
to the best available.
640x480
8, 16, or 24
60 Hz
72 Hz
75 Hz
85 Hz
800x600
60 Hz
72 Hz
75 Hz
85 Hz
1024x768
60 Hz
8 or 16
70 Hz
75 Hz
85 Hz
1152x900
66 Hz
8 only
76 Hz
1280x1024
60 Hz
70 Hz
75 Hz
85 Hz
1600x1200
60 Hz
65 Hz
Using a Local File System 9-15
Configuring a PC Card for Booting
5.
Use the right arrow key to highlight Network in the
menu bar. The Network window appears (Figure 9-1).
Help Keyboard Monitor
Network
Boot
Done
Network
Get IP Addresses From:
DHCP IP Addressing Order:
BOOTP IP Addressing Order:
RARP IP Addressing Order:
Terminal IP Address:
First Boot Host IP Address:
Second Boot Host IP Address:
Third Boot Host IP Address:
Gateway IP Address:
Subnet Mask:
Broadcast IP Address
Terminal NCDnet Address:
Host NCDnet Address:
Router NCDnet Address:
SNAP (802.2 LLC) Encapsulation:
Network
1
2
3
0.0.0.0
0.0.0.0
0.0.0.0
0.0.0.0
0.0.0.0
0.0.0.0
0.0.0.0
0.0
0.0
0.0
Enabled
NVRAM
Disabled
Figure 9-1 The Boot Monitor’s Network Menu
6.
9-16 Using a Local File System
In the Network window:
a. Use the left arrow key to set the value of Get IP
Addresses From to “NVRAM.”
b. Use the down arrow key to highlight Terminal IP
Address.
Use the backspace key to erase the current address
and enter the terminal’s IP address. Follow the
instructions in the help text displayed at the bottom of
the screen.
c. Highlight Gateway IP Address, backspace to erase the
current address, and enter the gateway address to be
used by the terminal (if any).
d. Highlight Subnet Mask and Broadcast IP Address
and change them to the addresses used on your
network.
Reboot the terminal by using the right arrow key to
highlight Done and pressing the Return key (Figure 9-2).
Configuring a PC Card for Booting
Figure 9-2 The Boot Monitor’s Done Menu
7.
The terminal boots and displays the Console and the
Login Chooser.
NFS Booting from a Remote PC Card
To boot an NCD terminal from another terminal’s PC card, you
must do the following:
❏ Configure the boot host (the terminal with the PC card).
This requires using the Local File Manager; see
“Managing Files in a Local File System” on page 9-3 for
directions.
❏ Configure each of the remote terminals that will be
booting from this boot host
❏ Manually boot each remote terminal
Configuring the Boot Host Terminal
On the boot host terminal:
1. Set the file-enable-nfs-server parameter to “true.”
2. The file-export-directory-list parameter equates the
default locations of the X server and support files
required for booting a terminal to the actual physical
location of the files (in /local). By default, the parameter is
set as follows:
Using a Local File System 9-17
Configuring a PC Card for Booting
3.
4.
Tip
To boot over NFS from a remote
terminal, you must have a noncompressed X server on the PC card.
(Compressed servers are named with
a .bl extension.)
5.
6.
file-export-directory-list = {
{ /tftpboot/ /local/ }
{ /usr/lib/X11/ncd/
/local/ }
}
If the defaults are not accurate for your configuration, set
the parameter to the actual location in /local.
On the PC card, use the Local File Manager to create a
/local/configs directory and place configuration files for
the remote terminal(s) in it.
Create configuration files for the remote terminals and
use the Local File Manager to copy them to the
/local/configs directory.
The configuration files for remote terminals need only
contain an entry specifying the font path, such as:
xserver-default-font-path = {
{ built-ins }
{ /tftpboot/fonts }
}
You can use a standard configuration file for all the
terminals (named ncd_std) or individual files (named for
each terminal’s IP address). For information about
creating and naming remote configuration files, see
Chapter 4.
Copy a non-compressed X server to the /local directory
on the PC card.
For example, for booting HMX terminals, you must place
an X server named Xncdhmx on the PC card. Both the
remote terminal and the terminal equipped with the PC
card can load and execute the Xncdhmx server.
Create a directory named modsmodel (where model
specifies the terminal model (hmx, xpt, or xpl) on the PC
card and copy each desired X server module into it. For
example, on an HMX terminal:
> mkdir modshmx
> copy /tftpboot/Xncd.5.1.xxx/modshmx/setup.hmx
9-18 Using a Local File System
modshmx/setup.hmx
Configuring a PC Card for Booting
Configuring the Remote Terminals
On each remote terminal booting from the PC card, use the
Boot Monitor to configure network parameters:
Tip
You can enter the Boot Monitor after
the terminal boots by using the
appropriate key combination (see
Table 3-5 on page 3-30).
1.
2.
3.
4.
5.
6.
Enter the Boot Monitor. To invoke the Boot Monitor
while the terminal is booting, press the Escape key while
address requests are being broadcast to the network
(when the words TFTP load or NFS load appear). After
you press the Escape key, the Boot Monitor prompt
appears.
Display the Boot Monitor Setup menus by typing the
following command:
> se
Use the right arrow key to highlight Monitor in the
menu bar. The Boot Monitor and Color Depth menus
appear.
a. Use the right arrow key to move to the Color Depth
menu, and use the down arrow key to select the color
depth. The available resolutions and refresh rates for
the chosen color depth are listed in the Resolution
menu.
b. Use the left arrow key to move to the Resolution
menu, and use the down arrow key to select the
resolution and refresh rate.
The available resolution and color depth settings are
listed in Table 9-2 on page 9-15. For more information
about color depth, see Appendix A, Using 16-bit and 24bit Color.
Use the right arrow key to highlight the item Network in
the menu bar (Figure 9-1 on page 9-16).
Use the left arrow key to set the value of Get IP
Addresses From to “NVRAM.”
Use the down arrow key to highlight Terminal IP
Address, and backspace to erase the current address
and enter the terminal’s IP address.
Follow the instructions in the help text displayed at the
bottom of the screen.
Using a Local File System 9-19
Configuring a PC Card for Booting
7.
Use the down arrow key to highlight First Boot Host
IP Address, and backspace to erase the current address.
Enter the IP address of the terminal equipped with the PC
card.
8. Use the down arrow key to highlight Gateway IP
Address, and backspace to erase the current address.
Enter the gateway address (if any) for your network.
9. Use the down arrow key to highlight Subnet Mask and
Broadcast IP Address and change them to the
addresses for your network.
10. Use the right arrow key to highlight Done.
11. Use the down arrow key to highlight Exit.
Booting the Remote Terminals
The remote terminals must be booted manually the first time.
See “Booting Terminals Manually” on
page 3-29 for more information on
manual booting.
At the Boot Monitor prompt (>), type the Boot Monitor
command for manual booting via NFS:
> bn
The terminal boots and loads its X server from the PC card.
9-20 Using a Local File System
Using a Local File System on a Diskette
Using a Local File System on a Diskette
See the documentation included with
the floppy drive for installation
instructions.
You can use DOS-compatible floppy disks on a terminal
equipped with a floppy drive. You can use floppy disks as offline storage for files or to copy files between a floppy disk and
your host system.
ncdfloppy is the hostside utility for managing and using DOScompatible file systems on 720K or 1.44M floppy disks.
Caution
Do not use the hostside ncdfloppy utility if you’ve already used
NFS to access the floppy. To avoid damaging files, you must
reboot the terminal before switching from one method of floppy
access to another.
Configuring a Terminal for Floppy Disk Drive Use
By default, ncdfloppy looks for a floppy drive connected
directly to the terminal. If you want to access a floppy drive
connected to another terminal, you can specify the terminal by
using the -h option (see “The ncdfloppy Command-Line
Syntax” on page 9-24 for more information).
To configure the terminal for the floppy disk drive, set the
“use-parallel protocol” field in the parallel-daemons-table to
“true” as shown in Figure 9-3.
TCP
port
parallel-daemons-table = {
{ 1
true
}
Port
number
5964
Use parallel
protocol
NCDnet
object
name
nil
LAT
service
name
false
nil
LAT
service
rating
0
}
Enable LAT
service
Figure 9-3 Setting the parallel-daemons-table for a Floppy Drive
Using a Local File System 9-21
Using a Local File System on a Diskette
If you don’t set the “use parallel protocol” field, the following
error message appears when you try to use the floppy drive:
No response from terminal--parallel protocol may
not be enabled or a previous connection to the
parallel port needs to be aborted (this can be
done from the Console). Unable to initialize
floppy drive.
If the error message appears and you need to use the floppy
drive immediately:
1. Reset the parallel port. From the Console, select Console
⇒ Abort Parallel Port.
2. In the Setup menus (Change Setup Menus ⇒ Parallel),
select the parallel port, set the Use Parallel Port
Protocol field to “true”, and click Apply.
The ncdfloppy Commands
To start an ncdfloppy interactive session, type:
% ncdfloppy
>
At the prompt, you can type any of the ncdfloppy commands
listed in Table 9-3. You can also supply commands in the
ncdfloppy command line; see “The ncdfloppy Command-Line
Syntax” on page 9-24.
Table 9-3 ncdfloppy Commands and Options
This command...
Performs this function
cat filename...
type filename ...
Displays the contents of a file on the screen.
cd [ directory ]
chdir [ directory ]
Moves you to the specified directory on the floppy
disk file system.
del filename
delete filename
Deletes a file from the floppy disk.
9-22 Using a Local File System
Using a Local File System on a Diskette
Table 9-3 ncdfloppy Commands and Options (Continued)
This command...
Performs this function
dir [-w] [ filename ... ]
ls [-w] [ filename ... ]
Displays a DOS-like directory listing of the floppy
disk files. If you omit the filename, a listing of the
current floppy disk directory appears.
The -w option displays only the filename, and omits
the size and creation dates.
exit
quit
Terminates the ncdfloppy session.
format [ -f 720 ] [ -l label ] [-q]
Creates a new DOS file system on the floppy disk.
By default, this command creates a file system for a
1.44M floppy; use the -f 720 option to format a
720K floppy disk.
The -l option specifies a volume label.
The -q option formats more quickly, but should be
used only if the disk has already been completely
formatted, and only if you are sure the disk is in
perfect condition (containing no bad sectors).
get [-n] [-m] flop-file local-file
get [-n] [-m] flop-file ... local-dir
Copies a file from the floppy disk onto the local
UNIX file system.
The -n option suppresses warning messages about
overwriting existing files.
The -m option preserves the original file’s
modification time.
help
?
Displays a list of ncdfloppy commands.
md [-v] directory ...
mkdir [-v] directory ...
Creates floppy disk directories.
The -v option displays a message if you must
modify the directory name to fit DOS directorynaming requirements.
Using a Local File System 9-23
Using a Local File System on a Diskette
Table 9-3 ncdfloppy Commands and Options (Continued)
This command...
Performs this function
put [-n] [-m] [-v] [-x] local-file flop-file
put [-n] [-m] [-v] [-x] local-file ... flopdir
Copies local_file from the local UNIX file system to
the floppy disk.
The -n option suppresses warning messages about
overwriting existing files.
The -m option preserves the original file’s
modification time.
The -v option displays a message if you must
modify the destination filename to fit DOS filenaming conventions.
The -x option suppresses filename expansion of
wildcard characters.
pwd
Displays the current floppy disk directory.
rd directory
rm directory
rmdir directory
Deletes one or more empty floppy disk directories.
ren [-v] file1 file2
rename [-v] file1 file2
Renames a file. The -v option displays a message if
you must modify the new filename to meet DOS
requirements.
The ncdfloppy Command-Line Syntax
The complete syntax of the ncdfloppy utility is:
ncdfloppy [ -h servername ] [ -p port ] [ command ]
where:
-h servername
9-24 Using a Local File System
Specifies the IP address or hostname of the
terminal to which the floppy drive is
connected. If you don’t specify this option,
the value of the DISPLAY variable is used
to determine which terminal to contact.
Using a Local File System on a Diskette
-p port
Specifies the TCP port for the parallel
daemon. If you use the default port (5964),
you don’t need to use this option. If you
change the default port number, you must
reboot the terminal before using its floppy
drive and use this option to specify the
port number.
command
Specifies one of the commands listed in
Table 9-3. After the command executes,
ncdfloppy exits. If you don’t specify a
command, ncdfloppy goes into interactive
mode and prompts you for commands.
For example, the following command copies a file from the
floppy disk into the current directory of the local UNIX file
system, then exits:
% ncdfloppy get my_file .
%
ncdfloppy Naming Conventions
When you specify filenames and directories with ncdfloppy
commands, keep the following guidelines in mind to avoid
conflicts between DOS- and UNIX-style file system
conventions:
❏ You can use either a UNIX-style slash (/) or a DOS-style
backslash (\) as a separator in pathnames.
❏ ncdfloppy recognizes the asterisk (*), question mark (?),
and square brackets ([ ]) in filenames and interprets
them as wildcard characters.
❏ DOS limits label names to eleven characters, and
ncdfloppy truncates label names that exceed that length.
❏ DOS limits filenames and directory names to an eightcharacter filename separated from a three-character
extension by a period (for example, letter21.doc)—
ncdfloppy truncates any names that exceed those lengths.
Using a Local File System 9-25
Using a Local File System on a Diskette
❏
9-26 Using a Local File System
For example, the UNIX filename ltr-first.draft, is truncated
to ltr-firs.dra when ncdfloppy copies the file to a floppy
disk.
DOS does not permit more than one period (the separator
between the filename and its extension) in filenames or
directory names—ncdfloppy converts extra periods to the
character x.
For example, the UNIX filename ltr.1.draft is changed to
ltr.1xd when ncdfloppy copies the file to the floppy disk.
Setup Menu Equivalents for Local File System Parameters
Setup Menu Equivalents for Local File System Parameters
Table 9-4 lists the remote configuration parameters discussed
in this chapter and a description of the corresponding Setup
menu field for each. This information is provided for system
administrators who configuring terminals through the Setup
menus.
Table 9-4 Setup Menu Fields for Configuring a Local File System
When Changes
Take Effect
Saved in
NVRAM
Setup ⇒ Change Setup
Parameters ⇒ File Service
⇒ Enable Floppy
Filesystem
At boot
No
file-enable-nfs-server
Setup ⇒ Change Setup
Parameters ⇒ File Service
⇒ Enable NFS Server
At boot
No
file-export-directory-list
Setup ⇒ Change Setup
Parameters ⇒ File Service
⇒ Export Directory List
Immediately
No
file-manager-access-controlenabled
Setup ⇒ Change Setup
Parameters ⇒ Access
Control (File Manager
section) ⇒ Enable File
Manager Access Control
Immediately
No
file-manager-access-control-list
Setup ⇒ Change Setup
Parameters ⇒ Access
Control (File Manager
section) ⇒ File Manager
Access Control List
Immediately
No
file-manager-password
Setup ⇒ Change Setup
Parameters ⇒ Access
Control ⇒ (File Manager
section) Password
Immediately
Yes
Parameter
Setup Menu Field
file-enable-floppy-filesystem
Using a Local File System 9-27
Setup Menu Equivalents for Local File System Parameters
Table 9-4 Setup Menu Fields for Configuring a Local File System (Continued)
When Changes
Take Effect
Saved in
NVRAM
Setup ⇒ Change Setup
Parameters ⇒ File
Manager ⇒ TCP Port
Number
At boot
No
file-manager-telnet-port
Setup ⇒ Change Setup
Parameters ⇒ File
Manager ⇒ Telnet Port
Number
At boot
No
file-nfs-access-control-default
Setup ⇒ Change Setup
Parameters ⇒ Access
Control (NFS Section) ⇒
NFS Server Access Control
Default
Immediately
No
file-nfs-access-control-list
Setup ⇒ Change Setup
Parameters ⇒ Access
Control (NFS Section) ⇒
NFS Server Access Control
List
Immediately
No
file-service-table
Setup ⇒ Change Setup
Parameters ⇒ File Service
⇒ File Service Table
Immediately
No
parallel-daemons-table
Setup ⇒ Change Setup
Parameters ⇒ Parallel ⇒
Parallel Daemons Table
“use parallel
protocol” takes
effect immediately;
all other fields take
effect at boot.
No
Parameter
Setup Menu Field
file-manager-tcp-port
9-28 Using a Local File System
10 Using Printers with NCD Terminals
This chapter describes how to configure printing from NCD
terminals. The topics covered in this chapter are:
Tip
Procedures in this chapter provide
directions for configuring terminals
through remote configuration files. For
system administrators who use the
Console for terminal configuration,
information about Setup menu fields
is provided at the end of the chapter.
❏
❏
Connecting a printer to a terminal
Using the command-line printing utilities for printers
attached to NCD terminals:
— Setting environment variables
— Using the ncdlp(1) print command
— Using the ncdprint(1) print command
❏ Using the terminal’s print table to set up printing for the
following local clients:
— The NCD (VT320) Terminal Emulator
— The NCD Mosaic Browser
— The NCD Applet Viewer (and other Java
applications)
For information about configuring printing services for the
NCD 3270 emulator, see Using the 3270 Emulator.
Overview
Terminals can be configured for printing to a local printer or
to a remote printer. If a local printer is attached to a serial port,
the port must be configured.
For printing from XRemote or using a command line for
printing, two utilities are included with NCDware. You can
use these commands to print to a local printer or to another
NCD terminal that has a printer attached to it.
For the local clients that have print commands in their menus
(NCD Terminal Emulator, 3270 terminal emulator, NCD
Using Printers with NCD Terminals 10-1
Connecting a Printer to a Terminal
Mosaic Browser and Applet Viewer), you can add local or
remote printers to client print dialogs.
Connecting a Printer to a Terminal
Connecting a local printer consists of attaching the printer to a
port. In addition, you may need to configure the serial port
and the serial or parallel daemon.
Printer Cabling
See your printer manual and terminal
hardware booklet to determine which
interface to use.
You can connect a printer to an NCD terminal’s serial or
parallel port.
❏ Serial port connection—Use a null modem cable (DTE-toDTE).
❏ Parallel port connection—Use a cable equipped with a
DB-25 connector on one end and a Centronics parallel
interface on the other.
Configuring Terminal Ports and Daemons
This section describes how to configure a serial port for a local
printer. Information is included about the parameters used to
configure the serial and parallel daemons, although these
parameters seldom need to be changed.
Configuring the Serial Port and Serial Daemon
The serial-interfaces-table configures the serial port. To
configure a serial port for printing:
1. Enable the serial port:
— To enable a terminal’s serial port for printing when
the terminal reboots, use either “printer” or “serialdaemon” as the value for the mode field (which
controls the function of the port at boot time).
— To enable a terminal’s serial port for printing
immediately, use either “printer” or “serial-daemon”
for the current mode (which controls how the port is
currently being used).
10-2 Using Printers with NCD Terminals
Connecting a Printer to a Terminal
2.
Set the other parameters in the table (baud rate, data bits,
stop bits, parity, handshake, and hangup) to match the
characteristics of the printer.
The example serial interfaces table in Figure 10-1 enables
serial port 1 for printing after the terminal reboots.
Data bits
serial-interfaces-table = {
{ 1 printer printer 9600
}
Baud
Mode
rate
Port
number
Handshake
8 1 none none none}
Current
mode
Stop
bits
Parity
Hangup
Figure 10-1 The serial-interfaces-table Parameter for Printing
The serial-daemons-table parameter configures the terminal’s
serial daemon. In most cases, you do not need to change the
defaults. Figure 10-2 shows the default table for a terminal
with one serial port.
Make sure that the use-serial-protocol field is set to “false.”
Port
number
serial-daemons-table = {{
1
LAT
service
name
TCP
port
false
87
Use serial
protocol
SERIALD
NCDnet
object name
false
nil
LAT
service
rating
50 }}
Enable LAT
service
Figure 10-2 The serial-daemons-table Parameter for Printing
Configuring the Parallel Daemon
The parallel-daemons-table parameter configures the
terminal’s parallel daemon. In most cases, you do not need to
change the default settings. Figure 10-2 shows the default
table for a terminal with one parallel port.
Using Printers with NCD Terminals 10-3
Using the Command-Line Printing Utilities
Make sure that the use-parallel-protocol field is set to “false.”
Port
number
LAT
service
name
TCP
port
parallel-daemons-table = {{ 1 false 5964 PARALLELD false nil
Use parallel
protocol
NCDnet
object name
LAT
service
rating
50 }}
Enable LAT
service
Figure 10-3 The parallel-daemons-table Parameter for Printing
Using the Command-Line Printing Utilities
The host-based utilities for printing to a printer connected to
an NCD terminal do not use the system print spooler and do
not queue print jobs. You can use these commands over an
XRemote, Ethernet, or Token-Ring connection to a UNIX host.
The printer can be attached to the local terminal or to another
NCD terminal. See Table 10-1 for list of the commands and the
types of printers supported for each command.
The print utilities run on a UNIX host. The NCDware
installation program (ncdinstall) installs the print utilities and
other necessary programs into the /usr/bin/X11/ncd directory.
Table 10-1 Host-side Printing Utilities
Command
Usage
ncdlp
Use for a simple ASCII printer, an HP DeskJet, or
an HP LaserJet or other PostScript-compatible
printer.
ncdprint
Use if you are not using a simple ASCII printer, an
HP DeskJet, an HP LaserJet, or a PostScript printer
10-4 Using Printers with NCD Terminals
Using the Command-Line Printing Utilities
Setting Environment Variables
After installing the printing binaries, make sure the directory
in which they reside is included in the user’s PATH
environment variable.
Make sure the DISPLAY variable is set. If you do not set this
variable in a startup file, users can set the variable in the print
utility’s command line.
Using the ncdlp Printing Utility
The ncdlp command sends a file to a printer connected to an
NCD terminal. It does not use the system print spooler, nor
does it queue printing jobs. You can use ncdlp over an
XRemote, Ethernet, or Token-Ring connection to a UNIX host.
Use ncdlp if you are using a simple ASCII printer, an HP
DeskJet, HP LaserJet, or a PostScript printer.
For example, to send a file called report to a PostScript printer
connected to the terminal on serial port 1 over TCP/IP, type:
% ncdlp -T ps report
When you are using a PostScript printer, ncdlp automatically
detects whether the file contains PostScript or ASCII data and
converts ASCII data to PostScript before sending it to the
printer.
See Chapter 16 for more information
about XRemote connections.
When communicating with the host over XRemote using the
XRemote protocol (instead of TCP/IP), use the -x option. For
example, to send a file to a PostScript printer connected to the
terminal on serial port 1:
% ncdlp -T ps -x report
The ncdlp command line options described in Table 10-2
specify:
❏ The physical port to which the printer is connected (the
default is serial port 1)
❏ If the printer is on a remote terminal, the name of the
terminal
❏ The printer type (the default is PostScript)
❏ The formatting of the printed output
Using Printers with NCD Terminals 10-5
Using the Command-Line Printing Utilities
The syntax of the ncdlp command is:
ncdlp [-T printer_type] [-i indent] [-l length] [-w width] [-r] [-o] [-x]
[-s serial_portnum | -p parallel_portnum][-n network_port][-h ncd_name] [filename...]
Table 10-2 ncdlp Command Line Options
Option
Description
Default
-T printer_type
The type of printer. Permitted values are:
ps
ps
PostScript printer. If you send ASCII text to a
PostScript printer, ncdlp converts the data to
PostScript format.
lj
HP LaserJet printer
dj
HP DeskJet printer
ascii
Simple ASCII printer
-i indent
The number of columns to indent the text from the left
margin on the printed page.
0
-l length
The number of lines that fit onto a printed page.
64 (60 for HP
LaserJet and HP
DeskJet)
-w width
The number of columns that fit onto a printed page.
ncdlp truncates characters that do not fit on the page.
A typical value is 80.
256
-r
Prints the pages in reverse order (last page first).
False
-o
Specifies that ncdlp does not interpret the filename as a
text file; instead, it simply dumps the file content to the
printer.
False
-x
Specifies an XRemote host/terminal connection.
False
10-6 Using Printers with NCD Terminals
Using the Command-Line Printing Utilities
Table 10-2 ncdlp Command Line Options (Continued)
Option
Description
Default
-s serial_port
Which serial port to use. Permitted values are:
1
-p parallel_port
1
Serial port 1
2
Serial port 2 (with ESP board only)
3
Serial port 3 (with ESP board only)
Which parallel port to use. Permitted values are:
1
Parallel port 1
2
Parallel port 2 (with PEP board only)
1
-n network_port
The TCP port on which the terminal listens for TCP
connections. Change this value only if you modify the
serial-daemons-table so that the Serial daemon is not
listening on a default port.
Serial port 1: 87
Serial port 2: 5962
Serial port 3: 5963
-h ncd_name
The name or IP address of the terminal to which the
printer is attached. When using XRemote, use DISPLAY
variable syntax for specifying the name (for example,
hawk:0).
Terminal named
in the DISPLAY
variable
filename...
The name of the file(s) to print. If you don’t specify a
filename, ncdlp reads the file from standard input
(stdin); press Ctrl-D to terminate input.
stdin
Using the ncdprint Printing Utility
See the ncdprint (1) man page for
additional information on ncdprint.
The hostside ncdprint utility is for printing on a printer
connected to an NCD terminal’s serial or parallel port. It does
not use the system print spooler, queue printing jobs, or
format the data to be printed. You can use ncdprint over either
an XRemote or an Ethernet connection to a UNIX host.
Use ncdprint if you are using a printer other than a simple ASCII
printer, an HP DeskJet, or an HP LaserJet.
To use ncdprint to send a document to the printer, use a UNIX
utility such as cat (1), enscript (1), or lwf (1) to process the file
Using Printers with NCD Terminals 10-7
Using the Command-Line Printing Utilities
for input to the ncdprint command. You can also use the UNIX
redirect-input operator (<).
The following example sends the file book over an Ethernet
connection to the printer connected by serial port 1 to the
terminal named hawk.
% cat book | ncdprint hawk
The following example sends the file book over XRemote
(specified by the -xport option) to the printer connected to
parallel port 1 (specified by including -xport p1 in the
command line) to the terminal named hawk:
% ncdprint -prot none -xport p1 hawk:0 < book
The syntax of ncdprint is:
ncdprint [-prot protocol] [-tcp port_number] [-xport com_port] ncd_name
Table 10-3 describes the command-line options used with
ncdprint to specify:
❏ Printer and physical port types
❏ TCP port number
❏ TCP or XRemote connection
❏ The name of the terminal, if the printer is attached to a
remote NCD terminal
Table 10-3 ncdprint Options
Option
Action
Default Value
-prot protocol
The protocol to use, which corresponds to the
printer type. The permitted values are:
none; -prot requires a
protocol argument.
-tcp port_number
pss
PostScript printer connected to a serial
port.
none
All other printers.
For terminals connected to the host by Ethernet,
specifies the TCP port on which the terminal
listens for connections.
10-8 Using Printers with NCD Terminals
Serial port 1: 87
Serial port 2: 5962
Serial port 3: 5963
Printing from Local Client Menus
Table 10-3 ncdprint Options (Continued)
Option
Action
Default Value
-xport com_port
For terminals connected to the host by XRemote,
specifies the physical port to which the printer is
attached. If you do not specify -xport, ncdprint
assumes a TCP connection. The permitted values
are:
-xport requires a
com_port argument.
ncd_name
s1
Serial port 1
s2
Serial port 2 (with an ESP board only)
s3
Serial port 3 (with an ESP board only)
p1
Parallel port 1
p2
Parallel port 2 (with a PEP board only)
For terminals connected to the host by TCP/IP,
specifies the name or IP address. of the terminal to
which the printer is connected.
If the connection is
XRemote, the default
ncd_name is the
display name used by
the XRemote helper
process.
Printing from Local Client Menus
Several NCD local clients—the NCD Terminal Emulator, the
3270 terminal emulator, the Mosaic Browser, and the Applet
Viewer—use the NCD print APIs (application programming
interfaces) to print via a terminal’s serial or parallel port or to
a remote host running the LPD print protocol. To configure a
terminal’s print services for local clients, you set up a table of
available printers in the print-lpr-servers parameter.
Each of the local clients that use the print APIs have items in
their menus for users to select a printer and send print jobs to
the printer queue.
A local printer does not have to be available in order to accept
print jobs. The print job is kept in buffers until the printer
Using Printers with NCD Terminals 10-9
Printing from Local Client Menus
becomes available or the print job is cleared by selecting the
appropriate Abort command from the Console (for example,
Abort Parallel Port 1 if the printer is on parallel port 1). There
is a limited amount of space in the buffers; if that space is used
up, print requests fail.
Remote printers on UNIX and Microsoft Windows NT hosts
must be available through the LPD protocol. For printers on
Windows NT systems, LPD must be enabled.
For remote printers on UNIX hosts, the terminal must have
permission to access the printer server. This is usually
accomplished by adding the terminal’s hostname to either the
/etc/hosts.equiv file or /etc/hosts.lpd file.
The rest of this section describes how to set up the print table
and discusses printing from each of the local clients that use
the print API.
Setting Up the Print Table
This section describes how to set up the print table (print-lprservers parameter).
You can manually add entries to the print table, and some
entries are automatically placed in the table. To manually add
entries, follow the examples in Figure 10-4. Entries are
automatically placed in the table under the following
circumstances:
❏ The first time a user attempts to print from the NCD
Terminal Emulator or 3270 terminal emulator, an entry is
automatically added to the print table for each parallel
port. Also, any improperly configured printers that have
been added to the print table are removed.
❏ If you configure a serial port for printing, as described in
“Configuring the Serial Port and Serial Daemon” on
page 10-2, an entry for the port is automatically added to
the print table.
❏ Printers that you add to the table through the Setup
menus appear immediately in the Select Printers dialog
boxes.
10-10 Using Printers with NCD Terminals
Printing from Local Client Menus
Automatic entries for a terminal whose hostname is ncdu01
are shown in the first two lines of the example print table in
Figure 10-4.
Host name
(where the
printer is
located)
Print
queue
name
Printer type/
data stream
type
Description
Whether to
request a
banner page
print-lpr-servers = {
{ ncdu01.ncd.com "parallel 1" ascii "Local ascii to parallel 1" false }
{ ncdu01.ncd.com "serial 1" ascii "Local ascii to serial 1" false }
{ 138.44.169.33 engr1 postscript "Engineering PostScript printer" true }
{ pubs_nt pubs1 nt-postscript "Techpubs PostScript Printer" false }
}
Figure 10-4 Example Local Client Print Table
When you add rows to the print table, use the special syntax
for adding rows to tables that have automatic entries. For
example:
print-lpr-servers[-1]={ pubs_nt pubs1 nt-postscript "Pubs Printer" false }
If a print queue is to be used for printing from Java
applications, such as the Applet Viewer, or for printing from
the NCD Mosaic Browser, the data stream type must be
PostScript:
❏ If the printer is on a Windows NT system, set the data
stream field to “nt-postscript.”
❏ If the printer is on a UNIX system, set the data stream
field to “postscript.”
For remote printers on NCD terminals, use the following
syntax for the queue name:
rmt:port_number
The queue name for a printer on serial port 1 is rmt:87. For
printers on serial ports 2 and 3, the queue names are rmt:5962
and rmt:5963 respectively.
Using Printers with NCD Terminals 10-11
Printing from Local Client Menus
Printing from Terminal Emulator Windows
This section explains the Terminal Emulator print commands
and the default printer.
Commands in the NCD Terminal Emulator and Dialer File
menus and the 3270 emulator File menu allow users to send
the contents of the window or the current session log to a
printer. Printers can be local; that is, connected to the
terminal’s serial or parallel ports; or they can be remote
printers.
The default printer is highlighted in the Select Printer dialog
box. If the user hasn’t selected a different default, the first
printer listed in the dialog box is the default. If the user selects
a different default, all Terminal Emulators started thereafter
have that printer as the default. When the user logs out, the
default reverts to the first printer in the list or the printer
named in the resource.
If you need to add entries to the print table and to the Select
Printer dialog box, see “Setting Up the Print Table” on
page 10-10.
Printing from the NCD Mosaic Browser
In the browser, users select File ⇒ Print from the browser’s
Document View window. The Print Setup dialog box is
displayed. The printers in the print table (print-lpr-servers) are
listed in the drop-down list from which the user selects a
printer.
Note that only PostScript printers appear in the drop-down
list in the Print Setup dialog box. The browser can only print
to PostScript printers.
For information about adding printers to the print table, see
“Setting Up the Print Table” on page 10-10.
10-12 Using Printers with NCD Terminals
Printing from Local Client Menus
Printing from the NCD Applet Viewer and Other Java Applications
NCDware supports printing from Java applications. The
Applet Viewer is an example of a Java application that uses
NCDware’s Java print support.
Java applications can only print to PostScript printers.
Printer Selection
After starting an applet with the Applet Viewer, the user can
select Print and display the Print Dialog. The user can print to
the default printer queue or enter the name of a different
printer queue.
Default Print Queue
Tip
The parallel 1 queue is placed in the
table by the NCD Terminal Emulator;
however this queue is configured as
an ASCII data stream and must be
changed to PostScript before Java
applications can send print jobs to this
queue. For more information about
the Terminal Emulator queues, see
“Setting Up the Print Table” on
page 10-10.
The default print queue for the Applet Viewer is PARALLEL1,
and there must be entry for this queue in the print table if you
want to use the default queue.
If there is no entry for PARALLEL1 or this queue is not
configured as a PostScript data stream, the Java print code
searches the print table for an entry with a queue named
parallel 1. If this entry is present and configured as PostScript,
the print job is sent to this queue. If neither of these queues is
in the print table and the user hasn’t entered a different and
valid queue name, the Print Error popup appears when the
user attempts to print.
If you specify a printer for Java command lines and a queue
name is repeated in the print table, the print job goes to the
first printer listed in the table. For example, at a large site
many printers may have the queue name LP0.
Other Java applications may have different default printer
queues. These queues must be entered into the print table and
correctly configured on the remote or local machine.
Printing to a File
If the user prints to a file, the resulting file contains PostScript
data. When printing to a file, the user must enter an absolute
path name in the Print Dialog box, and the file must be
accessible through the terminal’s file service table. For more
information about the file service table, see Chapter 3.
Using Printers with NCD Terminals 10-13
Setup Menu Equivalents for Printing Parameters
Setup Menu Equivalents for Printing Parameters
Table 10-4 lists the remote configuration parameters discussed
in this chapter and the corresponding Setup menu field for
each. This information is provided for system administrators
who need to configure terminals through Setup menus.
Table 10-4 Setup Menu Field for Printing
When Changes
Take Effect
Saved in
NVRAM
Setup ⇒ Change Setup
Parameters ⇒ Parallel ⇒
Parallel Daemons Table
“Use ParallelProtocol” field—
immediately; all
other fields—at boot
No
serial-daemons-table
Setup ⇒ Change Setup
Parameters ⇒ Serial ⇒
Serial Daemons Table
“Use Serial Protocol”
field—immediately;
all other fields—at
boot
No
serial-interfaces-table
Setup ⇒ Change Setup
Parameters ⇒ Serial ⇒
Serial Interfaces Table
“Mode” field—at
boot time; all other
fields—immediately
“Current Mode”
and “Hangup”
are not saved; all
other fields are.
print-lpr-servers
Setup ⇒ Change Setup
Parameters ⇒ Print ⇒
Lpr Servers
Immediately
No
Parameter Name
Setup Menu Field
parallel-daemons-table
10-14 Using Printers with NCD Terminals
11 Reassigning Keyboard Functions Using the
Keymap Editor
This chapter describes how to use the Keymap Editor to
remap keyboard functions and add custom translations to
keys for the 3270 terminal emulator (ncd3270) and NCD
Terminal Emulator (ncdterm). The topics in this chapter are:
❏ General information about the Keymap Editor
❏ Starting and exiting from the Keymap Editor
❏ Keymap Editor windows and menus
❏ Basic keyboard mapping
❏ Saving and applying keymaps
❏ Importing keymaps
❏ Advanced keyboard mapping (translations)
About the Keymap Editor
keymap
The assignments of client (3270 or
VT320) actions to keysyms. Keysyms
are the key press/release events;
actions are functions specific to each
client.
Each key on a keyboard has a default action associated with it.
When you press an alphabetic or numeric key, the character
printed on the keycap (key label) appears on the screen. Other
keys perform a function instead of displaying a character. For
example, an IBM 3270 keyboard has keys labeled with actions
such as Clear and Insert.
The Keymap Editor local client displays a layout of a
keyboard and allows you to change the actions or translations
assigned to keys. For example, on the UNIX-style 97-key
keyboard, the Cut action occurs when you press the PF3 key.
Using the Keymap Editor, you can assign this action to
another key by simply clicking on the word Cut on the
keyboard layout on the screen and dragging it to another key.
Reassigning Keyboard Functions Using the Keymap Editor 11-1
Starting the Keymap Editor
The Keymap Editor provides two modes of operation:
❏ Basic mode—Allows you to reassign actions associated with
3270 or VT320 terminal emulation. For example, in a VT320
window, you can assign the terminal bell to a key so that
pressing that key rings the bell.
❏
Advanced mode—Allows you to assign the full set of X
keyboard translations for 3270 or VT320 terminal emulation
windows. In advanced mode, for example, you can assign
multiple actions to a single key.
Starting the Keymap Editor
To start the Keymap Editor:
❏ From the Console, select Terminals ⇒ Keymap Editor.
❏ From a terminal emulator window, select Keys ⇒ Keymap
Editor.
See the keymap_editor (1)
man page for information on
options.
❏
❏
From a command line, use the rsh or remsh command in a
UNIX shell. For example:
% rsh ncd_name keymap_editor [ -option ]
where ncd_name is the hostname or IP address of the terminal
From the default window manager menu, click any mouse
button on the root window and select Keymap Editor from
the root menu.
Exiting from the Keymap Editor
To exit from the Keymap Editor, select Quit from the file menu.
To save the current keymap before quitting, apply the keymap to a
window, or save it in a file. See “Writing a Keymap to a File and
Applying a Keymap” on page 11-6.
11-2 Reassigning Keyboard Functions Using the Keymap Editor
Keymap Editor Window and Menus
Keymap Editor Window and Menus
Figure 11-1 shows a typical display when you first invoke the
Keymap Editor. The keyboard layout initially displayed is for the
keyboard attached to your terminal. You may choose a different
keyboard layout by selecting Keyboards from the menu bar and
clicking on a different keyboard name.
Trash Can (for deleting
an action from a key)
Keyboard
Name
Menu Bar
Action List
Keyboard
Layout
Figure 11-1 Keymap Editor Basic Mode Display
The keyboard layout in the Keymap Editor window shows the
keycaps (the legends printed on the keys) and the names of any
functions associated with a key.
If you start the Keymap Editor from the Console, no actions are
displayed because there is no keymap available. Select File ⇒ Read
Translations to import functions from an open window.
Reassigning Keyboard Functions Using the Keymap Editor 11-3
Keymap Editor Window and Menus
Although the keyboard layout shows only the US English version of
a keyboard, every key press on the keyboard appears in the layout,
allowing you to map actions to the correct keys no matter which
keyboard version you are using.
Keycap Sections
Each keycap in the layout has three sections:
❏ For all keys except the alphabetic keys, the top section shows
what happens when you press the key along with the Shift
key.
❏ The middle section shows what happens when you press the
key alone.
❏ The bottom section shows what happens when you press the
key along with the Control key.
#
3
Insert
Key plus Shift Key (Shift-3)
Key alone (3)
Key plus Control Key (Control-3)
Figure 11-2 Key Layout Sections
Menu Bar Options
The Keymap Editor menu bar has five options:
❏ The File menu includes options for reading and writing
translations, and for exiting from the Keymap Editor.
❏ The Edit menu includes options for basic editing functions
such as cut, copy, and paste.
❏ The View menu offers options for displaying only the keycaps,
only the translations, or both keycaps and translations. From
the View menu, you can also switch back and forth between
basic and advanced modes.
❏ The Keyboards menu displays the layouts of all NCD
keyboards supported by the Keymap Editor.
11-4 Reassigning Keyboard Functions Using the Keymap Editor
Mapping the Keyboard—Basic Mode
❏
Tip
Show Help Key is useful for
reading longer key actions that
do not fit on the keyboard
layout.
The Help menu offers two kinds of help:
— Show Help Text... displays quick reference information
for basic or advanced mode.
— Show Help Key displays all the sections in a keycap (next
to the trash can). First click a key, then select Show Help
Key from the Help menu. As long as Show Help Key is
enabled, the key cap sections are displayed for each key
you click.
Mapping the Keyboard—Basic Mode
Use the instructions in Table 11-1 to remap the keyboard in basic
mode. Use the mouse to select and move actions. In most cases, you
use mouse button 1 (typically the left button).
The changes you make to the keymap are in effect only while the
emulator window is open. Once you close the window and exit
from the emulator, the emulator reverts to its default keymap. See
“Writing a Keymap to a File and Applying a Keymap” on page 116 for information on saving a map and manually or automatically
applying the map to an emulator window.
Table 11-1 Functions of Keymap Editor Basic Mode
To perform this
function...
Follow these steps
Remove an action
from a key
1. Click on the action.
2. While holding down the mouse button, drag the action to the trash
can.
3. Release the mouse button.
Move an action from
one key to another
1. Click on the action.
2. While holding down the mouse button, drag the action to the desired
section of another key.
3. Release the mouse button.
Reassigning Keyboard Functions Using the Keymap Editor 11-5
Writing a Keymap to a File and Applying a Keymap
Table 11-1 Functions of Keymap Editor Basic Mode (Continued)
To perform this
function...
Follow these steps
Assign an action from
the Action List
1. Click on the desired action in the Action List.
2. While holding down the mouse button, drag the action to the
destination key and section.
3. Release the mouse button.
Copy an action from
one key to another so
that both keys have
the same action
1. Press the Shift key while clicking on the action.
2. While holding down the mouse button, drag the action to a key.
3. Release the mouse button.
Writing a Keymap to a File and Applying a Keymap
You can write keymaps to a file and apply keymaps to a window
from the Write Translations window.
These functions are available in both basic and advanced modes.
Displaying the Write Translations Window
To display the Write Translations window:
1. Start the Keymap Editor using a method described in
“Starting the Keymap Editor” on page 11-2.
2. Select File ⇒ Write Translations. The Write Translations
window (Figure 11-3) appears.
11-6 Reassigning Keyboard Functions Using the Keymap Editor
Writing a Keymap to a File and Applying a Keymap
Figure 11-3 Keymap Editor—Write Translations Window
Writing a Keymap to a File
You can write a keymap to a file and apply that file to an open
window, or apply the file when starting the emulator from a
command line.
See “Placing Required Files in
Non-Standard Locations” on
page 3-12 for more
information on the file service
table.
To write to a file that resides on a host computer, there must be an
entry for the file system in the terminal’s file service table (fileservice-table parameter). The file on the host system must be worldreadable. To write the keymap to a file, follow these steps from the
Write Translations window:
1. Select Translation file and type the complete pathname of
the file in the File: field.
2. Click on OK.
3. The resulting file contains a list of optional modifiers,
keysyms, and actions. For example:
<Key>KP_Enter: Enter()
Ctrl<Key>4: onecharacter(0x4A)
Reassigning Keyboard Functions Using the Keymap Editor 11-7
Importing a Keymap from a File or Window
Applying Keymaps to Windows on the Desktop
Keymap changes do not affect windows on the desktop until you
explicitly apply the keymap to the windows.
Applying a Keymap to the Original Window
To apply the current keymap to the window from which you
started the Keymap Editor, follow these steps from the Write
Translations window.
1. Select Original Application Window.
2. Click on OK.
Applying a Keymap to All Open Windows
Tip
Windows that you open after
applying the keymap do not
inherit the new keymap.
To apply the current keymap to all open 3270 or VT320 windows,
complete the following steps from the Write Translations window.
1. Select All Application Windows of Class:
— For 3270 windows, type ncd3270 in the Class: field.
— For VT320 windows, type ncdterm in the Class: field.
2. Click on OK.
Importing a Keymap from a File or Window
You can use the Read Translations window to import keymaps
from another file or window.
This function is available in both basic and advanced modes.
To import a keymap:
1. Start the Keymap Editor using a method described in
“Starting the Keymap Editor” on page 11-2.
2. Select File ⇒ Read Translations. The window shown in Figure
11-4 appears.
3. Starting from the Read Translations window, follow the
instructions in Table 11-2 to import a keymap from a variety of
sources.
11-8 Reassigning Keyboard Functions Using the Keymap Editor
Importing a Keymap from a File or Window
Figure 11-4 Keymap Editor—Read Translations Window
Table 11-2 Sources for Importing Keymaps
To import a...
Follow these steps
Keymap file created by
the Keymap Editor
1. Select Translation file.
2. Type the full pathname of the keymap file in the File: field.
3. Click on OK.
Keymap from a Version
1.2 Brixton keymap file
1. Select Brixton (‘brxkeMap’) file.
2. Type the full pathname of the file in the File: field.
3. Click on OK.
Keymap from a 3270 or
VT320 window
1. Select Application Window.
2. Click on OK.
3. Click on the window from which you want to read translations.
Reassigning Keyboard Functions Using the Keymap Editor 11-9
Mapping the Keyboard—Advanced Mode
Mapping the Keyboard—Advanced Mode
This section describes how to used advanced mode Figure 11-5
shows the Keymap Editor in advanced mode.
Advanced mode allows complete graphical editing of keyboard
translations. The subject of X translations is beyond the scope of this
book. For a complete description of key translations, see an X
Window System reference, such as Quercia, V. and O’Reilly, T., X
Toolkit Intrinsics Programming Manual, (O’Reilly & Associates, Inc.).
Displays translations for one key at
a time, as you press a key, instead
of displaying all translations
Action List (all actions associated
with 3270 or VT320 emulation)
Translations List (all
translations in the
file or window)
Function keys for
adding, replacing,
and deleting in the
Translations List
Modifiers
Keyboard
Layout
Figure 11-5 Keymap Editor Advanced Mode Display
To enter advanced mode:
1. Start the Keymap Editor using a method described in
“Starting the Keymap Editor” on page 11-2.
11-10 Reassigning Keyboard Functions Using the Keymap Editor
Mapping the Keyboard—Advanced Mode
Select View ⇒ Advanced Mode. The Advanced Mode
window appears.
2.
Advanced Mode Menus
Tip
To display quick reference
information, select Show Help
Text... from the Help menu.
All of the basic mode menus (described on page 11-4) are available
in advanced mode. Additional functions in advanced mode change
translations in the Translations List. These functions are explained
in Figure 11-6, which shows an enlarged view of the modifiers
section in the advanced mode window and explains the modifiers.
Specifies that the modifiers in the
Translations List (and no others) must
be present. The translation is prefaced
by an exclamation mark (!)
Adds modifier key(s) to
the translation definition
Specifies that the selected
modifier may not be present
Specifies a case distinction; for
example, a and A are not treated
identically. The translation is
prefaced by a colon (:)
Figure 11-6 Keymap Editor—Translation Modifiers
Creating Translations
A translation has three parts:
❏ Optional modifiers
❏ A key
❏ An action or action sequence
Use the instructions in Table 11-3 to remap the keyboard in
advanced mode.
Table 11-3 Functions of Keymap Editor Advanced Mode
To perform this function...
Follow these steps
Reassigning Keyboard Functions Using the Keymap Editor 11-11
Mapping the Keyboard—Advanced Mode
Table 11-3 Functions of Keymap Editor Advanced Mode (Continued)
Create a translation
1. Select the desired action(s) from the Action List, or type the
action(s) in the Action: field.
2. Select the desired modifier(s) (Figure 11-6).
3. Click on New. The translation(s) is added to the Translations List.
Replace a translation
1. Select a translation from the Translations List.
2. The translation appears in the Action: field.
3. Make the desired modifications by editing the Action: field, or
selecting modifiers from the modifiers list
(Figure 11-6 on
page 11-11) and actions from the Action List.
4. Click on Replace.
Delete a translation
1. Select a translation from the Translations List.
2. Click on Delete.
Change the order of
translations
1. Select a translation from the Translations List.
2. Select Edit ⇒ Cut or Edit ⇒ Copy.
3. Select another translation and select Edit ⇒ Paste Before or Edit
⇒ Paste After.
11-12 Reassigning Keyboard Functions Using the Keymap Editor
12 Accessing Windows NT Servers
This chapter describes:
Tip
Procedures in this chapter provide
directions for configuring terminals
through remote configuration files. For
system administrators who use the
Console for terminal configuration,
information about Setup menu fields
is provided at the end of the chapter.
❏
How to configure NCD terminals so users can connect to
multi-user Microsoft Windows NT servers
The major topics are:
— Overview and requirements, including a description of
the NCD ICA (Independent Computing Architecture)
Client
— Using the Console’s Windows Access chooser to
configure and start connections via ICA or WinCenter
— Other methods of starting connections
— Using international keyboards with the ICA Client
— Configuring the ICA Client for master browser queries
— Using the wincenter parameters to specify colormap
usage, window size, number of colors, and audio for
WinCenter sessions
❏ How to mount shared directories from Windows NT 3.51
or 4.0 servers so that NCD local clients can access the files
Accessing Windows NT Servers 12-1
Overview and Requirements
Overview and Requirements
This section gives an overview of Windows NT connection features
and methods.
Choosing a Connection Protocol
NCD terminals can connect to Windows NT servers in two ways:
WinCenter
An NCD product that
distributes Microsoft Windows
applications to NCD terminal
desktops while the
applications run on multi-user
Windows NT servers. Current
versions of WinCenter include
Citrix WinFrame.
❏
By using the NCD ICA client (can connect to Windows NT
servers running WinFrame or MetaFrame)
Citrix WinFrame is a multi-user version of Windows NT 3.51
that distributes the Windows desktop and Windows
applications to various clients. Citrix MetaFrame allows ICA
clients to connect to Microsoft Windows NT Server 4.0,
Terminal Server Edition.
❏ By using WinCenter (uses the X protocol instead of the ICA
protocol and connects to Windows NT servers running
WinCenter)
Table 12-1 summarizes the differences between using the ICA
Client and using WinCenter.
Table 12-1 Comparison of Connection Methods—ICA Client vs. WinCenter
Attribute
ICA Client
WinCenter
Terminal memory
Uses more terminal
memory
Uses less terminal memory
Network traffic
Less network traffic
More network traffic
NT server software required
WinCenter, WinFrame, or
MetaFrame
WinCenter only
Published applications 1
Yes
No
Browsing for Windows NT servers
and published applications
In the Windows Access
utility’s properties dialog
box
Via XDM and the Login
Chooser only
12-2 Accessing Windows NT Servers
Overview and Requirements
Table 12-1 Comparison of Connection Methods—ICA Client vs. WinCenter (Continued)
Attribute
ICA Client
WinCenter
Color depth
16 colors (4-bit)
256 colors (8-bit)
16 colors (4-bit)
256 colors (8-bit)
High Color (16-bit)
True Color (24-bit)
Window size
Full screen
640x480
800x600
1024x768
1152x900
1280x1024
Custom
Full screen
640x480
800x600
1024x768
1152x900
1280x1024
1600x1200
Custom
Terminal floppy drive accessible
from NT
No
Yes
Audio
No
Yes
1
Microsoft Windows applications that are configured on the Windows NT server to be available from the
network.
About the Windows Access Utility
Windows Access is an NCDware utility for choosing a Windows NT
session and for configuring sessions. Both ICA and WinCenter
connections can be configured in Windows Access.
If the user selects a server from the Windows Access chooser, the
desktop of the selected server appears in a window on the terminal
desktop. If the user selects a published application, the application
opens in a window on the terminal.
You start Windows Access from the Console (Utilities ⇒ Windows
Access).
Accessing Windows NT Servers 12-3
Overview and Requirements
About the ICA Client
The NCDware ICA Client is a local client program that uses the ICA
protocol to display the desktops of multi-user Windows NT servers
and to transmit application data between servers and NCD
terminals. As an application runs, its user interface (display,
keyboard, and mouse) data is intercepted and transmitted between
the server and the ICA Client program running on the user’s
terminal.
ICA Client features include:
❏ Support for multiple, simultaneous ICA sessions, limited only
by the installed RAM on the terminal
❏ Support for published applications
❏ Support for Windows NT server browsing. The ICA Client
queries the network for servers and:
— Presents servers in the Login Chooser
— Presents a list of servers and published applications in the
Windows Access chooser
❏ User-specified ICA session window size
❏ Support for simultaneous WinCenter and ICA sessions
❏ Support for international keyboards, both default keymap files
and custom keymap files (see “Specifying the Keymap” on
page 12-20)
❏ Configurable number of retries, timeout, and extended
diagnostic messages for queries to the master browser (see
“Configuring NCDware for ICA Master Browser
Connectivity” on page 12-22)
❏ Load balancing (requires WinFrame 1.7 or MetaFrame) (see
“Load Balancing” on page 12-5)
12-4 Accessing Windows NT Servers
Overview and Requirements
Requirements
To use the NCDware ICA Client, the following requirements must
be met on the Windows NT server:
WinStation
A virtual port on the server that
has been configured to allow
connection by remote devices
such as an NCD terminal.
❏
❏
You must have WinFrame or MetaFrame installed and
configured on the Windows NT servers.
Servers must have ICA WinStations installed.
For information about WinStations, see the Citrix
documentation.
Load Balancing
Both connection methods (ICA and WinCenter) can take advantage
of load balancing on Windows NT servers. Load balancing is the
ability to distribute requests from clients among a specified set of
servers. With load balancing, login requests and application
requests can be directed to the server that is least busy.
For ICA load balancing, the following are required:
❏ A master browser on the network
❏ A load balancing option pack installed on each server that is
participating in load balancing
You configure load balancing through the configuration tools in
WinCenter 3.1 (or later), WinFrame 1.7, or MetaFrame. See the
documents supplied with those products for more information.
About Color Depth
Appendix A explains how to set color depth and monitor
resolution in the Boot Monitor and how to set color depth in
NCDware.
Color depth and monitor resolution for Windows NT server
displays on the terminal can be set in the Windows Access chooser
and in command lines creating connections to servers.
Color depth and monitor resolution for WinCenter displays on the
terminal can also be set through the NCDware wincenter
configuration parameters. This is an older method and is
recommended in this release only for preventing colormap flash
when using 4-bit or 8-bit color depth. For more information about
Accessing Windows NT Servers 12-5
Overview and Requirements
controlling colormap flash, see “About the WinCenter
Configuration Parameters” on page 12-24.
Methods of Configuring Connections
There are several ways to set up connections to Windows NT
servers. All of the following methods can be used for both ICA
Client and WinCenter connections:
❏ Connection through the Windows Access chooser in the
Console (Utilities ⇒ Windows Access)
❏ Automatic connection to a Windows NT server after logging
out or restarting the terminal
❏ Connection through remote shell commands
❏ Connection through Start Local Command in the Console
(Utilities ⇒ Start Local Command)
❏ Connection through the NCD Window Manager’s default root
window
❏ Connection through the Login Chooser
These connection methods are described in the following sections.
Note
The NCDware wincenter parameters set the defaults
for colormap usage, color depth, window size, and
audio for all WinCenter connections. See “About
the WinCenter Configuration Parameters” on
page 12-24.
12-6 Accessing Windows NT Servers
Configuring Connections in the Windows Access Chooser
Configuring Connections in the Windows Access Chooser
The simplest way to configure access to Windows NT servers is to
add connections to the Windows Access chooser. Figure 12-1 shows
an example Windows Access dialog box.
With this method of accessing a Windows NT server, the user can
have an X session and multiple Windows NT connections running
at the same time. To start multiple connections through Windows
Access, a window manager must be running on the terminal.
Connections through the Windows Access dialog box can use
either the ICA Client or WinCenter. The two methods are compared
in “Choosing a Connection Protocol” on page 12-2.
.
Figure 12-1 Windows Access Chooser
Adding Connections
Tip
There must be at least one
connection in the Windows
Access chooser before the
user can start a session using
this method.
To add a new connection:
1. Start Windows Access in the Console (Utilities ⇒ Windows
Access) on the user’s terminal.
2. Click New. The properties dialog box appears (Figure 12-2).
Accessing Windows NT Servers 12-7
Configuring Connections in the Windows Access Chooser
Figure 12-2 Windows Access Connection Properties
3.
4.
5.
6.
7.
Fill in the Description field with a description of your choice.
The description for each connection must be unique.
Select the protocol from the Connection Type drop-down list
and specify the server to connect to:
— If you choose the WinCenter protocol, the
Server/Published Applcation section changes to
Hostname. Enter the name or IP address of the Windows
NT server in the Hostname field.
— If you choose the ICA/TCP protocol, you can enter the
name or IP address of a server, enter the name of a
published application, or select a server or published
application from a drop-down list. Click the down arrow
to display items in a drop-down list.
All other fields are optional and have default values. Table 122 explains all of the fields in the dialog box. Note that the
available options change depending upon whether you chose
ICA/TCP or WinCenter for the connection type.
Click Apply if you want to create additional connections at
this time. Click OK when you have finished adding
connections.
The new connections:
— Are added to the Windows Access chooser
12-8 Accessing Windows NT Servers
Configuring Connections in the Windows Access Chooser
— Are saved in the terminal’s auto-save remote
configuration file. See “Saving Connections” on page 1212 for more information about saving settings.
— Appear in the Login Chooser after the user logs out or
restarts the terminal
Copying Connections
To create a new connection by copying an existing connection,
select a connection in the Window Access chooser and click Copy.
The properties dialog box opens with all of the properties filled in.
Edit the fields you want to change and click OK.
Table 12-2 Windows Access Properties
Field Name
Description
Description
A description of the connection. Each description must be unique.
Server
Specifies connection to a Windows NT server. When the user
connects, the server’s desktop appears in a window on the user’s
terminal.
or
Hostname
The server you enter or select depends on the connection type:
❏ For WinCenter, type the name or IP address of a WinCenter server.
❏ For ICA/TCP, type the name or IP address of a WinFrame or
MetaFrame server or select a Windows NT server from the dropdown list of servers that responded to the ICA Client’s broadcast.
Published Application
(ICA/TCP only)
Specifies connection to a published application on a WinFrame or
MetaFrame server. When the user connects to a published
application, the user logs on to the server. Then, a window
containing the application appears on the user’s terminal. Quitting
the application logs the user off the server.
Type the name of a published application or select an application
from the drop-down list of applications that responded to the ICA
Client’s broadcast.
Accessing Windows NT Servers 12-9
Configuring Connections in the Windows Access Chooser
Table 12-2 Windows Access Properties (Continued)
Field Name
Description
Connection Type
Select a protocol from the drop-down list:
ICA/TCP—connection uses the ICA protocol
WinCenter—connection uses the X protocol
Window Colors
Number of colors:
16 colors
256 colors
High Color (16-bit) (WinCenter only)
True Color (24-bit) (WinCenter only)
Cache Size (KB)
The cache is used by ICA for video display, and a larger cache
increases the speed of the video display. Depending on the number of
simultaneous connections needed by the user and the amount of free
memory in the terminal, you may want to increase or decrease the
default value of 2048K. Reduce the cache size if the terminal is
running out of memory.
(ICA/TCP only)
Network Type
(WinCenter only)
Window Size
LAN—For connections to servers on the local network.
WAN—Enables optimized, accelerated communication on a low-
bandwidth connection. Use this option if the WinCenter server is
outside your building or accessed via a lower-bandwidth connection,
such as an ISDN line.
A predefined window size or custom size.
The default is Full Screen, which produces a window as large as the
monitor screen. Note, however, the maximum window sizes
explained below.
For Custom Size, enter a custom window size using the format
widthxheight; do not use spaces.
ICA/TCP: The maximum window size permitted is 1280x1024. The
user cannot resize the window after it is displayed.
WinCenter: The maximum window size is 1600x1200. The user can
resize the window after it is displayed.
12-10 Accessing Windows NT Servers
Configuring Connections in the Windows Access Chooser
Table 12-2 Windows Access Properties (Continued)
Field Name
Description
User Name
Password
The user’s account name and password on the Windows NT server. If
you include these values, plus the Windows NT domain, the user
will be automatically logged on to the server.
Including the password may compromise network security.
For a published application, the user logs on to the Windows NT
server where the application is located.
Domain
The NT domain in which the password and user name are valid.
Initial Program
The name of an initial program to be started automatically when the
user logs on to the Windows NT server. This field does not apply if
the connection is to a published application.
Working Directory
The path to the user’s working directory on the Windows NT server.
If you specify a path, applications use the working directory for
retrieving and saving files. Otherwise, the user’s home directory is
used. This field does not apply if the connection is to a published
application.
Editing Connections
To edit an existing connection, select the connection in the
Windows Access chooser and click Properties. The properties
dialog box opens with all of the properties of the connection
displayed. Edit the fields you want to change. When you click OK,
the changes are saved in the terminal’s remote configuration file.
Changes also appear in the NCDware Login Chooser the next time
the user logs in.
Deleting Connections
To remove an existing connection, select the connection in the
Windows Access chooser and click Delete. The connection is
removed from the terminal’s remote configuration file, and no
longer appears in the Login Chooser.
Accessing Windows NT Servers 12-11
Configuring Connections in the Windows Access Chooser
Saving Connections
All of the settings that you make in the Windows Access dialog are
saved to the auto-save remote configuration file after you click OK.
Connections that you delete are removed from the remote
configuration file.
The terminal must be configured for auto-save (config-auto-save-file)
in order to save connections; by default, auto-save is enabled. The
default auto-save filename is the initial configuration file loaded by
the terminal plus the suffix .stp. You can specify a different filename
in the config-auto-save-file-name parameter. See Chapter 4 for more
information about auto-save.
In the remote configuration file, connections are saved in the icachooser-entries parameter table. Each entry describes one
connection in the Windows Access chooser; for example:
ica-chooser-entries = {
{"-htype Server -ti Pubs -h verdi -ty ICA/TCP -g 1024x768"}
{"-htype Server -ti Mktg -h strauss -ty WinCenter -g 1024x768 -net LAN")
}
Note
NCD does not recommend manually adding ICA
connections to the remote configuration file or
manually editing existing connections. Use the
Windows Access properties dialog box instead.
Controlling the Windows Access Dialog Box
The local client command name of the Windows Access utility is
icaui. You can use this command as described in the discussion of
local clients in Chapter 7.
The icaui command has no arguments. For more information, see
the icaui(1) man page.
Automatically Displaying Windows Access
To automatically display the Windows Access chooser when the
user logs out or restarts the terminal, add the icaui command to the
exec-startup-commands parameter in the terminal’s remote
configuration file. If you want the Windows Access chooser to
appear automatically and do not want the user to log on to the
12-12 Accessing Windows NT Servers
Other Methods of Starting Windows NT Connections
terminal, make sure there is no login command in exec-startupcommands.
Preventing Modifications to Windows Access
If you do not want users to modify existing connection properties,
create new connections, or delete connections, you can disable the
ica-enable-chooser-editing parameter by adding the following line to
the terminal’s remote configuration file:
ica-enable-chooser-editing = false
The default for this parameter is “true,” which allows users to make
changes in the Windows Access dialog box. This parameter cannot
be set in the Console’s Setup menus.
Other Methods of Starting Windows NT Connections
The previous section described configuring Windows NT
connections in the Windows Access utility. This section describes
how to use ICA and WinCenter commands to configure Windows
NT connections.
Summary of Commands for Starting Connections
This section describes the commands for starting ICA/TCP and
WinCenter sessions.
Some commands reset the X session, and some do not. It is
important to use the correct command for each situation to prevent
the user from being left with a blank screen after logging out. The
directions in the following sections show example commands and
which command to use for each method.
Commands for Starting ICA Connections
The commands for starting ICA connections are:
❏ icaclnt—Local client for starting ICA connections. Does not
reset the X server when the user ends the connection. This
command is used by Windows Access, and should be used
whenever the ICA Client is started from an X session. The
command-line options are listed in Table 12-3.
Accessing Windows NT Servers 12-13
Other Methods of Starting Windows NT Connections
❏
login -c ica—Local client for starting automatic ICA
connections. Resets the X server when the user ends the
connection. After the terminal boots or the user logs out, a
new ICA session starts on the specified host. If the NCD
Window Manager is running, a logout dialog box confirms
that the user wants to log out. If the Window Manager is not
running, the user is logged out without requesting
confirmation.
You can use all of the options of the icaclnt command; put the
options after -c ica. Other options for the login command are
ignored.
Table 12-3 explains all of the options for the login -c ica and icaclnt
commands. Note that all options have short forms; for example,
-title can be written as -ti. The only required option is the name or IP
address of the server.
Table 12-3 Command Options for the icaclnt and login -c ica Commands
Name
Description
-h[ost] nt_server
The name or IP address of the Windows NT server or the name
of the published application.
To use a name instead of an IP address, the server must have
DNS (Domain Name System) enabled.
The -host option is optional; you can simply supply the server
hostname or IP address.
-help
Causes the command to print out a message describing its
options in the Console Message area.
-ca[che] kilobytes
The size of the cache used for video display. If the terminal
does not have enough memory to run the ICA Client, decrease
the cache size.
The default value is 2048 KB; the range is from 0 to 8192 KB.
-c[olor] 16
-c[olor] 256
The desired number of colors. Note that number of colors is
controlled by the NT server. Even though you specify 256
colors, the server may use 16.
The default is 256.
12-14 Accessing Windows NT Servers
Other Methods of Starting Windows NT Connections
Table 12-3 Command Options for the icaclnt and login -c ica Commands (Continued)
Name
Description
-g[eometry] widthxheight
The maximum size (in pixels) of the connection window.
The maximum window size you can achieve is 1280x1024,
even though the specified size may be 1600x1200.
The default is full-screen.
-ti[tle] window_name
The window title, which may be displayed by window
managers. The default title is the hostname of the server.
-na[me] client_name
The client name to use for this connection.
The client name becomes an environment variable on the
server, and appears in dialog boxes that list the clients
connected to the server. The default client name is the
hostname or IP address of the terminal. This option sets the
environment variable to the specified string.
-u[sername] user_name
-p[assword] password
The user’s account name and password on the Windows NT
server.
If you include these values, plus the Windows NT domain, the
user will be automatically logged on. Including the password
may compromise network security.
If you specify a published application instead of a server, the
user logs on to the Windows NT server where the application
is located.
-do[main] domain
The Windows NT domain in which the password and user
name are valid.
-wo[rkingdirectory] directory
The path to the user’s working directory on the Windows NT
server.
If you specify a path, applications use the working directory
for retrieving and saving files. Otherwise, the user’s home
directory is used. This option has no effect if the connection is
to a published application.
Accessing Windows NT Servers 12-15
Other Methods of Starting Windows NT Connections
Table 12-3 Command Options for the icaclnt and login -c ica Commands (Continued)
Name
Description
-key[map] keymap_file
The keymap definition file to use for this connection. 1
For more information, see “Specifying the Keymap for ICA
Connections” on page 12-20.
-- initial_program ...
1
An initial program (and its command-line arguments) to be
started on the Windows NT server. This must be the last option
on the command line. This option has no effect if the
connection is to a published application.
For the most commonly used keyboards, you can specify an international keyboard in the xserverkeyboard-type configuration parameter.
Commands for Starting WinCenter Connections
The commands for starting WinCenter connections are:
❏ wincen—Local client for starting WinCenter connections. Does
not reset the X server when the user ends the connection. This
command is used by Windows Access, and should be used
whenever a WinCenter connection is made from an X session.
This command simply starts the host-based wincenter
command, and you can use the arguments of the host-based
command.
To configure most attributes of a connection, use the
arguments of the host-based wincenter command. The
wincenter parameters affect some attributes. For information
on the host-based wincenter command, see the WinCenter
documentation. For information on wincenter parameters, see
“About the WinCenter Configuration Parameters” on page 1224.
❏ wincenter—Host-based command for starting a WinCenter
connection.
For information on the host-based wincenter command, see the
WinCenter documentation.
❏ login—Local client that you can use to start automatic
WinCenter connections. Resets the X server when the user
12-16 Accessing Windows NT Servers
Other Methods of Starting Windows NT Connections
ends the connection. After the terminal boots or the user logs
out, a new WinCenter session starts on the specified host. See
the ncdlogin(1) man page for information about command
options.
Starting a Session Automatically
You can configure a connection that starts an ICA or WinCenter
connection after the user logs off or restarts (reboots) the terminal.
Configuring an Automatic ICA Connection
Tip
If -c ica is included in a login
command line, all other login
command options are ignored.
To configure NCDware so an ICA session starts automatically, put
a login -c ica command in the exec-startup-commands table. The
syntax of the command line is:
login -c ica [ icaclnt command options ]
When configuring an automatic connection, you can use any of the
arguments listed in Table 12-3. For example:
exec-startup-commands = {
{ "login -c ica -ti Pubs -h verdi -c 256 -g 1024x768" }
}
If you are starting an application on the specified host, the last
argument on the command line must be:
-- #application
For example, if you are starting Microsoft Word, you might use the
following argument:
-- #Word
Configuring an Automatic WinCenter Connection
For an automatic WinCenter connection, use the login command in
the exec-startup-commands parameter, and specify a Windows NT
host. For example:
exec-startup-commands={{ "login pubs_nt" }}
Accessing Windows NT Servers 12-17
Other Methods of Starting Windows NT Connections
Starting a Session with a Remote Shell Command
See Chapter 7 for more
information on running local
commands.
You can start an ICA or WinCenter connection with the icaclnt
command or the wincen command and a remote shell command.
Starting an ICA Session
To start an ICA Client session, use the following command:
rsh ncdname icaclnt server [arguments] [--initial_program]
where ncdname is the terminal’s hostname or IP address and server
is the hostname or IP address of the Windows NT server.
Starting a WinCenter Session
To start a WinCenter session, use the following command:
rsh ncdname wincen server [arguments] [--initial_program]
where ncdname is the terminal’s hostname or IP address and server
is the hostname or IP address of the Windows NT server.
Starting a Session from Start Local Command in the Console
To start an ICA or WinCenter session from the Console’s Utilities
menu, select Start Local Command. In the dialog box that appears,
type an icaclnt or wincen command.
wincen server [arguments] [--initial_program]
or
icaclnt server [arguments] [--initial_program]
where server is the hostname or IP address of the Windows NT
server.
Adding an NT Session to the Default Root Menu
To add connections to the NCD Window Manager’s default root
menu, you can add wincen or icaclnt commands to the execcommand-menu parameter. For example:
exec-command-menu[-1] = { "Verdi NT server" "icaclnt verdi" }
Menu label
12-18 Accessing Windows NT Servers
Command line
Other Methods of Starting Windows NT Connections
default root menu
The default menu displayed
when the user presses a
mouse button in the root
window.
The notation [-1] adds the new command to the end of the table and
the end of the menu. Changes to this parameter take effect after the
NCD Window Manager restarts.
For more information about window manager menus, see Chapter
7.
Connection through the Login Chooser
ICA and WinCenter connections can appear in the Login Chooser.
Connections that Appear in the Login Chooser
The following connections appear in the Login Chooser:
❏ Connections created in the Windows Access utility
❏ WinCenter servers that respond to XDM broadcast requests
from the terminal
You can configure some attributes of WinCenter connections
through the NCDware wincenter parameters. The attributes
you can configure are colormap usage, initial window size,
color depth, and whether audio is enabled. For more
information on the wincenter parameters, see “About the
WinCenter Configuration Parameters” on page 12-24.
❏ Windows NT servers that offer login services. These entries
result from queries sent by the ICA Client to the master
browser and other Windows NT servers. For more
information, see “Configuring NCDware for ICA Master
Browser Connectivity” on page 12-22.
❏ Temporary connections started manually from the Login
Chooser as described in the NCDware User’s Guide. For
Windows NT connections, select ICA or WinCenter from the
drop-down Protocol list.
❏ Connections listed in the login-default-hosts parameter.
For Windows NT connections, specify the protocol as “ica” or
“wincenter.”
Accessing Windows NT Servers 12-19
Specifying the Keymap
For example:
login-default-hosts = {
{ ica pubsnt “Technical Publications” }
{ wincenter eagle “General Purpose Server” }
}
This parameter takes effect immediately and is not saved in
NVRAM.
For more information about the Login Chooser, see Chapter 5.
Changes to the Login Chooser
The following changes were made to the Login Chooser to support
Windows NT connections:
❏ Two items were added to the View menu —ICA Hosts and
WinCenter Hosts.
❏ Two items were added to the Protocol drop-down list— ICA
and WinCenter.
Specifying the Keymap
Both ICA and WinCenter connections support a number of
international and non-standard keyboards by default.
Specifying the Keymap for ICA Connections
The ICA Client reads the keyboard type set in the X server and loads
the appropriate keymap when the session starts.
The default keyboards supported for ICA connections and the
default keyboard map for each keyboard are specified in the
NCDKbd.txt database file; Figure 12-3 shows the default file. Both
NCDKbd.txt and the keymap files supplied for the ICA Client reside
in the boot directory (usually /tftpboot/Xncd.5.1.xxx) in a
subdirectory called icakbds.
You can edit the NCDKbd.txt file to add a keyboard/keymap pair or
substitute a different keymap file for any of the listed keyboards.
The keyboard must be one of the supported keyboards (that is, the
keyboards listed in Setup ⇒ Change Setup Parameters ⇒ Input
Devices ⇒ Keyboard Type or in the Boot Monitor Setup menus).
12-20 Accessing Windows NT Servers
Specifying the Keymap
Changes to the NCDKbd.txt file take effect after you start the ICA
Client.
Belgian CH-SAB
Belgian French
Danish
French
German
IBM PS/2
Italian
N-97
N-101
N-123 North American
N-108 US
Norwegian
Spanish
Spanish (Latin/America)
Swedish/Finnish
Swiss French
Swiss German
UK
English UK
belgfr.kbd
belgfr.kbd
dansk.kbd
frenchx.kbd
germanx.kbd
us.kbd
italianx.kbd
us.kbd
us.kbd
usx.kbd
dec108.kbd
norsk.kbd
spanishx.kbd
spanishx.kbd
svensk.kbd
swfrx.kbd
swgerman.kbd
uk.kbd
uk.kbd
Figure 12-3 The NCDKbd.txt File
The default keymap file is us.kbd, which corresponds to the IBM
PS/2, N-97, and N-101 keyboards.
To create other keymap files, you can copy or edit one of the
existing files or add a keymap file of your choice to the directory.
The format for keymap files is the same for both ICA and
WinCenter.
To specify a keyboard:
❏ For the keyboards listed in the NCDKbd.txt file, specify the
keyboard type in the xserver-keyboard-type parameter. This
parameter takes effect at boot time and is saved in NVRAM.
The keyboard and its keymap must be listed in the
NCDkbd.txt file.
❏ For keyboards not listed in the NCDkbd.txt file, use the
-keymapfile option to the icaclnt or wincen command to specify
the keymap file.
Accessing Windows NT Servers 12-21
Configuring NCDware for ICA Master Browser Connectivity
For example:
icaclnt -h verdi -keymapfile my.kbd
If the keymap file is not in the icakbds subdirectory, specify the
complete pathname to the keymap file.
Specifying the Keymap for WinCenter Connections
For information about specifying the keymap for WinCenter
connections, see the WinCenter documentation.
Configuring NCDware for ICA Master Browser Connectivity
This section describes NCDware parameters that affect how the ICA
Client communicates with the master browser. The master browser
is a Windows NT system that maintains the browse list and is
periodically updated by the other browsers. All WinFrame 1.7 or
MetaFrame servers automatically function as browsers. If you want
to use a master browser, however, you must specifically designate
and configure it.
The ICA Client sends queries to the master browser and uses the
response to:
❏ Populate the Server and Published Application lists in the
Window Access properties dialog box
❏ Add login hosts to the Login Chooser. Queries for available
login hosts can be disabled; see the next section.
By default, the ICA Client sends queries to find hosts to list in the
Login Chooser, but such attempts can be disabled. See the next
section for more information.
The ICA Client may be unable to reach the master browser because
a master browser is not available, or the retry attempts and timeout
may not be configured properly.
Disabling Queries to the Master Browser for Login Hosts
By default, the ICA Client broadcasts login requests. These requests
are handled first by the master browser. If the master browser does
not respond, the request is handled by other servers.
12-22 Accessing Windows NT Servers
Configuring NCDware for ICA Master Browser Connectivity
If you set the login-ica-enabled parameter to “false,” queries to the
master browser are disabled. If you disable login queries, the
NCDware Login Chooser should appear sooner.
This parameter takes effect immediately and is not saved in
NVRAM.
Setting the Number of Retry Attempts
The ica-retry-attempts parameter affects queries to the master
browser for login and other services. By default, the terminal makes
one attempt before timing out, and you can specify from 1 to 6
attempts. This parameter takes effect immediately and is not saved
in NVRAM.
Setting the Timeout
The ica-wait-time parameter affects queries to the master browser
for login and other services. By default, the terminal waits 500
milliseconds before timing out; you can specify a wait time of 100
to 5000 milliseconds. This parameter takes effect immediately and
is not saved in NVRAM.
Enabling Diagnostic Messages
If you are having problems contacting the master browser and
want to see more detailed diagnostic messages in the Console, you
can enable extended messages by setting the ica-extendeddiagnostics parameter to “true.” This parameter takes effect
immediately and is not saved in NVRAM.
Accessing Windows NT Servers 12-23
About the WinCenter Configuration Parameters
About the WinCenter Configuration Parameters
This section describes NCDware parameters that affect WinCenter’s
desktop display for both ICA and WinCenter connections. These
parameters affect:
❏ The default X colormap (helps control colormap flash)
❏ The size of the WinCenter window
❏ The number of colors used by WinCenter
❏ Whether audio is enabled
The WinCenter parameters take precedence over any similar
settings in the WinCenter administration tools on Windows NT
servers. The WinCenter parameters are overridden by similar
settings in the Windows Access utility and in icaclnt and wincen
command lines.
These parameters take effect the next time the user logs in, and they
are not saved in NVRAM.
Specifying Colormap Usage
This section describes how to specify colormap usage to dampen, or
reduce, colormap flashing. The X colormap defines the colors
available for all clients. As clients start, cells in the colormap are
allocated. When all of the available cells in the colormap are used
up, no new colors can be allocated. As a result, some applications
may be displayed in unexpected colors.
In this manual, colormap flashing refers to the colors in an
application’s windows changing and occurs when the user
switches to a Microsoft Windows application from a non-Windows
application. Colormap flashing is caused by one application’s
colormap taking priority over another’s.
You can control colormap flashing by stipulating that certain types
of programs use the Windows standard colors and selecting the
setting that results in the least amount of colormap flashing with
the programs you use. Be aware, however, that some applications
may fail if only the Windows standard colors are available. In
addition, reducing the number of colors in the WinCenter window
12-24 Accessing Windows NT Servers
About the WinCenter Configuration Parameters
to 16 helps control colormap flashing; see “Specifying Window
Size, Colors, and Audio” on page 12-26.
Colormap flashing does not occur at 16- and 24-bit color depths. If
xserver-color-depth is set to 16- or 24-bit color, wincenter-colors is
ignored. This is equivalent to setting wincenter-colors to “disabled.”
To specify colormap usage in the remote configuration file, use the
wincenter-colors parameter. Table 12-4 describes the values for this
parameter.
Table 12-4 Values for the wincenter-colors Parameter
Value
Result
disabled 1
The setting to use if you are not using WinCenter. No Windows
colors are pre-allocated in the default colormap and there is no
colormap flash dampening.
local-clients
The default. Pseudo-color visual becomes the default visual, and the
20 Windows standard colors are pre-allocated in the default
colormap using pixels 0-9 and 246-255. The default local client colors
and background color are chosen from the Microsoft standard colors.
wm-and-local-clients
The same as “local-clients” except that window managers also
allocate colors from the Windows standard colors.
all-clients 2
The same as “local clients” except that all clients allocate colors from
the Windows standard colors and a static color visual is the default
visual.
1
On HMXpro24 terminals, if this parameter is set to anything other than “disabled,” the default local client
colors and default background are chosen from the Windows standard 20 colors.
2
A wincenter-colors setting of "all-clients" overrides the xserver-default-visual parameter and sets the
visual to static color.
Accessing Windows NT Servers 12-25
About the WinCenter Configuration Parameters
Specifying Window Size, Colors, and Audio
This section describes how to set the following:
❏ Maximum window size
❏ Number of colors
❏ WinCenter audio enabled or disabled
The window size and number of colors you set here become the
defaults for all WinCenter sessions, and this is how you can set
these parameters from the terminal for WinCenter sessions started
with the login command or from XDM broadcasts.
To retain these values after the terminal reboots, set them in a
remote configuration file. The parameters to use are
wincenter-resolution, wincenter-numcolors, and wincenter-audio.
Table 12-5 lists the values you can assign to these parameters; the
default is in bold font.
Reducing the number of colors to 16 helps reduce colormap
flashing.
Table 12-5 Values for wincenter-resolution, wincenter-numcolors, and wincenter-audio
Parameter
Description
Values
Result
wincenter-resolution
Maximum size of the
WinCenter window
full-screen
default
640x480
800x600
1024x768
1152x900
1280x1024
1600x1200
The WinCenter window
covers the display area when
invoked via XDM and is
smaller than full screen when
invoked via a remote shell
command.
wincenter-numcolors
Number of colors in the
WinCenter window
16
16 colors
256
256 colors
truecolor
Available only on HMXpro24
terminals
true
WinCenter audio is enabled.
false
WinCenter audio is disabled.
wincenter-audio
Whether WinCenter
audio is enabled
12-26 Accessing Windows NT Servers
About the WinCenter Configuration Parameters
When you set the parameters listed in Table 12-5, their values are
assigned to resources for WinCenter. Table 12-6 lists the resources
and their values. The default value is shown in bold font.
Table 12-6 WinCenter Resources Set in NCDware
Resource
Values
WinCenter.resolution
FullScreen
640x480
800x600
1024x768
1152x900
1280x1024
1600x1200
WinCenter.colors
16
256
TrueColor
WinCenter.audio
Enabled
Disabled
These resources can also be set through the wincenter-resources
parameter. For example:
wincenter-resources = "WinCenter.colors: 16 Wincenter.audio: Enabled
Wincenter.resolution: Default"
Accessing Windows NT Servers 12-27
Accessing NT Files from NCD Terminals
Accessing NT Files from NCD Terminals
By mounting shared directories from Windows NT 3.51 and NT 4.0
servers, you can make files in those directories available to local
clients such as the NCD Mosaic Browser and Java applets. The SMB
(Server Message Block) protocol is used for accessing Windows NT
files, and the user must have permission to access the files.
Adding Directories to the File Service Table
To make Windows NT files available, add an entry for each desired
share name to the terminal’s file service table.
To add entries to the file service table in the remote configuration
file, specify the local mount point, the NT server’s name or IP
address, the protocol, and the share name on the NT server in the
file-service-table parameter. Enter the default values for all of the
other fields in the entry. For example, the following command adds
an entry to the end of the file service table:
Note
In this release, the local mount point must match
the NT share name.
file-service-table[-1] = {/SharedDocuments/ nil verdi.ncd.com smb /SharedDocuments/
unknown 3 30 8192 8192}
Local mount point
(must match the
share name)
NT server
Protocol
NT share name
Changes take effect immediately and are not saved in NVRAM.
User Accounts and Permissions
NCD recommends that you specify a username for SMB file access
in the remote configuration file because the default username,
“guest,” may not provide access to the user’s files. Also, it is
common for the guest account to be disabled for security reasons. If
you specify a username in the configuration file, a dialog box is
displayed requesting the user’s password when the client attempts
to open the file.
The parameter for specifying the username is file-smb-defaultusername. To prevent the display of the password dialog box, you
12-28 Accessing Windows NT Servers
Setup Menu Equivalents for Remote Configuration Parameters
can specify a password in the file-smb-default-password parameter.
Note, however, that the password is not encrypted; this may
present a security risk in your environment. These parameters take
effect immediately, are not saved in NVRAM, and cannot be set in
the Setup menus.
Even if a username and password are set in the remote
configuration file, the user may have to enter a username and
password under the following circumstances:
❏ The shared directory is in an NT domain for which the
specified username is not valid.
❏ The attempt to access the shared directory fails for some other
reason; for example, a special password is required to access
the directory.
Setup Menu Equivalents for Remote Configuration
Parameters
Table 12-7 lists the remote configuration parameters discussed in
this chapter and the corresponding Setup menu field for each. This
information is provided for system administrators who configure
terminals through the Setup menus.
Table 12-7 Setup Menu Fields for Configuring Windows NT Connections
When Changes
Take Effect
Saved in
NVRAM
Change Setup Parameters ⇒
Configuration (Configuration
Daemon Service section) ⇒
Auto Save File
Immediately
No
Change Setup Parameters ⇒
Configuration (Configuration
Daemon Service section) ⇒
Auto Save File Name
Immediately
No
Parameter
Setup Menu Field
config-auto-save-file
config-auto-save-file-name
Accessing Windows NT Servers 12-29
Setup Menu Equivalents for Remote Configuration Parameters
Table 12-7 Setup Menu Fields for Configuring Windows NT Connections (Continued)
When Changes
Take Effect
Saved in
NVRAM
Change Setup Parameters ⇒
Commands and Startup ⇒
Command Menu
Immediately
No
exec-startup-commands
Change Setup Parameters ⇒
Commands and Startup ⇒
Startup Commands
Immediately
No
ica-enable-chooser-editing
None
At session
startup
No
ica-extended-diagnostics
Change Setup Parameters ⇒
ICA ⇒ Extended ICA
Diagnostics
Immediately
No
ica-retry-attempts
Change Setup Parameters ⇒
ICA ⇒ Retry Attempts
Immediately
No
ica-wait-time
Change Setup Parameters ⇒
ICA ⇒ ICA Browser Wait
Timeout
Immediately
No
login-default-hosts
Change Setup Parameters ⇒
Login ⇒ Default Hosts
Immediately
No
login-ica-enabled
Change Setup Parameters ⇒
Login (ICA section) ⇒ Enable
ICA Broadcast
Immediately
No
wincenter-audio
Change Setup Parameters ⇒
WinCenter ⇒ Audio Enabled
At session
startup
No
wincenter-colors
Change Setup Parameters ⇒
WinCenter ⇒ Use WinCenter
Colors
At session
startup
No
wincenter-numcolors
Change Setup Parameters ⇒
WinCenter ⇒ Number of Colors
At session
startup
No
Parameter
Setup Menu Field
exec-command-menu
12-30 Accessing Windows NT Servers
Setup Menu Equivalents for Remote Configuration Parameters
Table 12-7 Setup Menu Fields for Configuring Windows NT Connections (Continued)
Parameter
Setup Menu Field
When Changes
Take Effect
Saved in
NVRAM
wincenter-resolution
Change Setup Parameters ⇒
WinCenter ⇒ Window Size
At session
startup
No
wincenter-resources
Change Setup Parameters ⇒
WinCenter ⇒ Audio Enabled,
Number of Colors, and Window
Size
At session
startup
No
xserver-keyboard-type
Change Setup Parameters ⇒
Input Devices ⇒ Keyboard Type
At boot
Yes
Accessing Windows NT Servers 12-31
Setup Menu Equivalents for Remote Configuration Parameters
12-32 Accessing Windows NT Servers
13 Configuring a Wireless Terminal
This chapter describes how to configure an NCD Explora
wireless terminal. The topics in this chapter are:
❏ Hardware and software requirements
❏ Configuring the terminal for wireless use
❏ Displaying wireless information
❏ Testing the wireless system
❏ Alternative methods for configuring an Access Point
The Wireless Network
A wireless network consists of wireless Explora 400/450
terminals and Proxim wireless LAN Access Points attached to
an Ethernet network. Terminals can use Access Points to boot
and to communicate with hosts on the Ethernet network.
Wireless terminals have the same access to network
application software, printers, e-mail, and other network
services as do terminals connected to the network through
Ethernet cabling.
Hardware and Software Requirements
Each wireless terminal must have a Proxim RangeLAN2 7200
or 7400 wireless LAN adapter installed. The LAN adapter is a
PC card with an antenna that functions as an Ethernet network
interface without a cable. You an purchase LAN adapters from
Proxim, Inc.
For wireless use, the terminal must have Boot Monitor 2.9 or
later, which includes the wireless commands and other
features for wireless use.
Configuring a Wireless Terminal 13-1
Installing the PC Card
There must be at least one Proxim Access Point connected to a
conventional Ethernet network. Terminals must have IP
addresses on the same subnet as the Access Point. Therefore,
each subnet involved in the wireless network must have its
own Access Point(s).
NCDware X servers must be installed on an Ethernet network
host that is accessible by the wireless terminals.
Installing the PC Card
For instructions on installing the LAN adapter and antenna,
see your Explora hardware installation document.
Configuring the Terminal
You can use ncdinstall to add terminals and configure them
normally as described in the NCDware CD insert and this
manual. Terminals boot from the network just as they do
when connected to the boot host through an Ethernet cable.
Terminal configuration, when necessary, consists of using
Boot Monitor commands to:
❏ Change the domain number if the Access Point is not
using the default.
❏ Change the roaming configuration.
❏ Set the security ID if the Access Point is using a security
ID. Before you configure the security ID, make sure the LAN
adapter is installed in the terminal. The security ID is stored
on the LAN adapter, not in the terminal’s NVRAM.
To use Boot Monitor commands, reboot the terminal and
interrupt the boot by pressing the Escape key when the
following message appears on the screen.
TFTP/NFS load <ESC> to abort
When the Boot Monitor prompt appears (>), you can type Boot
Monitor commands.
The following subsections provide directions for changing
and displaying wireless parameters.
13-2 Configuring a Wireless Terminal
Configuring the Terminal
Changing the Domain Number
The domain number and security ID determine with which
Access Point(s) the terminal can communicate. All hosts that
have wireless communications with each other must have the
same domain number.
The domain is a number from 0 to 15; the default is 0. If the
Access Point uses domain 0, there is no need to change the
domain number on the terminal.
If you have wireless terminals on multiple subnets, each
subnet must use a different domain number.
To change the domain number, use the wd command; for
example:
Tip
Press the Return key after typing
commands.
>wd 1
Setting Domain to 1
After you press Return, the terminal’s NVRAM is updated
with the new information and the terminal attempts to
communicate using the new domain number.
To display the domain number:
>wd
Valid Wireless Network Domain is 0 - 15
Default Domain is 0
Current Domain is 0
See Chapter 4 for information on
using the Setup menus or TELNET to
display configuration data.
In the Console, you can display the domain number in Change
Setup Parameters ⇒ Network Interfaces ⇒ Domain Channel.
To display the current domain number using TELNET, view
the net-domain-channel parameter.
Changing the Roaming Configuration
The term roaming describes a network in which terminals are
moved from the range of one Access Point to the range of
another. A terminal can roam if there is more than one access
point with the same domain and same security ID in the
wireless network. The value of the roaming parameter
determines how quickly the terminal switches from one
Access Point to another.
Configuring a Wireless Terminal 13-3
Configuring the Terminal
To change the roaming setting, use the wr command; for
example:
>wr 1
Setting Roam Configuration to 1
After you press Return, the terminal’s NVRAM is updated
with the new information.
The values for this command are:
❏ 0 is slow. Use this setting if coverage is sparse, that is,
there are only a few Access Points in the area.
❏ 1 is normal and is the default. Use this setting if the area
is not overcrowded with Access Points.
❏ 2 is fast. Use this setting if there are many Access Points
in the area.
To display the current roaming setting, type:
>wr
Valid Roam Configurations are:
0 - Slow, Few Masters
1 - Normal
2 - Fast, Many Overlapping Masters
Current Roam Configuration: 0
In the Console, you can display the current roaming setting in
Change Setup Parameters ⇒ Network Interfaces ⇒ Roaming
Condition. To display the current roaming condition using
TELNET, view the net-roaming-condition parameter.
Changing the Security ID
The security ID and domain determine with which Access
Point(s) the terminal can communicate. All hosts that
communicate with each other over the wireless network must
have the same security ID.
Tip
The LAN adapter must be installed in
the terminal before you can set the
security ID.
All LAN adapters and Access Points have the same default
security ID. This allows you to use wireless terminals without
configuring the domain, security ID, or roaming parameters.
Setting a security ID improves the security of the wireless
subnetwork. The ID is encrypted and cannot be read, although
you can change it.
13-4 Configuring a Wireless Terminal
Displaying Wireless Information
To change the security ID, type the ws command, followed by
an ID number of up to 20 characters. For example:
> ws 12345
If the ID number begins with a blank, precede the blank with
a left bracket character ( [ ). The ID must match the IDs of the
Access Point(s) and any other wireless hosts with which the
terminal communicates.
After you press Return, the terminal’s LAN adapter is updated
with the new information and the terminal attempts to
communicate using the new security ID.
To change the password back to the default:
> ws
Enter Y to change password to default
or Q to quit: Y
Security code: 30201
Starting wireless LAN to update Security ID
Testing updated security ID
When you enter a new security ID, it is encoded and converted
to hexadecimal. You cannot display the actual security ID, and
there is no corresponding remote configuration parameter or
Setup menu field.
Displaying Wireless Information
This section describes displaying information about the LAN
adapter card and the wireless network from the Boot Monitor,
the Console, and TELNET. For information about using SNMP
(Simple Network Management Protocol) to display
information, see “Using SNMP (Simple Network
Management Protocol)” on page 13-9.
Displaying Wireless Information from the Boot Monitor
To use Boot Monitor commands, reboot the terminal and
interrupt the boot by pressing the Escape key when the
following message appears on the screen.
TFTP/NFS load <ESC> to abort
When the prompt appears (>), you can type commands.
Configuring a Wireless Terminal 13-5
Displaying Wireless Information
The following subsections provide directions for displaying
wireless information and statistics.
Information About the LAN Adapter and Access Point
The wi command displays the following current wireless
network information:
❏ ROM version of the LAN adapter
❏ IP address of the terminal
❏ Wireless domain
❏ Hostname and IP address of the last Access Point to
which the terminal connected
❏ Wireless channel and subchannel
❏ Signal strength of packets received from last connection
To display this information, type:
>wi
Network Statistics
The Boot Monitor ds command displays network statistics for
the LAN adapter. To display this information, type:
>ds
Displaying Wireless Information from the Console
You can display wireless information and statistics from the
terminal’s Console.
Displaying Access Point, LAN Adapter, and Signal Information
The Show Wireless command in the Console’s Statistics menu
displays the following information:
Tip
Subchannels are used on Access
Points after all 15 channels have been
assigned.
❏ Wireless signal strength
❏ Access Point host name and IP address
❏ Channel and subchannel
❏ In sync count and roam alarm count
The Interface Table in Statistics ⇒ Show Statistics ⇒ Wireless
LAN displays the same information as the Show Wireless
command plus the wireless domain, the Access Point host
13-6 Configuring a Wireless Terminal
Displaying Wireless Information
name and IP address, and the ROM version of the LAN
adapter. The corresponding remote configuration parameter
is pwireless-interface-table.
Displaying Wireless Network Statistics
The Statistics Table in Statistics ⇒ Show Statistics ⇒ Wireless
LAN displays wireless network statistics. The corresponding
remote configuration parameter is pwireless-statistics-table.
Displaying Wireless Information using TELNET
You can display wireless information and statistics by
establishing a TELNET connection to the terminal’s
configuration data.
Displaying Access Point, LAN Adapter, and Signal Information
The pwireless-interface-table parameter reports the following
information:
❏ Wireless domain
❏ Access Point name and IP address
❏ Channel and subchannel
❏ ROM version of the LAN adapter
❏ Country code
❏ Signal strength
The corresponding Statistics menu field is Show Statistics ⇒
Wireless LAN ⇒ Interface Table.
See Chapter 4 for information on using TELNET to display
configuration data.
Displaying Wireless Network Statistics
The pwireless-statistics-table parameter reports wireless
statistics. The corresponding Statistics field is Show Statistics
⇒ Wireless LAN ⇒ Statistics Table.
Configuring a Wireless Terminal 13-7
Testing the Wireless System
Testing the Wireless System
The Boot Monitor ex command tests the wireless connection
when you enter 1 to select the Network Controller test.
This test attaches the wireless adapter card to the access point
and wraps 100 small packets (84 bytes) and 100 large packets
(1484 bytes) with the Access Point. Results are displayed after
the test is complete.
Configuring the Access Point
Tip
Proxim documents refer to three
different types of stations. In an NCD
wireless network, only an Access
Point can be a master station. The
NCD terminals are simply stations.
If you are configuring an Access Point from a system running
Windows 95 or NT, or configuring an Access Point through a
serial connection, follow the directions in the Proxim
documentation.
If you are using a UNIX system to boot the Access Point and
configuring the Access Point over the Ethernet, this section
provides additional information about using BOOTP/DHCP
and SNMP.
Using BOOTP/DHCP
BOOTP/DHCP provides network configuration data to the
Access Point when it boots. An /etc/bootptab file entry for a
Proxim Access Point contains the following data:
name:ht=ethernet:ha=address:ip=IP_address:gw=gateway:hm=subnet_mask:
where:
name
Is the hostname of the Access Point.
address
Is the hardware address on the back of
the Proxim Access Point.
IP_address
Is the IP address assigned to the Access
Point.
13-8 Configuring a Wireless Terminal
Configuring the Access Point
gateway
Is the IP address of the gateway used
by the Access Point to contact hosts
that are not on the same network
segment.
subnet_mask
Is the subnet mask for the network
segment connected to the Access Point.
It may be necessary to enable BOOTP/DHCP on the network
host; see your vendor documentation.
Using SNMP (Simple Network Management Protocol)
Before using SNMP to configure an Access Point, you must
install and set up the Proxim MIB. This involves reading the
MIB II file (proxim.mib) from the Proxim DOS diskette labelled
“Configuration Tool” and making the MIB accessible to SNMP
commands on a UNIX host.
Installing the MIB
To install and set up the MIB on an AIX host, place the Proxim
diskette labelled “Configuration Tool” into the diskette drive
of the AIX host. Type the following command:
% dosread -a proxim.mib proxim.mib
This loads the MIB II file that contains configuration variables
for the Proxim Access Point.
The MIB file for your Access Point may have a different name,
and the command to use on your UNIX host may be different.
Making the MIB Accessible
To make the MIB accessible to SNMP commands on the UNIX
host, run the mosy command:
% /usr/sbin/mosy -o proxim.defs /usr/samples/snmpd/smi.my \
/usr/samples/snmpd/mibII.my proxim.mib
Tip
For AIX versions from 3.2 up to 4.0,
the smi.my and mibII.my files are in
/usr/lpp/snmpd/.
This command creates a file called proxim.defs in the format
required by the snmpinfo command for displaying and
changing variables.
Configuring a Wireless Terminal 13-9
Configuring the Access Point
Displaying and Changing Variables
The snmpinfo command allows you to display or change
Proxim variables. There are two basic versions of the
command.
One version of the command displays the current
configuration information for the Proxim Access Point. To
display current values, type the following command:
% /usr/sbin/snmpinfo -m dump -v -h name -o proxim.defs
where name is the host name of the Access Point.
The other version of the command allows you to change the
values in the Proxim Access Point, although some values do
not change until the unit is rebooted. To change values in the
Access Point:
% /usr/sbin/snmpinfo -m set -v -c private -h name -o proxim.defs \
variable.instance=value
where:
name
Is the host name or IP address of the
Proxim access point.
variable.instance Is the name of the SNMP variable you are
changing.
value
Is the value of the variable as defined in the
Proxim documentation.
For more information on snmpinfo refer to the man pages for
snmpinfo and mosy on your UNIX system.
Finding the SNMP Variables
For descriptions and syntax of all of the SNMP variables for
configuring a Proxim Access Point, see the MIB file.
13-10 Configuring a Wireless Terminal
14 Configuring and Using Java
This chapter describes NCD’s implementation of the Java
Virtual Machine (JVM), version 1.1.4. The JVM is a network
programming environment for creating and running
embeddable Java applets and standalone Java applications.
Tip
Procedures in this chapter provide
directions for configuring terminals
through remote configuration files. For
system administrators who use the
Console for terminal configuration,
information about Setup menu fields
is provided at the end of the chapter.
The major topics in this chapter are:
❏ An overview of the components of NCD’s JVM
implementation
❏ Java files and directories
❏ Using Java commands
❏ Java fonts
❏ Setting the time of day for Java applications
❏ Setting environment variables for Java commands
❏ Printing from Java applications
Overview and Requirements
JVM requires a license for each terminal. Contact your sales
representative if you need to purchase licenses.
applet
A small Java application that can be
embedded in another application,
such as an applet viewer or Web
browser.
The user programs included with the JVM are:
❏ The java program, which allows users to run complete
Java applications.
❏ The appletviewer program, which is a Java application
that allows users to run applets in an applet viewer
window. Although appletviewer allows you to run
applets embedded in an HTML page, it does not display
any of the surrounding HTML data. The appletviewer
program provides print capability.
Configuring and Using Java 14-1
Java Files and Directories
You can start java and appletviewer from the Console’s Utilities
menu. Users can run applets and Java applications that reside
on the local network or the World Wide Web.
The only locale supported by NCD’s JVM is the C locale, which
sets the minimal environment for C language translation. A
locale is a database that contains information (such as
currency conversions) for a specific geographic area.
Java Files and Directories
ncdinstall installs the files listed in Table 14-1. Files are
installed by default in the java directory, which is located in
the /tftpboot/ncd/Xncd.5.1.xxx directory. If you are using secure
TFTP, the location is /secure_dir/tftpboot/ncd/Xncd.5.1.xxx/,
where secure_dir is the secure directory.
Table 14-1 Java Directories and Files
Directory or File
Description
classes.zip
A compressed file containing the base class files.1 These are class
files that provide access to resources such as the network, the
windowing system, and the host file system. This file must be
accessible through NFS. A .zip file is an archive, much like a tar
file. A .zip file contains other files, which may be individually
extracted.
classes
A directory containing the same files as those in the classes.zip
file. If Java cannot access the classes.zip file using NFS, it uses
TFTP to access files in this directory. 1
lib/appletviewer.properties
A file containing data and messages used by appletviewer. This
file is not editable.
.hotjava/properties
A configuration file, to be placed in a user’s home directory, for
configuring appletviewer.
1
Classes are the fundamental units of a Java application; they contain executable code and data. Classes can
be stored in files or archives on a local system or on a network server. They are normally located and
loaded at run time, as needed by the application. Class files are organized into functional units called
packages.
14-2 Configuring and Using Java
Using Java Commands
Protocols for Accessing Java Files
You can use either NFS or TFTP to access Java files. For best
performance, you should use NFS; if your Java applications
need file system operations, you must use NFS.
Caching Java Files for Better Performance
You can set the java-cache-class-file parameter to “true” to
specify that the Java classes shipped with NCDware are
loaded and cached in terminal memory. Files are loaded into
memory when the terminal reboots. Enabling class file
caching improves performance (especially if you are using
TFTP instead of NFS) but increases memory consumption. The
default setting for this parameter is “false.”
Installing Java Files in a Non-Standard Directory
If you do not install the files in the default directory, you must
specify the directory name in the java-directory remote
configuration parameter or in the java command line. For
information about java command-line options, see “Using the
java Command” on page 14-5.
See Chapter 3 for information on the
file service table.
If you install Java files in a non-standard location, make sure
they are accessible through the terminal’s file service table.
Using Java Commands
The appletviewer local client runs applets, and the java local
client runs full Java applications. While applets are embedded
in another application, such as appletviewer or a Web browser,
Java applications run as standalone programs.
Using appletviewer
You can start appletviewer by using any of the methods
described in Chapter 7, by using Start Local Command or
Start Java Applet in the Console’s Utilities menu, or by using
an appletviewer command line.
Configuring and Using Java 14-3
Using Java Commands
The Start Java Applet menu item opens a dialog box in which
you can type the URL of the applet you want to start.
Tip
The startjava command is especially
useful in user startup files or for
configuring window manager menus.
To display the dialog box using a command line, use the
startjava command:
rsh terminal startjava
where terminal is the hostname or IP address of the terminal on
which you want to display the dialog box.
The appletviewer command’s only arguments are one or more
URLs for HTML documents that contain Java applets. For
example:
rsh ncdu7 appletviewer http://java.sun.com/applets/DrawTest/example1.html
All the applets referenced in the document are downloaded
and each is displayed in its own window.
You can configure appletviewer by configuring the command
line and by configuring the properties file. The command-line
options and properties file affect different aspects of the
appletviewer.
Configuring the Command Line
The java-appletviewer-command remote configuration
parameter contains the java command-line arguments
supplied when appletviewer is invoked. The default value of
this parameter is “java ncd.applet.NCDAppletViewer.” You
can configure this command line to specify any of the Java
command-line options listed in Table 14-2 on page 14-6/
The string “ncd.applet.NCDAppletViewer” is an example of
package and class names. The package is “ncd.applet” and the
class is “NCDAppletViewer.” This string corresponds to the
pathname ncd/applet/NCDAppletViewer.
Configuring the Properties File
You can configure appletviewer by creating or editing the
.hotjava/properties file in a user’s home directory. If the user’s
home directory is unknown, appletviewer looks for a properties
file in the java/.hotjava directory created by ncdinstall.
14-4 Configuring and Using Java
Using Java Commands
The default properties file contains the following lines. Lines
beginning with # are comments.
#AppletViewer
appletviewer.version=1.0
firewallSet=false
#firewallHost=
#firewallPort=
proxySet=false
#proxyHost=
#proxyPort=
For example, if you are using a firewall, uncomment and
supply values as follows:
firewallSet=true
firewallHost=firewall_host
firewallPort=firewall_TCP_port
If you are using an HTTP proxy instead of a firewall,
uncomment the appropriate lines and set the following:
proxySet=true
proxyHost=proxy_host
proxyPort=proxy_TCP_port
Using the java Command
The java command is for running standalone Java
applications. You can use any of the methods described in
Chapter 7, or the Start Local Command item in the Console’s
Utilities menu to run this command.
The syntax of the java command is:
java [ options ] classname [ arguments ]
where:
options
Are modifiers to the java command. The
java options are listed in Table 14-2.
classname
Is the name of the class to be executed (the
name of the application).
arguments
Are options for the application and are
passed to the application.
Configuring and Using Java 14-5
Using Java Commands
For example, the following command starts a Java application
using the class name “Test.class” on the terminal called
“ncdux” and increases the sizes of the Java code stack, the C
code stack, and the memory allocation pool:
rsh ncdux java -oss64k -ss64k -mx12m Test.class
The options for the java command are listed in Table 14-2.
Table 14-2 Java Command Options
Option
Description
-classpath path
Specifies the path java uses to look up classes in the local or
host-based file system. Separate directories by colons. For
more information, see “Setting the Class Path” on page 14-8.
-D propertyName= newValue
Redefines a property value. propertyName is the name of the
property whose value you want to change and newValue is the
value to change it to. For more information, see “Setting java
Properties” on page 14-8.
-mx maxheap
Sets the maximum size of the memory allocation pool (the
garbage collection heap) to maxheap.
The default is 3 MB of memory. maxheap must be greater than
50 KB. By default, maxheap is measured in bytes. You can
specify maxheap in either kilobytes or megabytes by
appending the letter “k” for kilobytes or the letter “m” for
megabytes. For example, -mx5m creates a 5 MB heap.
The heap is created as soon as the JVM starts and does not
grow or shrink, so you must have at least maxheap bytes of
contiguous memory available. 2
-noasyncgc
Turns off asynchronous garbage collection 2. When activated,
no garbage collection takes place unless it is explicitly called or
the program runs out of memory. Normally garbage collection
runs as an asynchronous thread in parallel with other threads.
-noverify
Turns verification off. 1
14-6 Configuring and Using Java
Using Java Commands
Table 14-2 Java Command Options (Continued)
Option
Description
-oss javastacksize
-ss cstacksize
These options do not normally need to be changed, except to fix Java
or browser crashes by increasing the stack sizes.
Each Java thread has two stacks: one for Java code and one for
C code.
The -ss option sets the maximum stack size that can be used by
C code in a thread to cstacksize. Every thread spawned during
the execution of a Java program has cstacksize as its C stack
size. The default units for cstacksize are bytes and can range
from 32 KB to 512 KB. The default stack size is 32 KB (-ss32k).
The -oss option sets the maximum stack size used by the JVM
to interpret bytecodes. The default stack size is 400 KB.
You can modify the meaning of cstacksize and javastacksize
by appending either the letter “k” for kilobytes or the letter
“m” for megabytes.
-v or -verbose
Causes java to print a message to the diagnostic log each time
a class file is loaded.
-verify
Runs the verifier on all code. 1
-verifyremote
Runs the verifier on all code loaded into the system via a
classloader, that is, loaded from the network. verifyremote is
the default for the interpreter. 1
-verbosegc
Causes the garbage collector to print out messages whenever it
frees memory. 2
1
The verifier provides the first level of Java security by checking Java bytecode before it is run and making
sure the bytecode obeys the basic rules of the Java language.
2
Garbage collection is a technique used by Java to automatically detect objects that are no longer being
used and to free the memory used by such objects.
Configuring and Using Java 14-7
Using Java Commands
Setting the Class Path
Tip
In NCD’s implementation, if a .zip file
is not found in the directories in the
classpath, java tries to find class files
in the same directories.
You must specify the location of all classes you need. The
-classpath option specifies the path java uses to look up classes.
The general format for this option is your_path:NCDCLASSES.
NCDCLASSES is a special name recognized by NCD’s Java
Virtual Machine; it is the path to the base class files in the
classes.zip file.
Directories are separated by colons. For example, if all of your
application class files are in the directory /home/avh/classes,
you specify the class path as:
-classpath /home/avh/classes:NCDCLASSES
See Chapter 3 for information about
the file service table.
Make sure that the class directories are accessible by the
terminal through its file service table (preferably through NFS
rather than TFTP).
Setting java Properties
The -D option to the java command redefines a property. For
example, the following command line sets the value of the
property awt.button.color to green:
% java -Dawt.button.color=green ...
The java command accepts any number of -D options in a
command line.
Some of the more useful properties are described in the
following subsections.
Setting the Java Home Directory
The java.home property and java-directory remote
configuration parameter both specify the directory where the
Java files are installed. If you did not install the files in the
default directory, either set the parameter to the pathname of
the directory or use the -D option to the java command to
specify the pathname.
Setting the Current Working Directory
Some Java applications that reside on a UNIX host expect to be
run from a certain directory. For such applications, use the -D
option to set the user.dir property to the application directory.
14-8 Configuring and Using Java
Java Fonts
Setting the User’s Home Directory
If you are not running the ncddm daemon on your XDM host or
not using XDM, you should set the user.home property to the
user’s home directory. This allows Java to read the user’s
.hotjava/properties file.
See Chapter 5 for information on the ncddm daemon. See “Java
Files and Directories” on page 14-2 for a description of the
.hotjava/properties file.
Java Fonts
See Chapter 6 for more information on
fonts.
To provide fonts for Java applications, you can use a font
server, such as the NCD font server, or bitmap fonts. If you are
using bitmap fonts, make sure the terminal font path includes
the large point-size PCF fonts included in the NCDware
distribution. These fonts are included in the font path for
terminals installed by ncdinstall. The default font directory for
the Java fonts is /usr/lib/X11/ncd/fonts/pcf/java.
Setting the Time of Day
For applets and other applications that need the current date
and time, you can configure the terminal’s time parameters as
described in Appendix B, Setting the Time of Day.
Setting Environment Variables
Tip
If you use the NCD Display Manager
described in Chapter 5, you need not
set the USER and HOME variables in
pref-environment.
You can set environment variables for Java local clients
through NCD’s user preferences facility. Using remote
configuration files or TELNET, use the pref-environment
parameter.
For Java, you can set the USER and HOME variables for the
java command. This provides an alternative to using the NCD
Display Manager or java command-line options.
Configuring and Using Java 14-9
Providing Print Services
The pref-environment parameter is a table with rows consisting
of an environment variable name followed by its value; for
example:
pref-environment = {
{ USER ralph }
{ HOME /u/ralph }
}
Providing Print Services
The Java Virtual Machine (JVM) 1.1.4 supports printing to a
serial, parallel or remote printer or to a Postscript file from
trusted Java applets using standard Java classes. All printing
through the JVM generates Postscript output only, and the
Java application determines the page layout.
The JVM can print to a printer attached to the local terminal, a
printer on a remote terminal, or a printer attached to another
network host.
When you select Print from the Applet Viewer’s Applet menu,
a Print dialog box appears (Figure 14-1). For information on
setting up Applet Viewer printing, see Chapter 10. For
information on using the Print Dialog, see the NCDware User’s
Guide.
Figure 14-1 Printing from a Java Application
14-10 Configuring and Using Java
Setup Menu Equivalents for Java Configuration Parameters
Setup Menu Equivalents for Java Configuration Parameters
Table 14-3 lists the remote configuration parameters
discussed in this chapter and the corresponding Setup menu
field for each. This information is provided for system
administrators who use Setup menus to configuration
terminals.
Table 14-3 Setup Menu Fields for Configuring Java
When Changes
Take Effect
Saved in
NVRAM
Setup ⇒ Change Setup
Parameters ⇒ Java ⇒
AppletViewer Command
Immediately
No
java-cache-class-file
Setup ⇒ Change Setup
Parameters ⇒ Java ⇒ Cache
Class File
Immediately
No
java-directory
Setup ⇒ Change Setup
Parameters ⇒ Java ⇒ Java
Directory
Immediately
No
pref-environment
Setup ⇒ Change User
Preferences ⇒ Environment
Variables
Immediately
No
time-offset-from-gmt
Setup ⇒ Change Setup
Parameters ⇒ Time ⇒ Offset
from GMT
Immediately
No
time-server
Setup ⇒ Change Setup
Parameters ⇒ Time ⇒ Time
Server
Immediately
No
time-server-retries
Setup ⇒ Change Setup
Parameters ⇒ Time ⇒ Time
Server Retries
Immediately
No
Parameter
Setup Menu Field
java-appletviewer-command
Configuring and Using Java 14-11
Setup Menu Equivalents for Java Configuration Parameters
Table 14-3 Setup Menu Fields for Configuring Java
When Changes
Take Effect
Saved in
NVRAM
Setup ⇒ Change Setup
Parameters ⇒ Time ⇒ Time
Server Timeout
Immediately
No
Setup ⇒ Change Setup
Parameters ⇒ Time ⇒
Timezone
Immediately
No
Parameter
Setup Menu Field
time-server-timeout
time-zone
14-12 Configuring and Using Java
15 Configuring the NCD Mosaic Browser
This chapter describes how to configure the NCD Mosaic
Browser. The topics in this chapter are:
Tip
The procedures in this chapter
provide directions for configuring
terminals through remote
configuration files. For system
administrators who use the Console
for terminal configuration, information
about the corresponding Setup menu
fields is provided at the end of the
chapter.
❏
❏
❏
❏
❏
❏
❏
❏
❏
An overview of browser functionality
Requirements and recommendations for running the
browser
Specifying which browser version to run
Setting up the user’s environment for file access using
NFS or TFTP
Printing from the browser
Enabling Java
Enabling browser on-line help
Setting terminal configuration parameters for browser
user preferences and variables
Providing browser fonts
Overview
The NCD Mosaic Browser (nmosaic) is based on Version 3.2 of
Spyglass Mosaic and provides support for Java applets and
JavaScript Version 1.1.
The browser frees resources on application servers and the
network and can save computing resources if used instead of
a host-based browser; it is ideal for corporate intranets.
The browser runs as a local client and can be started through
the Console’s Utilities menu or by using a command line.
The browser can be configured in several ways:
❏ Many user preferences can be set from the browser’s Edit
⇒ Preferences menu and stored in preference files or set
through terminal remote configuration files. Proxy
Configuring the NCD Mosaic Browser 15-1
Requirements
servers, the mail server, and browser variables for special
environments are set through terminal configuration
parameters only. Browser remote configuration
parameters take effect immediately, are not saved in
NVRAM, and have Setup menu equivalents.
❏ Many preferences can be set through the X resources
described in the nmosaic man page.
You can set up printing from the browser to a local printer
attached to the terminal and to remote printers.
The browser has the following limitations:
❏ Some of the HTML 3.2 optional tags are not supported
❏ The only available helpers are the MPEG video player
and the AU audio player
❏ Plug-ins are not supported
Requirements
To provide users with full browser functionality, you should
use NFS for file access.
If you use TFTP, the user environment setup tasks must be
done manually and the following features are not available:
❏ The user cannot view the source for HTML files
❏ The Save As and Open Local commands cannot list files.
Therefore, the user cannot navigate through a directory
tree by clicking on directory names.
❏ Helpers cannot be used because TFTP cannot create the
temporary host files they need
❏ Preference files cannot be read or written unless they
already exist and are world-readable and writable
A license is required for each terminal that runs the NCD
Mosaic Browser. Contact NCD Sales Support if you need to
purchase licenses.
See the NCDware Release Notes for terminal memory
requirements of the browser.
15-2 Configuring the NCD Mosaic Browser
Selecting the Browser Version
Selecting the Browser Version
The browser-module parameter determines which module is
loaded when the browser starts. A change of module takes
effect the next time the browser is started. The module names
to use with this parameter are:
❏ “no-encryption”—the version for terminals with low
amounts of memory. This version does not include
gopher, finger, encryption, or SMTP (Simple Mail
Transfer Protocol). By default, this is the module loaded.
❏ “128-bit-encryption”—the version with all features and
128-bit encryption (for use in the US and other countries
that can import this type of encryption)
❏ “40-bit-encryption”—the version with all features and
40-bit encryption
If you are specifying module load policy for the browser in the
modules-load-policy parameter, the module names to use are:
❏
❏
❏
nmosaic for the browser without encryption
nmos128 for the browser with 128-bit-encryption
nmosaice for the browser with 40-bit encryption
Starting the Browser
Users can start the Browser from the Console’s Utilities menu.
The basic command for starting the browser from a command
line is:
rsh terminal browser
where terminal is the terminal’s hostname.
To specify a URL when you start the browser, use the
following command. This command opens a new browser
window displaying the specified URL:
rsh terminal browser -w URL
Configuring the NCD Mosaic Browser 15-3
Setting Up the User’s Environment—NFS
The browser command starts the browser version specified in
the browser-module parameter, as described in “Selecting the
Browser Version” on page 15-3.
To start the browser more quickly at boot time, specify the
following modules to load at boot:
modules-load-policy = {
{"libx2" at-boot}
{"libxt" at-boot}
{"libxmu" at-boot}
{"libxm" at-boot}
{"libxaw" at-boot}
{"libmos" at-boot}
{"desktop" at-boot}
{"loadb" at-boot}
{"browser" at-boot}
{"nmosaic" at-boot}
}
Setting Up the User’s Environment—NFS
Tip
If you are not using ncdinstall and
ncddm, see the nmosaic man page
for information about how to set up the
environment manually.
This section describes setting up the user environment if you
are using NFS as the terminal’s file access method. Most of
these tasks are done automatically by ncdinstall and the NCD
Display Manager (ncddm), which can be started by ncdinstall.
See Chapter 5 for more information about ncddm.
Table 15-1 lists the setup tasks and indicates whether the task
can be done automatically.
Table 15-2 lists the files for storing user preferences and other
information for users.
15-4 Configuring the NCD Mosaic Browser
Setting Up the User’s Environment—NFS
Table 15-1 Browser Setup Tasks—NFS
Task
Done Automatically
Setting the environment variables (HOME, USER, and
BROWSER_HOME)
Yes
Mounting the browser home directory (or user home directory)
Yes
Exporting the browser home directory
Yes 2
Creating individual user directories in the browser home directory
No
Mounting a directory for temporary storage of helper files
No
Setting the UID and GID
Yes
By ncddm
Creating preference files for each user
Yes
By the browser
By ncdinstall
and ncddm
1
By ncdinstall
and ncddm
By ncdinstall
1
If the browser home directory is the user’s home directory or the default (/usr/lib/X11/ncd/users)
2
If the browser home directory is the default (/usr/lib/X11/ncd/users)
Table 15-2 Browser Preference Files
Preferences File
Description
.nmosaic-viewers-default
Definitions of how to display files, such as graphics or word
processor files
.nmosaic-hotlist-default.html
The hotlist, which is a list of frequently accessed files
.nmosaic-global-history.html
The history list, which allows the user to return to recently
opened files
.nmosaic-prefs
The user preferences set from the browser’s Edit menu plus
browser parameters set from Setup menus and remote
configuration files
Configuring the NCD Mosaic Browser 15-5
Setting Up the User’s Environment—NFS
Setting the Environment Variables and Mounting Directories
This section describes the environment variables, files, and
directories used by the browser and describes what to do if
more than one user needs to run the browser on a given
terminal.
Environment Variables
The following environment variables are used by the browser
for reading and writing user preference files:
❏ HOME—the user’s home directory. This value is
provided by the NCD Display Manager.
❏ USER—the user’s login name. This value is provided by
the NCD Display Manager.
❏ BROWSER_HOME—the browser home directory, where
the browser looks for its user preference files. This value
is set by default to /usr/lib/X11/ncd/users/$USER.
Tip
If the USER variable is not set to the
user who logged in on the terminal, it
is set to “nobody” and the browser
looks for preference files in
/usr/lib/X11/ncd/users/nobody.
ncdinstall installs empty preferences
files in this directory.
The NCD Display Manager and the browser set up the
variables so that users can write to their user preference files
and the browser can read the files. For example, for a user with
the login tony, the value of BROWSER_HOME is
/usr/lib/X11/ncd/users/tony.
If you want browser preference files to be stored in the user’s
actual home directory or some other location, set
BROWSER_HOME to $HOME or to an alternate directory in the
pref-environment remote configuration parameter.
User Files and Directories
If user directories are located in the default browser home
directory, create a directory for each user in the users
subdirectory. ncdinstall automatically mounts and exports the
/usr/lib/X11/ncd directory, so the browser can read and write
any files that reside in users.
If you are storing user preference files in actual home
directories, you must export those directories. The terminal
mounts the user’s home directory using information provided
by the NCD Display Manager.
15-6 Configuring the NCD Mosaic Browser
Setting Up the User’s Environment—NFS
If the browser home directory is not the default directory or a
user’s home directory, make sure it is accessible through the
terminal’s file service table and exported.
More Than One User on a Terminal
If there is more than one user on a terminal, a user who did not
log in on the terminal can still access his or her own browser
home directory. The user does this by specifying a user name
in the Console in Change User Preferences ⇒ Environment
Variables and clicking Apply.
Mounting a Temporary Directory
To store data temporarily (for example, audio and MPEG files
for the helper applications), the browser attempts to write to a
directory called /tmp.
See Chapter 3 for more information on
the file service table.
The /tmp directory must be accessible through the terminal’s
file service table (file-service-table parameter), and must be
exported by the host system.
On the host, the /tmp directory can have any name on the host,
but the local mount point must be entered as /tmp in the file
service table; for example:
{ /tmp/ nil eagle.ncd.com nfs /browser_tmp/ unix 3 30 8 192 8192 }
Setting the UID and GID
Tip
If you need to change the UID and
GID, use the file-nfs-uid and file-nfsgid configuration parameters.
The NCD Display Manager gets the UID and GID variables
from the /etc/passwd file or from NIS. These variables are used
to create files with proper permissions so users can keep their
files private.
User Preference Files
The browser uses the preference files listed in Table 15-2 on
page 15-5. The browser creates these files in the designated
browser home directory as the user saves preferences and
uses other browser features.
Configuring the NCD Mosaic Browser 15-7
Setting Up the User’s Environment—TFTP
Setting Up the User’s Environment—TFTP
This section describes the tasks required to set up the user
environment if you are using TFTP as the terminal’s file access
method.
See “Overview” on page 15-1 for
information about browser limitations
when using TFTP for file access.
The tasks required to provide as much functionality as
possible for the user are:
❏ Setting environment variables
❏ Setting up browser home directories and user preference
files
Setting the Environment Variables
The environment variables that affect the browser’s ability to
access user preference files are:
Tip
The USER variable is not set, it
defaults to “nobody” and the browser
looks for preferences files in
/usr/lib/X11/ncd/users/nobody.
ncdinstall installs empty preferences
files in this directory.
❏
❏
❏
HOME—the user’s home directory
USER—the user’s login name
BROWSER_HOME—the browser home directory, where
the browser looks for its user preference files.
To set environment variables:
1. USER and HOME environment variables—These
variables can be set automatically using the NCD Display
Manager (ncddm). See Chapter 5 for information about
using ncddm.
If you are not running the NCD Display Manager, you
can set these variables in the pref-environment parameter.
2. BROWSER_HOME variable—The default value of this
variable is /usr/lib/X11/ncd/users/$USER. For example, if
USER is set to “bob,” the value of BROWSER_HOME
becomes /usr/lib/X11/ncd/users/bob.
3. To store browser preference files in the user’s home
directory, set BROWSER_HOME to $HOME. To store the
files in some other location, set BROWSER_HOME
accordingly.
15-8 Configuring the NCD Mosaic Browser
Setting Up the User’s Environment—TFTP
4.
For example, the following variables specify that the user
bob’s preference files are in /usr/lib/X11/ncd/users/bob:
pref-environment = {
{ USER bob }
{ HOME /usr/lib/X11/ncd/users/$USER }
{ BROWSER_HOME $HOME }
}
If there is more than one user on a terminal, a user who
did not log in on the terminal can still access his or her
own browser home directory by temporarily specifying a
user name in the Console in Setup ⇒ Change User
Preferences ⇒ Environment Variables and clicking on
Apply.
Setting Up Files and Directories
See “Selecting the Browser Version”
on page 15-3 for more information
about browser preference files.
If you use a browser home directory other than the default
directory or specify the user’s home directory as the browser
home directory, make sure the home directory is accessible
through the terminal’s file service table (file-service-table
parameter) and have the proper permissions.
See Chapter 3 for more information
about the file service table.
Browser preference files are listed in Table 15-2 on page 15-5.
To set up user preference files for each user:
1. If you are using a central location for preference files,
create a directory for each user and make the directories
world-readable and world-writable.
2. Empty user preference files are placed by ncdinstall into
the /usr/lib/X11/ncd/users/nobody directory. Copy the
preference files into each user directory.
3. Make the user preference files world-readable and
world-writable.
4. If you are using secure TFTP, make sure that all
directories to be accessed by the browser are in a secure
TFTP directory.
On some systems, such as AIX, the directories accessed
through secure TFTP must be listed in the /etc/tftpaccess.ctl
file. See the TFTP man page on your system.
Configuring the NCD Mosaic Browser 15-9
Providing Print Services
Providing Print Services
You can set up browser printing, either on remote printers
attached to other network hosts or a printer attached to the
terminal’s parallel port. Remote printing is through the LPD
protocol, and the terminal always sends a PostScript data
stream. Note that local printing may be slow and remote
printing uses terminal memory to store queued print jobs.
For information about setting up printing services, see
Chapter 10.
For information about using the Browser’s print dialog box,
see the NCDware User’s Guide.
Making Java Available
See Chapter 14 for more information
about Java.
ncdinstall installs the Java class files (.zip files) in a directory
called java in the same directory as the X servers. The class files
must be in this directory or in a directory linked to this
directory. If you use ncdinstall to install NCDware, the class
files are properly linked.
Browser Help Files
ncdinstall installs the browser’s help files, in HTML format, in
a directory called help in the same directory as the X servers.
15-10 Configuring the NCD Mosaic Browser
Setting Browser Variables and Controlling Preferences
Setting Browser Variables and Controlling Preferences
See “Specifying Proxy Servers and
the Mail Server” on page 15-13 for
remote configuration parameters
controlling preference items that
cannot be set by the user. See
“Setting Browser Variables for Special
Environments” on page 15-16 for
information on browser variables that
cannot be set as user preferences or
remote configuration parameters.
When it starts, the browser reads the .nmosaic-prefs file in the
browser home directory. Next, the browser checks for
preference settings loaded from the terminal’s remote
configuration file.
This section describes how to configure the following items:
❏ The size of the memory cache for temporary storage of
documents
❏ The maximum number of concurrent TCP/IP connections
❏ Enabling or disabling automatic image loading,
JavaScript, and applets; specifying the default home
page
If you set these items in Setup ⇒ Change Setup Parameters ⇒
Browser, click on Apply, and then start the browser, changes
take effect immediately. Parameters set while the browser is
running have no effect.
Specifying the Size of the Browser Cache
The first time a document is requested from a remote server,
the browser must download the document from the network
before displaying it in the document window. The browser
can temporarily store documents for faster retrieval the next
time they are requested. If you request a document you have
seen before during the current session, the browser checks to
see if it is in the cache and loads it from there instead of
retrieving it from the remote site.
You can increase or decrease the amount of terminal memory
reserved for cached files by specifying the size (in KB) in the
browser-cache-size parameter. The default is 0 KB, and the
range is 0 to 100000. Although a large cache improves browser
performance and reduces network traffic, it may restrict the
amount of memory available for other applications.
The cache size can be viewed, but not set, in the
browser’s Edit ⇒ Preferences menus.
Configuring the NCD Mosaic Browser 15-11
Setting Browser Variables and Controlling Preferences
Specifying Maximum TCP/IP Connections
Permitting the browser to open multiple TCP/IP connections
can improve browser performance. For example, with
multiple connections, images can be loaded simultaneously
instead of one at a time. To set the maximum number of
current TCP/IP connections, use the browser-max-connections
parameter.
The default is 5 simultaneous connections, and the permitted
range is 1 to 32.
The user can reset the maximum TCP/IP connections from the
browser for the duration of the browser session; however, this
preference is reset when the browser restarts.
Enabling or Disabling Automatic Image Loading
Loading documents without images improves browser
performance. Images that are not loaded are represented by
text enclosed in a box. After loading a document, the user can
load one or all of the missing images. In the browser
Preferences menus, automatic image loading is enabled.
The default value of browser-auto-load-images is “userpreference,” which allows the user to permanently enable or
disable automatic image loading by writing to the preference
file. To prevent the user from permanently changing this
preference item and always allow automatic image loading,
set the parameter to “enable.” To prevent automatic image
loading, set it to “disable.”
Enabling or Disabling JavaScript
JavaScript (or Jscript) is a language developed by Netscape
Communications Corp. for creating dynamic Web pages. It is
not the same as Java, although some of its capabilities are
similar.
The browser-jscript-active parameter controls whether
JavaScript routines are executed when a Web document is
loaded. In the browser Preferences menus, JavaScript is
enabled.
15-12 Configuring the NCD Mosaic Browser
Setting Browser Variables and Controlling Preferences
The default parameter value is “user-preference,” which
allows the user to permanently enable or disable this feature
by writing to the preference file. To prevent the user from
permanently changing this item and allow execution of
JavaScript routines, set it to “enable.” To prevent execution of
JavaScript routines, set it to “disable.”
Enabling or Disabling Applets
The NCD Mosaic Browser automatically runs any Java applets
encountered in Web documents.
The browser-java-applets parameter controls whether applets
are executed when the user loads a Web document. In the
browser Preference menus, Java is enabled.
The default parameter value is “user-preference,” which
allows the user to permanently enable or disable this feature
by writing to the preference file. To prevent the user from
permanently changing this preference item and allow applets
to be executed, set it to “enable.” To prevent execution of
applets, set it to “disable.”
Specifying a Default Home Page
There is no default browser home page, although the browser
displays a file with instructions about how to proceed. The
default value for browser-home-page is “nil.” To specify a
default home page, set the parameter to a URL; for example:
browser-home-page = "http://www.ncd.com"
If you do not specify a URL, the user can specify a home page
in the browser Preferences menu.
Specifying Proxy Servers and the Mail Server
This section describes the remote configuration parameters
for specifying proxy servers and the SMTP mail server.
These parameters cannot be set from the browser’s
Preferences menus.
Configuring the NCD Mosaic Browser 15-13
Setting Browser Variables and Controlling Preferences
About Proxy Servers
firewall
A router or other computer that
controls access to the internal
network by protecting it from external
access. The firewall can also be used
to control outgoing traffic.
Proxy server software allows access to the Internet from
within a firewall, although some firewalls do not require
proxy servers. Proxy servers are application-specific; for
example, an FTP (File Transfer Protocol) proxy server permits
or blocks incoming and outgoing FTP requests.
Proxy servers redirect connection requests from hosts on one
side of the proxy host to hosts on the other side. The proxy
server authenticates and authorizes the requests, establishes a
connection, and passes data back and forth.
Proxy overrides are hosts for which the browser should not
use the designated proxy servers. Bypassing proxy servers
when accessing sites inside the firewall improves performance
because all requests that use a protocol for which a proxy
server is specified must go through that proxy server unless
you specify overrides.
You can specify proxy servers for the HTTP, FTP, gopher, and
SOCKS protocols.
Specifying the HTTP Proxy Server and Overrides
An HTTP proxy server enforces access control for traffic that
uses the HTTP protocol to access Web documents. If the HTTP
proxy servers are not set up correctly, users cannot retrieve
URLs from outside the firewall.
Specifying the HTTP Proxy Host and Port
The browser-http-proxy-host parameter specifies the name or IP
address of the host that runs the HTTP proxy service. The
default is “nil.”
The browser-http-proxy-host-port parameter specifies the
TCP/IP port for the HTTP proxy server running on the HTTP
proxy host. The default is 80, and the range is 0 to 65535.
Specifying HTTP Overrides
The browser-http-proxy-overrides parameter contains a
comma-separated list of hosts (hostnames or IP addresses).
Requests for HTTP services directed to these hosts do not go
through the proxy server. The default value is “nil.”
15-14 Configuring the NCD Mosaic Browser
Setting Browser Variables and Controlling Preferences
Specifying the FTP Proxy Host and Overrides
An FTP proxy server enforces access control for traffic that
uses the FTP protocol for transferring files. If the FTP proxy
server is not set up correctly, users cannot retrieve files from
outside the firewall or transfer files outside the firewall.
Specifying the FTP Proxy Host and Port
The browser-ftp-proxy-host parameter specifies the name or IP
address of the host that runs the FTP proxy service. The
default is “nil.”
The browser-ftp-proxy-host-port parameter specifies the
TCP/IP port for the FTP proxy server on the FTP proxy host.
The default is 80, and the range is 0 to 65535.
Specifying FTP Overrides
The browser-ftp-proxy-overrides parameter contains a commaseparated list of hosts (hostnames or IP addresses). Requests
for FTP services directed to these hosts do not go through the
proxy server. The default value is “nil.”
Specifying the Gopher Proxy Host and Overrides
A gopher proxy server enforces access control for traffic that
uses the gopher protocol. Some information on the Internet is
offered through gopher servers.
Tip
Gopher is not included in the browser
module without encryption; it is
included in the other two modules.
Specifying the Gopher Proxy Host and Port
The browser-gopher-proxy-host parameter specifies the name
or IP address of the host running the gopher proxy server. The
default value is “nil.”
The browser-gopher-proxy-host-port parameter specifies the
TCP/IP port for the gopher proxy server. The default is 80, and
the range is 0 to 65535.
Specifying Gopher Overrides
The browser-gopher-proxy-overrides parameter contains a
comma-separated list of hosts (hostnames or IP addresses).
Requests for gopher services directed to these hosts do not go
through the proxy server. The default value is “nil.”
Configuring the NCD Mosaic Browser 15-15
Setting Browser Variables and Controlling Preferences
Specifying the SOCKS Server Host and Port
SOCKS is a networking proxy mechanism that allows hosts
inside a firewall to access the Internet. SOCKS is compiled into
applications to allow them to work through a firewall and
consists of the SOCKS proxy server and a client library.
The browser-socks-host parameter specifies the name of the
SOCKS host that approves requests from outside the local
network for a local network resource. The default is “nil.”
The browser-socks-host-port parameter specifies the TCP/IP
port for the SOCKS proxy server. The default is 1080, and the
range is 0 to 65535.
Specifying the Mail Server
Tip
SMTP and MAILTO are not included
in the browser module that has
encryption; they are included in the
other two modules.
To send mail, the browser connects to an SMTP server. You can
specify an SMTP server host using the browser-smtp-emailserver parameter.
Setting Browser Variables for Special Environments
You can set browser variables for special environments in the
browser-environment parameter.
Note that the names of the variables differ from the names of
the remote configuration parameters and the names in the
browser preferences menus.
Variables set in the browser-environment parameter take
precedence over the user’s preferences in the .nmosaic-pref file.
This means that variables set in browser-environment replace
those already set in .nmosaic-prefs.
The format for preferences that are not configuration
parameters or browser preference items is:
[NCD;NCDM] name value
where name is a variable name and value is its value.
15-16 Configuring the NCD Mosaic Browser
Setting Browser Variables and Controlling Preferences
For example, to specify an alternate location for the browser
help files:
Tip
Quotation marks must be placed
around browser-environment
entries as shown in the examples.
browser-environment = {
{"[NCD;NCDM] Help_Directory" "/home/ncd/help" }
}
The following sections describe some useful browser
variables.
Changing the Size of the Image and Document Caches
To make the browser work better on terminals that would
otherwise have insufficient free memory, you can reset the
size of the image and document caches:
❏ The image cache determines how many HTML objects
(for example, GIFs) are kept in memory and defaults to
50 objects.
❏ The document cache determines how many HTTP pages
are kept in memory and defaults to 4 pages.
On terminals that have little memory, you can set these
variables to 0 by adding the following rows to the browserenvironment table:
{ "[NCD;NCDM] Image-Cache-Size" "0" }
{ "[NCD;NCDM] Doc_Cache_Size" "0" }
Controlling the Display of Animated GIF Files
By default, the browser allows animated GIF files to take up to
three seconds to display. If displaying such a file takes more
than three seconds, a popup message informs the user that the
GIF display was stopped. You can configure the amount of
time the browser takes to display animated GIFs and whether
the popup message is displayed.
For example, to reset the display time to 10 seconds:
{ "[NCD;NCDM] animation_time_limit" "10" }
To prevent the popup message and display the message on
the status line and in the Console window only, set the
following preference:
{ "[NCD;NCDM] gif_show_animate_error " "FALSE" }
Configuring the NCD Mosaic Browser 15-17
About Browser Fonts
About Browser Fonts
Fonts required by the browser are included in the NCDware
distribution. These fonts are placed by ncdinstall in the
/usr/lib/X11/ncd/fonts/pcf/java directory, and the font directory
must be included in the font path or on font servers of
terminals that run the browser.
When you use ncdinstall to add a terminal to the network, the
/usr/lib/X11/ncd/fonts/pcf/java directory is included in the
terminal’s default font path.
The default font path of terminals installed by ncdinstall is:
xserver-default-font-path = {
{ "built-ins" }
{ "/usr/lib/X11/ncd/fonts/pcf/misc/" }
{ "/usr/lib/X11/ncd/fonts/pcf/75dpi/" }
{ "/usr/lib/X11/ncd/fonts/pcf/100dpi/" }
{ "/usr/lib/X11/ncd/fonts/pcf/dw75dpi/" }
{ "/usr/lib/X11/ncd/fonts/pcf/dw100dpi/" }
{ "/usr/lib/X11/ncd/fonts/pcf/java/" }
{ "/usr/lib/X11/ncd/fonts/pcf/Xol/" }
}
15-18 Configuring the NCD Mosaic Browser
Setup Menu Equivalents for Browser Configuration Parameters
Setup Menu Equivalents for Browser Configuration
Parameters
Table 15-3 lists the remote configuration parameters
discussed in this chapter and the corresponding Console
Setup menu field for each. This information is provided for
system administrators who configure terminals through the
Setup menus.
If you change browser preferences or variables, click on
Apply, then start the browser, the changes take effect.
Changes made while the browser is running have no effect.
Table 15-3 Setup Menu Fields for Browser Parameters
When Changes
take Effect
Saved in
NVRAM
Setup ⇒ Change Setup
Parameters ⇒ Browser ⇒ (User
Preferences Overrides section)
Automatically load images
When the
browser starts
No
browser-cache-size
Setup ⇒ Change Setup
Parameters ⇒ Browser ⇒
(General section) Cache Size Limit
(KB)
When the
browser starts
No
browser-environment
Setup ⇒ Change Setup
Parameters ⇒ Browser ⇒
(General section) Environment
Variables
When the
browser starts
No
browser-ftp-proxy-host
Setup ⇒ Change Setup
Parameters ⇒ Browser ⇒
(Network/Proxy Settings section)
FTP Proxy Host
When the
browser starts
No
Parameter Name
Setup Menu Field
browser-auto-loadimages
Configuring the NCD Mosaic Browser 15-19
Setup Menu Equivalents for Browser Configuration Parameters
Table 15-3 Setup Menu Fields for Browser Parameters (Continued)
When Changes
take Effect
Saved in
NVRAM
Setup ⇒ Change Setup
Parameters ⇒ Browser ⇒
(Network/Proxy Settings section)
FTP Proxy Host Port
When the
browser starts
No
browser-ftp-proxyoverrides
Setup ⇒ Change Setup
Parameters ⇒ Browser ⇒
(Network/Proxy Settings section)
FTP Proxy Host Overrides
When the
browser starts
No
browser-gopher-proxyhost
Setup ⇒ Change Setup
Parameters ⇒ Browser ⇒
(Network/Proxy Settings section)
Gopher Proxy Host
When the
browser starts
No
browser-gopher-proxyhost-port
Setup ⇒ Change Setup
Parameters ⇒ Browser ⇒
(Network/Proxy Settings section)
Gopher Proxy Host Port
When the
browser starts
No
browser-gopher-proxyoverrides
Setup ⇒ Change Setup
Parameters ⇒ Browser ⇒
(Network/Proxy Settings section)
Gopher Proxy Overrides
When the
browser starts
No
browser-home-page
Setup ⇒ Change Setup
Parameters ⇒ Browser ⇒ (User
Preference Overrides section)
Default home page
When the
browser starts
No
browser-http-proxy-host
Setup ⇒ Change Setup
Parameters ⇒ Browser ⇒
(Network/Proxy Settings section)
HTTP Proxy Host
When the
browser starts
No
browser-http-proxy-hostport
Setup ⇒ Change Setup
Parameters ⇒ Browser ⇒
(Network/Proxy Settings section)
HTTP Proxy Host Port
When the
browser starts
No
Parameter Name
Setup Menu Field
browser-ftp-proxy-hostport
15-20 Configuring the NCD Mosaic Browser
Setup Menu Equivalents for Browser Configuration Parameters
Table 15-3 Setup Menu Fields for Browser Parameters (Continued)
When Changes
take Effect
Saved in
NVRAM
Setup ⇒ Change Setup
Parameters ⇒ Browser ⇒
(Network/Proxy Settings section)
HTTP Proxy Overrides
When the
browser starts
No
browser-java-applets
Setup ⇒ Change Setup
Parameters ⇒ Browser ⇒ (User
Preference Overrides section) Java
applets
When the
browser starts
No
browser-jscript-active
Setup ⇒ Change Setup
Parameters ⇒ Browser ⇒ (User
Preferences Overrides section)
Jscript/JavaScript routines
When the
browser starts
No
browser-maxconnections
Setup ⇒ Change Setup
Parameters ⇒ Browser (General
section) Maximum TCP/IP
connections
When the
browser starts
No
browser-module
Setup ⇒ Change Setup
Parameters ⇒ Browser ⇒
(General section) Browser Module
When the
browser starts
No
browser-smtp-emailserver
Setup ⇒ Change Setup
Parameters ⇒ Browser ⇒
(Network/Proxy Settings section)
⇒ SMTP Email Server
When the
browser starts
No
browser-socks-host
Setup ⇒ Change Setup
Parameters ⇒ Browser ⇒
(Network/Proxy Settings section)
SOCKS Host
When the
browser starts
No
browser-socks-host-port
Setup ⇒ Change Setup
Parameters ⇒ Browser ⇒
(Network/Proxy Settings section)
SOCKS Port
When the
browser starts
No
Parameter Name
Setup Menu Field
browser-http-proxyoverrides
Configuring the NCD Mosaic Browser 15-21
Setup Menu Equivalents for Browser Configuration Parameters
Table 15-3 Setup Menu Fields for Browser Parameters (Continued)
When Changes
take Effect
Saved in
NVRAM
Setup ⇒ Change Setup
Parameters ⇒ File Service ⇒ File
Service Table
Immediately
No
modules-load-policy
Setup ⇒ Change Setup
Parameters ⇒ Loadable Modules
⇒ Load Policy
Immediately
No
pref-environment
Setup ⇒ Change User Preferences
⇒ Environment Variables
Immediately
No
Parameter Name
Setup Menu Field
file-service-table
15-22 Configuring the NCD Mosaic Browser
16 Setting Up XRemote
XRemote is NCD’s software for running X applications over a
serial line, although you can use it on an Ethernet or TokenRing network.
This chapter describes XRemote and shows how to set up the
physical connection between the terminal and the host,
prepare the user’s environment for XRemote, and set up
terminals for XRemote use.
The major topics in this chapter are:
Tip
Procedures in this chapter provide
directions for configuring terminals
through remote configuration files. For
system administrators who use the
Console for terminal configuration,
information about Setup menu fields
is provided at the end of the chapter.
❏
❏
❏
❏
❏
❏
❏
❏
❏
An overview of XRemote
Requirements for using XRemote
Setting up the physical connection
Setting up the terminal
Setting up XRemote hosts
Preparing the user’s environment
Accessing fonts when using XRemote
Using XRemote log files
Providing printing from the Dialer
Overview
XRemote software consists of a module in the X server and
two host-resident programs. The host-resident programs are
installed on the boot host when you run ncdinstall:
❏ The Xremote(1) helper program handles communication
between the X server running in the terminal and hostresident clients.
❏ The xinitremote(1) program is a user command for
starting the helper and clients from a startup file.
Setting Up XRemote 16-1
Overview
XRemote can be used:
❏ Over a serial line, either a direct connection or through a
modem
❏ Over an Ethernet or Token-Ring local area network
(LAN)
Figure 16-1 shows a representative XRemote system.
Host
Printer
Ethernet
(or Token-Ring)
Printer
RS-232 C
cable
Modem
RS-232 C
cable
Modem
Host with XRemote
helper program
XRemote X server
Figure 16-1 A Local Area Network With XRemote
XRemote Over a Serial Connection
Tip
NCD does not supply PPP or SLIP
software for hosts. Contact your host
or communication server vendor for
this software.
16-2 Setting Up XRemote
XRemote runs in two modes over a serial connection:
❏ Using PPP (Point-to-Point Protocol) or SLIP (Serial Line
Internet Protocol), either direct or through a modem
❏ Using the proprietary XRemote protocol, either through
a direct connection or a modem
To use XRemote over a serial line, the terminal must have an
X server on a PC card (Quick Start card) installed in the
terminal base. The X server cannot be downloaded over the
serial line from a network host.
Overview
For information about configuring terminals for use with
QuickStart cards, see Using a PC Card in Your Thin Client
Device. This manual is supplied with QuickStart cards.
Table 16-1 compares the PPP, SLIP, and XRemote protocols to
help you decide which protocol to use for serial XRemote
connections.
Table 16-1 Comparison of Protocols for XRemote Serial Connection
PPP Protocol
SLIP Protocol
XRemote Protocol
PPP and SLIP run on UNIX systems only.
Runs on UNIX systems.
Packets are autodetected.
The terminal automatically changes the mode of
the serial port.
Packets are autodetected. The terminal automatically changes the mode
of the serial port.
Packets are not autodetected. The user must
select SLIP from the Console's Dialer menu.
Slower performance.
Faster performance.
Allows configuration of your terminal using remote configuration files or TELNET.
Remote configuration files and TELNET are not available. The configuration file on the PC card is used.
Difficult to manage.
Simpler, more easily managed.
You can run X clients and all available network services
(such as NFS and TFTP, Local File Manager commands
for managing files on a PC card, and a name service).
You can run X clients (applications)
only. You can use the local Setup
menus to make changes to the configuration files on PC cards.
XRemote on a LAN
You may want to use XRemote on an Ethernet or Token-Ring
LAN to improve performance. If the user needs to run clients
on a host that is on a different local network and the
connection between the local networks is relatively slow, you
can use XRemote to improve performance.
Setting Up XRemote 16-3
Overview
Simultaneous XRemote and LAN Sessions
For terminals connected to a LAN, the terminal can
communicate through XRemote and the LAN at the same time.
A terminal cannot run an XRemote session using XRemote
protocol at the same time as an XRemote session using a
TCP/IP protocol.
XRemote and a Local Printer
For terminals with more than one serial port, a user can have
a printer attached to one serial port while using XRemote over
another serial port. For information about attaching and using
a printer, see Chapter 10.
How XRemote is Used
When using XRemote on a serial line the user selects a serial
port through the Console’s Dialer client, enters modem
commands (if using a modem), and logs into a host with an
XRemote helper through a terminal emulation window. The
user then types an xinitremote command to start the helper
process.
See the NCDware User’s Guide for
details on using XRemote.
16-4 Setting Up XRemote
When using XRemote on a LAN, the user logs into a host with
an XRemote helper through a terminal emulation window.
The user then types an xinitremote command to start the helper
process.
The helper looks for an XRemote startup file in the user’s
home directory or another designated place. If no startup file
is found, the helper starts an xterm terminal emulator.
Requirements for Using XRemote
Requirements for Using XRemote
See Chapter 3 for information on
setting the license-key parameter.
XRemote requires a license for each terminal. Contact NCD
Sales Support if you need to purchase licenses.
The XRemote host-resident software must be installed. If you
used ncdinstall to install NCDware, the XRemote software is
automatically installed.
XRemote over a serial line requires a QuickStart PC card with
all of the necessary files installed. The Quick Start card comes
with the Using a PC Card in Your Thin Client Device document,
which provides usage and configuration information.
Setting Up the Physical Connection
If you are using XRemote through the terminal’s Ethernet or
Token-Ring interface, the normal network cabling is
sufficient.
If you are using XRemote through the terminal’s serial port,
use a serial cable to connect the terminal to a modem or
directly to a host. Follow the directions in this section.
Setting Up a Modem Connection
This section describes modem requirements, ports and cables,
and modem setup.
Modem Requirements
For use with XRemote, a modem should:
Tip
Although NCD does not endorse
specific modems, the US Robotics
Courier HST Dual Standard modem
provides good service for XRemote.
This chapter provides instructions for
setting up the US Robotics modem.
❏
❏
Provide full-duplex transmission at 9600 baud or faster.
You can use slower modems, but performance is
degraded. Half-duplex modems are not recommended.
Comply with CCITT V.32 standard or V.32BIS for data
communications and V.34, the standard for 28.8K baud
modems.
Setting Up XRemote 16-5
Setting Up the Physical Connection
❏
Have low latency, incurring minimal delays in round-trip
transmissions, even when transmitting small packets.
If the modem compresses data, disable the compression to
prevent transmission delays. XRemote data is already
compressed.
Flow control is not required. If you must use flow control, use
hardware flow control (RTS/CTS). You need flow control, for
example, if the modem port is fixed at 19200 baud and a
connection is made at 9600 bps. Software flow control is not
recommended because a noisy modem line can inject spurious
XOFF characters, causing the connection to hang.
Cabling and Serial Ports
When connecting the terminal to a modem, use a short serial
cable with straight-through, pin-to-pin connections.
All NCD terminals have at least one serial port. Serial ports on
NCD terminals have a DB-9 female connector.
Most modems have a female connector, so the cable should
have a male connector on each end.
Setting Up a Modem—Generic Instructions
If you are using a US Robotics modem, see the next section.
Your modem manual should have instructions for enabling
and disabling the modem control signs that are referred to in
this procedure.
Configure the remote (user’s) modem and host-side modem in
the same way.
1. Assemble and attach the modem to the terminal,
following the instructions in the modem manual.
2. Turn the modem on.
3. Open a Dialer window from the Console (Terminals ⇒
New Dialer) and set the following modem parameters.
Use the commands described in your modem manual:
— Disable any compression used by the modem.
Consult your modem manual for instructions on
disabling compression and error correction, such as
Microcom Networking Protocol (MNP).
16-6 Setting Up XRemote
Setting Up the Physical Connection
4.
— Disable XON/XOFF flow control on the modem. If
you need to use flow control, enable hardware flow
control using RTS/CTS.
— Verify that the modem is configured for 8 data bits, 1
stop bit, no parity, and no handshake.
Type the modem command for saving parameters in the
modem’s NVRAM.
Setting Up a US Robotics Modem
If you are using a US Robotics Courier HST Dual Standard
modem, use the following procedure as an example for setting
up the remote (terminal) and host-side modems for XRemote.
Setting Up the Remote (User’s) Modem
1.
2.
3.
4.
Assemble and attach the modem to the terminal
following the instructions in the US Robotics modem
user’s manual.
Turn the modem on.
Open a Dialer window from the Console (Terminals ⇒
New Dialer).
In the Dialer window, type the commands listed in
Table 16-2. Press Return after each command.
Table 16-2 US Robotics Modem Configuration Settings
Command
Modem
Displays
AT&A3
OK
Displays error code indicators (HST, LAPM, MNP, SYNC, or
NONE) and data compression type (V42BIS or MNP5).
AT&B1
OK
Sets the DTE/DCE data rate to the DTE setting.
AT&H1
OK
Sets flow control to hardware only. This allows compatibility
with non-XRemote uses of the modem.
AT&M0
OK
Sets normal asynchronous mode, with no error control.
AT&N0 or AT&N6
OK
Sets the baud rate to default (normal link operations) or 9600
AT&W
OK
Saves settings to the modem’s NVRAM.
Result
Setting Up XRemote 16-7
Setting Up the Physical Connection
Setting Up the Host-Side Modem
1.
2.
3.
Assemble the modem following the instructions in the
US Robotics modem user’s manual and attach it to the
host.
Use the default switch settings on the back of the
modem, except set DIP switch 5 up (off) to enable auto
answer so that the modem answers on the first ring.
Type the modem commands listed in Table 16-3. Press
Return after each command.
Table 16-3 US Robotics Modem Configuration Settings
Command
Modem
Displays
Result
AT&B1
OK
Fixes DTE/DCE data rate at the DTE setting
AT&H1
OK
Enables hardware (Clear to Send—CTS) flow control to ensure that the
modem works for both XRemote and non-XRemote (serial) operation
AT&W
OK
Saves these settings to the modem’s NVRAM so you don’t have to
re-enter these commands each time you use XRemote
Setting Up a Direct Host Connection
XRemote can be used to connect an NCD terminal directly to a
local host over a serial cable. Use a null modem cable or
straight-through serial cable with a null modem adapter. Refer
to the pinout diagrams in your terminal installation booklet.
NCD terminals are configured as DTE (Data Terminal
Equipment) devices.
To set up a direct serial connection:
1. Connect one end of the cable to a serial port on the
terminal.
2. Connect the other end of the cable to your local host or
terminal switch box.
3. Use the documentation for your host or terminal switch
box to configure its serial port for 8 data bits, 1 stop bit,
and no parity.
16-8 Setting Up XRemote
Setting Up the Terminal
Setting Up a LAN Connection
A terminal on a LAN requires no special setup. Just make sure
the XRemote host-resident programs are installed on the host
where the user runs xinitremote.
Setting Up the Terminal
Setting up the terminal may involve the following steps:
❏ Making sure the terminal is using the correct X server
❏ Setting the terminal’s NVRAM to its default settings
❏ Configuring the serial port and SLIP or PPP interfaces
This section explains when you need to configure the terminal
and how to do it.
The X Server
If the terminal is on a LAN, the terminal can either download
an X server from a network host or use an X server on a PC
card installed in the terminal’s base. If the terminal is
connected through a serial line, the terminal must have its X
server on a Quick Start PC card.
Resetting NVRAM
If a terminal is on a serial line and the terminal was previously
used on a LAN, reset the terminal’s NVRAM to its default
settings. If the terminal is new or hasn’t been used on a LAN,
resetting NVRAM is not necessary.
To reset NVRAM:
Tip
You can enter the Boot Monitor after
the terminal boots by using the
appropriate key combination (see
Table 3-5 on page 3-30).
1.
Enter the Boot Monitor. To invoke the Boot Monitor
while the terminal is booting, press the Escape key while
address requests are being broadcast to the network
(when the words TFTP load or NFS load appear). After
you press the Escape key, the Boot Monitor prompt
appears.
Setting Up XRemote 16-9
Setting Up the Terminal
2.
Type the following commands:
> nv
NVRAM Utility
C [adr] - change location adr
D - [start] [end] display contents
L - load defaults X server
Q - return to monitor
M - load MWT defaults
R - reload NVRAM values
S - save new values
->> l
Load defaults.
->> s
Save configuration values.
Are you sure? y
->> q
Quit the NVRAM utility.
> rs
Reboot the terminal.
>
Setting Configuration Parameters
See Chapter 4 for more information
about terminal configuration methods.
If the terminal is on a LAN, edit the host-resident remote
configuration file. Host-resident configuration files are
created when you add terminals using the ncdinstall program.
Quick Start PC cards purchased from NCD have default
configuration files on them. To edit configuration files on the
PC card, make the changes in the Setup menus and write them
to the file from the Setup menus. By default, terminals are set
up to write from the Setup Parameters window to the user’s
configuration file and to the terminal’s NVRAM when you
click on the Apply button.
Serial Port Numbers in Parameters
The parameters used to configure the serial port for XRemote
are tables containing one row for each serial port.
On terminals with only one serial port, the port is numbered
Port 1.
An HMX terminal may have one, two, or three serial ports.
Port 1 is the connector labelled AUXILIARY on the terminal’s
back panel. On terminals with an ESP board, the serial
16-10 Setting Up XRemote
Setting Up the Terminal
connector on the board is Port 2. If there is a Y connector on
the ESP board, the A connector is Port 2, and the B connector
is Port 3.
Configuring the Serial Port
You may need to reconfigure the following characteristics of
the terminal’s serial port:
Tip
The serial interfaces table is saved in
NVRAM.
Port
number
❏
The handshake mode should match that of the modem
(“none” or “rts/cts”).
❏ The baud rate should be as high as possible:
— For a direct serial connection, set the baud rate as high
as the host can handle.
— For a modem connection, set the baud rate as high as the
modem-to-modem baud rate, which should be at least
9600 baud.
To configure the serial port, edit the serial-interfaces-table
parameter, or add the parameter if it’s not already in the
remote configuration file. Figure 16-2 shows the default serialinterfaces-table parameter and the fields you may need to
change.
serial-interfaces-table =
{ 1 terminal terminal
{ 2 terminal terminal
{ 3 terminal terminal
}
{
9600 8 1 none none none }
9600 8 1 none none none }
9600 8 1 none none none }
Baud rate
Handshake mode
Figure 16-2 The serial-interfaces-table Parameter—Default Settings
Configuring PPP and SLIP Characteristics
If you are using PPP or SLIP protocol for XRemote, you may
need to set the following parameters. These parameters are
not saved in NVRAM, so they must be set in a configuration
file to become permanent.
Setting Up XRemote 16-11
Setting Up the Terminal
Specifying IP Addresses and the Default Gateway
Most implementations of PPP allow address negotiation
between the terminal and the host on which PPP is running. If
your PPP implementation cannot assign the terminal an
address, enter its address manually in the ppp-slip-interfacestable parameter. This table has a row for each serial port.
If you are using SLIP, you must assign both the host address
and the terminal address.
If the host on which PPP is running is the default gateway, you
specify this in the same table. If the terminal is running on a
LAN and a default gateway is already specified, do not specify
a default gateway here.
The last field in a row controls compression of TCP/IP headers.
For PPP, this should be set to “true,” which is the default value.
For SLIP, set the parameter to “true” or “false,” depending
upon your implementation of SLIP.
Figure 16-3 shows the default ppp-slip-interfaces-table
parameter for a terminal with three serial ports.
IP address of the
host running
SLIP or PPP
Port
number
ppp-slip-interfaces-table = {
{ 1 0.0.0.0 0.0.0.0
{ 2 0.0.0.0 0.0.0.0
{ 3 0.0.0.0 0.0.0.0
}
IP address of the
terminal for SLIP or
PPP connection
Whether TCP/IP
headers are
compressed
false
false
false
true }
true }
true }
Whether the PPP
or SLIP host is a
default gateway
Figure 16-3 The ppp-slip-interfaces-table Parameter
The ppp-slip-interfaces-table parameter is not saved in
NVRAM.
16-12 Setting Up XRemote
Setting Up the Terminal
Specifying PPP Characteristics
The ppp-interfaces-table parameter controls several PPP
operating characteristics. The default values are acceptable
unless the PPP link cannot be successfully established.
If the PPP link is not successfully established:
❏ Set passive mode to “true” if host-side PPP expects to
initiate the configuration negotiation.
❏ Set old format to “true” if host-side PPP is an older
version (RFC 1171/1172). The current version is RFC 1331.
Figure 16-4 shows the default ppp-interfaces-table parameter
for a terminal with three serial ports.
Control character
formatting
Port
number
ppp-interfaces-table =
{ 1
0
{ 2
0
{ 3
0
}
{
1000
1000
1000
Compression in
PPP frame
true
true
true
Maximum bytes in
a PPP frame
true
true
true
Old
format
false
false
false
false }
false }
false }
Passive
mode
Figure 16-4 The ppp-interfaces-table Parameter
The ppp-interfaces-table parameter is not saved in NVRAM.
Setting Up XRemote 16-13
Setting Up XRemote Hosts
Setting Up XRemote Hosts
To set up a host for XRemote:
❏ Make sure the XRemote host-resident software is
installed on the host(s) where the user types the
xinitremote command to start XRemote. This command is
installed on the boot host when you install NCDware.
❏ Make sure PPP or SLIP is installed and properly
configured on the host if the user is running XRemote
with either of these protocols. If PPP does not start
automatically, provide the user with the command for
starting PPP.
Preparing the User’s Environment
The tasks involved in preparing a user’s environment for
XRemote use are:
❏ Providing the user with the following information:
— Method for starting XRemote: XRemote protocol,
PPP, SLIP, or over the LAN
— Phone number of the host if using a modem
— Address or hostname of host where the helper is
running if using PPP, SLIP, or a LAN connection
— Command to start PPP or SLIP if your
implementation does not start automatically
— Serial port to use
❏ Setting the search path to include the XRemote binaries
directory
❏ Preparing a startup file
❏ Specifying the font access method
❏ Specifying the directory for the XRemote log files
(optional)
16-14 Setting Up XRemote
Preparing the User’s Environment
Setting the User’s Search Path
Revise the user’s PATH environment variable to include the
directory in which xinitremote and Xremote reside. Usually,
these binaries are installed in /usr/bin/X11/ncd when you install
NCDware.
Creating the User’s Startup Files
When it starts, XRemote runs any clients listed in an XRemote
startup file. You can set up startup files to specify the clients
to start and to customize the helper.
About Startup Files
XRemote attempts to execute whichever of the following files
it finds first:
❏ A file referenced by the environment variable XINITRC
❏ The .xinitremoterc file in the user’s home directory
❏ The .xinitrc file in the user’s home directory (included for
compatibility with older versions of XRemote)
If none of these files exist, XRemote starts an xterm terminal
emulator window by running the following command:
xterm -geometry +1 +1 -n login
Creating Startup Files
Use the following guidelines in creating startup files:
❏ Use the same syntax you would use to start clients from
the UNIX shell.
❏ Run all but the last client in the background except for
commands that must run in the order in which they are
listed, such as xrdb(1).
❏ Run the last client in the foreground. When this client
exits or is terminated by the user, the XRemote session
ends.
❏ If the user normally logs in on a terminal that runs XDM,
you can make the XRemote environment identical to the
local environment by copying the user’s .xsession file as
Setting Up XRemote 16-15
Accessing Fonts When Using XRemote
the startup file for XRemote or by setting the XINITRC
variable to point to the .xsession file.
An example startup file follows. This file uses the ncdrestartwm
command to start the local NCD Window Manager (ncdwm).
Tip
A local window manager usually
performs better than a host-based
window manager for XRemote.
#Load client resources
xrdb -load $HOME/.Xres
#Start the local window manager
ncdrestartwm
xsetroot -solid gray &
xclock -g 50x50-0+0 -bw 0 &
xterm -g 80x24+0+0 &
xterm -g 80x24+0-0
Configuring the Helper
See the Xremote(1) man page for the
available options.
You can use a .xservremote file in the user’s home directory to
start a customized Xremote helper. In the file include an
Xremote command line followed by the options you want to
use.
Accessing Fonts When Using XRemote
In any XRemote mode, the terminal can access fonts using the
following methods, which require no configuration:
❏ Downloading fonts by the XRemote helper
❏ If the terminal has a PC card installed, loading fonts from
the card. Quick Start PC cards provided by NCD have a
large selection of fonts installed on them.
❏ Using built-in fonts
If the terminal is connected to a LAN or is using PPP or SLIP
over a serial line, the terminal can access fonts using the
following additional methods:
See Chapter 6 for information on
downloading fonts using NFS or TFTP
or using a font server.
16-16 Setting Up XRemote
❏
Downloading fonts using NFS or TFTP. Terminals
connected to a LAN or using PPP or SLIP automatically
try this method before trying to download fonts using
the XRemote helper. If you need to use a special font path
XRemote Log Files
❏
for XRemote, you can add an xset command to the user’s
.xinitremote file.
Downloading fonts using a font server. Using a font
server requires configuration.
XRemote Log Files
Both the XRemote helper and the clients run by the
.xinitremoterc startup file send messages to a log file. By
default, the output goes to a log file in the /usr/tmp directory.
Log files are named Xremoten, where n is a display number
assigned by XRemote. For example, the first terminal to start
an XRemote session creates a log file called Xremote1.
Two environment variables can be used to redefine the log file
directory. XRemote first consults the XREMOTETMPDIR
environment variable for the name of a directory. If this
variable is not set, XRemote consults the TMPDIR variable. If
this variable is not set, XRemote creates the log file in /usr/tmp.
These variables can be set in the user’s shell configuration file
(such as .login or .profile).
On some host systems there is a potential problem with the
permissions on the /usr/tmp directory. A user starts XRemote,
creating the log file Xremote1, for example, and quits XRemote.
Another user starts XRemote, and XRemote attempts to create
another file named Xremote1. If the directory permissions are
wrong, the old file cannot be overwritten and XRemote cannot
start. To overcome this potential problem, either:
❏ Set the directory permissions to world-read, world-write,
and world-execute, or
❏ Use the XREMOTETMPDIR or TMPDIR variable to
specify a log file in the home directory of each user.
Setting Up XRemote 16-17
Providing Print Services
Providing Print Services
You can set up printing from the Dialer, either on remote
printers attached to other network hosts or a printer attached
to the terminal’s parallel port. Remote printing is through the
LPD protocol, and the terminal always sends a PostScript data
stream. Note that local printing may be slow and remote
printing uses terminal memory to queue print jobs.
Commands in the Dialer’s File menu allow users to send the
contents of the Dialer window or the current session log to a
printer connected to the terminal’s serial or parallel port.
For information about setting up printing services, see
Chapter 10.
Setup Menu Equivalents for Configuration Parameters
Table 16-4 lists the remote configuration parameters discussed
in this chapter and the corresponding Setup menu field for
each. This information is provided for system administrators
who use Setup menus to configure terminals.
Table 16-4 Setup Menu Fields for Configuring XRemote
When Changes
Take Effect
Saved in
NVRAM
Setup ⇒ Change Setup Parameters ⇒ Serial ⇒ Serial Interfaces Table
“Mode” takes effect
at boot; all other
fields take effect
immediately.
Yes
ppp-slip-interfaces-table
Setup ⇒ Change Setup Parameters ⇒ PPP and SLIP ⇒ PPP
and SLIP Interfaces Table
Immediately
No
ppp-interfaces-table
Setup ⇒ Change Setup Parameters ⇒ PPP and SLIP ⇒ PPP
Interfaces Table
Immediately
No
Parameter
Setup Menu Field
serial-interfaces-table
16-18 Setting Up XRemote
17 Configuring Display PostScript
This chapter describes the DPS (Display PostScript) X server
module. The following topics are covered in this chapter:
Tip
Procedures in this chapter
provide directions for
configuring terminals through
remote configuration files. For
system administrators who
use the Console for terminal
configuration, information
about Setup menu fields is
provided at the end of the
chapter.
❏
❏
❏
❏
An overview of DPS
Requirements for using DPS
Using DPS support files
Information the about Adobe fonts for DPS included on the
NCDware CD-ROM
❏ Configuring the DPS resource path
❏ Configuring DPS font access by X clients
❏ Clearing the DPS cache to reclaim font memory
DPS is available on HMX and Explora 700 terminals only and
requires a license.
DPS Overview
The DPS X server module allows PostScript applications to display
their output on NCD terminals. Such local servicing of DPS requests
speeds application processing and reduces host and network
loading.
NCD’s DPS extension is based on Adobe’s Display PostScript Level
2 software, supports true WYSIWYG two-dimensional graphics, and
provides access to all Type 1 scaled font libraries.
The Display PostScript imaging model is device-independent,
allowing graphics to look the same on any supported platform. An
application that uses Display PostScript works and appears the
same on all supported platforms without modification of the
application.
Configuring Display PostScript 17-1
DPS Requirements
Display PostScript performs the following functions:
❏ Allows applications to scale, rotate, and render text, graphics,
and scanned images at any angle
❏ Scales fonts to any point size
❏ Automatically adjusts the colors appearing in color graphics
and scanned images on monochrome or grayscale monitors or
on monitors with limited color selections
❏ Renders graphics that use Bézier curves
❏ Allows users to import and display encapsulated postScript
(EPS) files in applications that support this format
❏ Automatically adjusts output to the current screen resolution
so that an application looks the same on any screen
❏ Allows easy porting of application programs to other DPS
environments
NCDware includes the following components for DPS:
❏ DPS X server modules—For information on managing X
server modules, see Chapter 3.
❏ DPS support files—For information on support files, see
“Using DPS Support Files” on page 17-3.
❏ Adobe font files—For information on DPS fonts, see
“Configuring DPS Font Access by X Clients” on page 17-11.
DPS Requirements
The requirements for using DPS on an NCD terminal follow:
❏ Using DPS requires a valid license for each terminal. If you do
not have DPS licenses, contact NCD Sales Support. If you have
licenses and need to configure license services, see Chapter 3.
After adding a license for a terminal, reboot the terminal so
that the X server can read the PostScript resource file.
❏ Additional terminal memory may be required. For
information on the amount of terminal memory required to
use DPS, see the NCDware Release Notes.
17-2 Configuring Display PostScript
Using DPS Support Files
❏
You must use NFS (Network File Service) as the file transfer
protocol for DPS. See Chapter 3 for information about
configuring the terminal’s file service table.
Using DPS Support Files
The following DPS support files are included with NCDware and
are installed by ncdinstall in /usr/lib/X11/ncd/dps:
❏ PSres.upr—the PostScript resource file
❏ VM_3_2.SNF—the virtual memory file
❏ CIE-dict19c.dat—the color-rendering file
❏ InitProc.dat—the context initialization file
The following sections describe these files in more detail.
The PostScript Resource File
The PostScript resource file, PSres.upr, is essential for DPS
operation. An NCD utility is provided for creating a new resource
file or updating an existing resource file. When working with the
resource file, keep the following in mind:
❏ If you change the default locations of the DPS support files or
DPS font files, you must modify the contents of the PostScript
resource file to reflect the changes. You may also need to add
new file service table entries; for information on the terminal’s
file service table, see Chapter 3.
❏ If you use other PostScript resource files, make sure they
follow the *.upr naming convention.
For more information about PostScript resource files, refer to
Programming the Display PostScript System with X from Adobe
Systems Incorporated.
Sections in the PostScript Resource File
The PostScript resource file contains the following sections:
❏ DPSVM—This section identifies the VM (Virtual Memory) file.
The VM file must be loaded for DPS to work correctly. For
example:
Configuring Display PostScript 17-3
Using DPS Support Files
DSPVM
local=VM_3_2_.snf
master=VM_3_2_.snf
❏
❏
❏
❏
ColorRendering—This section identifies the file containing
color-rendering information. The identified file aids the DPS
extension in rendering colors in a device-independent manner.
For example:
ColorRendering
DefaultCIE=CIE-dict19c.dat
ColorCIE=CIE-dict19c.dat
ContextInit—This section identifies the context initialization
file used when a context is created. For example:
ContextInit
InitProc=InitProc.dat
FontAFM—This section identifies the locations of the Adobe
Font Metric (AFM) files. Some applications that use the
PostScript language need these files for proper operation. The
section lists each font name and font location. For example:
FontAFM
AvantGarde-BoldObl=fonts/AFM/AGWO____.afm
AvantGarde-Book=fonts/AFM/AGW_____.afm
AvantGarde-Demi=fonts/AFM/AGD_____.afm
AvantGarde-DemiOblique=fonts/AFM/AGDO____.afm
FontFamily—This section identifies the supported font
families and additional typefaces. For example:
FontFamily
Courier=Bold Oblique,Courier-BoldOblique,Bold,CourierBold,Medium,Courier,
Oblique,Courier-Oblique
❏
FontOutline—This section identifies the locations of the
available outline font files. It lists each outline font name and
the font location. For example:
FontOutline
AvantGarde-Book=fonts/AGW_____.pfa
AvantGarde-BookOblique=fonts/AGWO____.pfa
AvantGarde-Demi=fonts/AGD_____.pfa
AvantGarde-DemiOblique=fonts/AGDO____.pfa
17-4 Configuring Display PostScript
Using DPS Support Files
❏
FontPrebuilt—This section identifies the locations of the
available hand-tuned, bitmap fonts. It lists each font name and
the font location. For example:
FontPrebuilt
Courier-BoldOblique=prebuilts/COBO____.bepf
Courier-Bold=prebuilts/COB_____.bepf
Courier=prebuilts/COM_____.bepf
Courier-Oblique=prebuilts/COO_____.bepf
Creating or Updating the PostScript Resource File
The makepsres utility allows you to make a new PostScript resource
file or update an existing file. The following example shows how to
use this utility to update the PSres.upr file so that DPS servers can
access more fonts:
1. Change to the directory to which you will be adding fonts.
Note
NCD recommends that you use a directory under
/usr/lib/X11/ncd. Otherwise, the DPS module may
not be able to locate the PostScript resource file. If
you must place the fonts in another location, make
sure that each terminal can access the new fonts
through its file service table.
2.
3.
4.
Add the desired fonts to the directory.
While in the directory, invoke makepsres:
# /usr/lib/X11/makepsres
makepsres creates a new PostScript resource file in the current
directory. If the current directory contains an existing
PostScript resource file, makepsres merges the contents of the
existing file with the information from the new fonts and
produces a new PSres.upr file.
Add the DPSVM section to the resulting PSres.upr file if that
section does not already exist.
If you invoke makepsres in a directory that does not contain an
existing PSres.upr file, you must include information
identifying the location of the VM file. To do this, add DPSVM
to the beginning of the PSres.upr file where it lists all sections
of the file. For example:
Configuring Display PostScript 17-5
Using DPS Support Files
PS-Resources-1.0
DPSVM
FontAFM
FontFamily
FontOutline
Add the DPSVM section to the file; for example:
DPSVM
local=VM_3_2_beta2.snf
master=VM_3_2_beta2.snf
5.
6.
When you finish modifying this file, it should resemble the
following example:
PS-Resources-1.0
DPSVM
ColorRendering
ContextInit
FontAFM
FontFamily
FontOutline
FontPrebuilt
.
DPSVM
local=VM_3_2_beta2.snf
master=VM_3_2_beta2.snf
.
ColorRendering
%DefaultCIE=CIE-dict19c
ColorCIE=CIE-dict19c.dat
.
.
.
If necessary, modify the dps-resource-path parameter on all
terminals using DPS so the DPS module can locate the resource
files. For information on setting this parameter, see
“Configuring the DPS Resource Path” on page 17-10.
Reboot the affected terminals so they can read the new
PSres.upr file.
17-6 Configuring Display PostScript
Using DPS Support Files
The Virtual Memory File
The virtual memory file, VM_3_2.SNF, provides information about
the VM (Virtual Memory) space that Display PostScript needs for
operation. The DPS extension uses two types of virtual memory:
❏ Shared VM holds system fonts and other resources shared by
all contexts.
❏ Private VM holds fonts specific to each context.
The Color-Rendering File
The color-rendering file, CIE-dict19c.dat, contains a PostScript
rendering dictionary that allows the DPS extension to provide
device-independent color. This file is loaded for each DPS context.
The information in the file allows all requests for color to be
honored. The output generated by DPS depends on the output
device:
❏ On monochrome monitors, the output consists of dithered,
halftone patterns of black and white pixels.
❏ On grayscale monitors, the output consists of halftone
patterns using gray levels.
❏ On color monitors, the output consists of the requested color
or a dithered pattern of RGB pixels that approximates the
color.
The Context Initialization File
The context initialization file, InitProc.dat, executes arbitrary
PostScript code when a context is created. You can use the file to set
various user parameters or to initialize local virtual memory.
Configuring Display PostScript 17-7
Adobe Fonts for DPS
Adobe Fonts for DPS
NCDware includes the following fonts for use with the DPS
extension:
❏ Adobe outline fonts
❏ Font metrics in AFM (Adobe Font Metric) format
❏ Adobe fonts in hand-tuned, bitmap format
Table 17-1 lists the fonts included in the distribution in both outline
and AFM formats.
Table 17-1 Adobe Outline Fonts for Display PostScript
Font Family
Additional Typefaces
Helvetica
Bold
Oblique
Bold Oblique
Helvetica Condensed
Bold
Oblique
Bold Oblique
Times Roman
Bold
Italic
Bold Italic
Courier
Bold
Oblique
Bold Oblique
New Century SchoolBook
Bold
Italic
Bold Italic
Avant Garde Gothic
Demi
Oblique
Demi Oblique
Bookman
Demi
Italic
Demi Italic
Palatino
Bold
Italic
Bold Italic
Zapf Chancery
Zapf Dingbats
Symbol
17-8 Configuring Display PostScript
Adobe Fonts for DPS
Table 17-2 lists the fonts included in the distribution in prebuilt
bitmap format.
Table 17-2 Bitmap Fonts for Display PostScript
Font Family
Additional Typefaces
Helvetica
Bold
Oblique
Bold Oblique
Times Roman
Bold
Italic
Bold Italic
Courier
Bold
Oblique
Bold Oblique
New Century SchoolBook
Bold
Italic
Bold Italic
Palatino
Bold
Italic
Bold Italic
Symbol
Table 17-3 lists the default font locations.
Table 17-3 Default Locations of Adobe Fonts
Font
Path
Type 1 outline fonts
/usr/lib/X11/ncd/dps/fonts/*.pfa
AFM font files
/usr/lib/X11/ncd/dps/fonts/AFM/*.afm
Prebuilt fonts
/usr/lib/X11/ncd/dps/prebuilts/*.bepf
Configuring Display PostScript 17-9
Configuring the DPS Resource Path
Configuring the DPS Resource Path
The dps-resource-path remote configuration parameter (Table 17-4)
specifies the location of the DPS resource files. By default, the files
reside in /usr/lib/X11/ncd/dps.
Because the dps-resource-path parameter recognizes colons as
significant characters, adhere to the following conventions when
assigning values to this parameter:
❏ Use one colon (:) to separate directory specifications in which
DPS resource files reside. For example, the assignment:
dps-resource-path = /usr/coe/ps:/usr/lib/X11/ncd/dps
❏
indicates that the DPS module should look first in /usr/coe/ps
for a DPS resource file and then in /usr/lib/X11/ncd/dps.
Use two colons (::) to indicate that the DPS extension should
look at the system default location for the DPS resource file.
For example, the default entry:
dps-resource-path = /usr/lib/X11/ncd/dps::
indicates that the DPS module should look first in
/usr/lib/X11/ncd/dps for a DPS resource file and then in the
system default location.
If you modify this parameter:
❏ Make sure the file service table equates the directories
specified with this parameter with the mount points on the
host system.
❏ Reboot the terminal so the new values can take effect. The
dps-resource-path parameter is not saved in NVRAM.
17-10 Configuring Display PostScript
Configuring DPS Font Access by X Clients
Table 17-4 dps-resource-path Parameter
Possible Values
Results
default
/usr/lib/X11/ncd/dps::
/usr/lib/X11/ncd/dps::
When attempting to locate DPS resource files, the X server looks first
in /usr/lib/X11/ncd/dps and then in the default system location.
path[:path[:path...]]
The X server looks in the specified directory or directories when
loading DPS resource files.
Configuring DPS Font Access by X Clients
To configure your environment so that X clients can access DPS
outline fonts, complete the following steps:
Note
1.
2.
3.
If you add new outline fonts, you must complete all
of the following steps. If you use only the outline
fonts included with the NCDware distribution, you
need only complete Step 5.
Set your current working directory to the directory in which
the DPS outline fonts reside; by default,
/usr/lib/X11/ncd/dps/fonts.
Make sure that each outline font file has a .pfa (PostScript Font
ASCII) extension.
Use the ncdmkfdir (1) utility to add an entry to the fonts.scale
file for each link or file created in the previous step.
% ncdmkfdir currentworkingdir
The fonts.scale file, which resides in the font directory, has an
entry for each font file that pairs the file with its XLFD name,
such as:
Symbol.pfa -adobe-Symbol-Medium-r-normal-*-0-0-0-0-P-0-adobe-fontspecific
ncdmkfdir works well with Adobe outline fonts. If you use it
on fonts from other sources in which the key values may be
Configuring Display PostScript 17-11
Freeing the DPS Cache
4.
5.
inaccurate. You may have to correct resulting fonts.scale file by
hand.
While still in the font directory, invoke the ncdmkfontdir utility.
This utility reads the contents of the fonts.scale file and any
bitmap font files and adds them to the fonts.dir file.
Add the font directory to the terminal’s font path:
— To change the terminal’s current font path, use the preffont-path parameter.
— To change the terminal’s default font path, use the xserverdefault-font-path parameter.
If you change the default font path only, you must reset
the terminal before the change takes effect.
Freeing the DPS Cache
By default, the DPS module caches the contents of the colorrendering file and the context initialization file when it is invoked
for the first application. It also caches fonts as it uses them. Caching
this information speeds processing for subsequent contexts.
To free the font memory in the cache, select Utilities ⇒ Free DPS
Memory from the Console.
17-12 Configuring Display PostScript
Setup Menu Equivalents for Remote Configuration Parameters
Setup Menu Equivalents for Remote Configuration
Parameters
Table 17-5 lists the remote configuration parameters discussed in
this chapter and the corresponding Setup menu field for each. This
information is provided for system administrators who use Setup
menus to configure terminals.
Table 17-5 Setup Menu Fields for Configuring XRemote
When Changes
Take Effect
Saved in
NVRAM
Setup ⇒ Change Setup
Parameters ⇒ Display
PostScript ⇒ DPS/X
Resource Path
At boot
No
pref-font-path
Setup ⇒ Change User
Preferences ⇒ Fonts ⇒
Current Font Path
Immediately
No
xserver-default-font-path
Setup ⇒ Change Setup
Parameters ⇒ Fonts ⇒
Default Font Path
Immediately
No
Parameter
Setup Menu Field
dps-resource-path
Configuring Display PostScript 17-13
Setup Menu Equivalents for Remote Configuration Parameters
17-14 Configuring Display PostScript
18 Troubleshooting
This chapter explains:
❏ How to resolve common problems
❏ What to do if a terminal crashes
❏ How to retrieve information from NCD’s World Wide
Web server or through FTP
❏ How to contact NCD Technical Support
Troubleshooting Boot Failures
If the terminal cannot boot (load an X server), it enters the Boot
Monitor (> prompt) after displaying diagnostic messages.
This section presents some general hints for booting the
terminal followed by details about specific problems you may
encounter.
Getting the Terminal Booted
To quickly get the terminal running, NCD recommends
resetting the terminal’s NVRAM (non-volatile RAM) to factory
defaults and booting the terminal manually.
Resetting NVRAM
Resetting NVRAM to its default settings often solves booting
problems, especially if:
❏ The terminal booted previously, but now you are trying
to load a different X server.
❏ You are booting the terminal from a different host.
❏ You have changed the terminal’s IP address.
❏ You want to run a previous release of the X server.
Troubleshooting 18-1
Troubleshooting Boot Failures
Before you reset NVRAM, make a note of the following
information so you can re-enter it in NVRAM if necessary:
❏ The terminal’s IP address
❏ The boot host’s IP address
❏ The gateway IP address
❏ The name of the X server file and the directory in which it
resides
Tip
Press Return after each Boot Monitor
command.
To reset NVRAM, start the NVRAM utility, and type the
following commands:
> nv
NVRAM Utility
C [adr] - change location adr
D - [start] [end] display contents
L - load defaults X server
Q - return to monitor
R - reload NVRAM values
S - save new values
->> l
Load defaults.
->> s
Save configuration values.
Are you sure? y
->> q
Quit the NVRAM utility.
>
Using the Boot Monitor Setup Menus
Tip
To boot via NFS in the NVRAM Setup
menus, you must specify the boot
directory with a trailing slash (/).
The Boot Monitor Setup menus offer a method of quickly
configuring the essential parameters for booting and saving
them in NVRAM. Using these menus is one way of making
sure the terminal boots and reads a configuration file (if
desired).
1. In the Boot Monitor, press the Setup key or type:
> se
Tip
In some cases, the terminal does not
boot correctly if you insert a leading
space in the X server filename.
18-2 Troubleshooting
2.
The initial screen is displayed with names of other
screens across the top. Follow the directions in the initial
screen to display the Network screen. In the Network
screen, follow the directions at the bottom of the screen to
set the parameters listed in Table 18-1.
Troubleshooting Boot Failures
Table 18-1 Network Menu Parameters
Field
Setting
Get IP Addresses From
NVRAM
Terminal IP Address
Terminal’s IP address
First Boot Host IP Address
Boot host’s IP address
In addition, the following parameters are often set:
Second Boot Host IP Address
Third Boot Host IP Address
Broadcast IP Address
Tip
The second and third boot hosts are
for backup in case the terminal cannot
boot from the first boot host.
If the boot host is on a different subnet from the terminal,
you must set the following:
Gateway IP Address
Subnet Mask
3.
4.
Move to the Boot screen and set the parameters listed in
Table 18-2.
Move to the Done menu and reboot the terminal.
Table 18-2 Boot Menu Parameters
Field
Setting
Boot File
The basic X server file; for example, Xncdhmx.
TFTP Boot Directory or
NFS Boot Directory
The directory containing the X servers; for example, /tftpboot/.
Config File
The terminal’s configuration file (if you are using remote
configuration files); for example, ncd_std.
TFTP Order:
NFS Order:
LOCAL Order:
Set the boot method to be tried first to 1.
UNIX Config Directory
The configuration file directory (if you are using remote
configuration files); for example, /usr/lib/X11/ncd/configs/.
Troubleshooting 18-3
Troubleshooting Boot Failures
Booting Manually
To boot the terminal without changing any of its parameters
you can use one of the following manual boot commands.
Manual Boot from the Local File System
To manually boot from the local file system on the PC card:
> bl filename
See Chapter 3 for more information
about using the manual boot
commands, including definitions of
the options.
where filename is the name of the X server file. If you are
booting a compressed server, be sure to include the .bl
filename extension.
Manual Boot Using TFTP or NFS
To boot from a host computer using TFTP, use the bt
command. The syntax for this command is:
bt [ file ][ terminal_IP host_IP ][ gateway_IP [ subnet_mask ] ]
To boot from a host computer using NFS, use the bn command.
The syntax is:
bn [ file ][ terminal_IP host_IP ][ gateway_IP [ subnet_mask ] ]
You may need to specify the directory name; for example,
/tftpboot/file.
Loopback Failure When Booting Manually
If the bt command fails and the terminal displays the message
external loopback failure, there is either an incorrect
setting on the interface board, a wiring problem in the
network, or a hardware problem on the interface board.
The probable causes are described in the following
subsections.
Wrong Switch Setting on the Interface Board
If your terminal has a NIM (Network Interface Module) board,
the network selection button may be in the wrong position. It
should be pressed in for thin Ethernet and out for AUI.
Problem in the Wiring or Physical Setup of the Network
Use the terminal’s network controller chip as follows to test
Ethernet transmissions:
18-4 Troubleshooting
Troubleshooting Boot Failures
external loopback test
Transmits a test packet on the
network. If the packet is not
successfully transmitted, the test
reports an error. To run this test, your
terminal must be connected to a
properly terminated network.
1.
At the Boot Monitor prompt, type ex and press Return.
The Boot Monitor displays a list of tests it can run.
2.
To run the external loopback test, type 1 and press
Return.
A numbered list of network controller tests appears on
the screen.
Type the appropriate number and press Return.
If a message other than Pass - 00000001 appears on the
screen, replace network wires, replace the external
transceiver, or move the terminal to another location. It’s
possible that a loose connection somewhere is
preventing the packet from being transmitted
successfully.
To return to the Boot Monitor prompt, type q and press
Return.
To reset the server, type rs and press Return.
3.
4.
5.
Problems in the Network Interface Board
If you find no problem in Ethernet transmissions, swap the
interface board with another terminal, swap the terminal for
another to see if the problem is in the terminal’s hardware, or
move the terminal to another network connection location.
Troubleshooting 18-5
Troubleshooting Boot Failures
Boot Failure Messages
Messages displayed when the terminal fails to boot are
explained in Table 18-3. These messages are not logged in the
Console messages area.
Table 18-3 Boot Monitor Messages
Boot Monitor Message
Diagnosis and Actions to Take
Host IP address timeout
The boot host is down.
or
The IP address of the host may be configured
incorrectly.
or
The terminal cannot connect to the host.
or
The boot host is on another subnet and the terminal
cannot get through the gateway.
Correct the boot host’s IP address in the host or
terminal configuration and reboot the terminal.
Check the network connection to the host.
TFTP timeout
The TFTP service is not running on the boot host or
is not set up properly. Correct the problem and
reboot the terminal.1
Failed to mount
The directory containing the X server may not be
exported. Correct the NFS problem and reboot the
terminal.
Gateway not on same subnet
The gateway is on a different subnet from the
terminal. Correct the terminal’s configuration and
reboot.
NVRAM checksum error
Reload NVRAM factory defaults and reboot. If this
doesn’t work, there may be a hardware problem.
Call NCD technical support.
18-6 Troubleshooting
Troubleshooting Boot Failures
Table 18-3 Boot Monitor Messages (Continued)
Boot Monitor Message
Diagnosis and Actions to Take
Load address out of range
or
The X server file is corrupted. Recopy the X server
from the distribution and try booting again.
Load image out of range
or
The X server was only partially downloaded. Try
booting again.
Object file larger than available
memory.
The terminal doesn’t have enough memory to boot
the specified X server file. This may be because
memory was installed improperly, or you may need
to add more memory.
See the memory installation booklet for your
terminal.
Incorrect object file
or Incorrect product file
The terminal tried to boot the wrong X server file or
you are trying to load an X server for a different
terminal model.
You can use the UNIX what(1) command to
determine the model and version for which an NCD
X server file is intended.
Searching for IP address..
IP Address Timeout
Port Unreachable
TFTP: no answer
or
1. Make sure RARP or BOOTP/DHCP address
resolution service is running on your network
and there is a correct entry in /etc/ethers for RARP
or in /etc/bootptab for BOOTP/DHCP.
2. Check for a loose Ethernet connection.
3. Make sure the boot host is up and running.
TFTP is not running on the system you are trying to
boot from.
Troubleshooting 18-7
Troubleshooting Boot Failures
Table 18-3 Boot Monitor Messages (Continued)
Boot Monitor Message
Diagnosis and Actions to Take
Tftp error 1 - File not found
Check the spelling of the X server filename in the
manual boot command or the /etc/bootptab file.
or
If you are using secure TFTP, turn the secure option
off or move the X server files to the secure
directory. 1
or
If the boot host is running System V UNIX, specify an
absolute pathname for the X server file.
Tftp error 2 - Access Violation
Check the file permissions on the X server file. The
permissions should be set so that all have read
permission.
or
You are using secure TFTP but the X server file you
are trying to load is a symbolic link to another file.
Secure TFTP cannot interpret symbolic links. 1
or
TFTP is not enabled properly or is not set up
properly on the boot host.
Failed to mount file system.
The NFS boot failed because the file system
containing the X server file is not exported properly
or the file system does not exist.
TFTP timeout or
TFTP aborted after 10 retries
High network traffic or network problem. 2 Make
sure TFTP is running on the boot host. Try booting
again.
Failed lookup of directory
directory or
Could not read symlink pathname in
directory directory.
The NFS boot failed because of symbolic links that
do not point to an X server file.
Access denied for file filename in
directory directory.
The NFS boot failed because the UID is set to the
wrong value. There may also be a problem with the
NFS block size. The terminal uses 8192 as the
default; to change the block size, use the Boot
Monitor’s nf size command.
18-8 Troubleshooting
Troubleshooting Boot Failures
Table 18-3 Boot Monitor Messages (Continued)
Boot Monitor Message
Diagnosis and Actions to Take
TFTP: connection refused or TFTP:
connection time out
Check for faulty cables or a faulty connection. Make
sure TFTP is running on the boot host.
Starting server, please wait...
Explora 400/450 series terminals require the
NCDware 5.1 version of the Xncdxpl X server. If you
attempt to boot your Explora 400/450 series
terminals using a previous version of Xncdxpl, the
terminal displays a misleading message and does
not boot. You must boot using the NCDware 5.1
server version.
CRC error
The X server file is corrupted or was corrupted as it
was downloaded. Try rebooting. Try recopying the
X server file from the CD-ROM.
1
See “Secure TFTP Problems” on page 18-12.
2
See “Network Configuration Problems” on page 18-28.
If the Terminal Boots from the Wrong Host
In the Boot Monitor, type the following command:
> da
The IP address of the terminal, the IP address the host from
which the X server was loaded, and the subnet mask are
displayed.
Booting from the wrong host may be caused by BOOTP or
RARP running on hosts other than the desired boot host.
Removing the terminal from the /etc/bootptab file on the other
host(s) prevents the terminal from booting from these hosts.
Troubleshooting 18-9
Troubleshooting Boot Failures
If X Server Modules Fail to Load
If the Console appears after booting but you cannot start any
clients from the Console menu bar, the terminal could not find
the X server modules. Messages resembling the following
appear:
%RTLD-E-ERROPEN error opening /tftpboot/modshmx/wm.hmx
%RTLD-E-ERROPEN unable to open module wm
NFS or TFTP Problems on the Host
If you are using NFS to boot, the file system containing the
modules may not be exported.
If you are using NFS as the file service during installation, the
ncdinstall utility does not configure the TFTP file service.
If you are using TFTP to boot, the TFTP daemon may not be
running or the host may be running secure TFTP that is not set
up properly.
Terminal Configuration Problems
If the problem is not in NFS or TFTP on the host, check the
modules-directory parameter:
1. Make sure that the modules-directory parameter is set to
the directory that contains the X server modules (Setup
⇒ Change Setup Parameters ⇒ Loadable Modules ⇒
Loadable Modules Directory or Setup ⇒ Change Quick
Setup ⇒ Files ⇒ Loadable Modules Directory).
2. Edit the terminal’s remote configuration file to correct the
parameter.
3. Reboot the terminal.
18-10 Troubleshooting
Terminal Can’t Find Other Files
Terminal Can’t Find Other Files
The terminal may boot correctly but be unable to find the
configuration file, color definition file, keymap file, or fonts.
Error Messages
See Chapter 8 for information about
turning on extended diagnostics.
When a terminal cannot locate files, error messages are
displayed in the Console message area. For example, with
extended diagnostics enabled, the following message might
appear:
%CONFIGD-E-noread. Unable to read configuration file filename
Error messages are displayed if the terminal cannot find:
❏ Its individual configuration file. If you are not using
terminal-specific remote configuration files or you are
using the generic configuration file (ncd_std), you don’t
need this file and you can ignore the message.
❏ The generic configuration file (ncd_std). If you are not
using remote configuration files, you don’t need this file
and you can ignore the message.
❏ The XKeysymDB file, which maps private vendor
keysyms or keysyms not in the libraries.
❏ The rgb.txt file, which defines the colors used by color
terminals.
❏ A font, font directory, or font management file (fonts.alias
or fonts.dir).
Solving File Transfer Problems
Before you take any of the actions described in this section for
diagnosing file transfer problems, NCD recommends that you:
See Chapter 8, for information about
turning on extended diagnostics and
logging messages to a file.
1.
2.
3.
4.
Turn on extended file service messages.
If there is a problem with loading fonts, turn on extended
font diagnostic messages as well.
Configure diagnostic message logging.
Reboot the terminal.
Troubleshooting 18-11
Terminal Can’t Find Other Files
If the Terminal Loaded a Configuration File
See Chapter 3 for more information
about the file service table.
If the terminal loaded a remote configuration file, but cannot
load other files, the configuration file may contain incorrect
settings. Check the file-service-table parameter (Setup ⇒
Change Setup Parameters ⇒ File Service ⇒ File Service Table).
NCD recommends that you return this parameter to its default
setting.
If You Are Using TFTP for File Transfers
This section provides solutions for TFTP file transfer problems.
Secure TFTP Problems
A common problem is trying to load files from a host that is
using secure TFTP. If the host is using secure TFTP, all files
loaded using TFTP must reside in or beneath the secure
directory.
You can find out if secure TFTP is in use by checking the line
in the host’s /etc/inetd.conf file that starts the tftpd daemon. If
secure TFTP is in use, the tftpd command is usually followed
by the -r or -s option. Some implementations of TFTP set the
secure directory without the -r or -s switch. Other
implementations use the /etc/passwd file to set secure TFTP.
There are three ways to solve this problem:
❏ Put all of the files that must be loaded using TFTP into the
secure directory specified in the host’s /etc/inetd.conf file.
❏ Remove the -r or -s option and the secure directory name
from the /etc/inetd.conf file and restart inetd.
❏ Use NFS instead of TFTP for the file transfer protocol.
TFTP Not Enabled
TFTP may not be enabled or running. Check /etc/inetd.conf. If
there is a comment (#) character at the beginning of the line
enabling tftpd, remove the character. Restart inetd by finding
its process ID and sending a hangup signal. For example:
# ps -acx | grep inetd or ps -ef | grep inetd 17601
? I 0:12 inetd
# kill -HUP 17601
18-12 Troubleshooting
Terminal Can’t Find Other Files
Next, test TFTP on the host by using TFTP to contact the boot
host. For example:
# cd /tmp
# tftp boot-host-ip-address
tftp> get /tftpboot/Xncdhmx
tftp> get Xncdhmx
Incorrect File Permission
Check the file permissions on files not found by the terminal.
All of the files loaded by the terminal must be readable by all.
Also check the permissions on the directories containing these
files.
If You Are Using NFS for File Transfers
A common problem is failing to export the file system where
the files needed by the terminal reside. Check the host’s NFS
configuration files.
Files Not Installed
All of the files loaded at boot time are installed by the
ncdinstall installation program. If you don’t use ncdinstall to
install your software or terminals, contact Technical Support
for information about configuring hosts and terminals.
File Service Table
All files accessed by the terminal must be available through
the terminal’s file service table (file-service-table parameter,
(Setup ⇒ Change Setup Parameters ⇒ File Service ⇒ File
Service Table).
By default, the terminal is configured to try only the first
matching directory name. You can configure the terminal to
try all matches by setting file-try-all-matches-on-open to “true.”
Trying all matches means that the terminal searches all
possible matching directories to find the files it needs. (Setup
⇒ Change Setup Parameters ⇒ File Service ⇒ Try All
Matches on Open.)
Troubleshooting 18-13
Troubleshooting XDM Login Failures
Troubleshooting XDM Login Failures
This section provides solutions for XDM problems.
Check the XDM Log File
A good first step is to check the messages in the XDM log file,
/usr/lib/X11/xdm/xdm-errors or /usr/openwin/lib/xdm/xdm-errors.
If the user has a personal .xsession file that logs error messages
in a personal error file, check the personal error file (.xsessionerrors) as well.
Problems with the Login Chooser
This section discusses the reasons for problems with the Login
Chooser.
If the Host Is Not Listed in the Login Chooser
If a login host is not listed in the Login Chooser, either XDM is
not running on the host or the host is on a different subnet
from the terminal.
Starting XDM
To check if XDM is running:
# netstat -a | grep xdm
If XDM is not running, you can start it immediately; for
example:
# /usr/bin/X11/xdm
If the Host is on a Different Subnet
If the host is on a different subnet, add the host to the logindefault-hosts table in the remote configuration file.
Check XDM on the Host
If XDM is running and the login host is not on a different
subnet from the terminal, run XDM in debug mode to see XDM
error messages:
# /usr/bin/X11/xdm -debug 2
18-14 Troubleshooting
Troubleshooting XDM Login Failures
Host Is Listed But XDMCP Message Appears
If the message No such XDMCP host appears in the Login
Chooser when the user attempts to select the host, the
terminal is not configured to use a name service. Possible
solutions are:
❏ The user can type the host’s IP address, instead of the
hostname, in the Login Chooser’s Host: field.
❏ Configure the terminal for name service; see Chapter 3.
❏ Add the login host to the terminal’s local name cache
table, tcpip-name-local-cache, in the remote configuration
file (Setup ⇒ Change Setup Parameters ⇒ TCP/IP Name
Service ⇒ Local Name Cache).
Host Does Not Respond
If the user selected a host in the Login Chooser or typed a host
name or IP address in the Host: field and the message Asking
for host .. login host not responding appears in the
Login Chooser message area, the problem is one of the
following:
❏ XDM is not running on the host.
See “Starting XDM” on page 18-14 for information about
testing for and starting XDM.
See “Network Configuration
Problems” on page 18-28 if you can’t
TELNET to the host.
❏
There is a network problem.
To check for a network problem, try to TELNET to the
host.
Logging in Through the Login Banner Fails
If the user’s attempt to log in fails:
❏ The user may be typing the wrong password. The user
should be using the password set in the /etc/passwd file.
❏ If you are using a shadow password file (System V
UNIX), you may be using the wrong version of XDM. The
version installed by ncdinstall is not the correct version to
use. NCD Technical Support can provide the correct
version for some hosts, or you can use the version
provided by your host vendor.
Troubleshooting 18-15
Troubleshooting XDM Login Failures
Login Banner Keeps Reappearing
If the user logs in and the Login Chooser or login banner
reappears a few seconds later, there is a problem in the
Xsession or .xsession file. Check the xdm-errors file or the user’s
personal error file (.xsession-errors), if any.
Tip
You can get sample Xsession files for
various hosts from NCD’s FTP or
WWW server. See “Contacting
Technical Support” on page 18-45.
This problem may be caused by the following:
❏ set or setenv commands in the user’s .login file are not
duplicated in either the user’s .xsession file or the user’s
shell startup file (such as .cshrc for the C shell). XDM does
not execute the .login file.
❏ Startup files depend on commands in the .login file.
❏ The last client in the .xsession file (or in the Xsession file if
the user has no .xsession file) is not started in the
foreground.
❏ A font problem is preventing a client from starting.
To isolate a problem to the .xsession file, rename the file and
log in again. To debug a .xsession file, you can put it in a line
setting up a personal error file and log in again.
XDM Logs Out for No Reason
If XDM keeps ending the session for no apparent reason, you
may need to tune the XDM keepalive parameters (login-xdmkeepalives-begin-time and login-xdm-keepalives-wait-time). For
more information on these parameters, see the Remote
Configuration Parameter Quick Reference and the NCDware
Reference Manual.
Clients in Session Files Don’t Start
Verify that the commands executed in the system-wide
Xsession file and the user’s .xsession file are in the user’s
command search path. When in doubt, replace simple
command names with their full path.
18-16 Troubleshooting
Troubleshooting XDM Login Failures
Other possible causes of the problem:
❏ If Xsession does not execute user .xsession files, verify
that at least one non-terminating command is run in the
foreground in Xsession.
❏ If Xsession executes user .xsession files, verify that at least
one non-terminating command is run in the foreground
in .xsession.
❏ The Xsession file must be world-readable and worldexecutable. The .xsession file must be at least executable
by the user.
❏ Make sure fonts have been read. Some clients do not start
without the correct fonts.
❏ To debug Xsession or .xsession files, you can login to the
XDM host from the Console by using Terminals ⇒ New
Telnet. Set the DISPLAY variable to the IP address of the
terminal with the suffix :0, for example:
% setenv DISPLAY 138.41.215.23:0
Run the session file, for example:
% /usr/bin/X11/xdm/Xsession
If Resource Settings are Ignored
If clients run but resource settings are ignored, check for an
xrdb invocation in the Xsession or .xsession file. xrdb should be
the first client started, and, unlike other clients, it should be
run in the foreground. Running xrdb in the foreground
ensures that it reads the user’s resource files before xdm starts
other X clients.
If XDM Stops Running
XDM may stop running if:
❏
❏
❏
There is a network problem.
The XDM binary on the host stops running.
The host crashes.
Troubleshooting 18-17
Font and Font Server Problems
If XDM stops running, the terminal displays the Logout popup
window with a message about the login host not responding.
The window offers two options:
❏ The No button keeps applications running; beware that
applications may not work properly.
❏ The Yes button logs the user out.
Problems with System Console XDM
If you are not using an NCD terminal as the system console
and you are using XDM to log in on the system console, the
console may not work properly once you install and configure
XDM for the NCD terminals. In that case, check the Xservers file
for a line that begins with :0 and comment the line out.
Font and Font Server Problems
Clients usually print a message if they cannot find a font. If it
is a warning message, the client uses another font. Some
clients, however, cannot run without the proper fonts.
See Chapter 8 for information about
configuring messages.
If you are having font problems, make sure that the terminal
is generating extended font messages and extended file
service messages and log the messages to a file.
See Chapter 3 for information about
making file systems accessible to the
terminal.
The most common font problem is that font directories are not
in a file system that is listed in the terminal’s file service table
(file-service-table parameter). Fonts are not accessible unless
the font directories are available through the file service table.
Besides the problem-solving information in this section, other
reasons the terminal may not be loading fonts as it boots are
described in “Terminal Can’t Find Other Files” on page 18-11.
Terminal Cannot Find Specific Fonts
If a client requests a font not known to the terminal, the
terminal issues the following message:
unable to open font fontname
18-18 Troubleshooting
Font and Font Server Problems
See Chapter 6 for more information
about the font path and font aliasing.
To see which fonts are available to the terminal, use the
xlsfonts(1) utility. If the font is not listed, the font directory
may not be in the terminal’s font path. Check the font path in
the Change Setup Parameters and Change User Preferences
menus. Add font directories if necessary.
If you don’t have the font required by a client and the client
accepts substitutes:
❏ Use wildcard characters in font requests.
❏ Add font aliases to the relevant fonts.alias files.
Font Format is Wrong
See Chapter 6 for information about
converting fonts to a usable format
and using the NCD font server.
NCD terminals can only read PCF, SNF, and DWF format
bitmap fonts (unless you are using a font server). If an
application requires fonts that are not in one of these formats,
convert the fonts and add their directories to the font path or
use a font server.
Incorrect Compression Factor
Many font files are compressed (have a .Z file suffix). Without
a font server, terminals can read fonts compressed with 12-bit
compression. Some systems use fonts compressed with 16-bit
compression, which the terminal cannot read. To solve this
problem, do one of the following:
❏ Uncompress the fonts and run mkfontdir in the same
directory.
❏ Uncompress the fonts and recompress them with the -b12
option.
❏ Run a font server on the host to serve these fonts to the
terminal.
New Font Path Doesn’t Work
If you changed the font path in the pref-font-path parameter
(Setup ⇒ Change User Preferences ⇒ Current Font Path) but
fonts are still not available, the terminal may be having a
problem loading files. See “Terminal Can’t Find Other Files”
on page 18-11.
Troubleshooting 18-19
Font and Font Server Problems
Using xset to Change the Font Path
You can change the current font path using xset(1). If xset
displays the error message BadValue (unable to set font
path), the font path is wrong or the font directory cannot be
accessed by TFTP or NFS.
Any font directories that you specify using xset must be
available through the terminal’s file service table (file-servicetable parameter).
Application Launcher Font Problems
The resources menuFont and Font cannot be used to specify
different fonts for the title and menus provided by ncdlauncher.
If both are specified, the font specified by menuFont is used for
both the menus and the title.
Host-Specific Font Problems
If clients are running on a Sun Microsystems system, the
75-dpi fonts must be first in the font path. The symptom of this
problem is that fonts don’t fit properly in dialog boxes and
other areas.
HP VUE requires HP fonts. Use either the HP or NCD font
server with HP VUE.
For clients running on Digital Equipment Corp. computers:
❏ The dw75dpi and dw100dpi font directories supplied by
NCD must be in the font path
or
❏ The directories for Digital Equipment Corp.’s
DECwindows fonts must be in the terminal’s font path.
Otherwise, you may have trouble with both line-drawing
characteristics and other special characters. Some IBM
applications require IBM fonts; use the IBM or NCD font server.
If you are using CDE for login service, fonts may be incorrectly
spaced. To solve this problem, run the host’s font server. Also,
see “Configuring the Font Path for CDE Bitmap Fonts” on
page 6-7 and “Adding Font Servers to the Font Path for CDE”
on page 6-12.
18-20 Troubleshooting
Keyboard and Keymap Problems
Font Server Problems
If the font server won’t start, it displays an error message.
Usually the problem is that a font server is already running
and using the port you specified. You can run the new font
server on a different port.
If the font server has been working but stops (the terminal no
longer finds fonts), you can restart it. The terminal continues
to try to use the font server even after the font server is no
longer responding.
You can run the font server in debug mode as follows or check
X server error messages:
# ncdfs -debug
Keyboard and Keymap Problems
For keyboard problems, a good first step is to enter the Boot
Monitor and make sure the correct keyboard type (and
language, if applicable) is saved in the terminal’s NVRAM.
While in the Boot Monitor, press the Setup key (or equivalent
key combination on keyboards without a Setup key).
Table 18-4 Boot Monitor Access Key Combinations
Keyboard Type
Key Combination
101-key or 102-key
Ctrl-Left Alt-Setup
Windows 95-compatible, US English, IBM PS/2
Caps Lock-Left Alt-Setup
VT220-compatible
Ctrl-Compose-F3
108-key
Ctrl-Left Alt-F3
97-key
Left Alt-Caps Lock-Setup
107-key (Sun Type-4-compatible)
Stop-A (L1-A)
122-key (3270-compatible Lexmark)
Alt Rule-Home
123-key (Sun Type-5-compatible)
Stop-A (L1-A)
Troubleshooting 18-21
Keyboard and Keymap Problems
Tip
NCD keyboards are identified by a
label on the bottom of the keyboard.
Also, check the terminal’s remote configuration file and make
sure the keyboard is not set incorrectly in that file. NCD
recommends that you do not set the keyboard type in the
remote configuration file (unless you are using a foreignlanguage version or, with a Boot Monitor version prior to
2.8.0, the PS/2 version of the 101-key keyboard). This is
because the terminal correctly identifies the keyboard when
the terminal is powered on.
Shift Keys Not Working Properly
Check to see if the pref-compatibility-decwindows-keyboards
parameter is turned on by mistake (Setup ⇒ Change User
Preferences ⇒ Compatibility ⇒ Be Compatible with Old
DECwindows Keyboards).
Control and Caps Lock Keys Swapped on 101-Key Keyboard
Make sure some other keyboard type is not selected in the
xserver-keyboard-type parameter (Setup ⇒ Change Setup
Parameters ⇒ Input Devices ⇒ Keyboard Type).
Make sure the Boot Monitor keyboard menu and/or remote
configuration file are not set for the PS/2-type keyboard. If
you are using the PS/2-type keyboard, make sure the
keyboard menu and/or remote configuration file are not set
for the generic 101-key keyboard instead.
The default N-101 keyboard type is N-101PS on terminals
equipped with Boot Monitor 2.8.0 or later; the default is
N-101US on terminals equipped with earlier versions of the
Boot Monitor.
New Keyboard Not Working Properly
When you plug in a new keyboard, terminal power must be
off or you must cycle power after plugging in the new
keyboard. The terminal does not recognize a new keyboard
until the terminal powers on.
18-22 Troubleshooting
Keyboard and Keymap Problems
If you see the following message while the terminal is booting,
the keyboard is not properly plugged in or there is a problem
with the keyboard connector:
timeout on keyboard controller
Escape Key Doesn’t Work on VT-220-style Keyboard
If you work in a Digital Equipment Corp. environment, but
occasionally use UNIX instead of VMS, the Escape key on the
VT-220 keyboard does not work in the UNIX environment. Set
up an xmodmap(1) file to automatically map the Escape key
when you are using UNIX.
Checking Keyboard Mapping
If pressing a key doesn’t give the expected result, two X clients
included in the MIT X distribution or the NCD Keymap Editor
can help resolve the problem.
Using the NCD Keymapper Utility
See Chapter 11 for information on using the NCD Keymap
Editor.
Using the xmodmap Client
The xmodmap (1) client remaps keyboards and displays the
current keymap. If the result of pressing keyboard keys
doesn’t seem to match the legends on the keycaps, you can:
keymap
The assignments of keysyms to
keycodes. Keycodes are the codes
assigned to the physical keys.
Keysyms are the actions taken when
keys are pressed.
❏
❏
Check the login scripts (for example, Xsession or
.xsession) to see if there is an xmodmap command reading
in a custom keymap.
Use xmodmap to display the current keymap table for the
keyboard attached to the terminal (both alphanumeric
and modifier keys):
$xmodmap -pm -pk
❏
To check that keycodes are correctly mapped for this
keyboard, compare the keycode values to those given on
a keycode map of the keyboard.
Troubleshooting 18-23
Window Manager Problems
Using the xev Client
The xev(1) client displays the X events that occur when you
press a key or mouse button. To invoke xev, enter the
following command:
$xev
The xev client displays an Event Tester window. If you place
the pointer in the window and type, click the mouse, or move
or resize the window, the corresponding events are displayed
in the terminal emulator window.
When you press a key while the pointer is in the Event Tester
window, xev displays both key press and key release events,
including keycode and keysym information.
By comparing the keycode values displayed by xev(1) with the
values for the keyboard, you can determine whether a key was
reassigned.
Compatibility with the Boot Monitor
Verify that the Boot Monitor PROMs installed in your terminal
support the keyboard you are using. For information about
Boot Monitor versions and which keyboards they support, see
the Boot Monitor Release Notes.
Window Manager Problems
If the local Motif Window Manager is slow to start, configure
the module load policy table (modules-load-policy parameter
or Setup ⇒ Change Setup Parameters ⇒ Loadable Modules)
to load this module at boot time.
When it initially sizes the window, the NCD Window Manager
ignores the WM_NORMAL_HINTS maximum size property.
18-24 Troubleshooting
Cut-and-Paste Between Local Clients
Cut-and-Paste Between Local Clients
In NCD local clients, the default selection area is PRIMARY, but
in OpenWindows, the selection area is CLIPBOARD. You must
change PRIMARY to CLIPBOARD before attempting to cut and
paste, using a resource similar to the following:
*stringSelections: CLIPBOARD
After this change, all local clients use CLIPBOARD instead of
PRIMARY for all text selections.
Key translations that specify multiple cut-and-paste selections
or multiple cut buffers (such as translations for transferring
data between local clients and OpenWindows clients) are not
supported in local clients.
Java Stack Overflows
Java applications can cause stack overflows that panic the
terminal. To avoid this problem, you can increase the Java
code stack size, C code stack size, and memory allocation
pool. The recommended strategy is to double the default sizes
until the Java application runs successfully. For information
about the command options to use and the default sizes, see
“Using the java Command” on page 14-5. The default sizes
allow most Java applications to run.
Here is an example:
rsh ncdux java -oss64k -ss64k -mx12m Test.class
NCD Mosaic Browser
This section provides solutions for browser problems.
Navigating in the NCD Mosaic Browser
Using the Home and End keys to move to the start and end of
a document may not work as expected. If the keyboard focus
is on a Web page, Home and End may work. If they do not
work, Shift-Home and Shift-End may work instead. If the
Troubleshooting 18-25
Local Printing Problems
keyboard focus is in a text-entry field or on any other portion
of the browser, the Home and End keys do not work at all.
Displaying Text and Graphics
The Common Desktop Environment (CDE) sets a resource so
that the text displays white. In the NCD Mosaic Browser,
certain pages such as the start page and help pages have a
white background. As a result, the text on these pages does not
display. To avoid this problem, set your screen background to
any color other than white using Setup ⇒ Change User
Preferences ⇒ Screen Background ⇒ Solid Color.
Fonts
The NCD Mosaic Browser might attempt to use fonts, such as
Palatino and ITC, that are not supplied by NCD. If you want to
use these fonts, you must add them to your font path.
In-line GIFs
The NCD Mosaic Browser does not display in-line GIF
(Graphics Interchange Format) graphics in the correct vertical
position.
Local Printing Problems
When the printer finishes a job, the message Closed Session
should appear in the Console Messages hide box. If this
message does not appear, you must explicitly close the
connection using the Abort Serial Line command in the
Console menu.
The print spooler software supplied in some previous releases
prints ASCII, PCL and PostScript files. PCL printing is not
supported in NCDware 5.1. Call NCD Technical Support for a
workaround.
18-26 Troubleshooting
Printer Setup Problem
Printer Setup Problem
When adding printers to the print table in the Setup menus,
do not use curly brackets in a text field, such as the
Description field. Using curly brackets in a text field causes
the NCD terminal to panic.
Colormap Problems
If colors in applications flash (that is, colors change depending
on whether an application’s window is active), you can
prevent or minimize the problem by specifying how
NCDware handles WinCenter colors.
If you are not using WinCenter, you can disable Microsoft
Windows colors by setting the wincenter-colors parameter to
“disabled.” In the Console, this parameter is Setup ⇒ Change
Setup Parameters ⇒ WinCenter ⇒ Use WinCenter Colors.
If you are using WinCenter, see the discussion in Chapter 12.
You can also change the color depth to either 16-bit or 24-bit
color to prevent colormap flashing. See Appendix A, Using
16-bit and 24-bit Color, for information on how to set or
change color depth using NCDware.
Application Launcher Problems
The line continuation character (a backslash at the end of the
line) does not work in .launchrc files. You can work around
this problem by using a single long line.
The launcher may generate an error message such as the
following when it starts:
Xlib: failed to load locale file:
/usr/lib/X11/nls/ISO8859-1
Although the error message appears, the launcher still works.
Troubleshooting 18-27
Network Configuration Problems
Network Configuration Problems
This section addresses problems with the network’s
configuration.
Checking Network Statistics
For network performance problems, check the network
statistics in the Console (Statistics ⇒ Show Statistics).
Lost Carrier Errors
If Lost Carrier errors are reported (Statistics ⇒ Show Statistics
⇒ Ethernet), check the following:
❏ If the terminal is using a transceiver:
— Make sure that it is an Ethernet revision 2 or IEEE
802.3 transceiver.
— Make sure that the transceiver cable type matches
the transceiver type.
— Check the transceiver tap, and make sure the
Ethernet is terminated correctly.
❏ If the terminal is connected to a thin Ethernet network,
check the BNC connector and the network cable for any
signs of failure.
High Collision Rates
If the Ethernet transceiver does not have SQE (squelch) mode
turned on, there are as many collisions as transmissions
(Statistics ⇒ Show Statistics ⇒ Ethernet and Statistics ⇒ Show
Statistics ⇒ IP). Each retransmission causes a delay of 9.6
microseconds. To solve this problem, turn on SQE on the
Ethernet transceiver.
Terminal Boots But Cannot Connect to Certain Hosts
The following sections list reasons that a terminal may boot,
but be unable to connect to some hosts.
18-28 Troubleshooting
Network Configuration Problems
Routing Table and ARP Cache
The most common reason for faulty connections is setting the
ip-routing-table or tcpip-arp-cache parameters in the remote
configuration file. NCD recommends removing these tables
from the remote configuration file.
Gateway Not Specified Correctly
The terminal may not be able to connect to hosts on a different
portion of the network because the gateway is not set
correctly. Check the ip-initial-default-gateway-1 and ip-initialdefault-gateway-2 parameters (Setup ⇒ Change Setup
Parameters ⇒ IP ⇒ Initial Default Gateway 1, Initial Default
Gateway 2).
Checking the Connection
Running the following tests may help you track down a faulty
connection.
Can the Host Connect to the Terminal?
Use the ping(1) utility from a host to find out whether the host
can connect to the terminal.
Tip
For normal operation of the terminal,
do not leave ip-respond-tobroadcast-icmp set to “true” because
it generates a great deal of network
traffic.
If you want the terminal to respond to ping -s requests, set the
ip-respond-to-broadcast-icmp parameter to “true” (Setup ⇒
Change Setup Parameters ⇒ IP ⇒ Respond to Broadcast
ICMP).
A single directed ping request is sufficient to determine the
status of the terminal.
Can the Terminal Connect to the Host?
Use the Test Network utility to find out if the terminal can
contact a host.
1. Display the Test Network dialog box (Utilities ⇒ Test
Network).
2. In the Host field, enter the hostname, IP address or
DECnet address of the host whose connection you want
to test. A hostname ending in double colons (::) is a
DECnet name.
Troubleshooting 18-29
Network Configuration Problems
3.
4.
Configure the following:
— If you specified a DECnet host, specify the number of
test packets you want to send over the network in
the Packets field. By default, NCDware sends only
one test packet.
— By default, the test utility times out if it doesn’t
receive an answer from the host within 20 seconds.
To specify a different timeout period, enter the time
(in seconds) in the Time field.
— By default, the test utility sends a packet of 56 bytes.
To send a larger packet, specify the number of bytes
in the Length field.
Click the Apply button. The Test Network utility displays
one of the messages listed in Table 18-5.
Table 18-5 Test Network Messages
Message
Meaning
Done: hosts’s IP answered all packets
The terminal received a response from the host.
No such host
The network was unable to find an address
associated with the hostname you specified.
The hostname cannot be resolved or host doesn’t
exist. Try using the IP address instead of the
hostname.
Data corrupted in retry packet
The host or the network medium is corrupting
data.
Internal error
Contact NCD Technical Support.
Time expired: host IP not responding
The terminal received no response from the host.
Reasons for Failures to Connect
If you are not able to make a connection after running ping and
Test Network, the most common reasons are incorrect setting
of the subnet mask, gateway address, or broadcast address,
either in the terminal’s configuration or on the host.
18-30 Troubleshooting
Network Configuration Problems
On the terminal, check the settings of the ip-subnet-mask
parameter, the gateway specified for the terminal in the
/etc/bootptab file, and the ip-initial-default-gateway-1 and ipinitial-default-gateway-2 parameters.
On hosts, these parameters are set and displayed using the
ifconfig(8) utility.
Hosts with Multiple Ethernet Addresses
If the connection problem is with a multi-homed host, make
sure that all addresses are set in the ip-equivalent-addresses
table (Setup ⇒ Change Setup Parameters ⇒ IP ⇒ Equivalent
IP Addresses).
Lost Ethernet Address
An NCD terminal does not work if its Ethernet address is not
in NVRAM. The Ethernet address is printed on a label on the
bottom of the terminal’s base. To re-enter an Ethernet address
that has been accidentally erased, invoke the Boot Monitor
and use the nv utility to change the address.
For example, to enter the Ethernet address 00 00 A7 10 24 14:
1. Start the NVRAM utility and type c 04 to start changing
the Ethernet address (the Ethernet address starts at
location 0x4).
> nv
NVRAM Utility
C [add] - change location add
D - display contents
Q - return to monitor
L - load defaults
R - reload NVRAM values
S - save new values
->> c 04
Troubleshooting 18-31
XRemote Problems
2.
Type each pair of numbers in the Ethernet address.
004:
005:
006:
007:
008:
009:
3.
xx
xx
xx
xx
xx
xx
?
?
?
?
?
?
At the following prompt, you have typed the entire
Ethernet address and you can type q to stop entering
numbers.
00A: xx ?
4.
00
00
A7
10
24
14
q
Type s to save, and y after the question, Are you sure?
->> s
Are you sure ?
5.
Type q to end the NVRAM utility session and resume
using the Boot Monitor utility.
->>
6.
y
q
You can reboot the terminal by typing the rs (reset)
command.
>
rs
XRemote Problems
XRemote statistics are displayed in the Console (Statistics ⇒
Show Statistics ⇒ XRemote). You may wish to use these
statistics to consult with Technical Support about improving
the performance of XRemote on your terminals.
XRemote Error Messages
Errors that occur during an XRemote session are logged in a
file called /usr/tmp/XRemoten, where n is a number assigned by
XRemote and displayed as XRemote starts. The log file is
cleared every time a new XRemote session begins.
If there is no log file, check the /usr/tmp directory permissions
to make sure the directory is writable.
18-32 Troubleshooting
XRemote Problems
Two common error messages in the log file are:
❏ Invalid arguments detected
This message indicates a probable error in the
.xinitremoterc file. If so, rename the file so it is not read by
XRemote and restart XRemote. If you can isolate the
problem to the file, start a new file and add back
commands one at a time until you find the command
that is causing the error message.
❏ Connection to X server lost
This message indicates that XRemote either did not start
or started and then quit.
Garbled Characters Displayed
See Chapter 16 for information about
how to set the terminal and modem for
8-bit transmission.
Garbled characters displayed after you type the xinitremote
command usually indicate that the connection is configured
to transmit 7-bit words rather than 8-bit words. The modem,
the tty port on the host, and the terminal emulator (if used),
must all be set to transmit 8-bit words.
Keystrokes Do Not Appear in the Terminal Emulator Window
If keys typed on the keyboard are not displayed in the Serial
Terminal Emulator window before you start XRemote:
❏ Verify that serial-interfaces-table’s current-mode field is
set to “terminal.”
See your terminal’s hardware manual
for information about the serial port
pinouts.
❏
❏
Verify your serial cable type; it might be the wrong one.
In the Dialer client (or Serial client), try typing a
sequence of characters that the modem responds to. For
example, type AT and press Return.
— If the modem does not respond, you may need to
change your cable configuration or the modem may
need to be configured to ignore some modem
control signals.
— If an error message appears in the message area of
the Console every time you press a key, you are
probably not in terminal mode (that is, your NCD
Terminal Emulator (ncdterm) window is not
Troubleshooting 18-33
Memory Problems
connected to the serial port). Re-establish your
connection.
Memory Problems
If the terminal displays popup warning messages about
memory or about modules that are not loading, you may not
have enough memory in the terminal.
Displaying Memory Statistics
Check the Console (Statistics ⇒ Show Memory) for
information about the amount of memory installed and how
much available (free) memory the terminal has.
If the Statistics module cannot be loaded, you can use the
ncdquery utility instead:
% ncdquery -a hostname
where hostname is the name of the terminal.
Popup Warning Messages
backing store
Off-screen storage for saving
obscured windows.
The X server displays up to three popup warnings when
applications consume too much of a terminal's memory,
depending upon the severity of the problem.
This message is displayed only if backing store is enabled:
Low On Memory -- Backing store has been discarded
You may free memory by terminating a client to avoid one
being terminated automatically in the future.
This message is displayed whether or not backing store is
enabled:
Low On Memory
Further attempts to open new windows may result in the
termination of some existing window.
If the second message has been displayed and clients continue
to consume more memory, the terminal displays a third
message:
Low On Memory
The newest client will be terminated.
18-34 Troubleshooting
Memory Problems
Failure to Open Display—Console Messages
Console messages may indicate failure to open the display
because of a possible memory problem. If the terminal is
generating such messages, but has an adequate amount of free
memory, you should specify pre-allocated network buffers;
normally these buffers are allocated automatically as needed.
To specify the number of buffers, use the net-minimum-databuffers parameter. You can specify up to 16,384 buffers.
Memory-Saving Suggestions
Some suggestions follow for increasing the amount of free
memory in the terminal.
Font Usage
By default, the font cache uses 100,000 bytes of terminal
memory. You can reduce the size of the font cache or disable
it by reducing its size to zero. The parameter to use is xserverfont-cache-max-size (Setup ⇒ Change Setup Parameters ⇒
Fonts ⇒ Font Cache Maximum Size).
See Chapter 6 for information about
using the NCD font server.
If you need to use a number of host-based fonts and want to
disable the font cache to save memory, you can use a font
server and outline fonts.
Reducing the size of the font cache may adversely affect the
performance of clients that use large numbers of fonts.
Discarding X Settings
By default, the terminal discards X settings when the user
starts a new X session in order to reclaim unused memory
fragments and recover from the memory leaks caused by
some clients. The settings discarded are the client resource
database and the keyboard, mouse, and screen saver settings.
If you have enabled the xserver-retain-x-settings parameter,
NCD recommends that you set it to “false.” (Setup ⇒ Change
Setup Parameters ⇒ X and Graphics ⇒ Retain X Settings
Across Sessions.)
Troubleshooting 18-35
Memory Problems
Diagnostic Messages Buffer Size
By default, the diagnostic messages buffer uses 8,192 bytes of
memory. You can change the size of the buffer using the diagbuffer-size parameter (Setup ⇒ Change Setup Parameters ⇒
Diagnostics ⇒ Buffer Size).
XRemote Data Compression Mode
By default, XRemote uses data compression mode LZW-12.
Although compression mode LZW-14 results in better
performance, it also uses more memory.
Disabling Local Clients
By default, all of the local clients are available for use and are
loaded into terminal memory at the user’s request. If some
clients are not necessary at your site, you can disable them and
prevent their use by listing them in the exec-disabledcommands table (Setup ⇒ Change Setup Parameters ⇒
Commands and Startup ⇒ Disabled Commands).
See Chapter 7 for information about
disabling local clients.
Another way to disable local clients is to prevent selected
modules from loading by specifying them as unloadable in the
modules-load-policy table (Setup ⇒ Change Setup Parameters
⇒ Loadable Modules ⇒ Load Policy).
Tip
If you disable the Setup menu clients,
they cannot be used to configure a
remote terminal.
Whichever method you use, the disabled or non-loadable
clients are grayed out in the Console menus to indicate that
they are not usable.
ARC Cache Size
Change the maximum size of the ARC cache to 0:
xserver-arc-cache-max = 0
Backing Store
Disable backing store:
pref-xserver-backing-store = disabled
18-36 Troubleshooting
Troubleshooting Display PostScript
Adding Memory
If you find you must add memory, check the hardware
documents shipped with your terminal to find out how much
memory you can install, which kind of SIMMs to use, and how
to install memory.
NCD Mosaic Browser/Java
For information about reducing the amount of memory used
by the browser, see “Changing the Size of the Image and
Document Caches” on page 15-17.
You may need to increase the net-minimum-data-buffers
parameter value if you are running Java or running the NCD
Mosaic Browser with Java and the NCD Console displays
messages like the following:
TERM-F-DISPLAY: Can’t open the display connection.
UI-F-NOCONN: Unable to connect to display ":.0." Possible low memory
condition.
Video Player
You may need to increase the size of net-minimum-data-buffers
if you are running the NCD Mosaic Browser with Java and the
Video Player at the same time and the NCD Console displays
messages like the following:
vp: error in NCDlibvideo: Connect() call Connection timed out videoConnect
call has failed, rc=-2, errmsg: Can’t get connection to "127.0.0.1" on port
6745 -- exiting
Troubleshooting Display PostScript
If the DPS Extension Fails to Start
If the DPS extension fails to start on a licensed terminal, the X
server generates an error message and displays it in the
Console Messages hide box. If the DPS extension fails to start
because no license key has been entered, no error messages
appear; the application simply does not access the DPS
extension. Check Statistics ⇒ Show Version ⇒ Licensable
Features to see if DPS is listed.
Troubleshooting 18-37
Troubleshooting Display PostScript
File Service Problems
Most DPS failures are caused by file service problems. To see
all messages related to file service, enable extended file
diagnostics. The parameter is file-extended-diagnostics (Setup
⇒ Change Setup Parameters ⇒ File Service ⇒ Extended
Diagnostics). After enabling Extended Diagnostics, reboot the
terminal and restart the application to see the additional
messages.
DPS file service messages resemble the following examples:
%NETFILE-I-OPENATTEMPT, attempting open for /usr/lib/X11/ncd/dps/fonts/Helvetica
%NETFILE-I-MATCHATTEMPT, attempting NFS open of
/usr/lib/X11/ncd/dps/fonts/Helvetica on 191.42.155.70 for
/usr/lib/X11/ncd/dps/fonts/Helvetica
%NETFILE-I-OPENSUCCESS, open succeeded for /usr/lib/X11/ncd/dps/fonts/Helvetica
DPS Applications on Solaris Systems
This section describes how to use AnswerBook, ImageTool,
and PageView on a Solaris system.
Running AnswerBook
Problems with AnswerBook derive from incorrect setting of
the OPENWINHOME environment variable or failing to set the
variable.
If OPENWINHOME is set incorrectly, an error message is
displayed as shown in the following example:
% setenv OPENWINHOME /u/ken
% answerbook
Verifying AnswerBook environment
Could not find the AnswerBook administration
utility
"ab_admin" in /u/ken/bin
%
18-38 Troubleshooting
Troubleshooting Display PostScript
If OPENWINHOME is not set, the following messages are
displayed:
% answerbook
Verifying AnswerBook environment
The "OPENWINHOME" environment variable is not set.
Are you running OpenWindows?
Check/reset the value of OPENWINHOME, then rerun
"AnswerBook".
%
No special fonts are needed for AnswerBook.
Running ImageTool
Problems with ImageTool are caused by unavailable fonts,
colormap flash, and incorrect setting of OPENWINHOME.
Font Problems
If the required fonts are not in the terminal’s font path or are
not in the correct order in the font path, the image appears
briefly and the application shuts down. Error messages
similar to the following are displayed:
% imagetool
X error of failed request: BadValue (integer parameter out of range for operation
Major opcode of failed request: 94 (X_CreateGlyphCursor)
Minor opcode of failed request: 0
Resource id in failed request: 0xc
Serial number of failed request: 1869
Current serial number in output stream: 1873
.
.
.
%
You need the following fonts and font management files, and
the font directory must be second in the font path (xserverdefault-font-path), right after built-ins:
OLCursor46.pcf
fonts.alias
fonts.dir
See Chapter 6 for more information about fonts.
Troubleshooting 18-39
Troubleshooting Display PostScript
Colormap Flash
To get the proper colors, make the window with the picture
the focus window and press Alt-F12.
OPENWINHOME Variable
If OPENWINHOME is not set or is set incorrectly:
❏
When you try to open an image from the ImageTool File
⇒ Open menu, the following error message appears:
File format not found. Use Open As option to choose file
❏
If you use Open As to choose a file, the following error
message appears:
Error opening /usr/openwin/share/images/PostScript/file.ps
To solve this problem, exit from ImageTool and set the
OPENWINHOME variable. Restart the application.
Running PageView
Problems with PageView are described in the following
subsections. No special fonts are required for PageView, and
you need not set the OPENWINHOME variable.
Displaying the Images
Run PageView from the /usr/openwin/bin directory. When
prompted by a “goto” request, enter the path to the images; for
example, /usr/openwin/share/images/PostScript.
Support Files
If the proper support files are not installed, images are not
displayed. Make sure the following files are in the NCD
PostScript directory; the default directory is
/usr/lib/X11/ncd/dps:
CIE-dict19c.dat
InitProc.dat
NCDFILE.MAP
PSres.upr
VM_3_2.snf
fonts
prebuilts
If any of the files are not installed, copy them from the
NCDware distribution CD-ROM.
18-40 Troubleshooting
Diagnosing Terminal Crashes
Colormap Flash
You can fix colormap flash problems by clicking in another
window and then clicking in the PageView main Window.
Also, try pressing Alt-F12 when the focus is on the PageView
window.
Diagnosing Terminal Crashes
If a terminal crashes, several messages appear on the screen
and the Boot Monitor prompt is displayed. For example:
*** PANIC-End of Diagnostic Log.
Preliminary Actions to Take After a Crash
Before rebooting the terminal:
❏ Write down what you or the user were doing just before
the terminal crashed. Specifically, note the window
manager you were using, the X server the terminal was
running, and the types and instances of each client,
including local clients. It’s very important to write down
this information.
❏ Write down the messages displayed during the crash. If
you are logging diagnostic messages to a file, check the
file for messages displayed just before the crash.
Crashes Caused by Hardware or Network Problems
If one terminal out of many is crashing and all the terminals
are running the same software, the crash may be caused by a
hardware problem. See your terminal’s hardware booklet for
information about diagnosing hardware problems.
Reproducing the Crash
Try to reproduce the crash by doing the same things you were
doing just before the terminal crashed. If the crash is
reproducible and you can’t figure out what went wrong,
upload information about the crash, as described in the
following section, and contact Technical Support.
Troubleshooting 18-41
Diagnosing Terminal Crashes
Uploading Files Generated by the Crash
upload
To transfer information from the NCD
terminal’s memory to a host,
preferably the boot host.
If the crash is reproducible, but you can’t diagnose the reason
for the crash, you can upload information about the crash and
send the resulting file to Technical Support. Uploading saves
the state of the terminal at the time of the crash and must be
done before rebooting the terminal. You can FTP the file to
NCD or copy the uploaded information to a tape and send it to
NCD for analysis. Contact NCD Technical Support for
information about how to send the file. You can use either
TFTP or NFS for X server image uploading.
Uploading Files Using TFTP
Tip
Some versions of the Boot Monitor do
not support upload using TFTP and
the file-naming syntax described here
(particularly the .dump suffix). If the
procedure fails to work, contact NCD
Technical Support for help.
The host must be providing TFTP services. If the terminal is
booting or loading files via TFTP, it is safe to assume that it can
upload via TFTP as well.
To upload using TFTP:
1. Prepare a file on the host for uploading the X server
image. The file must be empty, must be writable by
others, and must have the suffix .dump appended to its
name.
% touch /tftpboot/file.dump
% chmod 666 /tftpboot/file.dump
2.
up
Use the Boot Monitor up command to upload the X
server image.
Make sure you provide a full pathname for the file and
resolve links to the file locally to the Boot Monitor.
When specifying the file in the up command line, do not
include the .dump suffix. The Boot Monitor provides the
suffix.
The syntax of the up command is:
file_specification [ terminal_IP_address ] [ host_IP_address ]
For example:
> up /tftpboot/this_ncd 195.12.16.27 195.12.16.2
Using IP address - 192.012.016.027 .................
18-42 Troubleshooting
Diagnosing Terminal Crashes
3.
If you haven’t already done so, call Technical Support for
instructions before sending the dump file to NCD.
Uploading Files Using NFS
To upload files using NFS, you must have Boot Monitor 2.9 or
later. The file system containing the destination file must be
exported and must be writable.
To upload using NFS:
1. Prepare a file on the host for uploading the X server
image. The file must be empty, must be writable by
others, and must have the suffix .dump appended to its
name.
% chmod 666 /tftpboot/file.dump
2.
Use the Boot Monitor un command to upload the X
server.
Make sure you provide a full pathname for the file and
resolve links to the file locally to the Boot Monitor.
The syntax of the un command is:
un file_specification [ terminal_IP_address ] [ host_IP_address ]
For example:
> un /tmp/this_ncd 195.12.16.27 195.12.16.2
Using IP address - 192.012.016.027 .................
3.
If you haven’t already done so, call Technical Support for
instructions before sending the dump file to NCD.
Troubleshooting 18-43
Accessing NCD Support Files and Utilities
Accessing NCD Support Files and Utilities
NCD maintains an archive of utilities that are not included on
the NCDware CD-ROM and technical tips on numerous
subjects related to terminal use. To view and retrieve these
utilities and articles, you can connect to the archive through
FTP or NCD’s World Wide Web server.
Using FTP
To connect to the archive using FTP:
1. Type the command:
% ftp ftp.ncd.com
The following prompt appears:
Name (ftp.ncd.com:your login name):
2.
After the prompt, type the word anonymous or ftp and
press Return to display the following prompt:
Password:
3.
After the password prompt, type your complete e-mail
address press Return. The following prompt appears,
and you can type FTP commands (including help for a
list of commands):
ftp>
4.
5.
Go to the /pub/ncd/Archive directory.
For a list of files on the server, get the ls-lR file.
Depending on the version of UNIX on your host, you
may need to type a backslash before the -lR portion of the
filename.
Using the World Wide Web
When connecting through the Web, use the URL
http://www.ncd.com.
For utilities and technical tips, go to the Service and Support
page.
18-44 Troubleshooting
Contacting Technical Support
Contacting Technical Support
If you encounter difficulties, you can send e-mail or a fax to
NCD Technical Support or contact them by phone.
For information about services available from NCD Technical
Support, contact your NCD representative or send e-mail to
[email protected].
Sending E-Mail or Faxes to Technical Support
Technical Support uses an automated system for e-mail.
Send e-mail to the Internet address [email protected], or send
a fax to (503) 641-2959. To ensure that your e-mail is answered
quickly, please provide as much as possible of the information
listed under “Information to Provide” on page 18-46.
NCD
Using the Web
You can also submit a request through NCD Web Services. Go
to http://www.ncd.com to reach the Service and Support
home page.
Phoning Technical Support
From the U.S. and Canada, you can phone (800) 800-9599 and
ask for Technical Support. International customers can call
(503) 641-2200. Be prepared to provide as much as possible of
the information listed under “Information to Provide” on
page 18-46.
Troubleshooting 18-45
Contacting Technical Support
Information to Provide
Regardless of the method you use to report the problem to
NCD, you must have the following information ready:
❏ Your name and title
❏ Company or organization
❏ Phone number
❏ FAX number
❏ E-mail address
❏ Billing address
❏ Shipping address
❏ For each hardware item:
— Serial number
— Description of the problem
— Type of warranty (Standard, Express, Extended,
Express Exchange, Out-of-Warranty)
❏ For a software problem:
— Problem type: question, enhancement, bug, crash, or
other
— Type of host and its OS release
— Window manager
— Boot Method: TFTP, NFS, PROM, PC card, or MOP
— Model of NCD terminal
— Amount of installed memory
— NCDware version
— NCDware Boot Monitor version
— Detailed problem description
— If the problem involves a third-party application, the
name of the application and which version you are
running
18-46 Troubleshooting
A Using 16-bit and 24-bit Color
This appendix contains the following information:
❏ An overview of 16-bit and 24-bit color depth support
❏ The effect of color depth on maximum monitor
resolution and how to set resolution and color depth
❏ 16-bit and 24-bit color support in X server extensions and
local clients.
About Color Support
Color depth affects the number of colors that can be
displayed, with more colors displayed at greater depths.
16-bit and 24-bit color are supported for the terminals listed in
Table A-1.
Table A-1 Terminal Support for 16-bit and 24-bit Color
Terminal Model
16-bit Color
24-bit Color
Explora 400
X
Explora 450
X
X
Explora 700
X
X
Color depth is implemented as three X server modules: 8-bit,
16-bit, and 24-bit color. Because color depth is a loadable
module, only the color depth selected in the Boot Monitor is
loaded when you boot the terminal. The default is the module
for 8-bit color.
In 8-bit mode, you may encounter colormap flashing, which
occurs when one application’s colormap takes priority over
another’s. For example, as you move the mouse from one
window to another, the background color of the screen may
unexpectedly change. Colormap flashing disappears, and the
quality of color images is improved when you use either 16-bit
or 24-bit color mode.
A-1
Setting Color Depth and Monitor Resolution
With 16- and 24-bit color, only the True Color visual is
supported.
Setting Color Depth and Monitor Resolution
You can set color depth in the Boot Monitor, the remote
configuration file, or the Console Setup menus. Monitor
resolution can only be set in the Boot Monitor.
To use 16-bit or 24-bit color, you must set the resolution and
refresh rate according to the values listed in Table A-2.
Caution
Selecting an unsupported screen refresh rate or resolution
can damage the monitor. Always refer to your monitor
installation booklet and test to be sure the refresh rate or
resolution selection is supported by the monitor. Note
that the test grid may appear even though a monitor is not
rated to operate at the frequency selected.
Effects of Video Memory on Resolution and Color Depth
The amount of video memory in the terminal affects the color
depth and resolution:
❏ The Explora 400 has 1 MB of video memory. The highest
possible resolution is 800 x 600 for 16-bit color depth.
24-bit color depth is not supported.
❏ The Explora 450 or 700 has 2 MB of video memory. The
highest possible resolution at 16-bit color depth is 1024 x
768. For 24-bit color depth, the highest resolution is
800 x 600.
Effects of Color Depth on Other Configuration Parameters
Setting the color depth to 16- or 24-bit has the following
effects:
❏ The wincenter-colors parameter is ignored. This is
equivalent to setting wincenter-colors to “disabled.”
❏ The xserver-default-visual parameter is ignored. Only the
TrueColor visual is supported.
A-2
Setting Color Depth and Monitor Resolution
Setting Monitor Resolution and Color Depth in the Boot Monitor
To set color depth in the Boot Monitor, you need Boot Monitor
version 2.9.409 or later for Explora 400/450 terminals and
version 2.9.723 or later for Explora 700 terminals. If you have
an earlier Boot Monitor version, set the color depth in a remote
configuration file or the Console Setup menu.
To set monitor resolution and color depth in the Boot Monitor:
1. In the Boot Monitor, press the Setup key or type:
> se
2. Follow the directions in the initial screen to display the
Monitor window.
3. When you select the desired color depth, a list of possible
resolutions and refresh rates is displayed. Set the
monitor resolution to the maximum possible, taking into
account the available video memory. If your monitor is
DDC-compatible, the resolution is automatically set to
the best available when you select color depth.
Setting Color Depth in Remote Configuration Files
In remote configuration files, use the xserver-color-depth
remote configuration parameter. This parameter is saved in
NVRAM and takes effect when you boot the terminal. The
values for this parameter are 8-bit, 16-bit, and 24-bit. If there is
insufficient video memory to support 16-bit or 24-bit color
depth, the setting defaults to 8-bit color depth when you
reboot.
See the Remote Configuration
Parameter Quick Reference for more
information about xserver-defaultvisual.
At 16-bit and 24-bit color depths, the default visual setting is
Pseudo Color. To change the default visual, set the xserverdefault-visual remote configuration parameter to a different
visual.
See Chapter 12 for information about
setting WinCenter parameters.
The wincenter-colors and xserver-initialize-web-palette-colors
remote configuration parameters reduce or eliminate
colormap flashing when you use NCDware and WinCenter
together. Colormap flashing at 16-bit and 24-bit color depths
is not a problem, so these parameters do not apply and are
disabled automatically.
A-3
Setting Color Depth and Monitor Resolution
Setting Color Depth in the Console
In the Console, the Setup menu field for setting color depth is
Setup ⇒ Change Setup Parameters ⇒ X and Graphics ⇒ Color
Depth. Changes take effect at boot and are saved in NVRAM.
Table A-2 Monitor Resolution and Color Depth Settings
Resolution (pixels)
Color Depth (bits per pixel)
Automatic Detection (DDC)
This selection appears in the Boot Monitor Setup menus if a
DDC-compatible monitor is attached to the terminal.
640x480
8, 16, or 24
60 Hz
72 Hz
75 Hz
85 Hz
800x600
60 Hz
72 Hz
75 Hz
85 Hz
1024x768
60 Hz
70 Hz
75 Hz
85 Hz
A-4
8 or 16
Setting Color Depth and Monitor Resolution
Table A-2 Monitor Resolution and Color Depth Settings (Continued)
Resolution (pixels)
Color Depth (bits per pixel)
1152x900
8 only
66 Hz
76 Hz
1280x1024
60 Hz
70 Hz
75 Hz
85 Hz
1600x1200
60 Hz
65 Hz
Color Support for X Server Extensions and Local Clients
Some X server extensions and local clients do not support
16-bit or 24-bit color depths. Most local clients work at all
color depths. Some local clients have special requirements for
visual depth or may directly change the frame buffer.
The following X server extensions and local clients either do
not support 16- and 24-bit color or have limited support:
❏ OpenGL (24-bit only, HMXpro24 only)
❏ NCD Mosaic Browser (8-bit or 24-bit only)
❏ Video player (8-bit or 24-bit on HMXpro24, 8-bit only on
Explora)
❏ MPEG video decoder (slow and fast)
❏ SIE
❏ ICA Client
❏ Light pen (blue flooding does not work at 16- and 24-bit)
A-5
Color Support for Third-Party Applications
The following X server extensions and local clients support all
color depths:
❏ Console
❏ Warning Messages (low on memory, licensing, and
logout)
❏ Login Chooser
❏ NCD Terminal Emulator
❏ 3270 Terminal Emulator
❏ local Motif Window Manager
❏ Lock Screen
❏ Start Java Applet
❏ Change Quick Setup
❏ Change Setup Parameters
❏ Change User Preferences
❏ Show Version
❏ Show Memory
❏ Show X Connections
❏ Show Statistics
Color Support for Third-Party Applications
This section provides information about applications running
at 16-bit and 24-bit color depths.
8-bit Applications in 8-bit Mode
There are no functional changes in 8-bit color mode.
Applications should look and perform the same as in the
previous releases of NCDware.
8-bit Applications in 16-bit and 24-bit Modes
Most 8-bit applications should work without changes in 16-bit
and 24-bit color modes Applications that rely on an 8-bit
pseudo-color visual, however, may have problems. Problems
may also occur if applications assume that 8-bit pixmaps or
A-6
Color Support for Third-Party Applications
images are supported. One-bit pixmaps (bitmaps) are
supported at all color depths.
16-bit and 24-bit Applications in 16-bit and 24-bit Modes
Applications that display high quality graphics or images are
usually careful about checking visuals, pixmap depth, and
image depth. For example, a browser may check for a visual
that it supports and chose the highest quality available. Even
these applications, however, may fail if they cannot find a
visual they support.
Some optimized 16-bit or 24-bit applications might make
assumptions about the organization of the frame buffer and,
therefore, display the wrong colors.
A-7
Color Support for Third-Party Applications
A-8
B Setting the Time of Day
This appendix describes how to configure a terminal’s time
parameters so that the terminal can supply the current date
and time.
Overview
Normally, an NCD terminal does not know the current date
and time. Java applets and some other applications the current
date and time. Time parameters are also useful for general
NFS use and if you are using a diskette drive attached to a
terminal.
Specifying Time Server Hosts
To specify the time server host, set the time-server parameter
to the name or IP address of a host that provides the current
time from UDP port 37. The default time server is the boot host
or the time server specified in the BOOTP/DHCP packet
returned to the terminal.
Specifying Retries and the Timeout
To specify the number of attempts made to contact the time
server, use the time-server-retries parameter; the default is
three attempts.
To specify how long to wait for a reply from the time server,
use the time-server-timeout parameter; the default is three
seconds.
B-1
Overview
Specifying the Terminal’s Time Zone
To specify the time zone, use either the time-zone or timeoffset-from-gmt parameter. The time-zone parameter is easier
to use and adjusts for daylight savings time automatically.
Using the time-zone Parameter
To use the time-zone parameter, set it to the timezone file for
your area. By default, time zone files are installed in
/usr/lib/X11/ncd/zoneinfo when you install NCDware using
ncdinstall. If the files are not in the default location, you must
specify an absolute path to the timezone file. Otherwise, you
need only specify a relative path.
Each time zone is represented by a city, so you just select the
city in your time zone. For example, in the Pacific Standard
Time zone, you would specify:
time-zone="America/Los_Angeles"
For the US, the following files are available in addition to the
files for cities:
America/EST5EDT
America/CST6CDT
America/MST7MDT
America/PST8PDT
Using the time-offset-from-gmt Parameter
The time-offset-from-gmt parameter specifies the offset (in
minutes) from Greenwich mean time for your time zone. To
specify a location east of GMT, specify the offset as a positive
value. To specify a location west of GMT, specify the offset as
a negative value. You can also specify this value using
BOOTP/DHCP.
B-2
Setup Menu Equivalents for Configuration Parameters
Setup Menu Equivalents for Configuration Parameters
Table B-1 lists the remote configuration parameters discussed
in this chapter and the corresponding Setup menu field for
each. This information is provided for system administrators
who use Setup menus to configuration terminals.
Table B-1 Setup Menu Fields for Configuring Time
Parameter
Setup Menu Field
When Changes
Take Effect
Saved in
NVRAM
time-offset-from-gmt
Setup ⇒ Change Setup Parameters ⇒
Time ⇒ Offset from GMT
Immediately
No
time-server
Setup ⇒ Change Setup Parameters ⇒
Time ⇒ Time Server
Immediately
No
time-server-retries
Setup ⇒ Change Setup Parameters ⇒
Time ⇒ Time Server Retries
Immediately
No
time-server-timeout
Setup ⇒ Change Setup Parameters ⇒
Time ⇒ Time Server Timeout
Immediately
No
time-zone
Setup ⇒ Change Setup Parameters ⇒
Time ⇒ Timezone
Immediately
No
B-3
Setup Menu Equivalents for Configuration Parameters
B-4
C Updating the Boot Monitor
This appendix explains how to update the Boot Monitor on an
Explora 400, 450, or 700 terminal.
Overview
On Explora 400/450, and 700 series terminals you can
download updated Boot Monitor images from files that you
obtain from NCD and install on a network host. The latest Boot
Monitors at the time this manual was written are included on
the NCDware 5.1 CD-ROM. The ncdinstall installation program
installs these files in /tftpboot/prom. Included in the prom
directory are ASCII files explaining the new Boot Monitor
features.
From time to time, newer versions of the Boot Monitor may be
available from NCD’s FTP server.
Caution
Do not turn off power to the terminal while the Boot Monitor is
being updated. If the update process is interrupted before the
new Boot Monitor is written to PROM, the Boot Monitor will not
have the settings necessary to operate the terminal. In that case,
you would have to return the base to the factory for rework.
For this reason, NCD recommends that you promptly reboot
terminals as soon as you have configured them for Boot Monitor
update and that you not configure terminals for Boot Monitor
update when power outages are likely to occur.
C-1
Updating the Boot Monitor
Updating the Boot Monitor
To update a terminal’s Boot Monitor:
1. In the terminal’s remote configuration file, set the bootprom-update-file parameter to the absolute pathname of
the Boot Monitor update file.
2. Reboot the terminal.
3. The terminal downloads and verifies the entire update
file.
— If the update file is a newer version than the current
Boot Monitor installed in the terminal, the Boot
Monitor in the terminal is updated.
— If the terminal’s current Boot Monitor is at the same
version or a later version than the downloaded file,
no action is taken.
4. A Boot Monitor update takes about 15 seconds.
C-2
Bibliography
The following books describing the X Window System are
available at computer book stores:
❏ OSF/Motif User’s Guide, Release 1.2—Open Software
Foundation. Prentice-Hall.
❏ X: A Guide for Users—Jerry D. Smith. PTR Prentice-Hall.
❏ X Window System User’s Guide—Uday Pabrai and Hemant
Shah. Artech House.
❏ Volume 3: X Window System User’s Guide—Valerie Quercia
and Tim O’Reilly. O’Reilly & Associates, Inc.
❏ Volume 4: X Toolkit Intrinsics Programming Manual—Adrian
Nye and Tim O’Reilly. O’Reilly & Associates, Inc.
(Contains information about key translations).
❏ Volume 8: X Window System Administrator’s Guide—Linda
Mui and Eric Pearce. O’Reilly & Associates, Inc.
Biblio-1
Bibliography
Biblio-2
Glossary
This glossary contains definitions of terms used in this Guide.
applet
A small Java application that can be embedded in
another application, such as an applet viewer or a
Web page.
ARP
Address Resolution Protocol. The Internet protocol
for translating IP addresses to Ethernet addresses.
ARP cache
Configurable cache used by NCD terminals to store
information about addresses obtained by ARP.
ASCII
American Standard Code for Information
Interchange.
AUI cable
Attachment Unit Interface cable. Used to connect an
NCD terminal’s DB-15 Ethernet connector to thick,
thin, or twisted-pair (or fiber-optic) Ethernet
through a transceiver.
Auxiliary serial port
Serial port located on terminals in the HMX family.
For attaching a modem, printer, or other serial
device.
bitmap font
A collection of pre-rendered characters in a
particular style and size. Each bitmap font is stored
in a separate file.
Boot Monitor PROMs
Flash PROMs containing the Boot Monitor in the
terminal base.
Glossary-1
Glossary-2
Boot Monitor Setup
A menu-driven utility for simplified, first-time
terminal booting, accessed through the Boot
Monitor. Available only on terminals with Boot
Monitor 2.6 or later.
BOOTP
TCP/IP Bootstrap Protocol. Provides information for
downloading a server image to a terminal.
bootptab file
The configuration file used by BOOTP software.
broadcast
A technique in which copies of a single packet are
passed to all possible destinations.
broadcast address
An IP address that refers to all hosts on a network.
CD-ROM
Compact disk read-only memory.
color depth
The degree of richness or intensity of color. In
monitors, the number of colors a video adapter can
display at one time. Also known as visual depth.
color map
The X server structure that controls and allocates the
colors available to client programs.
color mode
In monitors, the available settings that can be
changed at boot time: 8-bit, 16-bit, and 24-bit.
color support
In monitors, a device that can display images in
multiple colors as well as shades of gray.
Configuration
daemon
Daemon that runs in the terminal and provides
network and local access to a terminal’s
configuration data.
configuration
language
A set of commands used in remote configuration
files and when accessing the Configuration daemon
through TELNET.
configuration
passwords
Two passwords used to control access to the
Configuration daemon through TELNET. The two
passwords control read-only and read/write access
and can be set through options in the Console.
DECnet
Digital Equipment Corp.’s networking software that
runs over Ethernet in local- and wide-area networks.
DHCP
Dynamic Host Configuration Protocol, an enhanced
bootstrap protocol, backwardly compatible with
BOOTP, that provides dynamic IP address
assignments without additional terminal
configuration.
Diagnostic daemon
The NCDware Diagnostic daemon, software that
collects NCDware messages and stores them in an
internal buffer. Messages can be logged to a file or
displayed in the Console Messages hide box.
display
The screen driven by a single X server.
DISPLAY
The environment variable that tells clients to which
display to connect. For NCD terminals, the DISPLAY
variable consists of the terminal hostname followed
by :0.
DNS
Domain Name System. A name service in which
programs use remote name servers to resolve
hostnames into Internet addresses.
domain
Part of the Internet naming hierarchy that provides
each host with a unique name.
domain name
The complete hierarchical name of a host on an
Internet network. For example,
bigmachine.ncd.com. See domain.
downloading
The process of transferring files from a host
computer to the terminal’s memory.
Glossary-3
Glossary-4
DPS
Display PostScript. A software system that displays
graphical information on a computer screen using
the same imaging model and PostScript language
used for printers and typesetters; provides device
and resolution independence for interactive
displays.
DRCS
Downloadable character sets. See the Digital
Equipment VT320 documentation for more
information.
ESP board
Ethernet/Serial/PC board. An NCD interface board
that incorporates one or two serial communication
channels, an Ethernet interface, and a socket for a PC
card.
Ethernet
A popular network protocol (IEEE 802.3) and a
physical channel for transmitting data over coaxial,
twisted-pair, or fiber-optic cable.
Ethernet address
The low-level address used by the physical Ethernet
network. Each device on the Ethernet has a unique
physical address assigned by IEEE and the device’s
vendor.
file service
NCDware X server software that provides access to
host files by an NCD terminal.
firmware
Software routines in read-only memory (Boot
Monitor PROMs) in NCD terminals.
font cache
A portion of an NCD terminal’s memory used for
temporary storage of downloaded fonts.
font server
Host-based software that relieves the X server of all
tasks related to downloading fonts; it also scales
outline fonts.
font service
NCD X server software that provides fonts to clients.
fonts.alias
A database in a font directory that lists fonts to
substitute for unavailable fonts.
fonts.dir
A database required in every font directory so that
the terminal can locate the fonts it contains.
fonts.scale
A file in a font directory that correlates outline fonts
with their XLFD name; used with the Display
PostScript extension.
gateway
A computer that attaches to two or more networks
and routes packets from one to the other.
GIF
Graphics Interchange Format. A graphics file widely
used to encode and exchange graphics files on the
Internet.
global password
A password that provides read/write access to the
Configuration, User Preferences, Local File Manager,
and SNMP daemons. Used instead of individual
passwords to save space in NVRAM’s optional string
space.
host
An individual device on a network, such as an NCD
terminal or a computer.
hostname
A string used to uniquely identify a device on a
network. Part of the domain name.
ICA
Independent Computing Architecture. A protocol
that allows communication between a WinFrame or
MetaFrame server and an ICA client.
ICMP
Internet Control Message Protocol. A broadcast
protocol that handles error and control messages.
An integral part of the Internet Protocol (IP).
IEEE
Institute of Electrical and Electronics Engineers.
Glossary-5
Glossary-6
IGMP
Internet Group Management Protocol. A broadcast
protocol that handles multicasting across multiple
networks. An integral part of the Internet Protocol
(IP).
IEN-116
An IEN (Internet Engineering Notes) name service
that provides translation from IP addresses to
hostnames.
initial file server
One of two hosts that can be specified for
downloading a terminal’s remote configuration file
at boot time.
Internet
The collection of networks and gateways that use
the TCP/IP protocol family and function as a single,
cooperative virtual network, and connects many
businesses, universities, and government facilities.
IP
Internet Protocol. Part of the TCP/IP family of
protocols. Responsible for network-level addressing
and routing of datagrams.
IP address
Internet Protocol address. The 4-part, 32-bit address
assigned to hosts so they can participate in the
Internet using the TCP/IP protocols. An Internet
address consists of a network portion and a host
portion.
Java
A network programming environment for creating
and running embeddable Java applets and
standalone applications.
keycap
The label on a keyboard key.
keymap
The assignments of client (3270 or NCD Terminal
Emulator) actions to keysyms; actions are functions
specific to each client.
keysym
Key press/release events.
LAT
launcher
Local Area Transport protocol. A Digital Equipment
Corp. communication protocol used in a local area
network. Used by NCDware for connecting to non-X
applications.
A client that provides application startup menus for
NCD window managers.
LED
Light-emitting diode.
local area network
(LAN)
A network that connects devices over relatively
short distances, typically within a building or
campus.
Local File Manager
An NCD utility for managing the local file system on
PC cards or floppy disks.
local file system
The file system located on a PC card or a floppy disk.
login banner
A window displayed on the screen for entering a
username and password for logging in.
low memory
threshold
A configurable memory threshold on NCD
terminals.
magic cookie
A secret password used with XDM to control access
to the X server and protect a user’s display from
unauthorized access.
modifier keys
Keys such as Control, Alt, and Shift that modify the
actions of other keys. X also supports a set of logical
modifier key functions (such as the meta key) that
can be mapped to physical keys.
name server
A host that provides translation between network
hostnames and IP addresses.
Glossary-7
NCD Display Manager NCD’s host-based daemon for providing user
information to local clients and preventing
unauthorized users from remotely starting local
clients on a terminal (ncddm).
Glossary-8
NCD Terminal
NCD’s VT320-compatible terminal emulation local
Emulator
client.
ncddm (1)
The NCD Display Manager.
NCDnet
An NCDware option that allows an NCD terminal to
participate fully in a DECnet network. Gives users
access to DECwindows. Offers attachment via
Ethernet or serial line. Synonymous with DECnet.
ncdterm (1)
The local NCD Terminal Emulator, providing VT320
terminal emulation plus support for color terminals.
Permits connection via LAT, TELNET, CTERM, and
serial protocols.
ncdrunwm
The host-based application launcher that provides
application startup and host access services for NCD
local clients.
NFS
Network File System. A protocol developed by Sun
Microsystems that allows computers to access each
other’s file systems as if they were local.
NIM
Network Interface Module. A removable printed
circuit board in an NCD terminal base that contains
the Boot Monitor PROMs, and network connectors.
Formerly called a Communications Interface
Module.
node
An individual device on a network. Same as host.
NVRAM
Non-volatile RAM in the terminal’s base, containing
the data for booting. NVRAM contents are initially
set at the factory and retained when the terminal is
rebooted or powered off.
NVRAM utility
A Boot Monitor utility used to set NVRAM
parameters.
OSF/Motif
The Open Software Foundation graphical user
interface. Used by the local NCD Window Manager.
outline font
A font that can be scaled to arbitrary sizes and
resolutions; it is stored as a set of instructions for
drawing curves.
Parallel daemon
Terminal-resident software used to manage
communication over a parallel line.
PC card
An integrated circuit card defined by the Personal
Computer Memory Card International Association
(PCMCIA). Provides local memory that can be used
for storing a terminal’s X server, font, and
configuration files. It can also store Token-Ring
support.
PEP board
Parallel/Ethernet/PC board. An NCD interface
board that incorporates parallel communication
channel, an Ethernet interface, and a socket for a PC
card.
PPP
Point-to-Point Protocol. An Internet standard for
transmitting datagrams over serial links.
PROM
Programmable read-only memory.
protocol
A formal description of message formats and the
rules computers must follow to exchange those
messages.
Quick Start PC card
A PC card with the server files, configuration file,
font, and color definition files already installed.
Glossary-9
RARP
Reverse Address Resolution Protocol. Used by
devices such as NCD terminals to determine their
Internet address at startup when they only know
their hardware address.
resolution
In monitors, expressed as the number of pixels
horizontally and lines vertically on-screen.
root window
The window that fills the screen during an X session.
All windows opened by clients appear on top of the
root window.
root menu
Menu displayed by placing the pointer on the root
window and clicking a mouse button.
RS-232 C
An accepted industry standard for serial
communications connections.
rsh, remsh
UNIX utilities for remotely starting programs. On
NCD terminals, used for remotely starting local
clients.
Glossary-10
rshd
Terminal-resident daemon for starting local clients
with an rsh or remsh command (same as execd).
Serial daemon
Terminal-resident daemon that controls a terminal’s
serial port(s).
SLIP
Serial Line Internet Protocol. A de facto standard
protocol for transmitting IP datagrams over serial
links. See also PPP.
SNMP
Simple Network Management Protocol. A protocol
for monitoring and controlling the activity of
devices on a network.
startup file
An executable file that prepares the terminal for the
user, including such actions as setting the DISPLAY
variable, loading resources, and starting a window
manager and other clients.
subnet
A physical network within a larger IP network. A
scheme that allows a site to use a single Internet
network for multiple physical networks.
subnet mask
A hexadecimal number with all 1s in the network
and subnet portions of a terminal’s IP address, and
all 0s in the remaining portion of the host field.
Indicates which bits in an IP address identify the
physical network.
TCP
Transmission Control Protocol. An Internet protocol
used by the X Window System to provide reliable
data communication.
TCP/IP
Transmission Control Protocol/Internet Protocol. A
common name for the Internet protocol family.
TELNET
The Internet standard protocol for remote terminal
connection service.
terminal
An intelligent display device that provides access
over a network to applications on different types of
hosts simultaneously.
terminal emulator
In X, a client that emulates the function of a
terminal, allowing users to connect to hosts and use
non-X applications. The terminal emulator (xterm) in
the MIT X distribution emulates a Digital VT102
terminal. The NCD Terminal Emulator (ncdterm)
emulates a VT320 terminal. NCD’s tn3270 terminal
emulator emulates an IBM 3278 terminal.
TFTP
Trivial File Transfer Protocol. The Internet standard
protocol for file transfer.
/tftpboot
Directory containing X server images.
Glossary-11
Glossary-12
thick Ethernet
A type of Ethernet cable used to connect devices
over a distance of up to 1000 meters. Can be
connected to an NCD terminal’s DB-15 Ethernet
connector through an AUI cable. IEEE 802.3 10Base5.
Also called ThickNet.
thin Ethernet
A type of Ethernet cable used to connect devices
over a distance of up to 300 meters. NCD Network
Interface Modules (NIM) and Parallel/Ethernet/PC
boards (PEP) have a BNC thin Ethernet connector.
NCD’s Ethernet/Serial/PC (ESP) board allows thin
Ethernet through a transceiver. IEEE 802.3 10Base2.
Also called Thinnet.
Token-Ring
A local area network architecture in which a token is
passed sequentially from station to station. Only the
station possessing the token can communicate on
the network.
transceiver
Device for connecting a terminal to an Ethernet
network.
TRP board
Token-Ring/PC. An interface board that
incorporates a Token-Ring connector and a socket
for a PC card.
twisted-pair Ethernet
A type of Ethernet that uses twisted-pair telephone
wire. NCD Network Interface Modules (NIM) and
Parallel/Ethernet/PC (PEP) boards have a twistedpair Ethernet connector. NCD Ethernet/Serial/PC
(ESP) boards allow twisted-pair Ethernet through a
transceiver. IEEE 802.3 10BaseT.
UDP
User Datagram Protocol. A protocol that specifies
the format for transmitting data using NFS and TFTP.
UID
A number used by the UNIX operating system to
identify a user.
URL
Uniform Resource Locator. A string of characters
that precisely identifies an Internet resource’s type
and location.
User Preferences
daemon
Daemon that runs in the terminal and provides
network and local access to a terminal’s user
preferences data.
visual
The method used by the X server to display clients;
for example, grayscale or True Color.
visual depth
The degree of richness or intensity of color. In
monitors, the number of colors a video adapter can
display at one time. Also known as color depth.
VRAM
Video RAM. Specially designed dynamic randomaccess memory chips that maximize the
performance of video adapters.
WinCenter
NCD’s software enabling Windows NT servers to be
shared by multiple users simultaneously, running
applications on NCD terminals, PCs, or
workstations.
window manager
A host-based or local client for manipulating
windows on the display.
X protocol
The communication protocol used in X for client/
server communications.
X resource
In the X Window System, a variable used to set a
value defining the behavior or appearance of a
client. An alternative to using command-line options
for defining client characteristics.
X resource file
A file, commonly named .Xdefaults, used to set
many resources at once. You can use command-line
options to override resources set through resource
files.
Glossary-13
Glossary-14
X Window System
A network-based graphics window system
developed at MIT to allow workstation users to use
applications running on multiple hosts. NCDware is
an optimized implementation of X Version 11,
Release 5. Also called X, X11, or X11R5.
xauth (1)
A utility used in host access control when access is
required by clients running on hosts other than the
user’s login host.
.Xauthority
A file created by XDM and used in user-based access
control for storing magic cookies.
XDMCP
X Display Management Control Protocol. The
program that provides XDM services on NCD
terminals.
xterm (1)
The standard host-based terminal emulator client.
XLFD
X Logical Font Description. The font name that
includes complete specification of the characteristics
of a font.
xmodmap (1)
An MIT X distribution utility that displays and alters
the X keyboard modifier map and keymap table.
xrdb (1)
X Resource Database Utility. An MIT X distribution
utility used to load resources from resource files.
xset(1)
An MIT X distribution utility that sets a variety of
display and keyboard user preferences, including
changing and displaying the font path.
Index
Numerics
address discovery 3-7 to 3-10
AnswerBook, on Solaris 18-38
applets, see Java; NCD Mosaic Browser
appletviewer local client 14-3
application launcher errors 18-27
16-bit color A-1
24-bit color A-1
3179G terminal emulator
command and options 7-4
defined 7-4
3270 terminal emulator
command and options 7-3
defined 7-3
Keymap Editor 11-1 to 11-12
3287 print emulator 7-9
message) 18-15
Audio Enabled (Setup menus) 12-30
autoConnect resource (ncdterm) 5-16
autoReconnect resource (ncdterm) 5-16
A
B
access control
local clients
disabling 7-15
host-based 7-16
remote shell (rsh, remsh)
command 7-17
user-based 5-12, 5-13, 7-17
Local File Manager 9-4, 9-7
local file system 9-9
SNMP 4-21
terminal configuration data 4-28 to
4-29
X server 5-9
XDM 5-8 to 5-11, 5-12
Access denied for file ... (Boot
Monitor message) 18-8
Access Points (wireless), configuring 13-8
address
Ethernet, see Ethernet address
IP, see IP address
physical, see Ethernet address
Token-Ring, see Token-Ring, address
Asking for host .. login host not
responding appears (X server
backing store, messages about 18-34
bitmap fonts, see fonts, bitmap
bl command (Boot Monitor) 3-30
bn command (Boot Monitor) 3-30
boot host
backup boot hosts 3-5
how to determine 8-10
Boot Monitor
accessing 18-21
actions at boot time 3-2
bl command 3-30
bt command 3-30
configuring essential booting
parameters 18-2 to 18-3
defined 2-3
ds command 13-6
keyboard compatibility 18-24
messages 18-6 to 18-9
nv command 9-14
prioritizing DHCP, BOOTP, and RARP
requests 3-7
Setup menus 9-14, 18-2 to 18-3
Index-1
Index
Boot Monitor (continued)
un command 18-42, 18-43
up command 18-42, 18-43
updating (Explora 400/450 and
700) C-1
uploading X server 18-42, 18-43
version, how to determine 8-9
wd command 13-3
wi command 13-6
wireless commands 13-2 to 13-5
wr command 13-4
ws command 13-5
boot-desired-source 3-29
booting
booting from the wrong host 18-9
defined 3-2
Explora 400/450 terminals 18-9
failure messages 18-6 to 18-9
from a PC card
boot source order 3-29
booting manually 3-30
locally 9-10 to 9-17
remote terminals 9-17
improving reliability 3-5 to 3-7
manual booting 3-29 to 3-31
modifying 3-2
problems locating X server
modules 3-16
quick boot from factory default
NVRAM 18-1 to 18-2
rebooting 3-29
secondary and tertiary retrieval
methods 3-5
specifying additional boot hosts 3-5
troubleshooting 18-1 to 18-13
booting (continued)
via another terminal’s PC card
remote terminal 9-17 to 9-20
via NFS 3-5, 18-10
via TFTP 3-5, 18-10
see also X server
Index-2
BOOTP
automatic IP address allocation 3-8
backup boot hosts 3-6
configuring wireless access
points 13-8
defined 3-2
option tags used by NCD
terminals 3-7 to 3-8
specifying configuration file
pathname 3-8
T144 tag 3-8
see also DHCP
bootpd (8) 3-6
bootptab.cfg file 3-8 to 3-10
bootptab.ip file 3-10
boot-second-source
Setup menu field for 3-31
specifying an alternate boot
source 3-5
boot-tcpip-second-server
Setup menu field for 3-31
specifying an alternate boot host 3-5
boot-tcpip-third-server
Setup menu field for 3-31
specifying an alternate boot host 3-5
boot-third-source
Setup menu field for 3-31
specifying an alternate boot
method 3-5
broadcast address:
specifying through BOOTP/DHCP 3-8
setting through the Boot Monitor
browser, see NCD Mosaic Browser
browser-auto-load-images
enabling/disabling image
loading 15-12
Setup menu field for 15-19
browser-cache-size
Setup menu field for 15-19
size of the browser cache 15-11
browser-environment
setting browser variables 15-16
Setup menu field for 15-19
Index
browser-ftp-proxy-host
browser-max-connections
Setup menu field for 15-19
specifying the FTP proxy host 15-15
Setup menu field for 15-21
specifying maximum TCP/IP
connections 15-12
browser-ftp-proxy-host-port
Setup menu field for 15-20
specifying the FTP proxy port 15-15
browser-module
browser version to load 15-3
Setup menu field for 15-21
browser-ftp-proxy-overrides
Setup menu field for 15-20
specifying FTP proxy overrides 15-15
browser-smtp-email-server
Setup menu field for 15-21
specifying the mail server 15-16
browser-gopher-proxy-host
Setup menu field for 15-20
specifying the gopher proxy
host 15-15
browser-gopher-proxy-host-port
Setup menu field for 15-20
specifying the gopher proxy
port 15-15
browser-gopher-proxy-overrides
Setup menu field for 15-20
specifying gopher proxy
overrides 15-15
browser-home-page
setting the default home page 15-13
Setup menu field for 15-20
browser-http-proxy-host
Setup menu field for 15-20
specifying the HTTP proxy host 15-14
browser-http-proxy-host-port
Setup menu field for 15-20
specifying the HTTP proxy port 15-14
browser-http-proxy-overrides
Setup menu field for 15-21
specifying HTTP proxy
overrides 15-14
browser-java-applets
enabling/disabling applets 15-13
Setup menu field for 15-21
browser-jscript-active
enabling/disabling JavaScript
routines 15-12
Setup menu field for 15-21
browser-socks-host
Setup menu field for 15-21
specifying the SOCKS host 15-16
browser-socks-host-port
Setup menu field for 15-21
specifying the SOCKS host port 15-16
bt command (Boot Monitor) 3-30
C
CDE (Common Desktop Environment)
adding font directories to the font
path 6-7
adding font servers to the font
path 6-12
with the NCD Display Manager 5-13
with the NCD Mosaic Browser 18-26
Change Quick Setup (Console), see Setup
menus
Change Setup Parameters (Console), see
Setup menus
Change User Preferences (Console), see
Setup menus
clients
adding to root menu 7-13
defined 2-2
status, displaying 8-11
see also local clients
color definition file
on a PC card 9-13
problem locating 18-11
Index-3
Index
color depth
16-bit and 24-bit support A-1
applications A-6
changing through remote
configuration A-3
changing through Setup menus A-4
changing through the Boot
Monitor 9-14 to 9-15, A-2
colormap flash A-1
effect of video memory on A-1
effects on visual and WinCenter
colors A-2
in Windows Access 12-10
local clients A-6
WinCenter 12-26
X server extensions A-5
X server modules A-1
colormap flash
8-bit mode A-1
troubleshooting 18-27
WinCenter 12-24, 12-26
with ImageTool 18-40
with PageView 18-41
compare command (Local File
Manager) 9-5
config-auto-saved-info
extent of data to write to a file 4-18
Setup menu field for 4-30
config-auto-save-file
saving changes to a file 4-18
Setup menu field for 4-30
config-auto-save-nvram
saving data to NVRAM 4-17
Setup menu field for 4-30
Configuration daemon
access from the Terminal Host
Chooser 5-14
defined 4-20
messages in Console 8-3
password 4-21, 4-29
configuration file directory 3-8, 4-6
Index-4
configuration file, see remote
configuration, configuration file; font
server, configuration file
Connect to New Unit (Show
Statistics) 8-13
Connection to X server lost
(XRemote error message) 18-33
Console
access 4-14, 8-1
command for 7-2
disabling 7-16
messages
format 8-4
logging to a file 8-5
viewing 8-4
console (local client) command 7-2
Could not read symlink pathname in
directory ... (Boot Monitor
message) 18-8
crashes, diagnosing 18-41 to 18-43
CRC error (Boot Monitor message) 18-9
.cshrc file
interaction with XDM startup
files 18-16
replication of content in XDM startup
files 5-7
CTERM, logging in through 7-4
curly brackets in remote configuration text
field 18-27
cut-and-paste between local clients 18-25
cwd command (Local File Manager) 9-5
D
DECnet
name service 8-12
status information 8-12
terminal address, how to
determine 8-10
Default Hosts (Setup menus) 12-30
defaultHost resource (ncdterm) 5-15
Index
DHCP (Dynamic Host Configuration
Protocol)
definition 3-2
during X server downloading 3-2
option tags used by NCD
terminals 3-7
priority of request 3-7
see also BOOTP
diag-buffer-size
decreasing to save memory 18-36
message buffer size 8-6
Setup menu field for 8-14
diag-log-file
name of the message log file 8-5
Setup menu field for 8-14
Diagnostic daemon
access from the Terminal
Emulator 8-5
access from the Terminal Host
Chooser 5-14
log file 8-5
diagnostics
file service messages, extended 18-11
font service messages, extended 18-11
ICA Client messages, extended 12-23
loss carrier errors 18-28
X server messages
format 8-4
logging to a file 8-5
types 8-3
diag-timestamp-frequency
Setup menu field for 8-14
time stamp on logged messages 8-6
dialer (local client) 7-5
Dialer (XRemote) 16-4, 16-6, 16-7, 16-18
Dialer, starting XRemote 16-4
diskette drive, see floppy drive
display (screen)
resolution, how to determine 8-9
resolution, how to set A-2
type, how to determine 8-9
DNS (Domain Name System)
defined 3-11
parameters set in ncd_stp 4-10
specifying through BOOTP/DHCP 3-7
terminal configuration for 3-11
verifying availability 3-11
documentation
comments on 1-6
conventions 1-5
intended audience 1-1
online man pages 1-4
server module listing 3-14
WinCenter Pro 1-4
X Window System 1
domain, NT 12-11, 12-15
DPS (Display PostScript)
cache, freeing 17-12
CIE-dict19c.dat file 17-7
file access protocols 17-3
fonts
adding 17-11
client access, configuring 17-11
directories 17-9
included in NCDware
distribution 17-8
InitProc.dat file 17-7
licensing 17-2
PSres.upr file 17-3 to 17-6
resource path 17-10
Solaris systems, running applications
on 18-38
support files 17-3 to 17-7, 17-10
terminals supported 17-1
troubleshooting 18-37
VM_3_2.SNF file 17-7
dps-resource-path 17-10
ds command (Boot Monitor) 13-6
dump (X server upload) 18-42
Index-5
Index
E
exec-startup-commands (continued)
Enable ICA Broadcast (Setup
menus) 12-30
/etc/bootptab (BOOTP database)
information added by ncdinstall 3-25
troubleshooting 18-31
/etc/bootptab.cfg file 3-8 to 3-9
/etc/bootptab.ip file 3-10
/etc/hosts (network database), modified by
ncdinstall 3-25
/etc/passwd file 5-13
Ethernet address
adding to system files 3-3, 3-26
defined 3-26
erased from NVRAM 18-31
how to determine current 8-9
how to determine default 8-9
multi-homed hosts 18-31
use while booting 3-2
Ethernet interface
status information 8-12
testing 18-4
exec-access-control-enabled
access to local clients 7-16
Setup menu field for 7-19
exec-access-control-list
access to local clients 7-16
Setup menu field for 7-19
exec-command-menu
default root menu, changing 7-14
Setup menu field for 7-19
exec-disabled-commands
local clients, disabling 7-15
saving memory 18-36
Setup menu field for 7-19
exec-startup-commands
automatic Windows NT
connections 12-17
in default ncd_std file 4-10
Setup menu field for 7-19
starting clients at boot time 7-10
Index-6
starting local clients not listed in
Console menus 7-9
with login local client 3-6, 5-3 to 5-5
with term local client 5-15
exec-user-access-control
Setup menu field for 5-18, 7-20
user-based access control 5-14, 7-17
exitOnDisconnect resource 5-16
Extended ICA Diagnostics (Setup
menus) 12-30
External loopback failure (Boot
Monitor message) 18-4
external loopback test, defined 18-5
F
Failed lookup of directory (Boot
Monitor message) 18-8
Failed to mount (boot message) 18-6
Failed to mount file system (Boot
Monitor message) 18-8
file service
changing default file locations 3-12 to
3-14
defining initial file servers 3-12
error messages 18-11
file service table, defined 3-12
problems locating files 18-11 to 18-13
secure TFTP file service
requirements 18-12
terminal configuration for host
access 3-13
troubleshooting 18-11 to 18-13
File transfer aborted (Boot Monitor
message) 18-6
file-enable-floppy-filesystem
floppy file system, exporting 9-8
Local File Manager, floppy drive 9-3
Setup menu field for 9-27
Index
file-enable-nfs-server
booting from remote terminal 9-17
local file system, exporting 9-8
Setup menu field for 9-27
file-export-directory-list
booting from remote terminal 9-17,
9-18
Setup menu field for 9-27
file-extended-diagnostics
detailed messages 8-6
file service messages 8-7
Setup menu field for 8-14
file-extended-diagnostics 18-38
file-initial-server-1
for accessing files 3-13
for accessing fonts 6-2
file-initial-server-2
for accessing files 3-13
for accessing fonts 6-2
file-manager-access-control-enabled
access to Local File Manager 9-7
Setup menu field for 9-27
file-manager-access-control-list
access to Local File Manager 9-7
Setup menu field for 9-27
file-manager-password 9-27
file-manager-tcp-port
port for Local File Manager 9-8
Setup menu field for 9-28
file-manager-telnet-port
port for Local File Manager 9-8
Setup menu field for 9-28
file-nfs-access-control-default 9-9
file-nfs-access-control-list 9-9
file-nfs-gid 5-13
file-nfs-uid 5-13
file-service-table
copying files to the PC card 9-11
for font access 6-2
placing files in non-standard
locations 3-12 to 3-14
file-service-table (continued)
problems in loading files other than
configuration file 18-12
Setup menu field for 3-32
trying all matches 18-13
Windows NT shared directories 12-28
file-smb-default-password 12-29
file-smb-default-username 12-29
file-try-all-matches-on-open, problems
accessing files 18-13
FLEXlm, see license server
floppy drive
access via NFS mount 9-8
disk size and format required 9-1
file and directory naming
conventions 9-25
hardware installation 9-21
Local File Manager 9-3 to 9-6
ncdfloppy (floppy management utility)
command and options 9-22 to 9-26
defined 9-21
terminal configuration for 9-21
usage 9-22 to 9-26
font management files, see fonts.alias,
fonts.dir, and fonts.scale
font path, see fonts, path; font server
font server
adding font servers to the font
path 6-11 to 6-12
configuration file
defined 6-9
location 6-8
parameters 6-9 to 6-11
configuration parameters 6-9
debug mode 18-21
defined 6-2
directory, default 6-8
fonts.scale file 6-13
formats recognized by NCD
terminals 6-8
installation 6-8
other vendors’ 6-8
Index-7
Index
font server (continued)
outline fonts
adding 6-13
defined 6-8
starting 6-11
troubleshooting 18-18 to 18-21
font-extended-diagnostics 18-11
fonts
bitmap
adding 6-3 to 6-4
defined 6-1
deleting 6-5
built-in
defined 6-1
in font path 6-5
purpose 6-5
cache
changing size 18-35
disabling 18-35
status information 8-12
CDE requirements 6-7, 6-12
DECwindows requirements 18-20
diagnostics 8-6
directories
causing X server to read 6-4
deleting 6-5
in font path 4-10
location of 6-2, 6-3
location problems 18-11
required permission settings 6-3
DPS fonts 17-8, 17-11
files
required formats 6-2, 6-3
required permission settings 6-3
fonts.alias file 6-4, 9-13, 18-18 to 18-19
fonts.dir file 6-5, 18-11
formats recognized by NCD
terminals 6-2, 18-19
HP VUE requirements 18-20
IBM requirements 18-20
Java fonts 14-9
Index-8
fonts (continued)
location problems,
troubleshooting 18-11
NCD Mosaic Browser fonts 15-18
on PC cards 9-12
outline fonts, see font server
path
adding CDE fonts 6-7
changing 6-6 to 6-8
changing on a remote terminal 6-6
default 6-6
defined 6-1
font server, adding 6-11 to 6-12
rescaning 6-5
setting font directory location 4-10
terminal does not recognize 18-19
using xset to change 18-20
reliability, improving 3-6
scaled, see font server
status information 8-12
substituting 6-4
troubleshooting 18-18 to 18-21
see also font server
fonts.alias file
adding font aliases to 6-4
on PC card 9-13
required font not available 18-19
fonts.dir file
problems locating 18-11
use in adding bitmap fonts 6-3
use in deleting fonts 6-5
fonts.scale file 6-13
FTP access to NCD technical archive 18-44
G
gateway
adding to system files 3-26
defined 3-26
incorrect specification 18-29, 18-31
specifying through BOOTP/DHCP 3-7
specifying through the Boot Monitor
9-16
Index
Gateway not on same subnet (Boot
ICA Client (continued)
Monitor message) 18-6
GID (group identification) 5-12, 5-13
global password
defined 4-29
how to set 4-21
retry attempts 12-23
video cache 12-10, 12-14
wait time 12-23
window size 12-15
see also Windows Access
ica-chooser-entries parameter 12-12
icaclnt command
defined 12-13
options 12-14
ica-enable-chooser-editing parameter 12-13,
12-30
ica-extended-diagnostics parameter 8-14,
12-23, 12-30
icakbds directory 12-20
ica-retry-attempts parameter 12-23, 12-30
icaui command 12-12
ica-wait-time parameter 12-23, 12-30
ICMP (Internet Control Message Protocol)
status information 8-12
IEN-116 3-6, 3-11
ifconfig (8) 18-31
ImageTool, on Solaris 18-39
Incorrect object file (Boot Monitor
message) 18-7
Incorrect product file (Boot Monitor
message) 18-7
info command (Local File Manager) 9-6
installing NCDware, see ncdinstall
Internet Protocol, status information 8-12
Invalid arguments detected (XRemote
error message) 18-33
IP address
adding to system files 3-3, 3-26
automatic allocation with BOOTP 3-8
to 3-9
converting to hexadecimal
filename 4-11
defined 3-26
how to determine 8-9
H
HMX terminals, setting the Token-Ring
speed 3-3
HOME environment variable 5-12
Host IP address timeout (Boot Monitor
message) 18-6
host software (NCDware) 2-4
hostname (terminal)
adding to system files 3-26
specifying through BOOTP/DHCP 3-7
hosts, testing connection to 18-29
.hotjava/properties file 14-4
I
ICA Browser Wait Timeout (Setup
menus) 12-30
ICA Client
automatic connections 12-17
client name 12-15
color depth 12-14
configuration parameters 12-22
connections
adding to root menu 12-18
in Login Chooser 12-19
remote shell command 12-18
Start Local Command 12-18
using Windows Access 12-7 to
12-13
diagnostic messages 12-23
disabling queries 12-23
initial program 12-16
keyboards supported 12-20
keymaps and keyboards 12-16
master browser 12-22
published applications 12-9
Index-9
Index
IP address (continued)
specifying through BOOTP/DHCP 3-8
specifying through the Boot Monitor
9-16
translating to hostname (name
service) 3-11
ip-equivalent-addresses 18-31
Java (continued)
user.dir property 14-8
user.home property 14-9
using ncddm 14-9
java command 14-5
java-appletviewer-command
format of appletviewer command 14-4
Setup menu field for 14-11
ip-extended-routing-diagnostics
generating routing messages 8-6
Setup menu field for 8-14
ip-initial-gateway-1 18-31
ip-initial-gateway-2 18-31
ip-respond-to-broadcast-icmp 18-29
ip-routing-table 18-29
ip-subnet-mask 18-31
java-cache-class-file
J
K
Java
applets, running 14-3
appletviewer 14-3 to 14-5
applications, running 14-5
class files 14-2, 14-8
components 14-1
current working directory 14-8
directory for Java Files 14-8
environment variables 14-9
file access protocols 14-3
files and directories installed 14-2
files in non-standard locations 14-3
fonts 14-9
.hotjava/properties file 14-4, 14-9
java command 14-5 to 14-9
java.home property 14-8
java/.hotjava directory 14-4
locale supported (C locale) 14-2
NCDCLASSES 14-8
printing 10-13, 14-10
setting properties 14-8
startjava command 14-3
time of day for applets B-1
troubleshooting 18-37
user home directory 14-9
Index-10
caching class files 14-3
Setup menu field for 14-11
java-directory
class file directory 14-3
Java home directory 14-8
Setup menu field for 14-11
Keyboard Type (Setup menus) 12-31
keyboards
Boot Monitor compatibility 18-24
control/caps lock keys
swapped 18-22
escape key errors 18-23
events, displaying 18-24
mapping, see Keymap Editor
shift key, problems with 18-22
troubleshooting 18-21 to 18-24
type attached to terminal, how to
find 8-9
Windows NT connections 12-20
keycap, defined 11-3
keycode, defined 11-1
keymap
defined 11-1
ICA Client 12-16, 12-20
troubleshooting 18-21 to 18-24
WinCenter 12-22
Windows NT connections 12-20
see also Keymap Editor
Index
Keymap Editor
applying keymap to a window 11-8
command 7-4
defined 11-1 to 11-2
file service table entry required 11-7
importing a keymap 11-8
keyboard translations, editing 11-10
license requirement 11-1
mapping the keyboard 11-5 to 11-6,
11-10 to 11-12
starting 11-2
writing keymap to a file 11-7
keymap_editor, see Keymap Editor
keysym, defined 11-1
Kill X Clients (dialog box) 8-8
L
LAT
logging in through 7-4
X server module, load policy
requirement 3-15
launcher, see ncdrunwm
.launchrc file 7-12
license requirements
determining features requiring
licenses 8-9
features that require licenses 3-16
Java 14-1
Keymap Editor 11-1
NCD Mosaic Browser 15-2
supplying keys through
ncdinstall 3-26
XRemote 16-5
see also license server
license server
configuring for reliability 3-7
defined 3-16 to 3-17
floating licenses 3-17 to 3-23
license management utilities 3-19
license.dat file 3-18, 3-20 to 3-22
node licenses 3-17, 3-26
options file 3-22
license server (continued)
required files and binaries 3-18
site licenses 3-17 to 3-23
specifying additional license
servers 3-20
starting 3-22
supplemental documentation 1-4,
3-17
types of licenses 3-16
WinCenter 3-20, 3-23
Windows NT 3-23
license.dat file
defined 3-18
on Windows NT hosts 3-20
using more than one 3-21 to 3-22
list command (Local File Manager) 9-6
lmcksum (1) 3-19
lmdiag (1) 3-19
lmdown (1) 3-19
lmgrd (1) 3-22, 3-23
lmhostid (1) 3-19
lmremove (1) 3-19
lmreread (1) 3-19
lmstat (1) 3-19
lmswitchr (1) 3-19
lmutil (1) 3-18
lmver (1) 3-19
Load address out of range (Boot
Monitor message) 18-7
Load image out of range (Boot Monitor
message) 18-7
loadable extensions
color depth A-1
/local pathname 9-2, 9-10
local clients
access
disabling 7-15, 18-36
restricting access through remote
shell commands 5-13
user-based access control 5-12
adding to root menu 7-13 to 7-14
color depth A-5
Index-11
Index
local clients (continued)
customizing
command-line options 7-18
remote configuration 7-17
X resources 7-18
defined 2-4, 7-1
disabling modules 3-15
starting automatically at boottime 7-10
starting from the Console 7-6, 7-15
starting from XDM startup files 5-6
using ncd_std for starting local
clients 4-10
X resources 7-17
Local File Manager
access from the Terminal Host
Chooser 5-14
commands 9-5 to 9-6
configuration 9-7
defined 9-3
global password for access 4-21, 4-29
password
setting and using 9-4, 9-7
use of global password 9-7
port specification 9-8
starting 9-3
usage 9-3 to 9-6
local file system
mounting 9-8
on a diskette 9-21 to 9-26
on a PC card 9-10 to 9-13
specifying on a floppy disk 9-2
specifying on a PC card 9-2
see also Local File Manager; PC cards
locale, supported by the JVM 14-2
lock (local client) 7-6
Lock Screen (Console) 7-6
.login file
interaction with XDM startup
files 18-16
replication of content in XDM startup
files 5-7
Index-12
login (local client)
command-line options 7-3
login -c ica 12-14, 12-17
login on Windows NT hosts 5-17
Windows NT connections 12-17
see also XDM
login banner
defined 5-2
repeated appearance 18-16
see also XDM
Login Chooser, see XDM
login hosts
broadcasting for 5-4
how to determine 8-10
listing in the Login Chooser 5-4 to 5-5
specifying 5-3
see also Terminal Host Chooser; XDM
Login New X Session (Console) 7-3
login through the NCD Terminal
Emulator, see Terminal Host Chooser
login-default-hosts
Login Chooser configuration 5-4, 5-5
Setup menu field for 5-18
Windows NT connections 12-19
login-default-hosts
Setup menu field for 12-30
login-ica-enabled parameter 12-23, 12-30
login-ncddm-enabled
getting user information 5-13
Setup menu field for 5-18
login-ncddm-tcp-port
port for NCD Display Manager 5-13
Setup menu field for 5-18
login-restrict-host-choices
restricting login hosts 5-5
Setup menu field for 5-18
login-xdm-action-on-disconnect
Setup menu field for 8-14
terminal action on logout 8-7
login-xdm-authentication-key 5-19
Index
login-xdm-broadcasts
Login Chooser configuration 5-5
login to first host to respond 5-4
Setup menu field for 5-19
login-xdm-broadcast-wait-time
Setup menu field for 5-19
time to wait for response 5-5
Logout (Console)
defined 7-3
function of 7-3
logout confirmation dialog box 8-7
logout (local client) 7-3
Logout dialog box 8-7
Low On Memory (popup warning
messages) 18-34
low-memory warning
defined 18-34
disabling 7-16
M
magic cookie, defined 5-11
makepsres(1) 17-5
man pages, online 1-4
master browser, ICA 12-22
memory
adding SIMMs 18-37
amount available 18-34
Console warning messages 18-35
free, determining 8-10, 18-34
increasing free memory
changes in font cache 18-35
changing data compression
mode 18-36
disabling local clients 18-36
discarding X settings 18-35
reducing diagnostic message
buffer 18-36
installed, determining 8-9, 18-34
popup warning messages 18-34
messages
Boot Monitor
boot failure 18-6 to 18-9
not logged 8-2
X server
Console Messages hide box 8-2
dialog boxes 8-7 to 8-8
format 8-4
logging 8-5 to 8-7
types 8-3
viewing via TELNET 8-5
XRemote error messages 18-32
MetaFrame, defined 12-2
Microsoft Windows NT, see Windows NT;
Windows Access
modem, with XRemote 16-5 to 16-8
modsmodel.doc file 3-14
modules, see X server, modules
modules-directory
location of X server modules 3-16
Setup menu field for 3-32
troubleshooting 18-10
modules-load-policy
browser module names 15-3
load policy, changing 3-15
saving memory 18-36
Setup menu field for 3-32
monitor
color depth A-2
resolution, setting A-2
Motif Window Manager
Console command 7-5
customizing root menus 7-11 to 7-12
launcher problems 18-27
slow to start 18-24
starting from .xsession 5-7
mount (UNIX command), use for access to
terminal’s local file system 9-8
multi-homed hosts 18-31
mwm command 7-5
mwm(1) 7-12
.mwmrc file 7-12
Index-13
Index
N
name service
defined 3-11
IEN-116 3-6, 3-11
reliability, improving 3-6
status information 8-13
see also DNS (Domain Name System)
named (DNS daemon) 3-11
NCD Display Manager
configuring 5-13
defined 5-12 to 5-13
environment variables,
obtaining 5-12
log files 5-12, 5-13
ncdloguser 5-12, 5-13
starting 5-13
use by the NCD Mosaic Browser 15-6
Xstartup and Xreset files 5-13
NCD Mosaic Browser
.nmosaic-global-history.html 15-5
.nmosaic-hotlist-default.html 15-5
.nmosaic-prefs 15-5, 15-16
.nmosaic-viewers-default 15-3
and the NCD Display Manager 15-6
animated GIF display,
configuring 15-17
applets, enabling/disabling 15-13
automatic image loading, enabling/
disabling 15-12
BROWSER_HOME environment
variable 15-6
default home page, specifying 15-13
displaying text and graphics with
CDE 18-26
document cache size, setting 15-17
encryption 15-3
environment variables 15-6, 15-8
features 15-2
with NFS 15-2
with TFTP 15-2
file cache size, specifying 15-11
Index-14
NCD Mosaic Browser (continued)
fonts 15-18, 18-26
FTP proxy server 15-15
gopher proxy server 15-15
HTTP proxy server 15-14
image cache size, setting 15-17
in-line GIFs 18-26
Java availability 15-10
JavaScript, enabling/disabling 15-12
limitations 15-2
mail server, specifying 15-16
maximum TCP/IP connections 15-12
memory problems 15-17
modules 15-3
multiple users on a terminal 15-7
navigating 18-25
NCD;NCDM in preference files 15-16
online help files 15-10, 15-17
print service 10-9 to 10-11, 10-12, 15-10
proxy servers 15-13 to 15-16
requirements 15-2
SOCKS proxy server 15-16
starting 15-3
troubleshooting 18-25, 18-37
user preferences 15-11 to 15-16
using NFS for file access 15-4 to 15-7
using TFTP for file access 15-8 to 15-9
/usr/lib/X11/ncd/users/nobody 15-6
variables, setting 15-16 to 15-17
versions 15-3
X server modules 15-3
see also Java
NCD Technical Support
technical tips archive 18-44
contacting Technical Support 18-45
NCD Terminal Emulator, see Terminal
Emulator
NCD Window Manager
Console command 7-5
host-based version
command 7-5
starting from .xsession 5-7
Index
NCD Window Manager (continued)
ncdinstall (continued)
launcher problems 18-27
local version
command 7-5
configuring root menu 7-11
restarting 7-11
starting from .xsession 5-7
slow startup 18-24
supported functions 7-12
ncd_std (generic configuration file)
as created by ncdinstall 4-8 to 4-10
use on a PC card 9-11
see also remote configuration files
ncd3287 (local client) 7-9
ncdclock (local client) 7-8
ncdconsole (1) 7-2
ncddm, see NCD Display Manager
modifying data in system files 3-27 to
3-28
name service parameters set 4-10
starting the NCD Display
Manager 5-13
NCDkbd.txt file 12-20
ncdlicense (1) 3-18, 3-22
ncdloadprefs 4-13
ncdlogin (1) 7-3
ncdlogout (1) 7-3
ncdloguser (1) 5-12
ncdlp (hostside print utility)
defined 10-4
using 10-5 to 10-7
ncdmkfdir(1) 17-11
ncdmkfontdir 6-4, 9-13
NCDnet, see DECnet
ncdpref (1) 7-7
ncdprint (hostside print utility)
defined 10-4
using 10-7 to 10-9
ncdquery 18-34
ncdrestartwm 7-11
ncdrunterm, see Terminal Emulator
ncdfloppy
defined 9-21
see also floppy drive
ncdinstall (installation program)
actions of 3-3
adding terminals to the network 3-7
boot preparations 3-3
browser installation 15-4, 15-10, 15-18
changes made to /etc/bootptab 3-25
changes made to /etc/hosts 3-25
changes to XDM files for the NCD
Display Manager 5-13
configuration files created by 4-6
defined 3-1
font installation 6-1
for terminal/network
configuration 3-25 to 3-28
Java files installed 14-2
Java/browser fonts installed 15-18
license daemon, starting 3-22
license file installation 3-20
license management binaries,
installing 3-19
list of commands 3-25
ncdrunwm
configuration file 7-11
defined 5-7
host-based client startup from root
menu 7-13
local client startup from root
menu 7-13
local window manager startup 7-5,
7-11
mwm functions supported 7-12
restarting 7-11
root menu
custom men us 7-11
default menu, customizing 7-14
use in .xsession files 5-7
ncdterm, see Terminal Emulator
Index-15
Index
NCDware
components of 2-3 to 2-5
version, how to find 8-9
ncdwm, see NCD Window Manager, hostbased version
net-domain-channel
domain number display 13-3
Setup menu field for 13-3
net-minimum-data-buffers 18-35, 18-37
net-roaming-condition
roaming condition display 13-4
Setup menu field for 13-4
network
buffer status information 8-12
interface
status information 8-12
testing 18-4
statistics, displaying 8-11
testing operation of 7-6, 18-29
troubleshooting 18-28 to 18-31
network computers, defined 2-1 to 2-3
New 3270 (Console)
command and options 7-3
defined 7-3
New CTerm (Console) 7-4
New Dialer (Console) 16-6
command and option 7-5
defined 7-5
starting XRemote 16-4
New LAT (Console) 7-4
New Serial (Console) 7-5
New Telnet (Console) 7-4
New Terminal (Console) 7-3
NFS (Network File System)
booting 3-5
file access 3-13, 14-3, 15-4 to 15-7
mount command use for local file
system access 9-8
security enhancements with the NCD
Display Manager 5-12
status information 8-12
troubleshooting 18-13
Index-16
NFS (continued)
UID and GID
controlling file access 5-13
returned by NCD Display
Manager 5-12
nmosaic, see NCD Mosaic Browser
No response from terminal-parallel protocol may not be
enabled (X server message) 9-22
No such XDMCP host (X server
message) 18-15
node licenses 3-17, 3-26
node name (DECnet), how to find 8-10
Number of Colors (Setup menus) 12-30
nv command (Boot Monitor) 9-14
NVRAM (non-volatile RAM)
defined 3-2
limited space 4-21, 4-29
password storage 4-21, 4-29
resetting 18-1 to 18-2
saving parameter settings in 4-17
NVRAM checksum error (Boot Monitor
message) 18-6
O
Object file larger than available
memory (Boot Monitor message) 18-7
P
PageView, on Solaris 18-40
Parallel daemon, status information 8-12
parallel port
cable for printer connection 10-2
configuring for printing 10-3
parallel-daemons-table
corresponding Setup menu field 9-28
setup for floppy drive 9-21
setup for printer 10-3
Setup menu field for 10-14
Index
passwords
access to configuration data 4-21, 4-22,
4-29
appearance when set 4-25
global 4-21, 4-29
Local File Manager 9-4, 9-7
SNMP 4-21
PC cards
access via NFS mount 9-8
booting manually from 18-4
booting other terminals from 9-17 to
9-20
configuration file loading from 4-6,
9-11
files required for booting 9-10
font file loading from 9-12
terminal configuration for PC
booting 9-13 to 9-17
XRemote use with 16-2
see also Quick Start PC card
PCL printing 18-26
PCMCIA cards, see PC cards
peripheral devices, see printing; floppy
drive
ping (1) 18-29
Port Unreachable (Boot Monitor
message) 18-7
PPP (Point-to-Point Protocol), for
XRemote 16-11 to 16-13
ppp-interfaces-table
for XRemote 16-13
Setup menu field for 16-18
ppp-slip-interfaces-table
for XRemote 16-12
Setup menu field for 16-18
pref (local client)
command-line options 7-7
see also Setup menus, Change User
Preferences
pref-compatibility-decwindowskeyboards 18-22
pref-console-key-sequence
Setup key, redefining 7-15
Setup menu field for 8-15
pref-environment
environment variables for Java 14-10
environment variables for the
browser 15-6, 15-8
Setup menu field for 14-11
Preferences daemon
defined 4-20
password 4-21
pref-font-extended-diagnostics
detailed font messages 8-6
Setup menu field for 8-15
pref-font-path
current font path 6-7
Setup menu field for 6-14
pref-xserver-current-pointing-device 7-8
printing
3287 print emulator local client 7-9
cables for terminal’s serial or parallel
port 10-2
configuration
parallel port 10-3 to 10-4
serial port 10-2 to 10-3
from local clients 10-9 to 10-13
from the Dialer 16-18
from the Terminal Emulator 10-12
Java applications and applets 10-13,
14-10
NCD Mosaic Browser 10-12
ncdlp (hostside print utility)
defined 10-4
file data type detection 10-5
syntax and options 10-5 to 10-7
XRemote usage 10-5
ncdprint (hostside print utility)
defined 10-4
syntax and options 10-7 to 10-9
PCL not supported 18-26
troubleshooting 18-26
print-lpr-servers 10-10
Index-17
Index
.profile file, replication of content in XDM
startup files 5-7
published applications, ICA Client 12-9
pwd command (Local File Manager) 9-5
pwireless-interface-table, wireless
statistics 13-7
pwireless-statistics-table, wireless
statistics 13-7
Q
Quick Start PC cards
use for XRemote 16-5
quicksetup (local client)
command-line options 7-7
see also Setup menus, Change Quick
Setup
R
RARP (Reverse Address Resolution
Protocol), use in booting 3-2
reclaim command (Local File Manager) 9-5
remote configuration
defined 4-2
parameters 4-4 to 4-5, 4-25 to 4-27
purpose 4-2
remote configuration files
.stp file (user’s configuration file) 4-7
configuration commands 4-12
configuration language 4-12
created by ncdinstall 4-6
creation by ncdinstall 4-2, 4-5
defined 4-2
downloading 3-2, 4-2, 4-6
editing 4-11
effects of Windows Access on 12-12
generic 4-8 to 4-10
IP address filename (hexadecimal) 4-6
ncd_std (generic file) 4-6
ncd_std.sample 4-10
passwords, setting in 4-29
pathname, specifying in /etc/
bootptab 3-8
Index-18
remote configuration files (continued)
permissions required 4-11
problems locating 18-11
sample 4-10
setting values in tables 4-26 to 4-27
specifying through BOOTP/DHCP 3-8
terminal-specific file 4-6, 4-7
user’s configuration file 4-6, 4-8
user’s preferences file 4-12
see also terminal configuration; Setup
menus
remote shell command
restricting use 7-17
use for starting local clients 7-13
remsh (1)
restricting use 7-17
use for starting local clients 7-13
Rescan Font Path (Console) 6-5
resolution, monitor A-2
resources (X)
.Xdefaults file 7-18
for local clients 7-17
specification
troubleshooting 18-17
XLFD requirement 6-4
Xresources file 5-2
Retry Attempts (Setup menus) 12-30
rgb.txt file (color definition file),
locating 9-13, 18-11
root menu 12-18
customizing 7-11
default menu, customizing 7-14
defined 7-11
router discovery, specifying through
BOOTP/DHCP 3-8
rsh (1)
restricting use 7-17
use for starting local clients 7-13
Index
S
screen (display)
resolution, how to determine 8-9
type, how to determine 8-9
Searching for IP address.. IP
Address Timeout (Boot Monitor
message) 18-7
security, see access control; passwords
serial connection, logging in through 7-5
Serial daemon, status information 8-12
serial port
cable for printer connection 10-2
configuring
printing 10-2 to 10-3
XRemote use 16-10 to 16-11
status information 8-12
serial-daemons-table
configuration for printing 10-3
Setup menu field for 10-14
serial-interfaces-table
configuration for printing 10-2
configuration for XRemote 16-11
configuring for printer 16-11
problems with NCD Terminal
Emulator 18-33
Setup menu field for 10-14
serial-interfaces-table 16-11
server modules, see X server, modules
setup (local client)
command-line options 7-7
see also Setup menus, Change Setup
Parameters
Setup key
keyboards without a Setup key
label 4-14
redefining 7-15
Setup menus (Boot Monitor) 9-14, 18-2 to
18-3
Setup menus (Console)
.stp file 4-18
access control 4-28 to 4-29
Setup menus (continued)
Change Quick Setup
command and options 7-7
purpose 4-15
Change Setup Parameters
command and options 7-7
purpose 4-15
Change User Preferences
command and options 7-7
purpose 4-15
changing parameter values 4-16
configuring a remote terminal 4-19
defined 4-2
disabling 4-28
displaying 4-14
field types 4-16
purpose 4-2
saving changes in a file 4-18
saving changes in NVRAM 4-17
see also remote configuration files
setup.exe 3-19
show connections, see Show X Connections
Show Memory (Console)
command 7-7
controls 8-10
defined 7-7, 8-10
disabling 7-16
information displayed 8-10
show memory, see Show Memory
Show Statistics (Console)
command and options 7-8
defined 7-8, 8-11
disabling 7-16
displaying from a remote
terminal 8-13
getting information about statistics
displayed 8-11
Show Version (Console)
command 7-7
cutting and pasting 8-9
defined 7-7
disabling 7-16
Index-19
Index
Show Version (continued)
information displayed 8-9
purpose 8-8
show version, see Show Version
Show Wireless (Console) 13-6
Show X Connections (Console)
command 7-8
defined 7-8, 8-11
disabling 7-16
showLocal resource 5-14
SLIP (Serial Line Internet Protocol)
for XRemote 16-11 to 16-13
SMB (Server Message Block)
protocol 12-28
SNMP (Simple Network Management
Protocol)
configuring wireless Access
Points 13-9
status information 8-12
use of global password for 4-21, 4-29
SQE 18-28
Start Java Applet (Console) 7-6
Start Local Command (Console) 7-6, 12-18
Start NCD Mosaic Browser (Console) 7-6
startcmd (local client) 7-6
Starting server, please wait (Boot
Monitor message) 18-9
startjava 14-4
Startup Commands (Setup menus) 12-30
startup file, see .xsession file, Xsession file,
.login file, .cshrc file, .profile file
statistics, displaying 8-11
stats, see Show Statistics
subnet mask
adding to system files 3-3, 3-26
defined 3-26
how to determine 8-9
specifying through the Boot Monitor
9-16
system.launchrc file 7-12
system.mwmrc file 7-12
Index-20
T
TCP login manager on host not
responding (X Server message) 8-7
TCP ports
for font server 6-10
for ncdfloppy 9-25
for the Local File Manager 9-8
TCP, status information 8-12
TCP/IP protocol, status information 8-12
tcpip-arp-cache 18-29
tcpip-dns-default-domain
default domain suffix 3-12
in default ncd_std file 4-10
Setup menu field for 3-33
tcpip-name-local-cache
name service problems 18-15
Setup menu field for 3-33
tcpip-name-server-protocol
in default ncd_std file 4-10
Setup menu field for 3-33
using DNS 3-11
tcpip-name-servers
in default ncd_std file 4-10
Setup menu field for 3-33
using DNS 3-12
Technical Support (NCD)
how to reach 18-44
technical tips archive 18-44
TELNET
logging in through 7-4
password 4-20
use in interactive terminal
configuration 4-20 to 4-27
TELNET ports
for the Configuration daemon 4-21
for the Local File Manager 9-8
term, see Terminal Emulator
term-default-connect-timeout 5-15
term-default-hosts
Setup menu field for 5-19
Terminal Host Chooser
configuration 5-15
Index
terminal configuration
access to configuration data,
controlling 4-28 to 4-29
booting without a configuration
file 4-6
changing user’s configuration file (.stp
file) 4-18
displaying current values 4-15
experimental configuration
changes 4-3
immediate configuration changes 4-3,
4-14 to 4-19
loading defaults (from Setup
menus) 4-18
methods (overview) 4-1
passwords 4-20, 4-28 to 4-29
permanent configuration changes 4-2
precedence of data from various
sources 4-3
read/write parameters 4-4, 4-25
read-only parameters 4-5, 4-25
temporary configuration
changes 4-14
troubleshooting 18-10
user’s preferences file 4-12
using Boot Monitor Setup menus 18-2
to 18-3
using TELNET 4-3, 4-20 to 4-23
when parameters take effect 4-5
see also remote configuration; remote
configuration files; Setup menus
Terminal Emulator
3270, see 3270 terminal emulator
bypassing login requirement 5-16
CTERM connection 7-4
defined 5-14
LAT connection 7-4
ncdrunterm 5-16
printing 10-12
serial connection 7-5
TELNET connection 7-4
use for logging into host 5-14 to 5-15
Terminal Emulator (continued)
see also Terminal Host Chooser
Terminal Host Chooser
command and options 7-3
configuring 5-14 to 5-15
defined 7-3
terminals
adding to network and host
databases 3-25 to 3-28
crash, troubleshooting 18-41 to 18-43
deleting 3-28
hostname (TCP/IP), determining 8-9
model, determining 8-9
problems with insufficient
memory 18-34 to 18-37
starting, see booting
statistics, displaying 8-11 to 8-13
wireless, see wireless
term-restrict-host-choices
restricting login 5-15
Setup menu field for 5-19
test net (local client) 7-6
Test Network (Console) 7-6, 18-29, 18-30
command 7-6
defined 7-6
TFTP (Trivial File Transfer Protocol)
enabling on host 18-12
file permission requirements 18-13
for Java 14-3
for the browser 15-8 to 15-9
secure TFTP
font directory location 6-3
font directory pathnames 6-6
server module location 3-15
solving file service problems 18-12
status information 8-13
TFTP aborted after 10 retries (Boot
Monitor message) 18-8
TFTP connection refused (Boot
Monitor message) 18-9
TFTP connection time out (Boot
Monitor message) 18-9
Index-21
Index
Tftp error 1 - File not found (Boot
Monitor) 18-8
Tftp error 2 - Access Violation
(Boot Monitor message) 18-8
TFTP no answer (Boot Monitor
message) 18-7
TFTP timeout (Boot Monitor
message) 18-8
/tftpboot/ncd/5.0.xxx/java directory 14-2
time of day
specifying with BOOTP/DHCP 3-8
time server hosts B-1
time zone, setting B-2
timeouts, configuring B-1
time-offset-from-gmt
Setup menu field for 14-11, B-3
time zone, specifying B-2
time-server
current time B-1
Setup menu field for 14-11, B-3
time-server-retries
number of attempts to get current
time B-1
Setup menu field for 14-11, B-3
time-server-timeout
Setup menu field for 14-12, B-3
time to wait for response B-1
time-zone
Setup menu field for 14-12, B-3
time zone, specifying B-2
TMPDIR variable 16-17
tn3270, see 3270 terminal emulator
Token-Ring
address
how to determine current 8-9
how to determine default 8-9
setting TRP speed on HMX
terminals 3-3
status information 8-13
touch screen, software support for 7-8
touchscreen (local client) 7-8
troubleshooting 18-1 to 18-43
Index-22
U
UDP (User Datagram Protocol)
status information 8-13
UID (user identification) 5-12, 5-13
un command (Boot Monitor) 18-43
unit-license-agents
adding license servers 3-7
Setup menu field for 3-33
unit-license-key
node licenses 3-17
Setup menu field for 3-33
up command (Boot Monitor) 18-42, 18-43
uploading X server image 18-42
Use WinCenter Colors (Setup
menus) 12-30
USER environment variable 5-12
user home directory, returned by the NCD
Display Manager 5-12
user preferences
establishing a non-standard
environment 5-6
setting in a .ncdprefs file 4-12
setting in a .xsession file 5-6
setting in remote configuration
file 4-8
username
accessing Windows NT files 12-28
returned by the NCD Display
Manager 5-12
/usr/lib/X11/ncd/configs (default
configuration file directory) 4-6
/usr/lib/X11/ncd/dps (DPS directory) 17-10
/usr/lib/X11/ncd/fonts (default font
directory) 6-1
/usr/lib/X11/ncd/fs (default font server
directory) 6-8
/usr/lib/X11/ncd/users (browser home
directory) 15-6
/usr/lib/X11/ncd/users/nobody (browser
directory) 15-6
/usr/lib/X11/ncd/zoneinfo timezone
files B-2
Index
/usr/lib/X11/xdm/ncd directory 5-13
/usr/tmp/Xremoten files 16-17
V
verify command (Local File Manager) 9-6
video (local client) 7-8
Video Player
troubleshooting 18-37
Video Player (Console) 7-6
video RAM (VRAM)
color depth setting A-1
visual
effect of wincenter-colors
parameter 12-25
effects of setting color depth A-2
vp (local client) 7-6
VT320 terminal emulation, see Terminal
Emulator
VUE, with the NCD Display Manager 5-13
W
wd command (Boot Monitor) 13-3
wincen (local client)
defined 12-16
using 12-18
WinCenter
audio, disabling 12-26
color depth 12-26
colormap flash 12-24, 12-26, 18-27
configuration parameters 12-24 to
12-27
connections
adding to root menu 12-18
automatic 12-17
in Login Chooser 12-19
network type 12-10
Start Local Command 12-18
using Windows Access 12-7 to
12-12
defined 12-2
keyboards 12-22
license management services 3-23
WinCenter (continued)
license.dat file 3-20
manuals for 1-4
resources 12-27
window size 12-26
see also Windows NT
wincenter (host-based command) 12-16
wincenter-audio parameter 12-26, 12-30
wincenter-colors parameter 12-25, 12-30
wincenter-numcolors parameter 12-26,
12-30
wincenter-resolution parameter 12-26,
12-31
wincenter-resources parameter 12-27, 12-31
window manager, see NCD Window
Manager, Motif Window Manager
Window Mgrs (Console)
defined 7-5
Window Size (Setup menus) 12-31
Windows Access
adding connections 12-7
configuring 12-7 to 12-13
controlling access to 12-12
copying connections 12-9
displaying 12-12
editing connections 12-11
in Console menus 7-6
properties 12-9
removing connections 12-11
saving connections 12-12
see also Windows NT
Windows NT
applications
published 12-9
starting automatically 12-9, 12-11
working directory 12-11, 12-15
connection methods
compared 12-2 to 12-3
summarized 12-6
Index-23
Index
Windows NT (continued)
connections
adding to root menu 12-18
automatic 12-17
commands for 12-13 to 12-19
in Login Chooser 12-19
starting 12-18
using Start Local Command 12-18
using the rsh command 12-18
using Windows Access 12-7 to
12-13
keymap files 12-20
license.dat file 3-20
master browser, ICA 12-22
shared directories, mounting on
terminal 12-28
see also Windows Access; ICA Client
WinFrame, defined 12-2
wireless
Access Point configuration 13-8 to
13-10
antenna 13-1, 13-2
Boot Monitor commands 13-2
domain number 13-3
LAN adapter card 13-1, 13-2
requirements 13-1
roaming 13-3
security ID 13-4
status information 8-13, 13-5 to 13-7
subnet requirement 13-2
terminal configuration 13-2 to 13-5
testing the network 13-8
wireless network 13-1
wm, see NCD Window Manager, local
version
World Wide Web
browser, see NCD Mosaic Browser
NCD technical archive 18-44
wr command (Boot Monitor) 13-4
ws command (Boot Monitor) 13-5
Index-24
X
X extensions
color depth A-5
in NCDware 2-4
X resources, see resources (X)
X server
access control, enabling 5-9 to 5-10
actions during booting 3-2
components 2-4
crashes 18-41 to 18-43
defined 2-2
host-resident, defined 2-4
local, defined 2-4
messages see messages, X server
modules
color depth A-1
defined 2-4
directory location 3-15
disabling 3-15, 18-36
list of modules, where to find 3-14
load policy, changing 3-15
load policy, defined 3-14
loading at boot-time 3-14
loading failure, solving 3-16, 18-10
loading on demand 3-14
relocating modules 3-16
status information 8-12
name, how to determine 8-9
specifying through BOOTP/DHCP 3-7
uploading 18-42
see also booting 2-1
Xaccess file, defined 5-2
.Xauthority file, defined 5-10
.Xdefaults file 7-18
XDM (X Display Manager)
.xsession file 5-6 to 5-7
access control 5-8 to 5-11
broadcast queries 5-4
configuration files 5-2
Index
XDM (continued)
configuring
login actions 5-3 to 5-5
non-standard environment 5-6
standard environment 5-6
debug mode 18-14
defined 5-1
encryption key 5-9, 5-10
error messages 18-14
login banner
defined 5-2
specifying login hosts 5-3
specifying the login host 5-3 to 5-4
Login Chooser
access from the Console 7-3
command and options 7-3
defined 5-2
no host listed 18-14
reappearing 18-16
specifying hosts listed 5-4 to 5-5
Windows NT connections 5-5
login failures, troubleshooting 18-15
logout action, configuring 8-7
specifying login hosts through
BOOTP/DHCP 3-8
starting 18-14
troubleshooting 18-14 to 18-18
with UNIX System V shadow
password file 18-15
Xaccess file 5-2
XDM-AUTHORIZATION-1 5-9, 5-10
xdm-config file 5-2, 5-8
xdm-keys file 5-9
Xreset file 5-2
Xresources file 5-2
Xsession file 5-6 to 5-7
Xstartup file 5-2
see also NCD Display Manager
xdm-config file 5-2, 5-8
XDMCP (X Display Management Control
Protocol) 5-1
xdm-errors 18-16
xdm-keys file 5-9, 5-10
xev (1) 18-24
/xfloppy pathname 9-2
.xinitrc file 16-15
xinitremote (1) 16-1, 18-33
.xinitremoterc file 16-15, 18-33
XKeysymDB file (keysym database)
problems locating 18-11
XLFD (X Logical Font Description), use in
resource specification 6-4
xlsfonts (1) 18-19
xmodmap (1) 18-23
xrdb (1)
execution from Xsession 5-6
including in startup file 18-17
XRemote
data compression mode 18-36
Dialer
printing 16-18
setting up the modem 16-7
starting a connection 16-6
starting connection 16-4
error message logging 18-32
features 16-1 to 16-4
font access methods 16-17
garbled characters 18-33
hardware requirements
cabling 16-6
LAN usage 16-5
modem 16-5, 16-6 to 16-8
serial port usage 16-5
helper program
customizing 16-16
defined 16-1
starting 16-4
host setup 16-14
Index-25
Index
XRemote (continued)
LAN connection
about 16-3
setup 16-9
X server source 16-9
license requirement 16-5
log file 16-17, 18-32
NVRAM reset 16-9
PATH variable required 16-15
printing 16-4
requirements 16-1
serial connection
direct 16-8
modem setup 16-5 to 16-8
PPP versus SLIP 16-3
terminal configuration 16-10 to
16-11
X server source 16-2
starting (xinitremote command) 16-1
startup file 16-4, 16-15
status information 8-13
terminal configuration 16-9 to 16-13
TMPDIR environment variable 16-17
troubleshooting 18-32 to 18-34
user environment, preparing 16-14,
16-16
.xinitremoterc file 16-15
XREMOTETMPDIR environment
variable 16-17
.xservremote file 16-16
Xremote (1) (XRemote helper
program) 16-1
XREMOTETMPDIR variable 16-17
Xreset file 5-13
Xresources file, defined 5-2
xserver-access-control-enabled
Setup menu field for 5-19
XDM access control 5-9
xserver-access-control-enabled-default
Setup menu field for 5-19
XDM access control 5-9
Index-26
xserver-access-control-list
authorized client connections 5-10
Setup menu field for 5-19
xserver-access-control-list parameter 5-9
xserver-color-depth parameter A-3
xserver-default-font-path
effect of X server reset 6-5
in the default ncd_std file 4-10
overridden by pref-font-path 6-7
permanent font path 6-6
Setup menu field for 6-14
xserver-default-visual
overridden by color depth setting A-2
overridden by wincenter-colors 12-25
xserver-font-cache-max-size 18-35
xserver-font-path-alias-table 6-5
xserver-initial-x-resources
not used with XDM 5-15
resources for local clients 7-17
Setup menu field for 7-20
xserver-keyboard-type parameter 12-21,
12-31
xserver-retain-font-path 6-14
xserver-retain-x-settings. memory problems
caused by 18-35
Xservers file 18-18
.xservremote file 16-16
.xsession file
defined 5-2
guidelines for use 5-6
starting local clients 7-13
troubleshooting 18-16
xrdb in 18-17
Xsession file
defined 5-2
purpose 5-6
sample files 5-6
starting local clients 7-13
troubleshooting 18-16
xrdb in 18-17
Index
xset (1) 18-20
Xstartup file 5-13
xterm(1) 7-13
Index-27
Index
Index-28