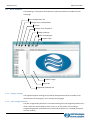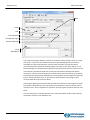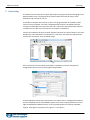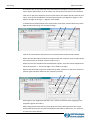
1
UDP Commander
(rev 1.70)
Setting and programming software for the DS, OS and LS
stepper motor drives series.
User’s Manual
The information in this document replace any other material previously published.
LAM Technologies reserves the right to change technical specification and price to any product herein at any time and without further notice.
This manual contains reserved and proprietary information. All rights are reserved. It may not be copied, disclosed or used for any purposes not
expressly authorized by LAM Technologies.
LAM Technologies warrants the products herein against defects in materials and workmanship for a period of 12 months. This warranty does
not apply to defects resulting from an improper use, inadequate installation or maintenance. This warranty also does not apply in case the
products are received modified or integrated with other parts and/or products not expressly authorized or provided for by LAM Technologies.
Any assistance request must be addressed to the product’s purchase source. In case of direct purchase from LAM Technologies a returned
material authorization number (RMA) must be obtained from [email protected] clearly specifying the product code, the serial
number, the problem found and the assistance required. The RMA will have to be clearly stated on each shipping documents otherwise the
parcel could be rejected.
The customer shall be responsible for the packaging and shipping of the defective product to LAM Technologies and the shipment must be
made charges prepaid. The product inspected, repaired or substituted will be available to be collected at LAM Technologies’.
During and within the warranty period, LAM Technologies can, on its judgment, repair or substitute the product. The cost of material and labor
will not be charged within the warranty period.
The above warranty also does not apply to the software. LAM Technologies shall not be liable for any direct or indirect damages such as, but
not limited to, costs of removal and installation, lost profits, coming from the use or the impossibility to use the software.
This manual is intended for skilled technical staff. In case the arguments, the terms and the concepts should not be clear you can contact
[email protected]. It is forbidden to use the products herein described without being sure to have understood
characteristics, installation and use procedures.
Even though products described have been designed with extreme care, they are not intended or authorized for use as components in
applications intended to support or sustain life and in application in which the failure of the product could create a situation where injury or death
may occur to people or animals.
LAM Technologies shall not be liable for any direct or indirect damages coming from the use of its products.
The information in this manual have been carefully checked and are believed to be accurate, however any suggestion to improve it will be highly
appreciated.
LAM Technologies is a registered trade-mark.
Contacts:
•
General information:
[email protected]
•
Technical support:
[email protected]
•
Commercial information:
[email protected]
UDP Commander
Sommario
1
Notes, Terms and Warnings ...................................................................................................................................... 7
2
Product description ................................................................................................................................................... 9
2.1
Main features .................................................................................................................................................... 9
2.2
Minimum system requirements........................................................................................................................ 9
3
Installation .............................................................................................................................................................. 11
4
Operativeness ......................................................................................................................................................... 17
4.1
Main window .................................................................................................................................................. 18
4.1.1
Change settings ....................................................................................................................................... 18
4.1.2
New configuration file............................................................................................................................. 18
4.1.3
Connect ................................................................................................................................................... 19
4.1.4
Change drive configuration ..................................................................................................................... 19
4.1.5
Update drive firmware ............................................................................................................................ 19
4.1.6
LAM Technologies ................................................................................................................................... 19
4.1.7
Program Quit ........................................................................................................................................... 19
4.2
xS10 series drive configuration window ......................................................................................................... 19
4.2.1
New configuration file............................................................................................................................. 20
4.2.2
Open configuration file ........................................................................................................................... 20
4.2.3
Save configuration file ............................................................................................................................ 21
4.2.4
Back to program selection form.............................................................................................................. 21
4.2.5
Configure drive ........................................................................................................................................ 21
4.2.6
Change the phase current waveform ..................................................................................................... 21
4.2.7
LAM Technologies ................................................................................................................................... 22
4.2.8
Program Quit ........................................................................................................................................... 22
4.2.9
Setting ..................................................................................................................................................... 22
4.2.10
Advanced functionalities ......................................................................................................................... 25
4.2.11
Information and diagnostics ................................................................................................................... 26
4.3
DS30 and DS5x series drive setting and programming window ..................................................................... 27
4.3.1
New application program ....................................................................................................................... 29
4.3.2
Open the application program ................................................................................................................ 29
4.3.3
Save the application program ................................................................................................................. 29
4.3.4
Export application program in text format ............................................................................................. 29
4.3.5
Copy and remove the selected block ...................................................................................................... 29
4.3.6
Import application program in text format ............................................................................................ 29
4.3.7
Copy the selected block .......................................................................................................................... 29
4.3.8
Insert the copied block............................................................................................................................ 29
Sommario
UDP Commander
4.3.9
Information on the drive ......................................................................................................................... 30
4.3.10
Back to program selection form.............................................................................................................. 30
4.3.11
Compile the application program ........................................................................................................... 30
4.3.12
Download the application program into the drive ................................................................................. 30
4.3.13
Field BUS setup ....................................................................................................................................... 31
4.3.14
Settings .................................................................................................................................................... 32
4.3.15
Skip download ......................................................................................................................................... 32
4.3.16
Overwrite warning .................................................................................................................................. 32
4.3.17
LAM Technologies ................................................................................................................................... 32
4.3.18
Program Quit ........................................................................................................................................... 32
4.3.19
Status bar ................................................................................................................................................ 32
4.3.20
Application program ............................................................................................................................... 32
4.3.21
Block number .......................................................................................................................................... 33
4.3.22
Block enable ............................................................................................................................................ 33
4.3.23
Information and diagnostics ................................................................................................................... 33
4.3.24
Programming tools (introduction) .......................................................................................................... 33
4.3.25
Programming tools (details).................................................................................................................... 34
4.4
DS30 and DS5x series drive execution window .............................................................................................. 48
4.4.1
Back to the edit mode ............................................................................................................................. 49
4.4.2
Start the application program execution ................................................................................................ 49
4.4.3
Start until the selected box is reached.................................................................................................... 49
4.4.4
Execute a single instruction block ........................................................................................................... 49
4.4.5
Suspend the application program execution .......................................................................................... 49
4.4.6
Insert / remove break point .................................................................................................................... 49
4.4.7
Force the first block to be executed ....................................................................................................... 49
4.4.8
Perform the application program reset .................................................................................................. 49
4.4.9
Registers and user variables monitor ..................................................................................................... 49
4.4.10
Program execution status ....................................................................................................................... 50
5
Exercising ................................................................................................................................................................ 51
6
Command line use .................................................................................................................................................. 57
6.1
udp (UDP30 interface serial number) ............................................................................................................. 57
6.2
frm (firmware update) .................................................................................................................................... 57
6.3
prg (setting or configuring) ............................................................................................................................. 58
6.3.1
run (user’s program execution) .............................................................................................................. 59
6.3.2
mrg (replacement of the user’s program parameters) ........................................................................... 59
6.4
bus (Field BUS configuration) .......................................................................................................................... 60
UDP Commander
Sommario
6.5
Error codes ...................................................................................................................................................... 62
6.6
Use inside a batch file ..................................................................................................................................... 63
UDP Commander
Notes, Terms and Warnings
1 Notes, Terms and Warnings
In this manual some symbols, whose meaning is listed below, are used to underline
particular subjects .
!
|
There is a dangerous condition which must be accurately evaluated and avoided. The notrespect of indications marked with this symbol can cause serious damages and injury to
people, animals and things.
The subject is very wide and could require a deeper examination with the technical
support.
The non-observation of what described could damage the products.
☺
Characteristics and functionalities which cannot be easily found in other products.
A shortcut to reach a target is shown.
#
A change or repairing intervention which can be made directly by the user.
Ã
An aspect connected to the temperature or longevity of the product.
7
Notes, Terms and Warnings
UDP Commander
The terms listed below are also used:
Product
The software described in this manual.
Device
The item handled by the software.
User
Who selects and/or installs and /or uses the product.
Application
The machine, the equipment, the device, etc. on which the product is applied.
The symbol “x” is often used as wildcard and substitutes any character to identify group
of products. For example the wording xS identifies all the drives belonging to the DS10,
OS10 or LS10 series, in the same way the wording DSxx76 identifies the products DS1076,
DS3076, DS5076, DS5276 and DS5476.
8
UDP Commander
Product description
2 Product description
The UDP Commander allows to setup the stepper motor drives of the DS10, LS10, OS10,
DS30 and DS5x series.
Each configuration or setting can be saved or loaded from a file. Therefore, it is possible,
simply and safely, to set more drivers exactly alike, as well as to send all over the world
the configuration of a specific application just transmitting a file.
☺
Through UDP Commander it is also possible to view in real time the drive working status,
as for example the inputs and outputs logic level, the motor status, etc.
Designed for Windows platform (Windows 98 version or greater), it has a simple and
intuitive graphic interface which allows to be operative soon. The several tooltips1 guide
the user in an interactive way, providing a synthetic description of the buttons, fields, or
menus that from time to time are met during the use of the program.
If the software revision is different from 1.70 it is possible that some of the following
images and descriptions do not result complete, pertaining or applicable. This may
happen also in case the firmware revision installed on the drives is different from 1.15 for
the xS10 series and 1.00 for the DS30 and DS5x series.
Some subjects which are outside of the working description of UDP Commander are
barely mentioned and for a deepening it is necessary to refer to the specific manual of
the device.
2.1 Main features
Single software for the whole range of microstepping drives (DS, OS and LS series)
Compatible with all the operative Windows systems from Windows 98 (Windows 7 at
32bit and 64bit included)
Multilanguage support
Automatic device recognition
Guided installation
Easy to use
Free
2.2 Minimum system requirements
UDP Commander can be installed and used on any PC with the following minimum
characteristics:
Operative system Windows 98, 98SE, ME, 2000, XP, Vista, Windows 7
Processor Pentium III 300MHz
256Mbyte RAM
32Mbyte hard disk
Video resolution 800x600
1
The tooltips are short messages which appear positioning the mouse punter on a button, field, menu, etc.
9
UDP Commander
Installation
3 Installation
The installation of UDP Commander is simple and fast thanks to the multilanguage guided
procedure.
The following images have been acquired from the Vista edition of the Windows
operative system. Different versions could generate a slightly different view, in this case
follow the indication on the video.
Before proceeding with the installation, close all open applications.
If necessary uncompact the files, then run UDP Commander 1.41 setup.exe .
Select the preferred language and click OK button.
Click Next button to continue.
11
Installation
UDP Commander
Read carefully the License Agreement and if all the conditions are comprehended and
accepted select the I accept the agreement option, then click on Next button to continue.
If needed click on Browse button to modify the installation folder, then click on Next
button to continue.
12
UDP Commander
Installation
If needed click on Browse button to modify the start menu folder where the connection
to the application will be saved, then click on Next button to continue.
Select Create a desktop icon if a connection to the application on the desktop is needed,
then click on Next button to continue.
13
Installation
UDP Commander
Verify that the installation data are correct and click on Install button to start the
installation.
During the installation a bar will show the progress status.
14
UDP Commander
Installation
Once the installation is completed you will be informed about the position of the folder
where the UDP30 interface drives have been copied (see the UDP30 user’s manual for an
exhaustive description of the product). Click on Next button to continue.
The last dialogue window will inform you that the installation is complete. Clicking on
Finish button you will terminate the installation procedure and if the Launch UDP
Commander check box is selected you will start the application.
15
UDP Commander
Operativeness
4 Operativeness
The dialogue window that appears at the start of the application allows to automatically
connect to the drive, through the UDP30 interface, or to manually select the product on
which to operate (off-line mode).
On the tool bar above there is the Change settings button which allows to you to setup the
language.
☺
Positioning the mouse on each object of the interface a brief description of the object
itself appears (as per figure below), this is useful to quickly and simply comprehend the
functionalities of the product.
17
Operativeness
UDP Commander
4.1 Main window
The following is a description of the elements and functionalities accessible from the
main page.
New configuration file
Change drive configuration
Connect
Update drive firmware
Change settings
LAM Technologies
Program Quit
Product image
Status bar
Supported products list
4.1.1
Change settings
The page that appears clicking on the Change settings button allows to modify some
characteristics of the program, as for example the language.
4.1.2
18
New configuration file
The New configuration file button is activated selecting from the Supported products list a
drive’s code. This button allows to have access, in off-line mode, to the setting or
programming window associated to the selected drive (further on a detailed description
of every window) .
UDP Commander
4.1.3
Operativeness
Connect
Clicking on the Connect button the program verifies if the UDP30 interface is connected
to the computer and if there is a drive connected to the interface itself. In this last case
the drive is automatically polled to identify the model, the serial number and the
firmware revision installed. These information are displayed on the status bar.
The button has a bistable functioning and, if clicked while the connection with the drive
is in progress, the connection itself is interrupted.
4.1.4
Change drive configuration
The Change drive configuration button is activated after a connection with the drive has
been established (see Connect button). This button allows to have access, in on-line
mode, to the setting or programming window associated to the connected drive (further
on a detailed description of every window).
4.1.5
Update drive firmware
The Update drive firmware button is activated after a connection with the drive has been
established (see Connect button). This button allows to choose the firmware file to be
uploaded to the drive. Usually the firmware files are contained in the folder \Firmware
inside the UDP Commander installation one. The name of the file has the following
format:
aaaaaa_rmnn.frm
where aaaaaa stands for the drive or the drive series and mnn for the revision of the
firmware itself in the format m.nn. For example The file xS10xx_r115.frm indicates that
the firmware is suitable for all the xS10 series drives and that the revision is 1.15.
In case we should try to upload a non-suitable file on a drive, a message will signal the
error.
4.1.6
LAM Technologies
Clicking on the LAM Technologies button an image with all the company contacts will
appear (press ESC key on the keyboard to close).
4.1.7
Program Quit
Click on the Program Quit button to quit the UDP Commander.
4.2 xS10 series drive configuration window
To access to this window connect to or select a drive belonging to the DS10, OS10 or LS10
series.
The window is divided into three frames. The one at the top, soon under the button bar,
allows the drive setting, the central zone allows to activate and use the advanced
functionalities, while the one on the bottom displays in real time the status of the drive.
19
Operativeness
UDP Commander
New configuration file
Open configuration file
Save configuration file
Back to program selection form
Configure drive
Change the phase current waveform
LAM Technologies
Program quit
Setting
Configuration name
Status bar
Advanced functionalities
Information and diagnostics
4.2.1
New configuration file
Clicking on the New configuration file button the values of the setting parameters are
substituted with the default standard ones proper to the selected drive model (visible on
the top on the title bar).
4.2.2
Open configuration file
Clicking on the Open configuration file button it is possible to load a file containing a
parameters configuration set.
20
UDP Commander
4.2.3
Operativeness
Save configuration file
Clicking on the Save configuration file button it is possible to save the configuration
parameters to upload them again successively and quickly set other drives in the same
way.
☺
4.2.4
Back to program selection form
Clicking on the Back to program selection form button the configuration window is quit to
go back to the main window.
4.2.5
Configure drive
Clicking on the Configure drive button all the configuration parameters are transferred to
the drive where they are permanently saved.
After having modified one or more parameters it is necessary to click on this button to
transfer the new configuration to the drive.
!
4.2.6
For safety reasons, during the transfer of parameters, the drive disables the motor with
subsequent torque annulment. Once the transfer is done, the motor is enabled again or
not according to the inputs status and to the new configuration.
The Configure drive button is not available when the drive is not connected (off-line
mode).
Change the phase current waveform
Through the Change the phase current waveform button it is possible to change the
waveform of the current supplied by the drive to the motor.
☺
This feature, very rare to be found in market common drives, allows to better adapt the
drive to the motor to obtain a smooth rotation.
Clicking on the button the following window appears:
Standard
Custom
Shape
Offset
Configure
Cancel
21
Operativeness
UDP Commander
4.2.6.1 Standard
The Standard option is selected by default and indicates that the waveform of the current
supplied by the drive to the motor is a pure sinusoidal wave.
4.2.6.2 Custom
Selecting the Custom option the Shape and Offset cursor keys are activated and allow to
personalize the current waveform.
4.2.6.3 Shape
The Shape cursor key acts on the harmonic content of the current supplied to the drive.
The optimal regulation value must be found experimentally and depends to the type of
motor. For LAM Technologies motors this value is usually included between 0 and -4.
4.2.6.4 Offset
The Offset cursor key allows to operate on the current offset in respect to the 0.
Usually this parameter does not need to be modified and can be left at the default value
(zero).
4.2.6.5 Configure
Clicking on the Configure button the settings are transferred to the drive.
!
For safety reasons, during the transfer of parameters, the drive disables the motor with
subsequent torque annulment. Once the transfer is done, the motor is enabled again or
not according to the inputs status and to the new configuration.
The Configure button is not available when the drive is not connected (off-line mode).
4.2.6.6 Cancel
Clicking on the Cancel button the page of the current waveform setting is closed.
4.2.7
LAM Technologies
Clicking on the LAM Technologies button an image with all the company contacts will
appear (press ESC key on the keyboard to close).
4.2.8
Program Quit
Click on the Program Quit button to quit the UDP Commander.
4.2.9
Setting
The Setting frame includes all the controls that allow to better adapt the drive to the
application requirements.
☺
22
Thanks to the several and accurate regulations, impossible to be obtained through the
common dip-switches, it is possible to set the drive to adapt itself to the control system
signals, to the type of motor used, etc. without the need to add external components as
resistors, etc.
UDP Commander
Operativeness
4.2.9.1 Current
The setting of the phase current must be made very carefully as an incorrect calibration
can permanently damage the motor.
Typically the drive must be calibrated at the nominal current of the motor as declared by
the motor manufacturer.
In some cases, if the work cycle allows it, it is possible to setup a higher current, anyway
not beyond the 30% in respect to the rated current of the motor. Similarly, if the full
torque the motor is able to supply is not required, it is possible to setup a lower current
value , in order to reduce the heating on the motor itself.
!
|
☺
Particular attention must be given to the motors which have 6 or 8 wires as they often
can be used with serial or parallel connection and, according to the chosen connection,
the calibration current of the drive may also vary of factor 2. If for example a motor,
characterized by the manufacturer for a phase current of 6Arms with parallel connection,
is used with serial connection, it is necessary to calibrate the drive to half of the nominal
current value, i.e. 3Arms. If we left the drive calibrated at 6Arms the motor would be
permanently damaged.
In case of doubts about the current setting it is a best practice to contact the
manufacturer of the motor.
In the end, note that the current is expressed in effective value and not peak value (Apk
or Amax), as in some marketed drives. The effective value of a sinusoidal current is 40%
higher than the peak current! This means that if you are already using mini or microstep
sinusoidal drives calibrated at for example 8Apk current (or 8Amax), you must set in UDP
Commander a current reduced by √2 (i.e. 5,7Arms), if you need the application continues
to work in the same way. This mean that a 5,7Arms LAM Technologies drive (effective
Ampere) performs the same work of an 8Apk (or 8Amax) sinusoidal drive!
4.2.9.2 Resolution
A stepper motor is created with its own number of steps per revolution. In the industrial
automation it is prevalent the division in 200 steps/rev where each step, called full step,
is equal to a movement of the motor shaft of 1,8°. Anyway, there are also motors with
400 full steps/rev (step angle of 0,9°) or with 100 full steps/rev (step angle of 3,6°), and
so on.
☺
The drives belonging to the xS series are able to electronically divide the full step of the
motor, to increase the resolution and to reduce the vibrations.
23
Operativeness
UDP Commander
Both binary and decimal divisions are available, as displayed in the below image.
The first value of each line of the list indicates the number of divisions of the motor
revolution, and it is referred to a 200 full steps/rev. motor (step angle of 1,8°). In case of
a 400 full steps/rev. motor, this values must be doubled while in case of a 100 full
steps/rev. motor they must be halved. The number in parenthesis instead indicates the
parts in which the full step is divided and it is independent of the division numbers of the
motor. In case of a ¼ full step resolution the step angle will be of 0,45° on a 200 full
steps/rev. motor (1,8°).
4.2.9.3 Current reduction
The current reduction can be personalized both in terms of time, from the reception of
the last step impulse, and in terms of reduction percentage.
☺
The calibration must be performed according to the application requirements. Take
present that to set a current reduction value of 0% is equal to exclude the current
reduction itself, while setting a value of 100% is equal to annul the motor current when
this is still. For further information see the user’s manual of the drive.
4.2.9.4 Input signals conditioning
The Control signals frame allows to define how the drive must read and handle the
various input and output digital signals.
☺
This extraordinary flexibility allows to invert the working logic of a signal, to force it
always active or to disable it.
4.2.9.5 Alarms and protections
The Alarms and protections frame allows to define the action necessary to remove an
alarm or a fault signal.
☺
24
•
Automatic, the drive is automatically re-enabled at cease of the alarm condition.
•
Permanent, the alarm signal remains till the power off of the drive.
•
ENABLE, the alarm signal remains till the drive is disabled through the ENABLE
signal.
UDP Commander
Operativeness
•
Disabled, the alarm signal is suppressed (for security reasons some alarms cannot
be deactivated).
For more information about the several alarms and faults see the user’s manual of the
drive.
4.2.9.6 Configuration name
In the space inside the Configuration name frame it is possible to digit a string, max 25
characters long, which will be saved in the drive.
This field is frequently used to assign a name to the configuration defined for the drive
(ex. “X-assis”).
4.2.10 Advanced functionalities
The xS10 microstepping drive series has exclusive functionalities which differentiate it
from the common marketed drives controllable through impulse train.
The following is a brief description of these functionalities, for more information see the
user’s manual of the drive.
4.2.10.1 Gate
☺
The Gate function is useful to control more drives with one only step signal (generated for
example by a PLC or by an axis control board).
After having selected the Gate option it is sufficient to choose the signal to be used to
enable or not the reception of the impulses applied to the STEPIN input.
In the below image, for example, it has been selected the ENABLE signal.
The last necessary operation consists to define the enable signal conditioning amongst
the Direct, Inverted, Active, Inactive options. For more information see paragraph 4.2.9.4
Input signals conditioning.
Take present that the chosen signal for the Gate function continues to perform also its
natural function and that consequently it could be necessary to intervene in the Control
Signals frame to set it as Active or Inactive.
4.2.10.2 Oscillator
☺
The Oscillator function allows to control the motor rotation through a start/stop signal
instead of through the impulse train. Note that when the oscillator is not active the
STEPIN input performs its natural function.
As displayed in the below image, to set the oscillator it is sufficient to select the Oscillator
option and to define the signal, and its conditioning (see paragraph 4.2.9.4 Input signals
conditioning), which will have to be used to command the motor rotation.
25
Operativeness
UDP Commander
In the central part of the frame it is possible to define two different frequencies
generated by the oscillator which will produce two different motor rotation speeds,
according to how the step resolution has been set (see paragraph 4.2.9.2 Resolution).
In the end, from the list on the right of the frame it is possible to choose the signal to be
used to select one between the two available frequencies. When the signal is inactive
the oscillator is set to Frequency 1, when the signal is active the oscillator will use the
Frequency 2. Also this signal can be conditioned as the previous ones (see paragraph
4.2.9.4 Input signals conditioning).
4.2.11 Information and diagnostics
The Drive status frame gives a complete view on the alarms eventually present, on the
inputs and outputs status and on the hardware and software revisions of the drive.
Inputs and outputs
Motor
Alarms and protections
Information
4.2.11.1 Inputs and outputs
The Inputs/Outputs area shows the active or inactive status of each single I/O.
4.2.11.2 Motor
The Motor frame allows to know in real time the status of the motor.
4.2.11.3 Alarms and protections
The Alarms/Protections area changes its color if at least an alarm is present and a
message explaining the problem found
26
UDP Commander
Operativeness
4.2.11.4 Information
The Information frame shows the revision of the product’s hardware, of the Loader (a
software that allows the update of the product) and of the firmware together with the
drive serial number.
Below the configuration line there is the name of the configuration (see the paragraph
4.2.9.6 Configuration name) and the date and hour in which the configuration has been
written in the drive (this information are taken from the clock of the PC).
4.3 DS30 and DS5x series drive setting and programming window
To access to this window connect to or select a drive belonging to the DS30 or DS5x
series.
The window is divided into three frames. The one on the left contains the instruction
blocks which compose the application program, high on the right there are the
programming tools, while the frame on the right bottom displays in real time the status of
the drive.
In the fields that accept numerical values it is possible to use also the hexadecimal format
preceding the number with the prefix “0x”. For example 0x10, 0xA5, 0xF2DC, etc. are
valid hexadecimal numbers.
27
Operativeness
UDP Commander
Copy and remove the selected block
New application program
Copy the selected block
Open the application program
Insert the copied block
Save the application program
Information on the drive
Back to program section form
Export application program in
text format
Compile the application program
Download the application
program into the drive
Import application program in
text format
Field BUS setup
Settings
LAM Technologies
Quit the program
Status bar
Block number
Block enable
28
Diagnostics
Application program
Programming
tools
UDP Commander
Operativeness
4.3.1
New application program
Clicking on the New application program button the application program eventually
present is deleted and the programming tools return to their default status.
4.3.2
Open the application program
Clicking on the Open the application program button it is possible to upload a file
containing an application program previously saved.
4.3.3
Save the application program
Clicking on the Save the application program button it is possible to save the application
program and all the associated parameters to be able to successively upload them and
quickly set other drives in the same way.
☺
4.3.4
Export application program in text format
Clicking on the Export application program in text format button it is possible to save the
program in text format, for example to successively print it.
4.3.5
Copy and remove the selected block
Clicking on the Copy and remove the selected block button the selected block (highlighted
by an sketched squared) is cut from the list and copied into the scratchpad.
4.3.6
Import application program in text format
Clicking on the Import application program in text format button it is possible to load the
program in text format. This function makes it possible to modify the program externally
using any text editor.
The syntax of the file must match that used for export by UDP Commander, otherwise
the import fails. If in doubt on how a particular block must be written for the import to
succeed it is recommended to export the same block and view the syntax used by UDP
Commander.
4.3.7
Copy the selected block
Clicking on the Copy the selected block button the selected block (highlighted by a
sketched squared) is copied into the scratchpad.
4.3.8
Insert the copied block
Clicking on the Insert the copied block button the block present in the scratchpadgets
ready to be inserted (the mouse punter changes).
29
Operativeness
4.3.9
UDP Commander
Information on the drive
Clicking on the Information on the drive button it appears a window that includes the
characteristic data of the connected drive as displayed in the below image.
Drive
information
User program
information
4.3.9.1
Drive information
The Drive information frame shows the hardware revision of the device , the revision of
the installed Loader, the firmware revision and the serial number of the drive.
4.3.9.2 User program information
In the User program information frame there are the description and the revision of the
user program assigned through the Configuration panel inside the Programming tools
(for more information see paragraph 4.3.25.6 Configuration).
The last two rows show the date and the hour in which the user program has been
download into the drive (this information are related to the PC clock).
4.3.10 Back to program selection form
Clicking on the Back to program selection form button the window is closed to go back to
the main one where it is possible to make the manual selection of the product or to make
the connection with the same.
4.3.11 Compile the application program
Clicking on the Compile application program button the application program is compiled
and ready to be transferred in the drive. In this phase eventual errors, such as for
example the lack of a jump destination label, are notified through pop up messages.
4.3.12 Download the application program into the drive
Clicking on the Download the application program into the drive button the compiled
application program is transferred into the memory of the drive to be executed.
At the end of the transfer UDP Commander predisposes itself for execution and debug of
the user program (for more information see paragraph 4.4 DS30 and DS5x series drive
execution window).
30
UDP Commander
Operativeness
4.3.13 Field BUS setup
The Field BUS setup button is activated when a drive belonging to the DS5x series is
connected and it allows to access the communication parameters configuration window.
Drive Address
Protocol
Data format
Delay
Configure
Abort
4.3.13.1 Drive address
It allows to assign the drive identification address to the net between 1 and 247. The
control master will use that value each time it will have to communicate with the drive.
4.3.13.2 Protocol
It allows to select the communication protocol.
4.3.13.3 Data format
Inside the Data format frame there are 4 menus which allow to select the communication
baud rate, the parity, the number of the data bits and the number of the stop bits.
To successfully connect to the drive is necessary to setup the same data format exactly
alike the one in use in the control master.
4.3.13.4 Delay
In some physical layers, as for example RS485, the communication is half duplex type. In
these cases the master transmits the message to the drive and successively puts itself in
hearing the reply. In some master devices the time necessary to pass from transmission
to reception can be of many ms and in this case there is the possibility that the reply sent
by the drive is lost as too quick. Setting a delay it is possible to postpone the drive reply
transmission to let the master device put itself in reception mode.
31
Operativeness
UDP Commander
4.3.13.5 Configure
Clicking on the Configure button the bus configuration is permanently transmitted into
the drive.
4.3.13.6 Abort
Clicking on the Abort button the configuration window is closed without modifying the
configuration present in the drive.
4.3.14 Settings
Clicking on the Settings button a window will appear allowing to set up the UDP
Commander behaviour.
Skip download
Overwrite warning
4.3.15 Skip download
With this option enabled the download of the program will not be executed if in the drive
is already loaded the same version. In this way it is possible to view the activity of the
program and access the contents of registers and variables without interfering with the
normal functioning of the drive.
4.3.16 Overwrite warning
Selecting this option a message will promptly notify when the program present in the
drive is going to be overwritten.
4.3.17 LAM Technologies
Clicking on the LAM Technologies button an image with all the company contacts will
appear.
4.3.18 Program Quit
Click on the Program Quit button to quit the UDP Commander.
4.3.19 Status bar
It gives information on last operation executed.
4.3.20 Application program
The frame includes all the instruction blocks composing the application program.
32
UDP Commander
Operativeness
4.3.21 Block number
It is a progressive number that identifies the instruction block.
4.3.22 Block enable
If flagged it includes the instruction block into the compiling process. If not flagged the
block is not compiled and therefore not executed.
This functionality can be useful to exclude some block without having to take them off of
the program.
4.3.23 Information and diagnostics
Inside the frame there are the information about the inputs and outputs status, both
digital and analog, the motor status and the presence of eventual alarms.
4.3.24 Programming tools (introduction)
From the programming tools area is possible to choose the instruction blocks that placed
in sequence will give origin to the application program.
Some fields and buttons are common to all the instruction block as displayed in the below
image.
Block entry label
Update
Clear all
Insert
Comment
33
Operativeness
UDP Commander
4.3.24.1 Block entry label
In this field can be inserted an alphanumeric string useful to identify the block (for
example to execute a jump to itself).
4.3.24.2 Update
Clicking on the Update button the block highlighted in the application program space (see
paragraph 4.3.20 Application program) is replaced with the block activated in the
programming tools.
4.3.24.3 Clear all
Clicking on the Clear all button the whole content of the instruction block activated in
the programming tools is set to the default value.
4.3.24.4 Insert
Clicking on the Insert button it is possible to insert the instruction block in the space on
the left reserved to the application program.
4.3.24.5 Comment
It is a field where it is possible to insert a comment to describe the functionality
performed by the block or to note down important information.
4.3.25 Programming tools (details)
The following image shows the various tabs which contain the programming tools and the
available configurations.
Math
Jump or wait
Assignment
34
Logic operations
Variables
Configuration
UDP Commander
Operativeness
4.3.25.1 Assignement
The tab contains three under tabs which allow to select as much different instruction
blocks. .
Function
Conditioning
Always
Register or
destination user
variable
Numeric value,
constant, user
variable or
register to be
assigned
4.3.25.1.1
Always
Selecting the Always tab it is possible to insert an assignment block able to assign to a
register or user variable an absolute value (a number) or the content of another register
or variable.
It is possible to assign up to 4 registers or user variables at time in each instruction block.
To executer a greater number of assignments it is sufficient to put in cascade more
instruction blocks.
Opening the menu on the left of the sign “=” it is possible to choose the register or
destination variable (alternatively it is possible to digit the name manually) while in the
menu on the right it is possible to digit the value to assign or to choose it from the ones in
the list.
4.3.25.1.2 Conditioning
☺
The assignment conditioning is a very useful feature that allows to assign a value to a
register or a variable only if the specified condition is true. It is also possible to define a
second optional value which is assigned to the register or variable if the condition is false
(else case). . If the optional value is not specigied, and the condition is false, the register
or the variable remain unchanged.
35
Operativeness
UDP Commander
Numeric value,
constant, user
variable or register
assigned if the
condition is true
Register or
destination user
variablee
Condition
Numeri value,
constant, user
variable or register
assigned if the
condition is false
4.3.25.1.3 Function
Selecting the Function tab it is possible to insert one of the available functions that can
be selected from the list.
Function List
36
UDP Commander
Operativeness
4.3.25.2 Jump or wait
The tab contains 4 under tabs which allow to select as many different instruction blocks.
Return
Delay
Compare
Always
Jump
Call
Jump
destination
4.3.25.2.1 Always
Selecting the Always tab it is possible to insert a block which will generate a jump to
another block (the destination block) with the entry label (for more information see
paragraph 4.3.24.1 Block entry label) exactly alike to the alphanumeric string present in
the Jump destination field.
The Jump destination field can be manually compiled or can be selected from one of the
labels in the dropdown list (the list is automatically updated each time a block is
inserted).
The Jump or Call option allows to choose if to execute a jump without return or a jump
with return. In this last case the drive memorizes the identifying code of the block
subsequent to the jump instruction (return block) and when it meets the Return
instruction block the execution of the program turns back to the return block, i.e. the
block subsequent to the block which generated the jump (note that the reference to the
return block is overwritten each time a Call jump is executed , therefore the Return
instruction is always referred to the last Call executed).
4.3.25.2.2 Compare
Selecting the Compare tab it is possible to insert an instruction block which will execute
the jump only if a predetermined condition is true or will wait till when the specified
condition becomes true (Wait option).
37
Operativeness
UDP Commander
Wait
Jump
Call
First operand
Comparison type
Second operand
Jump
destination
The Jump or Call option allows to choose if to execute a jump without return or a jump
with return. In this last case the drive memorizes the identifying code of the block
subsequent to the jump instruction (return block) and when it meets the Return
instruction block the execution of the program turns back to the return block, i.e. the
block subsequent to the block which generated the jump (note that the reference to the
return block is overwritten each time a Call jump is executed, therefore the Return
instruction is always referred to the last Call executed). Also note that the jump will be
executed only if the equation defined by the First operand, by the Comparison type and
by the Second operand is true, on the contrary the execution of the program will
continue with the next instruction block.
Selecting the Wait option the block will suspend the execution of the program till when
the equation defined by the First operand, by the Comparison type and by the Second
operand is true, when it happens the execution of the program continues with the next
block.
The First operand, the Second operand or the Jump destination field can be manually
compiled or chosen in the dropdown list.
38
UDP Commander
Operativeness
4.3.25.2.3 Delay
Selecting the Delay tab it is possible to insert a block which will suspend the execution of
the program for the time set in the Delay time field. In this field it is possible to digit a
numeric value or to select one in the dropdown list. It is also possible to select a register
or an user variable, in this case the suspension term will depend to the value contained in
the register or in the variable. Each unit is equivalent to 1ms and it is possible to set
values between 0 and 32000.
Wait time
39
Operativeness
UDP Commander
4.3.25.2.4 Return
Selecting the Return tab it is possible to create two different instruction blocks; the first
will make jump to the return block while the second will allow to setup the return block
itself.
When the Return option is selected the instruction blocks gives back the control to the
return block (the instruction block subsequent to the one that has executed the Call)
while if the Return label option is selected the instruction block will modify the reference
to the return block, setting it as specified in the Return block field. The Return block field
can be manually compiled or can be selected one label in the dropdown list (the list is
automatically updated each time a block is inserted).
Return block
40
UDP Commander
Operativeness
4.3.25.3 Math
The Math tab allows to create an instruction block able to execute mathematical
calculations with numeric constants, registers and user variables.
The calculation applied is ((A x B) / C) + D
If a simpler calculation is needed it is sufficient to leave empty the operand fields not
used.
The first, the second and the fourth operand can be numbers, registers or user variables.
The division coefficient (third operand) must be necessarily a power of 2 chosen in the
dropdown list.
Register or
destination user
variable
A-First operand
C-Third operand
B-Second
operand
D-Forth operand
41
Operativeness
UDP Commander
4.3.25.4 Logic operations
This tab allows to create an instruction block to handle bits of registers or of user
variables.
One only instruction block can execute up to two logic operations at a time. The
operation applied is:
(A opLogic B) opLogic C
Where A, B and C are three operands and opLogic is the chosen logic operation.
The SHIFT logic operation shift the content of the operand on the left by the number of
bits specified by the operand in the right. In the case of SHIFT_R the bits are shift towards
right, while in the case of SHIFT_L the bits are shift towards left (the remaining bits are
put to 0).
Register or
destination user
variable
Logic
operation
A-First operand
B-Second operand
C-Third operand
42
Logic
operation
UDP Commander
Operativeness
4.3.25.5 Variables
The Variables tab allows to declare user variables which can be freely used inside the
instruction blocks to compose the application program.
The Variable name field must be filled with the mnemonic assigned to the variable, while
from the Dimension dropdown list is chosen the dimension in byte of the variable itself.
It is possible to choose a dimension among 1, 2, 3 or 4 bytes. The following chart displays
the value range that the variable can contain according to the dimension:
Dimension
1 byte
2 bytes
3 bytes
4 bytes
Min
-128
-32768
-8388608
-2147483648
Max
+127
+32767
+8388607
+2147483647
Clicking on the Insert button the variable is inserted in the last free position in the
variables list.
When a variable is highlighted in the variables list it is possible to delete it clicking on the
Delete button or to move it through the Move up and Move down buttons.
The Address column, in the variables list, displays the assigned address of each single
variable. Such value is essential to access through the field bus to the variable itself. The
address is automatically assigned and it depends to the variable dimensions and to the
position in the list.
Move up
Move down
Address
Delete
Size
Update
Insert
Name
43
Operativeness
UDP Commander
4.3.25.6 Configuration
The Configuration tab includes several options which can be permanently stored inside
the drive but that cannot be changed during the execution of the program.
There are totally three under tabs.
Fault
Miscellaneous
Information
4.3.25.6.1 Fault
☺
The Fault under tab allows to define the action necessary to remove an alarm or a fault
signal.
•
Automatic, the drive is automatically enabled at the end of the alarm condition.
•
Permanent, the alarm signal remains till the drive is powered off.
•
ENABLE, the alarm signal remains till the drive is disabled.
•
Disabled, the alarm signal is suppressed (for security reasons some alarms cannot
be deactivated).
For more information on the several alarms and faults see the user’s manual of the drive.
44
UDP Commander
Operativeness
4.3.25.6.2 Miscellaneous
The Miscellaneous undertab contains the following settings
•
•
•
•
Multiplication coefficient of the acceleration
Activation of automatic variable save at shutdown
Setting of the threshold voltage for the analog inputs used as digital inputs
Setting of the current waveform
Variables save at
shutdown
Acceleration and
deceleration
coefficient
Threshold
voltage analog
inputs used as
digital inputs
Standard
Custom
Shape
Current
waveforme
Offset
4.3.25.6.2.1 Acceleration and deceleration coefficient
Selecting the “x 4” option, in the Acceleration and deceleration time frame, the
acceleration and deceleration values set in the program are quadrupled.
4.3.25.6.2.2 Variables save at shutdown
Enabling the save of variables at shutdown the drive will automatically copy in the flash
memory the value of all the variables whenever the under voltage alarm is activated..At
the next start of the program the variables will be loaded with the value previously saved
in the flash memory.
The download of a new program will delete the values saved in the flash memory.
For more information see also the user’s manual of the drive.
4.3.25.6.2.3 Threshold analog inputs used as digital inputs
the analog inputs can be used also as digital inputs and it is possible to define the
discrimination threshold voltage between 0 and 1 logic selecting it from the list.
45
Operativeness
UDP Commander
4.3.25.6.2.4 Current waveform
The Current waveform frame allows to intervene on the current waveform the drive
supplies to the motor.
☺
This feature, very rare to find in the common marketed drives, allows to better adapt the
drive to the motor to obtain a smooth rotation.
Selecting the Standard option the current waveform the drive supplies to the motor is a
pure sinusoidal wave. Selecting on the contrary the Custom option the Shape and Offset
cursor keys are activated and allow to personalized the current waveform.
The Shape cursor key intervenes on the harmonic content of the current supplied to the
drive. The optimal regulation value must be experimentally found and depends to the
motor type. For the LAM Technologies motors this value is usually included between 0
and -4.
The Offset cursor key allows to intervene on the current offset in respect to the 0.
Usually this parameter does not need to be modified and can be left at the default value
(zero).
46
UDP Commander
Operativeness
4.3.25.6.3 Information
The Information under tab can be used to assign a description and a revision number to
the application program.
The Description field can contain a 32 characters alphanumeric string which is memorized
inside the drive and that can be reread connecting with the drive itself.
The Description and the Revision are memorized inside the drive when the application
program is transferred. The revision is stored in the xx.yy format where xx is the number
inserted in the Revision field on the left and yy is the number in the field on the right.
The Notes field is not memorized inside the drive but it is saved together with the
program file and can be useful to take notes of a description of the program, of eventual
changes made, etc.
Description
Revision
Notes
47
Operativeness
UDP Commander
4.4 DS30 and DS5x series drive execution window
☺
After that the application program has been compiled and downloaded inside the drive,
the configuration window changes to supply the tools useful for the execution and the
debug of the program.
Start the application program execution
Back to the edit mode
Start until the selected box is reached
Execute a single instruction block
Suspend the application program execution
In execution
Insert / remove break point
Force the first block to be executed
Perform the application program reset
Registers and
user variables
monitor
48
Program
execution
status
UDP Commander
4.4.1
Operativeness
Back to the edit mode
Clicking the button the execution session ends and the program turns back to the edit
mode.
In case the application program is in the RUN status the execution continues even getting
out from the execution session.
4.4.2
Start the application program execution
Clicking on the button the application program execution starts form the block indicated
by the In execution blue arrow.
Usually the application program starts automatically within a second from the drive
power-on.
4.4.3
Start until the selected box is reached
The button starts the application program execution that will end when the selected
block is reached (highlighted by a sketched frame).
4.4.4
Execute a single instruction block
Clicking on the button only the instruction block indicated by the In execution blue arrow
will be executed.
4.4.5
Suspend the application program execution
Clicking on the button the application program execution is suspended.
4.4.6
Insert / remove break point
The button allows to insert a break point (i.e. an interruption point) on the selected
instruction block or to remove it if already present.
If during the execution the program meets a block with an active break point, the
execution is suspended.
4.4.7
Force the first block to be executed
During the test and debug operations could be useful to force the program execution
starting from a particular instruction block. Clicking the button with a selected instruction
block this becomes the next block to be executed.
4.4.8
Perform the application program reset
The button allows to reinstate the content of variables and registers to the default status,
as if the drive had just been powered on.
4.4.9
Registers and user variables monitor
The Registers and user variables monitor is a very powerful tool which allows to supervise
in real time the value of the registers or of the user variables (selecting the proper tab).
This makes possible to observe how the content of registers and user variables changes
during the execution of the several instruction blocks and/or the access of the field bus.
☺
The value of each register is displayed in decimal, hexadecimal and binary format.
49
Operativeness
UDP Commander
Making a double click on a register (accessible in writing mode) it appears a little window
which allows to arrange up to 4 values. Each field has an its own Set button which allows
to quickly write down the values of the register or variable indicated by the Name label.
Name
Set
Close
4.4.10 Program execution status
Inside the Program execution status frame there is the Follow the program box. If
selected, the In execution blue arrow will show the current block in execution in real
time. Take present that because of the high execution speed of the application program
the In execution arrow will not be able to faithfully follow each single executed
instruction block; anyway the given indication will be useful to know which section of the
program is in execution from time to time.
The Executing block field specifies the number of the instruction block in execution while
the Status label indicates if the program is in execution, in stopped or ended (respectively
RUN, STOP or END).
Follow the program
Executing block
Status
50
UDP Commander
Exercising
5 Exercising
The follow exercise shows how is quick and simple to program the drives belonging to the
DS30 and DS5x series. The program that will be written will make the motor move
backwards and onwards of one rev.
To be able to complete the exercise we need one programmable drive (DS30 or DS5x
series) correctly supplied, one motor compatible with the drive, the UDP30 interface
correctly installed (green led on) and at the end a copy of the UDP Commander software
installed on the PC (for more information see chapter 3 Installation).
Connect the UDP30 to the drive, already supplied, and click on Connect button in the main
window (for more information see chapter 4.1.3 Connect). The status bar will show the
result of the connection, as in the below image.
If the connection has successfully succeeded it is possible to click the Change drive
configuration button to access the programming window.
In the Assignment tab (for more information see chapter 4.3.25.1 Assignement) select in
the first dropdown list the ControlMode register, then select in the dropdown list on the
right the POSITION_CNTMD constant. In the second dropdown list select the bEnable
register, then digit in the space at the right of “=” the value 1.
51
Exercising
UDP Commander
Successively click on the Insert (for more information see chapter 4.3.24.4 Insert). The
mouse punter will become an arrow. Move it to the left area and click to insert the block.
Click now on the Clear all button (for more information see chapter 4.3.24.3 Clear all) and
select, from the first dropdown list of the Assignment tab, the TargetPos register. In the
field on the right of the sign “=” digit the value 25600.
In the Block entry label field (for more information see chapter 4.3.24.1 Block entry label)
digit the mainLoop string, as in the below image:
Click on the Insert button and position the new block under the previously inserted.
Select now the Wait option inside the Compare under tab, inside the Jump or Wait tab (for
more information see chapter 4.3.25.2 Jump or wait ).
Select from the first dropdown list the bInPosition register, from the central dropdown list
select the operator “=” and at then digit 1 in the field on the right.
Remove the mainLoop string from the Block entry label, click then on the Insert button to
position again the block under the one previously inserted.
Move again to the Assignment tab and insert a further instruction block assigning to the
TargetPos register the value 0.
After having positioned the block, select again the Jump or Wait tab and insert a block
exactly alike the previous one (the field should be still filled so, definitively, it is sufficient
to click on the Insert button).
52
UDP Commander
Exercising
Remaining inside the Jump or Wait tab, select the Always under tab (for more information
see chapter 4.3.25.2.1 Always). From the Destination jump label dropdown list select the
mainLoop label (as an alternative it is possible also to digit it in full). Then click on the
Insert button to insert this last block at the end of all the others.
At the end of this operation the area reserved to the Application program will appear as
follows:
Click on the Compile the application program button (for more information see chapter
4.3.11 Compil) to compile the application program and to arrange to be transferred into
the drive. At the end the Status bar will show the result of the operation and the quantity
of memory used.
53
Exercising
UDP Commander
Click on the Download the application program button (for more information see the
chapter 4.3.12 Download the application program into the drive) to transfer the
application program into the drive.
At the end of the transfer the UDP Commander will be in execution mode.
Click on the Start the application program execution to start the execution of the program
(for more information see chapter 4.4.2 Start the application program execution); the
motor will start to rotate onwards and backwards of one rev.
Clicking on the Suspend the application program execution button (for more information
see per chapter 4.4.5 Suspend the application program execution) the execution of the
program can be suspended. Clicking on the Execute a single instruction block button (for
more information see chapter 4.4.4 Execute a single instruction block) the program can be
made to advance one block at the time, to observe its behavior.
54
UDP Commander
Exercising
Making a double click on one of the registers contained in the Register and user variables
monitor area (for more information see chapter 4.4.9 Registers and user variables
monitor) the value of any register can be modified.
Try and make a double click on the TargetPos register and insert, in the first field of the
window that appears, the value 51200 then click on Set; the motor will move immediately
to the 51200 position. Insert now in the second field the value 0 and click on the
corresponding Force the first block to be executed button; the motor will rotate in inverse
sense to reach the quote 0. Click on Close to quit the window.
To quit from the execution mode it is sufficient to click on the Back to the edit mode (for
more information see chapter 4.4.1 Back to the edit mode).
55
UDP Commander
Exercising
6 Command line use
UDP Commander can be used from command line and this makes it suitable to be invoked
by other programs or simple batch file.
When UDP Commander is used from command line no output is shown on the video and
no string is sent to the console. Upon completion UDP Commander simply returns an exit
code (error code) that indicates whether the requested operation succeeded or not. The
program or batch file that invoked UDP Commander can use this information to take the
appropriate action.
The operations that UDP Commander can do when launched from the command line are:
•
•
•
Updating of the firmware of the drive
Configuring and / or setting of the drive
Setting of the fieldbus communication parameters (valid only for xS5x drives
series)
When you start UDP Commander from command line the UDP30 interface must be already
connected, the PC's USB port and the drives properly installed (green colored LED ON, for
more information see the UDP30 interface instruction manual), and the DUP port cable
already connected to the drive.
If more than one UDP30 interface are connected to the PC it is possible to specify the serial
number of the device you want to use, to communicate with the drive using the /udp
parameters.
Finally, UDP Commander can perform multiple operations in sequence simply specifying
multiple parameters on the command line.
6.1 /udp (UDP30 interface serial number)
The /udp parameter indicates to UDP Commander the specific UDP30 interface to use to
communicate with the drive. If the /udp parameter is omitted UDP Commander will use
the first available UDP30 interface connected to the PC.
The serial number of the UDP30 interface you want to use must be specified after the /udp
parameter and preceded by the character “:”, as shown in the following example:
UDPCommander.exe /udp:10071688
In this way UDP Commander will use exclusively the UDP interface with serial number
10071688 to connect to the drive.
6.2 /frm (firmware update)
The /frm parameter specifies to UDP Commander to update the firmware of the drive.
57
Exercising
UDP Commander
The file containing the firmware must be specified after the /frm parameter and preceded
by the character “:”. If the file is located in a folder different from the UDP Commander
installation one, it is then necessary to specify the full path of the file, as shown in the
following example:
UDPCommander.exe /frm:C:\work\samplecmdline\xs10xx_r115.frm
UDP Commander will update the firmware of the drive with the one contained in the file
xs10xx_r115.frm present in the folder C:\work\samplecmdline\.
The firmware update process takes about 40 seconds after which UDP Commander will
return the exit code 0 if the firmware has been correctly updated, or a different value if an
error has been reported (for more information about the possible return codes see
chapter 6.5 Error codes).
6.3 /prg (setting or configuring)
The /prg parameter indicates to UDP Commander to configure (xS10 drives series) or set
(xS30 and xS5x drives series) the drive with a specific user’s program.
The file containing the configuration or the user’s program must be specified after the
/prg parameter and preceded by the character “:”. If the file is located in a folder different
from the UDP Commander installation one it is then necessary to indicate the full path as
shown in the examples below:
UDPCommander.exe /prg:C:\work\samplecmdline\test1cmdl.dup
UDPCommander.exe /prg:C:\work\samplecmdline\DS1098s1.dcf
Launching the first command the UDP Commander will set the drive (xS30 or xS5x series)
with the user’s program test1cmdl.dup present in the folder
C:\work\samplecmdline\, while launching the second command UDP Commander
will configure the xS10 series drive with the configuration file DS1098s1.dcf (also
contained in the folder C:\work\samplecmdline\).
The configuration or setting process takes about 10 seconds after which UDP Commander
will return the exit code 0 if the drive has been correctly set or configured, or a different
value if an error has been reported (for more information about the return codes see
chapter 6.5 Error codes).
Note that the UDP Commander automatically compiles the program before sending it to
the drive and converts it from the xS30 series to the xS5x series and vice versa if necessary.
Running UDP Commander with the /prg parameter it is possible to specify also the
following subparameters:
•
58
/run, if it is present at the end of the setting process, the program downloaded
into the drive is immediately executed. If the /run parameter is not present the
program will be launched at the next restart of the drive.
UDP Commander
Exercising
•
/mrg, allows to specify a correspondence text file which will be used, before the
compiling, to replace one or more parameters in the user’s program. More, the
/mrg option allows to modify the behavior of an user’s program or parameterize it
for each single application or drive.
Below is a more detailed description of the /run and /mrg parameters.
6.3.1
/run (user’s program execution)
The /run parameter can be specified only if the /prg is present too.
At the end of the setting process (xS30 and xS5x series drives) UDP Commander verifies if
the /run parameter has been specified and executes the downloaded program, if present.
Without the /run parameter the user’s program downloaded into the drive will be
executed at the next restart of the drive.
6.3.2
/mrg (replacement of the user’s program parameters)
The /mrg parameter can be specified only if the /prg parameter is present too.
The correspondence file, containing the list of parameters to be replaced in the user’s
program, must be specified after the / mrg parameter and preceded by the character “:”. If
the file is located in a folder different from the UDP Commander installation one, it is then
necessary to indicate the full path as shown in the example below:
UDPCommander.exe /prg:C:\work\samplecmdline\test1cmdl.dup
/mrg:C:\work\samplecmdline\app1cst1.txt
UDP Commander will set the drive ( xS30 or xS5x series) with the user’s program
test1cmdl.dup present in the folder C:\work\samplecmdline\ after having
replaced the parameters according to the correspondence contained in the file
app1cst1.txt, also present inside the folder C:\work\samplecmdline\.
The correspondence file must be in text format and must use a different command for
each correspondence. The name of the parameter present in the user’s program to be
replaced must be followed by the character “:” which will be followed by the value object
of the replacement.
For example, if the correspondence file contains the following command:
MaxHomeTravel:1200000
and the user’s program the following block:
Jump to homeNotFound if:
Position > MaxHomeTravel
the drive is set as if the program block were written:
59
Exercising
UDP Commander
Jump to homeNotFound if:
Position > 1200000
In other words, before compiling, UDP Commander will replace all the parameters of the
user’s program also present in the correspondence file with the relative value.
Note that there shall not be any distinction between registers, variables, jump destinations
(both Jump and Call), therefore if the correspondence file contains the name of a register
(Position, for example) this will be replaced in the user’s program at each occurrence,
probably generating unexpected behaviors. For this reason it is recommended to highlight
with a very recognizable syntax, such as the use of parentheses, each parameter to be
replaced before compilation in order to make explicit, both in the program and in the
correspondence file, this intent. Consequently, the above example can be rewritten as
follows:
Correspondence file:
(MaxHomeTravel):1200000
Block of the user’s program:
Jump to homeNotFound if:
Position > (MaxHomeTravel)
In the correspondence file everything following the character “;” is ignored and therefore
it is possible to use the character “;” to insert comments as shown in the example below:
; START substitution file
(MaxHomeTravel):1200000
;Maximum travel before home not found error
; END substitution file
6.4 /bus (Field BUS configuration)
The /bus parameter indicates to UDP Commander to configure the field BUS (only for the
xS5x series drives).
The parameters which define the field BUS behavior must be specified after the / bus
parameter and preceded by the character “:”. Each parameter must be separated from
the other by the character “,”, as shown in the example below:
UDPCommander.exe /bus:prt,add,brate,prt,nbit,sbit,txdly
The following table describes the meaning of each parameter and the range of the allowed
values.
60
UDP Commander
Exercising
Parameter
Possible values
prt MODBUS-RTU
add 1..247
brate 1200
2400
4800
9600
19200
38400
prt N
E
O
nbit 8
sbit 1
txdly 0..40
Description
Protocol. Specifies the communication protocol
Address. Assigns the drive ID address on the web
Baud rate. Communication speed (bit rate)
expressed in baud.
Parity . Specifies the parity:
• N, no parity
• E, even parity
• O, odd parity
Number of data bit
Number of stop bit
Delay in the response transmission in ms
For example, launching the following command line the bus of the drive will be configured
with a Modbus-RTU communication protocol and will reply to the address 7, it will have a
baud rate of 9600baud with no parity, 8 data bits and one stop bit and at the end it will
respond to the master with 10ms transmission delay.
UDPCommander.exe /bus: MODBUS-RTU,7,9600,N,8,1,10
61
Exercising
UDP Commander
6.5 Error codes
At the end of the operations required by the command line, UDP Commander returns a
code indicating whether or not errors occurred. The exit code 0 indicates that all the
operations have been successfully completed while a value different from 0 designates
that there have been impediment to one or more operations.
The following table shows the meaning of error codes returned by UDP Commander with
some indications about the causes and the possible remedies.
Code
62
10
Description
Error in the command line
20
Error connecting with the UDP30
22
UDP30 not found
24
UDP30 with the serial number
specified not found
30
Connection with the drive failed
40
Error during loading file
50
Compile error
52
Firmware update necessary
58
60
Syntax error in the correspondence
file
Error during program download
66
Error during field BUS configuration
68
Error during firmware update
70
Unable to start the program
90
Error log file
99
Generic error
Notes
Verify the parameters syntax and if the application rules are conformity with
the instruction contained in this manual.
Verify the proper installation of the drive. Check the USB connection with the
PC and eventually replace the USB cable.
It was not possible to connect with the interface UDP30. Verify there is at
least one UDP30 interface connected to the PC with the green led ON and
that this interface is not already in use (for example by another application of
the UDP Commander program in execution).
It was not possible to connect with the UDP30 with the serial number
specified. Verify that the UDP30 interface with the serial number specified is
connected to the PC, with the green led ON and that this interface is not
already in use (for example by another application of the UDP Commander
program).
The UDP30 interface was found but it was not possible to communicate with
the drive. Verify that the UDP30 cable is properly connected to the DUP port
of the drive.
Verify to have correctly specified the type and location of the file for the
setting/configuration of the firmware and/or correspondence.
Verify the user’s program by compiling it with the windows version of the UDP
Commander. Verify that the eventual correspondence file contains all the
parameters that must be replaced in the user’s program, if one of them is not
replaced it is possible it leads to a compiling error.
One or more operations cannot be completed because the firmware currently
installed in the drive is obsolete and must be updated to the latest available
version.
Verify the syntax used in the correspondence file and make the appropriate
adjustments. Make sure that the comments are preceded by the character “;”.
Verify that the UDP30 cable is properly connected to the DUP port of the drive
and repeat the operation.
An error occurred during the configuration of the field BUS. Verify that the
UDP30 cable is properly connected to the DUP port of the drive and repeat
the operation.
An error occurred during the firmware update of the drive. Verify that the
UDP30 cable is properly connected to the DUP port of the drive and repeat
the operation.
The user’s program has been correctly transferred in the drive, but an error
occurred at the start of the program. Verify that the UDP30 cable is properly
connected to the DUP port of the drive and repeat the operation.
UDP Commander was not able to complete the requested operation because
of a problem. Inside the installation folder of the UDP Commander is a file
called log.txt containing the description of the problem occurred.
UDP Commander
Exercising
6.6 Use inside a batch file
To automate the operations UDP Commander can be launched within a batch file. At the
exit from the program the system variable ERRORLEVEL will contain the error eventually
returned by UDP Commander, or the value 0 if all the required operations were
successfully completed. Inside the batch file , the variable ERRORLEVEL can be tested to
execute further operations.
In the following example is a file batch that, evoking UDP Commander, will update the
firmware of the drive using the file xS50xx_r104.frm, then will configure the field
BUS with the Modbus-RTU protocol address 5, speed 9600baud with no parity, 8 data bits
one stop bit and 0ms of delay before sending the response to the master, therefore will set
the drive with the program app2.dup after having executed the replacements contained
in the file cstPROD.txt and then will execute the program itself. To communicate with
the drive UDP Commander will use the UDP30 interface with serial number 09401282.
At the exit of the program the variable ERRORLEVEL, containing the UDP Commander
return code (read code error) is tested and if the value is 0 the console displays the
message “SUCCESS.”. Instead, if the value contained in the variable ERRORLEVEL is
different from 0 then the message displayed is “FAIL. Error code:xx” with xx equal
to the code returned by UDP Commander.
For more information on the batch files consult the documentation of the operative
system in use.
@ECHO OFF
UDPCommander.exe /prg:app2.dup /udp:09401282 /mrg:cstPROD.txt /run /bus:MODBUSRTU,5,9600,N,8,1,0 /frm:xS50xx_r104.frm
IF %ERRORLEVEL%==0 (ECHO SUCCESS.) ELSE (ECHO FAIL. Error code:%ERRORLEVEL%)
PAUSE
63
LAM Technologies
Viale Ludovico Ariosto, 492/D
50019 Sesto Fiorentino
Firenze - ITALY
Ph. +39 055 4207746
Fax +39 055 4207651
www.lamtechnologies.com
General information [email protected]
Technical support [email protected]
Sales [email protected]
rev. 2.20