1
E-Notebook
About this document
This document is the “E-Notebook” section of the manual Chem & Bio Office®
Chem & Bio3D, Finder and E-Notebook and is made available as an excerpt for
fast downloading. To read the manual in its entirety or to download other sections,
visit:
http://www.cambridgesoft.com/services/DesktopSupport/Documentation/Manuals/Default.aspx.
Contents
NOTE: This manual begins on page 503 because page numbering is the same as in the ChemOffice 2006 complete manual.
Likewise, the chapter numbering begins with 26.
Chapter 26: Introducing E-Notebook 10.0
New Features . . . . . . . . . . . . . . . . . . . . . . . . . . . . . .
Terminology . . . . . . . . . . . . . . . . . . . . . . . . . . . . . . .
About the E-Notebook Guide . . . . . . . . . . . . . . .
Getting Started in E-Notebook . . . . . . . . . . . . . .
Logging In . . . . . . . . . . . . . . . . . . . . . . . . . . . . . . .
Start Menu Login. . . . . . . . . . . . . . . . . . . . . . . . . . .
Logging in with Internet Explorer . . . . . . . .
Navigation Overview . . . . . . . . . . . . . . . . . . . . .
Security Overview . . . . . . . . . . . . . . . . . . . . . . . .
503
504
506
506
506
506
506
507
507
E-Notebook Overview . . . . . . . . . . . . . . . . . . . . . 508
Chapter 27: Working with E-Notebook
Notebooks, Pages, Experiments, and Other
Collections . . . . . . . . . . . . . . . . . . . . . . . . . . . . . . . .
Working with the User Collection . . . . . . . . . .
Adding a New Collection to the User
Collection . . . . . . . . . . . . . . . . . . . . . . . . . . . . .
Adding a Reference within the User
Collection . . . . . . . . . . . . . . . . . . . . . . . . . . . . .
Browsing up to the User Group . . . . . . . . . .
Working with Notebooks. . . . . . . . . . . . . . . . . .
Creating a Notebook . . . . . . . . . . . . . . . . . . . .
Working with Pages and Experiments . . . . . .
Creating a Page or Experiment . . . . . . . . . . .
Creating a Page or Experiment from a
Template . . . . . . . . . . . . . . . . . . . . . . . . . . . . .
Closing and Reopening Pages and
Experiments . . . . . . . . . . . . . . . . . . . . . . . . . .
Working with the Inbox . . . . . . . . . . . . . . . . . . .
Working with Folders . . . . . . . . . . . . . . . . . . . . .
Creating a Folder . . . . . . . . . . . . . . . . . . . . . . .
Adding a Reference to the Folder . . . . . . . .
Working with the User Configuration Folder
Working with Reactants Collections . . . . . . . .
Adding a New Reactant to an Existing
E-Notebook 10
511
511
512
512
512
512
513
513
513
514
514
514
514
514
514
515
515
Reactant Collection . . . . . . . . . . . . . . . . . . . . . 515
Adding a New Reactant Collection . . . . . . . . 516
Working with Table of Contents . . . . . . . . . . . . 516
Hiding Columns . . . . . . . . . . . . . . . . . . . . . . . . 516
Showing Columns . . . . . . . . . . . . . . . . . . . . . . 516
Sorting Items in the TOC . . . . . . . . . . . . . . . . 517
Working with Templates. . . . . . . . . . . . . . . . . . . . . 517
Working with MS Office Sections,
Reactions, and other Sections . . . . . . . . . . . . . . 518
Reaction Sections . . . . . . . . . . . . . . . . . . . . . . . 518
Captured Image Sections . . . . . . . . . . . . . . . . 518
Ancillary Data Sections . . . . . . . . . . . . . . . . . . 518
Table Sections . . . . . . . . . . . . . . . . . . . . . . . . . . 519
Spectrum and Spectra Sections . . . . . . . . . . . 519
MS Word Sections . . . . . . . . . . . . . . . . . . . . . . 519
MS Excel Spreadsheet Sections . . . . . . . . . . . 519
Send2ENotebook and Send2File . . . . . . . . . . . . . 519
Working with Send2ENotebook . . . . . . . . . . . . 520
Working with Send2File . . . . . . . . . . . . . . . . . . . 521
Working Offline . . . . . . . . . . . . . . . . . . . . . . . . . . . . 522
Chapter 28: E-Notebook Features
Browsing the Collection Tree . . . . . . . . . . . . . . . . 525
Showing and Hiding Collections . . . . . . . . . . . . 525
Hiding the Collection Tree . . . . . . . . . . . . . . . . . 525
Limiting Collection Browsing. . . . . . . . . . . . . . . 525
Browsing from Home . . . . . . . . . . . . . . . . . . . . . 526
Browsing at a Higher Level. . . . . . . . . . . . . . . . . 526
Browsing the Entire Collection Tree . . . . . . . . 527
E-Notebook Workflows . . . . . . . . . . . . . . . . . . . . . 527
Reactions in E-Notebook . . . . . . . . . . . . . . . . . . 528
Drawing and Analyzing Reactions . . . . . . . . 528
Drawing a Structure or Reaction . . . . . . . . . . 528
Expanding the Drawing Window . . . . . . . . . 528
Working with ISIS/ Draw . . . . . . . . . . . . . . . . . 528
Drawing a Structure or Reaction . . . . . . . . . . 529
Contents
Administrator
Working with the Name=Struct Feature . . . . . 529
Working with the Reaction Toolbar . . . . . . . . . 529
Adding Structures with the Reaction
Toolbar . . . . . . . . . . . . . . . . . . . . . . . . . . . . . . . 530
Filtering Acronyms with the Reaction
Toolbar . . . . . . . . . . . . . . . . . . . . . . . . . . . . . . . 531
Defining a New Acronym with the
Reaction Toolbar . . . . . . . . . . . . . . . . . . . . . . 532
Deleting a Structure with the Reaction
Toolbar . . . . . . . . . . . . . . . . . . . . . . . . . . . . . . . 532
Working with the Stoichiometry Table . . . . . . 532
Adding Information to the Stoichiometry
able . . . . . . . . . . . . . . . . . . . . . . . . . . . . . . . . . . . 533
Removing Reactants and Products from
the Stoichiometry Table . . . . . . . . . . . . . . . . . 534
Working with Salts and Solvates in a
Reaction Section . . . . . . . . . . . . . . . . . . . . . . . 534
Working With Batch Explorer . . . . . . . . . . . . . . 535
Panning Experiments in Batch Explorer . . . 537
Flipping Experiments in Batch Explorer . . . 537
Saving Experiments as Bitmap in Batch
Explorer . . . . . . . . . . . . . . . . . . . . . . . . . . . . . . 538
Copying Experiments in Batch Explorer . . 538
Printing Experiments in Batch Explorer . . . 539
Selecting Experiments in Batch Explorer . . 539
Working with Autotext . . . . . . . . . . . . . . . . . . . . 540
Inserting Reactants and Products with
AutoText . . . . . . . . . . . . . . . . . . . . . . . . . . . . . . 540
Adding Items from the AutoText Pane . . . . 541
Inserting Links with Autotext . . . . . . . . . . . . 542
Inserting Custom Autotext . . . . . . . . . . . . . . . 542
Creating New Autotext Definitions . . . . . . . 543
Working with Solvents in a Reaction Section . 544
Using the Inbox . . . . . . . . . . . . . . . . . . . . . . . . . . . . 545
Working Offline . . . . . . . . . . . . . . . . . . . . . . . . . . 546
Working With the Offline Folder . . . . . . . . . 546
Creating an Offline Folder . . . . . . . . . . . . . . . 547
Chapter 29: Working with Data in
E-Notebook
Working with Chemical Structure Data . . . . . . 549
Drawing a Structure . . . . . . . . . . . . . . . . . . . . . 549
Expanding the Drawing Window . . . . . . . . . 549
ContentsCambridgeSoft
Working with Images in Chemical Structure Fields
550
Inserting an Image a Structure . . . . . . . . . . . 550
Annotating the Image . . . . . . . . . . . . . . . . . . . 550
Working with Database Tables . . . . . . . . . . . . . 550
Working with MS Excel Spreadsheets . . . . . . . 550
Importing an MS Excel document . . . . . . . . 551
Working with Captured Image Sections . . . . . 551
Importing and Exporting a PDF File . . . . . 551
Importing an Image File . . . . . . . . . . . . . . . . . 552
Annotating an Image File . . . . . . . . . . . . . . . . 552
Working with Image Viewer Sections . . . . . . . 553
Importing and Exporting an Image File . . . 553
Working with MS Word Sections . . . . . . . . . . . 554
Working with MS PowerPoint Slideshow
Sections. . . . . . . . . . . . . . . . . . . . . . . . . . . . . . . . . 554
Importing and Exporting an MS PowerPoint
slideshow . . . . . . . . . . . . . . . . . . . . . . . . . . . . . 555
Working with Property Lists . . . . . . . . . . . . . . . 555
Adding Properties to Property Lists . . . . . . 556
Removing Properties from a Property List 556
Setting and Editing Values in a Property
List . . . . . . . . . . . . . . . . . . . . . . . . . . . . . . . . . . 557
Working with Enumerated Lists in Property
Lists . . . . . . . . . . . . . . . . . . . . . . . . . . . . . . . . . . 558
Working with Numerical Units in Property
Lists . . . . . . . . . . . . . . . . . . . . . . . . . . . . . . . . . . 558
Creating a Reference within a Property List 559
Working with Spectrum and Spectra Sections 560
Adding a Spectrum . . . . . . . . . . . . . . . . . . . . . 562
Replacing a Spectrum . . . . . . . . . . . . . . . . . . . 562
Zooming in on a Spectrum Peak . . . . . . . . . 562
Other Fields in a Spectrum Section . . . . . . . 562
Working with Styled Text . . . . . . . . . . . . . . . . . . 562
Working with Subsections . . . . . . . . . . . . . . . . . 563
Working with Subsections in Button View 563
Working with Ancillary Data Sections. . . . . . . 564
Working with Table Sections. . . . . . . . . . . . . . . 565
Adding Columns and Rows to a Table . . . . 565
Removing Columns and Rows from a
Table . . . . . . . . . . . . . . . . . . . . . . . . . . . . . . . . . 566
Organizing Columns and Rows in a Table . 566
Resizing Columns and Rows in a Table . . . 567
Pivoting a Table . . . . . . . . . . . . . . . . . . . . . . . . 567
Adding Information to a Table Cell . . . . . .
Working with Structures and Images in
Tables . . . . . . . . . . . . . . . . . . . . . . . . . . . . . . . .
Changing Information in a Table Cell . . . . .
Working with Numerical Units in Tables . .
Creating a Reference within a Table Cell . .
Blocking of References in Tables . . . . . . . . .
Validation of Values in Tables . . . . . . . . . . .
Working with URL Displays . . . . . . . . . . . . . . .
Rendering in E-Notebook . . . . . . . . . . . . . . . . . . .
Exporting . . . . . . . . . . . . . . . . . . . . . . . . . . . . . . . .
Printing . . . . . . . . . . . . . . . . . . . . . . . . . . . . . . . . . .
E-Signatures . . . . . . . . . . . . . . . . . . . . . . . . . . . . .
Signing and Closing . . . . . . . . . . . . . . . . . . . . .
Reviewing a Document . . . . . . . . . . . . . . . . .
Countersigning a Document . . . . . . . . . . . . .
567
568
569
569
569
570
571
571
571
571
573
574
574
575
575
Chapter 30: Working with Sections and
Collections
Working with Sections . . . . . . . . . . . . . . . . . . . . . .
Creating a Section . . . . . . . . . . . . . . . . . . . . . . . .
Changing a Section . . . . . . . . . . . . . . . . . . . . . . .
Removing a Section . . . . . . . . . . . . . . . . . . . . . . .
Moving a Section within a Collection . . . . . . .
Renaming a Section . . . . . . . . . . . . . . . . . . . . . . .
Duplicating a Section within a Collection . . . .
Duplicating a Section between Collections . .
Exporting Sections to MS Word . . . . . . . . . . .
Printing Sections . . . . . . . . . . . . . . . . . . . . . . . . .
Working with Collections . . . . . . . . . . . . . . . . . . .
Behaviors of Collections in E-Notebook . . . .
Auto-Numbered Collections . . . . . . . . . . . . .
Collections that Cannot be Deleted . . . . . . .
Collections that Cannot be Deleted if
Modified . . . . . . . . . . . . . . . . . . . . . . . . . . . . . .
Collections that Cannot be Renamed . . . . .
Copying Collections that Contain
References . . . . . . . . . . . . . . . . . . . . . . . . . . . .
Creating a Collection . . . . . . . . . . . . . . . . . . . . . .
Organizing Collections . . . . . . . . . . . . . . . . . . . .
Moving Collections within a Container
Collection . . . . . . . . . . . . . . . . . . . . . . . . . . . . .
Moving Collections between Container
E-Notebook 10
579
579
579
579
580
580
580
Collections . . . . . . . . . . . . . . . . . . . . . . . . . . . . 585
Creating a Reference within the Collection
Tree . . . . . . . . . . . . . . . . . . . . . . . . . . . . . . . . . . 585
Duplicating a Collection within a Container
Collection . . . . . . . . . . . . . . . . . . . . . . . . . . . . . 586
Copying a Collection . . . . . . . . . . . . . . . . . . . . 586
Renaming a Collection . . . . . . . . . . . . . . . . . . . 587
Deleting a Collection . . . . . . . . . . . . . . . . . . . . 587
Viewing Collection Properties . . . . . . . . . . . . . . 587
Importing and Exporting Collections. . . . . . . . 588
Importing a Collection . . . . . . . . . . . . . . . . . . 588
Exporting a Collection . . . . . . . . . . . . . . . . . . 588
Changing Collection Security Properties . . . . . 589
Collection Security . . . . . . . . . . . . . . . . . . . . . . 589
Transition Security . . . . . . . . . . . . . . . . . . . . . . 591
Performing a Collection Transition. . . . . . . . . . 592
Exporting a Collection or Section to MS
Word . . . . . . . . . . . . . . . . . . . . . . . . . . . . . . . . . . . 592
Printing Collections . . . . . . . . . . . . . . . . . . . . . . . 593
Printing Multiple Collections at Once . . . . . 593
Performing a Collection Transition . . . . . . . . . . . 593
Working with Form Tools . . . . . . . . . . . . . . . . . . . 593
The New Section Tool. . . . . . . . . . . . . . . . . . . . . 594
The Duplication Collection Tool . . . . . . . . . . . 594
The New Child Collection Tool . . . . . . . . . . . . 594
The New Sibling Collection Tool . . . . . . . . . . . 595
581
581
581
581
582
582
582
583
583
583
583
584
584
Chapter 31: Changes and Audit Trail
Working with the Changes Icon . . . . . . . . . . . . 597
Saving Changes to a Collection . . . . . . . . . . . . . 597
Clicking the Changes Icon . . . . . . . . . . . . . . . 597
Selecting Annotate Last Change from the
Collection Menu . . . . . . . . . . . . . . . . . . . . . . . 598
Saving Changes by Browsing to Another
Collection . . . . . . . . . . . . . . . . . . . . . . . . . . . . . 598
Saving Changes through Autosave . . . . . . . . 598
Saving Changes through Backup and
Restore . . . . . . . . . . . . . . . . . . . . . . . . . . . . . . . 598
Annotation of Changes . . . . . . . . . . . . . . . . . . . . 598
Providing Required Annotation . . . . . . . . . . 599
Providing Unprompted, Optional
Annotation . . . . . . . . . . . . . . . . . . . . . . . . . . . . 599
Working with the History Pane . . . . . . . . . . . . . 600
Contents
Specifying an Annotation through the
History Pane . . . . . . . . . . . . . . . . . . . . . . . . . . . 601
Visual Display of Changes . . . . . . . . . . . . . . . . . 601
Administrator
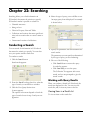
Chapter 32: Searching
Conducting a Search . . . . . . . . . . . . . . . . . . . . . . . . 605
Working with Query Results . . . . . . . . . . . . . . . 605
Viewing Items in a Results List . . . . . . . . . . . 605
Saving a Results List . . . . . . . . . . . . . . . . . . . . . 606
Customizing the Display of Search Results 606
Saving a Query . . . . . . . . . . . . . . . . . . . . . . . . . 606
Running a Saved Query . . . . . . . . . . . . . . . . . . 606
Refining a Search. . . . . . . . . . . . . . . . . . . . . . . . . . 607
Using the E-Notebook Search Types . . . . . . . . 607
Searching for Sections . . . . . . . . . . . . . . . . . . . 608
Collections Search . . . . . . . . . . . . . . . . . . . . . . 609
Chemical Structure Search . . . . . . . . . . . . . . . 610
General Query Properties . . . . . . . . . . . . . . . . . . 611
Searching with the Search Location Field . . . . . . 611
Searching with Collection Attributes . . . . . . . . . . 612
Searching with the Property Query and Table
Query Fields . . . . . . . . . . . . . . . . . . . . . . . . . . . . . . . 613
Adding Properties to the Field . . . . . . . . . . . . . . 613
Removing Properties from the Field . . . . . . . . 613
Search Options . . . . . . . . . . . . . . . . . . . . . . . . . . . 614
Searching for Text with the Query Text Field . . 614
Basic Text Searching . . . . . . . . . . . . . . . . . . . . . . 615
Exact Phrase Matching . . . . . . . . . . . . . . . . . . 615
Wildcard Searching . . . . . . . . . . . . . . . . . . . . . . 615
Advanced Text Searching . . . . . . . . . . . . . . . . . . 615
Escape Characters . . . . . . . . . . . . . . . . . . . . . . 615
ABOUT . . . . . . . . . . . . . . . . . . . . . . . . . . . . . . . 616
AND (&) . . . . . . . . . . . . . . . . . . . . . . . . . . . . . . 617
EQUIValence (=) . . . . . . . . . . . . . . . . . . . . . . . 617
Fuzzy (?) . . . . . . . . . . . . . . . . . . . . . . . . . . . . . . . 617
MINUS (-) . . . . . . . . . . . . . . . . . . . . . . . . . . . . . 618
NEAR . . . . . . . . . . . . . . . . . . . . . . . . . . . . . . . . . 618
NOT (~) . . . . . . . . . . . . . . . . . . . . . . . . . . . . . . . 619
OR (|) . . . . . . . . . . . . . . . . . . . . . . . . . . . . . . . . . 620
Soundex (!) . . . . . . . . . . . . . . . . . . . . . . . . . . . . . 620
Stem ($) . . . . . . . . . . . . . . . . . . . . . . . . . . . . . . . . 621
ContentsCambridgeSoft
Chapter 33: Introducing CombiChem for
E-Notebook
Setting up the Generic Reaction. . . . . . . . . . . . . . 623
Adding a Generic Reaction . . . . . . . . . . . . . . . . 623
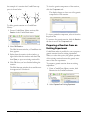
Preparing a Reaction from an Existing
Experiment . . . . . . . . . . . . . . . . . . . . . . . . . . . . . 624
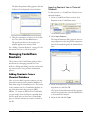
Managing CombiChem Reactants . . . . . . . . . . . .
Adding Reactants from a Chemical Database
Importing Reactants from a Chemical
Database . . . . . . . . . . . . . . . . . . . . . . . . . . . . . .
Adding Reactants Manually . . . . . . . . . . . . . .
Checking Reaction Sites . . . . . . . . . . . . . . . . . . .
Editing Reactants . . . . . . . . . . . . . . . . . . . . . . . . .
Removing Reactants from a CombiChem
Library. . . . . . . . . . . . . . . . . . . . . . . . . . . . . . . . . .
Removing a Selected Reactant . . . . . . . . . . .
Removing All Reactants from a
CombiChem Library . . . . . . . . . . . . . . . . . . .
Enumerating and Managing CombiChem
Products . . . . . . . . . . . . . . . . . . . . . . . . . . . . . . . . . .
Working with the Enumeration Template . . .
Creating an Enumeration Template . . . . . . .
Showing an Enumeration Template . . . . . .
Updating an Enumeration Template . . . . . .
Removing an Enumeration Template . . . . .
Enumerating Products . . . . . . . . . . . . . . . . . . . .
Enumerating All of the Products of a
Generic Reaction . . . . . . . . . . . . . . . . . . . . . .
Enumerating Selected Products of a
Generic Reaction . . . . . . . . . . . . . . . . . . . . . .
Exporting Products to an SD File . . . . . . . . . .
Removing Products from a CombiChem
Library. . . . . . . . . . . . . . . . . . . . . . . . . . . . . . . . . .
625
625
625
626
627
627
628
628
628
628
628
628
629
629
629
630
630
630
630
631
Using the CombiChem Navigator and Structure
Window . . . . . . . . . . . . . . . . . . . . . . . . . . . . . . . . . . . 631
Using the CombiChem Navigator . . . . . . . . . . 631
Using the Navigator when in Product
s Mode . . . . . . . . . . . . . . . . . . . . . . . . . . . . . . . 632
Using the Navigator in Reactants Mode . . . 632
Viewing and Hiding the Docked CombiChem
Navigator . . . . . . . . . . . . . . . . . . . . . . . . . . . . . 633
Viewing the Navigator as a Floating Palette 633
Docking the Navigator at Another
Location . . . . . . . . . . . . . . . . . . . . . . . . . . . . . . 633
Using the Structure Window . . . . . . . . . . . . . . .
Viewing and Hiding the Docked
CombiChem Structure Window . . . . . . . . .
Viewing the Structure Window as a
Floating Palette . . . . . . . . . . . . . . . . . . . . . . . .
Docking the Structure Window at
Another Location . . . . . . . . . . . . . . . . . . . . . .
Managing Plate Layout and Structure Palette
Settings . . . . . . . . . . . . . . . . . . . . . . . . . . . . . . . . . . .
Editing Structure Palette Display Settings . . .
Editing Reactant Layout Settings . . . . . . . . . . .
Editing Product Layout Settings . . . . . . . . . . . .
Specifying Empty Wells in the Plate . . . . . .
Changing the Size of the Plate . . . . . . . . . . .
Changing the Grouping Order . . . . . . . . . . .
Setting Product Grid Options . . . . . . . . . . . . . .
633
634
635
635
636
636
636
637
637
638
638
638
Chapter 34: Miscellaneous Topics
Using the Session Manager . . . . . . . . . . . . . . . . . . 641
Ending a Session . . . . . . . . . . . . . . . . . . . . . . . . . 641
Refreshing E-Notebook. . . . . . . . . . . . . . . . . . . . . 642
Viewing User Information . . . . . . . . . . . . . . . . . . 642
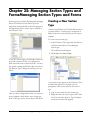
Chapter 35: Managing Section Types and
FormsManaging Section Types and Forms
Creating a New Section Type . . . . . . . . . . . . . . . .
Managing Fields within a Section Type . . . . . . .
Adding a Field to a Section Type . . . . . . . . . . .
Managing Summary Fields in a Table
of Contents . . . . . . . . . . . . . . . . . . . . . . . . . . . . .
645
646
646
647
Managing Form Tools . . . . . . . . . . . . . . . . . . . . . . 647
Adding a Form Tool to a Section Type . . . . . 647
Viewing and Editing the Properties of a Form
Tool . . . . . . . . . . . . . . . . . . . . . . . . . . . . . . . . . . . . 648
Removing a Form Tool from a Section Type 649
Managing the Standard Form Tools . . . . . . . . 650
Managing the Next Step Form Tool . . . . . . 650
Managing the New Section Form Tool . . . 650
Managing the New Subsection Section Form
Tool . . . . . . . . . . . . . . . . . . . . . . . . . . . . . . . . . 650
Managing the Spectrum Form Tool . . . . . . 651
Managing the Active Document Form Tool 651
Managing the Insert Reference Form Tool 652
E-Notebook 10
Managing the Print Multiple Form Tool . . . 652
Managing Section Listeners . . . . . . . . . . . . . . . . . . 652
Adding a Section Listener to a Section Type . 652
Viewing and Editing the Properties of a
Section Listener . . . . . . . . . . . . . . . . . . . . . . . . . . 653
Removing a Section Listener from a
Section Type . . . . . . . . . . . . . . . . . . . . . . . . . . . . . 654
Managing the Standard Section Listeners . . . . 654
Managing the Required Section Listener . . . 654
Managing the Fixed Section Name Listener 654
Managing the Audit Section Listener . . . . . . 655
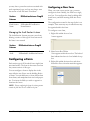
Configuring a Form . . . . . . . . . . . . . . . . . . . . . . . . . 655
Configuring a New Form . . . . . . . . . . . . . . . . . . 655
Setting the Fields in Boxes . . . . . . . . . . . . . . . 656
Reconfiguring an Existing Form . . . . . . . . . . . . 657
Adding a Field to an Existing Form . . . . . . . 657
Rearranging Boxes in a Form . . . . . . . . . . . . . 658
Deleting a Box from a Form . . . . . . . . . . . . . 658
Showing and Hiding the Max Button
for a Box . . . . . . . . . . . . . . . . . . . . . . . . . . . . . . . . 659
Hiding the Max Button . . . . . . . . . . . . . . . . . . 659
Showing the Max Button . . . . . . . . . . . . . . . . 659
Showing and Hiding the Name of a Box . . . . . 660
Hiding the Box Name . . . . . . . . . . . . . . . . . . . 660
Showing the Name of a Box . . . . . . . . . . . . . 661
Resizing Boxes in a Form . . . . . . . . . . . . . . . . . . 661
Changing the Weight of a Box . . . . . . . . . . . . 661
Changing the Dimensions of a Box
Manually . . . . . . . . . . . . . . . . . . . . . . . . . . . . . . 662
Clearing Fields when Configuring a Form. . . . 663
Hiding Fields and Boxes when Configuring
a Form . . . . . . . . . . . . . . . . . . . . . . . . . . . . . . . . . . 663
Hiding a Box . . . . . . . . . . . . . . . . . . . . . . . . . . . 663
Hiding Fields in a Form . . . . . . . . . . . . . . . . . 664
Changing Box Orientation . . . . . . . . . . . . . . . . . 664
Managing Export Templates for Section Types 665
Creating the Export Template for a
Section Type . . . . . . . . . . . . . . . . . . . . . . . . . . . . . 666
Editing the Export Template for a
Section Type . . . . . . . . . . . . . . . . . . . . . . . . . . . . . 666
Section Metadata Tags . . . . . . . . . . . . . . . . . . . 667
Standard Field Types . . . . . . . . . . . . . . . . . . . . 667
Page Breaks . . . . . . . . . . . . . . . . . . . . . . . . . . . . 668
Contents
Chapter 36: Managing Rendering in
E-Notebook
Administrator
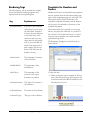
Configuring a Rendering Template . . . . . . . . . . . 669
Designing a Rendering Template . . . . . . . . . . . . . 670
Rendering Tags . . . . . . . . . . . . . . . . . . . . . . . . . . . 671
Templates for Headers and Footers . . . . . . . . . 671
Section Metadata Tags . . . . . . . . . . . . . . . . . . . . . 672
Managing the MS Word Section Renderers . . . . 672
Managing the Fixed Text After Word
Renderer . . . . . . . . . . . . . . . . . . . . . . . . . . . . . . . . 672
Managing the Full History Word Renderer . . . 673
Managing the Tracked History Word
Renderer . . . . . . . . . . . . . . . . . . . . . . . . . . . . . . . . 673
Managing the Standard Field Renderers . . . . . . . 673
Managing the Fixed Table Field Renderer . . . . 673
Managing the NonBlank Property Field
Renderer . . . . . . . . . . . . . . . . . . . . . . . . . . . . . . . . 674
Managing the One Property Value Field
Renderer . . . . . . . . . . . . . . . . . . . . . . . . . . . . . . . . 674
Managing the One Table Value Field
Renderer . . . . . . . . . . . . . . . . . . . . . . . . . . . . . . . . 674
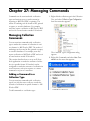
Chapter 37: Managing Commands
Managing Collection Commands . . . . . . . . . . . . . 677
Adding a Command to a Collection Type . . . . 677
Viewing and Editing the Properties of a
Collection Command . . . . . . . . . . . . . . . . . . . . . 678
Removing a Command from a
Collection Type . . . . . . . . . . . . . . . . . . . . . . . . . . 678
Managing the Standard Collection Commands679
Managing the Export to MS Word
Collection Command . . . . . . . . . . . . . . . . . . . 679
Managing the Export to PDF Collection
Command . . . . . . . . . . . . . . . . . . . . . . . . . . . . . 679
Managing the Print Collection Command . . 680
Managing Section Commands . . . . . . . . . . . . . . . . 680
Adding Commands to a Section Type . . . . . . . 680
Viewing and Editing the Properties of a
Section Command . . . . . . . . . . . . . . . . . . . . . . . . 680
Removing a Command from a Section Type . 681
Managing the Standard Section Commands . . 681
Managing the Export to MS Word Section
ContentsCambridgeSoft
Command . . . . . . . . . . . . . . . . . . . . . . . . . . . . 681
Managing the Print Section Command . . . . 681
Chapter 38: Managing Fields
Managing Field Listeners . . . . . . . . . . . . . . . . . . . . 683
Adding a Field Listener . . . . . . . . . . . . . . . . . . . . 684
Managing Generic Field Listeners . . . . . . . . . . 684
Managing the Block User Edit Field
Listener . . . . . . . . . . . . . . . . . . . . . . . . . . . . . . . 684
Managing the Block Edit Cell Field Listener 684
Managing the Copy Default Field Listener 685
Managing Data Fields . . . . . . . . . . . . . . . . . . . . . . . 685
Managing Active Document Fields . . . . . . . . . 685
Managing Active Document Field Listeners 686
Managing the Prevent External Link Active
Document Field Listener . . . . . . . . . . . . . . . 686
Managing the Extract Links Document
Listener . . . . . . . . . . . . . . . . . . . . . . . . . . . . . . . 686
Managing AutoText Fields . . . . . . . . . . . . . . . . . 686
Managing AutoText Field Listeners . . . . . . . . . 688
Managing the AutoText Color Field
Listener . . . . . . . . . . . . . . . . . . . . . . . . . . . . . . . 688
Managing Chemical Structure Fields . . . . . . . . 688
Managing Chemical Structure Field
Listeners . . . . . . . . . . . . . . . . . . . . . . . . . . . . . . 689
Configuring E-Notebook with ISIS
Draw Tool . . . . . . . . . . . . . . . . . . . . . . . . . . . . 689
Managing Database Table Fields . . . . . . . . . . . 690
Creating a Database Table Field . . . . . . . . . . 690
Configuring a Database Table Field . . . . . . 691
Managing Database Value Fields . . . . . . . . . . . 693
Configuring a Database Value Field . . . . . . 693
Managing Excel Fields . . . . . . . . . . . . . . . . . . . . 694
Managing Break Link Excel Listener . . . . . . 694
Managing Hide Addins Excel Listener . . . . 694
Managing Remove Macros Field Listener . 695
Managing PowerPoint Fields . . . . . . . . . . . . . . . 695
Managing Context Sensitive Help Fields . . . . 696
Managing Captured Image Fields . . . . . . . . . . . 696
Managing Property Lists . . . . . . . . . . . . . . . . . . . 697
Creating a Property List . . . . . . . . . . . . . . . . . 697
Managing Enumerated Values in
Property Lists . . . . . . . . . . . . . . . . . . . . . . . . . 699
Modifying Properties without Obscuring
Data . . . . . . . . . . . . . . . . . . . . . . . . . . . . . . . . . 700
Managing Database Values in Property
Lists . . . . . . . . . . . . . . . . . . . . . . . . . . . . . . . . . . 701
Managing Enumerated Values in Property
Lists . . . . . . . . . . . . . . . . . . . . . . . . . . . . . . . . . . . . 702
Managing Property List Listeners . . . . . . . . . . . 703
Managing the Formula Listener . . . . . . . . . . 704
Managing the Block Reference In State
Property List Listener . . . . . . . . . . . . . . . . . . 705
Managing the Person Property List Listener 706
Managing the Chemical Properties Property
List Listener . . . . . . . . . . . . . . . . . . . . . . . . . . 706
Managing the Validate Value Property
List Listener . . . . . . . . . . . . . . . . . . . . . . . . . . 706
Managing Spectrum Fields . . . . . . . . . . . . . . . . . 707
Managing Stored Document Fields . . . . . . . . . 707
Managing Subsection Fields . . . . . . . . . . . . . . . 708
Managing Subsection Field Listeners . . . . . 709
Managing the Button View Subsection
Listener . . . . . . . . . . . . . . . . . . . . . . . . . . . . . . 709
Managing the Hide Tools Subsection
Listener . . . . . . . . . . . . . . . . . . . . . . . . . . . . . . 710
Managing Table Fields . . . . . . . . . . . . . . . . . . . . 710
Creating a Table Field . . . . . . . . . . . . . . . . . . . 711
Configuring the Appearance of a Table . . . 712
Managing Database Values in Tables . . . . . 712
Managing Enumerated Values in Tables . . 713
Managing Table Listeners . . . . . . . . . . . . . . . 714
Managing URL Display Fields . . . . . . . . . . . . . 717
Managing Search Fields . . . . . . . . . . . . . . . . . . . . .
Chemical Query Fields . . . . . . . . . . . . . . . . . . . .
Collection Query Fields . . . . . . . . . . . . . . . . . . .
Collection Type Query Fields . . . . . . . . . . . . . .
Join Type Fields . . . . . . . . . . . . . . . . . . . . . . . . . .
Property Query Fields . . . . . . . . . . . . . . . . . . . . .
Query Text Fields . . . . . . . . . . . . . . . . . . . . . . . .
State Query Fields . . . . . . . . . . . . . . . . . . . . . . . .
Table Query Fields . . . . . . . . . . . . . . . . . . . . . . .
Unannotated Version Query Fields . . . . . . . . .
Search Location Fields . . . . . . . . . . . . . . . . . . . .
718
718
718
719
719
720
720
721
721
722
722
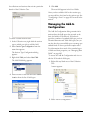
Managing the Add-In Configuration . . . . . . . . . . 723
Changing a Field Type . . . . . . . . . . . . . . . . . . . . 724
E-Notebook 10
Adding a new Field Type . . . . . . . . . . . . . . . . . . 724
Deleting a Field Type . . . . . . . . . . . . . . . . . . . . . . 724
Time Settings . . . . . . . . . . . . . . . . . . . . . . . . . . . . . . . 725
Managing Units in Property Lists and Tables . . 726
Specification of Units . . . . . . . . . . . . . . . . . . . . . . 727
Entry of data . . . . . . . . . . . . . . . . . . . . . . . . . . . . . 727
Chapter 39: Managing Collection Types
Creating a New Collection Type . . . . . . . . . . . . . . 731
Adding a Section Type to a Collection Type . . . 733
Having a Section Appear by Default . . . . . . . . 733
Removing a Section Type from a
Collection Type. . . . . . . . . . . . . . . . . . . . . . . . . . . . . 734
Managing Contained Collection Types . . . . . . . . 735
Adding a Contained Collection Type . . . . . . . . 735
Changing the Relationship between a
Contained Collection Type and the Parent
Collection Type . . . . . . . . . . . . . . . . . . . . . . . . . . 735
Removing a Contained Collection Type
from a Collection Type . . . . . . . . . . . . . . . . . . . 736
Managing Contained Reference Types . . . . . . . . 736
Adding a Contained Reference Type . . . . . . . . 736
Changing the Relationship between a
Contained Reference Type and the Parent
Collection Type . . . . . . . . . . . . . . . . . . . . . . . . . . 737
Removing a Contained Reference Type
from a Collection Type . . . . . . . . . . . . . . . . . . . 737
Configuring Relationships to Unspecified
Types of Collections . . . . . . . . . . . . . . . . . . . . . . . . 738
Managing Collection Listeners . . . . . . . . . . . . . . . 738
Adding a Collection Listener to a
Collection Type . . . . . . . . . . . . . . . . . . . . . . . . . . 738
Viewing and Editing the Properties of a
Collection Listener . . . . . . . . . . . . . . . . . . . . . . . 739
Removing a Collection Listener from a
Collection Type . . . . . . . . . . . . . . . . . . . . . . . . . . 740
Managing the Standard Collection Listeners . . 741
Managing the Auto Number Collection
Listener . . . . . . . . . . . . . . . . . . . . . . . . . . . . . . . 741
Managing the Audit Collection Listener . . . 741
Managing the Change Display Collection
Listener . . . . . . . . . . . . . . . . . . . . . . . . . . . . . . . 741
Contents
Administrator
Managing the Clear Value Collection
Listener . . . . . . . . . . . . . . . . . . . . . . . . . . . . . . . 742
Managing the Delete Spawn Collection
Listener . . . . . . . . . . . . . . . . . . . . . . . . . . . . . . . 742
Managing the Parent Prefix Collection
Listener . . . . . . . . . . . . . . . . . . . . . . . . . . . . . . . 742
Managing the Database Procedure
Collection Listener . . . . . . . . . . . . . . . . . . . . . 743
Managing the Fixed Name Collection
Listener . . . . . . . . . . . . . . . . . . . . . . . . . . . . . . . 743
Managing the Offline Collection Listener . . 743
Managing the Owner Full Control
Collection Listener . . . . . . . . . . . . . . . . . . . . . 743
Managing the No Create Offline
Collection Listener . . . . . . . . . . . . . . . . . . . . . 744
Managing the Parent Prefix Collection
Listener . . . . . . . . . . . . . . . . . . . . . . . . . . . . . . . 744
Managing the Prevent Reference Copy
Collection Listener . . . . . . . . . . . . . . . . . . . . . 744
Managing the Prevent Delete when
Referenced Collection Listener . . . . . . . . . . 744
Managing the Refresh Database Table
Privilege Change Collection Listener . . . . . 745
Managing the Section List Collection
Listener . . . . . . . . . . . . . . . . . . . . . . . . . . . . . . . 745
Managing the Security Collection Listener . 745
Managing the Sequence Collection Listener 746
Managing the Unduplicatable Collection
Listener . . . . . . . . . . . . . . . . . . . . . . . . . . . . . . . 746
Managing the Unique Child Collection
Listener . . . . . . . . . . . . . . . . . . . . . . . . . . . . . . . 746
Managing the User Collection Listener . . . . 746
Managing Templates . . . . . . . . . . . . . . . . . . . . . . . . 747
Managing Collection Type Form Tools . . . . . . 747
Managing the Duplicate Collection
Form Tool . . . . . . . . . . . . . . . . . . . . . . . . . . . . 747
Managing the Structure Form Tool . . . . . . . 748
Managing the Next Step Form Tool . . . . . . 748
Managing the New Section Form Tool . . . . 748
Managing the New Child Collection
Form Tool . . . . . . . . . . . . . . . . . . . . . . . . . . . . 748
Managing the New Sibling Collection
Form Tool . . . . . . . . . . . . . . . . . . . . . . . . . . . . 749
Managing Search Types . . . . . . . . . . . . . . . . . . . . . . 749
ContentsCambridgeSoft
Creating a Search Type . . . . . . . . . . . . . . . . . . . .
Managing the Standard Search Engines . . . . .
Collection Search Engine . . . . . . . . . . . . . . . .
Section Search Engine . . . . . . . . . . . . . . . . . .
Chemical Structure Search Engine . . . . . . . .
Creating a Search Form . . . . . . . . . . . . . . . . . . .
Viewing and Editing the Properties of a
Search Engine . . . . . . . . . . . . . . . . . . . . . . . . . . .
749
751
751
751
751
752
752
Managing States and Transitions . . . . . . . . . . . . . 753
Adding States to a Collection Type . . . . . . . . . 753
Configuring a Transition between States . . . . 754
Managing Transition Listeners . . . . . . . . . . . . . 755
Associating a Transition Listener with a
Transition . . . . . . . . . . . . . . . . . . . . . . . . . . . . . 755
Viewing and Editing the Properties of a
Transition Listener . . . . . . . . . . . . . . . . . . . . . 756
Removing a Transition Listener from a
Transition . . . . . . . . . . . . . . . . . . . . . . . . . . . . . 757
Managing the Standard Transition Listeners . 757
Managing the Annotate Transition Listener 757
Managing the Change Display Transition
Listener . . . . . . . . . . . . . . . . . . . . . . . . . . . . . . . 757
Managing Change Security Transition
Listener . . . . . . . . . . . . . . . . . . . . . . . . . . . . . . . 758
Managing Confirm Transition Listener . . . . 758
Managing the Export Transition Listener . 758
Managing the Final Print Transition
Listener . . . . . . . . . . . . . . . . . . . . . . . . . . . . . . . 758
Managing the Locked Container
Transition Listener . . . . . . . . . . . . . . . . . . . . . 759
Managing the Print Transition Listener . . . 759
Managing the Required Non-Blank
Properties Transition Listener . . . . . . . . . . . 760
Managing the Required Rows Transition
Listener . . . . . . . . . . . . . . . . . . . . . . . . . . . . . . . 760
Managing the Required Properties Transition
Listener . . . . . . . . . . . . . . . . . . . . . . . . . . . . . . . 760
Managing the Sign Version Transition
Listener . . . . . . . . . . . . . . . . . . . . . . . . . . . . . . . 760
Managing the Unlocked Contents Transition
Listener . . . . . . . . . . . . . . . . . . . . . . . . . . . . . . . 760
Managing the View Signed Versions Transition
Listener . . . . . . . . . . . . . . . . . . . . . . . . . . . . . . . 761
Configuring Change Control Options . . . . . . . . 761
Managing Visual Display of Changes . . . . . . . 761
Enabling Visual Display of Changes from
Collection Creation Onward . . . . . . . . . . . . 762
Enabling Visual Display of Changes
with a Transition . . . . . . . . . . . . . . . . . . . . . . 762
Configuring Annotation Options . . . . . . . . . 763
Configuring Autosave . . . . . . . . . . . . . . . . . . . 763
Managing Export Templates of Collection
Types . . . . . . . . . . . . . . . . . . . . . . . . . . . . . . . . . . . . . 764
Creating and Editing the Export Templates
for a Collection Type . . . . . . . . . . . . . . . . . . . . . 765
Creating the Export Templates for a
Collection Type . . . . . . . . . . . . . . . . . . . . . . . 765
Editing the Header and Footer Information 766
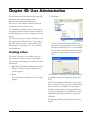
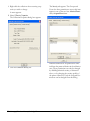
Chapter 40: User Administration
Creating a User . . . . . . . . . . . . . . . . . . . . . . . . . . . .
Creating a User Group . . . . . . . . . . . . . . . . . . . . . .
Changing a User's Properties . . . . . . . . . . . . . . . .
Changing the Security Properties of a User
Collection . . . . . . . . . . . . . . . . . . . . . . . . . . . . . . .
767
768
768
768
Chapter 41: Managing E-Notebook Security
Managing Collection Security . . . . . . . . . . . . . . . . 771
Collection Security . . . . . . . . . . . . . . . . . . . . . . . . 771
Transition Security . . . . . . . . . . . . . . . . . . . . . . . . 773
Managing the Security Properties of a Collection
Type . . . . . . . . . . . . . . . . . . . . . . . . . . . . . . . . . . . . . . 774
Collection Type Security. . . . . . . . . . . . . . . . . . . 775
Managing the Security Properties of a Section Type
777
Section Type Security . . . . . . . . . . . . . . . . . . . . . 778
Using the Session Manager . . . . . . . . . . . . . . . . . . 780
Ending a Session . . . . . . . . . . . . . . . . . . . . . . . . . 780
Chapter 42: Summary of the Standard AddIns
Transition Listeners . . . . . . . . . . . . . . . . . . . . . . . . . 784
Section Listeners . . . . . . . . . . . . . . . . . . . . . . . . . . . . 784
Form Tools . . . . . . . . . . . . . . . . . . . . . . . . . . . . . . . . 784
Search Engines . . . . . . . . . . . . . . . . . . . . . . . . . . . . . 785
Field Types . . . . . . . . . . . . . . . . . . . . . . . . . . . . . . . . 785
Field Listeners . . . . . . . . . . . . . . . . . . . . . . . . . . . . . . 786
Commands . . . . . . . . . . . . . . . . . . . . . . . . . . . . . . . . . 787
Rendering Add-ins . . . . . . . . . . . . . . . . . . . . . . . . . . 788
Chapter 43: Using the Batch Import Facility
<batch> . . . . . . . . . . . . . . . . . . . . . . . . . . . . . . . . . . . 788
<import> . . . . . . . . . . . . . . . . . . . . . . . . . . . . . . . . . . 788
<target> . . . . . . . . . . . . . . . . . . . . . . . . . . . . . . . . . . . 788
<collectionType>. . . . . . . . . . . . . . . . . . . . . . . . . . . 789
<childReference> . . . . . . . . . . . . . . . . . . . . . . . . . . 789
<source> . . . . . . . . . . . . . . . . . . . . . . . . . . . . . . . . . . 789
<log> . . . . . . . . . . . . . . . . . . . . . . . . . . . . . . . . . . . . . 789
<alert> . . . . . . . . . . . . . . . . . . . . . . . . . . . . . . . . . . . . 790
<refresh> . . . . . . . . . . . . . . . . . . . . . . . . . . . . . . . . . . 790
Technical Support
Serial Numbers . . . . . . . . . . . . . . . . . . . . . . . . . . . . . 185
Troubleshooting . . . . . . . . . . . . . . . . . . . . . . . . . . . . 185
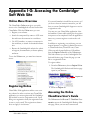
Accessing the CambridgeSoft Web Site
Registering Online . . . . . . . . . . . . . . . . . . . . . . . . . . 187
Accessing the Online ChemDraw User’s Guide 187
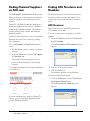
Accessing CambridgeSoft Technical Support . . 188
Finding Information on ChemFinder.com . . . . . 188
Finding Chemical Suppliers on ACX.com . . . . . 189
Finding ACX Structures and Numbers . . . . . . . . 189
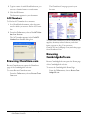
ACX Structures . . . . . . . . . . . . . . . . . . . . . . . . . . . 189
ACX Numbers. . . . . . . . . . . . . . . . . . . . . . . . . . . . 190
Browsing ChemStore.com . . . . . . . . . . . . . . . . . . . 190
Browsing CambridgeSoft.com . . . . . . . . . . . . . . . . 190
Using the ChemOffice SDK . . . . . . . . . . . . . . . . . 191
Index
Collection Listeners . . . . . . . . . . . . . . . . . . . . . . . . 783
E-Notebook 10
Contents
Administrator
ContentsCambridgeSoft
Section IV: E-Notebook
Chapter 26: Introducing E-Notebook 10.0
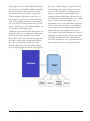
E-Notebook 10.0 is an electronic notebook that
facilitates daily record-keeping for scientists.
E-Notebook makes it possible for you to manage
diverse types of data on electronic pages that are
much like the pages of a paper notebook. The electronic pages make it easy to organize information
and streamline your workflow. E-Notebook also
provides a full audit trail and change tracking features for compliance with 21 CFR Part 11.
E-Notebook has many advantages over traditional,
paper notebooks. With E-Notebook, you can set
up Notebooks and Pages to manage information
about organic syntheses and related information
such as stoichiometry calculations, reaction preps,
spectra, analytical methods, notes, and spreadsheets. Since E-Notebook has electronic rather
than paper pages, you can conduct searches by
substructure, key word, date, and so on. You can
set up templates to avoid reentering information
that you often use. Also, E-Notebook fully automates stoichiometric calculations.
With E-Notebook, you can create a customized
electronic notebook that matches your workflow.
You can develop new fields to manage specialized
types of data, and configure your own forms to
manage the information that is important to you.
You can also add your own data analysis tools and
customized searches to E-Notebook.
You can use E-Notebook to organize a wide variety of other information critical to your work processes as well. For example, common reactants
used in reaction preps can be stored in the E-Notebook database and shared among researchers. In
large enterprises, E-Notebook can be configured
ChemOffice 2006/E-NotebookE-Notebook
to both supply and retrieve information from other
Enterprise systems, such as chemical registration
or chemical inventory management systems.
E-Notebook supports the Oracle database format.
New Features
NOTE: Note: the label
indicates that the
feature is only available in Enterprise versions of E-Notebook, not in the Desktop version.
Enterprise
E-Notebook 10.0 offers many new features,
including:
• Reaction Section Enhancements – E-Note-
book now updates the stoichiometry grid automatically when you edit a reaction drawing.
Additional features for working with salt codes
and solvents have been added as well.
• Reaction Toolbar – a new toolbar makes it
easy to manage reactants and products in
your reactions.
• AutoText – text in the preparation is
updated automatically, based on change you
make to the reaction drawing or stoichiometry grid.
• Reaction Explorer – you can now view a
reaction tree that displays the predecessors
and successors of a batch or compound.
(Enterprise version only).
Enterprise
•
ISIS/Draw Integration – with
the E-Notebook's ISIS Draw Tool, you can
draw and store chemical structures and reactions in the Chemical Structure Field just as
you would do with ChemDraw Tool.
• 503
• New Section Enhancements – Some more sec-
Administrator
tions have been added to E-Notebook environment to increase the range to express your
ideas.
• Captured Image Sections – allow you to manage PDF files in E-Notebook.
• MS PowerPoint Sections – You can use MS
PowerPoint Sections to manage MS PowerPoint slideshows in E-Notebook.
• Formulas – You can now associate your own
custom formulas with tables or property lists in
E-Notebook. The formulas can refer to other
values in an E-Notebook form.
•
Enterprise
PDF Rendering – You can now
export Collections to PDF, then manage them
as you would PDF documents.
• Searching enhancements – You can now
perform a search that is a union or an intersection of two searches. Or, you can subtract one
set of search results from another.
•
Enterprise
Inbox – It is now possible to
send data to an E-Notebook experiment or
another E-Notebook user.
• Acronyms database – E-Notebook provides
a database of 2400 acronyms, which you may
add to your reactions.
• Enhanced table of contents – You can now
create a customized table of contents: hiding
columns, showing additional columns, and
sorting items in an ascending or descending
order.
•
Enterprise
Offline data management –
You can create or modify experimental records
off-line, then upload them at a later time.
• Send2ENotebook/Send2File – It is now
possible to render the contents of a document
using a print driver, and insert the contents into
a collection.
504•Introducing E-Notebook 10.0CambridgeSoft
•
Enterprise
E-Signatures – You can now
get your experiments electronically signed and
then stored in PDF format once they are finished.
Terminology
Many of the terms used to describe the features of
E-Notebook are the same terms that one would
use in describing a paper notebook. In some cases,
however, the terminology is different, and familiar
words—such as collection or section—may have
different meanings. The following terminology is
used in the E-Notebook application and throughout this guide:
• Administrator – The person who configures
E-Notebook and sets up security permissions.
• Collection – A set of related items in E-Notebook. Collections are the items that appear in
the E-Notebook Collection Tree.
• Collection Listener – Collection Listeners
modify the behaviors of collections, such as
creating, hiding, renaming, duplicating and
moving behaviors. Administrators assign them
to collections.
• Collection Type – A unit of configuration
that contains business rules for organizing collections and sections. Each collection type has
a name, an icon for displaying collections of
that type in the collection hierarchy and a set of
business rules that describe what kinds of operations can be performed on collections of that
type
• Field – A description of a unit of data within a
section type. Each field has a type, which
describes the type of data stored in the field,
and a name. Examples of different types of
fields include a property list, a table, a chemical
structure, a spectrum, a Microsoft Word document. Depending on the type of data stored in
the field, the field may also contain additional
•
•
•
•
•
•
•
•
•
•
•
configuration information. For example, a
property list field contains a list of the properties that can be included in the property list.
Form – the layout of a section is determined by
the Form, which contains Fields, Boxes, and
possibly Form Tools.
Form Tool – a Form Tool is used to perform
particular function in an E-Notebook section,
such as data analysis or data import/export.
Full Control privilege – The privilege
required to manage the security settings of a
collection. The Full Control privilege subsumes all of the features associated with the
Read & Write privilege
History – A list of the versions and transitions
that have been made to a collection.
Home – The collection that appears when you
first log in to E-Notebook. It is the collection
associated with you as a user.
Logging In – Entering E-Notebook by providing a user name and password.
Meta-data – Data that describes other data.
For example, you can use meta-data such as
creation date or owner's name as parameters
when searching for data and information in
E-Notebook.
Owner, of a Collection – the E-Notebook
user who created the collection.
Property List – A list of data properties corresponding to a particular section. For example,
the property list in a reaction section may contain pressure, temperature, etc.
Read privilege – The privilege required to
view a collection in the collection tree, along
with its contents
Read & Write privilege – The privilege
required to modify the contents of a collection.
The Read & Write privilege subsumes all of the
features associated with the Read privilege.
ChemOffice 2006/E-NotebookIntroducing E-Notebook 10.0
• Region – A geographic area that is used to
•
•
•
•
specify characteristics of a user, such as the
name of the template used when converting
the contents of a set of sections to MS Word
document.
Table – A section (or part of a section) in
which you can record data in a tabular format.
Template – A collection containing data or
information that you wish to reuse multiple
times. You can use the template as the basis for
new collections.
Section – A set of related pieces of data. Each
piece of data is described by a field. For example, a reaction section might contain a chemical
structure drawing, a table of reactants, a table
of solvents, a table of products and a description of the procedure used to create the drawing.
Section Listener – Section Listeners modify
the behaviors of sections, such as renaming
and moving behaviors. Administrators assign
Section Listeners to various types of sections.
• Section menu icon – The
icon that
appears when sections are displayed. Rightclicking the icon displays the section menu.
• Section tools icons – The icons that appear
immediately below the section menu icon if
there are tools (such as import or export tools)
associated with the section displayed.
• Section Type – A unit of configuration that
contains a set of fields, form tools and a form.
In addition, you can associate section listeners
with a section type to implement business rules
associated with sections of this type.
• Transition—An action performed by a user to
move a collection from one state to another.
• 505
• Transition Listener—Transition Listeners
Administrator
modify the effect of a transition, usually by performing an operation that is associated with the
transition. System administrators configure
Transition Listeners.
• User—A person who uses E-Notebook. User
is also the term that E-Notebook uses to identify a person.
• Version—The contents of a collection saved
at a particular time.
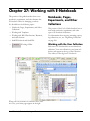
About the E-Notebook
Guide
The E-Notebook Guide provides you with stepby-step instructions for using the features of
E-Notebook. The left frame of this guide displays
the Table of Contents; you can open book icons to
display topics and the sub-topics they contain. The
right frame displays the specific topic you have
selected. Each topic includes hyperlinks to related
topics in the guide. This helps you to find the
information you need quickly and easily.
The E-Notebook Guide is organized into three
main portions:
1. Introducing E-Notebook 10.0 – provides an
overview of E-Notebook, including new features and E-Notebook terminology.
2. E-Notebook User's Guide – provides
detailed instructions for using E-Notebook.
3. E-Notebook Administrator's Guide – provides detailed instructions for configuring
E-Notebook.
In addition, this guide contains instructions for
using the Reagent Selector and CombiChem in
E-Notebook. (Each of these add-in features is sold
as a separate component).
• Introducing the Reagent Selector – allows
you to search ChemACX for chemical structures, and to add their properties and structures
to E-Notebook. (Enterprise version only).
506•Introducing E-Notebook 10.0CambridgeSoft
•
Enterprise
Introducing CombiChem for
E-Notebook – makes it possible for you to set
up and manage combinatorial chemistry libraries in E-Notebook.
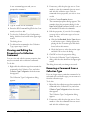
Getting Started in
E-Notebook
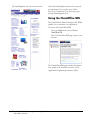
To start E-Notebook, you must log in to the application. Then, you can begin to browse or search
through E-Notebook.
Logging In
Depending upon your particular E-Notebook
setup, you may be logging-in in one of two ways:
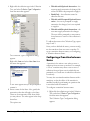
Start Menu Login
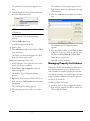
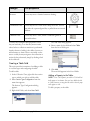
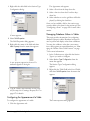
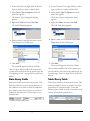
To log in from the Windows Start menu,
1. Select the Start menu, then All Programs.
The programs you may launch are displayed.
2. Point to ChemOffice 2006, then select E-Notebook Ultra 10.0.
You are logged into E-Notebook. The Collection Tree appears, displaying your Home Collection.
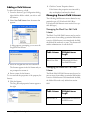
Logging in with Internet Explorer
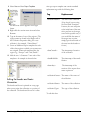
To log in to E-Notebook with Internet Explorer:
1. In the address field of your browser, type in the
address corresponding to E-Notebook.
Either you will be logged in automatically, or
the E-Notebook login page will appear,
prompting you to enter your username and
password.
2. If prompted, enter your username and password, then click the Enter button.
The Collection tree appears, displaying your
Home Collection.
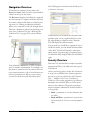
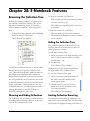
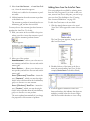
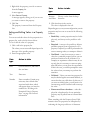
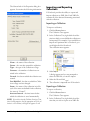
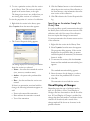
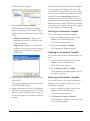
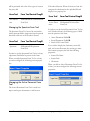
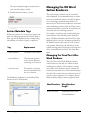
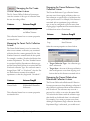
Navigation Overview
E-Notebook is composed of two main areas,
Browse and Search, each of which is represented by
a button at the top of the screen.
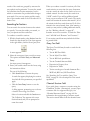
The Browse area displays the collections, organized
in a tree structure. To expand a collection and view
its contents, either double-click it or click the plus
sign next to it. Clicking an individual collection
allows you to view and/or edit it in the right frame.
There are a number of options for specifying your
view of the Collection Tree. See “Browsing the
Collection Tree” on page 525 for more information.
Browse button
itself. Clicking any item in the results list allows you
to browse to that item.
Certain menus in E-Notebook are accessed when a
particular item or icon is right-clicked. For example, right-clicking a collection in the Collection
Tree will display the collection menu.
If at any point you would like to expand the size of
a field in a section, you can double-click the titlebar
of the field. The field will expand to take up the
entire section area, increasing your working space.
To shrink the field, simply double-click the titlebar
again.
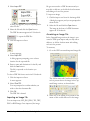
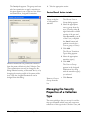
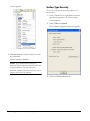
Security Overview
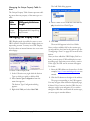
From within the Search area, you can construct a
query to search for information. For example, you
may want to search for all of the sections that contain a certain structure, or all of the collections created by a particular user. When you run a query,
you can save both the results list and the query
ChemOffice 2006/E-NotebookIntroducing E-Notebook 10.0
Each user of E-Notebook has a unique username
and password. Thus, only valid users may log in to
E-Notebook.
Once a user has logged in, security in E-Notebook
is set up on a collection basis. Security properties
may be set up for any collection in the Collection
Tree — whether it be a User, a Notebook, a
Folder, etc. The security properties of a collection
determine who has Read, Write, or Full Control
access to that collection. These access privileges
may be assigned to individual E-Notebook users or
to user groups.
• Read – permission to view the collection, but
not edit it.
• Read and Write – permission to view the collection and edit it, if it is in a state that permits
edits.
• 507
• Full Control – Read and Write permission,
Administrator
and also the ability to assign and remove security permissions for the collection.
By default, each collection inherits the security
properties of its parent in the Collection Tree. The
inherited security option may be disabled, however, so that the security properties of a collection
can be configured independently of its parent.
In addition to security at the collection level, security may also be configured for collection transitions, specifying which users may or may not
perform certain transitions on collections.
If you have Full Control permission to a collection,
you may determine who has access to the collec-
Examples of some common types of E-Notebook
Collections are:
• Notebook and Page
• Therapeutic Area
• Project
• Experiment
• Reaction Scheme
508•Introducing E-Notebook 10.0CambridgeSoft
tion. See “Changing Collection Security Properties” on page 589.
The Administrator Guide provides additional
information for system administrators.
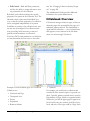
E-Notebook Overview
E-Notebook manages numerous types of data on
electronic pages that are much like the pages of a
traditional, paper notebook. This information is
organized into collections — sets of related items
that appear in a tree structure in the left frame
when you are browsing E-Notebook.
• Synthesis
For example, you could create a collection that
contains all of the reaction steps for a specific synthesis. Typically, primary research data is stored in
Experiments or Pages, which are organized within
Notebooks, just like the paper pages in paper notebooks. In this case, the synthesis could be a Notebook, and each of the steps could be a Page. Each
of the Pages may come from a different Notebook
and may have been created by a different Chemist,
but the Notebook for this, particular synthesis
could collect all of these Pages in a single place.
You can organize collections in other ways, too.
For example, you may want to create a collection
of all of the syntheses that lead to a certain product, or all of the E-Notebook users who are working on a specific project. E-Notebook enables you
to set up these relationships easily.
Collections are extremely flexible, because they are
designed to allow you to organize your information
in the way that is best suited to your workflow.
E-Notebook allows you to browse through collections and to search them for important information. Also, you can create references to them,
duplicate them, and, to prevent further changes,
you can transition them to a closed, read-only state.
ChemOffice 2006/E-NotebookIntroducing E-Notebook 10.0
Just as you would use pages in a paper notebook
for recording various types of data, you can use
sections in E-Notebook for recording reactions,
spectra, or any other kind of information. For
example, within an Experiment, there may be sections for Reactions, Notes, Reactants, etc. — whatever you need to record and display your
information the way you would with a paper notebook. You also have the option to use templates,
so that sections are set up automatically and uniformly with each new Experiment you create.
Your system configuration determines the types of
collections and sections that you can create within
E-Notebook and the rules that define their contents. The permission to view, edit, and create collections can be set up on a per-collection basis.
• 509
Administrator
510•Introducing E-Notebook 10.0CambridgeSoft
Chapter 27: Working with E-Notebook
This portion of the guide describes how to use
notebooks, experiments, and other features that
E-Notebook offers for managing your data.
It is divided into the following topics:
• Notebooks, Pages, Experiments, and Other
Collections
• Working with Templates
• Working with MS Office Sections, Reactions,
and other Sections
• Send2ENotebook and Send2File
•
Enterprise
Working Offline
Notebooks, Pages,
Experiments, and Other
Collections
This portion of the User's Guide describes how to
work with notebooks, experiments, and other
types of E-Notebook collections.
For information about copying, renaming, exporting collections, etc., see “Organizing Collections”
on page 584.
Working with the User Collection
Each user of E-Notebook has an associated user
collection. Your user collection is your home collection, and appears at the top of the Collection
Tree when you first log into E-Notebook.
When your user collection is selected in the Collection Tree, your home page appears in the right
ChemOffice 2006/E-NotebookWorking with E-Notebook
• 511
frame. The home page displays summary information about your open pages or experiments.
3. The new collection appears and you are
prompted to rename it.
Administrator
Adding a Reference within the User
Collection
You may add several different types of collections
directly to your user collection:
• Notebooks
• Folders
• User Configurations and AutoText Definitions
• Searches – Collection Searches, Section
Searches, Text Searches, Unannotated Version
Searches, Chemical Structure Searches.
• Page or Experiment Templates
• References to Notebooks
• References to Folders
• References to Page or Experiment Templates
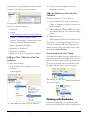
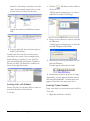
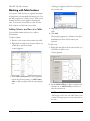
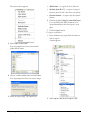
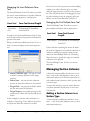
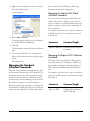
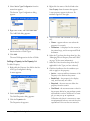
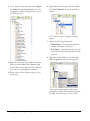
Adding a New Collection to the User
Collection
To add a new collection:
1. In the Collection Tree, right-click your user
collection.
A menu appears.
To add a reference in a User Collection:
1. In the Collection Tree, click the Notebook,
Folder, or Template to which you wish to create the reference.
2. While holding the CTRL and SHIFT keys, drag
the collection until the user collection is highlighted.
3. Release the mouse.
The Reference appears in the Collection Tree.
Alternatively, you may right-click the collection
you wish to reference, and select Copy from the
collection menu. Then, right-click the user collection and select Paste Reference.
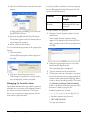
Browsing up to the User Group
If you have the required security permissions, you
may browse up to the next highest level in the Collection Tree and view the user group at that level.
To do this, right click your user collection, select
Go Up To, then the name of your user group.
Alternatively, you may select View from the menu
bar, then Go Up To.
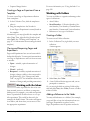
Working with Notebooks
2. Select New, then select a type of collection.
512•Working with E-NotebookCambridgeSoft
Notebooks contain Page or Experiment collections. Each Notebook has a table of contents asso-
ciated with it, which displays summary information
for each collection in the Notebook.
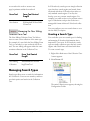
Creating a Notebook
To create a new Notebook collection:
1. In the Collection Tree, right-click your user
collection.
A menu appears.
When you rename a Notebook, the names of the
Pages or Experiments within it will change to
match the name of the Notebook.
Working with Pages and
Experiments
Pages/Experiments in E-Notebook may contain
several different types of sections for experimental
data.
Creating a Page or Experiment
To create a new Page or Experiment collection:
1. In the Collection Tree, right-click the Notebook collection to which you would like to add
the Page or Experiment.
A menu appears.
2. Select New, then Notebook.
3. A new Notebook collection appears and you
are prompted to rename it. Its Table of Contents section appears in the right frame.
TIP: If you would like to create a new Page/Experiment
within the Notebook, simply click the New Experiment icon
.
Each Notebook has a Table of Contents section
associated with it. The Table of Contents summarizes all of the Pages/Experiments that the notebook contains. Double-clicking the number
associated with any of the contained Pages/Experiments listed will allow you to navigate to that
Page/Experiment. You may also print the Table of
Contents to create a hardcopy of it; see “Printing
Sections” on page 581 for more information.
2. Select New, then Page (or Experiment).
A new Page or Experiment collection appears
within the Notebook. It is numbered automatically.
You may associate several types of sections with the
Page/Experiment:
• Reaction Section
• MS Word Document Section
• Ancillary Data Section
• Spectrum Section
• Spectra Section
• Table Section
• MS Excel Spreadsheet Section
• MS PowerPoint Section
ChemOffice 2006/E-NotebookWorking with E-Notebook
• 513
• Captured Image Section
Creating a Page or Experiment from a
Template
Administrator
To create a new Page or Experiment collection
from a template:
1. In the Collection Tree, click the template to
select it.
2. Drag the template into the Notebook.
A new Page or Experiment is created, based on
the template.
Alternatively, you may right-click the template and
select Copy. Then, right-click the Notebook and
select Paste. (See “Working with Templates” on
page 517 for information about creating the initial
template).
Closing and Reopening Pages and
Experiments
For more information, see “Using the Inbox” on
page 545.
Working with Folders
You can use folders to organize and manage other
types of collections:
• other Folders
• Saved Searches – Collection Searches, Sec-
tion Searches, Text Searches, Chemical Structure Searches, Unannotated Version Searches
• References to any type of collection
Creating a Folder
To create a new Folder collection:
1. In the Collection Tree, right-click your user
collection.
A menu appears.
Pages and Experiments have several states which
define their lifecycles. You may perform transitions
on a Page or Experiment to move it from one state
to another.
• Open – writable, optional annotation of
changes
• Closed – read-only
• Reopened – writable, required annotation of
changes, changes visible on the screen and in
the printed copy. (See “Changes and Audit
Trail” on page 597 for information about visualization of changes and providing annotation).
Enterprise
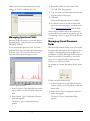
Working with the Inbox
E-Notebook makes it possible for data to be sent
from external sources to an Inbox or temporary
holding area. For example, you could send spectral
data to a particular E-Notebook user or to a specific experiment. This could be done with, for
example, the Send2 feature. The section will appear
in an Inbox, and from there you can move it into
the appropriate experiment.
514•Working with E-NotebookCambridgeSoft
2. Select New, then Folder.
3. A new Folder collection appears and you are
prompted to rename it.
Or, you may right-click an existing Folder collection and select New, then Folder, to create a Folder
within a Folder.
Adding a Reference to the Folder
You may add references to a folder if, for example,
you would like to keep the information from several Pages/Experiments together, but the
Pages/Experiments exist in separate notebooks.
1. In the Collection Tree, click the Collection to
which you wish to create the reference.
2. While holding the CTRL and SHIFT keys, drag
the collection until the folder collection is highlighted.
3. Release the mouse.
The Reference appears in the Collection Tree.
Alternatively, you may right-click the collection
you wish to reference, and select Copy from the
collection menu. Then, right-click the folder collection and select Paste Reference.
Working with the User
Configuration Folder
Within your user collection, there is a User Configuration Folder, which can contain Reactants, AutoText, and Templates.
To expand your User Configuration folder and
view its contents, either double-click it in the
Collection Tree or click the plus sign next to it:
• Templates folder – contains templates of var-
ious types that you can use to avoid unnecessary reentry of data. See “Working with
Templates” on page 517 for more information.
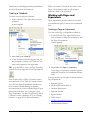
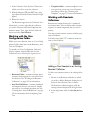
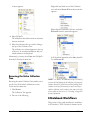
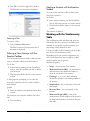
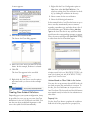
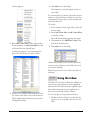
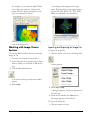
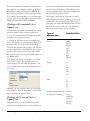
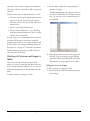
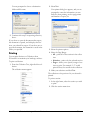
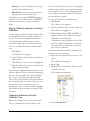
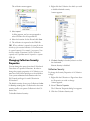
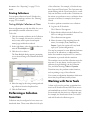
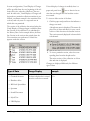
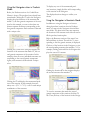
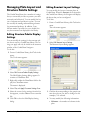
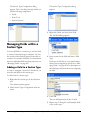
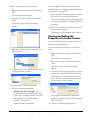
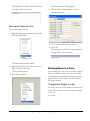
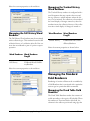
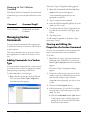
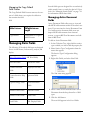
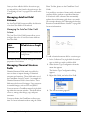
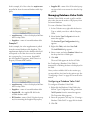
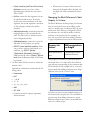
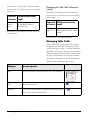
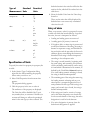
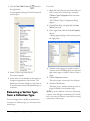
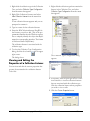
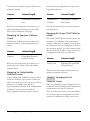
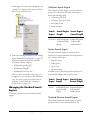
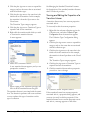
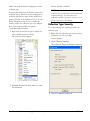
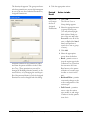
Working with Reactants
Collections
Reactants are named shortcuts for a commonly
used compounds. These could be either common
reagents, or named compounds that you use frequently.
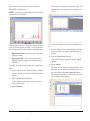
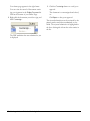
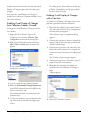
You may populate reaction sections with the properties of reactants.
E-Notebook provides 2477 commonly used reactants, as shown below:
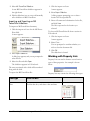
Adding a New Reactant to an Existing
Reactant Collection
• Reactants Folder – contains reactants whose
structures and properties you can add to Reaction Sections. See “Working with Reactants
Collections” on page 515 for information.
• AutoText Definitions – contains predefined
text fragments that you can reuse to simplify
text entry in, for example procedure text. See
“Creating New Autotext Definitions” on page
543 for information about configuring AutoText
ChemOffice 2006/E-NotebookWorking with E-Notebook
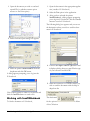
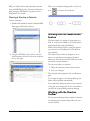
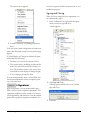
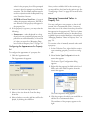
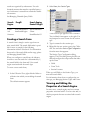
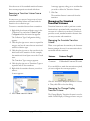
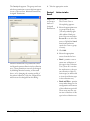
To add a new reactant section to an existing collection.
1. Browse to the Reactants collection to which
you wish to add the Reactant, clicking the collection in the Collection Tree to select it.
The Reactants collection appears, with the
existing reactants displayed in the right frame.
2. In the right frame, click the New Reactant button.
• 515
A new reactant section appears.
You may populate reaction sections with the properties of reactants.
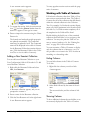
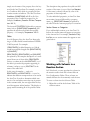
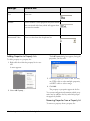
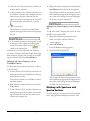
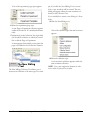
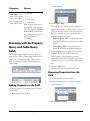
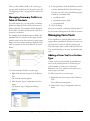
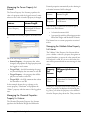
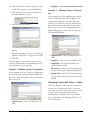
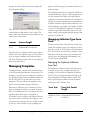
Working with Table of Contents
Administrator
3. To rename the section, click the section menu
icon
and select Rename Section from the
menu that appears. Then type in a name.
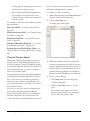
4. Draw or import the structure using the Chem-
Draw tools.
The formula and molecular weight properties
are updated automatically. The compound
name may be updated as well. The compound
name will be displayed in the table of contents
for the Reactants Folder that contains this reactant. (Click the Reactants Folder in the Collection Tree to view its table of contents).
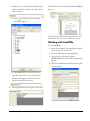
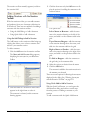
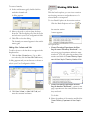
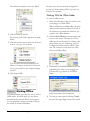
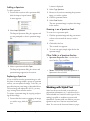
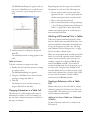
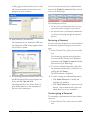
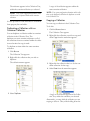
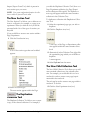
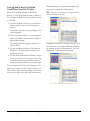
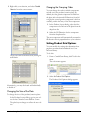
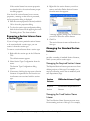
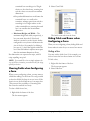
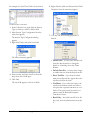
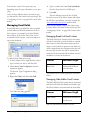
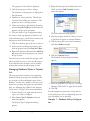
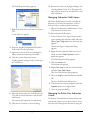
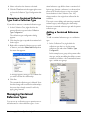
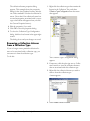
Adding a New Reactant Collection
You can add a new Reactant Collection to your
User Configuration folder in E-Notebook. To add
a new Reactant Collection:
1. Right-click the Reactants Folder and select
New, then Reactants.
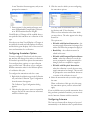
E-Notebook collections often have Table of Contents sections associated with them. The Table of
Contents lists all of the collections that fall directly
within the selected collection in the Collection
Tree. For example, if a Notebook contains Experiments, all of the Experiments in the Notebook will
be listed. Or, if a Folder contains templates, all of
the templates in the Folder will be listed.
Double-clicking the link by any of the contained
collections listed will allow you to navigate to that
collection. You may also print the Table of Contents to create a hardcopy of it. See “Printing Sections” on page 581 for more information.
You can customize a Table of Contents to display
only the columns that are of interest to you. It is
also possible to sort items in the TOC in either an
ascending or a descending order.
Hiding Columns
You can hide columns in the Table of Contents.
To do this:
1. Right-click the column you wish to hide.
A menu appears.
2. Select Hide followed by the name of the col-
A Reactants collection appears, and you are
prompted to rename it.
2. Enter a name for the Reactants collection.
3. Click the New Reactant tool in the right frame.
A new Reactant section appears.
516•Working with E-NotebookCambridgeSoft
umn.
The screen refreshes, and the column is hidden.
Showing Columns
To show additional columns that are hidden, or are
not currently displayed in the Table of Contents.
3. Right-click one of the columns in the Table of
A menu appears.
Contents.
A menu appears.
8. Select Sort Ascending.
4. Select Show Columns.
The Show Columns dialog appears, listing the columns you may select for display in the TOC. The
columns that are currently displayed are denoted
with checkmarks.
The items are sorted in ascending order according
to the column you selected.
To sort items in an descending order:
9. Right-click the column by which you wish to
sort the Table of Contents.
A menu appears.
10. Select Sort Descending.
The items are sorted in descending order by the
column you selected.
5. Select and deselect columns to customize the
TOC display.
The columns you selected appear with checkmarks
next to them.
6. Click OK to close the dialog.
The dialog closes, and the screen refreshes to display the additional columns.
Sorting Items in the TOC
You may sort items in the TOC in either an
ascending or descending order. To sort items in an
ascending order:
7. Right-click the column by which you wish to
sort the Table of Contents.
ChemOffice 2006/E-NotebookWorking with E-Notebook
Working with Templates
E-Notebook gives you the ability to use templates
so that you can avoid reentering information
unnecessarily. For example, you may create a template for a particular type of Experiment or Page. It
may contain data and notes that you often use, or
typical values for various properties.
To create a new template:
1. Within your User Configuration Folder, there
should be a My Template folder. Right click
this folder and select New, then the type of
template you wish to create.
The template appears within the folder.
2. Add any data you wish to the template.
In order to use the template as the basis for a new
experiment:
• 517
3. Select a notebook in the tree, and click the New
Experiment button:
Administrator
A list of the available templates is displayed.
4. Select the desired template.
A new experiment appears within the notebook. It contains all of the data that was in the
template.
Alternatively, simply click a template in the tree to
select it, and then drag it into the notebook to create a new Experiment.
Working with MS Office Sections,
Reactions, and other Sections
Pages/Experiments in E-Notebook may contain
several different types of sections for your experimental data. Just as you would use pages in a paper
notebook for recording various types of data, you
can use sections in E-Notebook for recording MS
Excel data, reactions, images, and other types of
information.
You may associate several types of sections with
the Page/Experiment:
• Reaction Sections
• Captured Image Sections
• Ancillary Data Sections
• Table Sections
• Spectrum and Spectra Sections
• MS Word Sections
• MS PowerPoint Sections
• MS Excel Spreadsheet Sections
Your system configuration determines the types of
sections that are available in E-Notebook.
518•Working with E-NotebookCambridgeSoft
Reaction Sections
Reaction Sections can be used to show one step in
a reaction. You can draw and store a reaction using
the ChemDraw reaction field. The ChemDraw
Toolbar allows you to create a chemical structures
in the reaction field. The section contains a stoichiometry grid as well, that analyzes the reaction
drawing automatically. The AutoText feature
updates the preparation text when you change the
reaction drawing and/or information in the stoichiometry grid.
For detailed information about all the features of
Reaction sections, see “Reactions in E-Notebook”
on page 528.
Captured Image Sections
Captured Image Sections allow you to view and
annotate PDF images and documents, using the
same tools as Adobe Acrobat software. With Captured Image Sections, you have the capability for
importing, exporting, viewing, and annotating PDF
documents. The section supports all image file
types such as JPG, GIF, PNG, TIFF and BMP.
For detailed information about importing, exporting, clearing etc., see “Working with Captured
Image Sections” on page 551.
Ancillary Data Sections
Ancillary Data Fields make it possible for you to
associate a file type which is not supported by
E-Notebook. Although the file cannot be viewed
from within E-Notebook, a user can export it to a
selected location, and then open it and view or edit
it from there.
When you import the file, the checksum, source
path, source file name, source file size and source
file type are populated automatically into the
E-Notebook.
For detailed information about all the features of
Ancillary Data Sections, see “Working with Ancillary Data Sections” on page 564.
Table Sections
Tables enable you to organize data in an easily
interpreted, tabular format. The Table sections in
E-Notebook can be used to organize the chemical
properties of compounds that interest you. You
can add properties to a Table, pivot a Table, resize
columns and rows, and organize columns and
rows. Tables may contain several basic types of
data — text data, numerical data, dates, or structures. You may set up tables in different sections in
E-Notebook to contain different types of information.
Another feature of tables is the ability for you to
add references to them. You can insert links to
other E-Notebook sections or collections into a
table. When you add a reference or link to a table,
you may navigate to the collection or section you
have referenced, simply by clicking a link in the
table cell.
See “Working with Table Sections” on page 565
for more information.
Spectrum and Spectra Sections
Spectrum Sections allow you to view and analyze
spectrum images, using the same tools as Galactic
GRAMS32 software. Thus, you can manage your
spectra data easily and effectively using Spectrum
and Spectra sections. You can import spectrum
images of various types. The section allows you to
copy and export spectrum images as well.
While the Spectrum Section can contain a single
spectrum, the Spectra section can contain multiple
spectra, organized in subsections or subtabs.
For more information, see “Working with Spectrum and Spectra Sections” on page 560.
MS Word Sections
MS Word Sections allow you to view and edit MS
Word documents within E-Notebook sections,
thus managing the information that you normally
record in MS Word. You can import MS Word
documents from external sources, or export MS
ChemOffice 2006/E-NotebookWorking with E-Notebook
Word documents and edit them in MS Word. The
toolbars displayed with an MS Word field in
E-Notebook are the toolbars that appear when you
open MS Word.
For more information, see “Working with MS
Word Sections” on page 554.
MS Excel Spreadsheet Sections
MS Excel Section allows you to manage Excel
spreadsheets in E-Notebook. Its main purpose is
to provide you with a facility to create, modify, and
save your Excel spreadsheets within E-Notebook
environment.
You can import the MS Excel spreadsheets into
E-Notebook. The section allows you to export and
clear the slideshows as well. The toolbars displayed
with an MS Excel field in E-Notebook are the
toolbars that appear when you open MS Excel
spreadsheets.
For detailed information on this topic, see “Working with MS Excel Spreadsheets” on page 550.
Send2ENotebook and
Send2File
You can send a file from another application to
E-Notebook with Send2ENotebook, and have it
appear within E-Notebook in PDF format. The
objective of the Send2 feature is to allow the convenient capture or various types of data from other
applications into E-Notebook system. This is typically output from either instrument control applications or from various scientific analysis software.
PDF is the format for Send2 feature.
With the Send2File feature, you can also send such
a file in PDF format to your network outside the
E-Notebook so that you can bring it later into the
E-Notebook whenever you require. This is useful
for sending files from workstations that do not
have the E-Notebook application installed.
To start the'Send2ENotebook or Send2File process:
• 519
1. Open the document you wish to send and
expand File (or whichever menu option
accesses to the Print option).
1. Open the document in the appropriate applica-
Administrator
tion (outside of E-Notebook).
2. Select the Print option in the application.
3. After you have selected the printer
Send2ENotebook, a dialog appears prompting
you to log into E-Notebook. Click the Connect
button to send to E-Notebook
The following dialog box appears and you can set
the destination where you wish to send the document in E-Notebook.
2. Select Print and a print dialog box appears.
4. Click the Set Target Collection Type button and
3. Select the printer Send2ENotebook from the
dropdown and click OK button.
it displays a dialog where you can fill in the type
of your collection and click OK.
A dialog appears prompting you to log into the
E-Notebook.
5. Select the Notebook or Collection where you
wish to send the document with the help of
dropdown list.
Click Connect button to send to E-Notebook and
click the Send2File button to send to file.
Working with Send2ENotebook
The checkmark
To Send a document to E-Notebook,
for the option to send the document in the Inbox
of the Collection.
520•Working with E-NotebookCambridgeSoft
below is
6. Alternatively, you can select User In Box if you
wish to send the document to the Inbox in the
User Collection.
Click Send button to finish the Send to E-Notebook
process:
a. Click
to open the User Collection.
A dialogue appears:
The document in PDF format gets added to your
collection in E-Notebook as a different section.
Working with Send2File
To start Send2File,
1. Open the document in the appropriate application (outside of E-Notebook).
2. Select the Print option in the application.
3. After you have selected the printer
Send2ENotebook, the E-Notebook login dialog
appears.
4. Click the Connect button and the following dialog box appears.
b. Click Select and you can select the User.
7.
Type the name of the section by which the
document will appear in the E-Notebook
collection in the following box:
8.
Fill the properties in the Property Values List:
ChemOffice 2006/E-NotebookWorking with E-Notebook
• 521
5. Select File option as:
8. Click Save and the dialog appears as:
Administrator
6. Alternatively, click the Send2File button to
send to a location outside E-Notebook.
The following dialog box appears:
9. Click the Send button to send the file to the
specified location and close the Send2File pro-
cess:
7. Click
to open the following destination
window and you can set the destination where
you wish to send the document. PDF is the
only format:
The document in PDF format gets saved to your
specified location and you can bring it into the
E-Notebook later.
Enterprise
Working Offline
E-Notebook makes it possible for you to work in
offline mode. In offline mode, you are disconnected from the network. When you reconnect,
you can upload the changes you made offline to
the central, E-Notebook database. See “Working
Offline” on page 546.
522•Working with E-NotebookCambridgeSoft
Chapter 28: E-Notebook Features
Browsing the Collection Tree
Collections, and their contents, are organized in a
tree structure, called the Collection Tree, on the
left side of the browsing screen. E-Notebook
offers a number of options for browsing collections.
• To begin browsing collections, click the Browse
button at the top of the screen.
The Collection Tree appears.
To show the contents of a collection:
Click the plus sign next to the collection whose
contents you wish to see.
The collection is expanded, and you can view
its contents.
To hide the contents of a collection:
Click the minus sign next to the collection.
The collection is minimized, so that you cannot
see its contents.
Hiding the Collection Tree
Use the Back and Forward arrows to the left of the
Browse button to navigate the Collection Tree
view. These arrows perform a similar function for
the collection tree that Back and Forward web
browser buttons perform for the browser window.
It is only possible for one E-Notebook user to edit
an individual collection at a time. If another user is
editing a particular Collection and you select the
Collection in the tree, you will be presented with a
message informing you that the Collection is
locked for editing by the other user.
It is possible to hide the Collection Tree if you
would to increase the screen area you have for
entering data into a section.
To hide the Collection Tree:
1. Move your cursor to the right boundary of the
tree, so that the cursor becomes a doubleheaded arrow.
2. Double-click.
The Collection Tree is hidden.
Alternatively, you may click the touch bar at
the right-border of the Collection Tree.
To view the Collection Tree again,
1. Move your cursor to the left boundary of
the section, until the double-headed
arrow appears again.
2. Double-click.(Or, you may click the
touch bar at the left boundary of the
E-Notebook window).
The Collection Tree reappears.
Showing and Hiding Collections
Limiting Collection Browsing
The Collection Tree provides you with a means of
expanding and contracting collections so that you
only see the information you need.
You can limit your browsing by selecting a root
collection for the Collection Tree. The root collection becomes the highest browsing level in the Col-
ChemOffice 2006/E-NotebookE-Notebook Features
• 525
Administrator
lection Tree. Limiting the Collection Tree view can
make it easier to find specific information.
To set a root for the Collection Tree:
1. Click the Browse button at the top of the
screen.
The Collection Tree appears.
2. Right-click the collection you wish to be the
root collection for browsing.
A menu appears.
To browse to your Home Collection and bring the
Home Collection to the top of the Collection Tree:
1. Click Browse.
The Collection Tree appears.
2. Right-click any blank area of the Collection
Tree.
A menu appears.
3. Click Go Home.
The Home Collection appears at the top of
Collection Tree.
Alternatively, you may select View, then Go To,
then Home from the E-Notebook menu bar:
3. Select Browse Here.
The collection you selected appears at the top
of the collection tree.
Browsing at a Higher Level
Browsing from Home
You can browse from your Home Collection,
which contains all of the collections associated
with you as a user of E-Notebook. This is the collection that appears when you first log in.
526•E-Notebook FeaturesCambridgeSoft
You can browse at a higher level in the Collection
Tree, and see all of the collections at that level.
To browse at a higher level:
1. Click Browse.
2. The Collection Tree appears.
3. Right-click a collection in the tree.
A menu appears.
Right-click any blank area of the Collection
tree, and select Browse All from the menu that
appears.
Right-click any collection in the tree, and select
Browse All from the menu that appears.
4. Select Go Up To.
The collections that either contain or reference
the item are listed.
5. Select the collection that you wish to bring to
the top of the Collection Tree.
The collection you selected appears at the top
of the tree. Its contained collections and contained references are displayed.
Alternatively, you may select View, then Go Up To
from the E-Notebook menu bar.
Browsing the Entire Collection
Tree
Browsing the entire Collection Tree enables you to
see all of the E-Notebook collections at once.
To browse the entire tree:
1. Click Browse.
The Collection Tree appears.
2. Do one of the following
In E-Notebook menu bar, select View, then Go
To, and Browse All.
NOTE: The Browse All command will only be available if
you have the Read privilege for the collection at the top of the
collection hierarchy. If you do not have Read privilege for the
collection at the top of the hierarchy, it may be necessary to
conduct a collection search in order to view some of the collections to which you have access. See “Searching” on page 605
for more information.
E-Notebook Workflows
This portion of the guide describes the workflows
in E-Notebook. The E-Notebook features can be
ChemOffice 2006/E-NotebookE-Notebook Features
• 527
combined to support a number of different workflows.
The ChemDraw toolbar appears.
Reactions in E-Notebook
Administrator
The following topics describe the features that are
used in an E-Notebook reaction section:
• Drawing and Analyzing Reactions
•
Enterprise
Editing Structures Using
NO2
ISIS/Draw
• Working with the Name to Structure Feature
• Working with the Reaction Toolbar
• The Stoichiometry Table
•
Enterprise
NO2
Me
Me
HC(OEt)3
TsOH
NH2
N
OEt
Working with Batch Explorer
• Working with AutoText
Drawing and Analyzing Reactions
You can draw a reaction using the ChemDraw
reaction field. When you draw a reaction, the stoichiometry grid is automatically populated with the
properties of the reactants and products. If you
remove a reactant or product from the stoichiometry grid, the corresponding structure will be
removed from the reaction drawing.
The ChemDraw Toolbar allows you to create a
chemical structure by connecting frequently used
substructures together. For more information
about using the ChemDraw Toolbar, please see the
ChemDraw User's Guide.
Drawing a Structure or Reaction
To draw a reaction:
1. Click within a reaction field.
2. Using the ChemDraw tools, draw a reaction,
with reactants to the left of the arrow and products to the right.
NOTE: You can access a drawing menu by right-clicking
in the structure window. This menu allows you to, among
other things, copy and paste structures.
Expanding the Drawing Window
To expand the drawing window:
1. Double-click the titlebar of the chemical structure field.
The chemical structure field expands.
2. Using the ChemDraw tools, draw the structure
or reaction.
When you are finished editing, double-click the
frame of the chemical structure field to return it to
its original size in the form.
Enterprise
Working with ISIS/
Draw
E-Notebook allows you to draw a reaction using
ISIS Draw. If your system is configured to use
528•E-Notebook FeaturesCambridgeSoft
ISIS, you will be able to draw chemical structures
using the ISIS/Draw tools. For more information
about using the ISIS Draw Tool, please see the
ISIS Draw User's Guide.
When you are finished editing, click on the close
icon,
to return to E-Notebook:
Drawing a Structure or Reaction
To draw a reaction:
1. Double-click within the reaction field and ISIS
Draw page will launch as shown:
Working with the Name=Struct
Feature
2. Using the ISIS Draw tools, draw a reaction,
with reactants to the left of the arrow and products to the right:
With this feature, the names of compounds you
draw in a reaction are added to the stoichiometry
grid automatically, using ChemDraw's
Name=Struct feature. Prior to using this feature,
you need to have ChemDraw Ultra installed on
your machine.
The Name=Struct feature is designed to be as
smart as a real chemist, interpreting chemical
names into their most reasonable structures as they
are actually used by chemists.
To convert a name to a structure,
1. Draw the structures in the reaction section.
2. Save your changes.
The structure names appear in the stoichiometry
grid.
If you make changes to the reaction drawing, the
names will be updated automatically.
If you manually change the name of any structure
in the grid, your change will not be overwritten if
you alter the corresponding structure drawing.
Working with the Reaction
Toolbar
The reaction toolbar provides a number of features
for managing the reactants and products in your
reaction section.
ChemOffice 2006/E-NotebookE-Notebook Features
• 529
The reaction toolbar normally appears just below
the reaction field.
3. Click the down arrow by the Add button to dis-
play the options for adding the structure to the
reaction section.
Administrator
Adding Structures with the Reaction
Toolbar
With the reaction toolbar, you can add reactants
and products from your Acronyms collections in
E-Notebook. There are two methods for adding a
structure with the reaction toolbar:
• Using the Add Dialog to Add a Structure
• Using Quick Add to Add a Structure
Using the Add Dialog to Add a Structure
The Add button on the reaction toolbar brings up
a dialog that allows you to select a structure and
add it to your reaction section.
To add a structure:
1. Click the Add button in the reaction toolbar.
The Select and Add Structure dialog appears,
displaying the acronyms in your Reactants
Folder:
The options are:
Left of Arrow as Reactant – adds the structure to the reaction drawing to the left of the
arrow, and adds it to the reactants table in the
grid.
Top of Arrow as Reagent – adds the structure
to the reaction drawing above the arrow, and
adds it to the reactants table in the grid.
Right of Arrow as Product – adds the structure to the reaction drawing to the right of the
arrow, and adds it to the products table in the
grid.
To Grid as Reagent – adds the structure to
the grid only, in the reactants table.
4. Select the option you desire from the menu.
5. Click the Add button.
The structure is added to the reaction section in
the manner you selected.
There are several options for filtering the acronyms
displayed in the dialog. See “Filtering Acronyms
with the Reaction Toolbar” on page 531.
Using Quick Add to Add a Structure
2. Click the name of a structure in the list that
appears in the right frame to select it.
The structure is selected, and its structure
drawing appears.
530•E-Notebook FeaturesCambridgeSoft
With the Quick Add button, you can bypass the
Add Structure dialog and remove several steps
from the process of adding a structure to your
reaction.
To add a structure with the Quick Add button:
1. Select an acronym from the dropdown list that
appears in the reaction toolbar. This dropdown
lists all of the acronyms in your Reactants
Folder.
2. Click the down arrow by the Quick Add button
in the reaction toolbar.
The options for adding the structure to the reaction section are displayed. The options are:
Left of Arrow as Reactant – adds the structure to the reaction drawing to the left of the
arrow, and adds it to the reactants table in the
grid.
Top of Arrow as Reagent – adds the structure
to the reaction drawing above the arrow, and
adds it to the reactants table in the grid.
Bottom of Arrow as Solvent – adds the structure to the reaction drawing below the arrow,
and adds it to the reactants table in the grid.
Right of Arrow as Product – adds the structure to the reaction drawing to the right of the
arrow, and adds it to the products table in the
grid.
To Grid as Reagent – adds the structure to
the grid only, in the reactants table.
To Grid as Solvent – adds the structure to the
grid only, in the solvents table.
3. Select the option you desired.
4. Click the Quick Add button in the reaction
toolbar.
The structure you selected is added to your
reaction.
Filtering Acronyms with the Reaction
Toolbar
The reaction toolbar offers several options for filtering acronyms before selecting one to add to
your reaction section.
ChemOffice 2006/E-NotebookE-Notebook Features
To jump to a particular structure:
1. Click the Add button in the reaction toolbar.
The Select and Add Structure dialog appears,
displaying the acronyms in your Reactants
Folder.
2. Begin typing the name of the structure you
wish to select.
The selected structure changes to match the
text you have typed.
beginning
of
structure
name
Applying a Filter
To filter the acronyms that are displayed in the dialog:
1. Click the Filter button at the top of the dialog.
The Apply Filter window is displayed.
2. From the dropdown list, select either Names
Starting with or Names Containing.
3. Enter the text for the filter. In this example,
chloro was entered.
• 531
4. Click OK to close the Apply Filter window.
The filtered list of acronyms is displayed.
Deleting a Structure with the Reaction
Toolbar
Administrator
You can use the reaction toolbar to delete structures from a reaction.
To do this:
6. In the reaction drawing, use the ChemDraw
tools to select the structure you wish to delete.
7. Click the down Delete button in the reaction
toolbar.
The structure is deleted.
Removing a Filter
To remove a filter:
1. Click the Remove Filter button.
The filter is removed, and the entire list of
acronyms is displayed.
Defining a New Acronym with the
Reaction Toolbar
You can use the reaction toolbar to add new acronyms to reactants collections in E-Notebook.
To do this:
2. In the reaction drawing, use the ChemDraw
tools to select the structure you wish to define
as an acronym.
3. Click the down Define button in the reaction
toolbar.
A dialog appears, prompting you to select the
Acronyms collection where you wish to add the
new acronym.
graphic
4. Select the collection and click the Create Here
button.
The structure you selected is added to the collection.
5. Close the dialog.
532•E-Notebook FeaturesCambridgeSoft
Working with the Stoichiometry
Table
The stoichiometry table calculates and stores stoichiometric data for a reaction. It is filled in automatically as you modify a reaction drawing. You
may change values manually as well.
It is also possible to add reactants from the Collection Tree to the stoichiometry table.
Depending upon your system configuration, certain of these properties may not appear, or additional properties may be present.
Reactant properties:
• Name – the text name of the reactant.
• Molecular Formula (MF) – the chemical for-
•
•
•
•
mula that shows the number and kinds of
atoms in a molecule of the reactant.
Limiting? – a yes or no value, indicating
whether the reactant is the limiting reactant in
the reaction.
Sample Mass – the total quantity of the reactant sample.
Reactant Mass – the total quantity of the
reactant.
Molecular Weight (MW) – sum of the
atomic masses (atomic weights) of the atoms in
the molecular formula, as set forth in the periodic table.
• Formula Mass – sum of the atomic masses
(atomic weights) of the atoms in the formula of
the compound. This tends to be a more general
term than molecular weight, and can be applied
to compounds such as ionic compounds.
• % by Weight (%Wt) – the percentage of reactant in the sample.
• Moles – the number of molecules of the reactant / 6.023 x 10²³.
• Equivalents – the proportion of the reactant
relative to the other components in the reaction.
• Molarity – the number of moles per volume of
the reactant.
• Volume (Vol) – the three-dimensional measurement of the reactant, such as mL, L, etc.
• Density (D) – the mass per unit volume of the
reactant.
• Loading – the number of reactant moles per
amount of the reactant sample.
Product Properties:
• Name – the text name of the product.
• Molecular Formula – the chemical formula
•
•
•
•
•
that shows the number and kinds of atoms in a
molecule of the product
Theoretical Mass – the calculated mass of
product the reaction yields.
Actual Mass – the actual mass of product the
reaction yields.
% Yield – the ratio of the actual amount to the
theoretical amount.
% Purity – the percentage of the actual
amount that is the product.
Molecular Weight – the sum of the atomic
masses (atomic weights) of the atoms in the
molecular formula, as set forth in the periodic
table.
ChemOffice 2006/E-NotebookE-Notebook Features
• Formula Mass – the sum of the atomic
•
•
•
•
masses (atomic weights) of the atoms in the
formula of the compound. This tends to be a
more general term than molecular weight, and
can be applied to compounds such as ionic
compounds.
Theoretical Moles – the calculated number of
moles of the product that the reaction yields.
Actual Moles – the actual number of moles of
the product that the reaction yields.
Equivalents – the proportion of the product
relative to the other components in the reaction.
Loading – the number of product moles per
amount of the product.
Adding Information to the Stoichiometry
Table
You can manually type stoichiometric information
into the stoichiometry table of a reaction section,
as well as add reactants from the Collection Tree.
To manually add information to a Stoichiometry
Table:
1. In the reaction section, click a cell in the stoichiometry table.
2. Type the information into the cell.
The information is saved, and the text is displayed in blue. If you have entered a number
and there are default units associated with the
property, the units are displayed. (See “Working with Numerical Units in Tables” on page
569 for more information).
3. Repeat the process for other cells in the table,
if necessary.
To enter reactant information into the Stoichiometry Table:
1. Right-click the a cell in the the Reactants section of the Stoichiometry Table.
• 533
A menu appears.
Removing Reactants and Products from
the Stoichiometry Table
Administrator
You can remove all of the information pertaining
to a particular product or reactant from the Stoichiometry Table automatically. If the reactant you
remove is the limiting reactant in the reaction, the
first remaining reactant becomes the limiting reactant.
To remove a reactant or product from the stoichiometry table:
1. Right-click the reactant or product you wish to
remove.
A menu appears.
2. Select Add Reactant After, to add a reactant after
the selected item or Add Reactant Before, to add
a reactant before the selected item.
A dialog box appears. You are prompted to
browse for the reactant you wish to select.
2. Select Remove Product if it is a product, or
Remove Reactant if it is a reactant.
3. Browse to the reactant section with the reac-
tant you wish to add. (See the Working with
Reactants portion of this guide for information
about creating and using reactants collections.
If you wish, you may add a new reactant to
E-Notebook from the Add Reactant dialog).
Information about the reactant is displayed on
the right side of the dialog box.
4. Click Add .
The dialog box closes, and the Stoichiometry
Table is populated with information about the
reactant.
534•E-Notebook FeaturesCambridgeSoft
A message appears, asking you if you are sure
you want to delete the reactant or product.
3. Click Yes.
The reactant or product is removed from the
Stoichiometry Table. If it was present in the
reaction drawing, it is removed from the drawing as well.
Working with Salts and Solvates in a
Reaction Section
In an E-Notebook reaction section, it is now easier
to represent a compound that is present in a salt or
hydrated form. You can enter a formula that
accounts for salts and hydrates.
To enter a formula,
4. In the stoichiometry grid, double-click the
molecular formula cell.
A dialog appears.
Enterprise
Working With Batch
Explorer
With the batch explorer, you can view a reaction
tree showing successors and predecessors of a
selected batch or compound.
To view Batch Explorer in the reaction section:
Click the Batch Explorer tool icon
5. Select a salt code or solvate from the drop-
down list. This list displays all of the salt codes
and solvates in your User Configuration folder.
6. Click OK to close the dialog
The formula you entered appears in the stoichiometry grid.
Adding New Solvates and Salts
To add a solvate or salt that does not appear in the
dropdown list:
7. Click the New Solvate button. (Or, to add a
new salt code, click the New Salt Code button).
A dialog appears and you can browse to solvate or
salts in your User Configuration folder.
in
the reaction section.
A menu appears:
The options are:
• Create Chemistry Experiment As Next
Step In same ‘Chemistry Notebook’ – creates a new page/experiment within the same
notebook. To do this, select the product of the
reaction and click the Create Chemistry Experiment As Next Step In Chemistry Notebook link.
• Create Chemistry Experiment As Next
8. Click New Solvate (or New Salt Code) and
enter the structure and name.
Step In Another ‘Notebook’ – creates a new
page/experiment in the same/different chemistry notebook.
To do this:
9. Select the product of the reaction and click the
Create Chemistry Experiment As Next Step In
link.
ChemOffice 2006/E-NotebookE-Notebook Features
• 535
A dialog appears, prompting you to select the
Notebook collection where you wish to create
the experiment.
A dialog appears, prompting you to select a
section that contains a Reaction.
Administrator
12.Click Select.
10.Click Select.
Another dialogue appears which tells you that
a link is set and asks you to navigate to the Reaction section of the selected Notebook collection.
• Create step Link To Existing ‘Chemistry
Experiment’ – creates a link between two
existing E-Notebook reactions in same/different notebooks such that the product of one
reaction is a reactant in the other. Both the
reaction sections should contain valid reactions. Hence a link is created between two preexisting pages.
To do this,
11.Click the Create Chemistry Experiment As Next
Step In link.
536•E-Notebook FeaturesCambridgeSoft
Another dialogue appears which tells you that
a link is set and asks you to navigate to the
Chemistry Experiment of the selected Notebook
collection.
• View Batch Explorer – displays a reaction
tree showing successors and predecessors of a
selected batch or compound.
To do this, select View Batch Explorer.
A dialogue appears, prompting you to select a
molecule to explore. Use the scroll buttons to
select a molecule and click OK.
The Batch Explorer window appears, and you
can right-click the molecule to view the options
to display predecessors or successors or all
steps of the batch.
Panning Experiments in Batch Explorer
You can use the panning feature to zoom in on a
particular portion of the reaction tree.
For panning an experiment:
13.To view the panning window, right-click
within a blank portion of the Batch Explorer
window. A menu appears:
14.Select Panning.
A dialog appears which allows you to use the
panning feature to zoom in on a particular portion of the reaction tree.
ChemOffice 2006/E-NotebookE-Notebook Features
15.Select the portion of the reaction tree in the
panning dialog and zoom to see the selected
portion as:
Flipping Experiments in Batch Explorer
You can flip experiments vertically or horizontally
in the Batch Explorer window in E-Notebook.
To flip an experiment:
16.To view the flipping window, right-click within
a blank portion of the Batch Explorer window.
A menu appears.
17.Select Flip and then Vertical or Horizontal.
A dialog appears which tells you that flipping
will change the way the entities are laid out and
asks you to continue.
• 537
18.Click the Yes button to flip and the following
window with flipped reaction sequence
appears:
Administrator
Saving Experiments as Bitmap in Batch
Explorer
E-Notebook provides you with this feature to save
your Experiment Links Diagram from Batch
Explorer window as Bitmap files.
To save an experiment as Bitmap:
1. Right-click within the blank portion of the
Batch Explorer window and a menu appears:
2. Click Save As Bitmap... to open the following
destination window and you can set the destination where you wish to save the Experiment
Link Diagram. Bitmap is the only format:
3. Click the Save button in the destination win-
dow to save the Experiment Link Diagram and
dismiss the dialog.
Copying Experiments in Batch Explorer
E-Notebook provides you with this feature to copy
your Experiment Links Diagram from the Batch
Explorer window.
To copy an experiment:
1. Right-click within a blank portion of the Batch
Explorer window to copy the experiment. A
menu appears:
2. Click Copy to copy the Experiment Link Dia-
gram.
3. Paste the Experiment Link Diagram at your
desired location.
538•E-Notebook FeaturesCambridgeSoft
Printing Experiments in Batch Explorer
You can print your Experiment Links Diagram
from the Batch Explorer window to maintain your
hardcopy archives.
To print an experiment:
4. Right-click within a blank portion of the Batch
Explorer window.
A menu appears:
7. Click Preview button to see the Print Preview as
shown below:
8. Click the Select Printer button to select the
printer.
The printer dialog box appears, and you can
select the printer:
5. Select Print...
A Print Diagram dialog is displayed which
allows you to make your selections:
9. Make all your selections and click the Print but-
ton.
The whole Experiment Link Diagram or portion of the reaction tree you selected is printed.
Selecting Experiments in Batch Explorer
6. Click the Margins button to set the page mar-
gins.
ChemOffice 2006/E-NotebookE-Notebook Features
E-Notebook provides you with this feature to
select the whole Experiment Links Diagram at
once in Batch Explorer window and perform other
functions.
To select the whole experiment:
• 539
10.Right-click within a blank portion of the Batch
Explorer window to select the experiment. A
menu appears:
The example below shows the Preparation field of
the reaction section.
Administrator
Inserting Reactants and Products with
AutoText
11.Click Select All to select the whole Experiment
Link Diagram, which looks like:
When you modify reactants and products in the
reaction drawing or stoichiometry grid, the AutoText will be updated automatically.
Inserting Reactants and Products from the
Stoichiometry Grid
To insert a reactant or product from the stoichiometry grid,
1. Right-click within the text field.
A menu appears.
12.Perform the desired action on the selected
Experiment Link Diagram.
Working with Autotext
With the Autotext feature, you can add predefined
fragments of text to a field. This allows you to create the contents of a text field quickly. You may
also add text that is pulled from other fields, for
example, reaction properties or values in the stoichiometry grid of a reaction section. As you
update the reaction drawing and the stoichiometry
grid, your changes are reflected in the AutoText.
2. Select Insert, followed by the name of the reac-
tant or product.
The name and properties of the reactant or
product you selected are inserted. The text
appears in a different color, and will be updated
automatically if you change the name or properties in the stoichiometry grid.
Inserting New Reactants and Products
To insert a new reactant or product that is not yet
present in the stoichiometry grid,
1. Right-click within the text field.
540•E-Notebook FeaturesCambridgeSoft
2. Select Insert New Reactant... or Insert New Product... from the menu that appears.
A blank row is added to the reactants or products table.
3. Add information about the reactant or product
to the blank row.
The reactant or product is inserted into the stoichiometry grid, and into the text field.
You may also use the reactants/products button to
populate the AutoText. To do this,
1. With your cursor in the text field at the point
where you wish to insert the reactant or product, click the reactants/products button
,
A menu appears.
Adding Items from the AutoText Pane
You can populate the text field by selecting items
from the AutoText pane. If you wish to add your
own, custom AutoText to this pane, you can set up
your own AutoText definitions. See “Creating
New Autotext Definitions” on page 543.
To add AutoText items to the text field:
1. Click the triangle button next to the word
“AutoText” in the upper left corner of the text
field.
The AutoText pane appears, listing the available AutoText items.
2. Select one of the options:
Insert Reactant... – allows you to browse to a
new reactant, and add it to the text and stoichiometry grid.
Insert Product... – allows you to browse to a
new product, and add it to the text and stoichiometry grid.
Insert “[Reactants]” AutoText – inserts the
text “[Reactants]”, which you may then rightclick to select a reactant from the stoichiometry
grid, or to browse to a new reactant.
Insert “[Products]” AutoText – inserts the
text “[Products]”, which you may then rightclick to select a product from the stoichiometry
grid, or to browse to a new product.
The text is updated automatically if you change
the properties of the reactant or product.
ChemOffice 2006/E-NotebookE-Notebook Features
2. Double-click any of the items in the list to
insert the corresponding AutoText. (In this
example, Back extract was double-clicked).
3. If words appear in different colored text
between brackets, this indicates that there are
multiple, possible values for the text. Rightclick the text within brackets to view a drop-
• 541
down list of the choices, and select one of the
values. In the example shown below, several
possible choices are listed for the layers.
1. Click the
Administrator
Link button in the toolbar of
the text field.
A dialog appears, prompting you to select a
collection or section for the target.
Organic was selected, and filled in automatically:
2. Browse to the collection or section, and click
the OK button.
A dialog appears, prompting you to enter the
text that will appear with the link.
4. You may right-click the colored text again to
modify your selection.
Certain items in the AutoText list may refer to
other data in the section. In the example below,
double-clicking “Conditions” in the AutoText
pane automatically fills the Reaction Conditions
into the text field. (The Reaction Conditions are
shown in the right side, below).
3. Enter the text or accept the default text, and
click the OK button.
The link appears within the text field.
4. Double-click the link to browse to its target.
Inserting Links with Autotext
From a text field, you can insert links to other sections and collections in E-Notebook
To do this,
542•E-Notebook FeaturesCambridgeSoft
Alternatively, you may right-click within the text
field, and select Insert Link... from the menu that
appears. Then follow the steps given above.
Inserting Custom Autotext
From a text field, you can insert custom AutoText.
To do this,
1. Right-click within the text field
A menu appears.
2. Select Insert Custom AutoText...
The Insert AutoText dialog appears.
1. Right-click the User Configuration point to
New, then select AutoText Definitions. (Or,
select an existing AutoText collection to modify, by clicking the collection in the tree).
2. Enter a name for the new collection.
3. Enter the following information:
In the example below, AutoText has been set up so
that a user may automatically enter a sentence
regarding a machine type, and select from a list of
several machine types. Double-clicking Machine
Type in the AutoText list for any styled text field
would cause the corresponding sentence to appear.
Then, the user would right-click [MACHINE TYPES]
to select from the list of machine types.
3. Select one of the AutoText items in the left
frame. In this example, Products is selected.
4. Click OK .
The AutoText appears in the text field.
5. Right-click the AutoText to see the options
associated with it, as shown in the example
below.
Creating New Autotext Definitions
Depending upon your system configuration, it may
be possible for you to set up your own AutoText
definitions for use in E-Notebook text fields. You
can then use these predefined fragments to add
text to the styled text field automatically.
ChemOffice 2006/E-NotebookE-Notebook Features
TIP: The title of the keywords tab must match the field
descriptor exactly. In this case, MACHINE TYPES is the
name of the keywords tab, and [MACHINE TYPES]
appears in the AutoText item.
Autotext Based on Other Fields in the Section
You may also set up autotext that will fill in the values from property lists and tables in a section. To
do this, you use a field name as a keyword in an
AutoText Item. The keywords and the field names
must match exactly in order for the substitution to
take effect.
Property Lists
For the AutoText Item to populate the styled text
field with all of the properties in a property list,
• 543
Administrator
simply use the name of the property list as the keyword in the AutoText Item. For example, say there
is a Conditions field, which is a property list that
contains reaction conditions. The AutoText Item
Conditions: [CONDITIONS] will fill in all of the
properties in the Conditions property list, for
example, Conditions: (Pressure: 200 atm, Temperature: 100 °C).
The keyword CONDITIONS followed by a property
name, such as [CONDITIONS:Temperature], will
populate the styled text field with that specific
property — for example, Temperature: 100 °C.
Tables
As with Property Lists, the AutoText Item referring to a Table should contain bracketed UPPERCASE keywords. For example:
“[REACTANTS1] is added dropwise to a 500 ml
round-bottom flask charged with [REACTANTS2]
in [SOLVENT].”
[REACTANTS1], [REACTANTS2], and [SOLVENT]
are replaced by the complete description of a compound from one of these tables. REACTANTS1
refers to a column in the table REACTANTS (or, if
the table is pivoted with properties appearing as
columns, it refers to a row). REACTANTS is the
name of the table field.
In this case, the number — such as in
REACTANTS1 and REACTANTS2 — is used to
indicate that different compounds are to be used in
the AutoText. In order to determine which reactant is to be used where more than one is present
in the reactants table, the user right-clicks the keyword that appears within brackets. This displays a
popup menu containing all of the possible values.
544•E-Notebook FeaturesCambridgeSoft
The description that populates the styled text field
consists of the name (or text of the form Reactant
1 if the name is absent) followed by a list of the
properties of that compound.
To select individual properties, an AutoText Item
can contain a keyword followed by a property
name, e.g., [REACTANTS:Amount] is replaced by
the value from the Amount property for a reactant.
Section Names as Categories
If you add multiple sections to an AutoText Collection, the section names will appear as categories
in the autotext list. For example, Standard and My
AutoText are two section names that appear as categories below:
Working with Solvents in a
Reaction Section
In E-Notebook, you may populate the solvents in
the reaction section from the solvents folder in
User Configuration Folder. These solvents are
named shortcuts for the commonly used solvents.
To enter a solvent into the Solvents Table:
1. Right-click a cell in the Solvents Table of the
reaction section.
A menu appears.
2. Select Add Solvent After to add a solvent after
the selected item, or Add Solvent Before to add
a solvent before the selected item.
A dialog box appears. You are prompted to
browse for the solvent you wish to select.
4. Click Add to close the dialog.
The formula you entered appears in the solvents table.
If a solvent which you wish to add in the solvents
table is not listed in Solvents Folder in your User
Configuration Folder, then you can manually add
that in the table cell.
To do this:
1. In the reaction section, right-click a cell in the
solvents table.
2. Select Add Solvent After or Add Solvent Before,
to add the solvent.
The Add Solvent dialog appears once again.
3. Checkmark the box Add Blank Solvent at the
bottom of the dialog box.
4. Click Add to close the dialog.
A blank row is added to the solvents table in the
reaction section where you can fill the solvent of
your choice manually.
Repeat the process for other cells in the table, if
necessary.
Enterprise
3. Browse to the solvents folder with the solvent
you wish to add. Select a solvent from the list.
This list displays all of the solvents in your User
Configuration folder.
ChemOffice 2006/E-NotebookE-Notebook Features
Using the Inbox
The Inbox in E-Notebook allows the addition of
various types of documents as well as graphical
data into the E-Notebook system, typically output
from either instrument control applications or
from various scientific analysis software.
To view the Inbox of a particular collection:
1. Double-click the collection (or click the plus
sign next to it) to expand it and view its contents.
• 545
The collection expands to show the Inbox.
In some cases, the system will be configured to
prevent you from working offline if you are connected to the network.
Administrator
Working With the Offline Folder
2. Click the Inbox to select it.
The sections in the Inbox appear in the right
frame.
3. Click the section menu to select one of the sections to cut, copy, etc. as shown:
You can export the PDF document in the
Inbox to a location outside the E-Notebook
just as you would do in the ‘Captured Image
sections’.
4. Click Export PDF:
Enterprise
Working Offline
E-Notebook makes it possible for you to work in
offline mode. In offline mode, you are disconnected from the network. When you reconnect,
you can upload the changes you made offline to
the central, E-Notebook database.
546•E-Notebook FeaturesCambridgeSoft
To work in offline mode:
1. Select the Collection or Page you wish to work
in and drag it to Offline folder.
When a collection is available offline, all of the
data associated with that collection, as well as
the references associated that collection, are
copied to the offline database.
2. Click the Work Offline button in the upper right
corner of the screen. This takes you to the
offline mode in which the User’s home collection contains only two collections, the User
Configuration folder and the Offline Collection. The contents of only these two collections are available offline.
3. Alternatively, click Work Offline button in the
login dialog box when you are logging into
E-Notebook to go directly to the Offline
folder:
You can work in Offline just as you would normally work when you are connected.
4. You can go online again by clicking Connect
button in the upper right corner of the screen.
A dialog appears prompting you to log into the
E-Notebook.
A dialog appears showing list of changes, original contents and updated contents.
5. Click Connect button
The Synchronization Dialog appears listing
each collection that has changed and each new
collection added.
a. Click OK to go back online and synchronize,
or...
b. Click Discard Changes to remove the new
collection or changes made in that collection.
8. Click the Cancel button to cancel the login.
NOTE: Depending on your configuration, the Discard
Changes button may not always be available to you when synchronizing the contents of a collection that has changed offline.
Creating an Offline Folder
6. Click the Synchronize button to update all the
changes that are stored offline in the online
content.
7. Click the Show Details button.
If you do not yet have an offline folder, you can
create one.To create a new, Offline collection:
9. In the Collection Tree, right-click your user
collection.
A menu appears.
10. Point to New, then select Offline.
A new Offline collection appears and you are
prompted to rename it.
ChemOffice 2006/E-NotebookE-Notebook Features
• 547
Administrator
A button, Work Offline appears in the upper right
corner of the screen. Clicking this button will
enable you to work in offline mode.
NOTE: You should have to create the offline folder only
once. You can then continue to use the same folder.
548•E-Notebook FeaturesCambridgeSoft
Chapter 29: Working with Data in E-Notebook
E-Notebook enables you to work with many,
diverse types of data, and then keep related data
together in collections such as Experiments and
Pages.
NOTE: Your system configuration determines what types of
data you can add to the sections in E-Notebook. To model
your workflow and ensure that E-Notebook accommodates
the data types you frequently use, your system configuration
may include modified versions of these data types. Also, certain data types may not appear in your configuration, and
additional, custom data types may have been added.
The ChemDraw toolbar appears.
Working with Chemical Structure
Data
Chemical structures can be drawn with the use of
the ChemDraw Toolbar. The ChemDraw Toolbar
allows users to create a chemical structure by connecting frequently used substructures together. For
more information about using the ChemDraw
Toolbar, please see the ChemDraw User's Guide.
It is also possible to paste standard image files into
chemical structure fields, and then user the ChemDraw toolbar for annotation, such as text and
arrows. Text in the chemical structure fields is
searchable.
Drawing a Structure
To draw a chemical structure:
1. Click within a chemical structure field.
ChemOffice 2006/E-NotebookWorking with Data in E-Notebook
2. Using the ChemDraw tools, draw a structure
or reaction.
TIP: You can access a drawing menu by right-clicking in
the structure window. This menu allows you to, among other
things, copy and paste structures.
Expanding the Drawing Window
To expand the drawing window:
1. Double-click the frame of the chemical structure field.
The chemical structure field expands.
2. Using the ChemDraw tools, draw the structure
or reaction.
3. When you are finished editing, double-click the
frame of the chemical structure field to return
it to its original size in the form.
• 549
Working with Images in
Chemical Structure Fields
Administrator
Chemical Structure Fields can also be used to display and annotate standard image files.
You can paste standard image files into chemical
structure fields, and then use the ChemDraw toolbar for annotation, such as text and arrows. Text in
the chemical structure fields is searchable.
Inserting an Image a Structure
To insert an image into a chemical structure field:
1. Copy the image onto the clipboard. You may
do this by, for example, selecting the Select All
and Copy commands when the image file is
open in Microsoft Photo Editor.
2. Right-click within the structure field in
E-Notebook.
A menu appears.
3. Point to Edit, and click Paste.
The image appears in the chemical structure
field.
4. Use F7 to zoom in, and F8 to zoom out.
Annotating the Image
To annotate the image:
1. Click the text tool
in the ChemDraw toolbar.
2. Click in the chemical structure field, and type
any text you would like to enter.
The text appears in the field.
3. Click the arrow tool in the tool bar to select it
if you would like to draw arrows to annotate
the image.
Working with Database Tables
Database Tables are used to pull in data from an
external database and display it in E-Notebook.
The data is for display only and cannot be edited.
550•Working with Data in E-NotebookCambridgeSoft
The table of contents is an example of a database
table.
In some configurations, database tables may be
filled in based on a value that you enter elsewhere
in a form. For example, the value you enter into a
particular property list field may be used to look up
and display related data, which will appear within
the database tables.
Working with MS Excel
Spreadsheets
You can use MS Excel spreadsheets to manage
Excel data in E-Notebook.
To create a new MS Excel Section:
1. In the Collection Tree, click the Page or Experiment to which you would like to add the section.
2. Click the New Section button.
A list of the section types that can be added
appears.
3. Select MS Excel Spreadsheet.
A new MS Excel Spreadsheet appears in the
right frame.
4. Edit the spreadsheet just as you would normally edit a spreadsheet in MS Excel.
Importing an MS Excel document
To import an MS Excel document,
1. Click the import tool icon for the MS Excel
field.
You are prompted to confirm whether you
wish to clear the document file.
3. Click OK.
The file is cleared.
Working with Captured Image
Sections
A menu appears when you click the icon.
2. Select Import MS Excel Spreadsheet.
A dialog box appears, and you are prompted to
select the file.
3. Select the file and click the Open button.
The spreadsheet appears in E-Notebook. The
section of the spreadsheet that was most
recently active is displayed.
To export the file:
1. Click the import tool icon:
A menu appears.
2. Select Export MS Excel Spreadsheet
A dialog appears prompting you to select a
location for the exported file.
3. Enter a destination for the file and a file name,
and click the Save button.
The file is exported to the location you
selected.
To clear an MS Excel file from a section in
E-Notebook:
1. Click the import tool icon:
A menu appears.
2. Select Clear MS Excel Spreadsheet
ChemOffice 2006/E-NotebookWorking with Data in E-Notebook
You can use Captured Image Sections to manage
both PDF files and standard image files in E-Notebook in PDF format.
To create a new Captured Image Section:
1. In the Collection Tree, click the Page or Experiment to which you would like to add the section.
2. Click the New Section button.
A list of the section types that can be added
appears.
3. Select Captured Image.
The new section appears within the Page. The
image below is an example of a PDF Viewer
section.
With this field you may import a PDF document
or a standard image file in PDF format.
Importing and Exporting a PDF File
To import a PDF document:
1. Click the import tool icon for the PDF field.
A menu appears when you click the icon.
• 551
2. Select Import PDF.
Administrator
A dialog box appears, and you are prompted to
select the file.
3. Select the file and click the Open button.
The PDF document appears in E-Notebook.
Enterprise
To export the PDF file:
4. Click the import tool icon.
file gets converted to a PDF document and you
may edit or add text, as the Adobe Acrobat menu
and editing tools are also present.
To import an image,
1. Click the import tool icon for the image field.
A dialog box appears, and you are prompted to
select the file.
2. Select the file and click the Open button.
The image in the form of a PDF document
appears in E-Notebook.
Annotating an Image File
In the Captured Image section the image is converted to PDF upon import and you may edit or
add text, as Adobe Acrobat menu with editing
tools are also present.
To annotate,
1. Go to the PDF converted imported image file.
A menu appears.
5. Select Export PDF.
A dialog appears prompting you to select a
location for the exported file.
6. Enter a name and destination for the file, and
click the Save button.
The file is exported to the location you
selected.
To clear a PDF file from a section in E-Notebook:
1. Click the import tool icon:
A menu appears.
2. Select Clear PDF.
You are prompted to confirm whether you
wish to clear the document file.
3. Click OK.
The PDF file is cleared.
Importing an Image File
You can import any GIF, JPG, JPEG, TIF, TIFF,
PNG or BMP image. Once imported, the image
552•Working with Data in E-NotebookCambridgeSoft
The Adobe menu with Acrobat annotation
tools is present above the image in the Captured Image section, as shown below:
2. Select any of the editing tools present in the
menu to edit or add some text in the image.
For example, you can click the Note Tool button to add your comments. A dialog is displayed within the image field where you can
type your comments as shown:
A new Image section appears in the right
frame. With this field, you can import images
such as GIF, JPG, JPEG, TIF, TIFF, PNG,
BMP, etc. and add text for explanation.
Similarly, you can use the other annotation
tools in the image field.
Working with Image Viewer
Sections
You can use MS PowerPoint Sections to manage
images in 576.
1. To create a new, Image Viewer Section:
2. In the Collection Tree, click the Page or Experiment to which you would like to add the section.
3. Click the New Section button:
Importing and Exporting an Image File
To import an Image File:
1. Click the import tool icon for the Image field.
A menu appears.
A list of the section types that can be added
appears.
4. Select Image.
2. Select Import Image.
A dialog box appears, and you are prompted to
select the file.
3. Select the file and click the Open button.
The image appears in E-Notebook.
To export the Image file:
1. Click the import tool icon:
ChemOffice 2006/E-NotebookWorking with Data in E-Notebook
• 553
Administrator
A menu appears.
2. Select Export Image.
A dialog appears prompting you to select a
location for the exported file.
3. Enter a file name and destination for the file,
and click the Save button.
The file is exported to the location you
selected.
To clear an Image file from a section in E-Notebook:
1. Click the import tool icon:
A menu appears.
2. Select Clear Image.
You are prompted to confirm whether you
wish to clear the document file.
3. Click OK.
The image is cleared.
Similarly, you can copy the images from the Image
sections and paste them in the other sections in
E-Notebook or in other applications.
Working with MS Word Sections
You can use MS Word Sections to manage information that you would normally record in MS
Word. This feature makes it possible for you to
keep MS Word information with related, E-Notebook information. You can edit this data just as
you would edit an MS Word document, either editing it within E-Notebook, or exporting it to MS
Word to take advantage of the full MS Word feature set.
To create a new MS Word Section:
1. Click the collection in the collection tree to
which you would like to add the MS Word Section.
NOTE: In the preconfigured E-Notebook, you can
only add an MS Word Section to a Page).
554•Working with Data in E-NotebookCambridgeSoft
2. Click the Sections icon on the right side of the
screen.
A menu appears.
3. Select New.
A list of the Section types that can be added
appears.
4. Select MS Word Document.
A new MS Word Document appears in the
right frame.
NOTE: An MS Word Section is one of the preconfigured
Sections of E-Notebook. Depending upon how your system
administrator has chosen to configure E-Notebook, this Section may not be available to you, or it may be available in a
modified form. For example, an MS Word document may
exist as one of multiple fields within a section.
Working with MS PowerPoint
Slideshow Sections
You can use MS PowerPoint Sections to manage
MS PowerPoint slideshows in E-Notebook.
To create a new MS PowerPoint slideshows Section:
1. In the Collection Tree, click the Page or Experiment to which you would like to add the section.
2. Click the New Section button:
A list of the section types that can be added
appears.
3. Select MS PowerPoint Slideshow.
A new MS PowerPoint slideshow appears in
the right frame.
4. Edit the slideshow just as you would normally
edit a slideshow in MS PowerPoint.
Importing and Exporting an MS
PowerPoint slideshow
To import an MS PowerPoint document,
1. Click the import tool icon for the MS PowerPoint field.
A menu appears.
2. Select Import Slideshow
A dialog box appears, and you are prompted to
select the file.
3. Select the file and click Open.
The slideshow appears in E-Notebook.
The notes associated with a slide will be rendered
along with the slide.
To export the MS PowerPoint file:
1. Click the import tool icon.
A menu appears.
2. Select Export Slideshow
A dialog appears prompting you to select a
location for the exported file.
3. Enter a file name and a destination for the file,
and click Save.
The file is exported to the location you
selected.
To clear an MS PowerPoint file from a section in
E-Notebook:
1. Click the import tool icon:
A menu appears.
2. Select Clear....
You are prompted to confirm whether you
wish to clear the document file.
3. Click OK.
The slideshow is cleared.
Working with Property Lists
Property Lists are used in forms to record various
types of data properties. An example is shown
below:
Property lists may contain the following data types:
Data type
Action to take
Date
Click the date box, and select a date and time.
ChemOffice 2006/E-NotebookWorking with Data in E-Notebook
• 555
Administrator
Data type
Action to take
Text
Enter text.
Number
Enter a number. Certain properties may have default
units associated with them, which will appear when
you enter the number.
Enumerated Value
Choose a value from the drop-down list.
Adding Properties to Property Lists
To add a property to a property list:
1. Right-click the within the property list in a section.
A menu appears.
The Add Property dialog box appears, listing the
properties you may add.
3. Click the property you wish to add. You may
2. Select Add Property....
use CTRL+click to select multiple properties,
or SHIFT+click to select a range.
4. Click Add.
The property or properties appear in the list.
You system configuration determines which properties may be added to the list, and which properties appear by default.
Removing Properties from a Property List
To remove a property from a property list:
556•Working with Data in E-NotebookCambridgeSoft
1. Right-click the property you wish to remove
from the Property List.
A menu appears.
2. Select Remove Property.
A message appears, asking you if you are sure
you want to remove the property.
3. Click Yes.
The property is removed from the Property
List.
Setting and Editing Values in a Property
List
You can set and edit values for the properties in a
property list, such as the list shown below.
To set or edit the value of a property:
1. Click a cell in the property list.
The values you can enter will depend upon the
data type of the specific property.
2. Enter an appropriate value.
Data
type
Action to take
Date
Click the date box, and select a
date and time.
Text
Enter text.
Number
Enter a number. Certain properties may have default units
associated with them, which
will appear when you enter the
number.See “Working with
Numerical Units in Property
Lists” on page 558 for more
information.
ChemOffice 2006/E-NotebookWorking with Data in E-Notebook
Data
type
Action to take
Enumerated Value
Choose a value from the dropdown list.
3. Click elsewhere in the section.
The value is displayed in the cell.
Depending upon your system configuration, certain
properties may have one or several of the following
attributes:
• Read Only – certain properties may be for dis-
play only, and it may not be possible to edit
them.
• Required – it may not be possible to delete a
particular property from a property list. If a
property is required, you will be presented with
an error message when you attempt to delete it.
• Not Blank – it may be necessary to enter a
value for a particular property before you can
perform a transition on the collection. For
example, an experiment collection may be set
up such that it is necessary to enter an equipment ID before you can close the experiment.
If this is the case, you will be prompted to enter
the values when you attempt to perform the
transition.
• Validated – Values you enter into property list
may be checked against an external database, to
ensure that they are valid values. In this case, if
you enter an invalid value, you will receive an
error message, and E-Notebook will not accept
the value.
• Enumerated from a database – values displayed in a dropdown list for any particular
property may be pulled from an external database.
When searching with the Property Query Field,
numeric values for properties are interpreted by
evaluating the longest possible set of characters
• 557
Administrator
that are converted into a number, starting with the
first character. For example, a search for 37.5 will
find 37.5g. A search for 2 will find 2 ATM/50. Also,
conversion is performed to find equivalent values.
For example, when searching over a volume property for which mL are the default units, a search for
50 mL will return both 0.05 L and 50 mL.
Working with Enumerated Lists in
Property Lists
Property lists may contain enumerated lists, which
may have default values associated with them.
Your system configuration determines the enumerated values for any given property.
A property in E-Notebook may be configured so
that it will contain a list of enumerated values. You
may then select one of the values from a dropdown list that appears in the property cell. This list
of values displayed in a dropdown list for any particular property may be some values either manually entered or pulled from an external database by
the administrator.
For example, there may be a property of “Collection's Name” under “Metadata Properties” in
search mode. Once you select the checkbox, you
may enter the values only from the dropdown list
as shown:
Similarly, you can select the values for other properties in the list from the dropdown lists after clicking the checkboxes opposite them.
Working with Numerical Units in
Property Lists
Property lists may contain numerical properties,
which may have default units associated with them.
558•Working with Data in E-NotebookCambridgeSoft
Your system configuration determines the default
units for any given property. The following types
of measurements may be specified or displayed in
the permitted units shown below.
For example, there may be a property of “mass”
and its default units may be grams (g). If you enter
a numerical value into the property without specifying units, the units will be displayed and stored as
grams. You may also enter any of the permitted
mass units shown below, such as mg or kg.
Type of
Measurement
Permitted Units
density
g/ml
µg/ml
mg/ml
µg/l
mg/l
g/l
kg/l
kg/m3
length
m
Å
nm
µm
mm
cm
mass
g
µg
mg
kg
molality (quantity per mass mol/kg
of solvent or substrate)
mol/g
mmol/kg
mmol/g
µmol/kg
µmol/g
Type of
Measurement
Permitted Units
Type of
Measurement
Permitted Units
molar mass
g/mol
kg/mol
dalton
D
kD
velocity
m/s
km/hr
mi/hr
volume
ml
µl
l
m3
molarity (quantity per
volume of solution)
moles (quantity of
substance)
mol/l
µmolar
mmolar
molar
mmol
µmol
mol
normality (ion equivalents N
per volume of solution)
mN
µN
pressure
temperature
time
atm
Pa
kPa
torr
bar
mbar
°C
K
°F
s
ms
µs
min
hr
ChemOffice 2006/E-NotebookWorking with Data in E-Notebook
When you are in Search mode, the property query
field allows you to find all equivalent values
entered in various units that share the same unit
type. For example, a search for a volume of 500 mL
will return both 500 mL and 0.5L. The search will
assume the default units for the property if you do
not enter units. Using the same example, if mL
were the default unit for a volume property, and a
search were conducted for a property value of 0.5,
no hits would be returned. A search for 0.5 L
would return both 500 mL and 0.5 L.
Creating a Reference within a Property
List
Within a property list, you can add a link to
another collection/section in E-Notebook or a link
to an external URL. This makes it easy to browse
back and forth between related data.
Adding a Link from a Property List to an
E-Notebook Collection
To add a link from a property list cell to a collection in E-Notebook,
1. In the Collection Tree, click the collection containing the property list, then select the section
containing the property list.
The section containing the property list
appears.
• 559
2. Click the cell of the property list to which you
Administrator
wish to add the reference.
3. In the Collection Tree, click the collection you
would like to reference and, holding the mouse
button down, drag the collection into the
upper-left corner of the property list cell, until
the cursor displays a small arrow, as shown
.
4. Release the mouse.
The reference is created, and a small arrow
appears in the upper-left corner of the property
list cell.
5. You can click the arrow in the property list cell
to navigate to the collection you have referenced, and click the Back arrow
to
return to the property list.
Alternatively, you may right-click the collection
you wish to reference and select Copy. Then, rightclick within the property list to which you are adding the reference, and select Paste Reference.
4. Right-click within a property list cell and select
Paste Reference from the menu that appears.
The reference is added to the property list cell,
and a small arrow appears in the upper-left corner of the cell. Clicking the arrow will display
the section you have referenced.
Adding a Link from a Property List to an External
URL
To add a link from a Property List cell to an external URL or an intranet URL,
1. Right-click within the property list cell to
which you wish to add the reference.
A menu appears.
2. Select Edit Reference.
The Edit Reference dialog appears.
3. Enter the URL and click OK.
Adding a Link from a Property List to an
E-Notebook Section
To add a link from a property list cell to a section
in E-Notebook:
1. In the Collection Tree, click the collection containing section that you would like to reference,
then select the section.
The section to which you would like to make a
reference appears.
2. Right-click the Section menu icon, and select
Copy Section.
3. In the Collection Tree, click the collection containing the property list to which you are adding the reference, then click the section that
contains the property list.
560•Working with Data in E-NotebookCambridgeSoft
The reference is added to the property list cell,
and a small arrow appears in the upper-left corner of the cell. Clicking the arrow will display
the URL you have referenced.
Working with Spectrum and
Spectra Sections
You can manage your spectra data easily and effectively using Spectrum and Spectra sections. This
topic refers to sections that contain Galactic’s
GRAMS32 software tools.
NOTE: Spectra may be handled differently in your specific
configuration of E-Notebook.
There are two types of sections for spectra. Each
type of section can also contain a set of properties
for each spectrum, and notes about each spectrum.
• Spectrum Section – this section can contain a
single spectrum.
• Spectra Section – this section can contain
multiple spectra, organized in subsections or
sub-tabs.
To create a new Spectrum section for a single spectrum:
1. In the Collection tree, click the Page or Experiment to which you wish to add the Spectrum
section.
2. Click the New Section button.
A menu appears, listing the types of sections
that you may add.
3. Select Spectrum.
ChemOffice 2006/E-NotebookWorking with Data in E-Notebook
The new section appears within the Page. The
image below is an example of a spectrum section.
To create a new Spectra section for multiple spectra:
1. In the Collection Tree, click the Page or Experiment to which you wish to add the Spectra
section.
2. Click the New Section button.
A list of the section types that can be added
appears.
3. Select Spectra.
The new section appears within the Page. You
may add as many spectrum subsections as you
wish (by clicking the New Spectrum button).
The image below shows a spectra section with
two spectrum subsections.
• 561
Adding a Spectrum
Administrator
To add a spectrum:
1. From within a section with a spectrum field,
click the import/export button:
A menu appears.
2.
3.
4.
5.
2. Select Import Spectrum.
The Import Spectrum dialog box appears and
you are prompted to select a spectrum image
file.
A menu is displayed.
Select Copy Spectrum.
Browse to the section containing the spectrum
image you wish to replace.
Click the spectrum button.
Select Paste Section.
The new spectrum image is replaces the image
in the section.
Zooming in on a Spectrum Peak
To zoom in on a spectrum peak:
1. Click the spectrum image and drag your mouse
to draw a box around the area you wish to
zoom.
2. Click within the box.
The zoomed view appears.
3. To zoom out again, simply right-click in the
spectrum image.
Other Fields in a Spectrum Section
• Spectrum Properties List – use this list to
store Analyst, Type, and Date.
3. Select a spectrum and click Open.
The Import Spectrum dialog box closes and
spectrum image appears in the section.
• Notes – Record any notes that pertain to a
Spectrum in the text field.
Replacing a Spectrum
If you would like another spectrum image to take
the place of an image within a spectra or spectrum
section, you can replace the image. To do this, you
may either import a new image, as described above.
The new image will replace the old. Or, you may
copy an image from another section.
To replace a spectrum image by copying and pasting another image:
1. From within the section containing the image
you wish to copy, click the
spectrum button:
562•Working with Data in E-NotebookCambridgeSoft
Working with Styled Text
Styled text boxes can be used to record notes,
preparation information, etc. A styled text box is
often included in a form with other types of data,
making it possible to combine text notes with
related data. Certain styled text fields in your configuration may have Autotext associated with
them. You can use the Autotext feature to popu-
late the styled text field automatically. See “Working with Autotext” on page 540 for more
information.
To format the text:
4. From within a section, click within the styled
text box.
A cursor appears in the box, and you can begin
typing.
Immediately above the box, there may be a
toolbar for formatting the text.
You may change the following formatting options:
• Font type
• Font size
• Bolded Text
• Italicized Text
• Superscript
• Subscript
• Left-alignment
• Center-alignment
• Right-alignment
You can also type the text, highlight it, then select
the text options you wish to apply to it. Standard
editing keys such as Control+C (for copy) and
Control+V (for paste) may be used as well.
Note that in your system configuration, the styled
text box may not include the formatting toolbar. In
addition, a styled text box may be read-only, meaning that you can view but not edit its contents.
A styled text box may also be required: it may be
necessary for you to enter text into the box before
you can perform a transition on a particular collection. For example, it may be necessary for you to
ChemOffice 2006/E-NotebookWorking with Data in E-Notebook
enter text into a text field before you can close a
Page or Experiment.
Working with Subsections
In E-Notebook, certain sections may be set up to
contain other sections, known as subsections. The
subsections appear as subtabs within a section.
To add a subsection to a section, for example to a
Spectra section:
5. Click the New Spectrum button.
A new spectrum in the form of a subsection
appears within the Spectra section.
NOTE: The options for a subsection button under the
section will differ according to your configuration.
You can manage a subsection just as you would a
section. See “Working with Sections” on page 579
for more information.
Working with Subsections in Button
View
You can manage subsections as you would sections. Your system administrator may configure
E-Notebook such that the subsections are forced
into button view and VCR style buttons are displayed to navigate the sections in a subsection, as
shown below.
You may then scroll through the subsections using
the arrow buttons, or right-click a subsection name
• 563
and select Go To in order to browse to a specific
subsection.
Administrator
Working with Ancillary Data
Sections
You can use an Ancillary Data section to associate
a file which is not supported by E-Notebook with
an E-Notebook page or experiment. When you
import the file, the checksum, source path, source
file name, and your user name are populated automatically.
Although the file cannot be viewed from within
E-Notebook, it can be exported to a selected location, then opened, viewed, or edited from there.
To create a new Ancillary Data section:
1. In the Collection Tree, click the Page or Experiment to which you would like to add the Ancillary Data Section.
2. Click the New Section button
in the right
frame:
A list of the section types that can be added
appears.
3. Select Ancillary Data.
A new Ancillary Data section appears in the
right frame.
4. Click the import tool
to import a file:
5. A menu appears.
6. Select Import....
A dialog box appears, and you are prompted to
select the file.
7. Select the file and click Open.
564•Working with Data in E-NotebookCambridgeSoft
The type of file and its size are displayed in
E-Notebook.
To edit a stored document file, you must first
export it to another location.
1. Click the import tool.
A menu appears.
2. Select Export....
A dialog appears prompting you to select a
location for the exported file.
3. Enter a destination for the file and a file name,
and click Save.
4. Open the appropriate application, and open
the file you created.
5. Edit the file just as you normally would.
6. Save the file.
7. From the section in E-Notebook, click the
import tool again.
A menu appears.
8. Select Import....
A dialog appears and you are prompted to
select the file to import.
9. Select the file and click Open.
The edited document with your changes is
stored in E-Notebook.
To clear a stored document file from a section in
E-Notebook:
1. Click the section tools icon.
A menu appears.
2. Select Clear Stored Doc.
3. You are prompted to confirm whether you
wish to clear the document file.
Click OK. The file is cleared.
Working with Table Sections
A dialog box appears with a list of the properties you may add.
You can use Table sections to organize the chemical properties of compounds that interest you. You
can add properties to a Table, pivot a Table, resize
columns and rows, and organize columns and
rows. You can also insert links to other E-Notebook sections or collections into a table.
Adding Columns and Rows to a Table
You can add columns and rows to a table in
E-Notebook.
To add a column:
1. Browse to the section that contains the table.
2. Right-click the table at the location where you
would like to add the column.
A menu appears.
4. Highlight the property you wish to add to the
table.
5. Click Add.
The property appears as a column in the table,
immediately in front of the location you
selected.
To add a row:
1. Right-click the table at the location where you
would like to add the row.
A menu appears.
3. Select Add Property Before, to add a property
before the current property, or Add Property
After, to add a property after the current prop-
erty.
2. Select Add Row Before, to add a row before the
current row, or Add Row After, to add a row
after the current row.
NOTE: If the Table has been pivoted, you would select
Add Property to add a row, and Add Column to add
a column. (Pivoting transposes the rows and columns in
the table).
ChemOffice 2006/E-NotebookWorking with Data in E-Notebook
• 565
Removing Columns and Rows from a
Table
Administrator
You can remove columns and rows from a table.
To remove a column:
1. Right-click the column or property you wish to
remove from the table.
A menu appears.
3. Click Yes.
The row is removed from the Table.
Organizing Columns and Rows in a
Table
You can easily rearrange rows and columns in a
table, organizing them so that the information is
displayed more effectively. You can move columns
left or right, move rows up or down, and sort data
in the table in ascending or descending order.
Move a column
To move a column left or right:
1. In the table, right-click the column you wish to
move.
A menu appears.
2. Select Remove Property.
A dialog box appears, asking you if you are sure
you want to delete the property from the table.
3. Click Yes.
The column is removed from the table.
NOTE: If the table has been pivoted, right-click a row to
remove a property.
To remove a row:
1. Right-click the row you wish to remove from
the table.
A menu appears.
2. Select Remove Row.
A dialog box appears, asking you if you are sure
you want to delete the row from the Table.
566•Working with Data in E-NotebookCambridgeSoft
2. Select Move Property Left or Move Property Right.
The column is moved either one place to the
left or one place to the right, depending upon
your selection.
Move a Row
To move a row up or down:
1. In the table, right-click the row you wish to
move.
A menu appears.
2. Select Move Row Up or Move Row Down.
The row is moved either up one place or down
one place in the table, depending upon your
selection.
Sort Data by a Property
To sort the table by a particular property:
1. Right-click the row or column corresponding
to the property by which you wish to sort the
table.
A menu appears.
Resizing Columns and Rows in a Table
You can easily resize rows and columns in a table,
so that the information is displayed more effectively.
To resize a row or column:
1. Move the cursor to the border of the row or
column in a table.
A double-headed arrow appears.
2. Drag the border in the direction you desire
until the column or row is the correct size.
The resized column or row appears in the table.
To autofit a column or row to the size of its contents, move your cursor to the name of the row or
column and double-click. The column or row
resizes.
Pivoting a Table
You can transpose the columns and rows of a table
to alter the way the information is displayed.
To pivot a table:
1. Right-click the table.
A menu appears.
2. Select Pivot Table.
The rows and columns of the table are transposed.
Figure 29.1Before
Figure 29.2After
2. Select either Sort Ascending or Sort Descending.
The data in the table is sorted according to the
values of the property you selected.
Adding Information to a Table Cell
There are a number of ways to add information to
a table cell. Data may be text, numbers, dates, or
ChemOffice 2006/E-NotebookWorking with Data in E-Notebook
• 567
Administrator
structures. Your system configuration determines
what type of data it is possible to add to any particular cell.
There are three ways to add information to a cell:
• Choose a value from the dropdown menu that
appears in the cell. You will use this option
when the cell has a list of possible values associated with it.
• Enter a value using the keyboard.
• Draw a Chemical Structure -- See “Working
with Structures and Images in Tables” on page
568 for more information.
In some cases, your system administrator may have
configured E-Notebook such that a particular
property in the table has one or more qualities, such
as ‘Read Only’. See “Setting and Editing Values in a
Property List” on page 557 for details on qualities.
Certain numerical properties in a table may have
units associated with them.
Working with Structures and Images in
Tables
Tables may contain chemical structure fields,
which you can use to manage data about the structures of compounds that interest you. You can also
add standard image files to the chemical structure
fields.
To add a structure or image to a table:
568•Working with Data in E-NotebookCambridgeSoft
1. Double-click a table cell corresponding to a
structure or image.
The Edit Structure dialog box appears, and you
can use the ChemDraw tools to draw the structure. Or, you may copy a standard image file
into the field.
2. Draw the structure or paste in the image and
click OK. Copy in an image by right-clicking
within the field and selecting Edit, then Paste.
The structure or image appears in the table.
Editing a Structure or Image
To edit a structure or image in a table:
1. Double-click the table cell containing the structure or image.
The Edit Structure dialog box appears, and you
can use the ChemDraw tools to edit the structure, or you may copy an image file into the
field.
Depending upon the data type, you can edit the
information in a cell one of the following ways:
• Choose another value from the menu that
appears in the cell — use this option when the
cell has enumerated values associated with it.
• Enter a value with the keyboard.
• Edit a Chemical Structure or change and image
— See “Working with Structures and Images in
Tables” on page 568 for more information.
Certain numerical properties in a table may have
units associated with them.
Working with Numerical Units in Tables
2. Edit the structure or change the image and
click OK.
The modified structure or image appears in the
table.
Delete a Structure
To delete a structure or image from a table:
1. Double-click the cell of the structure or image
you wish to delete.
The Edit Structure dialog box appears.
2. Using the ChemDraw tools, select the entire
structure or image and delete it.
3. Click OK.
The dialog box closes and the structure or
image is deleted from the table.
Changing Information in a Table Cell
The data type of a cell determines what type of
information you add to a cell. For example, you
can only draw a chemical structure in a cell with a
data type of structure.
Tables may contain numerical properties, which
may have default units associated with them. Your
system configuration determines the default units
for any given property in a table. See “Working
with Numerical Units in Property Lists” on page
558 for the table of default values.
When you are in Search mode, the table query field
allows you to find all equivalent values entered in
various units that share the same unit type. For
example, a search for a volume of 500 mL will
return both 500 mL and 0.5L. The search will
assume the default units for the property if you do
not enter units. Using the same example, if mL
were the default unit for a volume property, and a
search were conducted for a property value of 0.5,
no hits would be returned. A search for 0.5 L
would return both 500 mL and 0.5 L.
Creating a Reference within a Table
Cell
Within a table cell, you can add a link to another
collection/section in E-Notebook or a link to an
external URL. This makes it easy to browse back
and forth between related data.
Adding a Link from a Table to an E-Notebook
Collection
To add a link from a table cell to a collection in
E-Notebook,
ChemOffice 2006/E-NotebookWorking with Data in E-Notebook
• 569
Administrator
1. In the Collection Tree, click the collection con-
3. In the Collection Tree, click the collection con-
taining the table, then select the section containing the table.
The section containing the table.
Click the table cell to which you wish to add
the reference.
In the Collection Tree, click the collection you
would like to reference and, holding the mouse
button down, drag the collection into the
upper-left corner of the table cell, until the cursor displays a small arrow, as shown
.
Release the mouse.
The reference is created, and a small arrow
appears in the upper-left corner of the table
cell.
taining the table to which you are adding the
reference, then click the section that contains
the table.
4. Right-click within a table cell and select Paste
Reference from the menu that appears.
The reference is added to the table cell, and a
small arrow appears in the upper-left corner of
the cell. Clicking the arrow will display the section you have referenced.
2.
3.
4.
5.
6. You can click the arrow in the table cell to nav-
igate to the collection you have referenced, and
click the Back arrow to return to the table.
Alternatively, you may right-click the collection
you wish to reference and select Copy. Then, rightclick within the table cell to which you are adding
the reference, and select Paste Reference.
Blocking of References in Tables
You cannot always add links to the tables in the
E-Notebook. You may be blocked from adding a
reference to a specific type of collection that is in a
particular state. If E-Notebook is configured to
block the reference, you will be unable to add the
reference to the table. For example, you can not
add table references to pages/experiments that are
in an archived state.
In the example below, you are prevented from
adding or editing a reference to the Ancillary Data
in a collection that is in the Closed state.
Adding a Link from a Table to an E-Notebook
Section
To add a link from a table cell to a section in
E-Notebook:
1. In the Collection Tree, click the collection containing section that you would like to reference,
then select the section.
The section to which you would like to make a
reference appears.
2. Right-click the Section menu icon, and select
Copy Section.
570•Working with Data in E-NotebookCambridgeSoft
Similarly, you may be prevented from adding references to several different collection types and/or
several different states of a collection type depending on your system configuration.
Validation of Values in Tables
Values you enter into a table may be checked
against an external database to ensure that they are
valid values. In this case, if you enter an invalid
value, you will receive an error message, and
E-Notebook will not accept the value.
Actually, your system administrator may have configured E-Notebook such that the valid and invalid
values for a particular property in the table are
defined and have several qualities. Therefore, when
you attempt to enter a value for the property that
does not match the defined value, you will be presented with an error message to that effect. For
example, you cannot add text into a field in a table
which is meant for numerical values or structures
or dates.
For example, in a Reaction section, the Reaction
Molarity property cell in a Reaction Conditions
table can only contain numerical values. If you try
to enter text, you will see the following error message:
Working with URL Displays
URL Displays are used to store URLs within
E-Notebook and to display their corresponding
content. A URL may be for either an internal,
intranet site or an external webpage.
To enter a URL and display its corresponding
page:
ChemOffice 2006/E-NotebookWorking with Data in E-Notebook
1. Enter the URL address as shown above. In this
example, http://www.cambridgesoft.com was
entered.
2. Click the Go button to the right of the address.
The page corresponding to the URL appears.
You may navigate from within the displayed
page, if desired.
TIP: The URL does not change to reflect your
navigation. If you wish to change the URL that is saved
with the section, you must type in another address.
Rendering in E-Notebook
E-Notebook provides a number of options for
rendering the contents of your experiments and
other types of collections. You can export to a
PDF file or to an MS Word file.
E-Notebook also offers an E-Signatures feature
for electronically signing your experiments.
Exporting
You can export Sections to MS Word, or Collections containing the sections to PDF or MS Word,
then manage them as you would PDF or MS Word
documents. Rendering to PDF expands the Standard page size so that the page is sized to set the
contents of the section.
To export a section:
1. In the Collection Tree, click the collection containing the section(s) you wish to export to MS
Word.
The sections appear in the right frame.
2. Click the section menu icon.
• 571
The section menu appears.
• All Sections – to export all of the Sections.
• Sections from X to Y – to export a range of
Administrator
Sections, where X and Y are values you specify.
• Current Section – to export only the current
Section.
6. Click the checkbox Open Document After Export
if you would like the PDF document to be
opened immediately after the export is complete.
7. Click the Export button.
To export a collection:
1. In the collection tree, right-click the item you
wish to export.
A menu appears.
3. Select Export to MS Word.
You are prompted to choose a destination
folder and file name.
4. Choose a folder and file name and click Save.
You are prompted to choose an export range.
5. Select an export range. The options are:
572•Working with Data in E-NotebookCambridgeSoft
2. Select Export to MS Word or Export to PDF.
You are prompted to choose a destination
folder and file name.
2. Select Print.
Your printer dialog box appears, and you are
prompted to enter the information you normally do when printing, such as page printer
and number of copies, etc.
3. Continue with step 5 in exporting a Section,
above.
If you chose to open the document after export,
the document is opened, and it displays the Sections you selected for export. If you chose not to
open the document, the document is saved in the
folder you specified.
Printing
You can print Sections or Collections from
E-Notebook to maintain your hardcopy archives.
To print a collection:
1. From the Collection Tree, right-click the collection.
The collection menu appears.
ChemOffice 2006/E-NotebookWorking with Data in E-Notebook
3. Select the printer options
4. Select the Page Range:
• All – prints all of the sections in the collec-
tion.
• Selection – prints only the selected section.
• Pages – allows you to specify a range of sections to print. For example “1-5” would
print the first, five sections in the collection.
5. Make your selections and click Print.
The collection or the portion of it you selected is
printed.
To print a section:
1. In the right frame, select the section you wish
to print.
2. Click the section menu icon.
• 573
The section menu appears.
stored in a separate database for protection of your
intellectual property.
Signing and Closing
Administrator
When you have completed your experiment, you
can electronically sign it:
1. In the Collection Tree, right-click the experiment you wish to sign and close.
A menu appears.
3. Continue with step 2 of printing collections,
above.
Note that your system configuration contains templates that determine exactly how the printed page
appears.
If Visual Display of Changes is enabled, the print
will include the following:
• The data as is exists in the current version.
• The version history, including the date and the
author for each version after the baseline version. (The baseline version is the version that
existed when visual display of changes began).
• A list of changes grouped by field.
In some configurations, there is a Final Print transition that automatically creates a complete printout of the collection.
Enterprise
E-Signatures
With E-Signatures, you can electronically sign a
PDF version of your completed experiment. This
experiment rendition is then routed to co-authors
(where applicable) and witnesses. Once all required
parties have signed the experiment rendition, it is
2. Click Sign and Close.
A dialog appears which asks you to confirm
Sign and Close.
3. Click Yes.
574•Working with Data in E-NotebookCambridgeSoft
A dialog appears which contains a list of users
who can be potential witnesses and you are
prompted to select a witness.
You can view the record of your submitted documents in the Display Document List Field at the bottom of your Home Page.
The field displays two lists:
• the first is a list of documents sent to you by
some other author waiting for your action;
• the second is a list of documents submitted by
you that are still going through the signature
process.
4. Select witness(es) and click OK.
The experiment is now rendered to PDF and
the experiment in PDF format appears which
is now ready to submit.
5. Scroll through the entire rendition, enter your
userID and password in the appropriate text
boxes, and click Sign and Store.
Upon Sign and Store, the chosen witness is
given read permission to the experiment so
that s(he) can countersign it.
Reviewing a Document
You can review the documents you have submitted
for electronic signature through your user home
page:
1. In the Collection Tree, select your user collection.
Your home page appears in the right frame.
You can view the record of your submitted
documents in the Display Document List Field at
the bottom of your Home Page.
2. To review a submitted document, right-click
the document submitted by you from the second list and click Review...
The PDF rendition is displayed.
3. To make a change in a submitted document:
• Click Modify Submission to modify and
resubmit your rendition.
• Click Cancel Submission to cancel your submission. Once a submission has been cancelled, there is no way to resubmit it.
Countersigning a Document
To countersign a document that has been submitted to you:
1. In the Collection Tree, select your user collection.
ChemOffice 2006/E-NotebookWorking with Data in E-Notebook
• 575
Administrator
Your home page appears in the right frame.
You can view the record of documents awaiting your signature in the Display Document List
Field at the bottom of your Home Page.
2. Right-click the document you wish to sign, and
click Countersign...
The PDF rendition that was submitted to you
is displayed.
576•Working with Data in E-NotebookCambridgeSoft
3. Click the Countersign button to verify your
approval.
The document is countersigned and closed,
or...
Click Reject to deny your approval.
The rejected submission can be reviewed by the
primary author and either resubmitted or cancelled. The rejected submission is highlighted in
the list to distinguish it from the other entries in
the list.
Chapter 30: Working with Sections and
Collections
Working with Sections
A section is a form for E-Notebook data. Just as
you would use pages in a paper notebook for
recording various types of data, you can use sections in E-Notebook for recording reactions, spectra, and other types of information. Sections are
often associated with Experiments or Page collections. For example, an Experiment may contain
sections for reactions, notes, etc.
You can also use templates to set up sections automatically and uniformly. See “Working with Templates” on page 517 for more information.
Your system configuration determines the types of
sections that are available in E-Notebook.
Creating a Section
You can create a new section within a collection.
To create a section:
1. In the Collection Tree, click the collection to
wish you wish to add the section.
If the collection already contains sections, they
appear in the right frame.
2. Click the
icon in the right frame.
A menu appears, listing the types of sections
that you may add.
3. Select the type of section you wish to create.
A new section of that type appears.
Your system configuration determines which types
of sections can be added to which types of collections. These rules are very flexible, and they make
it possible to tailor the E-Notebook application to
your workflow.
Changing a Section
To modify a section within a collection:
1. Go to the section you wish to change.
2. Edit the data in the section. See the other por-
tions of the User Guide for information specific information about how to edit different
types of data in E-Notebook.
It is only possible for one E-Notebook user to edit
the sections in an individual collection at any given
time. If another user is editing a particular collection and you attempt to edit it, you will be presented with a message informing you that the
collection is locked for editing by the other user.
In some cases, you will only have Read permission
for a collection, meaning that you may view the
collection but not edit it.
See “Changes and Audit Trail” on page 597 for
more information about saving your changes.
Removing a Section
To remove a section from a collection:
1. Go to the section you wish to remove.
2. With the section displayed, click the
sec-
tion menu icon.
ChemOffice 2006/E-NotebookWorking with Sections and Collections
• 579
The section menu appears.
3. Select Move Up to move the section the left a
single position, or select Move Down to move
Administrator
the section to the right a single position.
The section is moved in the way you selected.
4. Repeat the process until the section is in the
desired location.
Renaming a Section
To rename a section:
3. Select Delete Section.
A message appears, prompting you to confirm
that you wish to remove the section.
4. Click Yes.
The Section is deleted.
NOTE: Your system configuration may prevent you from
deleting certain sections. For example, if you are working
with a collection that has Visual Display of Changes
enabled, it will not be possible for you to delete a section.
Also, in some cases, it may be possible to delete the sections
only if no data has been added to them.
Moving a Section within a
Collection
You can move a section within a collection. This
allows you to organize sections in the most effective way.
To move a section:
1. Go to the section you wish to move.
2. Click the
section menu icon.
A menu appears.
1. Go to the section you wish to rename.
2. Click the
section menu icon.
The section menu appears.
3. Select Rename Section.
A dialog box appears, and you are prompted to
type in a new name for the section.
4. Type in a new name and click the Rename but-
ton.
The dialog box closes and the new name of the
section appears.
TIP: Your system configuration may prevent you from
renaming certain sections.
Duplicating a Section within a
Collection
To duplicate a section within a collection:
1. Go to the section you wish to duplicate.
2. Click the
580•Working with Sections and CollectionsCambridgeSoft
section menu icon.
The section menu appears.
A copy of the section appears in the right
frame.
TIP: Note that in some cases, your system configuration
may prevent you from copying the section into a collection.
Exporting Sections to MS Word
You can export sections to MS Word, then manage
them as you would other MS Word documents.
See “Exporting” on page 571 for details.
3. Select Duplicate Section.
A copy of the section appears.
TIP: Note that in some cases, you system configuration may
prevent you from duplicating a particular section within a collection.
Duplicating a Section between
Collections
To copy a section from one collection to another:
1. Go to the section you wish to duplicate.
2. Click the
section menu icon.
The section menu appears.
Printing Sections
You can print sections from E-Notebook. See
“Printing” on page 573 for details.
Working with Collections
All of the information in E-Notebook is organized
into collections, which are the items displayed in
the Collection Tree. Collections may be notebooks, folders, experiments, pages, etc. E-Notebook allows you to browse through collections and
to search them for important information.
It is possible to manage collections in a number of
ways, as discussed in the following topics:
• Creating a Collection
• Browsing the Collection Tree (in Ch. 3).
• Organizing Collections
• Working with Templates
• Viewing Collection Properties
• Changing Collection Security Properties
• Performing a Collection Transition
3. Select Copy Section.
• Exporting a Collection or Section to MS Word
4. In the Collection Tree, click the collection in
• Printing Collections
which you would like the copied section to
appear.
5. Click the
section menu icon.
The section menu appears.
6. Select Paste Section.
Your system configuration determines the types of
collections that you can create within E-Notebook
and the rules that define their contents. The permission to view, edit, and create collections can be
set up on a per-collection basis. These rules are
configurable in E-Notebook.
ChemOffice 2006/E-NotebookWorking with Sections and Collections
• 581
Behaviors of Collections in
E-Notebook
Administrator
In E-Notebook, there are diverse behaviors associated with Collections—such as the creating, hiding,
renaming, duplicating, and moving behaviors.
Your system configuration determines the rules to
define the traits reflected by a collection. Therefore, depending on your system configuration,
there may be some additional behaviors that these
collections can show.
Auto-Numbered Collections
The collections in E-Notebook may be configured
to automatically number the collections contained
within a specific collection. Your system configuration determines the parameters for auto-numbering the collections.
If the E-Notebook is configured to auto-numbering of the collections, then the newly created collections will be automatically named by appending
a serial number to the name of the collection that
contains the newly created collection.
For example, if a Notebook collection contains
experiments, and the notebook is named Chemistry Notebook-01, the experiments within the collection will be automatically numbered (for
example, Chemistry Notebook-01-001) as shown:
When renaming a collection whose name was generated according to the auto-numbering, the collection will check to ensure that the name fits within
the parameters described by your system adminis-
582•Working with Sections and CollectionsCambridgeSoft
trator for the auto-numbering. For example, when
you rename a Notebook, the names of the Pages or
Experiments within it will change to match the
name of the Notebook. The name must begin with
the name of the parent collection followed by a
dash and a serial number.
Collections that Cannot be Deleted
In E-Notebook, you may be prevented from deleting the specific collections. Actually, your system
administrator may configure some specific collections so as to prevent you from deleting them once
they have been created. Therefore, the Delete command in the collection menu of such collections
will be grayed out.
For example, if the Notebook collection has been
configured to avoid deleting, then clicking on it
will show the menu with inactive Delete option as
shown:
Your system configuration determines which types
of collections cannot be deleted. Also, you cannot
delete a collection if references to it exist. E-Notebook, by default, is configured so that you can not
delete specific collections such as, User Collection,
User Configuration Folder, Notebook Collections
and Offline Folder.
In E-Notebook, in some cases, it may only be possible to delete collections if they have not been
modified since they were created. Once the collection is modified, you are prevented from deleting
such collections.In this case, the Delete option in
the collection menu is inactive when collections of
that type are selected.
Your system configuration determines which types
of collections cannot be deleted after modification.
exist in property lists and tables. It does not pertain
to references in the collection tree. For example, an
experiment/page collection type may be configured to prevent you from copying pages/experiments that contain references to folders that are in
a Closed state.
Your system configuration determines which types
of collections you can copy, and into which types
of container collections you can copy them.
For more information about copying collections,
see “Copying a Collection” on page 586.
Collections that Cannot be Renamed
Creating a Collection
Collections that Cannot be Deleted if
Modified
In E-Notebook, you may be prevented from
renaming specific collections, for example, a collection whose name is generated by the auto-numbering feature. If you attempt to rename an autonumbered collection, an error message to that
effect appears as shown:
Your system configuration determines which types
of collections cannot be renamed.
Copying Collections that Contain
References
It is possible to copy collections that contain references in the collection tree in the same way as you
would copy normal collections without references.
The copied collection contains references to all of
the collections that are contained within the collection at the time the copy is made.
In some cases, your system configuration may prevent you from copying collections that contain references to specific types of collections that are in
specific states. This pertains only to references that
Each item displayed in the collection tree represents a collection in E-Notebook. In order to create a new collection, you must first select a
container, or parent, collection for it. The new collection will be created within the container collection in the tree. For example, you may select a
notebook as the container collection, and you may
create new experiments or pages within the notebook.
Another example would be creating notebooks
within a user collection. All of the notebooks a
user creates could fall within the container collection that bears the user's name.
Your system configuration determines where various types of collections may be added to the Collection Tree.
To create a new collection:
1. Be sure you are in browse mode by clicking the
Browse button.
The Collection Tree appears.
2. Right-click the collection in the Collection Tree
that you would like to be the container for the
new collection.
ChemOffice 2006/E-NotebookWorking with Sections and Collections
• 583
A menu appears.
tainer collection to another. Your system configuration determines which items can be moved into
which types of collections.
Administrator
Moving Collections within a Container
Collection
You can organize collections within a container
collection by moving them up and down.
To move a collection up or down within its container:
1. Click Browse.
The Collection Tree appears.
3. Select New.
A menu appears, listing all of the type of collections that may be added to this container collection.
NOTE: Your system configuration determines which
options appear).
2. To expand a collection and view the items
4. Select the type of collection that you wish to
create.
The new collection appears under the container collection in the Collection Tree, and
you may be prompted to rename it.
5. Type in a name for the new collection (if
prompted).
The name is saved automatically.
within it, either double-click the collection, or
click the plus sign next to the collection.
3. Right-click the collection you wish to move up
or down within the container collection.
The collection menu appears.
Organizing Collections
You can organize collections in the Collection Tree
to make their order meaningful to you and other
E-Notebook users. Collections can be moved up
and down within a container collection. In some
cases, collections can be moved from one con-
584•Working with Sections and CollectionsCambridgeSoft
4. Select the appropriate option:
Move Up – moves the collection up a single
position in the Collection Tree.
Move Down – moves the collection down a
single position in the Collection Tree.
Alternatively you may press CONTROL and the up
arrow key to move a collection up, or CONTROL
and the down arrow key to move a collection
down.
Moving Collections between Container
Collections
You can organize collections in the Collection Tree
by moving them from one container collection to
another. Your system configuration defines the
rules that determine which collections can be
moved into which types of container collections.
To move an collection between container collections:
1. Click Browse.
The Collection Tree appears.
2. In the Collection Tree, click the collection you
wish to move.
The collection you wish to move is highlighted.
3. Drag the collection into the new container collection using your mouse.
If your system configuration permits the move, the
collection appears in the new location. Depending
upon the rules that define your system configuration, a copy or a reference may appear instead.
Also, it may not be possible to move the collection
into a particular type of container. If the new container will not accept the collection you are
attempting to move, you will be unable to highlight
the container when you attempt to drag the collection into it.
tree. The reference acts as a shortcut to the original
collection, and it reflects any changes that are made
to the original. Also, if you have editing privileges
to the original, any changes made to the reference
are reflected in the original.
To create a reference in the collection tree:
1. Click Browse.
The Collection Tree appears.
2. Click the collection that you wish to reference.
The collection is highlighted.
3. While holding down the CTRL and SHIFT keys,
drag the item into the Collection where you
would like it to be referenced.
A Reference to the item appears in the Collection Tree, within the collection you selected.
The icon contains a small arrow, which indicates that it is a reference.
An alternate method for creating a reference in the
collection tree is the following:
1. Right-click the collection that you wish to reference.
The collection menu appears.
2. Select Copy.
3. Right-click the collection into which you wish
to add the reference.
The collection menu appears.
Creating a Reference within the
Collection Tree
Within the collection tree, you can create a reference to a collection that exists elsewhere in the
4. Select Paste Reference.
ChemOffice 2006/E-NotebookWorking with Sections and Collections
• 585
The reference appears in the Collection Tree,
within the container collection you selected.
Administrator
NOTE: Your system configuration determines which
collections can be referenced within which container
collections.
It is also possible to create references to collections
from property lists and tables.
Duplicating a Collection within a
Container Collection
You can duplicate a collection within its container
collection in the Collection Tree. The
duplicate you create contains references to all of
the collections that are contained within the collection at the time the copy is made.
To duplicate an item within the same container
collection:
1. Click Browse.
The Collection Tree appears.
2. Right-click the collection that you wish to
duplicate.
The collection menu appears.
A copy of the collection appears within the
same container collection.
NOTE: Your system configuration determines which collections can be duplicated, and where the duplicates can reside
in the Collection Tree.
Copying a Collection
You can copy a collection in the Collection Tree.
To do this:
1. Click the Browse button.
The Collection Tree appears.
2. Right-click the collection you wish to copy and
select Copy from the menu that appears.
3. Right-click the collection that is to be the con-
tainer collection for the copy.
4. Select Paste from the menu that appears.
3. Select Duplicate.
586•Working with Sections and CollectionsCambridgeSoft
A copy of the collection appears in the Collection Tree, within the container you selected.
Alternatively, you may click the collection you are
copying to select it. Then, while holding down the
CONTROL key, drag it into a container collection to
create a copy.
NOTE: Your system configuration determines which types
of collections you can copy, and into which types of container
collections you can copy them.
Renaming a Collection
You can rename a collection to avoid a duplicate
name, or simply to make the name more meaningful to you and other E-Notebook users.
To rename a collection:
1. Click the Browse button.
The Collection Tree appears.
2. Right-click the collection you wish to rename
in the Collection Tree.
The collection menu appears.
3. Select Rename.
You are prompted to enter another name.
4. Enter a name.
The collection is renamed.
Your system configuration determines naming
conventions for various types of collections. If you
enter a name that does not adhere to the naming
conventions, an error message appears and you are
prompted to enter another name. In some cases, a
name may be assigned to a collection automatically, and it may not be possible to rename the collection at all.
Deleting a Collection
is relevant to your current needs. Your system configuration determines which types of collections
can be deleted.
To delete a collection from the Collection Tree:
1. Click the Browse button.
The Collection Tree appears.
2. Right-click the collection you wish to delete.
The collection menu appears.
3. Select Delete.
If your system configuration permits it, the collection is deleted.
You may also delete a collection by clicking it in
the tree to select it, then pressing the DELETE key.
NOTE: You cannot delete a collection if references to it
exist. Also, in some cases, it may only be possible to delete
collections if they have not been modified since they were created.
Viewing Collection Properties
You can see specific information about a collection
by viewing the Collection Properties.
To view properties of a Collection:
1. Click Browse.
The Collection Tree appears.
2. Right-click the item whose properties you wish
to view.
A menu appears.
3. Select Collection Properties.
You can delete a collection from the Collection
Tree so that you manage only the information that
ChemOffice 2006/E-NotebookWorking with Sections and Collections
• 587
The General tab of the Properties dialog box
appears. It contains the following information:
Importing and Exporting
Collections
Administrator
E-Notebook provides the ability to export and
import collections as XML files. Each XML file
contains all of the data and formatting associated
with the collection.
Importing a Collection
To import a collection,
1. Click the Browse button.
The Collection Tree appears.
2. In the Collection Tree, right-click the collection into which you would like the collection to
be imported. For example, if you would like to
import an Experiment into a Notebook, you
would right-click the Notebook.
The collection menu appears.
Name – the name of the collection.
Owner – the user who created the collection.
Type – the type of the Collection or Page.
Contents – the number of collections contained in the collection.
Created – the date on which the collection was
created.
Last Modified – the date on which the Collection or Page was last changed.
Status – the status of the collection in its lifecycle. If no states are defined for the collection,
the status is “Created”.
Autosave Interval – the time interval after
which the collection is saved automatically.
NOTE: If you wish to view the Collection Security or Transition Security properties, click the appropriate tab. If the collection is a user collection, the Region tab appears as well.
588•Working with Sections and CollectionsCambridgeSoft
3. Select Import.
A dialog appears and you are prompted to
select the XML file you wish to import.
4. Select the file and click Open.
5. The collection is imported into E-Notebook.
Exporting a Collection
To export a collection,
1. Click the Browse button.
The Collection Tree appears.
2. In the Collection Tree, right-click the collec-
tion that you wish to export as an XML file.
The collection menu appears.
1. Right-click the Collection for which you wish
to disable inherited security.
A menu appears.
3. Select Export.
A dialog appears, and you are prompted to
select a location for the exported file.
4. Select the location for the file and click Save.
5. The collection is exported to the XML file.
TIP: When a collection is exported, the export file does not
include any of the contained collections. Each collection must
be exported separately. For example, if you export a Notebook that contains Experiments, only the Notebook is
exported; each Experiment must be exported as a separate
XML file.
Changing Collection Security
Properties
You can change the access that other E-Notebook
Users have to a specific Collections. In order to
change the security properties of a Collection, you
must have Full Control privileges to the collection.
Your system administrator determines who has
Full Control privileges for each Collection in
E-Notebook
The default security for any new Collection is Inherits Security, meaning that a Collection has the same
security profile as its parent Collection in the Collection tree.
To disable inherited security:
2. If Inherits Security is checked, select it to clear
the checkmark.
Inherits Security is disabled.
Collection Security
To change the Security Properties of a Collection
or Page:
1. Right-click the Collection or Page whose Security Properties you wish to change.
A menu appears.
2. Select Collection Properties.
The Collection Properties dialog box appears.
3. Click the Collection Security tab.
ChemOffice 2006/E-NotebookWorking with Sections and Collections
• 589
Administrator
The Security tab appears. The Groups and
Users who have permission to access this item
appear in one of the two lists: Inherited Permissions, Assigned Permissions.
4. Take the appropriate action:
Desired
Result
Add a User or
Group to the list
Action to take
4. Click Add.
5. Select the appropriate user
or group from the tree. You
may either:
a) right-click within a blank
portion of the tree and
select Browse All to see all
of the Users, or
b) click the Search button
and perform a search for a
User or group of Users).
6. Click Add...
7. Select the appropriate
access from the listbox:
Read – permits a user to
view the Collection, but
not edit it.
Inherited Permissions are permissions inherited from the parent collection in the collection
tree. These permissions can not be changed
from this dialog. Only the Assigned Permissions can be changed from this dialog.
Read and Write – permits
a user to view and edit the
Collection.
Full Control – permits a
user to view the
Collection, edit it, and
assign or remove security
permissions for it.
Remove a User
or Group from
the list
590•Working with Sections and CollectionsCambridgeSoft
1. Highlight the user or group
in the list.
2. Click Remove.
Desired
Result
Change the type
of access for a
user or group
currently in the
list
Action to take
1. Highlight the user or group
in the list of Assigned
Permissions.
2. Select the appropriate
access from the listbox:
A menu appears.
2. Select Collection Properties.
The Collection Properties dialog box appears.
3. Click the Transition Security tab.
The Security tab appears. The Groups and
Users who have permission to apply a transition to this item appear in one of the two lists:
Inherited Permissions, Assigned Permissions.
• Read – permits a user to
view the Collection, but
not edit it.
• Read and Write – permits
a user to view and edit the
Collection.
• Full Control – permits a
user to view the
Collection, edit it, and
assign or remove security
permissions for it.
Transition Security
Transition Security is the security applied to the
collection transitions. For example, some users
may be allowed to close a collection while others
can also reopen the collection.
To change the Transition Security Properties of a
Collection or Page:
1. Right-click the Collection or Page whose Security Properties you wish to change.
ChemOffice 2006/E-NotebookWorking with Sections and Collections
Inherited Permissions are permissions inherited from the parent Collection in the Collection tree. These permissions can not be
changed from this dialog. Only the Assigned
Permissions can be changed from this dialog.
• 591
4. Take the appropriate action:
Administrator
Desired
Result
Add a User or
Group to the list
Action to take
1. Click Add...
The Choose User or
Group dialog appears.
2. Select the appropriate user
or group from the tree. You
may either:
a) right-click within a blank
portion of the tree and
select Browse All to see all
of the Users, or
b) click the Search button
and perform a search for a
User or group of Users.
3. Click Add.
The Choose Transition
Types dialog appears.
4. Select the appropriate
transition type(s).
5. Click Add.
The User or Group
appears in the Assigned
Permissions list, along
with the transition type(s)
you selected.
Remove a User
or Group from
the list
1. Highlight the user or group
in the list.
2. Click Remove.
592•Working with Sections and CollectionsCambridgeSoft
Performing a Collection
Transition
Collections may be configured to have states associated with them. These states define the life cycle
of the collections. For example, a Notebook may
have Open and Closed states; the Open state may
permit editing, and the Closed state may be a readonly state that does not allow edits. Transitions are
the actions you perform to move a collection from
one state to another, for example, from Open to
Closed.
In order to perform a transition on a collection:
1. Click Browse.
The Collection Tree appears.
2. Right-click the collection in the Collection Tree
that is to undergo the transition.
The collection menu appears.
3. Select the name of the transition from the
menu, for example Close, Final Print, or Reopen.
(Again, the options will vary based upon your
system configuration).
4. You may be prompted to enter additional
information — such as an annotation or additional data — before the transition can proceed. If so, enter the information to proceed
with the transition.
The transition occurs and the collection enters
the new state. You may always view the state of
the collection by right-clicking it in the Collection Tree, then selecting Collection Properties.
Transitions may also perform certain functions,
such as printing a copy of the collection.
Your system configuration determines which transitions may be performed, and by whom.
Exporting a Collection or Section
to MS Word
You can export Collections and Sections to MS
Word, then manage them as you would MS Word
documents. See “Exporting” on page 571 for
details.
Printing Collections
You can print collections from E-Notebook to
maintain your hardcopy archives. See “Printing”
on page 573 for details.
Printing Multiple Collections at Once
Some configurations provide the ability for you to
print multiple contained collections at once.
To do this:
1. Click the container collection in the Collection
Tree. For example, this may be a notebook,
and you may wish to print several experiments/pages within the notebook.
2. In the right frame, select the section that contains the Print Multiple tool
.
3. Click the tool to select it.
The Print Multiple dialog appears, prompting
you to select the range of contained collections
to print.
4. Select the range by choosing a starting and end-
ing collection from the dropdown lists.
5. Click the Print button.
Performing a Collection
Transition
of the collections. For example, a Notebook may
have Open and Closed states. The Open state may
permit editing, and the Closed state may be a readonly state that does not allow edits. Transitions are
the actions you perform to move a collection from
one state to another, for example, from Open to
Closed.
In order to perform a transition on a collection:
6. Log into the E-Notebook.
The Collection Tree appears.
7. Right-click the collection in the Collection Tree
that is to undergo the transition.
The collection menu appears.
8. Select the name of the transition from the
menu, for example, Close, Final Print, or
Reopen. (Again, the options will vary based
upon your system configuration).
You may be prompted to enter additional information such as an annotation, or additional data,
before the transition can proceed. If so, enter the
information to proceed with the transition.
The transition occurs and the collection enters the
new state. You may always view the state of the
collection by right-clicking it in the Collection
Tree, and then selecting Collection Properties.
Transitions may also perform certain functions,
such as printing a copy of the collection.
Your system configuration determines which transitions may be performed, and by whom.
Working with Form Tools
A form tool is used to perform a particular function in an E-Notebook form/field. There are several standard form tools in E-Notebook that may
be associated with the section or collection types,
for example, the New Section Form Tool associated with Notebook collection type or
Collections may be configured to have states associated with them. These states define the life cycle
ChemOffice 2006/E-NotebookWorking with Sections and Collections
• 593
Administrator
Import/Export Form Tool, which is present in
new section types you create.
NOTE: Your system configuration determines the collections to which this form tool can be added.
The New Section Tool
The New Section Tool allows you to add new sections to a collection, for example, to a page or an
experiment. When you click the tool you will be
presented with a list of the types of sections you
may add.
If you would like to create a new section within a
Page/Experiment:
9. Click the New Section icon,
you click the Duplicate Collection Tool/Icon on a
Page/Experiment collection, the Page/Experiment collection will be copied. The duplicate or
new copy will appear within the same container
collection in the Collection Tree.
To duplicate a collection with Duplication Collection Tool:
11.Select the experiment/page type you wish to
duplicate.
12.Click the Duplicate icon/tool,
.
A list of the section types that can be added
appears.
A new copy of the Page or Experiment collection appears within the same container Notebook.
13.Alternatively, in the Collection Tree, right-click
the experiment/page which you would like to
duplicate.
A menu appears.
14.Select Duplicate from the menu.
The New Child Collection Tool
10.Select the section type.
The new section appears within the Page.
The Duplication
Collection Tool
Enterprise
The Duplicate Collection Tool allows you to create
a copy of the selected collection. For example, if
594•Working with Sections and CollectionsCambridgeSoft
The New Child Collection Tool allows you to add
new contained collections to the selected collection. For example, you could click this tool on a
notebook in order to create a new page/experiment within the notebook.
The tool may be used to create a new page within a
notebook. To do this:
15.Click the New Experiment icon/tool,
A list of the experiment/page types appears.
ple, if you click the New Sibling Tool on a notebook, a new notebook will be created. The new
sibling will appear within the same container collection in the Collection Tree.
If you would like to create a new sibling of a Notebook:
18.Click the New Sibling icon,
16.Select the experiment/page type.
A new Page or Experiment collection appears
within the Notebook. It is numbered automatically.
17.Alternatively, in the Collection Tree, right-click
the Notebook collection to which you would
like to add the Page or Experiment.
A menu appears from which you can select the
page to be added to the Notebook Collection.
A list of the collection types that can be created
appears.
19.Select the collection type.
The New Sibling
Collection Tool
Enterprise
The New Sibling Collection Tool allows you to
create a new collection of the same type. For exam-
A new notebook collection appears within the
same container collection.
NOTE: Your system configuration determines the collections to which this form tool can be added.
ChemOffice 2006/E-NotebookWorking with Sections and Collections
• 595
Administrator
596•Working with Sections and CollectionsCambridgeSoft
Chapter 31: Changes and Audit Trail
E-Notebook provides auditing and change control
features for compliance with 21 CFR Part 11,
which is part of Title 21 of the Code of Federal
Regulations for the Food and Drug Administration
(FDA). 21 CFR Part 11 sets forth guidelines for
keeping, maintaining and authenticating electronic
records.
For every change made to E-Notebook data, an
audit trail records the logged in identity of the user,
the date, and the time. This is done automatically
when you add, delete, or update data. The audit
trail information is stored in the E-Notebook database.
In addition, E-Notebook may be configured so that
you can annotate the changes you make to
collections by providing reasons for them. See the
following topic for more information:
and that you have not opened the collection for
editing. The changes icon will always appear in
this form if the collection is in a read-only state.
•
If you click within one of the sections in
the collection, the key leaves the hole. This
indicates that you have locked the collection
for editing, and other E-Notebook users may
not edit it at this time. The Release state may
also indicate that another user of E-Notebook
has the collection open and locked for editing.
•
An open book in front of the key indicates
that unsaved changes have been made to the
collection.
If you are viewing a previous version, the save icon
will not appear.
• Annotation of Changes
Saving Changes to a Collection
• Working with the Changes Icon
There are a number of ways in which changes to a
collection may be saved. This topic addresses each
of these items in detail. They are:
• Saving Changes to a Collection
You can also view prior versions of collections
and, if Visual Display of Changes is enabled, you
can view and print the changes that were made to
the data in a collection. See the following topics:
• Working with the History Pane
• Visual Display of Changes
• Clicking the
• Selecting Save Changes or Save and Annotate
•
•
Working with the Changes Icon
The changes icon appears in the right frame of
E-Notebook. The appearance of the icon changes
to indicate various conditions:
•
When you first select a collection in the
collection tree, the changes icon appears as a
key in a keyhole. This indicates that you have
not made unsaved changes to the collection,
ChemOffice 2006/E-NotebookChanges and Audit Trail
changes icon.
•
•
Changes from the changes menu.
Browsing to another collection.
Through autosave, which your system administrator sets up to automatically save the collection after a set period of time has passed.
Selecting Backup Changes from the changes
menu. This option would be used in the event
of network failure, to prevent data loss.
Closing the Internet Explorer browser.
Clicking the Changes Icon
To save your changes using the changes icon:
• 597
1. Click the
Administrator
changes icon. The open book
indicates that there are unsaved changes.
2. If the changes must be annotated, you will be
prompted to enter annotation . If no annotation is required, your changes are saved immediately.
The saved version will appear in the History
Pane. The changes icon indicates that your
changes have been saved
tion, simply right-click the collection and select
Collection Properties from the menu.
.
Selecting Annotate Last Change from
the Collection Menu
This allows you to provide an optional annotation
for the last change you made to a collection. To
save your changes using a command in the changes
menu:
1. Right-click the collection and select Annotate
Last Change... from the menu.
A dialog appears and you are prompted to
enter an annotation for the change.
2. Select or enter an annotation and click the
Annotate button.
Saving Changes by Browsing to
Another Collection
To save changes by browsing to another collection:
1. Click another collection in the Collection Tree.
2. If your changes must be annotated, you will be
prompted to enter annotation . If no annotation is required, your changes are saved immediately.
The version appears in the History Pane.
Saving Changes through Autosave
Your system configuration may include the
autosave feature, which defines the set period of
time after which the collection is saved automatically. If autosave occurs and annotation is required,
you will be prompted to enter a reason for your
changes. To view the autosave interval for a collec-
598•Changes and Audit TrailCambridgeSoft
Saving Changes through Backup and
Restore
In the event of a network failure, you can save your
changes locally, and then add them to E-Notebook
at a later time using the Restore command.
To Backup and Restore your changes:
1. When the network goes down, you will be
prompted to save your changes as an XML file.
Select the name and destination for the file and
click OK.
2. When the network comes back up, browse to
the collection and right-click it.
3. Select Restore Changes.
The Restore Changes dialog appears, and you
are prompted to select the file containing the
changes.
4. Select the file you saved as a backup and click
Open.
Your changes are restored.
Annotation of Changes
E-Notebook may be configured so that you can
annotate the changes you make to data in collec-
tions. There are two possibilities for providing
annotation. They are:
• Required Annotation – each time you save
the collection, you must provide a reason for
the changes you made. You must also provide
a reason for the changes if autosave has
occurred.
• Optional Annotation – you may provide a
reason for the changes is you wish, but it is not
required.
Whether annotation is required or optional
depends upon 1) the type of collection and 2) its
state. For example, an Experiment or Page may be
configured such that it has three states: Open,
Closed, and Reopened.
• Open – the Open state may have optional
annotation, so that you may provide a reason
for a change if you wish.
• Closed – the Closed state may be read-only. It
may not be possible to edit the collection while
it is in this state.
• Reopened – the Reopened state may permit
changes, but only if they are annotated each
time the collection is saved.
In some configurations, annotation may be
required when you perform a collection transition.
For example, it may be necessary to provide a reason for moving a collection to the Reopened state.
Providing Required Annotation
With required annotation, you must provide a reason for your changes each time you save the collection or an autosave occurs. You must provide the
reason before making any further changes. The
dialog lists the changes you made to the collection
since the last time the collection was saved.
1. Click the changes icon
.
The annotation dialog appears:
2. Either click one of the Predefined Annotations
to select it, or type another annotation into the
bottom box.
The Save button is enabled.
3. Click the Save button.
The version of the collection is saved, along
with the annotation. The version is listed in the
History Pane.
Alternatively, you may save your changes by simply
browsing to another collection. If you have
unsaved changes, you will be prompted to enter an
annotation.
In some configurations, an autosave may occur
after a certain time period has elapsed. If autosave
occurs and annotation is required, you will be
prompted to enter the annotation for your
changes.
Providing Unprompted, Optional
Annotation
With Optional Annotation, you may provide a reason for your changes at any time. You initiate providing the reason; it is not mandatory. To provide
optional annotation:
1. Click the changes icon
.
A menu appears.
ChemOffice 2006/E-NotebookChanges and Audit Trail
• 599
2. Select Save and Annotate Changes.
1. Right-click the collection in the Collection
Tree.
The collection menu appears:
NOTE: This command will only be available if there
are unsaved changes.
Administrator
3. Click a predefined annotation or type in
another annotation.
4. Click Save.
The version is saved, along with the annotation. The version is listed in the History Pane.
Working with the History Pane
The History Pane indicates whether prior versions
of a collection exist, and enables you to view those
versions. A version of the collection is created each
time the collection is saved. For each version, the
history pane shows the date, time, and the action
name - which may be save, autosave, or a transition
name.
To view the History Pane of a collection:
2. Select Show History. The History Pane appears
in a pane below the Collection Tree. It displays
all versions and transitions for the collection, in
reverse chronological order. A save operation
is denoted with a paper and pencil icon. A collection transition is denoted with a rubber
stamp icon
.
600•Changes and Audit TrailCambridgeSoft
3. To view a particular version, click the version
2. Click the Previous button to view information
in the History Pane. The version is then displayed in the section frame, to the right.
The changes icon icon is not visible when you
are viewing older versions of a collection.
To view the properties of a version of a collection:
about the previous version of the collection, or
the Next button to view information about the
next version of this collection.
3. Click OK to dismiss the Version Properties dialog.
1. Right-click the version in the history pane.
Select Properties from the menu that appears.
• The Version Properties dialog appears.
Specifying an Annotation through the
History Pane
It is only possible to specify an annotation through
the History Pane for the most recent version of the
collection, and only if the state of the collection
does not require that changes be annotated.
To enter an annotation for the most recent version
of the collection:
1. Right-click the version in the History Pane.
2. Select Properties from the menu that appears.
The dialog displays the following information
about the version you selected:
• Name – the action that created the version
(save, autosave, transition name).
• Author – the person who performed the
action.
• Date – the date and time the version was
created.
If there is an annotation associated with the
change, the following information appears as
well:
• Person who entered the annotation
• Date and time the annotation occurred
• Text of the annotation
ChemOffice 2006/E-NotebookChanges and Audit Trail
The properties dialog appears. If the version
displayed in the properties dialog is unannotated and requires an annotation, the Annotate
button is visible.
3. To annotate this version, click the Annotate
button and the standard annotation dialog box
appears.
4.
The standard annotation dialog appears.
5. Enter the reason for the changes, or select a
reason from the predefined list of reasons.
6. Click OK .
The annotation is saved with the version.
Visual Display of Changes
Depending upon the type of collection and its
state, it is possible to view a Visual Display of
Changes that have been made to data in the collection. If Visual Display of Changes is enabled, the
changes that have been made to a collection can be
viewed in E-Notebook, and a record of the
changes made will be shown as footnotes in the
printed collection.
• 601
Administrator
In some configurations, Visual Display of Changes
will be possible from the very beginning of the collection life cycle, when the collection is first created. In other cases, Visual Display of Changes will
begin when a particular collection transition is performed; a common example is the transition from
a closed, read-only state to a reopened state in
which edits are permitted.
The version of the collection that existed when the
Visual Display of Changes began is called the Baseline Version of the collection. It is underlined in
the History Pane. In the example below, the Baseline Version in the version that existed when the
Close transition was performed. A black line
appears under this version.
If visual display of changes is enabled, there is a
paper and pencil icon
next to data in the section that was changed after the baseline version
was created.
To view an older version of the data:
1. Click the paper and pencil icon that indicates a
change was made.
A dropdown menu is displayed. The menu displays a list of dates and times for every saved
version of this data since the baseline version.
The version currently displayed is denoted with
a checkmark.
2. To view a particular version, select the corre-
sponding date from the dropdown list.
The entire version of the collection as of that
date and time is displayed.
Changes are displayed differently for different
types of data
Type of Data
• Chemical Structure
• Database tables
Change Display
Example
The data is displayed as it existed N/A
when the version was created.
• MS Excel Spreadsheet
• Spectrum
• Stored Document
• Styled Text
• URL Displays
602•Changes and Audit TrailCambridgeSoft
Type of Data
Change Display
Example
• MS Word
The change tracking features of
MS Word are used: new text is
underlined and displayed in red.
Deleted text is displayed with
red, strikethrough text.
• Property Lists
Changed Cells display a pencil
icon.
• Tables
New cells display a pencil icon.
Changed or new property:
Deleted property:
Deleted cells display an X
through them.
If Visual Display of Changes is enabled, the
printed output will include three main portions:
• The data as is exists in the current version.
• The version history, including the date and the
author for each version after the baseline version.
ChemOffice 2006/E-NotebookChanges and Audit Trail
• A list of changes grouped by field.
NOTE: Even when the visual display of changes is not
enabled, the audit trail still captures the history, and the history pane displays a list of the saved versions and transitions
for the collection.
• 603
Administrator
604•Changes and Audit TrailCambridgeSoft
Chapter 32: Searching
Searching allows you to find information in
E-Notebook that meets the criteria you specify.
E-Notebook makes it possible to search for:
• Chemical structures
• Strings of text
• Values in Property Lists and Tables
• Collections and sections that meet specific criteria, such as creation date or owner's name or
state.
• Unannotated versions of collections
4. Select the type of query you would like to run.
An empty query form is displayed. An example
is shown below:
Conducting a Search
You can search for information in E-Notebook
that meets the criteria you specify. You can then
save your queries and the results lists.
To conduct a search:
1. Click the Search button.
Search mode appears.
2. From the Search for drop-down list, select the
type of search you would like to conduct.
3. Click the New Query Section icon.
A menu appears.
The options in the menu depend on both the
type of search chosen in step 2 and your configuration.
ChemOffice 2006/E-NotebookSearching
5. Specify the parameters that will determine the
search results.
The parameters you can specify are determined
by the type of query you are conducting.
6. Do one of the following:
• Click Search Now to execute the query.
A results list appears.
• Click Save Query to save the query.
The Collection Tree appears with a new
search, and you are prompted to give the
search a name.
Working with Query Results
When you conduct a Search in E-Notebook, the
results are displayed in a list. You can save the
results list, and/or view any item on the list.
Viewing Items in a Results List
To view an item on the results list:
• 605
Click the arrow in the upper left corner of the
name of the item, as shown below.
Administrator
The Collection Tree appears, with the item displayed.
Saving a Results List
To save the results list:
1. Click Save Results.
A dialog appears, prompting you to browse to
the location in the Collection Tree where you
would like the results to be saved.
2. Click a collection to select it in the tree, and
click the Save button.
The Collection Tree appears, showing the
search results as a new collection. The links are
maintained so that you may browse to any of
the items.
Customizing the Display of Search
Results
You can customize the display of a hitlist, just as
you can customize a table of contents. To do this:
Right-click a column in the hitlist.
A menu appears.
You may hide the selected column or sort the
results list. You may also specify which columns
are displayed, using the Show command. See
“Working with Table of Contents” on page 516 for
a more detailed description of these options.
606•SearchingCambridgeSoft
Saving a Query
When you create a query in E-Notebook, you may
save the query in the Collection Tree.
To save a query:
1. Click the Save Query... button to the left of the
query form.
A dialog appears, and you are prompted to
select the location where you wish to save the
search.
2. Click a collection to select it as the location,
and click the Save button.
The Collection Tree appears, and the query
appears in the tree. You are prompted to
rename the query.
3. Enter a name for the query
TIP: The last query you created will appear by default
when you enter Search mode again.
Running a Saved Query
To run a query that is saved in the collection tree:
1. Click the Browse button at the top of the
screen.
The Collection Tree appears.
2. Select the query in the collection tree by clicking it.
The query form appears in the right frame.
3. Right-click the section menu icon, and select
Copy Section.
4. Click the Search button at the top of the
screen.
Search mode appears.
5. From the Search For dropdown list, select the
type of query that corresponds to the query
form you are copying.
6. Right-click the Section menu icon, and select
Paste Section.
The query form appears.
NOTE: It may be necessary to delete one of the query
forms if you do not want to use multiple query forms. See
“Removing a Section” on page 579 for more
information.
Refining a Search
Once you have conducted a search, you can further
refine it, performing a search that is:
• An intersection of two searches
• A union of two searches
• The exclusion of one set of search results from
another
It is possible to refine both section searches and
collection searches.
To do this:
1. From the dropdown list at the top of the query
form, choose any of the following options:
• Create a New Set of Search Results –
deletes the previous search results and
replaces them with the search results generated by the new query.
• Refine the Previous Search By Collection – uses the previous search results to
limit the collections in which a search is
done. The stored hit list will contain the
intersection of the previous search results
and the results specified by the new query.
• Refine the Previous Search By Section –
uses the previous search results to limit the
sections in which the search is done. The
stored hit list will contain the intersection of
the previous search results and the results
specified by the new query. If the current
search engine is a collection search engine,
then this option is not present.
ChemOffice 2006/E-NotebookSearching
• Exclude Collections from the Previous
Search – excludes collections from the
stored hit list that are part of the previous
search results. The stored hit list is completely replaced.
• Exclude Sections from the Previous
Search – excludes sections from the stored
hit list that are part of the previous search
results. The stored hit list is completely
replaced. If the current search engine is a
collection search engine, then this option is
not present.
• Add to the Previous Search – adds the
results specified in the search query to the
previous search results. Duplicate collections and/or sections will not be added.
• Remove from the Previous Search –
removes the results specified in the search
query from the previous search results.
2. Fill in the new search criteria.
3. Click the Search Now button.
The hitlist appears, modified according to the
option you chose in step 1.
If you wish, you may refine your search further, by
selecting another option from the dropdown list.
Using the E-Notebook Search
Types
E-Notebook offers an extensive array of searching
features. You can search for:
• Chemical structures
• Strings of text
• Values in property lists and tables
• Collections and sections that meet specific cri-
teria, such as creation date or owner's name.
You can search for sections that meet the criteria
you specify. Similarly, you can search for collections based on specific attributes. The Chemical
Structure search will find structures in chemical
structure fields and tables in E-Notebook. The
• 607
Administrator
results of the search are grouped by structure for
easy analysis and organization. You can also search
for collections that require annotation, but for
which no annotation was provided when changes
were made. You can save queries and the results
lists of the searches made to the E-Notebook Collection Tree.
Searching for Sections
You can search for sections that meet the criteria
you specify. You can then refine your search, or
save your queries and the results lists.
To conduct a search for sections:
1. While in Search mode, select Sections from the
Search for drop-down list. If no form appears
in the right frame, click the New Query icon.
When you conduct a search for sections, all of the
search criteria you enter into the query form must
exist in a section in order for the section to be considered a match. In other words, the search is an
“AND” search. If you add an additional search
form, you can conduct an “OR” search. The search
results will contain the sections that match 1) all of
the criteria in the first search form and 2) all of the
criteria in the second search form. After running a
search you may refine it, adding additional criteria,
etc. See “Refining a Search” on page 607.
Searches are not case sensitive. A search for “Benzene” will find both “Benzene” and “benzene”.
Your section search form may include the following search fields:
Query Text Field
The Query Text field may be used to search for the
following text:
A menu appears.
2. Select the new query form you wish to create.
The options are: Basic Query and Advanced
Query.
An empty query form appears.
3. Enter your search criteria into the form, using
the instructions below.
Do one of the following:
• Click Search Now to execute the query.
A results list appears, displaying the sections
for which all of the parameters you specified
apply.
• Click the Save Query button to save the
query.
A dialog appears, prompting you to choose
a location for waving your search.
Select a location and click the Save button.
The Collection Tree appears with a new
Section Search, and you are prompted to
name the search
608•SearchingCambridgeSoft
• Text in MS Word fields
• Text in Styled Text fields
• Text in MS Excel spreadsheets
• Text in Chemical Structure fields
• Properties in Property Lists
• Properties in Tables
• Text in several types of stored document files –
MS Word, MS Excel, MS PowerPoint
See “Searching for Text with the Query Text
Field” on page 614 for a description of the search
capabilities.
Chemical Structure Field
If you wish, draw a structure or reaction using the
ChemDraw Toolbar. (Alternatively, you may open
a structure file of a supported file type). See
“Chemical Structure Search” on page 610 for
information about performing a structure search.
The section search differs from the chemical struc-
ture search in that the results of a section search
are not organized by substructure.
with Collection Attributes” on page 612 for more
instructions on entering these criteria.
Property Query and Table Query Fields
These fields are included in the Advanced Section
Query. The Property Query Field is used to search
over Property Lists, and the Table Query field is
used to search over Tables. See “Searching with
the Property Query and Table Query Fields” on
page 613.
Search Location Field
The Search Location field allows you specify the
branch of the collection tree for your search. To
select a search location, simply click the Search In
checkbox to select it, and browse to or search for
the root collection for your search. The search will
cover the root you select and any collections within
it.
Collection (Metadata) Properties
Metadata Properties describe the collections that
contain the sections for which you are searching.
For Selecting, a checkbox makes visible an area
that allows you to enter criteria. See “Searching
ChemOffice 2006/E-NotebookSearching
Collections Search
The collection search allows you to search for collections, such as notebooks, folder, or experiments.
You may conduct a search based for specific content or for metadata, such as owner’s name and
creation date. You can save your queries and the
results lists in the Collection Tree.
To conduct a search for collections:
1. While in Search mode, select Collections from
the Search for drop-down list. If no form
appears in the right frame, click the New Query
icon.
A menu appears.
2. Select Basic Query or Advanced Query.
An empty query form appears.
3. Enter your search criteria, as described below.
Do one of the following:
• Click Search Now to execute the query.
A results list appears, listing the Collections
that match the criteria you specified.
• Click the Save Query button to save the
query.
• 609
Administrator
A dialog appears, prompting you to choose
a location for waving your search.
• Select a location and click the Save button.
The Collection Tree appears with a new
Collection Search, and you are prompted to
name the search.
Your search for collections may include the following search fields:
Query Text Field – see “Query Text Field” on
page 608.
Chemical Structure Field – see “Chemical Structure Field” on page 608.
Search Location Field – see “Search Location
Field” on page 609.
Collection (Metadata) Properties – see “Collection (Metadata) Properties” on page 609.
Property Query and Table Query Fields – see
“Property Query and Table Query Fields” on page
609.
however, will present the search results in a list,
rather than ordering them by structure.
To conduct a search for structures:
1. While in Search mode, select Chemical Structure
from the Search for drop-down list.
2. Click the New Query icon.
An empty query form appears.
Chemical Structure Search
Substructure searching finds structures that contain the query and any additional attachments at
the open positions. Using the ChemDraw toolbar,
you can attach different features, such as atom lists
and variable bond types, to a query to perform a
narrower or broader search.
The Chemical Structure search will find structures
in chemical structure fields and tables in E-Notebook. The results of the search are grouped by
structure for easy analysis and organization. You
can save queries and the results lists to the E-Notebook Collection Tree.
Note that you may also search for chemical structures with the Section Search and Collection
Search. These searches allow you to combine the
structure search with other search criteria. The
results of the Section Search and Collection Search,
610•SearchingCambridgeSoft
3. Within the chemical structure box, draw the
structure or substructure for which you wish to
search, or right click within the structure box to
import a file. (For more information about the
structure drawing capabilities of ChemDraw,
please consult the ChemDraw User’s Manual.)
4. Do one of the following:
• Click Search Now to execute the query.
A results list appears.
• Click the Save Query button to save the
query.
The Collection tree appears with a new
Structure Search, and you are prompted to
give the Structure Search a name.
An example of substructure searching of Cyclopentane. The substructure query:
For example, you can create a query such as the
following:
This indicates that the bond
must NOT be in a ring
Chn
Will hit the following (and other molecules):
That bond is already in a ring, so no hits are
returned for this query.
General Query Properties
O
For information on query properties, see ChemFinder Appendix II-A.
Searching with the Search
Location Field
HO
O
The search location field makes it possible for you
to select the specific branch of the collection tree
over which your search is conducted.
To use the search location field:
1. While in Search mode with a search form displayed, click the Search In... checkbox to activate the field.
The Collection Tree appears.
In searching substructures, E-Notebook finds the
substructure query regardless of its orientation or
drawing presentation in the targeted molecules.
E-Notebook does its best to follow your instructions even if those instructions are contradictory.
2. Then, either:
ChemOffice 2006/E-NotebookSearching
• 611
• Browse to the root collection over which
Administrator
you wish to select OR
• Click the Search button inside the search
location field to search for the root collection.
The collection that appears at the top of the
Collection Tree in the search location field is
the collection over which your search will be
run. This root collection, all of its contained
collections, and all of the collections
referenced within it in the collection
hierarchy will be included in the search.
Searching with Collection
Attributes
You may search for collections and sections in
E-Notebook based on specific attributes, such as
owner's name and creation date.
To conduct a search for collections:
1. While in Search mode, select Collections or Sections from the Search for drop-down list.
2. If no form appears in the right frame, click the
New Query icon.
A menu appears.
3. Select Basic Query or Advanced Query.
An empty query form appears.
4. If you would like to search by collection
attributes, select the checkboxes next to any
items you would like to include in the query.
Selecting a checkbox makes visible an area that
allows you to enter criteria.
612•SearchingCambridgeSoft
Specify the collection attributes that will determine
the search results. The parameters you may enter
are:
Parameter
Collection's
Name – the name
of the Collection
Options
• contains
• is
• starts with
• ends with
Owner's Name –
the name of the
User who created
the Collection.
• contains
Type – the Collection type. Examples
are Notebook,
Folder, Experiment,
or Page.
• is
Creation Date –
the date the Collection was created.
• is
Last Modified
Date – the date the
Collection was last
modified.
• is
• is
• starts with
• ends with
• is not
• is before
• is after
• is before
• is after
Parameter
State Name – the
name of the current
state of the Collection. Examples are
Open and Closed.
Options
A menu appears.
• contains
• is
• starts with
• ends with.
Each of these options can
be specified as of a certain
date. For example, Closed
as of 2/1/2003 would return
the Collections that were in
the Closed state on
2/1/2003.
Searching with the Property
Query and Table Query
Fields
The Property Query Field is used to search over
property lists, and the Table Query field is used to
search over E-Notebook tables. These search
fields are normally found in Advanced Section
Query forms.
2. Select Add Property.
The Add Property dialog appears, listing the
properties that appear in E-Notebook. If properties are already present in the field, the list is
filtered to display only those properties that
share the same section type:
• Property Query field – the properties that
appear in E-Notebook property lists are displayed.
• Table Query field – the properties that
appear in E-Notebook tables are displayed.
3. Select the properties you wish to include in the
search. You may use SHIFT+click and
CTRL+click to select multiple properties.
Make sure that all of the properties exist in the
same section type, or your search will return no
hits.
4. Click the Add button.
The properties appear in the search form.
Removing Properties from the
Field
Adding Properties to the Field
To remove a property from the field:
1. Right-click the property you wish to remove.
A menu appears.
To add properties to a Property Query or Table
Query field:
1. Right-click within the field.
2. Select Remove Property.
ChemOffice 2006/E-NotebookSearching
• 613
Administrator
You are prompted to confirm that you wish to
delete the property.
3. Click Yes.
The property is removed from the query field.
Search Options
You may either search for an exact match, or use
one of the following options:
Wildcard searches for text properties:
• If a property has a Data Type of text, you can
conduct a “contains” search. Use the percentage symbol as the wildcard. In the example
below, all of the Spectrum sections where the
Analyst name ends in Smith will be returned.
• If a property has a numerical Data Type, you
can search for a range, as shown below:
Other search options may be used with numerical
properties as well:
• Greater than – >30 returns all sections in
which the property is greater than 30
• Less than – <30 returns all sections in which
the property is less than 30
• Greater than or equal to – >=30 returns all
sections in which the property is greater than
or equal to 30
• Less than or equal to – <=30 returns all sections in which the property is less than or equal
to 30.
If you enter units, the search will return all of the
equivalent values entered in other units of the same
type. For example, a search for a volume of 500 mL
will return both 500 mL and 0.5L.
The search will assume the default units for the
property if you do not enter units. Using the same
614•SearchingCambridgeSoft
example, if mL were the default unit for a volume
property, and a search were conducted for a property value of 0.5, no hits would be returned. A
search for 0.5 L would return both 500 mL and
0.5 L.
Searching for Text with the
Query Text Field
With the Query Text field, you can search for text
that is contained in the following E-Notebook
fields:
• Styled Text fields
• MS Word fields
• MS Excel fields
• Stored document fields that are MS Word, MS
Excel, or MS PowerPoint
• E-Notebook property lists
• E-Notebook tables
• Text in chemical structure fields
If you enter text into the Query Text field and you
have specified no other search criteria in the search
form, all of the E-Notebook sections you have
read access to will be searched.
The searches are not case sensitive.
A number of basic and advanced text searching
options are available to you:
• Basic Text Searching
• Advanced Text Searching
Numerical properties in Property Lists and Tables
can be searched, but only as text; that is, if you perform a search for 500* you will find 500 g, 500 atm,
etc.; you cannot search for a numerical range or
perform a greater/less than search with the Query
Text field. Also, the advanced text searching
options do not apply to Property Lists and Tables.
Depending upon your database settings, text
entered into MS Word fields and Styled Text
fields may not be available for searching immediately after it is entered. There may be a delay of
several hours.
Basic Text Searching
You can use basic text searching, or querying, to
find information in MS Word and Notes portions
of E-Notebook. There are a number of special
characters used in basic text searching which will
help narrow or increase search results.
Normally, the more narrow a search, the more precise the search results become, making it easier to
find the information you need. As a search
becomes broader, the number of hits in the search
results list becomes greater.
Different types of basic text searching are available.
word root. Wildcard characters can be used in a
basic text search when searching for all documents
that contain a part of a word. This kind of search
typically returns more matches to search criteria
than the exact phrase search.
For example, the following searches really mean:
Searching For ...
Returns ...
synth*
any word with synth as the
first 5 letters in a document’s text. Matches
include synthesis,
synthetic, and syntheses.
*ethane
any word with ethane as
the last 6 letters in a document’s text. Matches
include ethane, and
methane.
Exact Phrase Matching
If a search is meant to find only exact matches for
the text entered, exact word or phrase matching
should be used. This is the most simple search, or
query, that returns exactly the information
requested.
For example, the following searches really mean:
Searching For ... Returns ...
thymidine synthesis
the words thymidine
synthesis in that order, with
no words between them in
the text of a document.
cyclohexane
the word cyclohexane in
the text of a document.
Wildcard Searching
If a prefix or a suffix for a word is either unknown
or variable, wildcard characters become useful in a
free test search to return all words with the same
ChemOffice 2006/E-NotebookSearching
Advanced Text Searching
E-Notebook offers a number of advanced text
searching options for searching Notes and MS
Word documents in the application. Using specific
operators in an advanced search allows you to narrow search parameters dramatically.
Escape Characters
In order to perform a query over words or symbols
that have special meaning to query expressions,
such as & or |, you must escape them. There are
two ways to escape characters in a query expression, using curly brackets {} or a backslash \.
Curly Brackets {}
Use braces to escape a string of characters or symbols. Everything within a set of braces in considered part of the escape sequence. When you use
braces to escape a single character, the escaped
character becomes a separate token in the query.
• 615
The following table has examples of how to use
curly brackets to escape an ampersand (&) and
a dash (-).
Administrator
Instead of
Use
AT&T
{AT&T}
high-voltage
{high-voltage}
Backslash \
Use the backslash character to escape a single character or symbol. Only the character immediately
following the backslash is escaped. The following
table has examples of how to use a backslash to
escape an ampersand (&) and a dash (-).
Instead of
Use
AT&T
AT\&T
high-voltage
high\-voltage
ABOUT
The ABOUT operator, when used in an advanced
text search, retrieves documents that contain information related to a word or phrase.
Use the ABOUT operator by entering the word
ABOUT in all capital letters followed by the word
or phrase on which to search in parentheses.
ABOUT searches are always case-sensitive. The text
string inside the parentheses is interpreted with
respect to case.
616•SearchingCambridgeSoft
For example, the following searches really mean:
Searching For ... Returns ...
ABOUT (carbon)
any word with words
related to carbon in the
document’s text. Matches
include coal and diamond.
ABOUT (carbon byproducts from
syntheses at 25
degrees Celsius)
any phrases with words
related to “carbon byproducts from syntheses at
25 degrees Celsius” in the
document’s text.
The ABOUT operator becomes very powerful
when coupled with other operators, such as AND
or NOT.
For example, the following searches really mean:
Searching For ... Returns ...
ABOUT (carbon)
AND diamond
any word with words
related to carbon as well as
the word diamond in the
document’s text.
ABOUT (carbon)
NOT ABOUT
any word with words
related to carbon but
excluding the word
diamond in the document’s text.
(diamond)
NOTE: For advanced Oracle users: The word or phrase
specified in an ABOUT query does not have to exactly
match the themes stored in the index. Oracle automatically
normalizes the word or phrase before performing lookup in
the Text index.
AND (&)
The AND operator used in an advanced text search
finds documents that contain more than one word
or phrase. The AND operator is used to search for
documents that contain at least one occurrence of
each of the query terms.
The AND operator is used by entering the first
term, then the word AND in all capital letters (or
entering the ampersand (& symbol)) followed by
another word or phrase on which to perform a
search.
For example, the following searches really mean:
Searching For ...
Returns ...
carbon AND diamond
both the words carbon,
and diamond, found
anywhere within a document’s text.
carbon & diamond
both the words carbon,
and diamond, found
anywhere within a document’s text.
carbon & diamond &
graphite
all the words carbon,
diamond, and graphite,
found anywhere within
a document’s text.
thymidine synthesis
AND carbon dioxide
both the phrases thymidine synthesis, and
carbon dioxide, found
anywhere within a document’s text.
EQUIValence (=)
The EQUIValence operator used in an advanced
text search, or query, will allow the user to find
ChemOffice 2006/E-NotebookSearching
documents that contain information about words
that can be used in place of each other, alone or in
a phrase. The EQUIValence operator is used to
specify an acceptable substitution for a word in a
query.
The EQUIValence operator is used by, entering
EQUIV in all capital letters (or enter the equals sign
(=)), followed by the phrase on which the search is
to be performed.
For example, the following searches really mean:
Searching For ... Returns ...
graphite EQUIV
diamond
the words graphite or
diamond found anywhere
within a document’s text.
graphite = diamond the words graphite or
diamond found anywhere
within a document’s text.
carbon
dioxide=monoxide
the words carbon dioxide,
carbon monoxide, or both
terms found anywhere
within a document’s text.
NOTE: The EQUIValent operator has higher precedence
than all other operators except the expansion operators
(fuzzy, soundex, stem).
Fuzzy (?)
The fuzzy operator used in an advanced text
search, or query, will find documents that contain
words similar to the word used in a search. For
example, the fuzzy operator can be used to expand
queries to include words that are spelled similarly
to the specified term. This type of expansion is
helpful for finding more accurate results when
there are frequent misspellings, or alternate spellings in the documents in the database.
• 617
Administrator
The fuzzy operator is used by entering a question
mark (?), followed by the word on which to perform a search.
For example, the following searches really mean:
The MINUS operator is used by, entering the first
term, then MINUS in all capital letters (or enter the
minus sign or hyphen (-)), followed by another
term on which to perform a search.
For example, the following searches really mean:
Searching For ... Returns ...
Searching For ... Returns ...
?boron
?read
?chemist
any word spelled similarly
to boron found anywhere
within a document’s text.
Matches include baron.
any words spelled similarly
to read found anywhere
within a document’s text.
Matches include read, lead,
and real.
any words spelled similarly
to chemist found
anywhere within a document’s text. Matches
include chemists and
chemistry.
MINUS (-)
The MINUS operator can be used in an advanced
text search, or query, to find documents that contain two phrases, with the first phrase taking precedence. The MINUS operator is used to search for
documents that contain two query terms, but documents containing the second term will ranked
lower than documents without the second term.
The MINUS operator is useful for lowering the
score of documents that contain a certain term,
without eliminating those documents.
618•SearchingCambridgeSoft
carbon - diamond
the words carbon and
diamond in them, but
documents with diamond
are listed last.
carbon MINUS
diamond
the words carbon and
diamond in them, but
documents with diamond
are listed last.
diamond -carbon
the words diamond and
carbon in them, but documents with carbon are
listed last.
NEAR
The NEAR operator is used in an advanced text
search, or query, to find documents that contain
two phrases that are close together. The maximum
distance between the two terms can be specified.
The NEAR operator is used by entering the first
term, followed by NEAR in all capital letters (or
enter a semicolon (;)), followed by the second term
on which the search is to be performed.
Use the NEAR operator to return documents based
on the proximity of two or more query terms.
NOTE: NEAR cannot be used in ABOUT queries.
For example, the following searches really mean:
Searching For ...
Returns ...
carbon NEAR
diamond
the words carbon and
diamond in them, but
only when they appear
less than 100 words apart
and in no specific order.
NEAR uses the following defaults:
• Search terms are found if they are 100 words
apart or less, unless specified otherwise. Use
whole numbers between 1 and 100.
• Search terms are found in any order, specified
otherwise. Use TRUE or FALSE.
The NEAR operator can be used with other operators, such as AND, OR, and EQUIValence.
For example, the following searches really mean:
Searching For ...
NEAR ((carbon,
diamond), 20,
FALSE)
NEAR ((carbon,
diamond), 20,
TRUE)
Returns ...
the words carbon and
diamond in them, less than
20 words apart, in no
specific order.
the words carbon and
diamond in them, less than
20 words apart, in this
specific order.
ChemOffice 2006/E-NotebookSearching
Searching For ...
NEAR ((carbon,
diamond), 10) AND
benzene
NEAR ((carbon,
diamond =
graphite), 10)
Returns ...
the words carbon,
diamond, and benzene in
them, but only when
carbon and diamond
appear less than 10 words
apart and in no specific
order.
the words carbon,
diamond, and graphite in
them, but only when
carbon and diamond or
carbon and graphite appear
less than 10 words apart
and in no specific order.
NOT (~)
The NOT operator can be used in an advanced text
search, or query, to find documents that contain a
word or phrase, but only when it appears without a
second word or phrase. The NOT operator is used
by, entering the term to be found, followed by the
word NOT in all capital letters (or enter a tilde (~)),
followed by the term to be excluded in the search.
Use the NOT operator to search for documents
that contain one query term and not another.
• 619
For example, the following searches really mean:
Searching For ...
Returns ...
Administrator
carbon NOT
diamond
the word carbon, but not
the word diamond
anywhere in the document’s text.
carbon ~ diamond
the word carbon, but not
the word diamond
anywhere in the document’s text.
For example, the following searches really mean:
Searching For ...
carbon OR diamond the words carbon,
diamond, or both anywhere
in the document’s text.
carbon | diamond
carbon NOT
(diamond OR
graphite)
the word carbon, but not
the word diamond or
graphite anywhere in the
document’s text.
NOTE: The NOT operator does not affect other logical
operators.
620•SearchingCambridgeSoft
the words carbon,
diamond, or both anywhere
in the document’s text.
carbon OR diamond the words carbon,
OR graphite
diamond, graphite, or any
combination of the terms
anywhere in the document’s text
thymidine synthesis
OR carbon dioxide
OR (|)
The OR operator can be used in an advanced text
search, or query, to find documents that contain
information about any words in the query, but not
necessarily all words in the query. The OR operator
is used by, entering the first term, followed by the
word OR in all capital letters (or enter the pipe (|)),
followed by another term on which the search is to
be performed.
Use the OR operator to search for documents that
contain at least one occurrence of any of the query
terms.
Returns ...
the words thymidine
synthesis, carbon dioxide,
or both terms anywhere in
the document’s text.
Soundex (!)
The soundex operator is used in an advanced text
search, or query, to find documents that contain
words that sound like the word used in a search.
The soundex operator is used by, entering an
exclamation point (!), followed by the word on
which to perform a search.
Use the soundex (!) operator to expand queries to
include words that have similar sounds; that is,
words that sound like other words. This function
allows comparison of words that are spelled differently, but sound alike in English.
For example, the following searches really mean:
Searching For ...
!carben
?read
Returns ...
any words that sound like
the word carben in a document’s text. Matches
include carbon and
carboxylic.
Use the stem operator to search for terms that
have the same linguistic root as the query term.
Stem expands a query to include all terms with the
same stem or root word as the search term.
For example, the following searches really mean:
Searching For ... Returns ...
$commit
any words with the root
commit found in the document’s text. Matches
include commits, committing, committee, and
committed.
$chemist
any words with the root
chemist found in the document’s text. Matches
include chemist, chemistry, and chemists in
them.
any words that sound like
the word read in a document’s text. Matches
include read and lead.
Stem ($)
The stem operator is used in an advanced text
search, or query, to find documents that contain
words similar to the word used in a search. When
the stem operator is used, enter a dollar sign ($),
followed by the word on which to perform a
search.
ChemOffice 2006/E-NotebookSearching
• 621
Administrator
622•SearchingCambridgeSoft
Chapter 33:
for E-Notebook
Enterprise
Introducing CombiChem
With the introduction of CombiChem™, it is now
possible for you to set up and manage combinatorial chemistry libraries in E-Notebook. You can set
up a generic reaction, add reactants, and automatically enumerate the products.
Features include:
• Data import/export – import reactants from
an SD file or other chemical database, and
CombiChem will scan the database for reactants that match generic
components. CombiChem also allows you to
export enumerated products to an SD file.
• Select reaction sites – when more than one
reaction site is possible, you can select which
reaction sites you would like to include in the
product enumeration process.
• Automatic stoichiometry calculations –
When you enumerate products in CombiChem, you can automatically populate the
stoichiometry grid for each individual reaction.
• Flexible plate handling – you can determine
the plate size, location of blanks, and grouping
order of reactants in the plate.
• Navigator and structure palettes – you can
browse through CombiChem easily. Clicking a
location in the CombiChem Navigator
displays the reaction components in that location. With the structure palette, you can scroll
through the corresponding structures of reactants and products.
• Configurable data sections – as with all
E-Notebook sections, the configuration of
CombiChem sections may be modified easily
so that your data is presented in the most effective manner.
See the following topics:
• Setting up the Generic Reaction
• Managing CombiChem Reactants
• Enumerating and Managing CombiChem
Products
• Using the CombiChem Navigator and Structure Window
• Managing Plate Layout and Structure Palette
Settings
CombiChem is sold as a separate, E-Notebook
add-in feature, and may not be available in your
configuration of E-Notebook.
Setting up the Generic
Reaction
In a CombiChem Library, you may either add a
new generic reaction, or prepare a reaction from an
existing experiment.
Adding a Generic Reaction
CombiChem is a reaction-based combinatorial
product. You first enter a reaction template with
R-groups at the variable sites in your starting materials, and then search for reactants based on these
structures. CombiChem puts your final product
structures together and creates a virtual library. All
sites of variability require unique R-group designations.
ChemOffice 2006/E-NotebookIntroducing CombiChem for E-Notebook
• 623
An example of a reaction that CombiChem supports is shown below:
R4
R3
H2 N
NH
Administrator
To view the generic components of the reaction,
click the Components tab.
The display changes to show one of the generic
components of the reaction.
R4
R3
NH
R3
NH
R2
R2
R4
R2
R1
R1
R1
To add a generic reaction to a CombiChem
Library:
1. From a CombiChem Library section, click
Reaction in the CombiChem menu.
2. Select Edit Reaction.
The Edit Structure window, a ChemDraw window, appears.
3. Either draw the reaction in the window, or
right-click within the window and select File,
then Open, to open an existing reaction file.
4. Click OK when you have finished editing the
reaction.
The Edit Structure window closes and the reaction appears in E-Notebook.
To view a particular component, select it from the
dropdown list.
To return to the generic reaction, click the Reaction
tab that is next to the Components tab.
Preparing a Reaction from an
Existing Experiment
CombiChem makes it possible for you to prepare a
generic reaction from an existing experiment.
When you select this option, the generic products
of the existing reaction become the generic reactants of the new experiment.
To prepare a generic reaction from an existing
experiment:
1. From a CombiChem Library section, click
Reaction in the CombiChem menu.
2. Select Prepare from Existing Experiment.
624•Introducing CombiChem for E-NotebookCambridgeSoft
The Select Experiment dialog appears, with the
Collection Tree displayed in the left frame.
Importing Reactants from a Chemical
Database
To add reactants to a CombiChem Library from a
chemical database:
1. From a CombiChem Library section, click
Reactants in the CombiChem menu.
3. Click the experiment to select it in the Collection Tree, then click the Select button.
The generic products of the reaction you
selected appear in the reaction field.
See “Adding a Generic Reaction” on page 623 for
instructions on how to edit the reaction.
The Reactants menu appears
2. Select Import Reactants.
The Import Reactants dialog appears, and you
are prompted to select the generic component
that will be matched against the chemical database.
Managing CombiChem
Reactants
This portion of the CombiChem guide provides
instructions for managing reactants in CombiChem - adding and editing reactants, and specifying reaction sites for the product enumeration
process.
O
R1
Adding Reactants from a
Chemical Database
After you have added a generic reaction, you may
either add reactants from a chemical database, or
draw them using the ChemDraw tools. The source
of the reactants can be a ChemFinder database or
any other datasource that can export MDL
SDFiles. (To create an SDFile from ChemFinder,
you can simply select the Export command from
the File menu after you have run a ChemFinder
query to find the reactants you wish to include in
the file).
3. Select the component to be matched from the
dropdown list, and click OK.
The Open Chemical Structures dialog appears,
and you are prompted to select the database file
to be scanned for matches.
4. Select the file and click Open.
ChemOffice 2006/E-NotebookIntroducing CombiChem for E-Notebook
• 625
Administrator
The file you selected is scanned for structures
that match the generic reactant. The matches
are imported into E-Notebook. Each imported
reactant appears as a subsection within the
Reactants section.
5. Use the scroll bar to scroll through the reactants:
The Add Reactant dialog appears, as shown
below.
– displays the first reactant
– displays the previous reactant
– displays the next reactant
– displays the last reactant
You may also browse to a particular reactant by
right-clicking the scroll bar and selecting Go To
Section.
Adding Reactants Manually
In addition to adding reactants from a chemical
database, you may add the reactants manually.
To add reactants manually:
1. From a CombiChem Library section, click
Reactants in the CombiChem menu.
The Reactants menu appears.
2. Select Add Reactant.
626•Introducing CombiChem for E-NotebookCambridgeSoft
3. In the left frame, select a generic reactant from
the dropdown list.
The correct generic reactant appears in the left
frame.
4. Using the navigator to the right, click a location
for the reactant to select that location.
5. Select an Add Option:
• Insert After – inserts the reactant after the
selected reactant (to the the right of the
selected reactant in the plate).
• Insert Before – inserts the reactant before
the selected reactant (to the left of the
selected reactant in the plate).
• Overwrite – replaces the reactant in the
selected location.
6. Click OK.
The Edit Reactant Structure dialog appears.
7. Draw the reactant or open a structure file.
8. Click OK.
CombiChem performs a check to ensure that the
reactant matches the generic component you
selected. If it does not match, a message is displayed to that effect, and you are prompted to
change the drawing. If it does match, the Add
Reactant dialog closes, and the reactant appears as
a new subsection in the CombiChem library.
Checking Reaction Sites
When a reactant has more than one possible reaction site, CombiChem makes it possible to choose
which site(s) participate in the product enumeration process, and which do not.
To check and select reaction sites:
1. From a CombiChem Library section, click
Reactants in the CombiChem menu.
The Reactants menu appears.
2. Select Check Reaction Sites.
The Check Reactants dialog appears. If there
are multiple matching reaction sites, a message
appears to that effect. The different reaction
sites appear in tabs.
By default, all of the possible reaction sites will
be used in the product enumeration process. If
there are certain reaction sites you do not want
to use in the enumeration process, click the
Use checkbox to deselect the site.
4. Click OK to close the Check Reactants dialog.
Editing Reactants
Once you have added reactants to a CombiChem
Library, either manually or from a chemical database, you may edit their structures.
To edit the structure of a reactant in a CombiChem
Library:
1. In a a CombiChem Library section, click the
Reactants tab.
2. Use the scroll bar or the Navigator to select the
reactant you wish to modify.
The reactant section you wish to modify
appears.
3. Click Reactants in the CombiChem menu.
The Reactants menu appears.
4. Select Edit Current Reactant.
3. Click the numbered tabs to the right in order to
view the different reaction sites.
The Edit Structure dialog appears, and you may
use the ChemDraw toolbar to edit the structure.
5. Make your edits, and click OK.
CombiChem performs a check to ensure that the
reactant matches the generic component you
selected. If it does not match, a message is displayed to that effect, and you are prompted to
change the drawing. If it does match, the Edit
Structure dialog closes, and the modified structure
appears in the CombiChem library.
ChemOffice 2006/E-NotebookIntroducing CombiChem for E-Notebook
• 627
Removing Reactants from a
CombiChem Library
Administrator
After you have added reactants to a CombiChem
Library, you may delete them. You have the option
to remove a selected reactant from the CombiChem Library or to remove all of the reactants at
once.
Removing a Selected Reactant
To remove a selected reactant from the CombiChem Library:
1. In a CombiChem Library section, browse to
the reactant you wish to remove.
The reactant appears.
2. Click Reactants in the CombiChem menu.
The Reactants menu appears.
5. Click Reactants in the CombiChem menu.
The Reactants menu appears.
6. Select Remove All Reactants.
A message appears, stating that the action will
remove all reactants and invalidate all products
already enumerated.
7. Click OK to proceed.
All of the reactants are removed from the
CombiChem Library.
Enumerating and Managing
CombiChem Products
Once you have added reactants to a CombiChem
library, you can set up a template to be used for the
enumerated products. Then, you can enumerate
the products, either enumerating all possible products, or only selected products.
Working with the Enumeration
Template
3. Select Remove Current Reactant.
A message appears, prompting you to confirm
that you wish to remove the reactant.
4. Click OK to confirm.
The reactant is removed from the CombiChem
Library,
Removing All Reactants from a
CombiChem Library
To remove all of the reactants from a CombiChem
Library:
628•Introducing CombiChem for E-NotebookCambridgeSoft
Before enumerating the products of a generic reaction, you must create an Enumeration Template,
which specifies the layout and content of the form
for each enumerated product. You may either create a template to display the reactions and their
corresponding stoichiometry grids, or you may create a template to display the structure and properties of the product.
Creating an Enumeration Template
To create the enumeration template:
1. From a CombiChem Library section, click the
Products section.
The Products section appears
2. From a CombiChem Library section, click
Products in the CombiChem menu.
The Products menu appears.
3. Select Create Enumeration Template.
The Select Product Template Type dialog
appears, and prompts you to select the type of
template. In the example below, you may select
either:
• Parallel or Small Array – displays each
enumerated product in a reaction that also
shows the reactants.
• Larger Array – displays each enumerated
product as a structure; the output structure
template does not display the reactants in
the drawing.
Once you have created the enumeration template,
you may enumerate products of the reaction. If
you would like to apply different settings to different wells, you can set up an enumeration template,
and then use the Enumerate Selection feature to
enumerate only selected wells. Then, you can set
up another enumeration template, and enumerate a
different selection of wells. Each time you enumerate a selection, the template settings will be applied
to each product that is enumerated.
Showing an Enumeration Template
To view the current enumeration template:
1. From a CombiChem Library section, click
Products in the CombiChem menu.
The Products menu appears
2. Select Show Enumeration Template.
The Enumeration Template appears.
Updating an Enumeration Template
If you wish to edit the current Enumeration Template:
1. From a CombiChem Library section, click
Products in the CombiChem menu.
The Products menu appears.
2. Select Update Enumeration Template.
The Enumeration Template appears, and you
may edit it as desired.
4. Click the type of template you desire to select,
and click OK.
The template appears in the Products section
of the CombiChem Library.
5. Add any information you wish to the template.
This may be reaction properties, etc. The information you enter will appear in the output section for each product you enumerate with this
template.
Removing an Enumeration Template
If you wish to remove the current Enumeration
Template to, for example, replace it with a new
Enumeration Template:
1. From a CombiChem Library section, click
Products in the CombiChem menu.
The Products menu appears.
2. Select Remove Enumeration Template.
The Enumeration Template is removed from
the CombiChem Library.
ChemOffice 2006/E-NotebookIntroducing CombiChem for E-Notebook
• 629
Enumerating Products
Administrator
When you enumerate the products of the generic
reaction, you may either enumerate all possible
products, or only a selection of the products.
5. Right-click your selection, and choose Enumerate Selection from the menu that appears.
Enumerating All of the Products of a
Generic Reaction
To enumerate all of the products for a reaction:
1. From a CombiChem Library section, click
Products in the CombiChem menu.
The Products menu appears
2. Select Enumerate All.
The Enumerating Products dialog appears,
showing the progress of the enumeration.
When the enumeration is complete, each product
appears as a subsection in the Products tab.
You may scroll through the products to view them.
Depending upon your enumeration template, the
products will either be displayed as structures or
displayed in reactions. If they are displayed in reactions, the stoichiometry grid will be populated for
each individual reaction.
If, in the enumeration process, the number of
products exceeds the number of wells in the product plate, additional plates will be generated.
The selected products are enumerated, and
appear in the Products section. (In this example, the products corresponding to columns 1
and 2 will be enumerated).
Exporting Products to an SD File
CombiChem makes it possible for you to export
products to an SD file, which you may then import
into ChemFinder.
To export products to an SD file:
1. From a CombiChem Library section, click the
Products tab to select it.
The Products tab appears.
2. Click Products in the CombiChem menu.
The Products menu appears.
Enumerating Selected Products of a
Generic Reaction
To enumerate only selected products of the reaction:
3. Click the Navigator button.
The navigator appears.
4. Using your mouse, highlight the locations representing the products you wish to enumerate.
You do this by clicking the first location in the
range, and then dragging your mouse to select
the entire range. Or, you may use Ctrl+click to
select multiple locations that are not contiguous.
630•Introducing CombiChem for E-NotebookCambridgeSoft
3. Select Export to SD File.
A dialog appears, and you are prompted to
enter a name and location for the file.
4. Enter the name and location and click Save.
The products are exported to the SD File. The
file may be opened with ChemFinder.
You may also open the file with ChemFinder for
Excel, which is useful for viewing and printing the
products.
Removing Products from a
CombiChem Library
After you have enumerated products in a CombiChem Library, you may remove them from the
library.
To remove the products from a CombiChem
Library:
1. In a CombiChem Library section, click the
Products tab to select it.
The products tab appears.
2. Click Products in the CombiChem menu.
The Products menu appears.
3. Select Remove Products.
A message appears, stating that the action will
irrevocably remove all enumerated products,
and asking you to confirm that you wish to
remove them.
4. Click Yes to confirm.
The products are removed from the CombiChem Library.
Using the CombiChem
Navigator and Structure
Window
The CombiChem Navigator represents a plate, and
can be used as a tool to browse through the reactants and products in CombiChem. When a location is selected in the CombiChem Navigator, the
CombiChem Structure Window displays the components of the reaction in that location.
Both the Navigator and the Structure Window can
be viewed either in a docked position on the screen
or as floating palettes.
Using the CombiChem Navigator
CombiChem offers a color-coded Navigator palette that represents a plate. When you are viewing
the Products portion of a CombiChem library,
each location or well in the Navigator represents
an individual reaction. Selecting a well makes it
possible for you to view the reaction components
that correspond to that well. Thus, by clicking locations in the Navigator, you can browse through the
reactions/products in the CombiChem library.
At the base of the navigator, there is a tab for each
generic reactant, and a tab for enumerated products. Clicking a tab displays the locations of the
corresponding component in the plate. Each
unique reactant or product is denoted with a
unique color.
In addition to the Navigator, CombiChem provides a structure palette, which displays the structures of the reactants and products in a well. When
you click a particular well in the navigator and the
structure palette is displayed, the structure palette
will change to display the structures in the well you
selected. See “Using the Structure Window” on
page 633 for more information.
When you are viewing the Reactants portion of a
CombiChem library, the Navigator changes to display the reactants plate, and allows you to browse
through the individual reactants.
ChemOffice 2006/E-NotebookIntroducing CombiChem for E-Notebook
• 631
Using the Navigator when in Products
Mode
Administrator
Below, the Products section of a CombiChem
Library is shown. The products have already been
enumerated. Clicking the C1 tab in the Navigator
displays the plate locations of the reactants that
match C1, the first generic component of the reaction. In this example, you can see that there are
thirteen separate structures corresponding to the
first generic component. Each structure is denoted
with a unique color.
Clicking the C2 tab in the Navigator displays the
locations of the reactants that match C2, the second generic component of the reaction. In this
example, there are seven, individual structures corresponding to the second generic component.
Again, each structure is denoted with a unique
color.
To display any one of the enumerated products/reactions, simply click the well corresponding
to the reaction in the Navigator.
The displayed section changes to reflect your
choice.
Using the Navigator in Reactants Mode
In addition to using the Navigator to browse
through products/reactions when in Products
mode, you may use the Navigator when in Reactants mode. The plate in this case may represent
the locations of the reactant stocks that are used to
fill the product/reaction plate.
Below, the Reactants section of the same CombiChem library is shown. The tab for C1, corresponding to the first generic reactant, is displayed.
Click any of the locations in the Navigator to view
the corresponding structure that matches C1. For
example, clicking position A2 in the Navigator displays the second C1 reactant.
Clicking the location A7 in the navigator displays
the second structure that matches C1:
Clicking the P1 tab displays the enumerated products of the reaction. In this example, there are
ninety one—(13 C1 * 7 C2)—one for each unique
combination of the reactants.
To view the reactants that match the second
generic component of the reaction, click the C2
tab. Then, click any of the locations in the Naviga-
632•Introducing CombiChem for E-NotebookCambridgeSoft
tor to view the corresponding structure that
matches generic component C2.
The appearance of the docking button changes
to indicate that the Navigator is no longer
docked.
3. Drag the Navigator to any place on the screen.
Viewing and Hiding the Docked
CombiChem Navigator
You have the option to either view the navigator
palette in a docked position or in a floating position, depending upon your viewing preference. Initially, the Navigator is docked, but you may
remove it from its dock and relocate it to any area
on the CombiChem screen. This allows you to customize the appearance of your CombiChem
library.
When the CombiChem Navigator is docked, you
use the Navigator button to display it. To view the
CombiChem Navigator when it is docked,
From the Reactants or Products section in a CombiChem Library, move your cursor until it is over
the Navigator button.
The Navigator appears, sliding out from its dock.
To hide the docked the navigator, simply move
your cursor to an area of the screen that is outside
of the Navigator, and the Navigator will slide into
its dock again.
Viewing the Navigator as a Floating
Palette
To remove the Navigator from its dock and view it
as a floating palette, as shown below.
1. If the Navigator is not already visible, move
your cursor over the Navigator button, so that
the Navigator becomes visible and slides out
from its dock.
2. Click the docking button
in the upper
right corner of the Navigator palette.
The Navigator appears in the new location
You may also resize the Navigator for more favorable viewing. (To do this, move your cursor to the
edge of the Navigator until it appears as a doubleheaded arrow, and then drag your mouse to resize
the Navigator).
Docking the Navigator at Another
Location
You may also dock the navigator elsewhere, such
as at the top or bottom of the section. To do this
1. View the Navigator as a floating palette. This
may require releasing the Navigator from its
dock, as described above.
2. Drag the Navigator toward a boundary of the
section.
As you drag the Navigator a gray rectangle
appears to show you what the new location will
be if you release the mouse at that point.
3. Drag the Navigator until the gray rectangle
expands to the width or length of the section.
This should happen when your cursor is position over an edge or corner of the section.
4. Release the mouse.
The Navigator is docked at the new location.
If you copy the Structure palette on top of the
Navigator, a button for each palette will appear,
allowing you to switch back and forth between the
two palettes.
Using the Structure Window
When you select a location in the CombiChem
Navigator, the CombiChem Structure Window displays the structures that participate in that reaction.
You may use the scroll bar to scroll through the
reactants and enumerated products in that well.
ChemOffice 2006/E-NotebookIntroducing CombiChem for E-Notebook
• 633
Viewing and Hiding the Docked
CombiChem Structure Window
Administrator
When the CombiChem Structure Window is
docked, you use the Structure button to display it.
To view the CombiChem Structure Window when
it is docked:
1. From the Products section in a CombiChem
Library, click a location in the Navigator to
select it.
The reaction or product corresponding to that
well is displayed.
2. Move your cursor until it is over the Structure
button. (The button may be either vertically or
horizontally oriented).
The Structure Window appears, sliding out
from its dock.
3. Use the scrollbar at the base of the Structure
Window to scroll through the reactants and
product in the well.
4. To hide the docked Structure Window, simply
move your cursor to an area of the screen that
is outside of the Structure Window, and the
Structure Window will slide into its dock again.
In the example shown below, the Navigator is displayed in the upper left. The well at location C 4 is
selected. The reaction corresponding to this well is
shown to the right. In the lower left, the Structure
634•Introducing CombiChem for E-NotebookCambridgeSoft
Window displays the structure that matches the
first generic component of this reaction.
TIP: The color of the reactant in the Navigator and the
Structure Window are the same.
Scrolling one position to the right using the scroll
bar at the base on the Structure Window displays
the reactant in this well that matches C2, the second generic component of the reaction.
Scrolling to the right once more displays the product of the reaction in this well.
NOTE: The selected tab in the Navigator does not change
automatically to reflect the component you are viewing in the
Structure Window.
3. Drag the Structure Window to any place on the
screen.
The Structure Window appears in the new
location
You may also resize the Structure Window for
more favorable viewing. To do this:
4. Move your cursor to the edge of the Structure
Window until it appears as a double-headed
arrow,.
5. Drag your mouse to resize the Structure Window.
Docking the Structure Window at
Another Location
Viewing the Structure Window as a
Floating Palette
As with the Navigator palette, you have the option
to either view the Structure Window in a docked
position or in a floating position, depending upon
your preference. Initially, the Structure Window is
docked, but you may remove it from its dock and
relocate it to any area on the CombiChem screen.
This allows you to customize the appearance of
your CombiChem library.
To remove the Structure Window from its dock
and view it as a floating palette, as shown below.
1. If the Structure Window is not already visible,
move your cursor over the Structure Window
button, so that the Structure Window becomes
visible and slides out from its dock.
2. Click the docking button
in the upper
right corner of the Structure Window.
The appearance of the docking button changes
to indicate that the Structure Window is
You may also dock the Structure Window elsewhere, such as at the top or bottom of the section.
To do this:
1. View the Structure Window as a floating palette. This may require releasing the Structure
Window from its dock, as described above.
2. Drag the Structure Window toward a boundary
of the section.
As you drag the Structure Window, a gray rectangle appears to show you what the new location will be if you release the mouse at that
point.
3. Drag the Structure Window until the gray rectangle expands to the width or length of the section. This should happen when your cursor is
positioned over the edge or corner of the section.
4. Release the mouse.
The Structure Window is docked at the new
location.
If you drag the Structure Window on top of the
Navigator, a button for each palette will appear,
allowing you to switch back and forth between the
two palettes.
no longer docked.
ChemOffice 2006/E-NotebookIntroducing CombiChem for E-Notebook
• 635
Managing Plate Layout and
Structure Palette Settings
Administrator
The CombiChem library has a number of settings
that you can modify in order to present your data
accurately and effectively. You can modify the layout of reactants and products in a plate. You can
also modify the naming and numbering schemes
for enumerated products. In addition, CombiChem makes it possible for you to modify the
way that structures are displayed in the library.
Editing Reactant Layout Settings
You can modify the layout of reactant plates in
CombiChem. When the Reactants tab is selected in
the CombiChem Library, the Navigator will display
the layout that you have configured.
To do this:
1. From a CombiChem Library, click Tools in the
menu.
The tools menu appears.
Editing Structure Palette Display
Settings
You can modify the settings for the structure palette that is used in a CombiChem library. The settings you apply will only be visible in the structure
window of the CombiChem Navigator.
To do this:
5. From a CombiChem library, click Tools in the
menu.
The Tools menu appears.
2. Select Edit Reactant Layout Settings.
The Reactant Layout dialog appears.
6. Select Edit Structure Palette Display Settings.
7.
8.
9.
10.
The Edit Display Settings dialog appears. It
contains a ChemDraw field.
Right-click within the ChemDraw field to display the ChemDraw menu.
The menu is displayed.
Select File, and Apply Document Settings From.
Select the source for the settings from the list
that appears, or select Other to choose another
file.
Click OK to close the Edit Display Setting
dialog.
636•Introducing CombiChem for E-NotebookCambridgeSoft
3. Click the tab corresponding to the generic reac-
tant whose layout you wish to change. In this
example, C1 is selected.
4. You may modify the following information:
• Columns – the number of columns in the
plate.
The Product Layout dialog appears, open to
the Design tab.
• Rows – the number of rows in the plate.
• Fill Direction – the direction in which the
plate is populated with the structures that
match this component.
5. Click another tab if you wish to modify the layout of another component.
6. Click OK to close the dialog.
Editing Product Layout Settings
You can modify the layout of the product/reaction
plate in CombiChem, changing the size of the
plate, the grouping order of components, and
specifying which wells are to remain empty.
When the Products tab is selected in the CombiChem Library, the Navigator will display the layout that you have configured.
To edit the product layout settings:
1. From a CombiChem library, click Tools in the
menu.
The Tools menu appears.
2. Select Edit Product Layout Settings.
Specifying Empty Wells in the Plate
You can specify which wells are to be left blank in
the plate. To do this,
1. Use your mouse to select the wells you would
like to be empty. You may do this by:
• Clicking the first well you are selecting and
dragging your mouse to the last well, OR
• Clicking a column header or row number to
select an entire column or row. You may use
CTRL+click to select multiple columns or
rows.
ChemOffice 2006/E-NotebookIntroducing CombiChem for E-Notebook
• 637
2. Right-click your selection, and select Disable
Selection from the context menu.
Changing the Grouping Order
Administrator
You can change the order in which components
are laid out in the product/reaction plate. By
default, the first generic component is filled into
the plate with a horizontal fill direction, from left
to right; the second generic component is laid out
vertically, within the array of the first component.
3. In the Product Layout dialog, select the first
component to be laid out in the plate from the
dropdown list.
4. Select the Fill Direction for the component
from the dropdown list.
The next component will automatically assume the
fill direction that is perpendicular to your selection.
Setting Product Grid Options
The Xs are removed from the wells, leaving the
wells blank:
You can modify the settings that determine how
products are named and numbered in a CombiChem Library.
To do this:
1. From a CombiChem library, click Tools in the
menu.
The tools menu appears.
2. Select Set Product Grid Options.
The Product Grid Options dialog appears.
Alternatively, you may click each well individually
to disable it.
Changing the Size of the Plate
To change the size of the product/reaction plate:
In the Product Layout dialog, type in new values for the Column Count and Row Count.
The plate layout changes to reflect the new values.
638•Introducing CombiChem for E-NotebookCambridgeSoft
3. Mouse over any of the values to view its
description. You may modify any of the following:
• Grid First Serial Number – the number that
is assigned to the first product/reaction plate.
The default value is 0001. (Note that there may
be multiple plates in a library if, during the enumeration process, the number of products
exceeds the number of locations in the grid).
• Grid Name Format – the format for the name
of the grid.
• &P – represents the collection name
• &S – represents the serial number
In the example above, the name of the
collection is “CombiChem-Notebook-009”
and the serial number is 0001. Hence, the
grid name is “CombiChem Notebook-0090001”
• Product Location ID Format – the format
for the ID of the product location.
• &R – row number
• &c – column number. Use a lower case letter for this value.
In the example above, the product location
is row number followed by column number.
So, the product in the first column and
second row would be B1; the product in the
fourth column and third row would be C4,
etc. (This assumes that the rows and
columns have not been rearranged in the
plate).
• Product Name Format – the format for the
name of the product.
• &G – grid name (as specified in the grid
name format)
• &W – product location ID (as specified in
the product location ID format).
In the example above, the product name is
the grid name followed by the product
location ID. Thus, the name for the product
in location A1 is CombiChem Notebook009-0001-A1.
4. Click OK to close the dialog and save your
changes.
ChemOffice 2006/E-NotebookIntroducing CombiChem for E-Notebook
• 639
Administrator
640•Introducing CombiChem for E-NotebookCambridgeSoft
Chapter 34: Miscellaneous Topics
This portion of the guide provides a description of
the following:
• Using the Session Manager
• Refreshing E-Notebook
• Viewing User Information
Alternatively, click Tools from the menu bar at
the top in the window and select Session Manager.....
Using the Session Manager
In certain situations, an E-Notebook session may
be left open. With the Session Manager, you can
end your old session, and release any collection
that may be locked by it.
To access the Session Manager,
1. Right-click within a blank portion of the Collection Tree.
A menu appears:
The Session Manager appears.
This dialog shows the Users, Session numbers,
and Start Times for each current session.
Ending a Session
If you wish to end a session:
2. Select Session Manager....
1. Click the session in the list.
The session is highlighted.
2. Click the End Session button.
ChemOffice 2006/E-NotebookMiscellaneous Topics
• 641
A message appears, asking you to confirm that
you wish to end the session.
1. Click Browse.
2. Right-click a blank space in the Collection
Tree.
Administrator
3. Click Yes.
The session is ended. Any record that was
locked by the session is released.
NOTE: You must have Full Control permission over
your home collection (your user collection) to end your
sessions.
A menu appears.
Refreshing E-Notebook
If other users add information to E-Notebook, you
may need to refresh your view of E-Notebook so
that you can see their changes.
To refresh E-Notebook:
3. Select User Info....
The User Properties dialog box appears. It
contains the following information:
1. Click Browse.
The Collection Tree appears.
2. Right-click any blank area in the Collections
Tree.
A menu appears.
3. Select Refresh.
E-Notebook information is updated.
Viewing User Information
You can see specific information about the
user who is currently logged into E-Notebook.
To do this:
• Login ID – the Login ID of the user who is
currently logged into E-Notebook.
• Password – Depending upon the type of login
authentication your system uses, this field may
be used to change the password for the loggedin user.
• Administrator – a checkbox that indicates
whether the user has administrative privileges.
NOTE: This checkbox is only visible if the logged-in
user is an administrator.
642•Miscellaneous TopicsCambridgeSoft
Chapter 35: Managing Section Types and
FormsManaging Section Types and Forms
Section types are used for displaying and managing
data in E-Notebook. Each section type has a
single form associated with it; this form appears in
the right frame when a section type is selected in
the Collection Tree.
Creating a New Section
Type
A section type defines an E-Notebook data section
or search section. A section type is composed of
fields, form tools, section listeners, and an export
template.
To create a new section type,
1. In the Collection Tree, right-click the folder or
collection into which you are adding the
section type.
The collection menu appears.
2. Select New, then Section Type.
To set up a section type, you add fields, form tools,
and section listeners. Then, you configure the
fields and form tools to create the form. You may
also specify a summary field for a table of contents.
The Section Type Configuration dialog is shown
below.
Once you have configured the form, you create an
export template, which allows users to print sections of this type, and to export them to MS Word.
A new section type appears in the Collection Tree;
its blank form appears to the right. You are
prompted to enter a new name for the section
type.
3. Type in a new name for the section type.
4. Right-click the new section type in the Collection Tree and select Section Type Configuration from the menu that appears.
ChemOffice 2006/E-NotebookManaging Section Types and FormsManaging Section Types and Forms
• 645
Administrator
The Section Type Configuration dialog
appears. This is the dialog through which you
add the following components:
• Fields
• Form Tools
• Section Listeners
The Section Type Configuration dialog
appears:
3. Right-click Fields, and select New Field.
The Add Field dialog appears.
Managing Fields within a
Section Type
You can add fields to a section type, and use them
to create a form and an export template. You can
also specify which field will appear in the table of
contents of a container collection. For information
about the individual fields and their properties, see
“Managing Fields” on page 683.
Adding a Field to a Section Type
In order to configure a form for E-Notebook, you
must first add fields to the section type.
To add a field to a section type:
4. Enter a name for the field and select a Field
Type.
Each type of field has its own, special characteristics and configuration options. See “Managing Fields” on page 683 for a description of
each field type, and instructions for configuring
the field.
1. Right-click the section type in the collection
tree.
The collection menu appears.
2. Select Section Type Configuration from the
menu.
5. Click Add.
The new field appears in the list of fields.
6. Repeat steps 3 through 5 to add multiple fields
to the section type.
646•Managing Section Types and FormsManaging Section Types and FormsCambridgeSoft
Once you have added a field to the section type,
you may add it to the form for the section type. See
“Configuring a Form” on page 655 for more information.
Managing Summary Fields in a
Table of Contents
For each section type, you can specify a summary
field that will appear in the table of contents of a
parent collection. The summary field is displayed
in the table of contents if that section is the first
section in a collection.
For example, if the chemical structure field is the
summary field of a reaction section type, and the
reaction section is the first section in a page/experiment, then the reaction drawing will appear in the
table of contents for the the notebook, as shown
below:
3. In the right frame, click the field that you wish
to be the summary field for this section type.
You may only select one of the following types
of fields as a summary field:
• a styled text field
• a chemical structure field
• a spectrum field
4. Close the dialog.
If you do not specify a summary field, the name of
the first section will appear in the table of contents.
Managing Form Tools
If you would like to perform data analysis or messaging within a particular E-Notebook section, you
can associate a form tool with that section type.
E-Notebook provides several standard form tools.
You can also develop your own, customized form
tools.
Adding a Form Tool to a Section
Type
To set the summary field for a section type,
1. Right-click the section type in the Collection
Tree.
The collection menu appears.
2. Select Section Type Configuration from the
menu.
The Section Type Configuration dialog
appears:
A form tool is used to perform a particular function in an E-Notebook form. E-Notebook provides a number of form tools, such as the
Reaction Form Tool, which you can add to new
section types you create.
To add a form tool to a section type:
1. Right-click the section type in the Collection
Tree.
The collection menu appears.
2. Select Section Type Configuration from the
menu.
ChemOffice 2006/E-NotebookManaging Section Types and FormsManaging Section Types and Forms
• 647
The Section Type Configuration dialog
appears:
7.
Administrator
8.
9.
3. Right-click Form Tools, and select New Form
Tool.
10.
4. A new form tool appears in the tree, and you
prompted to name it.
11.
A dialog appears, prompting you to select the
file icon file.
Select the file and click Open.
The icon is associated with the form tool, and
appears in the Enabled Icon box.
Associate a disabled icon with the form tool,
(following steps 6 and 7, above). This icon will
appear when the form tool is disabled.
If the form tool has properties to configure,
click the Custom Properties button.
The form tool properties dialog appears, and
you may configure the custom properties of
the form tool.
Click OK to dismiss the form tool properties
properties dialog.
The properties dialog closes.
To close the section type configuration dialog,
click the close button in the upper right corner.
The dialog closes. The form refreshes, and displays the icon associated with the form tool.
Viewing and Editing the
Properties of a Form Tool
5. Enter a name, and fill in the IENFormTool
ProgID.
This is the programmatic identifier that the
Windows registry uses to uniquely identify the
object that implements the corresponding
interface. The format is OleServerName.ObjectName.
For the ProgID's of the standard, E-Notebook
form tools, see “Managing the Standard Form
Tools” on page 650.
6. To associate an Enabled icon with the form
tool, click the Import... button.
You can view and edit the custom properties that
are associated with a form tool. For example, you
may want to associate the form tool with a different field in an E-Notebook form. Or, if you had
developed a form tool to conduct calculations, you
may want to change a property that defines the
precision of the calculated results.
To view and edit the properties of a form tool:
1. Right-click the section type in the Collection
Tree.
The collection menu appears.
2. Select Section Type Configuration from the
menu.
648•Managing Section Types and FormsManaging Section Types and FormsCambridgeSoft
The Section Type Configuration dialog
appears:
5. Edit the custom properties if desired, and click
OK to close the properties dialog.
6. To close the section type configuration dialog,
click the close button in the upper right corner.
The dialog closes. The form refreshes.
Removing a Form Tool from a
Section Type
3. If necessary, click the plus sign next to form
tools to expand the list and view the form tools
that are associated with the section type. Click
the form tool whose properties you wish to
view or change.
The ProgID's and license key information
appears to the right. You may edit this information if you wish.
4. Click the Custom Properties button.
If the form tool has properties associated with
it, the form tool properties dialog appears. This
example shows the dialog associated with the
Next Step Form Tool:
If you no longer want a particular form tool to be
associated with a form, you can remove it from the
section type.
To remove a form tool from a section type:
1. Right-click the section type in the Collection
Tree.
The collection menu appears.
2. Select Section Type Configuration from the
menu.
The Section Type Configuration dialog
appears.
3. If necessary, click the plus sign next to form
tools to expand the list and view the form tools
that are associated with the section type. Rightclick the form tool you wish to remove from
the form. A menu appears:
4. Select Delete Form Tool.
NOTE: If the form tool has no custom properties, a
message to that effect is presented, and no properties dialog is
displayed.
A message appears, asking you to confirm that
you wish to delete the form tool from the section type.
5. Click Yes.
The form tool is deleted.
ChemOffice 2006/E-NotebookManaging Section Types and FormsManaging Section Types and Forms
• 649
6. To close the section type configuration dialog,
Administrator
click the close button in the upper right corner.
The dialog closes. The form refreshes. If there
was an icon associated with the form tool, it no
longer appears in the form.
When you add a Reaction Form Tool to a form,
you must configure the following custom properties.
Managing the Standard Form
Tools
E-Notebook provides a number of standard form
tools. The form tools listed below may only be
associated with section types. There are several
form tools that may only be associated with collection types, for example, the New Section Form
Tool. See “Managing Collection Type Form
Tools” on page 747 for more information.
Managing the Next Step Form Tool
The Next Step Form Tool is used to create a new
page or experiment containing the products of the
associated chemical reaction.
In order to use the Next Step Form Tool in an
E-Notebook form, one of each of the following
types of fields must be present in the form:
The E-Notebook User Guide provides more information about the tool and the calculations in the
stoichiometry grid. The stoichiometric grid is the
combination of the Reactants and Products Fields.
Managing the New Section Form Tool
The New Section Form Tool allows users to add
new sections to a collection, for example, to a page
or an experiment. When users click the form tool
they will be presented with a list of the types of
sections they may add.
Form Tool Form Tool Control ProgID
• Chemical Structure Field
• Table Field with Reactants Listener
• Table Field with Products Listener
Form Tool Form Tool Control ProgID
Next Step
ENStandardCtl9.ReactionFormTool
New Section ENStandardCtl9.NewSectionForm
Tool
Managing the New Subsection Section
Form Tool
The New Subsection Form Tool allows users to
add new subsections to a section. For example, a
user may add new spectrum subsections to a spectra section. When users click the form tool they
650•Managing Section Types and FormsManaging Section Types and FormsCambridgeSoft
will be presented with a list of the types of sections
they may add.
Form Tool
New Subsection
E-Notebook Section. When the form tool can also
compute the checksum for the uploaded file and
display it in a property list.
Form Tool Control ProgID
ENStandardCtl9.NewSubsectionFormTool
Managing the Spectrum Form Tool
The Spectrum Form Tool is used in conjunction
with a spectrum field to import and export spectral
data from a file into an E-Notebook section.
Form Tool
Form Tool Control ProgID
Spectrum
ENStandardCtl9.SpectrumFormTool
In order to use the Spectrum Form Tool in a form,
a Spectrum Field must be present in the form.
When you add a Spectrum Form Tool to a form,
you must configure the following custom properties:
Form Tool
Form Tool Control ProgID
Active Document
ENStandardCtl9.ActiveDocFormTool
In order to use the Active Document Form Tool in
an E-Notebook form, the following types of fields
must be present in the form:
• Active Document Field OR
• Stored Document Field OR
• Excel OLE Control Field
If you wish to display the checksum, source file
path, and source file name, the section type must
also contain a property list with the following
properties:
• Source File Name
• Source Path
• Checksum
When you add an Active Document Form Tool to
a form, you must configure the following custom
properties:
Managing the Active Document Form
Tool
The Active Document Form Tool is used in to
import and export documents to and from an
ChemOffice 2006/E-NotebookManaging Section Types and FormsManaging Section Types and Forms
• 651
Managing the Insert Reference Form
Tool
Administrator
The Insert Reference Form Tool makes it possible
for users to insert references to a specific collection
type into a target property in a property list.
Form Tool
Form Tool Control ProgID
Insert Reference
ENStandardCtl9.InsertReferenceFormTool
In order to use the Insert Reference Form Tool in
an E-Notebook form, a Property List field must be
present in the form.
When you add a Insert Reference Form Tool to a
form, you must configure several custom properties.
Note that if you wish to prevent users from adding
references to other collection types, you must
make the target property read-only in the property
list. This will prevent users from dragging or copying other references into the property, and force
them to use the Insert Reference Form Tool.
Managing the Print Multiple Form Tool
The Print Multiple Form Tool allows a user to
print multiple collections with a single action. .
Form Tool
Form Tool Control
ProgID
Print Multiple ENStandardCtl9.PrintMultipleFormTool
If the collection containing the section in which
the form tool appears has contained collections or
references, a dialog box appears when the user
selects the Print Multiple form tool. The dialog
allows the user to specify the range of contained
collections to be printed.
The Print Multiple Form Tool has no custom
properties.
Managing Section Listeners
• Source Collection Type – the type of collec-
tion that a user may reference in the target
property.
• Source State – the state that the collection
must be in when the reference to it is created.
• Target Field – the property list field in which
the user may create the reference.
• Target Property – the specific property in the
property list to which the user may add the reference.
In this example, a user may add a reference to a
collection of type Page. The collection must be in
an Open state when the reference is created.
A Section Listener modifies the behaviors of sections—such as the add, duplicate, remove, move
and rename behaviors. E-Notebook provides several, standard section listeners, which you may add
to section types.
You may also develop your own section listeners
to further customize the behavior of sections in
E-Notebook.
Adding a Section Listener to a
Section Type
A section listener modifies the behaviors of sections — such as the add, duplicate, remove, move
and rename behaviors.
652•Managing Section Types and FormsManaging Section Types and FormsCambridgeSoft
To add a section listener to a section type:
1. Right-click the section type in the Collection
Tree.
The collection menu appears.
2. Select Section Type Configuration from the
menu.
The Section Type Configuration dialog
appears:
For the ProgID's of the standard, E-Notebook
section listeners, see “Managing the Standard Section Listeners” on page 654.
7. If the section listener has properties to configure, click the Custom Properties button.
The section listener properties dialog appears.
and you are prompted to configure the custom
properties.
8. Click OK to dismiss the section listener properties properties dialog.
The dialog box closes and the form refreshes.
Viewing and Editing the
Properties of a Section Listener
3. Right-click Section Listeners, and select New
Section Listener.
4. A new Section Listener appears in the tree, and
you are prompted to name it.
You can view and edit the properties that are associated with a section listener.
To view and edit the properties of a section listener:
1. Right-click the section type in the Collection
Tree.
The collection menu appears.
2. Select Section Type Configuration from the
menu.
The Section Type Configuration dialog
appears.
3. If necessary, click the plus sign next to Section
Listeners to expand the list and view the section listeners are associated with the section
type. Click the section listener whose properties you wish to view or change.
5. Enter a name for the section listener
6. Fill in the following information:
• IENSectionListener ProgID – the
programmatic identifier that the Windows
registry uses to uniquely identify the object
that implements the corresponding
interface. The format is:
OleServerName.ObjectName.
The ProgID's and license key information
appears to the right. You may edit this information if you wish.
4. Click the Custom Properties button.
ChemOffice 2006/E-NotebookManaging Section Types and FormsManaging Section Types and Forms
• 653
Administrator
If the section listener has custom properties
associated with it, the section listener properties dialog appears.
Note that if the section listener has no custom
properties, a message to that effect is presented,
and no properties dialog is displayed.
5. Edit the custom properties if desired, and click
OK to close the properties dialog.
6. To close the section type configuration dialog,
click the close button in the upper right corner.
The dialog closes. The form refreshes.
4. Right-click the section listener you wish to
remove and select Delete Section Listener
from the menu that appears.
A message appears, asking you to confirm that
you wish to delete the section listener.
5. Click Yes.
The section listener is removed from the section type.
Removing a Section Listener from
a Section Type
If you no longer want a particular section listener
to be associated with a section type, you can
remove it from the section type.
To remove a section listener from a section type:
1. Right-click the section type in the Collection
Tree.
The collection menu appears.
2. Select Section Type Configuration from the
menu.
The Section Type Configuration dialog
appears.
3. If necessary, click the plus sign next to Section
Listeners to expand the list and view the section listeners are associated with the section
type.
Managing the Standard Section
Listeners
e
provides a number of standard Section Listeners,
which you may add to section types.
Managing the Required Section Listener
The Required Section Listener prevents users from
deleting sections of this type. For example, you
may have a Results section that is mandatory with
each Experiment/Page.
Section
Listener
IENSectionListener ProgID
Required
Section
ENStandard9.RequiredSectionListener
Managing the Fixed Section Name
Listener
The Fixed Section Name Listener prevents users
from renaming sections of this type. For example,
654•Managing Section Types and FormsManaging Section Types and FormsCambridgeSoft
you may have a procedure section associated with
each experiment/page, and you may always want
the section to bear the name “Procedure”. .
Section
Listener
IENSectionListener ProgID
Fixed Section
Name
ENStandard9.FixedSectionNameListener
Managing the Audit Section Listener
The Audit Section Listener prevents a user from
deleting a section of this type if it has been modified since it was created.
Section
Listener
IENSectionListener ProgID
Audit
ENStandard9.AuditSectionListener
Configuring a Form
Each section type in E-Notebook has a single form
associated with it. The form is what users see when
they create sections of this type.
You can configure a form to display data in the
most effective way. Boxes are the building blocks
of forms. You can add boxes to forms, delete them
from forms, and manipulate their sizes and properties. You insert the fields you wish to appear in a
form into the boxes.
NOTE: Prior to configuring the form, the section type must
contain the fields that are to be added to the form.
Configuring a New Form
When you create a new section type, you must
configure its form. Initially, the form has a single,
root box. You configure the form by adding additional boxes, and then inserting fields into those
boxes.
The configuration created in the steps below is an
example. There are many ways in which boxes may
be organized within the form.
To configure a new form,
1. Right-click within the root box.
A menu appears.
2. Select Insert Box Within.
A box appears within the root box. The hashed
lines indicate that there is a box behind the top
box.
3. Right-click within the inner box, and select
Insert Box Above from the menu that appears.
ChemOffice 2006/E-NotebookManaging Section Types and FormsManaging Section Types and Forms
• 655
A box appears on top of the box you selected.
There are now two boxes, one on top of the
other, within the root box, as shown below:
A box appears to the right of the box you
selected, as shown below.
Administrator
Setting the Fields in Boxes
To set the field within a box,
1. Right-click within the box.
The next step you take depends upon the form layout you seek. In this example, we will configure the
form so that there are two fields in a row on top of
another field, for a total of three fields in the form.
4. Right-click within the top box, and select Insert
Box Within.
A menu appears.
2. Choose Set Field.
A dialog box appears, listing the fields that you
have added to the section type.
5. Right-click within the new box, and select
Insert Box to the Right.
3. Click the field you wish to insert into the box,
and click Insert.
656•Managing Section Types and FormsManaging Section Types and FormsCambridgeSoft
The field appears in the box. Any edits you
make to the field will appear in E-Notebook
when a user creates a section of this type.
2. Right-click the frame of the box that is to be
adjacent to the new box you are adding.
The box menu appears.
3. Select a menu option to add a new box to the
form.
In this example we are selecting Insert Box
Above to add a box above the Metadata Properties box.
4. Repeat steps 1 through 3 for the other boxes.
Once a field has been set in a box, you may
access the box menu by right-clicking the
frame of the box.
NOTE: The orientation of a box is determined by the orientation of its container. For example, say that Insert Box
Above and Insert Box Below are menu options for Box X.
Then, you insert Box Y within Box X, by using the Insert
Box Within command. The menu options for Box Y will
include Insert Box to the Right and Insert Box to the
Left. If you inserted Box Z into Box Y, the menu options for
Box Z would include Insert Box Above and Insert Box
Below. By default, the orientation of the container box is
opposite the orientation of the contained box.
The new box appears in the form:
Reconfiguring an Existing Form
In some cases, you may want to reconfigure a particular form, adding new fields, removing existing
fields, or changing the layout of the fields in the
form. For audit reasons, it is not possible to
remove a field from a form if that form is in use.
Adding a Field to an Existing Form
1. Click the section type of interest in the
Collection Tree.
The form for the section type appears in the
right frame.
ChemOffice 2006/E-NotebookManaging Section Types and FormsManaging Section Types and Forms
• 657
4. Right-click within the new box, and select Set
Field from the menu that appears.
Rearranging Boxes in a Form
You may rearrange the boxes in a form to change
the layout of the form.
Administrator
1. Right-click the frame of the box that you wish
The Insert Field dialog appears, listing the
Fields that have been added to the section type.
5. Select the field to be insert, and click Insert .
to move.
The box menu appears.
2. Select one of the options for moving the box.
(Depending upon the orientation the box,
either 1) Move Box Left and Move Box Right,
or 2) Move Box Up and Move Box Down will
appear in the menu). In this example, we are
moving a box to the left.
The box is moved according to the selection
you made.
The field appears in the form. In the example
below, a query text field has been inserted.
Deleting a Box from a Form
If you no longer want a particular box to be part of
a form, you may delete it. If you delete a box that
contains a field, there must be an empty box for
the field elsewhere in the form.
To delete a box from a form:
658•Managing Section Types and FormsManaging Section Types and FormsCambridgeSoft
1. Right-click the frame of the box you wish
delete.
A menu appears.
2. Select Delete Box.
The box is deleted from the form. (Note that if
the box contained a field, and you had customized the field for this form, you can add the
field to another box in the form and your
changes to the field will be maintained).
1. Right-click the frame of the box.
The box menu appears.
2. Select Box Properties.
The Box Properties dialog appears.
3. Click the Show Max Button checkbox to clear
it.
Showing and Hiding the Max
Button for a Box
In a form, each box may have a max button
associated with it. The button appears in the upper
right corner of the box. When a user clicks the button, the field expands to fill the entire section display. (Clicking the max button again returns the
field to its original size). The field below displays
the max button in the upper right corner:
Hiding the Max Button
To hide the max button for a box,
4. Click OK .
The dialog closes, and the max button is no
longer visible in the box.
Showing the Max Button
To show the max button for a box:
ChemOffice 2006/E-NotebookManaging Section Types and FormsManaging Section Types and Forms
• 659
1. Right-click the frame of the box.
The box menu appears.
2. Select Box Properties.
Showing and Hiding the Name of
a Box
Administrator
In a form, each box has a title bar associated with
it. You may choose to either hide of this bar or
have it appear above the box in the form:
Hiding the Box Name
To hide the name of a box,
1. Right-click the frame of the box.
The box menu appears.
2. Select Box Properties.
The Box Properties dialog appears.
3. Click the Show Max Button checkbox so that a
checkmark appears:
The Box Properties dialog appears.
3. Click the Show Name checkbox to clear it.
4. Click OK .
The dialog closes, and the max button appears.
36 .
4. Click OK .
660•Managing Section Types and FormsManaging Section Types and FormsCambridgeSoft
The dialog closes, and the name of the box is
no longer visible in the form.
The Box properties dialog appears.
4. Click the Show Name checkbox so that a
checkmark appears:
Showing the Name of a Box
To show the name of a box:
1. Right-click the section menu tool on the tab,
and select Hide Fields.
5. If you wish, edit the name for the box.
6. Click OK .
The dialog closes, and the box name appears in
the upper left corner of the box.
The fields in the form are hidden.
2. Right-click within the box whose name you
wish to display in the form.
The box menu appears.
3. Select Box Properties.
Resizing Boxes in a Form
You can change the size of a box to make it appear
larger or smaller in a form. You can set the maximum dimensions, minimum dimensions, and proportional size of a box relative to other boxes in
the same container.
Changing the Weight of a Box
To change the size of a box relative to other boxes
in the same container, you may change the weight
of the box.
To do this,
ChemOffice 2006/E-NotebookManaging Section Types and FormsManaging Section Types and Forms
• 661
1. Right-click the frame of the box whose weight
Administrator
you wish to change. In this example, the weight
of the Structure box will change.
The box menu appears.
2. Select Box Properties.
Changing the Dimensions of a Box
Manually
1. Right-click the frame of the box whose size you
wish to change.
The box menu appears.
2. Select Box Properties.
The box properties dialog appears.
3. Change the value of the Weight. In this example, we are changing the value to 3 (three times
greater than the default box weight of 1).
4. Click OK
The dialog closes, and the box sizes change to
reflect your change.
The Box Properties dialog appears.
3. Click the checkboxes to apply the options you
desire to the box.
The sizes of the boxes will change according to
the options you select.
• Minimum Height and Minimum Width
– The minimum height and width,
respectively, to which the box can shrink
when the E-Notebook window is resized or
the form is further configured in a way that
would shrink the box (for example, by
adding a box next to it).
• Preferred Height and Preferred Width –
The starting height and width, respectively,
of the box relative to other boxes in the
same container. To calculate the actual
height of a box within a container, begin
with the preferred height of the contained
boxes. Then,
•if the preferred dimensions would leave
extra space in the container box, add the
extra space in the container to each
662•Managing Section Types and FormsManaging Section Types and FormsCambridgeSoft
contained box according to its Weight
relative to the other boxes, ensuring that
each box does not exceed its maximum
dimensions.
•if the preferred dimensions would cause the
contained boxes to overflow the
container, subtract space from each box
according to its Weight relative to the
other contained boxes, ensuring that each
box is no smaller than its minimum
dimension.
• Maximum Height and Width – The
maximum height and width, respectively, a
box can attain when the E-Notebook
window is resized or as the form is further
configured in a way that would increase the
size of the box (for example, by deleting a
box next it). A scroll bar appears within the
box if the field within it requires more space
than the maximum dimension allows.
Box dimensions are expressed in twips, with 20
twips equalling one pixel.
NOTE: If you would like a box to simply conform to the
sizes of the boxes it contains, you can deselect all of the sizing
options for that box.
Clearing Fields when Configuring
a Form
2. Select Clear Field.
The field is removed from the form.
Hiding Fields and Boxes when
Configuring a Form
When you are configuring a form, hiding fields and
boxes makes it easier for you to access box menus.
Hiding a Box
You may wish to hide a box if, for example, you
wish to access the box that contains it in a form.
To hide a box,
1. Right-click the frame of the box.
The box menu appears.
2. Select Hide Box.
When you are configuring a form, you may remove
a field after adding it to the form. It is only possible
to clear the field if the form is not yet in use. If the
form is in use, the field will move to an empty box.
(This prevents the possibility of obscuring data
that a user has entered in a form).
To clear a field from a box,
1. Right-click the frame of the box.
The box menu appears.
ChemOffice 2006/E-NotebookManaging Section Types and FormsManaging Section Types and Forms
• 663
Administrator
The Box is no longer visible in the form, as
shown below. (In this case, the root box of the
form is visible. The root box does not display
the hash marks).
2. Select Hide Fields.
3. To access the box that contains the hidden
box, right-click within the hidden box, and
select Box Properties .
The fields in the form are hidden.
3. To see the field in a particular box again, rightclick within the box, and select Show Contents
from the menu that appears.
This menu option will only appear if 1) the box
contains a field or 2) a contained box is hidden.
The Box Properties dialog for the container of
the hidden box appears.
Hiding Fields in a Form
You may wish to hide the fields in a form while
you are configuring it, so that it is easier to access
the box menus. This may become especially important if you have hidden the frames of the boxes.
To hide the fields in a form:
1. Right-click the section menu icon that appears
in the form.
The section menu appears.
Changing Box Orientation
You may wish to change the orientation for a box,
so that the stacking of its contained boxes will
change from horizontal to vertical, or from vertical
to horizontal.
In this example, we will change the orientation of
contained boxes from a horizontal arrangement to
a vertical arrangement.
664•Managing Section Types and FormsManaging Section Types and FormsCambridgeSoft
In the form we are shown below, there are three,
horizontally arranged boxes within a single container box.
4. Click OK.
The Box Properties dialog closes. The three
boxes are now arranged vertically, as shown
below.
1. Right-click the frame of the box that contains
the three boxes (making sure you select the
correct box — the one that is directly outside
of the three boxes; in this example, “Container
Box 1” is selected).
The box menu appears.
Managing Export Templates
for Section Types
Export templates for section types allow users to
print E-Notebook sections and export sections to
Microsoft Word. You create export templates with
MS Word sections, using tags to refer to E-Notebook fields.
An export template must be set up for each, new
section type you create.
To view the export template:
1. Right-click the section type in the Collection
2. Select Box Properties.
The Box Properties dialog appears.
3. Change the Sub Box Layout to Vertical (i.e.,
the opposite of the current layout).
Tree.
A menu appears.
2. Select Show, and then Export Templates.
If the section type has an export template, the
template appears in the right frame. If not, the
right frame is blank, and you must create a new
template.
See the following topics:
• “Creating the Export Template for a Section
Type” on page 666.
• “Editing the Export Template for a Section
Type” on page 666
ChemOffice 2006/E-NotebookManaging Section Types and FormsManaging Section Types and Forms
• 665
Administrator
Creating the Export Template for
a Section Type
Editing the Export Template for a
Section Type
Export templates allow users to print E-Notebook
sections and to export sections to Microsoft Word.
To create an export template:
This topic provides instructions for setting up or
modifying an export template.
To do this:
1. Right-click the section type in the Collection
1. Right-click the section type in the Collection
Tree.
A menu appears.
2. Select Show, and then Export Templates.
Tree.
A menu appears.
2. Select Show, and then Export Templates.
The right frame is blank if there is no export
template associated with the section type. (For
information about configuring an existing
export template, see “Editing the Export Template for a Section Type” on page 666).
3. Click the New Default Section button
in the right frame.
A menu appears, listing all of the E-Notebook
section types.
4. Select Export Template.
A new export template appears.
See “Editing the Export Template for a Section
Type” on page 666 for instructions on setting up
the template.
The export template appears in the right frame.
If no template appears, you must first create
the template.
You can then edit the template in one of two
ways:
• You can edit it within E-Notebook, using
the MS Word tools that E-Notebook
provides.
• You can export it to MS Word and edit it
within MS Word to make use of the full, MS
Word feature set. You can then import it
back into E-Notebook. See Working with
MS Word Documents in the User Guide if
you would like more information about how
to import and export MS Word documents)
The body of each export template contains tags
that mark the locations for the content within the
exported section. The format of a tag consists of a
left bracket, the name of a field, and a right
bracket. For example, if there is a field named
“Reaction” it will replace the first instance of
“<Reaction>” in the export template.
Each field type determines how it will replace the
tag with its data (within the IENFieldCtl_Export
method).
666•Managing Section Types and FormsManaging Section Types and FormsCambridgeSoft
When a user prints a section, the printed header
and footer are pulled from the collection type export
template that corresponds to the user's region. See
“Creating and Editing the Export Templates for a
Collection Type” on page 765 for information
about headers, footers, and setting up templates
for users from different geographical regions.
Section Metadata Tags
Within the contents of the section type export
template, the following tags can be inserted. Each
of these tags will be replaced by the corresponding
information at the time of export or printout.
Tag
• Collection Query field type – The Collection
•
•
Replacement
<sectionName> The name of the section.
<sectionIndex> The numerical position of the
section within its containing set
of sections.
•
<sectionCount> The number of sections that
are contained within the set of
sections.
Standard Field Types
This section describes how each of the standard
add-in field types replaces the tags in an export
document with the field type.
• Active Document field type – The Active
Document field type replaces the export tag
with the body of the Word document.
• ChemDraw Structure field type – The
ChemDraw Structure field type substitutes a
ChemDraw OLE object into the Microsoft
Word document. As a result, the ChemDraw
application is required to render the OLE
object, either for display on the client machine,
or for printing.
•
Query field type replaces the export tag with
tab-separated descriptions of the selected collection query options.
Collection Type Query field type – The Collection Type Query field type replaces the
export tag with tab-separated description of
the collection type query.
Database Table field type – Normally, the
Database Table field type creates a Word table
to replace the contents of the tag. Each column
of the Database Table data corresponds to a
column in the Word table; each row of the
Database Table data corresponds to a row in
the Word table. If the tag appears within a
Word table, then, instead of creating a new
Word table, the Word table that contains the
tag is used to contain the Database Table data.
Any formatting within the Word table is
applied to the content.
Property List field type – In the export template, the tag for the Property List field type
should appear in an MS Word table; then, the
Word table that contains the tag is used to contain the data. The first column of the table contains the names of the properties, and the
second column contains the values of the
properties. Any formatting within the Word
table is applied to the content.
Property Query field type – Normally, the
Property List field type creates a Word table to
replace the contents of the tag. creates a Word
table to replace the contents of the tag. The
first column of the data corresponds to the
property name, and the second column corresponds to the value. a column in the Word
table; each row of the data corresponds to a
row in the Word table. If the tag appears within
a Word table, then, instead of creating a new
Word table, the Word table that contains the
tag is used to contain the data. Any formatting
within the Word table is applied to the content.
ChemOffice 2006/E-NotebookManaging Section Types and FormsManaging Section Types and Forms
• 667
• Query Text field type – The Query Text field
Administrator
•
•
•
•
•
•
•
type replaces the tag with the text stored in the
section.
Search Location field type – The field
marker within the template is either deleted (if
the “Search In” check box is unchecked) or
replaced by the name of the selected collection
(if the “Search In” check box is checked
Spectrum field type – The Spectrum field
type substitutes an image of the spectrum for
the tag.
State Query field type – The Collection Type
Query field type replaces the export tag with
tab-separated description of the collection type
query.
Stored Document field type – The Stored
Document field type replaces the export tag
with tab-separated description of the stored
document: its type and its size in bytes.
Styled Text field type – The Styled Text field
type replaces the tag with the formatted text
stored in the section.
Subsection field type – The Subsection field
type replaces the tag with the contents of a
Word document that is created by exporting all
of the sections contained in the subsection.
Table field type – Normally, the Table field
type creates a Word table to replace the contents of the tag. Each column of the Table data
corresponds to a column in the Word table;
each row of the Table data corresponds to a
row in the Word table. If the tag appears within
a Word table, then, instead of creating a new
Word table, the Word table that contains the
tag is used to contain the Table data. Any formatting within the Word table is applied to the
content.
• Table Query field type – creates a Word table
to replace the contents of the tag. Each column
of the data corresponds to a column in the
Word table; each row of the data corresponds
to a row in the Word table. If the tag appears
within a Word table, then, instead of creating a
new Word table, the Word table that contains
the tag is used to contain the data. Any formatting within the Word table is applied to the
content.
• URL Display field type – The URL Display
field type replaces the export tag with the contents of the web page specified in the section.
Page Breaks
By default, if a user prints a range of sections in a
collection, the sections will print contiguously,
without page breaks. You may however, insert a
page break at the end of the section type export
template if you do not want sections to print on
the same page. To add a page break before a section, check the “Page Break Before” paragraph setting for the first paragraph of the corresponding
export template. This is an MS Word setting. If this
paragraph setting is not checked, then the sections
will appear continuously on the word page.
668•Managing Section Types and FormsManaging Section Types and FormsCambridgeSoft
Chapter 36: Managing Rendering in
E-Notebook
This portion of the guide describes the configuration of printing and exporting in E-Notebook.
Printing and Exporting operations are configured
and executed in similar ways. Because of these similarities, the term “Render” is used throughout to
refer to either Printing or Exporting.
An E-Notebook system can be configured to render the contents of a collection in several contexts,
such as in response to a menu command, as part of
a transition, or the operation of a form tool. Different rendering add-ins support different workflows. For each use of a rendering add-in, the addin is configured with one or more rendering templates that determine how the information in a collection or section is laid out within the Microsoft
Word document. For add-ins that render collections, templates are created that specify paper sizes,
styles, headers, footers and the layout of data for
each type of section to be rendered.
During the rendering operation for collections, the
rendering add-in instantiates an instance of
Microsoft Word and uses a template associated
with the rendering add-in to lay out the document.
Each section in the collection whose type has a
rendering template associated with the rendering
add-in is then incorporated into the new document. For each field in each section, a tag is located
in the rendering template that contains the name of
the field associated with that section cell surrounded by brackets, such as <FieldName>. This
tag is replaced by a rendition of the field's
data. Once the document is rendered, it is either
printed or saved to a file, depending on the behavior of the rendering add-in
ChemOffice 2006/E-NotebookManaging Rendering in E-Notebook
Configuring a Rendering
Template
Many rendering operations require a template in
the form of a Microsoft Word document that
describes the layout of data to be rendered. When a
rendering add-in requires a rendering template as
part of its configuration, that rendering template
can reside in one of two places. It can either be
associated directly with the rendering add-in or it
can be located in users’ user configuration folders
and referenced by name from the add-in.
For rendering templates located in users’ user configuration folders, the rendering templates must be
stored in a Microsoft Word field in a section that is
contained in a configuration collection. This configuration collection is contained within a configuration folder. The configuration folder and the
configuration collection may be referenced within
the user configuration folder (if you want several
users to have the same rendering configuration) or
contained directly in the configuration folder (if
you want users to be able to customize their rendering templates).
To associate a rendering template for a section type
with an Export to MS Word command:
1. Right-click the collection type that contains the
section for which the rendering template has to
be associated.
2. Select Collection Type Configuration from the
menu that appears.
The Collection Type Configuration dialog
appears.
• 669
3. Click the plus sign next to Commands to view
Administrator
the commands that are associated with this collection type. In this example, click the command for Export to MS Word.
4. Click the Custom Properties button.
The command properties dialog appears. This
example shows the properties dialog for the
Export to MS Word command, which is one of
the standard E-Notebook commands.
5. Add the section type for which the rendering
template has to be associated. For this,
a. Click the New Section button to add section
types. A dialog appears displaying the list of
section types and checkboxes before their
names as:
b. Checkmark the boxes to select the section
types and click OK to close the dialog.
6. Click the section type, for MS Word document
in this case, and then the From Configuration
button in the dialog.
7. Select the properties as shown:
In this example, the rendering template is
located in the each user’s User Configuration
Folder within a folder named “Rendering
Folder” that contains a collection named “Page
Section Types”.
8. Click OK to close the properties dialog.
9. To close the Collection Type Configuration
dialog, click the close button in the upper right
corner.
The dialog closes and your changes are saved.
Similarly, you can configure the rendering templates for other sections and with other commands.
Designing a Rendering
Template
Export templates allow users to print and export
from E-Notebook. You can insert various tags in
the export templates to pull different types of
information into a rendition.
670•Managing Rendering in E-NotebookCambridgeSoft
Rendering Tags
The following tags can be inserted into headers,
footers and section rendering templates and
replaced with the corresponding data
Tag
Replacement
<collectionStatus>
The state of the collection.
(Note that if you are using
the Final Print Transition
Listener, the state will print
as the initial state of the
transition, and not as the
target state. In this specific
case, if you would like the
name of the target state to
print, simply type the text
name of the state into the
header or footer.)
<dateCreated>
The timestamp of creation
of the collection
<dateModified>
The timestamp of last
modification
<dateToday>
The timestamp of the
creation of the export
document or printout
<collectionOwner> The name of the owner of
the collection
<collectionName>
The name of the collection
<collectionType>
The type of the collection
ChemOffice 2006/E-NotebookManaging Rendering in E-Notebook
Templates for Headers and
Footers
Headers and Footers are described using templates
that are separate from the document settings template used to implement page sizes and styles. This
allows multi-section Word documents to be
included in rendered documents and the headers
and footers to be included in all sections of the
rendered documents.
The header and footer is printed on every page
when a user prints the collection or a portion of
the collection. The header and footer of a collection type export template can contain standard
replacement tags above.
The Rendering Template for a header looks as
shown below:
To edit this data:
1. While viewing the export template in E-Notebook, click the print layout view button in the
lower left corner of the MS Word field. It is the
third button in the row.
• 671
The export template appears in print layout
view, and the header is visible
2. Double-click the header or footer.
Administrator
Section Metadata Tags
Within the contents of a section type export template, the following tags can be inserted. Each of
these tags will be replaced by the corresponding
information at the time of export or printout.
Tag
Replacement
<sectionName>
The name of the section
<sectionIndex>
The numerical position
of the section within its
containing set of sections
<sectionCount>
The number of sections
that are contained within
the set of sections
The Rendering Template for an Ancillary Data
Section looks as shown below:
Managing the MS Word
Section Renderers
The word sections renderers can be associated
with commands (as a command listener) or transitions (as a transition listener) to modify the behavior of rendering commands and transitions. If
more than one Word section renderer is associated
with a rendering operation, then the Word section
renderers insert their contents in the order they are
associated with the rendering operation.
For example, a transition type contains three transition listeners in the following order: PrintTListener, Full History Renderer and Fixed Text After
Renderer. In this case, the document produced by
the PrintTListener will contain all of the sections
to be printed, followed by the full history of the
collection being printed, followed by the fixed text
that is associated with the Fixed Text After Renderer.
Managing the Fixed Text After
Word Renderer
The Fixed Text After Word Renderer renders
some fixed text at the end of a collection when
rendering the collection. This renderer is configured with a word document whose contents are
inserted into the main story of the rendered output
after all of the sections that are rendered as part of
a print or export operation. For example, the rendered document might contain a signature block.
Word Renderer Word Renderer
ProgID
Fixed Text After
672•Managing Rendering in E-NotebookCambridgeSoft
ENRenderWord9.FixedTextAfterRenderer
Select the custom properties as shown below:
Managing the Tracked History
Word Renderer
The Tracked History renderer is configured with a
word document that may contain other text and
the tag <History> which indicates where the history is to be inserted. If a collection to be rendered
has visual display of changes turned on, then this
renderer inserts the collection history of the collection since visual display of changes is turned on
Managing the Full History Word
Renderer
The Full History Word renderer may be associated
with a collection type. This renderer inserts the full
collection history of a collection after all of the sections that are rendered as part of a print or export
operation.
Word Renderer Word Renderer
ProgID
Tracked History
ENRenderWord9.TrackedHistoryRenderer
Select the custom properties as shown below:
Word Renderer Word Renderer
ProgID
Full History
ENRenderWord9.FullHistoryRenderer
Select the custom properties as shown below:
Managing the Standard
Field Renderers
Rendering of section cell data can be overridden by
a Field Renderer that is associated with a particular
section type in a particular add-in command.
Managing the Fixed Table Field
Renderer
The Fixed Table Renderer renders the contents of
a table according to the tags in a Word table. When
this renderer is associated with a table field, the
columns in the table are positioned using tags that
ChemOffice 2006/E-NotebookManaging Rendering in E-Notebook
• 673
appear in the second row of a word table. The tags
are of the form <FieldName><PropertyName>.
appear in the Word template. The tags are of the
form <FieldName><PropertyName>.
Administrator
Field Renderer
Field Renderer
ProgID
Field Renderer
Field Renderer
ProgID
Fixed Table
ENReaction9.FixedTableRenderer
One Property Value ENReaction9.OnePropertyValueRenderer
The renderer has no custom properties associated
with it.
The renderer has no custom properties associated
with it.
Managing the NonBlank
Property Field Renderer
Managing the One Table Value
Field Renderer
The NonBlank Property Renderer renders the
name and value of a property if the property is not
blank. When this renderer is associated with a
property list field, the label and the data are only
printed for properties that do not have blank values. The label is printed with a Bold typeface.
The One table Value renderer renders the value of
a single table cell according to the tags in a Word
table. When this renderer is associated with a table
field, the data for one property in the first row of
the table is positioned using tags that appear in the
Word template. The tags are of the form <FieldName><PropertyName>.
Field Renderer
Field Renderer
ProgID
NonBlank Property ENReaction9.NonBlankPropertyRenderer
The renderer has no custom properties associated
with it.
Managing the One Property
Value Field Renderer
The One Property Value Field Renderer renders
the value of a single property according to the tags
in a Word table. When this renderer is associated
with a property list field, the data for one property
in the property list is positioned using tags that
674•Managing Rendering in E-NotebookCambridgeSoft
Field Renderer
Field Renderer
ProgID
One Table Value
ENReaction9.OneTableValueRenderer
The renderer has no custom properties associated
with it.
Managing the Property Value Field Renderer
The Property Value Field renderer renders the values of all the properties in a property list without
their corresponding names. When this renderer is
associated with a property list field, the data for
each property in the property list is rendered with-
out its label. This is typically used for property lists
that have only one property.
Field Renderer
Field Renderer
ProgID
Property Value
ENReaction9.PropertyValueRenderer
ChemOffice 2006/E-NotebookManaging Rendering in E-Notebook
The renderer has no custom properties associated
with it.
• 675
Administrator
676•Managing Rendering in E-NotebookCambridgeSoft
Chapter 37: Managing Commands
Commands can be associated with a collection
types and sections types to render content in:
exporting to MS Word, PDF, or printing. The
results of renderings can be stored in files, printed
on paper, or stored in databases. For example,
users may export a collection to MS Word or PDF
and save it at some location outside E-Notebook.
1. Right-click the collection type in the Collection
Tree, and select Collection Type Configuration
from the menu that appears.
Managing Collection
Commands
You can associate commands with a collection
type to render the contents of collections in various formats i.e. MS Word or PDF. The results of
renderings can be stored in files, printed on paper,
or stored in databases. For example, users may
export a collection to MS Word or PDF and save it
at some location outside E-Notebook.
This section describes how to set up an E-Notebook application to render the contents of collection in a specific format. E-Notebook can be
configured to render the contents of a collection in
several contexts, such as in response to a menu
command or as part of a transition.
The Collection Type Configuration dialog
appears.
2. Right-click Commands and select New Command from the menu that appears:
Adding a Command to a
Collection Type
You can associate commands with a collection
type if you wish the users to allow to render the
contents of collections in specific formats i.e. MS
Word or PDF.
To add commands to a collection type:
ChemOffice 2006/E-NotebookManaging Commands
• 677
A new command appears and you are
prompted to rename it.
Administrator
3. Type in a name for the command.
4. Enter the IENCommandProgID for the Com-
mand you wish to add.
5. To close the Collection Type Configuration
dialog, click the close button in the upper right
corner.
The dialog closes.
6. To add another command to the Collection
Type, repeat steps 2 and 3.
Viewing and Editing the
Properties of a Collection
Command
You can view and edit the custom properties that
may be associated with a collection command.
To do this:
1. Right-click the collection type that contains the
command in the Collection Tree, and select
Collection Type Configuration from the menu
that appears.
The Collection Type Configuration dialog
appears.
678•Managing CommandsCambridgeSoft
2. If necessary, click the plus sign next to Com-
mands to view the commands that are associated with this collection type. Click the
command whose properties you wish to view
or edit.
3. Click the Custom Properties button.
The command properties dialog appears. This
example shows the properties dialog for the
Export to MS Word command, which is one of
the standard E-Notebook commands.
4. Edit the properties, if you wish. For example,
you may wish to add section types to be rendered. For this,
a. Click the Set Rendered Section Types button
to add section types. A dialog appears displaying the list of section types and checkboxes before their names.
b. Check the boxes to select the section types
and click OK to close the dialog.
5. Click OK to close the properties dialog.
6. To close the Collection Type Configuration
dialog, click the close button in the upper right
corner.
The dialog closes and your changes are saved.
Removing a Command from a
Collection Type
If you no longer want a particular command to be
associated with a collection type, you can remove it
from the collection type.
To do this:
1. Right-click the collection type that contains the
command in the Collection Tree, and select
Collection Type Configuration from the menu
that appears.
The Collection Type Configuration dialog
appears.
2. If necessary, click the plus sign next to Commands to view the commands that are associated with this collection type.
3. Right-click the command you wish to remove
from the collection type.
A menu appears.
4. Select Delete Command.
A message appears, asking you to confirm that
you wish to delete the command.
5. Click Yes.
The command is removed from the collection
type.
6. To close the Collection Type Configuration
dialog, click the close button in the upper right
corner.
The dialog closes.
Managing the Standard
Collection Commands
There are some standard commands that you may
associate with collection types in E-Notebook. The
commands are used to render the contents of collections in various formats i.e. MS Word or PDF
and the results of these renderings can be stored in
files, printed on paper, or stored in databases.
Printing and Exporting operations are configured
and executed in similar ways. Because of these similarities, the term “Render” is used throughout here
ChemOffice 2006/E-NotebookManaging Commands
when it refers to either Printing or Exporting,
depending on a specific configuration.
Managing the Export to MS Word
Collection Command
You can associate the Export to MS Word command to allow users to render or export the contents of a collection to an MS Word document type
thereby storing the results of these renderings in
files or databases.
For example, users may wish to export a collection
to MS Word and save it at some location outside
E-Notebook.
Command
Command ProgID
Export to MS Word ENRenderWord9.ExportC
Command
Managing the Export to PDF Collection
Command
E-Notebook can be configured to allow users to
render the contents of a collection to PDF document which is managed by associating Export to
PDF Collection Command with that collection
type.
For example, users may want to export a collection
and save it in PDF format at some location outside
E-Notebook.
Command
Command ProgID
Export to PDF
ENRenderWord9.ExportPDFCCommand
• 679
Managing the Print Collection
Command
Administrator
If the Print Collection Command is associated with
a collection type, users can print collections of that
type.
Command
Command ProgID
Print Collection
ENRenderWord9.PrintCCommand
Managing Section
Commands
You can associate commands with a section type
to render the contents of sections to MS Word, or
to print sections.
This section describes how to set up an E-Notebook application to render the contents of a section.
Adding Commands to a Section
Type
You can associate commands with a section type if
you wish the users to allow to render the contents,
either printing or exporting to MS Word.
To add commands to a section type:
1. Right-click the section type in the Collection
Tree, and select Section Type Configuration
from the menu that appears.
680•Managing CommandsCambridgeSoft
The Section Type Configuration dialog appears.
2. Right-click Commands and select New Command from the menu that appears:
A new command appears and you are
prompted to rename it.
3. Type in a name for the command.
4. Enter the IENCommandProgID for the Command you wish to add.
5. To close the Section Type Configuration dialog, click the close button in the upper right
corner.
6. The dialog closes.
To add another command to the Section Type,
repeat steps 2 and 3.
Viewing and Editing the
Properties of a Section Command
You can view and edit the custom properties that
may be associated with a section command.
To do this:
1. Right-click the section type that contains the
command in the Collection Tree, and select
Section Type Configuration from the menu that
appears.
The Section Type Configuration dialog
appears.
2. If necessary, click the plus sign next to Commands to view the commands that are associated with this collection type. Click the
command whose properties you wish to view
or edit.
3. Click the Custom Properties button.
4. Edit the properties, if you wish. For example,
you may wish to add section types to be rendered. For this,
a. Click the Set Rendered Section Types button
to add section types. A dialog appears displaying the list of section types and checkboxes before their names.
b. Check the boxes to select the section types
and click OK to close the dialog.
5. Click OK to close the properties dialog.
6. To close the Section Type Configuration dialog, click the close button in the upper right
corner.
The dialog closes and your changes are saved.
Removing a Command from a
Section Type
If you no longer want a particular command to be
associated with a section type, you can remove it
from the section type.
To do this:
1. Right-click the section type that contains the
command in the Collection Tree, and select
Section Type Configuration from the menu that
appears.
The Section Type Configuration dialog
appears.
2. If necessary, click the plus sign next to Commands to view the commands that are associated with this section type.
3. Right-click the command you wish to remove
from the section type.
A menu appears.
4. Select Delete Command.
A message appears, asking you to confirm that
you wish to delete the command.
5. Click Yes.
The command is removed from the section
type.
6. To close the Section Type Configuration dialog, click the close button in the upper right
corner.
The dialog closes.
ChemOffice 2006/E-NotebookManaging Commands
Managing the Standard Section
Commands
You can associate some standard commands with
section types in E-Notebook. These commands
are described here. The commands are used to render the contents of sections in MS Word format
and the results of these renderings can be stored in
files, printed on paper, or stored in databases.
The term “Render” is used throughout here when
it refers to either Printing or Exporting, depending
on a specific configuration. This is because of the
fact that Printing and Exporting operations are
configured and executed in similar ways.
Managing the Export to MS Word
Section Command
Export to MS Word command allows users to render the contents of a section to an MS Word document if it is associated with the section type. Thus,
the results of these renderings are stored in files or
databases.
For example, users can export a section to MS
Word and store at some location outside E-Notebook.
Command
Command ProgID
Export to MS Word ENRenderWord9.ExportS
Command
Managing the Print Section Command
If the Print Section command is associated with a
section type, users can print the contents of a section of that type by selecting the command from
the section menu.
• 681
For example, users can export a section to MS
Word and store at some location outside E-Notebook.
Administrator
Command
Command ProgID
Print Section
ENRenderWord9.PrintSCommand
682•Managing CommandsCambridgeSoft
Chapter 38: Managing Fields
Fields are the basis for the forms in E-Notebook.
Each field is based on an add-in field type.
E-Notebook provides many standard field types,
which you can use to configure your own data
forms, searches, and analysis tools. You may also
develop addition add-in field types for your own,
custom data types.
The field types in E-Notebook span many, diverse
types of data. They make it possible to customize
E-Notebook to match your workflow and manage
your information in the most effective way possible.
The following field types are designed for use in
data forms, for data entry, analysis, and display:
Active Document Fields (MS Word
fields)
AutoText Fields
Excel Fields
Chemical Structure
Fields
Property List Fields
Context Sensitive Help Spectrum Fields
Fields
Several Fields Types are designed for use
exclusively within search forms, to search for data
in E-Notebook. They are:
Chemical Query Fields
Property Query Fields
Collection Query Fields
Table Query Fields
Collection Type Query
Fields
Unannotated Version
Query Fields
Query Text Fields
Search Location Fields
State Query Fields
Join Type Fields
For information about adding custom field types
that you have developed, see “Managing the AddIn Configuration” on page 723.
Other topics in this portion of the documentation
are:
• Managing Field Listeners – provides instruc-
tions for associating a field listener with a field
in order to modify its behavior.
• Time Settings
• Managing Units in Property Lists and Tables
Captured Image Fields
Stored Document Fields
Managing Field Listeners
Database Table Fields
Subsection Fields
Database Value Fields
Table Fields
PowerPoint Fields
URL Display Fields
Field listeners modify the behavior of various types
of E-Notebook fields. E-Notebook provides many
standard field listeners that you can use in your
configuration.
You may also develop your own listeners to further
customize the behavior of fields in E-Notebook.
ChemOffice 2006/E-NotebookManaging Fields
• 683
Adding a Field Listener
Administrator
To add a field listener to a field,
1. From the Section Type Configuration dialog,
right-click the field to which you wish to add
the listener.
2. Select New Field Listener from the menu that
appears.
6. Click the Custom Properties button.
If the listener has properties associate with it,
they are displayed, and may be edited.
Managing Generic Field Listeners
The following field listeners are not limited to any
particular type of E-Notebook field. (Most
E-Notebook field listeners were created for a specific field type).
Managing the Block User Edit Field
Listener
A dialog appears, prompting you to enter the
ProgID for the listener.
The Block User Edit Field Listener may be used to
prevent users from editing a particular field within
a section. If this listener is associated with the field,
the field will be read-only to users. This listener still
enables administrators to edit the field.
Table Listener
IENTableListener
ProgID
Block User Edit
ENStandardCtl9.BlockUserEditlFEListener
3. Enter the ProgID and click the OK button.
The listener appears in the left frame and you
are prompted to rename it.
4. Enter a name for the listener.
To view and edit the properties of the property list
listener:
5. Click the listener.
The Prog ID and properties button appear to
the right.
684•Managing FieldsCambridgeSoft
Managing the Block Edit Cell Field
Listener
The Block Edit Cell Field Listener may be used to
prevent users from editing a particular field within
a section. If this listener is associated with the field,
the field will be read=only within that section.
field.
Table Listener
IENTableListener
ProgID
Block Edit Cell
ENStandardCtl9.BlockEdi
tCelllFEListener
Managing the Copy Default
Field Listener
The Copy Default Field Listener removes the content of a field when a user copies the collection
that contains the field.
field.
Table Listener
IENTableListener
ProgID
Copy Default
ENStandardCtl9.CopyDefaultFCListener
Managing Data Fields
The following E-Notebook field types are designed
for use in data forms, for data entry, analysis, and
display:
Active Document Fields (MS Word fields)
AutoText Fields
PowerPoint Fields
Chemical Structure
Fields
Property List Fields
Context Sensitive Help
Fields
Spectrum Fields
Captured Image Fields
Stored Document
Fields
Database Table Fields
Subsection Fields
Database Value Fields
Table Fields
Excel Fields
URL Display Fields
ChemOffice 2006/E-NotebookManaging Fields
Several fields types are designed for use exclusively
within search forms, to search for data in E-Notebook. See “Managing Search Fields” on page 718
for information about these fields.
Managing Active Document
Fields
Active Document Fields allow users to view and
edit MS Word documents within E-Notebook sections. If you associate the Active Document Form
Tool with an active document field, users can
import MS Word documents from external
sources, or export MS Word documents and edit
them in MS Word.
To add an Active Document field:
1. In the Collection Tree, right-click the section
type to which you wish to add the property list.
2. Select Section Type Configuration from the
menu that appears.
The Section Type Configuration dialog
appears.
3. Right-click Fields, and select New Field.
The Add Field dialog appears.
4. Enter a name for the field and select Active
Document from the drop-down list of field
types.
5. Click the Add button.
The new field appears in the list of fields.
• 685
6. In order for users to be able to import and
Administrator
export the MS Word documents, you must
associate the Active Document Form Tool
with the field.
Once you have added a field to the section type,
you may add it to the form for the section type. See
“Configuring a Form” on page 655 for more information.
Managing Active Document Field
Listeners
An Active Document Field Listener modifies the
behavior of an MS Word field in E-Notebook.
E-Notebook provides an active document listener
that prevents users from adding hyperlinks to
external URLs. See “Managing the Prevent External Link Active Document Field Listener” on page
686.
You may also develop your own Active Document
Field Listeners to further customize the behavior
of active document fields in E-Notebook.
See Managing Field Listeners for instructions on
associating a field listener with a field.
Managing the Prevent External Link
Active Document Field Listener
The Prevent External Link Active Document Field
Listener may be associated with active document
fields to prevent users from adding hyperlinks to
external URL's. If links are present in the field,
they will be stripped from the document when the
user browses away.
Active
Document
Listener
IENActiveDocListener
ProgID
Prevent External ENStandardCtl9.RequireENU
Link
RLDListener
686•Managing FieldsCambridgeSoft
Managing the Extract Links Document
Listener
The Extract Links Document Listener may be
associated with active document (MS Word) fields
to extract the links from the Word document into a
property list.
Active
Document
Listener
IENActiveDocListener
ProgID
Extract Links
ENStandardCtl9.ExtractLinksDListener
Managing AutoText Fields
With AutoText Fields, users can enter text that is
related to other data in a form. Users can add predefined fragments of text automatically, and values
from other fields in a section may be pulled in as
well. The E-Notebook User's Guide provides
instructions for configuring AutoText. Note that
for the AutoText features to function, the AutoText collection type name, section type name, and
field names in the section type must not be
changed.
If you configure the Styled Text Field to display the
toolbar, users may alter any of the following
formatting options.
• Font
• Underline
• Font Size
• Superscript
• Bold
• Subscript
• Italics
An example of a Styled Text Field is shown below.
6. Right-click the styled text field, and select Field
Properties from the menu that appears.
To add a Styled Text field:
1. In the Collection tree, right-click the Section
Type to which you wish to add the field.
2. Select Section Type Configuration from the
menu that appears.
The Section Type Configuration dialog
appears.
3. Right-click Fields, and select New Field.
7. You may edit the following properties, if
desired:
The Add Field dialog appears.
• Default Font – you may select another font
•
4. Enter a name, and select AutoText from the
drop-down list of field types.
5. Click Add.
The new field appears in the list of fields.
•
•
•
ChemOffice 2006/E-NotebookManaging Fields
from the drop-down list to change the
default to something other than Times
Roman.
Default Font Size – you may select a larger
or smaller font size from the drop-down list.
Show Tool Bar – if you clear the checkmark, the toolbar will not appear above the
styled text field in the form.
Not Blank – If you select this option, the
styled text field must contain text when a
user performs a specific transition on a collection. This option must be used in conjunction with the Required Properties
Transition Listener.
Read Only – the styled text field is for display only, and only administrators may edit
it.
• 687
Administrator
Once you have added a field to the section type,
you may add it to the form for the section type. See
“Configuring a Form” on page 655 for more information.
Managing AutoText Field
Listeners
An AutoText Field Listener modifies the behavior
of an AutoText field in E-Notebook.
Draw Toolbar, please see the ChemDraw User's
Guide.
It is possible to associate a listener with a chemical
structure field to perform a specialized function.
E-Notebook offers a listener that automatically
updates the stoichiometry grid when a user modifies a reaction drawing. See “Managing the Analyze
Reaction Chemical Structure Listener” on page 689
for more information.
Managing the AutoText Color Field
Listener
The AutoText Color Field Listener allows you to
configure the color of AutoText items within an
AutoText field.
Table
Listener
IENTableListener ProgID
AutoText Color ENStyledTextPlus9.AutoTextConfigFLstnr
You select the color you desire through the custom
properties of the listener.
Managing Chemical Structure
Fields
Chemical Structure Fields make it possible for
users to draw or import drawings of chemical
structures and reactions. These fields make use of
the ChemDraw ActiveX Control. An example of a
Chemical Structure Field is shown below. These
fields may also be used for images. Users can paste
in standard images, such as GIFs and JPEGs.
Users can access a ChemDraw menu by right-clicking within the structure window. This menu allows
a user to, among other things, copy and paste
structures.
Users may dismiss the ChemDraw toolbar at any
time. For more information about using the Chem-
688•Managing FieldsCambridgeSoft
To add a chemical structure field to a section type:
1. In the Collection Tree, right-click the section
type to which you wish to add the field.
2. Select Section Type Configuration from the
menu that appears.
The Section Type Configuration dialog
appears.
3. Right-click Fields, and select New Field.
4. The Add Field dialog appears.
5. Enter a name, and select Chemical Structure
from the drop-down list of field types.
6. Click the Add button.
The new field appears in the list of fields.
NOTE: Anything that you draw in the Chemical Structure
Field will appear with the new sections of this type that users
create.
Once you have added a field to the section type,
you may add it to the form for the section type. See
“Configuring a Form” on page 655 for more information.
You may also develop your own Chemical Structure Field Listeners to further customize the
behavior of chemical structure fields in E-Notebook.
Managing Chemical Structure Field
Listeners
A Chemical Structure Field Listener modifies the
behavior of a chemical structure field in E-Notebook.
Managing the Analyze Reaction Chemical
Structure Listener
The Analyze Reaction Chemical Structure Listener
may be associated with chemical structure fields to
update a stoichiometry grid automatically when
a user edits a reaction drawing. For automatic analysis to occur, you must also associate the Analyze
Reaction Table Listener with both the reactants
and products table fields.
Active Document IENActiveDocListener
Listener
ProgID
Analyze Reaction
ENStandardCtl9.AnalyzeRxnCSListener
ChemOffice 2006/E-NotebookManaging Fields
This listener has custom properties associated with
it. You must select the reactants field and the products field in the stoichiometry grid.
Managing the Chemical Property Chemical
Structure Listener
The Chemical Property Chemical Structure Listener calculates chemical structure properties of
molecular weight and molecular formula, and
inserts them into a property list when the contents
of the chemical structure change.
Active Document IENActiveDocListener
Listener
ProgID
Chemical Property
ENStandardCtl9.ChemPropertiesCSListener
The following are required in the section type in
order to use this listener.
• A chemical structure field.
• A property list with the following properties:
Molecular Weight and Molecular Formula.
Configuring E-Notebook with ISIS Draw
Tool
This topic provides instructions for administrators
who are adding the ISIS/Draw® tool to the ENotebook configuration.
Tool
Tool ProgID
ISIS Draw
ENISISDraw9.ISISDrawCSListener
To add the form tool to a section type:
• 689
1. Browse to the Section type in the Collection
tree and right-click on it to display the following menu:
ProgID of the Reaction field listener, as shown
above. This listener implements ISIS Draw
editing.
Administrator
2. Select Reaction and right click it to select Section Type Configuration from the menu that
appears.
The Section Type configuration dialog appears
as:
5. Click OK, and following dialog appears:
To countercheck that the configuration is done
properly, click Custom Properties, and the following dialog should appear:
6. Click OK, to dismiss the dialog.
7. Close the Section Type Configuration dialog.
Managing Database Table Fields
3. Right-click Field Listener, and the following dia-
log follows:
Database table fields display the results of a SQL
SELECT statement (represented as an ADO
record set). These fields are for display only, and
users may not edit them.
A Database Table Field may exist independently in
a section. Or, you may set up the field such that its
value(s) are determined by a value in a separate
property list field that is part of the same section.
See the following topics:
• “Creating a Database Table Field” on page 690.
• “Configuring a Database Table Field” on page
691.
Creating a Database Table Field
4. Replace the Analyze Reaction field listener,
with a new field listener. For this, click New
Field Listener. Enter a name and type
ENISISDraw9.ISISDrawCSListener in the
690•Managing FieldsCambridgeSoft
Database Table Fields are used to display data that
is pulled in from an external database.
To create a Database Table Field:
1. In the Collection tree, right-click the Section
Type to which you wish to add the Property
List.
2. Select Section Type Configuration from the
menu that appears.
The Section Type Configuration dialog
appears.
1. Right-click the Database Table Field in the Sec-
tion Type Configuration dialog, and select
Field Properties from the menu that appears.
The Properties dialog appears.
3. Right-click Fields, and select New Field....
The Add Field dialog appears.
4. Enter a name, and select Database Table from
the drop-down list of field types.
5. Click Add.
The new Field appears in the list of Fields.
See “Configuring a Database Table Field” on page
691 for instructions on defining the data to be displayed in the Field.
Once you have added a field to the section type,
you may add it to the form for the section type. See
“Configuring a Form” on page 655 for more information.
Configuring a Database Table Field
Database Table Fields are used to display data that
is pulled in from a database.
To configure a Database Table Field:
ChemOffice 2006/E-NotebookManaging Fields
2. Enter the following information. (See below
for examples).
• Connection String – A string used to
define a connection to a database. If this
string is 0-length (Null in the database), then
it is assumed to be a connection to the primary schema of the E-Notebook database.
If the string is a path to an MDB file, then a
connection is made to that file using the
Microsoft Access OLEDB provider. Otherwise, the string is treated as a valid string that
can be assigned to an ADODB.Connection
object’s ConnectionString property.
• Username – An optional string used to
specify the logon identification required to
connect to the specified database. If the
Username is 0-length and the Connection
• 691
Administrator
•
•
•
•
•
•
String is 0-length, then the owner of the primary schema of the E-Notebook database is
used as the username.
Password – An optional string used to identify the logon ID required to connect to the
specified database. If the UserName is
0-length and the Connection String is
0-length, then the password is ignored.
SQL String – A required string that starts
with the text “SELECT “. This string is used
to specify the record set that appears within
the E-Notebook section. The SQL String
can have the following special phrases that
are dynamically replaced based on the location of the section cell.
%%section_key%% – The unique identifier for the section containing the section
cell in which the record set appears. This
datum corresponds to a value in the
primary_key column for a row in the
ELN_sections table.
%%field_key%% – The unique identifier
for the field that describes the section cell in
which the record set appears. This datums
corresponds to a value in the primary_key
column for a row in the ELN_fields table.
%%collection_key%% – The unique identifier for the collection that contains the section containing the section cell in which the
record set appears. This datum corresponds
to a value in the section_set_key column for
a row in the ELN_collections table.
%%session_key%% – The unique identifier for the database session in which the
record set is retrieved. This datum corresponds to a value in the primary_key column for a row in the ELN_sessions table.
692•Managing FieldsCambridgeSoft
• %% logged_in_user_key%% – The
unique identifier for the person record for
the user that initiated the database session in
which the record set is retrieved. This datum
corresponds to a value in the primary_key
column for a row in the ELN_people table.
• %%home_collection_key%% – The
unique identifier for the home collection of
the user that initiated the database session in
which the record set is retrieved. This datum
corresponds to a value in the
section_set_key column for a row in the
ELN_collections table.
• %%access_view%% – The name of the
table used to validate security privileges for
the logged in user.
• In addition, a SQL string may contain the
name of a property that appears in a property field in the same section as the DBTable
section cell. This property field is identified
using the property field name property of
the SQL section cell, below. For example, a
property could appear in the WHERE
clause of the SQL statement to determine
which records in the database table appear
• Property List Field – An optional name of
a property list field that contains properties
which are used to parameterize the SQL
statement, above .
3. Click OK .
Several examples are given below. Note that the
syntax of the query may vary depending upon the
type of database you are querying.
Example 1
In this example, all of the values for suppliername
are pulled in from the external database table Suppliers.
• Supplier ID – name of the E-Notebook prop-
erty into which a user enters the value for SupplierID.
Managing Database Value Fields
• suppliername – value to be displayed in Data-
base Lookup Table.
• Suppliers – name of external database table.
Example 2
In this example, the value suppliername is pulled
from the external database table Suppliers. The
suppliername displayed in the database table field
corresponds to the value that a user has entered
into a property list. A user enters SupplierID
into the Supplier ID property, which exists in a
Property List named ID Number.
Database Value Fields are used to pull in and display values that are the results of SQL query from
an external database.
To create a Database Value Field:
1. In the Collection tree, right-click the Section
Type to which you wish to add the Property
Value.
2. Select Section Type Configuration from the
menu that appears.
The Section Type Configuration dialog
appears.
3. Right-click Fields, and select New Field.
The Add Field dialog appears.
4. Enter a name, and select Database Value from
the drop-down list of field types.
5. Click Add.
The new Field appears in the list of Fields.
See Configuring a Database Value Field for
instructions on defining the data to be displayed in
the Field.
Once you have added a field to the section type,
you may add it to the form for the section type. See
“Configuring a Form” on page 655 for more information.
Configuring a Database Value Field
• suppliername – value to be displayed in Data-
base Lookup Table.
• Suppliers – name of external database table.
• SupplierID – the supplier ID field in the
external database table.
• ID Number – name of the E-Notebook property list containing the Supplier ID property.
ChemOffice 2006/E-NotebookManaging Fields
To configure a Database Value Field:
1. Right-click the Database Value Field in the
Section Type Configuration dialog, and select
Field Properties from the menu that appears.
The Properties dialog appears.
2. Enter the properties. See step 2 in “Creating a
Database Table Field” on page 690 for details.
3. Click OK.
• 693
Administrator
Note that the syntax of the query may vary
depending upon the type of database you are querying.
Once you have added a field to the section type,
you may add it to the form for the section type. See
“Configuring a Form” on page 655 for more information.
Managing Excel Fields
Excel Fields make it possible for users to embed
and edit Microsoft Excel documents in E-Notebook sections. An example of an Excel Field is
shown below. If the Active Doc Form Tool is
associated with the section, a user may import or
export the document.
To add an Excel Field section type:
1. In the Collection Tree, right-click the section
type to which you wish to add the field.
2. Select Section Type Configuration from the
menu that appears.
The Section Type Configuration dialog
appears.
3. Right-click Fields, and select New Field.
4. Type in a name, and select Excel Spreadsheet
from the drop-down list of field types.
5. Click Add.
The new field appears in the list of fields.
In order for users to be able to import and export
the MS Excel spreadsheet, you must associate the
Active Document Form Tool with the field.
Once you have added a field to the section type,
you may add it to the form for the section type. See
“Configuring a Form” on page 655 for more information.
Managing Break Link Excel Listener
The Break Link Excel Listener may be associated
with the Excel fields to break the links to external
data sources in Excel documents when the document is saved. If links are present in the field, they
will be stripped from the document when the user
browses away and the user will be warned when
saving the file that the link will be broken once the
document is saved in E-Notebook.
Listener
IENListener ProgID
Break Link
ENStandardCtl9.BreakLinksOListener
The listener has no custom properties associated
with it.
Managing Hide Addins Excel Listener
The Hide Addins Excel Listener may be associated
with the Excel fields and disables and enables specified Excel Add-ins associated with the Excel field.
The Add Field dialog appears.
Listener
Hide Addins
IENListener ProgID
ENStandardCtl9.HideAddinsOListener
With the field listener selected in the tree,
694•Managing FieldsCambridgeSoft
1. Click the Custom Properties button in the right
panel to configure the properties associated
with it:
Managing Remove Macros Field
Listener
The Remove Macros Field Listener may be associated with the Excel fields to remove macros from
the field when a user performs a save. The user will
be presented with a message stating that the macros will be removed when the spreadsheet is saved.
Listener
Remove Macros
A dialog to configure the field listener opens. It
contains a box to list the Disabled Addins, an
enabled Add button, and a disabled Remove
button.
2. Click Add. A dialog opens that allows you to
enter the name of the Add-In you want to disable.
IENListener ProgID
ENStandardCtl9.Remove
MacrosFListener
Managing PowerPoint Fields
PowerPoint Fields make it possible for users to
embed and edit MS PowerPoint Slideshows in
E-Notebook sections. An example of a PowerPoint Field is shown below.
3. Enter name of an Add-In in the text box and
click OK. The dialog closes. The name you
entered is added to the Disabled Addins box,
below the text you added previously.
4. Similarly, to remove a previously added Add-In
from the disabled list, select one of the items in
the Disabled Addins box. The Remove button
gets enabled.
5. Click Remove. The selected item is removed
from the list in the Disabled Addins box.
6. Click OK. The dialog to configure the field listener closes.
ChemOffice 2006/E-NotebookManaging Fields
If the Active Doc Form Tool is associated with the
section, a user may import or export the document.
To add a PowerPoint Field section type:
1. In the Collection Tree, right-click the section
type to which you wish to add the field.
2. Select Section Type Configuration from the
menu that appears.
• 695
Administrator
The Section Type Configuration dialog
appears.
3. Right-click Fields, and select New Field.
The Add Field dialog appears.
4. Type in a name, and select PowerPoint Slideshow from the dropdown list of field types.
5. Click Add.
The new field appears in the list of fields.
In order for users to be able to import and export
the MS PowerPoint Slideshows, you must associate
the Active Document Form Tool with the field.
Once you have added a field to the section type,
you may add it to the form for the section type. See
“Configuring a Form” on page 655 for more information.
Managing Context Sensitive Help
Fields
Context Sensitive Help Fields are used in search
forms. They create a shortcut to the E-Notebook
User's Help Guide in the search form. Thus, these
fields make it possible for users to go directly to
the Help guide to find the information regarding
the instructions for using E-Notebook quickly and
easily.
A Context Sensitive Help
Field is visible in
search forms next to the text query field as shown:
To add a PowerPoint Field section type:
1. In the Collection Tree, right-click the section
type to which you wish to add the field.
2. Select Section Type Configuration from the
menu that appears.
The Section Type Configuration dialog
appears.
3. Right-click Fields, and select New Field.
The Add Field dialog appears.
696•Managing FieldsCambridgeSoft
4. Type in a name, and select Context Sensitive
Help from the dropdown list of field types.
5. Click Add.
The new field appears in the list of fields.
Once you have added a field to the section type,
you may add it to the form for the section type. See
“Configuring a Form” on page 655 for more information.
Managing Captured Image Fields
Captured Image Fields allow users to view and edit
PDF images and documents, using the same tools
as Adobe Acrobat software, thus helps manage
PDF files in E-Notebook.
If you associate the Active Document Form Tool
with a Captured image field, users can import or
export the PDF documents. Associating the Image
Importer Form Tool allows users to import images
of various types as well.
NOTE: Export to PDF is only available in Enterprise
versions of E-Notebook.
To add a Captured Image field:
1. In the Collection Tree, right-click the section
type to which you wish to add the Captured
Image field.
2. Select Section Type Configuration from the
menu that appears.
The Section Type Configuration dialog
appears.
3. Right-click Fields, and select New Field.
The Add Field dialog appears.
4. Type in a name, and select PDF Viewer from the
dropdown list of field types.
5. Click Add.
The new field appears in the list of fields.
In order for users to be able to import and export
the PDF documents and to import images, you
must associate the Active Document Form Tool
and Import Image Form Tool respectively with the
field.
Once you have added a field to the section type,
you may add it to the form for the section type. See
“Configuring a Form” on page 655 for more information.
Managing Property Lists
Property Lists are used in forms to record various
types of data properties. Property lists allow the
following data types:
Data type
User perspective
Date
A user may click the date box, and type in a date and
time.
Text
A user may enter text.
Number
A user may enter a number. A property may also be
configured to have units associated with it.
Enumerated Value
A user may choose a value from the drop-down list.
The values may be from either a preconfigured list
or a list that is pulled from an external database.
Validated Value
A user may enter a value, which is validated against
an external database.
You may configure property lists so that they are
read-only, or so that they must contain certain values before a collection transition is performed.
Another feature of property lists is the ability for
users to add references to them. When a user adds
a reference to a property, he may navigate to the
collection or section he has referenced, simply by
clicking a link in the property cell.
ChemOffice 2006/E-NotebookManaging Fields
Creating a Property List
This topic provides instructions for adding a Property List to a Section Type and configuring the
Property List.
To add a Property List:
1. In the Collection tree, right-click the Section
Type to which you wish to add the Property
List.
• 697
2. Select Section Type Configuration from the
Administrator
menu that appears.
The Section Type Configuration dialog
appears.
4. Right-click the name of the field and select
New Property from the menu that appears.
A new property appears in the tree. It's
attributes appear to the right:
3. Right-click Fields, and select New Field.
The Add Field dialog appears.
5. Type in a Name and Nickname for the prop-
4. Enter a name for the field and select Property
List from the list of Field Types.
5. Click Add.
The new Field appears in the list of Fields.
Adding a Property to the Property List
To add a Property:
1. Right-click the Property List field in the Sec-
tion Type Configuration dialog.
A menu appears.
2. Select Field Properties.
The Field Properties dialog appears.
3. Click the Properties tab.
The Properties tab appears.
698•Managing FieldsCambridgeSoft
erty.
• Name – appears when a user selects the
property for a search.
• Nickname – is displayed on the screen, in
the printed copy, and in an exported Word
document.
6. Select the Type from the drop-down list. (See
“Managing Units in Property Lists and Tables”
on page 726 for more information).
7. Select the Units from the drop-down list (if
applicable for the Type you have selected)
8. Click the checkboxes for the attributes you
wish to apply to the property:
• Active – users can add new instances of the
Property to the Sections they create.
• Read-Only – the property is for display
only, and users may not edit it.
• Required – the user may not delete the
property from the section.
• Not Blank – the user must enter a value for
the property before he van perform a particular transition on the Collection. For example, you may set up an experiment
Collection such that it is necessary to enter
an equipment id before a user can close the
experiment. If the user has not entered a
value for the property, he will be prompted
to enter it when he attempts to perform the
transition. The Not Blank attribute must be
used in conjunction with the Required Properties Transition Listener.
• ENTER to Create New Line – if a user is
editing the property and presses ENTER, a
new instance of the property will appear in
the property list.
9. If the property is type text, you may select the
following:
• Enumerator – values displayed in a dropdown list for any particular property may be
pulled fro an external database, or from a list
of values you enter. See “Managing Database Values in Property Lists” on page 701.
Configuring the Appearance of a Property
List
To configure the appearance of a property list:
1. Click the Appearance tab.
The Appearance tab appears.
Once you have added a field to the section type,
you may add it to the form for the section type. See
“Configuring a Form” on page 655 for more information.
Managing Enumerated Values in
Property Lists
You may configure a text property so that it will
contain a list of enumerated values. A user may
then select one of the values from a drop-down list
that appears in the property cell. This list of values
may be either manually entered, as described here,
or pulled from an external database, as described in
“Managing Database Values in Property Lists” on
page 701.
To associate a list of manually entered values with
a property:
1. In the Collection Tree, right-click the section
type containing property you wish to configure.
2. Select Section Type Configuration from the
menu that appears.
The Section Type Configuration dialog
appears.
3. Right-click the property list field in the list of
fields, and select Field Properties from the
menu that appears.
2. Select a Font from the drop-down list.
3. Select a font size from the Font Size drop-
down list.
4. Select whether or not the grid lines will be displayed, by clicking the checkbox.
ChemOffice 2006/E-NotebookManaging Fields
The Field Properties dialog appears.
4. Click the property for which you would like to
add the list of enumerated values.
The attributes of the property appear to the
right.
• 699
5. Click the drop-down arrow for the Enumera-
tor, and select Enumeration List.
Administrator
6. Click the Properties button.
NOTE: The button will only be enabled for a property of
data type text.
The Enumerated List Properties dialog
appears.
7. Click the Add Value button.
A blank item appears in the list.
8. Enter a value.
4. The Field Properties dialog appears. Click the
property whose values you wish to edit.
The attributes of the property appear to the
right. Enumeration List is displayed as the type
of Enumerator.
5. Click the Properties button under the Enumerator.
The Enumerated List Properties dialog
appears:
6. Click any value to edit it, or click Remove Value
to delete it. To move a value up or down in the
list, click the Move Value Up or Move Value
Down button, respectively.
7. Click OK to close the dialog.
9. Click Add Value to add another value, or OK
to close the dialog.
The values you entered will appear in a dropdown list in the property cell.
To Edit an Enumerated Values List:
1. In the Collection Tree, right-click the section
type to you wish to configure.
2. Select Section Type Configuration from the
menu that appears.
The Section Type Configuration dialog
appears.
3. Right-click the property list field in the list of
fields, and select Field Properties from the menu
that appears.
700•Managing FieldsCambridgeSoft
Modifying Properties without Obscuring
Data
Note that if you change the name of a property,
the name will change in all collections that include
the property, even collections that are in a locked,
read-only state. This means that you could potentially obscure data by changing property names.
The following procedure is recommended for
changing the name of a property:
1. In the collection tree, select the section type
containing the property you wish to modify.
The section type is displayed.
2. Right-click the field containing the property,
and select Field Properties from the menu that
appears.
The properties of the field are displayed.
3. Click the property you wish to change.
The attributes of the property are displayed in
the right frame.
4. Deselect the Active checkbox. This will prevent users from adding new instances of the
property to new or existing sections.
5. Add a new property (right-clicking Properties
and selecting New Property from the menu that
appears) and give it the new name.
6. Close the Section Type Configuration dialog.
If a section of this type appears by default in one
of the collection types, you will have to remove the
old property from the collection type.
7. Click the collection type in the tree to select it.
8. In the section containing the property, rightclick the property and select Remove Property.
9. Right-click within the field and select Add Property, then select the new property you created
in step 5, above.
Note that once you have made this change, it will
still be possible for users to view the old property
in the collections that contain it, and to conduct
searches that contain the old property as well.
3. Right-click the property list field in the list of
Fields, and select Field Properties from the
menu that appears.
The Field Properties dialog appears.
4. Click the property for whose value(s) you wish
to pull from an against an external database.
5. Click the drop-down arrow for Enumerator,
and select Database Lookup.
6. Click the Properties button.
The Database Lookup Properties dialog
appears.
Managing Database Values in Property
Lists
This topic provides instructions for configuring
database lookups in property lists. Database lookups are used to pull in and display values from a
database. You may also validate a value that a user
enters into a property list against an external database; see “Managing the Validate Value Property
List Listener” on page 706 for more information.
1. In the Collection tree, right-click the section
type to you wish to configure.
2. Select Section Type Configuration from the
menu that appears.
The Section Type Configuration dialog
appears.
ChemOffice 2006/E-NotebookManaging Fields
7. Enter the properties. See step 2 in “Creating a
Database Table Field” on page 690 for details.
8. Click OK.
Several examples are given below. Note that the
syntax of the query may vary depending upon the
type of database you are querying.
Example 1 – Database Lookup Configuration
• 701
Administrator
In this example, all of the values for suppliername
are pulled in from the external database table Suppliers. The values will appear in a drop-down list in
the property cell.
• ID Number – name of the E-Notebook
property list containing the Supplier ID
property.
• Supplier ID – name of the E-Notebook
property into which a user enters the value
for SupplierID.
Managing Enumerated Values in
Property Lists
• suppliername – value(s) to be displayed in
E-Notebook property.
• Suppliers – name of external database table
Example 2 – Database Lookup Configuration
In this example, the value suppliername is pulled
from the external database table Suppliers. The
suppliername displayed in the database table field
corresponds to the value that a user has entered
into a property list. A user enters SupplierID
into the Supplier ID property, which exists in a
Property List named ID Number.
You may configure a text property so that it will
contain a list of enumerated values. A user may
then select one of the values from a dropdown list
that appears in the property cell. This list of values
may be either manually entered, as described here,
or pulled from an external database, as described in
the Managing Database Values in Property Lists
topic.
Associating a list of manually entered values with a
property:
1. In the Collection Tree, right-click the section
type containing property you wish to configure.
2. Select Section Type Configuration from the
menu that appears.
The Section Type Configuration dialog
appears.
3. Right-click the property list field in the list of
fields, and select Field Properties from the
menu that appears.
• suppliername – value to be displayed in
E-Notebook property.
• Suppliers – name of external database table.
• SupplierID – the supplier ID field in the
external database table.
702•Managing FieldsCambridgeSoft
The Field Properties dialog appears.
4. Click the property for which you would like to
add the list of enumerated values.
The attributes of the property appear to the
right.
5. Click the dropdown arrow for the Enumerator,
and select Enumeration List.
The attributes of the property appear to the
right. Enumeration List is displayed as the type
of Enumerator.
5. Click the Properties button under the Enumerator.
6. Click the Properties button.
NOTE: the button will only be enabled for a property
of datatype text.
The Enumerated List Properties dialog
appears.
7. Click the Add Value button.
A blank item appears in the list.
8. Enter a value.
9. Click Add Value to add another value, or OK to
close the dialog.
The values you entered will appear in a dropdown list in the property cell.
Editing an Enumerated Values List:
1. In the Collection Tree, right-click the section
type to you wish to configure.
2. Select Section Type Configuration from the
menu that appears.
The Section Type Configuration dialog
appears.
3. Right-click the property list field in the list of
fields, and select Field Properties from the menu
that appears.
The Field Properties dialog appears.
4. Click the property whose values you wish to
edit.
ChemOffice 2006/E-NotebookManaging Fields
The Enumerated List Properties dialog
appears.
6. Click any value to edit it, or click Remove Value
to delete it. To move a value up or down in the
list, click the Move Value Up or Move Value
Down button, respectively.
7. Click OK to close the dialog.
Managing Property List Listeners
A Property List Listener modifies the behavior of
an E-Notebook property list. E-Notebook provides a number of standard property list listeners:
You may also develop your own Property List Listeners to further customize the behavior of property lists in E-Notebook.
To add a property list listener:
1. From the Section Type Configuration dialog,
right-click the property list field to which you
wish to add the listener.
• 703
2. Select New Field Listener...from the menu that
appears.
It is also possible to calculate a value in a property
list; see Managing the Formula Property List Listener for more information.
Administrator
Listener
Formula
A dialog appears, prompting you to enter the
ProgID for the listener.
3. Enter the ProgID and click the OK button.
The listener appears in the left frame and you
are prompted to rename it.
4. Enter a name for the listener.
To view and edit the properties of the property list
listener:
1. Click the listener.
The ProgID and properties button appear to
the right.
IENTableListener
ProgID
ENStandardCtl9.FormulaListener
To add a formula for a property:
3. Click the Custom Properties button for the
field listener.
The Formula Listener Properties dialog
appears. The dropdown list at the top of the
dialog contains a list of all of the properties in
the table.
4. Select the target property that is to be calcu-
2. Click the Custom Properties button.
If the listener has properties associate with it,
they are displayed, and may be edited.
Managing the Formula Listener
The formula listener makes it possible to perform
calculations in a cell using other numerical data in
the section and various functions. The listener
allows you to specify the target property, the formula, and an optional format.
704•Managing FieldsCambridgeSoft
lated from the dropdown list.
The selected property is displayed.
5. Type the formula into the formula box.
6. To reference values in other tables or property
lists within the same section, begin and end the
reference with square brackets ([and]), and use
colons to denote specific properties. For example, [Reaction Conditions: Reaction Molarity]
refers to the Reaction Molarity property in the
Reaction Conditions property list.
Standard symbols may be used:
• +, -, /, *, =, >, >=, <, <>, <=, &,!,!=,%, +/• Boolean operators may be used:
• NOT, AND, OR, XOR
You may use functions:
• IF(test, trueValue, [elseTest, elseTrueValue],
falseValue): returns one of two values,
•
•
•
•
depending upon whether the test returns
True or False.
OnError: returns the first argument if it can
be calculated without error. If an error
would occur in the calculation of the first
argument, the second argument is returned
(in this example, a blank cell would be
returned).
SaltWeight(salt code): returns the molecular
weight property of the salt with this salt
code. The Salt Codes are found in a user's
User Configuration folder.
SUM(tableproperty): returns the sum of the
table cells for the property you specify.
SELECT (value, tablefield, condition): allows
you to select a value in a table based on a
condition, e.g. SELECT ([Moles]
* [Equivalents], [Reactants], [Limiting?] =
"Yes") returns the value of [Moles] * [Equivalents] from the Reactants table for the limit-
ing reactant.
7. Use the format field if you wish to format the
numeric value.
Operands in a formula are evaluated in the following order:
• Parentheses
• Whenever the contents of the section are
changed, the formula will be checked, and
the target cell will be recalculated if necessary.
Managing the Block Reference In State
Property List Listener
The Block Reference In State property list listener
may be used to block users from adding a reference to a specific type of collection that is in a particular state. If the listener is configured to block
the reference, the user will be unable to add the
reference to the property list. For example, you
may wish to prevent users from adding references
to pages/experiments that are in an archived state.
Property List
Listener
IENPropertyListListe
ner ProgID
Block Reference In
State
ENStandardCtl9.BlockRefInStatePListener
This property list listener has custom properties
associated with it. You must select the collection
type and state corresponding to the references that
will be blocked. In the example below, a user will
be prevented from adding a reference to an “Page”
collection that is in the “Closed” state.
• NOT
• *, /,%, &
• +, -, +/• =, <, <=, >, >=, <>,!=
• AND
• OR, XOR
• Commas are used to separate arguments
within functions.
ChemOffice 2006/E-NotebookManaging Fields
Note that you may associate multiple instances of
this listener with a property list, if you would like to
prevent users from adding references to several
different collection types and/or several different
states of a collection type.
• 705
Administrator
Managing the Person Property List
Listener
Formula properties automatically as the drawing in
a chemical structure field is changed.
The Person Property List Listener populates the
value of a property with the logged-on user's name
whenever the value of another property is changed.
Listener
Listener ProgID
Chemical
Properties
ENStandardCtl9.ChemPropertiesCSListener
Listener
Listener ProgID
Person Property
ENStandardCtl9.PersonPropertyPListener
The listener has custom properties associated with
it:
The following is required in the section type in
order to use this listeners.
• A chemical structure field.
• A property list with the following properties:
Molecular Weight and Molecular Formula.
The listener has no custom properties associated
with it.
Managing the Validate Value Property
List Listener
Fill in the following information.
• Source Property – the property that, when
changed, will populate the target property with
the logged-on user's name.
• Target Field – the field containing the property that will display the user name or user ID.
• Target Property – the property that will display the user name or user ID.
• Target SQL – the SQL statement that selects
the username or user ID.
In the example shown above, a change to the
source property “Checksum” will populate the
“Editor” property with the name of the logged-on
user.
Managing the Chemical Properties
Property List Listener
The Chemical Properties Property List Listener
populates the Molecular Weight and Molecular
706•Managing FieldsCambridgeSoft
The Validate Value Property List Listener allows
you to validate a value in a property list against an
external database, to ensure the value entered into
E-Notebook is valid. If it is not a valid value, the
user will be presented with an error message to that
effect.
Property
List
Listener
IENPropertyListListener
ProgID
Validate
Value
ENStandardCtl9.ValidateValuePListener
Clicking the Properties button after adding the listener to a property list displays the following dialog. Here, you select the property to be validated
from the Property drop-down list. Then, enter the
database connection information and the SQL
string to be used for validating the value.
Managing Spectrum Fields
Spectrum Fields allow users to view and analyze
spectrum images, using the same tools as Galactic
GRAMS32 software.
If you associate the Spectrum Form Tool with a
spectrum field, users can import spectrum images
of various types. The form tool allows users to
copy and export spectrum images as well.
To add a spectrum field:
1. In the Collection Tree, right-click the section
type to which you wish to add the spectrum
field.
2. Select Section Type Configuration from the
menu that appears.
The Section Type Configuration dialog
appears.
ChemOffice 2006/E-NotebookManaging Fields
3. Right-click Fields, and select New Field.
The Add Field dialog appears.
4. Type in a name, and select Spectrum from the
drop-down list of field types.
5. Click Add.
The new field appears in the list of fields.
6. In order for users to be able to import and
export the spectrum images, you must associate the Spectrum Form Tool with the field.
Once you have added a field to the section type,
you may add it to the form for the section type. See
“Configuring a Form” on page 655 for more information.
Managing Stored Document
Fields
With Stored Documents Fields, users can associate
document files with sections in E-Notebook. For
example, a document file may be an MS Excel
spreadsheet or a PDF. Although the file cannot be
viewed from within E-Notebook, a user can be
export it to a selected location, and then open
it and view or edit it from there.
An example of a Stored Document Field is shown
below.
To add a stored document field:
1. In the Collection tree, right-click the Section
Type to which you wish to add the stored document field.
2. Select Section Type Configuration from the
menu that appears.
The Section Type Configuration dialog
appears.
• 707
3. Right-click Fields, and select New Field.
this example, the subsection field contains two
spectrum sections, which appear as subtabs.
Administrator
The Add Field dialog appears.
4. Type in a name and select Stored Document
from the drop-down list of field types.
5. Click Add.
The new field appears in the list of fields.
6. In order for users to be able to import and
export the stored documents, you must associate the Active Document Form Tool with the
field.
Once you have added a field to the section type,
you may add it to the form for the section type. See
“Configuring a Form” on page 655 for more information.
To add a subsection field:
1. In the Collection Tree, right-click the section
type to which you wish to add the field.
2. Select Section Type Configuration from the
menu that appears.
The Section Type Configuration dialog
appears.
3. Right-click Fields, and select New Field.
Managing Subsection Fields
With a subsection field, users may add sections
that appear as subtabs. This is one way to keep
related sections together in E-Notebook. An
example of a subsection field is shown below. In
708•Managing FieldsCambridgeSoft
The Add Field dialog appears.
4. Enter a name for the field and select Subsection from the list of field types.
5. Click Add.
The new field appears in the list of fields.
6. If you would like users to be able to add new
subsections, you must add the New Subsection
Form Tool to the field. Right click the field and
select Field Properties from the menu that
appears.
The Field Properties dialog appears.
13. Rename the form tool, by right-clicking it and
selecting Rename Form Tool. This name will
appear on the button the user will click to add
new subsections.
Managing Subsection Field Listeners
7. Right-click Form Tools and select New Form
Tool.
A new form tool appears.
8. Enter the ProgID ENStandardCtl9.NewSec-
tionFormTool in the right frame.
9. Import icons for the form tool (clicking the
Import button and selecting an icon file).
10. Click the Custom Properties button.
A dialog appears, listing all of the section types
in E-Notebook.
Subsection field listeners are used to modify the
behavior of E-Notebook subsections. E-Notebook provides a standard subsection listener:
• Button View Subsection Field Listener – forces
subsections into button view.
To add a subsection field listener,
1. In the Collection Tree, right-click the section
type containing the subsection field, and select
Section Type Configuration from the menu that
appears.
The Section Type Configuration dialog
appears.
2. Right-click the subsection field in the list of
Fields, and select Field Properties from the
menu that appears.
The Field Properties dialog appears.
3. Click the Listeners tab.
The listeners tab appears.
4. Right-click Listeners at the top of the left frame
and select New Field Listener.
The New Field Listener dialog appears:
5. Enter the ProgID for the Field listener and click
OK
The New Field Listener dialog closes.
6. If the listener has custom properties, click the
Properties button to configure them.
7. Close the properties dialog.
11. Select the section types you would like the user
to be able to add as subsections and click the
Add button.
The section types appear in the right frame.
12. Click the Close button to close the dialog.
ChemOffice 2006/E-NotebookManaging Fields
Managing the Button View Subsection
Listener
The Button View Subsection Listener forces subsections into button view, as shown below. A user
may then scroll through the subsections using the
• 709
arrow buttons, or right-click a subsection name
and select Go To in order to browse to a specific
subsection.
Administrator
Subsectio IENSubsectionListener
n Listener ProgID
Button
View
ENStandardCtl9.ButtonViewSSListener
The Button View Subsection Listener has no custom properties.
Managing the Hide Tools Subsection
Listener
The Hide Tools Subsection Listener hides the
form tool area of a subsection for more efficient
screen usage.
Subsectio IENSubsectionListener
n Listener ProgID
Hide Tools ENStandardCtl9.HideToolsSS
Listener
The listener has no custom properties.
Managing Table Fields
Tables enable users to organize data in an easily
interpreted, tabular format. Tables may contain
several basic types of data — text data, numerical
data, dates, or structures. You may set up tables in
different sections in E-Notebook to contain different types of information. You may also associate
table listeners with tables to modify their behavior.
Tables allow the following types of data:
Datatype
User perspective
Date
A user may click the date box, and type in a date and time.
Text
A user may enter text.
Number
A user may enter a number. A property may also be configured to have units associated with it.
710•Managing FieldsCambridgeSoft
Datatype
User perspective
Structure
A user may enter a chemical structure drawing.
Enumerated Value
A user may choose a value from a drop-down list. The list
may either be a preconfigured list, or pulled from an external
database.
Validated Value
A user may enter a value, which is validated against an
external database.
You may also configure table properties so that
they are read-only, or so that they must contain
values before a collection transition is performed.
Another feature of tables is the ability for users to
add references to them. When a user adds a reference to a table, he may navigate to the collection or
section he has referenced, simply by clicking a link
in the table cell.
The Add Field dialog appears.
4. Enter a name for the field and select Table
from the list of field types.
Creating a Table Field
This topic provides instructions for adding a table
to a section type and configuring the table.
To add a table:
1. In the Collection Tree, right-click the section
type to which you wish to add the table.
2. Select Section Type Configuration from the
menu that appears.
The Section Type Configuration dialog
appears.
3. Right-click Fields, and select New Field.
ChemOffice 2006/E-NotebookManaging Fields
5. Click Add.
The new field appears in the list of fields.
Adding a Property to the Table:
NOTE: Note: The Properties you add to a Table will initially appear as its columns. Once you have added the table
to a form, however, you may pivot the table so that the properties appear as rows.
To add a property to the table:
• 711
1. Right-click the table field in the Section Type
Configuration dialog.
Administrator
A menu appears.
2. Select Field Properties.
The Field Properties dialog appears.
3. Right-click the name of the field and select
New Property from the menu that appears.
A new property appears in the tree. It's
attributes appear to the right:
The Appearance tab appears.
2. Select a Font from the drop-down list.
3. Select a font size from the Font Size dropdown list.
4. Select whether or not the grid lines will be displayed, by clicking the checkbox.
Once you have added a field to the section type,
you may add it to the form for the section type. See
“Configuring a Form” on page 655 for more information.
Managing Database Values in Tables
This topic provides instructions for configuring
database lookups in tables. Database lookups are
used to pull in and display values from a database.
You may also validate a value that a user enters
into a table against an external database; see “Managing the Validate Value Table Listener” on page
716 for more information.
1. In the Collection tree, right-click the Section
Type to you wish to configure.
2. Select Section Type Configuration from the
menu that appears.
The Section Type Configuration dialog
appears.
3. Right-click the Table Field in the list of Fields,
and select Field Properties from the menu that
appears.
4. Type in a Name and Nickname for the prop-
erty. See step 4 in “Creating a Property List” on
page 697 for details.
Configuring the Appearance of a Table
To configure the appearance of a table:
1. Click the Appearance tab.
712•Managing FieldsCambridgeSoft
The Field Properties dialog appears.
4. Click the Property for whose value(s) you wish
to pull from an against an external database.
5. Click the drop-down arrow for Enumerator,
and select Database Lookup.
6. Click the Properties button.
The Database Lookup Properties dialog
appears.
7. Enter the properties. See step 2 in “Creating a
Database Table Field” on page 690 for details.
8. Click OK.
Several examples are given below. Note that the
syntax of the query may vary depending upon the
type of database you are querying.
Example 1 Database Lookup Configuration
In this example, all of the values for suppliername
are pulled in from the external database table Suppliers. The values will appear in a drop-down list in
the property cell.
• Suppliers – name of external database table
Example 2 – Database Lookup Configuration
In this example, the value suppliername is pulled
from the external database table Suppliers. The
suppliername displayed in the table field corresponds to the value that a user has entered into a
property list that exists elsewhere in the E-Notebook section. A user enters SupplierID into the
Supplier ID property, which exists in a Property
List named ID Number.
• suppliername – value to be displayed in the
•
•
•
•
table.
Suppliers – name of external database table.
SupplierID – the supplier ID field in the
external database table.
ID Number – name of the E-Notebook property list containing the Supplier ID property.
Supplier ID – name of the E-Notebook property into which a user enters the value for SupplierID.
Managing Enumerated Values in Tables
• suppliername – value to be displayed in the
You may configure a table property so that it will
contain a list of enumerated values. A user may
then select one of the values from the list. This list
of values may be either manually entered, as
described here, or pulled from an external database, as described in the Managing Database Values in Tables topic.
table
ChemOffice 2006/E-NotebookManaging Fields
• 713
Associating a list of manually entered values with a property
Administrator
To associate a list with a property:
1. In the Collection Tree, right-click the section
type containing table you wish to configure.
2. Select Section Type Configuration from the
menu that appears.
The Section Type Configuration dialog
appears.
3. Right-click the table field in the list of fields,
and select Field Properties from the menu that
appears.
The Field Properties dialog appears.
4. Click the property for which you would like to
add the list of enumerated values.
The attributes of the property appear to the
right.
5. Click the drop-down arrow for the Enumerator, and select Enumeration List.
6. Click the Properties button. Note: the button
will only be enabled for a property of data type
text.
The Enumerated List Properties dialog
appears.
714•Managing FieldsCambridgeSoft
7. Click the Add Value button.
A blank item appears in the list.
8. Enter a value.
9. Click Add Value to add another value, or OK to
close the dialog.
The values you entered will appear in a dropdown list in the table.
Editing an Enumerated Values List
To edit an enumerated values list:
1. In the Collection Tree, right-click the section
type to you wish to configure.
2. Select Section Type Configuration from the
menu that appears.
The Section Type Configuration dialog
appears.
3. Right-click the table field in the list of fields,
and select Field Properties from the menu that
appears.
The Field Properties dialog appears.
4. Click the property whose values you wish to
edit.
The attributes of the property appear to the
right. Enumeration List is displayed as the type
of Enumerator.
5. Click the Properties button under the Enumerator.
The Enumerated List Properties dialog
appears:
6. Click any of the values to edit it, or click
Remove Value to delete it. To move a value up
or down in the list, click the Move Value Up or
Move Value Down button, respectively.
7. Click OK to close the dialog.
Managing Table Listeners
Table listeners are used to modify the behavior of
E-Notebook tables. E-Notebook provides several,
standard table listeners.
See Managing Field Listeners for instructions on
associating a field listener with a field.
Managing the Reactants Table Listener
The reactants table listener calculates and displays
properties of reactants in a stoichiometry grid. The
table can be combined with a products field (a
table field with the products table listener) to create
a stoichiometry grid. The combination of the stoichiometry grid with a chemical structure field, and
the addition of the Reaction Form Tool creates a
Reaction Section.
Reaction Sections allow users to draw a reaction in
the chemical structure field, and then analyze the
reaction, automatically populating the stoichiometry grid with information about the reactants and
products. In addition, the Next Step function creates a new page or experiment containing the products of the chemical reaction.
Table Listener
IENTableListener
ProgID
Reactants
ENStandardCtl9.ReactantsListener
Managing the Products Table Listener
The products table listener calculates and displays
properties of products in a stoichiometry grid. The
table can be combined with a reactants field (a
table field with the reactants table listener) to create a stoichiometry grid. The combination of the
stoichiometry grid with a chemical structure field,
and the addition of the Reaction Form Tool creates a Reaction Section.
Reaction Sections allow users to draw a reaction in
the chemical structure field, and then analyze the
reaction, automatically populating the stoichiometry grid with information about the reactants and
products. In addition, the Next Step function cre-
ChemOffice 2006/E-NotebookManaging Fields
ates a new page containing the products of the
chemical reaction.
Table
Listener
IENTableListener ProgID
Products
ENStandardCtl9.ProductsListener
Managing the Products Fixed Limiting Table
Listener
This listener is similar to the Products Table Listener. The difference is that the limiting equivalents cannot vary if the Products Fixed Limiting
listener is used. .
Table
Listener
IENTableListener ProgID
Products
Fixed
Limiting
ENStandardCtl9.FixedLimitingEqProducts
Managing the Add Reactant Table Listener
The Add Reactant Table Listener makes it possible
for a user to populate the stoichiometry grid with
the properties of a reactant he selects from the
Collection Tree. The user does this by right-clicking within the table and selecting Add Reactant
from the menu that appears.
Table Listener
IENTableListener
ProgID
Add Reactant
ENReaction9.AddReactantTListener
Managing the Reactants Fixed Limiting
Table Listener
• 715
Administrator
This listener is similar to the Reactants Table Listener. The difference is that the limiting equivalents cannot vary if the Reactants Fixed Limiting
listener is used.
Table Listener
IENTableListener
ProgID
Reactants Fixed
Limiting
ENReaction9.FixedLimitingEqReactants
Managing the Validate Value Table Listener
The Validate Value Table Listener allows you to
validate a values of a property in a table against an
external database, to ensure the values entered into
E-Notebook are valid. If a user enters a value that
is not valid, he will be presented with an error message to that effect.
Table
Listener
IENPropertyListListener
ProgID
Managing the Block Reference In State
Table Listener
Validate
Value
ENStandardCtl9.ValidateValueTListener
The Block Reference In State Table Listener may
be used to block users from adding a reference to a
specific type of collection that is in a particular
state. If the listener is configured to block the reference, the user will be unable to add the reference
to the table. For example, you may wish to prevent
users from adding table references to pages/experiments that are in an archived state.
Clicking the Properties button after adding the listener to a table displays the following dialog. Here,
you select the property to be validated from the
Property drop-down list. Then, enter the database
connection information and the SQL string to be
used for validating the value.
Table
Listener
IENTableListener ProgID
Block
Reference
In State
ENStandardCtl9.BlockRefInStateTListener
This table listener has custom properties associated
with it. You must select the collection type and
state corresponding to the references that will be
blocked. In the example below, a user will be prevented from adding a reference to an “Ancillary
File Version” collection that is in the “Draft” state.
Note that you may associate multiple instances of
this listener with a table, if you would like to prevent users from adding references to several different collection types and/or several different states
of a collection type.
716•Managing FieldsCambridgeSoft
Managing the Analyze Reaction Table Listener
The Analyze Reaction Table Listener automatically
updates the reactants and products tables in a stoichiometry grid when a user edits a reaction drawing. This listener must be associated with both the
Reactants table field and the Products table field.
In addition, you must associate the Analyze Reaction Chemical Structure Listener with the reaction
field.
Active
IENActiveDocListener
Document ProgID
Listener
Analyze
Reaction
ENStandardCtl9.AnalyzeRxnTListener
This listener has no custom properties associated
with it.
Managing the Unique Property Table Listener
The Add Field dialog appears.
The Unique Property Table Listener prevents adding more than one property of the same type to a
table.
Table
Listener
IENPropertyListListener
ProgID
Unique
Property
ENStandardCtl9.UniquePropertyTListener
4. Enter a name for the Field and select URL Display from the list of Field Types.
Managing URL Display Fields
URL Displays make it possible for users to store
URL's within E-Notebook and to display their corresponding content. You may use a URL Display
Field for either an internal intranet site or an external webpage.
To create a URL Display field:
1. In the Collection tree, right-click the Section
Type to which you wish to add the field.
2. Select Section Type Configuration from the
menu that appears.
The Section Type Configuration dialog
appears.
3. Right-click Fields, and select New Field.
ChemOffice 2006/E-NotebookManaging Fields
5. Click Add.
The new field appears in the list of fields.
Once you have added a field to the section type,
you may add it to the form for the section type. See
“Configuring a Form” on page 655 for more information.
After you have added the URL Display Field to a
form, you may enter a URL and display its corresponding page. Each time a user creates a section
of this type, the URL and its content will appear.
To do this:
1. Enter the URL address as shown above. In this
example, http://www.cambridgesoft.com was
entered.
2. Click the Go button to the right of the address.
The page corresponding to the URL appears.
You may navigate from within the displayed page,
if desired. Note, however, that the URL does not
change to reflect your navigation. If you wish to
change the URL that is saved with the section type,
you must type in another address.
• 717
Managing Search Fields
Administrator
Several field types are designed for use exclusively
within search forms, to search for data in
E-Notebook. They are:
3. Right-click Fields, and select New Field.
The Add Field dialog appears.
• Chemical Query Fields
• Collection Query Fields
• Collection Type Query Fields
• Query Text Fields
4. Enter a name for the field and select Chemical
Query from the list of field types.
• State Query Fields
• Property Query Fields
• Table Query Fields
• Unannotated Version Query Fields
• Search Location Fields
• Join Type Fields
See Managing Data Fields for information about
the other E-Notebook Fields.
Chemical Query Fields
Chemical Query Fields are used in search forms,
for finding chemical structures in E-Notebook
tables and chemical structure fields.
5. Click Add.
The new field appears in the list of fields.
Once you have added a field to the section type,
you may add it to the form for the section type. See
“Configuring a Form” on page 655 for more information.
Collection Query Fields
Collection Query Fields are used in search forms,
for finding collections that match the metadata criteria that a user specifies:
The search is a substructure search. See the User
Guide if you would like more information on
structure searching.
To create a Chemical Query Field:
1. In the Collection tree, right-click the section
type to which you wish to add the field.
2. Select Section Type Configuration from the
menu that appears.
The Section Type Configuration dialog
appears.
718•Managing FieldsCambridgeSoft
Users must select each of the criteria they wish to
specify for the search.
To create a Collection Query Field:
1. In the Collection tree, right-click the section
type to which you wish to add the field.
2. Select Section Type Configuration from the
menu that appears.
The Section Type Configuration dialog
appears.
3. Right-click Fields, and select New Field.
The Add Field dialog appears.
2. Select Section Type Configuration from the
menu that appears.
The Section Type Configuration dialog
appears.
3. Right-click Fields, and select New Field.
The Add Field dialog appears.
4. Enter a name for the field and select Collection
Query from the list of field types.
4. Enter a name for the field and select Collection
Type Query from the list of field types.
5. Click Add.
The new field appears in the list of fields.
Once you have added a field to the section type,
you may add it to the form for the section type. See
“Configuring a Form” on page 655 for more information.
Collection Type Query Fields
Collection Type Query Fields are used in search
forms, for specifying the collection type over
which a search is run. For example, a user may
specify a Page, or an Experiment, so that any other
type of collection will not be included in the search
results.
Users must select this item in the search form in
order to specify it for the search.
To create a Collection Type Query Field:
1. In the Collection tree, right-click the section
type to which you wish to add the field.
ChemOffice 2006/E-NotebookManaging Fields
5. Click Add.
The new field appears in the list of fields.
Once you have added a field to the section type,
you may add it to the form for the section type. See
“Configuring a Form” on page 655 for more information.
Join Type Fields
Join Type fields are used in search forms. They
make it possible for a users conduct a search that is
a union of two searches, an intersection of two
searches, or a subtraction of one set of search
results from another. A join field is shown below:
To create a join type field:
• 719
1. In the Collection tree, right-click the section
Administrator
type to which you wish to add the field.
2. Select Section Type Configuration from the
menu that appears.
The Section Type Configuration dialog
appears.
3. Right-click Fields, and select New Field.
The Add Field dialog appears.
4. Enter a name for the field and select Join Type
from the list of field types.
5. Click Add.
The new field appears in the list of fields.
Once you have added a field to the section type,
you may add it to the form for the section type. See
“Configuring a Form” on page 655 for more information.
Property Query Fields
Property Query Fields are used in search
forms. They make it possible for a users to search
for specific properties in E-Notebook property
lists. (Note that Table Query Fields are used to
search for properties in E-Notebook tables).
To create a Property Query Field:
1. In the Collection tree, right-click the section
type to which you wish to add the field.
2. Select Section Type Configuration from the
menu that appears.
The Section Type Configuration dialog
appears.
3. Right-click Fields, and select New Field.
The Add Field dialog appears.
4. Enter a name for the field and select Property
Query from the list of field types.
5. Click Add.
The new field appears in the list of fields.
Once you have added a field to the section type,
you may add it to the form for the section type. See
“Configuring a Form” on page 655 for more information.
Query Text Fields
Query Text Fields are used in search forms. The
following fields data in E-Notebook is searched
when a user runs a search that contains query text:
• MS Word Fields
• Styled Text Fields
• Property Lists
• Tables
• Text in chemical structure fields
• MS Excel Fields
• Certain types of stored document files — MS
Word, MS Excel, MS PowerPoint
To create a Query Text Field:
720•Managing FieldsCambridgeSoft
1. In the Collection tree, right-click the Section
1. In the Collection Tree, right-click the section
Type to which you wish to add the field.
2. Select Section Type Configuration from the
menu that appears.
The Section Type Configuration dialog
appears.
3. Right-click Fields, and select New Field.
The Add Field dialog appears.
type to which you wish to add the field.
2. Select Section Type Configuration from the
menu that appears.
The Section Type Configuration dialog
appears.
3. Right-click Fields, and select New Field.
The Add Field dialog appears.
4. Enter a name for the field and select Query
4. Enter a name for the field and select State
Query from the list of field types.
Text from the list of field types.
5. Click Add.
5. Click Add.
The new field appears in the list of fields.
Once you have added a field to the section type,
you may add it to the form for the section type. See
“Configuring a Form” on page 655 for more information.
The new field appears in the list of fields.
Once you have added a field to the section type,
you may add it to the form for the section type. See
“Configuring a Form” on page 655 for more information.
State Query Fields
Table Query Fields
State Query Fields are used in search forms. They
make it possible for a user to specify the state of
the collections over which a search is conducted.
For example, a user may only want to search for
Collections that were in the Closed state as of a
particular date.
Table Query Fields are used in search forms. They
make it possible for a users to search for specific
properties in E-Notebook tables. (Note that
Property Query Fields are used to search for properties in E-Notebook property lists).
To create a State Query Field:
ChemOffice 2006/E-NotebookManaging Fields
• 721
Administrator
To create a Table Query Field:
1. In the Collection tree, right-click the Section
Type to which you wish to add the field.
2. Select Section Type Configuration from the
menu that appears.
The Section Type Configuration dialog
appears.
3. Right-click Fields, and select New Field.
The Add Field dialog appears.
required annotation have been made, but for
which no annotation has been provided.
To create an unannotated version query field:
1. In the Collection Tree, right-click the section
type to which you wish to add the field.
2. Select Section Type Configuration from the
menu that appears.
The Section Type Configuration dialog
appears.
3. Right-click Fields, and select New Field.
The Add Field dialog appears.
4. Enter a name for the field and select Table
Query from the list of field types.
4. Enter a name for the field and
select Unannotated Version Query from the list
of field types.
5. Click Add.
The new field appears in the list of fields.
Once you have added a field to the section type,
you may add it to the form for the section type. See
“Configuring a Form” on page 655 for more information.
Unannotated Version Query
Fields
Unannotated Version Query Fields are used in
search forms. They make it possible for a users to
search for collections in which changes that
5. Click Add.
The new field appears in the list of fields.
Once you have added a field to the section type,
you may add it to the form for the section type. See
“Configuring a Form” on page 655 for more information.
Search Location Fields
Search Location Fields are used in search
forms. They make it possible for a users to search
722•Managing FieldsCambridgeSoft
for collections and sections that exist in a particular
branch of the Collection Tree.
5. Click Add.
The new field appears in the list of fields.
Once you have added a field to the section type,
you may add it to the form for the section type. See
“Configuring a Form” on page 655 for more information.
Managing the Add-In
Configuration
To create a search location field:
1. In the Collection tree, right-click the section
type to which you wish to add the field.
2. Select Section Type Configuration from the
menu that appears.
The Section Type Configuration dialog
appears.
3. Right-click Fields, and select New Field.
The Add Field dialog appears.
The Add-In Configuration dialog contains information about the field types that are used as the
basis for fields in E-Notebook. E-Notebook
provides a number of standard field types, such as
Chemical Structure and Table field types, but you
can also develop custom field types to manage specialized kinds of data or perform complex tasks.
For information about each of the standard types
of fields and their properties, see “Managing Data
Fields” on page 685.
To access the Add-In Configuration and view or
edit the E-Notebook field types,
1. Right-click any blank area of the Collection
Tree.
A menu appears.
4. Enter a name for the field and select Search
Location from the list of field types.
2. Select Add-In Configuration .
ChemOffice 2006/E-NotebookManaging Fields
• 723
The System Configuration dialog appears.
3. Click the Change button.
Your changes are saved.
Administrator
Adding a new Field Type
To add a new field type to E-Notebook:
1. From the Add-In Configuration dialog, click
the New Field Type button.
2. Fill in the following information:
• Field Type – the name of the Field Type
• IENFormTool ProgID – the program-
This dialog displays the following information
about each of the Field Types:
• Field Type – the name of the field type
• IENFormTool ProgID – the programmatic
identifier that the Windows registry uses to
uniquely identify the object that implements
the corresponding interface. The format is
OleServerName.ObjectName.
• IENFormToolCtl ProgID – the programmatic identifier that the Windows registry uses
to uniquely identify the object that implements
the corresponding interface. The format is
OleServerName.ObjectName.
• License Key
• Active – an indication of whether new fields of
this type may be added to section types
Changing a Field Type
To change the information for a particular field
type:
1. Click the field type in that you wish to edit in
the list.
The field type is highlighted.
2. Edit any of the information for the field type,
changing its name, ProgID's, license key, or
active status.
724•Managing FieldsCambridgeSoft
matic identifier that the Windows registry
uses to uniquely identify the object that
implements the corresponding interface.
The format is: OleServerName.ObjectName.
• IENFormToolCtl ProgID – the programmatic identifier that the Windows registry
uses to uniquely identify the object that
implements the corresponding interface.
The format is OleServerName.ObjectName.
• License Key – if necessary.
• Active – an indication of whether new fields
of this type may be used in section types. If
the checkbox is selected, the field type is
active.
Deleting a Field Type
You may only delete field types that are not in use
within E-Notebook section types.
To delete a field type:
1. From the Add-In Configuration dialog, click
the field type in that you wish to delete.
The field type is highlighted.
2. Click the Delete button.
A message appears, asking you to confirm that
you wish to delete the field Type.
3. Click Yes.
If the field type is not used in an E-Notebook
section type, it is deleted. Otherwise, an error
message appears, notifying you that the field
type is in use and cannot be deleted.
Time Settings
Whenever a date or time is displayed in E-Notebook, it is displayed with a time zone bias from
UTC (Coordinated Universal Time). The format of
the time zone bias is +HHMM. The plus sign indicates time zones that are east of UTC to the international date line by a specified number of hours
and minutes (Paris to Auckland and beyond); a
minus sign indicates time zones that are west of
UTC to the international date line (Azores to Midway Island, and beyond).
Dates appear in the following locations:
• The history display
• The collection properties dialog box
• The version properties dialog box
• The session manager dialog box
• The properties field type control
• The tables field type control
• The query table field type control
• The collection query field type control
• The state query field type control
• The table of contents
In the history display, the collection properties dialog box, the version properties dialog box and the
session manager dialog box, dates are displayed
using the time zone of the client machine that generated the date. For example, the time of a version
is displayed in the time zone of the user who saved
the version; the time of an annotation is displayed
in the time zone of the user who created the annotation.
In the properties and tables field type controls,
when a user is about to edit a date, the date to be
edited is changed to the corresponding time stamp
ChemOffice 2006/E-NotebookManaging Fields
of the editing user's time zone. For example, User
A in New Jersey enters a date of June 1, 2004
12:00:00 PM in a date property in a property list.
After editing, the date appears as “06-01-2004
12:00:00 PM -0500”. User B in New Jersey views
the property list with the saved date and the date
appears the same. If User B decides to edit the
date, then, when the edit controls appear, the edit
controls are initialized with the date 06-01-2004
09:00:00 AM. If the user makes no changes, then
the value does not change. If the user changes the
time to 09:00:01 AM, then the date appears in the
property list as “06-01-2004 09:00:01 AM -0800”.
When user C in London views the date, it will
appear as “01-06-2004 09:00:01 AM -0800”
because user C’s date settings on their client
machine specify that days appear before months in
short dates.
In the query table field type control, the collection
query field type control and the state query field
type control, only the date is specified, along with a
time zone. When searching, the dates are converted to UTC using the time zone associated with
the date. The time zone appears in a popup menu
next to the date. In the event of editing a section
containing one of these field types, if the stored
time zone is different from the time zone of the
client machine, the popup menu will contain the
time zone of the client machine as well, so that the
user can change the query to match the time zone
of the client machine.
Queries by date compare the 24 hour period that
conforms to the date specified by time zone associated with the query date. For example, if a user in
California searches for date properties with a value
of “06-01-2004 -0800” then any date property with
a value between 06-01-2004 08:00:00 AM +0000
and 06-02-2004 07:59:59 AM +0000 (inclusive)
matches that date, wherever it was entered in the
world.
In the Table of Contents, only dates appear, with
no time zone reference. The date corresponds to
• 725
the date in the time zone of the generator of the
date.
Administrator
Managing Units in Property
Lists and Tables
You may associate the following types of measurements with a property in a property list or table.
The units may then be specified or displayed in the
several units shown. Note that in all cases, the standard units are the SI units for the given type, which
may not be the units commonly entered or displayed.
Type of
Standard
Measurement Units
Permitted
Units
molality
mol/kg
(quantity per mass
of solvent or
substrate)
mol/kg
mol/g
mmol/kg
mmol/g
µmol/kg
µmol/g
molar mass
kg/mol
g/mol
kg/mol
dalton
D
kD
Type of
Standard
Measurement Units
Permitted
Units
density
g/ml
µg/ml
mg/ml
µg/l
mg/l
g/l
kg/l
kg/m3
molarity
(quantity per
volume of solution)
mol/m3
mol/l
µmolar
mmolar
molar
moles
(quantity of
substance)
mol
mmol
µmol
mol
m
Å
nm
µm
mm
cm
normality
(ion equivalents
per volume of
solution)
mol/m3
N
mN
µN
pressure
Pa
atm
Pa
kPa
torr
bar
mbar
length
mass
kg/m3
m
kg
726•Managing FieldsCambridgeSoft
g
µg
mg
kg
Type of
Standard
Measurement Units
Permitted
Units
temperature
K
°C
°K
°F
time
s
s
ms
µs
min
hr
velocity
m/s
m/s
km/hr
mi/hr
volume
m3
ml
µl
l
m3
Specification of Units
To specify the units for a property in a property list
or table:
1. In the Section Type Configuration dialog,
right-click the field containing the property
whose units you wish to set.
2. Select Field Properties from the menu that
appears.
The properties dialog appears.
3. Click the property in the tree to select it.
The attributes of the property are displayed.
The Units list will be disabled if the Type is
text, number, date, or structure. Otherwise, its
contents will change to reflect the permitted
units for the unit type you have selected. The
ChemOffice 2006/E-NotebookManaging Fields
default selection in the units list will be the first
units in the list, which will be ordered as in the
table above.
4. Select the default Units from the Units dropdown list.
These are the units that will be displayed by
default when a user enters only a numerical
value into the cell.
Entry of data
When a user enters a value for a property list entry
or table cell which has been defined as a type that
has units, the text is interpreted as follows:
• Leading and trailing spaces are removed.
• A trailing period, if present, is removed.
• If a hyphen, dash, or minus sign is present and
not the first character of the string, the string is
deemed to represent a range, and divided into
the part before and the part after the first such
character. Spaces surrounding the character are
discarded. Each string is further interpreted
according to the subsequent rules.
• The string is tested iteratively, beginning with
the entire string, and truncating one character
off the end during each iteration, until a string
is found which is determined to be numeric, as
defined by the Visual Basic IsNumeric function.
If no such leading numeric substring is found,
the string is deemed uninterpretable.
• The remaining part of the string after removing
the leading numeric substring and any contained spaces is compared against the list of
units permitted for this type. If this string is not
empty, and a match is not found, the string is
deemed uninterpretable.
• If the string was found to consist of a range,
and a valid units designation was found only
for the second element of the range, that units
designation is used for both elements.
• If no units designation is present, then the
default units designation is applied.
• 727
Note that all measurements described in this topic
are stored in an E-Notebook property lists or
Administrator
728•Managing FieldsCambridgeSoft
tables. This topic does not apply to quantities in
text fields.
Chapter 39: Managing Collection Types
Information in E-Notebook is organized into collections, which are the items that appear in the collection tree. When a user creates a collection, the
properties and content of the collection are determined by the collection type, which you configure
as an administrator.
You may configure a collection type such that any
of the following are associated with it:
Section Types – collection types may be configured so that they contain section types, which are
the E-Notebook data forms. A page or experiment
is an example of a collection type that contains section types. Alternatively, a collection type—for
example, a folder—may not have section types
associated with it, but may simply contain other
collection types.
Contained Collection Types – A contained
collection is a collection that may exist within
a particular collection in the collection tree. For
example, a user group may contain users; user is a
contained collection type within the user group
collection type. Or, notebooks may contain experiments; experiment is a contained collection type
within the notebook collection type.
Contained Reference Types – A contained reference is a shortcut that allows E-Notebook users to
view a collection from elsewhere in the collection
tree. Any changes made to the original are reflected
in the reference.
States – a state is a condition that defines certain
properties of a collection, such as whether the collection may be edited. Multiple states may be used
to define the life cycle of a collection. You may
configure change control options based on state.
Search Engines – A search engine allows users to
search for information in E-Notebook. For example, the collection search engine makes it possible
ChemOffice 2006/E-NotebookManaging Collection Types
to search for collections that match certain metadata criteria, such as creation date and owner.
Collection Listeners – collection listeners modify
behaviors of collections, such as the move or create behaviors. An example is the User Collection
Listener, which displays a dialog for entry of UserID, user name, etc., when a new user is created.
Form Tools – form tools perform a certain function when a user selects them—for example, creating a new collection or a new section.
Creating a New Collection
Type
Collections organize related information in
E-Notebook, and each collection appears as an
item in the Collection Tree. When you create a new
collection type, you create a new means of organizing information in E-Notebook. For example, you
could create a collection type of Project or Experiment. E-Notebook Users would then be able to
use these Projects or Experiments to organize their
information in E-Notebook.
When you create a new collection type, you define
the rules that determine which sections users can
add to collections of this type. Also, you set up the
rules that govern how the collection type is related
to other collection types in the Collection Tree:
where can a new collection of this type be created,
and what types of collections can be created within
it? You can set up the rules that are modeled after
your workflow.
To create a new collection type:
1. Right-click a blank area of the Collection Tree.
A menu appears.
• 731
2. Select Browse All.
Administrator
The entire Collection Tree appears, showing
the Configuration Folder.
4. Right-click the Collection Types folder and
select New, then Collection Type.
A new Collection Type appears within the Collection Types folder, and you are prompted to
rename it.
5. Enter a name for the Collection Type.
6. Right-click the new Collection Type and select
Collection Type Configuration .
The Collection Type Configuration Dialog
appears.
7. Specify the following information:
• Plural Name – the name applied to multi-
3. If you wish, you may right-click the Configura-
tion Folder and select Browse Here, so that the
Configuration Folder will appear at the top of
the Collection Tree.
732•Managing Collection TypesCambridgeSoft
ple collections of this type.
• Icon Name – the icon to be associated with
the collection type in the Collection Tree.
8. If you would like the collection type to be used
as an organizational tool for administrators,
you may select any of the following options.
Normally these options are not selected for
new collection types. In the default E-Notebook setup, only Folders, such as the Collection Types folder, may contain collection types
and section types.
• Can Contain Collection Types – a check
mark indicating whether administrators may
add collection types to this collection type.
• Can Contain Section Types – a checkbox
indicating whether administrators may add
section types to this collection type.
• Can Contain Collection Type Refer-
1. Right-click the collection type to which you
ences – a checkbox indicating whether new
administrators may add references (shortcuts) to collection types to this collection
type.
• Can Contain Section Types – a checkbox
indicating whether administrators may add
references (shortcuts) to section types to this
collection type.
Once you have created the collection type, you will
want to configure it. See the related topics for
instructions.
wish to add the section type, and select
Collection Type Configuration from the menu
that appears.
The Collection Type Configuration dialog
appears.
2. Expand Form Tools , and right-click the New
Section Form Tool.
Adding a Section Type to a
Collection Type
3. In the right frame, click the Custom Properties
By adding sections types to a collection type, you
determine which sections an E-Notebook user can
add to that collection type in E-Notebook. For
example, and Experiment/Page may have several
section types associated with it, including reaction
sections or MS Word sections. When a user creates
an Experiment/ Page, he may add any of these sections to the Experiment/Page.
You may configure a collection type such that a
particular section appears by default, or, you may
configure it so that the user can add the section if
desired.
To add a section type to a collection type:
NOTE: It may be necessary for you to add this form
tool to the collection type. See “Managing the New
Section Form Tool” on page 650 for more information).
button.
A dialog appears, listing all of the section types
in the left panel.
4. Click the section type(s) you wish to add. You
may use CONTROL+click to select multiple
section types, or SHIFT+click to select a range.
5. Click the Add>> button.
The section type(s) are moved into the right
panel.
6. Click the Close button.
The Section Types dialog closes. The section
type(s) are added to the collection type. When
a user creates the collection in E-Notebook, he
will be able to add these sections to it.
Having a Section Appear by
Default
If you would like a section to appear automatically
when a user creates the collection:
ChemOffice 2006/E-NotebookManaging Collection Types
• 733
1. Click the New Default Section
Administrator
button in
the right frame.
A menu appears, listing all of the E-Notebook
section types.
To do this:
1. Right-click the collection type from which you
wish to remove the section type, and select
Collection Type Configuration from the menu
that appears.
The Collection Type Configuration dialog
appears.
2. Expand Form Tools, and right-click the New
Section Form Tool.
3. In the right frame, click the Custom Properties
button.
A dialog appears, listing of the section types in
the right panel.
4. Click the section type(s) you wish to remove.
2. Select a section type from the list.
The section appears.
3. If you wish, you can add data to the section, or
change the appearance of the section. The
alterations you make will appear only when an
E-Notebook user creates this particular type of
collection.
Removing a Section Type
from a Collection Type
If you no longer wish to include a particular section type in a collection type, you can remove the
section type.
734•Managing Collection TypesCambridgeSoft
You may use CONTROL+click to select multiple section types, or SHIFT+click to select a
range.
5. Click the Remove>> button.
The section types are moved to the left pane.
6. Click the Close button.
The dialog closes, and the section type can no
longer be added to the collection type.
NOTE: If you have added the section to the collection type,
so that the section will appear automatically in E-Notebook
when a user creates the collection, you must delete the existing
section from the collection type.
Managing Contained
Collection Types
Contained collection types are collections that may
exist within a particular collection in the Collection
Tree. For example, a user group may contain users;
user is a contained collection type within the user
group collection type. Or, notebooks may contain
experiments; experiment is a contained collection
type within the notebook collection type.
This topic covers adding and removing contained
collection types, and changing the relationship
between a contained collection type and the parent
collection type.
Adding a Contained Collection
Type
To add a contained collection type to a collection
type.
1. In the Collection Tree, right-click the
collection type that is to be the parent
collection and select Collection Type
Configuration.
In this example, user group is the parent collection type, and we are adding the ability to create
folders—the contained collection type—
within user groups.
The Collection Type Configuration dialog
appears.
2. Right-click Contained Collection and Page
Types.
A menu appears with the option New Contained Collection or Page Type.
3. Select New Contained Collection or Page Type.
A dialog box appears, listing the collection
types in E-Notebook (and their corresponding
templates).
4. Click the collection type you wish to add, and
click the Add button.
ChemOffice 2006/E-NotebookManaging Collection Types
5. The new contained collection type appears in
the left pane. In the right pane, the features of
the contained collection type within the parent
(or container) collection are displayed.
For example, if the contained Collection is the
child within the parent collection:
• New children can be added to parents.
• Copies of existing children can be added to
parents.
• Children can be deleted from parents.
• Children can be moved into parents.
• Children can be removed from parents and
moved into different collections.
6. Click the checkboxes to select the features you
wish to apply to the contained collection type.
Changing the Relationship
between a Contained Collection
Type and the Parent Collection
Type
To change the relationship between a contained
collection type and its parent collection type:
1. In the collection tree, right-click the parent
collection type and select Collection Type
Configuration.
The collection type configuration dialog
appears.
2. Click the plus sign to expand the contained collection types.
3. Click the contained collection type for which
you wish to change the relationship.
The relationship features appear to the right.
• 735
4. Select or deselect the features as desired.
5. Click the Close button in the upper right corner
Administrator
to close the Collection Type Configuration dialog.
Removing a Contained Collection
Type from a Collection Type
If you wish to remove a contained collection type:
1. In the Collection Tree, right-click the the
parent collection type and select Collection
Type Configuration.
The collection type configuration dialog
appears.
2. Click the plus sign to expand the contained collection types.
3. Right-click contained collection type you wish
to remove, and select Delete Relationship from
the menu that appears.
A message appears, asking you to confirm that
you wish to delete the relationship.
4. Click Yes.
The contained collection type is deleted. Note
that this change will not affect the relationships
that users have already created. It will only
apply going forward.
Managing Contained
Reference Types
You can set up a collection type to permit users to
add references to other collection types. A con-
736•Managing Collection TypesCambridgeSoft
tained reference type differs from a contained collection type, because a reference is a shortcut that
allows an E-Notebook user to view an original
from elsewhere in the Collection Tree. Any
changes made to the original are reflected in the
reference.
This topic covers adding and removing contained
reference types, and changing the relationship
between a contained reference type and the parent
collection type.
Adding a Contained Reference
Type
To add a contained reference type to a collection
type:
1. In the Collection Tree, right-click the
collection type that is to be the parent
collection type and select Collection Type
Configuration.
In this example, user group is the parent collection type, and we are adding the ability to create
references to folders—the contained reference
type—within user groups.
The Collection Type Configuration dialog
appears.
7. Click the checkboxes to select the features you
wish to apply to the contained reference type.
Changing the Relationship
between a Contained Reference
Type and the Parent Collection
Type
To change the relationship between a contained
reference type and its parent collection type:
2. To expand the collection type to which you
3.
4.
5.
6.
wish to add a contained reference type, either
double-click it or click the plus sign next to it.
Right-click Contained Reference Types.
A menu appears with the option New Contained Reference Type.
Select New Contained Reference Type.
A dialog box appears, listing the collection
types in E-Notebook (and their corresponding
Templates).
Click the collection type you wish to add as a
contained reference type, and click the Add
button.
The new contained reference type appears in
the left pane. In the right pane, the features of
the contained reference type within the parent
collection are displayed. For example, if the
contained reference is the child within the parent collection:
• New references to children can be added to
parents.
• Copies of existing references to children can
be added to parents.
• References to children can be deleted from
parents.
• References to children can be moved into
parents.
• References to children can be removed from
parents and moved into different collections.
ChemOffice 2006/E-NotebookManaging Collection Types
1. In the Collection Tree, right-click the parent
collection type and select Collection Type
Configuration.
2.
3.
4.
5.
The Collection Type Configuration dialog
appears.
Click the plus sign to expand the contained reference types.
Click the contained reference type for which
you wish to change the relationship.
The relationship features appear to the right.
Select or deselect the features as desired.
Click the Close button in the upper right corner
to close the Collection Type Configuration dialog.
Removing a Contained Reference
Type from a Collection Type
If you wish to remove a contained reference type:
1. In the Collection Tree, right-click the the
parent collection type and select Collection
Type Configuration.
The Collection Type Configuration dialog
appears.
2. Click the plus sign to expand the contained reference types.
3. Right-click the contained reference type you
wish to remove, and select Delete Relationship
from the menu that appears.
A message appears, asking you to confirm that
you wish to delete the relationship.
• 737
4. Click Yes.
Administrator
The contained reference type is deleted. Note
that this change will not affect the relationships
that users have already created. It will only
apply going forward
lection types when you add a new contained
collection type or contained reference type.
Configuring Relationships to
Unspecified Types of
Collections
E-Notebook has an “Unspecified Types of Collections” feature that you can use to configure the
relationship between a container collection type
and any collection type for which no relationship is
explicitly defined. For example, if you add
“Unspecified Types of Collections” as a contained
collection type within a Folder collection type, the
relationship you define will apply to all of the
E-Notebook collection types, excluding collection
types for which an individual relationship is set up.
In the example below, users will be able to add or
delete any type of collection from a Folder. The
features of Reactant collections within Folders may
be different, however, because this relationship is
defined separately:
Managing Collection
Listeners
Collection listeners modify the behaviors of collections—such as the creating, hiding, renaming,
duplicating, and moving behaviors. E-Notebook
provides several, standard collection listeners that
you may associate with collection types.
You may also develop your own, customized collection listeners to perform additional functions.
Adding a Collection Listener to a
Collection Type
“Unspecified Types of Collections” and “Unspecified Types of Template” appear in the list of col-
738•Managing Collection TypesCambridgeSoft
You can associate a collection listener with a collection type if you would like a particular function
to occur when a user takes an action on a collection. For example, if you create a new user and the
user collection listener is associated with the user
collection type, a dialog will appear prompting you
to enter a LoginID and other pertinent information.
See “Managing the Standard Collection Listeners”
on page 741 for information about the various collection listeners that E-Notebook provides.
To add a collection listener to a collection type:
1. Right-click the collection type in the Collection
Tree, and select Collection Type Configuration
2.
3.
4.
5.
from the menu that appears.
Right-Click Collection Listeners and select
New Collection Listener from the menu that
appears.
A new collection listener appears and you are
prompted to rename it.
Type in a name for the collection listener.
Enter the IENCollectionListener ProgID for
the Listener you wish to add. (This is the programmatic identifier that the Windows registry
uses to uniquely identify the object that implements the corresponding interface. The format
is OleServerName.ObjectName).
The collection listener is associated with the
collection type.
To close the Collection Type Configuration
dialog, click the close button
in the upper
right corner.
The dialog closes.
1. Right-click the collection type that contains the
listener in the Collection Tree, and select
Collection Type Configuration from the menu
that appears.
The Collection Type Configuration dialog
appears.
Viewing and Editing the
Properties of a Collection Listener
You can view and edit the custom properties that
you may be associated with a collection listener.
To do this:
2. If necessary, click the plus sign next to Collec-
tion Listeners to view the collection listeners
that are associated with this collection type.
Click the collection listener whose properties
you wish to view or edit.
3. Click the Custom Properties button.
ChemOffice 2006/E-NotebookManaging Collection Types
• 739
Administrator
The collection listener properties dialog
appears. This example shows the properties
dialog for the Auto Number Listener, which is
one of the standard E-Notebook collection listeners. (Note that if the collection listener has
no custom properties associated with it, a message to that effect will appear when you click
the Custom Properties button).
4. Edit the properties, if you wish.
5. Click OK to close the properties dialog.
6. To close the Collection Type Configuration
dialog, click the close button in the upper right
corner.
The dialog closes and your changes are saved.
1. Right-click the collection type that contains the
listener in the Collection Tree, and select
Collection Type Configuration from the menu
that appears.
Removing a Collection Listener
from a Collection Type
If you no longer want a particular collection listener to be associated with a collection type, you
can remove it from the collection type.
To do this:
The Collection Type Configuration dialog
appears.
2. If necessary, click the plus sign next to Collection Listeners to view the collection listeners
that are associated with this collection type.
3. Right-click the collection listener you wish to
remove from the collection type.
A menu appears.
4. Select Delete Collection Listener.
740•Managing Collection TypesCambridgeSoft
A message appears, asking you to confirm that
you wish to delete the collection listener.
5. Click Yes.
The collection listener is removed from the
collection type.
6. To close the Collection Type Configuration
dialog, click the close button in the upper right
corner.
The dialog closes.
Managing the Standard
Collection Listeners
E-Notebook provides several, standard collection
listeners that you may associate with collection
types. Collection listeners are used to modify the
behaviors of collections—such as the creating, hiding, renaming, duplicating and moving behaviors.
Managing the Auto Number Collection
Listener
The Auto Number Listener is used to automatically name newly created collections by appending
a serial number to the name of the collection that
contains the newly created collection.
For example, if a Notebook collection contains
experiments and the notebook is named NB-001,
the Auto Number Collection Listener can be associated with the Experiment collection type to automatically number experiments within the collection
(for example, NB-001-001).
of the first newly created collection. The increment
is used to specify the increment between newly created collections. The maximum is used to limit the
number of collections that can be contained.
When renaming a collection whose name was generated with the Auto Number Collection Listener,
the collection will check to ensure that the name
fits within the parameters described by the Auto
Number Listener properties. The name must begin
with the name of the parent collection followed by
a dash and a serial number.
Managing the Audit Collection Listener
The Audit Collection Listener is used to prevent
users from deleting a collection if the collection
has been modified since it was created. If this listener is associated with a collection type, then the
delete command will be disabled if the collection
has been modified.
Listener
Listener ProgID
Audit Collection
ENStandard9.AuditCollectionListener
Listener
Listener ProgID
This collection listener has no custom properties
associated with it.
Auto Number
ENStandard9.AutoNumberListener
Managing the Change Display
Collection Listener
The Auto Number Listener has three custom
properties: minimum, increment, and maximum.
The minimum is used to specify the serial number
ChemOffice 2006/E-NotebookManaging Collection Types
The Change Display Collection Listener is used to
enable Visual Display of Changes when a user cre-
• 741
ates a particular type of collection. (See “Managing
Visual Display of Changes” on page 761).
Administrator
Listener
Listener ProgID
Change Display
ENStandard9.ChangeDisplayListener
The Change Display Collection Listener is used to
enable Visual Display of Changes from collection
creation onward. Note that there is also a transition
listener that enables Visual Display of Changes
when a particular transition is performed on a collection. See “Managing the Change Display Transition Listener” on page 757 for more information.
Managing the Clear Value Collection
Listener
The Clear Value Collection Listener is associated
with a collection type containing sections with
tables/property fields. This listener can be used to
clear specified properties in tables or property list
fields when a collection is duplicated.
For example, you may wish to clear the table section of a collection when a user duplicates that section.
Listener
Listener ProgID
Clear Value
ENStandard9.ClearValueCListener
With the Custom Properties of the listener, you
specify the section type, the field, and the property
whose values are to be cleared. The top dropdown
list displays the Target Section Type in the collection type. The middle dropdown list displays the
Target Fields in the selected section type. The bottom dropdown list displays all of the Target properties in the field you have selected.
742•Managing Collection TypesCambridgeSoft
Managing the Delete Spawn
Collection Listener
Enterprise
The Delete Spawn collection listener is used in
conjunction with the batch explorer. (The batch
explorer is a form tool that makes it possible for
users to view the successors and predecessors of
reactions in a tree-like layout). When the Delete
Spawn Listener is associated with a collection type,
any batch explorer links to a collection of that type
will be deleted when the user deletes the collection.
Listener
Listener ProgID
Delete Spawn
ENStandard9.DelSpawnLinkLstnr
This collection listener has no custom properties
associated with it.
Managing the Parent Prefix Collection
Listener
The Parent Prefix listener is used to ensure that
when a user renames a collection, any contained
collection that has a name generated by the Auto
Number Listener is renamed with the new prefix.
For example, consider a Notebook collection that
contains Experiments. The Auto Number listener
is associated with the Experiment collection type
and the Parent Prefix listener is associated with the
Notebook collection Type. If a notebook name is
changed from “NB” to “Notebook”, then the Parent Prefix listener renames the contained experiments so that they begin with “Notebook”.
Listener
Parent
Prefix
Listener ProgID
ENStandard9.ParentPrefixListener
This collection listener has no custom properties
associated with it.
Managing the Database Procedure
Collection Listener
The Database Procedure Collection Listener is
used to execute a database procedure during an
operation on a collection.
For example, you may wish to clear the table section of a collection when a user duplicates that section.
Listener
Database
Procedure
Managing the Offline
Collection Listener
Enterprise
The Offline Collection Listener is associated with
Offline Collection type. This listener automatically
creates a reference to a newly created collection in
the offline folder.
Listener
Listener ProgID
Offline
ENStandard9.UniqueChildOfTypeCListener
Listener ProgID
ENStandard9.DBProcCollectionListener
With the Custom Properties of the listener, you
specify the name of the procedure and when it
should be called: for example, after create, before,
create, etc.
Managing the Fixed Name Collection
Listener
The Fixed Name Listener is used to prevent the
user from renaming collections. If the Fixed Name
Listener is associated with a collection type, then
the Rename command in the collection menu is
made inactive when collections of that type are
selected.
Listener
Listener ProgID
Fixed Name
ENStandard9.FixedNameListener
The Fixed Name Collection Listener has no custom properties associated with it.
ChemOffice 2006/E-NotebookManaging Collection Types
This collection listener has custom properties associated with it to configure. The dropdown list displays all of the collection types in the Container
Collection type and you can select the container
collection type to which you wish to add the
Offline Collection.
Managing the Owner Full Control
Collection Listener
The Owner Full Control collection listener provides the user with Full Control permission for this
type of collection when he/she is the owner. For
example, if this listener is associated with the notebook collection type, then the user who creates a
notebook will automatically be able to assign and
remove access permissions for the notebook.
Listener
Listener ProgID
Owner Full Control
ENStandard9.OwnerFullControlCListener
This Collection Listener has no custom properties
associated with it.
• 743
Managing the No Create
Offline Collection Listener
Enterprise
Administrator
The No Create Offline Collection Listener prevents the creation of this type of collection when
the user is working offline..
Listener
Listener ProgID
No Create Offline
ENStandard9.NoCreateOfflineCListener
This collection listener has no custom properties
associated with it
Managing the Parent Prefix Collection
Listener
The Parent Prefix listener is used to ensure that
when a user renames a collection, any contained
collection that has a name generated by the Auto
Number Listener is renamed with the new prefix.
For example, consider a Notebook collection that
contains Experiments. The Auto Number listener
is associated with the Experiment collection type
and the Parent Prefix listener is associated with the
Notebook collection Type. If a notebook name is
changed from “NB” to “Notebook”, then the Parent Prefix listener renames the contained
experiments so that they begin with “Notebook”.
Listener
Listener ProgID
Parent Prefix
ENStandard9.ParentPrefixListener
This collection listener has no custom properties
associated with it.
744•Managing Collection TypesCambridgeSoft
Managing the Prevent Reference Copy
Collection Listener
The Prevent Reference Copy collection listener
prevents users from copying collections that contain references to specific types of collections that
are in specific states. For example, if this listener is
associated with an experiment/page collection
type, it may be configured to prevent users from
copying pages/experiments that contain references
to folders that are in a Closed state.
Listener
Listener ProgID
Prevent Reference
Copy
ENStandard9.NoCopyRefStateCListener
Select the custom properties as shown below:
• Target Collection Type – the collection type
that is referenced.
• Target State – the state of the target collection
that would prevent a user from copying a collection that has this listener associated with it.
Managing the Prevent Delete when
Referenced Collection Listener
The Prevent Delete when Referenced Collection
Listener prevents users from deleting a collection if
the collection is referenced from another collection
in E-Notebook. The reference may occur in a
property list, a table, or an active document field.
You associate the listener with the collection type
that should not be deleted when it is referenced.
For example, if you want to prevent users from
deleting an Experiment/Page collection when that
Experiment Page is referenced, you would associ-
ate the listener with the Experiment/Page collection type.
Listener
Prevent Delete
when Referenced
Listener ProgID
ENStandard9.NoDeleteRefCListener
The Prevent Delete when Referenced Collection
Listener has no custom properties associated with
it.
Managing the Refresh Database Table
Privilege Change Collection Listener
The Refresh Database Table Privilege Change listener is used to refresh the contents of a database
table when the privileges associated with a collection change. The listener has properties that
describe the field that is refreshed when a privilege
is added or removed from a collection.
Listener
Refresh Database
Table Privilege
Change
Listener ProgID
ENStandard9.RefreshDBTablePCListener
With the Custom Properties of the listener, you
specify the target section type and target field. The
Target Section Type popup list contains a list of all
of the section types the currently logged in user can
read. The Target collection type should be set to
the section type that contains the field to be
refreshed. The Target Field popup list contains a
list of all of the database table fields in the Target
section type. The Target field should be set to the
ChemOffice 2006/E-NotebookManaging Collection Types
field which displays the data that is changed when
the privileges change.
Managing the Section List Collection
Listener
When the Section List Collection Listener is associated with a collection type, a list of the sections in
each collection of that type is cached on the
E-Notebook client. This makes it possible for
E-Notebook add-ins and field controls to use the
list. For example, in the default configuration, the
Section List Collection Listener is associated with
the Acronym collection type. A list of the sections
in an Acronym collection is cached on the client,
and the reaction toolbar accesses this list and displays it in the Quick Add dropdown.
Listener
Section List
Listener ProgID
ENStandard9.SectionListCListener
This collection listener has no custom properties
associated with it.
Managing the Security Collection
Listener
The Security Collection Listener allows you to
assign security privileges to a collection when it is
created. For example, you may define a collection
type that allows users to record their ideas and concepts. For IP reasons, you may want this type of
collection to be visible only to the owner and, for
example, a legal group in the company. This listener allows you to limit access to certain groups
and individuals automatically, when the collection
is created.
• 745
The owner of the collection is given Full Control
privilege by default.
Administrator
Listener
Security
Listener ProgID
ENStandard9.SecurityCListener
With the Custom Properties of the listener, you
specify individual users and groups who will be
able to access collections of this type.
Managing the Sequence Collection
Listener
The Sequence Collection Listener names a new
collection based on a global sequence that you
specify.
Listener
Sequence
Listener ProgID
ENStandard9.SequenceNumberCListener
With the Custom Properties of the listener, you
specify the prefix, format, suffix, and database
sequence names.
Managing the Unduplicatable
Collection Listener
If the Unduplicatable Collection Listener is associated with a collection type, contents of that type
will not be copied when a user copies the selected
collection. For example, there may be a
Page/Experiment collection. If the Unduplicatable
Collection Listener is associated with the
Page/Experiment collection type, these experi-
746•Managing Collection TypesCambridgeSoft
ments will not be copied when a user copies the
Experiment collection.
Listener
Unduplicatable
Collection
Listener ProgID
ENStandard9.UnduplicatableCListener
This collection listener has no custom properties
associated with it.
Managing the Unique Child Collection
Listener
The Unique Child Collection Listener ensures the
uniqueness of a collection of this type within its
container collection. For example, if you associate
the listener with the User Configuration collection
type, and then specify User as the container collection, it will only be possible to create a single User
Configuration within each user collection.
Listener
Unique Child
Listener ProgID
ENStandard9.UniqueChildOfTypeCListener
With the Custom Properties of the listener, you
specify the container collection.
Managing the User
Collection Listener
Enterprise
The User Collection Listener is designed for those
systems that use the Standard Oracle Authenticator
to authenticate users with E-Notebook.
The User Collection Listener is associated with the
User collection type to automatically set up users
correctly for authentication. When a new user is
created, the User Collection Listener displays the
User Properties dialog:
Once the user is specified, a new user collection is
created with the same name as the account. The
name of the user collection can be modified to any
valid version of the name.
Listener
User
Listener ProgID
ENStandard9.UserListener
Note that the User collection listener can only be
added to the User collection type, as E-Notebook
does not support multiple user collection types.
The User Collection Listener has no custom properties associated with it.
Managing Templates
Templates make it possible for E-Notebook users
to avoid reentering information unnecessarily. For
example, a user may create a template for a particular experiment/page. It may contain data and notes
that he often uses, or typical values for various
properties. The user can use the template as the
basis for new experiments/page collections.
Each time a collection type is created in E-Notebook, a template of that type is created automatically. As an administrator, you configure the rules
that determine which types of templates an
E-Notebook user can create, and which collection
types can contain or reference the templates. You
set up these rules the same way you would set them
up for any, other collection type: by adding tem-
ChemOffice 2006/E-NotebookManaging Collection Types
plates to collection types as contained collection or
reference types.
The template collection type should be added as a
contained collection type to a collection type that is
not the container into which users will drag the
templates to create new collections. For example, if
Notebooks contain Experiments, the Experiment
Template collection type should be added as a contained collection type within, for example, a Folder
or a User. If Experiment Template is a contained
collection type within Notebook, then a user will
simply create a new template when he drags a template into a Notebook.
Managing Collection Type Form
Tools
There are several form tools that may only be associated with collection types, for example, the New
Section Form Tool. These form tools are described
here. E-Notebook also provides a number of standard form tools that you may only associate with
section types. See Managing the Standard Form
Tools for more information.
Managing the Duplicate Collection
Form Tool
The Duplicate Collection Form Tool allows users
to create a copy of the selected collection. For
example, if a user clicks the Duplicate Collection
Form Tool on a Page/Experiment collection, the
Page/Experiment collection will be copied. The
new copy will appear within the same container
collection in the Collection Tree.
Form Tool
Form Tool Control
ProgID
Duplicate Collec- ENStandardCtl9.DuplicateCtion
FormTool
• 747
Managing the Structure Form Tool
Administrator
The Structure Form Tool is used to perform the
Analyze Structure command. The Analyze Structure command populates a property list with the
chemical formula and molecular weight of the
associated chemical structure.
In order to use the Structure Form Tool in an
E-Notebook form, one of each of the following
types of fields must be present in the form:
• Chemical Structure Field
• Property List - containing
• a “Molecular Weight” property and
• a “Molecular Formula” property.
Form Tool
Structure
• Table Field with Products Listener
Form Tool
Form Tool Control
ProgID
Next Step
ENStandardCtl9.ReactionFormTool
When you add a Reaction Form Tool to a form,
you must configure the following custom properties.
The E-Notebook User Guide provides more information about the tool and the calculations in the
stoichiometry grid. The Stoichiometry grid is the
combination of the Reactants and Products Fields.
Form Tool Control
ProgID
Managing the New Section Form Tool
ENStandardCtl9.StructureFormToolCtl
The New Section Form Tool allows users to add
new sections to a collection, for example, to a page
or an experiment. When the user clicks the form
tool he will be presented with a list of the types of
sections he may add.
When you add a Structure Form Tool to a Form,
you must configure the following custom properties.
Form Tool
Form Tool Control
ProgID
New Section
ENStandardCtl9.NewSectionFormTool
Managing the Next Step Form Tool
The Next Step Form Tool is used to create a new
page or experiment containing the products of the
associated chemical reaction.
In order to use the Next Step Form Tool in an
E-Notebook form, one of each of the following
types of fields must be present in the form:
• Chemical Structure Field
• Table Field with Reactants Listener
748•Managing Collection TypesCambridgeSoft
Managing the New Child Collection
Form Tool
The New Section Form Tool allows users to add
new contained collections to the selected collection. For example, a user could click this form tool
on a notebook in order to create a new
page/experiment within the notebook.
Form Tool
Form Tool Control
ProgID
New Section
ENStandardCtl9.NewChildCFormTool
Managing the New Sibling
Collection Form Tool
Enterprise
The New Sibling Collection Form Tool allows
users to create a new collection of the same type.
For example, if a user clicks the New Sibling Form
Tool on a notebook, a new notebook will be created. The new sibling will appear within the same
container collection in the Collection Tree.
Form Tool
Form Tool Control
ProgID
New Sibling
Collection
ENStandardCtl9.NewSiblingCFormTool
In E-Notebook, search types are simply collection
types that have search engines and search forms
associated with them. E-Notebook provides several, standard search engines. You may also
develop your own, custom search engines. For
example, you could use the tool to perform various
types of calculations and put the results into a
manageable format within an E-Notebook collection.
You can configure your own search forms to contain the fields you require.
Creating a Search Type
You can define your own search types for finding
and managing E-Notebook information that is
important to your users. In E-Notebook, search
types are simply collection types that have search
engines and search forms associated with them.
To create a search type,
1. Right-click a blank area of the Collection Tree.
A menu appears.
2. Select Browse All.
Managing Search Types
Search types allow users to search for information
in E-Notebook. Users can run searches, and then
save their queries and results in the Collection
Tree.
The entire Collection tree appears, showing the
Configuration Folder.
ChemOffice 2006/E-NotebookManaging Collection Types
• 749
3. If you wish, you may right-click the Configuration Folder and select Browse Here, so that the
Administrator
Configuration Folder will appear at the top of
the Collection tree.
6. Right-click the search type, and select Collection Type Configuration from the menu that
appears.
The Collection Type Configuration dialog
appears.
7. Specify the following information:
• Plural Name – enter the name applied to
multiple collections of this type.
• Icon Name – select Search as the icon to be
associated with the search type in the Collection tree.
8. Right-click Search Engines, and select New
Search Engine from the menu that appears.
4. Right-click the Search Types folder (or another
folder) and select New, then Collection Type.
A new collection type appears in the Collection
Tree, and you are prompted to rename it.
5. Enter a name for the collection type (i.e., the
search type).
A new search engine appears and you are
prompted to rename it. Its attributes appear to
the right. The name that you enter for the
750•Managing Collection TypesCambridgeSoft
search engine is the name that will appear in the
“Search For:” drop-down list when an E-Notebook user is in Search mode.
Collection Search Engine
The Collection Search Engine is used to perform
searches for collections and match criteria specified in the following fields:
• Collection Query field
• Collection Type Query field
• State Query Field
• Search Location
Search
Engine
Search Engine Search Engine
ProgID
Control ProgID
Collection ENSearchEngine9 ENSearchEngine9
.CollectionSearch- .CollectionReEngine
sultsResultsCtl
Section Search Engine
9. Enter the following information. (See “Manag-
ing the Standard Search Engines” on page 751
for more information about the standard,
E-Notebook Search Engines).
• IENSearchEngineProgID
• IENResultsCtlProgID
• IENResultsCtl License Key
Once you have created the search type, you
configure it as you would any other collection
type. The section type you associate with it
should be a search form. See “Creating a
Search Form” on page 752.
Managing the Standard Search
Engines
E-Notebook provides a several standard search
engines:
The Section Search Engine is used to perform
searches for sections and match criteria specified in
the a variety of field types:
• Property Query
• Table Query
• Query Text
• Chemical Query
In addition, any of the field types listed for the Collection Search Engine, above, may be used.
Search
Engine
Search Engine Search Engine
ProgID
Control ProgID
Section
ENSearchEngine9 ENSearchEngine9
.SectionSearch.CollectionReEngine
sultsResultsCtl
Chemical Structure Search Engine
The Chemical Structure Search Engine is used to
perform searches for chemical structures. The
ChemOffice 2006/E-NotebookManaging Collection Types
• 751
Administrator
results are organized by substructure. For each
chemical structure that matches a specified query, a
set of references is created that contain that chemical structure.
See Managing Chemical Query Fields.
Search
Engine
ProgID
2. Select New, then Section Type.
Search Engine
Control ProgID
ChemENChemSearch9.C ENChemSearch9
ical
hemSearchEngine .ChemStructure
SearchResults Ctl
Creating a Search Form
A search form is simply a section type that contains search fields. The search fields make it possible for users to search for the following
information within E-Notebook. For information
about each of the search fields and its usage, please
see Managing Search Fields.
When you configure a search form, the information that a user can search for is determined by 1)
the search fields in the form and 2) the search
engine associated with the search type.
To create a new search form,
1. In the Collection Tree, right-click the folder or
collection into which you are adding the search
form.
The collection menu appears.
A new section type appears in the Collection
Tree; its blank form appears to the right. You
are prompted to enter a name for the section
type.
3. Type in a name for the section type.
4. Right-click the new section type in the Collection Tree and select Section Type Configuration
from the menu that appears.
The Section Type Configuration dialog
appears. This is the dialog through which you
add and configure the components that make
up the Form
• Fields
• Form Tools
• Section Listeners
When you add Fields to the Section Type, you
must add search fields.
For information about how to configure the section type, see Managing Section Types and Forms.
Viewing and Editing the
Properties of a Search Engine
In some cases, a search engine may have custom
properties associated with it. You can view and/or
edit the properties that are associated with a search
engine.
752•Managing Collection TypesCambridgeSoft
5. Right-click the search type in the Collection
Tree, and select Collection Type Configuration
from the menu that appears.
8. Click the Custom Properties button.
If the search engine has custom properties associated with it, the properties dialog is displayed. You
may edit the properties at this point. If the search
engine has no custom properties, a dialog box
appears, stating that the search engine has no properties associated with it.
NOTE: None of the standard, E-Notebook search engines
have custom properties associated with them.
Managing States and
Transitions
The Collection Type Configuration dialog
appears.
6. Double-click Search Engines to expand the
category.
7. Click the search engine.
Its ProgID's appear to the right.
You can associate states with a collection type to
define properties of a collection at certain phases
or points in its life cycle. Transitions are the actions
a user takes to move collections from one state to
another. For example, a page/experiment may
have several states—each of which has different
annotation rules associated with it.
Transition listeners perform certain functions as
the collection moves from one state to another.
For example, a user may be prompted to enter values for certain fields, or a visual display of the
changes a user makes to a collection may be
enabled.
Adding States to a Collection
Type
The states of a collection type define properties,
such as change control options, that vary throughout its life cycle.
To add states to a collection type:
ChemOffice 2006/E-NotebookManaging Collection Types
• 753
1. Right-click the collection type in the Collection
Tree, and select Collection Type Configuration
from the menu that appears.
Administrator
The Collection Type Configuration dialog
appears.
Right-click States and select New State from
the menu that appears:
A new state appears and you are prompted to
rename it.
2. Enter a name for the State. Also, specify the
annotation rules that will apply to the State.
There are four annotation rules from which
you may choose. The rules appear in the dropdown lists.
The options are:
754•Managing Collection TypesCambridgeSoft
• Writable with Optional Annotation – the
user may supply annotation for changes if he
wishes. He will not be prompted to supply it.
• Read-Only – the collection cannot be
edited in this state.
• Writable with Prompted Optional Annotation – the user is prompted to supply
annotation for changes, but is not required
to supply it.
• Writable with Required Annotation – the
user must supply annotation for changes.
The user will be prompted to enter annotation whenever a version of the collection is
saved.
To add another state to the Collection Type, repeat
steps 2 and 3.
Once you have defined the states, you must configure the transitions from one state to another. To
set up a transition between states, see Configuring
a Transition between States.
Configuring a Transition between
States
A transition is the action a user takes to move a
collection from one state to another. For example,
a “Close” transition may allow a user to move a
collection from an Open state in which edits are
permitted to a Closed state in which the collection
is read-only.
You may also associated transition listeners with a
transition, so that the effect of the transition is
modified, usually by performing an operation that
is associated with the transition.
To configure a transition between states:
1. Right-click the collection type in the Collection
Tree, and select Collection Type Configuration
from the menu that appears.
The Collection Type Configuration dialog
appears.
2. Click the plus sign next to States to expand the
category and see the states that are associated
with the collection type.
3. Click the plus sign next to the state that is to be
the initial state in the transition. In this example, we are setting up a transition from the
Open state to the Closed state.
The Transition Types category appears.
4. Right-click Transition Types and select New
Transition Type from the menu that appears.
form the transition, but in some cases, you may
set up a transition that can only be performed
by administrators or certain users.
6. Select whether the owner may perform the
transition.
To associate a transition Listener with the transition, see Managing Transition Listeners.
Managing Transition Listeners
A dialog appears, listing the possible target
States for the Transition,
Transition listeners are used to perform a certain
function with the transition of a collection from
one state to another. For example, a transition may
be from an open state that permits edits to a
closed, read-only state. One of the standard transition listeners checks that required properties have
been entered before the transition can be completed.
E-Notebook provides several, standard transition
listeners that you may associate with transitions.
You may also develop your own, customized transition listeners to perform additional functions.
Associating a Transition Listener with a
Transition
5. Click a target state and click the Add button.
The target state appears within the list of Transition Types. To the right, a checkbox appears,
with which you may specify whether the owner
of the collection can perform the Transition.
By default, the owner of the collection can per-
Transition Listeners modify the effects of transitions, usually by performing an operation that is
associated with the transition.
To associate a transition listener with a transition:
1. Right-click the collection type in the Collection
tree, and select Collection Type Configuration
from the menu that appears.
The Collection Type Configuration dialog
appears.
ChemOffice 2006/E-NotebookManaging Collection Types
• 755
2. Click the plus sign next to states to expand the
Administrator
category and see the states that are associated
with the collection type.
3. Click the plus sign next to the state that is the
initial state in the transition. In this example,
the transition is from the Open state to the
Closed state.
The Transition Types category appears.
4. Click the plus sign next to Transition Types to
expand it and see the transitions.
5. Right-click the transition with which you wish
to associate the transition listener
A menu appears:
See Managing the Standard Transition Listeners
for descriptions of the standard, transition listeners
that E-Notebook provides.
Viewing and Editing the Properties of a
Transition Listener
A transition listener may have custom properties
associated with it.
To view and/or edit the custom properties:
1. Right-click the relevant collection type in the
Collection tree, and select Collection Type
Configuration from the menu that appears.
2.
3.
6. Select New Transition Listener .
A new transition listener appears, and you are
prompted to rename it.
4.
5.
The Collection Type Configuration dialog
appears.
Click the plus sign next to states to expand the
category and see the states that are associated
with the collection type.
Click the plus sign next to the state that is the
initial state in the transition. In this example,
the transition is from Open State to the Closed
State.
The Transition Types category appears.
Click the plus sign next to Transition Types to
expand it and see the transitions.
Click the transition listener whose properties
you wish to view or change.
7. Enter a name for the Transition Listener, and
fill in its IENTransitionListener ProgID.
The transition listener is associated with the transition. The function it performs will occur each time
a a user conducts this type of transition on this
type of collection.
756•Managing Collection TypesCambridgeSoft
6. Click the Custom Properties button.
If the transition listener has custom properties
associated with it, a properties dialog appears, and
you may view and/or edit the properties. If the
transition listener has no custom properties associated with it, a message appears to that effect.
Note that none of the standard transition listeners
have custom properties associated with them.
Removing a Transition Listener from a
Transition
In some cases, you may no longer want to have a
particular transition listener associated with the
transition for a collection type.
To remove a transition listener from a transition:
1. Right-click the relevant collection type in the
Collection Tree, and select Collection Type
Configuration from the menu that appears.
2.
3.
4.
5.
The Collection Type Configuration dialog
appears.
Click the plus sign next to states to expand the
category and see the states that are associated
with the collection type.
Click the plus sign next to the state that is the
initial state in the transition. In this example,
the transition is from Open state to the Closed
state.
The Transition Types category appears.
Click the plus sign next to Transition Types to
expand it and see the transitions.
Right-click the transition listener you wish to
remove.
A menu appears:
A message appears, asking you to confirm that
you wish to delete the Transition Listener.
7. Click Yes.
The transition listener is removed from the
transition.
Managing the Standard
Transition Listeners
Transition listeners are used to perform a certain
function that is associated with a transition from
one state of a collection to another. E-Notebook
provides several, standard transition listeners that
you may associate with transitions.
Managing the Annotate Transition
Listener
When a user performs the transition, the Annotate
listener prompts the user for an annotation that is
associated with the transition.
Listener
Listener ProgID
Comment
ENStandard9.AnnotateTListener
If you would like to make the annotation required,
you can configure the custom properties.
Click the Annotation Required checkbox to select
it. Then, click OK to close the dialog.
Managing the Change Display
Transition Listener
6. Select Delete Transition Listener.
ChemOffice 2006/E-NotebookManaging Collection Types
The Change Display Transition Listener is used to
enable Visual Display of Changes when a user per-
• 757
forms a particular transition. (See Managing Visual
Display of Changes).
Administrator
Listener
Listener ProgID
Change Display
ENStandard9.ChangeDisplayTListener
The Change Display Transition Listener has no
custom properties associated with it.
Note that there is also a collection listener that can
be used to enable Visual Display of Changes as
soon as a collection is created. See Managing the
Change Display Collection Listener for more
information
Managing Change Security Transition
Listener
The Change Security Transition Listener enables
Inherits Security for a collection during a transition. This may be used, for example, to limit access
to an experiment before it is in a Closed state.
Managing Confirm Transition Listener
The Confirm Transition Listener prompts a user to
confirm a specific transition prior to the transition
occurring and displays a message to the user whenever he goes for any transition, asking him to confirm that he is sure he wants to proceed with a
transition. If the user clicks Yes, then the transition
proceeds. If the user clicks No, then the transition
is canceled.
Listener
Listener ProgID
Confirm Transition
ENStandard9.ConfirmTListener
The Confirm Transition Listener has no custom
properties associated with it.
Managing the Export Transition Listener
The Export Transition Listener supports the printing workflow. It makes it possible to export the
contents of a collection as part of a transition.
Listener
Listener ProgID
Listener
Listener ProgID
Change Security
Transition
ENStandard9.ChangeSecuTransLstnr
Export Transition
ENStandard9.ExportTListener
With the custom properties of the transition listener, you have the option to specify whether, if a
particular property in the collection is filled in, the
Inherits Security option should remain off even
after the transition is completed. Specifically, you
can specify:
• Whether the property is in the collection or an
associated indexing collection.
• Section type containing the property
• Property list containing the Property
• Whether inherits security should be set or not
if the property is filled in.
758•Managing Collection TypesCambridgeSoft
The rendering sections and their corresponding
templates must be set as properties of this listener.
Managing the Final Print Transition
Listener
The final print transition listener can be added to a
transition to force the printout of the entire collection before the transition continues. The name of
the export template used for the final print is
“<Region> Final Print” where <Region> is
replaced by the name of the region of the currently
logged-on user.
When this transition listener is associated with a
transition type, transitions will be interrupted with
a message box as follows:
• “Click OK to print the final print of <Collection> using the printer <PrinterName>”.
where <Collection> is replaced with a description
of a collection, such as “experiment CS-00005”
and <PrinterName> is replaced with the name of
the default printer.
If the user clicks OK, then the transition proceeds
by printing all of the pages of the collection to the
default printer. If the user clicks Cancel, then the
transition is canceled.
After the printout is completed, another message
box appears as follows:
• “Did the final print of <Collection> succeed?
• Yes – Continue with this transition
• No – Print again
• Cancel – Abort this transition”
where <Collection> is replaced with a description
of a collection.
If the user clicks Yes, then the transition proceeds.
If the user clicks No, then the pages are printed
again and the message box re-appears. If the user
clicks Cancel, then the transition is canceled.
If the user wants to change the default printer, they
should choose print setup prior to performing the
transition.
Managing the Locked Container
Transition Listener
The Locked Container listener checks to ensure
that the container of the collection is in a state
which permits full control over the contents of the
container.
For example, consider an Experiment collection
contained within a Notebook collection. Closed is
a read-only (locked) state; the Reopen transition
moves a collection from the Closed, read-only state
to a state in which edits are permitted. If the
Locked Container Listener is associated with the
Reopen transition of the Experiment collection
type, then users will be prevented from reopening
an Experiment within a Notebook that is in the
Closed (locked) state.
Listener
Listener ProgID
Locked Contents ENStandard9.LockedContainerListener
The Locked Container Transition Listener has no
custom properties associated with it.
Managing the Print Transition Listener
The Print Transition Listener supports the printing
workflow. It makes it possible to print the contents
of a collection as part of a transition.
Listener
Listener ProgID
Listener
Listener ProgID
Final Print
ENStandard9.FinalPrintTListener
Print Transition
ENStandard9.PrintTListener
The Final Print Transition Listener has no custom
properties associated with it.
ChemOffice 2006/E-NotebookManaging Collection Types
The rendering sections and their corresponding
templates must be set as properties of this listener.
• 759
Managing the Required Non-Blank
Properties Transition Listener
Administrator
The Required Non-blank Properties Transition
Listener prevents a transition from occurring if
specific properties are not filled in.
Listener
Listener ProgID
Required Non- ENStandard9.RequiredNonblank Proper- BlankTListener
ties Transition
Required or Not Blank option, then the transition
will not be completed.
Listener
Listener ProgID
Required
Properties
ENStandard9.RequiredPropertiesListener
The Required Properties Transition Listener has
no custom properties associated with it.
Managing the Sign Version
Transition Listener
Enterprise
Managing the Required Rows Transition
Listener
The Required Rows Transition Listener prevents a
transition from occurring if specific rows are missing from a table.
Listener
Listener ProgID
Required
Rows Transition
ENStandard9.RequiredRowsTListener
Managing the Required Properties
Transition Listener
The Required Properties listener checks to ensure
that the contents of the property list and table section cells within the specified collection conform
to the Required and Not Blank options associated
with the properties of the property list and table
fields. If a property in a property list or a table
property does not conform with the corresponding
760•Managing Collection TypesCambridgeSoft
The Sign Version Transition Listener invokes ESignatures with a particular transition.
Listener
Listener ProgID
Sign Version
Transition
ENStandard9.SignVersionTL
The Configuration of this listener includes:
• Whether or not a countersignature is required
• The transition that should occur upon successful completion of the signature process (e.g.,
“to Closed”)
• The transition that should occur upon failure
of the signature process (e.g., “to Open”)
Managing the Unlocked Contents
Transition Listener
The Unlocked Contents listener checks to ensure
that the collections contained within a collection
are all locked before the container collection can
transition into a locked state (meaning that the
change and annotation rules for the state are ReadOnly).
For example, consider an Experiment collection
contained within a Notebook collection. Closed is
a read-only state, and the Close transition moves a
collection from an unlocked, editable state to the
Closed, read-only state. If the Unlocked Contents
Listener is associated with the Close transition of
the Notebook collection type, then users will be
prevented from closing a Notebook if it contains
experiments that are not Closed.
Listener
Listener ProgID
Unlocked
Contents
ENStandard9.UnlockedContentsListener
The Unlocked Contents Transition Listener has no
custom properties associated with it.
Managing the View Signed
Versions Transition Listener
Enterprise
The View Signed Versions Transition Listener
allows a user to view all of the electronically-signed
renditions of a collection. This listener is used with
the E-Signatures feature.
Listener
Listener ProgID
View Signed
ENStandard9.DisplaySignedVerVersions Tran- sionTL
sition
This listener has no custom properties.
Configuring Change Control
Options
E-Notebook provides auditing and change control
features. For every change that a user makes, an
audit trail records the logged in identity of the user,
the date, and the time. This is done automatically
when users add, delete, or update data. The audit
ChemOffice 2006/E-NotebookManaging Collection Types
trail information is stored in the E-Notebook database.
In addition, you may configure E-Notebook such
that users must annotate the changes they make to
collections. You may also enable Visual Display of
Changes at some point in the life cycle of a collection.
See the following topics:
• Managing Visual Display of Changes
• Configuring Annotation Options
• Configuring Autosave
Managing Visual Display of
Changes
Depending the collection type and its state, it is
possible for users to view a Visual Display of
Changes that have been made to data in the collection. If Visual Display of Changes is enabled, the
changes that have been made to a collection can be
viewed in E-Notebook, and the changes will be
shown in the printed collection.
Visual Display of Changes may be enabled from
the very beginning of the collection life cycle, when
the collection is first created. Alternatively, you
may enable Visual Display of Changes when a user
performs a particular collection transition; a common example is the transition from a closed, readonly state to a reopened state in which edits are
permitted.
The version of the collection that existed when the
Visual Display of Changes began is called the Baseline Version of the collection. (Note: a version is
created each time the collection is saved). Users
will see this version highlighted in the History
Pane. If Visual Display of Changes is enabled,
there are visual indicators next to the data that was
changed after the Baseline Version was saved. See
the User Guide for further description of the ways
changes are presented to the user.
When Visual Display of Changes is enabled for a
collection, the printed output will include 1) the
• 761
Administrator
baseline version that existed at the time that Visual
Display of Changes began and 2) all subsequent
changes.
Note that once Visual Display of Changes is
enabled for a collection, it remains enabled for the
life of the collection.
Enabling Visual Display of Changes
from Collection Creation Onward
To begin the Visual Display of Changes at collection creation,
1. Right-click the Collection Type in the
Collection tree, and select Collection Type
Configuration from the menu that appears.
The dialog closes. New collections of this type
will have Visual Display of Changes enabled
for their entire life cycles.
Enabling Visual Display of Changes
with a Transition
To enable Visual Display of Changes when a user
performs a particular collection transition:
1. Right-click the collection type in the Collection
2.
2. Right-Click Collection Listeners and select
New Collection Listener from the menu that
appears.
3.
4.
A new collection listener appears and you are
prompted to rename it.
5.
tree, and select Collection Type Configuration
from the menu that appears.
The Collection Type Configuration dialog
appears.
Click the plus sign next to States to expand the
category and see the states that are associated
with the collection type.
Click the plus sign next to the state that is the
initial state in the transition. For example, the
transition is from Closed state to the Reopened
state.
The Transition Types category appears.
Click the plus sign next to Transition Types to
expand it and see the transitions.
Right-click the transition with which you
would like the Visual Display of Changes to
begin.
A menu appears:
3. Type in a name for the collection listener.
4. Enter the ENStandard8.ChangeDisplayListener
as the IENCollectionListener ProgID for the
listener you wish to add.
The collection listener is associated with the
collection type.
5. To close the collection type configuration dialog, click the close button in the upper right
corner.
762•Managing Collection TypesCambridgeSoft
6. Select New Transition Listener.
A new Transition Listener appears, and you are
prompted to rename it.
7. Enter a name for the transition listener, and
enter ENStandard8.ChangeDisplayTListener
as its IENTransitionListener ProgID.
Visual Display of Changes will be enabled when a
user performs this transition on a collection of this
type.
Note that even when Visual Display of Changes is
not enabled, the audit trail still captures the history,
and the history pane displays a list of the saved versions and transitions for a collection.
Configuring Annotation Options
You may configure E-Notebook such that users
can annotate the changes they make to collections.
E-Notebook provides four options for annotation.
You configure these options on a per collection
type, per state basis. This allows you to configure
different annotation rules for the different phases
of a collection life cycle.
To configure the annotation rules for a state:
1. Right-click the collection type in the Collection
tree, and select Collection Type Configuration
from the menu that appears.
The Collection Type Configuration dialog
appears.
2. Click the plus sign next to states to expand the
category and see the states that are associated
with the collection type.
3. Click the state for which you are configuring
the annotation options.
You may select an annotation rule for 1) Existing Sections and 2) New Sections.
There are four annotation rules from which
you may choose. The rules appear in the dropdown lists.
The options are:
• Writable with Optional Annotation – the
user may supply annotation for changes if he
wishes. He will not be prompted to supply it.
• Read-Only – the collection cannot be
edited in this state.
• Writable with Prompted Optional Annotation – when the collection is saved, the
user is prompted to supply annotation for
changes, but is not required to supply it.
• Writable with Required Annotation –
when the collection is saved, the user must
supply annotation for changes. The user will
be prompted to enter annotation whenever
a version of the collection is saved.
4. Select the annotation rules you wish to apply to
the state.
When a collection of this type is in this state,
the annotation option you have selected will
apply.
If you would like users to provide annotation when
they perform a particular transition, you can associate the Annotate Listener with the transition.
Configuring Autosave
The Autosave feature allows changes to be saved
automatically to the database after a specified time
ChemOffice 2006/E-NotebookManaging Collection Types
• 763
Administrator
interval following a change made to the contents of
a section. The autosave interval for a particular collection can either by specified by a user that has full
control over the collection or can be inherited
from the parent collection.
To specify the autosave interval for a collection
The autosave interval appears in the Collection
Properties dialog.
1. In the collection tree, right-click the collection
and choose the Collection Properties from the
menu that appears.
The autosave interval appears, in units of minutes. If no autosave interval has been specified
for the collection or its containing collection,
then the autosave interval is “None” (as shown
above) and no autosave will occur for the collection.
2. Click the Edit Autosave Interval button.
The Edit Autosave Interval dialog box appears.
A dialog box appears in which the user can
specify the autosave interval for the collection.
The top portion of the dialog box displays the
autosave interval for the parent collection.
If the autosave interval you have specified is
greater than the autosave interval of the container of the collection, then the autosave interval of the container will override the autosave
interval specified for the collection.
Managing Export Templates
of Collection Types
3. Enter the autosave interval for the collection
and click OK .
764•Managing Collection TypesCambridgeSoft
Collection type export templates allow users to
print E-Notebook sections in a collection, or to
export sections to Microsoft Word. You create
export templates in MS Word sections, using tags
to refer to E-Notebook fields.
An export template must be set up for each, new
collection type you create.
To view the export template of a collection type:
1. Right-click the collection type in the Collection
Tree.
A menu appears.
2. Select Show, then Export Templates.
The right frame is blank if there is no export
template associated with the collection type. If
you wish to edit an existing export template,
see “Editing the Export Template for a Collection Type” below.
3. Right-click the section icon in the right frame.
The section menu appears.
If the collection type has an export template,
the template appears in the right frame. If not,
the right frame is blank, and you must create a
new template.
See the following topic:
• Creating and Editing the Export Template for
a Collection Type
Creating and Editing the Export
Templates for a Collection Type
4. Select Section Types.
The section types dialog box appears.
The export template for a collection type allows
users to print the E-Notebook sections in a particular collection, and to export sections to Microsoft
Word. The headers and footers from the collection
type export template are used in the printout.
Creating the Export Templates for a
Collection Type
To create an export template:
1. Right-click the collection type in the Collection
5. Select Export Template and click the Add but-
Tree.
A menu appears.
2. Select Show, then Export Templates.
ton.
6. Click the Close button.
The section types dialog closes.
7. Right-click the section menu icon again.
The section menu appears.
ChemOffice 2006/E-NotebookManaging Collection Types
• 765
8. Select New and then Export Template.
tion type export template can contain standard
replacement tags with the following data:
Administrator
Tag
9.
10.
11.
12.
An MS Word section appears in the right
frame.
Right-click the section menu icon and select
Rename.
Type in the name of one of the regions. (The
region names are found in the Region tab of
the Collection Properties dialog for a user
collection), for example, “United States”.
Create an additional export template for each
of the other regions to which your system users
are assigned. Name each template after the
region–e.g., “Europe” and “Asia/Pacific”.
Add the text “<Contents>” into each of the
templates. An example is shown below:
Editing the Header and Footer
Information
The header and footer is printed on every page
when a user prints the collection or a portion of
the collection. The header and footer of a collec-
<collectionStatus> The state of the collection.
(Note that if you are using
the Final Print Transition
Listener, the state will print
as the initial state of the transition, and not as the target
state. In this specific case, if
you would like the name of
the target state to print,
simply type the text name of
the state into the header or
footer.)
<dateCreated>
The timestamp of creation
of the collection
<dateModified>
The timestamp of last modification
<datetoday>
The timestamp of the
creation of the export document or printout
<collectionOwner> The name of the owner of
the collection
<collectionName> The name of the collection
<collectionType>
To edit this data:
766•Managing Collection TypesCambridgeSoft
Replacement
The type of the collection
1. While viewing the export template in
E-Notebook, click the print layout view button
in the lower left corner of the MS Word field.
It is the third button in the row.
The export template appears in print layout
view, and the header is visible
ChemOffice 2006/E-NotebookManaging Collection Types
2. Double-click the header or footer.
3. Edit as desired.
• 767
Administrator
768•Managing Collection TypesCambridgeSoft
Chapter 40: User Administration
You can create new users and associate logon IDs,
passwords, and security properties with
them. Security properties determine who
has access to a user and the collections that fall
under the user in the collection tree.
To streamline user administration, you can create
user groups, and then create users who inherit the
access privileges that you have assigned to the user
groups.
Users and user groups are types of collections and
they appear in the Collection Tree. You can manage users and user groups—copying them, referencing them, moving them, etc.—as you would
other collections.
Creating a User
You create a User just as you would create any
other collection. Users are often created within
User Groups. See Creating a User Group for more
information.
1. Right-click the collection (which may be a User
Group) to which you wish to add the User.
A menu appears.
2. Select.
A list of the types of collections you may add
appears.
ChemOffice 2006/E-NotebookUser Administration
3. Select User.
A User is created within the collection you
selected. You are prompted to enter a Login ID
and select whether the User is a system administrator. (Note: with some systems, you may be
prompted to enter a password for the user as
well).
Once you have created the User, you must assign a
geographical region. See Setting the Region for a
User.
The User automatically inherits the security privileges of the User Group (or other container collection) to which he was added. You may disable
inherited security and set the access permissions
for the User independently. In addition, you may
add additional security permissions to the User
Collection.
See Managing Collection Security for more information.
• 767
Creating a User Group
Administrator
You create a User Group just as you would create
another collection. You can then add Users to the
group, and the Users automatically inherit the
security profile of the group. It is possible to add
additional permissions to a User's individual security profile as well.
To create a User Group:
1. Right-click the collection to which you wish to
add the User Group. This is often the root collection of E-Notebook.
A menu appears.
2. Select New.
A list of the collections you may add appears.
3. Select User Group:
access to the collections you specify. See Managing
Collection Security for more information.
Changing a User's
Properties
If you are a system administrator, you can change a
user’s security and logon properties.
To change the logon ID and/or administrator status of a user:
1. Right-click the user in the Collection Tree.
A menu appears.
2. Select User Info.
The User Properties dialog box appears.
3. You may edit the logon ID and password, and
select whether or not the user has administrative privileges.
NOTE: The Administrator checkbox is only visible if
you are a full system administrator, and the password
field may not be present with your specific configuration
of E-Notebook.
A User Group is created and you are prompted
to give it a name.
Changing the Security Properties
of a User Collection
Depending upon your configuration, you may add
Users to the group by either 1) adding references
to the Users, or 2) adding User collections to the
User Group directly.
You may then assign security permissions to the
User Group, so that all members of the group have
768•User AdministrationCambridgeSoft
You may change the security properties for a User
Collection as well, to determine who may view or
edit the collections that the user creates. You
change the security properties for a user just as you
would change the security properties of any other
collection. See Managing Collection Security.
Chapter 41: Managing E-Notebook Security
Security in E-Notebook is set up on a collection
basis. Security properties may be set up for any collection in the Collection Tree—whether it be a
User, a Notebook, a Folder, etc. The security properties of a collection determine who has read,
write, or full control access to that collection.
These access privileges may be assigned to individual users or to user groups.
By default, each collection inherits the security
properties of its parent in the Collection Tree. The
inherited security option may be disabled, however, so that the security properties of a collection
can be configured independently of its parent.
In addition to security at the collection level, you
may also set up security for collection transitions,
specifying which users may or may not perform
certain transitions on collections.
In order for you to see who is logged into E-Notebook, there is a Session Management tool. This
tool also provides the ability to end the E-Notebook session for a particular user.
Managing Collection
Security
As an Administrator, you may change the access
privileges that E-Notebook Users have to specific
collections.
The default security for a new collection is Inherits
Security, meaning that a collection has the same
security profile as its parent collection in the collection tree. You may disable inherited security if you
would like the security profile of a collection to be
independent of the security profile of its parent.
To disable inherited security:
ChemOffice 2006/E-NotebookManaging E-Notebook Security
1. Right-click the collection for which you wish to
disable inherited security.
A menu appears.
2. If Inherits Security is checked, select it to clear
the checkmark.
Inherits Security is disabled.
NOTE: If you disable Inherits Security, the
permissions that the collection had inherited will become
assigned permissions. You must remove these
permissions explicitly if you do not wish these users or
groups to have access to the collection.
Collection Security
To configure or change the security properties of a
collection:
• 771
1. Right-click the collection whose security prop-
Administrator
erties you wish to change.
A menu appears.
2. Select Collection Properties.
The Collection Properties dialog box appears.
3. Click the Collection Security tab.
772•Managing E-Notebook SecurityCambridgeSoft
The Security tab appears. The Groups and
Users who have permission to access this item
appear in one of the two lists: Inherited Permissions, Assigned Permissions.
Inherited Permissions are permissions inherited from the parent collection in the collection
tree. (These permissions can only be changed
by disabling inherited security, as discussed
above, or by changing the security profile of
the parent collection). Only the Assigned Permissions can be changed from this dialog.
4. Take the appropriate action:
Desired Result
Add a User or Group
to the list of
Assigned Permissions.
Action to take
1. Click Add...
The Choose User or
Group dialog appears.
2. Select the appropriate
user or group from
the tree. (You may
either a) right-click
within a blank portion
of the tree and select
Browse All to see all of
the Users, or b) click
the Search button and
perform a search for a
User or group of
Users).
3. Click Add.
4. Select the appropriate
access from the list
box:
• Read – permits a user
to view the Collection, but not edit it.
• Read and Write –
permits a user to view
and edit the Collection.
Full Control – permits a
user to view the Collection, edit it, and assign or
remove security permissions for it.
Remove a User or
Group from the list
Desired Result
Change the type of
access for a user or
group currently in the
list.
Action to take
1. Highlight the user or
group in the list of
Assigned Permissions.
2. Select the appropriate
access from the listbox:
• Read
• Read and Write
• Full Control
NOTE: Note that a user
with Full Control permission
over his home collection (his
user collection) is also able to
end his own sessions by using
the Session Manager.
Transition Security
Transition Security is the security applied to the
collection transitions. For example, some users
may be allowed to close a collection while others
can also reopen the collection.
To change the Transition Security Properties of a
collection:
1. Right-click the collection whose Security Properties you wish to change.
A menu appears.
2. Select Collection Properties.
The Collection Properties dialog box appears.
3. Click the Transition Security tab.
1. Highlight the user or
group in the list.
2. Click Remove.
ChemOffice 2006/E-NotebookManaging E-Notebook Security
• 773
Administrator
The Security tab appears. The groups and users
who have permission to apply a transition to
this item appear in one of the two lists: Inherited Permissions, Assigned Permissions.
4. Take the appropriate action:
Desired Result Action to take
Add a User or
Group to the list
of Assigned Permissions.
1. Click Add...
2.
3.
4.
Inherited Permissions are permissions inherited
from the parent collection in the Collection Tree.
(These permissions can only be changed by disabling inherited security, as discussed above, or by
changing the security profile of the parent collection). Only the Assigned Permissions can be
changed from this dialog.
5.
Remove a User or
Group from the
list.
The Choose User or
Group dialog appears.
Select the appropriate
user or group from the
tree. (You may either 1)
right-click within a blank
portion of the tree and
select Browse All to see all
of the Users, or 2) click
the Search button and
perform a search for a
User or group of Users).
Click Add.
The Choose Transition
Types dialog appears.
Select the appropriate
transition type(s).
Click Add.
The User or Group
appears in the Assigned
Permissions list, along
with the transition type(s)
you selected.
• Click Remove.
Managing the Security
Properties of a Collection
Type
The access privileges that you set up for a collection type determine which users may create new
collections of this type in the Collection Tree, and
774•Managing E-Notebook SecurityCambridgeSoft
which users may modify the configuration of the
collection type.
As with other collections, the default security for a
collection type is Inherits Security, meaning that a
collection type has the same security profile as its
parent collection in the Collection Tree. You may
disable inherited security if you would like the
security profile of a collection type to be independent of the security profile of its parent.
To disable inherited security:
1. Right-click the collection type for which you
wish to disable inherited security.
The collection menu appears.
Inherits Security is disabled.
NOTE: If you disable Inherits Security, the
permissions that the collection had inherited will become
assigned permissions. You must remove these
permissions explicitly if you do not wish these users or
groups to have access to the collection.
Collection Type Security
To set up or change the security properties of a
collection type:
1. Right-click the collection type whose security
properties you wish to change.
A menu appears.
2. Select Collection Properties.
The Collection Properties dialog box appears.
2. If Inherits Security is checked, select it to clear
the checkmark.
3. Click the Collection Security tab.
ChemOffice 2006/E-NotebookManaging E-Notebook Security
• 775
Administrator
The Security tab appears. The groups and users
who have permission to access this item appear
in one of the two lists: Inherited Permissions,
Assigned Permissions.
4. Take the appropriate action
Desired
Result
Add a User
or Group to
the list of
Assigned
Permissions
Action to take
1. Click Add...
The Choose User or
Group dialog appears.
2. Select the appropriate user
or group from the tree.
(You may either 1) rightclick within a blank portion of the tree and select
Browse All to see all of the
users, or 2) click the Search
button and perform a
search for a user or group
of users).
3. Click Add.
4. Select the appropriate
access from the list box:
• Read – permits a user to
Inherited Permissions are permissions inherited from the parent collection in the collection
tree. (These permissions can only be changed
by disabling inherited security, as discussed
above, or by changing the security profile of
the parent collection). Only the Assigned Permissions can be changed from this dialog.
776•Managing E-Notebook SecurityCambridgeSoft
create new collections of
this type in the Collection
Tree. (Note: If a user also
has read access to the parent collection of this collection type, he will be able
to view the collection type
in the collection tree).
• Read and Write – permits
a user make changes to the
configuration and content
of the collection type itself.
These users may also create new collections of this
type in the collection tree.
Desired
Result
Action to take
• Full Control – permits a
user to view the collection
type, modify it, and assign
or remove security permissions for it.
Remove a
User or
Group from
the list
1. Highlight the user or
Change the
type of
access for a
user or
group currently in the
list
1. Highlight the user or
group in the list.
2. Click Remove.
group in the list of
Assigned Permissions.
2. Select the appropriate
access from the list box:
• Read – permits a user to
create new collections of
this type in the Collection
Tree. (Note: If a user also
has read access to the parent collection of this collection type, he will be able
to view the collection type
in the Collection Tree).
ChemOffice 2006/E-NotebookManaging E-Notebook Security
Desired
Result
Action to take
• Read and Write – permits
a user make changes to the
to the configuration and
content of the collection
type itself. These users
may also create new collections of this type in the
Collection Tree.
• Full Control – permits a
user to view the collection
type, modify it, and assign
or remove security permissions for it.
Managing the Security
Properties of a Section Type
The access privileges that you set up for a section
type determine which users may create view or
configure modify the section type.
This topic applies only to the security of the section type itself. If a user has access to a particular
collection type that contains the section type, it is
not necessary for the user to have access to the
section type in order to view/create sections within
a collection. That is, the privileges you set up for a
collection type apply to all of its sections.
As with other collections, the default security for a
section type is Inherits Security, meaning that a
section type has the same security profile as its parent collection in the Collection Tree. You may disable inherited security if you would like the security
profile of a section type to be independent of the
security profile of its parent.
To disable inherited security:
1. Right-click the section type for which you wish
to disable inherited security.
• 777
A menu appears.
Section Type Security
Administrator
To set up or change the security properties of a
section type:
1. In the Collection Tree, right-click the section
type whose properties you wish to change.
A menu appears.
2. Select Collection Properties.
The Collection Properties dialog box appears.
2. If Inherits Security is checked, select it to clear
the checkmark.
Inherits Security is disabled.
NOTE: If you disable Inherits Security, the
permissions that the collection had inherited will become
assigned permissions. You must remove these
permissions explicitly if you do not wish these users or
groups to have access to the collection.
3. Click the Collection Security tab.
778•Managing E-Notebook SecurityCambridgeSoft
The Security tab appears. The groups and users
who have permission to access this item appear
in one of the two lists: Inherited Permissions,
Assigned Permissions.
4. Take the appropriate action:
Desired
Result
Add a User
or Group to
the list of
Assigned
Permissions
Action to take
1. Click Add...
2.
3.
4.
•
Inherited Permissions are permissions inherited from the parent collection in the Collection Tree. (These permissions can only be
changed by disabling inherited security, as discussed above, or by changing the security profile of the parent collection). Only the Assigned
Permissions can be changed from this dialog.
•
•
ChemOffice 2006/E-NotebookManaging E-Notebook Security
The Choose User or
Group dialog appears.
Select the appropriate user
or group from the tree.
(You may either 1) rightclick within a blank portion of the tree and select
Browse All to see all of the
users, or 2) click the Search
button and perform a
search for a user or group
of users).
Click Add.
Select the appropriate
access from the listbox:
Read – permits a user to
view the section type in the
Collection Tree. (Note that
the user must also have
Read access to the parent
collection of a section type
in order to view it in the
tree).
Read and Write – permits
a user make changes to the
to the configuration of the
section type.
Full Control – permits a
user to view the section
type, modify it, and assign
or remove security permissions for it.
• 779
Desired
Result
Action to take
Administrator
Remove a
User or
Group from
the list
1. Highlight the user or
Change the
type of
access for a
user or
group currently in the
list
1. Highlight the user or
1. Right-click within a blank portion of the Col-
lection Tree.
A menu appears:
group in the list.
2. Click Remove.
2.
•
•
•
group in the list of
Assigned Permissions.
Select the appropriate
access from the listbox:
Read – permits a user to
view the section type in the
Collection Tree. (Note that
the user must also have
Read access to the parent
collection of a section type
in order to view it in the
tree).
Read and Write – permits
a user make changes to the
to the configuration of the
section type.
Full Control – permits a
user to view the section
type, modify it, and assign
or remove security permissions for it.
2. Select Session Manager....
The Session Manager appears.
This dialog shows the Users, Session numbers, and
Start Times for each current session.
Ending a Session
Using the Session Manager
The Session Manager makes it possible for you to
see who is logged in to E-Notebook at any given
time. This tool also provides the ability to end the
E-Notebook session for a particular user. You may
want to end a user's session if the user has locked a
collection for editing and another user must access
the collection.
To access the Session Manager:
780•Managing E-Notebook SecurityCambridgeSoft
If you wish to end a particular user's session, you
may do so. To end a session:
1. Click the session in the list.
The session is highlighted.
2. Click End Session.
A message appears, asking you to confirm that
you wish to end the session.
3. Click Yes.
The session is ended. The user must log on to
E-Notebook again.
NOTE: A user with Full Control permission over his
home collection (his user collection) may use the Session Manager to end his own sessions.
ChemOffice 2006/E-NotebookManaging E-Notebook Security
• 781
Administrator
782•Managing E-Notebook SecurityCambridgeSoft
Chapter 42: Summary of the Standard
Add-Ins
This topic summarizes the functions of all the
standard E-Notebook add-ins—listeners, field
types, and form tools—that you may use to configure E-Notebook.
Collection Listeners
Collection listeners are used to modify the
behaviors of collections—such as the creating,
hiding, renaming, duplicating and moving
behaviors.
•
•
Enterprise
•
•
•
•
Delete Spawn Collection Lis-
tener – deletes any batch explorer links to a collection when the collection is deleted.
• Database Procedure Collection Listener –
executes a database procedure during an operation on a collection.
• Fixed Name Collection Listener – prevents the
user from renaming collections.
•
•
•
ChemOffice 2006/E-NotebookSummary of the Standard Add-Ins
Offline Collection Listener –
automatically creates a reference to a newly created collection in the offline folder.
• Owner Full Control Collection Listener – provides the user with Full Control permission for
this type of collection when he/she is the
owner.
• Auto Number Collection Listener – allows the
administrator to specify a customized numbering scheme for a Collection Type.
• Audit Collection Listener – prevents the user
from deleting a collection if the collection has
been modified since it was created.
• Change Display Collection Listener – enables
Visual Display of Changes when a user creates
a particular type of collection.
• Clear Value Collection Listener – clears specified properties in tables or property list fields
when a collection is duplicated.
Enterprise
Enterprise
No Create Offline Collection
Listener – prevents the creation of this type of
collection when the user is working offline.
Parent Prefix Collection Listener – ensures that
when the collection is renamed, any contained
collection that has a name generated by the
Auto Number listener has the correct prefix if
the name of the parent collection changes.
Prevent Delete when Referenced Collection
Listener – prevents users from deleting this
type of collection when it is referenced from
another collection.
Prevent Reference Copy Collection Listener –
prevents users from copying collections that
contain references to specific types of collections that are in specific states.
Refresh Database Table Privilege Change Collection Listener – used to refresh the contents
of a database table when the privileges associated with a collection change.
Section List Collection Listener – caches a list
of sections in a collection on the E-Notebook
client.
Security Collection Listener – allows you to
assign security privileges to a collection when it
is created.
• 783
Administrator
• Sequence Collection Listener – names a new
• Required Rows Transition Listener – prevents
collection based on a global sequence that you
specify.
• Unduplicatable Collection Listener – blocks
the duplication of a specific type of collection.
• Unique Child Collection Listener – ensures the
uniqueness of a collection of this type within its
container collection.
• User Collection Listener – when a User is created, this listener displays a dialog box for key
information that must be entered, such as
logon ID.
a transition from occurring if specific rows are
missing from a table.
• Required Properties Transition Listener –
checks to ensure that the contents of the property list and tables meet the configured
Required or Not Blank option. If they do not,
then the transition will not be completed
• Unlocked Contents Transition Listener –
checks to ensure that the collections contained
within a collection are all locked before the
container collection can transition into a
locked state.
Transition Listeners
Transition listeners are used to perform a certain
function that is associated with a transition from
one state of a collection to another.
• Annotate Transition Listener – prompts the
•
•
•
•
•
•
•
user for an annotation that is associated with
the transition.
Change Display Transition Listener – enables
Visual Display of Changes when the transition
is performed.
Change Security Transition Listener – enables
Inherits Security for a collection during a transition.
Confirm Transition Transition Listener – a
user to confirm a specific transition prior to the
transition occurring.
Export Transition Listener – exports the contents of a collection as part of a transition.
Locked Container Transition Listener – checks
to ensure that the container of the collection is
in a state which permits full control over the
contents of the container.
Print Transition Listener – prints the contents
of a collection as part of a transition.
Required Non-blank Properties Transition Listener – prevents a transition from occurring if
specific properties are not filled in.
784•Summary of the Standard Add-InsCambridgeSoft
Section Listeners
E-Notebook provides a number of standard
Section Listeners, which may be used to modify the
behavior of sections:
• Audit Section Listener – prevents a user from
•
•
•
•
•
deleting the section only if it has been modified
since it was created.
Clear Value Section Listener – clears specified
values when a user duplicates a section.
Fixed Section Name Listener – prevents the
user from renaming the section.
New Name Section Listener – prompts a user
to enter a name for a section when it is created.
Required Section Listener – prevents the user
from deleting the section at any time.
Unduplicatable Section Listener – prevents
certain sections from being copied when a user
copies the collection that contains them.
Form Tools
E-Notebook provides a number of standard form
tools, which may be associated with section types to
perform certain functions:
Section Type Form Tools
• Active Document (Import/Export) Form
Tool – allows the import and export of MS
Word documents and stored document Fields.
•
Enterprise
Batch Explorer Form Tool –
allows a user to view a tree diagram of the predecessors and successors of a batch or compound.
• Character Map Form Tool – allows a user to
enter Unicode characters into a text field, property list, or table.
• Import Image Form Tool – allows a user
import a standard image file as a PDF.
• Insert/Export Form Tool – to insert and
export MS Word documents.
• Insert Reference Form Tool – allows a user
to reference to a specific collection type in a
target property of a property list.
• Load Query Form Tool – allows the user to
copy the contents of the currently selected
query into the query panel, to conduct a search.
• Mail Section Form Tool – allows a user to send
a section to the inbox of another collection,
such as an experiment or a user collection.
• New Subsection Form Tool – creates a new
subsection when clicked.
• Next Step Form Tool – creates a new collection with a reaction section containing the
products of the selected reaction.
• Spectrum Form Tool – enables the import of
various spectra files, and allows users to copy,
paste, import, and export those files.
• Word Link Form Tool – allows a user to create
a link from an MS Word document to a section
or collection in E-Notebook.
Collection Type Form Tools
• Duplicate Collection Form Tool – allows a
user to create a copy of the collection.
• New Child Collection Form Tool – creates a
new collection within the selected collection.
For example, the tool may be used to created a
new page within a notebook.
• New Section Form Tool – allows a user to
associate a new section with a collection.
•
Enterprise
New Sibling Collection Form
Tool – allows a user to create a new collection
of the same type.
Search Engines
• Three, standard search engines may be used:
• Collection Search Engine – used to search for
collections, based on their metadata.
• Section Search Engine – used to perform
searches for sections and match criteria specified in the a variety of field types.
• Chemical Structure Search Engine – used to
perform searches for chemical structures. The
results are organized by substructure.
Field Types
The following field types are designed for use in
data forms, for data entry, analysis, and display:
• Active Document Fields(MS Word fields)
• AutoText Fields
• Chemical Structure Fields
• Context Sensitive Help Fields
• Captured Image Fields
• Database Table Fields
• Database Value Fields
• Excel Fields
• PowerPoint Fields
• Property List Fields
• Spectrum Fields
• Stored Document Fields
• Subsection Fields
ChemOffice 2006/E-NotebookSummary of the Standard Add-Ins
• 785
• Table Fields
• Block Edit Cell Field Listener – makes a partic-
• URL Display Fields
Administrator
Several fields types are designed for use exclusively
within search forms, to search for data in
E-Notebook. They are:
• Chemical Query Fields – used for finding
•
•
•
•
•
•
•
•
chemical structures in E-Notebook tables and
chemical structure fields.
Collection Query Fields – used for
finding collections that match the metadata criteria that a user specifies.
Collection Type Query Fields – used for specifying the collection type over which a search is
run.
Query Text Fields – used for finding text that
occurs in several types of E-Notebook fields.
State Query Fields – used to specify the state of
the collections over which a search is conducted.
Property Query Fields – used for finding specific properties in E-Notebook property lists.
Table Query Fields – used for finding specific
properties in E-Notebook tables.
Unannotated Version Query Fields – used for
finding collections in which changes that
required annotation have been made, but for
which no annotation has been provided
Search Location Fields – used to specify the
branch of the collection tree over which the
search is to be run.
•
•
•
•
Field Listeners
Field listeners may be associated with fields to
modify their behavior.
• Generic Field Listeners – can be applied to any
field type:
• Block User Edit Field Listener – makes a particular field read-only to users.
786•Summary of the Standard Add-InsCambridgeSoft
•
ular field read-only to users and administrators.
Copy Default Field Listener – removes the
content of a field when a user copies the collection that contains the field.
Active Document Field Listeners:
• Analyze Reaction Chemical Structure Listener – automatically updates reactants and
products tables in a stoichiometry grid when
a user modifies the reaction drawing.
• Prevent External Link Active Document
Listener – may be associated with an Active
Document field to prevent users from linking to external URLs.
Chemical Structure Field Listeners:
• Analyze Reaction Chemical Structure
Listener – updates a stoichiometry grid
when a user edits a reaction
• Chemical Property Chemical Structure Listener – Calculates chemical structure properties of molecular weight and molecular
formula, and inserts them into a property list
when the contents of the chemical structure
change.
MS Excel Field Listeners:
• Break External Links Listener – notifies the
user the external link in MS Excel files
stored in E-Notebook will be broken.
• Hide Add-Ins Listener – allows the user to
disable add-ins associated with MS Excel in
E-Notebook.
• Remove Macros Listener – allows the user
to disable add-ins associated with MS Excel
in E-Notebook.
Property List Listeners
• Block Reference In State Property List Listener – prevents a user from adding a reference to a particular type of collection that is
in a particular state
• Person Property List Listener – populates
• Validate Value Table Listener – validates a
the value of a property with the logged-on
user's name whenever the value of another
property is changed.
• Chemical Properties Property List Listener
– populates the Molecular Weight and
Molecular Formula properties automatically
as the drawing in a chemical structure field is
changed
• Validate Value Property List Listener – validates a value in an E-Notebook property list
against an external database.
• Formula listener – allows you to associate a
formula with a cell in a property list, and display the returned value in the cell.
• Table Listeners:
• Analyze Reaction Table Listener – automatically updates reactants and products tables
in a stoichiometry grid when a user modifies
a reaction drawing.
• Block Reference table listener – prevents a
user from adding a reference to a specific
type of collection that is in a particular state.
• Formula listener – allows you to associate a
formula with a table cell, and display the
returned value in the cell.
• Products table listener – is associated with
the products table field in the stoichiometry
grid of a reaction section.
• Products Fixed Limiting table listener –
same as the Products listener, but the limiting equivalents cannot vary.
• Reactants table listener – is associated with
the reactants table field in the stoichiometry
grid of a reaction section.
• Reactants Fixed Limiting table listener –
same as the Reactants listener, but the limiting equivalents cannot vary.
value in an E-Notebook table against an
external database.
• Unique Property Table Listener – prevents
adding more than one property of the same
type to a table.
• Subsection Listeners:
• Button View Subsection Field Listener –
forces subsections into button view (as
opposed to the standard tab view).
• Hide Tools Subsection Listener – hides the
form tool area of a subsection for more efficient screen usage.
ChemOffice 2006/E-NotebookSummary of the Standard Add-Ins
Commands
Commands can be associated with a collection
types and sections types to render content in:
exporting to MS Word, PDF, or printing.
• Collection Commands
• Export to MS Word Collection Command –
this command allows you to render the contents of a collection to an MS Word document type.
Enterprise
•
Export to PDF Collection
Command – allows to render and save the
contents of a collection to a PDF document.
• Print Collection Command – prints the contents of a collection using an MS Word document.
• Section Commands
• Export to MS Word Section Command –
this command allows you to render the contents of a section to an MS Word document
type.
• Print Section Command – prints the contents of a section using an MS Word document.
• 787
Rendering Add-ins
Administrator
Rendering add-ins may be used to modify the
behavior of rendering – printing and exporting to
Word.
• Fixed Text After Word Renderer – This renderer renders some fixed text at the end of a
collection when rendering the collection.
• Full History Word Renderer – This renderer
renders the entire history of a collection when
rendering the collection.
• Tracked History Word Renderer – This renderer renders the history of a collection since
change display was turned on for the collection.
• Fixed Table Field Renderer – renders the con-
•
•
•
•
tents of a table according to the tags in a Word
table.
NonBlank Property Field Renderer – renders
the name and value of a property if the property is not blank.
One Property Value Field Renderer – renders
the value of a single property according to the
tags in a Word table.
One Table Value Field Renderer – renders the
value of a single table cell according to the tags
in a Word table.
Property Value Field Renderer – renders the
values of all the properties in a property list
without their corresponding names.
Chapter 43: Using the Batch Import Facility
The batch import facility in E-Notebook provides
for a means to import a partial or complete configuration in a single menu command. This process is
controlled by an import script called the Batch File,
which is an xml file adhering to the schema
described in this document. The Batch File typically refers to additional files, either E-Notebook
content files created with the Export command
(called Content Files) or subsidiary batch files. This
process is initiated by selecting a collection in the
E-Notebook collection tree (which will be referred
to as the Parent Collection) and choosing the
Import command.
<batch>
The root element must be a <batch>. There are no
attributes defined for the batch element. A batch
may contain zero or more of any of the following
elements, interspersed in any order, except as dictated by the dependencies between the imported
collection and section types.
788•Using the Batch Import FacilityCambridgeSoft
• log
• alert
• refresh
• import
<import>
The import element causes a single file to be
imported. This file may contain any content,
including section types, collection types, collections, or sections. There are no attributes defined
for the import element. Each import element may
contain a target element, if none is specified, the
target is the parent collection. Each import element
must contain a source element.
<target>
The target element describes where in the E-Notebook collection hierarchy the imported content is
to be placed. This element must contain one of the
following elements, depending on what sort of
content is being imported:
• collectionType
• childReference
<collectionType>
A collectionType element indicates that the relationships for a previously imported collection type
are to be imported. The name attribute specifies
the name of the collection type for which relationships are to be imported, and the collectionType
element must include a collection element which
specifies by position the first (and only) collection
which defines that collection type. For example:
<import>
<target><collectionType name="Binder">
<collection position="1"/></collectionType>
</target>
<source>Collection Types/Binder.xml
</source>
</import>
<childReference>
A <childReference> indicates a reference to a collection contained within the Parent Collection.
This element must contain a name or position
attribute, but is invariably used with a name. For
example, this may be used to create a grandchild of
the Parent Collection, as follows:
<import>
<source>Section Types.xml</source>
</import>
<import>
<target><childReference name="Section
Types"/>
</target>
<source>General Information.xml</source>
</import>
Assuming “Section Types.xml” describes a collection named “Section Types” and that “General
Information.xml” describes a section type, this
ChemOffice 2006/E-NotebookUsing the Batch Import Facility
<import> will create a “Section Types” collection,
and within that, a General Information section
type.
The E-Notebook collection hierarchy distinguishes
between the nodes, called “collections”, and the
links between the nodes, called “references”. Every
reference has one container collection and one target collection, and a collection may be referred to
as the target of any number of references. Thus,
the <childReference> describes a reference, but if a
<target> specifies a reference, it is assumed that the
target is the reference's target collection. A <childReference> may contain a <targetCollection> element explicitly to indicate that the target is the
collection, not the reference, but this is optional
unless one wishes to further specify a collection
contained within this collection. For example, to
specify deeper levels in the collection hierarchy,
one might use:
<import>
<target>
<childReference name="Some Folder">
<targetCollection>
<childReference name="Another Folder"/>
</targetCollection>
</childReference>
</target>
<source>Deeper Folder.xml</source>
</import>
<source>
The source element contains text which specifies
the path of the file to be imported. This is interpreted relative to the batch file.
<log>
The log element contains text which is written to
the client log file, if logging is enabled. If logging is
not enabled, this element is ignored. Example:
<log>General Information section type created
</log>
• 789
<alert>
Administrator
The alert element causes a message to be displayed.
This element must contain the text to be displayed,
and may have a title attribute which specifies the
title of the message box, and may have a buttons
attribute which may be 0 or 1. If the buttons
attribute is 0 or not specified, the message box will
have an OK button only. If the buttons attribute is
790•Using the Batch Import FacilityCambridgeSoft
1, the message box will have OK and Cancel, and
if Cancel is pressed, the import process will stop.
<refresh>
The refresh element causes the client to refresh the
display of section and collection type information
to show the effect of any imported objects. One
commonly uses a refresh element at the end of the
import script.
Appendix I-F: Technical Support
Overview
CambridgeSoft Corporation (CS) provides technical support to all registered users of this software
through the internet, and through our Technical
Support department.
Our Technical Support webpages contain answers
to frequently asked questions (FAQs) and general
information about our software. You can access
our Technical Support page using the following
address: http://www.cambridgesoft.com/services/
If you don’t find the answers you need on our
website, please do the following before contacting
Technical Support.
9. Check the ReadMe file for known limitations
or conflicts.
10.Check the system requirements for the software at the beginning of this User’s Guide.
11.Read the Troubleshooting section of this
appendix and follow the possible resolution
tactics outlined there.
12.If all your attempts to resolve a problem fail, fill
out a copy of the CS Software Problem Report
Form at the back of this User’s Guide. This
form is also available on-line at:
http://www.cambridgesoft.com/services/mail
• Try to reproduce the problem before con-
tacting us. If you can reproduce the problem, please record the exact steps that you
took to do so.
• Record the exact wording of any error messages that appear.
• Record anything that you have tried to correct the problem.
ChemOffice 2006/ChemFinderTechnical Support
Overview
You can deliver your CS Software Problem Report
Form to Technical Support by the following methods:
Internet: http://www.cambridgesoft.com/services/mail
Email: [email protected]
Fax: 617 588-9360
Mail: CambridgeSoft Corporation
ATTN: Technical Support
100 CambridgePark Drive
Cambridge, MA 02140 USA
Serial Numbers
When contacting Technical Support, you must
always provide your serial number. This serial number was on the outside of the original application
box, and is the number that you entered when you
launched your CambridgeSoft application for the
first time. If you have thrown away your box and
lost your installation instructions, you can find the
serial number in the following way:
• Choose About CS <application name> from the
Help menu. The serial number appears at the
bottom left of the About box.
For more information on obtaining serial numbers
and registration codes see: http://www.cambridgesoft.com/services/codes.cfm
Troubleshooting
This section describes steps you can take that
affect the overall performance of s Desktop Applications, as well as steps to follow if your computer
crashes when using a CS software product.
• 185
Performance
Administrator
Below are some ways you can optimize the performance of CambridgeSoft Desktop Applications:
• In the Performance tab in the System control
panel, allocate more processor time to the
application.
• Install more physical RAM. The more you
have, the less ChemOffice Desktop Applications will have to access your hard disk to use
Virtual Memory.
• Increase the Virtual Memory (VM). Virtual
memory extends RAM by allowing space on
your hard disk to be used as RAM. However,
the time for swapping between the application
and the hard disk is slower than swapping with
physical RAM.
Change the VM as follows:
• System control panel, Performance tab.
System Crashes
CambridgeSoft Desktop Applications should
never crash, but below are the steps you should go
through to try to resolve issues that cause computer crashes while using a CS software product.
1. Restart Windows and try to reproduce the
problem. If the problem recurs, continue with
the following steps.
2. The most common conflicts concern Video
Drivers, Printer Drivers, screen savers, and
virus protection. If you do need to contact us,
be sure to determine what type and version of
drivers you are using.
186•Technical SupportCambridgeSoft
Overview
• Video Driver related problems: If you are
having problems with the display of any
CambridgeSoft Desktop Application, try
switching to the VGA video driver in the
display Control Panel (or System Setup, and
then retest the problems. If using a different
driver helps, your original driver may need
to be updated–contact the maker of the
driver and obtain the most up-to-date
driver. If you still have trouble contact us
with the relevant details about the original
driver and the resulting problem.
• Printer Driver related problems: Try
using a different printer driver. If using a different driver helps, your original driver may
need to be updated–contact the maker of
the driver and obtain the most up-to-date
driver. If you still have trouble contact us
with the relevant details about the original
driver and the resulting problem.
3. Try reinstalling the software. Before you reinstall, uninstall the software and disable all background applications, including screen savers
and virus protection. See the complete uninstall instructions on the CambridgeSoft Technical Support web page.
4. If the problem still occurs, use our contact
form at: http://www.cambridgesoft.com/services/mail and provide the details of the problem to Technical Support.
Appendix I-G: Accessing the CambridgeSoft Web Site
Online Menu Overview
The ChemFinder Online menu gives you quick
access to the CambridgeSoft web site from within
ChemFinder. With the Online menu, you can:
• Register your software.
• Search for compounds by name or ACX number and insert the structure in a worksheet
• Use ACX numbers, or names or structures in
the worksheet, to search for chemical information
• Browse the CambridgeSoft website for technical support, documentation, software updates,
and more
To use the Online menu, you must have internet
access.
If your serial number is invalid for any reason, or if
you do not have an internet connection, you will
have to contact CambridgeSoft Support to receive
a registration code.
You may use your ChemOffice application a limited number of times while waiting for the registration process to be completed. Once the application
times out, you must register to activate the software.
In addition to registering your software, you can
request literature, or register for limited free access
to ChemFinder.com, ChemACX.com, ChemClub.com, and the email edition of ChemNews
from the Register Online link of the Online menu.
This link connects you to the CambridgeSoft Professional Services page. From this page you can
link to a registration form.
To register online:
1. From the Online menu, choose Register Online.
The CambridgeSoft Professional Services page
opens in your browser.
Register tab
Registering Online
ChemOffice 2006 applications utilize a new security scheme. In order to activate any ChemOffice
application, you must register with the CambridgeSoft website to receive a registration code. Upon
filling out a registration form, the registration code
is sent to you by email. This registration scheme
does not apply to site licenses.
2. Select the Register tab.
Accessing the Online
ChemDraw User’s Guide
The Online menu link Browse CS ChemDraw Documentation opens the CambridgeSoft Desktop Manuals page, where you can access current and
ChemOffice 2006/ChemFinderAccessing the CambridgeSoft Web Site
Online Menu Overview
• 187
Administrator
previous versions of the ChemFinder User’s
Guide.
To access the CambridgeSoft Manuals page:
1. From the Online menu, choose Browse
CS ChemDraw Documentation.
The Desktop Manuals page appears. PDF versions of the CambridgeSoft manuals can be
accessed from this page.
NOTE: If you do not have a CambridgeSoft User
account, you will be directed to a sign-up page first.
2. Click version of the manual to view.
Accessing CambridgeSoft
Technical Support
The Online menu link Browse CS ChemFinder
Technical Support also opens the CambridgeSoft
Professional Services page. There are a number of
links on this page for Troubleshooting, Downloads, Q&A (the ChemOffice FAQ), Contact, and
so forth.
Finding Information on
ChemFinder.com
The Find Information on ChemFinder.com menu
item links your browser to the ChemFinder database record of the compound you have selected.
188•Accessing the CambridgeSoft Web SiteCambridgeSoft
Online Menu Overview
ChemFinder is the public-access database on the
ChemFinder.com website. It contains physical,
regulatory, and reference data for organic and inorganic compounds.
To access ChemFinder.com:
1. In ChemFinder, select a structure you want to
look up.
2. From the Online menu, choose Find Information
on ChemFinder.com.
The ChemFinder.com page opens in your
browser with information on the selected
structure.
In ChemFinder.com you can search for chemical
information by name (including trade names), CAS
number, molecular formula, or molecular weight.
Follow the links to do substructure queries.The
following illustration shows part of the page for
Benzene.
Finding Chemical Suppliers
on ACX.com
Finding ACX Structures and
Numbers
The Find Suppliers on ChemStore.Com menu item
links your browser to the chemacx.com database
record of suppliers of the compound you have
selected.
ChemACX (Available Chemicals Exchange) is a
Webserver application that accesses a database of
commercially available chemicals. The database
contains catalogs from research and industrial
chemical vendors.
ChemACX allows the user to search for particular
chemicals and view a list of vendors providing
those chemicals.
To use Find Suppliers on ChemStore.Com menu
access:
1. In ChemFinder, select a structure you want to
look up.
2. From the Online menu, choose Find Suppliers
on ChemStore.com.
The ChemACX.Com page opens in your
browser with information on the selected
structure.
For example the ChemACX.com page for Benzene
is shown below.
ChemFinder searches ACX and returns information about related structures and numbers. You
can place the returned information in your document.
ACX Structures
There are two ways to find ACX structures: by
ACX number or by name.
To find a structure that corresponds to an ACX
number:
1. From the Online menu, choose Find Structure
from ACX Number.
The Find Structure from ACX number dialog box
appears.
2. Type the ACX registry number.
3. Click the OK button.
The Structure appears in your document.
To find a structure from a name
1. From the Online menu, choose Find Structure
from Name at ChemACX.com.
The Find Structure from Name dialog box
appears.
For more information on using the ChemACX
website, see the ChemOffice Enterprise Workgroup & Databases Manual.
ChemOffice 2006/ChemFinderAccessing the CambridgeSoft Web Site
Online Menu Overview
• 189
2. Type in a name. As with ChemFinder.com, you
Administrator
can use a chemical name or a trade name.
3. Click the OK button.
The Structure appears in your document.
The ChemStore.Com page opens in your
browser.
ACX Numbers
To Find an ACX number for a structure:
1. In a ChemFinder document, select the structure for which you want to find an ACX number.
2. From the Online menu, choose Find ACX Numbers from Structure.
The ACX number appears in the Find ACX
Numbers from Structure dialog box.
You can search ChemStore.Com for chemicals, lab
supplies, chemistry-related software, and other
items you want to buy. You can access
ChemACX.Com, LabEqwip.Com, and other pages
from ChemStore.Com.
Browsing
CambridgeSoft.com
Browsing ChemStore.com
Browse ChemStore.com opens the ChemStore
page of the CambridgeSoft web site.
To access Browse ChemStore.com:
From the Online menu, choose Browse ChemStore.com.
190•Accessing the CambridgeSoft Web SiteCambridgeSoft
Online Menu Overview
Browse CambridgeSoft.com opens the Home page
of the CambridgeSoft web site.
To access the CambridgeSoft Home Page:
From the Online menu, choose Browse CambridgeSoft.com.
The CambridgeSoft web site in your browser.
Check the CambridgeSoft web site for new product information. You can also get to ChemStore.Com, ChemNews.Com, and other pages
through CambridgeSoft.Com.
Using the ChemOffice SDK
The ChemOffice Software Developer’s Kit (SDK)
enables you to customize your applications.
To browse the ChemOffice SDK:
From the Online menu, choose Browse
ChemOffice SDK.
The CS ChemOffice SDK page opens in your
browser.
The ChemOffice SDK page contains documentation, sample code, and other resources for the
Application Programming Interfaces (APIs).
ChemOffice 2006/ChemFinderAccessing the CambridgeSoft Web Site
Online Menu Overview
• 191
Administrator
192•Accessing the CambridgeSoft Web SiteCambridgeSoft
Online Menu Overview
Index
A
About the E-Notebook Guide 506
Adding
information to the stoichiometry table 533
items from the autotext pane 541
new collections 512
new reactant collections 516
new reactants 515
properties to the field 613
reference within the user collection 512
references to the folder 514
spectra 562
structures 530
Adding a Collection Listener to a Collection Type
738
Adding a Contained Collection Type 735
Adding a Contained Reference Type 736
Adding a field to a Section Type 646
Adding a field to an existing form 657
Adding a Form Tool to a Section Type 647
Adding a link
from a property list to a collection 559
from a property list to a section 560
from a property list to an external URL 560
from a table to a collection 569
from a table to a section 570
Adding a new Field Type 724
Adding a Property to the Property List 698
Adding a Property to the Table
711
Adding a Section Listener to a Section Type 652
Adding a Section Type to a Collection Type 733
Adding States to a Collection Type 753
Advanced text searching 615
Advanced text searching options
ABOUT 616
E-Notebook 10
Advanced text searching options (continued)
AND (&) 617
Backslash 616
Curly Brackets {} 615
EQUIValence (= ) 617
Fuzzy (?) 617
MINUS (-) 618
NEAR 618
NOT (~) 619
OR (|) 620
Soundex (!) 620
Stem ($) 621
Annotation of changes 598
Applying a filter 531
Associating a list of manually entered values with
a property 699, 714
Associating a Transition Listener with a Transition 755
Autosave, saving changes with 598
Autotext
based on other fields in the section 543
inserting custom 542
inserting links with 542
working with 540
B
Basic text searching 615
Batch import commands
788, 789, 790
Browsing
at a higher level 526
from home 526
limiting collection 525
the entire collection tree 527
up to the user group 512
Index
•
i
C
Administrator
Changes and audit trail 597
Changes menu 598
Changing a Field Type 724
Changing a section 579
Changing a User's Properties 768
Changing Box Orientation 664
Changing collection security properties 589
Changing the Dimensions of a Box Manually
662
Changing the Relationship between a Contained
Collection Type and the Parent Collection Type
735
Changing the Relationship between a Contained
Reference Type and the Parent Collection Type
737
Changing the Security Properties of a User Collection 768
Changing the Weight of a Box 661
Chemical Structure Search Engine 751
Clearing Fields when Configuring a Form 663
Clicking the changes icon 597
Closing and reopening pages and experiments
514
Collection
changing security properties 589
deleting a 587
duplicating within a container 586
E-Notebook
adding from a property list 559
adding from a table 569
exporting 588
exporting to MS Word 592
importing 588
limiting browsing 525
moving between containers 585
moving within containers 584
organizing 584
printing 593
printing multiple 593
ii
•Index
Collection (continued)
reactant
adding a new 516
adding a new reactant to existing 515
renaming 587
saving and hiding 525
saving changes 597
security 589
transition, performing 592
tree, browsing the entire 527
tree, hiding 525
user
adding a new collection to 512
adding a reference within 512
viewing properties 587
Collection Listeners 783
Collection Search Engine 751
Collection Security 771
Collection Type Security 775
Configuring a Form 655
Configuring a New Form 655
Configuring a Transition between States 754
Configuring a Database Table Field 691
Configuring Annotation Options 763
Configuring Autosave 763
Configuring Change Control Options 761
Configuring Relationships to Unspecified Types
of Collections 738
Configuring the Appearance of a Property List
699
Configuring the Appearance of a Table 712
Creating
folders 514
new autotext definitions 543
notebooks 513
pages or experiments 513
pages or experiments from a template 514
references within a table cell 569
references within the collection tree 585
sections 579
Creating a Database Table Field 690
CambridgeSoft
Creating a New Collection Type 731
Creating a New Section Type 645
Creating a Property List 697
Creating a Search Form 752
Creating a Search Type 749
Creating a Table Field 711
Creating a User 767
Creating a User Group 768
Creating and Editing the Export Templates for a
Collection Type 765
Creating the Export Template for a Section Type
Ending a session 641
E-Notebook
getting started 506
introducing 503
refreshing 642
User's Guide 511
Escape characters 615
Exact phrase matching 615
Expanding the drawing window 528
Exporting a collection 588
Exporting a collection or section to MS Word
Creating the Export Templates for a Collection
Type 765
Cutting and pasting a section 580
Exporting sections to MS Word 581
666
D
Database Lookup Configuration 701, 702, 713
Delete a structure 569
Deleting a Box from a Form 658
Deleting a collection 587
Deleting a Field Type 724
Drawing a structure or reaction 528
Drawing and analyzing reactions 529
Duplicating a collection within a container collection 586
Duplicating a section between collections 581
Duplicating a section within a collection 580
E
Editing a structure or image 568
Editing an Enumerated Values List 714
Editing the Export Template for a Section Type
666
Editing the Header and Footer Information 766
Editing an Enumerated Values List 700
Enabling Visual Display of Changes from Collection Creation Onward 762
Enabling Visual Display of Changes with a Transition 762
Ending a Session 780
E-Notebook 10
592
F
FAQ, technical support 185
Field Listeners 786
Field Types 785
Filtering acronyms with the reaction toolbar 531
Form Tools 784
G
Getting started in E-Notebook 506
H
Having a Section Appear by Default 733
Hiding a Box 663
Hiding Fields and Boxes when Configuring a
Form 663
Hiding Fields in a Form 664
Hiding the Box Name 660
Hiding the collection tree 525
Hiding the Max Button 659
I
Importing
and exporting collections 588
collections 588
Inserting
custom Autotext 542
links with Autotext 542
Index
•
iii
Administrator
Inserting (continued)
new reactants and products 540
reactants and products from the stoichiometry grid 540
L
Limiting collection browsing 525
Logging In 506
Logging in with Internet Explorer 506
647
M
Managing Active Document Field Listeners 686
Managing Active Document Fields 685
Managing AutoText Fields 686
Managing Chemical Query Fields 718
Managing Chemical Structure Field Listeners
689
Managing Chemical Structure Fields 688
Managing Collection Listeners 738
Managing Collection Security 771
Managing Collection Type Form Tools 747
Managing Collection Types 731
Managing Contained Collection Types 735
Managing Contained Reference Types 736
Managing Data Fields 685
Managing Database Table Fields 690
Managing Database Values in Property Lists 701
Managing Database Values in Tables 712
Managing E-Notebook Security 771
Managing Enumerated Values in Tables 713
Managing Enumerated Values in Property Lists
699
Managing Excel Fields 694
Managing Export Templates for Section Types
665
Managing Export Templates of Collection Types
764
Managing Fields 683
Managing fields within a Section Type 646
Managing Form Tools 647
Managing Property List Listeners 703
iv
Managing Property Lists 697
Managing Search Fields 718
Managing Search Types 749
Managing Section Listeners 652
Managing Spectrum Fields 707
Managing States and Transitions 753
Managing Stored Document Fields 707
Managing Subsection Field Listeners 709
Managing Subsection Fields 708
Managing Summary Fields in a Table of Contents
•Index
Managing Table Fields 710
Managing Table Listeners 714
Managing Templates 747
Managing the Active Document Form Tool 651
Managing the Add Reactant Table Listener 715
Managing the Add-In Configuration 723
Managing the Analyze Reaction Table Listener
716
Managing the Annotate Transition Listener 757
Managing the Audit Section Listener 655
Managing the Auto Number Collection Listener
741
Managing the Block Reference In State Property
List Listener 705
Managing the Block Reference In State Table
Listener 716
Managing the Button View Subsection Listener
709
Managing the Change Display Collection Listener 741
Managing the Change Display Transition Listener 757
Managing the Chemical Properties Property List
Listener 706
Managing the Final Print Transition Listener 758
Managing the Fixed Name Collection Listener
743
Managing the Fixed Section Name Listener 654
Managing the Insert Reference Form Tool 652
CambridgeSoft
Managing the Locked Container Transition Listener 759
Managing the New Child Collection Form Tool
748
Managing the New Section Form Tool 650
Managing the New Subsection Section Form
Tool 650
Managing the Next Step Form Tool 650
Managing the Owner Full Control Collection Listener 743
Managing the Parent Prefix Collection Listener
742
Managing the Person Property List Listener 706
Managing the Prevent Delete when Referenced
Collection Listener 744
Managing the Prevent External Link Active Document Field Listener 686
Managing the Prevent Reference Copy Collection Listener 744
Managing the Print Multiple Form Tool 652
Managing the Products Table Listener 715
Managing the Reactants Table Listener 715
Managing the Required Properties Transition
Listener 760
Managing the Required Section Listener 654
Managing the Security Properties of a Collection
Type 774
Managing the Security Properties of a Section
Type 777
Managing the Spectrum Form Tool 651
Managing the Standard Collection Listeners 741
Managing the Standard Form Tools 650
Managing the Standard Search Engines 751
Managing the Standard Section Listeners 654
Managing the Standard Transition Listeners 757
Managing the Unlocked Contents Transition Listener 760
Managing the User Collection Listener 746
Managing the Validate Value Property List Listener 706
Managing the Validate Value Table Listener 716
E-Notebook 10
Managing the Analyze Reaction Chemical
Structure Listener 689
Managing Transition Listeners 755
Managing Units in Property Lists and Tables 726
Managing URL Display Fields 717
Managing Visual Display of Changes 761
Managing Property Query Fields 720
Managing Search Location Fields 722
Managing State Query Fields 721
Managing Table Query Fields 721
Managing Unannotated Version Query Fields
722
Move a column 566
Move a row 566
Moving a section within a collection 580
Moving collections between container collections 585
Moving collections within a container collection
584
N
Navigation overview 507
New features 503
O
Organizing collections 584
Other fields in a spectrum section 562
Overview 508
P
Page Breaks 668
Performance, optimizing 186
Performing a collection transition 592
Printing
collections 593
multiple collections at once 593
sections 581
Property lists 543
Providing required annotation 599
Providing unprompted, optional annotation 599
Index
•
v
R
Administrator
Reaction
drawing 528
drawing and analyzing 529
Reactions, MS Word, MS Excel, and other sections 525
Rearranging Boxes in a Form 658
Reconfiguring an Existing Form 657
Refreshing E-Notebook 642
Removing
filters 532
properties from the field 613
reactants and products from the stoichiometry table 534
sections 579
Removing a Collection Listener from a Collection Type 740
Removing a Contained Collection Type from a
Collection Type 736
Removing a Contained Reference Type from a
Collection Type 737
Removing a Form Tool from a Section Type 649
Removing a Section Listener from a Section
Type 654
Removing a Section Type from a Collection Type
734
Removing a Transition Listener from a Transition 757
Renaming a collection 587
Renaming a section 580
Replacing a spectrum 562
Resizing Boxes in a Form 661
S
Saving
changes through backup and restore 598
changes to a collection 597
changes, by browsing to another collection
598
changes, through Autosave 598
Search Engines 785
vi
•Index
Search options 614
Searching 605
for text, with the query text field 614
with collection attributes 612
with the property query and table query fields
613
with the search location field 611
with wildcards 615
Section
changing a 579
cutting and pasting 580
duplicating between collections 581
duplicating within a collection 580
exporting to MS Word 581
moving within a collection 580
names as categories 544
printing 581
reactions, MS Word, MS Excel 525
removing 579
renaming 580
spectrum, other fields in 562
Section Listeners 784
Section Metadata Tags 667
Section Search Engine 751
Section Type Security 778
Security overview 507
Serial number 185
Setting the Fields in Boxes 656
Showing and hiding collections 525
Showing and Hiding the Max Button for a Box
659
Showing and Hiding the Name of a Box 660
Showing the Max Button 659
Showing the Name of a Box 661
Sort data by a property 567
Specification of Units 727
Specifying an annotation through the history
pane 601
Spectra, replacing 562
Standard Field Types 667
Start menu login 506
CambridgeSoft
Structure
deleting a 569
drawing 528
editing 568
Summary of the Standard Add-Ins 783
System crashes 186
T
Table
numerical units, working with 569
Tables 544
Terminology 504
Time Settings 725
Transition Listeners 784
Transition Security 773
Transition security 591
Troubleshooting 185
U
User Administration 767
User collection
adding a new collection to 512
adding a reference within 512
working with 511
Using quick add to add a structure 530
Using the add dialog to add a structure 530
Using the Batch Import Facility 788
Using the Session Manager 780
Using the session manager 641
Listener 653
Viewing and Editing the Properties of a Transition Listener 756
Visual display of changes 601
W
Wildcard searching 615
Working with
Autotext 540
folders 514
numerical units in tables 569
pages and experiments 513
reactants collections 515
the changes icon 597
the history pane 600
the inbox 514
the reaction toolbar 529
the stoichiometry table 532
the user collection 511
the user configuration folder 515
Z
Zooming in on a spectrum peak 562
V
Viewing
collection properties 587
user information 642
Viewing and Editing the Properties of a Collection Listener 739
Viewing and Editing the Properties of a Form
Tool 648
Viewing and Editing the Properties of a Search
Engine 752
Viewing and Editing the Properties of a Section
E-Notebook 10
Index
•
vii