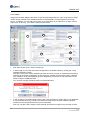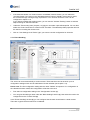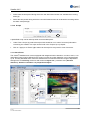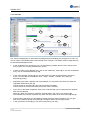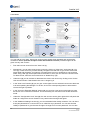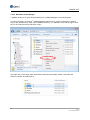
1
User Manual CamIQ® Satellite Version 4.5 © rosemann software GmbH 22.08.2013 Errors, changes and omissions excepted. “CamIQ", the CamIQ logo and "rosemann" are registered brands of rosemann software GmbH. Other brand names used here may be the brands or registered brands of other companies. Satellite V4.5 TABLE OF CONTENTS 1. INTRODUCTION AND INITIAL OPERATION .................................................................. 5 1.1 Product Description ..................................................................................................................... 5 1.2 Technical Support ........................................................................................................................ 5 1.3 System Requirements ................................................................................................................. 6 1.4 Server Installation ........................................................................................................................ 7 1.5 License Activation ........................................................................................................................ 9 1.6 Manager Installation .................................................................................................................. 10 2. THE SERVER ................................................................................................................. 11 2.1 Server Information ..................................................................................................................... 11 2.2 Status......................................................................................................................................... 11 2.3 Active Users............................................................................................................................... 11 2.4 Server Login .............................................................................................................................. 12 2.5 Commands ................................................................................................................................ 12 3. SYSTEM CONFIGURATION .......................................................................................... 12 3.1 Logging In .................................................................................................................................. 12 3.2 Server Status ............................................................................................................................. 14 3.3 Protocol...................................................................................................................................... 15 3.4 Administration ............................................................................................................................ 17 3.5 Saving/Loading .......................................................................................................................... 19 3.6 Manual ....................................................................................................................................... 21 3.7 Service ....................................................................................................................................... 22 3.8 Streaming Server ....................................................................................................................... 23 3.9 Devices/Image Sources............................................................................................................. 28 3.9.1 Embedding of AXIS Camera Server (MJPG) .................................................................... 31 3.10 Tracks ........................................................................................................................................ 32 3.11 Standard Operation ................................................................................................................... 35 3.12 Event Handling .......................................................................................................................... 36 3.12.1 Recording .......................................................................................................................... 38 3.12.2 Pre-Alarm Images .............................................................................................................. 39 3.12.3 Locking .............................................................................................................................. 40 3.12.4 Relays ................................................................................................................................ 40 3.12.5 E-Mail................................................................................................................................. 41 3.12.6 Surveillance Center Alarm (CamIQ® Connect) .................................................................. 41 3.12.7 Standard Network Cameras .............................................................................................. 42 3.12.8 Event-Driven Access Rights .............................................................................................. 42 3.12.9 Scripts ................................................................................................................................ 43 3.13 Alarm Zones .............................................................................................................................. 43 3.13.1 Privacy Zones / Fade-Out Area ......................................................................................... 48 3.14 Calendar .................................................................................................................................... 49 3.15 External Arming ......................................................................................................................... 51 3.16 Users ......................................................................................................................................... 52 3.17 Licenses..................................................................................................................................... 54 3.18 E-Mail......................................................................................................................................... 54 3.19 Surveillance Center / Remote Stations ..................................................................................... 56 3.20 Standard Network Cameras and the Tracking Option .............................................................. 57 3.20.1 Automatic Object Tracking ................................................................................................ 59 3.20.2 PTZ Box Installation .......................................................................................................... 64 3.20.3 Virtual Device..................................................................................................................... 67 3.21 Lens Correction ......................................................................................................................... 67 3.22 Error Relay / SNMP Configuration ............................................................................................ 68 2 © 2013 ALL RIGHTS RESERVED Satellite V4.5 3.23 Settings Manager (local/ global) ................................................................................................ 70 3.24 Hardware Acceleration .............................................................................................................. 74 3.25 User-Defined Filters ................................................................................................................... 75 3.26 Views ......................................................................................................................................... 76 3.27 Neighboring Cameras................................................................................................................ 78 3.28 Code Conversions ..................................................................................................................... 79 3.29 Advanced Client (optional) ........................................................................................................ 80 3.29.1 Site Plan ............................................................................................................................ 80 3.29.2 Multi-Start of the Manager ................................................................................................. 82 3.30 Scripts ........................................................................................................................................ 84 4. OPERATING THE MANAGERS (LIVE IMAGE) ............................................................ 87 4.1 General Overview ...................................................................................................................... 87 4.2 Cameras .................................................................................................................................... 88 4.3 Alarms........................................................................................................................................ 89 4.4 Monitors ..................................................................................................................................... 89 4.5 Camera Information ................................................................................................................... 90 4.6 Monitor Symbols ........................................................................................................................ 90 4.7 Instant Recording ...................................................................................................................... 91 4.8 Relays ........................................................................................................................................ 91 4.9 S/N Panel................................................................................................................................... 91 4.10 Displaying Detection Details ...................................................................................................... 92 4.11 Monitor Mode ............................................................................................................................. 92 4.12 Right-Click Menu ....................................................................................................................... 93 4.12.1 Switching to Monitor Mode ................................................................................................ 93 4.12.2 Camera Information ........................................................................................................... 93 4.12.3 Multiple View...................................................................................................................... 94 4.12.4 Bandwidth Optimization ..................................................................................................... 94 4.12.5 Instant Recording .............................................................................................................. 94 4.12.6 Switching Relays ............................................................................................................... 95 4.12.7 Displaying Camera Images ............................................................................................... 95 4.12.8 Monitor Mode ..................................................................................................................... 95 5. LONG-TERM ARCHIVING (PERMANENT TRACKS) ................................................... 96 5.1 General Overview ...................................................................................................................... 96 5.2 Track .......................................................................................................................................... 97 5.3 Sequences ................................................................................................................................. 97 5.4 Navigation .................................................................................................................................. 97 5.5 Camera Image ........................................................................................................................... 97 5.6 Sequence Control ...................................................................................................................... 98 5.7 Tool Bar ..................................................................................................................................... 98 5.8 Search ..................................................................................................................................... 100 6. EVENT ANALYSIS (EVENT LIST) ............................................................................... 102 6.1 General Overview .................................................................................................................... 102 6.2 Tracks ...................................................................................................................................... 103 6.3 Events ...................................................................................................................................... 103 6.4 Search Results ........................................................................................................................ 103 6.5 Navigation ................................................................................................................................ 105 6.6 Camera Image ......................................................................................................................... 105 6.7 Sequence Control .................................................................................................................... 106 6.8 Tool Bar ................................................................................................................................... 106 6.9 Storage Assistant .................................................................................................................... 108 3 © 2013 ALL RIGHTS RESERVED Satellite V4.5 7. ADVANCED OPERATION ........................................................................................... 110 7.1 Keyboard Control ..................................................................................................................... 110 7.2 Program Startup Parameters................................................................................................... 111 8. EXTERNAL PROGRAMS ............................................................................................. 112 8.1 RSV Player (Rapidshare Video Player) ................................................................................... 112 8.2 Webserver ............................................................................................................................... 114 8.2.1 Installation........................................................................................................................ 114 8.2.2 Operation ......................................................................................................................... 114 8.2.3 Login ................................................................................................................................ 115 8.2.4 Live Image ....................................................................................................................... 116 8.2.5 Permanent Tracks ........................................................................................................... 117 8.2.6 Events .............................................................................................................................. 118 8.2.7 Interface ........................................................................................................................... 119 8.2.8 Compatibility .................................................................................................................... 120 9. APPENDIX .................................................................................................................... 121 9.1 Text Overlay ............................................................................................................................ 121 9.2 Master-Subsystem ................................................................................................................... 122 9.3 Hot Standby ............................................................................................................................. 124 10. NOTES .......................................................................................................................... 128 4 © 2013 ALL RIGHTS RESERVED Satellite V4.5 1. INTRODUCTION AND INITIAL OPERATION 1.1 Product Description Thank you for having chosen this high-quality software product. It allows the convenient recording and evaluation of images from sources such as camera servers and frame grabbers. The server module enables multi-user simultaneous access to the management software, allowing live image display and the evaluation of permanent tracks as well as alarm entries. Commonly available IP camera types and frame grabbing cards can be used as image sources; tilt swivel camera models can be employed as well. A specially patented panel control field has been integrated to regulate the control of standard network cameras. In addition to its recording functionality, the software supports alarms via motion detection, the control of relays, manual recording, professional alarm processing functions (alarm actions), live image recompression for the evaluation of narrow-band connections (ISDN or UMTS, for example) and many other useful functions which will be covered in this manual. The evaluation software can run on PCs in the background and will automatically be switched on in case of an alarm event (configurable). Moreover, it is possible to integrate the server module within higher-level software applications and thus create the basis for setting up very large video units. We have incorporated all of our expertise as well as many years of experience in the area of video surveillance into this product. In our view, the user interface provides the optimal compromise between easy operation and installation while also effectively covering all of the real-life demands in actual practice. Thus, we hope that you will experience the handling and operation as smooth and simple while fully meeting your demands for a truly professional video surveillance system. 1.2 Technical Support If you have any questions or do you need help for the installation, do not hesitate to contact our technical support. E-Mail: [email protected] Serviceline: +49 (0) 431 799 699-20 5 © 2013 ALL RIGHTS RESERVED Satellite V4.5 1.3 System Requirements Minimum requirements are depending on configuration/ cameras and activated modules/ options. Recommended platform [Minimum requirements for standard version without options in brackets] • • • • • • • • ® Microsoft Windows Version 7 (SP1), Server 2008 R2 (SP2); Information about further OSVersions can be found on our website. ® ® Intel Core™ i7-2600 Processor, 3,4 GHz [Intel Atom N2800, 1,8 GHz or better] 4 GB RAM [2 GB RAM] Graphics card for a minimum resolution of 1280x1024 (dual head recommended for Adv. & Enterprise Client) 1 GB free hard disk space for installation DVD-ROM drive Installed TCP/IP network 1 USB port for dongle (for Enterprise Client) ® Additional for CamIQ Server • Additional hard disk space depending on required recording time (typical min. 250 GB per camera) • 1 USB port for dongle Please note: Additional information about hardware requirements and compatibility can be found on our website: www.camiq.net The use of this software is subject to the corresponding End User Licence Agreement (EULA) of rosemann software GmbH. The End User Licence Agreement can also be found on the internet at www.rosemann-software.de. Please read the End User Licence Agreement before installing and using the software. This software has to be activated via internet or by telephone after installation. ® ® CamIQ , the CamIQ logo and rosemann are registered trademarks of rosemann software GmbH. Other brand names can be trademarks or registered trademarks of third parties. 6 © 2013 ALL RIGHTS RESERVED Satellite V4.5 1.4 Server Installation Place the CD in your CD-ROM drive. The setup program should start automatically. If it does not, open the contents of the CD with your file manager and start the "setup.exe" program. This is a typical Windows installation procedure similar to those that you are most likely already familiar with. Simply follow the installation instructions presented on the screen. Before the data is written to your hard drive, you can select the type of installation desired from the menu. In this case, select the server installation. The Manager will automatically be installed as well. Confirm your selection with a click on "Next". The installation will continue from here. Simply follow the instructions as seen on the screen until the installation is complete. Please note: The "Custom Setup" option should only be used by informed technical staff. It offers the possibility of changing the installation path and installing further special device drivers. 7 © 2013 ALL RIGHTS RESERVED Satellite V4.5 In the "Server" section you can install drivers for the USB dongle, additional image source drivers, and the server as a service. And, in case you employ a compatible frame grabber, a watchdog service can be installed as well. Furthermore, you can determine whether or not the web server should be installed and run as a service. Activate the "TCP/IP-Alarms" module in order to install a TCP/IP interface for alarms. Select the "JavaApplet (API Demo)" in order to install the Java Applet allowing access to the server over a web browser. In the "Client" section you can select whether the Manager should be installed and whether it should start automatically at system startup time. The "Change" button allows you to alter the installation path. 8 © 2013 ALL RIGHTS RESERVED Satellite V4.5 1.5 License Activation In order to use the software you will need a USB dongle and a corresponding license. If your software has not yet been activated, you can do so as described below. First, you will need the license number for the activation. It is located on the label and looks something like this: In addition, you will need the dongle number. You will find it directly on the USB dongle or in the Manager Software (1) (see chapter 3.16). These numbers allow you to activate the license. Click on the button "Licence Activation via Manager" in the license menu (2) and fill in the required fields. Now click on "Request Activation Key" to have the activation code mailed to your e-mail address. Delivery usually takes place within a few minutes. Enter the activation code in the appropriate field and then click on the "Check License" button. Alternatively, you can also request the activation code via your browser by going to our homepage address www.camiq.net (3). Make your entry in the basic license field and then click on the "Check Basic License" button (4). Both methods require an Internet connection. 1 4 4 2 3 9 © 2013 ALL RIGHTS RESERVED Satellite V4.5 1.6 Manager Installation Place the CD in your CD-ROM drive. The setup program should start automatically. If it does not, open the contents of the CD with your file manager and start the "setup.exe" program. This is a typical Windows installation procedure similar to those that you are most likely already familiar with. Simply follow the installation instructions presented on the screen. Before the data is written to your hard drive, you can select the preferred type of installation from the menu. Select the Manager installation as depicted in the screen shot. Confirm your selection with a click on "Next". The installation will continue from here. Simply follow the instructions as seen on the screen until the installation is complete. 10 © 2013 ALL RIGHTS RESERVED Satellite V4.5 2. THE SERVER The server is the central unit; it receives and decodes the video data, records it and forwards it to connected clients. 1 3 4 2 5 2.1 Server Information Various items of information concerning the current operating status of the server are displayed in the "Server Info" area (1): - The software version of the server application - The TCP/IP address and the port in use - The operating time (runtime) - The current processor workload - The number of pictures the server receives, records and forwards to client systems per second 2.2 Status The status display (2) shows you the protocol of the executed server processes - the initialization of a track, for instance. 2.3 Active Users Under "Active Users" (3) you will find a record of all connected users along with their IP addresses and the duration of their connections. Please note: A maximum of 5 users can be connected simultaneously (optional Watchdog feature included!). 11 © 2013 ALL RIGHTS RESERVED Satellite V4.5 2.4 Server Login In order to activate the buttons in the "Commands" area (5), log in at the login screen (4) with a user account that has the right to log in at the server console (see chapter 3.15). 2.5 Commands After you have logged in, you can operate the buttons (5). By clicking on the "Configure" button, you can open the Manager (this button is not available if you are running the server as a service). By clicking on the "Restart" button, you can restart the server application. The "Shut Down" button allows you to shut down the server application. 3. SYSTEM CONFIGURATION Please note: When you configure the server from a client system, some options will not be available. You will only be able to access these when you operate the Manager directly at the server station. If an option is affected by this, it will be covered in the relevant chapter. 3.1 Logging In 4 5 1 2 3 Several options in the login screen are available to you. Enter the IP address or the computer name of the desired server under "Connection" (1). Additionally, you can activate the "Bandwidth Optimization (WAN)" by which the use of the Manager will be optimized (how to adjust the intensity of data reduction will be covered in chapter 3.9). 12 © 2013 ALL RIGHTS RESERVED Satellite V4.5 Please note: Only activate the bandwidth optimization in a WAN. It should remain deactivated in a LAN because here it does not offer any advantages and also increases the server load due to renewed image compression. In order to log in, you must enter your valid account credentials in the "User" and "Password" fields (2). The Manager supports the four-eye- principle for passwords which can be activated by clicking on the corresponding button. When using the four-eye-principle, two passwords are needed in order to connect. The use of this function requires that the user account in question has been configured with a corresponding four eyes password (see chapter 3.15). Please note: After the installation, you can log in with the user name "Administrator" even without a password. For security reasons, please go to the "User" menu and change the administrator password as soon as possible (see chapter 3.15). Click on a desired flag (5) at any time to change the language accordingly. After entering all required data, click on "Login" (3) to log in. To log out, click on "Logout" (3). By clicking on the (5) tool symbol you can change your current password (provided you have been granted the necessary permission by your adminstrator). You can return to this screen at any time to log out or change the language settings by selecting the tab "Start" (4). Please note: If a login is attempted with an incorrect password, the login will be disabled for 15 seconds after the 10th attempt. If this message appears, it means that another user with server configuration rights is already logged in. Multiple users will not limit each other's activities but they should nevertheless coordinate their actions to avoid actions (i.e. configuration activities) that could unintentionally lead to incorrect user settings. Once you are logged in, you can use the various tabs available to navigate to other Manager areas. To open the Manager's configuration section, select the "Configuration" tab. 13 © 2013 ALL RIGHTS RESERVED Satellite V4.5 3.2 Server Status When you click on the "Configuration" tab, you gain access to the "Server Status" menu (2) within the "Status/Info" function group (1). This menu serves primarily for diagnostic purposes. 1 3 2 4 8 9 10 5 11 6 7 The server application version will be displayed at the "Software Version" item (3). A "Server Version" and an "Internal Version" will be indicated; both refer to the server. In the "External Arming" section (4) (see chapter 3.14), the external arming status will be displayed. If the status is 0, then no arming contact has been established. If the status is 1, however, a contact has been made. The numbers seen in connection with "Configuration for Standard Operation" and "Configuration for Event Handling" refer to the configuration settings in the menus "Standard Operation" (see chapter 3.10) and "Event Handling" (see chapter 3.11) and indicate which are currently active. All established tracks (see chapter 3.9) are displayed in the field "Track List" (5). The line "Camera Status" (6) offers information concerning the analog connections assigned. Green indicates an occupied connection, gray indicates an open one. The line "Recording Status" (7) shows which tracks are currently being recorded. Green indicates an active recording while gray marks the tracks that are currently not being recorded. The information displayed in the field "Server Information" (8) is the same information that can be seen on the server console: - The number of users currently accessing the server - The server runtime - The current CPU workload - The number of images the server is currently receiving, recording and forwarding to clients 14 © 2013 ALL RIGHTS RESERVED Satellite V4.5 In field (9) you have the option of restarting the server or running the "Client Updater" to bring the Manager status up-to-date. When you select a track in the field "Track List" (5), additional information about this track will be displayed in the section "Selected Track Information in Detail" (10). The server displays the image data in graduated blocks: - The amount of image data in the current block in kilobytes - The overall number of blocks written to in this track (up to now) - The oldest unlocked image entry in the track - The number of images written per block in the track - The average block size in the track in kilobytes - The number of the current block Furthermore, three progress bars furnish additional information about the track: - The progress made writing the current block - The progress made writing the current image - The amount of the locked areas in proportion to the total track 3.3 There is also an additional "Recording Statistics for the Selected Track" (11) item which can be selected in the "Track List" field (5). These statistics evaluate the track's current recording duration. The longer the measuring period, the more exact the representation. Protocol 1 2 3 4 5 6 The protocol messages (1) record all server processes. By setting filters (2) you can sort the messages in various ways. You can activate or deactivate the display of certain types of messages by clicking on the relevant button. 15 © 2013 ALL RIGHTS RESERVED Satellite V4.5 - System messages (red) relate to the system, i.e. starting and shutting down the server. - Security messages (blue) deal with data security such as the locking or deletion of image data. - Communication messages (green) are concerned with questions of communication to other sites, the sending of e-mails, for example. - Miscellaneous messages (light blue) do not belong to any of the categories listed above and are, for the most part, status messages. Navigate through the protocol pages using the buttons in the "Navigation" field (3), To the first protocol page (the oldest entries) One page backward One page forward To the last protocol page (the newest entries) These buttons (4) allow you to delete the protocol; the deletion process will be the first entry in the new protocol. But they also allow you to export the protocol to a text file. To do this, you will be asked to select a location to save the file and a file name for the exported protocol. Confirm your selection with a click on "Save" to export the protocol. In the area "Date/Time" (5) you can enter a date and a time in order to access specific protocol entries directly. When you select one of the protocol messages (1), "Selected Entry Details" (6) will be displayed. This will provide you with additional information about every selected entry. If a data export has been selected in the protocol, an image preview of the export will be displayed to you in the "Attachments" (7). 16 © 2013 ALL RIGHTS RESERVED Satellite V4.5 3.4 Administration The Administration Menu allows you to unlock image data, export the Event List and make additional setting changes for the server. 2 1 3 4 Certain areas of a recorded track can be blocked during operation to ensure that image data is not overwritten. In order to unlock these locked areas and free up storage space, first select the desired track from the track list (1). In area (2) you can enter a starting and an ending time. All locked video data within this time frame will be unlocked as soon as you select the button "Unlock Area." Please note: If the locked image files are so old that they would have normally been overwritten through the rewriting cycle, unlocking them will lead to their immediate deletion. In the "Event List" menu (3) you can export the current event list as a text file (see chapter 6.3) using the "Export Event List" button. After the "Activate Data Deletion" button has been selected, you can delete the Event List with the "Delete Event List" button. Carry out additional setting changes – as needed - under the item "General Server Settings" (4). You can, for example, set the "Server Startup Delay" within a range of between 0 to 600 seconds. If the server application should start automatically after the server station startup, this function can be used to delay the application start until the server has started completely. For instance, only after all network services have successfully initialized. The option "Delay until Device Connections Established" performs a similar function. In this case, the application must wait a designated amount of time in order to allow the server to first establish connections to its registered image sources before starting. 17 © 2013 ALL RIGHTS RESERVED Satellite V4.5 With the "Holding Period for PTZ Commands" function, the locking period for tilt and swivel operations with lower priority than the last operation carried out (manual control, for example) can be configured. With the "Maximum Holding Period for Tracking Objects with Other Objects in the Image" option, you can set the duration of focus on one object when another object is also visible in the image. Use the "Image Quality in Fade-Out Areas" function to reduce - through compression - excessively large image files which have been created using fade-out areas (see chapter 3.12.1). With the "Display Duration for Live Images during Alarms" function, you can arrange to have pictures from live cameras with deactivated live image settings (see chapter 3.10) displayed during an alarm. The duration of the display can be set to last between 1 and 3600 seconds. The "Maximum Overall Duration of Image Data Export (with limited rights)" option allows you to determine the maximum overall duration for exported material to users with limited image export rights. The "Factoring in Time Changes with Time-Limited Access Rights" function makes it possible for users with limited access rights on the day of the switch to summer/winter time to ignore the time change. For example, in the case where 5 hours of rearwards directed access have been configured, the full 5 hours of access time would be available for analysis despite a loss of one hour due to daylight saving time. By activating the "Recording Access Protocol" option, a protocol is established for any and all access to a recording. Requirements for the validity of passwords used on the server can be defined under item "Password Settings" (5). With the "Password Validity (Days)" option you can define the number of days a password will be valid. Once the validity date has expired, the user is no longer entitled to use this password at login. Provided the user has been given the "Change Password" right, he or she will be able to change the password after the validity date has expired. The "Minimum Password Length" entry indicates the minimum number of characters a password must have to be allowed. "Minimum Interval Between Identical Passwords" determines how many successful password changes must have taken place before a password can be used again. If the "Password Must Contain At Least One Capital Letter" option is selected, only passwords containing at least one capital letter will be accepted. If the "Password Must Contain At Least One Digit" option is active, only passwords containing at least one digit will be accepted. Please note: This menu should only be accessed by administrators. As indicated in the name, it is not meant for regular users. Please be sure to take this to heart. 18 © 2013 ALL RIGHTS RESERVED Satellite V4.5 3.5 Saving/Loading In the "Saving/Loading" menu, you can export and import the server configuration. 1 2 To use the "Data Export" function (1), click on the "Export Configuration" button. The following window appears in which you are asked to enter a file name and location. A file name with the date and program version number will be suggested by the program. Confirm your entries by clicking on "Save". Please note: It is advisable to accept the suggested file name because the version number is included in the entry! To import a configuration file, first – within the "Data Import/Update" area (2) – activate the button indicating that you should backup your current configuration before importing the new configuration! Then click on the "Load the Archive File" button. A window appears in which you are requested to select a configuration file. Confirm your selection and click on "Open". 19 © 2013 ALL RIGHTS RESERVED Satellite V4.5 1 2 3 4 After that, the information related to the selected configuration file appears in the menu: You can see with which server version the configuration file was created in the „Archive Information“ area (1). Please compare this server version with the version you are currently using! They should correspond; otherwise this could lead to your server not functioning properly anymore! In addition, you can see on which day the file was generated. Various configuration components will be displayed under the "Table of Contents" item (2). You can activate or deactivate any of the elements you see by placing or removing a check in the appropriate box. You can also use the buttons "Untag All" (3) and Tag All" (4). Specifically, the components stand for the following configuration areas: ACCONFIG.DAT: Configuration for establishing the active connection (see chapter 3.18) ALARMCFG.DAT: Event handling (see chapter 3.11) CALENDAR.DAT Calendar (see chapter 3.13) MORPHIS.INI: Configuration for the frame grabber (see chapter 3.8.2) DEVICES.DAT: Devices/Image sources (See chapter 3.8) ERRORRELAY.DAT Error relay (see chapter 3.21) EXTACT.DAT: External arming (see chapter 3.14) LICENCES.DAT: License (see chapter 3.16) Please note: Make certain that you deactivate this entry if you plan to use the configuration file on a device other than the one on which the configuration file was generated! MESSAGING.DAT: E-Mail (see chapter 3.17) MOTDET.DAT: Alarm zones (see chapter 3.12) PERMANENT.DAT: Standard operation (see chapter 3.10) PRIVACYZONES.DAT: Private zones (see chapter 3.12.1) PTZSERIAL.DAT: Standard network cameras and tracking (see chapter 3.19) SERVICESETTINGS The menu service (see chapter 3.7) TRACKADV.DAT: Further track settings (see chapter 3.9) TRACKS.DAT: Basic track settings (see chapter 3.9) USER.DAT: Users (see chapter 3.15) Warning: Make sure to always load the files DEVICES.DAT and USER.DAT together! Both files are dependent upon each other for technical reasons. Loading only one of the two files can lead to a system failure! 20 © 2013 ALL RIGHTS RESERVED Satellite V4.5 After the configuration has been loaded, the server must be restarted. It is possible that the server will take longer to start than usual. Do not shut off the computer during the loading process! Warning: Exporting and importing configuration data should only be done with the same software versions! Warning: The LICENCES.DAT file can only be imported when the exported configuration stems from the same device which is now importing it! Or to put it more precisely: The LICENCES.DAT file is linked to the dongle. If another dongle is connected to the computer, the licenses will no longer be accepted! 3.6 Manual If you click on the menu item Manual, a compact operator's manual will open. It was created in PDF format and can be read using freeware programs such as Adobe Acrobat Reader or Foxit PDF Reader. 21 © 2013 ALL RIGHTS RESERVED Satellite V4.5 3.7 Service Smooth performance can be guaranteed only when hardware maintenance is carried out regularly. For this reason, the Manager offers you the option of entering the next service appointment along with a description of the work that is to be carried out; the user will be notified when the appointment date has arrived. 1 4 2 3 You can activate the reminder function in the "Next Service Appointment" field (1) as well as enter the appointment date (4). When the service appointment is due or exceeded, the date display turns red. Enter the address of the servicing company that will be doing the maintenance work in the "Service Address" field (2). In the "Scheduled Service" (3) field, you can enter what type of work should be carried out at this time. This way the technician in charge knows precisely what is to be done and can undertake comprehensive maintenance. The reminder message appears on the due date after the user has logged in. 22 © 2013 ALL RIGHTS RESERVED Satellite V4.5 3.8 Streaming Server With the aid of Advanced H.264 Streaming, CamIQ© 4 makes it possible to automatically adjust the quality of the video stream in the current live image view, thus saving CPU and bandwidth capacity. In the following section, the necessary configuration to be carried out is explained step by step using the example of an AXIS M1054. 23 © 2013 ALL RIGHTS RESERVED Satellite V4.5 Driver Configuration in CamIQ© Satellite First install three new “Camera via RTSP“ drivers. The group designation should be clear and identical for all three devices so that the 3 streams can be easily located for track assignment. Name the three devices “Stream 1“ – “Stream3“. To minimize configuration overhead, enter all the relevant data such as IP address, user and password for the first device and then use the “Copy Entry“ function. The three newly created drivers will now be defined with three different resolution and frame rate settings. The streams will later be utilized in the following way: Stream 1 1280x800 | This is a high resolution and frame rate that will later be used for recording and for the live image in a 1-on-1 view. Stream 2 640x400 |This stream will be used for presentation in a 4-on-1 view. Moreover, this stream can be used in a 1-on-1 and 4-on-1 view for client connections with small bandwidth. Alternatively, you can also work with just two streams and disregard the third stream altogether. Stream 3 160x100 | This stream will be used for CamIQ© detection. Its resolution should be defined depending on the desired detection sensitivity and the distance to the objects, in other words, from 160x100 (standard sensitivity) to 320x240 (very high sensitivity). Additionally, this resolution will be displayed starting from a 9-on-1 to a 64-on-1 view. Info: Stream assignment to the respective views will be explained in more detail later in the document. 24 © 2013 ALL RIGHTS RESERVED Satellite V4.5 Select the camera model under “Device Setup“ for each of the three drivers and add the following parameters to the corresponding “Request String“ entry: Stream 1 /axis-media/media.amp?videocodec=h264&resolution=1280x800&fps=25 For the configuration of Stream 1 it will also be necessary to check the “Use recording only mode“ selection. This option defines the stream as a “recording stream.” Stream 2 /axis-media/media.amp?videocodec=h264&resolution=160x100&fps=10 Stream 3 /axis-media/media.amp?videocodec=h264&resolution=640x400&fps=10 Then activate the three devices. Track Configuration in CamIQ© Satellite Assign the devices to the track as follows: 1 3 1 2 3 SN Recording = Detection/Live = Stream 1 Stream 3 Stream 1 Stream 2 Stream 3 = = = Stream 1 Stream 2 Stream 3 Should your device be a PTZ camera, add an Axis driver with active PTZ functionality to your driver group (as is usual with Satellite V1.x to V3.x). 25 © 2013 ALL RIGHTS RESERVED Satellite V4.5 Select this driver from the track assignment field “SN Camera“. Please note: If you click in an assignment field with your right mouse key, the group overview opens. If you work with many devices, this grouping function can simplify the overview for you. Configuring the CamIQ© Satellite Manager Using the local configuration of the CamIQ© Satellite Manager (Configuration > Manager (local) > General), the assignment of the stream to the respective views can be defined exclusively for this manager. The following should be defined here for the example scenario: LAN access (fast connection) Single View 9-Split View 25-Split View - Quad View 16-Split View 64-Spilt View = = = Stream 1 Stream 3 Stream 2 (1280x800) (640x400) (160x100) WAN access (slow connection /can be activated in the login window) Single View 9-Split View 25-Split View - Quad View 16-Split View 64-Spilt View = = = Stream 2 Stream 3 Stream 3 (640x400) (160x100) (160x100) 26 © 2013 ALL RIGHTS RESERVED Satellite V4.5 These settings are saved locally in the CamIQ© Satellite Manager and must also be configured for other Manager installations. Please note: It can take a few seconds before the image switches to the desired resolution in the live view. This switching time is dependent upon the frame rate of the stream and the camera’s key frame interval. The default key frame interval setting for the Axis configuration is “30.” Being that streams 2 and 3 in the example configuration only supply 10 fps, it can take up to three seconds before the first key frame arrives and the live image is displayed with its correct resolution. With devices that stream with less than 10 fps, the key frame interval should be reduced. Depending upon the frame rate, we recommend the two-fold value of this frame rate. 27 © 2013 ALL RIGHTS RESERVED Satellite V4.5 3.9 Devices/Image Sources In the "Basic Settings" function group (1) you can configure the server to meet your requirements. In the "Devices/Image Sources" menu (2) you can add and configure devices as image sources. The manual describes in detail how a frame grabber card (the Matrox Morphis4VD) and a video server (the AXIS 241S) are installed. But first, here is a look at the menu: 1 4 2 3 6 7 8 5 9 All the devices that can be added are displayed in the "Available Drivers" list (3). In order to install one of these drivers, click on the desired entry, hold the mouse button pressed, pull it over to the Device/Image Sources list (4) and let go (drag & drop). The Devices/Image Sources list (4) specifies all devices that you can use and configure as image sources. The icon next to the image source entry displays the current status: Green: The device has been configured and activated Gray: The device has not yet been activated Red: The device is activated but a connection is currently not possible (in this case, check the IP address and user data) (5) Click on the "Copy Device" button in order to duplicate the selected entry. Click on the “Copy Settings“ button to open the dialog box to take over specific driver properties. Click on the "Delete Device/Image Source" button if you wish to delete the entry selected in the device list. A dialog box will appear. Confirm with "Yes" if you wish to delete the selected entry. Click on the "Delete All Entries" if you wish to delete all devices. A dialog box will appear. Confirm with "Yes" if you wish to delete the entire list. 28 © 2013 ALL RIGHTS RESERVED Satellite V4.5 In the "General" field (6), you can examine and configure the general settings of a selected device. - Active Entry: After you have configured the device, checkmark the device to activate it. - Designation: Enter a designation for the device. This designation serves to identify the device in other lists like the Live Image View, for instance. - TCP/IP Address: Enter the IP address of the device. If a port entry is necessary, you can add this to the IP address by using a colon. - Users: If authorization for a device is necessary, enter the user name here. The entry field is only visible when the device supports authorization. - Password: If authorization on a device is necessary, enter the user's password here. The entry field is only visible if the device supports authorization. - Maximum Polling Interval: When camera images are retrieved ("polling“), the number of images retrieved per second can be limited here. This option is only visible if the driver supports polling. - Maximum Streaming Rate: If the camera images are immediately broadcast ("streaming“), the number of images received per second can be limited here. This option is only visible if the driver supports streaming. - Monitor Availability: If this option is selected, the server checks cyclically to see if the device is still available. - Motion Detection: If the device supports motion detection, this option can be activated or deactivated as desired. This option is only visible if motion detection can be activated on the device. - Device Setup: If the device has a special external configuration program, you can start this program by clicking on this button. The button will only be visible if the device has access to an external configuration program. - Automatic Configuration: Click on this button in order to initialize this device with a standard configuration. This button is visible only in a few drivers. It will appear, if applicable, when the device has been activated. In the "Cameras" field (7) you can make changes to the detailed settings of the various camera connections of the device selected. - Number: Select here the number of cameras for the given device. - Designation: Choose a designation for the camera here. This designation serves to identify the camera. - Standard Network Camera: If the camera selected is a standard network camera, select this option. - Streaming for Image Retrieval: Select this option if you want to use a streaming procedure for the image collection. If this option is deactivated, the camera images will be polled. This option is only visible if the driver supports streaming and polling. - Activate Image Compression: This activates an additional image compression process. This option is only visible if supported by the driver. 29 © 2013 ALL RIGHTS RESERVED Satellite V4.5 - Image Quality: Select an image quality with which the retrieved images are to be saved. A very high image quality means that the images will be saved with practically the original image resolution; this requires hardly any compression and also requires the biggest amount of storage space. When the image quality is low, the images will be highly compressed and need little storage space. This option is only visible if supported by the driver. The relays are shown on a list (8). Additional settings can be made to any relay on the list. Select the desired relay and configure the settings as follows: - Number: Select here the number of relays for the given device. - Designation: Choose a designation for the relay. This designation serves to identify the relay. - Toggle Switch/Trigger/Release: Select one of the three options. If a relay event is triggered, it can switch the current state (toggle switch), trigger or release. - Holding Time: Enter a holding time in seconds to have the relay trigger or release respectively. If the relay should be set to operate in "toggle switch" mode, holding time will have no influence. The alarm contacts are shown on a list (9). Additional settings can be made to any alarm contact on the list. Select and configure the given alarm contact as you wish: - Number: Select here the number of alarm contacts for the given device. - Designation: Choose a designation for the alarm contact. This designation serves to identify the alarm contact. - Alarm when Closing/Opening: Determine whether the alarm should be generated when the contact is closed or when it is opened. 30 © 2013 ALL RIGHTS RESERVED Satellite V4.5 3.9.1 Embedding of AXIS Camera Server (MJPG) 3 1 2 4 5 6 First select the "AXIS Camera Server" from the list of available drivers (1) and pull it into the "Devices/Image Sources" field (2) with "drag and drop". In the "General" section (3) you can enter a name for the image source in the "Designation" field. Thereafter, enter the "TCP/IP Address" and the "User" and "Password" appertaining to it, if applicable. Under the "Cameras" item (4) you can first enter the number of cameras that can be connected. Then you can select each camera individually and assign their names. Additionally, you can define a selection as being a tilt swivel camera by activating the "Standard Network Camera" button, thus allowing the camera to be controlled by the Manager. In the "Relay" section (5) you can enter the number of available relays. You can also give every selected relay a designation and define its switching properties. Under the "Alarm Contacts" item (6) you can first define the number of alarm inputs and then give each selected alarm input entry a designation. Once you have completed the configuration, click on "Active Entry" (3). If the IP address, user and password entries are correct, the symbol in the "Devices/Image Sources" field will turn green. If a connection could not be established, the symbol will turn red. In this case, check all data entered as well as device connectivity. When your entry is inactive, the symbol will turn gray. 31 © 2013 ALL RIGHTS RESERVED Satellite V4.5 3.10 Tracks Image sources were added to the server in the "Devices/Image Sources" menu (3.8). Now so-called "tracks" will be created. Every individual track must be assigned a camera signal from an image source. In addition, one can add to every track a recording area on the hard drive, an alarm contact and a relay. In this way, you create a virtual camera device. 3 1 10 4 7 8 5 6 2 9 First select a track in the "Tracks" section (1). In section (2) you can reset the track's configuration to its default values by clicking the "Track Defaults (Selection)" button. And with a click on the "Setup Assistant (All Tracks)" button you start an assistant process which asks during each track configuration for the track size, whether the VR license option is desired (see chapter 3.16) and automatically gives a designation to every track. The track size must lie within a range of 100MB and 2TB. You can also manually create the tracks as described below. In the "Creation of a Virtual Camera Device and Track Assignment" section (3) you can assemble a virtual camera device by yourself. First select an image source and then select the desired camera from the drop-down list below your marked entry. Now you can add a relay using the same method; first select an image source and then choose 32 © 2013 ALL RIGHTS RESERVED Satellite V4.5 from the corresponding drop-down menu. Thereafter, use the same method to select an alarm contact. Under the "Basic Settings" item (4) you can give the track a designation. You can either choose a name yourself or let the Manager do it for you by clicking on the "Suggest Designation" button. This designation will be composed of the device name and the camera name (see chapter 3.8). Tracks can also be configured in such a way that they will be treated as a group in the management view. Thus, an entire group of camera signals can be switched on with just one mouse click, for example (see chapter 4.2). The name prefix you give determines which cameras belong to a given group. This prefix must be located within brackets, [Group1] for example. The entire name of the group members would be [Group1] Camera 1 [Group1] Camera 2 and so on. You can also group together cameras from different image sources. You can put together as many groups as you wish. To allow the group to be displayed in the management view, the option "Group Function for Cameras in Live Image" in the "Settings" menu (see chapter 3.22) must be activated. In the "Path" field you will enter the location where the track's image data should be saved. You can select this location by clicking on the folder symbol. Please note: The track paths can only be changed when working directly at the server but not while working on a client station. The new path will come into effect only after the server has been restarted. In order to use the search function for the evaluation of permanent track recordings (see chapter 5.8), you must activate the "Ascertain Image Change" button. You can carry out a detailed track configuration in the "Track File Organization" section (5). Warning: The following setting changes should only be undertaken by competent technical personnel. Changes can cause image data loss, and incorrect entries can lead to incomplete recordings and system crashes. In order to make configuration changes, you must first activate the "Allow Track Setting Changes" button. Using the "Create Track after Server Restart" button, you determine whether the selected track should be created after a new system start (all image files are deleted in this process). This corresponds to quick formatting. When you activate the "Overwrite Data Completely" button, the track will be thoroughly formatted after the new start. Please note that in this case the reboot process will last much longer than usual! In the "Track Size" field you enter how many gigabytes will be made available for saving the image data of the selected entry. A value between 0.1 and 450 GB must be selected. Make sure that tracks are not assigned a storage space exceeding the physical hard drive space available. In the field "Smallest Expected Image Size" underneath, you can enter this value in kilobyte. Finally, you can enter the "Block Size" for the track in megabytes. It is recommended that you accept the default values as offered. Using the data entered for "Maximum Image Number per Block" and "Track Net Capacity for Image Data", the Manager automatically makes the calculation for you. If you have entered a VR (virtual reality) license (see chapter 3.16), an additional button entitled "VR License" appears. 33 © 2013 ALL RIGHTS RESERVED Satellite V4.5 If you want to define a track as a VR track, first activate the "Allow Changes to Track Settings" button and then click on "VR License". The track size will automatically be changed to 0.2 GB, this being the maximum size for a VR track. A permanent recording cannot take place on this track, it will only be used for recording purposes in case of an event. The Manager provides you with a "Calculator for Recording Duration and Image Number" (6). To use it, first enter the "Average Image Size" in kilobyte. In the "Server Status" menu (see chapter 3.2), you can access this data. Then enter the "Image Recording Rate". Using these values, the Manager calculates for you the expected recording duration and the number of images that will be recorded during this time. With the help of this calculator, you can adjust server settings to attain the recording time you wish. In the "Virtual Device Quality" section (7) you can enter the image quality in a percentage corresponding to high, medium and low. A high percentage value represents good quality. You will find these settings in the "Settings" menu located in the "Manager (local)" function group application where the compression strength for the various levels can be automatically adjusted (see chapter 3.22). You can limit the automatic locking of image data under the "Locking Track Areas" item (8). Locked track areas are no longer made available for cyclical rewriting until they have been unlocked again. You can configure the automatic locking of tracks in the "Event Handling" menu (see chapter 3.11) Click on the "Warning When a Locking Percentage Level is Reached" button and enter a percentage of total track size that will serve as the trigger to issue a warning message. By activating the "Discontinue Event-Driven Locking at a Locking Level of" button and entering a percentage, you can prevent additional track areas from being locked when a certain percentage of total track size has already been locked. Please note: By locking track areas, the overall recording time is shortened because locked areas are no longer available for cyclical rewriting. When 100% of a track is locked, no further recording can take place. If the configured locking level is reached, the warning will be visible in the Live Image. The text color of the camera in the camera list (see chapter 4.2) will initially change to orange. If a second locking level is reached, the text changes to red. 34 © 2013 ALL RIGHTS RESERVED Satellite V4.5 In the "Data Protection Regulations" section (9) you can limit the time available for image access. First enter a time period in days and hours and then click on the "Active" button. All image data older than the time you entered will be deleted. If you enter 7 days, for instance, recordings older than 7 days will not be available. By activating the "Include Locked Image Data" button, locked track areas will also be deleted. 3.11 Standard Operation Standard server operation (and with it the permanent recording process) can be controlled with up to 16 configuration settings. The Calendar (see chapter 3.13) administers these configuration settings. Please note: The first configuration setting with the name "Default" is important. If – for a certain time frame - no time value in the calendar has been configured, this configuration will automatically become the active one! First select a configuration setting in the "Configuration" section (1). You can give this setting a name under the "Basic Settings" section (2). Now select the track to be configured from the "Tracks" field (3). In the "Recording Mode" section (4) you can choose between four modes: - Recording Source: Select here the stream that is to be used for the recording. - No Recording: The track will not record permanently - Recording With Time Interval: Enter how many images per second, per minute or per hour should be recorded - Record Every Nth Number of Received Images: Every nth number of all received images will be recorded (a value of 1 would mean every image would be recorded) 1 2 4 3 5 6 7 35 © 2013 ALL RIGHTS RESERVED Satellite V4.5 If the selected camera is a virtual camera or a standard network camera, you can select the "Activate Preset Tour" button in the "Standard Network Camera" field (5). If this button is active, the camera will begin running through a preset tour. You can learn how such a tour can be configured in chapter 3.19. If your license includes the tracking option, you can use the "Activate Tracking" button to activate object tracking for selected cameras. Under the "Transcoding" item (chapter 3.17) (6) you can select a pre-defined profile. You can then select the "Code Conversion to a New Format" checkbox. The selected profiles properties will now be used for recording the chosen track. Click on "Use Settings for all Tracks" (7) if you want to use this configuration for all tracks. 3.12 Event Handling 3 1 4 2 5 6 The server can react automatically to various events. These reactions can be saved in up to 16 configuration settings which can be administered via the calendar (see chapter 3.13). Please note: The first configuration setting with the name "Default" is important. If no configuration in the calendar has been made, this configuration will be the active one! First select a configuration setting in the "Configuration" section (1). You can give this setting a name under the "Basic Settings" section (3). Now select the track to be configured from the "Tracks" field (2). In the "Event Handling" section (4) you can configure how the track should react to certain events. There are 3 types here that need to be considered: 36 © 2013 ALL RIGHTS RESERVED Satellite V4.5 Events: - Alarm Zone: When you have defined an alarm zone (see chapter 3.12) and something moves within this zone - Camera Alarm: A connected device reports the alarm - Alarm Contact: When a signal is received via an alarm input - Recording: When a manual image recording is initiated - Alarm Group Change: In this case, alarm group refers to the event handling configuration. This alarm event occurs when the configuration changes (either through the calendar or via external arming) - Sabotage: When the server determines sabotage (severed connection) Tracking Object: When the tracking option is activated and a tracking object has been detected (an event like this will trigger both the tracking camera and the reference camera) - TCP/IP Alarm: Alarms which are sent over the server's API interface Conditions: (the last two columns with white buttons) - Alarm Contact: The action will only be carried out if an additional contact on the trace-related alarm input is present - External Arming: The action will only be carried out if a contact made to the input was defined as an arming contact in the "External Arming" menu (see chapter 3.14). Actions: - Recording: The selected track will be recorded for the length of the holding time (5) (see sub item "Recording" (6)) - Locking: The image data being recorded during the holding time (5) will be locked and thus protected from being overwritten (see sub item "Locking" (6)) - Alarm: The event will be handled as an alarm and consequently give cause for a notification in the management view - Relay: The relay assigned to the track will be switched (see sub item "Relay" (6)) - E-Mail: And e-mail will be sent (see sub item "E-Mail" (6)) - Active Connection Setup: This is the active establishment of a connection to the surveillance center. The server will connect to the appointed surveillance center (optional additional software "CamIQ® Connect" (see sub item "Surveillance Center Alarm (CamIQ® Connect)" (6)) - Standard Network: If the selected track uses a standard network camera, a preconfigured preset position can be started up when an incident occurs (see sub item "Standard Network Camera" (6)) - Event-Driven Access Rights: This makes it possible for users to have the needed access rights in case of an alarm - and this only during the immediate alarm period (see sub item "Event-Driven Access Rights" (6)) - Scripts: You can execute scripts in case of an alarm (see sub item "Scripts" (6)) 37 © 2013 ALL RIGHTS RESERVED Satellite V4.5 Select an event on the left side and then go through the line with the white squares (buttons) from left to right. Activate all buttons for actions that should take place in case of an incident (these are described above the corresponding buttons) Please note that the last two buttons on each line are no longer actions but conditions. If you activate conditions, then the desired action will not be carried out with every event, but only when this condition is met once the event takes place. In the "Detailed Settings for Actions" section (5) you can enter the „Event Holding Period“ in seconds. If an event takes place and then occurs once again within this period, another event will not be triggered. Instead, the current event will be retained and extended (for instance; an alarm recording is triggered and another triggering lengthens the recording time instead of triggering a new alarm event). You can reach the other menus which will deal with the individual actions more closely by clicking on the buttons of the task bar with the sub items (6),. 3.12.1 Recording 1 2 In the "Recording Settings" section (1) you can configure how the alarm sequence is recorded. You have the choice here between 4 modes: "Record Every Image" If this setting is active, every received image will be recorded. "Recording Every Nth Image Received" You can determine how many images of all received images should be recorded. Set to "1", every image received will be recorded, set to "2", every second, set to "3", every third …and so forth. "Recording According To Time Interval" You can determine how many alarm sequence images per second should be recorded. Note: If you use “Advanced H.264 Streaming” or Dual Streaming with H.264 “recording only,” it is not possible to control the recording interval with the help of the modes. Only “record every image” will be available. 38 © 2013 ALL RIGHTS RESERVED Satellite V4.5 The “Recording Source” selection allows you to select one of the two possible recording sources available for the event. "No Change In Comparison To Permanent Recording" With this setting, the alarm sequence will be recorded with the same recording rate that is used for the permanent recording. Under the "Code Conversion" item (2) you can select a preconfigured profile (chapter 3.26). Then select the "Code Conversion to a New Format" checkbox. The selected profile properties will now be used in recording the chosen track. Click on the "Apply to All Tracks" button to take over the effected changes for all tracks. 3.12.2 Pre-Alarm Images 1 In the "Pre-Alarm Images" section (1) you can indicate if and how many pre-alarm images should be saved. When an alarm is triggered, pre-alarm images already precede the alarm sequence so that the seconds before the actual alarm triggering are also saved. To activate this, first click on the "Save PreAlarm Images" button. Then click on the "Pre-Alarm Time Period" button and enter how long the prealarm should be (between 1 and 30 seconds). Then determine with which image rate the pre-alarm images should be recorded (Interval). In the example above, the "Recording Interval" has been set to 0.5 seconds. An image will be recorded every half a second - or 2 images per second. 39 © 2013 ALL RIGHTS RESERVED Satellite V4.5 3.12.3 Locking In case of an event, a section of the permanent track can be locked. This ensures that this part of the recording will not be overwritten during the cyclical recording process. However, it must be noted here that recording capacity is reduced when track segments are locked. 1 2 In the "Locking" section (1) you can determine that specified time periods close to an event will be protected by selecting the buttons "Lock Segment before Event" and "Lock Segment after Event". After clicking on the respective button, enter a time between 1 and 120 minutes which should be locked on the permanent track. Click on the "Apply to All Tracks" button (2) to take over the effected settings for all tracks. Please note: Locking will first take place after the expiration of the holding period event. 3.12.4 Relays In this sub menu, you can determine how the relays assigned to the current track will react when an event takes place. 1 2 In the "Relay Switching" section (1) you can first configure whether the relay should "trigger" or "release" when an event takes place. Then, with the help of a "holding time" value in seconds, you can determine how long the relay should maintain this state before returning to its original condition. Click on the "Apply to All Tracks" button (2) to take over the effected settings for all tracks. 40 © 2013 ALL RIGHTS RESERVED Satellite V4.5 3.12.5 E-Mail 1 2 3 4 In case of an event, server e-mails can be sent. Please see the chapter on e-mails (3.18) for information concerning the technical configuration of e-mail transmission. In the present menu, you can only assign e-mail users to specific tracks. In the "Active E-Mail Groups" section (1), select which e-mail recipient should receive a message by clicking on the corresponding address. You can deactivate all addresses with the "Delete All" button (2). With the "Select All" button (3), you can activate all addresses. Click on the "Apply to All Tracks" button (4) to take over the effected settings for all tracks. 3.12.6 Surveillance Center Alarm (CamIQ® Connect) 1 2 3 4 41 © 2013 ALL RIGHTS RESERVED Satellite V4.5 In case of an event, the server can actively connect to the surveillance center and send an alarm to users if CamIQ Connect (optional additional software) was started there. You can read about the configuration of the individual targets in the "Active Connection Setup" chapter (3.18). In the "Surveillance Center Alarm" section (1), select which clients the server should connect to by selecting the corresponding IP address. With the "Delete All" button (2) you can deactivate all IP addresses. With the "Select All" button (3) you can activate all IP addresses. Click on the "Apply to All Tracks" button (4) to take over the effected properties for all tracks. 3.12.7 Standard Network Cameras When an event takes place, an installed standard network camera can be moved to one of your preset positions. 1 2 First, select the standard network camera or dome camera from the "Camera" list (1). Then select from the "Position" list (2) the preset position that the camera should be set to in case of an event. You can get information concerning the configuration of preset positions in the "Standard Network Cameras and Tracking" chapter (3.19). 3.12.8 Event-Driven Access Rights In case of an event, a user can optionally be given access to the image material taken during the time of the alarm (plus or minus a defined time period). 1 2 42 © 2013 ALL RIGHTS RESERVED Satellite V4.5 Define here the time period during which the user with limited access can evaluate the occurring alarm (1). Select the time period during which the user with limited access can evaluate the recording before the alarm took place (2). 3.12.9 Scripts 1 2 A predefined script can be called up when an event takes place. Under "Run a Script" (1), select the script which should be run in case of an event (information concerning the creation of a script can be found in the "Scripts" (2.23) chapter. Click on "Apply to All Tracks" (2) to take over the script for every track in case of an event. 3.13 Alarm Zones The CamIQ® Satellite server comes equipped with integrated motion detection. In order to use it, a socalled alarm zone must be defined for the screen in which the motion detection is to be implemented. Up to 16 freely-definable alarm zones are available and command an extensive range of adjustment settings such as sensitivity, minimum and maximum object size, pre-alarm zone (direction detection), detection resolution and perspective analysis. 6 7 1 8 4 5 3 9 10 12 2 14 13 11 43 © 2013 ALL RIGHTS RESERVED Satellite V4.5 Please note: An additional license is necessary in order to use the perspective analysis functionality. Setting Up an Alarm Zone First select a track from the “Virtual Cameras“ list (1). The current camera image appears in the “Zone Definition” field (2). Then click on “New” (3) to add a new zone. The new zone will be displayed in the “Zone List” (4). If you wish to delete a zone, highlight the zone in the Zone List (4) and select the “Delete” button (5). Use this area (6) to set the “Max Scanning Interval (fps)“. This is the sampling rate at which the images are to be searched for motion – it can lie between 1 and 1000 milliseconds. The current “Actual Interval” is displayed to the right of the field as the actual sampling rate is dependent upon the processor’s workload. If you click on the “Suggestion” button the Manager will enter a suitable interval for you. Select the “Evaluation Active“ button (7) in order to activate the zone evaluation function. In the “Object Size“ area (8) you can see a detection display. The vertical green line is the threshold at which an event will be triggered; the red line is the threshold at which no alarm will be triggered as the object in question is too large. The bar on the left shows the current detection intensity. If the bar exceeds the green line, it will turn red and has then reached the event-triggering range. In the “Selected Zone“ area (9) you can give the zone a designation as well as assign it a color. The menu item “Sensitivity“ allows you to select how sensitively the sensor should react to movement. The higher the sensitivity, the more discerning the sensor’s reaction to image changes, even smaller ones. You can drastically decrease the number of false alarms and differentiate between objects based on size with the help of the configurable minimum and maximum object size function. For better visualization, an auxiliary interface is superimposed directly onto the image: The small green frame is configurable using the input window on the left (10) and visualizes the minimum object size (an object that is smaller than the green frame will not trigger an alarm). The minimum object size lends itself to preventing alarms that would otherwise be triggered by animals or weather conditions, for instance. The red frame visualizes the maximum object size leading to an alarm. It is configurable using the second input window (10). The range between the minimum and maximum object sizes is cross-hatched in red and indicates the object size which will trigger an alarm. The object sizes here always correlate to 100% of the image to be analyzed. The effect brought about due to settings changes made can be seen in the detection display (8). 44 © 2013 ALL RIGHTS RESERVED Satellite V4.5 Alarm |No Alarm| No Alarm The “Zone Type“ item (11) allows you to determine what type of zone your selected zone should be configured as. Alarm Zone: If a movement is detected in this zone, the server triggers an event. If pre-alarm zones have been defined, the alarm zone can be linked to these. To do this, select the corresponding pre-alarm zone in the “Linked to Pre-Alarm Zone” field. Now a movement must first be detected in the pre-alarm zone and then in the alarm zone before an event will be triggered. If the alarm zone is linked to several pre-alarm zones, it will suffice if movement is detected in only one of them before an event is triggered. It is not necessary for something to occur in all of the pre-alarm zones. Pre-Alarm Zone: This zone detects changes to the image just like the alarm zone does. However, it does not trigger events. It merely precedes the alarm zone. You can adjust the time in seconds under the “Holding Period“ item. This holding period is the time limit in which a movement must be detected in both the pre-alarm and alarm zones so that an event will be triggered. If this time limit is exceeded, no event will be triggered. Please note: If you want to implement the direction recognition function, ensure that the space between the alarm and pre-alarm zones is as large as the object. Otherwise, this object will also trigger an event in the border area of both zones if it moves in the opposite direction. Tracking Zone: You also have the possibility of defining a zone as a tracking zone. This setting is only useful when using a so-called reference camera, as the zone highlights the area in the image in which object tracking should be executed with the help of a PTZ camera (an additional license is necessary to order to use tracking). The “Intensity“ area (12) allows you to determine the opacity the alarm zone should have in the live image. The first setting refers to the “Active Zone.” A zone is active when movement is detected within it. The second setting refers to the “Inactive Zone.” “Inactive” here means that no movement is currently being detected in the zone. Enter your values, whereby 255 sets the zone to full opacity and completely covers up the live image behind the zone. In the “Display Settings“ area (13) you can configure the image display (2), which can be helpful when setting up the zones. If the “Live Image“ button is active, a video stream will be played in area (2) showing the current image being received. If the button is deactivated, only a frozen image will be displayed. If one activates the “Display Selected Zone” button, the currently selected zone will be embedded within the image. If the button is deactivated, the zone is hidden. If the „Display All 45 © 2013 ALL RIGHTS RESERVED Satellite V4.5 Zones“ button is activated, all zones for the currently selected track are shown. In this way one can directly calibrate pre-alarm and alarm zones to one another. If the “Object Size“ selection box is active, the visualization for minimum and maximum object size will be superimposed. Using the tools offered in the “Drawing Functions“ area (14) you can plot the zones in the camera image (2). The “Rectangle“ tool allows you to draw a rectangle zone. To do this, place the mouse pointer on the position where one of the corners should be. Click on this position and press down on the mouse button. Keeping the button pressed, pull the mouse pointer away from the position. The drawn zone under the mouse pointer will increase in size in proportion to the distance moved. The “Pencil“ tool enables you to draw lines manually. Draw a circle in the middle of an area, for instance, by bringing the mouse pointer into position and then moving it accordingly with the mouse button pressed. Subsequently, you can use the “Fill-In“ tool to fill in the arc of the circle you created by clicking anywhere within the circle. The “Fill-In” tool functions by filling in connected areas of the same kind with the zone marking. The “Eraser“ tool functions in the same way that the “Rectangle“ does, only in this case the delineated zone is removed. By using the “Distance Calculation“ drawing function you can shift points “A (foreground)“ and “B (background)“. (This tool is part of the Enhanced Detection functionality of Distance Calculation.) By clicking on the “Delete“ button you can completely delete the selected zone. With a click to the “Undo“ button you can undo the last change made. Enhanced Detection Enhanced Detection uses complex algorithms for the gathering and analysis of characteristic objects under consideration of the camera perspective. 5 4 1 2 3 46 © 2013 ALL RIGHTS RESERVED Satellite V4.5 To use Enhanced Detection and the Distance Calculation (perspective), set up an alarm zone as described before and then activate the “Enhanced Detection“ (1) and “Distance Calculation“ (2) functions. First complete the calibration of the reference points. Measure the distance between the camera to point (A) and the distance between the camera and point (B). Also enter the installation height of the camera in the Distance Calculation (3). You can freely position reference points A and B on the camera image. To shift the points select the “Distance Calculation” tool (4). Please note: Select the reference points carefully and enter the most accurate measurements possible. The more precise the distance entered, the more precise the detection result. The minimum and maximum object size is defined in the same way as in a “normal“ alarm zone (5) (Enhanced Detection allows object size to be separately configured in height and width). 47 © 2013 ALL RIGHTS RESERVED Satellite V4.5 3.13.1 Privacy Zones / Fade-Out Area 2 1 4 3 5 6 In order to delineate a private zone and, through this, black out an area of the image, you will first need to activate the "Privacy zone" entry (4). Through this, the fade-out area will appear in the "Zone List" (1). Then select a color for the zone from the "Color" list box (3). The settings and tools under the items (5) and (6) function exactly the same way as when creating alarm and prealarm zones. The zone will be drawn in the camera image (2). Please note: The blacked-out area is no longer visible either in the Live Image or in the recording! 48 © 2013 ALL RIGHTS RESERVED Satellite V4.5 3.14 Calendar 1 6 2 8 9 10 3 4 5 7 11 The various configurations for permanent recording and event-handling (see chapters 3.10 and 3.11) can be used in a scheduled fashion with the help of the calendar. This allows certain configurations to be activated at designated times. In the "Calendar Entry" section (1), you can view existing calendar entries. The currently active entry is green, the currently selected entry is blue. In order to make a new calendar entry, click on the "New Entry" button (6). If you wish to delete an entry, click on "Delete Marked Entry" (8). In the "Time Settings" section (2) you can determine how often the selected entry should be active. You have the choice between "once", "daily", "weekly", "monthly" and "yearly" (in descending priority). Depending upon which repetition you have selected, you can place a time limit on it under the "Repetition Start/Finish" item (3). Choose a time for the start and a day and month when necessary. Choose a time for the finish and a day and month when necessary. If you click on the button "Repetition Time Limit" under item (9), you can determine the repetition time with the calendar. Select for "Start" and "Finish" a respective calendar date in the "Time Limit" section (10). The selected entry will then be active only within the time period as set under items (2) and (3). If two entries of the same type of repetition overlap during the same time period, you can give each entry a different priority under item (9). The higher value has the higher priority. In the "Comment" section (4) you can add a comment to your entry. 49 © 2013 ALL RIGHTS RESERVED Satellite V4.5 Under the Effects" item (5), select for every calendar entry a "Configuration for Standard Operation" (see chapter 3.10) and a "Configuration for Event-Handling" (see chapter 3.11). After you have made all the settings, click on the "Apply" button (11). If you would like to disregard the settings you have made, click on the "Cancel" button (7). Please note: If there is no calendar entry for a particular time period, the first configuration for standard operation and the first configuration for event-handling will be activated! Normally this configuration is referred to as the "Default". Configuration example: Employees in your company only work during the day, Mondays through Thursdays from 0800 to 1800 hours and Fridays from 0800 to 1500 hours. They are pleased to have their weekends off. A permanent recording is to take place 24/7. In addition, motion detection with alarm should be active at night and on weekends when no one is working. For this example you would need a configuration for standard operation in which permanent recording has been configured. We will name this "Recording", for example. Two configurations for event-handling will also be necessary; one which leads to an alarm when motion has been detected and one with which no alarm is given. These examples can be called "Armed" and "Unarmed". First make a calendar entry with the "Daily" (repetition) setting and with a starting time of 0800 hours and an ending time of 1800 hours This entry will be linked to the "Recording" and "Unarmed" configurations. Then a second entry is made. Here too, use "Daily" - but with a starting time of 1800 hours and a finishing time of 0800 hours. This will then be linked with the "Recording" and "Armed" configurations. Now the weekend must still be considered. We add for it a third entry with the "Weekly" repetition and set the starting time as "Friday, 1500 hours" and the finishing time as „Monday, 0800 hours“. You will select for this the "Recording" and "Armed" configurations. Due to its higher priority, the weekend entry will overlay the daily entry and in this way achieve the desired operating mode. 50 © 2013 ALL RIGHTS RESERVED Satellite V4.5 3.15 External Arming 2 3 4 5 1 The standard operation and event-handling configurations can be manually altered using external wiring. Select how the circuit should be switched in the „External Arming“ section (1): - Out: External arming is deactivated. - Via TCP/IP API Interface: The signal comes in over a TCP/IP connection (2) - Via External Contact: First select under the "Device" item (3) a device which has at least on alarm input at its disposal and then enter which "Alarm Contact" is to be used for the external arming. Then click on the "Switching the Configuration for Standard Operation" button (4) in the "Effects" section and select a configuration. You can manage the configurations in the "Standard Operation" menu (see chapter 3.10). After this, activate the "Switching the Configuration for Event-Handling" button (5) in the "Effects" section and select a configuration. You can manage these configurations in the "Event-Handling" menu (see chapter 3.11). Please note: Configurations that are activated by external contact have priority over those which are activated by the Calendar. 51 © 2013 ALL RIGHTS RESERVED Satellite V4.5 3.16 Users 3 5 4 6 1 7 11 12 8 2 9 10 You can add up to 32 users. Some user accounts have already been prepared and can be either modified or deleted (with the exception of the administrator account!). Individual rights can be given to every user account. First select a user account from the "User List" (1). Alternatively, you can also create a user account by clicking on "New User" under item (2). You can copy a user account if you have already configured one and wish to give a new account the same rights and properties, for instance. First mark the account you would like to copy and then select "Copy User" (2). A field opens above the button in which you can enter the new user name. To delete a user, mark the account and click on "Delete Entry" (2). Under item (3) you can activate or deactivate the chosen user account by clicking on the "Active User Account" button. Deactivated users can no longer log in. In the "User Level" section (4) you can give or take rights from the selected user account that have to do with operating the Manager. To do this, click on the corresponding button to either add or remove the right in question. In the "Access to Extension Module" section (5) you can give a user account the right to access the server over a TCP/IP API interface. This is necessary if a connection over the API should be made. Under the "Configuration Level" item (6), the user account can be given rights which will permit the holder to configure the server. Please be very careful when issuing these rights! In the "Additional Settings" section (7), you can undertake further safety measures. You can issue a two-part password for a user account, a so-called four-eye- password. You can also limit the validity of passwords or give the user the right to change his or her own password. You can also 52 © 2013 ALL RIGHTS RESERVED Satellite V4.5 have the Windows taskbar removed from sight and thus prevent the user from logging out of the Manager. This ensures that the Manager is always active in the foreground and that the alarm alerts will be seen immediately. Under the "Camera Access" item (8) you can either allow or prevent access to designated cameras for selected user accounts. You can do this by activating or deactivating access after clicking on the corresponding camera buttons. You can revoke all camera rights from a user by clicking on the "None" button (9). You can also issue all camera rights by clicking on the "Select All" button (10). Under the "Password" item (11) you can enter a password for a user account. Enter it in both fields and confirm your entries with a click on the checkmark. If both password entries are identical, the stars will disappear from the entry fields. If the entries are not identical, the fields will turn red. In this case, it will be necessary for you to double-check your entries. You can invalidate a password before the expiration date by clicking on the "End Password Validity" button. Warning: After the installation, no password will have been issued for the administrator account! Therefore, you must enter one as quickly as possible to protect your system from misuse! Under the "Access According to Operating Mode / Time Limit" item (12) you can either allow or deny a user access to the Live Image and the recording based on certain criteria. 53 © 2013 ALL RIGHTS RESERVED Satellite V4.5 3.17 Licenses In this menu you can view all issued licenses and activate additional options and extensions. 1 6 2 4 3 5 In the "USB Dongle" section (1) you can view the data concerning the USB Dongle. Along with the "Dongle Status", the "Dongle Number" and the "Basic License Type" are displayed. In the "Camera Licenses" section (2) all of the activated extended camera licenses to date are displayed. Under item (3) you will see the itemized total of activated cameras. In addition, you can see the maximum number of clients allowed to connect to the server (the Watchdog also counts as a client, see chapter 2.3). In the "Basic License" section (6) you can enter your basic license and have it verified. In the "New Additional License" menu (4) you can activate all the various kinds of additional licenses. To do this, enter the license number in the "License" field. Enter the activation code in the "Activation Code" field and then click on "Verify Additional License". If the license data is correct, the license will be activated and displayed in the "Camera Licenses" section (2). If you need to have a license activated, click on the "Manager License Activation" button under item (5) and fill out the necessary fields. The PC will need to be connected to the Internet for this, however. Alternatively, you can activate the license over your browser. To do this, visit our website at www.camiq.net or click on the "Product Activation with Browser" button. Please note: You can read up about license activation in chapter 1.4: "License Activation". 3.18 E-Mail 54 © 2013 ALL RIGHTS RESERVED Satellite V4.5 In the "Extended Settings" function group (1), you will find additional configuration menus for extended functions and optional modules. In the "E-Mail" menu (2), you can configure e-mail messaging. 3 1 4 2 5 8 6 7 9 10 Under item (3) you can set the "Minimum Interval between Two E-Mails" in minutes. This applies for e-mails that are initiated by an individual track. Other tracks can still send e-mails within this time interval. In the "SMTP Server" section (4) you can enter data about the mail delivery server which will be used by the server to send the e-mails. This can be a free mailer service in the Internet, for example, or an SMTP server in a local network. Enter the IP address or domain of the SMTP server (only when your network supports name resolution) in the "Server" field. For some mail services the sender address will need to be entered in the "Sender" field. If this is not required, you can enter anything here. SMTP servers (as well as free mail services in the Internet) demand authentification or dial-up data. You must enter this user name here along with the corresponding password in the "Password" field. It is only in this way that the server can gain access to the e-mail account and send the e-mails. In the "Message" section (5) you can individually adapt the alarm mail by making changes to the "Subject" and "Message" fields. You can use the HTML format for this, but do not change any of the variables denoted with the $ sign. $TRACKNAME$ stands for the track used by the alarmtriggering camera, $ALARMTIME$ is the point in time in which the alarm takes place and $ALARMPICTURE$ is the designation for the alarm image. Under the "Image Attachment" item (6) you can initially select a track. Then you can decide whether the alarm mail should have an image attached to it or not by activating or deactivating the "Image Forwarding" button under item (8). You can also compress the image by clicking on the "Reduce Image Quality To" button and entering a compression rate in percent. 100% corresponds to the original quality without compression but results in a high amount of data. By clicking on the "Apply to All Tracks" button, the current setting will be taken over for all other tracks. 55 © 2013 ALL RIGHTS RESERVED Satellite V4.5 Warning: If the images were taken using the interlaced scanning process, it is possible that they will appear squeezed together. In this case, click on the "Reduce Image Quality To" button (8). This recompresses the images and saves them using the proper ratio. In the "Target Addresses" section (7), first select an entry from the "E-Mail Groups" list. Under the "Selected Group" item (9) you can give the group a name by adding it in the "Designation" field. In the e-mail address field you can enter several e-mail addresses, each separated by a semicolon. With a click on the "Send a Test Message" button (10) you can forward a message and test to see whether your settings are correct. 3.19 Surveillance Center / Remote Stations With the help of the Surveillance Center, it will be possible for you to send events to a higher level CamIQ® Connect/ Surveillance Center server and to specify the appropriate measures. CamIQ® Connect is a separate product. For this reason, surveillance center configuration will not be covered in the CamIQ® Satellite User Manual. 56 © 2013 ALL RIGHTS RESERVED Satellite V4.5 3.20 Standard Network Cameras and the Tracking Option Standard network cameras and dome cameras connected to the station's COM ports or over a socalled PTZ box (see chapter 3.19.2) can be controlled by the server. Additionally, an activated tracking license allows you to track objects (see chapter 3.19.1). You can monitor and film persons individually in a larger monitored area, for instance. 5 1 7 8 9 2 3 4 6 First select the tilt swivel track in the "Cameras" section (1). The camera image appears under the "Standard Network Camera Live Image" item (2). You can assign the selected track to a COM port in the "COM Port Assignment" menu (5). Then enter the tilt swivel's "Receiver ID". This is the camera address that you must also set on the camera itself. In the "Sensitivity" field you can set how sensitively the tilt swivel camera should react to commands; 100 is the most sensitive setting. Please note: If the camera supports a server-controlled distance parameter setting, it is recommended that the sensitivity be set to a lower value such as 30, for example. With this, the operation of the menu is usually much easier You can also enter a value for the "Minimum Distance between Two Standard Network Cameras". This will be necessary with some dome cameras. Now the COM port can be configured. Select the desired port from the "COM Ports" list (7) and configure the "Baud Rate", "Parity", "Data Bits", "Stop Bits" and the protocol in section (8). Please note: Baud rate, parity, data bits and stop bits must correspond with the standard network device's COM port settings. 57 © 2013 ALL RIGHTS RESERVED Satellite V4.5 Only activate the "Use Receive Channel" button if you must receive data over the dome camera interface (during tracking, for example). Deactivating this item enables the control commands to be carried out faster. Click on the "Active" button to activate the COM port. Finish the procedure by clicking on "Initialize Configuration" (9). The configuration will be saved and the camera is now operational. Please note: To control PTZ cameras over COM ports in a TCP/IP network, a PTZ box can be installed (see chapter 3.19.2). Beneath the Live Image you will find the "Standard Network Camera Configuration" section (3). This is the so-called S/N Panel with which the camera can be controlled. In order to control the standard network camera, click on the gray quadrant in the middle of the cross with the left mouse button and hold it in place. Now move the mouse pointer within the control field. Observe that the camera moves faster the further away you move away from the middle of the control field. If you use an analog joystick (see chapter 3.22), the camera will move faster the further you direct the stick in one direction. You can zoom in or out by clicking on the + and – buttons with the left mouse button. You can focus using the + and – buttons. But you can also focus the lens itself by clicking on Auto, if the camera supports this function. Various dome camera models’ auto tours can also be started using this button. With buttons 1-8, you can call up saved camera positions. In order to save a position, position your camera in the way you wish to save it, select a position number (4) and then click on "Save". The "Test" button allows you call up the position that you have entered to the left of the arrow buttons. Operate the camera's own OSD (On Screen Display) menu using this control field if it can be accessed by sending presets. An OSD menu then opens in which you can operate the directional pad and the "OK" and "Return" buttons. In the "Preset Tour" section (6) you can configure a tour. First select a position from the "Position" list box. Then select the camera's dwelling time at this position from the "Duration" list box. Then click on the + button to add this position to the tour. If you would like to remove a position, select it from the "Positions" list and click on the - button. 58 © 2013 ALL RIGHTS RESERVED Satellite V4.5 In order to sort the positions in another manner, you can select a position and then change its place on the list with the "Up" and "Down" buttons. If the standard network camera does not have its own home position, you can simulate one by entering only one position in the preset tour. Of course the camera still remains manually accessible during a tour. The tour will merely be interrupted and continue again ten seconds after the last control command. 3.20.1 Automatic Object Tracking At least two cameras are necessary for object tracking. One camera (the reference camera) is set to cover the entire observable area. A second camera (a standard network camera) is responsible for the actual object tracking. Depending upon the local conditions, up to four reference cameras can be used. Tracking can - in this way - help to significantly reduce the necessary number of cameras needed for the surveillance of large areas. A special license is necessary for using the tracking option; it is obtainable from your supplier. Tracking will not be possible without this license (see chapter 3.16). 1 3 4 2 6 5 Please note: The use of tracking makes sense when a large area must be monitored in which relatively few objects are in motion. These objects will then be recorded in detail by the standard network camera. Reference Camera Selection To set up a reference camera, first click on the "+" button (5). Select the camera you wish to use as a reference camera from the camera assignment section. You can change the position of the reference camera in the "Reference Cameras" list (4) by using the "Up" and "Down" buttons (5). You can remove a camera from the list using the "-" button. 59 © 2013 ALL RIGHTS RESERVED Satellite V4.5 Please note: Several reference cameras can be configured for a standard network camera in order to cover a 360° area around it. The list of reference cameras is sorted by priority; this is why the correct layout of the cameras is important. Dimensions The dimensions relate to the coordinates that are to be measured. These values are entered in meters. The line between points A and B (green in the image) is thereby a reference line to which the four reference points (red in the image) relate. The following will explain the measuring process step by step: Set up a standard network camera. Set up a reference camera. Position the reference points in the reference camera image (3) by shifting the red and green squares while holding the mouse button in place. If these points will not move, activate the "Allow Reference Point Shifting" option in the "Reference Point" menu (6). Choose points in such a way that they will be easy to later locate for the measurement. All points must be within the viewing range of the standard network camera. Please note: If possible, the points in the image ("Reference Camera Live Image") should lie on one level. If tracking is to take place on a street, for instance, then the points should be positioned on the ground if possible (at the foot of a streetlight, for example). The more exact the measuring points lie on a level, the more precise the tracking will be. You should also distribute the points as evenly as possible across the entire area. Example: After you have placed the reference points in their suitable positions, go through the following steps for each of the six reference points: 1. Select a reference point in the Live Image (3). 2. You can use the S/N control field (2) of the standard network camera (1) to position on the selected reference point. You can use the zoom and focus functions at your discretion. 3. Click with the right mouse button on the selected point (3) and select "Set S/N-Position" from the context menu window. The position will be saved. Check the positions of all six reference points by accessing them individually. Click with the right mouse button on the selected reference point (3) and select "Access S/N Position". 60 © 2013 ALL RIGHTS RESERVED Satellite V4.5 Under "Options" (6) you can press the "Print Reference Points" button. A page will be printed which can help you with the measuring of the points. The following picture represents the printout for our example: The upper page displays the image taken by the reference camera along with the delineated points. The lower page shows a table in which the measurements are entered. The designations A, B, 1, 2, 3 and 4 in the table correspond to the points in the reference image. 4. A-B (m): The distance between points A and B. The distance in the image example is 18.2 meters. 5. In the second step, the distances between the four red reference points to the green A and B reference points are determined. In the example above, the distance between reference point 1 and point A is 5.0 meters. The distance between reference point 1 and point B is 19.2 meters. Using this method, the distances for all remaining reference points should be entered in the table. The distance of points A and B to the reference and standard network cameras should also be ascertained using the same method. In this example, the cameras are located very close to one another, thus the values are identical. The camera distance to point A is 37.5 meters and to point B 20.0 it is meters. The height of the cameras must also be determined. In our example, the height is 18 meters. This gives us the following table: 61 © 2013 ALL RIGHTS RESERVED Satellite V4.5 A-B (m) = 18.2 A (m) B (m) Height (m) 1 5.0 19.2 2 15.3 14.5 3 19.1 24.6 4 13.7 8.5 S/N Camera 37.5 20.0 18 Ref. Camera 37.5 20.0 18 The measured values are now entered into the software. First enter the distances between A and B under "Measurements" (6), as well as their distances to the cameras and their heights. When slight deviations in the symmetry of the measured values occur -or invalid or incomplete values are entered - the corresponding fields turn red. In this case, you should check to see if the values were taken over properly or whether a measurement error has perhaps taken place. Enter the distances of the reference points to A and B. To do this, select one of the four red reference points in the Live Image of the reference camera (3) and enter the distances in the fields provided. Once you have entered all the reference points, the tracking has been successfully calibrated. In the last step, you can set additional tracking options: - Projection (ms): With fast moving objects, inertia will continually hold the standard network camera back in its pursuit of the object. This option enables the camera to project the probable position of the moving object (in milliseconds) and pursue it accordingly. - Targeted Object Heights: Independent of the object, you have the option of entering a percentage height for the object. If you are detecting automobiles, for instance, and you want the camera's focus to be placed at the height of the license plate, then you would select a lower object height value, 20% for instance. If you are detecting people and want the standard network camera to focus on the face, then a higher value would be more appropriate, 90% for example. - Relative Zoom: Enter the relative zoom factor in percentage to the object height. 62 © 2013 ALL RIGHTS RESERVED Satellite V4.5 Tracking has now been configured. Hold the right mouse button and pull a square over the reference image. The standard network camera will be directed to this area. In this way you can check the expected tracking results beforehand. If the results are unsatisfactory, the system has not been calibrated precisely and you should check the settings and the measurements once again. A tracking zone will now need to be set up for every camera under the "Alarm Zone" menu item. You will find details concerning the zone setup in the "Alarm Zone" chapter 3.12. - Gauss: The higher the set value, the more thoroughly possible signal noise will be filtered out. If a value is set too high, sensor sensitivity is impaired. - History: Should an object suddenly stand still, it no longer has a triggering effect. The history value nevertheless enables the sensor to know where the object last was. - Object Size: Tracking will only be triggered once a specific object size (percentage in relation to the zone) is reached. Warning: If the standard network camera should encounter a completely abstruse angel of vision while tracking or accessing a reference point, please check to see if the receiving channel is in use and ready to operate. Should this error persist, check your measurements again; they must be very precise, especially when it comes to the installation height. 63 © 2013 ALL RIGHTS RESERVED Satellite V4.5 3.20.2 PTZ Box Installation With the help of a PTZ box, you can define virtual COM ports which can be addressed over a TCP/IP interface. This way, the server station can communicate with and direct the standard network cameras using its COM ports which are physically located within the network of the PTZ box. In the following example, the installation of a NetCom by Vision Systems will be described. Warning: Deactivate the Windows Firewall in the server station's control panel, or reconfigure it if you have experience here. All UDP services and ports used by the server must be unlocked (see NetCom Manager). Attach the NetCom to the server network. Alternatively, you can directly attach the NetCom to the server using a crosslink cable. Install the NetCom software and follow the directions given on the screen. The NetCom Manager should start automatically after the installation and begin searching for servers attached to the network. If this does not happen, start the NetCom Manager manually and click on the "Search" button. All servers discovered will be displayed with a blue symbol. If a question mark is visible on a blue symbol, click on it and then click again on "Verify". The system will check to see that the server is actually available and then the question mark will disappear. A red X on the blue symbol indicates that the server is not available. Click on the blue symbol and then click on "Properties". You can configure the server's IP address in the menu window that opens. Make sure that this IP address is in the same network as the server as they must communicate with each another. 64 © 2013 ALL RIGHTS RESERVED Satellite V4.5 The method for configuring the IP address as recommended by the manufacturer is different, however, and somewhat more involved. First you must readout the NetCom's current IP address under "Properties". Then adapt the server station's IP address to conform to this address thus enabling them to communicate with each other. Then you can enter the NetCom's IP address in your browser to enable access to the web interface. When it opens, click on "Server Configuration". In this menu you can configure NetCom's network properties, among other things. Enter here the desired IP address and click on "Save". NetCom takes over the address and will restart automatically. During this time, you can reset the server station's IP address back to its earlier settings. 65 © 2013 ALL RIGHTS RESERVED Satellite V4.5 The virtual COM ports should be set up automatically. Manual intervention should only be necessary when this is not the case or when several NetCom devices are connected to a server. You can configure the ports under the "Ports" tab and issue them COM port numbers. Once the numbers have been entered correctly in the NetCom Manager, close the software with a click on "OK." The COM ports will now be created. The Windows operating system will usually notify you that it will now begin with the installation of the drivers for the COM ports. This takes place for every port individually. In order to use the newly created ports, the server must be restarted again. First close the server applications (see chapter 2.5) and then close windows via "Start" – "Shutdown". Once the server has restarted, you can check to see if the COM ports are available be opening the Windows "Device Manager". You can do this by right-clicking on "Workplace" and then selecting "Properties". At the "Hardware" tab, click on the "Device Manager" button. You will find the NetCom COM ports there if everything functioned as it should have. If the installation has not worked up until this point, open the NetCom Manager once again. Click repeatedly on "Verify", issue new COM port numbers and then close the software with a click on "OK". Restart the server station as well. Also make sure that the NetCom IP settings are correct. Afterwards, you will still need to make changes to the NetCom server's IP switch settings depending on which camera is to be attached. 66 © 2013 ALL RIGHTS RESERVED Satellite V4.5 Please note: The NetCom server settings will be overwritten by the Manager settings. When in doubt, pay more attention to entering the correct configuration in the Manager application. Fine adjustments can be made by calling the NetCom server's IP address in the Internet Explorer. 3.20.3 Virtual Device The virtual device makes it possible to enlarge, to move, and to track objects in image sections of a permanent camera image as desired - without the use of a PTZ camera. The virtual device is created in the following manner: First, configure a track for the virtual device in the "Tracks" menu. Choose as a camera the track of the desired image source. You can find out more about setting up a track in the "Tracks" chapter (3.9). You can now zoom and move image sections of the new track as you wish with the help of the „S/N Panel .“ You can find out more about this function in chapter 4.9: "S/N Panel". Please note: In order to move the image section you must first zoom into the image. Virtual Tracking: You can activate object tracking for the virtual device and use the real camera as reference camera. To do this, first activate "Tracking" for the virtual device in "Standard Operation". You can find more detailed information on this in chapter 3.10: "Standard Operation". Set up a tracking zone for the real camera in which the object tracking should take place. You can read how to define a tracking zone in chapter 3.12: "Alarm Zones". The virtual device will now track objects that are targeted by the real camera. 3.21 Lens Correction For better tracking results, the distortion that can occur in the periphery of objects can be calculated out of the image. First, select the desired track and configure the parameters in such a way that all the straight lines in an image, walls of houses for instance, are also displayed straight within the image. To preview the results, click on "Snapshot"(1) or wait for 4 seconds after your entry. 1 67 © 2013 ALL RIGHTS RESERVED Satellite V4.5 3.22 Error Relay / SNMP Configuration This menu offers you the option of defining the relay of a random component in such a way that it will be switched in case of component failure. You could connect this relay to a siren or a signal light, for example. Click on the "Active" button (1) to use this function or to deactivate it again. The "Device" button (2) enables you to select the device that disposes of the desired relay. The devices that are available here were previously added within the "Devices/Image Sources" menu (see chapter 3.8). Then select the desired relay from the "Alarm Contact" list box. Use the "Trigger when..." field (3) to select the events that should trigger the error relay. These can be things like a hard drive failure, a device failure or a signal drop. 1 2 3 5 6 4 The relay's current state is displayed in the "Status" section (4). After rectifying a failure, you can reset the relay back to its original state with the "Reset Error Relay" button. The "E-Mail Configuration" box list (5) allows you to select the preconfigured e-mail addresses that should be contacted in the case of an error relay triggering. Please note: You can find further information concerning e-mail transmission in chapter 3.17: "EMail”. From the "Notify Surveillance Center / Remote Station" list box (6), you can select which receiver should be notified when the error relay is triggered. You can find out more about this in chapter 3.18: "Active Connection". 68 © 2013 ALL RIGHTS RESERVED Satellite V4.5 To the right of the error relay configuration you will find the SNMP configuration (you can find further information about SNMP in the Internet under “de.wikipedia.org/wiki/Simple_Network_Management_Protocol“). 1 2 3 6 4 5 Place a check in the "Active" (1) checkbox to activate SNMP. Enter a "port" in the desired "community"(2). Use the "traps" (3) configuration to define which event will trigger a message. Possible events correspond to those found in the event handling configuration. To activate an event as a trigger, place a corresponding check. Select a trap from the "trap list" (4) enter the connection information (5) in your SNMP client and set the entry to active (6). If you use several SNMP clients, define an additional trap (4) for this. 69 © 2013 ALL RIGHTS RESERVED Satellite V4.5 3.23 Settings Manager (local/ global) In the "Manager (local)" function group (1) you will find additional configuration menus dealing with the Manager software you are presently operating. Settings made here do not influence the server or the Manager software’s running on other PCs! You can configure the Manager software in the "General" menu (2). 1 3 11 7 2 4 8 5 6 9 10 In the "General Settings" section (3) you can set up how long a recording should be when you use the manual instant recording function in the Live Image View. Enter a time in seconds between 1 and 180 with the "Instant Recording Duration" button. Using the "Manager Overlay Effects Start/Finish" button, you can determine whether the Manager software should use fade-in effects. Should the software's image flicker or should it produce other unwanted effects, deactivate this button. Activate the "Automatic Reconnect after Connection Breakup" button to ensure that the Manager will automatically connect to the server should the connection be terminated (during a server restart, for instance). It is recommended that this button always remain activated. If you have activated the "Automatically Display S/N Panel with Basic View" button, the S/N Panel will be automatically overlain as soon as a standard network camera or dome camera has been switched to basic view. If the "Group Function for Cameras in Live Image" is active, the cameras listed in the Live View camera list will be sorted by devices. For example, all cameras associated with an AXIS or other server will be displayed as a group and can be turned on as such (see chapter 4.2). You can also put together groups yourself in the "Tracks" menu (see chapter 3.9). All cameras (or tracks) that are supposed to be put together in a group need to have a common name prefix. [Group1], for instance. The complete name of a group member would then be [Group1] Camera 1, [Group1] Camera 2, etc. 70 © 2013 ALL RIGHTS RESERVED Satellite V4.5 This way, cameras from various image sources can be put in a group together. You can create as many groups as you wish. When the "Always Display Application in the Foreground" button is active, no other program or window can cover the Manager. Under the "Maximum Image Interval" item (4) you can set how many images per second and track can be transferred over the network to the current Manager. You can configure this setting once for a local network (LAN) and once for a connection over a longer distance (WAN). WANs always have a lower bandwidth than LANs. Use the list box to select the number of images to be transferred per active camera image. If you select 5 images and 1 image is active in the Live View, for instance, 5 images per second will be transferred from the server to the Manager. If 4 images are active, 20 images per second will be transferred. If you don't wish to use the maximum image interval limit, select the "OFF" entry from the list box. You can set the "Validity Period of an Image" for a LAN and WAN in seconds using the appropriate list box. This is the time after which a camera without image updates will be classified as being not available. This setting is expressly recommended for a WAN connection. In the "Automatic Login at Program Start" section (5) you can configure the Manager to automatically log into the server whose IP is entered in the "TCP/IP Address" field - as soon as the program starts. To do this, enter the "User" and "Password" login data for the desired account in the appropriate entry fields (see chapter 3.15). You can also use the user credentials you are currently logged in with by clicking on the "Use the Current Credentials" button (6). Activate the "Start Manager Minimized" button so that the Manager starts minimized in the task bar after automatic login. If you click on the "Start in Monitor Mode" button, the Manager will start in full screen mode (see chapter 4.11) after automatic login. Using the "Delay" button lets you enter the time to pass - in seconds - before the Manager starts after automatic login. Click on the "Automatic Login Active" button to activate this function. The "Alarm Handling" item (7) allows you to configure how the Manager should react to incoming alarms. By clicking on the "Change to Live Image" button, the alarm-triggering track will be uplinked to the Live View. An automatic changeover to the Live View will also take place whenever one lingers in another area of the software. If the additional button "Change to Basic View" is activated, the alarm-triggering track will be uplinked in the basic view mode. When the "Switch the Manager to Foreground" button is activated, the Manager window covers the other windows which might be open in Windows. A minimized Manager would also be maximized in this case. Select the "Display Image Status in the Event List" button in order to see if image data for an alarm is present in the alarm list (see chapter 4.3). Additionally, you can have a preview image of the alarm displayed by moving the mouse over the alarm. Click on "Details" in the alarm list to switch on a view that will display the alarm preview images to you directly. 71 © 2013 ALL RIGHTS RESERVED Satellite V4.5 Inactive Active Please note: This function should only be activated on powerful server stations as it produces additional system load. When you select the "Only Display New Alarms (until confirmed)" button, alarms that have been confirmed in the Event List (see chapter 6.3) will no longer be displayed in the "Alarms" list of Live Image (see chapter 4.3). The "Audio Playback" item (8) lets you configure if and how the Manager should give out acoustic signals in case of an alarm. In order to shut off the audio playback function completely, select the "No Audio Playback" option. If the option "Playback Only after Previous Alarm Confirmation" is selected, then it is always only the first alarm that will be audible. Other alarms that follow will not trigger acoustic alarms as long as the first alarm has not yet been confirmed. If an audio signal should sound with every alarm, select the "Playback With Every Alarm" option. In the "Monitor Symbols" section (9) you can select which symbols will be visible over the respective camera images in the Live View. By selecting or deselecting the symbols you can display them or hide them from view (Functions, see chapter 4.6): "S/N-Panel" "Relay" "Instant Recording" "Image Updates" Under "Joystick Settings" (10) you can configure that the S/N Panel can be operated using a joystick. The joysticks - or joy pads - will either be connected to the game port or using a USB connection. These can be commercially available devices like those used for computer games. We recommend analog joysticks because these offer 360 directions and recognize the intensity of the movement as well as transfer this to the camera. Additionally, 4 firing buttons are required as described below: Button 1: Zoom in Button 2: Zoom out Button 3: Focus near Button 4: Focus far In the "Joystick Type" list box you can select which type of joystick you would like to use. Click on the "Joystick Active" button to activate the joystick's control. Activate the "Invert Y-Axis" button to interchange directions on the y axis. This means that the camera will not point upwards, but downwards instead when you move the joystick forward. And the other way around too, of course. Use the "Sensitivity" button to determine how sensitively the standard network camera reacts to movement. It might be necessary to experiment with this before you find the perfect settings. Use the "Tolerance" button to compensate for unwanted control signals sent from the joystick. Analog joysticks show wear marks when used often, usually exemplified by a control stick that 72 © 2013 ALL RIGHTS RESERVED Satellite V4.5 does not stand taut but always leans to the side instead. This causes unwanted signals to be sent. This phenomenon also occurs with joysticks that have been poorly calibrated (calibration is carried out within the Windows Control Panel) If you should experience such behavior with your joystick, simply increase the tolerance setting. This compensates for the "false" control signals and does not influence movable cameras. In the "S/N Panel Settings" (11) you can set the sensitivity of the S/N Panel globally (see chapter 3.19). Use the "Sensitivity" button to enter a value between 1 (not sensitive) to 100 (sensitive). In the "Settings per Track" menu, you can undertake additional settings that affect the alarm reactions and the image compression for the various tracks. First select a track under item (12). 13 12 14 15 17 16 In the "File Assignment for Audio Playback" section (13) you can have the Manager play an audio signal when an alarm for a chosen track is triggered by activating the "Playback Active" button. In the "Path" section you can enter the file path to the desired audio file. You can also click on the folder symbol to open the following pop-up window: Select here the audio file you wish to use and then click on "Open" to accept your selection. If you click on the loudspeaker symbol, the audio signal will be played. Along with the audio files supplied under \Client\Configuration\Wavefiles\ you can also use your own. Record these in .WAV format. Under the "User-Defined Application" item (14) you can enter the file path to an application in the "Path" field which will start in case of an alarm. You can also click on the folder symbol and select the executable file from the pop-up window that opens (see above). The file must have an .exe ending. To test the function, click on the "Start" button. You can individually set the image compression rate for various situations in the "Bandwidth Optimization / Image Quality Pre-selection" section (15). These various situations are as follows: - Basic View: Only one track is displayed in the Live View Quad View: Four tracks are displayed in the Live View Views > 4: More than four tracks are displayed in the Live View S/N Operation: The controlling of a tilt swivel or dome camera Playback: Playback of the permanent track or of event recordings 73 © 2013 ALL RIGHTS RESERVED Satellite V4.5 For every situation, you can set the compression for a LAN or a WAN connection. It will be possible for you to completely turn off the compression, to set the compression to a low, medium or high compression rate, or to activate a code conversion profile of your own. If the compression settings should be the same for all levels, click on the "Apply to All Tracks" button (16) to assign them to the rest of the tracks. To compensate for frame drops, the live image display is delayed by a 250ms buffering procedure (the buffering procedure is switched off automatically through the control of a PTZ camera). If the use of the buffering feature is not desired, it can be deactivated in the manager for a selected track here (17) or with the "Apply to all tracks" button" (16) for the complete image display. 3.24 Hardware Acceleration H.264 video streams will be decoded by using modern graphics chips, thus reducing the CPU workload and further enhancing image performance. In this connection, special video processors integrated in the graphics chips take over the decoding. Dedicated video cards and integrated graphics chips (APU, for example) from various manufacturers (Intel, nVidia, AMD/AT) are supported on compatible Windows systems. NOTE: In order to preclude errors and problems caused by older drivers while also attaining the best possible performance, we additionally recommend that you install the latest version of the video card driver. Get more detailed information concerning device compatibility at our website. Open the Setup Assistant in the local configuration menu in order to edit the hardware acceleration settings. Satellite Manager: Control: Monitor Extension: Configuration > Manager (local) > General > Hardware acceleration Configuration > Basic setup > Miscellaneous > Hardware acceleration Configuration > Hardware acceleration To activate hardware acceleration for this CamIQ® Satellite Manager, check the “Enable hardware acceleration“ (1) box. Additionally, activate the desired video card (2) in the video card selection list (all recognized video cards are displayed here. If a larger selection of video cards is available, you can also select several of these to be used for hardware acceleration.) 74 © 2013 ALL RIGHTS RESERVED Satellite V4.5 Activate the “Use new hardware by default”(3) option in order to use a new device for hardware acceleration when hardware changes are made (when a video card is replaced, for example) without having to activate a new device. Since hardware decoding can be ineffective when the image resolution is low, a minimum frame height can be entered here (4), which is necessary to ensure that the video stream remains hardware-decoded. 2 1 3 4 5 Click on “Apply” (5) to take over the setting changes and then restart the software. 3.25 User-Defined Filters In the "User-Defined Filters" function group you have the option of providing the CamIQ® Satellite with additional tabs that display user-defined filter settings in the Event List. To activate a new tab, select under "Available Filters" the Userbutton1. Place a checkmark in the "Filter Visible" checkbox (1). You can also configure the filter's designation and the default track under "Selected Filter Configuration". 2 1 75 © 2013 ALL RIGHTS RESERVED Satellite V4.5 Under "Available Filters" (2) you can make changes to your filter settings. The filter settings relate to all the settings in the standard Event List: 3.26 Views Configure various views in the "Views" function group. These views can easily be displayed in Live Image with drag & drop. 4 1 5 6 7 2 3 8 In the "Predefined Views" section (1) you will find all saved views that are available for display in Live Image. The "Add/Delete" button (2) lets you create new views and delete views that you no longer need. The "Up/Down" buttons (3) let you sort your list as desired. The entry in focus will be moved above or below the respective entry. 76 © 2013 ALL RIGHTS RESERVED Satellite V4.5 Under "Selected View Configuration" (4) you will be able to use the entry field to give the view a name. Under "Monitor Mode" you can also select the number of entries that should be viewed when your order is activated. You will find all available tracks in the "Tracks / Cameras" list (5). Further information is available in chapter 3.9: "Tracks". On the right side in the "Assignment of Cameras / Tracks" section (6) you can see what you currently have displayed. You can pull in other tracks to the desired position here with drag & drop. View / Configuration Live Image The "Deactivate Monitor" button (7) deactivates the focused monitor in the display. With a click on the "All" button, the standard display will be activated (Track01, Track02, Track03, etc.). Under "Select Preset Position" (8) you can select a preset position for the focused track under "Tracks" (5) which will be called up with the display of the view. 77 © 2013 ALL RIGHTS RESERVED Satellite V4.5 3.27 Neighboring Cameras The CamIQ® Satellite 3.5 makes it possible for you to define up to 8 neighbors that can be displayed in the Live Image, the Permanent Recording and the Event List using shortcuts. 2 4 1 3 6 5 Select the camera that you wish to define neighbors for from the track selection (1). Alternatively, you can pull the desired camera over from the "Tracks" list (2) and into the middle camera preview area (3) with drag & drop. In order to now define the neighbors for the selected camera, simply use drag & drop to pull any camera from the "Tracks" list (2) to the desired neighboring field of the middle camera. You can also define a preset position (4) for every neighboring camera which will be used during a given track's display. The preset position must first be configured in the camera setup. The neighboring cameras can now be displayed using keyboard commands in the Live Image, Permanent Recording and Event List. You can find out more about keyboard commands and configuration in chapter 7.1. You can reset all neighboring camera assignments you have made for a selected track with the "Reset All Neighboring Cameras" button (5). Neighboring cameras can also be automatically assigned (6). This occurs based on the layout configuration which must be prepared first. The neighboring cameras can be generated by means of the camera positions or the field of vision. Make sure to check the neighboring camera settings after an automatic configuration. 78 © 2013 ALL RIGHTS RESERVED Satellite V4.5 3.28 Code Conversions It is possible for you to influence the image properties of your cameras in the Live Image and in the Permanent Recording. To apply these settings to one recording, for example, you must first create a profile with the desired settings. 2 3 1 4 5 6 First select a profile template or an empty profile (1). In the "Basic Settings" section you can give your profile any name you wish (2). When you select this profile later this is the name that will be displayed. Select the codec type (3) for the code conversion (the first three profiles are reserved for JPEG settings). If you would like to change the scaling of the camera image, select the "Rescaling" checkbox (4) and enter the desired height and width. Under "JPEG Settings" (5) you can set the JPEG image quality manually in percent. Please note: If the codec type H.264 is chosen, changes made to the JPEG quality only relate to the prealarm images. ® Satellite always displays and records pre-alarm images in the JPEG format. Select the "Variable Bit Rate" checkbox (6) to deactivate the constant bit rate setting. Under "Kilobits per Second (at 25 fps)" (6) enter a set bit rate. Under "Key Frame Interval" (6) you can decide with which interval a key frame should be recorded. 79 © 2013 ALL RIGHTS RESERVED Satellite V4.5 3.29 Advanced Client (optional) 3.29.1 Site Plan CamIQ® Satellite allows you to create a layout to enhance the general overview of your camera scenario. 1 3 4 5 2 7 8 6 9 To activate the layout for the Live Image, Permanent Recording or Event List, click on " (1). First select a background graphic. Click on "Upload Background Image" (2) (you will find a sample graphic in the configuration directory located under C:\ Satellite\Server\Configuration\Layoutplan). Now you can begin to order your cameras within the layout. Simply use drag & drop to pull the desired camera from the track list (3) into the desired position of the layout preview (4). In the display section (5) you can adapt the colored settings to the display by interacting with the objects displayed on the layout. - Marked Element: Here you can set the color for the presently selected element. - Highlighted Element: Here you can set the color used to mark the element when the mouse hovers over it. - Display Viewing Angle: Here you can completely deactivate the ® Satellite Server viewing angle. - ". Display Bold: If this checkbox is selected, the entry over it will be displayed in bold lettering. 80 © 2013 ALL RIGHTS RESERVED Satellite V4.5 You can change the properties of the selected element (6) in the layout preview (4). - Track: The track assigned to the element - Type: The type of assigned device - Direction: The direction of the displayed viewing angle - Aperture Angle: The viewing angle's aperture angle - Length: The length of the viewing angle In the "Symbols" section (7) you can adjust the element status symbols for the layout. - Active: The device is accessible. - Inactive: The device is inaccessible. - Alarm: An alarm has been triggered on the track. - Recording: The track is being recorded. It is also possible to display status icons you have created yourself. Simply click on "Add Icon" (8) and select the icon you have prepared. It can have a maximum size of 8x8 pixels and must be in bitmap (.bmp) format. Your icon will be added to the selection and can now be used. If you want to remove an icon from the list, select it and then click on "Delete Icon" (8). With a click on "Delete" (9) you can reset the entire layout back to its original settings. 81 © 2013 ALL RIGHTS RESERVED Satellite V4.5 3.29.2 Multi-Start of the Manager ® Satellite allows you to open several instances of ® Satellite Manager on the same system. In order to smoothly run several ® Satellite Manager clients at once, it will be necessary to make a copy of the client directory. Open your installation directory: (C:\\ Satellite\), click with the right mouse key on the "Client" directory and select "Copy". Now right click on the empty white area within the directory and select "Paste". Name the new directory "Client2" and then open it. 82 © 2013 ALL RIGHTS RESERVED Satellite V4.5 With a right click on " Satellite Manager.exe" > "Send to"> "Desktop" you will create a desktop shortcut with which you can open your second ® Satellite Manager client. Important: Never start the ® Satellite Manager more than once with the same shortcut because this will not allow for local settings to be saved correctly. You can use the ® Satellite Manager to log in as usual with the ® Satellite Server. If you are logged in using two or more ® Satellite Manager clients on the same ® Satellite Server, it is possible to interact between the two managers using Drag & Drop. 83 © 2013 ALL RIGHTS RESERVED Satellite V4.5 3.30 Scripts This menu allows you to create small macros, so-called scripts. These can be triggered by alarms or also manually in the Live Image. The Scripts List (1) displays all scripts that have already been created. With the Save button (2) you can create a new script under a designated name (3) or save subsequent changes. The Delete button (4) enables you to delete a selected script. The actual script is written in field (5). Do this using a predefined syntax, which will be explained in detail later. The command field (6) shows the commands that are available. By double-clicking on a command, it can be selected. At this point, you only need to match the variables (in the brackets) to it. The Test Script button (7) enables you to test the selected script. 3 2 7 1 5 6 1 4 84 © 2013 ALL RIGHTS RESERVED Satellite V4.5 Syntax: Please note: Each command must begin with a new line! ALARM [TRACK(1..64)] [TYPE(1..3)] Function: An alarm is triggered. Parameters: TRACK: The track corresponds to the track number beginning at 1. TYPE: The alarm type serves to differentiate event handling. Here, “1-3“ refers to alarm types “API-Event 1-3“ Example: ALARM 5 1: Satellite signals a type 1 alarm on track 5. CALL [SCRIPTNAME] Function: Another script is started. Parameters: SCRIPTNAME: The script name corresponds to the designation of the script to be called up in the script overview. Example: CALL ALARM: The script with the designation ALARM is invoked. PRESETPOSITION [TRACK(1..64)] [PRESETPOS] Function: Jumps to a preset position. This function can only be used if the desired camera has been configured as an S/N camera. Parameters: TRACK(1..64): The track corresponds to the track number beginning at 1. PRESETPOSITION: The preset position that will be jumped to. Numeration of the preset position begins at 0. Example: PRESETPOSITION 2 4: The camera on track 2 will jump to the preset position 4. SENDHTTP [TRACK(1..64)] [REQUEST] (/axis-cgi/playclip.cgi?clip=9) Function: Sends an http string to the assigned device. Parameters: TRACK(1..64): The track corresponds to the track number beginning at 1. REQUEST: An http string must be entered here, which should subsequently be sent to a camera. Example: SENDHTTP 2 /axis-cgi/playclip.cgi?clip=9: The defined http string is sent to the camera on track 2 (the IP address, user and password of the assigned camera will be used). SENDURL [URL] (http://user:password@ip-address/axis-cgi/playclip.cgi?clip=9) Function: Sends an http string to a network address that can be defined. Parameters: URL: An arbitrary http string can be entered here, which will be executed during activation. 85 © 2013 ALL RIGHTS RESERVED Satellite V4.5 Example: SENDURL http://192.168.0.23/axis-cgi/playclip.cgi?clip=9: The defined http string is executed. 1 2 3 Each of the maximum of 64 tracks can be assigned up to 4 scripts, which can be executed with just a few clicks directly from the Live Image. From the tracks (1), first select the track that you want to assign a script to. Select from the script list (2) the script that should be executed. At Designation (3), enter an appropriate name for the command button. Then, in the selected track’s Live Image, open the context menu. The entered button with the designation specified will be visible in the context menu. By left clicking on the button, the assigned script will be executed. 86 © 2013 ALL RIGHTS RESERVED Satellite V4.5 4. OPERATING THE MANAGERS (LIVE IMAGE) The Live Image view is the standard interface with which a user operates the server. It is comprised of various components which enable operation on the one hand and provide information on the other. 4.1 General Overview Cameras (Chapter 4.2) A list of all the tracks, displayable on the monitor with drop & drag. Views (chapter 3.32) Displays a list with the preconfigured views Camera Information (chapters 4.5, 4.6) Displays the camera name and the buttons belonging to it Monitor (chapter 4.4) Live images are displayed in the socalled monitors Details Shows preview images of the triggered alarms, provided image material is available Alarms (chapter 4.3) A list of all alarms, double-click to get to the alarm sequence Alarm Zone (chapter 4.10) A left click blends the alarm zone in/out, bars show intensity of motion Relays (chapter 4.8) Pull to the monitor with drag & drop to switch the associated relay S/N Panel (chapter 4.9) Pull to the monitor with drag & drop to open the Standard Network Panel Monitor Mode (chapter 4.11) Switch to Full Screen / Monitor Mode Neighboring Cameras (chapter 3.24) Live images are displayed in the socalled monitors Multiple View (chapter 4.4) 1-, 4-, 9-, 13-, 16-, 33-, 36-, 64-fold Views 87 © 2013 ALL RIGHTS RESERVED Satellite V4.5 4.2 Cameras All cameras (or tracks) are displayed with symbols: - Camera is available (green) - Alarm in the track or a loss of camera signal (red) - Camera is a standard network camera - Camera is recording (red dot) - No camera attached (gray) Please note: Should a camera name appear in orange or red, this is an indication of a high degree of locking for the track (see chapter 3.9) You can display a camera image with a double-click or you can pull a camera symbol into the monitor with drag & drop. When you activate "Camera Grouping Function in the Live Image" in the "Settings" menu (see chapter 3.22), the cameras in the camera list will be displayed in groups. Cameras which are connected to a device like an AXIS Server or a frame grabber are represented in respective groups. You can also select a device entry and pull this into the monitor. The connected cameras will then be displayed - one after another - in the monitors that will then appear. Device entry Cameras 1 2 3 4 88 © 2013 ALL RIGHTS RESERVED Satellite V4.5 4.3 Alarms The 16 most recent alarm alerts are displayed in the "Alarms" list. Image data is on hand for the alarms marked in color (this must be activated, see chapter "Manager Local" 3.22). When you doubleclick on an alarm entry, you will be brought directly to the corresponding alarm record in the Event List (see chapter 6). The color coding for alarm alerts: Light Blue: Dark Blue: Yellow: Red: Green: Black: Alarm Zone (internal) Camera AlarmKameraalarm Sabotage / Connection Break Alarm Contact Manual Alarm Tracking / Miscellaneous Current alarms (not events!) are displayed in the software by displaying the monitor of the alarmtriggering camera in red. The alarm can be acknowledged with a double-click on the red camera information bar (see chapter 4.5). The blue taskbar symbol also turns red. . Optionally, an acoustic signal can be played (for its configuration see chapter 3.22). 4.4 Monitors The individual camera images in the Live View are called "Monitors". A monitor consists of the camera's live image and – optionally - the camera information bar (see chapter 4.5). With a click on the adjoining buttons, you can change the views / the number of monitors from between 1, 4, 9, 13, 16, 33, 36 and 64. A double-click on a monitor allows you to display it in the basic view. Please note: The Manager notes the distribution of the tracks on the monitors separately for every view (number of monitors). In this way, you can assemble a collection of video signals for every view without affecting other collections from other sets of monitors. 89 © 2013 ALL RIGHTS RESERVED Satellite V4.5 4.5 Camera Information With a click on the "Camera Information" button, you can activate or deactivate the camera information bar - including the monitor symbols for the individual monitors in the upper margin. Without camera information 4.6 With camera information Monitor Symbols Monitor symbols are embedded in the camera information bar. These are buttons that allow you to execute certain track functions and also status displays for the corresponding track. Instant recording: By clicking on this button, you start the camera recording immediately (see chapter 4.7). As long as the recording is active, the symbol changes to the following state: Relays: Click on this button if you want to switch the relay associated with the camera. If the relay is open, the symbol looks like this: When the relay is closed, the symbol will look like this: (Also see chapter 4.8) S/N Panel: By clicking on this symbol, the Standard Network Panel will be opened with which the tilt swivel camera can be operated. Of course, the button for the S/N Panel will only appear when the camera in question is a standard network camera. There are several variations of this symbol: – Green Bottom Right: The S/N camera is being manually operated – Red Top Right: The camera is tracking an object (tracking option) – Blue Top Left: The camera is taking a preset tour – Red Bottom Left: The S/N camera is shifting position due to the occurrence of an event Image Update Display: The image update symbol is not a button, but a display. The two green dots blink alternately when the camera image is being updated. The faster the dots blink, the more images are being transferred and displayed. If the dots no longer blink, this could indicate a problem with the image transmission. Information concerning monitor symbol configuration can be found in chapter 3.22. 90 © 2013 ALL RIGHTS RESERVED Satellite V4.5 4.7 Instant Recording Pull the "Instant Recording" button into a monitor with drag & drop. The server will immediately start a recording unless it is already performing a permanent recording of the track. You can find further information about instant recording configuration in chapter 3.22. 4.8 Relays Pull over the "Relays" button with drag & drop in order to switch the relay associated with the track (also see chapter 3.9). 4.9 S/N Panel Pull the "S/N Panel" button into a monitor with drag & drop, opening the tilt swivel and dome camera S/N Panel associated with the track. In section (1) you will find the directional pad. Click into the gray quadrant in the middle of the cross with the mouse pointer and keep the left mouse button pressed. Now when you move the mouse, the S/N or dome camera will move in the same fashion. The further away you move from the center of the gray quadrant, the faster the attached camera will move. Under item (2) you can direct the camera zoom. Click on + or – and the lens will continue to zoom in or out for as long as you hold on to the mouse button. 1 Under item (3) you can control the camera focus. Click on + or - and the lens will continue to focus for as long as you hold on to the mouse button. If the camera supports automatic focus, click on Auto to focus. However, some dome cameras interpret this click on focus as the command to start the automatic tour. 2 4 3 Click on "Focus" to switch the control to "Iris". In section (4) you can call up the camera's preset positions. To do this, left-click on any of the buttons between 1 and 8 and the camera will adjust itself to the relative preset position as described in chapter 3.19. As soon as the S/N Panel has opened, you can operate the standard network or dome camera using an attached joystick (see chapter 3.22). 91 © 2013 ALL RIGHTS RESERVED Satellite V4.5 4.10 Displaying Detection Details By clicking on the "Display Detection Details" button, you can overlay the current track's detection details in 5 different levels in Live Image. 1. No Detection Details 2. Object Sizes & Object Detection & Focus & Zones 3. Object Sizes & Object Detection & Focus 4. Object Sizes & Object Detection 5. Object Sizes & Focus The intensity scale displays how much motion is currently taking place in the image. The vertical line represents the threshold beyond which an event is triggered. Please note: This function is only available for single frame view. 4.11 Monitor Mode By clicking on this button you can change to "Monitor Mode". This is a full screen mode in which only the monitors are seen . The size of the Manager can be scaled as desired in this view. Just move the mouse pointer either along the border or in one of the window's corners. The mouse pointer changes into an arrow symbol with which the size of the window can be changed by clicking and holding on to the left mouse button. Video images are rescaled in the process. Using the right-click menu (see chapter 4.12), you can switch back to the normal Manager view. 92 © 2013 ALL RIGHTS RESERVED Satellite V4.5 4.12 Right-Click Menu When in Monitor Mode, the Manager can only be operated using the right-click menu. This menu is also available when using the normal Manager view. 4.12.1 Switching to Monitor Mode Right-click on any camera image in order to switch to Monitor Mode. In the menu that now opens, select the "Monitor Mode" entry and click on "Active" with the left mouse button. The view now changes to Monitor Mode (see chapter 4.11). To switch back to the normal view, repeat the process. 4.12.2 Camera Information To display or block out the Camera Information Bar (see chapters 4.5 and 4.6), open the right-click menu and click on "Camera Information" with the left mouse button. 93 © 2013 ALL RIGHTS RESERVED Satellite V4.5 4.12.3 Multiple View The number of monitors displayed can also be selected using the right-click menu. Open the menu and move the mouse pointer to the "View" entry. A list box opens from which you can choose the desired number of monitors to be displayed. 4.12.4 Bandwidth Optimization If you activated bandwidth optimization during login (see chapter 3.1), you may use the right-click menu to set the compression level for every individual track. Open the menu and move the mouse pointer to the „"Bandwidth Optimization" entry. A list box will open from which you can select the desired code conversion profile. 4.12.5 Instant Recording With the "Instant Recording" entry found in the right-click menu, you can manually start a recording. Right-click on the camera image you would like to record and then click on "Instant Recording" with the left mouse (also see chapter 4.7). 94 © 2013 ALL RIGHTS RESERVED Satellite V4.5 4.12.6 Switching Relays You can use the right-click menu to switch relays. Right-click on the image in the desired track to open the menu. Then click on the "Switch Relay" button (also see chapter 4.8). 4.12.7 Displaying Camera Images In order to display a camera image, first click with the right mouse button on the monitor in which the camera image is to be displayed. As soon as the number of cameras increases, the cameras will be grouped in the right-click menu. If necessary, move the mouse pointer to a group and select the desired camera from the list box which will open. 4.12.8 Monitor Mode The "Monitor Mode" menu item is further enhanced in monitor mode. In order to switch back to the normal view, click on the "Active" entry. If you deactivate the "Retain Aspect Ratio" entry, the displayed video images will be arbitrarily scaled when the program window is rescaled; this can lead to images that look stretched or squeezed together. When the "Display in Window" entry is active, a window bar like the one seen in the upper screen border of the normal view will be displayed around the video monitors. This bar lets you minimize the program window; maximize it to full screen size or close it. If you deactivate this entry, these functions are no longer available and the video images can fill up the entire screen – and this without being able to see any menu structures or anything else. If you activate the "Window Always in Foreground" entry, the current Manager view will always be visible in the screen foreground - even when other programs or tasks become active. 95 © 2013 ALL RIGHTS RESERVED Satellite V4.5 5. LONG-TERM ARCHIVING (PERMANENT TRACKS) The server can permanently record on the hard drives available to it. It is possible to protect or save sequences from being overwritten by the cyclical rewriting process. The server also uses "Smart Search" technology which allows it to examine sequences in a freely definable area for any changes that have taken place in the images. 5.1 General Overview Track (chapter 5.2) Track selection Sequences (chapter 5.3) A listing of all sequences Camera Image (chapter 5.5) Camera image of the recording Search (chapter 5.8) Display of the Smart Search menu Tool Bar (chapter 5.7) Tools used for the editing and saving a sequence Sequence Control (chapter 5.6) The operation of the sequence Navigation (chapter 5.4) The entry of date and time for the targeted search for images 96 © 2013 ALL RIGHTS RESERVED Satellite V4.5 5.2 Track You can select the track whose recordings you would like to see in the list box of the "Track" item. 5.3 Sequences Sequences of the recording can be displayed with a click on the "Sequences" button . The starting point is always shown on the left and the end point on the right. These permanent recordings are regularly overwritten through a cyclical process. In other words, as soon as the hard drives are full, the recording process begins overwriting the oldest images with the newest ones. In order to prevent this, parts of the permanent recording can be locked (see chapter 5.7). Locked sequences are displayed in red. 5.4 Navigation In the "Navigation" section you can enter an exact point in time. The currently selected sequence, which you can mark by clicking, will jump to the entered the point in time. You can fixate the current time with the item "Fixate Time". If you now select another track, it will jump directly to the time fixated. 5.5 Camera Image In the "Camera Image" section you will see the recording. An information area is located beneath the image which displays the following information: - Camera: Name of the currently displayed track - Sequence: Date and time of the first and the last image of the selected sequence - Time: The date and time of the currently displayed image. If you have marked a section of the sequence (see chapter 5.7), the date and the time of the first and last image of the marked sequence will be displayed in brackets behind it. 97 © 2013 ALL RIGHTS RESERVED Satellite V4.5 5.6 Sequence Control You can control a displayed sequence with the following buttons: Jump to the first image of the sequence Go backward one image Play backward (click repeatedly to increase the speed) Stop the playback Play forward (click repeatedly to increase the speed) Go forward one image Jump to the last image of the sequence You can move forward and backward within the sequence using the regulator. Click on the gray vertical slider bar and hold the mouse button down, pulling it to the left or to the right. The bar also shows you where you are located within the sequence. 5.7 Tool Bar The Manager offers a selection of tools with which the sequences can be evaluated: Define Sequence Start: Go to the point of time in the sequence that you would like to establish as the start of the partial sequence and click on this button. Define Sequence End: Go to the point of time in the sequence that you would like to establish as the end of the partial sequence and click on this button. You have now marked a section of the sequence. Regulator Zoom: For a finer gradation of the slider's movement, click on this button to zoom in on the slider's position. A 2-minute area on the slider is now distributed across the entire length of the bar. Alternatively, the sequence end and the sequence start can be defined, thus distributing this framed area across the bar's entire width. This makes it possible for you to meter the regulator's movement more exactly. Repeat Sequence: By activating this button, the current sequence will be repeated continuously. Otherwise, the next sequence will be played once the current sequence’s end has been reached. Lock Sequence: The sequence - or the marked partial sequence - will be locked and thus protected from being overwritten. Locked sequences are displayed in red in the sequence list (see chapter 5.3). Unlock Sequence: If the currently selected sequence is locked, you can unlock it with this button and release it to be used for the cyclical recording process. Warning: If the locked sequence is already so old that it would have normally been overwritten by the cyclical recording process, it will immediately be deleted as soon as it is unlocked. This will also be the case if you use the "Automatically Delete Image Data after X Days" function (see chapter „Tracks“, 3.9). If the sequence is older than the date entered here, it will automatically be deleted as soon as it is unlocked. 98 © 2013 ALL RIGHTS RESERVED Satellite V4.5 Save Sequence: Click on this button to save a sequence - or a marked partial sequence - to a hard drive or a mobile storage medium. This sequence is provided to the Export Assistant for the final export of a sequence compilation. You can get more detailed information about the Export Assistant in Chapter 1.9 "The Export Assistant." Screen Magnifier: By activating this button, the mouse pointer changes into a crosshairs symbol. You can now select an excerpt from the camera image by clicking on the camera image and moving the cross while holding down on the button. A framed image is formed. When you let go of the mouse again, this framed display detail enlarges to cover the entire image. You can switch back to the normal view again by clicking with the right mouse button. Save Image: Click on this button to save the image just displayed as a bitmap graphic on the hard drive or on a mobile storage medium. This image is provided to the Export Assistant for the final export of a compilation. You can get more detailed information about the Export Assistant in Chapter 1.9 "The Export Assistant." A window opens in which you will be prompted to enter a location and file name for saving. Print Image: Click on this button to print the current image. A printer must be connected for this, of course. First a window will appear in which you will be able to leave a comment. This comment will then appear below the image on the printout. After this, another window will open with the printing options - these varying with the type of printer installed. The printout will include the following data displayed below the image: - Server IP address - The user who did the printing - Track name - Time and date of the printout The comment entered Bandwidth Optimization: If you entered that you are connecting to the server with a WAN connection when you logged in (see chapter 3.1), you can use the list box to select the option that the sequence images should first be compressed before being played. This will enable you to transfer more images per second over the WAN connection. When saving the images, a window will appear in which you can choose whether to save the images in a compressed or in the original form. You can see how to set the various compression rates in chapter 3.9. 99 © 2013 ALL RIGHTS RESERVED Satellite V4.5 5.8 Search 1 2 6 3 4 5 When the "Determine Image Change" function is active (see chapter 3.9) you can reach Smart Search using the "Search" tab. Here you can search through a given image detail of a permanent recording for motion. In section (1) you can use the "Start" and "Stop" buttons to set the exact time periods within the permanent recording through which to search. In section (2) you can further modify the search: - Sensitivity: Here you can set one of three sensitivity levels for recognizing change to images. The most sensitive level is level 3. - Grouping Interval: The search results will be pooled in groups. The groupings will depend on how far apart the results lie. You can indicate a time (in seconds) within which all results are to be collected for a particular group. Please note: The grouping of search results is crucial for clarity. By grouping, a moving automobile, for example, or some other object in motion will be specified as a search result rather than every single image of their movement. There are several buttons at your disposal in section (3). The "Set/Show Search Mask" button allows you to display or hide the grid and the delineated zones in the camera image. The "Delete Search Mask" button allows you to delete a delineated zone completely. You can start or stop a search by simply clicking on "Start" or "Stop". All results of the Smart Search will be displayed under the "Search Results" item (4). Some will be pooled together in groups. You can recognize groups by way of the small + sign before the actual 100 © 2013 ALL RIGHTS RESERVED Satellite V4.5 entry. By clicking on the" + ", you can open the group and call up the individual sequences. The "Status" section (5) contains a progress bar. If you have started a search, you can see here how much progress has been made in the search process and approximately how much longer it will take for the search to finish. In the camera image (6) you can delineate a zone through which changes to images can be searched. To do this, display the search mask and use the left mouse key to delineate a field; this will be shown in red. If you wish to delete parts of the field, you can do so with the right mouse button. 101 © 2013 ALL RIGHTS RESERVED Satellite V4.5 6. EVENT ANALYSIS (EVENT LIST) Along with permanent recording, the server can also carry out event-based recording. Such eventbased recordings can be triggered and evaluated separately. Specific events can be quickly found with the help of numerous filters. 6.1 General Overview Tracks (chapter 6.2) A selection of the displayed tracks Events (chapter 6.3) Filters for sequence display Camera Image (chapter 6.6) Camera image of the recording Search Results (chapter 6.4) Display of all applicable sequences Detection Details (chapter 4.10) Focus, triggered alarm zones/all alarm zones Tool Bar (chapter 6.8) Tools for editing and copying a sequence Sequence Control (chapter 6.7) Sequence operation Navigation (chapter 6.5) Targeted search for sequences 102 © 2013 ALL RIGHTS RESERVED Satellite V4.5 6.2 Tracks Select the tracks from which the sequences are to be displayed from the "Tracks" list box. 6.3 Events The "Events" item enables you to filter events within the sequences. Simply deactivate all of the events which should not cause the display of a sequence. These sequences will then be hidden and only those which relate to the active filters will be displayed. Sorting based on actions is also possible. Just activate or deactivate the "Recordings" and "Alarms" buttons. In event-handling (see chapter 3.11), one differentiates between simple events like recording, for instance, and real alarms. Real alarms are only events which have the "Alarm" action activated in event-handling. In addition, confirmed alarms (see chapter 6.4) can be specifically blocked out. If you use an API connection or have commented on events (see chapter 6.4), you can enter „string“ and „ext. ID“ search items as entries to find the events you are searching for. 6.4 Search Results In the "Search Result" field you will see sequences displayed which apply to the active filter settings. The colors of the individual entries correspond to those of the event filter (see chapter 6.3). Only the colored sequences contain image data. Sequences which have not been given a color do not contain any images data. This can come about either when no recording was configured or in cases where image data was overwritten due to the cyclical rewriting process. You can protect individual sequences from being overwritten by locking them (see chapter 6.8). When you right-click on a sequence, an additional menu will open which offers you various functions. You may, for example, select "Mark Alarm as Confirmed". Henceforth, the sequence will be denoted with a checkmark. 103 © 2013 ALL RIGHTS RESERVED Satellite V4.5 Therefore, it will be recognized by the "Confirmed" filter (see chapter 6.3) and no longer appears in the Live Image alarm list (see chapter 4.3). With a click on "Mark Alarm as Unconfirmed", you can reset the status and remove the checkmark. You can also furnish a comment to the sequence. To do this, click on "Edit Alarm Data"; an input window opens in which you can enter your comment. This comment will appear below the camera image in the "Information" field (see chapter 6.6). Directed searches can be undertaken for only for sequences denoted in this way. Just enter your search item in the "String" field (see chapter 6.3) and the server will display all sequences for which a comment entry applies. For example, all deliveries from a particular supplier can be commented using his/her name. In this way, you only need to use this name as a search item to have all of this supplier's entries displayed. Please note: After having entered a comment, you must select the "Update" button (see chapter 6.5.) in order to bring the displayed view up-to-date. The right-click menu offers you the option of jumping directly from the event sequence to the permanent track. The appropriate track and matching time are automatically selected in the process. 104 © 2013 ALL RIGHTS RESERVED Satellite V4.5 6.5 Navigation In the "Navigation" section you can enter an exact point in time. If available, a sequence will automatically be chosen which matches this time. Additionally, you can page through the various sequence result pages should not all sequences found under "Search Result" be displayed at once on screen. Page one One page backward One page forward Last page Update (after adding a comment, for instance (see chapter 6.4)). In addition, you can display the track's alarm zone, if available, using the "Display Detection Details" button in the camera image. Please note: The current alarm zone will be displayed, not the one which was current at the time of the event! Without alarm zones 6.6 With alarm zones Camera Image You will see the recording in the camera image section. Below the image is an information area in which the following data is displayed: - Camera: Name of the currently displayed track - Sequence: Date and time of the first and last image of the selected sequence - Time: Date and time of the currently displayed image. If you have marked a section of the sequence (see chapter 6.8), you will see behind it the date and time of the first and last image of the marked section in brackets. - Information: Additional alarm data and comments 105 © 2013 ALL RIGHTS RESERVED Satellite V4.5 6.7 Sequence Control A displayed sequence can be controlled with the following buttons: Jump to the first image in the sequence One image backward Play backward (click repeatedly to increase the speed) Stop the playback Play forward (click repeatedly to increase the speed) One image forward Jump to the last image in the sequence You can move forward and backward within the sequence using the regulator. Click on the gray vertical slider bar and hold the mouse button down, pulling it to the left or to the right. The bar also shows you where you are located within the sequence. Please note: If you click on a sequence that has been configured for a prealarm recording (see chapter 3.11), the slider will not be positioned at the start but at the location where the prealarm and the actual alarm recording begins. 6.8 Tool Bar The Manager offers a selection of tools with which the sequences can be evaluated: Define Sequence Start: Go to the point of time in the sequence that you would like to establish as the start of the partial sequence and click on this button. Define Sequence End: Go to the point of time in the sequence that you would like to establish as the end of the partial sequence and click on this button. You have now marked a section of the sequence. Regulator Zoom: For a finer gradation of the slider's movement, you can click on this button to zoom in on the slider's position. A 2- minute area on the slider is now distributed across the entire length of the bar. Alternatively, the sequence end and the sequence start can be defined, thus distributing this framed area across the bar's entire width. This makes it possible for you to meter the regulator's movement more exactly. Repeat Sequence: If you activate this button, the current sequence will be repeated continuously. Otherwise, the next sequence will be played once the current sequence’s end has been reached. Lock Sequence: The sequence - or the marked partial sequence - will be locked and thus protected from being overwritten. Locked sequences are displayed in the search results list with a lock symbol (see chapter 6.4). 106 © 2013 ALL RIGHTS RESERVED Satellite V4.5 Unlock Sequence: If the currently selected sequence is locked, you can unlock it with this button and release it to be used for the cyclical recording process. Warning: If the locked sequence is already so old that it would have normally been overwritten by the cyclical recording process, it will immediately be deleted as soon as it is unlocked. This will also be the case if you use the "Automatically Delete Image Data After X Days" function (see chapter „Tracks“, 3.9). If the sequence is older than the date entered here, it will automatically be deleted as soon as it is unlocked. Save Sequence: Click on this button to save a sequence - or a marked partial sequence - to a hard drive or a mobile storage medium. You can find out more about saving a sequence in chapter 6.9. This sequence is provided to the Export Assistant for the final export of a sequence compilation. You can get more detailed information about the Export Assistant in Chapter 1.9 "The Export Assistant." Screen Magnifier: After you have activated this button, the mouse pointer changes into a crosshairs symbol. You can now select an excerpt from the camera image by clicking on the camera image and moving the cross while holding down on the button. A framed image is formed. When you let go of the mouse again, this framed display detail enlarges to cover the entire screen. By clicking with right mouse button you can switch back to the normal view again. Save Image: Click on this button to save the image just displayed as a bitmap graphic on the hard drive or on a mobile storage medium. This image is provided to the Export Assistant for the final export of a compilation. You can get more detailed information about the Export Assistant in Chapter 1.9 "The Export Assistant." A window opens in which you will be prompted to enter a location and file name for saving. Print Image: Click on this button to print the current image. A printer must be connected for this, of course. First a window will appear in which you will be able to leave a comment. This comment will then appear below the image on the printout. After this, another window will open with the printing options - these varying with the type of printer installed. The printout will include the following data below the image: - Server IP address - The user who did the printing - Track name - Time and date of the printout - The comment entered Bandwidth Optimization: If you entered that you are connecting to the server with a WAN connection when you logged in (see chapter 3.1), you can use the list box to select the option that the sequence images are to be compressed before being played. This will enable you to transfer more images per second over the WAN connection. When saving the images, a window will appear in which you can choose whether the images are to be saved in a compressed or in the original form. You can see how to set the various compression rates in chapter 3.9. 107 © 2013 ALL RIGHTS RESERVED Satellite V4.5 6.9 Storage Assistant To secure image material, partial sequences can be backed up on a storage medium. You can mark a section of a sequence in a permanent recording or in an event by using the t1 and t2 buttons ( ). Then select the "Save Sequence" button. The time range of the marked area will now be displayed over the ® Satellite tabs. Starting point Ending point Then change to the "Storage" tab. In this tab, all of the marked partial sequences to be saved will be made available to you. 2 1 3 4 5 6 All the sequences that are to be saved can be found under "Sequences" (1). On the left you will find the first, on the right the last image of the prepared partial sequence. In the middle you will find further sequence information: - Track: The name of the track from which the partial sequence originates - Start: The starting time of the partial sequence - Finish: The finishing time of the partial sequence - Duration: The length of the partial sequence 108 © 2013 ALL RIGHTS RESERVED Satellite V4.5 In addition to the partial sequences, a text document will also be saved to which additional information has been added: - Date: The date of the compilation User Name: The user who exported the data Name: The name (2) of the compilation Reason: The reason (3) the backup was made Comment: Additional comments (4) The "Delete Marked Entry" button (5) allows you to remove the marked entry from the compilation. To save a compilation on a storage medium, click on "Export Compilation" (6). A window opens in which you can select the path under which the compilation should be saved. The sequence will be saved in read-only RSV format (a file). A RSV player (see chapter 8.1) will also be saved in a folder called "Sequence Viewer". If you would like to pass on the sequence, you must furnish the RSV file together with the complete "Sequence Viewer" folder. 109 © 2013 ALL RIGHTS RESERVED Satellite V4.5 7. ADVANCED OPERATION In addition to the conventional operating method of using a mouse or by simply starting the software, there are also other ways to operate the program as described below: 7.1 Keyboard Control Shortcuts are key combinations pressed simultaneously to carry out certain functions. The Manager offers a series of shortcuts that help to operate the software quickly and easily without the mouse. The shortcuts are always a combination of the CTRL ("Control") key and a key from the number pad (NUM). + Neighboring cameras Play backward Play forward Stop Previous image Next image 110 © 2013 ALL RIGHTS RESERVED Satellite V4.5 First image Last image Minimize ® Satellite Maximize ® Satellite Change to 9-fold view Change to full-screen mode 7.2 Program Startup Parameters When you start the Manager from the command line, you can pass parameters to the software. By passing parameters, the Manager can be started by external software with an automatic login. There are three ways in which parameters can be passed: Simple Login: Use "-login" as your first parameter to log in automatically. For the login to be successful, the following parameters will have to follow in this order: - IP address - User name For example: "Manager –login 10.1.1.152 Administrator" Please note: No user password may be passed for automatic login. Alarm Login: Enter "-alarm" as the first parameter to log in automatically and have a track number's Live Image displayed in the Manager. For the login to be successful, the following parameters will have to follow in this order: - Track number - IP address - User name For example: "Manager –alarm 4 10.1.1.152 Administrator" Please note: No user password may be passed for automatic login. 111 © 2013 ALL RIGHTS RESERVED Satellite V4.5 Pre-assign Login Fields: Enter "-fill" as the first parameter to start the Manager with the passed parameters in the login fields. An automatic login does not take place here. Further parameters can be passed: IP address User name For example: "Manager –fill 4 10.1.1.152 Administrator" 8. EXTERNAL PROGRAMS In addition to the server applications and the Manager, there are also other programs which run independently and offer various functions. 8.1 RSV Player (Rapidshare Video Player) When you backup a sequence you are furnished with two files. One is the RSV file and the other is a folder with the designation "Sequence Viewer". The RSV file is the actual sequence. The RSV player is located in the "Sequence Viewer". In order to play the sequence, open the "Sequence Viewer" folder and double-click on the "RSVPlayer.exe" file. The player opens: 1 2 3 4 5 6 7 8 9 10 The recorded image can be seen in section (1). 112 © 2013 ALL RIGHTS RESERVED Satellite V4.5 Sequence information is displayed under item (2): - Information: The name of the track File Name: The path and the file name of the file being displayed Time: Time and date of the current image You can navigate within the sequence with the help of the slider (3) by clicking on the gray vertical bar and moving the mouse pointer left or right while holding down on the mouse key. In section (4) there are other buttons with which the sequence can be controlled: Jump to the first image of the sequence One image backward Play backward (click repeatedly to increase the speed) Stop the playback Play forward (click repeatedly to increase the speed) One image forward Jump to the last image of the sequence When the repeat button (5) is active, the open sequence will automatically repeat in a loop. The magnifying glass symbol (6) allows marked clip images to be enlarged in the display. After you have activated this button, the mouse pointer changes into a small crosshairs symbol. You can now select a clip from the camera image by clicking on it and moving the mouse with the button held down. A square frame appears. When you let go of the mouse button, the image cutout will now be seen in full-screen view. With a right-click of the mouse, you can return to the normal view. With the diskette symbol (7) you can save the current image as a bitmap graphic on the hard drive or on a mobile storage medium. A window opens in which you can enter a location and a file name under which the file will be saved. Use the "Export" button (8) to save a copy of an opened RSV file in the unprotected AVI format. This copy can then be played with an ordinary player program (Windows Media Player, for example). Using the "Date" and "Time" buttons (9) allows you to set a date and time to which the sequence will jump directly. With the open symbol (10) you can open another sequence to be played. 113 © 2013 ALL RIGHTS RESERVED Satellite V4.5 8.2 Webserver CamIQ® comes with an easy-to-use web/mobile client. It can be used to operate CamIQ® Satellite servers employing standard web browsers* as well as on mobile devices.* *Please observe the compatibility list (8.2.8 Compatibility) 8.2.1 Installation In order to use CamIQ® Web Client, the CamIQ® Middleware Service must be installed and running. These processes are automatic procedures of the CamIQ® setup process. The “CamIQ® Server“ installation method must merely be selected or, when using the user-defined installation, the additional “Middelware“ feature must be chosen. Additionally, the VLC Web plug-in must be installed on the PC/Mac (needed for Live Image playback) and some browsers will also need the current Adobe Flash Player plug-in installed (needed for sequence rendering). Should a necessary plug-in not be installed, this will be indicated to you the first time a connection is established. These plug-ins can be directly installed by CamIQ® without having an active Internet connection. 8.2.2 Operation Operating the CamIQ® Web Client is comparable to operating the CamIQ® Satellite Manager. To start CamIQ® Web Client, open your web browser and enter the IP address of the CamIQ® Middleware in the address bar (some browsers require that the complete URL http://[IPADDRESS]:80/ be entered). Once the plug-ins are installed and the web client has started successfully, launch the familiar CamIQ® Login Screen. 114 © 2013 ALL RIGHTS RESERVED Satellite V4.5 8.2.3 Login 3 1 2 Enter the “IP address“(1) in the login screen of the CamIQ® Satellite Server along with the valid login credentials and click on the “Login” button (2). The connection to the device will be established and this entry will appear on the server list (3). In contrast to CamIQ® Satellite Manager, CamIQ® Web Client can maintain a connection to several CamIQ® Satellite servers simultaneously. To do this, just enter the connection of another CamIQ® Satellite server in the Login screen (1) and establish the connection by clicking on “Login” (2). 4 To disconnect the connection to a CamIQ® Satellite server, click on the entry in the server list and then on the “Logout” (4) button. To remove a server that is no longer in use, select the entry and then click on the red “ “ symbol. 115 © 2013 ALL RIGHTS RESERVED Satellite V4.5 8.2.4 Live Image 1 2 3 4 Live Image – With a click on the “Live Image” (1) button you reach the Live Image View. In the “Cameras“ list (2) you will find a listing of all the available cameras on the connected CamIQ® Satellite servers. The Cameras list (2) displays all cameras with the following symbols: - Camera is available (green) - The track has an alarm or there is a loss of camera signal (red) - No camera is connected (gray) You can pull a camera into a Live Image monitor with drag & drop to display the live image. Change the view (4) in order to display up to 16 live images in your web client. Please note: The Live Image playback on an iPad/iPhone is currently limited to one camera. You will find the event log under the camera list. The most recent 100 events generated by the connected servers are displayed here. Provided that recorded footage of an event is available, you can jump directly to the recorded event with a click of the mouse (you will find more detailed information regarding event handling in chapter “2.5 Events“). 116 © 2013 ALL RIGHTS RESERVED Satellite V4.5 8.2.5 Permanent Tracks You can analyze the entire available recording in the “Permanent Tracks” view. 1 2 3 Select a camera from the device list (1). The recorded time ranges are listed in the sequence overview (2). Select the desired sequence. Use the navigation bar (3) or the slider to navigate back and forth through the recording. 117 © 2013 ALL RIGHTS RESERVED Satellite V4.5 8.2.6 Events 1 2 3 4 You can filter and evaluate specific server and camera events on the “Events” page. Select a server and a track (1). Change the filter setting (2). If there is a check next to the filter, alarms of this type will be displayed. The colors used for the alarm entries correspond to those used in the CamIQ® Satellite Manager. Alarm Zone Camera Alarm Sabotage Alarm Tracking/Others Manuel Alarm Alarm Contact Use the navigation elements (3) to page through the events pages or to renew your search for a specific date and time (4). 118 © 2013 ALL RIGHTS RESERVED Satellite V4.5 8.2.7 Interface The elements in the Web Client interface can be set to scale as needed. You will find a dividing line between two scalable elements. Take hold of this line with your mouse in order to change the size of these objects. Please note: To optimize interface resolution, it is recommended that you use the web browser in full screen mode. This can be launched using the “F11” key with standard browsers. 119 © 2013 ALL RIGHTS RESERVED Satellite V4.5 8.2.8 Compatibility The following web browsers displayed errors/limitations during testing: All browsers: No playback of recorded MPEG4 and MJPEG data. Only H.264 at this stage. Google Chrome (Desktop/Windows): Alarm list in section “Events” does not fill the box entirely. Internet Explorer (Desktop/Windows): Can´t display MJPEG live streaming (HTTP Streaming (mobile)). Opera (Desktop/Windows): Can´t display MJPEG live streaming (HTTP Streaming (mobile)). Safari (Desktop/Windows): Displays MJPEG live streaming (HTTP Streaming (mobile)) only after additional authentication via browser dialog. Alarm list in section “Events” does not fill the box entirely. Safari (iOS): Can´t display H.264 and MPEG4 live streams. Displays MJPEG live streaming (HTTP Streaming (mobile)) only after additional authentication via browser dialog. Playback in section “Permanent Tracks” does not work. Safari (Mac OS): Can´t display H.264 and MPEG4 live streams. The background image of the player in section “Permanent Tracks” switches sometimes from black to “no pic”-image. 120 © 2013 ALL RIGHTS RESERVED Satellite V4.5 9. APPENDIX As an owner of the original software, you have the privilege of enjoying additional functions which are described below. 9.1 Text Overlay In the "Extended Settings" menu group (1), you will find the "Text Overlay" menu (2). This is where screen overlays for every track can be configured. 1 4 3 2 5 6 7 8 First select the camera image from the "Tracks" list (3) in which the overlay should be configured. You can see the image in the "Live Image" field (4). In the "Headline" field (5) you can configure an overlay for the first line of the image. Enter the desired text or click on "Default" for a text suggestion. The "Font Color" and "Background Color" list boxes allow you to change the font appearance. You can also select another font by clicking on the "Font Type" button. If you do not wish to have a colored background for the overlay, you can activate the "Transparent" button. But please note that the readability of the font overlay can be affected by this. Please note: The "[DATE]" and "[TIME]" texts have a special function. [DATE] will be replaced by the actual date and [TIME] by the actual time when the overlay appears. Under "Text in Data Section" (6), you can enter additional text which will be displayed below the title. You can define the position of the text in the camera image by entering values in "Space from the Left" and "Space from Above". As with the title, you can select the "Font Color", "Background Color" and "Font Type" as desired and also turn off the background with the "Transparent" button as needed. To finish, click on "Apply Text" (7) to save the settings or "Delete" (8) to remove the text from the image. 121 © 2013 ALL RIGHTS RESERVED Satellite V4.5 9.2 Master-Subsystem 1 3 2 5 4 6 In the "Basic Settings" function group (1) you will find the "Tracks" menu (2). Here you can select a track to be used for a master subsystem. This enables the cascading of several recorders. You can simultaneously evaluate the live images and recordings of several recorders using a Manager user interface. First select a track from the track list (3). Then click on "Master Subsystem" in the "Operating Mode" field (4). Then select which track from which image source should be linked to this master subsystem under "Subsystem" (5). Please note: For another server to be selected as an image source, it must already have been added to the "Devices/Image Sources" menu (see chapter 3.8). In the "Basic Settings" field (6) you can give this track a name. The track is now available to the system as if it were a directly connected image source. Further configuration changes like motion detection will not be possible, however, because the recording and sensor technology for this track are still being handled locally by the other server (the subsystem). The new track is now available and visible in the Manager's "Live Image", which is logged into the master system. The subsystem image is thereby transferred over the network to the master system and utilized by the Manager. 122 © 2013 ALL RIGHTS RESERVED Satellite V4.5 With this, the track will be denoted as a "Master-Subsystem Track" with this symbol: camera list. in the The camera images will also be available during the evaluation of the "Permanent Tracks" and will be denoted with the symbol above. This ensures that it will be clear that the images stem from a subsystem and are currently being streamed over the network. The events from such a track are also available and can be accessed without having to first log into the other server. Here the symbol is also used to denote the image data from a master-subsystem source. 123 © 2013 ALL RIGHTS RESERVED Satellite V4.5 9.3 Hot Standby This software also provides the option of using the server as a backup system should a system failure occur. However, this only functions with network image sources like network cameras or network servers. In this process, so-called hot standby tracks are set up on a master system which has been designated as a backup system. If another server should fail, the image sources of this server will automatically be assigned to these hot standby tracks thus enabling the continuation of the recording. You will find the "Hot Standby Tracks" menu (2) in the "Expert Settings" function group (1). 3 1 4 2 5 6 7 Click on "Add" (5) to add a new hot standby track. In the "Track Size" field (3) you can determine how big the track should be. It need not be set to a particularly large size as it will only serve as a buffer in case another system should fail. All available tracks are displayed in the "Hot Standby Track Overview" list (4). You can enter a storage location for the track in the "Settings for the Selected Entry" field (6). If it should happen that the hot standby track takes over the recording of a failed server, you can see here which camera - and from which system - has been assigned to the hot standby track and when this took place. Once the failed server is up and running again, the assignment can be reset using the "Reset" button (7). Use the "Delete" button (7) when the hot standby track is to be deleted again. All servers that are to be monitored must be entered as image sources in the "Devices/Image Sources" menu (see chapter 3.8). The network components that are recorded by the various 124 © 2013 ALL RIGHTS RESERVED Satellite V4.5 servers must also be entered in this menu. Through this, the backup server has all the connection data from the other servers and the network components that are being recorded there. Go now to the "Tracks" menu (2) in the "Basic Settings" function group (1). 1 5 2 6 4 3 7 Select the track in section (3) that is supposed to serve as a hot standby track. Then select the "Master-Subsystem with Failover" option in the "Operating Mode" field (4). In section (5) the image source which will be recorded in case of system failure is entered - an Axis Camera, for example. This will have been previously entered using the "Devices/Image Sources" menu (see chapter 3.8). For this, first select the image source and then - from the drop-down list below - the desired camera for the selected image source. Then you can add a relay in the same manner; first by selecting the image source and then the corresponding relay. Finally, you can use the same method to add an alarm contact. You will enter a subsystem in section (6). That is, the track of the server that is to be monitored. Select the server from the list box above and then the server track from the list box below. Enter a name for this track in the "Designation" field (7) - "[Server 2] Track 3", for example. The track entered in the "Subsystem" field (6) will now be monitored. If this track is not reachable for 4 minutes, the failover function will be activated. The failed track will automatically be assigned to one of the hot standby tracks and thereby continue to record. Example: An Axis camera is configured as the image source for Server 1. It records with the designation “Track 1". A second server acts as a backup. Its image sources include both Server 1 and the Axis camera as entries. The backup server monitors the function of Track 1 on Server 1 – in other 125 © 2013 ALL RIGHTS RESERVED Satellite V4.5 words - the recording being made by the Axis camera. If Server 1 should fail, the backup system will notice. If Server 1 is not reachable within 4 minutes, the Axis camera will be assigned to one of the hot standby tracks. The backup server takes over the camera recording. The camera is then a part of the system - completely as though it had been assigned in the normal fashion. Your image data can be evaluated in the permanent recording (see chapter 5). Motion detection and other settings can also be configured. When Server 1 becomes available and functional again, this assignment can be reversed by clicking on the "Reset" button in the "Hot Standby Tracks" menu. The hot standby tracks will be displayed in the backup server's Live Image as follows: As long as everything functions properly, the symbol for the hot standby track is green. Should a monitored system fail, the symbol changes to gray After a 4-minute waiting period, the following symbol will be displayed. The symbol remains gray but the red H and the red dot indicate that the hot standby track has been assigned and that the video signal is being recorded. As soon as the monitored server track regains its functions, the symbol for the hot standby track will turn green again. When everything is back to normal, you can go to the "Hot Standby Tracks" menu. 1 2 3 Select there the track you now no longer need (1). In section (2) you can see the currently valid assignment. Click on "Reset" (3) in order to release the assignment and free up the hot standby track. 126 © 2013 ALL RIGHTS RESERVED Satellite V4.5 The following warning message points out that once the connection is released, the image data that has been saved on the backup server will be deleted. Planning Example: The initial situation is such that 4 servers are available for a project in which every server is to record the input of 16 network cameras. In other words, a total of 64 image sources will be available. A fifth server will be used as a backup system. Each of the four recording servers has access to 16 tracks and it is only these 16 cameras which should be entered in the four corresponding "Devices/Image Sources" menus (see chapter 3.8). However, the backup server has access to 64 tracks (16 x SW and 48 x VR) (see chapter Licenses 3.16) and here the 64 network cameras, as well as the recording servers, are entered. Additionally, 16 hot standby tracks have also been configured on the backup server (see chapter 9.1.4). These must not be licensed separately, however, as only the accessible tracks will be used. Server 1 Server 2 16 tracks 16 tracks Server 3 Server 4 16 tracks 16 tracks Backup Server 64 tracks total Lan Of these,16 are hot standby Should one of the 4 servers fail, its 16 tracks will be taken over by the 16 hot standby tracks on the backup server. 127 © 2013 ALL RIGHTS RESERVED Satellite V4.5 10. Notes 128 © 2013 ALL RIGHTS RESERVED