1
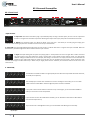
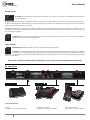
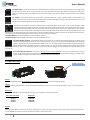
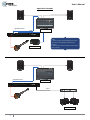
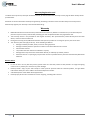
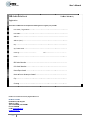
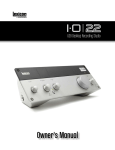
User’s Manual Table Of Contents -2- Page 2. Table of contents Page 3. Σημαντικές Οδηγίες Ασφαλείας Page 4. Important Safety Instructions Page 5. Introduction Page 6. BZ1 Front Panel Page 7. BZ1 Rear Panel Page 8. PU2 Pickup Page 9. Application Examples Page 10. Specifications Page 11. Warranty Registration Page 12. Registration form User’s Manual ENGLISH Important Safety Instructions Caution Caution This symbol, wherever it appears, alerts you to the presence of uninsulated dangerous voltage inside the enclosure – voltage that may be sufficient to constitute a risk of shock. Caution This symbol, wherever it appears, alerts you to important operating and maintenance instructions in the accompanying literature. Please read the manual. Caution Risk of electric shock. DO NOT OPEN! To reduce the risk of electric shock, do not remove the top cover (or the front or rear sections). No user serviceable parts inside. Refer servicing to qualified personnel. To reduce the risk of fire or electric shock, do not expose this appliance to rain or moisture. The apparatus shall not be exposed to dripping or splashing liquids and no objects filled with liquids, such as vases, shall be placed on the apparatus. To reduce the risk of electric shock, do not perform any servicing other than that contained in the operation instructions. Repairs have to be performed by qualified service personnel. We would like to bring your attention to the fact that extremely loud sound levels may damage your hearing as well as your loudspeakers. Please lower the volume before powering up the unit. Be sure to keep the volume at an appropriate level. Ventilation: The appliance should be situated so that its location or position does not interfere with its proper ventilation. For example, the appliance should not be situated on a bed, sofa, rug or similar surface that may block the ventilation openings; or placed in a built-in installation, such as a bookcase or cabinet that may impede the flow of air through the ventilation openings. -4- 1. 2. 3. 4. 5. 6. 7. Read these instructions. Keep these instructions. Heed all warnings. Follow all instructions. Do not use apparatus near water. Clean only with dry cloth. Do not block any ventilation openings. Install in accordance with the manufacturer’s instructions. 8. Do not install near any heat sources such as radiators, heat registers, stoves, or other apparatus (including amplifiers) that produce heat. 9. Do not defeat the safety purpose of the polarized or grounding-type plug. A polarized plug has two blades with one wider than the other. A grounding-type plug has two blades and a third grounding prong. The wide blade or the third prong are provided for your safety. If the provided plug does not fit into your outlet, consult an electrician for replacement of the obsolete outlet. 10. Protect the power cord from being walked on or pinched particularly at plugs, convenience receptacles, and the point where they exit from the apparatus. 11. Only use attachments/accessories specified by the manufacturer. 12. Use only with the cart, stand, tripod, bracket, or table specified by the manufacturer, or sold with the apparatus. When a cart is used, use caution when moving the cart/apparatus combination to avoid injury from tip-over. 13. Unplug this apparatus during lightning storms or when unused for long periods of time. 14. Refer all servicing to qualified service personnel. Servicing is required when the apparatus has been damaged in any way, such as power supply cord or plug is damaged, liquid has been spilled or objects have fallen into the apparatus, the apparatus has been exposed to rain or moisture, does not operate normally or has been dropped. 15. The apparatus should be connected to a MAINS socket outlet with a protective earthing connection. 16. Where the MAINS plug or an appliance coupler is used as the disconnect device, the disconnect device shall remain readily operable. User’s Manual Introduction Dear customer, Thank you for choosing the EBS BZ1/PU2 Bouzouki amplification package. The products are manufactured in England to the highest standards using high quality materials. They have been designed and tested to be reliable, long lasting state of the art products with a sound for the Bouzouki that is second to none. Quality The BZ1 is equipped with top quality materials. Some examples are: Gold plated jack sockets for long life, professional XLR balanced outputs for hum free sound, non polarized electrolytic capacitors for higher quality sound, polystyrene capacitors for EQ filtering. This results in a quality sound for years to come. The PU2 Pickup is built to the same high quality standards as the BZ1. The PU2 has a specialized amplifier on board that has huge power capability and high quality sound. The pickup coil is precision wound around a powerful ceramic magnet and then potted in resin for a low distortion crystal clear sound. Testing Our BZ1/PU2 Bouzouki amplification package is the result of many hours of listening tests, live tests at concerts and night clubs, with some of the finest Bouzouki soloists. We would like to thank all the Bouzouki soloists who tested our prototypes, giving us their suggestions and comments, and helping to make the BZ1/PU2 a reality that is now available to our customers. Thank you very much. -5- User’s Manual BZ-1 Bouzouki Preamplifier BZ-1 Front Panel Input Section: 1. Input Jack: Use a Mono Jack lead to plug in your EBS PU2 pickup. If using a wireless system, be sure to set its output level so that it is no higher than the PU2’s output level. Boosting the output level of your pickup will cause the BZ1 to overload! 2. MUTE: Press the Mute switch in to Mute the Signal at the Input Jack – this allows you to easily plug and unplug your instrument while avoiding on/off noises and without the need to turn your volume down. 3. Signal LED: The signal Light (LED) flashes Green when you start to play, to indicate that there is a signal at the input of the BZ1. When the Mute switch is pressed the light shines Red to indicate that the input is muted. 4. Style: The Style switch gives the option of 2 playing styles. In the IN position the sound is Legato with a softer sound that has more sustain. In the OUT position the sound is staccato with a more natural acoustic dynamic sound. You might prefer different settings for different venues. For example, when doing a sound check in an empty room the sound is more hard and brittle and you might prefer legato to soften the sound but once the gig begins and the room is full of people the room acoustics will change and soften the sound, in which case you might prefer staccato. If unsure, we recommend staccato as this is the most natural sound. 5. 5 Band EQ: The BZ1 when used with the PU2 and a good quality monitor will sound superb with all 5 bands of the EQ set to flat (centre position). If for example your monitor lacks smoothness and is thin and bright in the Treble, you can cut a little Treble and boost a little HMF to make the High frequencies smooth and mellow. If you prefer a more smooth mellow sound that is easy on the fingers, you can boost MF and HMF to make your sound more round and powerful. If your monitor sound is dull and bloated in the Bass, you can boost Bass a little and cut LMF a little to clean the low frequencies up. If you monitor has a small light Bass sound, you can Boost Bass and LMF to give it more body. EQ Examples -6- User’s Manual Reverb Section: 6. Reverb: We recommend you start at the centre position. For a cleaner drier sound just cut Reverb and for a softer richer sound boost Reverb. 7. Decay Time: We recommend starting with the Decay Time button pressed IN; this gives a nice balanced sound that is easy to play and is suited to most playing styles. With the Decay Time in the OUT position you have a shorter decay time which gives an ultra clean sound that is ideal for purists that play with little or no Reverb. 8. Large: The Large button, when pressed IN, overrides the Decay button and gives a large sounding reverb with a very long Decay Time. This is ideal for players that like a big dynamic sound with a long Reverb tail. We recommend starting with the Large button in the OUT position as this suits most playing styles. 9. Volume: This controls your Monitor volume and does not affect the volume of the Lineout. Lineout volume is controlled by the PA console/mixing desk that it is plugged into. Power Section: 10. ON Indicator: When the BZ1 is powered on the Indicator (LED) will shine Green. 11. Power: This is the On/Off switch that Powers the BZ1 on and off. Always power ON the BZ1 before powering on your Monitor to avoid switch on noises coming through the monitor. Also for the same reason, always power off your monitor before powering off the BZ1. Additionally when powering the BZ1 On or Off, always mute the appropriate channel on the PA console/mixing desk that the Lineout is connected to. Please ensure the BZ1 is switched off and unplugged from the mains electricity supply before being moved. BZ-1 Rear Panel Output Characteristics: Output: Post Volume > Post EQ > Post Reverb -7- Stage Monitor Lineout: Pre Volume > Post EQ > Post Reverb Front of House Lineout: Pre Volume > Pre EQ > Pre Reverb User’s Manual 12. Mains Input: The BZ1 is provided with a detachable power lead that connects here. The specific mains input voltage rating that your BZ1 has been built for is clearly marked on the back panel below the mains input. Before connecting for the first time, please ensure that your BZ1 is compatible with your electricity supply. If you have any doubts, please get advice from a qualified person. 13. Output: Fully balanced output for connecting to a powered speaker or a power amplifier driving a passive speaker. This output serves as the main output since it includes all the BZ-1 sections including level changes made from the volume control. This output can be considered as the “Bouzouki Player’s Output” The effects loop should be used in the instance where the bouzouki player has the need to use an external, higher quality reverberation processor. When an external processor is connected, the BZ-1 Reverb level control should be turned to zero so the internal Reverb gets deactivated. The sound of the external processor will be routed to the “Stage Monitor” and “Output” XLR line outputs. Changes made to the external processor will affect the overall sound of the BZ-1 preamplifier and the ratio between the “dry” bouzouki sound and the reverb amount will be controlled through the “MIX” parameter of the external reverb processor. The cables used should be unbalanced (TS) Jack lead cables, same type used for instruments. 14. Effects Return: Accepts the output of an external effects processor. 15. Effects Send: Sends the signal to the input of an external effects processor. 16. Stage Monitor Lineout: Fully balanced output for connection to an external PA console/mixing desk. This lineout sends the full sound with the EQ and Reverb sound to the mixing console, so be sure to set the PA console/mixing desk channel with all EQ flat or bypassed and any console/mixing desk effects set to zero. The stage monitor lineout will pass through all the EQ and reverb changes made by the player but not the volume changes. This will ensure that changes in level made by the bouzouki player will not affect the “Mix” in the other band members monitor zones. Volume changes made by the bouzouki player will affect just his personal mix. 17. Front of House Lineout DI: This Output is only for use by a sound engineer who requires a DI output for Front of house sound. This DI output sends the character of the BZ1 sound but bypasses all EQ, Reverb and Volume settings on the BZ1. So any setting changed on the BZ1 will not affect this Lineout and the front of house sound. PU-2 Bouzouki Pickup Audio Connector Battery: Use a 3V CR2 Lithium battery. Never attempt to use a higher voltage battery as this will damage the pickup! Polarity: Insert the battery in the direction, as shown inside the battery holder, with the + near the centre of the pickup and the – near the end of the pickup. Battery Life: Battery life is 2000 Hours. See the table below to give you an idea when to change your battery. Hours of use per week 40 Hours 30 Hours 20 Hours Battery Life - 12 Months 16 Months 24 Months On/Off: When you plug a Mono Jack Lead into the pickup, it will power on. When you remove the Mono Jack Lead, the Pickup will power off. Be sure to mute the BZ1 every time you connect a Lead to the pickup to avoid on/off noises. -8- User’s Manual Application Examples Stage Monitor Lineout Output Powered Mixer Notes: 1: Use the mixers input level (fader) to control the bouzouki level going through the main speakers. 2: Use the BZ-1 volume to adjust the level of the active monitor Active Monitor Stage Monitor Lineout Powered Mixer Output Passive Monitors -9- User’s Manual Specifications BZ-1 Bouzouki Preamplifier: Inputs: Input Impedance 308KΩ Effects Return Impedance 13KΩ Outputs: Output Impedance 600Ω Balanced Stage Line Output Impedance 600Ω Balanced FOH DI Line Output Impedance 600Ω Balanced Effects Send Impedance 600Ω Power Supply: Mains Voltage 230VAC / 50Hz – 60HZ Power consumption 15W Physical/Weight: Dimensions: 482mm x 160mm x 44mm Weight 2.5Kg CE mark for European harmonised standards The CE mark means the product conforms to EMC Directive (EN 55103-1 & EN 55103-2) and the Low Voltage Directive in the EU. PU-2 Bouzouki Pickup Output Impedance 1KΩ Recommended load ≥ 10KΩ Max Output 1.3V Peak Battery 3V CR2 Lithium Battery Life 2000 Hours Dimensions 82mm x 42mm x 32mm Weight 79g without battery (90g with battery) CE mark for European harmonised standards The CE mark means the product conforms to EMC Directive (EN 55103-1 & EN 55103-2). - 10 - User’s Manual Warranty Registration card To obtain warranty service, the buyer should first cut out, fill out and return the warranty card on page 12 within 10 days of the purchase date. Please fill out all the information carefully and genuinely, miswriting or absence of this card will void your warranty service. Alternatively register your warranty online at www.ebsaudio.gr Warranty 1. 2. 3. 4. EBS Audio Solutions warrants that this product will be free from any defects in materials and / or workmanship for a period of 1 year from the purchase date providing you have completed the warranty registration card. The warranty service is only available to the original consumer, who purchased this product directly from the retail dealer, and it cannot be transferred. During the warranty period, EBS Audio Solutions will repair this product at no charge to you for parts or for labor. The warranty does not apply under any of the following conditions: Damage caused by accident, abuse, misuse or during shipment. Damage caused by failure to operate or install in accordance with the user manual. Normal wear and tear The product has been altered or modified in any way. Damage which may have been caused either directly or indirectly by another product. Abnormal service or repairing by anyone other than the qualified service personnel authorized by EBS Audio Solutions. Return notice In case of return for any warranty service, please make sure that the product is well packed in its original shipping carton so as to protect your unit from any other damage. Please provide a copy of your sales receipt or other proof of purchase with the returned product, and give detail information about your return address and contact telephone number. A brief description of the defect will be appreciated. Please prepay all the costs involved in the return shipping , handling and insurance. - 11 - U User’s Man nual EBSS Audio SSolutionss Prod duct Warraanty Reggistration Please take a few w minutes to complete c the following form to register your productts. First Nam me / Organizzation ………… …………………… …………………… …………………… …………………… …………… Last Nam me ……………… …………………… …………………… …………………… …………………… …………………… …………… Address ………………… …………………… …………………… ……………………………………………………………………. Address (cont) ……… …………………………………………………………… …………………… …………………… …………. City ……… …………………… …………………… …………………… …………………… …………………… …………………… …………. Zip / Posstal Code …… …………………… …………………… …………………… …………………… …………………… ………….. Countryy ………………… …………………… ……….. Tel ……… …………….................................... E-mail … …………………… …………………… ……………………………………………………………………………… ……….. BZ1 Serrial Numberr ………………………………… …………………………………… …………………………. PU2 Serrial Numberr ……………… …………………… ………………… …………………… ………………… ………… Date off purchased ………………… ………………… …………………… ………………… …………………………. Name of o store wheere purchassed …………… …………………………………… ………………………… City …… …………………… ………………… …………………… ………………… …………………… ………………… ……….. Countryy ……………… …………………… ………………… …………………… ………………… …………………… ………. Pleasse cut out and mail m the warranty Registratio on Form to: EBS Audio A Solutio ons Εραττοσθένους 25 5, Παγκράτι Αθήννα Τ.Κ 11635 Τηλ: 210 75698033 / 210 756980 04 Fax: 210 75698000 e-maail: [email protected] www w.ebsaudio.grr - 12 - User’s Man nual - 13 -