1
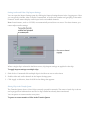
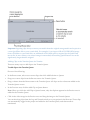
Important: Ingesting clips always extracts your media from the original storage media and copies it to a new QuickTime file on your scratch disk. For example, if you ingest 4 GB of DVCPRO HD footage from a P2 folder on your hard disk, an additional 4 GB of disk space is required for the QuickTime movie file. In cases where your source footage is transcoded, the resulting QuickTime movie can be significantly larger than the original. Adding Clips to the Transfer Queue for Transfer There are many ways to add clips to the Transfer Queue. To add clips to the Transfer Queue Do one of the following: § In the Browse area, select one or more clips, then click Add Selection to Queue. § Drag one or more clips from the Browse area to the Transfer Queue. § Drag a volume from the Browse area to the Transfer Queue. All clips on the volume are added to the Transfer Queue at once. § In the Preview area, click the Add Clip to Queue button. Note: When you click the Add Clip to Queue button, only the clip that appears in the Preview area is added to the Transfer Queue. § Click in the video image in the Preview area and drag the image to the Transfer Queue. You can also drag clips from the Log and Transfer window to your project in the Browser. Those clips are automatically logged in the project and added to the Transfer Queue, and their media is transferred.