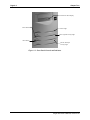
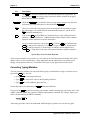
1
Eagle 450
Computer Owner's
Manual
DSM-00215-00
© 1998 ALPHA MICROSYSTEMS
FIRST EDITION: October 1998
To re-order this document, request part number DSO-00215-00.
FCC Notice
This equipment has been tested and found to comply with the limits for a Class A digital device, pursuant to Part 15 of the FCC
Rules. These limits are designed to provide reasonable protection against harmful interference when the equipment is operated in a
commercial environment. This equipment generates, uses and can radiate radio frequency energy and, if not installed and used in
accordance with the instruction manual, may cause harmful interference to radio communications. Operation of this equipment in a
residential area is likely to cause harmful interference in which case the user will be required to correct the interference at his own
expense.
Canadian Department of Communications Compliance Statement
This equipment does not exceed Class A limits per radio noise emissions for digital apparatus set out in the Radio Interference
Regulations of the Canadian Department of Communications. Operation in a residential area may cause unacceptable interference
to radio and TV reception requiring the owner or operator to take whatever steps are necessary to correct the interference.
Avis de Conformité aux Normes du Ministère des Communications du Canada
Cet équipment ne deapsse pas les limits de Classe A d'émission de bruits radioélectriques pour les appareils numeriques tels que
prescrites par le Règlement sur le brouillage radioélectrique établi par le ministère des Communications du Canada. L'exploitation
faite en milleu résidential peut entrainer le brouillage des réceptions radio et tele, ce qui obligerait le propriétaire ou l'opératour à
pendre les dispositions nécessaires pour en éliminer les causes.
Battery Warning
CAUTION: Danger of explosion if battery is incorrectly replaced. Replace only with the same or equivalent type recommended by
the manufacturer. Discard used batteries according to the manufacturer's instructions.
ATTENTION: Il y a danger d'explosion s'il y a replacement incorrect de la batterie. Remplacer uniquement avec une batterie du
même type ou d'un type recommandé par le constructeur. Mettre au rébut les batteries usagées conformément aux instructions du
fabricant.
For AM-3500-E100, -E200, -E300, -E400, -E500 and AM-990-01 systems replace battery with Panasonic or Ray-O-Vac BR2325
only. For AM-3500-E550, AM-3500-6000, and AM-990-04 systems, replace batteries with Panasonic or Ray-O-Vac BR1225 only.
Use of other batteries may present a risk of fire or explosion. Replacement batteries may be ordered from your authorized Alpha
Micro reseller.
Safety Warning
This computer contains no user-configurable components that require opening the computer case. Because the power supply in
this computer is capable of outputting high current levels hazardous to your safety, the computer case should only be opened by an
authorized service technician.
Cet ordinateur ne contient aucune pièce configurable par l’utilisateur qui nécessite l’ouverture du boitier. L’alimentation de cet
ordinateur peut preduire des nivaeux de tensions dangereux, le boitier ne devrait donc être ouvert que par un technician autoriaé.
SOFTWARE SECURITY DEVICE IDENTIFICATION NUMBER: _________________
The Alpha Micro Software Security Device (SSD) is a customized integrated circuit that personalizes the computer, providing
identity verification for it. Certain Alpha Micro and non-Alpha Micro software may require that your computer contain an SSD in
order to run software that has been customized to run only on your computer.
Please enter the identification of your SSD above and on the Contact Information Sheet at the back of this manual. The SSD
identification number should be on your computer ID label under "SSD Serial No." Software vendors may ask you for the SSD
number if they are customizing software to run only on your computer.
This document may contain references to products covered under the following U.S. Patent Number(s): 4,530,048
ALPHA MICROSYSTEMS
2722 Fairview Street
P. O. Box 25059
Santa Ana, CA 92704
Table of Contents
CHAPTER 1 - INTRODUCTION
THE EAGLE 450 DOCUMENTATION PACKAGE
What’s in This Book?
Graphic Conventions
HARDWARE FEATURES
Options
SOFTWARE FEATURES
CHAPTER 2 - USING YOUR COMPUTER
FRONT PANEL CONTROLS AND INDICATORS
REAR PANEL CONFIGURATION
TURNING THE COMPUTER ON
TURNING THE COMPUTER OFF
REBOOTING THE COMPUTER
CHAPTER 3 - KEEPING YOUR COMPUTER HAPPY
WHERE SHOULD THE COMPUTER BE?
REGULAR MAINTENANCE
Cleaning the Computer Cabinet
Caring for Tape Drives and Tapes
Caring for the Diskette Drive and Diskettes
BACKING UP YOUR DATA
Using a Streaming Tape Drive
Using a DAT Drive
Warm Booting
CHECKING THE DISK
The REDALL Command
The DSKANA Command
DSKANA Options
The CHECK Option and Automatic Backups
CHAPTER 4 - WHAT IF SOMETHING GOES WRONG?
IF THE PROBLEM IS WITH ONE TERMINAL
IF THE PROBLEM AFFECTS MORE THAN ONE USER
IF YOU CAN’T CONTACT YOUR DEALER
FOR MORE INFORMATION
Eagle 450 Owner's Manual, Revision 00
1-1
1-1
1-1
1-2
1-2
1-3
1-3
2-1
2-1
2-3
2-4
2-4
2-5
3-1
3-1
3-2
3-2
3-2
3-3
3-4
3-5
3-7
3-8
3-8
3-9
3-9
3-11
3-11
4-1
4-1
4-2
4-2
4-3
Page ii
CHAPTER 5 - ABOUT AMOS
THE TERMINAL KEYBOARD
Correcting Typing Mistakes
USER NAMES
Logging On
Adding User Names
HOW AMOS STORES INFORMATION
Device Names
Accounts
File Names
File Specifications
Organizing the Disk
Logging Into Other Accounts
Adding New Accounts
Table of Contents
5-1
5-1
5-2
5-3
5-3
5-4
5-4
5-4
5-5
5-6
5-6
5-7
5-8
5-8
CHAPTER 6 - WHERE TO NOW?
6-1
APPENDIX A - THE CONTROL CHARACTERS
A-1
ABOUT YOUR COMPUTER
ABOUT YOUR DEALER
ABOUT ALPHA MICRO
1
1
1
Eagle 450 Owner's Manual, Revision 00
Chapter 1 - Introduction
Welcome to the Eagle 450 Owner’s Manual. This book is for the new owner of an Eagle 450 computer.
It tells you how to keep your computer running happily, what to do if something should go wrong, and
how to get the most out of your computer hardware and software.
THE EAGLE 450 DOCUMENTATION PACKAGE
Besides this Owner’s Manual, two other documents describe the Eagle 450:
• The Eagle 450 Installation and Technical Manual, DSO-00216-00, describes how to set up the
system hardware and software, and includes technical details about system performance,
capability, and configuration.
• The Eagle 450 Service Manual, DSO-00217-00, contains instructions on adding and changing
components in an installed Eagle 450.
These other documents are intended for Alpha Micro dealers and, in the case of the Service Manual,
authorized technicians. If your computer is installed and running, this Owner’s Manual has the
information you need for its day-to-day operation and maintenance.
What’s in This Book?
This book contains five chapters:
• Chapter 1 - Introduction: describes the documentation and covers the hardware and standard
software included with your computer.
• Chapter 2 - Using Your Computer: tells you how to turn the computer on and off, and talks about
the controls and indicators on the front and back of the computer.
• Chapter 3 - Keeping Your Computer Happy: discusses the operating conditions the computer
prefers and the regular care and maintenance you can use to keep it running properly.
• Chapter 4 - What if Something Goes Wrong?: gives you procedures to follow to assist your
Alpha Micro dealer if certain system problems occur.
• Chapter 5 - About AMOS: discusses AMOS, the Alpha Micro Operating System. While most or
all of it may be invisible to you, the AMOS software enables your computer to run the
applications you use every day.
• Chapter 6 - Where to Now?: lists some other Alpha Micro documents you may find useful.
Eagle 450 Owner's Manual, Revision 00
Page 1-2
Chapter One
Graphic Conventions
Like other Alpha Micro documents, this Owner’s Manual uses some standard symbols and special
typefaces to make our examples and explanations easier to read and understand:
Symbol
Description
This means STOP!, and signals an important warning or restriction. Be sure to
read the text next to this symbol carefully, as it could help you avoid serious
problems.
This marks a hint—a shortcut or an easier way to do something.
This indicates a note: information which relates to the current topic, and may
be important for you to remember.
Text
We show characters the computer displays on your screen, such as prompts and
information messages, in this typeface.
TEXT
In examples, we use this typeface for the characters you type on your keyboard.
KEY
This symbol refers to a non-character key on your keyboard. For example: DIR
ENTER tells you to press the ENTER key at the end of the DIR command.
CTRL
/C
This combination of symbols tells you to hold down the first key and press the
second key. For example, to type a CTRL /C (Control-C), press the CTRL key
and, while holding it down, type a C.
HARDWARE FEATURES
The Eagle 450 comes in an attractive, compact deskside enclosure, as shown below. Inside the enclosure
are:
• A CPU (Central Processing Unit) board using the Motorola MCF5102 ColdFire CPU chip.
• At least one SCSI-2, Wide SCSI-2, or Ultra SCSI disk drive for permanent data storage.
• From 4MB to 256MB of Random Access Memory (RAM), used to store data and programs
during processing.
• A tape backup device. Depending on the device you’ve ordered, you may be able to store up to
26GB of data on a single tape. The tape drive is accessible through the computer’s front panel.
• At least eight and up to 32 serial input/output ports for connecting terminals, printers, modems,
and workstations. There are connectors for these ports on the back panel of the computer.
• An Ethernet network interface. You can attach your Eagle 450 to a computer network through a
connector on the back panel. You can then share information between computers, use PCs to run
programs on the Eagle 450, share printers, and much more. If your network is attached to the
Internet, you’ll be able to access the Eagle 450 from practically anywhere in the world.
Eagle 450 Owner's Manual, Revision 00
Introduction
Page 1-3
Options
Your computer may have additional devices, such as an internal diskette drive accessible through the
front panel, an external RAID disk subsystem for extremely reliable, high-capacity data storage, an
Uninterruptible Power Supply (UPS) to guard against data loss during a power failure, and more.
SOFTWARE FEATURES
All Eagle 450 computers use AMOS, the Alpha Micro Operating System. AMOS lets the various parts of
the hardware talk to each other—for example, it sends characters from the computer’s CPU to your
terminal screen or to the printer—and performs the calculations and information storage that is the heart
of the computer’s function.
Almost all Eagle 450’s also have at least one software application. An application is a software program,
or group of programs, which perform related tasks for a specific purpose. For example, an application
may contain all the programs needed to run a dental office—billing, scheduling, keeping patient records,
and so on—a hardware store, or any other business. Popular general purpose applications include word
processors, spreadsheets, electronic mail, and lots more.
The application software on your Eagle 450 was added by your dealer for your specific situation, so it
isn’t discussed in this manual. For information on the applications you have, please contact your Alpha
Micro dealer.
Eagle 450 Owner's Manual, Revision 00
Page 1-4
Chapter One
For more information about AMOS, including how to use some common AMOS commands,
please see Chapter 5. Depending on how your dealer configured your computer, AMOS may be
completely “hidden”: your application may include options for all the features you need, so you
never enter any AMOS command directly. In that case, while you may find the information in
Chapter 5 interesting, you don’t really need to know any of it.
Eagle 450 Owner's Manual, Revision 00
Chapter 2 - Using Your Computer
This chapter discusses some of the basic things you need to know to use your computer: what the buttons
and lights on the front panel mean, what attaches where on the back panel, and how to turn the computer
on and off.
FRONT PANEL CONTROLS AND INDICATORS
Figure 2-1, below, shows the computer’s front panel. The panel has these controls and indicators:
• The two-character status display shows various codes depending on the state of the computer. It
is also used during the computer’s self-test feature.
• The Power light is lit whenever the computer is turned on.
• The Turbo light indicates system activity.
• In some configurations, the Turbo button puts the system into a special diagnostic state known as
LEVEL7. This is necessary only if you are having certain hard-to-diagnose system problems. If
you have this feature, do not use it unless you are told to by your dealer. If you don’t have this
feature, the Turbo button has no effect.
• The Reset button lets you reset the computer. When you press it, the hardware resets and the
computer reboots. To avoid losing data, make sure there are no applications running and the
H.D.D. light is out before you press this button. See the section on “Rebooting the Computer”
later in this chapter.
• The H.D.D. light is lit whenever the computer is reading from or writing to a disk or tape.
• The Power switch, at the top right of the computer, turns it on and off. This switch is not shown
in Figure 2-1.
Eagle 450 Owner's Manual, Revision 00
Page 2-2
Chapter Two
Two-character status display
Turbo button
Power light
Turbo (system activity) light
Reset button
H.D.D. (disk/tape
activity) light
Figure 2-1: Front Panel Controls and Indicators
Eagle 450 Owner's Manual, Revision 00
Using Your Computer
Page 2-3
REAR PANEL CONFIGURATION
The illustration below shows the Eagle 450 rear panel configuration.
0
SCSI
115
NOTE: You can
use either Ethernet
port, but not both.
EXTERNAL SCSI PORT
Cover plate over PCI
bus connectors. PCI
bus devices not
supported on first
release.
10-BaseT
ETHERNET
PORT
15-PIN AUI
ETHERNET
PORT
25-PIN
PARALLEL
PORT
9-PIN UPS
STATUS
PORT
0
6
7
4
5
2
3
0
1
1
2
3
4
5
SERIAL I/O
EXPANSION
SLOTS
6
7
8 STANDARD
SERIAL PORTS
BOOT PORT
Figure 2-2: Eagle 450 Rear Panel Configuration
As shown, the back panel includes connectors for the serial ports (where you plug in terminals, printers,
and modems), two Ethernet connections (for connecting the Eagle 450 to a computer network; you can
use only one of the two at a time), and an external SCSI connector (for a disk, tape, or CD-ROM drive).
Eagle 450 Owner's Manual, Revision 00
Page 2-4
Chapter Two
TURNING THE COMPUTER ON
While you will probably leave your computer running most of the time, you will need to turn it on from
time to time. To do so, follow these steps:
1. Turn on all of the terminals and other devices connected to the computer’s back panel. You don’t
need to turn on other computers or devices which are attached to the network.
2. Press the power button at the top right of the front panel.
After you turn the computer on, it automatically “boots” the AMOS operating system: it loads the AMOS
programs from the disk drive into memory, determines what kind of devices are attached to the computer
by reading a special file called the system initialization file, and prepares the computer to run your
programs.
While AMOS is booting, you see a succession of codes on the front panel status display (see Figure 2-1),
then the AMOS license agreement appears on the operator terminal, followed by the commands in the
system initialization file. These scroll rapidly as the computer executes them. When AMOS is finished
booting, the operator terminal displays MEMORY 0.
Depending on how your computer is set up, your terminals may automatically display a menu or
start your application after you turn the computer on.
If nothing appears on the status display or the terminal screen after a minute's wait, please turn to
Chapter 4 to see what to do next.
When the computer is up and running, the front panel display will show a zero.
TURNING THE COMPUTER OFF
You need to turn off the computer whenever:
• A technician needs to open the computer chassis for any reason.
• You move the computer or servicing is required.
• You add or remove external SCSI devices. NEVER attach or detach a SCSI device while the
computer is on! Doing so could damage the device and/or the computer’s CPU board.
To turn off the computer always follow these steps:
1. Have everyone stop using the computer and log off.
2. Remove any backup media (such as streaming tape) from the computer.
3. After everyone is logged off and the H.D.D. light (see Figure 2-1) is out, press the power button
at the top right of the front panel.
4. Generally, you do not need to turn off devices connected to the serial ports, such as printers and
terminals, or devices connected via the network. If you do choose to turn off serial devices, turn
them off after turning off the Eagle 450.
Eagle 450 Owner's Manual, Revision 00
Using Your Computer
Page 2-5
REBOOTING THE COMPUTER
At times, you may want to have the computer restart the operating system without turning power off and
back on. This is called “rebooting” the computer, and you may do it if you install new or updated
software, change the computer’s configuration, or in some problem situations. To reboot the computer:
1. Have everyone stop using the computer and log off. If you are rebooting because one or more
users are “locked up,” have everyone else log off.
2. After everyone is logged off and the H.D.D. light (see Figure 2-1) is out, press the Reset button
on the front panel.
As when you turn the computer on, you’ll see a succession of codes on the front panel display, then the
AMOS license and the system initialization file commands will appear on the operator terminal.
Eagle 450 Owner's Manual, Revision 00
Chapter 3 - Keeping Your
Computer Happy
As you use your computer in your business, certain regular practices and daily habits can help keep it
performing at maximum efficiency. This chapter discusses:
• The best environment for the computer
• Taking care of the various components: the main enclosure, tape drives, and diskette drives
• Backing up your data
• Checking your disk data
WHERE SHOULD THE COMPUTER BE?
For your computer to do its best job, it needs to be in a clean environment it is comfortable in. Excessive
dust, extreme temperature, or very high or low humidity can cause computer failure.
Possibly your computer’s most critical need is enough reliable electrical power for all of its
components. The computer’s electrical needs are covered in the Eagle 450 Installation and
Technical Manual, and were no doubt considered when your computer was installed. If you need
to move the computer, make sure its new location meets its power requirements and is free from
electrical interference. You may want to check with your Alpha Micro dealer before relocating the
computer.
Most of the computer’s environmental requirements are just common sense: do not place it where people
may bump into it, trip over it, or use the cabinet as a desk or table. Never put drinks or food on the
computer—if a drop of coffee or chunk of doughnut gets inside the chassis, it could make the computer
fail.
In fact, anything, even excess dust, inside the chassis is not good for your computer. Try not to place it
in a high-traffic area. These areas have more dirt and dust, which can clog the computer’s air intakes and
cause cooling problems. High-traffic areas can also lead to static electrical discharge (from feet rubbing
on the floor or, especially, carpet) which can cause system resets and possibly damage delicate
components. To minimize static electricity, don’t place the computer on a carpet unless it’s unavoidable;
if you must, treat the area with anti-static spray regularly.
As far as temperature and humidity , if you’re comfortable, the computer probably is, too. The
temperature around the computer should be between 60 and 90 degrees Fahrenheit (16 to 32 Celsius),
and humidity should be between 10 and 90 percent.
It is very important for the health of your computer that you do not obstruct its cooling system. Allow at
least six inches behind the chassis for ventilation, and make sure none of its air intakes are blocked.
Specifically, do not place the computer on a surface which can block the air intakes on the bottom of the
chassis.
Eagle 450 Owner's Manual, Revision 00
Page 3-2
Chapter Three
All of the proper conditions were probably assured before your computer was installed, and shouldn’t be
a problem unless you move the computer or change its surroundings. If you have any questions, contact
your dealer.
REGULAR MAINTENANCE
Physical maintenance of your computer is very simple: it’s mostly a matter of keeping it clean. You also
need to be sure to take proper care of the tape drive and tapes in your computer, and your diskette drive if
you have one.
Cleaning the Computer Cabinet
The computer main enclosure is sturdy painted sheet metal and plastic. A light dusting is the safest
cleaning procedure, and probably all it will require. If necessary, you can clean the enclosure as you
would any other painted surface, using a gentle detergent. Remember, however, that if any liquid gets
inside the enclosure, it could severely damage the computer.
Caring for Tape Drives and Tapes
Every Eagle 450 has some kind of tape drive for data backup, usually either a ¼” streaming tape drive or
a DAT (Digital Audio Tape) drive. As discussed later in this chapter, in case of a problem your backup
tapes can be the only thing between your business and data disaster, so it’s very important to take
excellent care of your tape drive and the tapes it uses.
Caring for the Drive
It is very important to clean the read/write head or heads of your tape drive periodically. How often to
clean the heads depends on the tape drive. For streaming tape drives, if you back up once a day, you
should clean the head at least once a week. For more frequent use, keep in mind:
• When you use new tapes exclusively or often, clean the head after every two hours of tape drive
running time.
• If you reuse tapes most of the time, clean the head after every eight hours of running time.
For the AM-625, AM-626, AM-627, and AM-628 streaming tape drives, follow these cleaning
procedures:
• Dip a lint-free cotton swab in isopropyl alcohol (at least 91% strength)
• The head is a brass-colored metal square that can be seen in the tape slot. Rub the surface of the
head with the moist cotton swab.
• Rub the head with a dry swab to prevent residue buildup.
When cleaning tape drive heads, never use 70% rubbing alcohol. Make sure you use isopropyl
alcohol of at least 91% strength.
Eagle 450 Owner's Manual, Revision 00
Keeping Your Computer Happy
Page 3-3
For the AM-629 and AM-650 drives use the appropriate drive-cleaning cartridge, as described in the
documentation for the tape drive.
If you have a DAT drive, you should clean the drive heads whenever the tape cartridge status light
flashes.
As routine maintenance, the heads of a DAT drive should be cleaned after every 50 hours of use.
To clean the heads on the DAT drive, use a cleaning cartridge designed for your drive. The cartridge
contains the correct recognition holes to allow the DAT drive to identify it as a cleaning cartridge.
Follow these general guidelines to use the cleaning cartridge:
1. Insert the cleaning cartridge into the DAT drive. The drive will immediately detect that this is a
cleaning cartridge.
2. The drive will load and run the cartridge in about 10 seconds, then eject it.
Caring for the Tapes
A cartridge tape can store data from an entire disk, so it is worth taking care of properly. When using and
storing tapes, remember the following:
• Don’t touch the tape itself with your fingers or anything else.
• Keep tape cartridges in a dust-free environment.
• Store cartridges on edge, not lying flat. This places the weight of the tape on the hub of the
cartridge, not on the edge of the tape, which could bend the tape over time. Keep the writeprotect switch in the SAFE position.
• Keep magnets away from your tapes. Even weak magnets such as those in paper clip holders can
erase data on a cartridge tape.
• Don't expose tapes to very high or low humidity (more than 80% or less than 20%), or extremely
high or low temperatures. Don’t store them in direct sunlight.
• Cartridge tapes should be acclimated to computer-room temperature and humidity conditions
before use. If the tape has been stored away from the computer, it should be returned to the
computer environment at least eight hours before use. If it has been in a different environment
for less than eight hours, it should be kept in the computer location for at least as many hours as
it was away from it.
Caring for the Diskette Drive and Diskettes
Like the tape drive, a diskette drive needs to have its read/write heads cleaned regularly. This prevents
problems, such as data loss, which can result from dirty heads. If you do start noticing data loss, cleaning
the heads will probably take care of it.
You can clean your diskette drive using a special head-cleaning kit available from computer supply
stores.
Eagle 450 Owner's Manual, Revision 00
Page 3-4
Chapter Three
Diskettes require much the same care as magnetic tapes:
• The outside case of a diskette protects the actual recording surface inside—don’t touch the
recording surface itself.
• Treat diskettes gently. Fingerprints, scratches, spills, and dirt can ruin them.
• Keep your diskettes in a dust-free environment.
• Never expose diskettes to an electromagnetic field—it could erase your data! For example, do
not leave diskettes on top of the computer or a terminal since the equipment inside emits a strong
magnetic field.
• Keep magnets away from your diskettes. Even weak magnets such as those in paper clip holders
can erase data on a diskette.
• Avoid temperature extremes. Do not expose diskettes to temperatures below 50 degrees
Fahrenheit (10 degrees Celsius) or above 125 degrees Fahrenheit (52 degrees Celsius). Do not
leave your diskettes next to a window where direct sunlight can cook them.
Diskettes should be at about the same temperature as your computer. If the place you store them
is at a very different temperature than the computer, give a diskette a few minutes to adjust to the
computer’s temperature before using it.
BACKING UP YOUR DATA
Computers and disk drives are very reliable, but nobody can prevent all unforeseen occurrences: a power
outage, spilled cup of coffee, fire, or hardware malfunction could happen to anyone. So, no matter how
trouble-free your computer is, please remember one important thing—you must keep current copies of
the data you are working on! This copy is your "backup."
Your data is valuable—that’s probably one of the reasons you bought a computer to store and work with
it. How long would it take to re-enter the entire company payroll or all of your accounts receivable
invoices if they were lost? What if you could not reconstruct the information no matter how much time
you had?
All Eagle 450 computers come with some type of tape backup device. Whether yours is a
streaming tape or DAT drive, learn to use it! Develop regular backup procedures and follow
them! If disaster strikes, you'll be glad you did.
You should back up some or all of the data on your computer at regular intervals. How often you need to
back up depends on how often you add or change data. If you add important data every day, you should
back up your computer each night. If the data changes only once a week, back up once a week, etc.
We strongly suggest you have several sets of backup tapes, so you never record over your most recent
tape. That way, if something goes wrong during a backup, you still have recent data should you need it.
It’s also a good idea to keep one backup off-site so your data is safe if there’s a fire, flood, or similar
disaster in your building. Don’t let one broken water pipe destroy all your records!
Eagle 450 Owner's Manual, Revision 00
Keeping Your Computer Happy
Page 3-5
Backup programs generally work best if no one else is using the computer when they run, so it’s often
most convenient to run them at night. AMOS offers two ways—command files and the Task Manager—
to automate backups and have them run at any time you select, even if you aren’t there. These methods
can also automatically run diagnostic programs to check for disk errors before each backup, ensuring you
are copying good data to the backup tape.
If you haven’t yet done so, work with your dealer to determine the best backup schedule for your
business, and to develop a reliable and convenient backup procedure. AMOS uses the MTUSAV and
MTURES commands to transfer data to and from streaming tape. These commands are described in the
AMOS System Commands Reference Manual.
Using a Streaming Tape Drive
If your Eagle 450 includes a streaming tape drive for backup, it’s important that you know what tape
cartridges you can use with it, and how to insert them into and remove them from the drive. The sections
below show the tape cartridges and formats supported by each tape drive available from Alpha Micro,
and describe how to use the tapes with your drive.
Tape Capacity
There are several different ¼" streaming tape drives available for your computer: the AM-62x series of
narrow SCSI drives, and the AM-650 Wide SCSI-2 tape drive. The storage capacity of your tapes
depends both on the drive you have and the type of tape cartridge you are using. The following table
shows the different types of tape cartridges available and the corresponding capacity for the various
drives.
The cartridge tapes shown in the table below are the ones specified for use by the tape drive
manufacturer. Using tapes other than those recommended may cause excess head wear.
3M Cartridge
DC6037
DC6150
DC6250
DC6320
DC6525
Magnus 1.0
Magnus 2.0
Sony SLR5
Imation 13GB
Capacity
40MB
150MB
250MB
320MB
525MB
1GB
2GB
4GB or 8GB
13GB or 26GB
Eagle 450 Owner's Manual, Revision 00
Notes
Not supported in AM-650
Not supported in AM-625
Not supported in AM-625
Not supported in AM-625 or 626
AM-628, 629, and 650 only
AM-629 only
AM-650 only
Page 3-6
Chapter Three
¼" Tape Drive Read/Write Compatibility
Streaming tape drives use many different data formats. The tape drives for your computer can read (R)
and write (W) the following formats:
AM-625
AM-626
AM-627
AM-628
AM-629
AM-650
QIC-11
R - - - - - -
QIC-24
R R R R R - -
QIC-120
R R R R R - -
QIC-150
R W
R W
R W
R W
R W
R W
QIC-320
- R W
R W
R W
R W
R W
QIC-1000
- - R W
R W
R W
R W
QIC-2GB
- - - R W
R W
R W
The AM-629 also supports QIC-9634 and 9634C with 4GB tapes; the AM-650 also supports QIC-5010
and QIC 5010C formats with 13GB tapes.
In most cases, you don’t need to worry about tape format; the computer will automatically select the
proper format to read or write each tape. You’ll only be concerned with specific tape formats if you’re
using tape to transfer data to or from another computer with a different model tape drive.
Some software may have further restrictions on tape format.
Loading and Unloading Tape Cartridges
To avoid static discharge, always ground yourself by touching the metal chassis before loading or
unloading a tape cartridge.
For the AM-62x tape drives, follow this procedure to load a tape cartridge:
1. Press the button on the drive's front panel to open the tape drive door.
2. Hold the cartridge with the metal side down. The end of the tape cartridge with the write-protect
switch will enter the drive first.
3. Insert the cartridge into the drive. Keep pushing until the cartridge stops, and then close the door.
After the door closes, the drive positions the tape, after which it is ready for use.
Before unloading the tape cartridge, be sure the tape activity light is not flashing. To unload, press the
tape door release button and remove the tape from the drive.
This is the procedure for the AM-650:
1. Hold the cartridge with the metal side down. The end of the tape cartridge with the write-protect
switch will enter the drive first.
2. Insert the cartridge into the drive. When the cartridge is part way in, the drive will take it and
load it into the proper position.
Eagle 450 Owner's Manual, Revision 00
Keeping Your Computer Happy
Page 3-7
If you insert a tape incorrectly, the drive will reject it. Do not attempt to force a tape into the
drive! If the tape does not load easily, take it back out and check its orientation.
Before unloading the tape cartridge, be sure the tape activity light (the center green LED) is out. To
unload, press the tape eject and the drive will eject the tape.
Using a DAT Drive
The DAT drive is very simple to use:
1. In order to save data to the tape, the window on the tape cartridge must be in the write-enable
position. The figure below shows the tape window in both "write-enable" and "write-protected"
positions.
2. The tape inserts as shown below. As you insert the tape through the tape door, the DAT drive
pulls the tape cartridge into position.
DRIV
E ST
ATU
S
LED
s
TAP
E
DAT
EJE
CT B
UTT
ON
WIN
DOW
SHU
T=
WR
ITE
ENA
BLE
WIN
DOW
OPE
N=
WR
ITE
PRO
TEC
TED
DAT Tape Drive
3. Once the tape is loaded, the status lights on the drive indicate the status of both the drive and the
cartridge. See the manual that came with your tape drive for information on interpreting the
status lights.
4. To unload the tape cartridge from the DAT drive, press the tape eject button, which is shown
above. The drive will automatically eject the tape.
Eagle 450 Owner's Manual, Revision 00
Page 3-8
Chapter Three
Warm Booting
Warm booting is the process of booting the computer using a tape rather than the disk drive. It is
necessary only if a problem, usually with the disk drive, keeps the computer from booting normally. If
you have a warm boot tape, and a good backup tape, you can normally recover all your data even if your
disk drive “crashes” and is unreadable.
Warm booting requires a special tape containing the proper system software files. You should have at
least two, and possibly more, warm boot tapes.
Your dealer or technician may have made warm boot tapes when he or she installed the computer. Check
with your dealer to make sure the proper warm boot tapes for your computer exist, whether they’re at
your office or your dealer’s.
As you become more familiar with your computer, we strongly recommend you create several warm
boot tapes. In addition, if you ever change the drive configuration or AMOS version of your computer,
you will almost certainly want to make all new warm boot tapes.
You can use the WRMGEN program to generate a warm boot monitor, and the appropriate backup
command to place the monitor onto a tape. See the AMOS User's Guide and the AMOS System
Commands Reference Manual for details on these procedures.
CHECKING THE DISK
A disk diagnostic program reads data from a disk. If it cannot read an area of the disk, it reports the
problem to you. Checking your disk frequently with disk diagnostic programs helps prevent data loss—
the sooner you catch a malfunction, the less data is likely to be affected.
Before using disk diagnostic programs, talk to your dealer. If you have an automatic backup
procedure, it may include a disk diagnostic program as well as the backup. You may not need to
use these programs separately.
If a diagnostic program indicates problems, you may need to restore data from a backup copy or
reconstruct the data on a damaged disk. If you have this type of problem, contact your dealer.
Before running a disk diagnostic program, especially if you suspect a problem, it is a good idea to use the
SET DSKERR command:
SET DSKERR
ENTER
This causes the computer to report the location of any errors the diagnostic program finds. If you don't
use SET DSKERR, you see only that an error occurred, not where on the disk it happened. You must run
the diagnostic program from the same job where you used SET DSKERR.
See Chapter 5 for a discussion of how AMOS organizes information on the disk.
Eagle 450 Owner's Manual, Revision 00
Keeping Your Computer Happy
Page 3-9
The next two sections discuss two very useful diagnostic programs, REDALL and DSKANA. There is
more information on these disk diagnostic programs in the AMOS System Operator's Guide and the
AMOS User's Guide.
The REDALL Command
REDALL reads every block of data—or the number of blocks you choose—on the disk you specify, and
reports any errors. It does not change the data on your disk.
It is a good idea to run REDALL for each disk on your computer occasionally, possibly once a week.
That way, if any disk problems develop, you can be sure to detect them quickly.
To use REDALL:
1. To read all the blocks on a disk, enter REDALL followed by the device name (device names are
discussed in Chapter 5) of the disk you want to read. For example:
REDALL DSK2:
ENTER
If you don't want REDALL to read all blocks on the disk, follow the disk specification with the
number of blocks you want read:
REDALL DSK2:1000
ENTER
The command above tells REDALL to read the first 1000 blocks on DSK2:.
2. REDALL now tells you the number of blocks it is reading. For example:
REDALL DSK2: ENTER
Reading 13800 blocks
EXIT
3. REDALL ends when it finishes reading the blocks. If any errors occur, REDALL displays an
error message on your screen.
The DSKANA Command
Each file is stored in one or more disk blocks. AMOS keeps track of which disk blocks are currently used
in files and which are not by means of a special structure called a "bitmap." Each disk has its own
bitmap.
The DSKANA command is an important part of your disk maintenance routine. It compares the data on a
disk to the bitmap for the disk to make sure the bitmap is accurate. For example, if DSKANA finds a
disk block that is part of a file, but the bitmap shows the block not in use, DSKANA reports an error.
When DSKANA finishes analyzing the disk, it rewrites the bitmap, correcting any errors it found, unless
you tell it not to.
Use DSKANA frequently on all of your disks. It is a good practice to use DSKANA on every disk just
before you back up the files on that disk.
For more information on DSKANA, see the AMOS System Commands Reference Manual.
Eagle 450 Owner's Manual, Revision 00
Page 3-10
Chapter Three
NEVER use DSKANA (unless you are using the /C option described below) while other users
are accessing the disk you are checking; doing so may damage the bitmap and the files on the
disk.
Only the system operator should use DSKANA. If you can’t log to the system operator account,
as shown in step 1 below, you can’t use this command.
To use DSKANA, follow these steps:
1. Log into the OPR: account by typing:
LOG OPR:
ENTER
2. Type DSKANA followed by the device name of the disk you want to analyze and press
example, to analyze DSK1:, type:
DSKANA DSK1:
ENTER .
For
ENTER
You now see:
[Begin analysis of DSK1:]
As DSKANA checks the disk, it displays the disk account numbers (account numbers are
discussed in Chapter 5). When it finishes, it displays the results of its analysis. For example:
DSKANA DSK1: ENTER
[Begin analysis of DSK1:]
[1,2]
.
[100,20]
[The following blocks were marked in use but not in a file]
1767
1772
2562
3456
6265
[The following blocks were in a file but not marked in use]
[Rewriting BITMAP]
No file errors
If you see the "No file errors" message, the file structure on the disk is intact. If DSKANA lists a number
of file errors, there is a problem with the disk's file structure. Your next step is to run DSKANA again,
using either the /L or /E option—discussed below—to see where the errors are on the disk.
For the complete procedure to follow if DSKANA finds any file errors, see "Recovering From Disk
Errors" in the AMOS System Operator's Guide.
Eagle 450 Owner's Manual, Revision 00
Keeping Your Computer Happy
Page 3-11
DSKANA Options
Following are the most common DSKANA options. Please see the DSKANA reference sheet in the
AMOS System Commands Reference Manual for a complete option list.
Option
None
Function
Displays account numbers on disk and summary only.
/C
Same information as default, but does not rewrite bitmap.
/E
Lists files and blocks in which any errors occurred.
/L
Lists all files and blocks on the disk.
To use one of these options, place it after the DSKANA command like this:
DSKANA DSK1:/C
ENTER
As mentioned above, you need to use the /L or /E option to find the location of any file errors DSKANA
detects. The /C option is discussed in the next section.
To see the list of DSKANA options, type DSKANA
ENTER
without a device name.
The CHECK Option and Automatic Backups
At times, you may want to have DSKANA examine a disk without rewriting the bitmap, especially when
using a scheduled backup method which runs DSKANA automatically before your backup.
The reason for this is simple: if anyone on your computer leaves a file open on the device DSKANA is
checking, DSKANA doesn't know the file is open. So, it doesn’t take the open file into account when it
rewrites the bitmap. When the person returns in the morning and writes the file to the disk, it causes a
bitmap error. This could corrupt the disk, causing you to lose data.
To run DSKANA without rewriting the bitmap, use the /C option. You see DSKANA's normal display
when you use /C, except for the [Rewriting BITMAP] message.
Eagle 450 Owner's Manual, Revision 00
Chapter 4 - What If Something
Goes Wrong?
Your Eagle 450 computer is designed to be reliable and trouble-free. However, as with any product,
especially one as complex as a computer system, things may go wrong from time to time. If you do have
a problem, gathering the right information and following the correct procedure can help you and your
dealer solve it as quickly as possible. This chapter describes what you should do if you have a problem
with your computer that seems like it may be serious: for example, one or more terminals stops working
or the entire computer halts.
Briefly, you should gather as much information as possible and call your dealer as soon as you can. The
next few sections go into more detail about what your dealer may need to know to help you.
Your application documentation may include information on errors which could occur in your
application and what you should do about them. If so, refer to your application documentation
and follow any procedures there before calling your dealer.
IF THE PROBLEM IS WITH ONE TERMINAL
If only a single user encounters a problem—for example, there is an error message and the application
stops running or the terminal stops responding—here’s what to find out:
1. What exactly was that person doing when the problem occurred? What feature was he or she
using? What was the very last thing he or she did before the problem: chose an option (which
option?), typed a name (what name?), something else?
2. What happened? Did the terminal just stop working? Was there an error message? If so, write
down the exact message. Is the screen display from your application still displayed or did the
screen go blank?
3. Has this error happened before? Under the same circumstances? Can you make the error happen
by repeating certain actions?
4. Is the terminal responding now? If you type a command, what happens? If you press
what happens?
CTRL
/ C,
5. Was anyone else using the same feature or function at the same time? Are their terminals still
working? Did they see any error messages?
Once you have this information, call your dealer as soon as it’s practical. Ideally, you should call
immediately, while the user still has the error condition on the screen, but this isn’t always possible.
Also, use common sense: if it’s midnight, you may want to wait until morning before calling.
Eagle 450 Owner's Manual, Revision 00
Page 4-2
Chapter Four
IF THE PROBLEM AFFECTS MORE THAN ONE USER
Sometimes, the symptoms of a computer problem spread beyond one user. If two or more users, or all
users, on your computer encounter a problem or find their terminals have stopped working, please find
out the following before calling your dealer:
• Did the problem affect everyone at the same time, or did it start with one or two users, then
spread? Who was first affected? If only some users are affected, what do they have in common?
Is it everyone at one location? People who use PCs instead of terminals?
• What was each affected person doing when it happened? (If the problem started small and spread
out, what the first person was doing is especially important.) If the entire computer stopped
working, what was everyone doing? Be detailed: what feature was each person using? What data
was he or she entering? If some users can still work, what are they doing?
• Did everyone encounter the same symptoms? Did anyone receive an error message? Write down
all error messages, who received them, and what they were doing when they got the errors.
• If any background processes, such as a report generator, were running, what were they doing and
are they still working?
• Look at the two-digit status display on the front of the computer chassis. What code is shown?
Once you have this information, call your dealer as soon as it’s practical. Ideally, you should call
immediately, while the problem is still in effect, but this isn’t always possible. The more serious the
problem, the more important it is to call quickly: a complete system lockup is more critical than an error
on one or two terminals.
IF YOU CAN’T CONTACT YOUR DEALER
This chapter assumes your Alpha Micro dealer is your first line of support for your Eagle 450. Your
dealer is your best support option because he or she is most familiar with your computer installation and
how you use it in your business.
At the end of this book, there’s a Contact Information Sheet. It contains phone and fax numbers, email addresses, and Web page addresses for contacting Alpha Micro. It also contains fields for you
to fill out with the information listed in this section, so you have it handy if you need it.
However, we know that some Alpha Micro users have lost contact with their dealers. Your dealer may
have moved, or you may have, making contact difficult. If, for whatever reason, you cannot get in touch
with your dealer for help with your problem, call the Alpha Micro Technical Assistance Center for help.
They’ll be happy to either help you or put you in touch with a local Alpha Micro dealer who can.
Before you contact Alpha Micro, please have some additional information ready to give the technical
support representative. Since we aren’t as familiar with your computer as your dealer is, we’ll need to
know some background information:
• What model of computer is it?
• What version of the AMOS operating system do you use?
• What application do you use? What version of it?
Eagle 450 Owner's Manual, Revision 00
What if Something Goes Wrong?
Page 4-3
• How many users are on your computer?
• How much disk space and memory does the computer have?
If you aren’t sure of all of this information (and you don’t generally need to know it unless there’s a
problem), you can have the computer tell you. From a working terminal, or after rebooting if your
computer is completely locked up, run this command from AMOS command level:
AMSCFG/*/K/F:AMSCFG/H:system name
ENTER
Replace system name with a name describing your system (maybe the name of your business). This
produces a file called AMSCFG.CFG containing a great deal of information about the hardware and
software configuration of your computer. If requested, you can then e-mail this file to Alpha Micro if
your computer can send e-mail over the Internet, or you can print it and fax a copy. You can also use it to
fill out some of the fields on the Contact Information Sheet at the end of this book.
FOR MORE INFORMATION
Detailed technical and troubleshooting information for AMOS software and hardware is found in other
publications. These documents are available, free of charge, at our Web site: www.amos-online.com.
Many of these documents are for qualified personnel only; please do not use any of the procedures in
them unless you are sure you understand how to perform them and the purpose behind them. If you have
any questions, contact your dealer or the Alpha Micro Technical Assistance Center at the number on the
Contact Information Sheet.
Eagle 450 Owner's Manual, Revision 00
Chapter 5 - About AMOS
As we mentioned in Chapter 1, your Eagle 450 computer uses the Alpha Micro Operating System,
AMOS. AMOS lets the various pieces of hardware in the computer talk to each other, interprets
commands you type, reads information from and writes it to the disk drives, and more. This chapter talks
about some of the basic concepts of AMOS and describes some of its commonly used commands and
procedures. It covers:
• Using your terminal keyboard and correcting typing mistakes
• Logging on to the computer
• Adding new user names
• How AMOS stores information on the disk
• Adding new disk accounts
Depending on the way your application works and how your computer is set up, you may not
need to know much of this information. Some applications completely take over all interactions
with AMOS; rather than using any of the commands or keystrokes covered in this chapter, you
may make choices inside your application to perform the same functions. If you’ve received
specific instructions from your dealer about any of these topics—such as “To see a list of files,
use option 2 from the menu”—follow those instructions rather than the ones in this chapter.
THE TERMINAL KEYBOARD
The first step in communicating with AMOS is to be able to type your instructions on your keyboard.
Besides the character keys, it has some extra keys with special functions. Take a moment to look at your
keyboard so you can easily locate these keys later:
Key
ENTER
Description
(sometimes labeled RETURN or with an arrow that curves to the left) is the
carriage return key. ENTER tells the computer you are ending a line or field and
want to begin a new one.
ENTER
The computer does not normally process an instruction from you until you press
ENTER to let it know you are finished with that line.
RUBOUT
RUBOUT
DEL ,
or
is the deletion key; it backspaces and deletes. It may also be labeled
BACKSPACE .
RUB ,
If you make a mistake while typing an instruction to AMOS, you can erase it using
the RUBOUT key.
Eagle 450 Owner's Manual, Revision 00
Page 5-2
Key
Chapter Five
Description
The
key on most keyboards acts much like the shift key on a typewriter. By
, you can type upper case letters and the symbols on the upper
holding down
half of the keys with two symbols.
CAPS LOCK
While the CAPS LOCK key is enabled, letters you type appear in upper case. On most
keyboards, keys other than letters are not affected by CAPS LOCK .
ESC
This key is used with some programs (such as the AlphaVUE text editor) to signal
the end of input, or to switch between command modes; however, you do not use
ESC at AMOS command level.
CTRL
You use the CTRL (or CONTROL) key with other keys to enter a different kind of
character—a "control character." AMOS and much of the software on the computer
interprets control characters as special instructions.
key: hold down the
To type a control character, you use the CTRL key like the
CTRL key and press the other key. For example, to type a Control-C, hold down the
CTRL key and type the letter C. In this book, we indicate control characters this
way: CTRL / C. Appendix A lists some of the control characters AMOS recognizes.
Special Keys on the Terminal Keyboard
There are also a number of keys (often 12 or 16) at the top or left of the keyboard, labeled with F and a
number. These are the “function keys.” Many applications use the function keys to perform special
editing, choose options, and so on. Your dealer will tell you if your application uses these keys.
Correcting Typing Mistakes
You can correct any mistakes you may make while typing a command line as long as you have not yet
pressed the ENTER key. You can:
• Press
RUBOUT
• Type
CTRL
/ U to move the cursor to the beginning of the line.
• Type
CTRL
/ C to tell AMOS to ignore the line.
to erase single characters.
See the table above for explanations of
RUBOUT
and control characters.
If you press the ENTER key before correcting your mistake, and the command you entered was not a valid
AMOS command, AMOS lets you know it did not understand the command. For example, suppose you
make a mistake entering the PRINT command:
PRIMT ENTER
?PRIMT?
After letting you know it does not understand, AMOS displays its prompt. You can now try again.
Eagle 450 Owner's Manual, Revision 00
About AMOS
Page 5-3
If the AMOS line editor is enabled, you can recall a previous line to the screen by typing CTRL / R. (To
see if this feature is available, you can ask your dealer, or just try it. If it doesn’t work, no harm will be
done.) In the sample above, press CTRL / R at the AMOS prompt to recall the line PRIMT. Use the key
to move back to the M without erasing characters, then type an N to overwrite the M. Press the ENTER key
to enter the command again.
Your keyboard probably has many features we haven't covered. For complete information, refer to the
owner's manual that accompanied your terminal or workstation.
USER NAMES
To use your Eagle 450, you must tell it who you are. You do this by entering your user name and, if you
have one, your password. All Eagle 450’s have standard user names when they leave the factory; your
dealer probably set up more names for you to use. The following sections describe how to log on to the
computer using your user name and how to add more user names if you need to.
Logging On
People using the Eagle 450 from their PC or workstation over a network may have to click an
icon or use a command to connect to the computer. Depending on how your Eagle 450 and
network are set up, they may then have to enter information about the type of connection they
want before logging on as described here, or they may be connected, logged on, and even have
your application start, automatically.
The LOG command identifies you to the computer and lets you choose what disk account you want to
access (accounts are described later in this chapter) When you first log on to the computer—either after
logging off or after booting the system—you must tell the computer who you are and what account you
want to use. You can do this by entering the disk account you want. For example:
LOG [25,1]
ENTER
AMOS now asks for your user name. Type it and press
ENTER .
You can enter your user name instead of an account number in the LOG command. This logs you into the
root account defined when your user name was set up. For example:
LOG CARRIE SMITH
ENTER
This logs Carrie Smith into her root account. Your root account is normally the account you use most
often.
You can assign passwords to disk accounts and user names. If the account or user name you enter
has a password, AMOS asks you for the password before logging you in.
For more details about the LOG command, see the AMOS System Commands Reference Manual. For
information about user names, see the AMOS System Operator's Guide.
Eagle 450 Owner's Manual, Revision 00
Page 5-4
Chapter Five
Adding User Names
If you need to add a user name for your computer—for example, for a new employee—you can do so
with the MUSER command. Only the System Operator can use MUSER.
To use MUSER, first log into the System Operator’s account, DSK0:[1,2] (also called OPR:):
LOG OPR: ENTER
MUSER ENTER
At the MUSER menu, you can type L ENTER to list the currently defined users, or A ENTER to add new
users. Besides name and password, you can define many characteristics and limits for each user. For
details, see the MUSER sheet in the AMOS System Commands Reference Manual.
When you’re done adding users, type F
close the program.
ENTER
at the MUSER menu to save the changes you’ve made and
HOW AMOS STORES INFORMATION
User names let AMOS know who you are when you type commands. But, when you want to revise the
letter you stored last week, or print the company payroll, how does AMOS know where to find the
information? By using a file specification.
A file specification contains three pieces of information: the device the information is on, the account it
is in on that device, and the file name within the account. Together, these three items uniquely identify
every file on your computer. The next few sections discuss file specifications and their parts, then
describe how to switch between accounts, and how to add more accounts if you need to.
Unless you can leave your application and enter commands from AMOS command level, you
won’t be able to use the commands mentioned in the following sections. If that’s the case, read
this information only if you’re interested in how AMOS organizes information on your disk
drive.
Device Names
AMOS identifies the different devices that make up your computer by giving each one a name. Each disk
and tape drive has its own device name (terminals and printers are defined slightly differently). These
device names are defined in the system initialization file.
Alpha Micro device names have a specific format. All device names contain three letters and a number,
and end with a colon (:): for example, DSK3:. Disk device names often start with DSK; streaming tape
drive names usually start with STR.
Having a name for each device lets you specify which device you want to use for a specific command.
For example, you can see a list of files from just one of your disk drives, or copy data from one disk to
another or to a tape drive.
Eagle 450 Owner's Manual, Revision 00
About AMOS
Page 5-5
Generally, AMOS separates a single disk drive into multiple logical devices (in the same way DOS and
Windows can separate a drive into devices C:, D:, and so on). The name for each logical device then uses
the same three letters, with a different number for each. For example, a single 2.1GB hard disk drive
could contain devices named DSK0:, DSK1:, DSK2:, DSK3:, and so on. In most cases with AMOS you
refer to the logical device name.
The disk device containing the AMOS system files, the device AMOS "boots from," is referred to as the
System Disk ; its device name is always DSK0:. Normally this is the first logical device on the first hard
disk, but if for some reason you boot from a different drive, it becomes DSK0:. When you change the
device you boot from, it may also change the names of other devices on your computer—since you are
using a different system initialization command file, the devices may be defined differently.
For example, if your computer contains one disk drive split into three logical devices, and a second drive
divided into six logical devices:
• When your computer boots from the first drive (the usual state of affairs), that drive is referred to
as three devices named DSK0:, DSK1:, and DSK2:. The second drive is called, for example,
SEC0:, SEC1:, and so on through SEC5:.
• If you change the computer to boot from the second disk drive (how to do this is described in the
Installation and Technical Manual), it is now called DSK0: through DSK5:, while the “first”
drive might be called FIR0:, FIR1:, and FIR2:.
Remember, this is only an example. Your computer may have a different number of physical disk drives,
and may refer to each physical drive as more or fewer devices. You can see a list of the disk devices on
your computer by using the SYSTAT or DEVTBL command from AMOS command level. These
commands are described in the AMOS System Commands Reference Manual.
Accounts
Disk accounts are an organizational feature AMOS uses to help you keep track of your data. Instead of
making you search through one enormous list of files for the one you're looking for, AMOS groups files
into accounts. An account generally holds files that are related in some way. For example, your
application software and data files are probably organized into several accounts (the software may be in
one account and the data in another), and, often, each user has one or more accounts for his or her
personal files.
Accounts are identified by a two-part account number. The first number identifies the project the account
is in, and the second is the number of the account within the project. The two numbers are separated by a
comma and enclosed in brackets. [1,2], [200,0], and [34,11] are examples of account numbers.
Account numbers are octal numbers, so the digits 8 and 9 aren't used. The highest possible number
is [377,376] and the lowest is [1,0].
The two part structure of the account number allows you another level of organization. Besides grouping
files into accounts, you can group related accounts in the same project. For example, all accounts
containing files dealing with payroll may be in project 50 ([50,0], [50,1], etc.). There’s more on this
subject in the section “Organizing the Disk,” on page 5-7.
Eagle 450 Owner's Manual, Revision 00
Page 5-6
Chapter Five
Accounts are sometimes called disk accounts because each account is specific to a particular device—
usually a disk. For example, you may have the account [63,1] on both DSK0: and DSK1:. Though these
accounts have the same account number, since they are on different devices they are different accounts,
and contain different files.
You can also assign a password to each account on each disk. This provides limited security by making it
more difficult for someone who doesn’t know the password to log into the account. Please see the AMOS
User’s Guide for more information on disk accounts, passwords, and other AMOS security measures.
You can list the accounts on any device using the PPN command. Type PPN and the name of the device
you want the list for, and press ENTER . For example, to see all the accounts on DSK0:, type:
PPN DSK0:
ENTER
There is more information on the PPN command in the AMOS System Commands Reference Manual.
You can also add new accounts by using SYSACT, as described later in this chapter.
File Names
AMOS file names are shorter than those you may know from other operating systems, such as Windows.
An AMOS file name contains up to six characters, a period, and an extension of up to three characters
(the extension can be blank). File names can contain only letters and numbers, except for the period
before the extension. These are legal AMOS file names: AMOS32.INI, HEADER.TXT, PAY.BAS.
The extension normally identifies the type of file. In the previous paragraph, for example, TXT indicates
a text file and BAS indicates a BASIC program file.
You can see a list of the files in any account by using the DIR (short for directory) command. To see a
list of the files in the account you are currently in, type:
DIR/W
ENTER
For more information on DIR, please see the AMOS System Commands Reference Manual.
File Specifications
A complete file specification includes all the parts we’ve discussed: device, account and file name. By
convention, the device name comes first, followed by the file name, then the account. This is the format:
DEVn:filena.ext[#,#]
DEVn: is the device name, filena.ext is the name of the file, and [#,#] is the account number. With some
AMOS commands, the account number can come before the file name, but the device name always
comes first.
If your computer is attached to other AMOS computers via a network, you can refer to a file on
another computer by adding the CPU ID of the other computer to the beginning of the file
specification.
Eagle 450 Owner's Manual, Revision 00
About AMOS
Page 5-7
This diagram shows how a disk drive is divided into logical devices, projects, account, and files:
Physical Disk
Logical Disk
DSK0:
[1,*]
DSK1:
[3,*]
[2,*]
[4,*]
DSK2:
Logical
Disks
[5,*]
[6,*]
DSK3:
[7,*]
Account
[3,0]
START.CMD
[3,1]
DATA.DAT
[3,2]
DOCUM.TXT
etc.
etc.
Accounts
Files
[10,*]
DSK4:
DSK5:
Project
etc .
Projects
DSK6:
Figure 5-1: Disk Data Layout
This diagram is just a way to show how AMOS logically divides the disk. Data is not physically arranged
on the disk this way: for example, the data in one file may be in several locations, and all of the files in
an account are not necessarily in the same area of the drive. The actual physical location of the data on
the disk is not important to you; AMOS uses the logical device specification to find the physical data.
Organizing the Disk
Theoretically, you could store all your files in the same disk account. A list of the files—the system
software, your special application programs, memos, everything—would be many pages long and a
nightmare to decipher.
As discussed earlier, a better way is to organize your files by using separate accounts and projects, each
of which stores related files. Your system software is already organized into various accounts, and you
can add as many or as few additional ones as you need. For example, you could create a project to store
all files related to correspondence, with letters to vendors in one account, faxes in another, and so on.
As mentioned above, the same account number can exist on more than one disk device. Since the devices
are different, the accounts are different, though they have the same number. Because there is the danger
of logging into the wrong account in this situation, you may want to establish a numbering scheme to
prevent duplicates. You could reserve accounts [1,*] through [77,*] for DSK0:, accounts [101,*] through
[200,*] for DSK1:, and so on.
You can assign an ersatz name to any account. An ersatz name stands for a particular account:
you can refer to the account using either its number or the ersatz name, which is generally easier
to remember. For example, the DSK0:[1,2] account has the ersatz name OPR:. To log to this
account, you can type either LOG DSK0:[1,2] ENTER or LOG OPR: ENTER .The file
DSK0:ERSATZ.INI[1,4] contains several predefined ersatz names, and you can add more. The
AMOS System Operator's Guide contains more information on how to add and use ersatz names.
Eagle 450 Owner's Manual, Revision 00
Page 5-8
Chapter Five
Logging Into Other Accounts
Once you're logged on to the computer, as described on page 5-3, you can use LOG to switch to a
different account. You don't need to enter your user name again, just the account you want. For example:
LOG [36,14]
ENTER
If the account has a password assigned, you are asked for the password before you transfer to the
account.
The account number list for each device on your system is separate, so you may have duplicate account
numbers on different disks. Therefore, to completely specify what account you want, you may need to
enter both the device and account number. For example:
LOG DSK0:[7,12]
ENTER
You only have to enter the device name if the same account exists on more than one device, or if it is on
a device with a different three-letter name than the one you’re currently logged on to. If the account you
enter does not exist, you see a message on your screen indicating you've typed an invalid account
number.
For more details about the LOG command, see the AMOS System Commands Reference Manual.
Adding New Accounts
There is no specific number of accounts you must have; you can add as many as you want. When your
computer is new, the only accounts may be the ones the system software and application are stored in.
You may want to add more accounts as your business grows. To do so, use the SYSACT command,
following these steps:
1. If you want to see a list of the disk devices on your computer, type:
SYSTAT
ENTER
The end of the display lists the available disk devices. Decide what device to add the accounts to.
2. Log into account [1,2] on any disk device (for example, DSK0:). Type:
LOG DSK0:[1,2]
ENTER
If you weren't already logged in, you'll need to enter your user name. If there's a password for
this account, you'll be asked for it.
3. Type SYSACT followed by the name of the device you want to add the accounts to. For example:
SYSACT DSK1:
ENTER
4. SYSACT responds with its prompt symbol, an asterisk. To list the things SYSACT can do, type:
*H
ENTER
5. From the list that displays, you can select different functions. You want to add a new account, so
type A and the account number to add and press ENTER . For example:
*A 100,5
ENTER
Eagle 450 Owner's Manual, Revision 00
About AMOS
Page 5-9
Be very careful using SYSACT. Choosing the wrong option could destroy all the data
on your disk!
6. SYSACT responds:
Password:
If you want to protect the new account with a password, type it. The password can be up to six
characters (A-Z, 0-9, $). If you don’t want to assign a password, just press the ENTER key. If you
do enter a password, whenever anyone logs into the new account, he or she must type the
password. Anyone who doesn’t know the password is not allowed to log in.
7. You can see a list of all the account numbers on the disk device and their passwords by selecting
the L (List) function:
*L
ENTER
8. When you are finished using the SYSACT command and are ready to return to AMOS command
level, select the E (end) option:
*E
ENTER
SYSACT returns you to AMOS command level and the AMOS prompt symbol appears on your
screen.
For complete information on using SYSACT, see its reference sheet in the System Commands Reference
Manual.
Eagle 450 Owner's Manual, Revision 00
Chapter 6 - Where to Now?
Your dealer, and the documentation he or she gives you, is your best source for information on your
computer and how to get the most out of it. Your dealer knows your application and how it fits into the
daily routine of your business. If you have questions about exactly what your computer can do for you,
and how to make it happen, ask your dealer.
But, lots more information is also available from Alpha Micro. Our World Wide Web site,
www.amos-online.com, offers both technical and marketing literature in the industry-standard Adobe
Acrobat file format. You can find current revisions of most of our documentation, including all new
releases, there. You can print or download any document at no charge. You can also order printed copies
of Alpha Micro documentation through your dealer, or, if you’re out of contact with your dealer, directly
from Alpha Micro by calling 800/289-2574.
These free documentation files are also distributed to our dealers regularly on CD-ROM. You may
be able to get these document files directly from your dealer.
These documents will be of particular interest to many users:
• AMOS System Commands Reference Manual, DSO-00043-00. Contains a reference sheet on each
command available from AMOS command level.
• AMOS System Operator’s Guide, DSO-00001-00. Discusses many procedures important to the
person responsible for the daily operation of the computer, such as backing up, adding new disk
drives, and many more.
• AMOS System Operator’s Guide to the System Initialization Command File, DSO-00002-00. The
system initialization command file defines the computer’s hardware and software configuration.
This manual tells you how to update the file for new users, new software, and new equipment.
• The AlphaVUE User’s Manual, DSO-00023-00, and the AlphaXED User’s Manual, DSO-0010600, describe the two text editors included with AMOS. You use these editors to create and edit
text files, including command files and program source files.
• The AMOS Command File User’s Manual, DSO-00071-00, describes how to create command
files. A command file contains a series of commands and data input; using them can greatly
reduce the effort needed for repetitive tasks, such as daily backups.
• If you’re interested in writing BASIC programs, see the AlphaBASIC PLUS User’s Guide, DSO00045-00, or the AlphaBASIC User’s Guide, DSS-10073-00. All versions of AMOS include the
AlphaBASIC programming language; most new versions also include the more powerful
AlphaBASIC PLUS language.
If you do want to order any of these documents, refer to the part number shown in the list.
Other available documents describe networking your Eagle 450, the various hardware devices that make
up—or can be added to—your computer, writing assembly language programs, and much more.
Eagle 450 Owner's Manual, Revision 00
Appendix A - The Control
Characters
Your terminal keyboard allows you to type control characters which perform special functions. A control
character is the signal transmitted to the computer when you hold down the CTRL key and press another
key at the same time. The following list contains the most important control characters. The AMOS
User's Guide contains a complete list of control characters and their functions.
This appendix describes what these control characters do if you use them at AMOS command
level. Inside your application, these characters may not have any effect, or may do something
completely different. Check with your dealer before using any of these key combinations while in
your application.
Control-C
Control-C is the system interrupt command. You use it to interrupt whatever
program is in progress and return to AMOS command level. After pressing
CTRL / C to interrupt a program, you cannot resume execution of that program;
you must start it over from the beginning.
Some programs, such as AlphaVUE, do not recognize a Control-C as an exit
command; instead you must use the exit command for that program if you want
to return to AMOS command level.
Other programs do recognize a Control-C; however, if an exit command exists
for a program, it is better to use that command than to press CTRL / C. Many
programs perform various closing functions when you use their normal exit
commands and would not have a chance to perform those procedures for an
orderly exit if you bypass them by using a Control-C.
Control-U
At AMOS command level, you may move to the beginning of the command line
you are typing by pressing CTRL / U.
Control-S
A program or command often displays more data on your terminal than fits on
one screen. To stop the screen display, press CTRL / S.
You can now read the data on the screen at your leisure. Not only does the
display freeze, but AMOS actually stops sending data to your terminal until you
press CTRL / Q (see below); at that point, AMOS resumes sending information
where it left off.
While a Control-S is in effect, AMOS stores, but does not act upon, anything
you type except for CTRL / Q. There is, however, a limit to how much can be
stored. The exact number of characters depends upon your initial system setup.
Eagle 450 Owner's Manual, Revision 00
Page A-2
Appendix A
Control-Q
When you press CTRL / S (described above) to freeze the screen display, you
must press CTRL / Q to resume the screen display. If you have typed anything
while the Control-S was in effect, a Control-Q tells AMOS it can now go ahead
and act upon that input.
Control-R
The command buffer is an area of memory where the computer stores commands
you have entered. Pressing CTRL / R shows you what commands are in your
command buffer.
If the line editor is installed on your computer, you can use CTRL / R to call up
previous command lines, make changes to them, and then submit them again.
This is a great convenience if you want to enter a series of similar commands;
you can just keep making minor changes to one command, and reusing it.
Eagle 450 Owner's Manual, Revision 00
Index
A
Account · 5-3, 5-5, 5-7
adding new · 5-8
logging to · 5-3, 5-8
number · 5-5
organization · 5-7
password · 5-3
Activity light · 2-1
Adding accounts · 5-8
Adding user names · 5-4
Alpha Micro
contacting · 4-2
AlphaVUE · A-1
AMOS · 1-3
B
Backing up data · 3-4
scheduling · 3-4
Backup device type · 1-2
Bitmap · 3-9
Boot port
location · 2-3
Booting the computer · 2-4
C
Caring for diskettes · 3-4
Cleaning
DAT drive · 3-3
diskette drive · 3-3
tape drive · 3-2
the computer · 3-2
Command buffer · A-2
Commands
DEVTBL · 5-5
DIR · 5-6
DSKANA · 3-9
LOG · 5-3, 5-8
PPN · 5-6
REDALL · 3-9
SET DSKERR · 3-8
SYSACT · 5-8
SYSTAT · 5-5, 5-8
Computer
cleaning · 3-2
environment · 3-1
rebooting · 2-5
turning off · 2-4
Eagle 450 Owner's Manual, Revision 00
turning on · 2-4
ventilation · 3-1
Connectors
rear panel · 2-3
Contacting Alpha Micro · 4-2
Control characters · A-1
Controls
front panel · 2-1
Correcting typing mistakes · 5-2
CPU board · 1-2
D
DAT drive · 3-2
cleaning · 3-3
using · 3-7
Data
backing up · 3-4
Defining user names · 5-4
Device name · 5-4
and logging · 5-8
DEVTBL command · 5-5
Diagnostic programs
DSKANA · 3-9
REDALL · 3-9
Directory · 5-6
Disk
activity light · 2-1
analysis · 3-8
bitmap · 3-9
diagnostic programs · 3-8, 3-9
drive type · 1-2
organization · 5-4, 5-7
Disk account · See Account
Diskette drive
cleaning · 3-3
Diskettes
care · 3-4
Documentation
contents of this book · 1-1
other AMOS documents · 6-1
other Eagle 450 documents · 1-1
DSKANA command · 3-9
E
Environment for the computer · 3-1
Errors
troubleshooting · 4-1
Ethernet interface · 1-2
Page 2
Index
F
N
Features
hardware · 1-2
software · 1-3
File name · 5-6
File specification · 5-4, 5-6
Front panel · 2-1
Function keys · 5-2
Navigation · A-1
Network interface · 1-2
O
Optional devices · 1-3
Organizing the disk · 5-7
G
Graphics conventions · 1-2
H
H.D.D. light · 2-1
Hardware features · 1-2
Humidity for the computer · 3-1
K
Key symbol · 1-2
Keys
CAPS LOCK · 5-1
CONTROL · 5-1
DELETE · 5-1
ENTER · 5-1
ESCAPE · 5-1
RETURN · 5-1
RUBOUT · 5-1
SHIFT · 5-1
L
Lights
front panel · 2-1
Line editor · 5-3, A-2
LOG command · 5-3, 5-8
Logging on · 5-3
Logging to accounts · 5-8
Logical device · 5-5
M
Maintenance · 3-2
Memory
amount · 1-2
Mistakes
correcting · 5-2
MUSER command · 5-4
P
Password · 5-3
Power light · 2-1
Power switch · 2-1
PPN command · 5-6
Problems
troubleshooting · 4-1
R
RAM
amount · 1-2
Rear panel · 2-3
Rebooting the computer · 2-5
warm booting · 3-8
REDALL command · 3-9
Reset switch · 2-1, 2-5
Root account · 5-3
S
Safety procedures · 3-4
warm booting · 3-8
SCSI device
attaching or detaching · 2-4
Serial ports · 1-2
SET DSKERR command · 3-8
Site preparation · 3-1
Software features · 1-3
Status display · 2-1
Streaming tape drive · 3-2
Switching accounts · 5-8
SYSACT command · 5-8
SYSTAT command · 5-5, 5-8
System disk · 5-5
T
Taking care of tapes · 3-3
Tape
care of tapes · 3-3
format and capacity · 3-5
Eagle 450 Owner's Manual, Revision 00
Index
loading and unloading cartridges · 3-6
read/write compatibility · 3-6
Tape drive · 3-5
cleaning · 3-2
DAT · 3-2
streaming · 3-2
using · 3-5
using DAT · 3-7
Temperature for the computer · 3-1
Terminal
keyboard · 5-1, A-1
Troubleshooting · 4-1
Turbo button · 2-1
Turbo light · 2-1
Turning off the computer · 2-4
Turning on the computer · 2-4
Typing mistakes · 5-2
Eagle 450 Owner's Manual, Revision 00
Page 3
U
User name · 5-3, 5-4
V
Ventilation · 3-1
W
Warm booting · 3-8
Contact Information Sheet
Use this page to record information about your computer hardware and software, and your Alpha Micro
dealer. It also includes information about contacting Alpha Microsystems directly if you need to.
ABOUT YOUR COMPUTER
Computer Type: Eagle 450
Software Security Device (SSD) Number:
(found on label on back of cabinet)
Number of Users:
Amount of Memory:
Disk Drives:
Backup Device:
Connected to Network?: Yes / No
If Yes, IP Address:
Modem Phone Number and Speed
AMOS Version:
Main Application Software and Version:
Other Software and Versions:
ABOUT YOUR DEALER
Dealer Name:
Address:
Phone Number:
Fax Number:
E-mail Address:
Contact:
Other:
ABOUT ALPHA MICRO
Alpha Microsystems AMOS Web site:
Technical Assistance Center Phone Number:
Technical Assistance Center Fax Number:
Technical Assistance Center E-mail Address:
Sales Order Administration Phone Number:
Eagle 450 Owner's Manual, Revision 00
www.amos-online.com
800/487-7877
714/641-7613
[email protected]
800/289-2574