1
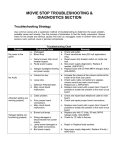
To Purchase This Item, Visit BMI Gaming | www.bmigaming.com | (800) 746-2255 | +1.561.391.7200
To Purchase This Item, Visit BMI Gaming | www.bmigaming.com | (800) 746-2255 | +1.561.391.7200
To Purchase This Item, Visit BMI Gaming | www.bmigaming.com | (800) 746-2255 | +1.561.391.7200
To Purchase This Item, Visit BMI Gaming | www.bmigaming.com | (800) 746-2255 | +1.561.391.7200
To Purchase This Item, Visit BMI Gaming | www.bmigaming.com | (800) 746-2255 | +1.561.391.7200
To Purchase This Item, Visit BMI Gaming | www.bmigaming.com | (800) 746-2255 | +1.561.391.7200
To Purchase This Item, Visit BMI Gaming | www.bmigaming.com | (800) 746-2255 | +1.561.391.7200
To Purchase This Item, Visit BMI Gaming | www.bmigaming.com | (800) 746-2255 | +1.561.391.7200
To Purchase This Item, Visit BMI Gaming | www.bmigaming.com | (800) 746-2255 | +1.561.391.7200
To Purchase This Item, Visit BMI Gaming | www.bmigaming.com | (800) 746-2255 | +1.561.391.7200
To Purchase This Item, Visit BMI Gaming | www.bmigaming.com | (800) 746-2255 | +1.561.391.7200
To Purchase This Item, Visit BMI Gaming | www.bmigaming.com | (800) 746-2255 | +1.561.391.7200
To Purchase This Item, Visit BMI Gaming | www.bmigaming.com | (800) 746-2255 | +1.561.391.7200
To Purchase This Item, Visit BMI Gaming | www.bmigaming.com | (800) 746-2255 | +1.561.391.7200
To Purchase This Item, Visit BMI Gaming | www.bmigaming.com | (800) 746-2255 | +1.561.391.7200
To Purchase This Item, Visit BMI Gaming | www.bmigaming.com | (800) 746-2255 | +1.561.391.7200
To Purchase This Item, Visit BMI Gaming | www.bmigaming.com | (800) 746-2255 | +1.561.391.7200
DEEP FREEZE TROUBLESHOOTING &
DIAGNOSTICS SECTION
Troubleshooting Chart
Problem
Probable Cause
No power to the game.
a. Unplugged.
b. Blown Fuse.
c. Circuit breaker tripped.
d. Bad power supply.
No Audio
a. Volume too low.
b. Loose wire at control or speaker.
c. Defective Potentimeter.
d. Main circuit board malfunction.
Fluorescent lighting not
functioning.
a. Fixture unplugged.
b. Lamp out.
c. Fixture Faulty
a. Bulb(s) out.
Halogen lighting not
functioning.
b. Fixture/cable problem.
c. Bad power supply
Playfield does not
vibrate in lowered
position.
An LED on AC
Driver Board
will come on
when solenoid
engages, if that
LED pulses, the
board is getting
a signal.
a. Fuse Blown.
AC
Driver is
getting
signal.
b. AC driver board is bad.
c. Faulty Kicker Solenoid.
a. Faulty wire from main board.
AC
Driver
Board is
not
getting
signal.
b. Faulty main board.
Remedy
a. Check wall outlet.
b. Check transformer fuse (220v
applications only - 7 amp fast
burn).
c. Reset power strip breaker
switch or building circuit
breaker. Attempt to determine
cause.
d. See power supply diagnostic.
Replace if faulty. (A5PS1001)
a. Increase the volume at the
volume control at the inside of
the front door panel.
b. Check audio cable connections
to speaker, volume control and
main circuit board. Check
continuity.
c. Replace pot. (A5PO1K)
d. Replace main board with board
from another Gen 5 game if
possible to isolate the problem
to the main circuit board.
a. Plug power cable into power
strip.
b. Replace fluorescent tube.
c. Replace entire fixture.
a. Replace only with 12 Volt, 20
watt, MR16 halogen bulbs.
(A5LA9050)
b. Check for 12 Volts to fixtures.
c. See power supply diagnostic.
Replace if faulty. (A5PS1001)
a. Replace fuse (A5FUSE3) in
fuse block on AC driver board.
b. Replace AC driver board.
(AABD5029)
c. Replace Solenoid. (AASO1001)
a. Check continuity from board to
board on these wires.
b. Replace main board.
To Purchase This Item, Visit BMI Gaming | www.bmigaming.com | (800) 746-2255 | +1.561.391.7200
Troubleshooting Chart
Problem
Playfield not
raising or
lowering.
An LED on
AC Driver
Board will
come on
when motor
engages, if
that LED
pulses, the
board is
getting a
signal.
Probable Cause
a. Blown Fuse.
AC Driver is
getting
signal.
b. Mechanical Link disconnected,
bent or jammed.
c. AC driver board is bad.
d. Motor bad or unplugged.
a. Faulty wire from main board.
AC Driver
Board is not
getting
signal.
b. Faulty main board.
Old game
with new
eprom
Err 0 shows on display.
a. Old games updated with a DF1.05
eprom will have to move the drop
table button signal wire on a main
board connector.
a. At coin up, the playfield should
lower then rise.
b. Sensor reflecting from arm
connected to playfield.
c. White cam too far from sensor.
Game doesn’t score or error
code E 1 – E 13 is displayed
on Ticket Display board.
a. Loose or broken wiring to the coin
sensor in target.
b. Faulty circuit board, diodes or
sensors.
c. Coin not tripping switch in coin
mechanism.
Tickets do
not dispense
or Wrong
amount
dispensed.
Check for
the correct
amount of
tickets
adding up
on Tickets
Owed
Display
Tickets
Owed
Display is
adding up
correct
a. Disconnected, loose or broken
wires.
b. Opto Sensor on ticket dispenser
dirty.
c. Faulty ticket dispenser.
d. Notch on tickets cut too shallow.
a. Incorrect dipswitch settings.
Tickets
Owed
Display is not
adding
correctly
b. Game is scoring too soon –
before coin reaches sensor board.
Remedy
a. Replace fuse in fuse(A5FUSE3)
block on AC driver board.
b. Reconnect or replace
mechanical arms between
motor and table.
c. Replace AC driver board.
d. Reconnect motor wiring or
replace drive motor.
a. Check for loose or broken wiring
at connectors for motor and
main circuit board. Check
continuity from board to board
on these wires.
b. Replace main board.
a. If eprom version is DF1.05,
make sure the red signal wire
connects to J3 connector, pin 6.
a. If doesn’t move – Refer to
Playfield not raising or lowering
section.
b. Paint arm a dull black to avoid
reflecting to sensor.
c. Reposition cam (A5CA8020) so
5 Volt signal drops to zero when
cam covers sensor(AABD5010).
a. Check for loose or broken wiring
at connectors. Check continuity.
b. Error code indicates faulty target
sensor circuit board. See chart
below for identification of faulty
target.
c. Check operation of the coin
mechanism and switch. Replace
if necessary.
a. Check connectors. Check for
continuity.
b. Blow dust from sensor and
clean with isopropyl alcohol.
c. Replace with working dispenser
to isolate the problem.
d. Flip tickets and load upsidedown to have large cut notch
toward opto sensor.
a. Check settings on main Gen 5
board.
b. Sensor board is bad –
Align/clean sensors, replace
board.(AABD1200, AABD1201,
AABD1203)
To Purchase This Item, Visit BMI Gaming | www.bmigaming.com | (800) 746-2255 | +1.561.391.7200
Deep Freeze Coin Sensor Error Codes
Error codes E1 through E13 indicate a faulty target sensor. The following figure
illustrates the position of the faulty board.
Sensor Board Part #’s:
Slots 1, 2, 3, 4, 5, and 8 are short
sensors- AABD1200
Slots 6,7,9,10 are tall sensors
AABD1201
Slots 11, 12, 13 are square sensors
AABD1203
1.) Clear the tickets owed:
Push the "table drop" button in the front of the game, it will drop the table and
clear the tickets owed.
2.) Play the game, the tickets owed display will jump up by a certain amount that amount should correspond with the bad sensor value, unplug that sensor
and it should stop adding up on the display.
For instance: If the game is adding up 10 tickets really fast, unplug all the 10
sensors. Make sure the game does not add up by itself anymore. Then plug in
one sensor at a time.
**** Make sure the game is turned off as you plug and un-plug sensors.
You should be able to isolate the problem to 1 sensor this way.
ERR 0
The Err 0 means that the playfield drop sensor is not reading the white cam on
the motor.
Refer to Troubleshooting Guide under Playfield not raising or lowering, and Err 0.
To Purchase This Item, Visit BMI Gaming | www.bmigaming.com | (800) 746-2255 | +1.561.391.7200
Deep Freeze Diagnose Power Supply
Use the following procedure to check the power
supply for Gen 5 games.
12 V OUT
Check the small green LED light on the power
supply circuit board. If the light is out there is a
short somewhere. If the light dims, there is an
overload in one of the circuits such as a bad motor.
Turn power OFF. Disconnect all 12 volt
output wires only. Turn power ON.
Green LED Light
comes ON.
Figure 1 Power Supply
Green LED Light
remains OFF.
Replace Power
Supply.
Turn power OFF. Unplug all outputs from the Gen 5 Circuit Board.
Reconnect the 12 volt output wires to the Power Supply. Turn power
ON.
Green LED Light
comes ON.
Turn power OFF.
Reconnect the outputs
at the Main Circuit
Board one at a time.
Wait 3 minutes
between tests to turn
power ON.
Green LED Light
comes ON.
Green LED Light
remains OFF.
Short in Main Board
- Replace.
Green LED Light
remains OFF.
Green LED Light
dims.
That cable is OK.
That cable or related
component is shorted out.
See Jumper Cable Pin-Outs
to see which component might
be at fault.
A related component such as
a solenoid is causing an
overload. See Jumper Cable
Pin-Outs beginning on page
18 to see which component
might be at fault.
To Purchase This Item, Visit BMI Gaming | www.bmigaming.com | (800) 746-2255 | +1.561.391.7200
To Purchase This Item, Visit BMI Gaming | www.bmigaming.com | (800) 746-2255 | +1.561.391.7200
To Purchase This Item, Visit BMI Gaming | www.bmigaming.com | (800) 746-2255 | +1.561.391.7200
To Purchase This Item, Visit BMI Gaming | www.bmigaming.com | (800) 746-2255 | +1.561.391.7200
To Purchase This Item, Visit BMI Gaming | www.bmigaming.com | (800) 746-2255 | +1.561.391.7200
To Purchase This Item, Visit BMI Gaming | www.bmigaming.com | (800) 746-2255 | +1.561.391.7200