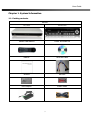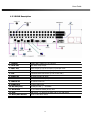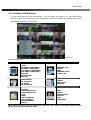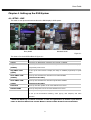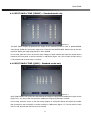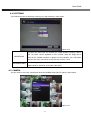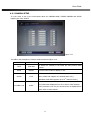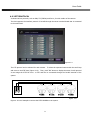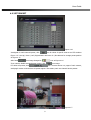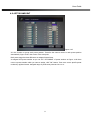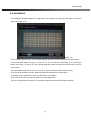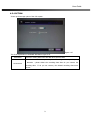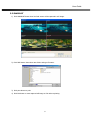
1
DVR User Guide USER GUIDE H.264 Digital Video Recorder Release Version : 1.0 RoHS This document contains preliminary information and subject to change without notice. User Guide SAFETY PRECAUTIONS EXPLANATION OF SYMBOLS This symbol is intended to alert the user to the presence of important operation and maintenance (servicing) instructions in the literature accompanying the appliance. This symbol is intended to alert the user to the presence of unprotected “dangerous voltage” within the product’s enclosure that may be strong enough to cause a risk of electric shock persons. CAUTION THIS PRODUCT HAS MULTIPLE-RATED VOLTAGES (110V AND 220V). SEE INSTALLATION INSTRUCTIONS BEFORE CONNECTING TO THE POWER SUPPLY THIS PRODUCT USES A LITHIUM BATTERY. RISK OF EXPLOSION IF THE BATTERY ON THE MAIN BOARD IS REPLACED BY AN INCORRECT TYPE. DISPOSE OF USED BATTERIES ACCORDING TO INSTRUCTIONS. See INSTALLION INSTRUCTION BEFORE CONNECTING TO THE SUPPLY. THIS EQUIPMENT AND ALL COMMUNICATION WIRINGS ARE INTENDED FOR INDOOR USE. TO REDUCE THE RISK OF FIRE ELECTRIC SHOCK, DO NOT EXPOSE THE UNIT TO RAIN OR MOISTURE. 2 User Guide WARNING The product should be installed by a trained professional. The DVR should be powered off when connecting camera, audio, or sensor cables. The manufacturer is not responsible for any damages caused by improper use of the product or failure to follow instructions for the product. The manufacturer is not responsible for any problems caused by or resulting from the user physically opening the DVR for examination or attempting to fix the unit. The manufacturer may not be held liable for any issues with the unit if the warranty seal is removed. 3 User Guide INDEX Chapter 1. System Information ............................................................................................8 1.1. Packing contents.................................................................................................................................. 8 1.2. ENTRY MODEL..................................................................................................................................... 9 1.2.1 FRONT Description ..................................................................................................................... 9 1.2.2 REAR Description........................................................................................................................ 9 1.3. STANDARD MODEL............................................................................................................................ 10 1.3.1 FRONT ...................................................................................................................................... 10 1.3.1.1 LED Description.............................................................................................................. 10 1.3.1.2 KEY Description...............................................................................................................11 1.3.2 REAR Description...................................................................................................................... 12 1.4. Remote Controller.............................................................................................................................. 13 1.5. Specification – Entry model............................................................................................................... 14 1.6. Specification – Standard model......................................................................................................... 15 Chapter 2. Installing Product..............................................................................................16 2.1. Installing HDD ................................................................................................................................... 16 2.2. Connecting Camera and Audio device............................................................................................... 16 2.3. Connecting Monitor ........................................................................................................................... 17 2.4. Connecting Optional device ............................................................................................................... 17 2.5. Connecting Network .......................................................................................................................... 17 2.6. Connecting Power Supply .................................................................................................................. 17 Chapter 3. Introduction......................................................................................................18 3.1. Boot Screen ....................................................................................................................................... 18 3.2. SYSTEM OSD ..................................................................................................................................... 19 3.3. The Menu of DVR System.................................................................................................................. 20 Chapter 4. Setting up the DVR System ..............................................................................21 4.1. SETUP - LIVE ..................................................................................................................................... 21 4.1.1 DISPLAY.................................................................................................................................... 22 4.1.2 COLOR ...................................................................................................................................... 23 4.1.3 SEQ DWELL TIME (SINGLE)..................................................................................................... 24 4.1.4 SEQ DWELL TIME (QUAD) ....................................................................................................... 24 4.1.5 SPOT DWELL TIME (SINGLE) – Standard model only.............................................................. 25 4.1.6 SPOT DWELL TIME (QUAD) – Standard model only ................................................................ 25 4.1.7 POSITION ................................................................................................................................. 26 4.1.8 PRIVATE ZONE ......................................................................................................................... 26 4.1.9 OPTIONS .................................................................................................................................. 27 4.2. CAMERA............................................................................................................................................. 27 4 User Guide 4.2.1 CAMERA SETUP ........................................................................................................................ 28 4.2.1.1 TEXT INPUT ................................................................................................................... 29 4.2.2 PTZ PROTOCOL ........................................................................................................................ 30 4.2.3 PTZ PRESET.............................................................................................................................. 31 4.2.4 PTZ SCANPOINT....................................................................................................................... 32 4.3. RECORD............................................................................................................................................. 33 4.3.1 REC PROPERTY......................................................................................................................... 34 4.3.2 SCHEDULE ................................................................................................................................ 35 4.3.3 MOTION DETECTION ............................................................................................................... 36 4.3.3.1 MOTION AREA ............................................................................................................... 36 4.3.3.2 SENSITIVITY .................................................................................................................. 38 4.3.3.3 ALARM OUT.................................................................................................................... 38 4.3.4 SENSOR DETECTION................................................................................................................ 38 4.3.4.1 THE ASSIGNED RECORDING CHANNEL......................................................................... 38 4.3.4.2 SENSOR TYPE ................................................................................................................ 39 4.3.4.3 ALARM OUT.................................................................................................................... 39 4.3.5 VLOSS....................................................................................................................................... 40 4.3.6 E-MAIL...................................................................................................................................... 40 4.3.7 E-MAIL SCHEDULE ................................................................................................................... 41 4.3.8 ALARM CONTROL ..................................................................................................................... 42 4.3.9 ALARM SCHEDULE.................................................................................................................... 43 4.3.10 OPTION .................................................................................................................................. 43 4.4. NETWORK.......................................................................................................................................... 44 4.4.1 NETWORK TYPE ....................................................................................................................... 44 4.4.1.1 STATIC ........................................................................................................................... 44 4.4.1.2 DYNAMIC........................................................................................................................ 45 4.4.1.3 ADSL(PPPOE) ................................................................................................................. 45 4.4.2 STREAM .................................................................................................................................... 45 4.4.3 DDNS ........................................................................................................................................ 46 4.4.4 NETWORK SETUP..................................................................................................................... 47 4.4.4.1 CLIENT PORT ................................................................................................................. 47 4.4.4.2 WEB PORT...................................................................................................................... 47 4.4.4.3 BANDWIDTH .................................................................................................................. 47 4.4.5 ACCESS LIST ............................................................................................................................ 48 4.5. SETUP – STORAGE ............................................................................................................................ 49 4.5.1 FORMAT.................................................................................................................................... 49 4.5.2 HDD S.M.A.R.T ......................................................................................................................... 50 5 User Guide 4.5.3 AUTO-BACKUP – Standard model only..................................................................................... 51 4.5.4 OPTION .................................................................................................................................... 53 4.6. SETUP – SYSTEM............................................................................................................................... 54 4.6.1 TIME ......................................................................................................................................... 54 4.6.1.1 CURRENT TIME.............................................................................................................. 55 4.6.1.2 DATE FORMAT................................................................................................................ 55 4.6.1.3 TIME FORMAT ................................................................................................................ 55 4.6.1.4 TIME ZONE..................................................................................................................... 55 4.6.1.5 TIME SYNC..................................................................................................................... 56 4.6.1.6 CHANGE TIME................................................................................................................ 56 4.6.2 UPDATE .................................................................................................................................... 57 4.6.3 CONFIG SETUP......................................................................................................................... 59 4.6.4 OPTIONS .................................................................................................................................. 60 4.6.4.1 SYSTEM ID ..................................................................................................................... 60 4.6.4.2 KEY TONE....................................................................................................................... 60 4.6.4.3 KEYBOARD CONTROL .................................................................................................... 61 4.6.5 USER......................................................................................................................................... 63 Chapter 5. SEARCH ............................................................................................................64 5.1. SEARCH – SEARCH BY TIME ............................................................................................................. 64 5.2. SEARCH – SEARCH BY CALENDAR .................................................................................................... 65 5.3. SEARCH – SEARCH BY EVENT........................................................................................................... 66 5.4. SEARCH – GO TO FIRST AND GO TO LAST....................................................................................... 67 Chapter 6. FUNCTION ........................................................................................................68 6.1. PTZ .................................................................................................................................................... 68 6.1.1 PTZ( GENERAL PTZ )................................................................................................................ 68 6.1.2 PTZ( ADVENCE PTZ ) ............................................................................................................... 69 6.1.2.1 FOCUS............................................................................................................................ 69 6.1.2.2 IRIS ................................................................................................................................ 69 6.1.2.3 SPEED ............................................................................................................................ 69 6.1.2.4 SCAN .............................................................................................................................. 70 6.1.2.5 GO .................................................................................................................................. 70 6.1.2.6 OSD MENU ..................................................................................................................... 71 6.2. SPOT – Standard model only............................................................................................................. 71 6.3. SEQUENCE......................................................................................................................................... 72 6.4. AUDIO................................................................................................................................................ 72 6.5. BACKUP ............................................................................................................................................. 73 6.6. LOG VIEW.......................................................................................................................................... 74 6 User Guide Chapter 7. OTHER FUNCTION ............................................................................................75 7.1. DIGITAL ZOOM .................................................................................................................................. 75 7.2. PIP ..................................................................................................................................................... 75 7.3. POP .................................................................................................................................................... 76 7.4. THE SETUP FOR IP ROUTER ............................................................................................................. 76 7.5. MOUSE CONTROL .............................................................................................................................. 77 7.6. CHANGE SCREEN MODE .................................................................................................................... 77 Enclient 1. INSTRUCTION ...................................................................................................................................... 79 1.1 Network Client Program .............................................................................................................. 79 1.2 Program Installation .................................................................................................................... 79 1.3 Client System Requirements........................................................................................................ 79 2. MONITORING FEATURE........................................................................................................................ 80 2.1 Starting Program ......................................................................................................................... 80 2.2 Monitoring control button feature ............................................................................................... 81 2.3 Connecting to Remote DVR......................................................................................................... 82 2.4 Monitoring ................................................................................................................................... 83 2.5 Storing in PC(Local Manual Record) ............................................................................................ 84 2.6 PAN/TILT/ZOOM/FOCUS CONTROL............................................................................................. 84 2.7 LOCK SCREEN.............................................................................................................................. 85 2.8 SNAP SHOT ................................................................................................................................. 85 3. SEARCH FEATURE................................................................................................................................. 86 3.1 Main Search Screen..................................................................................................................... 86 3.2 Search Button Feature................................................................................................................. 87 3.3 Remote Search – Selecting the recorded date and time............................................................. 89 3.4 Local Search ................................................................................................................................ 90 3.5 SNAPSHOT................................................................................................................................... 91 3.6 Search Log Information............................................................................................................... 92 4. BACKUP FEATURE................................................................................................................................. 93 4.1 Select Backup time period........................................................................................................... 93 4.2 AVI Backup time period............................................................................................................... 94 4.3 ENDB Backup time period ........................................................................................................... 94 5. SETUP PROPERTY................................................................................................................................. 95 5.1 Setup System .............................................................................................................................. 95 5.2 Setup System control button....................................................................................................... 95 5.3 Setup Property description .......................................................................................................... 96 7 User Guide Chapter 1. System Information 1.1. Packing contents DVR SET Entry Model Standard Model REMOTE CONTROLLER CLIENT SOFTWARE CD MANUAL SATA HDD CABLE SCREWS BATTERY Power Adapter POWER CABLE 8 User Guide 1.2. ENTRY MODEL 1.2.1 FRONT Description ① ② ③ ④ 1. USB Port USB device can be connected. To Back-up the Data and To Use USB Mouse. 2. POWER The POWER LIGHT turns on RED when the power is supplied to the DVR SYSTEM. 3. REC The LIGHT is blinking when the DVR SYSTEM records data. 4. NETWORK The LED LIGHT turns on when the NETWORK FUNCTION is operated through the connection of the Network Client. 1.2.2 REAR Description 1. DC 12V POWER Connect to Power Adaptor which was included in Box 2. ETHERNET 10/100 Network CABLE (RJ-45) Port 3. USB PORT USB Device can be connected 4. NTSC/PAL SWITCH NTSC or PAL select switch 5. 485 PORT RS-485 port has +, – terminals GROUND G for Ground used for earth ALARM A for Alarm, which signal occurs SIGNAL S for Signal 6. VGA PORT Connected with LCD Monitor (15 pin D-Sub Jack) 7. VIDEO OUT Connected with CRT Monitor (BNC) 8. AUDIO IN/OUT One channel Audio IN/OUT (RCA) 9. 10. 11. VIDEO IN VIDEO INPUT PORTS for 4 Channels, for 8 Channels, for 16 Channels 9 User Guide 1.3. STANDARD MODEL 1.3.1 FRONT 1.3.1.1 LED Description POWER The POWER LIGHT turns on RED when the power is supplied to the DVR SYSTEM. The LIGHT changes to GREEN and the SYSTEM BOOTING is started, when the POWER BUTTON of the FRONT PANEL and Remote Controller is pushed. HDD The LED LIGHT is blinking when the video or audio data is stored in the DVR System. ALARM The LIGHT turns on RED when the ALARM OUTPUT of the DVR SYSTEM operates. RECORD The LIGHT is blinking when the DVR SYSTEM records data. NETWORK The LED LIGHT turns on when the NETWORK FUNCTION is operated through the connection of the Network Client. BACKUP The LIGHT turns on RED during the BACKUP process of the stored data. CH LED Each Channel’s LED turns on when DVR recording starts. * USB Port use USB memory stick, CD-RW, DVD-RW as firmware update and backup. 10 User Guide 1.3.1.2 KEY Description 1. POWER SWITCH The POWER SWITCH should be selected to operate the DVR SYSTEM, even (STANBY POWER) though the POWER is supplied to the DVR SYSTEM. 2. USB There is a USB PORT in the FRONT of the DVR SYSTEM for the convenience of user, even though another USB PORT is located in the rear of the DVR SYSTEM. This USB PORT is for the External BACKUP Device. 3. FUNCTION The buttons of some features are located on the FRONT PANEL and users can use them directly. It operates the features of PTZ, SEQUENCE, AUDIO, BACKUP, and LOG VIEW. It can’t be operated by the remote controller. 4. BACKUP It backs up the stored image in the DVR SYSTEM. 5. AUDIO It turns ON each AUDIO OUTPUT or makes it MUTE. 6. SPOT It is for the SPOT function. It rotates the image between FULL MODE and QUAD MODES. The image is displayed on the monitor through the SPOT PORT. 7. PIP It displays a small pop-up screen on the full screen. With the PIP button, the (Picture In Picture) small pop-up and full screens are converted. 8. POP It displays the divided screens of 8 channels. 9. PT It operates the PAN/TILT CONTROL of the PTZ CAMERA that is installed on the DVR SYSTEM. 10. ZF It operates the digital zoom of the live and playback screen in DVR System. 11. MENU It displays the categories of SETUP and MENU of the DVR SYSTEM. 12. REW/STEP REW It rewinds and replays the stored image up to 128 times faster. It supports the STEP Rewind feature on the pause. 13. PLAY/PAUSE It plays/pauses the image during search. 14. STOP It stops the searching process of the stored image. 15. FAST FORWARD It is for the FAST Forward feature during the search of the stored image. It offers the search up to 128 times faster. a. REC It RECORDS the input image of the DVR SYSTEM or STOPS the recording process. b. SEARCH It searches the stored image. c. SCROLL BUTTON It moves (Up/Down/Left/Right)the cursor in the menu categories & PTZ screen. It displays full screen of camera(1ch/2ch/3ch/4ch) & division screens(4 division/ 8 division/ 9 division/16 division). d. CH BUTTON It show Full Screen Mode which you select a special channel. In case of 11~16CH selection, press 10+ button and then press 1~6 numbering button. 11 User Guide 1.3.2 REAR Description 1. CAMERA VIDEO INPUT PORTS for 16 Channels. 2. LOOP OUT Each Video Loop Out-put 3. SPOT OUT Video Out-put by Full Screen mode or Quad split mode 4. VIDEO OUT Connected with CRT Monitor (BNC) 5. VGA Connected with LCD Monitor (15 Pin D-Sub Jack) 6. AUDIO IN 16 channel Audio IN (RCA) 7. AUDIO OUT 1 channel Audio OUT (RCA) 8. SENSOR IN 16 channel Sensor IN. 8. ALARM OUT 4 channel Alarm OUT. 10. RS-485 (PTZ) RS-485 port has +, – terminals. 11. NETWORK 10/100 Network CABLE (RJ-45) Port. 12. USB USB Device - To Back-up the Data and To Use USB Mouse 13. NTSC/PAL SWITCH NTSC or PAL select switch 12 User Guide 1.4. Remote Controller 1) REC : Record button 2) DVR-ID 3) Number button 4) AUDIO : Audio ON / Mute 5) BACKUP : 1 Back up recorded data to other device 2 6) MENU : Go to ‘MENU’ mode to setup values 7) OSD : Show or Hide OSD 3 8) PTZ : Control Pan/Tilt/Zoom camera. 9) Digital Zoom 8 10) Direction (▲,▼,◀,▶) 5 4 Move cursor or control PTZF camera 9 6 ENTER 7 Select sub item in system setup mode 11) SEARCH : Search recorded video 10 11 14 15 13 17 21 12) 12 system 16 18 13) ◀◀ : Reverse play 19 14) ▶I : Play or Pause during playback 20 22 LOG : Show running status of DVR 15) ▶▶ : Fast forward play 24 16) ■ : Stop playback and go to Live mode 23 17) SPOT : Not Operated in this model 18) PIP : Go to PIP mode 19) POP : Enlarge specific channel in Live mode 20) SEQ : Show each camera rotation 21) Full screen mode 22) Quad screen mode 13 User Guide 1.5. Specification – Entry model MODEL 4 CH 8 CH Compression Algorithm Video : H.264 / Audio : G723 HDD Bay SATA HDD ×1 Operating System Video Input Video Output Backup 8 CH CVBS Loop out VGA 16 CH 1 CH, BNC X X X VGA ×1 (resolution : 800×600, 1024×768, 1280×1024 Selectable) 1, 4 & PIP 1, 4, 9 & PIP, POP 1, 4, 9, 16 & PIP, POP CIF 120/100 fps 240/200 fps 480/400 fps Half-D1 120/100 fps 240/200 fps 240/200 fps D1 120/100 fps 120/100 fps 120/100 fps Recording Modes Playback & Embedded Linux 4 CH Live Display Modes Rec. Speed 16 CH Continuous, Schedule, Sensor-Activated & Motion Detection Recording Pre & Post Alarm Recording, Emergency Recording Speed ×1, ×4, ×8, ×16, ×32 Search Search by Time Bar, Calendar, Event and First/Last Search Device USB Memory Stick Audio Input/Output 1 In / 1 Out Sensor in/Alarm out 1 In / 1 Out Port USB ×2, RS-485(PTZ) ×1 LAN 10/100 Base-TX Ethernet(RJ-45) – Static / DHCP / DDNS Transmission Network Client Web-view Video Dual-Stream (Local recording & Network Transmission) Live Monitoring, Playback & Backup, PTZ Control & setting, Snapshot Live Monitoring, Playback, PTZ Control Multi-Language, Firmware Upgrade by USB & Network Other Functions Configuration Import & Export, Water-Mark, Alarm out for Events & Video loss E-mail Notification/Alarm/Buzzer for Events, Warning for System Over-Temp External keyboard control Power Storage Temp/Humidity DC 12V, 3.3A -20 ~ 60℃ / 20 ~ 95% RH Operating Temp/Humidity Dimension (W×D×H) 5 ~ 40℃ / 20 ~ 80% RH 341×258×60, Packing : 374×383×126 (mm) Certification CE, FCC, RoHS 14 User Guide 1.6. Specification – Standard model MODEL 8 CH 16 CH Compression Algorithm HDD Bay Video : H.264 / Audio : G723 SATA HDD × 4 or SATA HDD × 2 & ODD × 1 Operating System Video Input Embedded Linux 8 CH 16 CH CVBS 1 CH, BNC Video Loop out Output Spot 1 CH (Full mode or Quad mode) VGA VGA ×1 (resolution : 800×600, 1024×768, 1280×1024 Selectable) Live Display Modes Rec. Speed Backup 16 CH 1, 4, 9 & PIP, POP 1, 4, 9, 16 & PIP, POP CIF 240/200 fps 480/400 fps Half-D1 240/200 fps 480/400 fps D1 240/200 fps 240/200 fps Recording Modes Playback & 8 CH Continuous, Schedule, Sensor-Activated & Motion Detection Recording Pre & Post Alarm Recording, Emergency Recording Speed ×1, ×4, ×8, ×16, ×32 Search Search by Time Bar, Calendar, Event and First/Last Search Device USB Memory Stick/HDD, DVD-RW & Network by CMS Audio Input/Output 8 In / 1 Out 16 In / 1 Out Sensor in/Alarm out 8 In / 4 Out 16 In / 4 Out Port USB ×2, RS-485(PTZ) ×1, RS-232 ×1 LAN 10/100 Base-TX Ethernet(RJ-45) – Static / DHCP / DDNS Transmission Network Client Web-view Video Dual-Stream (Local recording & Network Transmission) Live Monitoring, Playback & Backup, PTZ Control & setting, Snapshot Live Monitoring, Playback, PTZ Control Multi-Language, Firmware Upgrade by USB & Network Other Functions Configuration Import & Export, Water-Mark, Alarm out for Events & Video loss E-mail Notification/Alarm/Buzzer for Events, Warning for System Over-Temp External keyboard control Power Storage Temp/Humidity AC 100 ~ 220V -20 ~ 60℃ / 20 ~ 95% RH Operating Temp/Humidity Dimension (W×D×H) 5 ~ 40℃ / 20 ~ 80% RH 430×380×95, Packing : 520×470×230 (mm) Certification CE, FCC, RoHS 15 User Guide Chapter 2. Installing Product 2.1. Installing HDD Some HDD can be installed inside the product. If HDD was not installed in the product, please install HDD first as follows. Be careful not to be harmed by sharp edges of the product. (1) Loosen screws on both sides and back to detach (2) Lift the end of top cover and pull out from the product cover. product. 2 (3) To install HDD, you (4) Connect HDD Power and cable to HDD. should upside down the set, and HDD can be installed onto bottom with screw. (5) Insert top cover to product as side picture and tighten screws again. 2.2. Connecting Camera and Audio device Connect video signal cable shaped as BNC into VIDEO IN port on rear of the product. Connect RCA cable from microphone into AUDIO IN port on rear of the product. Connect RCA cable into AUDIO OUT port on rear of the product and into audio device. Camera input Audio In Audio OUT 16 1 User Guide 2.3. Connecting Monitor Connect Video out port and VGA port in DVR to monitor VIDEO OUT VGA 2.4. Connecting Optional device You can connect and control the PTZ device supporting RS-485 communication. 2.5. Connecting Network Connect LAN cable (RJ45) to Ethernet port on rear of the product. INTERNET LAN cable (RJ45) 2.6. Connecting Power Supply Connect provided power cable to AC-DC adaptor. Connect the adaptor to DC power port on rear of the product. Connect AC power plug to the plug socket. 17 User Guide Chapter 3. Introduction 3.1. Boot Screen Figure 3-1 ‘Boot Loading’ is shown on the screen after the system booting (Figure 3-1) and the booting process is started to operate. Figure 3-2 The authentication process would be started for the security of the system (Figure 3-2), when the booting process of Figure 3-3 is completed. The default password from factory is "0000" and can be changed by an administrator at the SETUP MENU. 18 User Guide 3.2. SYSTEM OSD Figure 3-3 The general indication of the system is displayed on the main screen (Figure 3-3) Camera Name Operation Status of System It indicates the camera channel and name. It indicates the current operation of the system. : The current status of the system is Recording. : The current status of the system is Motion Detection. : The current status of the system is Sequence mode : The current status of the system is Alarm detection. : The connection of the device that is connected to USB. : The current status of the system is PTZ control status. : The current status of system is the connected Network status STATUS BAR This system supports HDDs up to 4 that are indicated as , , : xx% (Recorded Space Ratio), Currently doing Record on HDD : Normally Installed HDD. : None (HDD is not installed or unavailable HDD is installed.) Date & Time It indicates the time & date that are set up on the current system. 19 , . User Guide 3.3. The Menu of DVR System It is the setup process for the DVR SYSTEM. Users can adjust and control it for their needs before starting to use it. This process sets up the environment of the DVR SYSTEM. Users should confirm each menu before starting to use the system. Figure 3-4 Details of Figure 3-4 LIVE CAMERA RECORD DISPLAY COLOR SEQ DWELL TIME(SINGLE) SEQ DWELL TIME(QUAD) SPOT DWELL TIME(SINGLE) SPOT DWELL TIME(QUAD) POSITION PRIVATE ZONE OPTIONS NETWORK NETWORK TYPE STREAM DDNS NETWORK SETUP ACCESS LIST STORAGE CAMERA SETUP PTZ PROTOCOL PTZ PRESET PTZ SCANPOINT FORMAT HDD SMART OPTIONS REC PROPERTY SCHEDULE MOTION DETECTION SENSOR DETECTION VLOSS E-MAIL E-MAIL SCHEDULE ALARM CONTROL ALARM SCHEDULE OPTION SYSTEM TIME UPDATE CONFIG SETUP OPTIONS USER SHUTDOWN ※ To move sub-menu from the main-menu, push the “SEL” button, and “Menu” button is back to the main-menu from the sub-menu. 20 User Guide Chapter 4. Setting up the DVR System 4.1. SETUP - LIVE This menu to set up the environment about the OSD display in DVR system. Entry Model Standard Model Figure 4-1 This chart is for the SYSTEM MENU of Figure 4-1. DISPLAY It sets up the display about the current status of OSD status. COLOR It changes the BRIGTNESS, CONTRAST, and COLOR of CAMERA. SEQ DWELL TIME It sets up the time interval between the images of each CAMERA, which are displayed (SINGLE) progressively in full screen. SEQ DWELL TIME It sets up the time interval to display the image of CAMERA progressively in QUAD (QUAD) Mode. SPOT DWELL TIME It sets up the circulation time interval for FULL SPOT SCREEN. (SINGLE) (Standard model ONLY) SPOT DWELL TIME It sets up the circulation time interval for QUAD SPOT SCREEN. (QUAD) (Standard model ONLY) POSITION It sets up the video position of the each channel in live screen. PRIVATE ZONE It sets up the private zone of the each channel in live screen. OPTIONS It sets up the other options of display in OSD screen. It sets up the de-interlaced scanning, event pop-up, VGA frequency and video detection. * Press the Menu Key of remote controller or click the right button of mouse if you want to return to Previous Menu from current Menu or return to Main Screen from current Menu. 21 User Guide 4.1.1 DISPLAY This part is how to display on OSD chart like DISPLAY MENU of Figure 4-2. Figure 4-2 This chart is for the DISPLAY MENU of Figure 4-2. MENU Value Description CAMERA NAME ON/OFF CAMERA NUMBER ON/OFF CAMERA BOADER ON/OFF LANGUAGE Select OSD HIDE Select It selects show or not the status bar in live screen. LEFT MARGIN 00~99 It operates the deflection of horizon/ vertical video by the values It selects show or not the camera name of each channel in live screen. It selects show or not the camera number of each channel in live screen. It selects show or not the outline of channel It selects the language to use. If you select a language, the language displayed as you selected. (00~99) for sets capacity of display devices. (Analog & VGA RIGHT MARGIN 00~99 TOP MARGIN 00~99 Monitor) If you want to change the margin, Please press OK button after select the position of the each margin box to change. Therefore BOTTTOM MARGIN 00~99 you have to fill the margin number. VGA or TV ICON Select As using VGA or TV, You can select VGA default or TV default. 22 User Guide 4.1.2 COLOR Figure 4-3 It adjusts the color and brightness of the camera (Figure 4-3). To adjust them, at first it moves the channel where is displayed at the right side of the screen. Please click the Left or Right cursor buttons and then change the value of the each menu. After finish, you must press the OK button. If you want to change the factory setting, press the DEFAULT button. The bellow chart is the changing value area to operate. Set Value BRIGHT -10 ~ +10 CONTRAST -10 ~ +10 COLOR / SATURATION -10 ~ +10 COLOR / HUE -10 ~ +10 23 User Guide 4.1.3 SEQ DWELL TIME (SINGLE) Figure 4-4 It sets up the time interval between images of each camera that was displayed progressively in full screen. The sequence time value with the scroll buttons on the line what you want. Each channel could be set-up up-to 99 seconds to sequence. seconds, you can find out the channel sequence on Live mode ( Its recommended time is under 10 ). 4.1.4 SEQ DWELL TIME (QUAD) Figure 4-5 It sets up the time interval between images of each camera that was displayed progressively in QUAD screen. It rotates the images in QUAD MODE and the time (interval) between the images that are rotated in each QUAD MODE set up from 1 to 9 normally. The set value for each time is 1~99 seconds and set inner 10 seconds. If it operates the sequence function, you will see the sequence image ( screen. 24 ) in the live User Guide 4.1.5 SPOT DWELL TIME (SINGLE) – Standard model only Figure 4-6 The SPOT feature displays progressively the image on the connected monitor in FULL or QUAD SCREEN, even though VIDEO-OUT shows the image as it is from the DVR SYSTEM.SPOT DWELL sets up the time interval to display the image progressively in FULL SCREEN. For its setup, place the cursor on the time setup category of each channel and select the number that is located on the front panel or remote controller or USB Mouse (Figure 4-6). The set value for each time is 0~99 seconds and must set inner 10 seconds. 4.1.6 SPOT DWELL TIME (QUAD) – Standard model only Figure 4-7 SPOT QUAD DWELL sets up the time interval that the images are progressively displayed in QUAD screen (Figure 4-7). It is sets up the time interval to display the image progressively in monitor. For its setup, place the cursor on the time setup category of each quad channel and select the number that is located on the front panel or remote controller or USB Mouse (Figure 4-7). The set value for each time is 0~99 seconds and must set inner 10 seconds. 25 User Guide 4.1.7 POSITION Figure 4-8 It is the setup for video position for the each video channel. You can change the video position of the each channel though to the Left / Right button. It was controlled the value from -10 to 10. According to the capacity of monitor, the video position does not have standard. The function is to control video screen position. 4.1.8 PRIVATE ZONE Figure 4-9 It is the setup to private zone for the each video channel. To protect privacy, you can choose the zone which can not be recorded. 26 User Guide 4.1.9 OPTIONS The functions are the De-Interlace, event pop-up, VGA Frequency, Video detect. Figure 4-10 It controls the flicker that can threaten the image quality by turning it ON or DEINTERLACE OFF. The flicker can be appeared in CCTV monitor, when the Image that is saved in the 720X480 resolution is played. For this situation, set it ON mode. And set it OFF mode, if the VGA PC monitor that has no flicker, is used. VGA RESOLUTION It can select appropriate VGA resolution according to user’s VGA Monitor. (VGA resolution : 800*600, 1024*768, 1280*1024) 4.2. CAMERA It is the menu to set up the environment about the CAMERA setup and PTZ option in DVR system. Figure 4-11 27 User Guide 4.2.1 CAMERA SETUP It is the menu to set up the environment about the CAMERA NAME, HIDDEN CAMERA and AUDIO mapping per video channel. Figure 4-12 The table is the description of camera setup the same as Figure 4-12. MENU Value TITLE TEXT BOX SHOW ON/OFF Description Its names for cameras in the blank box and preview name position. It selects camera video to display or not. Select connected audio channel. AUDIO CH-01 (Entry model DVR supports one channel audio only.) (Standard model DVR supports up-to 16th channels audio.) It selects the area of video channel. 1~8 AND 9~16 Select The initial screen displayed from ch1 to ch8 in video channels. And if press the 9~16 icon, the second screen is displayed from ch9 to ch16 in video channel. 28 User Guide 4.2.1.1 TEXT INPUT Figure 4-13 You can often see the text input box of Figure 4-13. It is used to the registration of camera name, user password, the IP Address and the others in DVR system. Now, you can see the descriptions of text input box. The table is the description of the Figure 4-13. KEY NUMERICS Description It is the “numeric” icon. Please press the numeric icon then it makes fill the selected numeric. It is the icon which is selected a capital letter or a small letter of English. CAP INS If press the cap key on the capital letter, It is going to change the small letter. It is the “Insert” key for add a specific character(s) between other characters. ARROW KEY It is the “Move” key for cursor position on the text box. Back Space It is the “Delete” key for delete left-side character from cursor position. DEL It is the “Delete” key for delete right-side character from cursor position. CLS It is the “Clear” key for clear text-box 29 User Guide 4.2.2 PTZ PROTOCOL It selects various protocols, such as PAN, TILT, ZOOM, and Focus, for each vendor of the camera. The DVR supports the interface protocol of RS-485 through the sensor terminal board that is connected to the main board. Figure 4-14 The PTZ protocol can be selected for each camera. To select the expected camera with the scroll keys and move to the PTZF item (Figure 4-14). Then, push “OK” button to display the name of each protocol. It can assign the PTZF ID from 1 to 255 and can be connected through the RS-485 terminal of the system. + PTZ 001 PTZ 002 PTZ 003 PTZ 004 Figure 4-15 Figure 4-15 is an example to connect the PTZF CAMERA to the system. 30 User Guide 4.2.3 PTZ PRESET Figure 4-16 icon for select of specific area as see PTZ windows It assigned for each camera’s preset, click Figure 4-17. Use Up / Down / Left / Right buttons and zoom In / Out buttons for arrange preset position as Figure 4-17. After finish icon image changed to icon as Figure 4-16. If you want to disable arranged preset section, click For delete all presets, click icon image. icon. Present section is 4 pages of each camera, each page’s section could be have 16 preset regions. That means, each one channel has 64 presets. Figure 4-17 31 User Guide 4.2.4 PTZ SCANPOINT Figure 4-18 It is the function to group each preset position. Therefore the camera moves to each preset position automatically. Figure 4-18 is the screen of the scan point. Each preset range has time difference as assigned interval time. It assigned PTZ preset number as you set 4.2.3 PTZ PRESET of preset number as Figure 4-18. Move cursor to preset number which you want to assign, click “OK” button. Then move cursor specific preset number by up/down button. Assigned range of preset scan points are list 1 to 4. 32 User Guide 4.3. RECORD It is for the record setup of the DVR system. Figure 4-19 Figure 4-19 is for the record Menu. REC PROPERTY -It sets up the image store resolution of the entire channel in 360x240, 720x240, and 720x480.(NTSC) -It selects the Store Frame Rate for each channel in 0, 1, 2, 4, 8, 15, 30.(NTSC) -It selects the recording quality for each channel. You can set to the BEST / HIGH / NORMAL / BASIC. SCHEDULE It assigns the image recording by Day and Time. MOTION DETECTION It sets up the field on the image motion, such as motion sensitivity and motion field. SENSOR DETECTION It sets up the sensor Interlock on the image store, such as entire set-up and individual set-up. VLOSS It set up the alarm to ring when video-loss occurs in a channel. E-MAIL Sending E-mail function for various events happenings. E-MAIL SCHEDULE Set-up for Sending E-mail Schedule ALARM CONTROL It sets up the field on the time of pre-recording and post-recording, buzzer On/ Off, the time of alarm operation time. ALARM SCHEDULE Set-up for Alarm Schedule OPTION It sets up for Continuous Recording On/Off and Water-mark On/Off. 33 User Guide 4.3.1 REC PROPERTY Figure 4-20 It selects recording mode for resolution, quality and frame rate. You can see 1 to 8ch’s status when you choice 1-8 button as below the screen and 9 to 16ch’s status when you choice 9-16 button. After finish set up, you must press “OK” button then saved. If you press “Cancel” button, the values are not saved and exit. The chart below is for RECORD PROPERTY of Figure 4-20 RESOLUTION It can be set up in 360X240, 720X240, and 720X480. (NTSC) Move the cursor to REC RESOLUTION and press OK button. Use this menu to specify the record quality & Frame rate for Event-situation. EVENT (Motion/Sensor/Manual recording) IMAGE QUALITY can be reduced from BEST > HIGH > NORMAL > BASIC. NORMAL Use this menu to specify the record quality & Frame rate for Normal-situation. It sets up the rate on the saved frame. This feature changes the rate into 1/2 Frame as the Setup Values on the standard of Real-Time. The standard setup values are 0, 1, 2, 4, 8.for 120frame. RESOLUTION FRAMERATE RATE Range 4 CH 8 CH 16 CH 360X240 0,1,2,4,8,15,30 0,1,2,4,8,15,30 0,1,2,4,8,15,30 720X240 0,1,2,4,8,15,30 0,1,2,4,8,15,30 0,1,2,4,8,15 720X480 0,1,2,4,8,15,30 0,1,2,4,8,15 0,1,2,4,8 It is available to adjust the rate of each channel within the entire frame rate. So, it can be divided. 34 User Guide 4.3.2 SCHEDULE The SCHEDULE RECORD assigns the image store of the camera by each time and helps to utilize the store time (Figure 4-21). Figure 4-21 For this setup, place the cursor on the wanted channel with the scroll keys and press the Enter button. If you press Enter button at once, it is sets up “C”. This is Continuous Recording. If you press Enter button once more, it is set up “E” This is Event Recording. There is motion record and sensor record in event record. If you press Enter button once more, it is set up “I”. This is Continuous and Event Recording. It can set up the schedule area per channel by select the channel box in under menu. It would be easy to Schedule set-up if you click Date or Time button. If you need to set up the all camera, choose “ALL” the channel box. Then you must press the ok button. If not press the OK button, the set-up would be canceled. 35 User Guide 4.3.3 MOTION DETECTION It is set-up menu for the image motion, such as motion sensitivity and motion field. And It sets up the alarm out channel each video input channel. If you use Motion record, you have to select “E” in the each desired Blank of schedule Menu. Figure 4-22 The chart below is for MOTION DETECTION of Figure 4-22 MOTION AREA It is set-up menu for the image motion, such as ALL, PART, OFF motion field. It sets up the sensibility, place the cursor on the field number of the sensitivity and press the number from 0 to 9. The sensitivity of 9 is the best SENSITIVITY sensitivity. The sensitivity of motion in “9” sensitivity is same to the continuous record. And the sensitivity of motion in “0” sensitivity is same to no record. ALARM OUT It sets up the channel of alarm device. There is the single unit channel and multi unit channel. 4.3.3.1 MOTION AREA The Motion Area is shown in Figure 4-23, when the MOTION AREA on the screen of Figure 4-22 is selected. At the MENU, If it sets up the ALL and PART, The sensitivity organized for the 5 label basically. Then you can choose the sensibility label from the level 0 to 9. To set up the motion area, place the cursor on the field number of the motion area, please press “OK” button, then it sets up the ALL and PART. If it sets up to OFF label of the motion area, the motion recording would be not working. 36 User Guide Figure 4-23 The entire image of the channel is set up as the motion detection field, when the ALL is selected. The motion detection field can be selected like Figure 4-23, when the PART is set up. For this setup, place the box on the wanted block area of the image and press the OK button to operate the motion detection on the wanted block. The part motion detection field can be selected like Figure 424, Figure 4-25. Figure 4-24 Figure 4-25 If you press CLEAR ALL button, the motion detection area would be cleared and the value of motion area is changed OFF. The status of CLEAR ALL is the status of no record for motion detection. The motion field has 8 blocks on length and 8 blocks on height like Figure 4-25 and total 64 blocks can be selected to operate this feature. 37 User Guide 4.3.3.2 SENSITIVITY The sensitivity label is from 0 to 9. The sensitivity of 0 - it means that the area of motion detection is not working. And the sensitivity of 9 - it means that the all area of motion detection is working. Namely the motion area of 9 is ALL .The label of sensitivity is high sensitivity as high as the number is better than 0 label. 4.3.3.3 ALARM OUT It sets up the channel of alarm device. There is the single unit channel and multi unit channel. Place the cursor on the field number of alarm out and press the alarm channel number. You can see the setup window of the Figure 4-22. 4.3.4 SENSOR DETECTION As Figure 4-26, it consists of Recording channel, Sensor type, Alarm out port by sensor channel for systematic operation. If you use Sensor record, you have to select “E” in the each desired Blank of schedule Menu. 4.3.4.1 THE ASSIGNED RECORDING CHANNEL It assigned single channel and multi channel. Regarding single channel, select a channel (camera) to record data in “Record” menu as Figure 4-26. Figure 4-26 38 User Guide Regarding multi channels, select some channels (cameras) to record data in “Record” menu as Figure 427. Also you can choose ALL or expected channels. Figure 4-27 4.3.4.2 SENSOR TYPE This sensor device has two types of NC (NORMAL CLOSE) and NO (NORMAL OPEN). Users should select NC or NO type on DVR system to operate the exterior input sensor for specific purpose. To assign NC/NO, click “OK” button on the type select box as Figure 4-26 then choose sensor type. 4.3.4.3 ALARM OUT It assigned alarm out to link with sensor. You can see the setup window of the Figure 4-26. 39 User Guide 4.3.5 VLOSS If you set the Alarm-out to port1, Alarm will ring when video-loss occurs in a channel. It is possible to set-up to various channels as Figure 4-28. Figure 4-28 4.3.6 E-MAIL When any event happens, it will be notified to the registered email address by E-mail. Figure 4-29 Event E-mail Select “ALL TIME” or “SCHEDULE” to use Email notification. Event type Select “Event type” to notify by e-mail. SENDER ID Input DVR Name or ID. E-mail address Input your email address to receive event information from DVR. 40 User Guide Ex) E-mail message From : [email protected] To : [email protected] Sent : Friday, July 24, 2009 6:11 PM Subject : EVENT MESSAGE [2009/07/24 18:10:11] [testdvr/192.168.001.121] MOTION ch 1 ON 4.3.7 E-MAIL SCHEDULE This function works when you select SCHEDUEL as the value of EVENT E-MAIL in E-mail MENU. You can get email from DVR according to schedule you select date or time. Figure 4-30 41 User Guide 4.3.8 ALARM CONTROL It assigned pre recording time, post recording time, buzzer On/Off, assigned device action. Figure 4-31 The belong chart show ALARM CONTROL function as Figure 4-31 For the recording mode by the motion or sensor detection, it sets up the pre-record time and post-record time to start it from the time PRE REC TIME of the motion or sensor detection (Figure 4-31). It will be save recording data from the motion or sensor detection to the selected range of pre-recording time. For the recording mode by the motion or sensor detection, it sets up the pre-record time and post-record time to start it from the time POST REC TIME of the motion or sensor detection (Figure 4-31). It will be save recording data from the motion or sensor detection to the selected range of pre-recording time. BUZZER OUT TIME EVENT POPUP POPUP SEQUENCE TIME It’s the selection of buzzer in main board when alarm is on. If buzzer is ON, it makes select active time of buzzer or external alarm device. Alarm device will be active as you selected on time. When event happens, the channel will pop up if ON is selected. Switching time to display popup channels. 42 User Guide 4.3.9 ALARM SCHEDULE If you select the date or time you want , the Buzzer goes off, after the value of alarm-out was chosen as any value in each sub menu of EVENT, when the related things happen during the selected times. Figure 4-32 4.3.10 OPTION The menu is the other functions of recoding which consist of ‘CONTINUE REC’ for continuous record ON/ OFF and ‘Water Mark’ for prohibit tinseled of recording data. Figure 4-33 REC MODE (Recording Mode) WATER MARK Schedule – System records according to recording schedule. Continue – System continue recording all day long. Event – Event recording will work regardless of schedule mode. If you select ON in water-mark window, the recording data will include watermark. 43 User Guide 4.4. NETWORK It is for the NETWORK setup of the DVR system. Figure 4-34 4.4.1 NETWORK TYPE It sets up the network type such as STATIC, DYNAMIC, PPPOE. Figure 4-35 4.4.1.1 STATIC As the network environment that uses the static IP, it can be operated after inputting the information of IP ADDRESS, SUBNET MASK, and GATEWAY. Figure 4-35 shows the set-up example for the static IP. 44 User Guide Users can input set points with the number buttons on the remote controller, after placing a cursor on each field. The set-up of network is completed by pushing MENU button when the input of set points is finished. 4.4.1.2 DYNAMIC When the DYNAMIC is selected, users automatically get the IP ADDRESS through the connected network and the indication of PLEASE WAIT is shown during the acquiring the IP ADDRESS. 4.4.1.3 ADSL(PPPOE) It is the network that uses the Internet service from Internet service providers (ISP). Users can connect the network by typing in the ID and password that are authenticated to users by ISP. Place the cursor on the blank and push the ENTER button to see the character arrangement. And then, select the characters to type in the ID and password. 4.4.2 STREAM You can set up the recording rate and Network transfer rate separately. If you select ON in dual streaming, the network transfer rate can be selected in accordance with desired value. If you select OFF in dual streaming, the network transfer rate follows the recording rate. 3 kinds of parameter can be chosen , the maximum frame per second in 120 Frame in CIF. Figure 4-36 RESOLUTION NORMAL FRAME 360×240, 720×240, 720×480 Basic, Normal, High, Best 1, 2, 4, 8, 15, 30 45 User Guide 4.4.3 DDNS DDNS supports the Dynamic IP users to connect automatically their network regardless of the change of the IP ADDRESS, when data is registered in DDNS. It is managed by the DDNS server. But, the users should consult with Manufacturer before their operation, if they want to build the network on the special network or for their own special management. There are 4 kinds of DDNS server as Figure 4-37. Among them which 4 kinds of DDNS server, OFF means “Disable”, the others are “Enable”. IPUPDATER.COM and DYNDNS.ORG are world wide and free DDNS servers. After you register these sites, input each ID/ PW then click connection button. Finally, DDSN set-up is done, then the window display DDNS connection status as below. If you choose NICEDDNS, you can see specific DDNS URL. If you choose other names, you can modify DDNS URL. For assign, click “OK” button and input URL on the text box of window. DDNS URL is www.niceddns.com. Figure 4-37 46 User Guide 4.4.4 NETWORK SETUP It sets up client port, web port and band width. Figure 4-38 4.4.4.1 CLIENT PORT It is for the assignment of communication port to communicate with the DVR system through RMS (Remote Management Software). It is recommended to avoid system port and user port that is generally used a lot. Figure 4-38 shows the network port of the default set-up. This port is good to use. Each port is required for RMS operation and should be assigned. 4.4.4.2 WEB PORT It is used with WEB MONITORING SERVICE. Default port number is “80”. 4.4.4.3 BANDWIDTH This chapter is for configuring Network Bandwidth connected to DVR and controlling the transferring Video and Audio relate to Network Bandwidth. As a result of this option, it can save Network bandwidth between Remote client connection and DVR. It can be set up to UNLIMITED, 64KBPS, 128KBPS, 256KBPS, 512KBPS, 1MBPS, 2MBPS, 4MBPS, 10MBPS like Figure 4-38. The “UNLIMITED” means that no BANDWIDTH selection for specific configuration. Regarding Network Client, Users feel that low throughput(64KBPS) is transferring data slowly, and high throughput(10MBPS) is transferring data more faster. 47 User Guide 4.4.5 ACCESS LIST Registered IP address is allowed to access DVR. If you set at least one IP address, then only entered IP address would be allowed to access DVR. Figure 4-39 48 User Guide 4.5. SETUP – STORAGE It sets up the STORAGE of the DVR system. Figure 4-40 4.5.1 FORMAT It sets up each SATA port device, information and formatting hard disk drive. This is SATA port type as below the list. Figure 4-41 49 User Guide Figure 4-42 4.5.2 HDD S.M.A.R.T This window shows the temperature of HDD. Figure 4-43 If you select “ON” in SMART, you can change the value of the each items. TEMPERATURE THRESHOLD INSPECTION CYCLE DAILY TIME The temperature of HDD exceeds the desired value you input, the beep happen and the below MENU appears How many often the system should check the Temperature of HDD. This inspection cycle as daily means what time the system should check the temperature of HDD. 50 User Guide 4.5.3 AUTO-BACKUP – Standard model only There are two values you can select “EXTEND” or “MIRROR” function. Figure 4-44 When you select “Extend” in Auto backup, if internal HDD is full, Internal HDD EXTEND start to overwrite data, the elder data removed from internal HDD will be stored in external HDD. The data recorded in Internal HDD also simultaneously recorded in External HDD. Mirror In that case, if you proceed to format HDD, External HDD is formatted as FAT32. And the backup viewer included in DVR is copied to external HDD. * NOTE : After setting auto backup, when you change the port of external HDD(USB port position), you should set auto backup again. EXTEND Backup ㅁA ㅁB B C C D Internal HDD External HDD Internal HDD 51 A USB HDD User Guide <USB MEMORY> <External HDD> Figure 4-45 Figure 4-46 <Backup Data List> 52 User Guide 4.5.4 OPTION It sets up the storage option of the DVR system. Figure 4-47 This is the explanation of STORAGE OPTION in Figure 4-47. OVERWRITE Overwrite existing data when hard disk drive was full-filled. Delete the recorded data as per set up time. The assigned time is per day. AUTO DELETE ※Attention : please delete the recording data after do you concern the recording data. If do you not concern, the deleted recording data never recover. 53 User Guide 4.6. SETUP – SYSTEM It sets up the SYSTEM of the DVR system. Figure 4-48 4.6.1 TIME It is sets up the TIME for DVR system. Figure 4-49 It supports current time, date format, time format, world-wide time zone, Day Light Saving ON/OFF and Time sync as Figure 4-49. 54 User Guide 4.6.1.1 CURRENT TIME It displays the current time of DVR system for checking DVR time and actual time. If DVR time is wrong, please modify date format, time format and time zone by manual, and then click CHANGE TIME icon as Figure 4-50. For more details, refer to 4.6.2.6. 4.6.1.2 DATE FORMAT It selects the time format of DVR system. There are 3 types of the time display - YY/MM/DD, DD/MM/YY, MM/DD/YY. Push the arrow keys on the front panel or remote controller to choose specific format, and then click OK button. 4.6.1.3 TIME FORMAT It sets up time format between 12/ 24 format. Push Enter key on the menu, and then you can select 24 or AM/PM. If you choose 24 HOUR, the time display is 15:00 at PM 3 o’clock, and if you choose AM/PM, the time display is PM 3. 4.6.1.4 TIME ZONE It assigns worldwide time zone on the DVR to have Time Sync as Figure 4-50. For Time Sync, move Cursor key on the Time Zone, then push OK button.. Figure 4-50 55 User Guide 4.6.1.5 TIME SYNC Figure 4-51 TIME SYNC SERVER IP This function is for synchronizing the time of DVR periodically with that of the connected server by every hour Enter IP address of time server. E.g. time.windows.com. 4.6.1.6 CHANGE TIME It assigns time as Fig. 4.6.2.1. If you need to change time on the DVR, select “CHANGE TIME” icon and then select OK button. It shows ENTER TIME on the window box. And then input date, time by using numeric key on Remote controller. Figure 4-52 56 User Guide 4.6.2 UPDATE It sets up the firmware update for DVR system. Figure 4-53 This is firmware update and shows firmware status as Figure 4-53. Before go this process, you have to check USB icon on the live screen. If you cannot find USB icon there, check your USB and DVR system. There are two ways to upgrade. One is through USB and through Network. If your network status is not stable, USB upgrade is more recommended, so USB as it could be halt during network update due to increased network traffic. Figure 4-54 This is to choose update method as Figure 4-54. You click UPDATE icon and then choose one of them by using scroll key. And click “OK” icon and then it starts to update the firmware. It takes 2-3 minutes or more and you should be patient and wait until the update process is over. 57 User Guide Figure 4-55 This is the process of USB update as Figure 4-55. DEVICE is automatically recognized name and path of DVR system. You can choose any file by using scroll key. Then, click OK button. Normally it takes about 2~3 minutes for update, but you have to wait until all process is over. Do not stop or turn off DVR during process. Figure 4-56 This is for network update as Figure 4-56. The assigned server should be used for network update. Network update is less recommended than USB update. “endvr-update.com” is for network update server URL as a factory default. But, file name could be changed without notice. So, check it with your vendor. Network update takes more time than USB update does and processing time is variable depending on network status. And please do not stop update process or turn off DVR system during process. 58 User Guide FILE NAME Entry model Standard model 4 CH dl04-eto.tar.gz - 8 CH dl08-eto.tar.gz dh08-eto.tar.gz 16 CH dl16-eto.tar.gz dh16-eto.tar.gz *CAUTION : As do Network Upgrade, Always Check the file name and Server IP 4.6.3 CONFIG SETUP It saves the configuration file of DVR system and loads the saved configuration file. Figure 4-57 SAVE CONFIG - This is to save the configuration file of DVR system setting. It is not recommended to change file name because this file could be used later for any loading. DEVICE means a specific device name and path which DVR system automatically calls. This configuration file should be saved on USB root path, and it’s recommended to save on your PC not on USB for safety. LOAD CONFIG - This is to load configuration file backed-up to the DVR system and you always keep backed-up configuration file to USB root path. If you change file name during the work, you have to change to original file name before loading. You should put on USB to front panel USB port before loading the configuration file. 59 User Guide 4.6.4 OPTIONS Figure 4-58 This is extra functions of DVR - System ID / Keyboard / Key Tone . 4.6.4.1 SYSTEM ID User can assign unique ID to each DVR in order to control specific DVR using ID. It is a useful feature when user controls each DVR among them. Move cursor to System ID as Fig. 4-53 and press SEL key. Then, input the specific number of remote controller and press OK button. Now, DVR has its own code. And Remote controller has the same ID to control DVR. [Example] You input “02” as SYSTEM ID on setup and press OK button. Then, SYSTEM ID is changed to [02] as the SYSTEM ID says on the setup menu. To use SYSTEM ID [02], you have to press “Remote Controller ID” button and “0” and “2” on Remote Controller’s, too. 4.6.4.2 KEY TONE It assigns key sound when you push any keys on Front panel or on Remote controller. Move cursor to KEY TONE and choose ON/ OFF and then, press “OK” key. 60 User Guide 4.6.4.3 KEYBOARD CONTROL Product support a connection with control keyboard (1) Connect RS-485 port of DVR and RS-485 port of keyboard (2) Input desire System ID in DVR setup menu [MENU→SYSTEM→OPTIONS→SYSTEM ID] ☞ You can choose one system ID from 00 to 99. ☞ If system ID is 00, DVR system will get signal from connected key board regardless of Keyboard ID. Enter ID (00~99) ---------(3) Select Keyboard protocol in DVR setup menu [MENU→SYSTEM→OPTIONS→KEYBOARD PROTOCOL] KEYBOARD-PROTOCOL NONE WONWOO HI-SHARP (4) Press mouse on/off button of keyboard ☞ whenever pressing mouse on/off button, keyboard changes to DVR control mode or PTZ camera control mode. (5) When keyboard indicates DVR mode, press DVR system ID by using number button of keyboard and press ENT button during 2~3 seconds. Ex) If system ID of DVR is 01, press + press (6) Then, keyboard indicates DVR ID and you can control DVR. 61 (hold) User Guide ◈ Button description of WTX-1200A for DVR operation 1. Mouse Icon : Change DVR control mode (DVR) or PTZ control mode (WDS) 2. Red Box : Number button 3. F1 : Full screen mode 4. F2 : 4ch screen mode 5. F3 : 9ch screen mode 6. F4 : 16ch screen mode 7. MENU/AUTO : Sequence mode 8. AUX : Search 9. OPEN : short press – Menu / long press – Function 10. SET : REC 11. CLOSE : Enter 12. NEAR : Play / Pause 13. FAR : Stop 14. TELE : Fast rewind 15. WIDE : Fast forward 16. JOYSTICK : Direction (◀ ▶ ▲ ▼) Moving cursor in DVR menu. ☞ If you change channel Press number button and press ENT button + press Ex) If you want to go to channel 7, press 62 . User Guide 4.6.5 USER ID and Password for the network are given up to 4 to avoid the system overload due to excessive connection on RMS and it intercepts the connection of unregistered ID. ID and Password that are registered on the system should be typed in to connect the RMS. For the registration, place the cursor on each blank and push the OK button to see the character arrangement. Select the characters to type in. Figure 4-59 USER There are two unchangeable user IDs (ADMIN, NETUSER), and additionally you can add four additional USERs by yourself. Only passwords for ADMIN and NETUSER are set to ‘0000’. When you create PASSWORD a new account, make sure that you have to enter new PASSWORD. And don’t forget the Password. SETUP REC.F Only by checking this box, accounts can be allowed to enter SETUP MENU. Checking this box allows users to control and change values about RECORD, PLAYBACK, and BACKUP functions. NETWORK Checking this box makes users access or control DVR in NETWORK function. MONITOR All users can monitor the current screens. When this is set to ON, LOGIN window will re-appear after entered time from TIME OUT any signal input. If you want to log out, you need to go to MENU and select LOG OUT like right picture 63 User Guide Chapter 5. SEARCH Figure 5-1 This menu searches the saved image data by Time, Date(Calendar), or Event replay (Figure 5-1). For secure reasons, according to select option, DVR system must have ID and password to assigned users. 5.1. SEARCH – SEARCH BY TIME Figure 5-2 It is the menu to search the video data by Date & Time. If you select the icon of SEARCH BY TIME, You will see the Figure 5-2. Then you have to fill the date & time to find recording data. 64 User Guide 5.2. SEARCH – SEARCH BY CALENDAR It is the menu to search the image data by recording time. The screen (Figure 5-3) is shown up when the TIME SEARCH is selected. Place the cursor on the data that you want to search with the scroll keys and push “OK” button. Figure 5-3 The existence of the image data is indicated and the image data is searched when the date to search is selected (Figure 5-3). The image data is indicated by colored section. Place the cursor on the colored section and push the OK button to play the saved image data. As the cursor moves, its location and time is indicated on the time bar at the bottom of the screen. The saved image data can be searched with REW (◀◀) / PLAY (▶Ⅱ) / STOP (■) / FF (▶▶) (Figure 54). During the playing, pushing the play button pause the play of the image data. Figure 5-4 65 User Guide The users can select the PLAY BUTTON (▶Ⅱ) on remote controller. To operate these features, select the PLAY BUTTON (▶Ⅱ) to start the search process and push REW (◀◀) or FF (▶▶) during the search. The play speed is doubled when the REW (◀◀) or FF (▶▶) is repeatedly pushed. The REW (◀◀) and FF (▶▶) BUTTONS increase the speed up to 128 times. Button and icon instruction for searching the image data REW (◀◀) -It rewinds the image data to replay the passed image during the search of the image data. -Its rewind speed goes up to 128 times faster by pushing this button repeatedly. -STEP REWIND feature is operated by pushing this button when the pause button is pushed during the search. :fast rewind(x2), : fast rewind (x3), PLAY (▶Ⅱ) It replays the saved image in normal speed. STOP (■) It stops the search of the image data. FF (▶▶) -It is for the search of the image data :fast rewind, : step rewind It pause the play by pushing it once more. with fast speed and replays up to 128 times faster. -STEP FORWARD feature is operated by pushing this button when the pause button is pushed during the search like REW (◀◀). :fast forward(x2), :fast forward(x3), :fast forward, : step forward 5.3. SEARCH – SEARCH BY EVENT This feature separates the data that is recorded by EVENT from the image data to search the image. The selectable event is the event of motion, sensor and video loss. If you select the event for motion, you can see the recording data for motion per Date/Time and video channel. Figure 5-5 66 User Guide In Figure 5-5, select Start/End time for search. Move cursor to START TIME by front panel key or remote controller, then input number of date/time. If you choose ALL check box, all channels are saved. If not you can choose specific channel, you can search by each Event (motion, sensor, video loss) with video and audio. Figure 5-6 Figure 5-6 is the shown recording data by event search and are done with the file type. By moving recording file with the cursor and selecting OK button, recording data can be shown. 5.4. SEARCH – GO TO FIRST AND GO TO LAST This function is the search for the start of recording date and last of recording data of recorded device. If you want to search start of recording data, click GOTO FIRST icon as Figure 5-1. Then recording data is play-back shortly. And if you want to search latest(previous) of recording data, click GOTO LAST icon. But you cannot see this data if you don’t have any recorded data. Please take care. At First, check your recording status on your DVR system. Next, check your recording device. If there’s any problem, we could recover your data. 67 User Guide Chapter 6. FUNCTION It is the additional function to support Main Menu. There are the PTZ Function, SPOT, SEQUENCE, AUDIO, BACKUP and LOG VIEW for DVR system. If you need to go into the Function menu, please click the “Menu” button on status bar and then select FUNCTION menu. Figure 6-1 6.1. PTZ 6.1.1 PTZ( Pan / Tilt / Zoom) After you set PTZ preset and scan point as figure chapter 4.2.3. PTZ PRESET to 4.2.4 PTZ SCANPOINT, you can use these function on this menu and PTZ control bar as figure 6-1 and Figure 6-2. Figure 6-2 You can use this menu after you set PTZ protocol as 4.2.2 PTZ protocol, and can have full screen video status. This control bar has UP/DOWN/LEFT/RIGHT and Zoom in/Zoom out control function. 68 User Guide 6.1.2 PTZ( ADVENCE PTZ ) Figure 6-3 This PTZ control bar for PTZ preset and PTZ SCANPOINT as chapter 4.2.3 PTZ Preset to 4.2.4 PTZ scan point includes Focus control and Auto Focusing (If camera supports). 6.1.2.1 FOCUS Click AUTO icon for auto focusing function. If you want to control by manual control, move the cursor to focus. And press the icon “+” and “–” . 6.1.2.2 IRIS There are manual control and auto control (if camera supports). Click AUTO icon, if video is darker or brighter than normal. If you have the same problems, click “+”, “-” icon to set video status. 6.1.2.3 SPEED It assigns speed value on the Control bar as Figure chapter 4.2.1 PTZ PROTOCOL setup. If PELCO-D PTZ Camera is ID 05, Baud 9600 and you need to choose speed, choose ID no. 05 by remote controller on the cursor as Chapter 4.2.1 and push ENTER key. Then choose PELCO-D on the PTZ protocol and Baud is 9600 after choosing speed by + or – as Figure 6-3 PTZ ADVANCE control bar. 69 User Guide 6.1.2.4 SCAN Figure 6-4 Click SCAN icon as Figure 6-3 PTZ ADVANCE on the Control bar and the display scrolls as assigned SCANPOINT number of chapter 4.2.4 PTZ SCANPOINT. If you choose a specific number of them, the camera moves to preset region automatically. For more detail, please see chapter 4.2.3 and 4.2.4. 6.1.2.5 GO It operates the function of PRESET number as you set preset number on 4.2.3 PTZ PRESET. To operate it, click GO icon on the PTZ advance control bar. If you don’t set this function on 4.2.3 PRESET, there is no preset number on GO control setup bar as figure 6-5. Figure 6-5 70 User Guide 6.1.2.6 OSD MENU When you click “OSD Menu” button, will go into PTZ own OSD Menu. Then you can set-up PTZ OSD Menu from DVR remotely. 6.2. SPOT – Standard model only Figure 6-6 It supports single Spot and quad Spot through SPOT output connector. Please refer to the content of [[ Chapter 4.1.5 / 4.1.6 ]] Page 25. 71 User Guide 6.3. SEQUENCE Figure 6-7 Click “sequence” button in Function menu after selecting 1 or 4 division screen from DVR. Then you can use Sequence function. Please refer to the content of [[ Chapter 4 – Live – Sequence]] Page 20. . 6.4. AUDIO It controls the audio output on each channel. The users can select the audio output to turn on of off by choosing AUDIO ON or OFF (Figure 6-8) and the audio output can be stopped by MUTE. Figure 6-8 72 User Guide 6.5. BACKUP It stores the saved image and sound data in backup device. Figure 6-9 It is the explanation of the BACKUP set-up. DEVICE This section display specification and information of USB device or DVD-RW for backup. CHANNEL It assigns the BACKUP type and target channel. All channels are assigned when ALL is selected, if you want choose specific channel, click ALL button for disable all channels. After that click specific channel which you want to backup. If you want to choose all channels, click the check box ALL. If you select “To AVI” menu, you can save the data by AVI format. However, it supports to Back-up for a channel data only. TIME It assigned start to end time of backup data, click the specific table of time “FROM” and click OK button as Figure 5-2, then you can see time selection box. Push numeric button on the front panel or remote controller to input specific time. After that process, click OK button then backup process is start. You have to wait for image processing on system before save on media in case of backup to USB memory device. 73 User Guide 6.6. LOG VIEW This function confirms the overall operation LOG in the DVR system. Push the FUNCTION KEY and select the LOG VIEW at the screen of Figure 6-1. You can choose LOG type. If you want to see all, try to click “ALL”. Also if you want the specific type, you can check what you want to see. Then check FROM and TO for specific time for log search. Finally, click SEARCH button. Figure 6-10 74 User Guide Chapter 7. OTHER FUNCTION 7.1. DIGITAL ZOOM It’s digital zoom, not optical zoom. Digital zoom has 2x and 4x, If you press Z/F button on remote controller in full screen mode, you can see Zoom screen as figure 7.1. Also If you press direction buttons (Up/ Down/ Left/ Right), Zoom-Area window will move. If you press Select key, Selected Zoom-Area will be displayed as full screen as figure 7.2. Figure 7-1 Figure 7-2 7.2. PIP PIP (Picture in Picture) displays another image in a small pop-up screen over the previous image in the FULL SCREEN. With the PIP BUTTON, the previous image is shown as CH No.1 in the FULL SCREEN and the another image is played as CH No.2 in the small pop-up screen. The sizes of the two screens are interchanged, when the PIP BUTTON is selected again. Figure 7-3 With the scroll button (◀▶▼▲) on remote controller, the small pop-up screen could be moved. 75 User Guide 7.3. POP POP focuses on the screen that is wanted to watch from the equal-size screens. On the POP (screen), the screen of the desired channel is displayed in the FULL screen, when the channel number is selected. Figure 7-4 7.4. THE SETUP FOR IP ROUTER If your network uses Dynamic IP and also uses one more network IP based on WAN IP by IP router, you have to configure IP router to use Network client program. STEP 1] Please check your WAN IP and DNS on IP router STEP 2] If you have many private IP on network, you have to set private IP on DVR system. STEP 3] Normally, IP router uses 192.168.0.1 or 192.168.1.1 on the network, so we recommend 192.168.0.5 later or 192.168.1.5 later. Example] WAN IP : 61.123.071.49 DNS : 168.136.0.1 on IP router, you need 4 IP and 1 DVR, 1. Set 192.168.0.6, 192.168.0.7, 192.168.0.8, 192.168.0.9 2. If you want to use 192.168.0.9 for DVR, set port forward that IP on your IP router. Port forward value is 7620 to 7624. There are many IP router brands, so you have to read IP router manuals and try to sets up as reference. 76 User Guide 7.5. MOUSE CONTROL z System support connection with USB mouse and can be operated by USB mouse. z For using mouse operation, Connect USB mouse to USB port of product. z Some USB mouse cannot be compatible with product. 7.6. CHANGE SCREEN MODE If you press right button of mouse on screen, following window will appear. Change the screen mode Channel button z If you double-click specific channel, screen changes full screen mode. If you want to go back to previous mode, double-click again. z At PIP mode, if you want change channel of small window, press right button of mouse. Then, screen mode menu will appear. Click desire channel button 77 User Guide EnNet Client Software Release Version : 2.5 EnNET2.5 client software is the software for controlling the system through the network. Any copy or change would be prohibited by law. 78 User Guide 1. INSTRUCTION 1.1 Network Client Program Client program which allows Client PC to live monitoring, search, save, and restrict PTZ camera and backup the images retrieved from DVR connected of EnNet2.5(Network Client Program). 1.2 Program Installation 1. Insert packaged Client Program CD in the CD-ROM. 2. Client Program will automatically start; if not manually double-click the icon to install. 3. Client Program install icon will appear, install the file or name the folder differently and install. 4. Once Installation is complete, Network Client Program (EnNet2.5) Icon will appear on the desktop, and in the Start Program List of OS. 5. Double click the icon to start the program. 1.3 Client System Requirements Least Recommended CPU Intel Pentium III Intel Pentium IV or higher Main Memory 256 MB 512 MB VGA Memory 64 MB 128 MB Screen Resolution 1024x768 1024x768 Free Disk Space 10 GB or higher 20 GB or higher OS Windows XP, 2000 Pro Windows XP, 2000 Pro, Vista Network 10/100 Base T 10/100 Base T DirectX Direct 9.0 or higher Direct 9.0 or higher 79 User Guide 2. MONITORING FEATURE 2.1 Starting Program Double click Client Program icon on the window desktop to start the program. Below image will appear for few second before Client Program appear on the main screen. [Figure 1. Initial Starting Screen] [Figure 2. Monitoring Main Screen] 80 User Guide 2.2 Monitoring control button feature FUNCTION DESCRIPTION Indicates name and current time on Client PC(Local) 4,6,9,13,16 Screen Divisions mode Transfer to Next Channel, Full, Auto-rotation mode Use the button to search data SEARCH Use the button to go to setup mode SETUP Indicate where camera is installed E-MAP Locking the screen of running function LOCK Save DVR’s data in Client PC LOCAL MANUAL RECORD Control PTZ camera’s Pan/Tilt/Zoom/Focus functions PTZ CONTROL A still image can be captured and saved in the desired SNAP SHOT folder Connecting to Remote DVR CONNECT Finish Client Program SOFTWARE TURN OFF Indicates log information : All, System, Status, Event Indicates Client information OSD(DISPLAY ON/OFF) Controls audio volume SOUND Event List scroll EVENT LIST SCROLL LOCK 81 User Guide 2.3 Connecting to Remote DVR Click the connection button then below Connection. Screen will be displayed. Site Configuration DVR TYPE The network-connect Information of Remote DVR Select either dvr.enview.net or www.esthub.co.kr (Please refer to DDNS Part of the provided Manual) Site Name Type in site name of DVR IP Address Type IP address of Remote DVR. If using DDNS, Type DDNS ID in this field. DDNS ID PORT(Network Port) If you use DDNS, Type your DDNS ID. (If you select Content of DDNS, “IP Address” change “DDNS ID”) Type the same port as DVR. Password Type the same password as DVR Channel Select the number of DVR channel Audio Connect Check to use or not to use an audio connection. (If this want to use, It has to set Audio connection from DVR) Add new DVR Edit Site information in Site list Delete DVR from the Site list Site List It display the entire site information of Remote DVR. It connect the selected DVR Exit 82 User Guide 2.4 Monitoring Live screen will appear once the connection is made between Client Program and Remote DVR, Client Program screen divides according to the number of Remote connected DVR’s channel. [Figure 3. Monitoring Screen] Once Client Program is connected to Remote DVR, event information will display on the list and you can search information at your request. Displays all event information Displays system related information Displays system status Displays event log Client Program Started Recording DVR connected Sensor detected Motion detected Configuration Changed Alarm alerted DVR shutdown Camera disconnected click disconnection button to close live screen then appears the main screen. 83 User Guide 2.5 Storing in PC(Local Manual Record) 1. [RECORD] Click Record button, then chosen live feed screen will store in chosen folder of Client Program menu 2. To stop storing, click Record button. You can click Search button and local search to play stored file. 2.6 PAN/TILT/ZOOM/FOCUS CONTROL Select channel with PTZ Camera in monitoring screen and click PTZ button screen will appear. Camera Panning Camera Tilting Zoom in , zoom out control Focus in , Focus out control Select PRESET number Run PRESET Stop PTZ Camera control function 84 then PTZ control User Guide 2.7 LOCK SCREEN 1. Click lock button then chosen lock screen from the Client Program menu function will run. 2. Type saved password 2.8 SNAP SHOT 1. Click SNAPSHOT button then live feed screen will be captured in still image. 2. Click JPEG save button then it would be saved under desired place and name. 3. Click Print button to print from connected Printer 4. Click Exit button then you can capture stored image or can go to Search Screen without Printing. 85 User Guide 3. SEARCH FEATURE 3.1 Main Search Screen Click Search icon in the main screen of client program then, main Search screen will appear [Figure 4. Main Search Screen] If the screen lock is set in the client program configuration menu, you need to enter the password. 86 User Guide 3.2 Search Button Feature FUNCTION DESCRIPTION Data stored date will be displayed in dark shades. Use arrow to choose wanted date 4,6,9,13,16 Screen Divisions mode Next Screen, Full Screen, and Panorama Search Backup button BACKUP Lock the screen LOCK SNAPSHOT button SNAP SHOT Event button EVENT Local Search button LOCAL SEARCH Remote Search button REMOTE SEARCH Go to the first data search Move backward by 1 frame Fast Backward Playback Reverse play Stop playing data Play the stored data Fast forward Playback 87 User Guide Move forward by 1 frame Go to the last data search Search and display by 4 channels Indicate recorded Hour Indicate recorded Minute Scroll 4 channels from recorded data Play audio Mute audio Exit 88 User Guide 3.3 Remote Search – Selecting the recorded date and time 1) Select the date from the right calendar. Saved data of the date will show in yellow, Date selected will change to red. 2) Select search date saved data will show in 24 Hour matrix. Blue is the data saved time, Red is the time you want to search. 3) Select search time then saved data will appear in red. Click play button to play from the first of data. Move the mouse to play the exact time of data. 4) Selected screen division mode will be applied when searching.. 89 User Guide 3.4 Local Search 1) Search and play recorded Date. Click local search button then display saved data files and under right list. Select the saving folder from client program setup menu. 2) Select a file which located in the right box and displays ENV file’s channel then Start time/ Exit time of data information recorded. 3) Click play button to play the recorded data. 4) Click cancel button, then exit to main screen. 90 User Guide 3.5 SNAPSHOT 1) Click SNAPSHOT button then live feed screen will be captured in still image. 2) Click JPEG button then select save folder and type file name. 3) Click print button to print 4) Click Exit button to save captured still image or Exit without printing. 91 User Guide 3.6 Search Log Information 1) Client program and Remote DVR information – Search and Save Motion detection, Alarm, Sensor detection data file Event Log Type Kinds of log information : All, System, Status, Event Search Search log information by Year and Month Date Select saved date Save as file Save to CSV file from selected log information(Type folder and file name) Close Exit search log information screen 92 User Guide 4. BACKUP FEATURE 4.1 Select Backup time period 1) From the saved data, select time period you want to backup and click [BACKUP] button 2) Click backup button then displays backup screen. 93 User Guide 4.2 AVI Backup time period 1) Select the type of BACKUP file in AVI then backup channel by channel. 4.3 ENDB Backup time period 1) Select the type of BACKUP file in default format then select channel and backup. 94 User Guide 5. SETUP PROPERTY 5.1 Setup System Click [SETUP] button in monitoring screen then display setup menu to configure client program property 5.2 Setup System control button Save modified configuration property and Exit to Main Screen Exit to Main Screen 95 User Guide 5.3 Setup Property description FUNCTION DESCRIPTION Program information Indicate program name and current version ∟ Program Name Client Program name ∟ Program version Client Program Version information Language and Date Indicate and Select client language /data type ∟ Language It is the language of setup menu on client program ∟ Date display It displays the type for date on client program Screen Setup It is control of the setup for Font size on client. ∟ Font Size(OSD) Control the font size of OSD on client screen ∟ Auto Sequence Dwell Time Control the interval time of sequence on client screen. ∟ Event Duration Time Display the event list by assigned time Save Folder Indicate the information for each saved folder. ∟ Recording Indicate the saved folder information for manual record. ∟ Still Image Indicate the saved folder information for still image. ∟ Backup Indicate the saved folder information for backup. ∟ Log Indicate the saved folder information for log. ∟ Recording Max Control the capacity of recording ∟ Log Saving Term Control the period to use log data space Screen Lock Control the authority for each module menu ∟ If check the each check box. When using the checked menu, You have to fill the password. ∟ It is the password for authority. 96