1
AL
MA
TE
RI
Building Resources
TE
D
Ruby on Rails is opinionated software. This doesn’t mean that it’s going to make fun of your
haircut, or tell you what kind of car to drive. It does mean that Rails has definite ideas about how
your web project should be structured, how it should interact with a database, how you should
test, and even what kinds of tools you should use. Tasks that Rails feels that you should do often
are easy, and tasks that Rails thinks should be rare are (usually) possible but more complicated.
This works because the Rails team has done an exceptionally good job of deciding how web
projects should work, and how they should not work.
GH
Two important principles that Rails favors are especially useful when starting a new Rails project:
Representational State Transfer (REST) is a relatively new mechanism for structuring a Rails
application by organizing the application around resources, rather than pages.
❑
Test Driven Development (TDD) is an important part of ensuring the correctness and design
of any software project, but Rails does a particularly good job of providing the developer
with the tools needed for easy and powerful automated testing.
PY
RI
❑
CO
In this chapter, you will begin the construction of the Rails project that will carry you throughout
the book. This will enable you to review the basic Rails functionality you should already be
familiar with, but with an added emphasis on REST and TDD. At the end of this chapter, your
Rails knowledge should be refreshed, state-of-the-art, and ready to go.
To run the examples throughout this book, a standard suite of applications is assumed to already
be installed on your computer. The suite includes Ruby, Rails, MySQL, and Subversion.
See Appendix A, “Things You Should Download,” for details on how to install these tools.
A Good Place to Star t
The sample application that drives this book is called Soups OnLine, your Web 2.0 guide to all
things hot and broth-y. As the site develops, it will have all sorts of modern web goodness,
including an Ajax interface, social networking and content development, RSS syndication, and
Chapter 1: Building Resources
fancy graphics. For the moment, though, all it has is the standard Rails application structure, which you
should see in your command window after you execute the following command:
rails -d mysql soupsonline
If you leave off the -d mysql, then your application will be created to use SQLite3, which is the new Rails
default. The database can be changed later in developemnt. In response, Rails will create a standard
application structure:
create
create
create
create
app/controllers
app/helpers
app/models
[... several creations skipped ...]
create
create
create
create
log/server.log
log/production.log
log/development.log
log/test.log
The examples in this book were written and tested against Ruby 1.8.6 and Rails 2.0.2. Ruby 1.9 has not
been released as of this writing, but is expected shortly.
A Recipe for Recipes
There are two useful places to start when planning a Rails application:
❑
You can start from the front-end and move backwards by thinking about what actions or
activities your users will perform in the site.
❑
You can start from the back-end and move forwards by thinking about what kind of data you
will need to be storing.
The two directions feed back and forth on each other, of course, and there’s no particularly correct way
to go about site design. Rails is extremely good at supporting incremental development, so starting in
one small place and gradually increasing functionality is a perfectly valid design process.
For the purposes of the book, I’d like to start with a brief description of user activities, but work in
earnest with the initial data structure and administrative side, catching up with the user activities in
future chapters. For me, at least, since Rails is so good at quick-and-easy data creation support, it feels
more direct to start with that part, get some quick success under my belt, and then start designing the
front end with some actual data to look at.
So, here’s a quick description of user activities. Soups OnLine is intended to start as a recipe repository,
where users can upload recipes, find recipes that match various categories or criteria, and comment on
recipes. More advanced uses might include the capability to make and receive recommendations,
information about various techniques or ingredients, and the capability to purchase equipment,
ingredients, or even premade soup.
2
Chapter 1: Building Resources
From the data perspective, the place to start is the recipe — that’s the main unit of data that the users will
be looking at. What’s the data for a recipe? Pulling out my handy-dandy Joy of Cooking (Simon & Schuster),
I see that a recipe consists of a title (“Cream of Cauliflower Soup”), a resulting amount (“About 6 cups”),
a description (“This recipe is the blueprint for a multitude of vegetable soups . . .”), some ingredients
(“¼ cup water or stock, 1 tablespoon unsalted butter”), and some directions (“Heat in a soup pot over
medium-low heat . . .”).
There are some interesting data representation questions right off the bat. To wit:
❑
Should the directions be a single text blob, or should each step have a separate entry?
❑
Should each ingredient be a single text string, or should the ingredients be structured with a
quantity and the actual ingredient name?
❑
Is the ingredient list ordered?
❑
The Joy of Cooking is unusual in that it actually interpolates ingredients and directions, which is
perhaps easier to read, and also enables lovely recipe visualizations such as the ones at the
website www.cookingforengineers.com. Should you try to allow for that?
❑
Sometimes an ingredient may itself have a recipe. Many soup recipes start with a standard base
stock, for example. How can you allow for that?
I find these decisions a lot easier to make with the understanding that they aren’t permanent, and that
the code base is quite malleable. Eventually, of course, there’ll be the problem of potentially having to
deal with a lot of data to migrate, but until then, here’s how I think the site should start:
❑
Directions are a single text blob. There isn’t really any data to them other than the text itself, and
if you have a convention in data entry of using newlines to separate steps, it’ll be easy enough to
migrate should you choose to.
❑
There will be structured and ordered ingredient lists. Usually ingredients are given in a
particular order for a reason. Adding the structure doesn’t cost much at this point, and will
enable some nice features later on (such as English-to-metric conversion). I also think that this
one would be harder to migrate to the structured data if you don’t start there — you’d have to
write a simple parser to manage that.
❑
Interpolating ingredients and directions could be managed by adding directions to the
ingredient data, but doing so adds some complexity to the user display, and I’m not ready to
start with that. The idea of being able to do those shiny table visualizations is tempting, though.
This is a possibility for change later on, although I suspect that it would be nearly impossible to
extrapolate data from preexisting recipes.
Having ingredients themselves have recipes is a complication you don’t need at this point. In case it’s
not clear, I should point out that I’m doing this planning in real time. As I write the draft of this, I haven’t
started the code yet, so I could yet turn out to be dead wrong on one of these assumptions, in which case
you’ll really see how suited Rails is for agile development.
Having done at least a minimum of design work, it’s time to instantiate the data into the database.
You’re going to do that using the new-style REST resources with Rails.
3
Chapter 1: Building Resources
The REST of the Stor y
I pledge right now that will be the only REST-related pun in the whole book (unless I think of a really
good one later on).
REST is another one of those tortured software acronyms — it stands for REpresentational State
Transfer. The basic idea dates back to the doctoral dissertation of Ray Fielding, written in 2000, although
it only started gaining traction in the Rails world in early 2006, when a couple of different plugins
allowed for a RESTful style within Rails. The functionality was rapidly moved to the Rails core and has
just as quickly become a very commonly used practice, especially for standard Create, Read, Update,
Delete (CRUD) style functionality.
What Is REST?
There are three different ways of thinking about REST as compared to a traditional Rails application:
❑
Pages versus resources
❑
Network protocols
❑
Rails features
You’ll explore each of these in the following sections.
Pages versus Resources
The traditional view of data on the Web is action-oriented. A user performs an action on a page, usually
by just accessing the page, but sometimes by sending data as well. The server responds with data,
usually in HTML, but a pure web service is likely to send XML or JSON.
A RESTful application, in contrast, is viewed as a set of resources, each of which contains some data and
exposes a set of functions to the Web. The core of these functions is made up of the standard CRUD
actions, and the application programming interface (API) for the standard functions is supposed to be
completely consistent between resources. A resource can also define additional actions for itself.
If this reminds you of the distinction between procedural programming and object-oriented
programming (OOP), with REST resources playing the part of objects, well then you’ve got the gist. One
difference is that using REST in Rails primarily changes the way in which the user accesses your data
because it changes the URL structure of your site, but the data itself will be largely unaffected, whereas
an object-oriented design does affect the way your data itself is structured.
Network Protocols
The signature feature of a REST-based web application is the use of HTTP access methods as critical data
when determining what to do in response to a request. HTTP defines four different methods for
requesting data (and eight methods overall). Many of us learned this fact in a beginning HTTP book or
network course and promptly filed the information under “trivia that might win a bet someday, in a
bizarre set of circumstances.” Only two of these methods are in general use — nearly every server since
the days of Mosaic has only used GET for getting information out of the server and POST for putting
4
Chapter 1: Building Resources
information into the server. In addition, most web applications used separate URLs for their GET and
POST operations, even where it was technically feasible to share URLs. For example, the Java Servlet
specification allows the same servlet to respond differently to a GET or POST, but all of the servlets I’ve
written either defined one of the methods as a clone of the other, or only respond to one method,
ignoring or failing if the other is invoked.
It turns out, though, that the HTTP protocol also defines PUT and DELETE. It’s easy to understand DELETE,
but it’s not immediately clear what the original intention was for the distinction between PUT and POST —
you’ll see in a second the distinction REST and Rails make between them. A RESTful application uses all
of these methods (often called verbs) as a meaningful part of the Web action. In other words, when
confronted with a URL like http://www.soupsonline.com/recipes/1, a RESTful Rails application
cannot determine what controller action to perform without knowing whether the request was a GET,
DELETE, or PUT. A GET request would result in a show action, the DELETE request triggers the delete
action, and the PUT request triggers the update action. In contrast, a traditional Rails application would
have the controller action explicitly specified in the URL, ignoring the HTTP verb. The traditional URL
might look like http://www.soupsonline.com/recipes/show/1 or http://www.soupsonline
.com/recipes/update/1. (I realize that it’s slightly absurd to refer to anything in Rails as traditional,
but there isn’t a better retronym for the non-REST applications.)
By now, you may have realized a contradiction that I’ve hand-waved my way past. If all the browsers
handle only GET and POST, then how does a RESTful Rails application use PUT and DELETE? The Rails
core team, like geniuses since time immemorial, is not going to let a little thing like the imperfection of
the current state of browsers get in the way of a conceptually nifty idea like REST. When you ask Rails to
create a PUT or DELETE link, it actually wraps the request inside a small POST form with a hidden field
that Rails then decodes on the server end. In the happier RESTful future, servers will implement the
complete HTTP specification, and Rails can dispense with the disguise and display its PUTs and
DELETEs proudly.
Rails Features
Within Rails, you do not explicitly define a class called a Resource in the same way that you explicitly
define Controller or Model classes — at least, not for resources controlled by the local Rails application
(see Chapter 9 for how you might access resources from a remote server). A resource emerges from the
interaction of a Controller and a Model, with some magic in the route-mapping gluing them together.
Although Rails provides a REST resource generator that creates a tightly coupled Controller and
Model, you could easily have two separate resources managing different facets of a model. Each resource
would have a separate controller. For instance, if you had some kind of employee database, you could
manage contact information and say, vacation days as separate resources with separate controllers, even
though they are in the same model. As you’ll see in just a few moments, you can also nest resources,
designating one resource as the parent of another.
RESTful resources also bring along some helpful nuts-and-bolts functionality that makes them quite easy
to deal with. The controller method respond_to was created for REST (although it can be used in any
Rails controller), and makes it extremely easy to deliver your data in multiple formats. Continuing the
description in the previous section, using respond_to, your application can return different data for
the URL http://www.soupsonline.com/recipes/1.xml as compared to http://www.soupsonline
.com/recipes/1.rss or even http://www.soupsonline.com/recipes/1.png.
5
Chapter 1: Building Resources
A RESTful view can also use some logically named methods to generate the URL that you might use
inside a link_to call in your view. Rather than fussing around with action parameters, or passing the
object or ID you want to control, Rails will automatically respond to methods such as recipe_path or
edit_recipe_path — assuming, of course, that you’ve defined a resource for recipes.
Why REST?
REST is elegant, and I think it’s a logical progression of where the best-practices design of Rails
applications has been heading since Rails was released. There’s been a continual motion towards having
more controllers, having thinner controllers with the real work done in the model, and enforcing
consistency between controllers. REST provides a framework for moving that design style to the next
level: lots of controllers, lots of activity possible with very little controller code, and absolute consistency
for CRUD-style controllers. If you are the kind of web designer who likes to have the URL interface to
your application be extremely crisp and concise — and many of us are — then REST will feel quite nice.
That said, you’re going to see the biggest benefits from REST if your application is either implementing
or consuming web services. The consistency of interfaces to REST resources, coupled with the almost
trivial nature of converting an ActiveRecord object to an XML representation and back turns every
Rails application into a potential web service, but if you aren’t thinking of your application in those
terms, it may not feel like that big of a win. Although you might try to think of your application as a
potential service, it may open avenues of functionality that you haven’t thought of before.
Even if you aren’t providing a web service, pretty much every Rails application has to do some set of
CRUD actions on its data. REST is a powerful mechanism for making that process even simpler. Again,
though, REST isn’t necessarily going to be much assistance in creating the fancy front-end of your
application, but it will make the wiring easier to install, which will leave you more time to make that
front-end even fancier.
Building Your First Resources
Earlier, you saw the initial design for Soups OnLine where two resources, recipe and ingredient, were
described. It’s time to put them in your application, using the Rails generate script. The action for the
script is scaffold. (In versions of Rails prior to 2.0, it was called scaffold_resource.) The syntax is
simple: the singular name of the resource, followed by pairs of the form attribute:datatype for each
attribute you want initially placed in the resource.
The data-type portion of each pair can be any type available for use as a data type in a Rails migration:
binary, boolean, date, datetime, decimal, float, integer, string, text, time, and timestamp.
There’s no expectation that you have to have the attribute list correct up front (it can always be changed),
but it should just be an easy place to start. The commands and responses look like this (for clarity, I’ve
removed lines where Rails shows that a directory already exists):
$ ruby script/generate scaffold recipe title:string servings:string
description:string directions:string
create
create
6
app/views/recipes
app/views/recipes/index.html.erb
Chapter 1: Building Resources
create app/views/recipes/show.html.erb
create app/views/recipes/new.html.erb
create app/views/recipes/edit.html.erb
create app/views/layouts/recipes.html.erb
create public/stylesheets/scaffold.css
create
app/models/recipe.rb
create
test/unit/recipe_test.rb
create
test/fixtures/recipes.yml
create
db/migrate
create
db/migrate/001_create_recipes.rb
create app/controllers/recipes_controller.rb
create test/functional/recipes_controller_test.rb
create app/helpers/recipes_helper.rb
route map.resources :recipes
$ ruby script/generate scaffold ingredient recipe_id:integer order_of:integer
amount:float ingredient:string instruction:string unit:string
create app/views/ingredients
create app/views/ingredients/index.html.erb
create app/views/ingredients/show.html.erb
create app/views/ingredients/new.html.erb
create app/views/ingredients/edit.html.erb
create app/views/layouts/ingredients.html.erb
create
app/models/ingredient.rb
create
test/unit/ingredient_test.rb
create
test/fixtures/ingredients.yml
create
db/migrate/002_create_ingredients.rb
create app/controllers/ingredients_controller.rb
create test/functional/ingredients_controller_test.rb
create app/helpers/ingredients_helper.rb
route map.resources :ingredients
That’s a lot of files for each scaffold, many of which will be familiar to you from traditional Rails code
generation. You’ve got your controller object, views, the model class, a fixture file, and unit and
functional tests. I’d like to focus some attention on items that are new or different.
Migrations
The generator script uses the attribute information provided to create Rails migration objects. Here’s the
one for Recipe, which you’ll find in db/migrate/001_create_recipes.rb:
class CreateRecipes < ActiveRecord::Migration
def self.up
create_table :recipes do |t|
t.string :title
t.string :servings
t.string :description
t.string :directions
t.timestamps
end
end
(continued)
7
Chapter 1: Building Resources
(continued)
def self.down
drop_table :recipes
end
end
The t.string syntax is a Rails 2.0 method for spelling what would previously have been written
t.column :string. The timestamps method adds the special Rails columns created_at and
updated_at. The creation of the ingredient resource generates a similar migration at db/migrate/002_
create_ingredients.rb.
Routes
The most important additions are the new routes added to the routes.rb file, which are the source of
all the RESTful magic. As created by your two generators, the routes look like this:
map.resources :ingredients
map.resources :recipes
Standard Routes
The purpose of the routes.rb file is to control the conversion from an HTTP request to a Rails method
call. Each of these map.resources lines causes Rails to associate URLs that start with the resource name
to the resource for that controller, in this case /recipes would invoke the recipe controller. So far, it
sounds similar to a traditional Rails route in :controller/:action/:id format. The difference is that
the REST routes infer the action to call in the controller based on the HTTP method invoked. There are
seven standard actions in a REST controller. The following table shows the standard interpretation of
URLs and the HTTP methods that are used to describe the corresponding controller actions. Each
controller action also has a path method, to be called inside views for link_to and form actions, as well
as a URL method, which is called inside the controller when you need to redirect to a different action.
8
URL Called
HTTP Method
Controller
Action
Path Method
URL Method
/recipes/1
GET
show
recipe_path(1)
recipe_url(1)
/recipes/1
PUT
update
recipe_path(1)
recipe_url(1)
/recipes/1
DELETE
destroy
recipe_path(1)
recipe_url(1)
/recipes
GET
index
recipes_path
recipes_url
/recipes
POST
create
recipes_path
recipes_path
/recipes/new
GET
new
new_recipe_path
new_recipe_url
/recipes/1/edit
GET
edit
edit_recipe_
path(1)
edit_recipe_
url(1)
Chapter 1: Building Resources
When you call one of these path or URL methods with a PUT or DELETE HTTP method, you must make
sure that the link_to or redirect call also contains the option:method => :delete or :method =>
:put to ensure that the URL is properly sent by Rails (link_to assumes GET; the form methods and
link_to_remote assume POST). If you are using the standard HTTP method, there’s a shortcut, where
you just specify the object that is the target of the link:
link_to @recipe
You’ll see examples of those calls when you examine the standard views that the generator has created.
Also, the methods that take an argument can take either an integer argument, in which case it’s assumed
to be the ID of the resource you are interested in, or they can take the resource object itself, in which case,
the ID is extracted for use in the URL or path. They can also take the usual key/value pairs, which are
converted to a query string for the request.
Nested Routes
You need to do a slight tweak of the routes to allow for the relationship between a recipe and its
ingredients. As the design currently stands, there’s a strict one-to-many relationship between recipes
and ingredients, with an ingredient only being meaningful inside its specific recipe. To make your Rails
routes reflect that relationship more accurately, the routes can be nested in routes.rb. Change your
routes.rb file so that the resource lines are as follows:
map.resources :recipes do |recipes|
recipes.resources :ingredients
end
With this nesting in place, Rails will generate similar routes for ingredients, but only with a recipe
attached at the beginning of the URL. For example, the URL to call the index method for the ingredients
in a recipe will be as follows:
/recipe/1/ingredients
And the URL for showing, updating, and deleting would look like this:
/recipe/1/ingredient/1
The named methods for a nested resource are similar to the parent-level methods listed previously, but
they contain the parent resource name in the method, such as the following:
recipe_ingredient_url(@recipe, @ingredient)
edit_recipe_ingredient_url(@recipe, @ingredient)
The path-based methods are similar. Again, the methods can take either integer IDs or the actual resource
objects. This naming convention is pretty clear when the nesting isn’t very deep or when the variables
9
Chapter 1: Building Resources
are well named. But if you get into things like user_address_street_house_room_url(x, y, z,
a, b), it could get a little hairy. There are a couple of ways to clean those long method names up:
❑
The arguments to the URL or path method can be entered as key/value pairs:
recipe_ingredient_url(:recipe_id => @recipe, :id => @ingredient)
❑
For URLs, the url_for method can be used (remember to specify the HTTP method if needed):
url_for(@recipe, @ingredient)
Either choice should help tame unclear route method calls.
Customizing Resource Routes
The resources call in the routes.rb file can also be customized to adjust the behavior of the routes.
The most common reason for doing this is to add your own actions to the resource. Each resource call
provides three options for specifying custom actions. The :member option is for actions that apply to a
specific resource, the :collection option is for actions on the entire list (like index), and the :new
option applies to resources that have not yet been saved to the database. In each case, the value for
each option is itself a hash. The keys of that hash are the method names, and the values are the HTTP
verbs to be used when calling that method. So, if you wanted to add a print action to your recipes, it
would look like this:
map.resources :recipes, :method => {:print => :get } do |recipes|
recipes.resources :ingredients
end
The addition here of :method => {:print => :get } creates the new print action, and tells Rails
that this action will be defined on a specific resource called via GET. The URL of this new action will be /
recipes/1/print. (This is a change from older versions of Rails, where this used to be spelled /
recipes/1;print — nobody really liked the semicolon syntax, and it tended to interfere with caching,
so it was changed for Rails 2.0.)
The URL for a collection-based action would look like /recipes/<action>, and the URL for a newbased action would be /recipes/new/<action>.
What’s more, you also get a URL and path method for the new action. In this case, they would be
print_recipe_path(@recipe) and print_recipe_url(@recipe).
The tricky thing about these custom routes is remembering to specify them. Unlike nearly everything
else in Rails, a custom resource route needs to be specified twice: once in the controller itself, and then
again in routes.rb. This is arguably a violation of one of Rails core design principles, namely Don’t
Repeat Yourself (DRY), and it’s entirely possible that somebody clever will come along and clean this up
at sometime in the future.
Like most of Rails, the standard names can be overridden if you like. In the case of a resource routing
call, there are a few options to change standard naming. You can specify an arbitrary controller class to
be the target of the resource with the :controller option. You can change the name of the controller
within the URL (the recipe in /recipe/1) using the :singular option, and you can require a prefix to
the URL with the :path_prefix option. The prefix passed to that option works just the same way as a
10
Chapter 1: Building Resources
traditional rails route — parts of the prefix specified as a Ruby symbol are converted to variables when
the path is dereferenced. For example, if you wanted all recipes to be attached to a chef, you could add the
option :path_prefix => “/chef/:chef_name”, and the show recipe URL, for example, would change
to /chef/juliachild/recipe/1. Within the controller, the variable params[:chef_name] would be
set to juliachild.
Controllers
The controller for each new resource contains seven actions, shown earlier in the table of standard
routes. Each action is helpfully commented with the URLs that cause that action to be invoked. Each
action is also set up by default to respond to both HTML and XML requests. Following are sections about
the default controllers for the recipe resource with some comments.
Index
First up, the index method, which displays a list of all the recipes:
# GET /recipes
# GET /recipes.xml
def index
@recipes = Recipe.find(:all)
respond_to do |format|
format.html # index.html.erb
format.xml { render :xml => @recipes }
end
end
If you’re familiar with traditional Rails, than the only new part here is the respond_to method, which is
the REST mechanism that allows the same controller action to return different data based on the
requested format.
Functionally what happens here is similar to a case expression — each potential format that the action
might respond to is listed in the body of the respond_to block, and exactly one of them is performed
based on the MIME type of the user request. In this case, if the URL request is /recipes or /recipes.
html, then the format.html line is chosen. If the URL is /recipes.xml, then the format.xml line is
chosen. Each type can have a block associated with it, which is executed when that type matches the user
request. If there is no block associated with the type, then the Rails default action for dealing with that
type is triggered. In the case of the html action, that would be the rendering of the matching html.erb
view, index.html.erb. It has become customary to explicitly note that the format is being handled in a
default manner with a comment naming the view file to be rendered.
Since this is one of those Ruby metaprogramming magic things, where it’s not immediately clear what’s
happening behind the scenes, it’s worth breaking the method down a little bit. The respond_to method
comes in two forms. The one shown previously takes a block. Alternately, you could just pass a list of
symbols corresponding to types (:html, :js). You would use the list version if every type on the list
was handled via the default action for that type.
In the more typical case, the block is defined with a single argument. The argument is of a Responder
class. Each line of the block calls a method on the responder object — in the previous code, those
methods are format.html and format.xml. Each of these format methods takes an optional argument,
which is also a block.
11
Chapter 1: Building Resources
When the respond_to method is called, the outer block is invoked. Each format method is called, and
does nothing unless the format method name matches the type of the request. (Metaprogramming fans
should note that this is elegantly implemented using method_missing.) If the types match, then
behavior associated with that type is invoked — either the block if one is explicitly passed or the default
behavior if not.
The convention is to have nothing in your respond_to block except for the format calls, and nothing in
the format calling blocks except the actual rendering call being made. This goes along with the general
idea in Rails design that the controller should be as thin as possible, and that complex data processing
should be handled in the model object.
The respond_to method adds a lot of flexibility to your Rails controller — adding XML data serialization
or RSS feeds is nearly trivial. The syntax, I think, may still have some tweaking ahead of it — I’m not sure
there’s a lot of love for the way default behaviors are specified, and if the rendering is complex, the nested
blocks can become hard to read.
Rails defines eight formats for you: atom, html, ics, js, rss, text, xml, and yaml. Just to be clear on
this, html is used for ordinary browser output, atom and rss should be used for feeds, xml and yaml
are used for object syndication, ics is the standard iCalendar format for calendar data, text is often
used for simple serialization, and js is used either to serialize data via the JSON format or as the target
of an Ajax call that would trigger JavaScript.
Adding your own formats is simple, assuming that the format has a MIME type. Suppose you wanted to
allow a URL like /recipes.png to return some kind of graphical display of your recipe list. All you
need to do is go into the config/environment.rb file and add the following line:
Mime::Type.register “image.png”, :png
Now any respond_to block in your application will enable you to use format.png as a method.
Show
The default show method is nearly identical to the index method, except that it only takes a single recipe
from the database, and renders the show.html.erb file.
# GET /recipes/1
# GET /recipes/1.xml
def show
@recipe = Recipe.find(params[:id])
respond_to do |format|
format.html # show.html.erb
format.xml { render :xml => @recipe }
end
end
The render :xml => @recipe method call creates an XML representation of the data object by making
all of the attributes of the data object into subordinate tags of the XML (see Chapter 9 for more details).
12
Chapter 1: Building Resources
New
The default new method is similar to show, except a new recipe object is created:
# GET /recipes/new
# GET /recipes/new.xml
def new
@recipe = Recipe.new
respond_to do |format|
format.html # new.html.erb
format.xml { render :xml => @recipe }
end
end
Edit
The default edit method is extremely simple because it does not have an XML representation defined,
so the traditional Rails default behavior happens automatically, and a respond_to method is not
needed. Here’s an example:
# GET /recipes/1/edit
def edit
@recipe = Recipe.find(params[:id])
end
Create
The create method is more complicated because it needs to output different information depending on
whether the creation is successful. The new recipe object is created based on the incoming parameters,
and then it is saved to the database. For example:
# POST /recipes
# POST /recipes.xml
def create
@recipe = Recipe.new(params[:recipe])
respond_to do |format|
if @recipe.save
flash[:notice] = ‘Recipe was successfully created.’
format.html { redirect_to(@recipe) }
format.xml { render :xml => @recipe,
:status => :created,
:location => @recipe }
else
format.html { render :action => “new” }
format.xml { render :xml => @recipe.errors,
:status => :unprocessable_entity }
end
end
end
13
Chapter 1: Building Resources
I mentioned earlier that you could have code other than the format methods inside the respond_to
block, and this example shows one reason why you might want to do that. The actual saving of the
recipe takes place inside that block. If the save is successful, then the HTML response simply redirects to
the show method. Rails infers that you want to show the object because the only argument to redirect_
to is the object itself, and it uses REST routing to determine the unique URL for that object. The XML
response returns the object as XML with a couple of extra headers containing additional information.
If the save is not successful, the HTML response is to show the new form again, and the XML response
is to send the errors and status via XML.
In case you are wondering why the create method needs to support an XML format, the answer is to
allow new objects to be created remotely via a separate web services client that might be dealing with
your recipe server via XML.
Update
The update method is nearly identical to the create method, except that instead of creating a new
recipe, it finds the existing recipe with the expected ID, and instead of calling save, it calls update_
attributes. Oh, and the XML output is slightly different. The update method is as follows:
# PUT /recipes/1
# PUT /recipes/1.xml
def update
@recipe = Recipe.find(params[:id])
respond_to do |format|
if @recipe.update_attributes(params[:recipe])
flash[:notice] = ‘Recipe was successfully updated.’
format.html { redirect_to(@recipe) }
format.xml { head :ok }
else
format.html { render :action => “edit” }
format.xml { render :xml => @recipe.errors,
:status => :unprocessable_entity }
end
end
end
Delete
Finally, delete. The default method doesn’t check for success or failure of delete; for an HTML
request, it redirects to the index page via the recipes_url helper. An XML request gets a header
signaling success. Here’s an example of the delete method:
# DELETE /recipes/1
# DELETE /recipes/1.xml
def destroy
@recipe = Recipe.find(params[:id])
@recipe.destroy
14
Chapter 1: Building Resources
respond_to do |format|
format.html { redirect_to(recipes_url) }
format.xml { head :ok }
end
end
Views
The views that are created by the generated script are largely similar to their non-REST counterparts, but
I would like show the differences that come from using the RESTful URL features. In the edit.html.erb
file, the form accesses its URL as follows
<% form_for(@recipe) do |f| %>
The form_for method merely takes the argument and automatically converts that to a PUT call to /
recipes/1 (or whatever the id of the recipe is), which translates in the HTML source to this:
<form action=”/recipes/1”
class=”edit_recipe”
id=”edit_recipe_1”
method=”post”>
<div style=”margin:0;padding:0”>
<input name=”_method” type=”hidden” value=”put” />
Although this is implemented as a POST from the server point of view, Rails inserts the hidden field for
_method with the value put to tell the Rails application to treat it as a PUT request and redirect to the
update action.
At the bottom of the edit page, the link_to method for show uses the GET version of the default URL
for the object, while the back link uses the named method for getting to the index action, as follows:
<%= link_to ‘Show’, @recipe %> |
<%= link_to ‘Back’, recipes_path %>
Similarly, from index.html.erb, it does this:
<%= link_to ‘New recipe’, new_recipe_path %>
And from show.html.erb, it does this:
<%= link_to ‘Edit’, edit_recipe_path(@recipe) %> |
<%= link_to ‘Back’, recipes_path %>
To clear up one quick issue, the .html.erb file-ending is a Rails 2.0 change. It was felt that .rhtml was
not accurate because the file is actually an erb file, and the .html is there to denote what kind of file the
erb file will be after it is processed.
15
Chapter 1: Building Resources
Route Display
If you find yourself becoming confused by all the RESTful routing magic, as of Version 2.0, Rails
provides a rake command, routes, that gives you a complete list of the routes that have been defined in
your application (output has been truncated). For example:
$ rake routes
recipes
GET
/recipes
{:controller=>”recipes”, :action=>”index”}
formatted_recipes
GET
/recipes.:format
{:controller=>”recipes”, :action=>”index”}
POST /recipes
{:controller=>”recipes”, :action=>”create”}
POST /recipes.:format
{:controller=>”recipes”, :action=>”create”}
new_recipe
GET
/recipes/new
{:controller=>”recipes”, :action=>”new”}
formatted_new_recipe
GET
/recipes/new.:format
{:controller=>”recipes”, :action=>”new”}
edit_recipe
GET
/recipes/:id/edit
{:controller=>”recipes”, :action=>”edit”}
formatted_edit_recipe GET
/recipes/:id/edit.:format
{:controller=>”recipes”, :action=>”edit”}
It’s a little tricky to see — you need some pretty long lines to lay this out, but the output is in four
columns: the named method stem that is used to access the route (for example, edit_recipe, which can
be the stem to edit_recipe_path or edit_recipe_url), the HTTP verb that triggers this call, the
actual URL with symbols inserted, and then the controller and action called by the route.
Building Ingredients
Having now gotten a thorough tour of the new mechanisms that RESTful Rails provides by default, it’s
time for you to start writing some code and making this site come to life. The first task is to enable
simple entry of a recipe, and allow the most recently entered recipes to be displayed on the user-centered
front page, blog-style.
The following problems stand between you and that goal:
❑
16
The database schema and sample code as generated do not associate recipes and ingredients, so
the forms that were created by the scaffold do not have a place to enter ingredient information.
Chapter 1: Building Resources
❑
You changed the default routing after the scaffolds were generated, and therefore the ingredient
forms, as generated, use invalid methods to create URLs.
❑
The basic index listing of recipes is useful from an administrative point of view, but it is not
what you want to present to a user. In addition to the functional changes, you’ll need it to be
much nicer looking.
That list will take you through the end of this chapter. Time to build a webapp!
Setting Up Your Database
Most of the work of setting up the initial database was already done when you created the resources and
generated migrations, but you still need to actually create the database instances. You’ll need to go to the
database.yml file first and adjust the database information for all three database environments —
development, test, and production. If you are using MySQL (version 5.x, please) and the database is on
your local development box, then you probably only need to put your root password into the file. (More
complicated database setups are discussed in Chapter 6, “The Care and Feeding of Databases.”)
A late change in Rails 2.0.2 has made SQLite3 the default database for new Rails projects. The examples
in this book use MySQL for the database connections.
Once that is done, you can use Rake to do all the database creation work, without touching your MySQL
administration application. The first rake command (new in Rails 2.0) is this:
rake db:create:all
This command goes through your database.yml file and creates a database schema for each database
listed for your local host.
Similarly, the rake db:create command creates only the development environment. The command
creates empty database schemas. To populate the development environment with the tables and columns
defined in the migration, enter the following command:
rake db:migrate
And to take that development environment and copy it to the test database, enter the following
command:
rake db:test:prepare
This gives you all the database setup you need to get started.
Aligning Your Tests to the Nested Resource
I’m a firm believer in automated testing — unit, functional, and integration — so I love the fact that Rails
includes such a complete test suite. It’s very important to keep that suite current and running clean. I
know that some of the tests will fail based on the routing changes that were made, but the first thing to
17
Chapter 1: Building Resources
do is get a sense of the damage with the following (this output has been modified slightly for
readability):
$ rake
(in /Users/noel/Documents/Programming/ruby/soupsonline)
/usr/local/bin/ruby -Ilib:test
“/usr/local/lib/ruby/gems/1.8/gems/rake0.7.3/lib/rake/rake_test_loader.rb”
“test/unit/ingredient_test.rb”
“test/unit/recipe_test.rb”
Started
..
Finished in 0.327569 seconds.
2 tests, 2 assertions, 0 failures, 0 errors
/usr/local/bin/ruby -Ilib:test
“/usr/local/lib/ruby/gems/1.8/gems/rake0.7.3/lib/rake/rake_test_loader.rb”
“test/functional/ingredients_controller_test.rb”
“test/functional/recipes_controller_test.rb”
Loaded suite /usr/local/lib/ruby/gems/1.8/gems/rake0.7.3/lib/rake/rake_test_loader
Started
EEEEEEE.......
Finished in 1.732989 seconds.
14 tests, 13 assertions, 0 failures, 7 errors
Looking at the errors, it seems that all the functional tests of the ingredients controller failed, as expected.
The following section describes what you need to do to clean them up.
The Test Object
Rails sets up some test data in the fixtures directory, which can be loaded into your test directories to
enable database-backed objects to work. By default, each controller test loads the fixtures for the data
type the controller manages. However, now that the ingredients resource is subordinate to the recipe
resource, the ingredients controller test also needs to load the recipe fixtures. This enables the controller
to access recipe data during testing. Add the following line to test/functional/ingredients_
controller_test.rb, right below where the ingredient fixture is loaded:
fixtures :recipes
Now, in the tests, there are two things that need to be fixed consistently throughout the test. Each
individual test calls the get, post, or put helper method to simulate the HTTP call. Each and every one
of those calls needs to add a parameter for the recipe_id. You can do this by adding the argument to
each of the calls (remember to place a comma between hash arguments — for some reason I always
forget that comma):
:recipe_id => 1
18
Chapter 1: Building Resources
A couple of the tests also confirm that Rails redirects to the ingredient index listing, with a line like this:
assert_redirected_to ingredient_path(assigns(:ingredient))
This line no longer works because, now that ingredients are a nested resource, the pathnames are all
defined in terms of a parent recipe. Change that line every time it appears to this:
assert_redirected_to
recipe_ingredient_path(assigns(:recipe),
assigns(:ingredient))
This changes the name of the helper method, and adds the recipe object to the arguments. The assigns
method gives access to any instance attributes set in the controller action.
The Controller Object
Because you are going to be testing for it, you need to make sure that every controller method actually
does assign a @recipe attribute. The best way to do that is with a before filter. The before_filter
method allows you to specify a block or method that is performed before every controller action gets
started. Add the following line to the beginning of the IngredientController class in app/
controllers/ingredient_controller.rb:
before_filter :find_recipe
This specifies that the find_recipe method needs to be run before each controller action. To define that
action, add the method to the end of the class as follows:
private
def find_recipe
@recipe = Recipe.find(params[:recipe_id])
end
It’s important that the method go after a private declaration; otherwise, a user could hit
/ingredients/find_recipe from their browser, and invoke the find_recipe method, which
would be undesirable. This mechanism ensures that every controller action will have a recipe defined,
and you no longer need to worry about consistency. Readability can be an issue with filters, though,
because it can sometimes be hard to track back into the filter method to see where attributes are defined.
It helps to make smaller controllers where the filters are simple and clear. You’ll see another common use
of filters in Chapter 3, “Adding Users.”
Next, you need to clean up the redirections. Two actions in this controller redirect to the show action
using redirect_to(@ingredient). Change those as follows:
redirect_to([@recipe, @ingredient])
19
Chapter 1: Building Resources
The redirection method automatically handles the list of nested resource objects. The destroy action
redirects to the list action, so you need to change that redirection as follows:
redirect_to(recipe_ingredients_url)
In this case, the controller automatically infers that it should use the @recipe attribute to generate the
correct index path.
The Views
All you need to do to the view objects at this point is change the URLs for the forms and links. The form
declaration in the edit and new views (in app/views/ingredients/edit.html.erb and app/views/
ingredients/new.html.erb) should now read as follows:
<% form_for([@recipe, @ingredient]) do |f| %>
Again, this implicitly creates the correct URL from the two objects.
You also need to change the URL in the edit page (app/views/ingredients/edit.html.erb) as
follows:
<%= link_to ‘Show’, [@recipe, @ingredient] %>
You make the same change to the URL on the index page (app/views/ingredients/index.html.
erb), except in this case, ingredient is a loop variable, not an instance variable, so you don’t include
the @ sign.
Similarly, you need to change all the named routes by adding the prefix recipe_ to the method name
and including the @recipe variable in the argument list. The link to the index page, accessed via the
back link on several pages in app/views/ingredients should be changed to this:
<%= link_to ‘Back’, recipe_ingredients_path(@recipe) %>
You also need to make changes to the other named links. Here are some examples:
<%= link_to ‘Edit’, edit_recipe_ingredient_path(@recipe, @ingredient) %>
<%= link_to ‘Destroy’, [@recipe, ingredient],
:confirm => ‘Are you sure?’, :method => :delete %>
<%= link_to ‘New ingredient’, new_recipe_ingredient_path(@recipe) %>
At this point, all your tests should run cleanly. If not, an error message will likely be displayed, showing
you exactly which method name change you missed. When you make the analogous change in the edit
view, note that the edit link in the index.html.erb page does not include the @ sign for the ingredient,
as it is a loop variable, not an instance variable.
20
Chapter 1: Building Resources
Rails Testing Tip
The default test runner text is fine as far as it goes, but sometimes it’s not very easy to
tell which methods have failed. If you include diagnostic print statements in your tests
while debugging, it can be difficult to tell which output goes with which tests.
There are a few options for more useful test output. Most IDEs include some kind of
graphical text runner, and over the past year or so, several Java IDEs have added Rails
support — Aptana for Eclipse, NetBeans, and IntelliJ all have graphical Rails test runners. There are also a couple of available stand-alone GUI test runners, depending on
the operating system you are running.
I’ve come to like a little gem called turn, which you can install and then place the line
require ’turn’ in your test_helper.rb file. It produces somewhat more useful
and verbose test-runner output. The error message for each test is associated with that
test, as is any diagnostic output. And if your command shell supports it, tests that pass
are in green and tests that fail are in red. Here is some sample output:
IngredientsControllerTest
test_should_create_ingredient PASS
test_should_destroy_ingredient PASS
test_should_get_edit PASS
test_should_get_index PASS
test_should_get_new PASS
test_should_show_ingredient PASS
test_should_update_ingredient PASS
RecipesControllerTest
test_should_create_recipe PASS
test_should_destroy_recipe PASS
test_should_get_edit PASS
test_should_get_index PASS
test_should_get_new PASS
test_should_show_recipe PASS
test_should_update_recipe PASS
====================================================================
pass: 14,
fail: 0,
error: 0
total: 14 tests with 25 assertions in 1.768561 seconds
====================================================================
Because turn changes the format of your text output, other plugins or tools that
depend on the test output — most notably Autotest (see Chapter 7) — might have
problems.
21
Chapter 1: Building Resources
Building a Recipe Editor
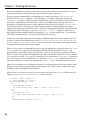
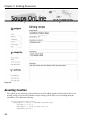
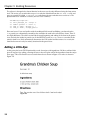
If you fire up the Rails server and look at the recipe input form, you’ll see that at this point, it looks
something like what is shown in Figure 1-1.
Figure 1-1
While maintaining the proper amount of reverence to the tool that provided this form for free, it’s easy to
see that it won’t do. Ingredients aren’t listed, all the boxes are the wrong size, and basically the thing
looks totally generic. Your punch list looks like this:
❑
Make the items that need longer data entry into text areas.
❑
Clean up the organization to look more like a finished recipe.
❑
Add ingredients to the recipe.
Naturally, you’ll start by writing some tests.
Adding Ingredients
Test-Driven Development (TDD, sometimes also called Test-First Development) is a practice that first
gained widespread attention as one of the core practices of Extreme Programming (or XP). Even if your
programming is less extreme, writing automated tests is perhaps the best single way to ensure the
quality and stability of your application over time. This is particularly true in Rails, because all kinds of
testing goodness have been built into the framework, making powerful tests easy to write.
22
Chapter 1: Building Resources
In this book, I’m going to try where possible to present working tests for the code samples as they are
presented. The idea is to give you a sense of strategies for testing various parts of a Rails application, and
to reinforce the idea that writing tests for all your Rails code is an achievable and desirable goal.
I’d like to start by reinforcing the previously created tests for the Recipe new form and the create
method. For new, I’d like to confirm that the expected elements in the form actually exist, and for
create, I’d like to confirm that when those elements are passed to the server, the expected recipe object
is created. For both, I’d like to test the ingredient functionality.
Asserting HTML
To test the form, you’ll use an extremely powerful feature of the Rails test environment called assert_
select, which allows you to test the structure of the HTML sent to the browser. Your first usage of
assert_select just scratches the surface of what it can do. The following test is in tests/
functional/recipe_controller_test.rb:
def test_should_get_new
get :new
assert_response :success
assert_select(“form[action=?]”, recipes_path) do
assert_select “input[name *= title]”
assert_select “input[name *= servings]”
assert_select “textarea[name *= ingredient_string]”
assert_select “textarea[name *= description]”
assert_select “textarea[name *= directions]”
end
end
The strategy in testing these forms is to verify the structure of the form. Writing tests for the visual
aspects of the form is likely to be very brittle, especially this early in development, and would add a lot
of cost in maintaining the test. However, no matter how it’s displayed, the recipe form is likely to have
some method for entering a title. You could test based on the CSS class of each form, if your design
process was such that those names are likely to be stable. Then you could experiment with the visual
display via the CSS file.
Each assert_select test contains a selector, and the job of the test is to validate whether the HTML
output of the test has some text that matches the selector. This is roughly equivalent to a regular
expression; however, the selectors are specifically structured for validating HTML output. Each selector
can contain one or more wildcards denoted with a question mark, and the next argument to the method
is a list of the values that would fill in those wildcard spots — similar to the way the find method works
with SQL statements. The wildcard entries can either be strings or, if you are determined to make it
work, regular expressions.
The first part of a selector element is the type of HTML tag that you are searching for. In the case of your
first test, that’s a form tag. Without any further adornment, that selector will match against all form tags
in your returned HTML. You can then pass a second argument if it’s a number or a range, and then the
selector tests to see if the number of tags matches. The following tests would pass:
assert_select “form”, 1
assert_select “form”, 0..5
23
Chapter 1: Building Resources
If the second argument is a string or regular expression, then the selector tests to see if there is a tag of
that type whose contents either equal the string or match the regular expression.
The type tag can be augmented in several different ways. Putting a dot after it, as in “form.title”,
checks to see if there’s a form tag that is of the CSS class title. Putting a hash mark after the type
“form#form_1” performs a similar test on the DOM ID of the tag. If you’re familiar with CSS, you’ll note
this syntax is swiped directly from CSS selector syntax. If you add brackets to the type, then you are
checking for an attribute that equals or nearly equals the value specified. The selector “form[action=?]”
tests for the existence of a form tag whose action attribute matches the URL specified in the second
argument. The equality test could also use the *= symbols, indicating that the attribute value contains the
value being tested as a substring, so your test “input[name *= title]” would pass if there was an
input tag whose name attribute contains the substring “title”. You can similarly use ^= to test that the
value begins with the string or $= to test if the value ends with the string.
You can do some further specifying with a number of defined pseudo-classes. Many of these allow you
to choose a specific element from the list, such as form:first-child, form:last-child, form:nthchild(n), and form:nth-last-child(n), each of which matches only elements of that type that have
the specified relationship with its parent element.
Finally, you can specify a relationship between two tags. Just putting one tag after the other, as in “form
input”, matches input tags that are some kind of arbitrarily distant descendent of the form tag.
Specifying those relationships can get a bit unwieldy, so you can nest the interior specification inside a
block, as is done in the previous test method. Because of the nested block structure, the test only matches
input tags that are inside a form tag. The specification can also be written “form>input”, in which case
the input needs to be a direct child of the form. Alternately “form + input” indicates that the input
tag is merely after the form tag in the document, and “form ~ input” would match the reverse case.
Add it all up, and your test is verifying the existence of a form tag that points to the create action. Inside
that tag, you are testing for inputs with names that include “title” and “servings,” and text areas that
include the names “description” and “directions.”
With the view as it is, these tests won’t pass, because the view doesn’t use textarea fields for data yet.
Update the app/views/recipes/new.html.erb code as follows:
<% @title = “Enter a Recipe” %>
<%= error_messages_for :recipe %>
<% form_for(@recipe) do |f| %>
<p>
<b>Recipe Name:</b><br />
<%= f.text_field :title, :class => “title”, :size => 48 %>
</p>
<p>
<b>Serving Size:</b>
<%= f.text_field :servings, :class => “input”, :size => 10
</p>
<p>
<b>Description (optional):</b><br />
24
%>
Chapter 1: Building Resources
<%= f.text_area :description, :rows => 5, :cols => 55, :class => “input” %>
</p>
<p>
<b>Ingredients:</b><br />
<%= f.text_area :ingredient_string, :rows => 5, :cols => 55, :class => “input” %>
</p>
<p>
<b>Directions:</b><br />
<%= f.text_area :directions, :rows => 15, :cols => 55, :class => “input” %>
</p>
<p>
<%= f.submit “Create”, :class => “title” %>
</p>
<% end %>
<%= link_to ‘Back’, recipes_path %>
There are a couple of changes. The fields that need more text now have text areas, things have been
moved around a very little bit, and I’ve added CSS classes to the input fields that increase the size of the
text being input (it bothers me when sites use very small text for user input).
The :ingredient_string accessor used in the preceding form is described in the next section.
Parsing Ingredients
The previous code listing included a bare text area for the user to enter ingredients. However, I’d still
like to have the data enter the database with some structure that could enable some useful functionality
later on, such as converting from English to metric units. Even so, I felt it was a little cruel to give the
user a four-element form to fill out for each ingredient. So I wrote a small parser to convert strings like
“2 cups carrots, diced” into ingredient objects. The basic test structure follows — put this code into the
ingredient unit test class (test/unit/ingredients.rb):
def assert_parse(str, display_str, hash)
expected = Ingredient.new(hash)
actual = Ingredient.parse(str, recipes(:one), 1)
assert_equal_ingredient(expected, actual)
display_str ||= str
assert_equal(display_str, actual.display_string)
end
The inputs are a string, a second string normalized for expected output, and a hash of expected values.
One ingredient object is created from the hash, another is created from the string, and you test for
equality. Then you test the display output string — if the input is nil, you assume the incoming string is
the same as the outgoing string.
25
Chapter 1: Building Resources
The test cases I started with are described in the following table.
Case
Description
2 cups carrots, diced
The basic input structure
2 cups carrots
Basic input, minus the instructions
1 carrots, diced
Basic input, minus the unit
1 cup carrots
Singular unit
2.5 carrots, diced
A test to see whether decimal numbers are correctly handled
1/2 carrots, diced
A test to see that fractions are handled
1 1/2 carrots, diced
A test to see whether improper fractions are handled
Here’s what the first two test cases look like in code (again, in test/unit/ingredient_test.rb):
def test_should_parse_basically
assert_parse(“2 cups carrots, diced”, nil, :recipe_id => 1, :order_of => 1,
:amount => 2, :unit => “cups”, :ingredient => “carrots”,
:instruction => “diced”)
end
def test_should_parse_without_instructions
assert_parse(“2 cups carrots”, nil, :recipe_id => 1, :order_of => 1,
:amount => 2, :unit => “cups”, :ingredient => “carrots”,
:instruction => “”)
end
These test cases use the assert_parse method defined earlier to associate the test string with the
expected features of the resulting ingredient. You should be able to define the remaining tests similarly.
There are, of course, other useful test cases that would make this more robust. Tests for proper error
handling in deliberately odd conditions would also be nice. For right now, though, the previous test
cases provide a sufficient level of complexity to serve as examples of how to do moderately complex
processing on user data.
The way this worked in practice was that I wrote one test, made it work, and then refactored and
simplified the code. I wrote the second test, which failed, and then fixed the code with another round of
refactoring and code cleanup. By the time I finished the last test, the code was in pretty good shape.
Here’s a description of the code after that test.
I created a separate class for this called IngredientParser, and placed the code in a new file, /app/
models/ingredient_parser.rb. The class starts like this:
class IngredientParser
UNITS = %w{cups pounds ounces tablespoons teaspoons cans cloves}
26
Chapter 1: Building Resources
attr_accessor :result, :tokens, :state, :ingredient_words,
:instruction_words
def initialize(str, ingredient)
@result = ingredient
@tokens = str.split()
@state = :amount
@ingredient_words = []
@instruction_words = []
end
def parse
tokens.each do |token|
consumed = self.send(state, token)
redo unless consumed
end
result.ingredient = ingredient_words.join(“ “)
result.instruction = instruction_words.join(“ “)
result
end
end
The parse method is of the most interest. After splitting the input string into individual words, the class
loops through each word, calling a method named by the current state. The states are intended to mimic
the piece of data being read, so they start with :amount, because the expectation is that the numerical
amount of the ingredient will start the line. Each state method returns true or false. If false is
returned, then the loop is rerun with the same token (presumably a method that returns false will have
changed the state of the system so that a different method can attempt to consume the token). After the
parser runs out of tokens, it builds up the ingredient and instruction strings out of the lists that the
parser has gathered.
The parser contains one method for each piece of data, starting with the amount of ingredient to be used,
as follows:
def amount(token)
if token.index(“/”)
numerator, denominator = token.split(“/”)
fraction = Rational(numerator.to_i, denominator.to_i)
amount = fraction.to_f
elsif token.to_f > 0
amount = token.to_f
end
result.amount += amount
self.state = :unit
true
end
If the input token contains a slash, then the assumption is that the user has entered a fraction, and the
string is split into two pieces and a Ruby rational object is created and then converted to a float (because
the database stores the data as a float). Otherwise, if it’s an integer or rational value, the number is taken
as is. The number is added to the amount already in the result (because an improper fraction would
come through this method in two separate pieces). The state is changed to :unit, and the method
returns true to signify that the token has been consumed.
27
Chapter 1: Building Resources
The unit method actually has provisions not to consume the token. If the token is numerical, the parser
assumes it’s a continuation of the amount, resets the state, and returns false so that the amount method
will take a crack at the same token. For example:
def unit(token)
if token.to_i > 0
self.state = :amount
return false
end
if UNITS.index(token) or UNITS.index(token.pluralize)
result.unit = token.pluralize
self.state = :ingredient
return true
else
self.state = :ingredient
return false
end
end
If the token is not numerical, then it’s checked against the list of known units maintained by the parser. If
there’s a match, then the token is consumed as the unit. If not, the token is not consumed. In either case,
the parser moves on to the ingredient itself. Here’s an example of how this works:
def ingredient(token)
ingredient_words << token
if token.ends_with?(“,”)
ingredient_words[-1].chop!
self.state = :instruction
end
true
end
The ingredient name is assumed to continue until the parser runs out of tokens, or until a token ends in a
comma, as in “carrots, diced”. Although none of the test cases expose it at this point, that’s easily
broken in the case where the ingredient is a list containing a comma. However, this error is handled
gracefully by the parser, and is also rather straightforward for the enterer to correct, so I chose not to beef
up the parser at this time.
Once you get past the comma, everything else is assumed to be part of the final instruction, as follows:
def instruction(token)
instruction_words << token
true
end
To use this, a class method in Ingredient sets the defaults and invokes the parser like this:
def self.parse(str, recipe = nil, order = nil)
result = Ingredient.new(:recipe_id => recipe.id,
:order_of => order, :ingredient => “”,
28
Chapter 1: Building Resources
:instruction => “”, :unit => “”, :amount => 0)
parser = IngredientParser.new(str, result)
parser.parse
end
Finally, the display_string method of Ingredient makes sure everything is in a standard format
as follows:
def display_string
str = [amount_as_fraction, unit_inflected,
ingredient_inflected].compact.join(“ “)
str += “, #{instruction}” unless instruction.blank?
str
end
The compact.join(““) construct gets rid of the unit if the unit is not set, and does so without putting
an extra space in the output. The amount_as_fraction method converts the decimal amount to a
fraction, matching the typical usage of cookbooks. (Although this may later be subject to localization,
because metric cookbooks generally don’t use fractions.) The inflected methods just ensure that the units
and ingredients are the proper singular or plural case to match the amount — because “1 cups carrots”
will just make the site look stupid.
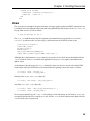
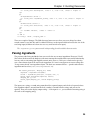
Adding a Coat of Paint
At this point, I went to www.freewebtemplates.com and chose the canvass template, also available at
www.freecsstemplates.org/preview/canvass. I wanted to spruce up the look of the site with
something clean that didn’t look like Generic Boring Business Site. The free templates on this site are
generally licensed via Creative Commons (although if you use one, check the download to make sure).
It’s a good place to get ideas and to see how various CSS effects can be managed. Naturally, if you were
doing a real commercial site, you’d probably want something more unique and original.
Integrating the template was straightforward. The template download has an HTML file, a CSS file, and
a bunch of image files. I copied the image files into the application’s public/images directory, and then
took the CSS file and copied the entries into the preexisting public/scaffold.css file. Alternately,
I could have just copied the entire file and added a link to it in the layout. Then I copied the body
elements from the provided HTML file into the app/layouts/recipes.html.erb file so that the main
content in the provided file was replaced by the <%= yield => call that will tell Rails to include the
content for the action. I also tweaked the text somewhat to make it work for Soups OnLine. Finally, I had
to go back into the CSS file and change the relative references to image files (images/img01.gif) to
absolute references (/images/img01.gif), so that they would be correctly found. The finished result is
shown in Figure 1-2. The final layout and CSS files are a bit long and off-point to be included in the text
here, but are available as part of the downloadable source code for this book.
29
Chapter 1: Building Resources
Figure 1-2
Asserting Creation
Let’s tighten up the remaining recipe controller tests while adding ingredient functionality. The test for
creating a recipe asserts that the number of recipes changes, but it doesn’t assert anything about the
entered data. So, I added the following:
def test_should_create_recipe
recipe_hash = { :title => “Grandma’s Chicken Soup”,
:servings => “5 to 7”,
:description => “Good for what ails you”,
:ingredient_string =>
30
Chapter 1: Building Resources
“2 cups carrots, diced\n\n1/2 tablespoon salt\n\n1 1/3 cups stock”,
:directions => “Ask Grandma”}
assert_difference(‘Recipe.count’) do
post :create, :recipe => recipe_hash
end
expected_recipe = Recipe.new(recipe_hash)
new_recipe = Recipe.find(:all, :order => “id DESC”, :limit => 1)[0]
assert_equal(expected_recipe, new_recipe)
assert_equal(3, new_recipe.ingredients.size)
assert_redirected_to recipe_path(assigns(:recipe))
end
In the new test, a hash with potential recipe data is defined, and sent to Rails via the post method. Then
two recipes are compared, one created directly from the hash, and the other retrieved from the database
where Rails put it (finding the recipe with the highest ID). The code then asserts that the two recipes
are equal, and somewhat redundantly asserts that the new recipe has created three ingredients from the
ingredients sent.
For that test to work, you also need to define equality for a recipe based on the values and not on the
object ID. I created the following (rather ugly) unit test for for the recipe_test.rb file, and then
the actual code for recipe.rb:
def test_should_be_equal
hash = {:title => “recipe title”,
:description => “recipe description”, :servings => 1,
:directions => “do it”, }
recipe_expected = Recipe.new(hash)
recipe_should_be_equal = Recipe.new(hash)
assert_equal(recipe_expected, recipe_should_be_equal)
recipe_different_title = Recipe.new(hash)
recipe_different_title.title = “different title”
assert_not_equal(recipe_expected, recipe_different_title)
recipe_different_dirs = Recipe.new(hash)
recipe_different_dirs.directions = “different directions”
assert_not_equal(recipe_expected, recipe_different_dirs)
recipe_different_description = Recipe.new(hash)
recipe_different_description.description = “different description”
assert_not_equal(recipe_expected, recipe_different_description)
recipe_different_servings = Recipe.new(hash)
recipe_different_servings.servings = “more than one”
assert_not_equal(recipe_expected, recipe_different_servings)
end
def ==(other)
self.title == other.title &&
self.servings == other.servings &&
self.description == other.description &&
self.directions == other.directions
end
31
Chapter 1: Building Resources
This might seem like overkill, to have a unit test for equality, but it took very little time to put together,
and it makes me less concerned about the bane of the unit tester — the test that really is failing but
incorrectly reports that it passed.
The data for the new ingredients comes in as a raw string via the ingredient text area. It’s the
responsibility of the recipe object to convert that string into the actual ingredient objects. Therefore, I
created unit tests in recipe_test.rb to cover the ingredient-adding functionality. The first test merely
asserts that ingredients in the recipe are always in the order denoted by their order_of attribute. To
make this test meaningful, the ingredient fixtures are defined in the YAML file out of order, so the test
really does check that the recipe object orders them, as you can see here:
def test_ingredients_should_be_in_order
subject = Recipe.find(1)
assert_equal([1, 2, 3],
subject.ingredients.collect { |i| i.order_of })
end
Making the ingredients display in order is extremely easy. You just add this at the beginning of the
Recipe class recipe.rb file:
has_many :ingredients, :order => “order_of ASC”,
:dependent => :destroy
The ingredient.rb file needs a corresponding belongs_to :recipe statement. The :order
argument here is passed directly to the SQL database to order the ingredients when the database is
queried for the related objects.
The test for the ingredient string takes an ingredient string and three expected ingredients, and compares
the resulting ingredient list of the recipe with the expected ingredients. It goes in recipe_test.rb like this:
def test_ingredient_string_should_set_ingredients
subject = Recipe.find(2)
subject.ingredient_string =
“2 cups carrots, diced\n\n1/2 tablespoon salt\n\n1 1/3 cups stock”
assert_equal(3, subject.ingredients.count)
expected_1 = Ingredient.new(:recipe_id => 2, :order_of => 1,
:amount => 2, :unit => “cups”, :ingredient => “carrots”,
:instruction => “diced”)
expected_2 = Ingredient.new(:recipe_id => 2, :order_of => 2,
:amount => 0.5, :unit => “tablespoons”, :ingredient => “salt”,
:instruction => “”)
expected_3 = Ingredient.new(:recipe_id => 2, :order_of => 3,
:amount => 1.333, :unit => “cups”, :ingredient => “stock”,
:instruction => “”)
assert_equal_ingredient(expected_1, subject.ingredients[0])
assert_equal_ingredient(expected_2, subject.ingredients[1])
assert_equal_ingredient(expected_3, subject.ingredients[2])
end
32
Chapter 1: Building Resources
To make this work, the Recipe class is augmented with a getter and setter method for the attribute
ingredient_string — this is the slightly unusual case where you want a getter and setter to do
something genuinely different. The setter takes the string and converts it to ingredient objects, and the
getter returns the recreated string:
def ingredient_string=(str)
ingredient_strings = str.split(“\n”)
order_of = 1
ingredient_strings.each do |istr|
next if istr.blank?
ingredient = Ingredient.parse(istr, self, order_of)
self.ingredients << ingredient
order_of += 1
end
save
end
def ingredient_string
ingredients.collect { |i| i.display_string}.join(“\n”)
end
At this point, the earlier test of the entire form should also pass.
The setter splits the strings on newline characters, and then parses each line, skipping blanks and
managing the order count. When all the ingredients have been added, the recipe is saved to the database
with the new ingredients. The getter gathers the display strings of all the ingredients into a single string.
Finishing up the testing of the basic controller features in test/functional/recipe_controller_
test.rb, the edit and update tests are augmented as follows:
def test_should_get_edit
get :edit, :id => 1
assert_response :success
assert_select(“form[action=?]”, recipe_path(1)) do
assert_select “input[name *= title]”
assert_select “input[name *= servings]”
assert_select “textarea[name *= ingredient_string]”
assert_select “textarea[name *= description]”
assert_select “textarea[name *= directions]”
end
end
def test_should_update_recipe
put :update, :id => 1,
:recipe => {:title => “Grandma’s Chicken Soup”}
assert_redirected_to recipe_path(assigns(:recipe))
actual = Recipe.find(1)
assert_equal(“Grandma’s Chicken Soup”, actual.title)
assert_equal(“1”, actual.servings)
end
33
Chapter 1: Building Resources
The edit test is changed to be almost identical to the new test, the only difference being the form action
itself. The easiest way to make this test pass is to take the form block from the new.html.erb file and
put it in a partial file called _form.html.erb, and change the new and edit views to refer to it. The
updated edit view would be as follows (the new view is similar):
<h1>Editing recipe</h1>
<%= error_messages_for :recipe %>
<%= render :partial => “form” %>
<%= link_to ‘Show’, @recipe %> |
<%= link_to ‘Back’, recipes_path %>
Short and sweet. If you are familiar with the traditional Rails model scaffolding, you know that the _
form partial was automatically created by that scaffold to be used in the edit and new forms. There is
one slight difference. The older version had the actual beginning and ending of the form in the parent
view, and only the insides in partial view. In the RESTful version, @recipe serves as a marker for the
action in both cases, Rails automatically determines the URL action from the context. As a result, the
form block can more easily be entirely contained in the partial view.
Adding a Little Ajax
At this point, the basic CRUD functionality works for recipes with ingredients. I’d like to add one little
piece of in-place Ajax editing, allowing the user to do an in-place edit of the ingredients from the recipe
show page. This will allow the user to switch from what is shown in Figure 1-3 to what is shown in
Figure 1-4.
Figure 1-3
34
Chapter 1: Building Resources
Figure 1-4
To allow Ajax to work in your Rails application, you must load the relevant JavaScript files by including the following line in the app/views.layouts/recipes.html.erb file. Place the line in the
HTML header.
<%= javascript_include_tag :defaults %>
I find the best way to build in-place action like this is to build the action as a standalone first, and then
incorporate it into the view where needed. I’ve made the design decision to leave the existing edit and
update actions alone, and instead add new actions called remote_edit and remote_update. Here are
the unit tests for them, in ingredient_controller_test.rb:
def test_should_get_remote_edit
get :remote_edit, :id => 1, :recipe_id => 1
assert_select(“form[action=?]”,
remote_update_recipe_ingredient_path(1, 1)) do
assert_select “input[name *= amount]”
assert_select “input[name *= unit]”
assert_select “input[name *= ingredient]”
assert_select “input[name *= instruction]”
end
end
def test_should_remote_update_ingredient
put :remote_update, :id => 1, :ingredient => { :amount => 2 },
:recipe_id => 1
assert_equal “2 cups First Ingredient, Chopped”, @response.body
end
35
Chapter 1: Building Resources
The tests are very similar to what you’d use for the normal edit and update, just with different URLs. The
response for the update method is the ingredient display string, not a redirect to the show ingredient
page, which enables the updated ingredient to be inserted back into place on the recipe page. In the
interest of full disclosure among friends, I should reveal that I didn’t actually develop this part strictly
test-first — I played around with the layout within the recipe page a little bit before going back and
writing the test.
Because this is a new action for a RESTful controller, new routes have to be added in the routes.rb file.
Modify it as follows:
map.resources :recipes do |recipes|
recipes.resources :ingredients,
:member => {:remote_edit => :get, :remote_update => :put}
end
This creates a new remote_edit route that responds to GET, and a remote_update route that
responds to PUT. Each of these routes gets a named method to refer to it: remote_edit_recipe_
ingredient_path and remote_update_recipe_ingredient_path. Run the rake routes command
for full details.
Both of these methods need controller methods and views. The controller methods are quite simple, and
go in app/controller/ingredient_controller.rb as follows:
def remote_edit
edit
end
You can’t get much simpler than that. The remote_edit method uses the same method of getting its
ingredient as edit does, so in the interest of avoiding cut and paste, I just call the other method directly.
The next step would be another before_filter, which would make both methods empty.
There’s also the following view for remote_edit, keeping things on as few lines as possible:
<% remote_form_for(@ingredient,
:url => remote_update_recipe_ingredient_path(@recipe, @ingredient),
:update => “ingredient_#{@ingredient.id}”) do |f| %>
<table>
<tr>
<th class=”subtle”>Amount</th>
<th class=”subtle”>Unit</th>
<th class=”subtle”>Ingredient</th>
<th class=”subtle”>Directions</th>
</tr>
<tr>
<td><%= f.text_field :amount, :size => “5” %></td>
<td><%= f.text_field :unit, :size => “10” %></td>
<td><%= f.text_field :ingredient, :size => “25” %></td>
<td><%= f.text_field :instruction, :size => “15” %></td>
<td><%= f.submit “Update” %></td>
</tr>
</table>
<% end %>
36
Chapter 1: Building Resources
Notice the pathname in the result. This is app/views/ingredients/remote_edit.html.erb.
The following remote_update method in the ingredient controller is a simplification of update (for one
thing, I’m not concerned here with responding in formats other than HTML):
def remote_update
@ingredient = Ingredient.find(params[:id])
if @ingredient.update_attributes(params[:ingredient])
render(:layout => false)
else
render :text => “Error updating ingredient”
end
end
The view for this method is simply this:
<%= h @ingredient.display_string %>
The only rendered output of this method is the display string of the newly constructed ingredient or an
error message. The only reason it’s in an erb file at all is to allow access to the h method to escape out
HTML tags and prevent an injection attack.
Finally, the call to create this form has to be placed in the recipe show.html.erb file. Here’s the
relevant chunk:
<div class=”ingredients”>
<h2>Ingredients</h2>
<% for ingredient in @recipe.ingredients %>
<div class=”ingredient”>
<span id=”ingredient_<%= ingredient.id %>”>
<%= h ingredient.display_string %>
</span>
<span class=”subtle” id=”edit_<%= ingredient.id %>”>
<%= link_to_remote “Edit”,
:url =>
remote_edit_recipe_ingredient_path(@recipe, ingredient),
:method => :get,
:update => “ingredient_#{ingredient.id}”%>
</span>
</div>
<% end %>
</div>
Watch out for the :method parameter of the link_to_remote call. By default, link_to_remote sends
its request as a POST, and I already specified that remote_edit was a GET. Other than that, the link_
to_remote call is typical. The URL to call is specified using the new name generated by the new route,
and the DOM element to update is the preceding span containing the ingredient display string.
37
Chapter 1: Building Resources
Resources
The primary source for the REST details in this chapter was the RESTful Rails tutorial, written by Ralf
Wirdemann and Thomas Baustert and translated from the original German by Florian Görsdorf and
Adam Groves. It’s available at www.b-simple.de/documents. It’s an excellent reference for the details
of the Rails version of REST.
For more details on recipes in general, I reference The Joy of Cooking by Imra S. Rombauer, Marion
Rombauer Becker, and Ethan Becker. The well-worn copy in my house was published by Scribner in
1997. I also recommend www.cookingforengineers.com, run by Michael Chu.
A full listing of all the assert_select codes can be found at http://labnotes.org/svn/public/
ruby/rails_plugins/assert_select/cheat/assert_select.html, which is maintained by Assaf
Arkin.
The CSS and text layout come from www.freewebtemplates.com.
Summar y
In this chapter, you start with nothing and finish with the beginnings of a recipe-sharing website. The
initial data design sets the pattern for the remainder of the development.
REST is a structure for organizing web pages by resource, with a common set of commands for accessing
the basic Create, Read, Update, Delete (CRUD) functionality for each resource. REST also allows for URL
patterns to be common from resource to resource, and depends on the specific HTTP method of the
request to determine what action the server should take in response to a URL.
Rails supports REST by easily scaffolding the creation of a REST model and its associated controller. A
single element in the routes.rb file specifies an entire suite of RESTful routes for the resource. These
routes can be seen using the rake routes command. Resources can be nested, in which case the child
resource URLs always contain an instance of the parent resource.
The basic application is augmented in this chapter with some server-side intelligence to make entering
data easier for the user. An in-place editor is added using basic Ajax techniques, and unit and functional
tests are written for all new code.
38