1
Paper type: GB(80kg), Paper Thickness=100 µm // Pages in book=64 // Print scale=81%
Gap (when printed at 81% scale) = Pages in book × Paper thickness / 2 = 3.200000 mm
RICOH COMPANY, LTD.
15-5, Minami Aoyama 1-chome,
Minato-ku, Tokyo 107-8544, Japan
Phone: +81-(0)3-3479-3111
Setup Guide
Setup Guide
Overseas Affiliates
U.S.A.
RICOH CORPORATION
5 Dedrick Place
West Caldwell, New Jersey 07006
Phone: +1-973-882-2000
Spain
RICOH ESPAÑA S.A.
Avda. Litoral Mar, 12-14,
08005 Barcelona
Phone: +34-(0)93-295-7600
The Netherlands
RICOH EUROPE B.V.
Groenelaan 3, 1186 AA, Amstelveen
Phone: +31-(0)20-5474111
Italy
RICOH ITALIA SpA
Via della Metallurgia 12,
37139 Verona
Phone: +39-045-8181500
United Kingdom
RICOH UK LTD.
Ricoh House,
1 Plane Tree Crescent, Feltham,
Middlesex, TW13 7HG
Phone: +44-(0)20-8261-4000
Germany
RICOH DEUTSCHLAND GmbH
Mergenthalerallee 38-40,
65760 Eschborn
Phone: +49-(0)6196-9060
France
RICOH FRANCE S.A.
383, Avenue du Général de Gaulle
BP 307-92143 Clamart Cedex
Phone: +33-(0)-821-01-74-26
Model number: RICOH Aficio AP4510
Printed in The Netherlands
EE
GB
G065-8620
Hong Kong
RICOH HONG KONG LTD.
21/F., Tai Yau Building,
181, Johnston Road,
Wan Chai, Hong Kong
Phone: +852-2862-2888
Singapore
RICOH ASIA PACIFIC PTE.LTD.
260 Orchard Road,
#15-01/02 The Heeren,
Singapore 238855
Phone: +65-830-5888
For safety, please read this manual carefully before you use this product and keep it
handy for future reference.
Paper type: GB(80kg), Paper Thickness=100 µm // Pages in book=64 // Print scale=81%
Gap (when printed at 81% scale) = Pages in book × Paper thickness / 2 = 3.200000 mm
Introduction
This manual contains detailed instructions on the operation and maintenance of this machine. To get
maximum versatility from this machine all operators should carefully read and follow the instructions in
this manual. Please keep this manual in a handy place near the machine.
Please read the Safety Information before using this machine. It contains important information related
to USER SAFETY and PREVENTING EQUIPMENT PROBLEMS.
Declaration of Conformity
“The Product complies with the requirements of the EMC Directive 89/336/EEC and the Low Voltage
Directive 73/23/EEC.”
Power Source
Aficio AP4510: 220 - 240 V, 50/60 Hz, 8 A or more
Please be sure to connect the power cord to a power source as shown above.
Two kinds of size notation are employed in this manual. With this machine refer to the metric version.
Operator Safety:
This printer is considered a class 1 laser device, safe for office/ EDP use. The printer contains 5-milliwat, 760 - 800 nanometer wavelength, GaAIAs laser diodes. Direct (or indirect reflected) eye contact
with the laser beam might cause serious eye damage. Safety precautions and interlock mechanisms
have been designed to prevent any possible laser beam exposure to the operator.
Warning
Changes or modifications not expressly approved by the party responsible for compliance could void
the user's authority to operate the equipment.
In accordance with IEC 60417, this machine uses the following symbols for the main power switch:
a means POWER ON.
b means POWER OFF.
The following label is attached on the back of the printer.
Laser Safety:
The optical housing unit can only be repaired in a factory or at a location with the requisite equipment.
The laser subsystem is replaceable in the field by a qualified Customer Engineer. The laser chassis is
not repairable in the field. Customer engineers are therefore directed to return all chassis and laser subsystems to the factory or service depot when replacement of the optical subsystem is required.
Important
Contents of this manual are subject to change without prior notice. In no event will the company be liable for direct, indirect, special, incidental, or consequential damages as a result of handling or operating the machine.
Caution:
Use of controls or adjustment or performance of procedures other than those specified in this manual
might result in hazardous radiation exposure.
Do not attempt any maintenance or troubleshooting other than that mentioned in this manual. This
printer contains a laser beam generator and direct exposure to laser beams can cause permanent eye
damage.
For good image quality, Ricoh recommends that you use genuine Ricoh toner.
Ricoh shall not be responsible for any damage or expense that might result from the use of parts other
than genuine Ricoh parts with your Ricoh office products.
Copyright © 2001 Ricoh Co., Ltd.
Setup-F3_FM.book Page i Friday, October 5, 2001 8:27 PM
Trademarks
Microsoft, Windows and Windows NT are registered trademarks of Microsoft
Corporation in the United States and/or other countries.
Novell, Netware, NDS are registered trademarks or Novell, Inc.
PostScript is a registered trademark of Adobe Systems, Incorporated.
PCL is a registered trademark of Hewlett-Packard Company.
AppleTalk, Apple, Macintosh, TrueType and LaserWriter are registered trademarks of Apple Computer, Incorporated.
IPS-PRINT Printer Language Emulation Copyright© 1999-2000 Oak Technology, Inc., All rights reserved.
Ethernet is a registered trademark of Xerox Corporation.
Other product names used herein are for identification purposes only and might
be trademarks of their respective companies. We disclaim any and all rights in
those marks.
• The product name of Windows® 95 is Microsoft® Windows® 95.
• The product name of Windows® 98 is Microsoft® Windows® 98.
• The product name of Windows® Me is Microsoft® Windows® Millennium
Edition (Windows Me).
• The product names of Windows® 2000 are as follows:
Microsoft® Windows® 2000 Advanced Server
Microsoft® Windows® 2000 Server
Microsoft® Windows® 2000 Professional
• The product names of Windows NT® 4.0 are as follows:
Microsoft® Windows NT® Server 4.0
Microsoft® Windows NT® Workstation 4.0
Notes:
Some illustrations in this manual might be slightly different from the machine.
Certain options might not be available in some countries. For details, please contact your local dealer.
i
Setup-F3_FM.book Page ii Friday, October 5, 2001 8:27 PM
Safety Information
When using your printer, the following safety precautions should always be followed.
Safety During Operation
In this manual, the following important symbols are used:
R WARNING:
Indicates a potentially hazardous situation which, if instructions
are not followed, could result in death or serious injury.
R CAUTION:
Indicates a potentially hazardous situation which, if instructions are
not followed, may result in minor or moderate injury or damage to
property.
R WARNING:
• Connect the power cord directly into a wall outlet and never use an extension cord.
• Disconnect the power plug (by pulling the plug, not the cable) if the
power cable or plug becomes frayed or otherwise damaged.
• To avoid hazardous electric shock or laser radiation exposure, do not
remove any covers or screws other than those specified in this manual.
• Turn off the power and disconnect the power plug (by pulling the plug,
not the cable) if any of the following conditions exists:
• You spill something into the equipment.
• You suspect that your equipment needs service or repair.
• Your equipment's cover has been damaged.
• Do not incinerate spilled toner or used toner. Toner dust might ignite
when exposed to an open flame.
• Disposal should take place at our authorized dealer or at appropriate
collection sites.
• Dispose of the used toner bottle in accordance with the local regulation.
ii
Setup-F3_FM.book Page iii Friday, October 5, 2001 8:27 PM
R CAUTION:
• Do not eat or swallow toner.
• Keep toner (used or unused) and toner bottle out of the reach of children.
• Protect the equipment from dampness or wet weather, such as rain, snow,
and so on.
• Unplug the power cord from the wall outlet before you move the equipment.
While moving the equipment, you should take care that the power cord will
not be damaged under the equipment.
• When you disconnect the power plug from the wall outlet, always pull the
plug (not the cable).
• Do not allow paper clips, staples, or other small metallic objects to fall inside
the equipment.
• For environmental reasons, do not dispose of the equipment or expended
supply waste at household waste collection points. Disposal can take place
at an authorized dealer or at appropriate collection sites.
• The inside of the machine could be very hot. Do not touch the parts with a
label indicating "v" (means hot surface). Touching "v" (means hot surface)
could result in a burn.
• Our products are engineered to meet high standards of quality and functionality, and we recommend that you only use the expendable supplies available at an authorized dealer.
• Do not put an object on the front cover when it is open.
• When removing misfed paper, do not touch the fusing section because it becomes very hot.
• To prevent an injury, this printer should be lifted by at least two people.
• When moving the machine, each person should hold the handles that are
located on opposite sides, and then lift it slowly. Lifting it carelessly or dropping it may cause an injury.
• Before installing options, the machine should be turned off and unplugged
for at least an hour. Components inside the machine become very hot, and
can cause a burn if touched.
iii
Setup-F3_FM.book Page iv Friday, October 5, 2001 8:27 PM
ENERGY STAR Program
As an ENERGY STAR Partner, we have determined
that this machine model meets the ENERGY STAR
Guidelines for energy efficiency.
The ENERGY STAR Guidelines intend to establish an international energy-saving system for
developing and introducing energy-efficient office equipment to deal with environmental issues, such as global warming.
When a product meets the ENERGY STAR Guidelines for energy efficiency, the Partner shall
place the ENERGY STAR logo onto the machine model.
This product was designed to reduce the environmental impact associated with office equipment by means of energy-saving features, such as Low-power mode.
• Energy Saver mode
This printer automatically lowers its power consumption 60 seconds after the
last operation has been completed. To exit Energy Saver mode, press any key
on the control panel. To change the setting of the Energy Saver mode, see
“System Menu” in the Printer Reference on the CD-ROM labeled “Operating
Instructions”.
❖ Specifications
Energy Saver mode
Power Consumption
9 W or less for Europe and
Asia/Pacific
8 W or less for North America
Default Time
60 seconds
- Recycled Paper
In accordance with the ENERGY STAR Program, we recommend use of recycled
paper which is environment friendly. Please contact your sales representative
for recommended paper.
iv
Setup-F3_FM.book Page v Friday, October 5, 2001 8:27 PM
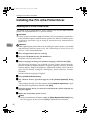
Manuals for This Printer
Manuals for This Printer
The following manuals describe the operational procedures and maintenance of
this machine.
To enhance safe and efficient operation of this printer, all users should read and
follow the instructions carefully.
❖ Quick Installation Guide
Describes how to install the printer.
❖ Setup Guide (this manual)
Provides information about setting up the printer and its options. This manual is provided as a printed manual, and also as a PDF file on the CD-ROM
labeled "Operating Instructions".
❖ Printer Reference
Provides information about using the printer and its options. This manual is
provided as a PDF file on the CD-ROM labeled “Operating Instructions”.
❖ Network Printing Guide
Provides information about setting up and using the printer in a network environment. This manual is provided as a PDF file on the CD-ROM labeled
“Operating Instructions”.
❖ PostScript 3 Operating Instructions Supplement
Describes the menus and features for the PostScript 3 printer driver. This
manual is provided as a PDF file on the CD-ROM labeled “Operating Instructions”.
Note
❒ There are three CD-ROMs that come with this printer. "Operating Instructions", "Printer Drivers and Utilities", and "Document Management Utility".
❒ Concerning UNIX information, please visit our web site or consult your authorized reseller.
v
Setup-F3_FM.book Page vi Friday, October 5, 2001 8:27 PM
How to Read This Manual
Symbols
In this manual, the following symbols are used:
R WARNING:
This symbol indicates a potentially hazardous situation which, if instructions
are not followed, could result in death or serious injury.
R CAUTION:
This symbol indicates a potentially hazardous situation which, if instructions
are not followed, may result in minor or moderate injury or damage to property.
* The statements above are notes for your safety.
Important
If this instruction is not followed, paper might be misfed, originals might be
damaged, or data might be lost. Be sure to read this.
Preparation
This symbol indicates the prior knowledge or preparations required before operating.
Note
This symbol indicates precautions for operation, or actions to take after misoperation.
Limitation
This symbol indicates numerical limits, functions that cannot be used together,
or conditions in which a particular function cannot be used.
Reference
This symbol indicates a reference.
[
]
Keys that appear on the machine's panel display.
Keys and buttons that appear on the computer's display.
{
}
Keys built into the machine's control panel.
Keys on the computer's keyboard.
vi
Setup-F3_FM.book Page vii Friday, October 5, 2001 8:27 PM
TABLE OF CONTENTS
1. Getting Started
Features of This Printer ............................................................................. 1
Printer Drivers for This Printer.................................................................. 3
Software and Utilities Included on the CD-ROM...................................... 5
Guide to This Printer .................................................................................. 6
Mainframe ...................................................................................................... 6
Control Panel ................................................................................................. 9
2. Installing Options
Available Options ..................................................................................... 11
How to Use the Screwdriver......................................................................... 13
Installing Options ..................................................................................... 14
Installing Memory Unit TypeC ...................................................................... 14
Installing Paper Bank PS430 ....................................................................... 15
Installing Printer Hard Disk Type4510.......................................................... 18
Installing 1394 Interface Unit Type 4510...................................................... 22
3. Configuring the Printer for the Network
Configuring the Printer for the Network with the Control Panel ......... 31
IEEE 1394 Configuration.......................................................................... 34
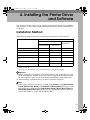
4. Installing the Printer Driver and Software
Installation Method................................................................................... 37
Quick Install .............................................................................................. 38
Installing the PCL 6/5e Printer Driver ..................................................... 40
Installing the PCL 6/5e Printer Driver........................................................... 40
Installing the RPCS Printer Driver .......................................................... 42
Installing the RPCS Printer Driver................................................................ 42
Installing the PostScript Printer Driver .................................................. 44
Windows 95/98/Me - Installing the PostScript Printer Driver........................ 44
Windows 2000 - Installing the PostScript Printer Driver............................... 45
Windows NT 4.0 - Installing the PostScript Printer Driver............................ 47
Using Adobe PageMaker Version 6.0 or 6.5................................................ 49
Installing the SmartNetMonitor for Client/Admin .................................. 50
Installing the Agfa Monotype Font Manager 2000................................. 51
Macintosh.................................................................................................. 52
Macintosh - Installing the PostScript 3 Printer Driver ................................... 52
Setting Up the PPD File ............................................................................... 52
Setting Up Options ....................................................................................... 53
INDEX......................................................................................................... 54
vii
Setup-F3_FM.book Page viii Friday, October 5, 2001 8:27 PM
viii
Setup-F3_FM.book Page 1 Friday, October 5, 2001 8:27 PM
1. Getting Started
Features of This Printer
This printer is designed especially for office work groups. It can be used for network environments and allows you to handle documents efficiently.
❖ High Performance
The new 45 print per minute (ppm) engine with RM7000A 250 MHz processor and built-in 10 GB Printer Hard Disk (HDD) reduces waiting time for output.
❖ Versatile Paper Handling Options
This printer offers a variety of paper handling options.
The large input capacity, up to 3,550 sheets from six input sources, reduces
the inconvenience of reloading paper.
The output devices free users from manually collating, stapling or punching
documents.
❖ High Productivity
A high-speed engine combined with advanced paper handling features increases the productivity of users who need to print several sets of multiple
page documents.
With the sample printing function, users can confirm that the output is correct
before several sets of documents are printed out.
❖ Network Connectivity
This printer is network capable with a built-in 100BASE-TX card.
It is easy to connect this printer to your network with utility.
❖ Crisp Print Image Quality
This printer supports PCL 6 as well as Adobe PostScript 3.
With a real 600dpi-resolution engine (plus smoothing technology), crisp images can be printed. The resolution is 1200 dpi equivalent when the edge
smoothing function is used.
1
Setup-F3_FM.book Page 2 Friday, October 5, 2001 8:27 PM
Getting Started
❖ Major Specifications
1
Continuous Printing Speed
45 ppm (A4/letterK, simplex and duplex)
Engine Resolution
300 dpi, 600 dpi
Printer Languages
PCL 5e, PCL 6, RPCS
Adobe PostScript 3
Paper Input Capacity
500 sheets × 2 trays + 50 sheets Bypass Tray
Max. 3,550 sheets with options
Paper Output Capacity
500 sheets
Max. 4,900 sheets with options
Memory
64 MB
Expandable to 320 MB
HDD
Interface
10 GB or more
100BASE-TX × 1
IEEE1284 × 1
Options
PS430 (Paper Bank, 500–sheet × 2 trays)
Large Capacity Tray RT36 (1500–sheet Large Capacity Tray)
Finisher SR720 (1000–sheet finisher)
Finisher SR730 (3000–sheet finisher)
Mailbox CS360 (9-bin mailbox)
Printer Hard Disk Type 4510 (10 GB or more)
1394 Interface Unit Type 4510
Memory Unit Type C 64MB, Memory Unit Type
C 128MB, Memory Unit Type C 256MB
Barcode Font DIMM Type A
Punch Kit Type450
Bridge Unit Type460
Bridge Unit Type1045
2
Setup-F3_FM.book Page 3 Friday, October 5, 2001 8:27 PM
Printer Drivers for This Printer
Printer Drivers for This Printer
Printing requires installation of a printer driver for your operating system. The
following drivers are included on the CD-ROM that comes with this printer.
Printer Language
PCL 6
PCL 5e
RPCS
PostScript3
Windows 95 *1
√
√
√
√ *8
Windows 98 *2
√
√
√
√ *8
√
√
√
√ *8
√
√
√
√ *8
√
√
√
1
Operating system
Windows Me
*3
Windows 2000 *4
Windows NT 4.0
Mac OS *6
*1
*2
*3
*4
*5
*6
*7
*8
*5
√ *7
*8
√ *8
Microsoft Windows 95 operating system
Microsoft Windows 98 operating system
Microsoft Windows Millennium Edition
Microsoft Windows 2000 Professional
Microsoft Windows 2000 Server
Microsoft Windows NT Server operating system version 4.0, Microsoft Windows NT
Workstation operating system version 4.0 in a computer using x86 processors.
Versions 8.6 to 9.1 of the Mac OS can be used. With OS X, the printer operates in Classic Mode.
Requires Service Pack 4 or later.
The Adobe PostScript printer drivers and PostScript Printer Description (PPD) files
are included on the CD-ROM labeled “Printer Drivers and Utilities”.
❖ PCL printer drivers
Printer drivers allow the computer to communicate with the printer via a
printer language. Two kinds of PCL printer drivers, PCL 6 and PCL 5e, are
provided with this printer. We recommend PCL 6 as your first choice.
Note
❒ Some of your applications might require the installation of the PCL 5e
printer driver. In this case, you can install PCL 5e in addition to PCL 6.
⇒ p.40 “Installing the PCL 6/5e Printer Driver”
❖ RPCS printer driver
This printer driver allows the computer to communicate with the printer via
a printer language.
⇒ p.42 “Installing the RPCS Printer Driver”
3
Setup-F3_FM.book Page 4 Friday, October 5, 2001 8:27 PM
Getting Started
❖ Adobe PostScript Printer Drivers and PPD files
The Adobe Postscript printer drivers and the PPD files are included on the
CD-ROM that comes with this printer. Adobe PostScript printer driver allows
the computer to communicate with the printer via a printer language. The
PPD files allow the printer driver to enable the printer specific functions.
⇒ p.44 “Windows 95/98/Me - Installing the PostScript Printer Driver”
⇒ p.45 “Windows 2000 - Installing the PostScript Printer Driver”
⇒ p.47 “Windows NT 4.0 - Installing the PostScript Printer Driver”
⇒ p.52 “Macintosh”
1
4
Setup-F3_FM.book Page 5 Friday, October 5, 2001 8:27 PM
Software and Utilities Included on the CD-ROM
Software and Utilities Included on the CD-ROM
There are three CD-ROMs that come with this printer. “Operating Instructions”,
“Printer Drivers and Utilities” and "Document Management Utility". The following items are included on the CD-ROMs.
1
❖ Agfa Font Manager
Helps you to install new screen fonts, or organize and manage fonts already
installed on the system. This manual is provided as a PDF file on the CDROM labeled “Printer Drivers and Utilities”.
❖ SmartNetMonitor for Admin
A utility for the system administrator to manage printers on the network. This
manual is provided as a PDF file on the CD-ROM labeled “Printer Drivers
and Utilities”.
Reference
See SmartNetMonitor for Admin online Help for more information about
using SmartNetMonitor for Admin.
❖ SmartNetMonitor for Client
A utility for users to manage their own print status on the network. This manual is provided as a PDF file on the CD-ROM labeled “Printer Drivers and
Utilities”.
Reference
See SmartNetMonitor for Client online Help for more information about
using SmartNetMonitor for Client.
❖ Acrobat Reader
A utility that allows you to read PDF. This manual is provided as a PDF file
on the CD-ROM labeled “Operating Instructions”.
Note
❒ Documentation about using the printer is included on the CD-ROM in PDF
format. See Acrobat Reader online Help for more information about using
Acrobat Reader.
Important
❒ If you upgrade to Windows 2000 from Windows 95/98/Me or Windows NT
4.0, the software and utilities must be uninstalled prior to installing Windows
2000. Then reinstall them in a Windows 2000 environment.
5
Setup-F3_FM.book Page 6 Friday, October 5, 2001 8:27 PM
Getting Started
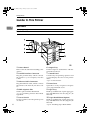
Guide to This Printer
Mainframe
1
Exterior: Front View
1. Printer Board
6. Output Tray
Remove this board when installing some
options.
Printed output is stacked here with the
print side face down.
2. Parallel Interface Connector
7. Control Panel
Plug the parallel cable, which connects
the printer to your computer, into this
socket.
Contains keys for printing operation and
a panel display that shows the printer
status.
⇒ p.9 “Control Panel”
3. Ethernet Cable Connector
6
Plug the Ethernet cable, which connects
the printer to the network, into this socket.
8. Front Cover
4. HDD (Option) Slot
9. Paper Tray
Set the optional Printer Hard Disk.
⇒ p.18 “Installing Printer Hard Disk
Type4510”
Holds up to 500 sheets of plain paper per
tray and 1000 sheets in total. (80 g/m2, 20
lb. bond)
5. Power Switch
10. Paper Bank PS430 (Option)
Use this switch to turn the printer power
on and off.
Holds up to 500 sheets of plain paper per
tray and 1000 sheets in total. (80 g/m2, 20
lb. bond)
⇒ p.15 “Installing Paper Bank PS430”
Open this cover if you replace some parts
or if a paper misfeed occurs.
Setup-F3_FM.book Page 7 Friday, October 5, 2001 8:27 PM
Guide to This Printer
Exterior: Rear View
1
1. Duplex Unit
5. Lower Vertical Paper Feed Cover
Allows you to print onto both sides of the
paper.
Open this cover when accessing the inside of the printer.
2. Duplex Unit Right Cover
6. Power Cord
Open this cover when accessing the inside of the printer.
Plug this cord into a wall outlet.
3. Bypass Tray
Helps to keep components inside the
printer from overheating.
Holds up to 50 sheets of plain paper. (80
g/m2, 20 lb. bond)
7. Ventilator
4. Upper Vertical Paper Feed Cover
Open this cover when accessing the inside of the printer.
If you install the optional Large Capacity
Tray RT36, remove this cover.
7
Setup-F3_FM.book Page 8 Friday, October 5, 2001 8:27 PM
Getting Started
Interior
1
1. Fusing Unit
4. Toner Holder
When “Replace Maintenance Kit” appears on the panel display, replace this
unit.
Slide this out when replacing the toner.
2. Transfer Unit
When “Replace Maintenance Kit” appears on the panel display, replace this
unit.
3. Toner Lock Handle
Turn up the lever when replacing the
toner.
8
5. Development Unit
When “Replace Maintenance Kit” appears on the panel display, replace this
unit.
6. Right Cover
Open this cover when accessing the inside of the printer.
Setup-F3_FM.book Page 9 Friday, October 5, 2001 8:27 PM
Guide to This Printer
Control Panel
1
1
2
3
5
8
6
9
7
10
11
4
1. Panel Display
5. {On Line}} Key
Shows the current status of the printer
and error messages.
See “Error & Status Messages on the Control
Panel” in the Printer Reference on the
CD-ROM labeled "Operating Instructions".
Press this key to switch the printer between online and offline.
2. Power Indicator
Is on when the printer power is on.
Is off when the power is off or when the
printer is in Energy Saver mode.
3. Error Indicator
Blinks or lights up whenever any printer
error occurs. A message describing the
cause of the error also appears on the
panel display.
See “Error & Status Messages on the Control
Panel” in the Printer Reference on the
CD-ROM labeled "Operating Instructions".
4. Data In Indicator
Blinks while the printer is receiving data
from a computer.
Is on if there is data to be printed.
6. {Job Reset}} Key
When the printer is online, press this key
to cancel any ongoing print job.
See “Canceling a Print job” in the Printer
Reference on the CD-ROM labeled "Operating Instructions".
7. {Form Feed}} Key
If the printer is offline, press this key to
print all the data left in the printer's input
buffer.
Note
❒ This does not work if the printer is online.
8. {Menu}} Key
Press this key to make and check the current printer settings.
See “Making Printer Settings with the Control Panel” in the Printer Reference on the
CD-ROM labeled "Operating Instructions".
9
Setup-F3_FM.book Page 10 Friday, October 5, 2001 8:27 PM
Getting Started
9. {Escape}} Key
Press this key to return to the previous
condition on the panel display.
10. {Enter #}} Key
1
Press this key to execute menu items selected on the panel display.
Press this key to clear some errors.
See “Troubleshooting” in the Printer Reference on the CD-ROM labeled "Operating
Instructions".
11. {U} {T} Keys
Use these keys to increase or decrease
values on the panel display when making
settings.
10
Setup-F3_FM.book Page 11 Friday, October 5, 2001 8:27 PM
2. Installing Options
R CAUTION:
• Before installing options, the machine should be turned off and unplugged
for at least thirty minutes. Components inside the machine become very
hot, and can cause a burn if touched.
• Before moving the machine, unplug the power cord from the outlet. If the
cord is unplugged abruptly, it could become damaged. Damaged plugs or
cords can cause an electrical or fire hazard.
• When lifting the machine, use the grips on both sides. The machine could
break or cause an injury if dropped.
See "Specifications" in the Printer Reference to confirm what kind of options are
available.
Important
❒ Rating voltage of the connector for options: max. DC 24 V.
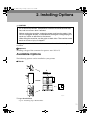
Available Options
The following options can be installed to your printer.
❖ Exterior
4
3
5
2
6
1
ZFCP711E
1. Paper Bank PS430
⇒ p.15 “Installing Paper Bank PS430”
11
Setup-F3_FM.book Page 12 Friday, October 5, 2001 8:27 PM
Installing Options
2. Large Capacity Tray RT36
5. Finisher SR730
Holds up to 1500 sheets of plain paper. (80 g/m2, 20 lb. bond)
If you want to install the Large Capacity Tray RT36, contact your sales or
service representative.
3. Bridge Unit Type1045
2
This unit is necessary when using the
Finisher or the Mailbox.
If you want to install the Bridge Unit
Type1045, contact your sales or service representative.
4. Finisher SR720
If you want to install the Finisher
SR720, contact your sales or service
representative.
If you want to install the Finisher
SR730, contact your sales or service
representative.
6. Mailbox CS360
If you want to install the Mailbox
CS360, contact your sales or service
representative.
Note
❒ The Bridge Unit Type460 is required
when you install both the Finisher
SR730 and the Mailbox CS360.
❒ To use the punch function with the
Finisher SR730, the Punch Kit
Type450 is required.
❖ Interior
1
2
3
1. Slot for the Memory Unit TypeC
Install the memory unit into the slots
in the printer board. There are three
types of Memory Unit TypeC, 64 MB,
128 MB and 256 MB. Only one of them
can be installed at once. ⇒ p.14 “Installing Memory Unit TypeC”
2. Slot for the 1394 Interface Unit
Type 4510
You can perform the print job on the
IEEE1394 environment.
⇒ p.22 “Installing 1394 Interface Unit
Type 4510”
3. Printer Hard Disk Type4510
Install the HDD into the slot in the
printer board.
⇒ p.18 “Installing Printer Hard Disk
Type4510”
Note
❒ When you install several different options, be sure to install the Paper Bank
PS430 first.
12
Setup-F3_FM.book Page 13 Friday, October 5, 2001 8:27 PM
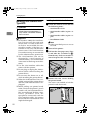
Available Options
How to Use the Screwdriver
The screwdriver (A) is attached in the standard paper tray (Tray 1). It is used to
install options. To easily drive a screw, first place the screw in the screwdriver,
and then tighten the screw.
2
13
Setup-F3_FM.book Page 14 Friday, October 5, 2001 8:27 PM
Installing Options
Installing Options
Installing Memory Unit TypeC
R CAUTION:
• Do not touch the inside of the
printer board compartment. It
may cause a machine malfunction or a burn.
2
Important
❒ The memory unit can be damaged
by a small amount of static electricity. Before touching it, touch some
metal to remove static electricity
from you.
❒ When the bidirectional transmission is not in operation, you must
set up the installed memory unit
using the printer driver in order to
use it. See p.37 “Installing the
Printer Driver and Software” for
setting up options. See p.48 “The
conditions of the bidirectional
transmissions” for information
about bidirectional transmission.
A Turn off the printer.
B Pull out the first paper tray (Tray
1) and take the screwdriver (A
A)
from the tray. Each screw to be removed requires this screwdriver.
C Remove
the two screws locking
the printer board.
The screws are needed to lock the
printer board afterwards.
D Hold
the handle, and carefully
pull out the printer board.
E Put the printer board on a flat surface.
F Insert the memory unit diagonally into the slot (A
A), and then push
it down to the direction shown
until it clicks into place (B
B).
ZFCP720E
14
Setup-F3_FM.book Page 15 Friday, October 5, 2001 8:27 PM
Installing Options
G Align the printer board with the
top and bottom rails in the printer, and then insert the printer
board slowly until it clicks into
place.
Installing Paper Bank PS430
R CAUTION:
• Before moving the machine, unplug the power cord from the outlet. If the cord is unplugged
abruptly, it could become damaged. Damaged plugs or cords
can cause an electrical or fire
hazard.
2
• When lifting the machine, use
the grips on both sides. The machine could break or cause an injury if dropped.
H Lock the printer board with the
two screws you removed in step
C.
Note
❒ Print a configuration page to
confirm that the unit is properly
installed. See "Printing a Configuration Page" in the Printer Reference on the CD-ROM labeled
"Operating Instructions".
❒ Be sure to return the screwdriver to the paper tray after using
it.
• When lifting the Paper Bank,
hold the bottom of it, and then lift
it slowly. Lifting it carelessly or
dropping it may cause an injury.
Important
❒ When the bidirectional transmission is not in operation, you must
set up the installed Paper Bank using the printer driver in order to
use it. See p.37 “Installing the
Printer Driver and Software” for
setting up options. See p.48 “The
conditions of the bidirectional
transmissions” for information
about bidirectional transmission.
A Confirm that the printer is turned
off, and the power cord is unplugged from the wall outlet.
15
Setup-F3_FM.book Page 16 Friday, October 5, 2001 8:27 PM
Installing Options
B Remove
the tape that holds the
Paper Bank, and then remove the
packing material.
D Align the printer over the Paper
Bank, and then lower it carefully
onto the Paper Bank.
Important
❒ Do not remove the tape that
holds the connector cable inside
the connector cover on the back
of the Paper Bank in this step. It
is removed in step L.
2
TAPP801E
Important
❒ The printer should be held by at
least two people.
❒ When lifting the printer, pull
out the grips from the front of
the printer. One person should
hold the grips on the front and
another person should hold the
grips on the rear.
TAPP811E
C Check the contents of the box for
the following items:
E Push
the grips into the printer.
Take out the cover inside Tray 2
and attach it between the paper
tray and the front cover.
1
2
3
TAPD011E
1. Screw
2. Knob Screw (Finger type)
3. Lock Plate
16
Setup-F3_FM.book Page 17 Friday, October 5, 2001 8:27 PM
Installing Options
F Pull the second paper tray (Tray 2)
until it stops. After that, lift it
slightly, and then pull it out.
I Set the second paper tray (Tray 2)
into the printer.
2
TAPH221E
G Pull out the first paper tray (Tray
1) , and take the screwdriver (A
A)
from the tray.
J Open
the lower vertical paper
feed cover on the right side of the
Paper Bank (A
A ). Hang the lock
plate hook in the hole inside (B
B),
and then fasten the plate with the
knob screw using your fingers.
ZFCP720E
H Lock
the Paper Bank and the
printer with the screw.
TAPP050E
K Close
the lower vertical paper
feed cover.
B), reL Open the connector cover (B
move the tape that holds the connector cable and attach the
connector cables (C
C) as shown in
the illustration.
Note
❒ Be sure to return the screwdriver to the paper tray after using
it.
17
Setup-F3_FM.book Page 18 Friday, October 5, 2001 8:27 PM
Installing Options
M Close the connector cover.
2
Note
❒ Print a configuration page to
confirm that the Paper Bank is
properly installed. See "Printing
a Configuration Page" in the
Printer Reference on the CDROM labeled "Operating Instructions".
Installing Printer Hard Disk
Type4510
R CAUTION:
• Do not touch the inside of the
printer board compartment. It
may cause a machine malfunction or a burn.
Important
❒ The Printer Hard Disk can be damaged by a small amount of static
electricity. You should touch some
metal to discharge static electricity.
❒ When the bidirectional transmission is not in operation, you must
set up the installed Printer Hard
Disk using the printer driver in order to use it. See p.37 “Installing
the Printer Driver and Software”
for setting up options. See p.48
“The conditions of the bidirectional transmissions” for information
about bidirectional transmission.
18
❒ When the Printer Hard Disk is being accessed, the Data In indicator
blinks. Do not turn off the printer
power when the Data In indicator
is blinking as it may destroy the
hard disk.
❒ When a print job is being spooled,
the printer sends data to the hard
disk, and the Data In indicator
blinks. Do not turn off the printer
or computer while a print job is being spooled, as it may destroy the
hard disk or the spooled job will
remain in the hard disk and be
printed repeatedly until erased.
A Check the contents of the box for
the following items:
• Printer Hard Disk
• Installation Guide
• Power Cord
• Connector
B Turn off the printer.
C Pull out the first paper tray (Tray
1) and take the screwdriver (A
A)
from the tray. Each screw to be removed requires this screwdriver.
ZFCP720E
Setup-F3_FM.book Page 19 Friday, October 5, 2001 8:27 PM
Installing Options
D Remove
the two screws locking
the printer board.
The screws are needed to lock the
printer board afterwards.
G Hold
the handle, and carefully
pull out the printer board halfway.
2
E Remove
the two screws locking
the Printer Hard Disk cover next
to the printer board.
H Connect
the bigger plug of the
power cord to the printer board.
I Connect
The screws are needed to lock the
cover afterwards.
the connector to the
printer board.
F Align the Printer Hard Disk with
the top and bottom rails , and then
insert the Printer Hard Disk slowly until it stops.
ZFCP241J
Note
❒ Connect either side of the connector.
19
Setup-F3_FM.book Page 20 Friday, October 5, 2001 8:27 PM
Installing Options
J Connect
the power cord to the
Printer Hard Disk.
M Align the printer board with the
top and bottom rails in the printer, and then insert the printer
board slowly until it stops.
2
K Connect
the connector to the
Printer Hard Disk.
N Lock the printer board with the
two screws you removed in step
D.
L Lock the Printer Hard Disk cover
with the two screws you removed
in step E.
Note
❒ Be sure to return the screwdriver to the paper tray after using
it.
The Printer Hard Disk will be formatted automatically when the
power is turned on.
Note
❒ Print a configuration page to confirm that the Printer Hard Disk is
properly installed. See "Printing a
Configuration Page" in the Printer
Reference on the CD-ROM labeled
"Operating Instructions".
20
Setup-F3_FM.book Page 21 Friday, October 5, 2001 8:27 PM
Installing Options
Formatting Printer Hard Disk Type4510
If you are formatting the Printer Hard
Disk from the menu, follow the procedures below while using the control
panel.
A Press {Menu}}.
“Menu” appears on the panel display.
B Press {U} or {T} to display the
“Maintenance” menu.
Menu:
Maintenance
C Press {Enter q}.
The following message appears on
the panel display.
Menu:
Image Density
D Press
{U} or {T} to display
“HDD Format”.
F Press {Enter q}.
Important
❒ Do not turn off the printer while
formatting the Printer Hard
Disk. Turning off the printer
while formatting the Printer
Hard Disk c an dam age the
Printer Hard Disk.
If you successfully format the
Printer Hard Disk, the following
message appears on the panel display.
2
Completed
Restart Printer
Note
❒ If you fail, see “Troubleshooting”
in the Printer Reference, on the
CD-ROM labeled "Operating
Instructions".
G Turn
off the power switch, and
then back on.
Menu:
HDD Format
Note
❒ If "HDD Format" is not displayed, the Printer Hard Disk is
not installed properly. In such a
case, reinstall from step B.
E Press {Enter q}.
The following message appears on
the panel display.
HDD Format:
Press# to Start
21
Setup-F3_FM.book Page 22 Friday, October 5, 2001 8:27 PM
Installing Options
Installing 1394 Interface Unit
Type 4510
R CAUTION:
• Do not touch the inside of the
printer board compartment. It
may cause a machine malfunction or a burn.
2
Important
❒ In Windows 2000, the 1394 Interface Unit can only be used with
Service Pack 1 or later. If the Service Pack is not installed, the connectable number of devices in a
1394 bus is only one, and the client
cannot access the 1394 Interface
Unit without using an account that
has the administrators permission.
❒ The 1394 Interface Unit can be
damaged by a small amount of
static electricity. You should touch
some metal to discharge static electricity.
❒ Use the 1394 interface cable that
comes with this printer.
❒ Do not plug or unplug the 1394 interface cable while installing the
printer driver.
❒ Do not turn the device on or off,
while installing the printer driver.
❒ When the 1394 Interface Unit is installed, uninstall the printer driver
after the 1394 interface cable is unplugged.
❒ Before pulling out printer board,
make sure that the printer’s power
switch is off, and 1394 interface cables are unplugged. If there is electricity provided from the
equipment connected with the
1393 interface cables, the printer
board and the 1394 Interface Unit
might be damaged.
22
Installing the 1394 Interface Unit
A Check the contents of the box for
the following items:
• 1394 Interface Unit
• 1394 interface cable (6–pin x 4–
pin)
• 1394 interface cable (6–pin x 6–
pin)
• Installation Guide
Note
❒ Other provided parts are not to
be used.
B Turn off the printer.
C Pull out the first paper tray (Tray
1) and take the screwdriver (A
A)
from the tray. Each screw to be removed requires this screwdriver.
ZFCP720E
D Remove
the two screws locking
the printer board.
The screws are needed to lock the
printer board afterwards.
Setup-F3_FM.book Page 23 Friday, October 5, 2001 8:27 PM
Installing Options
E Hold
the handle, and carefully
pull out the printer board.
I Lock the 1394 Interface Unit cover
with the two screws you removed
in step G.
2
F Put the printer board on a flat surface.
J Align the printer board with the
the two screws locking
the 1394 Interface Unit cover.
top and bottom rails in the printer, and then insert the printer
board slowly until it stops.
The screws are needed to lock the
1394 Interface Unit afterwards.
K Lock the printer board with the
G Remove
H Attach the 1394 Interface Unit to
the slot. Confirm that the unit is
firmly connected to the printer
board.
two screws you removed in step
D.
23
Setup-F3_FM.book Page 24 Friday, October 5, 2001 8:27 PM
Installing Options
Note
❒ Be sure to return the screwdriver to the paper tray after using it.
❒ Print a configuration page to
confirm that the unit is properly
installed. See "Printing a Configuration Page" in the Printer Reference, on the CD-ROM labeled
"Operating Instructions".
2
Connecting the 1394 interface cable to
the printer
A Attach the 1394 interface cable to
the jack on the board.
Both jacks are available.
B Connect the other end of the 1394
interface cable to the computer or
the other IEEE 1394 node.
24
Note
❒ The 1394 Interface Unit could not
receive data from more than one
PC at the same time. In this case, an
error message appears. The printer
can accept data sent from other
computers, after the first print job
has finished.
❒ The bidirectional transmissions
are not supported by the 1394 Interface Unit.
❒ When the 1394 Interface Unit is installed successfully, the printer icon
automatically changes from "Use
Printer Offline" to "Ready", according to the 1394 interface cable plug.
❒ To use the 1394 Interface Unit, configure the unit from the control
panel of the printer.
Printing with SCSI Print
You can print by directly connecting
the computer to the printer via the
1394 Interface cable and using the
SCSI print client function provided
with Windows 2000.
Limitation
❒ This function is available under
Windows 2000 only. It is not available under Windows 95/98/Me or
Windows NT 4.0.
❖ Installing the Printer Driver
• “SCSI print” must be set active
from the control panel. For
more information, see p.34
“IEEE 1394 Configuration”.
• If the connected printer's driver
is not installed, follow the procedure below.
A Connect this machine to your
computer with the 1394 interface cable.
B Press [Cancel] when "Detect
New Hardware Wizard" appears. If the same wizard reappears, press [Cancel] again.
C Insert the printer driver CDROM into the computer.
• For the port selection, select the
IEEE 1394 port.
• For more information about the
installation of the printer driver,see p.37 “Installing the Printer Driver and Software”.
Setup-F3_FM.book Page 25 Friday, October 5, 2001 8:27 PM
Installing Options
• If the printer driver for the connected printer has already been
installed, the icon is automatically added to the Printers folder. In this case, driver
installation is not necessary.
However, since the 1394 Interface Unit does not support bidire c t io n a l t r an s m i ss io n s , i f
options are installed, set up options from the Printer Driver
Properties. See p.37 “Installing
the Printer Driver and Software”.
If the 1394 Interface Unit has been
installed properly, the printer icon
automatically changes from "Use
Printer Offline" to "Ready" whenever the 1394 interface cable is connected.
Important
❒ If [Add Printer Wizard] starts on
the computer running Windows 95/98/Me, click [Cancel].
❒ Do not connect new IEEE 1394
or USB devices to the printer or
turn on the printer while installing the printer driver.
❒ To uninstall the printer driver,
first disconnect the 1394 interface cable.
Note
❒ The 1394 Interface Unit cannot
accept print data from more
than one computer at the same
time. If a computer sends print
data while it is receiving print
data from another computer, an
error message appears.
❒ The 1394 Interface Unit does not
support bidirectional transmissions.
Printing with IP over 1394
With the IPP driver of Windows Me
and by setting the IEEE 1394 Interface
IP Address for the IEEE 1394 with the
printer, you can make prints from a
computer running Windows Me.
2
Preparation
"IP over 1394" must be set on the
control panel and an IEEE 1394 Interface IP address must be specified.
For more information about how
to make printer settings, see p.34
“IEEE 1394 Configuration”.
Limitation
❒ With Windows Me, the provided
1394 driver can be used. Windows
95/98, Windows 2000, Windows
NT 4.0, and Macintosh do not support ”IP over 1394”.
❒ When using the 1394 Interface Unit
in a network, the Ethernet interface
cannot be used in the same network.
❒ Set the Subnet Masks for the 1394
Interface Unit and the Ethernet interface so they do not overlap.
Note
❒ The supported protocols are IPP
and FTP.
• To use IPP, see p.26 “Installing
the Printer Driver”.
• To use FTP, see the Network
Printing Guide.
❒ The maximum number of simultaneous print requests when connecting with IP over 1394 includes
the print requests from the Ethernet interface. For more information, see the Network Printing
Guide.
25
Setup-F3_FM.book Page 26 Friday, October 5, 2001 8:27 PM
Installing Options
M Click [Have Disk…].
Installing the Printer Driver
You need the Microsoft Windows Me
CD-ROM for the installation.
To find out whether the Windows Me
CD-ROM supplied by another supplier includes the IPP driver, contact
the each supplier.
2
A Insert the Windows Me CD-ROM
into the CD-ROM drive.
B Auto Run will start the Windows
Millennium CD-ROM.
C Click [Browse This CD].
A window showing the contents of
the CD-ROM appears.
D Double-click the [add-ons] folder.
E Double-click the [Ipp] folder.
For more information about installing the IPP Client, see the [Ipp]
file in the [Ipp] folder.
F Restart the computer and remove
the Windows Me CD-ROM from
the CD-ROM drive.
G Click
[Start], point to [Settings],
and then click [Printers].
H Double-click [Add Printer].
The "Add Printer Wizard" starts.
I Click [Next>].
J Select the [Network Printer]
check
box, and then click [Next>].
K In
[Network path or queue name],
type [http://<IP address of printer>/printer] for the printer IP address and the port number, and
then click [Next>].
L Click [Next>].
26
The "Install From Disk" dialog box
appears.
N Insert
the CD-ROM labeled
"Printer Drivers and Utilities"
that comes with the printer.
O Click [Browse…].
P Select the CD-ROM
drive from
the drop-down list in the [Drives]
box.
Q Select
the folder containing the
printer driver you want to install,
and then click [OK].
R Click [OK].
S Select the computer you use, and
then click [Next>].
T Change [Printer name] as necessary,
and then click [Next>].
U Check the configuration page, select [No], and then click [Finish].
Installation starts.
V Restart Windows.
The printer driver installation is
complete.
Setup-F3_FM.book Page 27 Friday, October 5, 2001 8:27 PM
Installing Options
Configuration and Usage from a Web
Browser
Preparation
If you want to use this printer from
a Web browser, its IP address must
be specified and the TCP/IP protocol (IP over 1394) set on the control
panel. For more information, see
p.34 “IEEE 1394 Configuration”.
When you browse the printer on
the network by the Web browser,
you need not to use the proxy server.
When setting an IEEE 1394 Interface IP address for the printer, use
an address that can be used without the proxy server.
Configuration
E Click [IEEE 1394].
Make all the necessary settings.
Note
❒ For more information about the
installation p ro cedure, see
Help.
❒ To access Help, the computer
must be connected to the Internet. With a dial-up connection,
t here m ay be a c on ne c tio n
charge to pay.
❒ Help is stored as an HTML file
on the CD-ROM that comes
with this printer. To see it, open
"\HELP\WSMHELP\**\index.html" on the CD-ROM. (**
stands for the language.)
Checking the Settings
A Start the Web browser.
B Enter [http://<IP address
A Start the Web browser.
B Enter [http://<IP address
C Click [OK].
C Click [Setting Reference].
D Click [IEEE 1394].
of printer
whose state you want to display>/] in
the address bar.
The selected printer status will appear in the Web browser.
A dialog box for entering a User
Name and Password will appear.
D Enter
the User Name and Password, and then click [OK].
The printer is factory-configured
so you can leave the User Name
blank and enter "pass" as the password.
2
of printer
whose state you want to display>/] in
the address bar.
The selected printer status will appear in the Web browser.
You can now check the settings
you have made.
27
Setup-F3_FM.book Page 28 Friday, October 5, 2001 8:27 PM
Installing Options
Troubleshooting
IEEE 1394 Printer Removal Utility
If you cannot print when the printer is
connected via the 1394 Interface Unit
or error messages appear, follow the
procedure:
2
A Make sure the 1394 Interface Unit
is installed properly.
B Make sure the IEEE 1394 cable is
connected properly.
C Restart the computer.
If the problem still exists, go to step
D.
D Disconnect all the IEEE 1394 cables from the computer.
E If you uninstall the printer driver
when the printer is connected to a
computer with “SCSI print”, the
printer driver may not be uninstalled properly. To uninstall the
driver properly, use the IEEE 1394
Printer Removal Utility on the
CD-ROM that comes with the
printer.
Stored in: CD-ROM labeled "Printer Drivers and Utilities"\DRIVERS\UTILITY\1394\
Note
❒ For more information about the
IEEE 1394 Printer Removal Utility, see the README file in the
same folder as the program.
F Restart the computer.
Invalidate Device for Windows 2000
With Windows 2000, if "Detect New
Hardware Wizard" appears every
time you restart the computer or unplug the cable, invalidate the device
using the following procedure.
A In "Start to Search New Hardware
Wizard", click [Next].
B Confirm
that "Automatic search
for a better driver [Recommended]"
is selected in "Installation of the
Hardware Device Driver", and
then click [Next].
Uncheck all the check boxes in
"Searching Location Options" in
"Specification of Driver File", and
then click [Next].
C Clear
all the check boxes in
"Searching Location Options" in
"Specification of Driver File", and
then click [Next].
D Confirm that "Invalidate Device"
in "Search for Driver File" is selected, and then click [Finish].
Invalidate Device for Windows Me
With Windows Me, if "Add New
Hardware Wizard" starts every time
you restart the computer or unplug
the cable, invalidate the device using
the following procedure.
A If "Windows
has found the following new hardware:" appears,
confirm that "Automatic search
for a better driver [Recommended]"
is selected, and then click[Next].
B When
"Windows was unable to
locate the software for this device." appears, click [Finish].
28
Setup-F3_FM.book Page 29 Friday, October 5, 2001 8:27 PM
Installing Options
- 1394 Interface Unit
specification
❖ Operating System:
Windows 2000 Service Pack 1 or
later (when connecting with SCSI
print)
Windows Me (when connecting
with IP over 1394)
2
❖ Interface:
IEEE Std 1394-1995 compliant,
IEEE Std 1394a-2000 compliant
❖ Interface Connector:
IEEE 1394 (6–pin × 2)
❖ Data Transmission:
400 Mbps (maximum)
❖ Required cable:
1394 interface cable (6–pin x 4–pin,
6–pin x 6–pin)
Important
❒ You cannot plug devices together to create loops.
❒ Do not use a cable more than 4.5
meters (14.8 feet) long.
❖ Connectable number of devices in a
bus:
Maximum 63
❖ Allowed cable hops in a bus:
Maximum 16
❖ Length of cable:
4.5 meters (maximum per hop)
❖ Power supply:
Non power supply
Cable Power repeated (IEEE1394a2000 compliant)
❖ Power repeat:
IEEE Std 1394a-2000 compliant
29
Setup-F3_FM.book Page 30 Friday, October 5, 2001 8:27 PM
Installing Options
2
30
Setup-F3_FM.book Page 31 Friday, October 5, 2001 8:27 PM
3. Configuring the Printer for
the Network
Configuring the Printer for the Network
with the Control Panel
After installing the optional Network
Interface Board, configure it for the
network using the printer's control
panel.
Configure the printer for the network
using the printer's control panel.
The following table shows the control
panel settings and their default settings. These are included in the “Host
Interface” menu.
Reference
For information about configuring
the computer for the network, see
the Network Printing Guide on the
CD-ROM labeled “Operating Instructions”.
For information about “Host Interface” menu, see “Host Interface
Menu” in the Printer Reference on
the CD-ROM labeled “Operating
Instructions”.
Setting Name
A Press {Menu}}.
“Menu” appears on the panel display.
B Press {U} or {T} to display “Host
Interface” menu.
Menu:
Host Interface
C Press {Enter #}}.
Value
IP Address
011.022.033.044
Subnet Mask
000.000.000.000
Gateway Address
000.000.000.000
Network Boot
None
Frame Type (NW)
(Frame type NetWare)
Auto
Active Protocol
TCP/IP
❍ *1
NetWare
❍
NetBEUI
❍ *1
AppleTalk
❍ *1
Ethernet
*1
*1
The following message appears on
the panel display.
Host Interface:
I/O Buffer
Auto
❍ means that this protocol is active.
31
Setup-F3_FM.book Page 32 Friday, October 5, 2001 8:27 PM
Configuring the Printer for the Network
D Press {U} or {T} to display “Network Setup”.
Host Interface:
Network Setup
E Press {Enter #}}.
The following message appears on
the panel display.
3
Network Setup:
IP Address
F Select
the protocol you want to
use.
Note
❒ Do not select protocols that are
not used on your network.
Network Setup:
IP Address
B Press {Enter #}
}.
The current IP address appears
on the panel display.
IP Address:
011.022.033.044
C Press {U} or {T} to enter the left
most entry field of the IP address.
IP Address:
192.022.033.044
A Press {U} or {T} to display
“Active Protocol”.
D Press {Enter #}
}.
The pointer (k) moves to the
next entry field automatically.
Network Setup:
Active Protocol
IP Address:
192.02k.033.044
B Press {Enter #}
}.
The current setting appears on
the panel display.
Active Protocol:
TCP/IP
C Set other protocols you need to
set in the same way.
Note
❒ Leave unused protocols "Not
Active".
G If you use TCP/IP, you should assign the IP address to the printer.
Note
❒ To get the IP address for the
printer, contact your network
administrator.
32
A Press {U} or {T} until the following message appears.
Note
❒ You can return the pointer
(k) to the previous (left) entry
field by pressing {Escape}
}.
❒ If you press {Escape}
} when
the pointer (k) is on the leftmost position, the selected IP
address is reset.
E Repeat steps C and D to enter
the IP address.
IP Address:
192.168.000.011
Check if the pointer (k) is at the
rightmost position, and press
{Enter #}
} to register the IP address you selected.
Network Setup:
IP Address
Setup-F3_FM.book Page 33 Friday, October 5, 2001 8:27 PM
Configuring the Printer for the Network with the Control Panel
H If you use TCP/IP, you should assign “Subnet Mask” and “Gateway Address” following the same
procedure for entering the IP address.
I If you use TCP/IP, you can make
settings for “Network Boot”.
You can select how to assign the
printer's address using the computer. Select one of the items below if
necessary.
• None (Default)
• DHCP
A Press {U} or {T} to display
“Network Boot”.
Network Setup:
Network Boot
B Press {Enter #}
}.
The current setting appears on
the panel display.
Network Boot:
*None
C Press {U} or {T} to display the
method you want to use.
D Press {Enter #}
}.
Note
❒ Usually, use the default setting
(“Auto ”). When you first select
“Auto ”, the frame type detected
by the printer is adopted. If your
network can use more than two
frame types, the printer may fail
to select the correct frame type if
“Auto ” is selected. In this case,
select the appropriate frame type.
A Press {U} or {T} to display
“Frame Type (NW)”.
3
Network Setup:
Frame Type (NW)
B Press {Enter #}
}.
The current setting appears on
the panel display.
Frame Type (NW):
*Auto
C Press {U} or {T} to display the
frame type you want to use.
D Press {Enter #}
}.
K Press {On Line}}.
J If
you use NetWare, select the
frame type for NetWare.
Select one of items below if necessary.
• Auto (Default)
• Ethernet 802.3
• Ethernet 802.2
• Ethernet II
• Ethernet SNAP
"Ready" appears on the panel display.
Ready
L Print a configuration page to conf ir m t h e s et t i n g s m a d e . S e e
"Printing a Configuration Page" in
the Printer Reference.
33
Setup-F3_FM.book Page 34 Friday, October 5, 2001 8:27 PM
Configuring the Printer for the Network
IEEE 1394 Configuration
Configure the printer for using in the
IEEE 1394 environment. The following table shows the control panel settings and their default settings. These
are included in the "Host Interface"
menu.
Setting Name
3
C Press {Enter #}}.
Value
IP Address1394
011.022.033.044
Subnet Mask1394
000.000.000.000
IP over 1394
IP over 1394
SCSI print
Active
A Press {Menu}}.
The following message appears on
the panel display.
Host Interface:
I/O Buffer
D Press {U} or {T} to display “IEEE
1394 Setup”.
Host Interface:
IEEE 1394 Setup
“Menu” appears on the panel display.
B Press {U} or {T} to display “Host
Interface” menu.
Menu:
Host Interface
E Press {Enter #}}.
The following message appears on
the panel display.
IEEE 1394 Setup:
IP Address1394
F Press {U} or {T} to display “IP
over 1394”.
IEEE 1394 Setup:
IP over 1394
34
A Press {Enter #}
}.
B Press {U} or {T} to select either Active" or "Not Active".
C Press {Enter #}
}.
The display returns to the previous menu in about two seconds.
Setup-F3_FM.book Page 35 Friday, October 5, 2001 8:27 PM
IEEE 1394 Configuration
G Set "SCSI print" in the same way.
H Assign the IP address to the print-
E Repeat steps C and D to enter
the IP address.
IP Address1394:
192.168.000.011
er.
Note
❒ To get the IP address for the
printer, contact your network
administrator.
A Press {U} or {T} until the following message appears.
IEEE 1394 Setup:
IP Address1394
B Press {Enter #}
}.
The current IP address appears
on the panel display.
Check if the pointer (k) is at the
rightmost position, and press
{Enter #}
} to register the IP address you selected.
3
IEEE 1394 Setup:
IP Address1394
I Set
"Subnet Mask1394" in the
same way.
J Press {On Line}}.
“Ready” appears on the panel display.
IP Address1394:
011.022.033.044
C Press {U} or {T} to enter the
leftmost entry field of the IP
address.
IP Address1394:
192.022.033.044
D Press {Enter #}
}.
The pointer (k) moves to the
next entry field automatically.
IP Address1394:
192.02k.033.044
Note
❒ You can return the pointer
(k) to the previous (left) entry
field by pressing {Escape}
}.
❒ If you press {Escape}
} when
the pointer (k) is on the leftmost position, the selected IP
address is reset.
Ready
K Print a configuration page to conf ir m t h e s et t i n g s m a d e . S e e
"Printing a Configuration Page"
in the Printer Reference.
-Address
❖ Subnet Mask
A number used to mathematically
“mask” or hide an IP address on the
network by eliminating those parts
of the address that are alike for all
the machines on the network.
❖ Gateway Address
A gateway is a connection or interchange point that connects two
networks. A gateway address is for
the router or host computer used
as a gateway.
Note
❒ To get the addresses, contact
your network administrator.
35
Setup-F3_FM.book Page 36 Friday, October 5, 2001 8:27 PM
Configuring the Printer for the Network
3
36
Setup-F3_FM.book Page 37 Friday, October 5, 2001 8:27 PM
4. Installing the Printer Driver
and Software
This manual assumes that you are familiar with general Windows procedures
and practices. If you are not, see the documentation that comes with Windows
for details.
Installation Method
The following table shows how to install the printer drivers and software.
Auto Run *1
Quick Install
PCL 6 printer driver
Network connection with TCP/IP
Parallel
connection
❍
❍
❍
❍
❍
❍
PCL 5e printer driver
RPCS printer driver
Custom
installation *2
❍
PostScript printer driver
❍
Agfa Monotype Font Manager
2000
❍
SmartNetMonitor for Admin
❍
SmartNetMonitor for Client
*1
*2
❍
❍
Available operating systems are as follows: Windows 95/98/Me, Windows 2000,
Windows NT 4.0
Using custom installation, you can install various software separately.
Important
❒ Before starting this installation, close all documents and applications. In a network environment, confirm that users who are logged on are disconnected.
Be sure to do this when it will create the least interference with other users.
❒ After installing a printer driver, you must restart the computer.
Note
❒ If the "plug and play" function is started, click [Cancel] in the [New Hardware
Found], [Device Driver Wizard] or [Found New Hardware Wizard] dialog box, and
then insert the CD-ROM. The [New Hardware Found], [Device Driver Wizard] or
[Found New Hardware Wizard] dialog box appears depending on the system version of the Windows 95/98/Me, Windows 2000.
37
Setup-F3_FM.book Page 38 Friday, October 5, 2001 8:27 PM
Installing the Printer Driver and Software
Quick Install
Auto Run will start the installer automatically when you load the CD-ROM in
the CD-ROM drive. By selecting Quick Install, you can install the necessary software easily.
TCP/IP requires the following:
• This machine must be connected to the network through the network interface cable.
• This machine must be turned on.
• The TCP/IP protocol must be configured.
• An IP address must be allocated to this machine and to the computer.
4
Limitation
❒ If your system is Windows 2000 or Windows NT 4.0, installing a printer driver by Auto Run requires Administrators permission. When you install a printer driver by Auto Run, log on using an account that has Administrators
permission.
Note
❒ Auto Run might not automatically work with certain OS settings. In this case,
launch "Setup.exe" located on the CD-ROM root directory.
If you want to cancel Auto Run, hold down the {SHIFT}
} key (when your system
is Windows 2000, hold down the left {SHIFT}
} key) while inserting the CD-ROM.
Keep the {SHIFT}
} key held down until the computer has finished accessing the
CD-ROM.
A Close all applications that are running.
B Insert the CD-ROM into the CD-ROM drive.
Auto Run will start the installer.
C Select a language to change the interface language, and then click [OK].
The following languages are available: Cestina (Czech), Dansk (Danish),
Deutsch (German), English (English), Espanol (Spanish), Francais (French),
Italiano (Italian), Magyar (Hungarian), Nederlands (Dutch), Norsk (Norwegian), Polski (Polish), Portugues (Portuguese), Suomi (Finnish), Svenska
(Swedish)
Default interface language is English.
D Select [Quick Install].
E The software license agreement appears in the [License Agreement] dialog
box.
After reading through all of the contents, click [I accept the agreement] to agree
with the license agreement, and then click [Next].
38
Setup-F3_FM.book Page 39 Friday, October 5, 2001 8:27 PM
Quick Install
F Click to select a model name you want to use when the "Select Printer" dialog box appears.
Note
❒ For a network connection with TCP/IP, select the printer whose IP address
is displayed in [Connect To].
❒ For parallel connection, select the printer whose printer port is displayed
in [Connect To].
G Click [Install].
H Follow the instructions on the screen.
Note
❒ During installation in Windows 2000, the [Digital Signature Not Found] dialog
box may appear. In this case, click [Yes] to continue the installation.
A message prompting you to restart your computer may appear. To complete
the installation, restart your computer.
4
39
Setup-F3_FM.book Page 40 Friday, October 5, 2001 8:27 PM
Installing the Printer Driver and Software
Installing the PCL 6/5e Printer Driver
Installing the PCL 6/5e Printer Driver
Two kinds of PCL printer drivers, PCL 6 and PCL 5e, are provided with this
printer. We recommend PCL 6 as your first choice.
Limitation
❒ If your system is Windows 2000 or Windows NT 4.0, installing a printer driver by Auto Run requires Administrators permission. When you install a printer driver by Auto Run, log on using an account that has Administrators
permission.
4
Important
❒ When updating the printer driver by installing the latest version, you should
uninstall that of former version if any. See “Uninstalling the Printer Driver and
Software” in the Printer Reference.
A Close all applications that are running.
B Insert the CD-ROM into the CD-ROM drive.
Auto Run will start the installer.
C Select a language to change the interface language, and then click [OK].
The following languages are available: Cestina (Czech), Dansk (Danish),
Deutsch (German), English (English), Espanol (Spanish), Francais (French),
Italiano (Italian), Magyar (Hungarian), Nederlands (Dutch), Norsk (Norwegian), Polski (Polish), Portugues (Portuguese), Suomi (Finnish), Svenska
(Swedish)
Default interface language is English.
D Select [PCL/RPCS Printer Drivers].
E The software license agreement appears in the [License Agreement] dialog
box.
After reading through all of the contents, click [I accept the agreement] to agree
with the license agreement, and then click [Next].
F Select the printer driver you want to install when the "Select Program" dialog box appears.
G Follow the instructions on the screen.
Note
❒ During installation in Windows 2000, the [Digital Signature Not Found] dialog
box may appear. In this case, click [Yes] to continue the installation.
40
Setup-F3_FM.book Page 41 Friday, October 5, 2001 8:27 PM
Installing the PCL 6/5e Printer Driver
Setting up options
Important
❒ If the printer is equipped with certain options, you should set up the options
with the printer driver.
Limitation
❒ In Windows 2000, changing the printer settings requires Manage Printers permission. Members of the Administrators and Power Users groups have Manage Printers permission by default. When you set up options, log on using an
account that has Manage Printers permission.
❒ In Windows NT4.0, changing the setting of the printer requires Full Control
permission. Members of the Administrators, Server Operators, Print Operators, and Power Users groups have Full Control permission by default. When
you set up options, log on using an account that has Full Control permission.
4
Note
❒ When setting up options, you should access the Printer Properties dialog box
from Windows. You cannot set up options by accessing the Printer Properties
dialog box from an application.
A Click [Start] on the taskbar, point to [Settings], and then click [Printers].
The [Printers] window appears.
B Click to select the icon of the printer you want to use.
C On the [File] menu, click [Properties].
The Printer Properties appear.
D Click the [Accessories] tab.
E Select options you have installed from the [Options] group.
F Click [OK] .
41
Setup-F3_FM.book Page 42 Friday, October 5, 2001 8:27 PM
Installing the Printer Driver and Software
Installing the RPCS Printer Driver
Installing the RPCS Printer Driver
Limitation
❒ If your system is Windows 2000 or Windows NT 4.0, installing a printer driver by Auto Run requires Administrators permission. When you install a printer driver by Auto Run, log on using an account that has Administrators
permission.
Important
❒ When updating the printer driver by installing the latest version, you should
uninstall that of former version if any. See “Uninstalling the Printer Driver and
Software” in the Printer Reference.
4
A Close all applications that are running.
B Insert the CD-ROM into the CD-ROM drive.
Auto Run will start the installer.
C Select a language to change the interface language, and then click [OK].
The following languages are available: Cestina (Czech), Dansk (Danish),
Deutsch (German), English (English), Espanol (Spanish), Francais (French),
Italiano (Italian), Magyar (Hungarian), Nederlands (Dutch), Norsk (Norwegian), Polski (Polish), Portugues (Portuguese), Suomi (Finnish), Svenska
(Swedish)
Default interface language is English.
D Select [PCL/RPCS Printer Drivers].
E The software license agreement appears in the [License Agreement] dialog
box.
After reading through all of the contents, click [I accept the agreement] to agree
with the license agreement, and then click [Next].
F Select the RPCS printer driver when the "Select Program" dialog box appears.
G Follow the instructions on the screen.
Note
❒ During installation in Windows 2000, the [Digital Signature Not Found] dialog
box may appear. In this case, click [Yes] to continue the installation.
42
Setup-F3_FM.book Page 43 Friday, October 5, 2001 8:27 PM
Installing the RPCS Printer Driver
Setting up options
Important
❒ If the printer is equipped with certain options, you should set up the options
with the printer driver.
Limitation
❒ In Windows 2000, changing the printer settings requires Manage Printers permission. Members of the Administrators and Power Users groups have Manage Printers permission by default. When you set up options, log on using an
account that has Manage Printers permission.
❒ In Windows NT4.0, changing the setting of the printer requires Full Control
permission. Members of the Administrators, Server Operators, Print Operators, and Power Users groups have Full Control permission by default. When
you set up options, log on using an account that has Full Control permission.
4
Note
❒ When setting up options, you should access the Printer Properties dialog box
from Windows. You cannot set up options by accessing the Printer Properties
dialog box from an application.
A Click [Start] on the taskbar, point to [Settings], and then click [Printers].
The [Printers] window appears.
B Click to select the icon of the printer you want to use.
C On the [File] menu, click [Properties].
The Printer Properties appear.
D Click the [Accessories] tab.
E Select options you have installed from the [Options] group.
F Click [OK] .
43
Setup-F3_FM.book Page 44 Friday, October 5, 2001 8:27 PM
Installing the Printer Driver and Software
Installing the PostScript Printer Driver
This section describes basic instructions for installing the PostScript printer driver. The actual procedure may differ depending on the operating system. Follow
the appropriate procedures below.
Important
❒ When updating the printer driver by installing the latest version, you should
uninstall that of former version if any. See “Uninstalling the Printer Driver and
Software” in the Printer Reference.
Windows 95/98/Me - Installing the PostScript Printer Driver
4
Installing the printer driver
A Close all applications that are running.
B Insert the CD-ROM into the CD-ROM drive.
Auto Run will start the installer.
C Select a language to change the interface language, and then click [OK].
The following languages are available: Cestina (Czech), Dansk (Danish),
Deutsch (German), English (English), Espanol (Spanish), Francais (French),
Italiano (Italian), Magyar (Hungarian), Nederlands (Dutch), Norsk (Norwegian), Polski (Polish), Portugues (Portuguese), Suomi (Finnish), Svenska
(Swedish)
Default interface language is English.
Note
❒ The printer driver with the selected language will be installed.
❒ The printer driver will be installed in English if you select the following
languages: Cestina, Magyar, Polski, Portugues and Suomi.
D Select [PostScript 3 Printer Driver].
[Add Printer Wizard] starts.
E Click [Next].
F Check [Local Printer] and then click [Next].
A dialog box for selecting the printer appears.
G Select the printer you want to use, and then click [Next].
H Follow the instructions on the screen.
44
Setup-F3_FM.book Page 45 Friday, October 5, 2001 8:27 PM
Installing the PostScript Printer Driver
Setting up options
Important
❒ If the printer is equipped with certain options, you should set up the options
with the printer driver.
A Click [Start] on the taskbar, point to [Settings], and then click [Printers].
The [Printers] window appears.
B Click to select the icon of the printer you want to use.
C On the [File] menu, click [Properties].
The Printer Properties appear.
4
D Click the [Accessories] tab.
E Select options you have installed from the [Options] group.
F Click [OK].
Windows 2000 - Installing the PostScript Printer Driver
Installing the printer driver
Limitation
❒ Installing a printer driver requires Administrators permission. When you install a printer driver, log on using an account that has Administrators permission.
A Close all applications that are running.
B Insert the CD-ROM into the CD-ROM drive.
Auto Run will start the installer.
C Select a language to change the interface language, and then click [OK].
The following languages are available: Cestina (Czech), Dansk (Danish),
Deutsch (German), English (English), Espanol (Spanish), Francais (French),
Italiano (Italian), Magyar (Hungarian), Nederlands (Dutch), Norsk (Norwegian), Polski (Polish), Portugues (Portuguese), Suomi (Finnish), Svenska
(Swedish)
Default interface language is English.
Note
❒ The printer driver with the selected language will be installed.
❒ The printer driver will be installed in English if you select the following
languages: Cestina, Magyar, Polski, Portugues and Suomi.
45
Setup-F3_FM.book Page 46 Friday, October 5, 2001 8:27 PM
Installing the Printer Driver and Software
D Select [PostScript 3 Printer Driver].
[Add Printer Wizard] starts.
E Click [Next].
F Check [Local Printer] and then click [Next].
A dialog box for selecting the printer port appears.
G Select the check box of the port you want to use, and then click [Next].
A dialog box for selecting the printer appears.
H Select the printer you want to use, and then click [Next].
I Follow the instructions on the screen.
4
Note
❒ During installation, the [Digital Signature Not Found] dialog box may appear.
In this case, click [Yes] to continue the installation.
Setting up options
Important
❒ If the printer is equipped with certain options, you should set up the options
with the printer driver.
Limitation
❒ Changing the printer settings requires Manage Printers permission. Members
of the Administrators and Power Users groups have Manage Printers permission by default. When you set up options, log on using an account that has
Manage Printers permission.
A Click [Start] on the taskbar, point to [Settings], and then click [Printers].
The [Printers] window appears.
B Click to select the icon of the printer you want to use.
C On the [File] menu, click [Properties].
The Printer Properties appear.
D Click the [Device Settings] tab.
E Select the options you have installed.
F Click [OK].
46
Setup-F3_FM.book Page 47 Friday, October 5, 2001 8:27 PM
Installing the PostScript Printer Driver
Windows NT 4.0 - Installing the PostScript Printer Driver
Installing the printer driver
Limitation
❒ Installing a printer driver requires Administrators permission. When you install
a printer driver, log on using an account that has Administrators permission.
Important
❒ The CD-ROM containing the Windows NT Server operating system version
4.0, or the Windows NT Workstation operating system is required for installing the printer driver.
❒ We recommend that you upgrade the Windows NT 4.0 operating system to
Service Pack 4 or later before installing the printer driver. Contact your Windows retailer for more information about the latest version available.
4
A Close all applications that are running.
B Insert the CD-ROM into the CD-ROM drive.
Auto Run will start the installer.
C Select a language to change the interface language, and then click [OK].
The following languages are available: Cestina (Czech), Dansk (Danish), Deutsch (German), English (English), Espanol (Spanish), Francais (French), Italiano
(Italian), Magyar (Hungarian), Nederlands (Dutch), Norsk (Norwegian), Polski (Polish), Portugues (Portuguese), Suomi (Finnish), Svenska (Swedish)
Default interface language is English.
Note
❒ The printer driver with the selected language will be installed.
❒ The printer driver will be installed in English if you select the following
languages: Cestina, Magyar, Polski, Portugues and Suomi.
D Select [PostScript 3 Printer Driver].
[Add Printer Wizard] starts.
E Click [Next].
F After confirming that the [My Computer] option is selected, click [Next].
A dialog box for selecting the printer port appears.
G Select the check box of the port you want to use, and then click [Next].
A dialog box for selecting the printer appears.
H Select the printer you want to use, and then click [Next].
I Follow the instructions on the screen.
47
Setup-F3_FM.book Page 48 Friday, October 5, 2001 8:27 PM
Installing the Printer Driver and Software
Setting up options
Limitation
❒ Changing the printer settings requires Manage Printers permission. Members
of the Administrators and Power Users groups have Manage Printers permission by default. When you set up options, log on using an account that has
Manage Printers permission.
Important
❒ If the printer is equipped with certain options, you should set up the options
with the printer driver.
A Click [Start] on the taskbar, point to [Settings], and then click [Printers].
The [Printers] window appears.
4
B Click to select the icon of the printer you want to use.
C On the [File] menu, click [Properties].
The Printer Properties appear.
D Click the [Accessories] tab.
E Select options you have installed from the [Options] group.
F Click [OK].
- The conditions of the bidirectional transmissions
When bidirectional transmissions are enabled, the information about the paper
size and feed direction settings are automatically sent to the machine by the
computer. You can also check the machine's status from your computer.
• Bidirectional transmissions are supported by Windows 95/98/Me, Windows
2000 and Windows NT 4.0.
• When the bidirectional transmission is working, the machine status and information are obtained when opening the printer driver screen.
To support the bidirectional transmissions, the following conditions are required.
❖ When connecting with a parallel cable
• The computer must support the bidirectional transmissions.
• The Interface cable must support the bidirectional transmissions.
• The machine must be connected to the computer using the standard parallel cable and the parallel connector.
• On Windows 95/98/Me, [Enable bi-directional support for this printer] must be
selected in [Spool Settings…] on the [Details] tab.
48
Setup-F3_FM.book Page 49 Friday, October 5, 2001 8:27 PM
Installing the PostScript Printer Driver
• On Windows 2000 and Windows NT 4.0, [Enable bi-directional support] must
be selected and [Enable printer spooling] must not be selected on the [port]
tab.
❖ When connecting with the network
• SmartNetMonitor for Admin or SmartNetMonitor for Client included on
the CD-ROM must be installed, and the TCP/IP protocol must be used.
Using Adobe PageMaker Version 6.0 or 6.5
If you use the printer under Windows 95/98/Me, Windows 2000, Windows NT
4.0 with Adobe PageMaker, you need to copy the PPD file to the PageMaker
folder.
The PPD file is the file with extension ".ppd". It is in the folder "DRIVERS\PS\
WIN9X_ME\(Language)\DISK1\" on the CD-ROM.
The [WIN9X_ME] folder, inside the [PS] folder is for the Windows 95/98/Me operating system. Use the folder at this level that is appropriate for the operating
system you are using.
The third folder, "(Language)" may be substituted by an appropriate language
name.
Copy this file to the PageMaker folder.
For PageMaker 6.0 default installation, the folder is "C:\PM6\RSRC\PPD4",
and for PageMaker 6.5 default installation, the directory is "C:\PM65\RSRC\
USENGLISH\PPD4". "USENGLISH" may differ depending on your language
selection.
4
Reference
For more information about the language name, see p.38 “Quick Install”.
49
Setup-F3_FM.book Page 50 Friday, October 5, 2001 8:27 PM
Installing the Printer Driver and Software
Installing the SmartNetMonitor for
Client/Admin
Limitation
❒ If your system is Windows 2000 or Windows NT 4.0, installing software by
Auto Run requires Administrators permission. When you install a printer
driver by Auto Run, log on using an account that has Administrators permission.
A Close all applications that are running.
B Insert the CD-ROM into the CD-ROM drive.
4
Auto Run will start the installer.
C Select a language to change the interface language, and then click [OK].
The following languages are available: Cestina (Czech), Dansk (Danish), Deutsch (German), English (English), Espanol (Spanish), Francais (French), Italiano
(Italian), Magyar (Hungarian), Nederlands (Dutch), Norsk (Norwegian), Polski (Polish), Portugues (Portuguese), Suomi (Finnish), Svenska (Swedish)
Default interface language is English.
D Select [SmartNetMonitor for Client/Admin].
E The software license agreement appears in the [License Agreement] dialog
box.
After reading through all of the contents, click [I accept the agreement] to agree
with the license agreement, and then click [Next].
F Select the program you want to install when the "Select Program" dialog
box appears.
G Follow the instructions on the screen.
50
Setup-F3_FM.book Page 51 Friday, October 5, 2001 8:27 PM
Installing the Agfa Monotype Font Manager 2000
Installing the Agfa Monotype Font
Manager 2000
Limitation
❒ If your system is Windows 2000 or Windows NT 4.0, installing software by
Auto Run requires Administrators permission. When you install a printer
driver by Auto Run, log on using an account that has Administrators permission.
A Close all applications that are running.
B Insert the CD-ROM into the CD-ROM drive.
4
Auto Run will start the installer.
C Select a language to change the interface language, and then click [OK].
The following languages are available: Cestina (Czech), Dansk (Danish), Deutsch (German), English (English), Espanol (Spanish), Francais (French), Italiano
(Italian), Magyar (Hungarian), Nederlands (Dutch), Norsk (Norwegian), Polski (Polish), Portugues (Portuguese), Suomi (Finnish), Svenska (Swedish)
Default interface language is English.
D Select [Agfa Monotype Font Manager 2000].
E Follow the instructions on the screen.
51
Setup-F3_FM.book Page 52 Friday, October 5, 2001 8:27 PM
Installing the Printer Driver and Software
Macintosh
Macintosh - Installing the PostScript 3 Printer Driver
It is necessary to install a printer driver and a PPD file to print from a Macintosh.
Follow these steps to install a printer driver and a PPD file on Macintosh running the 8.6 operating system or later up to 9.1.
A Insert the CD-ROM into the CD-ROM drive.
B Double-click the CD-ROM icon.
C Double-click the [PS DRIVER] folder.
D Double-click the folder of the language you use.
E Open [DISK1] and double-click the installer icon.
4
The PostScript 3 printer driver installer window appears.
F Follow the instructions on the screen.
G Double-click [Extensions] in [System Folder].
H Double-click [Printer Descriptions].
I Double-click the CD-ROM icon on the desktop.
J Double-click [DISK1] in the folder of the language you use.
K Drag the PPD file into [Printer Descriptions] in [Extensions] in [System Folder].
L Drag the plugin file into [Printer Descriptions] in [Extensions] in [System Folder].
M Restart the Macintosh.
Setting Up the PPD File
Preparation
Make sure that the machine is connected to an AppleTalk network before performing the following procedure.
A On the [Apple] menu, select [Chooser].
B Click the [Adobe PS] icon.
C In the [Select a PostScript Printer:] list, click the name of the machine you want
to use.
52
Setup-F3_FM.book Page 53 Friday, October 5, 2001 8:27 PM
Macintosh
D Click [Setup].
E Click the printer description file you want to use, and then click [Select].
The PPD file is set up, and the [Adobe PS] icon appears at the left of the machine name in the list. Next, follow the procedure on p.53 “Setting Up Options” to make the option settings, or close the [Chooser] dialog box.
Setting Up Options
A On the [Apple] menu, select [Chooser].
B Click the [Adobe PS] icon.
C In the [Select the PostScript Printer:] list, click the name of the machine you
4
want to use, and then click [Setup].
D Click [Configure].
A list of options appears.
E Select the option you want to set up and select the appropriate setting for it.
Note
❒ If the option you want to set up is not displayed, the PPD file might not be
set up correctly. Check the name of the PPD file shown in the dialog box.
F Click [OK].
The list of options closes.
G Click [OK].
The [Chooser] dialog box appears.
H Close the [Chooser] dialog box.
Reference
For information about installing the Printer Utility for Mac, see the PostScript 3 Operating Instructions Supplement.
53
Setup-F3_FM.book Page 54 Friday, October 5, 2001 8:27 PM
INDEX
G
Gateway Address, 31, 35
1394 Interface Unit Type 4510, 12, 22
A
Active Protocol, 31
Agfa Font Manager, 5, 51
B
Bridge Unit Type1045, 12
Bridge Unit Type460, 12
Bypass Tray, 7
C
Caution, ii
Control Panel, 6, 9
D
Data In Indicator, 9
development unit, 8
Duplex Unit, 7
Duplex Unit right cover, 7
E
Enter Key, 10
Error Indicator, 9
Escape Key, 10
Ethernet, 31
ethernet cable connector, 6
F
Finisher SR720, 12
Finisher SR730, 12
Form Feed Key, 9
Frame type NetWare, 31
front cover, 6
fusing unit, 8
54
H
HDD (Option) Slot, 6
I
IP address, 31
J
Job Reset Key, 9
L
Large Capacity Tray RT36, 11
lower vertical paper feed cover, 7
M
Mailbox CS360, 12
Memory Unit TypeC, 12, 14
Menu Key, 9
N
Network, 31
Network Boot, 31
Network Printing Guide, v
O
On Line Key, 9
Options, 11
options, installing, 14
options, setting up
Windows 2000, 46
Windows 95/98/Me, 45
Windows NT 4.0, 48
output tray, 6
Setup-F3_FM.book Page 55 Friday, October 5, 2001 8:27 PM
P
PageMaker 6.0 or 6.5, 49
Panel Display, 9
Paper Bank, 6, 11, 15
paper tray, 6
parallel interface connector, 6
PCL 5e, 3, 40
PCL 6, 3, 40
PostScript, 4
Windows 2000, installing, 45
Windows 95/98/Me, installing, 44
Windows NT 4.0, installing, 47
PostScript 3
Macintosh, Install, 52
power cord, 7
Power Indicator, 9
power switch, 6
printer board, 6
printer driver, 3
Printer Hard Disk Type4510, 12, 18
Printer Reference, v
PS430, 6, 11, 15
Q
Quick Install, 38
Quick Installation Guide, v
R
right cover, 8
RPCS, 3, 42
S
screwdriver, 13
Setup Guide, v
SmartNetMonitor for Admin, 5, 50
SmartNetMonitor for Client, 5, 50
Subnet Mask, 31, 35
T
toner holder, 8
toner lock handle, 8
transfer unit, 8
U
upper vertical paper feed cover, 7
V
ventilator, 7
W
Warning, ii
Windows 2000
PostScript, installing, 45
setting up options, 46
Windows 95/98/Me
PostScript, installing, 44
setting up options, 45
Windows NT 4.0
PostScript, installing, 47
setting up options, 48
55
Setup-F3_FM.book Page 56 Friday, October 5, 2001 8:27 PM
MEMO
56
EE
GB
G065