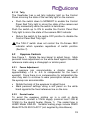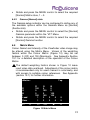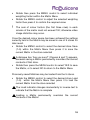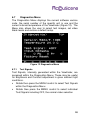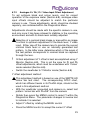
1
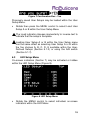
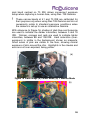
VF1280S Mk II
High Resolution Colour Viewfinder System
USER MANUAL
AccuScene Cor por a t ion Lim it e d
Unit 4
Dunferm line Business Cent re
I zat t Avenue
DUNFERMLI NE KY11 3BZ
Scot land
U.K.
©2005 AccuScene Corporation Ltd.
August 2005
CONTENTS
1
INTRODUCTION
5
2
OPERATING GUIDELINES
5
3
QUICK SETUP, REC 709 OPERATION
6
4
VIEWFINDER SPECIFICATION
7
5
VIEWFINDER CONTROLS
8
5.1
5.1.1
5.1.2
5.1.3
5.1.4
5.1.5
5.1.6
5.1.7
5.1.8
5.1.9
5.1.10
5.2
5.2.1
5.2.2
6
6.1
6.2
6.3
6.4
6.4.1
6.4.2
6.5
6.6
6.7
6.7.1
6.7.2
6.7.3
6.8
Viewfinder Image Controls
On-Screen Menu
User-defined setups
Peaking
Contrast
Bright
Magnify
A – B User Setup
Display Aspect (Sony only)
Zebra (Sony only)
Tally
Eyepiece Controls
Focus Adjustment
Demist heater
ON-SCREEN MENU
8
8
8
9
9
10
10
11
11
11
12
12
12
12
13
Main Menu
13
User Setup Menu
14
LED Setup Menu
15
VF! IND Menu
16
Matrix [Normal] state
16
Gamma [Normal] state
17
Matrix Menu
17
Gamma Menu
19
Diagnostics Menu
20
Test Signals
20
Analogue Ys’ Pb’, Pr’: Video Input Offset Adjustment 21
Factory Reset
23
Configuration Menu
23
2
6.8.1
6.8.2
6.8.3
6.8.4
Y Monitor Mode – Exposure Meter
Mono Mode
Progressive and Interlaced Modes
Image Inversion (Rotate)
23
27
28
28
7
ON-SCREEN INDICATORS
29
8
SOFTWARE UPGRADE
31
9
HANDLING AND STORAGE
31
10
ADJUSTMENTS AND REPAIRS
32
11
SUPPORT AND WARRANTY
32
11.1
11.2
Support
Warranty
32
32
12
DISCLAIMER
33
13
APPENDIX
34
13.1
Controlling colour using the Colour Matrix
34
ILLUSTRATIONS
Figure 1 Viewfinder and eyepiece controls
8
Figure 2 User Setup Recall – On-Screen Display
9
Figure 3 Brightness and contrast controls
10
Figure 4 On-Screen Menu (Main Menu)
13
Figure 5 User Setup Menu
14
Figure 6 Confirmation Box - No
14
Figure 7 Confirmation Box - Yes
15
Figure 8 LED Setup Menu
15
Figure 9 “VF!” IND Menu
16
Figure 10 Matrix Menu
17
Figure 11 Gamma Menu
19
Figure 12 Diagnostics Menu
20
Figure 13 SMTE HD Colour Bars
22
Figure 14 Configuration Menu
23
Figure 15 Exposure Meter Colours
25
3
Figure 16 Video image (a) Colour Mode, (b) Y Monitor Mode
26
Figure 17 On-Screen Indicators
29
Figure 18 CIE Colour Chart
36
Figure 19 Colour Matrix
36
TABLES
Table 1 On-Screen Indicators
30
4
1 INTRODUCTION
The AccuScene VF1280S Viewfinder System is designed for
use with Sony 700-series and 900-series High Definition digital
video cameras. With a suitable converter this Viewfinder may
also be used with other cameras. Certain camera control
interface functions are compatible only with Sony cameras.
Please refer to AccuScene for further information.
AccuScene recommends users to read and understand this
entire manual before attempting to use the Viewfinder.
In this manual, critical information or an important warning
is preceded by and must be followed.
In this manual, comment preceded by LVnot critical and
is included for information or clarification only.
2 OPERATING GUIDELINES
The VF1280S Mk II Viewfinder is designed only to be used as
described in this manual. Do not use for any other purpose.
•
Protect the Viewfinder from dust, rain, spray and direct
sunlight
•
Do not immerse in water
•
Do not lift or move the Viewfinder by its cable: this does
not support its weight
•
Do not lift or move the camera by way of the Viewfinder.
Only use the carrying handle on the camera or other
facilities provided for the purpose
•
Use only at ambient temperature between 0C (32°F) and
+40C (104°F) and protect the viewfinder from direct
sunlight, rain and snow
•
Before each use allow the Viewfinder to stabilise within the
operating environment
5
3 QUICK SETUP, REC 709 OPERATION
•
•
•
•
•
•
•
•
Mount the Viewfinder on the camera using brackets suitable to
carry its weight
Connect the Viewfinder cable to the camera Viewfinder socket
Power up the camera
Check that a video image appears in the Viewfinder – typically in
less than 10 seconds – with an on-screen display showing
‘AccuScene VF1280S’
Press the MENU control knob to continue – the on-screen
display disappears
Press MENU switch down to show the Main Menu
Adjust eyepiece to sharpen focus (Section 5.2.1)
Press MENU switch up or down to cancel Main Menu
Either start shooting or get a coffee. Continue critical
adjustments after the camera and the Viewfinder have
stabilised in their operating environment
•
•
•
•
•
•
•
•
•
•
Allow both the camera and the Viewfinder to stabilise – typically
in about 20 minutes to half an hour
Stop down the camera lens to exclude light
Perform auto-black calibration on the camera
Either set the camera to show colour bars or leave the lens
stopped down
Enter the Matrix Menu (Section 6.5) to ensure that default (or
your special) colour space is selected
Enter the Viewfinder Gamma Menu (Section 6.6) to ensure that
Rec709 Gamma is selected
Enter the Viewfinder Diagnostics Menu (Section 6.7) to perform
adjustment of Y, Pb and Pr Analogue Video Input offsets
Y offset adjustment is essential for correct operation of the
exposure meter
Adjust Peaking (Section 5.1.3) to 0 to see a natural image or to
approximately 8 to check camera focus / back focus
Adjust Contrast (Section 5.1.4) to suit ambient lighting
(Nominal setting -1.0 indoors, less at night, more in sun)
Check Brightness (Section 5.1.5) is set to 0 (default)
Put the coffee aside and start shooting seriously
6
4 VIEWFINDER SPECIFICATION
Video input interface
Nominal white level
Maximum Ys input
Video input format
Native input video
Colour conversion
Display resolution
16:9 aspect video
Contrast ratio
Viewfinder Latency
Exposure Meter
Weight
Dimensions
Input Voltage
Power
Environment
HD 1080 or 720, analogue Ys Pb Pr
700mV (100 IRE)
760mV (108 IRE)
Accepts SMPTE 274M formats:
1920 x 1080/60/I
1920 x 1080/59.94/I
1920 x 1080/50/I
1920 x 1080/30/PsF
1920 x 1080/29.97/PsF
1920 x 1080/25/PsF
1920 x 1080/24/PsF
1920 x 1080/23.98/PsF
1280 x 720/60/P
SMPTE Rec. 709
1280(h) x 848 (v) total active pixels
1280(h) x 720 (v) active pixels
200:1 typical
<50mSec (‘Action’ mode, 23.98/PsF)
Custom function, using pseudo-colours
2kg (4.5lb) nominal
295(l) x 90(h) x 91(d) mm
9.5(min) 12V (nom) 17 (max) Vdc
<10W at nominal input voltage
Min air temperature 0C (32°F)
Max air temperature +40C (104°F)
Shade unit from direct sunlight
Protect unit from rain or snow
The Viewfinder continues to operate outside the specified
temperature range, but may show an on-screen
Temperature warning. Performance outside the specified
temperature range may be degraded.
Continued operation
invalidates Warranty.
with
a
Temperature
warning
7
5 VIEWFINDER CONTROLS
Viewfinder Image Controls
Eyepiece
Focus
(Rotate)
Demist
Heater
(12Vdc)
Figure 1 Viewfinder and eyepiece controls
5.1
Viewfinder Image Controls
See Figure 1. A pop-up slider indicates the current setting
when Peaking, Contrast or Brightness is adjusted, unless the
On Screen Menu is active, in which case the current setting for
each is shown in the On-Screen Menu (Section 6.1).
5.1.1
On-Screen Menu
The On-Screen Menu shows selectable Viewfinder options
and settings (Section 6.1) using the MENU control and switch.
The Viewfinder on-screen menu does not provide access to
the camera on-screen menu system, which may be accessed
using the camera controls.
5.1.2
User-defined setups
User-defined setups can be loaded from non-volatile memory
by rotating the Menu control knob, when no other on-screen
menu is currently displayed (Section 6). An on-screen display
appears (Figure 2) allowing the user to select one of the five
stored setups: A, B, C, D or E. Once the desired setup has
8
been selected, push the Menu control to load that setup. Exit
the on-screen display by rotating the Menu control to select
‘Top’ and push it to complete the process.
Figure 2 User Setup Recall – On-Screen Display
Loading a User Setup permanently overrides the current
Viewfinder options and settings.
5.1.3
Peaking
Rotate the PEAKING control to highlight fine detail within the
video image (‘peaking’), to assist focus adjustment.
5.1.4
Contrast
Rotate the CONTRAST control to increase or decrease the
intensity of the video image to suit ambient light conditions
(Figure 3). Intensity steps are approximately one-tenth stop.
The Contrast range is deliberately wide to allow operation in
direct sunlight. At maximum intensity (Contrast = +1.0) the
video image is excessively bright for indoors use.
Excessive image intensity may lead to eye fatigue and
temporary loss of colour sensitivity.
Prolonged exposure to excessive image intensity may be
harmful. AccuScene Corporation Ltd. accepts no liability
for damage or loss resulting from inappropriate use.
9
5.1.5
Bright
Rotate the BRIGHT control to increase or decrease the
brightness of darker areas of the video image, to verify black
level or assess detail within shadow (Figure 3).
100%
Max
Linear
grayscale
Output
Increasing
brightness
Max contrast (+1.0),
(100%),
Min Brightness (0%)
Decreasing
contrast
Output
Linear
grayscale
0
Input
linear grayscale
100%
Max
Figure 3 Brightness and contrast controls
5.1.6
Magnify
Normally the Viewfinder scales an input video image of
1920(h) by 1080(v) pixels to suit the native 1280(h) by 720(v)
resolution of its display (Section 4). 720/60/P input video
images are displayed at native resolution. In Magnify mode,
the Viewfinder shows the central 1280(h) by 720(v) pixels
within the input video image at 1:1 pixel resolution for 1080 (v)
images, corresponding to a magnification factor of 2.25 times
the active video image. Correspondingly for 720/60/P images
a central area is magnified by a factor of 2. This may, for
instance, assist critical assessment of the central part of the
input video image.
•
Push the switch down to MOMENT to enable Magnify
mode momentarily while the switch is held down
•
Push the switch up to ON to enable Magnify mode
10
•
Return the switch to the centre OFF position to disable
Magnify mode
An on-screen indicator (Section 7) shows while the
Viewfinder is in Magnify mode.
5.1.7
A – B User Setup
A – B User Setups provide the user a convenient way of
recalling either of the first two of the five stored user-defined
setups. These contain a pre-set combination of the viewfinder
options and settings.
A – B User Setups are set up and saved by using the OnScreen Menu (Section 6.2).
•
Push the A – B switch up to A or down to B and release it
to load the corresponding User Setup
Loading a User Setup permanently overrides the current
Viewfinder options and settings.
5.1.8
Display Aspect (Sony only)
Display borders and aspect boxes are controlled via camera
controls on the Viewfinder.
•
Push the switch up to turn the Safe Area Boundary display
On or Off
•
Push the switch down to turn the Aspect display On or Off
5.1.9
Zebra (Sony only)
Zebra threshold is controlled via camera controls and can only
be activated or de-activated via the Viewfinder.
•
Push the switch down to Moment to display Zebra
momentarily and release to return to normal video image
•
Push the switch up to ON to display Zebra continuously
•
Return the switch back to the centre OFF position to return
to normal video image
11
5.1.10 Tally
The Viewfinder has a red tally indicator light on the Control
Panel mirroring the state of the red tally light on the camera.
•
Push the switch down to MOMENT to enable the Control
Panel Red Tally light to mirror the state of the camera red
tally momentarily while the switch is held down
Push the switch up to ON to enable the Control Panel Red
Tally light to mirror the state of the camera REC indicator
•
Return the switch to the centre OFF position to disable the
Control Panel Red Tally light
The TALLY switch does not control the On-Screen REC
indicator which operates regardless of switch position
(Section 7).
5.2
Eyepiece Controls
See Figure 1. Rotate the lens barrel to adjust focus. Mark
personal focus adjustment on the white band against the white
reference mark using a chinagraph or similar pencil.
5.2.1
Focus Adjustment
The eyepiece can accommodate a dioptre range of
approximately +1.5 to -4.5 to compensate for the user’s
eyesight. Since there is no compensation for astigmatism the
user may wish to continue to wear prescription lenses, which
the eyecup can accommodate.
•
•
Rotate the body of the eyepiece to adjust focus
Mark personal settings using a soft pencil on the white
band opposite the fixed reference line on the lens
5.2.2
Demist heater
To avoid the eyepiece misting up in a cold or damp
environment, connect a 12Vdc supply (nominal load 1.5W at
12Vdc) to the demist heater (Figure 1). The socket type is
LEMO Model ERA.0S. Suitable mating plugs include LEMO
Model FFA.0S.302.CLAC17 (not supplied by AccuScene).
12
6 ON-SCREEN MENU
6.1
Main Menu
The Viewfinder On-Screen Menu system opens showing the
Main Menu, giving the user a list of sub-menus (Figure 4). An
arrow at the left side of the main menu points to the sub-menu
selected.
The lowest line of the main menu and sub-menus shows
factors summarizing the current settings of Peaking (P),
Contrast (C) and Brightness (B) controls.
Figure 4 On-Screen Menu (Main Menu)
•
Push the MENU switch down (On/Off) to access the OnScreen Menu and to switch it off
•
Rotate the MENU control to scroll through On Screen
Menu options, and to adjust settings
•
Press the MENU control to select options or settings
•
Push the MENU switch up (Cancel) to undo changes
Menu options and settings are saved permanently when
the On-Screen Menu is switched off. To avoid losing
settings, switch off the On-Screen Menu at least 2 seconds
before removing power from the unit.
13
To return to the main menu from any of the sub-menus,
rotate the MENU control to select Top. Press the MENU
control to confirm.
6.2
User Setup Menu
Currently selected options and settings of the Viewfinder may
be saved as one of A, B, C, D or E User Setups (Figure 5)
within the User Setup Menu.
Figure 5 User Setup Menu
•
Rotate then press the MENU control to select Save User
Setup A, B, C, D or E within the User Setup Menu
A dialogue box ‘Are you sure?’ (Figure 6) appears,
because saving a User Setup permanently erases the
previously stored setup.
Figure 6 Confirmation Box - No
•
Press the MENU control to cancel the action and return to
the User Setup Menu
OR
•
Rotate then press the MENU control to select YES (Figure
7) to save the setup
14
Figure 7 Confirmation Box - Yes
Previously saved User Setups may be loaded within the User
Setup Menu.
•
Rotate then press the MENU control to select Load User
Setup A or B within the User Setup Menu
The Load indicator changes momentarily to inverse text to
indicate that the setup is complete.
Loading User Setup A or B within the User Setup menu
has the same effect as selecting User Setup A or B within
the five choices A, B, C, D, E available within the UserDefined Setups (Section 5.1.2) or using the A/B switch
(Section 5.1.7).
6.3
LED Setup Menu
On-screen indicators (Section 7) may be activated or hidden
within the LED Setup Menu (Figure 8).
Figure 8 LED Setup Menu
•
Rotate the MENU control to select individual on-screen
indicators within the LED Menu
15
•
Press the MENU control to activate or hide the selected
indicator
The Temperature Indicator cannot be hidden.
6.4
VF! IND Menu
The Viewfinder setup warning indicator ‘VF’ (Section 7) is
configured within the VF! IND Menu (Figure 9). On activating
or de-activating certain conditions, the ‘VF’ indicator warns of
non-standard setup.
Figure 9 “VF!” IND Menu
•
Rotate the MENU control to select individual on-screen
indicators within the VF! Menu
•
Press the MENU control to activate or de-activate the
selected condition
6.4.1
Matrix [Normal] state
The Matrix indicator [Normal] state can be defined as one of
five user-defined stored colour matrix settings (Section 6.5). If
any other Matrix setting is in use, this results in the ‘VF’
indicator being shown if this condition is activated.
•
Rotate and press the MENU control to select the [Normal]
Matrix parameter within the “VF!” Menu
16
•
Rotate and press the MENU control to select the required
[Normal] Matrix store, 1 – 5
6.4.2
Gamma [Normal] state
The Gamma setup indicator can be configured to define any of
the available options within the Gamma Menu as [Normal]
(Section 6.6).
•
Rotate and press the MENU control to select the [Normal]
Gamma parameter within the “VF!” Menu
•
Rotate and press the MENU control to select the required
[Normal] Gamma function
6.5
Matrix Menu
Colour Gamut and Intensity of the Viewfinder video image may
be altered using the Matrix Menu. Values of the weighting
factors within the Colour Matrix (Figure 10) may be set
between 0 (Off) and 100 (Maximum). See Appendix Section
13.1 for a detailed description of the operation of the Colour
Matrix.
The default weighting factors shown in Figure 10 leave
input video data unaltered. Adjustment of the colour matrix
is recommended only for users trained in colorimetry and
with access to suitable colour references. See Appendix
(section 13.1) for further information.
<Matrix>
R
100
0
0
100
1
1
R
G
B
I
Load
Save
P:
Top
0
C:
G
0
100
0
100
2
2
-1.0
3
3
B
0
0
100
100
4
4
B:
5
5
0
Figure 10 Matrix Menu
17
•
Rotate then press the MENU control to select individual
weighting factors within the Matrix Menu
•
Rotate the MENU control to adjust the selected weighting
factor then press it to confirm the required value
The sum of colour factors (the first three rows) in each
column of the matrix must not exceed 100; otherwise video
image distortion may occur.
Once the desired colour space has been achieved the settings
currently held in the Matrix may be saved in one of 5 stores for
later recall.
•
Rotate the MENU control to select the desired store Save
(1–5) within the Matrix Menu then press it to save the
current Matrix in the store selected
A dialogue box ‘Are you sure?’ (Figures 6 and 7) appears,
because saving a Matrix permanently overrides the current
contents of that store.
•
Rotate then press the MENU control to select YES to save
the Matrix, or to select NO to return to the Matrix Menu
Previously saved Matrices may be loaded from the 5 stores.
•
Rotate the MENU control to select the desired store Load
(1–5) within the Matrix Menu then press it to load the
current Matrix from the store selected
The Load indicator changes momentarily to inverse text to
indicate that the Matrix is complete
Loading a Matrix permanently overrides the current
contents of the Matrix.
18
6.6
Gamma Menu
Default Gamma function of the video image complies with
SMPTE Rec. 709. Other Gamma functions may be applied to
provide an alternative video image look or for video image
diagnostic purposes via the Gamma Menu (Figure 11).
It is possible to load and select alternative pre-computed
arbitrary Gamma functions in the form of 10-bit look-up tables,
by special arrangement with AccuScene.
Figure 11 Gamma Menu
•
Rotate the MENU control to select one of the Gamma
functions within the Gamma Menu then press it to select
the desired Gamma function
The current Gamma function is indicated in inverse text.
19
6.7
Diagnostics Menu
The Diagnostics Menu displays the current software version
code, the serial number of the specific unit in use and the
current internal temperature of the Viewfinder (Figure 12). The
Menu also allows the user to select test images, set video
black levels and restore a default setup.
Figure 12 Diagnostics Menu
6.7.1
Test Signals
Test Signals, internally generated within the Viewfinder, are
accessed within the Diagnostics Menu. These may be useful
for Brightness and Contrast adjustment in given ambient light
conditions.
•
Rotate then press the MENU control to select Test Signals
within the Diagnostics Menu
•
Rotate then press the MENU control to select individual
Test Signals including OFF, the normal video selection
20
6.7.2
Analogue Ys’ Pb’, Pr’: Video Input Offset Adjustment
To set optimum black and colour levels, and for correct
operation of the exposure meter (Section 6.8), analogue video
input offsets should be adjusted to match the particular
camera in use. These adjustments, which should be checked
regularly, are contained within the Diagnostics Menu.
Adjustments should be made with the specific camera in use,
and only once it has been allowed to stabilise in the operating
environment and with its black level suitably adjusted.
•
Selection of a nominal black image or area within an image
is critical to optimum adjustment of the black level, Y video
input. Either cap-off the camera lens to provide the current
nominal black level or use an internally generated test
pattern. In the latter case, determine which of the areas of
the test pattern corresponds to nominal black as captured
through the lens.
Critical adjustment of Y offset is best accomplished using Y
Monitor (Section 6.8). This is not the case for Pr and Pb
offset adjustments, which must be undertaken with ‘Colour’
mode selected (Section 6.8).
Switch the viewfinder to Y Monitor mode (Section 6.8)
Y offset adjustment method:
This adjustment method is based on use of the SMPTE HD
colour bar test chart. The corresponding NTSC chart,
which has different levels in its PLuGE chips, should not be
used in this adjustment method.
•
With the viewfinder connected and camera on, select test
pattern “colour bar with PLuGE” from the camera
•
•
Rotate then press the MENU control to select Y within the
Diagnostics Menu. The parameter changes to inverse text
to indicate it is selected
Adjust Y offset by rotating the MENU control
•
Press the MENU control to accept the current Y offset
21
•
With the viewfinder in Y Monitor mode, adjust the Y offset
level until the right-hand PLuGE chip (+2.5%) of the three
chips visible at the bottom of the test card (Figure 13) is
showing mostly black with some purple noise. As a check,
the peak white chip should be showing a mix of bright
yellow and pale orange
Figure 13 SMTE HD Colour Bars
Y offset adjustment method using a stopped-down lens:
•
With the viewfinder in Y Monitor mode, adjust the Y offset
level until the black portion of the video image is mostly
black with some purple noise
Before adjusting Pb and Pr offsets, restore the viewfinder to
‘Colour’ mode (Section 6.8).
Pb and Pr offset adjustment method:
• Rotate then press the MENU control to select Pb or Pr
within the Diagnostics Menu. The parameter changes to
inverse text to indicate it is selected
•
Adjust Pb or Pr offset by rotating the MENU control
•
Pb: Rotate the MENU control until the black area is just
neutral, containing no blue or green cast
•
Press the MENU control to accept the Pb setting
•
Pr: Rotate the MENU control until the black area is just
neutral, containing no red or green cast
•
Press the MENU control to accept the Pr setting
22
6.7.3
Factory Reset
If the User wishes to return the configuration of the Viewfinder
to a known default state, the Factory Default configuration may
be selected.
•
•
Rotate then press the MENU control to select Factory
Reset within the Diagnostics Menu
A dialogue box ‘Are you sure?’ (Figures 6 and 7) appears,
because invoking a Factory Reset permanently erases all
previously stored setups.
Factory Reset also overwrites previously stored analogue
video input offset adjustments with default values. For
correct operation, user adjustment of these is required
after Factory Reset.
Rotate then press the MENU control to select YES to
continue with a Factory Reset, or to select NO to return to
the Diagnostics Menu
6.8
Configuration Menu
Display modes and Viewfinder orientation are selected within
the Configuration Menu (Figure 14).
<Config>
Top
Display Mode
ÎColour
Mono
Action
PsF
I
Wide
Monitor Y
Rotate Image
P:
0
C:
-1.0
B:
0
Figure 14 Configuration Menu
•
Rotate then press the MENU control to select ‘Colour’ for
default colour video image mode
23
•
Alternatively, select ‘Mono’ mode to view a monochrome
image. In this mode, the eyepiece display is refreshed at
three times the rate of ‘Colour’ mode
Mono mode is especially useful if the camera or its
platform is in motion, such as mounted on a vehicle, where
the fast refresh rate provides a very stable image.
•
Alternatively, select ‘Monitor Y’ to view a display
highlighting extremes of exposure in the video image
(Section 6.8.1)
•
Rotate then press the MENU control to select ‘Action’
mode which is especially suited to follow-focus and other
action shots where minimal latency (delay) between input
video feed and display in the eyepiece is important. This
mode can be used whether the input video is in
progressive (PsF) or interlaced (I) format
•
Alternatively, select ‘PsF’ mode to view low-frame rate
(23.98, 24 or 25 /PsF) progressive format input video.
Video is displayed at three times input frame rate for
flicker-free images suited to performing lighting, motion
capture or other setup checks. In PsF mode the on-screen
indicators (Section 7) are displayed above and below the
active video image
PsF mode removes video flicker, leaving ‘Motion judder’
especially visible. This is inherent in progressive video
images captured at low frame rate. This mode may be
useful in setting up action shots where motion judder
requires careful consideration.
•
Alternatively, select ‘I’ to view interlaced input video at field
rate (twice frame rate) when working in interlaced (50 or 60
/I) format, also displaying on-screen indicators (Section 7)
above and below the active video image
•
Alternatively, select ‘Wide’ to view images whose natural
aspect ratio is 2.35:1 or 2.37:1, having been compressed
to 16:9 optically or electronically for compatibility with HD
video systems
24
6.8.1
Y Monitor Mode – Exposure Meter
In Monitor Y mode (Section 6.8) the Viewfinder operates as an
exposure meter, applying pseudo- (false) colour to indicate the
intensity of individual pixels in the image. The colours used,
and their relationship to Y’ (luma) video level (Figure 15) allow
the Viewfinder to provide simultaneous real-time exposure and
focus feedback to the camera operator.
0
Dark
Blue
Indigo
IRE
3
Blue
6
Turq
9
Original
luma
Teal
14
Skin
19
41
Light
Yellow
70
90
Yellow
95
Light
Orange
Orange
100
103
106
Red
Magenta
Black
Green
109
18%
Rec709
28
0-1 2-8
9-15
16-22
23-34
35-45
93-99
159-170
211-222 223-233 234-240 241-247 248-254 255
Figure 15 Exposure Meter Colours
When Y Monitor is selected, colours shown in Figure 14 are
superimposed on the active video image to show intensity
within the image (Figure 16). The central 70 IRE range,
between 20 and 90 IRE, is shown in monochrome. As lighting,
aperture and shutter speed are adjusted, colours at the
extremes outside this central range change to indicate how
nearly these areas approach black- or white-saturation.
Nominal white, 100 IRE, corresponds to 700mV Ys video input
voltage. This voltage is digitised to 235 on the 28 greyscale of
256 levels displayed by the Viewfinder. In Y Monitor mode this
level appears yellow or light orange. Black and Magenta are
reserved for the hard cut-offs of 0 (dark) and 255 (light) on this
scale, respectively.
Two narrow bands are highlighted for specific exposure setup. A grass-green (Scottish green grass!) band centred on 41
IRE relates to 18% density, when using Rec. 709 Gamma. A
25
pink band centred on 70 IRE allows convenient exposure
setup when capturing a human face, using Rec. 709 Gamma.
These narrow bands at 41 and 70 IRE are calibrated for
their purpose only when using Rec.709 Gamma and do not
necessarily relate to standard exposure conditions when
the camera is set up to use an alternative Gamma.
With reference to Figure 16, shades of dark blue and turquoise
are used to indicate the darker intensities, between 0 and 19
IRE. Yellows, oranges and reds are used to indicate lighter
intensities, between 89 and 108 IRE. Hard saturation (overexposure) is visible in the background, shown as magenta.
Small areas of pink are visible in the face, showing normal
exposure of skin around the chin. Highlights in the cheeks and
ears are not over-exposed, being yellow.
(a)
Figure 16 Video image (a) Colour Mode, (b) Y Monitor Mode
(b)
26
Y Monitor mode is also sensitive to critical focus and can be
used as an alternative to Peaking (Section 5.1.3).
Where Peaking detects and amplifies edges and
boundaries, Y Monitor mode artificially highlights subtle
differences in intensity. This can allow critical focus in
circumstances where Peaking would be less successful,
for instance in imaging foliage or shaded surfaces.
Before using the exposure meter, ensure that Analogue Ys
Pb Pr Video Input Offsets are correctly adjusted (Section
6.7.2) to avoid receiving misleading intensity information.
Current Viewfinder Gamma setting (Section 6.6) is applied
to the video image displayed in Y Monitor mode, although
the measurement of IRE level and the colour substitution
are made prior to this correction. Therefore Y Monitor
offers useful feedback regarding near-saturation in terms
of IRE value, not necessarily corresponding to lens stops
or specific exposure levels, depending on the camera
Gamma setting.
6.8.2
Mono Mode
The Viewfinder normally generates colour images using a
sequence of red, green and blue images at high frame rate. In
Mono mode the colour content of the active video input is
ignored, and the Ys’ (luma) content alone is used to generate
a monochrome image. The active video frame rate is also
tripled to provide an ultra-stable image which will reduce
image smear and break-up if the Viewfinder or camera
operator is subject to vibration or extreme motion.
If a fast-moving object or action in a scene is being followed,
the image remains clear and provides the best possible
feedback to the camera operator.
Current Gamma setting (Section 6.6) is applied in Mono
mode.
27
6.8.3
Progressive and Interlaced Modes
Although the Viewfinder automatically configures itself for any
of the frame rates listed (Section 4), for correct display of
interlaced video input, manual de-selection of PsF mode is
required. Since PsF and I mode video inputs share an
identical signal format, auto-selection is not possible. If Action
mode is selected (Section 6.8) then this manual choice is not
required, since in this mode the viewfinder display either PsF
or I video inputs correctly.
•
Rotate the MENU control to select the required frame
mode within the Configuration Menu
•
Press the MENU control to confirm the required frame
mode. The video image reappears after a short period
The current frame mode is indicated in inverse text.
Little difference may be observed between PsF and I
modes, depending on video image content. An example of
a pair of input video formats demonstrating the difference
is 25p / 50i. If the source is in 50i mode and the Viewfinder
is set to PsF mode, ‘Jaggies’ may appear on moving edges
within the video image. These disappear once I mode is
selected.
6.8.4
Image Inversion (Rotate)
The Viewfinder can compensate for inverted use (such as
right-side mounting), or for inverted video input, using the
Rotate Image function which reverses the orientation of the
image.
•
Rotate then press the MENU control to select Rotate
Image within the Configuration Menu
A dialogue box ‘Are you sure?’ (Figures 6 and 7) appears,
because invoking Rotate Image also inverts the On-Screen
Menu.
28
•
Rotate then press the MENU control to select YES to
continue with Rotate Image, or to select NO to return to the
Configuration Menu
7 ON-SCREEN INDICATORS
Indicators, described in Table 1, are shown above and below
the active video display to provide information about the status
of the camera and the Viewfinder (Figure 17).
BATT
VTR
TEMP
REC
TALLY
!
PE
VF
Figure 17 On-Screen Indicators
Indicators may be hidden from view or configured using OnScreen Menus (Sections 6.3 and 6.4).
The Temperature Indicator cannot be hidden.
29
Indicator
Symbol
Colour
Meaning
Battery
BATT
Orange
Viewfinder
Temperature
TEMP
Red
REC
Red
When flashing indicates low
battery.
When flashing indicates high
temperature. When steady
indicates
extreme
high
temperature.
When
steady
indicates
recording in progress. When
flashing indicates problem in
record module.
Record
Tally
Peaking
Viewfinder
Setting
Change
Camera
Setting
Change
Matrix
TALLY
Green
Indicates camera is being
recorded but is not on air.
PE
Orange
VF
Orange
!
Orange
Indicates peaking is being
applied to the image.
Indicates Viewfinder setting is
different from that of active
user setup.
Indicates camera setting is
different from that of active
user setup.
#
Orange
Magnify
Video Tape
Recorder
Orange
VTR
Orange
Indicates non-standard matrix
is being applied to the image.
Indicates Viewfinder image
contains central 1280(h) by
720(v) pixels within input video
(2.25x magnification factor).
Indicates the video tape
recorder is in power save
mode.
Table 1 On-Screen Indicators
Continued operation
invalidates Warranty.
with
a
Temperature
warning
30
8 SOFTWARE UPGRADE
Future enhancements may be available as software upgrades
are released. Software is uploaded using a self-extracting
application running on an external PC under Windows (98
onwards), using a serial cable (supplied with Upgrade Kit).
If problems are experienced during a software upgrade
procedure (for example, if Power is accidentally interrupted
during an upgrade), the Viewfinder may be returned to a stable
state ready to restart the software upload.
•
Switch off power to the Viewfinder
•
Push the Reset switch ON (small aperture in lower surface
of the Viewfinder) with a toothpick or similar
•
Switch on power to the Viewfinder while holding the Reset
switch ON
Care is required to avoid loss of power during the entire
upgrade process. If a software upload is interrupted the
Viewfinder will not operate until completion of the upload
restart process described above, followed by successful
software upload.
9 HANDLING AND STORAGE
The AccuScene VF1280S High Resolution Colour Viewfinder
System is supplied within protective packaging.
Transport and
packaging.
store
the
Viewfinder
using
suitable
Failure to do so may invalidate Warranty.
Storage environmental conditions should be controlled to suit
precision electronic equipment.
31
•
Store only at ambient temperature between -20C (32F)
and +70C (104F)
•
Humidity must not exceed RH90%, non-condensing
•
Altitude must not exceed 10km
•
Shock must not exceed 40g sinusoidal
10 ADJUSTMENTS AND REPAIRS
The controls described in this manual are the only User
adjustment and setup controls.
There are no User
adjustments or repairable parts within the AccuScene
VF1280S High Resolution Colour Viewfinder System.
Opening the unit invalidates Warranty.
11 SUPPORT AND WARRANTY
11.1 Support
If the Viewfinder fails to operate properly and AccuScene
support is required, the User should note the circumstances
(preferably by email to [email protected]) before
calling AccuScene, including the Viewfinder serial number, a
contact email address, User name and telephone number to
allow the AccuScene support team to return the contact.
Support services may be chargeable by AccuScene
Corporation Ltd. at its sole discretion.
11.2 Warranty
AccuScene Corporation Ltd. will at its sole discretion repair or
replace a unit which has failed within the Warranty Period
(separate Warranty Certificate), provided:
• The unit has been used, stored and transported in
accordance with the instructions and for the purpose
described in this manual
32
•
•
•
AccuScene Corporation Ltd. has been informed of the
Warranty claim (Section 11.1) and has agreed to accept
return of the unit.
This will include agreement by
AccuScene of the means and routing of the shipment and
the issue by AccuScene of a Return Materials
Authorization (RMA) number
The RMA number is clearly designated within the shipment
documentation
The unit is returned using suitable packaging to
AccuScene Corporation Ltd. using the agreed shipping
means and routing
AccuScene will agree a means and routing of the shipment
prior to issue of the RMA number. Returns made by any
other means will invalidate the Warranty.
Certain
environmental
conditions
are
recorded
permanently during operation of the AccuScene VF1280S
High Resolution Colour Viewfinder.
These will be
inspected to determine validity of a Warranty claim.
12 DISCLAIMER
AccuScene Corporation Ltd. (‘AccuScene’) operates a policy
of continuous development. AccuScene reserves the right to
make changes and improvements to any aspects of the
product described in this document without prior notice.
Under no circumstances shall AccuScene be responsible for
any loss of data or income or any special, incidental,
consequential or indirect damages howsoever caused.
The contents of this document are provided “as is”. Except as
required by law, no warranties of any kind, neither expressed
nor implied, including, but not limited to, the implied warranties
of merchantability and fitness for a particular purpose, are
made in relation to the accuracy, reliability or contents of this
document.
33
13 APPENDIX
13.1 Controlling colour using the Colour Matrix
The Viewfinder uses Light Emitting Diodes (LEDs) to illuminate
its display. Red (Rp), Green (Gp) and Blue (Bp) light from these
LEDs is very pure. Using these, the display can create very
vivid colours. In practice, the range or gamut of colours that
can be created exceeds the nominal High Definition video
colour gamut defined by Rec. 709 (Figure 18, CIE Colour
Chart).
The ‘I’ factors (fourth row of the matrix, Figure 19) control the
intensity of Red, Green and Blue LEDs which illuminate the
display in the Viewfinder. For instance, if Igreen (the central
factor in the ‘I’ row) is set to 50, the amount of green light is
50% of full-scale. In this condition, all the green components
of the image are half as bright as they would be if Igreen were
set to 100. The normal setting for the ‘I’ factors is 100.
When working with FilmStream video from a Thomson Viper
camera, the Green gain within these images is substantially
higher than the gain of Red and Blue channels. To view
natural colour images, this normally requires compensation to
restore colour balance. This correction could be achieved
using the RGB Colour Matrix alone, but the results could lead
to visible quantisation of the green component because the
number of discrete levels of Green intensity would be greatly
reduced. Using the Intensity (‘I’) controls, it is possible to
achieve the required reduction in Green intensity without
reducing the number of discrete levels within the Green
component, allowing superior image quality.
Using the Colour Matrix (Section 6.5) it is possible to construct
colour simulations. Since the native colour gamut of the
Viewfinder display is wide, the user may reduce the colour
gamut of its video display to simulate other displays or media.
34
The first three rows of the Colour Matrix (Figure 19) show the
relative amounts of Rp, Gp and Bp light used to represent Red,
Green and Blue input video data respectively. Red, Green
and Blue inputs are arranged down the side of the Colour
Matrix. Weighting factors in the range 0 (minimum) to 100
(maximum) are arranged across each row. These determine
the amount of Rp, Gp and Bp light used to represent each of the
Red, Green and Blue inputs, so determining the colour gamut
of the Viewfinder video display.
The default Colour Matrix shown in Figure 10 is a pure
translation of input video data to the most extreme display
colour gamut possible, with Red, Green and Blue being
represented by pure Rp, Gp and Bp respectively. The effect of
adding Rp in the Viewfinder representation of Green (Figure
19) is to make Green appear more yellow within the Viewfinder
display. If plotted on a CIE Colour Chart (Figure 18), this
representation of Green would move downwards towards Rp
from the position of Gp, the pure LED colour, closer to the
position of Rec. 709 Green.
R G and B factors should be set within the range 0 – 100
The sum of R, G and B factors (excluding I factors) in each
column of the matrix must not exceed 100; otherwise video
image distortion may occur.
Optimum colour resolution is obtained when the largest
column sum is 100 or just less (R, G and B factors only,
excluding I factor).
35
CIE
0.9
0.8
0.7
0.6
0.5
y
0.4
0.3
0.2
0.1
0
0
0.1
0.2
0.3
0.4
0.5
0.6
0.7
0.8
x
Blue LED
Green LED
Red LED
Rec. 709
CIE Spectral locus 1931
Figure 18 CIE Colour Chart
<Matrix>
Top
R
64
33
2
100
R
G
B
I
Load
Save
P:
G
5
91
0
100
1
1
0
2
2
C:
B
0
0
84
100
3
3
-1.0
4
4
B:
5
5
0
Figure 19 Colour Matrix
36