1
FINAL R/C SETUP - CONTINUED
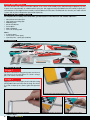
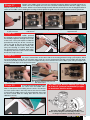
Stage 36
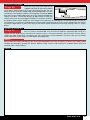
Now confirm the control surfaces
are moving in the correct
direction. Use the servo reversing
switches on your transmitter to
reverse the direction of a servo
if necessary. The most popular
transmitter mode (with the
throttle and rudder on the left,
with the ailerons and elevator on
the right) is shown here.
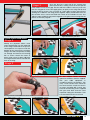
ELEVATOR UP
ELEVATOR DOWN
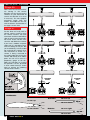
Stage 37
For the Tutor 40 II to fly well, its
control surfaces need to move
the correct amount. Too little
movement and the model will be
slow to react to your commands;
too much and it will be oversensitive and difficult to control.
If you have a modern computer
radio, then it is possible to finetune the settings to suit you. But
you should always set the model
up mechanically correctly first.
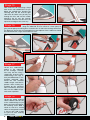
The movement, or ‘throw’ of a
surface is always measured at
the trailing edge (the rear) of the
surface and usually at its widest
point. You can use a ruler or a
proprietary gauge to do this.
Adjust the linkages by moving
the positions of the pushrods
in their control horns(as shown
here) to achieve the following
control surface throws:-
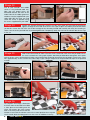
AILERON
DOWN
AILERON
UP
AILERON
UP
RUDDER
RIGHT
RUDDER
LEFT
AILERONS:
Elevator:
10 mm up
6 mm up
10 mm down
6 mm down
Rudder:
15 mm right
15 mm left
14
Irvine Tutor 40 II
AILERON
DOWN