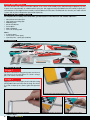
1
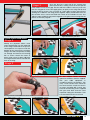
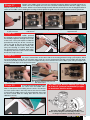
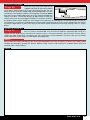
Once the glue has cured, trial fit the second wing
panel onto the first, making sure that the two panels
meet without an excessive gap. File the end of the tube if necessary to ensure
that the wing panels meet. Now apply plenty of epoxy to the wing root rib and
the joiner tube as shown. Use 30 minute or 1 hour epoxy to give yourself extra
working time. Slide the two wing panels together. Epoxy should ooze from the
joint and the excess can be removed with a cloth or tissue before it cures. Use
adhesive tape to hold the two panels together as the glue cures ensuring that the
panels are correctly aligned.
Stage 3
3.1. Apply plenty of adhesive
3.2. Slide the second wing panel into place
3.3. Ensuring a close fit, use tape to ensure
alignment while the glue cures
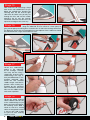
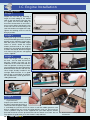
4.1. Mark around the mount with a pen
4.2. Carefully cut through the film (NOT Wood)
4.3. Apply epoxy or cyano adhesive
4.4. Attach the mount in place
FITTING THE AILERON SERVO
Stage 4
Identify the plywood aileron servo
mount and position it on the underside
of the wing centralised to the pre-cut
servo aperture. Use a pen to mark the
position of the mount on the covering.
Using a ruler and a sharp knife, carefully
cut through and remove the covering
film as shown. Attach the mount in
place using cyano or epoxy adhesive
ensuring the lead cutout is towards the
front of the wing.
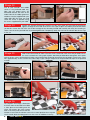
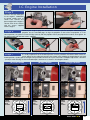
Stage 5
Fit the rubber servo mounting
grommets and brass ferrules supplied
with your radio equipment in
accordance with the instructions. Trim
away a small section of the mount for
the servo lead exit. Install the servo in
its mount and pilot drill (1.5mm) four
holes for the mounting screws supplied
with your servo. Now screw the servo
in position noting the orientation. Take
care not to drill into the servo lead.
5.1. Fit grommets and ferrules to the aileron servo
5.2. Trim the mount for the servo lead’s exit
5.3. Pilot drill the mounting holes
5.4. Screw the servo in position
Irvine Tutor 40 II
3