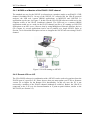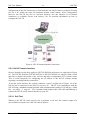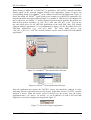
1
LOYTEC electronics GmbH
NIC
User Manual
for LOYTEC Network Interfaces
Version 2.6.4
LOYTEC electronics GmbH, Vienna
NIC User Manual
2
This page is intentionally left blank!
Version 2.6.4T
LOYTEC electronics GmbH
LOYTEC
NIC User Manual
3
LOYTEC
Contact
LOYTEC electronics GmbH
Blumengasse 35
A-1170 Vienna
AUSTRIA/EUROPE
[email protected]
http://www.loytec.com
Version 2.6.4
Document No. 88067208
LOYTEC MAKES AND YOU RECEIVE NO WARRANTIES OR CONDITIONS,
EXPRESS, IMPLIED, STATUTORY OR IN ANY COMMUNICATION WITH YOU, AND
LOYTEC SPECIFICALLY DISCLAIMS ANY IMPLIED WARRANTY OF
MERCHANTABILITY OR FITNESS FOR A PARTICULAR PURPOSE.
No part of this publication may be reproduced, stored in a retrieval system, or transmitted, in
any form or by any means, electronic, mechanical, photocopying, recording, or otherwise,
without the prior written permission of LOYTEC.
Version 2.6.4T
LOYTEC electronics GmbH
NIC User Manual
4
LOYTEC
Table of Contents
1
Introduction ..........................................................................................................................7
2
Installation for Windows Operating Systems.......................................................................8
2.1
NIC709-PP (LPA006, LPA-PP) ....................................................................................8
2.2
NIC709-PCI and NIC709-PCIP ....................................................................................8
2.3
NIC709-USB and NIC709-USBP (LPA-USB, LPA-USBP) ......................................10
2.4
NIC852 ........................................................................................................................11
2.4.1
NIC852 as a Member of the EIA852 / CNIP channel...........................................13
2.4.2
Remote LPA on L-IP ............................................................................................13
2.5
3
4
NIC709-IP ...................................................................................................................14
2.5.1
NIC-IP Direct Connection ....................................................................................15
2.5.2
NIC-IP Internet Connection..................................................................................15
2.5.3
NIC-IP Console Interface .....................................................................................16
2.5.4
NIC-IP LEDs, Status Button, and Reset to Factory Defaults ...............................22
Network Interface Configuration - LConfig Tool..............................................................24
3.1
Basic Interface and MNI Setup ...................................................................................24
3.2
Advanced Configuration..............................................................................................25
3.2.1
Legacy Driver / MNI Master Settings ..................................................................25
3.2.2
MIP/LDV Settings ................................................................................................25
3.3
Parallel Port (Printer Port) Configuration....................................................................26
3.4
PCI Configuration........................................................................................................27
3.5
USB Configuration ......................................................................................................27
3.6
NIC852 (CNIP) Configuration ....................................................................................28
3.6.1
Address Settings....................................................................................................28
3.6.2
Advanced Settings ................................................................................................29
3.6.3
Multicasting ..........................................................................................................30
3.6.4
Additional Information .........................................................................................30
3.6.5
Becoming a Channel Member and Testing the Connection .................................31
3.7
L-IP Assignment..........................................................................................................31
3.8
NIC-IP Assignment and Configuration .......................................................................33
3.8.1
Configure NIC-IPs ................................................................................................34
3.8.2
Upgrade NIC-IP Firmware....................................................................................36
3.8.3
Assign NIC-IPs .....................................................................................................37
Network Interface and Transceiver Selection ....................................................................38
Version 2.6.4T
LOYTEC electronics GmbH
NIC User Manual
5
5
LOYTEC
Legacy Support for MIP/LDV and LNS/VNI 3.x ............................................................. 40
5.1
Requirements and Settings for Windows 98/Me/NT .................................................. 40
5.2
Requirements and Settings for Windows 2000 ........................................................... 40
5.3
Requirements and Settings for Windows XP.............................................................. 41
5.4
Configuration of the Legacy Driver............................................................................ 42
5.5
Using LNS/VNI 3.x Management Tools such as LonMaker ...................................... 44
6
Multiplexed Network Interfaces ........................................................................................ 46
7
Personal Firewall Setup ..................................................................................................... 48
8
Product Registration .......................................................................................................... 49
9
Installation for Linux Operating Systems.......................................................................... 50
10
NIC Product Comparison ............................................................................................... 51
11
Specifications ................................................................................................................. 52
11.1
NIC709-PP (LPA006, LPA-PP / NIC-PP)............................................................... 52
11.2
NIC709-PCI and NIC709-PCIP............................................................................... 52
11.3
NIC709-USB and NIC709-USBP (LPA-USB, LPA-USBP) .................................. 53
11.4
NIC709-IPxE ........................................................................................................... 53
11.5
NIC709-IPxE100 ..................................................................................................... 53
11.6
NIC852 (USB Key).................................................................................................. 54
12
Revision History............................................................................................................. 55
Version 2.6.4T
LOYTEC electronics GmbH
NIC User Manual
7
LOYTEC
1 Introduction
Thank you for purchasing a LOYTEC product. Please observe that this document applies to
the NIC709 and NIC852 network interface series as well as the LPA006, LPA-PP, LPAUSB and LPA-USBP protocol analyzers from LOYTEC. Observe that some restrictions
might apply to your network interface depending on the hardware type, see Chapter 10.
The NIC709 and NIC852 network interfaces for PCs offer a performance and versatility yet
unrivaled in the industry. LOYTEC’s network interface family includes devices for PCI, EPP,
and USB as well as Ethernet/IP. Each NIC709 network interface (except NIC709-IP) comes
with three software selectable transceivers - including power-line - supporting bit-rates from
300 bps to 2.5 Mbps. The NIC709-IP is equipped with either an FT-10 or an XF-1250
interface. The NIC852 provides access to EIA852 / CNIP (Control Network over IP)
networks. A LOYTEC NIC can be used to run powerful software like e.g. LPA (LOYTEC
Protocol Analyzer), LSD (LOYTEC System Diagnostics Tool) as well as MIPTM/LDV and
LNSTM/VNI 3.x applications like LonMakerTM or NL220TM. Please refer to Chapter 10 for a
complete list of features and properties for each LOYTEC network interface.
This document describes in detail how to install and configure the LOYTEC Network
Interfaces.
Version 2.6.4T
LOYTEC electronics GmbH
NIC User Manual
8
LOYTEC
2 Installation for Windows Operating Systems
2.1 NIC709-PP (LPA006, LPA-PP)
The NIC-PP (NIC709-PP) works in Windows 98/Me/NT/2000/XP. Just connect the NIC-PP
to a printer port of your PC (LPT1 or LPT2), as depicted in Figure 1. The interface box must
be powered with 9 to 24V DC / 300mA. A 230V or 120V power supply is included with the
NIC709-PP package. Optionally you can use the Notebook Power Adapter L-NPA to power
the NIC-PP via a PS2 port of your PC or notebook.
Figure 1: NIC-PP Hardware Installation
To install the software and drivers for the NIC-PP, please put the LOYTEC Software CD into
your CDR/DVD drive and wait till the CD menu appears. If no menu appears please start
‘setup.exe’ from the CD manually. Click the button for NIC installation and follow the
instructions. The Windows hardware assistant might complain about a 'failed logo test', which
you can ignore and continue with the installation. Please observe that you must be logged in
as Administrator or have administrator rights to install the drivers in Windows NT/2000/XP.
Before working with the NIC709-PP, you must explicitly enable the parallel port device
within the LConfig tool (see Chapter 3), since all parallel port devices are disabled by default.
2.2 NIC709-PCI and NIC709-PCIP
The NIC-PCI and NIC-PCIP (NIC709-PCI / NIC709-PCIP) network interface cards work in
Windows 98/Me/NT/2000/XP (as well as Linux, see Chapter 9). Before hardware
installation, please install the NIC Network Interface Software. You must be logged in as
Administrator or have administrator rights to install the software and drivers in Windows
NT/2000/XP. Put the LOYTEC Software CD into your CDR/DVD drive and wait till the CD
menu appears. If no menu appears please start ‘setup.exe’ from the CD manually. Click the
button for NIC installation and follow the instructions. The Windows hardware assistant
Version 2.6.4T
LOYTEC electronics GmbH
NIC User Manual
9
LOYTEC
might complain about a 'failed logo test', which you can ignore and continue with the
installation. Now switch off your PC and plug the NIC-PCI(P) into an empty PCI slot as
depicted in Figure 2.
Figure 2: NIC-PCI Hardware Installation
The PCI card does not need any further hardware setup. The NIC-PCIP comes with an
additional power-line interface, which is used to connect the power-line network to the
corresponding port on the NIC-PCIP card. After hardware installation, please start the PC and
wait till the Windows hardware assistant automatically completes the driver installation. In
Windows XP the hardware assistant will ask you some questions:
1. Can Windows connect to Windows Update to search for software? (Windows XP SP2
only) – Choose ‘No, not this time’, click Next.
2. What do you want the Wizard to do? – Choose ‘Install the software automatically’,
click Next and finally Finish.
Driver installation in Windows XP may take a few minutes, so please be patient.
Should you be asked for a folder where the PCI drivers reside, or should the hardware assistant not find the
drivers, please choose the corresponding subfolder for your operating system within the folder the NIC software
has been installed to (e.g. ‘Program Files\LOYTEC\NIC\Windows\Driver\PCI\…’).
Version 2.6.4T
LOYTEC electronics GmbH
NIC User Manual
10
LOYTEC
2.3 NIC709-USB and NIC709-USBP (LPA-USB, LPA-USBP)
The NIC-USB and NIC-USBP (NIC709-USB, NIC709-USBP) network interfaces work in
Windows 98/Me/2000/XP. Before connecting the NIC-USB(P) to your PC please install the
NIC Network Interface Software. You must be logged in as Administrator or have
administrator rights to install the software and drivers in Windows 2000/XP. Put the
LOYTEC Software CD into your CDR/DVD drive and wait till the CD menu appears. If no
menu appears please start ‘setup.exe’ from the CD manually. Click the button for NIC
installation and follow the instructions. The Windows hardware assistant might complain
about a 'failed logo test', which you can ignore and continue with the installation. After the
installation, please disconnect all LOYTEC USB devices and reboot.
Figure 3: NIC-USB Hardware Installation
After reboot, plug in the NIC-USB(P) as depicted in Figure 3. If no LOYTEC USB devices
have yet been installed on your PC, please wait till the Windows hardware assistant
automatically completes driver installation. In Windows XP the hardware assistant will ask
you some questions:
1. Can Windows connect to Windows Update to search for software? (Windows XP SP2
only) – Choose ‘No, not this time’, click Next.
2. What do you want the Wizard to do? – Choose ‘Install the software automatically’,
click Next and finally Finish.
This procedure is executed twice, since two drivers must be installed for the NIC-USB.
Driver installation in Windows XP may take a few minutes, so please be patient. If you have
several free USB ports, it is recommended to repeat the procedure for all free ports since
Windows XP might request driver installation again for a different port.
Should you be asked for a folder where the USB drivers reside, or should the hardware assistant not find the
drivers, please choose the USB driver subfolder within the folder the NIC software has been installed to (e.g.
‘Program Files\LOYTEC\NIC\Windows\Driver\USB’).
Version 2.6.4T
LOYTEC electronics GmbH
NIC User Manual
11
LOYTEC
After the drivers are installed, the CONFIG LED on the USB network interface device should
light up (or blink) a few seconds after the NIC-USB is connected to the USB port. Please do
not start any software on the NIC before the CONFIG LED comes on. Make sure that the
NIC-USB is not disconnected as long as any LOYTEC software is running. If you use an
external USB hub, please make sure that it is an active Hub (with a separate power supply). If
problems occur when operating the NIC-USB behind a USB Hub, please try connecting the
NIC-USB directly to the PC.
It is not recommended to enter Standby or Hibernation mode as long as any software is
running on the NIC-USB. However, in Windows 2000/XP, Standby/Hibernation mode is
supported for the NIC-USB(P). After resuming from Standby/Hibernation mode, please
follow the instructions shown in the pop-up message box. Wait till the CONFIG LED on the
NIC-USB lights up and click on ‘Resume’. If the CONFIG LED should not light up after
about one minute, unplug and re-plug the NIC-USB, wait again for the CONFIG LED, and
click ‘Resume’. Should the resume not work after that, you can again try to unplug and replug the NIC-USB.
2.4 NIC852
The NIC852 network interface works in Windows 98/Me/2000/XP. Before connecting the
NIC852 USB key to your PC please install the NIC Network Interface Software. You must be
logged in as Administrator or have administrator rights to install the software and drivers in
Windows 2000/XP. Put the LOYTEC Software CD into your CDR/DVD drive and wait till
the CD menu appears. If no menu appears please start ‘setup.exe’ from the CD manually.
Click the button for NIC installation and follow the instructions. The Windows hardware
assistant might complain about a 'failed logo test', which you can ignore and continue with the
installation. Finally, disconnect all LOYTEC USB devices and reboot.
After reboot, plug in the NIC852 USB key as depicted in Figure 4. If no LOYTEC USB
devices have yet been installed on your PC, please wait till the Windows hardware assistant
automatically completes driver installation.
Version 2.6.4T
LOYTEC electronics GmbH
NIC User Manual
12
LOYTEC
Figure 4: NIC852 Hardware Installation
In Windows XP the hardware assistant will ask you some questions:
1. Can Windows connect to Windows Update to search for software? (Windows XP SP2
only) – Choose ‘No, not this time’, click Next.
2. What do you want the Wizard to do? – Choose ‘Install the software automatically’,
click Next and finally Finish.
This procedure is executed twice, since two drivers must be installed for the NIC852. Driver
installation in Windows XP may take a few minutes, so please be patient. If you have several
free USB ports, it is recommended to repeat the procedure for all free ports since Windows
XP might request driver installation again for a different port.
Should you be asked for a folder where the USB drivers reside, or should the hardware assistant not find the
drivers, please choose the USB driver subfolder within the folder the NIC software has been installed to (e.g.
‘Program Files\LOYTEC\NIC\Windows\Driver\USB’).
Make sure that the NIC852 USB key is not disconnected and the PC does not enter
Standby/Hibernation mode as long as any software is running on the NIC. If you use an
external USB hub, please make sure that it is an active Hub (with a separate power supply). If
problems occur when operating the NIC852 behind a USB Hub, please try connecting the
NIC852 directly to the PC.
The actual connection to the EIA852 / CNIP (Control Network over IP) network is done via
the Ethernet/IP port of the PC. Please refer to Chapter 7 for Personal Firewall Setup. The
NIC852 USB key is needed for assigning a unique serial number and Node ID to the EIA852
device. By using a LOYTEC L-IP or other EIA709/IP router, remote EIA709 networks can
easily be accessed using the NIC852. There are two basic use cases for the NIC852 in
combination with L-IPs and other CNIP devices, described in the next two sections.
Version 2.6.4T
LOYTEC electronics GmbH
NIC User Manual
13
LOYTEC
2.4.1 NIC852 as a Member of the EIA852 / CNIP channel
The standard use case for the NIC852 is to function as a member (node) on an EIA852 / CNIP
channel (LonMark IP-852). On top of the NIC852, PC software like the LPA-IP protocol
analyzer, the LSD tool, custom ORION applications, or MIP/LDV and LNS/VNI 3.x
applications can be run, see Figure 5. In this case the LPA-IP-SW software would receive the
complete traffic of the IP-852 (backbone) channel. The LSD tool or a custom ORION
application would act as a node on the IP-852 channel just like a PC running an LNS/VNI
application or an OPC server. Observe, that by using Multiplexed Network Interface devices
(see Chapter 6), several applications can be run in parallel on a single NIC852. Refer to
Section 3.6 for a detailed description on how to integrate the NIC852 into an existing EIA852
channel.
Figure 5: LPA-IP running on NIC852
2.4.2 Remote LPA on L-IP
The LPA-IP-SW software in combination with a NIC852 can be used to log packets from the
EIA709 port of a specific L-IP. Please observe that you must update your L-IPs to firmware
version 2.0 or higher for the Remote LPA functionality. In this use case, the PC is not
necessarily a member of the EIA852 channel (although it could be). Rather, the LPA-IP is
connected to the L-IP over the Internet/Intranet in a point-to-point fashion, similar to the
NIC709-IP (see Section 2.5).
Version 2.6.4T
LOYTEC electronics GmbH
NIC User Manual
14
LOYTEC
Figure 6: Remote LPA running on L-IP
In the example of Figure 6, two LPA logs are started, one on each L-IP device. Each LPA log
window shows the local traffic of the corresponding L-IP’s EIA709 port. To discover and
assign remote L-IP devices for the LPA-IP-SW software, a ‘Remote Device Discovery and
Assignment’ module is available, which is described in Section 3.7. For more information on
the LPA-IP, please refer to the LPA User Manual.
2.5 NIC709-IP
The NIC-IP (NIC709-IP) network interface works in Windows 98/Me/NT/2000/XP. It comes
in two different enclosures, the NIC709-IPxE (old version) and the NIC709-IPxE100 (new
version), see also Figure 12. The NIC709-IPxE interface box must be powered with 9 to 35
VDC or 12 to 24 VAC. The NIC709-IPxE100 interface box must be powered with 12 to 35
VDC or 12 to 24 VAC. Before connecting the NIC-IP please install the NIC Network
Interface Software. You must be logged in as Administrator or have administrator rights to
install the software and drivers in Windows NT/2000/XP. Put the LOYTEC Software CD into
your CDR/DVD drive and wait till the CD menu appears. If no menu appears please start
‘setup.exe’ from the CD manually. Click the button for NIC installation and follow the
instructions. The Windows hardware assistant might complain about a 'failed logo test', which
you can ignore and continue with the installation. Further, please check www.loytec.com for
the latest NIC-IP firmware release and upgrade your NIC-IP as explained in Section 2.5.3.4 or
Section 3.8.2.
Since the NIC-IP is connected to the PC via an Ethernet/IP connection, you have to make sure
that both your PC and the NIC-IP have valid IP addresses and are able to communicate with
each other. There are several ways of providing such a connection, as described in the next
sections. Observe that the IP configuration of the NIC709-IPxE100 can also be done using the
Version 2.6.4T
LOYTEC electronics GmbH
NIC User Manual
15
LOYTEC
console interface, see Section 2.5.3. Additionally, refer to Chapter 7 for Personal Firewall
Setup.
2.5.1 NIC-IP Direct Connection
Figure 7: NIC-IP Direct Connection
The NIC-IP can be directly connected to a PC over an Ethernet crossover cable as shown in
Figure 7 for the NIC709-IPxE enclosure (the same connectors exist on the NIC709-IPxE100
enclosure, see Figure 12). After connecting the NIC-IP, the PC’s Ethernet adapter should
automatically receive an ‘Auto-IP’ address. This will take approximately 1 min., so please be
patient. Check if the Ethernet adapter has got a valid IP address by typing ‘ipconfig’ in a
console (DOS) window. If your PC did not receive a valid IP address for the Ethernet adapter,
please configure a static IP address in the TCP/IP property dialog of your Ethernet card, e.g.:
IP address 169.254.X.Y / Subnet Mask 255.255.0.0
where X.Y can be any combination between 0.1 and 255.254. Finally, you must set the IP
configuration of the NIC-IP using the LConfig tool, see Section 3.8.1.
2.5.2 NIC-IP Internet Connection
Figure 8 shows how to use the NIC-IP in an Intranet or over the Internet. Note that although
Figure 8 shows the NIC709-IPxE enclosure, the same connections must be made on the
NIC709-IPxE100. First, the NIC-IP must be connected to the Intranet/Internet and the IP
Version 2.6.4T
LOYTEC electronics GmbH
NIC User Manual
16
LOYTEC
configuration of the NIC-IP must be set. Note that this can only be done by using the LConfig
tool on a PC within the same IP broadcast domain (same subnet). After configuration,
however, the NIC-IP can also be accessed remotely over the Internet (if an Internet
connection is available). Please read Section 3.8.1 for detailed information on how to
configure the NIC-IP.
Figure 8: NIC-IP Internet/Intranet Connection
2.5.3 NIC-IP Console Interface
Observe that this section only applies to NIC709-IPxE100 enclosures (see right side of Figure
12). The NIC709-IPxE100 (NIC709-IP1E100 or NIC709-IP3E100) is equipped with a serial
interface to display the results of the self test and allow configuration via a console menu.
This is useful especially for configuring the IP address in the NIC-IP without already
requiring a working Ethernet connection.
To use the serial interface, the console connector (‘serial’ in right side of Figure 12) of the
NIC-IP can be connected to the RS-232 port of a PC. The PC can communicate with the
NIC-IP using a standard terminal program with communication settings of 38,400 bps / 8 data
bits / no parity / 1 stop bit. Use a standard null-modem-cable with full handshaking to
connect the NIC-IP serial console interface to your PC.
2.5.3.1 Self Test
Whenever the NIC-IP comes out of reset it performs a self test. The console output of a
successful boot sequence on a NIC-IP reads as follows:
Version 2.6.4T
LOYTEC electronics GmbH
NIC User Manual
17
LOYTEC
LOYTEC electronics GmbH
www.loytec.com
Testing
Testing
Testing
Testing
Testing
Testing
Board ID (0)
RAM
boot loader
fallback image
primary image
Flash
Passed
Passed
Passed
Passed
Passed
Passed
Loading primary image
Passed
Bootloader version 2
NIC-IP Primary Image loading...
Firmware version 2.0.0
Type bootshell to enter the boot shell...
Mounting file system
Starting TCP/IP networking
Detecting EIA-709 port 1 (FT-10)
Starting RNI on EIA-709
Passed
Passed
Passed
Passed
NIC-IP(c)
LOYTEC electronics GmbH
Wed Sep 27 13:23:35 2006 - V2.0.0
2.5.3.2 Main Menu
After booting, the NIC-IP displays the following console menu:
Device Main Menu
================
[1]
[2]
[3]
[5]
[6]
[8]
[9]
Show device information
Serial firmware upgrade
System configuration
IP configuration
RNI configuration
Reset configuration (factory defaults)
Device statistics
[0]
Reset device
The menu options are described in the following sections.
2.5.3.3 Option 1 - Show device information
This menu item shows information on the NIC-IP and the current firmware:
Version 2.6.4T
LOYTEC electronics GmbH
NIC User Manual
18
LOYTEC
Device Information
==================
Product:
Product code:
Firmware:
Version:
Build date:
Serial number:
Free memory:
System temp:
Supply volt:
NIC-IP
NIC709-IP3E100
NIC-IP Primary Image
2.0.0
Wed Sep 27 13:23:35 2006
009501-80000001FC0E
14283K,469K
41.7C
12.0V
2.5.3.4 Option 2 - Serial firmware upgrade
This menu item allows updating the NIC-IP firmware via the serial interface (console).
Observe that the firmware can also be updated remotely over the Internet, see Section 3.8.2.
Note: The menu item [2] should never be selected manually. It is selected automatically by
the software described in this section. If you select this option accidentally, you can
return to the main menu by sending a break signal. In case your terminal program
does not offer an option to send a break signal, the device must be reset to return to
the main menu.
To download the firmware via the console interface, the NIC-IP must be connected to the RS232 port of a PC (via its console interface) as described in Section 2.5.3. You will need the
LOYTEC serial upgrade tool (LSU Tool), which can be downloaded from our homepage at
www.loytec.com.
Please make sure that the NIC-IP console shows the main menu. If not, navigate to the main
menu or simply power-cycle the NIC-IP.
Double click on the ‘*.dlc’ file that comes with the new firmware package. This should start
the LSU Tool and load the firmware image referenced in the ‘*.dlc’ file. Please note that the
‘*.dlc’ file and the ‘*.dl’ file must be stored in the same folder. The start window of the LSU
tool is shown in Figure 9.
Figure 9: LSU Serial Upgrade Tool in Idle Mode
Version 2.6.4T
LOYTEC electronics GmbH
NIC User Manual
19
LOYTEC
If the NIC-IP is not connected to COM1 you can change the port to COM2, COM3, or
COM4. Press “Download” to start the download. A progress bar as shown in Figure 10 can
be seen.
Figure 10: Progress Bar during Firmware Download
If the upgrade is successful, the following window appears (Figure 11).
Figure 11: Successful Firmware Upgrade
Double check that the new firmware is executed by selecting 1 and pressing Enter in the
console window. This will bring up the device information, which shows the current firmware
version (see Section 2.5.3.3).
2.5.3.5 Option 3 - System configuration
The system configuration menu is reserved for future use.
2.5.3.6 Option 5 - IP configuration
This menu is used to setup the IP configuration of the NIC-IP. The IP configuration menu,
when DHCP is disabled, is shown here:
Version 2.6.4T
LOYTEC electronics GmbH
NIC User Manual
20
LOYTEC
IP Configuration Menu
=====================
[1]
[2]
[3]
[4]
[5]
[6]
[7]
[9]
[b]
DHCP
IP Address
IP Netmask
IP Gateway
Hostname
Domainname
DNS Servers
MAC Address
Link Speed & Duplex
[q]
[x]
Quit without saving
Exit and save
:
:
:
:
:
:
:
:
:
disabled
192.168.12.104
255.255.192.0
192.168.1.1
new
<unset>
<unset>
00:0A:B0:01:0E:3F (factory default)
Auto Detect
The IP configuration menu, when DHCP is enabled, is shown here:
IP Configuration Menu
=====================
[1]
[9]
[b]
DHCP
IP Address
IP Netmask
IP Gateway
Hostname
Domainname
DNS Servers
MAC Address
Link Speed & Duplex
[q]
[x]
Quit without saving
Exit and save
[5]
:
:
:
:
:
:
:
:
:
enabled
192.168.12.104
255.255.192.0
192.168.1.1
new
<unset>
<unset>
00:0A:B0:01:0E:3F (factory default)
Auto Detect
Option [1] - DHCP
Switches between manual entry of the IP address, netmask, and gateway address or automatic
configuration from a DHCP server. If DHCP is disabled, one must enter the configuration
data described in the following sections. If DHCP is enabled, please skip menu items [2]
through [7].
Option [2] - IP Address, [3] - IP Netmask, [4] - IP Gateway
Please enter the IP address for the NIC-IP device, the netmask (e.g. 255.255.255.0), and the
default gateway address.
Option [5] - Hostname, [6] - Domainname
“Hostname” and “Domainname” are optional entries and can be left empty. For some DHCP
configurations it may be necessary to enter a hostname. Please contact your system
administrator to get information on how to configure DHCP to acquire an IP address.
Option [7] - DNS Servers
You can configure up to 3 Domain Name Servers. Currently, these entries are not used.
Option [9] - MAC Address
The NIC-IP comes configured with a unique MAC address. This address can be changed in
order to clone the MAC address of a different device. Please contact your system
administrator to avoid MAC address conflicts. After selecting menu item [9], the following
message appears:
Version 2.6.4T
LOYTEC electronics GmbH
NIC User Manual
21
LOYTEC
Override factory MAC address (y/n):
Enter “y” to input a new MAC address or enter “n” to return to the factory default MAC
address.
Option [b] - Link Speed & Duplex
If the NIC-IP is operated with a 10Mbit/s-only hub, the link speed should be switched from
“Auto Detect” to “10Mbps/Half-Duplex”. With modern 100/10Mbit/s switches, this setting
can be left as is.
Change Link Speed & Duplex
==========================
[1]
[2]
[3]
[4]
[5]
Auto Detect (default)
100Mbps/Full-Duplex
100Mbps/Half-Duplex
10Mbps/Full-Duplex
10Mbps/Half-Duplex
2.5.3.7 Option 6 - RNI configuration
This menu item allows setting up the remote network interface configuration of the NIC-IP.
The RNI sub menu is shown here:
RNI Configuration Menu
======================
[2]
[3]
[4]
[5]
[6]
RNI port
Device name
MD5 authentication
MD5 secret
Location string
[q]
[x]
Quit without saving
Exit and save
:
:
:
:
:
1628 (default)
test1
on
not displayed
Building_A
Option [2] - RNI port
Port for PC – NIC-IP communication. If the NIC-IP resides behind a NAT router, UDP and
TCP port forwarding to the NIC-IP must be enabled in the NAT router for the specified port
(default 1628). If several NIC-IPs are located behind the NAT router, each NIC-IP must be
configured with a different port and all ports must be forwarded accordingly in the NAT
router. To switch back to the default port, simply enter 0 (or 1628).
Option [3] - Device Name, [6] - Location String
Name and Location of NIC-IP device. These strings can be used to identify the NIC-IP in the
LConfig tool (see Section 3.8).
Option [4] - MD5 authentication, [5] - MD5 secret
If MD5 authentication is enabled, only PCs that have the correct ‘MD5 secret’ configured can
access the NIC-IP. Using MD5 authentication is highly recommended when using a NIC-IP
remotely over the Internet. Observe that the MD5 secret is never shown in the console menu
for security reasons.
Version 2.6.4T
LOYTEC electronics GmbH
NIC User Manual
22
LOYTEC
2.5.3.8 Option 8 - Reset configuration (factory defaults)
This menu item allows resetting the device to its factory default state. The following menu
appears:
Reset Configuration Menu
========================
[1]
[3]
Reset everything to factory defaults
Reset all passwords
[q]
Quit
Select menu item [1] to reset the complete device to factory defaults. Observe that you can
also reset to factory defaults using the status button, see Section 2.5.4.
Menu item [3] is reserved for future use.
2.5.3.9 Option 9 - Device statistics
This menu holds relevant information regarding the device statistics of the NIC-IP:
Statistics Menu
===============
[1]
[4]
Show RNI statistics
Show IP statistics
[q]
Quit
Use this menu for debugging purpose only. There is no need to access this menu if the NIC-IP
is running smoothly. Menu item [1] shows internal statistics of the NIC-IP. In menu item [4] besides the IP statistics - any detected IP address conflicts are displayed. If the NIC-IP’s IP
address conflicts with a different host on the network, the following text is displayed:
WARNING: Conflicting IP address detected!
IP address 10.125.123.95 also used by device with MAC address
00 04 5A CC 10 41!
Clear IP conflict history (y/n):
As useful information, the MAC address of the conflicting host is shown. If the information
about this conflict should be cleared, hit ‘y’. If ‘n’ is selected, the conflict will show up again
the next time this menu is entered.
2.5.3.10 Option 0 - Reset device
Use this menu item to reset the NIC-IP. Some configuration changes (such as IP settings)
require a reset in order to take effect.
2.5.4 NIC-IP LEDs, Status Button, and Reset to Factory Defaults
Figure 12 shows the two different NIC-IP enclosures, the NIC709-IPxE (left side) and the
NIC709-IPxE100 (right side).
Version 2.6.4T
LOYTEC electronics GmbH
NIC User Manual
23
LOYTEC
Figure 12: Enclosures of NIC709-IPxE (left side) and NIC709-IPxE100 (right side)
Both versions are equipped with the following LEDs (the name of the LED on the NIC709IPxE100 enclosure is written in brackets):
EIA709 activity (ACT FT):
flashes green when there is traffic on the EIA709 channel,
flashes red on overload (high traffic),
turns permanently red when EIA709 transceiver is defective or
the wrong transceiver is selected for the NIC-IP.
power (power):
comes on when the power supply is connected.
status (status):
EIA709 status LED (service LED).
connect (CONNECT):
stays orange until DHCP configuration has been received,
turns green when a PC has an active connection to the NIC-IP,
flashes green when there is traffic from or to the PC,
turns red when an error was detected.
Ethernet activity (ACT 100Base-T):
shows activity on the Ethernet connection.
Ethernet link (LINK):
comes on when the NIC-IP is physically connected to a PC or an Ethernet switch/hub.
Additionally, when the EIA709 activity and the connect LED blink in different colors for a
few seconds, a PC has ‘winked’ the NIC-IP, see Section 3.8.3.
The status button can be used to identify a NIC-IP in the LConfig tool, see Section 3.8.1. It is
also used for resetting the NIC-IP to factory defaults: Keep the status button pressed,
disconnect and reconnect the power supply. Release the status button as soon as both the
EIA709 activity and the connect LEDs turn orange (after approx. 8 sec).
Version 2.6.4T
LOYTEC electronics GmbH
NIC User Manual
24
LOYTEC
3 Network Interface Configuration - LConfig Tool
The LOYTEC Configuration tool (LConfig) is used to enable/disable and setup NIC709 and
NIC852 network interface devices. It is installed as part of the NIC software package and can
be started via the Windows Start menu from the ‘LOYTEC Network Interfaces’ program
folder or by double-clicking the LOYTEC systray icon.
Note that when you are logged in as a standard or restricted user in Windows NT/2000/XP,
not all options of the LConfig tool will be available (except when running as Service, see
Section 3.2.1). Specifically, functions to configure the hardware interface of your PC (such as
the printer port) will only be available when logged in with administrator rights. Observe also
that all non-hardware related settings (e.g. NIC852 configuration and L-IP/NIC-IP
assignments) are user-specific. This means when logging in as a different user, these settings
must be done again (except when running as Service, see Section 3.2.1). When the LConfig
tool is started, the dialog window shown in Figure 13 will appear.
Figure 13: LConfig Main Dialog Window
The Configuration Log lists the supported devices and displays all configuration actions as
well as warnings and errors that might occur during the configuration process. At the top of
the window the network interface type can be chosen. For each type of network interface
different configuration options are available, as described in the next sections. If you need
help on any function of the LConfig tool, just click on ‘Help’ or press F1 in any LConfig
dialog window.
3.1 Basic Interface and MNI Setup
In the ‘Device’-field (see Figure 13) a specific network interface can be selected for
configuration. Each device can be enabled or disabled with the ‘Enable Device’ checkbox.
This is useful e.g. when only one parallel port is present in a PC (the other one can be
disabled in this case). By clicking on ‘Test Device / Serial Number’ a short test of the device
is performed and the serial number is displayed. Any detected problems or errors are reported
Version 2.6.4T
LOYTEC electronics GmbH
NIC User Manual
25
LOYTEC
and logged in the ‘Configuration Log’ window. If e.g. a driver is missing or an installed
driver has the wrong version, a corresponding error message is shown indicating the problem.
Please refer to Chapter 2 in this case.
For PCI, USB, NIC852, and NIC-IP devices, a ‘Multiplexed Network Interface
Configuration’ panel is displayed. Here you can reserve a certain number of MNI devices for
Legacy applications (if your NIC has MNI capability). By clicking on ‘MNI Info’, the
number of MNI devices supported by the NIC as well as the corresponding Node IDs will be
displayed. Please refer to Chapters 5 and 6 for more information on MNI devices and Legacy
support.
3.2 Advanced Configuration
By clicking on ‘Advanced’ you can setup some advanced options of the Legacy Driver, see
Figure 14.
Figure 14: Advanced Configuration
3.2.1 Legacy Driver / MNI Master Settings
Here you can choose whether to run the Legacy Driver / MNI Master as a normal application
or as a Service (available in Windows NT/2000/XP). After changing this option, the Legacy
Driver is terminated and must be restarted manually via the start menu (this also
automatically restarts the MNI Master). Running the Legacy Driver / MNI Master as a
Service has the following advantages:
-
Applications running on LOYTEC devices may also be started as Services (without the
need of user login). This includes LNS/VNI applications like e.g. LNSTM Server as well as
MIP/LDV and ORION applications.
-
All functions of the LConfig tool (when started from the LOYTEC systray icon) are
available after user login, regardless of the user rights (Administrator or not),
-
Faster startup of the Legacy Driver since it is already started before user login.
3.2.2 MIP/LDV Settings
‘Clear all MIP/LDV Configurations on next Restart’ resets the MIP/LDV configuration of all
network interfaces after the next restart of the NIC Legacy Driver. This includes all
transceiver settings as well as the address configuration of the node (domain table, address
table, network variable binding information).
Version 2.6.4T
LOYTEC electronics GmbH
NIC User Manual
26
LOYTEC
‘Automatic Flush Cancel’: If this option is set, the MIP driver automatically leaves the flush
mode after it is opened or after a reset of the device.
By clicking on ‘Default’ you can restore the default values.
3.3 Parallel Port (Printer Port) Configuration
Figure 15: Parallel Port Configuration
LOYTEC parallel port devices such as NIC-PP are connected to one of the two parallel ports
(printer ports) of the PC. Hence, two devices are available: NIC_PP_1 and NIC_PP_2.
Observe that the printer ports must be configured to port address 0x378 (LPT1) and 0x278
(LPT2) in order to work with LOYTEC devices. Usually these settings can be changed in the
BIOS of the PC for the built-in printer ports. Further the printer port must be configured as
'EPP' or 'PS2' in the BIOS. By clicking on 'Detect Speed' in the LConfig tool (see Figure 15),
the appropriate communication speed between the PC and the parallel port device is
determined. If an error message is displayed you can try to go through the following steps:
-
Make sure the device (e.g. NIC-PP) is connected to the printer port.
-
Make sure the power supply or L-NPA (Notebook Power Adapter) is connected to the
device.
-
Connect the device directly to your printer port (without using a cable).
-
Restart the PC and choose 'EPP' in your BIOS.
-
Restart the PC and choose 'PS2' or 'bi-directional' in your BIOS.
-
Try to use a different parallel port (LPT2) if installed.
-
Try to select a lower speed manually (field 'Speed') and click on 'Test Device'.
If the device is detected and tested successfully and there are still problems within the used
software (e.g. LPA) please also select a lower speed manually.
Version 2.6.4T
LOYTEC electronics GmbH
NIC User Manual
27
LOYTEC
3.4 PCI Configuration
Figure 16: PCI Configuration
Up to four LOYTEC NIC-PCI cards can be installed in a PC (NIC_PCI_1 … NIC_PCI_4).
The corresponding network interface devices can be enabled/disabled and tested in the
LConfig tool.
3.5 USB Configuration
Figure 17: USB Configuration
Up to four LOYTEC NIC-USB devices can be installed (NIC_USB_1 … NIC_USB_4). All
USB devices can be enabled or disabled by clicking on 'Enable USB Network Interfaces'. If
only one USB device is connected, it will be assigned to 'NIC_USB_1'. Observe that a
NIC852 USB Key also occupies one USB device when it is connected to the PC.
Version 2.6.4T
LOYTEC electronics GmbH
NIC User Manual
28
LOYTEC
3.6 NIC852 (CNIP) Configuration
Figure 18: NIC852 Configuration
Up to four NIC852 devices can be used simultaneously in one PC. This means that up to four
LOYTEC USB keys can be connected and the PC can be a channel member in up to four
different EIA852 channels at a time (NIC_852_1 … NIC_852_4).
3.6.1 Address Settings
Before working with the NIC852 network interface in an EIA852 (CNIP) network, the PC
must become a member of the EIA852 channel. At first click on ‘CNIP Configuration’ in the
NIC852 section of the LConfig tool (see Figure 18). The CNIP configuration dialog as shown
in Figure 19 will appear.
Figure 19: CNIP Configuration, Address Settings
In the field ‘Device IP Address’ the IP address of your PC should be displayed. If the PC has
several IP addresses, please choose one address to be assigned to the CNIP device using the
buttons ‘<’ and ‘>’. If the correct IP address of your PC is not displayed, you can choose to
overwrite the IP address by enabling the checkbox ‘Overwrite’. In the ‘Port’ field you can
enter the configuration client port number as set in the configuration server. Usually this is the
default port number 1628 and does not need to be changed. The IP address of the
Version 2.6.4T
LOYTEC electronics GmbH
NIC User Manual
29
LOYTEC
configuration server must be entered it in the field ‘Conf. Server IP Addr.’. The default port
number of the configuration server is 1629 and usually does not need to be changed.
If your PC is located behind a NAT (Network Address Translation) router and the EIA852
(CNIP) channel is located on the public side of the router, the checkbox ‘Allow NAT
Routing’ must be enabled and the public address of the NAT router must be set in the field
‘NAT IP Address’. Further, in the NAT router, UDP and TCP port forwarding to the PC
running the NIC852 must be setup for the configuration client port number (usually 1628).
Please refer to the documentation of your NAT router or contact your system administrator
for making these settings. Note that if several EIA852 channel members (L-IPs, NIC852s, or
other EIA852 nodes) reside behind a NAT router, each member must be configured with a
different configuration client port number. The port-forwarding of the NAT router must be
setup accordingly for each of these ports.
In the field ‘Device Name’ the name of the EIA852 channel member as stored in the
configuration server can be set. By clicking on ‘Default’, the default values shown in Figure
19 will be restored.
3.6.2 Advanced Settings
In the ‘Advanced Settings’ section of the CNIP configuration dialog you can set the escrow
and aggregation timeout as well as the MD5 authentication key, see Figure 20.
Figure 20: CNIP Configuration, Advanced Settings
The escrow timeout is a CNIP channel property that specifies the amount of time the device
will wait for an out-of-sequence IP packet to arrive. This parameter is important in WANs
like the Internet where packets pass many routers that can change the order in which packets
arrive at the destination node. The default value is 64 ms.
Aggregation (or packet bunching) is a technique that collects multiple EIA709 packets into a
single larger CNIP packet. The aggregation timeout defines the time period in ms in which
the transmitting device collects the EIA709 packets before it transmits the CNIP packet over
the CNIP channel. Note, that aggregation adds a delay to the transactions but dramatically
improves the throughput of your CNIP channel. The default value is 16 ms.
MD5 authentication is a method to verify the authenticity of the sending device. Only devices
that have MD5 enabled and use the same MD5 authentication key can share information with
each other. If the configuration server has MD5 enabled only devices that have MD5 enabled
and use the same MD5 authentication key as the configuration server can join the logical
Version 2.6.4T
LOYTEC electronics GmbH
NIC User Manual
30
LOYTEC
CNIP channel. If the channel you want to join is MD5 authenticated please enable MD5
authentication and enter the MD5 authentication key. ‘Extended NAT Registration…’ should
be switched on, if MD5 authentication is used with an L-IP configuration server with
firmware version 3.0 or higher. In all other cases, this option must be switched off.
By clicking on ‘Default’, the default values shown in Figure 20 will be restored.
3.6.3 Multicasting
In the ‘Multicasting’ section of the CNIP configuration dialog you can setup a multicast
address, see Figure 21.
Using multicasting with L-IP and NIC852 devices can greatly improve the data throughput in
some configurations. Please refer to the L-IP manual for more information on the multicasting
functionality.
By default, multicasting is disabled, see Figure 21.
Figure 21: CNIP Configuration, Multicasting
3.6.4 Additional Information
In the ‘Info’ section of the CNIP configuration dialog, additional information about the SNTP
settings and the channel timeout can be observed, see Figure 22.
Figure 22: CNIP Configuration, Additional Information
Version 2.6.4T
LOYTEC electronics GmbH
NIC User Manual
31
LOYTEC
The SNTP servers are used for time synchronization of the channel members. The channel
timeout indicates how old a packet can be before it is discarded. This information is set
channel-wide in the configuration server and can therefore not be changed here.
3.6.5 Becoming a Channel Member and Testing the Connection
After configuring the CNIP device as described in the previous sections click on ‘OK’ in the
CNIP configuration dialog. The next step is to add the PC as a channel member in the
configuration server of the EIA852 (CNIP) channel. Please check the documentation of your
configuration server on how to add a channel member. If the configuration server runs on a
LOYTEC L-IP and the ‘auto member’ feature is enabled in the L-IP, the PC should
automatically be added when the configuration server is contacted for the first time. However,
this can only work if the configuration server IP address is setup correctly as described in
Section 3.6.1. To check if the PC can contact the configuration server and is accepted as a
channel member, please click on ‘Test Device / Serial Number’.
3.7 L-IP Assignment
An L-IP can be used to log the EIA709 traffic and display the packets in an LPA-IP-SW
software running on the PC. Other than recording the (backbone) traffic of the EIA852
channel by running the LPA-IP-SW software directly on the NIC852 device (see Figure 5),
this way the local traffic of a network segment residing behind one specific L-IP is monitored
(see Figure 6). In order to use the L-IPs as ‘Remote LPA’ devices, the physical L-IPs in the
field must be assigned to logical devices (LIP_01 … LIP_32). Click on ‘Device Assignment’
in the L-IP section of the LConfig tool (see Figure 23) to start the device discovery process.
The L-IP assignment dialog window as shown in Figure 24 will appear.
Figure 23: L-IP Configuration
In the device table all discovered channel members will be displayed. However, only L-IPs
can be selected for assignment, since the Remote LPA function is only available on L-IPs.
Non-L-IP devices as well as devices that cannot be contacted will be displayed gray. Use the
checkbox ‘Show All Devices’ to decide whether to see all remote devices or just the L-IPs.
During device discovery, already discovered devices can be assigned immediately. It is not
Version 2.6.4T
LOYTEC electronics GmbH
NIC User Manual
32
LOYTEC
necessary to wait for the completion of the discovery process since this can be a lengthy
procedure depending on the size of the scanned channel(s).
To assign an L-IP device please select the corresponding line of the device table and click on
‘Assign/Add’ or just double-click on the device to assign. To add a device not present in the
device table, also click on ‘Assign/Add’. The dialog box shown in Figure 25 will appear.
Figure 24: L-IP Assignment
Figure 25: Assign/Add L-IP
You can change the IP address and port manually in the fields ‘IP or NAT Address’ and
‘Port’. When the L-IP is located behind a NAT router, you must enter the IP address of the
NAT router. If MD5 is enabled in the L-IP, you must check ‘Enable MD5 Authentication’
and enter the correct ‘MD5 Authentication Key’. MD5 authentication is indicated by a small
key symbol in the ‘Assignment’ column of the device list, as shown in Figure 24. Before
assigning the device you can click on ‘Get Info’ to check the device name, type, interface list,
Version 2.6.4T
LOYTEC electronics GmbH
NIC User Manual
33
LOYTEC
configuration server and location string. Finally select a logical device (LIP_01 … LIP_32)
and click on ‘Assign’ to assign the device.
To automatically assign all currently discovered devices, click on ‘Auto Assign’ in the L-IP
Assignment dialog (Figure 24). You can sort the discovered devices first by clicking on a
specific column header in the device table. The assignments can be cleared, loaded and saved
using the buttons ‘Clear’, ‘Clear All’ ‘Load’, and ‘Save’. If no remote devices are discovered
or you want to add another EIA852 channel, please click on ‘Add Channel’, which opens the
dialog window depicted in Figure 26.
Figure 26: Add EIA852 Channel
Just like in the ‘Assign/Add’ dialog, please enter the IP/NAT address, the port number and
(optionally) the MD5 key of one channel member. You can click on ‘Get Info’ to see if the
chosen device can be contacted. Finally, click on ‘Add Channel Member and Restart Search’.
All members of the added channel should now be displayed in the L-IP Assignment dialog.
Note that you must assign at least one member of the new channel to add the channel
persistently in the LConfig tool.
By clicking on ‘Wink’ you can make the selected L-IP blink with some LEDs in different
colors. This can be used to locate a specific L-IP in the network. Note that this feature is only
available with L-IP firmware version 2.2 or higher.
The L-IP Assignment module is also available directly within the LPA-IP-SW software to
avoid having to start the LConfig tool every time assignments change. Please refer to the LPA
User Manual for more information.
3.8 NIC-IP Assignment and Configuration
Prior to using a NIC-IP, it must be configured and assigned to a logical device (NIC_IP_1 …
NIC_IP_8). Click on ‘Assignment & Config.’ in the NIC-IP section of the LConfig tool (see
Figure 27) to start the device discovery process. The NIC-IP assignment and configuration
dialog window as shown in Figure 28 will appear.
In the device table all discovered NIC-IPs will be displayed. Non-NIC-IP devices as well as
devices that cannot be contacted will be displayed gray. NIC-IPs that are un-configured or not
configured correctly are displayed red. Use the checkbox ‘Show All Devices’ to decide
whether to see all remote devices or NIC-IPs only. During device discovery, already
Version 2.6.4T
LOYTEC electronics GmbH
NIC User Manual
34
LOYTEC
discovered NIC-IPs can be configured and assigned right away. It is not necessary to wait for
the completion of the discovery process since this can be a lengthy procedure.
Figure 27: NIC-IP Configuration
Figure 28: NIC-IP Assignment and Configuration
3.8.1 Configure NIC-IPs
To configure a NIC-IP, please select the corresponding device in the device table and click on
‘Configure’. To make sure to configure the correct device, you can press the status button on
the NIC-IP beforehand, which will be indicated by an ‘X’ in the column ‘S’ (status button)
Version 2.6.4T
LOYTEC electronics GmbH
NIC User Manual
35
LOYTEC
and by a message in the ‘Device Discovery’ field, see Figure 28. Note that this only works if
the NIC-IP and the PC are in the same IP-subnet. The NIC-IP configuration window is shown
in Figure 29.
In the ‘Basic Configuration’ panel you can set the NIC-IP’s name and location string as well
as (optionally) an MD5 authentication key. If MD5 authentication is enabled, only PCs that
have the correct MD5 authentication key configured can access the NIC-IP. Using MD5
authentication is highly recommended when using a NIC-IP remotely over the Internet. Note
that the ‘Basic Configuration’ panel is only available when the NIC-IP has a correct IP
configuration.
Figure 29: NIC-IP Configuration
In the ‘Address Settings’ panel you must set the IP configuration of the NIC-IP. Note that this
section is only available when the PC running the LConfig tool is in the same broadcast
domain (same subnet) as the NIC-IP. If a DHCP server is running, you can enable DHCP (set
by default) to automatically configure the NIC-IP. The ‘Host Name’ field can be configured if
the DHCP server requires a valid host name from devices requesting an IP configuration. If
no DHCP service is available, you must disable DHCP and manually set the IP configuration:
IP Address
…
Local IP address of NIC-IP.
Port
…
Port for PC – NIC-IP communication. If the NIC-IP resides
behind a NAT router, UDP and TCP port forwarding to the
NIC-IP must be enabled in the NAT router for the specified port
(default 1628). If several NIC-IPs are located behind the NAT
router, each NIC-IP must be configured with a different port and
all ports must be forwarded accordingly in the NAT router.
IP Netmask
…
Netmask of NIC-IP’s subnet
Version 2.6.4T
LOYTEC electronics GmbH
NIC User Manual
36
LOYTEC
IP Gateway
…
Gateway address for the subnet. When the NIC-IP resides
behind a NAT router, the gateway address must usually be set to
the local address of the NAT router. If no gateway is present,
just enter ‘0.0.0.0’.
DNS Server 1
…
does not need to be configured (set to ‘0.0.0.0’).
DNS Server 2
…
does not need to be configured (set to ‘0.0.0.0’).
MAC Address
…
can be overwritten via ‘Overwrite’ checkbox. It is not
recommended to overwrite the MAC address.
If the NIC-IP is connected to the PC via an Ethernet crossover cable, the following settings
must be made:
IP Address
…
different from the PC’s IP address but within the same subnet
Port
…
1628
IP Netmask
…
same as PC‘s Netmask
IP Gateway
…
0.0.0.0
If e.g. the PC has got the static IP setup described in see Section 2.5.1, the following settings
must be made in the NIC-IP when using a crossover cable:
IP Address 169.254.X.Y / Port 1628 / IP Netmask 255.255.0.0 / IP Gateway 0.0.0.0
In this case, X.Y can be set to any combination between 0.1 and 255.254 but must be different
from the PC’s IP address. By clicking on ‘OK’ the new configuration is written to the NIC-IP.
Note that changing the IP configuration can result in connection loss to the NIC-IP. However,
when the PC is located in the same subnet as the NIC-IP, the NIC-IP will always be
discovered and displayed in the device table, regardless of its IP configuration.
3.8.2 Upgrade NIC-IP Firmware
By clicking on ‘Upgrade Firmware’ in the ‘NIC-IP Assignment and Configuration’ window
(Figure 28), you can easily upgrade the selected NIC-IP, even remotely over the Internet. The
upgrade dialog is shown in Figure 30.
Figure 30: Upgrade NIC-IP Firmware
Version 2.6.4T
LOYTEC electronics GmbH
NIC User Manual
37
LOYTEC
At the bottom of the form, the NIC-IP type (NIC709-IPxE or NIC709-IPxE100) and the
current firmware version is displayed. By clicking on ‘…’ you can choose a file (*.dl)
containing the new firmware (matching the displayed NIC-IP type). Start the upgrade process
by clicking on ‘Upgrade’. If an error occurs during the upgrade process, the current firmware
is restored automatically. If the upgrade was successful, the new firmware version is
displayed.
3.8.3 Assign NIC-IPs
To assign a NIC-IP to a logical device, please select the corresponding line of the device table
(Figure 28) and click on ‘Assign/Add’ or just double-click on the device to assign. To add a
device not present in the device table, also click on ‘Assign/Add’. The dialog box shown in
Figure 31 will appear.
Figure 31: Assign/Add NIC-IP
You can change the IP address and port manually in the fields ‘IP or NAT Address’ and
‘Port’. When the NIC-IP is located behind a NAT router, you must enter the public IP address
of the NAT router. If MD5 is enabled in the NIC-IP, you must check ‘Enable MD5
Authentication’ and enter the correct 16 Bytes ‘MD5 Authentication Key’.
If you have forgotten the MD5 key for your NIC-IP, reset the NIC-IP to factory defaults
(see Section 2.5.4) or change the MD5 settings via the console menu (see Section 2.5.3.7).
MD5 authentication is indicated by a small key symbol in the ‘Assignment’ column of the
device list, see Figure 28. Before assigning the device you can click on ‘Get Info’ to check the
device name, type, interface list, and location. Finally, select a logical device (NIC_IP_1 …
NIC_IP_8) and click on ‘Assign’ to assign the device.
To automatically assign all currently discovered devices, click on ‘Auto Assign’ in the NICIP Assignment and Configuration dialog (Figure 28). You can sort the discovered devices
first by clicking on a specific column header in the device table. The assignments can be
cleared, loaded and saved using the buttons ‘Clear’, ‘Clear All’ ‘Load’, and ‘Save’. By
clicking on ‘Wink’ you can cause the selected NIC-IP to blink with some LEDs in different
colors, see also Section 2.5.4. This can be used to locate a specific NIC-IP in the network.
The NIC-IP Assignment and Configuration module is also available directly within the LPA
software to avoid having to start the LConfig tool every time the assignments change. Please
refer to the LPA User Manual for more information.
Version 2.6.4T
LOYTEC electronics GmbH
NIC User Manual
38
LOYTEC
4 Network Interface and Transceiver Selection
Each application running on a LOYTEC network interface must specify the name of the
LOYTEC device it intends to use. Depending on the application some sort of network
interface selection dialog will be presented to the user. In LOYTEC applications (e.g. LPA
Protocol Analyzer), there are two modes of network interface selection: ‘Standard Mode’ and
‘Expert Mode’. In standard mode, each network interface can be used by several applications,
depending on the number of MNI devices available on the network interface. In expert mode,
all available MNI devices are displayed along with the physical network interfaces and can be
chosen explicitly. Chapter 6 describes the differences between using the physical network
interface and using an MNI device. Please also refer to the documentation of the
corresponding application (LPA) for more information on interface selection.
After selecting the network interface, a specific transceiver of the interface must be chosen,
since all LOYTEC network interfaces (except the NIC709-IP) are equipped with multiple
transceivers. The transceiver can be chosen using the LOYTEC systray icon, see Section 5.4.
Figure 32 shows the transceiver selection dialog window for the NIC709 network interface
series. Here you can set the transceiver port, transceiver type, and bit-rate of the network
interface. For each of the three ports a transceiver can be chosen and the corresponding bitrate will be displayed. You have to select one of the ports as currently active by clicking on
the small button on the left side. By clicking on the button ‘Test’ you can test if the network
interface works correctly. For the RS-485 transceivers (Port 3) you can also try automatic bitrate detection. After clicking on ‘Detect’ the network is searched for traffic using different
bit-rates. The correct bit-rate can only be detected if packets are received during the detection
process.
Figure 32: NIC709 Transceiver Selection
Figure 33 shows the transceiver selection dialog window for the NIC852 network interface
series. Here you can only choose between IP-10L (Local Area Network) and IP-10W (Wide
Area Network).
Version 2.6.4T
LOYTEC electronics GmbH
NIC User Manual
39
Figure 33: NIC852 Transceiver Selection
Version 2.6.4T
LOYTEC electronics GmbH
LOYTEC
NIC User Manual
40
LOYTEC
5 Legacy Support for MIP/LDV and LNS/VNI 3.x
For the support of MIP/LDV and LNS/VNI 3.x applications like LonMakerTM, a NIC Legacy
Driver is installed along with the NIC software package. The driver is also needed for MNI
support, see Chapter 6. You should see a LOYTEC icon
in the system tray of your
Windows task bar. If no LOYTEC icon appears in the system tray, please select ‘NIC Legacy
Driver’ in the section ‘LOYTEC Network Interfaces’ of your Windows start menu. Note that
you must be logged in with administrator rights to start LNS/VNI or MIP/LDV applications
in Windows NT/2000/XP. The MIP/LDV support works in Windows NT/2000/XP. The
LNS/VNI 3.x support works in Windows 98/Me/NT/2000/XP and requires a functional
TCP/IP-Stack. This means that your computer must have a valid IP address assigned,
regardless of the network interface type (NIC709 or NIC852). Please read through the
following sections for instructions on how to make sure your PC has a valid IP address
assigned even when not connected to an IP network. Further, please refer to Chapter 7 for
information of Personal Firewall setup.
5.1 Requirements and Settings for Windows 98/Me/NT
In order to run LNS/VNI 3.x applications in Windows 98/Me/NT, the following requirements
apply:
-
The computer must be equipped with an Ethernet Adapter.
-
The computer must have a valid IP address assigned.
-
You must be logged in with administrator rights (Windows NT).
You can check the IP configuration by typing ‘ipconfig’ in a console (DOS) window. For
Windows Me it is necessary to disable ‘Media Sense’ in order to get an IP address assigned
even when not connected to an IP network. This is done by going through the following steps:
1. Click Start, point to Settings, click Control Panel, and then double-click Network.
2. Click the TCP/IP connection that is bound to your Ethernet adapter, click on
Properties.
3. Click the IP Address tab, click to clear the Detect connection to network media
check box, and then click OK.
4. Click OK, and then restart your computer.
Since in Windows 98/NT there is no ‘Media Sense’ function, the computer should always get
the last valid IP address assigned if not connected to an IP network.
5.2 Requirements and Settings for Windows 2000
In order to run LNS/VNI 3.x applications in Windows 2000, the following requirements
apply:
Version 2.6.4T
LOYTEC electronics GmbH
NIC User Manual
41
LOYTEC
-
The computer must have installed the LOYTEC NIC Support driver if it is (at least
sometimes) used without an IP network connection (e.g. Notebook). The driver is
installed automatically during NIC Software installation.
-
The computer must have a valid IP address assigned.
-
You must be logged in with administrator rights.
You can check if a valid IP address is assigned by typing ‘ipconfig’ in a console (DOS)
window. For Office-PCs, which are always connected to an IP network, the LOYTEC NIC
Support driver can be disabled by right-clicking on the corresponding Local Area
Connection icon in the Network and Dial-up Connections settings and selecting Disable.
The driver can also be disabled if only NIC852 and NIC-IP network interfaces are used since
they require a physical IP connection anyway. If the driver is enabled, and problems occur
with other network applications you can try to go through the following steps:
1. Click Start, point to Settings, click Control Panel and double-click Network and
Dial-up Connections.
2. Find out which Local Area Connection icon is connected to the LOYTEC NIC
Support driver by clicking on the icons and checking the name at the bottom of the
window.
3. In the Network and Dial-up Connections window, select menu Advanced and
choose Advanced Settings, go to the Adapters and Bindings tab.
4. In the Connections panel, move down the Local Area Connection that corresponds
to the LOYTEC NIC Support driver to the lowest position.
5.
Click OK and close the Network and Dial-up Connections window.
If you still experience any problems with the LOYTEC NIC Support driver while being
connected to an IP network you can disable it since it is not needed in this case. Disable the
driver by right-clicking on the corresponding Local Area Connection icon in the Network
and Dial-up Connections settings and selecting Disable. You can enable it again by
selecting Enable. After changing the IP settings in such a manner, wait a few seconds and
move the mouse cursor over the LOYTEC systray icon (see Figure 37). If the status is ‘no IP
address’, try to reboot and check again.
5.3 Requirements and Settings for Windows XP
In order to run LNS/VNI 3.x applications in Windows XP, the following requirements apply:
-
The computer must have installed the LOYTEC NIC Support driver if it is (at least
sometimes) used without an IP network connection (e.g. Notebook). The driver is
installed automatically during NIC Software installation.
-
The computer must have a valid IP address assigned.
-
You must be logged in with administrator rights.
Version 2.6.4T
LOYTEC electronics GmbH
NIC User Manual
42
LOYTEC
You can check if a valid IP address is assigned by typing ‘ipconfig’ in a console (DOS)
window. For Office-PCs, which are always connected to an IP network, the LOYTEC NIC
Support driver can be disabled by right-clicking on the corresponding Local Area
Connection icon in the Network and Dial-up Connections settings and selecting Disable.
The driver can also be disabled if only NIC852 and NIC-IP network interfaces are used since
they require a physical IP connection anyway. If the driver is enabled, and problems occur
with other network applications you can try to go through the following steps:
1. Right-click the Network Neighborhood icon on the desktop and select Properties.
2. Find out which Local Area Connection icon is connected to the LOYTEC NIC
Support driver by clicking on the icons and checking the name in the Details window
to the left.
3. Select menu Advanced at the top of the window and choose Advanced Settings, go
to the Adapters and Bindings tab.
4. In the Connections panel, move down the Local Area Connection that corresponds
to the LOYTEC NIC Support driver to the lowest position.
5.
Click OK and close the window.
If you still experience any problems with the LOYTEC NIC Support driver while being
connected to an IP network you can disable it since it is not needed in this case. Disable the
driver by right-clicking on the corresponding Local Area Connection icon in the Network
and Dial-up Connections settings and selecting Disable. You can enable it again by
selecting Enable. After changing the IP settings in such a manner, wait a few seconds and
move the mouse cursor over the LOYTEC systray icon (see Figure 37). If the status is ‘no IP
address’, try to reboot and check again.
5.4 Configuration of the Legacy Driver
To configure the NIC Legacy Support, right-click on the LOYTEC systray icon as shown in
Figure 34.
Figure 34: Legacy Settings
All found LOYTEC network interfaces are shown at the top of the menu. The selected
transceiver for each network interface is displayed in parentheses. By selecting ‘Rescan
Devices’ you can search for new network interfaces. To change the transceiver of a network
interface, select the corresponding menu item. This will invoke the transceiver selection
dialog. Please refer to Chapter 4 for more information on transceiver selection.
Version 2.6.4T
LOYTEC electronics GmbH
NIC User Manual
43
LOYTEC
When starting a MIP/LDV or LNS/VNI 3.x application, all LOYTEC network interfaces
should appear in the network interface dialog of the application. Figure 35 shows the
corresponding dialog for LonMakerTM as an example for an LNS/VNI application. Figure 36
shows the dialog for NLUtilTM Node Utility as an example for a MIP/LDV application. For
network interfaces that support MNI (Chapter 6), a number of MNI devices, as configured in
the LConfig tool, see Section 3.1, will be displayed for the network interface. By default, two
MNI devices will be available, e.g. ‘NIC_852_1_000’ and ‘NIC_852_1_001’. You can use
the same MNI device for all LNS/VNI applications at the same time, since VNI already
supports multiple applications. It is recommended to always use the first MNI device for
LNS/VNI applications (e.g. ‘NIC_852_1_000’). The other MNI devices (e.g.
‘NIC_852_1_001’) of a LOYTEC network interface can be used for MIP/LDV and ORION
applications.
Figure 35: LonMakerTM Network Interface Selection
Figure 36: NLUtilTM Network Interface Selection
After the application has started, the LOYTEC systray icon should be rendered in color,
indicating that the connection between the legacy application and the LOYTEC network
interface is active. When the mouse cursor is moved over the systray icon, the legacy
application state (‘<n> active’, ‘no activity’, or ‘no IP address’) as well as all errors that
might have occurred are displayed as depicted in Figure 37.
Figure 37: One Active Legacy Application
Version 2.6.4T
LOYTEC electronics GmbH
NIC User Manual
44
LOYTEC
In case of errors, run the LConfig tool (see Chapter 3) and test the corresponding network
interface. The LConfig tool can be started by double-clicking the LOYTEC systray icon or
selecting ‘LConfig…’ in the system tray menu (Figure 34). When a problem with the IP
configuration of your computer occurs, the state of the Legacy Driver changes to ‘no IP
address’. Refer to Section 5.1, 5.2, or 5.3 (depending on your operating system) in this case.
By clicking on ‘Exit’ in the system tray menu, the NIC Legacy Driver is stopped. It can be
started again by selecting ‘NIC Legacy Driver’ in the section ‘LOYTEC Network Interfaces’
of the Windows start menu.
Please note that the LOYTEC network interface devices will also appear in the LNS Control
Panel application (‘LonWorks/IP Channels’), see Figure 38.
Figure 38: LNS Control Panel Application
The IP address will be set to a local address of your PC or the address of the ‘LOYTEC NIC
Support’ driver. The IP ports displayed here are only used internally by the Legacy Driver
and usually start with 16280.
Please do not change these settings manually!
When using a NIC852, the IP settings used externally on the EIA852 channel must be setup in
the LConfig tool, as described in Section 3.6.1. They do not correspond in any way to the
settings used internally by the Legacy Driver (shown in Figure 38).
5.5 Using LNS/VNI 3.x Management Tools such as LonMaker
Since most LOYTEC NIC709 network interfaces are equipped with multiple transceivers that
can be selected in software, some additional settings are required when starting a new project
in an LNS/VNI 3.x management tool such as LonMakerTM. Observe that applications that use
older LNS versions (e.g. 2.x) will not work with LOYTEC network interfaces. The following
procedures are described for the LonMaker network management tool but can easily be
applied to other management tools, e.g. NL220TM or ALEXTM. A new LonMaker project will
at first look like depicted in Figure 39.
Version 2.6.4T
LOYTEC electronics GmbH
NIC User Manual
45
LOYTEC
Figure 39: New LonMaker Project
The transceiver type of the channel will be set to IP-10L by default for all LOYTEC network
interfaces. If you are working with a NIC852, you can leave it as is and the following section
does not apply.
If you are working with a NIC709 (NIC-PP, NIC-USB, NIC-PCI, or NIC-IP), you could
simply change the channel type in your LNS application corresponding to the transceiver you
have selected via the LOYTEC systray icon (see Chapter 4). However, the LNS application
might change the channel type back to the default value (IP-10L) under certain conditions,
e.g. when changing between on-net and off-net. To avoid this problem, a Phantom Router - as
illustrated in Figure 40 - must be inserted between the NIC709 and the LNS network channel:
1. Create a new Channel by dragging a Channel shape into the current page.
2. In the Channel Definition dialog choose the Transceiver Type (e.g. TP/FT-10)
according to your EIA709 network connected to the LOYTEC NIC. Click on OK.
3. Drag a Router shape into the current page. The New Router Wizard dialog window
will appear.
4. In the first page of the wizard, make sure that Commission Device is not checked.
Click on Next.
5. In the second page choose the channel connected to the LNS Network Interface (see
Figure 39) as Channel A and the new channel (just created) as Channel B. Click
Next.
6. In the third page click Next.
7. In the fourth page change the Router Type to Repeater. Click Finish.
The resulting page should look like depicted in Figure 40. Add all your network devices to the
new channel (‘Channel 2’ in Figure 40).
Figure 40: LonMaker Setup for NIC709
Version 2.6.4T
LOYTEC electronics GmbH
NIC User Manual
46
LOYTEC
6 Multiplexed Network Interfaces
The NIC-PCI, NIC-USB, NIC-IP, and NIC852 network interfaces can be used in a
‘Multiplexed Network Interface’ mode. For NIC-PCI and NIC-USB, please check in the
LConfig tool, if your interface already supports MNI (see Section 3.1).
If MNI is supported by your NIC, the physical network interface is represented by 8
Multiplexed Network Interfaces (MNI devices). This means that you can start up to 8
different applications running on the same physical network interface at a time. These ‘virtual
interfaces’ behave like 8 individual nodes on a ‘virtual channel’ connected to the physical
channel via the physical network interface, as depicted in Figure 41.
Figure 41: Multiplexed Network Interfaces (MNI Devices)
You could e.g. run the LPA software, the LSD tool, a custom ORION application, an
LNS/VNI 3.x application, and a MIP/LDV application at the same time using only one
NIC709-PCI network interface. When using the ‘Standard Mode’ in the network interface
selection dialog of LOYTEC software (see Chapter 4), MNI devices are automatically used if
supported by the network interface. This way, both the LPA and the LSD software can e.g.
run on the same network interface ‘NIC_PCI_1’. In ‘Expert Mode’, the physical network
interface (e.g. ‘NIC_PCI_1’) as well as all corresponding MNI devices (‘NIC_PCI_1_000’,
‘NIC_PCI_1_001’, ‘NIC_PCI_1_002’, etc.) are displayed and can be selected explicitly. In
MIP/LDV and LNS/VNI applications, a certain number of ‘reserved’ MNI devices is
displayed for each network interface, see Sections 3.1 and 5.4. Following is a list of
differences between physical devices and MNI devices:
-
All MNI devices share the same serial number (equal to the serial number of the physical
network interface) but have different, unique Node IDs. It is guaranteed that a certain
MNI device (e.g. ‘NIC_PCI_1_002’) always gets assigned the same Node ID.
-
If the physical device is already occupied, the MNI devices for that physical device are
not available and vice versa.
-
LPA time stamps are calculated in software when logging from an MNI device (rather
than generated in hardware when logging from the physical device) and therefore have a
lower resolution.
Version 2.6.4T
LOYTEC electronics GmbH
NIC User Manual
47
LOYTEC
Other than that, the behavior of an MNI device is exactly the same as of a physical network
interface. It is completely transparent to the application if the underlying network interface is
multiplexed or not. Please note that the NIC Legacy Driver (see Chapter 5) must be running
to enable MNI devices.
Version 2.6.4T
LOYTEC electronics GmbH
NIC User Manual
48
LOYTEC
7 Personal Firewall Setup
If you have installed a Personal Firewall on your PC (e.g. Windows XP SP2 Firewall), and a
requester of the firewall pops up during LOYTEC software is used, all requested access
should be granted. Let the firewall create permanent rules for granting access to LOYTEC
applications automatically, if possible. If the firewall can only be configured manually, the
following settings must be made to ensure that the LOYTEC Network Interface software
works correctly:
Enable all incoming and outgoing UDP and TCP connections for the following applications:
-
Legacy Driver (LegacyDrv.exe)
-
LConfig tool (LConfig.exe)
-
MNI Master (MniMaster.exe)
-
Vni Server (VNISERVER.exe)
If you have installed the LPA or LSD Tool software or you are running a custom ORION
application that utilizes NIC852 or NIC-IP network interfaces, the same settings must be
made for the corresponding applications (e.g. LPA.exe, LSDTool.exe).
Version 2.6.4T
LOYTEC electronics GmbH
NIC User Manual
49
LOYTEC
8 Product Registration
When purchasing a LOYTEC software product, you will receive a Product Registration Code.
Please start the LConfig tool, click on 'Register', and type in the registration code that comes
with your software package as shown in Figure 42.
Figure 42: Product Registration
Click on 'Add' and then on 'OK'. If you want to register several LOYTEC products at a time,
just enter all registration codes as described. You can also export your set of registration
codes to a file and import it in all subsequent installations. Please observe that you must have
administrator rights in Windows 2000/XP to enter registration codes within the LConfig tool.
Upgrading the MNI devices of your network interface (see Chapter 6) is also done via a
Registration Code. In this case, the corresponding network interface must be connected when
entering the Registration Code. As soon as the NIC is upgraded, the Upgrade Registration
Code is not needed anymore for subsequent installations, since the corresponding data is
stored locally in the network interface.
Version 2.6.4T
LOYTEC electronics GmbH
NIC User Manual
50
LOYTEC
9 Installation for Linux Operating Systems
The NIC-PCI and NIC-PCIP (NIC709-PCI, NIC709-PCIP) network interfaces work in Linux
Kernel 2.4. Just plug the NIC-PCI(P) into an empty PCI slot of your PC. The PCI card does
not need any further hardware setup. The NIC-PCIP comes with an additional power-line
interface, which is used to connect the power-line network to the corresponding port on the
NIC-PCIP card. Please observe that you must be logged in as root to install the driver.
Additionally, the device file system (‘devfs’) must be enabled. To install the kernel module,
just copy the file ‘ldipci.o’ from the folder ‘NIC/Linux/Driver’ to a local directory and type
‘insmod ldipci.o’. If you want to load the driver permanently you can e.g. add the command
to one of the init scripts.
For a description on how to use the ORION Stack with Linux, refer to the
‘NIC_Developers_Manual.pdf’ in the folder ‘NIC/Doc’.
Version 2.6.4T
LOYTEC electronics GmbH
NIC User Manual
51
LOYTEC
10 NIC Product Comparison
The following table compares all important features and properties of the different LOYTEC
Network Interfaces:
Property
NIC709-PP
NIC709-USB(P)
NIC709-PCI(P)
NIC709-IP
NIC852
Runs ORION applications
Win 98/Me/NT/
2000/XP
Win 98/Me/
2000/XP
Win 98/Me/NT/
2000/XP
Win 98/Me/NT/
2000/XP
Win 98/Me/
2000/XP
Runs LNS/VNI 3.x
applications
Win 98/Me/NT/
2000/XP
Win 98/Me/
2000/XP
Win 98/Me/NT/
2000/XP
Win 98/Me/NT/
2000/XP
Win 98/Me/
2000/XP
Runs MIP/LDV
applications
Win NT/2000/XP
Win 2000/XP
Win NT/2000/XP
Win NT/2000/XP
Win 2000/XP
Runs 8 applications in
parallel (MNI)
No
Yes
Yes
Yes
Yes
LPA Bundles available
LPA-PP,
LPA-SET-PP
LPA-USB,
LPA-SET-USB
No
No
LPA-IP,
LPA-SET-PP/USB
LPA Software available
(order separately)
No
LPA-SW
LPA-SW
LPA-SW,
LPA-IP-SW *
LPA-IP-SW
LSD Software available
Yes
Yes
Yes
Yes
Yes
Can be used remotely over
the Internet
No
No
No
Yes
Connects to
EIA-852
PC connection
Printer port
(PS2 or EPP mode)
USB
(1.1 or 2.0)
PCI
Ethernet
USB (1.1 or 2.0)
and Ethernet
Transceiver
FT-10, RS-485,
TP-1250
FT-10, RS-485,
TP-1250 (USB) or
PLT-22 (USBP)
FT-10, RS-485,
TP-1250 (PCI) or
PLT-22 (PCIP)
FT-10 (IP3E)
or
TP-1250 (IP1E)
IP-852
(Ethernet)
* In combination with NIC852
Observe that depending on the version of your NIC-PCI(P) or NIC-USB(P) hardware, your
NIC might not have MNI capabilities. You can check for MNI functionality in the LConfig
tool, see Section 3.1. Further, if your hardware is labelled ‘LPA006’ or ‘LPA-PP’, it can only
be used as an LPA protocol analyzer, no other software will run on this interface. However,
the LPA-USB(P) hardware is equivalent to the NIC-USB(P) hardware and can therefore also
be used as a generic network interface (apart from possible lack of MNI capabilities).
Version 2.6.4T
LOYTEC electronics GmbH
NIC User Manual
52
LOYTEC
11 Specifications
11.1 NIC709-PP (LPA006, LPA-PP / NIC-PP)
Power supply
9-24 VDC
Current consumption
160 mA @ 12 VDC
Dimensions (LxWxH)
105x55x20 mm
Operating temperature range
0°C - 40°C
PC connector
D-Sub 25 pins
Power connector
1.3 mm, polarity insensitive
Network connector TP-XF1250/TPXF2500
Weidmüller product number 159736
Network connector FT-10/LPT-10
Weidmüller product number 159736
Network connector TP-RS485
Weidmüller product number 159737
Bit rates
300 bps - 2.5 Mbps
Network sensitivity
TP-XF1250: 600 mVpp
TP-XF2500: 1200 mVpp
Operating systems
Win98, WinMe, WinNT, Win2000, WinXP
Printer port
Enhanced Parallel Port (EPP) or bi-directional
11.2 NIC709-PCI and NIC709-PCIP
Power supply
via PCI bus
Current consumption
250 mA
Dimensions (LxWxH)
135x96x20 mm
Operating temperature range
0°C - 40°C
PC connector
PCI slot, 5 V
Network connector TP-XF1250/TP-XF2500
(NIC709-PCI only)
Weidmüller product number 159736
Network connector PLT-22
(NIC709-PCIP only)
PLT-Coupler
Network connector FT-10/LPT-10
Weidmüller product number 159736
Network connector TP-RS485
Weidmüller product number 159737
Bit rates
300 bps - 2.5 Mbps
Network sensitivity
TP-XF1250: 600 mVpp (NIC709-PCI only)
TP-XF2500: 1200 mVpp (NIC709-PCI only)
Operating systems
Win98, WinMe, WinNT, Win2000, WinXP, Linux 2.4
Version 2.6.4T
LOYTEC electronics GmbH
NIC User Manual
53
LOYTEC
11.3 NIC709-USB and NIC709-USBP (LPA-USB, LPA-USBP)
Power supply
via USB
Current consumption
< 130 mA
Dimensions (LxWxH)
115x68x23 mm
Operating temperature range
0°C - 40°C
PC connector
USB 1.1 or 2.0
Network connector TP-XF1250/TP-XF2500
(NIC709-USB only)
Weidmüller product number 159736
Network connector PLT-22
(NIC709-USBP only)
PLT-Coupler
Network connector FT-10/LPT-10
Weidmüller product number 159736
Network connector TP-RS485
Weidmüller product number 159737
Bit rates
300 bps - 2.5 Mbps
Network sensitivity
TP-XF1250: 600 mVpp (NIC709-USB only)
TP-XF2500: 1200 mVpp (NIC709-USB only)
Operating systems
Win98, WinMe, Win2000, WinXP
11.4 NIC709-IPxE
Power supply
9-35 VDC / 12-24 VAC, 40-70 Hz
Current consumption
300 mA @ 12 VDC
Dimensions (LxWxH)
145x91x28 mm
Operating temperature range
0°C - 40°C
PC connector
Ethernet 10Base-T
Network sensitivity
TP-XF1250: 600 mVpp (NIC709-IP1E only)
TP-XF2500: 1200 mVpp (NIC709-IP1E only)
Operating systems
Win98, WinMe, WinNT, Win2000, WinXP
11.5 NIC709-IPxE100
Power supply
12-35 VDC / 12-24 VAC, 40-70 Hz
Power consumption
2 Watt typ.
Dimensions (LxWxH)
105x85x60 mm
Operating temperature range
5°C - 50°C
PC connector
Ethernet 100Base-T
Network sensitivity
TP-XF1250: 600 mVpp (NIC709-IP1E100 only)
Operating systems
Win98, WinMe, WinNT, Win2000, WinXP
Version 2.6.4T
LOYTEC electronics GmbH
NIC User Manual
54
11.6 NIC852 (USB Key)
Power supply
via USB
Current consumption
< 50 mA
Dimensions (LxWxH)
65x18x8 mm
Operating temperature range
0°C - 40°C
PC connector
USB 1.1 or 2.0
Operating systems
Win98, WinMe, Win2000, WinXP
Version 2.6.4T
LOYTEC electronics GmbH
LOYTEC
NIC User Manual
55
LOYTEC
12 Revision History
Date
21.05.2002
26.07.2002
13.06.2003
Version
1.4.5
1.4.6
2.1
Author
AB
AB
AB
29.01.2004
2.2
AB
25.03.2004
2.3
AB
13.05.2004
17.01.2005
2.3.2
2.4
AB
AB
04.04.2005
20.06.2005
2.5
2.6
AB
AB
19.10.2006
2.6.4
AB
Version 2.6.4T
Description
Initial Version
Minor Corrections
Added Section 2.4 NIC852,
Added Chapter 3 Network Interface Configuration - LConfig Tool,
Added Chapter 4 Network Interface and Transceiver Selection,
Added Chapter 5 Legacy Support,
Added Chapter 6 Multiplexed Network Interfaces.
Changes in Chapter 2 regarding driver installation,
Added Section 2.5 NIC709-IP,
Added MNI configuration in Section 3.1,
Changed Section 3.7 regarding user interface for L-IP assignment,
Added Section 3.8 NIC-IP Assignment and Configuration,
Added ‘Standard Mode’ and ‘Expert Mode’ in Chapter 4,
Added MIP/LDV and LOYTEC NIC Support driver in Chapter 5,
Changed Section 5.4 regarding user interface for Legacy configuration,
Added Section 5.5 Using LNS/VNI 3.x Management Tools ,
Added ‘Standard Mode’ and ‘Expert Mode’ in Chapter 6,
Added notes on MNI Upgrade in Chapter 8.
Added Section 3.2 Advanced Configuration,
Added Chapter 7 Personal Firewall Setup,
Added Chapter 10 NIC Product Comparison.
Changes in Section 2.5.4 regarding LEDs.
Easier installation procedure due to new automatic driver installer, see
Chapter 2,
Changes in Section 2.3: Standby/Hibernation Support for Win2000/XP,
Added information on LEDs in Section 2.5.4,
Changed Section 3.6.1: Multiple EIA852 devices behind NAT router
Added ‘Extended NAT…’ option in Section 3.6.2,
Added Section 3.6.3 Multicasting,
Added ‘Host Name’ field in Section 3.8.1,
Added Notes on older LOYTEC network interfaces, see Chapter 10.
NIC Software can be started as Service, see Section 3.2.1.
Changes in Chapter 3 regarding user login,
Detailed description of Phantom Router in Section 5.5.
Added NIC709-IPxE100 device in Section 2.5,
Added Section 2.5.3 NIC-IP Console Interface,
Added Section 11.5 NIC709-IPxE100.
LOYTEC electronics GmbH