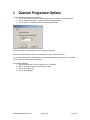
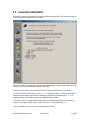
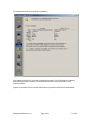
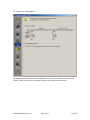
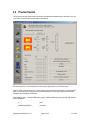
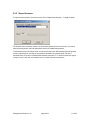
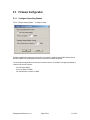
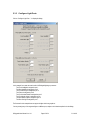
1
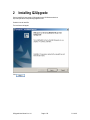
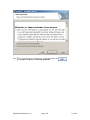
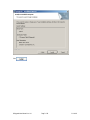
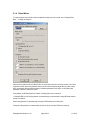
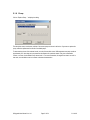
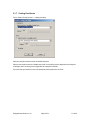
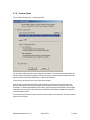
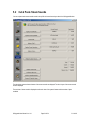
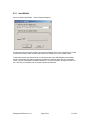
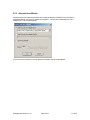
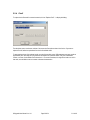
Q2Upgrade User Manual Version 1.4.1 21-July-08 Q2Upgrade User Manual Ver 1.4.1 Page 1 of 54 21-Jul-08 Table of Contents 1 2 3 4 Introduction .............................................................................................................................................................. 3 Installing Q2Upgrade ............................................................................................................................................... 4 Quantum Programmer Options ................................................................................................................................ 9 Basic Operation...................................................................................................................................................... 11 4.1 Instructions for Aristocraft G-Scale Locomotives........................................................................................... 11 4.2 Starting Q2Upgrade ...................................................................................................................................... 12 4.3 Help Page...................................................................................................................................................... 13 4.3 Locomotive Information ................................................................................................................................. 14 4.4 Load Q2 File.................................................................................................................................................. 16 4.5 Check Compatibility....................................................................................................................................... 17 4.6 Preview Sounds............................................................................................................................................. 20 4.7 Upgrade Locomotive ..................................................................................................................................... 22 4.8 Log ................................................................................................................................................................ 23 5 Advanced Operation .............................................................................................................................................. 24 5.1 Cut & Paste Diesel Sounds ........................................................................................................................... 24 5.1.1 Horn/Whistle........................................................................................................................................ 25 5.1.2 Alternate Horn/Whistle....................................................................................................................... 26 5.1.3 Bell ....................................................................................................................................................... 27 5.1.4 Diesel Motor ........................................................................................................................................ 28 5.1.5 Dynamic Brake Fans .......................................................................................................................... 30 5.1.6 Pump.................................................................................................................................................... 31 5.1.7 Cooling Fans/Vents ............................................................................................................................ 32 5.1.8 Custom Sound .................................................................................................................................... 33 5.2 Cut & Paste Steam Sounds........................................................................................................................... 34 5.2.1 Horn/Whistle........................................................................................................................................ 35 5.2.2 Alternate Horn/Whistle....................................................................................................................... 36 5.2.3 Bell ....................................................................................................................................................... 37 5.2.4 Chuff .................................................................................................................................................... 38 5.2.5 Steam Generator................................................................................................................................. 39 5.2.6 Pump.................................................................................................................................................... 40 5.2.7 Custom Sound .................................................................................................................................... 41 5.3 Firmware Configuration ................................................................................................................................. 42 5.3.1 Configure Squealing Brakes.............................................................................................................. 42 5.3.2 Calibrate BEMF Synchronized Chuff Rate ....................................................................................... 43 5.3.3 Configure Light Ports......................................................................................................................... 45 5.3.4 Configure Light Ports (Quantum Revolution) .................................................................................. 47 5.3.5 Change CV Default Values................................................................................................................. 48 5.4 Changing a Soundset Number ...................................................................................................................... 49 5.5 Saving a Modified Q2 File ............................................................................................................................. 50 6 Troubleshooting ..................................................................................................................................................... 51 6.1 Cannot establish a connection to the Quantum Programmer ....................................................................... 51 6.2 Unable to read Mfg ID ................................................................................................................................... 51 6.3 Test Initialization Step 1 Failed...................................................................................................................... 52 6.4 Flash Update Initialization Failed................................................................................................................... 52 6.5 Checksum Error ............................................................................................................................................ 52 6.6 Locomotive Hoots 3 Times............................................................................................................................ 53 6.7 Reset LTM to Factory Default Values failed.................................................................................................. 53 Q2Upgrade User Manual Ver 1.4.1 Page 2 of 54 21-Jul-08 1 Introduction The Q2Upgrade application is used together with a Quantum Programmer to upgrade the firmware in your Quantum 2 locomotive. In order for the upgrade to proceed, your locomotive must already contain Quantum 2 firmware, also referred to as “Q2” firmware. If your locomotive does not contain Q2 firmware, you must purchase a Q2 upgrade chip from QSI Solutions. See http://qsisolutions.com/ for further information. Q2Upgrade works only with “.Q2” files, which can be downloaded from QSI Solutions. Each Q2 file contains a binary image of the flash memory for a specific Quantum 2 locomotive, along with additional information describing the type of locomotive for which this binary image was constructed. In general, you should upgrade your locomotive with a Q2 file constructed for your particular locomotive. Q2Upgrade allows you some leeway when it comes to upgrading with a binary image constructed for a different model, but it will first warn you about potential problems that might result. Recent versions of Q2Upgrade support the SiLabs Virtual Comm Port Driver as well as the standard SiLabs USB Driver. The SiLabs Virtual Comm Port Driver for the Quantum Programmer is provided for use with applications that do not support USB drivers. If you want to run such applications with the Quantum Programmer you must use the Virtual Comm Port Driver. In that case, you can either switch back to the USB Driver when you want to run Q2Upgrade or you can configure Q2Upgrade to use the Virtual Comm Port Driver. To configure Q2Upgrade to use the Virtual Comm Port Driver, see the section on “Quantum Programmer Options”. Q2Upgrade User Manual Ver 1.4.1 Page 3 of 54 21-Jul-08 2 Installing Q2Upgrade Get the install file for latest version of Q2Upgrade from the QSI Solutions website at: http://www.qsisolutions.com/products/q-programmer.html Double click on the install file. The install screen will appear. Click Q2Upgrade User Manual Ver 1.4.1 Page 4 of 54 21-Jul-08 and then click Click Q2Upgrade User Manual Ver 1.4.1 Page 5 of 54 21-Jul-08 Click Q2Upgrade User Manual Ver 1.4.1 Page 6 of 54 21-Jul-08 Click Q2Upgrade User Manual Ver 1.4.1 Page 7 of 54 21-Jul-08 Click Q2Upgrade is now installed. Q2Upgrade User Manual Ver 1.4.1 Page 8 of 54 21-Jul-08 3 Quantum Programmer Options To display the Quantum Programmer Options dialog: 1) Click on the QSI icon at the upper left of the Q2Upgrade window. The system menu will be displayed. 2) Click on “Quantum Programmer…” to display the Quantum Programmer dialog. 3) Click on “Options…” to display the Quantum Programmer Options dialog. Select the driver that you have installed for use with the Quantum Programmer. If you select “SiLabs Virtual Comm Port Driver”, then specify the Comm Port that this driver uses. You can find out which Comm Port the driver uses by running the Device Manager and looking under “Ports (COM & LPT)” for “Silicon Labs CP210x USB to UART Bridge”. To run the Device Manager: 1) Right mouse button click on the “My Computer” icon on your desktop. 2) Click on “Properties” to display the System Properties dialog. 3) Click on the “Hardware” tab. 4) Click on “Device Manager”. Q2Upgrade User Manual Ver 1.4.1 Page 9 of 54 21-Jul-08 Q2Upgrade User Manual Ver 1.4.1 Page 10 of 54 21-Jul-08 4 Basic Operation 4.1 Instructions for Aristocraft G-Scale Locomotives When using Q2Upgrade with an Aristocraft G-Scale Locomotive: Turn the Lights switch to the Off position. Turn the Smoke switch to the Off position. Disconnect the AirWire receiver. Q2Upgrade User Manual Ver 1.4.1 Page 11 of 54 21-Jul-08 4.2 Starting Q2Upgrade You can start Q2Upgrade by double clicking on the Q2Upgrade shortcut on the desktop. In this case Q2Upgrade initially displays the “Help” page. You must proceed to the “Load Q2 File” in order to open a Q2 file. You can also start Q2Upgrade by dragging the name of a Q2 file onto the Q2Upgrade desktop shortcut. In this case, the Q2 file is opened and Q2Upgrade initially displays the “Load Q2 File” page. (Note: the desktop shortcut created by the InstallShield Wizard may not allow you to do this. You may have to create your own desktop shortcut by clicking the right mouse button on the Q2Upgrade.exe file name and selecting “Create Shortcut”.) You can also start Q2Upgrade by double clicking on a Q2 file name. The Q2 file is opened and Q2Upgrade initially displays the “Load Q2 File” page. This will not work, however, if Q2Upgrade is already running, since when you double click on the Q2 file name, the system attempts to start a second instance of Q2Upgrade. Because Q2Upgrade acquires the connection to the Quantum Programmer, only one instance of Q2Upgrade can run at a time. Q2Upgrade User Manual Ver 1.4.1 Page 12 of 54 21-Jul-08 4.3 Help Page This page shows how to use Q2Upgrade. Whenever you are uncertain what to do next, return to this page by clicking on the “Help” icon in the vertical control bar to the left. The first step is to retrieve information from your locomotive so that you can determine what firmware to download. To proceed, click on the “Locomotive Information” icon in the vertical control bar to the left. Q2Upgrade User Manual Ver 1.4.1 Page 13 of 54 21-Jul-08 4.3 Locomotive Information If you follow the instructions on this page, the Locomotive Information box will be filled in. This information will help you to select an appropriate upgrade file for your locomotive. To the right of “Model:” the model number, descriptive name and manufacturer are shown. In this example, the model number is “1008”, which is an Aftermarket Aristocraft G-Scale Diesel. To the right of “Class:” will be shown either “Diesel”, “Electric”, “Steam”, “Articulated Steam”, or “Gas Turbine”. To the right of “Soundset:” will be shown a number, “0”, “1”, etc. A soundset number of “0” indicates the locomotive’s firmware contains the original sound records as specified by the manufacturer. A soundset number of “1”, “2”, etc., indicates the firmware contains different sound records, a different horn for example. To the right of “Version:” is the major version number, minor version number and build number of the locomotive’s firmware. In this example, the major version is 7, the minor version is 17, and the build number is 0. To the right of “Build Date” is the month, day, and year the firmware was built. Q2Upgrade User Manual Ver 1.4.1 Page 14 of 54 21-Jul-08 To the right of “Last Modified” is the month, day, and year the firmware was modified by Q2Upgrade. If the firmware was never modified by Q2Upgrade, the “Build Date” and “Last Modified” entries will be identical. To the right of “Hardware:” you will see the Hardware Profile Number. The relevance of this information will become clearer as you proceed to the next step by clicking on the “Load Q2 File” icon in the vertical control bar to the left. Q2Upgrade User Manual Ver 1.4.1 Page 15 of 54 21-Jul-08 4.4 Load Q2 File You can click on the “Browse…” button to navigate your computer’s directory to find a file or you can select a file from the recently used list. You can also load a file by dragging a file name from a directory listing onto the Q2Upgrade window. Once a file is loaded, information about the firmware it contains is displayed. The model, class, soundset number, version numbers, and supported hardware are shown. The content of the comment field is stored with q2 file when you save the file to disk. However, the comment is not downloaded to the locomotive as part of the upgrade process. To see whether this firmware is suitable for your locomotive, proceed to the next step by clicking on the “Check Compatibility” icon in the vertical control bar to the left. Q2Upgrade User Manual Ver 1.4.1 Page 16 of 54 21-Jul-08 4.5 Check Compatibility The information gathered from steps 1 and 2 is compared on this page. Incompatibilities between your locomotive and the loaded Q2 file are marked with brackets “< >”. There are 4 levels of incompatibility: “< >” indicates a minor incompatibility. The Q2 file firmware will run on your locomotive, but the sounds may not be appropriate for this model. Because different models often have different motor characteristics, the BEMF vs. scale MPH calibration may not be correct. Your locomotive may not run smoothly without programming many CV’s related to motor control. “<< >>” indicates a significant incompatibility. The Q2 file firmware is for a different class of locomotive, and thus the sounds will not be appropriate even if the firmware will run on your locomotive. “<<< >>>” indicates a serious incompatibility. The Q2 file firmware may run on your locomotive, but the type and number of lights supported by your locomotive may not be the same as that supported by the Q2 file firmware. “<<<< >>>>” indicates total incompatibility. The Q2 file firmware will not run on your locomotive because of a hardware mismatch. Q2Upgrade User Manual Ver 1.4.1 Page 17 of 54 21-Jul-08 This example shows both minor and significant incompatibilities: In this example, the 1008-0v7-0-51.q2 firmware is ill suited for this locomotive. The Q2 file firmware is for a different model and a different class of locomotive. It has the same Hardware Profile, however, and should run on the locomotive’s hardware. In general, if you choose a Q2 file for the same model number as your locomotive, there will be no incompatibilities. Q2Upgrade User Manual Ver 1.4.1 Page 18 of 54 21-Jul-08 This example shows no incompatibilities: After determining that the Q2 file firmware is compatible with your locomotive, you may want to preview the sound records it contains. To do this click on the “Preview Sounds” icon in the vertical control bar to the left. Q2Upgrade User Manual Ver 1.4.1 Page 19 of 54 21-Jul-08 4.6 Preview Sounds You can listen to the major sound records in the Q2 file you loaded before downloading to your locomotive. First, click on the “Start Up” button to obtain a screen similar to the following. After pressing “Start Up”, you should be able to hear locomotive idling sounds on your PC audio system. Press the “HORN” button to play the horn. The horn will play until you release the HORN button. If you tap the HORN button, a hoot record will play. Some horns have a special ending which you can play by tapping the HORN button immediately after releasing the HORN button. These diagrams, where ‘_’ indicates HORN button up and ‘H’ indicates HORN button down (pressed), might make this easier to understand. ___H___ (hoot) ___HHHHHHHHHHHHHHH___ (horn blast) Q2Upgrade User Manual Ver 1.4.1 Page 20 of 54 21-Jul-08 ___HHHHHHHHHHHHHHH_H___ (horn blast with special ending) Certain locomotives have a second Horn/whistle, which we call the Alternate Horn/Whistle. If the q2 file contains a Alternate Horn/Whistle, you can play the Alternate Horn/Whistle using the “ALT HORN” button. Move the “Bell” switch to “On” to play the bell. Move the “Pump” switch to “On” to play the pump. Move the “Dynamic Brakes” switch to “On” to play the dynamic brake fans. Move the “Cooling Fan” switch to “On” to play the cooling fans and vents. To rev the motor increase the Throttle. NOTE: Q2Upgrade currently is not capable of playing diesel motor records using the new notching behaviors that you will hear when the same motor records are played in the locomotive. If you have specified a custom sound (see the Advanced Operation section), you can preview the sound record by pressing the “Custom Sound” button. You can use the slide bars at the lower left to adjust the relative volume levels of the various sounds. The name of the horn, alt horn, bell, etc, are displayed to the right of the volume levels. To stop the sounds, click on the “Shut Down” button. The sounds automatically shut down if you move to a different page. When you are certain these are the sounds you want in your locomotive, click on the “Upgrade Locomotive” icon in the vertical control bar at the left. Q2Upgrade User Manual Ver 1.4.1 Page 21 of 54 21-Jul-08 4.7 Upgrade Locomotive Follow the instructions on this page to upgrade your locomotive with the loaded Q2 file firmware. The Upgrade Confidence Test is optional. Run this test if you are not certain of the electrical connections between your PC and the Quantum Programmer or between the Quantum Programmer and your locomotive. The Confidence Test goes through the motions of upgrading your locomotive, testing the communication links, but without doing anything destructive like erasing your locomotive's flash memory. Click on “Upgrade Locomotive Firmware…” to actually upgrade your locomotive with the Q2 file firmware. The process takes slightly more than 5 minutes. Your locomotive’s flash memory is erased and then reprogrammed with the Q2 file firmware. During this time it is critical that none of the electrical connections between your PC and your locomotive are broken. Do not remove your locomotive from the programming track until Q2Upgrade says it is safe to do so. If the reprogramming process is interrupted for any reason, your locomotive’s flash memory could become corrupted, requiring removal of the chip for reprogramming by a certified dealer. Q2Upgrade User Manual Ver 1.4.1 Page 22 of 54 21-Jul-08 4.8 Log This page displays a history of Q2Upgrade actions for the current session. An accumulated history of Q2Upgrade actions is found in the file “Q2UpgradeHistoryLog.txt” located in the same directory as Q2Upgrade.exe. Q2Upgrade User Manual Ver 1.4.1 Page 23 of 54 21-Jul-08 5 Advanced Operation 5.1 Cut & Paste Diesel Sounds You can replace certain diesel sound records in the q2 file with sound records you select from Q2Upgrade libraries. The descriptive names and record names of the current records are displayed. The size in bytes of the current records are also displayed. The total size of these records is displayed as well as the size of the system firmware and the number of unused bytes. Q2Upgrade User Manual Ver 1.4.1 Page 24 of 54 21-Jul-08 5.1.1 Horn/Whistle Click on the “Replace Horn/Whistle…” button to display this dialog box: The descriptive name, record name, and size of the current horn/whistle are shown in one of the list boxes. If you want to replace this horn/whistle, select the replacement from the list of available horns or list of available whistles. To attenuate the volume of the selected record, move the Volume slider control. QSI attenuates most horn/whistle records to approximately 60% when incorporated into the firmware for a particular model. This gives a reasonable volume, to our ears, for the default Horn/Whistle volume level 11. For some locomotives, this might be too loud or too soft. In that case, move the slider control to increase or decrease the attenuation. Q2Upgrade User Manual Ver 1.4.1 Page 25 of 54 21-Jul-08 5.1.2 Alternate Horn/Whistle Certain locomotives have a second Horn/whistle, which is called the Alternate Horn/Whistle. If the q2 file contains a Alternate Horn/Whistle, you can use the “Replace Alt Horn/Whistle…” button to select a replacement from a list of available horns or a list of available whistles. If you do not want your locomotive to have an Alternate Horn/Whistle, select “No Alt Horn/Whistle”. Q2Upgrade User Manual Ver 1.4.1 Page 26 of 54 21-Jul-08 5.1.3 Bell Click on the “Replace Bell…” button to display this dialog box: The descriptive name, record name, and size of the current bell are shown in the list box. If you want to replace this bell, select the replacement from the list of available bells. To attenuate the volume of the selected record, move the Volume slider control. QSI attenuates most bell records to approximately 15% when they are incorporated into the firmware for a particular model. This gives a reasonable volume, to our ears, for the default Bell volume level 11. For some locomotives, this might be too loud or too soft. In that case, move the slider control to increase or decrease the attenuation. Q2Upgrade User Manual Ver 1.4.1 Page 27 of 54 21-Jul-08 5.1.4 Diesel Motor To replace the diesel motor sounds or make a configuration change to the motor sounds, click on “Replace Diesel Motor…” to display this dialog box: Select the motor profile from this list of Motor Profiles. A motor profile consists of a set of motor records, a set of turbo or generator records, and a set of parameters which control how these records are played. When you select a motor profile, the parameter fields are filled in according to the default parameters for this profile. You can modify these parameters to achieve a custom motor profile. In this example, the GE Dash 8 profile has “Dash 8” notching behavior, and no transitions. 1st Generation EMD or ALCO notching behavior is characterized by a pronounced drop in engine RPM and volume at the start of a transition. Dash 8 notching behavior is characterized by no change in RPM between notch 3 and notch 6. Continuous notching behavior is characterized by the lack of a steps in the motor RPM when notching up. Q2Upgrade User Manual Ver 1.4.1 Page 28 of 54 21-Jul-08 If the motor profile has one or more transitions, the SMPH for each transition is specified. If the SMPH for the 1st transition is “0”, then this motor profile does not have any transitions. The SMPH for the 2nd transition must be “0” or be greater than the SMPH for the 1st transition. Certain motor profiles, such as the one used for the E7, have dual motor start up and shut down sounds. You can specify dual motor start up and shut down sounds for any motor profile. Q2Upgrade User Manual Ver 1.4.1 Page 29 of 54 21-Jul-08 5.1.5 Dynamic Brake Fans Click on “Replace Dynamic Brake Fans…” to display this dialog: If you do not want your locomotive to have Dynamic Brake Fans, click on “No Dynamic Brake Fans”. Q2Upgrade User Manual Ver 1.4.1 Page 30 of 54 21-Jul-08 5.1.6 Pump Click on “Replace Pump…” to display the dialog: The descriptive name, record name, and size of the current pump are shown in the list box. If you want to replace this pump, select the replacement from the list of available pumps. To attenuate the volume of the selected record, move the Volume slider control. QSI attenuates most pump records to approximately 15% when they are incorporated into the firmware for a particular model. This gives a reasonable volume, to our ears, for the default Pump volume level 11. For some locomotives, this might be too loud or too soft. In that case, move the slider control to increase or decrease the attenuation. Q2Upgrade User Manual Ver 1.4.1 Page 31 of 54 21-Jul-08 5.1.7 Cooling Fans/Vents Click on “Replace Cooling Fan/Vents…” to display this dialog: Select the cooling fan records from the list of available cooling fans. Select the vent records from the list of available vent records. A vent opening record is played before the cooling fans sound begins, and a vent closing record is played after the cooling fans sound ends. If you do not want your locomotive to have vent opening and closing sounds, select “No Vents”. Q2Upgrade User Manual Ver 1.4.1 Page 32 of 54 21-Jul-08 5.1.8 Custom Sound Click on “Replace Custom Sound…” to display this dialog: Use this dialog to load a sound record of your making into the firmware. This sound record will be played when your decoder’s Custom Sound feature is triggered. In DCC you can trigger your custom sound by pressing a function key. Assign the Custom Sound feature (feature ID 25) to a function key using CV53. From the factory, the firmware comes with no Custom Sound included. Select “Specify a Custom Sound” and load a wav file containing the sound record you wish to use. Specify the maximum volume at which this record will be played. Select a compression scheme. For large files, select “High Compression”, as this uses approximately 50% less memory. High Compression theoretically may result in a slightly lower quality sound. In practice, for most sound records it is difficult to hear a difference between high compression and low compression records. If you do not want your locomotive to have a custom sound record, select “No Custom Sound”. This option conserves memory for other purposes. Q2Upgrade User Manual Ver 1.4.1 Page 33 of 54 21-Jul-08 5.2 Cut & Paste Steam Sounds You can replace certain steam sound records in the q2 file with sound records you select from Q2Upgrade libraries. The descriptive names and record names of the current records are displayed. The size in bytes of the current records are also displayed. The total size of these records is displayed as well as the size of the system firmware and the number of bytes available. Q2Upgrade User Manual Ver 1.4.1 Page 34 of 54 21-Jul-08 5.2.1 Horn/Whistle Click on the “Replace Horn/Whistle…” button to display this dialog box: The descriptive name, record name, and size of the current horn/whistle are shown in one of the list boxes. If you want to replace this horn/whistle, select the replacement from the list of available horns or list of available whistles. To attenuate the volume of the selected record, move the Volume slider control. QSI attenuates most horn/whistle records to approximately 60% when incorporated into the firmware for a particular model. This gives a reasonable volume, to our ears, for the default Horn/Whistle volume level 11. For some locomotives, this might be too loud or too soft. In that case, move the slider control to increase or decrease the attenuation. Q2Upgrade User Manual Ver 1.4.1 Page 35 of 54 21-Jul-08 5.2.2 Alternate Horn/Whistle Certain locomotives have a second Horn/whistle, which is called the Alternate Horn/Whistle. If the q2 file contains a Alternate Horn/Whistle, you can use the “Replace Alt Horn/Whistle…” button to select a replacement from a list of available horns or a list of available whistles. If you do not want your locomotive to have an Alternate Horn/Whistle, select “No Alt Horn/Whistle”. Q2Upgrade User Manual Ver 1.4.1 Page 36 of 54 21-Jul-08 5.2.3 Bell Click on the “Replace Bell…” button to display this dialog box: The descriptive name, record name, and size of the current bell are shown in the list box. If you want to replace this bell, select the replacement from the list of available bells. To attenuate the volume of the selected record, move the Volume slider control. QSI attenuates most bell records to approximately 15% when they are incorporated into the firmware for a particular model. This gives a reasonable volume, to our ears, for the default Bell volume level 11. For some locomotives, this might be too loud or too soft. In that case, move the slider control to increase or decrease the attenuation. Q2Upgrade User Manual Ver 1.4.1 Page 37 of 54 21-Jul-08 5.2.4 Chuff To replace the chuff records for a steam locomotive, click on “Replace Chuff…” to display this dialog: The descriptive name, record name, and size of the current chuff records are shown in the list box. If you want to replace this chuff, select the replacement from the list of available chuffs. To attenuate the volume of the selected record, move the Volume slider control. QSI attenuates most pump records to approximately 50% when they are incorporated into the firmware for a particular model. This gives a reasonable volume, to our ears, for the default Chuff volume level 11. For some locomotives, this might be too loud or too soft. In that case, move the slider control to increase or decrease the attenuation. Q2Upgrade User Manual Ver 1.4.1 Page 38 of 54 21-Jul-08 5.2.5 Steam Generator To replace the steam generator of a steam locomotive, click on “Replace Steam Generator…” to display this dialog: The descriptive name, record name, and size of the current steam generator are shown in the list box. If you want to replace this steam generator, select the replacement from the list of available steam generators To attenuate the volume of the selected record, move the Volume slider control. QSI attenuates most steam generator records to approximately 5% when they are incorporated into the firmware for a particular model. This gives a reasonable volume, to our ears, for the default Steam Generator volume level 11. For some locomotives, this might be too loud or too soft. In that case, move the slider control to increase or decrease the attenuation. Q2Upgrade User Manual Ver 1.4.1 Page 39 of 54 21-Jul-08 5.2.6 Pump Click on “Replace Pump…” to display the dialog: The descriptive name, record name, and size of the current pump are shown in the list box. If you want to replace this pump, select the replacement from the list of available pumps. To attenuate the volume of the selected record, move the Volume slider control. QSI attenuates most pump records to approximately 15% when they are incorporated into the firmware for a particular model. This gives a reasonable volume, to our ears, for the default Pump volume level 11. For some locomotives, this might be too loud or too soft. In that case, move the slider control to increase or decrease the attenuation. Q2Upgrade User Manual Ver 1.4.1 Page 40 of 54 21-Jul-08 5.2.7 Custom Sound Click on “Replace Custom Sound…” to display this dialog: Use this dialog to load a sound record of your making into the firmware. This sound record will be played when your decoder’s Custom Sound feature is triggered. In DCC you can trigger your custom sound by pressing a function key. Assign the Custom Sound feature (feature ID 25) to a function key using CV53. From the factory, the firmware comes with no Custom Sound included. Select “Specify a Custom Sound” and load a wav file containing the sound record you wish to use. Specify the maximum volume at which this record will be played. Select a compression scheme. For large files, select “High Compression”, as this uses approximately 50% less memory. High Compression theoretically may result in a slightly lower quality sound. In practice, for most sound records it is difficult to hear a difference between high compression and low compression records. If you do not want your locomotive to have a custom sound record, select “No Custom Sound”. This option conserves memory for other purposes. Q2Upgrade User Manual Ver 1.4.1 Page 41 of 54 21-Jul-08 5.3 Firmware Configuration 5.3.1 Configure Squealing Brakes Click on “Configure Squealing Brakes…” to display this dialog: By default squealing brake sounds play automatically if the locomotive’s speed exceeds 40 SMPH and then slows to less than 20 SMPH. The squealing brake sounds are not armed if the air brakes are applied. You can modify these thresholds to customize your locomotive’s behavior. For example, more appropriate settings for a switcher such as a SW7 might be: Arm if Air Brakes Applied Arm if Loco Speed > 20 SMPH Play If Armed and Loco Speed < 10 SMPH Q2Upgrade User Manual Ver 1.4.1 Page 42 of 54 21-Jul-08 5.3.2 Calibrate BEMF Synchronized Chuff Rate QSI calibrates the BEMF synchronized chuff rate for locomotives available to us at our office. This chuff rate may not conform to your particular locomotive. Sometimes the chuff rate is correct for one speed but slow or fast for another speed. We have developed the following procedure to allow you to calibrate your locomotive’s chuff rate. The procedure requires a Quantum Programmer and Q2Upgrade.exe. QuantumCVManager.exe makes the procedure easy to perform but is not required. (1) Using any DCC controller, set CV56.0 bit 3 to “1” to turn on the BEMF synchronized chuff calibration mode. In this mode the locomotive maintains a constant speed at each speed step and, in place of normal chuffing sounds, produces a single short air release sound once per wheel revolution. Cylinder Cocks sounds are turned off to make it easier to hear the air release sound. (2) Set CV56.12 Chuff Interval Scale Factor to “32”, which represents “1.0”. If CV56.12 it not “32”, the resulting calibration will be bogus. (3) Select 128 speed step mode on your DCC controller. (4) Move the throttle to speed step 5. Adjust CV56.13 Chuff Interval Trim to obtain exactly one air release per wheel revolution. Write the speed step and CV56.13 value in a table on a piece of paper. (5) Repeat step 3 for speed steps 3, 10, 15, 20, 25, 30. For each speed step, write the speed step and CV56.13 value in a table on a piece of paper. (6) If desired, repeat step 3 for additional speed steps. Enter the speed steps and CV56.13 values in the table. (7) Run Q2Upgrade and load the q2 file you last used to upgrade your locomotive. (8) Click on “Calibrate Chuff Rate…” in the “Cut&Paste Sounds” page to display this dialog: (9) Click on “Add…” and enter the first speed step and CV56.13 value from your table. Q2Upgrade User Manual Ver 1.4.1 Page 43 of 54 21-Jul-08 (10) Repeat step 8 for all the speed step, CV56.13 values in your table. Q2Upgrade sorts the entries in the list box by increasing order of speed steps. Duplicate entries per speed step are not allowed. If you need to make a correction, select the entry in the list box you wish to correct and click on “Edit…” or “Delete”. (11) When all the speed step and CV56.13 values have been entered, click on “OK”. Q2Upgrade now applies the data you entered to modify the chuff interval table in theQ2 file you loaded. (12) Save the Q2 file using the “Save File As…” button in the “Load File” page. You might first want to change the soundset number in order to distinguish the saved Q2 file from the original Q2 file. Add a comment to help you remember how this Q2 file differs from the original. (13) Place your locomotive on the programming track connected to the Quantum Programmer and upgrade your locomotive with the contents of the modified Q2 file. (14) After the upgrade, restore CV56.12 to your desired value if it is other than “32”. There is no need to restore CV56.0 bit 3 to “0” or CV56.13 to “128” since upgrading your locomotive resets these CV’s to their factory defaults. See the DCC Reference Manual for further information about CV56.0, CV56.12 and CV56.13. Q2Upgrade User Manual Ver 1.4.1 Page 44 of 54 21-Jul-08 5.3.3 Configure Light Ports Click on “Configure Light Ports…” to display this dialog: In this example for a steam locomotive with a AVR Mega48 lighting co-processor: The Front Headlight is assigned to port 1. The Rear Headlight is assigned to port 3. The Front Mars Light is assigned to port 2. The Firebox is assigned to port 6. The Front Number Boards is assigned to port 8. The Front Marker Lights is assigned to port 9. The Rear Marker Lights is assigned to port 10. The Rear Cab Light is assigned to port 7. The firmware for this example does not support the lights which are grayed out. You may reassign any of the supported lights to a different port, subject to the limitations spelled out in the dialog: Q2Upgrade User Manual Ver 1.4.1 Page 45 of 54 21-Jul-08 Some lights are restricted to ports 1…6. Some lights are restricted to ports 7…15. You cannot assign a light to port 13 or 14. You cannot assign two lights to the same port. For example, your locomotive may have the Front and Rear Headlights wired backwards. You can re-wire these lights or you can assign the Front Headlight to port 3 and the Rear Headlight to port 1. Some firmware may support more lights than there are ports available, which is not the situation in this example. In that case, some of the lights will be assigned to port “0”, a non-existent port, effectively disabling that light. Q2Upgrade User Manual Ver 1.4.1 Page 46 of 54 21-Jul-08 5.3.4 Configure Light Ports (Quantum Revolution) Click on “Configure Light Ports…” to display this dialog: In this example for a diesel locomotive: The Front Headlight is assigned to port 1 (and cannot be re-assigned). The Rear Headlight is assigned to port 2 (and cannot be re-assigned). The Front Ditch Lights are assigned to port 3 and port 4. The Front Number Boards are assigned to port 5. The Rear Cab Light is assigned to port 6. Lights which are assigned to port 0 are supported by the firmware, but are inactive. The firmware for this example does not support the lights which are grayed out. You may reassign any of the supported lights to a different port, subject to the limitations spelled out in the dialog: The Front Headlight and Rear Headlight are pre-assigned to port 1 and port 2. The remaining lights are restricted to ports 3…6. You cannot assign two lights to the same port. Some firmware may support more lights than there are ports available. In that case, some of the lights will be assigned to port “0”, a non-existent port, effectively disabling that light. Q2Upgrade User Manual Ver 1.4.1 Page 47 of 54 21-Jul-08 5.3.5 Change CV Default Values Click on “Change CV Default Values…” to display this dialog: Use this dialog to specify the default value for the CV’s supported. The locomotive’s CV’s will be set to these values when you command the locomotive to “Reset to Factory Defaults”. The tab format is almost identical to that found in QuantumCVManager. You can import a .qcv file from QuantumCVManager into this dialog by clicking on the “Load QCV…” button. You can also write the CV settings in this dialog to a .qcv file by clicking on the “Save QCV…” button. This dialog replaces the “Configure Motor”, “Configure PID Parameters” and “Configure Grade Crossing” dialogs that were found in previous versions of Q2Upgrade. Q2Upgrade User Manual Ver 1.4.1 Page 48 of 54 21-Jul-08 5.4 Changing a Soundset Number If you replace any of the q2 file records, or make any configuration changes, Q2Upgrade automatically changes the Soundset Number to a number in the range 1000…65535. This distinguishes factory created firmware from firmware that has been modified by Q2Upgrade. You can further change the Soundset Number by clicking on the “Change Soundset Number…” button in the “Load File” page to display this dialog: Q2Upgrade User Manual Ver 1.4.1 Page 49 of 54 21-Jul-08 5.5 Saving a Modified Q2 File To save the modified Q2 file to disk, click on the “Save File As…” button in the “Load File” to display this dialog: A recommended name, showing model number, soundset number, major version, minor version, and build number, is automatically generated by Q2Upgrade. You may modify the name if you so desire. Q2Upgrade User Manual Ver 1.4.1 Page 50 of 54 21-Jul-08 6 Troubleshooting 6.1 Cannot establish a connection to the Quantum Programmer When I press “Retrieve Locomotive Information…”, this message box is displayed Make sure the USB cable is connected to your PC and to the Quantum Programmer. Make sure that another program which connects to the Quantum Programmer, such as QuantumCVManager, is not running. 6.2 Unable to read Mfg ID When I press “Retrieve Locomotive Information…”, this message box is displayed Press “Retrieve Locomotive Information…” a second time. Possibly the first “Retrieve” operation failed because the locomotive was executing an automatic reset to factory defaults, which can happen when you first install a new chip or upgrade the chip to new firmware. If you get this error after repeated attempts, make sure your locomotive is making good contact with the programming track. Possibly your programming track needs to be cleaned. Possibly your locomotive’s wheels need to be cleaned. Make sure the Quantum Programmer is connected to the programming track. If your locomotive begins to play sound records when you press “Retrieve Locomotive Information…”, your locomotive’s firmware is probably an early version (version 1…6) which is not detecting DCC Service Mode properly. You must physically replace your locomotive’s flash memory chip with one already programmed with version 7 firmware. Q2Upgrade User Manual Ver 1.4.1 Page 51 of 54 21-Jul-08 6.3 Test Initialization Step 1 Failed When I press “Run Confidence Test…”, this message box is displayed The most common cause of this error is an improper Quantum Programmer power supply. The 300ma power supply which works well with most HO locomotives does not work reliably with any O-Scale or G-Scale locomotive. QSI specifies a 800ma power supply be used with all large scale locomotives. 6.4 Flash Update Initialization Failed When I press “Upgrade Locomotive Firmware…”, this message box is displayed The most common cause of this error is an improper Quantum Programmer power supply. The 300ma power supply which works well with most HO locomotives does not work reliably with any O-Scale or G-Scale locomotive. QSI specifies a 800ma power supply be used with all large scale locomotives. 6.5 Checksum Error At the end of the flash chip reprogramming, I get a message like this: This indicates that the flash chip reprogramming may not have been successful because the flash memory contents apparently do not match the binary image in the Q2 file. This is a rare event. Repeating the upgrade process again should fix the problem. First press “Run Confidence Test…” If that operation is successful, perform the “Upgrade Locomotive Firmware…” operation again. Q2Upgrade User Manual Ver 1.4.1 Page 52 of 54 21-Jul-08 6.6 Locomotive Hoots 3 Times After upgrading my locomotive’s flash memory, my locomotive hoots 3 times when I power up in Operations Mode. Does this indicate something is wrong? The 3 hoots after upgrading are normal. At the end of the upgrade procedure, Q2Upgrade commands the locomotive to reset its LTM to factory default values. The reset operation takes place in Service Mode with sounds turned off. When you first power up in Operations Mode and sounds are turned on, your locomotive hoots 3 times to signal that the reset to factory default values was carried out successfully. 6.7 Reset LTM to Factory Default Values failed At the end of the flash chip reprogramming, I get this message box: At the end of the upgrade procedure, Q2Upgrade commands the locomotive to reset its LTM to factory default values. This command may fail with some locomotives due to a long power up cycle. If this error occurs, it is not a big problem. Merely perform a manual reset to factory defaults using the reset jumper or reed switch as described in your locomotive’s operating manual. Q2Upgrade User Manual Ver 1.4.1 Page 53 of 54 21-Jul-08 © June 2008 QSIndustries, Inc. All rights reserved. Printed in the U.S.A. Information in this publication supersedes that in all previous published material. The contents and the product it describes are subject to change without notice. Broadway Limited is a trademark of Broadway Limited, Inc. Lionel is a registered trademark of Lionel LLC. QSI is a registered trademark of QSIndustries, Inc. Sound of Power, Quantum, QARC and Quantum Analog Remote Control are trademarks of QSIndustries, Inc. All other trademarks are the property of their respective holders. QSI makes no representations or warranties with respect to this publication. In no event shall QSIndustries, Inc., be liable for any damages, direct or incidental, arising out of or related to the use of this publication. Q2Upgrade User Manual Ver 1.4.1 Page 54 of 54 21-Jul-08