1
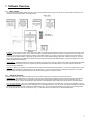
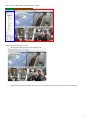
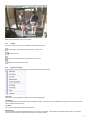
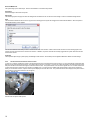
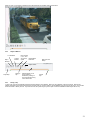
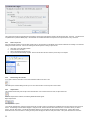
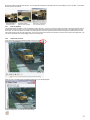
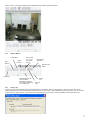
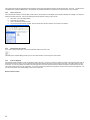
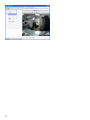
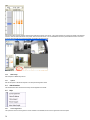
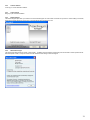
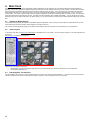
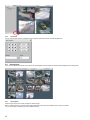
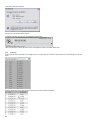
End User Guide
Viewing Live and Recorded Video
Version 4.15
VIDEO INSIGHT, INC.
3 RIVERWAY, STE 700
HOUSTON, TX 77056
2
VIDEO INSIGHT, INC........................................................................................................................................................................ 1
3 RIVERWAY, STE 700 ....................................................................................................................................................................1
HOUSTON, TX 77056 ....................................................................................................................................................................... 1
1
SOFTWARE OVERVIEW............................................................................................................................................................5
1.1
1.2
2
BASIC SYSTEM.........................................................................................................................................................................5
ADDITIONAL PRODUCTS ..........................................................................................................................................................5
MONITOR STATION SCREEN LAYOUT ................................................................................................................................ 6
2.1
LOGIN ...................................................................................................................................................................................... 6
2.2
VIEWING PANEL ...................................................................................................................................................................... 8
2.2.1
Layout Buttons ...................................................................................................................................................................8
2.2.2
Camera Image....................................................................................................................................................................8
2.2.3
Title Bar .............................................................................................................................................................................9
2.2.4
Right Click on Image..........................................................................................................................................................9
2.2.5
Left Click to Zoom and Picture within a Picture.............................................................................................................. 10
2.3
LEFT PANEL NAVIGATION TREE STRUCTURE ........................................................................................................................ 11
2.3.1
Enterprise View................................................................................................................................................................ 11
2.3.2
Elements in Left Navigation Tree Structure ..................................................................................................................... 11
2.3.3
Multi-Layered Facility Map ............................................................................................................................................. 13
2.3.4
Health Monitor.................................................................................................................................................................15
2.3.5
Action Items ..................................................................................................................................................................... 15
2.3.6
Facility Map View............................................................................................................................................................15
2.3.7
Layout View ..................................................................................................................................................................... 17
2.3.8
Right Click on Camera Name ..........................................................................................................................................17
2.4
PTZ AND AUDIO CONTROLS ..................................................................................................................................................19
2.4.1
PTZ Controls.................................................................................................................................................................... 19
2.4.2
Audio Controls .................................................................................................................................................................19
2.5
RECORDED VIDEO .................................................................................................................................................................20
2.5.1
To View a Recorded File..................................................................................................................................................20
2.5.2
Playback Buttons.............................................................................................................................................................. 21
2.5.3
Saving a Clip.................................................................................................................................................................... 21
2.5.4
Save a Clip on CD............................................................................................................................................................22
2.5.5
Downloading the entire file............................................................................................................................................. 22
2.5.6
Object Search...................................................................................................................................................................22
2.5.7
Zoom On Playback...........................................................................................................................................................23
2.5.8
Object Zoom and Print..................................................................................................................................................... 23
2.6
MEDIA PLAYER ..................................................................................................................................................................... 24
2.6.1
Selection Panel.................................................................................................................................................................25
2.6.2
Playback Buttons.............................................................................................................................................................. 27
2.6.3
Saving a Clip.................................................................................................................................................................... 27
2.6.4
Save a Clip on CD............................................................................................................................................................28
2.6.5
Downloading the entire file............................................................................................................................................. 28
2.6.6
Zoom On Playback...........................................................................................................................................................28
2.6.7
Media Player Tool Bar..................................................................................................................................................... 31
2.6.8
Single Player.................................................................................................................................................................... 32
2.6.9
Timeline View...................................................................................................................................................................32
2.6.10
Motion Events.............................................................................................................................................................. 32
2.6.11
Open File..................................................................................................................................................................... 32
2.6.12
Increase/Decrease Playback size ............................................................................................................................... 32
2.6.13
Magnify Current Image and Print............................................................................................................................... 32
3
PULL DOWN MENUS ................................................................................................................................................................ 33
3.1
FILE ....................................................................................................................................................................................... 33
3.1.1
Media Fixer...................................................................................................................................................................... 33
3.1.2
Exit ...................................................................................................................................................................................33
3.2
VIEW ..................................................................................................................................................................................... 33
3.2.1
Left Panel .........................................................................................................................................................................34
3.2.2
Full Screen ....................................................................................................................................................................... 34
3.2.3
Layout .............................................................................................................................................................................. 34
3.2.4
Layout Order.................................................................................................................................................................... 34
3
3.2.5
MiniToolbars.................................................................................................................................................................... 34
3.2.6
Status................................................................................................................................................................................ 35
3.2.7
Toolbars ...........................................................................................................................................................................35
3.3
TOOLS ...................................................................................................................................................................................35
3.3.1
System Log ....................................................................................................................................................................... 36
3.3.2
Axis Joystick Control ....................................................................................................................................................... 36
3.3.3
Live Window..................................................................................................................................................................... 37
3.3.4
PTZ Operations................................................................................................................................................................ 37
3.3.5
Synchronized Playback .................................................................................................................................................... 37
3.3.6
Media Player.................................................................................................................................................................... 38
3.3.7
Options............................................................................................................................................................................. 38
3.4
ADMINISTRATION ..................................................................................................................................................................38
3.5
HELP ...................................................................................................................................................................................... 38
3.5.1
License Agreement ...........................................................................................................................................................38
3.5.2
Online IP address............................................................................................................................................................. 39
3.5.3
Online Support .................................................................................................................................................................39
3.5.4
Remote Support ................................................................................................................................................................ 39
3.5.5
About Video Insight..........................................................................................................................................................39
4
WEB CLIENT .............................................................................................................................................................................. 40
4.1
4.2
4.3
4.3.1
4.3.2
4.3.3
4.3.4
4.4
4.4.1
4.4.2
4.5
4.5.1
4.5.2
4.5.3
4.5.4
4.5.5
4.6
4.6.1
4.6.2
4.6.3
4.6.4
4.6.5
5
4
SUPPORT FOR MOBILE DEVICES ............................................................................................................................................ 40
SCREEN LAYOUT ...................................................................................................................................................................40
LEFT NAVIGATION TREE STRUCTURE .................................................................................................................................... 40
Enterprise View................................................................................................................................................................ 41
Facility Map View............................................................................................................................................................41
Layout View ..................................................................................................................................................................... 41
PTZ Control ..................................................................................................................................................................... 42
VIEWING PANEL .................................................................................................................................................................... 42
Layout Option ..................................................................................................................................................................42
High Speed Mode ............................................................................................................................................................. 43
WEB CLIENT TOOL BAR ........................................................................................................................................................ 44
Live View..........................................................................................................................................................................44
Maps.................................................................................................................................................................................44
Events............................................................................................................................................................................... 44
Camera Selector............................................................................................................................................................... 44
Event Log .........................................................................................................................................................................46
HELP ...................................................................................................................................................................................... 47
Location Setup..................................................................................................................................................................47
License Agreement ...........................................................................................................................................................47
Help on the web................................................................................................................................................................ 47
User Manual .................................................................................................................................................................... 47
About Video Insight..........................................................................................................................................................47
TECHNICAL SUPPORT OPTIONS .........................................................................................................................................48
1 Software Overview
1.1
Basic System
Our product is a robust software platform that has 3 main components that are used to capture and view live or recorded video from anywhere: the
Service Monitor; the Monitor Station; and the Web Client.
IP Server – The IP Server is the basic engine of the product suite. It processes and stores images received from all connected IP cameras as well as
streams video to the client for viewing. The IP Server is installed on a standard Windows based PC and runs as a Windows service. The Server can
be linked to other servers to support hundreds of cameras. With software solution you can have a single server, multiple servers at one location or
multiple servers at multiple locations. Recordings can be stored on local or direct attached storage, NAS, SAN, or Network File Servers. As part of
our powerful infrastructure, the system stores all settings and log entries inside Microsoft SQL database tables. This gives the software a very solid
platform to deliver advanced features.
Monitor Station – The Monitor Station is the primary user interface in the product suite. From an end user point of view, it provides centralized viewing
of live and recorded images from any server. System and Security Administrators use the Monitor Station to setup and configure all servers and
cameras from a central location.
Web Client – Allows you to view live or recorded video from anywhere with using Microsoft Internet Explorer. You can view a single camera or select
up to 16 different cameras from multiple servers to view simultaneously. You can control PTZ cameras and playback recorded video. The system
supports multiple users and is tightly integrated into the Windows operating system for complete security.
1.2
Additional Products
In addition, software suite also provides the following accessory products to assist you in managing your servers and cameras:
Health Monitor – The Health Monitor monitors each of your servers on a regular basis to ensure server uptime and reporting of any issues affecting
the servers. The Health Monitor can be configured to send email alerts to the appropriate individual if the server has not responded in the predetermined time frame or if certain thresholds have been exceeded. The Health Monitor status windows can also be viewed in the Monitor Station
LTS – Long Term Storage - The LTS is a standalone application that helps you manage your recorded video. The easy to use application connects
to the video data directory allowing you to Move, Recompress or Trim the original AVI files. The LTS can also recompresses the original AVI file using
Microsoft’s WMV format and is able to double the available storage space. You can specify which cameras to copy, how many days to keep before
the copying and what time of the day to execute the copy. The new copied files can be viewed with any Windows Media Player.
5
2 Monitor Station Screen Layout
The Monitor Station has two primary functions: it records the video and provides tools to view live or recorded video. The system is designed to be easy
to use while having very powerful features.
2.1
Login
When the Monitor Station is initiated, a system login screen appears:
Check with your system administrator for your login information. For setting up users and groups, please see the Setup and Configuration Guide.
More options can be viewed by clicking on the Options button.
See your system administrator for most information on Options.
6
When you start the Monitor Station, the following screen appears:
There are three main sections of the screen:
•
Viewing Panel including the layout tool bar (outlined in red)
•
Left Navigation tree structure (outlined in blue) which can be used to navigate from camera to camera and to view recorded files.
7
•
2.2
Tool Bar (outlined in green) which provides convenient access to commonly used tools
Viewing Panel
The viewing panel can be configured to show from one to 32 cameras in various configurations.
2.2.1
Layout Buttons
The layout buttons at the top of the viewing panel allow you to control the number of cameras displayed. Click on the 4 camera grid and it displays the
first four cameras.
Click on the desired layout icon, and the viewing panel changes to reflect the new viewing configuration.
You can also create any number of custom views and select the layout to display on startup. To create custom layouts, please see the Setup and
Configuration manual.
2.2.2
Camera Image
Each pane in the layout shows a consistent view of the image and supports easy to use icons and “Right Click” functionality.
8
At the top of the image is the name of the camera.
2.2.3
Title Bar
On the top of each picture, there is a Title Bar with commonly used functions.
- Turns orange if motion has occurred in the picture. Click to reset.
Freezes the Frame
Pops up a live window that can be repositioned on your screen
Replays the last 30 seconds of motion.
2.2.4
Right Click on Image
By positioning the mouse on the image and right clicking, the following menu appears:
Full Screen
The Full Screen option enlarges the image to cover the entire viewing panel.
Live Window
The Live Window option creates another Window containing the image. The user can then move that Window to anywhere on the screen or another
screen if multiple monitors are setup.
Live Audio
The Live Audio option activates audio from that camera.
Recent History
The Recent History option automatically displays the last 30 seconds of recordings. If the camera is set to Motion Only Recording, there must be
motion in the last 30 seconds in order for the 30 seconds of recording to display.
9
Recorded Media Files
This option brings up the Video Player. See the documentation on the Video Player below.
Print Image
Sends the image in the frame to the printer.
Save Image
The Save Image option brings up the Save As dialogue box and allows the user to save the current image to a local or networked storage device.
Send
The Send function allows the user to send a copy of that live viewing pane to anyone that is logged in to another Monitor Station. When the option is
selected the following screen appears:
You can then select the users that you want to receive the live view of this camera. Please note that if the user does not have viewing rights to this
camera, they will not receive the live view from the camera. In addition, only those users that are currently logged into the system will receive the live
view from the camera.
Properties
The Properties option brings up the Property and Settings for that Camera. See the Setup and Configuration Manual for details on these settings.
2.2.5
Left Click to Zoom and Picture within a Picture
To zoom in on a picture, position the mouse on the upper left hand corner of the area that you want to zoom in on, then press the left mouse button and
drag the mouse over the area to be zoomed. The system will then zoom in on the area. To zoom out, position the mouse in the lower right hand corner,
then press the left mouse button and drag the mouse back over the area. The system will then zoom out to the original view. You can then use the PTZ
controls in the left pane to control the zoom function as a digital PTZ. You can click on the middle of the camera image to return to the normal view.
When you use the zoom function, a picture within a picture displays in the lower left corner. The picture without the zoom displays in the picture within a
picture with the zoomed area enclosed in an orange box.
Example – Regular view
Zoomed view with picture within picture.
10
You can also drag the orange box around the picture to create a digital PTZ control.
2.3
Left Panel Navigation Tree Structure
The Left Navigation Tree Structure provides the main means of navigating between locations and cameras. You can navigate to particular locations
(servers) and cameras, or you can navigate to custom layouts and facility maps. The key elements found in the navigation tree are Servers/Cameras,
Layouts, Facility Maps and Action Items. The following sections discuss each element in detail.
There are three different methods for navigating between locations and cameras: Enterprise, Facility Maps and Layouts.
These views can be selected by using the icons at the top of the Left Navigation Tree Structure
Enterprise
Layouts
Facility Map
2.3.1
Enterprise View
The Enterprise view has a structure of
2.3.2
Elements in Left Navigation Tree Structure
Servers and Cameras
The list of Servers show in the left navigation tree is the list of all of the servers that this particular user has access to. A server is an instance of the
software with various cameras attached. All Servers can be expanded to include a view of all servers
By selecting a particular server, all cameras from that server will be displayed in the viewing pane.
Each Server can then be expanded to show the cameras assigned to that server as well as any layouts or facility maps associated with that server.
11
When a particular camera is selected, that camera’s live view will be displayed in the viewing pane.
Note that when a server or camera is operational, the icon to the left of the name will be green. If the server or camera is not operational, the icon will be
orange.
Layouts
You can set up customized layouts that can display cameras from one or multiple servers.
In the example above, the administrator has set up two custom layouts: one consisting of the Key Locations within the Southeast Campus and one of
the Pickup areas of the Southeast Campus In the example above, when the layout “Front Entrances” is selected, the following view appears showing
cameras at each entrance of each of 4 different campuses
12
Layouts are stored on particular servers. However, given the right security access, anyone on any server can view any custom layout. For more
details on setting up custom layouts, consult the Setup and Configuration Guide.
Dynamic Layouts
You can also create dynamic layouts by selecting and dragging cameras onto the viewing panes. Select cameras from the left navigation tree and drag
them into the desired viewing panes. Cameras can be selected from any server.
2.3.3
Multi-Layered Facility Map
To help locate cameras across your organization, you can import images of your facilities into the system. Our easy to use setup, allows you to take
advantage of this feature without any customization.
If Facility maps have been set up, they will appear in the Navigation Tree. As with layouts, facility maps are stored on particular servers. However,
given the correct security access, you can view facility maps from any server. Facility maps can be layered for drill down purposes. You can set up a
map for an entire town, then drill down to an individual campus, and then drill down to an individual floor. You can set up default facility maps for a
server. For instance, the default facility map for the server is Lincoln.
13
By selecting the Lincoln Campus from the left navigation tree, the floor plan for Lincoln High School will appear. You can mouse over the camera and
that camera’s live image will appear in the pane to the right.
In the lower right hand corner is information on the camera, the Live Window option and the zoom in and out controls. By clicking on the 30 Seconds
button, you can review the last 30 seconds of recording for that camera.
The left arrow moves the view to the next higher facility map if you have set up multi-level facility maps.
14
At the top of the facility map are options to show or
remove the cameras, camera names or camera ranges from the facility map.
You can also change the font size on the camera names and remove the zoom bar from the camera view.
2.3.4
Health Monitor
If there are Health Monitors set up and connected to this Monitor Station, then the red cross icon will appear. See the Setup and Configuration Guide
for more information on Health Monitors.
2.3.5
Action Items
Action items are essentially buttons that can be clicked to initiate certain actions. In this case, we have set up two buttons: Alert Campus Police and
Alert Principal. When these actions are clicked, they automatically generate actions such as sounding an alarm or sending an email of a motion
event. Action Items are setup using the Rules Manager. Please see the Setup and Configuration Guide for more information on Action Items and the
Rules Manager.
2.3.6
Facility Map View
When the Facility Map View is selected the tree structure changes from the Enterprise view (Server oriented) to a Map oriented tree
In this case we have set up three different maps: one for the South Campus, one for the Southwest Campus and one for the first floor.
If you select one of the maps, then the list expands to show the cameras and the designated map appears.
15
You can then use the camera icons on the map to view the image from that camera.
16
2.3.7
Layout View
When the Layout View is selected, the tree structure changes to a Layout oriented tree.
Select the layout from the tree structure and that layout will appear in the viewing pane.
2.3.8
Right Click on Camera Name
When you right click on the camera, several options appear.
Live Window
When you select this option, a free floating live window for that camera pops up. You can move or enlarge this image by using your mouse.
Send…
The Send function allows the user to send a copy of that live viewing pane to anyone that is logged in to another Monitor Station. When the option is
selected the following screen appears:
17
You can then select the users that you want to receive the live view of this camera. Please note that if the user does not have viewing rights to this
camera, they will not receive the live view from the camera. In addition, only those users that are currently logged into the system will receive the live
view from the camera.
View Camera
This option places this camera in the viewing pane.
Properties
By selecting this option, you will be taken to the corresponding camera setup screens. For more detail on camera setup, consult your Setup and
Configuration Guide.
18
2.4
PTZ and Audio Controls
At the bottom of the left navigation area are controls for PTZ cameras as well as Audio Controls. By clicking on the arrow, you collapse the controls
so that they no longer appear in the left navigation area
2.4.1
PTZ Controls
With the PTZ Controls, you can control the PTZ camera by clicking on the arrows to move the camera, clicking on the zoom in and zoom out buttons.
When a PTZ camera is selected in the viewing panel, the PTZ controls affect the camera that is selected.
Use Digital PTZ – When this is selected, there is no actual movement of the camera. You can also use the mouse scroll wheel to control zooming.
2.4.2
Audio Controls
Balance – Balances sound between the left and right speakers.
Delay Buffer – sets the size of the audio buffer. This can be adjusted when you have a slow network connection.
Volume – sets the speaker volume.
19
2.5
Recorded Video
There are two ways of viewing recorded video: from the left navigation tree and from the Media Player. The Media Player provides the ability to view
recordings by motion events and time lines and will be discussed in the next section.
2.5.1
To View a Recorded File
Using the left navigation tree, click on a camera, date, and time.
Recorded files are organized into folders starting with Today. Click the folder to view the recorded files from today. The file names represent the time
when the file was created. For example, 06h44m09s means 6:44:09AM. The system creates a new file whenever the file size has reached the specified
size (default is 200mb). See the Setup and Configuration Guide for instructions on changing these settings. The file will play back in the viewer and you
can use the navigation buttons to move through the file. The system stores its files in a standard AVI format with the camera name, date and time
stored on the file. The file format is compatible with any Windows Media player and can be distributed without the requirement of a special viewer
The system automatically creates a new file at midnight, regardless of size, to keep all files organized by date. Depending on the amount of activity and
your settings, you might see as few as 1 file or as many as 20 files for a single day.
20
When you click on a recording, a playback screen will appear with the playback options shown below.
2.5.2
Playback Buttons
1 Frame Back
Play in
Reverse
1 Frame
Forward
Play Forward
2, 4, 8, 16 or
Download the
32x normal
Entire File
speed
Date and Time
Stamp
Object Search
Play& Stop
2.5.3
Saving a
Clip
Slide bar allows you to
move forward or
backward by clicking on
the cross bar and moving
it from side to side.
Create
Clip
Saving a Clip
To save a clip, open the recorded file and press the Pause button to stop playback. Notice the “clip indicators” under the scroll bar. Drag the left
indicator to the start of the clip and drag the right to the end of the clip. Once in position, click the diskette icon to bring up the clip menu. You can save
the file to a folder or directly to a CD. If you save to a CD, the system will give you the option of include a Standalone Video Player with the clip.
21
The system stores its files in a standard AVI format with the camera name, date and time stored in the path and file name. on the file. The file format is
compatible with any Windows Media player. Recorded files can be distributed without the requirement of a special viewer or any conversion.
.
2.5.4
Save a Clip on CD
After a clip has been created or a file has been saved to the CD, an information box will display on the bottom toolbar with the message “You have files
waiting to be written to the CD”. Click on this message to start the process of saving a clip to the CD.
1.
2.
3.
4.
2.5.5
Click “Next” on the CD Writing Wizard.
Put a blank CD in the drive.
Click on the “Write these files to a CD”
The process will automatically complete. Remove the CD from the drive when the process says it is complete.
Downloading the entire file
If you need to save the entire file to a CD or other Windows media mouse click on the
This action opens a Browse dialog box that you can use to save the file to a local computer or other media.
2.5.6
Object Search
The software includes many tools to help review recorded video. One of these tools is the smart, or object search tool.
When the Object button is selected, the following additional buttons appear.
Begin Object Search
And Object Search Options
From the left navigation tree, select the camera and the day you wish to search First select the recorded file from the drop down box that you wish to
search. The first image of the file will be displayed. Using the mouse, hold the left button down and draw a box on the screen where you want to
search. Click the “Next” button. The file will automatically advance to the next frame that has movement inside the box. Clicking “Next” again,
advances the file to the next instance. Clicking the “Play” button will play the video from that point forward. The system will search from one file to
22
another until it finds movement inside the box. You can adjust the sensitivity from the drop down menu if it’s finding too much or too little. If you need to
abort the search, click “Cancel.”
2.5.7
Zoom On Playback
The software provides the ability to zoom on playback as well as live view. To zoom in on a picture, position the mouse on the upper left hand corner of
the area that you want to zoom in on, then press the left mouse button and drag the mouse over the area to be zoomed. The system will then zoom in
on the area. To zoom out, position the mouse in the lower right hand corner, then press the left mouse button and drag the mouse back over the area.
The system will then zoom out to the original view. You can then use the PTZ controls in the left pane to control the zoom function as a digital PTZ. You
can click on the middle of the camera image to return to the normal view.
2.5.8
Object Zoom and Print
In the upper right corner of the playback window is an icon for Object Zoom
When you click on the Object Zoom the playback pauses and a new window appears.
Using the Object Zoom, you can save the current image.
23
Increase or decrease the size of the Window
Or Print the current image in the window.
You can also use the zoom function described above, i.e. left click on the area to be zoomed.
2.6
Media Player
You may also use the Media Player to view recorded video. The Media Player provides the ability to view recordings by motion events and time lines.
To access the Media Player, Select Tools from the top tool bar and then select Media Player
Recorded files are organized into folders starting with Today. Click the folder to view the recorded files from today. The file names represent the time
when the file was created. For example, 06h44m09s means 6:44:09AM. The system creates a new file whenever the file size has reached the specified
size (default is 200mb). See the Setup and Configuration Guide for instructions on changing these settings. The file will play back in the viewer and you
can use the navigation buttons to move through the file. The system stores its files in a standard AVI format with the camera name, date and time
stored on the file. The file format is compatible with any Windows Media player and can be distributed without the requirement of a special viewer
The system automatically creates a new file at midnight, regardless of size, to keep all files organized by date. Depending on the amount of activity and
your settings, you might see as few as 1 file or as many as 20 files for a single day.
24
The Media Player’s screen layout has the following sections:
•
Selection panel which determines what recording is played
•
Viewing panel (Playback panel)
•
Tool Bar
2.6.1
Selection Panel
There are four ways to select video recording to be played
•
Browse Video Servers
•
Browse Folders for Video
•
Quick Select
•
Motion Events
•
Player Controls
Use the down and up arrows to select the option.
25
Browse Video Servers
The Browse Video Server option uses a tree structure consisting of servers, cameras, and dates.
Navigate to the desired server, camera, date, and time to select the recorded video to be played.
26
When you click on a recording, a playback screen will appear with the playback options shown below.
2.6.2
Playback Buttons
1 Frame Back
Play in
Reverse
1 Frame
Forward
Play Forward
2, 4, 8, 16 or
32x normal
speed
Download the
Entire File
Date and Time
Stamp
Play& Stop
Slide bar allows you to
move forward or
backward by clicking on
the cross bar and moving
it from side to side.
2.6.3
Create
Clip
Saving a
Clip
Saving a Clip
To save a clip, open the recorded file and press the Pause button to stop playback. Notice the “clip indicators” under the scroll bar. Drag the left
indicator to the start of the clip and drag the right to the end of the clip. Once in position, click the diskette icon to bring up the clip menu. You can save
the file to a folder or directly to a CD. If you save to a CD, the system will give you the option of include a Standalone Video Player with the clip.
27
The system stores its files in a standard AVI format with the camera name, date and time stored in the path and file name. on the file. The file format is
compatible with any Windows Media player. Recorded files can be distributed without the requirement of a special viewer or any conversion.
2.6.4
Save a Clip on CD
After a clip has been created or a file has been saved to the CD, an information box will display on the bottom toolbar with the message “You have files
waiting to be written to the CD”. Click on this message to start the process of saving a clip to the CD.
5.
6.
7.
8.
2.6.5
Click “Next” on the CD Writing Wizard.
Put a blank CD in the drive.
Click on the “Write these files to a CD”
The process will automatically complete. Remove the CD from the drive when the process says it is complete.
Downloading the entire file
If you need to save the entire file to a CD or other Windows media mouse click on the
This action opens a Browse dialog box that you can use to save the file to a local computer or other media.
2.6.6
Zoom On Playback
The software provides the ability to zoom on playback as well as live view. To zoom in on a picture, position the mouse on the upper left hand corner of
the area that you want to zoom in on, then press the left mouse button and drag the mouse over the area to be zoomed. The system will then zoom in
on the area. To zoom out, position the mouse in the lower right hand corner, then press the left mouse button and drag the mouse back over the area.
The system will then zoom out to the original view. You can then use the PTZ controls in the left pane to control the zoom function as a digital PTZ. You
can click on the middle of the camera image to return to the normal view.
Browse Folders for Video
28
Using this option, you can browse folders directly on the server or other servers attached to the network. This option does not use the streaming to the
Monitor Station to play recorded video. Note that in order to play video through this option, you must have the correct CODEC installed on your
computer.
Quick Select
Using this option you can select recordings based on a calendar and timeline.
When a day is selected from the calendar, the timeline view will appear at the top of the viewing panel.
29
30
The Timeline chart is a graphical representation of where motion occurred throughout the day.
By clicking on the blue lines, the system will play that piece
of video. It’s a great tool for quickly reviewing the previous day’s video. You can also zoom in on the timeline chart by selecting the “+” button on the
right.
Motion Events
The Motion Event Log is a very powerful tool that allows you to rapidly review recorded events. The system creates an entry that includes the camera
name, time and duration each time a camera detects motion. For example, if you review the video in the morning from the previous night, you can start
by looking at the Motion Event Log. Select the camera and the date desired. Clicking on an entry plays just that piece of the video and gives you a
quick snapshot of the night’s events. The Motion Event Log can keep as many days of history as you feel is necessary and all entries are stored in the
Microsoft SQL database. You can enable the Motion Event Log by accessing the Server and selecting the Setup/Server Configuration/Advanced Tab.
The system also gives you the capability to label events (event tags). You can set up a specific event such as Door Open that reflects a specific motion
event rather than just motion on a camera. For instance, you can set up an event label called Door Open. When that event occurs, an entry in the event
log shows that label. Event labels are set up under Setup and Configuration/ Camera Configuration, Motion Settings.
2.6.7
Media Player Tool Bar
Decrease
playback size
Magnify Current
Image
Single
Player
Motion
Event
Timeline
View
Increase
playback size
Open
File
31
The tool bar on the Media Player presents icons for the easy navigation between various ways of selecting recordings to be viewed as well as zoom in
and out functionality.
2.6.8
Single Player
When the Single Player icon is selected, the Browse Folders for Video selection option appears in the selection panel to the left. Click on the file to be
played.
2.6.9
Timeline View
When the Timeline View icon is selected, the Quick Select option appears in the selection panel on the left. Click on the day and then select the time
from the timeline chart.
2.6.10
Motion Events
When the Motion Events icon is selected the Motion Event option appears in the selection on the left. Select the Motion event that you want to view.
2.6.11
Open File
2.6.12
Increase/Decrease Playback size
This option increases or decreases the size of the viewing panel for playback
2.6.13
Magnify Current Image and Print
When you click on the Magnify Current Image a new window appears.
Using the Object Zoom, you can save the current image.
Increase or decrease the size of the Window
Or Print the current image in the window.
You can also use the zoom function described above, i.e. left click on the area to be zoomed.
32
3 Pull Down Menus
3.1
3.1.1
File
Media Fixer
If the server is shut down unexpectedly due to a power outage or other situations that correct a video file, you can repair the damage with the Video
Fixer. This utility examines the file and deletes any corrupted portions that prevent the file from playing.
To fix a file:
1. Click the “Open File” button to select the file to be repaired.
2. You can use the Remove file or Remove all files button.
3. Once the file has been specified, click the Fix button to start the process. This function is for fixing a file on the local system. If you want to fix the
file on the server, you should right click on that file, and the video server will perform the media fixing.
3.1.2
Exit
Exits the application
3.2
View
The View Pull Down menu presents an easy to use means for choosing to display or not display various sections of the screen.
33
3.2.1
Left Panel
To remove the left panel from the display, uncheck the Left Panel option. After this has been unchecked, only the camera views will display.
3.2.2
Full Screen
You can maximize the viewing area by clicking on “Full Screen” or hitting the F11 key (exit full screen with F11). This mode will expand the images to
full screen, hide the left navigation tree and hide the tool bars. Once in this mode, you can navigate between the layouts by using the F1-F10 keys. By
enabling security you can prevent users from exiting the full screen mode.
3.2.3
Layout
Using the Layout option under View is another way of selecting the layout of the cameras on the viewing screen. This option also shows the function
keys that can be used to toggle between layouts.
3.2.4
Layout Order
This option displays the order of the cameras in the various 1, 4, 16, and 32 camera layouts.
3.2.5
MiniToolbars
Cycle Layouts
34
This feature turns on the automatic cycling. When this is activated the server will cycle between all 32 cameras via 1, 4, or 9 camera layout.
You can also create your own customized layouts for cycling by selecting the button on the right circled in red.
Clicking on the arrow will begin the cycling. You can turn off the cycling by clicking on the box.
PTZ Control
Cycle through all PTZ cameras
Cycles through the presets on that camera
- Stops movement
The options shown on the PTZ controls depend on the specific camera. For example, if the camera does not support focusing, those buttons will be
hidden.
3.2.6
Status
When Server Status in turned on, then the status of all servers appears at the bottom of the viewing pane.
3.2.7
Toolbars
Use these options to remove layout buttons from the screen. If you do not wish to show the login id of the current user at the upper left hand corner of
the left panel, turn the login option off.
3.3
Tools
35
3.3.1
System Log
The System Log allows you to view all system events that have occurred. The Date and Time of the action as well as the Message is shown. System
events include logs of the details of what changed on cameras and servers as well as server shutdown.
3.3.2
Axis Joystick Control
This option links to the standalone executable for the Axis Joystick. You can then use the joystick to move the PTZ.
36
3.3.3
Live Window
When Live Window is selected, a new window will be opened. You can select the camera to be viewed and move the window around the screen or
across multiple monitors.
3.3.4
PTZ Operations
You can control Pan-Tilt-Zoom cameras from the Monitor Station or Web Client These controls allow you to move the camera in all directions and save
preset locations for quick access. In addition, you can cycle through presets in a specified interval. This cycling can be started and stopped from the
Monitor Station and the Web Client. You can setup up to 16 PTZ cameras per server under the Setup/Cameras/PTZ setup screen and all 16 cameras
can be cycled. If you manually move a cycling camera, the cycling will pause for 30 seconds then resume the preset cycle.
3.3.5
Synchronized Playback
With the Synchronized Playback function you can achieve perfect playback of recorded files between 1 and 16 cameras. When Synchronized Playback
is selected, point the system to the correct folder with the video from the cameras to be displayed. Once the folder is selected, the following screen
appears:
Select the desired folder of video recordings, then select the cameras to be viewed.
Select the date of the recordings. Once the date has been selected, a time line appears with an indication of times of motion for each camera. To select
a time frame to view, move your cursor along the time line, and then left click and drag the cursor to highlight the time frame. In the example below, the
time between 12 noon and 2 PM will be viewed.
37
One the time frame has been selected, select the play button at the bottom of the screen. The system will begin the synchronous display of the selected
cameras. Note also that at the bottom of the picture, there is a time line as well, This is a detailed time line of the period selected from the Time frame
on the left. Note also that you can drag the pointer to anywhere along the time line.
3.3.6
Media Player
See description of Media Player above.
3.3.7
Options
See the description of the Monitor Options in the Setup and Configuration Guide.
3.4
Administration
The Administration tab is discussed in the Setup and Configuration User Guide.
3.5
3.5.1
Help
License Agreement
This option links to the License Agreement. When software is first installed, the terms of the agreement must be accepted.
38
3.5.2
Online IP address
Looks up your current external IP address.
3.5.3
Online Support
Brings up a pdf of the documentation
3.5.4
Remote Support
The Remote Support option sets up a connection so that Technical support can make a VNC connection into your server. Before making a connection,
please call Technical Support at 713 621 9779. They will indicate which support line to use.
3.5.5
About Video Insight
The Video Insight About shows the version, model number,. In addition it shows the Name and Company that are licensed to use this product and the
authorized phone number. This phone number must be referenced when calling for technical support.
39
4
Web Client
For even greater access, the IP Server automatically creates a website that can be viewed from any web browser like Microsoft Internet Explorer or
Netscape. You can view cameras from multiple servers at the same time and view recorded video from any of the cameras. The Web Client has all the
basic functionality of the Network Client without having to load any software on the remote PC. This is very useful if your organization has restrictions
about loading applications or is using other browsers. The system is compatible with all browsers including Apple Macintosh. You can control PTZ
cameras online. The system supports multiple users and is tightly integrated into the Windows operating system for complete security. Our Web Client
is with Microsoft’s Internet Information Servers (IIS). This allows us to take advantage of IIS’ scalability and flexibility. You can change the port or take
advantage of Dynamic or Static IP addresses. By utilizing security, you can restrict users from viewing specific cameras and their ability to play recorded
files.
4.1
Support for Mobile Devices
The software currently supports IE Mobile and Opera Mobile Support for IE Mobile. When you log into the web client the system detects the use of IE
mobile and changes the format so that it properly displays on a smaller screen size.
The video will now smoothly display giving you the ability to select different cameras, and perform PTZ commands from your mobile device.
4.2
Screen Layout
To access the web client use http://<yourip>/videoinsight4 in the address line of your browser. If security has been enabled, a user id and password will
be required.
After you login, the following screen appears:
There are two main sections of the screen:
•
Left Navigation tree structure (outlined in blue) which can be used to navigate from camera to camera and to view recorded files.
•
Viewing Panel (outlined in red)
4.3
Left Navigation Tree Structure
The Left Navigation Tree Structure on the Web Client functions in a manner very similar to the Monitor Station. You have the options of the Enterprise
View which shows all of the servers, facility maps and layouts in sequence, or the Facility Map view or the Layout View.
40
4.3.1
Enterprise View
Under this view, a listing of all servers, cameras, layouts and facility maps is shown.
From the list of the cameras, maps or layouts, you select the cameras that you wish to appear in the Viewing Pane. You may also select a layout or a
facility map.
4.3.2
Facility Map View
As with the Monitor Station, you can also select the Facility Map view. Once you select a facility map, the map appears in the viewing pane. You can
click on the camera icons on the maps to view images from that camera.
4.3.3
Layout View
The Layout View brings up the list of predefined layouts. Select the layout and the images from that layout appear.
41
4.3.4
PTZ Control
You can control a PTZ camera by expanding the Pan Tilt Zoom Option at the bottom of the left navigation tree.
4.4
Viewing Panel
Once you have selected the cameras or layouts from the left navigation tree, the images from those cameras will appear in the Viewing Pane
4.4.1
Layout Option
Select the type of layout to be used in viewing the camera images.
Best fit – takes the number of cameras to be viewed and determines which layout is the best fit for the number of cameras.
Or you have the option of selecting one of the predefined layouts.
42
4.4.2
High Speed Mode
By checking this option, you will enable Video Streaming.
43
4.5
4.5.1
Web Client Tool Bar
Live View
When the web client is first opened, this Tool Bar will be set to Live. When Live is selected, the camera images in the Viewing Pane are live images.
4.5.2
Maps
When the Maps Option is selected, only the Facility maps will appear on the web client. The left navigation bar will disappear.
4.5.3
Events
To view recorded images, select the Events Option.
When the Media Option is selected, the system brings up the Media Player.
As with the “Live view”, the system gives you the option to view and select the camera recordings via the Enterprise, Facility Map, or Layout view.
There are two sections of the
4.5.4
Camera Selector
Left pane in the Media Player: the navigation tree (Enterprise, Facility Map, or Layout Views) used to select cameras and recordings; and the Events
Pane used to view recordings based on motion events.
44
To view recorded video, select the camera and then expand to select the date and individual recordings.
The selected recording video will appear in the Viewing Pane.
The playback controls will depend on whether Streaming is enabled. If streaming is not enabled, then a simplified playback control appears.
Use the Slider bar to navigate through the recording.
To create a clip, click on the Clip icon and set the clip indicators to the portion of the recording that you want to save. Then click on the Download Clip
Icon.
45
The following dialog box will appear:
Save the clip to the desired media or directory.
If Streaming is Enabled, then the more robust playback controls appear.
These controls function in exactly the same manner as the Playback controls in the Monitor Station client.
4.5.5
Event Log
When a particular camera is selected in the navigation tree, the corresponding motion events for that camera for the current date appear in the pane
below:
Select the desired time and the view expands to show all of the motion recordings for that time.
46
Select the desired motion event and the recording appears in the viewing pane.
You can use the calendar selector to change the date from the current date to a previous date.
4.6
Help
In the upper right hand corner of the web client view is the Help option.
4.6.1
Location Setup
4.6.2
License Agreement
This option links to the Video Insight License Agreement. When Video Insight is first installed, the terms of the agreement must be accepted.
4.6.3
Help on the web
This option links to the Video Insight Support pages. These pages offer helpful tips and answers to frequently asked questions.
4.6.4
User Manual
This option links to the User Manual in PDF format. The manual can be viewed online or printed for later reference.
4.6.5
About Video Insight
The Video Insight About shows the version, model number, and serial number for the product. It also shows the dates that technical support will no
longer be available as well as the dates after which no product upgrades will be available. In addition it shows the Name and Company that are licensed
to use this product and the authorized phone number. This phone number must be referenced when calling for technical support
47
5 Technical Support Options
Your registered Video Insight product includes a one year software maintenance and technical support plan that begins on your purchase date. You can
contact Video Insight’s technical support staff by phone or by e-mail to receive one-on-one support when you are experiencing issues or have questions.
Online: www.video-insight.com/support
Email: [email protected]
Call:
800-513-5417
48