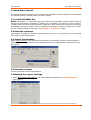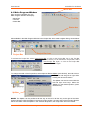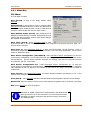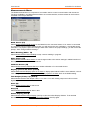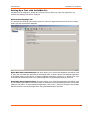
1
Pro
CeCalWin Pro
Sensor Configuration and
Data Acquisition Software
for
• Set-up and calibration of CORRSYS-DATRON Sensors
• Data acquisition with CORRSYS-DATRON Speed Sensors and a PC
USER MANUAL
VOLUME II
General Software Description
User Manual
CeCalWin Pro Software
For sensor / data acquisition hardware description
refer to the separate user manual(s) - Volume I.
For the sensor-specific / data-acquisition specific
software description refer to the separate user
manual(s) - Volume III.
© 2007 CORRSYS-DATRON Sensorsysteme GmbH, Wetzlar, Germany
D816-50-01-01E 06/07
2
User Manual
CeCalWin Pro Software
VOLUME II - General Software Description
Table of Contents
General Information . . . . . . . . . . . . . . . . . . . . . . . . . . . . . . . . . . . . . . . . . . . .4
Safety Instructions . . . . . . . . . . . . . . . . . . . . . . . . . . . . . . . . . . . . . . . . . . . . .5
Using CeCalWin Pro
1.
Installation . . . . . . . . . . . . . . . . . . . . . . . . . . . . . . . . . . . . . . . . . . . . . . . .7
2.
Introduction . . . . . . . . . . . . . . . . . . . . . . . . . . . . . . . . . . . . . . . . . . . . . .13
3.
Quick Start Tutorial and Overview . . . . . . . . . . . . . . . . . . . . . . . . . .15
3.1 Install CeCalWin Pro . . . . . . . . . . . . . . . . . . . . . . . . . . . . . . . . . . . . .16
3.2 Start the software . . . . . . . . . . . . . . . . . . . . . . . . . . . . . . . . . . . . . . . .16
3.3 Select the interface . . . . . . . . . . . . . . . . . . . . . . . . . . . . . . . . . . . . . .16
3.4 Connect a sensor . . . . . . . . . . . . . . . . . . . . . . . . . . . . . . . . . . . . . . . .16
3.5 Backup the sensor settings . . . . . . . . . . . . . . . . . . . . . . . . . . . . . . . .16
4.
Menu Selection and Navigation
4.1 Main Program Window . . . . . . .
4.2 Project Window . . . . . . . . . . . .
4.2.1 Menu Bar . . . . . . . . . . .
4.2.2 Tool Bar . . . . . . . . . . . .
4.2.3 Status Bar . . . . . . . . . .
4.2.4 Project Bar . . . . . . . . . .
5.
Test Configuration . . . . . . . . . . . . . . . . . . . . . . . . . . . . . . . . . . . . . . . .31
6.
Troubleshooting . . . . . . . . . . . . . . . . . . . . . . . . . . . . . . . . . . . . . . . . . . .47
. . . . . . . . . . . . . . . . . . . . . . . . . . . .19
. . . . . . . . . . . . . . . . . . . . . . . . . . . . .20
. . . . . . . . . . . . . . . . . . . . . . . . . . . . .21
. . . . . . . . . . . . . . . . . . . . . . . . . . . . .23
. . . . . . . . . . . . . . . . . . . . . . . . . . . . .30
. . . . . . . . . . . . . . . . . . . . . . . . . . . . .30
. . . . . . . . . . . . . . . . . . . . . . . . . . . . .30
CeCalWin Pro is a trademark of CORRSYS-DATRON Sensorsysteme GmbH, Wetzlar Germany. In a continuous effort to
improve our products CORRSYS-DATRON reserves the right to change specifications without prior notice.
© 2007 CORRSYS-DATRON Sensorsysteme GmbH, Wetzlar, Germany
D816-50-01-01E 06/07
3
User Manual
CeCalWin Pro Software
General Information
Legal Notice
Information furnished is believed to be accurate and reliable. However, CORRSYS-DATRON assumes
no responsibility for the consequences of use of such information nor for any infringement of patents
or other rights of third parties which may result from its use. No license is granted by implication or
otherwise under any patent or patent rights of CORRSYS-DATRON. Specifications in this publication
are subject to change without notice and do not represent a commitment on the part of CORRSYSDATRON. This publication supersedes and replaces all information previously supplied.
All brand names are trademarks of their respective holders.
Copyright Notice
© Copyright 2007, CORRSYS-DATRON
Revision
D816-50-01-01E 06/07
Contact
International Headquarters:
CORRSYS-DATRON Sensorsysteme GmbH
Charlotte-Bamberg-Str. 12
35523 Wetzlar / Germany
Phone ++49 (6441) 9282-0
Hotline ++49 (6441) 9282-82
Fax
++49 (6441) 9282-17
E-mail [email protected]
URL
www.corrsys-datron.com
North American Headquarters:
CORRSYS-DATRON Sensorsystems, Inc.
21654 Melrose Avenue, Building 16
Southfield, MI 48075 / USA
Phone ++1 (248) 204-0850
Toll-free++1 (800) 832-0732
Fax
++1 (248) 204-0864
E-mail [email protected]
URL
www.corrsys-datron.com
Chinese Headquarters:
CORRSYS-DATRON Sensorsysteme GmbH, China Office
Room 708, JinTianDi International Mansion,
No. 998 RenMin Road, Shanghai (200021), P.R.China
Phone: ++86-21-63114144 • Fax: ++86-21-63114154
E-mail: [email protected]
URL: www.corrsys-datron.com.cn
© 2007 CORRSYS-DATRON Sensorsysteme GmbH, Wetzlar, Germany
D816-50-01-01E 06/07
4
User Manual
CeCalWin Pro Software
Safety Instructions
Please read the following instructions carefully before installing or using
CeCalWin Pro Software
CORRSYS-DATRON is not responsible for damage that may occur if hardware and/or software is used
in any way other than that for which it is intended.
To assure safe and proper operation, all supplied equipment, components and/or accessories must be
carefully transported and stored, as well as professionally installed and operated. Careful maintenance
and usage in full accordance with operating instructions is imperative.
CORRSYS-DATRON hardware and/or software should be installed and operated only by qualified
persons who are familiar with devices of this type.
Local regulations may not permit the operation of motor vehicles on public highways while the equipment
is mounted on the exterior of the vehicle.
• Use hardware and/or software only for intended applications. Improper application is not advised.
• Do not modify or change equipment or its accessories in any way.
• Improper use or mounting of the equipment may affect the safety of the vehicle and/or occupants.
• The equipment must not be mounted and/or operated in any way that may compromise vehicle or
and/or occupant safety.
• Equipment must be mounted firmly and securely.
• Use only original equipment, components and/or accessories included in the scope of delivery.
• Do not mount equipment, components and/or accessories near heat sources (e.g. exhaust).
• Do not use defective or damaged equipment, components and/or accessories.
• Always note correct pin assignments and operating voltages when connecting equipment to
power supplies, data acquisition/evaluation systems, and/or any other applicable system or
component. Equipment may be damaged if not properly connected and/or operated.
• CORRSYS-DATRON recommends using cables supplied within the scope of delivery. If it is necessary to
make cables, always note correct pin assignments (see the pin assignments in the supplied
sensor user manual).
Damage to the device caused by cables other than those supplied by CORRSYS-DATRON
is not covered under the product warranty.
• For additional information, please call the CORRSYS-DATRON Hotline: ++49 (6441) 9282-82
or email: [email protected].
© 2007 CORRSYS-DATRON Sensorsysteme GmbH, Wetzlar, Germany
D816-50-01-01E 06/07
5
User Manual
CeCalWin Pro Software
Notes:
© 2007 CORRSYS-DATRON Sensorsysteme GmbH, Wetzlar, Germany
D816-50-01-01E 06/07
6
User Manual
CeCalWin Pro Software
Using CeCalWin Pro
Pro
1. Installation
© 2007 CORRSYS-DATRON Sensorsysteme GmbH, Wetzlar, Germany
D816-50-01-01E 06/07
7
User Manual
CeCalWin Pro Software
1. Installation
Installing CeCalWin Pro Software is a simple process that can be completed in minutes.
1. Insert the Software Setup CD in the CD-R drive, browse to setup.exe and open the file.
2. Select CeCalWin Pro as the application to be installed, then select the desired language using
the pull-down menu. Click on Install to proceed with the installation.
(continues next page)
© 2007 CORRSYS-DATRON Sensorsysteme GmbH, Wetzlar, Germany
D816-50-01-01E 06/07
8
User Manual
CeCalWin Pro Software
3. The Setup Wizard will open. Click on Next to continue.
4. System requirements for CeCalWin Pro will be displayed. View all requirements and click Next if
the host computer meets all listed requirements. If not, click Cancel or Back.
(continues next page)
© 2007 CORRSYS-DATRON Sensorsysteme GmbH, Wetzlar, Germany
D816-50-01-01E 06/07
9
User Manual
CeCalWin Pro Software
5. Select the desired option for application settings, as described below. Please note that you need
administrator rights when you select the option “Anyone who uses this computer”. Then choose
the Setup Type (Typical is the recommended setting). Select Next to continue.
6. Click Install to begin the installation.
(continues next page)
© 2007 CORRSYS-DATRON Sensorsysteme GmbH, Wetzlar, Germany
D816-50-01-01E 06/07
10
User Manual
CeCalWin Pro Software
7. The software will be installed automatically.
8. Click Finish to exit the Setup Wizard.
© 2007 CORRSYS-DATRON Sensorsysteme GmbH, Wetzlar, Germany
D816-50-01-01E 06/07
11
User Manual
CeCalWin Pro Software
Notes:
© 2007 CORRSYS-DATRON Sensorsysteme GmbH, Wetzlar, Germany
D816-50-01-01E 06/07
12
User Manual
CeCalWin Pro Software
Using CeCalWin Pro
Pro
2. Introduction
© 2007 CORRSYS-DATRON Sensorsysteme GmbH, Wetzlar, Germany
D816-50-01-01E 06/07
13
User Manual
CeCalWin Pro Software
2. Introduction
CeCalWin Pro Software is a 32-bit Windows®*program designed for set-up and operation of CORRSYS and
DATRON sensors. This powerful program also serves as a primary software tool for measurement of vehicle dynamics behaviors such as acceleration, braking, ABS, elasticity, maximum speed,
odometer/speedometer verification and many others.
As a data acquisition tool, CeCalWin Pro Software enables the user to easily set-up and store test
routines, which can be reloaded on demand and executed with a few simple key strokes. Series of tests
can be set to run automatically in specified sequences.
Users should read and understand this manual, including all safety instructions, before working with
CeCalWin Pro Software.
CeCalWin Pro Software should be used in accordance with all instructions and guidelines presented in this
manual.
All devices used in conjunction with CeCalWin Pro Software should be set-up and operated in accordance
with all instructions and guidelines presented in the respective user manuals for each device.
System Requirements
Computer:
Processor:
HDD space:
Interface:
Pentium 133 MHz
30 MB
1 serial or USB port
Ethernet (only for DAS-3)
Operating system:
WINDOWS 95
WINDOWS 95OSR2
WINDOWS 98
WINDOWS 98SE
WINDOWS ME
WINDOWS NT4.0
WINDOWS 2000
WINDOWS XP
DCOM installed**
DCOM installed**
Service pack 3
Service pack 1
**If you have the CeCalWin Pro installation CD, you
will find the DCOM installation in the directory
DCOM95. You must first install DCOM before you can install CeCalWin.
How to proceed
If you need to install CeCalWin Pro Software, start with Chapter 1: Installation, page 7.
If the software has been installed, but you are not familiar with the functions of
CeCalWin Pro Software, begin with Chapter 4: Menu Selection and Navigation, page 19.
Advanced users of non-contact distance and speed measurement may prefer to start with the Quick
Start Tutorial on page 15.
If you require assistance in using the Windows® operating system, please read your
Windows® user manual, or ask your system administrator for further help.
For assistance with CeCalWin Pro Software, please call the CORRSYS-DATRON Hotline:
++49 (6441) 9282-82 or email: [email protected].
Using Auxiliary Devices
CeCalWin Pro Software can be used with a variety of sensors and auxiliary devices. In the simplest
possible configuration, CeCalWin Pro Software can be used with a single CORREVIT® Non-Contact
Optical Sensor connected to a laptop PC via serial cable. For increased functionality, peripheral devices
such as trigger switches and light barrier interfaces can be used as follows:
• Trigger switches can be used to trigger test start and/or stop conditions.
• Light barriers are recommended for calibration runs (see Calibration of a Distance Sensor,
in the supplied sensor user manual (Volume III) for additional information).
*Windows is a registered trademarks of the Microsoft Corporation.
© 2007 CORRSYS-DATRON Sensorsysteme GmbH, Wetzlar, Germany
D816-50-01-01E 06/07
14
User Manual
CeCalWin Pro Software
Using CeCalWin Pro
Pro
3. Quick-Start Tutorial
and Overview
© 2007 CORRSYS-DATRON Sensorsysteme GmbH, Wetzlar, Germany
D816-50-01-01E 06/07
15
User Manual
CeCalWin Pro Software
3. Quick-Start Tutorial
The Quick-Start Tutorial provides a brief overview of the installation and basic operation of the CeCalWin
Pro Software package, including back-up of sensor settings.
3.1 Install CeCalWin Pro
NOTE: "Administrator" or "Power User" rights are required to use CeCalWin Pro with Windows 2000 and
Windows XP Professional. CeCalWin Pro Software can be installed in any directory of your file system.
To install, insert the program disk and browse to "Setup.exe". Next, double-click on the file icon and follow
the installation prompts. For faster access to CeCalWin Pro Software, a shortcut is created on your desktop. For complete installation instructions, see Chapter 1: Installation, page 7.
3.2 Start the software
After installing CeCalWin Pro Software, start the program by clicking on the program icon or by accessing
the program via Windows Explorer*.
3.3 Select the interface
Select Options>Interface, then select the port the sensor is connected to (if a DAS-3 data acquisition is
connected, you may also select Ethernet). Baud rate and other port parameters are automatically set by
the program.
3.4 Connect a sensor
Connect the sensor to the selected interface.
3.5 Backup the sensor settings
1. Select Measurement>Read Sensor (F3). Sensor settings will appear in the Project Window
(see page 21).
*Windows 2000, Windows XP Professional and Windows Explorer are registered trademarks of the Microsoft Corporation.
© 2007 CORRSYS-DATRON Sensorsysteme GmbH, Wetzlar, Germany
D816-50-01-01E 06/07
16
User Manual
CeCalWin Pro Software
If the sensor is not properly connected or if the sensor is not supported, the following message will be
displayed:
To proceed, Click OK, then check all sensor connections and confirm that the sensor is supported.
2. Select File>Save Sensor Configuration (Ctrl+Shift+S).
3. Select a directory into which the file will be saved.
4. Name the file and select "Save".
5. Saved sensor settings are now available to be written back to the sensor, should it ever become
necessary to do so.
i
All sensor configuration settings for sensors and DAS-2A, DAS-3 have the extension ".ccw"
All test configurations with the settings of the measurement function have the extension ".dls"
© 2007 CORRSYS-DATRON Sensorsysteme GmbH, Wetzlar, Germany
D816-50-01-01E 06/07
17
User Manual
CeCalWin Pro Software
Notes:
© 2007 CORRSYS-DATRON Sensorsysteme GmbH, Wetzlar, Germany
D816-50-01-01E 06/07
18
User Manual
CeCalWin Pro Software
Using CeCalWin Pro
Pro
4. Menu Selections
and Navigation
© 2007 CORRSYS-DATRON Sensorsysteme GmbH, Wetzlar, Germany
D816-50-01-01E 06/07
19
User Manual
CeCalWin Pro Software
Menu Bar
4.1 Main Program Window
Upon opening CeCalWin Pro, the
Main Program Window will display:
• Menu Bar
• Tool Bar
• Status Bar
Tool Bar
Status bar
Also available in the Main Program Window is the Project Bar, which adds a register listing, shown below:
Project Bar
Project Bar Icon
To activate the Project Bar, select View>Project Bar, or click on the Project Bar icon in the Tool Bar
(shown above). To de-activate the Project Bar, select
View>Project Bar again, or click on the Project Bar
icon in the Tool Bar again.
To change the width of the Project Bar, select Options>Resize Splitter (Ctrl+Shift+S), then left-click on
the Splitter and drag left or right while
holding the left mouse button.
The Splitter can also be moved with the
left and right arrow keys. When the
Splitter is in the desired position, press
the Enter key.
Splitter
NOTE: The Splitter can be positioned all the way to the left or all the way to the right of the Main
Program Window. With the Splitter in the extreme right position, the main area of the Program Window
will not be visible. With the Splitter in the extreme left position, the Project Bar will not be visible.
© 2007 CORRSYS-DATRON Sensorsysteme GmbH, Wetzlar, Germany
D816-50-01-01E 06/07
20
User Manual
CeCalWin Pro Software
4.2 Project Window
The Project Window opens automatically when a sensor is read or when a project file is opened. Here, all
selectable sensor settings are displayed within the tabbed sections.
NOTE: Available tabbed sections will vary depending upon the type of sensor connected (S-400 shown).
Each of the available sections can be accessed by clicking on the desired tab, or by using the Ctrl+Tab
key command to page through the sections sequentially.
© 2007 CORRSYS-DATRON Sensorsysteme GmbH, Wetzlar, Germany
D816-50-01-01E 06/07
21
User Manual
CeCalWin Pro Software
4.2 Project Window, continued
The Project Window also serves as an Online Display during testing, providing real-time sensor data.
Online Display Icon
To activate the Online Display, select Measurements>Online Display (Ctrl+D), or click on the Online
Display icon in the Tool Bar (shown above).
To
de-activate
the
Online
Display,
select
Measurements>Online Display (Ctrl+D) again, or click
on the Online Display icon in the Tool Bar again.
Online Display
with test data
© 2007 CORRSYS-DATRON Sensorsysteme GmbH, Wetzlar, Germany
D816-50-01-01E 06/07
22
User Manual
CeCalWin Pro Software
4.2.1. Menu Bar
File Menu
The File Menu includes:
New (Ctrl+N): to open a new, empty window, select
File>New.
Open (Ctrl+O): to open a saved *.CCW or *.DLS file, select
File>Open and locate the directory in which the desired file is
saved. From there, double-click the *.CCW or *.DLS file to be
opened or select the file and click the “Open” button.
Open Defaults Folder (Ctrl+D): when CeCalWin Pro is
installed, a Default directory is created. Example files from all
sensors and data acquisition systems (with default settings)
are available in this directory.
Save Tests (Ctrl+S): select File>Save Tests to save
acquired test data. If no file name has been previously assigned to the project, the Save Tests As...
process will be executed.
Save Tests as: select File>Save Tests As... to save acquired test data. The file extension “*.DLS” is
automatically appended to the new filename. For example, if you name a file “BrakeTest1”, the file will be
saved as “BrakeTest1.DLS”.
Save Sensor Configuration (Ctrl+Shift+S): select File>Save Sensor Configuration to save the
current sensor configuration. If no file name has been previously assigned to the project, the Save Sensor
Configuration As... process will be executed. Otherwise, the existing, open Sensor Configuration file will
be overwritten with the current data.
Save Sensor Configuration As…: select File>Save Sensor Configuration As... to save the
current Sensor Configuration as a Configuration file (*.CCW file). The file extension “*.CCW” is automatically appended to the new filename. For example, if you name a file “S400”, the file will be saved as
“S400.CCW”.
Print Preview: select File>Print Preview and follow standard Windows procedures to see a print
preview of the settings to be printed.
Print (Ctrl+P): select File>Print and follow standard Windows printing steps to print the current settings.
Recent File: select this option to view a list of recently opened configuration files (*.CCW and *.DLS files).
Exit: select File>Exit to close the program.
i
Windows 95, 98/ME, Windows NT, Windows 2000, and Windows XP
allow file names of up to 255 characters. For more information about
allowable punctuation characters and other file naming conventions,
see Windows Help.
© 2007 CORRSYS-DATRON Sensorsysteme GmbH, Wetzlar, Germany
D816-50-01-01E 06/07
23
User Manual
CeCalWin Pro Software
Edit Menu
Functions available in the Edit Menu are context-sensitive, and are related to the functions activated in
the Project Window.
Upon starting CeCalWin Pro, none of the functions in the Edit Menu are activated, as shown below.
To view available Edit Menu options, begin by activating the Project Bar by selecting View>Project Bar,
or by clicking on the Project Bar icon in the Tool Bar (also see Main Program Window, page 20).
The Project Bar will appear as shown below, left. NOTE: When the Sensors icon is selected none of
the options in the Edit Menu will be activated. Similarly, if a connected Sensor has been read, or if a
Sensor Configuration file is opened and the Sensor is selected, none of the Edit menu functions will be
activated (as shown below, right).
When the No defined Test icon is selected, General Test Settings are available in the Main Program
Window, as shown below, left. The following options will be available in the Edit Menu (below, right):
Delete (Del)
Select Edit>Delete to close the General Test Settings window.
NOTE: There is no security query prior to execution of the Delete function.
Insert Test (Ins)
Select Edit>Insert Test to create a new test set-up.
Insert Group (Ctrl + G)
Select Edit>Insert Group to create a list of tests that can be run in a selected sequence.
© 2007 CORRSYS-DATRON Sensorsysteme GmbH, Wetzlar, Germany
D816-50-01-01E 06/07
24
User Manual
CeCalWin Pro Software
Edit Menu, continued
After selecting Edit>Insert Test, a New Test will be created in the Project Bar. By default, Tests are numbered
sequentially, beginning with zero, as shown below, left. When a Test is selected, the following options are
available in the Edit Menu (below, right):
NOTE: The following Edit Menu options can also be accessed by right-clicking on a Test.
Insert (Ins)
Select Edit>Insert to create additional Tests.
Delete (Del)
Select Edit>Delete to delete a selected Test.
NOTE: There is no security query prior to execution of the Delete function.
Rename (F2)
Select Edit>Rename to rename a selected Test. The Test name will become editable, allowing you to
text-enter a new name.
Share (Ctrl + H)
The Share function is not active in this version of CeCalWin Pro.
Unshare (Ctrl + U)
The Unshare function is not active in this version of CeCalWin Pro.
Cut (Ctrl + X)
Select Edit>Insert Group to cut a selected value.
Copy (Ctrl + C)
Select Edit>Copy to copy a selected value to the Windows Clipboard.
Paste (Ctrl + V)
Select Edit>Paste to paste a value that has been copied to the Windows Clipboard.
© 2007 CORRSYS-DATRON Sensorsysteme GmbH, Wetzlar, Germany
D816-50-01-01E 06/07
25
User Manual
CeCalWin Pro Software
Measurements Menu
The Measurements Menu is comprised of commands used to control communication with the sensor.
Functions available in the Measurements Menu are context-sensitive, and are related to the functions
activated in the Project Window.
Read Sensor (F3)
Select Measurements>Read Sensor to read data from the connected sensor. If no sensor is connected
or if a general communication problem exists, you will receive the error notification, “Connected sensor
unknown!”. If a project is open and changes have been made to the project settings, you will receive the
prompt, “Save changes before reading?”.
Abort Reading (Shift + F3)
Select Measurements>Abort Reading to stop a sensor reading in progress.
Write Sensor (F2)
Select Measurements>Write Sensor to write changes made to the sensor settings in tabbed sections of
the Project Window to the connected sensor.
Calibrate Sensor (F5)
Select Measurements>Calibrate Sensor to initiate calibration of a connected Sensor.
Display speed in US Units (Ctrl+M)
Select Measurements>Display speed in US Units to display speed values in MPH. Once selected, a checkmark will appear to the left of Measurements>Display speed in US Units. Km/h is the default setting.
Test Output (5 kHz, 5 V) (Ctrl+T)
Select Measurements>Test Output 5 kHz, 5 V to set 5 V on each analog output and 5 kHz on each
digital output of the connected sensor.
Start (F4)
Select Measurements>Start to start a test.
Stop (F4)
Select Measurements>Stop to abort a test.
Online Display (Ctrl+D)
Select Measurements>Online Display (Ctrl+D) to view the Online Display Window. To de-activate
the Online Display, select Measurements>Online Display (Ctrl+D) again.
© 2007 CORRSYS-DATRON Sensorsysteme GmbH, Wetzlar, Germany
D816-50-01-01E 06/07
26
User Manual
CeCalWin Pro Software
Options Menu
The Options Menu includes commands used to control interface, password and language options.
General Test Settings
General Test Settings (Alt + F7)
Select Options>General Test Settings to activate and view the General Test Settings Tab (above, right)
in the Main Program Window.
Resize Splitter (Ctrl + Shift + S)
To change the width of the Project Bar, select Options>Resize Splitter, then left-click on the Splitter and
drag left or right while holding the left mouse button. The Splitter can also be moved with the left and right
arrow keys. When the Splitter is in the desired position, press the Enter key.
NOTE: The Splitter can be positioned all the way to the left or all the way to the right of the Main Program
Window. With the Splitter in the extreme right position, the main area of the Program Window will not be
visible. With the Splitter in the extreme left position, the Project Bar will not be visible.
Focus to Defined Tests (Ctrl + Shift + D)
Select Options>Focus to Defined Tests to highlight items (Sensors, Defined Tests or other Tests) in the
Project Bar.
Example:
The cursor is located to the left of “New Test 0” in the Settings Tab (below, left) of the Main Program
Window. When the Focus to Defined tests function is executed, “New Test 0” (below, right) is highlighted.
To shift the focus back to the Main Program Window, press the Tab key.
Before selecting Focus to Defined Tests
Before selecting Focus to Defined Tests
Password Protection...
Select Options>Password Protection... to set or change a password. This will open the Change
Password dialog box. Enter the required passwords and click OK. This function protects the settings
of a connected sensor (not data acquisition) or the *.CCW file. After you have entered and confirmed
the password, use the "Write sensor " and the sensor will be writeprotected. You can only write changes to the sensor after you
have entered the valid password.
© 2007 CORRSYS-DATRON Sensorsysteme GmbH, Wetzlar, Germany
D816-50-01-01E 06/07
27
User Manual
CeCalWin Pro Software
Options Menu, continued
Password Protection... (continued)
To unprotect the sensor settings, choose the Password Protection function and you will see
the dialog box below. Enter the old password and leave the both boxes blanket. After you have
pressed "Write sensor", the sensor is not longer protected with a password. You can also choose and
confirm a new password.
If you forget or lose the password, send the *.CCW file from the protected sensor to CDS at
[email protected].
Interface
Before connecting a sensor to the computer running CeCalWin Pro, select Options>Interface, then
select the interface to which the sensor will be attached. Baud rate and other port parameters are
automatically set by the program.
Language
CeCalWin Pro provides the option to choose the language in which the interface will be presented.
To set the language preference, open CeCalWin Pro and select Options>Language, then select the
desired language.
You will then be prompted with the following dialog box. Click OK to confirm the selection.
As indicated, language preference will be updated upon program restart.
© 2007 CORRSYS-DATRON Sensorsysteme GmbH, Wetzlar, Germany
D816-50-01-01E 06/07
28
User Manual
CeCalWin Pro Software
View Menu
The View Menu includes commands used to View options available in the Program Window.
View Toolbar
Select View>Toolbar to view the Tool Bar.
View Status Bar
Select View>Status Bar to view the Status Bar.
View Projectbar
Select View>Projectbar to view the Status Bar.
Help Menu
The Help Menu includes commands used to View options available in the Help Menu.
Help Topics
Help Topics are not activated in this version of CeCalWin Pro.
Help Topics
Select Help>About CeCalWin Pro… to access version and license information.
© 2007 CORRSYS-DATRON Sensorsysteme GmbH, Wetzlar, Germany
D816-50-01-01E 06/07
29
User Manual
CeCalWin Pro Software
4.2.2 Tool Bar
All Tool Bar functions correspond to functions also available in the Menu Bar.
See the illustration below to reference equivalent menu functions.
1.
2.
1.
2.
3.
4.
5.
6.
7.
8.
9.
10.
11.
12.
13.
14.
15.
3.
4.
5.
6.
7.
8.
9. 10.
11. 12. 13. 14. 15.
File>New
File>Open
File>Save
File>Save Sensor
Toggle Project Bar
Read Sensor
Write Sensor
Test Output
Toggle Units
Calibration
Start Test
Stop Test
View Online Display
Not activated
About CeCalWin Pro
4.2.3 Status Bar
The Status Bar is located at the bottom of the Main Program Window and displays text information
about the connected Sensor. If an error occurs during communication with the Sensor, the step in
which the error occurs will be displayed. This information provides the user a diagnostic basis from
which the required correction can be initiated. In the event that the error condition cannot be rectified,
please be sure to note the error message before contacting the manufacturer.
4.2.4 Project Bar
The Project Bar provides adds a register listing of Sensors, Tests, etc.
© 2007 CORRSYS-DATRON Sensorsysteme GmbH, Wetzlar, Germany
D816-50-01-01E 06/07
30
User Manual
CeCalWin Pro Software
Using CeCalWin Pro
Pro
5. Test Configuration
© 2007 CORRSYS-DATRON Sensorsysteme GmbH, Wetzlar, Germany
D816-50-01-01E 06/07
31
User Manual
CeCalWin Pro Software
Setting-Up a Test with CeCalWin Pro
CeCalWin Pro is designed to enable fast, easy test set-up. When you open the application, the
General Test Settings Tab will be displayed:
General Test Settings Tab
The General Test Settings Tab includes options to select the applications that will be used to display
and/or print test notes and/or data files.
Open Data File Command Line: this option allows you to select that application that will be used
to open and view data files generated in the defined tests. As shown above, the Notepad application
is the default setting for this option. To select a different application, click on the ... button to the right
of the file path field and browse to the desired application using standard Windows functions.
Print Data File Command Line: this option allows you to select that application that will be used
to print data files generated in the defined tests. As shown above, the Notepad application is the default
setting for this option. To select a different application, click on the ... button to the right of the file path
field and browse to the desired application using standard Windows functions.
© 2007 CORRSYS-DATRON Sensorsysteme GmbH, Wetzlar, Germany
D816-50-01-01E 06/07
32
User Manual
CeCalWin Pro Software
Test Configuration Settings
To access all other test configuration options, begin by selecting No defined Test in the Project Bar.
No defined test
Next, select Insert Test from the Edit Menu.
The Settings Tab will be active in the Project Window:
You will also see tabs labeled Online Display Settings and Data File Contents.
© 2007 CORRSYS-DATRON Sensorsysteme GmbH, Wetzlar, Germany
D816-50-01-01E 06/07
33
User Manual
CeCalWin Pro Software
Settings Tab > Settings selections
Selections available in the Settings section of the Settings Tab include:
Name: highlight the default Test Name and enter a new Test Name. In this example, the Test is named
Brake Test 1.
Delay after Trigger: this value represents the minimum time between two trigger pulses required
for each of the two pulses to be considered as separate pulse signals. Enter a value from 100 ms to
1000ms.
Sampling Rate: the Sampling Rate is fixed at 100 ms (10 Hz).
Show file identification editbox after test finish: when this option is selected, the Notepad
application will open automatically at the end of each test. This allows you to enter and save notes
about the test run upon completion. If preferred, other applications such as MS Word can be selected to
enter and save notes. To select an application other than Notepad, see General Test Settings on the
previous page.
Open data file with external application: when this option is selected,the Notepad application
will open automatically at the end of each test. It will display a Tab file of the data collected during the the
test that has just been completed. If preferred, other applications such as MS Word can be selected to
display test results. To select an application other than Notepad, see General Test Settings on the
previous page.
Print data file after the test with external application: when this option is selected, the
selected application will automatically open and print a Tab file of the data collected during the test that
has just been completed.
Remain Online Display open and wait for any key pressed after test finish: when this
option is selected, the online display will remain open until any key on the connected PC is pressed.
Remain Online Display open for: when this option is selected, the online display can be set to
remain open for a specified number of seconds after the test is completed. Enter the desired value
(in seconds) in the in the numeric field.
© 2007 CORRSYS-DATRON Sensorsysteme GmbH, Wetzlar, Germany
D816-50-01-01E 06/07
34
User Manual
CeCalWin Pro Software
Settings Tab > Conditions selections
Selections available in the Conditions section of the Settings Tab include:
Start: use the pulldown menu to select the desired Start Trigger, as shown below:
Available trigger selections include Hardware Trigger, Velocity, Distance, Time, Acceleration, and Keyboard
(Space).
When Velocity, Distance, or Time are selected, the > pulldown and the value field are activated.
As shown below, available selections in the > pulldown are > (greater than) and <= (less than or equal to):
Select the desired operator, then enter a value in the numeric field. As shown above, the unit for each of
the available trigger selections is automatically displayed to the right of the numeric field.
Stop: available selections for the Stop Trigger function are the same as the Start Trigger selections.
Acoustic Signal: select this setting to activate an acoustic signal, as applicable to the test configuration.
NOTE: the keyboard will also work as a trigger, e.g. when Velocity is chosen as a trigger. This is a
function to check your test configuration.
© 2007 CORRSYS-DATRON Sensorsysteme GmbH, Wetzlar, Germany
D816-50-01-01E 06/07
35
User Manual
CeCalWin Pro Software
Settings Tab > Extras
Selections available in the Extras section of the Settings Tab include:
DFL Factor: some sensors, such as the CDS MicroSTAR microwave speed and distance sensor are
equipped with an input for CDS DFL Fuel Flow Meters. A numeric value can be entered to set the
desired number of pulses to be generated per cubic centimeter of fuel measured by the DFL unit.
© 2007 CORRSYS-DATRON Sensorsysteme GmbH, Wetzlar, Germany
D816-50-01-01E 06/07
36
User Manual
CeCalWin Pro Software
Online Display Settings Tab
These settings are used to configure the CeCalWin Pro Online Display
As shown above (outlined in the orange box) is a small representation of the online display. There are 6
user-definable fields that can be configured with a variety of display parameters.
To activate a field, click on it. When activated, the field will be lighter in color. In the example above, the
field in the upper left-hand corner is highlighted.
Next, use the Digital Display pulldown menu to select the parameter to be displayed in the selected field.
As shown at left, the available
selections are Velocity, Distance,
Acceleration, Angle, Height, Time,
Start Velocity, Consumption (in 3
selectable units), and Nothing.
Finally, click on the Color pulldown (in the orange box above), to activate the Color dialog box, shown
below. Here, you can select the desired color for the display. Click OK to confirm the selection, or Cancel
to return to the Online Display settings.
Reset to Default: click on the Reset to Default to return the display settings to the default configuration.
© 2007 CORRSYS-DATRON Sensorsysteme GmbH, Wetzlar, Germany
D816-50-01-01E 06/07
37
User Manual
CeCalWin Pro Software
Online Display Settings Tab: Examples of typical measurement displays
After starting a test with the Start Button or F4 button, CeCalWin Pro displays the selected signals and
waits for the start trigger. The yellow "Waiting" bar is displayed at the bottom of the window.
After the start trigger, the yellow bar changes to the green "Measuring" bar and the data acquisition begins.
© 2007 CORRSYS-DATRON Sensorsysteme GmbH, Wetzlar, Germany
D816-50-01-01E 06/07
38
User Manual
CeCalWin Pro Software
Online Display Settings Tab: Examples of typical measurement displays
When the stop trigger is activated and the measurement stops, the Online Display remains open, if
selected in Settings, page 34. The display shows the last measurement values at the stop trigger
event. The red "Stop" bar will also be displayed at the bottom of the window with instructions explaining
the next required action.
© 2007 CORRSYS-DATRON Sensorsysteme GmbH, Wetzlar, Germany
D816-50-01-01E 06/07
39
User Manual
CeCalWin Pro Software
Data File Contents Tab
File Name: by default, the file name is the same as the Test Name entered in the Project Bar (in this
example, the Test Name is Brake Test 1). As shown above, the # characters in the file name will be
replaced by file numbers, which are ordered sequentially. In this example, the File Names would be Brake
Test 1_001.tab, Brake Test 1_002.tab, and so on.
Data File Path: click on the ... button to select a directory into which the Data Files will be saved. The
default Path created by installing CeCalWin Pro is "*:\Program Files\Corrsys\CeCalWin\Data"
ASCII FIle Column Separator: click to select the radio button for the desired Column Separator.
Available selections are Tabulator (Tab), Semicolon, Space, and Comma.
Line Steps: Line Step values determine the interval at which each consecutive line of data is to be
displayed. For example, if the Line Step value for the Distance channel is set to 10, a line of data will
be displayed every 10 units (units correspond to prior channel settings). Therefore, if a brake test starts
at 107.5 km/h, the next value will be 97.5, then 87.5 and so on. NOTE: the Step function is applicable
to lead channels ONLY; the LEAD setting must be set to ON in order to activate the Step function.
To activate the Line Step function, select the check box to the left of the parameter (Velocity,
Distance, or Time), and then enter the desired Line Step value.
The Extra Line selection provides for the display an extra step value. For example, if the Step value is
set to display in steps, or increments, of 10 (10, 20, 30, ...) it is also possible to add a line to be displayed
at any desired value (e.g. 26).
To activate the Extra Line function, select the Extra Line check box to the right of the parameter
(Velocity, Distance, or Time), and then enter the desired Extra Line value.
The Fix function sets the first line of data to display as an actual acquired value, then rounds that value
to the nearest whole number. This initial whole number is displayed and it is the starting point for the
table. For example, if the Step value for the distance channel is fixed at 10, a line of data will be displayed every 10 units (units correspond to prior channel settings), and each line will be a whole number.
Therefore, if a brake test starts at 106 Km/h, the FIX function will set data lines at 100 km/h, then 90,
80, 70, and so on.
(continues on next page)
© 2007 CORRSYS-DATRON Sensorsysteme GmbH, Wetzlar, Germany
D816-50-01-01E 06/07
40
User Manual
Data File Contents Tab
CeCalWin Pro Software
(continued from previous page)
Header Options: use the check boxes to select the desired information to be displayed in the Data File
header. Available options are Sensor Information, File Name, Date, Time, Start Trigger Info, Start Trigger
Info, and File Identification. If File Identification is selected, enter desired information in the available text
field.
Body Options: use the check boxes to select the desired parameters to be displayed in the Data File.
Available options are Velocity, Distance, Time, Angle, Height, Digital, Acceleration, Consumption (in 4 available units), Channel Names, Channel Units, and Line Status.
Footer Options: use the check boxes to select the desired parameters to be displayed in the Data File
footer. Available options are Average Velocity, Min. and Max Velocity, Total Distance, Total Time, MFDD,
Average Acceleration a(v,t), Average Acceleration a(v,s), Average Acceleration a(s,t), and Velocity Interval
(Avg. Acc.).
If Velocity Interval (Avg. Acc.) is is selected, enter the desired minimum and maximum values in the
numeric fields.
Definitions:
MFDD – Mean Fully Developed Deceleration
Average Acceleration a(v,t) – a calculated acceleration value
Average Acceleration a(v,s) – a calculated acceleration value
Average Acceleration a(s,t) – a calculated acceleration value
Velocity Interval (Avg. Acc.) – average calculated values a(v,t); a(v,s); a(s,t), calculated between the two
selected values, and distance and time.
© 2007 CORRSYS-DATRON Sensorsysteme GmbH, Wetzlar, Germany
D816-50-01-01E 06/07
41
User Manual
CeCalWin Pro Software
Data File Contents Tab: Sample measurement results
© 2007 CORRSYS-DATRON Sensorsysteme GmbH, Wetzlar, Germany
D816-50-01-01E 06/07
42
User Manual
CeCalWin Pro Software
Creating Test Groups
Multiple tests can be run in user-specified sequences by placing them into Test Groups. Subsequently,
Groups of Tests can be looped (repeated).To create a Test Group, begin by selecting Defined Tests in
the Project Bar.
Defined Tests
Next, select Insert Test from the Edit Menu.
The Group settings will be active in the Project Window:
As shown above in the Project Bar, a New Group (named New Group 0) has been created.
© 2007 CORRSYS-DATRON Sensorsysteme GmbH, Wetzlar, Germany
D816-50-01-01E 06/07
43
User Manual
Creating Test Groups
CeCalWin Pro Software
(continued from previous page)
Name: in the example above, the New Group has been named Performance Evaluation by clicking in the
Name field and entering the new Group name. This change is also seen in the Project Bar.
Tests: to add Tests to a Group, click on the desired Test in the Project Bar and drag it into the desired
Group in the Project Bar. In the example below, Brake Test 1 and Accel Test have been moved into the
Group named Performance Evaluation.
The order of the Tests can be changed by selecting a Test name in the Tests window and clicking on the
Up or Down buttons.
(continues on next page)
© 2007 CORRSYS-DATRON Sensorsysteme GmbH, Wetzlar, Germany
D816-50-01-01E 06/07
44
User Manual
Creating Test Groups
CeCalWin Pro Software
(continued from previous page)
Loops: to loop the Tests included in the Test Group a specified number of times, select the Number of
Loops radio button and enter the desired number of loops in the numeric field.
To loop the Tests included in the Test Group an number of times (until the available storage is filled), select
the Loop infinite radio button.
Path to separate Folder for storing loop Data Files: to store data from looped tests in a separate directory, select the checkbox, then click on the ... button and browse to the desired directory.
File Identification: to add information to the looped test data file, select the checkbox, then enter the
desired information in the text field.
© 2007 CORRSYS-DATRON Sensorsysteme GmbH, Wetzlar, Germany
D816-50-01-01E 06/07
45
User Manual
CeCalWin Pro Software
Notes:
© 2007 CORRSYS-DATRON Sensorsysteme GmbH, Wetzlar, Germany
D816-50-01-01E 06/07
46
User Manual
CeCalWin Pro Software
Using CeCalWin Pro
Pro
6. Troubleshooting
© 2007 CORRSYS-DATRON Sensorsysteme GmbH, Wetzlar, Germany
D816-50-01-01E 06/07
47
User Manual
CeCalWin Pro Software
The first step in troubleshooting should always be to check all connections:
•
•
•
•
•
First, check the wiring connection between sensor and PC/Notebook.
Also be sure to note which serial interface is used for sensor connection.
Open menu item, Options>Interface and choose the correct interface.
Proper communication with the sensor should now be possible.
Check this by selecting the Read Sensor command in the Measurements Menu.
Error messages and possible causes:
"Unknown communication protocol"
This message usually indicates that no sensor or an unknown sensor is connected. This message often
appears as a result of improper or incomplete connection. Double-check all connections and also check
the sensor interface by opening the menu Interface and choose the correct interface.
"COM port already in use"
This message usually indicates that the interface is occupied by another application. Close this application
or connect sensor to another interface.
"Sensor is not answering"
This message indicates that faults occurred by communication with sensor. This message often appears
as a problem with cables or when user start calibration during moving sensors (SCE-M and LCE-M
sensors).
"Sensor type not registered"
This message indicates an error encountered during the opening of a corrupt project file. The project file
(.ccw) contains faulty data or data for a sensor which is not registered in the current CeCalWin Pro
version.
“Failed to create equipment”
This message means that the DLLs are not registered correctly. It appears if you use the Windows 2000
or Windows XP Professional operating system without being registered as user with administrative rights
or as a Power User.
Note: At least "Power User" rights are required to use CeCalWin Pro with Windows 2000 and Windows XP
Professional.
Additional Notes On Error Correction
Sensor and data acquisition must use the same CAN baud rate and ID settings to enable proper CAN
communication and data acquisition function!
Please contact CORRSYS-DATRON Sensorsysteme GmbH if other faults occur and no error messages
are displayed. CORRSYS-DATRON Sensorsysteme GmbH can correct these issues in subsequent software versions and service releases.
For errors relating to the Windows* operating system, please see Windows Help or consult the Windows
user manual.
*Windows, Windows NT, Windows 2000, and Windows XP Professional are registered trademarks of the Microsoft
Corporation.
**Windows Explorer is a registered trademark of the Microsoft Corporation.
© 2007 CORRSYS-DATRON Sensorsysteme GmbH, Wetzlar, Germany
D816-50-01-01E 06/07
48