1
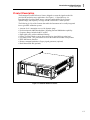
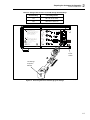
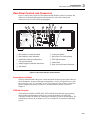
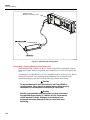
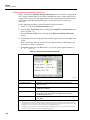
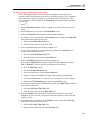
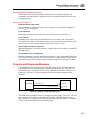
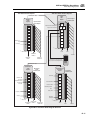
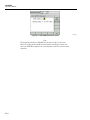
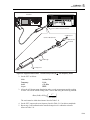
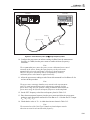
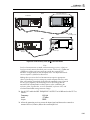
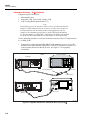
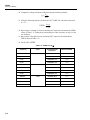
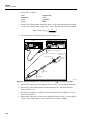
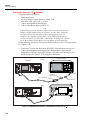
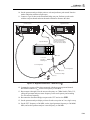
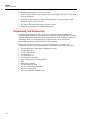
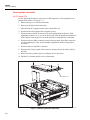
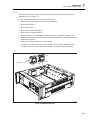
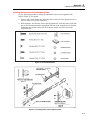
Local Operation
Operating the Instrument
3
Connecting a Leveling Head to the Instrument
W Caution
The 9640A front-panel connector interface is suited only for use
with Fluke 9640A-xx Leveling Heads. To avoid equipment
damage, no other connection is permitted.
Note
Background: The 9640A-xx Leveling Head contains a small EEPROM
device in which the head type, serial number, and calibration data is
stored. When a Leveling Head is fitted, it is automatically detected and the
stored data is read. The head type, 9640A-50 (50 Ohm) or 9640A-75 (75
Ohm), will be used to re-scale User Interface values in accordance with the
capabilities of the Leveling Head and may, therefore, cause displayed level
values to change.
Hot (power on) swapping of Leveling Heads is fully supported and will not
cause damage or RF leakage. The Hot removal of a Leveling Head will,
however, force the Instrument output into Standby.
The Base Unit and Leveling Heads are calibrated together, and details of
the association are stored in both the Base Unit and Leveling Heads.
Connecting a Head not associated with the Base will result in a warning
message being displayed, but normal operation will not be prevented.
Details of the Base/Head associations can be displayed by pressing the
Setup key, followed by the Calibration softkey.
Use the following procedure to connect the cable end of the Leveling Head to the RF
Output connector on the Instrument:
1. Remove the plastic connector protection caps from the cable-end connectors and save
them for future use.
2. Refer to Figure 3-5, and connect the multiway connector to the Leveling Head
Control connector on the Instrument. Press firmly on the multiway connector until it
latches.
3. Refer to Figure 3-5, and connect the SMA connector with the RF Output connector
on the Instrument.
4. Torque the connector to 0.45 Nm (4 in-lb) using an SMA connector torque wrench.
The torque wrench is available as an accessory; see Chapter 1, Options and
Accessories List.
3-31