1
User Manual
Part Number: MANDADP
Document Number: 131
Manual by: Andrew Bell and Emilijo Mihatov
Copyright © February 2001
Contents
1.
2.
Introduction .............................................................................................................. 4
Physical Components .............................................................................................. 4
2.1
The FD-24 Audio Dubber ...................................................................................................................... 4
2.1.1
Audio Channel Card .............................................................................................................................. 4
2.1.2
The CPU Card ........................................................................................................................................ 4
2.1.3
Storage ................................................................................................................................................... 4
2.1.4
Connections to the FD-24 Audio Dubber ............................................................................................... 5
2.2
The FC-100 Controller ........................................................................................................................... 6
2.2.1
The LCD Screen ..................................................................................................................................... 8
2.2.3
The Track Button Lights .......................................................................................................................... 9
3.
Software Operation................................................................................................ 10
3.1
Dubber and Track Selection ............................................................................................................... 10
3.1.1
Dubber Selection .................................................................................................................................. 10
3.1.2
Track Selection ..................................................................................................................................... 10
3.2
Transport Control ................................................................................................................................ 10
3.2.1
CHASE ................................................................................................................................................. 10
3.2.2
PLAY ..................................................................................................................................................... 11
3.2.3
Reverse Play ........................................................................................................................................ 11
3.2.4
Stop / Jog .............................................................................................................................................. 11
3.2.5
Fast Forward ......................................................................................................................................... 11
3.2.6
Rewind ................................................................................................................................................. 11
3.2.7
Locate ................................................................................................................................................... 11
3.3
Loading and Unloading Files .............................................................................................................. 12
3.3.1
The Title Menu ...................................................................................................................................... 12
3.3.2
The Load Sequence ............................................................................................................................. 12
3.3.3
Multi-Project Load (MPL) ...................................................................................................................... 12
3.3.4
The MPL Project Select Screen ........................................................................................................... 13
3.4
Slipping ................................................................................................................................................. 13
3.4.1
Tracks .................................................................................................................................................... 14
3.4.2
Dubbers ................................................................................................................................................ 15
3.4.3
Capturing Offsets .................................................................................................................................. 15
3.5
Synchronisation .................................................................................................................................. 16
3.5.1
The Chase Key ..................................................................................................................................... 16
3.5.2
The Sync Menu ..................................................................................................................................... 16
4.
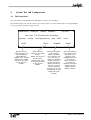
System Test and Configuration ............................................................................ 17
4.1
The Setup Menu ................................................................................................................................... 17
4.2
The Tests Submenu ............................................................................................................................. 18
5.
Preparing Projects for Export to DaDplus .......................................................... 18
5.1
MFX3plus Workstations ...................................................................................................................... 18
5.1.1
Hard Disks ............................................................................................................................................ 18
5.1.2
Exporting the Project. ........................................................................................................................... 18
5.1.3
Special Considerations ........................................................................................................................ 18
5.2
Pro Tools™ Workstations .................................................................................................................... 19
5.2.1
Hard Disks ............................................................................................................................................ 19
5.2.2
Exporting the Project ............................................................................................................................ 19
5.2.3
Special Considerations ........................................................................................................................ 19
5.3
Akai DDPlus™ Series ......................................................................................................................... 19
5.3.1
Hard Disks ............................................................................................................................................ 19
5.3.1
Exporting the Project ............................................................................................................................ 19
5.3.2
Special Considerations ........................................................................................................................ 19
6.
Index ........................................................................................................................ 20
3
DaDplus User Manual
1.
Introduction
Fairlight’s Digital Audio Dubber (DaDplus) was created for use as a playback device in film and television sound
mixing sessions, replacing commonly used machines such as multi-track tape machines and magnetic sprocketed
dubbers. It was also designed as a cost effective playback system wherever large numbers of tracks must be played
back cost effectively.
DaDplus is able to play project files created by Fairlight MFX3plus, Digidesign Pro Tools™ and Akai DDPlus™ audio
editing systems as well as audio edits from the Avid™ family of video editing platforms when converted to Pro
Tools™ using utilities available from Avid™.
2.
Physical Components
The MFX Dubber System consists of two major components: the FC-100 Controller and the FD-24 Audio Dubber.
FC-100 Controllers and Audio Dubbers can be connected in a network allowing simultaneous control of up to 24
Audio Dubbers from multiple Controllers.
2.1
The FD-24 Audio Dubber
Each Audio Dubber is a rack mounted digital audio reproducer for up to 24 simultaneous channels.
The Dubber is able to self-synchronise to time code at any industry standard frame rate in the forwards or reverse
direction. In addition, it can lock its Master Sample Clock to an external video or word clock reference.
The following section describes the hardware components of the Audio Dubber.
2.1.1 Audio Channel Card
Each Audio Channel card can reproduce four simultaneous mono audio clips, with up to 4 bands of equalisation on
each clip. Additionally, any of the reproduced clips may contain crossfades, which are performed in real time.
An Audio Dubber may contain up to 6 Channel cards.
2.1.2 The CPU Card
The CPU card performs functions required by the unit as a whole. These include file handling, disk accessing, user
interface and synchronisation. To make these functions happen, its hardware includes a microprocessor, a SCSI
chip and a dedicated time code reader and processor.
2.1.3 Storage
Each Audio Dubber contains an internal hard disk which is used purely for software and caching requirements. In
addition the unit may contain a fixed hard drive, a docking bay for a removable hard disk, and/or a magnetooptical drive, or may connect to any of these via the SCSI port at the rear of the machine.
Audio may be loaded on to the Dubber on removable optical media or removable disk drives. Projects on these
drives are played directly.
DaDplus User Manual
4
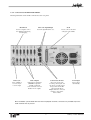
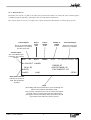
2.1.4 Connections to the FD-24 Audio Dubber
The diagram below shows all the connections to the rear panel.
RS-232 Port
Time Code Input/Output
SCSI
Used for computer connection, DaDView interfacing
and debugging.
Used for longitudinal time code.
Used to connect extra hard
or magneto optical disks.
House Sync
Audio Outputs
Control Network Ports
Power Input
Video, 256xFS or
word clock sync
reference input.
Both analogue and digital
(AES/EBU) outputs are
available on different
connectors. Each connector
handles 4 mono outputs.
One port is used for the
incoming control signal, and
the other to pass this signal
along to the next unit. The
control network allows
multiple units to be connected,
forming a "daisy chain"
between units.
Senses voltage
automatically.
Note: On Dubber systems fitted with fewer than 24 playback channels, connectors are provided only for the
audio channels that are present.
5
DaDplus User Manual
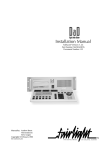
2.2
The FC-100 Controller
The Controller can be used to control up to 24 Dubbers at the same time, each with up to 24 tracks of playback. The 24
Dubbers are represented by the Dubber Status Lights, and are selected using the Machine Key and the Track keys.
Track Keys
Used to select tracks for slipping etc.
If the Machine Key is selected, these
keys select Audio Dubbers. The LEDs
in these keys show track status i.e.
active, selected, slipped (details later).
Soft Keys
The function of
each key is
written above it
on the LCD
screen
Rub Key
Fast Forward
Press this key
and then a Track
Key to produce
test audio output
from selected
track.
Causes selected
Dubber to move
forward at sixteen
times play speed
(if Chase is off or
no time code
present). Pressing
the key again
increases the
speed.
Play
Causes selected
Dubber to play
forwards. (If
Chase is off or no
time code
present)
Chase
Stop
Rewind
Reverse Play
Enables time code chase
mode for the selected
Dubber.
Causes selected Dubber to
stop (if Chase is off or no
time code present).
Causes selected Dubber to
move backwards at sixteen
times play speed (if Chase
is off or no time code
present). Pressing the key
again increases the speed.
Causes selected Dubber to
play in reverse (if Chase is
off or no time code present)
DaDplus User Manual
6
Machine Key
Dubber Lights
Mark In / Out
Press this key and then a
track key to select an Audio
Dubber
Show the status of each
Dubber controlled by the
FC-100 (details Page 9)
Not used in this version of
software.
All Key
Selects all tracks. If the
Machine Key is pressed,
selects all Audio Dubbers.
Menu Keys
Used to change the menu
on the LCD Screen.
Shift Key
Numeric Keypad
Hold Shift key down while
pressing various keys to
enable alternative functions
(details described later in
this manual).
Used for typing time codes
and entering parameter
numbers
Increment /
Decrement
Used to advance and retard
tracks, also to change
parameters in some of the
menus.
7
Jogger Wheel
Used for jogging selected
Dubber with audio
scrubbing (if Chase is off
or no time code present),
and for slipping tracks and
changing parameter
numbers
DaDplus User Manual
2.2.1 The LCD Screen
The LCD screen is used as a guide to the status and operations in the DaDplus. It contains all of the command options
available through the Soft Keys, and displays other text and numeric information.
The contents of this screen vary according to the context, but the items listed below are almost always present.
Current Dubber
Shows the selected dubber.
If all machines are selected,
the label shows ALL.
Project
Frame
Rate
Project
Sample
Rate
Number of
Loaded
Tracks
Time Code Display
Shows the current Play
Position for the Dubbers.
Current Project
The current MFX Project
loaded into the selected
Machine.
'$'1'7.7&
12352-(&7/2$'('
7+(0(37
!352-(&71$0(07
)2/(<352-(&707
',6.
%8))(5
&$1&(//2$'
6(783
Buffer Status Indicator
Indicates the amount of
audio data loaded into
the buffer.
Menu
Most editing and setup commands are accessed through the
Menus in the Liquid Crystal Display (LCD).
First you press a menu key (one of the four keys at the right of
the LCD). Then you select an item from the LCD menu by
pressing the Soft Key immediately below. Sometimes this will
open another menu with more Soft Key choices.
DaDplus User Manual
8
2.2.2
The Dubber Lights
The Dubber Lights are used to indicate the status of all Dubbers connected to the system.
GREEN
RED
When steady, indicates that the Dubber is
active i.e. it has an audio project loaded.
When steady, indicates
that one or more tracks
on the Dubber are
slipped away from
normal sync.
When flashing, indicates the selected
Dubber.
1
2
3
4
5
6
7
8
9
10
11
12
ACTIVE
SLIP
CHASE
ACTIVE
SLIP
YELLOW
CHASE
13
14
15
16
17
18
19
20
21
22
23
24
When steady, indicates that the Dubber
is locked to time code.
When flashing,
indicates that the
Dubber is waiting for
time code, or not yet
locked and playing.
2.2.3 The Track Button Lights
The Track Button Lights are used to indicate the status of each track on the selected Dubber.
GREEN
When steady, indicates that the Track is
active i.e. it has audio loaded ready to play.
When off, indicates that the Track is muted
(or not used in the current project).
1
2
RED
When steady, indicates that this track is
slipped away from normal sync.
When flashing, indicates that this track has
been selected for slipping.
9
DaDplus User Manual
3.
Software Operation
3.1
Dubber and Track Selection
3.1.1 Dubber Selection
Usually one Dubber is selected at a time. To do this, first press the Machine Key, then press the Track key corresponding to the Dubber you want to select. The number of this Dubber is shown in the LED display, and its green
light flashes.
If you want to escape from this mode before selecting a machine, press the Machine key again.
To select all Dubbers, press the Machine Key, then the ALL key. This is a special mode, and only a few operations
can be carried out with all Dubbers selected. To return to having only one Dubber selected, select one in the normal
way.
3.1.2 Track Selection
The Track Keys are used to mute and unmute tracks on the selected Dubber. Muted tracks have their green light
unlit. Immediately after loading a project, all the tracks that are active in that project will be illuminated.
When the Slip Menu is active, the Track Keys are used to select tracks for slipping. To select a track for slipping,
you must first press the Slip Menu key. Then press the desired Track key. You may select any number of tracks in
turn, prior to performing an action on them. Pressing the key on an already selected track, deselects that track.
"Solo" Track Selection
You may select a single track (and only that track) by double-clicking its Track key.
Group Track Selection
You may select a contiguous series of tracks by holding down one Track key and double-pressing another. All the
tracks in between will be selected. You may also select all tracks by pressing the ALL button.
Deselect All Tracks
You may deselect all tracks by holding the SHIFT key and pressing the ALL button.
3.2
Transport Control
Transport control of the Dubbers is achieved using dedicated keys on the FC-100 Controller Board. All transport
commands apply only to the selected Dubber.
3.2.1 CHASE
This key toggles the selected Dubbers (or all Dubbers) in and out of chase mode. When a Dubber is in chase mode,
it follows the time code at the time code input. While time code is present, and the Dubber is in chase mode, the
transport controls on the Dubber console are inactive.
Chase is the only transport command which can be given to all Dubbers at the same time. (Press MACHINE ALL
CHASE)
When chase mode is active, the light in the CHASE key flashes while the dubbers wait for time code. The light is
solid when the machine achieves time code lock and all channels start playing. If the Chase light on any machine
starts to flash, it indicates that some audio may not have played correctly. This is usually due to a problem with the
hard disk such as fragmentation or very high edit density.
DaDplus User Manual
10
3.2.2 PLAY
Puts the selected Dubber into normal PLAY mode. When CHASE is on, playback will be interrupted if time code is
presented to the selected Dubber. The dubber will then locate to the incoming time code and begin to play from
there.
If all Dubbers are selected, the play command cannot be used.
3.2.3 Reverse PLAY
Puts the selected Dubber into Reverse PLAY mode.
3.2.4 Stop / Jog
Brings the selected Dubber to a stop from either PLAY or SHUTTLE modes. The Jogger Wheel can now be used to
scrub the audio on the selected Dubber.
Holding down the Shift key while turning the Jogger Wheel causes scrubbing at exactly play speed, forwards or
backwards.
When Chase is on, scrubbing will be interrupted if time code is presented to the selected Dubber.
3.2.5 Fast Forward
Puts the selected Dubber into fast forward at twice play speed. If the Fast Forward key is pressed again the speed
doubles, and it will continue to do so with repeated pressing of the key, up to 128 times play speed.
When CHASE is on, fast forward will be interrupted if time code starts feeding the selected Dubber.
3.2.6 Rewind
Puts the selected Dubber into rewind at twice play speed. If the Rewind key is pressed again the speed doubles, and
it will continue to do so with repeated pressing of the key, up to 128 times play speed.
When Chase is on, rewind will be interrupted if time code is presented to the selected Dubber.
3.2.7 Locate
To locate a Dubber, type the time code or film footage on the Numeric Keypad. It will replace the TC Display
number at the upper right of the LCD screen. Now press STOP to locate the selected Dubber to that location.
Alternatively you may press PLAY to locate to the new position and start playing.
When typing in a time code number, the last digit(s) may be removed by pressing the Rub Out key. To remove all
digits press SHIFT + RUB OUT. When all digits have been removed, the original TC Display value returns to the
screen and the operation is cancelled.
11
DaDplus User Manual
3.3
Loading and Unloading Files
A Dubber must be loaded with a Project created on an MFX3plus, Pro Tools, or Akai DDplus workstation before it can
produce audio.
3.3.1 The Title Menu
The Title Menu provides file handling commands which work on the selected Dubber and its attached storage
devices.
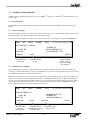
3.3.2 The Load Sequence
The right hand side of the LCD screen changes to show a list of all projects on the hard disk, which can be scrolled
through using the + and - keys. The LED in the load Soft Key flashes.
Scroll the project list until the desired project is situated in the centre of the display, then press the ENTER Key.
'$'1'7.7&
12352-(&7/2$'('
',6.
%8))(5
7+(0(37
!352-(&71$0(07
)2/(<352-(&707
&$1&(//2$'
Cancels the load
command.
6(783
Loads the selected
project.
Opens the Setup
menu , used for
testing and configuring machines.
3.3.3 Multi-Project Load (MPL)
To load multiple disparate projects from either the same or different disks, load a project using the method described in 3.3.2 The Load Sequence, then press the LOAD key again. Tracks not used by the first project have their
green LED lights lit ready for loading the next project.
Multi-Project Load allows you to select the tracks into which you load additional projects. To load an eight track
project into tracks nine to sixteen, hold down Track Key 9 and double click Track Key 16. The green LED indicators for these tracks will now be lit. If material from a previous load is already loaded into these tracks, this will be
replaced by the new material. Now use the +/- keys to select the desired project and press ENTER. Repeat this
process until all tracks have been loaded with project material.
'$'1'7.7&
352-(&71$0(07
',6.
%8))(5
$'5352-(&707
!7+(0(37
352-(&71$0(07
81/2$'/2$'6(/(&76(783
Unloads audio
data from
selected Tracks.
DaDplus User Manual
Loads the currently
selected Project into the
selected Tracks.
Displays the Project
Select screen.
12
3.3.4 The MPL Project Select Screen
This screen allows the user to toggle through the various projects loaded into the dubber in a Multi-Project Load
session and check the tracks for audio clips that may be missing from the project, or that are corrupted. It also
displays other information pertaining to the projects and allows the user to unload a particular project if needed.
Example: Load the first eight tracks of two projects into tracks 1 to 8 and then 9 to 16 of the dubber respectively. To check the validity of audio on the second track of Project 2 in a Multi-Project Load session, from the
Title Screen, press the SELECT button. The first project will be displayed. Then press NEXT. The screen will
now display the second project loaded, and the track lights for the Dubber tracks that contain this project will
be lit. Now press the second track key for this project (Track 10), if the audio on this track has loaded
successfully, the screen will show “TRACK 10 (02) IS OK” as in the illustration below.
MPL Project
Number.
Track
Status
Number of
tracks from this
project currently
loaded.
Number of
tracks this
project contains
on disk.
The Disk Number
from which this
project was loaded.
Location of the
first clip in this
project.
'$'1'7.7&
35-7.$9/'.33
352-(&71$0(07
75$&.,62.
Press to
proceed
to display
the next
project.
81/2$'/2$'1(;76(783
Notes:
If a 9 track project is being loaded, but only eight tracks are selected, only the first eight tracks of that project
will be loaded.
If a project has blank tracks, DaDplus’ Multi-Project Load function will automatically skip the blank tracks and
bring all used tracks together so that they appear on the DaDplus as consecutive tracks.
If the various projects loaded have different frame rates, the frame rate of the first project loaded will be used
by the DaDplus. This can be changed later, if required, in the SYNC menu.
Only projects with the same sample rate as the first project loaded can be added to a Multi-Project Load
session.
Projects from MFX3plus, Pro Tools™ and Akai™ can be mixed freely within a Multi-Project Load session.
To replace all loaded tracks with a new set of projects, click LOAD than ALL..
3.4
Slipping
Slipping advances or retards tracks compared to the time code source. Just as with synchroniser offsets:
Positive numbers represent advances (tracks playing earlier).
Negative numbers represent retards (tracks playing later).
'$'1'7.7&
352-(&71$0(07
75$&.
2))6(7
6/,3
&/($55(6725(2))6(7&$3785(
13
DaDplus User Manual
3.4.1 Tracks
Each track can be slipped individually, by frames or by smaller increments. Multiple tracks can be slipped together
by selecting them before changing the value.
Slippage.
To change slippage on a single track, press the SLIP key (if not already lit), then select the track.
The red SLIP light on the selected Track key starts flashing. You may now use the + and - keys to slip the selected
track by frames. If you wish to slip by a finer amount, hold down the Shift key at the same time. The track will now
be slipped by perforations (quarter frames) if the displayed time units are feet and frames, or by 5 subframes (onesixteenth of a frame) if the units are in time code format.
The Jogger Wheel can also be used to slip the selected track. If the transport is stopped the track is heard scrubbing
while you turn the Jogger Wheel. This can be used to locate a required sound on the track so it can be placed in
sync with the current TC Display value.
Slipping using the Jogger Wheel or + and - keys occurs immediately, even if the Dubbers are chasing time code, so
you can hear the results as you change the setting (this may be used to phase tracks if required). When you have
finished adjusting the amount of slip, press the Track key again to set the slip active. The red Slip light will now
stop flashing, but will remain lit solid if you have left the track at a non-zero slip.
Slipping Multiple Tracks
At any time the Slip key is lit, you may select any number of tracks. When more than one track is selected the
display shows "MULTI" next to the track number. The slippage on all the selected tracks changes at the same time.
If the tracks you selected have different slip amounts when you begin, the relative differences will remain while
you change them.
'$'1'7.7&
352-(&71$0(07
75$&.08/7,
2))6(7
&+$1*(
&/($55(6725(2))6(7&$3785(
Numerical Slippage
Slip values can also be entered numerically. After pressing the Slip key (even if you have already used the Jogger
Wheel or + and - keys) use the Numeric Keypad to enter a slip value in either feet and frames or time code format.
This number appears below the track slippage.
'$'1'7.7&
352-(&71$0(07
75$&.08/7,
2))6(7
6/,3
(175<
&/($55(6725(2))6(7&$3785(
DaDplus User Manual
14
Press ENTER to make the entry the ABSOLUTE slippage of the selected track(s).
Example: 5<ENTER> causes slip to read 5.
Press SHIFT-ENTER to make the entry into MINUS the ABSOLUTE slippage of the selected track(s).
Example: 5<SHIFT-ENTER> causes slip to read -5.
Press the PLUS (+) key , to add the entry to the existing slip for the selected track(s).
Example 5<PLUS> causes slip to increase by 5
Press the MINUS (-) key, to subtract the entry from the existing slip for the selected track(s).
Example 5<MINUS> causes slip to decrease by 5.
The PLUS and MINUS keys can be pressed repeatedly, using the same entry many times. To remove the slip value
entered, press <SHIFT-RUB OUT>.
Correcting Mistakes
If you make a mistake while typing a number, use the RUB OUT key to remove the last number(s), then type correct
ones in their place. The entire number can be removed by pressing <SHIFT-RUB OUT>.
Clear Slippage
To clear slippage from the selected tracks press the CLEAR Soft key. Or enter ZERO into the Numeric Keypad and
press ENTER.
Restore Previous Setting
To go back to the previous slip setting , press the RESTORE Soft Key.
3.4.2 Dubbers
It is possible to slip a whole Dubber, as well as individual tracks. This is an offset for the whole machine.
To slip a Dubber, first select it, then press the OFFSET Soft Key.
Now use the same controls to slip the Dubber as described above for slipping tracks. Press the OFFSET Soft Key
again to deselect it and store the slippage you have entered.
It is possible to slip all Dubbers at the same time. Select all Dubbers by pressing the MACH key and then ALL, then
operate the slip functions as described above. In this mode, it is not possible to select tracks.
3.4.3 Capturing Offsets
It is possible to set the slip value for a group of tracks or a Dubber by capturing its current position.
Stop the incoming time code at the new position for the audio to be slipped. You can also enter this location by
typing it into the numeric keypad and pressing ENTER.
Select the tracks you wish to slip by pressing the corresponding Track keys. Press ALL to select all tracks, or
choose OFFSET to slip the selected Dubber.
Press the CAPTURE key.
Enter the absolute time code value of the audio to be slipped on the numeric keypad or by using the jog wheel.
Remember to press ENTER when you’ve finished.
Press the CAPTURE soft key again to set the slip value.
To clear the slip settings, select the desired tracks, press the CAPTURE soft key, then press the CLEAR soft key.
15
DaDplus User Manual
3.5
Synchronisation
The DaDplus can chase time code, and can lock its sample clocks to a variety of external reference sources. These are
selected on the Sync Menu.
3.5.1 The Chase Key
The Chase key is used to place a Dubber (or all Dubbers) in sync with time code. When in Chase Mode, a Dubber is
always ready to respond to time code entering its input port. When there is no time code entering the port, the
normal transport controls can be used to play, shuttle or jog a selected Dubber, but as soon as the time code starts,
the Dubber jumps immediately into sync, ignoring all further transport commands. When the Chase key is turned
off for a Dubber it ignores time code input and follows local transport commands.
3.5.2 The Sync Menu
'$'1'7.7&
352-(&71$0(07
6<1&5$7(',63/$<-$06<1&02'(
:25'&/.1'7,0(&2'(2))6/2:
Sample Rate
Reference
Selection
Frame Rate
Selection
Time Code
Display
Selection
JAMSYNC
Mode
Selection
CHASE
Mode
Selection
SYNC (Timing Reference Selection) - This soft key allows selection of the timing reference for the digital
master clock. Press to change the reference signal shown in the lower line, pressing enough times to cycle
around to the desired choice. Choices are - VIDEO, WORD-CLK (digital word clock). SUPR-CLK (256 X
sample rate clock) or INTERNAL (internal crystal sync).
RATE (Frame Rate Selection) - Press this soft key to change the "expected" frame rate and format for
incoming time code. It is possible to "pull up" or "pull down" the play speed of the machine by setting the
frame rate at say 29.97 but actually providing time code at 30 frames per second. (This causes a 0.1%
increase in sample rate). If the wrong frame rate is selected, the display will report “TIME CODE TRACKING”,
and will not run at the correct speed. The available choices for this menu are - MP24 Motion Picture 24 fps,
EB25 European Broadcast 25 fps, DF29 DropFrame 30 fps pull-down compensated, ND29 Non Drop Frame
30 fps pull-down compensated, DF30 Drop Frame 30 fps, or ND30 Non Drop Frame 30 fps.
DISPLAY (Time Display Format) - Selects the type of timing units displayed on the LCD menus. Press
repeatedly to cycle through: TIME CODE (time code in the format shown in the FRAMES field), FILM/35 (feet
and frames for 35 mm film) and FILM/16 (feet and frames for 16 mm film). This choice also affects slip values
when the SHIFT key is held down - for FILM, slip is in quarter frames (perforations), while for TIME CODE it is
in subframes.
JAMSYNC Mode Selection - This function allows the selection of a time range over which DaDplus will “jam”
sync to the timing reference in the temporary absence of time code. The options for this function are: OFF no jam sync, stop immediately time code stops; BRIEF- handle brief dropouts, fast response; NORMAL handle dropouts, moderate response; LONG - handle dropouts up to a second, delays transport stop; or
LONGER - handle exceptionally long dropouts.
CHASE Mode Selection - The DaDplus’ motion ballistics are selectable so that the speed of the Dubber can
be made to ramp from zero to playback and back to zero in line with projector movements on film stages.
The options are: TV - assume non-linear LTC which has no ballistics, FILM - assume ballistic LTC with
projector ballistics, FAST - same as FILM but with faster ballistics, SLOW - same as FILM but with slower
ballistics.
DaDplus User Manual
16
4.
4.1
System Test and Configuration
The Setup Menu
Press the Soft Key under SETUP in the Title Menu, to display the Setup Menu.
The third line displays the current software version. Please take note of this number when contacting Fairlight
service personnel regarding any support issues.
)$,5/,*+7',*,7$/$8',2'8%%(56(783
9HUVLRQ3URGXFWLRQ5HOHDVH
6\VWHPVHWXSFRQILJXUDWLRQDQGVHOIWHVW
/(9(/7(676'8%%(53$1(/
Allows the user to
reduce the ouput level
of the DaDplus by
2dBu. While the
DaDplus has a nonimal
output level of +24dBu,
this allows the ouput
level to be set to
+22dBu.
Opens the Tests
Submenu, discussed
below.
Shows the ID number
of the selected
dubber, and allows
you to change it. Use
the + and - keys to
change the displayed
number, then press
the Soft Key again to
adopt that number. If
you try to set it to an
existing numbered
machine, an error will
be displayed, and the
number will not be
changed.
NOTE: This menu soft
key will only be
available when there
are no projects loaded
on the selected
Dubber.
17
Shows the number of
this controller Panel,
and allows you to
change it. Each
Dubbing system may
have up to two
Panels, which must
be numbered
differently. The Panel
numbers are independent from the
Dubber numbers.
DaDplus User Manual
4.2
The Tests Submenu
This menu is only available when the selected Dubber has no projects loaded. Please unload all projects from the
selected Dubber to obtain access to this menu if unavailable.
6<67(0&20321(17',$*1267,&7(676
6HOHFWRQHRIWKHRSWLRQVEHORZWRVWDUW
'636&6,3$1(/(;,7
The following tests are available:
DSP - Shows the presence of each DSP card, and indicates the operation status. Cards which are shown as
SICK or FAIL should be replaced. The BOOT option forces a reboot of all cards, during which a log of the
operation is written to the serial port. If your system has any problems, a Fairlight technician will tell you how
to extract a report from this log. This menu cannot be accessed when a project is loaded.
SCSI - Scans the SCSI bus and shows all drives, with information about their address, vendor and performance. The letter F indicates a fixed drive, while R indicates a removable. The figure under Kb/s is a worstcase seek disk speed check, which causes the disk to read data that is very widely spread across its surfaces. This is a good guide to the performance expectations of different disks used on the Dubber
(Note: To switch between synchronous SCSI mode and asynchronous SCSI mode, hold the SHIFT key
when selecting the SCSI test function soft key. For optimal performance, fast SCSI drives used in synchronous SCSI mode should be used when possible.)
PANEL - All LEDs are lit, so failures can be spotted. In addition you may check the function of any switch, or
the Jogger Wheel, by activating them.
5.
5.1
Preparing Projects for Export to DaDplus
MFX3plus Workstations
5.1.1 Hard Disks
The Fairlight MFX3plus uses two types of disk formatting, RBF, and FLFS. The DaDplus supports both of these
formats. Disks formatted on the Fairlight MFX2 or MFX3 to the MDR-DOS format are not supported. If necessary, a
disk formatted with the MDR-DOS standard can be connected to a MFX3plus where the project can be copied to a
RBF or FLFS disk.
5.1.2 Exporting the Project.
To export a project on the MFX3plus for use on a DaDplus, simply open the project on the MFX3plus workstation and
then press the “Blue - Export” button and select “Dubber Export” soft key. To limit the range of the project, while
in the Export mode, select the tracks required, and a Range with the “From” and “To” keys, and then press the
“Dubber Export” soft key.
5.1.3 Special Considerations
The MFX3plus allows the creation of clips that play over midnight , ie: start before Timecode location 00:00:00:00
and finish after this time. This is not a legal operation for the DaDplus and causes problems. Select a range of clips
within legal boundaries (anywhere between 00:00:00:00 and 23:59:59:29) and then export this range to the DaDplus
if the project contains clips that play over “Midnight”.
DaDplus User Manual
18
5.2
Pro Tools™ Workstations
5.2.1 Hard Disks
While Macintosh HFS disks for use with the DaDplus can have more than one partition, only the first partition will be
recognised by the DaDplus. The project and all associated audio files must be located on the first partition.
Try to remove unnecessary files from the hard disk being used to move a Pro Tools™ project to the DaDplus. The
DaDplus scans each file on a HFS Macintosh Disk to find files required to play the sessions, and scanning files that
are not required will unnecessarily slow DaDplus project loading operations.
5.2.2 Exporting the Project
When a Pro Tools™ session is created, a directory to contain the session is created containing the Session file, and
two folders called Audio Files and Fade Files. Normally, all the audio files for this project are contained within
these two folders. However, sometimes files required for the playback of a particular session may be located outside
of these folders, or even on another hard disk. If this occurs, there is no way for the DaDplus to locate and then play
these files, unless they are moved to the file locations normally associated with the session. Ensure all audio and
fade files are located in the appropriate directories before moving the disk to the DaDplus. No other preparation is
required.
5.2.3 Special Considerations
Only Pro Tools projects created on the Macintosh platform can be played on the Fairlight DaDplus. Pro Tools™
projects created on the NT platform are not currently supported.
DaDplus does not support Pro Tools™ level automation.
Tracks that are not assigned to a voice in Pro Tools™, but make up one of the first 24 tracks exported in a session,
will play on the DaDplus as if they have been assigned to a voice.
DaDplus supports both 16 bit and 24 bit Pro Tools™ sessions.
HFS Disks used with the DaDplus should be formatted with FWBTM’s Hard Disk Toolkit versions 2.0 and above to
ensure disk driver compatability and reliable operation.
5.3
Akai DDPlus™ Series
5.3.1 Hard Disks
Only hard disks created in the DDPlus™ format are supported by the Fairlight DaDplus. The Akai must have the
audio File Type set to AKAI->FAIRLIGHT before any audio is recorded if the projects are to be eventually played
on the DaDplus. This parameter is set in the RECORD MODE window of the Akai.
5.3.1 Exporting the Project
Ensure all library files are also saved to the disk being used to play on the DaDplus. It’s often easy to forget to
transfer these when preparing a disk for playback in another location.
5.3.2 Special Considerations
Akai DD8Plus™ systems have two different 20 bit audio formats. The Fairlight DaDplus only supports the 20 Bit
Uncompressed system, not the 20 Bit Compressed audio. All other bit depths from Akai systems are supported.
19
DaDplus User Manual
6. Index
INTERNAL 16
Introduction 4
Symbols
256 X Sample rate 5
256 X Sample rate 16
J
JAMSYNC 16
Jog 11
Jogger Wheel 7
A
ABSOLUTE slippage 15
Akai DDPlus 19
All Key 7
Audio Channel Card 4
Audio Outputs 5
L
Buffer Status Indicator 8
LCD Screen 8
level automation 19
Load Sequence 12
Loading and Unloading Files 12
Locate 11
C
M
Capturing Offsets 15
CHASE 10, 16
Chase 6
Chase Key 16
Clear Slippage 15
Clips Playing over Midnight 18
Connections to the FD-24 Audio Dubber 5
Control Network Ports 5
Correcting Mistakes 15
CPU Card 4
Current Dubber 8
Current Project 8
Machine Key 7
Macintosh 19
Macintosh HFS 19
Mark In / Out 7
Menu 8
Menu Keys 7
MFX2 18
MFX3plus Workstations 18
Multi-Project Load (MPL) 12
B
N
NEXT 13
Number of Loaded Tracks 8
Numeric Keypad 7
Numerical Slippage 14
D
Deselect All Tracks 10
Disk Partitions 19
DISPLAY 16
DSP 18
Dubber and Track Selection 10
Dubber Lights 7, 9
O
OFFSET 15
P
F
PANEL 18
Partitioned Disks 19
Physical Components 4
PLAY 11
Play 6
Power Input 5
Preparing Projects for Export to DaD 18
Pro Tools NT 19
Pro Tools Workstations 19
Project Frame Rate 8
Project Sample Rate 8
Project Select Screen 13
Fast Forward 6, 11
FC-100 controller board 6
FD-24 Audio Dubber 4
FILM/16 16
FILM/35 16
FLFS 18
G
Group Track Selection 10
H
R
HFS 19
House Sync 5
RATE 16
RBF 18
RESTORE 15
Reverse Play 6, 11
I
Increment / Decrement 7
DaDplus User Manual
20
Rewind 6, 11
RS-232 Port 5
Rub Key 6
S
Scrubbing 11
SCSI 5, 18
Select 13
SETUP 17
Setup Menu 17
Shift Key 7
SHUTTLE 11
Slipping 13
Slipping Multiple Tracks 14
Soft Keys 6
Software Operation 10
"Solo" Track Selection 10
Stop 6, 11
Stop / Jog 11
Storage 4
SYNC menu 13
Sync Menu 16
Synchronisation 16
System Test and Configuration 17
T
Tests Submenu 18
TIMECODE 16
Timecode Display 8
Timecode Input/Output 5
Title Menu 12
Track Button Lights 9
Track Keys 6
Tracks 14
Transport Control 10
V
VIDEO 16
Video 5
W
WCLOCK 16
Word clock 5
21
DaDplus User Manual