1
POLYMATHIC COMPUTER
CORPORATION
ACCOUNTS PAYABLE SYSTEM
USER'S GUIDE
CHAPTER 1:
SYSTEM OVERVIEW
1-1
GENERAL DESCRIPTION
1-1
FEATURES
1-1
CHAPTER 2:
ACCOUNTS PAYABLE CYCLE
PROCESSING CHECKLIST
2-1
2-1
Initial Set-up Procedures
2-1
Monthly Procedures
2-1
INITIAL SET UP PROCEDURES
2-1
MONTHLY PROCEDURES
2-2
MONTHLY PROCESSING CHECKLIST
2-3
CHAPTER 3:
GENERAL DATA ENTRY
INSTRUCTIONS
The ENTER Key
3-1
3-1
3-1
Menus and Submenus
3-1
Optional Fields
3-2
Date Fields
3-2
The Decimal Point
EDITOR
3-2
3-3
Rekey From a Field
3-3
Rekey/Display Line
3-3
Cancel Processing
3-3
F5 LOOKUP FEATURE
3-4
CHAPTER 4:
MENUS
4-1
MAIN MENU - ALL SYSTEMS
4-1
MAIN MENU - ACCOUNTS PAYABLE SYSTEM
4-1
CHAPTER 5:
DAILY PROCESSING
ENTER SUPPLIER INVOICES
5-1
5-2
Supplier Number
5-3
Supplier Invoice Number
5-3
Invoice Date
5-3
Payment Date/Terms
5-3
Total Invoice Amount
5-3
Description
5-4
Hold Invoice
5-4
P.O. Check
5-4
Line
5-4
Print Cheque Option
SINGLE CHEQUE PROCESSING
Select Invoices
Print Cheque
Options
AUTOMATIC CHEQUE PROCESSING
Cheque Print Date
5-4
5-5
5-6
5-12
5-15
5-19
5-20
ENTER CANCELLED CHEQUES
CHAPTER 6: YEARLY PROCESSING
YEARLY PROCESSING
CHAPTER 7: REPORTS
AGED CASH REQUIREMENTS
Standard
Consolidated
AGED TRIAL BALANCE
5-22
6-1
6-1
7-1
7-2
7-3
7-4
7-6
Current
7-7
Report Type
7-7
Aging Date
7-7
Supplier Selection
7-7
Monthly/Yearly Backup
CASH REQUIREMENTS
7-8
7-12
Cut Off Date
7-13
Held Items
7-13
Sequence
7-13
Supplier
7-13
CHEQUE RECONCILIATION
7-14
CHEQUE REGISTER AND CHEQUES
7-16
Cheque Print Date
G/L Discount Code
CHEQUE REPORT
7-17
7-17
7-18
Current
7-19
History
7-19
PURCHASE JOURNAL
7-21
REPRINT PURCHASE JOURNAL
7-23
REPRINT CASH DISBURSEMENTS JOURNAL
7-25
SUPPLIER OPEN ITEM
7-27
Current
7-28
Monthly Backup
7-30
Yearly Backup
7-31
SUPPLIER MASTER
7-33
Standard
By G/L Code
7-34
7-35
SUPPLIER MASTER UPDATES
7-36
FAX TELEPHONE NUMBERS
ASCII File
7-38
7-39
Comma Delimited File
7-39
PURCHASES BY SUPPLIER
7-40
By Supplier
7-41
By Supplier [Monthly]
7-43
GST EDIT REPORT
7-45
Purchase Journal Analysis Files
7-46
Processing Year
7-46
File Selection
7-46
GST Code
7-46
Division Selection
7-46
Cut off Date
7-46
Record Selection
7-46
PURCHASES BY SUPPLIER (qst)
7-48
CASH DISBURSEMENTS SUMMARY
7-49
By Supplier
By Supplier [Monthly]
REPRINT SUPPLIER OPEN ITEM
Current
Monthly Backup
Yearly Backup
SYSTEM STATUS
CHAPTER 8:
MAINTENANCE AND INQUIRY
CHEQUES
CASH REQUIREMENTS
PURGE ACCOUNTS PAYABLE FILE
7-50
7-52
7-54
7-55
7-55
7-55
7-56
8-1
8-2
8-4
8-8
PURGE CHEQUE FILE
8-10
SUPPLIER MASTER
8-11
Supplier Code
8-12
Supplier Name
8-12
Address Line 1 to 4
8-12
Phone Number
8-12
Fax Number
8-12
Contact Name
8-12
Contact's Title
Mobile Phone Number
8-12
8-12
Email Address
8-12
Web Site Address
8-13
Payment Terms
8-13
Discount Percentage
8-13
Homed Code
8-13
P.O. Required for Invoice
8-13
GST Registration Number
8-14
QST Registration Number
8-14
Alternate Phone Number
8-14
Alternate Discount
8-14
Home Job Cost Code
8-14
Holdback Code
8-14
Temporary Suppliers
8-14
Remarks
8-14
Memo Field
8-15
SUPPLIER OPEN ITEM
8-16
PURGE SUPPLIER MASTER UPDATES
8-18
MICR CHEQUE PRINTER SETUP
8-19
Printer Number
8-20
Printer Name
8-20
Description
8-20
MICR Settings
Network Information
8-21
8-21
PC LINK
Import Utilities
Export Utilities
GST Codes
GST Code
Description
8-22
8-23
8-23
8-26
8-27
8-27
Tax Rate
G/LCode
8-27
8-27
PURGE CHEQUE INQUIRY
8-28
PURGE SUPPLIER MASTER
8-30
SUPPLIER MEMOS
8-31
Memo Records
8-32
Memo Edit Functions
8-32
PURGE OPEN ITEM INQUIRY
8-33
PURGED SUPPLIER MASTER INQUIRY
8-35
CHAPTER 9: DATA FILE STATUS
ACCOUNTS PAYABLE SYSTEM
CHAPTER 10: COMPANY INFORMATION
9-1
9-1
10-1
ACCOUNTS PAYABLE SYSTEM
10-1
CHAPTER 11: COMPANY SETUP
11-1
INITIALIZE A NEW COMPANY
11-1
Company Number
11-2
Long Company Name
11-2
Short Company Name
11-2
Company Initials
11-2
Holding Company Initials
11-2
Affiliated Companies
11-2
Last Month Closed Date
11-2
GST Registration Number
Home Directory
11-2
11-2
Export Directory
11-2
Mailing Address
INITIALIZE ACCOUNTS PAYABLE SYSTEM
Copy Supplier Master Layout From An Existing Company
Company Information
CHAPTER 12: PRINT REPORTS
PRINTING SPOOLED REPORTS
11-2
11-3
11-6
11-8
12-1
PRINT SCREEN FIELDS
12-1
12-3
FUNCTION KEYS AND PRINT COMMANDS
Emailing A Report
12-4
12-4
Converting A Report
12-4
Zooming A Report
12-5
Functions
12-5
CHAPTER 13: DAILY STARTUP
LOG ON INSTRUCTIONS
CHAPTER 14: MONTHLY CLOSING
13-1
13-2
14-1
MONTHLY CLOSING - AUTOMATIC
MONTHLY CLOSING - MANUAL
14-1
14-1
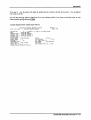
CHAPTER 1: SYSTEM OVERVIEW
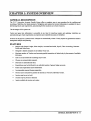
GENERAL DESCRIPTION
The P.C.C. Interactive Accounts Payable System offers a complete, easy to use procedure for the verifying and
recording of liabilities, the timely payment of obligations and assures that current information is available for use in
determining future cash requirements, and planning for the maximum use of cash resources.
The advantages of this system are:
Vendor and open item information is accessible at any time for reporting, inquiry and updating. Liabilities are
automatically aged. Cash requirements are projected, and available discounts are identified.
Invoices can be paid on a selective basis. Cheques are automatically written. Timely reports are generated to assist in
management analysis and planning.
FEATURES
•
Interacts with General Ledger, Sales Analysis, Accounts Receivable, Payroll, Time Accounting, Customer
Profile and Order Entry.
•
Designed to handle companies in an industry of any size.
•
Maximum number of Vendors and accounts payable transactions is limited only by the amount of available
disk space.
•
Cash or accrual method of accounting may be used.
•
Cheques are automatically prepared.
•
Discounts are automatically taken.
•
Expenditures may be distributed to an unlimited number of general ledger accounts.
•
Future cash requirements can be determined.
•
Accommodates manual cheque preparation.
•
Invoices can be selected for payment by due date as well as by individual vendor.
•
Invoices may be put on hold.
•
Journals may be printed on demand.
•
Inquiry available by invoice and vendor.
GENERAL DESCRIPTION ■ 1-1
CHAPTER 2: ACCOUNTS PAYABLE CYCLE
PROCESSING CHECKLIST
The following is a summary of the major stages in the Accounts Payable Cycle:
Initial Set-up Procedures
Page
1.
Supplier Master Maintenance
8-11
2.
Spool Supplier Master updates
7-36
Monthly Procedures
1.
Enter supplier invoices
2.
Spool cash requirements report
Page
5-2
7-12
3.
Process cheques.
5-19
4.
Spool cheque register and cheques
7-16
5.
Enter cancelled cheques
5-22
6.
Spool cheque reconciliation
7-21
7.
Spool purchase journal
7-27
8.
Spool supplier open item report
7-27
9.
Spool accounts payable aged trial balance report
10.
Purge accounts payable file
7-6
8-8
8-10
11.
Purge cheque file
12.
Spool aged cash requirements
7-2
13.
Close purchase journal
14-1
14.
Close cash disbursements journal
14-1
15.
Indicate month closed
14-1
INITIAL SET UP PROCEDURES
1.
Supplier Master Maintenance
This program is used to set up supplier numbers and maintain information relating to suppliers. The supplier
data base is set up initially and modified to reflect the addition or deletion of suppliers and changes to
information maintained on the supplier master.
PROCESSING CHECKLIST ■ 2-1
ACCOUNTS PAYABLE CYCLE
MONTHLY PROCEDURES
1. Entering Transactions
Debit and credit transactions for all Accounts Payable activity are entered through the "Enter supplier
invoices " program, or the general journal program.
2.
Print Journals and Reports
The Accounts Payable system accumulates the data needed to produce the following reports for each
accounting period:
Page
Supplier master update listing
Supplier listing in alphabetical or numerical order
Purchase journal
Cash requirements report
Cheque reconciliation report
Open item listing
Detailed aged trial balance
Aged cash requirements
3.
7-36
7-33
7-21
7-12
7-14
7-27
7-6
7-2
Closing Out The Period
The Accounts Payable cycle ends with:
Closing Out
Closing out the current month, by adding all current amounts to year to date amounts, and preparing the
data files for the next month.
Backing Up
Backing up the current period data files.
Purging Accounts Payable
Purging the accounts payable clears each supplier account of all entries that have been completed as of
the specified purge date. The accounts payable file is cleared of the following items:
1.
Invoices that have been completely paid.
1.
Manual payments that have been fully cleared against invoices.
1. Unapplied amounts from previous periods that have been applied in the current period.
1. Journal entries that have been cleared against invoices.
Purging Cheque File
Purging the cheque file clears all cheques that have been cancelled.
2-2 ■ MONTHLY PROCEDURES
ACCOUNTS PAYABLE CYCLE
MONTHLY PROCESSING CHECKLIST
MONTHLY PROCESSING CHECKLIST ■ 2-3
CHAPTER 3: GENERAL DATA ENTRY
INSTRUCTIONS
A number of data entry procedures are the same for all the applications described in this manual. These data entry
procedures are as follows:
The ENTER Key
The enter key, I*-*Enter! is always pressed after every entry to start processing. The only time you don't press I*-1 Enter 1
is when you are using a function key such as |F5 |.
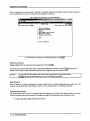
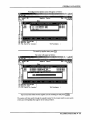
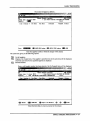
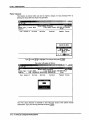
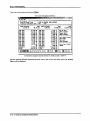
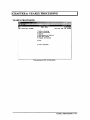
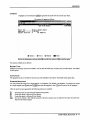
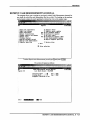
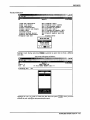
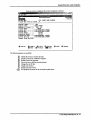
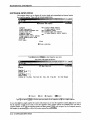
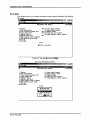
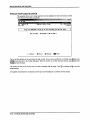
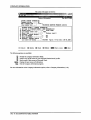
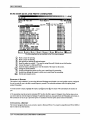
Menus and Submenus
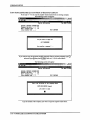
The programs that make up this accounting package are accessed by means of a menu. Each menu choice is
displayed on the screen, with a number to its left. To make a selection, type the number of the desired item, and press
I^Enterl.
For example, the following menu is typical:
MAIN
MENU
RM
CRT S 96
TYPIST ft
■nSTER
3.5
Thu APR 18,2002
10:30:35
6
1
2
3
4
5
6
7
8
9
10
11
12
13
14
Payroll
Accounts Receivable
Accounts Payable
Sales Analysis
General Ledger
Security
System Utilities
Oaily Closing
Monthly Closing
Print Reports
Tine Recounting
Fixed Assets
Inventory / Order Entry
Uertical Markets
Q Query
S Status
E Exit
§
Enter selection
To select Accounts Payable, type (3), and press l
INSTRUCTIONS ■ 3-1
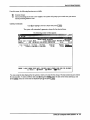
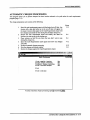
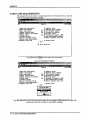
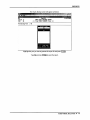
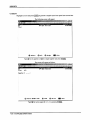
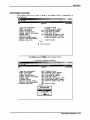
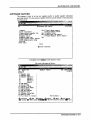
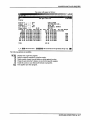
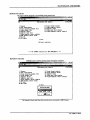
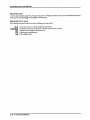
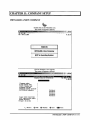
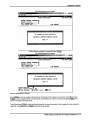
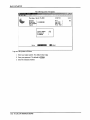
GENERAL DATA ENTRY
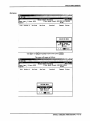
When an application has been selected, a submenu is frequently displayed, providing a number of further choices on
how the application is to be run, or what part of the application is to be run.
For example, the following is a typical submenu:
fe
&ft
To select Daily processing, you would type Q, and press
Optional Fields
Optional fields (fields not required) may be skipped by pressing I^Enterl.
A number of screen entry fields allow entry of data but also default to a particular value if I*-1 Enter) is pressed. A
default value is simply a value automatically selected by the program if you do not enter a value.
Example:
• A date field will often default to the current date (system date) or the last date entered.
• [♦-'Enter) can often be pressed to answer a Yes or No question by default.
Date Fields
Enter all dates in the format ddmmyyyy (six numeric digits, with no slashes) representing day month year. The
computer will check that the month entered is valid (1-12), as well as the day (1-31) and the year (0-99).
The Decimal Point
The decimal point does not have to be entered unless the characters to the right of the decimal point are non zero.
However, decimal points must be entered if the digits to the right of the decimal point are not equal to zero.
^ Commas and dollar signs should not be entered.
3-2 ■ INSTRUCTIONS
GENERAL DATA ENTRY
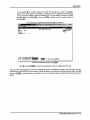
EDITOR
The system includes an Editor utility that allows you to correct errors made during data entry. The EDITOR can be
accessed by pressing (F1 \.
The Editor utility will not always bring up the same options because the options change according to where you are
calling the editor from. The options that are available through the editor and how they are to be used follows.
Rekey From a Field
This option may be used to rekey any of the data entered in a field. If you are on field number 6 and you want to
change something in field number 1 you will have to rekey the information from that field on. In most cases, you can
press |<-iEnier| back to line 6 because I*-1 Enter \ will remember what you entered in that field last.
To use this option type Q, and press I^Enter!.
The system will then display:
[
]:Enter [field number| or [ENTER| to return.
Type the number of the field that is to rekeyed and press l<-*Enteri. The system will then automatically return to this
field number.
Simply make your corrections and continue entering your data.
Rekey/Display Line
In some of the programs such as invoices, you can have more than one line entry per item. The Rekey Line option
allows you to modify information within a specific line.
Type the number corresponding to Rekey line and press I*-1 Enter\. The system will prompt you to enter the line
number that you want to change. It will then display that line allowing you to modify your entries. Once you have
made the changes you can continue where you left off.
The Display Line option will prompt you to enter the line number that you want to display. Once you type in the line
number and press I^Enterl. the line will be displayed. The system will request that you press I ^ Enter) to continue
where you left off.
Cancel Processing
The Cancel option will cancel whatever you are doing. If you are in the middle of an invoice or sales order etc., and
you want to cancel press Ifi ! and type the letter corresponding to cancel. The system will ask you if you are sure you
want to cancel before it performs this step.
EDITOR ■ 3-3
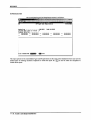
GENERAL DATA ENTRY
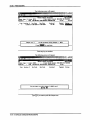
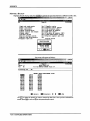
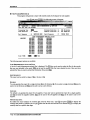
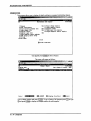
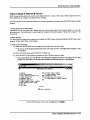
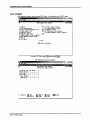
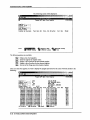
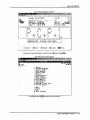
F5 LOOKUP FEATURE
The lookup feature allows you to search for information from various input fields. This feature eliminates the need
for users to memorize codes used for general ledger accounts, customer accounts, supplier account and numerous
other items. For instance the 1F5 | lookup feature can be used to display a supplier account code in the following
manner:
Press [F5 l at the Supplier Number field and the following screen will appear:
flccuunts Payable
TU1PP01
Supplier
Master
RM
Typist: 06
Port: 96
Show
Screen 1
Suppliers
1)
1642
POLYMnOlIC DEVELOPMENT CtlRPHUnTIOM
2)
POLYMflTHIC COMPUTER SYSTEMS LTD
.; 3) Su! 16S0
POLVHflTHIC TECHNOLOGIES IHC.
16S6
4>
PQLVMATHIC COMPUTER CORPORATION
5)
18258
Enter Supplier HOME =
6)
7)
8) FA
9) Co
Co
11) No
12)
13)
(ton
3.501
FEB 10,2003
16:04:55
/116-<190-Mri0
418-490-8010
416-490-8010
416-490-8010
10)
14)
Pylifi
PgDn
Top
Hot too
Esc-EniJ
F1-Option;
Pi
15) Discount Percentage
16) Home G/L Code
17) P.O. Req'd for Invoice
Vtd Purchases
The following options are available:
Cursor upwards through the data
Cursor downwards through the data
Page up one screen of data
Page down one screen of data
Move to the top of the data
Move to the bottom of the data
Exit the lookup feature
Options:
The options of the lookup feature vary according to what program you are using. This
feature will allow you to search for a particular record according to the search criteria that
you enter.
For example, if you are in the supplier master of Accounts Payable and you want to search
for a supplier by the supplier name, you can press |fi ) for Options, then 1F3 I to search by
the supplier's name and enter three or more letters for the supplier you are looking for. The
system will then search through the supplier master for the closest match to the three letters
that you entered.
3-4 ■ F5 LOOKUP FEATURE
GENERAL DATA ENTRY
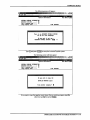
Press [F1 \ and the Options screen will appear as follows:
m
RM
Help
Typist: 06
Port: 96
Screen 1
1) Si
2) Su
4)
1666
5)
16250
Master
TLfJPPOl
3.50
FEB 10,2003
16:04:55
Mon
F2 - Find Supplier CODE
F3 - Find Supplier NflME
ESC- Exit
6)
7)
9)
10)
11)
12)
13)
14)
15)
16)
17)
Pnyable
Show
3) Sul
8)
flccounts
Supplier
490-8010
490-8010
Ffi
Co
Co
Mo
En
PgUp
PijOn
He
P
Discount Percentage
Home G/L Code
P.O. Req'd for Invoice
Top
Rot torn
Esc-EmJ
F1-Opt ion:;
Ytd Purchases
To search by supplier name, press (F3 ).
The screen will appear as follows:
-Ibl xl
gdk
Help
I'.C.F'.L
fit;counts Payable
RM
Supplier
Typist: 06
Mon
Master
Port: 96
Show
Screen 1
1) Su i? Suppliers
2) Su
3) Su
4)
5)
6)
7)
8)
9)
10)
11)
12)
13)
14)
PDUYMfiTHir:
1650
1666
16258
TWPP01
3.50
FEB 10,2003
16:04:55
DEUEUIPMIiHI
COHPDHfi! IIIN
POlYMATHIC COMPUTER SYSTEMS LTD
416-490-8010
POLYMATHIC TECHNOLOGIES INC.
POLYMATHIC COMPUTER CORPORATION
Enter
Suonlier
416-490-8010
416-490-8010
NflML
Ffi
Co
Co
Mo
En
Ue
Pa
PgUp
PcjDii
15) Discount Percentage
16) Home G/L Code
17) P.O. Req'd for Invoice
Top
BolKin
Ecc-Entl
F1-Options
Ytd Purchases
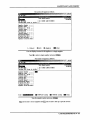
Type at least three letters for the supplier you are searching for and press I*-1 Enter t
The system will then search through the supplier master for the closest match to your search
criteria and will highlight that supplier in the lookup window.
F5 LOOKUP FEATURE ■ 3-5
GENERAL DATA ENTRY
The screen will appear as follows:
Accounts
Supplier
RM
Typist: 06
Port: 96
Screen_l
Suppliers
1) S
2)
3)
4)
5)
6)
Su
Su
TLfUTOI
Pnyah
3.50
FEB 10,2003
16:04:55
Show
POLYMATHIC COMPUTER SYSTEMS LTD
POLYKATHIC TECHHOLOGIES INC.
POLVMATMIC COMPUTER CORPORATION
16S0
166G
16258
tfon
Master
416-490-8010
416-490-8010
416-490-3010
n
8)
9)
10)
11)
12)
13)
Fft
Co
Co
Mo
t
1
PgUp
PyOn
Top
Optioiu
14) PaE
15)
16)
Discount Percentage
Hone G/L Code
17) P.O. Req'd for Invoice
Ytd Purchases
To select the supplier simply press I*-1 Enter) and the system will enter the supplier into the
field you initially activated the Lookup feature from.
You can exit out of the Lookup feature at any time by pressing (Iscl. (licl will exit one level
of the program, therefore if you are in the options section of Lookup you will have to press
[Esc> twice to exit completely out of Lookup.
3-6 ■ F5 LOOKUP FEATURE
CHAPTER 4: MENUS
MAIN MENU - ALL SYSTEMS
Edit
MAIN MENU - ACCOUNTS PAYABLE SYSTEM
MAIN MENU - ALL SYSTEMS ■ 4-1
CHAPTER 5: DAILY PROCESSING
To select Daily Processing, type Qj and press I*-1 Enter \,
The screen will appear as follows:
flcctiunts
TLrtPPZO
rnviihlc
Daily Processing
RM
1
2
3
4
Enter supplier invoices
Single cheque processing
Automatic cheque processing
Enter cancelled cheques
?..GA\
31/01/2003
Run
Run
Run
Run
E Exit
E Enter selection
5-1
DAILY PROCESSING
ENTER SUPPLIER INVOICES
This program allows you to enter supplier invoice information and distribute supplier invoice amounts to the general
ledger accounts. The major features of the program are:
•
Each invoice entered into the system can have up to 999 separate distributions to the general ledger,
either debit or credit amounts.
•
The supplier's standard terms can be overridden and special terms can be entered.
•
All distributions are balanced by the system before the operator is allowed to proceed to the next entry.
•
You can specify the due date or have it automatically assigned by the system.
Accounts Payable
Daily Processing
RH
1
2
3
4
Enter supplier invoices
Single cheque processing
fiutcmatic cheque processing
Enter cancelled cheques
31/01/2003
Run
Run
Run
Run
E Exit
E Enter selection
To select Enter supplier invoices, type Q and press I*-1 Enter\.
5-2 ■ ENTER SUPPLIER INVOICES
DAILY PROCESSING
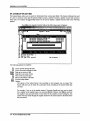
The screen will appear as follows:
P.C.I'.L
RH
1)
2>
3)
4)
5)
6)
7)
Typist: 06
Supplier number
:
Supplier invoice no. :
Supplier invoice date
Payment date/terns ..
Total invoice amount
Description
Hold invoice (V/N) ..
9)
Line
Enter
RL
Code
[ffll-LOOKUP
TLflPPOb
JftN 31,2003
Enter Supplier Invoices
8) P.O. check:
Doscrintitin
]]-ADD supplier
[g jl-PRIKT cheque
[033]-End
Invoices entered
0
Total
.00
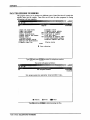
Enter an invoice as follows:
Supplier Number
Enter the supplier number, (fs \ can be used to list all the suppliers. If the supplier you are searching for is not in the
master file you can press |F4 \ to add them. |F4 | will automatically bring up the supplier master file and allow you to
add a new supplier. For more information on the Supplier Master refer to page 8-11.
Supplier Invoice Number
Enter up to ten alphanumeric characters to indicate the supplier invoice number. The system automatically verifies
that this invoice number has not been duplicated. The system will only check those invoice numbers that have not
been purged out of the accounts payable open item file.
Invoice Date
Press I ^ Enter | to accept the default system date shown on the screen or enter the desired date in the ddmmyyyy
format.
Payment Date/Terms
Press I +■* Enter \ to accept the default payment date shown on the screen or enter the desired date in the ddmmyyyy
format. Press Q then l<-*Enier| and the system will automatically calculate the due date based on the payment terms
on the supplier master.
Total Invoice Amount
Enter up to eight numeric characters. The highest dollar amount you can enter is 999,999.99 without the comma.
ENTER SUPPLIER INVOICES ■ 5-3
DAILY PROCESSING
Description
Enter up to thirty five characters of description. For instance you may enter IBM PC - XT. This description will
appear in the analysis schedules run using the General Ledger sub-system. The description will also appear in the
Purchase Journal.
Hold Invoice
You can put any positive invoice on Hold. When an invoice is on hold the system cannot process a cheque for it. To
place an invoice on hold change this field to Q, Yes.
&£
Credit invoices cannot be put on hold.
P.O. Check
This field is filled in automatically by the system.
Line
You may distribute the total amount of the invoice to as many different general ledger accounts as you wish. Enter
only one distribution if that is all you need.
The system will suggest the general ledger distribution account to which the invoice is to be distributed based on the
information set up on the supplier master under home GL code (refer to page 8-13 for details.). Press I*-'Enter) to
accept the default GL Code or type a GL Code number and press I*-1 Enter). |fs ) can be pressed to list all valid GL
codes and a new GL code can be added by pressing fFTl.
The cursor will now move to the amount field and display the total invoice amount as the default amount. Press
I*-1 Enter| to accept the default amount or type the amount that you wish distributed to this GL code and press I^Enter).
The cursor will now return to the GL Code field.
If the amount in the Balance field does not equal 0 you must continue distributing amounts to additional general
ledger codes. Once the amount in the balance field is 0, type (|) and press I<-* Enter! to exit. The cursor will now return
to the supplier number field.
If you wish to continue entering invoices for this particular supplier simply press I*-1 Enter). There is no need to re-
enter the supplier number as the system will automatically retain the last previously entered supplier number.
If you wish to enter invoices for a different supplier type the new supplier's number and follow the procedures
outlined above.
If you have finished entering invoices and wish to exit from the program type (D and press I ^ Enter).
Print Cheque Option
To invoke the Single Cheque Processor and print a cheque. Press |F7 ) at any time during invoice entry. Please note
that if you want to print a cheque for the invoice you are entering you must complete the invoice first.
^ If you select the Cheque Print option from the Supplier Invoicing program and you are processing a
cheque for ONE invoice only, the due date will be printed on the cheque instead of the invoice date.
5-4 ■ ENTER SUPPLIER INVOICES
DAILY PROCESSING
SINGLE CHEQUE PROCESSING
This program allows you to print a cheque for selected invoices.
Type d) and press l<-'Enter| to select Single cheque processing.
The screen will appear as follows:
.Iblxi
&*
TL0PP29
flccounts Payable
RM
Hanual Cheque Processor
Cheque type
: 6-Laser MICR
Supplier
:
Item
Invoice tt
2.34
JAN 31/2003
C Last Month Closed: DEC/2002 HO PRINTER
Total:
Inv Date
Due Date
Invoiced
Payment
Status
SELECTION MENU
jrint cheque
print [plank cheque
Sptians
t
i
To select a function from the menu you may type the capitalized letter for the desired
function or use Q/Q to highlight the function, then press 1<-* Enter).
SINGLE CHEQUE PROCESSING ■ 5-5
DAILY PROCESSING
The following functions are available from this selection menu:
(D
Q
(2)
The Select invoices function will display all open items for the specified supplier and allow you to
select the invoices you want to process for the single cheque.
The Print cheque function allows you to print a cheque that was previously spooled but not printed, or
reprint a cheque.
The following functions are available through the Options menu selection:
Q
The printer setup function allows you to change the printer type, printer port
(D
change Form type should be selected when you need to change the type of
GD
and printer control codes.
cheque you are printing.
This function allows you to display the bank account balance.
Select Invoices
This function is selected to choose the invoices that you want to pay on this cheque. You can
only print a cheque for one supplier at a time but you can include as many invoices as you
want on that cheque.
ftccounts Payable
RM
Cheque type : 6-Laser MICR
Supplier
:
Item
Invoice ft
Inv Date
Manual Cheque Processor
JftN 31/2003
[ Last Month Closed: DEC/2002 NO PRINTER
Total:
Due Date
Invoiced
Payment
Status
SELECTION MENU
•fin 1 e c t
i nvo i n r «;
print Blank cheque
Options
t
i
-Exit
To select invoices, type (js) or use the arrow key to highlight the function, then press [<-*Enter]
5-6 ■ SINGLE CHEQUE PROCESSING
DAILY PROCESSING
The screen will appear as follows:
RM
Cheque type : 6-Laser MICR
Supplier
Item
Enter
Manual Cheque Processor
: HM
Invoice t)
Total:
Inv Date
[MIHIIIlllMIl
JftH 31/2003
I Last Month Closed: DEC/2002 NO PRINTER
Due Date
(QQ]-SUPPLIER lookup
Invoiced
Payment
[ffil-OPEH ITEM lookup
Status
[IBS 1-END
Enter the supplier number to which the cheque will be issued.
The system also gives you the following options:
jF5 |
IF6 1
List all suppliers.
Display a list of open items. If no supplier is specified a list of all open items will be displayed,
otherwise open items for the specified supplier are displayed.
lEsc)
End this function.
Once a valid supplier number has been entered, a list of all unpaid items will be displayed.
TlflPP?!)
2.34
JAN 31/2003
Demounts Payable
RM
Manual Cheque Processor
Cheque type : 6-Laser NICR
( Last Month Closed: DEC/2002 NO PRINTER
Supplier
:
1642
POLVMflTHIC DEUELOPMEHT CORPORATION
Total:
Item
Invoice It
Inv Date
Due Date
Invoiced
Payrcent
Status
3i-.inn-2nn3
-SELECT
ClTOl]-UNSELECT
-Open I ten DETAILS
[Ql
[Qffll-ENO
Select the items that you want to process for this cheque.
SINGLE CHEQUE PROCESSING ■ 5-7
DAILY PROCESSING
Items are selected by using (tJ/Q to highlight the item then pressing fF9~l. The status field will indicate what items
have been selected and a running cheque total is given in the top right hand corner of the screen. An item may be
unselected by pressing IfioI.
If you would like specific details about an item, you can highlight the item and press fF5~).
The screen will appear as follows:
TLAPP2U
P.C.P.L
2.3A]
RM
Manual Cheque Processor
JAN 31/2003
Cheque type : 6-Laser HICR
I Last Month Closed: DEC/2002 HO PRINTER
Supplier
: 1S42 POLYMATHIC DEUELOPMENT CORPORATION
Total:
Item
Paynent
Invoice 8
Supplier
:
Address
:
1642
Status
POLYMATHIC DEVELOPMENT CORPORATION
245 YORKLAND BLUD.,
SUITE 100
UILLOUDALE, ONTARIO
M2d 4W9
123456
Invoice ti
Invoice Date
Original Due Date
Current Due Date
Payment Date
Invoice Amount
Discount Amount
Payment Terns
Discount
31-JAH-2003
31-JAN-2003
Cheque Number
Cheque Date
Branch Code
Source Code
Invoice Tvoe
Once you have selected the invoices to be paid on this cheque, press fEscl to end the selection process.
The screen will appear as follows:
Accounts P<iy;ihl.t:
P.C.P.I.
TLAPP29
2.31
RM
Manual Cheque Processor
JAN 31/2003
Cheque type : 6-Laser MICR
t Last Month Closed: DEC/2002 NO PRINTER
Supplier
:
1642 POLYMATHIC DEUELOPMENT CORPORATION
Total:
115.00
Hen
1
1
Invoice M
Inv Date
Due Date
123456 31-JAH-2003 31-JAN-2003
Invoiced
115.00
Paynent
115.00
Status
Selected
SELECTION MENU
t
5-8 ■ SINGLE CHEQUE PROCESSING
I
-Exit
DAILY PROCESSING
From this menu, the following fiinctions are available:
(D
(£)
Generate cheque
Cancel processing and re-enter a new supplier. The system will prompt you to make sure you want to
cancel processing before it exits.
Generate Cheque
Type (g) or highlight Generate cheque then press I ^ Enter 1.
The system will automatically generate a cheque for the selected items.
6ft
fciotp
■■■■
The following screen will then appear:
TLflfT2!l
Accounts Pavalile
RN
Cheque type : 6-Laser NICH
Supplier
:
Item
Invoice It
"•
1
1642
Manual Cheque Processor
JAN 31/2003
I Last Month Closed: DEC/2002 NO PRINTER
POLVHflTHIC DEUELOPMENT CORPORATION
Inv Date
Due Date
123456 31-JAN-2Q03 31-UAN-2003
Invoiced
115.00
Total:
Paynent
115.00
115.00
^
I8HIBBBBICT
CHEQUE [ 40541 CHEQUE PRINT DATE: 31012003 [JAN 31/2003] YEAR END EFEB 20/20021
[_3 Select:
[Q]-flCCEPT
tJl-MODIFY
l(2S]~Exit
You can accept the date displayed by the system or enter a new date for the cheque. The date entered must be before
the year end date. To enter a different date type (m) and press l<-*Enter|. Enter the date in the format ddmmyyyy and
press I*-1 Enter|. Once the correct date is displayed type Q and press I*-1 Enter!.
SINGLE CHEQUE PROCESSING ■ 5-9
DAILY PROCESSING
The following screen will appear:
Recounts Payable
TLflFT29
2.34}
RM
Manual Cheque Processor
JAN 31/2003
Cheque type : 6-Laser HICR
[ Last Honth Closed: DEC/2002 NO PRINTER
Supplier
:
1642 PQLYMATHIC OEUELOPMEHT CORPORATION
Total:
115.00
I ten
1
Invoice tt
Inv Date
Due Date
123456 31-JAN-2003 31-JAN-2003
Invoiced
115.00
115.00 produced using cheque tt
Cheque for
Paynent
115.00
4054
to continue
Press
Press any key to continue.
The following screen will appear:
Edit
Help
Recounts I livable
TLMT29
2.341
RM
Manual Cheque Processor
JAN 31/2003
Cheque type : 6-Laser NICR
( Last Month Closed: DEC/2002 NO PRINTER
Supplier
:
1642 POLYMATHIC DEUELOPMEHT CORPORATION
Total:
I ten
Invoice It
Inv Date
Invoiced
Due Date
Do you want to print cheque [ 4054] now ?
fiE
|
Type Q if you want to print the cheque now.
5-10 ■ SINGLE CHEQUE PROCESSING
Paynent
Status
DAILY PROCESSING
Print Cheque
The following screen appears after you have generated the single cheque.
Recounts Payable
RM
Manual Cheque Processor
JAN 31/2003
Cheque type : 6-Laser HICR
[ Last Month Closed: DEC/2002 NO PRINTER
Supplier
: 1642 POLYHflTHIC DEUELOPKENT CORPORATION
Total:
Item
Invoice #
Inv Date
Due Date
Invoiced
Payment
Status
The following functions are available:
(£)
Select this function when you are ready to print your cheque. Please note that a printer must be selected
before you can print the cheque. The printer that is selected is displayed in the top right portion of the
screen. In the example above, no printer is currently selected. To select a printer type (o) and go to Printer
(D
Setup.
This function will allow you to print a VOIDED cheque to ensure that everything is lined up correctly.
<3~
(2)
This option is only required for printing cheques on dot matrix printers and MICR laser
cheques.
The printer setup, change form type and bank balance functions are available through the Options menu
selection. See (5-15) for further instructions on Options.
If you have a printer selected and are ready to print your cheque, type C. Your cheque will then be printed.
SINGLE CHEQUE PROCESSING ■ 5-11
DAILY PROCESSING
Print Cheque
This function is selected when you need to reprint a cheque or if you answered "No" to
printing the cheque after the cheque was generated.
RM
Cheque type : 6-Laser HICR
Supplier
:
Item
Invoice tt
Manual Cheque Processor
JflN 31/2003
( Last Month Closed: DEC/2002 NO PRINTER
Total:
Inv Date
Due Date
Payment
Invoiced
Status
SELECTION NENU
jjrint cheque
print Qlanlc cheque
[Options
t
I
[(l&Bl-Exit
Type (£) or use Q/Q to highlight Print cheque then press I*-1 Enter \,
The screen will appear as follows:
1LAPP2IJ
2.34
RM
Manual Cheque Processor
JAN 31/2003
Cheque type : 6-Laser HICR
[ Last Honth Closed: DEC/2002 HPLJ4
Supplier
:
1642 POLVMflTHIC DEUELOPMEHT CORPORATION
Total:
Item
Invoice It
Inv Date
Due Date
Invoiced
Paynent
Status
The Print cheque function is restricted to users who have access to the system security
maintenance. Type your security password and press l<-*Enter|.
5-12 ■ SINGLE CHEQUE PROCESSING
DAILY PROCESSING
The following screen will appear:
ftccounts
Pnyahle
RN
Manual Cheque Processor
JflH 31/2003
Cheque type : 6-Laser MICR
[ Last Month Closed: DEC/2002 HPLJ4
Supplier
:
1642 POLYMflTHIC OEUELOPMENT CORPORATION
Total:
Item
Invoice 8
Inv Date
Invoiced
Due Date
Enter
Paynent
Status
CHEQUE I*
Select the cheque number for printing. IF5 I can be used to list the available cheques.
If the cheque has already been printed, the following screen will appear:
Jjjta
£dit
I
Accounts Paviiiuc
RM
Manual Cheque Processor
JflH 31/2003
Cheque type : 6-Laser MICR
( Last Month Closed: DEC/2002 HPLJ4
Supplier
:
1642
POLYMflTHIC DEUELOPKENT CORPORATION
Total:
I ten
Invoice #
Inv Date
Due Date
Enter
Invoiced
CHEQUE «
Q|-Lookup
Paynent
Status
405S
QQQ-End
Cheque C 40551 has already been printed !
Do you want to reprint that cheque ?
Qes/(go C_l
Type (y) to reprint the cheque.
SINGLE CHEQUE PROCESSING ■ 5-13
DAILY PROCESSING
The following screen will then appear:
Recounts Payable
P.C.I'.L
RM
Manual Cheque Processor
JflH 31/2003
Cheque type : 6-Laser HICR
I Last Month Closed: DEC/2002 HPLJ4
Supplier
:
1642 POLYMflTHIC DEUELOPMEHT CORPORATION
Total:
I ten
Invoice #
Inv Date
Due Date
Payment
Invoiced
Status
print Qineup
Eptions
t
i
-Exit
The following functions are available:
Select this function when you are ready to print your cheque.
This function will allow you to print a VOIDED cheque to ensure that everything is lined up correctly.
v
This option is only required for printing cheques on dot matrix printers and MICR laser
cheques.
The printer setup, change form type and bank balance functions are available through the Options
menu selection.
5-14 ■ SINGLE CHEQUE PROCESSING
DAILY PROCESSING
Options
RN
Cheque type : 6-Laser MICR
Supplier
:
Item
Invoice tt
Inv Date
Manual Cheque Processor
JAN 31/2003
[ Last Month Closed: DEC/2002 NO PRINTER
Total:
Payment
Invoiced
Due Date
Status
SELECTION MENU
jrint cheque
print Qlank cheque
itions
t
I
-Exit
Type (o) or use (iMi) to highlight Options then press
The screen will appear as follows:
Accounts
RM
Cheque type : 6-Laser MICR
Supplier
:
Item
Invoice tt
Psivanlt:
Manual Cheque Processor
JAN 31/2003
C Last Month Closed: DEC/2002 HPLJ4
Total:
Inv Date
Due Date
Invoiced
Payment
Status
OPTIONS NEKU
change Qorn type
(Sank balance
t
4
[(2fi]-Exit
SINGLE CHEQUE PROCESSING ■ 5-15
DAILY PROCESSING
Printer Setup
This function allows you to change the printer, printer type, and printer control codes.
Type (s) or use Q/Qt0 highlight printer setup then press I*-* Enter |.
The screen will appear as follows:
PRINT 5CTUI> FUNCTIONS'.1
PRINTER SELECTION
\\BOB-CUMMINGS\LASERBC
\\CAL-SPARE1\CoStar LabelWriter XL Turbo
\\CAL-XP\Laserjet
\\HERONNT1\\\PR8FF5DB\MICR
\\HERONNT1\U2200-5
\\HER0NNT1\U4
\\HER0NNT1\Xerox-PCL
\\P0LYNT4\FacSys Queue Monitor
Acrobat Distiller
Dymo LabelWriter EL6Q
FACSys Fax Printer
HP LaserJet 2100
rDOT MATRIX-^
(* No Setup
Matrix
C Condensed Pr;int
Laser
C Setup 8-17Z" Cheques
fiance!
Send Setup Code
Printer Selection:
|
MICR Setup...
|
All printers available to you will be displayed under Printer Selection. Use your mouse to click
on the printer you want to print to.
Type:
Laser:
Click on Laser if the printer is a laser printer or Matrix if the printer is a Dot Matrix printer.
If you select a Laser type printer the system will give you a group of laser options. The options
are as follows:
No Setup
Landscape 16.66 - Letter
Landscape 16-66 Legal
Landscape TMS RMN 6 pt
Portrait small print
Landscape - small print
Portrait - large print
When printing cheques it does not matter what setup is selected as the program controls what
font and style are used.
Dot Matrix:
If you select a Dot Matrix printer your options are as follows:
No Setup
Condensed Print
Setup 8-1/2" Cheques
Send Setup Code:
Select - Setup 8-1/2" Cheques to print cheques to a Dot Matrix printer.
This function will send the setup codes you selected to the printer. You are not required to do
this before printing, as the program will also send the setup codes to the printer when you print
your cheque.
MICR Setup:
This function will allow you to control the MICR settings for the printer you selected. For more
information on this function please refer to 8-19.
5-16 ■ SINGLE CHEQUE PROCESSING
DAILY PROCESSING
Change Form Type
This function should be selected when you need to change the type of cheque you are
printing.
Type (f) or use (t}/(T) to highlight change form type then press I ^ Enter).
The screen will appear as follows:
Fte
Edit
Hdp
RM
Cheque type : 6-Laser HICR
Supplier
:
Item
ZB
ftccounts I'jiyahle
P.C.f'.L
Invoice tt
Inv Date
2.34
Manual Cheque Processor
JAN 31/2003
[ Last Month Closed: DEC/2002 HPLJ4
Total:
Due Date
Invoiced
Payment
Status
SELECTION MENU
0 - Cheque style 0
1 - Cheque style B
2
3
4
5
-
Cheque style C
Laser (Moore)
Laser (LT102)
Preprinted HICR
6BBB99UIII9BH
9 - SPECIAL cheques
t
A
-Exit
Use Q/(T) to highlight the correct form type and press I*-*Enter! to select it.
Bank Balance
This function allows you to display the bank balance. The amounts displayed are only current to the last running of
the Preliminary Trial Balance report. (Please refer to your General ledger documentation for more details.)
SINGLE CHEQUE PROCESSING ■ 5-17
DAILY PROCESSING
Type your security password and press I ^ Enter |
The screen will appear as follows:
..iPlxi
£e
get*
tjelp
G/L Summary 1.34
General Ledger Code
Financial Statement Code
CURB PER/2003
29,793.44
MAR 2002
APR 2002
KAY 2002
JUN 2002
JUL 2002
A06 2002
SEP 2002
OCT 2002
HOU 2002
DEC 2002
JAN 2003
FEB 2003
ACCRUALS
TOTAL
1020-10 GENERAL BflHK ACCOUNT
AAA
Cash
-22,279.02
-24,118.54
43,042.93
48,998.00
18,949.34
-78,880.42
17,447.10
28,295.87
-1,127.38
-6,672.47
29,793.44
.00
87,026.82
140,474.87
2002
87,026.82
CURR PER/2002
7,659.99
2003
140,474.87
MAR
APR
HAY
JUN
JUL
2001
2001
2001
2001
2001
7,164.11
2001
119,414.93
System Date
-55,980.18
[FEB 21/20033
40,043.88
-1,966.05
29,702.48
Signon Date
[JAN 31/2003]
AUG 2001
-61,846.70
Last Month Closed
SEP 2001
OCT 2001
NOU 2001
DEC 2001
JAN 2002
FEB 2002
ACCRUALS
TOTAL
16,279.54
-21,949.66
-32,941.57
47,157.07
-5,711.02
7,659.99
119,414.93
07,026.82
[DEC 20021
Vear end
I-Next/Previous/Fir s t/Las I
[|]-Enail
[FEB 28/2002]
Prior Vear Status
[OPEN]
[[jSHl-End
[ffll-Options
Currently this program assumes that the G/L bank account is 1020-10.
the monthly financial statement has been run for the current and prior years, the monthly
figures will be displayed.
5-18 ■ SINGLE CHEQUE PROCESSING
DAILY PROCESSING
AUTOMATIC CHEQUE PROCESSING
This program allows you to process cheques for those invoices selected to be paid under the cash requirements
program (page 7-12).
The cheque preparation cycle consists of the following:
Page
Spool the cash requirements report with the desired cut off date. Any
7-12
invoice with a due date before or on the cut off date will appear on
the report. Invoices that appear on the Cash Requirements report will
have cheques processed for them during the automatic cheque run.
Review the cash requirements report and modify due dates for
8-4
invoices you want to pay in this cheque run..
Place invoices on hold for any items that you don't want to pay
8-4
during this cheque run.
4.
Spool the Cash Requirements report again and review any changes
7-12
you made.
6.
Perform Automatic cheque processing.
Print the cheques and cheque register.
7.
Review the cheques against the Cash Requirements report.
5.
5-19
12-1
ilIt-;.UJS|xl
.£&
Help
To select Automatic cheque processing, type [3) and press I+-1 Enter).
AUTOMATIC CHEQUE PROCESSING ■ 5-19
DAILY PROCESSING
The screen will appear as follows:
[_) Select:
[01-Start
ftfl-Modify
[0331 "Exit
Cheque Print Date
The cheque print date will determine whether or not an invoice is eligible for processing. It will also determine
whether or not a discount is allowed for the invoice. The default cheque print date is the cash requirements cut off
date which is updated when the cash requirements report is run. If the cash requirements cut off date is not available
the system will use the signon date.
The cheque print date can be modified. You can use the cash requirements cut off date, [fi ), the system signon date,
|F2 j. or enter your own date in the format, ddmmyyyy. If the cheque print date is modified and the date is greater
than the cash requirements cut off date the system will prompt you with a warning message indicating that the
applicable discounts, if any, will be re-calculated.
The system will then prompt you with another message asking you if you want to use the cheque print date or the
cash requirements cut off date to determine which invoices should be paid. If you select the cash requirements cut off
date only those invoices on your cash requirements report will be processed. If you use the cheque print date any
invoice with a due date less than or equal to the cheque print date will be selected and processed.
Once the correct date has been entered,
to start processing the cheques.
The system will now begin to process the cheques and display the supplier numbers as it processes them. The
cheques and cheque register will automatically be spooled and ready to print.
5-20 ■ AUTOMATIC CHEQUE PROCESSING
DAILY PROCESSING
The screen will appear as follows when the cheques have been spooled.
Recounts Payable
31/01/2003
Disbursements Journal
Last Month Closed : DEC/2002
1 Cheque print date :
2 6/L discount code :
Report type
:
Cheque format ....:
Report name
Journal & register
Cheques
15/ 1/2003
4685
Summary
6 Laser MICR
File name
Page
RHf)PR12.PRT
1
Chequed
RMAPR126.PBT
PROCESSIHG COMPLETED
Press
to continue
AUTOMATIC CHEQUE PROCESSING ■ 5-21
DAILY PROCESSING
ENTER CANCELLED CHEQUES
This program allows you to cancel cheques that have been cashed. Cheques that have been
specified as cashed and cancelled can then be purged from the cheque reconciliation file.
To select Enter cancelled cheques, type Q and press I <-* Enter \.
The screen will appear as follows:
Accounts
RM
Payable
TLflPPH
Cancelled Cheque Matching
Bank Statement Date : 31/ 1/2003
[JAN 31/20031
l_] Select:
103-Start
til-Modify
If the bank statement date is incorrect, type (mJ to modify the date.
Once the date is correct, type (s) to start canceling cheques.
5-22 ■ ENTER CANCELLED CHEQUES
1.2/
31/01/2003
DAILY PROCESSING
The screen will appear as follows:
TLRPP14
1.27
31/01/2003
flccounts Payable
P.C.P.L
Cancelled Cheque Matching
RM
Bank Statement Date : 31/ 1/2003
MAN 31/20033
TOTRL
Cheques
0
Cancelled Cheque No.
Amount
Amount
.00
Supplier Name
Issue Date
Cancel Date
Cutoff Date
Enter
riti»atui»inH1lgfli
[QQ]-Lookup Cheque File
I-End
[33]-Display Current Cancelled Cheques
Enter the number of the cheque to be cancelled and the system will display the amount,
supplier name, issue date and cut off date. The system will ask you if you want to cancel this
cheque. Type Q to cancel or (n) if you do not want to cancel the cheque
Repeat this process for all cheques to be cancelled. To exit from the program type
and
press |<-*Enier| with the cursor in the Cancelled Cheque No. field.
ENTER CANCELLED CHEQUES ■ 5-23
CHAPTER 6: YEARLY PROCESSING
YEARLY PROCESSING
This selection is NOT AVAILABLE.
YEARLY PROCESSING ■ 6-1
CHAPTER 7: REPORTS
jji»il«
,.., jo).*]
&ifc
To select Reports, type (3) and press I<-JEnter!.
The screen will appear as follows:
00 gtSt tjelp
7-1
REPORTS
AGED CASH REQUIREMENTS
This program allows you to print a complete aged list of all invoices that have a due date
before or including the specified cut off date.
Qfe Edit tielp ,
'
,
Type Q and press I*-1 Enter) to select Aged cash requirements.
The screen will appear as follows:
Accounts Pavahle
TUPP2IJ
?.S>4\
Type (s) to generate the Aged Cash Requirements report for one company or (c] to generate the Aged Cash
Requirements report for a number of consolidated companies.
7-2 ■ AGED CASH REQUIREMENTS
REPORTS
Standard
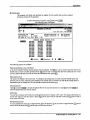
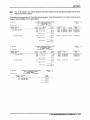
The Standard Aged Cash Requirements screen is as follows:
iiii'1 -In] xj
TLfiPPt/
1.20
31/01/2003
Accounts P<)val)lt.*
P.C.P.L
fl/P flged Cash Requirements
flging Date
: 24/ 1/2003 [JflH 24/20031
Include HELD items in totals : V
[_] Select:
tgl-Start
Ijl-Modify
-Exit
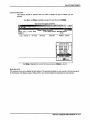
The following report options are available:
Aging Date
The aging date automatically defaults to the system date the first time it is run. The default
date them becomes the last aging date that was used. To modify this date type (m), press
I^ Enter! and enter the date in the format ddmmyyyy.
Include Held Items
All invoices on Hold are automatically included in this report. To exclude invoices on Hold
set this option to (n).
AGED CASH REQUIREMENTS ■ 7-3
REPORTS
Consolidated
The Consolidated Aged Cash Requirement screen is as follows:
The report options for the Consolidated Aged Cash Requirements are the same as the Standard however you have the
added option of selecting numerous companies to create the report for. |F5 \ is used to select the companies to
include in the report.
7-4 ■ AGED CASH REQUIREMENTS
REPORTS
A sample Standard Aged Cash Requirements report follows:
RUN
DATS:
POLYMATHIC COMPUTER PRODUCTS LIMITED
ACCOUKTS PAYABLE AGED CASH REQUIREMENTS REPORT
HELD Items Included in Totals
JAN 31/2003
TODAY'S BATE:
AGING DATE:
FEB 21/2003
JAM 31/2003
TOTAL AMOUHT
SUPPLIER
NUMBER
61
SUPPLIER KANE
-
90 DAYS
DUE
TOTALS
FOR ALL
TOTAL AMOUNT
91-12
0
DAYS
DUE
SUPPLIERS
END OF REPORT
A sample page from a Consolidated Aged Cash Requirements report for two companies follows:
RUN
DATE:
FSB
TODAY'S DATE:
AGING DATE:
21,2003
FSB 21.2003
JAN 31,2003
SUPPLIER
NUMBER
SUPPLIER NAME
1308
EN SUPPLIER COMPANY
2
1308
EN SUPPLIER COMPANY
2
850
EM SUPPLIER COMPANY
2
850
EM SUPPLIER COMPANY
2
355
HC
20699
754
20BS1
2029
SUPPLIER COMPANY
1
EN SUPPLIER COMPANY
2
EN
2
SUPPLIER COMPANY
HC SUPPLIER COMPANY 1
EN SUPPLIER COMPANY 2
2015
2040
EN SUPPLIER COMPANY 2
EH SUPPLIER COMPANY 2
2041
HC
20B53
2300
2OB84
2031
2051
SUPPLIER COMPWIY
1
HC SUPPLIER COMPANY 1
EH SUPPLIER COMPANY 2
EH
SUPPLIER COMPANY 2
EH
SUPPLIER COMPANY 2
EH
COMPANY 2
SUPPLIER
EN SUPPLIER
20530 EN SUPPLIER
427 EN SUPPLIER
20526
COMPANY 2
COMPANY 2
COMPANY
2
427 EN SUPPLIER CCMPAMY 2
204 7 EN SUPPLIER COMPANY 2
2053 EN SUPPLIER COMPANY 2
2103
EN
SUPPLIER COMPANY 2
21000
EN
SUPPLIER COMPAHY 2
21100
EN SUPPLIER COMPAHY 2
2228
EN
SUPPLIER COMPANY 2
3401
EN
SUPPLIER COMPANY
1751 EN
2
SUPPLIER COMPAMY 2
22520
EN
SUPPLIER COMPANY 2
2234
HC
SUPPLIER COMPAHY 1
550 HC SUPPLIER COMPAHY 1
TOTALS
FOR ALL SUPPLIERS
COMPANIES
SELECTED:
HC
COMPANY
1
COMPANY
2
AGED CASH REQUIREMENTS ■ 7-5
REPORTS
AGED TRIAL BALANCE
This program allows you to print a complete aged list of unpaid invoices in vendor number
order.
Type [2) and press (*-*Enter! to select Aged trial balance.
The screen will appear as follows:
Accounts Payable
Reports
RM
1
2
: 3
4
ftged cash requirements
Aged trial balance
Cash requirements
Cheque reconciliation
! 5
i 6
7
8
I 9
10
Cheque register and cheques
Cheque report
Purchase journal
Reprint purchase journal
Reprint cash disbursements
Supplier open item
Run 11
12
Run 13
Run 14
15
Supplier master
Supplier master updates
Fax telephone numbers
Purchases by supplier
6ST edit report
Run 16 Purchases by supplier <QST>
17 Cash disbursements summary
18 Reprint supplier open item
S System status
SELECTION MENU
Monthly Backup
Yearly Backup
t
7-6 ■ AGED TRIAL BALANCE
TLAPP20
2.GA)
31/01/2003
4
[SB]-Exit
REPORTS
Current
Highlight Current and press I*-1 Enter) to generate the report from the current open items.
The screen will appear as follows:
Review the information and type either (m) to modify the options or (s) to start the report.
The options available are as follows:
Report Type
Detailed and summary reports are available. You can print the detail only, summary only or both reports. The default
is both reports.
Aging Date
The aging date is the cut off date for invoices you want included in this report. The default is the signon date.
Supplier Selection
You can produce this report for a single supplier or all suppliers. The default is all suppliers. To produce this report
for a single supplier type (s) and press I+-1 Enter) then enter the supplier's code. IF5 \ can be used to list all suppliers.
After the report has been generated, the following options are available:
(w)
Email this report to your Microsoft Outlook email profile.
Create this report in Microsoft Word format.
Create this report in Microsoft Excel format.
Use]
Exit. If you choose to exit without using one of the above options you can still print the report from the Print
Reports main menu program.
AGED TRIAL BALANCE ■ 7-7
REPORTS
Monthly/Yearly Backup
This report can be generated from a monthly or yearly backup file. In order to generate the
Aged Trial Balance report from a backup file you must have the backup option set to Yes in
Company Information. Refer to (11-10) for more details.
IflflnMHHHHHHHHBn^^
Llnl xil
1 Aged cash requirements
2 Aged trial balance
3 Cash requirements
4 Cheque reconciliation
5
6
7
8
Cheque register and cheques
Cheque report
Purchase journal
Reprint purchase journal
Run 11
12
Run 13
Run 14
15
Supplier master
Supplier master updates
Fax telephone numbers
Purchases by supplier
GST edit report
Run 16 Purchases by supplier (QST)
17 Cash disbursements summary
18 Reprint supplier open item
3 Reprint cash disbursements
S System status
10 Supplier open item
Highlight Monthly Backup and press (<-* Enter) to generate the report from month-end backup files.
Highlight Yearly Backup and press 1^ Enter | to generate the report from year-end backup files.
The Monthly Backup screen will appear as follows:
P.C.P.L
RM
iTypist
Port
TLAPP20
Accounts Payable
6
9S
Processing Year
^^^
02
MONTHLY OPEN ITEMS BACKUP FILES
flfiWitki
JAN/01
FEB/02
FEB/O1
FE8/00
MAR/02
MAR/01
MAR/OO
JUN/02
JUH/O1
dUH/OO
tlUL/02
flUG/02
dUL/01
AUB/01
dUL/OO
flUG/OO
SEP/02
SEP/O1
SEP/OO
OCT/02
NOU/O2
DEC/02
OCT/O1
NOU/O1
DEC/01
OCT/OO
NOU/OO
DEC/OO
APR/02
MAY/02
2.64
31/01/2003
Reports
06E0 TRIAL BALANCE REPORT
<<< From MONTHLY BACKUP Files >>>
APR/HI
MAY/01
JflN/OO
APR/OO
MAY/OO
t[2]l -Selects
tSSQl-Unselects
Q
Q
[JUSl-End
Select a single month using fF9l then type (D and press I^Enter| to spool the report.
7-8 ■ AGED TRIAL BALANCE
REPORTS
The Yearly Backup screen will appear as follows:
flccounts Payable
Typist
Port
Reports
fiGEO TRIAL BALANCE REPORT
<<< Fron YEflRLY BACKUP Files »>
6
96
Processing Year
HfiPPZO
2.M\
31/01/2003
02
f
Top
I
PgUp PgDn
[Jot ton
Esc
Highlight the year you want to generate the report for and press [<-* Enter]
Type (s) and press I^ Enter! to spool the report.
AGED TRIAL BALANCE ■ 7-9
REPORTS
Various reports are generated from the Aged Trial Balance option. Samples follow:
AGING DATE -
ACCOUNTS PAYABLE AGED TRIAL BALANCE REPORT
January 31,2093
SUPPLIER
NUMBER HAKE
163
SUPPLIER HAMS
331
SUPPLIER HAMS
S51
SUPPLIER HAKE
sae
SUPPLIER NAME
630 SUPPLIER NAME
705
SUPPLIER NAME
755 SUPPLIER NAME
SUPPLIER NAME
940 SUPPLIER NAME
1150 SUPPLIER NAME
1230 SUPPLIER NAME
1305 SUPPLIER NAME
1625 SUPPLIER NAME
1642 SUPPLIER NAME
1666 SUPPLIER NAME
167B SUPPLIER NAME
1815 SUPPLIER NAME
8BB
1830 SUPPLIER NAME
1870 SUPPLIER NAME
1B71 SUPPLIER NAME
1955 SUPPLIER NAME
1960
SUPPLIER NAME
1989
SUPPLIER NAME
2013 SUPPLIER NAME
2036 SUPPLIER MAKE
2050 SUPPLIER HAKE
250S
SUPPLIER HAMS
TOTALS
AGIXG
FOR ALL SUPPLIERS
DATE -
January
INVOICE
31,2003
ACCOUNTS
PAYABLE AGED TRIAL BALANCE REPORT -
DETAILED
INVOICE
DATE
NUMBER
DIV
STATUS
30/12/2002
11041
10
TOTAL
755 SUPPLIER NAME
6/ 1/2003 40-9656011
10
9/ 1/2003 40-6654111
10
TOTAL
940 SUPPLIER NAME
31/
1/2003
31012003
10
1150 SUPPLIER NAME
TOTAL
31/12/2002
3/ 1/2003
TOTAL
1955
1356946
10
1359452
10
SUPPLIER NAME
23/12/2002
7/ 1/2003
7/ 1/2003
1272943
1282454
1283142
10
10
10
TC7AL
1960 SUPPLIER NAME
TOTALS
FOR ALL
SUPPLIERS
DATE: JAN 31/2003
AGING DATE - January 31,2003
INVOICE
RMAPR191 2.39
PAGE
2
LIMITED
PAYABLE AGED TRIAL BALANCE REPORT
-
DETAILED
<-
OVER
INVOICE
NUMBER DIV
DATE
SUMMARY
POLYMATHIC COMPUTER PRODUCTS
ACCOUNTS
STATUS
0-30
120
DAYS
DAYS
OUTSTANDING ->
AMOUNT
DAYS
PAGE
10
3588.45
.00
3713.31
TOTAL COMPANY
3588.4S
.00
3713.31
DIVISION
96.638%
.000?.
OPEN
ITEMS as
at
Jan
31,2003
3713.31
END OF REPORT
DATE:
AGING
JAN 31/2003
DATE - January
POLYMATHIC
31,2003
ACCOUNTS
COMPUTER
PRODUCTS
RMAPR192
LIMITED
SUPPLIER
NUMBER
31-60
NAME
DAYS
TOTALS
FOR ALL
SUPPLIERS
7-10 ■ AGED TRIAL BALANCE
.00
DAYS
61-90
2.39
PAGE
PAYABLE AGED DEBIT LIST
DAYS
91-120
DAYS
OVER
121
1
TOTAL
DAYS
OUTSTANDING
REPORTS
POLYMATHIC
DATE: JAN 31/2003
AGING DATE - January 31,2003
ACCOUNTS
INVOICE
INVOICE
NUMBER
DATE
123456 31-JAN-2OO3
SUPPLIER NUMBER/NAME
1642
SUPPLIER NAME
DATE:
JAN
AGING
DATE
POLYMATHIC
31/2003
-
January 31,2003
<«
PAGE
DATED CHEQUES
INVOICE
AMOUNT
115.00
COMPUTER PRODUCTS
CHEQUE
4054
NUMBER
INVOICE
DATE
2.39
1
CHEQUE
NUMBER
DATE
31-JAN-2003
RMAPR194
LIMITED
ACCOUNTS PAYABLE FUTURE PAID ITEMS
INVOICE DATE and CHEQUE DATE EXCEED AGING DATE
INVOICE
SUPPLIER NUMBER/NAME
RMAPR193
COMPUTER PRODUCTS LIMITED
PAYABLE FUTURE
PAGE
2.39
1
>»
INVOICE
CHEQUE
CHEQUE
AMOUNT
NUMBER
DATE
.00
AGED TRIAL BALANCE ■ 7-11
REPORTS
CASH REQUIREMENTS
This program allows you to print a list of all invoices to be paid by a specified date. It is
generally run before you process cheques to show you what invoices will be paid to each
supplier and what the cheque total will be.
&e m
Help
Type (D and press |<-*Enter) to select Cash requirements.
The screen will appear as follows:
flr.rnnnts
rayahlc
Cash Requirements
RM
CUT OFF DATE
Include HELP items in totals
[0] Select:
31/01/2003
: 31/ 1/2003 [JAN 31/20031
Sequence : A
: V
Supplier: A All Suppliers
[0]-Start
[Hi-Modify
[fiJffh-Exit
Type (m) to modify the report options or (s) to start spooling the report.
7-12 ■ CASH REQUIREMENTS
NAME
REPORTS
The following options are available:
Cut Off Date
All invoices that have a due date before or up to the cut off date will be listed in the Cash Requirements report.
Held Items
Items that are on hold will not be processed for payment however you can include the held items in the total per
supplier on the Cash Requirements report. The default is to include all held items in the total.
Sequence
You can print a Cash Requirements by supplier name or supplier number. Type
and press I*-* Enter! to print this
report by supplier name or (n) and press I*-1 Enter 1 to print by supplier number.
Supplier
You can print a Cash Requirements report for a single supplier or all suppliers. All suppliers is the default. To print
this report for a single supplier type (s) and press I«-*Enter! then enter the supplier number. IF5 1 can be used to list all
suppliers.
Once you are ready to generate the Cash Requirements report type (s) and press 1 ^Enter).
After the report has been generated, the following options are available:
(EJ
(w)
flsci
Email this report to your Microsoft Outlook email profile.
Create this report in Microsoft Word format.
Exit. If you choose to exit without using one of the above options you can still print the report from the Print
Reports main menu program.
A sample Cash Requirements report follows:
POLYWATHIC COMPUTER PRODUCTS
CASH
REQUIREMENTS
HELD Itexjs
INVOICE
NUMBER
LIMITED
REPORT
INCLUDES ITEMS UP TO DUE DATE:
PAGE
RMAPR10
1
3.3B
JAN 31/2003
Included in Totals
INVOICE
POSTING
DATE
DATE
11041
30/12/2002
11/01/2003
40-6654111
40-9656011
09/01/2003
06/01/2003
11/01/2003
11/01/2003
31012003
31/01/2003
06/01/2003
1272943
1262454
1263142
23/12/2002
01/01/2003
07/01/2003
17/01/2003
14/01/2003
17/01/2003
1356946
1359452
31/12/2002
03/01/2003
17/01/2003
17/01/2003
END OF REPORT
CASH REQUIREMENTS ■ 7-13
REPORTS
CHEQUE RECONCILIATION
This program allows you to print a complete list of all outstanding cheques up to and
including the cut off date entered under Enter Cancelled Cheques (page 5-22).
®*
You must enter cancelled cheques as outlined on page 5-22 prior to running this
selection.
Type Q and press I*-1 Enter! to select Cheque reconciliation.
The screen will appear as follows:
ftccounts HiivalJle
RM
Cheque Reconciliation Report
including cheques up to and including 31/ 1/2003
[„] Select:
[|]-Start
[[J3-Modify
31/01/2003
tdflH 31/20031
[(S3]-Exit
Type [s) and press [<-*Enter! to spool the report. The system will return to the report menu
when the cheque reconciliation report is complete.
7-14 ■ CHEQUE RECONCILIATION
REPORTS
After the report has been generated, the following options are available:
(D
®
Email this report to your Microsoft Outlook email profile.
Create this report in Microsoft Word format.
(Escj
Exit. If you choose to exit without using one of the above options you can still print the report from the Print
Reports main menu program.
A sample Cheque Reconciliation report follows:
POLYMATHIC COMPUTER
DATE JAN 31/2003
CHEQUE
PRODUCTS
RECONCILIATION
LIMITED
RMAPR15
REPORT
INCLUDING CHEQUES UP TO JAN
SUPPLIER NAME
JAN
31/2003
18-DEC-2002
163
SUPPLIER
NAME
02-JAN-2003
630
SUPPLIER NAME
02-JAN-2003
940
SUPPLIER NAME
02-JAN-2003
1150
SUPPLIER NAME
02-JAN-2003
1230
SUPPLIER NAME
02-JAN-2003
1830
SUPPLIER NAME
02-JAN-2003
1955 SUPPLIER NAME
02-JAN-2003
1989 SUPPLIER NAME
02-JAN-2003
SUPPLIER NAME
04-JAN-2003
1960 SUPPLIER NAME
06-JAN-2003
1B70
SUPPLIER NAME
09-JAN-2003
163
SUPPLIER NAME
15-JAN-2003
557
SUPPLIER NAME
15-JAN-2003
630 SUPPLIER NAME
15-JAN-2003
888
SUPPLIER NAME
15-JAN-2003
940
SUPPLIER NAME
15-JAN-2003
1150
SUPPLIER NAME
15-JAN-2003
1230
SUPPLIER NAME
15-JAN-2003
1815
SUPPLIER NAME
15-JAN-2003
1830
SUPPLIER NAME
15-JAN-2003
1955
SUPPLIER
NAME
15-JAN-2003
1960
SUPPLIER NAME
15-JAN-2003
2050
SUPPLIER NAME
15-JAN-2003
2505
SUPPLIER NAME
15-JAN-2003
CHEQUE
CHEQUE
CANCEL
SUPPLIER
NUMBER
AMOUNT
AMOUNT
NUMBER
4055
115.00
TOTAL OUTSTANDING
TOTAL CANCELLED
DATE
NAME
PRODUCTS
1642
LIMITED
RMAPR15 1.25
PAGE
2
RECONCILIATION REPORT
INCLUDING CHEQUES UP TO JAN
CHEQUE
CANCEL
DATE
SUPPLIER
POLYMATHIC COMPUTER
DATE
CHEQUE
337
588
SUPPLIER
31/2003
NAME
SUPPLIER NAME
26 CHEQUES TOTALLING
0 CHEQUES TOTALLING
1
31/2003
CANCEL SUPPLIER
AMOUNT NUMBER
1.25
PAGE
CHEQUE
CANCEL
DATE
DATE
31-JAN-2003
36141.10
DOLLARS
.00
DOLLARS
CHEQUE RECONCILIATION ■ 7-15
REPORTS
CHEQUE REGISTER AND CHEQUES
This step is performed during Automatic Cheque Processing. The program will print the
cheques and a list of all transactions processed by the Automatic Cheque Processing
program. The cheque register report will summarize all amounts posted to the bank,
accounts payable and discounts earned.
@e
&ft
Help
Type (5) and press I ^ Enter! to select Cheque register & cheques.
The screen will appear as follows:
Type (m) to modify the options or (s) to start processing the cheques.
7-16 ■ CHEQUE REGISTER AND CHEQUES
REPORTS
The following options are available:
Cheque Print Date
You can modify the cheque print date to print a different date than the one listed. The default date is the signon date.
G/L Discount Code
The default discount code is set up in Company Information however you can change the discount code for the
current cheque run. To modify the discount code permanently you must change the code under Company
Information.
A sample Cheque Register follows:
POLYMATHIC COMPUTER PRODUCTS
DATE
CASH
JAN 31/2003
CHEQUE
CHEQUE
SUPPLIER
DATE
NUMBER
NUMBER
31/
31/
31/
31/
31/
1/2003
1/2003
1/2003
1/2003
1/2003
LIMITED
DISBURSEMENTS JOURNAL AND CHEQUE REGISTER
CHEQUE
A/P
AMOUNT
AMOUNT
AMOUNT
SUPPLIER NAME
112.35
112.35
476.78
.00
2600.00
.00
.00
.00
755
940
4058
1150
SUPPLIER NAME
SUPPLIER NAME
4059
4060
1955
SUPPLIER NAME
135.23
2600.00
135.23
I960
SUPPLIER NAME
388.95
388.95
476.78
RMAPR12M 1.34
PAGE
1
FEB 24/2003
DISCOUNT
SUPPLIER NAME
4057
4056
RUN DATE
.00
3713.31
CHEQUE REGISTER AND CHEQUES ■ 7-17
REPORTS
CHEQUE REPORT
This program allows you to print all details relating to un-purged outstanding cheques.
P.C.P.L
Accounts Payable:
Type (6) and press l<-*Enterl to select Cheque report.
The screen will appear as follows:
7-18 ■ CHEQUE REPORT
TLflPP2ll
2.64
REPORTS
Current
Type Q) and press [«-*Enter! to generate the report using the current year's data.
The screen will appear as follows:
History
Type (D and press l<-*Enter| to generate the report using data that is stored in the history file
The screen will appear as follows:
P.O. P.L
RM
ftccounts Pavablc
31/01/2003
ction
Highlight the year that you want to generate the report for and press I*-1 Enter)
CHEQUE REPORT ■ 7-19
REPORTS
The report options for the Cheque report are as follows:
Supplier:
Type (a) and press I+-1 Enter) for all suppliers or type (D and enter the Supplier code for a single
supplier. 1F5 ) can be used to list all suppliers.
Sorted By:
The sorting options available are as follows:
(c)
Cheque number
(d) Cheque issue date
(s) Supplier number
IS) Supplier name
Start Date:
This report is automatically generated for all dates. To select a range of dates enter a start date in the
format ddmmyyyy.
End Date:
If you entered a start date above enter the end date in this field using the format ddmmyyyy.
A sample Cheque report follows:
Total
cheques:
7-20 ■ CHEQUE REPORT
REPORTS
PURCHASE JOURNAL
This program allows you to print the accounts payable transactions entered under "Enter
Supplier Invoices". It allows you to verify that the distribution to the General Ledger
accounts is correct. It also provides a month end summary of the amounts posted to the
General Ledger.
Type Q and press l^-*Enter| to select Purchase journal.
The screen will appear as follows:
Accounts
RH
Typist: 06
GST Code:
Pavahle
Purchase Journal Print
JAN 31/2003
Last Month Closed : DEC/2002
<« NOTE >»
The SUPPLIER INUOICE JOURNAL is EMPTY !
There is nothing to print.
Press
to continue
Invoices are posted automatically when they are entered. This option will usually state that
there is nothing to print. If it does not, type (s) and press I*-* Enter j to generate the Purchase Journal report.
PURCHASE JOURNAL ■ 7-21
REPORTS
A sample Purchase Journal follows:
DATE 31/01/2003
SUPPLIER
NO.
NAME
P0LYMA7HIC COMPUTER PRODUCTS LIMITED
PURCHASE JOURNAL
REFERENCE
NUMBER
SUPPLIER
SUPPLIER
INVOICE NO INV.DATE
TOTAL
AMOUNT
RMAPR06 5.26
PAGE
1
24/02/2003
RUN DATE:
DUE
DATE
1230 SUPPLIER NAME
JAN2003 31/01/2003
150.00 02/03/2003
1642 SUPPLIER NAME
31607 31/01/2003
500.00 31/01/2003
650.00
***
7-22 ■ PURCHASE JOURNAL
END OF REPORT ***
GL
CODE
GL GL
LINE
AMOUNT DESCRIPTN
NO
8165-10
150.00 ENTERTAINM
9
8710-10
500.00 CAR EXPENS
12
650.00
REPORTS
REPRINT PURCHASE JOURNAL
This program allows you to reprint any previously printed Purchase Journals for any month
for which the purchase journal files are on disk. The heading on the purchase journal report
contains the word reprinted to indicate that it is not the original copy.
TU1PP20
Accounts Payable
2.641
To select Reprint purchase journal type [D and press (<-* Enter j
The screen will appear as follows:
TLflPPZB
1.2S
31/01/2003
flccounts Payable
P.C.P.L
Purchase Journal Reprint
Last Month Closed : DEC/2002
1 Starting month ...: JB
2 Ending month
.....: 12
2002
Year
2002
3 Supplier selection: h ALL
Enter
rj»m«im—pminni
REPRINT PURCHASE JOURNAL ■ 7-23
REPORTS
The following report options are available:
Starting month/year:
Enter the starting month and year for the range of purchase journals you want to reprint.
Ending month/year:
Enter the ending month and year for the range of purchase journals you want to reprint.
Supplier:
The default is All suppliers. If you want to print the purchase journal for one supplier type (s)
and press l<-*Enter|. Enter the supplier code for the supplier you want, [fs ) can be used to list
all suppliers.
If a previous purchase journal exists the system will prompt you to Overwrite or Append to the report. To overwrite
the existing report type (o) and press I*-1 Enter |. Type (a) and press I<-* Enter | to append your report to the end of an
existing report.
Once the report is generated the following options are available:
(ID
(D
®
Display this report on the screen.
Email this report to your Microsoft Outlook email profile.
Create this report in Microsoft Word format.
[Iscl
Exit. If you choose to exit without using one of the above options you can still print the report from the Print
Reports main menu program.
7-24 ■ REPRINT PURCHASE JOURNAL
REPORTS
REPRINT CASH DISBURSEMENTS JOURNAL
This program allows you to reprint any previously printed Cash Disbursements Journals for
any month for which the cash disbursement files are on disk. The heading on the purchase
journal report contains the word reprinted to indicate that it is not the original copy.
To select Reprint cash disbursements journal type (Jj and press [«-* Enter).
The screen will appear as follows:
.P.C.P.L
RM
Typist: 06
Enter
Recounts Payable
TLflPPZ/
31/01/2003
Cash Disbursements Journal Reprint
Last Month Closed : DEC/2002
1 Starting month ...: 10
Year
2 Ending ttonth
: 12
3 Supplier selection: A flLL
Year
2002
2002
[0-End
REPRINT CASH DISBURSEMENTS JOURNAL ■ 7-25
REPORTS
The following report options are available:
Starting month/year:
Enter the starting month and year for the range of cash disbursements journals you want to
reprint.
Ending month/year:
Enter the ending month and year for the range of cash disbursements journals you want to
reprint.
Supplier:
The default is All suppliers. If you want to print the cash disbursements journal for one
supplier type (s) and press [<-■ Enter|. Enter the supplier code for the supplier you want, (fs )
can be used to list all suppliers.
If a previous cash disbursements journal exists the system will prompt you to Overwrite or Append to the report. To
overwrite the existing report type (o) and press I<-*Enter\. Type Q and press I+-1 Enter) to append your report to the end
of an existing report.
Once the report is generated the following options are available:
®
CD
fEscl
Display this report on the screen.
Email this report to your Microsoft Outlook email profile.
Exit. If you choose to exit without using one of the above options you can still print the report from the Print
Reports main menu program.
7-26 ■ REPRINT CASH DISBURSEMENTS JOURNAL
REPORTS
SUPPLIER OPEN ITEM
This program allows you to print or display a complete list of unpaid invoices for a single
supplier or all suppliers.
Type QGD an£* press I<-* Enter! to select Supplier open item.
The screen will appear as follows:
SUPPLIER OPEN ITEM ■ 7-27
REPORTS
Current
Highlight Current and press I ♦-'Enter! to generate a supplier open item report from current data
The following screen will appear:
Type (a) for all suppliers or [s) for a single supplier and press [ <-■ Enter |.
The screen will appear as follows:
ftccounts
Print
TLflPPin
Payable
ftll
Supplier
tQ[3 Select REPORT TVPE:
Cjl-Wide
CQ[3-Narrow
-Exit
Type (n) for narrow paper (81/2x11) and press l^-1 Enter \.
7-28 ■ SUPPLIER OPEN ITEM
3.37
31/01/2003
fi/P Open I ten List
Rt1
REPORTS
If you selected (s) for a single supplier, the system will prompt you to enter the supplier's
number here. Many options are available. You can get a list of suppliers by pressing IF5 ).
You can enter the supplier's name by pressing fF3">. You can lookup an invoice to get the
suppliers name by pressing |F8 \ or you can lookup a cheque to get the supplier name by
pressing(fs ).
If you selected all suppliers the screen will appear as follows:
fflTOSi
TLflPPIl
fl/P Open I ten List
flM
Print
fill
Harrow
Supplier tt
:).
31/01/2003
RKAPR1B.PRT
Page
..
Enter matching date
Enter MATCHING DATE tj
to list all payables
Enter the matching date and press [<-* Enter).
Type (a) and press I^ Enter j to accept the matching date entered, or (R) to rekey the date.
Once the correct matching date is entered and accepted the system will generate the report. After the report has been
generated the system will give you the option to Email this report to your Microsoft Outlook Email Profile. Type (§)
and press I«-* Enter) to email this report to yourself. If you want to print this report go to the Print Reports main menu
option.
SUPPLIER OPEN ITEM ■ 7-29
REPORTS
Monthly Backup
Highlight Monthly Backup and press I ^ Enter i to generate an open item list from a different month's data.
The screen will appear as follows:
Edit
Help
Use IF9 | to select the month you want to extract the data from. Once you have selected the
month, press lEsci to exit and (1) to start generating the report.
7-30 ■ SUPPLIER OPEN ITEM
REPORTS
Yearly Backup
£dit
Recounts ravaill
Repor ts
RM
Run
Run
Run
Run
Run
Run
Run
Run
Run
1 Aged cash requirements
2 Aged trial balance
3 Cash requirements
A Cheque reconciliation
5
6
7
8
9
10
Cheque register and cheques
Cheque report
Purchase journal
Reprint purchase journal
Reprint cash disbursements
Supplier open item
11
12
13
14
15
16
17
18
31/01/2003
Supplier master
Supplier master updates
Fax telephone numbers
Purchases by supplier
GST edit report
Purchases by supplier (QST)
Cash disbursements summary
Reprint supplier open item
S System status
SELECTION MENU
Monthly Backup
Yearly Backup
t
I
CSS]-Exit
Highlight Yearly Backup and press [<-* Enter! to generate an open item list from a different
years data.
The screen will appear as follows:
Ete
id*
fcjdp
"
■•
Highlight the year you want to extract the data from and press l<-*Enteri. Once you have
selected the year, type (s) to start generating the report.
SUPPLIER OPEN ITEM ■ 7-31
REPORTS
A sample Open Item Report for a single supplier follows:
DATE:
POLYMATHIC COMPUTER PRODUCTS LIMITED
A/P DETAIL OPEN ITEM LIST
JAN 31/2003
INVOICE NO
INV.DATE
POST DATE
SRC
SUPPLIER NUMBER
PAYMENT TERMS
DISCOUNT %
1230
30
.00
CITY,
LAST
4047
POSTAL CODE
CHEQUE
CHEQUE AMT
JAN2003
10012003
13122002
30112002
311102002
DEC 31-02
NOV 14-02
OCT 15-02
NO
ORIG DUE
CURR DUE
3.37
1
CHEOJ
SUPPLIER NAME
SUPPLIER ADDRESS
PROVINCE
40.00
31/01/2003
10/01/2003
13/12/2002
30/11/2002
31/10/2002
31/12/2002
14/11/2002
15/10/2002
DISC.AMT
RMAPR18
PAGE
31/01/2003
14/01/2003
13/12/2002
02/12/2002
31/10/2002
02/01/2003
14/11/2002
15/10/2002
3
3
3
3
3
3
3
3
TOTAL
7-32 ■ SUPPLIER OPEN ITEM
150.00
40.00
79.39
85.39
85.00
91.28
50.00
94.97
02/03/2003
10/01/2003
13/12/2002
30/11/2002
31/10/2002
31/12/2002
14/11/2002
15/10/2002
150.00
*
4047
4022
4009
3982
4034
3996
3970
REPORTS
SUPPLIER MASTER
This program allows you to print a listing of the Supplier Master in alphabetical or
numerical order.
flee mints
1
Aged cash requirements
2
3
4
5
6
7
8
Aged trial balance
Cash requirements
Cheque reconciliation
Cheque register and cheques
Cheque report
Purchase journal
Reprint purchase journal
TLflPP2lI
Payable
2.64
11 Supplier master
12 Supplier master updates
Run 13 Fax telephone numbers
Run 14 Purchases by supplier
15 GST edit report
Run 16 Purchases by supplier (QST)
17 Cash disbursements summary
18 Reprint supplier open item
9 Reprint cash disbursements
10 Supplier open item
S System status
E Exit
Q
Enter selection
Type QG) ancj press l<-*Enter! to select Supplier master.
The screen will appears as follows:
&e
Edit
tjeip
TLAPP20
Dec aunts P avail In
Un!
1 Aged cash requirements
2 Aged trial balance
3 Cash requirements
Run 11 Supplier master
Run 12 Supplier master updates
Run 13 Fax telephone numbers
4 Cheque reconciliation
5 Cheque register and cheques
Run
Run
Run
Run
6
7
8
9
10
Z.FM
31/01/2003
Reports
RM
Purchases by supplier
GST edit report
Purchases by supplier <QST>
Cash disbursements summary
Run 18 Reprint supplier open item
Run
Cheque report
Purchase journal
Reprint purchase journal
Reprint cash disbursements
Supplier open item
Run
14
15
16
17
S System status
E Exit
SELECTION MENU
by G/L CODE
t
4
|]-Exit
SUPPLIER MASTER ■ 7-33
REPORTS
Standard
To generate the standard Supplier Master Report highlight Standard and press I*-1 Enter!.
The following screen will appear:
The options are as follows:
Report Sequence
Q
(ID
Sort suppliers by supplier name.
Sort suppliers by supplier number.
Report Type
Q
IS)
CO
(ID
©
Print a detailed list of the supplier master.
Print supplier names and addresses only.
Print a list in mailing label format.
Print a list in rolodex format.
Print a detailed list of the supplier master including all memo entries.
Number of lines on form
The system will default to a number, depending on the option selected under report type above.
Starting Supplier
The system defaults to the first supplier number or you may enter any valid supplier number.
Ending Supplier
The system defaults to the last supplier number or you may enter any valid supplier number.
Once all report options are set, type (s) and press !<-* Enter j to start spooling the report.
7-34 ■ SUPPLIER MASTER
REPORTS
Once the report is generated the following options are available:
(D
©
Email this report to your Microsoft Outlook email profile.
Create this report in Microsoft Word format.
flscl
Exit. If you choose to exit without using one of the above options you can still print the report from the Print
Reports main menu program.
By G/L Code
Select this option to generate a Supplier Master report by the Home G/L code for the
Supplier. The Home G/L code is entered in field 16 of the supplier master screen.
The following screen will appear:
ftccmmts
Payable
TLnPP03G 1.20
31/01/2003
Supplier Master Report by HOME G/L CODE
RM
REPORT SEQUENCE
: G
G/L CODE SELECTION: ft
G/L CODE
ALL
[_] Select:
C0]-Start
[(^-Modify
[[S3]-Exit
A sample page from the Supplier Master Report follows:
POLYMATHIC COMPUTER PRODUCTS
SUPPLIER MASTER -
50
SUPPLIER NAME
SUPPLIER ADDRESS LINE
CITY, PROVINCE/STATE
POSTAL CODE/ZIP
TELEPHONE:
FAX
:
COST
GST
55
NUMERIC
#
...:
HOLDBACK:
1
TELEPHONE:
999-123-4567
FAX
:
COST CODE:
GST tf . . .:
1-999-891-1234
HOLDBACK:
31/2003
Page
1
RMAPR03
2.25
:
:
0
.00
NORMAL TERMS
DISCOUNT %
SUPPLIER:
HOME G/L CODE
:501010
YTD PURCHASES
:
P.O.
:NO
REQUIRED
523.23
LAST UPDATE:27-JAN-2003
:01-OCT-2002
LAST USED
CHANGE
999999999
NAME
SUPPLIER ADDRESS LINE
CITY, PROVINCE/STATE
POSTAL CODE/ZIP
SEQUENCE
TEMPORARY
999-123-4567
1-999-891-1234
CODE:
SUPPLIER
1
JAN
LIMITED
«
:
NORMAL TERMS
DISCOUNT %
TEMPORARY
1
:
:
0
.00
SUPPLIER:
HOME G/L CODE
:814610
YTD
:
P.O.
PURCHASES
REQUIRED
.00
:NO
LAST UPDATE:02-JUN-1995
LAST USED
:13-JUN-1986
CHANGE
:
#
9
SUPPLIER MASTER ■ 7-35
REPORTS
SUPPLIER MASTER UPDATES
This program allows you to print a list of updates which have been made to the Supplier
Master.
Type (TjQQ and press I*-1 Enter!.
The screen will appear as follows:
Ililiiiiiiil.i-aisiisJ
Type (s) and press I^Enter) to start.
The system will then prompt you with:
Do you want to purge the Audit Trail file (Y/N) ?
7-36 ■ SUPPLIER MASTER UPDATES
REPORTS
If you type Y - Yes, the system will delete all updates that are currently in the file. If you type N - No, all updates
will remain in the file.
You will then have the option to Email the file to your Outlook profile. If you want to email the report to your
Outlook profile type (e) and press I*-1 Enter l.
A sample Supplier Master Update Report follows:
POLYMATHIC
DATE
31/01/2003
SUPPLIER
50
NO.
COMPUTER
PRODUCTS
<« MODIFY
>» Typist:
06
LESLIE
1.22
28
PRIOR
SUPPLIER NAME
NAME
ADDRESS
LINE
1
SUPPLIER ADDRESS
ADDRESS
ADDRESS
LINE
LINE
2
3
SUPPLIER ADDRESS 2
ADDRESS
LINE
4
PHONE NUMBER
NORMAL TERMS
DISCOUNT
TEMPORARY
LAST
RMAPR02
PAGE
LIMITED
SUPPLIER MASTER UPDATES
%
SUPPLIER ADDRESS
GLCODE
JAN 27/2003
COST CODE
SEQ. NO.
1
Computer/User:LESLIE-P4TE/Leslie
CHANGE
YTD
P.O.
FAX
FLAG
UPDATED
3
999-999-9999
0
.00
501010
523.23
PURCHASES
REQ'D FLAG
999-999-9999
NUMBER
LAST CHANGE
N
DATE
OCT
1/2002
SUPPLIER MASTER UPDATES ■ 7-37
REPORTS
FAX TELEPHONE NUMBERS
This program allows you to produce two different types of data files that will contain the
supplier name and fax number. These files can be used by other programs for faxing
information to all your suppliers.
Type QGD an^ Press I <-* Enter I to select Fax telephone numbers.
The screen will appear as follows:
0e
Edit
flr.nnunts
RM
Pnvnhlc
31/01/2003
16:03:59
Fax Telephone Numbers
This program generates specially formatted fiSCII
[|] Select:
[01-Start
files.
[[S3]-Exit
Type (s} and press l^-1 Enter! to start processing the files.
7-38 ■ FAX TELEPHONE NUMBERS
REPORTS
The following screen will be displayed:
1L0PPO1M 1 .201
31/01/2003
16:04:48
Accounts Payable
P.C.P.L
RM
Fax Telephone Numbers
This program generates specially formatted ASCII
files.
PflOCESSIKG COMPLETED. Press MMM to EXIT: |
ASCII File
The ASCII file generated by the system will place the supplier name on one line and the supplier fax number on the
second line.
Comma Delimited File
The Comma Delimited file will place the supplier name and fax number on the same line and place each field in
double quotes separating the fields with a comma.
FAX TELEPHONE NUMBERS ■ 7-39
REPORTS
PURCHASES BY SUPPLIER
This program allows you to generate a report of the purchases by supplier by the months
To select Purchases by supplier type QQ an<^ press I*-1 Enter |.
The screen will appear as follows:
RH
Accounts Pnvahle
Reports
Purchases Summary
1 by Supplier
2 by Supplier CMDHTHLV3
| Enter selection
CdgS]-Exit
7-40 ■ PURCHASES BY SUPPLIER
TLflPPZu
2.
31/01/2003
REPORTS
By Supplier
This program will detail each purchase by supplier for the months that you have selected.
Numerous reports will be generated.
To select Purchases by Supplier, type Q and press (<-* Enter |.
The following screen will appear:
&e
The following options are available:
Purchase Journal Analysis Files
A list of all available Purchase Journal analysis files is displayed. The IF9 | key can be used to select the files for the
months that you want to include purchases from. [fio| can be used to unselect files that were selected in error. Once
you have selected the files you want to extract the information from, press lEsc).
Processing Year
The system will default to the current year. To change the processing year you must select the Modify option and
enter the year you want. Since the system defaults to the current year you will have to wait till the modify option is
listed before you can change this. The year should be entered in the format yyyy.
File Selection
Type (a) and press l<-*Enter| to include all analysis files for the year selected above or type (s) and press I<-*Enter! to
select the analysis files you want to include.
GST Code
You can have numerous GST codes set up through Maintenance & Inquiry, GST codes. The system will prompt you
for the GST code you want the report to detail. |fs \ can be used to list all valid GST codes and |F4 ) can be used to
set up a new GST code.
Division Selection
You can generate this report for a single division, [|) or all divisions,
). If you select a single division |F5 \ can be
used to list all divisions and |F4 ) can be used to set up a new division.
PURCHASES BY SUPPLIER ■ 7-41
REPORTS
Supplier Selection
All suppliers are included by default. Type (s) and press I ^ Enter) to only include records associated with a single
supplier. Type the supplier number and press I ^ Enter |. (F5 \ can be used to list all divisions.
Type CD and press l<-*Enterl to generate the report. Once the report has been generated the following options are
available:
(D
®
Email this report to your Microsoft Outlook email profile.
Create this report in Microsoft Word format.
lEsc)
Exit. If you choose to exit without using one of the above options you can still print the report from the Print
Reports main menu program.
Three reports are generated. All purchases by supplier by G/L Code, Invoice # and a Summary. Samples of all three
are below:
POLYMATHIC COMPUTER PRODUCTS
PURCHASES
From:
TRANSACTION
Total
foe
Total
SUPPLIER
for
for
31-DEC-2002
630
9040213
JAN032003
1-53434351
11041
COSTAR XL
31-DEC-2O02
Total
TURBO LABELWRITER REPAIR
GSTtf
31-DEC-2002
for
JOURNAL DESCRIPTION
588
1-53434351
Supplier
PURCHASE
3
630
for
1
GST# R99999999999
03-JAN-2003
30-DEC-2002
1.26
Page:
GST# R99999999999
31-DEC-2002
82891
GST AMOUNT
557
31-DEC-2002
Total
G/L AMOUNT
SUPPLIER 2
SUPPLIER
RMAPR100
CLIENT DELIVERY
1-53434351
Total
G/L CODE
1
30-NOV-2OO2
03-JAN-2003
Total
NUMBER
31-DEC-2002
30-KOV-2002
JAN032003
LIMITED
SUPPLIER
SUPPLIER
DATE
31-DEC-2002
BY
BY G/L CODE
JAN/2003
To: JAN/2003
ACCOUNT
ACCOUNT
H1260-4504-2
H1260-4504-2
(INTEL)
(INTEL)
GSTtt
SUPPLIER 4
SSUSBEOO1024
3O-DEC-2OO2
GSTH
SUPPLIER 4
47.75
3.12
44.63
47.75
3.12
44.63
30-NOV-2002
123.05
8.05
115.00
Supplier Total
123.05
8.05
115.00
03-JAN-2003
625.00
.00
625.00
Supplier Total
625.00
.00
625.00
31-DEC-2OO2
67.15
28.07
39.08
Supplier Total
67.15
28.07
39.08
30-DEC-2002
112.35
7.35
105.00
Supplier Total
112.35
7.35
105.00
Grand Total
7-42 ■ PURCHASES BY SUPPLIER
163
SUPPLIER
1
GST R999999999
557
SUPPLIER 2
GST R999999999
588
SUPPLIER
3
SUPPLIER
4
SUPPLIER
5
GST
630
GST
755
GST R999999999
R999999999
RMAPR101
1.26
Page:
1
REPORTS
31
JAN
POLYMATHIC
2003
COMPUTER
PRODUCTS
LIMITED
PURCHASES BY SUPPLIER
RMAPR102
1.2 6
Page:
1
SUMMARY REPORT
From:
ALL Divisions
JAN/2003
To:
JAN/2003
SUPPLIER
NUMBER
NAME
163
SUPPLIER
1
557
SUPPLIER
2
588
630
SUPPLIER 3
SUPPLIER 4
755
SUPPLIER 5
By Supplier [Monthly]
This program will generate a report with monthly totals for each supplier.
Type (U and press I«-* Enter \. The following screen will appear:
Edit
tjdjp
The following options are available:
Purchase Journal Analysis Files
A list of all available Purchase Journal analysis files is displayed. The [F9 \ key can be used to select the files for the
months that you want to include purchases from. |fio| can be used to unselect files that were selected in error. Once
you have selected the files you want to extract the information from, press |Esc|.
Processing Year
The system will default to the current year. To change the processing year you must select the Modify option and
enter the year you want. Since the system defaults to the current year you will have to wait till the modify option is
listed before you can change this. The year should be entered in the format yyyy.
File Selection
Type (a) and press I*-1 Enter) to include all analysis files for the year selected above or
select the analysis files you want to include.
PURCHASES BY SUPPLIER ■ 7-43
REPORTS
GST Code
You can have numerous GST codes set up through Maintenance & Inquiry, GST codes. The system will prompt you
for the GST code you want the report to detail. |F5 ! can be used to list all valid GST codes and IF4 ! can be used to
set up a new GST code.
Sort Sequence
By default the report is sorted by supplier name. Type (n) and press I*-1 Enter! to sort this report by supplier number.
Division Selection
You can generate this report for a single division, (s) or all divisions, (a). If you select a single division |F5 ! can be
used to list all divisions and fFT~) can be used to set up a new division.
Supplier Selection
All suppliers are included by default. Type (£) and press I*-1 Enter! to only include records associated with a single
supplier. Type the supplier number and press l<-*Enter|. fFsl can be used to list all divisions.
Month Sequence
By default this report displays the monthly data sorted by Fiscal year. Type (c) and press [+-1 Enter! to display the
monthly data sorted by Calendar year or type (£) then enter the start and end date in the format mmyyyy to display the
monthly data for a specific date range.
Type (s) and press [<-* Enter) to generate the report. Once the report has been generated the following options are
available:
(D
Email this report to your Microsoft Outlook email profile.
7-44 ■ PURCHASES BY SUPPLIER
REPORTS
GST EDIT REPORT
This program generates a report that lists any GST posted for the selected analysis files. You
have the option of listing all GST amounts or only the GST exceptions.
FLfiPPHO
Type Q)GO and press I*-1 Enter! to select GST edit report.
The screen will appear as follows:
GST EDIT REPORT ■ 7-45
REPORTS
Purchase Journal Analysis Files
A list of all Purchase Journal analysis files is displayed. The O key can be used to select the files for the months
that you want to report the GST for. fnol can be used to unselect files that were selected in error. Once you have
selected the files you want to extract the information from, press (lie).
Processing Year
The system will default to the current year. To change the processing year you must select the Modify option and
enter the year you want. Since the system defaults to the current year you will have to wait till the modify option is
listed before you can change this. The year should be entered in the format yyyy.
File Selection
Type (a) and press [<-* Enter) to include all analysis files for the processing year selected above or type (J[) and press
I^Enteri to select the analysis files you want to include.
GST Code
You can have numerous GST codes set up through Maintenance & Inquiry, GST codes. The system will prompt you
for the GST code you want the report to detail. Ifs \ can be used to list all valid GST codes and IF4 ) can be used to
set up a new GST code.
Division Selection
You can generate this report for a single division, (s) or all divisions, (a). If you select a single division Ifs \ can be
used to list all divisions and |F4 | can be used to set up a new division.
Cut off Date
You must enter a cut off date for this report. The system will only include invoices up to the cut off date entered.
You can use the last month end date, fFT"j. or enter your own date in the format ddmmyyyy.
Record Selection
This report is set to display GST Exceptions only. GST exceptions include when no GST was posted for an invoice
or the GST amount posted was not 7% of the net invoice amount. Type (a) and press [<-■ Enter! to include all records.
An asterisk "*" will be printed at the end of the calculated GST field for all GST exceptions when all records is
selected.
Once all your report options are set type (s) and press I*-1 Enter) to start spooling the report. Once the report has been
generated the following options are available:
CD
®
Email this report to your Microsoft Outlook email profile.
Create this report in Microsoft Word format.
|Esc)
Exit. If you choose to exit without using one of the above options you can still print the report from the Print
Reports main menu program.
7-46 ■ GST EDIT REPORT
REPORTS
A sample GST Edit report for GST exceptions only follows:
31
JAN
POLYMATHIC COMPUTER PRODUCTS LIMITED
GST EDIT REPORT
2003
From:
ALL Divisions
INVOICE
NUMBER
TRANSACTION
DATE
196952
1342275
24122002
1-53434351
DEC
31-02
DEC 31-02
DEC-2002
JAN/2003
To:
CUT OFF DATE
:
SUPPLIER
GST
GST
AMOUNT
CALCULATED
91.00
5.95
5.54
888
SUPPLIER NAME
18-DEC-2OO2
615.17
40.24
37.45
1658.74
28.97
100.97
1955
1870
SUPPLIER NAME
24-DEC-2OO2
NUMBER
NAME
16-DEC-2002
18-DEC-2002
24-DEC-2OO2
31-DEC-2002
16-DEC-2002
31-DEC-2002
67.15
28.07
4.09
630
31-DEC-2002
31-DEC-2002
31-DEC-2002
91.28
5.26
5.56
1230
SUPPLIER NAME
31-DEC-2002
3757.73
3757.73
228.73
SUPPLIER NAME
31-DEC-2002
31-DSC-2002
3305.44
.00
201.20
1815
2050
SUPPLIER NAME
SUPPLIER
NAME
SUPPLIER NAME
A sample GST Edit report for All GST records follows:
31
JAN
2003
POLYMATHIC COMPUTER
GST
From:
EDIT
TRANSACTION
DATS
1230122
1S-NOV- 2002
9040213
40-8176312
40-8176313
40-9603321
30-NOV- 2002
1261767
1261771
196952
1267109
1342275
1342465
1270584
1270623
40-9504011
197598
40-3241311
1272943
24122002
11041
82391
1-53434351
DEC
31-02
DEC
31-02
1356946
DEC-2002
11-DEC12-DEC12-DEC12-DEC12-DEC16-DEC17-DEC-
2002
2002
2002
2002
2002
2002
2002
1B-DEC- 2002
18-DEC- 2002
19-DEC- 2002
INVOICE
DATE
15-KOV30-NOV11-DEC12-DEC-
2002
2002
2002
2002
12-DEC- 2002
12-DEC- 2002
12-DEC- 2002
16-DEC- 2002
17-DEC- ■2002
18-DEC- 2002
To:
:
GST
CALCULATED
219.35
123.05
14.35
14.35
8.05
6.37
8.05
97.37
97.37
6.37
6.37
1272.12
1022.39
83.22
66.89
14.42
5.95
19.60
40.24
83.22
91.00
299.60
615.17
689.64
19-DEC- 2002
1755.87
19-DEC- 2002
194.74
20-DEC- •2002
23-DEC- •2002
23-DEC- •2002
23-DEC- 2002
24-DEC- 2002
30-DEC- ■2002
31-DEC- •2002
31-DEC- •2002
31-DEC- •2002
31-DEC- ■2002 31-DEC- •2002
31-DEC- •2002 31-DEC- ■2002
31-DEC- •2002 31-DEC- ■2002
294.44
129.25
45.12
114.87
1658.74
112.35
12.74
19.26
8.46
58.52
24.75
28.97
7.35
47.75
3.12
67.15
91.28
3757.73
-365.74
3305.44
28.07
894.52
378.25
5.26
3757.73
-23.93
.00
1.12
1
JAN 31,2003
GST
AMOUNT
220.42
RMAPR110
Page:
LIMITED
JAN/2003
TOTAL
AMOUNT
18-DEC- 2002
19-DEC- •2002
20-DEC- •2002
23-DEC- •2002
23-DEC- •2002
23-DEC- •2002
24-DEC- •2002
30-DEC- •2002
31-DEC- •2002
31-DEC- •2002
31-DEC- •2002
PRODUCTS
REPORT
JAN/2003
CUT OFF DATE
INVOICE
NUMBER
1
JAN/2003
TOTAL
ALL Divisions
1.12
Page:
JAN 31,2003
AMOUNT
INVOICE
DATE
RMAPR110
6.37
66.89
14.42
5.54*
19.60
37.45*
45.12
114.87
12.74
19.26
8.46
58.52
24.75
100.97*
7.35
3.12
4.09*
5.56*
228.73*
-23.93
201.20*
SUPPLIER
NUMBER
1960
557
940
940
940
1960
1960
888
1960
1955
1955
1960
1960
NAME
SUPPLIER NAME
SUPPLIER NAME
SUPPLIER NAME.
SUPPLIER NAME
SUPPLIER NAME
SUPPLIER NAME
SUPPLIER NAME
SUPPLIER NAME
SUPPLIER NAME
SUPPLIER NAME
SUPPLIER NAME
SUPPLIER NAME
SUPPLIER
NAME
940
SUPPLIER NAME
888
SUPPLIER NAME
940
SUPPLIER NAME
1960
SUPPLIER NAME
1870
SUPPLIER NAME
755
SUPPLIER NAME
163
SUPPLIER NAME
630
SUPPLIER
NAME
1230
SUPPLIER NAME
1615
SUPPLIER
1955
2050
SUPPLIER NAME
NAME
SUPPLIER NAME
GST EDIT REPORT ■ 7-47
REPORTS
PURCHASES BY SUPPLIER (QST)
This program produces three reports that detail the QST paid to each supplier.
To select Purchases by supplier (QST) type QH) and press I
The screen will appear as follows:
Tl.fii'P^ll
Reports
Cash Disbursements Summary
1 by Supplier
2 by Supplier
[MONTHLY]
1 Enter selection
t [S3l-Exit
Please refer to Cash Disbursements Summary documentation (7-49) for details.
7-48 ■ PURCHASES BY SUPPLIER (QST)
2.64
31/01/2003
REPORTS
CASH DISBURSEMENTS SUMMARY
This program generates a cheque summary by supplier for any period of time. It may be run
for one month, two months, one year, two years or since the first day that you started using
our software.
iilfojiii!!^
Edit
ijetp
To select Cash disbursements summary type QJQ and press I<-*Enter),
The following screen will be displayed:
0>o
Edit
flccount<;
RM
Pnvahlt:
31/01/2003
Reports
Cash Disbursements Summary
1 by Supplier
2 by Supplier
[MONTHLY]
| Enter selection
[ [IS ]-Exit
CASH DISBURSEMENTS SUMMARY ■ 7-49
REPORTS
By Supplier
This program will detail each cheque for the months that you have selected. Numerous
reports will be generated.
Type Q and press I*-1 Enter |. The following screen will appear:
The following report options are available:
Cash Disbursements Analysis Files
A list of all cash disbursements analysis files is displayed. The |F9 \ key can be used to select the files for the months
that you want included in the report. Ifio) can be used to unselect files that were selected in error. Once you have
selected the files you want to extract the information from, press [Esc>.
Sort Sequence
This report can be sorted by cheque # (£), or Invoice #,
Division
You can generate this report for a single division, Qs) or all divisions, Q- If you select a single division 1F5 ) can be
used to list all divisions and IF4 \ can be used to set up a new division.
Supplier
The default is to generate this report for all suppliers. If you only want to generate the report for a single supplier,
type (s) and enter the supplier number. |F5 | can be used to list all suppliers and |F4 \ can be used to add a new
supplier.
Once all your report options are set type (s) and Press l<~'Enterl to start spooling the report. Once the report has been
generated the following options are available:
CD
®
Email this report to your Microsoft Outlook email profile.
Create this report in Microsoft Word format.
7-50 ■ CASH DISBURSEMENTS SUMMARY
REPORTS
|Escj
Exit. If you choose to exit without using one of the above options you can still print the report from the Print
Reports main menu program.
Three reports are generated by the Cash disbursements program. Cash disbursements by G/L Code, by Invoice and a
Summary report. Samples of all 3 reports follow:
31
JAN
POLYMATHIC COMPUTER PRODUCTS
2003
CASH
All
From:
Divisions
NUMBER
31
JAN
02-JAN-2003
4030
19.35
82658
02-JAN-2003
1020-10
02-JAN-2003
4041
47.75
82891
1S-JAN-2003
1020-10
15-JAN-2003
9040213
15-JAN-2003
1020-10
15-JAN-2003
76.49
«•••*•••••*
123.05
Supplier Total
123.05
Grand Total
199.54
CASH DISBURSEMENTS
BY
All
From:
Divisions
To:
CHEQUE
O2-JAN-2003
4030
19.35
82658
02-JAN-2003
4041
47.75
82891
15-JAN-2003
02-JAN-2003
15-JAN-2003
9040213
15-JAN-2003
1S-JAN-2003
76.49
123.05
123.05
199.54
Grand Total
POLYMATHIC COMPUTER PRODUCTS
DISBURSEMENTS
SUMMARY
All
From:
Divisions
SUPPLIER
NUMBER
JAN/2003
SUPPLIER
NAME
163
SUPPLIER NAME
557
SUPPLIER NAME
DATE
02-JAN-2003
4042
CASH
DATE
82420
Supplier Total
JAN 2003
1
9.39
Supplier Total
31
1.13
Page:
TRANSACTION
INVOICE
NUMBER
4030
SUPPLIER NAME
RMAPR301
JAN/2003
PAID DATE
NUMBER NAME
557
LIMITED
SUMMARY
INVOICE NUMBER
JAN/2003
SUFPLIER SUPPLIER
163 SUFPLIER NAME
DATE
1020-10
POLYMATHIC COMPUTER PRODUCTS
2003
G/L CODE
02-JAN-2003
4042
SUPPLIER NAME
DATE
82420
Supplier Total
557
1
9.39
4030
163 SUPPLIER NAME
1.13
Page:
TRANSACTION
INVOICE
CHEQUE
PAID DATE
NAME
RMAPR300
BY G/L CODE
JAN/2003
To: JAN/2003
SUPPLIER SUPPLIER
NUMBER
LIMITED
DISBURSEMENTS SUMMARY
LIMITED
SUMMARY
RMAPR302
1.13
Page:
1
REPORT
To:
JAN/2003
TOTAL
AMOUNT
76.49
123.05
194.54
CASH DISBURSEMENTS SUMMARY ■ 7-51
REPORTS
By Supplier [Monthly]
This program will generate a report with monthly totals of all cheques for each supplier.
Type (£) and press I^Enter). The following screen will appear:
-iDlxl
The following report options are available:
Cash Disbursements Analysis Files
A list of all cash disbursements analysis files is displayed. The |F9 \ key can be used to select the files for the months
that you want included in the report. |Fiol can be used to unselect files that were selected in error. Once you have
selected the files you want to extract the information from, press Iesc).
Sort Sequence
This report can be sorted by cheque # (c), or Invoice #, Q
Division
You can generate this report for a single division, (s) or all divisions, (a)- If you select a single division [fs
can be
used to list all divisions and (F4 ) can be used to set up a new division.
Supplier
The default is to generate this report for all suppliers. If you only want to generate the report for a single supplier,
type (s) and enter the supplier number. IF5 ] can be used to list all suppliers and |F4 \ can be used to add a new
supplier.
Month Sequence
By default this report displays the monthly data sorted by Fiscal year. Type (c) and press l<-*Enter| to display the
monthly data sorted by Calendar year or type (d) then enter the start and end date in the format mmyyyy to display the
monthly data for a specific date range.
7-52 ■ CASH DISBURSEMENTS SUMMARY
REPORTS
Once all your report options are set type (s] and press I*-* Enter! to start spooling the report. Once the report has been
generated the following options are available:
Email this report to your Microsoft Outlook email profile.
Create this report in Microsoft Word format.
Exit. If you choose to exit without using one of the above options you can still print the report from the Print
(w)
fEscl
Reports main menu program.
A sample Cash Disbursements Summary by Supplier [monthly] follows:
JAN
Last Year End:
All
POLYMATHIC COMPUTER
31/2003
FEB 28/2002
Divisions
MONTHLY
From:
CASH DISBURSEMENTS
JAN/2003
NOV
SUPPLIER
163
SUPPLIER
1
5B8
SUPPLIER
2
PRODUCTS
2002
To:
BY
LIMITED
2002
1.14
Page:
1
SUPPLIER
Run Date:
JAN/2003
DEC
RMAPR350
JAN
MAR 21/2003
2003
FEB 2003
TOTAL
0.00
0.00
0.00
0.00
76.49
625.00
.00
.00
76.49
625.00
0.00
0.00
701.49
.00
701.49
CASH DISBURSEMENTS SUMMARY ■ 7-53
REPORTS
REPRINT SUPPLIER OPEN ITEM
This program allows you to reprint Supplier Open item lists from current, monthly or yearly
backups.
gte .Edit
To select Reprint supplier open item type (T)^} and press I*-1 Enter!.
The following screen will appear:
Recount r» I'ayah It:
UnTPZO
1
11
Aged cash requirements
3
A
5
6
7
8
9
Supplier master
12 Supplier master updates
13 Fax telephone numbers
14 Purchases by supplier
2 Aged trial balance
Cash requirements
Cheque reconciliation
Cheque register and cheques
Cheque report
Purchase journal
Reprint purchase journal
Reprint cash disbursements
15 6ST edit report
16 Purchases by supplier (QST)
17 Cash disbursements summary
18 Reprint supplier open item
S System status
10 Supplier open item
SELECTION MENU
Monthly Backup
Yearly Backup
t
7-54 ■ REPRINT SUPPLIER OPEN ITEM
4
?.J>A\
31/01/2003
Reports
CBSfil-Exit
REPORTS
Current
Highlight Current and press I^Enter! to reprint the current supplier open items. The
following screen will appear:
TLflPI'48
1.M
Reprint fl/P Open I ten List
RH
Typist: 06
31/01/2003
Port: 96
Last Month Closed: JAN/2003
Last Year End: FEB 28,2002
CUTOFF DATE : 31/ 1/2003[ JflH 31,2003 1
REPORT TYPE : N
[Harrow ]
[|] Select:
[|3-Starl
[Hi-Modify
The following report options are available:
Cutoff Date
The cutoff date defaults to the last month-end date. To change the cutoff date type
the desired date in the format ddmmyyyy.
press I «-* Enter | then enter
Report Type
The default report type is Narrow. To switch to Wide format, type (m) and press 1<-*Enter! then enter |wj.
A sample from a reprinted Supplier open item report follows:
DATE:
POLYMATHIC COMPUTER PRODUCTS
JAN 31/2003
LIMITED
A/P DETAIL OPEN ITEM LIST - REPRINT
CUTOFF DATE
INVOICE NO
INV.DATE
SUPPLIER NUMBER
PAYMENT
DISCOUNT
LAST
TERMS
V.
CHEQUE NO
CHEQUE AHT
POST DATE SOURCE
163
DISC.AHT
PAGE
|
1.14
1
JAN 31/2003
CURR DUE
]
CHEQUE*
SUPPLIER NAME
0
ADDRESS
LINE
1
.00
ADDRESS
LINE
2
4041
ADDRESS
LINE
3
47.75
ORIG DUE
RMAPR48
ATTENTION:
CONTACT NAME
TOTAL
Monthly Backup
Please refer to (7-30) for further details.
Yearly Backup
Please refer to (7-31) for further details.
REPRINT SUPPLIER OPEN ITEM ■ 7-55
REPORTS
SYSTEM STATUS
This program allows you to print a listing of the accounts payable system parameters and
menu selection status indicators.
Hecounts Payable
P.C.P.L
TLAPP20
31/01/2003
Reports
11
1 Aged cash requirements
2 Aged trial balance
3 Cash requirements
Supplier Piaster
12 Supplier toaster updates
Run 13 Fax telephone numbers
Run 14 Purchases by supplier
4 Cheque reconciliation
5 Cheque register and cheques
15
Run 16
17
18
6 Cheque report
7 Purchase journal
8 Reprint purchase journal
GST edit report
Purchases by supplier (QST)
Cash disbursements summary
Reprint supplier open item
9 Reprint cash disbursements
S System status
TO Supplier open item
E Exit
3
Enter selection
Type (s) and press [<-* Enter! to select System status.
The screen will appear as follows"
Efc
gdt
TI.F)PP!!li
System Status Report
[_] Select:
[0]-StarI
tEHBl-Exit
Type (s) and press I^Enter! to produce a report similar to the following:
7-56 ■ SYSTEM STATUS
1.10
31/01/2003
REPORTS
24/ 3/2003
14:30:56
POLYMATHIC COMPUTER PRODUCTS LIMITED
Accounts Payable
System
Status
TLAPP96 1.10
RMAPR96.PRT
Report
A/P System Parameters
Year End Date
:
28/ 2/2002
Last Month Closed (System)
Last Month Closed (A/P)
G/L Code for Discount Earned
Cheque Format
Last Cheque Number Used
Report Type
:
:
:
:
:
:
12/2002
(IDENT)
12/2002
(SRM)
4685
6 (*** UNKNOWN ***)
4 060
1 (Summary report)
Menu Selection Status
Indicators
Daily
Processing
Status
Enter
supplier
COMPLETED
invoices
Single cheque processing
Automatic cheque processing
Enter cancelled cheques
COMPLETED
COMPLETED
COMPLETED
Report
Status
Processing
Spool aged cash requirements
Spool aged trial balance
Spool cash requirements
COMPLETED
COMPLETED
COMPLETED
Spool
cheque
reconciliation
COMPLETED
Spool
cheque
register and cheques(CD journal)
COMPLETED
Spool cheq'ue report
COMPLETED
Maintenance
Status
Spool purchases journal
Reprint purchases journal
Reprint cash disbursements journal
Spool supplier open items
Spool supplier master
Spool supplier master updates
Processing
Purge accounts payable file
Purge cheque file
Enter supplier master updates
Requested by TYPIST
6
:
LESLIE
COMPLETED
COMPLETED
COMPLETED
COMPLETED
COMPLETED
COMPLETED
COMPLETED
COMPLETED
COMPLETED
PRIOR
SYSTEM STATUS ■ 7-57
CHAPTER 8: MAINTENANCE AND INQUIRY
08
Edit
Accounts Payiilile
P.C.i'.L
Main
RM
Menu
Last month end: 12/2002
1
2
3
4
TLnPPZO
2.611
31/01/2003
Last year end: 28/ 2/2002
Daily processing
Yearly processing
Reports
Maintenance and inquiry
5 Data file status
6 Company information
E Exit
E Enter selection
To select Maintenance and inquiry type (£j and press I ^ Enter |
The screen will appear as follows:
Ste Edit fcfelp'
8-1
MAINTENANCE AND INQUIRY
CHEQUES
This program allows you to display all details relating to un-purged outstanding cheques.
Efe
£dt
Help
Type Q and press I ^ Enter) to select Cheques.
The screen will appear as follows:
31/01/2003
RM
Display node
Last cheque # issued:
4060
Cheque ft....
Enter:
riHnaniiwiiTMTli
-LOOKUP
101-Display from Start
Type a cheque number and press I*-1 Enter!. To get a listing of all cheques press [F5 \ or type
[?) and press l<-*Enter| to display the cheque numbers for each supplier.
8-2 ■ CHEQUES
MAINTENANCE AND INQUIRY
The system will display the cheque details as follows:
ficrountr. Pnvablc
RM
Display node
Cheque 8
Cheque
:
4034$
Date
DEC 31-02 31/12/2002
91.28
Proc dale
Report
Can date
invoice ;inl
91.20
2/ 1/2003
tH] Select:
31/01/2003
Last cheque fl issued:
1230 LESLIE PRIOR
'aid
niDt
91.28
Disc
4060
ant
.00
(Q[]-Next
CHEQUES ■ 8-3
MAINTENANCE AND INQUIRY
CASH REQUIREMENTS
This program allows you to display the cash requirements for all or individual suppliers.
Once an invoice is displayed you can modify the due date, place the invoice on hold or
release the invoice for payment.
Type (D and press I*-1 Enter! to select Cash requirements.
The screen will appear as follows:
unmii
3.3HI
31/01/2003
Cash Requirements
: 31/ 1/2003 [JAN 31/2003]
CUT OFF DATE
Include HELD items in totals : V
[S3 Select:
Cgl-Start
l-Modify
[[S3]-Exit
Invoices will only be displayed if the due date is less than or equal to the cut off date.
Type (s) and press I^Enter) to start or (m) to modify the cut off date. Enter the desired cutoff date in the format
ddmmyyyy. The system will automatically display items that are on hold. To change this set Include Held items in
totals to N - No.
8-4 ■ CASH REQUIREMENTS
MAINTENANCE AND INQUIRY
The screen will appear as follows:
mm
Rll
ftccountr,
Pnyafilf:
31/01/2003
14:50:03
Cash Requirements
CUT OFF DATE
: 31/ 1/2003 UAH 31/20031
Include HELD items in totals : V
Supplier Nunber
:
Supplier Name
:
Discount X / Terms ...:
Invoice Nunber
:
Invoice Date
:
Posting Date
:
Invoice Amount .......:
Discounted Amount ....:
Original Due Date ....:
Current Due Date
:
Payment Terms Oue Date:
[_] Select:
lJ]-All
[01-Supplier
[(S33-Exit
You can display invoices for all suppliers or a single supplier.
Type (s) to select a single supplier and press 14-1 Enter!
The screen will appear as follows:
gb
Edit
tjetp
RH
Cash Requirements
fiffiflBWi
31/01/2003
14:50:03
CUT OFF DATE
: 31/ 1/2003 CJfiH 31/20031
Include HELD items in totals : V
Supplier Nunber
Supplier Hane
:
:
HI
Discount * / Terms ...:
Invoice Nunber
Invoice Date
:
:
Posting Date
:
Invoice Amount
:
Discounted Amount ....:
Original Due Date ....:
Current Due Date
:
Payment Terms Oue Date:
Enter
[(£]]-SUPPLIER Lookup
[{jQl-INUOICE Lookup
Type the supplier number and press I ♦-'Enter).
can be used to list all suppliers and (F6 \ can be used to look up a specific invoice.
CASH REQUIREMENTS ■ 8-5
MAINTENANCE AND INQUIRY
Once a supplier has been selected the screen will appear as follows:
0a
Edit Help
QygHuSSHR
CUT OFF DOT
Include HEL
Supplier Nuaber
:
1230
Supplier Nane
: LESLIE PRIOR
Discount X I Terns ...:
Invoice Kunber
:
Invoice Date
:
Posting Date
:
Invoice Amount
:
Discounted Amount
:
Original Due Date ....:
Current Due Date
:
Paynent Terns Due Date:
Enter
tllllMHWMmiUHlli
[Q|]-SUPPLIER Lookup
[QEl-INUOICE Lookup
[[IB]-Exit
Enter the invoice number that you want to display.
|F6 \ can be used to list all invoices for the selected supplier.
To view a list of details on an invoice press |fi ). Options and [F5 |. Open item details.
The screen will appear as follows:
i-ipi*i
0e
£dit
8-6 ■ CASH REQUIREMENTS
MAINTENANCE AND INQUIRY
Once an invoice is displayed, the screen will appear as follows:
Btllfr
fl.nPPIll
RM
Cash Requirements
ITHfflflHflHfll
3.3H
31/01/2003
15" 13 * 37
CUT OFF DATE
: 31/ 1/2003 [JAN 31/20031
Include HELD items in totals : V
Supplier Nunber
:
Supplier Naae
:
Discount * / Terns ...:
Invoice Number
:
Invoice Date
:
Posting Date
:
Invoice Amount
:
Discounted Amount ....:
Original Due Date
:
Current Due Date
:
1230
LESLIE PRIOR
.00 / 30
136574
31/01/2003CJAN 31/20031
31/01/2003CJAN 31/20031
257.50
257.50
Q2/03/2Q03CMAR 2/20031
31/01/2003CJAN 31/20031
Payment Terns Oue Date:
Til Select:
[IT]-Modify
tj|]-Nexl
[Ql-Fetch
[Ql-Previous
[Si-Release
[(SSl-Exit
[[Ql-Hold
[Ql-Change
The following options are available:
Modify the invoice's current due date.
Display invoices for a difference supplier.
Release invoice for payment.
Put an invoice on hold to prevent payment.
Change the cut off date.
Display next invoice.
Display previous invoice.
Exit program and return to the Accounts Payable menu.
CASH REQUIREMENTS ■ 8-7
MAINTENANCE AND INQUIRY
PURGE ACCOUNTS PAYABLE FILE
This program allows you to clear each supplier account of all entries that have been paid and
are older than the time frame you specify.
«•
The Accounts Payable file should be purged on a monthly basis after you have
reconciled the accounts payable amount on your financial statement to your
accounts payable sub ledger.
_______„
08
Type CD and press l<-*Enter| to select Purge accounts payable file.
The screen will appear as follows:
flee omit & Payable
31/01/2003
Accounts Payable Purge
Paid items will be purged after [01 months
[1] Select:
(Si-Start
ill-Modify
[[S3J-Exit
Type (s) and press I ^ Enter) to purge all paid and zero items that are 3 months or older.
To modify the number of months type (m) and enter the new month setting.
8-8 ■ PURGE ACCOUNTS PAYABLE FILE
MAINTENANCE AND INQUIRY
The screen will appear as follows:
31/01/2003
Accounts Payable Purge
RM
Paid itens will be purged after [0] months
Ore you sure you want to start the PURGE (Q/Q[) ?
Type Q to continue with the purge or (n) to exit from the purge program.
The system also creates a purge report. A sample of this report follows:
31
01
POLYMATHIC COMPUTER PRODUCTS
2003
ACCOUNTS
15:21:17
Supplier
Number
Invoice
163
79614
163
Number
Invoice
Date
Posting Source
Discount
Amount
Date
OCT
Current
Due
Due
Date
Date
Paid
Amount
2.10
1
Cheque Description
Number
38.82
3972
DESCRIPTION
08-OCT-2002
54.71
15-OCT-2002
22-OCT-20O2
51.32
18.79
3972
3983
DESCRIPTION
DESCRIPTION
3983
DESCRIPTION
50.54
3984
DESCRIPTION
759.70
3968
DESCRIPTION
38.82
01-OCT-2002
54.71
163
79891
80157
3
3
3
163
80389
22-OCT-2002
3O-OCT-2002
3
51.32
18.79
630
4-44421702
237343
1B-OCT-2002
09-OCT-2002
30-OCT-2002
10-OCT-2002
3
3
50.54
18-OCT-2002
759.70
09-OCT-2002
purged
Page:
Original
U-OCT-2OO2
11-OC7-2002
3O-OCT-2002
973.88
RHAPR13
LIMITED
PURGE
31,2002
01-OCT-2002
08-OCT-2002
15-OCT-2002
705
Total
PAYABLE
CUT OFF DATE:
973.B8
items
PURGE ACCOUNTS PAYABLE FILE ■ 8-9
MAINTENANCE AND INQUIRY
PURGE CHEQUE FILE
This program allows you to clear the file of all cheques that have been cancelled.
&H*
£dfc
Type Q and press I ^ Enter 1 to select Purge cheque file.
The screen will appear as follows:
flor.ountt;
Pavahlc
Cheque File Purge
l_] Select:
[0]-Start
[B!B3-Exit
Type (s) and press I^ Enter! to start the purge.
8-10 ■ PURGE CHEQUE FILE
n.nmr,
1 .?,n\
31/01/2003
MAINTENANCE AND INQUIRY
SUPPLIER MASTER
This program is used to set up new suppliers and/or to modify supplier information
previously entered. You may access a supplier either by account number or name once they
have been set up.
gdit
fje$
Type (JO and press l<-*Enter| to select Supplier master.
The screen will appear as follows:
Ed*
SUPPLIER MASTER ■ 8-11
MAINTENANCE AND INQUIRY
The functions available are:
Add a new supplier
D
D
Modify an exiting suppliers' information
Delete a supplier
Display a supplier by selecting the supplier code
Zero out the year to date purchases field
find a supplier using the lookup feature
Retrieve the next/previous supplier record
Retrieve the first/last supplier record
Exit menu
To add a new supplier, type (a) and press I<-* Enter).
Enter the information as follows:
Supplier Code
This area is coded using up to five alphanumeric characters of your choice. The number assigned is used for
identification of the supplier. You cannot assign the same code to more than one supplier and you cannot change
this code once you enter it.
&"
If you type a supplier code that was previously used for a supplier that has been deleted, the system will
display a message that the supplier code exists in the history file. You will have the option to reinstate the
old supplier or rekey new supplier information.
Supplier Name
This area is coded using up to thirty five characters of your choice. Type in the full name of the supplier. Please note
that the name you enter will appear on the cheques.
Address Line 1 to 4
These four lines are coded using up to thirty five characters per line. Type the supplier's street address, unit number
(if any), city, province and postal code. The first three lines of the address section must be used when entering the
address.
Phone Number
Enter up to twelve numeric characters for the area code and telephone number of the supplier. Please note that the
area code is not required and it is suggested that you only enter it for calls that are long distance for you to make.
Fax Number
Enter up to twelve numeric characters for the area code and fax number of the supplier. Once again, only enter the
area code for long distance numbers.
Contact Name
Enter the name of your contact with this supplier. The maximum number of characters that can be entered is 35.
Contact's Title
Using a maximum of 35 characters, enter the contact's title.
Mobile Phone Number
Enter the mobile phone number for this supplier.
Email Address
Enter the email address for this supplier.
8-12 ■ SUPPLIER MASTER
MAINTENANCE AND INQUIRY
Web Site Address
Enter the full web site address for this supplier.
Payment Terms
Enter up to three numeric digits to identify the normal terms of this supplier. These terms will be used to calculate
the due dates of invoices entered in the supplier invoice entry program.
Discount Percentage
Enter up to four numeric characters excluding the decimal point if the terms for this particular supplier allow an early
payment discount. The system will automatically take this discount on all invoices paid within the term specified in
the Payment Terms field above.
EXAMPLE: Type Q[OiD[2) and press I<-* Enter j This indicates that you are entitled to a 5% discount on all
invoices paid within payment terms for this particular supplier.
Home Gl Code
Enter the general ledger account code to which the debit entries for this particular supplier are normally posted to.
This must be a valid general ledger account number set up using the Polymathic General Ledger system.
|F5 j can be used to list all general ledger codes and [F4 ) can be used to add a new GL code if required.
P.O. Required for Invoice
If a purchase order is required for an invoice, type Q here, otherwise type (n).
Review the information entered and if no modifications are required, type Q to accept and save the data.
SUPPLIER MASTER ■ 8-13
MAINTENANCE AND INQUIRY
Once you have saved the information on the first screen. The following screen will appear
Continue entering the information as follows:
GST Registration Number
Enter the supplier's Goods & Services Tax registration number in this field. Please note that a supplier must provide
this number to you in order to charge GST.
QST Registration Number
Enter the Quebec Sales Tax number here. The maximum number of characters is 18. This is an optional field.
Alternate Phone Number
This field is used to list another number that may be used to reach your supplier. You might enter your contact's
direct line number, a pager number or a night line number. This field is used for reference only.
Alternate Discount
This field is used to enter an alternate discount percentage.
Home Job Cost Code
Enter the job cost code that relates to this supplier. fFiT) can be used to search through the cost codes.
Holdback Code
Enter the holdback code for this supplier. |F5 \ can be used to search through the available holdback codes.
Temporary Suppliers
Type (x) for yes and press I*-1 Enter! if you will only be dealing with this particular supplier on a temporary basis or
press l<-*Enter| to bypass the field. The data in this field is for information purposes only and is not used by the
system.
Remarks
This field allows you to list any remarks or comments you have for this supplier. This field is used for reference
only.
8-14 ■ SUPPLIER MASTER
MAINTENANCE AND INQUIRY
Review the information entered and if no modifications are required, type (a) to accept and save the data. You may
continue entering new suppliers or type IEsc| to exit the Supplier Master.
Memo Field
When you are modifying an existing supplier you have the option to add a memo entry, |fb ). A memo record can
contain specific information about a supplier that does not fit into any of the fields within the supplier master record.
Details such as directions to the suppliers, special products, key contact names... can be listed in the memo record
and shared by anyone who has access to the Supplier Master program. The Memo function can also be accessed from
the Maintenance & Inquiry menu via option 13, Supplier memos.
A sample memo screen would be as follows:
Recount;;
RM
Typist: 06
Port: 96
SUPPLIER :
1230
ravnole
SUPPLIER MEMO KAINTENAKCE
MAR 24,2003
LESLIE PRIOR
SAMPLE MEMO ENTRY
t
4
PgUp
PgDn
ffl-Deletc Line
(HQ-CANCEL
SUPPLIER MASTER ■ 8-15
MAINTENANCE AND INQUIRY
SUPPLIER OPEN ITEM
This program allows you to display all invoices (paid and outstanding) and journal entries
for a specific supplier. These will not include purged items.
Type (6) and press 1<-* Enter 1 to select Supplier open item.
The screen will appear as follows:
flcr.oiints Pay;>hle
fl/P Open Iten List
RM
31/01/2003
Display
Supplier ft
Paynent
terms
:
...:
Discount *
:
Last Cheque tt ...:
Cheque amount
..:
Invoice no
Inv.Date
Post Date Src
fjl Select:
[01-A11
Disc, flnt
Orig Due
Curr Due Cheque
[£!]]-Supplier
Type (a) and press I*-1 Enter! to list the open item details for all suppliers or (JQ for a single supplier.
If you select (s) for a single supplier the system will prompt you to enter the supplier's number. IF5 \ can be used to
list all suppliers or |F3 | can be used to enter the supplier's name. Further options are available once you enter a
supplier number. If you type the supplier number and don't press I^EnterL you can get a list of all cheques issued to
that supplier by pressing |F6 \ Or a list of all invoices entered by pressing (fb ).
8-16 ■ SUPPLIER OPEN ITEM
MAINTENANCE AND INQUIRY
The screen will appear as follows:
&» •'Btit
The following options are available.
Display next or previous supplier.
Retrieve a specific supplier by supplier number.
Match manual cheques, journal entries or debits against invoices.
Purge all open items that's balance is zero for this specific supplier.
Email this screen to your Microsoft Outlook email profile.
Exit supplier open item program.
SUPPLIER OPEN ITEM ■ 8-17
MAINTENANCE AND INQUIRY
PURGE SUPPLIER MASTER UPDATES
This program allows you to purge the audit trail file for the supplier master updates. The
audit trail file lists all updates that have been made to supplier master records since your last
purge. To get a list of all changes print the Supplier Master Updates report (page 7-36).
Ejte
gdit
Type Q and press |<-*Enterl to select Purge supplier master updates.
The screen will appear as follows:
He
Rft
Help
Accounts
RM
Pii
Supplier Master Update Print
31/01/2003
Do you want to PURGE the AUDIT trail file (Q/Q[) ?
Type Q and press [«-*Enter! to purge the audit trail file or (n) to cancel processing.
8-18 ■ PURGE SUPPLIER MASTER UPDATES
MAINTENANCE AND INQUIRY
MICR CHEQUE PRINTER SETUP
MICR cheque printing allows you to print your cheques directly to a laser printer using a blank cheque form and a
MICR (Magnetic Ink Character Recognition) toner cartridge.
The following steps must be performed before you can begin printing your cheques using the MICR Cheque Printing
program.
1. Setup Static Cheque Information
Information such as your bank name, address and your bank account number must be setup before you can start
printing cheques. This information is setup through the Company Information program. Please refer to page 10-1 for
more details.
2. Define Printers
You must define all printers that are going to be available for MICR cheque printing through the MICR Printer Setup
program. Further details follow in this chapter.
3. Tools To Have On Hand
(A) Make sure that the MICR toner cartridge has been loaded into your laser printer.
^ Be sure to read all special instructions that come with the toner cartridge before loading it into
your printer.
(B) Have your blank cheque paper loaded into the paper tray.
(C) Have the MICR Visual Inspection template and your CHEQsys manual on hand.
o~ It is a good idea to use your MICR Visual Inspection template to check a few cheques of your first
cheque run. Thereafter, visual inspections should be performed after every 200 cheques.
msmssmmm
&tt
Help
To select MICR cheque printer setup, type Q and press I ^ Enter |
MICR CHEQUE PRINTER SETUP ■ 8-19
MAINTENANCE AND INQUIRY
The screen will appear as follows:
Maintenance
Monday
MAR 24,2003
Printer number
Printer name
Description
MICR SETTINGS
Horizontal offset
Uertical offset
Creation date
Typist
NETWORK INFORMATION
Print server :
Print queue
:
Last update
:
hnd
Jjdd
o r 1 n 1 ti r
printer
Codify printer
delete printer
Jflide
motions
jtnext/previous
]:first/last
l:exit
The functions available are as follows:
(D
Q
IM)
0
(H)
(2)
Q/Q
[Homel/fEndl
(t)/Q
lEsc)
Displays a list of available printers.
Allows you to setup a new printer record.
Allows you to modify an existing printer record.
Delete an existing printer record.
Temporarily removes the menu box from the screen.
The options function is not available at the present time.
Retrieve the next/previous printer record.
Retrieve the first/last printer record.
Move up or down through the menu functions.
Exit this menu.
To add a printer record type (a) and press I*-1 Enter). Enter the information as follows:
Printer Number
Each printer must be assigned a unique printer number. Display all printers by using fF5~j and then assign the next
sequential printer number.
Printer Name
Type up to a 20 character name for the printer you are defining. This field is useful if your printers are on a network.
Each printer on a network has a unique name. Enter this name in this field.
Description
This field is best used to give the location and type of printer. The maximum number of characters that you can enter
is 35.
8-20 ■ MICR CHEQUE PRINTER SETUP
MAINTENANCE AND INQUIRY
MICR Settings
When you are first testing your cheques with the Visual Inspection template sometimes the horizontal and/or vertical
offset of the numbers are off slightly. These fields allow you to adjust the offset of the font in order to get the
numbers to print within the allowable area.
The offset number is a decimal number representing the number of 1/720" to the position of the cursor. If you are
adjusting the horizontal offset a positive number would adjust the cursor position to the right and a negative number
would move the cursor position to the left. With the vertical offset a positive number moves the cursor
position down and a negative number moves the cursor position up.
Network Information
If the printer you are adding is a network printer these fields allow you to enter the name of the print server that the
printer is attached to and the printer queue name. Enter this information only if your printer is on a network.
MICR CHEQUE PRINTER SETUP ■ 8-21
MAINTENANCE AND INQUIRY
PC LINK
This program allows you to import and export accounts payable information into different
file formats.
Account:;
1
Cheques
Run 11
12
Run 13
Run 14
15
Run
2 Cash requirenents
3
4
5
6
7
Pavablc
Maintenance and Inquiry
RM
Purge accounts payable file
Purge cheque file
Supplier Piaster
Supplier open item
Purge supplier master updates
31/01/2003
Purge cheque inquiry
Purge supplier master
Supplier nemos
Purge open item inquiry
Purged Supplier master inquiry
8 HICR cheque printer setup
9 PC link
10 GST codes
E Exit
Enter selection
To select PC link type (U and press I«-*Enter).
The screen will appear as follows:
Maintenance and Inquiry
1
2
3
4
5
6
7
8
9
10
Cheques
Cash requirenents
Purge accounts payable file
Purge cheque file
Supplier Piaster
Supplier open item
Purge supplier master updates
HICR cheque printer setup
PC link
GST codes
E Exit
11
12
13
14
Purge cheque inquiry
Purge supplier master
Supplier nenos
Purge open iten inquiry
15 Purged Supplier master inquiry
SELECTION MENU
Export utilities
t
8-22 ■ PC LINK
I
31/01/2003
t(S3]-Exit
MAINTENANCE AND INQUIRY
Import Utilities
The import utilities program is not available at the present time.
TLnPP2ll
31/01/2003
Accounts Payiihle
Maintenance and Inquiry
11
12
13
14
15
1 Cheques
2 Cash requirements
3 Purge accounts payable file
4 Purge cheque file
5 Supplier master
5 Supplier open item
Purge cheque inquiry
Purge supplier toaster
Supplier nemos
Purge open iten inquiry
Purged Supplier master inquiry
7 Purge supplier master updates
8 NICR cheque printer setup
9 PC link
10 6ST codes
E Exit
9E Enter selection
<« The IMPORT utilities are NOT AUAILABLE !
>>>
Export Utilities
Highlight Export utilities and the screen will appear as follows:
Be,
The Supplier Master and Open Item records can be converted to DBF format.
PC LINK ■ 8-23
MAINTENANCE AND INQUIRY
Supplier Master
Highlight Supplier master and press I +* Enterl. The following screen will appear:
Export SUPPLIER MASTER File to DBF Fornat
RM
Typist
Tue
6
LOGGED OH Directory: t H:\DEM0\RM\ 1
EXPORT Directory
: t LOGGED OH DIRECTORY 1
Input File
Output File
Record Count
MAR 25,2003
10:45:34
Port 96
RKftPFOI-TXT
RKAPFO1.DBF
Start Tine
Current Time
Stop Tirae
[0] Select:
[01-Start
[[IE]-Exit
Type (s) and press I*-1 Enter! to export the Supplier master to DBF format.
Open Items
Highlight Open items file and press 1<-* Enter!. The following screen will appear:
Qe .Edit ,,13%
h
,,
(>>
TlfifTfl^R
RM
Typist
6
Port
96
Export ft/P OPEH ITEMS File to DBF Format
Include CHEQUE DATES
Include CSU HEOOER ..
Include ZERO UNPAID .
N
Y
¥
NO
YES
YES
Input File
Output File
Record Count
RHAPF03.1S1
RKAPF03.DBF
Start Time
Current Tine
Stop Time
Select FILE:
8-24 ■ PC LINK
[[g]-CURRENT
CQJ]-HI STORY
rJl-BftCKUPCNonthly)
[IBM]-Exit
Tue
1 .?.i)
HflR 25,2003
10:47:47
MAINTENANCE AND INQUIRY
The following export options are available:
GD
(ID
GD
Export open item records from the current year's open items file.
Export open items from the open items history file.
Export open items from monthly backup files. The system will display all backup
files and request you highlight the one you want to export from.
flicl
Exit the Open items export utility.
Once you have selected the open item files you want to export from type (s) and press I*-1 Enter) to export the open
items to DBF format. The DBF filename will be displayed on the screen.
PC LINK ■ 8-25
MAINTENANCE AND INQUIRY
GST CODES
This program is used to set up various GST codes. You can have up to 9 GST codes.
&fc
To select GST codes type QGD an^ press [<-* Enter
The following screen will appear:
SV!*.ti:n Tjitile
RH
1
2
3
4
In for n;>t inn
Maintenance and Inquiry
Federal Tax Codes (GST)
Federal tax code (GST)
Description
Tax rate
G/L code
Last updated
Updated by
[_] Select:
tp-WOOIFV
l-DELETE
8-26 ■ GST Codes
[Ql-PRINT
[|]-LIST
usmiao
i .31
31/01/2003
MAINTENANCE AND INQUIRY
To add a new GST code type (a) and press (*-'Enter|. Enter the information as follows:
GST Code
Enter a two digit alpha-numeric number to represent the GST code.
Description
Enter a description for the GST code. For example GST TAXABLE.
Tax Rate
Enter the tax rate that is being charged. For example: 7% would be entered as 7.00.
G/L Code
Enter the G/L code that you want to book the GST to. fF5~> can be used to list all valid GL codes and IF4 \ can be
used to add a new GL code.
Once all the information has been entered and reviewed type (a) to accept and save the GST code.
GST Codes ■ 8-27
MAINTENANCE AND INQUIRY
PURGE CHEQUE INQUIRY
This program allows you to perform a lookup on a cheque that has been purged by the Purge
Cheque File program, (page 8-10).
flee<Mint<; Pay«ihle
P.C.I'.t.
Maintenance and Inquiry
RH
Run 11 Purge cheque inquiry
1 Cheques
2 Cash requirements
3 Purge accounts payable file
A Purge cheque file
5 Supplier naster
6
7
6
9
10
31/01/2003
12 Purge supplier master
Run 13 Supplier nemos
Run 14 Purge open iten inquiry
15 Purged Supplier master inquiry
Run
Supplier open iten
Purge supplier Raster updates
HICR cheque printer setup
PC link
GST codes
E Exit
|E Enter selection
11111 and Dress I*-1 Enter \ to select Purge cheque inquiry.
The screen will appear as follows:
Purged Cheque Inquiry
31/01/2003
|= YEAR =T
2000
2001
2002
2003
Highlight the year that contains the cheque that you want to inquire about and press
8-28 ■ PURGE CHEQUE INQUIRY
MAINTENANCE AND INQUIRY
The screen will appear as follows:
Il.flPP.W
ttr.nmints I'.'tyahli:
RM
[ Mm ]
Cheque ft....:
Invoice
Enter
Proc date
Can date
I-LOOKUP
[
Invoice
1.11!
31/01/2003
Purged Cheque Inquiry
ant
Paid
ant
Disc
ant
]-Display FIRST/LOST cheque
Enter the cheque number you want to display. 1^5 \ can be used to list all cheques.
I Home |/| End 1 can be used to display the first or last cheque.
Once you have entered the cheque number the cheque details will be displayed. Q and Q
can be used to display the next and previous cheques.
PURGE CHEQUE INQUIRY ■ 8-29
MAINTENANCE AND INQUIRY
PURGE SUPPLIER MASTER
This program allows you to purge suppliers from the database that have not had any activity
within the time frame that you specify.
flr.cminis I'nyafole
Tue
Supplier Master Purge
RM
Typist: 06
Port: 96
MAR 25,2003
11:22:11
Purge all SUPPLIER records up to and including the CUT OFF DATE.
CUT OFF DATE : 25/03/2001
[_] Select:
CQ]-Start
t MAR 25,2001
[ftl-Modify
)
[(S|]-Exit
The cut off date defaults to the year before the sign on date. If you want to modify the cut off date, type (m) and press
[<-*Enter). Enter the date in the format ddmmyyyy. When the correct cut off date has been entered, type (s) and press
|<-*Enter| to start the purge.
The system will ask you if you are sure you want to continue with the purge. Type Q to continue or (n) to exit the
purge program.
All supplier records that have not had any activity up to and including the cut off date will be deleted.
8-30 ■ PURGE SUPPLIER MASTER
MAINTENANCE AND INQUIRY
SUPPLIER MEMOS
A memo record can contain specific information about a supplier that does not fit into any of
the fields within the supplier master record. Details such as directions to the suppliers,
special products, key contact names etc... can be listed in the memo record and shared by
anyone who has access to the Supplier Master program. The Memo function can also be
accessed from the Supplier Master Maintenance program by pressing("fbI.
0o
gdt
Help
TLflPP2()
V..&A
31/01/2003
Accounts Payable
Maintenance and Inquiry
P.C.P.L
RM
Run 11
12
Run 13
Run 14
15
Run
1 Cheques
2 Cash requirements
3 Purge accounts payable file
4 Purge cheque file
5 Supplier master
6 Supplier open item
Purge cheque inquiry
Purge supplier master
Supplier tnenos
Purge open item inquiry
Purged Supplier master inquiry
7 Purge supplier master updates
B NICR cheque printer setup
9 PC link
10 GST codes
E Exit
(E Enter selection
Type QXD and press I ^ Enter) to select Supplier memos.
The screen will appear as follows:
£f!e
frft
fcfclp
Accounts Pnvahle
RN
Typist: 06
Port: 96
SUPPLIER
SUPPLIER MEMO MAINTENANCE
I-SUPPLIER Lookup
MAR 25,2003
[(Hl-MEMO Lookup
Enter the supplier number for the supplier you want to create the memo entry for. |F5
can
be used to list all suppliers and [fb \ can be used to list all memo entries.
SUPPLIER MEMOS ■ 8-31
MAINTENANCE AND INQUIRY
Memo Records
A memo record consists of 16 lines. You can enter up to 75 characters per line. Once you have finished entering text
in the memo record press lEsc) and type Q to record the entry.
Memo Edit Functions
The following keys can be used to aid you in editing your memo entries.
(tJ/Q
Moves the cursor up or down through the memo lines
Positions the cursor on the first line or the last line of the memo record
Deletes the text on the line the cursor is on
Cancels memo modifications
Ends editing session
8-32 ■ SUPPLIER MEMOS
MAINTENANCE AND INQUIRY
PURGE OPEN ITEM INQUIRY
This program allows you to display purged open item inquiries.
Type QQ and press I*"Enter) to select Purge open item inquiry.
The screen will appear as follows:
P.C.I'.L
flccoiints
I livable
Purged fi/P Open Item Inquiry
RM
Supplier 8
:
Paynent terns ...:
Discount %
:
Last Cheque § ...:
Cheque amount
..:
Invoice no Inv.Date
Post Date Src
(A3 Select:
[ftl-flll
31/01/2003
Disc, ftnt Orig Due
Curr Due
Cheqtt
(gl-Supplier
The system default is to display all suppliers.
To display a specific supplier type (s) and I*-*Enter) then enter the supplier number.
PURGE OPEN ITEM INQUIRY ■ 8-33
MAINTENANCE AND INQUIRY
The following screen will be displayed:
Qte , Edit.
ftccounh; Paynhli:
31/01/2003
Purged fi/P Open [ten Inquiry
RM
Supplier D
:
Payment terns ...:
Discount *
:
Last Cheque tt ...:
Cheque amount
..:
Invoice no Inv.Oate
Post Date Src
Enter
J-CHEQUE Lookup
Disc. Ant Orig Due
ill-Supplier Name
E
Lookup
Curr Due
Cheqtt
gl-SUPPLIEB Lookup
UB J-End
The following options are available.
Obtain a list of all suppliers.
Enter the supplier by supplier name.
Display a list of cheques for the selected supplier.
Display a list of invoices for the selected supplier.
Exit out of the Purge open item inquiry program.
Once you select the supplier you want to display the purged open items for the screen will look similar to the
following:
8-34 ■ PURGE OPEN ITEM INQUIRY
MAINTENANCE AND INQUIRY
PURGED SUPPLIER MASTER INQUIRY
This program allows you to display purged suppliers.
»mm
Type QGQ and press |<-*Enter| to select Purged Supplier master inquiry.
The screen will appear as follows:
RH
Typist:
Port: 96
Screen 1
Supplier
Supplier
Supplier
Purged Supplier Master Inquiry
06
Code
Name
Address
Address
Address
Address
Tue
MAR 25,2003
11:43:12
1
2
3
4
Phone #
FAX Number
Contact Name
Contact's Title
Mobile Phone Number
Email Address
Web Site Address
Payment Terns
Discount Percentage
Home G/L Code
P.O. Req'd for Invoice
[|] Function:
Vtd Purchases
]]-Lookup
[(SQ
Ql-Hext/Previous/First/Last
Type (s) and press I^Enter) to display a purged supplier.
| can be used to list all suppliers that are in the purged supplier master file.
PURGED SUPPLIER MASTER INQUIRY ■ 8-35
MAINTENANCE AND INQUIRY
The screen will appear as follows:
i;LJSl*J
The following options are available.
Email a copy of the screen to your Microsoft Outlook email profile.
Display a list of supplier from the purged supplier master file.
Display the next screen of information for this supplier.
Exit the purged supplier master inquiry program.
Display the next or previous supplier.
Display the first or last supplier.
8-36 ■ PURGED SUPPLIER MASTER INQUIRY
CHAPTER 9: DATA FILE STATUS
ACCOUNTS PAYABLE SYSTEM
This program allows you to determine which purchase or cash disbursements journal
analysis files are on the disk drives, which journals have not been printed, which journals
have been printed but not closed, and the date of the last month closed.
&e> gdk tielp
'
Type Q and press I ^ Enter 1 to select Data file status.
The screen will appear as follows:
Be
Accounts
Payable
UfiPP20
?..
31/01/2003
Data File Status
RM
1 Accounts payable system status
E Exit
E Enter selection
Type Q and press I +-1 Enter |.
ACCOUNTS PAYABLE SYSTEM ■ 9-1
DATA FILE STATUS
The screen will appear as follows:
Data File Status
31/01/2003
Enter FISCflL YEAR : 2003
Enter VEflR [J55551
Enter the year in the format yyyy and press 1<-* Enter l
The screen will appear as follows:
Recounts Pav;tlilt:
Data File Status
RM
31/01/2003
Enter FISCAL VEAR : 2003
[_] Select:
{Ql-Purchase Journal
[Q]-Cash Disbursements Journal
Type (p) for the status of Purchase journal files or
(c) for the status of Cash disbursement journal files then press I <-* Enter]
9-2 ■ ACCOUNTS PAYABLE SYSTEM
DATA FILE STATUS
The screen will appear as follows if you select the P - Purchase journal:
tjelp
If you need to modify the last month closed type (mj and press I ^ Enter |
then enter the last month closed in the format mmyyyy.
ACCOUNTS PAYABLE SYSTEM ■ 9-3
CHAPTER 10: COMPANY INFORMATION
ACCOUNTS PAYABLE SYSTEM
This program allows you to display and/or modify any of the system information set up
when the Accounts Payable System was first installed.
Type (e) and press |<-*Enterl to select Company information.
The screen will appear as follows:
E&
Edit
P.C.P.L
TLflPP^l)
Company Information
RM
1
?..b4\
31/01/2003
General company information
E Exit
_ Enter selection
To gain access to Company Information you must have the security password.
Type the password and press I*-1 Enter\,
ACCOUNTS PAYABLE SYSTEM ■ 10-1
COMPANY INFORMATION
The screen will appear as follows:
#I'ULYMAIlllt:
flCCIIIIHTS
PfiVftlll.r
Systen Infornation
Thu MAR 27,2003
GENERAL COMPANY INFORMATION
Company initials
:
RM
Short conpany nawe ...:
P.C.P.L
Long conpany name ....:
POLYMATHIC COMPUTER PRODUCTS LIMITED
1)
2)
3)
4>
5)
6)
7)
8)
ACCOUNTS PAYABLE - GENERAL INFORMATION
G/L code for DISCOUNT EARNED : 4685 DISCOUNTS-PST
Cheque format
: 6
(Laser MICR)
Last cheque number used
:
4060
Report type
: 1
(Sumnary report)
Password - Single Cheques
:
Year end BACKUP
Month end BACKUP
Password - Supplier Master
Last month end backup
IM Select:
[I]-Modify
: V
YES
: Y
YES
..:
: DEC/2002
[Q]-Email
[Q]-MSUord
Typist: 14 Run date: JAN 01,2003
[(2Q2Q]-Next screen
[EBB 1-Exit
The following options are available:
(HI
(D
E)
(PgDn!
[Esc|
Modify the company information fields.
Email a copy of the screen to your Microsoft Outlook email profile.
Send a copy of this screen to Microsoft Word.
Display the next screen of information.
Exit the Company information program.
For more information on the Company Information options, refer to Company Information (11-8).
10-2 ■ ACCOUNTS PAYABLE SYSTEM
CHAPTER 11: COMPANY SETUP
INITIALIZE A NEW COMPANY
Double click on the Polymathic icon.
The screen will appear as follows:
0e
THU
Edit
Help
MAR 27,2003
11:26:17
SIGN ON
INITIALIZE a New Company
EXIT to Operating System
Click on Initialize a new company.
The screen will appear as follows:
f'OLYMAIHIC - COMPANY SETUP
INITIALIZE A NEW COMPANY ■ 11-1
COMPANY SETUP
To add a new company, enter the company information as follows:
Company Number
The system will automatically assign the next sequential number for this company.
Long Company Name
Enter the companies full name in this field. The length of this field is 50 characters.
Short Company Name
Enter a short form for the company name. The maximum length of the field is 10 characters.
Company Initials
Enter the company initials you want to use for this company.
Holding Company Initials
Enter the initials of the holding company or press IF9 \ to clear the field.
Affiliated Companies
Enter the initials of any affiliated companies here along with their division number. You can enter up to five
affiliated companies or press lEscj to bypass these fields.
Last Month Closed Date
Enter the last month closed in the form of mmyyyy.
GST Registration Number
Enter your GST Registration number or press IF9 1 to clear the field.
Home Directory
Enter the home directory of the data files. If you are in the correct directory, simply press I +-1 Enter \.
Export Directory
Enter the file path to the directory you want exported files to be saved.
Review the information entered so far and if everything is correct, type (a) and press [<-* Enter! to continue.
Mailing Address
In this section, enter the information that you want to appear as your mailing address.
Once you have finished entering this information, review it and if everything is correct, type (a) to accept and save
the information.
The system will prompt you as follows:
Do you wish to COPY the SECURITY file from another company (Y/N)?
If you type Y - Yes, the system will prompt you to enter the company initials. If you type N - No the system will
copy the security file from the existing company.
11-2 ■ INITIALIZE A NEW COMPANY
COMPANY SETUP
INITIALIZE ACCOUNTS PAYABLE SYSTEM
dcfp
THU
MAR 27,2003
11:26:17
SIGN ON
INITIALIZE a New Company
EXIT to Operating System
Press l<-'Enter| to sign on to an existing company.
The screen will appear as follows:
E JU|.»«fttimiTOT^flR«IMH«»lH«a
&o
gdit
Thursday, March 27,2003
13:13:51
3.44
Conpany
Port
Last tt/E
96
Directory
Last Signon
Typist
H:\DEH0\RM
Last Y/E
Prior Year
1 User Number
2 Password
3 Company
Enter
riwiawniiniflBl
-Exit
Enter your typist number. The default value is 1.
Enter your password. The default is I^ Enter |.
Enter the Company number or initials.
INITIALIZE ACCOUNTS PAYABLE SYSTEM ■ 11-3
COMPANY SETUP
The screen will appear as follows:
Sfcf'OLYMAIHIC - SIGNON-'.' '!i:!
Thursday, March 27,2003
Company TC
Directory
Last Signon
Typist
1
TC
13:15:18
(ft
2)
MAR 27/2003
PROCESSING DATE : 31/01/2003
[03 Select:
Port
Last H/E
Last Y/E
Prior Vear
H:\DEH0\RH
10]-StarI
[Q]-Modify
3.44
96
DEC/2002
CLOSED
NAN 31/20031
[01-Cancel
-Exit
Type (£) and press I*-1 Enter!
The main menu will now appear.
tie
Edit
lift
N
FNI
Fri JAN 31,2003
13:16:00
TC
CRT tt 96
TVPIST »
1
1
2
3
4
5
6
7
8
9
10
11
12
13
14
Payroll
Accounts Receivable
Accounts Payable
Sales Analysis
General Ledger
Security
System Utilities
Daily Closing
Monthly Closing
Print Reports
Tine Accounting
Fixed Assets
Inventory / Order Entry
Uertical Markets
Q Query
S Status
E Exit
9
Enter selection
Select the Accounts payable System by typing [3) and pressing (^ Enter).
11-4 ■ INITIALIZE ACCOUNTS PAYABLE SYSTEM
COMPANY SETUP
The following screen will appear:
iSliF-ifciiir
nmmms
•
rnvniu.p
System Infornation
Thu MAR 27,2003
GENERAL COMPANY INFORMATION
Company initials
:
TC
Short conpany name
...:
Long conpany name ....:
TC
TEST COMPANY
There is no ACCOUNTS PAYABLE SYSTEM
set up for this company!!
Do you want to set up a
ACCOUNTS PAYABLE SYSTEM ? (J/ffl)
N
Type Q and press l<-*Enter) to setup the Accounts Payable system.
The following screen will then appear:
ilpPOLYMATHIC
Thu MAR 27,2003
System Infornation
GENERAL COMPANY INFORMATION
Company initials
:
TC
Short company name ...:
TC
Long company name
....:
TEST COMPANY
Do you wish to copy the
SUPPLIER MASTER Layout
from another company ?
1
If you want to copy the supplier master layout from an existing company type Q,
otherwise type (n) then press I <-* Enter |.
INITIALIZE ACCOUNTS PAYABLE SYSTEM ■ 11-5
COMPANY SETUP
Copy Supplier Master Layout From An Existing Company
If you type Y - Yes to copy the supplier master layout from an existing company
the following screen will appear:
£<flt
nmumis pnvmiu:
i Hnni'
Systen Inf or (nation
1 .r.K
Thu MAR 27,2003
GENERAL COMPfiNY INFORMATION
Company initials
:
TC
Short company name ...:
TC
Long ccnpany nane
....:
TEST COMPANY
Do you wish to copy the
A/P PASSWORDS
from another company ?
_
If you want to copy the accounts payable passwords from an existing company type Q,
otherwise type (n) then press I*-1 Enter). Refer to (11-8) for more details.
The following screen will appear:
System Information
GENERAL COMPANY INFORMATION
Company initials
:
TC
Short company name ...:
TC
Long company name ....:
Thu MAR 27,2003
TEST COMPANY
Enter the initials of the company whose
SUPPLIER HASTER Layout
you wish to copy
Type the initials of the company you want to copy the supplier master from.
11-6 ■ INITIALIZE ACCOUNTS PAYABLE SYSTEM
COMPANY SETUP
The following screen will appear:
iHM'olymaihic
i hit or
i .r>6
Thu MAR 27,2003
System Information
GEHERflL COMPANY INFORMATION
Company initials
:
Short company name ...:
Long company narae
TC
TC
TEST COMPANY
....:
The company you have selected is
POLYMATHIC COMPUTER PRODUCTS LIMITED
Okay ? V
Confirm that the company is correct and press I^Enterl
The following screen will appear:
WPOLYMATMIC
I Nil ftl»
GENERAL COMPANY INFORMATION
Company initials
:
TC
Short company name ...:
TC
Long company name
1.66
Thu MAR 27,2003
System Information
TEST COMPANY
:
The company you have selected is
POLYMATHIC COMPUTER PRODUCTS LIMITED
Okay ? Y
Branch selection
: Qj
Clear financial data: N
[ftl-ALL branches
NO
[01-SIHGLE branch
___
[ (US 1-Exit
Enter the information as follows:
Press (♦-'Enterl to copy the supplier information for all branches of the company you selected. Type (s) and press
[<-■ Enter \ to select a single branch. Type the number of the branch you want to copy from and press I <-* Enter). The
system will display the branch name.
Type (y) and press l<-*Enter| to clear the financial data that is currently recorded in the company that you selected to
copy from. Type (n) and press l<-*Enter| to retain the financial data.
INITIALIZE ACCOUNTS PAYABLE SYSTEM ■ 11-7
COMPANY SETUP
Company Information
The following screen will appear if you opted not to copy the supplier master layout from an
existing company or once you answered the question about which company you want to
copy the supplier master layout from.
#K)LYMAIH1C
0a ..
Thu HflR 27,2003
System Information
GENERAL COMPANY IHFORMflTIOH
Company initials .....:
Short company name ...:
Long company name ....:
TC
TC
ACCOUNTS PAYABLE - GEHERflL INFORMATION
1) G/L code for DISCOUNT EARNED
2) Cheque format
3) Last cheque number used
4) Report type
5) Password - Single Cheques ...
6) Vear end BACKUP
7) Month end BACKUP
Password - Supplier Master ..
Last nonth end backup
Enter
l-SETUP G/L code
TEST COMPANY
Typist:
Run date:
[[El-LOOKUP
Enter the information as follows:
General Ledger Code for Discount Earned
This is the general ledger code that the system will automatically post discounts on supplier invoices to. A valid
general ledger code must be entered. IF5 \ can be used to list all codes.
11-8 ■ INITIALIZE ACCOUNTS PAYABLE SYSTEM
COMPANY SETUP
Cheque Format
POLYMATH If.
nc
n
hks
rnvn
.:
H
THP
1.
Thu MAR 27,2003
System Infornation
GENERAL COMPANY INFORMATION
Company initials .
Short company name
Long company nane
:
...:
TC
TC
TEST COMPANY
....:
ACCOUNTS PAYABLE - GENERAL INFORMATION
1) G/L code for DISCOUNT EARNED : 4685
2)
Cheque
3)
4)
5)
6)
7)
8)
Last cheque number used
:
Report type
:
Password - Single Cheques ...:
Year end BACKUP
:
Month end BACKUP
:
Password - Supplier Haster
Last nonth end backup
format
:
SELECTION MENU
Ch untu; stylo
Typist:
1
2
3
4
5
6
9
-
Cheque style B
Cheque style C
Laser (Moore)
Laser (LT102)
Preprinted HICR
Laser MICR
SPECIAL cheques
t
i
[Rl-Exit
Type the number beside your cheque style and press I<-* Enter |
Last Cheque Number Used
Enter the number of the last cheque used in your manual system.
Report Type
POLYMATHIC
TS PfiVfllJLE
i hit fir
GENERAL COMPANY INFORMATION
Company initials
:
TC
Short company name ...:
TC
Long company nane ....:
1 .fir>
Thu MAR 27,2003
System Information
TEST COMPANY
ACCOUNTS PAYABLE - GENERAL INFORMATION
1) G/L code for DISCOUNT EARNED : 4685
2) Cheque format
3) Last cheque number used
4) Report type
5)
6)
7)
8)
: 6
:
9876
: 1
Password - Single Cheques ...:
Year end BACKUP
:
Month end BACKUP
:
Password - Supplier Master ..:
Last month end backup
:
Enter REPORT TYPE:
(Laser MICR)
Typist:
Run date
rlJ-DETAIL report
CQl-SUHMARY report
Cfl]
[Q]
[(USB ]-End
The options are:
GD
CD
Paid invoice details will show in cash disbursements journal.
No invoice details shown in disbursements journal, only cheque total.
Type the number corresponding to the report type you want and press I+-1 Enter).
INITIALIZE ACCOUNTS PAYABLE SYSTEM ■ 11-9
COMPANY SETUP
Password - Single Cheques
If you want the printing of single cheques to be password protected, enter the password here.
Year end Backup
If this field is set to yes year end backup files of the Supplier Master and Open Items files will be generated when the
General Ledger year end roll has been run.
Month end Backup
If this field is set to yes monthly backup files for the Supplier Master and Open Items files will be generated from the
Monthly Closing program.
Password - Supplier Master
If you want password protect the addition and modification of suppliers, enter the password here.
The following options are available:
Q
©
GD
IPgDni
(D
®
|Esc)
Save the data.
Modify the company information.
Cancel the initialization of Accounts Payable.
Display the next screen of information.
Email a copy of this screen to your Microsoft Outlook email profile.
Send a copy of this screen to Microsoft Word.
Exit the Company information program.
Review the information entered and if everything is ok type Q and press I<-* Enter \ to save and continue.
The following screen will appear:
"MP0LYM/V1HIC
nCKfll MS I'flVflllU
IN! TOP
System Infornation
GENERAL COMPANY INFORMATION
Company initials
:
TC
Short company nans ...:
TC
Long conpany nanc ....:
TEST COMPANY
ACCOUNTS PAYABLE - BANK INFORMATION
1) Bank account nunber
2) Bank transit nunber
3) Bank naoe
4)
5)
6)
7)
Enter
Bank
Bank
Bank
Bank
address
address
address
address
-
street ...
city
province .
postal code:
Q
[[HD]-Clear field
11-10 ■ INITIALIZE ACCOUNTS PAYABLE SYSTEM
I .fifi
Thu MAR 27,2003
I-End
COMPANY SETUP
The data entered in this screen must be entered if you are using the Laser MICR cheque form type. The information
entered here will appear on your cheques.
Once you have entered the information, verify that everything is correct then type (a) and press [<-*Enter! to accept and
save the information.
Once all the static information has been entered the system will then ask:
"On what drive do you want to set up the A/P files for this company ?"
Type the drive letter on which the company was set up and press IJ-1 Enter! or press I*-1 Enter) to set the company up on
the default drive.
The Accounts Payable System is now ready for use. Proceed according to the Accounts Payable Cycle outlined in
the user's manual.
INITIALIZE ACCOUNTS PAYABLE SYSTEM ■ 11-11
CHAPTER 12: PRINT REPORTS
PRINTING SPOOLED REPORTS
Polymathic application software generates reports by spooling to disk files. This means that when you wish to
produce a report such as the Chart of Accounts, the report is not printed directly to the printer, but is saved or
spooled on your hard disk for printing at some later time. Spooling reports rather than printing them directly has
several advantages, some of which are as follows:
•
•
Reports are produced faster, since writing to disk is faster than printing directly to a printer.
All reports which have been spooled to the disk may be printed at one time instead of waiting for
the printer to finish printing one report before printing the second report.
•
You can print multiple copies of the same report without having to recreate and reprint the report.
•
You can start printing at any page number.
After you have spooled one or more reports using the programs outlined in Chapter 7 you can print them by
selecting Print Reports from the Main Menu.
To select Print Reports type QXJD> and press I ^ Enter).
PRINTING SPOOLED REPORTS ■ 12-1
PRINT REPORTS
The screen will appear as follows:
'*)
PRINT SETUP FUNCTIONS:i
PRINTER SELECTION;
t\BOB-CUMMINGS\LASERBC
t\CAL-SPARE1\CoStar LabelWriter XL Turbo
ftCAL-XP\Laserjet
ftHERONNTI \\\PR8FF5DB\MICR
ftHERONNT1\U2200-5
ftHERONNTI \LJ4
ftHERONNTHXerox^PCL
(\P0LYNT4\FacSys Queue Monitor
Acrobat Distiller
Dymo LabetWriter EL60
FACSys Fax Printer
HP LaserJet 2100
rDOT MATRIX
TVPE
(? No Setup
Matrix
C Condensed Print
Laser
C Setup B-l/2" Cheques
fiancel
Send form Feed
Highlight the printer you are going to print to.
If you are using a Laser printer, select Laser under TYPE and select Portrait - small print under LASER.
If you are using a Dot Matrix printer, select Matrix under TYPE and select Condensed Print under DOT MATRIX.
Click on OK.
®"
These settings only have to be set the first time. The system will always bring up the Printer Selection window
but you will be able to click on OK unless you changed printers.
The print screen will then appear listing all the reports you can print.
Edit
■
Uetp
'OLVIMTIIIC GROUP
Typist: 06
HPLJ4
fl-print
Port: 96
(Q-delete
PC'RI NT
Print Reports
Thu
2.G1j
APR 18,2002
10:14:35
0-start
0-eraail
12-2 ■ PRINTING SPOOLED REPORTS
Q-convert
Q-zoon
QQ-functions
QQBJ-scroll
PRINT REPORTS
PRINT SCREEN FIELDS
The print screen is made up of seven columns. The function of each column is as follows:
Report name:
This is an identification label assigned to the various reports which may be spooled. Each
individual report is assigned a unique name by the system.
copy:
This column is used to indicate the number of copies of the individual report which are to be
printed.
D/K:
This column is used to indicate whether the spooled report should be deleted from or kept on
the disk after it has been printed.
Start page:
This column is used to indicate the page number on which you wish to start printing each
report. This would normally be page one.
Status:
The next three columns labeled Copy, Page and Messages are used by the system during
printing to display the current copy and page being printed and other status messages.
The system will automatically scan the disk for spooled print reports when you select print reports from the main
menu. This may take several minutes. The system will then display the names of the reports it has found. To print an
individual report proceed as follows:
1.
If the report you want to print is not highlighted, use the down arrow key to move through the reports until
the report you want to print is highlighted.
2. Type Q on the highlighted report. If you wish to accept the system defaults of Q) for number of copies, [£)
for delete report after printing, and Q for start printing on page one, simply move the highlight to the next
report which you wish to print. If you wish change any of the defaults for these three fields press 1^ Enter t.
a.
The cursor will now move to the "copy" field. Type the number of copies that you wish to print and
press I^Enter| or simply press I*-1 Enter! to accept the system default of Q.
b.
The cursor now moves to the "D/K" field. Indicate whether you wish the report to be the deleted or
kept after printing. To delete the report after printing press I*-1 Enter! to accept system default. To keep
the report after printing type (k) and press I*-* Enter!.
c.
The cursor will proceed to the "page" field. Type the number of the page that you wish to start printing
on and press I^Enter! or press l<-*Enter) to accept the system default of Q.
3. Press |s) to start printing the desired reports.
A sample print screen follows:
POLYMATH IC GROUP
PCPRINT
2.65
PRINT SCREEN FIELDS ■ 12-3
PRINT REPORTS
FUNCTION KEYS AND PRINT COMMANDS
fjolp
The following functions are available in the Print report program:
Marks a report for printing.
Marks a report for deleting.
Start printing or deleting the selected reports.
Email the report to yourself. * You must be using Microsoft Outlook to use this function.
Convert the report to Microsoft Word.
Zoom the report, allowing you to view the details of the report on the screen.
Change the printer defaults.
Scrolls up through the reports to allow you to mark them for processing.
Scrolls down through the reports to allow you to mark them for processing.
flsci
Exit the print reports screen.
Emailing A Report
This option is only available if you are using Microsoft Exchange and Outlook. An email profile must be configured
for you in order for you to be able to email reports to yourself. For technical assistance with this option please
contact Polymathic.
To email yourself a report, highlight the report, type (D and press (s). The report will automatically be emailed to
you.
A file association must be set up for extension PRT to allow the file to open in Notepad. Once this has been set up
you will be able to view the report in Notepad. To print the report you must print from the Polymathic print menu. A
file association can be set up to print the report. For assistance with this option please contact Polymathic.
Converting A Report
The Convert program allows you to convert a report to Microsoft Word. You must be using Microsoft Word 2000 or
later in order to use this function.
12-4 ■ FUNCTION KEYS AND PRINT COMMANDS
PRINT REPORTS
The convert a report to Microsoft Word, highlight the report, type (£) and press (s). Microsoft Word will be
launched and the report will then be converted to Word.
Zooming A Report
The zoom utility allows you to display a report to the screen. To zoom a report, highlight the report and type (z) You
can use the arrow keys to move through the report. I Home! will take you to the beginning of the report and |End| will
take you to the end of the report. When you have finished viewing the report, type IEsc| to exit.
Functions
The functions command allows you to change the printer you are going to print to or change the settings for the
printer you are printing to.
Press (F4 | and the screen will appear as follows:
liliiiJ
PRINT SETUP FUNCTIONS
PRINTER SELECTION
\\BOB-CUMMiNGS\LASi;FlBC
\\CAL-SPARE1\CoStar LabelWriter XL Turbo
WHERONNT1 \\\PR8FF5DB\MICR
\\P0LYNT4\FacSys Queue Monitor
Acrobat Distiller
FACSys Fax Printer
HPLJ4
DOT MATRIX—*-~~^~~r~
•TYPE
r No Setup
■■(TjiMatifbc
C Condensed Print
C Setup 8^1 ^Cheques
Send form Feed
||
£ancel
The printer selection area lets you switch between dot matrix and laser printers, send
commands to your printer and change the output device. Select the appropriate type and
setup required for the fonts then press OK.
FUNCTION KEYS AND PRINT COMMANDS ■ 12-5
CHAPTER 13: DAILY STARTUP
LOG ON INSTRUCTIONS
Follow the steps below to start using your accounting system for daily use:
Double click on your Polymathic icon to launch the Polymathic Accounting software.
The following screen will appear:
POLYMATHIC - SYSTEM ftS'tRY;:
THU
14:56:55
MAB 27,2003
SIGN ON
INITIALIZE a New Company
EXIT to Operating System
Press I^Enter) to sign on to an existing company.
LOG ON INSTRUCTIONS ■ 13-1
DAILY STARTUP
The following screen will appear:
POLYMATHJC - SU>XJN
Thursday, March 27,2003
14:57:10
Company
:
Directory
: H:\DEW0\RM
Port
;
Last WE
;
Last V/E
Prior Vear:
Last Signon:
Typist
:
1 User Number
2 Password
3 Company
Enter
Log on to the system as follows:
1. Enter your typist number. The default value is
2.
Enter your password. The default is l<-*Enterl
3.
Enter the Company number.
13-2 ■ LOG ON INSTRUCTIONS
I-Exit
3.44
96
DAILY STARTUP
The screen will appear as follows:
# POLYMATHS - SIGNUN■
PROCESSING DATE : 31/01/2003
[S3 Select:
[03-Start
tj]-Modify
URN 31/20033
[|]-Cancel
tflBl-Exit
Make sure the processing date is correct then type (s] and press (<-* Enter |.
The main menu will now appear.
Type d) and press (<-* Enter) to select Accounts payable.
LOG ON INSTRUCTIONS ■ 13-3
CHAPTER 14: MONTHLY CLOSING
1ftIN
RM
CRT ft 96
iTYPIST ft
MENU
Thu flPR 18,2002
10:30:35
6
1
Payroll
2
3
A
5
6
7
8
9
Accounts Receivable
Accounts Payable
Sales Analysis
General Ledger
Security
System Utilities
Daily Closing
Monthly Closing
10
11
12
13
14
Print Reports
Tine Accounting
Fixed Assets
Inventory / Order Entry
Uertical Markets
Q Query
S Status
E Exit
I
Enter selection
Type [9) and press I^Enter) to select Monthly closing.
The screen will appear as follows:
lOofxi
MONTHLY CLOSING - AUTOMATIC
The automatic closing function will automatically identify the modules that your company uses and all
the relevant journals and reports will be generated without stopping between the selected options.
Type (a) and press I«-* Enter! to select Automatic.
14-1
MONTHLY CLOSING
The screen will appear as follows:
Monthly
RM
Last month closed: 02/2002
CRT fl 6
ACCOUNTS PAYABLE
Purchases journal.......
Cash disbursements jrnl.
A/P open items list
ft/P aged trial balance..
Closmn
Signon date: MftR 31/2002
Today's date: MAY 2/2002
Vear end date: FEB 28/2002
r.FEB/2002)
PAYROLL
Payroll HTD register
HOT INSTALLD
Payroll 11T0 update...... HOT INSTALLD
Payroll journal
HOT INSTALLD
ACCOUNTS RECEIUfiBLE
TIME ACCOUNTING
Cash receipts journal...
Sales journal
ft/R open items list
A/R aged trial balance..
Apply tine sheets
HOT INSTALLO
Apply cash receipts
HOT INSTALLD
GENERAL LEDGER
Detailed client history. NOT INSTALLD
General journal...
..
Trial balance
Financial statements....
S/L report.....
Indicate nonth closed.
[_] Select:
[§1-Start
Apply client billings... NOT INSTALL!)
Apply client expenses... HOT INSTALLO
Apply yiP adjustments... HOT INSTALLD
[|]-Modify
[03-fill
[|]-Cancel
The functions available are as follows:
Start closing
Modify option selections
jF9 |
CEEQ
QQ
|Esc)
Select option
Unselect option
Used to move through options
Exit Modify function
Select all options
Cancel closing
Once you have selected the options that you want closed, type (s) and press I<-*Enter) to start the closing. The closing
of the journals will update the general ledger and the reports for the options you selected will be available for
printing.
MONTHLY CLOSING - MANUAL
The manual closing function allows you to close one option at a time.
Type (m) and press [<-*Enter! to select Manual.
The screen will appear as follows:
14-2 ■ MONTHLY CLOSING - MANUAL
MONTHLY CLOSING
MONTHLY CLOSING - MANUAL
The manual closing function allows you to close one option at a time.
Type (m) and press I^Enter) to select Manual.
The screen will appear as follows:
Edit
fc^fp
Mori till v
Last month closed: 02/2002
CRT ft 6
ACCOUNTS PAYABLE
:\.3A
Signon date: MAR 31/2002
Today's date: MAY 2/2002
Year end date: FEB 28/2002
CFEB/2002]
PAYROLL
I Purchases journal
i Cash disbursements jrnl.
\
IL nil 10
Closinn
RM
A/P open items list
Payroll MTD register
HOT INSTALLD
Payroll HTO update
NDT INSTftLLD
Payroll journal
HOT INSTALLD
TIME ACCOUNTING
Apply tine sheets
Apply cash receipts
Apply client billings...
Apply client expenses...
Apply WIP adjustments...
Detailed client history.
HOT
NOT
NOT
NOT
NOT
NOT
A/P aged trial balance..
j
ACCOUNTS RECEIUflBLE
,
Cash receipts journal...
Sales journal
R/B open items list
A/R aged trial balance..
■
■
GENERAL LEDGER
General journal
INSTALLD
INSTALLO
INSTflLLD
INSTALLD
INSTALLD
INSTALLD
Trial balance
Financial statements....
i
Indicate month closed...
G/L report....
I-Selects
[[jflj]]-Cancels
tfll
The functions available are as follows:
Select option
Unselect option
Used to move through options
|Esc|
Exit Closing function
Once you have selected an option the following options are available:
Start closing
Cancel closing
Type {sj to start closing the option you select. Once the option is closed, the appropriate report will be available for
printing and the Closing screen will display "Completed" beside that selection.
MONTHLY CLOSING - MANUAL ■ 14-3
Emailing a report
12-4
Export Utilities
Accounts Payable Cycle
Initial set-up procedures
2-1
Monthly procedures
2-1
8-22
Supplier master
8-22
F5 Lookup Feature
B
3-4
Features
Backups
Yearly and Month-end.
Open items
11-10
Polymathic Accounts Payable
1-1
General Data Entry
Cancelled Cheques
Entering cancelled cheques
5-22
Cash Disbursements Journal
Reprint report
7-25
Cash Requirements
Display a specific supplier
8-4
Hold invoice to prevent payment
8-7
Modify invoice due date
8-7
Release invoice for payment
8-7
Cheque Processing
Automatic Cheque Processing Steps
5-19
Cheque Print Date
5-20
Date fields
3-2
Decimal points
3-2
Instructions
3-1
Menus and submenus
3-1
Optional fields
3-2
The ENTER key
General Description
3-1
1-1
General Ledger Code
Default GL code for supplier
8-13
GST Code
Set up new GST code
8-26
Cheques
Display details
8-2
Company Information
11-3
Invoice Entry
5-2
Description
Company Setup
5-4
Affiliated companies
11-2
GL distribution
5-4
Company initials
11-2
Hold Invoice
5-4
Company number
11-2
Invoice amount
5-3
Export directory
11-2
Invoice date
5-3
GST Registration number
11-2
Payment due date
5-3
Holding company
11-2
PO check
5-4
Home directory
11-2
Print cheque option
5-4
Last month closed
11-2
Long company name
11-2
Supplier invoice number
Supplier number
5-3
5-3
Mailing address
11-2
Short company name
11-2
Convert report to Microsoft Word
12-4
Log-On Instructions
D
M
Daily Processing
Enter supplier invoices
Displaying a report
13-1
5-2
12-5
E
Editor
Manual Cheques
Matching against invoices
8-17
Menus
Accounts payable subsystem
4-1
Main menu
4-1
MICR
Cancel processing
3-3
Rekey from a field
3-3
Rekey/display line
3-3
Magnetic ink character recognition
8-19
MICR Cheque Printing
Add printer
8-20
Emailing a report
12-4
Export Utilities
Accounts Payable Cycle
Initial set-up procedures
2-1
Monthly procedures
2-1
Open items
8-22
Supplier master
8-22
F5 Lookup Feature
B
3-4
Features
Backups
Polymathic Accounts Payable
Yearly and Month-end.
1-1
1-10
General Data Entry
Cancelled Cheques
Entering cancelled cheques
Cash Disbursements Journal
Reprint report
5-22
7-25
Cash Requirements
Date fields
3-2
Decimal points
3-2
Instructions
3-1
Menus and submenus
3-1
Optional fields
3-2
The ENTER key
3-1
Display a specific supplier
8-4
Hold invoice to prevent payment
8-7
General Description
Modify invoice due date
8-7
Release invoice for payment
8-7
General Ledger Code
Cheque Processing
Automatic Cheque Processing Steps
5-19
Cheque Print Date
5-20
1-1
Default GL code for supplier
8-13
GST Code
Set up new GST code
8-26
Cheques
Display details
8-2
Company Information
11-3
Company Setup
Invoice Entry
5-2
Description
5-4
Affiliated companies
11-2
GL distribution
5-4
Company initials
11-2
Hold Invoice
5-4
Company number
11-2
Invoice amount
5-3
Export directory
11-2
Invoice date
5-3
GST Registration number
11-2
Payment due date
5-3
Holding company
11-2
PO check
5-4
Home directory
11-2
Print cheque option
5-4
Last month closed
11-2
Supplier invoice number
5-3
Long company name
11-2
Supplier number
5-3
Mailing address
11-2
Short company name
11-2
Convert report to Microsoft Word
12-4
Log-On Instructions
D
M
Daily Processing
Enter supplier invoices
Displaying a report
5-2
12-5
E
Manual Cheques
Matching against invoices
8-17
Menus
Accounts payable subsystem
4-1
Main menu
4-1
MICR
Editor
Cancel processing
13-1
3-3
Rekey from a field
3-3
Rekey/display line
3-3
Magnetic ink character recognition
8-19
MICR Cheque Printing
Add printer
8-20