1
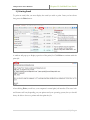
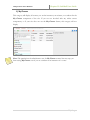
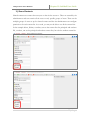
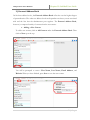
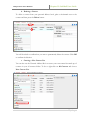
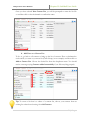
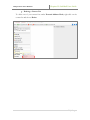
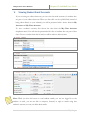
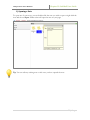
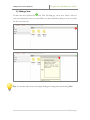
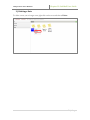
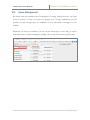
User Guide
Chapter 23
SafeMail User Guide
SharpSchool User Manual
Chapter 23: SafeMail User Guide
Table of Contents
About SafeMail ..................................................................................................................................... 4
About this Guide.................................................................................................................................. 4
Who Should Use this Guide ............................................................................................................... 4
Accessing your Website....................................................................................................................... 4
I.
Accessing SafeMail ...................................................................................................................... 5
II.
Reading Email in SafeMail ......................................................................................................... 6
1)
Sorting Mail .............................................................................................................................. 7
2)
Searching for Email ................................................................................................................. 8
3)
Navigating Messages ............................................................................................................... 9
4)
Creating New Folders ........................................................................................................... 10
5)
Moving Messages ................................................................................................................... 11
6)
Downloading Attachments .................................................................................................. 12
7)
Checking for New Email ...................................................................................................... 13
8)
Deleting Email ....................................................................................................................... 14
9)
Printing Email ........................................................................................................................ 16
III.
Writing Email in SafeMail .................................................................................................... 17
1)
Starting an Email ................................................................................................................... 17
2)
Writing an Email Message .................................................................................................... 18
a.
Choosing Email Recipients .............................................................................................. 18
b. Setting the Subject ............................................................................................................. 18
c.
Writing the Email .............................................................................................................. 18
d. Attaching Files ................................................................................................................... 19
IV.
e.
Setting Priority on an Email ............................................................................................. 20
f.
Saving a Draft .................................................................................................................... 20
g.
Sending Email .................................................................................................................... 20
Contacts .................................................................................................................................. 21
1)
My Classes .............................................................................................................................. 22
2)
Shared Contacts ..................................................................................................................... 23
3)
Personal Address Book......................................................................................................... 24
2|Page
SharpSchool User Manual
a.
Chapter 23: SafeMail User Guide
Adding a New Contact ..................................................................................................... 24
b. Deleting a Contact............................................................................................................. 25
c.
Creating a New Contact List............................................................................................ 25
d. Add Users to a Contact List............................................................................................. 26
V.
e.
Removing Users from a Contact List ............................................................................. 27
f.
Renaming a Contact List .................................................................................................. 27
g.
Deleting a Contact List ..................................................................................................... 28
Viewing Student Email Accounts ........................................................................................... 29
VI.
Calendar .................................................................................................................................. 30
VII.
Notes ....................................................................................................................................... 31
1)
Opening a Note ..................................................................................................................... 32
2)
Adding a Note........................................................................................................................ 33
3)
Deleting a Note...................................................................................................................... 34
VIII.
Space Management ............................................................................................................ 35
3|Page
SharpSchool User Manual
Chapter 23: SafeMail User Guide
About SafeMail
S
harpSchool’s SafeMail provides users with the ability to access, send, receive and
manage their email from any computer with an internet connection. Since
SafeMail can be accessed both at home and at school, teachers and students can
easily keep in contact with each other. SharpSchool’s SafeMail solution also gives users
the ability to create and organize contact lists, store events on a personal calendar, and
write virtual notes. The SafeMail solution is cross browser compliant. Each user is assigned
150 MB of storage space. If you require additional storage, please contact your SharpSchool
Account Manager for more details.
About this Guide
This user guide offers users an introduction into the operation of SharpSchool’s SafeMail
system.
Who Should Use this Guide
The contents of this guide are written to be readable by users of all technical backgrounds.
This guide will be used by teachers and other staff at educational institutions.
If you have been given a training site, it is a good idea to practice the steps covered in this
guide before working on your real site. This eliminates the risk of accidentally deleting
important content or ruining anything on your real site.
Accessing your Website
In order to use SafeMail, you must first log into your website. The login page to your school
or district site will contain fields for the username and password. The location of the login
button will vary according to your website’s design; however, login buttons are typically
available on the upper right corner of your website.
4|Page
SharpSchool User Manual
I.
Chapter 23: SafeMail User Guide
Accessing SafeMail
Once you log on to your website, you can reach SafeMail by clicking on a link. The exact
name and location of the link may vary from site to site but it will be listed with other
published links (such as My Classes and Photo Gallery). These links are generally located
across the top or the bottom of the page near (or in) the header or footer. If you do not see
SafeMail, look for similar terms such as “Mail” or “Webmail.” You can also reach the
webmail by adding /webmail/ at the end of your site’s URL. i.e.
http://www.yoursite.org/webmail/
Note: If, instead of an inbox, you see, “We are sorry, there is no mailbox associated with
your user account. Please contact the administrator” then you do not have an email address
set up for your account. If you should have an email account, contact your site administrator
about having one created for you.
5|Page
SharpSchool User Manual
II.
Chapter 23: SafeMail User Guide
Reading Email in SafeMail
In most cases, clicking the SafeMail link will take you directly to your inbox. This webmail
interface works much like any other mail client, be it on the web, or installed on your
computer.
Note: If you are listed as an instructor in an online classroom, and your school has enabled
the monitoring feature, you will be given the choice to go to your account or the account of
one of your students. For more information on viewing student accounts, consult Viewing
Student Email Accounts later in this manual.
To view a specific email, simply click on the email. The message will populate in the preview
window. To switch from preview to viewing the full message, double-click on the email
instead.
You can also configure how the preview window will display. By default the preview window
will be to the right of your list of emails, however you can use the three preview buttons in
the top-right of the webmail window to switch between preview right (preview window to
the right of emails), preview bottom (preview window underneath emails), and preview off
(no preview window).
6|Page
SharpSchool User Manual
Chapter 23: SafeMail User Guide
1) Sorting Mail
Mail can be sorted by date, to, from, subject and size. To sort mail, hover over the icon and
a dropdown menu will provide you with a list of sorting methods.
SORTING METHODS
Date
Sorts emails numerically by date received.
From
Sorts emails alphabetically by sender.
To
Sorts email alphabetically by addressee.
Subject
Sorts email alphabetically by subject line.
Size
Sorts email numerically by size.
Tip: To toggle between ascending order and descending order, click the item in the
dropdown menu again.
7|Page
SharpSchool User Manual
Chapter 23: SafeMail User Guide
2) Searching for Email
SafeMail allows you to search through your emails by name of the sender, text in the subject
or text in the body of the email. To begin searching, click on Search Mail. This will open a
search box.
To perform a search, select a search type from the dropdown menu. You can choose From,
Subject, or Body. From will search the text of both the email address and the name fields.
Subject will search the text of the subject field and Body will search the text of the body of
the email. Once you have made your selection, type in your search term in the Search box
and then press the Search button.
Tip: Searches are NOT case-sensitive.
8|Page
SharpSchool User Manual
Chapter 23: SafeMail User Guide
3) Navigating Messages
While reading an email, it is possible to move on to the next email or the previous email
through the use of the Next and Previous buttons. This is particularly useful if you are
inside the message window and do not want to return to the inbox listing window to read
your next message.
9|Page
SharpSchool User Manual
Chapter 23: SafeMail User Guide
4) Creating New Folders
SafeMail gives you the ability to create new folders for your emails. You can use these folders
to organize your emails into different categories, making it easier to find an email when you
need it.
To create a new folder, right-click on an existing folder and choose New Folder. Name
your new folder and click on the checkmark to confirm the folder creation.
Tip: Right-clicking on one of the new folders allows you to Rename or Delete the folder.
10 | P a g e
SharpSchool User Manual
Chapter 23: SafeMail User Guide
5) Moving Messages
To move email messages into one of your new folders, or one of the default folders, place a
checkmark next to each email you want to move, then click on Move To and choose your
desired destination from the drop-down menu.
11 | P a g e
SharpSchool User Manual
Chapter 23: SafeMail User Guide
6) Downloading Attachments
Attachments are displayed in the message header, just below the To field.
To download an attachment, click on the file name. The exact wording and look of the
window may vary based on your operating system and the browser but in every case a
window will pop-up asking you to either open or save the file. It is generally considered best
practice to save the file, that way you will have easy access to it - even after you have closed
the webmail interface.
12 | P a g e
SharpSchool User Manual
Chapter 23: SafeMail User Guide
7) Checking for New Email
When you first log in to SafeMail, the client will automatically check for new email messages.
You can check for new messages yourself at any time by pressing Check Mail.
13 | P a g e
SharpSchool User Manual
Chapter 23: SafeMail User Guide
8) Deleting Email
If you find yourself running low on free space, or if you just want to tidy up your inbox, you
can delete unwanted or unneeded items. There are two ways to delete mail items. One
method is to place a checkmark next to the items you want to delete and then press the
Delete button. This method can be used to delete multiple emails at one time.
The other method for deleting email is to right-click on the item you want to delete and
choose Delete from the list.
14 | P a g e
SharpSchool User Manual
Chapter 23: SafeMail User Guide
In both cases, the deleted emails will be moved to the Deleted Items folder. To delete the
items permanently, right-click on the Deleted Items folder and choose Empty. You will be
asked to confirm that you want to permanently delete the items in the folder. Pressing OK
will complete the deletion.
Tip: You can restore items from the Deleted Items folder using the Move To button. For
information on how to use Move To refer to later in this chapter.
Pitfall: While you can restore items while they are still in the Deleted Items folder, if you
delete the items in the Deleted Items folder, they can no longer be recovered.
15 | P a g e
SharpSchool User Manual
Chapter 23: SafeMail User Guide
9) Printing Email
To print an email, first you must display the email you wish to print. Once you have done
that, press the Print button.
A window will pop-up to display a preview of the print job. Click Print to continue with the
print job.
After clicking Print you will see your computer’s normal print job interface. The exact look
and features will vary depending on your printer and your operating system, but you should
always be able to choose a printer and then print the job.
16 | P a g e
SharpSchool User Manual
III.
Chapter 23: SafeMail User Guide
Writing Email in SafeMail
Writing an email in SafeMail is similar to writing an email in most mail clients or webmail
interfaces. If you have written an email before, you should have no trouble getting used to
SafeMail’s interface.
1) Starting an Email
There are four different ways to begin writing an email message. Which method you choose
will depend on the situation.
•
Composing a New Email Message
To begin writing a new email message, click on the Compose button at the top-left of the
window.
•
Replying to an Email Message
To begin writing an email reply, click on the email you want to respond to and then click on
the Reply button.
•
Replying to All for an Email Message
To begin writing an email reply to the author of an email as well as all the people the author
sent the email to, click on the email you want to reply to and click the Reply All button.
•
Forwarding an Email Message
To begin forwarding an email, click on the email you want to forward and click the Forward
button.
The choice you select will impact what goes in the To field and whether the email includes
the text of a previous message, but the actual message composition process will be the same
with all four options.
17 | P a g e
SharpSchool User Manual
Chapter 23: SafeMail User Guide
2) Writing an Email Message
Once you choose Compose, Reply, Reply All, or Forward you will be presented with the
composition screen.
a. Choosing Email Recipients
To set who will receive your email, you will need to fill in the To field. You can also
include the CC and BCC fields by clicking the Show Cc & Bcc button.
You can type the email address into the To field or you can click the To button to bring
up your emails from your contact lists. For information on creating and accessing the
contact lists, referring to later in this manual.
b. Setting the Subject
To set the subject, type the subject into the Subject field.
c. Writing the Email
To create the body of the email, write your message into the main window. The email
editor is a simplified version of the RadEditor.
18 | P a g e
SharpSchool User Manual
Chapter 23: SafeMail User Guide
d. Attaching Files
To attach files to your email, click on the Attach File(s) button. This will bring up a file
attachment interface.
Press Select to choose a file to upload. If you have additional files to upload, use the
Add button. When you have selected all the files to attach, press the Upload button.
Note: Each email has a maximum size of 10 megabytes. Therefore, do not attach any
files that are larger than 10 megabytes or else you will get an error on sending.
19 | P a g e
SharpSchool User Manual
Chapter 23: SafeMail User Guide
e. Setting Priority on an Email
In some cases you may want to indicate that the contents of your email are particularly
urgent. Conversely, if the email contains only a routine report, you may want to mark it
as a less urgent priority. SafeMail allows for both these possibilities.
• High Priority
To mark an email as urgent or high priority, press the High Priority button.
• Low Priority
To mark an email as a low priority, press the Low Priority button.
f. Saving a Draft
If you find yourself called away in the middle of writing an email, you can use the draft
function to save your work. That way when you return to SafeMail you can continue on
from where you left off.
To save your email as a draft, press the Save Draft button. This will save the draft to the
draft folder where you can later return to it.
g. Sending Email
Once you are satisfied with your email message, you can send it by pressing the Send
button.
20 | P a g e
SharpSchool User Manual
IV.
Chapter 23: SafeMail User Guide
Contacts
Emails are often sent to the same user or group of users over and over again. As such, it can
be rather tiresome to have to type out the same email addresses again and again. The contact
feature allows you to create an easy short-hand for your frequently emailed contacts and to
group them into lists allowing you to email an entire group of users quickly and easily.
To access your list of contacts, click on the word Contacts in the left-hand navigation bar.
There are three different main categories of contacts: My Classes, Personal Address
Book, and Shared Contacts. All three categories handle contacts in a different way so we
will discuss each category separately.
Pitfall: While there are three categories of contacts, you may not see all three listed on your
screen. That is because whether you see a particular category or not is dependent on how
your administrator has set permissions for each of the three contacts.
21 | P a g e
SharpSchool User Manual
Chapter 23: SafeMail User Guide
1) My Classes
This category will display all courses you are the instructor, an assistant, or a student for the
My Classes component of the site. If you are not involved with any online course
components, or if your site does not use the My Classes feature, this category will not
display.
Note: The permissions the administrator sets for My Classes contact lists may stop you
from seeing My Classes even if you are a student or an instructor of a course.
22 | P a g e
SharpSchool User Manual
Chapter 23: SafeMail User Guide
2) Shared Contacts
Shared contacts are contacts that everyone on the site has access to. These are created by site
administrators and can contain all site users or only specific groups of users. There can be
multiple groups of users set up for shared contacts and the site administrator can configure
permissions for each contact list. As a result, you may not be able to see all the contact lists.
In the example below, Karina, a student, can see the contact lists for principals and teachers.
Ed, a teacher, can see the principal and teacher contact lists, but also the student contact list.
23 | P a g e
SharpSchool User Manual
Chapter 23: SafeMail User Guide
3) Personal Address Book
Of the three address books, the Personal Address Book offers the user the highest degree
of personalization. The other two address books are dependent on classes you are associated
with and the lists that the administrator puts together. The Personal Address Book,
however, is composed entirely of contacts that the user creates.
a. Adding a New Contact
To add a new contact, click on All Contacts under the Personal Address Book. Then
click on New up at the top.
You will be prompted to enter a First Name, Last Name, Email Address, and
Website. When you have finished, press Save to save the new contact.
24 | P a g e
SharpSchool User Manual
Chapter 23: SafeMail User Guide
b. Deleting a Contact
To delete a contact from your personal address book, place a checkmark next to the
contact and then press the Delete button.
You will be asked to confirm that you want to permanently delete the contact. Click OK
to confirm the deletion.
c. Creating a New Contact List
You can also use the Personal Address Book to create your own contact lists made up of
contacts in your all contacts folder. To do so right-click on All Contacts and choose
New Contact List.
25 | P a g e
SharpSchool User Manual
Chapter 23: SafeMail User Guide
Once you have selected New Contact List, you will be prompted to name the list. Do
so and then click on the checkmark to confirm the name.
d. Add Users to a Contact List
To do so, go back to all contacts to bring up the list of contacts. Place a checkmark to
each contact you want on your new list (Chem Group, in our example) and then click on
Add to Contact List. Choose the desired list from the dropdown menu. You should
receive a message saying Contacts added successfully if you did everything properly.
Tip: To create a list that is a subset of a current list, choose your contacts from an
existing list rather than choosing from All Contacts.
26 | P a g e
SharpSchool User Manual
Chapter 23: SafeMail User Guide
e. Removing Users from a Contact List
To remove users from a contact list, first click on the contact list and then place a
checkmark next to each contact you want to remove from the list. When you have
selected all the users you want to remove, click on Remove From Contact List.
f. Renaming a Contact List
To rename one of the contact lists within the Personal Address Book, right-click on
the contact list and choose Rename. Enter the new name and click on the checkmark to
confirm your change.
27 | P a g e
SharpSchool User Manual
Chapter 23: SafeMail User Guide
g. Deleting a Contact List
To delete one of your contact lists under Personal Address Book, right-click on the
contact list and choose Delete.
28 | P a g e
SharpSchool User Manual
V.
Chapter 23: SafeMail User Guide
Viewing Student Email Accounts
If you are using an online classroom, you can view the email accounts of students who
are part of your online classroom. When you first click on the SafeMail link, instead of
being taken directly to your webmail, you will be presented with a choice between My
Accounts and My Class Accounts.
To view a student’s account, first choose the class from the My Class Accounts
dropdown menu. You will then be presented with a list of students who are part of that
class. Choose a student from the list and you will be taken to their account.
Note: While you have full access to read student emails, you are not logged in as the
student. As such, you are not able to compose, forward, or reply to emails using that
student’s account, nor can you delete their emails.
29 | P a g e
SharpSchool User Manual
VI.
Chapter 23: SafeMail User Guide
Calendar
SafeMail’s webmail interface includes a personal calendar that can be used for keeping track
of upcoming tests, assignments and other important dates.
To access the calendar, log into your webmail account and click on the Calendar button in
the left-hand column. For more information on how to use the Sharpschool Calendar, refer
to Chapter 4: Calendar.
Tip: Any event you create, sign-up for, or are invited to anywhere on the site will
automatically be displayed on this personal calendar. Any quizzes or assignments from My
Classes class will also be displayed on this calendar.
30 | P a g e
SharpSchool User Manual
VII.
Chapter 23: SafeMail User Guide
Notes
The SafeMail interface also contains a notes feature. This feature allows you to store virtual
reminder notes to yourself.
To access your notes, sign in to SafeMail and then click on Notes in the left-hand column.
31 | P a g e
SharpSchool User Manual
Chapter 23: SafeMail User Guide
1) Opening a Note
To open one of your notes, you can double-click the note you wish to open or right-click the
note and choose Open. Either action will open the note on your page.
Tip: You can edit any existing note or title once you have opened the note.
32 | P a g e
SharpSchool User Manual
Chapter 23: SafeMail User Guide
2) Adding a Note
To add a new note, click on the
icon. This will bring up a new note. Enter a title for
your note and whatever text you want. When you have finished working on your note, click
the X to close the note.
Tip: You can also add a new note by right-clicking an existing note and choosing New.
33 | P a g e
SharpSchool User Manual
Chapter 23: SafeMail User Guide
3) Deleting a Note
To delete a note you no longer want, right-click on the note and choose Delete.
34 | P a g e
SharpSchool User Manual
VIII.
Chapter 23: SafeMail User Guide
Space Management
By default each user’s mailbox has 150 megabytes of storage (though this may vary from
school to school). As long as you are not receiving a lot of large attachments, this will
provide you with enough space for hundreds or even thousands of messages in your
mailbox.
Whenever you access your mailbox, you can see how much space you are using, as well as
how much space you have remaining by looking at the storage meter in the top-left corner.
35 | P a g e