1
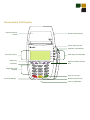
Retail Application Quick Reference Guide VeriFone® Omni 3700 & Vx Series VeriFone ® Omni 3700 & Vx Series Credit Sale Reprint To scroll menu, press until desired option appears. > Swipe customer card > Press [REPRINT] > Select [CREDIT] > If LAST is selected: • The last receipt prints > Input last 4 digits of account # and press [ENTER] > Input invoice # and press [ENTER] , if prompted > Input customer # and press [ENTER] (purchase card only) > Input clerk ID and press [ENTER] , if prompted > Input $ amount and press [ENTER] > Input tax amount and press [ENTER] (purchase/business card only) > Print customer copy –[F1] for Yes or [F2] for No Debit Sale To scroll menu, press until desired option appears. > Swipe card or press [SALE] > Select [DEBIT] > Input invoice # and press [ENTER] , if prompted > Input clerk ID and press [ENTER] , if prompted > Input $ amount and press [ENTER] > Input cash back amount and press [ENTER] (only if enabled) > Cardholder enters PIN and presses [ENTER] > Print customer copy –[F1] for Yes or [F2] for No > Choose from these options: [LAST/ANY] > If ANY is selected: • Input invoice # and press [ENTER] • The selected receipt prints Manual Sale To scroll menu, press until desired option appears. > Press [SALE] > Input account # and press [ENTER] > Input expiration date (MMYY) and press [ENTER] > Card present – [F1] for Yes or [F2] for No > If YES , imprint card and press [ENTER] > Input invoice # and press [ENTER] , if prompted > Input customer # and press [ENTER] (purchase card only) > Input clerk ID and press [ENTER] , if prompted > Input $ amount and press [ENTER] > Input tax amount and press [ENTER] (purchase/business card only) > Input zip code and press [ENTER] , if prompted > If NO, input invoice # and press [ENTER] , if prompted > Input customer # and press [ENTER] (purchase card only) (Manual Sale Continues) VeriFone ® Omni 3700 & Vx Series (Manual Sale Continued) > Input address and press [ENTER] > Input clerk ID and press [ENTER] , if prompted > Input $ amount and press [ENTER] > Input zip code and press [ENTER] > Input tax amount and press [ENTER] (purchase/business card only) > Input V-Code and press [ENTER] > If no code entered: Code present? Select [NO] [XREAD] > Input address and press [ENTER] , if prompted > Print customer copy – [F1] for Yes or [F2] for No Void To scroll menu, press until desired option appears. > Press [VOID] > Void last transaction – [F1] for Yes or [F2] for No > Input zip code and press [ENTER] , if prompted > Retrieve by: [INV#] [ACCT#] > Print customer copy –[F1] for Yes or [F2] for No > Input invoice # or last 4 digits of account # and press [ENTER] Mail/Telephone Order Terminal Displays: [NO] to cancel [YES] to void [NEXT] to scroll To scroll menu, press until desired option appears. > Press [PHONE ORDER] > Input account # and press [ENTER] > Input expiration date (MMYY) and press [ENTER] > Input invoice # and press [ENTER] , if prompted > Input customer # and press [ENTER] (purchase card only) > Input clerk ID and press [ENTER] , if prompted > Input $ amount and press [ENTER] > Input tax amount and press [ENTER] (purchase/business card only) > Input V-Code and press [ENTER] > If no code entered: Code present? Select [NO] [XREAD] > Print customer copy –[F1] for Yes or [F2] for No Quick Reference Guide Re t a i l A p p l i c a t i o n Credit Refund To scroll menu, press until desired option appears > Press [REFUND] > Input password and press [ENTER] > Swipe or input account # and press [ENTER] Debit Refund To scroll menu, press until desired option appears. > Press [REFUND] > Input password and press [ENTER] > Swipe card > Select [DEBIT] > Select [CREDIT] or [PURCH] , if prompted > Input invoice # and press [ENTER] , if prompted > Input expiration date (MMYY) and press [ENTER] (manual sale only) > Input clerk ID and press [ENTER] , if prompted > Input last 4 digits of account # and press [ENTER] (swiped sale only) > Input $ amount and press [ENTER] > Input invoice # and press [ENTER] , if prompted > Input customer # and press [ENTER] (purchase card only) > Input clerk ID and press [ENTER] , if prompted > Input $ amount and press [ENTER] > Input tax amount and press [ENTER] (purchase/business card only) > Print customer copy – [F1] for Yes or [F2] for No > Input original transaction date (MM/DD/YY) > Cardholder enters PIN and presses [ENTER] > Print customer copy – [F1] for Yes or [F2] for No Reports > Press [REPORTS] > Press until desired option appears: [TOTLS RPT] – prints a total report [DETL RPT] – prints a detail report > Press to view additional reports from the main menu screen > Select report to print: Report(s) prints Report Key: m = Manually keyed * = Trans. adjusted Balance Inquiry Manual Sale For ECI > Choose from these options: [CURR] [PREV] • Select [CURR] for current batch > Input account # and press [ENTER] To scroll menu, press until desired option appears. > Press [BALANCE INQ] • Select [PREV] for previous batch > The balance of the selected batch will display Report prints Batch Review To scroll menu, press until desired option appears. > Press [BATCH REVIEW] Available only for the internet industry. To scroll menu, press until desired option appears. > Press [SALE] > Select [CREDIT] , if prompted > Input expiration date (MMYY) and press [ENTER] > Card present – [F1] for Yes or [F2] for No > If YES, imprint the card and press [ENTER] > Input invoice # and press [ENTER] , if prompted > Input password and press [ENTER] > Input customer # and press [ENTER] (purchase card only) > Retrieve by [CLRK] [AMNT] [ACCT#] or [INV #] > Input clerk ID and press [ENTER] , if prompted > Input clerk ID, amount, last 4 digits of account #, or invoice #, and press [ENTER] > Input $ amount and press [ENTER] > Select [ADJ] to adjust transaction > Select [VOID] to print receipt > Select [PREV] to scroll > Input tax amount and press [ENTER] (purchase/business card only) > Input zip code and press [ENTER] > Terminal dials for authorization and prints a receipt if approved > Select [NEXT] to scroll > If NO, choose either the Phone or Web transaction type Settlement > If Web: To scroll menu, press until desired option appears. > Press [SETTLEMENT] > Input password and press [ENTER] > Displays totals > Confirm totals and press [ENTER] Report prints > Encrypted – [F1] for Yes or [F2] for No, if prompted > Input invoice # and press [ENTER] , if prompted > Input customer # and press [ENTER] (purchase card only) > Input clerk ID and press [ENTER] > Input $ amount and press [ENTER] > Input tax amount and press [ENTER] (purchase/business card only) > Input V-Code and press [ENTER] > If no code entered: Code present? Select [NO] [XREAD] > Input address and press [ENTER] Authorization Only To scroll menu, press until desired option appears. > Press [AUTH ONLY] > Swipe or input account # and press [ENTER] > Input zip code and press [ENTER] > Choose from these options: [CREDIT/DEBIT/ PURCH] , if prompted > Print customer copy – [F1] for Yes or [F2] for No > Input expiration date (MMYY) and press [ENTER] (manual sale only) Force To scroll menu, press until desired option appears. > Press [FORCE] > Swipe or input account # and press [ENTER] > Select [CREDIT] or [PURCH] , if prompted > Input expiration date (MMYY) and press [ENTER] (manual sale only) > Input last 4 digits of account # and press [ENTER] (swiped sale only) > Input invoice # and press [ENTER] , if prompted > Input customer # and press [ENTER] (purchase card only) > Input clerk ID and press [ENTER] , if prompted > Input $ amount and press [ENTER] > Input tax amount and press [ENTER] (purchase/business card only) > Input auth code and press [ENTER] > Print customer copy – [F1] for Yes or [F2] for No > Input last 4 digits of account # and press [ENTER] (swiped sale only) > Input invoice # and press [ENTER] , if prompted > Input customer # and press [ENTER] (purchase card only) > Input clerk ID and press [ENTER] , if prompted > Input $ amount and press [ENTER] > Input tax amount and press [ENTER] (purchase/business card only) > Print customer copy – [F1] for Yes or [F2] for No VeriFone ® Omni 3700 & Vx Series Processing Tips = Enter or Yes = Backspace = Cancel or No > To scroll through the menu, press [MORE] Vx610 Specific Functions How to Power on: > Press and hold down [ENTER] until unit powers on How to Power off: > Ensure power cord is not connected > Press and hold down [CANCEL] until unit powers off > Press [3] multiple times until the paper advances to desired length NOTE: The terminal will go into sleep mode after 10 minute of inactivity. It will power off automatically after 30 minutes of inactivity. To receive the lowest rates, swipe all cards through the card reader and keep the terminal connected to power and a phone line at all times so that it can automatically settle daily. Communication Status: Wireless communication is being used You may also obtain Authorizations over the phone by dialing: (800)525-5093. *Phone Authorizations must be followed with a FORCE in order receive payment* For all error messages, technical assistance, supplies or any questions related to your merchant account, please contact Customer Service: (800)476-5020 or visit us on the web: www.elect-mer.com Dial communications is being used Terminal’s antenna is working properly and is connected to the wireless network Terminal’s antenna is unable to connect to the wireless network Terminal’s power cord is connected Wireless signal strength is between 1% to 25% Wireless signal strength is between 26% to 50% Wireless signal strength is between 51% to 75% Wireless signal strength is between 76% to 100% Battery Status: Battery level is below 10% capacity. Plug the unit into the power source to recharge Empty Battery Full Battery Terminal Key Pad Display Internal Thermal Printer Printer Cover Release Green Indicator LED Magnetic Card Reader Terminal Display Alpha Key Scroll Key ATM-Style Function Keys Programmable Function Keys Telephone-Style Keypad Enter or Yes Key Cancel or No Key Backspace/Clear Key Smar t Card Reader A c c ept Cr ed i t C a r d s O nl i n e Re po rti n g The Online Window To Your Payment Processing Account Accept Credit Cards website, with online reporting, is your onestop destination for online customer service. It contains everything your need to manage your electronic payment activity: My Account Manage your account online. View statements, view or update your profile, get information on new products, services and equipment. My Reports Provides you with timely and secure accounting information such as deposit summaries, transaction activity, chargeback and retrieval status and more. Support Find resource information about transaction processing, industry mandates, product support and practical tips to help improve your bottom line. Getting Started Is: Fast, Easy, Secure and Free! Go to www.elect-mer.com