Download User`s Guide Network Scanner Operations
Transcript
User’s Guide Network Scanner Operations . Contents 1 2 Introduction 1.1 Energy Star®..................................................................................... 1-4 What is an ENERGY STAR® Product? .......................................... 1-4 1.2 Trademarks and registered trademarks......................................... License information........................................................................ OpenSSL Statement ...................................................................... Kerberos......................................................................................... 1.3 About this manual............................................................................. 1-9 Structure of the manual ................................................................. 1-9 Notations...................................................................................... 1-10 Images that are used ................................................................... 1-10 1.4 User manuals .................................................................................. User manual [Copy Operations]................................................... User manual [Network Scanner Operations] (this manual) .......... User manual [Box Operations] ..................................................... User manual [Print Operations] .................................................... User manual [Advanced Scan Operations] .................................. User manual [Facsimile Operations] ............................................ 1-11 1-11 1-11 1-11 1-11 1-11 1-11 1.5 Explanation of manual conventions.............................................. Safety advices.............................................................................. Sequence of action ...................................................................... Tips .............................................................................................. Special text markings................................................................... 1-12 1-12 1-12 1-13 1-13 1-5 1-5 1-6 1-8 Features 2.1 Scan to E-Mail................................................................................... 2-3 2.2 Scan to FTP ....................................................................................... 2-4 2.3 Scan to SMB...................................................................................... 2-5 2.4 Scan to HDD...................................................................................... 2-6 2.5 Internet faxing ................................................................................... 2-7 2.6 PageScope Web Connection........................................................... 2-8 bizhub 362/282/222 Contents-1 3 Setup 3.1 Connecting to a LAN ......................................................................... 3-3 Connecting the LAN cable.............................................................. 3-3 3.2 Specifying the network settings ...................................................... 3-4 Network setting table...................................................................... 3-4 To specify initial network settings................................................... 3-7 3.3 Basic Settings .................................................................................... 3-9 Settings ........................................................................................... 3-9 DHCP ............................................................................................ 3-10 IP Address Setting ........................................................................ 3-11 Subnet Mask................................................................................. 3-12 Gateway........................................................................................ 3-13 Network Board Set ....................................................................... 3-14 To specify the network board settings ......................................... 3-14 3.4 DNS Settings.................................................................................... 3-15 DNS Setting .................................................................................. 3-16 Host Name .................................................................................... 3-16 Domain Name ............................................................................... 3-17 DNS Server Address ..................................................................... 3-17 3.5 Machine Name ................................................................................. 3-18 To specify the machine name....................................................... 3-18 3.6 SMTP Settings ................................................................................. 3-19 SMTP Server Address .................................................................. 3-20 E-Mail Address ............................................................................. 3-22 SMTP Authentication User Name ................................................. 3-23 SMTP Authentication Password ................................................... 3-24 3.7 POP3 Settings .................................................................................. 3-25 POP3 Server Address ................................................................... 3-25 POP3 User Name.......................................................................... 3-27 POP3 Password............................................................................ 3-28 Auto-RX Check ............................................................................. 3-29 3.8 Priority Compress Level (E-Mail Mode)......................................... 3-30 TX Size (Max.) ............................................................................... 3-31 TX Quality (Max.)........................................................................... 3-32 Coding Method ............................................................................. 3-33 3.9 Priority Compress Level (Scan Mode) ........................................... 3-34 To specify the scan mode settings ............................................... 3-34 Contents-2 bizhub 362/282/222 4 3.10 Scanner Settings ............................................................................ Activity Report.............................................................................. RX Doc. Header Print ................................................................... E-Mail Header Text ...................................................................... Gateway TX.................................................................................. Subject Registration..................................................................... Divide Settings ............................................................................. 3-35 3-37 3-38 3-39 3-40 3-41 3-42 3.11 LDAP Setting ................................................................................... LDAP Search................................................................................ LDAP Server Setting .................................................................... To specify the LDAP server settings ............................................ Search Default Setting ................................................................. 3-44 3-44 3-45 3-46 3-48 3.12 IP Filtering ....................................................................................... 3-49 To specify IP filtering settings ...................................................... 3-49 3.13 Specifying e-mail server settings.................................................. 3-51 To the network administrator ....................................................... 3-51 3.14 Entering a domain name ................................................................ 3-52 Registering a domain name ......................................................... 3-52 Using a registered domain name ................................................. 3-54 3.15 Checking the network connection (Ping) ..................................... 3-55 To check the network connection................................................ 3-55 3.16 User authentication and account track ........................................ User authentication and account track........................................ If user authentication settings have been specified..................... If account track settings have been specified ............................. 3-56 3-56 3-57 3-58 Scan to E-Mail 4.1 Specifying a destination with a one-touch dial button ................. 4-3 Selecting a one-touch dial button.................................................. 4-3 Specifying a destination by touching a one-touch dial button ...... 4-4 Entering the number of a one-touch dial button............................ 4-6 Searching for a one-touch dial button ........................................... 4-8 Specifying chain dialing ............................................................... 4-10 4.2 Entering an address ....................................................................... 4-11 To enter an address ..................................................................... 4-11 4.3 Specifying the scanning quality and zoom ratio.......................... Quality .......................................................................................... To specify the scanning quality ................................................... Density ......................................................................................... To specify the density settings .................................................... Original Size Set........................................................................... bizhub 362/282/222 4-14 4-14 4-15 4-16 4-16 4-17 Contents-3 5 4.4 Specifying additional functions...................................................... 4-18 Specifying the transmission report printing conditions ................ 4-20 To specify the transmission report printing conditions................. 4-20 Specifying 2in1 transmission ........................................................ 4-21 Specifying double-sided transmission.......................................... 4-22 Specifying priority transmission.................................................... 4-24 Specifying timer transmission....................................................... 4-24 Specifying the stamp setting ........................................................ 4-25 Changing the subject.................................................................... 4-26 Specifying a reply address ........................................................... 4-27 Specifying a file name................................................................... 4-28 Other functions ............................................................................. 4-29 4.5 If transmission could not be completed........................................ 4-30 Viewing a transmission report....................................................... 4-30 Resending ..................................................................................... 4-31 4.6 Registering destinations................................................................. 4-32 Programming a one-touch dial button.......................................... 4-32 To program a one-touch dial button............................................. 4-33 Changing or deleting a one-touch dial button .............................. 4-36 Copying a one-touch dial button .................................................. 4-37 Registering/deleting a secondary destination .............................. 4-38 Naming an index ........................................................................... 4-39 To name an index ......................................................................... 4-39 Registering mail programs............................................................ 4-41 To register a mail program............................................................ 4-43 Changing/deleting a mail program ............................................... 4-46 Scan to FTP 5.1 Specifying a destination with a one-touch dial button .................. 5-3 Selecting a one-touch dial button................................................... 5-3 Specifying a destination by touching a one-touch dial button ....... 5-3 Entering the number of a one-touch dial button............................. 5-5 Searching for a one-touch dial button ............................................ 5-7 5.2 Specifying the scanning quality and zoom ratio ............................ 5-9 Quality............................................................................................. 5-9 To specify the scanning quality .................................................... 5-10 Density .......................................................................................... 5-11 To specify a density setting .......................................................... 5-11 Original Size Set............................................................................ 5-12 5.3 Specifying additional functions...................................................... 5-13 Specifying the transmission report printing conditions ................ 5-14 To specify the transmission report printing conditions................. 5-14 Specifying 2in1 transmission ........................................................ 5-15 Contents-4 bizhub 362/282/222 Specifying double-sided transmission......................................... Specifying priority transmission ................................................... Specifying timer transmission ...................................................... Specifying the stamp setting ....................................................... Specifying the e-mail notification destination .............................. Specifying a file name .................................................................. 6 5-16 5-18 5-18 5-19 5-20 5-21 5.4 If transmission could not be completed....................................... 5-22 Viewing a transmission report...................................................... 5-22 Resending .................................................................................... 5-23 5.5 Registering destinations ................................................................ Programming a one-touch dial button......................................... To program a one-touch dial button............................................ Changing or deleting a one-touch dial button ............................. Copying a one-touch dial button ................................................. 5-24 5-24 5-25 5-29 5-30 Scan to SMB 6.1 Specifying a destination with a one-touch dial button ................. Selecting a one-touch dial button.................................................. Specifying a destination by touching a one-touch dial button ...... Entering the number of a one-touch dial button............................ Searching for a one-touch dial button ........................................... 6.2 Specifying the scanning quality and zoom ratio............................ 6-9 Quality ............................................................................................ 6-9 To specify the scanning quality ................................................... 6-10 Density ......................................................................................... 6-11 To specify a density setting ......................................................... 6-11 Original Size Set........................................................................... 6-12 6.3 Specifying additional functions ..................................................... Specifying the transmission report printing conditions ............... To specify the transmission report printing conditions................ Specifying 2in1 transmission ....................................................... Specifying double-sided transmission......................................... Specifying priority transmission ................................................... Specifying timer transmission ...................................................... Specifying the stamp setting ....................................................... Specifying the e-mail notification destination .............................. Specifying a file name .................................................................. 6.4 If transmission could not be completed....................................... 6-23 Viewing a transmission report...................................................... 6-23 Resending .................................................................................... 6-24 bizhub 362/282/222 6-3 6-3 6-3 6-5 6-7 6-13 6-14 6-14 6-15 6-16 6-18 6-19 6-20 6-21 6-22 Contents-5 6.5 7 Registering destinations................................................................. 6-25 Programming one-touch dial button............................................. 6-25 To program a one-touch dial button............................................. 6-26 Changing or deleting a one-touch dial button .............................. 6-30 Copying a one-touch dial button .................................................. 6-31 Internet faxing 7.1 Specifying a destination with a one-touch dial button .................. 7-3 Selecting a one-touch button ......................................................... 7-3 Specifying a destination by touching a one-touch dial button ....... 7-3 Entering the number of a one-touch dial button............................. 7-5 Searching for a one-touch dial button ............................................ 7-7 Specifying chain dialing .................................................................. 7-9 7.2 Entering an address ........................................................................ 7-10 To enter an address ...................................................................... 7-10 7.3 Specifying the scanning quality and zoom ratio .......................... 7-12 Quality........................................................................................... 7-12 To specify the scanning quality .................................................... 7-13 Density .......................................................................................... 7-14 To specify a density settings ........................................................ 7-14 Original Size Set............................................................................ 7-15 7.4 Specifying additional functions...................................................... 7-16 Specifying the transmission source setting .................................. 7-18 Specifying the transmission report printing conditions ................ 7-19 Specifying 2in1 transmission ........................................................ 7-20 Specifying double-sided transmission.......................................... 7-21 Specifying rotation transmission .................................................. 7-23 Specifying priority transmission.................................................... 7-23 Specifying timer transmission....................................................... 7-24 Specifying the stamp setting ........................................................ 7-25 Changing the subject.................................................................... 7-26 Specifying a reply address ........................................................... 7-27 Specifying a file name................................................................... 7-28 7.5 If transmission could not be completed........................................ 7-29 Viewing a transmission report....................................................... 7-29 Resending ..................................................................................... 7-30 7.6 Receiving Internet faxes ................................................................. 7-31 Settings for Internet faxing............................................................ 7-31 Receiving Internet faxes automatically ......................................... 7-31 Data the can be received .............................................................. 7-31 Receiving Internet faxes manually ................................................ 7-32 Contents-6 bizhub 362/282/222 7.7 8 9 Registering destinations ................................................................ Programming a one-touch dial button......................................... To program a one-touch dial button............................................ Changing or deleting a one-touch dial button ............................. Copying a one-touch dial button ................................................. Registering/deleting a secondary destination.............................. 7-33 7-33 7-34 7-37 7-38 7-39 Using an LDAP server 8.1 Searching the destination information from the server ................ 8-3 Basic Search and Detail Search .................................................... 8-3 To search the destination information ........................................... 8-4 8.2 Registering destination information to one-touch dial buttons........................................................................................ 8-6 To register destination information to a one-touch dial button ..... 8-6 Specifying settings using PageScope Web Connection 9.1 Items that can be specified using PageScope Web Connection ............................................................................... Scan tab (User mode) .................................................................... Scan tab (Administrator mode) ...................................................... Network tab (Administrator mode) ................................................. 9-3 9-3 9-4 9-5 9.2 Using PageScope Web Connection ................................................ 9-6 Operating environment .................................................................. 9-6 Accessing PageScope Web Connection ....................................... 9-7 If user authentication settings have been applied ......................... 9-8 If account track settings have been applied .................................. 9-8 Page structure................................................................................ 9-9 Logging on to Administrator mode .............................................. 9-11 Web browser cache ..................................................................... 9-13 For Internet Explorer .................................................................... 9-13 For Netscape................................................................................ 9-13 9.3 One-Touch Key Registration (User mode) ................................... Naming an index .......................................................................... Registering a one-touch dial destination ..................................... Registering a secondary recipient ............................................... Changing the settings for a one-touch dial destination ............... Deleting a one-touch dial destination .......................................... 9-14 9-21 9-23 9-25 9-29 9-31 9.4 FAX Program Registration (User mode) ....................................... Registering fax programs............................................................. Changing the settings of the fax program ................................... Deleting a fax program................................................................. 9-33 9-36 9-38 9-39 bizhub 362/282/222 Contents-7 9.5 Domain Name Registration (User mode) ...................................... 9-41 To register domain names ............................................................ 9-41 9.6 Export/Import (Administrator mode) ............................................. 9-42 Exporting data as files .................................................................. 9-43 Importing files ............................................................................... 9-45 9.7 TSI Registration ............................................................................... 9-48 To register transmission sources.................................................. 9-48 9.8 TX Settings (Administrator mode).................................................. 9-49 Specifying the transmission settings ............................................ 9-50 Com. Mode ................................................................................... 9-51 9.9 RX Settings (Administrator mode) ................................................. 9-52 Specifying the reception settings ................................................. 9-53 9.10 Scan Setting (Administrator mode)................................................ 9-54 Specifying the scan settings......................................................... 9-55 9.11 TX Document (Administrator mode) .............................................. 9-56 Specifying the address of the forwarding destination .................. 9-57 9.12 RX Document (Administrator mode).............................................. 9-58 Specifying the processing of received documents at each line ... 9-59 Specifying the processing of other received documents ............. 9-61 9.13 Report Settings (Administrator mode) .......................................... 9-62 Specifying the report output settings ........................................... 9-63 9.14 TCP/IP (Administrator mode) ......................................................... 9-64 Specifying the TCP/IP settings ..................................................... 9-66 9.15 IP Filtering ........................................................................................ 9-68 To specify IP filtering settings....................................................... 9-69 9.16 LDAP (Administrator mode)............................................................ 9-70 Specifying the LDAP settings ....................................................... 9-70 9.17 LDAP Server Setting (Administrator mode) .................................. 9-71 Registering an LDAP server .......................................................... 9-73 Deleting an LDAP server ............................................................... 9-75 9.18 E-Mail/Internet FAX (Administrator mode).................................... 9-76 Specifying the POP3 settings ....................................................... 9-79 Specifying the SMTP settings....................................................... 9-81 Specifying the subject or text settings ......................................... 9-82 Specifying other settings .............................................................. 9-83 9.19 FTP Configuration (Administrator mode) ...................................... 9-84 Specifying the FTP settings .......................................................... 9-85 Contents-8 bizhub 362/282/222 9.20 SNMP ............................................................................................... 9-86 Specifying the SNMP setting ....................................................... 9-86 9.21 SSL/TLS (Administrator mode)...................................................... When a certificate is created ....................................................... Creating certificates ..................................................................... Deleting certificates ..................................................................... Specifying the SSL/TLS settings ................................................. 9.22 User Authentication (Administrator mode) .................................. 9-96 Specifying user authentication settings ....................................... 9-97 9-87 9-88 9-89 9-92 9-94 10 Specifying management settings 10.1 Available parameters...................................................................... 10-3 Administrator Management 1....................................................... 10-3 Administrator Management 2....................................................... 10-4 10.2 Registering transmission source names...................................... 10-5 To register a transmission source name ...................................... 10-5 10.3 Specifying transmission report settings (TX Settings)................ 10-7 Specifying the Quality/Mode settings .......................................... 10-8 Specifying Comm. Menu settings.............................................. 10-10 10.4 Specifying the print timing for received documents (RX Settings).................................................................................. Memory Lock Time .................................................................... To specify the Memory Lock Password setting......................... To print manually........................................................................ 10-12 10-12 10-14 10-16 10.5 Specifying the transmission report printing conditions (Report Settings)........................................................................... 10-17 Specifying TX Report settings.................................................... 10-18 Specifying the Activity Report settings ...................................... 10-19 10.6 Forwarding a transmission document to a specified destination (TX Forwarding) ............................................................................ 10-20 Specifying the forwarding destination ....................................... 10-20 10.7 Specifying the processing method for received documents (Document Management) ............................................................ Specifying the processing of documents received on a port .... To specify the processing method for received documents ..... Specifying the processing of documents received on other lines................................................................................... To specify the processing of received documents .................... bizhub 362/282/222 10-22 10-22 10-23 10-25 10-26 Contents-9 10.8 Contents-10 Specifying software switch settings (machine functions) ......... 10-28 Software switch settings............................................................. 10-28 To specify a software switch setting .......................................... 10-30 Specifying whether or not the destination name is inserted (mode 001) .................................................................................. 10-32 Specifying settings for address input and broadcast transmissions (mode 018)........................................................... 10-33 Specifying settings for the image in the results report (mode 023) .................................................................................. 10-34 Specifying administrator forwarding settings (mode 198) .......... 10-35 Blocking calls from callers that are not specified (mode 306) .... 10-36 Specifying Internet fax settings (mode 350) ............................... 10-37 Specifying whether to add the transmission source information when faxing or when forwarding received documents (mode 352) ..... 10-38 Specifying SMTP transmission timeout settings (mode 356) ..... 10-39 Specifying SMTP reception timeout settings (mode 357) .......... 10-40 Specifying POP3 reception timeout settings (mode 358) ........... 10-41 Specifying the default address input screen (mode 366) ........... 10-42 Specifying DNS query timeout setting (mode 367)..................... 10-43 Including the scan transmission log in the activity report (mode 368) .................................................................................. 10-44 Specifying switching of the SMTP server (mode 371) ................ 10-45 Specifying the transmission interval when e-mail messages are separated (mode 372) ................................................................. 10-46 Specifying the Internet fax full mode function settings (mode 373) .................................................................................. 10-47 Specifying e-mail security functions (mode 380)........................ 10-48 Specifying use of registered user authentication information to log on to the LDAP server (mode 466) ................................... 10-50 Specifying whether to enable access locks, and whether to enable the password rules (mode 469) .................................. 10-51 Specifying the export file format (mode 470).............................. 10-52 Specifying settings to limit the use of communication modes-1 (mode 475)................................................................... 10-53 Specifying settings to limit the use of communication modes-2 (mode 476)................................................................... 10-55 Specifying settings to limit the use of communication modes-3/ Specifying restrictions for registering fax addresses and printing reports and specifying how one-touch dial recipients are displayed (mode 477) .................................................................................. 10-57 Specifying the deleting method for [Del.] in input screens (mode 478) .................................................................................. 10-59 Specifying settings for limiting user authentication to only Scan functions (mode 479) ......................................................... 10-60 bizhub 362/282/222 10.9 Specifying SSL/TLS settings ....................................................... 10-61 To specify SSL/TLS settings...................................................... 10-61 11 Reports and lists 11.1 Checking the transmission conditions (TX Report)..................... 11-3 To print a transmission report ...................................................... 11-4 Contents of the report.................................................................. 11-5 11.2 Checking the reception conditions (RX Report) .......................... 11-7 Printing a reception activity report ............................................... 11-7 Contents of the report.................................................................. 11-8 11.3 Checking the destinations registered in one-touch dial buttons (One-Touch List) ............................................................................. 11-9 Printing the One-Touch List ......................................................... 11-9 Contents of the list..................................................................... 11-10 11.4 Printing the mail program list ...................................................... 11-11 To print the mail program list ..................................................... 11-11 Contents of the list..................................................................... 11-12 11.5 Checking the function settings (Setting List)............................. 11-13 Printing the setting list ............................................................... 11-13 Contents of the list..................................................................... 11-14 12 Scan function troubleshooting 12.1 When the following are displayed ................................................. 12-3 12.2 Network error list............................................................................ Internet fax transmission/Scan to E-Mail ..................................... Internet fax reception ................................................................... Scan to FTP ................................................................................. Scan to SMB ................................................................................ 12.3 Troubleshooting.............................................................................. 12-8 Internet fax transmission/Scan to E-Mail ..................................... 12-8 Internet fax reception ................................................................... 12-9 Other .......................................................................................... 12-10 12-4 12-4 12-5 12-6 12-7 13 Appendix 13.1 Product specifications ................................................................... Internet fax specifications ............................................................ Scan to E-Mail specifications ...................................................... Scan to FTP specifications .......................................................... Scan to SMB specifications......................................................... bizhub 362/282/222 13-3 13-3 13-3 13-4 13-4 Contents-11 13.2 Entering text..................................................................................... 13-5 To type text................................................................................... 13-5 List of available characters ........................................................... 13-6 13.3 Glossary............................................................................................ 13-7 13.4 Index ............................................................................................... 13-13 Contents-12 bizhub 362/282/222 1 Introduction Introduction 1 1 Introduction Thank you for choosing this machine. This user manual contains details on the operation methods required for using the network connection and scanner functions of the bizhub 362/282/222, precautions on their use, and basic troubleshooting procedures. Carefully read this user manual before using the machine, to ensure proper and efficient use. After reading the manual, store it in the designated holder so that it can easily be referred to when questions or problems arise during operation. Views of the actual equipment may be slightly different from the illustrations used in this user manual. bizhub 362/282/222 1-3 Introduction 1 1.1 Energy Star® As an ENERGY STAR® Partner, we have determined that this machine meets the ENERGY STAR® Guidelines for energy efficiency. What is an ENERGY STAR® Product? An ENERGY STAR® product has a special feature that allows it to automatically switch to a "low-power mode" after a period of inactivity. An ENERGY STAR® product uses energy more efficiently, saves you money on utility bills and helps protect the environment. 1-4 bizhub 362/282/222 Introduction 1.2 1 Trademarks and registered trademarks KONICA MINOLTA, KONICA MINOLTA Logo, and The essentials of imaging are registered trademarks or trademarks of KONICA MINOLTA HOLDINGS, INC. PageScope and bizhub are registered trademarks or trademarks of KONICA MINOLTA BUSINESS TECHNOLOGIES, INC. Netscape Communications, the Netscape Communications logo, Netscape Navigator, Netscape Communicator, and Netscape are trademarks of Netscape Communications Corporation. Compact-VJE Copyright 1986-2003 VACS Corp. RC4® is a registered trademark or trademark of RSA Security Inc. in the United States and/or other countries. RSA® is a registered trademark or trademark of RSA Security Inc. RSA BSAFE® is a registered trademark or trademark of RSA Security Inc. in the United States and/or other countries. License information This product includes RSA BSAFE Cryptographic software from RSA Security Inc. bizhub 362/282/222 1-5 Introduction 1 OpenSSL Statement OpenSSL License Copyright © 1998-2000 The OpenSSL Project. All rights reserved. Redistribution and use in source and binary forms, with or without modification, are permitted provided that the following conditions are met: 1. Redistributions of source code must retain the above copyright notice, this list of conditions and the following disclaimer. 2. Redistributions in binary form must reproduce the above copyright notice, this list of conditions and the following disclaimer in the documentation and/or other materials provided with the distribution. 3. All advertising materials mentioning features or use of this software must display the following acknowledgment: FTP server "This product includes software developed by the OpenSSL Project for use in the OpenSSL Toolkit. (http://www.openssl.org/)" 4. The names "OpenSSL Toolkit" and "OpenSSL Project" must not be used to endorse or promote products derived from this software without prior written permission. For written permission, please contact [email protected]. 5. Products derived from this software may not be called "OpenSSL" nor may "OpenSSL" appear in their names without prior written permission of the OpenSSL Project. 6. Redistributions of any form whatsoever must retain the following acknowledgment: "This product includes software developed by the OpenSSL Project for use in the OpenSSL Toolkit (http://www.openssl.org/)" THIS SOFTWARE IS PROVIDED BY THE OpenSSL PROJECT "AS IS" AND ANY EXPRESSED OR IMPLIED WARRANTIES, INCLUDING, BUT NOT LIMITED TO, THE IMPLIED WARRANTIES OF MERCHANTABILITY AND FITNESS FOR A PARTICULAR PURPOSE ARE DISCLAIMED. IN NO EVENT SHALL THE OpenSSL PROJECT OR ITS CONTRIBUTORS BE LIABLE FOR ANY DIRECT, INDIRECT, INCIDENTAL, SPECIAL, EXEMPLARY, OR CONSEQENTIAL DAMAGES (INCLUDING, BUT NOT LIMITED TO, PROCUREMENT OF SUBSTITUTE GOODS OR SERVICES; LOSS OF USE, DATA, OR PROFITS; OR BUSINESS INTERRUPTION) HOWEVER CAUSED AND ON ANY THEORY OF LIABILITY, WHETHER IN CONTRACT, STRICT LIABILITY, OR TORT (INCLUDING NEGLIGENCE OR OTHERWISE) ARISING IN ANY WAY OUT OF THE USE OF THIS SOFTWARE, EVEN IF ADVISED OF THE POSSIBILITY OF SUCH DAMAGE. This product includes cryptographic software written by Eric Young ([email protected]). This product includes software written by Tim Hudson ([email protected]). 1-6 bizhub 362/282/222 Introduction 1 Original SSLeay License Copyright © 1995-1998 Eric Young ([email protected]) All rights reserved. This package is an SSL implementation written by Eric Young ([email protected]). The implementation was written so as to conform with Netscapes SSL. This library is free for commercial and non-commercial use as long as the following conditions are aheared to. The following conditions apply to all code found in this distribution, be it the RC4, RSA, Ihash, DES, etc., code; not just the SSL code. The SSL documentation included with this distribution is covered by the same copyright terms except that the holder is Tim Hudson ([email protected]). Copyright remains Eric Young’s, and as such any Copyright notices in the code are not to be removed. If this package is used in a product, Eric Young should be given attribution as the author of the parts of the library used. This can be in the form of a textual message at program startup or in documentation (online or textual) provided with the package. Redistribution and use in source and binary forms, with or without modification, are permitted provided that the following conditions are met: 1. Redistributions of source code must retain the copyright notice, this list of conditions and the following disclaimer. 2. Redistributions in binary form must reproduce the above copyright notice, this list of conditions and the following disclaimer in the documentation and/or other materials provided with the distribution. 3. All advertising materials mentioning features or use of this software must display the following acknowledgement: "This product includes cryptographic software written by Eric Young ([email protected])" The word ‘cryptographic’ can be left out if the rouines from the library being used are not cryptographic related. 4. If you include any Windows specific code (or a derivative thereof) from the apps directory (application code) you must include an acknowledgement: "This product includes software written by Tin Hudson ([email protected])" THIS SOFTWARE IS PROVIDED BY ERIC YOUNG "AS IS" AND ANY EXPRESS OR IMPLIED WARRANTIES, INCLUDING, BUT NOT LIMITED TO, THE IMPLIED WARRANTIES OF MERCHANTABILITY AND FITNESS FOR A PARTICULAR PURPOSE ARE DISCLAIMED. IN NO EVENT SHALL THE AUTHOR OR CONTRIBUTORS BE LIABLE FOR ANY DIRECT, INDIRECT, INCIDENTAL, SPECIAL, EXEMPLARY, OR CONSEQUENTIAL DAMAGES (INCLUDING, BUT NOT LIMITED TO, PROCUREMENT OF SUBSTITUTE GOODS OR SERVICES; LOSS OF USE, DATA, OR PROFITS; OR BUSINESS INTERRUPTION) HOWEVER CAUSED AND ON ANY THEORY OF LIABILITY, WHETHER IN CONTRACT, STRICT LIABILITY, OR TORT bizhub 362/282/222 1-7 Introduction 1 (INCLUDING NEGLIGENCE OR OTHERWISE) ARISING IN ANY WAY OUT OF THE USE OF THIS SOFTWARE, EVEN IF ADVISED OF THE POSSIBILITY OF SUCH DAMAGE. The licence and distribution terms for any publically available version or derivative of this code cannot be changed. i.e. this code cannot simply be copied and put under another distribution licence [including the GNU Public Licence.] All other product names mentioned are trademarks or registered trademarks of their respective companies Kerberos Copyright © 1985-2005 by the Massachusetts Institute of Technology. All rights reserved. permission notice WITHIN THAT CONSTRAINT, permission to use, copy, modify, and distribute this software and its documentation for any purpose and without fee is hereby granted, provided that the above copyright notice appear in all copies and that both that copyright notice and this permission notice appear in supporting documentation, and that the name of M.I.T. not be used in advertising or publicity pertaining to distribution of the software without specific, written prior permission. Furthermore if you modify this software you must label your software as modified software and not distribute it in such a fashion that it might be confused with the original MIT software. M.I.T. makes no representations about the suitability of this software for any purpose. It is provided “as is” without express or implied warranty. THIS SOFTWARE IS PROVIDED “AS IS” AND WITHOUT ANY EXPRESS OR IMPLIED WARRANTIES, INCLUDING, WITHOUT LIMITATION, THE IMPLIED WARRANTIES OF MERCHANTIBILITY AND FITNESS FOR A PARTICULAR PURPOSE. THIS SOFTWARE IS NOT ORIGINAL MIT SOFTWARE, MODIFIED BY KONICA MINOLTA BUSINESS TECHNOLOGIES, INC. 1-8 bizhub 362/282/222 Introduction 1.3 1 About this manual This user manual covers the bizhub 362, 282 and 222 network and scanning functions. This section introduces the structure of the manual and notations used for product names, etc. This manual is intended for users who understand the basic operations of computers and the machine. For operating procedures of the Windows or Macintosh operating system and application programs, refer to the respective manuals. Structure of the manual This manual consists of the following chapters. Chapter 1 Introduction Chapter 2 Features Chapter 3 Setup Chapter 4 Scan to E-Mail Chapter 5 Scan to FTP Chapter 6 Scan to SMB Chapter 7 Internet faxing Chapter 8 Using an LDAP server Chapter 9 Specifying settings using PageScope Web Connection Chapter 10 Specifying management settings Chapter 11 Reports and lists Chapter 12 Scan function troubleshooting Chapter 13 Appendix bizhub 362/282/222 1-9 Introduction 1 Notations Product name Notations in the manual bizhub 362/282/222 This machine, 362/282/222 Internal network controller Printer controller Microsoft Windows NT 4.0 Windows NT 4.0 Microsoft Windows 2000 Windows 2000 Microsoft Windows XP Windows XP Microsoft Windows Vista Windows Vista Microsoft Windows Server 2003 Windows Server 2003 Microsoft Windows Server 2008 Windows Server 2008 When the operating systems above are written together Windows NT 4.0/2000/XP Images that are used Generally, the touch panel screens and application windows that appear in this manual show that the options have not been installed. 1-10 bizhub 362/282/222 Introduction 1.4 1 User manuals The following user manuals have been prepared for this machine. User manual [Copy Operations] This manual contains details on basic operations and the operating procedures for the various copy functions. - Refer to this user manual for details on operating procedures for copy functions, including precautions on installation/use, turning the machine on/off, loading paper, and troubleshooting operations such as clearing paper misfeeds. User manual [Network Scanner Operations] (this manual) This manual contains details on specifying network functions for standard equipment and on operations for scanning functions. - Refer to this user manual for details on operating procedures for network functions and for using the Scan to E-Mail, Scan to FTP, Scan to SMB and Internet fax operations. User manual [Box Operations] This manual contains details on operating procedures for using the Box functions. - Refer to this user manual for details on printing a proof copy or a locked job and on functions that use the optional hard disk drive, such as routing and saving documents in boxes. User manual [Print Operations] This manual contains details on operating procedures using the standard built-in printer controller. - For details on the printing functions, refer to user manual (PDF file) on User Software CD-ROM. User manual [Advanced Scan Operations] This manual contains details on the operating procedures for the functions that can be used when the optional scanner unit is installed. - Refer to this user manual for details on using the IP address faxing, IP Relay and Scan to PC operations and on using IP Scanner. User manual [Facsimile Operations] This manual contains details on operating procedures for using the Fax functions. - Refer to this user manual for details on operating procedures for the Fax functions when the fax kit is installed. bizhub 362/282/222 1-11 Introduction 1 1.5 Explanation of manual conventions The marks and text formats used in this manual are described below. Safety advices 6 DANGER Failure to observe instructions highlighted in this manner may result in fatal or critical injuries in fact of electrical power. % Observe all dangers in order to prevent injuries. 7 WARNING Failure to observe instructions highlighted in this manner may result in serious injuries or property damage. % Observe all warnings in order to prevent injuries and to ensure safe use of the copier. 7 CAUTION Failure to observe instructions highlighted in this manner may result in slight injuries or property damage. % Observe all cautions in order to prevent injuries and to ensure safe use of the copier. Sequence of action 1 The number 1 as formatted here indicates the first step of a sequence of actions. 2 Subsequent numbers as formatted here indicate subsequent steps of a sequence of actions. An illustration inserted here shows what operations must be performed. Text formatted in this style provides additional assistance. % Text formatted in this style describes the action that will ensure the desired results are achieved. ? 1-12 bizhub 362/282/222 Introduction 1 Tips 2 Note Text highlighted in this manner contains useful information and tips to ensure safe use of the copier. 2 Reminder Text highlighted in this manner contains information that should be reminded. ! Detail Text highlighted in this manner contains references for more detailed information. Special text markings [Copy] key The names of keys on the control panel are written as shown above. MACHINE SETTING Display texts are written as shown above. bizhub 362/282/222 1-13 1 1-14 Introduction bizhub 362/282/222 2 Features Features 2 2 Features 2.1 Scan to E-Mail The Scan to E-Mail operation is used to send images scanned on this machine as e-mail attachments. By registering a destination with a onetouch dial button, paper documents can be sent by e-mail simply by touching a button in the One-Touch screen. - The original document is attached to an e-mail (MIME format) and sent as an image file in the TIFF format or the PDF format. In order to view the received image on a computer, e-mail software that supports the MIME format and software that displays the TIFF format or PDF format must be installed. - Images in the TIFF format can be viewed with a TIFF viewer, which is standard in Windows. - Images in the PDF format can be viewed with Adobe Reader. - This machine must be connected to a LAN, and the network settings must be specified. For details, refer to Chapter 2, "Setup" on page 3-3. - For details, refer to Chapter 3, "Scan to E-Mail" on page 4-3. E-mail server Client computer Intranet Internet E-mail server Client computer bizhub 362/282/222 2-3 Features 2 2.2 Scan to FTP The Scan to FTP operation is used to upload the scanned data of an original document to an FTP sever on a network. By registering a destination with a one-touch dial button, paper documents can be converted into data and uploaded simply by touching a button in the One-Touch screen. The uploaded data can be downloaded to a computer on the network. - The original document is sent as an image file in the TIFF format or the PDF format. - You can specify whether to have an e-mail message sent to notify you of the location where the data was saved when the FTP transmission is complete (E-mail Notification function). - This machine must be connected to a LAN, and the network settings must be specified. For details, refer to Chapter 2, "Setup" on page 3-3. - For details, refer to Chapter 4, "Scan to FTP" on page 5-3. FTP server Intranet Internet FTP server 2-4 bizhub 362/282/222 Features 2.3 2 Scan to SMB The Scan to SMB operation is used to send the scanned data of an original document to a shared folder on a computer on the network. By registering a destination with a one-touch dial button, paper documents can be converted into data and sent simply by touching a button in the One-Touch screen. In order to perform a Scan to SMB operation, a shared folder must be specified in advance on the computer where the data is to be received. - Data cannot be saved in shared folders created on the domain controller of Windows Server 2003 and Windows Server 2008. - The original document is sent as an image file in the TIFF format or PDF format. - You can specify that an e-mail message be sent to notify the recipient of the location where the data was saved when the Scan to SMB operation is complete (E-mail Notification function). - Images in the TIFF format can be viewed with a TIFF viewer, which is standard in Windows. - Images in the PDF format can be viewed with Adobe Reader. - This machine must be connected to a LAN, and the network settings must be specified. For details, refer to Chapter 2, "Setup" on page 3-3. - For details, refer to Chapter 5, "Scan to SMB" on page 6-3. Client computer Intranet bizhub 362/282/222 2-5 Features 2 2.4 Scan to HDD Data specified for copying, scanning or printing can be saved in a user box on the optional HDD. The saved file can be printed, downloaded or routed, depending on the mode in which it was saved. - The original document is sent as an image file in the TIFF format or PDF format. - You can specify whether to have an e-mail message sent to notify you of the location where the data was saved (E-mail Notification function). - This machine must be connected to a LAN, and the network settings must be specified. For details, refer to Chapter 2, "Setup" on page 3-3. - For details, refer to User manual [Box Operations]. Client computer Intranet Print HDD 2-6 bizhub 362/282/222 Features 2.5 2 Internet faxing The Internet fax operation attaches the image data of an original document to an e-mail message and sends it over the Internet or an intranet to an Internet fax terminal. You can send data simply by specifying an e-mail address at the same time that a fax number is specified for a transmission using a general telephone line. By registering a destination with a one-touch dial button, the data can be sent simply by touching a button in the One-Touch screen. The original document is attached to an e-mail (MIME format) and sent as an image file in the TIFF format. - Internet faxing operates in an environment quite different from fax transmissions over a telephone line, and faxes are not transmitted directly to the destination. Therefore, there are certain limitations. - When sending an Internet fax, the reception results at the destination can be checked. In addition, the reception capabilities of the destination machine can be detected and the transmission adapted accordingly (the destination machine must support full mode). - This machine must be connected to a LAN, and the network settings must be specified. For details, refer to Chapter 2, "Setup" on page 3-3. - For details, refer to Chapter 6, "Internet faxing" on page 7-3. E-mail server Client computer Internet fax terminal Intranet Internet E-mail server Client computer bizhub 362/282/222 2-7 Features 2 2.6 PageScope Web Connection A computer can be used to check the transmission/printing status and fax log of the machine. In addition, one-touch dial buttons and mail programs can be registered. PageScope Web Connection provides a User mode page and an Administrator mode page. - This machine must be connected to a LAN, and the network settings must be specified. For details, refer to Chapter 2, "Setup" on page 3-3. - For details, refer to Chapter 8, "Specifying settings using PageScope Web Connection" on page 9-3. 2-8 bizhub 362/282/222 3 Setup Setup 3 3 Setup 3.1 Connecting to a LAN This machine communicates with the TCP/IP protocol using a LAN. Therefore, a LAN cable must be connected. To connect to a LAN, use a LAN cable (Fast Ethernet 100BASE-TX cable). Connecting the LAN cable Connect the LAN cable connector to the port (LAN) on the right of this machine and the other end to the hub. The port is located on the right side of the machine. Use a Fast Ethernet 100BASE-TX (category 5) cable for the LAN cable. 2 Note The LAN cable is not supplied with this machine. Use a suitable cable for the installation environment. The status of each LED is described below. LED color Status Description Green and yellow Off The machine is not turned on. The LAN is not properly connected. Green Yellow bizhub 362/282/222 On The LAN is properly connected (100 Mbps). Flashes Data is being received (100 Mbps). On The LAN is properly connected (10 Mbps). Flashes Data is being received (10 Mbps). 3-3 Setup 3 3.2 Specifying the network settings The operations that are available depend on the LAN environment of the machine. Specify the network settings according to the LAN environment and the operation to be performed. ! Detail Before specifying any settings, contact your network administrator for the required information. Specify the network settings in Administrator mode by using either this machine’s control panel or PageScope Web Connection. The setting procedure using this machine’s control panel is described below. To specify the settings using on PageScope Web Connection, refer to Chapter 8, "Specifying settings using PageScope Web Connection" on page 9-3. Network setting table The network settings required for each operation are described below. o: A setting is required. +: A setting is required depending on the environment. 0: The parameter is available. – : The parameter is not available. Operation Parameter Scan to E-Mail Scan to FTP Scan to SMB Scan to HDD Internet faxing Basic Settings DHCP + + + + + IP Address Setting o o o o o Subnet Mask o o o o o Gateway o o o o o Self-Domain Name – – – – – Network Board Set + + + + + YES/NO + + + + + Host Name + + + + + Domain Name + + + + + DNS Server Address + + + + + DNS Settings 3-4 bizhub 362/282/222 Setup 3 Operation Parameter Scan to E-Mail Scan to FTP Scan to SMB Scan to HDD Internet faxing 0 0 0 0 0 o +*1 +*1 +*1 o E-Mail Address o + *1 +*1 + *1 o SMTP Authentication User Name + +*1 +*1 +*1 + SMTP Authentication Password + +*1 +*1 +*1 + Machine Name Machine Name SMTP Settings SMTP Server Address POP3 Settings POP3 Server Address – – – – o POP3 User Name – – – – o POP3 Password – – – – o Auto-RX Check – – – – o E-Mail Mode – – – – 0 Scan Mode 0 0 0 0 – Activity Report – – – – 0 RX Doc. Header Print – – – – 0 Mail/Scan Setting Scanner Settings E-Mail Header Text 0 – – – 0 Gateway TX – – – – – Subject Registration 0 – – – 0 Divide Settings 0 – – – 0 Ping: Perform as necessary. Frame Type Setting: Specify when connected to a NetWare server and printing from a computer. LDAP Settings: Specify when using the LDAP search function. IP Filtering: Specify the range of IP addresses that can be accessed and the range that is blocked. FTP Configuration: Specify in Administrator mode by using PageScope Web Connection. Proxy IP Address – + – – – Port Number – + – – – FTP Connection Timeout – + – – – *1 When using the E-Mail Notification function, also specify the e-mail transmission (SMTP) settings. bizhub 362/282/222 3-5 Setup 3 2 Reminder If the [Utility/Counter] key was pressed to register items and specify settings, be sure to press the [Reset] key in the control panel after returning to the initial screen. 3-6 bizhub 362/282/222 Setup 3 To specify initial network settings 1 Press the [Utility/Counter] key. 2 Touch [Admin. Management]. 3 Type in the administrator password using the keypad, and then touch [Enter]. – – "12345678" is registered at the factory. To change the administrator password, refer to the User manual [Copy Operations]. 4 Touch [Admin. 2]. 5 Touch [Network Settings]. bizhub 362/282/222 3-7 Setup 3 6 If the optional scanner unit or fax kit has been installed, touch [Network Setting 1]. 7 Specify each network setting, and then touch [Enter]. 8 To apply the settings specified on a screen that is displayed by touching a button marked with , turn the machine off, then on again. – 9 3-8 When turning the machine off, then on again with the main power switch, wait about 10 seconds to turn the machine on after turning it off. The machine may not operate correctly if it is turned on immediately after being turned off. Touch [Enter] until the first screen appears. bizhub 362/282/222 Setup 3.3 3 Basic Settings Settings Settings can be specified for the following. Item Description DHCP Specify whether to acquire an IP address automatically from the DHCP server or use a fixed IP address. IP Address Setting Set the machine’s IP address. Specify when "DHCP" is set to "IP Input". Subnet Mask Enter the subnet mask of the network to be connected. Specify when "IP Input" was selected in [DHCP]. Gateway Enter the gateway address of the network to be connected. Specify when "DHCP" is set to "IP Input". Self-Domain Name Specify the domain name of this machine. Network Board Set Specify the network board (LAN board) transmission speed. bizhub 362/282/222 3-9 Setup 3 DHCP 1 In the Network Setting screen, touch [Basic Settings]. 2 Touch [DHCP]. 3 To use the DHCP server, touch [Auto-Obtain]. To use a fixed IP address, touch [IP Input]. – 4 3-10 When [IP Input] was selected, specify the settings for "IP Address Setting" and "Subnet Mask". Touch [Enter]. bizhub 362/282/222 Setup 3 IP Address Setting Specify a setting when "DHCP" is set to "IP Input". 1 In the Network Setting screen, touch [Basic Settings]. 2 Touch [IP Address Setting]. 3 Use the keypad to type in the IP address. – – 4 You cannot specify an IP address that begins with 0, 127, or 224 or higher. When less than three digits are entered, use to move the cursor to the next number. Touch [Enter]. bizhub 362/282/222 3-11 Setup 3 Subnet Mask Specify a setting when "DHCP" is set to "IP Input". 1 In the Network Setting screen, touch [Basic Settings]. 2 Touch [Subnet Mask]. 3 Use the keypad to type in the IP address. – 4 3-12 When less than three digits are entered, use to move the cursor to the next number. Touch [Enter]. bizhub 362/282/222 Setup 3 Gateway Specify a setting when "DHCP" is set to "IP Input". 1 In the Network Setting screen, touch [Basic Settings]. 2 Touch [Gateway]. 3 Use the keypad to type in the IP address. – – 4 You cannot specify an IP address that begins with 0, 127, or 224 or higher. When less than three digits are entered, use to move the cursor to the next number. Touch [Enter]. bizhub 362/282/222 3-13 Setup 3 Network Board Set Settings can be specified for the following. Item Description Auto Selects the transmission speed automatically by auto-negotiation. 100M-Full Manually specifies a transmission speed of 100 Mbps in full-duplex mode when the transmission speed cannot be selected automatically. 100M-Half Manually specifies a transmission speed of 100 Mbps in halfduplex mode when the transmission speed cannot be selected automatically. 10M-Full Manually specifies a transmission speed of 10 Mbps in full-duplex mode when the transmission speed cannot be selected automatically. 10M-Half Manually specifies a transmission speed of 10 Mbps in half-duplex mode when the transmission speed cannot be selected automatically. To specify the network board settings 1 In the Network Setting screen, touch [Basic Settings]. 2 Touch [Network Board Set]. 3 Touch [Network Board Set], and then select the transmission speed. – 4 3-14 "Auto" is the usual setting. Touch [Enter]. bizhub 362/282/222 Setup 3.4 3 DNS Settings Settings can be specified for the following. Item Description DNS Setting Specify "YES" or "NO" for the DNS (Domain Name System). When using a DNS server within a network, specify "YES". When not using a DNS server within a network, specify "NO". When using an external server such as an Internet provider, specify "NO" if the IP address of the e-mail server is public. If the DNS name of the e-mail server is public and the IP address is not public, specify "YES". For details on the network environment, contact the network administrator. Host Name Specify the host name of this machine. Contact the network administrator for the information to be entered. Specify when "DNS Setting" is set to "YES". Domain Name Specify the domain name of the DNS server. Contact the network administrator for the information to be entered. Specify when "DNS Setting" is set to "YES". DNS Server Address Specify the IP addresses of the DNS server. Contact the network administrator for the information to be entered. Specify when "DNS Setting" is set to "YES". bizhub 362/282/222 3-15 Setup 3 DNS Setting 1 In the Network Setting screen, touch [DNS Settings]. 2 To use the DNS server, touch [YES]. If the DNS server is not to be used, touch [NO]. – 3 If "YES" is selected, specify settings for "Host Name", "Domain Name", and "DNS Server Address". Touch [Enter]. Host Name 3-16 1 In the DNS Setting screen, touch [Host Name]. 2 Type in the host name of this machine, and then touch [Enter]. bizhub 362/282/222 Setup 3 Domain Name 1 In the DNS Setting screen, touch [Domain Name]. 2 Type in the domain name of the DNS server, and then touch [Enter]. DNS Server Address 1 In the DNS Setting screen, touch [DNS Server Address]. 2 Touch [DNS Server Address 1]. 3 Type in the IP address of DNS server 1, and then touch [Enter]. – – You cannot specify an IP address that begins with 0, 127, or 224 or higher. When less than three digits are entered, use to move the cursor to the next number. 4 When specifying multiple DNS servers, type in the IP addresses for DNS server 2 and DNS server 3. 5 Touch [Enter]. bizhub 362/282/222 3-17 Setup 3 3.5 Machine Name Specify the name of this machine. The machine name is used as part of the file name with Scan to E-Mail, Scan to FTP, Scan to SMB, Scan to HDD, and Internet faxing. In addition, part of the Subject line is used in Scan to E-Mail and Internet fax transmissions. To specify the machine name 1 In the Network Setting screen, touch [Machine Name]. 2 Enter the machine name. – 3 3-18 Up to 16 alphanumeric characters can be entered. Touch [Enter]. bizhub 362/282/222 Setup 3.6 3 SMTP Settings Settings can be specified for the following. Item Description SMTP Server Address Specify when performing Scan to E-Mail or Internet faxing. In addition, specify when using the E-Mail notification function with Scan to FTP, Scan to SMB or Scan to HDD. Contact the network administrator for the information to be entered. E-Mail Address Enter the e-mail address of this machine. Contact the network administrator for the information to be entered. SMTP Authentication User Name Specify the user name when using the e-mail transmission authentication (SMTP authentication) function. Contact the network administrator for the information to be entered. It is not necessary to specify the setting when the SMTP authentication user name and the POP3 user name are the same. SMTP Authentication Password Specify the password when using the e-mail transmission authentication (SMTP authentication) function. Contact the network administrator for the information to be entered. It is not necessary to specify the setting when the SMTP authentication password and the POP3 password are the same. 2 Note The following appear when bits 6 and 2 of mode 380 are set to "1" in the Software Switch Setting screen. For details, refer to "Specifying software switch settings (machine functions)" on page 10-28. - SMTP Authentication User Name - SMTP Authentication Password If bit 4 of mode 371 is set to "1" in the Software Switch Setting screen, two SMTP servers can be registered. For details, refer to "Specifying software switch settings (machine functions)" on page 10-28. bizhub 362/282/222 3-19 Setup 3 SMTP Server Address 1 In the Network Setting screen, touch [SMTP Settings]. 2 Touch [SMTP Server Address]. 3 Type in the SMTP server address. – 3-20 When "DNS Setting" is set to "YES", you can enter the IP address and the host name. 4 To specify the host name, touch [Host Name], type in the host name, and then touch [Enter]. 5 To change the port, touch [Port]. The Port screen appears. bizhub 362/282/222 Setup 3 6 Type in the port number using the keypad, and then touch [Enter]. – 7 To return to the default setting, touch [Default]. Touch [Enter]. bizhub 362/282/222 3-21 Setup 3 E-Mail Address 3-22 1 In the Network Setting screen, touch [SMTP Settings]. 2 Touch [E-Mail Address]. 3 Enter the e-mail address of this machine, and then touch [Enter]. bizhub 362/282/222 Setup 3 SMTP Authentication User Name 1 In the Network Setting screen, touch [SMTP Settings]. 2 Touch [SMTP Authentication User Name]. 3 Type in the SMTP authentication user name, and then touch [Enter]. bizhub 362/282/222 3-23 Setup 3 SMTP Authentication Password 3-24 1 In the Network Setting screen, touch [SMTP Settings]. 2 Touch [SMTP Authentication Password]. 3 Touch [New Password], type in the SMTP password, and then touch [Enter]. 4 Touch [Confirm New Password], type in the SMTP password again, and then touch [Enter]. bizhub 362/282/222 Setup 3.7 3 POP3 Settings Settings can be specified for the following. Item Description POP3 Server Address Required setting for receiving Internet faxes. Contact the network administrator for the information to be entered. POP3 User Name Specify the POP3 user name of this machine. Contact the network administrator for the information to be entered. POP3 Password Specify the POP3 password of this machine. Contact the network administrator for the information to be entered. Auto-RX Check Specify the interval at which to connect to the POP3 server and check for e-mail messages (Internet faxing). (1—99 minutes) POP3 Server Address 1 In the Network Setting screen, touch [POP3 Settings]. 2 Touch [POP3 Server Address]. 3 Type in the POP3 server address using the keypad. – When "DNS Setting" is set to "YES", you can enter the IP address and the host name. bizhub 362/282/222 3-25 Setup 3 4 To specify the host name, touch [Host Name], type in the host name, and then touch [Enter]. 5 To change the port, touch [Port]. The Port screen appears. 6 Type in the port number using the keypad, and then touch [Enter]. – 7 3-26 To return to the default setting, touch [Default]. Touch [Enter]. bizhub 362/282/222 Setup 3 POP3 User Name 1 In the Network Setting screen, touch [POP3 Settings]. 2 Touch [POP3 User Name]. 3 Type in the POP3 user name, and then touch [Enter]. bizhub 362/282/222 3-27 Setup 3 POP3 Password 3-28 1 In the Network Setting screen, touch [POP3 Settings]. 2 Touch [POP3 Password]. 3 Touch [New Password], type in the POP3 password, and then touch [Enter]. 4 Touch [Confirm New Password], type in the SMTP password again, and then touch [Enter]. bizhub 362/282/222 Setup 3 Auto-RX Check 1 In the Network Setting screen, touch [POP3 Settings]. 2 Touch [Auto-RX Check]. 3 Type in the interval for POP3 reception using the keypad, and then touch [Enter]. – If POP3 reception is not to be performed automatically, touch [Check OFF]. bizhub 362/282/222 3-29 Setup 3 3.8 Priority Compress Level (E-Mail Mode) You can specify the maximum transmission size, the maximum transmission quality, and the encoding method that are given priority when sending an Internet fax. The transmission size setting specified here is the default setting when programming a one-touch dial button. When sending Internet faxes, the recipient may not be able to view the data if the receiving machine does not support the transmitted size, quality, or encoding method. If the maximum settings have been specified in E-Mail Mode in advance, the transmission settings are adjusted to the specified maximum, even if the settings specified for the transmission exceed the maximum. In E-Mail Mode, settings can be specified for the following. 3-30 Item Description TX Size (Max.) Specify the maximum document size that can be transmitted. Select "Letter", "Legal", or "11 × 17". TX Quality (Max.) Specify the maximum resolution that can be sent. Select "200 dpi", "400 dpi", or "600 dpi". Coding Method Select the encoding method for data to be sent. Select "MH", "MR", or "MMR". The data capacity is lowest with "MMR" and highest with "MH". bizhub 362/282/222 Setup 3 TX Size (Max.) 1 In the Network Setting screen, touch [Priority Compress Level]. 2 Touch [E-Mail Mode]. 3 Touch [TX Size (Max.)]. 4 Select the maximum document size for transmission, and then touch [Enter]. bizhub 362/282/222 3-31 Setup 3 TX Quality (Max.) 3-32 1 In the Network Setting screen, touch [Priority Compress Level]. 2 Touch [E-Mail Mode]. 3 Touch [TX Quality (Max.)]. 4 Select the maximum resolution for transmission, and then touch [Enter]. bizhub 362/282/222 Setup 3 Coding Method 1 In the Network Setting screen, touch [Priority Compress Level]. 2 Touch [E-Mail Mode]. 3 Touch [Coding Method]. 4 Select the encoding method, and then touch [Enter]. bizhub 362/282/222 3-33 Setup 3 3.9 Priority Compress Level (Scan Mode) You can specify the file format and encoding method for transmitting files with the Scan to E-Mail, Scan to FTP, Scan to SMB, or Scan to HDD operations. The transmission size setting specified here is the default setting when programming a one-touch dial button. In Scan Mode, settings can be specified for the following. Item Description File Type Select the file format (TIFF or PDF) for sending files. If "TIFF" was selected, the setting changes to "Multi Page TIFF" with the Scan to FTP, Scan to SMB or Scan to HDD operation. Coding Method Select either "MH" or "MMR" as the encoding method for the selected file format. The data capacity is lowest with "MMR" and highest with "MH". To specify the scan mode settings 3-34 1 In the Network Setting screen, touch [Priority Compress Level]. 2 Touch [Scan Mode]. 3 Select the file format and encoding method, and then touch [Enter]. bizhub 362/282/222 Setup 3.10 3 Scanner Settings Settings can be specified for the following. Item Description Activity Report Specify whether to be notified of the Internet fax reception results. RX Doc. Header Print Select whether to print the e-mail header on the first page of a document received through Internet faxing. E-Mail Header Text Text can be added to Scan to E-Mail and Internet fax text. Fixed Text: Inserts the text that has been registered on this machine in advance. Custom Text: Inserts any desired text. OFF: Does not insert any text. With Scan to E-Mail, fixed text is inserted, even if "OFF" is selected. 2 Note You can save any text using PageScope Web Connection. For details, refer to "E-Mail/Internet FAX (Administrator mode)" on page 9-76. Gateway TX Always select "Restrict" for this machine. If the optional scanner unit or fax kit has been installed, select "Allow" to use this machine in the following ways. • When this machine is used as a relay machine with an IP relay transmission 2 Note For details on IP relay transmission operations, refer to the User manual [Advanced Scan Operations]. Subject Registration When sending with Scan to E-Mail or Internet faxing, the subject can be specified. Up to 4 subjects can be registered, allowing you to use different subjects depending on the contents of the transmission. Up to 40 characters can be entered. Divide Settings When performing Scan to E-Mail or sending Internet faxes, specify whether to separate and attach the scanned original document data. The separation types that can be specified are described below. Page Division: Used when performing Scan to E-Mail and sending Internet faxes. Sends the scanned data separated into pages. Binary Division: Used when performing Scan to E-Mail. Sends the specified data separated into portions of a specified size. 2 Note The binary division function may not be usable depending on the e-mail software used by the recipient. bizhub 362/282/222 3-35 Setup 3 In the Divide Settings screen, settings can be specified for the following. Item Description Page Division Used when performing Scan to E-Mail and sending Internet faxes. Select whether scanned data is divided into pages when being sent. Binary Division Used when performing Scan to E-Mail. Select whether scanned data is divided into fixed portions when being sent. 2 Note The binary division function may not be usable depending on the e-mail software used by the recipient. Binary Division Size 3-36 When "Binary Division" is set to "ON", enter a division size between 16 and 2,000 KB. bizhub 362/282/222 Setup 3 Activity Report 1 In the Network Setting screen, touch [Scanner Settings]. 2 Touch [Activity Report]. 3 Select "ON" or "OFF", and then touch [Enter]. bizhub 362/282/222 3-37 Setup 3 RX Doc. Header Print 3-38 1 In the Network Setting screen, touch [Scanner Settings]. 2 Touch [RX Doc. Header Print]. 3 Select "ON" or "OFF", and then touch [Enter]. bizhub 362/282/222 Setup 3 E-Mail Header Text 1 In the Network Setting screen, touch [Scanner Settings]. 2 Touch [E-Mail Header Text]. 3 Select the text insertion method, and then touch [Enter]. bizhub 362/282/222 3-39 Setup 3 Gateway TX 3-40 1 In the Network Setting screen, touch [Scanner Settings]. 2 Touch [Gateway TX]. 3 Select whether to allow or restrict gateway transmissions, and then touch [Enter]. bizhub 362/282/222 Setup 3 Subject Registration 1 In the Network Setting screen, touch [Scanner Settings]. 2 Touch [Subject Registration]. 3 Touch the number of the subject to be registered or changed, type in the text, and then touch [Enter]. 4 Touch [Enter]. bizhub 362/282/222 3-41 Setup 3 Divide Settings 3-42 1 In the Network Setting screen, touch [Scanner Settings]. 2 Touch [Divide Settings]. 3 Select "ON" or "OFF" for Page Division and Binary Division. 4 If "Binary Division" is set to "ON", touch [Binary Division Size]. bizhub 362/282/222 Setup 3 5 Type in the data division size, and then touch [Enter]. 6 Touch [Enter]. bizhub 362/282/222 3-43 Setup 3 3.11 LDAP Setting The settings used by the LDAP (Lightweight Directory Access Protocol) server in a network can be specified. Settings can be specified for the following. Item Description LDAP Search Select whether to enable or disable the address search used by an LDAP server. When "Yes" is selected, an LDAP server can be specified. LDAP Server Setting Register the LDAP server to be accessed. Up to 5 LDAP servers can be registered in this machine. Search Default Setting When multiple LDAP servers are registered, select the primary LDAP server for performing searches. LDAP Search 1 In the Network Setting screen, touch [LDAP Setting]. 2 Touch [LDAP Search]. 3 Select whether to allow LDAP searches. – 3-44 If [Yes] was selected, specify the LDAP server settings. bizhub 362/282/222 Setup 3 LDAP Server Setting LDAP server settings can be specified for the following. Item Description LDAP Server Name Enter the LDAP server name. Up to 16 characters can be entered. Server Address Enter the IP address or host name of the LDAP server. Up to 64 characters can be entered. Search Base Specify the location on the LDAP server where searches are to be started. Up to 255 alphanumeric characters can be entered, excluding ^. Authentication Setting Specify the authentication settings. General Settings: Select the LDAP authentication method. Login name: Enter if "General Settings" is set to "Anonymous". Up to 64 alphanumeric characters can be entered, excluding ^. Password: Enter if "General Settings" is set to "Anonymous". Up to 32 alphanumeric characters can be entered, excluding ^. Domain Name: Enter if "General Settings" is set to "GSS-SPNEGO". Up to 64 alphanumeric characters can be entered, excluding ^. Maximum number of search Specify the maximum number of hits to be received in an LDAP search between 5 and 100. Connection time out Specify a search timeout between 5 and 300 seconds. SSL/TLS Select whether to perform encryption of the send data using SSL/TLS. Port Number Enter a number between 1 and 65535 for the port used to communicate with the LDAP server. Initialize Setting Clears all of the settings that were entered. After the settings are cleared, check the message, and then touch [Enter]. Check Connection Check the connection to the LDAP server, using the entered settings. bizhub 362/282/222 3-45 Setup 3 To specify the LDAP server settings 1 In the Network Setting screen, touch [LDAP Setting]. 2 Touch [LDAP Server Setting]. 3 Touch the button for the LDAP server to be registered or changed. – 4 3-46 To register a new LDAP server, touch a button with no name on it. Specify the detailed LDAP server settings. bizhub 362/282/222 Setup 3 5 Touch [Fwd], and then specify the settings. 6 Check the settings, and then touch [Enter]. bizhub 362/282/222 3-47 Setup 3 Search Default Setting 0 [Search Default Setting] appears when two or more LDAP servers have been registered. 3-48 1 In the Network Setting screen, touch [LDAP Setting]. 2 Touch [Search Default Setting]. 3 Select the primary LDAP server for performing searches, and then touch [Enter]. bizhub 362/282/222 Setup 3.12 3 IP Filtering Select whether or not reception is possible within the range of specified IP addresses. As an example, this section provides the procedure for specifying the range where access is permitted. The range where access is denied is specified in the same way as the range where access is permitted. Settings can be specified for the following. Item Description Accept Setting Reception of only the IP addresses in the specified range is permitted. Deny Access IP addresses in the specified range are blocked. 2 Note 0.0.0.0 cannot be included in a specified range. For example, to specify the range of addresses before 192.168.1.20, specify the range from 0.0.0.1 to 192.168.1.20. To specify IP filtering settings 1 In the Network Setting screen, touch [IP Filtering]. 2 Touch [Accept Setting] or [Deny Access]. 3 Touch [Enable] or [Disable]. bizhub 362/282/222 3-49 Setup 3 4 Touch [1] of the range. 5 Touch [Start], and then type in the IP address at the beginning of the range. – – 6 3-50 To change an entered value, touch and to move the cursor to the number to be changed, touch [Delete], and then type in the desired number. To clear all entered values, press the [C] (clear) key. Touch [Enter], and then touch [Enter] in the next two screens that appear. IP filtering is specified. bizhub 362/282/222 Setup 3.13 3 Specifying e-mail server settings To be able to use the scanning functions of this machine, it is necessary to specify certain settings according to the network environment of the machine. For the required settings, contact your network administrator. To the network administrator The following settings are required to be able to use the scanning functions of this machine. For each setting, refer to the operation manual for the e-mail server. - IP address of this machine - E-mail account (e-mail address) of this machine - POP3 user name and POP3 password of this machine - Acquisition of SMTP for the account that is the sub-domain of this machine (device domain name) - Specify the delivery of e-mail from the e-mail server to this machine (DNS server setting) When setup of the network is complete, inform the users of this machine of the information described below. - The network subnet mask to connect to this machine - The network gateway address to connect to this machine - The IP address and host name (when using DNS) of the SMTP server - The IP address and host name (when using DNS) of the POP3 server bizhub 362/282/222 3-51 Setup 3 3.14 Entering a domain name When entering an e-mail address with this machine’s control panel, the destination address can be entered quickly when the character string of a domain name that is entered often has been registered. On this machine’s control panel, the domain names can be automatically entered by touching [Domain] when it appears. 2 Note Up to 6 domain names can be registered. Registering a domain name 1 Press the [Utility/Counter] key. 2 Touch [User Setting]. 3 Touch [E-Mail Input]. – 4 3-52 If the optional fax kit has been installed, touch [FAX]. Touch [Domain Name]. bizhub 362/282/222 Setup 3 5 Touch the button for the domain name to be registered or changed. – 6 Type in the domain name, and then touch [Enter]. – 7 To register a new domain name, touch a button with no name on it. Up to 64 characters can be entered. Touch [Enter] until the initial screen appears. bizhub 362/282/222 3-53 Setup 3 Using a registered domain name On a screen where [Domain] appears, you can enter the registered characters with a single operation. 1 On an input screen, touch [Domain]. 2 Touch the key where the domain name to be entered. – 3-54 Touch [Alpha] to return to the text input screen. bizhub 362/282/222 Setup 3.15 3 Checking the network connection (Ping) By sending a ping, you can check whether the network (LAN) is properly connected. The connection to an SMTP server, POP3 server, or any server (with a specified IP address) can be checked. To check the network connection 1 Enter Administrator mode, and then touch [Admin. 2]. 2 Touch [Ping]. 3 Select the connected server. – 4 If [Ping IP Address] is selected, enter the IP address of the appropriate server. Press the [Start] key. Pinging is performed. 5 Check the results, and then touch [Enter]. bizhub 362/282/222 3-55 Setup 3 3.16 User authentication and account track To limit the users of this machine, settings for user authentication and account track can be specified. For details on the user authentication and account track settings, refer to the User manual [Copy Operations]. The various procedures for accessing the machine are described below. User authentication and account track If settings for user authentication and account track have both been specified, the operating procedure differs depending on the specified authentication settings. For details on the authentication settings specified on this machine, consult with the administrator. 3-56 Authentication Setting Description When synchronizing user authentication and account track When a user is registered, the account that the user belongs to is also registered. When the user name and password is entered for authentication, the user is automatically logged on and can perform operations as a user of the registered account. When not synchronizing user authentication and account track Users and accounts are registered separately. User authentication, then account authentication must be completed before machine operations can be performed. bizhub 362/282/222 Setup 3 If user authentication settings have been specified Contact the administrator for the user name and password to be used. 1 Touch [User Name], type in the user name, and then touch [Enter]. – – If user authentication is performed with an external server and a domain other than the default domain name is used as an Active Directory, type in the user name as "user_name@domain_name". If user authentication is performed with an external server, select the domain for performing authentication with Active Directory. 2 Touch [Password], type in the password, and then touch [Enter]. 3 Touch [Login] or press the [Access] key in the control panel. The initial screen appears. bizhub 362/282/222 3-57 Setup 3 If account track settings have been specified Contact the administrator for the track name and password to be used. 1 Touch [Account Name], type in the account number, and then touch [Enter]. 2 Touch [Password], type in the password, and then touch [Enter]. 3 Press the [Access] key on the control panel. The initial screen appears. 3-58 bizhub 362/282/222 4 Scan to E-Mail 
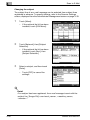
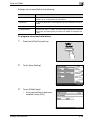
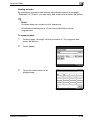
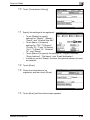
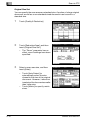
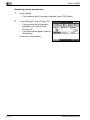
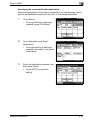
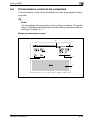
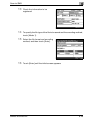
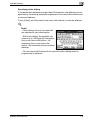
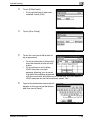
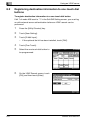
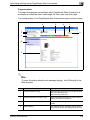
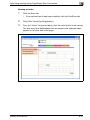
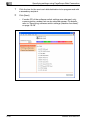
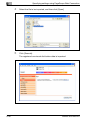
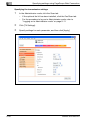
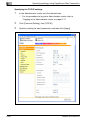
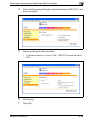
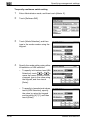
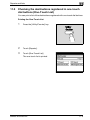
Scan to E-Mail 4 4 Scan to E-Mail 4.1 Specifying a destination with a one-touch dial button You can transmit data simply by touching a one-touch dial button if the email address of a destination or a mail program has been registered with a one-touch dial button in advance. For registering one-touch dial buttons and mail programs, refer to "Registering destinations" on page 4-32. Selecting a one-touch dial button A one-touch dial button can be selected in any of the following ways. Use the appropriate method according to the number of recipients and the desired use. - Directly touching the one-touch dial button - Entering the number of the one-touch dial button - Specifying chain dialing bizhub 362/282/222 4-3 Scan to E-Mail 4 Specifying a destination by touching a one-touch dial button 1 Position the document to be scanned. 2 Press the [Fax/Scan] button. – 3 Touch [One-Touch]. 4 Select the index containing the desired destination, and then touch the one-touch dial button. – – 5 To select an index, touch the corresponding tab, or touch or to select a different one. You can specify multiple destinations for one transmission with the same one-touch dial button. Up to 300 destinations can be specified at a time. Specify the Quality & Reduction setting for the original document to be sent. – 4-4 After pressing [Fax/Scan], you can specify Priority Screen settings in the User’s Choice screen that appears. For details, refer to the User manual [Copy Operations]. For details, refer to "Specifying the scanning quality and zoom ratio" on page 4-14. bizhub 362/282/222 Scan to E-Mail 6 4 Specify the necessary Menu settings. – – 7 If the optional fax kit has been installed, specify the FAX Menu settings. For details, refer to "Specifying additional functions" on page 4-18. Press the [Start] key. bizhub 362/282/222 4-5 Scan to E-Mail 4 Entering the number of a one-touch dial button A one-touch dial button is assigned a number, as shown in the illustration. You can quickly select a destination by specifying the number of a one-touch dial button instead of touching the button. Index 1 4-6 1 Position the document to be scanned. 2 Press the [Fax/Scan] key. 3 Press the [#] key on the control panel. Index 36 bizhub 362/282/222 Scan to E-Mail 4 4 Use the keypad to type in the number of the one-touch dial button. – – 5 Specify the Quality & Reduction settings for the original document to be sent. – 6 For details, refer to "Specifying the scanning quality and zoom ratio" on page 4-14. Specify the necessary Menu settings. – – 7 The specified one-touch dial button is highlighted. You can specify multiple destinations for simultaneous transmission with the same onetouch dial button. Up to 300 destinations can be specified at a time. If the optional fax kit has been installed, specify the FAX Menu settings. For details, refer to "Specifying additional functions" on page 4-18. Press the [Start] key. bizhub 362/282/222 4-7 Scan to E-Mail 4 Searching for a one-touch dial button To find a one-touch dial button, the name of a destination registered with the button can be searched for. 1 Position the document to be scanned. 2 Press the [Fax/Scan] key. 3 Touch [Search]. – 4 If "LDAP Search" in the Network Settings screen is set to "Yes", a screen appears, allowing you to select the search method. Touch [Search One-Touch Keys] when the screen appears. Type in the destination name, and then touch [Search]. A screen appears, containing the one-touch dial buttons programmed with a destination that begins with the entered name. 5 Touch the desired one-touch dial button. – – 4-8 You can specify multiple destinations for simultaneous transmission with the same onetouch dial button. Up to 300 destinations can be specified at a time. If LDAP searches are possible, touch [LDAP Search] to perform a searches. bizhub 362/282/222 Scan to E-Mail 6 4 Specify the Quality & Reduction settings for the original document to be sent. – 7 Specify the necessary Menu settings. – – 8 For details, refer to "Specifying the scanning quality and zoom ratio" on page 4-14. If the optional fax kit has been installed, specify the FAX Menu settings. For details, refer to "Specifying additional functions" on page 4-18. Press the [Start] key. bizhub 362/282/222 4-9 Scan to E-Mail 4 Specifying chain dialing If the destination address is longer than 64 characters, the address can be specified by combining addresses registered to one-touch dial buttons and an entered address. Touch [Chain], and then select one-touch dial buttons or enter an address. ! Detail Chain dialing can only be used with one destination per transmission. With chain dialing, the address can contain up to 192 digits (64 characters from a one-touch dial button + 64 characters from a one-touch dial button + 64 characters from an entered address). The one-touch dial buttons to be used with chain dialing must be programmed in advance. 4-10 bizhub 362/282/222 Scan to E-Mail 4.2 4 Entering an address You can directly enter destinations that have not been registered in a onetouch dial button. In addition, multiple destinations can be specified using chain dialing to combine destinations registered in a one-touch dial button and destinations that are entered. 2 Note If bit 3 of mode 018 is set to "1" in the Software Switch Setting screen, addresses cannot be directly entered. For details, refer to "Specifying software switch settings (machine functions)" on page 10-28. To enter an address 1 Position the document to be scanned. 2 Press the [Fax/Scan] key. 3 Touch [Direct Input]. 4 To select the communication mode, touch [Change Comm. Mode]. bizhub 362/282/222 4-11 Scan to E-Mail 4 5 Touch [PC], [E-Mail], then [Enter]. – 6 Type in the destination address. – – To change an entered address, press the [C] (clear) key, and then enter a new address. If parts of frequently used addresses are registered, they can be quickly entered by touching [Domain]. For details, refer to "Registering a domain name" on page 3-52. 7 To select the file format and encoding method, touch [Scan Mode]. 8 Specify the Quality & Reduction settings for the original document to be sent. – 4-12 If mode 476 of the software switch settings was changed, only communication modes that can be selected appear. For details, refer to "Specifying software switch settings (machine functions)" on page 10-28. For details, refer to "Specifying the scanning quality and zoom ratio" on page 4-14. bizhub 362/282/222 Scan to E-Mail 9 4 Specify the necessary Menu settings. – – 10 If the optional fax kit has been installed, specify the FAX Menu settings. For details, refer to "Specifying additional functions" on page 4-18. Press the [Start] key. bizhub 362/282/222 4-13 Scan to E-Mail 4 4.3 Specifying the scanning quality and zoom ratio You can specify the scanning quality and zoom ratio by touching [Quality & Reduction] in the screen that appears when the [Fax/Scan] key on the control panel is pressed. ! Detail When the transmission is complete, the specified settings return to their default. Quality You can select the scan resolution (amount of details). Select from the following resolution settings according to the type of document being scanned. Item Description Standard For documents containing plain text such as handwriting Fine Super Fine 600 dpi Text For documents containing small print, such as newspapers, or detailed illustrations Text/Photo 600 dpi Text&Photo For documents containing both text and images with color shades, such as photos GSR Super GSR 600 dpi Photo For documents containing color shades, such as photos ! Detail If data is sent using the "Text/Photo" setting, moiré patterns may appear in some photos. To reduce the appearance of moiré patterns, send the data using the "GSR" or "Super GSR" setting. When a high resolution is selected to send a clearer image, the size of the attached image data may exceed the size limitations of the provider or server being used. Before sending the data, check the transmission capacity. 4-14 bizhub 362/282/222 Scan to E-Mail 4 To specify the scanning quality 1 Touch [Quality & Reduction]. 2 Touch [Quality], and then touch the desired quality setting. – To select a higher resolution, touch [600dpi]. bizhub 362/282/222 4-15 Scan to E-Mail 4 Density According to the type of document being sent, select the appropriate density from the settings described below. Item Description Light For documents with a dark background color, such as newspapers and blueprints Std. For normal documents Dark For documents with faint or colored text ! Detail If "600 dpi Text" or "600 dpi Text & Photo" is selected, the density can be set to one of three levels: "Light", "Std.", and "Dark". To specify the density settings 4-16 1 Touch [Quality & Reduction]. 2 Touch [Density], and then touch the desired density setting. bizhub 362/282/222 Scan to E-Mail 4 Original Size Set. You can specify the scan area as a standard size. A portion of a large original document as well as a non-standard-sized document can be sent in a standard size. 1 Touch [Quality & Reduction]. 2 Touch [Reduction/Area], and then touch [Original Size Set.]. – 3 The "Zoom" parameter has no effect, even if settings have been specified. Select a scan area size, and then touch [Enter]. – – Touch [Auto Detect] to automatically select the size closest to the size of the original document. However, Letter size is selected for documents smaller than Letter size. Touch [Metric] to specify metric size. bizhub 362/282/222 4-17 Scan to E-Mail 4 4.4 Specifying additional functions You can add the following functions by pressing the [Fax/Scan] key on the control panel, then touching [Menu] on the screen that appears. 2 Note If the optional fax kit has been installed, [Menu] changes to [Fax Menu]. 2 Note The following functions have no effect, even if settings have been specified. - "TSI" on the Setting 1 tab - "Rotation TX" on the Setting 1 tab - "E-Mail Notification" on the Network tab Item Setting 1 *(Set 1) Setting 2 *(Set 2) Description TX Report Select under which conditions the transmission report is to be output. Default: Outputs according to the specifications of the administrator. ON: Prints regardless of the transmission results. If TX Fails: Prints only when undeliverable. OFF: Does not print regardless of the transmission results. 2in1 Select whether to send using the 2in1 function (printing two pages to fit on one page). 2-Sided TX Select whether to perform double-sided transmission. You can specify the position of the binding margin and the document orientation. Priority TX Select whether a job is given priority over other. Timer TX Setting Select whether to set the send time. Specifies the send time when "ON" is selected. Stamp Specify whether the document is stamped to indicate that it has been scanned. The document must be loaded into the ADF. 2 Note To use the Stamp function, optional stamp unit must be installed. Network *(Net.) 4-18 Subject Selection The Subject line of an e-mail can be selected from Subject lines specified in advance. Reply Address Displays the e-mail address of this machine as the sender of the e-mail message. When specifying e-mail addresses other than that of this machine, select an address from a registered one-touch dial button. File Name Enter when a set file name is to be specified as the file name when saving the file. Up to 16 characters can be entered. bizhub 362/282/222 Scan to E-Mail 4 * Changes to ( ) if the optional fax kit has been installed. bizhub 362/282/222 4-19 Scan to E-Mail 4 Specifying the transmission report printing conditions You can specify the conditions for printing a transmission report (TX Report). The printing conditions for a transmission report are preset with the Report Settings parameters from the Administrator Management screen. Select the appropriate printing condition. Settings can be specified for the following. Item Description Default Displays the printing conditions specified in Administrator Management screen. ON Prints regardless of the results. If TX Fails Prints when the transmission failed. OFF Does not print regardless of the results. To specify the transmission report printing conditions 1 Touch [Menu]. – 2 Touch [Setting 1], then [TX Report]. – 4-20 If the optional fax kit has been installed, touch [FAX Menu]. If the optional fax kit has been installed, touch [Set 1], then [TX Report]. bizhub 362/282/222 Scan to E-Mail 3 4 Specify the desired printing conditions, and then touch [Enter]. Specifying 2in1 transmission 1 Touch [Menu]. – 2 If the optional fax kit has been installed, touch [FAX Menu]. Touch [Setting 1], then [2in1]. – If the optional fax kit has been installed, touch [Set 1], then [2in1]. – Touch the button again to cancel the setting. The button is highlighted. bizhub 362/282/222 4-21 Scan to E-Mail 4 Specifying double-sided transmission 1 Touch [Menu]. – 2 Touch [Setting 1], then [2-Sided TX]. – 3 If the optional fax kit has been installed, touch [Set 1], then [2Sided TX]. Select the desired binding margin position. – – – Left Bind: The document is scanned with a binding margin on the left side. Top Bind: The document is scanned with a binding margin at the top. Auto: The binding margin is set according to the scanning direction. 4 Touch [Original Direction]. 5 Select the orientation of the document, and then touch [Enter]. – 6 Auto: The long side of the document is automatically set as the binding position. Touch [Enter]. – 4-22 If the optional fax kit has been installed, touch [FAX Menu]. Touch [OFF] to cancel the settings. bizhub 362/282/222 Scan to E-Mail 4 ! Detail When loading a double-sided document with pages of different widths, we recommend loading the pages with the same orientation. When a document with pages of different orientations is scanned, the orientation of the image data may not be correct. bizhub 362/282/222 4-23 Scan to E-Mail 4 Specifying priority transmission 1 Touch [Menu]. – 2 If the optional fax kit has been installed, touch [FAX Menu]. Touch [Setting 2], then [Priority TX]. – If the optional fax kit has been installed, touch [Set 2], then [Priority TX]. – Touch the button again to cancel the setting. The button is highlighted. Specifying timer transmission 1 Touch [Menu]. – 2 Touch [Setting 2], then [Timer TX Setting]. – 3 Touch [Hour] or [Minute], and then type in the desired value using the keypad. Touch [Enter]. – 4-24 If the optional fax kit has been installed, touch [Set 2], then [Timer TX Setting]. Enter the time for transmission. – 4 If the optional fax kit has been installed, touch [FAX Menu]. Touch [OFF] to cancel the settings. bizhub 362/282/222 Scan to E-Mail 4 Specifying the stamp setting 1 Touch [Menu]. – 2 Touch [Setting 2], then [Stamp]. – 3 If the optional fax kit has been installed, touch [FAX Menu]. If the optional fax kit has been installed, touch [Set 2], then [Stamp]. Select the print position of the stamp, and then touch [Enter]. bizhub 362/282/222 4-25 Scan to E-Mail 4 Changing the subject The subject line of an e-mail message can be selected from subject lines registered in advance. To specify settings, refer to the Scanner Settings screen, displayed from the Administrator Management screen on page 3-35. 1 Touch [Menu]. – 2 If the optional fax kit has been installed, touch [FAX Menu]. Touch [Network], then [Subject Selection]. – 3 If the optional fax kit has been installed, touch [Net.], then [Subject Selection]. Select a subject, and then touch [Enter]. – Touch [OFF] to cancel the settings. ! Detail If no subject has been registered, the e-mail message is sent with the subject line “[Image File] <one-touch_name>, <machine_name>, <number>”. 4-26 bizhub 362/282/222 Scan to E-Mail 4 Specifying a reply address From the e-mail addresses registered with a one-touch dial button, you can specify the return e-mail address displayed to the recipient. 1 Touch [Menu]. – 2 Touch [Network], then [Reply Address]. – 3 If the optional fax kit has been installed, touch [FAX Menu]. If the optional fax kit has been installed, touch [Net.], then [Reply Address]. Select a return address, and then touch [Enter]. – Touch [OFF] to cancel the setting. bizhub 362/282/222 4-27 Scan to E-Mail 4 Specifying a file name You can specify the file name of the image data to be attached in an e-mail. Up to 16 characters can be entered. 1 Touch [Menu]. – 2 Touch [Network], then [File Name]. – 3 If the optional fax kit has been installed, touch [FAX Menu]. If the optional fax kit has been installed, touch [Net.], then [File Name]. Type in the file name, and then touch [Enter]. – – Touch [OFF] to cancel the setting. It is not necessary to type in an extension. 2 Note When no file name is specified, the file is automatically sent with a name in the following format: <machine_name><scan_date_and_time>.<extension>. 4-28 bizhub 362/282/222 Scan to E-Mail 4 Other functions Other settings related to sending e-mail messages can be specified. Contact the administrator of this machine for the administrator management settings. Item Description Refer to Changing the body text You can specify custom text other than the text that was specified at the factory to be inserted into an e-mail message. Specify this text in the Scanner Settings screen, displayed from the Administrator Management screen. page 3-35 Page Division and Binary Division When attaching the data of multi-page documents or data of a large volume, you can send the data separated into pages or portions of specified size. Specify this setting in the Scanner Settings screen, displayed from the Administrator Management screen. page 3-35 bizhub 362/282/222 4-29 Scan to E-Mail 4 4.5 If transmission could not be completed If the transmission could not be completed correctly, a transmission report is printed. ! Detail You can change the transmission report printing conditions. For details, refer to "Specifying the transmission report printing conditions (Report Settings)" on page 10-17. Viewing a transmission report 2 1 3 4 5 4-30 No. Item Description 1 Report output date and time Shows the date and time that the report was printed. 2 Transmission source information (TSI) Shows the registered transmission source name. 3 Transmission information Prints the document number, the duration of the transmission, and the transmission mode. bizhub 362/282/222 Scan to E-Mail 4 No. Item Description 4 Transmission result Shows the transmission result. Any of the following may appear. OK: The transmission was completed successfully. INTERR: The transmission was interrupted. F. MEM: The memory capacity was exceeded. NG: The transmission failed. PT. DEL: The transmission to some destinations failed. Error code: For details, refer to "Network error list" on page 12-4. 5 Transmission Image Prints a part of the sent image. Resending You can resend up to 20 failed transmissions. 1 Touch [Job List], then [Type], and then select the document that could not be sent. – 2 If [Retry] and [Change Destination] appear in the screen, the document does not need to be scanned again. To send to the same destination, touch [Retry]. – To send to a different destination, touch [Change Destination]. bizhub 362/282/222 4-31 Scan to E-Mail 4 4.6 Registering destinations Programming a one-touch dial button By registering a destination with a one-touch dial button, transmissions can be performed easily and accurately. You can register two types of destinations with a one-touch dial button: a main destination and a secondary destination, where the data is sent if transmission to the main destination fails. 2 Note A secondary recipient can be specified if the optional scanner unit or fax kit is installed. If the "Restrict One-Touch Editing" parameter on the Administrator Set screen (displayed from the Administrator Management screen) is set to "ON", [E-Mail Input] is added to the Administrator Management 1 screen and can be used to register, change and delete one-touch dial buttons. For details on the Administrator Set screen, refer to the User manual [Copy Operations]. If the optional fax kit has been installed, the [E-Mail Input] changes to the [FAX]. ! Detail The following communication modes can be specified for the secondary destination. - PC (E-Mail) - PC (Scanner)* - InternetFAX (Internet FAX) - InternetFAX (IP-TX)* - InternetFAX (IP Relay)* - FAX (G3)** *The communication mode can be specified if the optional scanner unit or fax kit is installed. **The communication mode can be specified if the optional fax kit is installed. 4-32 bizhub 362/282/222 Scan to E-Mail 4 Settings can be specified for the following. Item Description One-Touch Name Type in the destination name that will appear on the one-touch dial button. Up to 12 characters can be entered. Destination Type in the destination e-mail address. Up to 64 characters can be entered. File Type Select the file format (TIFF or PDF) for sending files. Coding Method Select either "MH" or "MMR" as the encoding method for the selected file format. The data capacity is lowest with "MMR" and highest with "MH". To program a one-touch dial button 1 Press the [Utility/Counter] key. 2 Touch [User Setting]. 3 Touch [E-Mail Input]. – If the optional fax kit has been installed, touch [FAX]. bizhub 362/282/222 4-33 Scan to E-Mail 4 4 Touch [One-Touch]. 5 Touch the one-touch dial button to be programmed. – – 6 Type in the destination name that will appear on the one-touch dial button, and then touch [Next]. 7 Select the communication mode. Touch [PC], [E-Mail], then [Next]. – 4-34 Touch an index tab or [Index List], then the desired one-touch dial button. If the machine is set to allow LDAP searches, a screen appears, allowing you to permit or prohibit the address registered with the one-touch dial button to be found with an LDAP search. If LDAP searches are not to be allowed, select "No". If mode 476 of the software switch settings was changed, only communication modes that can be selected appear. For details, refer to "Specifying software switch settings (machine functions)" on page 10-28. bizhub 362/282/222 Scan to E-Mail 8 4 Enter the destination e-mail address. – – If parts of frequently used addresses are registered, they can be quickly entered by touching [Domain]. For details, refer to "Entering a domain name" on page 3-52. To change an entered address, touch or to move the cursor, or press the [C] (clear) key to enter a address. 9 To change the file format and encoding method, which were specified in advance by the administrator, touch [Scan Mode]. 10 Touch [Enter]. 11 Check the information to be registered, and then touch [Enter]. 12 Touch [Enter] until the initial screen appears. bizhub 362/282/222 4-35 Scan to E-Mail 4 Changing or deleting a one-touch dial button 1 Perform steps 1 through 4 of the procedure in "To program a onetouch dial button". 2 Touch the one-touch dial button to be change or deleted. – 3 Touch the button for the information to be changed, and then make the change. – 4-36 If the specified one-touch dial button is programmed as an administrator forwarding destination, the screen for entering the administrator number appears. To delete the information, touch [Delete], check that the correct information is to be deleted, and then touch [OK]. 4 Check the information to be registered, and then touch [Enter]. 5 Touch [Enter] until the initial screen appears. bizhub 362/282/222 Scan to E-Mail 4 Copying a one-touch dial button 1 Perform steps 1 through 4 of the procedure in "To program a onetouch dial button". 2 Touch the one-touch dial button to be copied. 3 Touch [One-Touch], then [OneTouch Copy]. 4 Touch the one-touch dial button where the information is copied to. – – 5 Select a one-touch dial button that has not yet been programmed. To deselect the one-touch dial button where the information is to be copied to, touch the selected one-touch dial button again. Touch [Enter] until the initial screen appears. bizhub 362/282/222 4-37 Scan to E-Mail 4 Registering/deleting a secondary destination 0 A secondary recipient can be specified if the optional scanner unit or fax kit is installed. 1 Perform steps 1 through 4 of the procedure in "To program a onetouch dial button". 2 Touch the one-touch dial button where the secondary destination is to be registered. 3 Touch [One-Touch], then [Sub Address Registration]. 4 Select the communication mode for the secondary destination. – 4-38 If mode 476 of the software switch settings was changed, only communication modes that can be selected appear. For details, refer to "Specifying software switch settings (machine functions)" on page 10-28. 5 Enter the secondary destination information, and then touch [Enter]. 6 Touch [Enter] until the initial screen appears. bizhub 362/282/222 Scan to E-Mail 4 Naming an index By classifying one-touch dial buttons into indexes named, for example, "Branches" or "Clients", you can easily find a desired one-touch dial button. ! Detail An index name can contain up to 8 characters. 36 indexes containing up to 15 one-touch dial button can be programmed. To name an index 1 Perform steps 1 through 3 of the procedure in "To program a onetouch dial button". 2 Touch [Index]. 3 Touch the index button to be programmed. bizhub 362/282/222 4-39 Scan to E-Mail 4 4-40 4 Type in the index name, and then touch [Enter]. 5 Touch [Enter] until the first screen appears. bizhub 362/282/222 Scan to E-Mail 4 Registering mail programs If settings to be applied to a transmission are registered with the destination information, a transmission can be performed with the registered settings simply by touching a one-touch dial button. This is known as a mail program and is convenient when always sending transmissions with specific settings to a specific destination. If the optional fax kit has been installed, the [Mail Program] changes to the [FAX Program]. As shown below, the settings of certain parameters may not be available for registration in a program, depending on the operation used. Refer to the page for each item. o: Available +: Available under certain conditions – : Unavailable Operation Parameter Scan to E-Mail Scan to FTP Scan to SMB Scan to HDD Internet fax Quality o o o o o Density o o o o o Zoom – – – – – Original Size Set. o o o o o TSI – – – – o TX Report o o o o o 2in1 o o o o o 2-Sided TX o o o o o Rotation TX – – – – + Priority TX o o o o o Timer TX Setting o o o o o Stamp + + + + + Subject – – – – + Reply o – – – + File Name o o o o + E-Mail Notification – o o o – bizhub 362/282/222 4-41 Scan to E-Mail 4 ! Detail Up to 30 mail programs can be registered. However, the total number of mail programs and one-touch button may not exceed 540. Up to 300 destinations can be registered per mail program. 2 Note To use the Stamp function, optional stamp unit must be installed. ! Detail For procedures on specifying settings for the various operations, refer to the following pages. Scan to E-Mail (p. 4-11, p. 4-14) Scan to FTP (p. 5-9, p. 5-13) Scan to SMB (p. 6-9, p. 6-13) Scan to E-HDD (User manual [Box Operations]) Internet fax (p. 7-10, p. 7-12) 4-42 bizhub 362/282/222 Scan to E-Mail 4 To register a mail program 1 Press the [Utility/Counter] key. 2 Touch [User Setting]. 3 Touch [E-Mail Input]. – 4 If the optional fax kit has been installed, touch [FAX]. Touch [Mail Program]. – If the optional fax kit has been installed, touch [FAX Program]. bizhub 362/282/222 4-43 Scan to E-Mail 4 5 Touch the one-touch dial button to be registered. – 6 Type in the program name which will appear on the one-touch dial button, and then touch [Next]. – The program name can contain up to 12 characters. 7 If the optional fax kit has been installed, select the transmission type, and then touch [Next]. 8 Specify the destination. – – – 9 4-44 Touch an Index tab or [Index List], then the desired one-touch dial button. To specify the destination with a one-touch dial button, touch [One- Touch], touch the onetouch dial button for the desired destination, and then touch [Enter]. To specify the destination with a one-touch search, touch [Search], specify the destination, and then touch [Enter]. If no destination is to be registered, touch [No Destination]. Touch [Next]. bizhub 362/282/222 Scan to E-Mail 4 10 Touch [Transmission Setting]. 11 Specify the settings to be registered. – – – – Touch [Quality] to specify settings for "Quality", "Density", "Zoom", and "Original Size Set.". Touch [Menu 1] to specify settings for "TSI","TX Report", "Priority TX", "Timer TX Setting", "2in1", "2-Sided TX", "Rotation TX", and "Stamp". Touch [Menu 2] to specify the settings for "Subject Selection", "Reply Address", "File Name", and "Email Notification". In order to use the "Stamp" function, the optional stamp unit must be installed. 12 Touch [Enter]. 13 Check the information to be registered, and then touch [Enter]. 14 Touch [Enter] until the initial screen appears. bizhub 362/282/222 4-45 Scan to E-Mail 4 Changing/deleting a mail program 1 Perform steps 1 through 4 of the procedure in "To program a onetouch dial button". 2 Touch the one-touch dial button with the mail program to be changed or deleted. – 4-46 Touch an Index tab or [Index List], then the desired one-touch dial button. 3 Touch the button for the setting to be changed, and then change the setting. To delete the mail program, touch [Delete]. 4 Check the information to be registered, and then touch [Enter]. 5 Touch [Enter] until the initial screen appears. bizhub 362/282/222 5 Scan to FTP Scan to FTP 5 5 Scan to FTP 5.1 Specifying a destination with a one-touch dial button You can transmit data simply by touching a one-touch dial button if the secondary destination of the upload destination or a mail program has been registered with a one-touch dial button in advance. ! Detail For registering one-touch dial buttons, refer to "Registering destinations" on page 5-24. For registering mail programs, refer to "Registering mail programs" on page 4-41. Selecting a one-touch dial button A one-touch dial button can be selected in any of the following ways. Use the appropriate method according to the number of recipients and the desired use. - Directly touching the one-touch dial button - Entering the number of the one-touch dial button Specifying a destination by touching a one-touch dial button 1 Position the document to be scanned. 2 Press the [Fax/Scan] button. – 3 After pressing [Fax/Scan], you can specify Priority Screen settings in the User’s Choice screen that appears. For details, refer to the User manual [Copy Operations]. Touch [One-Touch]. bizhub 362/282/222 5-3 Scan to FTP 5 4 Select the index containing the desired destination, and then touch the one-touch dial button. – – – 5 Specify the Quality & Reduction settings for the original document to be sent. – 6 – 5-4 For details, refer to "Specifying the scanning quality and zoom ratio" on page 5-9. Specify the necessary Menu settings. – 7 To select an index, touch the corresponding tab, or touch or to select a different one. To change the index name, refer to "To name an index" on page 4-39. You can specify multiple destinations for one transmission with the same one-touch dial button. Up to 300 destinations can be specified at a time. If the optional fax kit has been installed, specify the FAX Menu settings. For details, refer to "Specifying additional functions" on page 5-13. Press the [Start] key. bizhub 362/282/222 Scan to FTP 5 Entering the number of a one-touch dial button A one-touch dial button is assigned a number, as shown in the illustration. You can quickly select a destination by specifying the number of a one-touch dial button instead the button. Index 1 1 Position the document to be scanned. 2 Press the [Fax/Scan] key. 3 Press the [#] key on the control panel. bizhub 362/282/222 Index 36 5-5 Scan to FTP 5 4 Use the keypad to type in the number of a one-touch dial button. – You can specify multiple destinations for simultaneous transmission with the same onetouch dial button. Up to 300 destinations can be specified at a time. The specified one-touch dial button is highlighted. 5 Specify the Quality & Reduction settings for the original document to be sent. – 6 Specify the necessary Menu settings. – – 7 5-6 For details, refer to "Specifying the scanning quality and zoom ratio" on page 5-9. If the optional fax kit has been installed, specify the FAX Menu settings. For details, refer to "Specifying additional functions" on page 5-13. Press the [Start] key. bizhub 362/282/222 Scan to FTP 5 Searching for a one-touch dial button To find a one-touch dial button, the name of a destination registered with the button can be searched for. 1 Position the document to be scanned. 2 Press the [Fax/Scan] key. 3 Touch [Search]. 4 Type in the destination name, and then touch [Search]. A screen appears, containing the one-touch dial buttons programmed with a destination that begins with the entered name. 5 Touch the desired one-touch dial button. – You can specify multiple destinations for simultaneous transmission with the same onetouch dial button. Up to 300 destinations can be specified at a time. bizhub 362/282/222 5-7 Scan to FTP 5 6 Specify the Quality & Reduction settings for the original document to be sent. – 7 Specify the necessary Menu settings. – – 8 5-8 For details, refer to "Specifying the scanning quality and zoom ratio" on page 5-9. If the optional fax kit has been installed, specify the FAX Menu settings. For details, refer to "Specifying additional functions" on page 5-13. Press the [Start] key. bizhub 362/282/222 Scan to FTP 5.2 5 Specifying the scanning quality and zoom ratio You can specify the scan quality and zoom ratio by touching [Quality & Reduction] in the screen that appears when the [Fax/Scan] key on the control panel is pressed. ! Detail When the transmission is complete, the specified settings return to their defaults. Quality You can select the scan resolution (amount of details). Select from the following resolution settings according to the type of document being scanned. Item Description Standard For documents containing plain text such as handwriting Fine Super Fine 600 dpi Text For documents containing small print, such as newspapers, or detailed illustrations Text/Photo 600 dpi Text&Photo For documents containing both text and images with color shades, such as photos GSR Super GSR 600 dpi Photo For documents containing color shades, such as photos ! Detail If data is sent using the "Text/Photo" setting, moiré patterns may appear in some photos. To reduce the appearance of moiré patterns, send the data using the "GSR" or "Super GSR" setting. When a high resolution is selected to send a clearer image, the size of the attached image data may exceed the size limitations of the provider or server being used. Before sending the data, check the transmission capacity. bizhub 362/282/222 5-9 Scan to FTP 5 To specify the scanning quality 1 Touch [Quality & Reduction]. 2 Touch [Quality], and then touch the desired quality setting. – 5-10 To select a higher resolution, touch [600dpi]. bizhub 362/282/222 Scan to FTP 5 Density According to the type of document being sent, select the appropriate density from the settings described below. Item Description Light For documents with a dark background color, such as newspapers and blueprints Std. For normal documents Dark For documents with faint or colored text ! Detail If "600 dpi Text" or "600 dpi Text & Photo" is selected, the density can be set to one of three levels: "Light", "Std.", and "Dark". To specify a density setting 1 Touch [Quality & Reduction]. 2 Touch [Density], and then touch the desired density setting. bizhub 362/282/222 5-11 Scan to FTP 5 Original Size Set. You can specify the scan area as a standard size. A portion of a large original document as well as a non-standard-sized document can be sent in a standard size. 1 Touch [Quality & Reduction]. 2 Touch [Reduction/Area], and then touch [Original Size Set.]. – 3 Select a scan area size, and then touch [Enter]. – – 5-12 The "Zoom" parameter has no effect, even if settings have been specified. Touch [Auto Detect] to automatically select the size closest to the size of the original document. However, Letter size is selected for documents smaller than Letter size. Touch [Metric] to specify metric sizes. bizhub 362/282/222 Scan to FTP 5.3 5 Specifying additional functions You can add the following functions by pressing the [Fax/Scan] key on the control panel, then touching [Menu] on the screen that appears. 2 Note If the optional fax kit has been installed, [Menu] changes to [Fax Menu]. 2 Note The following functions and parameters have no effect, even if settings have been specified. - "TSI" on the Setting 1 tab - "Rotation TX" on the Setting 1 tab - "Subject Selection" on the Network tab - "Reply Address" on the Network tab Item Setting 1 *(Set 1) Setting 2 *(Set 2) Description TX Report Select under which conditions the transmission report is to be output. Default: Outputs according to the specifications of the administrator. ON: Prints regardless of the transmission results. If TX Fails: Prints only when undeliverable. OFF: Does not print regardless of the transmission results. 2in1 Select whether to send using the 2in1 function (printing two pages to fit on one page). 2-Sided TX Select whether to perform double-sided transmission. You can specify the position of the binding margin and the document orientation. Priority TX Select whether a job is given priority over others. Timer TX Setting Select whether to set the send time. Specifies the send time when "ON" is selected. Stamp Specify whether the document is stamped to indicate that it has been scanned. The document must be loaded into the ADF. 2 Note To use the Stamp function, optional stamp unit must be installed. Network *(Net.) File Name Enter when a set file name is to be specified as the file name when saving the file. Up to 16 characters can be entered. E-Mail Notification Specify whether to have an e-mail message sent to a specified onetouch destination to notify you when the transmission is complete. * Changes to ( ) if the optional fax kit has been installed. bizhub 362/282/222 5-13 Scan to FTP 5 Specifying the transmission report printing conditions You can specify the conditions for printing a transmission report (TX Report). The printing conditions for a transmission report are preset with the Report Settings parameters from the Administrator Management screen. Select the appropriate printing condition. Settings can be specified for the following. Item Description Default Displays the printing conditions specified in the Administrator Management screen. ON Prints regardless of the results. If TX Fails Prints when the transmission failed. OFF Does not print regardless of the results. To specify the transmission report printing conditions 1 Touch [Menu]. – 2 Touch [Setting 1], then [TX Report]. – 5-14 If the optional fax kit has been installed, touch [FAX Menu]. If the optional fax kit has been installed, touch [Set 1], then [TX Report]. bizhub 362/282/222 Scan to FTP 3 5 Specify the desired printing conditions, and then touch [Enter]. Specifying 2in1 transmission 1 Touch [Menu]. – 2 If the optional fax kit has been installed, touch [FAX Menu]. Touch [Setting 1], then [2in1]. – If the optional fax kit has been installed, touch [Set 1], then [2in1]. – Touch the button again to cancel the setting. The button is highlighted. bizhub 362/282/222 5-15 Scan to FTP 5 Specifying double-sided transmission 1 Touch [Menu]. – 2 Touch [Setting 1], then [2-Sided TX]. – 3 If the optional fax kit has been installed, touch [Set 1], then [2Sided TX]. Select the desired binding margin position. – – – Left Bind: The document is scanned with a binding margin on the left side. Top Bind: The document is scanned with a binding margin at the top. Auto: The binding margin is set according to the scanning direction. 4 Touch [Original Direction]. 5 Select the orientation of the document, and then touch [Enter]. – 6 Auto: The long side of the document is automatically set as the binding position. Touch [Enter]. – 5-16 If the optional fax kit has been installed, touch [FAX Menu]. Touch [OFF] to cancel the settings. bizhub 362/282/222 Scan to FTP 5 ! Detail When loading a double-sided document with pages of different widths, we recommend loading the pages with the same orientation. When a document with pages of different orientations is scanned, the orientation of the image data may not be correct. bizhub 362/282/222 5-17 Scan to FTP 5 Specifying priority transmission 1 Touch [Menu]. – 2 If the optional fax kit has been installed, touch [FAX Menu]. Touch [Setting 2], then [Priority TX]. – If the optional fax kit has been installed, touch [Set 2], then [Priority TX]. – Touch the button again to cancel the setting. The button is highlighted. Specifying timer transmission 1 Touch [Menu]. – 2 Touch [Setting 2], then [Timer TX Setting]. – 3 Touch [Hour] and [Minute], and then type in the desired value using the keypad. Touch [Enter]. – 5-18 If the optional fax kit has been installed, touch [Set 2], then [Timer TX Setting]. Enter the time for transmission. – 4 If the optional fax kit has been installed, touch [FAX Menu]. Touch [OFF] to cancel the settings. bizhub 362/282/222 Scan to FTP 5 Specifying the stamp setting 1 Touch [Menu]. – 2 Touch [Setting 2], then [Stamp]. – 3 If the optional fax kit has been installed, touch [FAX Menu]. If the optional fax kit has been installed, touch [Set 2], then [Stamp]. Select the print position of the stamp, and then touch [Enter]. bizhub 362/282/222 5-19 Scan to FTP 5 Specifying the e-mail notification destination When the transmission of the data is complete, an message can be sent to the destination specified in the URL of the uploaded destination. 1 Touch [Menu]. – 2 Touch [Network], then [Email Notification]. – 3 If the optional fax kit has been installed, touch [Net.], then [Email Notification]. Select the destination address, and then touch [Enter]. – 5-20 If the optional fax kit has been installed, touch [FAX Menu]. Touch [OFF] to cancel the setting. bizhub 362/282/222 Scan to FTP 5 Specifying a file name You can specify the file name of the image data to be sent. Up to 16 characters can be entered. When no file name is specified, the file is automatically sent with a name in the following format: <machine_name><scan_date_and_time>.<extension>. 1 Touch [Menu]. – 2 Touch [Network], then [File Name]. – 3 If the optional fax kit has been installed, touch [FAX Menu]. If the optional fax kit has been installed, touch [Net.], then [File Name]. Type in the file name, and then touch [Enter]. – – Touch [OFF] to cancel the setting. It is not necessary to type in a extension. bizhub 362/282/222 5-21 Scan to FTP 5 5.4 If transmission could not be completed If the transmission could not be completed correctly, a transmission report is printed. ! Detail You can change the transmission report printing conditions. For details, refer to "Specifying the transmission report printing conditions (Report Settings)" on page 10-17. Viewing a transmission report 2 1 3 4 5 5-22 No. Item Description 1 Report output date and time Shows the date and time that the report was printed. 2 Transmission source information (TSI) Shows the registered transmission source name. 3 Transmission information Prints the document number, the duration of the transmission, and the transmissionmode. bizhub 362/282/222 Scan to FTP 5 No. Item Description 4 Transmission result Shows the transmission result. Any of the following may appear. OK: The transmission was completed successfully. INTERR: The transmission was interrupted. F. MEM: The memory capacity was exceeded. NG: The transmission failed. PT. DEL: The transmission to some destinations failed. Error code: For details, refer to "Network error list" on page 12-4. 5 Transmission Image Prints a part of the sent image. Resending You can resend up to 20 failed transmission. 1 Touch [Job List], then [Type], and then select the document that could not be sent. – 2 If [Retry] and [Change Destination] appear in the screen, the document does not need to be scanned again. To send to the same destination, touch [Retry]. – To send to a different destination, touch [Change Destination]. bizhub 362/282/222 5-23 Scan to FTP 5 5.5 Registering destinations Programming a one-touch dial button By registering a destination with a one-touch dial button, transmissions can be performed easily and accurately. 2 Note If the "Restrict One-Touch Editing" parameter on the Administrator Set screen (displayed from the Administrator Management screen) is set to "ON", [E-Mail Input] is added to the Administrator Management 1 screen and can be used to register, change and delete one-touch dial buttons. For details on the Administrator Set screen, refer to the User manual [Copy Operations]. If the optional fax kit has been installed, the [E-Mail Input] changes to the [FAX]. Settings can be specified for the following. 5-24 Item Description Remote Destination Name Type in the destination name that will appear on the one-touch dial button. Up to 12 characters can be entered. FTP Server Address Specifies the server address of the upload destination using an IP address or host name. Use Proxy Selects whether to use a proxy server to upload data. FTP Port No. Enter the port number to be used for FTP. Enter a numeric value within the range of 1 to 65535. Anonymous Select whether to permit anonymous access (access that does not require a user name or password). To permit anonymous access, select "Yes". To prohibit anonymous access, select "No", and then specify the login user name and password. Directory Specify the directory path to the upload destination. Up to 128 characters can be entered. File Type/Coding Method Sets the file type and encoding method for saving data. You can select from TIFF (multiple), TIFF (single), and PDF for the file type. Select either "MH" or "MMR" as the encoding method for the selected file format. The data capacity is lowest with "MMR" and highest with "MH". bizhub 362/282/222 Scan to FTP 5 To program a one-touch dial button 1 Press the [Utility/Counter] key. 2 Touch [User Setting]. 3 Touch [E-Mail Input]. – 4 If the optional fax kit has been installed, touch [FAX]. Touch [One-Touch]. bizhub 362/282/222 5-25 Scan to FTP 5 5 Touch the one-touch dial button to be registered. – – 6 Type in the destination name that will appear on the one-touch dial button, and then touch [Next]. 7 Select the communication mode. Touch [PC], [FTP], then [Next]. – 8 If mode 476 of the software switch settings was changed, only communication modes that can be selected appear. For details, refer to "Specifying software switch settings (machine functions)" on page 10-28. Enter the upload destination host address, and then touch [Next]. – – 5-26 Touch an Index tab or [Index List], then the desired one-touch dial button. If the machine is set to allow LDAP searches, a screen appears, allowing you to permit or prohibit the address registered with the one-touch dial button to be found with an LDAP search. If LDAP searches are not to be allowed, select "No". To specify the host name, touch [Host Name], and then touch [Next]. To change an entered address, touch or to move the cursor, or press the [C] (clear) key to enter a new address. bizhub 362/282/222 Scan to FTP 5 9 Select whether to use a proxy server, and then touch [Next]. 10 Enter the FTP port number. Press the [C] (clear) key to delete the number, type in the port number using the keypad, and then touch "Next". 11 Specify the Account Information, and then touch [Next]. – 12 If "Private Site" is selected, enter the login user name and password. Enter the server directory name to be saved, and then touch [Next]. bizhub 362/282/222 5-27 Scan to FTP 5 5-28 13 Check the FTP server information, and then touch [Enter]. 14 Check the information to be registered. 15 To specify the file type of the file to be saved and the encoding method, touch [Mode 1]. 16 Select the file format and encoding method, and then touch [Enter]. 17 Touch [Enter] until the initial screen appears. bizhub 362/282/222 Scan to FTP 5 Changing or deleting a one-touch dial button 1 Perform steps 1 through 4 of the procedure in "To program a onetouch dial button". 2 Touch the one-touch dial button to be changed or deleted. – 3 If the specified one-touch dial button is programmed as an administrator forwarding destination, the screen for entering the administrator number appears. Touch the button for the information to be changed, and then make the change. – To delete the information, touch [Delete]. 4 Check the information to be registered, and then touch [Enter]. 5 Touch [Enter] until the initial screen appears. bizhub 362/282/222 5-29 Scan to FTP 5 Copying a one-touch dial button 1 Perform steps 1 through 4 of the procedure in "To program a onetouch dial button". 2 Touch the one-touch dial button to be copied. 3 Touch [One-Touch], then [OneTouch Copy]. 4 Touch the one-touch dial button where the information is copied to. – – 5 5-30 Select a one-touch dial button that has not yet been programmed. To deselect the one-touch dial button where the information is to be copied to, touch the selected one-touch dial button again. Touch [Enter] until the initial screen appears. bizhub 362/282/222 6 Scan to SMB Scan to SMB 6 6 Scan to SMB 6.1 Specifying a destination with a one-touch dial button You can transmit data simply by touching a one-touch dial button if the secondary destination of the upload destination or a mail program has been registered with a one-touch dial button in advance. ! Detail For registering a one-touch dial button, refer to "Registering destinations" on page 6-25. For registering mail programs, refer to "Registering mail programs" on page 4-41. Selecting a one-touch dial button A one-touch dial button can be selected in any of the following ways. Use the appropriate method according to the number of recipients and the desired use. - Directly touching the one-touch dial button - Entering the number of the one-touch dial button Specifying a destination by touching a one-touch dial button 1 Position the document to be scanned. 2 Press the [Fax/Scan] key. – 3 After pressing [Fax/Scan], you can specify Priority Screen settings in the User’s Choice screen that appears. For details, refer to the User manual [Copy Operations]. Touch [One-Touch]. bizhub 362/282/222 6-3 Scan to SMB 6 4 Select the index containing the desired destination, and then touch the one-touch dial button. – – – 5 Specify the Quality & Reduction settings for the original document to be sent. – 6 – 6-4 For details, refer to "Specifying the scanning quality and zoom ratio" on page 6-9. Specify the necessary Menu settings. – 7 To select an index, touch the corresponding tab, or touch or to select a different one. To change the index name, refer to "To name an index" on page 4-39. You can specify multiple destinations for one transmission with the same one-touch dial button. Up to 300 destinations can be specified at a time. If the optional fax kit has been installed, specify the FAX Menu settings. For details, refer to "Specifying additional functions" on page 6-13. Press the [Start] key. bizhub 362/282/222 Scan to SMB 6 Entering the number of a one-touch dial button A one-touch dial button is assigned a number, as shown in the illustration. You can quickly select a destination by specifying the number of a one-touch dial button instead of touching the button. Index 1 1 Position the document to be scanned. 2 Press the [Fax/Scan] key. 3 Press the [#] key on the control panel. bizhub 362/282/222 Index 36 6-5 Scan to SMB 6 4 Use the keypad to type in the number of a one-touch dial button. – You can specify multiple destinations for simultaneous transmission with the same onetouch dial button. Up to 300 destinations can be specified at a time. The specified one-touch dial button is highlighted. 5 Specify the Quality & Reduction settings for the original document to be sent. – 6 Specify the necessary Menu settings. – – 7 6-6 For details, refer to "Specifying the scanning quality and zoom ratio" on page 6-9. If the optional fax kit has been installed, specify the FAX Menu settings. For details, refer to "Specifying additional functions" on page 6-13. Press the [Start] key. bizhub 362/282/222 Scan to SMB 6 Searching for a one-touch dial button To find a one-touch dial button, the name of a destination registered with the button can be searched for. 1 Position the document to be scanned. 2 Press the [Fax/Scan] key. 3 Touch [Search]. 4 Type in the destination name, and then touch [Search]. A screen appears, containing the one-touch dial buttons programmed with a destination that begins with the entered name. 5 Touch the desired one-touch dial button. – You can specify multiple destinations for simultaneous transmission with the same onetouch dial button. Up to 300 destinations can be specified at a time. bizhub 362/282/222 6-7 Scan to SMB 6 6 Specify the Quality & Reduction settings for the original document to be sent. – 7 Specify the necessary Menu settings. – – 8 6-8 For details, refer to "Specifying the scanning quality and zoom ratio" on page 6-9. If the optional fax kit has been installed, specify the FAX Menu settings. For details, refer to "Specifying additional functions" on page 6-13. Press the [Start] key. bizhub 362/282/222 Scan to SMB 6.2 6 Specifying the scanning quality and zoom ratio You can specify the scanning quality and zoom ratio by touching [Quality & Reduction] in the screen that appears when the [Fax/Scan] key on the control panel is pressed. ! Detail When the transmission is complete, the specified settings return to their defaults. Quality You can select the scan resolution (amount of details). Select from the following resolution settings according to the type of document being scanned. Item Description Standard For documents containing plain text such as handwriting Fine Super Fine 600 dpi Text For documents containing small print, such as newspapers, or detailed illustrations Text/Photo 600 dpi Text&Photo For documents containing both text and images with color shades, such as photos GSR Super GSR 600 dpi Photo For documents containing color shades, such as photos ! Detail If data is sent using the "Text/Photo" setting, moiré patterns may appear in some photos. To reduce the appearance of moiré patterns, send the data using the "GSR" or "Super GSR" setting. When a high resolution is selected to send a clearer image, the size of the attached image data may exceed the size limitations of the provider or server being used. Before sending the data, check the transmission capacity. bizhub 362/282/222 6-9 Scan to SMB 6 To specify the scanning quality 1 Touch [Quality & Reduction]. 2 Touch [Quality], and then touch the desired quality setting. – 6-10 To select a higher resolution, touch [600dpi]. bizhub 362/282/222 Scan to SMB 6 Density According to the type of document being sent, select the appropriate density from the settings described below. Item Description Light For documents with a dark background color, such as newspapers and blueprints Std. For normal documents Dark For documents with faint or colored text ! Detail If "600 dpi Text" or "600 dpi Text & Photo" is selected, the density can be set to one of three levels: "Light", "Std.", and "Dark". To specify a density setting 1 Touch [Quality & Reduction]. 2 Touch [Density], and then touch the desired density setting. bizhub 362/282/222 6-11 Scan to SMB 6 Original Size Set. You can specify the scan area as a standard size. A portion of a large original document as well as a non-standard-sized document can be sent in a standard size. 1 Touch [Quality & Reduction]. 2 Touch [Reduction/Area], and then touch [Original Size Set.]. – 3 Select a scan area size, and then touch [Enter]. – – 6-12 The "Zoom" parameter has no effect, even if settings have been specified. Touch [Auto Detect] to automatically select the size closest to the size of the original document. However, Letter size is selected for documents smaller than Letter size. Touch [Metric] to specify metric sizes. bizhub 362/282/222 Scan to SMB 6.3 6 Specifying additional functions You can add the following functions by pressing the [Fax/Scan] key on the control panel, then touching [Menu] on the screen that appears. 2 Note If the optional fax kit has been installed, [Menu] changes to [Fax Menu]. 2 Note The following functions and parameters have no effect, even if settings have been specified. - "TSI" on the Setting 1 tab - "Rotation TX" on the Setting 1 tab - "Subject Selection" on the Network tab - "Reply Address" on the Network tab Item Setting 1 *(Set 1) Setting 2 *(Set 2) Description TX Report Select under which conditions the transmission report is to be output. Default: Outputs according to the specifications of the administrator. ON: Prints regardless of the transmission results. If TX Fails: Prints only when undeliverable. OFF: Does not print regardless of the transmission results. 2in1 Select whether to send using the 2in1 function (printing two pages to fit on one page). 2-Sided TX Select whether to perform double-sided transmission. You can specify the position of the binding margin and the document orientation. Priority TX Select whether a job is given priority over others. Timer TX Setting Select whether to set the send time. Specifies the send time when "ON" is selected. Stamp Specify whether the document is stamped to indicate that it has been scanned. The document must be loaded into the ADF. 2 Note To use the Stamp function, optional stamp unit must be installed. Network *(Net.) File Name Enter when a set file name is to be specified as the file name when saving the file. Up to 16 characters can be entered. E-Mail Notification Specify whether to have an e-mail message sent to a specified onetouch destination to notify you when the transmission is complete. * Changes to ( ) if the optional fax kit has been installed. bizhub 362/282/222 6-13 Scan to SMB 6 Specifying the transmission report printing conditions You can specify the conditions for printing a transmission report (TX Report). The printing conditions for a transmission report are preset with the Report Settings parameters from the Administrator Management screen. Select the appropriate printing conditions. Settings can be specified for the following. Setting Description Default Displays the printing conditions specified in the Administrator Management screen. ON Prints regardless of the results. If TX Fails Prints when the transmission failed. OFF Does not print regardless of the results. To specify the transmission report printing conditions 1 Touch [Menu]. – 2 Touch [Setting 1], then [TX Report]. – 6-14 If the optional fax kit has been installed, touch [FAX Menu]. If the optional fax kit has been installed, touch [Set 1], then [TX Report]. bizhub 362/282/222 Scan to SMB 3 6 Specify the desired printing conditions, and then touch [Enter]. Specifying 2in1 transmission 1 Touch [Menu]. – 2 If the optional fax kit has been installed, touch [FAX Menu]. Touch [Setting 1], then [2in1]. – If the optional fax kit has been installed, touch [Set 1], then [2in1]. – Touch the button again to cancel the setting. The button is highlighted. bizhub 362/282/222 6-15 Scan to SMB 6 Specifying double-sided transmission 1 Touch [Menu]. – 2 Touch [Setting 1], then [2-Sided TX]. – 3 If the optional fax kit has been installed, touch [Set 1], then [2Sided TX]. Select the desired binding margin position. – – – Left Bind: The document is scanned with a binding margin on the left side. Top Bind: The document is scanned with a binding margin at the top. Auto: The binding margin is set according to the scanning direction. 4 Touch [Original Direction]. 5 Select the orientation of the document, and then touch [Enter]. – 6-16 If the optional fax kit has been installed, touch [FAX Menu]. Auto: The long side of the document is automatically set as the binding position. bizhub 362/282/222 Scan to SMB 6 6 Touch [Enter]. – Touch [OFF] to cancel the setting. ! Detail When loading a double-sided document with pages of different widths, we recommend loading the pages with the same orientation. When a document with pages of different orientations is scanned, the orientation of the image data may not be correct. bizhub 362/282/222 6-17 Scan to SMB 6 Specifying priority transmission 1 Touch [Menu]. – 2 If the optional fax kit has been installed, touch [FAX Menu]. Touch [Setting 2], then [Priority TX]. – If the optional fax kit has been installed, touch [Set 2], then [Priority TX]. – Touch the button again to cancel the settings. The button is highlighted. 6-18 bizhub 362/282/222 Scan to SMB 6 Specifying timer transmission 1 Touch [Menu]. – 2 Touch [Setting 2], then [Timer TX Setting]. – 3 If the optional fax kit has been installed, touch [Set 2], then [Timer TX Setting]. Enter the time for transmission. – 4 If the optional fax kit has been installed, touch [FAX Menu]. Touch [Hour] or [Minute], and then type in the desired value using the keypad. Touch [Enter]. – Touch [OFF] to cancel the setting. bizhub 362/282/222 6-19 Scan to SMB 6 Specifying the stamp setting 1 Touch [Menu]. – 2 Touch [Setting 2], then [Stamp]. – 3 6-20 If the optional fax kit has been installed, touch [FAX Menu]. If the optional fax kit has been installed, touch [Set 2], then [Stamp]. Select the print position of the stamp, and then touch [Enter]. bizhub 362/282/222 Scan to SMB 6 Specifying the e-mail notification destination When the transmission of the data is complete, an e-mail message can be sent to the destination specified in the URL of the upload destination. 1 Touch [Menu]. – 2 Touch [Network], then [Email Notification]. – 3 If the optional fax kit has been installed, touch [FAX Menu]. If the optional fax kit has been installed, touch [Net.], then [Email Notification]. Select the destination address, and then touch [Enter]. – Touch [OFF] to cancel the setting. bizhub 362/282/222 6-21 Scan to SMB 6 Specifying a file name You can specify the file name of the image data to be sent. Up to 16 characters can be entered. When no file name is specified, the file is automatically sent with a name in the following format: <machine_name><scan_date_and_time>.<extension>. 1 Touch [Menu]. – 2 Touch [Network], then [File Name]. – 3 If the optional fax kit has been installed, touch [Net.], then [File Name]. Type in the file name, and then touch [Enter]. – – 6-22 If the optional fax kit has been installed, touch [FAX Menu]. Touch [OFF] to cancel the setting. It is not necessary to type in an extension. bizhub 362/282/222 Scan to SMB 6.4 6 If transmission could not be completed If the transmission could not be completed correctly, a transmission report is printed. ! Detail You can change the transmission report printing conditions. For details, refer to "Specifying the transmission report printing conditions (Report Settings)" on page 10-17. Viewing a transmission report 2 1 4 3 5 bizhub 362/282/222 6-23 Scan to SMB 6 No. Item Description 1 Report output date and time Shows the date and time that the report was printed. 2 Transmission source information (TSI) Shows the registered transmission source name. 3 Transmission information Shows the document number, the duration of the transmission, and the transmission mode. 4 Transmission result Shows the transmission result. Any of the following may appear. OK: The transmission was completed successfully. INTERR: The transmission was interrupted. F. MEM: The memory capacity was exceeded. NG: The transmission failed. PT. DEL: The transmission to some destinations failed. Error code: For details, refer to "Network error list" on page 12-4. 5 Transmission image Shows a part of the sent image. Resending You can resend up to 20 failed transmissions. 1 Touch [Job List], then [Type], and then select the document that could not be sent. – 2 To send to the same destination, touch [Retry]. – 6-24 If [Retry] and [Change Destination] appear in the screen, the document does not need to be scanned again. To send to a different destination, touch [Change Destination]. bizhub 362/282/222 Scan to SMB 6.5 6 Registering destinations Programming one-touch dial button By registering a destination with a one-touch dial button, transmissions can be performed easily and accurately. 2 Note If the "Restrict One-Touch Editing" parameter on the Administrator Set screen (displayed from the Administrator Management screen) is set to "ON", [E-Mail Input] is added to the Administrator Management 1 screen and can be used to register, change and delete one-touch dial buttons. For details on the Administrator Set screen, refer to the User manual [Copy Operations]. If the optional fax kit has been installed, the [E-Mail Input] changes to the [FAX]. Settings can be specified for the following. Item Description Remote Destination Name Type in the destination name that will appear on the one-touch dial button. Up to 12 characters can be entered. Host Address Specifies the destination computer with an IP address or host name. Directory Type in the file path of the destination folder. Up to 128 characters can be entered. 2 Note A shared folder created on the domain controller of Windows Server 2003 and Windows Server 2008 cannot be specified. User Name Type in the login name for the destination computer. Up to 32 characters can be entered. Password Type in the login password for the destination computer. Up to 14 characters can be entered. File Type/Coding Method Sets the file type and encoding method for saving data. You can select from TIFF (multiple), TIFF (single), and PDF for the file type. Select either "MH" or "MMR" as the encoding method for the selected file format. The data capacity is lowest with "MMR" and highest with "MH". bizhub 362/282/222 6-25 Scan to SMB 6 To program a one-touch dial button 1 Press the [Utility/Counter] key. 2 Touch [User Setting]. 3 Touch [E-Mail Input]. – 4 6-26 If the optional fax kit has been installed, touch [FAX]. Touch [One-Touch]. bizhub 362/282/222 Scan to SMB 5 6 Touch the one-touch dial button to be programmed. – – Touch an Index tab or [Index List], then the desired one-touch dial button. If the machine is set to allow LDAP searches, a screen appears, allowing you to permit or prohibit the address registered with the one-touch dial button to be found with an LDAP search. If LDAP searches are not to be allowed, select "No". 6 Type in the destination name that will appear on the one-touch dial button, and then touch [Next]. 7 Select the communication mode. Touch [PC], [SMB], then [Next]. – 8 If mode 476 of the software switch settings was changed, only communication modes that can be selected appear. For details, refer to "Specifying software switch settings (machine functions)" on page 10-28. Enter the destination host address, and then touch [Next]. – – To change the host name, touch [Host Name], and then touch [Next]. To reenter an address, touch or to move the cursor, or press the [C] (clear) key to enter a new address. bizhub 362/282/222 6-27 Scan to SMB 6 9 Enter the file path of the data to be saved, and then touch [Next]. 10 Type in the login user name, and then touch [Next]. 11 Type in the login password, and then touch [Next]. – 12 6-28 To confirm the password, enter the password again. Check the destination information. bizhub 362/282/222 Scan to SMB 6 13 Check the information to be registered. 14 To specify the file type of the file to be saved and the encoding method, touch [Mode 1]. 15 Select the file format and encoding method, and then touch [Enter]. 16 Touch [Enter] until the initial screen appears. bizhub 362/282/222 6-29 Scan to SMB 6 Changing or deleting a one-touch dial button 1 Perform steps 1 through 4 of the procedure in "To program a onetouch dial button". 2 Touch the one-touch dial button to be changed or deleted. – 3 Touch the button for the information to be changed, and then make the change. – 6-30 If the specified one-touch dial button is programmed as an administrator forwarding destination, the screen for entering the administrator number appears. To delete the information, touch [Delete]. 4 Check the information to be registered, and then touch [Enter]. 5 Touch [Enter] until the initial screen appears. bizhub 362/282/222 Scan to SMB 6 Copying a one-touch dial button 1 Perform steps 1 through 4 of the procedure in "To program a onetouch dial button". 2 Touch the one-touch dial button to be copied. 3 Touch [One-Touch], then [OneTouch Copy]. 4 Touch the one-touch dial button where the information is copied to. – – 5 Select a one-touch dial button that has not yet been programmed. To deselect the one-touch dial button where the information is to be copied to, touch the selected one-touch dial button again. Touch [Enter] until the initial screen appears. bizhub 362/282/222 6-31 6 6-32 Scan to SMB bizhub 362/282/222 7 Internet faxing Internet faxing 7 7 Internet faxing 7.1 Specifying a destination with a one-touch dial button You can transmit data simply by touching a one-touch dial button if the email address of a destination or a mail program has been registered with a one-touch dial button in advance. ! Detail For registering one-touch dial buttons, refer to "Registering destinations" on page 7-33. For registering mail programs, refer to "Registering mail programs" on page 4-41. To change the index name, refer to "Naming an index" on page 4-39. Selecting a one-touch button A one-touch dial button can be selected in any of the following ways. Use the appropriate method according to the number of recipients and the desired use. - Directly touching the one-touch dial button - Entering the number of the one-touch dial button - Specifying chain dialing Specifying a destination by touching a one-touch dial button 1 Position the document to be scanned. 2 Press the [Fax/Scan] key. 3 Touch [One-Touch]. bizhub 362/282/222 7-3 Internet faxing 7 4 Select the index containing the desired destination, and then touch the one-touch dial button. – – 5 Specify the Quality & Reduction settings for the original document to be sent. – 6 – 7-4 For details, refer to "Specifying the scanning quality and zoom ratio" on page 7-12. Specify the necessary Menu settings. – 7 To select an index, touch the corresponding tab, or touch or to select a different one. You can specify multiple destinations for one transmission with the same one-touch dial button. Up to 300 destinations can be specified at a time. If the optional fax kit has been installed, specify the FAX Menu settings. For details, refer to "Specifying additional functions" on page 7-16. Press the [Start] key. bizhub 362/282/222 Internet faxing 7 Entering the number of a one-touch dial button A one-touch dial button is assigned a number, as shown in the illustration. You can quickly select a destination by specifying the number of a one-touch dial button instead of touching the button. Index 1 1 Position the document to be scanned. 2 Press the [Fax/Scan] key. 3 Press the [#] key on the control panel. bizhub 362/282/222 Index 36 7-5 Internet faxing 7 4 Use the keypad to type in the number of the one-touch dial button. – You can specify multiple destinations for simultaneous transmission with the same onetouch dial button. Up to 300 destinations can be specified at a time. The specified one-touch dial button is highlighted. 5 Specify the Quality & Reduction settings for the original document to be sent. – 6 Specify the necessary Menu settings. – – 7 7-6 For details, refer to "Specifying the scanning quality and zoom ratio" on page 4-14. If the optional fax kit has been installed, specify the FAX Menu settings. For details, refer to "Specifying additional functions" on page 7-16. Press the [Start] key. bizhub 362/282/222 Internet faxing 7 Searching for a one-touch dial button To find a one-touch dial button, the name of a destination registered with the button can be searched for. 1 Position the document to be scanned. 2 Press the [Fax/Scan] key. 3 Touch [Search]. – 4 If "LDAP Search" in the Network Settings screen is set to "Yes", a screen appears, allowing you to select the search method. Touch [One-Touch Search] when the screen appears. Type in the destination name, and then touch [Search]. A screen appears, containing the one-touch dial buttons programmed with a destination that begins with the entered name. 5 Touch the desired one-touch dial button. – You can specify multiple destinations for simultaneous transmission with the same onetouch dial button. Up to 300 destinations can be specified at a time. bizhub 362/282/222 7-7 Internet faxing 7 6 Specify the Quality & Reduction settings for the original document to be sent. – 7 Specify the necessary Menu settings. – – 8 7-8 For details, refer to "Specifying the scanning quality and zoom ratio" on page 7-12. If the optional fax kit has been installed, specify the FAX Menu settings. For details, refer to "Specifying additional functions" on page 7-16. Press the [Start] key. bizhub 362/282/222 Internet faxing 7 Specifying chain dialing If the destination address is longer than 64 characters, the address can be specified by combining addresses registered to one-touch dial buttons and an entered address. Touch [Chain], and then select one-touch dial buttons or enter an address. ! Detail - Chain dialing can only be used with one destination per transmission. - With chain dialing, the address can contain up to 192 digits (64 characters from a one-touch dial button + 64 characters from a one-touch dial button + 64 characters from an entered address). - The one-touch dial buttons to be used with chain dialing must be programmed in advance. bizhub 362/282/222 7-9 Internet faxing 7 7.2 Entering an address You can directly enter destinations that have not been registered in a onetouch dial button. In addition, multiple destinations can be specified using chain dialing to combine destinations registered in a one-touch dial button and destinations that are entered. To enter an address 7-10 1 Position the document to be scanned. 2 Press the [Fax/Scan] key. 3 Touch [Direct Input]. 4 To select the communication mode. Touch [Change Comm. Mode]. 5 Touch [InternetFAX], [Internet FAX], then [Enter]. bizhub 362/282/222 Internet faxing 6 7 Type in the destination address. – – 7 To select the maximum transmission size and the encoding method, touch [E-Mail Mode]. – – 8 For details, refer to "Specifying the scanning quality and zoom ratio" on page 7-12. Specify the necessary Menu settings. – – 10 For details, refer to "Priority Compress Level (E-Mail Mode)" on page 3-30. After specifying the desired settings, touch [Enter]. Specify the Quality & Reduction settings for the original document to be sent. – 9 To change an entered address, press the [C] (clear) key, and then enter a new address. If parts of frequently used addresses are registered, they can be quickly entered by touching [Domain]. For details, refer to "Registering a domain name" on page 3-52. If the optional fax kit has been installed, specify the FAX Menu settings. For details, refer to "Specifying additional functions" on page 7-16. Press the [Start] key. bizhub 362/282/222 7-11 Internet faxing 7 7.3 Specifying the scanning quality and zoom ratio You can specify the scanning quality and zoom ratio by touching [Quality & Reduction] in the screen that appears when the [Fax/Scan] key on the control panel is pressed. ! Detail When the transmission is complete, the specified settings return to their defaults. Quality You can select the scan resolution (amount of details). Select from the following resolution settings according to the type of document being scanned. Item Description Standard For documents containing plain text such as handwriting Fine Super Fine 600 dpi Text For documents containing small print, such as newspapers, or detailed illustrations Text/Photo 600 dpi Text&Photo For documents containing both text and images with color shades, such as photos GSR Super GSR 600 dpi Photo For documents containing color shades, such as photos ! Detail If data is sent using the "Text/Photo" setting, moiré patterns may appear in some photos. To reduce the appearance of moiré patterns, send the data using the "GSR" or "Super GSR" setting. When a high resolution is selected to send a clearer image, the size of the attached image data may exceed the size limitations of the provider or server being used. Before sending the data, check the transmission capacity. 7-12 bizhub 362/282/222 Internet faxing 7 To specify the scanning quality 1 Touch [Quality & Reduction]. 2 Touch [Quality], and then touch the desired quality setting. – To select a higher resolution, touch [600dpi]. bizhub 362/282/222 7-13 Internet faxing 7 Density According to the type of document being sent, select the appropriate density from the settings described below. Item Description Light Std. For documents with a dark background color, such as newspapers and blueprints For normal documents Dark For documents with faint or colored text ! Detail If "600 dpi Text" or "600 dpi Text & Photo" is selected, the density can be set to one of three levels: "Light", "Std.", and "Dark". To specify a density settings 7-14 1 Touch [Quality & Reduction]. 2 Touch [Density], and then touch the desired density setting. bizhub 362/282/222 Internet faxing 7 Original Size Set. You can specify the scan area as a standard size. A portion of a large original document as well as a non-standard-sized document can be sent in a standard size. 1 Touch [Quality & Reduction]. 2 Touch [Reduction/Area], and then touch [Original Size Set.]. – 3 The "Zoom" parameter has no effect, even if settings have been specified. Select a scan area size, and then touch [Enter]. – – Touch [Auto Detect] to automatically select the size closest to the size of the document. However, Letter size is selected for documents smaller than Letter size. Touch [Metric] to specify metric sizes. bizhub 362/282/222 7-15 Internet faxing 7 7.4 Specifying additional functions You can add the following functions by pressing the [Fax/Scan] key on the control panel, then touching [Menu] on the screen that appears. 2 Note If the optional fax kit has been installed, [Menu] changes to [Fax Menu]. 2 Note The following functions have no effect, even if settings have been specified. - "File name" on the Network tab - "E-Mail Notification" on the Network tab Item Setting 1 **(Set 1) Setting 2 **(Set 2) Description TSI Select the entered information, such as this machine‘s name, fax number or address, that is printed at the edge of the page. In addition, the destination name registered with a one-touch dial button can be printed in this information. For details on registering transmission source information, refer to "Registering transmission source names" on page 10-5. TX Report Select under which conditions the transmission report is to be output. Default: Outputs according to the specifications of the administrator. ON: Prints regardless of the transmission results. If TX Fails: Prints only when undeliverable. OFF: Does not print regardless of the transmission results. 2in1 Select whether to send using the 2in1 function (printing two pages to fit on one page). 2-Sided TX Select whether to perform double-sided transmission. You can specify the position of the binding margin and the document orientation. Rotation TX Select whether to rotate the image according to the paper orientation of the receiving machine. The quality can be specified as 200 dpi or less when sending A4 size. Priority TX Select whether a job is given priority over others. Timer TX Setting Select whether to set the send time. Specifies the send time when "ON" is selected. Stamp Specify whether the document is stamped to indicate that it has been scanned. The document must be loaded into the ADF. 2 Note To use the Stamp function, optional stamp unit must be installed. 7-16 bizhub 362/282/222 Internet faxing 7 Item Network **(Net.) Description Subject Selection* The subject line of an e-mail message can be selected from subject lines registered in advance. Reply Address* Displays the e-mail address of this machine as the sender of the email message. When specifying e-mail addresses other than that of this machine, select an address from a registered one-touch dial button. File Name Enter when a set file name is to be specified as the file name when saving the file. Up to 16 characters can be entered. 2 Note The file name in Network functions only when the destination is a computer e-mail address. * The receiving machine prints these items when "Yes" is specified on the RX Doc. Header Print screen. ** Changes to ( ) if the optional fax kit has been installed. bizhub 362/282/222 7-17 Internet faxing 7 Specifying the transmission source setting Entered text such as the name, fax number, and address can be printed at the top of the output page. FROM: NEW YORK Image data has been attached to the e-mail. 1 Touch [Menu]. – 2 Touch [Setting 1], then [TSI]. – 7-18 If the optional fax kit has been installed, touch [FAX Menu]. If the optional fax kit has been installed, touch [Set 1], then [TSI]. 3 Select the desired type of transmission source information. 4 To print the transmission source information, touch [TSI Selection]. bizhub 362/282/222 Internet faxing 5 7 Select the name of the transmission source, and then touch [Enter]. – Touch [OFF] to cancel the setting. Specifying the transmission report printing conditions You can specify the conditions for printing a transmission report (TX Report). The printing conditions for a transmission report are preset with the Report Settings parameters from the Administrator Management screen. Select the appropriate printing condition. 1 Touch [Menu]. – 2 Touch [Setting 1], then [TX Report]. – 3 If the optional fax kit has been installed, touch [FAX Menu]. If the optional fax kit has been installed, touch [Set 1], then [TX Report]. Check the printing conditions, and then touch [Enter]. bizhub 362/282/222 7-19 Internet faxing 7 Specifying 2in1 transmission 1 Touch [Menu]. – 2 If the optional fax kit has been installed, touch [FAX Menu]. Touch [Setting 1], then [2in1]. – If the optional fax kit has been installed, touch [Set 1], then [2in1]. – Touch the button again to cancel the settings. The button is highlighted. 7-20 bizhub 362/282/222 Internet faxing 7 Specifying double-sided transmission 1 Touch [Menu]. – 2 Touch [Setting 1], then [2-Sided TX]. – 3 If the optional fax kit has been installed, touch [FAX Menu]. If the optional fax kit has been installed, touch [Set 1], then [2Sided TX]. Select the desired binding margin position. – – – Left Bind: The document is scanned with a binding margin on the left side. Top Bind: The document is scanned with a binding margin at the top. Auto: The binding margin is set according to the scanning direction. 4 Touch [Original Direction]. 5 Select the orientation of the document, and then touch [Enter]. – 6 Auto: The long side of the document is automatically set as the binding position. Touch [Enter]. – Touch [OFF] to cancel the setting. bizhub 362/282/222 7-21 Internet faxing 7 ! Detail When loading a double-sided document with pages of different widths, we recommend loading the pages with the same orientation. When a document with pages of different orientations is scanned, the orientation of the image data may not be correct. 7-22 bizhub 362/282/222 Internet faxing 7 Specifying rotation transmission 1 Touch [Menu]. – 2 If the optional fax kit has been installed, touch [FAX Menu]. Touch [Setting 1], then [Rotation TX]. – If the optional fax kit has been installed, touch [Set 1], then [Rotation TX]. – Touch the button again to cancel the settings. The button is highlighted. Specifying priority transmission 1 Touch [Menu]. – 2 If the optional fax kit has been installed, touch [FAX Menu]. Touch [Setting 2], then [Priority TX]. – If the optional fax kit has been installed, touch [Set 2], then [Priority TX]. – Touch the button again to cancel the settings. The button is highlighted. bizhub 362/282/222 7-23 Internet faxing 7 Specifying timer transmission 1 Touch [Menu]. – 2 Touch [Setting 2], then [Timer TX Setting]. – 3 Touch [Hour] or [Minute], and then type in the desired value using the keypad. Touch [Enter]. – 7-24 If the optional fax kit has been installed, touch [Set 2], then [Timer TX Setting]. Enter the time for transmission. – 4 If the optional fax kit has been installed, touch [FAX Menu]. Touch [OFF] to cancel the setting. bizhub 362/282/222 Internet faxing 7 Specifying the stamp setting 1 Touch [Menu]. – 2 Touch [Setting 2], then [Stamp]. – 3 If the optional fax kit has been installed, touch [FAX Menu]. If the optional fax kit has been installed, touch [Set 2], then [Stamp]. Select the print position of the stamp, and then touch [Enter]. bizhub 362/282/222 7-25 Internet faxing 7 Changing the subject The subject line of an e-mail message can be selected from subject lines registered in advance. To specify settings, refer to the Scanner Settings screen, displayed from the Administrator Management screen on page 3-35. 0 The subject line is printed by the receiving machine when "Yes" is specified in the RX Doc. Header Print screen. 1 Touch [Menu]. – 2 If the optional fax kit has been installed, touch [FAX Menu]. Touch [Network], then [Subject Selection]. – 3 If the optional fax kit has been installed, touch [Net.], then [Subject Selection]. Select a subject, and then touch [Enter]. – Touch [OFF] to cancel the setting. ! Detail When no subject is registered, the e-mail subject line “[Image File] (onetouch name), (machine name), (number)” is sent. 7-26 bizhub 362/282/222 Internet faxing 7 Specifying a reply address From the e-mail addresses registered with a one-touch dial button, you can specify the return e-mail address displayed to the recipient. 0 The reply address is printed by the receiving machine when "Yes" is specified in the RX Doc. Header Print screen. 1 Touch [Menu]. – 2 Touch [Network], then [Reply Address]. – 3 If the optional fax kit has been installed, touch [FAX Menu]. If the optional fax kit has been installed, touch [Net.], then [Reply Address]. Select a return address, and then touch [Enter]. – Touch [OFF] to cancel the setting. bizhub 362/282/222 7-27 Internet faxing 7 Specifying a file name You can specify the file name of the image data to be attached in an e-mail. Up to 16 characters can be entered. 1 Touch [Menu]. – 2 Touch [Network], then [File Name]. – 3 If the optional fax kit has been installed, touch [FAX Menu]. If the optional fax kit has been installed, touch [Net.], then [File Name]. Type in the file name, and then touch [Enter]. – – Touch [OFF] to cancel the setting. It is not necessary to type in an extension. 2 Note When no file name is specified, the file is automatically sent with a name in the following format: <machine_name><scan_date_and_time>.<extension>. 7-28 bizhub 362/282/222 Internet faxing 7.5 7 If transmission could not be completed If the transmission could not be completed correctly, a transmission report is printed. ! Detail You can change the transmission report printing conditions. For details, refer to "Specifying the transmission report printing conditions (Report Settings)" on page 10-17. Viewing a transmission report 2 1 3 4 5 No. Item Description 1 Report output date and time Shows the date and time that the report was printed. 2 Transmission source information (TSI) Shows the registered transmission source name. 3 Transmission Information Shows the document number, the duration of the transmission, and the transmission mode. bizhub 362/282/222 7-29 Internet faxing 7 No. Item Description 4 Transmission result Shows the transmission result. Any of the following may appear. OK: The transmission was completed successfully. INTERR: The transmission was interrupted. F. MEM: The memory capacity was exceeded. NG: The transmission failed. PT. DEL: The transmission to some destinations failed. Error code: For details, refer to "Network error list" on page 12-4. 5 Transmission image Shows a part of the sent image. Resending You can resend up to 20 failed transmissions. 1 Touch [Job List], then [Type], and then select the document that could not be sent. – 2 To send to the same destination, touch [Retry]. – 7-30 If [Retry] and [Change Destination] appear in the screen, the document does not need to be scanned again. To send to a different destination, touch [Change Destination]. bizhub 362/282/222 Internet faxing 7.6 7 Receiving Internet faxes Not only can this machine send Internet faxes, it can also receive Internet faxes. The methods for receiving Internet faxes are described below. Settings for Internet faxing Specify the following settings in advance. If the settings are not specified correctly, communication malfunctions may occur and Internet faxes may not be properly received. - IP address of this machine - POP3 server address - POP3 user name - POP3 password Receiving Internet faxes automatically Internet faxes are sent and received by an e-mail server. If the abovementioned settings are correctly specified, the arrival of Internet faxes to the specified POP3 server is periodically checked and faxes are received (printed). However, if "Auto-RX Check" in the POP3 Settings screen (displayed from the Network Setting screen) is set to "Check OFF", the data is stored in the POP3 server and not printed. In this case, perform reception manually. For details, refer to "Receiving Internet faxes manually" on page 7-32. In addition, you can specify whether to print the received document or save it in a box. For details, refer to "Specifying the processing method for received documents (Document Management)" on page 10-22. Data the can be received Data of the following formats can be received. - Text format - TIFF-F image - Text and TIFF-F image combination - DSN and MDN The following formats may not be received. - The file format of an original application ! Detail If the e-mail message is in a format that cannot be received, a result notification (MDN) is returned to the sender as described below. - TIFF and PDF files sent using Scan to E-Mail - Data forwarded to the Internet fax address bizhub 362/282/222 7-31 Internet faxing 7 Receiving Internet faxes manually 1 Press the [Utility/Counter] key. 2 Touch [User Management]. 3 Touch [POP3 RX]. When an Internet fax has been received by the POP3 server, it is received and printed. 7-32 4 A mark is displayed at the bottom of the screen during reception. 5 When reception is complete, touch [Enter] until the initial screen appears. bizhub 362/282/222 Internet faxing 7.7 7 Registering destinations Programming a one-touch dial button By registering a destination with a one-touch dial button, transmissions can be performed easily and accurately. You can register two types of destinations with a one-touch dial button: a main destination and a secondary destination, where the data is sent if transmission to the main destination fails. 2 Note A secondary recipient can be specified if the optional scanner unit or fax kit is installed. If the "Restrict One-Touch Editing" parameter on the Administrator Set screen (displayed from the Administrator Management screen) is set to "ON", [E-Mail Input] is added to the Administrator Management 1 screen and can be used to register, change and delete one-touch dial buttons. For details on the Administrator Set screen, refer to the User manual [Facsimile Operations]. If the optional fax kit has been installed, the [E-Mail Input] changes to the [FAX]. ! Detail The following communication modes can be specified for the secondary destination. - PC (E-Mail) - PC (Scanner)* - InternetFAX (Internet FAX) - InternetFAX (IP Address Fax)* - InternetFAX (IP Relay)* - FAX (G3)** * The communication mode can be specified if the optional scanner unit or fax kit is installed. ** The communication mode can be specified if the optional fax kit is installed. bizhub 362/282/222 7-33 Internet faxing 7 Settings can be specified for the following. Item Description One-Touch Name Type in the destination name that will appear on the one-touch dial button. Up to 12 characters can be entered. Destination Type in the destination e-mail address. Up to 64 characters can be entered. TX Size (Max.) Specify the maximum document size that can be transmitted. Select "Letter", "Legal", or "11 × 17". TX Quality (Max.) Specify the maximum resolution that can be sent. Select "200 dpi", "400 dpi", or "600 dpi". Coding method Select the encoding method for data to be sent. Select "MH", "MR", or "MMR". The data capacity is lowest with "MMR" and highest with "MH". To program a one-touch dial button 7-34 1 Press the [Utility/Counter] key. 2 Touch [User Setting]. bizhub 362/282/222 Internet faxing 3 7 Touch [E-Mail Input]. – If the optional fax kit has been installed, touch [FAX]. 4 Touch [One-Touch]. 5 Touch the one-touch dial button to be programmed. – – 6 Touch an index tab or [Index List], then the desired one-touch dial button. If the machine is set to allow LDAP searches, a screen appears, allowing you to permit or prohibit the address registered with the one-touch dial button to be found with an LDAP search. If LDAP searches are not to be allowed, select "No". Type in the destination name that will appear on the one-touch dial button, and then touch [Next]. bizhub 362/282/222 7-35 Internet faxing 7 7 Select the communication mode. Touch [InternetFAX], [Internet FAX], then [Next]. – 8 Enter the destination e-mail address, and then touch [Next]. – – 7-36 If mode 476 of the software switch settings was changed, only communication modes that can be selected appear. For details, refer to "Specifying software switch settings (machine functions)" on page 10-28. If parts of frequently used addresses are registered, they can be quickly entered by touching [Domain]. For details, refer to "Registering a domain name" on page 3-52. To change an entered address, press the [C] (clear) key, and then enter a new address. 9 To change "TX Size (Max.)", "TX Quality (Max.)", or "Coding Method", which have been specified in advance by the administrator, touch [E-Mail Mode], specify the settings, and then touch [Enter]. 10 Check the information to be registered, and then touch [Enter]. 11 Touch [Enter] until the initial screen appears. bizhub 362/282/222 Internet faxing 7 Changing or deleting a one-touch dial button 1 Perform steps 1 through 4 of the procedure in "To program a onetouch dial button". 2 Touch the one-touch dial button to be changed or deleted. – 3 If the specified one-touch dial button is programmed as an administrator forwarding destination, the screen for entering the administrator number appears. Touch the button for the information to be changed, and then make the change. – To delete the information, touch [Delete]. 4 Check the information to be registered, and then touch [Enter]. 5 Touch [Enter] until the initial screen appears. bizhub 362/282/222 7-37 Internet faxing 7 Copying a one-touch dial button 1 Perform steps 1 through 4 of the procedure in "To program a onetouch dial button". 2 Touch the one-touch dial button to be copied. 3 Touch [One-Touch], then [OneTouch Copy]. 4 Touch the one-touch dial button where the information is copied to. – – 5 7-38 Select a one-touch dial button that has not yet been programmed. To deselect the one-touch dial button where the information is to be copied to, touch the selected one-touch dial button again. Touch [Enter] until the initial screen appears. bizhub 362/282/222 Internet faxing 7 Registering/deleting a secondary destination 0 A secondary recipient can be specified if the optional scanner unit or fax kit is installed. 1 Perform steps 1 through 9 of the procedure in "To program a onetouch dial button". 2 Touch the one-touch dial button where the secondary destination is to be registered. 3 Touch [One-Touch], then [Sub Address Registration]. 4 Select the communication mode for the secondary destination. – If mode 476 of the software switch settings was changed, only communication modes that can be selected appear. For details, refer to "Specifying software switch settings (machine functions)" on page 10-28. 5 Enter the secondary destination information, and then touch [Enter]. 6 Touch [Enter] until the initial screen appears. bizhub 362/282/222 7-39 7 7-40 Internet faxing bizhub 362/282/222 8 Using an LDAP server Using an LDAP server 8 8 Using an LDAP server 8.1 Searching the destination information from the server You can search a destination from the LDAP server. To use the LDAP search function, set "LDAP Search" in the LDAP Setting screen (displayed from the Network Setting screen) to "Yes" in advance to enable LDAP searches, and register the information of the LDAP server to be connected. For details, refer to "Specifying the network settings" on page 3-4. To register the LDAP server, refer to "LDAP Setting" on page 3-44. 2 Note If "^" is included in the registered information, the destination may not be found correctly. Basic Search and Detail Search The LDAP server contains various types of destination information. With the LDAP search function of this machine, you can use a basic search method by specifying a keyword that meets the information contained in the address, or you can use an advanced search method by specifying detailed search items and conditions. Item Description Basic Search If a keyword is entered, the search can be performed based on the keyword. The keyword can contain up to 10 characters. Detail Search Searches the address by specifying a keyword for various search items and specifying conditions. Up to 10 characters can be entered. In addition, four conditions can be specified at a time. The following search items can be selected: Full name, EMail, Last Name, First Name, Fax, City, Company, Department The following conditions can be selected: Contains (keyword), AND, START, End, OFF 2 Note If 11 or more characters are entered for the keyword, the tenth character is replaced with the last character entered, preventing the search from being performed correctly. Therefore, be sure to enter no more than 10 characters. bizhub 362/282/222 8-3 Using an LDAP server 8 To search the destination information 8-4 1 Press the [Fax/Scan] key. 2 Touch [Search]. 3 Touch [LDAP Search]. 4 When multiple LDAP servers are registered, select the server to be searched, and then touch [Enter]. bizhub 362/282/222 Using an LDAP server 5 8 Touch [Name]. – To specify detailed search conditions, touch [Detail Search]. 6 Type in the keyword, and then touch [Enter]. 7 Touch [Start Search]. 8 Select the destination. – To check the search conditions, touch [Search Condition]. 9 Enter the destination information, and then touch [Dest. Register]. 10 Select the transmission method, and then touch [Enter]. bizhub 362/282/222 8-5 Using an LDAP server 8 8.2 Registering destination information to one-touch dial buttons To register destination information to a one-touch dial button If bit 7 of mode 466 is set to "1" in the Soft SW Setting screen, you must log on with external server authentication before an LDAP search can be performed. 1 Press the [Utility/Counter] key. 2 Touch [User Setting]. 3 Touch [E-Mail Input]. – 8-6 If the optional fax kit has been installed, touch [FAX]. 4 Touch [One-Touch]. 5 Select the one-touch dial button to be programmed. 6 On the LDAP Search screen, touch [ON], and then touch [Enter]. bizhub 362/282/222 Using an LDAP server 7 When multiple LDAP servers are registered, select the server to be searched, and then touch [Enter]. 8 Touch [Name]. – To specify detailed search conditions, touch [Detail Search]. 9 Type in the keyword, and then touch [Enter]. 10 Touch [Start Search]. 11 Select the destination. – 8 To check the search conditions, touch [Search Condition]. bizhub 362/282/222 8-7 Using an LDAP server 8 8-8 12 Enter the destination information, and then touch [Set]. 13 Select the transmission method, and then touch [Enter]. 14 Check the information to be registered, and then touch [Enter]. 15 Touch [Enter] until the initial screen appears. bizhub 362/282/222 9 Specifying settings using PageScope Web Connection Specifying settings using PageScope Web Connection 9 Specifying settings using PageScope Web Connection 9.1 Items that can be specified using PageScope Web Connection 9 PageScope Web Connection is a device management utility supported by the HTTP server built into the device. Using a Web browser on a computer connected to the network, machine settings can be specified from PageScope Web Connection. When changing settings, operations such as typing text can be performed more easily from your computer. Settings for the following network and scan functions can be specified. PageScope Web Connection provides a User mode, which can be accessed by all users, and an Administrator mode, which can only be accessed with the required administrator password. Settings for the following can be specified in each mode. Scan tab (User mode) Item Description One-Touch Key Registration Register one-touch dial destinations for recipients of data sent using the Scan to E-Mail, Scan to FTP, Scan to SMB, or Internet fax operation. The registered data can also be changed or deleted. In addition, the index name can be changed. FAX Program Registration Register fax programs as one-touch dial destinations. Unlike the one-touch dial destination where only recipients can be registered, scan settings and multiple recipients can be registered. The registered data can also be changed or deleted. Domain Name Registration Register specific characters in advance for quick input such as when entering a domain name. ! Detail When the "Restrict One-Touch Editing" parameter on the Administrator Set screen (displayed from the Administrator Management screen) is set to "ON", the Scan (2) tab is added to the Administrator mode page so that one-touch dial destinations can be registered, changed, or deleted. The Scan tab does not appear on the User mode page. bizhub 362/282/222 9-3 Specifying settings using PageScope Web Connection 9 Scan tab (Administrator mode) Item One-Touch Key Registration Description Export Exports the one-touch dial button information registered on this machine and saves the data as a file. Import Imports the one-touch dial button information saved on a computer and writes the data to this machine. TSI Registration TX Settings Register the text, such as a name, fax number, or address, that is printed at the top of pages sent with the Internet fax operation. Register the transmission source name that is added at the top of e-mail messages sent using the Scan to E-Mail operation. TX Settings Specify the default transmission settings. Com. Mode Select whether or not each communication mode can be used. RX Settings Specify the time and day of the week to print documents received with the Internet fax operation. Scan Setting Specify the device name of this machine, which will be used in file names, and the transmission settings for scanned data. TX Document When sending documents from this machine, the document can be forwarded simultaneously to the addresses specified by the administrator. Specify the address of the forwarding destination. RX Document Report Settings Port Specify how documents received over a network are processed and forwarded. All Other Documents Specify how documents not received over a network are processed and forwarded. Specify the output conditions of result reports and transmission reports. 2 Note If the optional fax kit has been installed, the Scan tab changes to the Fax/Scan tab. 9-4 bizhub 362/282/222 Specifying settings using PageScope Web Connection 9 Network tab (Administrator mode) Item Common Setting E-Mail/ Internet FAX Description TCP/IP Specify the required settings for using this machine over a network. IP Filtering Select whether or not reception is possible within the range of specified IP addresses. IPP For details, refer to the User manual [Print Operations]. NetWare For details, refer to the User manual [Print Operations]. NetWare Status For details, refer to the User manual [Print Operations]. Windows For details, refer to the User manual [Print Operations]. AppleTalk For details, refer to the User manual [Print Operations]. LDAP Specify whether to use the LDAP search function. LDAP Server Setting Register the LDAP server to be searched when using the LDAP search function. POP3 Specify the POP3 server to be used with Internet faxing. SMTP Specify the SMTP server to be used with the Scan to EMail or Internet fax operation. Subject/Text Register the subject and text of e-mail messages sent with the Scan to E-Mail or Internet fax operation. Other Specify other e-mail transmission settings. FTP Configuration Specify FTP server settings and FTP proxy server settings. SNMP Select whether or not SNMP is used. SSL/TLS When SSL/TLS is enabled, the communication between the machine and the client computer can be encrypted. Specify settings for creating, deleting, or encrypting certificates. User Authentication Displays the authentication type when "External Server Authentication" is specified. Specify the server type and domain name to be used in authentication. bizhub 362/282/222 9-5 Specifying settings using PageScope Web Connection 9 9.2 Using PageScope Web Connection Operating environment Item Environment Network Ethernet (TCP/IP) Computer applications For Windows NT 4.0: Microsoft Internet Explorer 4 or later, or Netscape Navigator 4.73 or 7.0 For Windows 2000: Microsoft Internet Explorer 5 or later, or Netscape Navigator 7.0 For Windows XP/Server 2003: Microsoft Internet Explorer 6 or later, or Netscape Navigator 7.0 For Windows Vista/Server 2008: Microsoft Internet Explorer 7 or later, or Netscape Navigator 7.0 * With Microsoft Internet Explorer 5.5, the one-touch dial buttons may not exported correctly. Use Microsoft Internet Explorer 5.5 Service Pack 1 or later. ! Detail PageScope Web Connection is a device management utility supported by the HTTP server built into the device. Using a Web browser on a computer connected to the network, machine settings can be specified from PageScope Web Connection. 9-6 bizhub 362/282/222 Specifying settings using PageScope Web Connection 9 Accessing PageScope Web Connection PageScope Web Connection can be accessed directly from a Web browser. Do not use a proxy server when accessing from PageScope Web Connection. 1 Start the Web browser. 2 In the Address bar, type the IP address of this machine, and then press the [Enter] key. – http://<IP_address_of_the_machine>/ Example: If the IP address of the machine is 192.168.1.20 http://192.168.1.20/ ! Detail When SSL/TLS is enabled, the URL becomes: https://<IP_address_of_machine>/ Even if "http://" is entered, the URL at "https://" is automatically accessed. bizhub 362/282/222 9-7 Specifying settings using PageScope Web Connection 9 If user authentication settings have been applied If user authentication or external server authentication settings have been applied, the following page appears. Type in the user name and password, and then click [Log-in]. 2 Note For details on user authentication, refer to User manual [Copy Operations]. Contact the network administrator for a user name and password. When logged on with user authentication, a timeout occurs and you will automatically be logged off from Administrator mode if no operation is performed for 10 minutes. If user authentication is performed with an external server and a domain other than the default domain name is used as an Active Directory, type in the user name as "user_name@domain_name". To log off, click [Log-out] in the upper-left corner of the page. If account track settings have been applied If account track settings have been applied, the account number is not required in order to access PageScope Web Connection. 9-8 bizhub 362/282/222 Specifying settings using PageScope Web Connection 9 Page structure The page that appears immediately after PageScope Web Connection is accessed is called the User mode page. All users can view this page. The configuration of the PageScope Web Connection page is shown below. 4 5 6 7 1 2 8 3 10 9 2 Note To reset the status display and message display, click [Refresh] in the Web browser. No. Item Description 1 KONICA MINOLTA logo Click the logo to go to the Konica Minolta Web site at the following URL. http://konicaminolta.com/ 2 PageScope Web Connection logo Click the PageScope Web Connection logo to display the version information. 3 Administrator mode logon button Click the button to log on to Administrator mode. 4 Status display The statuses of this machine’s printer section and scanner section are displayed using icons. bizhub 362/282/222 9-9 Specifying settings using PageScope Web Connection 9 No. Item Description 5 Message display If an error occurred in the machine, the status of the malfunction/error and other error information are displayed. 6 Tabs Select the category of the page to be displayed. The following tabs are displayed in User mode. • System • Job • Print • Scan 2 Note If the optional fax kit has been installed, the Scan tab changes to the Fax/Scan tab. 7 Device name The name of the device being accessed is displayed. 8 [Log-out] button This button appears after you have logged on when user authentication or external server authentication settings have been applied. Click this button to log off. 9 Information and settings Details of the item selected from the menu are displayed. Menu Information and settings for the selected tab are listed. The menu that appears differs depending on the tab that is selected. 10 9-10 bizhub 362/282/222 Specifying settings using PageScope Web Connection 9 Logging on to Administrator mode You can switch between User mode and Administrator mode. However, in order to specify system or network settings, you must be logged on to Administrator mode. 0 When logged on to Administrator mode, the machine’s control panel is locked and cannot be used. 0 Depending on the status of the machine, you may not be able to log on to Administrator mode. 0 When logged on to Administrator mode, if no operation is performed for 10 minutes, a timeout occurs and you will automatically be logged off from Administrator mode. 1 Type in the administrator password, and then click [Log-in]. bizhub 362/282/222 9-11 Specifying settings using PageScope Web Connection 9 The Administrator mode page appears. 2 9-12 To return to User mode, click [Log-out]. bizhub 362/282/222 Specifying settings using PageScope Web Connection 9 Web browser cache The newest information may not appear in the PageScope Web Connection pages because older versions of pages are saved in the cache for the Web browser. In addition, problems may occur when the cache is used. When using PageScope Web Connection, disable the cache for the Web browser. ! Detail If the utility is used with the cache enabled and Administrator mode was timed out, the timeout page may appear even after the utility is accessed again. In addition, since the machine’s control panel remains locked and cannot be used, the machine must be restarted. In order to avoid this problem, disable the cache. 2 Note The menus and commands may vary depending on the Web browser version. For details, refer to the Help for the Web browser. For Internet Explorer 1 On the "Tools" menu, click "Internet Options". 2 On the General tab, click [Settings] under "Temporary Internet files". 3 Select "Every visit to the page", and then click [OK]. For Netscape 1 On the "Edit" menu, click "Preferences". 2 In the "Category" box, click "Advanced", then "Cache". 3 Under "Compare the page in the cache to the page on the network", select "Every time I view the page". bizhub 362/282/222 9-13 Specifying settings using PageScope Web Connection 9 9.3 One-Touch Key Registration (User mode) The recipients of scanned data can be registered with one-touch dial destinations. A secondary recipient can also be registered with the onetouch dial destination in case the transmission to the main recipient failed. In addition, the index name can be specified. 2 Note The secondary recipient can be specified when the optional scanner unit is installed. 36 indexes can be registered on this machine, and up to 15 one-touch dial buttons and fax programs can be registered in each index. The following destination types can be registered here. 9-14 Item Description TX: PC (E-mail) Register a recipient of a Scan to E-Mail operation. TX: PC (FTP Server) Register a recipient of a Scan to FTP operation. TX: Internet FAX Register a recipient of an Internet fax operation. TX: PC (SMB) Register a recipient of a Scan to SMB operation. bizhub 362/282/222 Specifying settings using PageScope Web Connection 9 The following parameters are available on the page for each communication mode. When "TX: PC (E-mail)" is selected Item Description One-Touch Name Type in the name of the recipient that will appear as the name of the onetouch dial destination. Up to 12 characters can be entered. Destination Address Type in the e-mail address of the recipient. File Type Select the format ("TIFF" or "PDF") of the file that is to be sent. Coding Method Select the coding method ("MH" or "MMR") for the data to be sent. The data amount with the MMR coding method is less than with the MH method. bizhub 362/282/222 9-15 9 Specifying settings using PageScope Web Connection When "TX: PC (FTP Server)" is selected 9-16 bizhub 362/282/222 Specifying settings using PageScope Web Connection 9 Item Description One-Touch Name Type in the name of the recipient that will appear as the name of the onetouch dial destination. Up to 12 characters can be entered. FTP Server Address Type in the IP address or host name of the server where the data is to be uploaded. 2 Note The host name can be entered if "DNS Setting" in the Network Setting screen is set to "YES". Use Proxy Select whether to use a proxy server when uploading data. Port Number Enter the server port number. Enter a numeric value within the range of 1 to 65535. Anonymous Select whether to permit anonymous user access (access that does not require a login name or password). User Name Enter the user name. Up to 32 characters can be entered. Password Enter the login password for the server. Up to 32 characters can be entered. 2 Note The password appears as "••••". To correct the entered password, clear "••••", and then type in the correct password. Retype Password Reenter the login password. Directory Specify the name of the directory where the data is to be uploaded. Up to 128 characters can be entered. Passive Mode Select whether to enable or disable the passive mode. File Type Select the format ("Multi Page TIFF", "Single Page TIFF" or "PDF") of the file that is to be sent. Coding Method Select the coding method ("MH" or "MMR") for the data to be sent. The data amount with the MMR coding method is less than with the MH method. bizhub 362/282/222 9-17 Specifying settings using PageScope Web Connection 9 When "TX: Internet FAX" is selected 9-18 Item Description One-Touch Name Type in the name of the recipient that will appear as the name of the onetouch dial destination. Up to 12 characters can be entered. Destination Address Type in the e-mail address of the recipient. Up to 64 characters can be entered. TX Size (Max.) Select the maximum document size ("Letter/Legal" or "11*17") for the data to be sent. TX Quality (Max.) Select the maximum resolution ("200 dpi", "400 dpi" or "600 dpi") for the data to be sent. Coding Method Select the coding method ("MH", "MR" or "MMR") for the data to be sent. The data amount for the coding methods increase as follows: MMR, MR, MH. bizhub 362/282/222 Specifying settings using PageScope Web Connection 9 When "TX: PC (SMB)" is selected bizhub 362/282/222 9-19 Specifying settings using PageScope Web Connection 9 Item Description One-Touch Name Type in the name of the recipient that will appear as the name of the onetouch dial destination. Up to 12 characters can be entered. Destination Address Type in the IP address or host name of the server where the data is to be uploaded. File Path Type in the path to the destination folder. Up to 128 characters can be entered. 2 Note A shared folder created on the domain controller of Windows Server 2003 and Windows Server 2008 cannot be specified. User Name Enter the user name. Up to 32 characters can be entered. Password Type in the login password for the computer where the data is to be sent. Up to 14 characters can be entered. 2 Note The password appears as "••••". To correct the entered password, clear "••••", and then type in the correct password. 9-20 Retype Password Reenter the login password. File Type Select the format ("Multi Page TIFF", "Single Page TIFF" or "PDF") of the file that is to be sent. Coding Method Select the coding method ("MH" or "MMR") for the data to be sent. The data amount with the MMR coding method is less than with the MH method. bizhub 362/282/222 Specifying settings using PageScope Web Connection 9 Naming an index 1 Click the Scan tab. – If the optional fax kit has been installed, click the Fax/Scan tab. 2 Click [One-Touch Key Registration]. 3 From the "Index" list (center table), click the index that is to be named. The one-touch dial destinations that are saved in the selected index appear in the lower half of the page. bizhub 362/282/222 9-21 Specifying settings using PageScope Web Connection 9 4 Enter the index name, and then click [Apply]. – Up to 8 characters can be entered. The index name appears in the index list in the upper half of the page. 9-22 bizhub 362/282/222 Specifying settings using PageScope Web Connection 9 Registering a one-touch dial destination 1 Click the Scan tab. – If the optional fax kit has been installed, click the Fax/Scan tab. 2 Click [One-Touch Key Registration]. 3 From the "Index" list, click the index where the one-touch dial destination is to be saved. The one-touch dial destinations saved in the selected index appear in the lower half of the page. 4 Click a box where a one-touch dial destination has not yet been registered. Which are the boxes where a one-touch dial destination has not yet been registered? % The boxes where a one-touch dial destination has not yet been registered contain "---". ? bizhub 362/282/222 9-23 Specifying settings using PageScope Web Connection 9 5 Select the communication mode, and then click [Next]. – 6 Specify settings for the parameters in the page for the selected communication mode. – – 7 If mode 476 of the software switch settings was changed, only communication modes that can be selected appear. For details, refer to "Specifying software switch settings (machine functions)" on page 10-28. To also register the secondary recipient, specify settings for the parameters, and then click [Sub Address Registration]. For details on the parameters, refer to "One-Touch Key Registration (User mode)" on page 9-14. Click [Apply]. The one-touch dial destination is registered. 9-24 bizhub 362/282/222 Specifying settings using PageScope Web Connection 9 Registering a secondary recipient A secondary recipient can be specified in case the transmission to the recipient of the one-touch dial destination failed. The communication modes in which a secondary recipients can be specified are "TX: PC (E-mail)" and "TX: Internet FAX". 0 A secondary recipient can be specified if the optional scanner unit or fax kit is installed. 0 Any of the following communication modes can be specified for the secondary recipient. - TX: PC (E-mail) - TX: PC (Scanner)* - TX: InternetFAX (E-mail)* - TX: InternetFAX (IP-TX)* - TX: InternetFAX (IP-Relay)* - FAX (G3)** - TX: SIP-FAX** * The communication mode can be specified if the optional scanner unit or fax kit is installed. ** The communication mode can be specified if the optional fax kit is installed. bizhub 362/282/222 9-25 Specifying settings using PageScope Web Connection 9 1 Click the box for the one-touch dial destination to be programmed with a secondary recipient. 2 Click [Next]. – 9-26 If mode 476 of the software switch settings was changed, only communication modes that can be selected appear. For details, refer to "Specifying software switch settings (machine functions)" on page 10-28. bizhub 362/282/222 Specifying settings using PageScope Web Connection 9 3 Click [Sub Address Registration]. 4 Select the communication mode for the secondary recipient, and then click [Next]. – If mode 476 of the software switch settings was changed, only communication modes that can be selected appear. For details, refer to "Specifying software switch settings (machine functions)" on page 10-28. bizhub 362/282/222 9-27 Specifying settings using PageScope Web Connection 9 5 Specify the various settings, and then click [Apply]. – For details on the parameters, refer to "One-Touch Key Registration (User mode)" on page 9-14. 2 Note The name that appears beside "One-Touch Name" is the same as that specified for the main recipient. Settings for all other parameters can be specified. To delete the registered secondary recipient, click [Sub Address Delete]. 9-28 bizhub 362/282/222 Specifying settings using PageScope Web Connection 9 Changing the settings for a one-touch dial destination 1 Click the Scan tab. – If the optional fax kit has been installed, click the Fax/Scan tab. 2 Click [One-Touch Key Registration]. 3 From the "Index" list, click the index that contains the one-touch dial destination that is to be changed. The one-touch dial destinations saved in the selected index appear in the lower half of the page. 4 Click the one-touch dial destination whose settings are to be changed. – A one-touch dial button programmed as an administrator forwarding destination cannot be selected. Are there one-touch dial destinations that cannot be selected even if they are clicked? % A fax program cannot be selected, even if it is clicked. ? bizhub 362/282/222 9-29 Specifying settings using PageScope Web Connection 9 5 To change the communication mode, select the communication mode, and then click [Next]. 6 Specify settings for the parameters in the page for the selected communication mode. – 9-30 For details on the parameters, refer to "One-Touch Key Registration (User mode)" on page 9-14. bizhub 362/282/222 Specifying settings using PageScope Web Connection 9 Deleting a one-touch dial destination 1 Click the Scan tab. – If the optional fax kit has been installed, click the Fax/Scan tab. 2 Click [One-Touch Key Registration]. 3 From the "Index" list, click the index that contains the one-touch dial destination that is to be deleted. The one-touch dial destinations saved in the selected index appear at the bottom of the page. bizhub 362/282/222 9-31 Specifying settings using PageScope Web Connection 9 4 Select the check box of the one-touch dial destination that is to be deleted. – 5 9-32 A one-touch dial button programmed as an administrator forwarding destination cannot be selected. Click [Delete]. bizhub 362/282/222 Specifying settings using PageScope Web Connection 9.4 9 FAX Program Registration (User mode) Fax programs can be registered as one-touch dial destinations. Unlike the one-touch dial destination where only recipients can be registered, scan settings and multiple recipients can be registered. The registered data can also be changed or deleted. 2 Note Up to 30 fax programs can be registered. However, the total number of one-touch dial destinations and fax programs must not exceed 540. Some functions or parameters registered with a fax program have no effect depending on the operation performed, as shown in the following table. For details on each function and parameter, refer to the appropriate page. o : Has an effect + : Has an effect under certain conditions – : Does not have an effect Operation Function/ Parameter Scan to E-Mail Scan to FTP Scan to SMB Scan to HDD Internet fax Original Type o o o o o Density o o o o o Reduction – – – – – Scan Area o o o o o TSI – – – – o Dest. Insert – – – – o TX Report o o o o o 2in1 o o o o o 2-Sided TX o o o o o Rotation TX – – – – + Priority TX o o o o o Timer o o o o o Stamp + + + + + Subject Selection o – – – + Set Reply E-Mail Address o – – – + E-Mail Notification Destination – o o o – Set File Name o o o o + bizhub 362/282/222 9-33 Specifying settings using PageScope Web Connection 9 When registering a fax program, specify settings for the following functions/parameters. Item Description Program Name Type in the name of the program that will appear as the name of the one-touch dial destination. Up to 12 characters can be entered. Mode Select "TX". Destination Specify the program destination. Click [Select Destination], select the check box of a registered one-touch dial destination, and then click [Apply]. Original Type Original Type Select the scan resolution. Density Select the scan density. Reduction This is a fax setting. For details, refer to the User manual [Facsimile Operations]. Scan Area Specify the document size for scanning. Menu 1 9-34 TSI Select transmission source information to print the registered text, such as the name, fax number, or address, at the edge of pages sent with the Internet fax operation. For details on registering transmission source information, refer to "TSI Registration" on page 9-48. Dest. Insert Select whether to print the destination name registered with the one-touch dial button together with other transmission source information when TSI1 through TSI8 is selected. TX Report Select the conditions for outputting the transmission results report. Default: Select this setting to output the report according to the setting specified from the Administrator Management screen. Output On: Select this setting to output the report, regardless of the transmission result. If TX Fail: Select this setting to output the report only if the transmission failed. Output Off: Select this setting to not output the report, regardless of the transmission result. 2in1 Select whether to send an Internet fax using the 2in1 function (printing two pages on one page). 2-Sided TX Select whether or not a double-sided transmission is performed with the Internet fax operation. On: Select this setting to perform a double-sided transmission. When set to "On", specify the binding margin and page orientation. Off: Select this setting to not perform a double-sided transmission. Rotation TX Select whether or not to rotate the scan image according to the paper orientation of the receiving machine when sending an Internet fax. The resolution can be set to 200 dpi or less when sending an A4size document. Priority TX Select whether or not the data is sent with priority over other jobs. bizhub 362/282/222 Specifying settings using PageScope Web Connection 9 Item Description Timer Select whether or not the transmission time is to be set. Specify the transmission time when "On" is selected. Stamp Specify whether the scanned document is stamped to indicate that it has been scanned. In addition, load the document into the ADF. 2 Note To use the Stamp function, optional stamp unit must be installed. Menu 2 Subject Selection Select the subject of the e-mail message from the text that has been registered in advance. For details on registering subject text, refer to "E-Mail/Internet FAX (Administrator mode)" on page 9-76. Set Reply E-Mail Address The e-mail address of this machine is displayed as the e-mail reply destination. To select an e-mail address other than that of this machine, click [Select Reply E-Mail Address], and select an e-mail address from those registered with one-touch dial destinations. E-Mail Notification Destination Specify the e-mail address where notification of the URL of the data location is sent when performing the Scan to FTP, Scan to SMB or Scan to HDD operation. Click [Select E-Mail Notification Destination], and then select an e-mail address from those registered with one-touch dial destinations. Set File Name Type in a file name to specify the name of the file being saved. Up to 16 characters can be entered. ! Detail For procedures on specifying settings for the various operations, refer to the following pages. - Scan to E-Mail (p. 4-11, p. 4-14) - Scan to FTP (p. 5-9, p. 5-13) - Scan to SMB (p. 6-9, p. 6-13) - Scan to E-HDD (User manual [Box Operations]) - Internet fax (p. 7-10, p. 7-12) bizhub 362/282/222 9-35 Specifying settings using PageScope Web Connection 9 Registering fax programs 0 To specify the recipient of a fax program, register the recipient with a one-touch dial destination in advance. 1 Click the Scan tab. – If the optional fax kit has been installed, click the Fax/Scan tab. 2 Click [FAX Program Registration]. 3 From the "Index" list, click the index where the fax program is to be registered. The one-touch dial destinations saved in the selected index appear in the lower half of the page. 4 Click a box where a one-touch dial destination has not yet been registered. Which are the boxes where a one-touch dial destination has not yet been registered? % The boxes where a one-touch dial destination has not yet been registered contain "---". ? 9-36 bizhub 362/282/222 Specifying settings using PageScope Web Connection 5 Specify settings for the various parameters. 6 Click [Apply]. bizhub 362/282/222 9 9-37 Specifying settings using PageScope Web Connection 9 Changing the settings of the fax program 1 Click the Scan tab. – 2 Click [FAX Program Registration]. 3 From the "Index" list, click the index that contains the fax program that is to be changed. The one-touch dial destinations saved in the selected index appear in the lower half of the page. 4 Click the fax program that is to be changed. – 5 6 A one-touch dial destination other than a fax program cannot be selected, even if it is clicked. Specify settings for the program parameters. – 9-38 If the optional fax kit has been installed, click the Fax/Scan tab. For details on the parameters, refer to "FAX Program Registration (User mode)" on page 9-33. Click [Apply]. bizhub 362/282/222 Specifying settings using PageScope Web Connection 9 Deleting a fax program 1 Click the Scan tab. – If the optional fax kit has been installed, click the Fax/Scan tab. 2 Click [FAX Program Registration]. 3 From the "Index" list, click the index that contains the fax program that is to be deleted. The one-touch dial destinations saved in the selected index appear at the bottom of the page. bizhub 362/282/222 9-39 Specifying settings using PageScope Web Connection 9 9-40 4 Select the check box of the fax program to be deleted. 5 Click [Delete]. bizhub 362/282/222 Specifying settings using PageScope Web Connection 9.5 9 Domain Name Registration (User mode) When entering an e-mail address from this machine’s control panel, the destination address can be entered quickly if domain names that are often entered have been registered in advance. On this machine’s control panel, a registered domain name can be selected after touching [Domain] in the displayed screen. Up to 6 domain names can be registered. To register domain names 1 Click the Scan tab. – If the optional fax kit has been installed, click the Fax/Scan tab. 2 Click [Domain Name Registration]. 3 Enter the domain name, and then click [Apply]. Up to 64 characters can be entered. 4 Click [OK]. bizhub 362/282/222 9-41 Specifying settings using PageScope Web Connection 9 9.6 Export/Import (Administrator mode) The data that was registered with one-touch dial button on this machine can be exported as a file. Files can be exported with the following four modes. Item Description Mode 1 Select this setting to export the data in its complete format, including the mail program data (fax program data if the optional fax kit has been installed). The data can be edited and imported again. In addition, the data can be imported onto a different machine of the same model. 2 Note Before importing the data onto a different machine, erase all of the data first. Since all of the data is exported, it can also be used as a backup of the data. Mode 2 Select this setting to export the data in its simple format, which does not include the mail program data (fax program data if the optional fax kit has been installed). The data can be edited and imported only onto the machine from where it was exported. Mode 3 In addition to the conditions described for Mode 1, the password is encrypted. The password cannot be edited. Mode 4 In addition to the conditions described for Mode 2, the password is encrypted. The password cannot be edited. ! Detail The exported data is written in the UTF-8 character code. Edit the data with the UTF-8 character code. 2 Note Do not edit data exported with "Mode 3" or "Mode 4" selected, otherwise the data may not be imported correctly. 9-42 bizhub 362/282/222 Specifying settings using PageScope Web Connection 9 Exporting data as files 1 In the Administrator mode, click the Scan tab. – – If the optional fax kit has been installed, click the Fax/Scan tab. For the procedure to log on to Administrator mode, refer to "Logging on to Administrator mode" on page 9-11. 2 Click [One-Touch Key Registration], then [Export]. 3 Select the export format, and then click [Execute]. 4 Click [Save]. bizhub 362/282/222 9-43 Specifying settings using PageScope Web Connection 9 5 Specify the directory where the data is to be saved. The file name can also be changed. 6 Click [Save]. The exported data is saved in the specified directory. 9-44 bizhub 362/282/222 Specifying settings using PageScope Web Connection 9 Importing files The one-touch dial button data that was saved on a computer can be imported and written to this machine. 1 In the Administrator mode, click the Scan tab. – – If the optional fax kit has been installed, click the Fax/Scan tab. For the procedure to log on to Administrator mode, refer to "Logging on to Administrator mode" on page 9-11. 2 Click [One-Touch Key Registration], then [Import]. 3 Click [Browse]. bizhub 362/282/222 9-45 Specifying settings using PageScope Web Connection 9 4 Select the file to be imported, and then click [Open]. 5 Click [Execute]. The registered one-touch dial button data is imported. 9-46 bizhub 362/282/222 Specifying settings using PageScope Web Connection 9 2 Note Check in advance for information regarding the models that can use the exported data. bizhub 362/282/222 9-47 Specifying settings using PageScope Web Connection 9 9.7 TSI Registration Text, such as a name, fax number, or address, can be registered so that it can be printed at the top of pages sent with the Internet fax operation. Transmission source names can be registered. Since multiple transmission source names can be registered, a different transmission source name can be used for different recipients or for different accounts. The registered transmission source name can be changed by following the same procedure used to register it. To register transmission sources 1 In the Administrator mode, click the Scan tab. – – 2 Click [TSI Registration]. 3 Enter the transmission source name, and then click [Apply]. – – 4 9-48 If the optional fax kit has been installed, click the Fax/Scan tab. For the procedure to log on to Administrator mode, refer to "Logging on to Administrator mode" on page 9-11. Up to 8 transmission source names can be registered. Up to 40 characters can be entered. Click [OK]. bizhub 362/282/222 Specifying settings using PageScope Web Connection 9.8 9 TX Settings (Administrator mode) Default transmission settings can be specified. Settings can be specified for the following. Item Description Quality/Mode Default Quality Select the default quality setting that is specified after an operation is complete. Default Density Select the default density setting that is specified after an operation is complete. Com. Mode Select the default communication mode that is specified after an operation is complete. Select "TX: PC (E-mail)" or "TX: Internet FAX". FAX Menu TSI Select how the transmission source name is attached and the type of transmission source information from 1 through 8. Off: Select this setting to not attach the transmission source name. Inside Body Text: Select this setting to print the transmission source name on the original document. Outside Body Text: Select this setting to not print the transmission source name on the original document. Rotation TX Specify whether to reset the rotation transmission after the operation is complete. 2-Sided TX Specify whether to reset the double-sided transmission after the operation is complete. Original Bind Direction If "2-Sided TX" was set to "On", select from "Left Binding", "Top Binding" or "Auto" for the binding position of the document. bizhub 362/282/222 9-49 Specifying settings using PageScope Web Connection 9 Specifying the transmission settings 1 In the Administrator mode, click the Scan tab. – – 9-50 If the optional fax kit has been installed, click the Fax/Scan tab. For the procedure to log on to Administrator mode, refer to "Logging on to Administrator mode" on page 9-11. 2 Click [TX Settings]. 3 Specify settings for each parameter, and then click [Apply]. bizhub 362/282/222 Specifying settings using PageScope Web Connection 9 Com. Mode Select whether or not each communication mode can be used. 1 In the Administrator mode, click the Scan tab. – If the optional fax kit has been installed, click the Fax/Scan tab. 2 Click [TX Settings]. 3 Click [Com. Mode]. 4 Specify a setting for each parameter, and then click [Apply]. – If mode 476 of the software switch settings was changed, only communication modes that can be selected appear. For details, refer to "Specifying software switch settings (machine functions)" on page 10-28. 2 Note The communication modes that can be set differ depending on the options that are installed. bizhub 362/282/222 9-51 Specifying settings using PageScope Web Connection 9 9.9 RX Settings (Administrator mode) Specify the time and day for printing an Internet fax that is received while the machine is in the off mode (mode where printing is not immediate, even when a fax is received). By regulating the time when printing is performed, Internet faxes transmitted late at night can be safely received. Settings can be specified for the following. Item Description Timer Specify whether or not received Internet faxes are printed at a specified time instead of being printed immediately. On: Select this setting to collect all received Internet faxes during the specified time period on the specified days, and print them together. Specify the days, starting time and ending time. Off: Select this setting to immediately print an Internet fax that is received. Stop Time Type in the ending time for printing received Internet faxes. Start Time Type in the starting time for printing received Internet faxes. Day Of The Week Select the day of the week to print at the specified time. Memory Lock Password Specify the four-digit password used to print Internet faxes received outside of the specified time period. To change the password, click [Change Password], and then specify a new password. 2 Note The password appears as "••••". To correct the entered password, clear "••••", and then type in the correct password. 2 Note For details on entering a password to print received Internet faxes, refer to "To print manually" on page 10-16. 9-52 bizhub 362/282/222 Specifying settings using PageScope Web Connection 9 Specifying the reception settings 1 In the Administrator mode, click the Scan tab. – – If the optional fax kit has been installed, click the Fax/Scan tab. For the procedure to log on to Administrator mode, refer to "Logging on to Administrator mode" on page 9-11. 2 Click [RX Settings]. 3 Specify a setting for each parameter, and then click [Apply]. bizhub 362/282/222 9-53 Specifying settings using PageScope Web Connection 9 9.10 Scan Setting (Administrator mode) The device name of this machine used in the file name and the transmission of the scanned data can be specified. Settings can be specified for the following. Item Description Machine Name Enter the device name of this machine that is used for the file name. Up to 16 characters can be entered. Division by Page Applied when performing the Scan to E-Mail or Internet fax operation. Select whether the data is divided by page when scanned data is sent. Division by Size Applied when performing the Scan to E-Mail operation. Select whether the data is divided by a fixed size when scanned data is sent. 2 Note Depending on the e-mail software used by the recipient, the binary division ("Division by Size") may not be available. Size of Division When "Division by Size" is set to "On", type in the size of the data sections (between 16 and 2000 KB) Interval of Division Transmission When "Division by Size" is set to "On", type in the number of seconds (between 1 and 255) for the interval when the divided data is sent. E-mail Mode TX Quality (Max.) Select the maximum resolution ("200 dpi", "400 dpi" or "600 dpi") for the data to be sent as an Internet fax. TX Size (Max.) Select the maximum document size ("Letter", "Legal" or "11*17") for the data to be sent as an Internet fax. Coding Method Select the coding method ("MH", "MR" or "MMR") for the data to be sent as an Internet fax. The data amount for the coding methods increase as follows: MMR, MR, MH. Scan Mode 9-54 B/W: File Type Select the format ("TIFF" or "PDF") of the data that is to be saved when performing the Scan to E-Mail, Scan to FTP, Scan to SMB, or Scan to HDD operation. If "TIFF" was selected, the setting changes to "Multi Page TIFF" with the Scan to FTP, Scan to SMB or Scan to HDD operation. B/W: Coding Method Select the coding method ("MH" or "MMR") for the data to be sent when performing the Scan to E-Mail, Scan to FTP, Scan to SMB, or Scan to HDD operation. The data amount with the MMR coding method is less than with the MH method. bizhub 362/282/222 Specifying settings using PageScope Web Connection 9 Specifying the scan settings 1 In the Administrator mode, click the Scan tab. – – If the optional fax kit has been installed, click the Fax/Scan tab. For the procedure to log on to Administrator mode, refer to "Logging on to Administrator mode" on page 9-11. 2 Click [Scan Setting]. 3 Specify a setting for each parameter, and then click [Apply]. bizhub 362/282/222 9-55 Specifying settings using PageScope Web Connection 9 9.11 TX Document (Administrator mode) When sending documents from this machine, the document can be forwarded simultaneously to the addresses specified by the administrator. Specify the address of the forwarding destination. 2 Note Select the forwarding recipient from a one-touch dial destination. Be sure to register the address of the forwarding recipient as a one-touch dial destination in advance. A document that was sent and forwarded cannot be forwarded to the administrator. 9-56 bizhub 362/282/222 Specifying settings using PageScope Web Connection 9 Specifying the address of the forwarding destination 1 In the Administrator mode, click the Scan tab. – – If the optional fax kit has been installed, click the Fax/Scan tab. For the procedure to log on to Administrator mode, refer to "Logging on to Administrator mode" on page 9-11. 2 Click [TX Document]. 3 Select the address of the forwarding destination. Click [Select Forwarding Destination]. The list of one-touch dial destinations appears. 4 Select the address of the forwarding destination, and then click [Apply]. – 5 Only one address can be selected. Click [Apply]. bizhub 362/282/222 9-57 Specifying settings using PageScope Web Connection 9 9.12 RX Document (Administrator mode) The method for processing a received document can be specified. This can be specified only for documents received over a network. The following processing methods are available. - Processing documents received on each line (Port): Specify the operation performed, such as printing or forwarding the received document, for each line where a document is received. - Processing all other received documents (All Other Documents): Specify the processing method of documents received on lines other than ports. If "Port" is clicked, settings can be specified for the following. Item Description Distribution Conditions Select whether or not an operation is performed when a document is received on the selected line. Auto: Select this setting to not process the received document Specifies: Select this setting to specify where the received document is saved or forwarded. RX Doc. Settings When "Distribution Conditions" is set to "Specified", select the processing method for the received document. Forward: Select this setting to forward the data to the specified destination. Print: Select this setting to print the document. Print & Forward: Select this setting to print the document and forward the data to the specified destination. Forwarding Destination Specify a forwarding destination when "RX Doc. Settings" is set to "Forward". Click [Select Forwarding Destination], select the forwarding destination address, and then click [Apply]. If "All Other Documents" is clicked, settings can be specified for the following. Item Description RX Doc. Settings Select how the received document is processed. Memory RX: Select this setting to save the document in the memory. Forward: Select this setting to forward the data to the specified destination. Print: Select this setting to print the document. Print & Forward: Select this setting to print the document and forward the data to the specified destination. Forwarding Destination Specify a forwarding destination when "RX Doc. Settings" is set to "Forward". Click [Select Forwarding Destination], select the forwarding destination address, and then click [Apply]. 2 Note If bit 7 of mode 306 is set to "1" in the Soft SW Setting screen, only "Port" is available. For details, refer to "Specifying software switch settings (machine functions)" on page 10-28. 9-58 bizhub 362/282/222 Specifying settings using PageScope Web Connection 9 Specifying the processing of received documents at each line 1 In the Administrator mode, click the Scan tab. – – If the optional fax kit has been installed, click the Fax/Scan tab. For the procedure to log on to Administrator mode, refer to "Logging on to Administrator mode" on page 9-11. 2 Click [RX Document], then [Port]. 3 Click [Network]. bizhub 362/282/222 9-59 Specifying settings using PageScope Web Connection 9 4 9-60 Specify a setting for each parameter, and then click [Apply]. bizhub 362/282/222 Specifying settings using PageScope Web Connection 9 Specifying the processing of other received documents 1 In the Administrator mode, click the Scan tab. – – If the optional fax kit has been installed, click the Fax/Scan tab. For the procedure to log on to Administrator mode, refer to "Logging on to Administrator mode" on page 9-11. 2 Click [RX Document], then [All Other Documents]. 3 Specify a setting for each parameter, and then click [Apply]. bizhub 362/282/222 9-61 Specifying settings using PageScope Web Connection 9 9.13 Report Settings (Administrator mode) The conditions for outputting the transmission results report and activity report can be specified. Settings can be specified for the following. 9-62 Item Description TX Report (Single destination) Select the conditions for outputting the results report for a transmission to a single destination. Output On: Select this setting to output the report, regardless of the transmission result. If TX Fail: Select this setting to output the report only if the transmission failed. Output Off: Select this setting to not output the report, regardless of the transmission result. TX Report (Multiple destinations) Select the conditions for outputting the results report for a transmission to multiple destinations. Output On: Select this setting to output the report, regardless of the transmission result. If TX Fail: Select this setting to output the report only if the transmission failed. Output Off: Select this setting to not output the report, regardless of the transmission result. Activity Report Select whether or not the activity report is outputted with every 50 transmissions. bizhub 362/282/222 Specifying settings using PageScope Web Connection 9 Specifying the report output settings 1 In the Administrator mode, click the Scan tab. – – If the optional fax kit has been installed, click the Fax/Scan tab. For the procedure to log on to Administrator mode, refer to "Logging on to Administrator mode" on page 9-11. 2 Click [Report Settings]. 3 Specify a setting for each parameter, and then click [Apply]. bizhub 362/282/222 9-63 Specifying settings using PageScope Web Connection 9 9.14 TCP/IP (Administrator mode) Specify the required settings for using this machine over a network. If "TCP/IP" is clicked, settings can be specified for the following. Item Description TCP/IP [*] Select whether to enable or disable TCP/IP. DHCP Configuration [*] Select whether the DHCP server is enabled (the IP address is acquired automatically) or disabled (a fixed IP address is specified). IP Address [*] Specify the IP address of this machine. Specify a setting when "DHCP Configuration" is set to "Disable". Subnet Mask [*] Type in the subnet mask of the network to be connected. Specify a setting when "DHCP Configuration" is set to "Disable". Gateway Address [*] Type in the default gateway of the network to be connected. Specify a setting when "DHCP Configuration" is set to "Disable". RAW Port [*] Select whether or not a port number is used with RAW printing. RAW Port Number Specify the RAW port number. Enter the port number within the range of 1 to 65535. Self-Domain Name [*] Specify the domain name of this machine. 2 Note "Self-Domain Name" and "Port Number" appear if the optional scanner unit or fax kit has been installed. Port Number[*] Type in a port number between 1 and 65535 for this machine’s domain. DNS Configuration Select "Yes" or "No" for the DNS (Domain Name System). When using a DNS server within a network, select "Yes". When not using a DNS server within a network, select "No". When using an external server such as an Internet provider, select "No" if the IP address of the mail server is public. If the DNS name of the mail server is public and the IP address is not public, select "Yes". For details on the network environment, contact the network administrator. Host Name Specify the host name of this machine. For details on the settings to be specified, contact the network administrator. Specify a setting when "DNS Configuration" is set to "No". Domain Name Specify the domain name of the DNS server. For details on the settings to be specified, contact the network administrator. Specify a setting when "DNS Configuration" is set to "No". DNS Server Address 1 to 3 Specify the IP addresses of the DNS server. For details on the settings to be specified, contact the network administrator. Specify a setting when "DNS Configuration" is set to "No". DNS Query Timeout Select the time when a query to the DNS server is timed out. Select 20, 40, 80, 160, 320, or 640 seconds. SLP [*] Select whether to enable or disable SLP (Service Location Protocol). LPD [*] Select whether to enable or disable LPD (Line Printer Daemon). * If the setting of a parameter marked with [*] is changed, turn this machine off, then on again. 9-64 bizhub 362/282/222 Specifying settings using PageScope Web Connection 9 2 Note When specifying an IP address or DNS server address, the IP address cannot be specified to begin with "0.", "127.", or a number greater than 224. bizhub 362/282/222 9-65 Specifying settings using PageScope Web Connection 9 Specifying the TCP/IP settings 1 In the Administrator mode, click the Network tab. – 9-66 For the procedure to log on to Administrator mode, refer to "Logging on to Administrator mode" on page 9-11. 2 Click [Common Setting], then [TCP/IP]. 3 Specify a setting for each parameter, and then click [Apply]. bizhub 362/282/222 Specifying settings using PageScope Web Connection 4 9 If the setting of a parameter marked with [*] is changed, turn this machine off, then on again. 2 Reminder When turning the machine off, then on again with the main power switch, wait about 10 seconds to turn the machine on after turning it off. The machine may not operate correctly if it is turned on immediately after being turned off. bizhub 362/282/222 9-67 Specifying settings using PageScope Web Connection 9 9.15 IP Filtering Select whether or not reception is possible within the range of specified IP addresses. Settings can be specified for the following. Item Description Accept IP Range Reception of only the IP addresses in the specified range is permitted. Reject IP Range IP addresses in the specified range are blocked. 2 Note 0.0.0.0 cannot be included in a specified range. For example, to specify the range of addresses before 192.168.1.20, specify the range from 0.0.0.1 to 192.168.1.20. 9-68 bizhub 362/282/222 Specifying settings using PageScope Web Connection 9 To specify IP filtering settings 1 In the Administrator mode, click the Scan tab. – If the optional fax kit has been installed, click the Fax/Scan tab. 2 Click [IP Filtering]. 3 Specify a setting for each parameter, and then click [Apply]. bizhub 362/282/222 9-69 Specifying settings using PageScope Web Connection 9 9.16 LDAP (Administrator mode) The settings used by the LDAP (Lightweight Directory Access Protocol) server in a network can be specified. Settings can be specified for the following. Item Description LDAP Select whether to enable or disable address searches where the LDAP server is used. If "Enable" is selected, the LDAP server can be specified. Search Default Setting Select which of the registered LDAP servers is to be accessed. This parameter appears if an LDAP server has been registered. Specifying the LDAP settings 1 In the Administrator mode, click the Network tab. – 9-70 For the procedure to log on to Administrator mode, refer to "Logging on to Administrator mode" on page 9-11. 2 Click [Common Setting], then [LDAP]. 3 Select whether to enable or disable LDAP searches, and then click [Apply]. bizhub 362/282/222 Specifying settings using PageScope Web Connection 9.17 9 LDAP Server Setting (Administrator mode) If LDAP searches are enabled, the LDAP server to be accessed can be registered. Up to 5 LDAP servers can be registered in this machine. For details on the LDAP search methods, refer to "Searching the destination information from the server" on page 8-3. 2 Reminder If "LDAP" is not set to "Enable", the LDAP server information cannot be registered. To register the LDAP server information, be sure to set "LDAP" to "Enable". If "LDAP Server Setting" is clicked, settings can be specified for the following. Item Description LDAP Server Name Enter the LDAP server name. Up to 16 characters can be entered. LDAP Server Address: IP Address Specify the IP address of the LDAP server. LDAP Server Address: Host Name Enter the LDAP server host name. Up to 64 characters can be entered. SSL/TLS Select whether to perform SSL/TLS encryption of the sent data. Port Number Type in the port number (between 1 and 65535) used to communicate with the LDAP server. Search Base Specify the location on the LDAP server where searches are to be started. Up to 255 characters can be entered. Connection timeout Type in the time (between 5 and 300 seconds) when a search is timed out. Maximum number of Search Type in the maximum number of hits (between 5 and 100) to be received as LDAP search results. Authentication Setting Select the LDAP authentication method. Domain Name Specify a setting when "Authentication Setting" is set to "Active Directory". Up to 64 characters can be entered. Login Name Specify a setting when "Authentication Setting" is not set to "Anonymous". Up to 64 alphanumeric characters and symbols can be entered, excluding ^. Password Specify a setting when "Authentication Setting" is not set to "Anonymous". Up to 32 alphanumeric characters and symbols can be entered, excluding ^. [Check connection] Click to use the entered settings and check the connection to the LDAP server. bizhub 362/282/222 9-71 Specifying settings using PageScope Web Connection 9 2 Note If bit 7 of mode 466 is set to "1" in the Soft SW Setting screen, select "GSS-SPNEGO" beside "Authentication Setting". For details on the software switch settings, refer to "Specifying software switch settings (machine functions)" on page 10-28. If bit 7 of mode 466 is set to "1" in the Soft SW Setting screen, the information entered beside "Login Name" and "Password" is used when checking the connection. For details on the software switch settings, refer to "Specifying software switch settings (machine functions)" on page 10-28. 9-72 bizhub 362/282/222 Specifying settings using PageScope Web Connection 9 Registering an LDAP server 1 In the Administrator mode, click the Network tab. – For the procedure to log on to Administrator mode, refer to "Logging on to Administrator mode" on page 9-11. 2 Click [Common Setting], then [LDAP Server Setting]. 3 Click a box containing "---" for the LDAP server to be registered. bizhub 362/282/222 9-73 Specifying settings using PageScope Web Connection 9 9-74 4 Specify a setting for each parameter. 5 Click [Apply]. 6 Click [OK]. bizhub 362/282/222 Specifying settings using PageScope Web Connection 9 Deleting an LDAP server 1 In the Administrator mode, click the Network tab. – For the procedure to log on to Administrator mode, refer to "Logging on to Administrator mode" on page 9-11. 2 Click [Common Setting], then [LDAP Server Setting]. 3 Select the check box of the LDAP server to be deleted. 4 Click [Delete]. bizhub 362/282/222 9-75 Specifying settings using PageScope Web Connection 9 9.18 E-Mail/Internet FAX (Administrator mode) Transmission settings for the Scan to E-Mail and Internet fax operations can be specified. Settings can be specified for the following. Item Description POP3 Specify the POP3 server for sending Internet faxes. SMTP Specify the SMTP server for sending data with the Scan to E-Mail operation. Subject/Text Specify the subject and any text to be used when sending data with the Scan to E-Mail or Internet fax operation. Other Specify all other related send and receive settings. Specify settings for the following. POP3 Item Description POP3 Server Address Specify the settings required to receive Internet faxes. Type in the IP address or host name (up to 64 characters). For details on the settings to be specified, contact the network administrator. POP3 User Name Specify the POP3 user name (up to 64 characters) of this machine. For details on the settings to be specified, contact the network administrator. POP3 Password Specify the POP3 password (up to 32 characters) of this machine. For details on the settings to be specified, contact the network administrator. 2 Note The entered password appears as "••••". To correct the entered password, clear "••••", and then type in the correct password. Auto-RX Check Select whether to automatically check for received e-mail messages (Internet fax) when connected to the POP3 server. Auto-RX Check Interval If "Auto-RX Check" is set to "Yes", type in the time interval (between 1 and 99) at which the check is performed. Port Number Type in the number (between 1 and 65535) of the port where the POP3 server is connected. POP3 Timeout [*] Select the time until the connection with the POP3 server is timed out. Select from 30, 60, 90, 120, 150, 180, 210, 240, 270, and 300 seconds. APOP [*] Select whether or not APOP authentication is enabled. * If the setting of a parameter marked with [*] is changed, turn this machine off, then on again. 9-76 bizhub 362/282/222 Specifying settings using PageScope Web Connection 9 SMTP Item Description SMTP Server Address Specify a setting for sending data with the Scan to E-mail or Internet fax operation. In addition, specify a setting when using the E-Mail Notification function with the Scan to FTP, Scan to SMB or Scan to HDD operation. Type in the IP address or host name (up to 64 characters). For details on the settings to be specified, contact the network administrator. Port Number [*] Type in the number (between 1 and 65535) of the port where the SMTP server is connected. SMTP TX Timeout [*] Select the time until the connection with the SMTP server is timed out. Select from 30, 60, 90, 120, 150, 180, 210, 240, 270, and 300 seconds. SMTP RX Timeout [*] Select the time until the connection with the SMTP server is timed out. Select from 30, 60, 90, 120, 150, 180, 210, 240, 270, and 300 seconds. E-Mail Address Specify the e-mail address (up to 64 characters) of this machine. This address appears as the From address when sending data with the Scan to E-Mail or Internet fax operation. For details on the settings to be specified, contact the network administrator. SMTP Authentication User Name Specify the user name for using e-mail transmission authentication (SMTP authentication). For details on the settings to be specified, contact the network administrator. It is not necessary to specify a setting when the SMTP authentication user name and the POP3 user name are the same. SMTP Authentication User Password Specify the password for using e-mail transmission authentication (SMTP authentication). For details on the settings to be specified, contact the network administrator. It is not necessary to specify a setting when the SMTP authentication password and the POP3 password are the same. 2 Note The entered password appears as "••••". To correct the entered password, clear "••••", and then type in the correct password. * If the setting of a parameter marked with [*] is changed, turn this machine off, then on again. 2 Note The following parameters appear when bits 6 and 2 of mode 380 are set to "1" in the Software Switch Setting screen. For details, refer to "Specifying software switch settings (machine functions)" on page 10-28. - SMTP Authentication User Name - SMTP Authentication User Password If bit 4 of mode 371 is set to "1" in the Software Switch Setting screen, two SMTP servers can be registered. For details, refer to "Specifying software switch settings (machine functions)" on page 10-28. bizhub 362/282/222 9-77 Specifying settings using PageScope Web Connection 9 Subject/Text Item Description Subject 1 to 4 The subject can be specified for sending data with the Scan to E-Mail or Internet fax operation. Up to 4 subjects can be registered, therefore, subjects can be used depending on the contents of the transmission. Up to 40 characters can be entered. Text Type in the text attached to data sent with the Scan to E-Mail or Internet fax operation. Text that has been specified in advance is "fixed text", and text that can be specified freely is "custom text". The text entered here is registered as "custom text". Up to 256 characters can be entered. Other 9-78 Item Description Activity Report Specify whether to notify the destination of the results when an Internet fax is received. RX Doc. Header Print Select whether to print the e-mail header on the first page of the received document when an Internet fax is printed. TX Doc. Text Insert Text can be inserted into the text of data sent with the Scan to E-Mail or Internet fax operation. No: Select this setting to not insert text. For the Scan to E-Mail operation, fixed text is inserted even if "No" is selected. Default: Select this setting to insert the fixed text that has been saved in advance on this machine. Custom: Select this setting to insert text that can be set freely. Gateway TX Select "Restict" for this machine. bizhub 362/282/222 Specifying settings using PageScope Web Connection 9 Specifying the POP3 settings 1 In the Administrator mode, click the Network tab. – For the procedure to log on to Administrator mode, refer to "Logging on to Administrator mode" on page 9-11. 2 Click [E-Mail/Internet FAX], then [POP3]. 3 Specify a setting for each parameter, and then click [Apply]. 4 Click [OK]. 5 If the setting of a parameter marked with [*] is changed, turn this machine off, then on again. bizhub 362/282/222 9-79 Specifying settings using PageScope Web Connection 9 2 Reminder When turning the machine off, then on again with the main power switch, wait about 10 seconds to turn the machine on after turning it off. The machine may not operate correctly if it is turned on immediately after being turned off. 9-80 bizhub 362/282/222 Specifying settings using PageScope Web Connection 9 Specifying the SMTP settings 1 In the Administrator mode, click the Network tab. – For the procedure to log on to Administrator mode, refer to "Logging on to Administrator mode" on page 9-11. 2 Click [E-Mail/Internet FAX], then [SMTP]. 3 Specify a setting for each parameter, and then click [Apply]. 4 Click [OK]. 5 If the setting of a parameter marked with [*] is changed, turn this machine off, then on again. 2 Reminder When turning the machine off, then on again with the main power switch, wait about 10 seconds to turn the machine on after turning it off. The machine may not operate correctly if it is turned on immediately after being turned off. bizhub 362/282/222 9-81 Specifying settings using PageScope Web Connection 9 Specifying the subject or text settings 1 In the Administrator mode, click the Network tab. – 9-82 For the procedure to log on to Administrator mode, refer to "Logging on to Administrator mode" on page 9-11. 2 Click [E-Mail/Internet FAX], then [Subject/Text]. 3 Specify a setting for each parameter, and then click [Apply]. 4 Click [OK]. bizhub 362/282/222 Specifying settings using PageScope Web Connection 9 Specifying other settings 1 In the Administrator mode, click the Network tab. – For the procedure to log on to Administrator mode, refer to "Logging on to Administrator mode" on page 9-11. 2 Click [E-Mail/Internet FAX], then [Other]. 3 Specify a setting for each parameter, and then click [Apply]. 4 Click [OK]. bizhub 362/282/222 9-83 Specifying settings using PageScope Web Connection 9 9.19 FTP Configuration (Administrator mode) Detailed FTP proxy server and FTP server settings can be specified. Settings can be specified for the following. Item Description Proxy IP Address Type in the IP address or host name (up to 64 characters) for the proxy server. For details on the settings to be specified, contact the network administrator. Port Number Type in the number (between 1 and 65535) of the port where the FTP server is connected. FTP Server [*] Select whether or not the FTP server is used. FTP Connection Timeout Select the time until the connection with the FTP server is timed out. Select from 30, 60, 90, 120, 150, 180, 210, 240, 270 and 300 seconds. * If the setting of a parameter marked with [*] is changed, turn this machine off, then on again. 9-84 bizhub 362/282/222 Specifying settings using PageScope Web Connection 9 Specifying the FTP settings 1 In the Administrator mode, click the Network tab. – For the procedure to log on to Administrator mode, refer to "Logging on to Administrator mode" on page 9-11. 2 Click [FTP Configuration]. 3 Specify a setting for each parameter, and then click [Apply]. 4 Click [OK]. 5 If the setting of a parameter marked with [*] is changed, turn this machine off, then on again. 2 Reminder When turning the machine off, then on again with the main power switch, wait about 10 seconds to turn the machine on after turning it off. The machine may not operate correctly if it is turned on immediately after being turned off. bizhub 362/282/222 9-85 Specifying settings using PageScope Web Connection 9 9.20 SNMP Select whether or not SNMP is used. Specifying the SNMP setting 1 In the Administrator mode, click the Network tab. – For the procedure to log on to Administrator mode, refer to "Logging on to Administrator mode" on page 9-11. 2 Click [SNMP]. 3 Specify a setting for each parameter, and then click [Apply]. 4 After changing the settings, turn the machine off, then on again. 2 Reminder When turning the machine off, then on again with the main power switch, wait about 10 seconds to turn the machine on after turning it off. The machine may not operate correctly if it is turned on immediately after being turned off. 9-86 bizhub 362/282/222 Specifying settings using PageScope Web Connection 9.21 9 SSL/TLS (Administrator mode) The SSL/TLS settings can be specified. When SSL/TLS is enabled, the communication between the machine and the client PC is encrypted to prevent information, such as passwords, from being leaked. Certificates can be created and deleted, and the SSL/TLS status can be specified. If "Create a Self-Signed Certificate" is clicked, settings can be specified for the following. Item Description Common Name The machine’s IP address is displayed. When DHCP is enabled, the host name is displayed. Organization Enter the organization name or group name. (Up to 63 ASCII characters) Organization Unit Enter the department name. (Up to 63 ASCII characters) Locality Enter the locality name. (Up to 127 ASCII characters) State/Province Enter the state or province name. (Up to 127 ASCII characters) Country Type in the two-character country code defined by ISO03166.2. United States: US United Kingdom: GB Italy: IT Australia: AU Netherlands: NL Canada: CA Spain: ES Czech Republic: CZ China: CN Denmark: DK Germany: DE Japan: JP France: FR Belgium: BE Russia: RU Validity Start Date The valid start date (date and time when this screen is displayed) is displayed. Validity Period (day) Enter the number of days that the certificate is valid from the valid start date. The input range is 1 to 3650. Encryption Strength Specify the SSL/TLS encryption type. Specify settings for the following in order to specify the SSL/TLS settings. Item Description SSL/TLS Select whether SSL/TLS is enabled or disabled. Encryption Strength Select the encryption type. bizhub 362/282/222 9-87 9 Specifying settings using PageScope Web Connection When a certificate is created When a certificate is created with SSL/TLS enabled, the settings appear, as shown in the following page. 9-88 bizhub 362/282/222 Specifying settings using PageScope Web Connection 9 Creating certificates 1 In the Administrator mode, click the Network tab. – For the procedure to log on to Administrator mode, refer to "Logging on to Administrator mode" on page 9-11. 2 Click [SSL/TLS]. 3 Select "Create a Self-Signed Certificate", and then click [Next]. bizhub 362/282/222 9-89 Specifying settings using PageScope Web Connection 9 4 Specify a setting for each parameter. 5 Click [Create]. The certificate is created. 9-90 bizhub 362/282/222 Specifying settings using PageScope Web Connection 6 9 When creation of the certificate is complete, click [OK]. Log off from Administrator mode. bizhub 362/282/222 9-91 Specifying settings using PageScope Web Connection 9 Deleting certificates 1 In the Administrator mode, click the Network tab. – 2 Click [SSL/TLS]. 3 Click [SSL/TLS Setting]. – 9-92 For the procedure to log on to Administrator mode, refer to "Logging on to Administrator mode" on page 9-11. If "Enhance Security" is set to "ON", certificates cannot be deleted. bizhub 362/282/222 Specifying settings using PageScope Web Connection 4 Select "Delete Certificate", and then click [Next]. 5 Check the message, and then click [OK]. 9 The certificate is deleted. 6 Click [OK]. Log off from Administrator mode. bizhub 362/282/222 9-93 Specifying settings using PageScope Web Connection 9 Specifying the SSL/TLS settings 1 In the Administrator mode, click the Network tab. – 9-94 For the procedure to log on to Administrator mode, refer to "Logging on to Administrator mode" on page 9-11. 2 Click [SSL/TLS]. 3 Click [SSL/TLS Setting]. bizhub 362/282/222 Specifying settings using PageScope Web Connection 9 4 Select "Set Encryption Strength and Enable/Disable of SSL/TLS.", and then click [Next]. 5 Specify a setting for each parameter. – If "Enhance Security" is set to "ON", "SSL/TLS" cannot be set to "Off". 6 Click [Apply]. 7 Click [OK]. bizhub 362/282/222 9-95 Specifying settings using PageScope Web Connection 9 9.22 User Authentication (Administrator mode) This page appears when "External Server" is specified as the authentication method. The user authentication server type and domain name can be specified. If "User Authentication" is clicked, settings can be specified for the following. Item Description Active Directory Type in a domain name of up to 64 characters for the Active Directory. Ten domain names can be registered. Specify the default domain name in the "Default Domain Setting" box. NTLM Type in the domain name for the NT server. Up to 15 characters can be entered. NDS: Tree Name Type in the NDS tree name. Up to 63 characters can be entered. NDS: Context Name Type in the NDS context name. Up to 127 characters can be entered. 2 Note If user authentication is performed and a domain other than the default domain name is used as an Active Directory, type in the user name as "user_name@domain_name". For "user_name@domain_name", specify a domain name of up to 64 characters. If bit 7 of mode 466 is set to "1" in the Soft SW Setting screen, select "Active Directory". For details on the software switch settings, refer to "Specifying software switch settings (machine functions)" on page 10-28. 9-96 bizhub 362/282/222 Specifying settings using PageScope Web Connection 9 Specifying user authentication settings 1 In the Administrator mode, click the Network tab. – For the procedure to log on to Administrator mode, refer to "Logging on to Administrator mode" on page 9-11. 2 Click [User Authentication]. 3 Select the server type used for authentication, and specify a setting for each parameter. 4 Click [Apply]. bizhub 362/282/222 9-97 9 9-98 Specifying settings using PageScope Web Connection bizhub 362/282/222 10 Specifying management settings Specifying management settings 10 10 Specifying management settings 10.1 Available parameters The following Administrator Management parameters are related to the information in this manual. Administrator Management 1 Item Description Initial Setting TSI Registration Prints the entered text such as the name, fax number, and address at the top of the output page when sending an Internet fax. Registers this transmission source name. TX Settings Specifies the default settings for transmission. RX Settings Specifies the time and day of the week to print when receiving an Internet fax. Report Settings Specifies the output conditions of the result reports and communication control reports. Document Management TX Document RX Document bizhub 362/282/222 When sending documents from this machine, they can simultaneously be forwarded to the addresses specified by the administrator. Specifies the forwarding addresses. Port Specifies the processing and forwarding of documents received over a network. All Other Documents Specifies the processing and forwarding of documents received in other ways than over a network. 10-3 Specifying management settings 10 Administrator Management 2 Item Description Network Settings Specifies the required settings for using this machine over a network. For details, refer to Chapter 2, "Setup" on page 3-3. Software SW Specifies function status settings. Ping Checks whether this machine is connected to a network. For details, refer to Chapter 2, "Setup" on page 3-3. SSL/TLS When SSL/TLS is enabled, the communication between the machine and the client computer can be encrypted. Specifies the creation, deletion, or encryption of certificates. 2 Reminder If the [Utility/Counter] key was pressed to register items and specify settings, be sure to press the [Reset] key in the control panel after returning to the initial screen. 10-4 bizhub 362/282/222 Specifying management settings 10.2 10 Registering transmission source names When sending Internet faxes, the text of the transmission source entered can be printed. You can register the transmission source name. The transmission source name can be used with the following operations. Item Description Internet fax Prints the name of the transmission source at the top of the page. 2 Note Up to 8 transmission source names can be registered. Since multiple transmission sources can be registered, the names for each destination and track can be used separately. Transmission source names of up to 40 characters can be registered. To register a transmission source name 1 Enter Administrator mode, and then touch [Admin. 1]. 2 Touch [Initial Setting]. 3 Touch [TSI Registration]. bizhub 362/282/222 10-5 Specifying management settings 10 10-6 4 Select the number of the transmission source to be registered. 5 Type in the transmission source name, and then touch [Enter]. 6 Check the information to be registered, and then touch [Enter]. 7 Touch [Enter] until the initial screen appears. bizhub 362/282/222 Specifying management settings 10.3 10 Specifying transmission report settings (TX Settings) You can specify the default settings for transmission. Settings can be specified for the following. Item Description Quality/Mode Default Quality Specify the quality default value that is reset after an operation is completed. Default Density Specify the density default value that is reset after an operation is completed. Communication Mode Specify the communication mode default value that is reset after an operation is completed. Select from PC (e-mail) or Internet FAX (Internet FAX). Comm. Menu TSI Select the transmission source name. OFF: Does not attach the transmission source name. Inside Body Text: Prints the transmission source name on the original document. Outside Body Text: Does not print the transmission source name on the original document. Rotation TX Specify whether to reset the rotation transmission after an operation is completed. 2-Sided TX Specify whether to reset the duplex transmission after an operation is completed. bizhub 362/282/222 10-7 Specifying management settings 10 Specifying the Quality/Mode settings 10-8 1 Enter Administrator mode, and then touch [Admin. 1]. 2 Touch [TX Settings]. 3 Touch [Quality/Mode]. 4 Select a setting, and then touch [Enter]. – In the Default Quality screen, select the desired quality. – In the Default Density screen, select the desired density by touching [Light] or [Dark]. bizhub 362/282/222 Specifying management settings – 10 In the Com.Mode screen, select the desired communication mode. 5 Touch [Enter]. 6 Touch [Enter] until the initial screen appears. bizhub 362/282/222 10-9 Specifying management settings 10 Specifying Comm. Menu settings 10-10 1 Enter Administrator mode, and then touch [Admin. 1]. 2 Touch [TX Settings]. 3 Touch [Comm. Menu]. 4 Select a setting, and then touch [Enter]. – In the TX Time Information screen, select the print position of the transmission source. – In the TSI Selection screen, select the transmission source name to be printed. bizhub 362/282/222 Specifying management settings – In the Rotation TX screen, select whether to enable rotation transmission. – In the 2-Sided TX screen, select whether to enable duplex transmission. If "ON" is selected, specify the binding position. 5 Touch [Enter]. 6 Touch [Enter] until the initial screen appears. bizhub 362/282/222 10 10-11 Specifying management settings 10 10.4 Specifying the print timing for received documents (RX Settings) The time and day of the week to print an Internet fax that was received can be specified when the Off mode has been specified (setting that does not print right after the fax is received). By regulating the time when printing is performed, Internet faxes transmitted late at night can be safely received. Settings can be specified for the following. Item Description Memory Lock Time Specify whether or not received Internet faxes are printed at a specified time instead of being printed immediately. Specify whether to collect all received Internet faxes during the specified time period on the specified days, and print them together. Specify the days, starting time and ending time. Memory Lock Password Specify the four-digit password used to print Internet faxes received outside of the specified time period. ! Detail For details on entering a password to print received Internet faxes, refer to "To print manually" on page 10-16. Memory Lock Time 10-12 1 Enter Administrator mode, and then touch [Admin. 1]. 2 Touch [RX Settings]. bizhub 362/282/222 Specifying management settings 3 Touch [Memory RX Time Setting]. 4 Touch [Memory Lock Time]. 5 Specify the settings, and then touch [Enter]. – 6 10 If no settings are to be specified, touch [OFF]. Touch [Enter] until the initial screen appears. bizhub 362/282/222 10-13 Specifying management settings 10 To specify the Memory Lock Password setting 1 Log on to the administrator mode, and then touch [Admin. 1]. 2 Touch [RX Settings]. 3 Touch [Memory RX Time Setting]. 4 Touch [Memory Lock Password]. 5 Touch [New Password], type in the password, and then touch [Enter]. – – 10-14 Type in a four-digit password using the keypad. To erase the entered text, press the [C] (clear) key. bizhub 362/282/222 Specifying management settings 6 Touch [Confirm New Password], type in the password again, and then touch [Enter]. 7 Touch [Enter] until the initial screen appears. bizhub 362/282/222 10 10-15 Specifying management settings 10 To print manually Use the following procedure to print outside of the specified time. 1 Press the [Utility/Counter] key. 2 Touch [User Management]. 3 Touch [Memory RX ON/OFF]. 4 If the Memory Lock Password setting was specified, type in the password using the keypad, and then touch [Enter]. 5 Select [Lock OFF], and then touch [Enter]. – – 6 10-16 To stop printing in the middle of a print job, touch [Lock ON], and then touch [Enter]. To restart a stopped print job, touch [Temporarily Print]. Touch [Enter] until the initial screen appears. bizhub 362/282/222 Specifying management settings 10.5 10 Specifying the transmission report printing conditions (Report Settings) You can specify the printing conditions for the transmission results and activity reports. Settings can be specified for the following. Item Description TX Report Select to print the transmission report sent to single destinations or broadcast. ON: Prints regardless of the transmission results. If TX Fails: Prints only when undeliverable. OFF: Does not print regardless of the transmission results. Activity Report Select whether to print the activity report automatically every 50 transmissions. ! Detail If "Activity Report" is set to "ON", the activity report contents can be outputted as a CSV file and sent by e-mail to the administrator when the activity report is printed. To manage the contents of the activity report as data, specify the e-mail address of the administrator. For details on the specifying the e-mail address of the administrator, refer to the User manual [Copy Operations]. bizhub 362/282/222 10-17 Specifying management settings 10 Specifying TX Report settings 10-18 1 Enter Administrator mode, and then touch [Admin. 1]. 2 Touch [Report Settings]. 3 Touch [TX Report]. 4 Specify the settings, and then touch [Enter]. 5 Touch [Enter] until the initial screen appears. bizhub 362/282/222 Specifying management settings 10 Specifying the Activity Report settings 1 Enter Administrator mode, and then touch [Admin. 1]. 2 Touch [Report Settings]. 3 Touch [Activity Report]. 4 Specify the settings, and then touch [Enter]. 5 Touch [Enter] until the initial screen appears. bizhub 362/282/222 10-19 Specifying management settings 10 10.6 Forwarding a transmission document to a specified destination (TX Forwarding) In order to control the documents sent from this machine, you can specify to have a sent document forwarded to a destination specified by the administrator. ! Detail Select the forwarding destination with a one-touch dial button. Be sure to first register the forwarding destination with a one-touch dial button. A document that was sent, then forwarded cannot be forwarded to the administrator. Specifying the forwarding destination 10-20 1 Enter Administrator mode, and then touch [Admin. 1]. 2 Touch [Document Management]. 3 Touch [TX Document]. bizhub 362/282/222 Specifying management settings 4 Touch [TX Forwarding]. 5 Specify the forwarding destination, and then touch [Enter]. – – – 6 10 To specify the forwarding destination with a one-touch dial button, touch [One-Touch], specify the destination, and then touch [Enter]. To search for a one-touch dial button, touch [Search], specify the destination, and then touch [Enter]. You can select one address for the forwarding destination. Touch [Enter] until the initial screen appears. bizhub 362/282/222 10-21 Specifying management settings 10 10.7 Specifying the processing method for received documents (Document Management) You can specify the method for processing documents received over a network. Specifying the processing of documents received on a port On this machine, you can specify the processing method, such as printing and forwarding, for documents received on a port. Settings can be specified for the following. 10-22 Item Description Document management Select whether to process the documents from a selected line. NO: Does not process the received documents. YES: Specifies the save destination and forwarding destination of the received documents. RX Doc. Settings When "YES" is selected in the Document Management screen, select the processing method for the received documents. Print: Prints the document. Forward: Forwards the data to the specified destination. Print and Forward: Prints the document and at the same time forwards the data to the specified destination. Forwarding Dest. Specify when "Forward" is selected in the Setting of RX Doc. screen. bizhub 362/282/222 Specifying management settings 10 To specify the processing method for received documents 1 Enter Administrator mode, and then touch [Admin. 1]. 2 Touch [Document Management]. 3 Touch [RX Document]. 4 Touch [Port]. 5 Touch [Network]. bizhub 362/282/222 10-23 Specifying management settings 10 6 Select whether to enable document management. – 7 Specify the processing method for received documents. – 8 – – 10-24 Touch [RX Doc. Settings], select the processing method, and then touch [Enter]. Specify the forwarding destination if "Forward" is selected in the Setting of RX Doc. screen. – 9 If "YES" is selected in the Document Management screen, specify the processing method for received documents. To add a new forwarding destination, touch [Next Destination]. To view the details of the forwarding destinations, touch [Forward], and then touch [Detail]. To delete a forwarding destination, touch [Forward], and then touch [Delete]. Touch [Enter] until the initial screen appears. bizhub 362/282/222 Specifying management settings 10 Specifying the processing of documents received on other lines You can specify the processing method for documents received on lines other than a port. The following settings can be specified. Item Description RX Doc. Settings When "Distribution Conditions" is set to "Specified", select the processing method for the received document. Print: Prints the document. Forward: Forwards the data to the specified destination. Print and Forward: Prints the document and at the same time forwards the data to the specified destination. Memory RX: Receives the memory by force. Forwarding Dest Specify the forwarding destination if "Forward" is selected in the Setting of RX Doc. screen. Touch [Next Destination], touch the button for the recipient’s address, and then touch [Enter]. 2 Note If bit 7 of mode 306 is set to "1" in the Soft SW Setting screen, only "Port" is available. For details, refer to "Specifying software switch settings (machine functions)" on page 10-28. bizhub 362/282/222 10-25 Specifying management settings 10 To specify the processing of received documents 1 Enter Administrator mode, and then touch [Admin. 1]. 2 Touch [Document Management]. 3 Touch [RX Document]. 4 Touch [All Other Documents]. 5 Specify the processing method for received documents. – 10-26 Touch [RX Doc. Settings], select the processing method, and then touch [Enter]. bizhub 362/282/222 Specifying management settings 6 Specify when "Forward" is selected in the Setting of RX Doc. screen. – – – 7 10 To add a new forwarding destination, touch [Next Destination]. To view the details of the forwarding destinations, touch [Forward], and then touch [Detail]. To delete a forwarding destination, touch [Forward], and then touch [Delete]. Touch [Enter] until the initial screen appears. bizhub 362/282/222 10-27 Specifying management settings 10 10.8 Specifying software switch settings (machine functions) By using the software switch settings, the mode, bit, and HEX values of each function of the machine can be changed from the factory settings to meet your specific needs. 2 Reminder Do not change any modes or bits other than those described in this manual. 2 Note When "Enhance Security" is set to "ON", the software switch settings cannot be changed. Software switch settings 10-28 Item Description Mode Selection Parameters to be specified are represented by a three-digit number. Type in the value using the keypad. Bit Selection A mode status is expressed with an eight-digit number. By specifying a binary number (1 or 0) for each of the bits 0 through 7, a setting can be specified for each parameter. HEX Selection The settings of each mode are expressed using hexadecimal numbers (combinations of 0-9 and A-F). The bit selection "00110000" equals the HEX selection "30". Specify mode settings either with bit or hexadecimal selections. bizhub 362/282/222 Specifying management settings 10 Examples of settings in bit selection (binary numbers) and HEX selection (hexadecimal numbers) are shown below. Decimal number Bit Selection (binary number) HEX Selection (hexadecimal number) 0 0000 0000 00 1 0000 0001 01 2 0000 0010 02 3 0000 0011 03 4 0000 0100 04 5 0000 0101 05 6 0000 0110 06 7 0000 0111 07 8 0000 1000 08 9 0000 1001 09 10 0000 1010 0A 11 0000 1011 0B 12 0000 1100 0C 13 0000 1101 0D 14 0000 1110 0E 15 0000 1111 0F 16 0001 0000 10 17 0001 0001 11 18 0001 0010 12 19 0001 0011 13 20 0001 0100 14 . . . . . . . . . 252 1111 1100 FC 253 1111 1101 FD 254 1111 1110 FE 255 1111 1111 FF bizhub 362/282/222 10-29 Specifying management settings 10 To specify a software switch setting 10-30 1 Enter Administrator mode, and then touch [Admin. 2]. 2 Touch [Software SW]. 3 Touch [Mode Selection], and then type in the mode number using the keypad. 4 Specify the mode setting using either bit selection or HEX selection. – To specify in bit values, touch [Bit Selection], touch or to move the cursor to the bit to be changed, type in the value using the keypad, and then touch [Enter]. – To specify in hexadecimal values, touch [HEX Selection], specify the value by using the keypad and touching [A]—[F], and then touch [Enter]. bizhub 362/282/222 Specifying management settings 5 To change the settings for other modes, repeat steps 3 and 4. 6 Touch [Enter] until the initial screen appears. 7 Turn the machine off, then on again. 10 2 Reminder When turning the machine off, then on again with the main power switch, wait about 10 seconds to turn the machine on after turning it off. The machine may not operate correctly if it is turned on immediately after being turned off. bizhub 362/282/222 10-31 Specifying management settings 10 Specifying whether or not the destination name is inserted (mode 001) Select whether or not the destination name is inserted as transmission source information. Factory settings Bit 7654 3210 Setting 0 0 0 1 0 1 0 0 (HEX: 14) Specifying settings The shaded cells indicate the factory settings. The page numbers on the right side refer to the descriptions for the corresponding function. 10-32 Bit Description Setting Description Page Reference 7, 6, 5, 4, 3, 2, 1 ------- 000101 0 *Do not change these bits when specifying settings for this function. ------- 0 Specifies whether or not the destination name is inserted. 0 The destination name is not inserted. ------- 1 The destination name is inserted. bizhub 362/282/222 Specifying management settings 10 Specifying settings for address input and broadcast transmissions (mode 018) Select whether or not recipients can be specified by directly entering their address, and select whether or not broadcast transmissions are permitted. Factory settings Bit 7654 3210 Settings 0 0 0 0 0 0 0 1 (HEX: 01) Specifying settings The shaded cells represent the factory settings. The page numbers on the right refer to the descriptions of the corresponding functions. Bit Description Setting Description Page Reference 7, 6, 5, 4 ---------- 0000 *Do not change these bits when specifying settings for this function. ---------- 3 Specifies whether or not a destination can be specified by directly entering its address.* 1 0 Permitted ---------- 1 Prohibited Specifies whether or not broadcast transmissions are permitted. 0 Permitted 1 Prohibited ---------- 01 *Do not change these bits when specifying settings for this function. 2 1, 0 ---------- ---------- *1 Prohibited when bit 6 of software switch setting mode 477 is set so that the settings can only be specified in Administrator mode bizhub 362/282/222 10-33 Specifying management settings 10 Specifying settings for the image in the results report (mode 023) Specify whether or not an image of the transmitted document is added to the results report. Factory settings Bit 7654 3210 Setting 1 1 1 1 1 0 0 0 (HEX: F8) Specifying settings The shaded cells represent the factory settings. The page numbers on the right refer to the descriptions of the corresponding functions. Bit Description Setting Description Page Reference 7, 6, 5, 4 ----------------------- 1111 *Do not change these bits when specifying settings for this function. ---------- 3 Specifies whether or not an image of the transmitted document is added to the results report. 0 Is not added ---------- 1 Is added ----------------------- 000 *Do not change these bits when specifying settings for this function. 2, 1, 0 10-34 ---------- bizhub 362/282/222 Specifying management settings 10 Specifying administrator forwarding settings (mode 198) You can specify whether a received document is forwarded to a destination specified by the administrator. Factory settings Bit 7654 3210 Setting 1 1 0 1 0 0 0 0 (HEX: D0) Specifying settings The shaded cells represent the factory settings. The page numbers on the right refer to the descriptions of the corresponding functions. Bit Description Setting Description Page Reference 7 Specifies whether a received document is forwarded to a destination specified by the administrator. 0 Not forwarded 1 Forwarded page 10-2 0 Specifies whether to enable TX Forwarding when scanning.(*) 0 Not forwarded 1 Forwarded Specifies the print conditions of transmission reports for TX Forwarding.(*) 00 Not output 01 Undeliverable 10 Always prints 11 *Do not specify these settings. 0000 *Do not change these bits when specifying settings for this function. 6 5, 4 3, 2, 1, 0 (*) ----------------------------- --------- --------- --------- Bit 7 of mode 198 is enabled only when "1 (transmit)" is specified. bizhub 362/282/222 10-35 Specifying management settings 10 Blocking calls from callers that are not specified (mode 306) This mode can be set if the optional fax kit is installed. Specify whether or not only faxes (G3) received from callers with a specified F-code (bulletin board/confidential/forwarding) can be received and all other faxes (G3) are blocked. Factory settings Bit 7654 3210 Setting 0 0 0 0 0 0 0 0 (HEX: 00) Specifying settings The shaded cells indicate the settings selected during production. Bit Description Setting Description Page Reference 7 Specifies whether or not to block calls from callers that are not specified. 0 Does not block --------- 1 Blocks ----------------------------- 0000000 *Do not change these bits when specifying settings for this function. 6, 5, 4, 3, 2, 1, 0 --------- 2 Note If bit 7 is set to "1", a setting for "All Other Documents" (displayed by touching [Admin. 1], then [RX Document]) cannot be specified. 10-36 bizhub 362/282/222 Specifying management settings 10 Specifying Internet fax settings (mode 350) You can specify the Internet fax capabilities of the destination machine and POP3 settings. Factory settings Bit 7654 3210 Setting 1 0 1 0 1 0 0 0 (HEX: A8) Specifying settings The shaded cells represent the factory settings. The page numbers on the right refer to the descriptions of the corresponding functions. Bit Description Setting Description Page Reference 7 ---------------------------- 1 *Do not change this bit when specifying settings for this function. --------- 6 Specifies whether to enable a confirmation (POP3) before arriving to SMTP. 0 Arrival not confirmed --------- 1 Arrival confirmed ---------------------------- 101000 *Do not change these bits when specifying settings for this function. 5, 4, 3, 2, 1, 0 bizhub 362/282/222 --------- 10-37 Specifying management settings 10 Specifying whether to add the transmission source information when faxing or when forwarding received documents (mode 352) You can specify how the transmission source information is added when faxing directly and when forwarding received documents. Factory settings Bit 7654 3210 Setting 1 1 0 1 0 0 0 0 (HEX: D0) Specifying settings The shaded cells represent the factory settings. The page numbers on the right refer to the descriptions of the corresponding functions. Bit Description Status Description Page Reference 7, 6 ----------------------------- 11 *Do not change this bit when specifying settings for this function. --------- 5 Specifies whether transmission source information is added when forwarding received documents. 0 Not added 1 Added page 105 Specifies how transmission source information is added when forwarding received documents. 0 Outside body text 1 Inside body text ----------------------------- 0000 *Do not change these bits when specifying settings for this function. 4 3, 2, 1, 0 10-38 --------- --------- bizhub 362/282/222 Specifying management settings 10 Specifying SMTP transmission timeout settings (mode 356) You can specify the time until a timeout of the SMTP server connection occurs when sending e-mail messages. Factory settings Bit 7654 3210 Setting 0 1 0 0 0 0 0 0 (HEX: 40) Specifying settings The shaded cells represent the factory settings. The page numbers on the right refer to the descriptions of the corresponding functions. Bit Description Setting 7, 6, 5, 4 Specifies the time until a timeout of the SMTP server connection occurs when sending e-mail messages.(*) 3, 2, 1, 0 (*)After ----------------------------- Description Page Reference 0001 30 seconds --------- 0010 60 seconds 0011 90 seconds 0100 120 seconds 0101 150 seconds 0110 180 seconds 0111 210 seconds 1000 240 seconds 1001 270 seconds 1010 300 seconds Other *Do not specify other settings than the above. 0000 *Do not change these bits when specifying settings for this function. --------- changing the settings, the machine must be turned off, then on again. 2 Reminder When turning the machine off, then on again with the main power switch, wait about 10 seconds to turn the machine on after turning it off. The machine may not operate correctly if it is turned on immediately after being turned off. bizhub 362/282/222 10-39 Specifying management settings 10 Specifying SMTP reception timeout settings (mode 357) You can specify the time until a timeout of the SMTP server connection occurs when receiving e-mail messages. Factory settings Bit 7654 3210 Setting 0 1 0 0 0 0 0 0 (HEX: 40) Specifying settings The shaded cells represent the factory settings. The page numbers on the right refer to the descriptions of the corresponding functions. Bit Description Setting Description Page Reference 7, 6, 5, 4 Specifies the time until a timeout of the SMTP server connection occurs when sending e-mail messages.(*) 0001 30 seconds --------- 0010 60 seconds 3, 2, 1, 0 ----------------------------- (*)After changing the 0011 90 seconds 0100 120 seconds 0101 150 seconds 0110 180 seconds 0111 210 seconds 1000 240 seconds 1001 270 seconds 1010 300 seconds Other *Do not specify other settings than the above. 0000 *Do not change these bits when specifying settings for this function. --------- settings, the machine must be turned off, then on again. 2 Reminder When turning the machine off, then on again with the main power switch, wait about 10 seconds to turn the machine on after turning it off. The machine may not operate correctly if it is turned on immediately after being turned off. 10-40 bizhub 362/282/222 Specifying management settings 10 Specifying POP3 reception timeout settings (mode 358) You can specify the time until a timeout of the SMTP server connection occurs when receiving e-mail messages. Factory settings Bit 7654 3210 Setting 0 0 1 0 0 0 0 0 (HEX: 20) Specifying settings The shaded cells represent the factory settings. The page numbers on the right refer to the descriptions of the corresponding functions. Bit Description Setting 7, 6, 5, 4 Specifies the time until a timeout of the SMTP server connection occurs when sending e-mail messages.(*) 3, 2, 1, 0 (*)After ----------------------------- Description Page Reference 0001 30 seconds --------- 0010 60 seconds 0011 90 seconds 0100 120 seconds 0101 150 seconds 0110 180 seconds 0111 210 seconds 1000 240 seconds 1001 270 seconds 1010 300 seconds Other *Do not specify other settings than the above. 0000 *Do not change these bits when specifying settings for this function. --------- changing the settings, the machine must be turned off, then on again. 2 Reminder When turning the machine off, then on again with the main power switch, wait about 10 seconds to turn the machine on after turning it off. The machine may not operate correctly if it is turned on immediately after being turned off. bizhub 362/282/222 10-41 Specifying management settings 10 Specifying the default address input screen (mode 366) Specify the settings concerning the default address input screen for the Scan to FTP and Scan to SMB operations. Settings at time of purchase Bit 7654 3210 Setting 0 0 0 0 1 0 0 0 (HEX: 08) Specifying settings The shaded cells represent the factory settings. Bit Description Setting Description Page Reference 7 ----------------------------- 0 *Do not change this bit when specifying settings for this function. --------- 6 Specifies the default screen that is displayed when registering a one-touch dial button with the Scan to FTP and Scan to SMB operations. 0 Gives priority to IP address input --------- 1 Gives priority to host name input ----------------------------- 001000 *Do not change these bits when specifying settings for this function. 5, 4, 3, 2, 1, 0 10-42 --------- bizhub 362/282/222 Specifying management settings 10 Specifying DNS query timeout setting (mode 367) You can specify the time until a timeout of the DNS server connection occurs. Factory settings Bit 7654 3210 Setting 0 0 1 0 0 0 0 0 (HEX: 20) Specifying settings The shaded cells represent the factory settings. The page numbers on the right refer to the descriptions of the corresponding functions. Bit Description Setting 7, 6, 5, 4, 3 Specifies the time until a timeout of the DNS server connection occurs. 2, 1, 0 ----------------------------- bizhub 362/282/222 Description Page Reference 00001 20 seconds --------- 00010 40 seconds 00011 80 seconds 00100 160 seconds 10101 320 seconds 00110 640 seconds Other *Do not specify other settings than the above. 000 *Do not change these bits when specifying settings for this function. --------- 10-43 Specifying management settings 10 Including the scan transmission log in the activity report (mode 368) Specify whether or not the transmission log is included in the activity report. Factory settings Bit 7654 3210 Setting 1 1 0 0 0 0 1 0 (HEX: C2) Specifying settings The shaded cells represent the factory settings. The page numbers on the right refer to the descriptions for the corresponding functions. Bit Description Setting Description Page Reference 7, 6, 5, 4, 3, 2 ---------- 110000 *Do not change these bits when specifying settings for this function. ---------- 1 Specifies whether or not the log is included in the activity report during scan transmissions. 0 Not included ---------- 1 Included ---------- 0 *Do not change this bit when specifying settings for this function. 0 10-44 ---------- bizhub 362/282/222 Specifying management settings 10 Specifying switching of the SMTP server (mode 371) Two SMTP servers can be registered for Scan to E-Mail and Internet fax operations. The SMTP server will be switched when a transmission error occurs. Factory settings Bit 7654 3210 Setting 0 1 0 0 0 0 0 0 (HEX: 40) Specifying settings The shaded cells indicate the factory settings. The page numbers on the right side refer to the descriptions for the corresponding function. Bit Description Setting Description Page Reference 7, 6, 5 ------- 010 *Do not change these bits when specifying settings for this function. ------- 4 Specifies operation of the SMTP server. 0 The SMTP server is not switched when an error occurs. page 3-19, page 9-76 1 The SMTP server is switched when an error occurs. 0000 *Do not change these bits when specifying settings for this function. 3, 2, 1, 0 ------- bizhub 362/282/222 ------- 10-45 Specifying management settings 10 Specifying the transmission interval when e-mail messages are separated (mode 372) You can specify the transmission interval when e-mail messages are separated. Factory settings Bit 7654 3210 Setting 0 0 0 0 1 1 1 1 (HEX: 0F) Specifying settings The shaded cells represent the factory settings. The page numbers on the right refer to the descriptions of the corresponding functions. Bit Description Setting Description Page Reference 7, 6, 5, 4, 3, 2, 1, 0 Specifies the transmission interval when email messages are separated.(*) 00000101 5 seconds page 3-35 00001010 10 seconds 00001111 15 seconds 00011110 30 seconds 00111100 60 seconds 01011010 90 seconds 01111000 120 seconds 10010110 150 seconds 10110100 180 seconds 11010010 210 seconds 11110000 240 seconds 00000000 *Do not specify this status. (*)Settings between "0000 0001 (HEX: 01) 1 second" and "1111 1111 (HEX: FF) 255 seconds" can be specified. When specifying the value, refer to the HEX selection table. 10-46 bizhub 362/282/222 Specifying management settings 10 Specifying the Internet fax full mode function settings (mode 373) You can specify the Internet fax full mode function settings. Factory settings Bit 7654 3210 Setting 0 0 0 0 1 0 0 0 (HEX: 08) Specifying settings The shaded cells represent the factory settings. The page numbers on the right refer to the descriptions of the corresponding functions. Bit Description Setting Description Page Reference 7 Specifies whether to enable the full mode function. 0 No page 2-7 1 Yes 6, 5, 4, 3, 2, 1, 0 ----------------------------- 0001000 *Do not change these bits when specifying settings for this function. bizhub 362/282/222 --------- 10-47 Specifying management settings 10 Specifying e-mail security functions (mode 380) You can specify security functions when receiving and sending e-mail messages. Factory settings Bit 7654 3210 Setting 0 0 0 0 0 0 0 0 (HEX: 00) Specifying settings The shaded cells represent the factory settings. The page numbers on the right refer to the descriptions of the corresponding functions. Bit Description Status Description Page Reference 7 Specifies whether to enable the e-mail reception authentication (APOP authentication) function. 0 No --------- 1 Yes Specifies whether to enable the e-mail transmission authentication (SMTP authentication) function.(*1) 0 No 1 Yes Specifies whether to prohibit the e-mail transmission authentication (CRAM-MD5 authentication) function.(*2) 0 Not prohibited 1 Prohibited Specifies whether to prohibit the e-mail transmission authentication (LOGIN authentication) function.(*2) 0 Not prohibited 1 Prohibited Specifies whether to prohibit the e-mail transmission authentication (PLAIN authentication) function.(*2) 0 Not prohibited 1 Prohibited Specifies whether to enable sharing of the SMTP authentication ID & password with the POP3 user name & password. 0 ID and password shared 1 ID and password not shared ----------------------------- 00 *Do not change these bits when specifying settings for this function. 6 5 4 3 2 1, 0 page 3-19 page 3-25 --------- page 3-19 page 3-25 --------- --------- --------- (*1) The SMTP authentication function is enabled when all of the conditions described below have been met. - Bit 6 of mode 380 is set to "1". - The SMTP authentication user name & password and the POP3 user name & password are being shared, and bit 2 of mode 380 is set to "0". 10-48 bizhub 362/282/222 Specifying management settings - - 10 The SMTP authentication user name and & password and the POP3 user name & password are not being shared, bit 2 of mode 380 is set to "1", and "SMTP Authentication User Name" and "SMTP Authentication User Password" are specified in the Network Settings screen. Either bit 5, 4, or 3 of mode 380 is set to "0". (*2) When all of the authentication functions are enabled (bits 5, 4, and 3 are set to "0"), the priority is given in the order of "CRAM-MD5 authentication (bit 5)", "LOGIN authentication (bit 4)", and "PLAIN authentication (bit 3)". bizhub 362/282/222 10-49 Specifying management settings 10 Specifying use of registered user authentication information to log on to the LDAP server (mode 466) Specify whether or not user names and passwords registered with user authentication are used to log on to the LDAP server. Factory settings Bit 7654 3210 Setting 0 0 0 0 0 0 0 0 (HEX: 00) Specifying settings The shaded cells indicate the settings selected during production. Bit Description Setting Description Page Reference 7 Specifies whether or not the user name/password used for external server authentication is used to log on to the LDAP server. 0 Not used for logon --------- 1 Used for logon ----------------------------- 0000000 *Do not change these bits when specifying settings for this function. 6, 5, 4, 3, 2, 1, 0 --------- ! Detail The information for the LDAP server to be connected to must be registered in order to use the LDAP server. In addition, when LDAP and user authentication are synchronized, select "Active Directory" as the user authentication method. Select "GSS-SPNEGO" as the LDAP authentication method. For details on the user authentication method, refer to the User manual [Copy Operations]. For details on the LDAP authentication method, refer to "LDAP Setting" on page 3-44 or "LDAP (Administrator mode)" on page 9-70. 10-50 bizhub 362/282/222 Specifying management settings 10 Specifying whether to enable access locks, and whether to enable the password rules (mode 469) Specify whether to lock access if the password is entered incorrectly, and specify whether to apply the password rules. Factory settings Bit 7654 3210 Setting 0 0 0 0 0 0 0 0 (HEX: 00) Specifying settings The shaded cells represent the factory settings. The page numbers on the right refer to the descriptions of the corresponding functions. Bit Description Setting 7 Specify whether to lock access when a password (account track and administrator passwords) is entered incorrectly three times. 6, 5 4 3, 2, 1, 0 Description Page Reference 0 Does not lock access ---------- 1 Locks access --------------------- 00 * Do not change these bits when specifying settings for this function. ---------- For security, specify whether to apply a password rule. 0 Do not apply a password rule ---------- 1 Apply a password rule --------------------- 0000 * Do not change these bits when specifying settings for this function. ---------- 2 Note For the Access Lock function, refer to User manual [Copy Operations]. If applying a password rule, the conditions that are required in the password are described below. 8 alphanumeric characters (only 8 alphanumeric character for the administrator password, and 8 alphanumeric characters or more for the user authentication user password) Only passwords with the same characters are not allowed. Passwords that do not meet the password rule are not accepted. For the password rules, refer to User manual [Copy Operations]. bizhub 362/282/222 10-51 Specifying management settings 10 Specifying the export file format (mode 470) You can specify the file format and default value when exporting registered information for one-touch dialing. Factory settings Bit 7654 3210 Setting 0 0 0 0 0 0 0 0 (HEX: 00) Specifying settings The shaded cells represent the factory settings. The page numbers on the right refer to the descriptions of the corresponding functions. Bit Description Setting Description Page Reference 7 Export file format 0 TXT format page 9-42 1 CSV format Default value of export file type 0 Mode 1 1 Mode 2 ----------------------------- 000000 *Do not change these bits when specifying settings for this function. 6 5, 4, 3, 2, 1, 0 10-52 --------- bizhub 362/282/222 Specifying management settings 10 Specifying settings to limit the use of communication modes-1 (mode 475) Specify whether to permit or prohibit the use of individual communication modes. Prohibited communication modes do not appear in their selection screens. 2 Note Programmed one-touch dial buttons can be used for transmission even if a prohibited communication mode has been specified. If all communication modes are prohibited (modes 475 to 477), some screens, such as those for specifying transmission settings, may not normally be displayed. Factory settings Bit 7654 3210 Setting 0 0 0 0 0 0 0 0 (HEX: 00) bizhub 362/282/222 10-53 Specifying management settings 10 Specifying settings The shaded cells represent the factory settings. The page numbers on the right refer to the descriptions of the corresponding functions. Bit Description Setting Description Page Reference 7 Specifies whether or not the use of TCP/IP is prohibited. 0 Permitted ---------- 1 Prohibited Specifies whether or not the use of LPD is prohibited. 0 Permitted 1 Prohibited Specifies whether or not the use of a RAW port is prohibited. 0 Permitted 1 Prohibited Specifies whether or not the use of SLP is prohibited. 0 Permitted 1 Prohibited Specifies whether or not the use of a Scan to FTP is prohibited. 0 Permitted 1 Prohibited Specifies whether or not the use of an FTP server is prohibited. 0 Permitted 1 Prohibited Specifies whether or not the use of SNMP is prohibited. 0 Permitted 1 Prohibited ----------------------- 0 *Do not change this bit when specifying settings for this function. 6 5 4 3 2 1 0 10-54 ---------- ---------- ---------- ---------- ---------- ---------- ---------- bizhub 362/282/222 Specifying management settings 10 Specifying settings to limit the use of communication modes-2 (mode 476) Specify whether to permit or prohibit the use of individual communication modes. Prohibited communication modes do not appear in their selection screens. 2 Note Programmed one-touch dial buttons can be used for transmission even if a prohibited communication mode has been specified. If all communication modes are prohibited (modes 475 to 477), some screens, such as those for specifying transmission settings, may not normally be displayed. Factory settings Bit 7654 3210 Setting 0 0 0 0 0 0 0 0 (HEX: 00) bizhub 362/282/222 10-55 Specifying management settings 10 Specifying settings The shaded cells represent the factory settings. The page numbers on the right refer to the descriptions of the corresponding functions. Bit Description Setting Description Page Reference 7 Specifies whether or not the use of the Scan to SMB operation is prohibited. 0 Permitted ---------- 1 Prohibited Specifies whether or not the use of SMB printing is prohibited. 0 Permitted 1 Prohibited Specifies whether or not the use of G3 faxing is prohibited. 0 Permitted 1 Prohibited Specifies whether or not the use of the Scan to HDD operation is prohibited. 0 Permitted 1 Prohibited Specifies whether or not the use of the Scan to E-Mail operation is prohibited. 0 Permitted 1 Prohibited Specifies whether or not the use of the Internet fax operation is prohibited. 0 Permitted 1 Prohibited Specifies whether or not the use of IP relay is prohibited. 0 Permitted 1 Prohibited Specifies whether or not the use of IP address fax operation is prohibited. 0 Permitted 1 Prohibited 6 5 4 3 2 1 0 ---------- ---------- ---------- ---------- ---------- ---------- ---------- 2 Note Bits 7 and 0 cannot be changed on the model for Europe. 10-56 bizhub 362/282/222 Specifying management settings 10 Specifying settings to limit the use of communication modes-3/ Specifying restrictions for registering fax addresses and printing reports and specifying how one-touch dial recipients are displayed (mode 477) Specify whether to permit or prohibit the use of individual communication modes. Prohibited communication modes do not appear in their selection screens. Specify whether or not fax addresses can be registered and reports can be printed by users, and specify whether or not one-touch dial information is displayed in screens and reports. 2 Note Programmed one-touch dial buttons can be used for transmission even if a prohibited communication mode has been specified. If all communication modes are prohibited (modes 475 to 477), some screens, such as those for specifying transmission settings, may not normally be displayed. Factory settings Bit 7654 3210 Setting 0 0 0 0 0 0 0 0 (HEX: 00) bizhub 362/282/222 10-57 Specifying management settings 10 Specifying settings The shaded cells represent the factory settings. The page numbers on the right refer to the descriptions of the corresponding functions. Bit Description Setting Description Page Reference 7 Specifies whether or not the use of the computer (scanner) is prohibited. 0 Permitted ---------- 1 Prohibited Specifies whether settings for registering mail addresses or printing reports can be specified by only the administrator or also by the user. 0 Settings can also be specified by users. 1 Settings can only be specified in Administrator mode. Specifies whether or not only recipient names are displayed (and the fax number or address is not displayed) in reports and Job List screens and when a onetouch dial button is touched. *1, *2 0 Displayed 1 Not displayed 4 ----------------------- 0 *Do not change this bit when specifying settings for this function. ---------- 3 Specifies whether or not the use of TCPSocket is prohibited. 0 Permitted ---------- 1 Prohibited ----------------------- 000 *Do not change these bits when specifying settings for this function. 6 5 2, 1, 0 page 10-17 ---------- ---------- *1 If bit 6 is set to "1", the settings will not be applied if bit 5 is set to "1" (not displayed). If you do not wish to display the fax number or address of the recipient, bit 6 must also be set to "1" (settings can only be specified in Administrator mode). *2 If the recipient is directly specified from the Direct Input tab, the recipient is displayed, even if "1" (not displayed) is selected. 10-58 bizhub 362/282/222 Specifying management settings 10 Specifying the deleting method for [Del.] in input screens (mode 478) Specify the deleting method for [Del.] in input screens. Select whether the character at cursor’s position or the character to the left of the cursor is deleted. Factory settings Bit 7654 3210 Setting 0 0 0 0 0 0 0 0 (HEX: 00) Specifying settings The shaded cells represent the factory settings. The page numbers on the right refer to the descriptions of the corresponding functions. Bit Description Setting Description Page Reference 7 Specify the deleting method for [Del.] in input screens. 0 Deletes the character at the cursor’s position page 13-5 1 Deletes the character to the left of the cursor ----------------------- 0000000 *Do not change these bits when specifying settings for this function. 6, 5, 4, 3, 2, 1, 0 ---------- 2 Note North American model default setting: 1 Other model default setting: 0 bizhub 362/282/222 10-59 Specifying management settings 10 Specifying settings for limiting user authentication to only Scan functions (mode 479) Specify whether or not user authentication is performed only when the [Fax/Scan] or [Extra Scan] key is pressed. Factory settings Bit 7654 3210 Setting 0 0 0 0 0 0 0 0 (HEX: 00) Specifying the setting The shaded cells represent the factory settings. The page numbers on the right refer to the descriptions of the corresponding functions. Bit Description Setting Description Page Reference 7, 6, 5 ---------------------- 000 *Do not change these bits when specifying settings for this function. ---------- 4, 3, 2, 1, 0 Specifies whether or not to limit authentication on Fax and Scan functions. 11001 Limited ---------- 00000 Not limited 2 Reminder Do not specify settings for mode 479 other than those described in "Specifying the setting". ! Detail If user authentication is limited to Scan functions, touch [Account/User Auth.] in the Administrator Management 1 screen, and then select "External Server" as the user authentication method. For details on the external server authentication settings, refer to the User manual [Copy Operations]. 10-60 bizhub 362/282/222 Specifying management settings 10.9 10 Specifying SSL/TLS settings The SSL/TLS settings should be specified. When SSL/TLS is enabled, the communication between the machine and the client PC is encrypted to prevent leakage of information such as passwords. Acquire SSL/TLS certificates in PageScope Web Connection. For details, refer to "SSL/TLS (Administrator mode)" on page 9-87. To specify SSL/TLS settings 1 Enter Administrator mode, and then touch [Admin. 2]. 2 Touch [Security Setting]. 3 Touch [SSL/TLS]. 4 Specify whether to use SSL/TLS, and then touch [Enter]. – 5 If "Enhance Security" is set to "ON", "SSL/TLS" cannot be set to "OFF". Touch [Enter] until the Initial screen appears. bizhub 362/282/222 10-61 10 10-62 Specifying management settings bizhub 362/282/222 11 Reports and lists Reports and lists 11 Reports and lists 11.1 Checking the transmission conditions (TX Report) 11 The transmission report (TX Report) shows the document number, start date and time of the transmission, duration of the transmission, destination, mode, number of pages transmitted, transmission results, and transmission volume. According to the factory setting, the machine is set to automatically print a report after every 50 transmissions. The method for manually printing a report is described below. ! Detail To change the report-related settings, refer to User manual [Copy Operations]. 2 Note If bit 6 of mode 477 is set to "1" in the Software Switch Setting screen, reports can be printed with "Print Lists" in the Administrator Management 1 screen. For details, refer to "Specifying software switch settings (machine functions)" on page 10-28. bizhub 362/282/222 11-3 Reports and lists 11 To print a transmission report 1 Press the [Utility/Counter] key. 2 Touch [Reports]. 3 Touch [TX Report]. The transmission report is printed. 11-4 bizhub 362/282/222 Reports and lists 11 Contents of the report 1 3 4 2 5 6 7 No. Item Description 1 Transmission source information (TSI) Shows the name and number of the transmission source. 2 Report output date and time Shows the date and time that the report was printed. 3 Mode Shows the transmission mode used. The following may appear. PC e-mail: PC-M FTP: FTP SMB: SMB Internet fax: Email Scan to HDD: HDD IP-TX: IP address faxing PC(SCANNER): Scan to PC IP-RELAY: IP relay 2 Note "HDD" appears if the optional hard disk drive is installed. "IP-TX", "PC(SCANNER)", and "IP-RELAY" appear if the optional scanner unit is installed. 4 Transmission function Shows the symbol of the transmission function used. I: Individual login F: Forwarding S: Transmission to secondary address Blank: Other transmission 5 Pages Shows the number of document pages that were transmitted. bizhub 362/282/222 11-5 Reports and lists 11 No. Item Description 6 Result Shows the transmission result. Any of the following may appear. OK: The transmission was completed successfully. INTERR: The transmission was interrupted. F. MEM: The memory capacity was exceeded. NG: The transmission failed. PT. DEL: The transmission to some destinations failed. F.DATA: The size of the data exceeds the allowable limit. IMG NG: The transmission resolution was incorrect so the transmission was ended. Error code: For details, refer to "Network error list" on page 12-4. 7 User/Account Shows the user name or account name that was authenticated. *1 : When e-mail messages are transmitted separately by the separation setting, only the actual time of the e-mail message transmission is displayed in the "Duration" column. The control time for separating e-mail messages is not included. When e-mail messages are separated, the duration between the beginning and end of the transmission and the duration time displayed in the report may vary. 11-6 bizhub 362/282/222 Reports and lists 11.2 11 Checking the reception conditions (RX Report) The reception activity report (RX Report) shows the document number, start date and time of the reception, duration of the reception, destination, mode, number of pages received, and the transmission results. Printing a reception activity report 1 Press the [Utility/Counter] key. 2 Touch [Reports]. 3 Touch [RX Report]. The reception activity report is printed. bizhub 362/282/222 11-7 Reports and lists 11 Contents of the report 1 3 4 2 5 6 7 No. Item Description 1 TSI Shows the name and address of the transmission source. 2 Report output date and time Shows the date and time that the report was printed. 3 Mode Shows the mode used for transmission. The following may appear. Internet fax: Email IP-RX: IP address faxing 2 Note "IP-RX" appears if the optional scanner unit is installed. 11-8 4 Reception functions Shows the symbol of the transmission function used. I: Individual login F: Forwarding Blank: Other transmission 5 Pages Shows the number of pages printed. 6 Result Shows the transmission result. Any of the following may appear. OK: The transmission was completed successfully. INTERR: The transmission was interrupted. F. MEM: The memory capacity was exceeded. NG: The transmission failed. IMG NG: The transmission resolution was incorrect so the transmission was ended. B.PRT: The job is being printed. Error code: For details, refer to "Network error list" on page 12-4. 7 User/Account Shows the user name or account name that was authenticated. bizhub 362/282/222 Reports and lists 11.3 11 Checking the destinations registered in one-touch dial buttons (One-Touch List) You can print a list of the destinations registered with one-touch dial buttons. Printing the One-Touch List 1 Press the [Utility/Counter] key. 2 Touch [Reports]. 3 Touch [One-Touch List]. The one-touch list is printed. bizhub 362/282/222 11-9 Reports and lists 11 Contents of the list 1 2 3 No. Item Description 1 Transmission source information (TSI) Shows the name and number of the transmission source. 2 Report output date and time Shows the date and time that the report was printed. 3 Communication mode Shows the registered transmission mode. The following may appear. Internet fax: Internet FAX PC (e-mail): PC (E-MAIL) FTP: FTP SMB: SMB HDD: HDD IP-TX: IP address faxing PC(SCANNER): Scan to PC IP-RELAY: IP relay 2 Note "HDD" appears if the optional hard disk drive is installed. "IP-TX", "PC(SCANNER)", and "IP-RELAY" appear if the optional scanner unit is installed. 11-10 bizhub 362/282/222 Reports and lists 11.4 11 Printing the mail program list You can print the list of mail programs registered with one-touch dial buttons. To print the mail program list 1 Press the [Utility/Counter] key. 2 Touch [Reports]. 3 Touch [Mail Program List]. – If the optional fax kit has been installed, touch [Program List]. The mail program list is printed. bizhub 362/282/222 11-11 Reports and lists 11 Contents of the list 11-12 bizhub 362/282/222 Reports and lists 11.5 11 Checking the function settings (Setting List) You can print a list of all of the machine functions. Only the administrator can print the setting list. Printing the setting list 1 Press the [Utility/Counter] key, and then enter Administrator mode. 2 Touch [Admin. 1]. 3 Touch [Print Lists]. 4 Touch [Setting List]. The setting list is printed. bizhub 362/282/222 11-13 Reports and lists 11 Contents of the list The POP 3 password and network administrator password appear as "*****". 11-14 bizhub 362/282/222 12 Scan function troubleshooting Scan function troubleshooting 12 12 Scan function troubleshooting 12.1 When the following are displayed Screen bizhub 362/282/222 Cause Action POP3 reception fails. Check that the POP3 user name and password are correctly specified. The administrator is logged on from a computer on the network. Wait until the administrator operation are completed and the administrator has logged out. If the administrator closes the Web browser without logging out, the administrator must log in again and log off correctly. 12-3 Scan function troubleshooting 12 12.2 Network error list When an error occurs such as during a scan transmission, error codes are displayed on the job list screen and in a report. When an error code is displayed, troubleshoot the problem as described below. Internet fax transmission/Scan to E-Mail 12-4 Error code Cause Action E4DXXX Since the SMTP server address is not specified, connection to the e-mail server is not possible. Specify the SMTP server address. Refer to page 3-19. E5AXXX Since the DNS settings are incorrect, transmission is not possible. Check the DNS settings. Refer to page 3-15. E5DXXX Since the e-mail address or the destination e-mail address is not specified or is incorrect, transmission is not possible. Check the settings and the destination e-mail address. Refer to page 3-19. E6FXXX The data is too large to be sent. Even when scanning is complete, transmission may not be possible depending on the original document. Change the quality to fine or standard, and then send the data again. E7XXXX SMTP authentication failed. Check the SMTP authentication account and password. EAXXXX The LAN cable is not connected, communication to the SMTP server failed, or transmission was attempted to an incorrect destination address. Check that the LAN cable is properly connected, that the SMTP server can communicate, that the network settings such as the subnet mask are correct, and that the destination e-mail address is correct. Refer to page 3-19. EAX212 SMTP authentication is requested. Enable the SMTP authentication settings. Refer to page 3-19. EABXXX POP3 before SMTP authentication failed. Check the POP3 account and password. Refer to page 3-25. bizhub 362/282/222 Scan function troubleshooting 12 Internet fax reception Error code Cause Action E40XXX Since the POP3 server address is not specified, connection to the e-mail server is not possible, or connection to the server is not possible due to an error in the server. Check the POP3 server address. Check that the POP3 server is operating properly. Refer to page 3-25. E50XXX E51XXX E52XXX Since the POP3 user name or password is not specified or is incorrect, reception is not possible. Check the user name and password settings. Refer to page 3-25. E60XXX E61XXX Data incompatible with POP3 reception was received. An email with a file attachment of a format other than TIFF-F, or text that exceeds 1,000 characters per line, or large data, or an e-mail message containing no data was received. Check with the sender. E7XXXX APOP authentication failed. Check the POP3 account and password. Refer to page 3-25. ECXXXX The LAN cable is not connected, communication to the POP3 server failed, or the user name and password are not registered in the server and differ from the settings on this machine. Check that the LAN cable is properly connected and that the POP3 server settings are correct. Refer to page 3-25. bizhub 362/282/222 12-5 Scan function troubleshooting 12 Scan to FTP 12-6 Error code Cause Action ED09C6 The LAN cable is not connected, or the destination address is incorrect. Check that the LAN cable is correctly connected. Also, check that the settings for the FTP server address, port number, and proxy server are correctly specified. ED09C7 The user name or password is incorrect. Check the user name and password. ED09C8 The specified folder does not exist. Check that the save destination folder exists and check the folder name. ED09C9 The FTP server capacity is full. Free up disk space on the FTP server. ED09CA An error occurred when data was being transferred. Check that the FTP server is operating properly, or check that the LAN cable is not broken. EF09CF The protocol is incorrect. Ask the administrator to deactivate the protocol usage restrictions, or look for other delivery methods. ED09CC The FTP server is malfunctioning if other than the above. Check the status of the FTP server. EF09CD Available memory is not sufficient. Expand the memory of this machine. EF09D0 Characters that cannot be used have been entered. Change the file name. bizhub 362/282/222 Scan function troubleshooting 12 Scan to SMB Error code Cause Action ED09C6 The LAN cable is not connected, or the destination address is incorrect. Check that the LAN cable is correctly connected. Also, check that the settings for the destination address and port number are correctly specified. ED09C7 The user name or password is incorrect. Check the user name and password. ED09C8 The specified folder does not exist. Check that the save destination folder exists and check the folder name. ED09C9 The disk capacity is full. Free up the disk space on the corresponding disk. ED09CF The protocol is incorrect. Ask the administrator to deactivate the protocol usage restrictions, or look for other delivery methods, or look for other delivery methods. ED09CC SMB transmission malfunctions other than the above Check the status of the destination device. A Scan to SMB transmission cannot be performed with a UNIX or LINUX system. EF09CD Available memory is not sufficient. Expand the memory of this machine. EF09D0 Characters that cannot be used have been entered. Change the file name. bizhub 362/282/222 12-7 Scan function troubleshooting 12 12.3 Troubleshooting Perform the procedures described below to troubleshoot a malfunction. Internet fax transmission/Scan to E-Mail 12-8 Symptom Cause Action Cannot send The connection is incorrect. Check the hub LED indicator and check the connection status. A user is logging on and sending e-mails when a user e-mail address is not registered. Register the e-mail address of the user who is logging on. Required settings for this machine have not been registered. Specify the required network settings. Refer to page 3-4. The LAN cable is broken. Replace the LAN cable. Other causes Check the communication malfunction under "Type" in the job list, and refer to the error code. Refer to page 12-4. Transmission is possible, but the image cannot be output on the destination terminal and computer. The destination terminal does not have the ability to process the transmitted image. Specify the settings such as the size, quality, and encoding method supported by the destination terminal, and then send the data again. Refer to page 3-35. No text was inserted into the transmitted document. Depending on the e-mail software, attachments cannot be viewed when only the attachment is sent without text. Specify the settings to insert text into the document being sent, and then send the document again. Refer to page 3-35. The transmission cancellation has been specified, but it is not canceled. Time may be required to cancel an Internet fax. Wait until the job is canceled. bizhub 362/282/222 Scan function troubleshooting 12 Internet fax reception Symptom Cause Action Cannot receive The connection is incorrect. Check the hub LED indicator and check the connection status. The Auto Receive Check setting is not specified. Specify the time interval to check reception automatically. Refer to page 3-29. Required settings for this machine have not been registered. Specify the required network settings. Refer to page 3-4. The same POP3 user name is being used by another e-mail software and user. Do not use the same POP3 user name with other e-mail software. The LAN cable is broken. Replace the LAN cable. Data in a format that is not supported is attached, or an email with no data is received. Ask the sender to send a TIFF-F file or text. The received document has not been specified to be printed. To print the received document, specify the received document to be printed. Refer to page 10-12, page 10-22. Memory exceeded Print the saved documents, decrease the memory usage of this machine, and then ask the sender to send the data again. Other causes Check the communication malfunction under "Type" in the job list, and refer to the error code. Refer to page 12-4 Binary code data is received (printed). Data is attached in a format other than MIME, or the e-mail is received via a server that does not support MIME. When data is attached in a format other than MIME, the binary code is printed as text. (This is not a machine malfunction.) Ask the sender to send the data in the MIME format. The same document is received many times. Since the size of the e-mail is too large, a connection timeout with the server occurs while the data is being received. From a computer, receive the data as proxy and delete the corresponding email from the server. Ask the sender to decrease the size of the e-mail and to send it again. The reception cancellation has been specified, but it is not canceled. Time may be required to cancel an Internet fax reception. Wait until the job is canceled. The POP3 reception malfunction icon does not disappear. Since the time of the Auto-RX has not elapsed since the previous time a POP3 reception failed, POP3 reception is not performed. Once the POP3 reception malfunction icon is displayed, it does not disappear until reception is successful. Specify the setting to shorten time of the Auto-RX, and check that POP3 reception is possible. Can be received but cannot be printed. bizhub 362/282/222 12-9 Scan function troubleshooting 12 Other 12-10 Symptom Cause Action An attempt to deliver an e-mail message has been made, but transmission fails. The e-mail address of the specified user to which the email message is to be delivered is not registered. When sending an e-mail message, the email address must be specified. Register the email address of the specified user to which the e-mail message is to be delivered. The e-mail message is delivered from this machine, but it is not delivered to the forwarding destination. The forwarding destination address is incorrect. Check the one-touch e-mail address specified for the forwarding destination. Other causes The user e-mail address of the specified e-mail delivery may have returned an error e-mail message. Check the contents of the email message. "Network Settings" does not appear on the Administrator Management screen. Machine malfunction Contact your technical representative. bizhub 362/282/222 13 Appendix Appendix 13 13 Appendix 13.1 Product specifications Internet fax specifications Item Specifications Transmission protocol E-mail send: SMTP (IETF RFC 2821 and RFC 2822), TCP/IP E-mail receive: POP3 (IETF RFC 1725 and RFC 1939), TCP/IP Original document sizes transmitted Letter w/v, Legal w, 11 e 17 w, A4 w/v, B4 w, A3 w Resolution 200 e 100 dpi, 200 e 200 dpi, 400 e 400 dpi, 600 e 600 dpi Data format E-mail format: MIME Attachment format: TIFF-F Encoding method MH, MR, MMR Compatible cable Ethernet LAN (100Base-TX, 10BASE-T connection) Scan to E-Mail specifications Item Specifications Transmission protocol E-mail send: SMTP (IETF RFC 2821 and RFC 2822), TCP/IP Original document sizes transmitted Letter w/v, Legal w, 11 e 17 w, A4 w/v, B4 w, A3 w Resolution 200 e 100 dpi, 200 e 200 dpi, 400 e 400 dpi, 600 e 600 dpi Data format E-mail format: MIME Attachment format: TIFF-F, PDF Encoding method MH, MMR Compatible cable Ethernet LAN (100Base-TX, 10BASE-T connection) Destination registration Computer e-mail address registration: Up to 540 bizhub 362/282/222 13-3 Appendix 13 Scan to FTP specifications Item Specifications Transmission protocol TCP/IP Original document sizes transmitted Letter w/v, Legal w, 11 e 17 w, A4 w/v, B4 w, A3 w (Depending on the setting, other sizes can be sent.) Resolution 200 e 100 dpi, 200 e 200 dpi, 400 e 400 dpi, 600 e 600 dpi Data format Single-page TIFF, multipage TIFF, PDF Encoding method MH, MMR Destination registration FTP Server address or host name registration: Up to 540 Scan to SMB specifications 13-4 Item Specifications Transmission protocol TCP/IP Original document sizes transmitted Letter w/v, Legal w, 11 e 17 w, A4 w/v, B4 w, A3 w (Depending on the setting, other sizes can be sent.) Resolution 200 e 100 dpi, 200 e 200 dpi, 400 e 400 dpi, 600 e 600 dpi Data format Single-page TIFF, multipage TIFF, PDF Encoding method MH, MMR Destination registration Destination computer IP address or host name registration: Up to 540 bizhub 362/282/222 Appendix 13.2 13 Entering text This section contains details on using the keyboard that appears in the touch panel for typing in passwords and text to register one-touch recipients. The keypad can also be used to type in numbers. The following procedure describes how to enter characters in the User Name screen when registering users for user authentication. To type text % In the keyboard that appeared, touch the button for the desired character. – Numbers can also be typed in with the keypad. – To type in uppercase letters, touch [Caps]. – To cancel Caps mode, touch [Caps] again. 2 Note To cancel the entered text, touch [Cancel]. To clear all entered text, press the [C] (clear) key. ! Detail To switch between entering letters or symbols, touch the button for switching the input mode. To change a character in the entered text, touch and to move the cursor to the character to be changed, touch [Del.], and then type in the desired letter or number. The software switch settings can be used to change how characters are deleted. For details on the software switch settings, refer to "Specifying software switch settings (machine functions)" on page 10-28. If the number of characters exceeds the limit allowed, the last character is replaced with the last character entered. bizhub 362/282/222 13-5 Appendix 13 List of available characters Type Characters Alphanumeric characters / symbols 13-6 bizhub 362/282/222 Appendix 13.3 13 Glossary Term Definition 10Base-T/100BaseTX/1000Base-T A standard for Ethernet, which is connected through a cable consisting of twisted copper wire pairs. The transmission speed of 10BaseT is 10 Mbps, of 100Base-TX is 100 Mbps, and of 1000Base-T is 1,000 Mbps. Active Directory A service that manages all information such as hardware resources for servers, clients, and printers on a network supported by Microsoft and the attributes and access permissions of the users anonymous FTP While normal FTP sites are protected by an account name and password, this type of FTP site can be used by anyone without a password by simply entering "anonymous" as the account name. APOP Abbreviation for Authenticated Post Office Protocol. An authentication method with encrypted passwords, which results in increased safety, as compared to the usual unencrypted passwords used by POP to retrieve e-mail messages AppleTalk A generic name for the protocol suite developed by Apple Computer for computer networking Auto IP A function for automatically acquiring the IP address. If acquisition of the IP address failed with DHCP, an IP address is acquired from the address space of 169.254.0.0. bit Abbreviation for Binary Digit. The smallest unit of information (data quantity) on a computer or printer. Displays data using 0 or 1. BMP Abbreviation for Bitmap. A file format for saving image data, which uses the .bmp extension. Commonly used on Windows platforms. You can specify the color depth from monochrome (2 values) to full color (16,777,216 colors). Images are not usually compressed when saved. Byte Unit of information (data quantity) on a computer or printer. Configured as 1 byte equals 8 bits. Client A computer that uses the services provided by a server through a network Contrast The difference in intensity between the light and dark parts of the image (light/dark variation). An image with little light/dark variation is said to have a low contrast, and an image with large light/dark variation is said to have a high contrast. CSV Abbreviation for Comma-Separated Values. One of the formats for saving database or spreadsheet data as a text file. (The file extension is ".csv".) The data, which is separated by commas (as the delimiter), can be shared by different applications. Default The initial settings. The settings first selected when the machine is turned on, or the settings first specified when the function is selected. Default Gateway A device, such as a computer or router, used as a "gateway" to access computers not on the same LAN Density An indication of the amount of darkness in the image bizhub 362/282/222 13-7 Appendix 13 13-8 Term Definition DHCP Abbreviation for Dynamic Host Configuration Protocol. A protocol in which a client computer on a TCP/IP network automatically specifies the network settings from the server. With collective management of the IP address for DHCP clients on the DHCP server, you can avoid duplication of an address and you can build a network easily. DNS Abbreviation for Domain Name System. A system that acquires the supported IP addresses from host names in a network environment. DNS allows the user to access other computers over a network by specifying host names, instead of difficult to memorize and understand IP addresses. DPI (dpi) Abbreviation for Dots Per Inch. A resolution unit used by printers and scanners. Indicates how many dots per inch are represented in an image. The higher the value, the higher the resolution. Driver Software that works as a bridge between a computer and a peripheral device. Ethernet LAN transmission line standard File Extension The characters added to the file name in order to differentiate file formats. The file extension is added after a period, for example, ".bmp" or ".jpg". FTP Abbreviation for File Transfer Protocol. A protocol for transferring files over the Internet or an intranet on the TCP/IP network. Gateway Hardware and software used as the point where a network is connected to a network. A gateway also changes data formats, addresses, and protocols according to the connected network. Gradation The light and dark levels of an image. As the number increases, smoother brightness variations can be reproduced. Grayscale Monochrome image expressive form using the gradation information from black to white GSS-SPNEGO/Simple/Digest MD5 Authentication methods for logging on to the LDAP server. The authentication method (GSS-SPENGO, SIMPLE or Digest MD5) for the LDAP server differs depending on the server being used and the server settings. Halftone The method of producing the light and dark parts of an image through varying sizes of black and white dots Hard Disk Large capacity storage device for storing data. The data can be stored even if the power is turned off. Host Name Displayed name of a device over a network HTTP Abbreviation for HyperText Transfer Protocol. A protocol used to send and receive data between a Web server and a client (Web browser). Documents containing images, recordings, and video clips can be exchanged with the expressive form information. ICM Abbreviation for Image Color Management. The color management system used by Windows. Color differences of input/output devices, such as monitors, scanners and printers, are adjusted to reproduce colors so that they are nearly the same on any device. IMAP Abbreviation for Internet Message Access Protocol. The protocol for retrieving e-mail messages with the function for managing mailboxes on the server. Currently, IMAP4 (the fourth version of IMAP) is most often used. bizhub 362/282/222 Appendix 13 Term Definition Install To install hardware, operating systems, applications, printer drivers on to a computer IPP Abbreviation for Internet Printing Protocol. A protocol that sends and receives print data and controls printers over the Internet on a TCP/IP network. Data can also be sent to printers in remote areas to print over the Internet. IP Address A code (address) that is used to identify individual network devices over the Internet. A maximum of three digits for four numbers are displayed such as 192.168.1.10. IP addresses are assigned to devices, including computers, which are connected to the Internet. J2RE Abbreviation for Java 2 Runtime Environment. One type of JavaVirtual Machine (Java VM) in a program operating environment written in the object-oriented language Java, developed by Sun Microsystems. This is required to run applications that were created with Java. Java A programming language developed by Sun Microsystems, which runs on most computers, regardless of the installed hardware and operating system. However, in order to run Java applications, an operating environment called "Java Virtual Machine (Java VM)" is required. JPEG Abbreviation for Joint Photographic Experts Group. One of the file formats for saving image data. (The file extension is ".jpg".) The compression ratio is roughly 1/10 to 1/100. This format uses an effective method in the compression of continuous-tone images, such as photographs. Kerberos A type of network authentication system used by Windows 2000 or later. Used in Active Directory authentication. Users can be safely and efficiently authenticated with a two-phase authentication (user logon and network resource usage) on a dependable site set up on the network. LAN Abbreviation for Local Area Network. A network which connects computers on the same floor, in the same building, or in neighboring buildings. LDAP Abbreviation for Lightweight Directory Access Protocol. On a TCP/IP network, such as the Internet or an intranet, this protocol is used to access a database for managing environment information and the email addresses of network users. LPR/LPD Abbreviation for Line Printer Request/Line Printer Daemon. A printing method over a network in a Windows NT system or UNIX system. Using TCP/IP, you can output print data from Windows or Unix to a printer over a network. MAC Address Abbreviation for Media Access Control address. With a special ID number for each Ethernet card, data can be sent and received between the cards. A number consists of 48 bits. The first 24 bits consist of a special number for each manufacturer controlling and assigning IEEE. The last 24 bits consist of a number that the manufacturer assigns uniquely to the card. Memory Storage device for storing data temporally. When the power is turned off the data may or may not be erased. NetBEUI Abbreviation for NetBIOS Extended User Interface. A network protocol developed by IBM. By simply specifying the computer name, you can build a small-scale network. bizhub 362/282/222 13-9 Appendix 13 13-10 Term Definition NetWare Network operating system developed by Novell. NetWare IPX/SPX is used as the communication protocol. MH Abbreviation for Modified Huffman. A data compression encoding method for fax transmissions. Documents containing mostly text are compressed to about 1/10 their original size. MIB Abbreviation for Management Information Base. In a TCP/IP transmission, this uses SNMP to define the management information format for a group of network devices. There are two formats: the manufacturer-specific private MIB and the standardized MIB. MMR Abbreviation for Modified Modified Read. A data compression encoding method for fax transmissions. Documents containing mostly text are compressed to about 1/20 their original size. NTLM Abbreviation for NT LAN Manager. User authentication method used by Windows NT or later. With the MD4 and MD5 encoding methods, passwords are encoded. NTP Abbreviation for Network Time Protocol. The protocol for correctly adjusting the computer’s internal clock over the network. In a hierarchical method, the time is adjusted with the server at the highest level using GPS to acquire the correct time, which is then referenced by each lower level host. OCR Abbreviation for Optical Character Reader. A device or software that converts handwritten or printed documents to text data by optically scanning it and, through comparison with a previously stored pattern, specifies the characters. OS Abbreviation for Operating System. Basic software for controlling the system of a computer. PASV Abbreviation for PASsiVe. A mode for connecting to an FTP server from within a firewall. If this mode is not specified, the firewall will be considered inaccessible and the connection will be terminated, preventing the file from being sent. Peer-to-peer A network format that allows connected devices to communicate without using a dedicated server PDF Abbreviation for Portable Document Format. An electronically formatted document which uses the .pdf extension. Based on the PostScript format, you can use the free Adobe Acrobat Reader software to view documents. Pixel An image pixel. The smallest unit of an image. POP Abbreviation for Post Office Protocol. A protocol for retrieving e-mail messages from a mail server. Currently, POP3 (the third version of POP) is most often used. Port Number The number that identifies the transmission port for each process running on a computer on the network. The same port cannot be used by multiple processes Proxy Server A server that is installed to act as an intermediary connection between each client and different servers to effectively ensure security over the entire system for Internet connections bizhub 362/282/222 Appendix 13 Term Definition RAW port number The TCP port number used when the RAW protocol is selected for Windows TCP printing. Usually set to 9100. Resolution Displays the ability to reproduce the details of images and print matter correctly Preview A function that allows you to view an image before processing a print or scan job Property Attribute information When using a printer driver, various functions can be specified in the file properties. In the file properties, you can check the attribute information of the file. Protocol The rules that allow computers to communicate with other computers or peripheral devices Scanning With the scanning operation of the scanner, an image is read while the row of image sensors is gradually moved. The direction that the image sensors are moved is called the main scanning direction, and the direction in which the image sensors are arranged is called the sub-scanning direction. Screen Frequency Indicates the density of dots used to create the image Single-Page TIFF A single TIFF file that contains only a single page SMB Abbreviation for Server Message Block. A protocol that shares files and printers over a network and which is mainly used by Microsoft Windows. SMTP Abbreviation for Simple Mail Transfer Protocol. A protocol for sending and forwarding e-mail. SNMP Abbreviation for Simple Network Management Protocol. A management protocol in a network environment using TCP/IP. SSL/TLS Abbreviation for Secure Socket Layer/Transport Layer Security. The encoding method for safely transmitting data between the Web server and browser. Subnet Mask The unit used to divide a TCP/IP network into small networks (subnetworks). It is used to identify the bits in a network address that are higher than the IP address. TCP/IP Abbreviation for Transmission Control Protocol/Internet Protocol. The defacto standard protocol used by the Internet that uses IP addresses to identify each network device. TIFF Abbreviation for Tagged Image File Format. One of the file formats for saving image data. (The file extension is ".tif".) Depending on the tag indicating the data type, information for various image formats can be saved in a single image data. Thumbnail A small image that shows the contents of the image or document file (the image displayed when the file was opened) USB Abbreviation for Universal Serial Bus. A general interface standard for connecting a mouse, printer, and other devices to a computer. Uninstall To delete software installed on a computer Web Browser Software such as Internet Explorer and Netscape Navigator for viewing Web pages bizhub 362/282/222 13-11 Appendix 13 13-12 Term Definition Zone A name given in an AppleTalk network. This is used to group multiple devices on an AppleTalk network. bizhub 362/282/222 Appendix 13.4 13 Index Numerics 2in1 4-18, 4-21, 5-13, 5-15, 6-13, 6-15, 7-16, 7-20, 9-34 2-sided TX 4-18, 4-22, 5-13, 6-13, 7-16, 9-34, 9-49, 10-7 A Accessing PageScope Web Connection 9-7 Account track 3-56, 9-8 Common settings 9-5 Connection check 3-45, 9-71 Connection timeout 3-45, 9-71 Custom Text 3-35 D Day of the week settings 9-52 Default density 10-7 Default gateway 9-64 Default quality 10-7 Density 4-16, 5-11, 6-11, 7-14, Activity Report 3-35, 9-62, 9-78, 9-34 10-17, 10-19 Destination 9-34 Activity report 3-37 Destination address 4-33, 7-34, Administrator forwarding 10-20, 10-35, 10-36 Administrator mode 9-11 Anonymous 5-24, 9-17 AppleTalk 9-5 Authentication settings 3-45, 9-71 Auto-RX check 3-25, 3-29, 9-76 Auto-RX check interval 9-76 B B/W: coding method 9-54 B/W: file type 9-54 Basic search 8-3 Basic settings 3-9 Binary division 3-36, 3-42 Binary division size 3-36, 3-42 C Cache 9-13 Certificate 9-88, 9-89, 9-92 Chain dialing function 4-10, 7-9 Coding Method 3-30, 3-33, 3-34, 4-33, 9-15, 9-17, 9-18, 9-20, 9-54 Com. mode 9-49, 10-7 Comm. menu settings 10-10 bizhub 362/282/222 9-15, 9-18, 9-20 Destination name 4-33, 5-24, 6-25, 7-34, 9-15, 9-17, 9-18, 9-20 Destination registration 4-32, 5-24, 6-25, 7-33 Detail search 8-3 Device domain name 9-64 DHCP configuration 9-64 DHCP settings 3-9 Directory name 5-24, 9-17 Distribution conditions 9-58 Divide settings 3-35 Division by page 9-54 Division by size 9-54 DNS configuration 9-64 DNS query timeout 9-64, 10-43 DNS server address 3-15, 3-17, 9-64 DNS settings 3-15 Document management 10-22 Domain name 3-15, 3-17, 3-52, 9-64, 9-71 Domain name registration 9-3, 9-41 13-13 Appendix 13 E I E-mail address 3-19, 3-22 Import 9-4, 9-42, 9-45 E-mail divided transmission time interval 10-46 Initialize setting 3-45 E-mail header text 3-35, 3-39 Internet fax 2-7, 7-3, 10-37 Interval of Division Transmission E-mail mode 7-11, 9-54 9-54 E-mail notification destination 5-20, IP address setting 3-9, 3-11, 9-64 6-21, 9-35 E-mail program 4-41 IPP 9-5 E-mail program list 11-11 L E-mail server settings 3-51 LAN Connection 3-3 Entering an address 4-11, 7-10 LDAP search 3-44, 9-70 Export 9-4, 9-42, 10-52 LDAP server address 9-71 F LDAP server setting 3-44, 3-45, 9-5 FAX program registration 9-3, 9-33 File name 4-18, 5-13, 5-21, 6-13, 6-22 LDAP server name 3-45, 9-71 LDAP setting 3-44, 9-5, 9-70 Login name 9-71 File path 6-25, 9-20 M File type 3-34, 4-33, 9-15, 9-17, Machine name 3-18, 9-54 9-20 Mail/Internet FAX 9-5, 9-76 File type/coding method 5-24, 6-25 Memory lock password 9-52, Fixed text 3-35 10-12, 10-14 Forwarding destination 9-58, Memory lock time 10-12 10-22, 10-25 Memory RX on/off 10-16 FTP configuration 9-5, 9-84 Mode 9-34 FTP connection timeout 9-84 FTP port number 5-24 N FTP server address 5-24, 9-17 NetWare 9-5 Full mode function 10-47 NetWare status 9-5 G Gateway 3-9, 3-13 Gateway TX 3-35, 9-78 Network board setting 3-9, 3-14 Network error list 12-4 Network settings 3-4, 10-4 H Host address 6-25 Host name 3-15, 3-16, 9-64 13-14 bizhub 362/282/222 Appendix O One-touch 4-3, 5-3, 6-3, 7-3 One-touch key registration 5-24, 9-3, 9-4, 9-14 One-touch number 5-5, 6-5 Operating environment 9-6 Other settings 9-5, 9-76, 9-78 P Page division 3-36, 3-42 PageScope Web Connection 2-8, 9-3 Passive mode setting 9-17 Password 6-25, 9-17, 9-20, 9-71 Ping 3-55, 10-4 POP3 password 3-25, 3-28, 9-76 POP3 server address 3-25, 9-76 POP3 Settings 3-25, 9-5, 9-76 POP3 Timeout 9-76 POP3 user name 3-25, 3-27, 9-76 Port 9-4 Port number 3-45, 9-17, 9-71, 9-76, 9-77, 9-84 Priority density 9-49 Priority quality 9-49 Priority TX 4-18, 4-24, 5-13, 6-13, 7-16, 9-34 Program name 9-34 Proxy IP address 9-84 Proxy server 5-24, 9-17 Q Quality 4-14, 5-9, 6-9, 7-12, 9-34 Quality/mode 10-8 13 Reply address 4-18, 4-27, 7-17, 7-27 Reply address selection 9-35 Report output settings 9-4, 9-62, 10-3, 10-17 Resending 4-31, 5-23, 6-24, 7-30 Retype password 9-17, 9-20 Rotation TX 7-16, 9-34, 9-49, 10-7 RX Doc. header 3-35, 3-38, 9-78 RX Doc. settings 9-58, 10-22, 10-25 RX document 9-4, 9-58, 10-3 RX report 11-7 RX settings 9-4, 9-52, 10-3, 10-12 S Scan area 9-34 Scan mode 9-54 Scan registration 9-3, 9-4 Scan to e-mail 2-3, 4-3 Scan to FTP 2-4, 5-3 Scan to HDD 2-6 Scan to SMB 2-5, 6-3 Scanner settings 3-35, 9-4, 9-54 Search base 3-45 Search default setting 3-44, 9-70 Search number (max.) 3-45, 9-71 Search root 9-71 Security function 10-48 Self-domain name 3-9 Server address 3-45 Setting list 11-13 SMTP authentication password 3-19, 3-24, 9-77 R SMTP authentication user name RAW port number 9-64 SMTP reception timeout 9-77, Receiving Internet faxes 7-31 Reduction 9-34 bizhub 362/282/222 3-19, 3-23, 9-77 10-40 SMTP server address 3-19, 9-77 13-15 Appendix 13 SMTP settings 3-19, 9-5, 9-76, TX: Internet fax 9-14, 9-18 9-77 TX: PC (e-mail) 9-14, 9-15 SMTP transmission timeout 9-77, 10-39 Software switches 10-4, 10-28 SSL/TLS settings 3-45, 9-5, 9-71, 9-87, 10-4, 10-61 Stamp settings 4-18, 4-25, 5-13, 5-19, 6-13, 6-20, 7-16, 7-25, 9-35 Start time 9-52 Stop time 9-52 Subject 4-26, 9-78 Subject Registration 3-35, 3-41 Subject selection 4-18, 7-17, 9-35 Subject/Text 9-5, 9-76, 9-78 Subnet mask 3-9, 3-12, 9-64 TX: PC (FTP server) 9-14, 9-16 TX: PC (SMB) 9-14, 9-19 U User authentication 3-56, 9-5, 9-96 User name 6-25, 9-17, 9-20 W Windows 9-5 T TCP/IP 9-5, 9-64 Text 9-78 TIFF (multiple), (single) 6-25 Timer RX setting 9-52, 10-12 Timer TX setting 4-18, 4-24, 5-13, 6-13, 7-16, 9-35 To search for a one-touch key 4-8, 5-7, 6-7, 7-7 Transmission Report 9-62 Transmission source 7-18, 9-48 TSI 9-34, 9-49, 10-7 TSI registration 9-4, 10-3 TX Doc. text insert 9-78 TX forwarding 10-20, 10-35 TX quality (max.) 3-30, 3-32, 9-18, 9-54 TX report 4-18, 4-30, 5-13, 5-22, 6-13, 6-23, 7-16, 9-34, 9-62, 10-17, 10-18, 11-3 TX settings 9-49, 10-3, 10-7 TX size (max.) 3-30, 3-31, 9-18, 9-54 13-16 bizhub 362/282/222