1
FLAME GUI User Manual
Bülent Özel, Mehmet Gençer, Vehbi Sinan Tunalıoğlu and Kaan Erkan
TUBITAK-UEKAE
The Turkish Academic Network and Information Centre
Kocaeli, Turkey
1
Contents
List of Figures
iv
1 Executive Summary
1
2 Introduction
3
3 Requirements and Installation
3.1 Installing required software . . . . . . . . . . . . . . . . . . . . . . . . . . . . . . . . . . .
3.2 Installing EURACE-GUI from binary distribution . . . . . . . . . . . . . . . . . . . . . .
3.3 Installing EURACE-GUI from sources . . . . . . . . . . . . . . . . . . . . . . . . . . . . .
5
5
6
6
4 Overview of Agent and Population Design Process
7
5 Agent Design with XMML-Editor
10
6 Compiling Agents with GXparser
12
7 Population Design with PopGUI
7.1 Using PopGUI . . . . . . . . . . . . . . . . . . . . . . . . . . . . . . . . . . .
7.2 STEP 1: Creating a population . . . . . . . . . . . . . . . . . . . . . . . . . .
7.3 STEP 2: Specifying population composition . . . . . . . . . . . . . . . . . . .
7.4 STEP 3: Specifying agent memory variables . . . . . . . . . . . . . . . . . . .
7.4.1 Distinguishing simple and composite variables . . . . . . . . . . . . . .
7.4.2 Specification syntax for variables and basic random distributions . . .
7.4.3 Deterministic initialization . . . . . . . . . . . . . . . . . . . . . . . .
7.4.4 Using other memory variables of agent in expressions . . . . . . . . . .
7.4.5 Initializing arrays . . . . . . . . . . . . . . . . . . . . . . . . . . . . . .
7.4.6 Using model constants or population size for scalability purposes . . .
7.4.7 Accessing other agents and initializing agent relations . . . . . . . . .
7.4.8 A note about managing dependencies . . . . . . . . . . . . . . . . . .
7.4.9 Some useful Python constructs . . . . . . . . . . . . . . . . . . . . . .
7.4.10 FINISHING UP: Validating and saving memory variable specifications
7.5 STEP 4: Editing constants . . . . . . . . . . . . . . . . . . . . . . . . . . . .
7.6 STEP 5: Instantiating population and finishing up . . . . . . . . . . . . . . .
7.7 Command line options, utilities, and debugging . . . . . . . . . . . . . . . . .
7.8 NOTES . . . . . . . . . . . . . . . . . . . . . . . . . . . . . . . . . . . . . . .
.
.
.
.
.
.
.
.
.
.
.
.
.
.
.
.
.
.
.
.
.
.
.
.
.
.
.
.
.
.
.
.
.
.
.
.
.
.
.
.
.
.
.
.
.
.
.
.
.
.
.
.
.
.
.
.
.
.
.
.
.
.
.
.
.
.
.
.
.
.
.
.
.
.
.
.
.
.
.
.
.
.
.
.
.
.
.
.
.
.
.
.
.
.
.
.
.
.
.
.
.
.
.
.
.
.
.
.
.
.
.
.
.
.
.
.
.
.
.
.
.
.
.
.
.
.
8 Running Simulations through ExpGUI
9 Analysis of results using
9.1 Overview . . . . . . .
9.2 Features . . . . . . . .
9.3 Using VisGUI . . . . .
9.3.1 Platforms . . .
VisGUI
. . . . . .
. . . . . .
. . . . . .
. . . . . .
.
.
.
.
.
.
.
.
.
.
.
.
13
14
15
16
16
19
19
20
20
21
21
22
24
24
25
25
25
26
26
28
.
.
.
.
.
.
.
.
.
.
.
.
ii
.
.
.
.
.
.
.
.
.
.
.
.
.
.
.
.
.
.
.
.
.
.
.
.
.
.
.
.
.
.
.
.
.
.
.
.
.
.
.
.
.
.
.
.
.
.
.
.
.
.
.
.
.
.
.
.
.
.
.
.
.
.
.
.
.
.
.
.
.
.
.
.
.
.
.
.
.
.
.
.
.
.
.
.
.
.
.
.
.
.
.
.
.
.
.
.
.
.
.
.
.
.
.
.
30
30
30
33
34
CONTENTS
9.4
9.3.2 External Packages . . . . . . . . . . . . . . . . . . . . . . . . . . . . . . . . . . . .
9.3.3 Standalone Installation . . . . . . . . . . . . . . . . . . . . . . . . . . . . . . . . .
Summary . . . . . . . . . . . . . . . . . . . . . . . . . . . . . . . . . . . . . . . . . . . . .
iii
34
35
35
A Manual installation from sources
A-1
A.1 Installing PopGUI . . . . . . . . . . . . . . . . . . . . . . . . . . . . . . . . . . . . . . . . A-1
A.1.1 Installation on GNU/Linux . . . . . . . . . . . . . . . . . . . . . . . . . . . . . . . A-1
A.1.2 Installation on Windows . . . . . . . . . . . . . . . . . . . . . . . . . . . . . . . . . A-1
List of Figures
1.1
EURACE GUI . . . . . . . . . . . . . . . . . . . . . . . . . . . . . . . . . . . . . . . . . .
2
4.1
Flow of multi-agent design in EURACE . . . . . . . . . . . . . . . . . . . . . . . . . . . .
8
5.1
XMME (AgentGUI) Screenshot . . . . . . . . . . . . . . . . . . . . . . . . . . . . . . . . .
11
6.1
GUI for XParser . . . . . . . . . . . . . . . . . . . . . . . . . . . . . . . . . . . . . . . . .
12
7.1
7.2
7.3
Population properties dialog . . . . . . . . . . . . . . . . . . . . . . . . . . . . . . . . . . .
Editing population composition . . . . . . . . . . . . . . . . . . . . . . . . . . . . . . . . .
Editing memory variables . . . . . . . . . . . . . . . . . . . . . . . . . . . . . . . . . . . .
15
17
18
8.1
Experiment Manager . . . . . . . . . . . . . . . . . . . . . . . . . . . . . . . . . . . . . . .
28
9.1
9.2
9.3
9.4
9.5
9.6
9.7
9.8
Parallel Database Creation . . . . . . . . .
Parallel Database Creation . . . . . . . . .
Visualization of Time Series a Variable . . .
Visualization of Distribution of a Variable .
Visualization of Advanced Time Series Plots
Exporting Raw Data of Plots . . . . . . . .
File Operations . . . . . . . . . . . . . . . .
Configuring Workspace . . . . . . . . . . . .
31
32
33
34
35
36
37
38
iv
. . . . . . . . . . .
. . . . . . . . . . .
. . . . . . . . . . .
. . . . . . . . . . .
of an Experiment
. . . . . . . . . . .
. . . . . . . . . . .
. . . . . . . . . . .
.
.
.
.
.
.
.
.
.
.
.
.
.
.
.
.
.
.
.
.
.
.
.
.
.
.
.
.
.
.
.
.
.
.
.
.
.
.
.
.
.
.
.
.
.
.
.
.
.
.
.
.
.
.
.
.
.
.
.
.
.
.
.
.
.
.
.
.
.
.
.
.
.
.
.
.
.
.
.
.
.
.
.
.
.
.
.
.
.
.
.
.
.
.
.
.
.
.
.
.
.
.
.
.
.
.
.
.
.
.
.
.
.
.
.
.
.
.
.
.
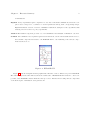
Chapter 1
Executive Summary
Creation of software utilities for use in design of agents, design of agent populations, preparation of
simulations, and visualization of simulation results has been an essential objective of EURACE project
in order to present a complete platform to facilitate use of agent based simulations in policy design. The
EURACE Graphical User Interface (GUI) presented here refers to a collection of compatible software tools
which provide the components that correspond to these functions of the EURACE software platform.
Design of the EURACE GUI reflects our intention that these software tools reflect most general
definition of the particular problems they intend to solve in agent based approach, to the extend that
it is possible, while at the same time they are complete in the sense that they can be deployed in the
EURACE project. In particular that they work with the FLAME simulation framework [? ].
Following are the components of EURACE GUI that correspond to different aspects of simulation
development work:
XMML Editor Agent design requires a tedious process of describing agent memory and behavior in
an XML format specific to FLAME (the so called XMML format) while controlling for consistency
of design in terms of parameters that affect the overall model. The XMML Editor provides a
graphical interface which allows the agent designer to focus in his/her job, in addition to providing
facilities for detecting errors in the design. It was named after the fact that it translates the design
into the XMML format which is usable in FLAME framework.
GXparser Once a model composed of several agent types is designed, it has to be compiled by the so
called XParser component of the FLAME. The GXparser provides a graphical tool to ease this
manual process and report possible compilation errors back to the designer.
PopGUI A population corresponding to the European Economy in EURACE simulations is composed
of multiple (thousands) copies of several types of agents in several geographical regions, whose
memory and relations with each other are characterized by statistical features derived from actual
data. The PopGUI component enables simulation designers to describe composition of populations
and statistical features of agents, and produce population instances that are used as initial states
1
Chapter 1. Executive Summary
2
for simulations.
ExpGUI Policy experiments require comparison of outcomes of alternative simulations, where the compared cases correspond to covariation of several parameters among their corresponding ranges.
ExpGUI facilitates creation of a series of simulation tasks from description of the experiment, thus
reducing errors in creation of policy experiments.
VisGUI The VisGUI component provides a tool for visualization and analysis of simulation outcomes.
ConGUI Since simulation development requires several iterations over the various tasks described above,
the ConGUI component was added to the EURACE GUI to ease launching of the various components described above.
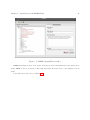
Figure 1.1: EURACE GUI
Figure 1.1 is the flow diagram and the graphical user interface of the toolkits developed for EURACE.
The deliverable presented here first describes the architecture of EURACE GUI in relation to other components of the EURACE Software Platform, then proceeds to instructions for using various components
of the GUI as part of simulation development work.
Chapter 2
Introduction
This document serves as the definitive documentation for the suite of user level programs that are created
as part of the EURACE project effort. The EURACE project aims to produce socio-economic models
and multi-agent simulation software for use in economic policy experiments. The project has started in
September 2006, and will conclude in September 2009. Information on EURACE project can be found
at http://www.eurace.org.
An important requirement for EURACE project was creation of a software platform for design
and implementation of agents, creation of agent populations, creation and execution of experiment
sets, and evaluation and visualization of simulation results. While an existing multi-agent framework
(FLAME/Xagents framework) was adopted in EURACE project and improved as part of the project
effort [? ], such tools for pipeline of agent, population, and experiment design not existed at the time
and created as part of the EURACE project.
The set of user interface tools in EURACE software platform, collectively called here as EURACEGUI, were distributed individually during early stages of project. This documentation provides a single entry introduction to capabilities and usage of EURACE-GUI. Up-to-date information about the
EURACE-GUI can be accessed online at http://eurace.cs.bilgi.edu.tr.
EURACE-GUI consists of several independent modules that were created at different stages of the
project. Various different technologies were employed for each module in order to satisfy implementation
and agile development needs. For this reason modules are written using different computer languages
(C++, Python), and uses various software and libraries (GTK, Qt, R-project). Despite their independence, the modules in EURACE-GUI can be invoked easily from within an entry point program called
Control GUI (ConGUI).
These independent modules all correspond to stages of the process of designing, running, and evaluation multi-agent simulations of complex systems. Following is a brief description of each module in the
EURACE-GUI:
ConGUI : ConGUI is a front-end which facilitates invocation of different modules of EURACE-GUI
3
Chapter 2. Introduction
4
easily as part of a design pipeline.
XMML-Editor : Used for designing different types of agents, their memory variables and behavior, in
addition to global constants and messages used in a multi-agent system.
GXparser : Used as a front-end for validating agent models produced with XMML-Editor, by parsing
them through FLAME’s xparser.
PopGUI : Used for creating populations of agents whose state variables and relations can be initialized
according to given criteria.
ExpGUI : Used for creating sets of experiments using agent models and populations, then for executing
them on a FLAME simulation engine.
VisGUI : Used for visualization and statistical analysis of simulation outcomes.
The reader is recommended to read Chapter 4 which provides an overview of the multi-agent model,
population and experiment design process, before proceeding to subsequent chapters which explain usage
of individual modules.
Chapter 3
Requirements and Installation
EURACE-GUI is written with portability in mind. Despite the variety of libraries it depends upon,
all such dependencies are available for common computing platforms including 32-bit or 64-bit variants
of GNU/Linux, Unix or BSD, and Microsoft Windows. While it is likely that it can be run on other
systems such as Mac OS, it is neither tested on those platforms not we provide installation packages for
them. Manual installation of individual modules of EURACE-GUI and libraries required by them can be
cumbersome. Nevertheless, details of doing so are described in Appendix A and module sources can be
downloaded from http://eurace.cs.bilgi.edu.tr.
Before installing EURACE-GUI using installation packages, you are recommended to install the
following software separately:
FLAME : FLAME multi-agent platform is developed and distributed by University of Sheffield. Please
check http://ccpforge.cse.rl.ac.uk for FLAME installers.
R : R statistics package installers are available for a variety of platforms and is distributed under the
GPL license. R installers can be downloaded from http://www.r-project.org.
Although you can install and run EURACE-GUI without having the above software, you should be aware
that created simulations cannot be run without FLAME platform, and most features of the VisGUI
component will not be available without R. However, if your intention is merely using a computer as a
multi-agent design workstation, it is perfectly possible to install and run EURACE-GUI without these
two software packages.
3.1
Installing required software
Although EURACE-GUI can be installed and run without the following software, its use and features
are limited without them. Therefore it is recommended that the following are installed, in this order:
R : R statistics package can be downloaded and installed from http://www.R-project.org. If you are
using a Debian or Ubuntu Linux, it can also be installed using the package ‘r-base’.
5
Chapter 3. Requirements and Installation
6
FLAME : First get the sources from http://ccpforge.cse.rl.ac.uk. After unzipping the sources,
you need to compile and install two components from FLAME tree: libmboard and xparser. Enter
to these directories in the given order, run ‘make’ then ‘make install’.
3.2
Installing EURACE-GUI from binary distribution
To get a copy of EURACE-GUI installer, go to http://eurace.cs.bilgi.edu.tr and download the
most recent binary package for your platform (supported platforms are Windows, Linux and other Unix
variants). Execute this file to complete the installation.
3.3
Installing EURACE-GUI from sources
If you are working on Microsoft Windows, MinGW is required to compile and install the EURACE GUI
from sourse distribution. It can be downloaded from http://www.mingw.org. On Ubuntu or Debian
Linux platforms you will need to have the package named build-essentals installed. Once you have this
built environment for your platform, follow the instructions in Appendix A.
Chapter 4
Overview of Agent and Population
Design Process
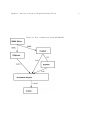
Certain stages of multi-agent simulation design envisioned in EURACE depend on output of other stages.
Figure 4.1 visualizes the flow of work through modules in EURACE-GUI, also indicating the type of data
that comes out from modules and used as input to others. This visualization is exactly what you will
see when you launch the ConGUI, which acts as the control panel for invocation of different modules in
EURACE-GUI.
The first stage in EURACE multi-agent simulation design is creation of agents and shared environment
using XMML-Editor. Agent design involves (1) designing agent memory for different types of agents,
(2) describing agent behavior, in the case of EURACE/FLAME the language used for such description
is C programming language using a few FLAME specific constructs, (3) designing global environment
variables shared by agents, (4) designing data types that occur in memory variables and exchanged as
data units between communicating agents. Use of XMML-Editor to carry out these tasks is described
in Chapter 5. Once the multi-agent model design is completed, the model is saved in a FLAME specific
format called XMML.
The next stage is designing a population of agents which will be the initial state of simulation. The
model created in XMML-Editor is used as an input to PopGUI, which enables one to specify how different
geographical regions in the simulated system are composed of different number of each type of agents,
how each agent’s memory should be initialized, and what should be the values of environment constants
shared by all agents. PopGUI provides a variety of expressions which can be used to specify random
distributions for initializing agent memory, or to establish relations between agents (e.g. employment
relations in an economic simulation). Using these specifications PopGUI can create population instances
which are different but has the same stochastic properties.
The model and a population instance is sufficient to run a simulation. The model contains what are
the memory variables of agents and program code describing their behavior. The population instance
7
Chapter 4. Overview of Agent and Population Design Process
Figure 4.1: Flow of multi-agent design in EURACE
8
Chapter 4. Overview of Agent and Population Design Process
9
on the other hand contains initial values of agent memory for a whole set of agents comprising the
population. Before a simulation is run however, the model must be compiled to generate an executable.
The GXparser module allows user to do this without going down the elaborate steps of xparser program
in FLAME.
Economic simulations are useful when one can compare outcomes of different environments, populations, or behavior. The ExpGUI program provides facilities to create a set of different initial conditions
(populations) and to run simulations easily.
Finally the VisGUI program can be used to visualize and analyze the results of simulations. The
program use plotting and statistical facilities of R statistics package [? ].
Chapter 5
Agent Design with XMML-Editor
XMME (X-Machines Modelling Editor) provides the functionality of designing and implementing agent
specification and behavior. It is a GUI application and the XMML (X-Machines Markup Language)
provides the underlying modeling schema.
In particular, XMME helps its user to visually edit an XMML formatted file. XMML is a highly
verbose and partially untyped data specification language based on XML format. This sort of nature
makes it relatively difficult to edit individual XML files to describe agents’ specification and behavior
which are very sophisticated in so far that the agents have internal variable and external message dependencies. Furthermore, the nested model fascility of XMML specification makes it virtually unmanageable
if it comes to large models.
The XMME wraps the XMML specification and functionality by means of nested data models. In
its runtime, all the decoupled XMML files and XMML nodes are managed by the application so that
the model specification remains consistent over time. By doing this, XMME does not limit the XMML
capabilities which allow to represent sophisticated agent models, on the contrary, it helps modeler to deal
with the technical details and internal model specification consistency.
XMME is a free and open source software application which is developed using C++ and Trolltech/QT
development framework. The development idea is based on content-presentation seperation, ie. the model
internals are controlled by a seperate routine which is a software library called libxmm2. libxmm2 provides
the model whereas XMME presents it to the user. At the same time, it passes all the user input to the
libxmm2. libxmm2 is written purely in C++ and core QT library which means that it can be used by
any other software routine, such as web server applications, command line programs etc. During the
EURACE software toolkit development phase, developers have made extensive use of this library with
fast-prototyping principles. Beyond libxmm2, XMME uses QT’s model-view classes, which makes it easy
to align to XMML while new functionalities added to XMML specification.
Both XMME and and libxmm2 are cross-platform applications. So far, it has been ported to Microsoft
Windows, GNU/Linux and MacOSX operating systems.
10
Chapter 5. Agent Design with XMML-Editor
11
Figure 5.1: XMME (AgentGUI) Screenshot
XMME GUI design is based on two panes. Left pane provides a hierarchical tree-view widget where
all the XMML nodes are represented. The right hand pane allows the user to edit available nodes in
detail.
A screenshot is provided below on Table 5.1
Chapter 6
Compiling Agents with GXparser
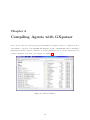
Once a model composed of several agent types and markets is designed, it has to be compiled by the so
called XParser component of the FLAME. The GXparser module of EURACE Toolkit is essentially a
graphical user interface wrapper of XParser. It eases the manual process of economic design and report
possible compilation errors back to the designer. See Figure 6.1.
Figure 6.1: GUI for XParser
12
Chapter 7
Population Design with PopGUI
PopGUI is written for creating agent populations for EURACE Project simulations using FLAME multiagent framework. The program reads already designed agent models described in FLAME XMML format,
and provides facilities to specify composition of population and specifications for initializing each agent’s
memory variables. Populations created by the program is then exported as an XML file (so called 0.xml
file in FLAME), which can be fed into a simulation engine which uses these initial conditions and agent
behavior described in models to carry out the simulations.
When reading through this guide it is important to distinguish the terms ‘population’ and ‘population instance’. PopGUI’s central concern is to maintain specifications for creating initial populations.
‘Population’ refers to these specifications and the program stores them in its own format in ’.pop’ files.
Many ‘population instance’s(0.xml files) can be created from the same population specification. Although
PopGUI is designed to create valid population instances, the program does not read them back or allow
their manipulation.
Population specification involves two main phases. First is population composition. In the FLAME
framework an agent population can be divided into any number of sub-populations. For example, the
EURACE model contains geographical regions, such as countries, and one can distribute the agents
among these regions using the PopGUI. One most straightforward example is countries of the world.
Although each country’s social life is composed of same types of agents such as workers/consumers,
firms, banks, etc., their compositions and demographic features are different since each country have
a different population (number of people), number and average size of firms, etc. To account for such
realistic populations, PopGUI allows its user to create several regions and specify numbers of each type
of agent separately for each region; therefore allowing each region to have a different composition.
The second phase of specifying a population involves assigning values to agents’ memory variables.
Each type of agent is described by a different set of variables. For example employees can be described
with their skill set, income and employment status, whereas a firm is described by number of workers,
production capacity, etc. For a realistic population one usually needs standard or empirical random
distributions. For instance in our economic world example, sizes of firms in a country usually shows a
13
Chapter 7. Population Design with PopGUI
14
normal distribution, although its mean is different for each country/region. PopGUI provides a rich set
of expressions to specify memory variables.
Another feature of a realistic population is that the agents in it are not isolated but relate to one
another. For example workers are employed by firms in their region, or firms borrow money from banks
in their country. Therefore these relations must also be initialized in order to create a population, and
they must be stored in agent memory variables. In the case of employment relation example, firms will
have employees whose skillset is suitable for what firm produces, and furthermore the relation is exclusive
(i.e. if a person is employed in a firm, he/she cannot be employed by another). In the firm-bank relation
example firms usually borrow money from banks in their own region, and the relation is not exclusive
(i.e. other firms also borrow money from the same bank). PopGUI provides a rich set of features for
creating relations between agents, both exclusive and otherwise.
In additional to those substantial features mentioned above, some rather practical features were also
implemented to address needs of agent modelers. For example agent models change through time. New
agent types may be added, or agent memory variables are changed. It would be quite impractical to start
over with the population design when such changes occur. For this reason PopGUI allows importing
population specifications from populations that were worked out for older versions of models. With
the help of this feature populations can be re-used with only incremental changes. Such features are
introduced in the relevant sections below.
7.1
Using PopGUI
In order to create populations with PopGUI, you need a model describing your agents (their memory
and behavior). Since PopGUI was written as a part of EURACE project, it currently can use only
models given in XMML format, which is the format of the FLAME framework, the official simulation
environment of EURACE. Similarly the population instances created by the program are exported only
in the XML format adhering to FLAME specifications.
Although agent models contain behavior in addition to memory of agents, only the agent memory is
of interest when creating populations. Agent behavior is used later by the simulation engine, along with
the population created by PopGUI.
Working out a population with PopGUI consists of several stages:
1. Create a population by choosing a model, choosing the number of regions in simulation, and
optionally importing previous work from an existing population.
2. Specify population composition by entering how many agents of each type will exist in each region.
3. Specify how agent memory variables will be initialized. This also means specification of relations
between agents since relations are expressed as an agent’s identification number appearing as a
value in some other agent’s memory.
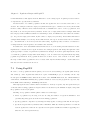
Chapter 7. Population Design with PopGUI
15
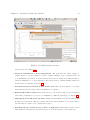
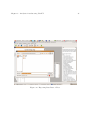
Figure 7.1: Population properties dialog
4. Enter values of global environment constants.
5. Create one or more instances of population.
Each of stages are described in the sections below.
7.2
STEP 1: Creating a population
First create a new population, from file menu. When creating a population you’ll be asked for the model
xml file which must be in FLAME XMML format. Then you can give a name to the population and
set the number of regions in the window that pops up, as shown in Figure 7.1. The default number
o regions is 1. You can increase this number depending on your needs. When you are finished you
must save your changes using “Update and close” button in the properties dialog. You can later view or
change these properties using the “Properties” button in the toolbar. The update operation only updates
the population in your session, and does not save the changes in the file system. To save your changes
permanently at any point, you must use “Save population” or “Save population as” menu items from
the “File” menu group. The population information is saved in a file with ‘.pop’ extension in your file
system. If you want to use a previously created population, click the “Open population” menu in the
“File” menu group, then choose a population. Alternatively the name of a ‘.pop’ file can be given as
a command line argument to PopGUI when invoking the program (see section 7.7 about command line
Chapter 7. Population Design with PopGUI
16
options below).
Once you have a population loaded to PopGUI, pressing “Model summary” button will display a
rudimentary structure of the model you have chosen, for inspection purposes.
Note that there’s also an “import...” button on the properties dialog. The import feature is provided
for a practical concern in modeling work. Once a population is created, PopGUI forgets about the
original model and only remembers agents and their memory variables. However the agent models may
change while work on population continues. It would be quite impractical to start over entering population
specifications every time the model changes, and when the changes are minor (e.g. a few memory variables
are added or updated in the model). In such cases what you need to do is to create a new population using
the newest model, and then import your previous work into the new population using this “import...”
button on the properties menu. However special care must be paid since import operation will import
agent memory variable specifications for only those that exists in your latest model. Therefore if there
are newly added memory variables or agents, it is up to you to complete the specifications for such new
variables and agents.
A restriction of import operation is that number of regions in the current population must match
that of the population you are importing from. Therefore even if you plan to change number of regions,
you must do so only after importing.
NOTE: As new features are added to PoPGUI it may not stay backwards compatible. For ensuring
stability data structures used by PopGUI are given a version number. If you try to open an old population
with newer versions of the PopGUI there is a chance that it will fail with a warning about the versions.
The recommended way to handle such situations is to create a population from scratch and import
memory variables as described above.
7.3
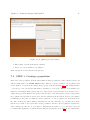
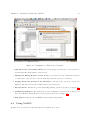
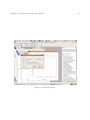
STEP 2: Specifying population composition
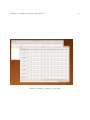
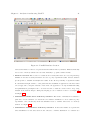
Next step is to set number of each type of agent in each region. When you click “Edit Regions” button
in the toolbar, you will be presented a table whose columns are regions and whose rows are agents (see
Figure 7.2). You can enter the number of agents in this grid and then press “update and close” button
if you want to save these changes. Your entries must be either positive integers or zero.
7.4
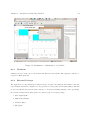
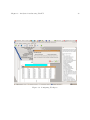
STEP 3: Specifying agent memory variables
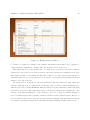
This is the most elaborate step of specifying populations in PopGUI. When you press “Edit memory
variables” toolbar button, you will be presented with a detailed display of agents and their variables with
several buttons at the bottom part of screen, as shown in Figure 7.3. Agents, their memory variables,
and sub-components of these memory variables are presented in the form of a tree, parts of which can
Chapter 7. Population Design with PopGUI
Figure 7.2: Editing population composition
17
Chapter 7. Population Design with PopGUI
18
Figure 7.3: Editing memory variables
be collapsed or expanded by clicking on the branches. Alternatively all branches can be expanded or
collapsed using the “Expand all”/”Collapse All” buttons at the bottom of the screen.
This display also have a grid structure since one must provide specification for memory variables
separately for each of the regions. However in most cases the specifications for different regions of the
same variable are same or very similar. For this reason a “Region copy” button is provided in this screen.
Using this feature you can copy specifications for one region to other regions, and then make incremental
changes, to speed up your work.
As described above, specifications of memory variables are elaborate and has two basis: values and
relations. Although both are addressed in the language used for memory variable initialization (or
’initform’ as we refer to them in EURACE), different features are required and thus we will present them
in separate sections below. The ’syntax help’ button on the memory variables screen displays up-to-date
reference on the initform language for your convenience. As a note to users, the initform language is
based on dynamic interpretation capability of Python, and hence it has a Pythonic syntax. However. it
is not necessary at all for users to have any experience in Python language (although a little bit can help
if one wants to use lambda expressions for extending the initform language as will be shown below).
Chapter 7. Population Design with PopGUI
7.4.1
19
Distinguishing simple and composite variables
Next to each variable’s name in the memory variable editing screen, you will see a variable type. Following
are the varieties of these types:
• A few variables are special. Currently these are the ones named ‘id’ and ‘region id’. Users cannot
enter anything for these variables. The ‘id’ is a unique identifier of each agent in the population
(for referencing purposes) and it will be assigned sequentially during population instantiation. This
variable must exist for FLAME simulations to work. ‘region id’, when used, will contain an integer
which is the number of the region in which the agent is placed.
• Some variables are STATIC or CONSTANT. These appear in cases where their value is fixed in
the model or taken from a constant. The names of constants are defined in agent model, but their
values are entered in PopGUI using “Edit constants” toolbar button.
• Simple variables has a type which is one of ‘int’ or ‘double’.
• Composite variables are actually C structs. The names and structure of these come from agent
model which is used when creating a new population. When a variable is of a composite type, its
sub-fields can be expanded and will be entered in separate boxes.
• Finally, a variable can be an array of a simple of composite type. For such variables users will enter
a specification for the length of array in addition to the variable (which is used for each element of
the array). Special features are provided when one wishes to address all elements of an array, such
as when they will be selected from a set without replacement.
Most common use of STATIC or CONSTANT variables occur in array sizes, in cases when array
size is fixed in the model either hard coding or by tying to a constant.
7.4.2
Specification syntax for variables and basic random distributions
The entries for memory variables are arithmetic expression which produce a single numeric value (except
the special case of array initialization). Therefore the expressions entered into the boxes in this screen
can be as simple as a constant number, or a simple arithmetic expression: e.g. “2” or “2*2-(3.14/4)”.
Whenever necessary, PopGUI will convert integer values to real numbers, or vice verse.
In most cases the values will not be constants. Use of random or deterministic initializations are very
common. Following functions are provided for use in such cases in initforms:
rand(int,int) : a random integer from the inclusive range.
rand(real,real) : a random real number from the range.
choice([v1,v2,... )]: Pick a value from the list randomly.
normal(mu, sigma) : Normal distribution. mu is the mean, and sigma is the standard deviation.
Chapter 7. Population Design with PopGUI
20
discrete( (probability,value), (probability,value),... ) : Choose value given discrete probabilities.
Probabilities must add up to 1.0.
Also you can combine any of the above in arithmetic expressions: e.g. “2+rand(0,5)” or “rand(2,6)+choice([1,3,6]
etc. Discrete versions of random distributions are automatically chosen by PopGUI. In other words even
if you use “random(1.0,2.0)” for a variable whose type is integer, it will be automatically treated as
“random(1,2)” by PopGUI.
The expressions you enter are essentially Python expressions which must produce a single value (with
the exception of array initialization, see Section 7.4.5). If you have some knowledge of Python, you can
enter any valid expression combining the special functions provided by PopGUI.
While entering specifications, the “Syntax help” button on the bottom of this screen can provide you
a quick reference help, as an alternative to this user manual. Once you are finished entering specifications
you can use the “Validate” button on this screen to ensure that your expressions are correct. This
validation is mostly a syntactic one and does not guarantee that you will be able to generate a population
instance at the end. That depends on various things including setting up of relations, and its success
cannot be determined before you actually proceed to create an instance.
7.4.3
Deterministic initialization
“deterministic(min,max, lambda function)” will assign values by taking one value at a time from
inclusive range and applying function to selected value. Min and Max must be integer, and Max must
be greater than Min. e.g. “deterministic(0,10,lambda x:x*10)” will initialize the memory variable
of a sequence of agents as:
agent[0]=0
agent[1]=10
...
agent[10]=100
agent[11]=0
...
7.4.4
Using other memory variables of agent in expressions
It is possible to use value of a memory variable of agent itself in specification of another. The “getSelfVar()”
function is provided for this purpose. For example if agent has two memory variables of simple types
named ‘numberofchildren’ and ‘monthlyexpenses’, one can depend on the other by entering “getSelfVar("numberofchild
in the box for ‘monthlyexpenses’.
Chapter 7. Population Design with PopGUI
21
However you must be careful about dependencies of variables. PopGUI will analyse which other
memory variables a variable depends on and sets their values in proper order. But if there are cyclic
dependencies which cannot be satisfied, you will face an error at some point.
In the example above “getSelfVar()” returned simply a numeric value since the named variable was
a simple variable. However, if the memory variable referred to is an array or a composite type, rather
than a simple variable, one usually needs to further refer to its elements. For example if the returned
value is an array “getSelfVar("somearray")[0]” will return first (zero indexed) element of it. If the
returned value is a composite variable “getSelfVar("somecomposite")["x"]” will return its sub-field
named ‘x’, and so on.
The “getSelfVar()” cannot be used to refer to the variable itself, for example to access sibling
variables in a data structure, etc. For this purpose another function is provided: “getSibling("sibling
var name")”. When used in an array of data structure, this function will retreive the data field of
the current array element. In cases where a data structure contains other data structures or elements,
getSibling() can instead access higher levels in the data structure hierarchy using ’level’ parameter to
climb up the hierarchy. For example “getSibling("uncle X",level=1)” and “getSibling("grand
uncle Y",level=2)” will seek entities at the level of parent and grandparent in the data structure
hierarchy, respectively.
7.4.5
Initializing arrays
The only case where the result of your expression is allowed not to be a single numeric value is when
you want elements of an array specified at once. In this case your expressions must yield a list whose
length is the same with the array length. For example if you have an array of length four, you can use
something like “[1,2,3,4]” to initialize the array elements sequentially from this list. A few functions
whose return values are lists are provided for possible use in such cases:
sample([1,2,3,... ,k)] : Return a k length list of unique elements chosen from the sequence. Used for
random sampling without replacement.
permutation([x,y,z,... )]: Return the same list with elements randomly re-ordered.
sequence(start,end,increment), realsequence(start,end,increment) : generate a sequence of integers with given increment within the inclusive interval: [start, start+increment, start+2*increment,
..., END] where END≤end. rsequence is the version which works for real numbers
7.4.6
Using model constants or population size for scalability purposes
You can access model constants or number of agents in the population using the following:
getConstant(constantname) : Returns the value of model constant. e.g. “getConstant("alpha")”
to retrieve the value of constant named ”alpha”. (These constant values are what you set in the
Chapter 7. Population Design with PopGUI
22
“Edit constants” tab of the program).
getAgentCountGlobal(agentname) : Get global count of agents with given name, i.e. sum of number
of agents in all regions. e.g. “getAgentCount("Firm")”
getNumRegions() : Returns the number of regions in the population.
getAgentCountRegional(agentname) : Get regional count of agents with given name.
getAgentIDListRegional(agentname, agentname, ...) : Get a list of agent IDs. You may specify
name of one or more agents. Please note that agent names are case sensitive. i.e. if you named an
agent as “Firm” you must specify the exact name. The function is deterministic, ie. when called
several times the list of agent IDs will be in the same order.
getAgentIDListGlobal(agentname, agentname, ...) : Get a list of agent IDs. You may specify
name of one or more agents. Please note that agent names are case sensitive. i.e. if you named an
agent as “Firm” you must specify the exact name. The function is deterministic, ie. when called
several times the list of agent IDs will be in the same order.
Since the last two functions return a list, rather than a value, they are usually intended for array initialization.
7.4.7
Accessing other agents and initializing agent relations
Agents are not isolated. For example employees and firms in an economics simulation are related to one
another through employment relations. To address this aspect of populations PopGUI provides a means
to select other agents in the population using some criteria, and use their memory variables in specifying
another agent’s memory.
In order to pick an agent one can use:
getAgentRegional(agentname, conditions=[(”varname”,condition), (..), ... )]
getAgentGlobal(agentname, conditions=[... )]
The first one selects an agent from the same region with the referring agent, and the second selects one
from the whole population. The selectios are random. Both functions can be provided with zero or more
conditions on the agent to be selected using the following format:
“getAgentRegional("Bank", conditions = [ ("givescredit",equals(1)), ("badreputation",equals(0),
...
]
)
”
Please note that conditions is a list of tuples (variable name, condition function). Variable name
must be a variable of the selected agent, and condition is one of the special functions defined. These
functions can be one of the following:
equals(what) : checks whether the value of selected variable equals to the value
Chapter 7. Population Design with PopGUI
23
between(a,b) : checks whether the value of selected variable within the range
contains(x) is the value of selected variable (which must be a list) contains the value
MooreNeighbour(numcolumns,no) : checks whether the variable (an integer) is in the Moore neighbourhood of ”no” in a geography where regions are laid out in rows with a width of ’numcomulmns’.
For example if there are 9 regions laid out as follows: 1 2 3 4 5 6 7 8 9 then neighbours of region 1
are 2,5,4, whereas neighbours of region 5 are1,2,3,4,6,7,8,9, etc.
your own functions : Other conditions can be defined using so called lambda functions in Python language, such as “lambda x:
x<100 and x>=5”. For example “getAgentRegional("Employee",
conditions = [ ("skill",lambda skill :
skill<100 and skill>50) ] ) ”
subequals(index,what) : checks whether x[index]==what
subsubequals(index1,index2,what) : checks whether x[index1][index2]==what
Once an agent is selected, its variables can be accessed using a function called “getAgentVar(variablename)”.
For example: “getAgentGlobal("Bank", conditions = [ ("region id", MooreNeighbour(10,getSelfVar("region
) ] ).getAgentVar("id")”. If the selected variable is a struct or a list, its elements can be accessed using
a syntax similar to the examples given for “getSelfVar()”, e.g. “getAgent("Bank").getAgentVar("interestrates")["
The agents are selected randomly by the current implementation of the above functions in PopGUI
to prevent procedural bias in selection.
Exclusive selection If one wishes to prevent others from selecting the same agent, it is possible to do
so by setting the ’exclusive’ flag to 1 in getAgent variants, i.e. “getAgentRegional("Employee",exclusive=1)”.
Once you do this, the selected employee will never be selected again. However one must be careful since
it is possible, depending on the composition of the population, that such conditions may not be satisfied
once all agents are taken.
Selecting multiple agents at once Two similar functions allow one to select all agents that match
the criteria, instead of only one:
getAllAgentsRegional(agentname,conditions=[])
getAllAgentsGlobal(agentname,conditions=[])
The variants accept same arguments as “getAgentRegional()” and “getAgentGlobal()”. However
what is returned is a list of agents. These functions has an optional argument which can be used to turn
of random shuffling of the returned agent list. For example getAllAgentsRegional(”Firm”,randomize=0)
will always return the same list in the same order.
If one needs to process specific variables of the agents selected, you will need Pythonic expressions as
in the following example:
Chapter 7. Population Design with PopGUI
24
sum([ agent.getAgentVar("somevar")
for agent in getAllAgentsRegional("Bank",
conditions=[("givescredit",equals(1)),("badreputation",equals(0))]) ])
The above expression is based on a Python construct which computes a list from elements of a given list,
e.g. “[i*i for i in [1,2,3]]”
7.4.8
A note about managing dependencies
The group of functions getAgentGlobal/Regional() and getAllAgentsGlobalRegional() create a dependency between agents. In some cases this creates cyclic dependencies which cannot be resolved by the
PopGUI. If desired you can solve such situations by using one of the two functions. First is signaling a
delayed execution of memory variable initialization:
delayedExecution("some expression"): the expression is executed after all agents and their variabl
to evoid syntax errors due to quotes in your own expressions, use long string syntax in Python by putting
your expression in triple quotes. e.g.:
delayedExecution(\"""getAgentGlobal("Bank").getAgentVar("id")\""")
Another function is available to fine tune dependencies at the level of variables instead of agents:
dependencyFineTune(type,toagent,tomemvar,expression)
e.g.:
dependencyFineTune("Global","Government","gov_id",
\"""getAgentGlobal("Government",conditions=
[("regions",MooreNeighbour(3,getSelfVar("region_id")))]).getAgentVar("gov_id")""")
7.4.9
Some useful Python constructs
Python has a simple syntax and some simple constructs can prove useful in expressing your memory
variables. We present some constructs here that are observed to be of common use based on feedback
from our users. For further information you are advised to consult Python tutorial at its website http:
//www.python.org.
Constructing lists : range(start,end[,step]) constructs a list which includes start but not end. If given
the list is incremented with the given step value.
Lambda functions : An anonymous function can be constructed using lambda function syntax. For
example a function to return true if a number is even would be ‘lambda x: x
Chapter 7. Population Design with PopGUI
25
List processing : A new list can be produced by processing numbers in a given list. For example to
return squares of a range of numbers ‘map(lambda x:x*x, range(1, 11))’.
If what you want is to select only items from a list that match a criteria, use filter. For example
to select even numbers from a list: ‘filter(lambda x: x
7.4.10
FINISHING UP: Validating and saving memory variable specifications
Before saving memory variables you can use the ’Validate’ button on the window, which provides elementary syntax checking of expressions you enter. After validation use “Save and close” button on the
memory variables screen to save your entries.
The validation operation only validates expression syntax and does not attempt a full initialization
and checking of expressions and references for fitness. Thus you may still catch some problems when you
attempt to instantiate population later.
7.5
STEP 4: Editing constants
The constants defined in your model will be assigned a value of zero initially. You can change these values
using the “Edit Constant” toolbar button. The constants screen also have a “Validate” button to ensure
the expressions you have entered are valid, before you save them.
Instead of numbers, you can also use getAgentCount(”agent name”) as a value for constants.
Unless you set sensible values to constants, it is likely that you will get errors like “division by zero”
when you validate memory variable specifivations that use these constants.
7.6
STEP 5: Instantiating population and finishing up
Once you finish entering memory variables and update your changes using the ’save and close’ button,
you can create an instance of the population (i.e. the 0.xml file in EURACE parlance) using ’Instantiate
population’ button. You will be asked for the name of the file to export the population.
Depending on the number of agents in your population this process can take a long time, and the
progress will be displayed on the main screen. You can cancel this operation using the “Cancel” button
at any time.
Once you are finished working with your population remember to save it before you quit the program.
Later you can re-open them from the file menu, and create new population instances for the same
population. Different instances will not be the same but will have same statistical distributions adhering
to your specifications.
Chapter 7. Population Design with PopGUI
7.7
26
Command line options, utilities, and debugging
PopGUI accepts a few command line options when run from command line instead of from within
ConGUI. Use:
python popgui.py -h
to display help on these options. Option “-v” will display program version, and “-d” will turn on
debugging so that program will dump a lot of messages in the terminal it is being run, which can be
helpful in reporting bugs.
Also you can give a population file as command line argument for the program to open the population
during start up. For example:
python popgui.py -d test.pop
will open the population saved in “test.pop” and will turn on debugging while you work.
PopGUI uses versioning for the saved populations to identify the data structure changes that are
not backwards compatible, and denies to open populations that were created using past versions of the
program and are not compatible with the current version. You can disable version checking using “-i”
parameter at the command line, however it is strongly recommended that such usage should be avoided.
Distributed with the PopGUI is a small program named popdoc.py, which is for producing LATEXtables
for constants, population composition, and memory variables in the population specification. When the
program is run without any parameters, it will ask a few questions to produce desired output. When
given a tex file as command line argument, output is written to that file instead od screen.
7.8
NOTES
1. Avoiding dependencies whenever possible: The group of functions getAgentGlobal/Regional
getAllAgentsGlobal/Regional create dependency between agents. We have seen modelers using
these functions just to retrieve id’s of other agents. However the correct way to do that is to use
getAgentIDListGlobal/Regional. This is because all agents are created and given id’s before any
of them are populated with memory variables. Therefore retrieving agent id’s does not generate
any dependency, and is a faster operation.
2. Resolving dependencies: If you end up with a cyclic dependency, the first thing you can try is
to use delayedExecution()
3. Be careful with Lambda functions: When describing conditions in agent selection, you may
resort to using Python Lambda functions. However you must beware that lambda functions
are evaluated when they are called, not when they are created. For example if you want to
choose agents whose regionid is same with the choosing agent, you’d try a function like “lambda
Chapter 7. Population Design with PopGUI
27
x:x["regionid"]==getSelfVar("regionid")”. However the function is executed within the context of agent being evaluated for selection, because of the inherent way how Python lambda functions are evaluated. (This was the reason that functions such as subequals() subsubequals() were
created.)
4. Using external replicators to create hude populations: If you start PopGUI with ‘-r’ option,
the created xml files will have all agent ID numbers preceeded with the string ‘REPLACE ID ’.
Chapter 8
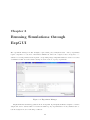
Running Simulations through
ExpGUI
The experiment manager module is highly coupled with policy analysis module. Policy experiments
require comparison of outcomes of alternative simulations, where the compared cases correspond to covariation of several parameters among their corresponding ranges. ExpGUI facilitates creation of a series
of simulation tasks via a GUI, thus reducing errors in creation of policy experiments.
Figure 8.1: Experiment Manager
ExpGUI inherits an initial population file from PopGUI. It principally facilitates designer to run the
designed model for desired number of iterations within a policy experimentation. Policy maker is able to
test the designed model on following conditions:
28
Chapter 8. Running Simulations through ExpGUI
• sensitivity to policy parameters
• sensitivity to initial population
• sensitivity to stochastic process through out iterations.
Figure 8.1 is a snapshot of the experimet manager under Windows.
29
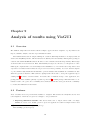
Chapter 9
Analysis of results using VisGUI
9.1
Overview
The VisGUI design takes an advanced GUI workspace approach where designers or policy makers can
import, visualize, analyze, edit and export simulation results.
The VisGUI architecture is designed aiming an overall modular implementation. It employs a Model
View Controller(MVC) scheme, which enables its modularity and extendability. Although the package is
a sub-module within EURACE Software Toolkit, it can be installed and run independently. This design
decision is taken for several reasons. First, this flexibility is targeted to allow it to be integrated for other
multi-agent computational tools as an analyses and visualization tool. For that reason, importation and
exportation of standard data formats are adopted for better interoperability. Second, it allows designers
or policy makers easily install and run VisGUI to perform analyses and visualizations of simulations data
which are generated elsewhere. Third, this decoupling feature allowed us to develop the application upon
existing GPL1 licensed tools and software. In return, after a maturation stage of the application, the
package will be made available publicly on public repositories2 as a GPL package. This will enable a contribution back to the open source community and contribution from the developers from the community
to extend and maintain it in the future.
9.2
Features
A set of features are developed and made available to designers. The features are briefly listed below and
some snapshots of their use are given accordingly to ease presentation:
• Importing Simulation Results: The user is made able to import either result of a single
simulation or a set of it. If this option is opted, the application reads in a sample iteration and
1
2
GNU Public License, see urlhttp://www.gnu.org/
Such as urlhttp://sourceforge.net/
30
Chapter 9. Analysis of results using VisGUI
31
Figure 9.1: Parallel Database Creation
retrieves information on the set of agents and their available memory variables. This automatically
detected set of memory variables are used automatically to populate variable menus.
• Database Creation: The creation of a database is necessary when there is a very long and large
simulation. It is also necessary when there are a set of policy experiment results. Created database
speeds up time to visualize and analyze the results. It also allows portability of experiment results
in a standard and light format to other platforms and visualization applications. We have taken
a novel approach to integrate database creation into the application. It exploits multi-threading
and parallelisation paradigms both to decrease the time of database creation and to keep doing
analysis at the main workspace during any lengthy process of database creation. See Figure 9.1
and Figure 9.2.
• Visualization of Time Series of Memory Variables: The nature of simulation necessitates a
quick trace of some variables over iterations before further examination or more advanced policy
experiments. User can directly check raw simulation data to examine time series of a memory
variable. See Figure 9.3.
• Visualization of Distribution of Memory Variables: In the same manner as a quick time
series visualization of raw data, users are also allowed to examine distribution of a variable at a
Chapter 9. Analysis of results using VisGUI
32
Figure 9.2: Parallel Database Creation
desired iteration.See Figure 9.4.
• Advanced Visualization of Policy Experiments: The application also allows designer to
examine impact of a policy parameter on macro results, sensitivity of the computational model
to an initialization and effects of random interactions in between agents across different runs by
advanced visualization tool of the application. The feature allows to examine multiple variables at
the same time very quickly. See Figure 9.5.
• Automatic Report Generation of Data Points: This feature allows designers to view summary statistics and exact data points of visualization of a variable.
• Exporting Raw Data of Plots: The feature allows to export data points of a plot in standard
data format, presumably to be tested or re-visualized by a different application. See Figure 9.6.
• Managing Generated Reports and Plots: Analyses and visualizations of an experiment results
in many reports and plots. This set of feature allows user either visualize or close them easily or
automatically store them on a secondary memory space.
• Automatic Storage and Re-storage of State of Application: This feature allows both the
main application and all interactive GUI dialogs to store its latest state for subsequent uses.
Chapter 9. Analysis of results using VisGUI
33
Figure 9.3: Visualization of Time Series a Variable
• GUI Interaction and Validity Checks: All of GUI dialogs are interactive to user preferences
and automatically checks validity of user actions.
• Writing and Editing Reports: VisGUI Workspace provides a text editor with basic functions
to enable user to write reports or edit automatically generated reports for convenience.
• Logging Status and Actions in the Workspace: All major user actions are logged and
displayed. The user can scroll and examine his/her previous actions.
• File Operations: All basic file operations including printing options are provided. See Figure 9.7.
• Configuring Workspace: The application provides configuration options for the workspace, its
state, and automatic management of produced plots and reports. See Figure 9.8.
• Help Menu: VisGUI provides an HTML based navigable help interface.
9.3
Using VisGUI
In this section, we will very briefly demonstrate how VisGUI can be used.
Chapter 9. Analysis of results using VisGUI
34
Figure 9.4: Visualization of Distribution of a Variable
9.3.1
Platforms
VisGUI is developed and tested both in Linux and Windows environments. The application will also be
adopted for MAC platforms.
9.3.2
External Packages
The application is being implemented using Python2.5 and Qt4. All distributional statistics, and time
series analysis and inference analysis are being performed by employing and integrating RPy2. RPy has
provided an efficient and practical Python interface to the R Programming Language. More specifically,
the software is implemented using Python 2.5 with the help of following packages:
• GUI: PyQt4.QtGui
• XML: PyQt4.QtXml
• Statistics: RPy 2
• DB: SqlLite
Chapter 9. Analysis of results using VisGUI
35
Figure 9.5: Visualization of Advanced Time Series Plots of an Experiment
9.3.3
Standalone Installation
The modular design approach of VisGUI allows it to be installed and used as a standalone application.
This flexibility will allow the package to be later developed as an platform and economic model independent workspace which can be used to analyse and and visualize results of other computational economics
platforms.
9.4
Summary
The section has presented a brief overview of VisGUI. The modular approach of the its implementation
and its major design principles will provide us to further develop it and share it with computational
economics community in the future.
Chapter 9. Analysis of results using VisGUI
Figure 9.6: Exporting Raw Data of Plots
36
Chapter 9. Analysis of results using VisGUI
Figure 9.7: File Operations
37
Chapter 9. Analysis of results using VisGUI
Figure 9.8: Configuring Workspace
38
Appendix A
Manual installation from sources
A.1
Installing PopGUI
PopGUI is written in Python language for faster development and portability reasons. It uses GTK+ for
its graphical user interface, Therefore PopGUI will run on any platform for which Python (version 2.5 or
higher) and GTK+(version 2.0 or higher) is available, including GNU/linux, Microsoft Windows, most
Unixes, and others.
The program itself consists of two files only: poplib.py which contains the library functions, and
popgui.py which provides the GUI. Follow the instructions below for your operating system to start using
PopGUI.
A.1.1
Installation on GNU/Linux
Install python-gtk2 package. Then place poplib.py and popgui.py into some directory, and run popgui.py.
If you want to do these from a command line, do as follows (example for Debian or Ubuntu Linux):
$ sudo aptitude install python-gtk2
$ python popgui.py
A.1.2
Installation on Windows
Install the following in order (See http://www.pygtk.org/downloads.html for detailed instructions and
links for setting up Python with GTK support):
1. Python 2.5 or newer
2. GTK+ win32 runtime
3. PyCairo
4. PyGObject
A-1
Appendix A. Manual installation from sources
5. PyGTK
After that copy poplib.py and popgui.py into a directory, and run popgui.py.
A-2


![Fridfinnsson Biografi [Bio]](http://vs1.manualzilla.com/store/data/006433724_1-ad51df93b72a00d32fbec9d84dd4a93b-150x150.png)