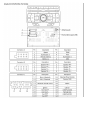
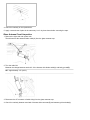
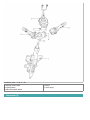
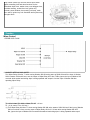
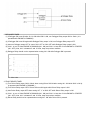
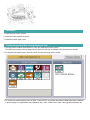
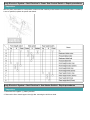
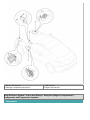
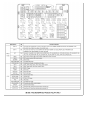
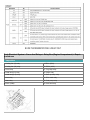
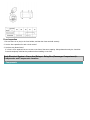
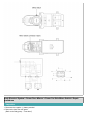
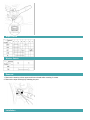
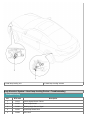
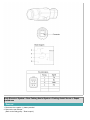
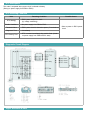
1
GENESIS COUPE(BK) > 2010 > G 3.8 DOHC > Body Electrical System
Body Electrical System > General Information > General Information
General Troubleshooting Information
Before Troubleshooting
1. Check applicable fuses in the appropriate fuse/relay box.
2. Check the battery for damage, state of charge, and clean and tight connections.
(Refer to the Engine Electrical System - Battery)
• Do not quick-charge a battery unless the battery ground cable has been disconnected, otherwise you will
damage the alternator diodes.
• Do not attempt to crank the engine with the battery ground cable loosely connected or you will severely
damage the wiring.
3. Check the alternator belt tension.
Handling Connectors
1. Make sure the connectors are clean and have no loose wire terminals.
2. Make sure multiple cavity connectors are packed with grease (except watertight connectors).
3. All connectors have push-down release type locks (A).
4. Some connectors have a clip on their side used to attach them to a mount bracket on the body or on another
component. This clip has a pull type lock.
5. Some mounted connectors cannot be disconnected unless you first release the lock and remove the connector from
its mount bracket (A).
6. Never try to disconnect connectors by pulling on their wires; pull on the connector halves instead.
7. Always reinstall plastic covers.
8. Before connecting connectors, make sure the terminals (A) are in place and not bent.
9. Check for loose retainer (A) and rubber seals (B).
10. The backs of some connectors are packed with grease. Add grease if necessary. If the grease (A) is contaminated,
replace it.
11. Insert the connector all the way and make sure it is securely locked.
12. Position wires so that the open end of the cover faces down.
Handling Wires And Harnesses
1. Secure wires and wire harnesses to the frame with their respective wire ties at the designated locations.
2. Remove clips carefully; don't damage their locks (A).
3. Slip pliers (A) under the clip base and through the hole at an angle, and then squeeze the expansion tabs to
release the clip.
4. After installing harness clips, make sure the harness doesn't interfere with any moving parts.
5. Keep wire harnesses away from exhaust pipes and other hot parts, from sharp edges of brackets and holes, and
from exposed screws and bolts.
6. Seat grommets in their grooves properly (A). Do not leave grommets distorted (B).
Testing And Repairs
1. Do not use wires or harnesses with broken insulation.
Replace them or repair them by wrapping the break with electrical tape.
2. After installing parts, make sure that no wires are pinched under them.
3. When using electrical test equipment, follow the manufacturer's instructions and those described in this manual.
4. If possible, insert the remover tool from the wire side (except waterproof connector).
5. Use a remover tool with a tapered tip.
Refer to the user's guide in the wiring repair kit II (Pub. No. : 0K000 003 A05)
Five-step Troubleshooting
1. Verify the complaint
Turn on all the components in the problem circuit to verify the customer complaint. Note the symptoms. Do not
begin disassembly or testing until you have narrowed down the problem area.
2. Analyze the schematic
Look up the schematic for the problem circuit.
Determine how the circuit is supposed to work by tracing the current paths from the power feed through the circuit
components to ground. If several circuits fail at the same time, the fuse or ground is a likely cause.
Based on the symptoms and your understanding of the circuit operation, identify one or more possible causes of the
problem.
3. Isolate the problem by testing the circuit.
Make circuit tests to check the diagnosis you made in step 2. Keep in mind that a logical, simple procedure is the
key to efficient troubleshooting.
Test for the most likely cause of failure first. Try to make tests at points that are easily accessible.
4. Fix the problem
Once the specific problem is identified, make the repair. Be sure to use proper tools and safe procedures.
5. Make sure the circuit works
Turn on all components in the repaired circuit in all modes to make sure you've fixed the entire problem. If the
problem was a blown fuse, be sure to test all of the circuits on the fuse. Make sure no new problems turn up and
the original problem does not recur.
Battery Reset
Description
When reconnecting the battery cable after disconnecting, recharging battery after discharged or installing the memory
fuse located on the driver's side panel after removing, be sure to reset systems mentioned on the below table.
In addition, when replacing or reinstalling their fuses after removing, they should be reset according to the below table.
Please refer to the below table when servicing.
SYSTEM
Manual down
window
RESETTING
Whenever the window cannot be properly closed or opend, discharged or the related fuse is
replaced or reinstalled, reset the Manual down window system according to the procedure
below.
1) Turn the ignition switch to the ON position.
2) Push down the power window switch until the window glass is entirely down.
3) Turn the ignition switch from OFF to ON within 2 sec.
4) Push down the power window switch three times continuously within 5 sec.
Whenever the battery is disconnected, discharged or the related fuse is replaced or
reinstalled, the sunroof system must be reset according to the procedure below.
1) Turn the ignition switch to the ON position.
2) According to the position of the sunroof, do the following.
- In case the sunroof is closed completely or tilted:
Push the sunroof control lever upward until the sunroof tilts completely upward.
- In case the sunroof is open:
Push the sunroof control lever forward until the sunroof closes completely. Push the
sunroof control lever upward until the sunroof tilts completely upward.
3) Release the sunroof control lever.
4) Push the sunroof control lever upward until the sunroof has returned to the original tilt
position after it is raised a little higher than the maximum tilt position. Then, release the lever.
5) Push the sunroof control lever upward until the sunroof operates as follows;
TILT DOWN → SLIDE OPEN → SLIDE CLOSE
Then, release the lever.
Sunroof
Trip computer
When the battery is disconnected and reconnected, the set functions of the trip computer
become initialized. So, you need to explain this information to the customer.
Clock
When the battery is disconnected and reconnected, the clock becomes initialized. So, the
clock should be reset.
Audio
When the battery is disconnected and reconnected, the customer's radio stations become
initialized. So, you need to record the customer's radio stations prior to service, and after
service, set the customer's radio stations into the audio.
Body Electrical System > Audio > Specifications
Specification
Audio
Item
Specification
RADIO/CD/MP3/XM
(PA710S)
Model
Power supply
RADIO/CDC/MP3/XM
(PA760S)
DC 14.4V
Rated output
Max. 43W x 4
Max. 3.2Vrms
Antenna
80PF 75Ω
Tuning type
PLL synthesized type
Other
Frequency range
/ Channel space
Internal amplifier
External amplifier
FM
87.5~107.9 MHz/ 200KHz
AM
530~1710 KHz/ 10KHz (General)
Speaker
Item
Input power
(W or V)
PA710S
PA760S
Front
MAX 40W
8 Vrms
Rear
MAX 40W
8 Vrms
Front center
-
8 Vrms
Front tweeter
MAX 40W
8 Vrms
Sub woofer
-
16 Vrms
Front
4 ± 0.6
Min 1.6
Rear
4 ± 0.6
2.2 ± 0.4
Impedance(Ω)
Front center
-
2.15 ± 0.25
Front tweeter
3.4 ± 0.5
Min 3.6
Sub woofer
-
4.8 ± 0.1
6
8
Number of speaker
Body Electrical System > Audio > Components and Components Location
Component Location
1.
2.
3.
4.
5.
6.
Audio unit
Tweeter speaker
External amp
Glass antenna
Front door speaker
Rear speaker
8. Antenna feeder cable
9. Crash pad center speaker
10. Feeder cable joint connector
11. Audio monitor
12. Aux jack
13. Roof antenna (SDARS)
7. Woofer speaker
※ SDARS : Satellite Digital Audio Radio Service
Body Electrical System > Audio > Audio Unit > Components and Components Location
Components
Body Electrical System > Audio > Audio Unit > Repair procedures
Removal
1. Disconnect the negative (-) battery terminal.
2. Remove the console upper cover(A).
3. Remove the crash pad center fascia lower panel(A).
(Refer to the BD group - "Crash pad")
4. Remove the mounting screws then remove the audio head unit(A).
5. Remove the connectors and cable(A).
Disassembly
1. Remove the brackets(A) after loosening the mounting screws.
2. Disassemble the front panel(A) then disconnect the connector(B) and cable jack(C) between the unit and front
panel.
3. Disassemble the front cover(A) after loosening 4 screws.
4. Disconnect the connector(B) between the unit and the deck(A) after loosening screws.
5. Disassemble the deck from the unit.
Reassembly
1. Reassemble the deck to the audio unit.
2. Reassemble the front cover.
3. Reassemble the front panel.
4. Reassemble the audio brackets.
Make sure the film connector and cable jack are plugged in properly.
Installation
1. Connect the audio unit connectors and cables.
2. Install the audio unit.
3. Install the crash pad center fascia lower panel.
4. Install the console upper cover.
5. Check the audio system.
Make sure the audio head unit connectors are plugged in properly and the antenna cable is connected properly.
Body Electrical System > Audio > Speakers > Repair procedures
Inspection
1. Troubleshooting for Speaker
(1) Basic inspection of speaker
Inspect the sound from speaker after verifying that the speaker mounting screws is removed and the wiring
connector is connected precisely to remove vibration transmitted from body trims and surrounding parts.
(2) Case Troubleshooting
No.
1
2
Case
Trembling
sound
Noise
Inspection/Remedy
1. Before replacing the speaker, inspect that the mounting screw is installed normally.
2. After re-installing the speaker, verify that no trembling sound is heard.
3. When hearing a trembling sound again, replace the speaker with new one.
1. Check if the wiring connector is connected normally. If not, reconnect the wiring
connector.
2. In case of radio static, check if there is a noise from CD.
3. When a noise is heard on turning radio and CD on, replace the speaker with new
one.
In case there is only radio static, this causes from poor radio reception. Thus the
speaker needs no repair and replacement.
Inspection of the wiring connection between the battery and the speaker
1. Before replacing the speaker, inspect the wiring connection between the battery and
the speaker is normal.
2. Check the supplying power to the speaker and the resistance, then inspect the
sound quality.
■ Specified impedance : 2 ~ 4Ω
3
Poor working
3. If the speaker works poorly, replace it with new one.
- During dealing of speaker
- Do not damage the speaker with impact as like a drop and a throw.
- Be careful not to cover water and oil over the speaker.
- Caution during dealing of speaker because the material of diaphragm is paper which is easy to be torn
by impact and external force.
- When modifying audio system as customer pleases, this does electric damage to speaker.
- And, in this case the speakers are not covered by the manufacturer's warranty.
Removal
Front Speaker
1. Remove the front door trim panel.
(Refer to the Body group - "Front door")
2. Remove the front speaker (A) after loosening 4 rivets.
Rear Speaker
1. Remove the rear seat.
(Refer to the Body group - "Rear seat")
2. Remove the rear side trim and then remove the rear speaker (A) after removing 4 bolts.
Crash pad center speaker
1. Remove the center fascia upper panel(A).
2. Remove the speaker grille(A).
3. Remove the center speaker(A) after loosening the mounting screws.
Tweeter Speaker
1. Remove the front door trim(A).
(Refer to the Body group - "Front door")
2. Remove the tweeter speaker(A) from the front door trim after disconnecting the connector.
Woofer Speaker
1. Fold the rear seat forward.
(Refer to the Body group - "Rear seat")
2. Remove the rear package tray.
(Refer to the Body group - "Interior trim")
3. Remove the woofer speaker (A) after removing 4 bolts.
External Amp
1. Remove the rear seat.
(Refer to BD group - "Rear seat")
2. Remove the rear right side trim.
3. Remove the external amplifier connector(A) from the rear right quarter panel.
4. Remove the external amplifier(A) after loosening the mounting bolts.
Installation
Front Speaker
1. Install the front speaker.
2. Install the front door trim.
Rear Speaker
1. Install the rear speaker.
2. Install the rear side trim.
3. Install the rear seat.
Crash pad center speaker
1. Install the center speaker.
2. Install the center speaker grille.
3. Install the center fascia upper panel.
Tweeter Speaker
1. Install the tweeter speaker after connecting the tweeter speaker connector.
2. Install the front door trim.
Woofer Speaker
1. Install the woofer speaker after connecting the connector.
2. Install the rear package tray and rear seat assembly.
External Amp
1. Install the external amplifier after connecting the connector.
2. Install the rear right side trim.
Body Electrical System > Audio > Antenna > Components and Components Location
Component
Body Electrical System > Audio > Antenna > Repair procedures
Inspection
Glass Antenna Test
1. Wrap aluminum foil (A) around the tip of the tester probe (B) as shown.
2. Touch one tester probe to the glass antenna terminal (A) and move the other tester probe along the antenna wires
to check that continuity exists.
Glass Antenna Repair
To make an effective repair, the broken section must be no longer than one inch.
1. Lightly rub the area around the broken section (A) with fine steel wool, and then clean it with alcohol.
2. Carefully mask above and below the broken portion of the glass antenna wire (B) with cellophane tape (C).
3. Using a small brush, apply a heavy coat of silver conductive paint (A) extending about 1/8″on both sides of the
break. Allow 30 minutes to dry.
Thoroughly mix the paint before use.
4. Check for continuity in the repaired wire.
5. Apply a second coat of paint in the same way. Let it dry three hours before removing the tape.
Glass Antenna Circuit Inspection
1. Remove the right side rear quarter trim.
Then disconnect the antenna feeder cable(A) from the glass antenna amp.
2. Turn the radio ON.
Measure the voltage between terminal 2 of the harness side feeder cable(A) and body ground(B).
OK : approximately 12V (ACC+)
3. Disconnect the 2P connector of radio wiring from the glass antenna amp.
4. Check for continuity between terminals of harness side connector(B) and antenna grid terminals(A).
5. Check the grid lines for continuity.
6. When a poor radio reception is not repaired through the above inspection methods, replace the amp.
If the radio reception is still poor, check the radio cable for short and radio head unit for failure.
Antenna Cable
1. Remove the antenna jack from the audio unit and antenna.
2. Check for continuity between the center poles of antenna cable.
3. Check for continuity between the outer poles of antenna cable. There should be continuity.
4. If there is no continuity, replace the antenna cable.
5. Check for continuity between the center pole (A) and outer pole (B) of antenna cable. There should be no continuity.
6. If there is continuity, replace the antenna cable.
Removal
Roof Antenna (SDARS)
1. Remove the rear roof trim.
(Refer to the Body group - "Roof trim")
2. Disconnect the antenna connector from the feeder cable connector.
3. Remove the SDARS roof antenna(A) from the roof panel hole after loosening a nut(B).
Installation
1. Install the roof antenna to the roof panel.
2. Tighten the nut.
3. Connect the roof antenna connector.
Body Electrical System > Audio > Audio Remote Control > Schematic Diagrams
Circuit Diagram
Body Electrical System > Audio > Audio Remote Control > Repair procedures
Inspection
1. Check the audio remote control switch(A) for resistance between No.3 and No.4 terminals in each switch position.
Switch
Connector
terminal
Resistance
(±5%)
Volume Down
3-4
6.81 kΩ
Volume Up
3-4
4.61 kΩ
Seek Up
3-4
430 Ω
Seek Down
3-4
1.11 kΩ
Mode
3-4
2.11 kΩ
Removal
1. Disconnect the negative (-) battery terminal.
2. Remove the driver airbag module.
(Refer to the airbag group)
3. Remove the steering wheel.
(Refer to ST group - "Steering column & shaft")
4. Remove the steering wheel cover after loosening the 4 screws.
5. Remove the audio remote control switch (A) after removing the steering wheel remote control switch connector and
2 screws.
Installation
1. Reassemble the steering wheel remote control switch after connecting the connector.
2. Reassemble the steering wheel.
3. Reassemble the driver airbag module.
Make sure the audio remote control switch and the airbag module connectors are plugged in properly.
Body Electrical System > Audio > AUX(Auxiliary) Jack > Components and Components
Location
Components
Body Electrical System > Audio > AUX(Auxiliary) Jack > Schematic Diagrams
Circuit Diagram
Body Electrical System > Audio > AUX(Auxiliary) Jack > Description and Operation
Description
The multimedia jack on the console upper cover is for customers who like to listen to external portable music players
like the MP3, iPod and etc., through the vehicle's sound system when it is linked to this jack. The customer has this
added option.
In case of distortions from media connected to the AUX source, the audio unit may not be defect but the output level of
the used media does not match the specification of the AUX input.
Body Electrical System > Audio > AUX(Auxiliary) Jack > Repair procedures
Removal
1. Remove the shift lever knob.
(Refer to BD group - "Console")
2. Remove the console upper cover(A).
3. Disconnect the connector(A) from the console upper cover and console.
4. Remove the console.
(Refer to BD group - "Console")
5. Remove the multimedia jack(A) from the console under cover after loosening the mounting screws.
Installation
1. Install the multimedia jack.
2. Connect the AUX jack connector.
3. Install the center console.
4. Install the console upper cover.
5. Install the shift lever knob.
Make sure the Aux connector and the console connectors are plugged in properly.
Body Electrical System > Audio > Troubleshooting
Troubleshooting
Customer Complaint Analysis Check Sheet
There are six areas where a problem can occur: wiring harness, the radio, the CD player, and speaker. Troubleshooting
enables you to confine the problem to a particular area.
Chart 1
Chart 2
Chart 3
Chart 4
Chart 5
Chart 6
Chart 7
Body Electrical System > Multifunction switch > Specifications
Specifications
Items
Rated voltage
DC 12V
Operating temperature range
-30°C ~ +80°C (-22 ~ +176°F)
Dimmer & passing switch
High : 0.2A (Relay load)
Low : 0.2A (Relay load)
Passing : 0.2A (Relay load)
Lighting switch
Lighting : 0.2A (Relay load)
Turn signal & lane change switch
Rated load
Specifications
Front fog lamp switch
Wiper & mist switch
Washer switch
Variable intermittent volume switch
6.6 ± 0.5A (Lamp load)
0.2A (Relay load)
Low, High : 4.5A (Motor load)
Intermittent : 0.22 ± 0.5A (Relay load)
Lock : Max. 28A (Motor load)
4A (Motor load)
Max. 25mA
Body Electrical System > Multifunction switch > Components and Components Location
Component (1)
<Installation order : A→B→C→D>
1. Steering column shaft
2. Lighting switch
3. Wiper and washer switch
Component (2)
4. Screw
5. Clock spring
Body Electrical System > Multifunction switch > Repair procedures
Inspection
Lighting Switch Inspection
With the multi function switch in each position, make sure that continuity exists between the terminals below. If
continuity is not as specified, replace the multi-function switch.
Lighting Switch (Auto Light)
Lighting Switch
Dimmer And Passing Switch
Turn Signal Switch
Front Fog Lamp Switch
Wiper And Washer Switch Inspection
With the multi function switch in each position, make sure that continuity exists between the terminals below. If
continuity is not as specified, replace the multi-function switch.
Wiper Switch
Washer Switch
Removal
1. Disconnect the negative (-) battery terminal.
2. Remove the steering wheel.
(Refer to ST group - "Steering column & shaft")
3. Remove the steering column upper and lower shrouds after removing 3 screws.
4. If necessary of removing the wiper & washer switch, release the lock of wiper switch using tool without removing the
steering wheel.
5. Remove the clock spring(A).
6. Loosen the screws from the multifunction switch assembly.
7. Remove the multifunction switch assembly(A) after loosening the connectors.
Installation
1. Install the multifunction switch.
2. Install the clock spring.
3. Install the steering column upper and lower shrouds.
4. Install the steering wheel.
Make sure the multifunction switch connectors are plugged in properly.
Body Electrical System > Horn > Components and Components Location
Component Location
1. Horn switch
4. Horn (High pitch)
2. Horn relay (Engine room compartment)
3. Horn (Low pitch)
5. Clock spring
Body Electrical System > Horn > Repair procedures
Inspection
Test the horn by connecting battery voltage to the 1 terminal and ground the 2 terminal.
The horn should make a sound. If the horn fails to make a sound, replace it.
Horn Relay Inspection
1. Remove the horn relay (A) from the engine room relay box.
2. There should be continuity between the No.30 and No.87 terminals when power and ground are connected to the
No.85 and No.86 terminals.
3. There should be no continuity between the No.30 and No.87 terminals when power is disconnected.
Removal
1. Remove the front bumper.
(Refer to the Body group - "Front bumper")
2. Remove the bolt and disconnect the horn connector, then remove the high pitch horn(A) and the low pitch horn(B).
Installation
1. Connect the horn connector, then reassemble the high pitch horn and low pitch horn.
2. Reassemble the front bumper.
Adjustment
Operate the horn, and adjust the tone to a suitable level by turning the adjusting screw.
After adjustment, apply a small amount of paint around the screw head to keep it from loosening.
Body Electrical System > AVN System [2009-05-01~] > Components and Components
Location
Component Location
1.
2.
3.
4.
5.
6.
7.
AVN (A/V & Navigation) head unit
Tweeter speaker
External Amplifier
Glass antenna (Radio)
Front door speaker
Rear door speaker
Woofer speaker
※ SDARS : Satellite Digital Audio Radio Service
Components
AVN (A/V & Navigation) Head Unit
8. Antenna feeder cable
9. Crash pad center speaker
10. Feeder cable joint connector
11. Multi display
12. Aux jack
13. Roof antenna (GPS + SDARS)
Body Electrical System > AVN System [2009-05-01~] > Schematic Diagrams
System Block Diagram
Body Electrical System > AVN System [2009-05-01~] > Description and Operation
Limitations Of The Navigation system
GPS Signal Reception State
As the GPS satellite frequency is received/transmitted in straight lines, reception may not work if hiding devices are
placed on or near the GPS antenna or when traveling through the following locations.
• Tunnels
• Basement parking structures
• Underneath an overpass
• Roads within forested areas
• Areas near high rise buildings
• Roads within canyons
Vehicle Position Display
1. If multipass errors occur due to reflections from buildings or related causes, the current position mark on the
navigation may differ from the actual position of the vehicle.
2. The position of the vehicle on the navigation may be different from the actual position if the vehicle is under the
occur, driving for a short period of time will vehicle through map matching or GPS information (several minutes may
be necessary in certain cases).
A. When driving on a Y-shaped road with a narrow angle, the current position may be displayed in the opposite
direction.
B. If the vehicle is loaded onto a car transport vehicle, the current position mark may be stalled on the last position
prior to loading.
C. When driving on a spiral-shaped road.
D. When driving in mountain regions with sharp turns or sudden brakes.
E. When entering a road after having been in an underground parking structure, building parking structure, or
turnable with many rotations.
F. When the tires have recently been replaced (Especially upon use of spare or studless tires)
G. If the battery terminal is removed.
H. When driving in city streets, the current position may be displayed on the opposite side or on an off-road
position.
I. When changing the zoom level from the maximum zoom in level to a different zoom level, the current position
mark may be displayed on a different road.
J. When driving in heavy traffic with frequent go · stops in traffic or intersections.
K.
L.
M.
N.
O.
P.
Q.
R.
When driving under slippery conditions, such as heavy sand, snow, etc.
When driving with the tire chain in place.
When using a tire with an incorrect size specification.
When the tire pressure for the 4 tires are different.
When the replacement tire is a worn or used tire (Especially studless tires having passed a 2nd seasons, etc.)
When driving near high-rise buildings
If a roof carrier has been installed
When driving under high speeds or having calculated a long-distance route.
Route Guidance
Suitable route guidance may not occur caused by search conditions or the driving position.
• Guidance to go straight may be given while driving on a straight road.
• Guidance may not be given even when having turned at an intersection.
• There are certain intersections in which guidance may not occur.
• A route guidance signaling entrance into a no enter zone may occur (No enter zone, road under construction, etc.)
• Guidance may be given to a position removed from the actual destination if roads to reach the actual destination do
not exist or are too narrow.
• Faulty voice guidance may be given if the vehicle breaks from the designated route (ex : if a turn is made at an
intersection while the navigation provided guidance to go straight).
• Map Data may be missing or incorrect causing route guidance to not be given.
Route Re-calculation
The following phenomena may occur after conducting route recalculation.
• Guidance may be given to a position differing from the current position when turning at an intersection.
• Route recalculation may take a longer period of time when driving under high speeds.
• A route guidance signaling for a U-Turn in a No U-Turn location may occur.
• A route guidance signaling entrance into a no enter zone may occur (No enter zone, road under construction, etc).
• Guidance may be given to a position removed from the actual destination do not exist or are too narrow.
• Faulty voice guidance may be given if the vehicle breaks from the designated route (ex : if a turn is made at an
intersection while the navigation provided guidance to go straight)
Body Electrical System > AVN System [2009-05-01~] > Repair procedures
Removal
1. Disconnect the negative (-) battery terminal.
2. Remove the console upper cover(A).
3. Remove the crash pad center fascia lower panel(A). (Refer to the BD group - "Crash pad")
4. Remove the mounting screws.
5. Remove the connectors and cable(A) then remove the AVN head unit.
Installation
1. Connect the AVN head unit connectors and cables.
2. Install the AVN head unit.
3. Install the crash pad center fascia lower panel.
4. Install the console upper cover.
5. Check the AVN system.
Make sure the AVN head unit connectors are plugged in properly and the antenna cable is connected properly.
Body Electrical System > AVN System [2009-05-01~] > Troubleshooting
Troubleshooting Guide
Before Thinking The Product Has Malfunctioned
1. Errors which occur during the operation or installation of the device may be mistaken as a malfunction of the actual
device.
2. If you are having problems with the divice, try the suggestions listed below.
3. If the problems persist, contact your point of purchase or the nearest service center.
Problem
Function
There are small red, blue, or green dots Because the LCD is manufactured with technology requiring high point
on the screen
density, a pixel deficiency or lighting may occur within 0.01% of total pixels.
The sound or image is not working
• Has the switch for the vehicle been turned to [ACC] or [ON]?
• Has the SYSTEM been turned OFF?
The video is being displayed but sound
is not working
• Has the volume been set to a low level?
• Has the volume been set on mute?
When the power is turned on, the
corners of the screen are dark
• The display looking somewhat darker after prolonged periods of use is a
normal phenomenon with LCD panels. It is not a malfunction.
• If the screen is very dark, contact your point of purchase or the nearest
service center.
Sound is working from only one speaker
• Is the position of FAL/BAL sound controls or volume adjusted to only
one side?
Sound and video does not work in AUX
mode
Is the audio and video connector jacks fully inserted into the AUX terminal?
The external device is not working
Is the external device connected with a standard connector cable?
The road is missing
Some map data may be missing or incorrect.
The road name is spoken incorrectly
The TTS(Text To Speech) engine speaks the street name based off of the
phonetic spelling.
This will continuously be update with the map datebase.
Troubleshooting
Problem
The power does not
turn on.
Possible Cause
The fuse is disconnected.
Replace with a suitable fuse. If the fuse is disconnected
again, please contact your point of purchase or service
center.
Device is not properly connected.
Check to see that the device has been properly connected.
XM only goes through The XM mode is in category.
one category
The CD does not
play.
Solution
Press the mode button to change to channel mode.
The DISC has not been inserted
Insert the disc properly so that the sides are facing the
or has been inserted upside down. correct direction.
The DISC has been contaminated. Wipe dirt dirt and other foreign substances from the DISC.
The vehicle battery is low.
Charge the battery. If the problem persists, please contact
your point of purchase or service center.
A disc which is not supported by
the device has been inserted.
Insert a disc which is supported for play by the device.
The sound does not
work.
• The volume level is set the
lowest level.
• The connector is not properly
connected.
• The device is currently fastforwarding, rewinding,
scanning, or playing in slow
mode.
• Adjust the volume level.
• Check the connection state.
• The sound will not work when the device is fastforwarding, rewinding, scanning, or playing in slow
mode.
The sound or video
quality is low.
• The DISC is dirty or scrached.
• Vibration is occuring from the
position in which the
conversion switch has been
• Wipe off water or dirt from the DISC. Do not use a disc
which has been scrached.
• The sound may be short-circuited and the image
distorted if the device begins to vibrate. The device will
installed.
• The color and tone quality of
the image is low.
return to normal operation once the vibration has
stopped.
• Aging of the video display and deterioration in
performance may cause certain quality degradations.
The USB does not
work.
• USB memory is damaged.
• USB memory has been
contaminated.
• A separately purchased USB
HUB is being used.
• A USB extension cable is
being used.
• A USB which is not a Metal
Cover Type USB Memory is
being used.
• A HDD type, CF, SD Memory
is being used.
• There are no music files which
can be played.
• Please use after formatting the USB into FAT 12/16/32
format.
• Remove any foreign substances on the contact surface
of the USB memory and multimedia terminal.
• Directly connect the USB memory with the multimedia
terminal on the vehicle.
• Directly connect the USB memory with the multimedia
terminal on the vehicle.
• Use a standard USB memory.
• Use a standard USB memory.
• Only MP3, WMA file formats are supported. Please use
only the supported music file formats.
The iPod is not
recognized even
though it has been
connected.
• There are no titles which can
be played.
• The iPod firmware version has
not been properly updated.
• The iPod device does not
recognize downloads.
• Use iTunes to download and save MP3 files into the
iPod.
• Use iTunes to update the firmware version and
reconnect the iPod with the device.
• Reset the iPod and reconnect with the device.
Body Electrical System > AVN System [2009-05-01~] > AUX(Auxiliary) Jack > Description
and Operation
Description
The multimedia jack on the console upper cover is for customers who like to listen to external portable music players
like the MP3, iPod and etc., through the vehicle's sound system when it is linked to this jack. The customer has this
added option.
In case of distortions from media connected to the AUX source, the audio unit may not be defect but the output level of
the used media does not match the specification of the AUX input.
Body Electrical System > AVN System [2009-05-01~] > AUX(Auxiliary) Jack > Schematic
Diagrams
Circuit Diagram
Body Electrical System > AVN System [2009-05-01~] > AUX(Auxiliary) Jack > Repair
procedures
Removal
1. Remove the shift lever knob.
(Refer to BD group - "Console")
2. Remove the console upper cover(A).
3. Disconnect the connector(A) from the console upper cover and console.
4. Remove the console.
(Refer to BD group - "Console")
5. Remove the multimedia jack(A) from the console under cover after loosening the mounting screws.
Installation
1. Install the multimedia jack.
2. Connect the AUX jack connector.
3. Install the center console.
4. Install the console upper cover.
5. Install the shift lever knob.
Make sure the Aux connector and the console connectors are plugged in properly.
Body Electrical System > Smart key System > Specifications
Specification
Smart Key Unit
Items
Rated voltage
Operating voltage
Operating temperature
Load
Specification
DC 12V
DC 9 ~ 16V
-30°C ~ 75°C (-22°F ~ 167°F)
Max. 2mA
RF Receiver
Items
Frequency
Antenna type
Specification
315 MHz
FSK (Frequency Shift Keying)
Smart Key FOB
Items
Battery
Distance
Battery life
Push buttons
Specification
Lithium battery 3V 1EA
30m
More than 2years (10 times / a day)
Door lock / unlock, Trunk lid
Frequency(Rx)
125 kHz
Frequency(Tx)
315 MHz
Numbers
2EA
Antenna
Items
Rated voltage
Operating voltage
Operating temperature
Frequency
Specification
DC 12V
DC 9 ~ 16V
-30°C ~ 75°C (-22°F ~ 167°F)
125kHz
Numbers
Interior(3EA), Door(2EA), Bumper(1EA)
Body Electrical System > Smart key System > Components and Components Location
Component Location (1)
1. Buzzer
2. RF receiver
3.SMART KEY unit
4. Interior antenna 1
Component Location (2)
5. Interior antenna 2
6. Trunk antenna
7. Bumper antenna
1. Electronic Steering Column Lock (ESCL)
2. Door outside handle
3. Door outside handle button
Body Electrical System > Smart key System > Description and Operation
Description
The SMART KEY system is a system that allows the user to access and operate a vehicle in a very convenient way.
To access the vehicle, no traditional key or remote control unit is needed.
The user carries a SMART KEY FOB which does not require any conscious actions by the user (e.g. operate a RKE
button). The SMART KEY system is triggered by pressing a push button in the door handle.
After being triggered the vehicle sends out a request in a limited range. If the SMART KEY FOB receives this request,
it automatically sends a response to the vehicle. Then the system decides whether to perform a particular action
(unlocking, locking…) or remain inactive.
In a similar manner the vehicle’s Electrical Steering Column Lock (ESCL) is released. Again, a communication between
the vehicle and the SMART KEY FOB is needed before any actions will be performed.
The System offers the following features :
• Passive unlock via door driver side and passenger side
• Passive locking via door driver side and passenger side
• Passive start
• Max. 2 fobs can be handled by the system
• Immobilizer backup antenna driver integrated into FOB-HOLDER for TP authentication (i.e. limp home mode)
• Communication with engine management system
• Communication with SRX
• LF-RF communication
1. Passive unlock
The system allows the user to access (unlock) the vehicle without performing any actions with the SMART KEY
FOB. This feature could be different depending on platform as follows:
A. Pressing Push button in door handle
2. Passive locking
The system allows the user to lock the vehicle by pushing a button on door handle with the SMART KEY FOB.
3. Button start
The system allows the user to release ESCL and to switch the power modes (Off, Accessory, Ignition), as well as to
start and stop the vehicle’s engine without performing any actions with the SMART KEY FOB. See Button Engine
Start system specification.
4. LIMP HOME Mode
Additionally, the system offers so called “limp home mode”, which is the user can operate all vehicle functions by
inserting the key into the FOB HOLDER.
Smart Key ECU (SMK ECU)
The SMK ECU manages all functions related to “Passive Unlock”, “Passive Lock” and “Passive Authorization for Engine
Start Operation”.
It reads the inputs (Push button in door handle, Start Stop Button (SSB), P(A/T) or N(M/T) position Switch), controls the
outputs (e.g. exterior and interior antennas), and communicates via the CAN/LIN (depends on the vehicle) as well as a
single line interface to further devices of the car.
It reads the inputs (Push button in door handle, Start Stop Button (SSB), P(A/T) or N(M/T) position Switch), controls the
outputs (e.g. exterior and interior antennas), and communicates via the CAN as well as a single line interface to further
devices of the car.
For communication with the SMART KEY FOB, SMK ECU generates a request (challenge) as an encoded and
modulated 125 kHz signal at the inductive antenna outputs and receives the SMART KEY FOB’s response via the
external RF receiver.
The main functional blocks of the SMK ECU are:
• Power supply
• Microcontroller with FLASH Memory
• Single Line Interface to SRX
• Single Line Interface to EMS
• Input stage
• LF antenna amplifier/driver
• CAN communication with BCM
• LIN communication with other unit (depending on platform)
The LF antenna amplifier/driver generates a 125 kHz sinusoidal carrier signal which is distributed to the different
antennas.
Smart Key FOB
The system supports up to 2 SMART KEY FOBs.
The main functions of the SMART KEY FOB are:
• Passive functionality: receives LF-challenge and sends automatically RF response.
• Classic RKE function by action up to 6 push buttons.
• Transponder-functionality in case of a flat battery or a disturbed communication.
• LED for operation feedback and battery monitoring.
The FOB's LED indicator may continue to light even with a low transmitter battery.
If the performance or range of the FOB is less than expected, check the transmitter battery.
Antennas
1. Emitting LF Antennas:
Inductive antennas in and at the vehicle are used to transform the current, driven by the SMK ECU antenna driver,
into a 125 kHz magnetic field, which is the carrier for the SMART KEY challenge.
Three antennas cover the vehicle’s exterior: two antennas in the Door Handles (DS and PS) cover the area around
the doors; one antenna in the rear bumper covers the area around the trunk.
Two antennas cover the vehicle’s exterior: two antennas in the Door Handles (DS and PS) cover the area around
the doors.
Up to three antennas cover the vehicle’s interior and the trunk interior: two in the passenger compartment and one in
the trunk.
2. Bidirectional Immobilizer Antenna (for Limp Home):
The Immobilizer Backup Antenna is used for sending and receiving data: it emits a magnetic field (125 - 135 kHz
challenge) and receives changes in the field strength (response of Transponder).
3. External Receiver
The SMART KEY FOB’s response is received via the external RF receiver, which is connected to the SMK ECU via
a serial communication Line.
The SMK ECU provides a connector pin for the serial communication Line.
Door Handle
The front door handles of the two doors (driver door / passenger door) are equipped with emitting LF-antennas to emit
the 125 kHz signals. The front door handles are also equipped with a push button.
Push Button
The push button in door handle serves as a trigger to indicate the user’s intent to unlock or lock the vehicle.
The push buttons are installed at front doors, integrated into the door handles.
Operation
Passive Functions
The system allows the user to access the vehicle without having to perform any actions (e.g. RKE button pressing) with
the SMART KEY FOB. It is sufficient that a valid SMART KEY FOB is located within a defined and limited range with
respect to the vehicle. So the system is capable of detecting and authenticating a SMART KEY FOB in the ranges as
specified below.
Operating Range
The SMART KEY FOB receives and interprets a challenge sent from the vehicle via the exterior antennas in a free
space range of min. 0.7m measured around the exterior antennas which are integrated in the door handles; refer to the
below given picture.
The SMART KEY FOB receives and interprets a challenge sent from the vehicle via the exterior antennas in a free
space range of min. 0.7m measured around the exterior antennas which are integrated in the door handles; refer to the
below given picture
Passive Access (Passive Entry)
Pressing one of the push buttons in the door handles when all doors locked indicates the operator’s intent to access
the vehicle and thus triggers the system for unlock
Passive Locking (Exit)
Pressing one of the push buttons in the door handles when one of the following condition is fulfilled:
• At least one door is unlocked and two_steps timer is not running or
• Two_steps timer is running and one of the push button except Front Left side is triggered
indicates the operator’s intent to lock the vehicle and thus triggers the system for a lock.
Passive Trunk Warning
Whenever the trunk is closed, SMK ECU uses a suitable search strategy to avoid trunk buzzer warning by a fob
outside the vehicle. Then SMK searches for a SMART KEY FOB in the interior of the trunk. If a valid SMART KEY
FOB is found in the trunk, the SMK ECU activates SMK external buzzer to inform the user that the trunk has been
closed with a fob inside the trunk.
SMK will send the trunk open command to BCM for trunk reopening if Trunk reopening bit is set(BK)For this
functionality, a “valid” SMART KEY FOB means any SMART KEY FOB that belongs to the vehicle, even if it’s
DEACTIVATED.
- A blind spot in the trunk similar to any RF disturbance may lead to no trunk warning. Due to the penetration of
the bumper antenna into the trunk area the lid may open without an Identification Device outside.
- A blind spot in the trunk similar to any RF disturbance may lead to no trunk warning
Smart Key Reminder 1
1. Preconditions:
All terminals OFF & at least one door open & locking status is not locked checked by SMK periodically every 100ms,
as long as CAN/LIN active.
2. Event:
At least 1 door knob status changed from unlock to lock.
3. SMK actions:
A. IF NO FOB-IN ACTIVE
SMK performs a search for the fobs in the interior of the vehicle. The same LF-strategy has to be used as it is
defined for the ID out warning (registering only, no authentication
B. IF FOB-IN ACTIVE
SMK sends request toward PDM to search valid TP
If no fob or no TP has been found, no action is required.
If any valid fob or valid TP has been found, SMK unlocks the vehicle by sending a CAN Key Reminder unlock
message with the fob number.
If any valid fob has been found, SMK unlocks the vehicle by sending a CAN/LIN Key Reminder unlock message
with the fob number.
Smart Key Reminder 2
1. Preconditions:
All terminals OFF & any door (including trunk) open & no FOB-IN & no locking status (checked by SMK periodically
every 100ms, as long as CAN/LIN active)
2. Vehicle action:
Closing last door or trunk with knobs locked state, or with a locking in progress
3. SMK actions:
Before elapsing 500ms after the closing if all doors are locked then:
A. IF NO FOB-IN ACTIVE
SMK performs a search for the fobs in the interior of the vehicle.
The same LF-strategy has to be used as it is defined for the ID out warning (registering only, no authentication)
B. IF FOB-IN ACTIVE
SMK sends request toward PDM to search valid TP
If no fob has been found, no action is required.
If any valid fob or valid TP has been found, SMK sends unlock command via CAN and activates ext. buzzer
warning.
If any valid fob has been found, SMK sends unlock command via CAN/LIN and activates ext. buzzer warning.
Smart Key Door Lock Warning
Door Lock Warning 1
1. Preconditions:
While (at least one door knob is unlocked) & (ACC ON or IGN ON) & (No FOB-IN) :
A. (All doors are closed) & (trunk closed)
2. Event:
A. User presses the push button in door handle or trunk
3. SMK actions:
SMK performs a search for the fobs outside of the vehicle; the same LF-strategy has to be used as it is defined for
"Scenario Access with I/O Distinction".
Door Lock Warning 2
1. Preconditions:
Same as passive locking precondition but with at least one door open.
2. Event:
User presses the door handle Push button .
3. SMK actions:
SMK performs a search for the fobs outside of the vehicle; the same LF-strategy has to be used as it is defined for
"Scenario Access with I/O Distinction".
If no fob has been found, no action is required.
If the preconditions are no longer valid during buzzer active time (3 seconds), the SMK ECU stops the buzzer
immediately.
Door Lock Warning 3
1. Preconditions:
Same as passive locking precondition
2. User action:
A. User presses the door handle Push button
3. SMK ECU actions:
A. If ATWS(Anti Theft Warning System) is in DISARM status, SMK ECU performs a search for the fob inside of the
vehicle (use "Door Lock Warning 3" scenario)
If no fob has been found, the passive locking is performed.
If any valid fob has been found, SMK ECU activates the external buzzer.
If the activity timer elapsed or ACC ON or IGN1 ON or NOT All door closed or FOB-IN, the SMK ECU stops the
buzzer immediately.
After searching of inside fob, SMK ECU also performs a search for fobs outside of the vehicle.
Smart Key Lamp Warning
1. SMK actions:
As long as the preconditions are valid, the SMK ECU performs a periodical search for the fobs in the interior of the
vehicle; the same LF-strategy has to be used as it is defined for the ID out warning (registering only, no
authentication); periodical means, the search is done every 3 seconds.
If no fob has been found, the SMK ECU starts Key out indicator lamp activation as all preconditions are valid and
will perform another search 3 seconds later.
If any valid fob has been found, the SMK ECU stops the Key out indicator lamp and will (if one door is open) perform
another search 3 seconds later; if no door is open then it’s only at the next When the preconditions are still valid, the
search resumes by opening of one door.
Failsafe Functions (Backup For Limp Home)
In case of a discharged battery of the SMART KEY FOB or disturbed transmission, the following functions are available:
• Unlocking / locking of doors or trunk (or tailgate depending of the vehicle configuration): use of mechanical key
User Information Functions
ID OUT Warning
1. Preconditions:
A. (ACC or IGN1) & (any door open or trunk open)
2. Event:
The last opened door is closed
3. SMK action:
SMK searches for a SMART KEY FOB in the interior.
A. If no valid SMART KEY FOB is found, the SMK activates external buzzer and also sends ID OUT WNG via CAN
(exterior buzzer warning and internal buzzer warning).
B. If a door is opened and closed again during terminals on and inside valid fob, SMK re-enables the authentication
and stops the warning. If the terminal is in ACC, SMK shall turn on immobilizer lamp.
If there is a LF error (LF overheating or LF antenna failure), the system will have the same behavior as it is with
no fob found.
Immobilizer Lamp
Removing the PIF from the MSL and reinserting the PIF and pushing the MSL Knob will switch the lamp on again.
Fob Battery Low Voltage Detection
To detect fob low battery condition, certain battery voltage measurement and low voltage detection strategy are
implemented into fob. The measurement of the battery voltage will be done if fob button is pressed or if a LF
measurement command is received.
If the fob has detected a low battery voltage, the LED will not be switched on at button press.
Learning Description
In this chapter, the learning procedure for SMK, PDM, ESCL and FOBs is described.
For the learning of the SMK, PDM, ESCL and FOBs, it's necessary to have a connection to the diagnostic tool.
Learning MODE
Whatever the mode, the learning procedures are managed by the SMK.
Prior to start learning service, Fob-In signal must be active and the vehicle secret code (called as PIN code) should be
known.
Teaching MODE
This mode is used by the dealers in order to replace SMK and/or PDM and/or ESCL and/or the set of keys, or to
register additional keys for an existing system. That means the system already has been learnt with certain PIN Code.
The PIN Code is fixed for the life time of the vehicle, therefore the same PIN Code must be used in this mode.
Otherwise learning will be failed
Teaching MODE Procedure Description (Step By Step)
Objective: Key teaching procedure at service station
Initial state:
- SMK replacement: SMK is not learnt, PDM and ESCL and SMART FOB are already learnt with same PIN code
- PDM replacement: PDM is not learnt, SMK and ESCL and SMART FOB are already learnt with same PIN code
- ESCL replacement: ESCL is not learnt, SMK and PDM and SMART FOB are already learnt with same PIN code
- Additional or new keys teaching: SMK and PDM and ESCL are already learnt with same PIN code
Starting After Replacing (Virgin Start)
Starting is possible by following process after replacing new smart key unit , PDM, FOB key or ESCL.
• It is for starting at virgin condition
• All related parts are virgin condition (Smart key, IPM, PDM, ESCL ECM)
• ESCL is always unlock at virgin
• When virgin smart key is inserted in smart key holder, possible to start, IG ON and ACC position
• Press brake pedal in P or N range
• After inserting virgin smart key to holder, push start button once.
Body Electrical System > Smart key System > Repair procedures
Inspection
Self Diagnosis With Scan Tool
It will be able to diagnose defects of SMART KEY system with GDS quickly. GDS can operates actuator forcefully,
input/output value monitoring and self diagnosis.
The following three features will be major problem in SMART KEY system.
1. Problem in SMART KEY unit input.
2. Problem in SMART KEY unit.
3. Problem in SMART KEY unit output.
So the following three diagnosis operates will be the major problem solution process.
1. SMART KEY unit Input problem : switch diagnosis
2. SMART KEY unit problem : communication diagnosis
3. SMART KEY unit Output problem : antenna and switch output diagnosis
Switch Diagnosis
1. Connect the cable of GDS to the data link connector in driver side crash pad lower panel, turn the power on GDS.
2. Select the vehicle model and then SMART KEY system.
3. Select the "SMART KEY unit".
4. After IG ON, select the "Current data".
5. You can see the situation of each switch on scanner after connecting the "current data" process.
Display
Description
FL Toggle SW
ON : Push button is ON in the driver door handle.
FR Toggle SW
ON : Push button is ON in the assist door handle.
Trunk SW
Gear P Position
ON : Trunk button is ON.
ON : Shift lever is P position.
IGN 1
ACC
ON : IGN switch is IG position.
ON : IGN switch is ACC position.
Push Knob SW
ON : Push knob switch is ON.
External Buzzer
ON : Buzzer is ON.
Communication Diagnosis With GDS (Self Diagnosis)
1. Communication diagnosis checks that the each linked components operates normal.
2. Connect the cable of GDS to the data link connector in driver side crash pad lower panel.
3. After IG ON, select the "DTC".
Antenna Actuation Diagnosis
1. Connect the cable of GDS to the data link connector in driver side crash pad lower panel.
2. After IG ON, select the "ACTUATION TEST".
3. Set the smart key near the related antenna and operate it with a GDS.
4. If the LED of smart key is blinking, the smart key is normal.
5. If the LED of smart key is not blinking, check the voltage of smart key battery.
6. Antenna actuation
A. INTERIOR Antenna 1
B. INTERIOR Antenna 2
C. Trunk antenna
D. BUMPER/ Trunk Antenna
E. DRV_DR Antenna
F. AST_DR Antenna
Antenna Status Check
1. Connect the cable of GDS to the data link connector in driver side crash pad lower panel.
2. Select the "Antenna Status Check".
3. After IG ON, select the "Antenna Status Check".
4. Set the smart key near the related antenna and operate it with a GDS.
5. If the smart key runs normal , the related antenna, smart key(transmission, reception) and exterior receiver are
normal.
6. Antenna status
A. INTERIOR Antenna 1
B. INTERIOR Antenna 2
C. Trunk antenna
D. BUMPER/ Trunk Antenna
E. DRV_DR Antenna
F. AST_DR Antenna
Serial Communication Status Check
1. Connect the cable of GDS to the data link connector in driver side crash pad lower panel.
2. Select the "Serial Communication Line Check".
3. After IG ON, select the "Receiver Communication Line Check".
4. Check the serial communication line with a GDS.
5. If the receiver communication line runs normal, check the "ESCL Communication Line Check".
6. If the smart key runs normal, the communication of smart key unit, exterior receiver and ESCL are normal.
7. If the smart key runs abnormal, check the following items.
A. Disconnection or no response of the exterior receiver communication line.
B. The exterior receiver communication line disconnection and ground connection.
C. The ESCL disconnection or no response
D. The ESCL disconnection and ground connection
Interior Antenna Actuation Check
1. Set the smart key in the following shade area and check the IG ON.
2. If the ignition is ON, the antenna runs normal.
3. Check the interior antenna ignition mode.
4. Set the smart key in the following shade area and actuate the antenna. Check the LED of smart key is blinking.
5. If the LED of smart key is not blinking, check the antenna in shade area.
FOB Status Check
1. Connect the cable of GDS to the data link connector in driver side crash pad lower panel.
2. After IG ON, select the "FOB KEY STATUS INFO".
Smart Key Status Check
1. Connect the cable of GDS to the data link connector in driver side crash pad lower panel.
2. After IG ON, select the "SMK STATUS INFO".
PDM Status Check
1. Connect the cable of GDS to the data link connector in driver side crash pad lower panel.
2. After IG ON, select the "PDM STATUS INFO".
ESCL Status Check
1. Connect the cable of GDS to the data link connector in driver side crash pad lower panel.
2. After IG ON, select the "ESCL STATUS INFO".
Neutralization Status Check
1. Connect the cable of GDS to the data link connector in driver side crash pad lower panel.
2. After IG ON, select the "Neutralization mode".
Input Switch List
No
Item name
Unit
1
SSB SW2
-
2
ACC
-
3
IGN1
-
4
Gear 'P' Position
-
5
Brake SW
-
6
FL Door Lock Button
-
7
FR Door Lock Button
-
8
Trunk Lid SW
-
9
Battery Voltage
-
10
Alternator Voltage
-
11
KEY out Indicator Lamp
-
12
Immobilizer Lamp
-
13
External Buzzer
-
14
ESCL Enable
-
Actuator List
No.
Item name
Condition
1
KEY out Indicator Lamp
Ignition switch ON
Engine off
2
Immo.indicator Lamp
Ignition switch ON
Engine off
3
External Buzzer
Ignition switch ON
Engine off
4
Interior Antenna 1 Active
Ignition switch ON
Engine off
5
Interior Antenna 2 Active
Ignition switch ON
Engine off
6
Interior Antenna 3 Active
Ignition switch ON
Engine off
7
Bumper/trunk Antenna Active
Ignition switch ON
Engine off
8
DRV_DR Antenna Active
Ignition switch ON
Engine off
9
AST_DR Antenna Active
Ignition switch ON
Engine off
Body Electrical System > Smart key System > Troubleshooting
Troubleshooting
SMK DTC List
NO
DTC code
Description
1
B1602
CAN Error
2
B1603
CAN Bus off
3
B1625
ECM Communication Data failure
4
B1689
CAN Time-out PDM
5
B1971
Parking Position Input Error
6
B1978
Electric Steering Column Lock Failure
Body Electrical System > Smart key System > B1602 CAN Error
General Description
CAN Communication is a circuit, consists of CAN LOW and CAN HIGH, in order to communicate among control units.
Control Modules are respectively communicating via CAN line in order to control Body Electrical.
DTC Description
DTC B1602 is set if Smartkey Module detects that CAN HIGH or CAN LOW is short to battery, short to ground, open
and short between CAN High and CAN Low each other.
DTC Detecting Condition
Item
DTC Strategy
Enable Conditions
Threshold value
Failsafe
Detecting Condition
• CAN Signal Check
• IG ON
• CAN communication error for 2 sec.
• Lamp OFF
Diagnostic Circuit Diagram
Possible cause
• Poor Connection
• Power source to Smart Key
module
• Short to battery in CAN
communication
• Short to ground in CAN
communication
• Short between CAN high and
CAN low each other
• Faulty Smartkey Module
• Faulty each modules
Signal Waveform & Data
Monitor Scantool data
■ Check DTC
1. Check DTC with scantool.
2. Check DTC related CAN communication is set on Smartkey Module and every modules.
3. If there is DTC related Module Check the DTC according to troubleshooting guide.
4. Repair and erase the DTC with Scantool.
5. Is the DTC erased ?
▶ Check poor connection between harness connector and Smartkey Module or ECM
: Thoroughly check the looseness, poor connection, bent, corrison, contamination, deformation or
damage of connector. Repair or replace as necessary and then, go to "Verification of Vehicle
Repair" procedure.
▶ Go to next procedure.
Terminal and Connector Inspection
1. Many malfunctions in the electrical system are caused by poor harness and terminals.
Faults can also be caused by interference from other electrical systems, and mechanical or chemical damage.
2. Thoroughly check connectors for looseness, poor connection, bending, corrosion, contamination, deterioration,or
damage.
3. Has a problem been found?
▶ Repair as necessary and go to "Verification of Vehicle Repair" procedure.
▶ Go to 'Check CAN communication Line" procedure.
CAN communication Line Inspection
■ Check CAN communication
1. Connect all of control module connector.
2. IG KEY ON.
3. Make CAN communication is wake up status (Ex. . ON/OFF Door SW)
4. Measure signal waveform of B-CAN-HIGH terminal of Diagnostic connector and chassis ground.
5. Measure signal waveform of B-CAN-LOW terminal of Diagnostic connector and chassis ground.
Specification : Refer to Signal waveform and Data
6. Is the measrured signal waveform normal ?
▶ Check poor connection between harness connector and Smartkey Module or ECM
: Thoroughly check the looseness, poor connection, bent, corrison, contamination, deformation or
damage of connector. Repair or replace as necessary and then, go to "Verification of Vehicle
Repair" procedure.
▶ Disconnect SMK ECU, IPM, DDM, FAM, Tilt ECU, PDM, ADM, RAM and IMS one by one and
then, check that DTC is erased with scantool.
▶ Substitute with a known-good module and check for proper operation. If the problem is
corrected, replace module and then go to "Verification of Vehicle Repair" procedure.
▶ If the measured value is battery voltage, check short to battery in CAN line. Repair or replace
as necessary. And then, go to "Verification of Vehicle Repair" procedure. In case that
Communication is in sleep mode, 12V will be measured. Therefore, check that communication is
in Wake up status.
▶ If 0V is detected, Check short to ground, short between CAN high and low each other or open
in CAN high or CAN low harness. Repair or replace as necessary and then, go to "Verification of
Vehicle Repair" procedure.
Verification of Vehicle Repair
After a repair, it is essential to verify that the fault has been corrected.
1. Connect scantool and selet "Diagnostic Trouble Codes(DTCs)" mode and then clear DTC.
2. Operate the vehicle and monitor the DTC on the scantool.
3. Are any DTCs present?
▶ Go to the applicable troubleshooting procedure.
▶ System is performing to specification at this time.
Body Electrical System > Smart key System > B1603 CAN Bus Off
General Description
CAN Communication is a circuit, consists of CAN LOW and CAN HIGH, in order to communicate among control units.
Control Modules are respectively communicating via CAN line in order to control Body Electrical.
DTC Description
Smartkey Module sets DTC B1603 if smart key module detects short to battery, short to ground in CAN HIGH and CAN
low simultaneously.
This DTC means that both CAN HIGH and CAN LOW line are error. Therefore, CAN communication is not available.
DTC Detecting Condition
Item
DTC Strategy
Enable Conditions
Threshold value
Failsafe
Detecting Condition
• CAN Signal Check
• IG ON
• CAN communication Error for 2 sec.
•-
Diagnostic Circuit Diagram
Possible cause
• Poor Connection
• Power Source to smart key
module
• Short to battery in CAN HIGH
LOW or ground
simultaneously.
• Faulty Smartkey Module
Signal Waveform & Data
Monitor Scantool data
■ Check DTC
1. Check DTC with scantool.
2. Check DTC related CAN communication is set on Smartkey Module and every modules.
3. If there is DTC related Module Check the DTC according to troubleshooting guide.
4. Repair and erase the DTC with Scantool.
5. Is the DTC erased ?
▶ Check poor connection between harness connector and Smartkey Module or ECM
: Thoroughly check the looseness, poor connection, bent, corrison, contamination, deformation or
damage of connector. Repair or replace as necessary and then, go to "Verification of Vehicle
Repair" procedure.
▶ Go to next procedure.
Terminal and Connector Inspection
1. Many malfunctions in the electrical system are caused by poor harness and terminals.
Faults can also be caused by interference from other electrical systems, and mechanical or chemical damage.
2. Thoroughly check connectors for looseness, poor connection, bending, corrosion, contamination, deterioration,or
damage.
3. Has a problem been found?
▶ Repair as necessary and go to "Verification of Vehicle Repair" procedure.
▶ Go to 'Check CAN communication Line" procedure.
CAN communication Line Inspection
■ Check CAN communication
1. Connect all of control module connector.
2. IG KEY ON.
3. Make CAN communication is wake up status (Ex. . ON/OFF Door SW)
4. Measure signal waveform of B-CAN-HIGH terminal of Diagnostic connector and chassis ground.
5. Measure signal waveform of B-CAN-LOW terminal of Diagnostic connector and chassis ground.
Specification : Refer to Signal waveform and Data
6. Is the measrured signal waveform normal ?
▶ Check poor connection between harness connector and Smartkey Module or ECM
: Thoroughly check the looseness, poor connection, bent, corrison, contamination, deformation or
damage of connector. Repair or replace as necessary and then, go to "Verification of Vehicle
Repair" procedure.
▶ Disconnect SMK ECU, IPM, DDM, FAM, Tilt ECU, PDM, ADM, RAM and IMS one by one and
then, check that DTC is erased with scantool.
▶ Substitute with a known-good module and check for proper operation. If the problem is
corrected, replace module and then go to "Verification of Vehicle Repair" procedure.
▶ If the measured value is battery voltage, check short to battery in CAN line. Repair or replace
as necessary. And then, go to "Verification of Vehicle Repair" procedure. In case that
Communication is in sleep mode, 12V will be measured. Therefore, check that communication is
in Wake up status.
▶ If 0V is detected, Check short to ground, short between CAN high and low each other or open
in CAN high or CAN low harness. Repair or replace as necessary and then, go to "Verification of
Vehicle Repair" procedure.
Verification of Vehicle Repair
After a repair, it is essential to verify that the fault has been corrected.
1. Connect scantool and selet "Diagnostic Trouble Codes(DTCs)" mode and then clear DTC.
2. Operate the vehicle and monitor the DTC on the scantool.
3. Are any DTCs present?
▶ Go to the applicable troubleshooting procedure.
▶ System is performing to specification at this time.
Body Electrical System > Smart key System > B1625 ECM Communication Data Failure
General Description
Smartkey Module communicates with ECM through the serial communication line.
If ECM requests authetication from Smartkey Module after IG ON, Smartkey Module check authentication with
transponder then, sends this signal to ECM whether authentication is O.K or not.
DTC Description
Smartkey Module sets DTC B1625 if Data from ECM is error such as check sum error, Data Frame error, ID Unknown
error, Data length error and Time out error.
DTC Detecting Condition
Item
DTC Strategy
Enable Conditions
Threshold value
Failsafe
Detecting Condition
• Check received Data Status from ECM
• Data that Smartkey Module received from ECM is error
after IGN OFF to IGN ON
• Received data error from ECM
•-
Diagnostic Circuit Diagram
Possible cause
• Poor Connection in Harness
• Input Power to Smartkey
Module
• Open or short in EMS
communication line.
• Faulty Smartkey Module
• Faulty ECM
Monitor Scantool data
■ Check DTC status
1. Check DTC on the ECM with Scantool.
2. Check that there is any DTC related ECM.
3. Perform Troubleshooting the DTC from ECM with appropriate DTC Troubleshooting Guide first.
4. Repair or replace as necessary after erasing DTC with Scantool.
5. Check DTC on SMK Module side and erase the DTC with scantool.
6. Has the DTC gone after erasing with scantool ?
▶ Check poor connection between harness connector and Smartkey Module or ECM
: Thoroughly check the looseness, poor connection, bent, corrison, contamination, deformation or
damage of connector. Repair or replace as necessary and then, go to "Verification of Vehicle
Repair" procedure.
▶ Go to " Inspection & Repair " procedure.
Terminal and Connector Inspection
1. Many malfunctions in the electrical system are caused by poor harness and terminals.
Faults can also be caused by interference from other electrical systems, and mechanical or chemical damage.
2. Thoroughly check connectors for looseness, poor connection, bending, corrosion, contamination, deterioration,or
damage.
3. Has a problem been found?
▶ Repair as necessary and go to "Verification of Vehicle Repair" procedure.
▶ Go to " Check serial commuication Cricuti Inspection" as follow.
Serial Communicatin Circuit Inspection
■ Check short in serial communication line
1. "IG KEY OFF"
2. Disconnect Smartkey Module connector and ECM connector.
3. Measure resistance between serial communication signal terminal of ECM harness connector and chassis ground.
Specificatin : Infinite (∞)
4. Is the measured resistance within specification ?
▶ Go to open in harness as follow
▶ Check short to ground in harness. And then, repair or replace as necessary. Finally, go to
"Verification of Vehicle Repair" procedure.
■ Check open in harness
1. IG KEY OFF.
2. Disconnect Smartkey Module connector and ECM connector.
3. Measure resistance between signal terminal of Smartkey Module harness connector and signal terminal of ECM
harness connector.
Specification : About below 1Ω
4. Is the measured resistance within specification ?
▶ Check poor connection between harness connector and Smartkey Module or ECM
: Thoroughly check the looseness, poor connection, bent, corrison, contamination, deformation or
damage of connector. Repair or replace as necessary and then, go to "Verification of Vehicle
Repair" procedure.
▶ Check open in signal harness. And, repair or replace as necessary then, go to "Verification of
Vehicle Repair " procedure.
Verification of Vehicle Repair
After a repair, it is essential to verify that the fault has been corrected.
1. Connect scantool and selet "Diagnostic Trouble Codes(DTCs)" mode and then clear DTC.
2. Operate the vehicle and monitor the DTC on the scantool.
3. Are any DTCs present?
▶ Go to the applicable troubleshooting procedure.
▶ System is performing to specification at this time.
Body Electrical System > Smart key System > B1689 CAN Time-out PDM
General Description
CAN Communication is a circuit, consists of CAN LOW and CAN HIGH, in order to communicate among control units.
Control Modules are respectively communicating via CAN line in order to control Body Electrical.
DTC Description
Smart Key module sets DTC B1689 if Smartkey Module have not received CAN signal from PDM for 3 sec.
DTC Detecting Condition
Item
DTC Strategy
Enable Conditions
Threshold value
Failsafe
Detecting Condition
• CAN signal check
• IG ON
• No can signal message from PDM for 3 sec.
•-
Diagnostic Circuit Diagram
Possible cause
• Poor Connection
• Power source to Smart Key
module
• Power source to PDM
• Short to battery in CAN
communication line
• Short to ground in CAN
communication line
• Short between CAN HIGH
AND LOW communication line
each other
• Faulty Smartkey Module
• Faulty PDM
Signal Waveform & Data
Monitor Scantool data
■ Check DTC
1. Check DTC with scantool.
2. Check DTC related CAN communication is set on PDM.
3. If there is DTC related PDM, Check the DTC according to troubleshooting guide
4. Repair and erase the DTC with Scantool.
5. Is the DTC erased ?
▶ Check poor connection between harness connector and each module
: Thoroughly check the looseness, poor connection, bent, corrison, contamination, deformation or
damage of connector. Repair or replace as necessary and then, go to "Verification of Vehicle
Repair" procedure.
▶ Go to next procedure.
Terminal and Connector Inspection
1. Many malfunctions in the electrical system are caused by poor harness and terminals.
Faults can also be caused by interference from other electrical systems, and mechanical or chemical damage.
2. Thoroughly check connectors for looseness, poor connection, bending, corrosion, contamination, deterioration,or
damage.
3. Has a problem been found?
▶ Repair as necessary and go to "Verification of Vehicle Repair" procedure.
▶ Go to "Check CAN communication Line" procedure.
CAN communication Line Inspection
■ Check CAN communication
1. Connect all of control module connector.
2. IG KEY ON.
3. Make CAN communication is wake up status (Ex. ON/OFF Door SW)
4. Measure signal waveform of B-CAN-HIGH terminal of Smartkey Module connector and chassis ground.
5. Measure signal waveform of B-CAN-LOW terminal of Smartkey Module connector and chassis ground.
Specification : Refer to Signal waveform and Data
6. Is the measrured signal waveform normal ?
▶ Check poor connection between harness connector and Smartkey Module or ECM
: Thoroughly check the looseness, poor connection, bent, corrison, contamination, deformation or
damage of connector. Repair or replace as necessary and then, go to "Verification of Vehicle
Repair" procedure.
▶ Disconnect SMK ECU, IPM, DDM, FAM, Tilt ECU, PDM, ADM, RAM and IMS one by one and
then, check that DTC is erased with scantool.
▶ Substitute with a known-good module and check for proper operation. If the problem is
corrected, replace module and then go to "Verification of Vehicle Repair" procedure.
▶ If the measured value is battery voltage, check short to battery in CAN line. Repair or replace
as necessary. And then, go to "Verification of Vehicle Repair" procedure. In case that
Communication is in sleep mode, 12V will be measured. Therefore, check that communication is
in Wake up status.
▶ If 0V is detected, Check short to ground, short between CAN high and low each other or open
in CAN high or CAN low harness. Repair or replace as necessary and then, go to "Verification of
Vehicle Repair" procedure.
■ Check open in CAN communication line
1. IG KEY OFF.
2. Disconnect smart key module and PDM connector.
3. Measure resistance between communication line terminal of Smartkey Module connector and communication line of
PDM harness connector.
Specification : About below 1Ω
4. Is the measured resistance within specification ?
▶ Check poor connection between harness connector and Smartkey Module or PDM
: Thoroughly check the looseness, poor connection, bent, corrison, contamination, deformation or
damage of connector. Repair or replace as necessary and then, go to "Verification of Vehicle
Repair" procedure.
▶ Repair or replace open in CAN communication line and go to "Verification of Vehicle Repair"
procedure.
Verification of Vehicle Repair
After a repair, it is essential to verify that the fault has been corrected.
1. Connect scantool and selet "Diagnostic Trouble Codes(DTCs)" mode and then clear DTC.
2. Operate the vehicle and monitor the DTC on the scantool.
3. Are any DTCs present?
▶ Go to the applicable troubleshooting procedure.
▶ System is performing to specification at this time.
Body Electrical System > Smart key System > B1971 Parking Position Input Error
General Description
Parking Position Switch indicates that Shift Lever is in P range or not.
Smartkey Module decides that engine starting is enable after receiving Parking Position Switch signal.
DTC Description
SMARTKEY Module sets DTC B1971 if vehicle speed is over 3km/h while parking switch signal is ON.
DTC Detecting Condition
Item
DTC Strategy
Detecting Condition
• Check Voltage
Enable Conditions
• After battery Voltage is energized to Smartkey Module
Threshold value
• After IGN ON, Vehicle speed is over 3km/h with brake
switch ON for 10 seconds.
Failsafe
Possible cause
•-
Diagnostic Circuit Diagram
• Poor Connection in harness
• Faulty Parking Switch
• Faulty Smartkey Module
Monitor Scantool data
■ Check parking position switch status.
1. Connect scantool with diagnostic connector.
2. Check current data with scantool.
3. Check "Shift lever P position" parameter on current data.
4. Check that data is appropriately changeable according to the shift lever position in P or others.
Specification : P position : ON, Not in P position : OFF.
5. Is the shift lever P position normal ?
▶ Check poor connection between harness connector and Parking Postion switch or Smartkey
Module : Thoroughly check the looseness, poor connection, bent, corrison, contamination,
deformation or damage of connector. Repair or replace as necessary and then, go to "Verification
of Vehicle Repair" procedure.
▶ Go to " Inspection & Repair " procedure.
Terminal and Connector Inspection
1. Many malfunctions in the electrical system are caused by poor harness and terminals.
Faults can also be caused by interference from other electrical systems, and mechanical or chemical damage.
2. Thoroughly check connectors for looseness, poor connection, bending, corrosion, contamination, deterioration,or
damage.
3. Has a problem been found?
▶ Repair as necessary and go to "Verification of Vehicle Repair" procedure.
▶ Go to check "signal circuit Inspection" procedure.
Signal Circuit Inspection
■ Check Signal Circuit
1. IG KEY OFF.
2. Disconnect parking position switch connector.
3. IG KEY ON.
4. Measure voltage between signal terminal of parking position switch harness connector and chassis ground.
Specification : Battery Voltage
5. Is the measured voltage within specification ?
▶ Check open in ground harness. And then, repair or replace as necessary, Finally go to
"Verification of Vehicle Repair " procedure.
▶ Check open or short to ground in signal harness. And then, repair or replace as necessary
finally go to "Verification of Vehicle Repair " procedure.
Component Inspection
■ Check Parking Position Switch
1. IG KEY OFF.
2. Disconnect Parking Position switch connector.
3. Measure resistance between one and the other connector when parking postion switch ON and OFF.
Specification : Measurement 1 : Infinite (∞), Measurement 2 : About below 1Ω
4. Is the measured resistance within specification ?
▶ Check poor connection between harness connector and Parking Postion switch or Smartkey
Module : Thoroughly check the looseness, poor connection, bent, corrison, contamination,
deformation or damage of connector. Repair or replace as necessary and then, go to "Verification
of Vehicle Repair" procedure.
▶ Substitute with a known-good parking position switch and check for proper operation.
If the problem is corrected, replace parking postion switch and then go to "Verification of Vehicle
Repair" procedure.
Verification of Vehicle Repair
After a repair, it is essential to verify that the fault has been corrected.
1. Connect scantool and selet "Diagnostic Trouble Codes(DTCs)" mode and then clear DTC.
2. Operate the vehicle and monitor the DTC on the scantool.
3. Are any DTCs present?
▶ Go to the applicable troubleshooting procedure.
▶ Go to the applicable troubleshooting procedure.
▶ System is performing to specification at this time.
Body Electrical System > Smart key System > B1978 Electric Steering Column Lock
Failure
General Description
ESCL(Electronic Steering Column Lock) is a system to control the lock or unlock of the Steering Column.
It is installed on steering column and Smartkey Module is located inside of instrument panel, left knee of driver side.
It consists of ESCL control Module, Smartkey Module, PDM and SSB(engine Start Stop Button)
It is operating as follows
1.Pushing SSB → 2. Switch 1 signal goes to PDM, Switch 2 signal goes to Smartkey Module → 3.PDM supplies power
supply to ESCL → 4.SMARTKEY Module sends ENABLE signal and operation signal to ESCL → 5.ESCL controls bolt
to lock or unlock ESCL → 6.PDM detects ESCL Unlock signal.
DTC Description
Smartkey Module receives ESCL lock or unlock stuatus signal from ESCL and PDM(via CAN). And then, Smartkey
Module compares PDM is lock or unlock signal with ESCL is lock or unlock signal.
If the both signals are unmathing, Smartkey Module sets DTC B1971.
DTC Detecting Condition
Item
DTC Strategy
Enable Conditions
Threshold value
Failsafe
Detecting Condition
• Check voltage and Data
• After battery voltage is suppiled to Smartkey Module
• When both signal from ESCL lock or unlock status and
PDM lock or unlock stuatus are unmatching
•-
Possible cause
• Poor connection in harness or
connector.
• After battery voltage is
supplied to Smartkey Module
- If IPM detects pins related
ESCL are failed
1. Faulty ESCL control Module
2. Open or short in battery /
ground curcuit of ESCL
3. Open or short to battery /
ground in communicantion
circuit of ESCL
4. Open in O_ESCL Enable
circuit from Smartkey Module
5. Open or short in
ESCL_Unlock circuit to PDM
- DTC is set although it is not
ESCL fault
6. No battery voltage to PDM
7. Short to battery in power
relay on the PDM line such as
ACC, IGN1, IGN2, Starter Rly
8. When actuation test for
PDM9. It is leant status but
not with same PIN code for all
Smartkey Module/PDM/ESCL
• Faulty Smartkey Module
• Faulty PDM
• Faulty ESCL control Module
Diagnostic Circuit Diagram
Monitor Scantool data
■ Check DTC status
1. Check DTC on PDM side with scantool.
2. Check that there is any DTC on PDM side or ESCL side.
3. Inspect DTC related ESCL first if there is any DTC on the PDM side according to DTC troubleshooting guide.
4. After inspetion and repair, erase DTC related ESCL.
5. Erase DTC B1971 ESCL failure on Smartkey Module side.
6. Has the DTC gone after erasing DTC with scantool ?
▶ Check poor connection between harness connector and ESCL, PDM or Smartkey Module
: Thoroughly check the looseness, poor connection, bent, corrison, contamination, deformation or
damage of connector. Repair or replace as necessary and then, go to "Verification of Vehicle
Repair" procedure.
▶ Go to check current dat as follows if there is DTC B1971 ESCL failure.
■ Check current Data
1. Select current data parameters related Smartkey Module with scantool.
2. Monitor "ESCL ENABLE" and "SMK State" are normal.
3. Select current data parameter related PDM.
4. Monitor "ESCL BATTERY OUTPUT" , "ESCL GND OUTPUT" and "ESCL UNLOCK STATE INPUT" are normal.
Specification : - Current Data parameter related Smartkey Module 1.ESCL ENABLE : It is ON, if IPM sends enable signal to ESCL
2.SMK State : It shows ESCL current status. It shows ESCL FAULURE if there is a failure
Specification : - Current Data parameter related PDM 1.ESCL BATTERY OUTPUT : It will be changed form OFF to ON when PDM supplies operation
voltage with PDM.
2.ESCL GND OUTPUT : It will be changed form OFF to ON when PDM supplies operation voltage
with PDM.
3.ESCL UNLOCK STATE INPUT : In case that ESCL bolts is unlock, it will be ON.
5. Are all parameters related ESCL funtioning normally ?
▶ Check poor connection between harness connector and ESCL, PDM or Smartkey Module
: Thoroughly check the looseness, poor connection, bent, corrison, contamination, deformation or
damage of connector. Repair or replace as necessary and then, go to "Verification of Vehicle
Repair" procedure.
▶ Check harness and system related ESCL if "SMK STATE" is shown ESCL FAILURE
▶ If there is any parameter on the system or harness displayed abnormal, check harness and
system.
▶ Go to "Inspection & Repair " procedure.
Terminal and Connector Inspection
1. Many malfunctions in the electrical system are caused by poor harness and terminals.
Faults can also be caused by interference from other electrical systems, and mechanical or chemical damage.
2. Thoroughly check connectors for looseness, poor connection, bending, corrosion, contamination, deterioration,or
damage.
3. Has a problem been found?
▶ Repair as necessary and go to "Verification of Vehicle Repair" procedure.
▶ Go to "Check ESCL Circuit " procedure.
Check ESCL circuit
■ Check short to ground in ESCL circuit.
1. IG KEY OFF
2. Disconnect ESCL control Module, PDM and Smartkey Module connector.
3. Measure resistance between all the terminals of ESCL harness connector and chassis ground.
Specification : Infinite
4. Is the measured resistance within specification ?
▶ Go to "Check short to battery in ESCL harness " procedure.
▶ Repair or replace as necessary and then, go to "Verification of Vehicle Repair"procedure.
■ Check short to battery in ESCL harness
1. IG KEY OFF.
2. Disconnect ESCL control Module, PDM and SMARTKEY Module connector.
3. Measure resistance between each terminal of ESCL control Module harness connector and chassis ground.
Specification : About 0V
4. Is the measured voltage within specification ?
▶ Go to "check open in ESCL harness " as follows
▶ Repair or replace the short to battery as necessary and then, go to 'Verification of Vehicle
Repair" procedure.
■ Check open in ESCL harness
1. IG KEY OFF.
2. Disconnect ESCL control Module, PDM and Smartkey Module connector.
3. Measure resistance between one and the other terminal of ESCL control module harness connector or IPM harness
connector.
Specification : About below 1Ω
4. Is the measured resistance within specification ?
▶ Check poor connection between harness connector and ESCL Control Module, PDM or
Smartkey Module
: Thoroughly check the looseness, poor connection, bent, corrison, contamination, deformation or
damage of connector. Repair or replace as necessary and then, go to "Verification of Vehicle
Repair" procedure.
▶ After replacing ESCL control module or Smartkey Module, perform Key teaching procedure
with scantool.
▶ Repair open in harness or replace as necessary and then, go to "Verification of Vehicle Repair"
procedure.
Verification of Vehicle Repair
After a repair, it is essential to verify that the fault has been corrected.
1. Connect scantool and selet "Diagnostic Trouble Codes(DTCs)" mode and then clear DTC.
2. Operate the vehicle and monitor the DTC on the scantool.
3. Are any DTCs present?
▶ Go to the applicable troubleshooting procedure.
▶ System is performing to specification at this time.
Body Electrical System > Smart key System > Smart key > Repair procedures
Smart Key
Smart Key Code Saving
1. Connect the DLC cable of GDS to the data link connector (16 pins) in driver side crash pad lower panel, turn the
power on GDS.
2. Select the vehicle model and then do "Smart key code saving".
3. After selecting "Smart key teaching" menu, push "Enter" key, then the screen will be shown as below.
4. After inserting the teaching key, push "ENTER" key.
5. Input the "Pin code" for first key teaching.
6. Confirm the message "First key teaching completed".
7. Input the "Pin code" for second key teaching.
8. Confirm the message "Second key teaching completed".
9. Then the screen will be shown as below when key teaching process is completed.
Body Electrical System > Smart key System > Smart key unit > Components and
Components Location
Component (1)
Connector Pin Information
Pin
Connector A
Pin
Connector B
1
Battery
1
Interior 2 antenna 2
2
Immobilizer Indicator
2
Interior 1 antenna 2
3
GND 1
3
-
4
-
4
-
5
Trunk lid
5
Interior 3 antenna 1
6
Front left door lock / unlock
6
Trunk antenna 1
7
External buzzer
7
Front right side antenna 1
8
ALT L
8
Front left side antenna 1
9
ACC
9
Interior 2 antenna 1
10
CAN high
10
Interior 1 antenna 1
11
CAN low
11
-
12
ESCL Communication
12
-
13
RF Communication
13
Interior 1 antenna 2
14
IGN 1
14
Trunk antenna 2
15
P position
15
Front right side antenna 2
16
GND 2
16
Front left side antenna 2
17
Key out indicator
18
ESCL Enable
19
-
20
Front right door lock / unlock
21
-
22
Diagnosis
23
SSB switch
24
Brake
25
EMS COM
26
-
Component (2)
Body Electrical System > Smart key System > Smart key unit > Schematic Diagrams
Circuit Diagram
Body Electrical System > Smart key System > Smart key unit > Repair procedures
Inspection
Smart Key Unit
- Refer to the BE group - inspection / self diagnosis with scan tool.
Smart Key Switch
- Refer to the BE group - inspection / self diagnosis with scan tool.
Antenna
- Refer to the BE group - inspection / self diagnosis with scan tool.
Trunk Lid Open Switch
1. Remove the trunk trim.
(Refer to BD group - "Trunk trim")
2. Check for continuity between the Trunk actuator terminals.
3. If continuity is not specified, inspect the switch
Removal
Smart key unit
1. Disconnect the negative(-) battery terminal.
2. Remove the glove box(A).
(Refer to BD group - "Crash pad")
3. Remove the glove box housing(A) after loosening the mounting screws.
4. Loosen the nuts(2EA) from the smart key unit(A) after disconnecting the connector.
RF Receiver
1. Disconnect the negative(-) battery terminal.
2. Remove the glove box(A).
(Refer to BD group - "Crash pad")
3. Remove the glove box housing(A) after loosening the mounting screws.
4. Disconnect the connector after loosening the RF receiver(A) nut(1EA).
Interior 1 Antenna
1. Disconnect the negative(-) battery terminal.
2. Remove the console upper cover(A).
(Refer to BD group - "Console")
3. Remove the center fascia lower panel(A).
4. Loosen the interior 1 antenna(A) screws(2EA) located in front of the console.
5. Remove the interior 1 antenna(A) after disconnect the connector.
Interior 2 Antenna
1. Disconnect the negative(-) battery terminal.
2. Remove the console rear cover(A).
(Refer to BD group - "Console")
3. Disconnect the interior 2 antenna connector located at the console rear side, then remove the interior 2 antenna(A)
after loosening screws(2EA).
Interior 3 Antenna
1. Disconnect the negative(-) battery terminal.
2. Remove the trunk panel(A) after loosening the mounting screws.
3. Disconnect the interior 2 antenna connector(A) and remove the interior 3 antenna(B) after loosening nut(2EA).
Exterior Bumper Antenna
1. Disconnect the negative(-) battery terminal.
2. Remove the rear bumper.
(Refer to BD group - "Rear bumper")
3. Disconnect the antenna connector(B) and remove the exterior bumper antenna(A) after loosening the nuts(2EA).
Buzzer
1. Disconnect the negative(-) battery terminal.
2. Remove the left side fender.
(Refer to BD group - "Fender")
3. Remove the external buzzer(A).
Door Outside Handle
1. Disconnect the negative (-) battery terminal.
2. Disconnect the connector after removing the door trim.
(Refer to the Body group - "Front door")
3. After loosening the mounting bolt, then remove the key holder (A).
4. Remove the outside handle (A) by sliding it rearward.
Installation
Smart Key Unit
1. Install the smart key unit.
2. Install the smart key unit mounting nut and connector.
3. Install the glove box housing.
4. Install the glove box.
5. Install the negative (-) battery terminal and check the smart key system.
RF Receiver
1. Install the RF receiver.
2. Install the glove box housing.
3. Install the glove box.
4. Install the negative (-) battery terminal and check the smart key system.
Interior 1 Antenna
1. Install the interior 1 antenna.
2. Install the center fascia lower panel.
3. Install the console upper cover.
4. Install the negative (-) battery terminal and check the smart key system.
Interior 2 Antenna
1. Install the interior 2 antenna.
2. Install the console rear cover after connecting the connector.
3. Install the negative (-) battery terminal and check the smart key system.
Interior 3 Antenna
1. Install the interior 3 antenna.
2. Install the trunk panel.
3. Install the negative (-) battery terminal and check the smart key system.
Exterior Bumper Antenna
1. Install the exterior bumper antenna.
2. Install the rear bumper.
3. Install the negative (-) battery terminal and check the smart key system.
Buzzer
1. Install the buzzer.
2. Install the left side fender.
3. Install the negative (-) battery terminal and check the smart key system.
Door Outside Handle
1. Install the outside handle.
2. Install the door trim.
3. Install the negative (-) battery terminal and check the smart key system.
Body Electrical System > Keyless Entry And Burglar Alarm > Components and
Components Location
Component Location
1. Hood switch
2. Burglar horn
3. RF receiver
4. Front door switch
5. Front door lock actuator & switch
6. Trunk lid lock actuator
Body Electrical System > Keyless Entry And Burglar Alarm > Description and Operation
Description
Burglar Alarm System
The burglar alarm system is armed automatically after the doors, hood, and trunk lid are closed and locked.
The system is set off when any of these things occur:
• A door is forced open.
• A door is unlocked without using the transmitter.
• The trunk lid is opened without using the key.
• The hood is opened.
• The engine starter circuit and battery circuit are bypassed by breaking the ignition switch.
When the system is set off, the alarm (horn) sounds and the hazard lamp flash for about two minutes or until the
system is disarmed by unlocking the transmitter.
For the system to arm, the ignition switch must be off and the key removed. Then, the body control module must
receive signals that the doors, hood, and trunk lid are closed and locked. When everything is closed and locked, none
of the control unit inputs are grounded.
The door switches, hood switch and trunk lid switch are all close and lock the doors with the remote transmitter and
then the system arms immediately.
If anything is opened or improperly unlocked after the system is armed, the body control module gets a ground signal
from that switch, and the system is set off.
If one of the switches is misadjusted or there is a short in the system, the system will not arm. As long as the body
control module continues to get a ground signal, it thinks the vehicle is not closed and locked and will not arm.
The receiver is integrated in the body control module.
Keyless Entry System
The burglar alarm system is integrated with the keyless entry system. The keyless entry system allows you to lock and
unlock the vehicle with the remote transmitter. When you push the LOCK button, all doors lock. When you push the
UNLOCK button all doors unlock.
The room lamp, if its switch is in the center position, will come on when you press the UNLOCK button. If you do not
open a door, the light will go off in about 30 seconds, the doors will automatically relock, and the burglar alarm system
will rearm. If you relock the doors with the remote transmitter within 30 seconds, the light will go off immediately.
You cannot lock or unlock the doors with the remote transmitter if the key is in the ignition switch.
The system will signal you when the doors lock and unlock by flashing the hazard lamp once when they lock, and twice
when they unlock.
Data Flow
Transmitter(TX) Spec
1. Transmission Distance : 30m or more from outside of the car
2. Registration procedure of the transmitter
(1) In registration mode, it shall be possible to register up to Max 4EA.
(2) At re-registration, data are registered newly after deleting the previous TX DATA
No.
Saved CODE
CODE to change
Changed CODE
1
A
C
C (A is deleted)
2
A, B, C, D
E
E (A, B, C, D is deleted)
3
A, B
C, D, E
C, D
4
A, B
C, C, D
C
(3) For the registration procedures by using Hi-scan tool, refer to "TRANSMITTER CODE REGISTRATION".
3. Transmitter signal & Receiver Spec
(1) Transmission signal
A. Transmit relevant transmission DATA (Transmission frame) twice by pushing TX SW.
B. Only LOCK signal is output when pushing TX LOCK SW and UNLOCK SW at the same time.
Functions
1. Disarm
Condition 1
State
Description
Initial Condition ALARM
Event
- IGN KEY ON during 30sec or ALT”L”=on during 3 sec.
NON SMK(Smart key)
- Any door open&TX UNLOCK
- TX TRUNK-TX Lock & Lock confirm Failed
SMK :
- Any door open & RKE CMD=UNLOCK/Passive Access Unlock=1
- RKE_TRUNK=1-TP(Transponder)AUTH=1 / PIC AUTH=1 / TP FBK=X2 (X:Don't care)
- RKE CMD=LOCK/Passive Access Lock=1 & Lock confirm Failed
Mechanical Key OPTION Enable:
- Mechanical UNLOCK
- Mechanical LOCK&Lock confirm Failed
Action
The state goes to DISARM state
- Horn Relay, Hazard Relay, Start Inhibit Relay OFF
- TX Unlock
→Unlock Relay on for 0.5 sec
→Hazard Relay on (twice)
T1 : 0.5s
T2 : 0.5s +-0.1s
Condition 2
State
Description
Initial Condition DISARMstate & (IGN KEY OUT) & Any Door open
Event
NON SMK :
- Any door open & TX UNLOCK
SMK :
- Any door open & RKE CMD=UNLOCK / Passive Access Unlock=1 / RKE TRUNK=1 / Trunk
reopen=1
- TP AUTH=1 / PIC AUTH=1 / TP FBK=X2 (X:Don't care)
Action
No state change
- TX UNLOCK, RKE CMD=UNLOCK, Passive Access Unlock=1
→Hazard Relay for 0.5s ON/OFF(twice)
Condition 3
State
Description
Initial Condition ARM WAIT state
Event
- Any door open or Hood Switch OPEN or Trunk switch OPEN
- Any door is unlocked
- Key In switch ON
SMK :
TP AUTH=1 / PIC AUTH=1 / TP FBK=X2
Mechanical Key OPTION Enable:
M UNLOCK
Action
The state goes to DISARM state
- M-unlock
→Hazard relay for 0.5 sec. ON/OFF(twice)
Condition 4
State
Description
Initial Condition AUTOLOCK TIMER1 STATE
Event
- Any door open or Hood Swithc OPEN or Trunk Switch OPEN
- Key In Switch ON
- AUTO LOCK & Lock confirmation failure
NON SMK spec:
- AUTO LOCK & Lock confirmation failure
SMK spec:
- RKE CMD=LOCK / Passive Access Lock=1& Lock confirmation failure
- TP AUTH=1 / PIC AUTH=1 / TP FBK=X2
Mechanical Key option Enable:
- Mechanical LOCK & Lock confirmation failure
Action
The state goes to DISARM state
Condition 5
State
Description
Initial Condition AUTOLOCK TIMER2 STATE
Event
-
Any door open
Key In Switch ON
AUTO LOCK & Lock confirmation failure
Hood Switch Open and Memory Hood was Close
Trunk Switch Open and Memory Trunk was Close
NON SMK :
- TX LOCK& Lock confirmation failure
SMK :
- RKE CMD=LOCK/ Passive Access Lock=1& Lock confirmation failure
- TP AUTH=1/ PIC AUTH=1 / TP FBK=X2
Mechanical Key option Enable:
Mechanical LOCK & Lock confirmation failure
Action
The state goes to DISARM state
Condition 6
State
Description
Initial Condition ARMSTATE
Event
- IGN KEY ON
SMK :
- TP AUTH=1 / PIC AUTH=1 / TP FBK=X2
Mechanical Key option Enable:
- Mechanical UNLOCK
Action
The state goes to DISARM state
- M-unlock
→Hazard relay for 0.5 sec. ON/OFF(twice)
Condition 7
State
Description
Initial Condition REARM state
Event
Execpt china spec:
- IGN KEY ON during 30sec or ALT ”L”=on during 3 sec.
NON SMK :
- TX LOCK & Lock confirmation failure
- TX TRUNK
SMK :
- TP AUTH=1 / PIC AUTH=1 / TP FBK=X2
- RKE CMD=LOCK / PassiveAccess Lock=1 & Lock confirmation failure
- RKE TRUNK=1 / Trunk reopen=1
Mechanical Key option Enable:
- Mechanical UNLOCK
- Hazard relay for 0.5 sec. ON/OFF(twice)
- Mechanical LOCK & Lock confirmation failure
Action
The state goes to DISARM state
Start Inhibit Relay OFF
Condition 8
State
Description
Initial Condition PREARM state
- Key In Switch ON
- All entrance closed & Any Door is unlocked
- Any Door open & Tx Unlock
NON SMK:
- Any door open & TX UNLOCK
SMK :
- TP AUTH=1 / PIC AUTH=1 / TP FBK=X2
- Any door open & C RKE CMD=UNLOCK/ Passive Access Unlock=1
Mechanical Key option Enable :
- MECHANICAL UNLOCK
Action
The state goes to DISARMECHANICAL state
- Hazard Relay for 0.5s ON/OFF(twice)
Condition 9
State
Description
Initial Condition ARMHOLD
- IGN KEY ON
SMK :
- TP AUTH=1 / PIC AUTH=1 / TP FBK=X2
Mechanical Key option Enable:
- MECHANICAL UNLOCK
Action
The state goes to DISAR state
- M-unlock
→Hazard relay for 0.5 sec. ON/OFF(twice)
2. Arm
Condition 1
State
Description
Initial Condition ARM state
Event
NON SMK :
- TX LOCK
SMK:
- RKE CMD=LOCK / Passive Access Lock=1
Action
No state change
HazardRly 1Time on(1sec)
Condition 2
State
Description
Initial Condition ARM WAIT state
Event
Action
- Afte ARM WAIT TIMER finished
The state goes to ARM state
Condition 3
State
Description
Initial Condition ARMHOLD state
Event
Trunk close for at least Trunk Release Time Out(default 30sec) in ARMWAIT state
Action
The state goes to ARM state
3. Alarm
Condition 1
State
Description
Initial Condition ARM state
Event
Any door open or Hood Switch open or Trunk Switch open
Action
The state goes to ALARM state
- Engine Start Inhibit is ON
- The horn relay is ON one time for 27sec(±2sec) and OFF two times for 10sec(±1sec).
- The hazard is driven also (During Horn driving)
T1 : 27s(±2sec),
T2 : 10s(±2sec),
T3 : 0.5s ± 0.1sec
Condition 2
State
Description
Initial Condition REARM state
Event
Any door open or Hood Switch OPEN or Trunk Switch OPEN
Action
The state goes to ALARM state
The horn relay is ON one time for 27sec(±2sec) and OFF two times for 10sec(±1sec).
The hazard is driven also (During Horn driving)
Condition 3
State
Description
Initial Condition ARMHOLD state
Event
Any door open or Hood Switch OPEN
Action
The state goes to ALARM state
The horn relay is ON one time for 27sec(±2sec) and OFF two times for 10sec(±1sec).
The hazard is driven also (During Horn driving).
4. Arm Wait Mode
Condition 1
State
Description
Initial Condition ARMWAIT state
Event
NON SMK :
- TX LOCK
SMK:
- RKE CMD = LOCK / Passive Access Lock=1
Action
No state change
Hazard Relay 1Time on(1sec)
Condition 2
State
Description
Initial Condition DISARM state & IGN KEY OUT & All entrances closed(DOORS, HOOD and TRUNK)
Event
NON SMK:
- Tx Lock & locked confirmed
SMK:
- RKE CMD=LOCK / Passive Access Lock=1 & locked confirmed
Mechanical Key option Enable:
- MECHANICAL LOCK & locked confirmed
- DOOR LOCK state : Any door open → All door closed
Action
- The state goes to ARMWAIT State
- Start ARMWAITTIMER
- Hazard Relay 1Time on(1sec)
Condition 3
State
Description
Initial Condition ALARM state & All entrances closed(DOORS, HOOD and TRUNK)
Event
NON SMK:
- Tx Lock & locked confirmed
SMK :
- RKE CMD=LOCK / Passive Access Lock=1 & locked confirmed
Mechanical Key option Enable:
- MECHANICAL LOCK & locked confirmed
Action
-
The state goes to ARMWAIT State
Horn Relay, Start Inhibit Relay = OFF
Hazard Relay 1Time on(1sec) (MECHANICAL LOCK : Except)
Start ARMWAIT TIMER
Condition 4
State
Description
Initial Condition AUTOLOCK TIMER1 state
Event
AUTOLOCK & locked confirmed
NON SMK:
- Tx Lock & locked confirmed
SMK:
- RKE CMD=LOCK / Passive Access Lock=1 & locked confirmed
Mechanical Key option Enable:
MECHANICAL LOCK & locked confirmed
Action
- The state goes to ARMWAIT State
- Hazard Relay 1Time on(1sec)
- Start ARMWAIT TIMER
Condition 5
State
Description
Initial Condition PREARM state
Event
Action
All door closed and (Trunk Switch CLOSE & TRUNK MARK=CLEAR) & Hood Switch CLOSE &
DOOR LOCK
- The state goes to ARMWAIT State
- Hazard Relay 1Time on(1sec)
- Start ARMWAIT TIMER
Condition 6
State
Description
Initial Condition REARM state
Event
NON SMK :
TX LOCK & locked confirmed
SMK :
- RKE CMD=LOCK/ Passive Access Lock=1 & locked confirmed
Mechanical Key option Enable:
- MECHANICAL LOCK & locked confirmed
Action
-
The state goes to ARMWAIT State
Hazard Relay 1Time on(1sec) (MECHANICAL LOCK : Except)
Start Inhibit Relay OFF
Start ARMWAIT TIMER
5. Rearm Mode
Condition 1
State
Description
Initial Condition ALARM state
Event
All entrance is closed & ALARM Patten finished
Action
The state goes to REARM state
6. Autolocktimer1 Mode
Condition 1
State
Description
Initial Condition ARM state
Event
NON SMK :
TX UNLOCK
SMK :
RKE CMD=UNLOCK / Passive Access Unlock=1
Action
- The state goes to AUTO LOCK TIMER1 state
- Start AUTO LOCK TIMER1
- Hazard Relay Twice on (0.5s ON/0.5s OFF)
Condition 2
State
Description
Initial Condition AUTO-LOCK TIMER1 state
Event
AUTOLOCK TIMER1 finished
NON SMK:
TX UNLOCK
SMK:
RKE CMD=UNLOCK / Passive Access Unlock=1
Action
No change state
CASE1: AUTOLOCK TIMER1 Finished
AUTOLOCK
CASE2: TX UNLOCK, RKE CMD=UNLOCK, Passive Access Unlock=1
Hazard Relay Twice on(0.5s ON/0.5s OFF)
Restart AUTOLOCK TIMER1
Condition 3
State
Description
Initial Condition ARM WAIT state
Event
NON SMK :
TX UNLOCK
SMK:
RKE CMD=UNLOCK / Passive Access Unlock=1
Action
- The state goes to AUTO LOCK TIMER1 state
- Start AUTO LOCK TIMER1
- Hazard Relay Twice on(0.5s ON/0.5s OFF).
Condition 4
State
Description
Initial Condition DISARM state & All entrances closed(DOORS, HOOD & TRUNK) & IGN KEY OUT
Event
NON SMK:
TX UNLOCK
SMK:
RKE CMD=UNLOCK/ Passive Access Unlock=1
Action
- The state goes to AUTO LOCK TIMER1 state
- Start AUTO LOCK TIMER1
- Hazard Relay Twice on(0.5s ON/0.5s OFF).
Condition 5
State
Description
Initial Condition ALARM state & All door closed and Trunk Switch CLOSE, Hood Switch CLOSE
Event
NON SMK:
TX UNLOCK
SMK:
RKE CMD=UNLOCK / Passive Access Unlock=1
Action
-
The state goes to AUTO LOCK TIMER1 state
Start AUTO LOCK TIMER1
Hazard Relay Twice on(0.5s ON/0.5s OFF).
Start Inhibit Relay off / Horn Relay off
Condition 6
State
Description
Initial Condition REARM state
Event
NON SMK:
TX UNLOCK
SMK:
RKE CMD=UNLOCK/ Passive Access Unlock=1
Action
The state goes to AUTO LOCK TIMER1 state
- Start AUTO LOCK TIMER1
- Hazard Relay Twice on(0.5s ON/0.5s OFF).
- Start Inhibit Relay off
7. Autolocktimer2 Mode
Condition 1
State
Description
Initial Condition AUTO-LOCK TIMER2 state
Event
Finished AUTOLOCK TIMER2
NON SMK:
TX UNLOCK
SMK:
RKE CMD=UNLOCK/ Passive Access Unlock=1
Action
No change state
CASE1: AUTOLOCK TIMER2 finished
AUTOLOCK
CASE2: TX UNLOCK, RKE CMD=UNLOCK, Passive Access Unlock=1
- Start AUTO LOCK TIMER2
- Hazard Relay Twice on(0.5s ON/0.5s OFF).
Condition 2
State
Description
Initial Condition DISARM state & IGN KEY OUT & (Trunk or Hood Switch OPEN) state
Event
NON SMK :
TX UNLOCK
SMK:
RKE CMD=UNLOCK/ Passive Access Unlock=1
Action
-
The state goes to AUTO LOCK TIMER2 state
Start AUTO LOCK TIMER2
Hazard Relay Twice on(0.5s ON/0.5s OFF).
Memo Hood/ Trunk state
Condition 3
State
Description
Initial Condition ALARM state & All door closed & (Trunk or Hood Switch OPEN) state
Event
NON SMK:
TX UNLOCK
SMK:
RKE CMD=UNLOCK / Passive Access Unlock=1
Action
-
The state goes to AUTO LOCK TIMER2 state
Horn Relay, Start Inhibit Relay = OFF
Start AUTO LOCK TIMER2
Hazard Relay Twice on(0.5s ON/0.5s OFF).
Memo Hood/Trunk state
Condition 4
State
Description
Initial Condition PREARM state & All door closed & (Trunk Switch or Hood OPEN)state
Event
NON SMK:
TX UNLOCK
SMK:
RKE CMD=UNLOCK / Passive Access Unlock=1
Action
-
The state goes to AUTO LOCK TIMER2 state
Start AUTO LOCK TIMER2
Hazard Relay Twice on(0.5s ON/0.5s OFF).
Memo Hood/Trunk state
Condition 5
State
Description
Initial Condition ARMHOLD state
Event
NON SMK:
TX UNLOCK
SMK:
RKE CMD=UNLOCK / Passive Access Unlock=1
Action
-
The state goes to AUTO LOCK TIMER2 state
Start AUTO LOCK TIMER2
Hazard Relay Twice on(0.5s ON/0.5s OFF).
Memo Hood/Trunk state
8. Prearm Mode
Condition 1
State
Description
Initial Condition AUTO-LOCK TIMER2 state
Event
AUTO LOCK & locked confirmed
NON SMK:
TX LOCK & locked confirmed
SMK :
RKE CMD=LOCK/ Passive Access Lock=1 & locked confirmed
Mechanical Key option Enable:
MECHANICAL LOCK & locked confirmed
Action
The state goes to PREARM state
Condition 2
State
Description
Initial Condition DISARM state & IGN KEY OUT
Event
NON SMK:
- Any door open or Hood Switch OPEN or Trunk Switch OPEN state & locked confirmed
SMK :
- Any door open or Hood Switch OPEN or Trunk Switch OPEN state RKE CMD=LOCK /
Passive Access Lock=1 & locked confirmed
Mechanical Key option Enable:
MECHANICAL LOCK & locked confirmed
ALL DOOR LOCK state (Any door open → All doors closed) and (Trunk Switch OPEN or Hood
Switch OPEN)
Action
The state goes to PREARM state
Condition 3
State
Description
Initial Condition ALARM state& IGN KEY OUT and(Any door open or Hood Switch OPEN or TrunkSwitch OPEN)
Event
NON SMK :
TX LOCK & locked confirmed
SMK :
RKE CMD=LOCK/ Passive Access Lock=1 & locked confirmed
Mechanical Key option Enable:
MECHANICAL LOCK & locked confirmed
Action
Condition 4
The state goes to PREARM state
Horn Relay, Hazard Relay, Start Inhibit Relay → OFF
State
Description
Initial Condition ARMHOLD state
Event
NON SMK:
TX LOCK & locked confirmed
SMK:
RKE CMD=LOCK/ Passive Access Lock=1 & locked confirmed
Mechanical Key option Enable:
MECHANICAL LOCK locked confirmed
Action
The state goes to PREARM state
Condition 5
State
Description
Initial Condition ARMWAIT state
Event
NON SMK:
TX TRUNK
SMK:
RKE TRUNK=1 / Trunk reopen=1
Action
The state goes to PREARM state
Start TRUNKTIMER
TRUNK MARK = Set
Condition 6
State
Description
Initial Condition PREARM state
Event
Trunk Switch OPEN
TRUNKTIMER expired (Trunk Release Time Out: 30s)
Action
No state change
CASE Trunk Switch OPEN :
• Stop to TRUNKTIMER.
• TRUNK MARK = Clear
CASE TRUNKTIMER expired
• TRUNK MARK = Clear
9. Armhold Mode
Condition 1
State
Description
Initial Condition ARM state
Event
NON SMK:
TX TRUNK
SMK:
RKE TRUNK=1 / Trunk reopen=1
Action
The state goes to ARMHOLD state
Body Electrical System > Keyless Entry And Burglar Alarm > Repair procedures
Inspection
Burglar Alarm Horn
Check for continuity between the terminals.
1. There should be continuity between the No.8 and No.9 terminals when power and ground are connected to the No.8
and No.1 in the ICM relay B terminals.
2. There should be no continuity between the No.8 and No.9 terminals when power is disconnected.
Burglar Alarm
Check for continuity between the terminals.
1. There should be no continuity between the No.11 and No.10 terminals when power and ground are connected to the
No.11 and No.4 in the ICM relay B terminals.
2. There should be continuity between the No.11 and No.10 terminals when power is disconnected.
Front Door Lock Actuator Inspection
1. Remove the front door trim.
(Refer to the Body group - "Front door")
2. Remove the front door module.
3. Disconnect the 6P connector from the actuator.
4. Check actuator operation by connecting power and ground according to the table. To prevent damage to the
actuator, apply battery voltage only momentarily.
Trunk Lid Release Actuator Inspection
1. Remove the trunk lid trim panel.
(Refer to the Body group - "Trunk lid")
2. Disconnect the 3P connector from the actuator.
3. Check actuator operation by connecting power and ground according to the table. To prevent damage to the
actuator, apply battery voltage only momentarily.
Front Door Lock Switch Inspection
1. Remove the front door trim panel.
(Refer to the Body group - "Front door")
2. Remove the front door module.
3. Disconnect the 6P connector from the actuator.
4. Check for continuity between the terminals in each switch position according to the table.
Trunk Lid Open Switch Inspection
1. Remove the trunk lid trim.
(Refer to the Body group - "Trunk lid")
2. Disconnect the 3P connector from the actuator.
3. Check for continuity between the terminals in each switch position according to the table.
Door Switch Inspection
Remove the door switch and check for continuity between the terminals.
Hood Switch Inspection
1. Disconnect the 1P connector from the hood switch(A).
2. Check for continuity between the terminals and ground according to the table.
Burglar Horn Inspection
1. Remove the burglar horn(A) after removing 1 bolt and disconnect the 2P connector from the burglar horn.
2. Test the burglar horn by connecting battery power to the terminal 1 and ground the terminal 2.
3. The burglar horn should make a sound. If the burglar horn fails to make a sound replace it.
Body Electrical System > Keyless Entry And Burglar Alarm > Transmitter > Specifications
Specifications
Items
Specifications
Keyless entry transmitter
Power source
Lithium 3V battery (1EA, CR2032)
Transmissible distance
10m or more
Life of battery
2 years or more (at 20 times per day)
Button
Door lock
Door unlock
Trunk lid open
Panic
Transmission frequency
315 MHz
Body Electrical System > Keyless Entry And Burglar Alarm > Transmitter > Repair
procedures
Inspection
1. Check that the red light flickers when the door lock or unlock button is pressed on the transmitter.
2. Remove the battery and check voltage if the red light doesn't flicker.
Standard voltage : 3V
3. Replace the transmitter battery with a new one, if voltage is below 3V then try to lock and unlock the doors with the
transmitter by pressing the lock or unlock button five or six times.
4. If the doors lock and unlock, the transmitter is O.K, but if the doors don't lock and unlock, register the transmitter
code, then try to lock and unlock the doors.
5. If the doors lock and unlock, the transmitter is O.K, but if the doors don't lock and unlock, replace the transmitter.
Transmitter Code Registration (Using Code Saver)
1. Open Door.
2. Connect POWER (B+) and GND, signal line of Code Saver.
3. If connection is normal, signal line is activated and RED LED turns ON.
4. If SW of Code Saver turns ON, data via signal line will be transmitted.
5. BCM enters into Code Save mode when it receives data from Code Saver and send Code Save Start signal via
signal line.
6. Code Saver turns Green LED ON when it receives Code Save Start signal.
7. When you press Lock or Unlock button of transmitter, BCM will save Codes.
8. If there are 2 transmitters for Code Saving, register by performing item 7).
9. If SW of Code Saver turns OFF or is disconnected, Code Saving mode will be finished.
Transmitter Code Registration (Using GDS)
1. Connect the DLC cable of GDS to the data link connector (16 pins) in driver side crash pad lower panel, turn the
GDS ON.
2. Select the vehicle model and then do "CODE SAVING"
3. After selecting "CODE SAVING" menu, button "ENTER" key, then the screen will be shown as below.
4. After removing the ignition key from key cylinder, push "ENTER" key to proceed to the next mode for code saving.
Follow steps 1 to 4 and then code saving is completed.
Body Electrical System > BCM (Body Control Module) > Body Control Module (BCM) >
Specifications
Specifications
Rated load
Items
Specifications
Rated voltage
DC 12V
Operating voltage
DC 9 ~ 16V
Operating temperature
-22°F~167°F(-30°C~ 75°C)
Insulation resistance
100MΩ or more
Dark current
Less than 3mA
Door Lock Relay
DC 12V 200mA (Induction load)
Door Unlock Relay
DC 12V 200mA (Induction load)
Horn Relay
DC 12V 200mA (Induction load)
Hazard Relay
DC 12V 200mA (Induction load)
Key Hole Illumination LED
DC 12V 10mA(LED)
Rear Fog Relay
DC 12V 200mA (Induction load)
Tail Lamp Relay
DC 12V 200mA (Induction load)
Driver Door Unlock Relay
DC 12V 200mA (Induction load)
Trunk Release Relay
DC 12V 200mA (Induction load)
Start Inhibit Relay
DC 12V 200mA (Induction load)
Defogger Relay
DC 12V 200mA (Induction load)
Wiper Relay
DC 12V 200mA (Induction load)
Front Deicer Relay
DC 12V 200mA (Induction load)
Head Lamp Low Relay
DC 12V 200mA (Induction load)
Room Lamp
DC 12V 25W LAMP
Safety Power Window ECU
DC 12V 200mA (Induction load)
Driver Seatbelt Indicator
DC 12V 10mA(LED)
Security Indicator
DC 12V 10mA(LED)
ATM Shift Lock Relay
DC 12V 200mA (Induction load)
Key Lock Solenoid
DC 12V 1A (Induction load)
Body Electrical System > BCM (Body Control Module) > Body Control Module (BCM) >
Components and Components Location
Component
Body Electrical System > BCM (Body Control Module) > Body Control Module (BCM) >
Schematic Diagrams
BCM Connector Terminals
Pin NO.
Description
Input acquisition threshold voltage
(Operating Voltage 9V to 16Vat normal temperature/Output type)
A01
Battery
Operating Voltage 9V ~ 16V
A02
Ignition2 Switch
Switch on 8V above
Switch off 2V below
A03
Wiper Intermittent SW
Switch on 8V above
Switch off 2V below
A04
Vehicle Speed Sensor
Frequency Input
A05
Driver Door Actuator Unlock Switch
Switch on 6V above
Switch off 2V below
A06
Power Window Door Lock Switch
Switch on 6V above
Switch off 2V below
A07
Driver Door Key Lock Switch
Switch on 6V above
Switch off 2V below
A08
Driver Door Key Unlock Switch
Switch on 6V above
Switch off 2V below
A09
Reserved Active Low Switch1
/ Vbb_sleep
Switch on 6V above
Switch off 2V below
A10
TRUNK RELEASE SW
Switch on 6V above
Switch off 2V below
A11
Inhibit D Switch
Switch on 8V above
Switch off 2V below
A12
Inhibit N Switch
Switch on 8 above
Switch off 2V below
A13
Ground1
GND
A14
Ignition1 Switch
Analog input
A15
Alternator Level
Analog input
A16
Washer Switch
Switch on 8V above
Switch off 2V below
A17
Mist Switch
Switch on 8V above
Switch off 2V below
A18
ACC Switch
Switch on 8V above
Switch off 2V below
A19
Assistant Door Actuator Unlock
Switch
Switch on 6V above
Switch off 2V below
A20
Power Window Door Unlock Switch
Switch on 6V above
Switch off 2V below
A21
Assistant Door Key Lock Switch
Switch on 6V above
Switch off 2V below
A22
Assistant Door Key Unlock Switch
Switch on 6V above
Switch off 2V below
A23
Crash Unlock Input
Switch on 6V above
Switch off 2V below
A24
Start Stop Switch
Switch on 8V above
Switch off 2V below
A25
Wiper Intermittant Volume
Analog input
A26
Ground2
GND
B01
Inhibit R Switch
Back Up Switch
Switch on 8V above
Switch off 2V below
B02
Reserved Active Low Switch2
/Vbb_sleep Switch on 6V above
Switch off 2V below
B03
Driver Door Switch
Switch on 6V above
Switch off 2V below
B04
Trunk Switch
Switch on 6V above
Switch off 2V below
B05
Tail Switch
Switch on 6V above
Switch off 2V below
B06
Driver Seat Belt Switch
Switch on 6V above
Switch off 2V below
B07
Auto Light Switch
Switch on 6V above
Switch off 2V below
B08
Front Fog Switch
Switch on 6V above
Switch off 2V below
B09
Inhibit P Switch
Switch on 8V above
Switch off 2V below
B10
Stop Switch
Switch on 8V above
Switch off 2V below
B11
Key Interlock Switch
Switch on 6V above
Switch off 2V below
B12
Assistant Door Switch
Switch on 6V above
Switch off 2V below
B13
Hood Switch
Switch on 6V above
Switch off 2V below
B14
Key In Switch
Switch on 6V above
Switch off 2V below
B15
Reserved Active Low Switch4
/Vbb_Normal
Switch on 6V above
Switch off 2V below
B16
Defogger Switch
Switch on 6V above
Switch off 2V below
C01
Head Lamp Switch
Switch on 6V above
Switch off 2V below
C02
Reserved Active Low Switch4
/Vbb_Normal
Switch on 6V above
Switch off 2V below
C03
Auto Light Sensor Power
5V Output / Analog Input
C04
CAN HIGH
Communication Line
C05
CAN LOW
Communication Line
C06
Auto Light Sensor Input
Analog Input
C07
Reserved Active Low Switch4
/Vbb_Sleep
Low side / FET
C08
Door Lock Relay
Low side / FET
C09
Door Unlock Relay
Low side / FET
C10
Horn Relay
Low side / FET
C11
Hazard Relay
Low side / FET
C12
-
-
C13
Over Speed Signal
Switch on 6V above
Switch off 2V below
C14
Auto Light Sensor Ground
GND
C15
Code Saver line
Switch on 6V above
Switch off 2V below
C16
Diagnosis K-Line
Communication Line
C17
Key Hole Illumination LED
Low side / TR
C18
Rear Fog Relay
Low side / FET
C19
Tail Lamp Relay
Low side / FET
C20
Driver Door Unlock Relay
Low side / FET
C21
Trunk Release Relay
Low side / FET
C22
Start Inhibit Relay
Low side / FET
D01
Defogger Relay
Low side / FET
D02
Wiper Relay
Low side / FET
D03
Front Deicer Relay
Low side / FET
D04
NA
D05
Head Lamp Low Relay
Low side / FET
D06
Room Lamp
Low side / FET
D07
Safety Power Window ECU
Low side / FET
D08
Autolight State
Low side / FET
D09
Driver Seatbelt Indicator
Low side / TR
D10
Security Indicator
Low side / TR
D11
Door Unlock State
Low side / FET
D12
ATM Shift Lock Relay
Low side / FET
D13
Key Lock Solenoid
Low side / FET
D14
NA
Body Electrical System > BCM (Body Control Module) > Body Control Module (BCM) >
Description and Operation
Description
Body control module (A) receives various input switch
Body control module (A) receives various input switch
signals controlling time and alarm functions for the
intermittent wiper timer, washer timer, rear defogger timer,
seat belts warning, central door lock, ignition key
reminder, power window, door warning, tail lamp, crash
door unlock, ignition key hole illuminatio and keyless entry
& burglar alarm.
Function
Wiper Control
1. WIPER DATA FLOW
2. WASHER INTERLOCKING WIPER
Turn Wiper Relay ON after T1 when turning Washer SW ON at the status of IGN2 ON and if the input of Washer
SW is between 0.06 and 0.2sec, turn the output of Wiper Relay OFF after T3.But, ignore the input of Washer SW
occurred while washer interlocking wiper is being operated and accept it from the input of Washer SW after
operating Wiper Relay.
T1 : 0.3 ± 0.1sec, T2 : 0.06 ~ 0.2sec, T3 : 0.7 ± 0.1sec
T3 = 0 (In case of T2 ≤ 0.06 sec.)
(1) Turn Wiper Relay ON after T1 when turning Washer SW ON at the status of IGN2 ON and if the input of Washer
SW is more than 0.2sec, turn the output of Wiper Relay ON for 2.5~3.8sec after turning Washer SW OFF.
But, ignore the input of Washer SW occurred while washer interlocking wiper is being operated and accept it
from the input of Washer SW after operating Wiper Relay.
T1 : 0.3 ± 0.03s, T2 : over 0.2s, T3 : 2.5 ~ 3.8s
(2) Turn the output of WASHER INTERLOCKING WIPER ON when Washer SW is turned ON for more than 0.2sec
during the operation of INT WIPER. If Washer SW is turned on for less than 0.2sec, turn the output of Wiper
Relay ON once.
T1 : 0.3 ± 0.1s, T2 : over 0.2s,
T3 : 2.5 ~ 3.8s, T4 : INT TIME - 0.7s,
T5 : 0.06 ~ 0.2s, T6 : 0.7 ± 0.1s
(3) In case of starting (IGN1 ON & IGN2 OFF) ignore the input of Washer SW.
3. MIST INTERLOCKING WIPER
(1) Turn the output of Wiper Relay for 700ms when turning Mist SW ON at the status of IGN2 ON.
T1 : Min 60 ms, T2 : Max 100ms,
T3 : 700 ± 100ms
(2) If the input of Mist SW is continuous (for more than 700ms), keep the condition of Wiper Relay is ON and if Mist
SW is turned OFF, turn the output of Wiper Relay for 700ms from that point.
(3) Ignore the input of Mist SW while operating WIPER by INT WIPER, WASHER Interlocking WIPER.
T1 : Min 60 ms, T2 : Max 100ms,
T3 : 700 ± 100ms, T4 : 700ms
Lamp Control
1. EXTERIOR LAMP CONTROL DATA FLOW
2. TAIL LAMP AUTO CUT
(1) Turn IGN OFF when turning Tail SW ON after turning IGN ON and turn Tail Lamp Relay OFF (automatic
blackout) when opening Driver door SW.
(2) Also, turn Tail Lamp Relay OFF (automatic blackout) even though IGN is turned OFF after opening Driver door
SW at the condition that IGN is ON.
(3) When turning Tail SW ON again from OFF after the automatic blackout, Tail Lamp Relay will be turned ON and
AUTO CUT function will be cancelled.
(4) When turning IGN KEY ON after the automatic blackout, Tail Lamp Relay will be turned ON and AUTO CUT
function will be cancelled.
(5) AUTO CUT will be kept when removing or installing B+ at the status of AUTO CUT.
(6) Tail Lamp Relay will be kept turning OFF though Driver door SW is closed from opened at the status of AUTO
CUT.
*1 IGN KEY ON : Key in SW ON or ACC ON or IGN 1 ON or IGN 2 ON (Non-SMK)
Fob in ON or ACC ON or IGN 1 ON or IGN 2 ON (SMK)
IGN KEY ON : Key in SW OFF and ACC ON and IGN 1 OFF and IGN 2 OFF (Non-SMK)
Fob in OFF and ACC ON and IGN 1 OFF and IGN 2 OFF (Non-SMK)
3. AUTO LIGHT CONTROL
(1) If the service voltage (Auto light_VCC) of AUTO LIGHT SENSOR is less than 4v or more than 6v at the status of
IGN1 ON, it means it has defects. Always turn Tail Lamp Relay and Head Lamp Relay ON regardless of the
value of SENSOR when turning Auto Light SW ON with trouble. The FILTERING time for defects and recovery of
the service voltage is 300msec each.
(2) If the value of Auto Light Signal is input value of LIGHT ON at the status of IGN1 ON and Auto Light SW ON,
turn the LIGHT ON in 2.5sec ± 100msec.
(3) If the value of Auto Light Signal is input value of LIGHT OFF at the status of LIGHT ON, turn the LIGHT OFF in
2.5sec ± 100msec.
(4) If the value of Auto Light Signal is input value of TAIL LAMP ON, turn Tail Lamp Relay ON only and if it is input
value of HEAD LAMP ON, turn Tail Lamp Relay and Head Lamp Relay ON.
(5) Turn the proper LIGHT ON immediately when turning Auto Light SW ON in the condition of LIGHT ON and turn
the LIGHT OFF when turning Auto Light SW OFF.
(6) Keep the output of head lamp SW without blinking if the value of Auto light signal is input value of head lamp
ON when moving the head lamp SW ON position to the Auto light SW ON position.
(7) Keep the output of head lamp SW without blinking when moving the Auto light SW ON position to the head lamp
SW ON position.
(8) Follow the table below for each value of LIGHT ON for Auto Light Signal.
TAIL LAMP
HEAD LAMP
ON
0.82±0.05V
0.82±0.05V
OFF
1.65±0.05V
1.65±0.05V
T1 : 12 ± 0.2s, T2 : 12 ± 0.2s
4. HEAD LAMP LOW
(1) Turn Head Lamp Relay ON when turning Head Lamp SW ON while IGN1 is ON.
(2) Turn Head Lamp Relay OFF if IGN1 OFF or Head Lamp SW is OFF.
(3) Do not control things above if Head Lamp Relay can be controlled by Auto Light function.
Interior Room Lamp
1. INTERRIOR ROOM LAMP DATA FLOW
ATWS : Logic signal of ATWS
RKECMD : RKE LOCK/UNLOCK signal
2. Room Lamp Off
(1) Condition 1
State
Description
Initial condition
Room Lamp OFF and IGN OFF and DOOR CLOSE
Event
Action
- Unlock
- Key in ON to OFF
Room Lamp ON for 30± 3 sec.
(2) Condition 2
State
Description
Initial condition
Room Lamp OFF
Event
Any DOOR OPEN for over 0.1 sec. when ALL DOORS are closed
Action
ROOM LAMP ON for 20 min
(3) Condition 3
State
Description
Initial condition
Room Lamp OFF and IGN1 OFF
Event
IGN1 ON and DOOR OPEN for over 0.1 sec.
Action
ROOM LAMP ON
T1 : 20 ± 1min, T2 :30 ± 3sec, T3 : 100 ms
3. Room Lamp On for 30s
(1) Condition 1
State
Description
Initial condition
ROOM LAMP ON for 30s and IGN1 OFF
Event
DOOR OPEN for over 0.1 sec. when ALL DOORS are closed.
Action
ROOM LAMP ON for 20min
(2) Condition 2
State
Description
Initial condition
ROOM LAMP ON for 30s and IGN1 OFF
Event
UNLOCK by TX
Key in ON to OFF
Action
ROOM LAMP ON for 30s
(3) Condition 3
State
Description
Initial condition
ROOM LAMP ON for 30s and IGN1 OFF
Event
IGN1 ON, after 30sec, entering ARM state or ALL DOOR LOCK
Action
The state go to ROOM LAMP DECAYING state
Room Lamp decaying for 2 ± 0.2 sec and OFF
T1 : 20 ± 1min, T2 : 30 ± 3sec
4. Room Lamp On for 20min
(1) Condition 1
State
Description
Initial condition
Room Lamp ON for 20min and IGN1 OFF
Event
IGN1 ON
Action
ROOM LAMP ON
(2) Condition 2
State
Description
Initial condition
Room Lamp ON for 20min and IGN1 OFF
Event
DOOR CLOSE and ALL DOOR LOCK
Or after 20min
Action
ROOM LAMP DECAYING for 2 ± 0.2 sec and OFF
(3) Condition 3
State
Description
Initial condition
ROOM LAMP ON for 20min and IGN1 OFF
Event
DOOR CLOSE
Action
ROOM LAMP ON for 30s
T1 :20 ± 1min, T2 : 30 ± 3sec
5. Room Lamp Decaying
(1) Condition 1
State
Description
Initial condition
ROOM LAMP DECAYING and IGN1 OFF
Event
DOOR OPEN for over 0.1 sec. when All doors are closed
Action
ROOM LAMP ON for 20min
(2) Condition 2
State
Description
Initial condition
ROOM LAMP DECAYING and IGN1 OFF and DOOR CLOSE
Event
UNLOCK by TX
Key in ON to OFF
Action
ROOM LAMP ON for 30s
(3) Condition 3
State
Description
Initial condition
ROOM LAMP DECAYING
Event
After decaying
Action
ROOM LAMP OFF
(4) Condition 4
State
Description
Initial condition
ROOM LAMP DECAYING
Event
IGN1 ON and DOOR OPEN for 0.1 sec.
Action
ROOM LAMP ON
T1 : 20 ± 1min, T2 : 30 ± 3sec.
6. Room Lamp On
(1) Condition 1
State
Description
Initial condition
Room Lamp ON and IGN1 ON and DOOR OPEN
Event
DOOR CLOSE
Action
ROOM LAMP DECAYING for 2 ± 0.2 sec. and OFF
(2) Condition 2
State
Description
Initial condition
Room Lamp ON and IGN1 ON and DOOR OPEN
Event
IGN1 OFF
Action
ROOM LAMP ON for 20min
(3) Condition 3
State
Description
Initial condition
Room Lamp ON and IGN1 ON and DOOR OPEN
Event
DOOR CLOSE and IGN1 OFF
Action
ROOM LAMP ON for 30s
T1 : 20 ± 1min, T2 : 30 ±3sec
1. ROOM LAMP should not be flickered when turning IGN1 ON.
2. Exposure for the ROOM LAMP should be more than 32 steps.
7. BUZZER CONTROL
Data Flow
(1) SPECIFICATION of BUZZER SOUND
Frequency
Frequency
DUTY
Cycle
Sound
pressure
Remark
Seat Belt
Warning/
Seat Belt
Reminder
800Hz
50%
1.0s
70±10dB
Decreasing
sound
Key Operated
Warning
800Hz
50%
0.6s
70±10dB
Decreasing
sound
ESCL Not
Unlocked
Warning/
SSB SW
Warning
800Hz
50%
-
70±10dB
Decreasing
sound
ID Out
Warning
800Hz
50%
-
70±10dB
Continuous
sound
Back up
Warning
1700Hz
50%
-
70±10dB
Decreasing
sound
(2) Priority :
A. Seat belt Warning/seat Belt Reminder
B. Key Operated Warning
C. ESCL Not Locked Warning
D. ID Out Warning
E. ESCL Not Unlocked Warning
F. SSB SW Warning
G. Back Up Warning
(3) Keep the output up to the OFF cycle when turning the output OFF.
(4) Measurement distance for sound pressure: 1.0 m
Warning Control
1. WARNING CONTROL DATA FLOW
Seat Belt Reminder
1. From IGN1 OFF (Default state)
State
Description
Initial condition
IGN1 OFF
Event
Driver Seat Belt SW belted and IGN1 ON
Action
- Start bulb check 6 seconds driver indicator blinking
- The automaton state is changed to IGN1 ON DRIVER BELTED
State
Description
Initial condition
IGN1 OFF
Event
Driver Seat Belt SW unbelted and IGN1 ON
Action
- Start bulb check 6 seconds blinking for Driver Seat Belt IND
- Start bulb check 6 seconds warning for Buzzer
- The automaton state is changed to IGN1 ON DRIVER UNBELTED
2. From IGN1 ON Driver belted
State
Description
Initial condition
IGN1 ON DRIVER BELTED
Event
IGN1 OFF
Action
- Stop bulb check 6 seconds blinking for Driver Seat Belt IND
- Stop bulb check 6 seconds warning for Buzzer
- The automaton state is changed to IGN1 OFF
State
Description
Initial condition
IGN1 ON DRIVER BELTED
Event
- Driver Seat Belt SW unbelted & Vehicle speed < 5Km/h
Action
- Start normal 6 seconds blinking for Driver Seat Belt IND
- The automaton state is changed to IGN1 ON DRIVER UNBELTED
State
Description
Initial condition
IGN1 ON DRIVER BELTED
Event
Driver side seat belt is unbelted & Vehicle speed ≥ 5Km/h
Action
- Stop normal 6 seconds blinking for Driver Seat Belt IND
- Stop normal 6 seconds warning for Buzzer
- The automaton state is changed to IGN1 ON DRIVER UNBELTED
3. From IGN1 ON DRIVER UNBELTED
State
Description
Initial condition
IGN1 ON DRIVER UNBELTED
Event
IGN1 OFF
Action
- Stop Bulb check 6 seconds driver indicator blinking- Stop Normal 6
seconds driver indicator blinking- The automaton state is changed to
IGN1 OFF
State
Description
Initial condition
IGN1 ON DRIVER UNBELTED
Event
Driver side seat belt is belted
Action
- Stop Normal 6 seconds driver indicator blinking- Stop ALL 6 seconds
buzzer warning- The automaton state is changed to IGN1 ON DRIVER
BELTED
State
Description
Initial condition
IGN1 ON DRIVER UNBELTED
Event
Vehicle Speed >= 10km/h
Action
- Start buzzer and driver indicator Pattern (10 times (6sec ON/24sec
OFF) + 6sec ON)- The automaton state is changed to PATTERN
4. From PATTERN
State
Description
Initial condition
PATTERN
Event
IGN1 OFF
Action
- Stop Buzzer and driver indicator Pattern- Stop ALL 6s driver indicator
blinking- Stop ALL 6s buzzer warning- The automaton state is
changed to IGN1 OFF
State
Description
Initial condition
PATTERN
Event
Driver side seat belt is belted
Action
- Stop Buzzer and driver indicator Pattern- Stop Normal 6s driver
indicator blinking- Stop ALL 6s buzzer warning- The automaton state
is changed to IGN1 ON DRIVER BELTED
State
Description
Initial condition
PATTERN
Event
Vehicle Speed <= 5km/h
Action
- Stop Buzzer and driver indicator Pattern- If 6s buzzer period, after 6s
warning stop Pattern- The automaton state is changed to IGN1 ON
DRIVER UNBELTED
5. KEY OPERATED WARNING
(1) When Driver Door SW is ON at the status of KEY IN ON, Buzzer will be outputted per 0.6sec continuously.
(2) If KEY IN turns OFF or Driver Door SW is CLOSED during Buzzer output, the output will turn OFF.
(3) When IGN1 turns ON while outputting, the output will be stopped.
T1 : 0.6 ± 0.1sec
6. ESCL NOT LOCKED WARNING (SMK)
When receiving C_ESCL_Notlocked_Warning(CAN) ON, warning buzzer is on. And when releasing while putting a
alarm into effect, it’ll be canceled immediately.
7. ESCL NOT UNLOCKED WARNING (SMK)
When receiving C_ ESCL_Notunlocked_Warning ON signal, outputting a warning buzzer ON one times for 1 sec.
T1 : 1.0 ± 0.1 sec
8. ID OUT WARNING (SMK)
When receiving C_ID OUT_WNG(CAN) ON, outputting a alarm. When receiving OFF, warning buzzer is canceled
immediately.
9. SSB SW WARNING (SMK)
When receiving C_SSB_Warning (CAN) ON, outputting a alarm, and when receiving OFF, a stop will do a alarm
immediately.
T1 : 0.6 ± 0.1 sec
Defogger & Deicer Timer Control
1. DEFOGGER & DEICER CONTROL DATA FLOW
2. DEFOGGER TIMER
(1) If Defogger SW turns ON after Alt L is ON while IGN1 is ON, turn Defogger Relay output ON for 20min. (It is
operated while ENGINE is RUNNING)
(2) If Defogger SW turns ON again while Defogger Relay output is ON, turn Defogger Relay output OFF.
(3) Also turn Defogger output OFF in case of Alt L OFF or IGN1 OFF while Defogger Relay output is ON.
(4) If Alt L is over 10 Volts ENGINE is RUNNING (Alt L ON) and if Alt L is less than 5 Volts ENGINE is STOPPED
(Alt L OFF). Also, Alt L is between 5 and 10 Volts, keep the previous condition.
(5) Defogger Relay should not be outputted when turning Alt L ON while Defogger SW is pressed.
T1 : 20 ± 1min
3. FRONT DEICER TIMER
(1) Turn Deicer Relay output ON for 20min when turning Deicer SW ON after turning Alt L ON while IGN1 is ON (It
is operated while ENGINE is RUNNING.)
(2) Turn Deicer Relay output OFF if Deicer SW turns ON again while Deicer Relay output is ON.
(3) Also Deicer Relay output OFF when turning ALT “L” or IGN1 OFF while Deicer Relay output is ON.
(4) If Alt L is over 10 Volts ENGINE is RUNNING (Alt L ON) and if Alt L is less than 5 Volts ENGINE is STOPPED
(Alt L OFF). Also, Alt L is between 5 and 10 Volts, keep the previous condition.
(5) Deicer Relay should not be outputted when turning Alt L ON while Deicer SW is pressed.
T1 : 20 ± 1min
4. POWER WINDOW TIMER
(1) Turn safety power window ECU output ON when turning L_IGN2 ON.
(2) Turn safety power window ECU output OFF after keeping safety power window ECU output for 30sec when IGN2
is OFF.
(3) Turn safety power window ECU OFF immediately when opening Driver Door SW or Passenger Door SW within the
condition (2) above.
(4) Turn safety power window ECU output OFF when IGN2 is OFF while Driver Door SW or Passenger Door SW is
open.
T1 : 30 ± 3sec
Door Lock/unlock Control
1. DOOR LOCK/UNLOCK CONTROL DATA FLOW
2. DOOR LOCK/UNLOCK RELAY CONTROL
(1) 2-Turn unlock
Mode
Door Unlock Relay
Driver Door Unlock Relay
Door Lock Relay
ALL DOOR LOCK
OFF
OFF
ON
ALL DOOR UNLOCK
ON
ON
OFF
Driver Door Unlock
OFF
ON
OFF
3. CENTRAL DOOR LOCK/UNLOCK
(1) If Driver Door Key Lock SW or Passenger Door Key Lock SW turns ON, turn Door Lock Relay output ON during
T1. But prohibit the output when KEY IN ON *2) and IGN1 are ON.
(2) When Driver Door Key Unlock and Passenger Door Key Unlock turn ON, turn Door Unlock Relay and Driver
Door Unlock Relay output ON during T1.
(3) Turn CENTRAL LOCK *3) ON during T1 when receiving TX LOCK signal.
But ignore LOCK input when Driver Door SW or Passenger Door SW is ON.
(4) Turn CENTRAL UNLOCK *4)ON during T1 when receiving TX UNLOCK signal.
(5) Turn Door Lock Relay output ON during T1 when Power window Door Lock SW turns ON.
(6) Turn CENTRAL UNLOCK output ON during T1 when Power window Door Unlock SW turns ON. But prohibit the
operation by Power window Door Unlock SW at the condition of ARM, ARMWAIT, REARM and ALARM.
(7) LOCK/UNLOCK by SAFETY KNOB is not interlock (Mechanical operation).
(8) Malfunction should be free when joining BATTERY (Also malfunction should be free at the location of Key In SW
ON).
(9) Input which is less than 60msec should not be received (KEY LOCK/UNLOCK SW).
(10) Do
*2)
*3)
*4)
not execute the output of DOOR LOCK (UNLOCK) by KNOB change.
KEY IN ON : Key In ON
CENTRAL LOCK : Refer to control mode for each Spec.
CENTRAL LOCK : Refer to control mode for each Spec.
T1 : 0.5 ± 0.1sec
4. IGN KEY REMINDER
(1) This function will not be operated if the speed of cars exceed 3km/h.
(2) Perform Door Unlock Relay output for 1s after 0.5s when the condition becomes to be KEY IN ON, Driver Door
SW is OPENED and Driver Door Unlock SW is LOCKED.
(3) Perform ALL Door Unlock Relay output for 1s in 0.5s when the condition becomes to be KEY IN ON, Passenger
Door SW is OPENED and Passenger Door Unlock SW is LOCKED.
(4) Output ALL DOOR UNLOCK for 1s in 0.5s based on (3) if (2) and (3) are satisfied.
(5) Output UNLOCK up to 3 times (excluding output for 1s) if LOCK condition is maintained though UNLOCK output
is performed for 1s by (2), (3)(cycle for 1s: 0.5s ON/OFF).
(6) Try UNLOCK once when DOOR is CLOSED while keeping LOCK condition after performing (5).
(7) Output Door Unlock Relay once for 1s when Driver Door SW is closed within 0.5s since Driver Door Unlock SW
is changed from UNLOCK to LOCK during KEY IN ON.
(8) Output ALL DOOR UNLOCK once only for 1s when Passenger Door SW is closed within 0.5s since Passenger
Door Unlock SW is changed from UNLOCK to LOCK during KEY IN ON.
(9) Output ALL Door Unlock Relay once only for 1s if Driver Door Unlock SW becomes LOCK from UNLOCK within
0.5s since Driver Door SW is changed from OPEN to CLOSE during KEY IN ON.
(10) Perform the function of KEY REMINDER when turning Power window Door Lock SW ON after opening Driver
Door SW or Passenger Door SW during KEY IN ON.
(11) Judge if RETRY output is performed or not at the point of the beginning of RETRY output(in 1.5s from the
initial UNLOCK output).
(12) Output UNLOCK though the condition is not kept for 0.5sec after realizing that of UNLOCK. But, do not output
UNLOCK in case that KEY IN is OFF at the point of 0.5s passed after realizing the condition by the change of
UNLOCK → LOCK in Driver Door Unlock SW or Passenger Door Unlock SW.
T1, T3 : 0.5 ± 0.1sec, T2 : 1 ± 0.1sec,
T4 : 0.5sec Max
** KEY IN ON : Key In ON or IGN1 ON or IGN2 ON
KEY IN OFF : Key In OFF and IGN1 OFF and IGN2 OFF
5. CRASH DOOR UNLOCK
(1) Always perform CENTRAL UNLOCK *9) output whenever Crash Input signal is inputted while IGN1 is ON.
(2) Keep CENTRAL UNLOCK output for the time left though IGN1 turns OFF from ON while outputting CENTRAL
UNLOCK.
(3) Do not output CENTRAL UNLOCK if IGN1 SW turns ON from OFF after Crash Input signal is already inputted.
(4) Output CENTRAL UNLOCK during T3 if Driver Door Unlock SW or Passenger Door Unlock SW or Rear Right
Door Unlock SW or Rear Left Door Unlock SW turns to LOCK from UNLOCK after outputting CENTRAL
UNLOCK.
(5) Do not perform AUTO DOOR LOCK function at the condition of CRASH UNLOCK.
(6) CRASH DOOR UNLOCK function has priority to LOCK/UNLOCK control by other functions.
(7) Ignore the request for LOCK/UNLOCK by other functions while or after outputting CRASH DOOR UNLOCK. But,
control LOCK/UNLOCK by other functions if IGN1 SW becomes OFF.
T1 : 40 msec, T2 : 5 ± 0.5 sec
6. AUTO DOOR LOCK
(1) AUTO DOOR LOCK is classified into non-activation/20km actiovation/40km actiovation. And follow the table
below for the basic value and selected value of the regional operation SPEC.
Item
Description
Standard
Disable
Option 1
20 km/h
(2) On condition of IGN1 SW ON, output all door lock within T1 when keeping more than setting speed in (1). But,
do not output LOCK if all DOORS are LOCKED or FAIL at first.
(3) Perform outputting LOCK up to 3 times (cycle for 1s) if either of DOORS is UNLOCKED after outputting LOCK
in (2). But, ignore the DOOR that has changed to LOCK condition from UNLOCK during the output 3 times.
(4) Regard the respective DOOR FAILED if it is UNLOCKED after outputting 3 times.
(5) Output LOCK once only if the DOOR is UNLOCKED after the failed DOOR changes(UNLOCK→LOCK).
(6) Output LOCK once only if DOOR which was LOCKED after outputting LOCK in (2) becomes to be UNLOCKED.
But, output LOCK once for the respective DOOR although it keeps UNLOCK after LOCK output.
(7) Clear the FAILED DOOR when L_IGN1 SW is OFF.
(8) Do not perform AUTO DOOR LOCK function on condition of CRASH UNLOCK.
T1 : Max 1.5sec, T2 : 0.5 ± 0.1sec
*1 ON (UNLOCK) : Driver DR Unlock SW│Passenger DR Unlock SW UNLOCK
OFF (LOCK) : Driver DR Unlock SW│Passenger DR Unlock SW LOCK
7. AUTO DOOR UNLOCK
(1) AUTO DOOR UNLOCK is classified into non-activation and activation and activated for domestic ones only but
not activated for others.
(2) If any door is locked, output all door unlock when turning KEY IN OFF after KEY IN is ON.
[(But, if all door is UNLOCK, it will not output.) AUTO DOOR UNLOCK should operate regardless outputing auto
door lock.) ]
T1 : 0.5 ± 0.1sec
*1 ON (UNLOCK) : Driver DR Unlock SW│Passenger DR Unlock SW UNLOCK
OFF (LOCK) : Driver DR Unlock SW│Passenger DR Unlock SW LOCK
*2 KEY IN ON : Key In ON (SMK : Fob in ON) or IGN1 ON or IGN2 ON
KEY IN OFF : Key In OFF (SMK : Fob in OFF) and IGN1 OFF and IGN2 OFF
Trunk Release Control
1. TRUNK RELEASE RELAY CONTROL DATA FLOW
RKECMD : TX LOCK, TX UNLOCK, TRUNK REOPEN UNLOCK
Body Electrical System > BCM (Body Control Module) > Body Control Module (BCM) >
Repair procedures
Removal
1. Disconnect the negative (-) battery terminal.
2. Remove the console upper cover(A).
3. Remove the center fascia lower panel(A).
4. Remove the body control module(A) after loosening 2 nuts and disconnecting the connectors.
Installation
1. Install the body control module.
2. Install the center fascia lower panel.
3. Install the console upper cover.
Trouble Diagnostics When Using Diagnosis Tool
1. The body control module can diagnose by using the diagnosis tool more quickly.
The BCM communicates with the diagnosis tool and then reads the input/output value and drives the actuator.
2. To diagnose the BCM function, select the menu of model and body control module.
3. To consult the present input/out value of BCM, "Current DATA". It provides information of BCM input/output conditions
of power supply, turn signal/brake lamp, headlamp, door, locks, outside mirror, wiper, auto-light and transmitters etc.
4. To perform compulsory operation on BCM input factors, select "ACTUATION TEST".
Body Electrical System > Seat Electrical > Components and Components Location
Component Location
1. Slide motor
2. Front height motor
3. Rear height motor
4. Power seat switch
Body Electrical System > Seat Electrical > Power Seat Motor > Repair procedures
Inspection
Slide Motor Limit Switch
1. Disconnect the limit switch (A) and operate the limit switch.
2. Check for continuity between the terminals.
3. Make sure that the seat operation is normal in the reverse after the maximum operation.
4. If there is an abnormality, replace the limit switch.
Power Seat Motor
1. Disconnect the connectors for each motor.
2. With the battery connected directly to the motor terminals, check if the motors run smoothly.
3. Reverse the connections and check that the motor turns in reverse.
4. If there is an abnormality, replace the motors.
Body Electrical System > Seat Electrical > Power Seat Control Switch > Repair procedures
Inspection
With the power seat switch in each position, make sure that continuity exists between the terminals below. If continuity
is not as specified, replace the power seat switch.
Body Electrical System > Seat Electrical > Seat Heater Switch > Repair procedures
Inspection
1. Disconnect the negative (-) battery terminal.
2. Remove the floor console upper cover(A) after removing the shift lever knob.
3. Disconnect the seat heater switch connectors.
4. Check for continuity between the terminals in each switch position according to the table.
Removal
1. Disconnect the negative(-) battery terminal.
2. Remove the console upper cover(A) after removing the shift lever knob.
3. Disconnect the seat heater switch connector(A).
4. Remove the seat heater switch(A).
Installation
1. Install the seat heater switch.
2. Install the console upper cover.
3. Install the shift lever knob.
Body Electrical System > Seat Electrical > Seat Heater > Components and Components
Location
Component Location
Body Electrical System > Seat Electrical > Seat Heater > Repair procedures
Inspection
1. Check for continuity and measure the resistance between No.1 and NO.2 terminals.
Standard value: 2.43Ω ± 10% / SET
(Cushion: 1.22Ω ± 10%, Back: 1.21Ω ± 10%)
Body Electrical System > Fuel Filler Door > Components and Components Location
Component Location
1. Fuel filler door open switch
2. Fuel filler door release actuator
Body Electrical System > Fuel Filler Door > Fuel Filler Door Release Actuator > Repair
procedures
Inspection
1. Remove the fuel filler door housing.
(Refer to BD group - "Interior trim")
2. Loosen the mounting bolts and remove the fuel filler door release actuator(A).
3. Disconnect the fuel filler door connector(A).
4. Check for continuity between terminal No. 1 and No. 2. If there is no continuity replace the fuel filler door release
actuator(A).
Body Electrical System > Fuel Filler Door > Fuel Filler Door Open Switch > Repair
procedures
Inspection
1. Remove the front door trim panel.
(Refer to the Body group - "Front door")
2. Disconnect the switch connector.
3. Check the switch for continuity between the No. 1 and No. 2 terminals.
4. If the continuity is not as specified, replace the switch.
Body Electrical System > Fuses And Relays > Components and Components Location
Component Location
1. Engine room relay box
2. Passenger compartment junction box
3. ICM relay box
4. Engine room sub-box
Body Electrical System > Fuses And Relays > Relay Box (Engine Compartment) >
Components and Components Location
Components
Body Electrical System > Fuses And Relays > Relay Box (Engine Compartment) > Repair
procedures
Inspection
1. Cooling fan (HI) relay
9. ESCL (IGN1)
2. Cooling fan (LO) relay
10. ESCL (ACC)
3. A/con relay
11. Fog lamp relay
4. Head lamp (HI) relay
12. Wiper relay
5. Head lamp (LO) relay
13. Back up lamp relay
6. Horn relay
14. ECU main relay
7. Start relay
15. Fuel pump relay
8. ESCL (IGN2)
16. Sub start relay
Power Relay Test (Type A)
Check for continuity between the terminals.
1. There should be continuity between the No.30 and No.87 terminals when power and ground are connected to the
No.85 and No.86 terminals.
2. There should be no continuity between the No.30 and No.87 terminals when power is disconnected.
[A] Type:
3. A/con relay
11. Fog lamp relay
4. Head lamp (LO) relay
13. Back up lamp relay
5. Head lamp (HI) relay
15. Fuel pump relay
6. Horn relay
16. Sub start relay
Power Relay Test (Type B)
Check for continuity between the terminals.
1. There should be continuity between the No.30 and No.87 terminals when power and ground are connected to the
No.85 and No.86 terminals.
2. There should be continuity between the No.30 and No.87a terminals when power is disconnected.
[B] Type:
1. Cooling fan (HI) relay
8. ESCL (IGN2)
2. Cooling fan (LO) relay
9. ESCL (IGN1)
3. Start relay
10. ESCL (ACC)
Power Relay Test (Type C)
Check for continuity between the terminals.
1. There should be continuity between the No.30, 87a and No.87 terminals when power and ground are connected to
the No.85 and No.86 terminals.
2. There should be no continuity between the No.30, 87a and No.87 terminals when power is disconnected.
[C] Type :
14. ECU main relay
Power Relay Test (Type D)
Check for continuity between the terminals.
1. There should be continuity between the No.30 and No.87 terminals when power and ground are connected to the
No.85 and No.86 terminals.
2. There should be continuity between the No.30 and No.87 terminals when power is disconnected.
[D] Type:
12. Wiper relay
Fuse Inspection
1. Be sure there is no play in the fuse holders, and that the fuses are held securely.
2. Are the fuse capacities for each circuit correct?
3. Are there any blown fuses?
If a fuse is to be replaced, be sure to use a new fuse of the same capacity. Always determine why the fuse blew
first and completely eliminate the problem before installing a new fuse.
Body Electrical System > Fuses And Relays > Relay Box (Passenger Compartment) >
Components and Components Location
Components
Body Electrical System > Fuses And Relays > Relay Box (Passenger Compartment) >
Repair procedures
Fuse Inspection
1. Be sure there is no play in the fuse holders, and that the fuses are held securely.
2. Are the fuse capacities for each circuit correct?
3. Are there any blown fuses?
If a fuse is to be replaced, be sure to use a new fuse of the same capacity. Always determine why the fuse blew
first and completely eliminate the problem before installing a new fuse.
Replacement
Passenger Compartment Junction Box
1. Disconnect the negative(-) battery terminal.
2. Remove the crash pad lower panel(A).
(Refer to BD group - "Crash pad")
3. Remove the passenger compartment junction box(A) after loosening the mounting nut(2EA) and bolt(1EA) and
disconnecting the connectors.
4. Installation is the reverse of removal.
Body Electrical System > Fuses And Relays > ICM (Integrated Circuit Module) Relay Box >
Components and Components Location
Component
Body Electrical System > Fuses And Relays > ICM (Integrated Circuit Module) Relay Box >
Description and Operation
Description
The ICM is united with many kinds of relay and installed inside the driver crash pad lower panel.
Body Electrical System > Fuses And Relays > ICM (Integrated Circuit Module) Relay Box >
Repair procedures
Inspection
Hazard Lamp Relay
Check for continuity between the terminals.
1. There should be continuity between the No.13 and No.12 terminals when power and ground are connected to the
No.13 and No.3 in the ICM relay B terminals.
2. There should be no continuity between the No13 and No.12 terminals when power is disconnected.
Burglar Alarm Horn
Check for continuity between the terminals.
1. There should be continuity between the No.8 and No.9 terminals when power and ground are connected to the No.8
and No.1 in the ICM relay B terminals.
2. There should be no continuity between the No.8 and No.9 terminals when power is disconnected.
Burglar Alarm
Check for continuity between the terminals.
1. There should be no continuity between the No.11 and No.10 terminals when power and ground are connected to the
No.11 and No.4 in the ICM relay B terminals.
2. There should be continuity between the No.11 and No.10 terminals when power is disconnected.
Removal
1. Disconnect the negative(-) battery terminal.
2. Remove the crash pad lower panel(A).
(Refer to BD group - "Crash pad")
3. Remove the ICM relay box(A) after disconnecting the connector and removing the mounting nut.
Installation
1. Install the ICM relay box.
2. Install the crash pad lower panel.
Body Electrical System > Indicators And Gauges > Components and Components
Location
Component Location
1.
2.
3.
4.
5.
6.
Cluster assembly
Seat belt switch
Vehicle speed sensor
Engine coolant temperature sender
Oil pressure switch
Brake fluid level warning switch
7. Parking brake switch
8. Door switch
9. Fuel gauge sender
10. Wheel speed sensor
11. ABS ECU
Body Electrical System > Indicators And Gauges > Instrument Cluster > Components and
Components Location
Components
Body Electrical System > Indicators And Gauges > Instrument Cluster > Repair procedures
Inspection
Speedometer
1. Adjust the pressure of the tires to the specified level.
2. Drive the vehicle onto a speedometer tester. Use wheel chocks(A) as appropriate.
3. Check if the speedometer indicator range is within the standard values.
Do not operate the clutch suddenly or increase/ decrease speed rapidly while testing.
Tire wear and tire over or under inflation will increase the indication error.
[km/h - Canada]
Velocity
(km/h)
20
40
60
80
100
120
140
Tolerance
(km/h)
+3.0
0
+3.3
0
+3.4
0
+3.8
0
+4.1
0
+4.9
0
+5.2
0
Velocity
(km/h)
160
180
200
220
240
260
280
Tolerance
(km/h)
+5.7
0
+6.2
0
+6.5
0
+6.7
0
+6.9
0
+7.1
0
+7.3
0
[MPH- USA]
Velocity
(MPH)
10
20
40
60
80
Tolerance
(MPH)
+2.3
0
+2.4
0
+2.5
0
+2.6
0
+2.7
0
Velocity
(MPH)
100
120
140
160
Tolerance
(MPH)
+2.8
0
+2.9
0
+3.0
0
+3.3
0
Tachometer
1. Connect the scan tool to the diagnostic link connector or install a tachometer.
2. With the engine started, compare the readings of the tester with that of the tachometer. Replace the tachometer if
the tolerance is exceeded.
1. Reversing the connections of the tachometer will damage the transistor and diodes inside.
2. When removing or installing the tachometer, be careful not to drop it or subject it to severe shock.
Revolution(rpm)
1,000
2,000
3,000
4,000
Tolerance(rpm)
±100
±125
±150
±150
Revolution(rpm)
5,000
6,000
7,000
8,000
Tolerance(rpm)
±150
±180
±210
±240
Fuel Gauge
1. Disconnect the fuel sender connector from the fuel sender.
2. Connect a 3.4 watt, 12V test bulb to terminals 1 and 3 on the wire harness side connector.
3. Turn the ignition switch to the ON, and then check that the bulb lights up and the fuel gauge needle moves to full.
Main Fuel Gauge Sender
1. Using an ohmmeter, measure the resistance between terminals 1 and 3 of sender connector (A) at each float level.
2. Also check that the resistance changes smoothly when the float is moved from "E" to "F"
Position
Resistance(Ω)
Sender (E)
193.4 ± 2
Warning lamp
186.8 ± 2
1/2
104.3 ± 2
Sender (F)
13.5 ± 2
3. If the height resistance is unsatisfied, replace the fuel sender as an assembly.
After completing this test, wipe the sender dry and reinstall it in the fuel tank.
Fuel Gauge Servo Sender
1. Using an ohmmeter measure the resistance between terminals 1 and 2 of servo sender connector (A) at each float
level.
2. Also check that the resistance changes smoothly when the float is moved from "E" to "F".
Position
Resistance (Ω)
E
193.4 ± 2Ω
1/2
104.3 ± 2Ω
F
13.5 ± 2Ω
Engine Coolant Temperature Gauge
1. Disconnect the wiring connector (A) from the engine coolant temperature sender in the engine compartment.
2. Turn the ignition switch ON. Check that the gauge needle indicates cool. Turn the ignition switch OFF.
3. Connect a 12V, 3.4 watt test bulb between the harness side connector and ground.
4. Turn the ignition switch ON.
5. Verify that the test bulb flashes and that the indicator moves to HOT.
If operation is not as specified, replace the engine coolant temperature gauge. Then recheck the system.
Engine Coolant Temperature Sender
1. Using an ohmmeter, measure the resistance between the terminal 2 and ground.
2. If the resistance value is not as shown in the table, replace the temperature sender.
Temperature
[°F(°C)]
131(55)
160(71) ~
230(110)
257(125)
Gauge angle (°)
-45
-70 ± 25
+35
Oil Pressure Switch
1. Check that there is continuity between the oil press switch terminal (A) and ground with the engine off.
2. Check that there is no continuity between the terminal and ground with the engine running.
3. If operation is not as specified, replace the switch.
Oil Pressure Warning Lamp
1. Disconnect the connector (A) from the warning switch and ground the terminal on the wire harness side connector.
2. Turn the ignition switch ON. Check that the warning lamp lights up. If the warning lamp doesn't light, test the bulb or
inspect the wire harness.
Brake Fluid Level Warning Switch
1. Remove the connector(A) from the switch located at the brake fluid reservoir.
2. Verify that continuity exists between switch terminals 1 and 2 while pressing the switch (float) down with a rod.
Brake Fluid Level Warning Lamp
1. Ignition "ON"
2. Release the parking brake.
3. Remove the connector from the brake fluid level warning switch.
4. Ground the connector at the harness side.
5. Verify that the warning lamp lights.
Parking Brake Switch
The parking brake switch (A) is a pulling type. It is located under the parking brake lever. To adjust, move the switch
mount up and down with the parking brake lever released all the way.
1. Check that there is continuity between the terminal and switch body with the switch ON (Lever is pulled).
2. Check that there is no continuity between the terminal and switch body with the switch OFF (Lever is released).
If continuity is not as specified, replace the switch or inspect its ground connection.
Door Switch
Remove the door switch and check for continuity between the terminals.
[Front Door Switch]
Seat Belt Switch
1. Remove the connector from the switch.
2. Check for continuity between terminals.
Seat belt condition
Continuity
Fastened
Non-conductive (∞Ω)
Not fastened
Conductive (Ω)
Seat Belt Warning Lamp
With the ignition switch turned ON, verify that the lamp glows.
Seat belt condition
Warning lamp
Fastened
OFF
Not fastened
ON
Removal
1. Disconnect the negative (-) battery terminal.
2. Tilt the steering column down.
3. Remove the cluster fascia lower panel(A).
4. Remove the cluster(A) after loosening the screws.
5. Disconnect the cluster connector (A), then remove the cluster.
Installation
1. Install the cluster to the cluster housing.
2. Install the cluster fascia lower panel.
Body Electrical System > Indicators And Gauges > Troubleshooting
Troubleshooting
Symptom
Speedometer does not operate
Tachometer does not operate
Fuel gauge does not operate
Low fuel warning lamp does not light
up
Water temperature gauge does not
operate
Oil pressure warning lamp does not
light up
Parking brake warning lamp does not
light up
Possible cause
Remedy
Cluster fuse (10A) blown
Check for short and replace fuse
Speedometer faulty
Check speedometer
Vehicle speed sensor faulty
Check vehicle speed sensor
Wiring or ground faulty
Repair if necessary
Cluster fuse (10A) blown
Check for short and replace fuse
Tachometer faulty
Check tachometer
Wiring or ground faulty
Repair if necessary
Cluster fuse (10A) blown
Check for short and replace fuse
Fuel gauge faulty
Check gauge
Fuel sender faulty
Check fuel sender
Wiring or ground faulty
Repair if necessary
Cluster fuse (10A) blown
Check for short and replace fuse
Bulb burned out
Replace bulb
Fuel sender faulty
Check fuel sender
Wiring or ground faulty
Repair if necessary
Cluster fuse (10A) blown
Check for short and replace fuse
Water temperature gauge faulty
Check gauge
Water temperature sender faulty
Check sender
Wiring or ground faulty
Repair if necessary
Cluster fuse (10A) blown
Check for short and replace fuse
Bulb burned out
Replace bulb
Oil pressure switch faulty
Check switch
Wiring or ground faulty
Repair if necessary
Cluster fuse (10A) blown
Check for short and replace fuse
Bulb burned out
Replace bulb
Brake fluid level warning switch faulty
Check switch
Parking brake switch faulty
Check switch
Wiring or ground faulty
Repair if necessary
Open door warning lamp and trunk lid Memory fuse (15A) blown
warning lamp do not light up
Bulb burned out
Door switch faulty
Check for short and replace fuse
Replace bulb
Check switch
Seat belt warning lamp does not light
up
Wiring or ground faulty
Repair if necessary
Cluster fuse (10A) blown
Check for short and replace fuse
Bulb burned out
Replace bulb
Seat belt switch faulty
Check switch
Wiring or ground faulty
Repair if necessary
Body Electrical System > Power Door Locks > Components and Components Location
Component Location
1. Front door lock actuator & switch
5. Door lock knob
2. Body control module
3. Junction box (Door lock/unlock relay)
4. Trunk lid release actuator
6. Driver central door lock switch
7. Passenger central door lock switch
Body Electrical System > Power Door Locks > Power Door Lock Actuators > Repair
procedures
Inspection
Front Door Lock Actuator Inspection
1. Remove the front door trim.
(Refer to the Body group - front door)
2. Remove the front door module.
3. Disconnect the 6P connector from the actuator.
4. Check actuator operation by connecting power and ground according to the table. To prevent damage to the
actuator, apply battery voltage only momentarily.
Trunk Lid Release Actuator Inspection
1. Remove the trunk lid trim panel.
(Refer to the Body group - trunk lid)
2. Disconnect the 3P connector from the actuator.
3. Check actuator operation by connecting power and ground according to the table. To prevent damage to the
actuator, apply battery voltage only momentarily.
Front Door Lock Switch Inspection
1. Remove the front door trim panel.
(Refer to the Body group - front door)
2. Remove the front door module.
3. Disconnect the 6P connector from the actuator.
4. Check for continuity between the terminals in each switch position according to the table.
Trunk Lid Open Switch Inspection
1. Remove the trunk lid trim panel. (Refer to the Body group - trunk lid)
2. Disconnect the 3P connector from the actuator.
3. Check for continuity between the terminals in each switch position according to the table.
Body Electrical System > Power Door Locks > Power Door Lock Relay > Repair
procedures
Inspection
1. Disconnect the negative (-) battery terminal.
2. Remove the junction box.
3. Check for continuity between the terminals.
Door Lock
1. There should be continuity between the No.2 terminal in the I/P-F and No.2 terminal in the I/P-E when power and
ground are connected to the No.14 terminal in the I/P-E and No.1 terminal in the I/P-K.
2. There should be no continuity between the No.2 terminal in the I/P-F and No.2 terminal in the I/P-E when power is
disconnected.
Door Unlock
1. There should be continuity between the No.3 terminal in the I/P-F and No.2 terminal in the I/P-E when power and
ground are connected to the No.3 terminal in the I/P-E and No.1 terminal in the I/P-E.
2. There should be no continuity between the No.3 terminal in the I/P-F and No.2 terminal in the I/P-E when power is
disconnected.
Body Electrical System > Power Door Locks > Power Door Lock Switch > Repair
procedures
Replacement
Front Door Lock Switch
1. Disconnect the negative(-) battery terminal.
2. Remove the front door trim panel.
(Refer to Body group - "Front door")
3. Disconnect the module connector(A) from the wiring harness.
A. Loosen the screw(1EA).
B. Remove the grip handle cover then loosen the upper screw.
C. Loosen the screws(3EA).
D. Remove the power window switch bracket.
E. Loosen the screws from the bracket.
4. Remove the power window switch module(A) from the front door trim panel.
Passenger Door Lock Switch
1. Disconnect the negative(-) battery terminal.
2. Remove the door trim panel.
(Refer to Body group - "Front door")
3. Disconnect the module connector(A).
A. Loosen the screw(1EA).
B. Remove the grip handle cover then loosen the upper screw.
C. Loosen the screws(3EA).
D. Remove the power window switch bracket.
E. Loosen the screws from the bracket.
4. Remove the power window switch module(A) from the front door trim panel.
Body Electrical System > Power Door Mirrors > Components and Components Location
Component Location
1. Power door mirror
2. Power door mirror switch
Body Electrical System > Power Door Mirrors > Power Out Side Mirror Switch >
Components and Components Location
Component
Body Electrical System > Power Door Mirrors > Power Out Side Mirror Switch > Repair
procedures
Inspection
1. Disconnect the negative (-) battery terminal.
2. Remove the front door trim panel.
(Refer to the Body group - "Front door")
3. Disconnect the 12P connector from the switch.
4. Check for continuity between the terminals in each switch position according to the table.
Body Electrical System > Power Door Mirrors > Power Door Mirror Actuator > Repair
procedures
Inspection
1. Remove the front door quadrant delta cover.
(Refer to the Body group - "Front door")
2. Disconnect the power door mirror connector from the harness.
3. Apply battery voltage to each terminal as shown in the table and verify that the mirror operates properly.
Mirror Heater Inspection
Side Repeater Lamp
Body Electrical System > Power Windows > Components and Components Location
Component Location
1. Driver power window main switch
2. Passenger power window switch
3. Front window motor (Safety window)
Body Electrical System > Power Windows > Description and Operation
Function Of Safety Power Window
When driver door power window auto-up switch is operated, safety function is activated.
1. Safety function condition
When detect the force of 100N (using the 10N/mm spring) during the window rising, window is reversed.
2. Length of window reversing (except holding the auto-up switch)
A. When detect the jamming during the 4mm ~ 250mm from top of the door.
→ Window is reversed until 300mm from top of the door.
B. When detect the jamming over the 250mm from top of the door.
→ Window is reversed until 20mm from jamming position.
3. Length of window reversing (holding the auto-up switch)
A. When detect the jamming during holding the auto-up switch.
→ Window is reverse until 25mm from jamming position.
B. Auto-up function is not available during the 5 seconds from above condition.
→ When holding the auto-up switch, window is operated as a manual-up function. (Safety function is not
activated.)
C. When holding the auto-up switch after 5 seconds from above condition.
→ Window is reverse until 25mm from jamming position.
4. Safety function is not available area
Safety function is not available during the 4mm from top of the door.
Initializing Method Of The Safety Power Window
1. Initializing of Battery Connection
When the window cannot be properly closed or opend, safety power window switch need the initializing.
(1) Power window operation before initializing
A. Manual-Down function is not available
(2) Turn the ignition switch to the ON position.
(3) Push down the power window switch until the window glass is entirely down.
(4) Turn the ignition switch from OFF to ON within 2 sec.
(5) Push down the power window switch three times continuously within 5 sec.
Reinitializing Method
1. Close the power window.
2. Push up the power window switch to the close position for 1 sec.
Short Drop
The short drop (SD) functionality is linked to the door ajar signal. In case of door opened, the door ajar signal (low
level) will be received by the ECU. As a result the upper stop position will be changed from upper mechanical block
position to the short drop position (EEPROM parameter). Short drop commandos will be executed independent of multi
function line state.
Window lifter behavior due to door ajar signal:
Window
Event
Action
Closed
Door opened → Short drop active Glass moves down to SD position
Over SD position
Door opened → Short drop active Glass moves down to SD position
Below SD position
Door opened → Short drop active
Glass will not move, but upper stop position will be
changed to SD position
SD position
Door opened → Short drop active
Glass will not move, but upper stop position will be
changed to SD position
SD position
Door closed → Short drop inactive
Glass will move to upper block position, upper stop
position is equal to mechanical stop SD position
Below SD position
Door closed → Short drop inactive
Glass will not move, but upper stop position will change to
mechanical stop position
Body Electrical System > Power Windows > Power Window Motor > Schematic Diagrams
Circuit Diagram
Body Electrical System > Power Windows > Power Window Motor > Repair procedures
Inspection
Front Power Window Motor
1. Remove the front door trim panel.
(Refer to the Body group - "Front door")
2. Disconnect the connector from the motor.
3. Connect the terminal No.4 directly to battery voltage (12V) and check that the motor operates smoothly. If the
operation is abnormal, replace the motor.
Body Electrical System > Power Windows > Power Window Switch > Schematic Diagrams
Circuit Diagram
Driver Power Window Switch
Assist Power Window Switch
Body Electrical System > Power Windows > Power Window Switch > Repair procedures
Inspection
Power Window Main Switch Inspection
1. Disconnect the negative (-) battery terminal.
2. Remove the front door trim panel.
(Refer to the Body group - front door)
3. Disconnect the 12P connector from the switch.
4. Check for continuity between the terminals in each switch position according to the table. If the continuity condition
is not normal, replace the switch.
Assist Power Window Switch Inspection
1. Disconnect the negative (-) battery terminal.
2. Remove the front door trim panel.
(Refer to the Body group - front door)
3. Disconnect the 12P connector from the switch.
4. Check for continuity between the terminals in each switch position according to the table. If the continuity condition
is not normal, replace the switch.
Body Electrical System > Rear Glass Defogger > Components and Components Location
Component Location
1. Rear window defogger switch (A/C controller)
2. Rear window defogger
3. Body control module (Rear window defogger relay)
Body Electrical System > Rear Glass Defogger > Rear Glass Defogger Printed Heater >
Repair procedures
Inspection
Wrap tin foil around the end of the voltmeter test lead to prevent damaging the heater line. Apply finger pressure
on the tin foil, moving the tin foil along the grid line to check for open circuits.
1. Turn on the defogger switch and use a voltmeter to measure the voltage of each heater line at the glass center
point. If a voltage of approximately 6V is indicated by the voltmeter, the heater line of the rear window is considered
satisfactory.
2. If a heater line is burned out between the center point and (+) terminal, the voltmeter will indicate 12V.
3. If a heater line is burned out between the center point and (-) terminal, the voltmeter will indicate 0V.
4. To check for open circuits, slowly move the test lead in the direction that the open circuit seems to exist. Try to find
a point where a voltage is generated or changes to 0V. The point where the voltage has changed is the open-circuit
point.
5. Use an ohmmeter to measure the resistance of each heater line between a terminal and the center of a grid line,
and between the same terminal and the center of one adjacent heater line. The section with a broken heater line will
have a resistance twice as that in other sections. In the affected section, move the test lead to a position where the
resistance sharply changes.
Repair Of Broken Heater Line
Prepare the following items:
1. Conductive paint.
2. Paint thinner.
3. Masking tape.
4. Silicone remover.
5. Using a thin brush:
Wipe the glass adjacent to the broken heater line, clean with silicone remover and attach the masking tape as
shown. Shake the conductive paint container well, and apply three coats with a brush at intervals of about 15
minutes apart. Remove the tape and allow sufficient time for drying before applying power. For a better finish,
scrape away excess deposits with a knife after the paint has completely dried. (Allow 24 hours).
Body Electrical System > Rear Glass Defogger > Rear Glass Defogger Switch > Repair
procedures
Inspection
1. The rear window defogger switch inputs can be checked using the GDS.
2. To check the input value of rear window defogger switch, select option "BODY CONTROL MODULE".
3. Select option "CURRENT DATA".
4. To check the input value of rear window defogger switch in force mode, select option "ACTUATION TEST".
Removal
1. Disconnect the negative(-) battery terminal.
2. Remove the console upper cover(A).
3. Remove the center fascia lower panel(A).
4. Disconnect the heater control unit connector(A).
5. Remove the heater control unit contained the rear window defogger switch from the center fascia panel.
Installation
1. Install the heater control unit.
2. Install the center fascia panel.
3. Install the console upper cover.
Body Electrical System > Windshield Wiper/Washer > Components and Components
Location
Component Location
1.
2.
3.
4.
Windshield wiper arm & blade
Wiper & washer switch
Windshield washer hose
Windshield wiper motor & linkage
5. Washer motor
6. Washer reservoir
7. Wiper relay (Engine room relay box)
Body Electrical System > Windshield Wiper/Washer > Windshield Wiper-Washer Switch >
Repair procedures
Inspection
Check for continuity between the terminals while operating the wiper and washer switch. If it is not normal condition,
replace wiper and wiper switch.
Wiper Switch
Washer Switch
Removal
1. Remove the steering column upper and lower shrouds after removing 3 screws.
2. Remove the wiper switch(A) by releasing the part.
Installation
1. Install the wiper switch.
2. Install the steering column upper and lower shrouds.
Body Electrical System > Windshield Wiper/Washer > Front Wiper Motor > Components
and Components Location
Component Location
1.
2.
3.
4.
Wiper motor & linkage assembly
Wiper arm
Wiper blade
Cowl top cover
5.
6.
7.
8.
Cap
Bolt
Nut
Rivet
Body Electrical System > Windshield Wiper/Washer > Front Wiper Motor > Repair
procedures
Inspection
Speed Operation Check
1. Remove the connector from the wiper motor.
2. Attach the positive (+) lead from the battery to terminal 5 and the negative (-) lead to terminal 2.
3. Check that the motor operates properly.
Removal
1. Remove the wiper arm mounting nut(B) after removing the wiper cap(A).
2. Remove the windshield wiper arm(A) and blade(B).
Torq ue : 23~27 Nm (2.3~2.7 kgf.m, 16.6~20 lbf.ft)
3. If necessary of removing the wiper blade, push in the bottom of the wiper blade clip(A) and remove the wiper blade
from the inside radius of the wiper arm.
4. Remove the weather strip then remove the cowl top cover(A) after removing 3 rivets.
5. Disconnect the wiper motor connector(A).
6. Remove the windshield wiper motor and linkage assembly(A) after removing 2 bolts.
Torq ue : 7-11Nm (0.7-1.1, kgf.m, 5.0-7.9 lbf.ft)
Installation
1. Install the wiper arm and blade to the specified position.
Specified position
A
B
Distance
[in (mm)]
1.49 ± 0.2
(38 ± 5)
1.97 ± 0.2
(50.1 ± 5)
2. Set the washer nozzle on the specified spray position.
Specified position
Distance [in (mm)]
A
21.1 (535)
B
21.1 (535)
C
17.0 (432)
D
17.0 (432)
E
24.4 (620)
F
20.3 (515)
G
20.3 (515)
H
24.4 (620)
I
21.3 (540)
Body Electrical System > Windshield Wiper/Washer > Front Washer Motor > Repair
procedures
Inspection
1. With the washer motor connected to the reservoir tank, fill the reservoir tank with water.
Before filling the reservoir tank with water, check the filter for foreign material or contamination. if necessary,
clean the filter.
2. Connect positive (+) battery cables to terminal 1 and negative (-) battery cables to terminal 2 respectively.
3. Check that the motor operates normally and the washer motor runs and water sprays from the front nozzles.
4. If they are abnormal, replace the washer motor.
Connector No.1 : Windshield washer(+),
2 : Ground
Washer Fluid Level Sensor Switch
1. Disconnect the negative(-) battery terminal.
2. Drain the washer fluid less than 650 cc.
3. Check for continuity between the No. 1 and No.2 terminal in each float position.
There should be continuity when the float is down.
There should be no continuity when the float is up.
4. If the continuity is not as specified, replace the washer fluid level switch
Removal
- When servicing the washer pump, be careful not to damage the washer pump seal.
- Do not operate the washer pump before filling the washer reservoir.
Failure to do so could result in premature pump failure.
1. Disconnect the negative (-) battery terminal.
2. Remove the front bumper.
(Refer to BD group - "Front bumper")
3. Remove the washer hose and disconnect the washer motor connector(A) and level sensor connector(B).
4. Remove the washer motor(A).
5. Remove the funnel part(A) of reservoir after loosening the mounting bolt(1EA).
6. Remove the washer reservoir (A) after removing 2 bolts.
Installation
1. Install the washer reservoir.
Before installing the pump motor, check the filter for foreign material or contamination. if necessary, clean the
filter into the pump motor.
2. Install the funnel.
3. Install the washer motor.
4. Install the washer hose.
5. Connect the washer motor connector and level sensor connector.
6. Install the front bumper.
Body Electrical System > Electro chromic Inside Rear View Mirror > Schematic Diagrams
Circuit Diagram
Body Electrical System > Electro chromic Inside Rear View Mirror > Description and
Operation
Description
The ECM (Electro Chromic inside rear view Mirror) is for dimming the reflecting light from a vehicle behind at night, in
order the user not to be dazzled by the light. The front looking sensor detects brightness of the surroundings, while the
rearward looking sensor the strength of the reflecting light so that adjusts the reflexibility of the mirror in the range of
10~70%. But, when the reverse gear is engaged, it stops functioning.
(6. Home link power(12V), 8. Ground,
9. Reverse gear signal, 10. IGN(12V))
1. The front looking sensor sees if the brightness of the surroundings is low enough for the mirror to operate its
function.
2. The rearward looking sensor detects glaring of the reflecting light from a vehicle behind.
3. The ECM is darkened to the level as determined by the rearward looking sensor. When the glaring is no longer
detected, the mirror stops functioning.
(A : ON/OFF Button, B : Forward looking sensor, C : Rearward looking sensor, D : Indicator)
4. For Home link function, button priorities are as follow.
A. 1 Dot - Priority #3
B. 2 Dot - Priority #2
C. 3 Dot - Priority #1
Automatic-dimming Function
To protect your vision during nighttime driving, your mirror will automatically dim upon detecting glare from the vehicles
traveling behind you. The auto-dimming function can be controlled by the Dimming ON/OFF Button :
1. Pressing and holding the Feature Control button for more than 3 but less than 6 seconds turns the auto-dimming
function OFF which is indicated by the green Status Indicator LED turning off.
2. Pressing and holding the Feature Control button again for more than 3 but less than 6 seconds turns the autodimming function ON which is indicated by the green Status Indicator LED turning on.
The mirror defaults to the "ON" position each time the vehicle is started.
Body Electrical System > Electro chromic Inside Rear View Mirror > Repair procedures
Inspection
Check it by the procedure below to see if the function of the ECM is normal.
1. Turn the ignition key to the "ON" position.
2. Press the (A) button to turn the automatic dimming function ON/OFF.
3. Cover the forward looking sensor(B) to stop functioning.
4. Head a light to the rearward looking sensor(C).
5. The ECM should be darkened as soon as the rearward looking sensor detects the light.
If this test is performed in daytime, the ECM may be darkened as soon as the forward looking sensor is
covered.
Removal
1. Remove the mirror wire cover(A).
2. Disconnect the inside rear view mirror connector(B).
3. Loosen the mirror mounting screw(A).
4. Remove the inside rear view mirror(A) pulling it upside carefully.
Make sure the mounting bracket of the mirror not to be damaged.
Installation
1. Install the inside rear view mirror.
2. Connect the inside rear view mirror connector.
3. Install the mirror wire cover.
Body Electrical System > Electro chromic Inside Rear View Mirror > Compass Mirror >
Description and Operation
Description
The compass feature is designed to be integrated into an electro chromic interior rearview mirror.
The mirror assembly shall display a compass heading.
The compass mirror then take the sensor information to determine static field strengths and rotating field information to
determine an accurate compass heading.
Specification
Item
Standard value
Rate voltage
DC 12V
Operating voltage range
DC9 ~ 16V
Operating temperature range
-30 ~ +65°C
Direction display
8
Renewal time
2 sec.
Switch Point Accuracy
The compass module shall, while compensating for the vehicle magnetic fields, until the Earth's varying magnetic fields
to determine direction.
[Switch points]
Switch point
Heading ± 10°
N - NE
22.5
NE - E
67.5
E - SE
112.5
SE - S
157.5
S - SW
202.5
SW - W
247.5
W - NW
292.5
NW - N
337.5
There should be hysteresis at each switch point.
Switch points between the 8 cardinal directions, these switch points are ± 10°
Compass display interval
Compass display should be updated at every two seconds.
Function
The compass can be turned ON and OFF and will remember the last state when the ignition is cycled. To turn the
display feature ON/OFF :
1. Press and release the feature control button (A) to turn the display feature OFF.
2. Press and release the feature control button (A) again to turn the display back ON.
Additional options can be set with press and hold sequences of the feature control button (A) and are detailed
below.
There is a difference between magnetic north and true north. The compass in the mirror can compensate for this
difference when it knows the magnetic zone in which it is operating. This is set either by the dealer or by the user.
Body Electrical System > Electro chromic Inside Rear View Mirror > Compass Mirror >
Repair procedures
Adjustment
Calibration procedure
If the display read "C", calibrate the compass.
1. Driving the vehicle in a circle at less than 8km/h 3 times or until the compass heading appears.
2. Driving in a circle in right-handed direction and opposite direction are possible, and if the calibration is completed,
the compass heading will appear.
3. Keep driving in a circle until a commpass heading appears.
To adjust the Zone setting :
1. Determine the desired zone number based upon your current location on the zone maps.
2. Press and hold the Feature Control button for more than 6 but less than 9 seconds, the current zone number will
appear on the display (B).
3. Pressing and holding the feature control button (A) again will cause the numbers to increment (Note: they will repeat
…13, 14, 15, 1, 2,..). Releasing the button when the desired zone number appears on the display will set the new
zone.
4. Within about 5 seconds the compass will start displaying a compass heading again.
To re-calibrate the compass :
There are some conditions that can cause changes to the vehicle magnets. Items such as installing a ski rack or a
antenna or even some body repair work on the vehicle can cause changes to the vehicle's magnetic field. In these
situations, the compass will need to be re-calibrated to quickly correct for these changes.
1. Press and hold the feature control button (A) for more than 9 seconds. When the compass memory is cleared, a "C"
will appear in the display (B).
2. To calibrate the compass, drive the vehicle is 2 complete circles at less than 8 KPH (5 MPH).
Zone Map
Body Electrical System > Hands Free System > Components and Components Location
Components
1. Hands free call switch
2. Mic
3. Front left speaker
4. Front right speaker
5. Audio head unit (hands free control)
※ There is no hands free jack. This system supports Bluetooth(wireless system).
Body Electrical System > Hands Free System > Description and Operation
Function
Bluetooth Phone Operation
• Bluetooth Volume
• Operation Button
General Feature
• This system supports Bluetooth, a wireless system that allows you to make or receive calls without taking your
hands from the steering wheel and without using cables to connect the phone and system.
• The phone must be paired to the system before using the hands-free feature.
Only one linked cellular phone can be used with the system at a time. The system is available in English, US
Spanish, or Canadian French languages.
If the vehicle is moving do not use a cellular phone or connect the Bluetooth phone.
Some Bluetooth devices do not offer a perfect compatibility with this system.
Voice Recognition Activation
• The voice recognition engine containedin the Bluetooth System can be activatedin the following conditions:
- Button Activation
The voice recognition system will beactive when the
button is pressed and after the sound of a Beep.
- Active Listening
The voice recognition system will beactive for a period of time when the Voice Recognition system has askedfor a
customer response.
• The system can recognize single digits from zero to nine while number greaterthan ten will not be recognized.
• If the command is not recognized, the system will announce "Pardon" or Noinput voice signal from microphone.
(Noresponse)
• The system shall cancel voice recogntionmode in following cases : When pressing the
button and saying cancel
following the beep. When not making a call and pressing the
button. When voice recognition has failed 3
consecutive times.
• At any time if you say "help", the system will announce what commands areavailable.
Menu tree
Phone Setup
Pairing phone
To use the hands-free system, you need to register your phone in the system. Up to 5 phones can be registered in the
system.
1. Press the
button.
2. Say "Set Up".
3. Say "Pair Phone".
4. Say "Yes".
5. Say the name of the contact.
6. Say "Yes".
7. The Pairing procedure of the cellularphone varies according to each cellularphone.
The system may not function in the followingcases:
If 5 phones have already been registered.If the system cannot communicate withthe phone.
To connect phone
The registered phones can be selected. When the system connects to Bluetooth,the phone previously used is
automatically selected. Select a different phone if necessary. Only the selected phone can be used with the hands-free
system.
1. Press the
button.
2. Say "Set Up".
3. Say "Select Phone".
4. Say the name of the contact or the number of the contact.
5. Say "Yes".
The system may not function in the following cases:
If the phone is not found.
If the system does not recognize the voice command.
Deleting phone
The registered phones can be deleted.
1. Press the
button.
2. Say "Set Up".
3. Say "Delete Phone".
4. Say the name of the contact, the number of the contact or "Delete all phone".
5. Say "Yes".
Receiving a phone call
When receiving a phone call, a ring toneis audible and the system changes into telephone mode.
When receiving a phone call, the phone number and the message "Incoming" will be displayed.
• Do either one of the following:
Press the send switch to take the call. Press the end switch to refuse the call.
• To adjust the ring volume, push "+" or "-" on the steering volume controls.
Volume adjustment cannot be madeusing the audio system.
• To transfer a call to the phone:
The received call can be transferred from the hands-free system to the cellularphone that is connected to Bluetooth.
For details, please refer to you user's manual for the cellular phone or go to the Key matrix in this manual (next
page).
Talking on the phone
When talking on the phone, the display will differ depending on whether or not the vehicle is in motion.
Number and "active call" is displayed.
When the call is finished, press the end switch.
In the following situations, your voice may not reach the other party:
1. Talk alternately with the other partyon the phone. If you talk at the sametime, the voice may not reach
eachother parties. (This is not a malfunction.)(It is not a malfunction.)
2. Keep the volume of receiving voice to a low level. Otherwise, high volumes may result in an echo. When you
talk on the phone, speak clearly towards the microphone.
3. When driving on a rough road.
4. When driving at high speeds.
5. When the window is open.
6. When the air conditioning vents are facing the microphone.
7. When the sound of the air conditioning fan is loud.
Key matrix
Class
No.
1
KEY
Paired
H/P
Empty
Connected
Disconnected
Normal
mode
BT
SETUP
menu
Incoming Outgoing
Call
Call
Active
Call
Active
Call
SHORT
Not
Paired
Not
Connecting
-
-
-
2nd call
2nd Call
1st
2nd
Call:waiting Call:waiting
2nd
1st
Call:active Call:active
LONG
-
-
-
-
-
-
Transfer call:secret call
VR
SHORT
VR
MODE
Cancel
VR MODE
Cancel
VR MODE VR MODE
Cancel
Cancel
Reject
Call
End Call
End Call
End Call
Speaker
Speaker
Adaptation Adaptation
(Only
(Only
English)
English)
-
-
-
-
2
3
LONG
[10sec]
-
-
SHORT
Active
Active
Active
Active
-
-
-
-
Change
language
Change
language
Change
language
-
-
-
-
LONG Change
[10sec] language
Body Electrical System > Hands Free System > Hands Free Switch > Schematic Diagrams
Circuit Diagram
Body Electrical System > Hands Free System > Hands Free Switch > Repair procedures
Inspection
1. Check the hands free remote control switch for resistance between No.3 and No.4 terminals in each switch position.
Switch
Connector
terminal
Resistance
(±5%)
END
3 - 4 (LH)
18.91 kΩ
CALL
3 - 4 (LH)
40.91 kΩ
VOICE
Recognition
2 - 4 (RH)
10.71 kΩ
Removal
1. Disconnect the negative (-) battery terminal.
2. Remove the driver airbag module.
(Refer to the airbag group)
3. Remove the steering wheel.
(Refer to ST group - "Steering column & shaft")
4. Remove the steering wheel cover after loosening the 4 screws.
5. Remove the hands free remote control switch (A) after removing the steering wheel remote control switch connector
and 2 screws.
Installation
1. Reassemble the steering wheel remote control switch after connecting the connector.
2. Reassemble the steering wheel.
3. Reassemble the driver airbag module.
Make sure the hands free remote control switch and the airbag module connectors are plugged in properly.
Body Electrical System > Hands Free System > Hands Free Mic > Repair procedures
Inspection
1. Disconnect the negative(-) battery terminal.
2. Remove the hands free mic(A) after loosening the connector from loof top.
3. Check the continuity of Mic between terminals.
Body Electrical System > Sun Roof > Components and Components Location
Component Location
1. Sunroof
2. Sunroof switch
3. Sunroof motor & controller
Body Electrical System > Sun Roof > Schematic Diagrams
Circuit Diagram
Body Electrical System > Sun Roof > Sunroof Switch > Repair procedures
Inspection
1. Disconnect the negative (-) battery terminal.
2. Open the sunglass case cover from the overhead console then remove the 2 screws holding the overhead
console(A).
3. Disconnect the connector. Check for continuity between the terminals. If the continuity is not as specified, replace
the sunroof switch.
Body Electrical System > Sun Roof > Sunroof Motor > Repair procedures
Inspection
1. Disconnect the negative (-) battery terminal.
2. Open the sunglass case cover from the overhead console then remove the 2 screws holding the overhead console.
Disconnect the connector then remove the overhead console lamp assembly from the headliner.
3. Disconnect the sunroof motor(A) connector.
4. Ground the terminals as below table, and check that the sunroof unit operates as below table.
5. Make these input tests at the connector
If any test indicates a problem, find and correct the cause, then recheck the system.
If all the input tests prove OK, the sunroof motor must be faulty; replace it.
Test
condition
Terminal
Test: Desired result
3
IG2 ON
Check for voltage to ground:
There should be battery voltage.
1
Under all
conditions
Check for continuity to ground:
There should be continuity.
6
Under all
conditions
Check for voltage to ground:
There should be battery voltage.
Resetting The Sunroof
Whenever the vehicle battery is disconnected or discharged, or you use the emergency handle to operate the sunroof,
you have to reset your sunroof system as follows:.
1. Turn the ignition key to the ON position.
2. According to the position of the sunroof, do as follows.
(1) In case that the sunroof has closed completely or been tilted :
Press the TILT UP button until the sunroof has tilted upward completely.
(2) In case that the sunroof has slide-opened:
Press and hold the CLOSE button for more than 5 seconds until the sunroof has closed completely.
Press and hold the CLOSE button for more than 5 seconds after the sunroof has closed completely. Press the
TILT UP button until the sunroof has tilted upward completely.
3. Release the TILT UP button.
4. Press and hold the TILT UP button once again until the sunroof has raised above and returned to the maximum
TILT UP position.
When this is complete, the sunroof system is reset.
Protecting Motor From Overheating
In order to protect the sunroof motor from overheating from continuous motor operation, the sunroof ECU controls the
Run-time and Cool-time of the motor as follows:
1. The Sunroof ECU detects the Run- time of motor
2. Motor can be operated continuously for the 1st run-time(120 ± 10sec.).
3. The continuous operation of motor stops after the 1st Run-time(120 ± 10sec.).
4. Then Motor is not operated for the 1st Cool-time(18 ± 2sec.).
5. Motor is operated for the 2nd Run-time(10 ± 2sec.) at the continued motor operation after 1st Cool-time(18 ± 2sec.)
6. The continuous operation of motor stops operating after the 2nd Run-time(10 ± 2sec.)
7. Motor is not operated for the 2nd Cool-time(18 ± 2sec.).
8. Motor repeats the 2nd run-time and 2nd cool-time at the continued motor operation.
A. In case that motor is not operated continuously, the run-time is increased.
B. The Run-Time of motor is initialized to "0" if the battery or fuse is reconnected after being disconnected,
discharged or blown.
T1 : 120 ± 10 sec., T2 : 18 ± 2 sec.,
T3 : 10 ± 2 sec., T4 : 18 ± 2 sec.
Body Electrical System > Lighting System > Specifications
Specification
Items
Bulb Watt (W)
Head lamp (High/Low)
55/55
Front turn signal lamp
28
Front position lamp
Outside mirror lamp (If equipped)
Front fog lamp
Rear tail/stop lamp (Outside)
Rear tail lamp (Inner) - General
8
LED
27
8/27
8
Back up lamp
18
Rear turn signal lamp
27
License plate lamp
5
Overhead console lamp
10 x 2
High mounted stop lamp
LED
Luggage lamp
5
Vanity lamp
5
Glove box
5
Body Electrical System > Lighting System > Components and Components Location
Component Location
1.
2.
3.
4.
5.
6.
7.
Head lamp (High)
Head lamp (Low)
Front turn signal lamp, Front position lamp
Front side marker
Front fog lamp
Side turn signal lamp
High mounted stop lamp
8. Tail lamp
9. Stop lamp
10. Turn signal lamp
11. Back up lamp
12. Rear side marker
13. Overhead console lamp
14. Luggage lamp
Body Electrical System > Lighting System > Head Lamps > Components and Components
Location
Component
1.
2.
3.
4.
5.
6.
Head lamp assembly housing
Screw
Ballast
Head lamp (High) bulb
Dust cover
Turn signal / Tail lamp bulb
7. Bulb holder
8. Head lamp (Low) bulb (HID) & Ignitor
9. Stealing
10. Screw
11. Dust cover
12. Rubber ring
※ A : HID Type Components
B : Halogen Type Components
Body Electrical System > Lighting System > Head Lamps > Description and Operation
HID Head Lamp
1. Bulb
(1) Elements
Xenon gas: Xenon gas activates the initial reaction for rapid illuminating.
Molybdenum electrode: anode arcing
Metal halide salts: color composing component
(2) Lightening principle
When Xenon gas and metal halide salt will discharge the molybdenum anode in a capsule, it emits light.
2. Ignitor
Ignitor (A) is an electromagnetic transformer that receives current from ballast and boost voltage to light on the arc
light source in any environment.
3. Ballast
(1) Ballast (A) delivers an instant high voltage pulse to the ignitor electrode, to initialize discharge in the source.
(2) Ballast supplies the stable power to the bulb and the ignitor during initialization and normal state of arc.
4. Stability
(1) Durable for vibration as there is no filament.
(2) Does not operate if polarity are changed.
(3) Doesn't operate if the input voltage is not in the range of 10-16V.
(4) Doesn't operate if the circuit is short.
(5) Doesn't operate if the bulb burnt out.
Body Electrical System > Lighting System > Head Lamps > Repair procedures
Inspection
1. Check-points upon head lamp failure (HID)
(1) Check the battery voltage. (Low beam will be on when the battery voltage above 9V.)
(2) Check the fuse and relay.
(3) Check the polarity of ballast. (If the polarity are changed, low beam doesn't lighten)
(4) Check the bulb connector securely.
(5) Visually bulb checking (no filament): damaged glass, damaged for upper parts and lower parts of glass tube.
(6) After (1)~(5), replace the ballast and the ignitor. (ballast assembly).
2. Service procedure and warning (HID)
No.
Item
Service procedures
1. Disconnect the power
connector from the lamp.
1
Replacement of
lamp assembly
2. Remove and replace the lamp
assembly.
Warning
• Disconnect the head lamp
power connector to avoid
high voltage.
3. Connect the power connector.
1. Disconnect the power
connector from the lamp.
(head lamp, turn signal, head
lamp leveling device)
2. Remove the lamp assembly.
2
Replacement of
the Bulb
3. Remove the ballast and dust
cover.
4. Remove the bulb socket and
replace the bulb.
Remarks
• Other
description is
the same as
the halogen
bulbs.
• Disconnect the head lamp
power connector to avoid
high voltage.
• Be careful not to damage the
bulb and use genuine bulbs
only.
• Do not apply excessive force
and fit it correctly.
5. Installation is the reverse of
removal.
1. Disconnect the power
connector from the lamp.
2. Remove the lamp and then
the ballast and the dust cover.
3
Replacement of
the Ballast (with
built-in ignitor)
3. Remove the head lamp
leveling device and then the
bulb socket.
4. Connect the bulb socket on
the replacement ballast and
install the leveling device.
• Disconnect the head lamp
power connector to avoid
high voltage.
• Replace the
ballast only and
install the used
lamp.
• Replace the
sub assembly
except the
ballast.
5. Installation is the reverse of
removal.
1. Power supply should be
according to the rated
capacity.
2. Use the rated fuse and wire.
• All parts should be serviced
• HID lamp
should not be
installed on
4
Others
3. Bulb socket shall be free from
moisture or dirt.
4. Do not apply the ballast
severe shock, water, or
extreme
only at specified service
centers.
installed on
other cars
(Dangerous, fire
may occur.)
HID lamp shall not be used on other cars.(Fire may occur.)
Fire may occur when HID lamp initially lights due to the fact that arc-discharge generates high voltage (max.
30,000V) and high current (12-13A), and are different from the halogen lamp specification.
Characteristic
1. Durable for vibration as there is no filament.
2. HID lamp had a more long life than halogen lamp.
3. Does not operate if polarity is changed.
4. Operating input voltage : 9-16V
Head Lamp Aiming Instructions
The head lamps should be aimed with the proper beam-setting equipment, and in accordance with the equipment
manufacturer's instructions.
If there are any regulations pertinent to the aiming of head lamps in the area where the vehicle is to be used,
adjust so as to meet those requirements.
Alternately turn the adjusting gear to adjust the head lamp aiming. If beam-setting equipment is not available, proceed
as follows:
1. Inflate the tires to the specified pressure and remove any loads from the vehicle except the driver, spare tire, and
tools.
2. The vehicle should be placed on a flat floor.
3. Draw vertical lines (Vertical lines passing through respective head lamp centers) and a horizontal line (Horizontal line
passing through center of head lamps) on the screen.
4. With the head lamp and battery in normal condition, aim the head lamps so the brightest portion falls on the
horizontal and vertical lines.
Make vertical(A) adjustments to the lower beam using the adjusting wheel.
Front Fog Lamp Aiming
The front fog lamps should be aimed as the same manner of the head lamps aiming.
With the front fog lamps and battery normal condition, aim the front fog lamps by turning the adjusting screw(A) with a
driver.
Head Lamp And Fog Lamp Aiming Point
1. General Type (VOR)
A. Turn the low beam on without driver aboard.
B. The cut-off line should be projected in the allowable range (shaded region) shown in the picture.
C. If head lamp leveling device is equipped, adjust the head lamp leveling device switch with 0 positions.
2. HID Type (VOL)
A. Turn the low beam on without driver aboard.
B. The cut-off line should be projected in the cut-off line shown in the picture.
C. If head lamp leveling device is equipped, adjust the head lamp leveling device switch with 0 positions.
3. Turn the front fog lamp on without the driver aboard.
The cut-off line should be projected in the allowable range (shaded region)
Removal
1. Disconnect the negative (-) battery terminal.
2. Remove the head lamp assembly(A) after loosening the mounting bolt(2EA).
Take care that holding clip (A, B) is not to be damaged.
3. Disconnect the head lamp connectors(A).
4. Remove the bulb caps from the head lamp assembly after turning in the counter clock-wise direction.
Installation
1. Install the head lamp assembly after connecting the connector.
2. Connect the negative (-) battery terminal.
Replacement
Bulb (HID)
1. Turn the head lamp switch off.
2. Remove the lamp assembly.
3. Disconnect the power connector from the lamp.
4. Remove the dust cover after loosening the screw.
5. Remove the ignitor clip(A).
6. Disconnect the ignitor connector.
7. Remove the ignitor(A) and bulb(B).
8. Installation is the reverse of removal.
Turn the head lamp switch off to avoid high voltage
Be careful not to damage the bulb and use genuine bulbs only
• Do not apply excessive force and fit it correctly.
• Confirm the bulb locking
Ballast
1. Turn the head lamp switch off.
2. Remove the head lamp assembly.
3. Disconnect the power connector from the lamp.
4. Remove the ballast (A) after loosening the screws (3EA).
Be careful not to be damaged when disconnecting the ballast connector.
5. Installation is the reverse of removal.
• Turn the head lamp switch off to avoid high voltage.
• HID lamp shall not be used on other cars.(Fire may occur.)
• Fire may occur when HID lamp initially lights due to the fact that arc-discharge generates high voltage (max.
20,000V) and high current (12-13A), and are different from the halogen lamp specification.
• Install the dust cover after confirming the locking state between bulb and bulb holder.
• When testing the HID head lamp, turn the power on or off with switch between power supply and lamp
because of high voltage.
• Do not operate the head lamp switch with the bulb not installed, because it generates spark momently.
Head lamp(high) bulb
1. Turn the head lamp power off.
2. Remove the head lamp assembly.
3. Disconnect the power connector from the lamp.
4. Remove the dust cap.
5. Disconnect the connector.
6. Remove the clip(A) from the head lamp (High) bulb.
7. Remove the head lamp (High) bulb(A).
Front turn signal lamp
1. Turn the head lamp power off.
2. Remove the lamp assembly.
3. Disconnect the power connector from the lamp.
4. Remove the dust cap and bulb(A).
Body Electrical System > Lighting System > Rear combination lamp > Repair procedures
Inspection
Back Up Lamp Relay
1. Disconnect the negative(-) battery terminal.
2. Pull out the back up lamp relay(A) from the engine compartment relay box.
3. Check for continuity between the terminals.
Removal
1. Disconnect the negative (-) battery terminal.
2. Loosen the rear combination lamp mounting nuts(4EA) and disconnect the connector(A) then remove the rear
combination lamp assembly(B).
3. If necessary to replace the bulb, replace the bulb turning the cap in the counter clock-wise direction without removal
of rear combination lamp assembly.
A : Stop lamp, B : Turn signal lamp
C : Back up lamp, D : Tail lamp
Installation
1. Install the rear combination lamp assembly after replacing the bulbs.
Body Electrical System > Lighting System > Overhead Console Lamp > Repair procedures
Inspection
Remove the overhead console lamp assembly then check for continuity between terminals. If the continuity is not as
specified, replace the map lamp switch.
Removal
1. Disconnect the negative (-) battery terminal.
2. Loosen 2 screws holding the overhead console(A).
3. Disconnect the connectors(A) of sunroof switch then remove the overhead console lamp assembly.
4. If necessary to replace the bulb(A), replace the bulb after opening the overhead console lens.
Installation
1. Install the overhead console lamp after connecting the sunroof switch connector and lamp connector.
2. Install the lens after tightening 2 screws.
Body Electrical System > Lighting System > Hazard Lamp Switch > Repair procedures
Inspection
Hazard Lamp Switch
1. Disconnect the negative (-) battery terminal.
2. Remove the console upper cover(A).
(Refer to Body group - "Console")
3. Remove the center fascia lower panel(A).
4. Disconnect the hazard lamp switch connector.
5. Operate the switch and check for continuity between terminals with an ohmmeter.
Hazard Lamp Relay
1. Disconnect the negative (-) battery terminal.
2. Disconnect the ICM relay box connector.
3. Check for continuity between terminals.
There should be continuity between the No.12 and No.13 of ICM-B terminals when power and ground are connected
to the No.13 and No.3 of ICM-B terminals.
4. There should be no continuity between the No.12 and No.13 of ICM-B terminals when power is disconnected to the
No.13 and No.3 of ICM-B terminals.
Body Electrical System > Lighting System > Flasher Unit > Repair procedures
Inspection
1. Disconnect the negative (-) battery terminal.
2. Remove the driver crash pad lower panel (A).
3. Remove the flasher unit (A) after loosening the bolt and disconnecting the connector.
4. Connect the positive (+) lead from the battery to terminal 2 and the negative (-) lead to terminal 3.
5. Connect the two turn signal lamps in parallel to terminals 1 and 3. Check that the bulbs turn on and off.
The turn signal lamps should flash 60 to 120 times per minute. If one of the front or rear turn signal lamps has
an open circuit, the number of flashes will be more than 120 per minute. If operation is not as specified, replace
the flash unit.
Body Electrical System > Lighting System > Rheostat > Repair procedures
Inspection
1. Disconnect the negative (-) battery terminal.
2. Remove the lower crash pad switch (A) from the side crash pad cover by using the scraper.
3. Disconnect the rheostat connector from lower crash pad switch.
4. Check for intensity. If the light intensity of the lamps changes smoothly without any flickering when the rheostat is
turned, it can be assumed that the rheostat is normal.
Body Electrical System > Lighting System > Front Fog Lamps > Repair procedures
Inspection
1. Disconnect the negative(-) battery terminal.
2. Remove the lighting switch of the multi-function switch. (Refer to the multi-function switch)
3. With the front fog lamp switch, make sure that continuity exists between the terminals below.
If continuity is not as specified, replace the multi-function switch.
Front Fog Lamp
Front Fog Lamp Relay
1. Disconnect the negative(-) battery terminal.
2. Pull out the front fog lamp relay(A) from the engine compartment relay box.
3. Check for continuity between terminals. There should be continuity between the No.87 and No.30 terminals when
power and ground are connected to the No.85 and No.86 terminals.
4. There should be no continuity between the No.87 and No.30 terminals when power is disconnected.
Removal
1. Disconnect the negative (-) battery terminal.
2. Remove the front bumper.
(Refer to the body group - front bumper)
3. Disconnect the front fog lamp connector(A).
4. Replace the front fog bulb turning it in the counter clock-wise direction.
Installation
1. Install the front fog bulb.
2. Reconnect the lamp connector.
3. Install the front bumper.
Body Electrical System > Lighting System > Luggage Room Lamps > Repair procedures
Removal
1. Disconnect the negative (-) battery terminal.
2. Remove the luggage room lamp with a flat-tip screwdriver and disconnect the 2P connector.
3. Remove the bulb(A).
Installation
1. Install the bulb.
2. Install the luggage lamp lens.
Body Electrical System > Lighting System > Troubleshooting
Troubleshooting
Symptom
Possible cause
Remedy
One lamp does not light
(all exterior)
Bulb burned out
Replace bulb
Socket, wiring or ground faulty
Repair if necessary
Head lamps do not light
Bulb burned out
Replace bulb
Ignition fuse (LOW:15A, HIGH:15A)
blown
Check for short and replace fuse
Head lamp fuse (15A) blown
Check for short and replace fuse
Head lamp relay faulty
Check relay
Lighting switch faulty
Check switch
Wiring or ground faulty
Repair if necessary
Tail lamps and license plate lamps do Bulb burned out
not light
Tail lamp fuse (20A) blown
Replace bulb
Check for short and replace fuse
Tail lamp relay faulty
Check relay
Lighting switch faulty
Check switch
Wiring or ground faulty
Repair if necessary
Bulb burned out
Replace bulb
Stop lamp fuse (15A) blown
Check for short and replace fuse
Stop lamp switch faulty
Adjust or replace switch
Wiring or ground faulty
Repair if necessary
Stop lamps do not turn off
Stop lamp switch faulty
Repair or replace switch
Instrument lamps do not light
(Tail lamps light)
Rheostat faulty
Check rheostat
Wiring or ground faulty
Repair if necessary
Bulb burned out
Replace bulb
Stop lamps do not light
Turn signal lamp does not flash on
Turn signal lamp does not flash on
one side
Turn signal lamps do not light
Hazard warning lamps do not light
Back up lamps do not light
Front fog lamps do not light
Map lamp does not light
Luggage room lamp does not light
Turn signal switch faulty
Check switch
Wiring or ground faulty
Repair if necessary
Bulb burned out
Replace bulb
Turn signal lamp fuse (10A) blown
Check for short and replace fuse
Flasher unit faulty
Check flasher unit
Turn signal switch faulty
Check switch
Wiring or ground faulty
Repair if necessary
Bulb burned out
Replace bulb
Hazard warning lamp fuse (15A)
blown
Check for short and replace fuse
Flasher unit faulty
Check flasher unit
Hazard switch faulty
Check switch
Wiring or ground faulty
Repair if necessary
Bulb burned out
Replace bulb
Back up lamp fuse (10A) blown
Check for short and replace fuse
Back up lamp switch (M/T) faulty
Check switch
Transaxle range switch (A/T) faulty
Check switch
Wiring or ground faulty
Repair if necessary
Bulb burned out
Replace bulb
Front fog lamp fuse (15A) blown
Check for short and replace fuse
Front fog lamp relay faulty
Check relay
Front fog lamp switch faulty
Check switch
Wiring or ground faulty
Repair if necessary
Bulb burned out
Replace bulb
Room lamp fuse (10A) blown
Check for short and replace fuse
Map lamp switch faulty
Check switch
Wiring or ground faulty
Repair if necessary
Bulb burned out
Replace bulb
Room lamp fuse (10A) blown
Check for short and replace fuse
Luggage room lamp switch faulty
Check switch
Wiring or ground faulty
Repair if necessary
Body Electrical System > Auto Lighting Control System > Specifications
Specifications
Items
Specifications
Rated voltage
5V
Load
Max. 1mA
Tail lamp
Detection illuminations
ON : 0.82 ± 0.05V
OFF :1.65 ± 0.05V
Detection illuminations
Head lamp
ON : 0.82 ± 0.05V
OFF : 1.65 ± 0.05V
Body Electrical System > Auto Lighting Control System > Components and Components
Location
Component Location
1. Auto light sensor
2. Head lamps
3. Lighting switch (Auto)
4. Tail lamps
5. Body control module (BCM)
Body Electrical System > Auto Lighting Control System > Schematic Diagrams
Circuit Diagram
Body Electrical System > Auto Lighting Control System > Auto Light Switch > Repair
procedures
Inspection
Operate the auto light switch, then check for continuity between terminals of multi-function switch connector.
Body Electrical System > Auto Lighting Control System > Auto Light Sensor > Repair
procedures
Inspection
In the state of IGN1 ON, when multi function switch module detects auto light switch on, tail lamp relay output and
head lamp low relay output are controlled according to auto light sensor's input.
The auto light control doesn't work if the pin sunlight supply (5V regulated power from Ignition 1 power to sunlight
sensor) is in short circuit with the ground.
If IGN1 ON, The BCM monitors the range of this supply and raises up a failure as soon as the supply’s voltage is out
of range. Then this failure occurs and as long as this is present, the head lamp must be turned on without taking care
about the sunlight level provided by the sensor.
This is designed to prevent any head lamp cut off when the failure occurs during the night.
Tail lamp
Head lamp
ON
0.82 ± 0.05V
0.82 ± 0.05V
OFF
1.65 ± 0.05V
1.65 ± 0.05V
Removal
1. Disconnect the negative (-) battery terminal.
2. Remove the photo & auto light sensor(A) from crash pad upper side by using screw (-) driver.
3. Remove the auto light connector.
Installation
1. Reconnect the auto light connector.
2. Install the auto light sensor.
Body Electrical System > Head lamp leveling Device > Components and Components
Location
Component Location
1. Head lamp leveling unit
2. Head lamp leveling actuator
Body Electrical System > Head lamp leveling Device > Troubleshooting
Troubleshooting
NO
DTC code
Description
1
C1212
Vehicle Speed Sensor Failure
2
C1255
Rear Height Sensor
3
C1260
Steering Angle Sensor-Signal
4
C1522
Head lamp Switch Fault
5
C1604
ECU Fault
6
C1606
ECU Software Error
7
C1620
First Setup Not Completed
8
C1621
Excessive Operating Temp.
9
C2226
Output Voltage Short to Battery or Short to Ground
Body Electrical System > Head lamp leveling Device > C1212 Vehicle Speed Sensor
Failure
General Description
AHLS provides driver with the best visibility by adjusting vertical direction of the headlamp. It consists of ECM, Linkage
and actuator. The ECM detects the vehicle speed to use it a compensation factor for the actuator control. In other
words, when the vehicle speed is low the acutator needs to repond slowly though the linkage of height sensor moves
quickly ( reponse filter value is high ) .But when the vehicle speed is high, ECM operates the actuator quickly in
proportion to the height sensor variation.
DTC Description
The ECM sets DTC C1212 if the speed signal line carries a higher frequency than defined maximum value(approx.
420Hz) for 2 seconds.
DTC Detecting Condition
Item
DTC Strategy
Detecting Condition
• Frequency check
Detecting mode
• When vehicle is driving
Threshold Value
• Frequency >420Hz
Detecting time
Possible Cause
• 2 Sec
Diagnostic Circuit Diagram
• Poor connection
• Faulty Vehicle speed sensor
• AHLS-ECM faulty
Signal Waveform & Data
Fig.1) It shows Signal waveform at driving condition that changes frequncy according to vehicle speed.
Scantool Diagnostics
1. Connect scantool and Engine "ON"
2. Select "Vehicle Speed" parameter on the scantool.
(check wheel speed output value at ABS(ESC) system. And, check vehicle speed at ECM and Air conditioner
system.)
3. Check the "vehicle speed' parameter on the scantool.
Specification : It is changable according to vehicle speed.
Fig.1) Engine ON, Idle status after starting - ESC, Idle status after starting - Air conditioner system
4. Are all the parameters normal ?
▶ Fault is intermittent caused by poor contact in the sensor's and/or AHLS ECM connector or
was repaired and AHLS ECM memory was not cleared. Throughly check connectors for
looseness, poor connection, bending, corrosion, contamination, deterioration or damage.Repair or
replace as necessary and go to "Verification Vehicle Repair" procedure.
▶ Incorrect Vehicle Speed Output (Including ABS(ESC) wheel speed output) :
→ Repair or replace wheel speed sensor and ABS(ESC) system according to ABS(ESC)
troubleshooting guide as necessary and then, go to "Verification of Vehicle Repair" procedure.
▶ Incorrect Vehicle Speed Output after Cluster :
→ Substitute with a known-good Cluster and check for proper operation. If the problem is
corrected, replace Cluster as necessary and then go to "Verification of Vehicle Repair" procedure.
▶ Incorrect Vehicle Speed Output only at AHLS ECM :
→ Go to "Verification of Vehicle Repair" procedure.
Terminal and Connector Inspection
1. Many malfunctions in the electrical system are caused by poor harness and terminals. Faults can also be caused by
interference from other electrical systems, and mechanical or chemical damage.
2. Thoroughly check connectors for looseness, poor connection, bending, corrosion, contamination, deterioration,or
damage.
3. Has a problem been found?
▶ Repair as necessary and go to "Verification of Vehicle Repair" procedure.
▶ Go to "Signal circuit Inspection" procedure.
Signal circuit Inspection
■ Check vehicle speed sensor
1. Ignition "OFF"
2. Disconnect Auto Head Lamp Leveling Sensor harness connector.
3. After lifting up the vehicle, keep the engine "ON" for measurement condition.
4. Measure signal waveform at AHLS ECM harness connector.
Specification : Signal Waveform & Data
5. Is "waveform" measured near the specified form in General information?
▶
▶
or
▶
▶
This is a intermittent problem caused by poor contact of component or Control Unit
Thoroughly check the looseness, poor connection, bent, corrison, contamination, deformation
damage of connector.
Repair or replace as necessary and then, go to "Verification of Vehicle Repair" procedure.
After its repair done, Perform the lamp actuation by GDS in order to verify its normal operation.
▶
▶
▶
▶
Check the dashboard, wheel speed sensor and ABS(ESC) system.
Check for open/short in harness.
Repair as necessary and then go to "Verification of Vehicle Repair" procedure.
After its repair done, Perform the lamp actuation by GDS in order to verify its normal operation.
Verification of Vehicle Repair
After a repair, it is essential to verifying that the fault has been corrected.
1. Connect scan tool and select "Diagnostic Trouble Codes(DTCs)" mode.
2. Using scantool, Clear DTC.
3. Operate the vehicle within DTC Enable conditions in General information.
4. Are any DTCs present ?
▶ Go to the applicable troubleshooting procedure.
▶ System is performing to specification at this time.
Body Electrical System > Head lamp leveling Device > C1255 Rear Height Sensor
General Description
AHLS provides driver with the best visibility by adjusting vertical direction of the headlamp. It consists of ECM, Linkage
and actuator. The height sensor measures the angular displacement of lever by measuring the magnetic field of stator
parts formed by rotation of rotor.
DTC Description
The ECM sets DTC C1255 if the useable range of 45° is overridden caused by separation of actuator clamping bolt or
lifting of vehicle.
DTC Detecting Condition
Item
DTC Strategy
Enable Conditions
Threshold Value
Detecting time
Detecting Condition
Possible Cause
• Leveling road angle check
• IG KEY ON, ENGINE ON, HEAD LAMP ON
• Angle >45°
• 2 Sec
Diagnostic Circuit Diagram
• Loosened Actuator fixing bolt
• Faulty height sensor
Scantool Diagnostics
1. Park the vehicle in a flat land and remove all the loads from the vehicle.
2. Connect scantool to Data Link Connector(DLC).
3. Monitor DTC(Diagnostics Trouble Code) on the scantool.
4. Monitor the "SENSOR ANGLE" Parameter on the Scantool.
Specification : Below - 0.4 ± 2 DEG (Unloaded Vehicle Condition)
5. Is parameter displayed within the Specification?
▶
▶
or
▶
▶
This is a intermittent problem caused by poor contact of component or Control Unit.
Thoroughly check the looseness, poor connection, bent, corrison, contamination, deformation
damage of connector.
Repair or replace as necessary and then, go to "Verification of Vehicle Repair" procedure.
After its repair done, Perform the lamp actuation by GDS in order to verify its normal operation.
▶ Go to "Inspection and Repair" procedure.
Component Inspection
■ Check Status of Linkage of height sensor
1. Check the separation or faulty assemblage of linkage of heightsensor with the vehicle lifted.
Fig.1 .2) Component : Height sensor .
2. Has the problem found ?
▶ Repair as necessary and go to "Verification Vehicle Repair" procedure.
▶ Go to "AHLS-ECU" procedure .
■ Check ECU(AHLS)
1. Engine "ON" and Head lamp"ON"
2. Lift the vehicle.
3. Disconnect the linkage of height sensor.
4. Monitor the "SENSOR ANGLE" Parameter on the Scantool while moving linkage vertically.
5. Is there any change in "SENSOR ANGLE" Parameter?
▶ Fault is intermittent caused by poor contact in the AHLS ECM connector or was repaired and
AHLS ECM memory was not cleared. Thoroughly check connectors for looseness, poor connection,
bending, corrosion, contamination, deterioration, or damage.
Repair or replace as necessary and then go to "Verification of Vehicle Repair" procedure.
▶ Check Head Lamp movement with actuation test and then, go to 'Verification of Vehicle
Repair"procedure.
▶ Substitute with a known-good "AHLS-ECM(SENSOR)" and check for proper operation. If the
problem is corrected, replace "AHLS-ECM(SENSOR)" and then go to "Verification Vehicle Repair"
procedure.
▶ After its repair done, Perform the lamp actuation by GDS in order to verify its normal operation.
Perform Vehicle Selection and Level Initialization with scantool if AHLS ECM is repalce. (Auto Levelling Sensor)
Verification of Vehicle Repair
After a repair, it is essential to verifying that the fault has been corrected.
1. Connect scan tool and select "Diagnostic Trouble Codes(DTCs)" mode.
2. Using scantool, Clear DTC.
3. Operate the vehicle within DTC Enable conditions in General information.
4. Are any DTCs present ?
▶ Go to the applicable troubleshooting procedure.
▶ System is performing to specification at this time.
Body Electrical System > Head lamp leveling Device > C1260 Steering Angle SensorSignal
General Description
AHLS provides driver with the best visibility by adjusting vertical direction of the headlamp. It consists of ECM, Linkage
and actuator. The height sensor measures the angular displacement of lever by measuring the magnetic field of stator
parts formed by rotation of rotor .
DTC Description
AHLS ECM sets DTC C1260 if AHLS ECM detects no signal changes inside of axle(height) sensor while vehicle is
driving over 30km/h for 5min.
DTC Detecting Condition
Item
DTC Strategy
Enable Conditions
Threshold Value
Detecting time
Detecting Condition
Possible Cause
• Check time for no signal movement
• IG ON, Engine ON, Head Lamp ON, Vehicle Speed
>30km/h
• Time for no signal movement > 5min
• 5 min.
Diagnostic Circuit Diagram
• AHLS-ECM faulty
Scantool Diagnostics
1. Connect scantool with Diagnostic Connector.
2. Engine "ON" and Turn on the auto head light system.
3. Check "Actuator" parameter on scantool. (It should be checked while the vehicle is unloaded condition)
Specification : 80%±2%
4. Is parameter displayed within the Specification?
▶
▶
or
▶
This is a intermittent problem caused by poor contact of component or Control Unit
Thoroughly check the looseness, poor connection, bent, corrison, contamination, deformation
damage of connector.
Repair or replace as necessary and then, go to "Verification of Vehicle Repair" procedure.
▶ Go to "Inspection and Repair" procedure.
Component Inspection
■ Check ECU(AHLS)
1. Engine "ON" and Head lamp"ON"
2. Lift the vehicle.
3. Disconnect the linkage of height sensor.
4. Monitor the "SENSOR ANGLE" Parameter on the Scantool while moving linkage vertically.
5. Is there any change in "SENSOR ANGLE" Parameter?
▶ This is a intermittent problem caused by poor contact of component or Control Unit.
▶ Thoroughly check the looseness, poor connection, bent, corrison, contamination, deformation or
damage of connector.
▶ Repair or replace as necessary and then, go to "Verification of Vehicle Repair" procedure.
▶ Substitute with a known-good "AHLS-ECM(SENSOR)" and check for proper operation. If the
problem is corrected, replace "AHLS-ECM(SENSOR)" and then go to "Verification Vehicle Repair"
procedure.
▶ After its repair done, Perform the lamp actuation by GDS in order to verify its normal operation.
Perform Vehicle Selection and Level Initialization with scantool if AHLS ECM is repalce. (Auto Levelling Sensor)
Verification of Vehicle Repair
After a repair, it is essential to verifying that the fault has been corrected.
1. Connect scan tool and select "Diagnostic Trouble Codes(DTCs)" mode.
2. Using scantool, Clear DTC.
3. Operate the vehicle within DTC Enable conditions in General information.
4. Are any DTCs present ?
▶ Go to the applicable troubleshooting procedure.
▶ System is performing to specification at this time.
Body Electrical System > Head lamp leveling Device > C1522 Head lamp Switch Fault
General Description
AHLS provides driver with the best visibility by adjusting vertical direction of the headlamp. It consists of ECM, Linkage
and actuator. ECM detects the signal of headlamp switch which is operated by multi-function switch to diagnose the
Headlamp light singal line.
DTC Description
AHLS ECM sets DTC C1522 if AHLS ECM detects HEAD Lamp signal circuit is open.
DTC Detecting Condition
Item
DTC Strategy
Enable Conditions
Threshold Value
Detecting time
Detecting Condition
• Voltage check
• IG KEY ON, ENGINE ON, HEAD LAMP ON
• 2V < Signal Voltage< 6V
• 2 Sec
Diagnostic Circuit Diagram
Possible Cause
• Poor connection
• Open circuit in H/Lamp switch
signal
• Faulty AHLS ECU
Scantool Diagnostics
1. Connect scantool with Diagnostic Connector.
2. Engine "ON" and Turn on the auto head light system.
3. Check "HEAD LAMP status" parameter on Scantool.
Specification : When Head Lamp is ON : "ON"
4. Is the current data normal ?
▶
▶
or
▶
This is a intermittent problem caused by poor contact of component or Control Unit
Thoroughly check the looseness, poor connection, bent, corrison, contamination, deformation
damage of connector.
Repair or replace as necessary and then, go to "Verification of Vehicle Repair" procedure.
▶ Go to "Inspection and Repair" procedure.
Terminal and Connector Inspection
1. Many malfunctions in the electrical system are caused by poor harness and terminals. Faults can also be caused by
interference from other electrical systems, and mechanical or chemical damage.
2. Thoroughly check connectors for looseness, poor connection, bending, corrosion, contamination, deterioration,or
damage.
3. Has a problem been found?
▶ Repair as necessary and go to "Verification of Vehicle Repair" procedure.
▶ Go to "Signal circuit Inspection" procedure.
Signal circuit Inspection
■ Check power in harness
1. Ignition "OFF"
2. Disconnect Auto Head Lamp Leveling Sensor harness connector.
3. Ignition "ON", HEAD LAMP "ON"(ENGINE "OFF").
4. Measure voltage between H/LP (LO) Relay terminal of AHLS ECM harness connector and chassis ground.
Specification : B+
5. Is "voltage" display near the specified value?
▶ Check the condition of connected part and go to "Verification Vehicle Repair" procedure.
▶ Check for circuit in harness between ECM and headlamp switch signal line.
▶ Repair as necessary and then go to "Verification of Vehicle Repair" procedure.
▶ After its repair done, Perform the lamp actuation by GDS in order to verify its normal operation.
Verification of Vehicle Repair
After a repair, it is essential to verifying that the fault has been corrected.
1. Connect scan tool and select "Diagnostic Trouble Codes(DTCs)" mode.
2. Using scantool, Clear DTC.
3. Operate the vehicle within DTC Enable conditions in General information.
4. Are any DTCs present ?
▶ Go to the applicable troubleshooting procedure.
▶ System is performing to specification at this time.
Body Electrical System > Head lamp leveling Device > C1604 ECU Fault
General Description
AHLS provides driver with the best visibility by adjusting vertical direction of the headlamp. It consists of AHLS ECU,
Linkage and Headlamp actuator. AHLS ECU is composed of many IC components, such as A/D(AD converter),
EEPROM, ROM, RAM and others.It also contains several different parameter-sets which defines the behavior in
different car types and respect different mounting places. For efficient operation of system, The internal components of
ECM ( A/D , EEPROM, ROM, RAM ) are checked internally during every start-up sequence.
DTC Description
The ECM sets DTC C1604 if one of component self-test result is negative.
DTC Detecting Condition
Item
Detecting Condition
DTC Strategy
Possible Cause
• ECM internal component monitoring
Enable Conditions
• Engine "ON" and Head lamp"ON"
• ECU Hardware error (A/D converter Fail)
• ECU의 Software error (EEPROM/ROM Fail)
Threshold Value
Detecting time
• Faulty AHLS ECU
•-
Component Inspection
■ Check ECU(AHLS)
1. Connect scantool to Data Link Connector(DLC).
2. Engine "ON" and Head lamp"ON".
3. Erase the DTC with scantool.
4. Is it possible to erase the DTC with Scantool ?
▶ Check head lamp movement with actuation test, and then, go to "Verification of Vehicle Repair"
Procedure.
▶ Substitute with a known-good "AHLS-ECM(SENSOR)" and check for proper operation. If the
problem is corrected, replace "AHLS-ECM(SENSOR)" and then go to "Verification Vehicle Repair"
procedure.
▶ After its repair done, Perform the lamp actuation by GDS in order to verify its normal operation.
Perform Vehicle Selection and Level Initialization with scantool if AHLS ECM is repalce. (Auto Levelling Sensor)
Verification of Vehicle Repair
After a repair, it is essential to verifying that the fault has been corrected.
1. Connect scan tool and select "Diagnostic Trouble Codes(DTCs)" mode.
2. Using scantool, Clear DTC.
3. Operate the vehicle within DTC Enable conditions in General information.
4. Are any DTCs present ?
▶ Go to the applicable troubleshooting procedure.
▶ System is performing to specification at this time.
Body Electrical System > Head lamp leveling Device > C1606 ECU Software Error
General Description
AHLS provides driver with the best visibility by adjusting vertical direction of the headlamp. It consists of AHLS ECU,
Linkage and Headlamp actuator. AHLS ECU is composed of many IC components, such as A/D(AD converter),
EEPROM, ROM, RAM and others.It also contains several different parameter-sets which defines the behavior in
different car types and respect different mounting places. For efficient operation of system, The internal components of
ECM ( A/D , EEPROM, ROM, RAM ) are checked internally during every start-up sequence.
DTC Description
The ECM sets DTC C1606 if the parameter-sets are incompletely coded.
DTC Detecting Condition
Item
Detecting Condition
DTC Strategy
Possible Cause
• ECM internal component monitoring
Enable Conditions
• Engine "ON" and Head lamp"ON"
Threshold Value
• Detected Initialized status
Detecting time
• Selecting Invaid vehicle model
• Faulty AHLS ECU
•-
Component Inspection
■ Check ECU(AHLS)
1. Connect scantool to Data Link Connector(DLC).
2. Engine "ON" and Head lamp"ON".
3. Erase the DTC with scantool.
4. Is it possible to erase the DTC with Scantool ?
▶ Check head lamp movement with actuation test, and then, go to "Verification of Vehicle Repair"
Procedure.
▶ Substitute with a known-good "AHLS-ECM(SENSOR)" and check for proper operation. If the
problem is corrected, replace "AHLS-ECM(SENSOR)" and then go to "Verification Vehicle Repair"
procedure.
▶ After its repair done, Perform the lamp actuation by GDS in order to verify its normal operation.
Perform Vehicle Selection and Level Initialization with scantool if AHLS ECM is repalce. (Auto Levelling Sensor)
Verification of Vehicle Repair
After a repair, it is essential to verifying that the fault has been corrected.
1. Connect scan tool and select "Diagnostic Trouble Codes(DTCs)" mode.
2. Using scantool, Clear DTC.
3. Operate the vehicle within DTC Enable conditions in General information.
4. Are any DTCs present ?
▶ Go to the applicable troubleshooting procedure.
▶ System is performing to specification at this time.
Body Electrical System > Head lamp leveling Device > C1620 First Setup Not Completed
General Description
AHLS provides driver with the best visibility by adjusting vertical direction of the headlamp.To ensure an optimum
operation of the system, The HLS ( Headlamp Levelling System) has to be adjusted at end-of line procedure.The
mechanical basic setting of the headlamps is to be performed with ignition being switched ON. It is important to adjust
the system electronically and mechanically at the same place. Only by this way it is quaranteed that the car is in the
same suspension condition.
DTC Description
The ECM sets DTC C1620 if the headlamp leveling system has not been adjusted since installation.
DTC Detecting Condition
Item
DTC Strategy
Detecting Condition
• First Setup result monitoring
Detecting mode
• Engine "ON" and Head lamp"ON"
Threshold Value
• When being not aware of the origin setting code input
right after downloading parameter.
Detecting time
Possible Cause
• Faulty ACTUATOR
ADJUSTING
• Faulty AHLS ECU
•-
Scantool Diagnostics
1. Connect scantool with Diagnostic Connector.
2. Perform vehicle selection and Level Initialization with scantool as follows. And then, check "Actuator" parameter on
scantool (It must be unloaded vehicle condition)
Specification : 80%±2%
Fig.1) Vehicle Selection and Level Initialization
Fig.2) Engine ON
3. Are "Vehicle selection & Level Initalization" and current data normal ?
▶ Go to "Verification of Vehicle Repair" procedure.
▶ Substitute with a known-good "AHLS-ECM(SENSOR)" and check for proper operation. If the
problem is corrected, replace "AHLS-ECM(SENSOR)" and then go to "Verification Vehicle Repair"
procedure.
▶ After its repair done, Perform the lamp actuation by GDS in order to verify its normal operation.
Perform Vehicle Selection and Level Initialization with scantool if AHLS ECM is repalce. (Auto Levelling Sensor)
Verification of Vehicle Repair
After a repair, it is essential to verifying that the fault has been corrected.
1. Connect scan tool and select "Diagnostic Trouble Codes(DTCs)" mode.
2. Using scantool, Clear DTC.
3. Operate the vehicle within DTC Enable conditions in General information.
4. Are any DTCs present ?
▶ Go to the applicable troubleshooting procedure.
▶ System is performing to specification at this time.
Body Electrical System > Head lamp leveling Device > C1621 Excessive Operating Temp.
General Description
AHLS provides driver with the best visibility by adjusting vertical direction of the headlamp. It consists of ECM, Linkage
and actuator. The SIECM which is mounted in rear wheel suspention detects the change of vehicle vertical location and
control actuator ( which changes the vertical direction of the headlamp) based on the driving and load condition.The
EEPROM is equipped with a temperatutre sensor which is used to avoid damage related to overtemperature.
DTC Description
The ECM sets DTC C1621 if measured temperature at temperature sensor in EEPROM is over 120 degree C for 2
seconds.
DTC Detecting Condition
Item
Detecting Condition
DTC Strategy
Possible Cause
• Temperature check
Detecting mode
• Every 100ms
Enable Conditions
• - 40°C( -40°F)~ +70°C(158°F)
Threshold Value
• Faulty AHLS ECU
• Measured temperature > 120°C(248°F)
Detecting time
• 2 Sec
Component Inspection
■ Check ECU(AHLS)
1. Connect scantool with Diagnostic Connector.
2. Engine 'ON" and Turn On the auto head light system.
3. Erase the DTC with Scantool.
4. Is it possible to erase the DTC with Scantool ?
▶ Check head lamp movement with actuation test and then, go to 'Verification of Vehicle Repair"
procedure.
▶ Substitute with a known-good "AHLS-ECM(SENSOR)" and check for proper operation. If the
problem is corrected, replace "AHLS-ECM(SENSOR)" and then go to "Verification Vehicle Repair"
procedure.
▶ After its repair done, Perform the lamp actuation by GDS in order to verify its normal operation.
Perform Vehicle Selection and Level Initialization with scantool if AHLS ECM is repalce. (Auto Levelling Sensor)
Verification of Vehicle Repair
After a repair, it is essential to verifying that the fault has been corrected.
1. Connect scan tool and select "Diagnostic Trouble Codes(DTCs)" mode.
2. Using scantool, Clear DTC.
3. Operate the vehicle within DTC Enable conditions in General information.
4. Are any DTCs present ?
▶ Go to the applicable troubleshooting procedure.
▶ System is performing to specification at this time.
Body Electrical System > Head lamp leveling Device > C2226 Output Voltage Short to
Battery or Short to Ground
General Description
AHLS provides driver with the best visibility by adjusting vertical direction of the headlamp. It consists of ECM, Linkage
and actuator. ECM ouputs the singal based on the driving and loading condition and delivers it to actuator, and then the
actuator changes vertical direction of the headlamp .
DTC Description
AHLS ECM sets DTC C2226 If AHLS ECM detects Signal circuit of Actuator is short to ground or battery.
DTC Detecting Condition
Item
DTC Strategy
Detecting Condition
• Voltage check
Detecting mode
• IG KEY ON, ENGINE ON, HEAD LAMP ON
Threshold Value
• Short to Battery AND Short to GND
Detecting time
• 2 Sec
Possible Cause
• Poor connection
• Short circuit to chasis ground
and battery
• Faulty AHLS ECU
Diagnostic Circuit Diagram
Scantool Diagnostics
1. Connect scantool with Diagnostic Connector.
2. Engine "ON" and Turn on the auto head light system.
3. Check "Actuator" parameter on the scantool(It must be checked while vehicle is unloaded condition)
Specification : 80%±2%
4. Is the "actuator" parameter normal ?
▶
▶
or
▶
This is a intermittent problem caused by poor contact of component or Control Unit
Thoroughly check the looseness, poor connection, bent, corrison, contamination, deformation
damage of connector.
Repair or replace as necessary and then, go to "Verification of Vehicle Repair" procedure.
▶ Go to "Inspection and Repair" procedure.
Terminal and Connector Inspection
1. Many malfunctions in the electrical system are caused by poor harness and terminals. Faults can also be caused by
interference from other electrical systems, and mechanical or chemical damage.
2. Thoroughly check connectors for looseness, poor connection, bending, corrosion, contamination, deterioration,or
damage.
3. Has a problem been found?
▶ Repair as necessary and go to "Verification of Vehicle Repair" procedure.
▶ Go to "Signal circuit Inspection" procedure.
Signal circuit Inspection
■ Check short to ground in harness
1. Ignition "OFF"
2. Disconnect AHLS-ECM and leveling actuator(LH/RH) harness connector.
3. Measure resistance between Signal terminal of leveling actuator(LH/RH) harness connector and chassis ground .
Specification : Infinity
4. Is the measured resistance within specification?
▶ Go to Check short to battery in harness as follows.
▶ Check for short to ground in signal harness.
▶ Repair as necessary and then go to "Verification of Vehicle Repair" procedure.
▶ After its repair done, Perform the lamp actuation by GDS in order to verify its normal operation.
■ Check short to battery in harness
1. Ignition "OFF"
2. Disconnect AHLS-ECM and leveling actuator(LH/RH) harness connector.
3. Ignition "ON", HEAD LAMP "ON"(ENGINE "OFF").
4. Measure voltage between Signal(+) terminal of leveling actuator(LH/RH) harness connector and chassis ground.
Specification : 1 V below
5. Is the measured resistance within specification?
▶ Check the condition of connected part and go to "Verification Vehicle Repair" procedure.
▶ Check for short to battery circuit in leveling actuator output harness. Repair as necessary and
go to "Verification Vehicle Repair" procedure.
▶ After its repair done, Perform the lamp actuation by GDS in order to verify its normal operation.
Verification of Vehicle Repair
After a repair, it is essential to verifying that the fault has been corrected.
1. Connect scan tool and select "Diagnostic Trouble Codes(DTCs)" mode.
2. Using scantool, Clear DTC.
3. Operate the vehicle within DTC Enable conditions in General information.
4. Are any DTCs present ?
▶ Go to the applicable troubleshooting procedure.
▶ System is performing to specification at this time.
Body Electrical System > Head lamp leveling Device > Auto Head lamp leveling Unit >
Schematic Diagrams
Circuit Diagram
Body Electrical System > Head lamp leveling Device > Auto Head lamp leveling Unit >
Description and Operation
Description
According to driving environment and loading state of vehicle, head lamp lighting direction is changed to keep the
driver's visibility range and to protect the driver's vision from glare, aiming at safety driving.
Sensor integrated ECU mounting on the rear center arm drives the actuator mounting on the head lamp since sensing
the input signal following the vehicle's statically changes.
Head lamp beam is automatically operated by chassis tilt.
Operation
Operating Procedure
1. Suspension angle change resulted from vehicle's load change.
2. Sensor angle change.
3. Microprocessor calculates necessary head lamp angle change amount.
4. Sending a proper signal to head lamp leveling device and driving actuator.
Operating Condition
1. Ignition on
2. Low beam on
3. On stop : If sensor lever change is 2° and above, head lamp is operated after max. 1.5 sec.
4. On driving : If vehicle velocity is over 4km/h(2.48mile/h), velocity change is not over 0.8-1.6km/h(0.5 ~ 1.0mile/h) per
second, and loading condition is changed, then head lamp is operated.
Components
1. Auto head lamp leveling unit
1. Leveling unit & sensor
2. Sensor mounting bracket
3. Sensor linkage
4. Linkage bracket
5. Assist arm
A. Using a Micro-processor, percept the operation lever's mechanical angle change or speed signal.
B. As an actuator control device of inner control program, mounting on the rear center arm.
2. Actuator
A. Change the head lamp lighting direction up or down since automatic head lamp leveling unit sensing the input
signal following the vehicle's statically changes.
Body Electrical System > Head lamp leveling Device > Auto Head lamp leveling Unit >
Repair procedures
Removal
1. Remove the head lamp leveling unit connector(A).
2. Loosen the mounting bolts (3EA) of automatic head lamp leveling unit assembly.
Torque : 3-5 Nm (30~50 kg.cm, 2.21 ~ 3.68 lbf.ft)
3. Remove the head lamp leveling unit assembly.
Installation
1. Install the head lamp leveling unit.
2. Reconnect the head lamp leveling unit connector.
Inspection
1. Ignition "ON".
2. Turn on the head lamp switch.
3. Check for operation. If the aim of the head lamps changes smoothly when the head lamp leveling switch is turned.
4. If the operation does not work well, inspect the connector and terminals to be sure they are all making good contact.
If the terminals are bent, loose or corroded, repair them as necessary, and recheck the system.
If the terminals look OK, go to step 5.
5. Substitute with a known-good head lamp assembly and check for proper operation.
Body Electrical System > Head lamp leveling Device > Head lamp leveling Actuator >
Repair procedures
Replacement
1. Disconnect the negative (-) battery terminal.
2. Remove the head lamp assembly (Refer to the head lamp).
3. Remove the head lamp leveling actuator (A) by loosening the adjusting bolt (B) after rotating it to an arrow direction.
4. Installation is the reverse of removal procedure.
Body Electrical System > Immobilizer System > Description and Operation
Description
The immobilizer system will disable the vehicle unless the proper ignition key is used, in addition to the currently
available anti-theft systems such as car alarms, the immobilizer system aims to drastically reduce the rate of auto theft.
1. Encrypted SMARTRA type immobilizer
A. The SMARTRA system consists of a passive challenge - response (mutual authentication)transponder located in
the ignition key, an antenna coil, a encoded SMARTRA unit, an indicator light and the PCM(ECM).
B. The SMARTRA communicates to the PCM(ECM) (Engine Control Module) via a dedicated communications line.
Since the vehicle engine management system is able to control engine mobilization, it is the most suitable unit to
control the SMARTRA.
C. When the key is inserted in the ignition and turned to the ON position, the antenna coil sends power to the
transponder in the ignition key. The transponder then sends a coded signal back through the SMARTRA unit to
the PCM(ECM).
D. If the proper key has been used, the PCM(ECM) will energize the fuel supply system. The immobilizer indicator
light in the cluster will simultaneously come on for more than five seconds, indicating that the SMARTRA unit has
recognized the code sent by the transponder.
E. If the wrong key has been used and the code was not received or recognized by the PCM(ECM) the indicator
light will continue blinking for about five seconds until the ignition switch is turned OFF.
F. If it is necessary to rewrite the PCM(ECM) to learn a new key, the dealer needs the customer's vehicle, all its
keys and the Hi-scan (pro) equipped with an immobilizer program card. Any key that is not learned during
rewriting will no longer start the engine.
G. The immobilizer system can store up to eight key codes.
H. If the customer has lost his key, and cannot start the engine, contact Hyundai motor service station.
Components Operations
PCM (Power Train Control Module)
1. The PCM(ECM) (A) carries out a check of the ignition key using a special encryption algorithm, which is
programmed into the transponder as well as the PCM(ECM) simultaneously. Only if the results are equal, the engine
can be started. The data of all transponders, which are valid for the vehicle, are stored in the PCM(ECM).
ERN (Encrypted Randorn Number) value between EMS and encrypted smartra unit is checked and the validity of
coded key is decided by EMS.
ENCRYPTED SMARTRA unit (A)
The SMARTRA carries out communication with the built-in transponder in the ignition key. This wireless communication
runs on RF (Radio frequency of 125 kHz). The SMARTRA is mounted behind of the crash pad close to center cross
bar.
The RF signal from the transponder, received by the antenna coil, is converted into messages for serial communication
by the SMARTRA device. And, the received messages from the PCM(ECM) are converted into an RF signal, which is
transmitted to the transponder by the antenna.
The SMARTRA does not carry out the validity check of the transponder or the calculation of encryption algorithm. This
device is only an advanced interface, which converts the RF data flow of the transponder into serial communication to
the PCM(ECM) and vice versa.
TRANSPONDER (Built-in keys)
The transponder (A) has an advanced encryption algorithm. During the key teaching procedure, the transponder will be
programmed with vehicle specific data. The vehicle specific data are written into the transponder memory. The write
procedure is once only; therefore, the contents of the transponder can never be modified or changed.
Antenna coil
The antenna coil (A) has the following functions.
- The antenna coil supplies energy to the transponder.
- The antenna coil receives signal from the transponder.
- The antenna coil sends transponder signal to the SMARTRA.
It is located directly in front of the steering handle lock.
Body Electrical System > Immobilizer System > Repair procedures
Replacement
Problems And Replacement Parts:
Problem
Part set
Scan tool required?
All keys have been lost
Blank key (4)
YES
Antenna coil unit does not work
Antenna coil unit
NO
ECM does not work
PCM(ECM)
YES
Ignition switch does not work
Ignition switch with Antenna coil unit
YES
Unidentified vehicle specific data occurs
Key, PCM(ECM)
YES
SMARTRA unit does not work
SMARTRA unit
YES
Replacement Of Ecm And Smartra
In case of a defective ECM, the unit has to be replaced with a "virgin" or "neutral" ECM. All keys have to be taught to
the new ECM. Keys, which are not taught to the ECM, are invalid for the new ECM (Refer to key teaching procedure).
The vehicle specific data have to be left unchanged due to the unique programming of transponder.
In case of a defective SMARTRA, it needs teaching the smartra. A new SMARTRA device replaces the old one and
smartra need teaching.
1. Things to remember before a replacement (PCM(ECM))
2. Things to remember before a replacement (Keys & Additional registration)
1. When there is only one key registered and you wish to register another key, you need to re-register the key
which was already registered.
2. When the key #1 is registered and master key #2 is not registered, Put the key #1 in the IG/ON or the start
position and remove it. The engine can be started with the unregistered key #2.
(Note that key #2 must be used within 10 seconds of removing key #1)
3. When the key #1 is registered and key #2 is not registered, put the unregistered master key #2 in the
IG/ON or the start position.
The engine cannot be started even with the registered key #1.
4. When you inspect the immobilizer system, refer to the above paragraphs 1, 2 and 3.
Always remember the 10 seconds zone.
5. If the pin code & password are entered incorrectly on three consecutive inputs, the system will be locked for
one hour.
6. Be cautious not to overlap the transponder areas.
7. Problems can occur at key registration or vehicle starting if the transponders should overlap.
Neutralizing Of ECM
The PCM(ECM) can be set to the "neutral" status by a tester.
A valid ignition key is inserted and after ignition on is recorded, the PCM(ECM) requests the vehicle specific data from
the tester. The communication messages are described at "Neutral Mode" After successfully receiving the data, the
PCM(ECM) is neutralized.
The ECM remains locked. Neither the limp home mode nor the "twice ignition on" function, is accepted by the
PCM(ECM).
The teaching of keys follows the procedure described for the virgin PCM(ECM). The vehicle specific data have to be
unchanged due to the unique programming of the transponder. If data should be changed, new keys with a virgin
transponder are requested.
This function is for neutralizing the PCM(ECM) and Key. Ex) when lost key, Neutralize the PCM(ECM) then teach keys.
(Refer to the Things to do when Key & PIN Code the PCM(ECM) can be set to the "neutral" status by a scanner. If
wrong vehicle specific data have been sent to SMATRA three times continuously or intermittently, the SMATRA will
reject the request to enter neutral mode for one hour. Disconnecting the battery or other manipulation cannot reduce
this time. After connecting the battery the timer starts again for one hour.
• Neutralizing setting condition
- In case of PCM(ECM) status "Learnt" regardless of user password "Virgin or Learnt"
- Input correct PIN code by scanner.
- Neutralizing meaning .
: PIN code (6) & user password (4) deletion.
: Locking of ECM (except key teaching permission)
• Neutralizing meaning:
- PIN Code(6) & User P/Word(4) deletion
- Locking of EMS(except Key Learning permission)
Neutralizing Of SMARTRA
The EMS can be set to the status "neutral" by tester
Ignition key (regardless of key status) is inserted and after IGN ON. If receiving the correct vehicle password from
GST, SMARTRA can be neutralized. The neutralization of SMARTRA is possible if DPN is same as the value inputted
by GST.
In case that the SMARTRA status is neutral, the EMS keeps the lock state. And the start is not possible by "twice
ignition".
In case of changing the vehicle password, new virgin transponder must be only used. And in case of virgin key, after
Learning the key of vehicle password, it can be used.
If wrong vehicle specific data have been sent to SMATRA three times continuously or intermittently, the SMATRA will
reject the request to enter neutral mode for one hour. Disconnecting the battery or other manipulation cannot reduce
this time. After connecting the battery the timer starts again for one hour.
• Neutralizing Setting condition :
- In case of "SMARTRA status", "Learnt"
- Input correct Pin code by tester
• Neutralizing meaning :
- Vehicle password(DPN Code) & SEK Code deletion.
- Permission of New DPN Learning.
Teaching Procedures
1. Key Teaching Procedure
Key teaching must be done after replacing a defective PCM(ECM) or when providing additional keys to the vehicle owner.
The procedure starts with an PCM(ECM) request for vehicle specific data (PIN code: 6digits) from the tester. The "virgin"
PCM(ECM) stores the vehicle specific data and the key teaching can be started. The "learnt" PCM(ECM) compares the
vehicle specific data from the tester with the stored data. If the data are correct, the teaching can proceed.
If incorrect vehicle specific data have been sent to the PCM(ECM) three times, the PCM(ECM) will reject the request of
key teaching for one hour. This time cannot be reduced by disconnecting the battery or any other manipulation. After
reconnecting the battery, the timer starts again for one hour.
The key teaching is done by ignition on with the key and additional tester commands. The PCM(ECM) stores the relevant
data in the EEPROM and in the transponder. Then the PCM(ECM) runs the authentication required for confirmation of the
teaching process. The successful programming is then confirmed by a message to the tester.
If the key is already known to the PCM(ECM) from a previous teaching, the authentication will be accepted and the
EEPROM data are updated. There is no changed transponder content (this is impossible for a learnt transponder).
The attempt to repeatedly teach a key, which has been taught already during the same teaching cycle, is recognized by
the PCM(ECM). This rejects the key and a message is sent to the tester.
The PCM(ECM) rejects invalid keys, which are presented for teaching. A message is sent to the tester. The key can be
invalid due to faults in the transponder or other reasons, which result from unsuccessful programming of data. If the
PCM(ECM) detects different authenticators of a transponder and an PCM(ECM), the key is considered to be invalid.
The maximum number of taught keys is 8
If an error occurs during the Immobilizer Service Menu, the PCM(ECM) status remains unchanged and a specific fault
code is stored.
If the PCM(ECM) status and the key status do not match for teaching of keys, the tester procedure will be stopped and a
specific fault code will be stored at PCM(ECM).
When teaching the 1st key, Smartra regists at the same time.
(1) PCM(ECM) learnt status.
(2) PCM(ECM) virgin status.
After replacing new "PCM(ECM)" scan tool displays that PCM(ECM) is virgin status in Key Teaching mode.
"VIRGIN" status means that PCM(ECM) has not matched any PIN code before.
Password Teaching/changing
1. User Password Teaching Procedure
The user password for limp home is taught at the service station. The owner of the vehicle can select a number with
four digits.
The user password teaching is only accepted by a "learnt" PCM(ECM). Before first teaching of user password to an
PCM(ECM), the status of the password is "virgin" No limp home function is possible.
The teaching is started by ignition on, with a valid key(learnt key) and sending the user password by tester. After
successful teaching, the status of the user password changes from "virgin" to "learnt"
The learnt user password can also be changed. This can be done if the user password status is "learnt" and the
tester sends authorization of access, either the old user password or the vehicle specific data. After correct
authorization, the PCM(ECM) requests the new user password. The status remains "learnt" and the new user
password will be valid for the next limp home mode.
If wrong user passwords or wrong vehicle specific data have been sent to the PCM(ECM) three times continuously
or intermittently, the PCM(ECM) will reject the request to change the password for one hour. This time cannot be
reduced by disconnecting the battery or any other actions. After reconnecting the battery, the timer starts again for
one hour.
2. User password teaching
※ In case of putting wrong password, retry from first step after 10 seconds.
3. User password changing
Limp Home Function
1. Limp Home By Tester
If the PCM(ECM) detects the fault of the SMARTRA or transponder, the PCM(ECM) will allow limp home function of
the immobilizer. Limp home is only possible if the user password (4 digits) has been given to the PCM(ECM) before.
This password can be selected by the vehicle owner and is programmed at the service station.
The user password can be sent to the PCM(ECM) via the special tester menu.
Only if the PCM(ECM) is in status "learnt" and the user password status is "learnt" and the user password is correct,
the PCM(ECM) will be unlocked for a period of time (30 sec.). The engine can only be started during this time. After
the time has elapsed, engine start is not possible.
If the wrong user password is sent, the PCM(ECM) will reject the request of limp home for one hour. Disconnecting the
battery or any other action cannot reduce this time. After connecting the battery to the PCM(ECM), the timer starts
again for one hour.
2. Limp Home By Ignition Key
The limp home can be activated also by the ignition key. The user password can be input to the PCM(ECM) by a
special sequence of ignition on/off.
Only if the PCM(ECM) is in status "learnt" and the user password status is "learnt" and the user password is correct,
the PCM(ECM) will be unlocked for a period of time (30 sec.). The engine can be started during this time. After the
time has elapsed, engine start is not possible. After a new password has been input, the timer (30 sec.) will start
again.
After ignition off, the PCM(ECM) is locked if the timer has elapsed 8 seconds. For the next start, the input of the
user password is requested again.
Body Electrical System > Immobilizer System > Troubleshooting
Diagnosis Of Immobilizer Faults
- Communication between the ECM and the SMARTRA.
- Function of the SMARTRA and the transponder.
- Data (stored in the ECM related to the immobilizer function.
The following table shows the assignment of immobilizer related faults to each type:
Immobilizer Related Faults
Fault types
Diagnostic codes
PCM(ECM) fault
1. Non-Immobilizer-EMS connected to an Immobilizer
P1610
Transponder key fault
1. Transponder not in password mode
2. Transponder transport data has been changed.
P1674
(Transponder status error)
Transponder key fault
1. Transponder programming error
P1675
(Transponder programming
error)
SMARTRA fault
1. Invalid message from SMARTRA to PCM(ECM)
P1676
(SMARTRA message error)
SMARTRA fault
1.
2.
3.
4.
Virgin SMARTRA at learnt EMS
Neutral SMARTRA at learnt EMS
Incorrect the Authentication of EMS and SMARTRA
Locking of SMARTRA
P169A
(SMARTRA Authentication
fail)
SMARTRA fault
1.
2.
3.
4.
No response from SMARTRA
Antenna coil error
Communication line error (Open/Short etc.)
Invalid message from SMARTRA to PCM(ECM)
P1690
(SMARTRA no response)
Antenna coil fault
1. Antenna coil open/short circuit
Immobilizer indicator lamp
fault
1. Immobilizer indicator lamp error (Cluster)
Transponder key fault
1. Corrupted data from transponder
2. More than one transponder in the magnetic field
(Antenna coil)
3. No transponder (Key without transponder) in the
magnetic field (Antenna coil)
PCM(ECM) fault
1. Request from PCM(ECM) is invalid
(Protocol layer violation- Invalid request, check sum
error etc.)
P1694
(PCM(ECM) message error)
PCM(ECM) internal
permanent memory
(EEPROM) fault
1. PCM(ECM) internal permanent memory (EEPROM)
fault
2. Invalid write operation to permanent memory
(EEPROM)
P1695
(PCM(ECM) memory error)
Locked by timer
1. Exceeding the maximum limit of Twice IGN ON (⊇ 32
times)
P1691
(Antenna coil error)
Troubleshooting
NO
DTC code
Description
1
P1610
Non-Immobilizer-EMS Connected to an Immobilizer
2
P1674
Immobilizer-Transponder status Error
3
P1675
Immobilizer-Transponder Programming Error
4
P1676
Immobilizer-Smartra Message Error
5
P169A
Immobilizer-SMARTRA Authentication Fail
6
P1690
Immobilizer-Smartra No Response
7
P1691
Immobilizer-Antenna Coil Error
8
P1692
Immobilizer Indicator Lamp Error
9
P1693
Immobilizer-Transponder Error
10
P1694
Immobilizer-EMS Message Error
11
P1695
Immobilizer-EMS Memory Error
12
P1696
Immobilizer-Authentication Fail
P1692
(Immobilizer lamp error)
P1693
(Transponder no response
error/invalid response)
P1699
(Twice IG ON over trial)
13
P1699
Immobilizer-Twice Overtrial
Body Electrical System > Immobilizer System > P1610 Non-Immobilizer-EMS Connected to
an Immobilizer
General Description
The immobilizer system consists of a passive challenge-response (mutual authentication) transponder inside the key
head, the encoded SMARTRA3 unit /key and the EMS can decode the secret code stored in the SMARTRA3.
The EMS carries out the immobilizer function, the SMATRA3 management and the key management. The immobilizer
function is the unlocking of EMS only after detection of a valid ignition key /the SMATRA3 and the locking of EMS after
switching off the engine. The EMS communicates the encoded messages to the SMARTRA3 via a dedicated
communication line and confirms the key with the SMARTRA3.
The EMS related to immobilizer has the 3 kinds of software. At the first IGN on, the EMS concludes the software of
each option (smart key, non-encoded SMARTRA3, encoded SMARTRA3) by communication. It is called “The
autodection for EMS”
The EMS keeps the previous option before being neutral when it is setted to each option.
DTC Description
The PCM/ECM sets DTC P1610 if Non Immobilizer EMS is installed on vehicle equipped with Immobilizer.
DTC Detecting Condition
Item
DTC Strategy
Enable Conditions
Detecting Condition
•• IG ON
Threshold value
• Non Immobilizer PCM/ECM connected
Detecting time
• Immediately
FAIL SAFE
Possible Cause
•-
Diagnostic Circuit Diagram
• Invalid PCM/ECM
Monitor Scantool Data
1. Check status
(1) IGN "ON" & Engine "OFF"
(2) Monitor the "ECM Status" Parameter on the Scantool.
Specification : 'LEARNT'
Fig.1) This data show that 3 keys have been taught, ECU has been learnt, Key in key cylinder has been learnt and
SMARTRA3 has been learnt
(3) Has the ECM been learnt ?
▶ Check connectors for looseness, poor connection, bending, corrosion, contamination,
deterioration, or damage. Repair or replace as necessary and then go to "Verification of Vehicle
Repair" procedure.
▶ Substitute with a ECM equipped with Immobilizer and perform the Key teaching procedure with
scantool and check for proper operation.
If the problem is corrected, replace ECM and then go to "Verification of Vehicle Repair" procedure.
If the EMS is only replaced using an existing key and SMARTRA3, after replacing the “virgin”
or “ neutral” EMS, reteaching is possible by key Learning mode of scanner.
When the same PIN used in existing vehicle is only inputted, the SMARTRA3 Learning and key
Learnings are possible.
Verification of Vehicle Repair
After a repair, it is essential to verify that the fault has been corrected.
1. Connect scantool and selet "Diagnostic Trouble Codes(DTCs)" mode and then clear DTC.
2. Operate the vehicle and monitor the DTC on the scantool.
3. Are any DTCs present?
▶ Go to the applicable troubleshooting procedure.
▶ System is performing to specification at this time.
Body Electrical System > Immobilizer System > P1674 Immobilizer-Transponder status
Error
General Description
The vehicle immobilizer system consists of the ECM, the SMARTRA3 and ignition keys with built-in transponder.
The ECM carries out the check of ignition key by special encryption algorithm with SMARTRA3 and Transponder.
The encryption algorithm (between ECM and SMARTRA3) is the one offered from BOSCH.
The encryption algorithm (between ECM and Transponder) is Hitag type 2 which is a high level system. With IGN On,
the ECM executes the key Authentication after SMARTRA3 authentication. The Engine can be started when the key
authentication is confirmed by the SMARTRA3.
The Key teaching procedure starts with ECM request of PIN from Scanner. The "virgin“ECM stores the PIN and the key
Learning can be started. The "learnt“ECM compares the PIN from tester with the vehicle password in Transponder. If
the data are correct, the key Learning can be started.
Scanner requests the Learning of the first key, the SMARTRA3 is registered at first and then the first key is registered
by ECM. If the SMARTRA3 status is learnt and PIN number is different, the SMARTRA3 will return the incorrect PIN
data to the ECM. In this case,The ECM can’t excute the key learning process.
DTC Description
The ECM sets DTC P1674 if transponder key that can't be register(Transponder not in the password mode or whose
transport data has been changed) is inserted for registration procedure.
DTC Detecting Condition
Item
DTC Strategy
Enable Conditions
Detecting Condition
•• IG ON (On Registering TP Procedure)
Threshold value
• Key not in ‘VIRGIN’ Status or with invalid ID code
Detecting time
• Immediately
FAIL SAFE
Possible Cause
•-
Diagnostic Circuit Diagram
Monitor Scantool Data
1. Check status
(1) IGN "ON" & Engine "OFF"
(2) Monitor the "ECM, Key and Smartra Status" Parameter on the Scantool.
Specification : 'LEARNT'
• Invalid transponder.
※ Key not in 'VIRGIN' Status
or with invalid ID code
Fig.1) This data show that 3 keys have been taught, ECU has been learnt, Key in key cylinder has been learnt and
SMARTRA3 has been learnt
(3) Have both the ECM and KEY status been learnt ?
▶ Substitute with known good "virgin" transponder and go to "Component Inspection" Procedure.
▶ Go to "Component Inspection" Procedure.
Component Inspection
1. Check transponder
(1) IGN "ON" & Engine "OFF"
(2) Neutralize ECM and Register transponder key by scantool.
Pin code is requied to Neutralize ECM and to Register transponder key
(3) Are Neutralizing and Registering completed normally ?
▶ Check connectors for looseness, poor connection, bending, corrosion, contamination,
deterioration, or damage. Repair or replace as necessary and then go to "Verification of
Vehicle Repair" procedure.
▶ Substitute with a known-good transponder and perform key teaching procedure with
scanner.
If the problem is corrected, replace transponder and then go to "Verification of Vehicle Repair"
procedure.
Verification of Vehicle Repair
After a repair, it is essential to verify that the fault has been corrected.
1. Connect scantool and selet "Diagnostic Trouble Codes(DTCs)" mode and then clear DTC.
2. Operate the vehicle and monitor the DTC on the scantool.
3. Are any DTCs present?
▶ Go to the applicable troubleshooting procedure.
▶ System is performing to specification at this time.
Body Electrical System > Immobilizer System > P1675 Immobilizer-Transponder
Programming Error
General Description
The vehicle immobilizer system consists of the ECM, the SMARTRA3 and ignition keys with built-in transponder.
The ECM carries out the check of ignition key by special encryption algorithm with SMARTRA3 and Transponder.
The encryption algorithm (between ECM and SMARTRA3) is the one offered from BOSCH.
The encryption algorithm (between ECM and Transponder) is Hitag type 2 which is a high level system. With IGN On,
the ECM executes the key Authentication after SMARTRA3 authentication. The Engine can be started when the key
authentication is confirmed by the SMARTRA3.
The Key teaching procedure starts with ECM request of PIN from Scanner. The "virgin“ECM stores the PIN and the key
Learning can be started. The "learnt“ECM compares the PIN from tester with the vehicle password in Transponder. If
the data are correct, the key Learning can be started.
Scanner requests the Learning of the first key, the SMARTRA3 is registered at first and then the first key is registered
by ECM. If the SMARTRA3 status is learnt and PIN number is different, the SMARTRA3 will return the incorrect PIN
data to the ECM. In this case,The ECM can’t excute the key learning process.
DTC Description
The ECM sets DTC P1675 if characteristic data of transponder doesn't coincide with that of ECM owing to transponder
programming error.
DTC Detecting Condition
Item
DTC Strategy
Enable Conditions
Detecting Condition
•• IG ON(During the authentification)
Threshold value
• Invalid characteristic data
• No transponder or more than two transponder is
detected by coil antenna
Detecting time
• Immediately
FAIL SAFE
Possible Cause
•-
Diagnostic Circuit Diagram
• Invalid transponder.
※ Invalid characteristic data
※ No transponder or more
than two transponder is
detected by coil antenna
Monitor Scantool Data
1. Check status
(1) IGN "ON" & Engine "OFF"
(2) Monitor the "ECM, Key and Smartra Status" Parameter on the Scantool.
Specification : 'LEARNT'
Fig.1) This data show that 3 keys have been taught, ECU has been learnt, Key in key cylinder has been learnt and
SMARTRA3 has been learnt.
(3) Are "KEY STATUS", "SMARTRA STATUS" and "ECU STATUS' Parameter within specifications?
▶ Check connectors for looseness, poor connection, bending, corrosion, contamination,
deterioration, damage on the ECM or SMARTRA. And This DTC has not erased in previous repair.
Repair or replace as necessary and then go to "Verification of Vehicle Repair" procedure.
▶ Go to "Component Inspection" Procedure.
Component Inspection
1. Check transponder
(1) IGN "ON" & Engine "OFF"
(2) Neutralize ECM and Register transponder key by scantool.
Pin code is required to Neutralize ECM and to Register transponder key
(3) Are Neutralizing and Registering completed normally ?
▶ Check connectors for looseness, poor connection, bending, corrosion, contamination,
deterioration, or damage. Repair or replace as necessary and then go to "Verification of
Vehicle Repair" procedure.
▶ Substitute with a known-good transponder and perform the key teaching procedure with
scanner.
If the problem is corrected, replace transponder and then go to "Verification of Vehicle Repair"
procedure.
Verification of Vehicle Repair
After a repair, it is essential to verify that the fault has been corrected.
1. Connect scantool and selet "Diagnostic Trouble Codes(DTCs)" mode and then clear DTC.
2. Operate the vehicle and monitor the DTC on the scantool.
3. Are any DTCs present?
▶ Go to the applicable troubleshooting procedure.
▶ System is performing to specification at this time.
Body Electrical System > Immobilizer System > P1676 Immobilizer-Smartra Message Error
General Description
1. The sequences of the PIN code storage are as follows.
(1) Input the PIN code into the scanner when key teaching process.
he scanner transmits the Encrypted Code to the ECM after converting the PIN code into Encrypted Code.
(2) When the ECM gets the firtst key learning command, it transmits the SMARTRA3 learnt command and
Encrypted Code to the SMARTRA3
(3) If the SMARTRA3 statue is virgin/neutral, the SMARTRA3 stores Encrypted Code in EEPROM and transmits the
success message of the Encrypted Code storage.
(If the SMARTRA3 is learnt, the SMARTRA3 compares Encrypted Code transmitted by the ECM with Encrypted
Code stored in EEPROM and transmits the (in)correct Encrypted Code message to ECM)
(4) If the SMARTRA3 is learnted normally or the Encrypted Code of the registered SMARTRA3 is the same as the
ECM, the ECM begins operation the Transponder Learning.
(5) If the learning of the first transponder, the ECM stores the Encrypted Code in its EEPROM and converts state
into learnt state.
2. The SMARTRA3 learning :
(1) starts with EMS request of PIN from scanner through the key teaching procedure.
(2) is possible in case that the status of SMARTAR is “virgin” or “neutral“.
(3) In case that the SMARTRA3 is “learnt”, the SMARTRA3 will transmits the information if PIN inputted from
scanner is same as the PIN in SMARTRA3.
(4) is possible regardless of key status.
3. The sequence of the SMARTRA3 confirms are as follows.
(1) After communication with the SMARTRA3, the ECM transmits the random number with requirement of the TP ID
information.
(2) The SMARTRA3 encryptes the random number and transmits the result(Encrypted Random Number) to the
ECM with TP ID information.
(3) The ECM compares the result transmitted from the SMARTRA3 with the result calculated by ECM.
And If result are coincided with each other; the ECS concludes the valid confirmation of the SMARTRA3.
DTC Description
The ECM sets DTC P1676 if there's any fault in message from SMARTRA to ECU
DTC Detecting Condition
Item
DTC Strategy
Enable Conditions
Detecting Condition
•• IG ON
Threshold value
• SMARTRA Message error
Detecting time
• Immediately
FAIL SAFE
Possible Cause
•-
Diagnostic Circuit Diagram
• Faulty SMARTRA
Monitor Scantool Data
1. Check transponder and ECU status
(1) IGN "ON" & Engine "OFF"
(2) Monitor the "ECM, Key and Smartra Status" Parameter on the Scantool.
Specification : 'LEARNT'
Fig.1) This data show that 3 keys have been taught, ECU has been learnt, the Key in key cylinder has been learnt and
SMARTRA3 has been learnt
(3) Has the "Smartra STATUS" been learnt ?
▶ Check connectors for looseness, poor connection, bending, corrosion, contamination,
deterioration, damage on the ECM or SMARTRA. And this DTC has not erased in previous repair.
Repair or replace as necessary and then go to "Verification of Vehicle Repair" procedure.
▶ Go to "Component Inspection" Procedure.
Component Inspection
1. Check SMARTRA
(1) IGN "ON" & Engine "OFF"
(2) Neutralize SMARTRA with scantool.
(3) Neutralize ECM and Register transponder key by scantool.
Pin code is required to Neutralize SMARTRA & ECM and to Register transponder key
(4) Are Neutralizing and Registering Key completed normally ?
▶ Check connectors for looseness, poor connection, bending, corrosion, contamination,
deterioration, damage on the ECM or SMARTRA. Or It has not erased this DTC in previous
repair. Repair or replace as necessary and then go to "Verification of Vehicle Repair"
procedure.
▶ Substitute with a known-good SMARTRA and perform the Key teaching.
If the problem is corrected, replace SMARTRA and then go to "Verification of Vehicle Repair"
procedure.
If the SMARTRA3 is only replaced using an existing key and ECM, after replacing the
“virgin” or "neutral” SMARTRA3, reteaching is possible by key Learning mode of GDS. In
this case, all existing key must be retaught.
If SMATRA3 is replaced to another one (used at other vehicle), it can only recycle its
neutralized first before replacing.
Verification of Vehicle Repair
After a repair, it is essential to verify that the fault has been corrected.
1. Connect scantool and selet "Diagnostic Trouble Codes(DTCs)" mode and then clear DTC.
2. Operate the vehicle and monitor the DTC on the scantool.
3. Are any DTCs present?
▶ Go to the applicable troubleshooting procedure.
▶ System is performing to specification at this time.
Body Electrical System > Immobilizer System > P169A Immobilizer-SMARTRA
Authentication Fail
General Description
1. The sequences of the PIN code storage are as follows.
(1) Input the PIN code into the scanner when key teaching process.
The scanner transmits the Encrypted Code to the ECM after converting the PIN code into Encrypted Code.
(2) When the ECM gets the firtst key learning command,
it transmits the SMARTRA3 learnt command and Encrypted Code to the SMARTRA3
(3) If the SMARTRA3 statue is virgin/neutral, the SMARTRA3 stores Encrypted Code in EEPROM and transmits the
success message of the Encrypted Code storage.
(If the SMARTRA3 is learnt, the SMARTRA3 compares Encrypted Code transmitted by the ECM with Encrypted
Code stored in EEPROM and transmits the (in)correct Encrypted Code message to ECM)
(4) If the SMARTRA3 is learnted normally or the Encrypted Code of the registered SMARTRA3 is the same as the
ECM, the ECM begins operation the Transponder Learning.
(5) If the learning of the first transponder, the ECM stores the Encrypted Code in its EEPROM and converts state
into learnt state.
2. The SMARTRA3 learning :
(1) starts with EMS request of PIN from scanner through the key teaching procedure.
(2) is possible in case that the status of SMARTAR is “virgin” or “neutral “.
(3) In case that the SMARTRA3 is “learnt”, the SMARTRA3 will transmits the information if PIN inputted from
scanner is same as the PIN in SMARTRA3.
(4) is possible regardless of key status.
3. The sequence of the SMARTRA3 confirms are as follows.
(1) After communication with the SMARTRA3, the ECM transmits the random number with requirement of the TP ID
information.
(2) The SMARTRA3 encryptes the random number and transmits the result(Encrypted Random Number) to the
ECM with TP ID information.
(3) The ECM compares the result transmitted from the SMARTRA3 with the result calculated by ECM.
And If result are coincided with each other; the ECS concludes the valid confirmation of the SMARTRA3.
DTC Description
The PCM/ECM sets DTC P169A if authentication between PCM/ECM and SMARTRA has failed
DTC Detecting Condition
Item
DTC Strategy
Enable Conditions
Detecting Condition
Possible Cause
•
• IG ON
Threshold value
•
•
•
•
Virgin SMARTRA at Learnt EMS
Neutral SMARTRA at Learnt EMS
Incorect the Authetication of EMS and SMARTRA
Locking of SMARTRA
Detecting time
•-
Diagnostic Circuit Diagram
• Locking of SMARTRA
Monitor Scantool data
1. Connect scantool to Data Link Connector(DLC).
2. IG "ON" & Engine "OFF"
3. Monitor the "KEY STATUS", "SMARTRA STATUS" and "ECU STATUS' Parameter on the Scantool.
Specification : 'LEARNT'
Fig.1) This data show that 3 keys have been taught, ECU has been learnt, Key in key cylinder has been learnt and
SMARTRA3 has been learnt.
4. Has the "SMARTRA STATUS' been learnt ?
▶ Keep "KEY ON" status for 1 hours to withdraw "Locked by Timer" status. Then register
transponder and go to "Verification of Vehicle Repair" procedure.
▶Go to 'Component Inspection" procedure.
Component Inspection
1. Check SMARTRA
(1) IG "ON" & Engine "OFF"
(2) Neutralize Both "SMARTRA" and "ECM" and Register transponder key by scantool.
Pin code is required to Neutralize SMARTRA and to Register transponder key
(3) Are Neutralizing and Registering completed normally ?
▶ Perform all the key teaching procedure with scantool. (All the keys must be retaught) and
then, go to "Verification of Vehicle Repair" Procedure.
▶ Substitute with a known-good SMARTRA and Perform Key teaching procedure.
▶ If the problem is corrected, replace SMARTRA and then go to "Verification of Vehicle Repair"
procedure.
Verification of Vehicle Repair
After a repair, it is essential to verify that the fault has been corrected.
1. Connect scantool and selet "Diagnostic Trouble Codes(DTCs)" mode and then clear DTC
2. Operate the vehicle and monitor the DTC on the scantool
3. Are any DTCs present?
▶ Go to the applicable troubleshooting procedure.
▶ System is performing to specification at this time.
Body Electrical System > Immobilizer System > P1690 Immobilizer-Smartra No Response
General Description
1. The sequences of the PIN code storage are as follows.
(1) Input the PIN code into the scanner when key teaching process.
The scanner transmits the Encrypted Code to the ECM after converting the PIN code into Encrypted Code.
(2) When the ECM gets the firtst key learning command,
it transmits the SMARTRA3 learnt command and Encrypted Code to the SMARTRA3
(3) If the SMARTRA3 statue is virgin/neutral, the SMARTRA3 stores Encrypted Code in EEPROM and transmits the
success message of the Encrypted Code storage.
(If the SMARTRA3 is learnt, the SMARTRA3 compares Encrypted Code transmitted by the ECM with Encrypted
Code stored in EEPROM and transmits the (in)correct Encrypted Code message to ECM)
(4) If the SMARTRA3 is learnted normally or the Encrypted Code of the registered SMARTRA3 is the same as the
ECM, the ECM begins operation the Transponder Learning.
(5) If the learning of the first transponder,
the ECM stores the Encrypted Code in its EEPROM and converts state into learnt state.
2. The SMARTRA3 learning :
(1) starts with EMS request of PIN from scanner through the key teaching procedure.
(2) is possible in case that the status of SMARTAR is “virgin” or “neutral“.
(3) In case that the SMARTRA3 is “learnt”, the SMARTRA3 will transmits the information if PIN inputted from
scanner is same as the PIN in SMARTRA3.
(4) is possible regardless of key status.
3. The sequence of the SMARTRA3 confirms are as follows.
(1) After communication with the SMARTRA3, the ECM transmits the random number with requirement of the TP ID
information.
(2) The SMARTRA3 encryptes the random number and transmits the result(Encrypted Random Number) to the
ECM with TP ID information.
(3) The ECM compares the result transmitted from the SMARTRA3 with the result calculated by ECM.
And If result are coincided with each other; the ECS concludes the valid confirmation of the SMARTRA3.
DTC Description
The ECM sets DTC P1690 if there's No Response from SMARTRA.
DTC Detecting Condition
Item
DTC Strategy
Enable Conditions
Detecting Condition
Possible Cause
•
• IG ON
Threshold value
• No signal from SMARTRA
Detecting time
•-
FAIL SAFE
•-
Diagnostic Circuit Diagram
• Open Circuit in signal harness
• Short Circuit in signal harness
• Faulty SMARTRA
Monitor Scantool Data
1. Connect scantool to Data Link Connector(DLC).
2. IG "ON" & Engine "OFF"
3. Monitor the "ECU, KEY and Smartra STATUS' Parameter on the Scantool.
Specification : 'LEARNT'
Fig.1) This data show that 3 keys have been taught, ECU has been learnt, Key in key cylinder has been learnt and
SMARTRA3 has been learnt.
4. Has the "Smartra STATUS' been learnt ?
▶ Check connectors for looseness, poor connection, bending, corrosion, contamination,
deterioration, damage on the ECM or SMARTRA. And this DTC has not erased in previous repair.
Repair or replace as necessary and then go to "Verification of Vehicle Repair" procedure.
▶ Go to "Inspection & Repair" procedure
Terminal and Connector Inspection
1. Many malfunctions in the electrical system are caused by poor harness and terminals. Faults can also be caused by
interference from other electrical systems, and mechanical or chemical damage.
2. Thoroughly check connectors for looseness, poor connection, bending, corrosion, contamination, deterioration, or
damage.
3. Has a problem been found?
▶ Repair as necessary and go to "Verification Vehicle Repair" procedure
▶ Go to "W/Harness Inspection" procedure.
Power Circuit Inspection
1. Check for open in harness
(1) Ignition "OFF"
(2) Disconnect SMARTRA Connector.
(3) Ignition "ON" & Engine "OFF"
(4) Measure voltage between Engine Control Relay Power of SMARTRA harness connector and chassis ground.
Specification : 9~16V
(5) Is the measured voltage within specifications?
▶ Go to "Signal circuit Inspection" procedure
▶ Check for open or short in harness. Repair as necessary and go to "Verification of Vehicle
Repair" procedure.
(6)
Signal Circuit Inspection
1. Check for open in harness
(1) Ignition "OFF"
(2) Disconnect SMARTRA connector.
(3) Measure resistance between signal terminal of smartra harness connector and ECM/PCM harenss connector
Specification : 1 Ω or less
(4) Is the measured resistance within specifications?
▶ Go to "Check for short in harness" procedure.
▶ Check for open in harness. Repair as necessary and go to "Verification of Vehicle Repair"
procedure.
2. Check for short in harness
(1) Ignition "OFF"
(2) Disconnect SMARTRA connector.
(3) Ignition "ON" & Engine "OFF"
(4) Measure voltage between signal terminal of SMARTRA harness connector and chassis ground.
Specification : Approx. 5.48V
(5) Is the measured voltage within specifications?
▶ Go to "Signal circuit Inspection" procedure
▶ Check for open in harness. Repair as necessary and go to "Verification of Vehicle Repair"
procedure.
Ground Circuit Inspection
1. Check for open in ground harness
(1) Ignition "OFF"
(2) Disconnect SMARTRA connector.
(3) Measure resistance between ground terminal of SMARTRA harness and chassis ground.
Specification : 1 Ω or less
(4) Is the measured resistance within specifications?
▶ Go to "Component Inspection" procedure.
▶ Check for open in harness. Repair as necessary and go to "Verification of Vehicle Repair"
procedure.
Component Inspection
1. Check SMARTRA
(1) IG"ON" & Engine "OFF"
(2) Neutralize Both "SMARTRA" and "ECM" and Register transponder key by scantool.
Pin code is required to Neutralize SMARTRA and to Register transponder key
(3) Are Neutralizing and Registering completed normally ?
▶ Perform all the key teaching procedure with scantool. (All the keys must be retaught) and
then, go to "Verification of Vehicle Repair" Procedure.
▶ Substitute with a known-good SMARTRA and Perform Key teaching procedure.
▶ If the problem is corrected, replace SMARTRA and then go to "Verification of Vehicle Repair"
procedure.
Verification of Vehicle Repair
After a repair, it is essential to verify that the fault has been corrected.
1. Connect scantool and selet "Diagnostic Trouble Codes(DTCs)" mode and then clear DTC
2. Operate the vehicle and monitor the DTC on the scantool
3. Are any DTCs present?
▶ Go to the applicable troubleshooting procedure
▶ System is performing to specification at this time.
Body Electrical System > Immobilizer System > P1691 Immobilizer-Antenna Coil Error
General Description
This wireless communication runs on RF (Radio frequency of 125 kHz). The antenna coil is mounted on the top of
ignition lock for RF transmission and receiving. The RF signal from the transponder received by the antenna coil is
converted into messages for serial communication by the SMARTRA device. And the received messages from the
ECM are converted into an RF signal, which is transmitted, to the transponder by the antenna.
DTC Description
The ECM sets DTC P1691 if there's any fault in immobilizer antenna coil.
DTC Detecting Condition
Item
DTC Strategy
Enable Conditions
Detecting Condition
Possible Cause
•
• IG ON
Threshold value
• Error in antenna coil signal
Detecting time
•-
FAIL SAFE
•-
Diagnostic Circuit Diagram
• Open Circuit in antenna coil
• Short Circuit in antenna coil
• Faulty antenna coil
Monitor Scantool Data
1. Connect scantool to Data Link Connector(DLC).
2. IG "ON" & Engine "OFF"
3. Monitor the "ECU, KEY and Smartra STATUS' Parameter on the Scantool.
Specification : 'LEARNT'
Fig.1) This data show that 3 keys have been taught, ECU has been learnt, Key in key cylinder has been learnt and
SMARTRA3 has been learnt.
4. Have the both "ECM, KEY and Smartra STATUS' been learnt ?
▶ Check connectors for looseness, poor connection, bending, corrosion, contamination,
deterioration, damage on the ECM or SMARTRA. And this DTC has not erased in previous repair.
Repair or replace as necessary and then go to "Verification of Vehicle Repair" procedure.
▶ Go to "Component Inspection" procedure
Component Inspection
1. Check coil antenna.
(1) Ignition "OFF"
(2) Disconnect SMARTRA connector .
(3) Measure resistance between antenna coil(+) and (-) terminal of SMARTRA harness connector.
Specification : Approx 8.5 Ω
(4) Is the measured resistance within specifications?
▶ Go to "Check SMARTRA" procedure
▶ Check for open or short in antenna coil. Repair as necessary and go to "Verification of Vehicle
Repair" procedure.
2. Check SMARTRA
(1) IG "ON" & Engine "OFF"
(2) Neutralize Both "SMARTRA" and "ECM" and Register transponder key by scantool.
Pin code is required to Neutralize SMARTRA and to Register transponder key
(3) Are Neutralizing and Registering completed normally ?
▶ Perform all the key teaching procedure with scantool. (All the keys must be retaught) and
then, go to "Verification of Vehicle Repair" Procedure.
▶ Substitute with a known-good SMARTRA and Perform Key teaching procedure.
▶ If the problem is corrected, replace SMARTRA and then go to "Verification of Vehicle Repair"
procedure.
Verification of Vehicle Repair
After a repair, it is essential to verify that the fault has been corrected.
1. Connect scantool and selet "Diagnostic Trouble Codes(DTCs)" mode and then clear DTC
2. Operate the vehicle and monitor the DTC on the scantool
3. Are any DTCs present?
▶ Go to the applicable troubleshooting procedure
▶ System is performing to specification at this time.
Body Electrical System > Immobilizer System > P1692 Immobilizer Indicator Lamp Error
General Description
When driver inserts key and IGN "ON", Immobilizer informs status of system and result of Authentication by blinking of
immobilizer lamp on instrument cluster. through Authentication procedure immobilizer lamp keep lighting up till engine
starts. In normal status. Immobilizer lamp lights up for 30sec Right after ignition "ON". If there's any fault in immobilizer
system or in Authentication, lamp blinks 5 times after ignition "ON"
DTC Description
The ECM sets DTC P1692 if there's short circuit in immobilizer lamp circuit.
DTC Detecting Condition
Item
DTC Strategy
Enable Conditions
Detecting Condition
Possible Cause
•
• IG ON
Threshold value
• Short to GND, Wiring open
Detecting time
•-
FAIL SAFE
•-
Diagnostic Circuit Diagram
• Short Circuit in immobilizer
lamp circuit.
• Open/Short in control harness
• Faulty PCM/ECM
Terminal and Connector Inspection
1. Many malfunctions in the electrical system are caused by poor harness and terminals. Faults can also be caused by
interference from other electrical systems, and mechanical or chemical damage.
2. Thoroughly check connectors for looseness, poor connection, bending, corrosion, contamination, deterioration, or
damage.
3. Has a problem been found?
▶ Repair as necessary and go to "Verification Vehicle Repair" procedure
▶ Go to "W/Harness Inspection" procedure
Control circuit inspection
■ Check for open in harness
1. IG KEY OFF.
2. Connect SMARTRA connector and disconnect PCM connector .
3. IG KEY ON & Engine "OFF".
4. Measure voltage between indicator terminal of PCM harness connector and chassis ground.
Specification : Batt.
5. Is the measured voltage within specifications?
▶ Go to "Component Inspection" procedure
▶ Check for open or short in harness. Repair as necessary and go to "Verification of Vehicle
Repair" procedure.
Visual/Physical Inspection
■ Check immobilizer lamp circuit
1. Ignition "ON" & Engine "OFF"
2. Check if immobilizer lamp operates properly.
Right after ignition "ON", Immobilizer lamp lights up for 30sec.
If lamp blinks 5 times after ignition "ON", a fault exists in immobilizer system.
3. Is the immobilizer lamp operating properly?
▶ Check connectors for looseness, poor connection, bending, corrosion, contamination,
deterioration, or damage. Repair or replace as necessary and then go to "Verification of Vehicle
Repair" procedure.
▶ Go to "Component Inspection" procedure.
Component Inspection
■ Check immobilizer lamp.
1. IG KEY OFF
2. Connect SMARTRA connector and disconnect PCM connector
3. Ground indicator terminal of PCM harness connector with wire
4. IG KEY ON & Engine "OFF"
Specification : Immobilizer lamp "ON"
5. Is the Immobilizer lamp "ON"?
▶ Substitute with a known-good ECM and check for proper operation.
▶ If the problem is corrected, replace ECM and then go to "Verification of Vehicle Repair"
procedure.
ECM substitued for old one must be in "Virgin" or "Neutral" status and Pin code is requied to
Neutralize ECM and to Register transponder key
▶ Check that fuse has blown off and harness between ECM connector and Battery is in normal
condition. And check connectors for looseness, poor connection, bending, corrosion, contamination,
deterioration, or damage. Repair or replace as necessary and then go to "Verification of Vehicle
Repair" procedure.
Verification of Vehicle Repair
After a repair, it is essential to verify that the fault has been corrected.
1. Connect scantool and selet "Diagnostic Trouble Codes(DTCs)" mode and then clear DTC
2. Operate the vehicle and monitor the DTC on the scantool
3. Are any DTCs present?
▶ Go to the applicable troubleshooting procedure.
▶ System is performing to specification at this time.
Body Electrical System > Immobilizer System > P1693 Immobilizer-Transponder Error
General Description
The vehicle immobilizer system consists of the ECM, the SMARTRA3 and ignition keys with built-in transponder.
The ECM carries out the check of ignition key by special encryption algorithm with SMARTRA3 and Transponder.
The encryption algorithm (between ECM and SMARTRA3) is the one offered from BOSCH.
The encryption algorithm (between ECM and Transponder) is Hitag type 2 which is a high level system. With IGN On,
the ECM executes the key Authentication after SMARTRA3 authentication. The Engine can be started when the key
authentication is confirmed by the SMARTRA3.
The Key teaching procedure starts with ECM request of PIN from Scanner. The "virgin“ECM stores the PIN and the key
Learning can be started. The "learnt“ECM compares the PIN from tester with the vehicle password in Transponder. If
the data are correct, the key Learning can be started.
Scanner requests the Learning of the first key, the SMARTRA3 is registered at first and then the first key is registered
by ECM. If the SMARTRA3 status is learnt and PIN number is different, the SMARTRA3 will return the incorrect PIN
data to the ECM. In this case, The ECM can’t excute the key learning process.
DTC Description
The ECM sets DTC P1693 if there's abnormal response from transponder.
DTC Detecting Condition
Item
DTC Strategy
Enable Conditions
Detecting Condition
Possible Cause
•
• IG ON
Threshold value
• Corrupted data from Transponder
• More than one TP in the magnetic field
• No TP(Key without TP) in the magnetic field
Detecting time
•-
FAIL SAFE
•-
Diagnostic Circuit Diagram
• Corrupted data from
Transponder
• More than one TP in the
magnetic field
• No TP(Key without TP) in the
magnetic field
Monitor Scantool Data
1. Check transponder and ECU status
(1) IG "ON" & Engine "OFF"
(2) Monitor the "ECU, KEY and Smartra STATUS' Parameter on the Scantool.
Specification : 'LEARNT'
Fig.1) This data show that 3 keys have been taught, ECU has been learnt, Key in key cylinder has been learnt and
SMARTRA3 has been learnt
(3) Have both the ECM and KEY status been learnt ?
▶ Substitute with known good "virgin" transponder and go to "Component Inspection" Procedure.
▶ Go to "Component Inspection" Procedure.
Component Inspection
1. Check transponder
(1) IG "ON" & Engine "OFF"
(2) Neutralize ECM and Register transponder key by scantool.
Pin code is required to Neutralize ECM and to Register transponder key
(3) Are Neutralizing and Registering completed normally ?
▶ Check connectors for looseness, poor connection, bending, corrosion, contamination,
deterioration, or damage. Repair or replace as necessary and then go to "Verification of Vehicle
Repair" procedure.
▶ Substitute with a known-good transponder and perform the key teaching precedure.
▶ If the problem is corrected, replace transponder and then go to "Verification of Vehicle Repair"
procedure.
Verification of Vehicle Repair
After a repair, it is essential to verify that the fault has been corrected.
1. Connect scantool and selet "Diagnostic Trouble Codes(DTCs)" mode and then clear DTC
2. Operate the vehicle and monitor the DTC on the scantool
3. Are any DTCs present?
▶ Go to the applicable troubleshooting procedure
▶ System is performing to specification at this time.
Body Electrical System > Immobilizer System > P1694 Immobilizer-EMS Message Error
General Description
The ECM and the SMARTRA communicate by dedicated line. During this communication of ECM and SMARTRA the K
line of ECM cannot be used for communication. The ECM controls the communication either to SMARTRA or to other
devices(e.g. scanner) on K line by switching of a multiplexer and specific communication procedures. The multiplexer is
a part of ECM H/W.
DTC Description
The ECM sets DTC P1694 if Request from EMS is invalid.
DTC Detecting Condition
Item
DTC Strategy
Enable Conditions
Detecting Condition
Possible Cause
•
• IG ON
Threshold value
• Protocol layer violation
- Invalid request
- Check sum error
Detecting time
•-
FAIL SAFE
•-
Diagnostic Circuit Diagram
Monitor Scantool Data
1. Check status
(1) IG "ON" & Engine "OFF"
(2) Monitor the "ECU, KEY and Smartra STATUS' Parameter on the Scantool.
• Faulty EMS
※ Protocol layer violation
- Invalid request
- Check sum error
Specification : 'LEARNT'
Fig.1) This data show that 3 keys have been taught, ECU has been learnt, Key in key cylinder has been learnt and
SMARTRA3 has been learnt
(3) Are "KEY STATUS", "SMARTRA STATUS" and" ECU STATUS' Parameter within specifications?
▶ Check connectors for looseness, poor connection, bending, corrosion, contamination, deterioration,
damage on the ECM or SMARTRA. And this DTC has not erased in previous repair. Repair or replace
as necessary and then go to "Verification of Vehicle Repair" procedure.
▶ Go to "Component Inspection" procedure.
Component Inspection
1. Check ECM
(1) IG "ON" & Engine "OFF"
(2) Neutralize ECM and Register transponder key by scantool.
Pin code is requied to Neutralize ECM and to Register transponder key
(3) Are Neutralizing and Registering completed normally ?
▶ Check connectors for looseness, poor connection, bending, corrosion, contamination,
deterioration, or damage. Repair or replace as necessary and then go to "Verification of Vehicle
Repair" procedure.
▶ Substitute with a known-good transponder and perform key teaching procedure with scanner.
▶ If the problem is corrected, replace transponder and then go to "Verification of Vehicle Repair"
procedure.
ECM substitued for old one must be in "Virgin" or "Neutral" status and Pin code is required to
Neutralize ECM and to Register transponder key
Verification of Vehicle Repair
After a repair, it is essential to verify that the fault has been corrected.
1. Connect scantool and selet "Diagnostic Trouble Codes(DTCs)" mode and then clear DTC
2. Operate the vehicle and monitor the DTC on the scantool
3. Are any DTCs present?
▶ Go to the applicable troubleshooting procedure
▶ System is performing to specification at this time.
Body Electrical System > Immobilizer System > P1695 Immobilizer-EMS Memory Error
General Description
The relevant data for the immobilizer function are stored at permanent memory (EEPROM or Flash etc.).
The immobilizer data are stored by three independent entries.
The data from EEPROM are evaluated by "2 of 3 decision“. That means all three entries are read and the content is
compared before authentication process.
If the contents of all entries are equal, the authentication will run without additional measures.
If only the contents of two entries are equal, the authentication will run and fault code "EEPROM defective“ is stored at
ECM.
If the contents of all three entries are different from each other, no authentication will be possible and the fault code
"EEPROM defective“ will be stored. The limp home function cannot be activated. The ECM shall be replaced if the
EEPROM related fault occurs again after new teaching of all keys.
DTC Description
The ECM sets DTC P1695 if there's any fault in EMS internal permanent memory(EEPROM or Flash etc.)
DTC Detecting Condition
Item
DTC Strategy
Enable Conditions
Detecting Condition
Possible Cause
•
• IG ON
Threshold value
• Inconsistent data of EEPROM
• Invalid write operation to EEPROM
Detecting time
•-
FAIL SAFE
•-
Diagnostic Circuit Diagram
• Faulty EMS
Monitor Scantool Data
1. Check status
(1) IG "ON" & Engine "OFF"
(2) Monitor the "KEY STATUS", "SMARTRA STATUS" and "ECU STATUS' Parameter on the Scantool.
Specification : 'LEARNT'
Fig.1) This data show that 3 keys have been taught, ECU has been learnt, Key in key cylinder has been learnt and
SMARTRA3 has been learnt
(3) Are "KEY STATUS", "SMARTRA STATUS" and "ECU STATUS' Parameter within specifications?
▶ Check connectors for looseness, poor connection, bending, corrosion, contamination, deterioration,
damage on the ECM or SMARTRA. And this DTC has not erased in previous repair. Repair or replace
as necessary and then go to "Verification of Vehicle Repair" procedure.
▶ Go to "Component Inspection" procedure
Component Inspection
1. Check ECM
(1) IG "ON" & Engine "OFF"
(2) Neutralize ECM and Register transponder key by scantool.
Pin code is requied to Neutralize ECM and to Register transponder key
(3) Are Neutralizing and Registering completed normally ?
▶ Check connectors for looseness, poor connection, bending, corrosion, contamination,
deterioration, or damage. Repair or replace as necessary and then go to "Verification of Vehicle
Repair" procedure.
▶ Substitute with a known-good transponder and perform key teaching procedure with scanner.
▶ If the problem is corrected, replace transponder and then go to "Verification of Vehicle Repair"
procedure.
ECM substitued for old one must be in "Virgin" or "Neutral" status and Pin code is required to
Neutralize ECM and to Register transponder key
Verification of Vehicle Repair
After a repair, it is essential to verify that the fault has been corrected.
1. Connect scantool and selet "Diagnostic Trouble Codes(DTCs)" mode and then clear DTC
2. Operate the vehicle and monitor the DTC on the scantool
3. Are any DTCs present?
▶ Go to the applicable troubleshooting procedure.
▶ System is performing to specification at this time.
Body Electrical System > Immobilizer System > P1696 Immobilizer-Authentication Fail
General Description
The
The
The
The
vehicle immobilizer system consists of the ECM, the SMARTRA3 and ignition keys with built-in transponder.
ECM carries out the check of ignition key by special encryption algorithm with SMARTRA3 and Transponder.
encryption algorithm (between ECM and SMARTRA3) is the one offered from BOSCH.
encryption algorithm (between ECM and Transponder) is Hitag type 2 which is a high level system. With IGN On,
the ECM executes the key Authentication after SMARTRA3 authentication. The Engine can be started when the key
authentication is confirmed by the SMARTRA3.
The Key teaching procedure starts with ECM request of PIN from Scanner. The "virgin“ECM stores the PIN and the key
Learning can be started. The "learnt“ECM compares the PIN from tester with the vehicle password in Transponder. If
the data are correct, the key Learning can be started.
Scanner requests the Learning of the first key, the SMARTRA3 is registered at first and then the first key is registered
by ECM. If the SMARTRA3 status is learnt and PIN number is different, the SMARTRA3 will return the incorrect PIN
data to the ECM. In this case, The ECM can’t excute the key learning process.
DTC Description
The ECM sets DTC P1696 if invaild key is inserted into key hole for Authentication
DTC Detecting Condition
Item
DTC Strategy
Enable Conditions
Detecting Condition
•
• IG ON
Threshold value
• Virgin TP at PCM/ECM status “Learnt”
• Learnt(Invalid) TP at PCM/ECM status “Learnt”
Detecting time
• Immediately
FAIL SAFE
Possible Cause
•-
Diagnostic Circuit Diagram
• Invalid transponder.
Monitor Scantool Data
1. Check status
(1) IG "ON" & Engine "OFF"
(2) Monitor the "ECM, Key and Smartra Status" Parameter on the Scantool.
Specification : 'LEARNT'
Fig.1) This data show that 3 keys have been taught, ECU has been learnt, Key in key cylinder has been learnt and
SMARTRA3 has been learnt
(3) Have both the ECM and KEY status been learnt ?
▶ Substitute with known good "virgin" transponder and go to "Component Inspection" Procedure.
▶ Go to "Component Inspection" Procedure.
Component Inspection
1. Check transponder
(1) IG "ON" & Engine "OFF"
(2) Neutralize ECM and Register transponder key by scantool.
Pin code is requied to Neutralize ECM and to Register transponder key
(3) Are Neutralizing and Registering completed normally ?
▶ Check connectors for looseness, poor connection, bending, corrosion, contamination,
deterioration, or damage. Repair or replace as necessary and then go to "Verification of Vehicle
Repair" procedure.
▶ Substitute with a known-good transponder and perform key teaching procedure with scanner.
▶ If the problem is corrected, replace transponder and then go to "Verification of Vehicle Repair"
procedure.
Verification of Vehicle Repair
After a repair, it is essential to verify that the fault has been corrected.
1. Connect scantool and selet "Diagnostic Trouble Codes(DTCs)" mode and then clear DTC
2. Operate the vehicle and monitor the DTC on the scantool
3. Are any DTCs present?
▶ Go to the applicable troubleshooting procedure
▶ System is performing to specification at this time.
Body Electrical System > Immobilizer System > P1699 Immobilizer-Twice Overtrial
General Description
This is a special function for engine start by vehicle manufacturer. The engine can be started for moving from the
production line to an area where the key teaching is conducted.
DTC Description
The ECM sets DTC P1699 if the maximum limit of Twice IGN is Exceeded.
DTC Detecting Condition
Item
Detecting Condition
Possible Cause
DTC Strategy
Enable Conditions
•
• IG ON
Threshold value
• Twice IGN ≥ 32 times
Detecting time
•-
FAIL SAFE
•-
Diagnostic Circuit Diagram
Monitor Scantool Data
1. Check status
(1) IG "ON" & Engine "OFF"
(2) Monitor the "ECM, Key and Smartra Status" Parameter on the Scantool.
Specification : 'LEARNT'
• Over time trial of Twice IGN
Fig.1) This data show that 3 keys have been taught, ECU has been learnt, Key in key cylinder has been learnt and
SMARTRA3 has been learnt.
(3) Is the "ECU STATUS' Parameter "Locked"?
▶Keep "KEY ON" status for 1 hours to withdraw "Locked by Timer" status. Then turn the key OFF for
10seconds. Next register transponder and go to "Verification of Vehicle Repair" procedure.
▶ Check connectors for looseness, poor connection, bending, corrosion, contamination, deterioration,
damage on the ECM or SMARTRA. And this DTC has not erased in previous repair. Repair or replace
as necessary and then go to "Verification of Vehicle Repair" procedure.
Verification of Vehicle Repair
After a repair, it is essential to verify that the fault has been corrected.
1. Connect scantool and selet "Diagnostic Trouble Codes(DTCs)" mode and then clear DTC
2. Operate the vehicle and monitor the DTC on the scantool
3. Are any DTCs present?
▶ Go to the applicable troubleshooting procedure.
▶ System is performing to specification at this time.
Body Electrical System > Immobilizer System > Immobilizer Control Unit > Repair
procedures
Replacement
1. Disconnect the negative (-) battery terminal.
2. Remove the crash pad lower panel (A).
3. Disconnect the 5P connector of the SMARTRA unit and then remove the SMARTRA unit (A) after loosening the
screw.
4. Installation is the reverse of removal procedure.
Body Electrical System > Immobilizer System > Antenna Coil > Repair procedures
Replacement
1. Disconnect the negative (-) battery terminal.
2. Remove the crash pad lower panel (A).
3. Remove the steering column shaft (Refer to the ST group).
4. Disconnect the 6P connector of the coil antenna and then remove the coil antenna after loosening the screw.
5. Installation is the reverse of removal procedure.
Body Electrical System > Trip Computer > Description and Operation
Description
The trip computer displays information related to driving, including distance to empty, average speed and average fuel
consumption on this display.
To change the function as described below, push the mode button less than 2 second.
TRIP [1] → Distance to empty [2] → Average fuel consumption [3] → Average speed [4].
Operation
Function
Item
Function
Detection
Fuel sender
Remark
Distance to empty
The estimated distance indication to empty
Average fuel
consumption
The average fuel consumption indication since
Fuel sender
the last driving time reset
0.1L
Average speed
The average speed indication since the last
driving time reset
1Km/h(1MPH)
Speed sensor
1Km(1mile)
Distance to empty mode
1. Description
This mode indicates the estimated distance to empty based on the current fuel in the fuel thank and the amount of
fuel delivered to the engine.
2. Indication range : 50Km ~ 999Km(30miles ~ 999miles)
3. Indication division : 1Km(mile)
When the remaining distance is below 50Km (30miles), a blinking "---" symbol will be displayed. (Blinking interval :
0.6sec.)
4. Data clear : at battery + off
Average fuel consumption mode
1. Description
This mode calculates the average fuel consumption from the total used fuel and the distance after reconnecting the
batter or resetting the data.
2. Indication range : 0.1L ~ 99.9L/100Km or MPG(mile per gallon)
3. Indication division : 0.1L/100Km(MPG)
When there is no pulse signal on vehicle speed after reconnecting the battery or resetting the data, "---L/100Km
(MPG)" symbol will be displayed.
4. Indication interval : 10 sec.
5. Data clear: press the reset button for more than 1 sec. or Battery + on
Average speed mode
1. Description
This mode indicates the estimated speed by the driving distance to the indication timing after reconnecting the batter
or resetting the data.
2. Indication range : 0 Km/h(MPH) ~ 999 Km/h(MPH)
3. Indication division : 1Km/h(MPH)
When the battery is reconnected or the data are reset, "---" symbol will be displayed until the timing.
4. Indication interval : 10 sec.
5. Data clear: press the reset button for more than 1 sec. or Battery + on
Body Electrical System > Trip Computer > Repair procedures
Removal
1. Disconnect the negative (-) battery terminal.
2. Remove the crash pad side cover(A).
3. Remove the trip computer switch (A) from crash pad upper panel after disconnecting the trip computer connector
and loosening a screw.
Installation
1. Install the trip computer to the crash pad upper panel.
2. Install the crash pad upper panel.
3. Install the crash pad side cover.
Inspection
1. Remove the crash pad upper panel(B).
2. Operate the switch (A) and check for continuity between terminals with an ohmmeter.
Body Electrical System > Rear Parking Assist System > Specifications
Specification
Item
Back warning control unit
Voltage rating
Operation voltage
Operation temperature
Operation current
Operation frequency
Detective method
Ultrasonic sensor
Voltage rating
Detecting range
DC 12V
DC 9 ~ 16 V
-30°C ~ + 80°C
MAX 600 mA
48 ± 5 KHz
Direct and indirect detection
DC 8 V
40 cm ~ 120 cm
Operation voltage
DC 7 ~ 9 V
Operation current
MAX 20 mA
Operation temperature
Piezo buzzer
Specification
-30°C ~ + 80°C
Operation frequency
40 ± 5 KHz
Number of sensors
4 (Left side, Left center, Right center, Right side)
Voltage rating
Operation voltage
Operation temperature
Operation current
Sound, tone
DC 12 V
DC 9 ~ 16 V
-30°C ~ + 80°C
MAX 60 mA
Oscillation frequency : 2.0 ± 0.5 KHz
Sound level : 65 dB (DC 13V /m)
Body Electrical System > Rear Parking Assist System > Components and Components
Location
Component Location
1. Rear parking assist system control unit
2. Ultrasonic sensor
3. Buzzer
Body Electrical System > Rear Parking Assist System > Schematic Diagrams
Circuit Diagram
Body Electrical System > Rear Parking Assist System > General Safety Information and
Caution
Warning
1. Range detected by back sensors is limited.
Watch back before reversing.
2. There is a blind spot below the bumper. Low objects (for example boundary barrier) may be detected from minimum
1.5m away unable to detect at nearer.
3. Besides there are some materials unable to be detected even in detection range as follows.
(1) Needles, ropes, rods, or other thin objects.
(2) Cotton, snow and other material absorbing ultrasonic wave(for example, fire extinguisher device covered with
snow)
4. Reversing toward the sloped walls.
5. Reversing toward the sloped terrain.
6. False alarm may operate in the following condition: irregular road surface, gravel road, sloped road and grass. Upon
alarm generation by grass the alarm may be generated by rock behind grass. Be sure to check for the safety.
The sensors cannot discriminate between materials.
7. Sensors may not operate correctly in the below conditions.
Ensure sensors are clean from mud or dirt.
(1) When spraying the bumper, the sensor opening is covered with something in order not to be contaminated. If
sensor opening is contaminated with mud, snow, or dirt, detection range will be reduced and alarm may not be
generated under the crash condition. Dirt accumulated on the sensor opening shall be removed with water.
Do not wipe or scrape sensor with a rod or a hard object.
(2) If the sensor is frozen, alarm may not operate until sensor thaws.
(3) If a vehicle stays under extremely hot or cold environment, the detection range may be reduced. It will be
restored at the normal temperature.
(4) When heavy cargo is loaded in trunk, it changes the vehicle balance, which reduces the detection range.
(5) When other vehicle's horn, motor cycle engine noise, or other ultra-sonic wave sources are near.
(6) Under heavy rain.
(7) When reversing towards a vertical wall and the gap between the vehicle and the wall is 15cm. (Alarm may
sound despite the absence of a barrier)
(8) If radio antenna is installed at the rear.
(9) If the vehicle rear wiring is re-routed or electrical component is added at the rear part.
(10) Vehicle balance is changed due to the replacement of the rear spring.
(11) The unit will operate normally when the vehicle speed is 5km/h or less. Above this speed, the unit may not
operate normally.
8. Check the rear bumper for installation condition and deformation. If installed improperly or the sensor orientation is
deviated, it may cause malfunction.
9. Be careful not to apply shock during sensor installation on the transmission or reception unit.
10. When adding electrical devices or modifying harness at the rear body of the vehicle, ensure not to change the
transmission and reception unit wiring. Tagging the transmission side and reception side, it may cause malfunction.
11. High power radio transmitter (above 10W) may cause malfunction. Do not install it on the vehicle.
12. Be careful that excessive heat or sharp objects shall not touch ultrasonic sensor surface.
Do not cover the sensor opening or press the sensor.
Body Electrical System > Rear Parking Assist System > Description and Operation
Description
When reversing, the driver is not easy to find objects in the blind spots and to determine the distance from the object.
In order to provide the driver safety and convenience, back warning system will operate upon shifting to "R" Ultrasonic
sensor will emit ultrasonic wave rearward and detect the reflected wave. Control unit will calculate distance to the object
using the sensor signal input and output buzzer alarm in three steps (first, second and third alarm).
Alarm Range
Upon detecting an object at each range out of 3 ranges as stated below within the operation range, it will generate
alarm.
First alarm : Object comes near to the sensor located at the rear of vehicle, within 81-120cm ± 15cm
Second alarm : Object comes near to the sensor located at the rear of vehicle, within 41-80cm ± 10cm
Third alarm : Object comes near to the sensor located at the rear of vehicle, within 40cm ± 10cm
1. Time tolerance of the above waveform : Time ± 10%
2. At nearer distance than 40cm, detection may not occur.
3. Alarm will be generated with vehicle reversing speed 5km/h or less.
For moving target, maximum operation speed shall be target approach speed of 5km/h.
4. When the vehicle or the target is moving, sequential alarm generation or effective alarm may be failed.
5. Misalarm may occur in the following conditions.
- Irregular road surface, gravel road, reversing toward grass.
- Horn, motor cycle engine noise, large vehicle air brake, or other object generating ultrasonic wave is near.
- When a wireless transmitter is used near to the sensor.
- Dirt on the sensor.
- Sequential alarm may not occur due to the reversing speed or the target shape.
Body Electrical System > Rear Parking Assist System > Troubleshooting
Diagnosis
1. Operate with ignition switch on and shift the lever to position "R"
2. Then it checks the system condition.
If no trouble, it generates buzzer alarm sound for 0.3 seconds after 0.8 seconds from power approval. In case of
system failure, then it indicates the failed point as follows.
A. Left sensor failure : beep-beep-beep
B. Left center sensor failure : beep beep-beep beep-beep beep
C. Right center sensor failure: beep beep beep-beep beep beep-beep beep beep
D. Right sensor failure: beep beep beep beep-beep beep beep beep-beep beep beep beep
3. Alarm is generated 3 times sequentially.
4. Effective operation range is 10km/h or less for the vehicle speed.
Body Electrical System > Rear Parking Assist System > Rear Parking Assist System
Control Unit > Repair procedures
Removal
1. Disconnect the negative (-) battery terminal.
2. Remove the rear seat.
(Refer to BD group - "Rear seat")
3. Remove the interior left side quarter trim.
4. Loosen the mounting bolts and disconnect the connector.
5. Remove the rear parking assist system control unit (A).
Installation
1. Install the rear parking assist system control unit.
2. Install the left side quarter trim.
3. Install the rear seat.
Body Electrical System > Rear Parking Assist System > Parking Assist Sensor >
Description and Operation
Operation Principle
The sensor emits ultrasonic wave to the objects, and it measures the time until reflected wave returns, and calculates
the distance to the object.
Distance Detection Type
Direct detection type and indirect detection type are used together for improving effectiveness of the detection.
1. Direct detection type: One sensor transmits and receives signals to measure the distance.
2. Indirect detection type: One sensor transmits signals and the other sensor receives the signals to measure the
distance.
Measurement Principle
Back warning system (BWS) is a complementary device for reversing. BWS detects objects behind vehicle and
provides the driver with buzzer alarm finding objects in a certain area, using ultrasonic wave propagation speed and
time.
The propagation speed formula of ultrasonic wave in air is following :
v=331.5 + 0.6t (m/s)
v=ultrasonic wave propagation speed
t=ambient temperature
The basic principle of distance measurement using ultrasonic wave is :
Sensor Detection Range
1.
2.
3.
4.
14cm (dia.) plastic rod is used for the test target.
The test result may differ by a different target object.
Detection range may be reduced by dirt accumulated on sensor, and extremely hot or cold weather.
The following object may not be detected.
- Sharp object or thin object like rope.
- Cotton sponge, snow or other materials absorbing sonic wave.
- Smaller objects than 14cm (dia.), 1m length.
Body Electrical System > Rear Parking Assist System > Parking Assist Sensor >
Components and Components Location
Component
Body Electrical System > Rear Parking Assist System > Parking Assist Sensor > Repair
procedures
Removal
1. Disconnect the negative (-) battery terminal.
2. Remove the rear bumper.
(Refer to the Body group - "Rear bumper")
3. Disconnect the sensor connector(B) at the inside of the rear bumper, and then remove the sensor(A).
4. Pull out the sensor(A) by opening the sensor holder(B) out.
Installation
1. Connect the connector, and then install the sensor.
2. Install the rear bumper.
Body Electrical System > Button Engine Start System > Components and Components
Location
Component Location
1.
2.
3.
4.
5.
6.
7.
Start Stop Button(SSB)
FOB key holder
FOB key
PDM(Power Distribution Module)
Smart key unit
RF receiver
ESCL(Electrical Steering Column Lock)
8. Interior antenna 1
9. Interior antenna 2
10. Interior antenna 3
11. Door handle & door antenna
12. Bumper antenna
13. Body control module
Body Electrical System > Button Engine Start System > Schematic Diagrams
Circuit Diagram
Body Electrical System > Button Engine Start System > Description and Operation
Description
System Overview
The System offers the following features:
- Human machine interface through a 1-stage button, for terminal switching and engine start.
- Control of external relays for ACC / IGN1 / IGN2 terminal switching and STARTER, without use of mechanical
ignition switch.
- Steering column locking with an ESCL device; Monitoring of the vehicle status to insure safe activation of the ESCL.
- Indication of vehicle status through LED or explicit messages on display.
- Immobilizer function by LF transponder communication between fob and fob holder.
- Redundant architecture for high system dependability .
- Interface with Low Speed CAN vehicle communication network.
- Interface with LIN vehicle communication network depending on platform .
The RKE and SMART KEY functions are not considered part of this Button Engine Start system and are specified in
separated system.
System Main Function
-
Steering column locking/unlocking with ESCL.
Switching of ACC / IGN1 / IGN2 terminals.
Control of the STARTER relay BAT line (high side) based on communication with EMS ECU.
Management of the Immobilizer function.
Management of BES warning function.
Button Engine Start System
The Button Start System allows the driver to operate the vehicle by simply pressing a button (called as SSB) instead of
using a standard mechanical key. It also manages the locking and the unlocking of the steering column (called as
ESCL)without any specific actions by the driver.
If the driver press the SSB while prerequisites on brakes, fob authentication and transmission status are satisfied, the
BES System will proceed with the locking/unlocking of the steering column, the control of the terminal, and the
cranking of the engine.
The driver can release the SSB as soon as this sequence initiated. After positive response from immobilizer
interrogation, the system will activate the starter motor and communicate with the EMS to check the engine running
status for starter release.
The driver will be able to stop the engine by a short push on the SSB if the vehicle is already in standstill. Emergency
engine stop will be possible by a long press of the SSB or 3 consecutive presses in case the vehicle is in ENGINE
RUNNING.
If the conditions for engine cranking are not satisfied while a push on the SSB is detected and a valid fob
authenticated, the system will unlock the steering column and switch the terminals to IGN. Another push on the SSB
will be necessary to start the engine.
In case of a vehicle equipped with SMART KEY system, fob authentication will not require any action from the driver.
For limp home start or in case of vehicle without SMART KEY, the driver will have to insert the fob into the fob holder.
• Control Ignition and engine ON/OFF by Sending signal to IPM and PDM.
• Display status by LED Lamp ON/OFF. (Amber or Blue)
Indicator ON/OFF Condition At Ignition Key Off Condition
No.
Character lamp
Conditions
1
Indicator Lamp ON
Door open, Tail lamp ON, ACC, IG ON
2
Indicator Lamp 30sec ON → Lamp OFF
Door close, Tail lamp OFF, IG OFF
3
Indicator Lamp OFF
Remote LOCK, Passive LOCK
4
Rheostat at tail lamp ON (Illumination lamp)
Indicator ON/OFF Condition According To Ignition Key's Position
No.
Ignition conditions
Start Button LED status
1
IG OFF
LED OFF
2
IG ACC
Amber color LED ON
3
IG ON (Engine OFF)
Blue color LED ON
4
Cranking
Maintain LED status before cranking
5
Engine running
LED OFF
Wireless Communication
Electromagnetic waves are used to exchange information between the vehicle and the FOB. Two types of RKE Key
can supplement the BES system:
- Non-smart key RKE
- SMART KEY FOB
Currently the BES system comprises with SMART KEY FOB always.
The transmitter, receiver and antennas required for the communication between the fob and the vehicle will differ
depending on functionalities and regional areas.
The RKE and SMART KEY functions are in separated documents. Refer to Smart key system for more detailed
information about SMART KEY function.
Smart Key
The SMK manages all function related to:
•
•
•
•
•
•
•
"Start Stop Button (SSB) monitoring",
"Immobilizer communication" (with Engine Management System unit for immobilizer release),
"ESCL control",
"Authentication server" (Validity of Transponder and in case of Smart Key option Passive Fob authentication ),
"System consistency monitoring",
"System diagnosis",
Control of display message / warning buzzer .
The unit behaves as Master role in the whole system.
In case of SMART KEY application, for example “Passive Access”, “Passive Locking” and “Passive Authorization are
integrated for ESCL/Terminal switching Operations”.
It collects information about vehicle status from other modules (vehicle speed, alarm status, driver door open...), read
the inputs (e.g. SSB, Lock Button and PARK position Switch), controls the outputs (e.g. exterior and interior antennas),
and communicates with others devices via the CAN network as well as a single line interfaces.
The diagnosis and learning of the components of the BES System are also handled by the SMK.
PDM
The PDM manages the functions related to the "terminal control" by activating external relays for ACC, IGN1 and IGN2.
This unit is also responsible for the control of the STARTER relay.
It controls also the power supply of the ESCL by switching the power and ground ESCL supply lines depending on
vehicle status. The purpose of this function is to prevent the ESCL to be energized if ACC or IGN are switched on.
The PDM is also controlling the illumination of the SSB as well as the "system status indicator", which consists of 2
LEDs of different color. The illumination of the fob holder is also managed by the PDM.
The PDM reads the inputs (Engine fob_in, vehicle speed, relays contact status, ESCL lock status), controls the outputs
(Engine relay output drivers, ESCL power), and communicates with others devices via the CAN.
The internal architecture of the PDM is defined in a way that the control of the terminal and of the ESCL power is
secured even in case of failure of one of the two microcontrollers, system inconsistency or interruption of
communication on the CAN network.
In case, failure of one of the two controllers, the remaining controller shall disable the starter relay and the ESCL power
supply. The IGN1 and IGN2 terminals relays shall be maintained in the state memorized before the failure and the
driver shall be able to switch those IGN terminals off by pressing the SSB with EMERGENCY_STOP pressing
sequence. However, engine restart will not be allowed. The state of the ACC relay will depend on the type of failure.
The PDM is diagnosed through the SMK MUT service, using the CAN network.
The main functions of the PDM are:
•
•
•
•
•
•
•
Control of Terminal relays
Monitoring of the Vehicle speed received from sensor or ABS/ESP ECU.
Control of SSB LEDs (illumination, clamp state) and FOB HOLDER illumination.
Control of ESCL power lines and monitoring of the ESCL unlock status
Control of the base station located in fob holder through direct serial interface.
System consistency monitoring to diagnose SMK failure and to switch to relevant limp home mode.
Providing vehicle speed information
Fob Holder
This unit is used for transponder authentication. In case of a vehicle equipped with Smart key, this transponder
authentication is necessary in case of failure of the passive fob authentication (Engine loss of RF or LF link with the
fob).
The Fob holder module integrates a slot where to insert the fob. The fob is maintained in position with a push-push
mechanical locking (not electrically driven) and a signal (FOB_IN) is sent back to the PDM as soon as its insertion is
detected.
The power supply of the fob holder is active only if a communication is initiated by the PDM.
The insertion of the fob into the holder and the communication with the transponder should be possible regardless of
the insertion direction of fob to the holder (buttons facing up or bottom).
A lighting device is also integrated for illumination of the Fob Holder and it is driven directly by the PDM,
The main functions of the Fob holder are:
• Transponder base station
• Fob mechanical lock
• Illumination
Transponder
External Receiver(SRX)
The data transmitted by the RKE or Smart key Fob is received by an external RF receiver called as SRX. This receiver
will be same as that one for the SMK applications, with respect to electronics, housing, connector and software.
This receiver is connected to the SMK via a serial communication line.
Terminal And Starter Relays
Relays will be used to switch the terminals ACC / IGN1 / IGN2. Those normally-open relays will be driven by the PDM
and located either in the passenger or engine compartment depending on the vehicle architecture.
Only one relay coil is connected to the terminal outputs of the PDM.
Those relays should integrate a resistor connected in parallel to the coil in order to reduce the transients during
commutation.
Start/Stop Button(SSB)
A single stage push button is used for the driver to operate the vehicle. Pressing this button allows:
• To activate the power modes ‘Off’, ’Accessory’, ‘Ignition’ and 'Start' by switching the corresponding terminals
• To start the engine
• To stop the engine
The contact will be insured by a micro-switch and a backlighting is provided to highlight the marking of the button
whenever necessary.
Two (2) LED colors are located in the center of the button to display of the status of the system. Another illumination
LED is also integrated into the SSB for the lighting of the "Engine Start/Stop" characters.
Electronic Steering Column Lock (ESCL)
The ESCL is needed to lock the steering column in order to prevent unauthorized usage of the vehicle. In order to
achieve the required safety integrity level, the ESCL is controlled and monitored by 2 independent units, the SMK and
the PDM. Such redundant architecture guarantees that the ESCL motor is supplied only during locking/unlocking
operation and that it is disconnected from the battery and ground lines otherwise to avoid unexpected operation while
the vehicle is in motion.
Data are exchanged between the ESCL and SMK through an encrypted serial communication interface.
BES System State Chart
System STATES in LEARNT MODE
In learnt mode, the BES System can be set in 6 different sates, depending on the status of the terminals, ESCL and
Engine status:
System State
Terminal Status
ESCL Status
Engine status
1. OFF - Locked
OFF
Locked
Stopped
2. OFF - Unlocked
OFF
Unlocked
Stopped
3. ACC
ACC
Unlocked
Stopped
4. IGN
IGN1, IGN2, ACC
Unlocked
Stopped
5. Start
IGN1, Start
Unlocked
Cranking
6. IGN - Engine
IGN1, IGN2, ACC
Unlocked
Running
(means "self-running")
Referring to the terminals, the system states described in the table above are same as those one found in a system
based on a mechanical ignition switch. The one of distinction with Mechanical-Ignition-Switch based system is that the
BES system allows specific transition from [OFF] to [START] without going through [ACC] and [IGN] states.
System STATES IN VIRGIN MODE
The BES System can be set in 5 different states (OFF LOCKED is not available in virgin mode), depending on the
status of the terminals, ESCL and Engine status:
System State
Terminal Status
ESCL Status
Engine status
1. OFF - UNLOCKED
OFF
Unlocked
Stopped
2. ACC
ACC
Unlocked
Stopped
3. IGN
IGN1, IGN2, ACC
Unlocked
Stopped
4. Start
IGN1, START with special
pattern of activation see
Chap 6.2.1 for details
Unlocked
Cranking
5. IGN - Engine
IGN1, IGN2, ACC
Unlocked
Running
(means "self-running")
Referring to the terminals, the system states described in the table above are same as those one found in a system
based on a mechanical ignition switch. The one of distinction with Mechanical-Ignition-Switch based system is that the
BES system allows specific transition from [OFF] to [START] without going through [ACC] and [IGN] states.
Body Electrical System > Button Engine Start System > Start/Stop Button > Components
and Components Location
Component
Body Electrical System > Button Engine Start System > Start/Stop Button > Repair
procedures
Removal
1. Disconnect the negative(-) battery terminal.
2. Remove the start/stop button cover(A).
3. Remove the start/stop button (A).
Installation
1. Install the start/stop button.
2. Install the start/stop button cover.
Body Electrical System > Button Engine Start System > Fob Holder > Components and
Components Location
Component
Body Electrical System > Button Engine Start System > Fob Holder > Repair procedures
Removal
1. Disconnect the negative(-) battery terminal.
2. Remove the console upper cover(A).
(Refer to BD group - "Console")
3. Remove the center fascia lower panel(A).
4. Disconnect the connector and remove the fob holder(A) after loosening the mounting screws.
Installation
1. Install the fob holder assembly.
2. Install the center fascia lower panel.
3. Install the console upper cover.
Body Electrical System > Button Engine Start System > ESCL(Electronic Steering Column
Lock) > Components and Components Location
Component
Body Electrical System > Button Engine Start System > ESCL(Electronic Steering Column
Lock) > Repair procedures
Removal
1. Disconnect the negative(-) battery terminal.
2. Remove the steering column upper and lower shrouds(A).
(Refer to ST group - "Steering column and shaft")
3. Disconnect the electronic steering column lock connector(A).
4. Remove the electronic steering column lock(A).
(Refer to Steering system - "Steering column and shaft")
Installation
1. Install the electronic steering column lock.
Tightening torque :
7 ~ 13 N.m (0.7 ~ 1.3 kgf.m, 5 ~ 9.4 lb.ft)
2. Install the steering column.
Body Electrical System > Button Engine Start System > PDM(Power Distribution Module) >
Components and Components Location
Component
Body Electrical System > Button Engine Start System > PDM(Power Distribution Module) >
Schematic Diagrams
System Circuit Diagram
Body Electrical System > Button Engine Start System > PDM(Power Distribution Module) >
Repair procedures
Inspection
PDM Diagnosis With GDS
1. It will be able to diagnose defects of Smart key with GDS quickly. GDS can operates actuator forcefully, input/output
value monitoring and self diagnosis.
2. Select model and "Smart key system(Button start)" menu if you want to check PDM.
3. Select "PDM" in the manu.
4. Select "Current Data", if you want to check current data of PDM.
It provides the input/output status of each module.
5. If you want to check PDM data operation forcefully, select "Actuation test".
DTC Code List
No.
DTC CODE
Description
1
B1602
CAN ERR
2
B1603
CAN Communication Bus Off
3
B1987
Sub micom Failed
4
B1988
ESCL BAT Short To BAT
5
B1989
ESCL GND Short To BAT
6
B1990
ESCL BAT Short To GND
7
B1991
IMMO TX Short To GND
Input/output Current Data
NO
Description
Unit
1
Load Battery Voltage
V
2
Abs Speed Sensor(main)
Km/h
3
Start Stop Button SW
OFF/ON
4
ACC input
OFF/ON
5
IGN1 Input
OFF/ON
6
IGN2 Input
OFF/ON
7
Fob In Switch
RELEASE/INSERT
8
Start Relay Monitoring Input
9
SSB Ember LED Output
OFF/ON
10
SSB Blue LED Output
OFF/ON
11
Fob Holder Illumination Output
OFF/ON
12
SSB Illumination Output
OFF/ON
13
ACC Relay Output
OFF/ON
14
IGN1 Relay Output
OFF/ON
15
IGN2 Relay Output
OFF/ON
16
Start Relay S1 Output
OFF/ON
17
ESCL Battery Output
OFF/ON
18
ESCL GND Output
OFF/ON
19
CPU Battery Voltage
V
20
Engine Speed
DATA*1.0
21
ACC Relay SCB
OFF/ON
22
IGN1 Relay SCB
OFF/ON
23
IGN2 Relay SCB
OFF/ON
24
Start Relay SCB
OFF/ON
25
SCC Relay Open
OFF/ON
26
IGN1 Relay Open
OFF/ON
27
IGN2 Relay Open
OFF/ON
28
ACC Output SCB
OFF/ON
29
IGN1 Output SCB
OFF/ON
30
IGN2 Output SCB
OFF/ON
31
Start Output SCB
OFF/ON
32
ACC Output SCG
OFF/ON
33
IGN1 Output SCG
OFF/ON
34
IGN2 Output SCG
OFF/ON
35
Start Output SCG
OFF/ON
Actuation Test
No.
Description
1
SSB Ember LED
2
SSB Blue LED
3
Fob Holder Illumination
4
SSB Illumination
5
ACC Output
6
ING1 Output
7
ING2 Output
8
Start Output
9
Perform ESCL Open Check
ESCL OPEN STATUS CHECK
1. Select the "ESCL open status check" menu if you want to check ESCL open.
Removal
1. Disconnect the negative(-) battery terminal.
2. Remove the crash pad lower panel(A).
(Refer to Body group-"Crash pad")
3. Disconnect the power distribution module(PDM) connector.
4. Remove the power distribution module(A) after loosening nut and bolt.
Installation
1. Install the power distribution module.
2. Install the crash pad lower panel.
Body Electrical System > Button Engine Start System > PDM(Power Distribution Module) >
Troubleshooting
Troubleshooting
NO
DTC code
Description
1
B1602
CAN Error
2
B1603
CAN Bus Off
3
B1987
Sub Micom Failed
4
B1988
ESCL Battery Short Circuit To Battery
5
B1989
ESCL Ground Short Circuit To Battery
6
B1990
ESCL Battery Short Circuit To Ground
7
B1991
Immobilizer TX Short Circuit To Ground
Body Electrical System > Button Engine Start System > PDM(Power Distribution Module) >
B1602 CAN Error
General Description
This is DTC which is related with communication error between PDM and other units.
(※ Control Units : BCM (Body Control Module), PDM(Power Distribution Module), SMK(Smart Key) ECU.
*¹ CAN (Controller Area Network) : CAN is serial bus communication type which links not only communication system
but also control units each other.
*² LIN (Local Interconnect Network) : LIN is serial communication type which is used in electrical control system. (This
is less expensive.)
DTC Description
Pattern
Status
1
Open in CAN High circuit
2
Open in CAN Low circuit
3
Short to battery in CAN High circuit
4
Short to battery in CAN Low circuit
5
Short to ground in CAN High circuit
6
Short to ground in CAN Low circuit
7
Short between CAN High and Low circuit
Communication is normal but DTC set if PDM detects 7 error status as follows.
1. Short to battery in CAN High circuit
2. Short to ground in CAN High circuit
3. Short to battery in CAN Low circuit
4. Short to ground in CAN Low circuit
5. Short between CAN High and Low circuit
6. Open or Poor connection in CAN Low circuit
7. Open or Poor connection in CAN High circuit
DTC Detecting Condition
Item
DTC Strategy
Enable Conditions
Detecting Condition
• CAN communication status
• IG "ON"
• Engine "START"
• B/T voltage engerzied to PDM
CAN high
Threshold Value
CAN low
Diagnostic Time
DTC Erasing Time
Possible Cause
0V
Short to ground
B+ V
Short to battery
0V
Short to ground
B+ V
Short to battery
• Failure has been continued for 2sec.
• DTC is erased immediately after trouble fixed(In case
of the past error, perform DTC erasing procedure.)
Diagnostic Circuit Diagram
• Short to battery / ground in
CAN high circuit
• Short to battery / ground in
CAN low circuit
• Short between CAN high and
CAN low circuit
• Open or poor connection in
CAN high and low circuit.
• Faulty IPM
Signal Waveform & Data
Fig.1) Signal waveform of CAN Low and HIGH
Fig.2) CAN BUS VOLTAGE LEVEL (LOW SPEED CAN)
Monitor Scantool Data
■ Check DTC
1. Connect GDS.
2. IG "ON" and engine "OFF".
3. Select "DTC Analysis" mode.
4. After erase DTC, keep the vehicle condition within "the enable conditions"
(Refer to "DTC Detecting Condition" table)
5. Is the same DTC occurred again?
▶ Go to next procedure.
▶ Fault is intermittent caused by poor contact in the sensor's and/or PDM's connector or was
repaired and PDM memory was not cleared. Thoroughly check connectors for looseness, poor
connection, bending, corrosion, contamination, deterioration, or damage. Repair or replace as
necessary and then go to "Verification of Vehicle Repair" procedure.
Terminal & Connector Inspection
1. Many malfunctions in the electrical system are caused by poor harness(es) and terminals. Faults can also be caused
by interference from other electrical systems, and mechanical or chemical damage.
2. Thoroughly check connectors for looseness, poor connection, bending, corrosion, contamination, deterioration, or
damage.
3. Has a problem been found?
▶ Repair as necessary and go to "Verification of Vehicle Repair" procedure.
▶ Go to " Signal Circuit Inpsection " procedure.
Signal Circuit Inpsection
■ Check CAN high circuit
1. IG "ON" & ENG "OFF".
2. Connect GDS and select Scope meter fucntion.
3. Measure signal waveform of PDM CAN High line.
Specification : Refer to signal waveform and data
4. Is the measured signal waveform of CAN high circuit normal ?
▶ Go to next procedure
▶ Check short to battery / ground in CAN high circuit, and repair or replace as necessary.
Go to "Verification of Vehicle Repair" procedure.
■ Check CAN Low circuit
1. IG "ON" & ENG "OFF"
2. Connect GDS and select Scope meter fucntion.
3. Measure signal waveform of PDM CAN Low line.
Specification : Refer to signal waveform and data
4. Is the measured signal waveform of CAN low circuit normal ?
▶ Go to next procedure.
▶ Check short to battery / ground in CAN low circuit and, repair or replace as necessary. And
then, go to 'Verification of Vehicle Repair" procedure.
Component Inspection
■ Check internal errors of CAN communication units
1. Connect GDS.
2. IG "ON" and engine "OFF".
3. Select "DTC Analysis" mode.
4. Disconnect CAN communication units one by one and monitor DTC to find the cause.
*CAN communication units : BCM(Body Control Module), PDM(Power Distribution Module), CLU(Cluster),
SMK(Smart Key) ECU.
5. Is the code erased?
▶ Substitute with a known - good unit and check for proper operation.
If the problem is corrected, replace the unit and go to "Verification of Vehicle Repair" procedure.
▶ Thoroughly check connectors for looseness, poor connection, bending, corrosion,
contamination, deterioration, or damage. Repair or replace as necessary and go to "Verification of
Vehicle Repair" procedure.
Verification of Vehicle Repair
After a repair, it is essential to verify that the fault has been corrected.
1. Connect scan tool and select "DTC Analysis" mode.
2. Clear the DTCs and Operate the vehicle within DTC Enable conditions in General information.
3. Is any DTC outputted again?
▶ Go to the applicable troubleshooting procedure.
▶ System performing to specification at this time.
Body Electrical System > Button Engine Start System > PDM(Power Distribution Module) >
B1603 CAN Bus Off
General Description
This is DTC which is related with communication error between PDM and other units.
(※ Control Units : BCM (Body Control Module), PDM(Power Distribution Module), SMK(Smart Key) ECU.
*¹ CAN (Controller Area Network) : CAN is serial bus communication type which links not only communication system
but also control units each other.
*² LIN (Local Interconnect Network) : LIN is serial communication type which is used in electrical control system. (This
is less expensive.)
DTC Description
This is DTC which is related with communication error between PDM and other units.
※ Control Units : BCM(Body Control Module), PDM(Power Distribution Module), CLU(Cluster), SMK(Smart Key) ECU.
Case1: After short between PDM CAN Low Line and High Line, short to ground together.
Case2: After short between PDM CAN Low Line and High Line, short to power together.
※ This code is occurred when It is not possible to transmit data by CAN Line in those way of Software and Hardware.
But, It is possible to receive data by CAN Line.
This code reports BUS OFF status when data transmit error count number is over 255. The purpose is to verify the
status of CAN controller and CAN communication line when error is detected.
According to operation condition, some of module which are connected to CAN line may not detect B1603.
Also, B1602 coincides with B1603 at all times.
Difference between CAN ERROR and CAN BUS ERROR
CAN Error : MIL On, CAN Bus Error : No MIL
DTC Detecting Condition
Item
DTC Strategy
Detecting Condition
• CAN Communication Check
Possible Cause
• BCM,PDM are not Sleep
condition
Enable Conditions
• BCM, PDM power on
Threshold Value
• CAN High/Low : 0V or B+
Diagnostic Time
• Immediately
DTC Erasing Time
• DTC is erased immediately after trouble fixed.
Diagnostic Circuit Diagram
Signal Waveform & Data
condition
1. CAN High and Low Line short
to ground coincident
2. CAN High and Low Line short
to battery coincident
Fig.1) Signal waveform of CAN Low and HIGH
Fig.2) CAN BUS VOLTAGE LEVEL (LOW SPEED CAN)
Monitor Scantool Data
■ Check DTC
1. Connect GDS.
2. IG "ON" and engine "OFF".
3. Select "DTC Analysis" mode.
4. After erase DTC, keep the vehicle condition within "the enable conditions"
(Refer to "DTC Detecting Condition" table)
5. Is the same DTC occurred again?
▶ Go to next procedure.
▶ Fault is intermittent caused by poor contact in the sensor's and/or PDM's connector or was
repaired and PDM memory was not cleared. Thoroughly check connectors for looseness, poor
connection, bending, corrosion, contamination, deterioration, or damage. Repair or replace as
necessary and then go to "Verification of Vehicle Repair" procedure.
Terminal & Connector Inspection
1. Many malfunctions in the electrical system are caused by poor harness(es) and terminals. Faults can also be caused
by interference from other electrical systems, and mechanical or chemical damage.
2. Thoroughly check connectors for looseness, poor connection, bending, corrosion, contamination, deterioration, or
damage.
3. Has a problem been found?
▶ Repair as necessary and go to "Verification of Vehicle Repair" procedure.
▶ Go to "Component Inspection" procedure.
Component Inspection
■ Check internal errors of CAN communication in PDM.
1. Replace with a known-good PDM after removing installed PDM
2. Connect GDS.
3. IG "ON" and engine "OFF".
4. Select "DTC Analysis" mode.
5. Is the code erased?
▶ Substitute with a known - good unit and check for proper operation.
If the problem is corrected, replace the unit and go to "Verification of Vehicle Repair" procedure.
▶ Thoroughly check connectors for looseness, poor connection, bending, corrosion,
contamination, deterioration, or damage. Repair or replace as necessary and go to "Verification of
Vehicle Repair" procedure.
Verification of Vehicle Repair
After a repair, it is essential to verify that the fault has been corrected.
1. Connect scan tool and select "DTC Analysis" mode.
2. Clear the DTCs and Operate the vehicle within DTC Enable conditions in General information.
3. Is any DTC outputted again?
▶ Go to the applicable troubleshooting procedure.
▶ System performing to specification at this time.
Body Electrical System > Button Engine Start System > PDM(Power Distribution Module) >
B1987 Sub Micom Failed
General Description
This is DTC which is related with communication error between PDM and other units.
(※ Control Units : BCM(Body Control Module), PDM(Power Distribution Module), SMK(Smart Key) ECU.
*¹ CAN (Controller Area Network) : CAN is serial bus communication type which links not only communication system
but also control units each other.
*² LIN (Local Interconnect Network) : LIN is serial communication type which is used in electrical control system. (This
is less expensive.)
DTC Description
This code reports the malfunction of NEC MCU inside PDM. This is the case which there is the NEC MCU
communication error.
DTC Detecting Condition
Item
DTC Strategy
Enable Conditions
Detecting Condition
• NEC MCU Communication Check
• PDM power on
Threshold Value
• Communication error
Diagnostic Time
• Immediately
DTC Erasing Time
• DTC is erased immediately after trouble fixed.
Diagnostic Circuit Diagram
Signal Waveform & Data
Possible Cause
• Short to ground/power or open
in communication circuit of
NEC MCU inside PDM
• Replace PDM
(In case It is unable to verify
the cause.)
Fig.1) Signal waveform of CAN Low and HIGH
Fig.2) CAN BUS VOLTAGE LEVEL (LOW SPEED CAN)
Monitor Scantool Data
■ Check DTC
1. Connect GDS.
2. IG "ON" and engine "OFF".
3. Select "DTC Analysis" mode.
4. After erase DTC, keep the vehicle condition within "the enable conditions"
(Refer to "DTC Detecting Condition" table)
5. Is the same DTC occurred again?
▶ Go to next procedure.
▶ Fault is intermittent caused by poor contact in the sensor's and/or PDM's connector or was
repaired and PDM memory was not cleared. Thoroughly check connectors for looseness, poor
connection, bending, corrosion, contamination, deterioration, or damage. Repair or replace as
necessary and then go to "Verification of Vehicle Repair" procedure.
Terminal & Connector Inspection
1. Many malfunctions in the electrical system are caused by poor harness(es) and terminals. Faults can also be caused
by interference from other electrical systems, and mechanical or chemical damage.
2. Thoroughly check connectors for looseness, poor connection, bending, corrosion, contamination, deterioration, or
damage.
3. Has a problem been found?
▶ Repair as necessary and go to "Verification of Vehicle Repair" procedure.
▶ Go to "Component Inspection" procedure.
Component Inspection
■ Check internal errors of CAN communication in PDM
1. Replace with a known-good PDM after removing installed PDM.
2. Connect GDS.
3. IG "ON" and engine "OFF".
4. Select "DTC Analysis" mode.
5. Is the code erased?
▶ Substitute with a known - good unit and check for proper operation.
If the problem is corrected, replace the unit and go to "Verification of Vehicle Repair" procedure.
▶ Thoroughly check connectors for looseness, poor connection, bending, corrosion,
contamination, deterioration, or damage. Repair or replace as necessary and go to "Verification of
Vehicle Repair" procedure.
Verification of Vehicle Repair
After a repair, it is essential to verify that the fault has been corrected.
1. Connect scan tool and select "DTC Analysis" mode.
2. Clear the DTCs and Operate the vehicle within DTC Enable conditions in General information.
3. Is any DTC outputted again?
▶ Go to the applicable troubleshooting procedure.
▶ System performing to specification at this time.
Body Electrical System > Button Engine Start System > PDM(Power Distribution Module) >
B1988 ESCL Battery Short Circuit To Battery
General Description
The body electrical system is comprised of four ECU applied CAN*¹ communication nodes.
※ Control Units : BCM(Body Control Module), PDM(Power Distribution Module), SMK(Smart Key) ECU.
The steering wheel lock/unlock state of ESCL and the required data when EMS(Engine Management System)controls
starting are sent to PDM by the serial communication line.
*¹ CAN (Controller Area Network) : CAN is serial bus communication type which links not only communication system
but also control units each other.
*² LIN (Local Interconnect Network) : LIN is serial communication type which is used in electrical control system. (This
is less expensive.)
DTC Description
This code is outputted when power circuit is shorted to battery.
(During no power supply from PDM to ESCL)
DTC Detecting Condition
Item
DTC Strategy
Enable Conditions
Detecting Condition
• ESCL power output line check
(by voltage monitoring)
• No power supply from PDM to ESCL
Threshold Value
• ESCL power circuit is shorted to power (7V and above)
Diagnostic Time
• Immediately
DTC Erasing Time
Possible Cause
• DTC is erased immediately after trouble fixed. (Under
no power supply from PDM to ESCL state)
Diagnostic Circuit Diagram
Signal Waveform & Data
• Short to power in ESCL power
circuit
Fig.1) ESCL Data Signal Waveform
Scantool Data Analysis
1. Connect GDS.
2. IG "ON" and engine "OFF".
3. Select "DTC Analysis" mode.
4. After erase DTC, keep the vehicle condition within "the enable conditions" (Refer to "DTC Detecting Condition" table).
5. Is the same DTC occurred again?
▶ Go to next procedure.
▶ Fault is intermittent caused by poor contact in ESCL's and/or PDM's connector or was repaired
and PDM memory was not cleared. Thoroughly check connectors for looseness, poor connection,
bending, corrosion, contamination, deterioration, or damage. Repair or replace as necessary and
then go to "Verification of Vehicle Repair" procedure.
■ Service Data Analysis
1. IG "OFF" and connect GDS.
2. IG "ON" and select "Cu rrent Data" menu.
3. Check the service data of ESCL BATT.
Specification : OFF
4. Is the service data within specifications?
▶ Thoroughly check connectors for looseness, poor connection, bending, corrosion,
contamination, deterioration, or damage. Repair or replace as necessary and then go to
"Verification of Vehicle Repair" procedure.
▶ Go to next procedure.
Terminal & Connector Inspection
1. Many malfunctions in the electrical system are caused by poor harness(es) and terminals. Faults can also be caused
by interference from other electrical systems, and mechanical or chemical damage.
2. Thoroughly check connectors for looseness, poor connection, bending, corrosion, contamination, deterioration, or
damage.
3. Has a problem been found?
▶ Repair as necessary and go to "Verification of Vehicle Repair" procedure.
▶ Go to "Component Inspection" procedure.
PDM Ground Circuit Inspection
■ Check short at power terminal of PDM
1. IG "ON" & ENG "OFF".
2. Measure voltage between ESCL power terminal of PDM and chassis ground.
(Measure the voltage while ESCL doesn't work.)
Specification : Approx. 0 V
3. Is the measured voltage within specifications?
▶ Go to next procedure.
▶ Check open or short on the power circuit between PDM and ESCL.
Repair as necessary and go to "Verification of Vehicle Repair"
■ Check short to power on ESCL power circuit
1. IG "ON" & ENG "OFF"
2. Disconnect the connectors of IPM, PDM, ESCL.
3. Measure voltage between ESCL power terminal and chassis ground.
Specification : Approx. 0V
4. Is the measured voltage within specifications?
▶ Substitute with a known - good ESCL and check for proper operation.
If the problem is corrected, replace the unit and go to "Verification of Vehicle Repair" procedure.
▶ Substitute with a known - good PDM and check for proper operation.
If the problem is corrected, replace the unit and go to "Verification of Vehicle Repair" procedure.
▶ Repair as necessary and go to "Verification of Vehicle Repair".
Verification of Vehicle Repair
After a repair, it is essential to verify that the fault has been corrected.
1. Connect scan tool and select "DTC Analysis" mode.
2. Clear the DTCs and Operate the vehicle within DTC Enable conditions in General information.
3. Is any DTC outputted again?
▶ Go to the applicable troubleshooting procedure.
▶ System performing to specification at this time.
Body Electrical System > Button Engine Start System > PDM(Power Distribution Module) >
B1989 ESCL Ground Short Circuit To Battery
General Description
The body electrical system is comprised of four ECU applied CAN*¹ communication nodes.
※ Control Units : BCM(Body Control Module), PDM(Power Distribution Module), CLU(Cluster), SMK(Smart Key) ECU.
The steering wheel lock/unlock state of ESCL and the required data when EMS(Engine Management System) controls
starting are sent to PDM by the serial communication line.
*¹ CAN (Controller Area Network) : CAN is serial bus communication type which links not only communication system
but also control units each other.
*² LIN (Local Interconnect Network) : LIN is serial communication type which is used in electrical control system. (This
is less expensive.)
DTC Description
This code is outputted when ground circuit is shorted to battery.
(During no power supply from PDM to ESCL)
DTC Detecting Condition
Item
DTC Strategy
Enable Conditions
Detecting Condition
• ESCL ground output line check
(by voltage monitoring)
• No power supply from PDM to ESCL
Threshold Value
• ESCL ground circuit is shorted to power (7V and
above)
Diagnostic Time
• Immediately
DTC Erasing Time
Possible Cause
• DTC is erased immediately after trouble fixed. (Under
no power supply from PDM to ESCL state)
Diagnostic Circuit Diagram
• Short to power in ESCL
ground circuit
Signal Waveform & Data
Fig.1) ESCL Data Signal Waveform
Scantool Data Analysis
1. Connect GDS.
2. IG "ON" and engine "OFF".
3. Select "DTC Analysis" mode.
4. After erase DTC, keep the vehicle condition within "the enable conditions" (Refer to "DTC Detecting Condition" table).
5. Is the same DTC occurred again?
▶ Go to next procedure.
▶ Fault is intermittent caused by poor contact in ESCL's and/or PDM's connector or was repaired
and PDM memory was not cleared. Thoroughly check connectors for looseness, poor connection,
bending, corrosion, contamination, deterioration, or damage. Repair or replace as necessary and
then go to "Verification of Vehicle Repair" procedure.
■ Service Data Analysis
1. IG "OFF" and connect GDS.
2. IG "ON" and select "Current Data" menu.
3. Check the service data of ESCL GND.
Specification : OFF
4. Is the service data within specifications?
▶ Thoroughly check connectors for looseness, poor connection, bending, corrosion,
contamination, deterioration, or damage. Repair or replace as necessary and then go to
"Verification of Vehicle Repair" procedure.
▶ Go to next procedure.
Terminal & Connector Inspection
1. Many malfunctions in the electrical system are caused by poor harness(es) and terminals. Faults can also be caused
by interference from other electrical systems, and mechanical or chemical damage.
2. Thoroughly check connectors for looseness, poor connection, bending, corrosion, contamination, deterioration, or
damage.
3. Has a problem been found?
▶ Repair as necessary and go to "Verification of Vehicle Repair" procedure.
▶ Go to "Component Inspection" procedure.
PDM Ground Circuit Inspection
■ Check short at ground terminal of PDM
1. IG "ON" & ENG "OFF".
2. Measure voltage between ESCL ground terminal of PDM and chassis ground.
(Measure the voltage while ESCL doesn't work.)
Specification : Approx. 0 V
3. Is the measured voltage within specifications?
▶ Go to next procedure.
▶ Check open or short on the ground circuit between PDM and ESCL.
Repair as necessary and go to "Verification of Vehicle Repair"
■ Check short to power on ESCL GND circuit
1. IG "ON" & ENG "OFF"
2. Disconnect the connectors of IPM, PDM, ESCL.
3. Measure voltage between ESCL ground terminal and chassis ground.
Specification : Approx. 0 V
4. Is the measured voltage within specifications?
▶ Substitute with a known - good ESCL and check for proper operation.
If the problem is corrected, replace the unit and go to "Verification of Vehicle Repair" procedure.
▶ Substitute with a known - good PDM and check for proper operation.
If the problem is corrected, replace the unit and go to "Verification of Vehicle Repair" procedure.
▶ Repair as necessary and go to "Verification of Vehicle Repair".
Verification of Vehicle Repair
After a repair, it is essential to verify that the fault has been corrected.
1. Connect scan tool and select "DTC Analysis" mode.
2. Clear the DTCs and Operate the vehicle within DTC Enable conditions in General information.
3. Is any DTC outputted again?
▶ Go to the applicable troubleshooting procedure.
▶ System performing to specification at this time.
Body Electrical System > Button Engine Start System > PDM(Power Distribution Module) >
B1990 ESCL Battery Short Circuit To Ground
General Description
The body electrical system is comprised of four ECU applied CAN*¹ communication nodes.
※ Control Units : BCM(Body Control Module), PDM(Power Distribution Module), CLU(Cluster), SMK(Smart Key) ECU.
The steering wheel lock/unlock state of ESCL and the required data when EMS(Engine Management System) controls
starting are sent to PDM by the serial communication line.
*¹ CAN (Controller Area Network) : CAN is serial bus communication type which links not only communication system
but also control units each other.
*² LIN (Local Interconnect N etwork) : LIN is serial communication type which is used in electrical control system. (This
is less expensive.)
DTC Description
This code is outputted when power circuit is shorted to ground.
(During power supply from PDM to ESCL)
DTC Detecting Condition
Item
DTC Strategy
Enable Conditions
Detecting Condition
• ESCL power output line check
(by voltage monitoring)
• Under power supply from PDM to ESCL
Threshold Value
• ESCL power circuit is shorted to ground(2V and below)
Diagnostic Time
• Immediately
DTC Erasing Time
Possible Cause
• DTC is erased immediately after trouble fixed. (Under
power supply from PDM to ESCL state)
Diagnostic Circuit Diagram
• Short to ground in ESCL
power circuit
Signal Waveform & Data
Fig.) ESCL Data Signal Waveform
Scantool Data Analysis
1. Connect GDS.
2. IG "ON" and engine "OFF".
3. Select "DTC Analysis" mode.
4. After erase DTC, keep the vehicle condition within "the enable conditions" (Refer to "DTC Detecting Condition" table).
5. Is the same DTC occurred again?
▶ Go to next procedure.
▶ Fault is intermittent caused by poor contact in ESCL's and/or PDM's connector or was repaired
and PDM memory was not cleared. Thoroughly check connectors for looseness, poor connection,
bending, corrosion, contamination, deterioration, or damage. Repair or replace as necessary and
then go to "Verification of Vehicle Repair" procedure.
■ Service Data Analysis
1. IG "OFF" and connect GDS.
2. IG "ON" and select "Current Data" menu.
3. Check the service data of ESCL BATT.
Specification : ON
4. Is the service data within specifications?
▶ Thoroughly check connectors for looseness, poor connection, bending, corrosion,
contamination, deterioration, or damage. Repair or replace as necessary and then go to
"Verification of Vehicle Repair" procedure.
▶ Go to next procedure.
Terminal & Connector Inspection
1. Many malfunctions in the electrical system are caused by poor harness(es) and terminals. Faults can also be caused
by interference from other electrical systems, and mechanical or chemical damage.
2. Thoroughly check connectors for looseness, poor connection, bending, corrosion, contamination, deterioration, or
damage.
3. Has a problem been found?
▶ Repair as necessary and go to "Verification of Vehicle Repair" procedure.
▶ Go to "Component Inspection" procedure.
PDM Ground Circuit Inspection
■ Check short at power terminal of PDM
1. IG "ON" & ENG "OFF".
2. (2) Measure voltage between ESCL power terminal of PDM and chassis ground.
(Measure the voltage while ESCL works.)
Specification : Approx. 12 V
3. Is the measured voltage within specifications?
▶ Go to next procedure.
▶ Check open or short on the power circuit between PDM and ESCL.
Repair as necessary and go to "Verification of Vehicle Repair"
■ Check short to ground on ESCL power circuit
1. IG "ON" & ENG "OFF"
2. Disconnect the connectors of IPM, PDM, ESCL.
3. Measure resistance between ESCL power terminal and chassis ground.
Specification : ∞ Ω
4. Is the measured voltage within specifications?
▶ Substitute with a known - good ESCL and check for proper operation.
If the problem is corrected, replace the unit and go to "Verification of Vehicle Repair" procedure.
▶ Substitute with a known - good PDM and check for proper operation.
If the problem is corrected, replace the unit and go to "Verification of Vehicle Repair" procedure.
▶ Repair as necessary and go to "Verification of Vehicle Repair".
Verification of Vehicle Repair
After a repair, it is essential to verify that the fault has been corrected.
1. Connect scan tool and select "DTC Analysis" mode.
2. Clear the DTCs and Operate the vehicle within DTC Enable conditions in General information.
3. Is any DTC outputted again?
▶ Go to the applicable troubleshooting procedure.
▶ System performing to specification at this time.
Body Electrical System > Button Engine Start System > PDM(Power Distribution Module) >
B1991 Immobilizer TX Short Circuit To Ground
General Description
The body electrical system is comprised of four ECU applied CAN*¹ communication nodes.
※ Control Units : BCM(Body Control Module), PDM(Power Distribution Module), CLU(Cluster), SMK(Smart Key) ECU.
After insert the fob into the fob holder, press SSB button. Then, the communication state between the fob and the
immobilizer is inputted to PDM.
*¹ CAN (Controller Area Network) : CAN is serial bus communication type which links not only communication system
but also control units each other.
*² LIN (Local Interconnect Network) : LIN is serial communication type which is used in electrical control system. (This
is less expensive.)
DTC Description
This code is outputted when the immobilizer data circuit is shorted to ground.
(In this case, it is not possible to get authorization although the fob is in the holder.)
DTC Detecting Condition
Item
DTC Strategy
Enable Conditions
Detecting Condition
• Immobilizer data line check
(by voltage monitoring)
• The communication state between the fob and the fob
holder when SSB button is pushed. (The fob is in the
holder.)
Threshold Value
• Short to ground in immobilizer data circuit (2V and
below)
Diagnostic Time
• Immediately
DTC Erasing Time
Possible Cause
• DTC is erased immediately after trouble fixed. (After
communication recovery)
• Short to ground in immobilizer
data circuit
Diagnostic Circuit Diagram
Signal Waveform & Data
Fig.1) IMMO_CLOCK & IMMO_DATA signal waveform
Scantool Data Analysis
1. Connect GDS.
2. IG "ON" and engine "OFF".
3. Select "DTC Analysis" mode.
4. After erase DTC, keep the vehicle condition within "the enable conditions" (Refer to "DTC Detecting Condition" table).
5. Is the same DTC occurred again?
▶ Go to next procedure.
▶ Fault is intermittent caused by poor contact in PDM's connector or was repaired and PDM
memory was not cleared. Thoroughly check connectors for looseness, poor connection, bending,
corrosion, contamination, deterioration, or damage. Repair or replace as necessary and then go
to "Verification of Vehicle Repair" procedure.
■ Service Data Analysis
1. IG "OFF" and connect GDS.
2. IG "ON" and select "Current Data" menu.
3. Check the service data of SMART KEY HOLDER INSERT SIGNAL.
Specification : ON (When the fob is inserted in the holder)
4. Is the service data within specifications?
▶ Thoroughly check connectors for looseness, poor connection, bending, corrosion,
contamination, deterioration, or damage. Repair or replace as necessary and then go to
"Verification of Vehicle Repair" procedure.
▶ Go to next procedure.
Terminal & Connector Inspection
1. Many malfunctions in the electrical system are caused by poor harness(es) and terminals. Faults can also be caused
by interference from other electrical systems, and mechanical or chemical damage.
2. Thoroughly check connectors for looseness, poor connection, bending, corrosion, contamination, deterioration, or
damage.
3. Has a problem been found?
▶ Repair as necessary and go to "Verification of Vehicle Repair" procedure.
▶ Go to next procedure.
Immobilizer TX Terminal Inspection
■ Check short to ground on IMMO TX terminal
1. IG "ON" & ENG "OFF".
2. Disconnect the connectors of IPM, PDM, ESCL.
3. Measure resistance between IMMO TX terminal and chassis ground.
Specification : ∞ Ω
4.
5. Is the measured resistance within specifications?
▶ Substitute with a known - good PDM and check for proper operation.
If the problem is corrected, replace the unit and go to "Verification of Vehicle Repair" procedure.
▶ Substitute with a known - good fob holder and check for proper operation.
If the problem is corrected, replace the unit and go to "Verification of Vehicle Repair" procedure.
▶ Repair as necessary and go to "Verification of Vehicle Repair".
Verification of Vehicle Repair
After a repair, it is essential to verify that the fault has been corrected.
1. Connect scan tool and select "DTC Analysis" mode.
2. Clear the DTCs and Operate the vehicle within DTC Enable conditions in General information.
3. Is any DTC outputted again?
▶ Go to the applicable troubleshooting procedure.
▶ System performing to specification at this time.