1
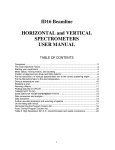
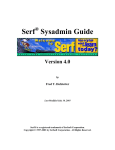
Model JI-210
I2C Bus Monitor
User’s Manual
Version 2.0
Jupiter Instruments
JI-210
1/29/2006 Edition
1/18/06
TABLE OF CONTENTS
1.
INTRODUCTION
3
1.1
Front Panel Description
4
1.2
Rear Panel Description
4
2.
GETTING STARTED
5
2.1
Software Installation
5
2.2
Hardware Setup
5
2.3
Communications Check
5
2.4
I2C Message Capture w/o Trigger
6
2.5
I2C Message Capture with Trigger
7
3.
MAIN WINDOW AND MENU DESCRIPTIONS
9
3.1
Main Window
9
3.2
Trace Memory Setup Menu
10
3.3
Comm Port Menu
11
3.4
Trigger Menu
12
4.
TRACE LOG PANE
4.1
Message Syntax Definitions
14
14
APPENDIX A
16
1.
PC System Requirements
16
2.
Size and Weight
16
APPENDIX B
1.
17
Specifications
17
APPENDIX C
1.
JI-210
19
General Information
19
1
12/30/04
Jupiter Instruments_____________________________________________________________________________________
1.1
Warranty
19
1.2
Thirty-Day Return Policy
19
1.3
Limitation of Liability
19
1.4
Contact Us
19
JI-210
2
11/4/04
Jupiter Instruments_____________________________________________________________________________________
1. INTRODUCTION
The JI-210 is a PC hosted I2C bus monitor used to non-invasively monitor and analyze a variety of I2C
networks. The desktop unit captures and stores up to 32KBs of bus activity including data and address
values, stop/start, read/write, ACK/NACK, and frame error events. Data is displayed as both I2C
messages and Timing Waveforms. A Windows software application manages captured I2C
messages, timing waveform display, trigger setup, and sampling rates. RS-232* provides the PC to
desktop unit communications link.
A unique FPGA architecture allows the JI-210 to capture and display all I2C bus events (valid or invalid)
between message Start and Stop conditions. For example, the action of a Master mistakenly ignoring the
NACK response of a Slave by continuing to transmit data bytes will be captured, showing the invalid
NACK response for each transfer. Bus anomalies such as a Start followed by a Stop without data, or
multiple Stop/Starts conditions will be captured and displayed as they occurred. Additionally, the JI-210
can be configured to trigger and capture bus errors such as truncated address or data values or missing
ACK/NACK responses.
Features
•
Compatible with Standard (100kbit/s), Fast(400kbit/s), and bit rates up to 700kbit/s without
clock stretching.
•
Timing Waveform sampling rates up to 50ns (20Mhz)
•
Supports 7-bit and 10-bit addressing
•
Compliant with 3.3V and 5.0V bus networks
•
Combinational Event Triggering -- based on Address, Data, and R/W values, and Frame
Error events.
•
Selectable pre/post trigger position for both I2C Message capture and Timing Waveform
data
•
Message period timestamp with 1us resolution
•
Trigger output signal available via BNC connector -- used to trigger a digital oscilloscope
•
Easy to use Graphical User Interface (GUI) software included
Applications
•
Firmware debugging and hardware troubleshooting
•
Production line testing
•
Equipment repair and diagnostics
*Note: If the host PC does not have an available COM port, but does have a free USB port, a USB to RS-232 converter can
be used to communicate with the desktop unit. Successful operation has been achieved with the IOGear Model GUC232A
USB to Serial/PDA converter cable.
JI-210
3
11/4/04
Jupiter Instruments_____________________________________________________________________________________
1.1 Front Panel Description
I2C Bus Monotor Mo del JI-210
I2C Bus Monoitor Mo del JI-210
Jupit er Instruments
Jupit er Instruments
Power
SCL
1
SDA
2
Trigger
Output
Input
Trigger
3
4
5
1. Power – Power on indicator.
2. SCL, SDA – I2C bus activity indicators.
3. Input – I2C probe cable jack input. 5-pin, polarized, latching header (Molex 70553-0004)
4. Trigger – Trigger event / Recording indicator. Blinking LED = Recording in progress, Solid
LED = Trigger event has occurred.
5. Output – Trigger output signal. 3.3V, 10us pulse, BNC connector.
1.2 Rear Panel Description
Power
RS-232
9 V DC
1
2
1. Power – Power input jack, 2.1mm x 5.5mm
2. RS-232 – Serial Communications, RS-232, Sub-D, 9-pin, Female
JI-210
4
11/4/04
Jupiter Instruments_____________________________________________________________________________________
2. GETTING STARTED
2.1 Software Installation
The I2C Bus Monitor software can be installed locally on the host PC’s hard-drive or executed
directly from the CD-ROM. To install on the C: drive:
1. Insert the JI-210 CD-ROM disk into the CD drive.
2. Using Windows Explorer, copy the JI folder containing the bus monitor executable
(I2C_Bus_Mon.exe) from the CD-ROM to a convenient location on PC’s C: drive.
2.2 Hardware Setup
1. Connect the I2C bus Monitor unit to the host PC using the 9-pin serial cable.
2. Connect the AC adapter to the power-jack on the rear panel of the I2C Bus Monitor unit. Then
plug the adapter into the wall.
3. Ensure that the power-on LED on the I2C Bus Monitor unit is illuminated.
2.3 Communications Check
1. Go to the folder C:\JI\
2. Launch the I2C Bus Monitor application by clicking I2C_Bus_Mon.exe.
3. Verify that the main I2C Bus Monitor window is displayed as shown in figure 1.
Figure 1. I2C Bus Monitor Window
JI-210
5
11/4/04
Jupiter Instruments_____________________________________________________________________________________
If an error occurs and the window does not appear, begin by verifying that the .NET Framework
1.1 is installed. To do this, click Start on your windows desktop, select Control Panel, and then
double-click the Add or Remove Programs icon. When the window appears, scroll through the
list of applications. If you see the .NET Framework 1.1 listed, the latest version is installed. If not
listed, go to msdn.microsoft.com/netframework/downloads/howtoget.aspx for instructions on
downloading and installing the latest .NET Framework version.
4. At the menu bar, configure the COM port by selecting Setup then Comm Port.
5. Verify that the Comm Port menu opens as shown in figure 2.
Figure 2. Comm Port Menu
6. Select the desired host COM port number (COM 1 – COM4), and then select Open.
7. Ensure that the selected port is available and open by verifying an open port status.
8. Click OK to save.
9. At the main window, click the Run button. Wait a few seconds, then click Stop.
10. Verify an output similar to that shown below is now displayed in the Trace Log pane.
I2C Bus Monitor Application Version 2.1 Date: 1/18/2006
Hardware Version 0d!
1/18/2006 8:48:34 AM
Memory count = 0000!
No Data!
2.4 I2C Message Capture w/o Trigger
1. Ensure the I2C bus Monitor unit is connected to the host PC.
JI-210
6
11/4/04
Jupiter Instruments_____________________________________________________________________________________
2. Ensure that the Bus Monitor application is running and a host COM port has been
selected.
3. Connect the I2C probe cable to the Input jack on the I2C bus Monitor front panel.
4. Connect the three I2C bus probes (SDA, SCL, and GND) to an active I2C bus.
5. Verify I2C bus activity by observing the SDA and SCL LEDs on the front panel of the I2C Bus
Monitor unit.
6. At the main window, select Free-Run Capture in the Trace Mode group.
7. Click the Run button to begin capturing I2C data.
8. Verify I2C recording by observing an increasing byte count in the Record Memory text box and
the message Recording in the Trace Control Progress text box.
9. Click the Stop recording button after filling memory with a few hundred bytes.
10. When the message Stopped is displayed in both the Trace Control and Timing Waveform
Progress test boxes, click the Zoom All button in the Timing Waveform section.
11. Verify that I2C messages are now displayed in the Trace Log pane and that SDA and SCL
waveforms have been captured (Note: If the density of I2C message traffic is low and/or
the clock frequency is low, flat line waveforms may be displayed).
2.5 I2C Message Capture with Trigger
1. If you have not already done so, run the steps in section 2.4 I2C Message Capture w/o
Trigger.
2. Scroll through the captured I2C messages in the Trace Log pane and locate a message
with an infrequent occurrence suitable for use as a trigger. For this test, select a message
with a 7-bit address that has at least one data argument. Note the address, R/W, and data
values.
3. At the menu bar, open the trigger menu by selecting Setup then Trigger.
4. Using your selected I2C message, set the trigger menu as follows:
• Address Format:
“7-bit”
• Trigger Configuration:
“Address and Data”
• Address Value:
Your selected trigger Address value
• Data Value:
Your selected trigger Data value
• R/W Value:
Your selected trigger R/W value
• Trigger Output:
“Disabled”
5. Click OK to save the trigger setup.
6. Select a Timing Waveform sampling clock suitable for the I2C bus under test. To do this,
click the Sampling Clock combo box at the lower left side of the window. Choose a
sampling clock that is approximately 20x faster than the I2C clock rate.
7. At the main window, select a triggered trace by clicking the Trigger radio button.
8. Verify I2C bus activity by observing the SDA and SCL LEDs on the front panel of the I2C
Bus Monitor unit.
9. At the main window, click the Run button to begin capturing I2C data.
10. Verify I2C message recording by observing an increasing byte count in the Record
Memory text box.
JI-210
7
11/4/04
Jupiter Instruments_____________________________________________________________________________________
11. Watch the Progress text box in the Trace Control section. When a Triggered message
appears, wait a few seconds and then click the Stop button. If a Triggered message is
never observed, click the Stop recording button and verify trigger menu settings, trace
mode selection, and chosen trigger message.
12. At the Trace Log pane, scroll through the captured messages to locate the trigger
message. This message is identified by an asterisk preceding the message number and
horizontal bars above and below the message. As an example:
Msg 005 <Start>[Add:A1(R)]<ACK>[#12]<ACK>[#23]<ACK>[#56]<ACK>[#78]<ACK>[#9A]
<ACK>[#BC]<ACK>[#DE]<ACK>[#F0]<ACK>[#11]<NACK><Stop>
Msg 006 <Start>[Add:A6(W)]<ACK>[#00]<ACK><Stop>
t=109869us
t=1202us
__________________________________________________________________________________
* Msg 007 <Start>[Add:A7(R)]<ACK>[#22]<ACK>[#23]<ACK>[#24]<ACK>[#25]<ACK>[#26]
<ACK>[#27]<ACK>[#FF]<ACK>[#FF]<ACK>[#FF]<NACK><Stop>
t=109361us
___________________________________________________________________________________
Msg 008 <Start>[Add:A0(W)]<ACK>[#00]<ACK><Stop>
t=1202us
Msg 009 <Start>[Add:A1(R)]<ACK>[#12]<ACK>[#23]<ACK>[#56]<ACK>[#78]<NACK><Stop>
t=108373us
13. Examine the captured trigger message and verify a match with the trigger menu
selections.
14. At the Timing Waveform display, use the zoom and scroll controls to locate the trigger
message. This message’s location is indicated by the blue vertical bar. This bar marks the
point in time where the trigger condition was satisfied. Zoom-in to a point where SCL clock
and SDA data signals are clearly visible and clocked data values can be determined.
15. Visually decode the timing signals and verify a match with the trigger menu trigger menu
selections.
JI-210
8
11/4/04
Jupiter Instruments_____________________________________________________________________________________
3. MAIN WINDOW AND MENU DESCRIPTIONS
3.1 Main Window
The I2C Bus Monitor main window is illustrated in Figure 3. The Trace Log pane and associated
monitor and control options are located on the top 3/4s of the window, and the Timing Waveform
display and associated monitor and control options are located towards the bottom.
1
2
3
4
5
11
6
7
8
9
10
Figure 3. I2C Bus Monitor Main Window
1. Trace Log – Captured I2C messages are displayed in this pane.
2. Trace Mode – I2C data can be captured via two modes: Trigger and Free-Run Capture. In
Trigger mode, captured data is written to memory using a circular buffer arrangement. When a
trigger occurs, data is tagged and the remainder of memory is filled. The result is memory filled
with pre and post trigger I2C data. In Free Run Capture mode, all triggering is ignored. I2C data
is simply captured and written to memory, beginning at address 0 and ending at the selected
memory depth.
3. Run/Stop – These buttons control the I2C capture session. The Run button initiates a session
and the Stop button terminates it. A capture session will automatically stop when the both
message and timing waveform memories are full.
4. Progress (Trace) – Messages reporting the status of the capture session are displayed here.
JI-210
9
11/4/04
Jupiter Instruments_____________________________________________________________________________________
5. Memory (Trace) – The memory byte count is displayed both numerically and graphically.
6. Sampling Clock – The sampling rate for the Timing Waveform display is selected here.
7. Trigger Position – This control selects (in percentage) the amount of timing data
recorded before and after the trigger event. This control is ignored when a non-triggered
captured is initiated (i.e. Free-Run Capture mode or Snap-Shot)
8. Progress (Timing Waveform) – Messages reporting the status of the capture session (as
related to the timing data) are displayed here.
9. Snap-Shot – This control initiates a non-triggered capture and display of timing data. It is used
to take a quick look at the state of the SDA and SCL signals.
10. Timing Waveform Control – These controls are used to manipulate the timing signals
displayed in the timing waveform display. Zoom in, zoom out, zoom all, scroll left (<), and scroll
right (>) controls are available.
11. Timing Waveform Display – SDA and SCL signals are displayed here. When a Trigger Trace
Mode is initiated and a trigger event has occurred, a blue vertical bar in the timing data is
displayed. This bar marks the point in time where the trigger condition was satisfied and
corresponds to the trigger message in the Trace Log. Note that only a single trigger event is
generated during a session.
3.2 Trace Memory Setup Menu
This menu (Figure 4.) selects both the Memory Depth and the number of bytes recorded before and after
a trigger event.
Figure 4. Trace Memory Setup Menu
When the Trace Memory is full, captured I2C messages will be automatically displayed in the Trace Log.
To take advantage of this display feature, set the memory depth as small as possible for your testing.
Otherwise, the memory should be set to the default value of 32K.
The Trigger Position is adjustable in three steps from 25% to 75% of the selected memory depth. By
judicious selection of the Trigger Position, viewing a particular I2C message or bus event long before or
after a trigger event is possible.
JI-210
10
11/4/04
Jupiter Instruments_____________________________________________________________________________________
3.3 Comm Port Menu
The selection of a COM port (COM1 – COM4) and status (Open/Closed) is provided by the Comm Port
Menu (Figure 5.)
Figure 5. Comm Port Menu
Four COM port are available: COM1 (3F8h), COM2 (3F8h), COM3 (3F8h), or COM4 (3F8h). Click the
Open or Close button to either open or close the selected port. Status of the selected port is indicated in
the Port Status text box. A pop-up message warns against a nonexistent or unavailable COM port.
*Note: If the host PC does not have an available COM port, but does have a free USB port, a USB to
RS-232 converter can be used to communicate with the desktop unit. Successful operation has been
achieved with the IOGear Model GUC232A USB to Serial/PDA converter cable.
JI-210
11
11/4/04
Jupiter Instruments_____________________________________________________________________________________
3.4 Trigger Menu
The Trigger Menu proves a simplified and convenient means of entering and maintaining a trigger setup.
This menu is illustrated in Figure 6. A trigger event is generated if a match occurs between a captured
I2C bus message and the trigger setup values. Only a single trigger event is generated during a
recording session.
1
2
3
4
5
6
Figure 6. Trigger Menu
1. Address Format – Radio buttons select either a 7-Bit or 10-Bit addressing. If the trigger type is
not based on an address (such as Frame Error Only), the buttons are dimmed and not
selectable.
2. Trigger Configuration – A list box selects 1 of 7 trigger configurations:
Configuration
Match Variables
• Address and Data
Address, Data, Address Format, and R/W
• Address only
Address, Address Format, and R/W
• Data only
Data and R/W
• (Address & Data) or Frame Error (Address, Data, Address Format, and R/W) or Frame
Error
JI-210
• Address or Frame Error
(Address, Address Format, and R/W) or Frame Error
• Data or Frame Error
(Data and R/W) or Frame Error
• Frame Error Only
Frame Error Only
12
11/4/04
Jupiter Instruments_____________________________________________________________________________________
3. Address Value – Address trigger values for either 7-bit or 10-bit formats is entered here. When
7-bit addressing is selected, even address values from 0 to FEh are available. This follows the
I2C convention using the upper 7-bit of a byte as the address and setting the LSB to 0. For 10bit addressing, all values from 0 to 3FFh are available.
4. Data Value – Value range is from 0 to FFh.
5. R/W Value – Radio buttons select read (RD), write (WR), or a Don’t Care value for the
I2C message direction bit (R/W).
6. Trigger Output – The Trigger Output enables or disables the generation of 10us trigger
event signal. This output signal is available at front panel BNC connector. Note that only a
single trigger event is generated during a recording session.
JI-210
13
11/4/04
Jupiter Instruments_____________________________________________________________________________________
4. TRACE LOG PANE
Captured I2C messages are assigned a message number and sequentially displayed in the trace log
pane. Displayed message details include message data and address values, stop/start, read/write,
ACK/NACK, and frame error events. Message execution time (Start to Stop or Start to repeated Start) is
also displayed. An asterisk preceding the message number and horizontal bars above and below the
message identifies a trigger message.
4.1 Message Syntax Definitions
Syntax
Description
<Start>
Start event
<Stop>
Stop event
<ACK>
Acknowledge event
<NACK>
not-Acknowledge event
[Add:hh(d)]
[Add10:hh(d)]
followed by
[Add10:hh]
[#hh]
7-bit Message Address with direction.
hh
Address value displayed in conventional I2C hexadecimal
format (i.e. upper 7-bits make up the slave address and the
LSB determines message direction)
d
Message direction: R = Read, W = Write.
10-bit Message Address with direction.
Since a 10-bit address is formed from the first two bytes following a
Start condition, the 10-bit address syntax is displayed as two bytes: the
upper 2 bits of the 10-bit address make up the first byte value, and the
remaining 8 bits of the 10-bit address make up the second byte value.
Message direction is displayed in parentheses in the first byte.
hh
Address displayed as hexadecimal value
d
Message direction: R = Read, W = Write.
Data byte value
hh
JI-210
Data displayed as hexadecimal value.
14
11/4/04
Jupiter Instruments_____________________________________________________________________________________
<Frame Error!>
<ACK/NACK Error!>
T=ddddduS
An address or data value has been truncated by a Stop condition.
A stop condition has terminated the message before an ACK/NACK is
generated.
Message execution time measured from Start to Stop or Start or repeated
Start.
ddddd
*Msg
Time displayed as a decimal value.
An asterisk preceding the message number identifies a trigger message.
Additionally, horizontal bars above and below the message body are
added. A trace log example follows below:
Msg 005 <Start>[Add:A1(R)]<ACK>[#12]<ACK>[#23]<ACK>[#56]<ACK>[#78]<ACK>[#9A]
<ACK>[#BC]<ACK>[#DE]<ACK>[#F0]<ACK>[#11]<NACK><Stop>
Msg 006 <Start>[Add:A6(W)]<ACK>[#00]<ACK><Stop>
t=109869us
t=1202us
__________________________________________________________________________________
* Msg 007 <Start>[Add:A7(R)]<ACK>[#22]<ACK>[#23]<ACK>[#24]<ACK>[#25]<ACK>[#26]
<ACK>[#27]<ACK>[#FF]<ACK>[#FF]<ACK>[#FF]<NACK><Stop>
t=109361us
___________________________________________________________________________________
JI-210
Msg 008 <Start>[Add:A0(W)]<ACK>[#00]<ACK><Stop>
t=1202us
Msg 009 <Start>[Add:A1(R)]<ACK>[#12]<ACK>[#23]<ACK>[#56]<ACK>[#78]<NACK><Stop>
t=108373us
15
11/4/04
Jupiter Instruments_____________________________________________________________________________________
APPENDIX A
1. PC System Requirements
•
Microsoft Windows 98*, 2000*, and XP
*These OS require the .NET framework. If installation is required, go to
msdn.microsoft.com/netframework/ downloads/howtoget.aspx
•
Serial port, 115.2K BAUD
•
CD ROM drive
•
5 MB hard disk space
2. Size and Weight
JI-210
•
4.2x1.5x6.5 inches
•
1.0 lbs.
16
11/4/04
Jupiter Instruments_____________________________________________________________________________________
APPENDIX B
1. Specifications
Power
Input Power:
Receptacle:
6VDC @100mA
2.1mmx5.5mm coaxial DC jack
Communications:
BAUD rate:
Connector:
Serial RS-232C
115.2K
9-pin, sub-D, female
Connector:
5-pin latching (0.100” spacing, 0.025” pins)
Pins:
Pin 1 = Gnd
Pin 2 = SCL (Red)
Pin 3 = Gnd (Black)
Pin 4 = SDA (Green)
Pin 5 = Gnd
Bus Speed:
0 to 1.0Mbit/s (w/o bus errors)
0 to 700kbit/s (with bus errors)
Input Threshold:
VIL: 1.0V (typ.)
VIH: 2.0V (typ.)
VH: 0.8V (typ.)
Input Range:
-0.3V to 5.5V (operational)
-5.0 to +10V (max. rating)
Input Capacitance:
45pf – typical (including 34” probe cable)
Connector:
Output Signal:
BNC
10uS, 3.3V pulse
Power:
SCL:
SDA:
Trigger:
Power-On
Bus clock activity
Bus data activity
Message Recording / Trigger Event
PC Interface
I2C Interface
Trigger Output
LEDs
Message Recording
Capacity:
32Kb buffer
Triggering:
Pre-Trigger:
Address, Data, R/W, Frame Error combination
Selectable 25%, 50%, and 75% pre-trigger recording
Message Time Stamp: 1us to 1.0485s, 1us resolution. Period measured from
Message Start to Stop, or Start to repeated Start.
JI-210
17
11/4/04
Jupiter Instruments_____________________________________________________________________________________
Timing Waveform
Sampling Rates:
Selectable – 50ns, 100ns, 200ns, 500ns, 1us, 2us, 5us,
10us, 20us, 50us, 100us, 200us, 500us, 1ms
Sampling Capacity:
8K/channel
Pre-Trigger Recording: Selectable – 0%, 25%, 50%, 75%, 100%
Capture Modes:
JI-210
Triggered and Free-run (SnapShot)
18
11/4/04
Jupiter Instruments_____________________________________________________________________________________
APPENDIX C
1. General Information
1.1 Warranty
The equipment is warranted for one year from data of purchase against defects in materials or
workmanship. Jupiter Instruments reserves the right to repair or replace products at its own and
complete discretion. Customer must obtain from Jupiter Instruments a Return Authorization Number
(RMA) prior to returning any products to Jupiter Instruments. Products returned under this Warranty
must be unmodified and in original packaging. Jupiter Instruments reserves the right to refuse
warranty repairs or replacements for any products that are damaged or not in original form.
The customer is responsible for the shipping and insurance cost arising from the return of products
to Jupiter Instruments. Jupiter Instruments will return all in-warranty products with shipping cost
prepaid.
1.2 Thirty-Day Return Policy
Customers may return Jupiter Instruments products for a full refund if Jupiter Instruments is
contacted within thirty days of the customer’s receipt of the product. Customer may return Jupiter
Instruments products for credit, exchange, or a refund. Customer must obtain form Jupiter
Instruments a Return Authorization Number (RMA) prior to returning any products to Jupiter
Instruments. Products must be returned unmodified and in original packaging. Jupiter Instruments
reserves the right to refuse return rights for any products that are damaged or not in original form.
Volume orders may be subject to a significant restocking fee.
1.3 Limitation of Liability
Jupiter Instruments’ liability shall be limited to the repair or replacement of defective products in
accordance with the Jupiter Instruments limited warranty.
Jupiter Instruments shall not be liable for any incidental, special or consequential damages for
breach of any warranty, expressed or implied, directly or indirectly arising out of Jupiter Instruments’
sale of merchandise, including any failure to deliver any merchandise, or arising out of customer's
installation or use, whether proper or improper, of the product, separately or in combination with
other equipment, or from any other cause. Use the JI-210 at your own risk.
Products sold by Jupiter Instruments are not authorized for use as critical components in life support
devices or systems.
1.4 Contact Us
•
Address:
Jupiter Instruments
25108 Marguerite Pkwy Suite, B #109
Mission Viejo, CA 92692-2400
•
Email:
[email protected]
[email protected]
JI-210
•
Phone:
Sales and Information: (949)-716-0154
•
Website
www.Jupiteri.com
19
11/4/04