1
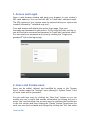
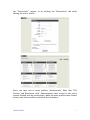
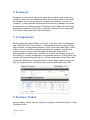
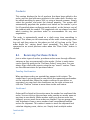
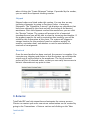
TotalCode ERP
Keep it simple. Make it powerful.
1. Access and Login
Open a web browser window and point your browser to your system’s
URL (web address). You can find the URL in TotalCode’s welcome email.
The URL consists of your system name (as entered when your system was
created) followed by “.totalcode-erp.com”.
Your web browser will display the system login page. Type your
username and password to gain access. If this is the first time you log in,
you will find your username and password in TotalCode’s welcome email
You can reset your password at any time by clicking the “Forgot your
password?” link in the login page.
2. Users and Permissions:
Users can be added, deleted, and modified by going to the “System
Users” section under the “Settings” menu (Settings > System Users). A list
of active users will be presented.
You can add new users by clicking the “New User” button or you can
modify any user’s profile and contact information by clicking the user’s
name. You can also delete one or more users by selecting the checkboxes
in the first column and then clicking the “Delete” button. Permissions for
each user can also be viewed and changed by clicking the “Set” link under
TotalCode ERP 2 the “Permissions” column, or by clicking the “Permissions” tab while
editing the user’s profile.
Users can have one or more profiles: Administrator, Sales Rep, POS
Cashier, and Warehouse clerk. Administrators have access to the entire
system (limited only by permissions), while the other profiles have limited
access (only those sections related to their function).
TotalCode ERP 3 3. System Configuration:
System settings can be managed by clicking the “Settings” menu and then
the “System Settings” link. Select the section (tab) you want to configure:
General, sales orders, shipping, invoicing, payment processing, purchase
orders, inventory, EDI, or web.
3.1
General Configuration
The “General” tab under system settings holds basic information about
your company, including company name, tax ID, business type, and
location of headquarters.
3.2
Orders Settings
Settings for all order types can be edited here (sales, purchases,
transfers, production). The “General” subsection applies to all types of
orders, and lets you determine how long order drafts are kept, how
much in advance of an order’s ship start date should products be
allocated to it, if automatic inventory adjustments should occur when
an inventory mismatch is detected during order packing, and the
default source warehouse.
The “Sales” subsection lets you choose the default view for sales
orders (by individual sales order or grouped by client purchase order),
the late order alarm interval, sales department email address, and
geographical shipping limitations. The “ERP Sales” subsection controls
the manual creation of orders within the ERP. The default channel,
payment terms, and price list can be selected, along with the option to
enable unrestricted discounts (system users can enter a discount
amount instead of being limited to existing discount codes).
TotalCode ERP 4 The “Point of Sale” subsection allows for the configuration of any sales
completed in POS terminals. The price list to be used in the terminals
and maximum number of simultaneous turns per terminal can be
configured, along with the minimum client information requirements
(phone number, email address, tax ID). You can also setup the system
to email a copy of the POS invoice to the client, enable the sale of
products with zero price, and enable the production (auto-build) of
products with materials when not in stock.
The maximum return percentage and late return warnings can be
configured in the “Returns” subsection. Under the “Purchase Orders”
subsection, you can determine when late vendor confirmation and
shipping alarms are triggered, the maximum allowed overpayment
(supplier invoice vs. original PO), and setup drop shipment behavior (if
the order should be marked delivered when shipped by the vendor).
3.3
Shipping Configuration
Shipping settings can be configured using the “Shipping” tab. A
default carrier (and service) can be selected. If the carrier has no
online rate functionality, the system will default to the amount
selected as the default shipping rate. If the carrier does have online
rate functionality, the system can add a percentage to the carrier’s
quoted rate.
When using a carrier that doesn’t provide online rate functionality, it is
important to determine the default shipping rate as described above,
and you can also setup exceptions to the default rate (by weight range
and destination). For example, if a shipment exceeds 100lbs, you may
want to create an exception so that the shipping rate is higher than
the default rate.
TotalCode ERP can connect to UPS and FedEx in order to get rates,
automatically create labels, and track shipments. In order to enable
each (or both) you must provide the connection information under the
“UPS” and/or “FedEx” subsections. This information is provided by the
carrier when you signup for online services.
3.4
Invoicing Configuration
This section allows for the configuration of multiple invoicing options.
You can determine whether TotalCode ERP creates invoices
automatically when orders are packed or shipped, determine what
email address clients can use to contact the billing department, and
manage invoice sequences. Separate invoicing sequences can be used
TotalCode ERP 5 for different channels (POS, web sales, ERP manual sales) and even by
POS store or POS terminal.
The look of invoices can also be configured separately for invoices
generated by the different channels (POS, web, ERP). Each channel can
be setup to display a different invoice header and footer (which can be
an image or text) and for some channels the number of products per
page, font size, and width can be configured.
3.5
Payment Processing
The “Payment Processing” tab holds the configuration for payment
processors. You must first determine what payment processor you use
for credit cards (Authorize.net, FirstData, etc.) and then input the
information required for that specific processor (which is provided by
the processor itself once a contract has been signed).
Apart from credit card payments, direct bank deposits can also be
enabled and only requires basic bank account information. You can
even set a minimum invoice amount that needs to be met in order to
offer bank deposit payment. PayPal, Collect on Delivery (COD) and
phone processing of credit cards can also be enabled.
3.6
Inventory Settings
Under the “Inventory” tab, the system can be configured to
automatically copy new products’ UPC to SKU, copy product container
name to its new variants, enable or disable transfer of consignment
goods between warehouses, and manage price lists.
3.7
EDI Configuration
The EDI (Electronic Data Interchange) section holds basic EDI
information and only needs to be completed if your company uses EDI.
The X12 EDI ID can be entered in this section, along with the primary
EDI contact within your organization, and options related to price
validation and price preference when receiving inbound transmissions.
You can also determine whether or not discounts will be included in
the 810 (invoice) transmissions.
TotalCode ERP 6 3.8
Web Store Configuration
Setting up you web store is extremely easy. All you need to do is
adjust some parameters under the “Web Store” tab. The store name
(which can be the company name or a separate store name) and store
phone help provide web store customers with contact information. If
you check the “Private Store” option, web store visitors will be required
to enter their email and password in order to see the store. If the store
is private, you can check the “Enable private store invitations” option
to allow customers to invite others to join. You can also determine if
you want to display Facebook Like and Twitter Share buttons, if a copy
of the customer’s invoice should be emailed (in addition to the order
confirmation email), and if the customer’s company name and Tax ID
are required. If most of your web store customers purchase items for
themselves, it might be a good idea to enable the “Copy shipping to
billing address” option, so that their address is copied to both
shipping and billing by default (they can always manually change it).
The Template Management section lets you control the look and
banners of your store.
The “Products” subsection controls the way products are displayed in
the web store. You can choose to display products in all subcategories
when viewing a specific category, hide or display product stock status
(this will show customers if a product is in stock or out of stock, and
the probable ship date based on existing sales and purchase orders),
you can choose to list out-of-stock products but prevent them from
being added to the shopping cart, or even completely hide all out-ofstock products. The shopping cart can be configured to offer the
option of entering a Zip code to calculate shipping an taxes before the
checkout process begins, or select a specific delivery date for the
order. Product ratings by customers can be enabled or disabled, and
you can determine whether or not an “Add to Cart” button is displayed
in product lists (not only in the product page).
The “Pricing and Gift Cards” section lets you choose a price list for the
web store (this will be overridden once a client logs in), determine if
the discount code and gift card options are presented to customers,
and if the tax and shipping lines under the order’s subtotal should be
displayed even if their value is zero.
Under the “Delivery” section you can choose to enable customer
pickups at your warehouses or stores (for web store orders), select the
default warehouse for web store order shipment, and determine if you
want the customer to select the shipping destination type (residential,
business, hospital, etc.).
TotalCode ERP 7 4. Products and Inventory
Products are grouped into categories and subcategories, providing both
clients and system users a hierarchical structure they can browse.
Creating an intuitive category structure will greatly benefit you and your
clients. The category tree can be created using the Inventory > Category
Management or Inventory > Product Management tools.
By going to the Inventory > Product Management tool, you can manage
both categories and products simultaneously. The topmost section will
display the current category (initially the “Main” category is displayed).
The left column displays all subcategories of the currently selected
category, and the right column displays the products in the currently
selected category. In a newly created system both subcategories and
products will be empty.
The “Main” category is special in that only subcategories can be created
under it - not products. The first step is to create subcategories under
the “Main” category by clicking the “New Category” button. When creating
a new category, please enter the category’s name (if multi-language is
enabled you will be asked for the category name in all active languages),
if the category should be displayed in the web store, and if products in
the category should by default be tracked by expiration date, lot number,
and/or serial number - when a product is scanned for packing or
receiving, the system will ask for this information. This is just the
category default, but you can later select these characteristics in a
product-by-product basis. Once you click the “Save” button, you will be
returned to the Product Management tool.
You can now click a category and add subcategories or add products. A
new product can be created by clicking the “New Product” button in the
right column of the Product Management Tool. The “New Product”
window will be displayed, displaying the basic characteristics of the new
product:
•
UPC (Universal Product Code): This is the product’s barcode, the
global unique identifier of the product. You can use a barcode
scanner to populate this field in order to avoid typos.
TotalCode ERP 8 •
SKU (Stock-Keeping Unit): Your company’s internal product
code. If desired you can use the UPC as the SKU (this can be
completed automatically by going to Settings > System Settings
> Inventory and checking the “Copy UPC as SKU” option).
•
Unit
of
Measure:
Specify
whether
a
product
is
sold/purchased/stored as a unit, or if it’s sold by pounds (for
example beef), inches (for example fabric), etc. The default is
“Unit”.
•
Weight: Enter each unit’s weight in pounds (and decimals). This
allows the system to calculate shipping weights and
corresponding shipping costs.
•
Name: The product’s name. Ideally use a clearly identifying
unambiguous name (if multi-language is enabled you will be
asked for the product name in all active languages).
•
Description: The description can be left blank, but it is very
important to enter it when selling through the web store, as this
is ranks the product much better in search engines, and helps
the customer clear any doubts as to the product’s characteristics
(if multi-language is enabled you are encouraged to enter the
product description in all active languages).
You can also select the channels through which this product will be sold,
the product type (if it’s a service or if it’s delivered electronically – for
example software can be delivered electronically).
Very similar products can be grouped so that a container holds multiple
variants. For example, a pair of shoes can come in multiple sizes. Ideally,
you don’t want to display each size of the same model as a separate
product (specially in the web store as it will take too much space which
can be better used by displaying other models). The best option would be
to create a product called “Shoe X” and make it into a container by
checking the “Allow Variants” option. Then create variants for this
product that could be called “Shoe X - size 9”, “Shoe X - size 9.5”, “Shoe
X – size 10”, etc. This will display “Shoe X” in the web store and once the
customer clicks on the product, the system will ask for the desired size
(variant). Containers themselves are not sold, nor do they have a stock
TotalCode ERP 9 level, but only serve as a grouping entity. Variants are sold and have a
stock level.
The product will be created when you click the “Save Changes” button. At
this time, two new sections will be displayed: “Specifications” and “Price
Lists”. Also, new tabs will appear for inventory information, product
gallery, vendors, and others related to the new product.
The “Price Lists” section lets you assign a price to the current product for
each of the existing price lists. Each client can be assigned a price list
(and a default price list is also assigned to the Web Store and POS). New
price lists can be created using the Inventory > Price List Management
tool. Common price lists can include “retail” and “wholesale”. Price breaks
can also be assigned when product pricing within a price list changes
depending on the number of units sold.
Specifications are optional but very useful, as they allow clients and
system users to find products not only by name and category, but also by
product characteristics. Common specs include brand, color, size, etc. An
unlimited number of specs can be assigned to each product.
The “Inventory” tab under each product displays stock level information
for the product, including level by warehouse, consignment goods, and
items allocated to orders. Stock level and cost adjustments can be
completed by authorized users – just choose the warehouse and bin
location to be affected by the adjustment and enter the number of units.
Stock alarms can also be configured in this tab. A product can also be
moved to other bin locations within the same warehouse using this tab.
The “Status” tab displays information related to the product based on
current and previous orders and levels. You can see which sales orders
include the product, and see the stock level history and forecast for the
product.
The “Gallery” tab lets you upload up to six images and a video for each
product. You can arrange existing images by dragging them into the
desired order, and you can add new images in the “New Image” section.
Images must be in JPG format. You can also enter a YouTube video code
to display the product’s video in the web store. The YouTube code can be
found in the YouTube video page URL after the “v=”, or after the last “/”
when you click the “Share” link under the video.
You can also setup the product’s unique identifiers for different vendors
and clients by clicking on the “Vendors” and “Clients” tabs. This will let
you send purchase orders to vendors using their own internal product
TotalCode ERP 10 identifiers, and send invoices to clients using their identifiers, thus
speeding up both the purchasing and payment process.
5. Sales
New sales orders can be created by going to Transactions > Sales and
clicking the “New Sales Order” button (top right corner).
Three sections need to be completed to create an order: Client, Details
and Products.
Client:
Typing the first few letters of a company name or customer name will
bring up a list of possible clients. The list will get shorter as you type
more, allowing you to click on the desired client. If the desired client
doesn’t appear on the list, click the “New” button to create a new
client.
Once the client has been selected or created, you will be presented
with a list of available shipping addresses for that client, or you might
want to create a new shipping address for the selected client by
clicking the “New” button.
Details:
If an existing client has been selected, TotalCode ERP will
automatically populate the “Details” section with the client’s defaults.
These defaults, however, can be modified for the specific order, or can
be changed permanently for the client by editing the client’s profile.
TotalCode ERP 11 Order details include order type (standard, samples, or allocate-only),
start date and cancel date (date range when the client wants to receive
the order), client Purchase Order (PO) number (a single PO# can be
used for multiple orders), payment terms, price list (applies only to
current order), default warehouse, number of shipments allowed, and
sales rep.
Products:
This section displays the list of products that have been added to the
order, and lets you add more products to the order draft. Products can
be added searching by name, SKU, or using a barcode scanner. Simply
select the product and enter the desired quantity. The system will
automatically determine the product price based on the selected price
list (which by default is the price list assigned to the client). If the
user’s permissions allow it, the product prices can be edited by hand.
You will also be able to enter discount codes (or a discount amount if
you user has the correct permissions and unrestricted discounts are
enabled) and select a shipping carrier and service. The system will
automatically determine if sales tax is applicable and calculate it.
The order is automatically saved as a draft every time something is
changed. This allows you to browse away of the order creation page (even
log out) and then return to the where you left off (as long as the “Save
order drafts for” setting hasn’t been exceeded). The order draft is
converted to an actual order when the “Place Order” button is clicked.
The system will evaluate client credit and the order will appear as an open
order, or as an order on hold if the client’s credit limit is exceeded or
“Prepaid” is selected under payment terms.
5.1
Order Processing and Fulfillment
All sales orders can be viewed by going to Transactions > Sales. You
can always filter sales order reports using the top “search” section.
Multiple tabs are presented displaying the different order processing
status. Each tab displays the status and the number of orders in that
status. Note that a single order could include items in more than one
status (for example, a portion of the order is open, a portion is
released, and another portion is shipped – you will see the order in
multiple tabs).
The following tabs are available:
TotalCode ERP 12 Overview
Graphically displays an overview of sales order status. An order goes
through several different statuses in order to be fulfilled:
1. On Hold: The order requires payment (payment terms are
“prepaid”) or exceeds the client’s credit limit (in which case a
user with the corresponding permissions can override the
system and authorize the order).
2. Open: The order has been created and can still be modified.
Most frequently orders in this status are simply waiting for
the ship start date, or merchandise is not yet available.
3. Released: The order has been released to the warehouse for
picking and packing (one ore more pick tickets have been
created).
4. Packed: Merchandise has been packed and is awaiting pickup
by the selected carrier.
5. Shipped: The carrier has picked up the merchandise. If the
carrier provides live tracking information, the system will be
able to determine if the merchandise has been delivered.
On Hold
This tab displays orders that have been placed on hold by the system
or by the user when the order was created. You can click an order
TotalCode ERP 13 number to see details, to apply a client payment (for example for
prepaid orders), or to authorize the order (if you have the required
permissions). You can also click the client name to see client details.
Open
This tab lists open orders. You can click the order number or client
name to see the corresponding details. Each order’s start and cancel
date are listed (and color coded so that users can easily determine
which orders need to be released). The number of open items and
corresponding dollar amount are also displayed, along with the
number of items that are allocated from stock (ISA – in stock allocated)
and allocated from incoming orders (ITA – in transit allocated).
The system attempts to allocate available merchandise to the order (if
the order start date is within the auto-allocation days configured in
Settings > System Settings > General). Allocation basically assigns or
locks merchandise to a specific order. Merchandise can be assigned to
an order either from stock, or from incoming purchase orders,
production orders, or warehouse transfers.
Allocation can also be triggered manually, either for an individual
order or for multiple orders. Just check the checkbox in the first
column beside the desired orders, select “Allocate” in the function
selector under the order list, and click process. You could also select
“Reallocate” for orders that need to be urgently released. The
reallocate functionality can allocate merchandise to the selected order
from other orders (basically ‘stealing’ merchandise from another
order) while allocation will only allocate available merchandise (that
isn’t allocated to any other order).
It’s important to note that only merchandise that has been allocated
from stock can be released. Before releasing an order, it’s a good idea
to check the ISA (in stock allocated) percentage and allocate additional
items if required. You can release only a portion of the order (by
default, the portion that is allocated) and the remaining portion will
remain open.
Released
When products are released, the system creates a pick ticket for each
(partially) released order. Pick tickets can optionally be printed. Pick
tickets serves as a guide for the warehouse clerks to proceed to the
specified bin locations, collect the required product quantities, and
pack them.
TotalCode ERP 14 Warehouse clerks can pick the required items and pack them by going
to the Transactions > Pick & Pack page. All types of outgoing released
orders (actually pick tickets) will be listed here. While picking and
packing, it is highly recommended to use a barcode or RFID scanner in
order to make sure the correct products and quantities are being
packed. However, you can also select the “Without Scanner” option and
simply instruct the system what has been packed along with the
carton distribution.
Packed
Once picking and packing has been completed, merchandise is
marked as packed. If the carrier selected for the order offers direct
label creation (UPS, FedEx, USPS), TotalCode ERP will communicate
with the carrier, request pickup, automatically create the required
labels, and record the tracking number for each carton. If the carrier
doesn’t offer direct label creation, tracking numbers for each carton
can be entered manually (and the carrier should be notified about the
shipment).
Packed merchandise is awaiting carrier pickup.
Shipped
Once the carrier picks up the packed merchandise, it can be marked
as shipped. If the carrier provides direct online tracking, delivered
cartons will automatically be marked as delivered. Otherwise, they can
be marked delivered manually (or simply left as shipped).
Orders (or portions of orders) can be canceled at any time, except
once they’ve been shipped. These cancellations will be displayed
under the “Canceled” tab.
Invoices are created automatically based on the client’s invoicing
preferences when merchandise is marked as packed or shipped (the
moment when invoicing occurs is determined in Settings > System
Settings > Invoicing > General).
Just as you can view a list or orders in each status, you can click on an
order and see exactly which items are in which status. The same
status tabs as described above will be displayed when checking order
details.
TotalCode ERP 15 6. Proposals:
Proposals are created in the exact same way in which sales orders are
created, except for one additional field: an expiration date. It also can’t
be released, so once a proposal is created it can only be “current” or
“expired”. A user with the required permissions can change an expired
proposal into a current proposal. Proposals can be edited to match any
negotiations with the client. Also, a current proposal can be converted
into a Sales Order with the click of a button.
7. Consignments:
When submitting merchandise to a client in the form of a consignment,
you should use the Transactions > Consignment section instead of the
Sales section. Consignments behave in very much the same way as sales
orders, but no invoice is created when they are shipped. Instead, the
system keeps a record of all merchandise that has been sent as
consignments to each client, and lets you invoice the clients using the
Accounting > Invoice Outgoings Consignments section. At this point, the
system will present the previous vs current stock levels at the client and
invoice the difference. Pricing defaults to the original order pricing, but
can be changed to the current pricing from any selectable price list.
8. Purchase Orders:
New purchase orders can be created by going to Purchase Orders > New
Purchase Order.
TotalCode ERP 16 Three sections need to be completed to create a purchase order: Vendor,
Details and Products.
Vendor:
Typing the first few letters of a company name or vendor name will
bring up a list of possible vendors. The list will get shorter as you type
more, allowing you to click on the desired vendor. If the desired
vendor doesn’t appear on the list, click the “New” button to create a
new vendor.
After the vendor has been selected or created, you can select the
warehouse where you want the merchandise delivered from the list of
available warehouses.
Details:
If an existing vendor has been selected, TotalCode ERP will
automatically populate the “Details” section with the vendor’s defaults.
These defaults, however, can be modified for the specific order, or can
be changed permanently for the vendor by editing the vendor’s
profile.
Order details include start date and cancel date (date range when you
want the vendor to deliver the order), purchasing currency (for
international vendors – if you decide to transact in foreign currency),
and the “Goods on Consignment” checkbox in case you are receiving
the vendor’s merchandise on consignment.
TotalCode ERP 17 Products:
This section displays the list of products that have been added to the
order, and lets you add more products to the order draft. Products can
be added searching by name, SKU, or using a barcode scanner. Simply
select the product and enter the desired quantity. The system will
automatically populate the product cost based on the vendor’s price
list (if provided when configuring each product), or the historic cost of
the product with the vendor. The suggested cost can always be edited
when creating the purchase order to accommodate for any cost
negotiation.
The order is automatically saved as a draft every time something is
changed. This allows you to browse away of the order creation page (even
log out) and then return to the where you left off (as long as the “Save
order drafts for” setting hasn’t been exceeded). The order draft is
converted to an actual purchase order when the “Place Order” button is
clicked.
8.1
Receiving Purchase Orders
Just as other types of orders, purchase orders move through different
statuses as they are processed by the vendor. Orders in each status
can be listed by going to the “Purchase Orders” menu item. You can
always filter sales order reports using the top “search” section. These
are the different status for purchase orders:
Pending Confirmation
When purchase orders are created they appear in this status. The
vendor hasn’t yet confirmed he can deliver the requested merchandise
on the selected date. When the vendor confirms he can deliver as
requested, you can check the checkboxes on the right column and
click the “Confirm” button to move them to the next status.
Confirmed
Orders will be listed in this section once the vendor has confirmed the
order. You can click on the purchase order number or vendor name at
any time to see details. When vendors notify you that an order has
shipped, you can mark those orders as shipped. You can group orders
into shipments if one or more vendors have consolidated multiple
orders for shipment. This makes it easier to track the shipment and
calculate shipping costs, duties, etc. Simply check multiple orders
TotalCode ERP 18 when clicking the “Create Shipment” button. If provided by the vendor,
you can enter the shipment tracking number.
Shipped
Shipped orders are listed under this section. You can also see any
incoming shipments by going to Purchase Orders > Incoming
Shipments. The “Shipments in transit” tab displays any shipments that
have been shipped by the client and will be arriving at the desired
warehouse. Once the shipment reached the warehouse, you can click
the “Receive” button. The system will present a list of expected
merchandise and you will be able to scan the incoming merchandise. If
the product requires lot and/or expiration date tracking, you will be
asked for this information at this point. The system will suggest a
storage location for the products based on rotation, weight, lot
number, expiration date, and whether or not the merchandise is
received on consignment.
Received
Once the merchandise has been received, the process is complete. You
can enter any shipping and duties so that the system can calculate the
actual cost of each product in the warehouse. The list of received
orders will list all received orders so that you can easily have access to
historic information at any point in time.
9. Returns:
TotalCode ERP can help streamline and automate the returns process.
Clients can contact you and a new return authorization can be created by
going to the Transactions > Returns section and clicking on the “New
TotalCode ERP 19 Return” button (top right). The system will ask you to select the invoice
corresponding to the merchandise that will be returned. Invoices can be
searched by invoice number, client name, or client PO.
The system will display the merchandise included in the selected invoice
and will let you enter the number of items that will be returned for each
of the invoice lines. Once this step is complete, you can click the “Next
Step” button and enter the warehouse where the returned items will be
received, along with a description of the issue triggering the return as
stated by the client.
The system will generate at Return Authorization number that will help
track the progress of the return. Once the merchandise reaches the
selected warehouse, the status of the merchandise can be determined.
You will be able to determine if a full or partial refund will be issued, and
if the returned merchandise will be restocked, repaired, or discarded.
If a refund is issued, a credit memo will be created in the selected
amount. This will directly affect the client’s balance. If desired, an
outgoing client payment can be created, or the client’s balance can be
used to complete a new sales order.
10. Clients - CRM:
The existing client list is displayed at Clients > Client List. You can filter
the list by name, account type, geographic location, past purchasing
habits, price list, client properties, or sales rep. You can click on any
client on the list to see client details.
When clicking on a client or creating a new client (Clients > New Client),
multiple tabs will be displayed which contain information related to the
selected client. The “Profile” tab is selected by default, and holds the
client’s billing address and contact information. Multiple shipping
addresses can be associated to a specific client, allowing for faster
creation of orders as the saved address can be easily reused. Invoicing
and payment options can also be configured for each client, which will be
loaded by default when creating a sales order, allowing the assignment of
an account type, default price list, default payment terms, default
payment method, paper vs email vs EDI invoicing, and the way in which
invoices should be consolidated. This enables the system to automatically
invoice each client. Shipping preferences such as default carrier, service,
and client requirements such as UCC-128 labels, packing lists, content
TotalCode ERP 20 labels, grouping into Bills of Lading (BOL), and default shipment to
distribution centers (DC) can also be setup.
The “Contacts” tab lets you create multiple contacts for each client. This
is useful when more than one point of contact exists for a client (for
example, someone in the billing department, in purchasing, etc.) A new
contact can be created by clicking the “New Contact” button.
The “Communications” tab keeps record of all incoming and outgoing
communications with the selected client. New communications can be
created using the “New Communication” button. The communication
channel, time, subject, and details can be entered and will then be
displayed in this section.
The “Follow Ups” tab can be used whenever a follow-up contact is
required with the client, or when a list of pending and/or completed
follow-ups is required. This lets you schedule future tasks and see a
report of all pending tasks under Clients > Follow-ups.
Multiple client properties, or characteristics, can be saved in the client
record. Example of common properties include birthday, preferred
football team, number of employees, topics to avoid, etc. This helps the
sales team with valuable information, and can serve as an additional filter
when creating, for example, a mail or other campaign.
A set of tabs display sales orders for the selected client separated by
current order status (open, released, packed, shipped, canceled). Each
contains a list of any order in the selected status for the selected client.
The “Finance” tab presents a list of all client invoices, credit memos,
client payments, and outgoing payments, along with the current balance
of the client’s account. This report can be filtered by date and/or by
transaction type. You can click any of the transaction in the list to see its
details.
The “Returns” and “Chargebacks” tabs display and returns or chargebacks
associated with the client.
11. Vendors:
The existing vendor list is displayed at Vendors > Vendor List. You can
filter the list by name and geographic location. You can click on any
vendor on the list to see vendor details.
TotalCode ERP 21 When clicking on a vendor or creating a new vendor (Vendors > New
Vendor), multiple tabs will be displayed which contain information related
to the selected vendor. The “Profile” tab is selected by default, and holds
the vendor’s primary address and contact information. Multiple shipping
addresses can be associated to a specific vendor, allowing for faster
creation of returns as the saved address can be easily reused. Invoicing
and payment options can also be configured for each vendor, which will
be loaded by default when creating a purchase order, allowing the
assignment of the default payment terms, default payment method,
default shipping method, default currency, and account type.
The “Contacts” tab lets you create multiple contacts for each client. This
is useful when more than one point of contact exists for a client (for
example, someone in the billing department, in purchasing, etc.) A new
contact can be created by clicking the “New Contact” button.
The “Communications” tab keeps record of all incoming and outgoing
communications with the selected vendor. New communications can be
created using the “New Communication” button. The communication
channel, time, subject, and details can be entered and will then be
displayed in this section.
A set of tabs display purchase orders for the selected vendor separated
by current order status (pending confirmation, confirmed, shipped,
received, and canceled). Each contains a list of any purchase order in the
selected status for the selected vendor.
TotalCode ERP 22